If you’ve got a polymer clay extruder hanging out in your tool stash, you’re sitting on a whole world of crisp lines, clean repeats, and satisfying little strands. These polymer clay extruder ideas are all about turning those perfectly shaped extrusions into jewelry-ready patterns, textures, and “how did you make that?” details.
Perfect Stripe Strands for Checkerboard Patterns
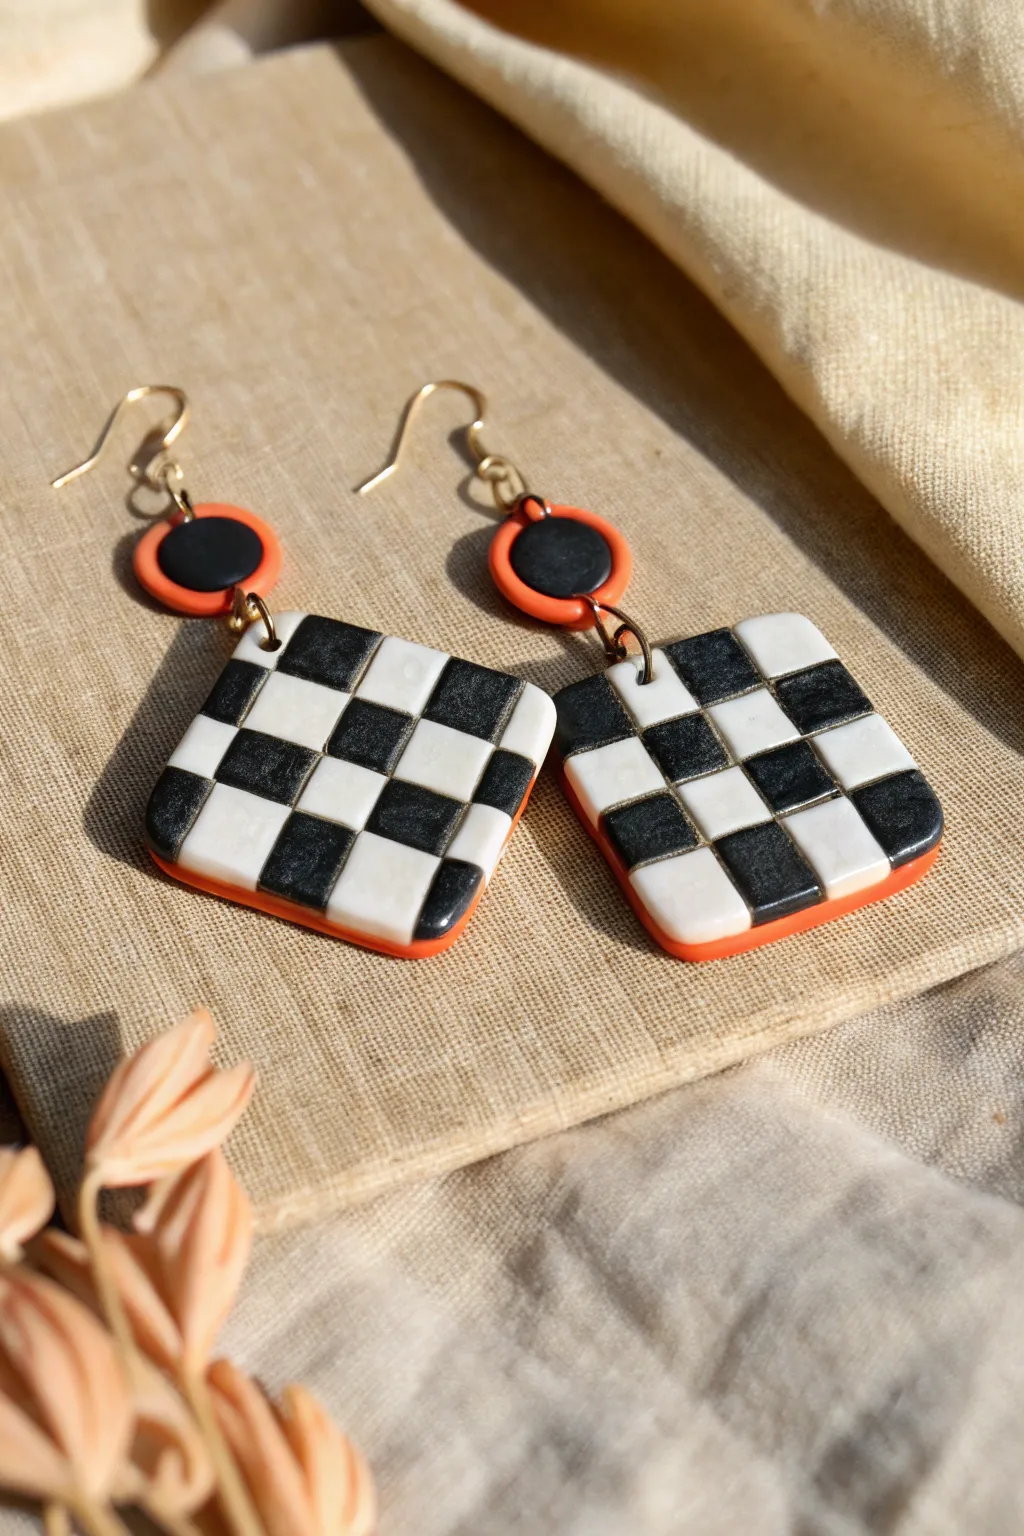
These statement earrings combine a retro 8-bit aesthetic with modern color blocking, featuring a polished black and white checkerboard pattern set against a vibrant orange base. By using a clay extruder, you can achieve perfectly uniform squares for a professional, high-end finish.
Step-by-Step Guide
Materials
- Black polymer clay
- White or translucent white polymer clay
- Orange polymer clay
- Polymer clay extruder with a square disc
- Tissue blade or rigid slicing blade
- Acrylic roller
- Small round cutter (approx. 10mm)
- Square cutter (approx. 25-30mm)
- Earring hooks (gold tone)
- Jump rings (gold tone)
- Needle tool or small drill bit
- Jewelry pliers
- Oven for baking
Step 1: Creating the Checkered Cane
-
Condition the clay:
Start by thoroughly conditioning your black and white polymer clay separately until it is soft and pliable. This step is crucial for smooth extrusion. -
Load the extruder:
Form a log of white clay that fits inside your extruder barrel. Attach the square disc and extrude a long, continuous strand. Repeat this process with the black clay so you have equal lengths of both colors. -
Cut equal lengths:
Lay the extruded square strands next to each other. Using your rigid blade, cut them into identical lengths, approximately 3 inches long. You will need a total of five white strands and four black strands per earring block (or vice versa depending on your preferred starting color). -
Assemble the rows:
Begin assembling your checkerboard block by stacking the strands. I like to start with a row of three, alternating colors (e.g., Black-White-Black). Press them gently together side-by-side. -
Stack vertical layers:
Create the next row on top of the first, reversing the color order (White-Black-White). Continue stacking until you have a square cane that is 3 strands wide by 3 strands high (a 9-square grid). -
Consolidate the cane:
Gently press the sides of your square cane inward to bond the strands together. Be careful not to distort the square shape; rotate the cane and press lightly on all four sides.
Step 2: Forming the Base & Components
-
Roll the backing slab:
Condition the orange clay and roll it out into a sheet about 2mm thick (usually a middle setting on a pasta machine). This will serve as the backing and border. -
Slice the checkerboard:
Using a very sharp tissue blade, slice two thin slabs (approx. 2-3mm thick) from your checkered cane. Slice slowly and steadily to avoid smearing the black clay onto the white. -
Mount on backing:
Place the checkered slices onto the orange slab. Use your blade to gently nudge the edges if the square shape warped slightly during cutting. -
Cut the final squares:
Using a square cutter slightly larger than your checkered pattern (or simply trimming with a blade), cut through the orange clay around the checkerboard, leaving a visible orange border on all sides. -
Create the stud toppers:
Ideally, utilize leftover extruded strands or sheet clay. Create a small thick disc of black clay. Then, cut a slightly larger circle from the orange clay sheet. -
Assemble the toppers:
Center the black circle on top of the orange circle to create a framed stud component that matches the main drop. -
Punch holes:
Before baking, use a needle tool to create holes for your jump rings. Place one hole at the top corner of the checkerboard square (for a diamond hang) and one at the bottom of the round topper.
Smear Campaign?
Black pigment bleeds easily! Wipe your blade with alcohol or a baby wipe between EVERY single slice of the cane to keep the white squares crisp and clean.
Step 3: Baking and Assembly
-
Bake the pieces:
Place all clay components on a ceramic tile or baking sheet lined with parchment paper. Bake according to the manufacturer’s instructions for your specific brand of clay (usually 275°F/135°C for 30 minutes). -
Sand and buff:
Once fully cooled, lightly sand the edges if there are any sharp spots. If you smeared any black onto the white squares, a light sanding on the surface can often remove the surface stain. -
Attach jump rings:
Using two pairs of jewelry pliers, twist open a jump ring. Thread it through the hole in the square pendant and the hole in the round topper, then close the ring securely. -
Add earring hooks:
Open the loop on your earring hook (or use a second small jump ring) and attach it to the top of the round component. -
Final check:
Ensure all rings are closed tightly so the heavy components don’t slip off. Your geometric statement earrings are ready to wear.
Level Up: Texture
Before baking, gently press a piece of sandpaper or coarse fabric onto the orange backing clay to give the exposed borders a matte, fabric-like texture.
Creating these precise geometric patterns is a satisfying way to practice your extruder skills while making a bold fashion statement


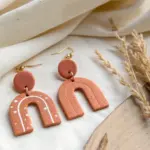
Retro Geometric Canes Built from Extruded Logs
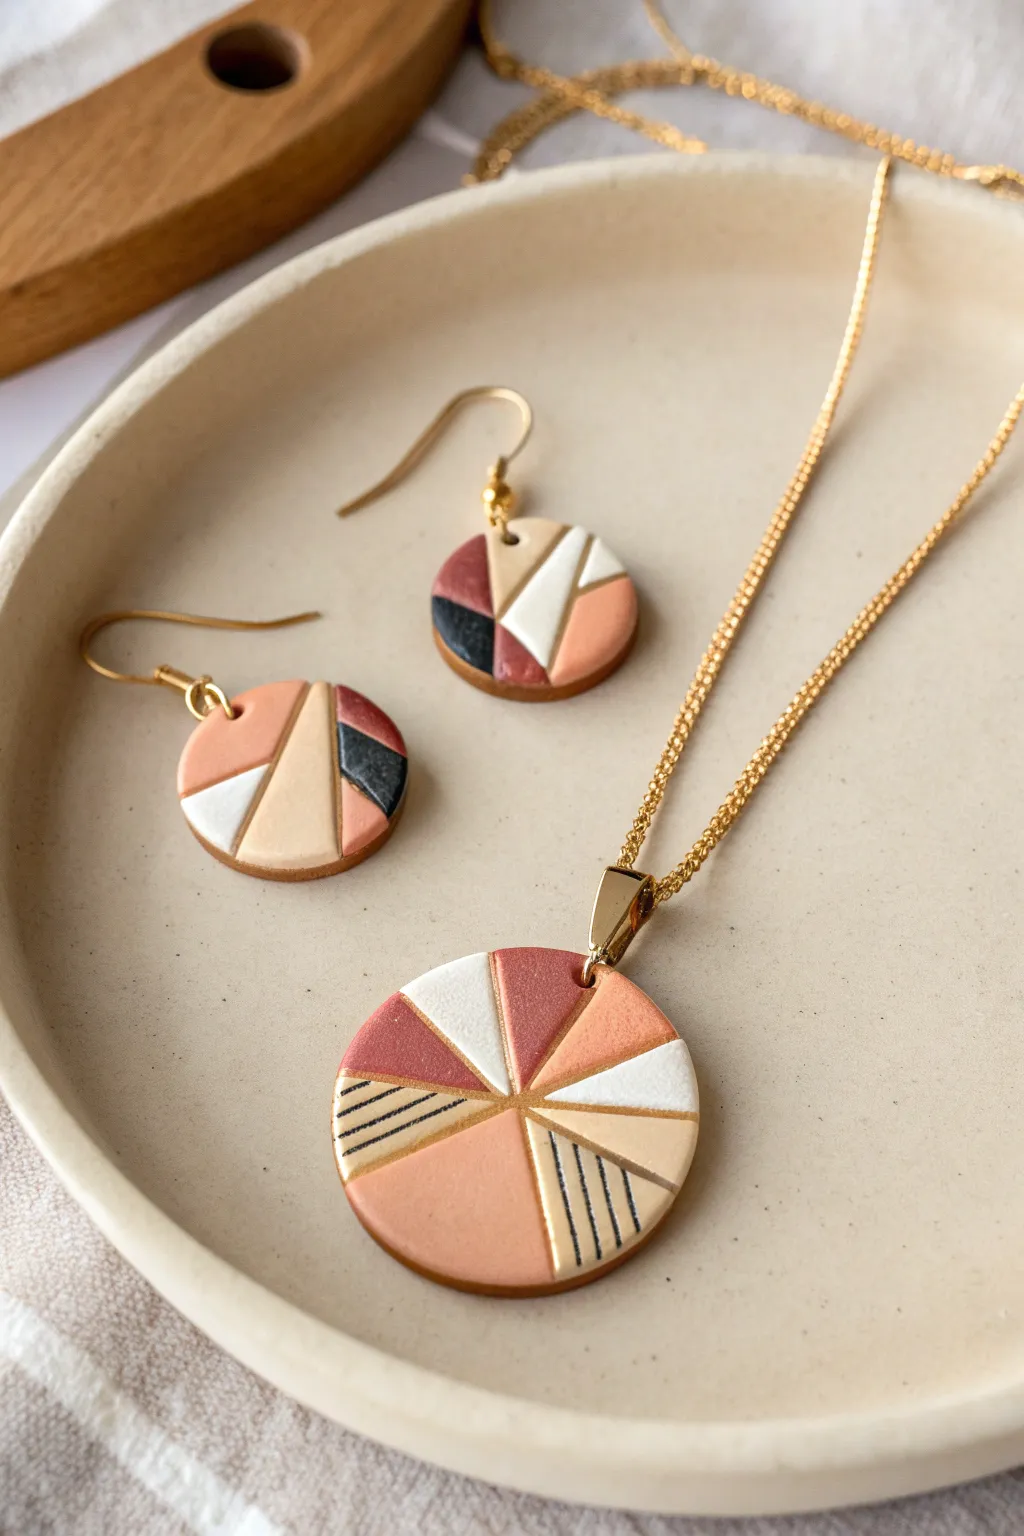
Achieve a sophisticated mid-century modern look with this geometric jewelry set featuring earthy terracotta, peach, and cream tones. By using a polymer clay extruder to create precise logs, you can build a retro ‘pie chart’ cane that slices beautifully for pendants and earrings.
Detailed Instructions
Materials
- Polymer clay in terracotta, peach/coral, beige, white, and black
- Polymer clay extruder with triangular and small circle discs
- Gold polymer clay or gold acrylic paint (for detailing)
- Tissue blade or rigid slicing blade
- Circle cutters (various sizes for pendant vs. earrings)
- Acrylic rolling pin
- Jewelry findings: gold jump rings, earring hooks, pendant bail, necklace chain
- Needle tool or hand drill
- Sandpaper and buffing cloth (optional)
Step 1: Preparing the Components
-
Condition the clay:
Begin by conditioning all your clay colors—terracotta, peach, beige, white, and black—until they are soft and pliable. This step is crucial for smooth extrusion without cracking. -
Create the striped component:
To make the striped sections seen in the pendant, stack alternating thin sheets of black and beige clay. Compress this stack into a rectangular log. -
Extrude triangular logs:
Load your conditioned solid colors (terracotta, peach, white, beige) individually into the extruder fitted with a triangle disc. Extrude several lengths of each color. These triangular logs will form the ‘slices’ of our geometric pie. -
Prepare the striped triangle:
Take your black-and-beige striped rectangular log and gently pinch and shape it into a long triangular prism that matches the size of your extruded solid triangles.
Step 2: Assembling the Cane
-
Plan the layout:
Arrange your triangular logs on your work surface to test the color composition. Aim for a mix of high contrast, placing dark terracotta next to bright white or the striped segments. -
Add gold dividers:
Roll a very thin sheet of gold clay (or use gold leaf if you prefer a surface effect later). Wrap one side of each triangular log with this gold layer so that when they are pressed together, a thin gold line separates the colors. -
Form the large log:
Begin assembling the triangles into a circle. Press the points of the triangles together at a central axis, building outwards until you have a complete cylinder. -
Compress and reduce:
Gently squeeze the cylinder from all sides to fuse the triangles together. If you need smaller designs for earrings, elongate the cane by rolling and pulling gently to reduce its diameter.
Smudged Slices?
If clay drags while slicing, pop the cane in the fridge for 20 minutes first. The cooler clay firms up, allowing the blade to cut cleanly without distorting the geometric lines.
Step 3: Cutting and Finishing
-
Slice the components:
Using a sharp tissue blade, slice thin, even cross-sections from your cane. You will need one larger slice for the pendant and two smaller slices for the earrings. -
Refine the shape:
Use a circle cutter to trim the edges of your slices perfectly round. This cleans up any distortion that might have happened during slicing. -
Add stripe details:
If you didn’t create a striped cane earlier, you can now carefully paint fine black lines onto specific beige segments using a tiny detail brush and acrylic paint. I find this method gives you more control over the final look. -
Drill holes:
Use a needle tool to pierce holes for the jump rings near the top edge of each circle before baking. Make sure the hole is large enough for your hardware. -
Bake the pieces:
Bake the clay pieces according to the manufacturer’s instructions for your specific brand of clay. Using an oven thermometer is always a good idea to prevent scorching. -
Sand and buff:
Once cool, wet sand the edges and surface with fine-grit sandpaper to remove fingerprints and smooth the surface. Buff with a soft cloth for a subtle sheen. -
Assemble jewelry:
Attach the gold bail to the large pendant using a jump ring and thread it onto the chain. Use jump rings to attach the smaller circles to the earring hooks.
Golden Glow Up
Instead of gold clay dividers, try painting the grooves between baked segments with liquid gold leaf. The paint settles into the seams for a rich, metallic inlay effect.
Wear your new retro-chic set with a simple linen top to let natural colors really pop


Ombre Strands for Smooth Gradient Wraps
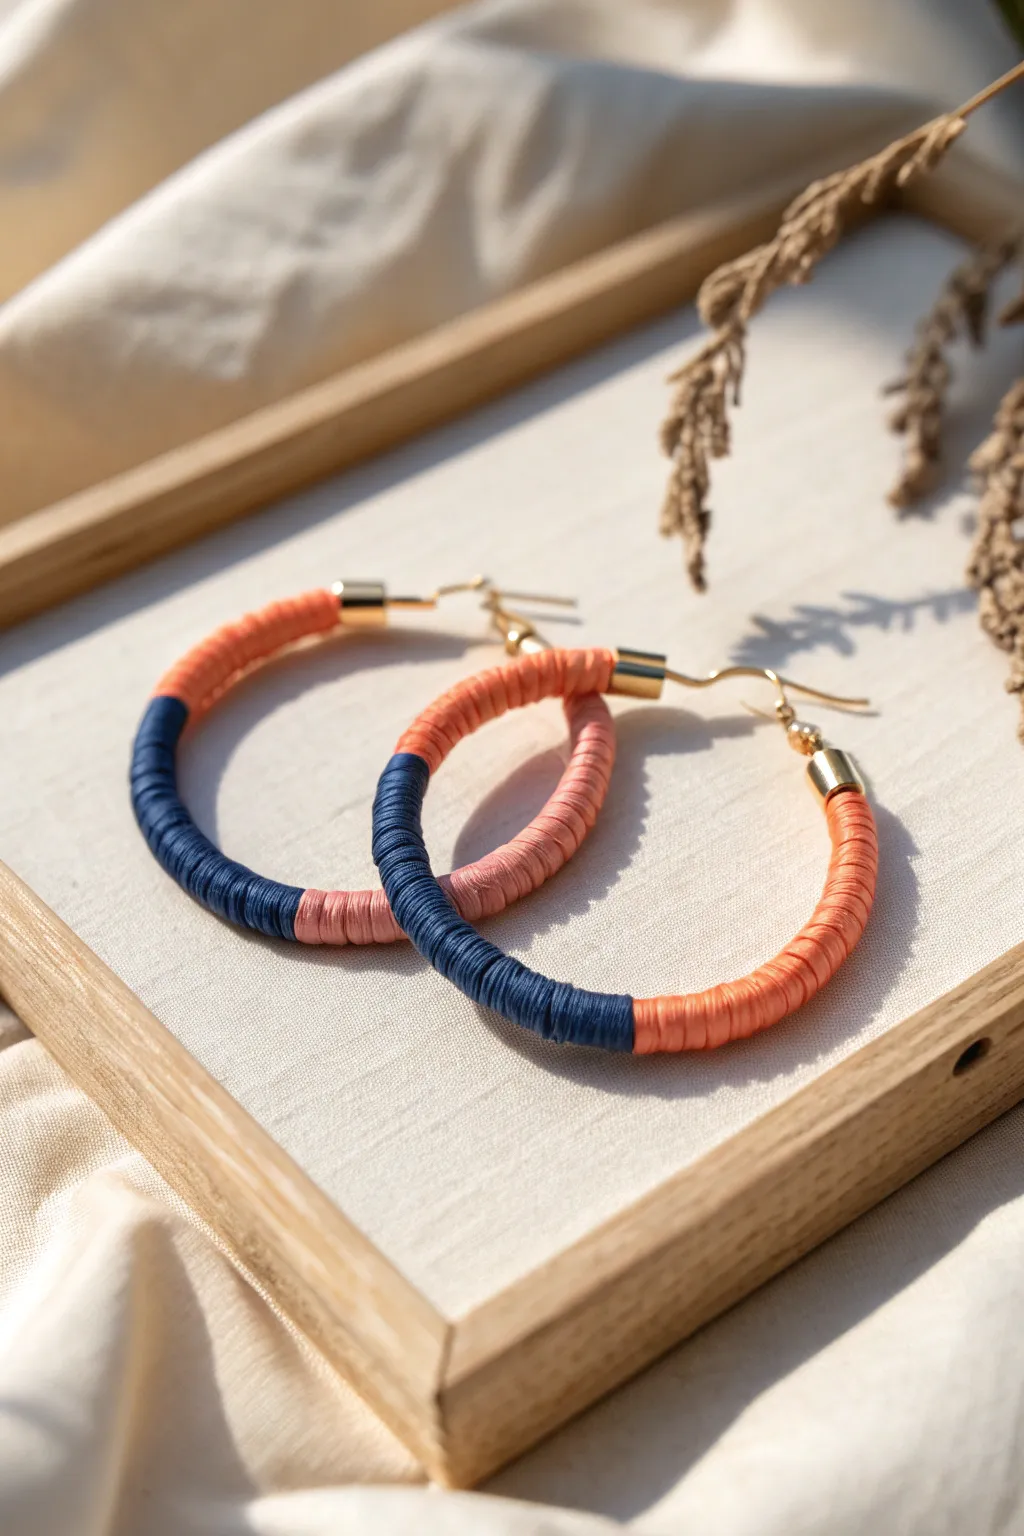
These stylish hoop earrings feature a modern color-blocked design created by wrapping strands around a metal base. While the article discusses polymer clay extruders, this specific project uses the extruder’s precision to create perfectly uniform clay “threads” that mimic wrapped cord for a smooth, unique finish.
Step-by-Step Guide
Materials
- Polymer clay (navy blue, coral, blush pink)
- Polymer clay extruder with small round/circle disc
- Large metal hoop earring findings (gold or silver tone)
- Liquid polymer clay (bakeable adhesive)
- Craft knife or tissue blade
- Ceramic tile or glass work surface
- Oven for baking
- Jewelry pliers (flat nose)
- Optional: Fine-grit sandpaper
Step 1: Preparation & Extrusion
-
Condition the clay:
Begin by thoroughly conditioning your three colors of polymer clay—navy blue, coral, and blush pink—until they are soft and pliable. This is crucial for smooth extrusion without cracking. -
Load the extruder:
Select a small round disc for your extruder. The size should be thin, resembling embroidery floss or yarn. Roll your conditioned navy blue clay into a snake that fits inside the extruder barrel. -
Extrude the clay:
Twist the handle to push the clay through the disc. You’ll need a continuous, long strand of clay. Repeat this process for the coral and blush pink clays, cleaning the barrel thoroughly between colors to avoid streaking. -
Prepare the hoop:
Take your metal hoop finding. Apply a very thin layer of liquid polymer clay all over the surface of the metal hoop. I find using a cheap synthetic brush or a finger helps get an even, tacky coating which prevents the clay from slipping later.
Sticky Situation?
If the clay strands aren’t sticking to the metal hoop, apply a thicker layer of liquid clay and let it sit for 5 minutes to get tacky before wrapping.
Step 2: Wrapping the Design
-
Start with navy blue:
Pick up your extruded navy blue strand. Place one end against the hoop (closer to where the finding opens) and gently press it into the liquid clay. -
Wrap the first section:
Begin wrapping the clay strand around the metal hoop. Keep the coils tight against each other so no metal shows through, but don’t pull so hard that the clay stretches or breaks. Wrap until you cover about one-third of the hoop. -
Make the cut:
Use your craft knife to slice the navy strand cleanly on the *inside* edge of the hoop. Gently press the cut end down to smooth it into the coil. -
Transition to coral:
Pick up the coral clay strand. Butt the starting end right up against the navy blue end you just finished. The transition should be seamless. -
Wrap the middle section:
Continue wrapping with the coral clay for the largest section of the hoop, maintaining that same tight, uniform tension. This section should cover the bottom curve of the earring. -
Finish with blush:
Cut the coral strand and introduce the blush pink strand just like before. Wrap the final third of the hoop, stopping just before the end mechanism of the metal finding. -
Secure the ends:
Trim the final end of the blush clay on the inside edge. Use a sculpting tool or your fingertip to gently burnish the clay where it meets the metal end caps to ensure a secure bond.
Step 3: Baking & Assembly
-
Transfer to baking surface:
Carefully place your wrapped hoops onto a ceramic tile or baking sheet lined with cardstock. Check the underside to ensure the clay hasn’t flattened; if it has, gently reshape it with your fingers. -
Bake the pieces:
Bake the earrings according to the manufacturer’s instructions for your specific brand of clay. Usually, this is around 275°F (130°C) for 30 minutes. Tent with foil to prevent scorching the light pink color. -
Cool down:
Allow the hoops to cool completely in the oven or on a dedicated cooling rack. The clay is fragile when hot but hardens as it cools. -
Add findings:
If your metal hoops came with separate end caps or jump rings that needed to be removed, re-attach them now using flat-nose pliers. -
Final polish:
Inspect your wraps. If there are any fingerprints or rough spots on the clay, you can very lightly buff them with fine-grit sandpaper, though usually the texture hides imperfections well.
Texture Twist
Twist two different colored thin strands together before wrapping them around the hoop to create a micro-striped, candy-cane effect.
Enjoy wearing your sophisticated, lightweight hoops that mimic high-end textile jewelry


Filigree Swirls Made from Thin Extruded Snakes
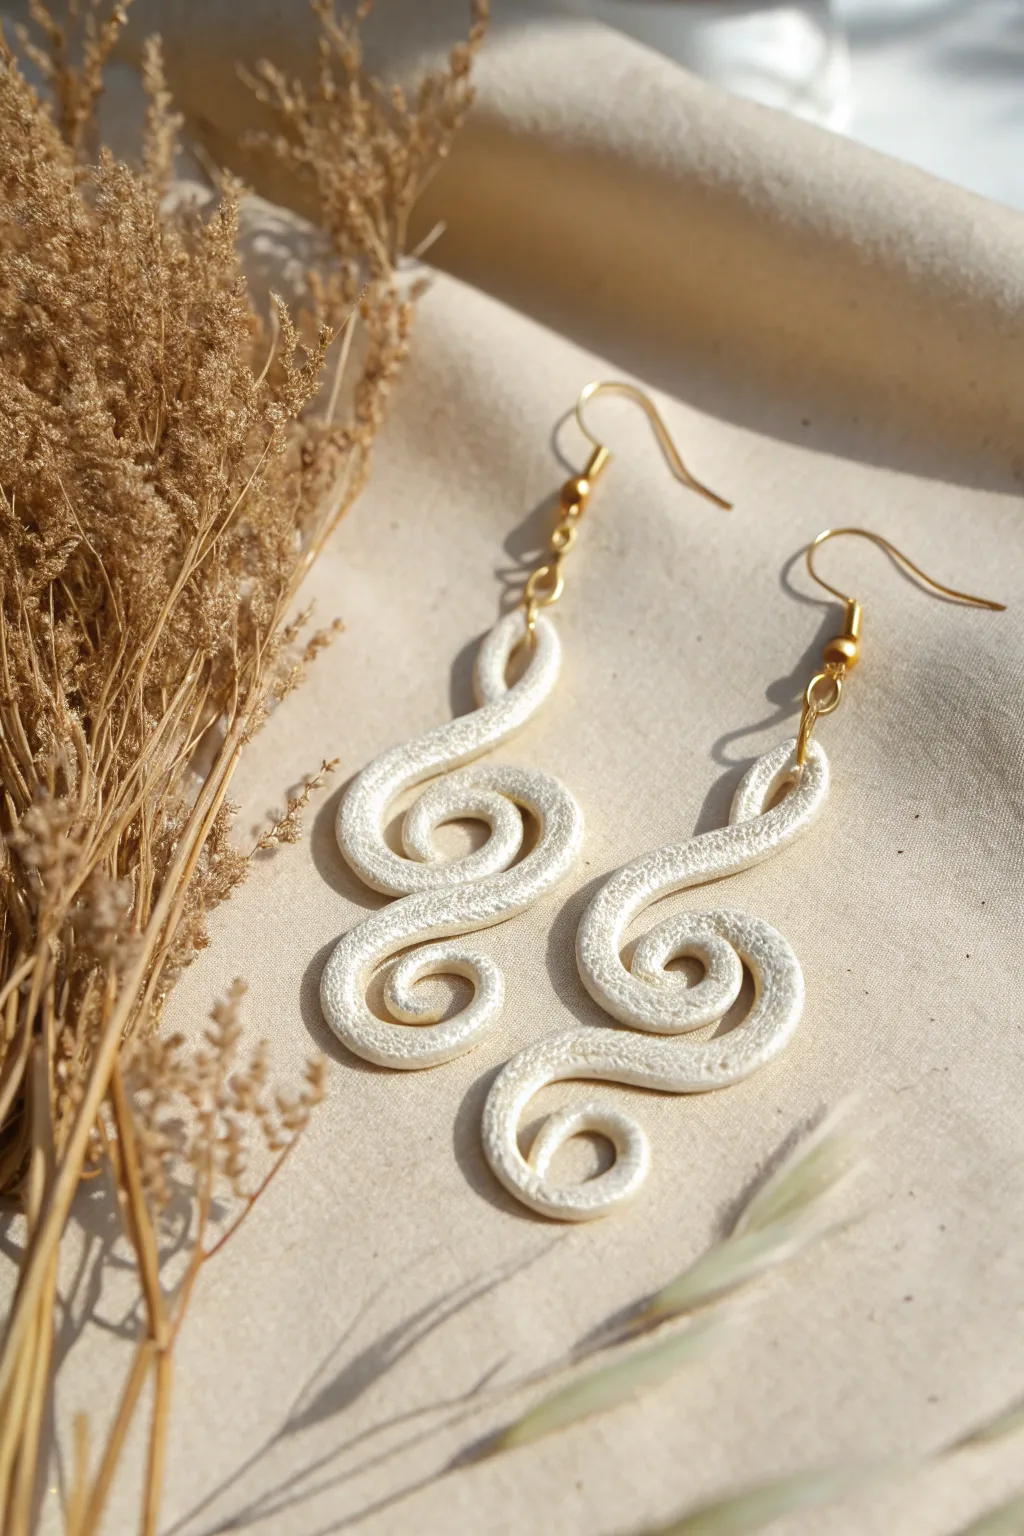
These elegant earrings mimic the graceful curves of a musical treble clef using nothing but extruded clay snakes. With their pearlescent white finish and organic S-curve design, they make a subtle yet sophisticated statement piece perfect for music lovers.
Step-by-Step
Materials
- White polymer clay (metallic or pearl finish)
- Extruder tool with small-to-medium round disc
- Liquid polymer clay (clear or translucent)
- Gold earring hooks (fishhook style)
- Gold jump rings (4mm or 5mm)
- Jewelry pliers (flat nose and round nose)
- Baking tile or heat-safe ceramic surface
- Craft blade or scalpel
- Toothpick or needle tool
- Sandpaper (optional, high grit)
Step 1: Preparation & Extrusion
-
Condition the Clay:
Begin by thoroughly kneading your white pearl polymer clay until it is soft and malleable. Warm clay extrudes much smoother, preventing the ‘snakes’ from breaking or having ragged edges. -
Load the Extruder:
Select a round disc for your extruder. A medium-small size works best for this design—you want the snake to be sturdy enough to hold its shape but delicate enough to look elegant. -
Extrude the Snake:
Push the clay through the extruder to create one long, continuous strand. Try to keep a consistent pressure so the thickness remains uniform throughout the entire length. -
Cut to Length:
Using your craft blade, cut two equal lengths of the extruded clay. Each piece should be approximately 3 to 4 inches long, depending on how large you want your final earrings to be.
Cracking Clay?
If the clay creates jagged edges as it comes out of the extruder, it isn’t conditioned enough. Add a drop of baby oil or clay softener and knead firmly until warm.
Step 2: Shaping the Clef Design
-
Create the Top Loop:
Take one clay strand and form a small teardrop loop at the very top. This is where your jump ring will eventually go, so make sure there is a clear negative space in the center. -
Form the Main S-Curve:
Gently guide the clay downwards from the top loop, curving it to the right and then sweeping it back to the left to initiate a large S-shape. -
Create the Central Spiral:
Continue curling the clay inwards at the center of the ‘S’ to create a tight spiral. This mimics the belly of a treble clef. Press the clay gently against itself where the strands touch to fuse them slightly. -
Form the Bottom Tail:
With the remaining length of the strand, sweep the tail downwards and curl it up into a final, smaller loose spiral at the bottom. -
Secure the Joints:
Flip the shape over carefully. Apply a tiny dot of liquid polymer clay at the contact points where the curves touch one another. This acts as a powerful glue during baking. -
Refine the Shape:
Use your fingers or a silicone tool to gently smooth out any fingerprints. Ensure the curves flow naturally without any sharp kinks. -
Create the Second Earring:
Repeat the shaping process with the second strand of clay. Place it directly next to the first one on your work surface to ensure they are mirror images or identical matches in size. -
Add Texture (Optional):
If your clay is plain white and you want that shimmery look shown in the photo, you can lightly brush mica powder over the raw clay now before baking.
Step 3: Baking & Assembly
-
Bake the Clay:
Transfer your baking tile with the earrings to the oven. Bake according to the manufacturer’s instructions for your specific brand of clay, usually around 275°F (130°C) for 30 minutes. -
Cool Down:
Allow the clay to cool completely in the oven or on the tile. Do not try to lift them while hot, as the clay is still fragile. -
Inspect and Sand:
Once cool, check for any rough edges. If needed, very gently sand the back or edges with high-grit sandpaper to smooth them out. -
Prepare Jump Rings:
Use your two pairs of pliers to twist open two gold jump rings. Remember to twist the ends away from each other (front to back), rather than pulling them apart, to maintain the circle shape. -
Attach to Polymer Clay:
Slide the open jump ring through the top loop you created in the clay. -
Add Earring Hook:
Before closing the jump ring, slide the loop of the gold fishhook ear wire onto the jump ring. -
Close the Ring:
Use your pliers to twist the jump ring closed again, ensuring the ends meet perfectly so the hook doesn’t slip out. -
Final Check:
Repeat the assembly for the second earring and give them a gentle shake to ensure all connections are secure and the movement feels right.
Make it Sparkle
Before baking, lightly brush the raw clay with white or gold mica powder. This enhances the pearlescent effect and highlights the curves of the extrusion.
Now you have a stunning pair of musical swirls ready to wear or gift to your favorite melody maker

What Really Happens Inside the Kiln
Learn how time and temperature work together inside the kiln to transform clay into durable ceramic.
Hollow Tube Beads Sliced Like Perfect Little Donuts
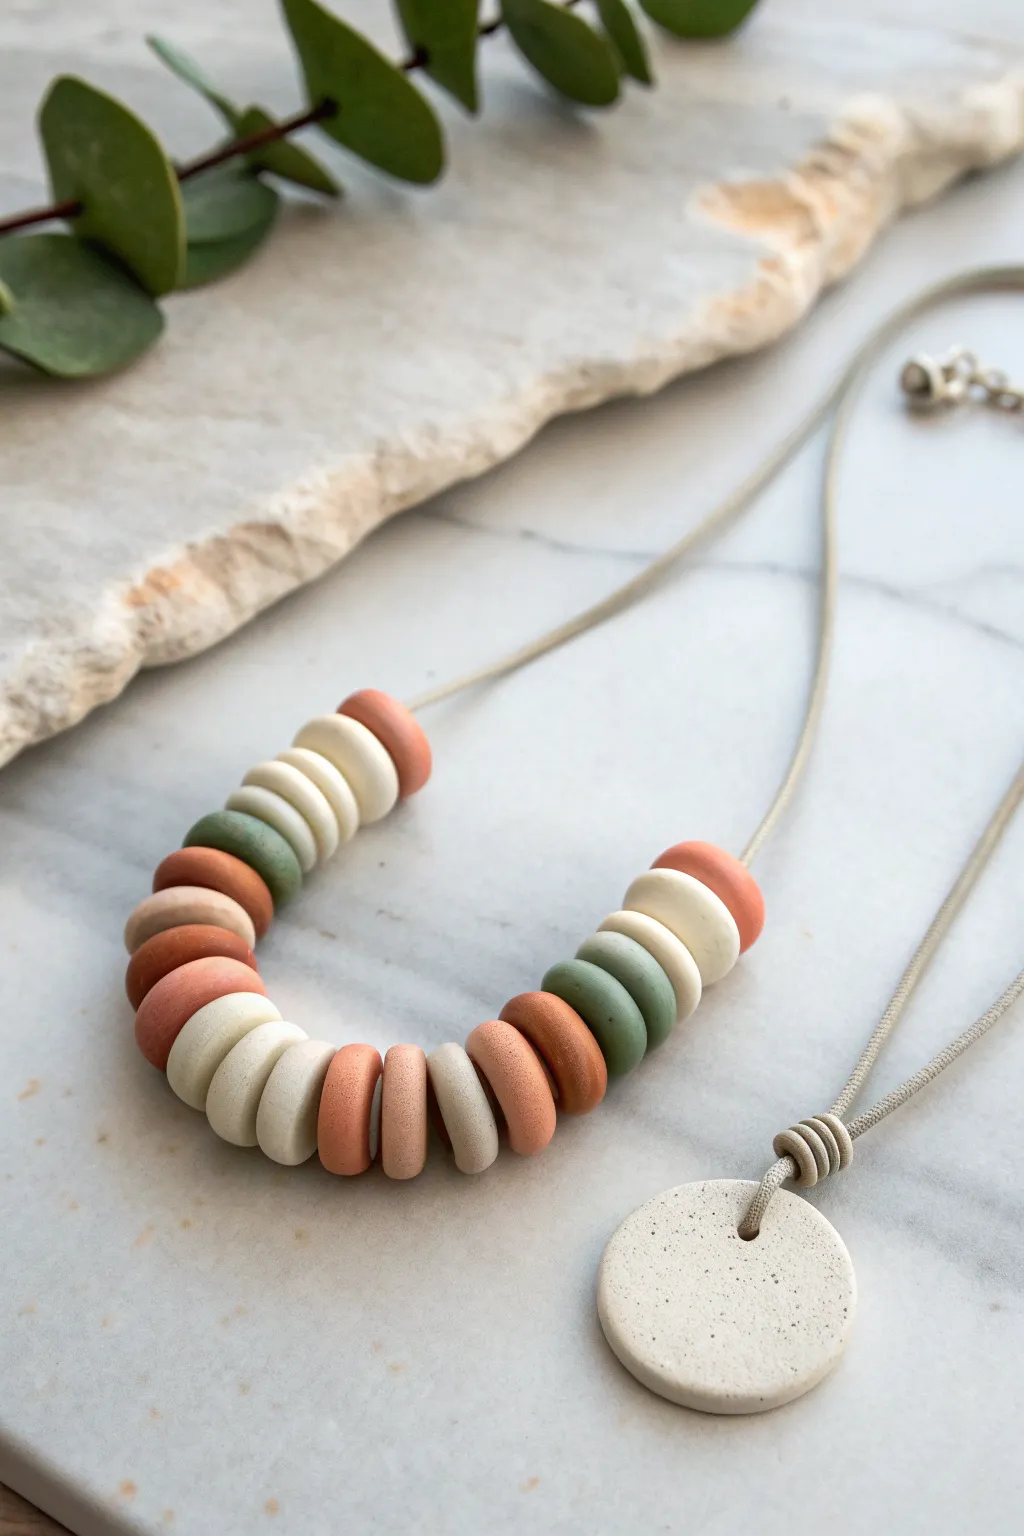
Create a stunning statement piece with uniform, organic-looking beads using the power of a polymer clay extruder. These flattened donut shapes, featuring a palette of terracotta, sage, and cream, offer a modern bohemian vibe that looks incredibly high-end yet is simple to achieve.
Step-by-Step Tutorial
Materials
- Polymer clay in terracotta, cream/ecru, sage green, and speckled beige
- Polymer clay extruder tool
- Large round disc for extruder (approx. 1 cm opening)
- Medium round core adapter (to create the hollow center)
- Tissue blade or very sharp craft knife
- Acrylic roller or pasta machine
- Baking sheet and cardstock or ceramic tile
- Beading cord (waxed cotton or suede)
- Closure findings (optional, or use sliding knots)
- Wet/dry sandpaper (400-800 grit)
Step 1: Extruding the Clay Tubes
-
Condition the Clay:
Begin by thoroughly conditioning each color of polymer clay until it is soft and pliable. Warm clay extrudes much smoother than stiff clay. -
Prepare the Extruder:
Set up your extruder with a large round disc. Crucially, insert the core adapter to create a hollow tube rather than a solid snake. This is the secret to getting that perfect donut hole without drilling later. -
Load and Extrude:
Roll your first color (e.g., terracotta) into a log that fits inside the extruder barrel. Crank the handle steadily to push out a long, flawless hollow tube. -
Repeat for All Colors:
Clean the extruder barrel thoroughly between colors to avoid streaking. Process the sage green, cream, and speckled beige clays into separate hollow tubes. -
Chill the Tubes:
Place your extruded tubes in the refrigerator or freezer for about 10-15 minutes. This firms up the clay, preventing it from squashing into an oval shape during the slicing process.
Tube Collapsing?
If your hollow tubes flatten while slicing even after chilling, insert a small wooden skewer or knitting needle inside the tube to support the walls while you cut.
Step 2: Slicing and Shaping
-
Slice the Beads:
Once firm, place a tube on your work surface. Using your sharp tissue blade, slice straight down to create ring shapes. -
Vary the Thickness:
Aim for slightly varying widths for visual interest—some can be thin washers, while others are thicker, chunkier rings. -
Soften the Edges:
Pick up each sliced ring and gently tap the cut edges with your finger to round them over slightly. I find this creates a more finished look than leaving the sharp cut edge exposed. -
Refine the Shape:
If any beads became slightly oval during cutting, gently roll them between your thumb and forefinger to regain a perfect circle. -
Create the Focal Pendant (Optional):
For the second necklace style shown, roll a slab of speckled clay and use a round circle cutter. Use a straw or small tool to punch a hole near the top edge.
Step 3: Baking and Assembly
-
Arrange for Baking:
Place your unbaked beads on a piece of cardstock on your baking sheet. The cardstock prevents shiny spots from forming where the clay touches the baking surface. -
Bake:
Bake according to your specific brand’s package instructions. Usually, this is around 275°F (130°C) for 30-45 minutes. Let them cool completely before handling. -
Sand for Smoothness:
If there are any rough spots, gently wet-sand the beads using 400 or 600 grit sandpaper under running water. -
Plan the Pattern:
Lay out your cord and arrange the beads in a pleasing pattern. The example uses color blocking mixed with alternating sections: e.g., three cream, one terracotta, two sage. -
String the Beads:
Thread the beads onto your chosen cord. A waxed cotton cord or suede lace works beautifully and grips the beads slightly so they sit nicely. -
Finish the Ends:
Tie sliding knots for an adjustable length, or attach metal crimps and a clasp if you prefer a fixed length necklace.
Textured Finishes
Before baking, gently roll the outside of some beads in coarse salt or sand for a stone-like texture, then wash it away after the beads are fully baked and cooled.
Now you have a chic, lightweight necklace ready to wear with your favorite casual outfit
Micro Extruded Frames to Outline Cutout Shapes
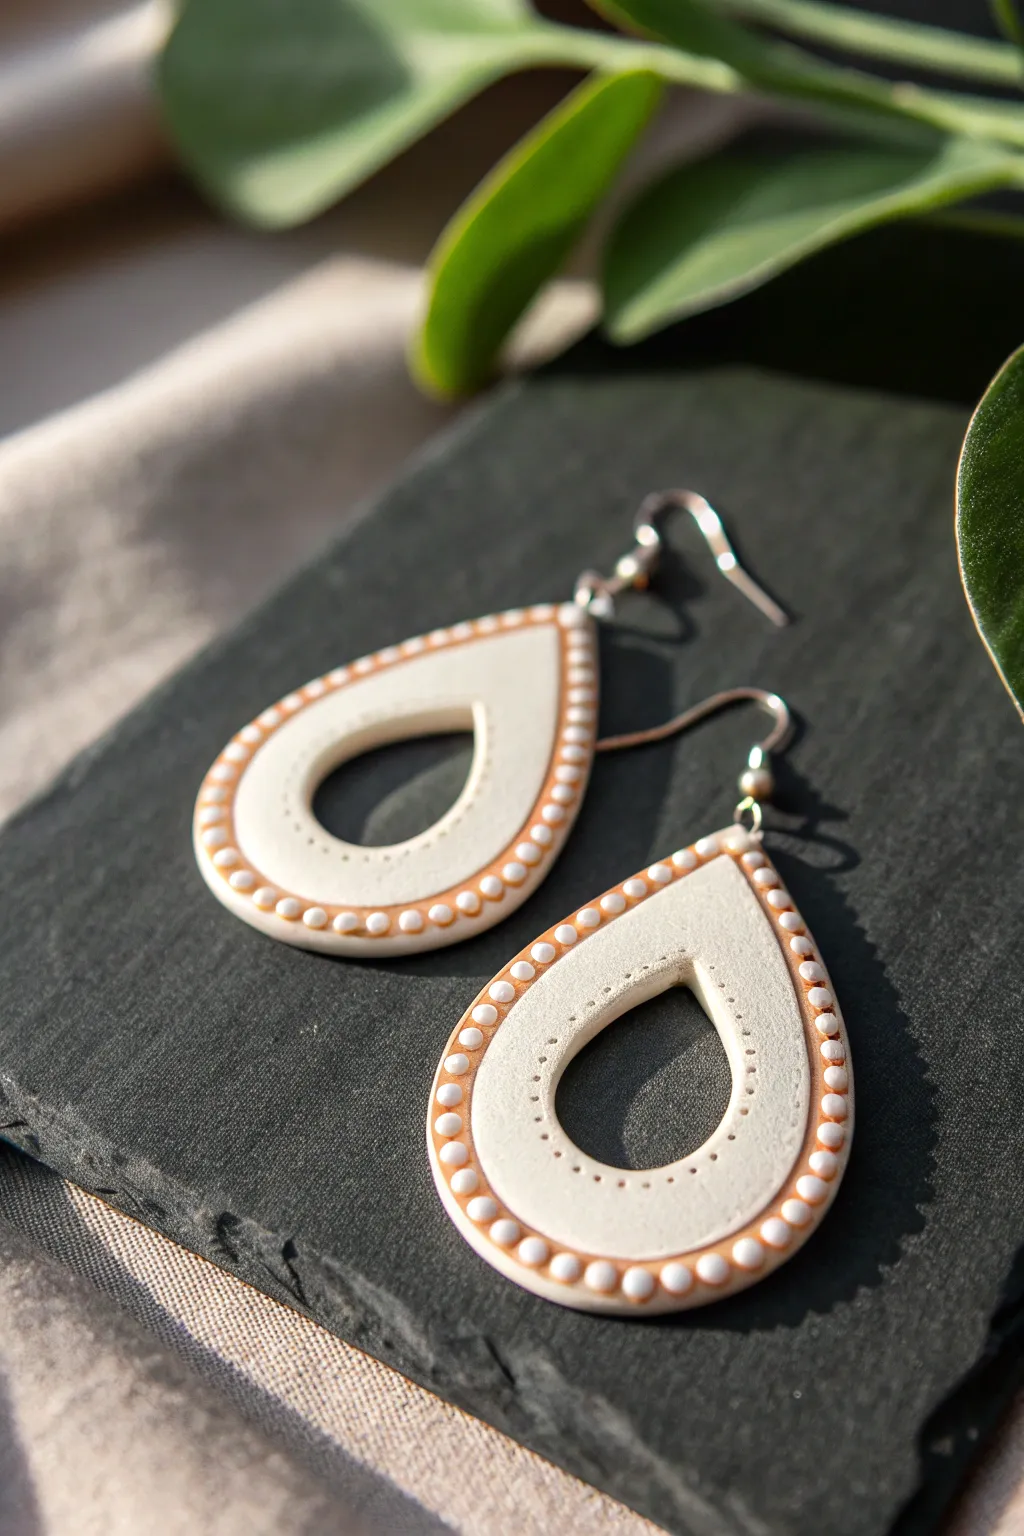
These elegant polymer clay earrings feature a classic teardrop cutout shape framed by delicate, beaded-look texture. The contrast between the smooth white clay and the warm, textured outline creates a sophisticated, bohemian-inspired accessory perfect for everyday wear.
Step-by-Step Tutorial
Materials
- White or cream polymer clay
- Light terracotta/peach polymer clay
- Clay extruder with a very small round disc (approx. 1mm)
- Teardrop cutter (medium to large size)
- Smaller teardrop cutter (for the cutout)
- Acrylic roller or pasta machine
- Needle tool or dotting tool
- Liquid polymer clay (translucent or matching)
- Small craft drill or Dremel
- Jump rings and earring hooks
- Pliers (flat nose and round nose)
- Work tile or baking surface
Step 1: Creating the Base Shape
-
Condition the clay:
Start by thoroughly conditioning your white polymer clay until it is soft and pliable. Run it through the thickest setting of your pasta machine or roll it out to a uniform thickness of about 3mm. -
Cut the main shape:
Place your medium-large teardrop cutter onto the white clay sheet. Press down firmly to cut out two identical shapes. Leave the clay stuck to your work tile if possible to avoid distortion when moving it. -
Create the cutout:
Take the smaller teardrop cutter and center it inside the large teardrop you just cut. Gently press down to remove the center, creating an open frame shape. Lift away the excess center clay. -
Smooth the edges:
Using your finger or a soft silicone tool, gently run along the cut edges of both the outer and inner teardrop shapes to soften any sharp cutting ridges.
Step 2: Extruding and Applying the Frame
-
Prepare the accent color:
Condition the light terracotta/peach clay. It needs to be very soft for the extruder to work smoothly without crumbling. -
Extrude the clay strands:
Load the peach clay into your extruder fitted with a small round disc. Extrude a long, continuous snake of clay. -
Apply adhesive:
Apply a very thin, sparing layer of liquid polymer clay along the top surface of the white teardrop, following the outer edge. This will help the extruded frame bond securely. -
Attach the frame:
In one of my favorite steps, carefully lay the extruded peach strand along the outer perimeter of the white shape. Gently press it down so it adheres without flattening the round profile too much. -
Trim the excess:
Where the two ends of the extruded strand meet (usually at the point of the teardrop), use a craft knife to slice them cleanly and blend the seam together.
Uneven Extrusions?
If your clay snake breaks or looks jagged, your clay is likely too cold or hard. Mix in a drop of clay softener or baby oil, re-knead thoroughly, and try extruding again.
Step 3: Adding Texture and Finishing
-
Create the beaded effect:
Using a blunt tool or the back of a needle tool, press gentle indentations into the peach frame at regular intervals. This segments the snake, making it look like tiny individual beads. -
Add inner details:
Take a needle tool and gently prick small holes or dots into the white clay surface, following the curve of the inner cutout. This adds a subtle, embroidered look to the white space. -
Bake the pieces:
Place your work tile with the earrings into a preheated oven. Bake according to your brand of clay’s specific instructions (usually 275°F/130°C for at least 30 minutes). -
Cool and drill:
Allow the pieces to cool completely. Once hard, use a small hand drill or rotary tool to bore a hole at the very top point of the teardrop for the hardware. -
Sand (optional):
If the edges feel rough, you can lightly sand the sides with fine-grit sandpaper, being careful not to damage the extruded detailing on top. -
Assemble the hardware:
Open a jump ring using your pliers—twist it sideways rather than pulling it apart. Thread it through the drilled hole. -
Attach the hook:
Add the earring hook onto the jump ring before closing it securely. Repeat for the second earring.
Level Up: Ombré Frame
Instead of a solid color, create a ‘skinner blend’ gradient log before putting it into the extruder. Your frame will slowly shift colors as it wraps around the shape.
Now you have a stunning pair of earrings that showcase the precision of micro-extrusions


The Complete Guide to Pottery Troubleshooting
Uncover the most common ceramic mistakes—from cracking clay to failed glazes—and learn how to fix them fast.
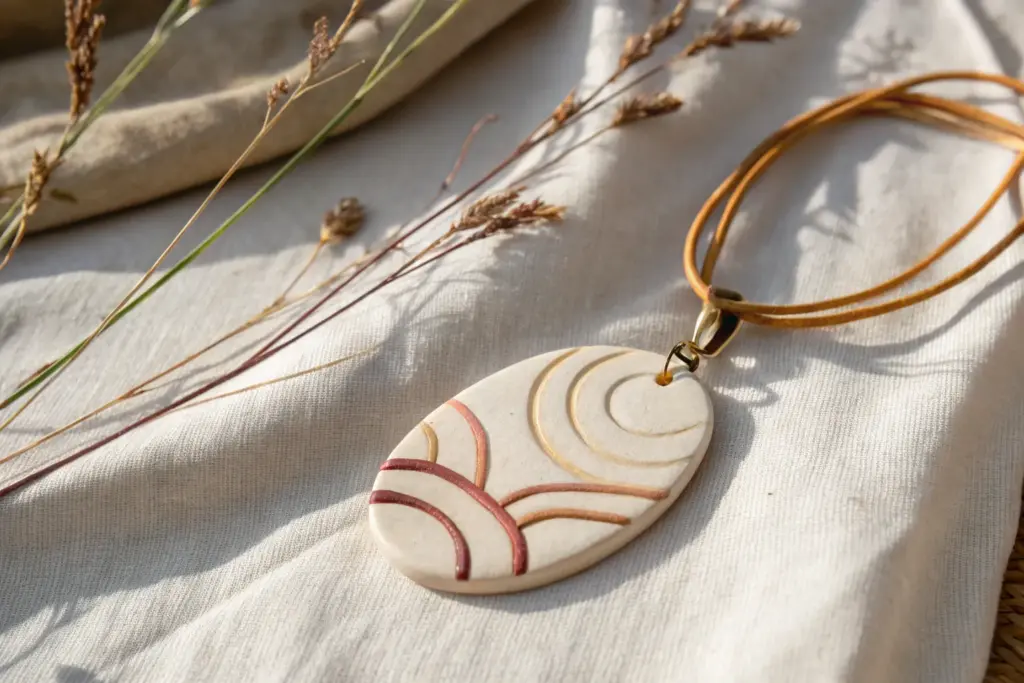
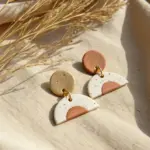
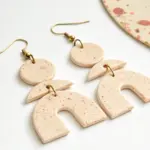
Extruded Texture Lines for Minimalist Surface Design
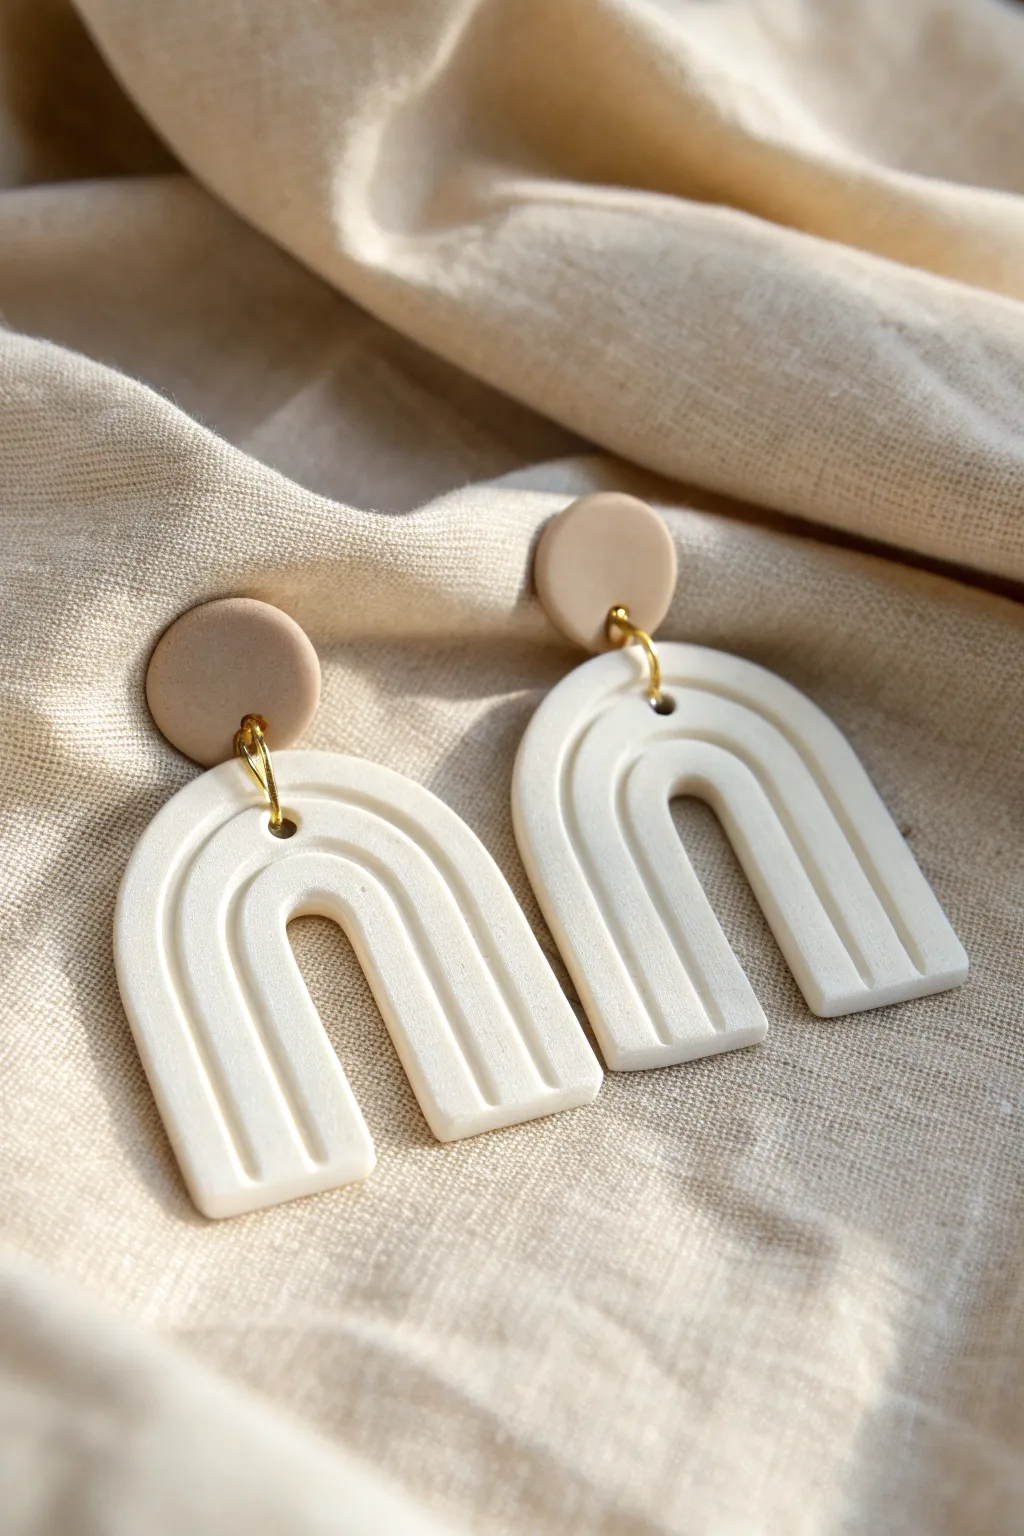
These sophisticated polymer clay earrings feature clean, extruded-style lines for a modern minimalist look. The creamy white arches pair perfectly with soft beige studs, creating a neutral accessory that goes with everything.
Step-by-Step
Materials
- White or cream polymer clay
- Beige or tan polymer clay
- Polymer clay extruder with a small circle disc
- Acrylic rolling pin
- Arch shaped clay cutter
- Small circle cutter (approx. 10mm)
- Small jump rings (gold or brass)
- Earring posts and backs
- Super glue or jewelry resin
- Hand drill or needle tool
- Pliers
- Tile or parchment paper
- Clay slicer blade
Step 1: Prepping the Arch Base
-
Condition the white clay:
Start by thoroughly kneading your white or cream clay until it is soft and pliable. This prevents air bubbles and ensures a smooth finish. -
Roll the base sheet:
Roll out a sheet of the white clay to a medium thickness, roughly 3mm or setting #1 on a pasta machine. Place this on your ceramic tile or parchment paper so you don’t have to move it later. -
Cut the arch shapes:
Use your arch cutter to firmly press into the clay sheet. Don’t remove the excess clay around the shape yet; keeping it in place can help distorting the shape while you work on the texture.
Clean Lines Pro-Tip
Lay a piece of cling wrap over the clay before cutting your main arch shape. This creates a beautifully domed, rounded edge that requires almost no sanding after baking.
Step 2: Creating the Linear Texture
-
Load the extruder:
Condition a separate small ball of the same white clay and load it into your clay extruder fitted with a small circle disc. -
Extrude clay strings:
Extrude long, thin snakes of clay. You want these to be smooth and consistent in thickness. -
Indent the lines:
Instead of placing the extruded snake *onto* the clay, you can actually use the extruded snake as a pressing tool, or simply use a dull needle tool or knitting needle to press three deep, parallel vertical grooves into your arch shape. The image shows indented lines that mimic the look of distinct strands. -
Refine the surface:
Run your finger or a little cornstarch lightly over the grooves to soften any sharp edges created by the tool. You want the lines to look molded, not scratched. -
Clean up edges:
Now, carefully peel away the excess clay from around your cut arches. If the edges look rough, smooth them gently with a fingertip. -
Create holes:
Using a needle tool, poke a hole at the very top center of each arch. Make sure the hole is big enough for your jump rings.
Step 3: Making the Studs
-
Condition beige clay:
Knead the beige or tan clay until conditioned. -
Roll and cut circles:
Roll this clay out to the same thickness as your arches. Use the small circle cutter to punch out two discs. -
Pierce the studs:
Create a hole near the bottom edge of each circle. This is where the arch will connect.
Level Up: Speckled Stone
Mix black pepper or dried used coffee grounds into the white clay before rolling it out to create a faux-stone or ceramic pottery effect.
Step 4: Baking and Assembly
-
Bake the pieces:
Bake all clay components according to your specific brand’s package instructions. Usually, this is around 275°F (130°C) for 30-45 minutes. -
Cool and inspect:
Let the pieces cool completely on the tile. Check for any rough spots and lightly sand them with fine-grit sandpaper if needed. -
Attach earring posts:
Glue flat-pad earring posts to the back of the beige circles using strong super glue. For extra durability, I find covering the pad with a tiny drop of UV resin or liquid clay helps secure it permanently. -
Connect with jump rings:
Use pliers to open your jump rings. Thread one through the hole in the arch and the hole in the stud, then close the ring securely. -
Final check:
Ensure the jump rings are closed tight so the pieces don’t slip apart.
Enjoy wearing your sleek, modern earrings with your favorite casual outfit
Marbled Extruder Loads for Swirly One-Pull Magic
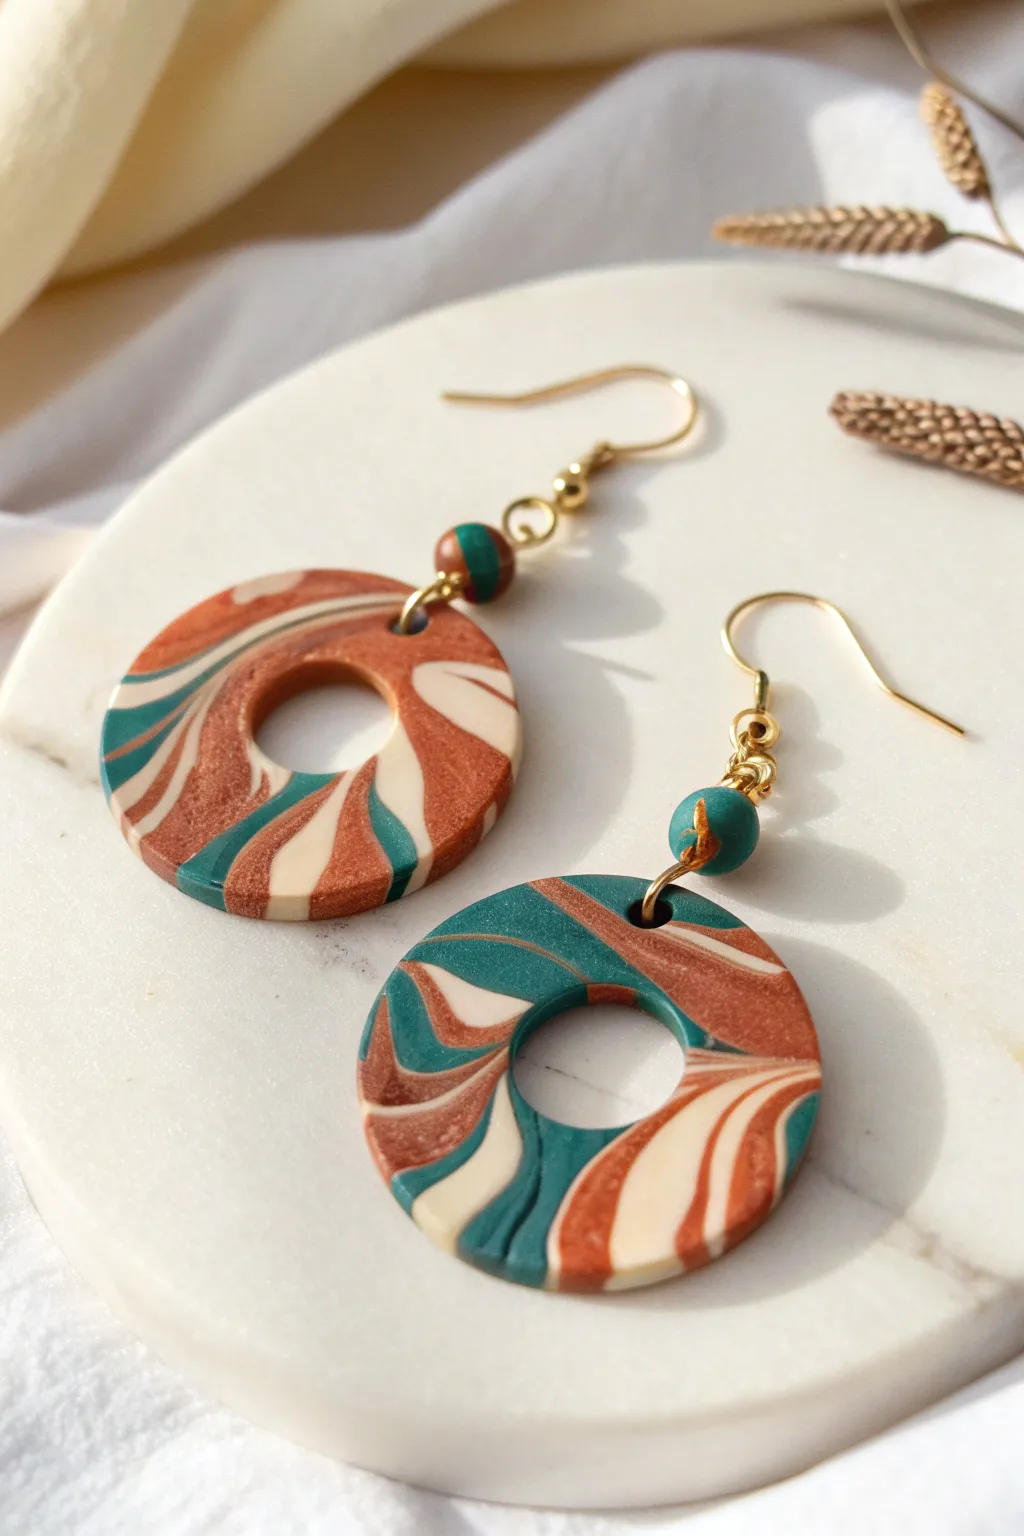
These elegant earrings feature a mesmerizing, organic swirl of teal, terracotta, and cream that mimics stone or agate. Using a simple extruder technique, you’ll create a unique slab that pairs beautifully with gold hardware for a polished, modern look.
Step-by-Step Tutorial
Materials
- Polymer clay (Teal, Terracotta/Rust, Cream/Off-white)
- Clay extruder with a large circle disc
- Acrylic rolling pin
- Tissue blade or rigid slicing blade
- Two circle cutters (one roughly 1.5 inch for the outer shape, one 0.5 inch for the inner hole)
- Small bead ream or toothpick
- Two teal or terracotta round beads (approx. 6mm or 8mm)
- Gold jewelry wire (24 gauge)
- Four gold jump rings (4mm or 5mm)
- Two gold ear wires (French hooks)
- Jewelry pliers (round nose and chain nose)
- Oven for baking
Step 1: Prepping the Clay Load
-
Condition the Clay:
Begin by thoroughly conditioning your teal, terracotta, and cream polymer clay until it is soft and pliable. This step is crucial to prevent cracking later. -
Make Discs:
Roll each color into a thick log that matches the interior diameter of your extruder barrel. Slice these logs into consistent discs, roughly a quarter-inch thick. -
Stack the Barrel:
Load your extruder barrel by stacking the colored discs in a random alternating pattern (e.g., Teal, Cream, Rust, Cream, Teal). This creates the foundational color mix for the swirl. -
Extrude the Snake:
Attach the large circle disc to the extruder cap. Crank the handle steadily to push the clay out, resulting in a long, multi-colored snake. I usually aim for one long, continuous strand.
Step 2: Creating the Marbled Slab
-
Cut and Arrange:
Cut the long extruded snake into shorter segments, each about 3 to 4 inches long. Lay these segments side-by-side on your work surface to form a rough rectangle. -
Consolidate the Cane:
Gently press the snakes together from the sides to eliminate gaps. Then, use your acrylic roller to flatten the logs slightly, turning them into a cohesive sheet. -
Roll and Fold:
Roll the sheet out thinner, then fold it in half or twist it gently to distort the straight lines into curves. Be careful not to over-mix, or the colors will turn muddy. -
Final Roll:
Roll the slab to your final desired thickness, roughly 3mm (or a number 3 setting on a pasta machine). Look for the section of the slab with the most pleasing swirl pattern.
Clean Cuts Every Time
Place a piece of cling wrap over the clay before using your cutters. This creates a beautifully rounded, domed edge rather than a sharp, harsh one.
Step 3: Cutting and Baking
-
Cut Outer Circles:
Place your larger circle cutter onto the chosen area of the slab. Press down firmly to cut two matching circles. -
Cut Inner Holes:
Using the smaller circle cutter, center it visually inside each large circle and cut out the middle to create the donut shape. -
Pierce Top Holes:
Use a toothpick or small tool to poke a hole near the top edge of each donut. Ensure the hole is large enough for your jump rings. -
Make Matching Beads (Optional):
If you have leftover marbled clay, you can roll small beads to use as spacers, or simply use the solid-color beads listed in the materials. -
Bake:
Place the cut pieces on a tile or parchment-lined baking sheet. Bake according to the manufacturer’s instructions for your specific brand of clay, usually around 275°F (135°C) for 30-45 minutes.
Air Bubble Trouble?
If you see a bubble after rolling your slab, gently pierce it with a needle tool and smooth the air out with your finger before baking.
Step 4: Assembly
-
Sand and Buff:
Once cooled, lightly sand any rough edges with fine-grit sandpaper for a professional finish. You can buff them with a soft cloth to bring out a slight sheen. -
Create Bead Links:
Thread a piece of gold wire through your accent bead. Create a wrapped loop on both the top and bottom of the bead using your round nose pliers. -
Attach to Clay:
Open a jump ring (always twist sideways, never pull apart) and thread it through the hole in the clay donut and the bottom loop of your bead link. Close the jump ring securely. -
Attach Ear Wire:
Open the loop on your ear wire and attach it to the top loop of the bead link. Repeat for the second earring.
Enjoy wearing these sophisticated, geometric pieces that look far more complex to make than they really are

TRACK YOUR CERAMIC JOURNEY
Capture glaze tests, firing details, and creative progress—all in one simple printable. Make your projects easier to repeat and improve.
Cane Veneers to Refresh Scrap Clay Bases
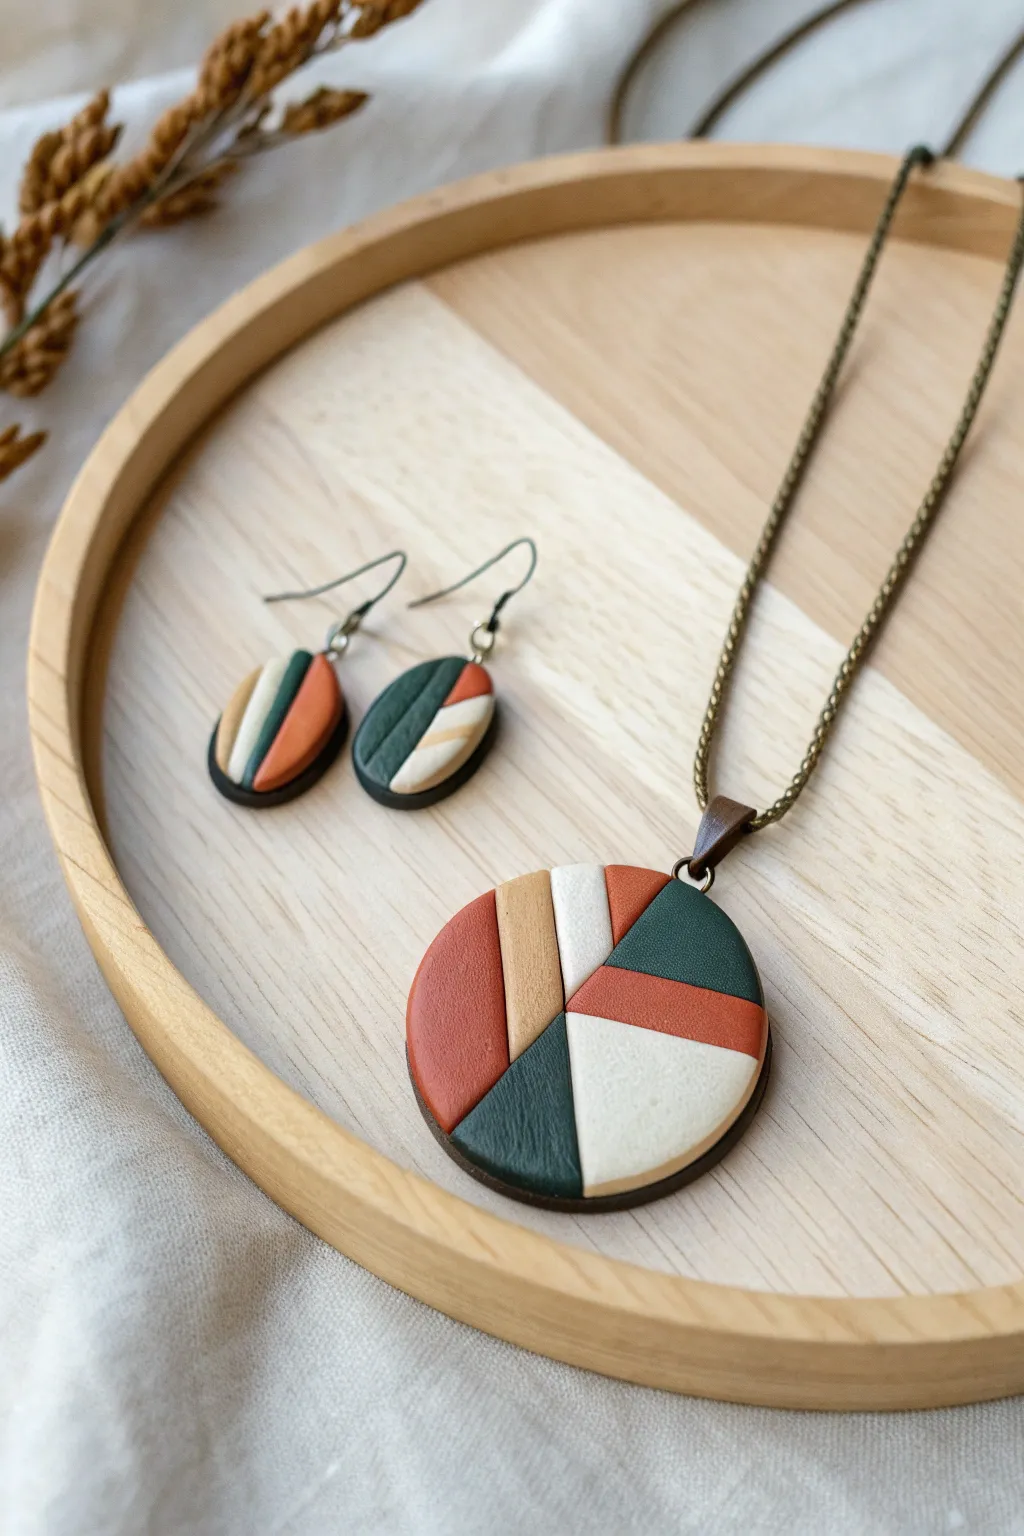
Transform scrap clay into a sophisticated, modern jewelry set with this geometric veneer technique. The earthy tones of rust, deep green, cream, and beige create a striking abstract pattern that looks beautifully polished on both earrings and pendants.
Step-by-Step Guide
Materials
- Polymer clay in rust, deep forest green, beige, white, and black
- Scrap clay for bases
- Pasta machine or acrylic roller
- Clay extruder (optional, for making precise strips)
- Tissue blade or flexible cutting blade
- Round cutter (approx. 4-5 cm)
- Small oval cutters
- Bail glue-on finding (antique bronze finish)
- Jump rings and earring hooks (antique bronze finish)
- Jewelry chain
- Jewelry glue (usually E6000 or similar)
- Sandpaper (various grits from 400 to 1000)
- Oven for baking
Step 1: Preparing the Geometric Veneer
-
Condition the Clay:
Start by thoroughly conditioning your rust, deep green, beige, and white clays separately. They should be pliable and warm to the touch. -
Create Flat Sheets:
Roll each color through your pasta machine on a medium-thin setting (usually setting 3 or 4) to create uniform sheets. -
Cut Geometric Strips:
Using a sharp blade, cut random geometric shapes—trapezoids, triangles, and angled strips—from your colored sheets. Avoid perfect squares to keep the organic, abstract look. -
Prepare the Base Sheet:
Roll out a thin sheet of black clay. This will act as the ‘canvas’ or backing for your geometric puzzle. -
Assemble the Pattern:
Place your colored shapes onto the black backing sheet. Fit them together like a puzzle, leaving very thin gaps between them so the black base shows through acting as a grout line. -
Burnish the Veneer:
Place a piece of parchment paper over your assembled sheet. Gently rub over the surface with an acrylic roller or a burnishing tool to ensure the pieces adhere to the backing and the seams are flush.
Step 2: Creating the Jewelry Components
-
Prepare the Structural Base:
Condition your scrap clay and roll it out on a medium-thick setting (setting 1 or 2). This will provide the sturdy core for your jewelry pieces. -
Attach the Veneer:
Carefully lay your patterned veneer sheet on top of the scrap clay base. Gently roll over it once more to bond layers without distorting the pattern. -
Cut the Pendant:
Position your large round cutter over a section of the pattern that has a nice balance of colors. Press down firmly to cut the main pendant shape. -
Cut the Earrings:
Using your oval cutters, cut two shapes. Try to find areas where the stripes or angles complement each other, though they don’t need to be identical. -
Refine Edges:
Before baking, gently smooth the cut edges with your finger to remove any loose bits of clay. -
Baking:
Place your pieces on a ceramic tile or baking sheet lined with parchment paper. Bake according to your polymer clay manufacturer’s instructions (usually 275°F/130°C for at least 30-45 minutes).
Clean Lines Pro-Tip
Chill your clay sheet in the fridge for 10 minutes before cutting shapes. Cold clay distorts less under the cutter pressure, keeping your geometric lines crisp.
Step 3: Finishing and Assembly
-
Cooling and Sanding:
Let the pieces cool completely. If there are rough spots, wet sand the edges and surface lightly, starting with 400 grit and moving up to 1000 grit for a super smooth finish. -
Buffing:
Rub the pieces vigorously with a soft denim cloth or use a buffing wheel to bring out a natural satin sheen. -
Attach the Bail:
Apply a small dab of strong jewelry glue to the flat pad of your bail finding. Press it firmly onto the back of the round pendant near the top edge. -
Drill Earring Holes:
Use a small hand drill or rotary tool to make holes at the very top of each oval earring piece. -
Assemble Hardware:
Open your jump rings using two pairs of pliers. Attach the earring hooks to the drilled holes and thread the pendant onto your chain.
Level Up: Texture
Before baking, gently press a piece of coarse sandpaper or a texture sponge over the veneer to give the clay a stone-like, matte surface finish.
Now you have a stunning set of custom jewelry ready to wear or gift
Tiny Coil “Springs” Made from Extruded Thread
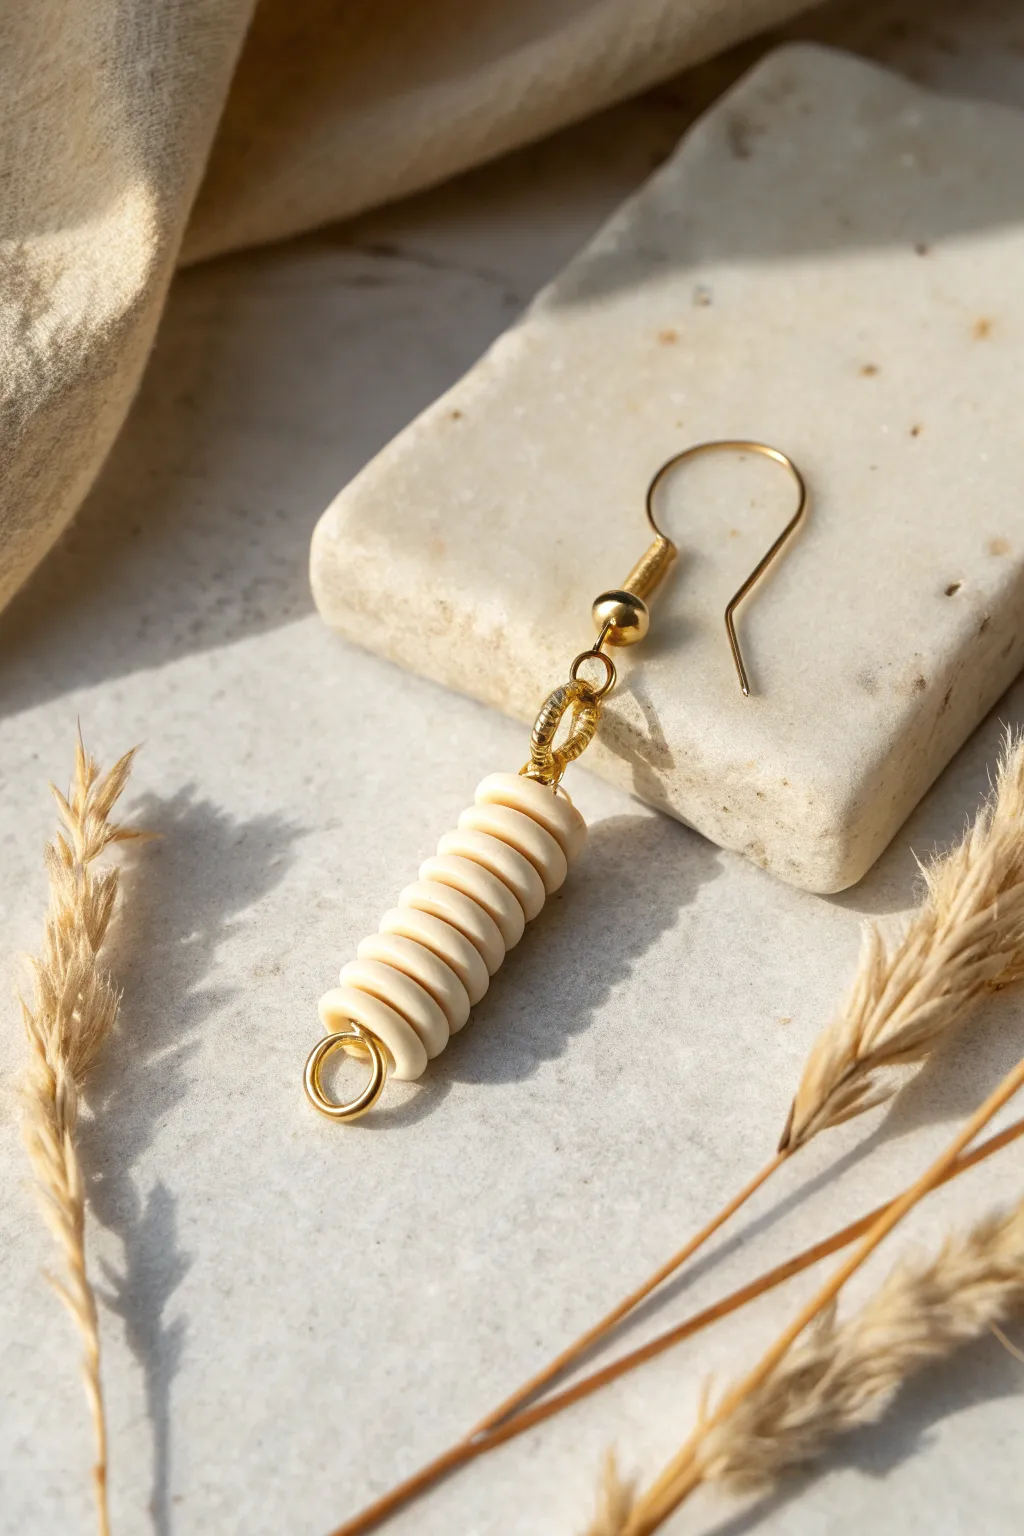
These elegant earrings feature a stack of uniform polymer clay discs that mimic the look of carved bone or ivory. Created using a simple extruding technique, the resulting coil shape adds lovely texture and movement to a classic drop design.
How-To Guide
Materials
- Cream or bone-colored polymer clay
- Polymer clay extruder with a small circular disc (approx. 2-3mm)
- Small mandrel or thin knitting needle (metal)
- Blade or craft knife
- Headpins or jewelry wire (gold)
- Earring hooks (gold)
- Small gold spacer beads (optional)
- Jewelry pliers (round nose and flat nose)
- Wire cutters
- Baking sheet and cardstock
Step 1: Extruding and Coiling
-
Condition the Clay:
Start by thoroughly conditioning your cream-colored polymer clay until it is soft and pliable. Warm clay extrudes much smoother and reduces the risk of ragged edges. -
Load the Extruder:
Roll the clay into a log that fits inside your extruder barrel. Select a small circle disc—something around 2mm or 3mm in diameter works best for this scale. -
Extrude a Snake:
Slowly turn the handle or push the plunger to extrude a long, even snake of clay. Try to keep the pressure consistent so the thickness doesn’t vary. -
Prepare the Mandrel:
I find it helpful to lightly dust a metal mandrel or a thin knitting needle with cornstarch or baby powder to prevent sticking. -
Wrap the Coil:
Gently wrap the extruded clay snake around the mandrel to form a tight spring. Ensure each loop touches the previous one without merging completely; you want distinct ridges. -
Cut the Lengths:
Decide on the length of your bead stack—about 1 inch is standard for this style. Use your blade to slice the clay while it’s still on the mandrel to create clean, flat ends.
Coil Separation
If your coils merge into a solid tube while baking, try chilling the mandrel with the raw clay in the fridge for 10 minutes before putting it in the oven to firm it up.
Step 2: Baking and Finishing
-
Bake on the Mandrel:
Leaving the clay on the metal mandrel helps it hold its shape perfectly. Place the mandrel on a piece of cardstock on your baking sheet to prevent shiny flat spots. -
Oven Curing:
Bake according to your clay manufacturer’s instructions. Usually, this means 275°F (130°C) for about 30 minutes. Let it cool completely before handling. -
Remove from Mandrel:
Once cool, gently twist the clay coil to break the seal and slide it off the metal rod. It should come off easily if you used powder earlier. -
Prepare the Wire:
Cut a piece of jewelry wire approximately 3 inches long. Create a small wrapped loop at one end using your round nose pliers. -
Assemble the Drop:
Thread the wire through the center of your polymer clay coil bead. The loop you made should act as a stopper at the bottom. -
Add Decorative Accents:
Slide a small gold spacer bead onto the wire at the top of the clay coil. This adds a polished finish and hides the hole entrance. -
Create the Top Loop:
Using your round nose pliers, create a loop at the top of the wire, directly above the spacer bead. Wrap the excess wire around the base of the loop for security, creating a ‘wrapped loop’ style. -
Trim Excess Wire:
Snip off any remaining wire tail with your flush cutters and tuck the sharp end in with flat nose pliers. -
Attach Earring Hardware:
Open the loop on your earring hook by twisting it sideways. Slide your finished coil pendant onto the hook. -
Final Adjustments:
Close the loop on the earring hook securely. Repeat all steps to create the second earring for a matching pair.
Dual-Tone Effect
Twist two very thin strands of different colored clay together before extruding. The resulting snake will have a subtle marble, adding depth to your coil.
Enjoy wearing your sophisticated, handcrafted coil earrings that look far more complex than they actually are
Geometric Links Built from Extruded Profiles
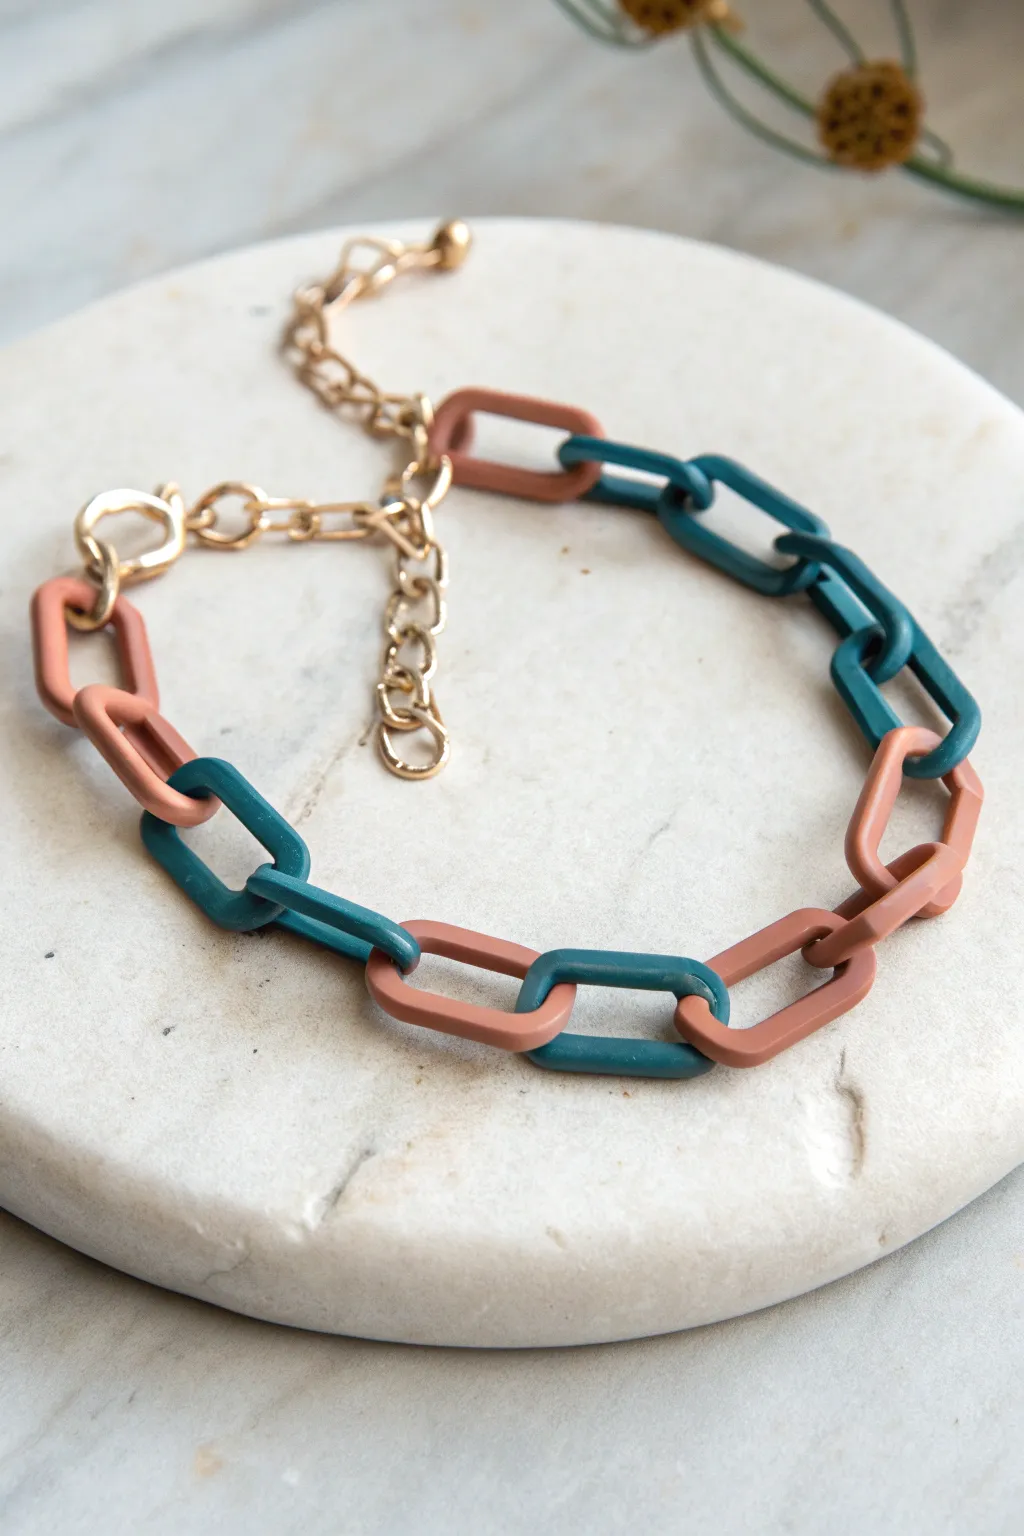
Master the art of creating clean, modern geometric jewelry with this two-tone chain link bracelet. By using an extruder, you can achieve uniform, professional-looking rectangular links in complementary muted teal and terracotta shades.
Detailed Instructions
Materials
- Polymer clay in teal and terracotta (or custom mixed muted tones)
- Polymer clay extruder with a small rectangle or square disc
- Sharp tissue blade or craft knife
- Ruler or measured grid surface
- Ceramic tile or baking sheet
- Oven thermometer
- Gold-tone jewelry chain (cable stye)
- Gold-tone lobster clasp
- 4 large gold jump rings
- Jewelry pliers (chain nose and round nose)
- Fine-grit sandpaper (optional)
- Liquid clay or bake-and-bond (optional)
Step 1: Extruding the Profiles
-
Condition the Chain Colors:
Begin by thoroughly conditioning your teal and terracotta polymer clay separately until they are pliable and warm. -
Load the Extruder:
Select a small rectangular disc for your extruder. Roll the terracotta clay into a snake slightly smaller than the extruder barrel width and insert it. -
Extrude the Strand:
Twist the extruder handle smoothly to push out a long, continuous strand of clay. Try to keep a steady pace to ensure the strand remains an even thickness without lumps. -
Repeat for Color Two:
Clean the extruder barrel thoroughly to avoid color streaks, then repeat the process with the teal clay to create a matching strand.
Seam Splitting?
If seams pop open during baking, apply a tiny dot of liquid clay or bond to the raw ends before pressing them together. This acts as ‘glue’ for a permanent bond.
Step 2: Forming the Links
-
Measure and Cut Segments:
Lay your extruded strands straight on your work surface. Use a ruler and your sharp blade to cut uniform segments, approximately 2 inches (5cm) long each. -
Form the First Link:
Take a terracotta segment and gently bend it into a rectangle shape. Bring the two cut ends together cleanly. -
Seal the Seam:
Press the cut ends together firmly. Use a smoothing tool or your finger to blend the clay across the seam so the join becomes invisible. Place this finished link on your baking tile. -
Start the Chain:
Take a teal segment and thread it through the center of the finished terracotta link. -
Close the Second Link:
Bend the teal segment into a matching rectangle shape, joining the ends just like you did before. Ensure the link moves freely and isn’t stuck to the first one. -
Build the Pattern:
Continue alternating colors—terracotta, teal, terracotta—threading each new strip through the previous closed link before sealing it shut. -
Check Length:
Keep adding links until the chain reaches about 1-1.5 inches short of your total desired bracelet length to account for the clasp assembly. -
Final Shape Adjustment:
Before baking, gently nudge each rectangle with your blade to ensure the corners are distinctive and the sides are straight, as handling them might have rounded them slightly.
Texture Play
Before cutting your extruded strands, gently roll them over a textured sandpaper or fabric. This adds a subtle, matte stone finish to the plastic-like clay surface.
Step 3: Baking and Assembly
-
Bake the Chain:
Bake the entire linked chain on your tile according to the clay manufacturer’s temperature instructions. I usually bake for 45-60 minutes to ensure maximum strength. -
Cool and Inspect:
Allow the clay to cool completely in the oven. Once cool, check for any rough seams and lightly sand them with fine-grit sandpaper if needed. -
Prepare the Hardware:
Cut a 2-inch length of gold extender chain and separate your lobster clasp. -
Attach the Clasp:
Using two pliers, twist open a large jump ring. Loop it through the clay link at one end of your bracelet and attach the lobster clasp before closing the ring securely. -
Attach the Extender:
On the opposite end of the clay chain, use another jump ring to attach your length of gold extender chain. -
Final Touches:
Add a small decorative bead or tiny charm to the very end of the extender chain for a professional finish.
Enjoy wearing your custom-colored geometric statement piece
Mini Mosaic Tiles from Square Extrusions
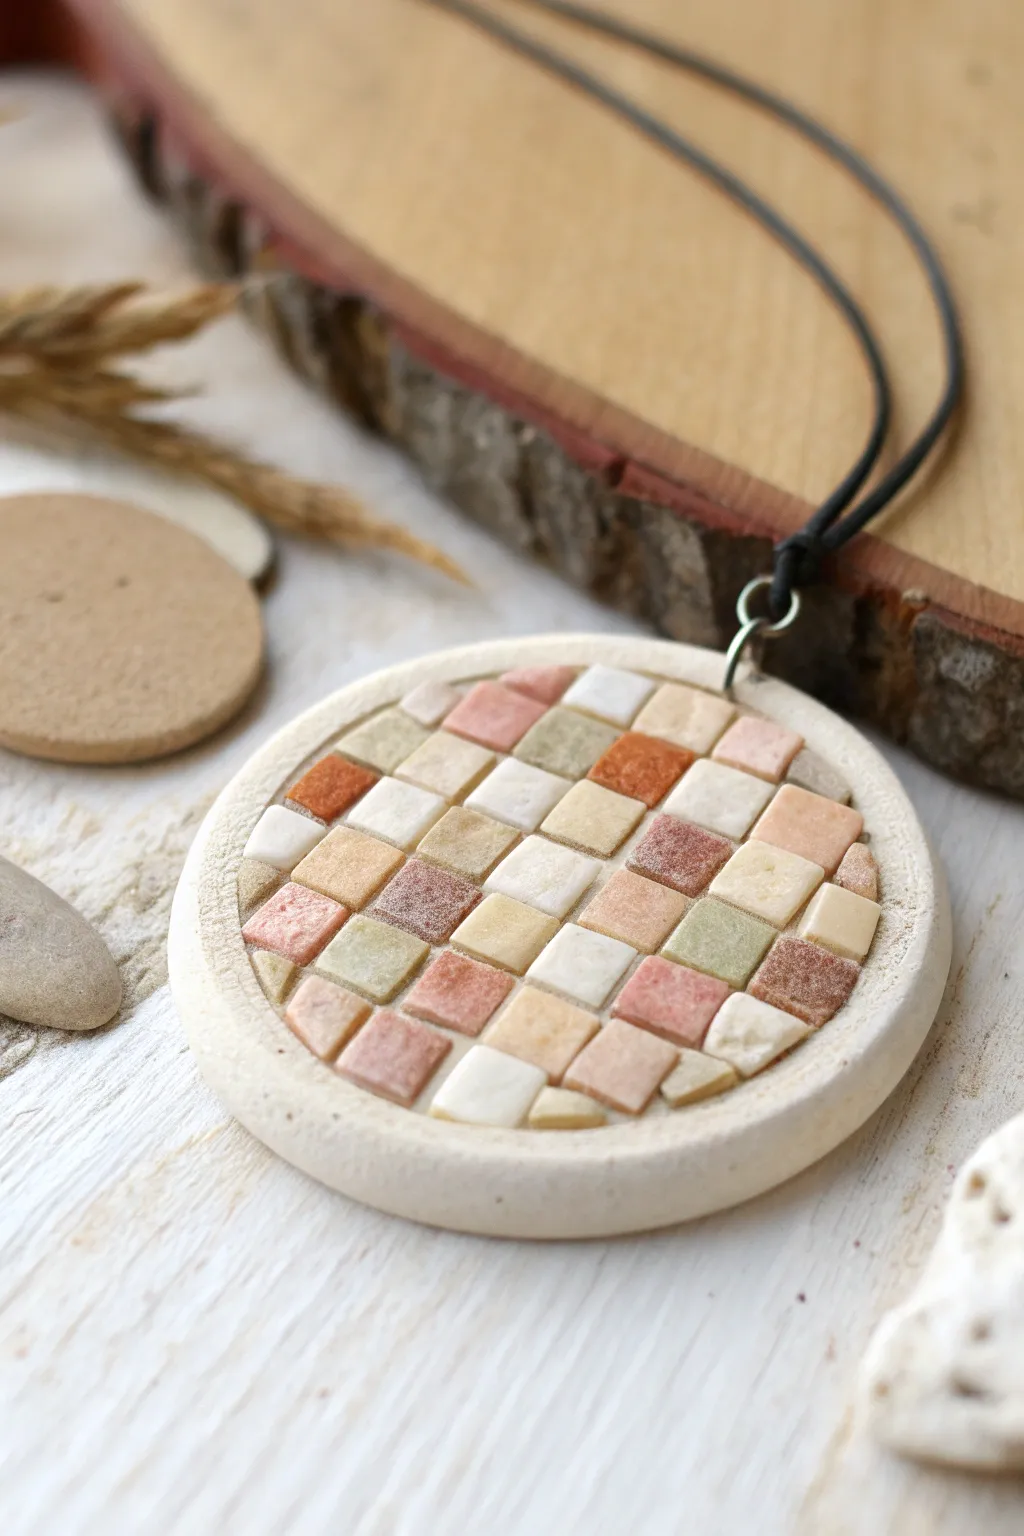
Capture the timeless beauty of ancient mosaics in a wearable format with this polymer clay pendant project. By using a square disc in your clay extruder, you can create perfectly uniform mini tiles in soft, natural earth tones without endless cutting and measuring.
How-To Guide
Materials
- Polymer clay in various earth tones (terracotta, beige, white, sage green, dusty pink)
- Granite-effect or stone-texture polymer clay (for the base)
- Clay extruder with a small square disc
- Round clay cutter (approx. 2-3 inches dia)
- Smaller round cutter (to imprint the inner circle)
- Liquid polymer clay (clear or translucent)
- Tissue blade or rigid craft knife
- Acrylic roller
- Needle tool or jewelry bail
- Leather cord for stringing
- Fine-grit sandpaper (optional)
- Oven for baking
Step 1: Creating the Mosaic Tiles
-
Conditioning the clay:
Begin by conditioning your colored clays separately until they are soft and pliable. Since we are aiming for an organic look, you can also mix small amounts of white or granite clay into your solid colors to create subtle marbling or muted shades. -
Loading the extruder:
Insert the small square disc into your clay extruder. Roll your first color of conditioned clay into a snake that fits the barrel width, insert it, and steadily crank the handle to extrude a long, square rope. -
Extruding all colors:
Repeat the extrusion process for every color in your palette. I find it helpful to wipe the barrel clean between contrasting colors, like going from terracotta to white, to keep the shades pure. -
Slicing the tiles:
Lay the extruded square ropes side-by-side on your work surface. Use your tissue blade to slice straight down across the ropes, creating hundreds of tiny, uniform square tiles. Aim for a thickness of about 2-3mm. -
Adding texture:
For that rugged, stone-like appearance seen in the photo, gently tumble the cut tiles in a small container with a pinch of cornstarch or sandpaper. Alternatively, tap each one lightly with a toothbrush to remove the perfect manufactured shine.
Stone Texture Tip
Before baking, gently dab a stiff-bristled brush or a piece of actual sandstone over the tiles. This removes fingerprints and adds realistic pitting.
Step 2: Preparing the Base
-
Rolling the base sheet:
Condition the granite or stone-effect clay for your pendant base. Roll out a sheet that is thick enough to hold the weight of the tiles, roughly 4mm or a ‘medium’ setting on a pasta machine. -
Cutting the main shape:
Use your larger round cutter to punch out the main pendant shape. Smooth the edges with your finger to remove any sharp drag marks from the cutter. -
Defining the mosaic area:
Take the slightly smaller round cutter and press it gently into the center of your base circle. Do not cut all the way through; you are just creating an indented guideline or a shallow well where the tiles will sit. -
Adding adhesive:
Apply a thin, even layer of liquid polymer clay inside the inner circle you just marked. This acts as the grout and glue ensuring the tiles stick during baking.
Uneven Tiles?
If extruded ropes are getting squished while slicing, chill the clay ropes in the fridge for 10 minutes first. The firm clay will slice cleanly without deforming.
Step 3: Assembly and Finishing
-
Starting the pattern:
Begin placing your square tiles into the liquid clay bed. I prefer starting from the center and working spirally outward to ensure the pattern looks balanced, but random placement works beautifully for this rustic style. -
Fitting the edges:
As you reach the rounded edge of the inner circle, you may need to slice some tiles in half or at angles using your craft knife to make them fit snugly against the curved border. -
Leveling the surface:
Once all tiles are placed, gently roll over the top of the mosaic area with an acrylic roller. Use very light pressure—just enough to ensure all tiles are at an even height and firmly seated in the liquid clay. -
Filling gaps:
If there are significant gaps between tiles that bother you, you can fill them with a tiny bit more liquid clay mixed with chalk pastel dust, or leave them open for a deeply textured look. -
Adding hardware:
Insert a metal eye pin at the top of the pendant, or pierce a hole through the top edge using a needle tool so you can add a jump ring later. -
Baking:
Bake the piece according to your clay manufacturer’s instructions (usually 275°F/130°C for 30 minutes). Use an oven thermometer to ensure the temperature is accurate to prevent scorching light colors. -
Sanding (optional):
After the piece has cooled completely, you can lightly sand the edges of the base circle for a cleaner finish. -
Stringing:
Attach a large jump ring through your hole or eye pin, and thread a simple leather cord through it to complete the natural aesthetic.
Wear your handcrafted mosaic piece with pride, knowing you’ve created a complex-looking texture with simple tools.
Layered Die Stacks for Unexpected Cross-Sections
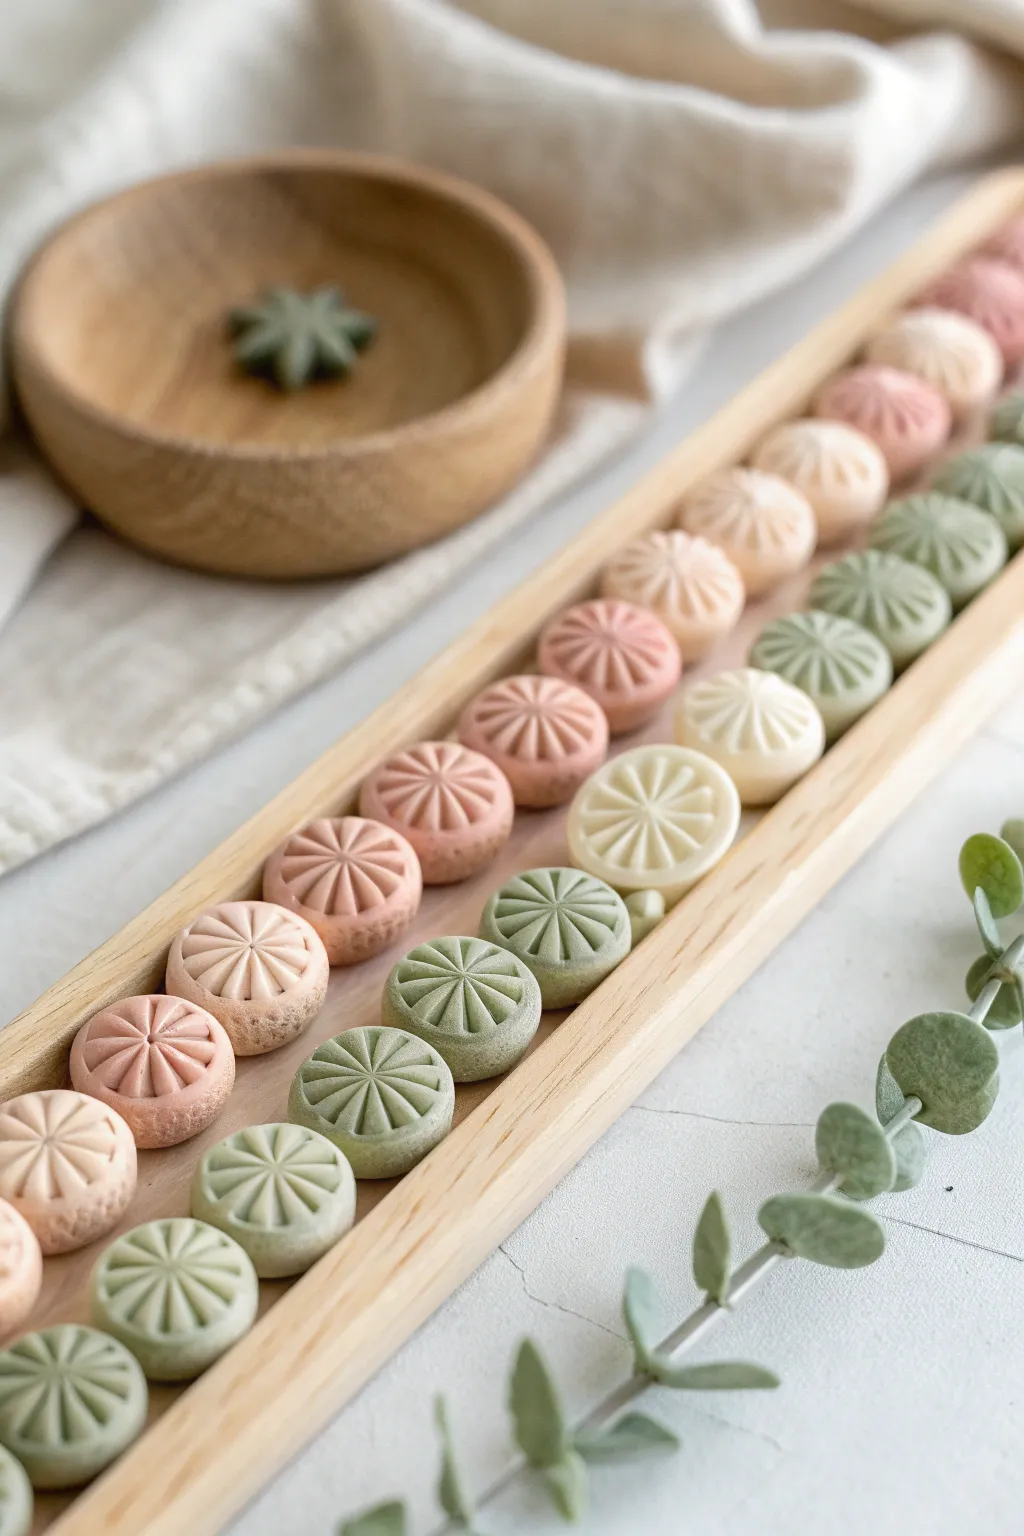
These delicate, wheel-patterned discs mimic the soft elegance of Japanese Wagashi sweets, arranged in a soothing gradient palette. Using a clever polymer clay extruder hack, you’ll create intricate internal radial designs that are revealed only when you slice the cane.
Detailed Instructions
Materials
- Polymer clay in pastel shades: pale pink, peach, cream, sage green, olive green
- Polymer clay extruder with various discs
- Circle cutter (approx. 1 inch diameter)
- Tissue blade or rigid slicing blade
- Acrylic roller or pasta machine
- Sandpaper (various grits)
- Matte varnish (optional)
- Small wooden tray for display
Step 1: Preparing the Pattern Cane
-
Select your extruder discs:
To achieve the radial spoke pattern, you will need a disc with a multi-hole screen (like a showerhead) or a custom die. Alternatively, you can stack a circle die with a custom wire mesh insert to create the segmented look. -
Prepare the core color:
Condition your cream or white clay thoroughly. Roll a log that fits snugly inside your extruder barrel. This will form the defining lines of the pattern. -
Prepare the color wedges:
Condition your pastel clays (pink, peach, green). For the specific spoked design, form small triangular wedges of your colored clay. The goal is to maximize the contrast between the color segments and the cream lines. -
Assemble the extruder stack:
Create a retro cane stack directly inside the barrel. Place a small disc of cream clay, followed by wedges of colored clay, separated by thin sheets of cream clay. -
Extrude the cane:
Slowly crank the handle. The pressure will force the clay through the patterned die, fusing the separate wedges into a solid log with the internal radial design running through it. -
Rest the cane:
Once extruded, the clay will be warm and soft. Let the long log rest on a flat surface for about 30 minutes to firm up. This prevents the pattern from distorting during slicing.
Step 2: Shaping the Discs
-
Slice the segments:
Using your sharpest tissue blade, slice the long extruded log into discs approximately 1/4 inch thick. Try to cut cleanly without sawing to keep the circle shape true. -
Refine the shape:
The extrusion process might leave the edges slightly rough. Gently roll the edge of each disc on your work surface to smoothen it into a perfect circle. -
Domed effect:
To get the puffy, soft look of a sweet, gently press the edges of the top surface down with your thumb, creating a slight dome in the center. Avoid flattening the pattern. -
Texture the surface:
I like to take a piece of fine sandpaper or a stiff-bristle brush and tap it lightly over the surface. This removes fingerprints and adds a sugary, matte texture. -
Add detail lines:
If your extrusion didn’t leave deep enough grooves, use a dull knife or a needle tool to gently re-impress the radial lines extending from the center to the edge.
Clean Cuts Only
Chill your extruded cane in the fridge for 15 minutes before slicing. Cold clay resists squishing, keeping your radial patterns perfectly symmetrical.
Step 3: Finishing Touches
-
Bake the pieces:
Arrange your discs on a ceramic tile or baking sheet. Bake according to your brand of clay’s instructions—usually 275°F (135°C) for 30 minutes for this thickness. -
Cool down:
Let the pieces cool completely in the oven. This annealing process makes the clay stronger. -
Sanding:
Once cool, lightly wet-sand the edges if there are any sharp bits, but be careful not to remove the surface texturing we added earlier. -
Matte finish:
These sweets look best with a natural, powdery finish. If your clay is shiny after baking, apply a very thin coat of matte varnish. -
Display arrangement:
Arrange your finished faux sweets on a narrow wooden tray or in a small bowl, sorting them by color gradient for a calming visual effect.
Scented Decor
Mix a drop of essential oil into the clay before extruding. Though the scent fades after baking, adding it to unbaked clay stored in a jar creates a lovely sensory gift.
Enjoy the peaceful process of arranging your beautiful, inedible sweets
Custom Texture Stamps Made from Baked Extrusions
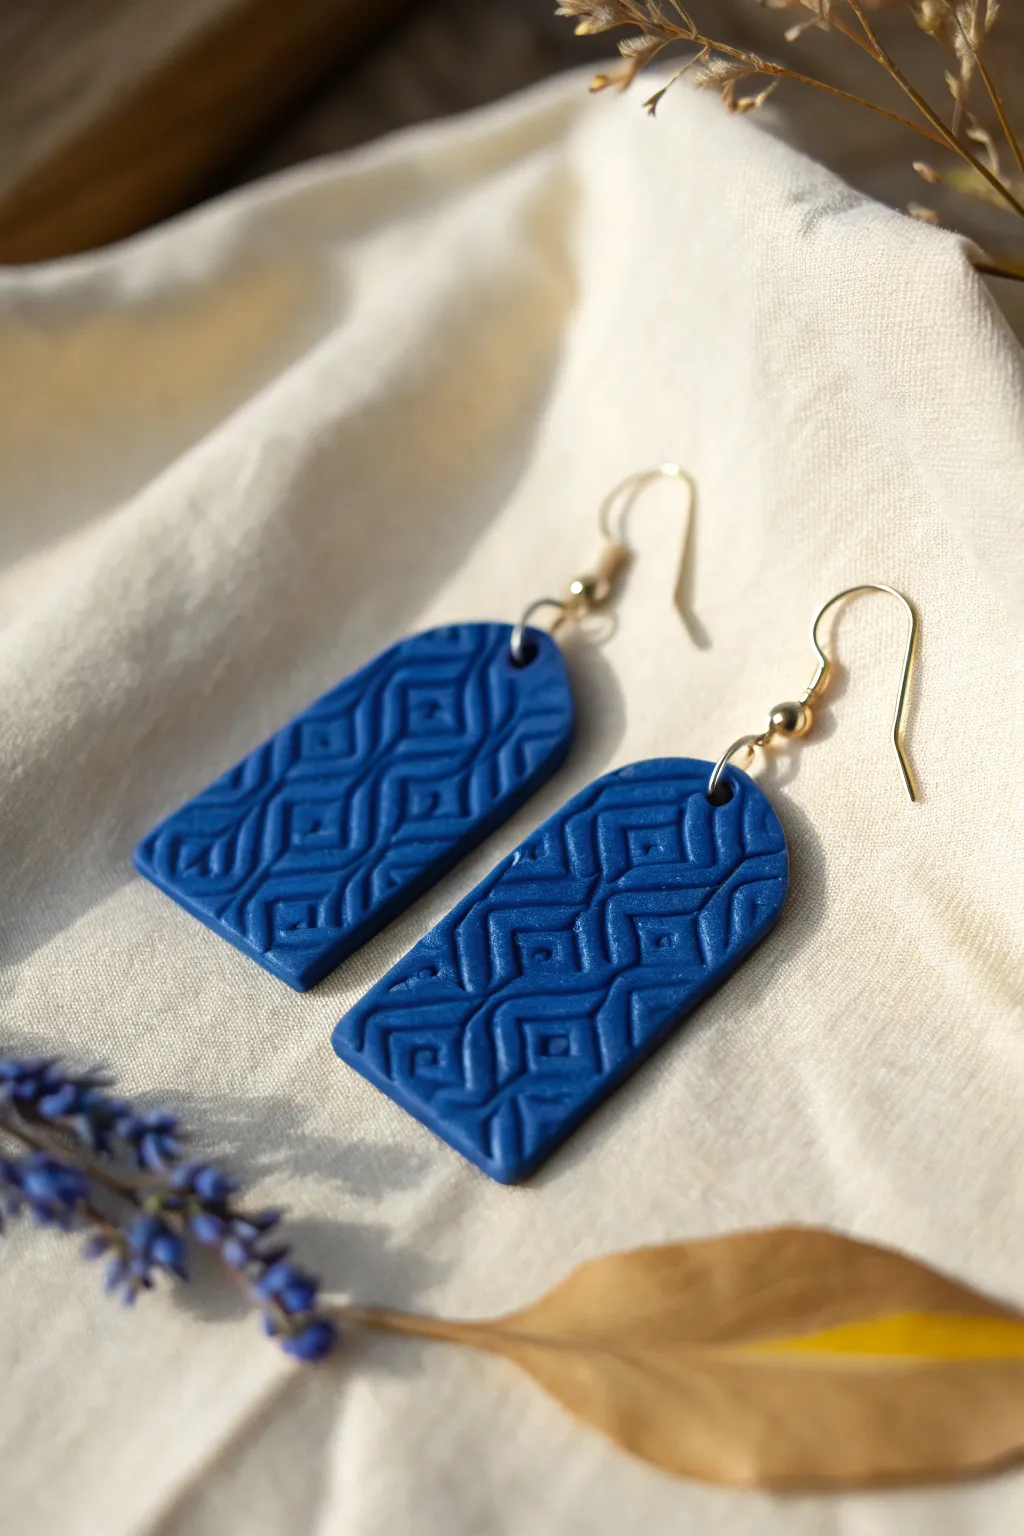
These striking blue drop earrings feature a custom geometric relief pattern created using a clever DIY stamp technique. By baking your own clay extruder strands into a texture plate, you can imprint unique, intricate designs that look professional.
How-To Guide
Materials
- Polymer clay (Deep Royal Blue or Navy)
- Scrap polymer clay (for the stamp base)
- Polymer clay extruder with small square or circle disc
- Liquid polymer clay (Bake & Bond)
- Acrylic roller or pasta machine
- Arch cutter (long U-shape)
- X-acto knife or tissue blade
- 2 Earring hooks (gold)
- 4 Jump rings (gold)
- Jewelry pliers
- Small hand drill or pin vice
- Fine grit sandpaper
Step 1: Creating the Extruder Stamp
-
Condition the clay:
Begin by conditioning your scrap clay thoroughly. Roll it out into a flat, thick sheet (about 3-4mm) to serve as the base for your stamp. -
Extrude the pattern lines:
Load conditioned scrap clay into your extruder. Use a small square disc for the sharpest geometric lines, though a round disc works for a softer look. Extrude a long continuous strand. -
Apply adhesive:
Spread a thin layer of liquid polymer clay over your flat base sheet. This acts as the glue to hold your extruded design in place during baking. -
Arrange the zig-zags:
Cut your extruded strand into equal lengths. carefully arrange them onto the base in a vertical zig-zag or wave pattern. -
Add the diamonds:
Cut smaller pieces of the extruded clay and place them in the negative spaces between your zig-zags to create small diamond or square shapes. -
Secure the design:
Once your pattern is laid out, gently press down on the strands to ensure they make contact with the liquid clay, but don’t squash the texture flat. -
Bake the stamp:
Bake this ‘master stamp’ according to your clay manufacturer’s instructions (usually 275°F/130°C for 30 minutes). Let it cool completely until it is hard.
Clean Cuts Pro Tip
Place plastic wrap over your textured clay before cutting. This creates a soft, domed pillow effect on the edges, minimizing the need for sanding later.
Step 2: Making the Earrings
-
Prepare the blue clay:
Condition your navy blue clay well to prevent air bubbles. Roll it out into a slab approximately 3mm thick. -
Apply a release agent:
Dust your cooled DIY stamp lightly with cornstarch or spray with a mist of water. I find this critical to stop the raw clay from sticking to the detailed crevices. -
Impress the texture:
Place your DIY stamp face down onto the blue clay slab. Use your acrylic roller to roll firmly over the back of the stamp, ensuring a deep, even impression. -
Reveal the pattern:
Carefully peel the stamp away from the clay to reveal the raised geometric design. -
Cut the shapes:
Position your long arch cutter over the most interesting part of the pattern. Press down firmly to cut out two matching shapes. -
Clean the edges:
Gently smooth the sides of your cutouts with your fingertip to remove any stray bits of clay or sharp ridges from the cutter. -
Bake the earrings:
Place the blue cutouts on a ceramic tile or baking sheet covered with cardstock. Bake according to package directions, typically 30-45 minutes for durability.
Step 3: Assembly
-
Sand and finish:
Once cooled, lightly sand the edges if needed. Optional: Apply a very thin layer of matte varnish if you want to protect the surface, though the raw matte look is lovely. -
Drill holes:
Using a small hand drill or pin vice, create a hole at the top center of each arch, about 2-3mm from the edge. -
Attach hardware:
Open a jump ring with your pliers (twist sideways, don’t pull apart). Thread it through the hole in the clay. -
Add the hook:
Slide the loop of your earring hook onto the open jump ring, then twist the jump ring closed securely. -
Repeat:
Repeat the hardware attachment for the second earring to complete the set.
Level Up: Mica Shift
Use metallic clay for the earrings. After stamping, shave off the raised parts. Because mica particles align differently, a ‘ghost’ image remains on a flat surface.
Now you have a stunning pair of custom-textured earrings that prove bespoke tools are just an extrusion away