Whenever I need a quick, satisfying project, I reach for polymer clay flowers—they’re cheerful, forgiving, and endlessly customizable. Here are my favorite polymer clay flower ideas, starting with the classics and moving into the fun, unexpected twists.
Simple Daisy Discs
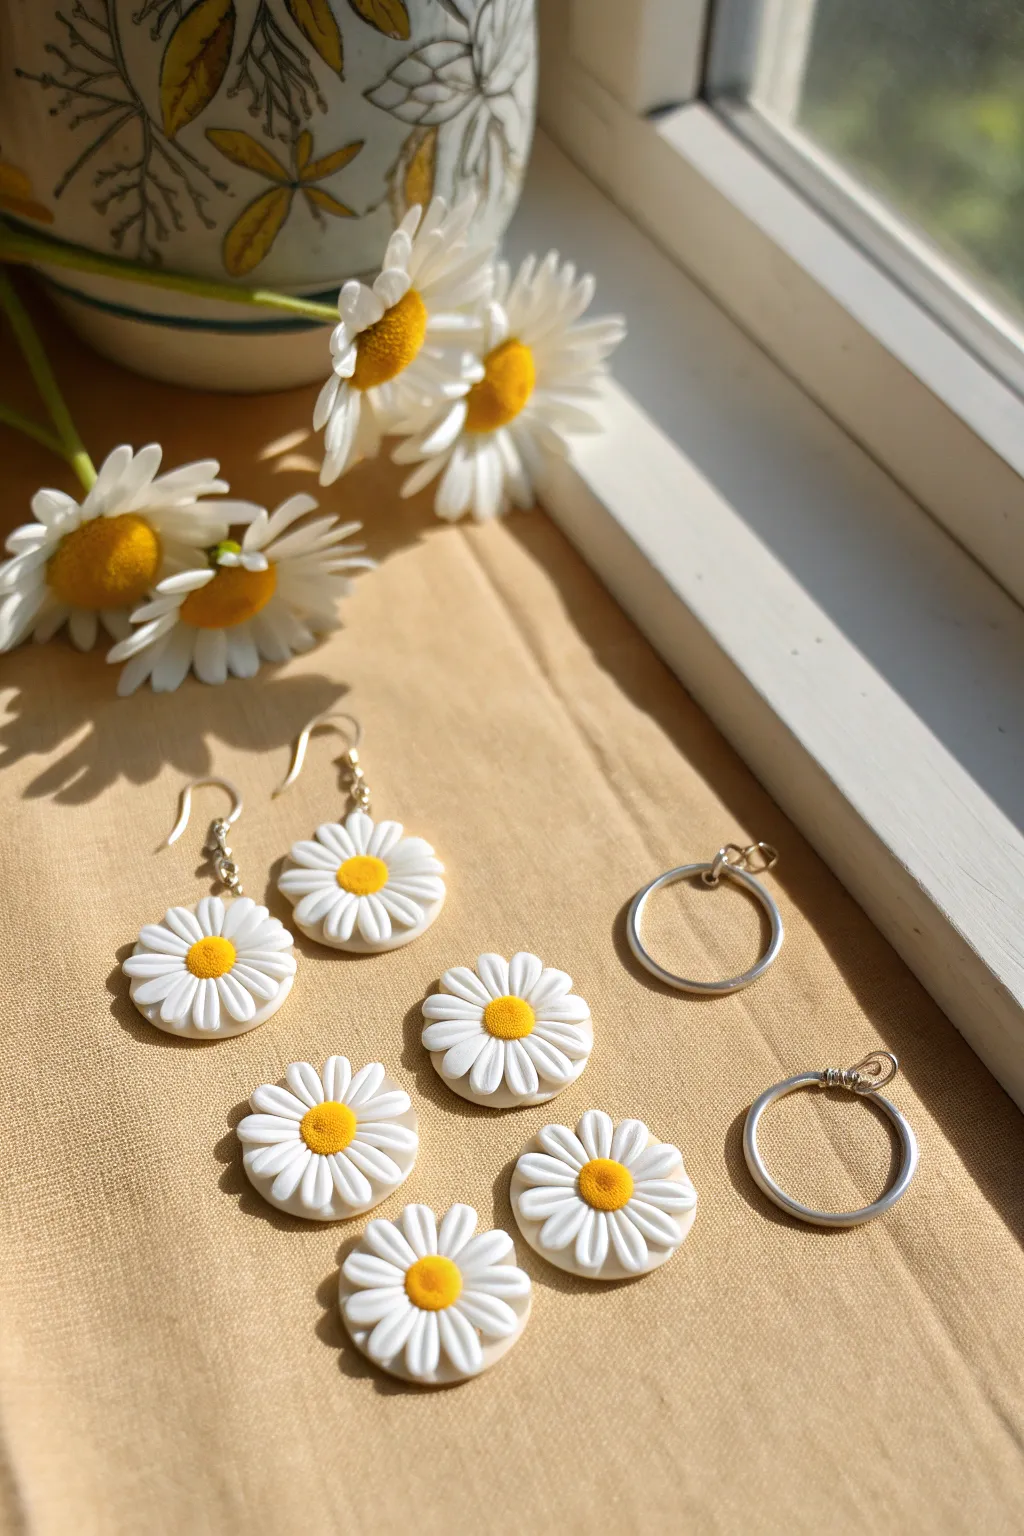
Brighten up any outfit with these delightful, never-wilting daisy earrings that capture the simple joy of a summer garden. Using basic polymer clay techniques, you’ll sculpt perfectly textured petals and sunny yellow centers to create durable, wearable floral art.
Detailed Instructions
Materials
- White polymer clay
- Yellow polymer clay (sunflower or golden yellow)
- Translucent or white polymer clay (for backing base)
- Round clay cutter (approx. 20-25mm)
- Small ball tool or dotting tool
- Needle tool or toothpick
- Texture sponge, toothbrush, or crumpled foil
- Earring hooks (silver or gold tone)
- Jump rings (4-6mm)
- Jewelry pliers
- Baking sheet and parchment paper
- Hand drill or pin vibe (if drilling holes after baking)
Step 1: Prepping the Base
-
Condition the clay:
Start by thoroughly conditioning your white and translucent clay until it is soft and pliable. This prevents cracking and makes the pieces easier to shape. -
Roll out the base sheet:
Roll out a sheet of white or translucent clay to a medium thickness, roughly 2-3mm. This will serve as the structural foundation for your petals. -
Cut the circles:
Using your round cutter, punch out discs for as many daisies as you plan to make. Smooth the edges with your finger to remove any stray bits of clay.
Clean Petal Tip
Before baking, wipe your white clay with a Q-tip dipped in a tiny bit of rubbing alcohol or acetone to remove any dust, fingerprints, or lint.
Step 2: Sculpting the Petals
-
Form petal logs:
Roll a small amount of white clay into a long, thin log about 3mm in diameter. Slice this log into equal little segments, aiming for about 12-14 pieces per daisy. -
Shape teardrops:
Roll each small segment into a ball, then pinch one end to form a teardrop shape. Flatten these slightly with your fingertip. -
Arrange the first layer:
Place the petals onto your base disc, orienting the pointed ends toward the center. Arrange them closely together so they touch but don’t completely overlap. -
Refine the shape:
Use a needle tool or toothpick to gently press a central vein down the middle of each petal. The image shows distinct indentations, so press firmly enough to make a groove but not cut through. -
Soften the edges:
If the petal tips look too sharp or geometric, use your finger or a silicone tool to round them off gently for a softer, organic look.
Why is my clay brittle?
If pieces snap after baking, they may be under-baked. Verify your oven temperature with an external thermometer and ensure you bake for the full recommended time.
Step 3: Adding the Pollen Center
-
Create the center ball:
Roll a small ball of yellow clay that fits proportionally in the middle of your petal ring. Flatten the bottom slightly so it sits stable. -
Place and secure:
Press the yellow ball firmly into the center of the flower where all the petal points meet. This helps lock the petals in place. -
Texture the center:
To mimic the fuzzy look of real pollen, gently tap the surface of the yellow dome with a texture sponge, an old toothbrush, or even a ball of crumpled foil. I like to use a stiff brush to get that stippled effect. -
Prepare for hardware:
If you are using jump rings, use a needle tool to create a hole in one of the petals near the edge before baking. Alternatively, you can drill this hole after baking.
Step 4: Baking and Assembly
-
Bake the pieces:
Place your daisies on a parchment-lined baking sheet. Bake according to your clay manufacturer’s instructions—typically around 275°F (130°C) for 30 minutes depending on brand. -
Cool securely:
Let the pieces cool completely inside the oven or on a flat surface to prevent warping. They are strongest once fully cooled. -
Attach hoop findings:
For the hoop style shown, open the loop found on some hoop findings or use a large jump ring to thread through the drilled hole in your flower. -
Attach hook findings:
For the dangling style, use small pliers to open a jump ring, thread it through the flower’s hole, and attach an earring hook before closing the ring securely.
Now you have a charming set of daisy accessories ready to wear or gift


Sunny Sunflowers With Textured Centers
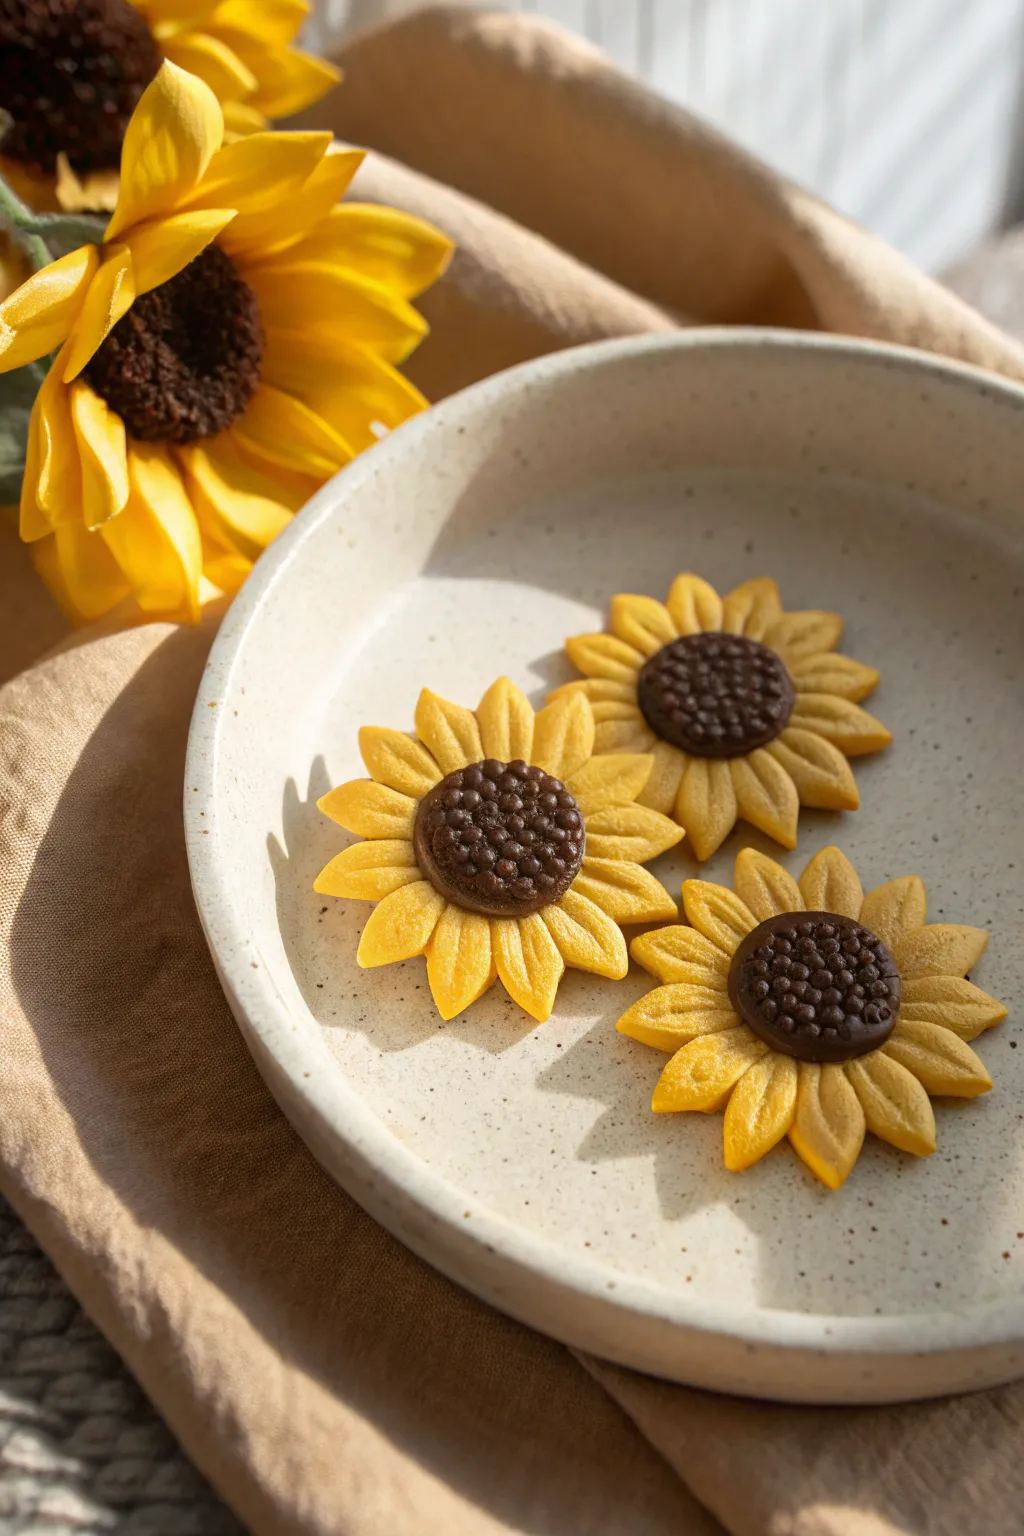
These cheerful sunflower pieces capture the warmth of a summer garden with their golden yellow petals and remarkably detailed centers. The textured chocolate-brown core contrasts beautifully with the soft, matte finish of the petals, making them perfect for jewelry or magnets.
How-To Guide
Materials
- Golden yellow polymer clay
- Dark chocolate brown polymer clay
- Rolling pin or pasta machine
- Sunflower or daisy petal cutter (medium size)
- Small circle cutter (for the center)
- Needle tool or toothpick
- Ball stylus tool (small)
- Blade or craft knife
- Soft pastel chalks (orange/yellow) for shading
- Small fluffy paintbrush
- Baking sheet and parchment paper
Step 1: Shaping the Petals
-
Condition the Clay:
Start by thoroughly conditioning your golden yellow polymer clay until it is soft and pliable. This prevents cracking later. -
Roll out the Sheet:
Roll the yellow clay into a sheet approximately 3-4mm thick. You want it sturdy enough to hold the petal definition. -
Cut the Base Shape:
Using your sunflower or daisy cutter, punch out your floral shapes. If the clay sticks to the cutter, dip the cutter in a little cornstarch first. -
Refine Petal Edges:
Gently smooth the sides of each petal with your finger to remove any harsh cut lines or burrs left by the cutter. -
Add Petal Veins:
Take your needle tool or the back of a craft knife and press a central vein line down the middle of each petal. Start near the center and drag outward, tapering off near the tip.
Step 2: Creating the Seed Center
-
Prepare Brown Clay:
Condition the dark brown clay. Roll it into a sheet that is slightly thicker than your yellow layer, about 4-5mm. -
Cut Center Circles:
Use a small circle cutter to punch out discs for the flower centers. These should fit comfortably inside your petal arrangement without obscuring the petals. -
Soften the Edges:
Gently pat the edges of the brown circles to dome them slightly, making them look less like flat discs and more like organic seed heads. -
Attach the Center:
Place a brown circle directly into the middle of a yellow flower base. Press down gently to ensure the clays bond together. -
Begin Texturing:
Using a small ball stylus, start pressing small indentations into the brown clay. I prefer to start around the outer perimeter and work my way inward in concentric circles. -
Create Seed Depth:
Vary your pressure slightly. Make some indentations deeper and others shallower to mimic the natural irregularity of sunflower seeds. -
Center Detail:
For the very center of the brown disc, you can switch to a slightly smaller tool or a needle tip to make the seeds look tightly packed.
Sticky Situation?
If your clay is getting stuck in the intricate petal cutter, place a sheet of plastic wrap over the clay before cutting. This creates a soft, pillowed edge and releases easily.
Step 3: Finishing Touches
-
Shade the Petals:
Scrape a little orange soft pastel into a powder. Use a small fluffy brush to dust the powder very lightly at the base of the yellow petals, right where they meet the brown center. -
Clean Up:
Check for any fingerprints or lint. You can gently wipe the surface with a tiny bit of baby oil on a finger if smoothing is needed. -
Pre-Bake Inspect:
Ensure the petal tips are slightly lifted or curved for a natural look, rather than lying perfectly flat. -
Bake:
Place your sunflowers on parchment paper and bake according to your specific clay brand’s manufacturer instructions (usually 275°F/135°C for 15-30 minutes). -
Cool Down:
Allow the pieces to cool completely before handling them, as warm polymer clay is fragile.
Make it Sparkle
Mix a tiny amount of translucent clay or fine gold mica powder into your yellow clay before rolling. This gives the petals a subtle, sun-kissed shimmer in the light.
Once cooled, these sunny creations are ready to brighten up your day as lovely accessories.


Tiny Wildflower Mix-and-Match Set
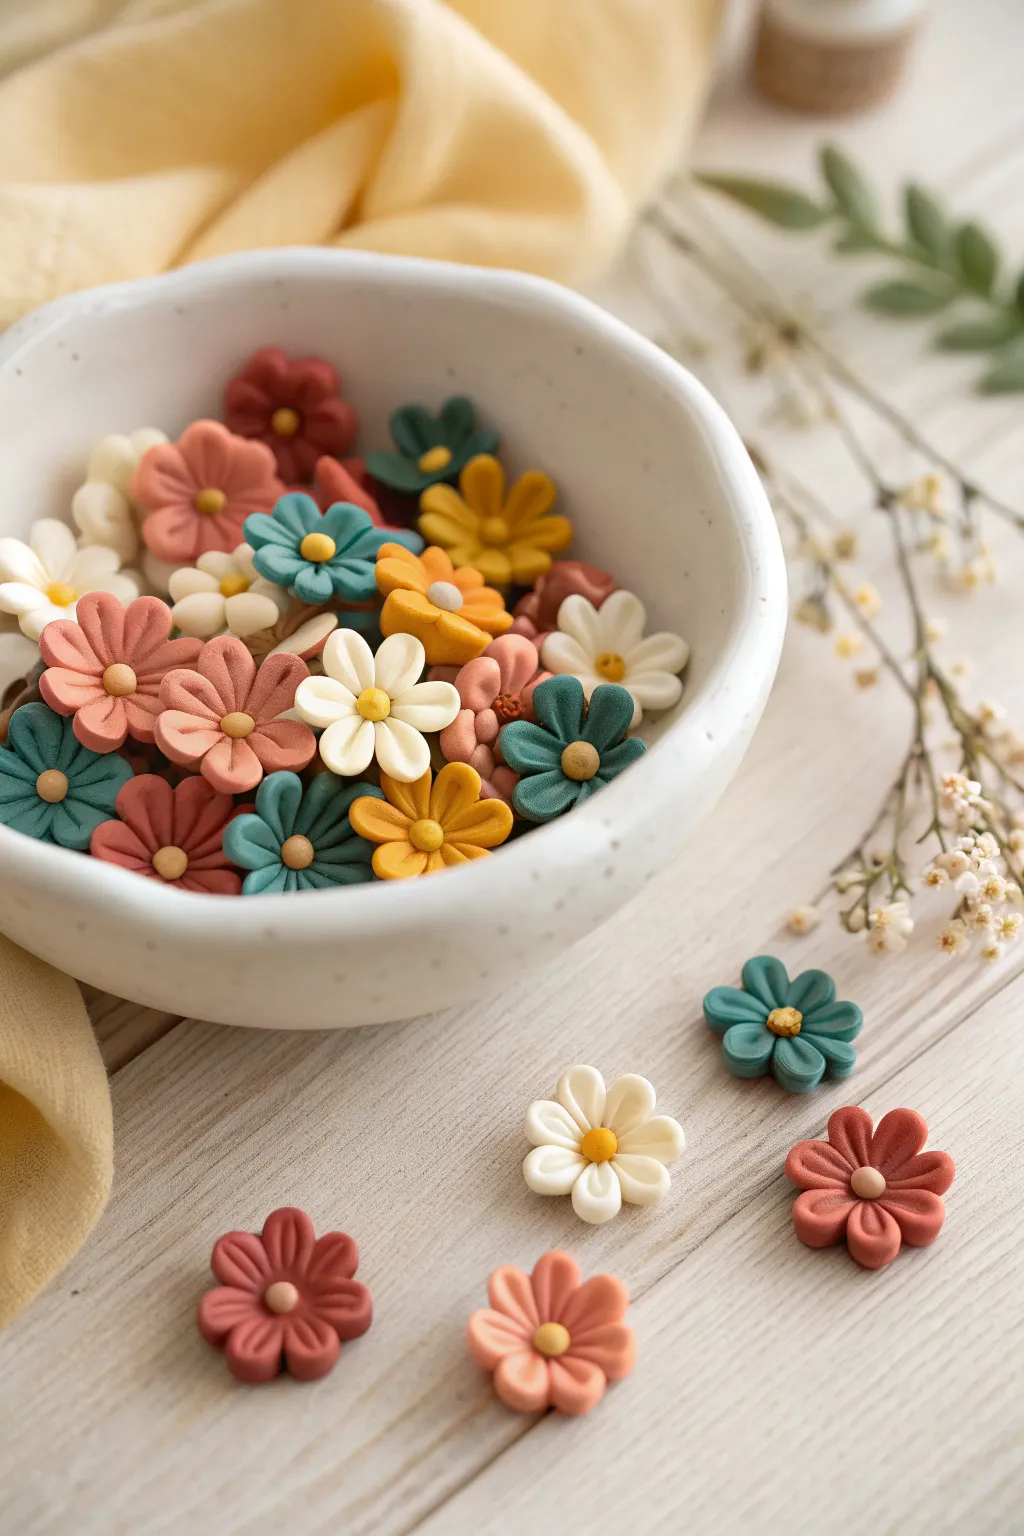
Capture the charm of a sun-drenched meadow with this collection of tiny, mix-and-match clay wildflowers. With their muted earth tones and simple shapes, these durable little blooms are perfect for jewelry making, scattering as table confetti, or filling decorative bowls.
How-To Guide
Materials
- Polymer clay in muted tones: terra cotta, mustard yellow, teal, dusty pink, and cream white
- Ball stylus tool (small and medium sizes)
- Needle tool or toothpick
- X-acto knife or clay blade
- Ceramic tile or glass work surface
- Baking sheet
- Parchment paper
- Clay oven or toaster oven
- Matte spray varnish (optional)
Step 1: Preparing the Palette
-
Condition the clay:
Start by warming the clay in your hands, kneading each color separately until it is soft, pliable, and free of cracks. -
Mix custom shades:
To achieve the specific muted look in the photo, mixing your colors is key. Try adding a tiny pinch of brown or grey to bright primary colors to tone them down into earthy shades like mustard and teal. -
Create uniformly sized balls:
Roll out thin snakes of each color, roughly 1/4 inch thick. Slice these snakes into tiny, equal-sized pieces. These will become your petals, so consistency here ensures your flowers look uniform later.
Step 2: Forming the Flowers
-
Assemble the base shape:
For a standard daisy shape, take five or six of your small clay segments of the same color. Roll them into tiny balls and arrange them in a circle on your work surface so they are all touching. -
Add the center:
Select a contrasting color for the flower center—mustard yellow looks great on teal or white petals. Roll a slightly smaller ball and press it gently into the middle of the ring of petals. -
Bond the clay:
Using your thumb or a flat tool, press down very gently on the entire flower assembly just enough to slightly flatten the balls and ensure the clay pieces stick to one another. -
Shape the petals with a tool:
Take your needle tool or a toothpick and press an indentation into the outer edge of each petal. This creates that little heart-shaped dip or cleft you see on some of the petals. -
Detail the center:
Using the needle tool again, texturize the center dot. You can poke tiny holes for a porous look, or simply press the ball stylus into the middle for a smooth, concave button effect. -
Define the petal separation:
If the petals have smushed together too much, use the knife tip to gently re-define the lines between them, dragging from the center outward. -
Sculpt the lift:
Slide your blade underneath the flower to lift it. Pinch the undersides of the petals slightly upward so the flower isn’t perfectly flat; giving it a slight cup shape makes it look more organic.
Clean Edges Upgrade
Before baking, use a soft brush dipped in baby oil or rubbing alcohol to lightly smooth away any fingerprints or dust specks on the petals for a professional finish.
Step 3: Repeat and Variation
-
Create color variations:
Repeat the process to create a large batch. Mix and match your color combinations—try terra cotta petals with a cream center, or teal petals with a mustard center. -
Vary the petal count:
Don’t make them all identical. Some flowers in the mix should have five petals, while others look fuller with six or seven. This variety mimics nature. -
Make buds or smaller blooms:
For filler flowers, use smaller bits of clay and only four petals. These tinier blooms add excellent visual texture when the whole set is displayed together in a bowl.
Sticking to Surface?
If flowers stick to your table when you try to lift them, work directly on a small piece of parchment paper or plastic wrap so you can peel the backing away easily.
Step 4: Baking and Finishing
-
Arrange for baking:
Transfer your finished flowers onto a baking sheet lined with parchment paper. Leave a little space between each one so they don’t stick together during baking. -
Bake the batch:
Bake according to your specific polymer clay manufacturer’s instructions (usually around 275°F or 130°C for 15-30 minutes). I find it safer to use an oven thermometer to ensure the temperature creates a hard, durable finish without burning. -
Cool down:
Let the flowers cool completely on the baking sheet. They are fragile when hot but will harden fully as they return to room temperature. -
Final touches:
If you want to protect the surface or change the sheen, you can apply a very light coat of matte spray varnish, though the natural matte look of the clay is often beautiful on its own.
Fill a favorite ceramic dish with your new garden harvest and enjoy the permanent pop of color on your table

Floral Stud Earrings and Dangles
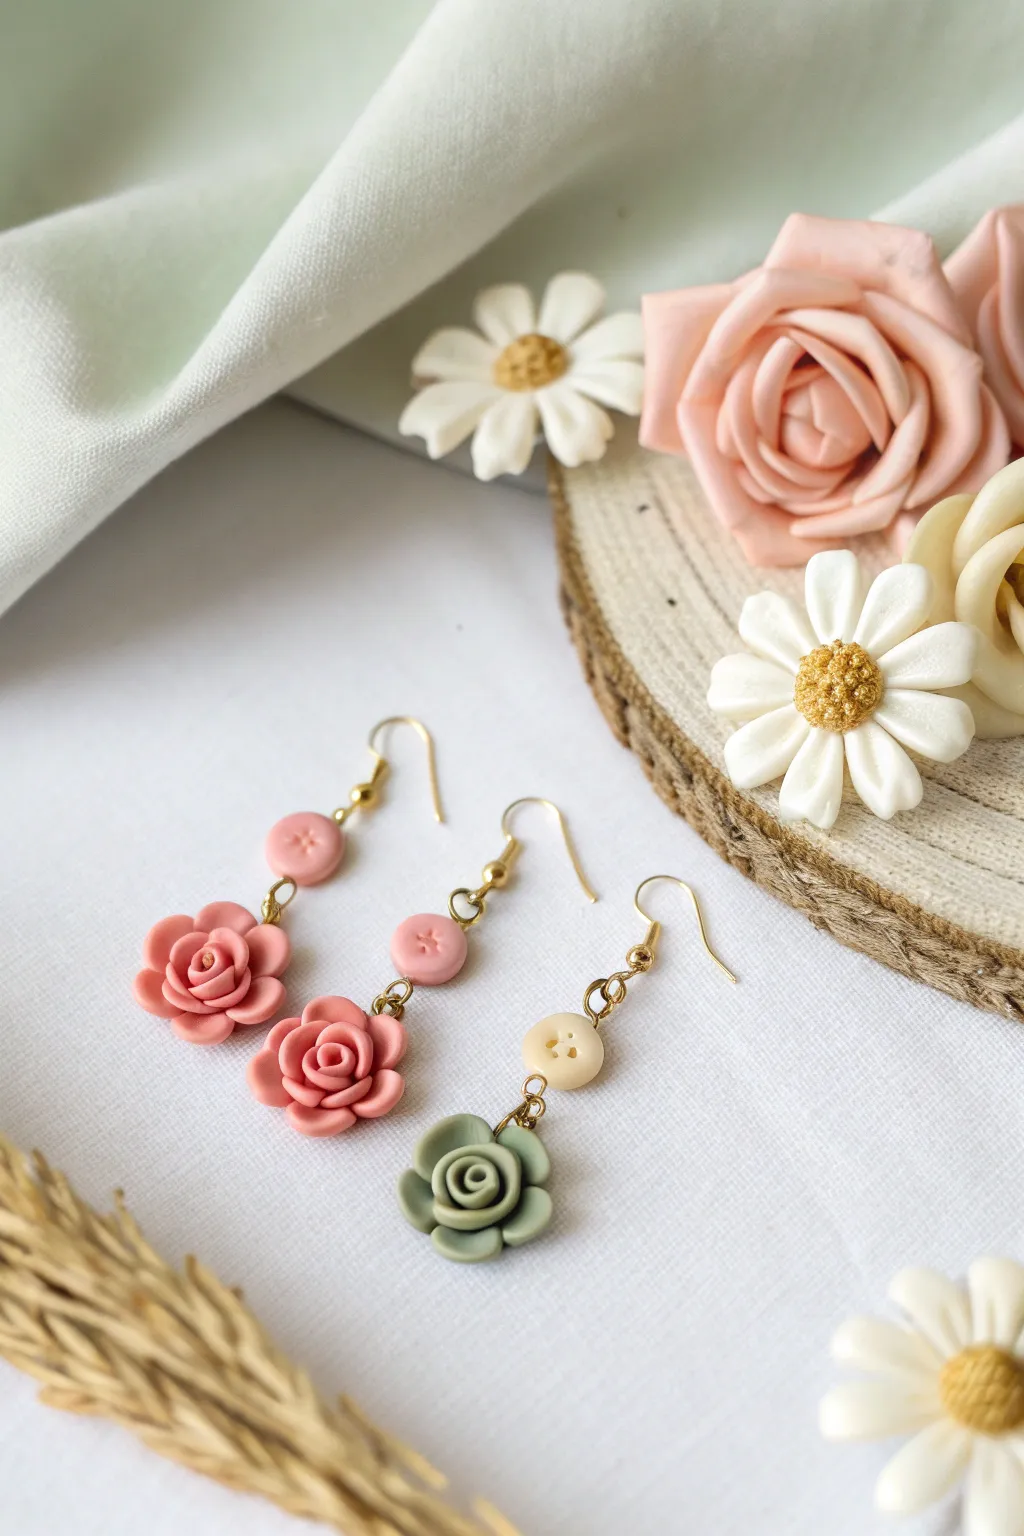
These charming dangle earrings combine sweet sculpted roses with faux button accents for a delightful, vintage-inspired look. The soft pink and sage green color palette adds a romantic touch perfect for everyday wear or special occasions.
Step-by-Step Tutorial
Materials
- Polymer clay in soft pink, sage green, and cream
- Gold-tone earring hooks
- Gold-tone eye pins
- Jump rings (4mm or 5mm)
- Small circle cutter (approx 8-10mm)
- Needle tool or toothpick
- Round nose pliers
- Flat nose pliers
- Wire cutters
- X-acto knife or clay blade
- Gloss glaze (optional)
Step 1: Sculpting the Roses
-
Condition the clay:
Begin by conditioning your pink and sage green polymer clay until it is soft and pliable. This prevents cracking during sculpting. -
Create the center bud:
Roll a very small snake of clay and flatten it into a thin ribbon. Roll this ribbon up tightly to form the central swirl of your rose. -
Form the petals:
Roll small balls of clay, about the size of peppercorns. Flatten each ball between your fingers to create thin, rounded petal shapes. -
Build the flower:
Gently press the first petal against the center bud, wrapping it slightly. Add subsequent petals around the center, overlapping each new one slightly over the edge of the previous one. -
Adjust the shape:
Continue adding layers until your rose reaches the desired size (approx. 1.5 cm diameter). Use your fingertip to gently curl the petal edges outward for a realistic bloom. -
Trim the base:
Carefully slice off the excess clay at the back of the rose using your blade to create a flat surface. This ensures the flower will hang correctly. -
Insert eye pins:
Trim an eye pin to about 1 cm long. Insert the straight end into the top of the rose before baking. I find adding a tiny dot of liquid clay on the pin helps secure it permanently.
Sticky Situation?
If your clay gets too soft and sticky to handle, pop it in the fridge for 10 minutes. This firms up the clay, making it much easier to sculpt thin petals without squishing them.
Step 2: Creating the Faux Buttons
-
Cut the shapes:
Roll out pink and cream clay to a thickness of about 3mm. Use your small circle cutter to punch out two pink circles and one cream circle. -
Detail the rim:
Use a slightly smaller cutter or a rounded tool to gently impress a circle inside the perimeter, creating a raised rim effect common on buttons. -
Add button holes:
Using a needle tool, poke four symmetrical holes in the center of each circle to mimic a sewn button look. -
Insert hardware:
Insert an eye pin through the top edge of the button and another eye pin through the bottom edge. Ensure the loops are facing the correct direction for assembly. -
Bake the pieces:
Arrange the roses and buttons on a tile or baking sheet. Bake according to your clay manufacturer’s instructions—usually 275°F (130°C) for 15-30 minutes.
Variation Idea
Swap the faux buttons for gold hoops or textured brass connectors. You can also mix clay colors to create a marbled effect for the button components to add more depth.
Step 3: Assembly
-
Connect the components:
Once cooled, use your pliers to open the bottom loop of the button component. Slide the rose’s eye pin onto it and close the loop securely. -
Attach the hook:
Open the loop on your earring hook. Attach it to the top loop of the faux button component. -
Finishing touches:
Double-check all jump rings and loops are tightly closed so pieces don’t slip off. -
Optional glaze:
If you prefer a shiny finish, lightly brush a water-based sculpting glaze over the petals, avoiding the button area for a nice textural contrast.
Now you have a lovely set of botanical earrings ready to verify your crafting skills

The Complete Guide to Pottery Troubleshooting
Uncover the most common ceramic mistakes—from cracking clay to failed glazes—and learn how to fix them fast.
Flower Pendant With Leaf Backing
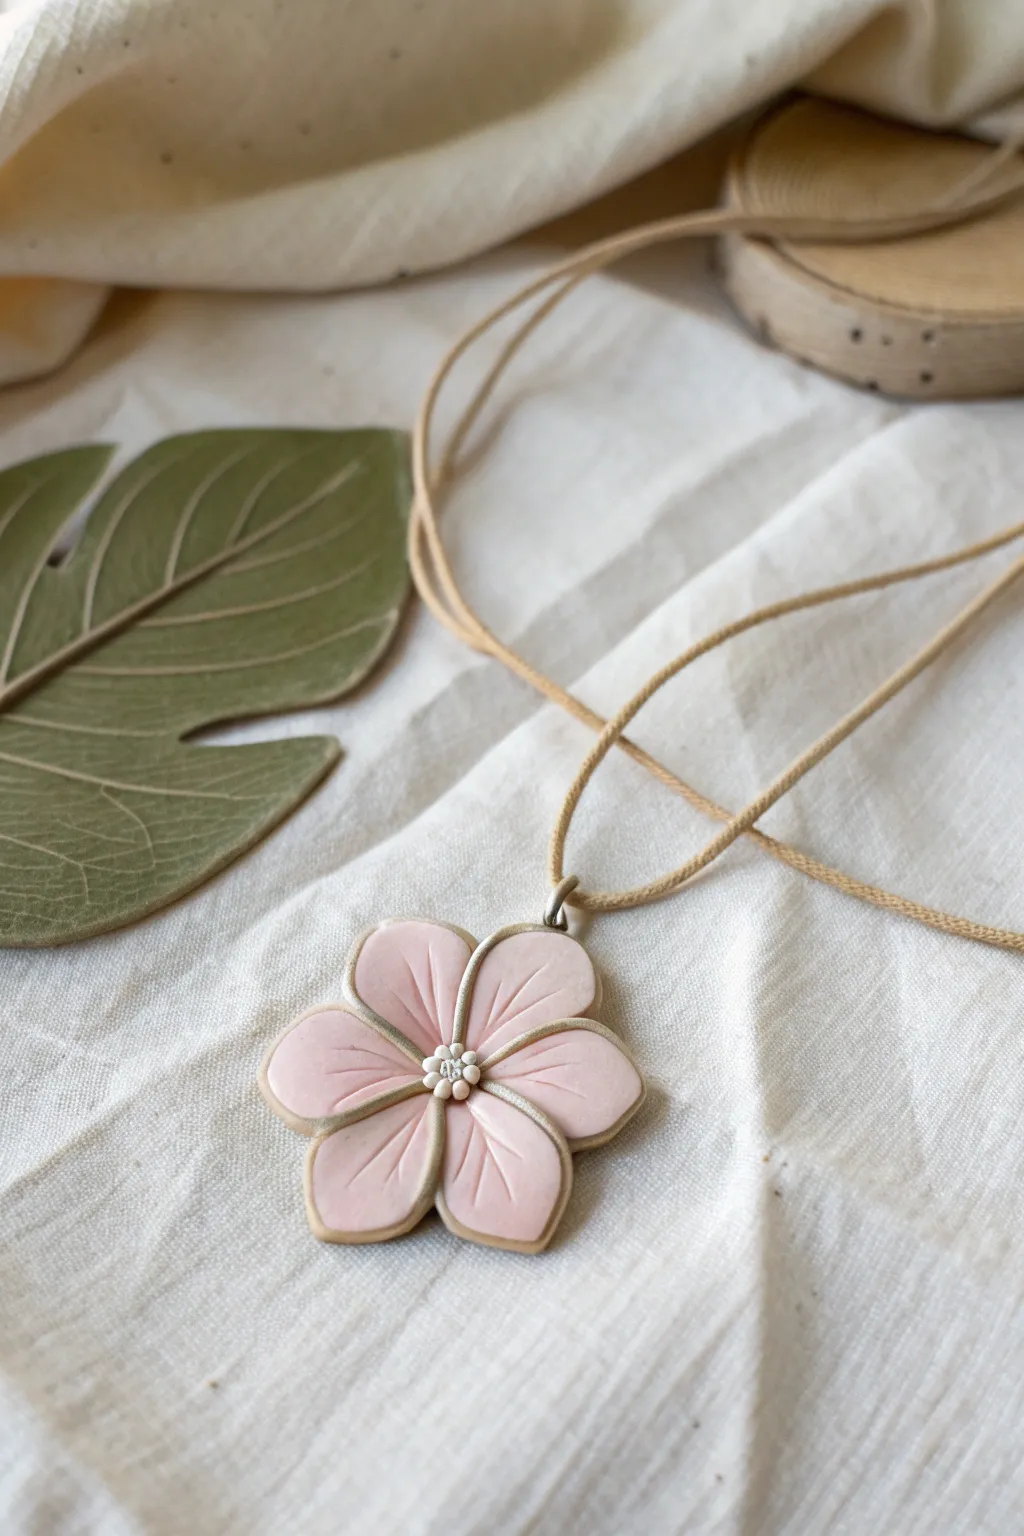
Capture the softness of spring with this elegant polymer clay flower pendant, featuring tender pink petals bordered in warm beige. The design is complemented by a simple faux-suede cord, making it a perfect everyday accessory.
Step-by-Step
Materials
- Polymer clay (Soft Pink)
- Polymer clay (Beige or Light Tan)
- Polymer clay (White or Cream)
- Liquid polymer clay (optional, for adhesion)
- Acrylic roller or pasta machine
- Small teardrop cutter (approx. 2-3 cm)
- Needle tool or toothpick
- Ball tool (small)
- craft knife or scalpel
- Jewelry eye pin or jump ring
- Beige faux suede cord (approx. 18-24 inches)
- Gloss or matte varnish (optional)
Step 1: Petal Preparation
-
Condition the Clay:
Begin by thoroughly kneading both your soft pink and beige clays until they are pliable and warm. This ensures they won’t crack during shaping. -
Roll the Sheets:
Roll out the pink clay to a medium thickness (about 2-3mm). Roll out the beige clay slightly thinner than the pink, perhaps 1-2mm. -
Cut the Base Petals:
Using your teardrop cutter, press out five identical petal shapes from the pink clay sheet. Set them aside on a clean tile or work surface. -
Create the Backing Layers:
Using the same cutter, cut five teardrop shapes from the beige clay. These will serve as the framing layer. -
Assemble the Petals:
Gently place one pink petal directly on top of a beige petal. Press them together lightly, then use your fingers to smooth the beige clay so it peeks out just slightly around the edges, creating a subtle outline.
Step 2: Shaping and Detailing
-
Form the Flower Shape:
Arrange the five layered petals in a circle, with their pointed ends meeting in the center. Press the center points together firmly to bond them; a dab of liquid clay here can help if they aren’t sticking. -
Soften the Edges:
Use your fingertip to gently flatten and round the outer edges of each petal, giving the flower a softer, more organic look rather than a sharp geometric one. -
Add Texture Details:
Take your needle tool or the back of a craft knife and gently press a central vein line down the middle of each pink petal. Start from the center and fade out towards the tip. -
Create the Bead Center:
Roll several tiny balls (about 1-2mm) of white or cream clay. You’ll need about 6-7 of these. -
Place the Stamens:
Cluster these tiny white balls securely in the very center of the flower to create the stamen. Press them down gently with a small ball tool to ensure they adhere to the petals. -
Secure the Hanging Hardware:
Insert a metal eye pin into the top of the flower, embedding it between two petals or into the backing clay. Ensure the loop is facing the correct direction for threading a cord.
Clean Edges Clean Look
Before baking, use a cotton swab dipped in rubbing alcohol to gently wipe the clay surface. It removes lint and fingerprints instantly.
Step 3: Finishing Touches
-
Final Inspection:
Check for any fingerprints or dust. You can smooth fingerprints with a tiny amount of baby oil or cornstarch on your finger. -
Bake the Piece:
Bake the pendant according to your clay manufacturer’s instructions (usually 230°F – 275°F for 15-30 minutes). I usually tent foil over my light-colored pieces to prevent scorching. -
Cool and Varnish:
Let the flower cool completely. If desired, apply a thin coat of matte varnish for protection, or gloss varnish just on the center stamens for contrast. -
String the Pendant:
Once dry, thread the beige faux suede cord through the loop of your eye pin.
Pastel Shading
Before baking, brush a tiny amount of pink pastel chalk dust near the center of the petals to create a soft, deepening blush effect.
Now you have a charming floral piece ready to wear or gift.
Bloom-Topped Hair Clip Accents
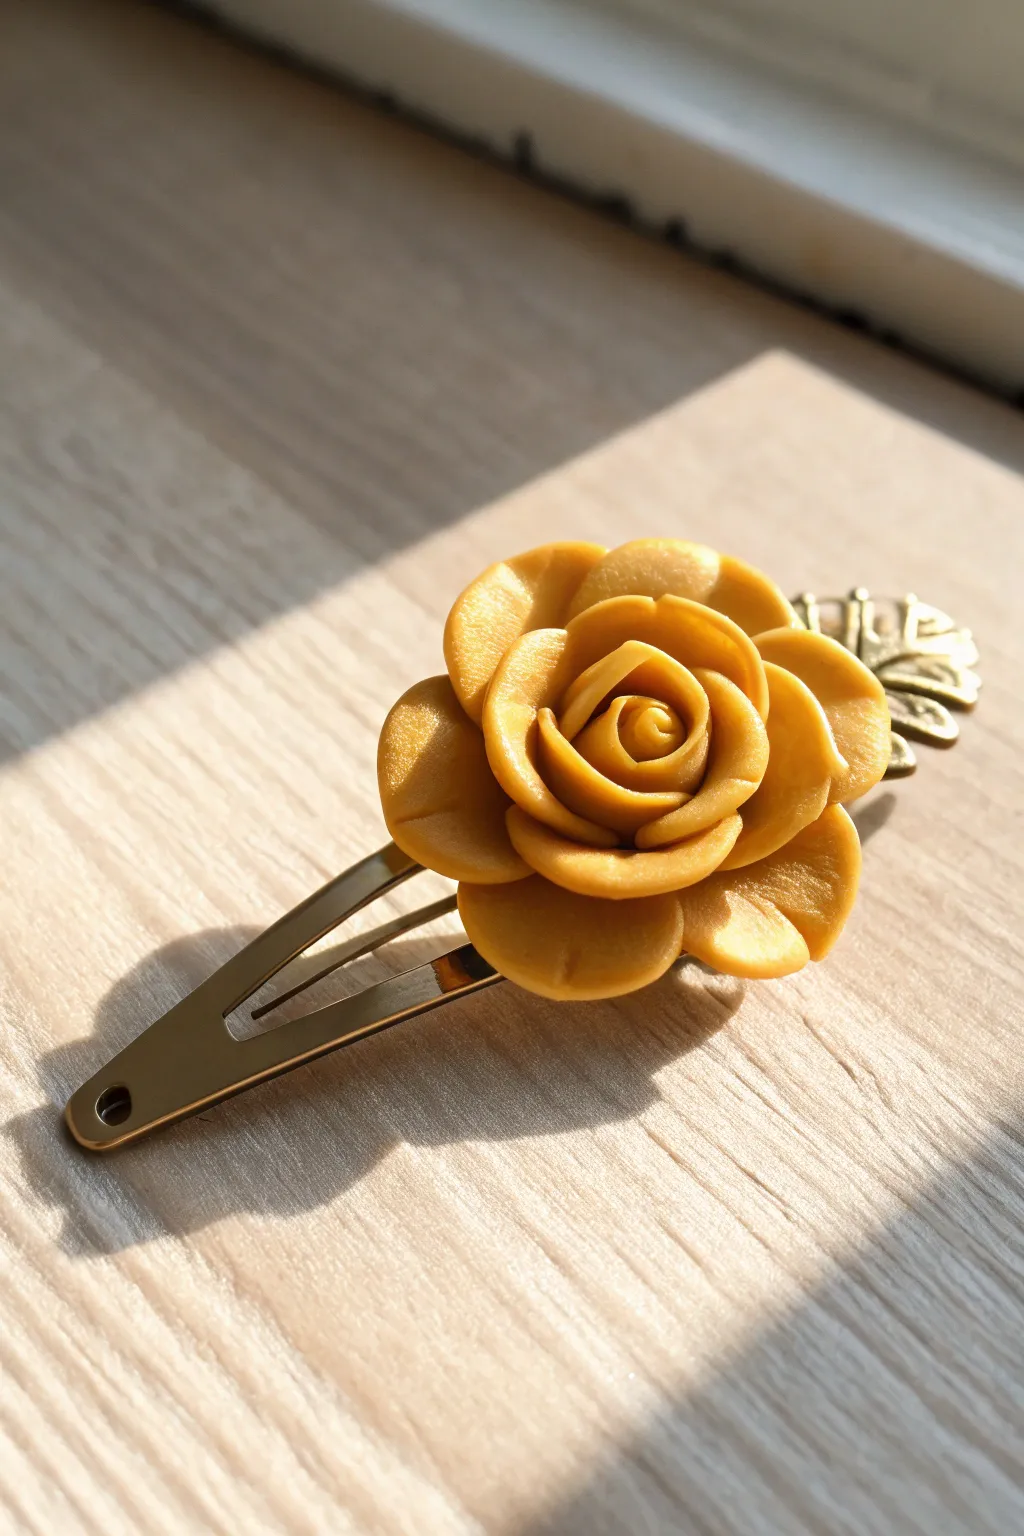
Capture the warmth of a summer afternoon with this elegant hair accessory, featuring a handcrafted polymer clay rose in a rich golden-yellow hue. Mounted on a classic metal snap clip with a hidden leaf charm, this piece adds a vintage-inspired floral touch to any hairstyle.
Detailed Instructions
Materials
- Polymer clay (golden yellow or ochre)
- Metal snap hair clip (bronze or gold finish)
- Metal leaf charm or filigree finding (bronze)
- Strong craft adhesive (E6000 or similar)
- Polymer clay blade or craft knife
- Ball stylus tool
- Liquid polymer clay (optional but recommended)
- Small ceramic tile or baking sheet in oven
- Gloss or satin varnish (optional for finish)
- Acrylic roller or pasta machine
Step 1: Preparing the Clay Base
-
Condition the Clay:
Begin by kneading your golden yellow polymer clay until it is soft, pliable, and free of air bubbles. Warm hands make this process much easier. -
Create a Sheet:
Roll out the clay to a uniform thickness, roughly 2mm thick, using an acrylic roller or the medium setting on a pasta machine. -
Cut Petal Circles:
Using a very small round cutter or by hand, cut out approximately 10-12 small circles of clay. These don’t need to be perfectly identical, as natural variation looks better. -
Thin the Edges:
Place a clay circle on your palm. Using your thumb or a ball stylus tool, gently press and roll along just the edges of the circle to thin them out creating a delicate, ruffled look. -
Repeat for All Petals:
Continue this thinning process for all your cut circles, setting them aside on your work surface or tile.
Fingerprint Eraser
Before baking, brush a tiny amount of baby oil or cornstarch over the petals to smooth out any accidental fingerprints left during sculpting.
Step 2: Assembling the Rose
-
Form the Center Bud:
Take one of your thinned petals and roll it tightly into a spiral tube to create the very center of the rose bud. -
Add the First Layer:
Take a second petal and wrap it around the center spiral, positioning the seam of the first spiral in the middle of this new petal. -
Secure the Base:
Gently pinch the bottom of the rose assembly to secure the layers together as you work. -
Building Outward:
Continue adding petals one by one, slightly overlapping the previous petal each time. I like to place each new petal slightly higher than the last to ensure the center remains recessed. -
Refining the Shape:
As the flower grows, gently curl the edges of the outer petals backward with your fingertip to mimic a rose in full bloom. -
Check Size:
Stop adding petals when the flower reaches a diameter that fits nicely on the wide part of your hair clip, usually about 1 inch wide. -
Trim the Base:
Once assembled, carefully slice off the excess clay at the bottom of the rose with your blade to create a flat surface for mounting.
Rose Won’t Stick?
If the rose pops off after gluing, the metal was likely too smooth. Sand the metal surface thoroughly and score the back of the clay rose for better grip.
Step 3: Baking and Mounting
-
Bake the Rose:
Place your clay rose on a ceramic tile and bake according to the manufacturer’s instructions for your specific brand of clay (usually 275°F/135°C for 15-30 minutes). -
Cool Down:
Allow the clay rose to cool completely before handling. It will harden fully as it cools. -
Prepare the Clip:
Scuff the surface of the metal hair clip lightly with sandpaper where the flower will sit to help the glue adhere better. -
Attach the Metal Leaf:
Apply a small dot of strong adhesive to the clip and press the metal leaf charm down first, positioning it so it will peek out from under the rose. -
Mount the Rose:
Apply a generous amount of adhesive (or liquid clay if re-baking) to the flat bottom of your rose and press it firmly onto the clip, centering it over the base of the metal leaf. -
Final Cure (Optional):
If you used liquid clay for adhesion, bake the entire assembly again for 15 minutes. If using glue, simply let it cure for 24 hours.
Now you have a charming, durable accessory ready to preserve a bit of summer sunshine in your hair style


What Really Happens Inside the Kiln
Learn how time and temperature work together inside the kiln to transform clay into durable ceramic.
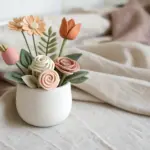
Bouquet Fridge Magnets
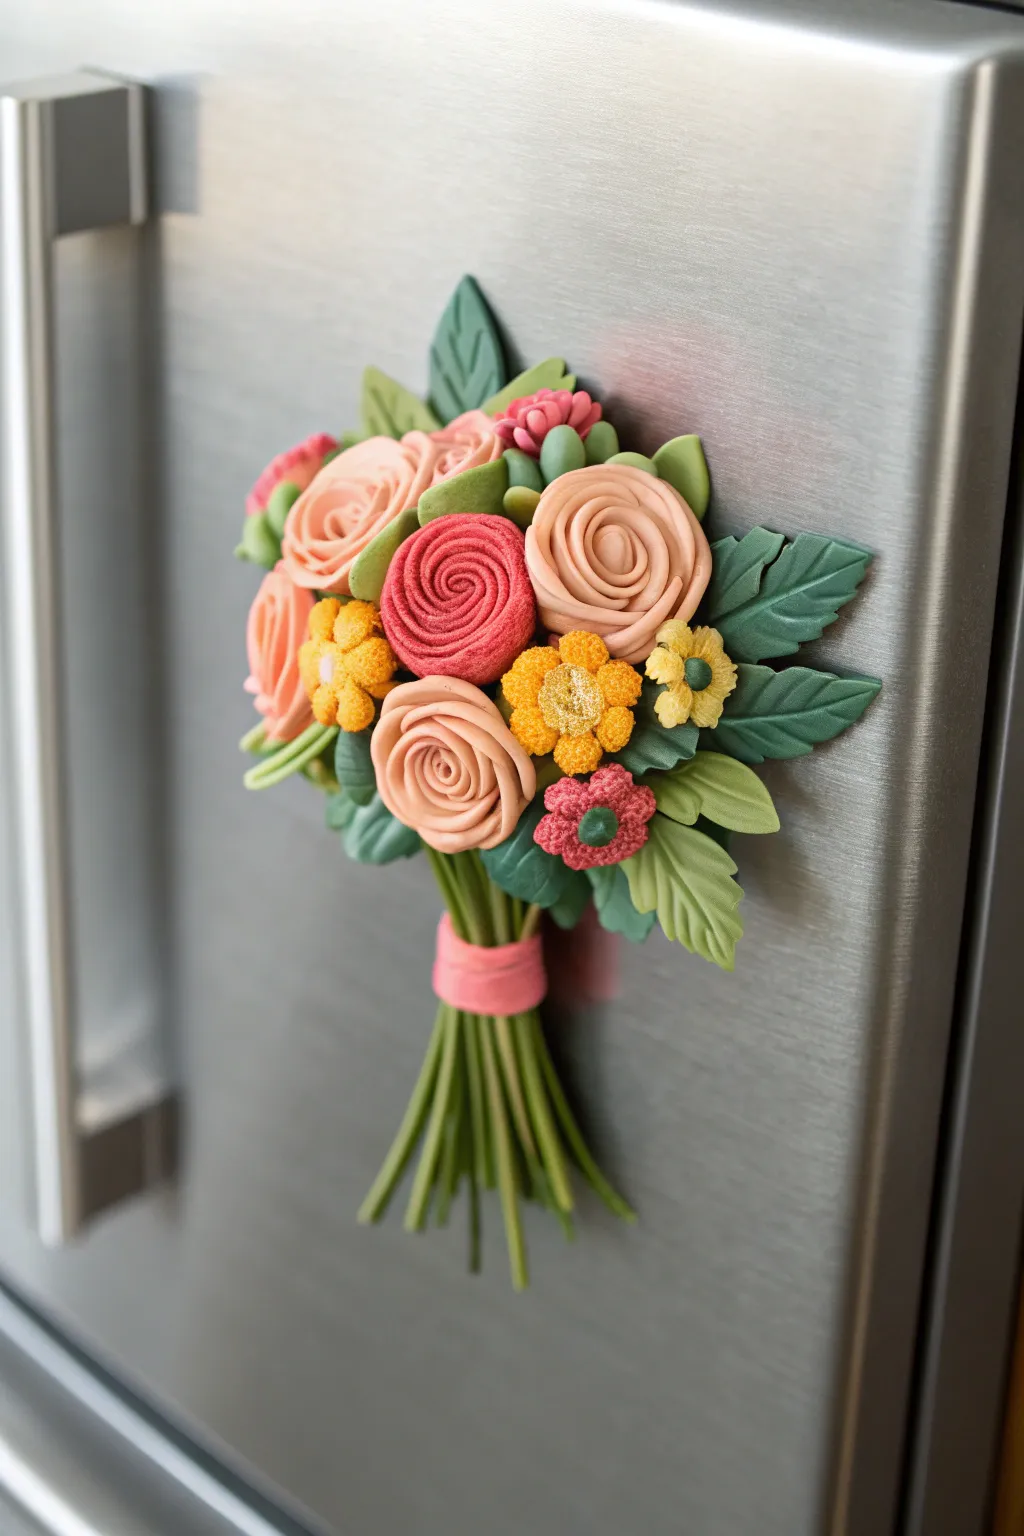
Bring a permanent burst of spring to your kitchen with this charming polymer clay refrigerator magnet. This miniature bouquet features soft peach and coral roses nestled among textured greenery, all tied together with a delicate clay ribbon.
Step-by-Step Tutorial
Materials
- Polymer clay in peach, coral, dark pink, yellow, and two shades of green
- Strong neodymium magnet (approx. 10mm)
- Liquid polymer clay (such as translucent or bake and bond)
- Needle tool or toothpick
- Ball stylus tool
- Small craft knife or clay blade
- Sandpaper (optional, for backing)
- Acrylic roller or pasta machine
- Gloss glaze (optional)
Step 1: Making the Greenery Base
-
Prepare the stems:
Roll out thin snakes of medium-green clay to create about 10-12 stems. Trim them so they are approximately 1.5 inches long, keeping the ends clean. -
Assemble the bundle:
Cluster the stems together, flaring them out slightly at the top and gathering them tightly at the bottom. Press them gently together so they bond. -
Create the leafy backdrop:
Roll out dark green clay into a thin sheet. Cut out several teardrop shapes for leaves, ranging from small to medium sizes. -
Detail the leaves:
Use your needle tool or craft knife to score a central vein and smaller branching veins onto each leaf for realistic texture. -
Building the fan:
To form a sturdy base, press a flat, fan-shaped piece of scrap clay behind the top of your stem bundle. Begin arranging your textured dark green leaves onto this fan, fanning them out to create a lush background for the flowers.
Sticky Situation?
If your clay is too soft and petals are drooping, leach it by pressing thin sheets between printer paper for 30 minutes to absorb excess plasticizer.
Step 2: Sculpting the Roses & Flowers
-
Form the rose centers:
For the main roses, take peach and coral clay. Roll a very small strip of clay and coil it tightly to make the center bud. -
Add petals:
Flatten tiny balls of clay into thin ovals. Wrap these petals around the center coil, overlapping each one slightly. I find sticking to 5-7 petals creates the perfect size for this scale. -
Create the textured zinnias:
Take yellow and dark coral clay. Form small, flattened domes. Use a needle tool to stipple the entire surface, creating a fuzzy, pollen-like texture. -
Sculpt small filler flowers:
Make five tiny yellow teardrops and press them together in a circle. Add a tiny green dot in the center for contrast. -
Position the blooms:
Press the roses and textured flowers onto your green leaf base. Use a dot of liquid clay if they aren’t sticking well. Arrange them tightly so no backing shows through.
Level Up: Scented
After baking and cooling, add a single drop of rose or floral essential oil to the unglazed back of the clay. It acts as a porous diffuser for the fridge.
Step 3: Assembly and Finishing
-
Add extra leaves:
Tuck a few smaller, lighter green leaves in between the flowers to add depth and break up the colors. -
Tie the ribbon:
Roll a thin strip of pink clay. Wrap it around the point where the stems gather, overlapping the ends neatly at the back to simulate a tied ribbon. -
Secure the magnet:
Press your neodymium magnet gently into the back of the bouquet while the clay is still raw to create an indentation, then remove it. This ensures a flush fit later. -
Bake:
Bake the piece according to your clay manufacturer’s instructions (usually 275°F/135°C for 15-30 minutes). Support the stem area with a bit of polyester batting so it doesn’t sag in the oven. -
Cool and glue:
Once fully cooled, use a strong super glue or E6000 to attach the magnet into the indentation you made earlier.
Your kitchen will now have a permanent floral arrangement that never needs watering
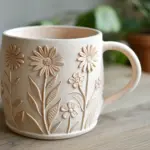
Picture Frame Corner Blossoms
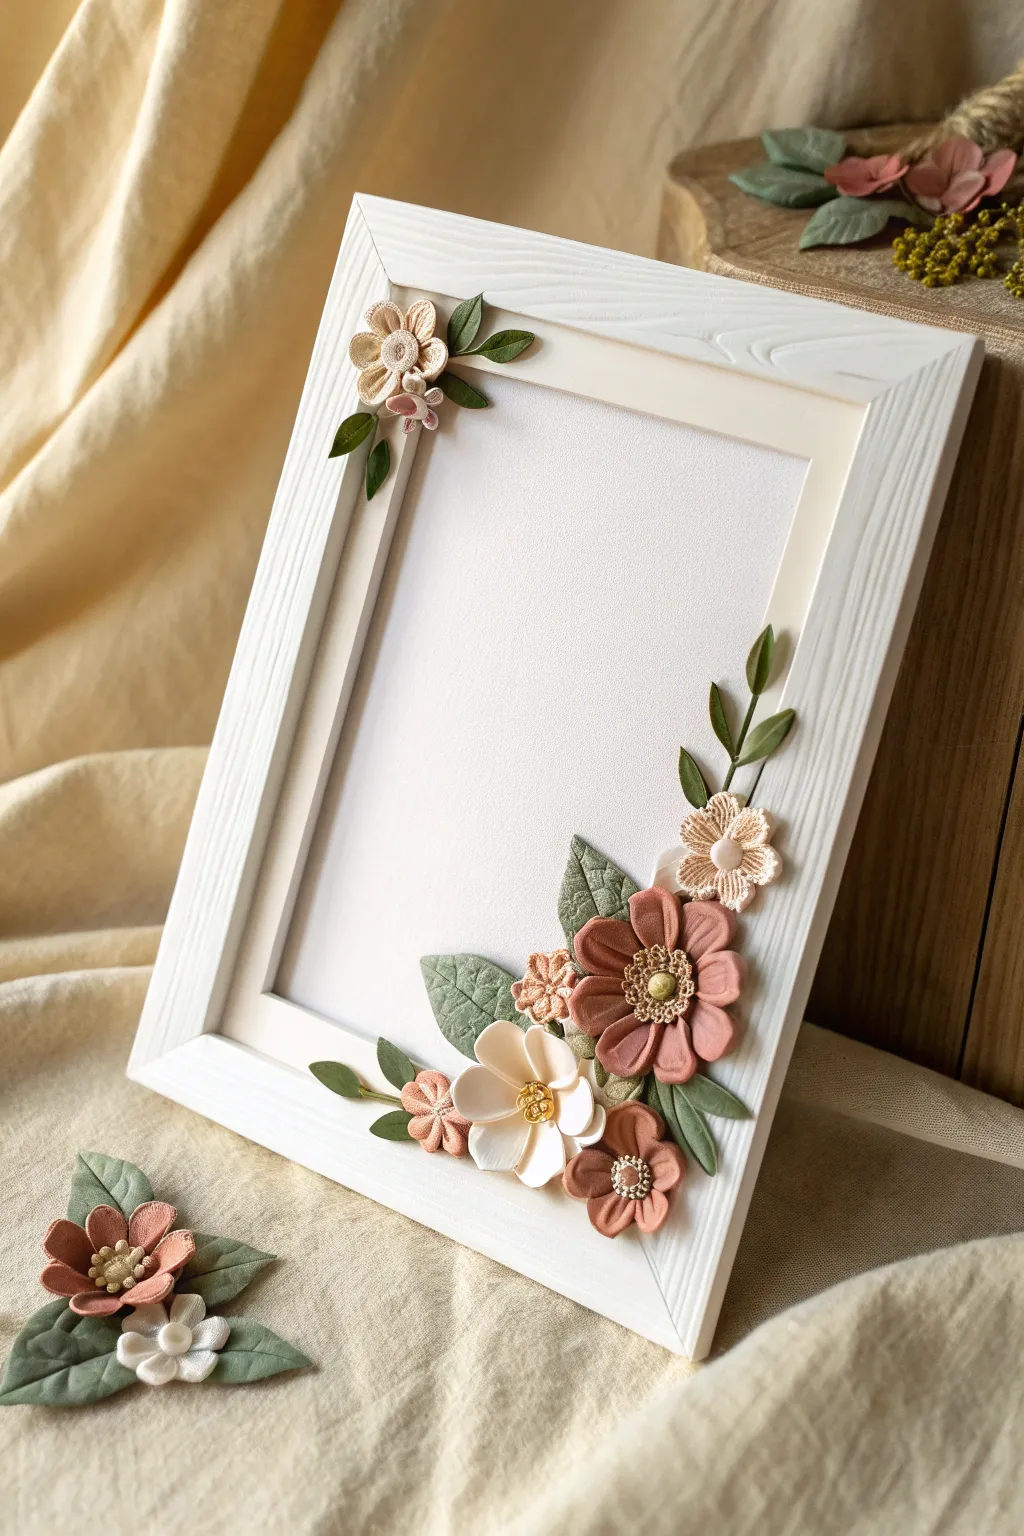
Transform a plain white frame into a boutique-worthy piece with these delicate polymer clay corner blossoms. Featuring a muted palette of dusty rose, cream, and sage green, the textured finish gives the clay a surprisingly soft, fabric-like appearance.
Step-by-Step Guide
Materials
- Polymer clay (Dusty Rose, Cream/White, Sage Green, Terracotta)
- Plain white wooden picture frame
- Liquid polymer clay (or strong craft glue)
- Needle tool or toothpick
- Ball stylus tool (small and medium)
- Small flower petal cutter (optional, teardrop shape)
- Texture sponge or stiff brush
- Gold micro-beads or gold acrylic paint
- Baking tile or parchment paper
- Oven
Step 1: Flower Base Preparation
-
Conditioning the clay:
Begin by conditioning your dusty rose, cream, and terracotta clays until they are soft and pliable. Mix a touch of terracotta into the rose clay if you want that warmer, deeper hue seen in the larger blooms. -
Creating the centers:
Roll tiny balls of cream and terracotta clay to serve as the bases for your flowers. Flatten them slightly onto your baking tile, grouping them by the size of flower you intend to make.
Step 2: Sculpting the Large Blooms
-
Forming petals:
Roll a small snake of the dusty rose clay and cut it into equal segments. Roll each segment into a ball, then flatten it into a teardrop shape to form a petal. You will need 6-8 petals for the main flowers. -
Adding texture:
Before assembling, I like to gently press a texture sponge or a stiff brush onto the surface of each petal. This gives it that lovely, matte fabric look instead of a shiny plastic finish. -
Assembling the bloom:
Arrange the petals in a circle, overlapping the edges slightly. Press the pointed ends together in the center. Use your ball stylus to create a depression in the middle, securing the petals together. -
Building the center:
Place a small flattened ball of yellow or light green clay in the divot you just made. Use a needle tool to poke tiny holes all over this center piece to simulate pollen texture. -
Adding details:
For the finishing touch on the main flowers, press a few gold micro-beads into the very center, or create tiny clay dots if you don’t have beads.
Pro Texture Tip
Press raw clay gently onto a piece of real linen or coarse cotton fabric before cutting petals. This transfers an authentic weave pattern.
Step 3: Crafting Leaves & Filler Flowers
-
Making the leaves:
Condition the sage green clay. Roll it thin and cut elongated diamond or teardrop shapes. Use your needle tool to draw a central vein down each leaf. -
Texturing leaves:
Gently gently press a piece of sandpaper or your sponge onto the leaves to match the matte texture of the petals. -
Creating cream blossoms:
Repeat the petal process with cream clay for the smaller white flowers. Keep these petals slightly cupped upwards rather than flat to give the arrangement dimension. -
Making tiny buds:
Roll very small balls of pink clay and press a tiny star-shaped tool or the end of a small Phillips head screwdriver into them to create instant tiny filler blossoms.
Vintage Vibe Level-Up
After baking, lightly brush ‘burnt umber’ acrylic paint over the texture crevices and wipe off the excess immediately for an antique look.
Step 4: Assembly and Baking
-
Pre-bake arrangement:
Here is the critical part: Arrange your raw clay pieces directly on the corner of the frame to check fit and spacing. Gently curve the leaves so they flow naturally along the frame’s edge. -
Transfer:
Carefully lift your arrangement (often in small clusters) and move it to your baking tile, maintaining the curved shapes. -
Baking:
Bake the pieces according to your clay package instructions (usually 275°F/135°C for 15-30 minutes). Let them cool completely. -
Final attachment:
Once cool and hard, arrange the pieces back onto the frame corners. Use liquid polymer clay (if the frame is oven-safe and you want to bake again) or a strong craft glue like E6000 to permanently attach them. -
Touching up:
If you didn’t use gold beads earlier, use a tiny brush to dab a little gold acrylic paint into the centers of the flowers for a hint of elegance.
Now step back and admire how these soft, botanical accents bring a warm, homemade charm to your favorite photo

TRACK YOUR CERAMIC JOURNEY
Capture glaze tests, firing details, and creative progress—all in one simple printable. Make your projects easier to repeat and improve.
Gradient Petals With Color Blends
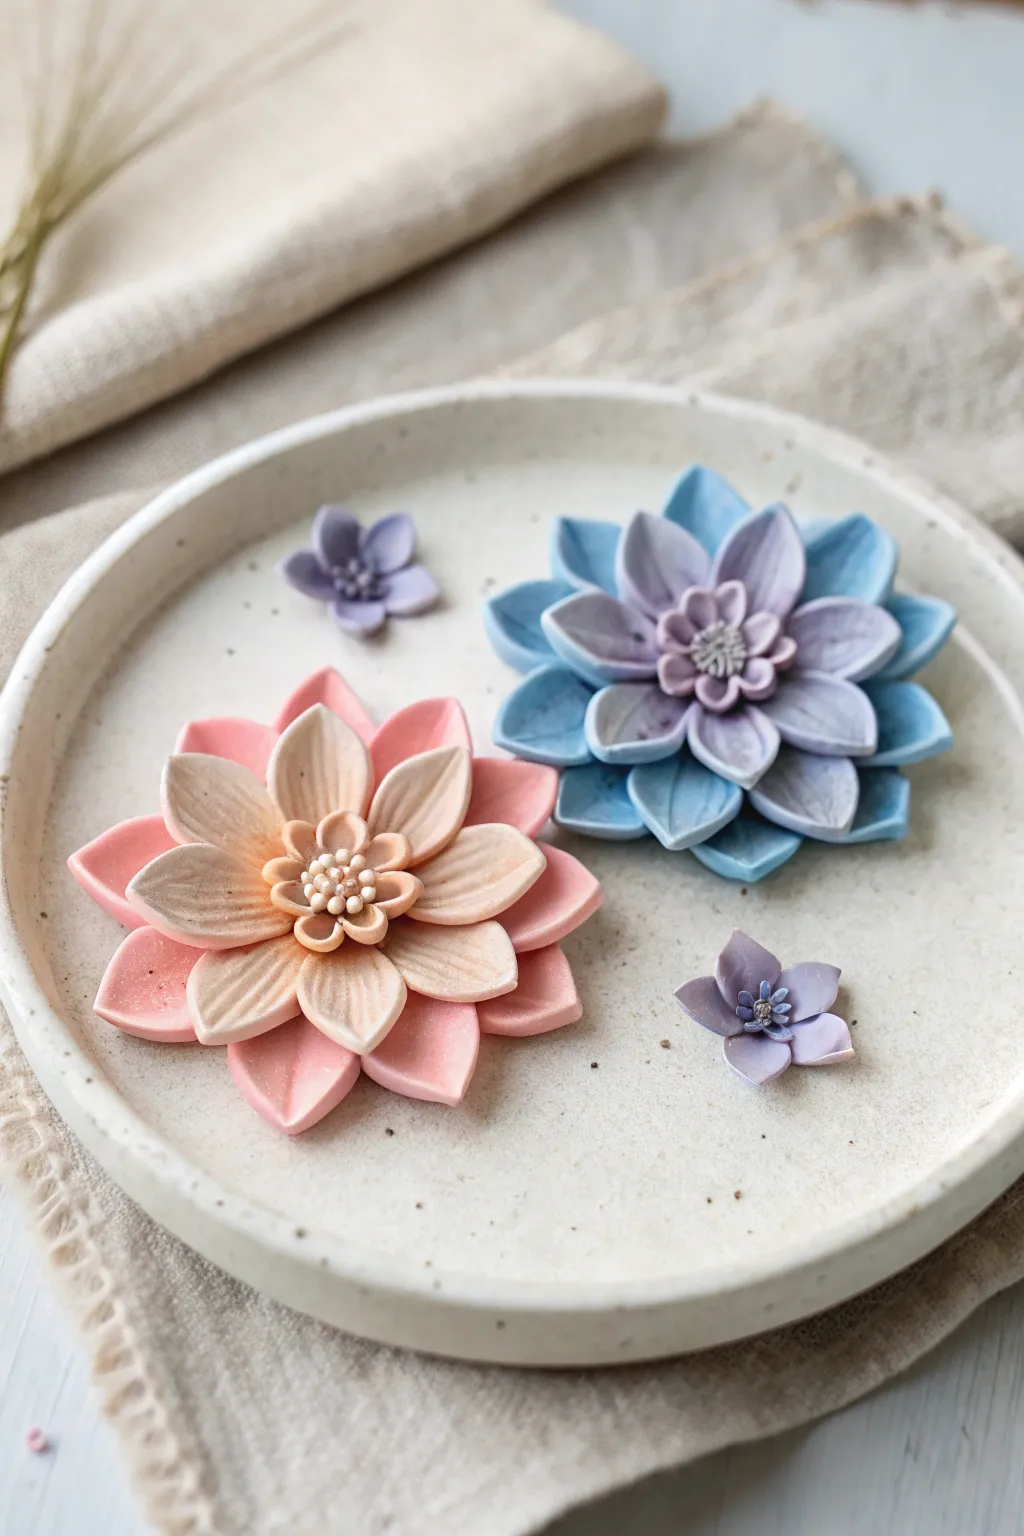
Capture the delicate beauty of a blooming dahlia using the Skinner blend technique to create soft, realistic color transitions. These multi-layered polymer clay blooms feature centers that shift from creamy centers to vibrant edges, sitting alongside sweet miniature accent flowers.
How-To Guide
Materials
- Polymer clay (white, peach/pink, light blue, lavender, translucent)
- Acrylic rolling pin or pasta machine
- Leaf veining tool or texture sheet
- Needle tool
- Ball stylus tool (medium and small)
- Cornstarch or baby powder (as release agent)
- Small teardrop cutters (various sizes)
- Liquid polymer clay (optional)
- Ceramic tile or baking surface
- Oven
Step 1: Creating the Color Blends
-
Prepare the Skinner Blend:
Start by conditioning your clay well. To achieve the pink flower’s look, create a triangle of peach/pink clay and a triangle of cream or translucent white. Join them to form a square and pass this through your pasta machine on the widest setting. -
Refine the Gradient:
Fold the sheet in half matching the colors (pink to pink, white to white) and run it through again. Repeat this folding and rolling process about 15-20 times until you have a smooth, seamless transition from pink to cream. -
Create the Blue Blend:
Repeat the previous blending steps using light blue and lavender clay to create the cool-toned sheet for the second flower. Roll both final blended sheets to a medium thickness cards.
Unwanted Fingerprints?
Before baking, lightly brush your raw clay petals with a soft brush dipped in a tiny bit of baby oil or cornstarch. This smoothes out fingerprints instantly.
Step 2: Shaping the Petals
-
Cut the Petals:
Using teardrop cutters, cut out approximately 12 large petals, 10 medium petals, and 8 small petals for each flower. Try to position your cutter so the pointed tip aims toward the lighter color of your gradient. -
Thin the Edges:
Place a petal in the palm of your hand. Gently rub the edges with your finger or a ball tool to thin them out, which gives the clay a more organic, delicate flower look. -
Add Texture:
Press a veining tool or a needle tool gently down the center of each petal to create a central vein. For extra realism, I like to lightly press the petal onto a texture sponge or fine sandpaper to give it a matte, natural surface. -
Pinch the Tips:
Gently pinch the pointed end (the lighter end) of each petal to curl it slightly inward, giving the dahlia its characteristic cupped shape.
Turn Them Into Jewelry
Before baking, embed a metal eyepin into the back of the clay base. Once baked, these lightweight beauties make stunning pendants or statement brooches.
Step 3: Assembling the Large Blooms
-
Form the Base:
Create a small, flat disc of scrap clay to serve as the base. Arrange the largest petals in a circle on this base, overlapping them slightly. -
Build the Layers:
Add the medium-sized petals in a second ring, placing each one in the gap between two petals from the row below. Repeat this brick-laying pattern with the smallest petals as you move inward. -
Create the Center:
Roll tiny balls of the lightest clay color. Flatten them slightly and use a needle tool to create a stippled texture. Place a cluster of these in the very center of the flower to mimic stamens.
Step 4: Making the Miniature Blooms
-
Cut Mini Petals:
For the tiny purple accents, use a very small cutter or shape tiny teardrops by hand from solid purple clay. -
Form the Flower:
Press five tiny petals together at their points. Use a small ball tool to indent the center, effectively merging the petals together. -
Detail the Center:
Place a microscopic ball of light blue or white clay in the center and poke it with a needle tool for a star-like detail.
Step 5: Finishing Touches
-
Final Adjustments:
Before baking, give your flowers a once-over. Use a needle tool to lift any petals that have flattened out and ensure the layers differentiate nicely. -
Bake the Flowers:
Bake according to your clay manufacturer’s instructions (usually 275°F/130°C for 15-30 minutes). I recommend tenting them with foil to prevent the light colors from scorching. -
Cool and Protect:
Let the flowers cool completely before handling. You can leave them matte or add a drop of satin varnish to just the centers for a bit of contrast.
Now you have a set of everlasting gradient blooms ready to decorate a jewelry dish or be turned into wearable art
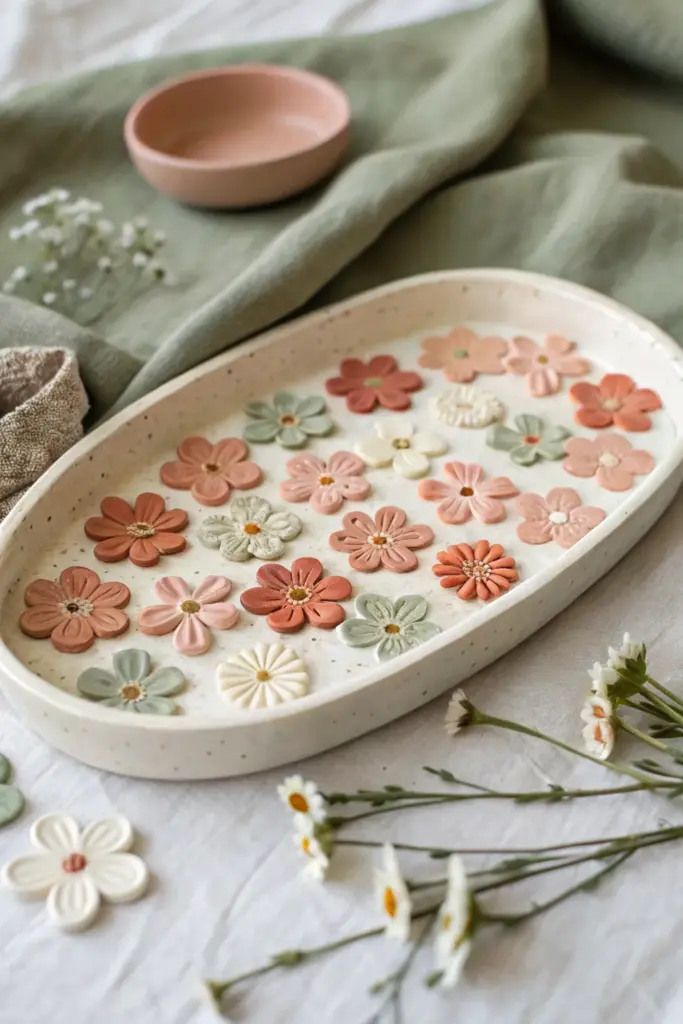
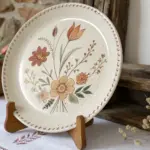
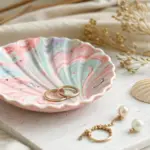
Floral Cane Slices for Confetti Patterns

Transform simple polymer clay florals into a stunning, speckled trinket dish that looks perfectly handmade. This project combines a faux-ceramic base with flattened floral appliqués in a muted, earthy color palette for a sophisticated yet whimsical finish.
How-To Guide
Materials
- Polymer clay (white, translucent, terracotta, sage green, blush pink, beige)
- Black pepper or dried coffee grounds (for speckling)
- Acrylic rolling pin
- Oval cutter or paper template
- Small flower cutters (various petal shapes)
- Needle tool or toothpick
- Small ball tool
- Liquid polymer clay (clear or translucent)
- Oven-safe bowl or form (oval shape)
- Cornstarch or baby powder
- Fine-grit sandpaper (optional)
- Matte varnish
Step 1: Creating the Faux-Ceramic Base
-
Mix the Base Clay:
Start by mixing a large block of white polymer clay with a small amount of translucent clay and a tiny pinch of beige. This creates a more natural, stoneware look rather than a stark white plastic finish. -
Add the Speckles:
To achieve that signature ceramic speckled effect, knead in a pinch of coarse ground black pepper or dried used coffee grounds. Fold the clay repeatedly until the speckles are evenly distributed throughout the batch. -
Roll and Cut:
Roll your speckled clay out to a medium thickness, about 1/4 inch (6mm). Using an oval cutter or a paper template and craft knife, cut out the main tray shape. Smooth the edges with your finger to soften any sharp cuts. -
Form the Rim:
Roll a long snake of the same speckled clay. Adhere this snake to the outer edge of your oval base, blending the seam on the inside and outside with a modeling tool so it becomes one seamless piece with a raised lip.
Sticky Situation?
If your clay sticks to the table while rolling large slabs, roll it out on baking parchment or a ceramic tile. You can then bake it directly on that surface without trying to peel it off.
Step 2: Crafting the Florals
-
Prepare Floral Colors:
Condition your colored clays—terracotta, sage, blush, and cream. I like to mix a little white into each to keep the tones soft and pastel-earthen rather than overly bright. -
Cut Flower Shapes:
Roll the colored clays into thin sheets. Use your small flower cutters to punch out varied shapes. If you don’t have cutters, you can form 5-6 small balls of clay and press them together in a circle to form petals manually. -
Texture the Petals:
Using a needle tool, gently press a line down the center of each petal to give it dimension. For some flowers, use the needle to create small indentations or ‘hairlines’ radiating from the center. -
Add Flower Centers:
Roll tiny balls of contrasting clay (e.g., yellow or white) and press them into the center of each flower. Use a needle tool to stipple the center, giving it a pollen-like texture. -
Create Multi-Layer Blooms:
For the larger focal flowers, stack a smaller flower shape on top of a larger one in a contrasting color before adding the center. This adds lovely depth to the arrangement.
Pro Tip: Seamless Texture
To make the flowers look truly inlaid, place a sheet of parchment paper over the arranged flowers and burnish firmly with a spoon back before baking. This levels everything perfectly.
Step 3: Assembly and Curing
-
Arrange the Composition:
Place your finished raw clay flowers onto the raw clay tray base. Don’t press them down firmly yet; just arrange them until you are happy with the spacing and color balance. -
Embed the Flowers:
Once satisfied, gently roll over the flowers with your acrylic roller or press them flat with your fingers. The goal is to embed them slightly into the base so they look like an inlay pattern rather than sitting high on top. -
Add Liquid Clay/Bonding:
If the flowers aren’t sticking well, lift them slightly and add a tiny dot of liquid polymer clay underneath before pressing them back down. -
Prepare the Form:
Take your oven-safe oval bowl or form. Dust the outside lightly with cornstarch or baby powder to prevent sticking. -
Shape the Tray:
Carefully drape your clay slab (with the flowers) over the inverted bowl to give it a curved, dish-like shape. Ensure the rim is even. -
Bake:
Bake the project according to your clay manufacturer’s instructions (usually 275°F/135°C for 30-45 minutes). Let it cool completely on the form before removing. -
Finish:
Once cool, lightly sand any rough edges if necessary. Seal the piece with a thin coat of matte varnish to protect the surface while maintaining that natural ceramic aesthetic.
Now you have a charming, botanical catch-all dish perfect for jewelry or keys