If you’re craving a fun project that’s equal parts cute and impressive, polymer clay food is the sweet spot. I love how you can go from simple shapes to seriously convincing miniature food replicas with just a few textures and tiny details.
Classic Mini Donut Charms With Sprinkles
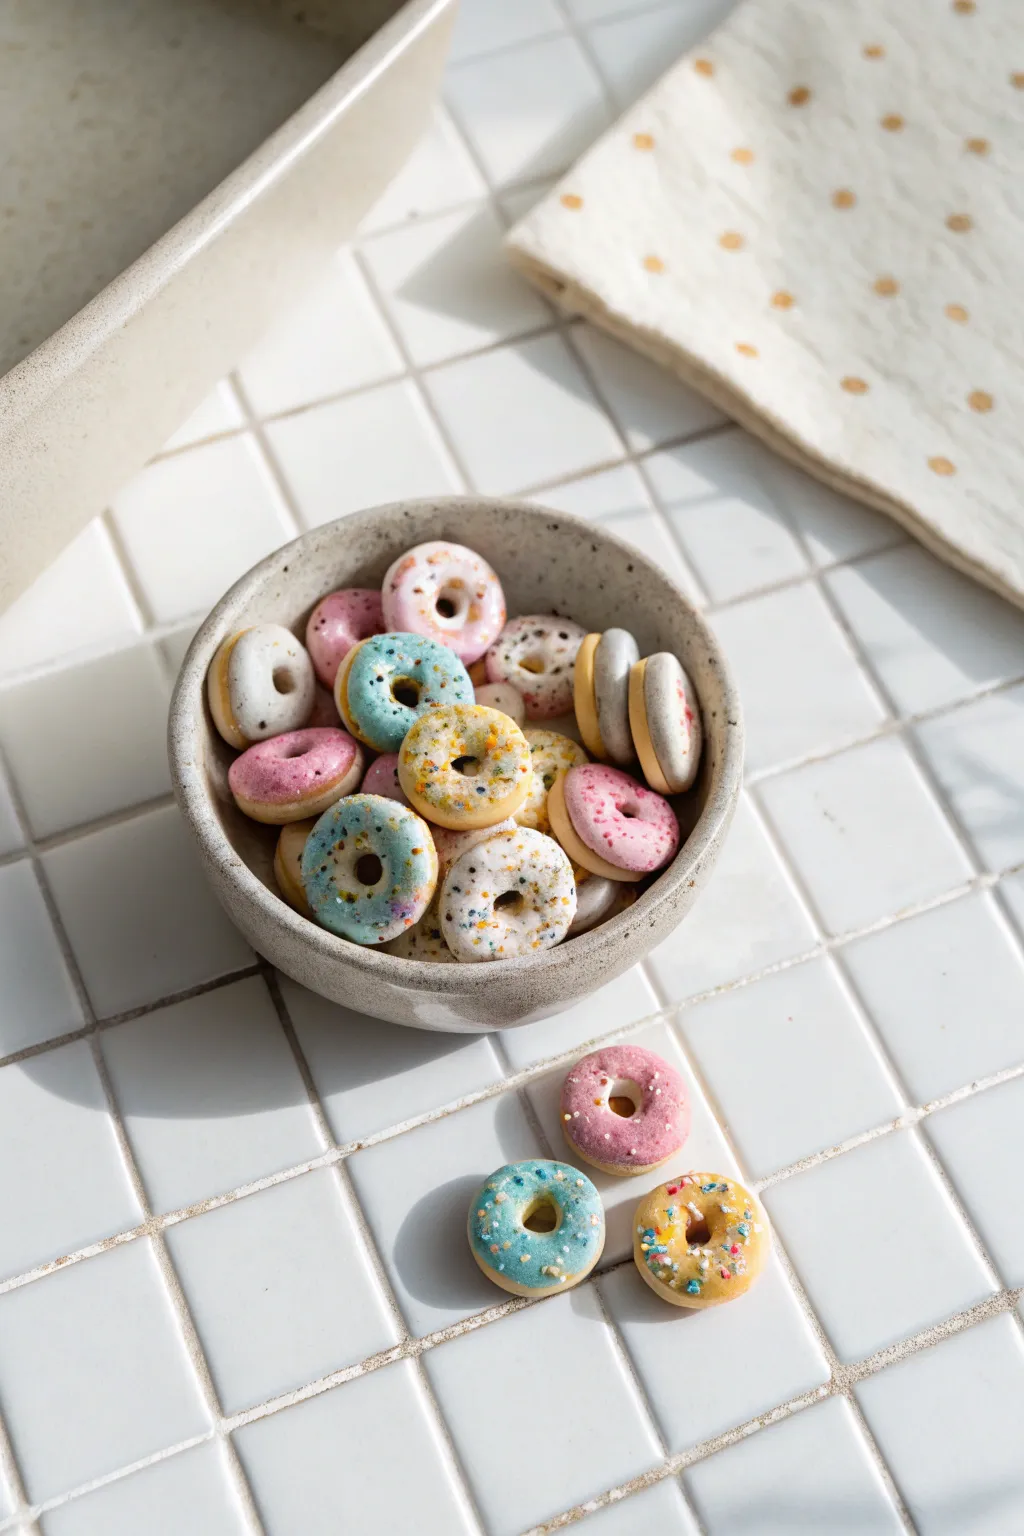
These adorable mini donuts look good enough to eat but are designed to be charming accessories rather than snacks. With realistic frosting textures and tiny sprinkles, these polymer clay creations make perfect earrings, pendants, or dollhouse treats.
Detailed Instructions
Materials
- Polymer clay in beige/light tan (for the dough)
- Polymer clay in pastel pink, blue, yellow, and white (for frosting)
- Liquid polymer clay (Translucent or White)
- Chalk pastels (orange, brown, yellow ochre)
- Small paintbrush
- Dotting tool or toothpick
- Small circle cutter (approx. 1/2 inch) or a large straw
- Tiny circle cutter (approx. 1/8 inch) or a small straw
- Blade or X-Acto knife
- Needle tool
- Gloss glaze (optional)
- Real sprinkles or cured polymer clay chopped into sprinkles
Step 1: Shaping the Dough Base
-
Condition the Clay:
Start by thoroughly conditioning your beige or tan polymer clay until it is soft and pliable. This prevents cracks during baking. -
Mix the Perfect Dough Color:
If your tan is too dark, mix in a significant amount of white clay. Aim for a raw dough color; we will add the baked look later with pastels. -
Roll the Sheet:
Roll out the beige clay into a thick sheet, approximately 4mm to 5mm thick. You want the donuts to have a nice, plump height. -
Cut the Base Circles:
Using your larger circle cutter, punch out several rounds of clay. If the clay sticks to the cutter, dip it in a little cornstarch first. -
Create the Centers:
Use the smaller circle cutter or a small straw to punch a hole directly in the center of each round. Remove the center bit. -
Soften the Edges:
Gently tap the cut edges of the donuts with your finger to round them off so they don’t look like they were just machine-cut. -
Add Texture:
Take a toothbrush or a crumpled ball of aluminum foil and gently tap it all over the surface of the donut. This mimics the porous texture of fried cake dough.
Step 2: Coloring and Baking
-
Shade the Dough:
Scrape some orange, brown, and yellow ochre chalk pastels into fine powders. Mix them to get a golden-brown ‘baked’ shade. -
Apply the Shading:
Using a soft brush, dust the pastel powder over the donuts. Focus slightly more on the edges and bottom, leaving the top center a bit lighter for realism. -
First Bake:
Place your donuts on a tile or parchment-lined baking sheet and bake according to your clay package instructions (usually 275°F/135°C) for about 10-15 minutes. Let them cool completely.
Frosting Too Runny?
If your liquid clay mix is too thin, let it sit on a piece of paper for 10 minutes. The paper will leach out some of the plasticizer, thickening the mix instantly.
Step 3: Frosting and Sprinkles
-
Prepare the Frosting:
To make realistic icing, mix a small amount of colored clay (pink, blue, or yellow) with liquid polymer clay in a small cup or on a mat. Mash it until it becomes a thick, sticky paste. -
Adjust Consistency:
Keep adding liquid clay drop by drop until the mixture is the consistency of thick frosting—it should hold its shape but be spreadable. -
Frost the Donuts:
Using a toothpick or needle tool, carefully scoop up the ‘frosting’ and spread it onto the cooled donuts. Let it drip slightly down the sides naturally, but don’t cover the whole thing. -
Add the Sprinkles:
While the frosting is still wet, sprinkle your tiny decorations on top. Gently press them down with a clean finger so they embed securely into the liquid clay. -
Final Cure:
Place the frosted donuts back in the oven. Bake for another 15 minutes to set the liquid clay frosting. Watch closely to ensure the white frosting doesn’t yellow. -
Optional Glaze:
Once fully cooled, you can brush a tiny amount of gloss glaze just over the frosting if you want a shiny, glazed donut look, or leave it matte for a classic sugar icing finish.
Make It a Charm
Before the second bake, insert a small metal eye pin into the side or top of the donut. Secure it with a tiny dab of liquid clay so it bakes in permanently.
Now you have a delightful batch of mini donuts ready to be turned into charming jewelry or displayed in a miniature scene


Pizza Slices With Layered Toppings
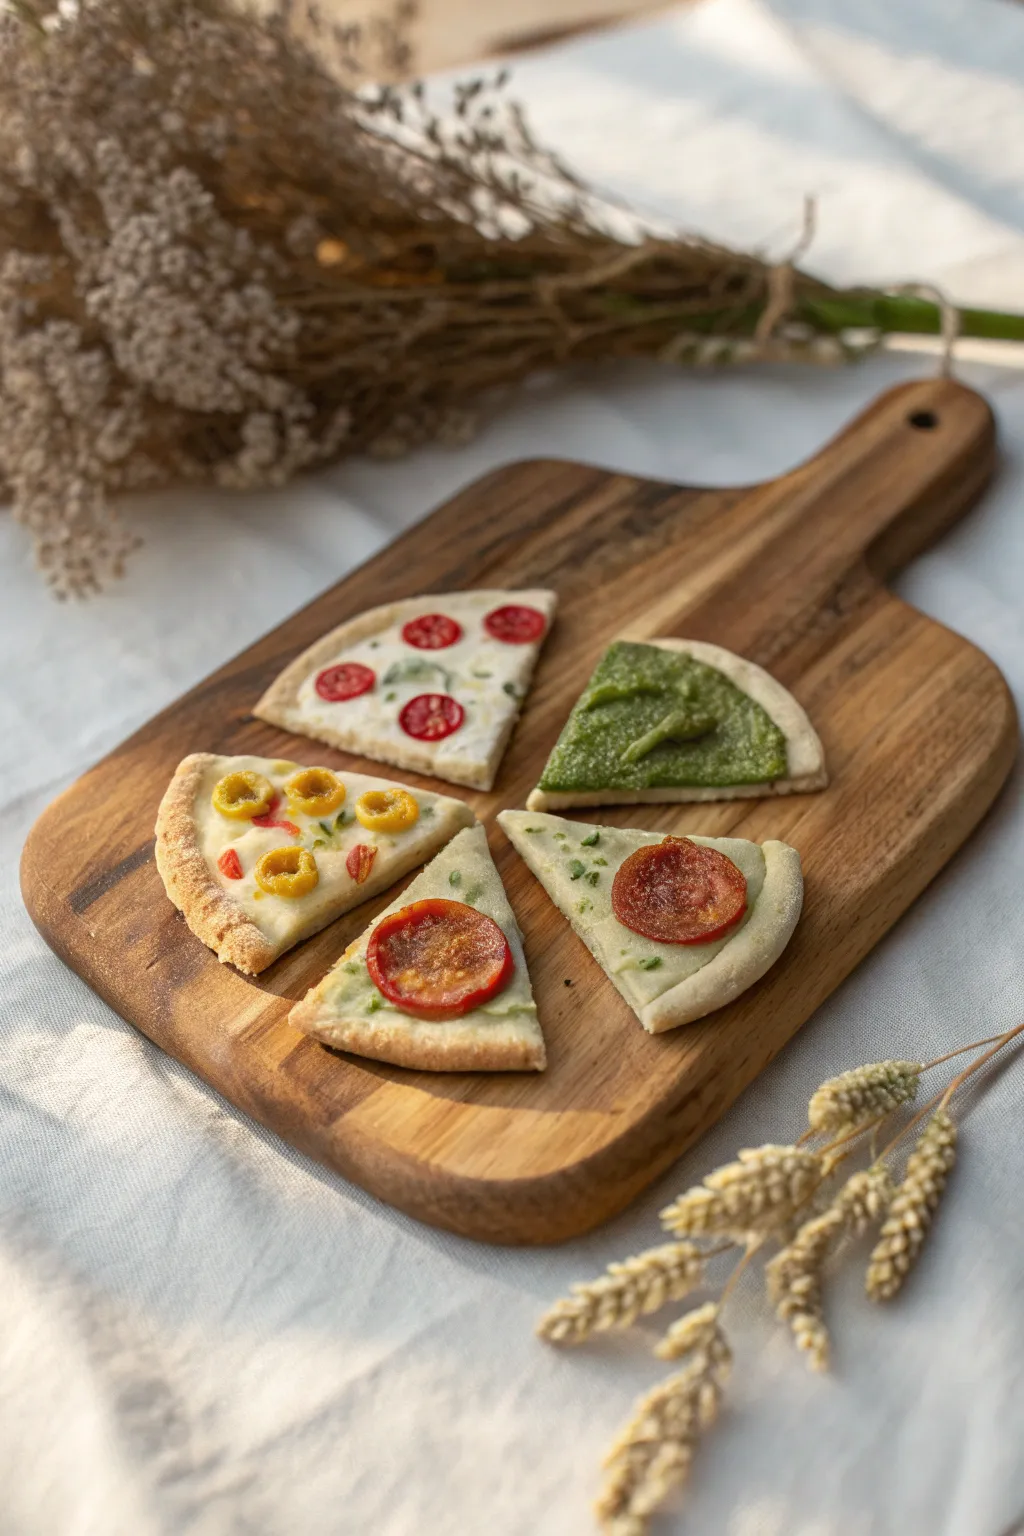
Create a mouth-watering assortment of miniature pizza slices that look freshly baked and ready to serve. By layering translucent liquids and textured clays, you will achieve the realistic depth of melted cheese, bubbly sauce, and crispy crusts.
How-To Guide
Materials
- Polymer clay (beige, translucent, white, red, green, yellow)
- Liquid polymer clay (translucent and white)
- Pastel chalks (yellow ochre, burnt umber, orange)
- Texture tools (toothbrush, needle tool, ball tool)
- Rolling pin or pasta machine
- Craft knife or tissue blade
- Small mixing cups and toothpicks
- Gloss varnish or UV resin (optional for wet look)
Step 1: Creating the Crust Base
-
Mix the dough color:
Start by mixing a ‘dough’ shade using a large portion of beige clay with a tiny touch of translucent and white. This gives the baked clay a realistic, slightly airy look rather than a flat plastic color. -
Roll and texture:
Roll the clay out to a medium thickness, about 3-4mm. Using a clean toothbrush or crumpled aluminum foil, tap the entire surface vigorously to create a bread-like texture. -
Cut the wedges:
Use a round cutter to create a circle, then slice it into equal wedges with a sharp blade. Alternatively, cut individual triangle shapes freehand if you want a more rustic, artisan pizza look. -
Define the crust edge:
Use a ball tool to gently indent the center of each triangle, leaving a raised rim around the outer curved edge to form the ‘cornicione’ or crust handle. -
Pre-shade the crust:
Before adding toppings, shave some yellow ochre and burnt umber pastel chalk into powder. Use a soft brush to dust the raised crust edges, giving them a par-baked appearance.
Secret Sauce Texture
Mix sand or salt into liquid clay sauces (like pesto) to add realistic graininess. Do not use sugar, as it melts and burns!
Step 2: Sauce and Cheese Application
-
Prepare the sauce base:
In a small cup, mix translucent liquid clay with a tiny scraping of red pastel chalk for tomato sauce, or green chalk and tiny clay distinct bits for pesto. I prefer keeping the sauce slightly translucent so the dough texture shows through. -
Apply the sauce:
Using a toothpick or needle tool, spread a thin layer of your chosen sauce into the indented center of the slice, being careful not to spill onto the raised crust. -
Create the melted cheese:
Mix white liquid clay with a small amount of yellow pastel chalk to create an off-white mozzarella color. Drizzle this irregularly over the sauce, allowing some red or green to peek through for depth. -
Adding texture to cheese:
If you want a thicker cheese look, mix tiny bits of solid white clay into the liquid mixture. Use a needle tool to swirl it slightly, mimicking melted strands.
Fixing Bubbles
If air bubbles appear in the liquid clay while baking, pop them instantly with a needle tool while hot, then smooth with a silicone tool.
Step 3: Custom Toppings and Baking
-
Make pepperoni slices:
Mix translucent clay with red and a touch of brown. Roll it into a very thin log (cane) and slice ultra-thin rounds. Press a stiff brush onto each slice to add meaty texture before placing them on the cheese. -
Create veggie toppings:
For peppers or olives, roll tiny snakes of yellow or green clay. Slice them into small rings. Place them gently into the wet liquid clay so they look embedded in the cheese. -
Add herbs and spices:
Grate a tiny amount of green baked clay or use dried tea leaves to sprinkle ‘oregano’ over the slices. For the tomato slice pizza, add tiny distinct leaves of green clay for basil. -
Final shading:
Once all toppings are placed, lightly brush a little more burnt umber pastel on the edges of the toppings (like the pepperoni) to simulate charring. -
First bake:
Bake the slices according to your clay manufacturer’s instructions, usually at 275°F (130°C) for 15-20 minutes. -
Post-bake touches:
Once cooled, inspect your crusts. If they look too pale, add a wash of brown acrylic paint mixed with water, then wipe it off quickly to leave color only in the textured crevices. -
Gloss finish:
To make the sauce and pepperoni look suitably greasy and delicious, apply a thin coat of gloss varnish or UV resin just to the toppings, leaving the crust matte.
Arrange your finished slices on a tiny wooden board and enjoy the eternal freshness of your miniature Italian feast


Cheeseburger Stacks With Crisp Layers
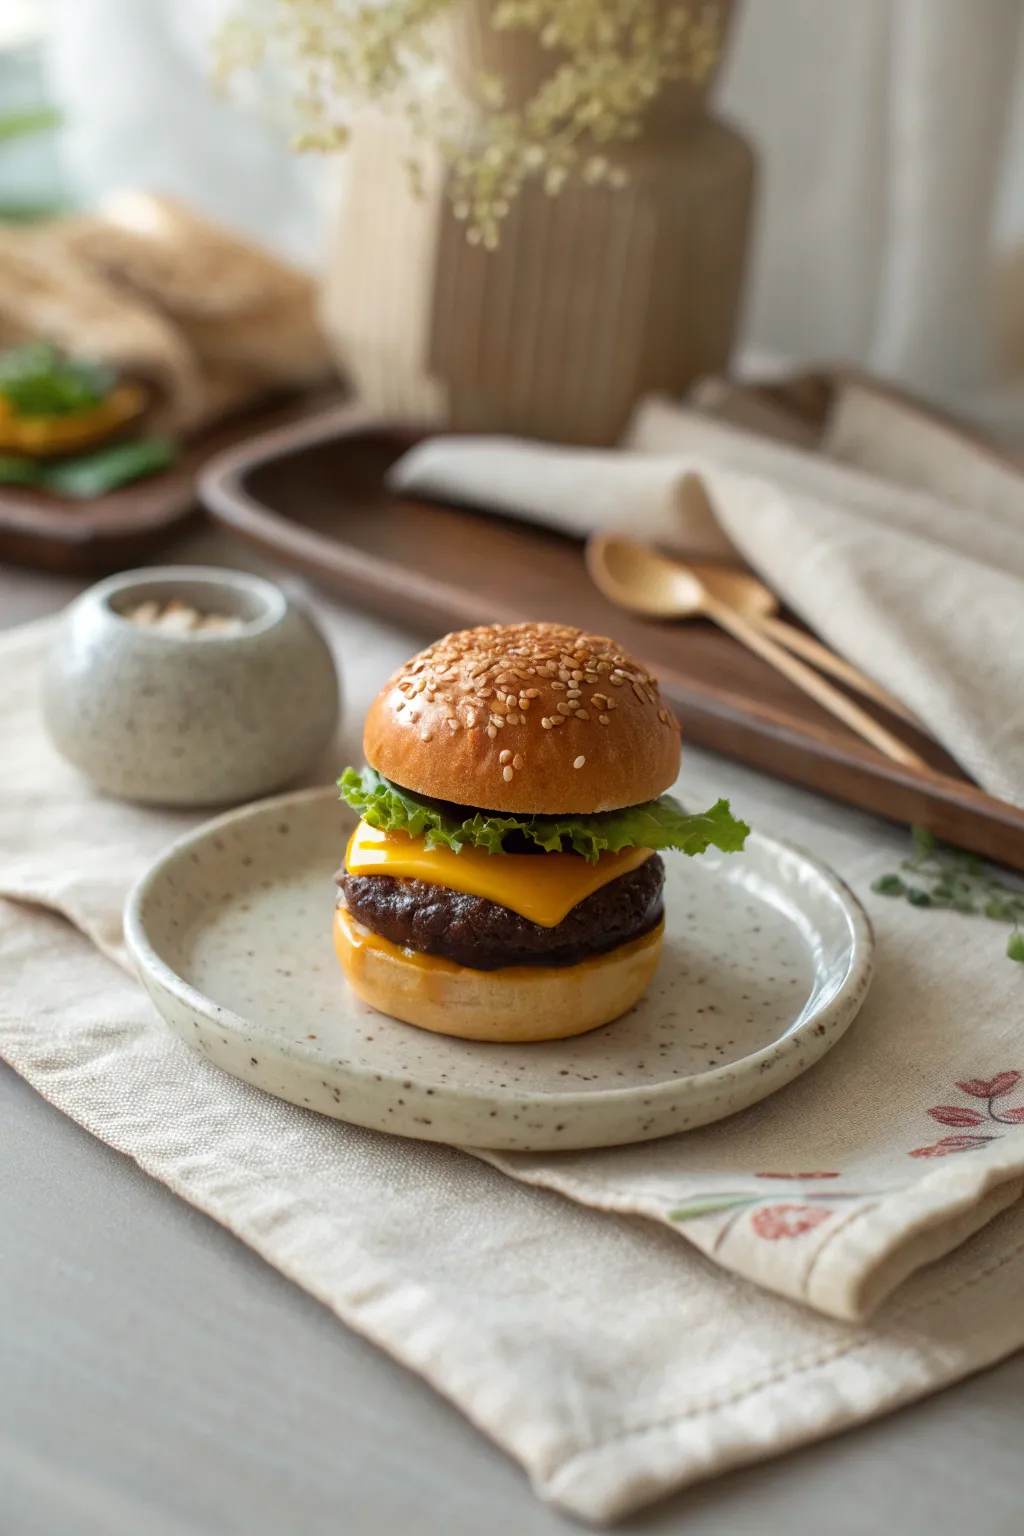
Capture the mouth-watering appeal of a classic diner burger in miniature form with this realistic polymer clay project. You will sculpt textured layers, from a seeded bun to a perfectly melted slice of cheese, creating a charming display piece.
Step-by-Step Tutorial
Materials
- Polymer clay (colors: ochre, translucent white, dark brown, leaf green, golden yellow, orange)
- Liquid polymer clay (translucent)
- Chalk pastels (orange, brown, red-brown)
- Soft paintbrush for shading
- Ball stylus tool
- Needle tool or toothpick
- Toothbrush or crumpled foil (for texturing)
- Scalpel or craft knife
- Rolling pin
- Gloss glaze (optional)
Step 1: The Perfect Patty & Bun Base
-
Mix the Bun Color:
Start by mixing ochre clay with a generous amount of translucent white and a tiny pinch of white. This creates a realistic, baked-bread color rather than a flat yellow. -
Form the Bottom Bun:
Roll a small ball of your bun mixture and flatten it slightly into a disc. This forms the heel of the burger. Use a toothbrush or crumpled foil to gently texture the sides for a bread-like crumb. -
Mix the Patty Color:
Combine dark brown clay with a touch of black and a bit of translucent clay. The translucent helps the ‘meat’ look juicy rather than like plastic. -
Texture the Meat:
Flatten a ball of the meat mixture into a thick patty shape, sizing it to match the bottom bun. Use a needle tool to vigorously stipple and roughen the edges to mimic ground beef texture. -
Shade the Patty:
Using a soft brush, dust the edges of the patty with dark brown chalk pastel to give it a seared, cooked look. -
Assemble the Base:
Place the textured patty on top of the bottom bun, pressing down gently so they adhere without losing their shape.
Step 2: Melty Cheese & Fresh Greens
-
Create the Cheese:
Mix golden yellow with a tiny speck of orange to get that classic American cheese color. Roll it out very thinly on your work surface. -
Cut and Drape:
Cut a square from the rolled clay that is slightly larger than your patty. Place it on top of the meat. -
The Melt Effect:
Gently press the corners of the cheese down over the patty. I like to use the side of a needle tool to coax the clay downwards, making it look like it’s melting from heat. -
Adding Lettuce:
Mix a small amount of liquid polymer clay with green clay to make a soft, pliable paste, or simply roll translucent green clay paper-thin. -
Ruffling the Edges:
Tear small, irregular pieces of the green clay. Using a ball tool, thin and ruffle the edges until they look wavy and crisp. -
Layering the Greens:
Arrangement is key here; place your ruffled lettuce pieces on top of the cheese, ensuring the wavy edges overhang slightly for visibility.
Secret Sauce Secret
Mix liquid clay with orange and yellow chalk pastel dust. Drip this sparingly between the cheese and lettuce layers before baking for a gooey sauce effect.
Step 3: Top Bun & Finishing Touches
-
Form the Dome:
Using the remaining bun-colored clay, roll a ball and flatten the bottom. Shape the top into a nice, high dome. -
Texture the Crown:
Texture the cut side (the bottom flat part) of the top bun just like you did the heel. Lightly texture the dome surface gently to remove fingerprints. -
Shading for Baking:
Shave some orange and reddish-brown chalk pastels into a powder. Brush this gently onto the top of the bun, concentrating the darker color in the center to mimic a golden crust. -
Making Sesame Seeds:
Roll tiny logs of translucent white clay or very light ochre. Slice microscopic bits off and gently roll them into teardrop seed shapes. -
Applying Seeds:
Dab a tiny amount of liquid clay or water on the top bun and place your seeds randomly. Don’t make them too uniform; randomness looks more natural. -
Final Assembly:
Place the top bun onto the lettuce layer. Give the whole stack a very gentle squeeze to bond the layers. -
Baking:
Bake the piece according to your clay manufacturer’s instructions, usually around 275°F (130°C) for 15-20 minutes.
Deluxe Toppings
Add tiny slices of red clay canes for tomatoes or purple clay translucent rings for red onions to add more color and detail to your burger stack.
Now you have a delicious-looking miniature burger ready to display in a dollhouse or as a quirky charm


Hot Dogs With Swirled Toppings

Capture the charm of classic comfort food with these adorable polymer clay hot dogs. These miniatures feature perfectly toasted buns, realistic reddish-brown franks, and a signature swirl of mustard across the top.
Step-by-Step Tutorial
Materials
- Polymer clay (white, translucent, yellow, red, brown)
- Liquid polymer clay (translucent)
- Chalk pastels (ochre, light brown, dark brown)
- Soft paintbrush for shading
- Pointed sculpting tool or needle tool
- Toothbrush or texturing tool
- Clean ceramic tile or work surface
- Oven for baking
Step 1: Creating the Frankfurters
-
Mix the meat color:
Start by mixing a ‘hot dog’ shade. Try combining red clay with a bit of brown and a touch of translucent clay to give it that slightly waxy, processed meat look. -
Shape the sausages:
Roll your mixed clay into a thin log. Cut it into two equal segments, each about 1 inch long (or your preferred scale). -
Round the ends:
Gently roll the cut ends of your logs against your finger to round them off so they look like distinct sausages rather than a cut tube. -
Pre-bake the franks:
Place the sausages on a tile and bake them for 5-10 minutes. This partial bake makes them firm enough to push into the raw buns later without deforming.
Clean Lines
For the neatest mustard swirl, practice your zig-zag motion on a scrap piece of glass first to ensure the flow is even before piping onto the final piece.
Step 2: Baking the Buns
-
Mix the dough color:
Combine white clay with a small amount of yellow and a tiny pinch of brown to create a pale, unbaked dough color. -
Form the logs:
Roll the dough-colored clay into a slightly thicker log than your sausages. Cut two segments that are just slightly longer than your pre-baked franks. -
Shape the bun:
Flatten the bottom of each log slightly so it sits stable. Round the top and ends to create that classic oblong bun shape. -
Create the split:
Using a blunt tool or the side of a needle tool, press a deep indentation lengthwise down the center of the bun. Don’t cut all the way through; just create a trough for the sausage. -
Add texture:
Take a clean toothbrush and gently tap the surface of the clay buns. This creates a realistic bread texture instead of a smooth, plastic look.
Plate It Up
Make a simple plate using speckle-mixed white clay (add black pepper or sand). Press the finished hot dogs onto the raw plate before final baking for a permanent bond.
Step 3: Assembly & Shading
-
Insert the sausage:
Press your pre-baked sausage firmly into the trough of the raw bun. The raw clay should hug the sausage slightly. -
Shade the bread:
Scrape some ochre and light brown chalk pastels into fine powder. I like to use a fluffy brush to dust the top and sides of the bun with ochre first. -
Add baked accents:
With a smaller brush, apply the light brown pastel powder to the very top ridges and the ends of the bun to mimic a golden-brown crust. -
Final bake:
Bake the assembled hot dogs according to your clay manufacturer’s instructions to cure the bun.
Step 4: The Mustard Swirl
-
Prepare the mustard:
Mix yellow clay with a tiny bit of translucent clay and liquid polymer clay. You want a consistency that is thick but flows smoothly, like heavy cream. -
Check consistency:
If the mixture is too runny, add a tiny crumb of solid yellow clay. If too thick, add more liquid clay. -
Apply the topping:
Use a needle tool or a very fine piping bag to drape a squiggly line of the mustard mixture back and forth across the length of the hot dog. -
Seal it:
Pop the pieces back into the oven for a final short bake (5-10 minutes) solely to set the liquid clay topping.
Now you have a set of appetizing miniature hot dogs perfect for a tiny picnic scene

What Really Happens Inside the Kiln
Learn how time and temperature work together inside the kiln to transform clay into durable ceramic.
Sushi Rolls With Clean Cane-Style Centers
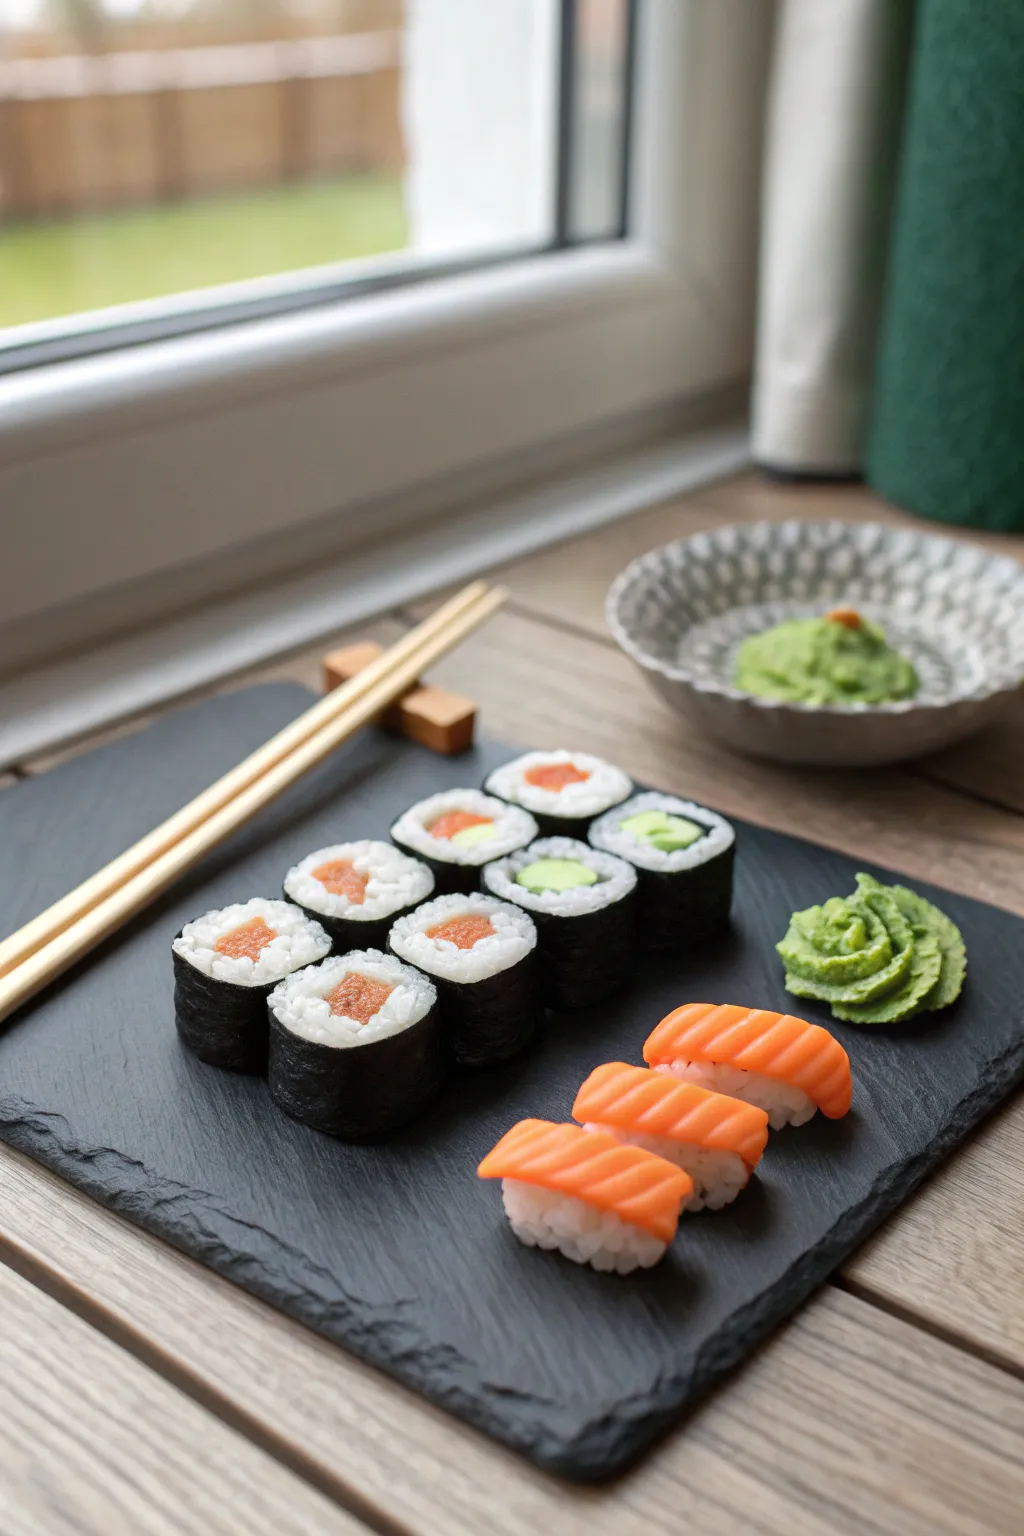
Recreate the intricate details of a fresh sushi dinner using polymer clay techniques that mimic the translucency of raw fish and the texture of sticky rice. This project focuses on building cane-style maki rolls and sculpting delicate nigiri for a display that looks good enough to eat.
Step-by-Step Tutorial
Materials
- Polymer clay (translucent, white, orange, black, green)
- Liquid polymer clay (translucent)
- White sand or embossing powder (for rice texture)
- Tissue blade or very sharp craft knife
- Needle tool
- Toothbrush or texturing brush
- Acrylic rolling pin
- Gloss glaze or UV resin
Step 1: Preparing the Sushi Rice
-
Mix the rice base:
Start by conditioning your translucent clay and mixing it with a very small amount of white clay. You want an off-white, semi-opaque look rather than stark white. -
Create grain texture:
Chop this clay into tiny, rice-sized bits using your tissue blade. This takes patience, but it’s crucial for realism. Alternatively, mix the clay with white sand or embossing powder to simulate the granular texture. -
Bind the rice:
Mix the chopped ‘grains’ with a little liquid polymer clay. This acts as the sticky vinegar mixture, holding the grains together while keeping that distinct texture.
Step 2: Constructing the Maki Canes
-
Mix salmon color:
Combine translucent clay with a touch of orange and a pinprick of red. I like to keep the mixing slightly imperfect to simulate the natural muscle fibers of the fish. -
Form the salmon center:
Roll your salmon mix into a distinct cylinder log. This will be the heart of your hosomaki roll. -
Create cucumber center:
For the veggie rolls, mix translucent clay with green. Create a small log and surround it with a very thin sheet of lighter green clay to mimic the cucumber skin and flesh difference. -
Wrap with rice:
Take your prepared sticky ‘rice’ mixture and press it firmly around your central filling logs. Try to keep the layer even, but a varied edge is natural. -
The Nori wrap:
Condition black clay and mix in a tiny bit of green for a natural seaweed tone. Roll it out as thin as paper on a setting #1 or #2 on a pasta machine. -
Final assembly:
Wrap the black sheet around the rice-covered log. Smooth the seam gently with your finger so it disappears. -
Slice the rolls:
Let the cane rest in the fridge for 10 minutes to firm up. Then, using your sharpest blade, slice the log into equal segments to reveal the cross-section. -
Texture the rice:
After slicing, pick at the white areas gently with a needle tool to fluff up the ‘grains’ that may have been smashed during cutting.
Smudged Slices?
If your knife drags the black clay into the white rice when cutting the cane, your clay is too warm. Chill the log for 20 minutes before slicing again.
Step 3: Sculpting the Salmon Nigiri
-
Form the rice mount:
Shape a small rectangular mound using your rice mixture. Round the corners to mimic the hand-pressed shape of nigiri. -
Create the fish slice:
Flatten a piece of your salmon-colored clay. Use a needle tool to gently impress diagonal lines across the surface to represent the fat striations. -
Drape the fish:
Gently lay the salmon slice over the rice mound. Press it down lightly so it conforms to the rice texture underneath.
Serving Suggestions
Create a miniature slate board using black clay rolled flat and textured with a crumpled foil ball. Use a dry brush to dust edges with grey chalk for a stone look.
Step 4: Finishing Touches
-
Make the Wasabi:
Mix green clay with yellow and texturize it roughly with a toothbrush to look like grated wasabi paste. Form a small, irregular pile. -
Baking:
Bake all pieces according to your clay manufacturer’s instructions, usually at 275°F (130°C) for 15-30 minutes. -
Glazing:
Once cool, apply a thin coat of gloss glaze or UV resin only to the ‘fish’ parts to make them look moist and fresh. Leave the rice and nori matte.
Arranging your miniature sushi platter creates a satisfying display that captures the elegance of Japanese cuisine permanently
Breakfast Plate With Eggs and Toast
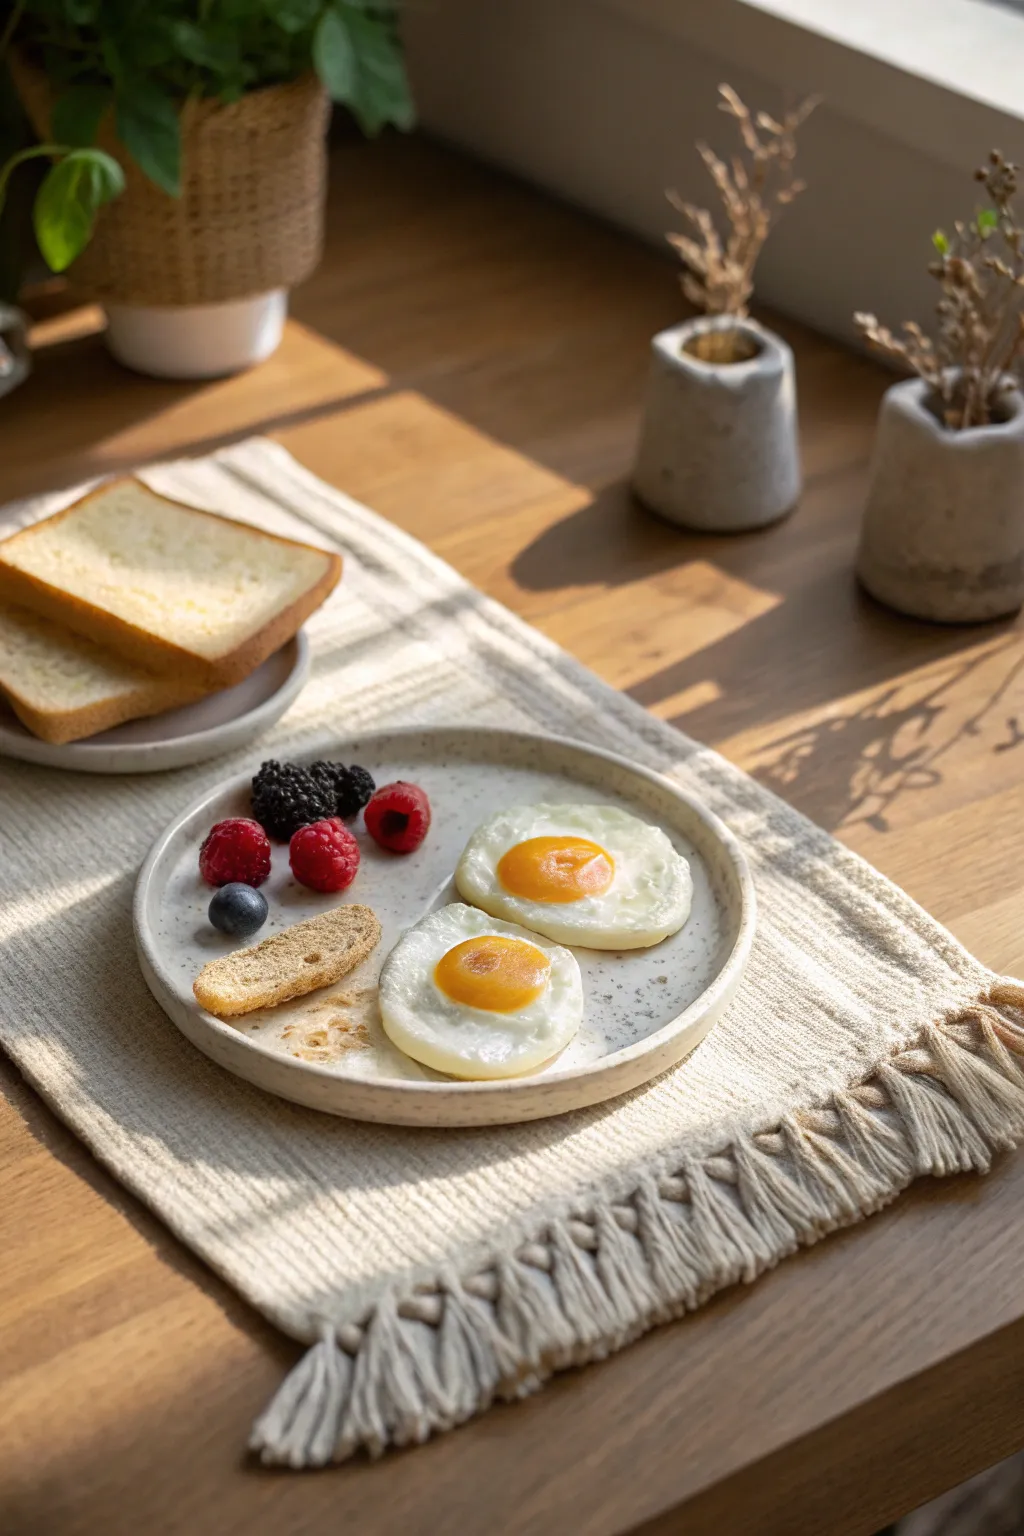
Capture the golden hour of a weekend morning with this hyper-realistic polymer clay breakfast set. From the speckled ceramic plate to the translucent egg whites, this project focuses on achieving lifelike textures on a miniature scale.
Detailed Instructions
Materials
- Polymer clay (white, translucent, yellow, red, blue, black, ecru/beige)
- Liquid polymer clay (translucent)
- Chalk pastels (brown, orange, yellow ochre)
- Gloss glaze or UV resin
- Matte varnish
- Toothbrush (for texturing)
- Needle tool
- Dotting tool
- Small craft brush
- Rolling pin or pasta machine
- Sandpaper (fine grit)
Step 1: Crafting the Ceramics
-
Mix the Stoneware Clay:
Start by conditioning a block of white clay mixed with a small amount of ecru or beige for a natural ceramic tone. For the speckled look, grate a tiny amount of black baked clay or black pepper into the raw clay and knead until distributed. -
Form the Plate:
Roll your speckled clay out to about 3mm thickness. Use a circle cutter to punch out the base, then use your fingers to gently lift the edges to form a shallow rim. -
Create the Toast Plate:
Repeat the process with a slightly smaller circle cutter to create the side plate for the toast. Smooth any fingerprints with a drop of baby oil. -
Bake the Plates:
Bake these plate bases according to your clay package instructions (usually 275°F/135°C for 15-30 minutes) so they are solid surfaces for the food assembly.
Secret Ingredient: Salt
Mix real salt or sugar into the bread clay before baking. Once baked, soak the piece in water to dissolve the crystals, leaving realistic air pockets.
Step 2: The Perfect Eggs
-
Mix the Whites:
Combine white clay with an equal part of translucent clay. This mixture ensures the egg whites look cooked but natural, rather than plasticky opaque white. -
Shape the Whites:
Take two small balls of the white mixture and flatten them onto the baked main plate. Keep the edges irregular and thinner than the center to mimic a real fried egg. -
Form the Yolks:
Roll two small balls of yellow clay. Gently press them into the center of your egg whites. Don’t flatten them completely; keep a nice dome shape. -
Gloss the Yolks:
Before full detail work, I like to mix a tiny drop of orange chalk pastel dust with liquid translucent clay and paint a very thin glaze over just the yolk for depth.
Level Up: Table Setting
Don’t stop at the food. Use a scrap of textured linen fabric and dip it in fabric stiffener to create a permanent, realistic placemat for your display.
Step 3: Berries and Sides
-
Make the Raspberries:
Roll tiny spheres of red clay. Create a hollow cone shape from a larger piece of red clay, then attach the tiny spheres all over the outside to build the berry structure. -
Blackberry Texture:
Repeat the raspberry process using dark purple or black clay. Use a needle tool to gently poke the center of each tiny sphere to make them look juicy and open. -
Sculpt the Biscotti:
Mix beige clay with translucent. Shape a small oblong log and texture the surface vigorously with a toothbrush and needle tool to simulate crumbs and air pockets. -
Add Toast:
For the side plate, mix white, translucent, and yellow ochre. Cut out square slices. Texture the surface with a toothbrush. Use brown chalk pastel to shade the crusts and the face of the bread for a ‘toasted’ look. - Arrange the Plate:
-
Final Assembly:
Place the berries and the small biscotti onto the main plate next to the eggs. Liquid clay can act as a glue here to keep them secure.
Step 4: Finishing Touches
-
Final Bake:
Bake the entire assembly again for the full recommended time to cure the food items attached to the plates. -
Glazing:
Once cool, apply a high-gloss glaze or UV resin to the egg yolks and the berry surfaces to make them look wet. Apply a matte varnish to the toast and biscotti for a dry texture. -
Plate Finish:
If you want a glazed ceramic look, coat the visible parts of the plate in a semi-gloss varnish, being careful not to paint over the matte bread items.
Your delicious morning spread is now ready to be displayed in your miniature kitchen or dollhouse


The Complete Guide to Pottery Troubleshooting
Uncover the most common ceramic mistakes—from cracking clay to failed glazes—and learn how to fix them fast.
Cake Slices With Sponge and Frosting Layers
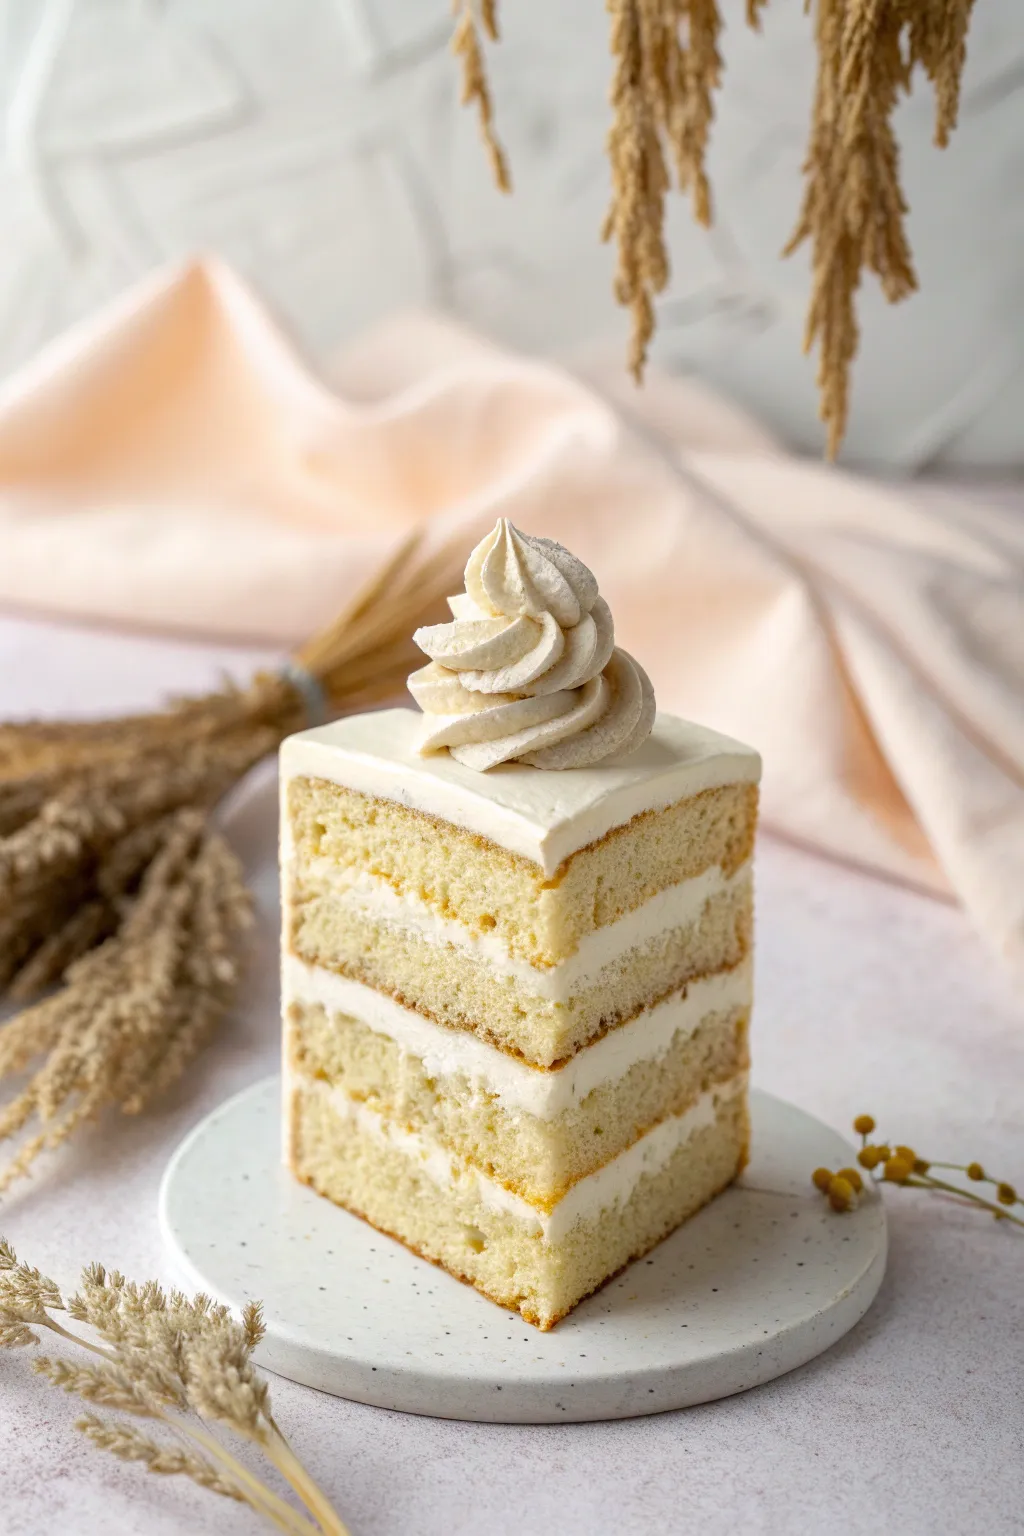
Capture the airy elegance of a classic vanilla sponge with this realistic polymer clay project. You’ll master texturing techniques to create fluffy crumb layers and smooth, creamy frosting for a slice that looks good enough to eat.
Step-by-Step Tutorial
Materials
- Translucent polymer clay
- White polymer clay
- Yellow ochre polymer clay (or chalk pastel)
- Ecru or beige polymer clay
- Liquid polymer clay (Translucent and White)
- Needle tool or toothpick
- Old toothbrush or stiff bristle brush
- Tissue blade or X-acto knife
- Star piping tip (small size for miniatures)
- Sandpaper (coarse grit)
- Small ball tool
Step 1: Creating the Sponge Base
-
Mix the batter color:
Start by mixing translucent clay with a generous amount of white, a tiny pinch of yellow ochre, and a speck of ecru. You want a pale, buttery yellow color that looks like baked batter, not bright lemon. -
Form the block:
Roll your mixed clay into a thick sheet, approximately 5-6mm thick. Cut out three identical squares (about 1.5 inches wide, or your desired scale). These will be your three cake layers. -
Texture the edges:
Using a needle tool, gently pick at the sides of each square to break up the smooth clay surface. This is the first step in creating that open, airy crumb structure. -
Refine the crumb:
Take an old toothbrush or a stiff brush and aggressively stipple the sides you just picked. Don’t be afraid to distort the shape slightly; real cake isn’t a perfect geometric block. I like to twist the brush slightly as I press to create deeper pockets. -
Add a baked effect:
Shave some yellow ochre and light brown chalk pastel into a fine powder. With a dry fluffy brush, very lightly dust the top and bottom edges of each square layer to simulate the darker ‘crust’ where the cake touched the pan.
Step 2: Applying the Frosting
-
Prepare the buttercream:
Mix white clay with a tiny amount of translucent clay and add liquid clay until you achieve a texture similar to tacky chewing gum or soft frosting. It should be spreadable but hold its shape. -
Layer the cake:
Spread a generous, even layer of your ‘buttercream’ mixture onto the first cake square. Place the second square on top and press down gently until the filling bulges slightly at the sides. -
Repeat the stack:
Add another layer of frosting, then the final third cake square on top. Check your alignment to ensure the slice stands straight. -
Texture the filling:
Use a needle tool to gently drag the bulging frosting flush with the cake sides, or leave it slightly rough for a rustic look. Ensure there is a visible separation between the fluffy crumb texture and the smoother creamy filling. -
Coat the top:
Apply a final, smoother layer of the frosting mixture to the very top of the stack. Use a flexible blade to smooth it out flat, letting it extend just to the edges.
Crumbling Crumb?
If your sponge texture looks ‘melty’ rather than fluffy, pop the clay in the fridge for 10 mins before texturing. Cold clay tears cleaner than warm clay.
Step 3: The Final Details
-
Creating the piping clay:
For the decorative swirl, you need a slightly firmer mix. Take white clay and soften it with a drop of baby oil or clay softener until it is extremely soft and pliable, but not sticky like the filling mix. -
Pipe the swirl:
Pack your softened white clay into a piping bag with a small star tip (or use a clay extruder with a star disc). Pipe a single, tall rosette directly onto the center of the cake slice. -
Refine the shape:
If the piped tip looks too pointy, gently tap it down. If the ridges aren’t sharp enough, carefully define them with a needle tool. -
Final texture check:
Inspect the sponge layers one last time. If handling the stack smoothed out your crumb texture, go back in with the needle tool and re-fluff the holes before baking. -
Bake:
Bake according to your polymer clay manufacturer’s instructions. Usually, this is around 275°F (130°C) for 30 minutes, but check your specific package. -
Dusting definition:
Once cooled, you can optionally brush a tiny amount of cornstarch or baby powder over the piped swirl to give it a matte, sugary appearance.
Level Up: Vanilla Bean
Mix tiny specks of black pepper or black sand into your white frosting clay mix before spreading. This creates a realistic ‘vanilla bean’ speckled look.
Place your finished slice on a tiny ceramic plate for a charming miniature display
Cookies and Crackers With Realistic Crumb Texture
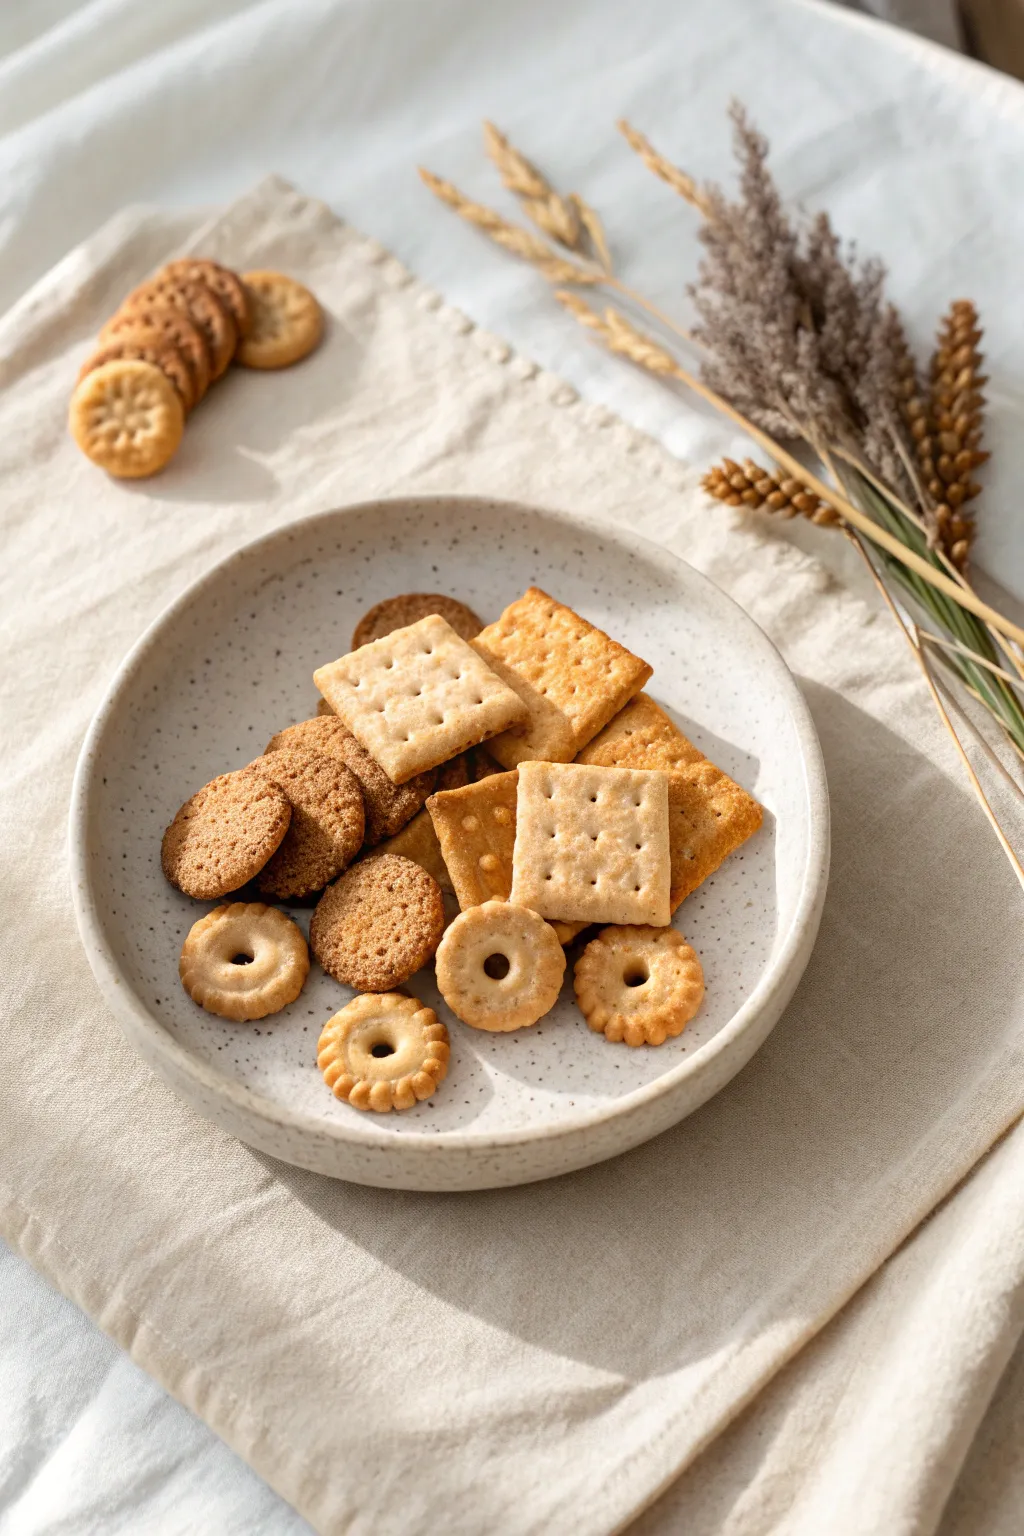
Create a realistic spread of miniature baked goods featuring buttery shortbread rings, textured ginger snaps, and savory crackers. This project focuses heavily on achieving that perfect “baked” crumb texture and realistic shading for a lifelike finish.
Detailed Instructions
Materials
- Polymer clay (translucent, white, ecru, and hints of yellow ochre)
- Liquid polymer clay (optional, for bonding)
- Soft pastel chalks (yellow ochre, burnt sienna, raw umber)
- Sandpaper or a rough toothbrush (for texturing)
- Needle tool or toothpick
- Small round piping tip or straw (for cutting circles)
- Blade or craft knife
- Small scallop-edged cutter (optional)
- Soft paintbrush for shading
Step 1: Dough Preparation
-
Mix the perfect dough color:
Start by conditioning your clay. Aim for a realistic dough tone by mixing a base of white and translucent clay with a significant amount of ecru. Add just a tiny speck of yellow ochre to warm it up, resembling rich cookie dough. -
Roll out the slab:
Roll the mixed clay into a sheet about 2-3mm thick. It shouldn’t be too thin, as you want the cookies to have some substance. -
Create the base texture:
Before cutting any shapes, gently press sandpaper or a firm toothbrush over the surface of the clay sheet. This imparts a subtle, overall graininess that mimics flour and surface crumbs.
Texturing Tip
For ultra-realistic saltine texture, press a piece of real sandpaper directly onto the raw clay. The grit gets pushed in, creating microscopic pores like real baked dough.
Step 2: Shaping the Crackers
-
Cut the squares:
Using a blade, cut several squares from your textured sheet. Aim for squares approximately 1cm by 1cm. Don’t worry if the edges aren’t razor-sharp; a little softness looks more baked. -
Dock the crackers:
Use a needle tool to poke a grid of small holes into the surface of each square. I prefer a 3×3 or 4×4 grid. Press gently so the holes are distinct but don’t distort the square shape. -
Add deep texture:
For a rougher cracker look, like the darker ones in the image, take a ball of aluminum foil and roll it gently over the surface of a few squares to create deeper pits and unevenness.
Step 3: Creating Shortbread Rings
-
Cut the rounds:
Use a small round cutter or a piping tip to punch out circles from the clay sheet. If you have a tiny scalloped cutter, use that for the fluted-edge cookies shown in the foreground. -
Detail the scalloped edges:
If you don’t have a scalloped cutter, use the side of a needle tool to gently press indentations around the perimeter of the round clay circles, creating a fluted flower effect. -
Punch the centers:
Use a smaller straw or the tiny end of a piping tip to remove the very center of each round, creating the classic ring shape. -
Soften the cuts:
Gently tap the edges with your finger to remove any sharp cut marks. Real cookies puff slightly and don’t have hard 90-degree angles.
Level Up: Salt & Sugar
Mix semi-translucent white clay with liquid clay into a paste. Dab tiny specks on crackers for ‘salt’ or brush on cookies and sprinkle clear glitter for ‘sugar’ before baking.
Step 4: Forming Sugar Cookies
-
Shape simple rounds:
Roll small balls of clay and flatten them slightly with your finger to create organic, rustic round cookies like ginger snaps. -
Apply heavy texture:
aggressively texture these rounds with a toothbrush. Use a stiff, stippling motion to really break up the surface, making it look craggy and sugary.
Step 5: Shading and Baking
-
Prepare the pastels:
Scrape your soft pastel chalks into fine powders. You’ll need yellow ochre for a light bake, burnt sienna for golden brown, and a touch of raw umber for burnt edges. -
Initial shading layer:
Using a soft fluffy brush, dust the yellow ochre powder over the tops and bottoms of all the cookies. -
Highlight the texture:
Dip your brush into the burnt sienna. Lightly brush this over the high points of the textured surfaces, especially on the crackers and rough sugar cookies. This makes the texture pop. -
Simulate baking heat:
Focus the darker burnt sienna and a tiny bit of raw umber on the very edges of the square crackers and the ridges of the scalloped rings. Real cookies brown fastest at the edges. -
Bake the batch:
Arrange your pieces on a ceramic tile or baking sheet. Bake according to your polymer clay manufacturer’s instructions, usually around 275°F (130°C) for 15-20 minutes. -
Final matte finish:
Once cool, the cookies should look naturally matte. If the clay has any shine, give them a very light coat of matte varnish mixed with a tiny drop of translucent liquid clay to kill the gloss.
Arrange your freshly baked miniature treats on a tiny plate for a delightful display that looks good enough to eat

TRACK YOUR CERAMIC JOURNEY
Capture glaze tests, firing details, and creative progress—all in one simple printable. Make your projects easier to repeat and improve.
Ice Cream Cones With Swirled Scoops

Create these delightful miniature treats featuring realistic waffle textures and perfectly piped swirls of pink and teal clay. This project captures the whimsical charm of soft-serve ice cream without the melting mess.
Step-by-Step
Materials
- Polymer clay (Tan/Biscuit color for cone)
- Polymer clay (Teal)
- Polymer clay (Strawberry Pink)
- Liquid polymer clay (Translucent or White)
- Clay extruder with star tip (or a star piping tip)
- Needle tool or toothpick
- Texture sheet or fine mesh screen (waffle pattern)
- Pastel chalks (brown/orange for shading)
- Small paintbrush
- Microbeads or white nonpareils
- X-acto knife or craft blade
- Small rolling pin
Step 1: Crafting the Waffle Cone
-
Condition the Clay:
Begin by conditioning the tan polymer clay until it is soft and malleable. Roll it out into a thin, even sheet, about 2mm thick. -
Cut the Cone Shape:
Using your craft blade, cut a shape that resembles a pie slice or a wide triangle with a curved bottom edge. This will form the body of the cone. -
Texture the Waffle:
Press a grid texture sheet or a piece of fine wire mesh firmly onto the clay to create the classic waffle pattern. If you don’t have these, use the back of your knife to gently press a diamond grid pattern manually. -
Shape the Cone:
Carefully roll the textured clay around a cone form or simply curl it into a cone shape by hand, overlapping the edges slightly. Press the seam gently to seal it without flattening your texture. -
Create the Wide Rim:
For the distinct double-cup look seen in the photo, create a second, wider ring of textured clay and attach it to the top rim of your base cone to flare it out. -
Add Realistic Shading:
Using a dry paintbrush, dust the textured surfaces with a mix of orange and brown pastel chalks. Focus on the raised grid lines to simulate a baked, golden-brown finish. -
Pre-Bake the Cone:
Bake the cone alone for about 10-15 minutes at the temperature recommended on your clay package. This hardens it so you can press the ice cream onto it without crushing the cone.
Clay Too Hard to Pipe?
Add liquid clay drop by drop! Mix thoroughly with a palette knife on a glass tile. You want a ‘chewing gum’ texture—soft enough to push through a tip but firm enough to hold ridges.
Step 2: Swirling the Ice Cream
-
Prepare the Frosting Clay:
Condition your teal and pink clay separately. To get that realistic soft-serve texture, I like to mix the solid clay with a few drops of liquid polymer clay until it reaches a consistency similar to stiff frosting or whipped cream. -
Load the Extruder:
You can use a clay extruder with a star disc, or for a more organic look, place your softened clay mixture into a piping bag with a small metal star tip. -
Pipe the Teal Base:
Start with the teal clay mixture. Pipe a generous swirl directly into the opening of your baked cone, filling the top and creating a wide, ruffled base layer. -
Add the Pink Top:
Switch to the pink clay mixture. Pipe a second swirl directly on top of the teal layer, tapering it upward into a classic soft-serve peak. -
Refine the Swirls:
Use a needle tool to gently nudge any flattened ridges back into shape, ensuring deep distinct lines that mimic piped ice cream.
Step 3: Final Details
-
Add Sprinkles:
While the swirled clay is still uncured and sticky, carefully place small white microbeads or nonpareils onto the ridges of the pink and teal swirls. -
Create Mini Meringues:
Use any leftover piping mixture to create tiny standalone swirls (propping them next to the cone like the photo) to start building a little scene. -
Final Bake:
Bake the entire piece again for the full duration recommended by the manufacturer (usually 30 minutes per 1/4 inch of thickness) to set the ‘ice cream’. -
Cool and Finish:
Let the piece cool completely before handling. If desired, you can brush a matte varnish over the cone to seal the chalk pastels.
Crispy Cone Edges
For ultra-realism, use sandpaper to lightly distress the very top rim of the baked cone. This mimics the jagged, crumbly edge of a real waffle cone.
Display your sweet sculpture in a miniature cup or turn it into a charming fridge magnet for a permanent sugar rush
Candy Jars With Mixed Tiny Sweets
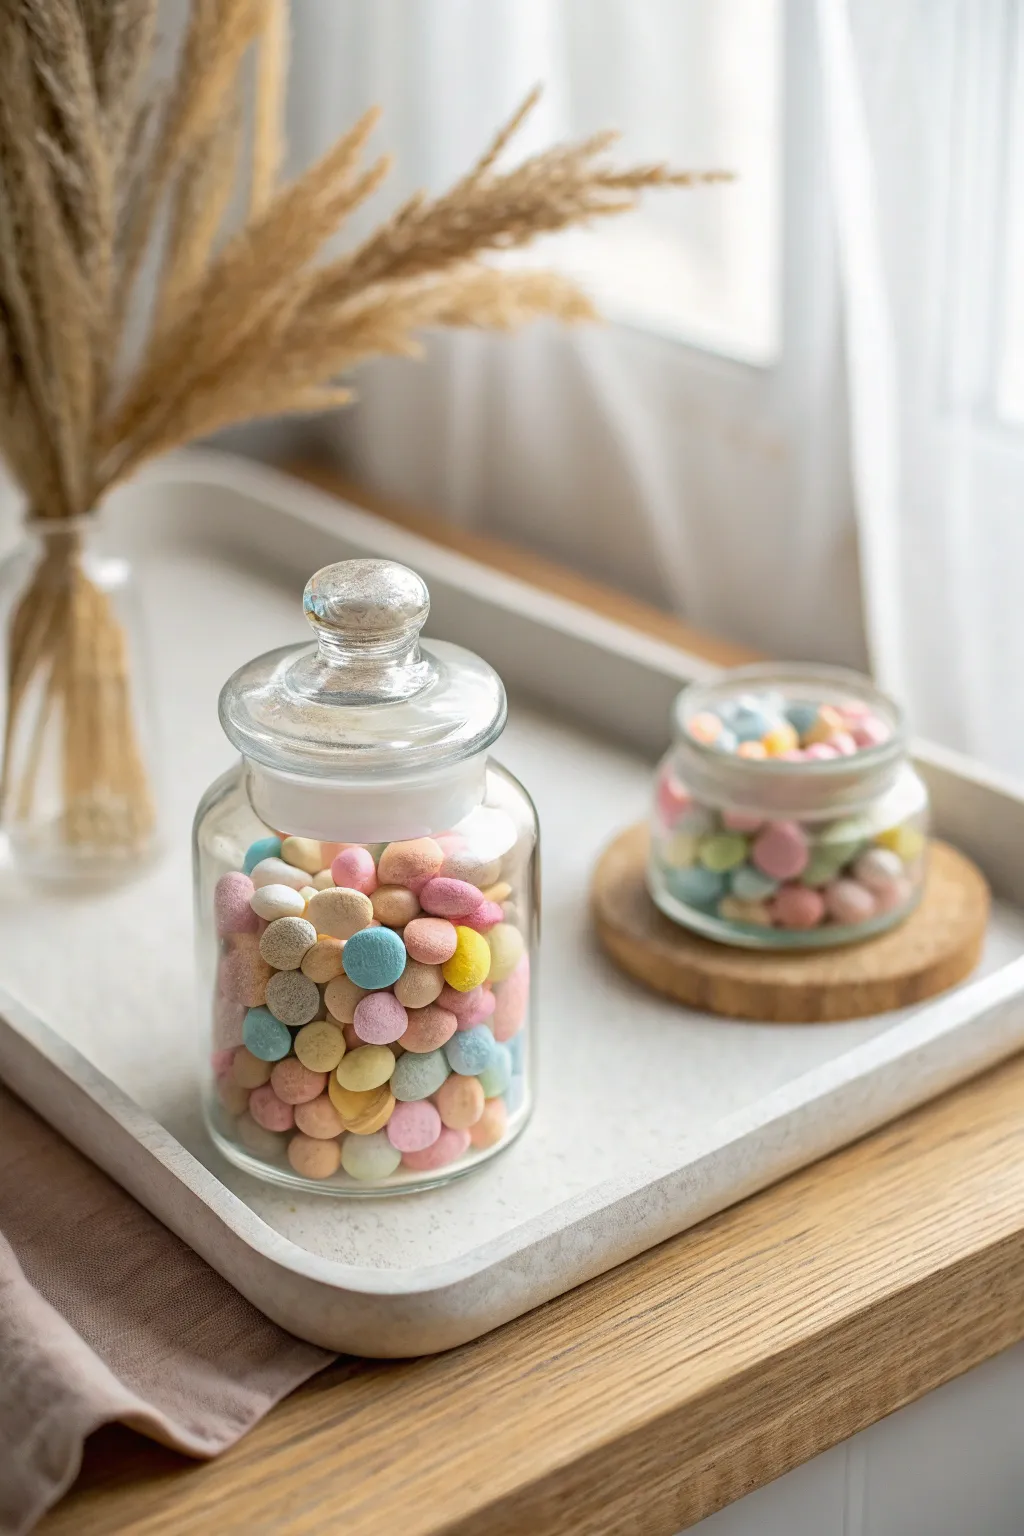
Capture the charm of a candy shop with these miniature apothecary jars filled with tiny, matte pastel sweets. This project focuses on creating realistic volume and texture, making these faux candies look almost too good to eat.
Step-by-Step Guide
Materials
- Polymer clay in pastel shades (yellow, light pink, baby blue, mint green, peach, lavender)
- Translucent liquid polymer clay
- Small glass jars with lids (apothecary or regular style)
- Small round cutter or a standard drinking straw
- Cornstarch or baby powder (for texturing)
- Needle tool or toothpick
- Make-up sponge or stiff bristled brush
- Baking sheet and tile
- Oven
Step 1: Preparing the ‘Candy’ Clay
-
Condition the clay:
Start by thoroughly conditioning each color of your pastel clay until it is soft and pliable. If your colors feel too vibrant, mix in a tiny amount of white or beige to achieve that chalky, sweet look seen in the photo. -
Roll out sheets:
Roll each color into a thick sheet, approximately 3mm to 4mm thick. You want them chunky enough to look like little coated chocolates. -
Texture the surface (optional):
For a powdery, realistic finish, lightly tap the surface of your clay sheets with a coarse sponge or a stiff brush. This removes the artificial plastic shine before you even cut shapes.
Sticky Situation?
If clay sticks to your cutter, dip the cutter in cornstarch before punching shapes. If stuck inside a straw, blow through the other end to release it.
Step 2: Shaping the Sweets
-
Cut the circles:
Use a small round cutter or the end of a drinking straw to punch out numerous circles from each color sheet. You will need a significant amount to fill the jars, so make more than you think you need. -
Soften the edges:
Take each little circle and gently press the edges with your finger pads to round them off slightly. They shouldn’t be perfect cylinders; they need to look like tumbled candy coatings. -
Create variation:
Deliberately squish or slightly misshape a few candies. Real candy jars never have perfectly uniform pieces, and these imperfections add realism. -
Apply powder coating:
Place all your raw clay candies into a small container with a pinch of cornstarch. Shake them gently to coat. This prevents sticking and adds a matte, sugary finish after baking. -
Bake the candies:
Spread the candies out on your baking tile and bake according to the manufacturer’s instructions for your specific brand of clay. Let them cool completely before handling.
Step 3: Assembly
-
Clean the glass:
Wipe the inside of your miniature glass jars with alcohol to remove any fingerprints or dust. -
Prepare the adhesive:
Squeeze a small amount of translucent liquid clay into the bottom of the jar. This will help the bottom layer of sweets stay in place so they don’t rattle if moved. -
Begin filling:
Drop the cooled, baked candies into the jar one by one. I like to use tweezers here to ensure the colors are mixed evenly and you don’t end up with a clump of just pink or blue in one spot. -
Pack them in:
Gently tap the jar on the table as you fill it. This settles the candies into the gaps, maximizing how full the jar looks. -
Secure the top layer:
Once the jar is full, apply a tiny drop of liquid clay or strong craft glue to the candies at the very top rim to keep them from spilling out if the jar is tipped. -
Seal the jar:
Place the lid on the jar. If you want it permanently sealed, add a rim of clear glue around the stopper before pressing it down.
Pro Tip: Fillers
To save time and clay, put a ball of aluminum foil or scrap clay in the center of the jar first, then arrange the nice candies around the outside.
Now you have a delightful jar of permanent sweets to brighten up your miniature display or shelf
Fruit Slices With Translucent-Look Details
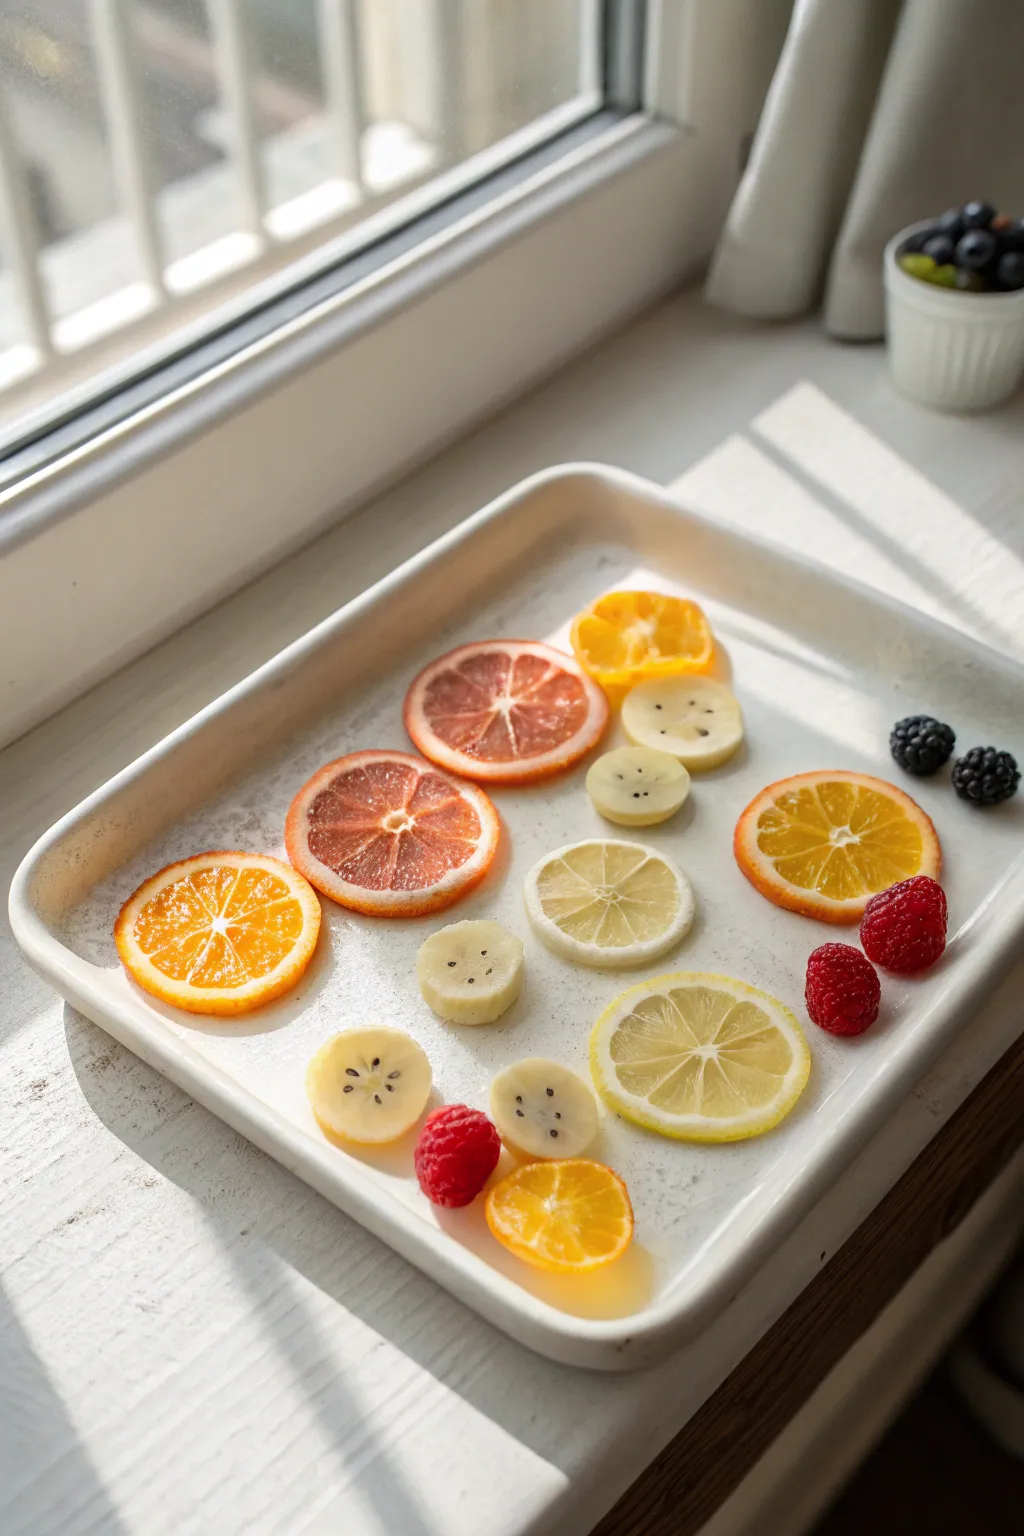
Capture the translucent beauty of freshly sliced citrus and berries with this remarkably realistic polymer clay sculpted tray. By using translucent clay variations and careful tinting, you’ll create juicy-looking fruits that seem to catch the sunlight just perfectly.
How-To Guide
Materials
- Translucent polymer clay (Cernit or Premo frosted)
- Opaque white polymer clay
- Liquid polymer clay (translucent)
- Alcohol inks (orange, yellow, red)
- Chalk pastels (yellows, oranges, light browns)
- Needle tool or toothpick
- Small round cutter (approx. 5mm) for bananas
- Black polymer clay (tiny amount for seeds)
- High-gloss glaze or UV resin
- Miniature ceramic tray or white clay to sculpt a tray
- Caning blade or sharp tissue blade
- Dotting tool or ball stylus
- Sandpaper 400-800 grit (optional)
Step 1: Citrus Cane Construction
-
Mix the citrus pulp:
Start by mixing translucent clay with a very small drop of orange alcohol ink for oranges, yellow for lemons, and a mix of red/orange for grapefruits. You want the clay to remain mostly translucent, so go easy on the pigment. -
Form the segments:
Shape your tinted translucent clay into a thick log, then flatten it slightly into a teardrop shape relative to the cross-section. This represents a single juice segment. -
Add the pith lines:
Roll out a very thin sheet of opaque white clay. Wrap your teardrop-shaped log in this white sheet. This creates the white membrane that separates the fruit segments. -
Assemble the cane:
Stretch and reduce your wrapped log until it’s about pencil-thick. Cut it into 8 equal lengths. Arrange these pieces in a circle, pointing the narrow ‘teardrop’ ends toward the center to form a wheel. -
Wrap the rind:
Fill the tiny center gap with a thin snake of white clay. Wrap the entire bundle in another layer of white clay for the inner pith, followed by a layer of tinted opaque clay (yellow/orange) for the skin. -
Reduce to scale:
Gently squeeze and roll your large cane to reduce its diameter. Aim for sizes ranging from 1cm to 2cm to create variety between lemons, oranges, and grapefruits. -
Slice effectively:
Let the cane rest for 30 minutes to firm up. Use a sharp tissue blade to cut thin, even slices. Vary the thickness slightly for realism.
Ice Bath Shock
Plunge baked pieces directly into ice water while hot. This ‘shocks’ the translucent clay, making it significantly clearer and more realistic.
Step 2: Berries & Bananas
-
Banana base:
Mix white clay with equal parts translucent and a tiny speck of yellow. Roll a log about 1cm thick. -
Banana seeds:
Using a needle tool, poke three tiny holes in the center of the log’s face in a triangular pattern. Insert extremely thin threads of black clay into these holes, then slice the log into discs. -
Raspberry texture:
Mix translucent clay with red alcohol ink. Create dozens of tiny balls (about 1mm). Cluster them together over a small cone-shaped core of the same clay to form the hollow raspberry shape. -
Blackberry variation:
Repeat the raspberry process using dark purple/black tinted translucent clay. Keep the individual drupelets distinct and spherical.
Step 3: Finishing Touches
-
Texturing the citrus:
Take a needle tool and gently roughen the surface of the translucent citrus segments. This disrupts the light and mimics pulp fibers. -
Arrangement:
Place your slices onto your miniature tray. Overlap some pieces naturally, as if they were just tossed there. -
Baking:
Bake according to your clay manufacturer’s instructions, usually 275°F (130°C) for 15-20 minutes. If using translucent clay, watch carefully to prevent scorching. -
The juicy look:
Once cool, coat the citrus fruit segments (avoiding the white pith/rind) with a high-gloss glaze or a thin layer of UV resin. This is crucial for that ‘wet’ fresh-cut appearance seen in the photo. -
Final dusting (optional):
Brush a tiny amount of powdered sugar (white pastel dust) over the tops of the berries or bananas for contrast if desired.
Rind Texture Trick
Before slicing your cane, roll the entire log over a piece of sandpaper or a textured sponge. This gives the outer skin that realistic porous orange-peel texture.
Display your tray near a light source to show off that incredible translucency you achieved
Charcuterie Board With Cheese Cubes and Crackers
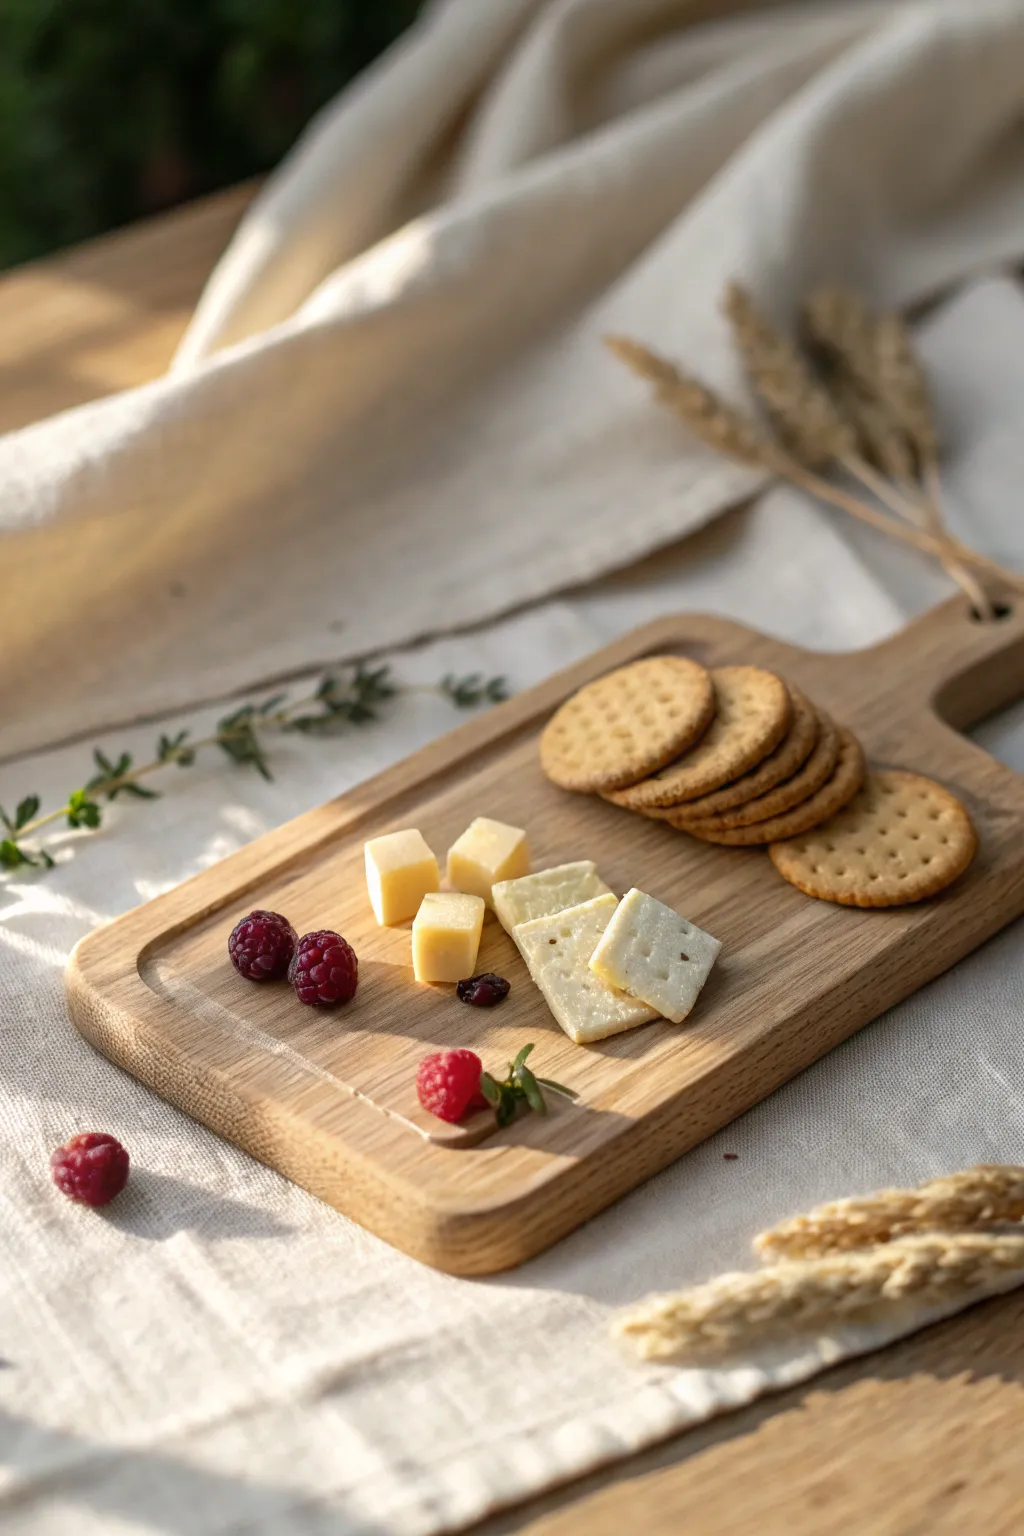
This delightful miniature captures the cozy feel of an afternoon snack with warm wood tones and realistic textures. You’ll create a tiny wooden serving board laden with savory crackers, sharp cheddar cubes, and delicate Swiss slices, finished with a pop of berry red.
Step-by-Step Guide
Materials
- Polymer clay (Tan, Translucent white, Yellow, Orange, Red, Purple)
- Liquid polymer clay (optional)
- Texturing tools (sandpaper, toothbrush, needle tool)
- Chalk pastels (Browns, Yellow ochre)
- Blade or X-Acto knife
- Small round cutter or straw
- Rolling pin or pasta machine
- Gloss glaze (for berries)
- Matte varnish (optional)
Step 1: Crafting the Wooden Board
-
Mix the wood tone:
Start by mixing tan clay with a small amount of translucent clay to give the ‘wood’ some depth. Roll it into a slab about 3-4mm thick. -
Shape the board:
Cut a rectangular shape with rounded corners. Create a handle shape at one end, seamlessly blending it into the main body of the board. -
Add wood grain texture:
Use a needle tool to gently scratch long, slightly wavy lines across the surface to mimic wood grain. Don’t worry about being perfect; natural wood has variation. -
Detail the edges:
Gently press sandpaper against the edges and surface to soften the texture and remove any fingerprints. Use a larger tool to impress a subtle groove around the perimeter if desired. -
Shade the wood:
Brush brown chalk pastel powder over the surface, concentrating on the grain lines and edges to bring out the texture. Bake this piece according to your clay’s package instructions so it provides a solid base.
Texturing Tip
For ultra-realistic cheese texture on the cubes, gently dab them with a stiff toothbrush. It breaks up the plastic shine.
Step 2: Creating the Crackers
-
Mix the dough color:
Combine tan, a tiny bit of yellow, and translucent clay. Roll this out very thinly. -
Cut:
Use a small round cutter (or the end of a straw) to punch out several circles. -
Texture the crackers:
Gently press a piece of sandpaper or a toothbrush onto the surface of each round to give it a bubbly, baked texture. Use a needle tool to poke small holes in a pattern on top. -
Toast the edges:
Dust the edges and tops lightly with yellow ochre and light brown pastel chalks to make them look golden baked. Stack a few slightly overlapping on the cooled board.
Level Up: Crumbs
Make tiny crumbs from baked leftover cracker clay. Glue them randomly on the board with liquid clay for a messy, eaten look.
Step 3: Making the Cheese and Berries
-
Form the cheddar cubes:
Mix yellow and a touch of orange clay. Form a thick log and slice off sharp, precise cubes. Place a group of three near the center of the board. -
Create the Swiss slices:
Mix translucent white with a tiny dot of yellow. Roll flat and cut into squares. Use a needle tool to poke a few distinctive holes for the ‘Swiss’ look. -
Arrange the cheese:
Lay two Swiss slices casually near the cubes. I find slightly overlapping them makes the arrangement look more natural and less stiff. -
Sculpt the raspberries:
Mix red with a tiny bit of purple clay. Roll many tiny, microscopic balls. Cluster these tiny balls together onto a larger base ball to form the bumpy texture of a raspberry. -
Add the stem:
Use a tiny bit of green clay to create a small leaf or stem fragment and attach it to one berry. -
Final assembly:
Position the berries on the board—one near the cheese and another stray one off to the side for artistic balance. Press everything gently onto the baked board (using a dab of liquid clay as glue). -
Final Bake:
Bake the entire piece again. Once cooled, adding a touch of gloss glaze just to the berries makes them look fresh and juicy.
Display your miniature board on a dollhouse table or turn it into a charming fridge magnet
Drinks and Desserts Like Milkshakes and Floats
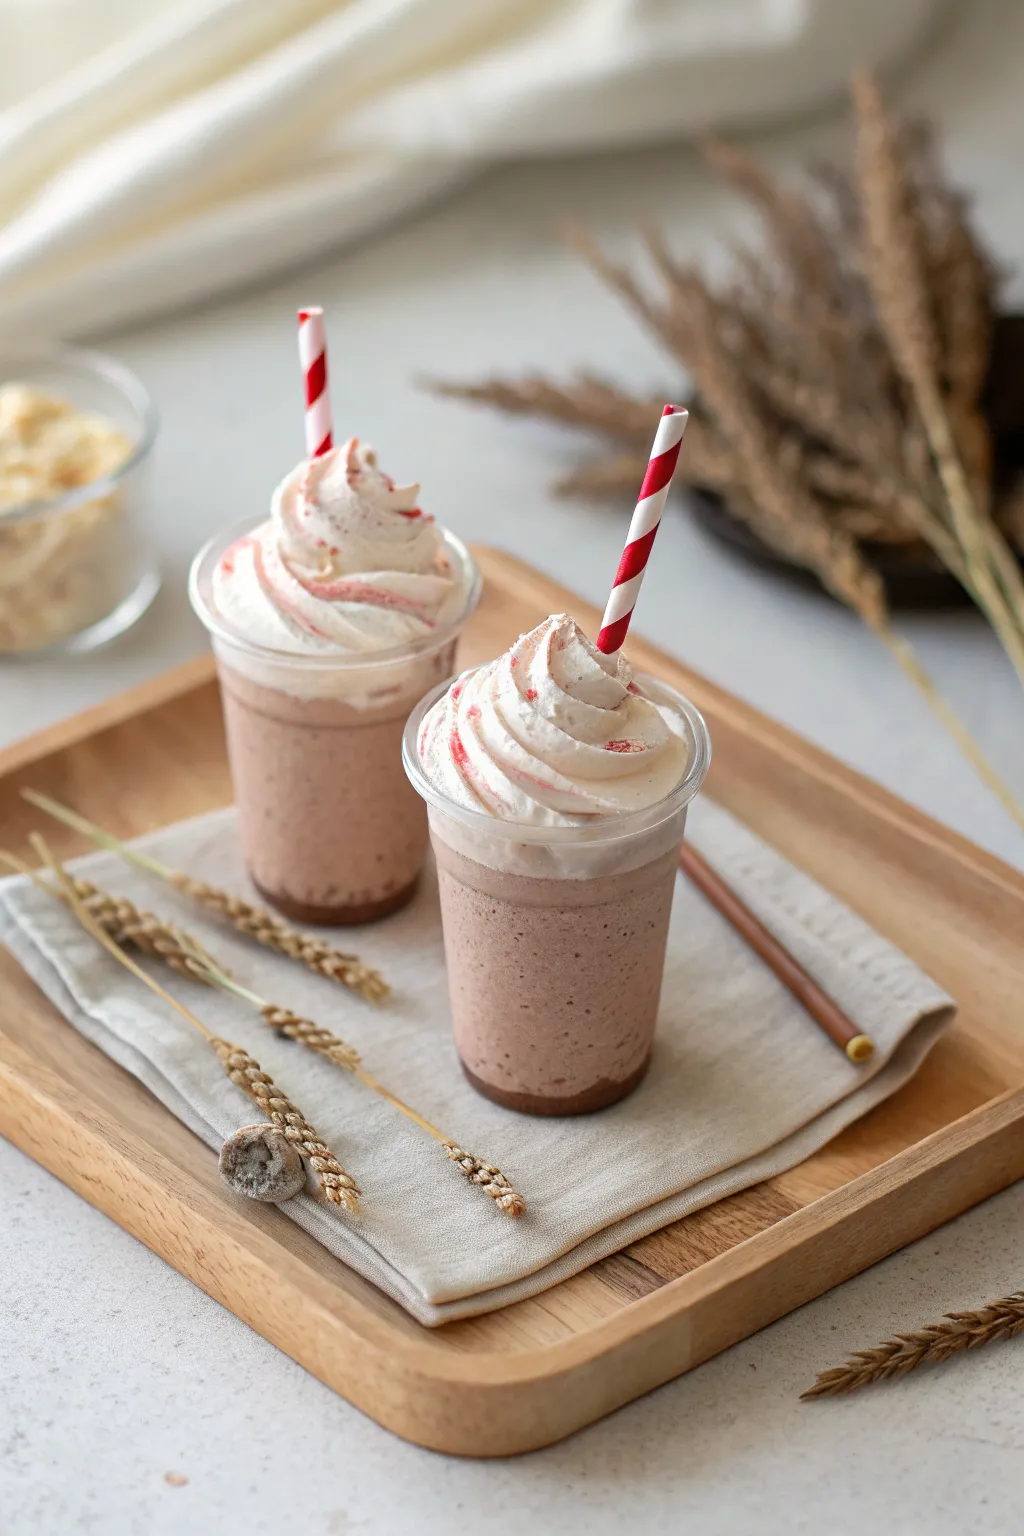
Capture the sweetness of a summer treat with these hyper-realistic polymer clay chocolate milkshakes. Complete with tiny striped straws and a dusting of cocoa, these miniature delights look good enough to sip.
Detailed Instructions
Materials
- Translucent liquid polymer clay (Liquid Sculpey or Fimo Liquid)
- Brown and white polymer clay
- Soft pastel chalks (dark brown, reddish-brown)
- Miniature clear plastic cups (1:12 or 1:6 scale)
- Glass microbeads or fine sand (optional for texture)
- Red acrylic paint or glass paint
- Thin paper or cardstock (red and white)
- Craft glue or superglue
- Toothpicks and needle tool
- Star-tipped nozzle for clay extruder (optional)
- Gloss varnish
Step 1: Preparing the Shake Base
-
Mix the Chocolate Color:
Start by mixing translucent liquid clay with a very small amount of brown solid clay or brown pastel shavings. You want a milky, semi-opaque consistency that mimics melted ice cream, not a solid block of color. -
Add Texture:
To simulate the icy texture of a real milkshake, mix in a pinch of fine sand or clear glass microbeads. This subtle grit catches the light just like blended ice crystals. -
Create the Syrup Layer:
Mix a separate, darker batch of liquid clay using plenty of dark brown pastel chalk. Pour a thin layer of this ‘chocolate syrup’ into the very bottom of your miniature plastic cup and let it settle. I like to tilt the cup slightly to let it coat the bottom sides. -
Fill the Cup:
Pour your main milkshake mixture over the syrup base, filling the cup about three-quarters of the way full. Tap the cup gently on your work surface to release any trapped air bubbles.
Step 2: Crafting the Toppings
-
Whip the Cream:
Soften a chunk of white polymer clay until it is extremely pliable. If you have a clay extruder, use a star-tipped disc to press out a long, rippled rope. -
Manual Piping Technique:
If you don’t have an extruder, roll a tapered snake of white clay. Use a needle tool to gently score deep, spiral grooves along its length to mimic the ridges of piped cream. -
Assemble the Swirl:
Carefully coil the textured white clay on top of the liquid clay in the cup. Start from the outer rim and spiral upward into a peak, just like a soft-serve machine. -
Straw Construction:
Cut a thin strip of white paper. Paint fine diagonal red stripes across it. Once dry, roll the paper tightly around a toothpick or wire to form a tube, securing the end with a tiny dot of glue. -
Insert the Straw:
Cut your paper straw to the appropriate scale length. Gently press it into the milkshake mixture before baking, angling it slightly for a casual look.
Cloudy Cups?
If your plastic cups warp or cloud in the oven, try pre-baking the liquid clay shake filling in a silicone mold first, then popping it into the plastic cup with a drop of glue afterward.
Step 3: Finishing Touches
-
Add Strawberry Drizzle:
Mix a tiny amount of translucent liquid clay with red pastel shavings or a drop of red glass paint. Using a needle tool, carefully drag thin lines of this red ‘syrup’ over the ridges of the whipped cream. -
Dusting the Cocoa:
Scrape a brown pastel stick with a craft knife to create fine powder. Pick up the powder with a soft brush and tap it gently over the whipped cream for a chocolate dusting effect. -
Baking:
Bake the pieces according to the instructions on your brand of liquid clay. Since plastic cups can melt, ensure you are using heat-safe plastic or bake at a lower temperature for a longer time if unsure. -
Varnishing:
Once cool, coat the ‘glass’ of the cup with gloss varnish if it became cloudy during baking. You can also add a touch of gloss to the red syrup drizzle to make it look wet and sticky.
Level Up: Condensation
For a chilled look, mix gloss varnish with tiny glass beads or white craft sand. Dab sparse dots on the outside of the cup to mimic condensation droplets.
Display your tiny treats on a miniature tray for an adorable café scene
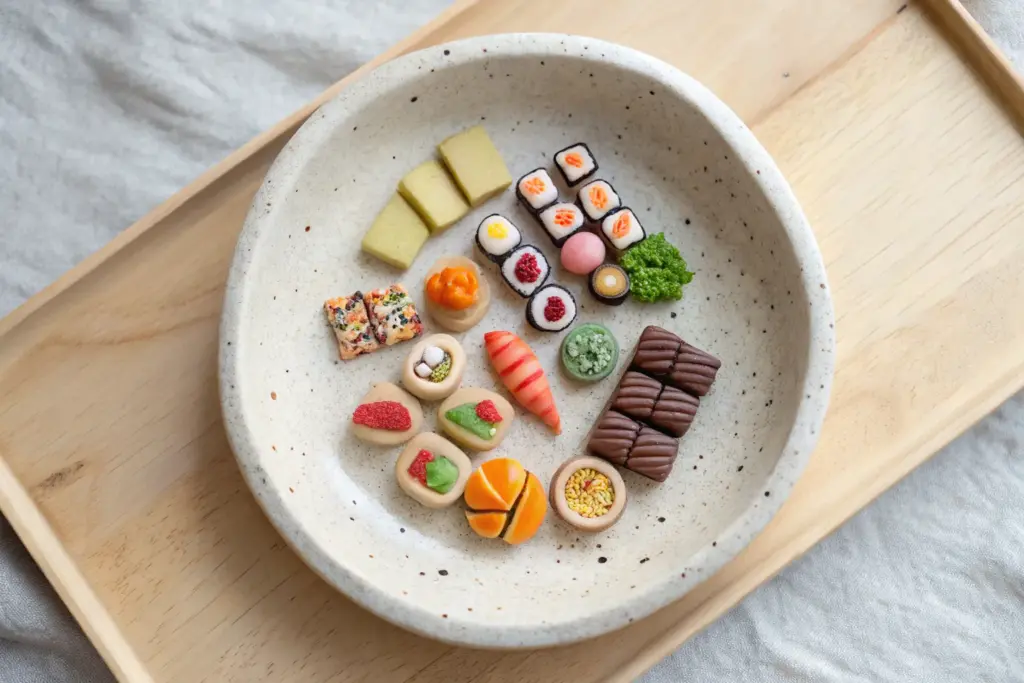
Mixed “Mini Menu” Grid for Dollhouse Pantry Fillers
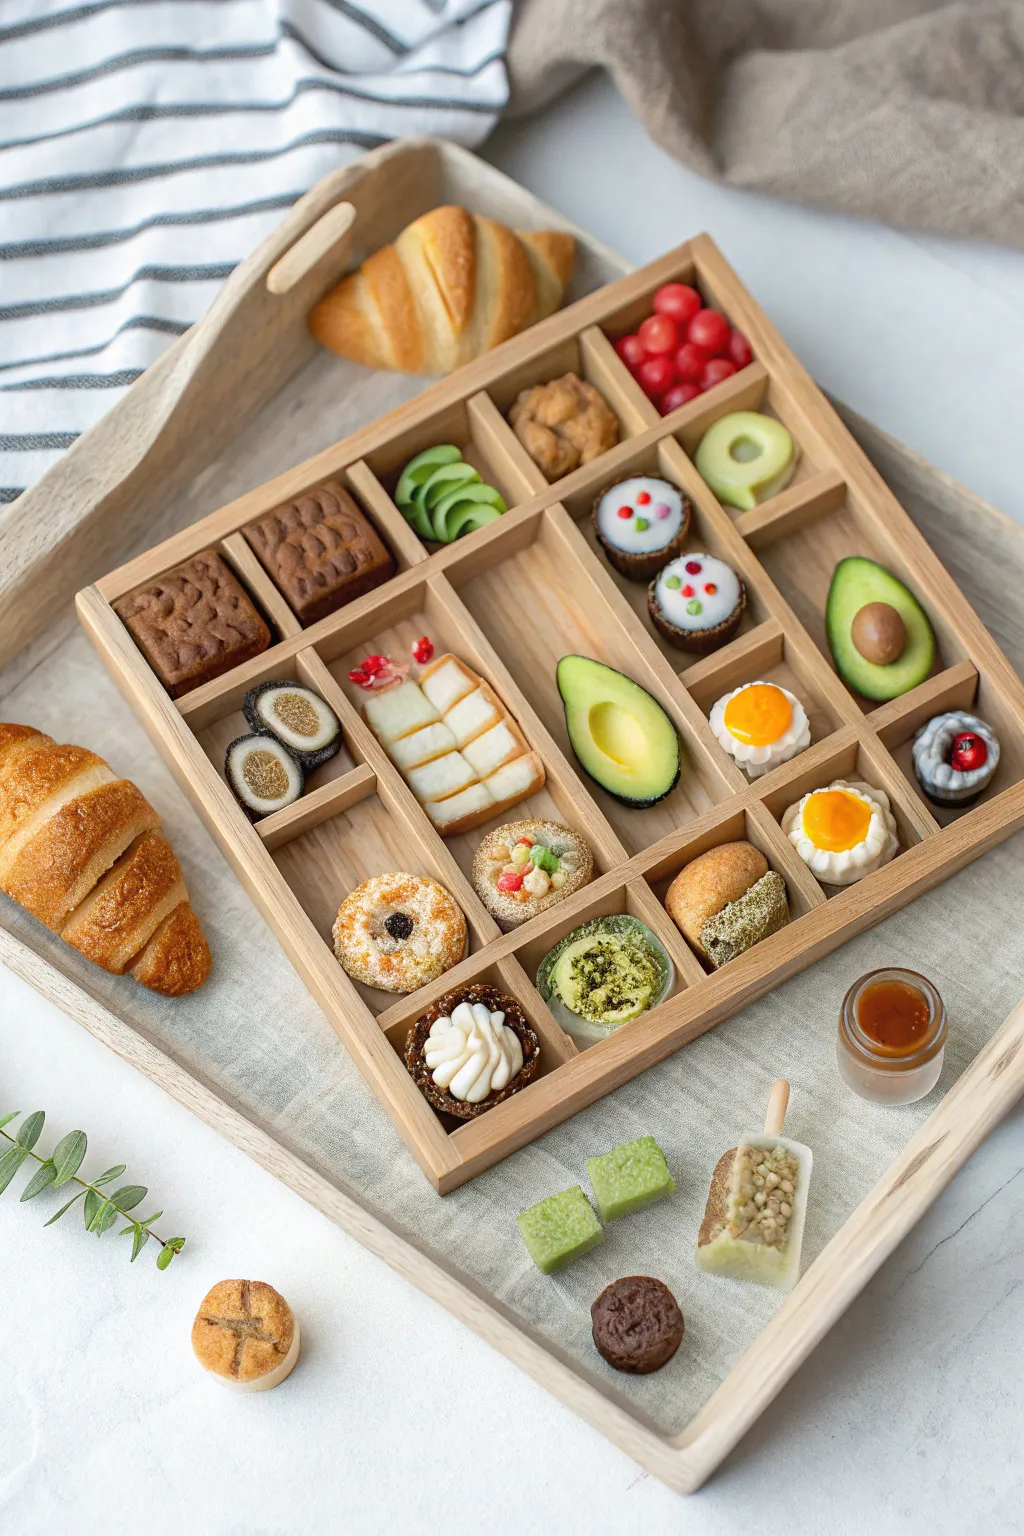
This delightful project creates a bento-style sampler of tiny culinary treats frozen in time. From realistic avocado halves to sugar-dusted donuts, this grid display is the perfect way to practice diverse texturing and sculpting techniques in polymer clay.
Step-by-Step Guide
Materials
- Polymer clay (white, translucent, yellow, red, green, brown, black)
- Wooden divider tray or bento box
- Liquid polymer clay (translucent and white)
- Chalk pastels (various browns, oranges, yellows)
- Needle tool and ball stylus tool
- Toothbrush or texturing foil
- X-acto knife or razor blade
- Gloss glaze or UV resin
- Sandpaper
Step 1: Bakery Basics: Croissants & Squares
-
Mixing the dough color:
Start by mixing white clay with small amounts of yellow and a tiny speck of brown to create a raw dough color. This base will be used for several items. -
Sculpting the croissant:
Take a larger piece for the croissant. Flatten it into a triangle, roll it up starting from the wide base, and gently curve the ends inward. Use a needle tool to deepen the rolled crevices for realism. -
Texturing the breads:
Create the square brownie-like cakes by cutting thick squares of chocolate-colored clay. Press a toothbrush or sandpaper aggressively onto the surface to simulate a baked crumb texture. -
Shading with pastels:
Before baking, use a soft brush to dust shaved orange and brown chalk pastels onto the croissant and bread squares. Focus the darker browns on the ridges and edges to mimic baking browning.
Sticky Situation?
If clay gets too soft and sticky while sculpting tiny details, pop it in the fridge for 10 minutes. This firms it up, making intricate cuts much cleaner.
Step 2: Fresh Produce: Avocados & Fruit
-
Creating the avocado skin:
Mix a dark forest green clay. Roll a small teardrop shape, then flatten it slightly. This forms the outer skin. -
Adding the flesh:
Mix a pale yellow-green for the avocado flesh. Press this into the dark green skin, smoothing the edges. Use a ball tool to create a pit indentation in one half. -
Sculpting the pit:
Roll a tiny ball of brown clay for the seed and place it into the indentation. Texture it slightly with a needle tool. -
Making red currants:
Roll tiny balls of translucent red clay. Pile them together into a small cluster to fit one of the grid squares, simulating currants or cherries.
Make it Miniature Magic
Add tiny labels or parchment paper liners cut from real wax paper beneath the pastries. It adds an incredible layer of bakery realism to the display.
Step 3: Sweet Treats: Donuts & Tarts
-
Forming the donut base:
Using the dough mixture, roll a small snake and join the ends to form a ring. Texture the surface lightly with a toothbrush. -
Sugaring the donut:
Mix liquid clay with white chalk pastel shavings. I find this creates a perfect glaze; drizzle it over the donut. While wet, sprinkle fine glitter or white sand for a sugar effect. -
Assembling the fruit tarts:
Make small cup shapes from tan clay. Fill the center with white liquid clay (to mimic cream) and place tiny dots of colored clay on top for fruit decorations. -
Creating the chocolate tart:
Fill another tart shell with brown clay. Roll a very thin snake of white clay, twist it, and coil it on top to look like piped whipped cream.
Step 4: Savory Rolls & Assembly
-
Making the sushi rolls:
Roll a cylinder of white clay (rice) and wrap it in a thin sheet of black clay (nori). Slice the cylinder into rounds using a sharp blade to prevent squishing. -
Filling the centers:
Indent the center of each sushi slice and add tiny bits of green (cucumber) or orange (fish) clay, or fill with brown liquid clay for a cooked filling. -
Baking the collection:
Arrange all your tiny foods on a tile, separated by type. Bake according to your clay manufacturer’s instructions, usually 275°F (135°C) for 15-30 minutes. -
Glazing for moisture:
Once cool, apply gloss glaze selectively. Brush it onto the fruit fillings, avocado pit, and pastry jams to make them look wet and fresh, leaving breads matte. -
Arrangement:
Glue the finished pieces into your wooden grid tray. Use tweezers for precise placement to ensure every item sits perfectly in its compartment.
Now you have a charming sampler platter that looks good enough to eat but will last forever in your miniature collection