There’s something ridiculously satisfying about turning a tiny bit of polymer clay into a cute little fridge magnet you’ll see every day. Here are my go-to ideas—starting with the classics everyone loves, then easing into more playful, unexpected designs.
Sunny-Side-Up Egg and Bacon Magnet Duo
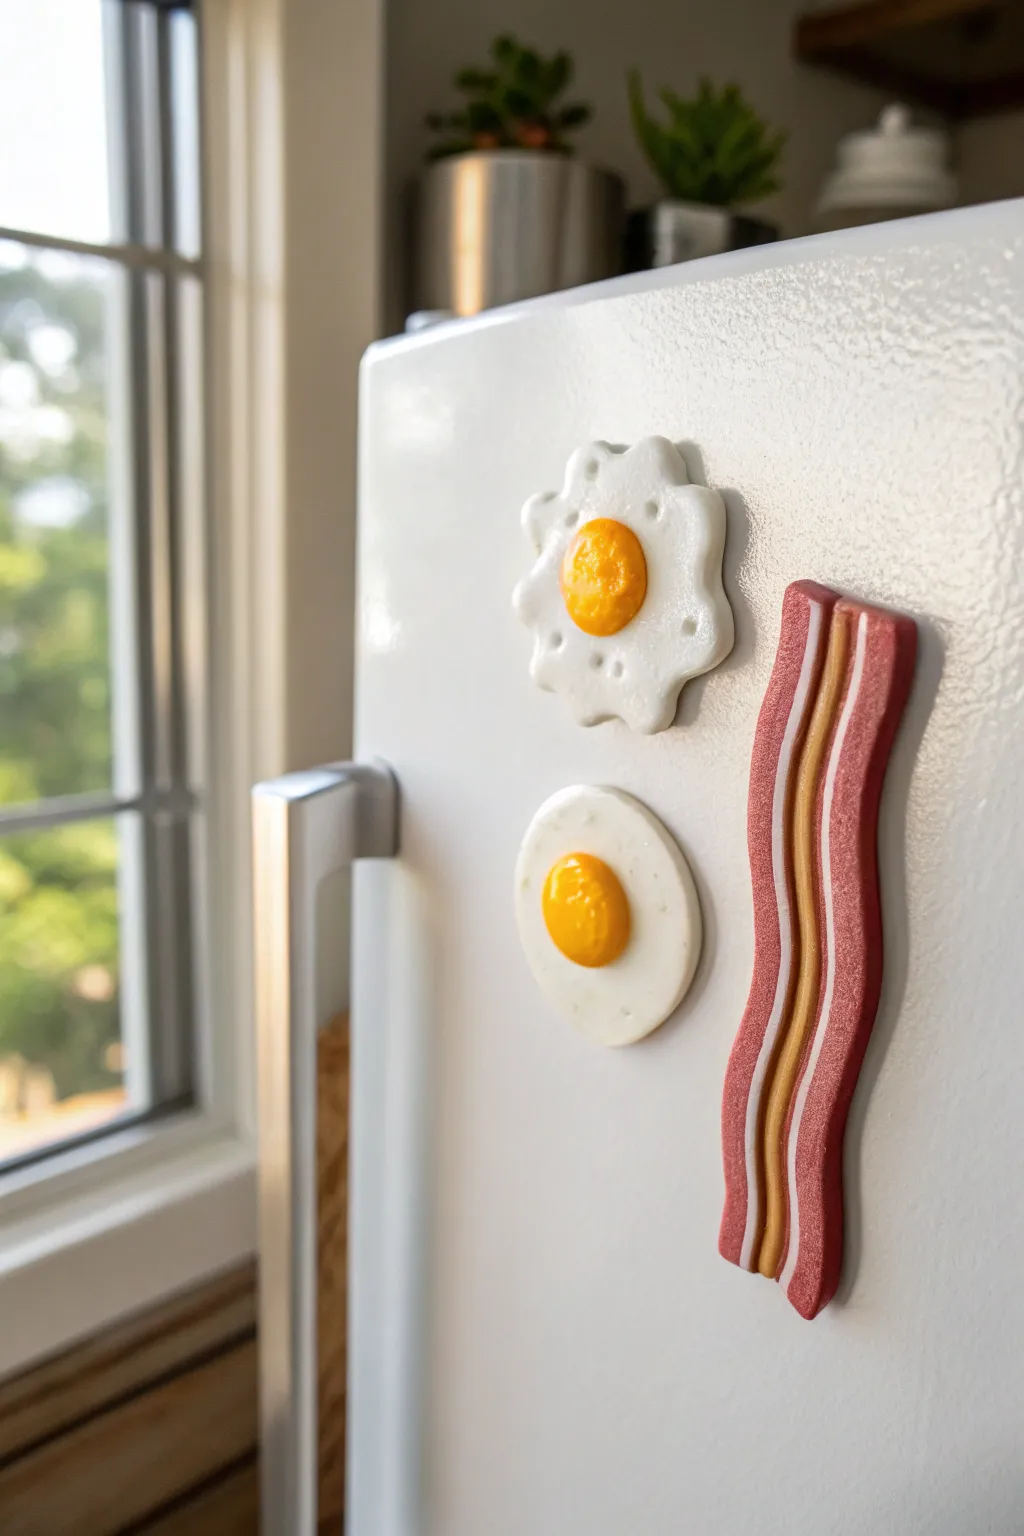
Bring a hearty dose of morning cheer to your kitchen with this classic trio of breakfast staples. These glossy, realistic magnets feature two styles of fried eggs and a crispy, wavy bacon strip that looks good enough to eat.
Detailed Instructions
Materials
- White polymer clay
- Yellow/orange polymer clay (sunshine or golden yellow)
- Red-brown or maroon polymer clay
- Beige or light flesh-tone polymer clay
- Translucent liquid polymer clay (optional but recommended)
- Gloss glaze or polyurethane varnish
- Circle cutter (small)
- Small ball tool or dotting tool
- Needle tool or toothpick
- Rolling pin or pasta machine
- Strong craft magnets
- E6000 or super glue
Step 1: Shaping the Eggs
-
Condition the white clay:
Start by kneading your white polymer clay until it is soft and pliable, then flatten it into a sheet about 3mm thick. -
Cut the shapes:
For the circular egg, use a small round cutter to punch out a perfect circle. For the ‘frilly’ egg, shape a freehand blob or use a flower cutter, then gently pull and stretch the edges to make them irregular and natural. -
Smooth the edges:
Use your fingertip to gently bevel and smooth the edges of the white base pieces so they slope down towards the surface, imitating real egg whites. -
Create the yolks:
Roll two small balls of yellow clay. I like to mix a tiny bit of orange into the yellow to get that rich, farm-fresh yolk color. -
Attach the yolks:
Place a yellow ball onto the center of each white base. Press them down gently to flatten the bottom, creating a dome shape. -
Texture the yolks:
Take a toothbrush or a small piece of sandpaper and lightly tap the surface of the yellow yolks to remove fingerprints and add a subtle organic texture.
Pro Tip: Liquid Clay
Mix a tiny drop of yellow chalk pastel into translucent liquid clay and dab it over the yolk after baking for an ultra-realistic, permanent wet look.
Step 2: Crafting the Bacon
-
Prepare bacon colors:
Roll out ropes of your reddish-brown clay and the beige/light flesh clay. You will need two thick red ropes and two thinner beige ropes. -
Stack the strips:
Lay the ropes side-by-side in an alternating pattern: red on the outside, then a white stripe, red in the middle, white stripe, and red on the other outside edge. -
Compress the slab:
Gently squeeze the ropes together laterally, then use your rolling pin to flatten the entire assembly into a single, cohesive strip. -
Create the wave:
Cut the strip to your desired length (usually 3-4 inches). Gently bend the strip into an ‘S’ curve to mimic the way bacon shrinks and waves when fried. -
Add texture:
Use a toothbrush or a ball of aluminum foil to texture the red meat sections of the bacon, giving it a cooked, crispy appearance.
Step 3: Baking and Finishing
-
Bake:
Place all pieces on a parchment-lined baking sheet or ceramic tile. Bake according to the manufacturer’s instructions for your specific brand of clay—usually 275°F (135°C) for 15-30 minutes. -
Cool down:
Allow the pieces to cool completely before handling. This ensures the clay hardens fully and doesn’t warp. -
Glaze the eggs:
Apply a coat of gloss glaze or polyurethane varnish specifically to the yellow yolks. For extra realism, coat the entire egg to make it look freshly fried in oil. -
Glaze the bacon:
Apply the gloss glaze selectively to the fat strips on the bacon or lightly over the whole piece for a greasy finish. -
Attach magnets:
Flip the cured pieces over. Apply a strong adhesive like E6000 to the back and press a magnet firmly into the glue. -
Final dry:
Let the glue cure for at least 24 hours to ensure a secure bond before sticking them to your fridge.
Troubleshooting: Fingerprints
If you see pesky fingerprints on your clay before baking, lightly brush the surface with a tiny amount of baby oil or cornstarch to smooth them away instantly.
Enjoy your delicious-looking, calorie-free kitchen decor


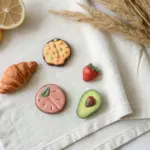
Fruit Slice Fridge Magnet Set
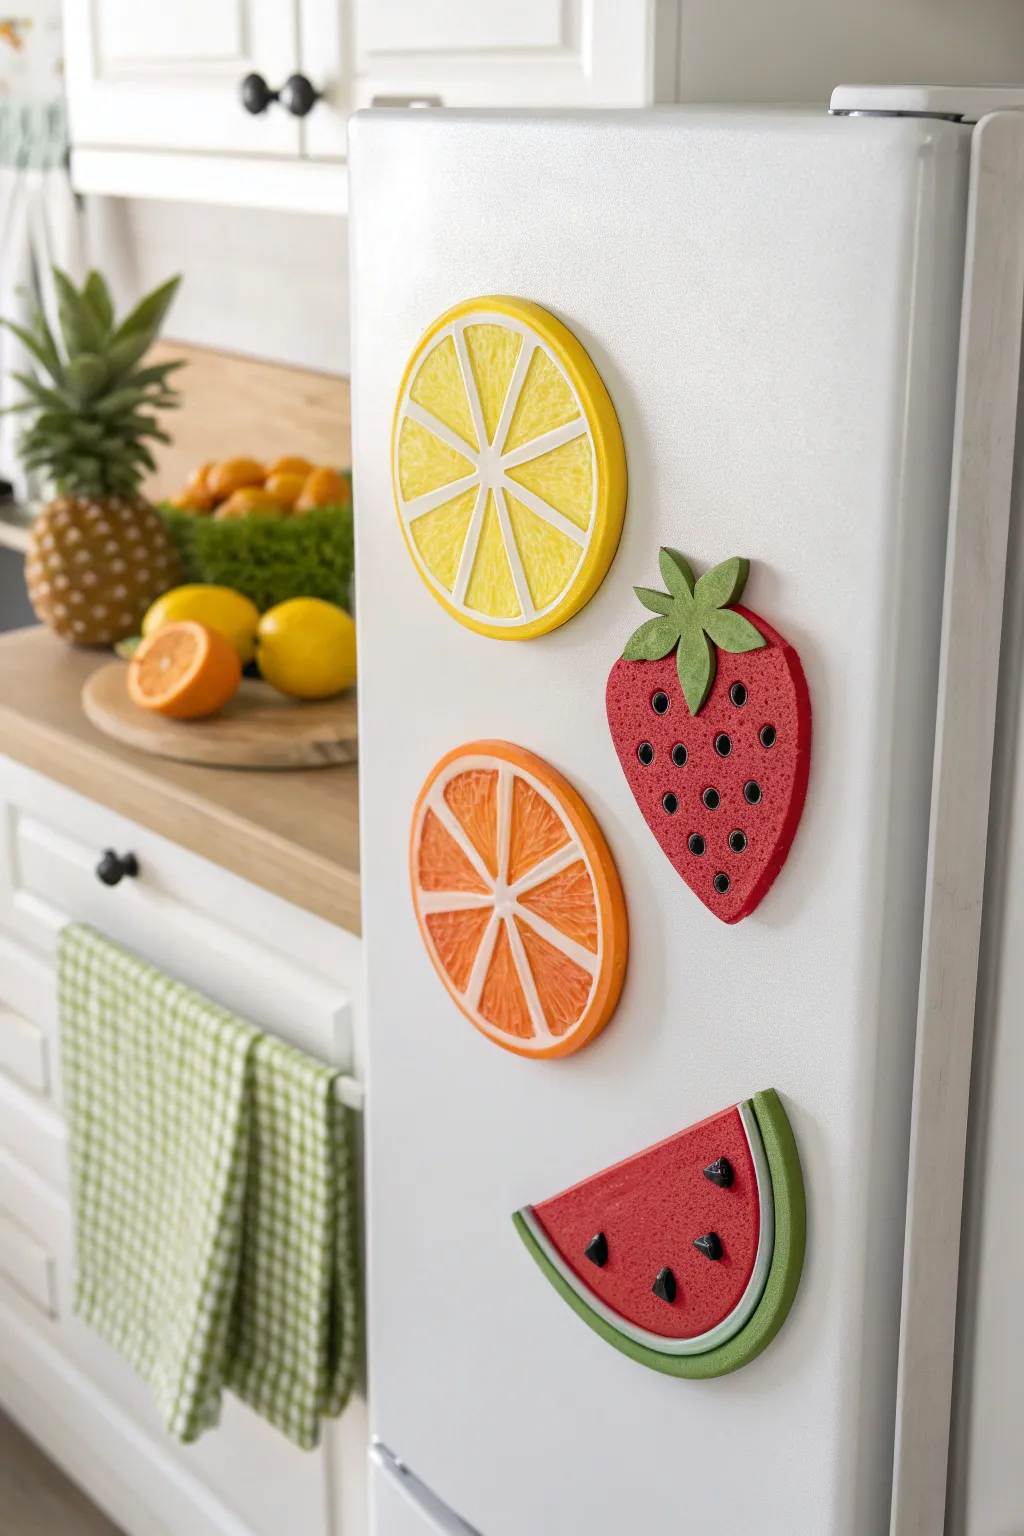
Brighten up your kitchen with these refreshingly easy-to-make fruit magnets that look good enough to eat. With their textured surfaces and vibrant colors, this set including citrus slices, a strawberry, and watermelon adds a playful pop of summer to any appliance.
Step-by-Step
Materials
- Polymer clay in yellow, orange, red, white, green, and black
- Rolling pin or pasta machine
- Round cookie cutters (various sizes)
- Texture tools (sponge, sandpaper, or needle tool)
- Craft knife or scalpel
- Strong craft glue or E6000
- Round ferrite or neodymium magnets
- Translucent liquid clay (optional)
- Gloss glaze (optional)
Step 1: Creating the Citrus Slices
-
Base Preparation:
Start by conditioning your yellow clay for the lemon and orange clay for the orange. Roll each into a thick sheet, about 1/4 inch thick. Cut out large circles using your round cutter. -
Adding the Rind:
Roll out a thin sheet of white clay. Cut a strip long enough to wrap around the circumference of your colored circles. Repeat this with a slightly thicker strip of yellow (for the lemon) and orange (for the orange) to create the outer skin layer. -
Assembly:
Wrap the white strip around the colored circle first, trimming any excess for a clean seam. Follow this by wrapping the matching colored strip around the white layer. Smooth the seams gently with your finger. -
Creating Segments:
Roll very thin ‘snakes’ of white clay. Lay them across the top of your citrus slice like spokes on a wheel to create the fruit segments. I usually place 8 spokes for a realistic look. Gently press them into the clay so they adhere flat. -
Texturing:
Use a coarse sponge or a ball of crumpled aluminum foil to press texture into the colored ‘fruit’ areas between the white lines. This mimics the juicy pulp texture.
Step 2: Sculpting the Strawberry
-
Shaping the Berry:
Condition red clay and shape it into a flat, rounded triangle or heart shape with a blunted bottom. Make sure it is a similar thickness to your citrus slices. -
Texturing the Surface:
Using your sponge tool again, dab the entire surface of the red clay to give it a porous, berry-like texture. -
Adding Seeds:
Take a small ball tool or the end of a paintbrush to make small indentations across the strawberry surface. Roll tiny balls of black clay and press them into these indentations. -
Making the Calyx:
Roll out a small piece of green clay. Use a craft knife to cut out a star-like shape with five or six points for the leaves. Place this at the top of the strawberry. -
Detailing Leaves:
Use a needle tool to press a central vein line down the middle of each green leaf for added dimension.
Texturing Tip
For the most realistic citrus pulp, lightly dab the clay with a clean toothbrush or hard bristle brush. It creates deeper, finer pores than a sponge.
Step 3: Forming the Watermelon Slice
-
Creating the Wedge:
Roll out red clay into a sheet and cut a semi-circle shape. This will be the juicy flesh of the watermelon. -
Building the Rind:
Roll a thin snake of white clay and a slightly thicker snake of green clay. Wrap the white clay along the curved bottom edge of the red semi-circle, followed by the green clay on the very outside. -
Adding Seeds:
Just like the strawberry, roll three or four small teardrop shapes from black clay. Press these slightly into the red area to resemble seeds. -
Texturing:
Lightly texture the red portion with your sponge tool, being careful not to disturb the seeds or rind.
Make it Sparkle
Before baking, brush a thin layer of translucent liquid clay mixed with glitter onto the fruit sections. It makes them look perpetually juicy and wet.
Step 4: Final Steps
-
Baking:
Place all your fruit pieces on a baking tile or parchment-lined tray. Bake according to the manufacturer’s instructions for your specific brand of clay (usually 275°F/135°C for 15-30 minutes). -
Cooling:
Once baked, turn off the oven and let the pieces cool down completely inside before removing them to prevent any cracking. -
Attaching Magnets:
Apply a dab of strong glue to the back of each fruit piece. Press a magnet firmly into the glue. Let it cure undisturbed for at least a few hours.
Once the glue is fully set, your cheerful fruit magnets are ready to hold up your shopping lists and photos with style


Cookie and Biscuit Fridge Magnets
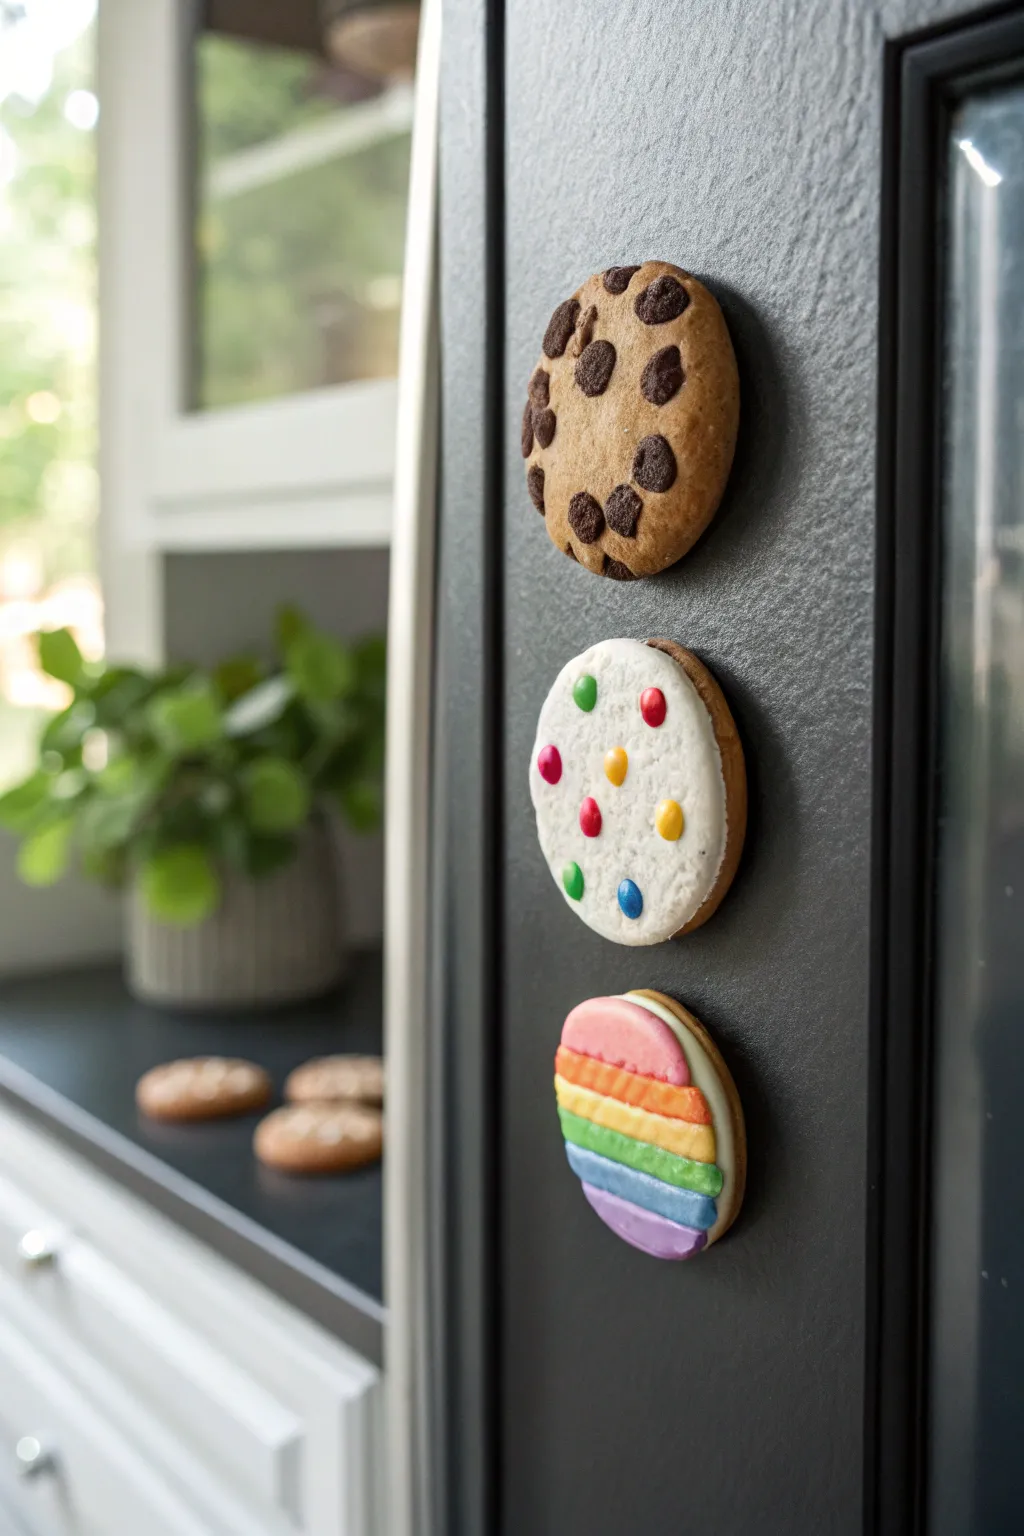
Transform your fridge into a bakery display with these delightful, realistic cookie magnets. This project guides you through creating a classic chocolate chip cookie, a festive dotted sugar cookie, and a colorful rainbow-frosted biscuit, all perfect for holding up your grocery lists.
Step-by-Step
Materials
- Polymer clay (colors: tan/beige, dark brown, white, red, yellow, green, blue, purple)
- Texturing tool (toothbrush or stiff bristle brush)
- Needle tool or toothpick
- Ball stylus tool
- Liquid polymer clay (translucent or white)
- Chalk pastels (brown, orange, yellow)
- Soft paintbrush
- Circle cookie cutters (approx. 2 inches)
- Rolling pin or pasta machine
- Strong craft magnets (neodymium recommended)
- Super glue or E6000
- gloss glaze (optional)
Step 1: The Chocolate Chip Cookie BASE
-
Mix the perfect dough color:
Start by mixing translucent clay with a good amount of tan and a tiny pinch of yellow to create a realistic cookie dough shade. This translucency adds depth that looks just like baked goods. -
Form the base:
Roll your mixed clay into a ball and flatten it into a thick disc, roughly 1/4 inch thick. Use your fingers to soften the edges so they look baked and rounded rather than sharp. -
Texture the surface:
Take a clean toothbrush or a stiff bristle brush and firmly tap texturing onto the entire surface and sides of the cookie. Don’t be shy—real cookies are rough and cratered. -
Add baked shading:
Scrape some brown and orange chalk pastel into a fine dust. Using a soft dry brush, gently dust the edges and high points of the texture to mimic a golden-brown baked look.
Fixing “Plastic” Looks
Does the clay look too smooth? Texture is key! Re-texture with a toothbrush and dust gently with cornstarch before baking to remove any shiny fingerprints.
Step 2: Adding the Chips
-
Create chocolate chunks:
Roll out a thin snake of dark brown clay. Chop it into small, irregular segments to form the chocolate chips. -
Embed the chips:
Press the chocolate pieces firmly into the top of your textured cookie base. I like to push some deeper than others so they look like they were baked right inside the dough. -
Texture the chips:
Lightly tap the tops of the chocolate chips with your toothbrush again so they don’t look perfectly smooth and plastic-like.
Pro Tip: Bite Marks
Use a flower-shaped cutter to remove a chunk from the side of a cookie before baking. Texture the inside edge to make it look like a realistic bite mark!
Step 3: The Dotted Sugar Cookie
-
Create the sugar cookie base:
Using a slightly lighter tan clay than the first cookie, roll and cut a circle using your cutter. Texture the sides slightly with your toothbrush. -
Frost the cookie:
Roll out a thin sheet of white clay and cut a circle slightly smaller than your base. Place this on top of the tan circle to act as the royal icing. -
Rough up the icing:
Gently dab the white clay with your texture tool. You want it to look like dried sugar icing, which often has a microscopic texture, not perfectly smooth fondant. -
Add candy dots:
Roll tiny balls of red, yellow, green, and blue clay. Press these gently onto the white icing layer, spacing them out evenly like confetti sprinkles.
Step 4: The Rainbow Biscuit
-
Construct the biscuit:
Make another tan cookie base using your circle cutter. Creating a sandwich-style look, add a thin layer of white clay on top, but leave a visible rim of the tan cookie showing underneath. -
Create rainbow stripes:
Roll very thin snakes of pink, orange, yellow, green, blue, and purple clay. Arrange them horizontally across the white icing layer, pressing them down so they adhere to each other and the base. -
Trim the excess:
Use your circle cutter one more time to gently trim the edges of the rainbow stripes so they align perfectly with the white icing layer underneath. -
Smooth the stripes:
Gently roll over the stripes with an acrylic roller to flatten them into a single smooth surface, ensuring no gaps remain between colors.
Step 5: Baking and Assembly
-
Bake the cookies:
Place all created pieces on a ceramic tile or baking sheet. Bake according to your polymer clay manufacturer’s instructions (usually 275°F for 15-30 minutes depending on thickness). -
Cool down:
Allow the cookies to cool completely before handling. Moving them while warm can distort the shapes or cause breakage. -
Add gloss (Optional):
For the rainbow cookie and the candy dots, brush on a thin layer of gloss glaze to make them look sugary and wet. Keep the cookie dough parts matte for realism. -
Attach the magnets:
Flip the cool cookies over. Apply a strong dab of super glue or E6000 to the back and press your neodymium magnet firmly into the center. Let dry for 24 hours.
Enjoy displaying your favorite photos and notes with these deliciously deceptive treats


Sushi Roll Friends Fridge Magnets
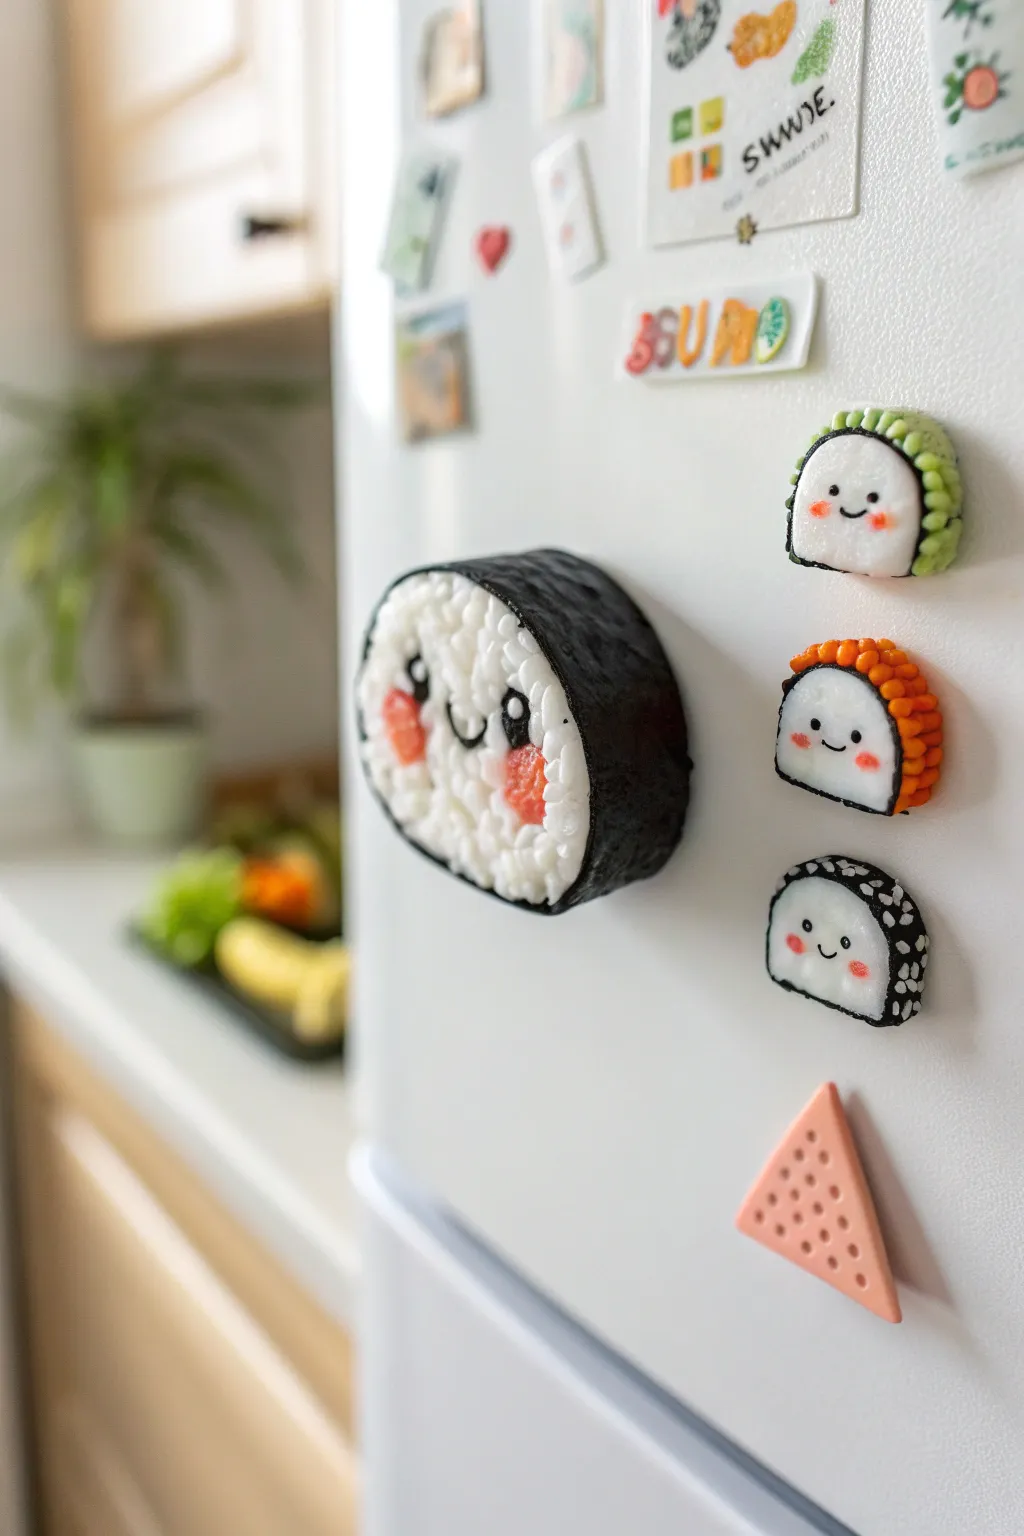
Transform your kitchen into a cute sushi bar with these adorable polymer clay magnets featuring textured rice grains and smiling faces. This set includes a large classic maki roll and a trio of mini nigiri-style friends to keep it company.
Step-by-Step Guide
Materials
- White polymer clay (lots of it for the rice)
- Black polymer clay (nori)
- Green polymer clay (avocado/cucumber)
- Orange polymer clay (roe/cheeks)
- Translucent liquid polymer clay (optional)
- Needle tool or toothpick
- Small round cutter (approx. 2 inches)
- Smaller oval or round cutter (approx. 1 inch)
- Acrylic rolling pin
- Strong craft glue (E6000 or similar)
- Round ceramic or neodymium magnets
- Gloss glaze (optional)
Step 1: Prepping the Rice Base
-
Conditioning the clay:
Start by thoroughly conditioning your white polymer clay until it is soft and malleable. This is crucial to prevent cracking later. -
Creating the large roll base:
For the main character, roll a large ball of white clay and flatten it into a thick disc, about 3/4 inch thick. Use your acrylic roller or simply press it against your work surface to get flat sides. -
Making the mini bases:
For the three smaller friends, create three equal-sized balls of white clay. Flatten the bottoms slightly and shape the tops into rounded domes, resembling a semi-circle or a classic nigiri shape. -
Adding rice texture:
This is the most important step for realism! Roll hundreds of tiny, tiny rice-grain-sized ovals from white clay. Yes, it takes patience, but the result is worth it. -
Applying the grains:
Cover the front face of the large disc and the top curved surface of the smaller bases with these tiny grains. Press them gently so they adhere to the base clay but keep their shape. I find working in small sections helps keep the clay sticky enough.
Sticky Situation?
If the tiny rice grains aren’t sticking to the base, brush a tiny amount of liquid polymer clay or baby oil onto the base before pressing the grains on.
Step 2: Wrapping and Topping
-
Wrapping the Norimaki:
Roll out a strip of black polymer clay until it’s quite thin. Cut a long rectangular strip that matches the width of your large rice disc. -
Attaching the seaweed:
Wrap this black strip around the circumference of the large white disc. Overlap the ends slightly at the bottom and smooth the seam with your finger or a clay tool. -
Texturing the nori:
Take a piece of scrunched-up aluminum foil or a coarse sponge and gently press it into the black clay band to give it that rough, dried seaweed texture. -
Creating the Avocado Roll:
For the first small magnet, roll a thin snake of green clay. Wrap it over the top arch of one mini rice mound. Use a needle tool to dimple it, mimicking avocado or cucumber texture. -
Creating the Roe Roll:
For the second mini magnet, roll many tiny orange balls. Cluster them tightly over the top arch of the second rice mound to look like salmon roe (ikura). -
Creating the Sesame Roll:
For the third mini magnet, create a thin black strip and wrap it over the top arch. Add tiny specks of white clay on top of the black band to represent sesame seeds.
Level Up: Wasabi!
Make a tiny dollop of green clay, texture it with a needle tool, and attach it to the side of the large roll or as a separate mini magnet to complete the set.
Step 3: Bringing Them to Life
-
Making the eyes:
Roll very small balls of black clay. Place two on the front of each sushi piece. Flatten them gently to secure them. -
Adding the smiles:
Roll extremely thin threads of black clay for the mouths. Shape them into little ‘U’ shapes and press them onto the faces between the eyes. -
Rosy cheeks:
Roll tiny slightly flattened discs of orange or pink clay. Apply these under the eyes for that signature kawaii flush. -
Highlighting:
Add a microscopic dot of white clay to the upper corner of each black eye. This ‘catchlight’ instantly gives them personality. -
Baking:
Bake your creations according to your clay manufacturer’s instructions (usually 275°F/135°C for 15-30 minutes). Let them cool completely before handling. -
Glazing and Magnetizing:
Once cool, create a divot or simply glue a strong magnet to the flat back of each piece. Optionally, brush a gloss glaze over the ‘roe’ or the eyes to make them shine.
Now your fridge has the friendliest food in the house, ready to hold up your grocery lists!

The Complete Guide to Pottery Troubleshooting
Uncover the most common ceramic mistakes—from cracking clay to failed glazes—and learn how to fix them fast.
Cute Panda Face Fridge Magnet
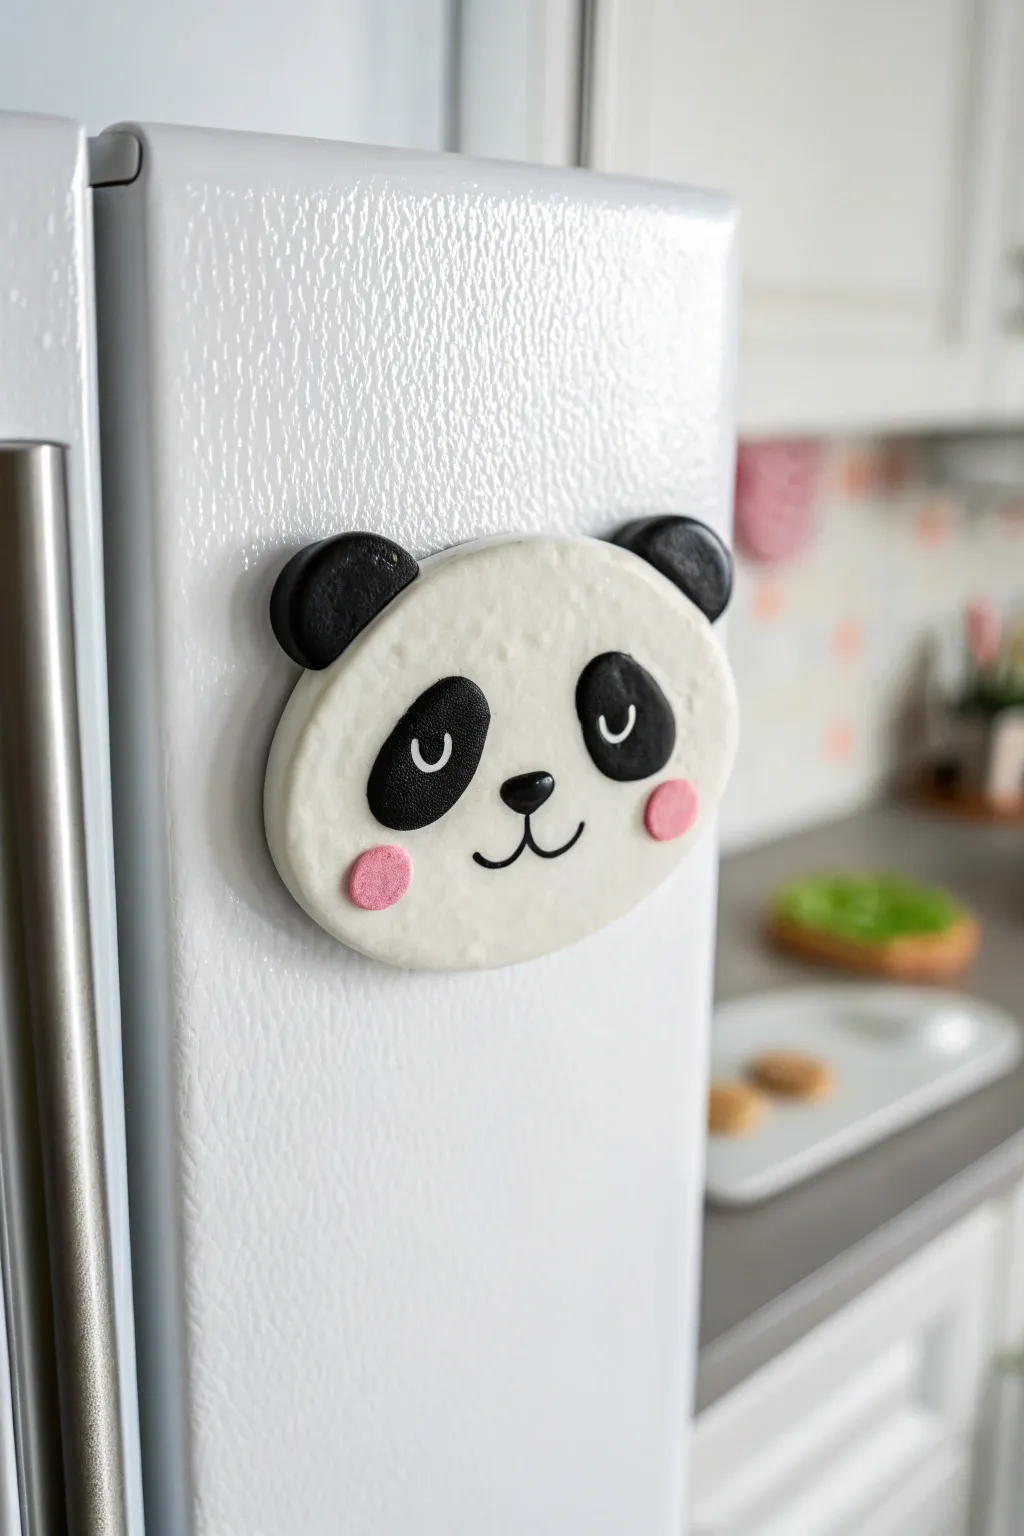
This adorable panda face magnet adds a touch of sweetness to any kitchen appliance with its soft, rounded features and cheerful expression. The flat, relief-style design is perfect for beginners, using simple shapes to create a character full of personality.
Detailed Instructions
Materials
- White polymer clay
- Black polymer clay
- Pink polymer clay (soft pastel shade)
- Circle cutter (approx. 2-3 inches)
- Small circle cutter (for cheeks and ears)
- Small ball stylus tool or dotting tool
- Acrylic rolling pin
- Blade or craft knife
- Strong craft glue or E6000
- Round ceramic or neodymium magnet
- Oven for baking
Step 1: Forming the Base
-
Condition the Clay:
Begin by kneading a portion of white polymer clay until it is soft and pliable, ensuring there are no air bubbles trapped inside. -
Roll the Slab:
Using your acrylic rolling pin, roll the white clay out into a smooth slab that is roughly 1/4 inch thick. You want it substantial enough to hold the magnet but not too heavy. -
Cut the Face Shape:
Press your large circle cutter into the clay to create a perfect round disc. If you prefer the slightly oval shape seen in the photo, gently compress the circle from the top and bottom after cutting to widen it slightly. -
Smooth the Edges:
Run your finger lightly around the cut edge of the white clay to soften the sharp angle left by the cutter, giving it a more finished look.
Step 2: Adding Features
-
Create the Ears:
Condition a small amount of black clay and roll it to the same thickness as the face. Use the smaller circle cutter to cut two circles. -
Attach the Ears:
Cut a small sliver off the bottom of each black circle so they sit flush against the curve of the head. Press them firmly against the top left and right of the white face base, blending the seam slightly on the back for strength. -
Shape the Eye Patches:
Roll two small balls of black clay into teardrop shapes. Flatten them with your finger so they are thin but opaque. -
Place the Patches:
Position the flattened teardrops onto the face, angled slightly downward towards the center to create that classic sad-but-cute panda look. -
Add the Nose:
Roll a tiny ball of black clay into a soft triangle or oval shape. Place it right in the center of the face, slightly below the eye patches. -
Detail the Eyes:
Roll two very thin, tiny snakes of white clay. Curve them into ‘U’ shapes to represent closed, smiling eyelids and press them gently onto the black eye patches.
Clean Clay Tip
Work with the white clay first, then pink, and finally black. Black pigment transfers easily to hands and tools, which can smudge your pristine white face.
Step 3: Finishing Touches
-
Sculpt the Mouth:
Make a very thin snake of black clay. Cut a small piece for the vertical line dropping from the nose, and two curved pieces for the smile. Arrange them carefully using your needle tool or knife tip. -
Add Rosy Cheeks:
Take two small pinch of pink clay and roll them into balls. Flatten them into small discs and press them onto the cheeks, just outside the eye patches. -
Texture the Surface:
I like to take a toothbrush or a crumpled ball of aluminum foil and very lightly tap the white surface of the face. This removes fingerprints and adds a subtle ‘furry’ texture. -
Bake the Piece:
Place your panda on a baking sheet lined with parchment paper or cardstock. Bake according to your specific brand of clay’s instructions (usually around 275°F for 15-30 minutes). -
Cool Down:
Let the piece cool completely inside the oven or on a wire rack before handling it, as warm clay is fragile. -
Attach the Magnet:
Once fully cooled, flip the panda over. Apply a strong dab of E6000 or super glue to the back and press your magnet firmly into place. Let it cure for 24 hours before sticking it to the fridge.
Make it a Set
Create a whole zoo! Use this same base shape but change the ear shapes and colors to make a brown bear, a koala, or even a tiger.
Your charming panda is now ready to hold up your grocery lists and favorite photos with a smile
Sweet Puppy Portrait Fridge Magnet
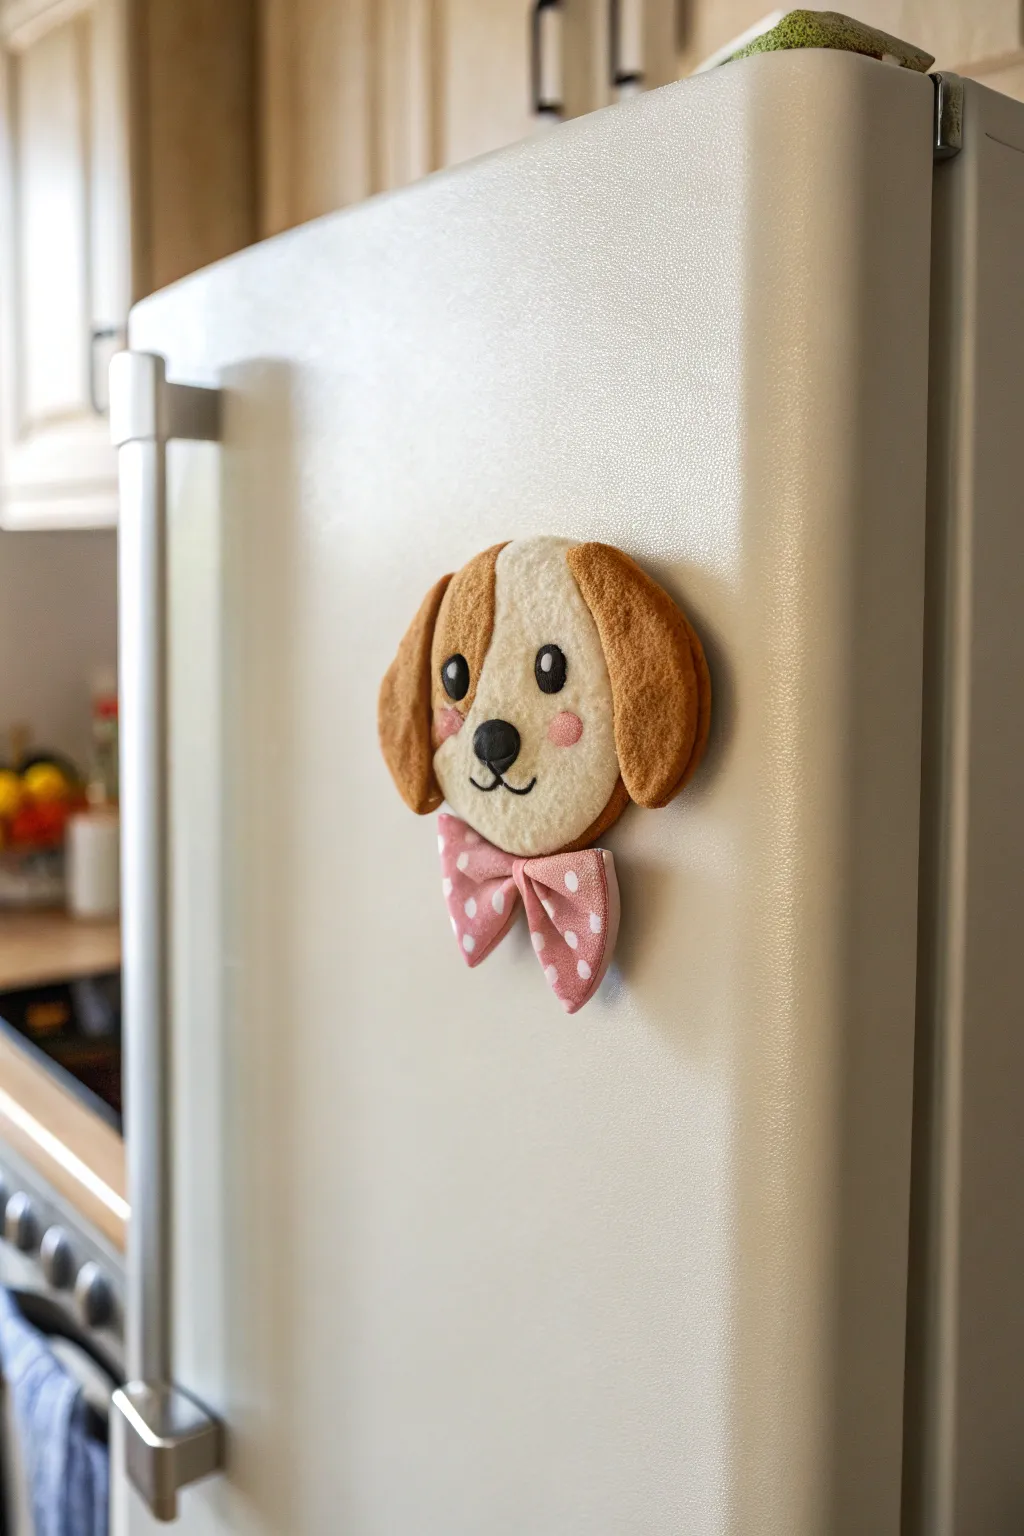
Brighten up your kitchen with this adorable puppy face magnet, complete with a dashing pink bow tie. We’ll use texture techniques to give the polymer clay a soft, felt-like appearance that adds warmth and charm.
How-To Guide
Materials
- Polymer clay (white, caramel/tan, black, pink)
- Texture sponge or stiff toothbrush
- Ball stylus tools (various sizes)
- Needle tool or toothpick
- Strong neodymium magnet
- Super glue (cyanoacrylate)
- Acrylic rolling pin
- White acrylic paint (optional for dots)
Step 1: Base and Ears
-
Condition the Clay:
Begin by conditioning your white and caramel clays separately until warm and pliable. This prevents cracking later on. -
Whiskers and Snout:
Roll a ball of white clay about the size of a walnut and flatten it into a thick oval. This will serve as the main face shape. -
Add Texture:
Gently press a texture sponge or a clean, stiff toothbrush over the entire surface of the white oval. This stippling effect creates the fuzzy, fabric-like finish that makes this puppy so cute. -
Form the Ears:
Take two equal portions of caramel clay and shape them into teardrops. Flatten them slightly, keeping them thick enough to look plush. -
Attach and Texture Ears:
Press the ears onto the sides of the white face. Use your texturing tool again on the brown clay to blend the seam slightly and match the finish of the face. -
Ear Details:
For added dimension, I like to roll a very thin snake of caramel clay and outline the outer edge of each ear, blending the inside edge down. Texture this rim as well.
Baby Powder Secret
Dust your texture sponge with cornstarch or baby powder before pressing into the clay. This prevents the sponge from sticking and pulling up the clay.
Step 2: Face Details
-
Create Eye Sockets:
Use a large ball tool to gently impress two shallow divots where the eyes will go. -
Add the Brow Patch:
Take a small piece of caramel clay, flatten it very thin, and shape it to cover the left eye area (your left) like a patch. Press it gently onto the face and re-texture. -
Place the Eyes:
Roll two small balls of black clay. Flatten them slightly and press them into the eye sockets. Add tiny specks of white clay to each eye for a reflective highlight. -
Nose Job:
Form a soft triangle from black clay for the nose. press it into the center of the face, slightly lower than the eyes. -
Mouth and Cheeks:
Use a needle tool or knife to gently incise a ‘J’ shape curving left and right from the bottom of the nose to create the smile. Add two tiny flattened circles of pink clay for rosy cheeks.
Step 3: The Bow Tie
-
Shape the Bow Wings:
Roll out pink clay into a small sheet. Cut two triangles with rounded corners. Pinch the pointed ends together to form the sides of the bow. -
Center Knot:
Place a small strip of pink clay over the pinched center to create the knot. -
Add Polka Dots:
Roll extremely tiny balls of white clay and press them flat onto the pink bow. Alternatively, you can paint these on after baking. -
Attach Bow:
Press the finished bow tie firmly against the bottom of the puppy’s chin.
Make it a Breed
Customize the ear shape and color! Use black clay with pointy ears for a Boston Terrier, or grey with folded ears for a Schnauzer.
Step 4: Baking and Finish
-
Insert Magnet:
Flip the puppy over. Press your magnet into the back to create an indentation, then remove it. This ensures a flush fit later. -
Bake:
Bake the piece according to your clay manufacturer’s instructions (usually 275°F/135°C for 15-30 minutes). Let it cool completely. -
Secure Magnet:
Place a drop of super glue into the indentation you made earlier and press the magnet in. Hold for 30 seconds to bond.
Now your fridge has a loyal new guardian ready to hold up your grocery lists


What Really Happens Inside the Kiln
Learn how time and temperature work together inside the kiln to transform clay into durable ceramic.
Sunflower Bloom Fridge Magnet
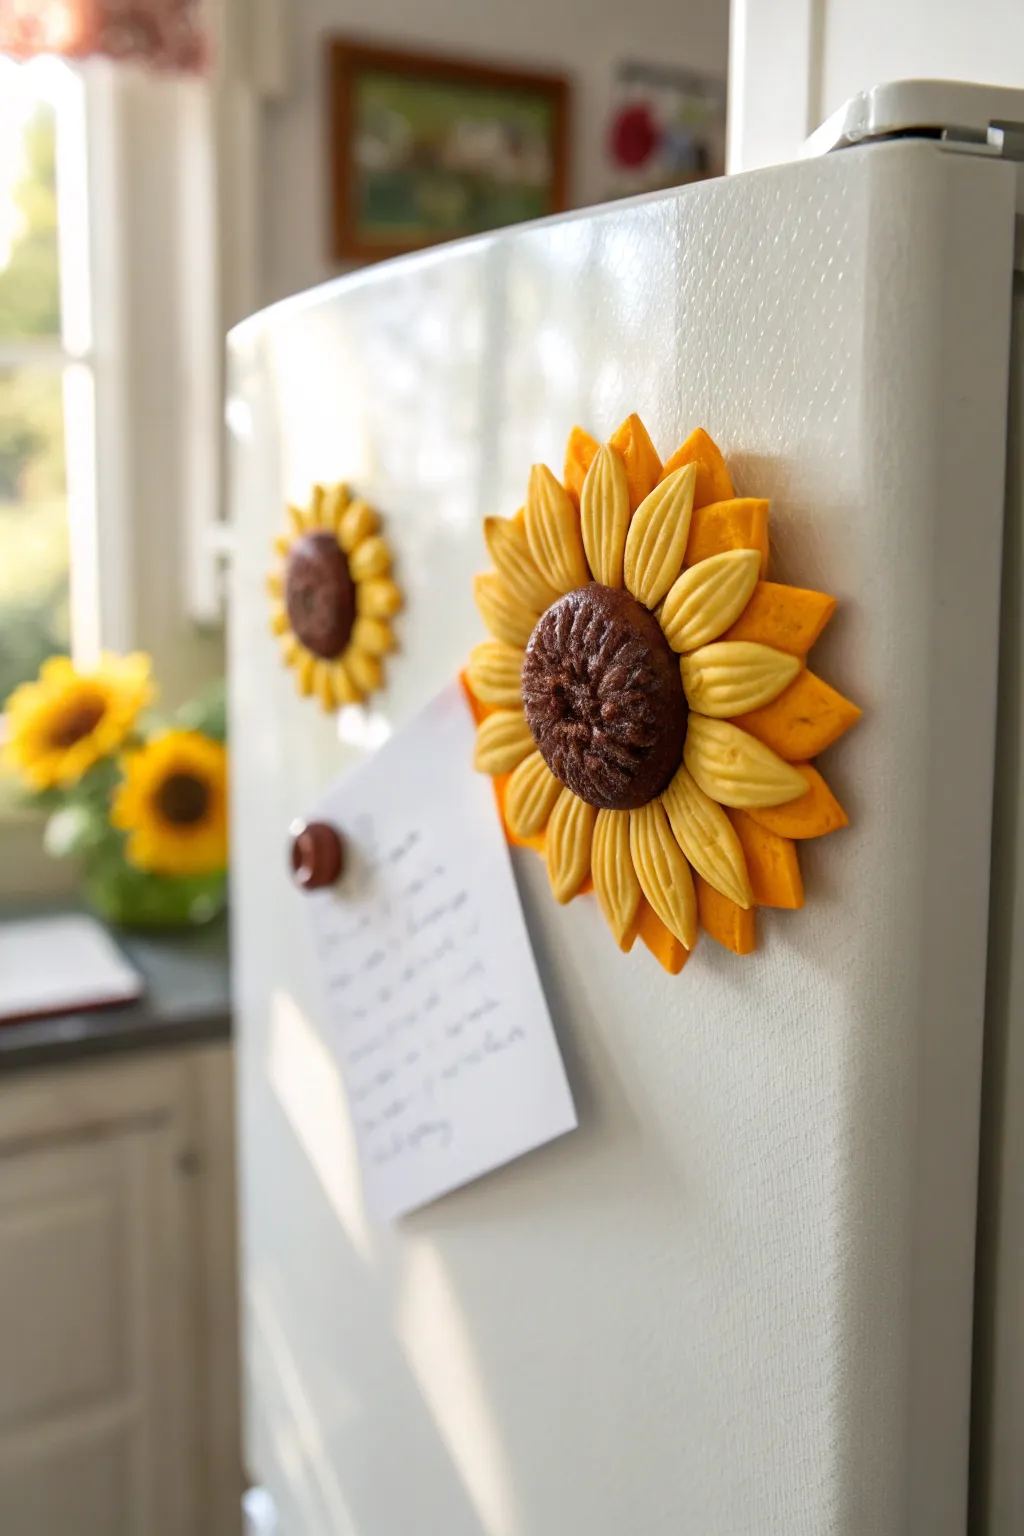
Brighten up your kitchen with this sunny, multi-layered sunflower magnet. Featuring textured petals and a realistic seed center, this durable polymer clay piece adds a touch of summer warmth to any magnetic surface.
Step-by-Step
Materials
- Polymer clay in dark brown
- Polymer clay in light yellow
- Polymer clay in golden yellow/orange
- Needle tool or toothpick
- Round clay cutter (approx. 1.5 inches)
- Small ball tool or texturing sponge
- Strong craft glue or E6000
- Round ceramic or neodymium magnet
- Non-stick work surface
- Oven/toaster oven for baking
Step 1: Creating the Base Layers
-
Prepare the workspace:
Begin by cleaning your work surface thoroughly to prevent dust from sticking to the light yellow clay. -
Condition the clay:
Knead each color of clay separately until it is soft, pliable, and easy to shape. -
Form the backing:
Roll out a small amount of golden yellow or scrap clay into a flat disk about 2 inches in diameter to serve as the structural base for your flower. -
Make the outer petals:
Roll the golden orange clay into a sheet about 1/8 inch thick. -
Cut triangular shapes:
Cut roughly 12-14 elongated triangles for the bottom layer of petals. These should be wider at the base and pointed at the tip. -
Attach outer petals:
Press these orange petals onto the outer rim of your base disk, overlapping them slightly so no gaps show.
Step 2: Sculpting the Details
-
Pre-shaping inner petals:
For the top layer, roll the light yellow clay into about 12 small balls of equal size. -
Forming teardrops:
Roll each yellow ball into a teardrop shape, flattening it gently between your fingers. -
Adding petal texture:
Using a needle tool, press three distinct vertical lines down the center of each yellow petal to mimic the veins shown in the photo. -
Arranging top petals:
Place these textured yellow petals in a circle on top of the orange layer, spacing them so they sit between the gaps of the petals below. -
Create the center:
Roll a ball of dark brown clay, flattening it slightly until it fits perfectly in the negative space in the center of your petals. -
Texture the seeds:
I like to use a ball tool or a crumpled piece of aluminum foil to stipple the surface of the brown center, giving it a rough, seed-like texture. -
Secure the center:
Press the textured brown disk firmly into the center of the flower, ensuring it bonds with the inner edges of the yellow petals.
Texturing Trick
For a hyper-realistic seed center, press a piece of coarse sandpaper or a stiff toothbrush into the brown clay before baking.
Step 3: Baking and Assembly
-
Final check:
Look over the sunflower for any fingerprints and smooth them out gently before baking. -
Bake the clay:
Bake the flower according to your polymer clay package instructions (usually 275°F/135°C for 15-30 minutes). -
Cool down:
Allow the clay to cool completely in the oven or on a wire rack to ensure durability. -
Attach the magnet:
Apply a strong dab of E6000 or heavy-duty glue to the back of the clay flower. -
Press and hold:
Press your magnet firmly into the glue and let it cure for at least 24 hours before placing it on the fridge.
Add Some Sparkle
Dust the petals with gold mica powder before baking to give your sunflower a subtle, sun-kissed shimmer.
Now you have a cheerful bloom that will never wilt, perfect for holding up your favorite photos and notes on the fridge
Sea Turtle Fridge Magnet With Patterned Shell
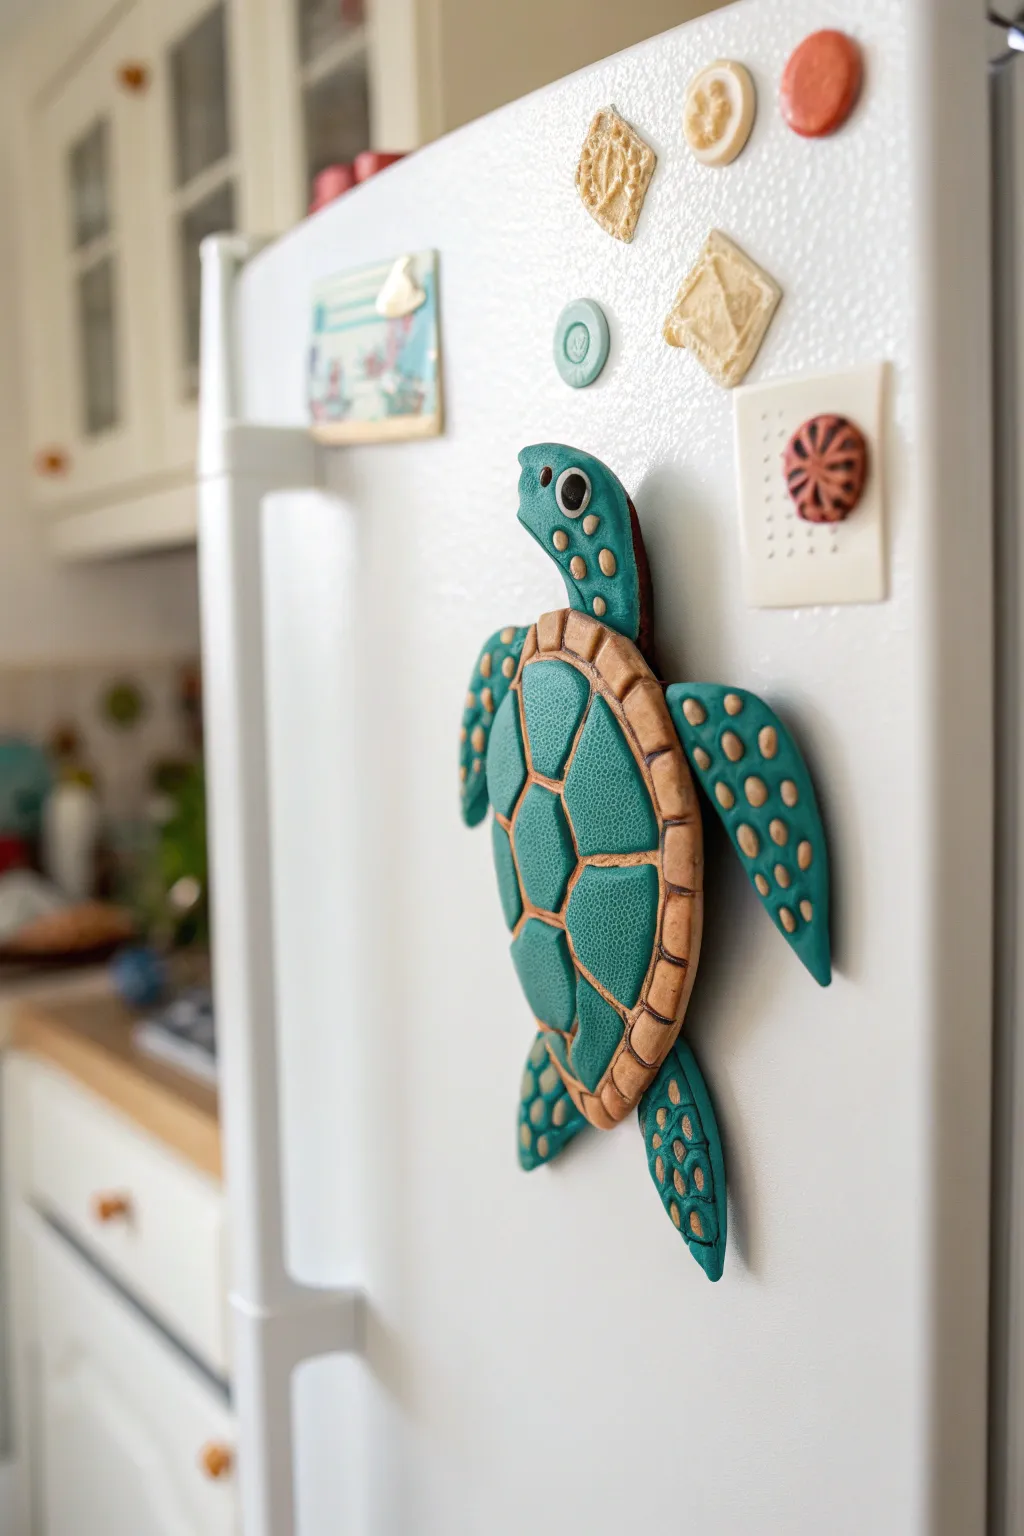
Bring the ocean into your kitchen with this charming sea turtle magnet, featuring a unique pebbled texture that mimics stamped leather. The distinct teal and tan color palette gives it a rustic yet playful vibe perfect for holding up your favorite photos.
Step-by-Step
Materials
- Teal polymer clay (leather-effect or standard)
- Tan or beige polymer clay
- Black and white polymer clay (tiny amounts for eyes)
- Texture sponge or rough sandpaper
- Clay knife or scalpel
- Needle tool
- Small round cutter or drinking straw
- Strong round craft magnet
- Super glue or E6000
- Acrylic roller
- Oven and baking tray
Step 1: Shaping the Head and Flippers
-
Condition the clay:
Start by thoroughly conditioning your teal clay until it is soft and pliable. If you are using specialist leather-effect clay, this is crucial for flexibility later. -
Form the head:
Roll a small ball of teal clay and shape it into a tear-drop, slightly flattening it. Gently pinch the narrower end to create a neck that will tuck under the shell. -
Create flippers:
Roll four teardrop shapes for the flippers—two larger ones for the front and two smaller ones for the back. Flatten them to about 3mm thickness. -
Add texture:
Press a coarse texture sponge or rough sandpaper firmly against the surface of all teal parts to create that signature pebbled, leather-like finish. -
Decorate flippers:
Roll tiny balls of tan clay and press them onto the flippers. Use your needle tool to poke a small indentation into the center of each tan dot.
Uneven Texture?
If the leather texture isn’t showing up well, try letting the clay ‘rest’ and cool for 10 minutes before texturing. Warm clay can sometimes bounce back and lose detail.
Step 2: Constructing the Textured Shell
-
Base layer:
Create an oval base from scrap clay or a flattened sheet of teal clay roughly the size you want the final shell to be. -
Make shell plates:
Roll out a sheet of teal clay. Cut irregular geometric shapes—some pentagons and misshapen squares—to serve as the scutes (shell plates). -
Texture the plates:
Before attaching them, remember to texture each cut piece with your sponge or sandpaper to match the skin. -
Arrange the shell:
Place the teal plates onto the base, leaving noticeable gaps between them. These gaps will be filled with the tan borders. -
Create the borders:
Roll thin snakes of tan clay. Lay these snakes into the gaps between the teal plates. -
Refine the border:
Use a tool to gently flatten the tan snakes so they sit flush with the teal plates. I like to then re-texture the whole surface lightly to unify the look. -
Edge detail:
For the outer rim of the shell, use a slightly thicker snake of tan clay. Press vertical indentations all around this rim using a dull knife edge to simulate segmentation.
Make It Glossy
For a ‘wet’ look, brush a thin layer of gloss glaze strictly over the teal shell plates after baking, leaving the tan grout lines matte for contrast.
Step 3: Assembly and Finishing
-
Attach components:
Arrange your head and flippers on your work surface. Place the finished shell on top, pressing down gently to bond the clay parts together. -
Add the eye:
Flatten a tiny circle of white clay and place it on the side of the head. Add a smaller black pupil and a miniscule white highlight dot for life. -
Final texture check:
Inspect your turtle for any fingerprints. If you find any, lightly tap the area with your texture sponge to disguise them. -
Bake:
Bake the turtle according to your package instructions, usually around 230°F to 265°F (110°C to 130°C) for 30 minutes. Let it cool completely. -
Attach magnet:
Flip the cooled turtle over. Place a dab of strong glue on the back center and press your round magnet firmly into place.
Now your little leather-look swimmer acts as a trusty guardian for your grocery lists and photos

TRACK YOUR CERAMIC JOURNEY
Capture glaze tests, firing details, and creative progress—all in one simple printable. Make your projects easier to repeat and improve.
Abstract Terrazzo Fridge Magnet Tiles
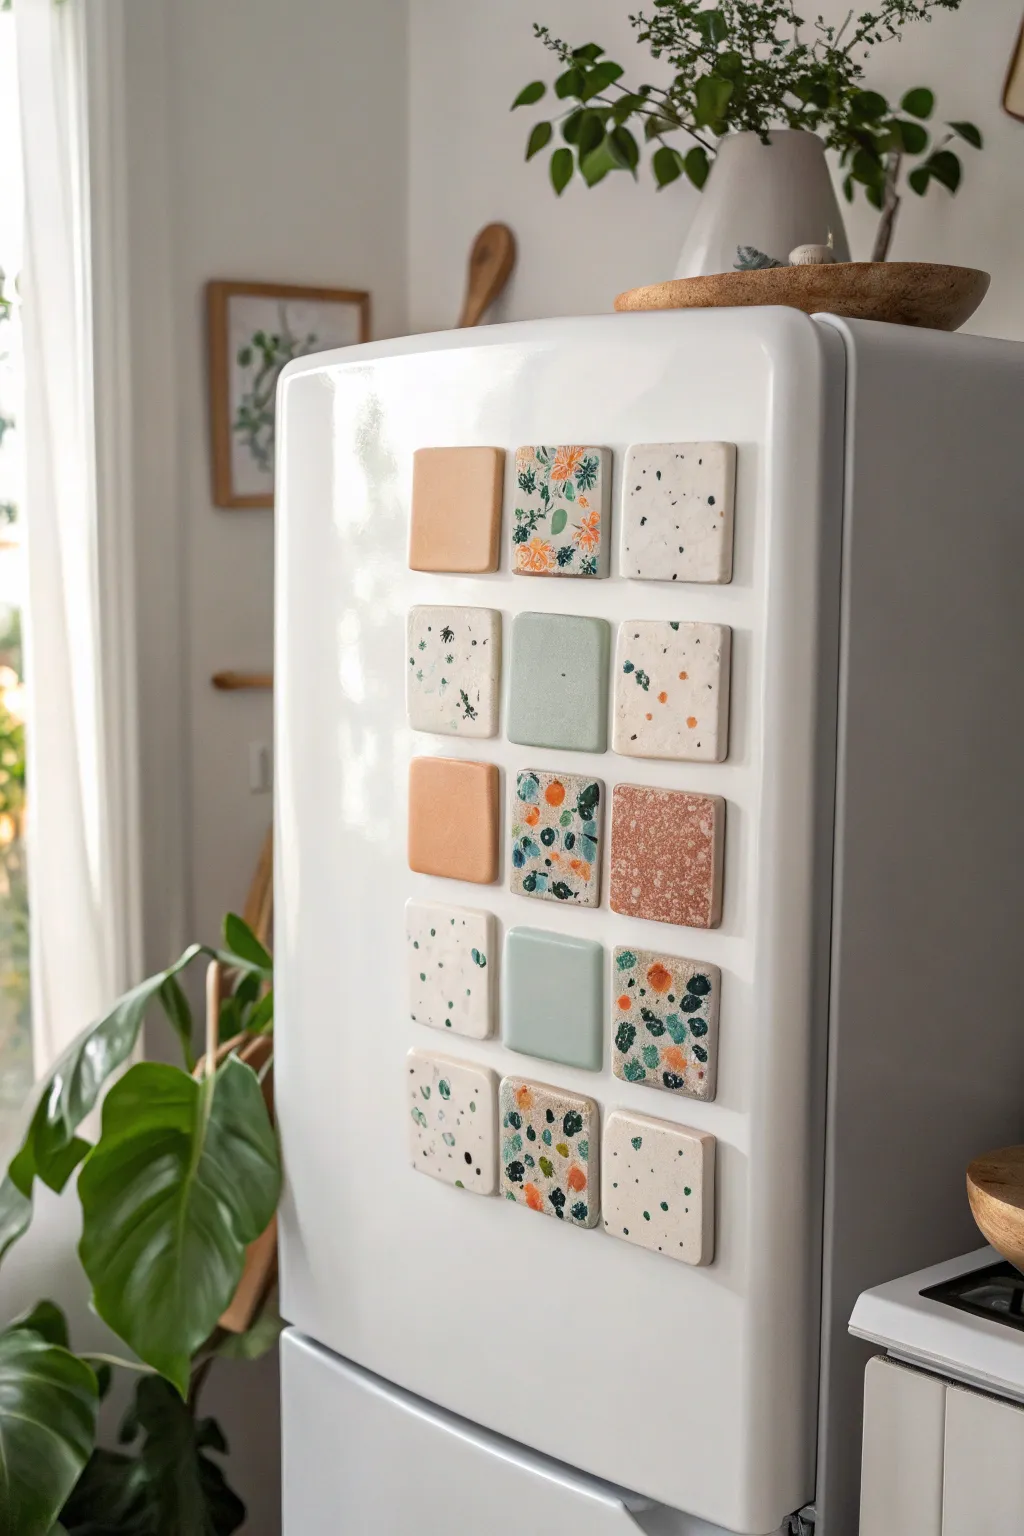
Transform your fridge into a modern art display with these chic, polymer clay square magnets that mimic the look of expensive terrazzo and ceramic tiles. Their soft color palette of peach, sage, and cream, combined with playful speckled patterns, adds a sophisticated yet handmade touch to any kitchen.
Detailed Instructions
Materials
- Polymer clay (white, beige, peach, terracotta, sage green, dark green, black)
- Rolling pin or pasta machine
- Square cookie cutter (approx. 2 inches)
- Blade or craft knife
- Parchment paper or ceramic tile for baking
- Sandpaper (various grits from 400 to 1200)
- Oven
- Strong adhesive (E6000 or super glue)
- Round ceramic or neodymium magnets
- Matte or satin polymer clay varnish (optional)
Step 1: Prepping the Base Colors
-
Condition the clay:
Start by thoroughly kneading your white or beige clay to create the base color. It needs to be soft and pliable to accept the terrazzo chips without cracking. -
Roll out the sheets:
Roll your base colors out to a thickness of about 1/4 inch (6mm). You want these to have a substantial, tile-like feel, not be paper-thin. -
Create solid tiles:
Cut out a few plain squares using your cookie cutter from the peach, sage green, and beige slabs. These will act as calming visual breaks in your final grid pattern.
Step 2: Creating the Terrazzo Patterns
-
Chop the chips:
Take small amounts of your accent colors (terracotta, dark green, sage, peach, and black) and roll them into very thin sheets. Bake these thin sheets for just 5-10 minutes to harden them slightly, then chop them into irregular, jagged fragments with your blade. -
Mix the classic terrazzo:
For the classic speckled look, press a variety of the chopped colored chips onto a raw sheet of white or cream clay. -
Embed the chips:
Use your rolling pin to firmly roll over the sheet again. This pushes the chips down so they become flush with the surface rather than sitting on top. -
Make the ‘floral’ terrazzo:
I noticed the image features a unique pattern that looks almost floral. To achieve this, take tiny balls of green clay and smudge them onto a beige base to look like leaves, then press small jagged orange chips nearby to suggest flowers. -
Create the high-contrast mix:
For the darker speckled tiles, use a heavier hand with dark green and black chips on a white background, ensuring you have a good distribution of large and small flecks. -
Smooth the surface:
Run your roller over all the patterned slabs one final time to ensure they are perfectly flat and even.
Clean Cuts Only
Before cutting your squares, cover the clay sheet with plastic wrap. Press the cutter through the plastic for soft, rounded pillow-like edges that require almost no sanding.
Step 3: Cutting and Baking
-
Cut the patterned squares:
Position your square cutter over the most interesting sections of your terrazzo slabs and press down firmly to cut your tiles. -
Soften the edges:
Gently tap the edges of each square with your finger to remove the sharp cut line, giving it a more molded, ceramic tile appearance. -
Bake the tiles:
Place all your squares on a parchment-lined baking sheet or ceramic tile. Bake according to your clay package instructions (usually 275°F/135°C for 15-30 minutes depending on brand). -
Cool under weight:
As soon as you remove them from the oven, place a heavy book on top of them while they cool. This helps ensure they stay perfectly flat.
Add Some Sparkle
Mix small amounts of gold leaf or translucent clay into your terrazzo chip pile. When sanded, these inclusions add depth and a hint of high-end mineral shine.
Step 4: Finishing Touches
-
Sand for stone effect:
Once cool, wet-sand the surface of the terrazzo tiles. Start with 400 grit and work up to 1200 grit to reveal the true depth of the chips and create a smooth, stone-like finish. -
Buff or seal:
Wipe away any dust. You can leave them matte for a natural stone look, or apply a thin layer of satin varnish if you prefer a glazed ceramic look. -
Attach the magnets:
Apply a dab of strong adhesive to the back of each tile and press a round magnet firmly into the center. -
Cure the glue:
Let the glue cure completely (usually 24 hours) before placing them on your fridge to prevent sliding.
Now you can arrange your beautiful custom grid and enjoy a piece of handmade modern art every time you reach for a snack
Marbled Initial Letter Fridge Magnets
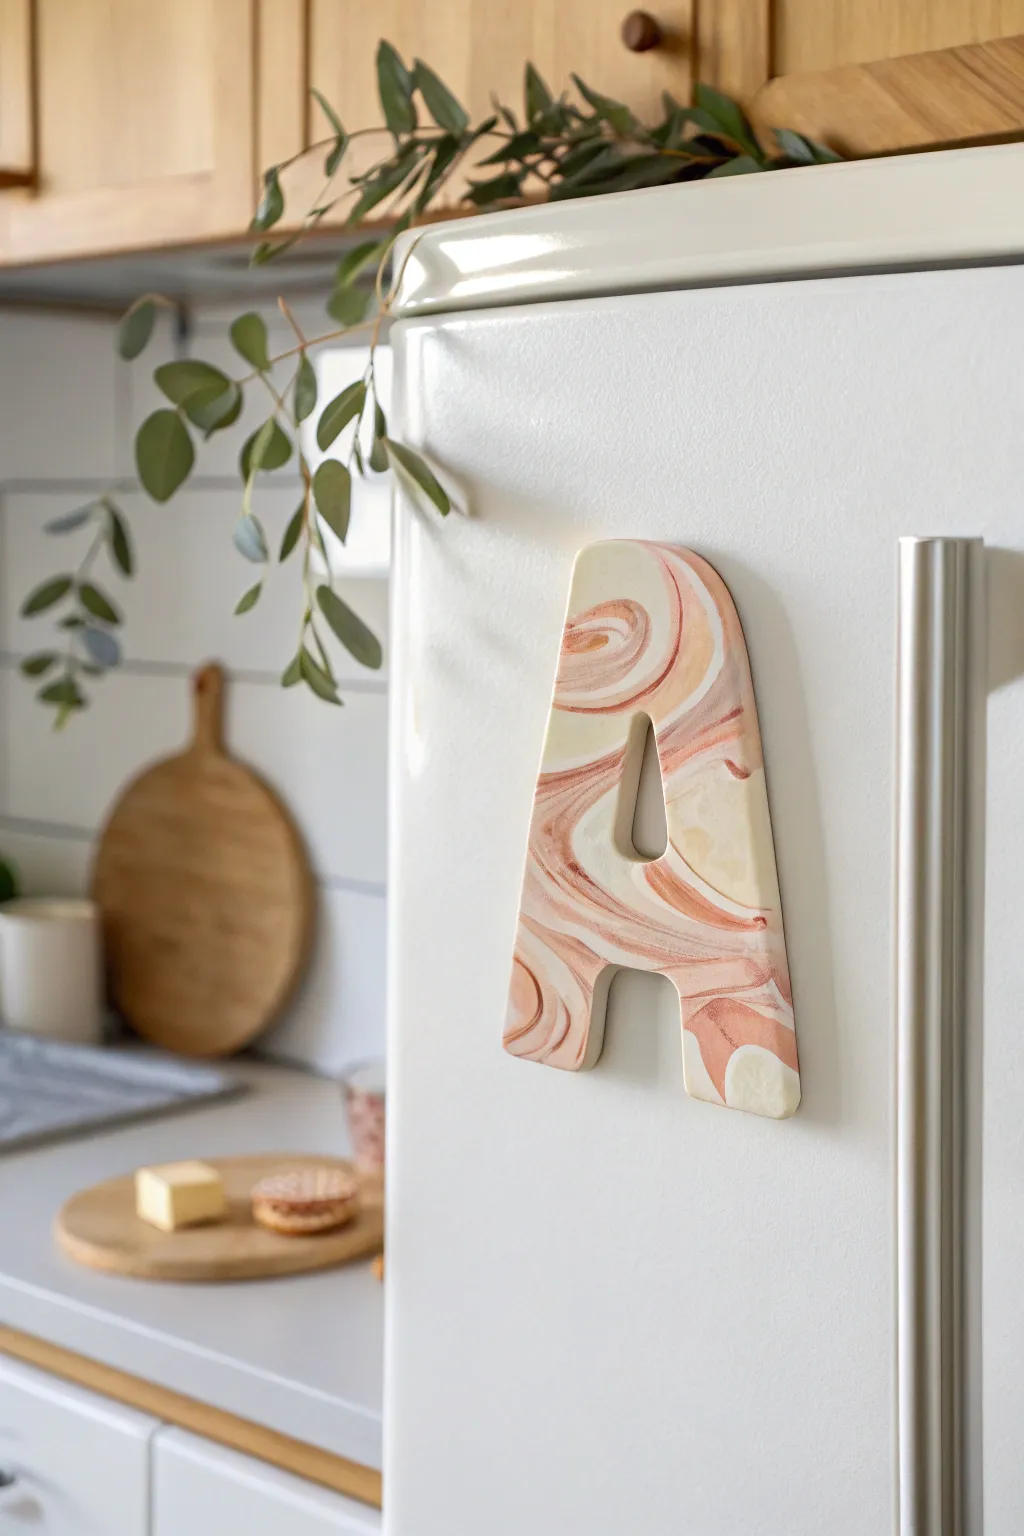
Transform simple blocks of clay into a personalized piece of art for your kitchen with this marbling technique. The finished result is a chunky, sturdy letter featuring elegant swirls of cream, peach, and terracotta that mimics polished stone.
Step-by-Step
Materials
- Polymer clay (white, beige, terracotta/brown)
- Acrylic rolling pin or pasta machine
- Large printed letter template (san-serif font works best)
- Craft knife or scalpel
- Smooth ceramic tile or glass work surface
- Strong round magnets
- Super glue or E6000
- Fine grit sandpaper (wet/dry 400-1000 grit)
- Matte or satin polymer clay glaze (optional)
Step 1: Preparing the Clay
-
Condition the white base:
Start by taking a large block of white or cream polymer clay. Knead it thoroughly in your hands until it becomes soft, warm, and pliable. This will form the bulk of your letter. -
Prepare accent colors:
Condition smaller amounts of beige and terracotta clay. Roll these into thin ropes or snakes, varying the thickness slightly for a more organic look later. -
Create the color stack:
Flatten your white clay into a thick log. Lay the colored ropes lengthwise along the log, spacing them out unevenly. I like to twist a few ropes together before placing them to create finer lines.
Step 2: Marbling and Rolling
-
Twist the log:
Grasp both ends of your clay log and twist in opposite directions like a candy wrapper. Continue twisting until tight spirals form and the colors begin to merge. -
Fold and roll:
Fold the twisted log in half and roll it smooth again. Repeat this twist-and-fold process 2-3 times, but be careful not to over-mix, or the colors will turn muddy instead of distinctly marbled. -
Form the slab:
Ball the clay up and place it on your work tile. Using your acrylic roller, flatten it into a slab about 1/4 inch (6mm) thick. The thicker slab gives the magnet that substantial, quality feel shown in the photo. -
Check the pattern:
Examine your slab. If you don’t love the surface pattern, you can slice off a thin layer from the top using a tissue blade to reveal the swirl design underneath.
Air Bubble Blues?
If you see a bubble while rolling, pierce it gently with a needle tool and smooth the air out with your finger immediately to prevent bumps after baking.
Step 3: Cutting and Finishing
-
Place the template:
Print and cut out a large letter ‘A’ (or your chosen initial) from cardstock. Place it gently onto the most attractive section of your marbled slab. -
Trace and cut:
Holding the craft knife vertically, carefully trace around the template. Use steady, continuous strokes for straight lines to avoid jagged edges. -
Refine the inner cuts:
For letters with holes (like A, B, or O), carefully cut the interior shape. Use the tip of your blade to lift the excess clay out gently without distorting the letter’s walls. -
Soften the edges:
Before baking, run your finger lightly along the cut edges to smooth out any sharpness or burrs left by the knife. This saves sanding time later. -
Bake the clay:
Bake the letter on the tile according to your clay package instructions (usually 275°F/130°C for 15-30 minutes depending on thickness). Let it cool completely before moving it. -
Sand for smoothness:
Once cool, use fine-grit sandpaper with a little water to buff the edges and surface. This removes fingerprints and gives the clay a professional, stone-like finish. -
Attach the magnets:
Flip the letter over. Apply a dot of super glue or E6000 to the back and press two strong round magnets into place—one at the top and one at the bottom for stability.
Make it Shine
Add gold leaf flakes into the marbling mix before the twisting phase. The metallic flecks will get trapped in the swirls for a chic, high-end finish.
Pop your new custom initial onto the fridge and enjoy the organized aesthetic it brings to your kitchen space
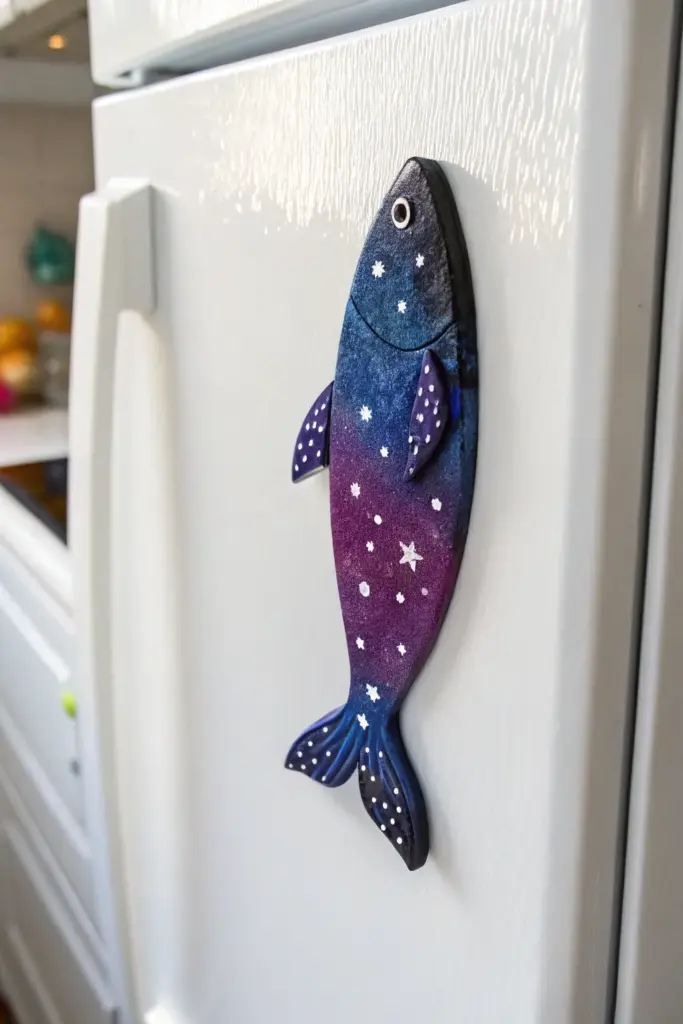
Galaxy Fish Fridge Magnet Silhouettes
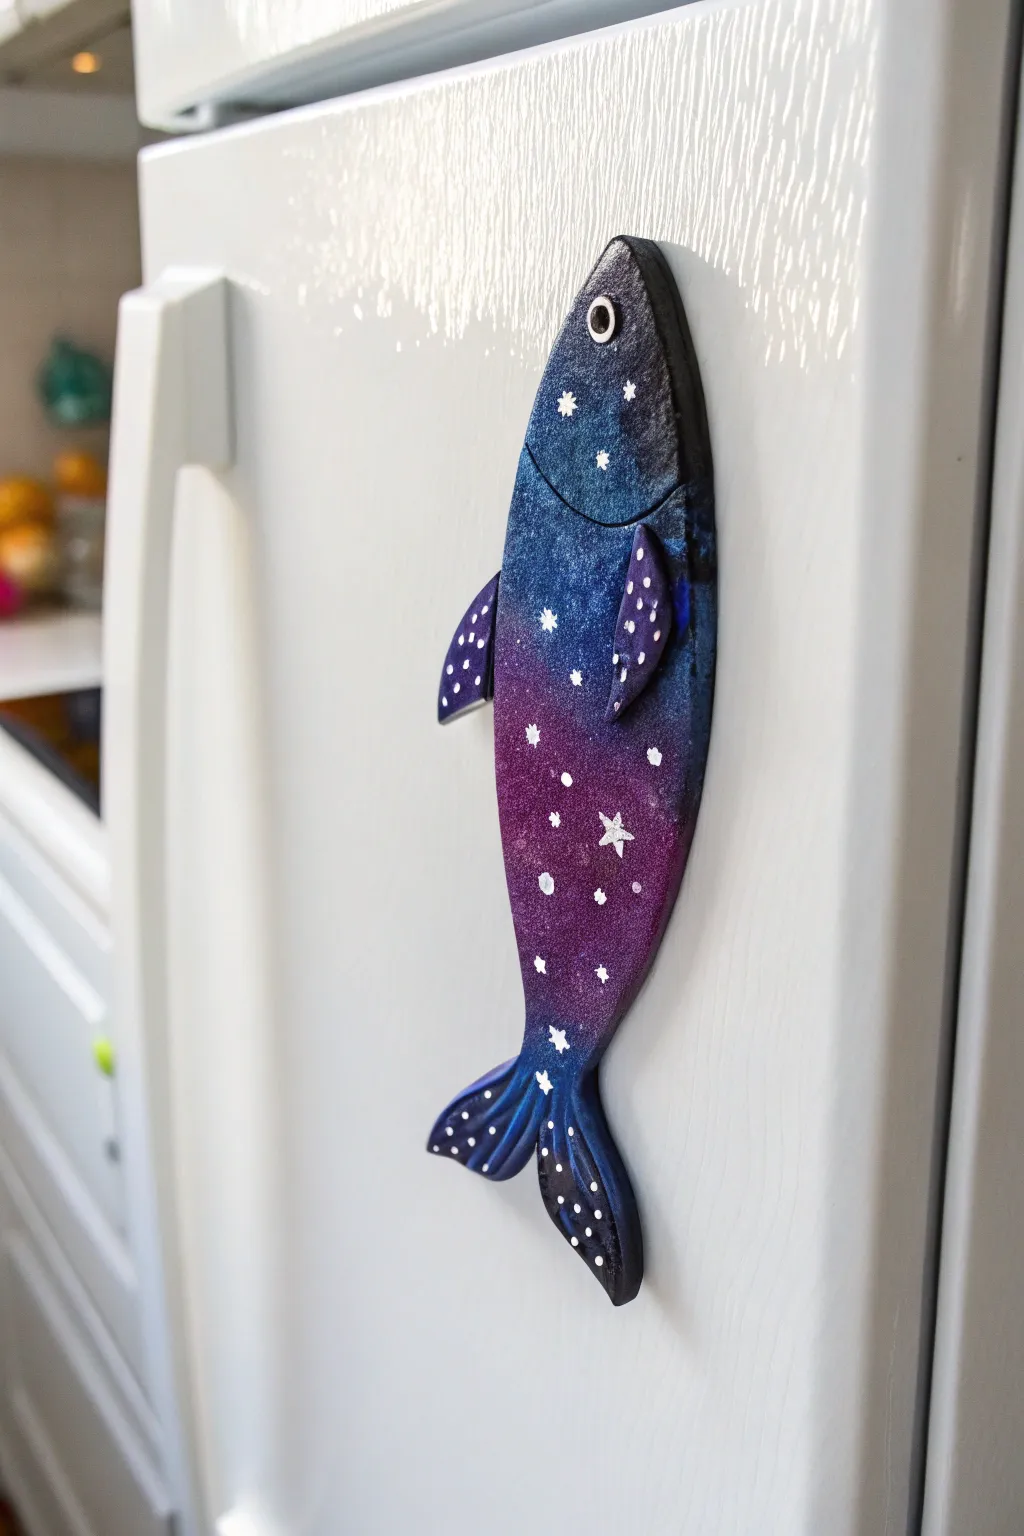
Bring the mysteries of deep space to your kitchen with this galaxy-themed fish magnet. The project combines simple sculpting with a fun, layered painting technique to achieve that stunning nebula effect.
How-To Guide
Materials
- White or grey polymer clay
- Fish silhouette template (paper)
- Small rolling pin
- X-Acto knife or clay blade
- Googly eye or sculpted clay eye
- Acrylic paints (black, dark blue, purple, magenta, white)
- Small sponge pieces
- Fine detail paintbrush
- Toothpick or dotting tool
- Strong craft glue (E6000)
- Round ceramic magnet
- Gloss varnish (optional)
Step 1: Sculpting the Base
-
Prep the Clay:
Condition your polymer clay by kneading it in your hands until it is soft and pliable. Roll it out into a slab that is approximately 1/4 inch thick to ensure durability. -
Cut the Shape:
Place your paper fish template onto the clay. Use your craft knife to carefully trace around the perimeter, cutting out the main body shape. Smooth the raw edges with your fingertip to remove any harsh cuts. -
Add Dimension:
Using a modeling tool or the back of your knife, gently press an curved line near the front to define the gill area, separating the head from the body. -
Sculpt the Fins:
Form two small teardrop shapes from leftover clay for the side fins. Press these onto the sides of the fish body. You can blend the clay seams or leave them distinct for a layered look. -
Detail the Tail:
Create texture on the tail and fins by using a needle tool or toothpick to press in shallow lines that mimic the ribbing of fish fins. -
Create the Eye:
If you are using a sculpted eye, roll a tiny ball of clay, press it flat onto the head area, and indent the center. If using a googly eye later, just skip this step. -
Bake:
Place your fish on a parchment-lined baking sheet. Bake according to your customized clay package instructions (usually 275°F for 15-30 minutes). Let it cool completely before painting.
Step 2: Painting the Galaxy
-
Base Coat:
Paint the entire fish with a solid coat of black acrylic paint. I find this creates the best depth for the galaxy colors later. Let this dry completely. -
Sponge the Blues:
Dip a small piece of sponge into dark blue paint. Dab off the excess on a paper towel, then lightly sponge color onto the top and bottom edges of the fish, leaving some black visible. -
Add Purple Hues:
Using a clean sponge section, dab purple paint through the center of the body. Overlap slightly with the blue areas to create a blended transition. -
Highlight with Magenta:
For a vibrant pop, sponge tiny amounts of magenta or bright pink into the center of the purple sections. This adds that glowing nebula effect. -
Paint the Belly:
On the fins and the very bottom of the tail, darken the edges again with a touch of black or deep indigo to re-establish contrast. -
Detail the Eye:
Paint the sculpted eye rim silver or white, and the center black. If you skipped the sculpted eye, glue on your googly eye or flat-back gem now.
Paint Lifting?
If the sponge pulls up the base layer of paint, ensure the black coat is 100% dry and use lighter dabbing pressure during the sponging phase.
Step 3: Adding Starts & Finish
-
Create Distant Stars:
Load an old toothbrush or stiff brush with watered-down white paint. Run your thumb over the bristles to flick a fine mist of white speckles across the dryer paint. -
Hand-paint Larger Stars:
Using your finest detail brush, paint a few small 5-point stars in white. Cluster them slightly near the lighter colored areas of the galaxy. -
Add Dot Accents:
Dip a toothpick or dotting tool into white paint and add distinct dots of varying sizes to represent planets or brighter stars, especially on the fins. -
Protect the Art:
Once the paint is bone dry, apply a coat of gloss varnish. This will seal the paint and give the galaxy surface a beautiful, glassy shine. -
Attach Magnet:
Flip the fish over. Apply a dime-sized amount of E600 strong glue to the back and press your ceramic magnet firmly into place. Let it cure for 24 hours.
Mix It Up
Try using metallic or color-shift acrylics for the nebula layers to make the galaxy effect shimmer and change color in different lighting.
Now you have a stunning piece of cosmic art ready to hold your important notes on the fridge