If you’ve ever wanted to make something small, beautiful, and genuinely giftable, polymer clay is such a sweet spot. These ideas are the kinds of projects I love recommending in the studio because they look boutique-level without needing fancy skills.
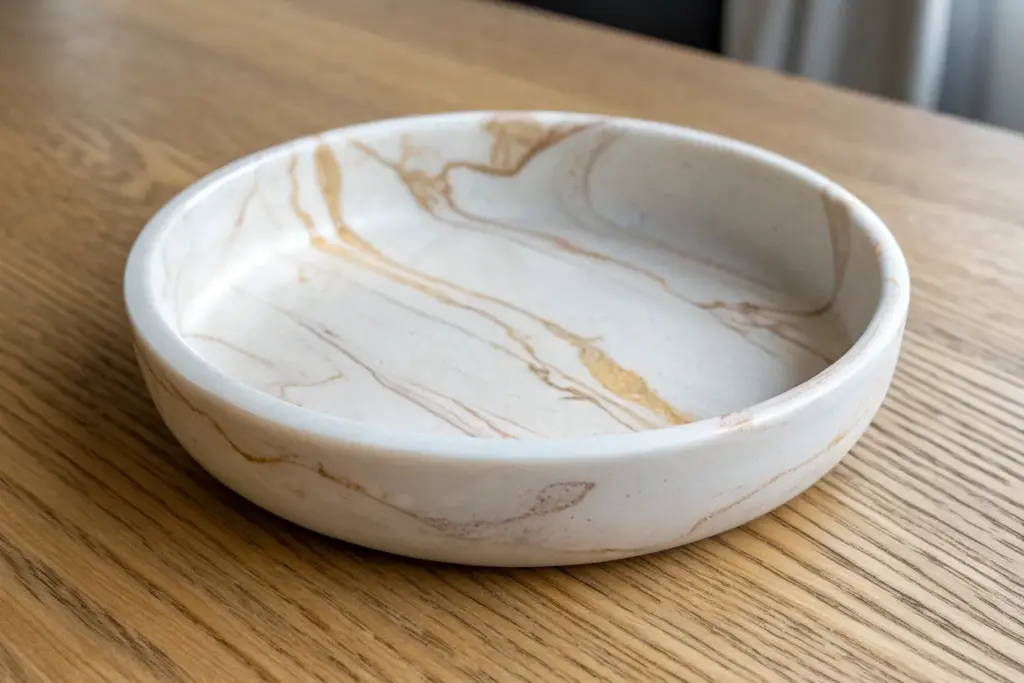
Marbled Ring Dish for Everyday Jewelry Drops
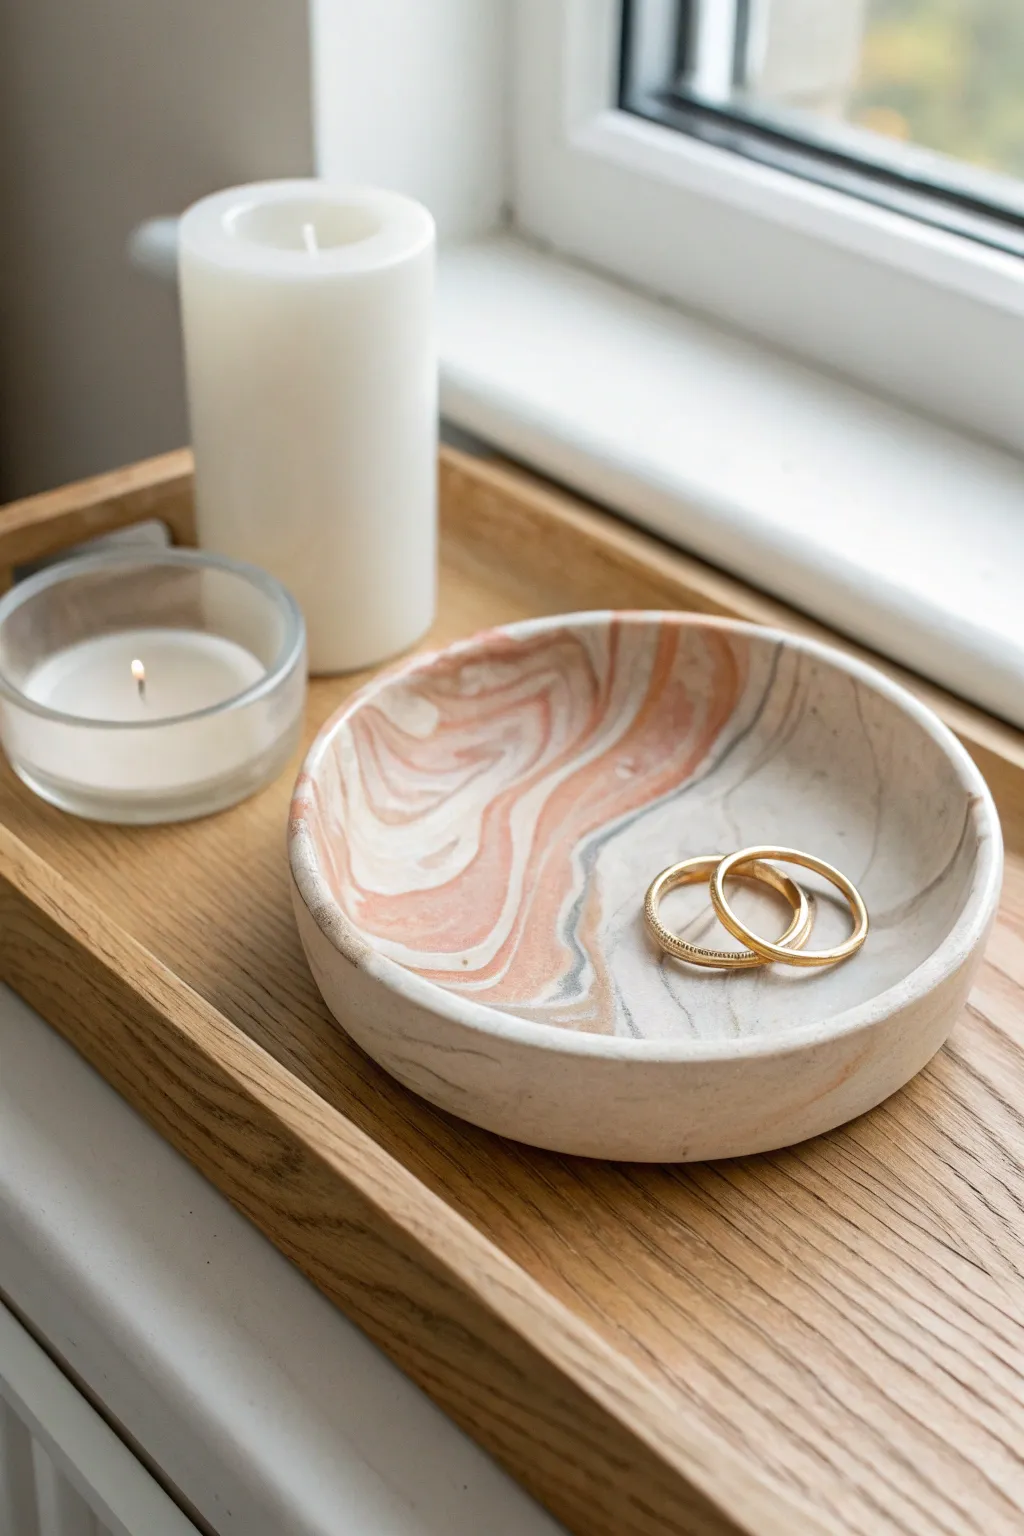
Create a sophisticated landing spot for your daily jewelry with this beautiful clay catch-all. The swirling peach, white, and soft grey marble effect looks surprisingly high-end but is simple enough for beginners to master in an afternoon.
How-To Guide
Materials
- White polymer clay (approx. 2 oz)
- Peach or terracotta polymer clay (approx. 1 oz)
- Grey polymer clay (approx. 0.5 oz)
- Acrylic rolling pin or straight glass bottle
- Circle cutter (approx. 4-5 inches) or a bowl to trace
- Oven-safe bowl (ovenproof glass or ceramic)
- Craft knife or clay blade
- Fine grit sandpaper (400-600 grit)
- Matte or satin polymer clay varnish (optional)
Step 1: Prepping the Clay
-
Condition the clay:
Start by kneading each color of clay separately until it is soft and pliable. This conditioning step is crucial to prevent cracks later on. -
Form snakes:
Roll each color into long, snake-like ropes. You’ll want the white rope to be the thickest, the peach medium-sized, and the grey the thinnest to mimic the proportions in the photo. -
Twist together:
Gather your three snakes and twist them together into one large rope. The more you twist, the more intricate your marble pattern will become. -
Fold and roll:
Fold the twisted rope in half and roll it out into a snake again. Repeat this folding and rolling process 2-3 times to blend the colors without muddying them. -
Create a ball:
Once you are happy with the swirl, roll the entire mixture into a smooth ball. Check for any air bubbles and smooth them out.
Step 2: Shaping the Dish
-
Roll out the slab:
Place the ball on a smooth surface and use your acrylic roller to flatten it into a pancake. Aim for a thickness of about 1/4 inch (6mm) for sturdy walls. -
Check the pattern:
Look closely at your rolled slab. If you don’t love the pattern, you can fold and roll it again, but be careful not to execute this too many times or the colors will turn into a solid beige. -
Cut the circle:
Place your circle cutter or an upside-down bowl onto the clay slab. Use your craft knife to trace around the edge and cut out a perfect circle. -
Smooth the edges:
Dip your finger in a tiny bit of water or baby oil and run it along the cut edge of the circle. This smooths out any jagged cuts or rough textures.
Fixing Air Bubbles
If you see a bubble while rolling, pierce it gently with a needle tool or pin, then smooth the clay over with your finger to seal the hole invisibly.
Step 3: Baking and Finishing
-
Form the curve:
Gently lift your clay circle and place it inside your oven-safe bowl. Press it down lightly so it takes the curved shape of the bowl bottom. -
Bake the clay:
Place the bowl with the clay inside into a preheated oven. Bake according to your specific clay package instructions—usually around 275°F (135°C) for 15-30 minutes. -
Cool completely:
Remove the bowl from the oven and let the clay cool down completely inside the mold. Removing it while hot can cause the dish to warp. -
Pop it out:
Once cool, carefully pop the clay dish out of the bowl. It should release easily. -
Sand the rim:
Taking your fine-grit sandpaper, lightly sand the top rim of the dish to ensure it is perfectly flat and smooth to the touch. -
Optional sealing:
If you want a bit of shine or extra protection, apply a thin layer of matte or satin varnish. I usually skip this for a natural stone look, but it does help with durability.
Add a Gold Rim
After baking, use a fine-tip gold paint pen to color just the top edge/rim of the dish. This adds a chic, expensive-looking detail.
Place this lovely marbled dish on your nightstand or by the kitchen sink to keep your favorite rings safe


Modern Geometric Dangle Earrings in Custom Colors
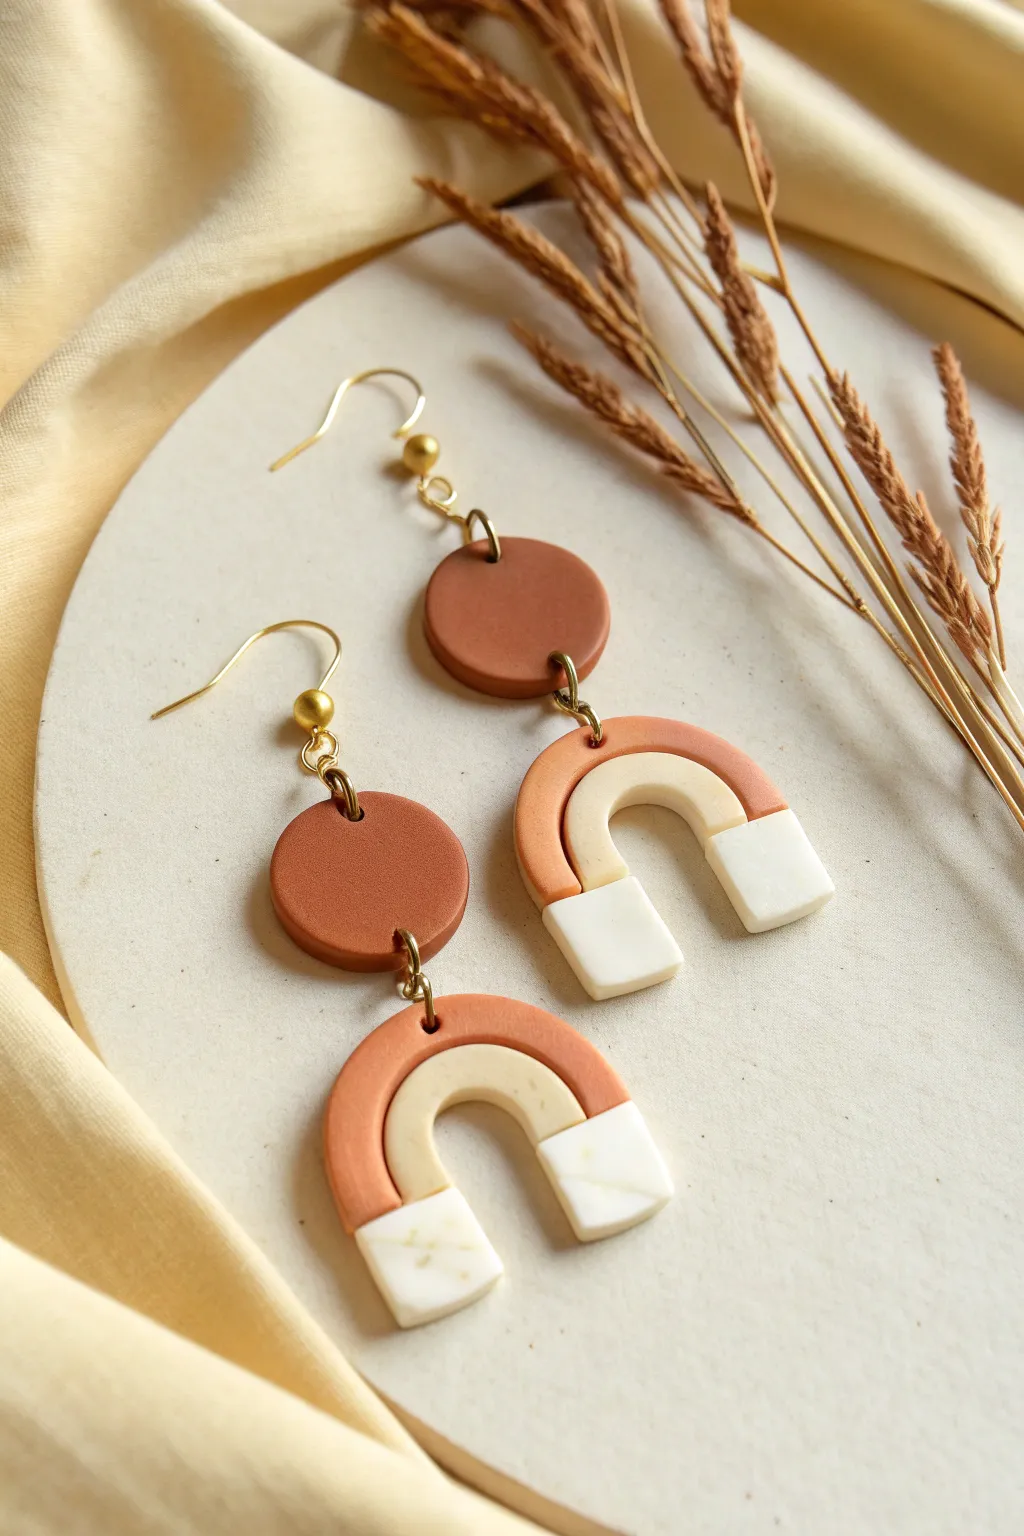
These trendy dangle earrings combine warm terracotta tones with soft creams and whites for a modern, earthy aesthetic. The geometric design features a classic circle stud connected to a multi-layered arch, making them the perfect statement piece for everyday wear.
Step-by-Step Tutorial
Materials
- Polymer clay in terracotta/burnt orange
- Polymer clay in cream or beige
- Polymer clay in white
- Translucent polymer clay (optional for marbling)
- Small circle cutter (approx. 1.5 cm)
- U-shape or arch cutter (or a craft knife and template)
- Acrylic roller or pasta machine
- Needle tool or toothpick
- Jewelry pliers (flat nose and round nose)
- Two gold earring hooks
- Four gold jump rings (6-8mm)
- Two gold ball-post studs (optional, if replacing hooks)
- Ceramic tile or baking sheet
- Oven
Step 1: Preparing the Clay
-
Condition the clay:
Start by kneading each color of polymer clay separately until they are soft and pliable. This conditioning process prevents cracking during baking. -
Create the marble effect:
For the white end pieces, take a small amount of white clay and mix in tiny flecks of translucent or light beige clay. Chop them up finely and roll them back together to create a subtle stone-like texture. -
Roll out slabs:
Using an acrylic roller or pasta machine on a medium setting, roll out your terracotta, cream, and marbled white clays into even sheets. Aim for a thickness of about 3mm for durability.
Smooth Moves
Before baking, lightly dip your finger in cornstarch or baby oil and rub it over the clay surface. This magically erases fingerprints and dust.
Step 2: Cutting the Shapes
-
Cut the circles:
Use your small circle cutter to punch out two circles from the terracotta slab. These will form the top connector piece of your earrings. -
Cut the outer arches:
From the terracotta slab, cut two large U-shapes. If you don’t have a specific cutter, you can print a paper template and trace around it with a sharp craft knife. -
Cut the inner arches:
From the cream clay, cut two slightly smaller U-shapes that will nest inside the terracotta ones. Ensure the curve matches the interior of your terracotta arch. -
Form the caps:
Cut four small rectangles from the marbled white clay. These will act as the ‘caps’ or ends for the U-shape.
Bubbles Be Gone
If you see air bubbles trapped in the clay after rolling, pierce them gently with a needle tool and smooth the air out with your finger before cutting.
Step 3: Assembling the Components
-
Trim the arches:
Lay the terracotta arch and the cream arch together on your workspace. Trim the ends of both arches so they are flush and even. -
Attach the distinct sections:
Place the white rectangular caps at the bottom of the arch legs. Press the cut edges of the terracotta/cream arches gently against the top edge of the white caps to bond the clay seams together. -
Smooth the seams:
Flip the pieces over and gently smooth the seams on the back with your finger or a sculpting tool to ensure a strong bond between the colors. -
Pierce holes:
Using a needle tool, poke a hole at the top and bottom of each terracotta circle. Then, poke a hole at the very top center of your assembled arch pieces. Ensure the holes are large enough for your jump rings.
Step 4: Baking and Finishing
-
Bake the clay:
Arrange your pieces on a ceramic tile or baking sheet lined with parchment paper. Bake according to the manufacturer’s instructions for your specific brand of clay (usually around 275°F/135°C for 30 minutes). -
Cool down:
Allow the pieces to cool completely in the oven or on a wire rack before handling them, as warm clay is fragile. -
Sand the edges:
Once cool, use fine-grit sandpaper or a buffing tool to smooth out any rough edges or fingerprints on the sides of your pieces. -
Open jump rings:
Use two pairs of pliers to twist your jump rings open. Remember to twist sideways (front to back), never pull them apart, to maintain their circle shape. -
Connect the pieces:
Thread a jump ring through the top hole of the arch and the bottom hole of the terracotta circle. Close the ring securely. -
Attach the hook:
Open the small loop on your earring hook (or use a second jump ring) and attach it to the top hole of the terracotta circle. -
Final check:
Repeat the assembly for the second earring and ensure all rings are closed tight so pieces don’t slip off.
Now you have a stunning pair of geometric earrings ready to gift or wear yourself


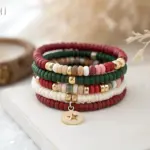
Personalized Initial Keychain with Speckled Terrazzo Style
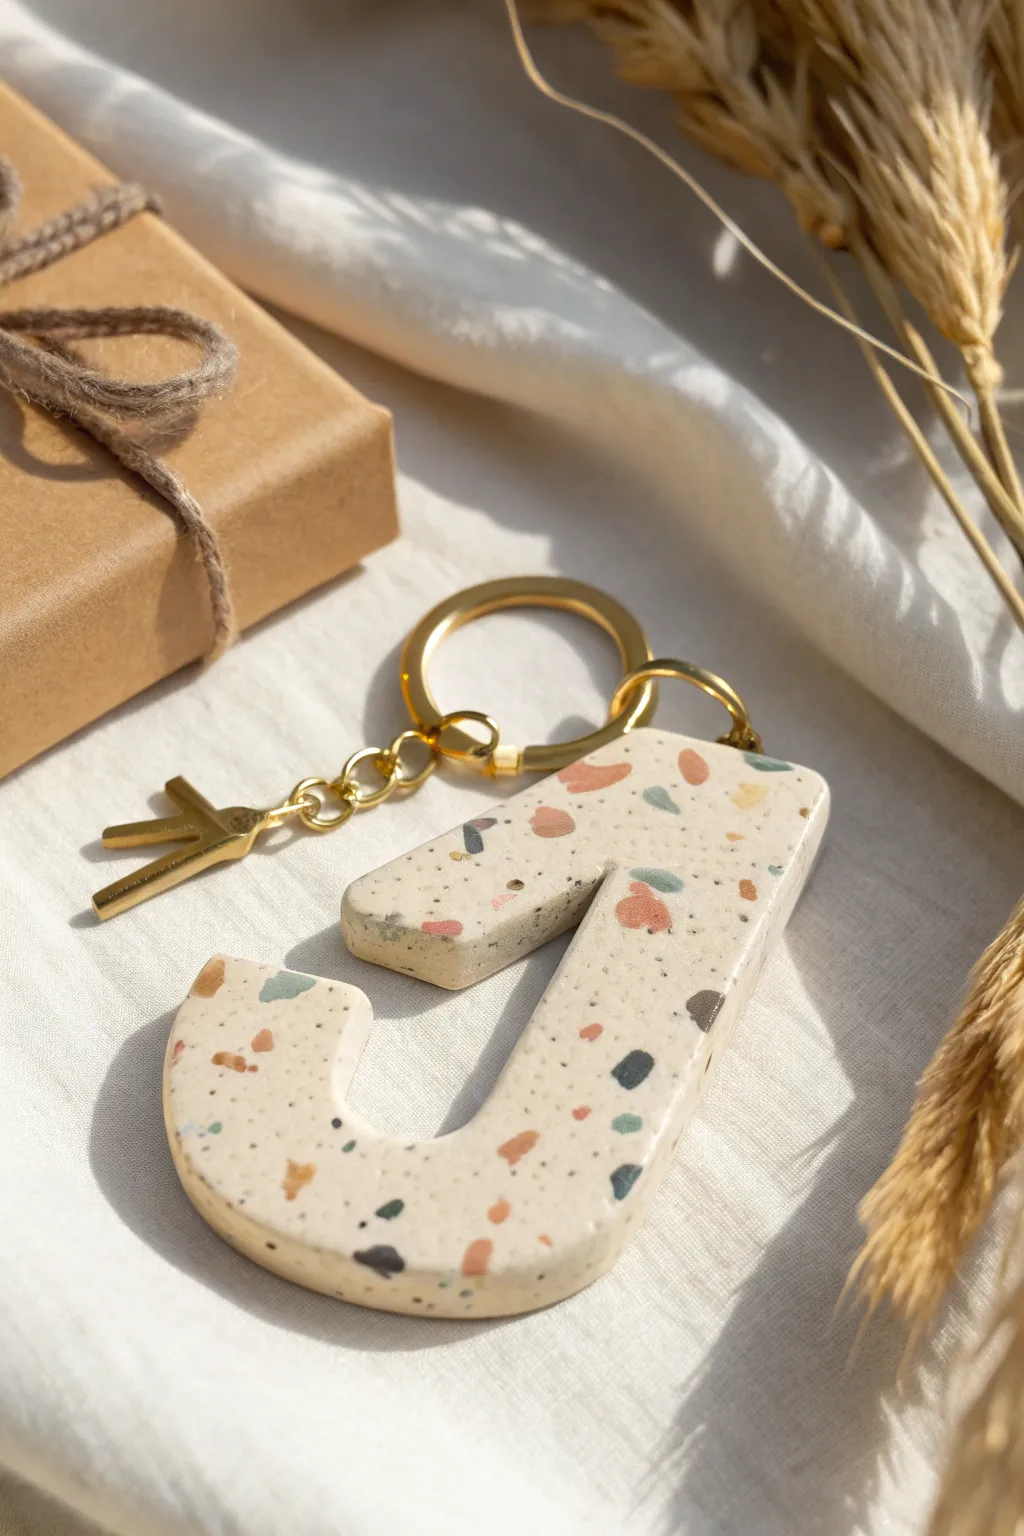
Transform simple polymer clay into a chic, high-end accessory with this terrazzo technique. The creamy base speckled with earthy tones of terracotta, sage, and charcoal creates a modern piece that looks like authentic stone but is lightweight enough for your keys.
Step-by-Step
Materials
- Polymer clay (white or cream for base)
- Polymer clay (terracotta, sage green, grey, black for speckles)
- Acrylic rolling pin or pasta machine
- sharp tissue blade or craft knife
- Letter template (paper printout) or large letter cookie cutter
- Sandpaper (various grits from 400 to 1000)
- Hand drill or pin vice
- UV resin or gloss glaze (optional for finish)
- Gold keychain hardware with jump rings
- Jewelry pliers
- Baking tile or parchment paper
Step 1: Preparing the Terrazzo Chips
-
Condition the colors:
Start by conditioning small amounts of your accent clays—terracotta, sage green, grey, and black. Roll them into very thin sheets, about the thickness of cardstock. -
Bake the accent sheets:
Place these thin sheets on a baking tile and bake them for about 10-15 minutes at the temperature recommended on your clay package. Use a lower time since they are thin; we want them hard enough to chop but not fully cured to the point of turning brittle. -
Cool and chop:
Once the sheets are cool to the touch, use your sharp tissue blade to chop them into tiny, irregular jagged pieces. Aim for a variety of sizes, from dusty specks to slightly larger chunks.
Smudged Colors?
If your terrazzo chips smear when rolling, the base clay was too soft or the chips weren’t baked long enough. Ensure chips are cooled & hardened pre-rolling.
Step 2: Creating the Terrazzo Slab
-
Prepare the base:
Condition a large block of white or cream clay until it is soft and pliable. Roll it into a thick sheet, approximately 5-6mm thick. This thickness ensures the keychain is sturdy. -
Apply the chips:
Scatter your chopped baked chips randomly over the surface of the raw cream clay. Be generous, but leave some negative space so the background color shines through. -
Embed the chips:
Cover the slab with a piece of parchment paper or wax paper. Use your acrylic roller to firmly press the chips down into the base clay until the surface feels flush and smooth. -
Smooth the surface:
Remove the paper and roll over the slab one more time to ensure everything is level. If you see any gaps, you can press tiny bits of colored clay into them now.
Step 3: Cutting and Refining
-
Cut the letter shape:
Place your paper letter template onto the clay slab. Carefully trace around it with a craft knife or use a sharp blade to cut out your initial. If you have a matching cookie cutter, simply press it down firmly. -
Smooth the edges:
Gently lift the letter off the work surface. Use your finger to smooth the raw cut edges, softening any sharp corners or drag marks left by the blade. -
Drill the hole:
Before baking, create a hole for the hardware at the top corner of the letter using a toothpick or small tool. Make it slightly larger than your jump ring, as it can shrink minutely during baking. -
Final Bake:
Bake the finished letter according to the manufacturer’s instructions for the thickness of your piece (usually 30-45 minutes). Tent it with foil to prevent whites from yellowing.
Pro Tip: Depth effect
Mix tiny specks of black pepper or sand into the translucent liquid clay before coating to add even more organic, stony texture to the final piece.
Step 4: Finishing Touches
-
Sand for stone effect:
Once fully cooled, wet-sand the piece under running water. Start with 400 grit to reveal the crisp edges of the embedded chips, then move to 600, 800, and 1000 grit for a silky smooth finish. -
Buff or glaze:
Dry the piece thoroughly. You can buff it with a denim cloth for a natural matte stone look, or apply a thin layer of UV resin if you prefer a glossy, ceramic-like shine. -
Attach hardware:
Open a jump ring using two pairs of pliers (twist sideways, don’t pull apart). Thread it through the hole in the clay letter and attach it to the gold keychain ring. -
Add charms:
I like to add a tiny metal initial charm to the chain for an extra personalized detail, just like in the inspiration photo. Close the jump ring securely to finish.
Now you have a durable, personalized accessory that makes for a thoughtful handmade gift


Stamped Clay Gift Tags That Double as Keepsakes
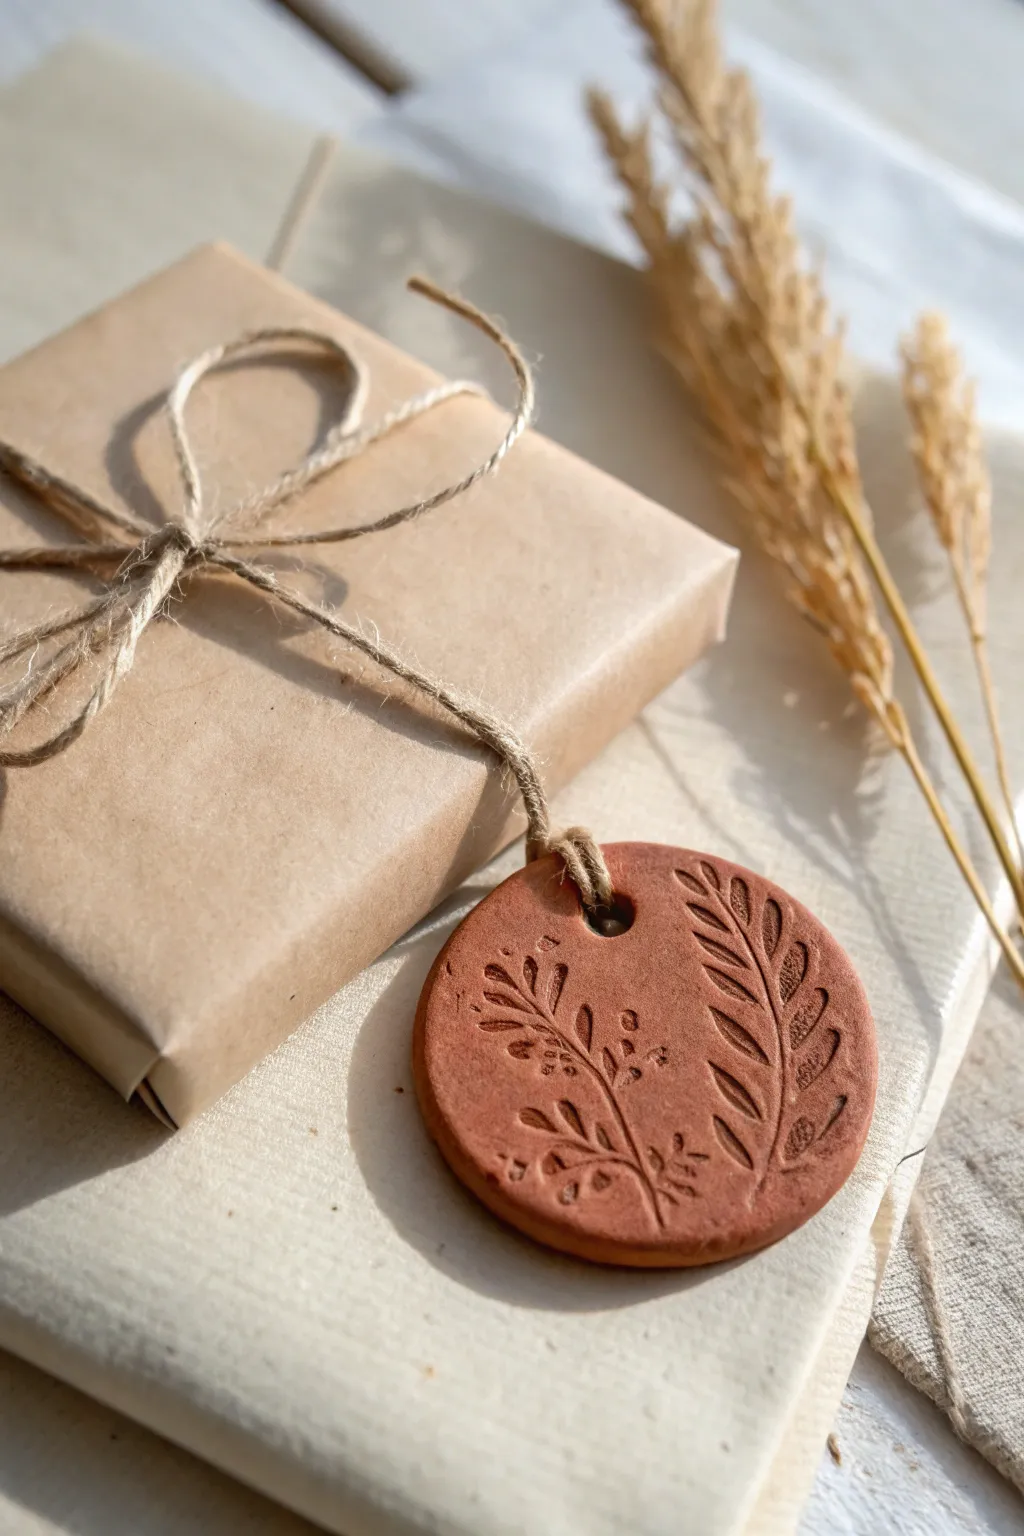
Embrace the warmth of nature with these earthy terracotta gift tags, featuring delicate botanical imprints that add a heartfelt touch to any package. The raw, unglazed finish combined with natural twine creates a timeless, rustic aesthetic that recipients will want to hang onto long after unwrapping.
Step-by-Step Tutorial
Materials
- Terracotta-colored polymer clay (e.g., Fimo Soft Terracotta or Sculpey Premo)
- Acrylic rolling pin
- Circular cookie cutter (approx. 2-3 inches)
- Rubber botanical stamps or mounted stamps
- Small straw or specialized clay punch tool
- Smooth work surface (ceramic tile or glass)
- Parchment paper
- Jute twine
- Sandpaper (fine grit, optional)
- Oven and baking tray
Step 1: Preparing the Clay Base
-
Condition the Clay:
Begin by working a block of terracotta polymer clay in your hands. Knead it thoroughly until it becomes soft, warm, and pliable to prevent cracks during rolling. -
Roll Out the Sheet:
Place the conditioned clay on your smooth work surface. Using your acrylic rolling pin, roll the clay out to an even thickness of about 1/4 inch (6mm). Avoid going too thin, as you want the tag to feel substantial. -
Cut the Shape:
Press your circular cookie cutter firmly into the clay sheet. Give it a gentle wiggle to ensure a clean cut, then lift the cutter. Carefully peel away the excess clay from around the circle. -
Smooth the Edges:
I like to run a finger lightly around the cut edge of the circle (dipped in a little cornstarch if sticky) to smooth down any sharp ridges left by the cutter.
Stamp Release Trick
If your stamp keeps sticking to the raw clay, lightly misty the rubber with water or dab it with cornstarch before pressing it down.
Step 2: Adding the Design
-
Plan Your Composition:
Before stamping, visualize where you want your botanical elements. An off-center arrangement often looks more organic and pleasing than placing everything strictly in the middle. -
Clean Your Stamps:
Ensure your rubber stamps are clean and dry. If they have old ink on them, clean it off, as we want a pure textual impression without color transfer. -
First Impression:
Press your main leaf stamp into the clay. Apply firm, even pressure to get a deep impression, but be careful not to push all the way through the clay slab. -
Add Detail Elements:
Using a smaller stamp with berries or delicate stems, stamp secondary accents around the main leaf to fill the space visually. -
Release the Stamp:
Lift the stamps straight up to avoid smudging the design. If the stamp sticks, a very light dusting of water or cornstarch on the rubber before pressing can help. -
Create the Hole:
Use a small straw or a clay punch to create the hole for the twine. Position this near the top edge, ensuring there is roughly 1/4 inch of clay between the hole and the edge for strength.
Bubbles in Clay?
If you see an air bubble surface while rolling, pierce it gently with a needle tool and smooth the air out with your finger immediately.
Step 3: Baking and Finishing
-
Transfer to Tray:
Carefully lift your clay tag using a broad blade or spatula and place it on a baking tray lined with parchment paper. -
Bake the Tag:
Bake according to the specific manufacturer’s instructions on your clay package. This is typically around 230°F – 275°F (110°C – 135°C) for 15 to 30 minutes depending on thickness. -
Cool Down:
Once baken, turn off the oven and let the tag cool completely inside or on a wire rack. Do not handle it while hot as polymer clay is slightly flexible until fully cool. -
Optional Sanding:
If there are any rough spots on the edges after baking, gently buff them with fine-grit sandpaper for a professional finish. -
Distress (Optional):
For an even more rustic look, you can lightly dry-brush white paint over the texture and wipe it back immediately, though the plain clay offers a beautiful clean look on its own. -
Add the Twine:
Cut a length of jute twine. Fold it in half, push the loop through the tag hole, and pull the tails through the loop to create a lark’s head knot. -
Attach to Gift:
Wrap your gift in simple kraft paper and tie the tag securely onto the package using the jute tails.
Your beautifully textured tags are now ready to add a sophisticated, handmade charm to your thoughtful gifts

The Complete Guide to Pottery Troubleshooting
Uncover the most common ceramic mistakes—from cracking clay to failed glazes—and learn how to fix them fast.
Terrazzo Coasters for the Friend Who Loves Modern Decor
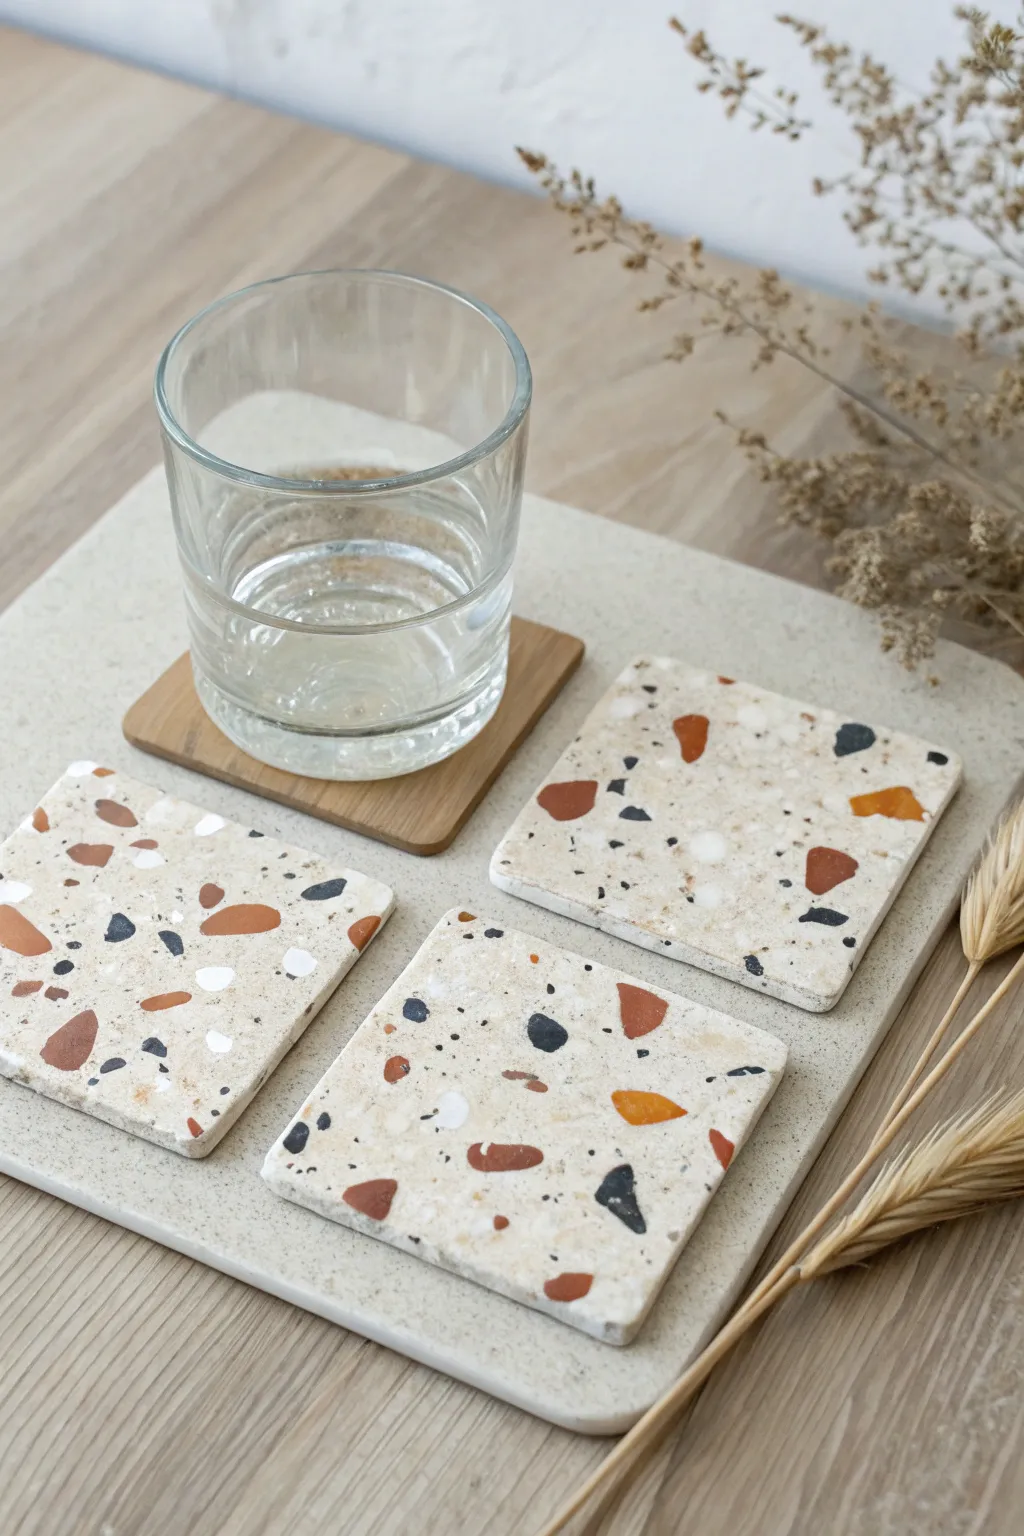
Bring the chic, speckled charm of classic Italian flooring to your coffee table with this accessible polymer clay project. These lightweight yet durable coasters feature a creamy base dotted with organic chips of terracotta, black, and slate for a sophisticated, earthy feel.
Step-by-Step Tutorial
Materials
- Polymer clay (colors: beige/granite effect for base, plus terracotta, black, white, and grey for chips)
- Rolling pin or pasta machine
- Square clay cutter (approx. 3.5 in / 9 cm)
- Sharp blade or X-Acto knife
- Baking sheet and parchment paper
- Fine-grit sandpaper (400 to 1000 grit)
- Matte polyurethane varnish or glaze
- Soft paintbrush
- Optional: cork backing sheet and adhesive
- Optional: square bamboo insert (if replicating the specific holder design)
Step 1: Creating the Terrazzo Chips
-
Prepare chip colors:
Condition small amounts of your accent clays: terracotta orange, black, white, and dark grey. Roll each color out into a very thin sheet, roughly 1mm thick. -
Bake the accent sheets:
Place these thin sheets on parchment paper and bake them for about 10-15 minutes at the temperature recommended on your clay package. Let them cool completely until hard. -
Chop the chips:
Once cool, use your sharp blade to chop these baked sheets into irregular, jagged fragments. Aim for a mix of sizes, from tiny specks to larger triangles, to create an authentic stone look.
Step 2: Forming the Coaster Base
-
Condition the base clay:
Take a large block of your beige or granite-effect clay. Condition it thoroughly until it is soft and pliable. -
Add raw speckles:
For extra depth, grate a tiny amount of unbaked black clay into the beige base and mix it in just enough to create a ‘dirty’ stone effect without turning the whole batch grey. -
Roll out the slab:
Roll your base clay into a thick slab, approximately 4mm to 5mm thick. Ensure it is wide enough to cut out your squares.
Sticky Situation?
If clay sticks to your cutter, dip the cutter in cornstarch or water before pressing down. This helps it release cleanly without distorting your square shape.
Step 3: Assembling the Terrazzo Pattern
-
Scatter the chips:
Press your chopped, pre-baked chips firmly into the top surface of the raw beige slab. Be generous but uneven with placement to keep it organic. -
Embed the chips:
Cover the slab with a piece of parchment paper and use your rolling pin to firmly roll over the surface. This pushes the hard chips flush into the soft clay base. -
Roll smooth:
Continue rolling in different directions until the surface feels relatively smooth and the chips are fully integrated. -
Cut the shapes:
Position your square cutter over the patterned slab and press down firmly to cut your coaster shapes. If you don’t have a cutter, measure a template and cut carefully with a blade. -
Create the indent (optional):
If you want to replicate the coaster holder look shown in the image, take one square and gently press a slightly smaller square object (like a bamboo coaster) into the center to create a shallow recess before baking.
Make it a Set
Create a large rectangular tray using the same technique to hold the coasters when not in use, essentially making a custom storage platter for them.
Step 4: Finishing and Refining
-
Final bake:
Place your cut squares on a baking sheet lined with parchment paper. Bake according to package instructions, typically 275°F (135°C) for 30-45 minutes to ensure durability. -
Cool under weight:
As soon as you remove them from the oven, place a heavy book on top of the coasters while they cool. I find this really helps prevent any warping so they sit perfectly flat. -
Sand for stone effect:
Once fully cool, wet-sand the surface using fine-grit sandpaper. This is the magic step that reveals the sharp clarity of the chips and makes the surface feel like real stone. -
Wash and dry:
Rinse off any sanding dust and dry the coasters thoroughly with a lint-free cloth. -
Seal the surface:
Apply a thin layer of matte varnish to protect the clay from moisture and stains without making it look plasticky. -
Add backing:
Cut a square of cork slightly smaller than your coaster and glue it to the underside. This adds a professional feel and protects your table surfaces.
Stack your new creations on your coffee table and enjoy the modern, handmade touch they bring to your living space
Minimal Incense Holder in Clean, Simple Shapes
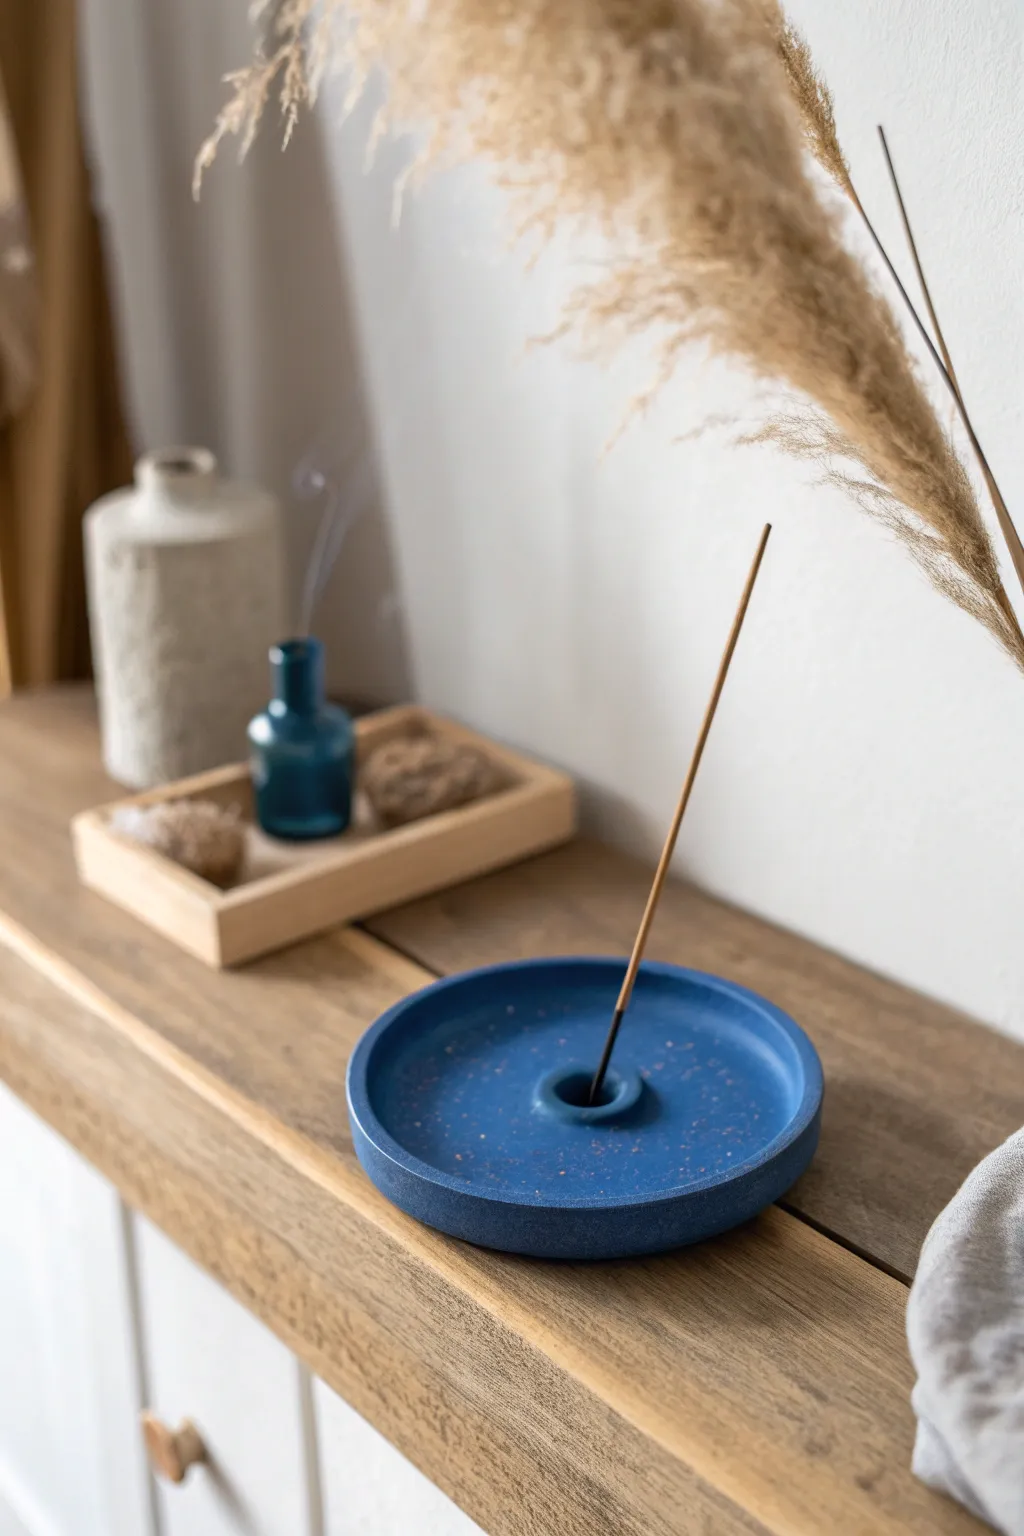
This minimalist incense holder features a serene, deep blue tone scattered with subtle speckles that resemble a tiny galaxy. Its clean, circular shape and raised rim make it both a practical ash-catcher and a striking piece of modern decor.
Step-by-Step Guide
Materials
- Deep blue polymer clay (approx. 2-3 oz)
- Small amount of translucent or granite-effect clay (optional, for speckling)
- Gold or copper glitter/mica powder (for speckles)
- Round cookie cutter (approx. 4-5 inches diameter)
- Rolling pin or acrylic roller
- Incense stick (for sizing the hole)
- Modeling tool or toothpick
- Fine-grit sandpaper
- Matte varnish (optional)
Step 1: Prepping the Clay
-
Conditioning:
Start by warming the deep blue polymer clay in your hands. Knead it thoroughly until it is soft, pliable, and free of any air bubbles. -
Creating the Speckle Mix:
If your blue clay isn’t pre-speckled, now is the time to add character. Flatten your conditioned clay and sprinkle a pinch of gold or copper mica powder onto it. You might also grate a tiny bit of hardened black or white clay into the mix for texture. -
Incorporating the Inclusions:
Fold the clay over the inclusions and knead it again. Repeat folding and rolling until the speckles are distributed evenly throughout the ball, creating a stone-like effect. -
Rolling Out:
Use your acrylic roller to flatten the clay ball into a smooth sheet. Aim for a thickness of about 1/4 inch (6mm) to ensure the base is sturdy enough to hold the incense stick upright.
Step 2: Shaping the Dish
-
Cutting the Base:
Place your large round cookie cutter onto the clay sheet and press down firmly to cut out a perfect circle. -
Forming the Rim:
Take the excess clay trimmed from the edges and roll it into a long, even snake. The thickness of this snake determines the height of your rim, so aim for about 1/4 inch thick. -
Attaching the Rim:
Lay the clay snake on top of the circle’s outer edge. Gently press it down to adhere it to the base. -
Blending the Seam:
Use a modeling tool or your thumb to drag the clay from the snake down onto the base on the inside of the dish. I like to do this slowly to ensure there’s no visible seam. -
Smoothing the Outside:
Repeat the blending process on the outside of the rim, smoothing the clay downward so the wall and base become one solid unit. -
Refining the Shape:
Use your fingers to pinch and smooth the rim one last time, ensuring it stands up straight and has a consistent height all around.
Uneven Rim?
If your rim looks wavy, place a flat object (like a hardcover book) gently on top of the rim before baking to level it out perfectly.
Step 3: Building the Center Holder
-
Creating the Mound:
Roll a small ball of the remaining blue clay, about the size of a large marble or a grape. -
Positioning:
Place this ball directly in the center of your dish. Press it down slightly so the bottom flattens and adheres to the base, but keeps a rounded, domed top. -
Blending the Holder:
Use a small blending tool to smooth the edges of the mound onto the dish floor, ensuring it is securely attached and won’t pop off after baking. -
Creating the Hole:
Take an unlit incense stick and press the wooden end vertically into the center of the mound. Push it deep enough to hold a stick securely, but not all the way through the bottom base. -
Wiggle Room:
Give the stick a very gentle wiggle to widen the hole slightly, as clay can shrink microscopically or swell during baking.
Stone Texture Trick
After baking, gently tap the surface with coarse sandpaper or a stiff toothbrush to create a realistic, porous stone texture before sealing.
Step 4: Finishing
-
Final Smoothing:
Dip your finger in a little bit of baby oil or cornstarch and rub it lightly over the entire piece to remove fingerprints and smooth out any tool marks. -
Baking:
Place your incense holder on a ceramic tile or baking sheet lined with parchment paper. Bake according to your clay package’s instructions (usually around 275°F/135°C for 15-30 minutes). -
Cooling:
Let the piece cool completely in the oven with the door cracked slightly. This slow cooling helps prevent thermal shock cracks. -
Sanding:
Once cool, take a piece of fine-grit sandpaper and wet-sand the rim and edges under running water to remove any sharpness. -
Sealing:
Finish by applying a thin coat of matte varnish if you want to protect the surface, or leave it raw for a more natural, stone-like texture.
Give your new incense holder a spot of honor and enjoy the calm atmosphere it brings to your space


What Really Happens Inside the Kiln
Learn how time and temperature work together inside the kiln to transform clay into durable ceramic.
Ombre Taper Candle Holders for a Cozy Set Gift
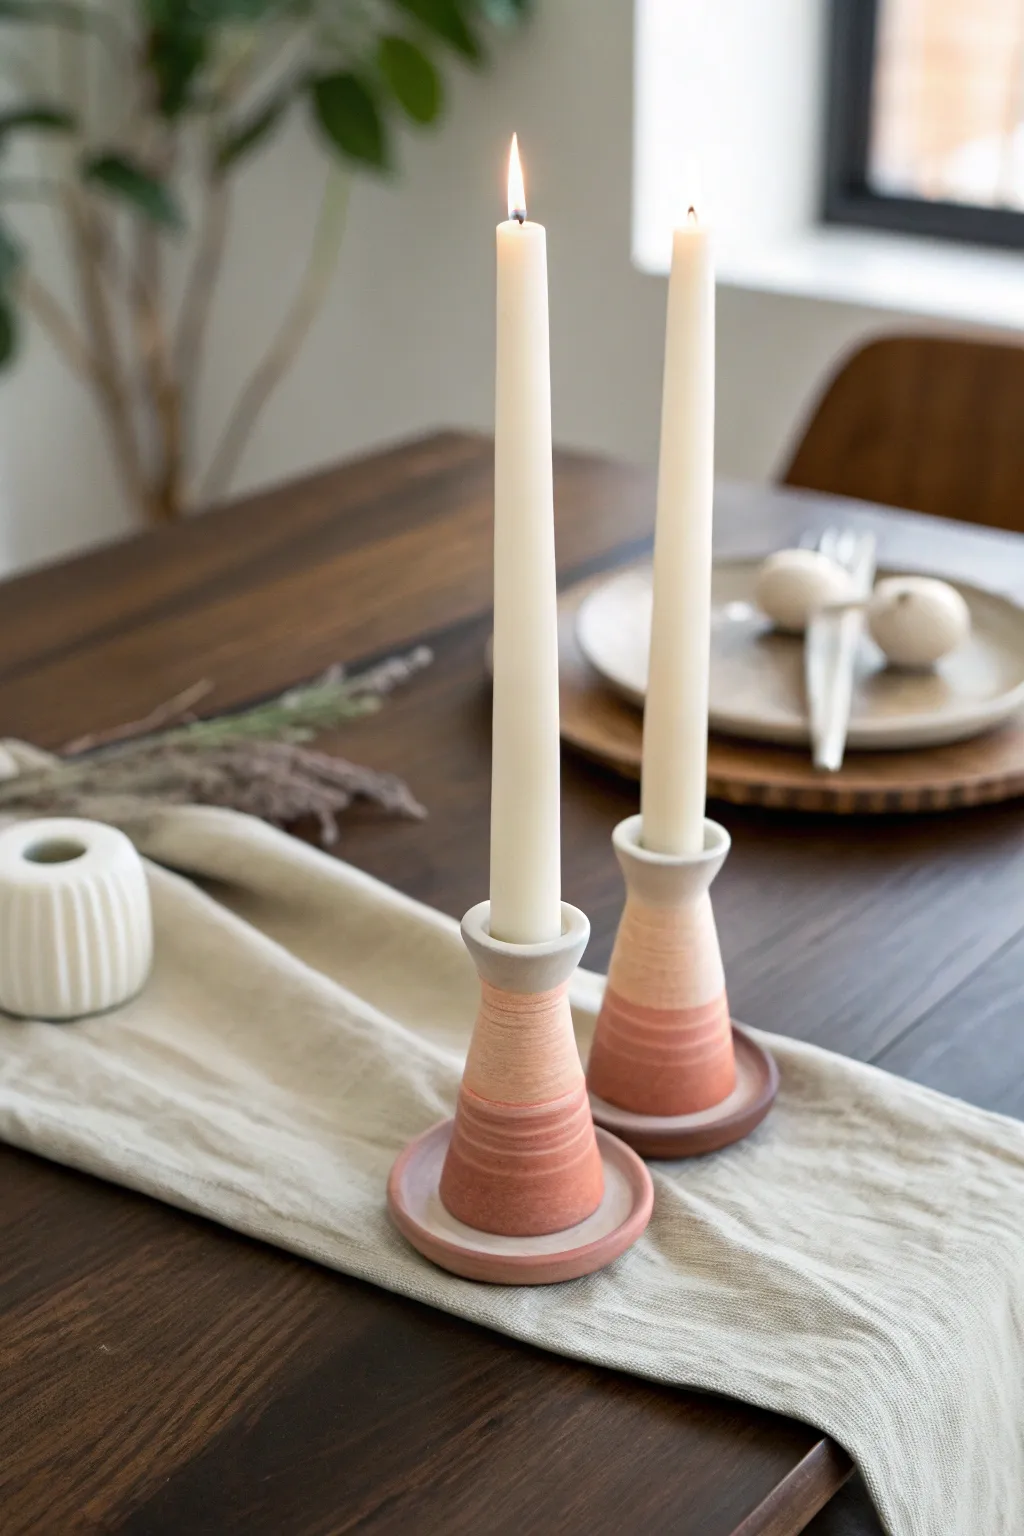
Create a cozy, rustic atmosphere with these charming ombre candle holders that mimic the look of artisanal pottery. The warm, terracota-inspired gradient makes them a perfect centerpiece for any thoughtful tablescape or a heartfelt handmade gift.
Detailed Instructions
Materials
- Polymer clay in three colors: terracotta red, peach/blush, and soft stone grey
- Rolling pin or pasta machine
- Sharp craft blade or clay slicer
- Cardstock or empty toilet paper rolls (for armature)
- Tape
- Circle cutters (various sizes)
- Texture sponge or stiff bristle brush
- Oven-safe glass or ceramic tile (for baking)
- Liquid clay or Bake & Bond
Step 1: Creating the Conical Form
-
Prepare the Armature:
To keep the holders hollow and lightweight, fashion a cone shape using stiff cardstock. Roll it into a cone that is roughly 4-5 inches tall with a base diameter of about 2 inches. Secure the seam firmly with tape. -
Condition the Clay:
Start by conditioning your terracotta, peach, and grey clays separately until they are soft and pliable. You’ll need the most of the terracotta color for the base. -
Roll Out Sheets:
Roll each color into a sheet roughly 1/8 inch thick. I like to use a pasta machine for a uniform thickness, but a hand roller works perfectly fine too. -
Cut the Strips:
Cut a wide strip of the terracotta clay (for the bottom), a slightly narrower strip of peach (for the middle), and a narrow strip of grey (for the top neck). The lengths should be enough to wrap around your cardstock cone at their respective heights.
Fixing Cracks
If small cracks appear after baking, fill them with a mix of liquid clay and tiny shavings of the matching color clay. Re-bake for 10 minutes to set the patch invisibly.
Step 2: Assembling the Ombre Effect
-
Wrap the Base Layer:
Take your terracotta strip and wrap it around the bottom portion of your cardstock cone. Overlap the edges slightly and smooth the seam with your finger so it disappears. -
Add the Middle Layer:
Place the peach strip directly above the terracotta one, overlapping the bottom edge over the top of the terracotta layer just a bit. Press them together gently to adhere. -
Complete with the Top Layer:
Wrap the grey strip around the very top section of the cone, again slightly overlapping the peach layer below it to ensure a strong bond. -
Blend the Seams:
Using your thumb or a clay tool, gently smudge the clay downward across the horizontal seams where the colors meet. You want a distinct color change, but a physically smooth transition without bulky ridges. -
Texturing the Surface:
To achieve that rustic, stone-like appearance, gently pat the entire surface with a coarse texture sponge or stipple it with a stiff brush. This hides fingerprints and adds character.
Step 3: Forming the Rim and Base
-
Create the Saucer Base:
Roll out a thicker slab of mixed terracotta and peach clay (about 1/4 inch thick). Use a large circle cutter (approx 3.5 inches) or a bowl guide to cut a perfect circle for the saucer. -
Attach the Saucer:
Apply a thin layer of liquid clay to the bottom rim of your cone structure. Center the cone onto the saucer base and press down firmly to bond them. Use a modeling tool to blend the clay from the inside of the cone onto the base for extra security. -
Create the Candle Cup:
Roll a thick snake of grey clay. Form it into a ring that fits the top of your cone. The inner diameter must fit a standard taper candle (about 7/8 inch). -
Refine the Top Rim:
Attach this ring to the top of the cone using liquid clay. Smooth the clay downwards to blend it into the neck, flaring the lip out slightly for an elegant silhouette. -
Check the Fit:
Gently test the opening with an actual taper candle to ensure it fits snugly. Remove the candle before baking.
Speckled Stone Look
Mix black pepper or dried used coffee grounds into your clay before rolling. This creates instant realistic faux-ceramic speckles that look high-end.
Step 4: Baking and Finishing
-
First Bake:
Place your holders on a ceramic tile. Bake according to your clay manufacturer’s instructions (usually 275°F for 15-30 minutes). You can leave the cardstock inside; it won’t burn at this low temperature. -
Cool and Remove Core:
Let the piece cool completely. Once cool, carefully twist and pull out the cardstock core. If it sticks, you can dampen the paper to help peel it away. -
Sand and Seal (Optional):
If there are any rough nuances you don’t like, lightly sand them with fine-grit sandpaper. For a matte finish that protects the clay, apply a thin coat of matte water-based varnish.
Now you have a stunning set of faux-ceramic candle holders ready to warm up your dinner table
Statement Hair Clips With Bold Slab Patterns
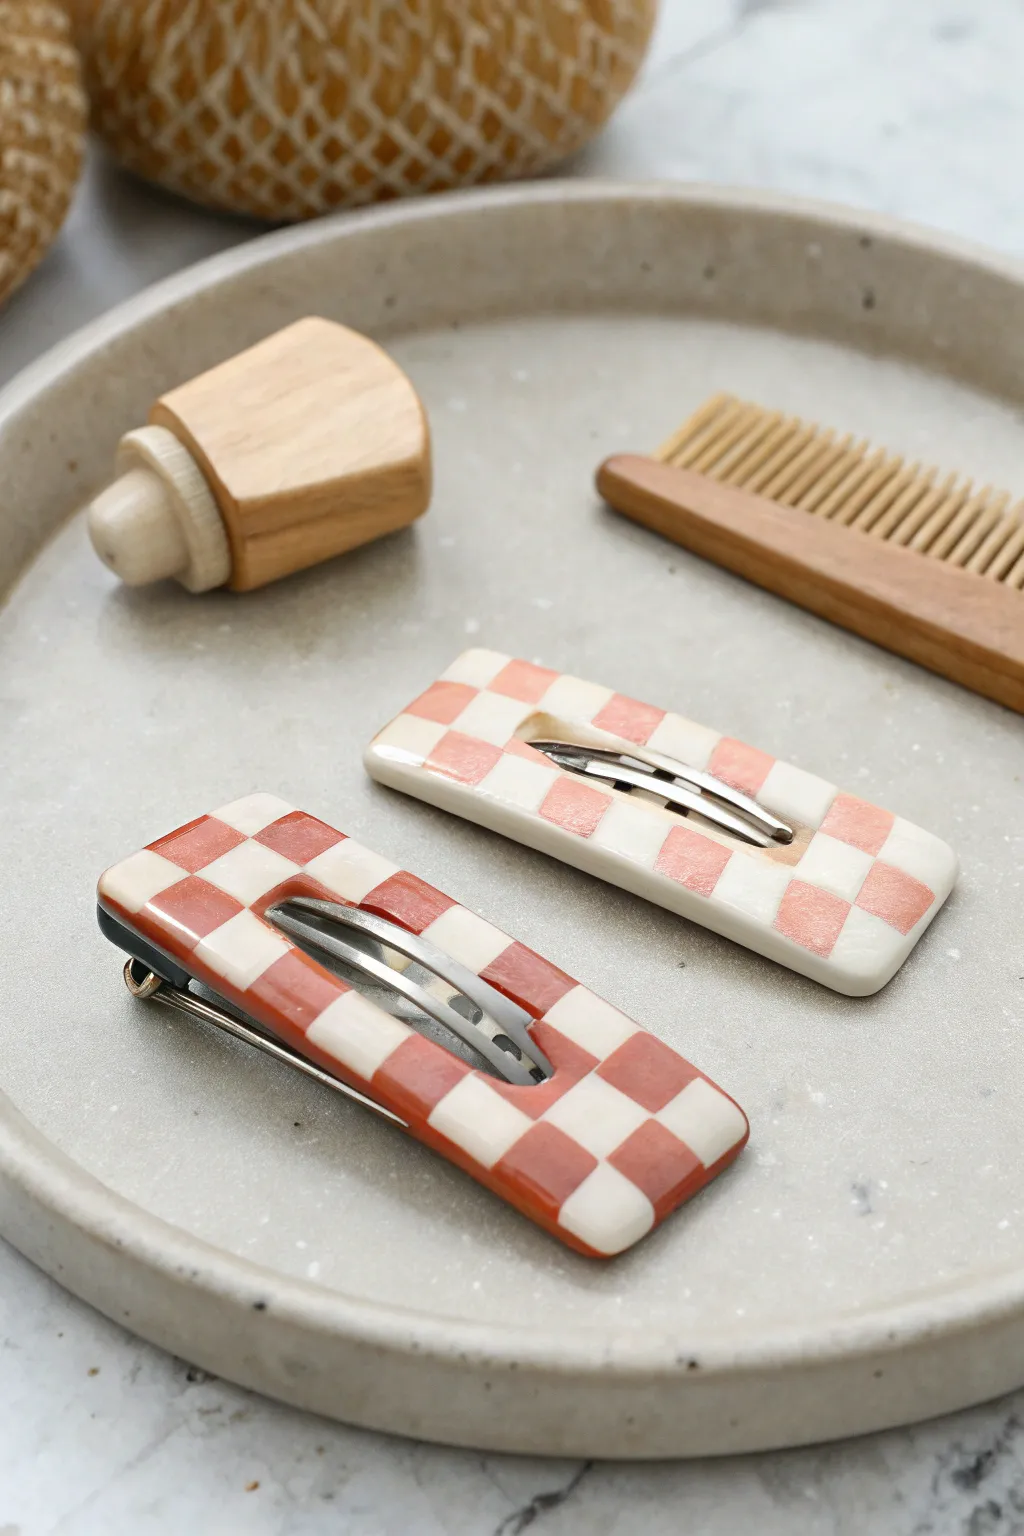
Embrace the retro revival with these stylish checkerboard hair clips made from polymer clay. The classic grid pattern gets a modern update with warm terracotta and soft peach tones, creating a chic accessory that adds a pop of pattern to any hairstyle.
Step-by-Step Guide
Materials
- Polymer clay in White, Terracotta/Burnt Orange, and Peach/Light Pink
- Liquid polymer clay (translucent or matching colors)
- Rectangular alligator hair clip blanks (approx. 2-3 inches)
- Tissue blade or sharp craft knife
- Main clay rolling pin (acrylic)
- Pasta machine (optional but recommended for even thickness)
- Grid paper or ruler
- Fine grit sandpaper (400-1000 grit)
- UV resin or polyurethane gloss varnish (optional for shine)
- Oven and baking sheet/tile
Step 1: Prepping the Checkerboard Cane
-
Conditioning the Clay:
Begin by thoroughly conditioning your white clay and your chosen colored clay (either terracotta or peach). Knead them in your hands until they are soft, pliable, and free of cracks. -
Creating Slabs:
Roll out both the white and colored clay into thick slabs of equal thickness. Using an acrylic roller with depth guides or a pasta machine on a medium-thick setting (around 3-4mm) works best to ensure consistency. -
Cutting Strips:
Use your tissue blade to cut long, straight strips from both slabs. Aim for a square cross-section, meaning the width of the cut strip should equal the thickness of the slab. I find using grid paper underneath helps keep my cuts straight. -
Assembling the Rows:
Lay a white strip next to a colored strip and press them gently together so they adhere but don’t distort. Repeat this pattern, alternating colors, until you have a slab width that is slightly wider than your hair clip blank. -
Stacking the Layers:
Cut your striped slab into shorter segments. Stack these segments on top of each other, ensuring that you alternate the colors to create the checkerboard pattern (a white square should always sit on top of a colored one). -
Consolidating the Block:
Gently press the block from all sides to close any gaps between the strips. Be careful not to press too hard or you might warp the square grid pattern.
Warped Checks?
If your checkerboard pattern distorts when slicing the block, let the clay block rest in the fridge for 20 minutes before cutting. Cold clay holds its shape better against blade pressure.
Step 2: Shaping and Baking
-
Slicing the Slab:
Use your sharpest tissue blade to slice a thin slab (about 2-3mm thick) from your checkerboard block. This will be the decorative face of your clip. -
Smoothing the Surface:
Place a piece of parchment paper over your slice and gently burnish it with a roller or your finger to smooth out the seams between the checks. -
Cutting the Shape:
Place your metal hair clip on the clay slice to use as a sizing guide, leaving a small margin of clay around the edges. Use your blade to cut a clean rectangle shape around it. -
Creating the Center Cutout:
Carefully cut a rectangular slot in the center of the clay piece. This allows the spring mechanism of the alligator clip to function properly without obstruction. -
Optional Backing Layer:
For extra durability, you can roll a thin sheet of scrap clay or matching solid color to place underneath your checkered slice before cutting the final shape. This adds strength to the finished clip. -
Refining Edges:
smooth the outer edges and the inner cutout with your finger or a silicone tool to remove any sharpness or burrs. -
Baking:
Place your clay rectangles on a ceramic tile or baking sheet lined with parchment paper. Bake according to your polymer clay brand’s instructions (usually 275°F/135°C for 30 minutes).
Mix It Up
Try a distinct geometric twist by cutting your initial strips at varied widths. This creates a cool, asymmetrical ‘barcode’ pattern instead of a perfect grid.
Step 3: Assembly and Finishing
-
Cooling and Sanding:
Let the clay pieces cool completely. If there are any uneven spots, wet sand the edges and surface with fine-grit sandpaper for a professional finish. -
Attaching the Clip:
Apply a strong adhesive or a thin layer of liquid polymer clay to the top flat surface of the metal alligator clip. If using liquid clay, you will need to re-bake the piece for 15 minutes to bond it. -
Final Bond:
Press the clay rectangle onto the metal clip, centering the cutout over the spring mechanism. If you used instant glue, hold it firm for 30 seconds. -
Sealing (Optional):
To get the glossy look seen in the photo, apply a thin coat of UV resin or polyurethane varnish. Cure under a UV lamp or let dry completely.
Enjoy styling these versatile clips that bring a touch of handmade artistry to your everyday look

TRACK YOUR CERAMIC JOURNEY
Capture glaze tests, firing details, and creative progress—all in one simple printable. Make your projects easier to repeat and improve.
Playful Fruit Slice Magnets for a Fun Kitchen Gift
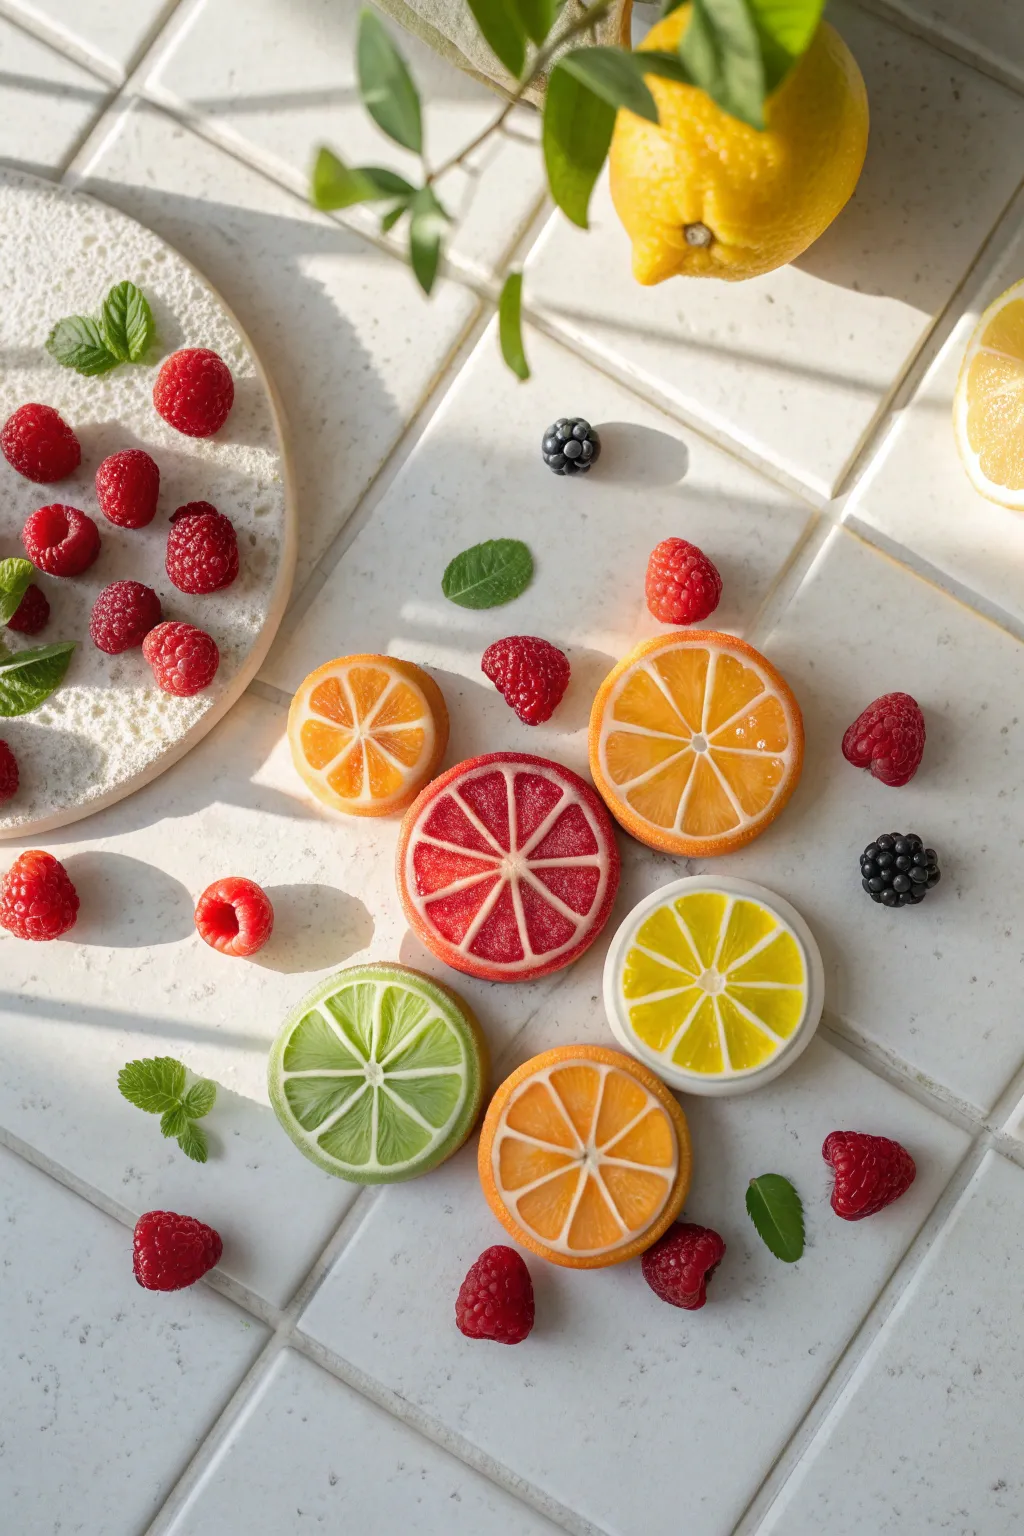
Bring a burst of summer freshness to your fridge with these incredibly realistic polymer clay fruit slices. By layering translucent and opaque clays, you’ll achieve that irresistible juicy texture that catches the light beautifully.
Step-by-Step
Materials
- Translucent polymer clay (yellow, orange, red, green)
- Opaque white polymer clay
- Opaque polymer clay matching the rind colors (yellow, orange, green, pink)
- Liquid polymer clay (translucent)
- Small round cutter (for the fruit shape)
- Craft blade or scalpel
- Rolling pin or pasta machine
- Needle tool or toothpick
- Small high-strong magnets
- Super glue or E6000
- Gloss varnish or UV resin
- Sandpaper (fine grit)
Step 1: Creating the Canes
-
Mix Translucent Colors:
Start by mixing translucent clay with tiny amounts of colored clay to create your ‘pulp’ shades. You need a bright yellow for lemon, orange for orange slices, yellow-green for lime, and a pinkish-red for grapefruit. The mix should remain largely translucent. -
Form the Segment Log:
Take your mixed pulp color and roll it into a thick log, about 1 inch in diameter. Pinch one side of the log along its entire length to create a teardrop cross-section, resembling a single fruit segment. -
Wrap in Pith:
Roll out a very thin sheet of opaque white clay. Wrap this sheet carefully around your teardrop-shaped log, ensuring the seam is smooth. This white layer represents the membrane between segments. -
Reduce and Cut:
Gently squeeze and stretch the log (reducing the cane) until it’s much longer and thinner. Cut this long cane into 8 to 10 equal-length pieces. These will become your individual fruit segments.
Step 2: Assembling the Fruit
-
Assemble the Segments:
Arrange the teardrop segments in a circle, with the pointy ends meeting in the center. Use a tiny snake of white clay in the very center to fill any gap where the tips meet. -
Wrap the Whole Fruit:
Roll out a thicker sheet of white clay and wrap it around the entire circle of segments to form the inner pith layer. Smooth the seam so it disappears. -
Add the Rind:
Roll out a sheet of your colored rind clay (opaque yellow, orange, green, etc.). Wrap this final layer around the white pith. Roll the entire heavy cane on your work surface gently to ensure all layers are bonded. -
Final Reduction:
Carefully reduce the large cane to your desired diameter—about 2 to 2.5 inches is perfect for magnets. Let the cane rest for an hour before slicing; cutting warm clay will distort the pattern.
Smudged Colors?
If your white lines look blended or muddy, your clay was likely too soft. Place your cane in the fridge for 20 minutes before slicing to harden it up.
Step 3: Visualizing and Finishing
-
Slice the Discs:
Using a very sharp blade, slice the cane into even discs, approximately 4-5mm thick. Try to cut straight down to avoid warping the circle. -
Texturize the Pulp:
I prefer to use a needle tool here to pick at the translucent inner distinct segments gently. Roughing up the surface creates that sparkling, juicy texture once baked. -
Bake:
Bake the slices according to your clay manufacturer’s instructions. Usually, this is around 275°F (130°C) for 15-30 minutes depending on thickness. -
Cool and Sand:
Allow the slices to cool completely. If there are any rough edges on the rind, lightly sand them smooth with fine-grit sandpaper. -
Add Gloss:
Apply a coat of gloss varnish or UV resin specifically to the fruit pulp area, avoiding the white pith and outer rind if you want a matte contrast. This mimics real fruit juice. -
Attach the Magnet:
Flip the slice over. Use a dab of E6000 or strong super glue to attach a magnet to the back center. Let the glue cure fully before sticking it to your fridge.
Juicy Sparkle
Mix a tiny pinch of clear embossing powder into your translucent clay pulp mix. When baked, it melts into tiny texture pockets that look like realistic citrus cells.
Now your kitchen has a permanent touch of summer brightness that looks good enough to eat
Petal-Trim Mini Planter for Plant-Loving Friends
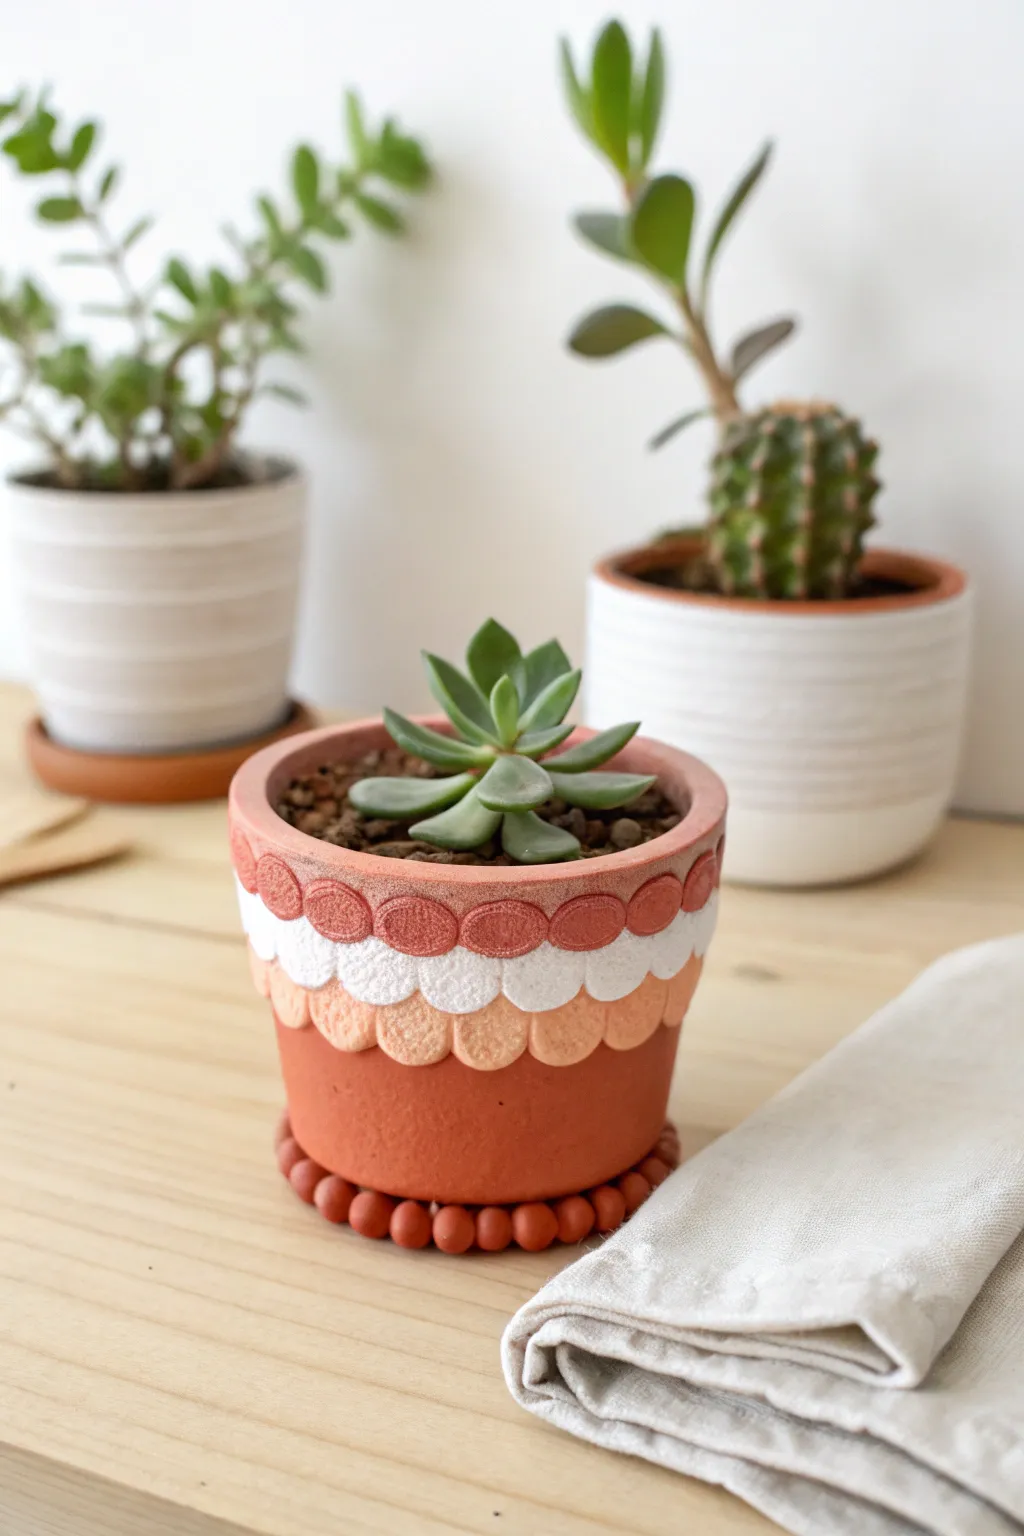
Transform a plain terracotta pot into a textural delight for your succulents using layers of polymer clay scallops. This petal-inspired design features warm, earthy tones and a charming beaded base that adds a modern yet handcrafted touch to any windowsill.
Step-by-Step Tutorial
Materials
- Small terracotta pot (clean and dry)
- Polymer clay in terracotta red/brown
- Polymer clay in white
- Polymer clay in pale peach
- Small round circle cutter (approx. 0.5 inch)
- Acrylic roller or pasta machine
- Liquid polymer clay (Bake & Bond)
- Craft knife
- Baking sheet
- Oven (designated for clay use)
Step 1: Preparation & Bead Base
-
Clean surface:
Begin by ensuring your terracotta pot is thoroughly clean and completely dry. Any moisture trapped inside the porous clay can cause issues during baking. -
Mix colors:
Condition your polymer clay blocks by kneading them until soft and pliable. If the terracotta color is too dark, mix in a tiny amount of white to soften it slightly. -
Roll spheres:
Take the terracotta-colored clay and roll out a long snake. Cut equal segments and roll them into small, uniform spheres to create the beaded base. -
Apply adhesive:
Apply a thin line of liquid polymer clay around the bottom edge of the pot where it meets the surface. This acts as the glue for your beads. -
Attach beads:
Press the clay spheres firmly into the liquid clay line and against the pot, encircling the entire base. Ensure they touch each other for a continuous look.
Clean Cuts Only
If your circle cutter sticks to the clay, dip it into a little cornstarch or water before each cut. This ensures perfectly round edges without distortion.
Step 2: Creating the Scallops
-
Roll sheets:
Roll out your three clay colors (terracotta, white, peach) into sheets of even thickness, roughly 1/8th of an inch. A pasta machine is best for consistency, but a roller works fine. -
Cut circles:
Using your small circle cutter, punch out numerous circles from each color. You will need enough to wrap around the circumference of your pot for each layer. -
Texturize (Optional):
For the specific look in the photo, lightly press a piece of coarse sandpaper or a texture sponge onto the clay circles before applying them to give them a rough, stone-like surface. -
Apply liquid clay:
Brush a band of liquid polymer clay around the pot, starting about halfway down where you want the bottom row of petals to begin.
Step 3: Layering the Design
-
First row (Peach):
Take the peach circles and press them onto the pot. Overlap the edges slightly or butt them up close against each other. I like to gently flatten the top half of each circle so the next layer sits flush. -
Second row (White):
Apply more liquid clay just above the peach row. Place the white circles so they overlap the peach ones, positioning the center of the white circle directly above the seam of the two peach circles below it. -
Third row (Terracotta):
Repeat the process with the terracotta-colored circles for the top row, overlapping the white layer. Ensure the top edge aligns neatly with the rim of the pot. -
Trim the rim:
If the terracotta circles extend over the lip of the pot, use a craft knife to carefully slice off the excess clay so it is perfectly flush with the rim. -
Smooth seams:
Gently run your finger along the very top edge of the clay to smooth it down, ensuring there are no gaps between the clay and the terracotta pot rim.
Ombré Effect
Try mixing your clay colors to create a gradient effect. Start with a dark base color for the bottom row and mix in increasing amounts of white for each subsequent row moving up.
Step 4: Baking & Finishing
-
Check adhesion:
Give the pot a final inspection. Press down gently on all layers to ensure the liquid clay has grabbed and there are no air bubbles trapped underneath. -
Baking:
Place the pot on a baking sheet. Bake according to the instructions on your specific brand of polymer clay (usually 275°F for 15-30 minutes). -
Cooling:
Let the pot cool completely in the oven with the door open. This prevents thermal shock which could crack the clay or the pot. -
Potting:
Once fully cooled, add your soil and favorite succulent to your new handmade home.
Now you have a cozy, textured home ready for your favorite little green plant
Comfy Crochet Hook Handles for Your Crafty Friend
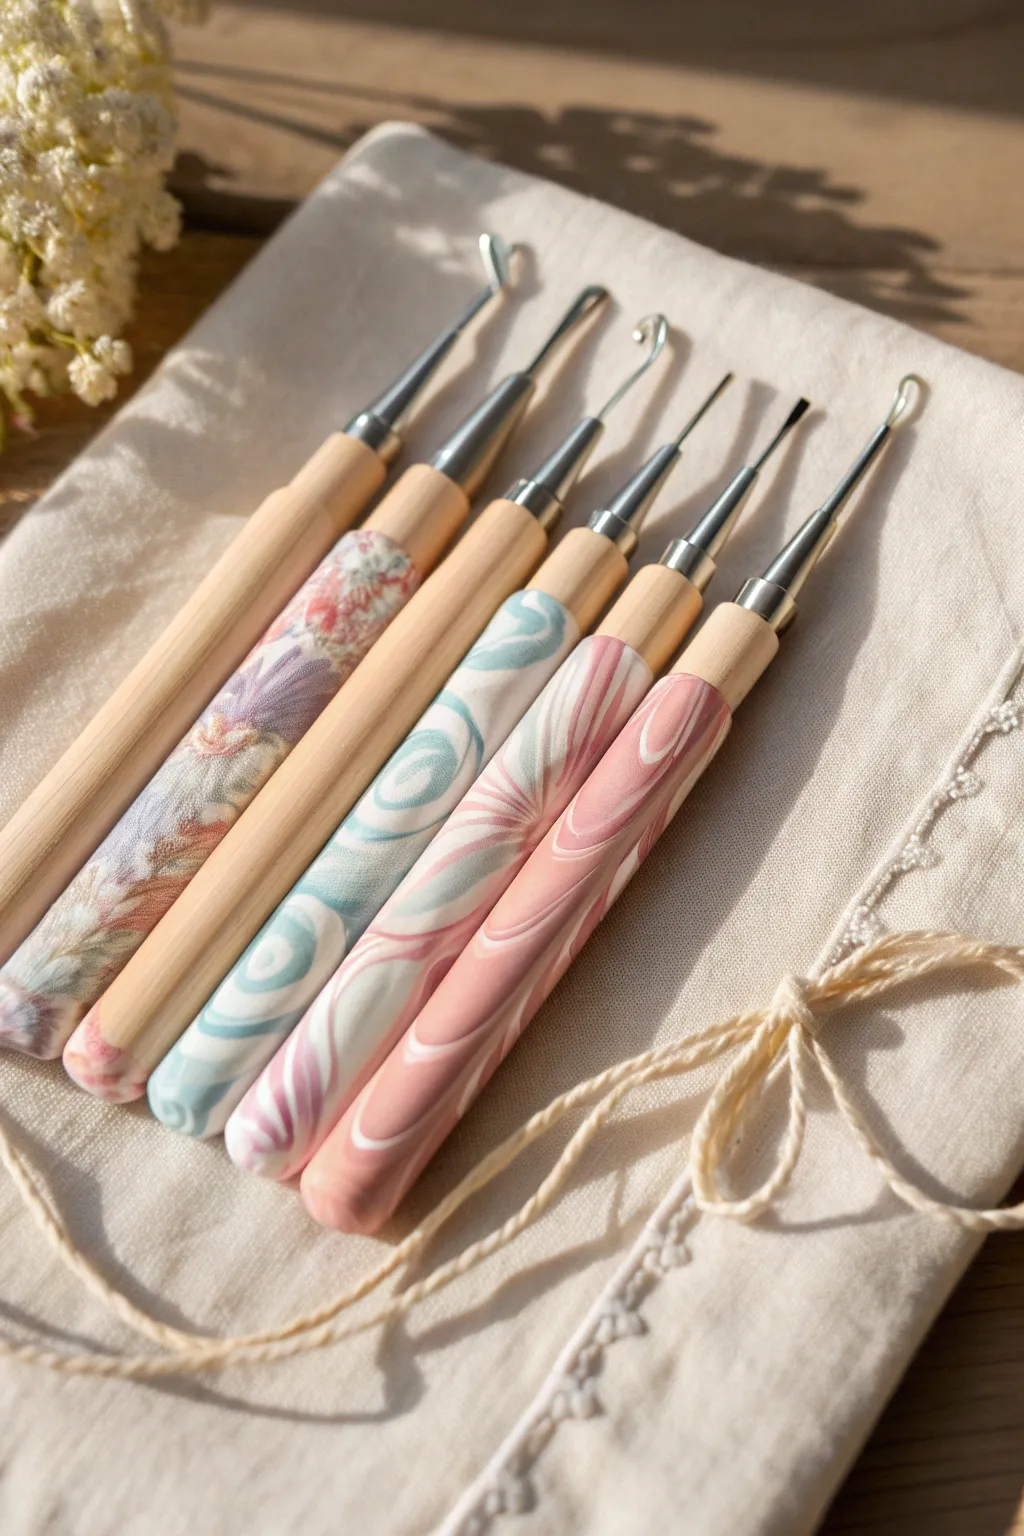
Transform standard wooden-handled crochet hooks into customized, ergonomic tools of beauty using polymer clay. These handles feature soft, swirled marbling and delicate floral patterns that not only look stunning but make hours of stitching more comfortable.
Step-by-Step Tutorial
Materials
- Wooden crochet hooks (set of various sizes)
- Polymer clay (white, pastel pink, soft blue, and floral cane/transfer pattern)
- Acrylic rolling pin
- Tissue blade or X-Acto knife
- Pasta machine (optional, for conditioning)
- Wet/dry sandpaper (400 to 1000 grit)
- Polycrylic or water-based polyurethane varnish
- Soft paintbrush
- Oven and baking tray/tile
Step 1: Preparation & Marbling
-
Clean the handles:
Before beginning, wipe down the wooden handles of your crochet hooks with a slightly damp cloth to remove any oils or dust. Let them dry completely. -
Condition the clay:
Work your white, pink, and blue polymer clay in your hands until it is soft and pliable. Proper conditioning prevents cracking later. -
Create the pink swirl:
Roll a log of white clay and a thinner log of pink clay. Twist them together like a candy cane, then fold and roll again. Repeat this twisting and folding process without over-mixing, so distinct streaks of pink and white remain. -
Create the blue swirl:
Repeat the marbling process with white and blue clay. You want defined swirls rather than a solid light blue color. -
Sheet the clay:
Flatten your marbled logs. I prefer using a pasta machine on a medium setting for consistent thickness, but an acrylic roller works perfectly well too.
Step 2: Wrapping the Hooks
-
Measure the wrap area:
Decide how far up the handle you want the clay to go. In the example, the clay covers the bottom two-thirds, leaving the natural wood exposed near the metal hook. -
Cut clay rectangles:
Using your tissue blade, cut rectangles from your marbled sheets that are wide enough to wrap fully around the handle and long enough to cover your designated area. -
Apply the clay:
Lay a wooden handle onto the edge of a clay rectangle and roll it up. Ensure the clay is tight against the wood to avoid air bubbles. -
Seam smoothing:
Slice off any excess clay overlap with your blade. Gently rub the seam with your thumb or a smoothing tool until it disappears and the surface looks continuous. -
Applying floral section:
For the floral handle, you can use thin slices of a pre-made floral milliefiori cane or apply a clay transfer paper to a sheet of white clay before wrapping the handle. -
Refine the ends:
Pay special attention to the top edge where clay meets wood and the bottom rounded end. Smooth clay over the bottom to cap it comfortably.
Loose Handles?
If the clay feels loose after baking, the wood may have shrunk. A tiny drop of superglue slipped between the wood and clay at the top rim will secure it instantly.
Step 3: Finishing
-
Final smooth:
Check for fingerprints. Lightly roll the handle on your work surface or smooth with a drop of baby oil to ensure a flawless finish before baking. -
Bake:
Place the hooks on a baking tile or parchment-lined tray. Bake according to the clay manufacturer’s instructions (usually 275°F/135°C for 15-30 minutes per 1/4 inch thickness). -
Cool down:
Allow the hooks to cool completely in the oven or on a wire rack. Do not handle them while hot as the clay is still fragile. -
Sand for silkiness:
Once cool, wet sand the clay handles under running water. Start with 400 grit to remove minor bumps and move up to 1000 grit for a silky smooth feel. -
Seal:
Apply a thin coat of water-based varnish like Polycrylic to protect the design and give it a soft sheen. Let dry completely before using.
Stamped Size Marker
Before baking, use small metal letter stamps to impress the hook size (e.g., ‘4mm’) into the bottom of the clay handle so you never grab the wrong one.
Your custom set is now ready to make your next crochet session uniquely stylish and cozy
Knot Paperweight That Looks Like Modern Sculpture
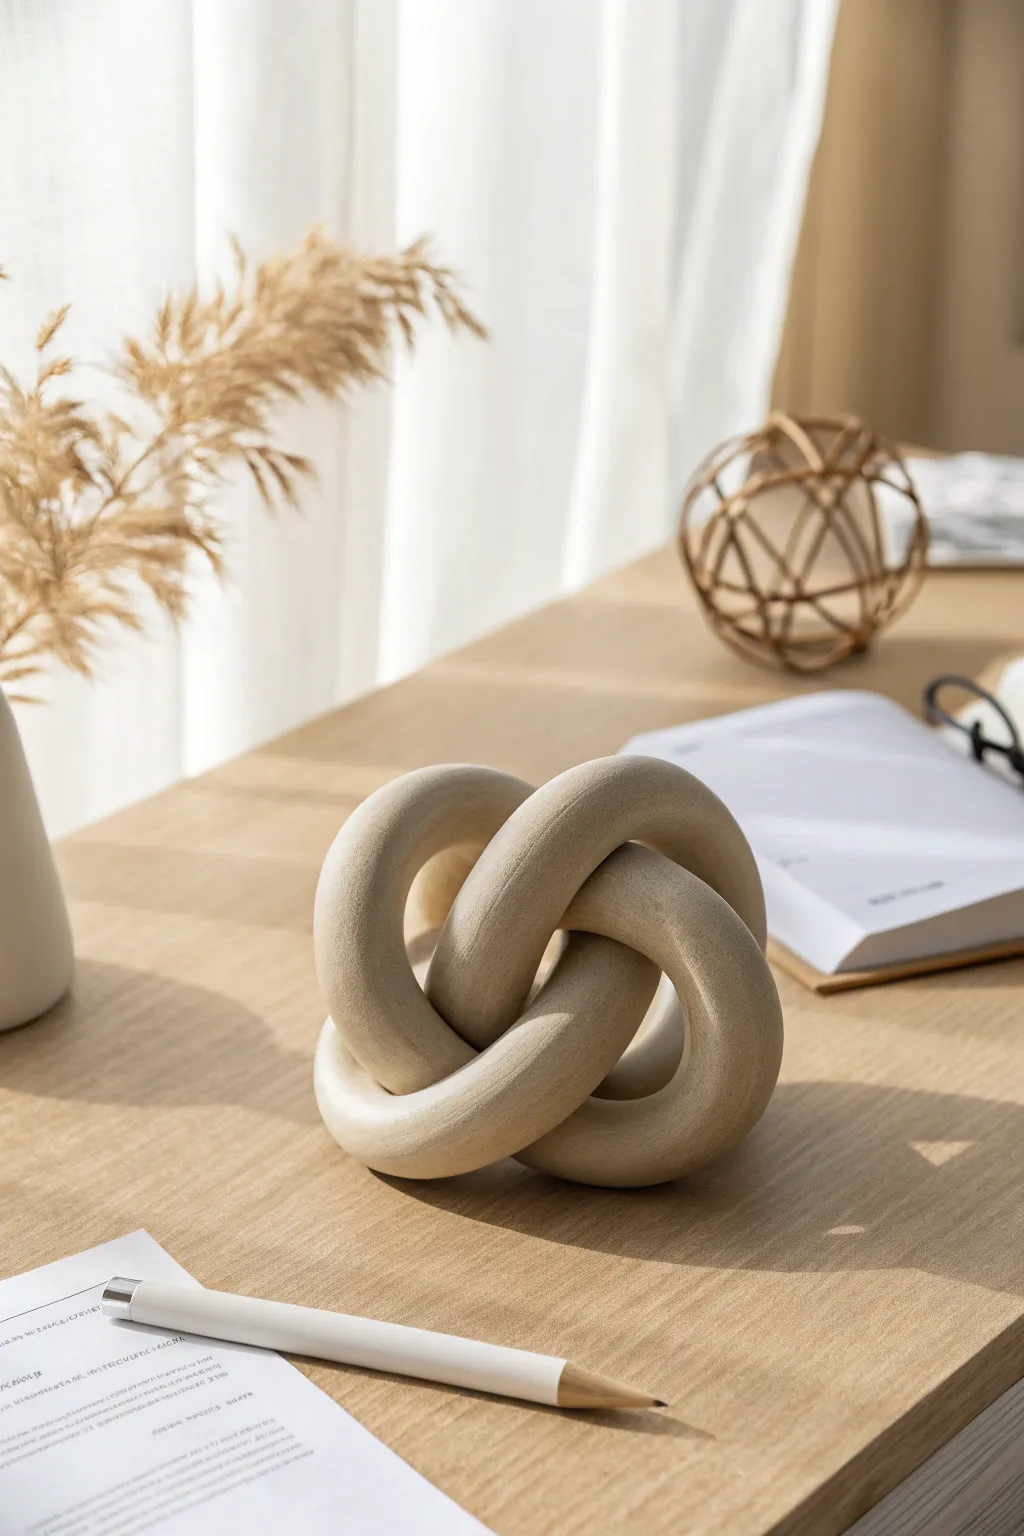
Elevate your desk decor with this sophisticated knot paperweight that mimics the high-end look of modern ceramic sculpture. Using simple polymer clay, you will create a minimalist accent piece that feels both organic and architectural.
Step-by-Step Guide
Materials
- Polymer clay (beige, white, or granite finish)
- Acrylic rolling pin
- Ceramic tile or glass work surface
- Aluminum foil
- Masking tape
- Pottery sponge
- Fine-grit sandpaper (400 and 800 grit)
- Toothbrush or texture sponge
- Baking soda and beige acrylic paint (optional for texture)
Step 1: Creating the Internal Structure
-
Prepare the foil armature:
Cut two large sheets of aluminum foil. Crumple and roll each sheet into a tight, long snake shape. These should be roughly 10-12 inches long and about 3/4 inch thick. -
Smooth the armature:
Compress the foil snakes firmly against your work surface to remove large air pockets and make them as dense as possible. -
Form the first loop:
Take one foil snake and curve it into an oval loop. Secure the ends together tightly with masking tape. This forms the first link of your chain. -
Interlock the second loop:
Take the second foil snake and thread it through the center of the first closed loop. Bring the ends of the second snake together to form a linked chain. -
Secure the shape:
Tape the ends of the second loop together. Gently manipulate the two linked ovals until they rest in a pleasing, knotted formation that sits flat on the table.
Step 2: Applying the Clay
-
Condition the clay:
Knead your polymer clay thoroughly until it is soft and pliable. If you want a stone effect, mix a little white clay with translucent or granite-effect clay. -
Roll out sheets:
Using your acrylic rolling pin, roll the clay into long, flat sheets approximately 1/4 inch thick. You’ll need enough length to wrap around the foil tubes. -
Wrap the first loop:
Lay a sheet of clay over the exposed part of one foil loop. Wrap it around the foil fully so the seam meets on the inside curve where it is less visible. -
Trim and seal:
Trim any excess clay with a blade and pinch the seams together. Use your fingers to smooth the join line until it disappears completely. -
Navigate the intersection:
When you reach the point where the loops connect, carefully push clay into the crevices. I find a silicone sculpting tool helps smooth these tight corners without distorting the shape. -
Wrap the second loop:
Repeat the process for the second loop, carefully maneuvering the clay sheet through the first loop to ensure total coverage of the foil.
Seamless Seams
Apply a tiny amount of liquid polymer clay or ‘Bake and Bond’ to the edges of your clay sheets before wrapping them. It acts like glue and helps seams vanish.
Step 3: Texturing and Finishing
-
Smooth the surface:
Dip your fingers in a tiny bit of water (or baby oil) and run them over the entire sculpture to remove any fingerprints or lumps. -
Add stone texture:
Take an old toothbrush or a coarse texture sponge and gently tap it all over the wet clay. This disrupts the plastic-like sheen and creates a faux-ceramic porosity. -
Double-check the balance:
Set the sculpture on your tile. Ensure it sits stable and flat without wobbling. Gently press down if needed to create a tiny flat spot on the bottom for stability. -
Bake the project:
Bake according to your polymer clay package instructions (usually 275°F/130°C for 30-45 minutes). Use an oven thermometer to ensure accuracy, as scorching creates unwanted color changes. -
Cool down:
Leave the sculpture in the oven with the door cracked open to cool slowly. This prevents thermal shock and cracking. -
Post-bake sanding:
Once fully cool, lightly sand the surface with 400 grit wet/dry sandpaper to remove any sharp bits, then finish with 800 grit for a velvety matte touch. -
Optional texture paint:
If the finish looks too smooth, mix baking soda into beige acrylic paint (1:1 ratio) and dab it on for a gritty, sandstone appearance.
Speckled Stone Effect
Knead roughly ground black pepper or dried tea leaves into your beige clay before rolling it out. This adds organic speckles that look like real stoneware.
Place your finished sculpture on a stack of books or beside your laptop for an instantly chic, studious vibe
Mini Hobby Charms Tailored to Their Personality
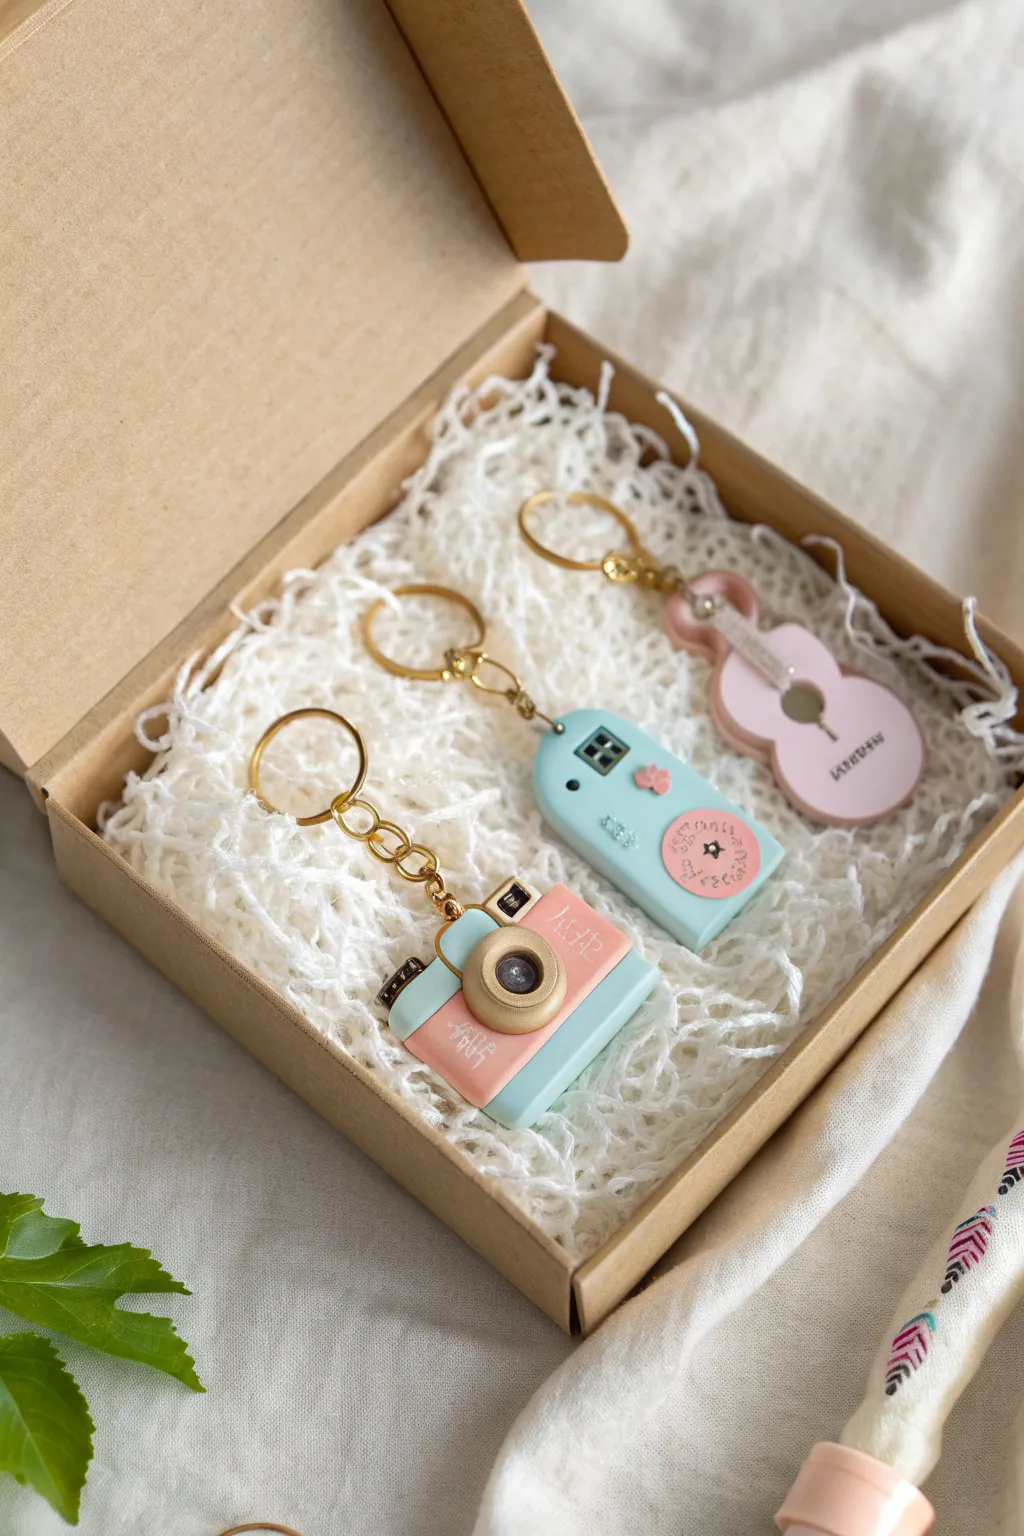
These adorable pastel-themed keychains capture beloved hobbies in miniature form, featuring a retro camera, a music player, and an acoustic guitar. Using soft polymer clay colors and gold hardware, they make perfect personalized gifts tailored to your creative friends’ passions.
Step-by-Step
Materials
- Polymer clay (pastel pink, light blue, white, black, gold/tan)
- Clay rolling pin or pasta machine
- Various small circle cutters
- X-Acto knife or clay blade
- Needle tool or dotting tool
- Gold screw eye pins
- Gold keychain rings with chains
- Jewelry pliers
- Gloss glaze (UV resin or polyurethane varnish)
- Oven and baking sheet
Step 1: Prepping and Shaping Bases
-
Condition the clay:
Start by warming and conditioning your pink, blue, and tan clay until soft and pliable. Use a rolling pin to flatten sheets to a consistent thickness of about 4-5mm for the main body pieces. -
Cut the camera body:
For the camera, cut a small rectangle from light blue clay. Then, cut a slightly shorter rectangle from pink clay and press it gently onto the top half of the blue piece to create a two-tone body. -
Shape the music player:
Cut a tall, rounded rectangle from the light blue clay. Use your fingers to smooth and round off the top corners to mimic a handheld device shape. -
Form the guitar body:
For the guitar, roll out pink clay and use a small figure-8 cutter or hand-cut a classic guitar body shape. Create the neck using a thin strip of tan or light grey clay and attach it firmly to the top.
Step 2: Adding the Details
-
Create the camera lens:
Roll a ball of gold or tan clay, flatten it into a thick disc, and press it onto the center of the camera body. Indent the center with a smaller tool and add a tiny black dot for the lens glass. -
Add camera buttons:
Form tiny squares or circles from black and gold clay and place them on the top edge of the camera for the shutter button and viewfinder. -
Detail the music player:
Cut a small square of black clay for the screen and place it near the top. I prefer to add a tiny white square inside it for a reflection effect. -
Make the control wheel:
Create a pink circle for the control wheel. Before attaching it, gently scribe star or heart symbols into the surface with a needle tool, then press it onto the lower half of the blue body. -
detail the guitar:
Press a small circle cutter into the center of the guitar body to create the sound hole. Add a tiny bridge piece made of tan clay below it. -
Secure the hardware:
Dip the ends of your gold screw eye pins into liquid clay or bake-and-bond. -
Insert eye pins:
Carefully screw the pins into the top center of each charm. Ensure they go deep enough to be secure but don’t poke through the sides.
Clean Edges Tip
Use a little cornstarch on your cutters so the clay releases instantly without sticking, keeping your geometric shapes like the camera crisp and sharp.
Step 3: Finishing Touches
-
Clean up fingerprints:
Before baking, gently wipe the surface of your charms with a little baby oil or rubbing alcohol on a brush to smooth out any fingerprints or lint. -
Bake the charms:
Place all charms on a baking sheet lined with parchment paper or cardstock. Bake according to your brand of clay’s instructions (usually 275°F/135°C for 15-30 minutes). -
Cool down:
Let the charms cool completely in the oven before handling them to prevent cracking. -
Apply glaze:
Once cool, coat the front and sides with a gloss glaze or UV resin to give them a ceramic-like shine and protect the small details. -
Assemble the keychains:
Using jewelry pliers, open the jump ring on your keychain hardware and loop it through the eye pin on the charm. Close the ring securely.
Make it Sparkle
Before baking, lightly brush gold mica powder over the lens rim or guitar strings area for a subtle metallic sheen that catches the light.
Now you have a set of personalized charms ready to be boxed up and gifted to your favorite hobbyist
Tabletop Tic-Tac-Toe Set for a Handmade Coffee-Table Gift
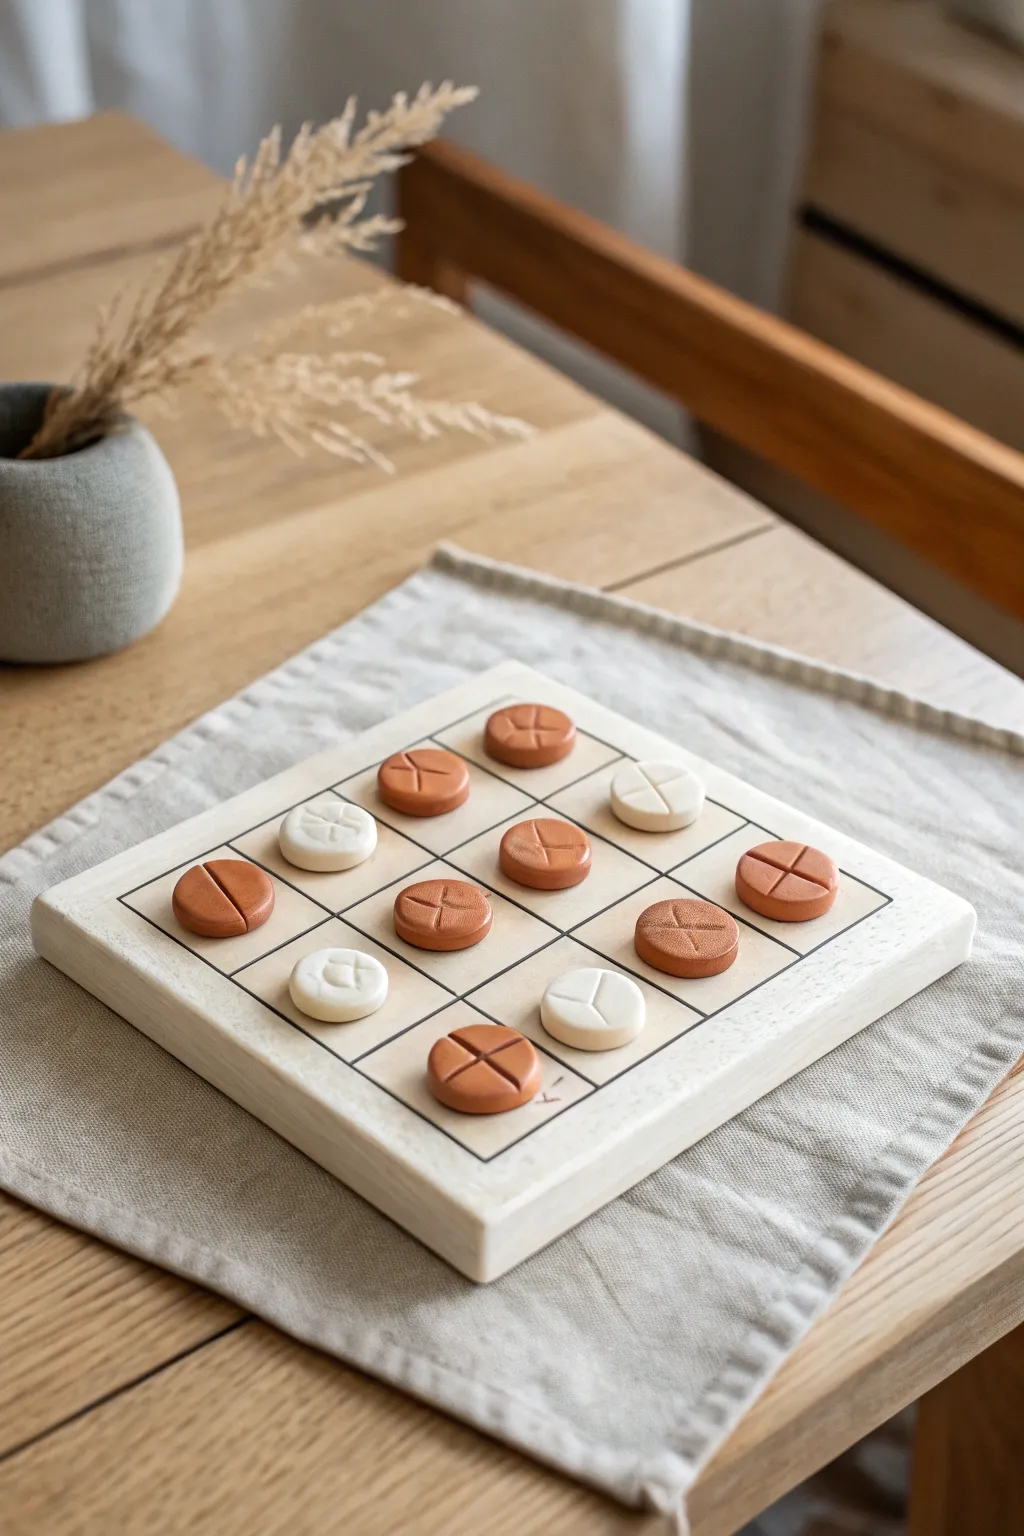
Elevate your coffee table décor with this minimalist Tic-Tac-Toe set, featuring smooth, tactile game pieces and a crisp grid. The warm terracotta and clean white tones create a sophisticated, grown-up version of the classic childhood game.
Step-by-Step Tutorial
Materials
- White polymer clay
- Terracotta or rust-colored polymer clay
- Square wood block or thick MDF base (approx. 5 x 5 inches)
- Black acrylic paint or fine-tip black paint pen
- Rolling pin or pasta machine
- Small round cookie cutter (approx. 1 inch)
- Clay knife or craft blade
- Ruler
- Sandpaper (fine grit)
- Baking sheet and parchment paper
- Matte finish varnish (optional)
Step 1: Crafting the Game Pieces
-
Condition the white clay:
Start by warming the white polymer clay in your hands, kneading it until it is soft and pliable to prevent cracks during baking. -
Roll out the slab:
Using a rolling pin or pasta machine, flatten the white clay to a uniform thickness of about 1/4 inch. I like to use guide rails to ensure every piece is perfectly even. -
Cut the circles:
Press your round cutter firmly into the clay slab to cut out six circles. Wiggle it slightly before lifting to release the clay cleanly. -
Repeat with terracotta:
Clean your roller to avoid color transfer, then condition and roll out the terracotta clay to the same thickness. Cut out six circles from this color as well. -
Smooth the edges:
Gently rub the edges of each cut circle with a fingertip dipped in a tiny bit of baby oil or cornstarch to soften the sharp cut lines for a rounded, organic look. -
Impress the X marks:
Take your clay knife and gently press an ‘X’ into the top of each terracotta piece. Don’t cut all the way through; just make a deep impression that adds texture. -
Impress the O marks (optional):
For the white pieces, you can press a smaller cross or a simple line pattern to distinguish them, as seen in the photo. Alternatively, leave them smooth or impress a circle. -
Bake the pieces:
Arrange all clay pieces on a parchment-lined baking sheet. Bake according to the manufacturer’s instructions (usually 275°F for 15-30 minutes), then let them cool completely.
Step 2: Preparing the Game Board
-
Prepare the base:
While the clay cools, sand your wooden base until it is completely smooth. Wipe away any dust with a tack cloth or slightly damp rag. -
Prime and paint:
Apply a coat of white acrylic paint to the wooden base. You may need two or three thin layers to achieve an opaque, smooth finish that matches your white clay pieces. -
Dry thoroughly:
Allow the paint to dry completely. If the grain raised during painting, give it a very light sanding with fine-grit paper and add a final thin coat of paint. -
Measure the grid:
Using a ruler and a light pencil, mark out a 3×3 grid on the top surface. Ensure the squares are large enough to comfortably hold your clay pieces. -
Draw the lines:
Go over your pencil marks with a fine-tip black paint pen or a thin brush with black acrylic paint. Use the ruler as a guide to keep lines crisp and straight. -
Avoid smudging:
Be careful not to drag your hand through the wet ink. Work from the top down or left to right depending on your dominant hand.
Clean Lines
To get perfectly straight grid lines without bleed, apply strips of painter’s tape along your pencil marks and paint strictly within the gap.
Step 3: Finishing Touches
-
Seal the board:
Once the grid lines are bone dry, brush a thin layer of matte varnish over the entire wooden board to protect the paint from chipping during play. -
Seal the pieces:
Apply the same matte varnish to your cooled clay pieces. This deepens the terracotta color and gives the white pieces a finished, ceramic-like feel. -
Test placement:
Once everything is dry, place the pieces on the board to ensure they fit well within the grid squares.
Add Magnetism
Embed small magnets into the bottom of the clay pieces before baking, and glue washers into the wood board for a travel-friendly magnetic set.
Now you have a stylish, playable art piece ready for display or your next game night