When I’m craving a creative reset, polymer clay is my favorite way to make something that actually fits into real adult life—pretty, practical, and not at all “kid craft.” Here are my go-to polymer clay ideas for adults that look polished on your body, your desk, or your coffee table.
Statement Polymer Clay Earrings With Modern Shapes
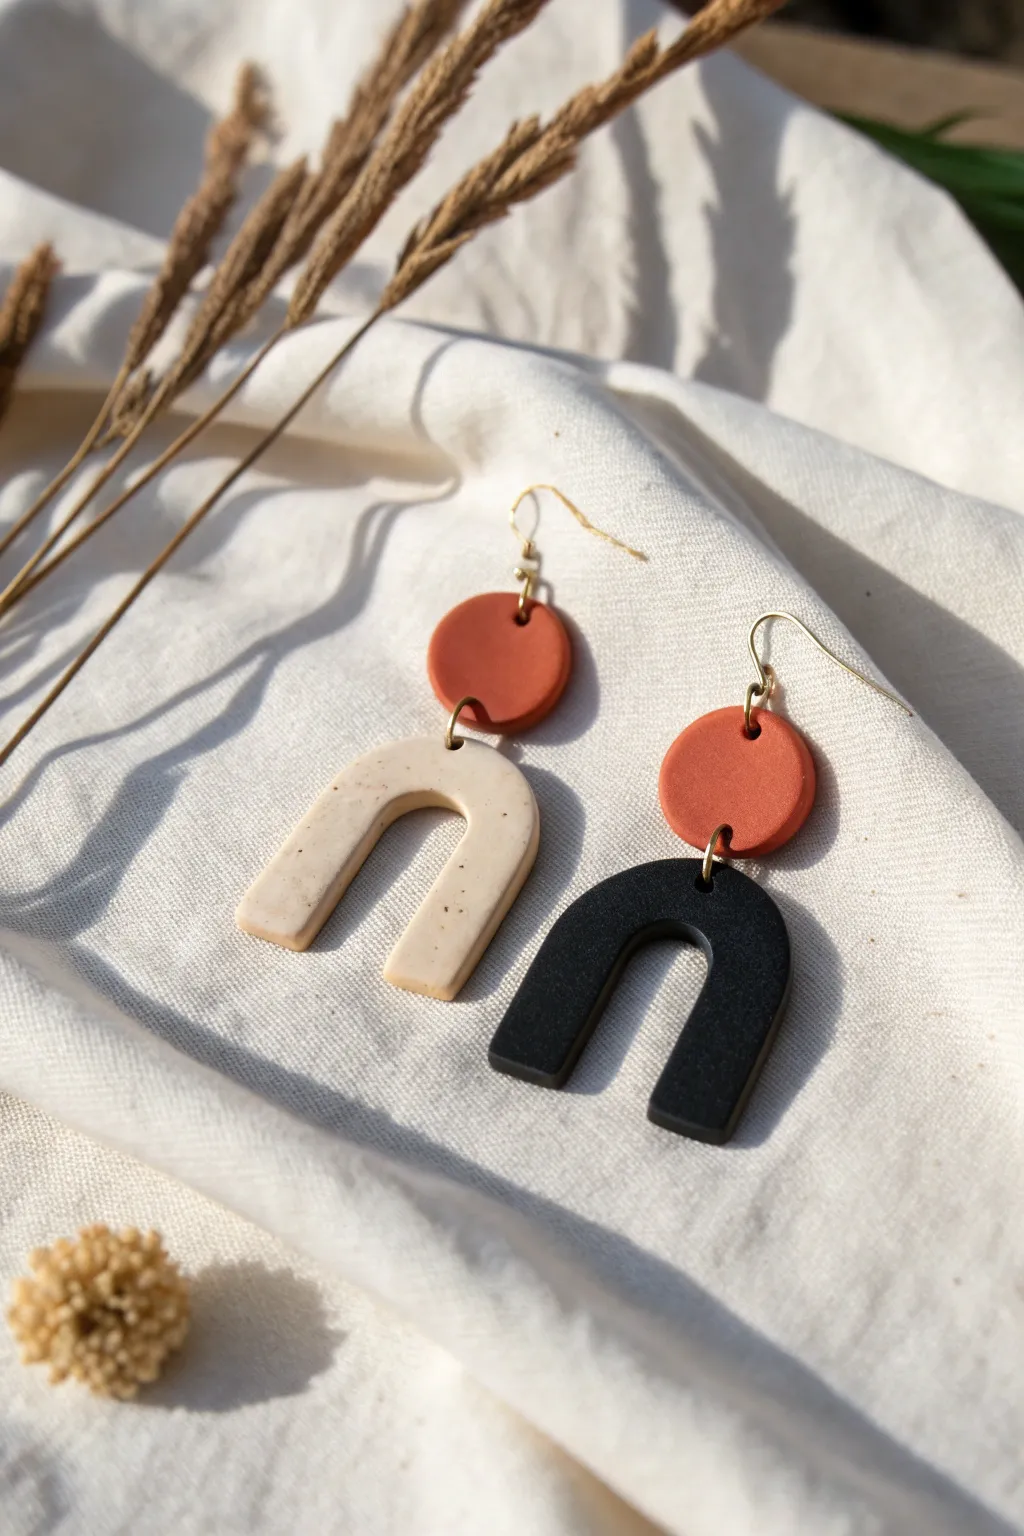
These statement earrings combine earthy tones with bold, modern silhouettes for a look that is both sophisticated and playful. The design pairs a simple rust-colored disc with a contrasting arch, creating a balanced and trendy accessory perfect for everyday wear.
Step-by-Step
Materials
- Polymer clay in rust orange
- Polymer clay in black
- Polymer clay in beige or cream
- Black pepper (finely ground) or brown acrylic paint (for speckling)
- Acrylic rolling pin or pasta machine
- Circle clay cutter (approx. 15mm)
- U-shape or arch clay cutter (approx. 30-40mm)
- X-acto knife or tissue blade
- Hand drill or pin vibe with small bit
- Jump rings (gold, approx. 6mm or 8mm)
- Fishhook ear wires (gold)
- Jewelry pliers (flat nose and round nose)
- Baking tile or parchment paper
- fine-grit sandpaper (optional)
- Oven
Step 1: Preparing the Clay
-
Condition the clay:
Begin by thoroughly conditioning your rust, black, and beige polymer clays. Knead each color separately in your hands until they are soft, pliable, and warm. -
Create the speckled beige:
To achieve the stone-like effect seen in the cream arch, flatten your beige clay. Sprinkle a very small pinch of finely ground black pepper onto it. Fold the clay over and knead it until the specks are evenly distributed. Add more pepper if you want a denser texture. -
Roll out slabs:
Using your acrylic roller or pasta machine, roll all three colors of clay into sheets of even thickness. Aim for about 3mm to 4mm thickness to ensure the earrings are sturdy but essentially lightweight.
Step 2: Cutting and Baking
-
Cut the circles:
Take your rust orange clay slab and use the small circle cutter to punch out two identical circles. These will be the top studs for both earrings. -
Cut the arches:
Use your arch-shaped cutter on the black clay slab to create one U-shape. Repeat this process with the speckled beige clay to create the second U-shape. If you don’t have a cutter, you can print a template and trace around it carefully with your X-acto knife. -
Smooth the edges:
Before baking, I always gently rub the edges of the cut shapes with your fingertip to soften any harsh cutter marks or loose bits of clay. This saves sanding time later. -
Pierce holes:
Using a needle tool or toothpick, carefully poke holes for assembly. You need one hole at the bottom of each rust circle, one at the top of each circle, and one at the very top center of each U-shape arch. Ensure the holes are large enough for your jump rings. -
Bake carefully:
Arrange all four pieces on a ceramic tile or parchment-lined baking sheet. Bake according to your specific clay manufacturer’s instructions—usually around 275°F (135°C) for 30-45 minutes.
Clean Cuts Every Time
Cover your clay slab with a piece of plastic wrap before pressing your cutters down. This creates a lovely domed edge that mimics resin and requires zero sanding later.
Step 3: Finishing and Assembly
-
Cool and sand:
Allow the pieces to cool completely inside the oven or on the counter. Once cool, use fine-grit sandpaper to smooth out any remaining rough edges if necessary. -
Open the jump rings:
Using two pairs of pliers, twist your jump rings open laterally (side-to-side, not pulling apart). You will need two jump rings for connecting the pieces. -
Connect the shapes:
Thread an open jump ring through the top of the beige arch and the bottom of one rust circle. Close the jump ring securely so there is no gap. -
Repeat for the second earring:
Do the same for the black arch, connecting it to the second rust circle with a jump ring. -
Attach ear wires:
Open the small loop at the bottom of your fishhook ear wires using your pliers. Thread this loop through the top hole of the rust circle. -
Secure the wire:
Gently squeeze the loop on the ear wire closed. Repeat for the other earring, ensuring the front of the clay shapes face forward.
Fingerprint Troubles?
If you notice fingerprints on your raw clay shapes before baking, lightly brush them with a small amount of cornstarch or baby oil to smooth the surface instantly.
Enjoy wearing your custom-made modern accessories with any outfit


Terrazzo-Style Polymer Clay Earrings
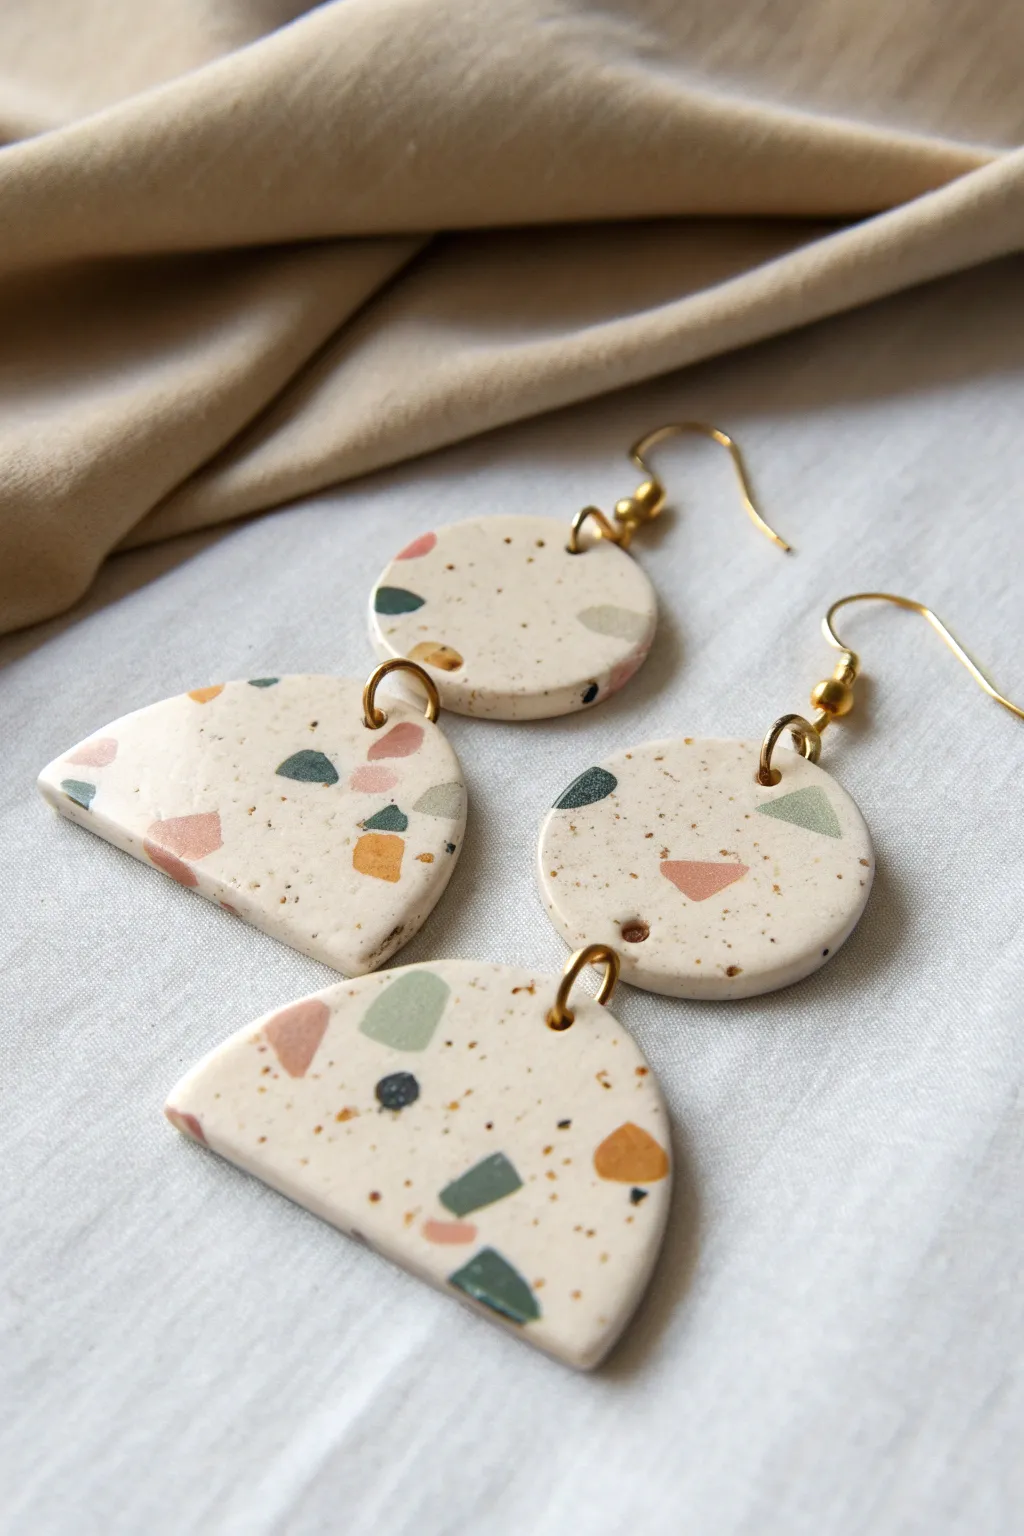
Embrace the modern, artistic flair of terrazzo without the heavy stonework using polymer clay. These lightweight dangle earrings feature a classic cream base speckled with muted earthy tones like sage, terracotta, and slate, giving you a sophisticated accessory that matches everything.
Step-by-Step Tutorial
Materials
- Polymer clay (Cream or White for base)
- Polymer clay (Sage green, Terracotta/Peach, Slate blue, Mustard yellow, Black)
- Acrylic roller or pasta machine
- Tissue blade or craft knife
- Circle cutters (approx. 20mm and 40mm)
- Needle tool or small drill bit
- Parchment paper or ceramic tile
- Sandpaper (various grits from 400 to 1000)
- Jump rings (gold)
- Earring hooks (gold)
- Flat nose pliers
- UV resin or glossy varnish (optional for finish)
- Ground black pepper or sand (optional for texture)
Step 1: Preparing the Terrazzo Palette
-
Condition the base:
Begin by thoroughly conditioning your cream or white clay until it is soft and pliable. If you want that speckled, natural stone look seen in the photo, knead in a tiny pinch of ground black pepper or sand. -
Create the color chips:
Condition small amounts of your colored clays—sage green, terracotta, mustard, and slate blue. Roll each color out into a very thin sheet. -
Chop the colors:
Use your tissue blade to chop these thin colored sheets into tiny, irregular fragments. Aim for a variety of shapes and sizes, from specks to small triangles, keeping them separate for now. -
Roll the base canvas:
Roll your conditioned cream clay into a slab about 3mm thick. This will be the canvas for your terrazzo pattern.
Smudge Prevention
To keep your cream base spotless while rolling, wipe your work surface, hands, and roller with a baby wipe or alcohol in between handling the darker colored clays
Step 2: Creating the Pattern
-
Apply the fragments:
Gently pick up the colored clay chips and place them randomly onto the cream slab. Avoid clumping similar colors together; try to space them out organically. -
Embed the chips:
Place a sheet of parchment paper over the slab to prevent sticking. Use your acrylic roller to gently roll over the clay, pressing the colored fragments flush into the base surface. -
Smooth the surface:
Continue rolling until the surface is completely smooth and level. You might need to roll both vertically and horizontally to ensure the chips are fully integrated and not just sitting on top.
Step 3: Cutting and Baking
-
Cut the top circles:
Use your smaller circle cutter (around 20mm) to punch out two circles. These will be the top studs or connectors. -
Cut the large circles:
Use the larger circle cutter (around 40mm) to punch out two large circles. -
Form the semi-circles:
Take your tissue blade and cut the two large circles exactly in half. Select the two best halves to use as the bottom dangles of your earrings. -
Pierce holes:
Using a needle tool, poke holes for your jump rings. You’ll need one hole at the bottom of the small circles and one hole at the top center of the semi-circles. I like to double-check alignment by laying them out before piercing. -
Bake:
Place your pieces on a ceramic tile or parchment-lined baking sheet. Bake according to your clay manufacturer’s instructions (usually 275°F/135°C for 30-60 minutes).
Make it Metallic
Add flecks of gold leaf foil along with your colored clay chips before the final roll. The gold will embed into the surface just like the clay for a luxe finish
Step 4: Finishing and Assembly
-
Cool and inspect:
Let the pieces cool completely. If the edges feel rough, wet sand them gently under running water, starting with 400 grit and moving to 1000 grit for a silky finish. -
Buffing (Optional):
For a matte stone look, leave as is. For a slight sheen, you can buff the pieces with a denim cloth or apply a very thin layer of matte varnish. -
Add jump rings:
Open a gold jump ring using your pliers by twisting the ends away from each other (never pull them apart). Thread it through the hole in the semi-circle and the hole in the small circle, then close it securely. -
Attach earring hooks:
Open the loop on your earring hook. Thread it through the top of the small circle (or add another small jump ring if needed for movement) and close the loop. -
Final check:
Hold the earrings up to ensure the pieces dangle freely and face forward correctly. Adjust the jump rings if necessary.
Now you have a stunning pair of artisan-style earrings ready to wear or gift.


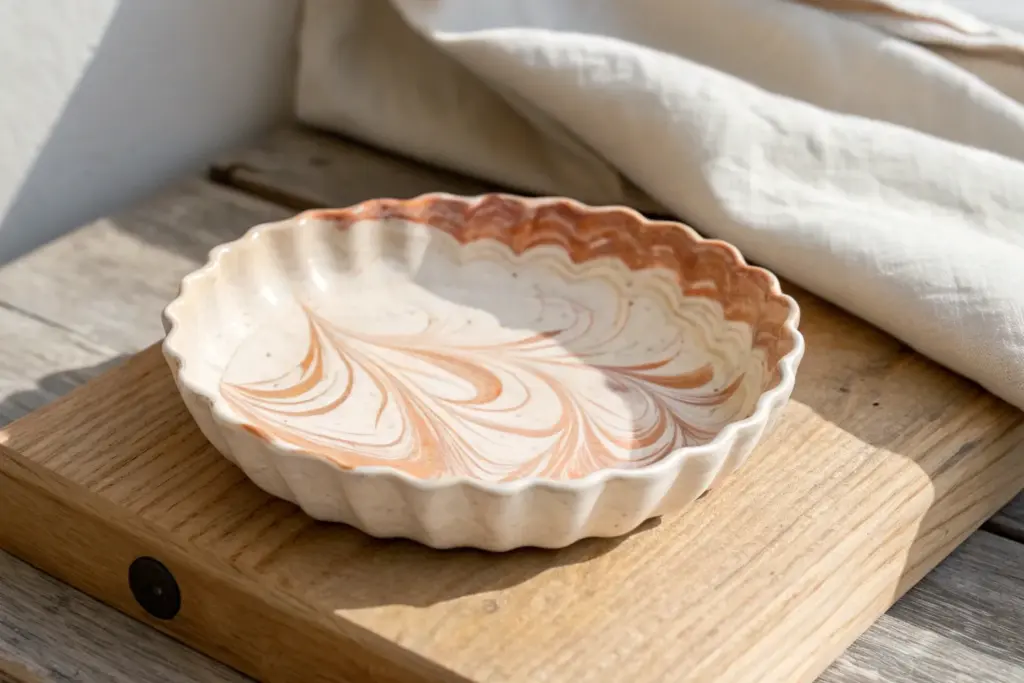
Marbled Ring Dish for Nightstand Jewelry Drops

Elevate your nightstand with this sophisticated catch-all that perfectly mimics the look of high-end agate or marble. Using translucent and metallic polymer clays, you’ll create swirling layers of cream, grey, brown, and gold that capture the organic beauty of natural stone.
Step-by-Step Guide
Materials
- Polymer clay in White, Translucent, Beige/Tan, and Dark Grey
- Liquid gold leaf or gold paint
- Rolling pin or acrylic roller
- Large circular cookie cutter (approx 4-5 inches)
- Oven-safe bowl (to use as a form)
- X-Acto knife or clay blade
- Gloss varnish or resin (optional)
- Fine grit sandpaper (400 to 1000 grit)
- Clean work surface (ceramic tile or glass mat)
Step 1: Creating the Marbled Slab
-
Condition the clays:
Begin by thoroughly kneading each color of clay separately until they are soft and pliable, ensuring there are no air bubbles trapped inside. -
Form the snakes:
Roll each color into long, thin ropes or ‘snakes’ of varying thicknesses; matching the photo, use more white and translucent clay, keeping the dark grey and beige portions smaller for accent veins. -
Twist and combine:
Gather all your clay ropes into one large bundle and twist them together tightly, folding the clay over itself and twisting again to begin the marbling process. -
Roll and fold:
Roll the twisted bundle into a smooth log, then fold it in half and twist again; repeat this step 2-3 times, but be careful not to over-mix, or the colors will turn muddy instead of distinct. -
Create the slab:
Smush the log into a ball and begin rolling it flat with your acrylic roller until it is about 1/4 inch thick, rotating often to keep an even shape. -
Inspect the pattern:
Check your flattened slab for the desired marbling effect; if you aren’t happy with the visible side, flip it over, as the underside often reveals a completely different and beautiful pattern.
Step 2: Shaping and Baking
-
Cut the circle:
Place your large circular cutter onto the most attractive section of the marbled slab and press down firmly to cut your base shape. -
Smooth the edges:
Gently run your finger dipped in a little cornstarch or water around the cut edge to soften any sharp angles left by the cutter. -
Form the dish:
Carefully lift your clay circle and drape it inside or over your oven-safe bowl, gently pressing it to conform to the bowl’s curve without stretching the pattern. -
Bake the clay:
Place the bowl with the clay on a baking sheet and bake according to the specific temperature and time instructions on your package of clay (usually 275°F for 15-30 minutes). -
Cool down:
Once bakes, turn off the oven and let the dish cool completely inside the oven or on the counter before attempting to remove it from the form to prevent cracking.
Muddy Colors?
If your colors are blending into one solid hue, you’ve over-rolled. Stop twisting sooner next time. The distinct separation is key for the faux stone effect.
Step 3: Finishing Touches
-
Sand the surface:
Using wet/dry sandpaper and a little water, lightly sand the edges and rim of the dish to ensure they are perfectly smooth and professional-looking. -
Clean the dish:
Wipe the dish down with a damp cloth or rinse it under water to remove any clay dust from sanding, then dry it thoroughly. -
Paint the rim:
Dip a fine brush into your liquid gold leaf and carefully paint the rim of the dish; I find that a slightly irregular, painterly line looks more natural and organic than a perfect stripe. -
Add gold veins (optional):
If you want to enhance the stone look, trace a few of the darker grey veins in the marbling with a very fine line of gold paint. -
Seal:
For a glossy ‘polished stone’ finish, apply a thin coat of gloss varnish or UV resin over the entire inside of the dish to protect the paint and make the colors pop.
Level Up: Gemstone Vibe
Mix a tiny amount of gold glitter or gold leaf flakes directly into the translucent clay rope before twisting. It adds depth resembling quartz inclusions.
Place this beautiful dish on your bedside table to keep your favorite rings safe and stylishly displayed


Textured Polymer Clay Coasters That Look Like Stone
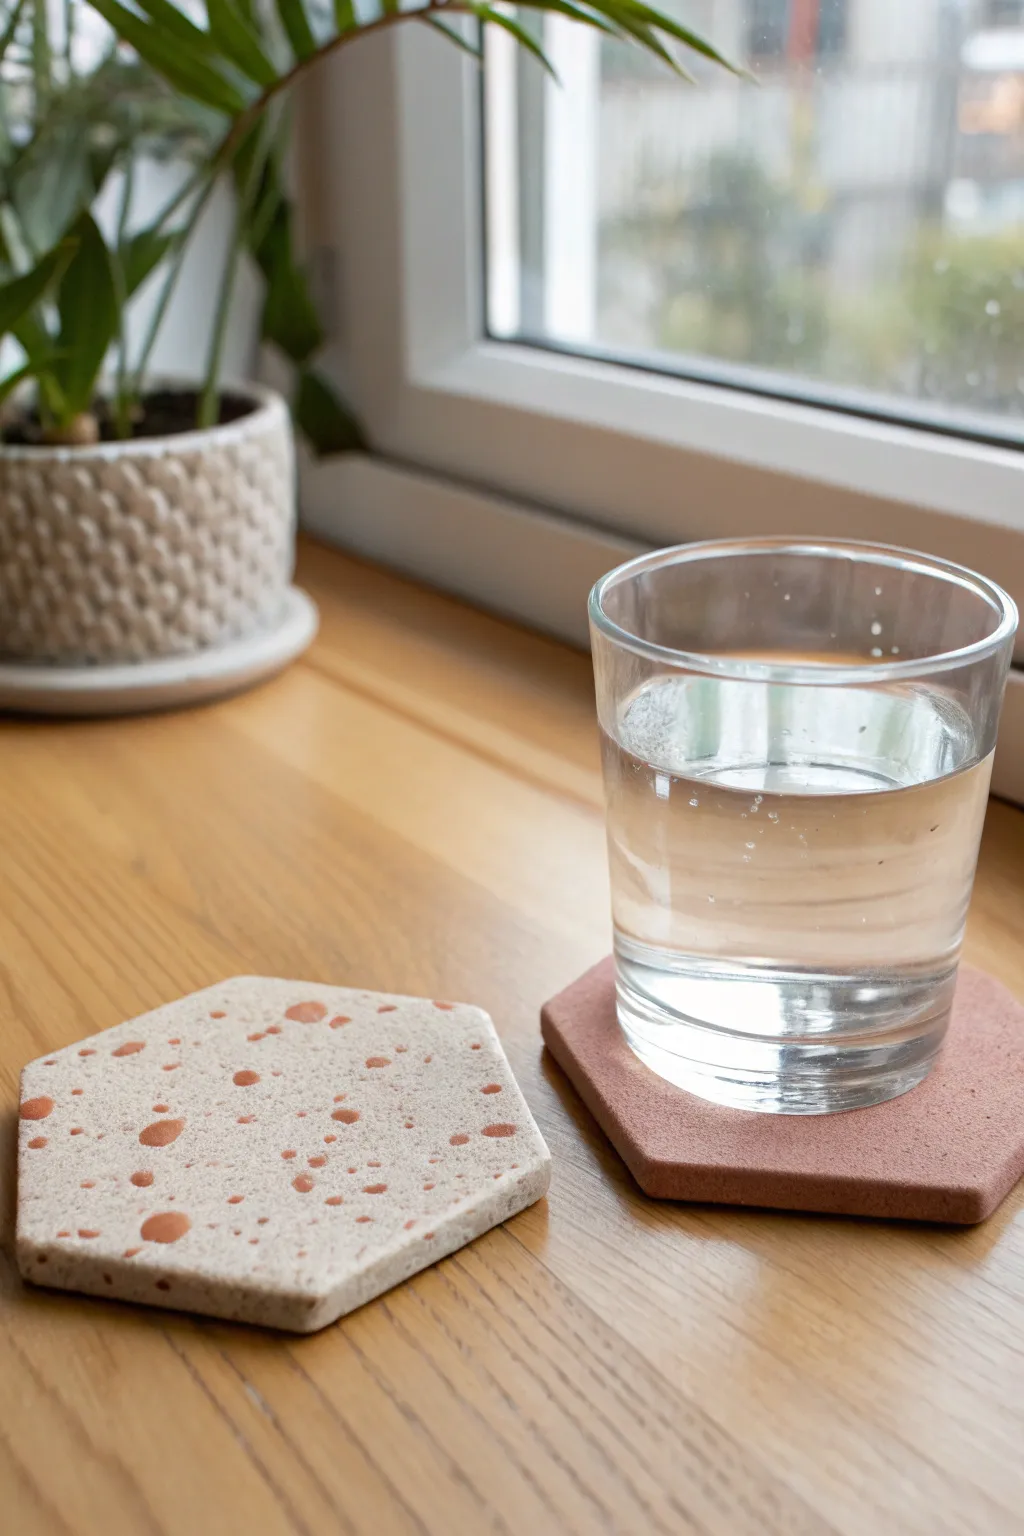
These chic, geometric coasters mimic the look of natural stone and terrazzo without the heavy weight or high price tag. With subtle speckling and a modern hexagon shape, they bring an earthy, minimalist vibe to your coffee table.
Detailed Instructions
Materials
- Polymer clay (cream or beige)
- Polymer clay (terracotta or brick red)
- Polymer clay (translucent or granite effect – optional for texture)
- Hexagon cookie cutter (approx. 4 inches)
- Acrylic rolling pin or pasta machine
- Coarse sandpaper or salt (for texture)
- Fine grit sandpaper (for finishing)
- Baking sheet
- Parchment paper
- Craft knife
- Ceramic sealant or matte varnish
Step 1: Preparing the Base
-
Condition the Clay:
Begin by thoroughly conditioning your cream-colored polymer clay. Knead it in your hands until it becomes soft, pliable, and free of cracks. -
Create the Speckle Mix:
To achieve the stone-like texture, mix fine shavings or tiny crumbs of translucent clay into your main cream block. Don’t over-mix; you want visible flecks rather than a blended color. -
Roll the Slab:
Roll out the cream clay on a clean, flat surface to a thickness of about 1/4 inch (6mm). Using depth guides or slat rails is a great way to ensure the thickness is perfectly even across the whole slab. -
Texture the Surface:
For that realistic gritty stone look seen in the photo, gently press coarse sandpaper onto the surface of the raw clay, or lightly sprinkle salt and roll over it once before shaking the excess off.
Stone Texture Trick
Mix dried used coffee grounds or cracked black pepper into the clay for realistic, granitic specks that won’t bake out or change color.
Step 2: Applying the Terrazzo Pattern
-
Prep the Terracotta Clay:
Condition a small amount of the terracotta or brick-red clay. -
Create Chips:
Pinch off irregular, organic-shaped pieces of the terracotta clay. Vary the sizes from tiny specks to larger, bean-sized flakes. -
Place the Chips:
Scatter these red clay chips randomly across your textured cream slab. Aim for an uneven distribution to keep it looking natural. -
Embed the Pattern:
Cover the slab with a piece of parchment paper to protect your texture. Use your roller to gently press the red chips down so they become flush with the cream base surface.
Step 3: Cutting and Baking
-
Cut the Shape:
Position your hexagon cutter over the most pleasing section of your patterned slab. Press down firmly to cut the shape. -
Clean Edges:
If the clay sticks to the cutter, gently push it out. Use your finger or a smoothing tool to soften any sharp ridges on the top edge of the cut. -
Make the Solid Mate:
Repeat the rolling and cutting process with just the terracotta clay if you want a matching solid-color coaster like the one in the photo. -
Bake:
Transfer the cut hexagons to a parchment-lined baking sheet. Bake according to your specific clay brand’s instructions (usually around 275°F for 15-30 minutes). -
Cool Down:
Allow the coasters to cool completely on the baking sheet before handling them to prevent warping while they remain soft.
Level Up: Gold Veins
Apply thin gold leaf flakes alongside the terracotta chips before the final roll. The metallic shimmer mimics expensive quartz or marble veins.
Step 4: Finishing Touches
-
Initial Sanding:
Once cool, dip the coaster in a bowl of water and use wet/dry sandpaper to smooth the edges and the surface. -
Reveal the Terrazzo:
Sand the top surface firmly. This step is crucial because it scrapes away the top film of cream clay, making the red chips pop and look clearly defined. -
Dust Off:
Rinse the coaster under water to remove all clay dust and dry it thoroughly with a lint-free towel. -
Seal:
Apply a thin layer of matte varnish or a ceramic sealant to protect the surface from moisture. -
Add Grip:
I prefer to stick small cork or felt pads to the bottom corners. This protects your furniture and stops the coaster from sliding around.
Place your finished coasters on your favorite table and enjoy the modern, handcrafted touch they add to your space

What Really Happens Inside the Kiln
Learn how time and temperature work together inside the kiln to transform clay into durable ceramic.
Minimalist Polymer Clay Pendant Necklace
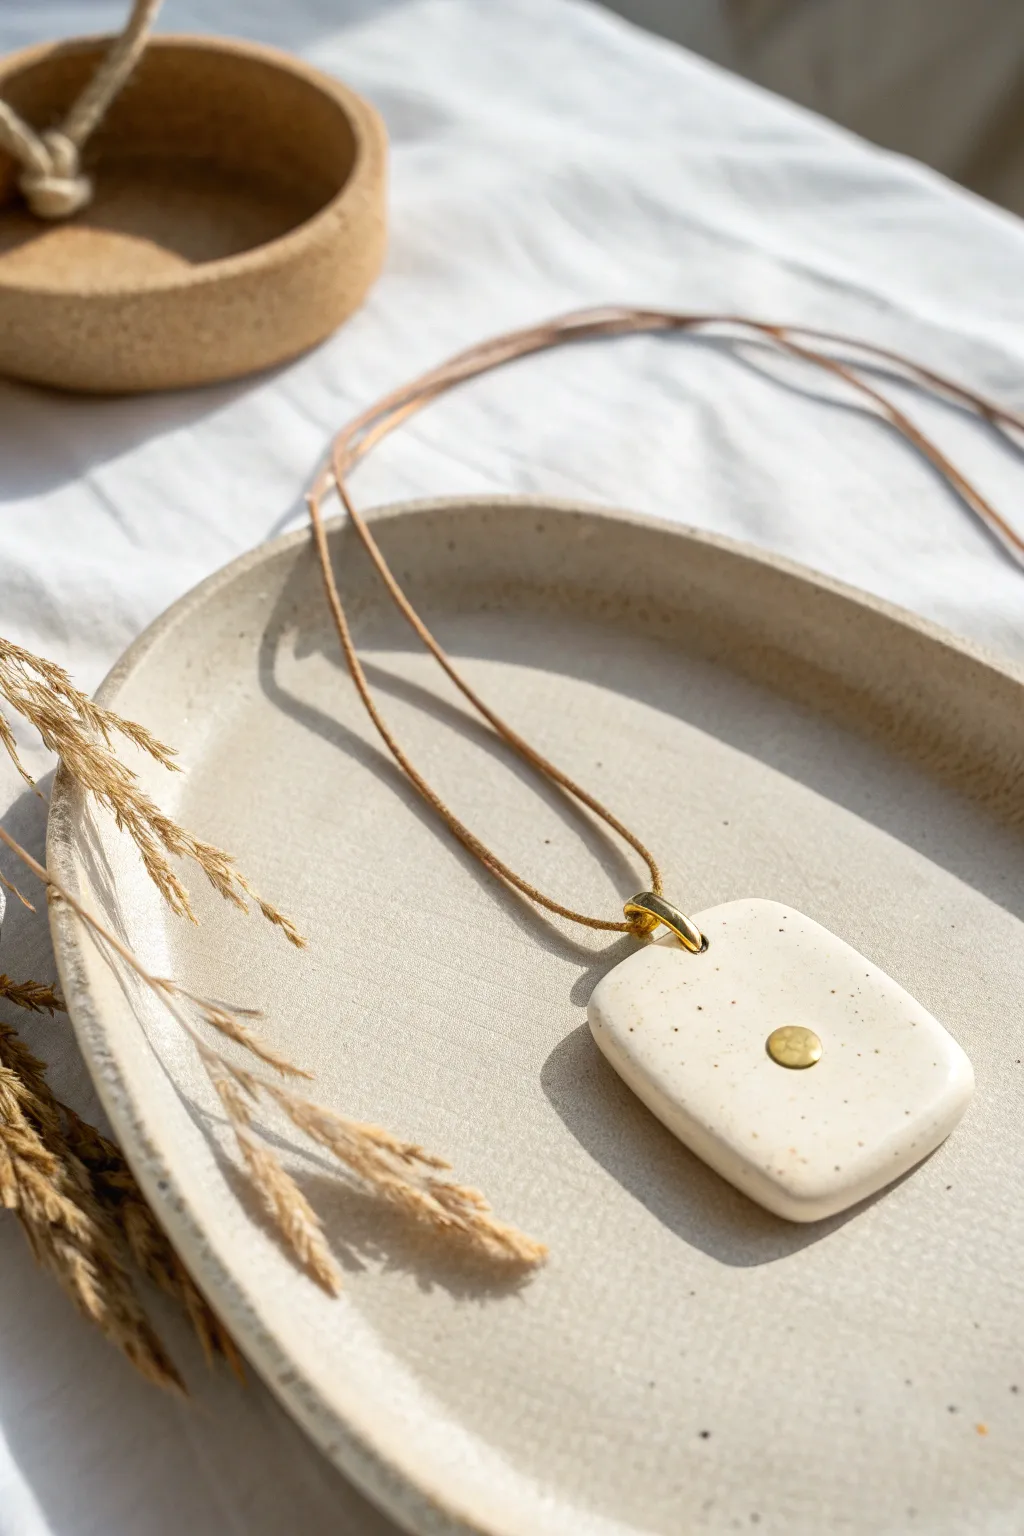
Embrace the beauty of modern minimalism with this sophisticated rectangular pendant. The subtle speckled clay mimics natural stone, while a single gold accent adds a touch of refined luxury to your everyday wardrobe.
How-To Guide
Materials
- Polymer clay (white or translucent)
- Black pepper, dried herbs, or pre-speckled clay (like ‘Granitex’)
- Gold clay or small gold round brad/finding
- Gold oval jump ring
- Thin leather cord or waxed cotton cord (tan)
- Pasta machine or acrylic rolling pin
- Rectangular clay cutter (approx. 1.5″ x 1″) with rounded corners
- Clay piercing tool or needle
- Sandpaper (various grits from 400 to 1200)
- Clay oven thermometer
- Ceramic tile or baking sheet
Step 1: Preparing the Clay Body
-
Condition the clay:
Begin by warming the white polymer clay in your hands to condition it. If you are using pre-speckled clay, simply roll it until smooth and pliable. -
Create the speckle effect:
If you are using plain white clay, flatten it out and sprinkle a tiny pinch of ground black pepper or finely crushed dried herbs onto the surface. Fold the clay over and knead it thoroughly until the specks are evenly distributed throughout the block. -
Roll out the slab:
Using your acrylic roller or a pasta machine on a thick setting, roll the clay into a smooth sheet. For this substantial pendant look, aim for a thickness of about 4mm to 5mm. -
Cut the shape:
Place your rectangular cutter onto the clay slab. Press down firmly and wiggle slightly to ensure a clean cut through the entire thickness. If you don’t have a rounded-corner cutter, cut a sharp rectangle and gently smooth the corners with your finger. -
Soften the edges:
After removing the excess clay, gently run your finger along the cut edges of the rectangle. You want to remove that sharp ‘cookie-cutter’ look and create a soft, pillowed edge like a tumbled stone.
Fixing Fingerprints
If you notice fingerprints after baking, don’t worry. The wet sanding steps will remove them easily. Just spend a little extra time with the 400-grit paper.
Step 2: Adding Details & Baking
-
Make the hole:
Using a needle tool or piercing pin, create a hole at the top center of the rectangle. Ensure the hole is large enough to accommodate your heavy-gauge jump ring. Twist the tool gently as you push through to avoid distorting the clay shape. -
Create the gold accent:
Roll a very tiny ball of gold polymer clay. Flatten it slightly into a small disc. -
Apply the accent:
Place the gold disc onto the lower center of the pendant face. Press it down gently so it bonds with the base clay but remains slightly raised. Alternatively, you can create a small indentation here to glue a metal stud in after baking. -
Final smooth:
Check the surface for any fingerprints. I like to lightly buff the surface with a piece of ordinary printer paper or a fingertip dipped in a tiny drop of baby oil to remove unintentional textures. -
Bake carefully:
Place the pendant on a ceramic tile or baking sheet lined with parchment paper. Bake according to the manufacturer’s instructions for your specific brand of clay—usually around 275°F (130°C) for 30 minutes. Tent with foil to prevent yellowing. -
Cool down:
Allow the piece to cool completely in the oven with the door slightly ajar. Sudden temperature changes can sometimes cause brittleness.
Natural Texture
Mix a tiny amount of translucent clay into your white base. This adds depth and makes the final piece look more like real quartz or ceramic than plastic.
Step 3: Finishing & Assembly
-
Wet sanding:
Once cool, dip the pendant and a piece of 400-grit sandpaper in water. Sand the edges and back in a circular motion. Progress to higher grits (up to 1200) for an incredibly smooth, stone-like feel. -
Buffing:
Dry the piece and buff it vigorously with a denim scrap or soft cotton cloth. This creates a natural, satin sheen without needing glaze. -
Install the jump ring:
Open your gold oval jump ring by twisting the ends sideways (never pull them apart). Thread it through the hole you pierced earlier and close it securely. -
Thread the cord:
Cut your leather or waxed cotton cord to your desired length. A longer length (around 30 inches) works well for this style to let it hang low. -
Secure the loop:
Fold the cord in half and pull the looped end through the jump ring. Then, pull the loose ends of the cord through that loop to create a lark’s head knot, securing the pendant to the cord.
Wear your new minimalist masterpiece with pride, knowing you crafted a timeless accessory.
Modern Polymer Clay Catchall Tray for Keys and Sunglasses
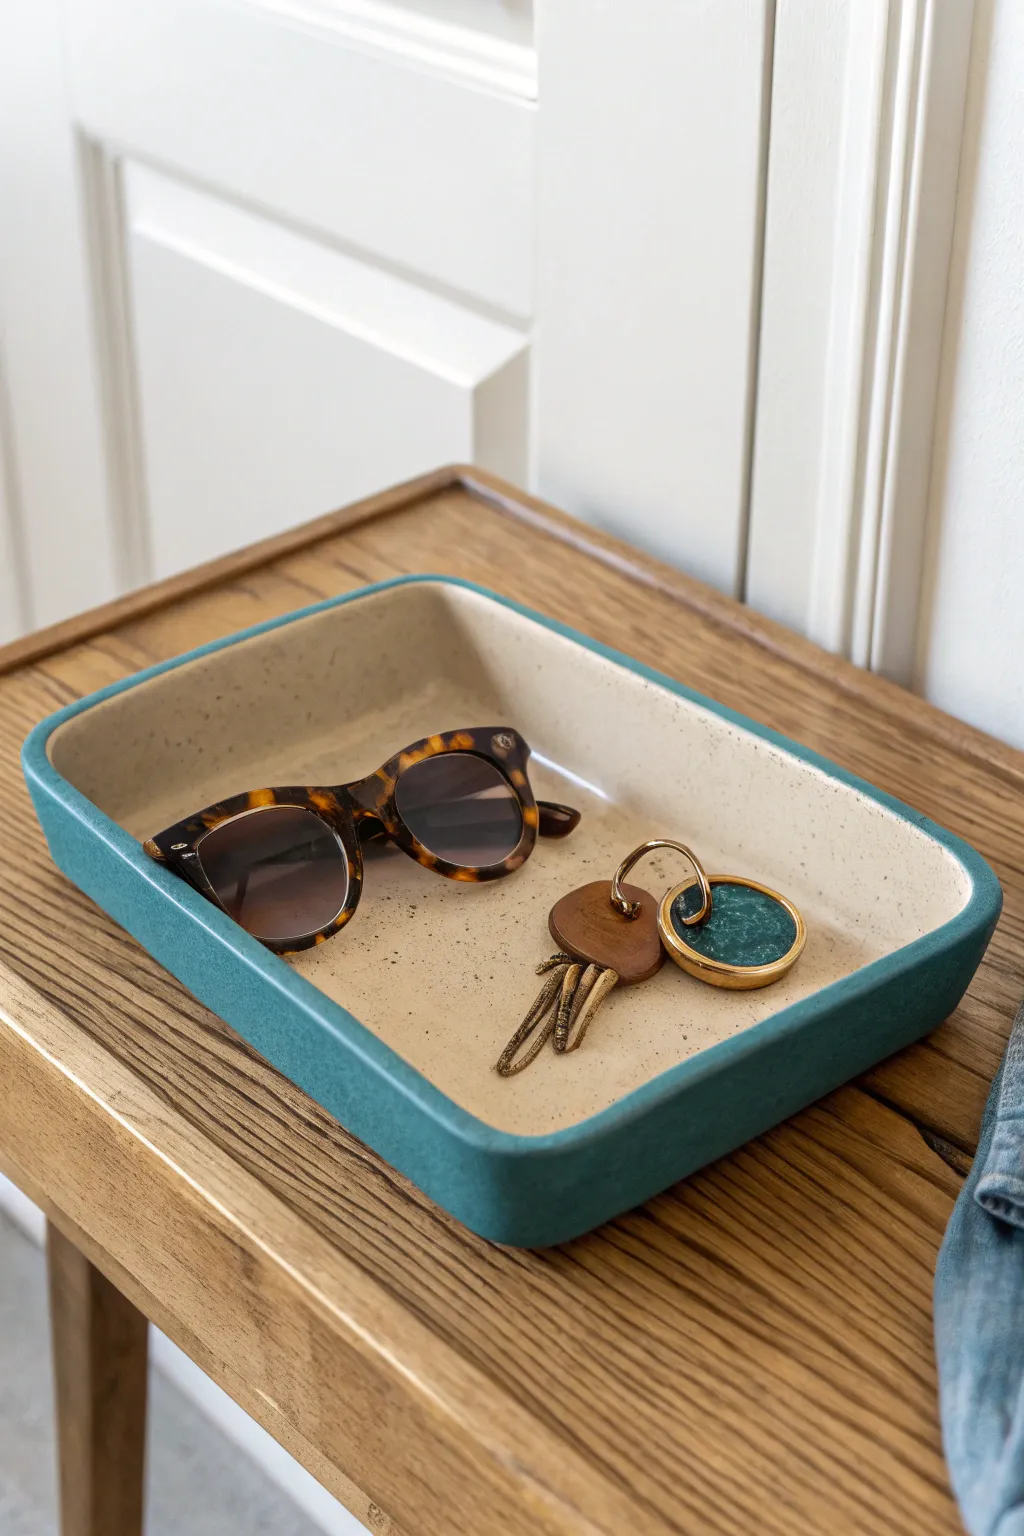
This sleek, rectangular catchall tray mimics the look of high-end ceramics with a speckled cream interior and a bold teal exterior. It’s the perfect modern accent for your entryway table to corral sunglasses and keys in style.
How-To Guide
Materials
- Polymer clay (Teal/Turquoise)
- Polymer clay (Beige or Ecru)
- Black pepper or faux granite embossing powder (for speckles)
- Acrylic rolling pin or pasta machine
- Rectangular tray template (cardstock or paper)
- Craft knife or tissue blade
- Ceramic baking dish or metal baking pan (rectangular)
- Cornstarch (release agent)
- Sandpaper (wet/dry, various grits)
- Matte varnish (optional)
- Liquid polymer clay (optional, for joining)
- Oven thermometer
Step 1: Creating the Speckled Stone Interior
-
Condition the beige clay:
Start by thoroughly conditioning your beige or ecru polymer clay until it is soft and pliable. Use your hands to warm it up or run it through the widest setting of a pasta machine several times. -
Add the speckled effect:
Flatten the conditioned beige clay. Sprinkle a small pinch of ground black pepper or coarse embossing powder over the surface. Fold the clay over to trap the speckles inside. -
Mix until distributed:
Knead and roll the clay repeatedly until the speckles are evenly distributed throughout the batch. I like to stop before they get too fine so the texture remains visible. -
Roll out the sheet:
Roll this speckled clay out into a large, even sheet, approximately 1/8 inch (3mm) thick. Ensure the sheet is larger than your intended tray size.
Clean Cuts Only
Chill your clay-lined mold in the fridge for 15 minutes before trimming the edges. Cold clay is firmer and slices much cleaner, leaving you with less sanding work later.
Step 2: Preparing the Exterior Layer
-
Condition the teal clay:
Clean your workstation and rolling pin to avoid color contamination. Condition the teal or deep turquoise clay just as you did with the beige. -
Roll the exterior sheet:
Roll the teal clay into a sheet of identical thickness to the beige layer. It needs to be the same size or slightly larger. -
Stack the layers:
Carefully place the speckled beige sheet on top of the teal sheet. Use your rolling pin to gently press them together, preventing air bubbles from getting trapped between the layers.
Step 3: Shaping the Tray
-
Prepare your form:
Select an oven-safe rectangular baking dish that matches the size you want your final tray to be. Lightly dust the inside bottom and corners with cornstarch to prevent sticking. -
Drape the clay:
Lift your double-sided clay sheet and gently drape it into the baking dish, speckled side facing up. Press firmly into the bottom and carefully work the clay into the corners. -
Smooth the transition:
Use your fingers to smooth the clay against the walls of the dish. Ensure the corner transitions are curved and organic rather than sharp right angles. -
Trim the excess:
Using a craft knife or tissue blade held parallel to the rim of the baking dish, slice away the excess clay hanging over the edges to create a perfectly level rim. -
Refine the rim:
Run a finger dipped in a little cornstarch along the cut edge of the rim to smooth out any harsh cutting lines and blend the two colors slightly.
Level Up: Gold Rim
For a luxe touch, paint the top edge rim with liquid gold leaf or metallic acrylic paint after baking. This highlights the separation between the teal and speckled layers.
Step 4: Baking and Finishing
-
Bake the tray:
Place the baking dish with the clay inside into a preheated oven. Bake according to the clay manufacturer’s instructions (usually 275°F or 130°C) for at least 45 minutes to ensure durability. -
Cool down:
Allow the tray to cool completely inside the baking dish. Removing it while hot can warp the shape. -
Remove and sand:
Pop the clay tray out of the mold. Wet sand the edges and the rim with fine-grit sandpaper (400 to 600 grit) to achieve a professional, smooth finish. -
Buff surface:
Lightly buff the exterior teal surface to remove any fingerprints or sheen inconsistencies. -
Seal (Optional):
If you want extra protection, apply a thin coat of matte varnish to seal the surface, though quality polymer clay is durable enough on its own.
Place your finished tray near the door for an instant upgrade to your daily organization routine


The Complete Guide to Pottery Troubleshooting
Uncover the most common ceramic mistakes—from cracking clay to failed glazes—and learn how to fix them fast.
Abstract Polymer Clay Planters for Succulents
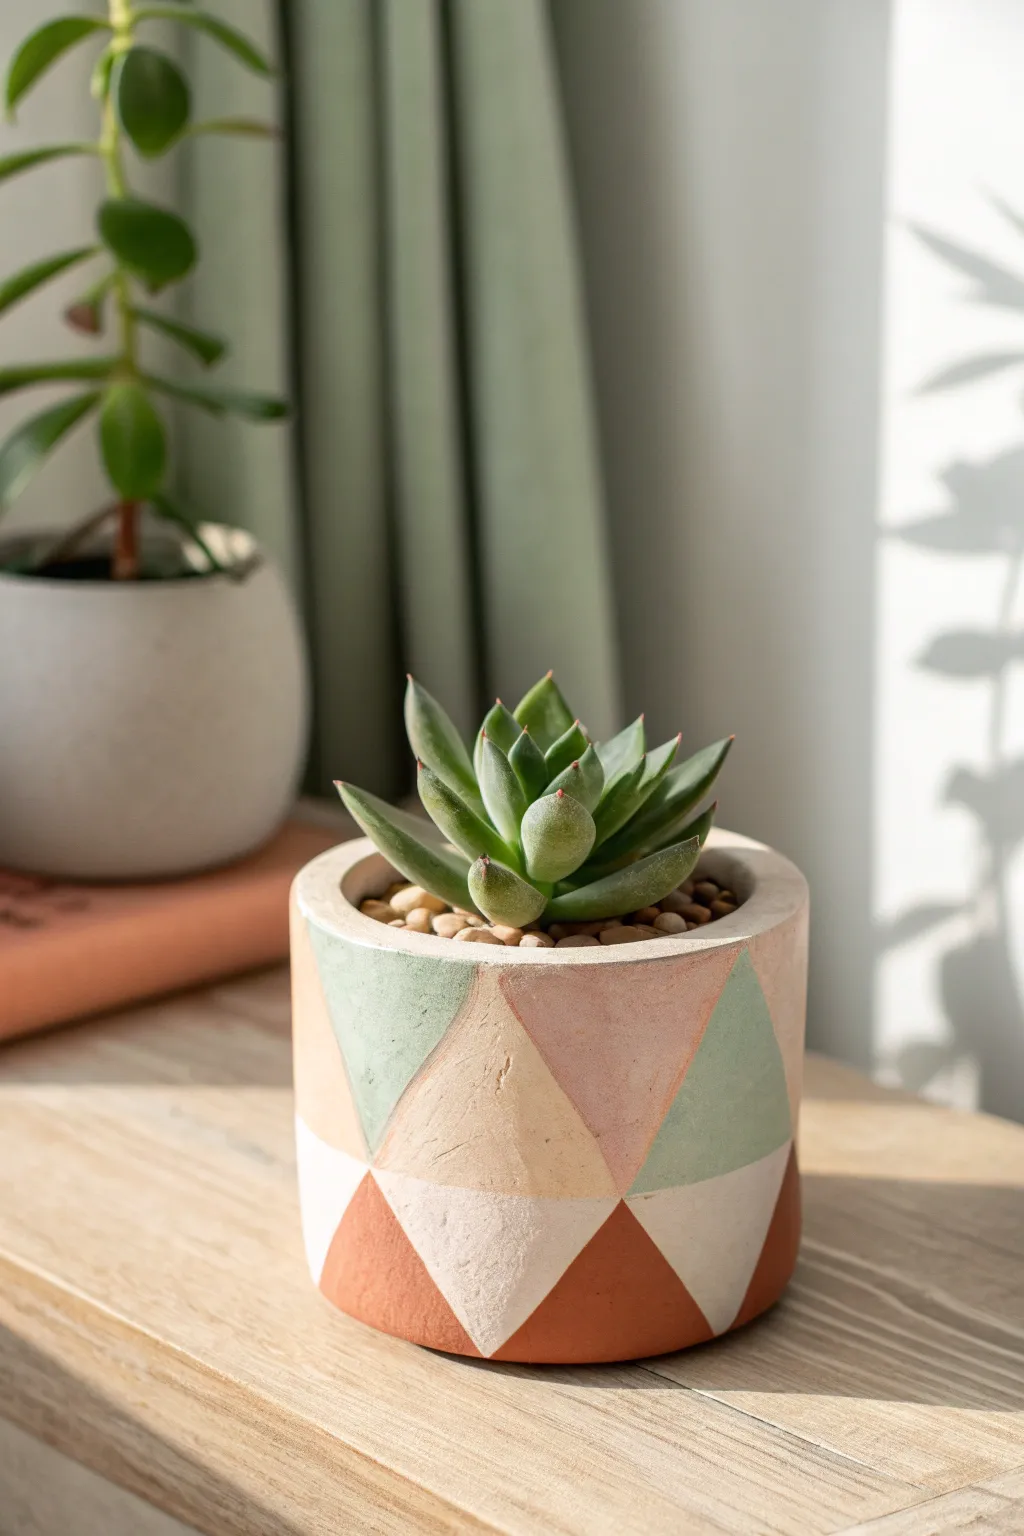
Transform a plain glass or ceramic cylinder into a trendy geometric planter using polymer clay veneers. This project combines soft pastel tones with faux-concrete texture for a sophisticated, modern home for your succulents.
Step-by-Step Guide
Materials
- Straight-sided glass or ceramic cylinder vessel (approx. 3-4 inch diameter)
- Polymer clay (white, muted green, dusty pink, terra cotta, beige)
- Coarse salt, black pepper, or fine sand (for texture)
- Acrylic rolling pin or pasta machine
- Flexible tissue blade
- Ruler
- Paper template (grid paper)
- Liquid polymer clay (Bake & Bond)
- Oven thermometer
- Craft knife
- Fine grit sandpaper (400-600 grit)
Step 1: Preparing the Faux Stone Clays
-
Condition the clay:
Start by thoroughly conditioning each color of polymer clay until it is soft and pliable. You will need roughly equal amounts of muted green, dusty pink, terra cotta, and white. You’ll need a larger amount of beige to act as the unifying stone color. -
Mix stone inclusions:
To create the faux stone look, take your beige clay and mix in a pinch of coarse black pepper or some fine sand. Knead it thoroughly until the specks are evenly distributed. Do the same for the white clay to give it a speckled finish. -
Mute the colors:
If your colored clays are too vibrant, mix a small amount of your speckled beige or white into the green, pink, and terra cotta. This creates that cohesive, earthy palette seen in the photo rather than harsh primary colors. -
Roll out sheets:
Roll each color out into a sheet of uniform thickness, approximately 2mm thick (usually setting 3 or 4 on a pasta machine). Stack these sheets aside on some parchment paper.
Step 2: Creating the Geometric Pattern
-
Measure the vessel:
Measure the height and circumference of your cylindrical vessel. Draw a rectangle on a piece of paper matching these dimensions to create a template. -
Draft the triangles:
On your paper template, draw a grid of equilateral triangles. The size is up to you, but triangles with a base of about 1.5 inches work well for standard pots. Cut out one single paper triangle to use as a master cutting guide. -
Cut clay triangles:
Using your master template and a sharp craft knife or tissue blade, cut multiple triangles from each color of clay. Aim for a random distribution of quantities, but ensure you have enough total triangles to cover the surface area of your pot. -
Apply base adhesive:
Coat the outside of your glass or ceramic vessel with a thin layer of liquid polymer clay. This acts as the glue that bonds the raw clay to the cured surface.
Closing the Gaps
If tiny gaps appear between triangles after baking due to shrinkage, mix a little matching clay with liquid clay to make a paste (grout) to fill them, then re-bake briefly.
Step 3: Assembly and Finishing
-
Begin the mosaic:
Start placing your clay triangles onto the vessel, starting from the bottom rim. Butt the edges of the triangles tightly against each other so there are no gaps revealing the vessel underneath. -
Alternate colors:
As you work your way up, alternate the colors randomly. Try not to place two of the same color touching each other. I find it helpful to lay them out on the table first to check the color balance before committing them to the pot. -
Trim the rim:
Once the container is fully covered, you likely have triangle points sticking up past the rim. Use your flexible blade to slice these flush with the top edge of the vessel for a clean, flat lip. -
Smooth the seams:
Gently roll the vessel on your work surface or use your acrylic roller to press the triangles firmly against the glass and each other. This helps flatten the seams. You want the surface to feel like one continuous sheet, not separate stickers. -
Add texture:
To enhance the stone effect, gently tap the surface with an old toothbrush or a crumpled ball of aluminum foil. This removes fingerprints and adds a realistic matte texture. -
Bake carefully:
Bake the project according to the manufacturer’s instructions for your specific brand of clay (usually 275°F/130°C). Use an oven thermometer to ensure the temperature doesn’t spike and scorch the light colors. -
Cool and sand:
Allow the pot to cool completely in the oven. Once cool, lightly wet-sand the surface under running water with fine-grit sandpaper to remove any rough edges or sharp points at the rim. -
Final planting:
Fill your new planter with succulent soil and your favorite Echeveria. Top it off with small decorative pebbles to complete the clean, modern look.
Go Metallic
For a luxe touch, replace one of the pastel colors with gold or copper polymer clay. Alternatively, paint the ‘grout’ lines between triangles with liquid gold leaf after baking.
Now you have a stylish, custom planter that looks like high-end boutique decor
Minimalist Moon Phase Wall Hanging in Polymer Clay
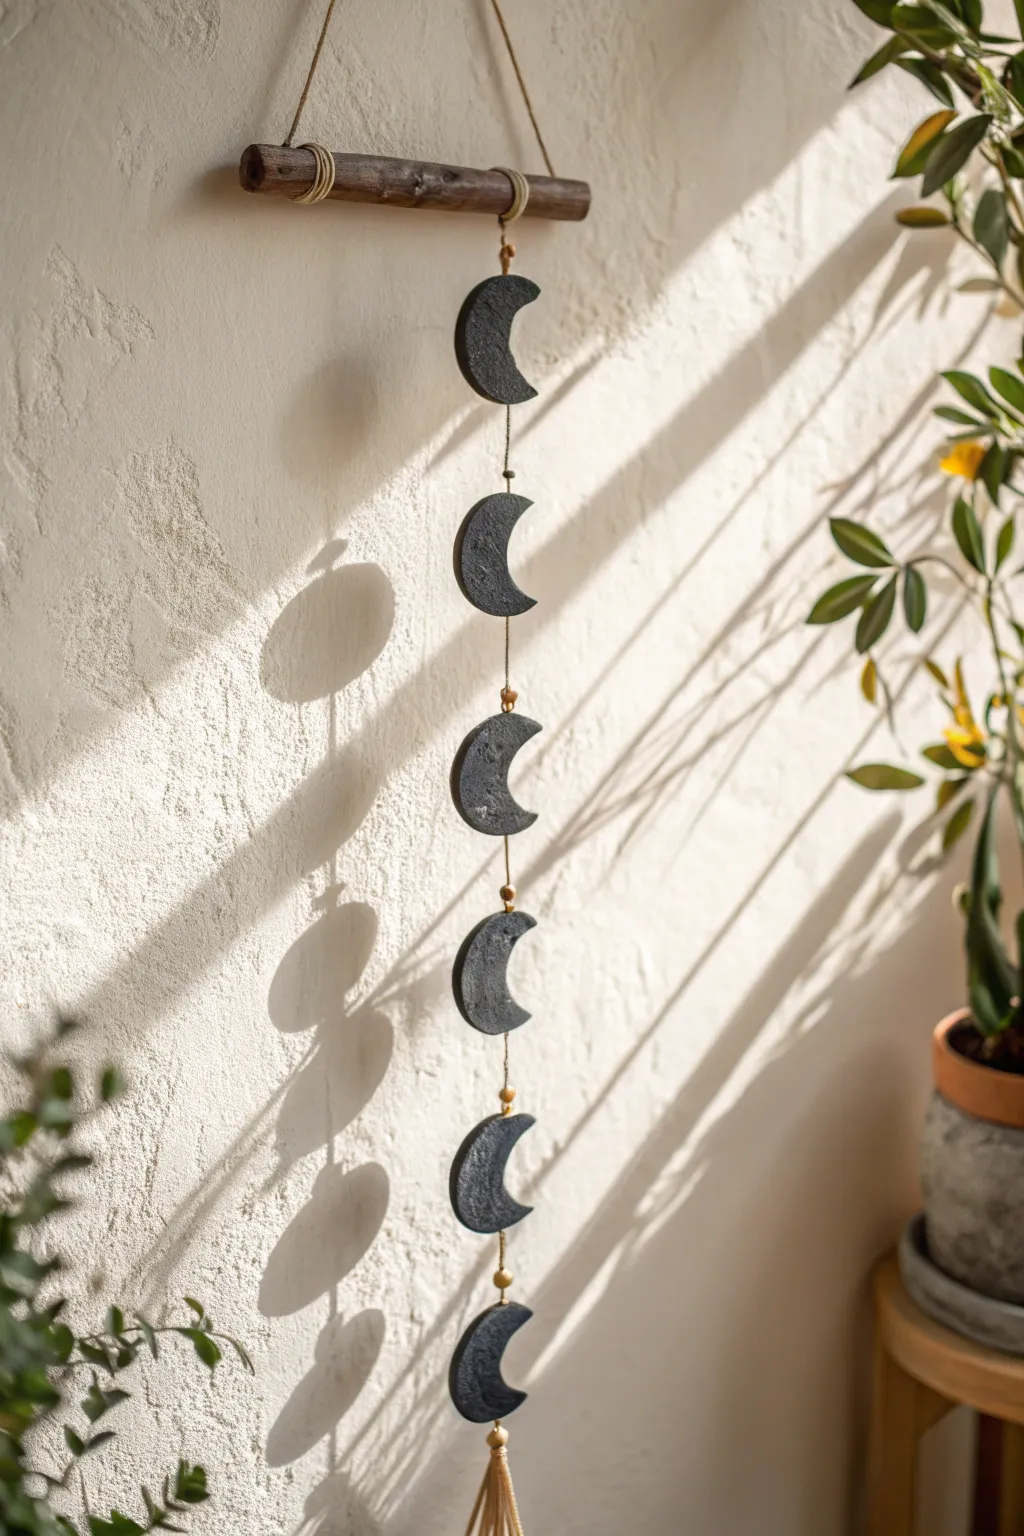
Bring the serene energy of the night sky into your home with this textured, minimalist moon phase wall hanging. This project combines the organic warmth of driftwood with sleek, black polymer clay moons to create a striking piece of decor that plays beautifully with light and shadow.
Step-by-Step
Materials
- Black polymer clay (approx. 2-3 blocks)
- Circle cutter (2-3 inches diameter)
- Small round cutter (approx. 1 inch diameter) or bottle cap
- Rolling pin or acrylic roller
- Texture tool (coarse sandpaper, toothbrush, or crumpled foil)
- Driftwood stick or wooden dowel (approx. 10-12 inches)
- Natural jute twine or hemp cord
- Gold or wood spacer beads (approx. 6-8mm)
- Large needle or clay piercing tool
- Baking sheet and parchment paper
- Strong craft glue or E6000 (optional)
- Scissors
Step 1: Shaping the Moons
-
Condition the clay:
Begin by warming the black polymer clay in your hands, kneading it thoroughly until it is soft, pliable, and free of any air bubbles. -
Roll out the slab:
Use your rolling pin to flatten the clay into a consistent sheet, approximately 1/4 inch thick. A slightly thicker slab gives the moons a nice weight and durability. -
Add texture:
Before cutting, gently press a piece of coarse sandpaper, a clean toothbrush, or a crumpled ball of aluminum foil onto the clay surface to create a stone-like, pitted texture. -
Cut the bases:
Using your large circle cutter, punch out six full circles from the textured clay sheet. -
Form the crescents:
Take your smaller round cutter and align it off-center over one of the large clay circles. Cut into the circle to remove an inner section, leaving behind a crescent moon shape. Repeat this for all six circles, varying the thickness of the crescent if you want to represent different phases. -
Smooth the edges:
Gently run your finger dipped in a tiny bit of water or baby oil along the cut edges of each moon to smooth out any sharpness or burrs. -
Create holes:
Using a needle tool, pierce a vertical hole through the top and bottom tips of each crescent moon. Ensure the hole is large enough for your twine to pass through later.
Clean Edges Trick
Before baking, use a cotton swab dipped in rubbing alcohol to gently wipe away fingerprints and smooth rough edges on the black clay for a professional finish.
Step 2: Baking and Assembly
-
Bake the pieces:
Place your clay moons on a parchment-lined baking sheet. Bake according to the manufacturer’s instructions (usually around 275°F or 135°C for 15-30 minutes). Let them cool completely before handling. -
Prepare the driftwood:
While the clay cools, engage your driftwood. Cut a length of jute twine about 24 inches long. Tie each end securely to the outer edges of the driftwood to create the main hanging loop. -
Secure the decorative knots:
Wrap extra twine around the knot points on the driftwood several times to create a decorative band, then secure with a dab of glue or a tight knot. -
Cut the main cord:
Cut a long piece of twine, roughly 3 to 4 feet tailored to how long you want the final hanging to be. Tie the top end to the center of your driftwood stick. -
Attach the first moon:
Thread the loose end of the central twine through the top hole of your first moon. Slide it up to your desired starting height, about 2-3 inches below the wood. -
Secure the position:
To keep the moon in place, tie a knot underneath the top hole or add a dab of glue if the twine is thick enough to hold it by friction alone. Then thread the twine through the bottom hole to exit. -
Add spacer beads:
Slide a gold or wooden bead onto the twine immediately after the first moon. Tie a knot below the bead to hold it in position and create spacing before the next moon. -
Repeat the pattern:
Continue this process—threading a moon, securing it, adding a bead, and knotting—until all six moons are attached in a vertical line. -
Finish with a tassel:
After the final moon, leave about 4 inches of twine. Create a simple tassel by wrapping twine around your hand 10 times, tying it off at the top, cutting the bottom loops, and attaching it to the very end of your main cord.
Gilded Glamour
After baking, dry brush a tiny amount of gold acrylic paint onto the textured surface of the moons to highlight the craters and add a touch of celestial shimmer.
Hang your new moon phase creation near a window to watch the shadows dance as the light changes througout the day