If you’re brand-new to polymer clay, the trick is starting with projects that break down into basic shapes you can roll in a minute. These beginner-friendly ideas are the same ones I teach in my studio because they feel truly step-by-step and still look polished when you’re done.
Classic Smooth Round Beads
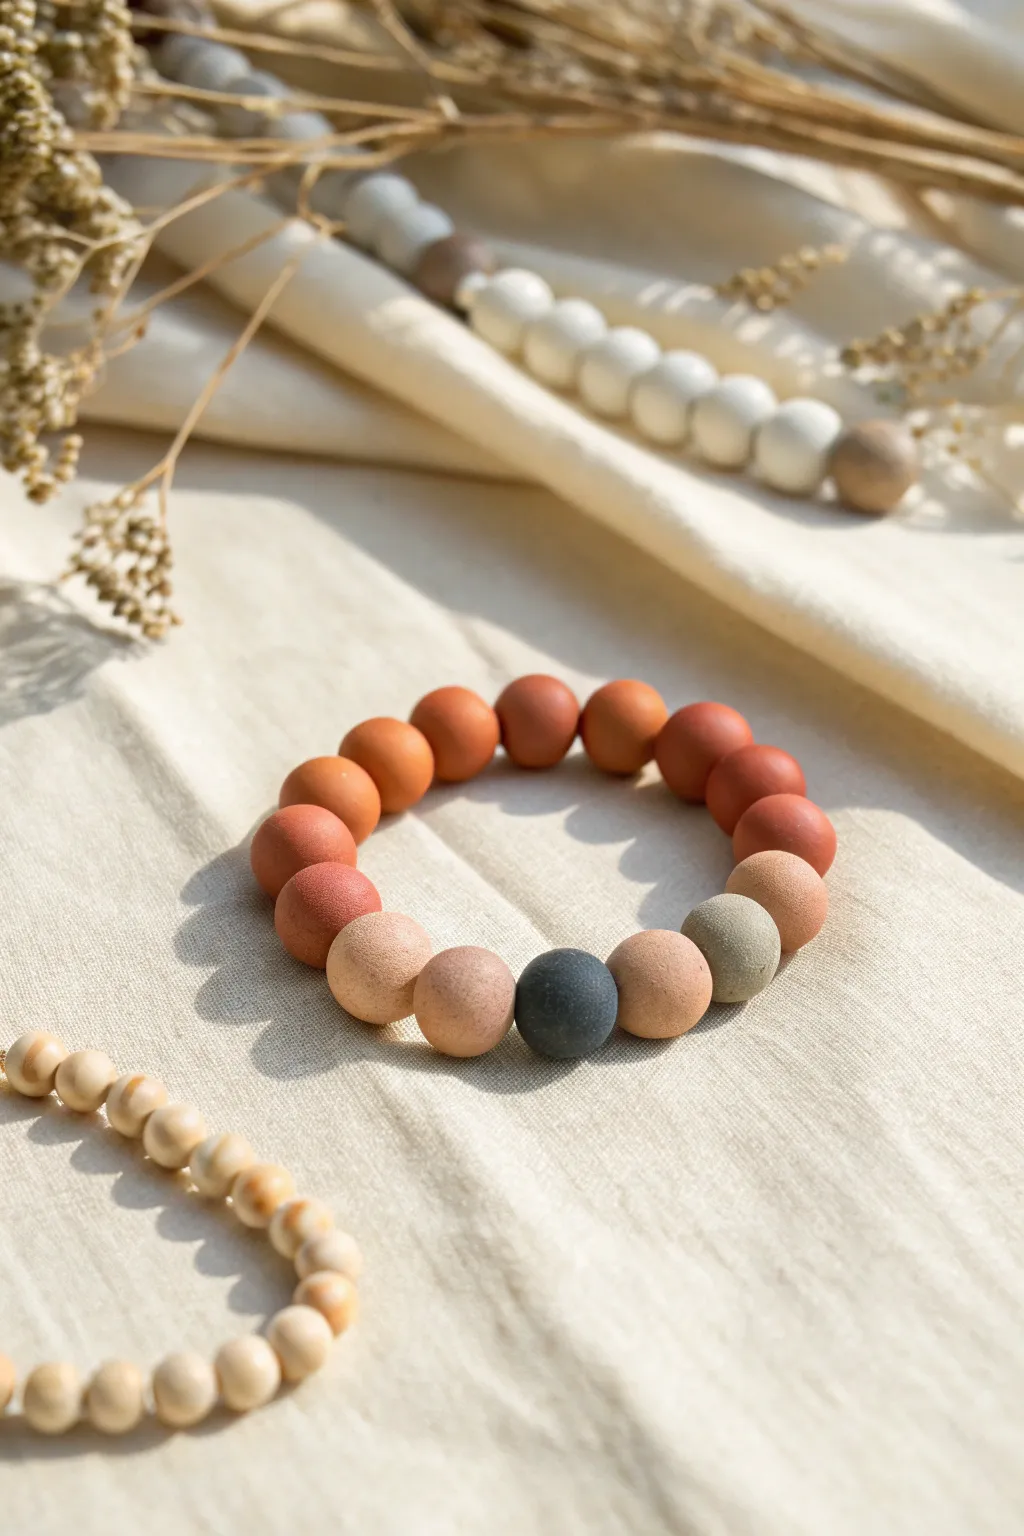
Recreate this serene aesthetic with a collection of perfectly smooth, matte polymer clay beads in a warm, gradient-like color palette. This project masters the fundamental skill of hand-rolling uniform spheres, resulting in a sophisticated accessory that celebrates rich terracotta and calming grey tones.
Step-by-Step
Materials
- Polymer clay (terracotta/rust, dark orange, peach, light sand/beige, sage green, charcoal grey)
- Elastic jewelry cord (0.8mm or 1mm)
- Bead piercing pins or a thick needle
- Ceramic tile or glass sheet (for rolling)
- Fine grit sandpaper (400, 600, and 800 grit)
- Ruler
- Cutting blade
- Oven for baking
- Jewelry glue or superglue
Step 1: Preparing the Clay Palette
-
Condition the clay:
Start by warming and kneeling each color of clay separately in your hands until it becomes soft and pliable. This conditioning step is crucial to prevent cracks later. -
Mix custom shades:
To achieve the subtle gradient seen in the photo, you may need to mix colors. Blend a bit of white or beige into your rust color to create the lighter terracotta shades. You want about 5-6 distinct warm tones ranging from deep rust to pale peach. -
Create a uniform log:
Roll each conditioned color into a snake or log of even thickness, roughly half an inch in diameter. -
Measure equal portions:
Using your slicing blade and ruler, cut equal-sized segments from your logs. This ensures every bead will be the exact same size. For this bracelet, you will need approximately 16-18 segments total.
Step 2: Rolling and Piercing
-
Roll spheres:
Take a clay segment and roll it between your palms. Apply firm pressure initially, then lighten your touch as the ball becomes rounder to smooth out any fingerprints. -
Perfect the shape:
Place the ball on your work surface and use a flat acrylic block or slightly cupped hand to roll it in circles. This helps achieve that perfect, machine-made roundness. -
Create the holes:
Hold the bead gently without squishing it. Insert your bead pin or needle into the center and push through carefully while twisting. I find it helps to stop halfway, pull the pin out, and pierce through from the opposite side to meet in the middle. -
Check the hole size:
Ensure the hole is wide enough for your elastic cord to pass through comfortably, possibly doubling the width if you plan to hide the knot inside a bead. -
Inspect for flaws:
Before baking, give every bead a final inspection. Smooth out any nail marks or lint with a light fingertip brush.
Fingerprint Patrol
Make your hands cold before rolling the final shape! Run them under cold water and dry well; cool hands leave fewer prints and keep the clay firm.
Step 3: Baking and Finishing
-
Bake the beads:
Arrange your beads on a baking sheet or tile. To prevent flat spots, you can bake them on a bed of cornstarch or bunched accordion-folded paper. Bake according to your clay package instructions (usually 275°F/135°C for 30 minutes). -
Cool down:
Allow the beads to cool completely in the oven with the door cracked, or remove and let sit at room temperature. -
Sand for texture:
To get that specific matte, stone-like look from the photo, skip the glaze. Instead, wet sand each bead under water using 400 grit, then 600, and finally 800 grit sandpaper. This removes fingerprints and leaves a velvety finish. -
Buff finish:
Dry the beads and buff them vigorously with a piece of denim or a soft cotton cloth to bring out a subtle, natural sheen without adding gloss. -
Arrange the pattern:
Lay your beads out in a line to verify the color flow. The reference image groups similar tones: a run of rust/terracotta, transitioning to peach, then beige, grey, and charcoal.
Stone Texture Trick
For a grittier, natural stone texture, mix ground black pepper or dried tea leaves into the clay before rolling. It adds realistic speckles.
Step 4: Assembly
-
String the beads:
Cut a piece of elastic cord about 10-12 inches long. Thread your beads onto the cord in your chosen order. -
Pre-stretch the cord:
Before tying, give the elastic a few gentle tugs. This pre-stretching prevents the bracelet from becoming loose after the first few wears. -
Tie the knot:
Tie a surgeon’s knot (right over left twice, then left over right twice). Pull it very tight. -
Secure the knot:
Apply a tiny drop of jewelry glue or superglue to the knot. Let it dry for a few seconds. -
Hide the end:
Thread one tail of the elastic back through the adjacent bead and pull firmly until the knot pops inside that bead, hiding it from view. Trim the excess cord close to the bead.
Now you have a stunning, professional-looking bracelet that showcases the natural beauty of matte polymer clay.


Flat Circle and Arch Earrings
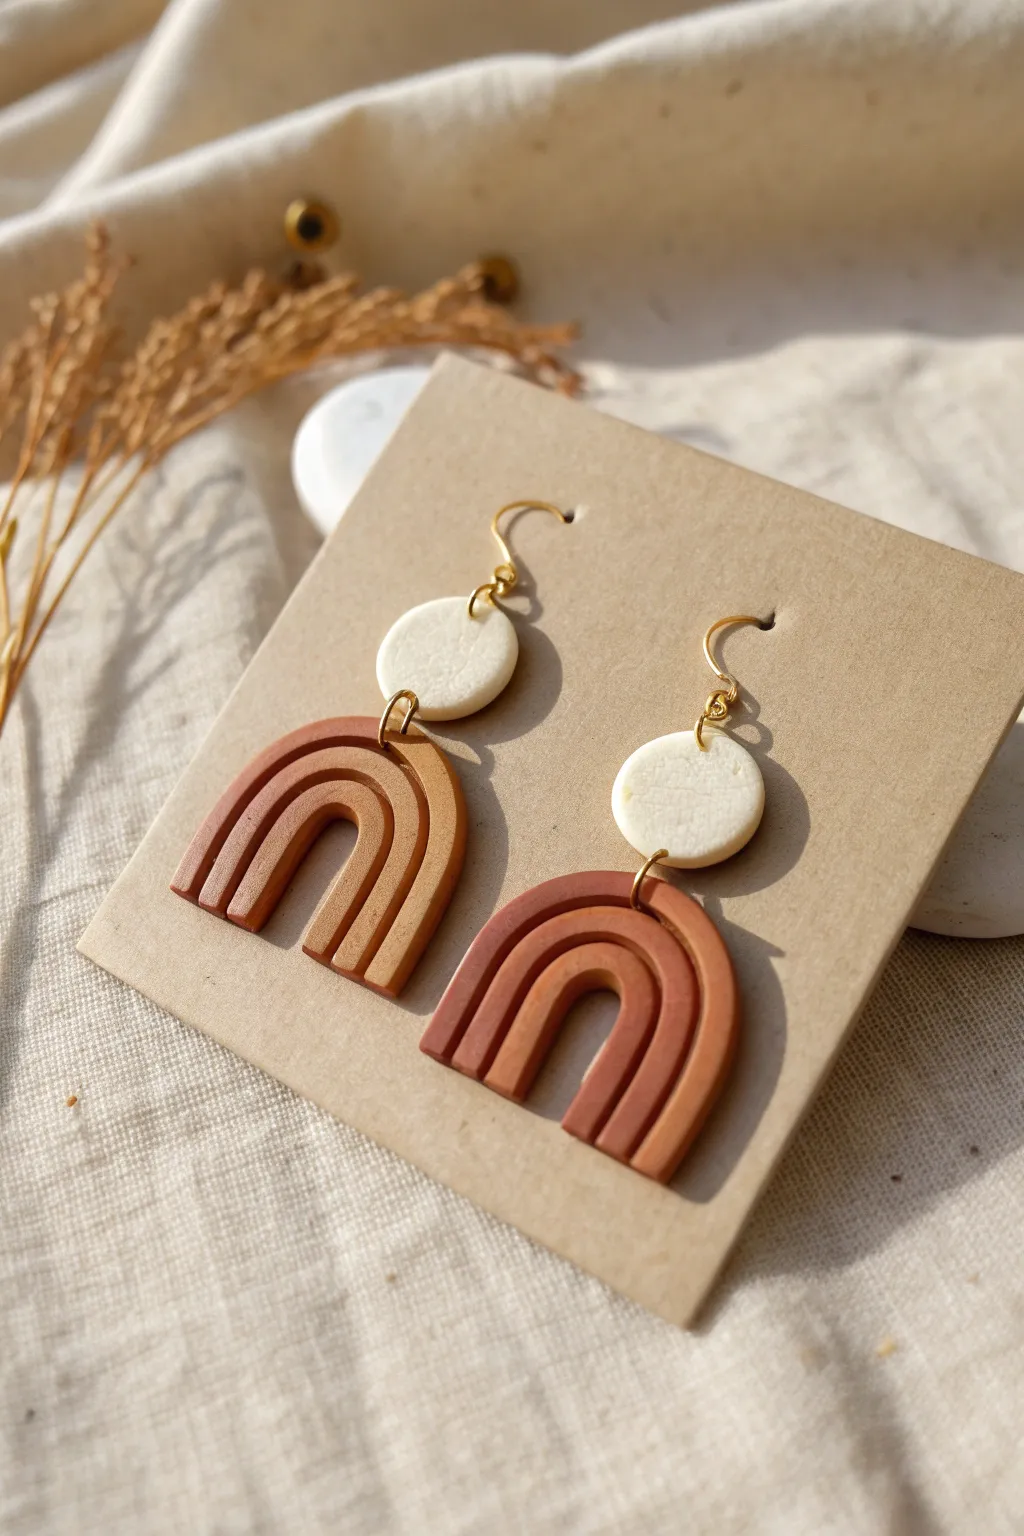
These boho-chic earrings combine a textured cream stud with a warm, earth-toned rainbow arch for a look that is both modern and grounded. The design uses simple geometric shapes and beginner-friendly techniques to create professional-quality jewelry perfect for everyday wear.
Detailed Instructions
Materials
- Polymer clay in White or Cream
- Polymer clay in Terracotta (red-brown)
- Polymer clay in Burnt Sienna (medium brown)
- Polymer clay in Ochre or Mustard (yellow-brown)
- Acrylic rolling pin
- Small round cutter (approx. 10-12mm)
- Texture tool (sandpaper, toothbrush, or dedicated texture sheet)
- Clay extruder (optional but helpful for even coils)
- Flexible tissue blade or craft knife
- Liquid polymer clay (Bake & Bond)
- Jewelry pliers (round nose and flat nose)
- 4 large gold jump rings (6-8mm)
- 2 earring hooks (gold)
- Hand drill or pin vibe
- Oven baking sheet and parchment paper
Step 1: Preparing the Components
-
Condition the Clay:
Begin by thoroughly kneading your white clay until it is soft and pliable. Do the same for your three earth-toned colors—terracotta, burnt sienna, and ochre—keeping them separate to avoid color bleeding. -
Roll the Base Sheet:
Roll out a small portion of white clay to a medium thickness (about 3mm) using your acrylic roller or pasta reference machine on a medium setting. -
Add Texture:
Before cutting, press a piece of sandpaper or a clean toothbrush gently onto the surface of the white clay to create a stone-like, pitted texture. -
Cut the Circles:
Using your small round cutter, punch out two identical circles from the textured white slab. These will form the top stud component. -
Create the Rainbow Strands:
Take your three earth-toned colors. Roll each color into a long, even snake or coil. They should be roughly the same thickness, about 3-4mm in diameter.
Clean Edges Trick
Before baking, wipe your raw clay fingerprints away with a cotton swab dipped in a tiny bit of rubbing alcohol or acetone.
Step 2: Assembling the Arch
-
Form the Inner Arch:
Take the darkest color (terracotta) and bend it into a tight U-shape to form the smallest, innermost arch. -
Layer the Middle Arch:
Apply a tiny amount of liquid polymer clay along the outer edge of the first arch. Wrap the medium brown (burnt sienna) coil snugly around it. -
Add the Outer Arch:
Add another thin line of liquid clay to the edge of the second arch. Wrap the lightest color (ochre) around the outside to complete the rainbow shape. -
Trim the Bottoms:
Use your flexible tissue blade to make a clean, straight cut across the bottom of the rainbow legs so they are perfectly flush. -
Repeat for Second Earring:
Repeat the previous steps to create the second rainbow arch, ensuring it matches the height and width of the first one. -
Pre-Bake Hole Creation:
Use a toothpick or needle tool to poke a hole near the bottom edge of the white circles and the top center of the rainbow arches. Make sure the holes are large enough for your jump rings.
Step 3: Finishing Touches
-
Baking:
Place all four clay pieces on a parchment-lined baking sheet. Bake according to your clay manufacturer’s instructions (usually 275°F/130°C for 30 minutes). -
Cooling and Sanding:
Allow the pieces to cool completely inside the oven to prevent cracking. Once cool, lightly sand the edges if there are any rough spots. -
Drilling (If Needed):
If your holes closed up during baking, I find using a small hand drill or pin vise works perfectly to reopen them cleanly. -
Connecting Components:
Open a jump ring using your pliers (twist sideways, don’t pull apart). Thread it through the hole in the rainbow arch and the hole in the white circle, then close it securely. -
Attaching Hooks:
If your earring hooks have a loop that opens, attach them directly to the top of the white circles (drilling a top hole first if necessary). Alternatively, use a second jump ring to connect the hook to the circle.
Gaps Between Coils?
If your rainbow arches have gaps, gently push the coils together while they lie flat on your work surface before trimming the bottom.
Enjoy styling these versatile earrings that bring a touch of earthy warmth to any outfit


Simple Marbled Pendant
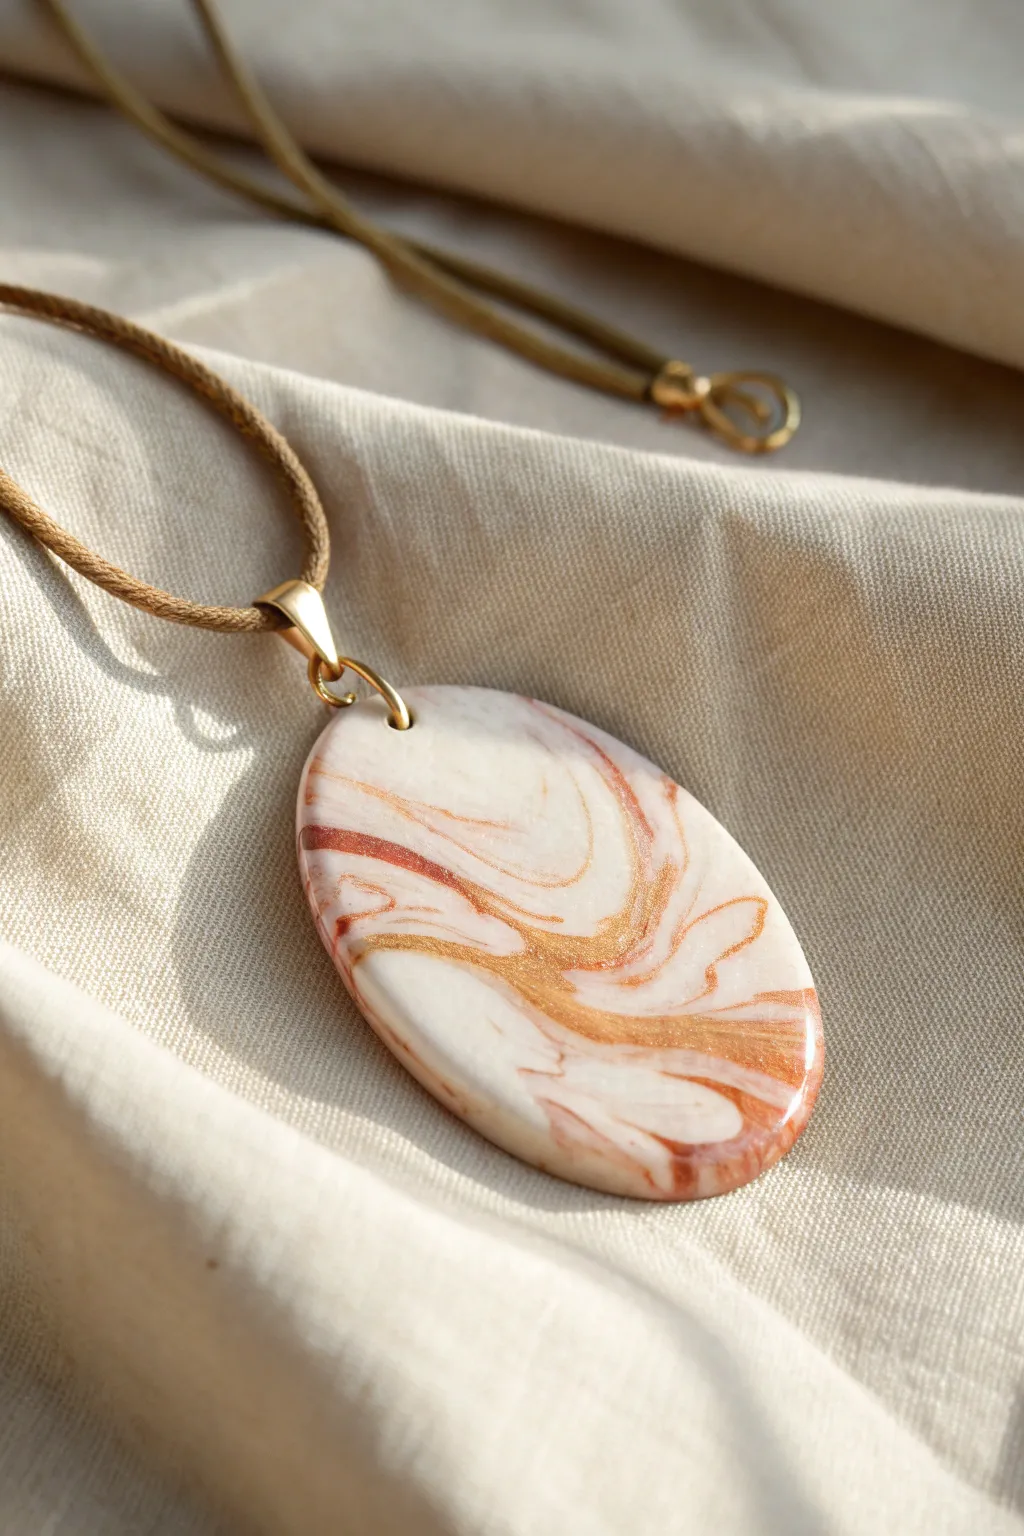
Create a sophisticated piece of jewelry that looks like polished gemstone using simple clay techniques. This oval pendant features a mesmerizing swirl of milky white, soft terracotta, and shimmering metallic gold that catches the light beautifully.
How-To Guide
Materials
- Polymer clay (White, Terracotta/Burnt Orange, Metallic Gold)
- Acrylic rolling pin
- Oval clay cutter (approx. 2 inches long)
- Clay slicing blade (tissue blade)
- Needle tool or small drill bit
- Wet/dry sandpaper (400 to 1000 grit)
- Gloss glaze or UV resin (optional)
- Gold bail
- Jump ring
- Brown cord necklace
Step 1: Preparing and Mixing the Clay
-
Condition the white clay:
Start by taking a generous amount of white polymer clay. Knead it in your hands until it is soft, pliable, and warm. -
Condition the accent colors:
Repeat the conditioning process with smaller amounts of terracotta and metallic gold clay. You’ll want a ratio of roughly 3 parts white to 1 part each of the accents. -
Form the ropes:
Roll each color into a distinct snake or rope shape. The white rope should be the thickest, while the terracotta and gold can be slightly thinner. -
Combine the ropes:
Lay the three ropes side-by-side and twist them together gently to form one large, multi-colored rope. -
Fold and twist:
Fold the twisted rope in half and twist it again. Repeat this folding and twisting motion 2-3 times. Be careful not to over-mix; you want distinct streaks, not a muddy brown color. -
Form a ball:
Roll the twisted clay into a smooth ball. Check the surface to see if you like the pattern distribution.
Muddy Colors?
If your colors are blending into a single muddy shade instead of distinct swirls, you have over-mixed. Stop twisting sooner next time, or wait for the clay to verify minimal blending.
Step 2: Shaping and Curing
-
Roll out the slab:
Using your acrylic rolling pin, flatten the ball into a slab about 1/4 inch thick. I find rolling in different directions helps maintain an organic marbled pattern. -
Inspect the pattern:
Look at both sides of your slab. The marbling will differ on each side, so choose the one with the most attractive gold veining and swirls. -
Cut the shape:
Place your oval cutter over the chosen area and press down firmly to cut out your pendant shape. -
Smooth the edges:
Gently lift the cut shape. Use your finger to lightly smooth the sharp edges created by the cutter, giving it a soft, stone-like appearance. -
Create the hole:
Using a needle tool, carefully pierce a hole near the top of the oval. Make sure the hole is large enough to fit your jump ring later. -
Bake the clay:
Place the pendant on a ceramic tile or baking sheet covered with parchment paper. Bake according to your clay manufacturer’s instructions (usually 275°F/135°C for 15-30 minutes per 1/4 inch thickness). -
Cool down:
Allow the pendant to cool completely inside the oven or on a cooling rack before handling it further.
Add Texture
Before baking, gently press gold leaf flakes onto the metallic veins of your raw clay slab. This enhances the shimmer and adds a luxurious, high-end texture to the finished piece.
Step 3: Finishing Touches
-
Sand the surface:
Once cool, wet sand the pendant edges and surface with 400 grit sandpaper, moving up to 1000 grit for a silky smooth finish. -
Clean the piece:
Wash the pendant with water and a drop of dish soap to remove any sanding dust or residue, then dry thoroughly. -
Apply glaze (Optional):
For a high-shine look like the photo, apply a thin coat of gloss glaze or UV resin. I prefer UV resin for that glass-like durability. -
Attach the hardware:
Open a gold jump ring using two pairs of pliers. Thread it through the hole in the pendant and attach the gold bail. -
String the pendant:
Thread your brown cord through the bail to complete the necklace.
Wear your new faux-stone pendant with pride or gift it to someone special


Easy Donut Charms
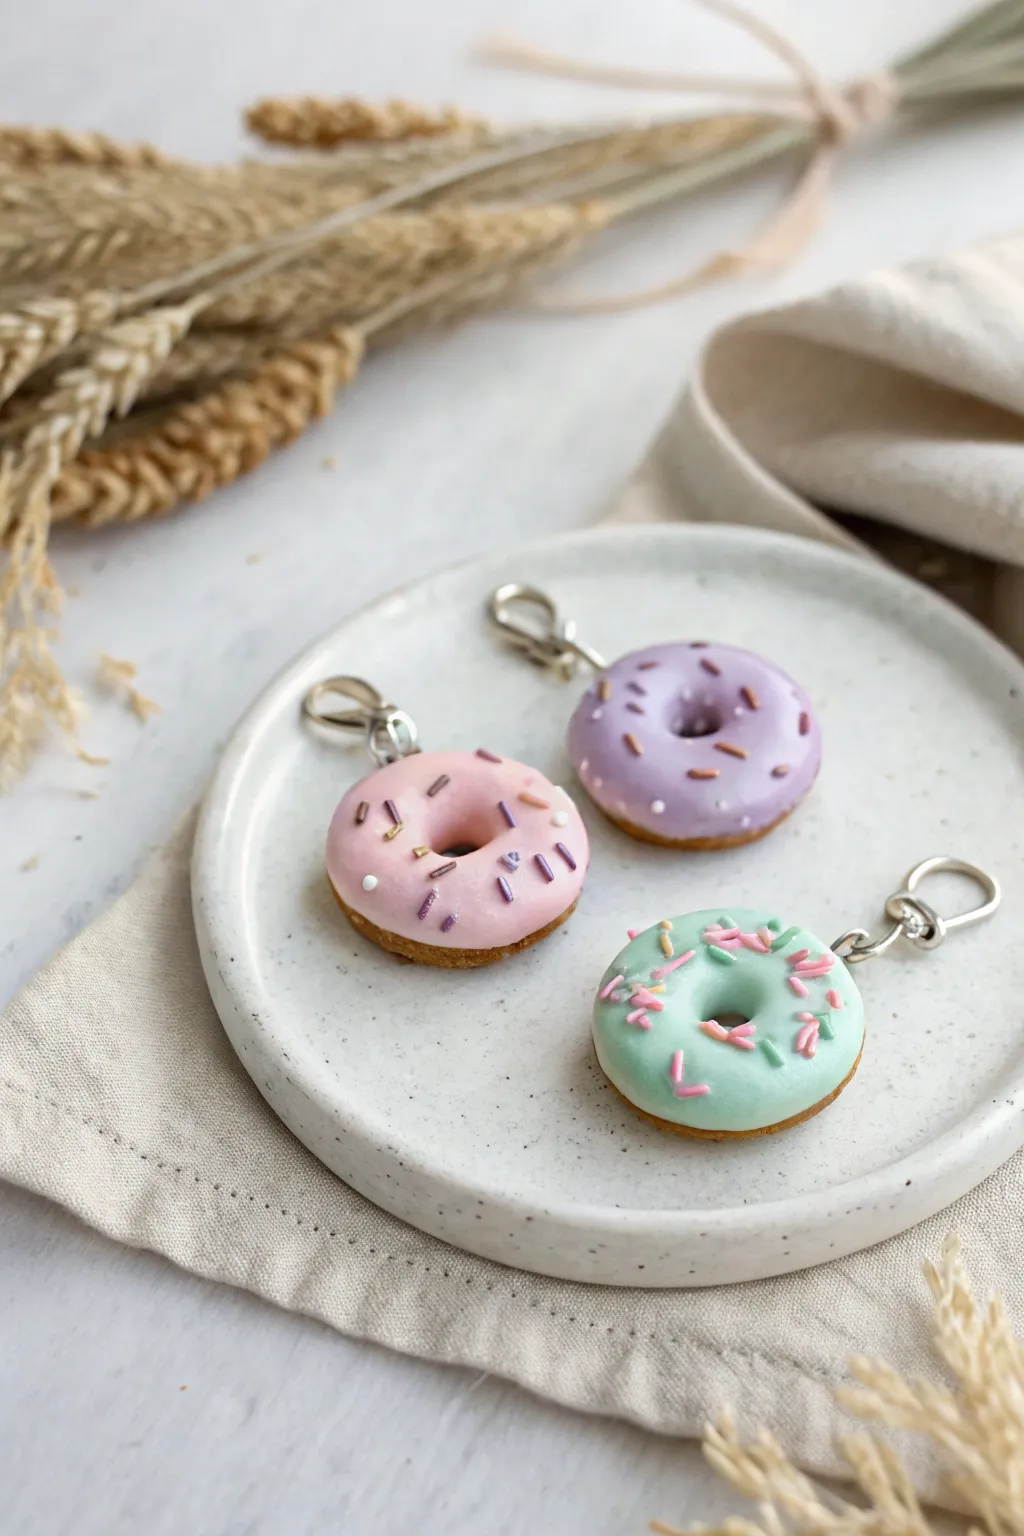
These adorable mini donuts look good enough to eat with their soft pastel glazes and tiny, realistic sprinkles. This project is the perfect introduction to polymer clay sculpting, teaching you how to texture realistic ‘baked’ dough and create smooth, glossy icing effects.
Step-by-Step Tutorial
Materials
- Polymer clay (Tan/Beige for dough)
- Polymer clay (Pink, Lilac, Mint Green for icing)
- Liquid polymer clay (Translucent or White)
- Polymer clay scraps (Various colors for sprinkles)
- Toothbrush or crumpled foil (for texturing)
- Needle tool or toothpick
- Small circle cutter
- Smaller circle cutter (or straw) for the center hole
- Soft pastel chalks in orange/brown shades
- Small paintbrush
- Eye pins or screw eyes
- Jump rings and lobster clasps
- Glaze or varnish (gloss or semi-gloss)
- Oven for baking
Step 1: Shaping the Dough Base
-
Prepare the dough color:
Condition your tan or beige clay until it’s soft and pliable. If the color feels too flat, mixing in a tiny speck of white and translucent clay can give it a more realistic dough appearance. -
Form the donuts:
Roll the clay into a smooth ball, then gently flatten it into a thick disc shape. It should look like a flattened hamburger bun, slightly rounded on the edges. -
Create the center hole:
Use your small circle cutter or a straw to punch a hole directly in the center of the disc. I find gently twisting the cutter while pushing down helps keep the shape from distorting. -
Soften the edges:
After cutting the hole, the inner edges might look sharp and unnatural. Use your fingertip to gently smooth and round off the inner rim so it looks like soft, risen dough.
Step 2: Texturing and Coloring
-
Apply texture:
Take an old toothbrush or a ball of crumpled aluminum foil and tap it gently all over the surface of the donut. This creates that porous, bready texture. Pay special attention to the sides and the bottom. -
Add the baked effect:
Shave some orange and light brown chalk pastels into a powder. Using a dry, soft paintbrush, lightly dust the powder onto the textured clay to simulate a golden-brown baked finish. Focus on the edges where a real donut would brown the most.
Donut Symmetry
If your donut hole gets warped while texturing, slide the handle of a paintbrush into the hole and gently spin it to re-round the opening perfectly before baking.
Step 3: Creating the Icing
-
Mix liquid clay:
Separate small amounts of liquid polymer clay into three containers. Mix a tiny bit of your colored solid clay (pink, lilac, mint) into each container until you have a thick, opaque liquid icing. -
Apply the glaze:
Carefully spoon or drip the colored liquid clay onto the top of your donut bases. Use a needle tool to guide the icing near the edges, letting it form natural drips and irregular curves. -
Making sprinkles:
Roll super thin snakes of various colored clays. Bake these thin strands for just a few minutes first. Once cool and hard, chop them into tiny bits with a blade to create realistic ‘jimmies’ or sprinkles. -
Decorate:
While the liquid icing is still wet, gently press your pre-baked sprinkles onto the surface. You can use tweezers for precision placement or just sprinkle them on for a random look.
Make it a Set
Create tiny matching donut holes using the center cutouts. Texture and glaze them just like the big ones for a cute matching pair of stud earrings.
Step 4: Assembly and Baking
-
Insert hardware:
Trim an eye pin or screw eye to a short length. Insert it into the top edge of the donut, ensuring it goes deep enough into the firm dough section, not just the icing. -
Final Bake:
Place your donuts on a baking sheet or ceramic tile. Bake according to your brand of clay’s instructions (usually around 275°F/135°C for 15-30 minutes). -
Cooling down:
Let the charms cool completely before handling. Polymer clay is slightly soft when hot and hardens as it cools. -
Sealing:
To make the icing look wet and sugary, apply a coat of gloss glaze carefully over just the icing part. I prefer to leave the dough part unglazed so the texture remains matte and realistic. -
Attach the clasp:
Once the glaze is dry, open a jump ring with pliers, loop it through the eye pin, and attach your lobster clasp before closing the ring securely.
Now you have a sweet set of charms ready to clip onto your zipper or keychain

What Really Happens Inside the Kiln
Learn how time and temperature work together inside the kiln to transform clay into durable ceramic.
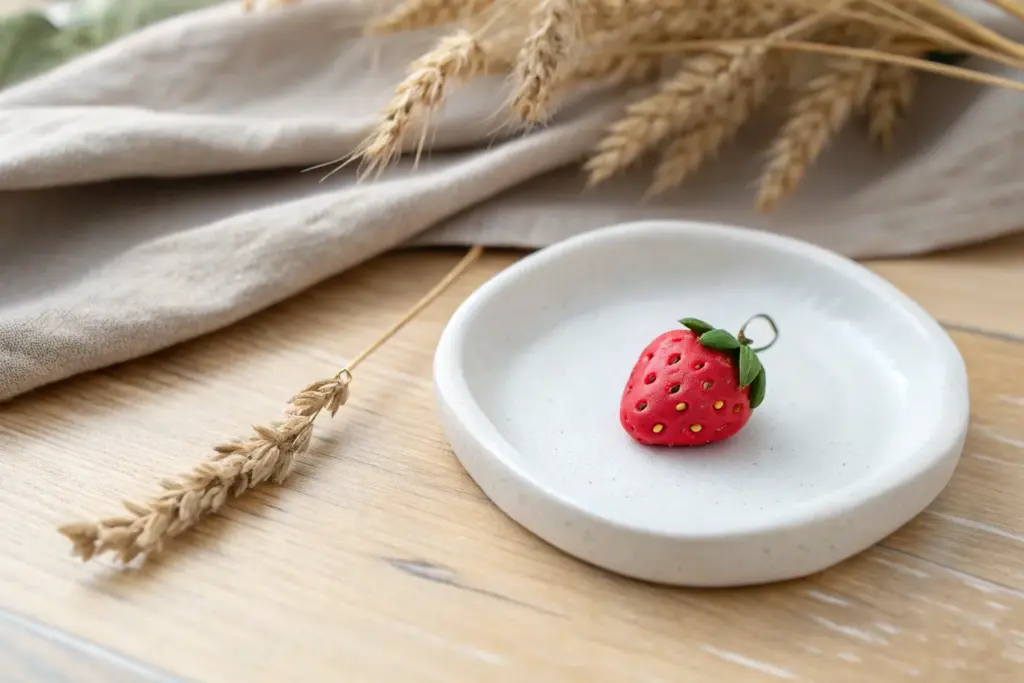
Tiny Strawberry Charms
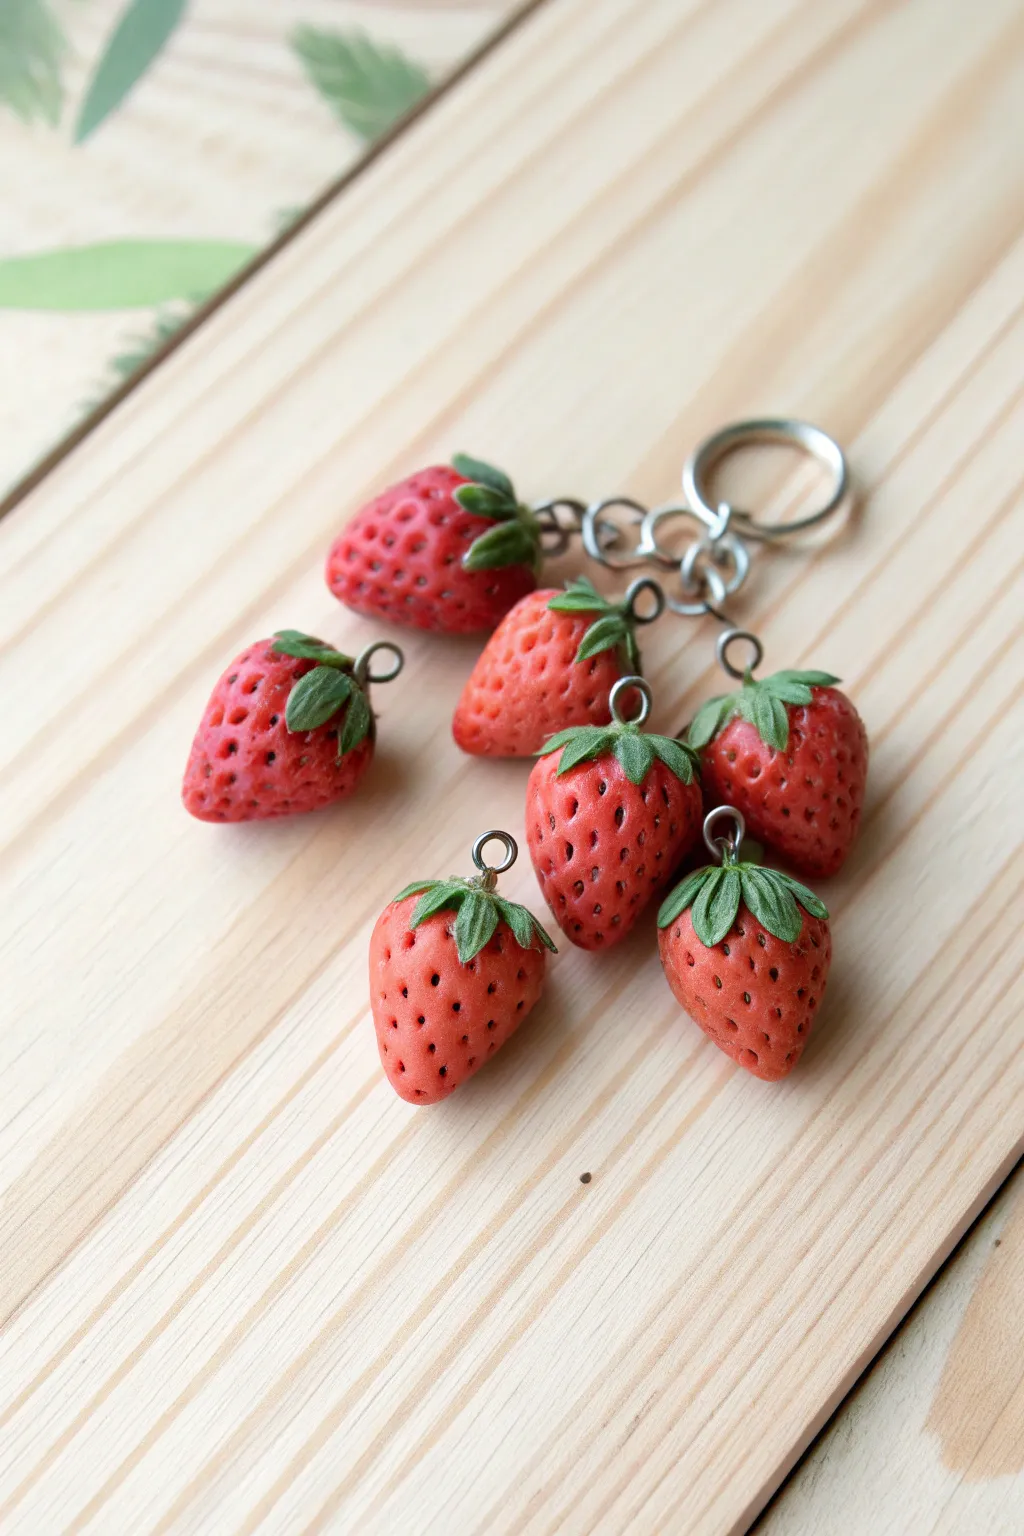
These delightfully realistic strawberry charms look fresh enough to eat, with tiny seeds and textured leaves adding incredible detail. Perfect for a summer keychain or zipper pull, this project teaches you how to master organic textures and subtle shading on a miniature scale.
Step-by-Step Guide
Materials
- Red polymer clay
- Green polymer clay (leaf green)
- Translucent polymer clay (optional, for mixing)
- Needle tool or toothpick
- Ball stylus tool (small)
- Chalk pastels (dark red, brown)
- Paintbrush (soft)
- Eye pins (silver tone)
- Jump rings and keyring hardware
- Liquid polymer clay or bake-and-bond
- Gloss glaze or polyurethane varnish
- Wire cutters
Step 1: Shaping the Berries
-
Prepare the red clay:
Start by conditioning your red polymer clay until it is soft and pliable. If you want a slightly more realistic, fleshy look, mix in a tiny pinch of translucent clay. -
Form the basic shapes:
Roll the clay into a log and cut it into six equal segments. Roll each segment into a smooth ball, then gently taper one end to create a rounded cone or teardrop shape similar to a real strawberry. -
Refine the silhouette:
Slightly flatten the top (the wider end) of each cone so it isn’t perfectly round, giving the leaves a flat place to sit later.
Needle Tool Trick
To make seeds look more realistic, angle your needle tool slightly upward when poking, rather than going straight in perpendicular to the surface.
Step 2: Adding Texture and Seeds
-
Create seed indentations:
Using a needle tool, gently poke small holes all over the surface of the strawberry. Start from the bottom tip and work your way up in a somewhat staggered pattern, avoiding the very top flat area. -
Shape the seeds:
Instead of just poking straight in, gently drag the needle tool downward slightly as you pull it out to create a slight teardrop impression, which mimics how real seeds sit in the fruit. -
Apply shading:
Scrape some dark red or brown chalk pastel into a fine powder. Use a soft brush to dust this powder over the strawberries, focusing on getting the pigment into the seed indentations to add depth. -
Wipe the surface:
I like to gently wipe the surface of the clay with a baby wipe or a finger to remove excess powder from the raised areas, leaving the darkness only inside the seed pockets.
Step 3: Creating the Calyx (Leaves)
-
Roll out green clay:
Condition your green clay and roll it out into a very thin sheet. You want this delicate enough to look like foliage. -
Cut star shapes:
Use a tiny star cutter or a craft knife to cut out six small 5- or 6-pointed star shapes. These will become the leafy caps. -
Texturize the leaves:
Place the green stars on your work surface and use a needle tool to press tiny veins into each leaf point, dragging from the center outward. -
Attach the leaves:
Add a tiny dab of liquid clay to the flat top of a strawberry. Place a green star on top, centering it. -
Drape the leaves:
Gently press the leaf points down onto the shoulders of the strawberry so they hug the fruit naturally. Curl one or two tips upward for a dynamic look.
Level Up: Ripeness
Dust the very bottom tip of each strawberry with a tiny bit of white pastel powder before texturing to mimic the look of an under-ripe, growing berry.
Step 4: Assembly and Baking
-
Insert hardware:
Trim your eye pins to an appropriate length (about half the height of the berry). Dip the end in liquid clay or super glue gel. -
Secure the pin:
Push the eye pin straight down through the center of the green leaves into the body of the strawberry. -
Bake the charms:
Arrange the strawberries on a baking tile or parchment paper. Bake according to your clay manufacturer’s instructions (usually 275°F/135°C for 15-30 minutes). -
Cool down:
Let the charms cool completely before handling them, as hot clay is fragile. -
Seal the piece:
Apply a thin coat of matte varnish for a natural look, or a gloss glaze if you want them to look like sweet, candied fruit. -
Attach to keychain:
Once the varnish is dry, use pliers to open jump rings and attach each strawberry charm to the chain links of your keyring.
Now you have a refreshing cluster of berries ready to brighten up your accessories collection
Mini Heart Charm Set
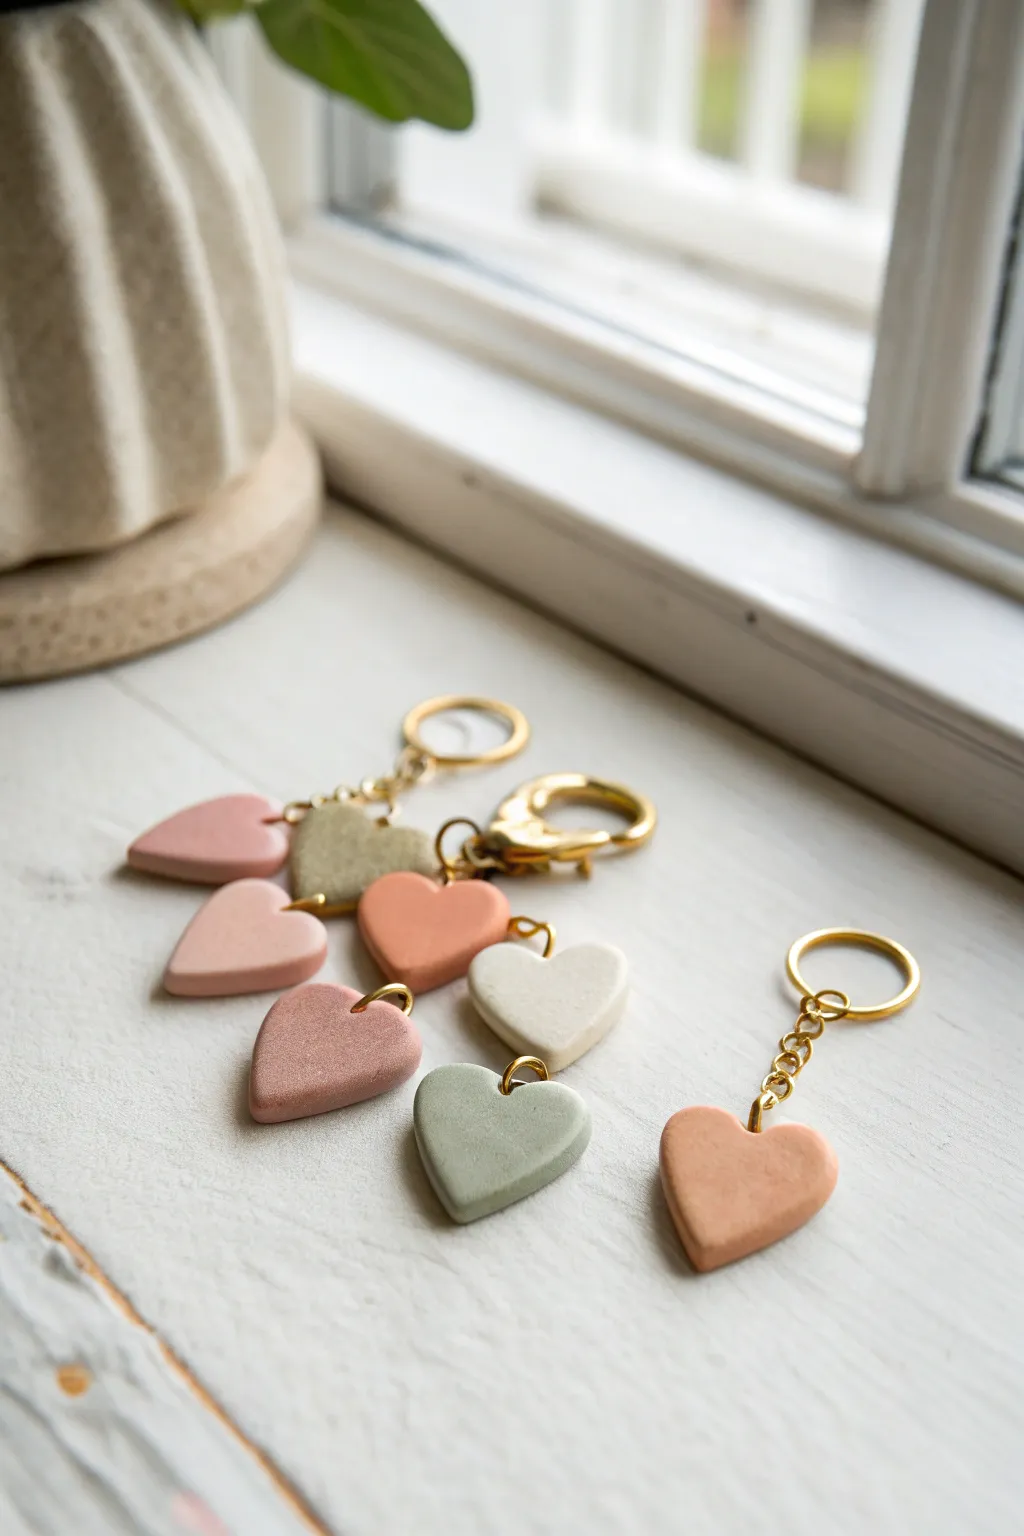
These sweetly simple heart charms feature a warm, muted color palette that feels modern and sophisticated. Perfect for keychains or bag dangles, their smooth matte finish and gold hardware give them a professional, boutique-quality look.
Step-by-Step Tutorial
Materials
- Polymer clay in muted tones (blush pink, terracotta, sage green, cream)
- Acrylic rolling pin or clay blending machine
- Small heart-shaped cookie cutter (approx. 1 inch)
- Small jump rings (gold finish)
- Keychain clasps with chain (gold finish)
- Needle tool or toothpick
- Parchment paper or ceramic tile
- Oven for baking
- Flat nose jewelry pliers
- Fine-grit sandpaper (optional)
Step 1: Preparing the Clay
-
Condition the clay:
Start by taking a small portion of your first clay color. Knead it thoroughly in your hands until it becomes soft, warm, and pliable. Proper conditioning is crucial to prevent cracking later. -
Roll it out:
Using your acrylic rolling pin, flatten the conditioned clay on a piece of parchment paper or a clean tile. Aim for a uniform thickness of about 4-5mm; you want these charms to be sturdy, not wafer-thin. -
Check surface quality:
inspect the surface of your rolled clay for any air bubbles or lint. If you see bubbles, gently pierce them with a needle tool and smooth the area with your finger.
Step 2: Shaping the Hearts
-
Cut the shapes:
Press your heart-shaped cutter firmly into the clay. Give it a tiny wiggle before lifting to ensure a clean cut. -
Release the shape:
If the clay sticks inside the cutter, gently push it out from the edges. Repeat this process with all your different clay colors until you have the desired number of hearts. -
Smooth the edges:
Once cut, run your finger lightly along the bottom edge of the heart to soften any sharp ridges left by the cutter. This gives the final piece a more finished, stone-like appearance. -
Create the hole:
Using a needle tool or toothpick, create a hole near the top of one of the heart lobes. Make sure the hole is large enough for your jump ring to fit through freely, but not so close to the edge that it will tear.
Fixing Fingerprints
Before baking, lightly brush the unbaked clay surface with a tiny amount of baby oil or cornstarch. This smooths away fingerprints without altering the shape.
Step 3: Baking and Finishing
-
Bake the pieces:
Arrange your hearts on a parchment-lined baking sheet. Bake according to your brand of clay’s specific instructions—usually around 275°F (135°C) for 30 minutes for this thickness. -
Cool down:
Allow the hearts to cool completely inside the oven or on a wire rack. They are actually quite fragile while hot and harden fully as they cool. -
Sanding (optional):
If you notice any fingerprints or rough spots after baking, lightly buff the surface under running water using fine-grit wet/dry sandpaper. -
Open the jump ring:
Take a gold jump ring and use two pairs of pliers (or your fingers if the wire is soft) to twist it open sideways—never pull the ends apart directly. -
Attach to chain:
Slide the open jump ring through the hole in your clay heart, then hook on the end of the keychain hardware. -
Close the ring:
Twist the jump ring back into a closed position, ensuring the two ends meet perfectly flush so the charm doesn’t slip off. -
Assemble clusters:
For the multi-heart keychain style seen in the image, attach multiple hearts to a single larger jump ring before connecting it to the main clasp.
Add Some Texture
Before baking, gently press a piece of coarse sandpaper or a clean sponge onto the raw clay surface. This creates a realistic ‘stone’ texture that looks amazing.
Clip these charming accessories onto your keys or gift a set to a friend for a thoughtful handmade surprise


The Complete Guide to Pottery Troubleshooting
Uncover the most common ceramic mistakes—from cracking clay to failed glazes—and learn how to fix them fast.
Letter Tile Name Tag
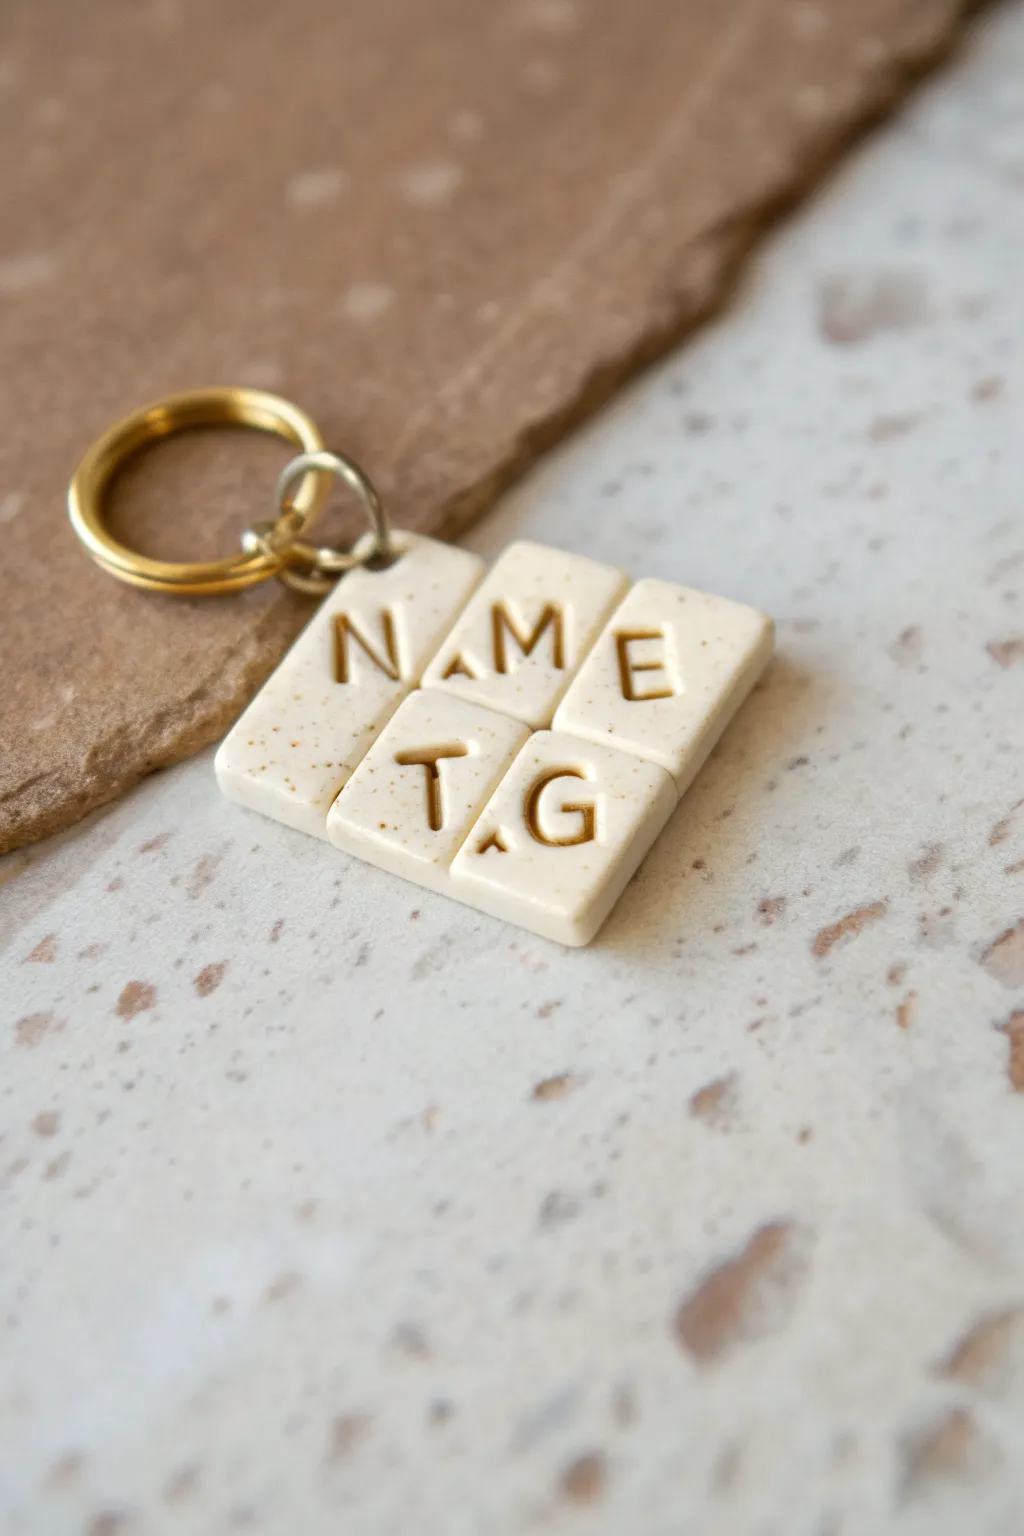
Create a charming, personalized keychain that mimics the look of speckled ceramic tiles arranged in a grid. This beginner-friendly project uses simple stamping techniques and liquid gold leaf to turn a basic name tag into a sophisticated, boutique-style accessory.
Step-by-Step Guide
Materials
- Polymer clay (Granite or Beige/Speckled effect)
- Small square clay cutter (approx. 1 cm)
- Acrylic rolling pin
- Depth guides or playing cards (approx. 4mm thick)
- Small alphabet stamp set
- Liquid clay (Bake & Bond or similar)
- Small ball tool or needle tool
- Gold acrylic paint or liquid gold leaf
- Fine detail paintbrush
- Cotton swabs and rubbing alcohol
- Gloss glaze (optional)
- Brass jump ring (10mm)
- Brass key ring
- Flat nose pliers
- Hand drill or pin drill
Step 1: Creating the Tiles
-
Condition the clay:
Start by warming the speckled clay in your hands, kneading it until soft and pliable. This prevents cracks later on. -
Roll out a slab:
Place your clay between depth guides on a smooth surface. Roll it out to an even thickness of about 4mm. We want these tiles to feel substantial, not flimsy. -
Cut the base shape:
Before cutting individual tiles, cut a larger rectangle or square base from a thinner sheet of the same clay (about 2mm thick). This will serve as the backing plate to hold your tiles together invisibly. -
Cut individual tiles:
Using your small square cutter, punch out enough squares for your desired name or word. For the ‘NAME TAG’ design shown, you will need seven squares, plus a few extras for practice. -
Smooth the edges:
Gently tap the cut edges of each square with your finger to remove any sharp ridges left by the cutter, giving them a softer, tumbled stone look. -
Stamp the letters:
Press your alphabet stamps firmly into the center of each tile. ensure you press deep enough to create a clear impression for the paint later, but not so hard that you warp the square shape.
Step 2: Assembly and Baking
-
Arrange the grid:
Lay out your stamped tiles on your work surface in the desired grid pattern to check the spacing. The example uses a staggered 4-tile then 3-tile arrangement. -
Apply liquid clay:
Smear a thin layer of liquid clay (Bake & Bond) onto the backing slab you created earlier. -
Attach the tiles:
Transfer the tiles onto the backing slab one by one, pressing them gently so they adhere. Keep them touching snugly. I find using a ruler to push the sides helps keep everything perfectly straight. -
Trim the backing:
Using a craft knife, carefully trim away any excess backing clay that is peeking out from under your tile grid, cutting flush against the tile edges for a clean finish. -
Add a hole:
Use a small straw or a needle tool to punch a hole in the corner of one of the top tiles for your jump ring. Make sure it’s not too close to the edge to avoid breakage. -
Bake the piece:
Place the assembled tag on a ceramic tile or baking sheet. Bake according to your clay manufacturer’s instructions (usually 275°F/130°C for 30 minutes). Let it cool completely.
Uneven Tiles?
If your tiles distort while lifting them from the table, place the clay slab on a piece of paper before cutting. You can then rotate the paper to lift the excess clay away without touching the squares.
Step 3: Finishing Touches
-
Fill the impressions:
Dip a fine brush into your gold paint or liquid leaf. Carefully fill in the stamped letter impressions. Don’t worry if you get paint outside the lines; we will fix that next. -
Clean up:
Once the paint is semi-dry, dip a cotton swab in a little rubbing alcohol. Gently wipe the surface of the tiles to remove excess paint, leaving the gold effectively trapped only inside the recessed letters. -
Seal (Optional):
For extra durability and a ceramic-like shine, brush a thin layer of gloss glaze over the tiles. -
Attach hardware:
Use your pliers to twist open the jump ring (open sideways, never pull apart). Thread it through the hole you made and attach the larger key ring before closing it securely.
Simulate Speckles
Can’t find granite-effect clay? Mix translucent clay with a tiny pinch of black pepper or used dried coffee grounds to create your own organic, speckled stone texture.
Clip your new custom tag onto your keys or bag and enjoy the personalized flair
Swirled Rope Ring
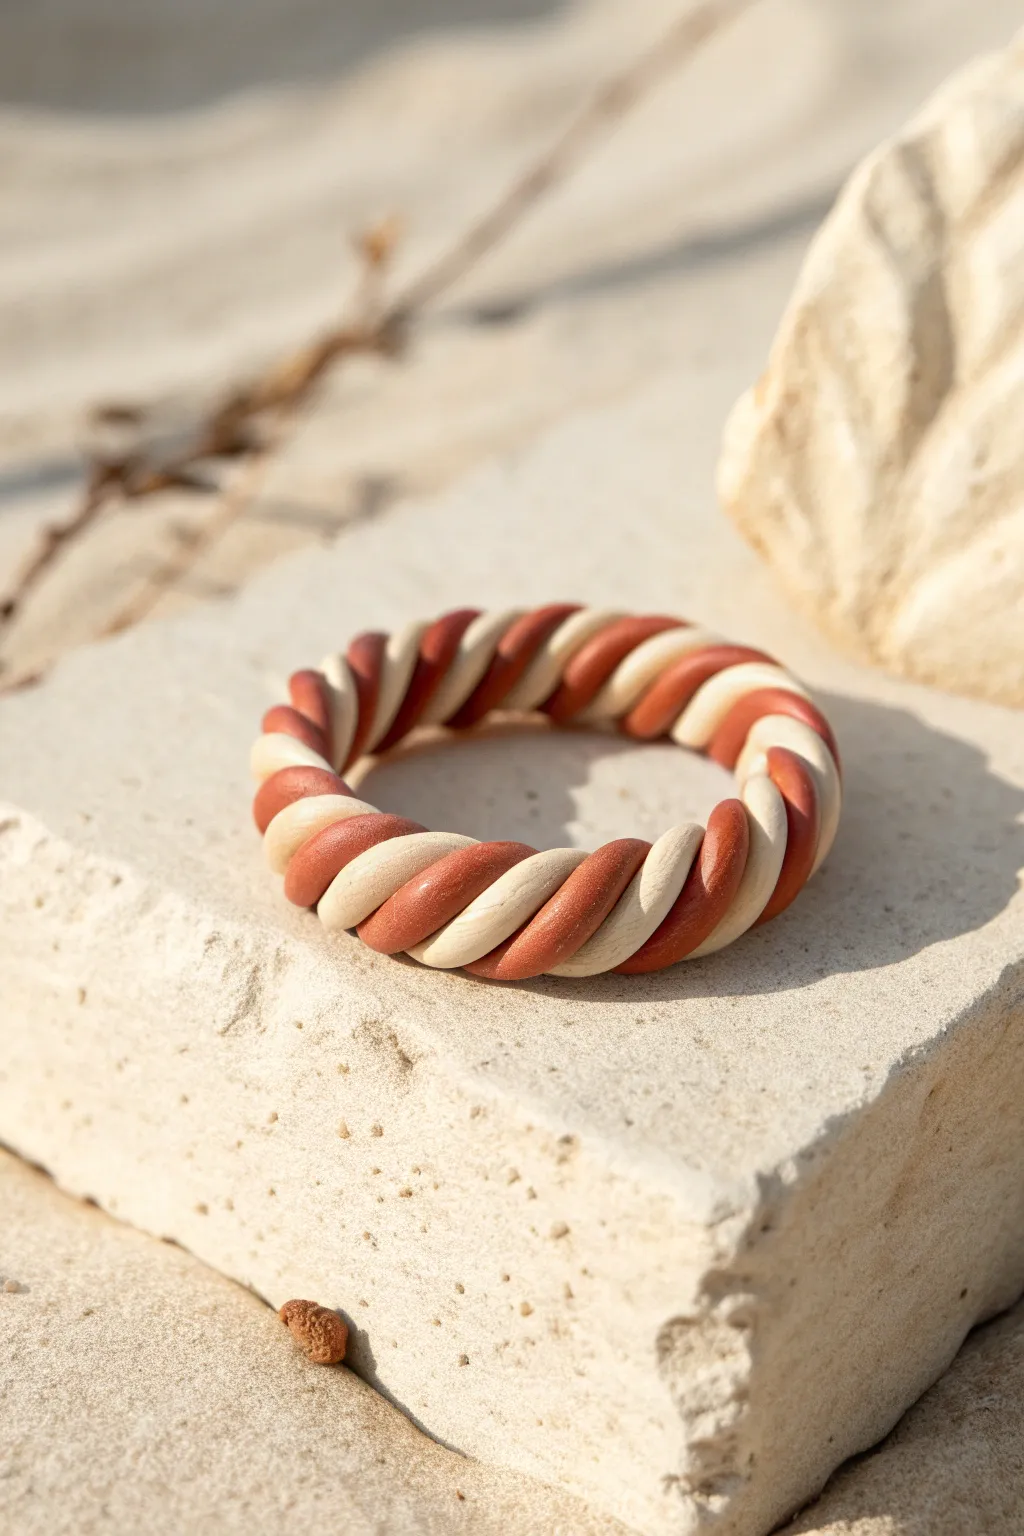
Embrace organic texture and earthy tones with this beautifully simple two-tone ring. By twisting contrasting strands of polymer clay, you’ll create a durable, minimal accessory that mimics the look of woven rope.
Step-by-Step
Materials
- Polymer clay (terracotta/rust color)
- Polymer clay (cream/beige color)
- Acrylic roller
- Cutting blade or craft knife
- Ring sizing mandrel or a thick marker
- Ruler
- Oven for baking
- Baking sheet with parchment paper
- Clay extruder (optional, for even ropes)
Step 1: Preparation and Rolling
-
Condition the Clay:
Begin by thoroughly kneading your terracotta and cream clays separately. It’s crucial that they are soft, pliable, and free of air bubbles before you start working. -
Roll Snakes:
Take a small portion of the terracotta clay and roll it on your work surface using the palm of your hand to create a long, thin ‘snake’ or rope. -
Check Thickness:
Aim for a thickness of about 3 to 4 millimeters. Try to keep the pressure consistent so the rope is the same width from end to end. -
Repeat for Cream:
Repeat the previous step with the cream clay, ensuring this rope matches the thickness of your terracotta rope as closely as possible. -
Trim to Length:
Lay the two ropes side-by-side. Trim them so they are both approximately 4 to 5 inches long, which gives you plenty of excess to work with for the twist.
Keep It Clean
Work with the lighter cream clay first, then the darker terracotta. Wash hands between colors to prevent the red pigment from staining the white cords.
Step 2: Creating the Twist
-
Begin the Twist:
Press the two ends of your ropes together to anchor them. Gently begin twisting them around each other in a clockwise direction. -
Maintain Even Tension:
As you twist, try not to stretch the clay. Instead, let the strands naturally wrap around one another to keep the rope looking thick and substantial. -
Tighten the Weave:
Continue twisting until the two colors form a tight, consistent spiral pattern. I like to give it a very gentle roll on the table afterward to smooth out any fingerprints, but don’t flatten the texture. -
Size the Ring:
Wrap your twisted rope around a ring mandrel or a marker that matches the desired finger size. -
Cut the Seam:
Where the two ends of the rope overlap on the mandrel, use your blade to make a clean, straight cut through both layers simultaneously. This ensures the ends will match up perfectly.
Go Metallic
Before baking, lightly brush the raised ridges of the ring with gold mica powder. This highlights the twisted texture and adds a luxe finish.
Step 3: Finishing and Baking
-
Join the Ends:
Remove the excess clay cutoff. Gently push the two cut ends of the ring together on the mandrel. -
Smooth the Seam:
Using a modeling tool or your fingertip, carefully blend the clay at the seam. Try to align the colored stripes so the spiral pattern appears continuous across the join. -
Add Texture (Optional):
If the smooth clay looks too shiny, you can lightly tap it with a stiff toothbrush to give it a matte, stone-like texture before baking. -
Bake:
Carefully slide the ring off the mandrel and place it on your baking sheet. Bake according to the manufacturer’s instructions for your specific brand of clay (usually around 275°F or 130°C for 15-30 minutes). -
Cool Down:
Let the ring cool completely on the baking sheet before handling. Polymer clay hardens fully as it returns to room temperature. -
Final Sanding:
If there are any rough spots around the seam or edges, use a very fine-grit sandpaper to gently smooth them away for a professional finish.
Slide on your new statement ring and enjoy the custom fit of your handmade accessory

TRACK YOUR CERAMIC JOURNEY
Capture glaze tests, firing details, and creative progress—all in one simple printable. Make your projects easier to repeat and improve.
Polka-Dot Stud Earrings

These charming stud earrings combine a creamy off-white base with warm terracotta dots for a retro-inspired look. Perfect for beginners, this project teaches you how to create consistent patterns and smooth, domed surfaces with polymer clay.
How-To Guide
Materials
- Polymer clay (white and translucent mix for the base, terracotta or burnt orange for dots)
- Small round clay cutter (approx. 10-12mm)
- Acrylic rolling pin
- Dotting tool or small ball stylus
- Ceramic tile or baking sheet
- Two stud earring posts (stainless steel or surgical steel)
- Strong jewelry glue (e.g., E6000)
- Fine grit wet/dry sandpaper (optional)
- Gloss or matte glaze (optional)
- Oven thermometer
Step 1: Preparing the Clay Base
-
Condition the base color:
Begin by conditioning your base clay. I like to mix a standard white with a tiny bit of translucent and a speck of beige to get that organic, creamy pottery look. Knead it until it is soft and pliable. -
Roll out the slab:
Using your acrylic rolling pin, roll the conditioned clay out into a slab. Aim for a thickness of about 3mm—thick enough to be sturdy, but light enough for comfortable wear. -
Cut the circles:
Take your small round cutter and punch out two circles. Twist the cutter slightly before lifting to ensure a clean edge. -
Clean the edges:
Gently smooth the sides of your cut circles with your fingertip to remove any loose bits of clay or sharp edges left by the cutter. -
Dome the surface:
Place the circles on your work surface. Gently pat the top with your fingertip to slightly round off the sharp upper edge, giving it that soft, pebble-like domed appearance shown in the photo.
Uneven Dots?
If your hand-rolled dots are too varied in size, roll a thin ‘snake’ of orange clay first. Slice equal tiny sections with a blade, then roll those slices into balls for consistency.
Step 2: Adding the Polka Dots
-
Prepare the dot color:
Condition a small amount of terracotta or burnt orange clay. You want this clay to be very soft so it spreads easily. -
Create tiny spheres:
Pinch off extremely tiny pieces of the orange clay and roll them into minuscule balls between your fingers. You will need about 9-11 balls per earring. -
Place first dot:
Using your dotting tool or just the tip of your finger, place one dot near the center, but slightly off-set. Don’t press it flat yet. -
Arrange the pattern:
Place the remaining tiny balls around the first one. Let some sit right on the edge of the circle so the pattern looks continuous and not trapped in the middle. -
Flatten the dots:
Once you are happy with the arrangement, gently press each dot down so it becomes flush with the surface of the white clay. Using a piece of parchment paper over the top and rubbing gently can help keep fingerprints off. -
Smooth the surface:
Roll your acrylic roller very lightly over the top one final time to ensure the dots are completely embedded and the surface is uniform.
Texture Twist
Before baking, gently press a piece of sandpaper or a rough sponge over the clay surface. This gives the earrings a stone-like texture that hides fingerprints perfectly.
Step 3: Baking and Assembly
-
Prepare for baking:
Place your clay circles on a ceramic tile or a baking sheet lined with parchment paper. -
Bake the pieces:
Bake according to the manufacturer’s instructions for your specific brand of clay (usually 275°F/135°C for 30 minutes). Use an oven thermometer to ensure the temperature is accurate to prevent scorching. -
Cool down:
Allow the clay pieces to cool completely inside the oven or on a cooling rack before handling them. They harden as they cool. -
Sand (Optional):
If you have any fingerprints, lightly wet-sand the surface with fine-grit sandpaper for a professional finish. -
Prepare adhesion:
Apply a very small dab of strong jewelry glue to the flat pad of your earring post. -
Attach the post:
Press the glued post onto the back of the clay circle. I prefer to place the post slightly above the center point so the earring sits well on the earlobe. -
Dry time:
Let the glue cure fully according to the package directions (usually 24 hours) before wearing.
Pop these sunny studs in your ears and enjoy your handmade accessory
Leaf-Imprint Trinket Dish
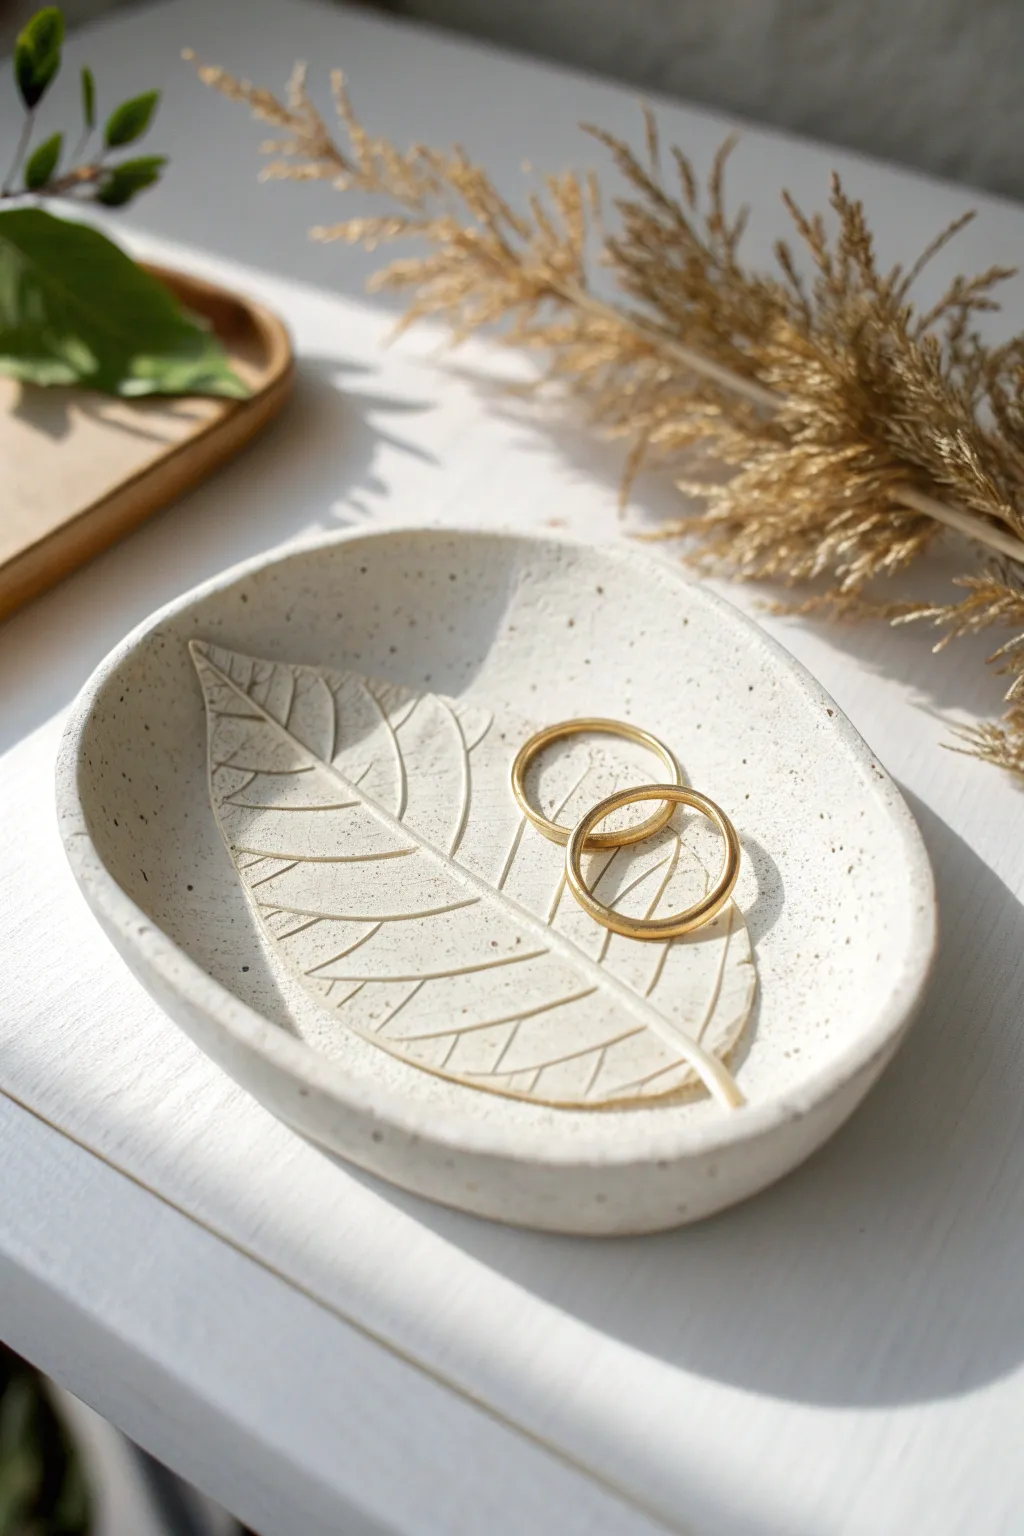
This elegant trinket dish uses natural textures to create a sophisticated, organic resting place for your jewelry. The speckled clay mimics stoneware pottery, while the delicate leaf skeleton impression adds a fossil-like beauty to the center.
Detailed Instructions
Materials
- White or beige granite-effect polymer clay (e.g., Fimo Effect or Premo Granite)
- A rolling pin or acrylic roller
- A real or artificial skeleton leaf (must have prominent veins)
- A round or oval cookie cutter (approx. 4-5 inches) or a craft knife
- A small oven-safe bowl (to help shape the clay)
- Non-stick work surface (glass, tile, or silicone mat)
- Fine-grit sandpaper (optional)
- Matte or satin polymer clay varnish (optional)
Step 1: Preparation & Rolling
-
Condition the Clay:
Begin by warming the polymer clay in your hands. Knead it thoroughly until it is soft, pliable, and free of cracks. If the clay feels stiff, patience is key—keep working it until it’s smooth. -
Form a Ball:
Roll your conditioned clay into a smooth ball. Inspect it closely to ensure there are no trapped air bubbles, which can cause bumps later. -
Roll it Out:
Place the ball on your non-stick surface. Using your acrylic roller, flatten the clay into an even slab. Aim for a thickness of about 4-5mm (roughly 1/4 inch). You want it sturdy but not chunky. -
Check Thickness:
Ensure the thickness is consistent across the entire slab so your dish will bake evenly. If you have playing cards, you can stack a few on either side of the clay as guide rails for your roller.
Step 2: Creating the Imprint
-
Position the Leaf:
Take your skeleton leaf and place it gently onto the center of the rolled clay slab. Decide on the orientation now; diagonal placement often looks very dynamic. -
Embed the Pattern:
Use your roller to press the leaf into the clay. Roll firmly over the leaf once or twice. You want to push the veins deep enough to leave a clear impression without completely burying the leaf. -
Remove the Leaf:
Carefully lift the corner of the skeleton leaf. Peel it back slowly. You should see a crisp, beautiful network of veins left behind in the clay surface.
Vein Definition
If your leaf imprint is too faint, try using a slightly thicker skeleton leaf or lightly dusting the leaf with cornstarch before rolling to prevent sticking.
Step 3: Shaping & Baking
-
Cut the Shape:
Using your cookie cutter or a craft knife, cut out your dish shape around the leaf imprint. An oval or organic circle works best to frame the leaf naturally. -
Smooth the Edges:
Dip your finger in a tiny bit of water or baby oil and run it along the cut rim of the clay. This smooths out any harsh cutting lines or ragged bits before baking. -
Form the Curve:
Gently lift your clay slab and place it on the *outside* of your overturned oven-safe bowl, or inside it if you prefer a deeper curve. Gravity will help it take a gentle, concave shape. -
Refine the Form:
Press lightly to ensure the clay conforms to the bowl’s curve, but be careful not to squash your beautiful leaf texture. -
Bake:
Place the bowl with the clay on a baking sheet. Bake according to your clay manufacturer’s instructions (usually around 230°F – 275°F / 110°C – 135°C) for 15-30 minutes. -
Cool Down:
Once baking is complete, remove the tray from the oven. Let the clay cool completely on the bowl. Do not try to pop it off while hot, or it might warp.
Gilded Edges
After baking, paint the jagged rim of your dish with liquid gold leaf or metallic acrylic paint. This adds a luxurious contrast to the speckled stone effect.
Step 4: Finishing Touches
-
Sand Edges:
After the dish is cool and hard, inspect the rim. If there are any sharp spots, gently buff them away with fine-grit sandpaper for a professional finish. -
Seal (Optional):
For extra durability, you can apply a thin coat of matte or satin varnish to the inside of the dish to protect the leaf detail from dust and oils.
Now you have a stunning, minimalist piece of decor ready to hold your favorite rings
Terrazzo Chip Keychain
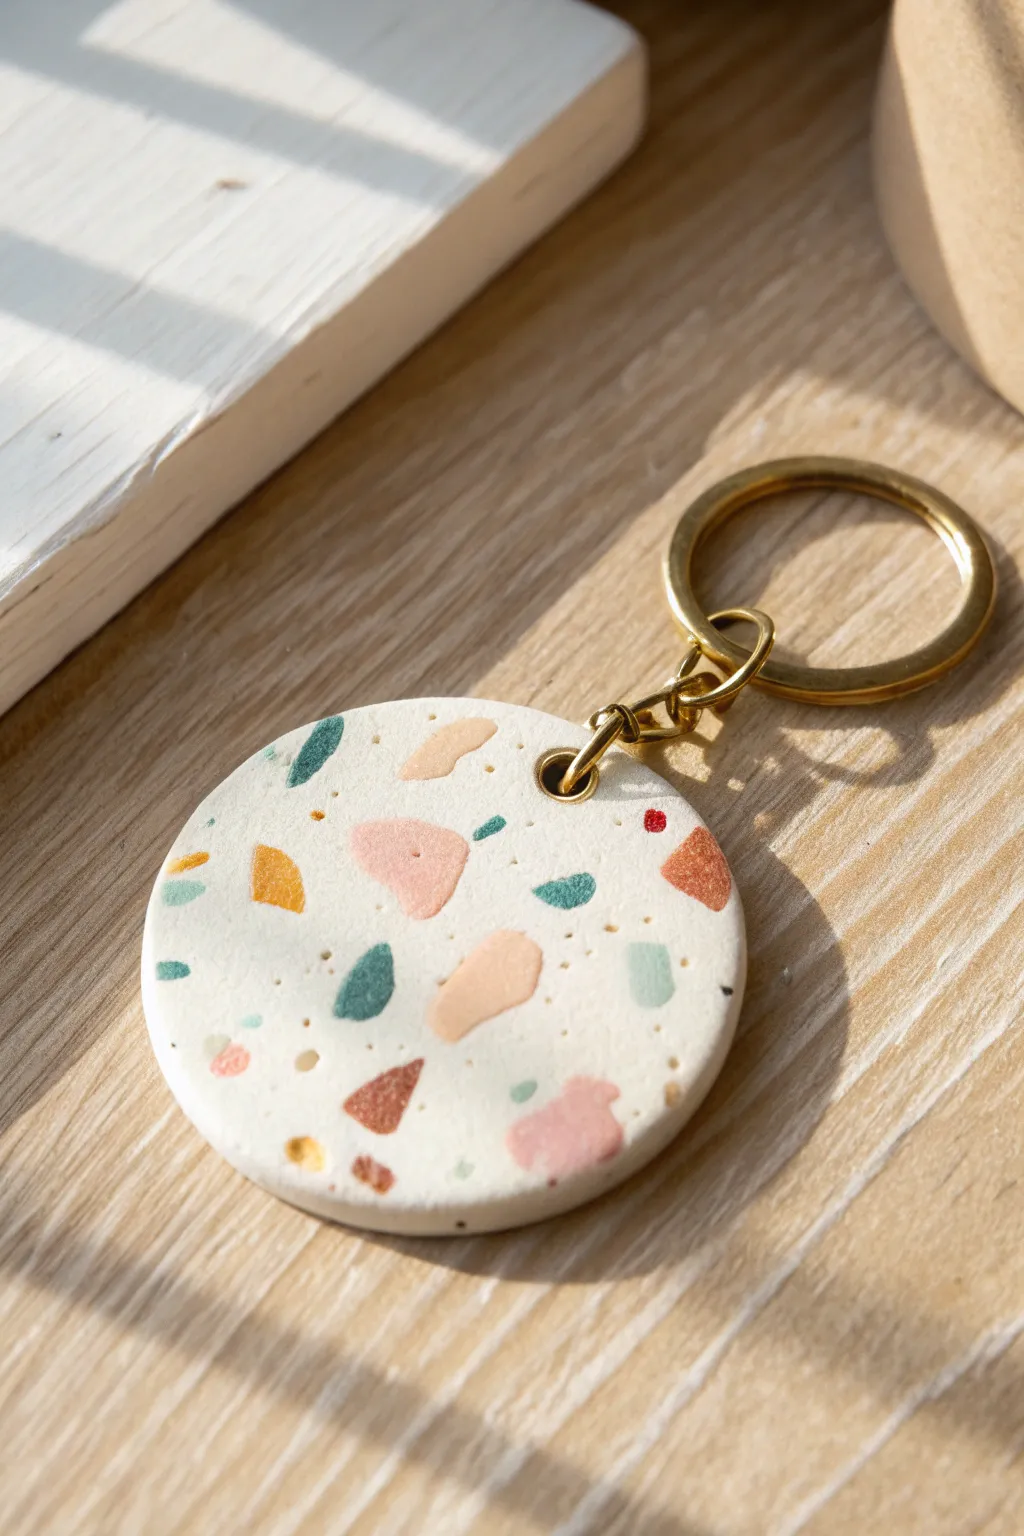
This trendy keychain captures the fun, scattered aesthetic of classic terrazzo flooring in a palm-sized accessory. With its creamy white base and pops of muted pastel chips, it’s a modern and stylish way to keep your keys organized.
Step-by-Step Guide
Materials
- White polymer clay (base)
- Small amounts of colored polymer clay (teal, peach, muted pink, mustard yellow, rust red)
- Acrylic rolling pin or clay machine
- Circle clay cutter (approx. 2 inches)
- Small coffee straw or precision drill
- Parchment paper or ceramic tile (for baking)
- Fine-grit sandpaper (400 to 1000 grit)
- UV resin or gloss glaze (optional)
- Gold jump ring
- Gold keyring
- Jewelry pliers
Step 1: Creating the Chips
-
Condition the colored clay:
Start by taking small amounts of your colored clays—teal, peach, pink, yellow, and rust. Knead each color individually until they are soft and pliable to prevent cracking later. -
Roll thin sheets:
Roll each colored piece into a very thin sheet. You want them almost paper-thin, as these will become the ‘chips’ embedded in the base. -
Tear and chop:
Use your fingers to tear tiny, irregular pieces from the thin sheets, or use a clay blade to chop them broadly. Variety is key here; aim for different sizes and angular shapes. -
Set chips aside:
Keep your pile of confetti-like chips separated by color on a piece of parchment paper so they are ready to grab.
Step 2: Forming the Base
-
Condition the white clay:
Take a larger block of white polymer clay and condition it thoroughly until it’s smooth. This is your canvas, so keep your hands and work surface clean to avoid dust. -
Roll the base slab:
Roll the white clay out to a medium thickness, roughly 1/4 inch (about 5-6mm). It needs to be thick enough to hold the hardware securely. -
Apply the chips:
Gently place your colored chips onto the white slab. Scatter them randomly, leaving some white space between them. I prefer to place larger pieces first and fill gaps with tiny specks. -
Embed the pattern:
Once you like the arrangement, place a piece of parchment paper over the slab. Gently roll over it with your acrylic roller to press the chips flush into the white base. -
Smooth the surface:
Remove the paper and ensure the surface is level. If the chips look distorted, you can gently pat them back into shape with your finger.
Clean Rolling Tip
Work on a ceramic tile or piece of glass. This keeps the back of your keychain perfectly flat and creates less texture than baking on parchment paper.
Step 3: Cutting and Baking
-
Cut the shape:
Press your circle cutter firmly into the slab to cut out your keychain shape. Lift the excess clay away from the edges before removing the cutter to keep the circle perfect. -
Create the hole:
Use a small coffee straw or a tool to poke a hole near the top edge for the hardware. Make sure the hole isn’t too close to the rim to prevent breakage. -
Smooth the edges:
Gently run your finger around the perimeter of the circle to soften any sharp edges created by the cutter. -
Bake the piece:
Place your clay circle on a ceramic tile or baking sheet lined with parchment paper. Bake according to your clay manufacturer’s instructions (usually around 275°F or 130°C for 15–30 minutes). -
Cool completely:
Let the piece cool down completely before handling. Polymer clay is still slightly soft when hot and hardens as it cools.
Elevate the Look
Add tiny flecks of gold leaf flakes alongside the colored chips before rolling flat. This adds a subtle, metallic shimmer that looks very high-end.
Step 4: Finishing Touches
-
Sand the surface:
Dip your fine-grit sandpaper in water and gently sand the surface and edges. This reveals the crisp, clean lines of the terrazzo chips and makes the surface buttery smooth. -
Rinse and dry:
Wash off any sanding residue with water and dry the piece thoroughly with a soft cloth. -
Open the jump ring:
Using two pairs of jewelry pliers, twist the gold jump ring open sideways (never pull it apart outwards). -
Attach hardware:
Thread the open jump ring through the hole in your clay circle, then loop the large gold keyring onto the jump ring. -
Close the ring:
Twist the jump ring back into a closed position, ensuring the ends meet perfectly flush so your clay piece won’t slip off.
Clip your new terrazzo masterpiece onto your key set and enjoy that pop of color every time you head out the door
Faux Granite Beads
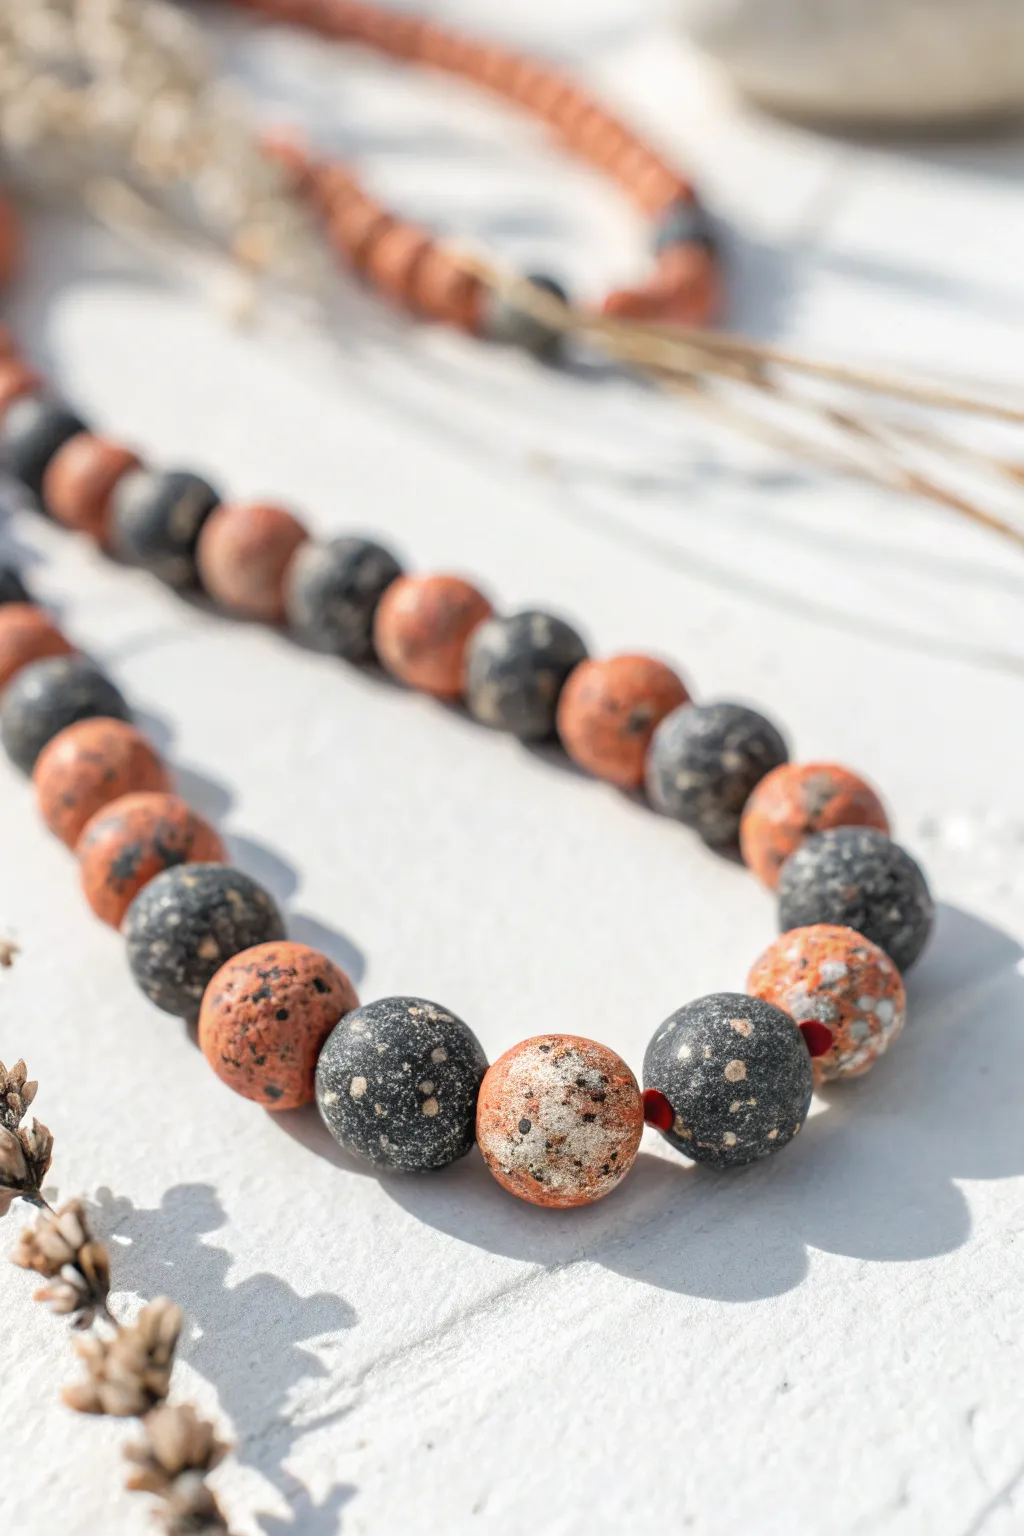
Transform ordinary polymer clay into rustic, stone-like treasures with this simple faux granite technique. By using simple additives like ground pepper and sand, you can achieve an incredibly realistic organic texture without needing specialized tools.
Step-by-Step Tutorial
Materials
- Polymer clay (terracotta/orange and black)
- Translucent polymer clay
- Coarsely ground black pepper
- Fine craft sand (white or beige)
- Black acrylic paint
- Stiff bristle toothbrush
- Bead piercing pins or toothpicks
- Oven for baking
- Baking sheet or ceramic tile
- Wet/dry sandpaper (400-800 grit)
- Matte varnish (optional)
Step 1: Preparing the Clay Mixtures
-
Condition the base colors:
Begin by thoroughly conditioning your terracotta and black polymer clay separately until they are soft and pliable. Use about two parts colored clay to one part translucent clay to give the final beads a slight visual depth. -
Add texture to the terracotta:
Flatten the terracotta mix into a pancake shape. Sprinkle a generous amount of coarse black pepper and a pinch of fine sand onto the clay surface. -
Incorporate the inclusions:
Fold the clay over the inclusions and knead thoroughly. You want the pepper and sand to be evenly distributed throughout the entire batch so every bead has speckles. -
Prepare the black granite mix:
Repeat the previous process for the black clay mixture, but focus on adding more white sand or light-colored spices to ensure the speckles show up against the dark background.
Sticky Situation
If your clay is too soft and sticky to hold a shape, leach it by pressing flattened sheets between two pieces of plain printer paper for 30 minutes to absorb excess plasticizer.
Step 2: Forming the Beads
-
Portion the clay:
Roll both clay mixtures into long, even snakes of equal diameter. Slice the snakes into equal-sized segments to ensure your beads will be uniform in size. -
Roll spheres:
Take each segment and roll it between your palms to form a smooth ball. I find that cupping my hands slightly helps create a perfectly round shape. -
Pierce the holes:
Ideally, let the raw beads sit for about 10 minutes to firm up slightly. Then, gently twist a bead pin or toothpick through the center of each sphere to create the stringing hole, being careful not to distort the round shape. -
Texturize the surface:
For a pitted stone look, gently tap the surface of each raw bead with the bristles of a stiff toothbrush or a ball of crinkled aluminum foil.
Level Up: Geodes
Before rolling your ball, wrap the clay around a small nugget of translucent clay mixed with glitter. When you drill the hole later, it will look like a crystal core.
Step 3: Baking and Finishing
-
Bake the beads:
Arrange the beads on your baking tile or sheet. Bake according to your clay manufacturer’s specific instructions, usually around 275°F (130°C) for 30-45 minutes. -
Cool down:
Allow the beads to cool completely in the oven with the door cracked open. This prevents thermal shock and ensures the clay is fully cured. -
Apply an antiquing wash:
Dilute a small amount of black acrylic paint with water. Brush this wash over the cooled terracotta beads, making sure it gets into the toothbrush textures. -
Wipe back the paint:
Quickly use a damp paper towel or sponge to wipe the surface paint off the beads. The dark paint will remain in the crevices and pits, enhancing the realistic stone look. -
Sand for finish:
For a weathered river-stone feel, lightly sand the beads under running water using 400-grit wet/dry sandpaper. This exposes the pepper and sand inclusions more clearly. -
Buff and seal:
Buff the beads dry with a soft denim cloth. If you want to protect the paint wash, apply a very thin coat of matte varnish, or leave them bare for a natural rock texture.
String your new faux stone beads onto leather cord or elastic for an earthy, stylish accessory
Simple Stripe Cane Slices
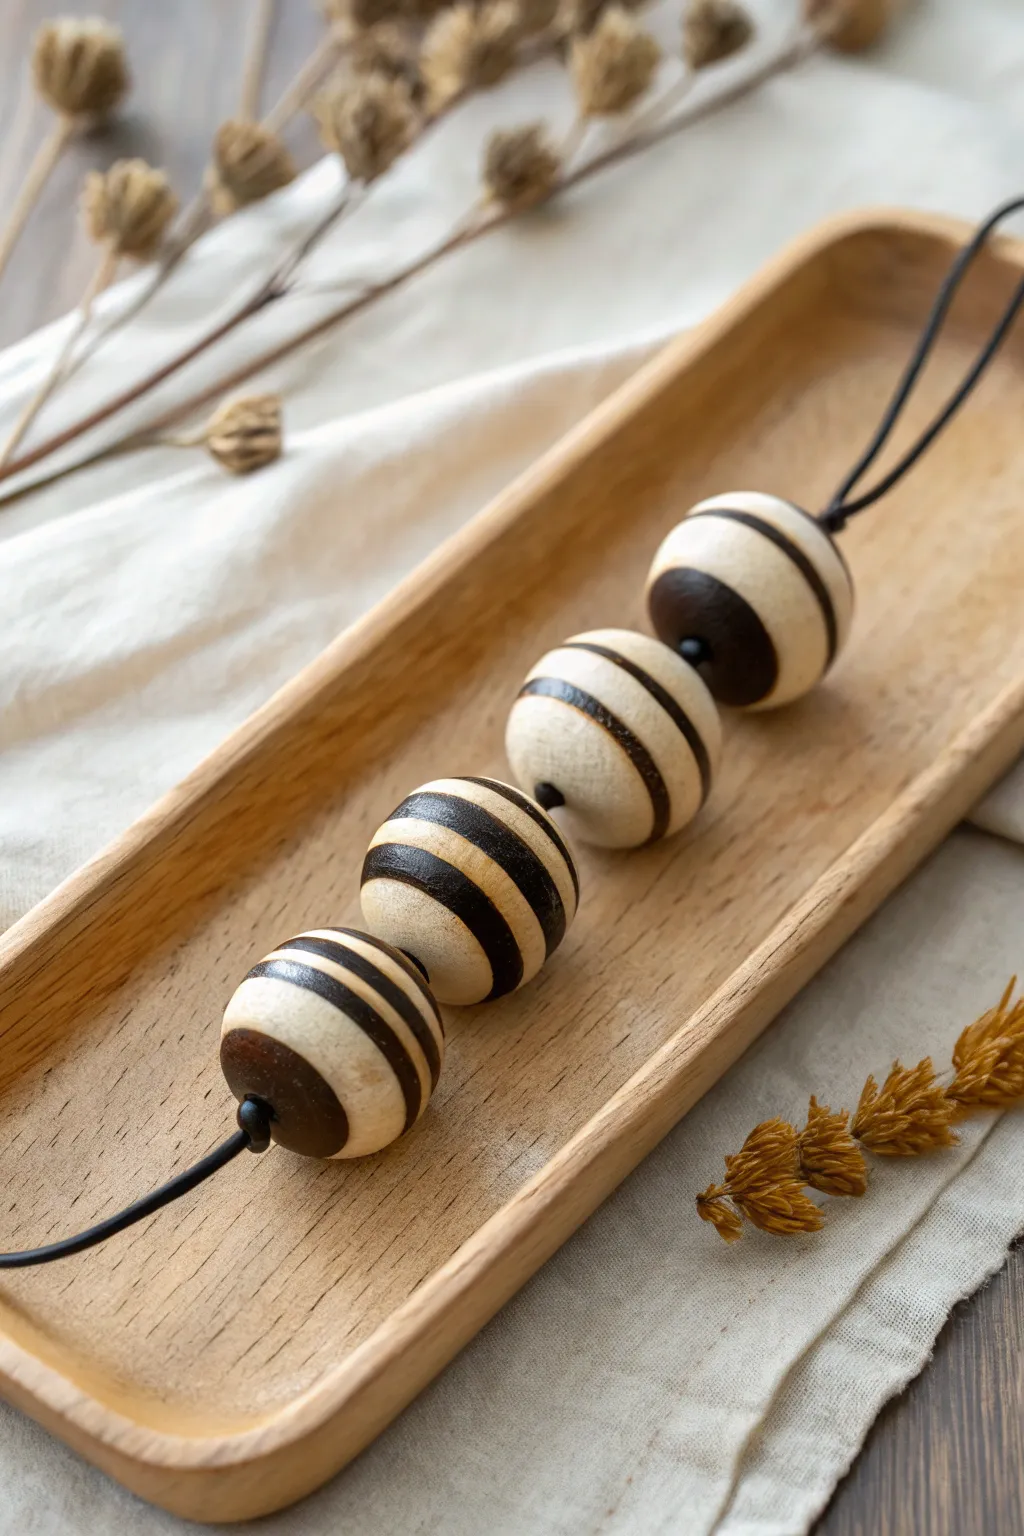
These striking beads feature bold, alternating bands of cream and dark espresso that mimic the look of inlaid wood. By mastering a simple stacking technique, you’ll create chunky, eye-catching focal beads perfect for a minimalist necklace.
Detailed Instructions
Materials
- Polymer clay in cream or white
- Polymer clay in dark brown or black
- Acrylic rolling pin or pasta machine
- Circle cutters (various sizes)
- Rigid tissue blade
- Bead piercing pins or a thick needle
- Wet/dry sandpaper (400 to 1000 grit)
- Black cord or leather thong
- Oven for baking
Step 1: Creating the Striped Stack
-
Condition the Clay:
Begin by thoroughly conditioning both the cream and dark brown polymer clay until they are pliable and warm in your hands. -
Roll Flat Sheets:
Roll out both colors of clay into sheets of equal thickness. Using a pasta machine on a thick setting (around #1 or #2) ensures consistency, but a hand roller with guide rings works well too. -
Cut Circles:
Use a circle cutter to punch out multiple discs from both colors. You will need enough discs to create a stack about 1.5 inches high. -
Stack the Discs:
Layer the discs on top of each other, alternating between cream and dark brown. Press them firmly together as you stack to eliminate any trapped air bubbles. -
Consolidate the Block:
Once stacked, gently compress the cylinder from the top and bottom, and roll it slightly on your work surface to ensure the layers are fused into a solid log.
Stripes Going Wonky?
If your lines get too wavy while rolling, chill the clay stack in the fridge for 10 minutes before cutting and rolling. Firmer clay holds the pattern shape better.
Step 2: Forming the Beads
-
Slice Segments:
Using your rigid tissue blade, cut the log into four equal segments. For larger beads like the ones shown, keep the segments fairly thick. -
Shape into Spheres:
Take one segment and begin gently rolling it between your palms. Use a light touch at first to avoid distorting the stripes too much, gradually applying more pressure as it becomes round. -
Refine the Stripes:
As you roll, the straight layers will curve around the sphere. If the stripes become too wonky, you can gently pat the bead back into shape before resuming rolling. -
Check for Smoothness:
Inspect the bead for any seams or fingernail marks. Roll it against a smooth surface like a tile to perfect the spherical shape. -
Pierce the Holes:
While the clay is still raw, use a bead piercing pin to create a hole through the center. I like to twist the pin as I push to prevent the bead from squishing. -
Create Large Openings:
Since this necklace uses a thick cord, ensure the hole is wide enough. You may need to wiggle the pin or use a larger tool to expand the opening.
Wood Grain Effect
For a more organic, wood-like texture, mix a tiny pinch of translucent clay into your cream color before starting. It adds depth after baking.
Step 3: Finishing the Necklace
-
Bake the Beads:
Arrange your beads on a baking sheet, ideally resting them in a bed of cornstarch or on a bead rack to prevent shiny flat spots. Bake according to your clay manufacturer’s instructions. -
Cool and Sand:
Allow the beads to cool completely. Wet sand them starting with 400 grit and moving up to 1000 grit to achieve that smooth, matte wood-like finish visible in the photo. -
Buff (Optional):
Rub the beads briskly with a denim cloth if you want a subtle sheen, though keeping them matte enhances the organic look. -
String the Beads:
Cut a length of black cord. Thread the four beads onto the cord, ensuring they sit snugly against each other. -
Final Adjustments:
Tie a simple knot at the ends of the cord to complete the necklace, adjusting the length to suit your preference.
Wear your new statement necklace with pride or gift it to a friend who loves bold accessories
Checkerboard Pattern Tiles
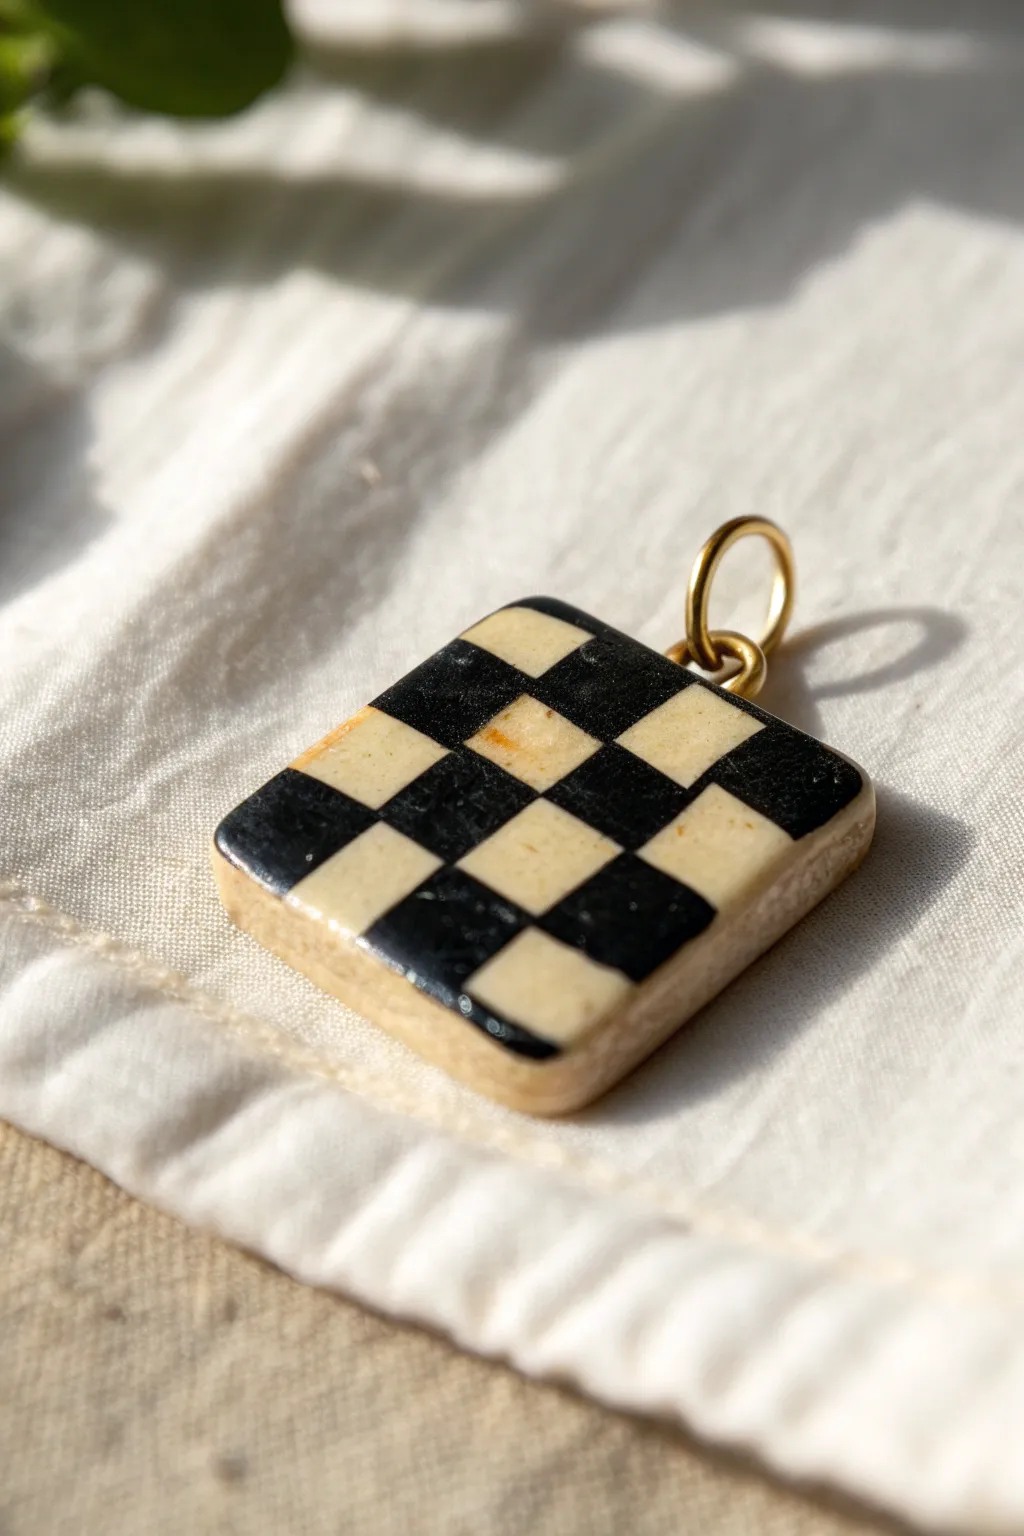
This striking black and white checkerboard pendant proves that simple geometric patterns can look incredibly high-end. With its glossy finish and slightly softened edges, it mimics the look of vintage bone or ceramic tiles.
Step-by-Step Tutorial
Materials
- Black polymer clay
- White or antique white polymer clay
- Acrylic roller or pasta machine
- Tissue blade (flexible)
- Square cutter (approx. 1 inch)
- Needle tool or small drill bit
- Gold jump ring (6-8mm)
- Gloss varnish or UV resin
- Fine grit sandpaper (400-800 grit)
- Work surface (ceramic tile or glass)
Step 1: Building the Cane
-
Condition the Clay:
Begin by thoroughly conditioning both your black and white clay separately until they are soft and pliable. This prevents cracking later on. -
Create Slabs:
Roll out both colors into thick slabs of equal height. If you are using a pasta machine, use the thickest setting. Aim for about 3-4mm thickness. -
Cut Strips:
Using your tissue blade, cut several long, even strips from each color slab. Try to make them square in cross-section—meaning the width of the cut equals the height of the slab. -
Assemble Rows:
Lay a black strip next to a white strip and press them gently together. Repeat this, alternating colors, until you have a flat striped sheet 5 strips wide. -
Stack and Offset:
Cut your striped sheet into 5 equal lengths. Stack these new sheets on top of each other, but make sure to alternate the pattern so a black square sits on top of a white one. -
Consolidate the Cane:
Gently press the sides of your square log (cane) to fuse the layers together. Avoid distorting the square shapes; just apply even pressure on all four sides.
Smudged Colors?
If black clay smears onto the white during cutting, wipe your blade with an alcohol wipe between every single slice. Clean tools equal crisp lines.
Step 2: Shaping and Baking
-
Slice the Tile:
Use your sharpest blade to slice a thin, even tile from the end of your cane. I usually aim for about 4mm thickness for a sturdy pendant. -
Refine the Shape:
If the slicing deformed the square slightly, use your square cutter to trim the edges for a perfect geometric shape, or gently reshape it with your fingers. -
Backing (Optional):
For extra durability, you can roll a thin sheet of plain white clay and press your checkerboard slice onto it, trimming the excess. -
Create the Hanging Hole:
Using a needle tool, poke a hole near one corner or in the center of the top edge. Wiggle it slightly to ensure it’s large enough for your jump ring. -
Soften Edges:
Gently tap the corners and edges with your fingertip to round them off slightly. This gives it that softer, pottery-like feel seen in the photo. -
Bake:
Bake the piece according to your clay manufacturer’s instructions (usually 275°F/130°C for 15-30 minutes). Let it cool completely.
Step 3: Finishing Touches
-
Sand for Smoothness:
Once cool, wet sand the surface and edges with fine-grit sandpaper to remove any fingerprints or lint. Rinse and dry thoroughly. -
Apply Gloss:
Brush on a coat of gloss varnish or apply a thin layer of UV resin. Cure or let dry to achieve that glass-like shine. -
Add Hardware:
Open your gold jump ring using pliers (twist it sideways, don’t pull apart), slide it through the hole, and twist it closed securely.
Make it Retro
Instead of a straight grid, gently twist the entire cane before slicing to create a warped, psychedelic checkerboard effect perfect for funky earrings.
Now your chic geometric pendant is ready to be strung on a gold chain for an instant style upgrade
Mini Mushroom Earrings
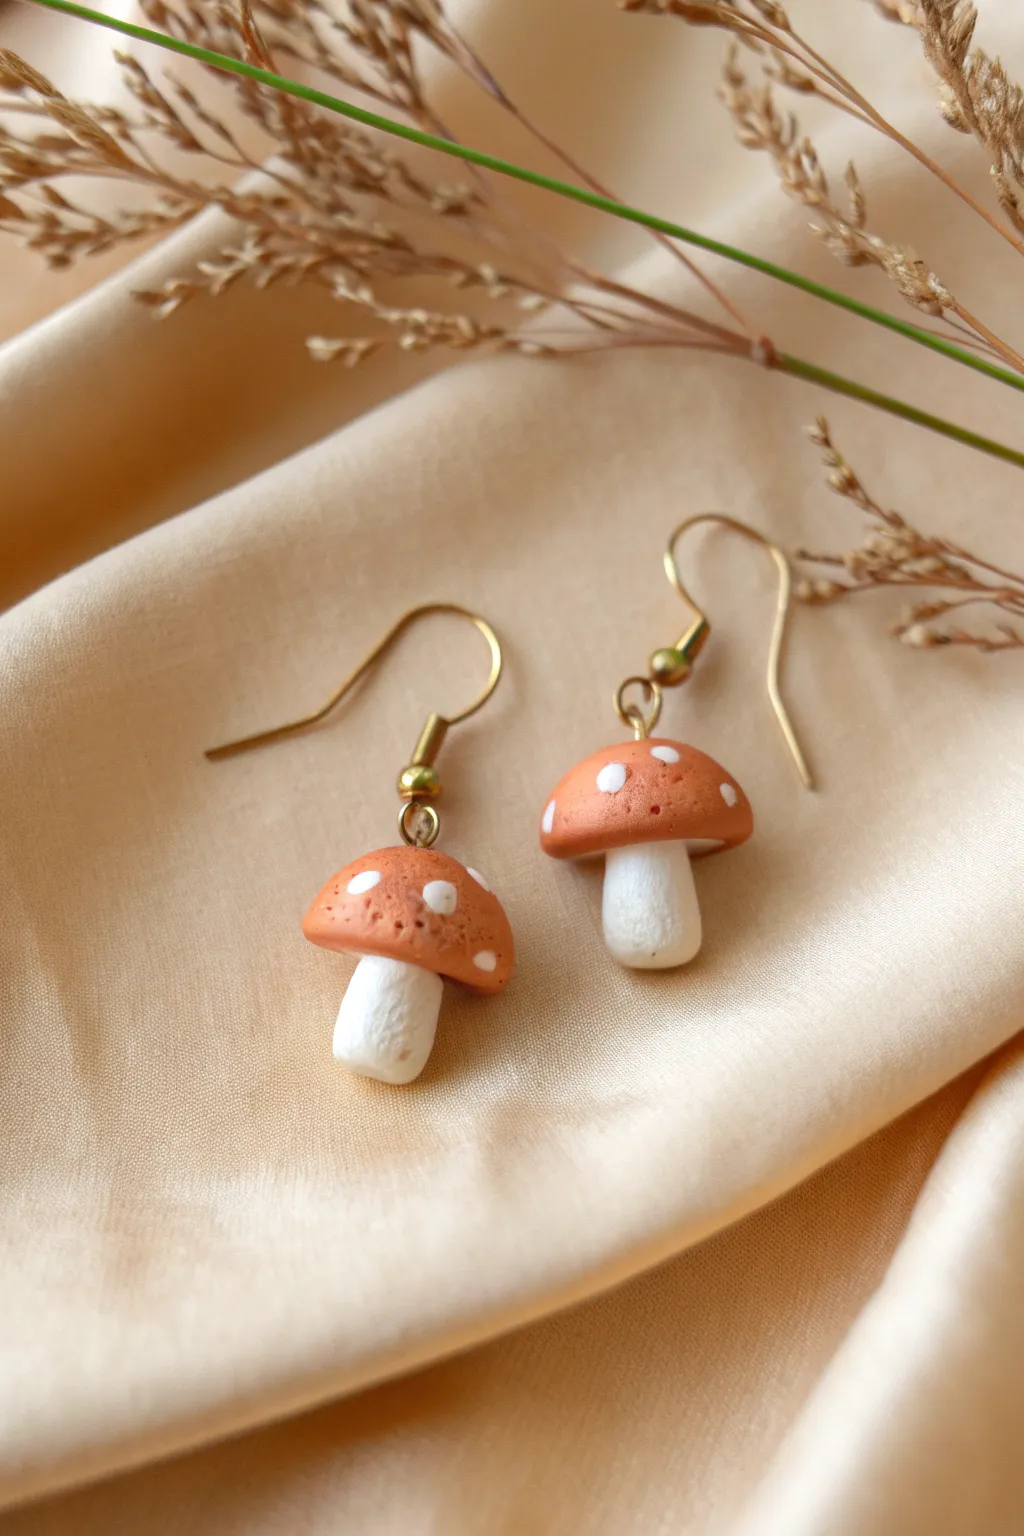
These charming little mushroom earrings bring a touch of woodland magic to any outfit with their warm terracotta caps and speckled details. Perfect for beginners, this project teaches you basic shaping and joining techniques to create jewelry that feels both rustic and whimsical.
Step-by-Step
Materials
- Polymer clay (white and terracotta/burnt orange)
- Liquid polymer clay (translucent or white)
- Acrylic paint (white)
- Dotting tool or toothpick
- Headpins (gold or brass)
- Earring hooks (gold or brass)
- Needle nose pliers and round nose pliers
- Clay blade or craft knife
- Fine grit sandpaper (optional)
- Matte varnish (optional)
Step 1: Shaping the Stems
-
Condition the white clay:
Start by warming a small piece of white polymer clay in your hands. Knead and roll it until it becomes soft, pliable, and easy to work with. -
Roll a cylinder:
Roll the clay into a smooth log that is roughly the thickness you want your mushroom stems to be—about 1/4 inch thick is usually perfect for earrings. -
Cut the stems:
Using your clay blade, cut two equal segments from the log, each about 1/2 inch long. Keep the cuts clean and straight for the base. -
Refine the shape:
Gently roll each segment between your fingers to round off the cut edges slightly. Taper the top end just a little bit so it will fit snugly under the cap later. -
Create texture:
For a realistic look, you can gently roll the stems over a piece of fine sandpaper or use a toothbrush to add subtle texture, mimicking a natural mushroom stem.
Uneven Spots?
If your white clay dots look lumpy, lightly roll the entire mushroom cap on your work surface before baking. This presses the dots flush into the orange clay for a smooth finish.
Step 2: Creating the Caps
-
Condition the cap color:
Take your terracotta or burnt orange clay and condition it thoroughly until it is soft and free of cracks. -
Form two spheres:
Divide the orange clay into two equal balls. Size them so they look proportional to your stems—usually slightly wider than the stems. -
Flatten the base:
Press each ball gently down onto your work surface to create a dome shape. The bottom should be flat. -
Indent the underside:
Use the rounded end of a tool or your pinky finger to press a small indentation into the flat bottom of each cap. This creates a socket for the stem.
Glazed Look
For a dewy, morning-rain look, coat just the orange caps with a high-gloss glaze after baking, but keep the stems matte for a realistic texture contrast.
Step 3: Assembly and Detailing
-
Insert the headpins:
Push a gold headpin straight up through the bottom of a white stem until it pokes out the top center. Repeat for the second stem. -
Join stem and cap:
Put a tiny drop of liquid polymer clay into the indentation of the orange cap. Thread the headpin through the center of the cap and press the stem gently into the socket. -
Secure the pin:
Ensure the headpin comes out the very top center of the orange cap. Smooth the seam where the clay meets if needed, though the overhang usually hides it. -
Add texture to the cap:
Using a clean toothbrush or texturing sponge, lightly tap the surface of the orange caps to remove fingerprints and give them that earthy, porous look. -
Add the spots:
Roll tiny distinct specks of white clay and press them onto the caps, or wait until after baking to paint them on. For this look, small flat discs of white clay pressed in before baking work best. -
Bake carefully:
Arrange the mushrooms upright on a baking sheet or stuck into a ball of foil. Bake according to your clay package instructions (usually 275°F/130°C for 15-30 minutes).
Step 4: Finishing Touches
-
Cool down:
Let the mushrooms cool completely before handling. The clay hardens fully as it returns to room temperature. -
Trim the pin:
Using wire cutters, trim the exposed headpin wire sticking out of the top, leaving about 1cm (roughly 0.4 inches) of wire. -
Create a loop:
Use your round nose pliers to grab the tip of the wire and roll it downward to create a closed loop flush against the top of the mushroom cap. -
Attach the hook:
Open the loop on your earring hook slightly with pliers, slide on the mushroom loop, and close it securely.
Now you have a darling pair of forest fungi ready to wear or gift to a nature-loving friend
Chubby Animal Face Magnet
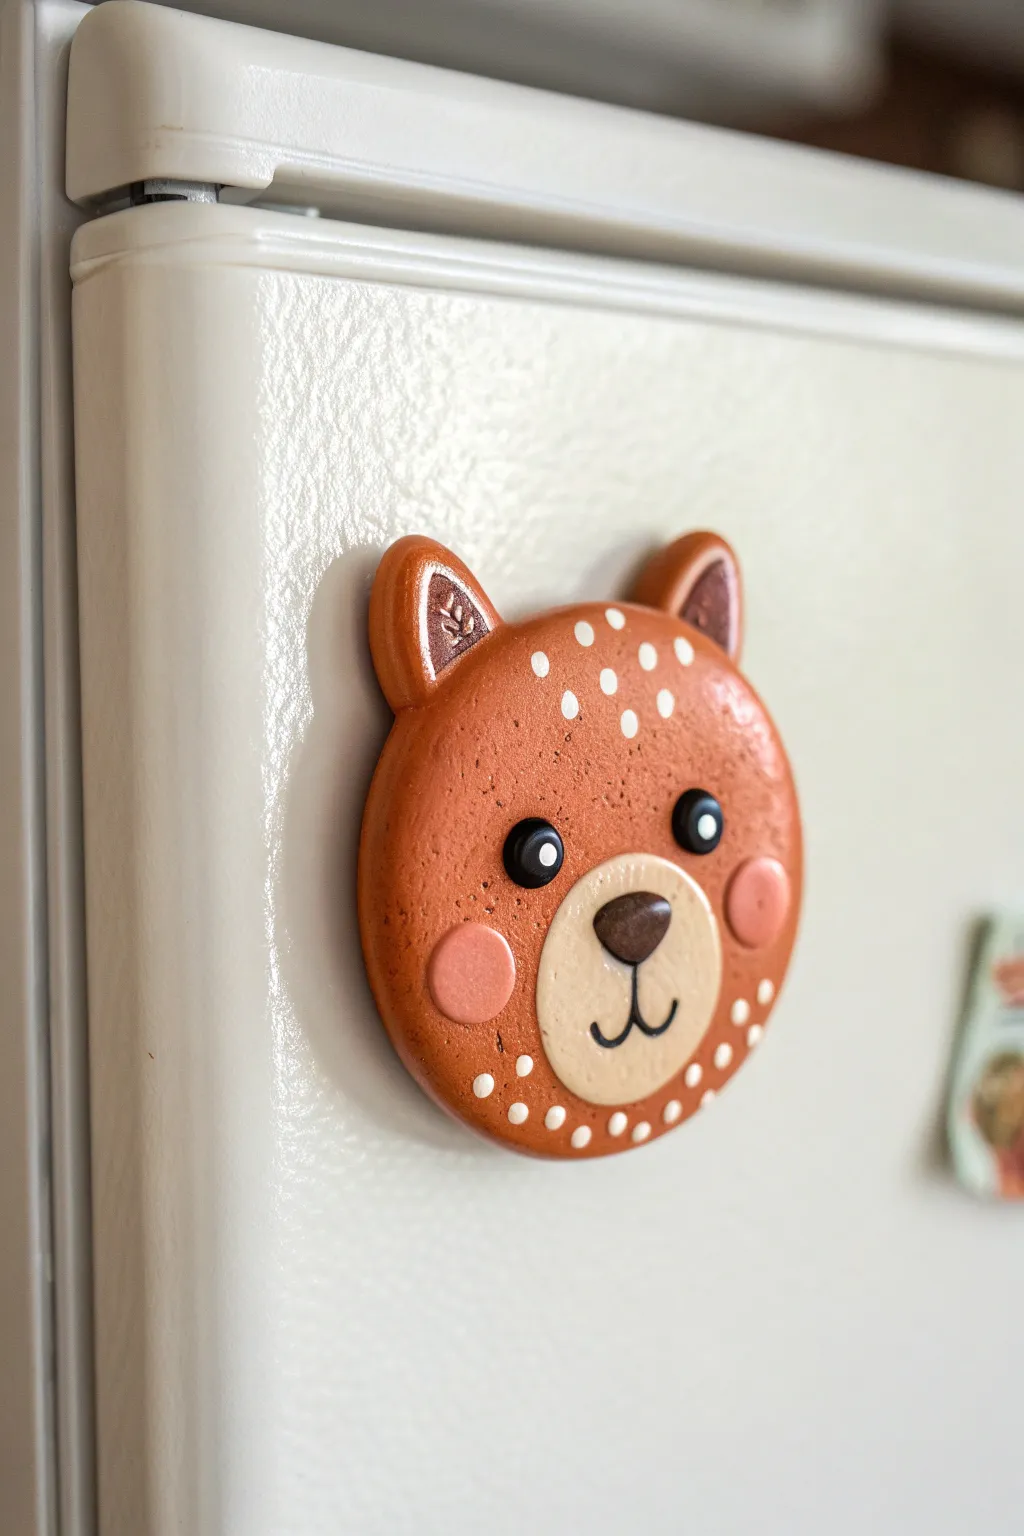
Add a touch of whimsy to your fridge with this adorable, woodland-inspired bear face magnet. Its simple, round shape and charming painted details make it a perfect starter project for learning how to layer and texture polymer clay.
Detailed Instructions
Materials
- Polymer clay (terracotta or reddish-brown, beige, pink, black, dark brown)
- Acrylic paint (white)
- Small dotting tool or toothpick
- Rolling pin or acrylic roller
- Round clay cutter (approx. 2-3 inches)
- Needle tool
- Strong craft magnet
- Super glue or E6000
- Gloss glaze (optional)
- Oven for baking
Step 1: Shaping the Base
-
Draft the head shape:
Start by conditioning your terracotta or reddish-brown clay until it is soft and pliable. Roll it out into a sheet about 1/4 inch thick. -
Cut the circle:
Use your round cutter to punch out a perfect circle. If the edges are sharp, gently tap them with your finger to soften the look. -
Form the ears:
Roll two small balls of the same brown clay. Pinch them slightly into rounded triangles and press them onto the top of the circle head. Blend the seams at the back so they are securely attached. -
Add ear details:
Take tiny snakes of darker brown clay and press them into the center of the ears for the inner ear detail. I like to use a needle tool to scratch a tiny leaf or vein pattern into this darker clay for extra texture.
Step 2: Building the Face
-
Create the muzzle:
Condition a small amount of beige clay and flatten it into an oval shape. Place this near the bottom center of the face, pressing gently to adhere it without distorting the round shape. -
Add rosy cheeks:
Roll two small balls of pink clay and flatten them into discs. Position these on either side of the muzzle to create blushing cheeks. -
Shape the eyes:
Roll two small balls of black clay. Flatten them slightly and press them onto the face above the muzzle, spacing them evenly apart. -
Add the nose:
Form a small, rounded triangle from dark brown clay. Press this onto the top center of the beige muzzle area. -
Sculpt the mouth:
Roll a very thin snake of black clay. Cut a small piece for the vertical line dropping from the nose, and two curved pieces for the smile. Carefully press these onto the beige muzzle using your needle tool to guide them.
Unwanted Fingerprints?
If you notice fingerprints on your smooth clay parts before baking, lightly brush them with a tiny amount of baby oil or cornstarch to smooth them out.
Step 3: Details & Finishing
-
Add eye sparkles:
Place tiny dots of white clay onto the black eyes to bring them to life. Alternatively, you can paint these on after baking. -
Texture the fur:
Use a toothbrush or a crumpled ball of aluminum foil to gently tap texture onto the brown parts of the face, avoiding the smooth eyes and nose. -
Apply decorative dots:
Roll tiny, varied sizes of white clay into balls and press them onto the forehead and chin area, mimicking the spotted pattern in the photo. -
Bake:
Preheat your oven according to your clay manufacturer’s instructions (usually around 275°F or 130°C). Bake the piece on a tile or parchment-lined tray for about 30 minutes. -
Cool down:
Allow the piece to cool completely inside the oven or on a wire rack before handling, as warm clay is fragile. -
Attach the hardware:
Flip the cooled bear over. Apply a dab of strong super glue or E6000 to the back and press your magnet firmly into place. -
Optional glaze:
For a shiny finish like the reference image, apply a thin coat of polymer clay gloss glaze to the eyes and nose.
Make it a Set
Create a whole woodland family by changing the ear shapes and colors to make foxes, raccoons, or deer using the same base circle technique.
Now your fridge has a cheerful new guardian ready to hold up your grocery lists and photos
Tiny Succulent Desk Buddy
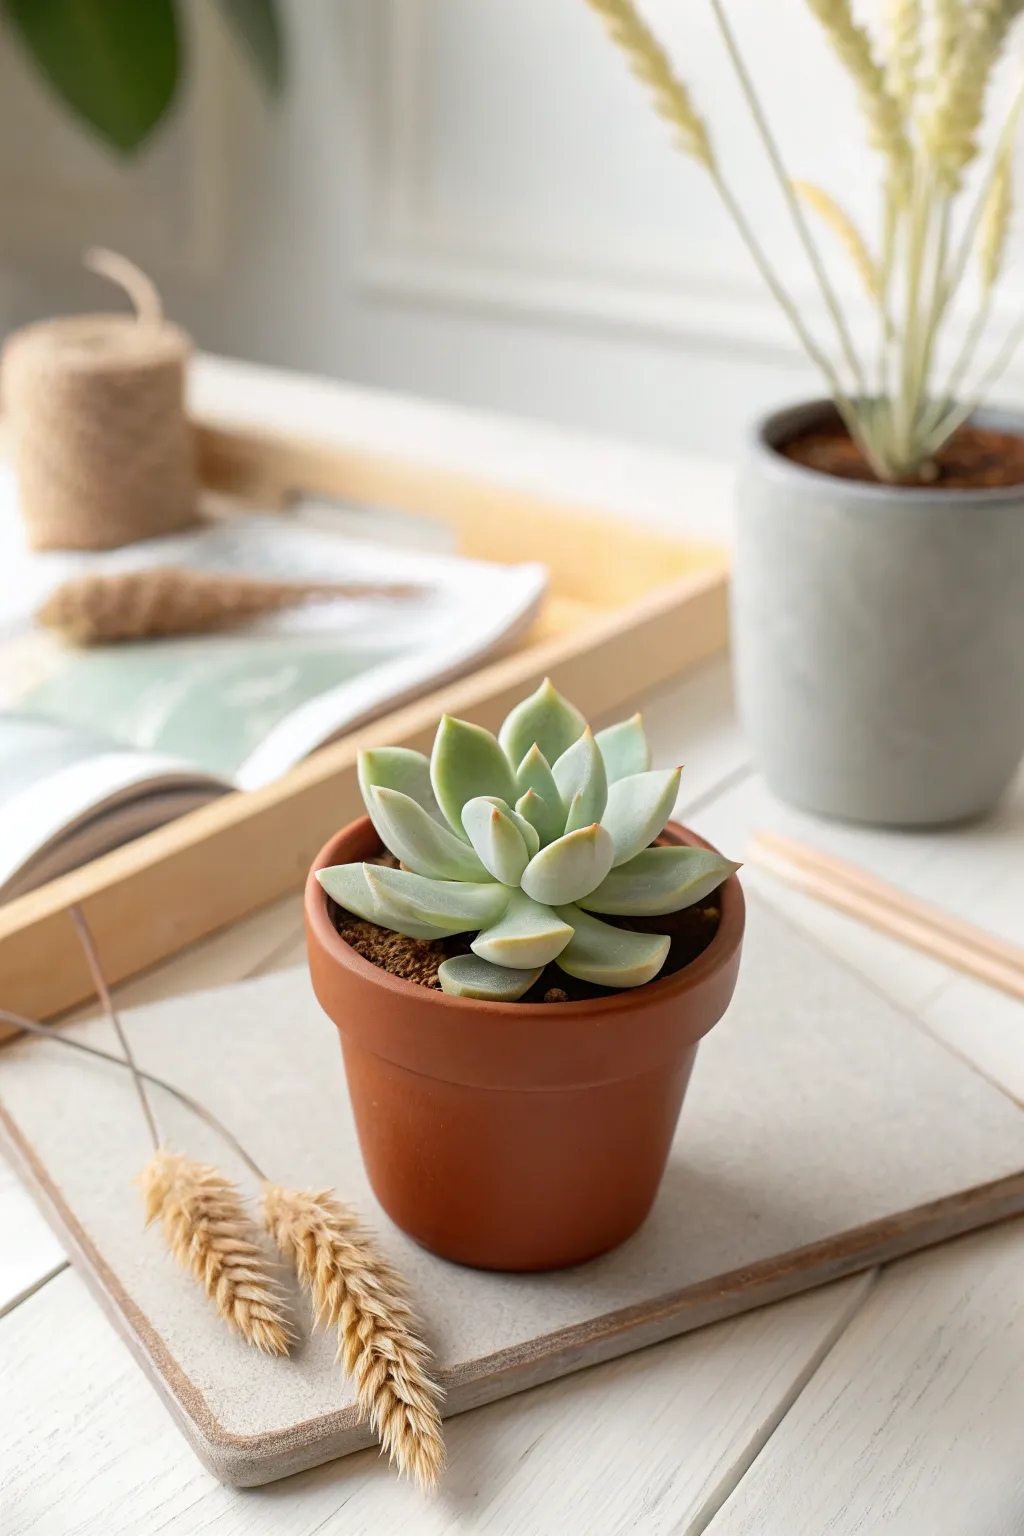
Bring a touch of everlasting greenery to your workspace with this remarkably realistic polymer clay succulent project. You will sculpt a smooth, pale green Echeveria rosette nestled perfectly inside a miniature terracotta-style pot that never needs watering.
Step-by-Step Tutorial
Materials
- Polymer clay (terracotta/burnt orange color)
- Polymer clay (translucent or porcelain white)
- Polymer clay (leaf green or sage green)
- Soft pastel chalks (pink, light red, brown)
- Small paintbrush for dusting
- Ball stylus tool
- Aluminum foil
- Circular clay cutter (approx. 2 inches)
- Liquid polymer clay (optional)
- Textured sponge or toothbrush
Step 1: Sculpting the Pot
-
Condition the Clay:
Start by taking a block of terracotta-colored clay and conditioning it in your hands until it becomes soft, pliable, and free of cracks. -
Form the Base:
Roll the clay into a smooth ball, roughly the size of a golf ball. Flatten the bottom slightly against your work surface so it stands upright on its own. -
Shape the Pot Body:
Using your thumb, press into the center of the ball while rotating it. Pinch the sides gently to pull them upwards, creating a classic tapered pot shape with thick, even walls. -
Refine the Rim:
Roll a thick snake of terracotta clay and flatten it into a strip. Wrap this strip around the very top edge of your pot to create the distinct rim found on flowerpots. Blend the seam at the back. -
Create Soil Texture:
Crumple a small ball of aluminum foil and press it firmly into the bottom inside of the pot to fill the void, then cover the foil with a thin layer of brown scrap clay. Use a toothbrush or textured sponge to tap the surface, making it look like loose potting soil.
Drooping Leaves?
If leaves sag while working, prop them up with tiny bits of tissue or cotton. The clay will harden in that lifted position during baking, then remove the props.
Step 2: Creating the Succulent Leaves
-
Mix Custom Green:
Mix a large portion of translucent clay with a very small amount of sage green. You want a pale, milky jade color that looks slightly see-through when thin. -
Form Leaf Teardrops:
Pinch off roughly 15-20 small pieces of clay. Roll each one into a ball, then elongate one end to create a teardrop shape. Make three sizes: small for the center, medium for the middle, and large for the base. -
Flatten and Curve:
Press each teardrop flat between your fingers. Gently curve the wider end upward slightly to mimic the cupped shape of a succulent leaf. -
Assemble the Base Layer:
Place 5-6 large leaves in a circle directly onto the ‘soil’ in your pot. Press the pointed ends together in the very center so they adhere to the brown clay. -
Build the Layers:
Add the medium-sized leaves in a second ring, positioning them in the gaps between the leaves of the first layer. Repeat this process with the smallest leaves until you reach the center. -
Refine the Center:
For the tightest center bud, take three tiny teardrops and press them together vertically before placing them into the very middle of the rosette.
Tip: Smooth Finish
Mix cornstarch with baby powder to dust your fingers. This prevents fingerprints on the smooth leaves without leaving a white residue after baking.
Step 3: Finishing Details
-
Apply Leaf Tips:
Scrape a small amount of pink or light red soft pastel chalk into a fine powder. Dip a soft brush into the powder. -
Dust the Edges:
Very gently brush the powder onto the very tips and pointed edges of the leaves. This subtle ‘sun-stressed’ look adds incredible realism. -
Final Smooth:
Check the exterior of the terracotta pot for fingerprints. Use a drop of baby oil on your finger to lightly buff them away for a pristine matte finish. -
Bake:
Bake the entire piece according to your clay manufacturer’s instructions, usually at 275°F (130°C) for about 30 minutes. Let it cool completely before moving.
Place your zero-maintenance plant on a bright windowsill to enjoy its charm year-round
Faux Glazed Color-Block Pin
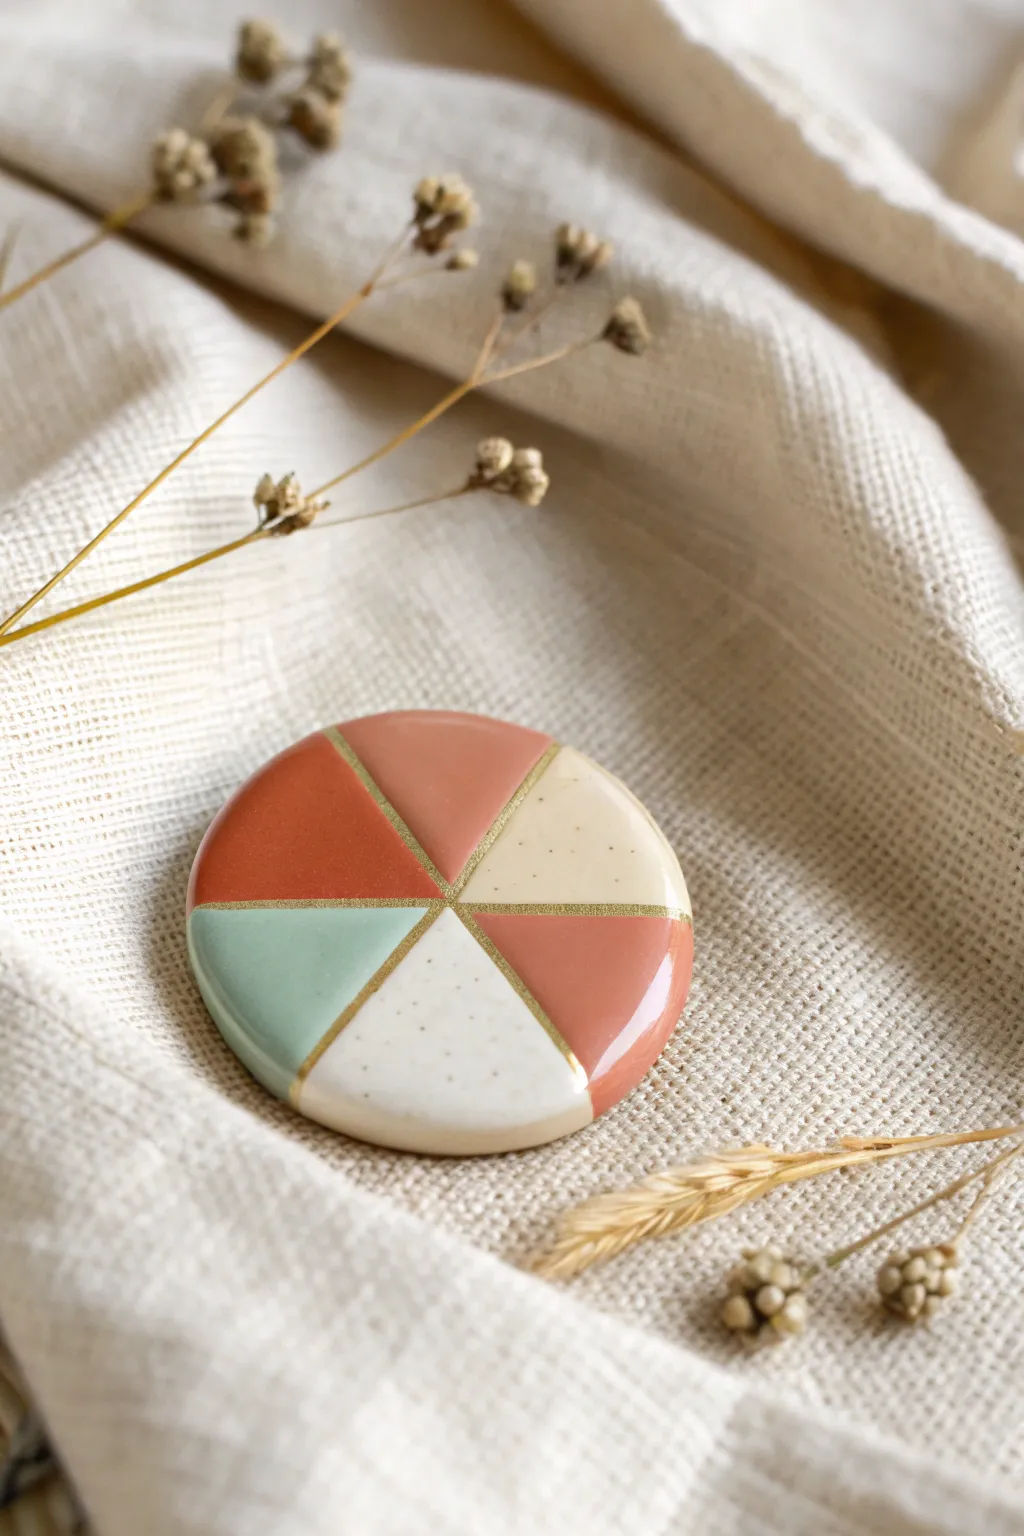
Achieve the high-end look of glazed ceramic using simple polymer clay techniques with this elegant pin project. The dusty terracotta, sage, and cream tones create a soothing palette, enhanced by distinctive gold detailing and a glossy, glass-like finish.
Step-by-Step Guide
Materials
- Polymer clay in terracotta, peach/coral, sage green, and cream/white with speckles
- Circle clay cutter (approx. 1.5 – 2 inches diameter)
- Acrylic rolling pin or pasta machine
- Flexible tissue blade or craft knife
- Gold acrylic paint or gold gilding wax
- Fine detail paintbrush
- UV resin or polyurethane gloss varnish
- UV lamp (if using resin)
- Pin back mechanism
- Super glue or heavy-duty jewelry glue
- Ceramic tile or glass baking surface
Step 1: Creating the Base & Design
-
Condition the Clay:
Begin by conditioning each color of polymer clay until it is soft and pliable. If you don’t have pre-speckled cream clay, you can mix a tiny amount of black pepper or black sand into plain white or ecru clay for that organic pottery look. -
Roll Flat Sheets:
Roll each color out into a flat sheet, aiming for a consistent thickness of about 3mm. A pasta machine on a medium setting works best for uniformity, but a rolling pin with guide rings is a great alternative. -
Cut the Wedges:
Using your circle cutter as a template, envision the circle divided into six equal pie slices. Cut wedge shapes from your various colored sheets. You will need roughly equal-sized triangles to form the complete circle. -
Assemble the Pattern:
On your glass or ceramic work surface, arrange the colored wedges into a circle. Press the edges gently together side-by-side. The order shown in the image alternates between warm tones and cool/neutral tones for balance. -
Fuse the Seams:
Once the pieces are arranged, place a piece of parchment paper over the top. Gently roll over the assembly with your acrylic roller to fuse the seams together without distorting the round shape too much. -
Cut the Final Shape:
Take your circle cutter and press it firmly down exactly in the center of your assembled colors. This trims away the uneven outer edges and leaves you with a perfect, clean-edged round disc. -
Smooth the Edges:
Lift away the excess clay. Use your fingertip to gently smooth the cut edge of the circle to remove any sharpness or drag marks from the cutter. -
Baking:
Bake the clay disc according to the manufacturer’s instructions on the package (usually 275°F/135°C for 15-30 minutes). Let it cool completely before moving to the next phase.
Step 2: Finishing Details
-
Carving the Grooves (Optional):
If your seams are very tight and invisible, you might want to gently score along the color divisions with a craft knife to create a guide for the gold paint, though painting directly on the surface works too. -
Applying Gold lines:
Dip a fine detail brush into gold acrylic paint or use a small amount of gilding wax on a tool. Carefully paint over the seams where the colors meet, creating the ‘kintsugi’ or gold-inlay effect. -
Drying the Paint:
Allow the gold paint to dry fully. If any paint strayed onto the colored sections, you can gently scrape it away with a toothpick while it is still semi-dry or wipe with a damp q-tip. -
Applying the Glaze:
Pour a small amount of UV resin onto the center of the disc. Use a toothpick or brush to spread it to the very edges, ensuring surface tension keeps it from dripping over the sides. -
Curing the Glaze:
Place the piece under a UV lamp for 2-4 minutes until the surface is hard, non-tacky, and glass-like. If using polyurethane varnish instead, apply two thin coats, letting them dry completely in between. -
Attaching the Backing:
Flip the cured piece over. Place a drop of heavy-duty jewelry glue on the back and press the pin mechanism into it. I prefer to add a small patch of scrap clay over the metal bar (avoiding the hinge) and baking again briefly or using UV resin to secure it permanently.
Clean Lines Pro-Tip
Wipe your clay cutter with a baby wipe or dip it in cornstarch before cutting the final circle. This prevents the clay from sticking to the metal and ensures a razor-sharp edge.
Terrazzo Twist
Instead of solid blocks, try turning one section into a terrazzo pattern. Chop up tiny bits of your other colors, press them into a white wedge, and roll flat before assembling the wheel.
Now you have a stunning, professional-looking accessory that mimics the beauty of glazed pottery
Hollow Beads With Foil Core

This project teaches you how to create a stunning, rustic necklace featuring chunky beads that look heavy but are surprisingly light. By using a foil core technique, you can craft large, statement beads with a beautiful stoneware finish without the weight.
Step-by-Step Tutorial
Materials
- Polymer clay (white, terracotta, beige/tan)
- Aluminum foil
- Coarse black pepper or dried coffee grounds (for speckling)
- Acrylic paint (brown or burnt umber) for antiquing
- Leather or waxed cotton cord (beige/tan)
- Gold seed beads or spacer beads
- Beading awl or thick needle
- Varnish or satin glaze (optional)
- Wet wipes or paper towels
Step 1: Preparing the Cores
-
Crumple foil centers:
Begin by tearing off small sections of aluminum foil. Crumple them tightly into balls. You will need about 7–9 foil balls varying slightly in size, from roughly 1 cm to 2 cm in diameter. -
Roll for smoothness:
Roll each foil ball vigorously between your palms. This compacts the foil and helps smooth out sharp points that might poke through the clay later. -
Check the sizing:
Arrange your foil balls in a graduated line to visualize the necklace shape. You’ll want the largest ball in the center, tapering down to smaller sizes on the sides.
Use Liquid Clay
Before wrapping the foil, coat it lightly with liquid polymer clay or Bake & Bond to ensure the clay covering sticks firmly to the core.
Step 2: Mixing & Creating Bead Clays
-
Mix the faux-granite:
Take a portion of white or beige clay. To create the speckled stoneware look, knead in a pinch of coarse black pepper or dry coffee grounds until evenly distributed. -
Condition solid colors:
Condition your terracotta and plain beige clay separately until they are soft and pliable. I find it helpful to roll these into sheets of uniform thickness, about 2–3mm. -
Wrap the foil:
Select a foil ball and a sheet of clay. Wrap the clay entirely around the foil core, pinching the seams shut so no air is trapped inside. -
Roll to perfect:
Roll the clay-covered bead continuously between your palms. The warmth of your hands will help fuse the seams and make the surface perfectly spherical. -
Repeat for variety:
Continue this process for all your foil cores, alternating between the speckled mixture, the solid terracotta, and the plain beige to match the pattern in the photo. -
Create space for smaller beads:
Roll a few very small beads (about 5-8mm) from solid clay without foil cores. These will serve as spacer beads near the top of the necklace.
Wood Effect
To mimic wood grain on the brown beads, lightly drag a coarse sandpaper or a stiff brush across the raw clay surface before baking.
Step 3: Piercing & Baking
-
Pierce holes:
Before baking, use a bead piercing pin or a thick needle to create holes in each bead. Gently twist the tool through the center (piercing the foil) rather than pushing straight through to avoid flattening the sphere. -
Refine the holes:
Ensure the holes are large enough to accommodate your leather cord. Wiggle the tool slightly to widen the opening if necessary. -
Bake the beads:
Place all beads on a baking sheet or tile. Bake according to your clay manufacturer’s instructions (usually 275°F/130°C for 30–60 minutes depending on thickness). -
Cool down:
Allow the beads to cool completely before handling. The foil core retains heat, so be careful not to touch them too soon.
Step 4: Finishing & Assembly
-
Optional texture:
If you want a more weathered look, lightly sand the baked beads with fine-grit sandpaper to remove any fingerprints or shiny spots. -
Stringing the center:
Cut a long length of leather cord. Thread the beads onto the cord, starting with the smaller side beads and working toward the large center bead, placing gold spacer beads or small clay spacers between the main beads. -
Add accent beads:
For the upper section (as seen in the top right of the image), thread a few small wooden or metallic beads about 3 inches up the cord on each side to add visual interest. -
secure in place:
Tie a simple overhand knot in the leather cord directly above and below these upper accent beads to keep them floating in position. -
Create the closure:
Finish the necklace by tying the ends of the cord into an adjustable sliding knot, or attach a metal clasp if you prefer a fixed length.
Wear your beautiful, lightweight statement piece with pride knowing perfectly matches your style
Sanded-and-Buffed Glossy Finish
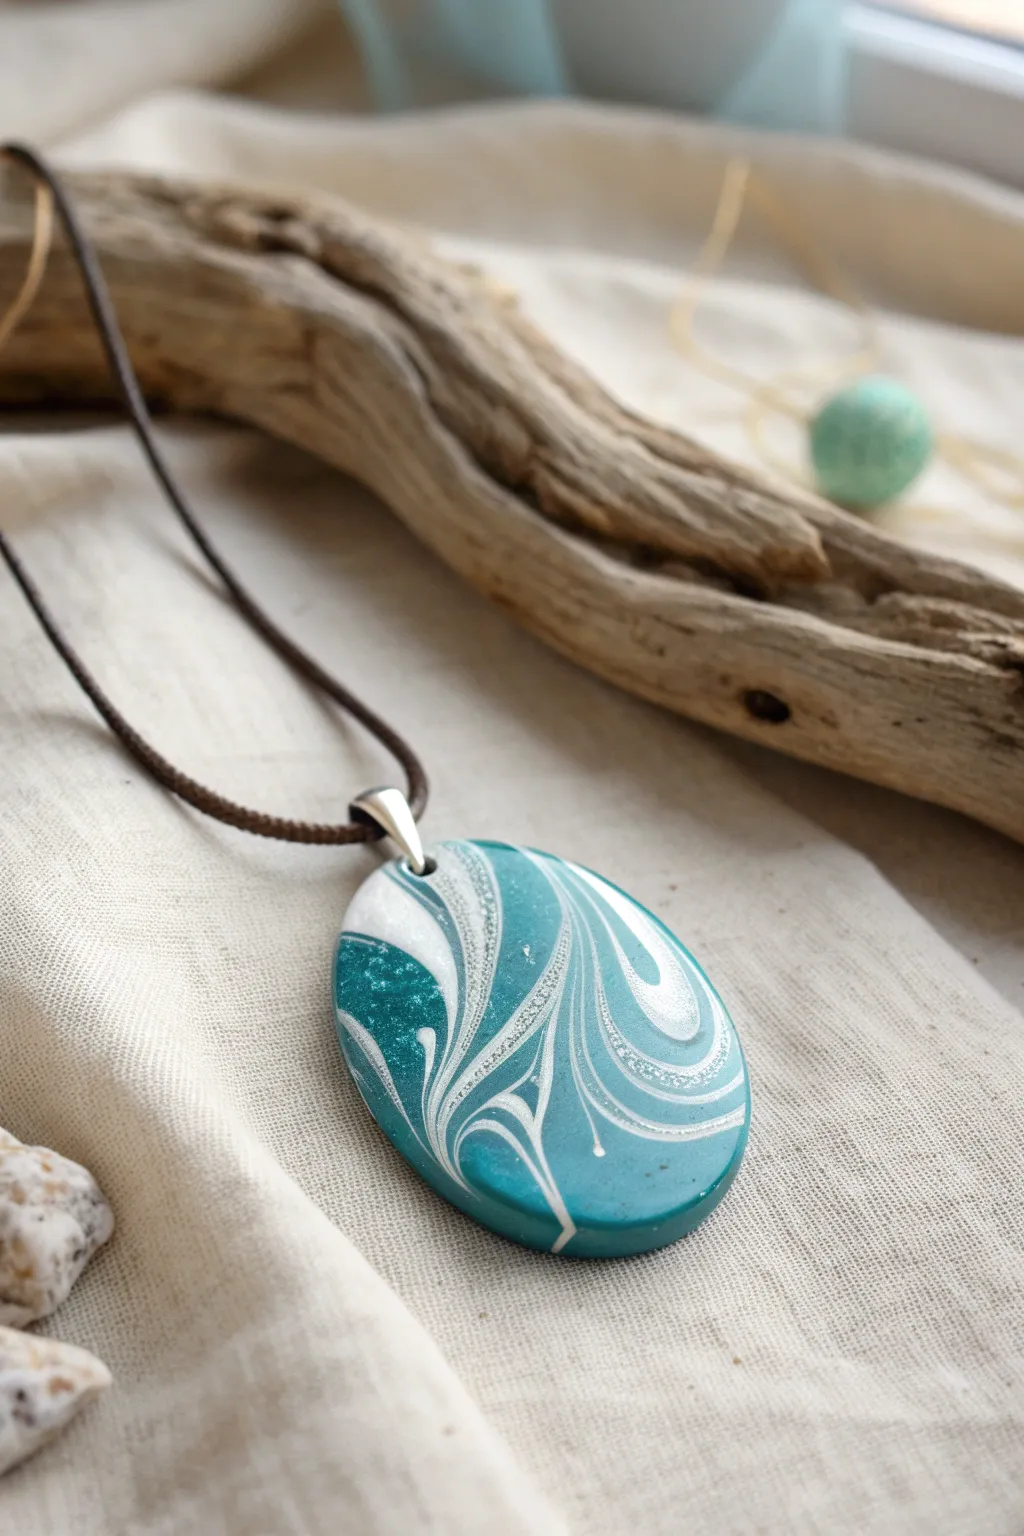
This striking pendant captures the movement of ocean waves with its fluid swirls of teal, white, and silver. By sanding and buffing the cured clay, you will achieve a glass-like finish that makes the colors truly pop without needing any glaze.
Step-by-Step Guide
Materials
- Polymer clay (Teal, White, Translucent, Silver/Pearl)
- Acrylic roller or pasta machine
- Oval shape cutter
- Tissue blade
- Needle tool or toothpick
- Wet/dry sandpaper (grits 400, 600, 800, 1000, 2000)
- Bowl of water with a drop of dish soap
- Heavy fabric (denim or buffing wheel)
- Pendant bail
- Cord for hanging
Step 1: Creating the Swirl Pattern
-
Condition the clay:
Begin by thoroughly conditioning your teal, white, silver, and translucent polymer clay blocks until they are soft and pliable. Warm clay mixes better and reduces the risk of cracking later. -
Form logs:
Roll each color into several thin snakes or logs. You want a variety of thicknesses, but generally keep them around 5mm in diameter. -
Bundle colors:
Gather your snakes together into one large bundle. Gently twist the entire bundle like you are wringing out a towel to start blending the colors. -
Fold and twist:
Fold the twisted log in half and twist again. Repeat this process 2-3 times, rolling it out into a smoother log between twists. Don’t overdo it, or the colors will turn muddy. -
Create a slab:
Squish your swirled log into a rough block shape. Using your acrylic roller or pasta machine on a medium setting, flatten this block into a sheet about 3-4mm thick. -
Refine the swirls:
Look at your sheet. If you want more definition like the reference image, take a needle tool and gently drag lines through the surface clay to distort the pattern, creating feathering effects.
Mokume Gane Styling
For more intricate swirls, shave thin layers off your clay stack with a flexible blade instead of rolling a slab. This reveals hidden patterns inside.
Step 2: Shaping and Baking
-
Cut the pendant:
Place your oval cutter over the most interesting section of the pattern. Press down firmly to cut your shape. Use your finger to gently rub the edges of the clay inside the cutter to round them off before removing the tool. -
Add a bail hole:
If you are using a pinch bail that requires a hole, pierce the top of the oval with a needle tool now. If you plan to glue a bail on the back later, skip this step. -
Smooth fingerprints:
Check the surface for any fingerprints or dust. Lightly brush them away with a tiny bit of baby oil on your finger if needed. -
Bake the piece:
Place the pendant on a ceramic tile or cardstock. Bake according to your brand of clay’s instructions (usually 275°F/130°C) for at least 45 minutes. A longer bake ensures strength for sanding. -
Cool down:
Allow the piece to cool completely in the oven or on a heat-safe surface before handling.
Step 3: Sanding and Buffing
-
Prepare for wet sanding:
Fill a bowl with water and a drop of dish soap. The soap acts as a lubricant and keeps sandpaper from clogging. -
Start with coarse grit:
Dip both the pendant and the 400-grit sandpaper into the water. Sand the surface in a circular motion to remove any large bumps or texture. Rinse frequently. -
Progress through grits:
Move to 600, then 800, then 1000 grit, sanding thoroughly with each step. I find it helpful to sand in one direction for one grit, then a perpendicular direction for the next to ensure scratches are removed. -
Finish sanding:
Finish with the 2000 grit or higher. By this stage, the clay should feel incredibly smooth, almost satiny to the touch when dry. -
Buff to a shine:
Dry the pendant completely. Rub it vigorously against a piece of heavy denim or use a buffing wheel on a rotary tool. The friction creates heat which brings out the natural high gloss of the polymer.
Hazy After Sanding?
If the finish looks dull or cloudy, you likely didn’t sand long enough at the lower grits. Go back to 600 grit and work your way up again slowly.
Step 4: Assembly
-
Attach hardware:
Attach your silver bail either by inserting the pinch prongs into the hole you made or gluing a flat bail pad to the back with superglue or 2-part epoxy. -
Add the cord:
Thread a simple leather or waxed cotton cord through the bail to complete the organic look.
Wear your polished creation with pride, knowing you achieved that shine purely through patience and craftsmanship