When I’m planning polymer clay projects for boys, I always aim for pieces that can handle real play and still look awesome on a shelf. These ideas are all about fun themes—think monsters, dinosaurs, vehicles, and games—with results you’ll actually want to keep using.
Silly Monster Figurines
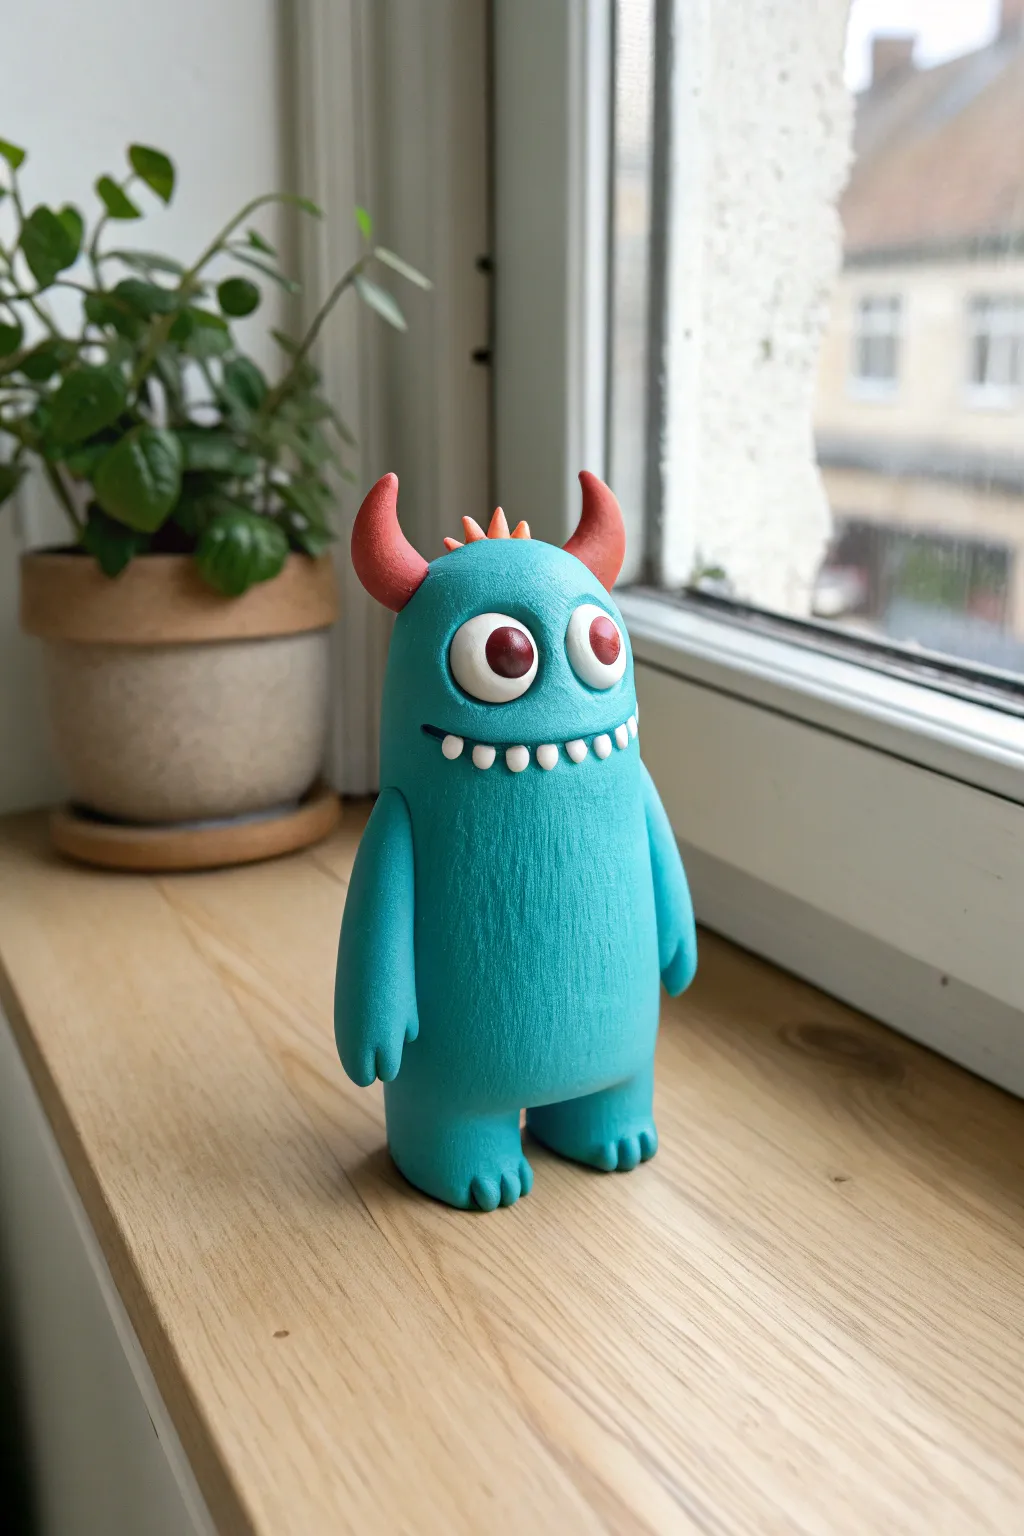
This friendly little monster brings a pop of color and personality to any shelf with its bright turquoise body and slightly goofy grin. The unique, brushed texture gives it a fur-like appearance that sets it apart from typical smooth clay figurines.
Step-by-Step Guide
Materials
- Turquoise polymer clay
- White polymer clay
- Coral/orange polymer clay
- Dark red or maroon polymer clay
- Black polymer clay
- Armature wire or heavy-duty aluminum foil
- Stiff bristle brush (e.g., an old toothbrush or stiff paintbrush)
- Clay sculpting tools (needle tool, ball stylus)
- Baking sheet or ceramic tile
- Oven
Step 1: Forming the Body
-
Build the core:
Start by creating a compact core using tightly crumpled aluminum foil. Shape it into a thick, elongated oval—roughly the shape of a potato—to serve as the bulk of the monster’s body. This saves clay and keeps the figurine lightweight. -
Condition the main color:
Take a large block of turquoise clay and condition it thoroughly until it is warm and pliable. Roll it into a sheet roughly 1/4 inch thick. -
Cover the core:
Wrap the turquoise sheet entirely around your foil core. Smooth out any seams with your thumbs, blending the join lines until vanishing so you have one continuous, solid shape. -
Sculpt the feet:
Roll two thick, short logs of turquoise clay for the legs. Attach them firmly to the bottom of the body. Use your fingers to flatten the toes slightly and then use a sculpting tool to press vertical indentations to define three toes on each foot. -
Attach the arms:
Create two longer, tapering logs for the arms. Press them onto the sides of the body so they hang down naturally. Blend the clay at the shoulder connection point so the arms look like part of the body, not just stuck on completely separate.
Fingerprint Troubles?
Fingerprints are the enemy of smooth clay. However, since this monster is fully texturized with a brush, you can simply stamp over any accidental fingerprints to hide them instantly.
Step 2: Adding Texture and Facial Features
-
Create the fur texture:
Before adding the face, I like to texturize the whole body. Take your stiff bristle brush or toothbrush and firmly tap it all over the turquoise surface. Don’t drag the brush; just stamp it repeatedly to create that fuzzy, pitted texture. -
Carve the mouth:
Use a knife tool or a curved blade to cut a horizontal slit for the mouth about a third of the way down the body. Gently pry it open slightly to create a cavity for the teeth. -
Insert the teeth:
Roll tiny balls of white clay into small teardrop shapes. Use a needle tool to press these into the mouth gap, arranging them in a row. They don’t need to be perfectly straight—a little jaggedness adds character. -
Make the eye sockets:
Use a large ball tool or your thumb to press two shallow indentations just above the mouth where the eyes will sit. -
Form the eyes:
Roll two balls of white clay and press them into the sockets. They should bulge out significantly. -
Add IRIS details:
Take two smaller balls of dark red/maroon clay and press them onto the white eyeballs. Add a tiny dot of white to each pupil to create a ‘sparkle’ or reflection.
Step 3: Horns and Finishing Touches
-
Shape the main horns:
Detailed horns make a big difference. Roll two cones of coral/orange clay. Bend them slightly so they curve inward. -
Attach the horns:
Place the curved horns on the sides of the head. Use a small blending tool to smooth the connection seam gently against the textured head. -
Add the spikes:
Create three very small cones from the same coral clay. Place these in a row running down the center of the top of the head, between the main horns. -
Final check:
Look over your monster. If you smoothed out any texture while attaching the face or horns, go back in with your bristle tool and re-stamp those areas carefully. -
Bake:
Place your monster on a baking sheet. Follow the specific temperature and time instructions on your package of polymer clay (usually 275°F for about 15-30 minutes depending on thickness). -
Cool down:
Let the figure cool completely in the oven with the door open to prevent cracking.
Making Eyes Pop
Before baking, brush a tiny amount of liquid translucent clay or gloss glaze over the eyeballs. This makes them look wet and alive compared to the matte texture of the fur.
Once cooled, your durable little monster is ready to stand guard on a desk or windowsill.


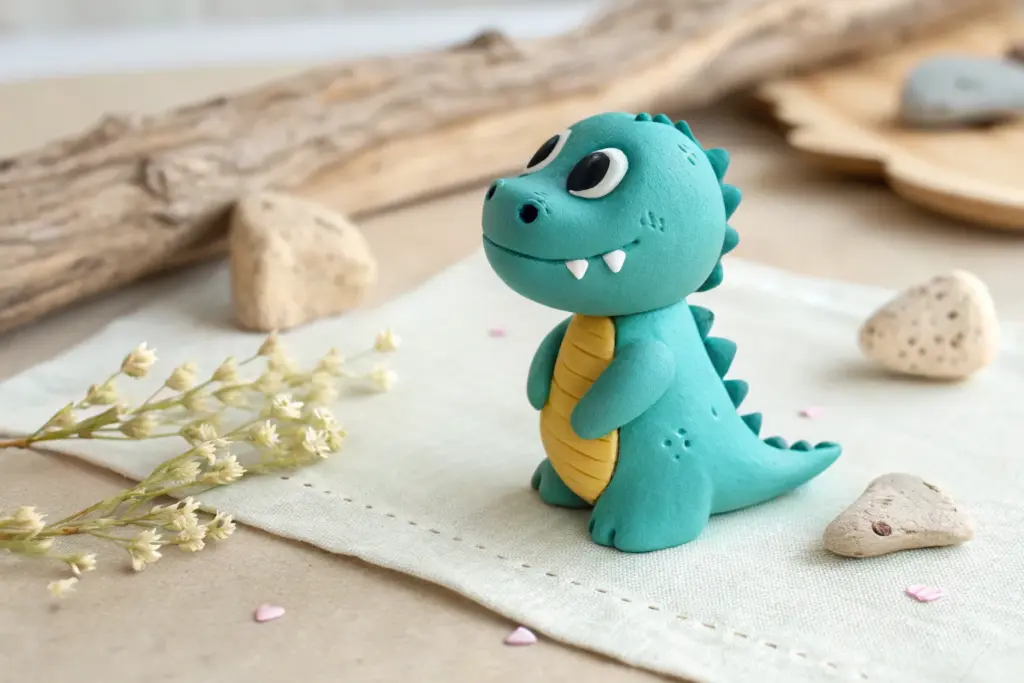
Dinosaur Buddy Sculptures
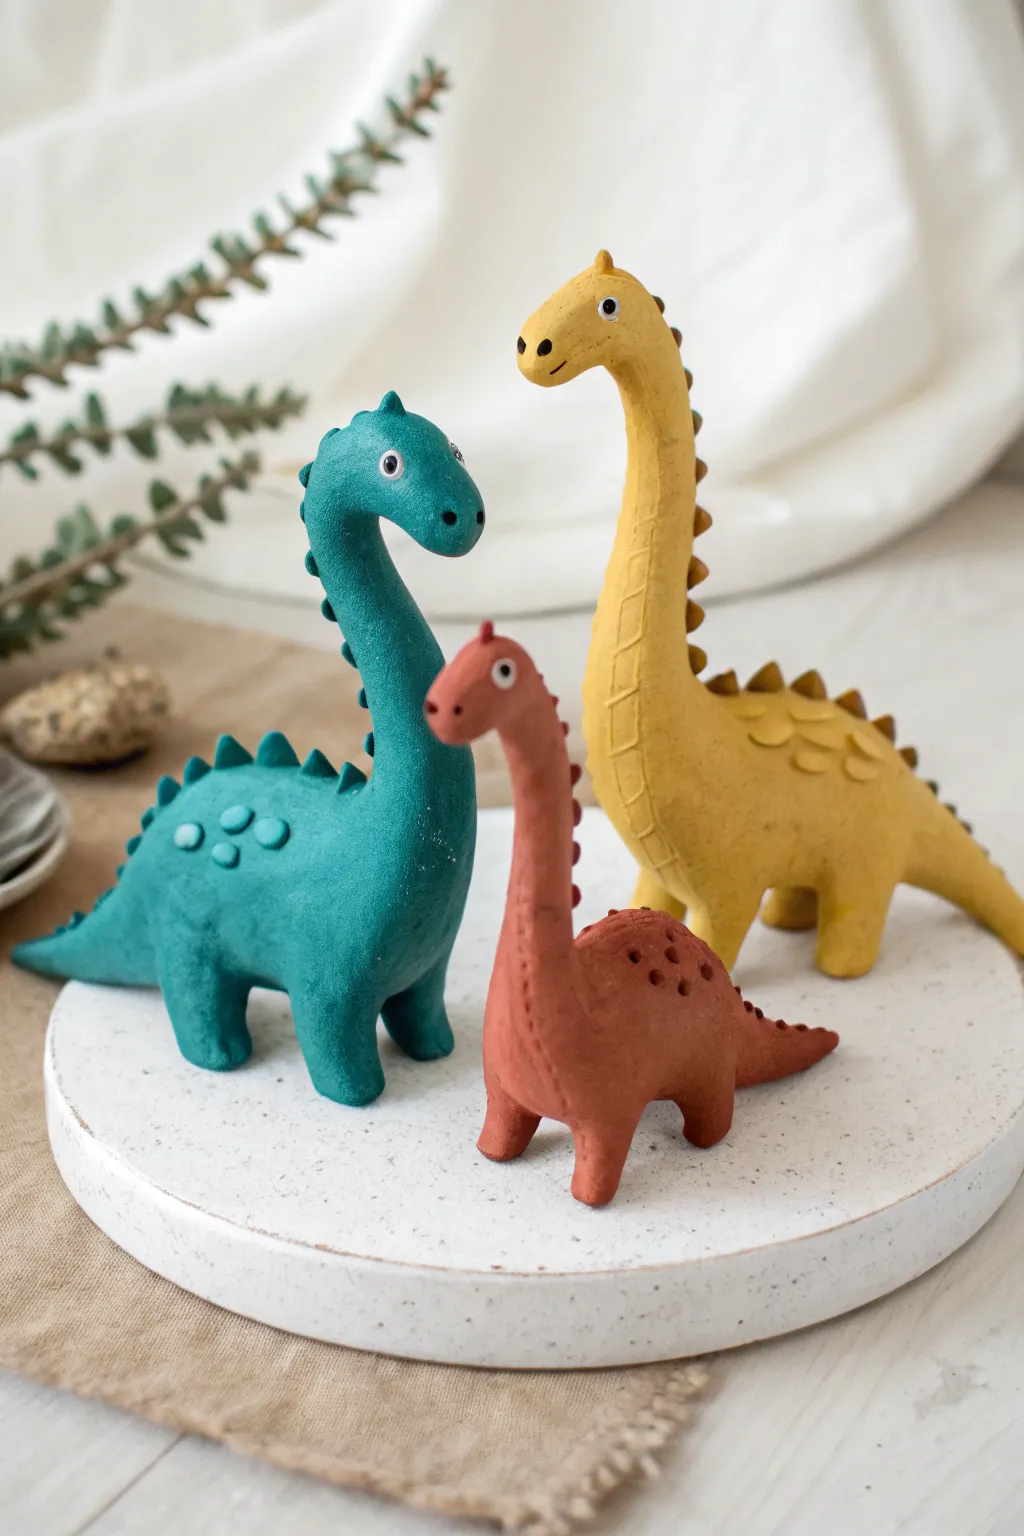
These charming polymer clay dinosaur buddies are perfect for a prehistoric-themed bedroom or a fun play set. With their elongated necks, textured skin, and distinct sizes, this trio captures a stylized, artistic look that is surprisingly easy to achieve.
Detailed Instructions
Materials
- Polymer clay (mustard yellow, teal/deep green, terracotta/rust red, white, black)
- Aluminum foil (for armature)
- Pointed modeling tool or toothpick
- Ball stylus tool
- Rolling pin or pasta machine
- Baking sheet and parchment paper
- Oven (for curing)
- Texture sponge or stiff brush (optional)
Step 1: Planning and Body Basics
-
Proportion your clay:
Start by dividing your colored clay based on the size of the dinosaurs. You’ll need a large amount of yellow for the tallest dino, a medium amount of teal for the middle one, and a smaller amount of terracotta for the little one. -
Create foil cores:
To save clay and keep the bodies lightweight, crumple aluminum foil into rough oval shapes for the bodies of the two larger dinosaurs. You can skip this for the smallest red one as it’s solid enough. -
Cover the cores:
Roll sheets of your colored clay to about 1/4 inch thickness. Wrap the clay completely around your foil cores, smoothing out the seams with your thumbs until you have seamless egg-shaped bodies.
Stay Standing
If the long necks keep drooping while you work, insert a piece of toothpick or stiff wire inside the neck connecting to the body to act as an internal skeleton.
Step 2: The Majestic Yellow Sauropod
-
Form the neck and head:
Roll a thick snake of yellow clay. Attach it to the front of the body, blending the clay downward so there is no join line. Curve it upwards and slightly backwards for a proud posture, forming a rounded head at the top. -
Add chunky legs:
Create four sturdy cylinders of yellow clay. Attach these to the underside of the body, blending the seams thoroughly. Press the feet flat against your work surface to ensure the figure stands well on its own. -
Tail time:
Shape a cone of yellow clay and blend it onto the rear of the body, allowing it to rest on the ground for extra stability. This forms a tripod with the back legs. -
Spine details:
Pinch small varying sizes of triangle shapes from brownish or darker yellow clay. Run a line of these ridges down the back of the neck and along the spine, pressing them firmly to adhere.
Matte Finish Magic
After baking, dust the dinosaurs lightly with cornstarch before sealing with a matte varnish. This removes the ‘plastic’ shine and makes them look like high-end ceramic decor.
Step 3: The Teal & Terracotta Companions
-
Sculpt the teal walker:
Follow a similar process for the medium teal dinosaur, but make the neck slightly shorter and curved more dramatically forward. This one looks best in a walking pose. -
Add spots:
Roll three small balls of a slightly lighter teal shade and flatten them into discs. Press these onto the dinosaur’s flank for decoration. -
Make the baby rex:
For the small terracotta dino, shape a single piece of clay into an L-shape, pulling a tail from the back and a neck from the front. Add two small legs that are wide at the hips. -
Poke texture:
Using a toothpick or small tool, poke a tight cluster of holes on the back of the red dinosaur to create a unique dimpled texture.
Step 4: Finishing Touches
-
Facial features:
For the eyes, press tiny circles of white clay onto the heads, followed by minuscule black pupils. Use a needle tool to add nostrils and a simple smile line. -
Skin texture:
I like to texturize the skin before baking. Gently press a piece of coarse sandpaper or a stiff brush against the bodies to give them a leathery look, rather than leaving them perfectly smooth. -
Review and refine:
Check all sculptures from every angle. Ensure that legs are secure, heads are balanced, and no fingerprints are visible. Smooth out any last imperfections with a drop of baby oil on your finger. -
Bake:
Place your trio on a parchment-lined baking sheet. Bake according to your polymer clay package instructions—usually around 275°F (135°C) for 15-30 minutes depending on thickness. -
Cool down:
Let the dinosaurs cool completely in the oven with the door cracked open. This gradual cooling helps prevent cracking.
Once cooled, arrange your colorful dino herd on a shelf or desk for instant jurassic charm


Mini Race Cars That Roll
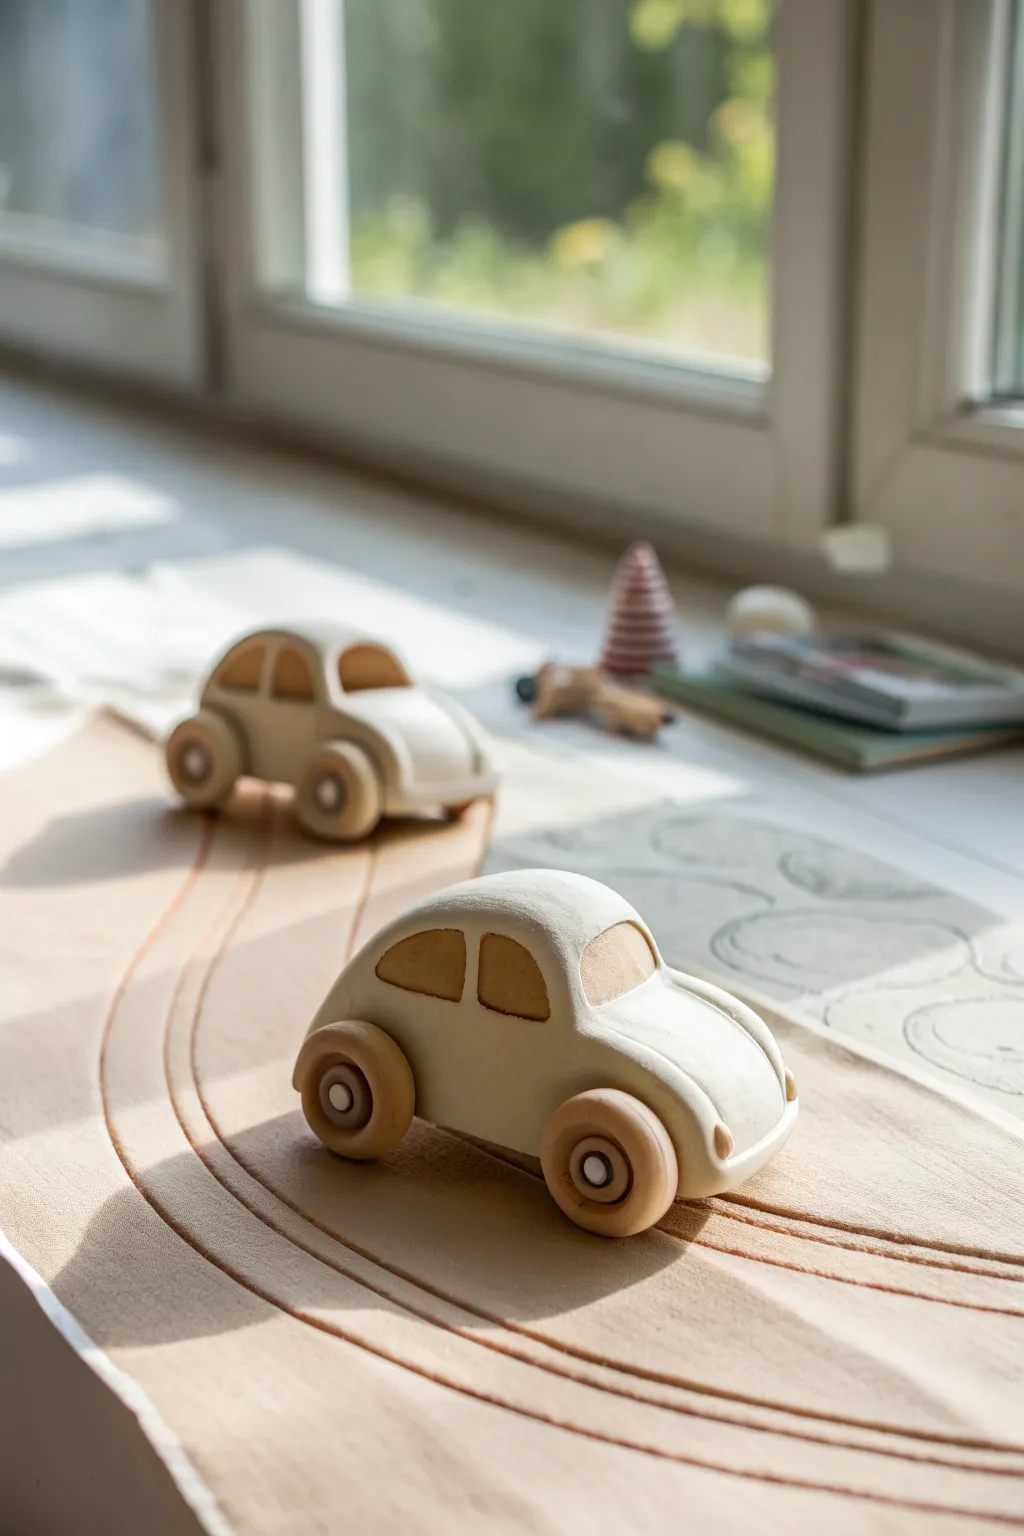
These minimalist, vintage-inspired beetle cars aren’t just for display—they are fully functional toys that are sturdy enough for gentle play. The design focuses on clean lines, a neutral Scandinavian color palette, and a simple, rounded chassis that captures the classic bug shape.
Step-by-Step Guide
Materials
- Light beige polymer clay (base body)
- Tan/Caramel polymer clay (windows and wheel accents)
- White polymer clay (wheel rims)
- Small wooden dowels or rigid wire (axles)
- Basic clay sculpting tools (rounded shaping tool, knife)
- Small circle cutters (two sizes for wheels)
- Durable straw or hollow plastic tube (axle casing)
- Fine-grit sandpaper
- Matte varnish (optional)
Step 1: Shaping the Chassis
-
Prepare the core shape:
Start by conditioning a large block of your light beige clay until it is soft and pliable. Form it into a smooth, solid oval about the size of a small lemon. -
Flatten the base:
Gently press the oval onto your work surface to create a flat bottom. You want the car to sit level without rocking, so check this frequently as you work. -
Define the hood and trunk:
Using your thumbs, gently slope the front and back of the oval downwards. Aim for that iconic curved beetle profile—a higher roofline that swoops down symmetrically to the bumpers. -
Carve the wheel wells:
Use a rounded sculpting tool to press indentations into the four corners where the tires will go. These need to be deep enough so the wheels don’t rub against the body later. -
Install the axle housing:
Carefully poke a hole through the side of the car, connecting the front two wheel wells. Do the same for the back. Insert your hollow plastic tube or straw into these holes and trim it flush with the clay surface. This housing ensures the wheels spin freely.
Sticky Wheels?
If wheels won’t spin after assembly, apply a tiny bit of graphite from a pencil or dry lubricant powder inside the axle tube to reduce friction.
Step 2: Adding Details
-
Create the windows:
Roll out a thin sheet of the tan or caramel-colored clay. Cut out two semi-circles for the side windows, a curved rectangle for the windshield, and a smaller one for the rear window. -
Attach the windows:
Press these shapes gently onto the car body. I find using a silicone tool helps smooth the edges into the body so they look inlaid rather than just stuck on top. -
Create the hood lines:
Use a needle tool or a dull knife to lightly scribe the outline of the trunk and the hood. Add a subtle center line down the front hood for authentic detailing. -
Add headlights:
Roll tiny balls of the base color or white clay, flatten them slightly, and press them onto the front fenders. Use a small ball tool to indent the center slightly.
Step 3: Making Functional Wheels
-
Cut the tires:
Roll out a thick slab of tan clay (about 1/4 inch thick). Use your larger circle cutter to punch out four identical wheels. -
Create the hubs:
Roll out white clay slightly thinner. Use a smaller circle cutter to make four centers. Press these firmly into the middle of your tan tires. -
Add the center cap:
Add a tiny dot of darker clay in the very center of the white hub for realism. -
Drill the wheels:
Poke a hole exactly in the center of each wheel that matches the diameter of your wooden dowel or wire axle. -
Smooth the tread:
Gently roll the outer edge of each wheel on your table to flatten the tread surface so the car rolls smoothly.
Build a Track
Use leftover clay (beige with brown stripes) to create flat, curved road ribbons. Bake these flat parts between two tiles to keep them perfectly level.
Step 4: Baking and Assembly
-
Bake components separately:
Bake the body and the four wheels separately according to your clay package instructions. You might want to prop the car body up on some batting so the bottom stays flat. -
Sand for smoothness:
Once fully cooled, lightly sand any fingerprints off the body and ensure the wheels are perfectly round. -
Cut the axles:
Cut your wooden dowel or wire to length. It should be the width of the car plus the width of two wheels, plus a tiny bit of wiggle room. -
Attach the first wheel:
Glue one wheel onto the end of your axle. Let the glue set completely. -
Thread the axle:
Slide the axle through the hollow tube in the car body. -
Secure the final wheel:
Apply a dot of strong glue to the exposed axle end and slide the second wheel on. Be careful not to glue the wheel to the car body itself—leave a tiny gap so it spins.
Watch these charming little racers zoom across the table once the final glue has dried


Rocket Ships and Planets
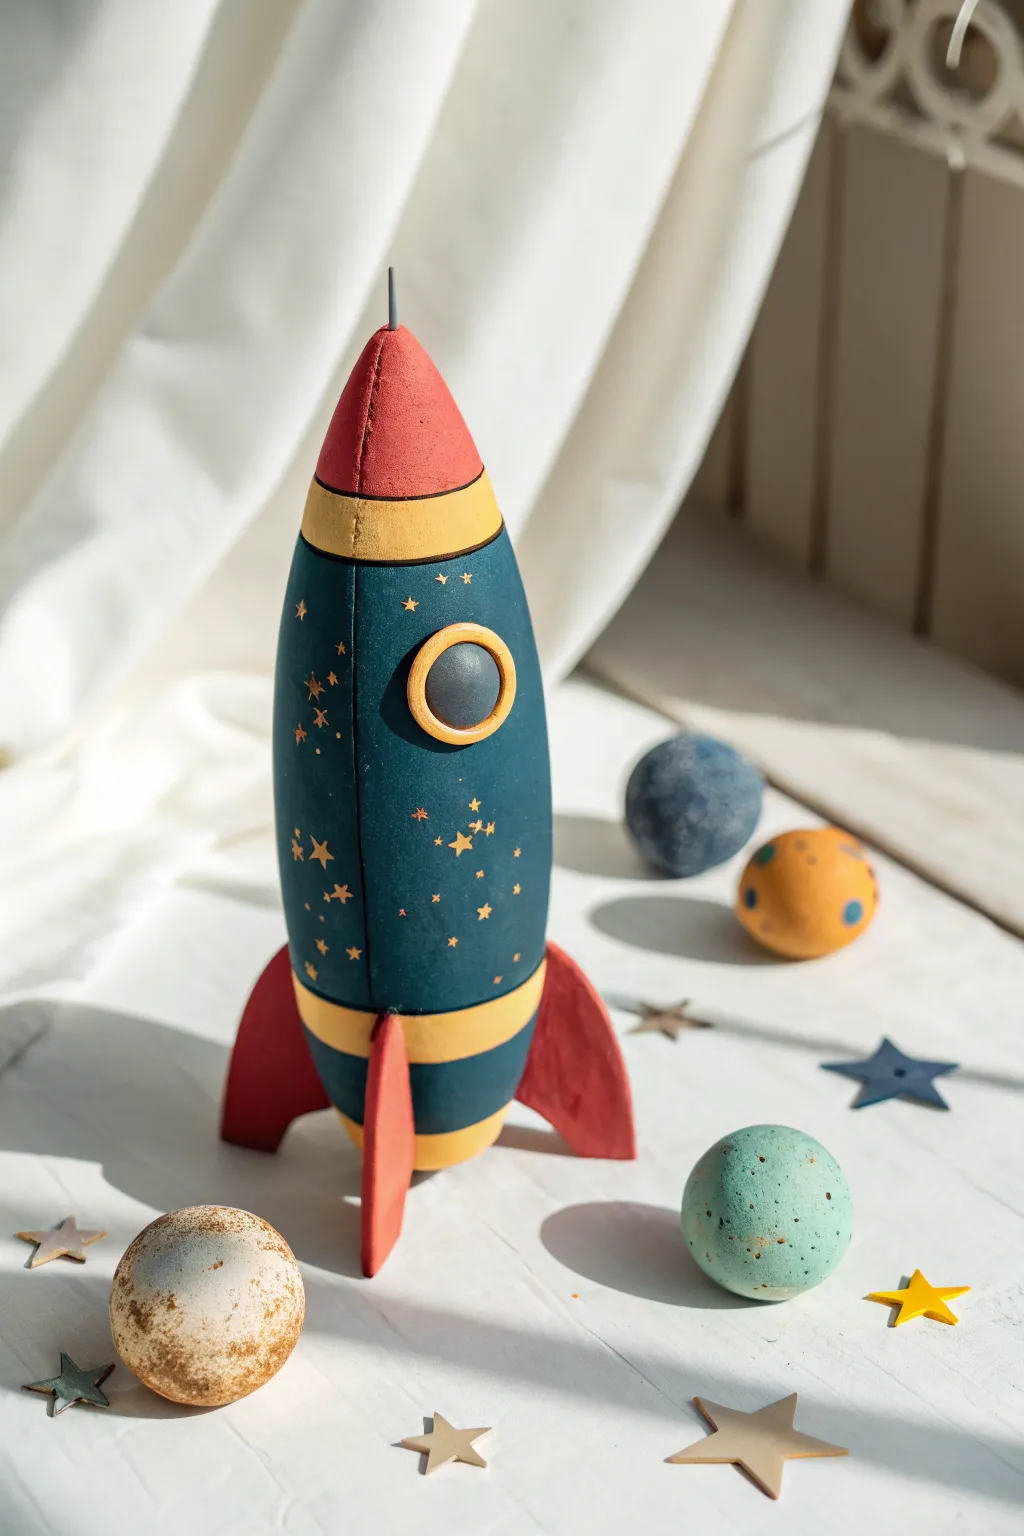
Blast off into creativity with this vintage-style rocket ship and accompanying planetary system. This project combines rich, matte colors with gold accents to create a timeless space scene perfect for a bedroom shelf or desk display.
How-To Guide
Materials
- Polymer clay in navy blue, red, yellow, grey, and white
- Rolling pin or pasta machine
- Clay blade or craft knife
- Circle cutters (various sizes)
- Ball tool or dotting tool
- Aluminum foil (for armature)
- Gold acrylic paint or gold leafing pen
- Small stiff paintbrush
- Needle tool
- Baking sheet and oven
Step 1: Forming the Rocket Fuselage
-
Create the core armature:
Crumple aluminum foil into a tapered cylinder shape, roughly resembling a tall teardrop. This saves clay and keeps the rocket lightweight. -
Prepare the main body color:
Condition a large block of navy blue clay until soft. Roll it out into a sheet about 1/4 inch thick using your rolling pin or pasta machine. -
Cover the armature:
Wrap the blue clay sheet around the foil core, smoothing the seams carefully with your fingers or a clay tool until the surface is seamless and uniform. -
Shape the nose cone:
Form a cone from red clay. Gently press this onto the top of the blue fuselage, blending the seam slightly or leaving a clean line depending on your preference. -
Add the engine stripe:
Roll out a strip of yellow clay and wrap it around the base of the red nose cone. Create a matching yellow strip near the bottom of the blue body for that classic retro look. -
Construct the porthole:
Cut a small circle of grey clay for the window glass. Roll a thin snake of yellow clay and wrap it around the grey circle to form a frame, then press this assembly onto the upper front of the rocket.
Step 2: Fins and Details
-
Cut the fins:
Roll out a slab of red clay to about 1/4 inch thickness. Use a blade to cut three identical curved triangle shapes for the fins. -
Attach the fins:
Score the bottom sides of the rocket body where the fins will go. Press the fins firmly into place, blending the clay at the attachment point on the underside for strength. -
Install the antenna:
Insert a short piece of wire or a hardened grey clay spike into the very tip of the red nose cone to act as a radio antenna. -
Sculpt the planets:
Roll remaining clay colors (blues, oranges, greys) into various sized spheres. Mixing colours partially can create a marbled, realistic planetary surface. -
Texture the moons:
For the moon-like sphere, use a toothbrush or stiff brush to stipple the surface, giving it a cratered texture. -
Bake the components:
Place the rocket, planets, and any flat clay stars you wish to make on a baking sheet. Bake according to your clay manufacturer’s instructions (usually 275°F/130°C for 15-30 minutes).
Drooping Fins?
If the heavy red fins sag before baking, prop them up with wedges of cardboard or crumpled foil. Bake the rocket with these supports in place.
Step 3: Galactic Finishing Touches
-
Cool down:
Allow all pieces to cool completely before handling, as the clay is fragile while hot. -
Paint the stars:
Using a very fine brush and gold paint, carefully hand-paint small stars and constellations directly onto the navy blue body of the rocket. I find random sizing makes it look more magical. -
Add planetary details:
Add dots or rings to your baked planets using paint. For the orange planet, add blue dots; for the grey moon, lightly brush gold over the textured areas to highlight the craters. -
Seal the work (Optional):
If you want a different finish, apply a matte varnish to the rocket body to protect the paint, or leave the clay raw for a natural matte texture.
Glow-in-the-Dark
Mix glow-in-the-dark polymer clay into your white clay for the stars or planets. When the lights go out, the galaxy will come alive
Arrange your solar system and enjoy a handmade journey to the stars

The Complete Guide to Pottery Troubleshooting
Uncover the most common ceramic mistakes—from cracking clay to failed glazes—and learn how to fix them fast.
Robot Figures With Blocky Shapes
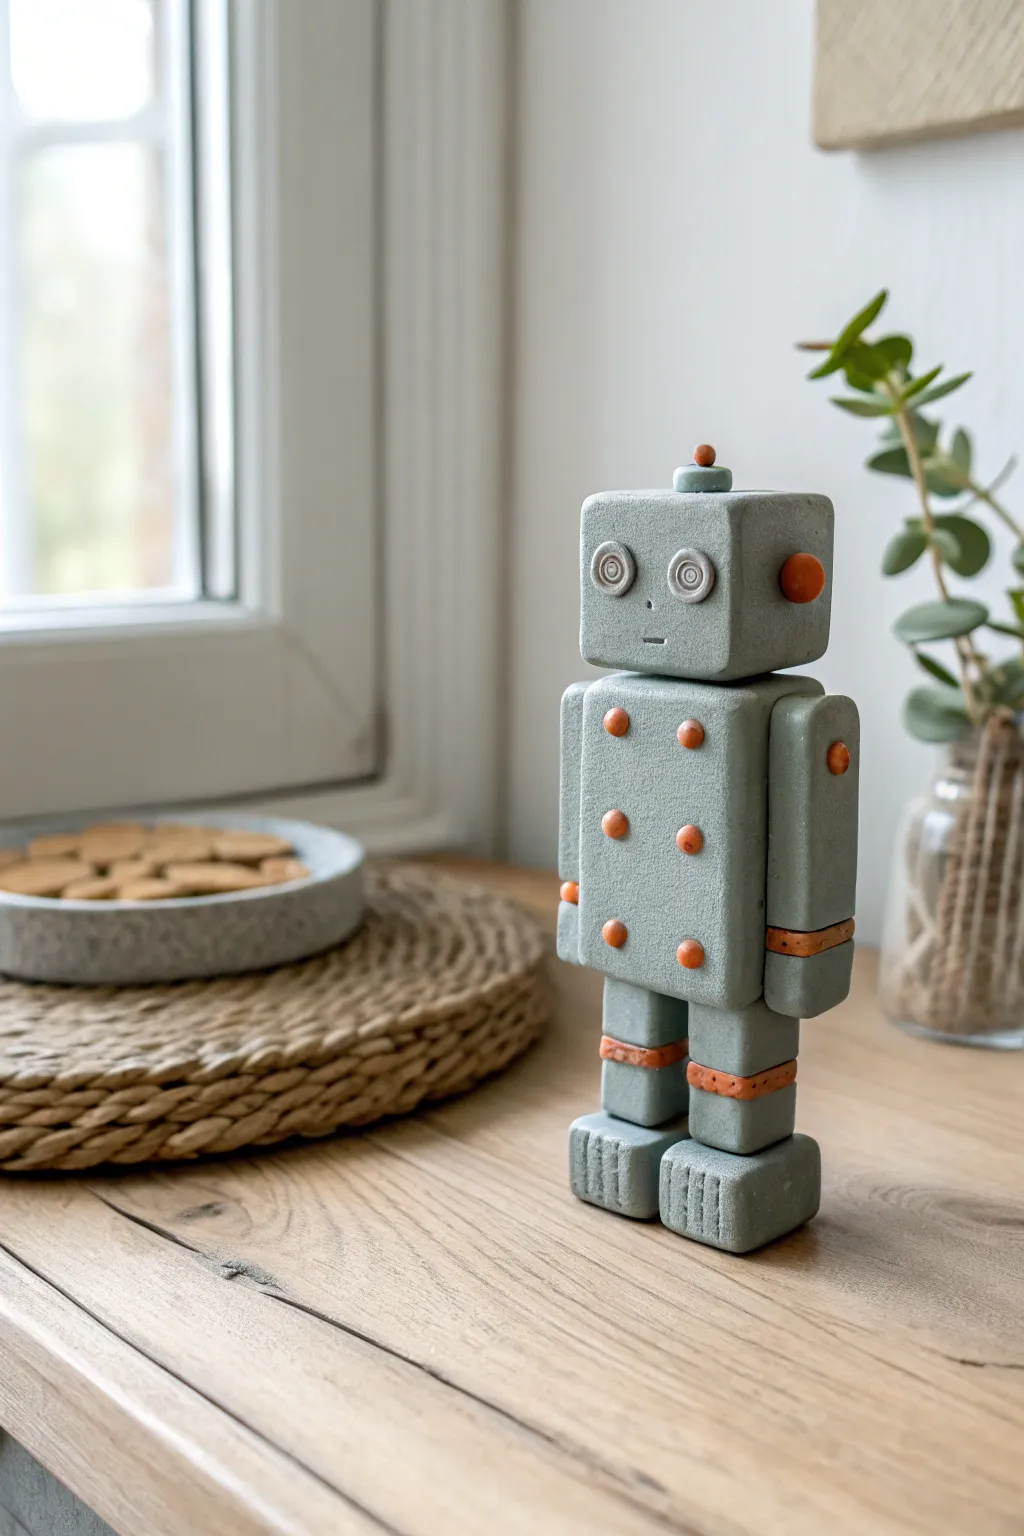
This charming little robot combines a modern, industrial concrete aesthetic with playful toy-like features. Its simple geometric shapes make it an approachable project, while the faux-stone finish gives it a unexpectedly sophisticated look perfect for a shelf display.
Step-by-Step Tutorial
Materials
- Polymer clay (grey granite or stone effect)
- Polymer clay (burnt orange or terracotta)
- Polymer clay (light grey for eyes)
- Polymer clay (white for eye details)
- Clay blade or craft knife
- Rolling pin or pasta machine
- Liquid polymer clay (bake and bond)
- Needle tool or toothpick
- Small dotting tool
- Coarse sandpaper or texture sponge
- Oven for baking
Step 1: Forming the Body Blocks
-
Condition the clay:
Start by thoroughly conditioning your stone-effect grey clay until it is pliable. You want a consistent texture throughout to avoid cracks during baking. -
Shape the torso:
Form a large rectangle for the torso. Aim for sharp, crisp edges by pressing each side against your work surface or using an acrylic block to square it off. -
Create the head:
Shape a cube for the head that is slightly wider than the torso but not as tall. Again, focus on keeping the faces flat and corners relatively sharp. -
Texture the surfaces:
Gently press coarse sandpaper or a stiff texture sponge against all sides of your grey blocks. This creates that realistic ‘poured concrete’ pitted surface seen in the reference.
Clean Edges Trick
To get those sharp, mechanical corners without distorting the clay, chill your shaped blocks in the fridge for 10 minutes before assembling. Harder clay holds its shape better during handling.
Step 2: Adding the Limbs
-
Make the arm segments:
Create two long rectangles for the arms. They should be slightly thinner than the torso depth. Square them off just like the body. -
Create the legs:
Form two smaller rectangles for the upper legs. For the feet, create two squat, wider blocks that will provide a stable base for the robot to stand. -
Detail the feet:
Using the back of your knife blade, gently press three vertical indentations into the front of each foot block to mimic toes or mechanical treads. -
Prepare the orange joints:
Roll out a thin sheet of the terracotta/orange clay. Cut four small strips—sized to fit as ‘gaskets’ or joints. Two will go on the arms near the wrists, and two on the legs above the feet. -
Assemble the legs:
Stack the leg pieces: foot block, orange strip, leg block. Use a dab of liquid clay between layers to ensure a strong bond.
Step 3: Facial Features and Buttons
-
Make the eyes:
Roll two small balls of light grey clay and flatten them into discs. Press a smaller concentric circle into the center using a small cutter or tube. -
Add pupils:
Place a tiny dot of white or very light grey clay in the center of the concentric circles for the pupils. -
Create the mouth:
Use a needle tool or small blade to impress a simple, short horizontal line for the mouth, placed centrally below the eyes. -
Create the buttons:
Roll six tiny balls of the orange clay. Press them gently onto the torso in two columns of three. Flatten them slightly so they look like embedded rivets or buttons. -
Add side details:
Place one orange ball on the side of the head (like an ear bolt) and one on the upper arm shoulder area. Press these flat as well.
Drooping Arms?
If the heavy block arms keep sliding off the body before baking, insert short lengths of wire or toothpicks into the clay to pin the limbs to the torso, along with your liquid clay.
Step 4: Final Assembly and Baking
-
Connect head and body:
Use a small piece of wire or a toothpick as an internal armature between the head and torso for extra stability. Apply liquid clay and press them together. -
Attach the limbs:
Attach the assembled legs to the bottom of the torso and the arms to the sides using liquid clay. I usually prop the arms up with a bit of foil during baking so they don’t slide down. -
Add the antenna:
Place a small grey button shape on top of the head, and top it with a tiny orange ball to finish the antenna. -
Final texture check:
Look over the robot for any fingerprints. If you find any, gently tap them out with your texture sponge. -
Bake:
Bake in a preheated oven according to your clay manufacturer’s instructions, typically around 275°F (130°C) for 30 minutes depending on thickness.
Once cooled, your industrial little block-bot is ready to guard your desk or bookshelf
Sports Ball Keychains
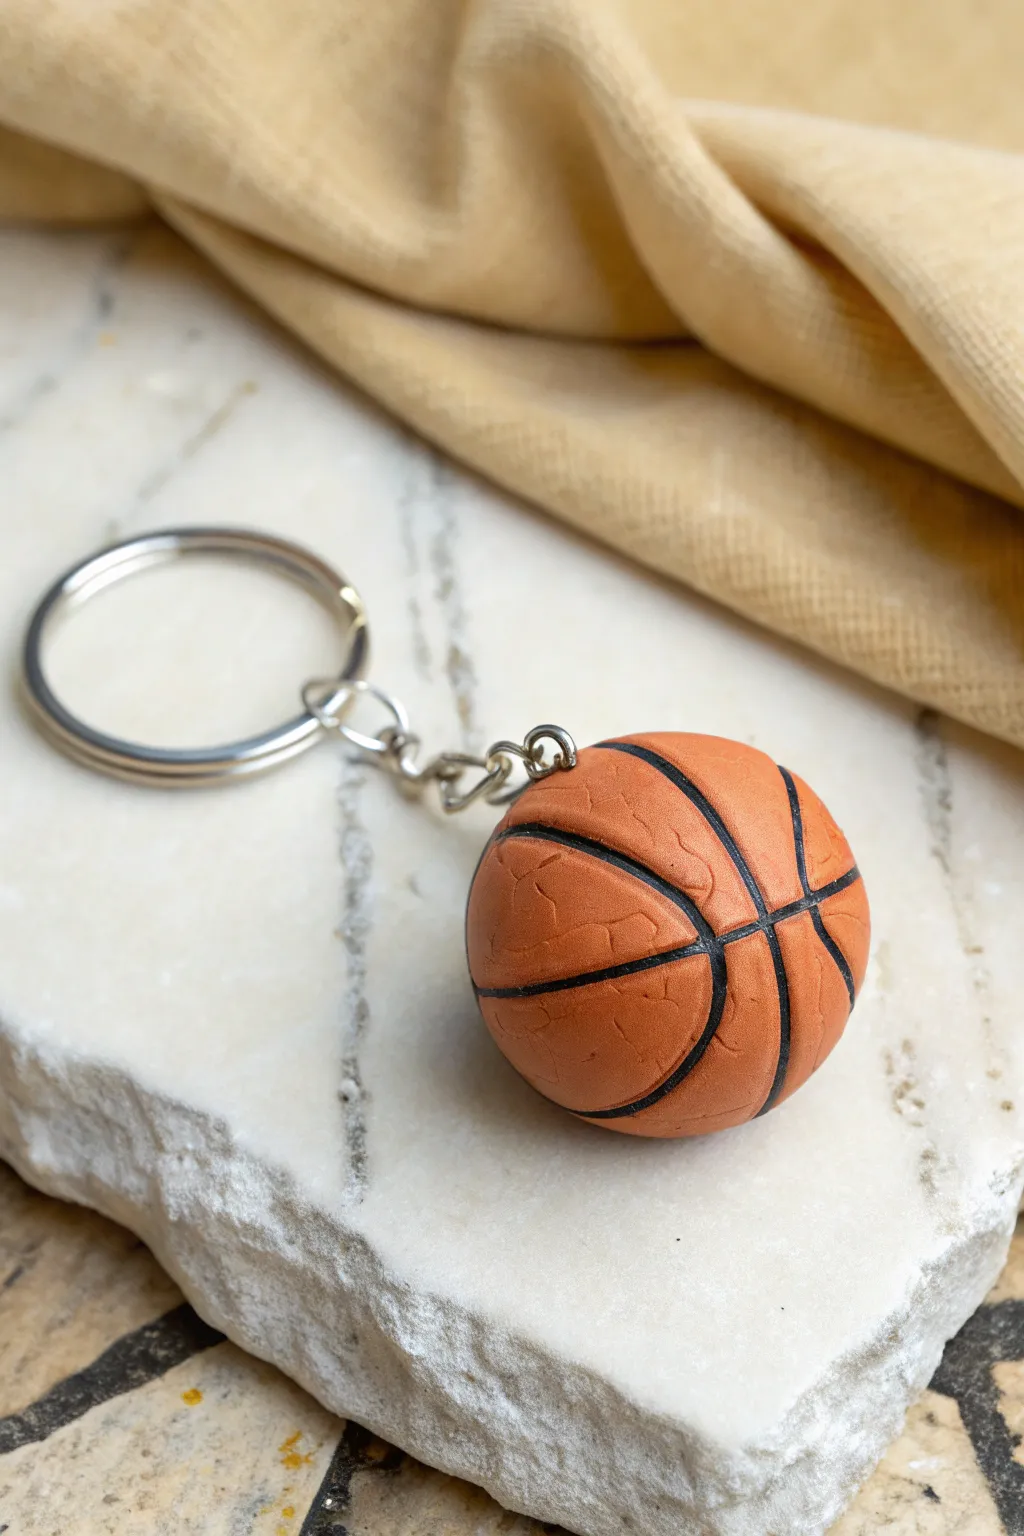
This realistic-looking basketball keychain is a perfect starter project for sports fans, featuring that classic pebbled texture and bold black lines. It’s durable enough to hang on a backpack and small enough to fit in a pocket.
Step-by-Step Tutorial
Materials
- Orange polymer clay (burnt orange or terracotta)
- Black polymer clay (very small amount)
- Keychain ring with chain and jump ring
- Eye pin (screw or loop style)
- Toothbrush or textured sponge
- Detail tool or needle tool
- Liquid polymer clay (optional)
- Oven for baking
Step 1: Forming the Base
-
Condition the clay:
Start by taking a chunk of orange polymer clay. Knead it thoroughly in your hands until it becomes soft, pliable, and free of cracks. -
Create a sphere:
Roll the orange clay between your palms to form a smooth, perfect ball. Mine is usually about 1 to 1.5 inches in diameter, but you can adjust the size to your preference. -
Add texture:
To mimic the pebbled leather surface of a real basketball, gently press a clean toothbrush or a textured sponge all over the surface of the ball. Roll it lightly as you go to ensure even coverage without flattening the sphere.
Step 2: Adding the Lines
-
Mark the guide:
Using a needle tool or a dull knife, very lightly sketch the lines of the basketball onto your sphere. Start with a single line around the circumference, then a cross line, and finally the curved side lines. -
Deepen the grooves:
Once you are happy with the placement, go back over your sketched lines with a bit more pressure to create distinct channels where the black clay will sit. -
Prepare black snakes:
Roll out a very thin, consistent snake of black polymer clay. It needs to be thin enough to fit inside the grooves you just created. -
Insert the first line:
Lay the black clay snake into one of the grooves. Gently press it down so it is flush with the orange surface, then trim the excess. -
Complete the markings:
Continue placing black snakes into all the grooves. If the black clay smears slightly, you can clean it up later with a bit of rubbing alcohol on a cotton swab. -
Secure the lines:
Roll the ball very gently between your hands one final time. This helps fuse the black clay into the orange clay so the lines don’t pop out later. -
Re-texture if needed:
If handling the ball smoothed out your texture too much, give it another light tap with your toothbrush, avoiding the black lines.
Smudgy Lines?
If black clay smears onto the orange, dip a q-tip in rubbing alcohol or baby oil and gently wipe the stain away before baking. Do this carefully to avoid removing texture.
Step 3: Assembly and Baking
-
Insert the hardware:
Take an eye pin. I like to dip the end in a tiny drop of liquid polymer clay for extra grip, then push it straight down into the top of the basketball. -
Bake the project:
Place your basketball on a baking sheet or ceramic tile. Bake it according to the temperature and time instructions on your specific package of clay (usually around 275°F or 135°C for 15-30 minutes). -
Cool down:
Let the clay cool completely before handling. It is still fragile when hot and needs to harden as it returns to room temperature. -
Attach the ring:
Using pliers, open the jump ring at the end of your keychain hardware. Loop it through the eye pin on your basketball. -
Close the loop:
Twist the jump ring closed securely with your pliers to finish the assembly.
Pro Tip: Harder Texture
For a deeper, more realistic ‘leather’ look, use a ball of aluminum foil instead of a toothbrush. Pressing crumpled foil into the clay creates sharper, irregular divots.
Now you have a sporty accessory ready to organize your keys or decorate a bag


What Really Happens Inside the Kiln
Learn how time and temperature work together inside the kiln to transform clay into durable ceramic.
Locker Magnets With Bold Icons
Blast off into creativity with this vintage-inspired rocket ship magnet, featuring bold terracotta and cream stripes. This chunky, layered polymer clay project adds a cool, graphical touch to any school locker or magnetic board.
Detailed Instructions
Materials
- Polymer clay in terracotta (rust orange), cream/off-white, and deep navy blue
- Rolling pin or pasta machine
- Clay slicer or craft blade
- Small round cutters (two sizes)
- Needle tool or toothpick
- Liquid polymer clay (optional, for adhesion)
- Strong round magnets
- Super glue or E6000
- Oven and baking sheet
- Parchment paper
Step 1: Creating the Base Shape
-
Condition the clay:
Start by conditioning your terracotta clay until it is soft and pliable. Roll it out into a slab that is about 1/4 inch thick to ensure the magnet will be sturdy. -
Cut the fuselage:
Using a craft knife, freehand cut a tall, elongated bullet shape for the rocket body. It should be wide at the bottom and taper gently to a rounded point at the top. Smooth the cut edges with your finger. -
Prepare the stripe sections:
Roll out the cream-colored clay to a slightly thinner setting. You will need a slab large enough to cover the middle sections of your rocket. -
Slice and layer:
Visualizing the rocket in four horizontal segments, cut wide bands of the cream clay. Lay these over the terracotta base to create the second and bottom-most segments of the fuselage, pressing gently so they adhere without distorting the shape. -
Trim the excess:
Use your blade to trim the excess cream clay flush with the edges of the underlying terracotta base, re-establishing the smooth bullet silhouette.
Clean Lines Pro Tip
Chill your rolled clay slabs in the fridge for 10 minutes before cutting. This firms up the material, preventing drag on your blade and ensuring your geometric stripes stay perfectly crisp.
Step 2: Adding Wings and Details
-
Form the fins:
Roll out more terracotta clay. Cut two curved, shark-fin shapes for the side boosters. Creating them separately allows you to attach them to the back or flush against the sides for that dimensional look. -
Attach the fins:
Press the fins firmly onto the bottom sides of the rocket body. I find that blending the clay slightly on the backside helps keep them secure during baking. -
Create the portholes:
Roll out a small amount of navy blue clay and punched out two circles using a small round cutter. Roll a thin snake of matching cream clay to wrap around these blue circles as a border. -
Place the windows:
Position one porthole on the upper cream stripe and one on the lower cream stripe. Press them down gently to bond them to the body. -
Add graphical vents:
In the middle terracotta stripe, use a needle tool or a dull knife to impress two horizontal lines. These act as intake vents and add to the retro aesthetic. -
Detail the nose cone:
At the very top terracotta section, use your needle tool to press in three small, vertical indentations for extra texture.
Step 3: Finishing Touches
-
Make the thruster:
Form a small trapezoid from navy blue clay and attach it to the very bottom center of the rocket body. -
Add the flame:
Cut a small, jagged flame shape from cream clay. To make it look distinct, you can layer a tiny piece of terracotta clay in the center of the flame before attaching it to the blue thruster. -
Bake the project:
Place your rocket on a parchment-lined baking sheet. Bake according to your clay package instructions (usually 275°F for 15-30 minutes depending on thickness). -
Cool down:
Let the piece cool completely on the baking sheet. Moving it while hot can cause the clay to warp or crack. -
Attach the magnets:
Once cool and hard, flip the rocket over. Apply a dab of strong super glue or E6000 to the back and press two round magnets into place—one near the top and one near the bottom for stability.
Fixing Fingerprints
If you notice fingerprints on your finished sculpt before baking, lightly brush the surface with a tiny amount of baby oil or cornstarch to smooth them away without ruining the detail.
Pop this on a metal surface and enjoy the classic space-age vibe you’ve created
Desk Pencil Holder With Racing Stripes
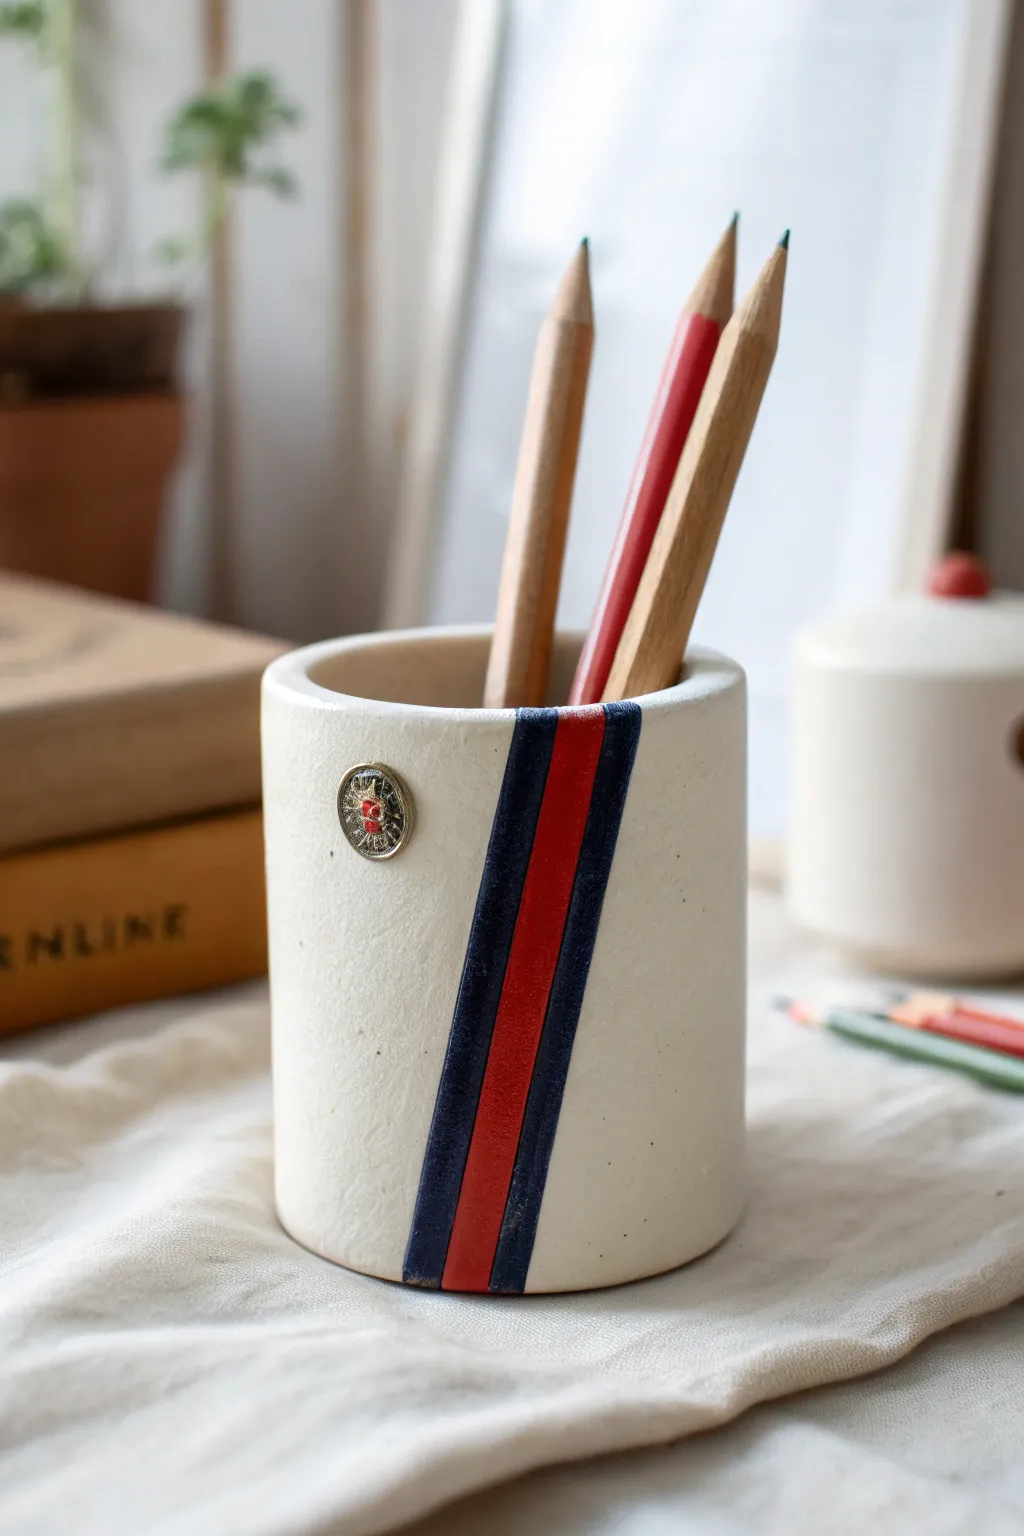
Rev up a boring desk with this sleek, sporty pencil holder inspired by classic race car liveries. The clean white base makes the bold navy and red stripes pop, creating a functional piece of décor that is both stylish and sturdy.
Step-by-Step Guide
Materials
- White polymer clay (approx. 4-6 oz)
- Navy blue polymer clay
- Red polymer clay
- Empty, clean tin can (soup can size) or a glass jar (for the mold)
- Aluminum foil
- Acrylic rolling pin or pasta machine
- Craft knife or clay blade
- Small round metal charm, button, or clay stamp (optional)
- Liquid polymer clay (optional, for adhesion)
- Cornstarch (release agent)
- Sandpaper (fine grit)
Step 1: Preparing the Base Form
-
Wrap the core:
Take your empty tin can or glass jar and wrap the outside completely with a smooth layer of aluminum foil. This prevents the clay from sticking to the metal or glass and makes removal easier later. -
Condition the white clay:
Condition your white polymer clay thoroughly until it is soft and pliable. Since white shows lint easily, make sure your hands and work surface are impeccably clean before starting. -
Roll the main sheet:
Roll out the white clay into a large, even rectangular sheet. It needs to be about 1/4 inch thick to ensure the cup is sturdy. The sheet should be wide and long enough to wrap around your foil-covered form with a little overlap. -
Create the base cylinder:
Wrap the white clay sheet around the foil-covered can. Trim the excess clay where the ends meet so they butt up against each other perfectly, rather than overlapping. -
Seal the seam:
Gently smooth the seam with your finger or a clay tool until it disappears. Roll the can on your work surface gently to help even out the texture. -
Cut the clay base:
Place the wrapped can onto the remaining white clay sheet. Trace around the bottom with your craft knife to cut out a circle for the base of the cup. -
Attach the bottom:
Press the circle onto the bottom of the wrapped can. Blend the edges of the circle up into the walls of the cylinder using a smoothing tool or your thumb so it becomes one seamless unit.
Clean Lines
Before cutting your colored stripes, pop the rolled clay sheets in the fridge for 10 minutes. Cold clay cuts much cleaner and won’t drag under the knife blade.
Step 2: Adding the Racing Stripes
-
Roll out accent colors:
Condition and roll out the navy blue and red clay into thin sheets. I prefer to roll these quite thin, roughly 1/16th of an inch, so they don’t add too much bulk to the side of the cup. -
Cut the stripes:
Using a ruler and a sharp blade, cut two strips of navy blue clay (about 1/4 inch wide) and one strip of red clay (about 1/3 inch wide). Make sure they are long enough to span the full height of your cup. -
Position the red stripe:
Place the red stripe vertically onto the white cup. You can place it straight up and down or at a slight diagonal for a faster look. Press it gently to adhere. -
Add blue borders:
Place the navy blue strips on either side of the red stripe, leaving no gap between them. The colors should touch perfectly. Use a roller to gently press them into the white base so they sit flush. -
Trim edges:
Trim any excess colored clay from the top rim and the bottom edge so the stripes end cleanly with the white clay.
Make it Matte
For that matte, unglazed ceramic look shown in the photo, lightly dust the unbaked white clay with cornstarch before texturing. It prevents fingerprints and reduces shine.
Step 3: Detailing and Baking
-
Add the emblem:
Press a small metallic button, a circular gear charm, or a coin-sized circle of clay into the white space to the left of the stripes. If using metal, you can bake it with the clay; if it’s plastic, add it after baking with glue. -
Smooth the texture:
To achieve the matte, stone-like texture seen in the photo, lightly tap the surface of the white clay with a piece of sandpaper or a stiff bristle brush. Avoid texturing the sleek stripes. -
Bake the project:
Bake the cup (still on the can/jar form) according to your clay package instructions. Usually, this is around 275°F (135°C) for 30-45 minutes depending on thickness. -
Cool and release:
Let the piece cool completely inside the oven. Once cool, carefully slide the clay cylinder off the form. If the foil stuck, peel it away from the inside. -
Finish the rim:
If the top rim feels rough or sharp, give it a quick sanding with fine-grit sandpaper to smooth it out before placing it on the desk.
Now you have a custom organizer that’s ready for the finish line

TRACK YOUR CERAMIC JOURNEY
Capture glaze tests, firing details, and creative progress—all in one simple printable. Make your projects easier to repeat and improve.
Comic-Style Word Bubble Pins
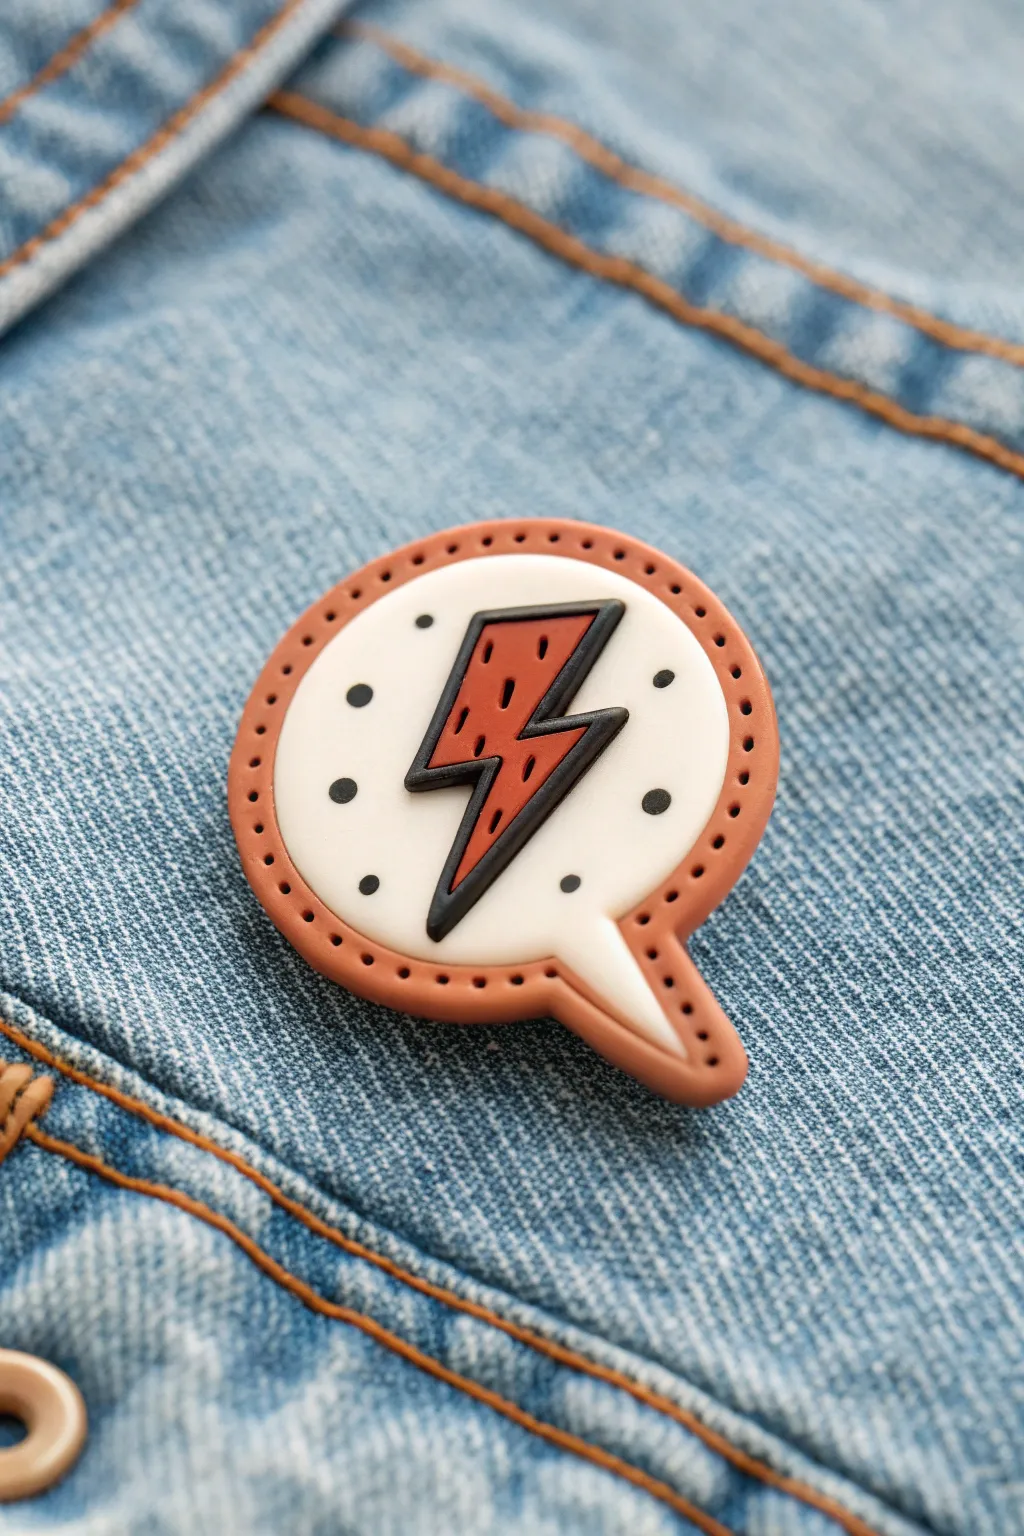
Capture the energy of a classic comic book with this vibrant speech bubble pin. Featuring a bold red lightning bolt and dotted details, this accessory adds a pop of superhero style to any denim jacket or backpack.
How-To Guide
Materials
- White polymer clay
- Rust-red or terracotta polymer clay
- Black polymer clay
- Rolling pin or pasta machine
- Round cutter (approx. 1.5 inches)
- X-acto knife or clay blade
- Needle tool or toothpick
- Pin backing
- Super glue or liquid clay
- Oven
Step 1: Creating the Base
-
Condition the white clay:
Begin by kneading the white polymer clay until it is soft and pliable. Roll it out into a smooth sheet about 1/8 inch thick. -
Cut the circle:
Use your round cutter to punch a perfect circle from the white clay sheet. -
Form the speech tail:
Cut a small triangle from the leftover white clay. Attach it to the bottom right edge of the circle, smoothing the seam with your finger or a clay tool to create the speech bubble tail. -
Prepare the red border:
Condition the rust-red clay and roll it into a long, thin snake. Ideally, use a clay extruder if you have one for even thickness, but hand-rolling works too. -
Wrap the border:
Gently press the red clay snake around the entire perimeter of the white speech bubble shape. Trim any excess where the ends meet and smooth the joint seamlessly. -
Flatten the border:
Lightly press down on the red border with a flat tool or acrylic block just enough to ensure it adheres to the white base without losing its rounded definition.
Smudge Prevention
White clay picks up everything. Wipe your hands and work surface thoroughly with a baby wipe before switching back to white clay after handling the black or red colors.
Step 2: Adding the Emblem
-
Make the lightning bolt:
Roll out a small piece of rust-red clay. Using your X-acto knife, carefully cut out a small lightning bolt shape that fits comfortably inside the white circle. -
Create the black outline:
Roll a very thin snake of black clay. This needs to be extremely fine, almost like a thread. -
Outline the bolt:
Wrap this thin black thread around the edges of your red lightning bolt. Press it gently against the red clay to bond them. -
Refine the shape:
Go back in with your knife to sharpen the corners of the lightning bolt, ensuring the black outline follows the sharp angles precisely. -
Mount the bolt:
Place the outlined lightning bolt into the center of the white speech bubble. Press down gently to secure it.
Step 3: Detailing and Finishing
-
Add floating dots:
Roll tiny balls of black clay. Position these randomly around the lightning bolt on the white background and flatten them slightly into dots. -
Create texture on the bolt:
Using a needle tool, gently scratch small, short vertical lines into the red surface of the lightning bolt for a comic book texture. -
Texture the border:
Take your needle tool again and press small holes evenly spaced along the red outer border to create a stitched or perforated look. -
Bake:
Place your creation on a tile or parchment-lined baking sheet. Bake according to your specific clay brand’s instructions (usually 275°F for 15-30 minutes). -
Cool down:
Allow the piece to cool completely before handling. It will harden fully as it returns to room temperature. -
Attach the backing:
Flip the pin over. Apply a drop of super glue or strong adhesive to a metal pin back and press it firmly against the center of the clay.
Sharper Edges
For crisper lines on the lightning bolt, pop the rolled-out red clay in the fridge for 10 minutes before cutting. The firmer clay resists dragging under the knife.
Now you have a dynamic, custom accessory ready to spark some conversation
Shield and Helmet Pretend-Play Set
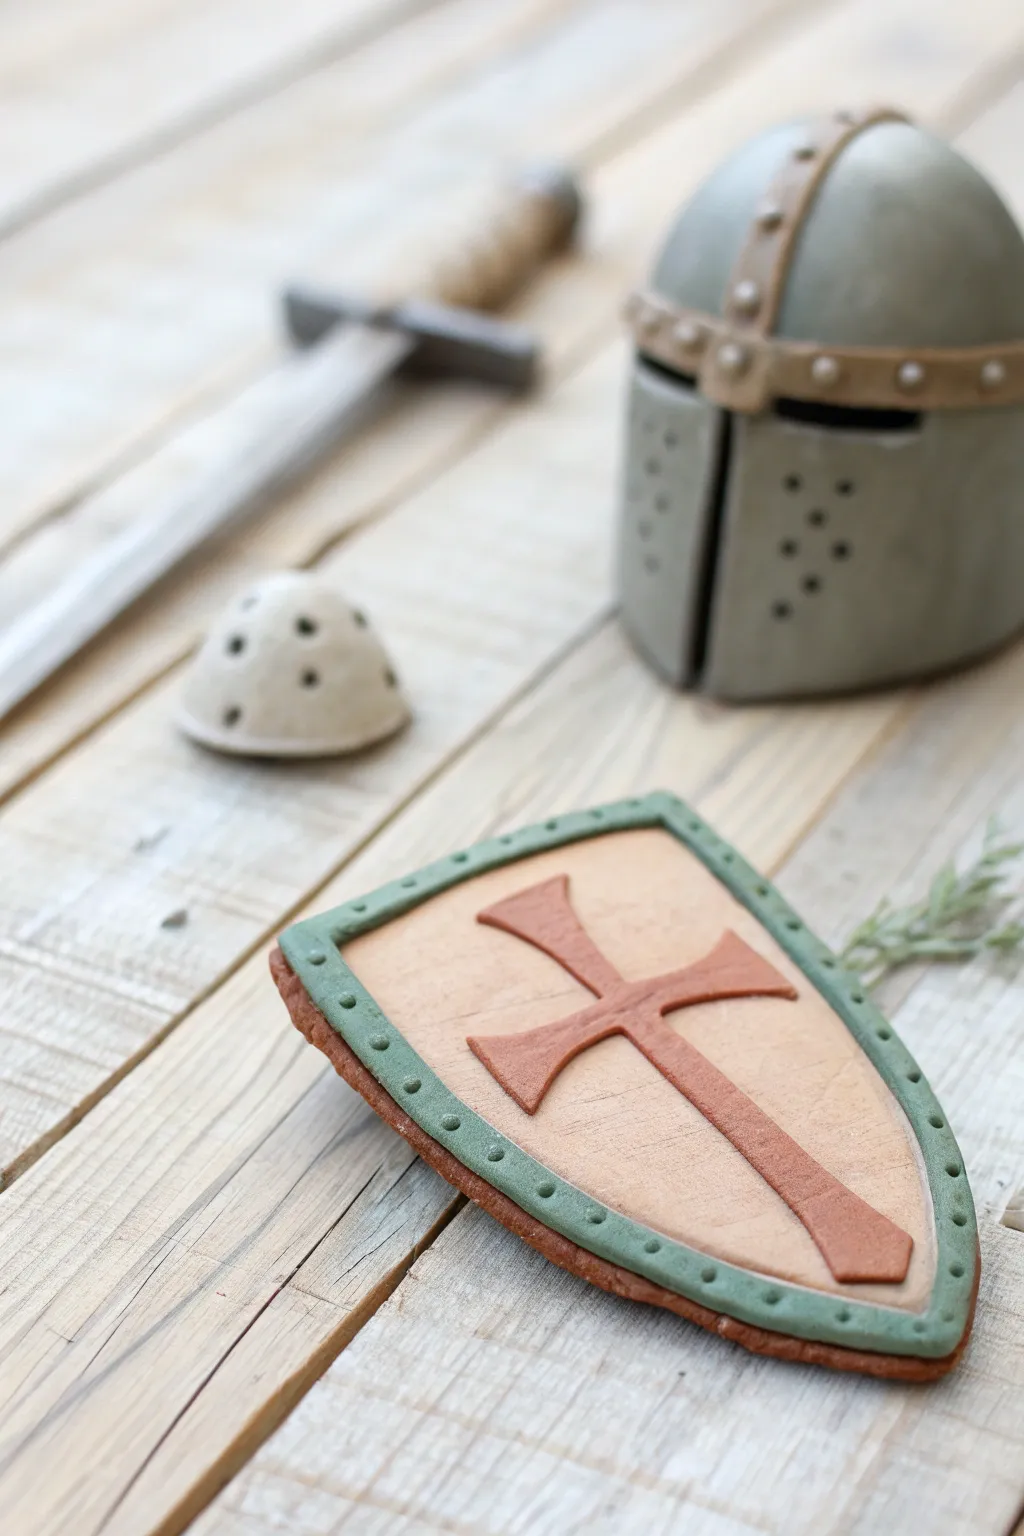
Bring the age of chivalry to life with these textured polymer clay miniatures featuring a crusader shield and a battle-ready great helm. With their distinct rivets and weathered finish, these pieces look like authentic iron and leather, perfect for dioramas or imaginative play.
Step-by-Step Tutorial
Materials
- Polymer clay (grey, terracotta/rust, stone/beige, sage green)
- Rolling pin or pasta machine
- Precision craft knife
- Needle tool or toothpick
- Ball stylus tool (small)
- Shield-shaped cookie cutter (optional)
- Black acrylic paint
- Paper towels or wet wipes
- Paintbrush
- Liquid polymer clay or bake-and-bond
- Work surface (tile or mat)
Step 1: Forging the Crusader Shield
-
Base Preparation:
Begin by rolling out a sheet of terracotta-colored clay to about 3mm thickness. Cut out your shield shape using a cutter or by tracing a template. This rust-colored base will create a nice border effect later. -
Adding the Face:
Roll out a slightly thinner sheet of stone or beige-colored clay. Cut this into a shield shape that is just slightly smaller than your base layer and press it gently on top. -
Creating the Cross:
Roll a thin strip of the terracotta clay. Using your knife, cut two strips: one long vertical strip and one shorter horizontal one. Flare the ends slightly to create the classic cross pattée shape. -
Mounting the Heraldry:
Center the cross pieces on the beige shield face. Gently press them down to adhere without distorting the shape. I find using the flat side of a knife helps tap them into place evenly. -
Adding the Border:
Roll a snake of sage green clay and flatten it into a long, thin ribbon. Carefully lay this around the perimeter of the beige layer to frame the shield. -
Rivet Detailing:
Use your small ball stylus or a blunt toothpick to press small indentations evenly spaced along the green border to simulate iron rivets.
Step 2: Crafting the Great Helm
-
Forming the Helmet Dome:
Roll a ball of grey clay into a smooth sphere, then gently pinch and flatten the bottom to create a dome shape. Hollow it out slightly with your thumb if you want it to be light, or keep it solid for stability. -
The Face Guard:
Roll a strip of grey clay, flatten it, and wrap it around the lower half of the dome. Smooth the seam where it meets the dome so it looks like one continuous piece of metal. -
Defining the Visor:
Use your craft knife to cut a deep vertical slit down the center of the face guard. Cut a horizontal slit near the top for the eye opening (the oculars). -
Adding Reinforcement Strips:
Create thin strips of stone or light brown clay. Lay one horizontally across the brow line of the helmet and one vertically running from the top center down the nose ridge. -
Securing the Strips:
Apply a tiny dot of liquid clay or bake-and-bond under these strips before pressing them down to ensure they don’t shift during baking. -
Helmet Rivets:
Roll tiny, poppy-seed-sized balls of grey clay. Press these onto the reinforcement strips you just added to mimic heavy bolting. -
Breathing Holes:
Using your needle tool, poke a pattern of small ventilation holes on either side of the central vertical slit on the face guard. -
Baking:
Bake your pieces according to your specific clay brand’s instructions (usually 275°F/130°C for 15-30 minutes). Let them cool completely.
Texturing Trick
Before baking, lightly tap the grey ‘metal’ parts with a stiff toothbrush or crumpled foil. This creates a pitted texture that looks like hammered iron rather than smooth plastic.
Step 3: Antiquing and Finishing
-
Applying the Wash:
Dilute black acrylic paint with a little water. Brush this mixture generously over the cooled clay pieces, ensuring it gets into all the rivets, breathing holes, and crevices. -
Wiping Back:
Before the paint dries, quickly wipe the surface with a paper towel or wet wipe. The dark paint will stay in the recesses, creating instant depth and grime. -
Final Touches:
If you are also making the sword or debris shown, use scraps of grey and brown clay to form a simple handle and blade, applying the same antiquing technique.
Baking Support
If the helmet starts to sag or lose its round shape while sitting on the tray, prop it up on a crumpled ball of aluminum foil or a mound of baking soda for support.
Once sealed with a matte varnish, your miniature armory is ready for display or battle alongside your favorite figurines
Dinosaur Footprint Stamps
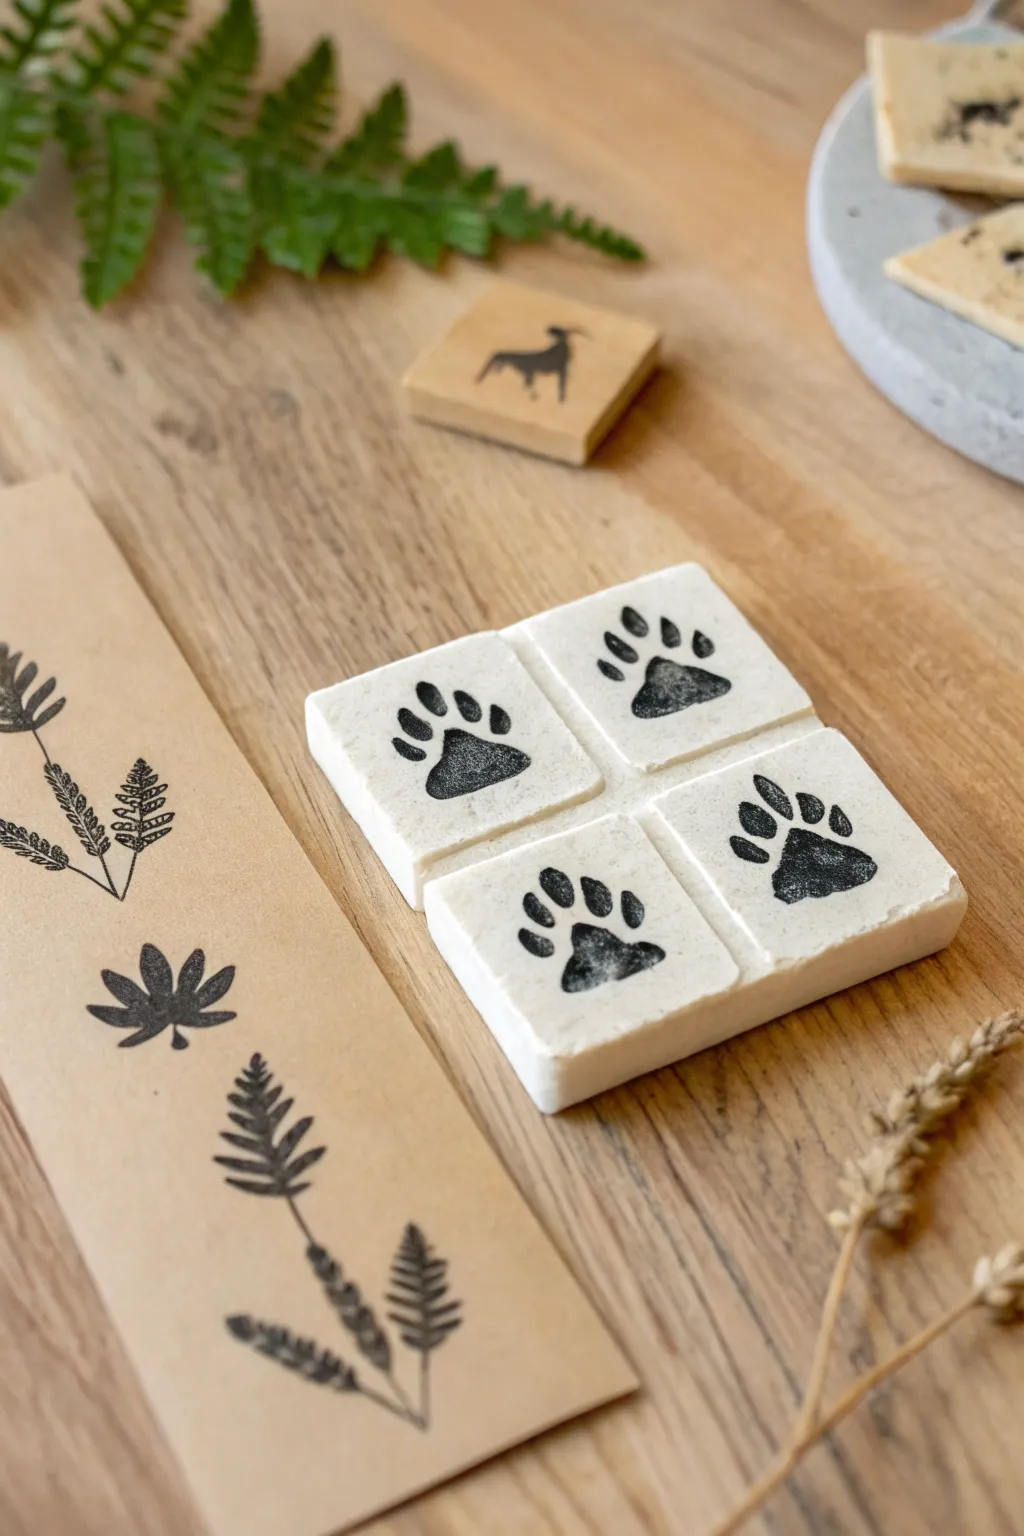
Create your own set of fossil-like stamps using polymer clay to capture the rugged look of ancient dinosaur tracks. These textured square tiles feature bold, black paw prints that are perfect for adding a Jurassic touch to stationery or play dough.
Detailed Instructions
Materials
- White or cream polymer clay
- Rolling pin or acrylic roller
- Square cookie cutter (approx. 1.5 – 2 inches)
- Black ink pad (permanent or pigment ink)
- Rubber stamp with a paw print design
- Fine-grit sandpaper (optional)
- Parchment paper
- Baking sheet
- Oven
Step 1: Shaping the Clay Base
-
Condition the Clay:
Start by warming the white polymer clay in your hands, kneading it until it becomes soft and pliable without any cracks. -
Roll out the Slab:
Place the clay on a sheet of parchment paper or a smooth work surface. Use your rolling pin to flatten it into an even slab. -
Aim for Thickness:
Ensure the slab is relatively thick, about 1/4 inch to 3/8 inch, to give the tiles a substantial, stone-like feel. -
Texture the Surface:
For a rustic look, lightly tap the surface of the clay with a crumpled piece of foil or a stiff brush to remove the shiny, manufactured finish. -
Cut the Squares:
Use a square cookie cutter to punch out four identical shapes. I find that wiggling the cutter slightly helps release the clay cleanly. -
Smooth the Edges:
Gently run your finger along the cut edges of each square to soften any sharp corners or burrs left effectively by the cutter.
Smudged Prints?
If the ink smudges on the raw clay, don’t panic. Use a cotton swab dipped in rubbing alcohol to gently wipe the surface clean, let it dry, and restamp.
Step 2: Stamping and Baking
-
Ink the Stamp:
Take your paw print rubber stamp and press it firmly onto the black ink pad, ensuring the design is evenly coated. -
Make the Imprint:
Center the stamp over one of your clay squares and press straight down with steady, moderate pressure. -
Lift and Repeat:
Lift the stamp straight up to avoid smudging the ink or distorting the print. Repeat this process for all four clay squares. -
Check the Ink:
Allow the ink to sit for a few minutes. Some inks may need to dry slightly before baking, while others bake right in. -
Prepare for Baking:
Arrangement the punched and stamped tiles on a parchment-lined baking sheet, leaving a little space between each one. -
Bake the Clay:
Bake the tiles according to your specific polymer clay package instructions (usually 275°F for 15-30 minutes). -
Cool Down:
Remove the baking sheet from the oven and let the tiles cool completely undisturbed. They are fragile while hot. -
Inspect the Finish:
Once cool, check the edges. If there are any rough spots, you can lightly sand them with fine-grit sandpaper. -
Optional Sealant:
If you plan to use these heavily, you can brush a thin layer of matte varnish over the patterned side to protect the ink.
Make it Magnetic
Turn these into functional decor by gluing strong crafting magnets to the back after baking. They make excellent refrigerator art holders.
Stack your finished dinosaur tiles together or use them to stamp fun patterns into kinetic sand during playtime
Camouflage Texture Trinket Tray
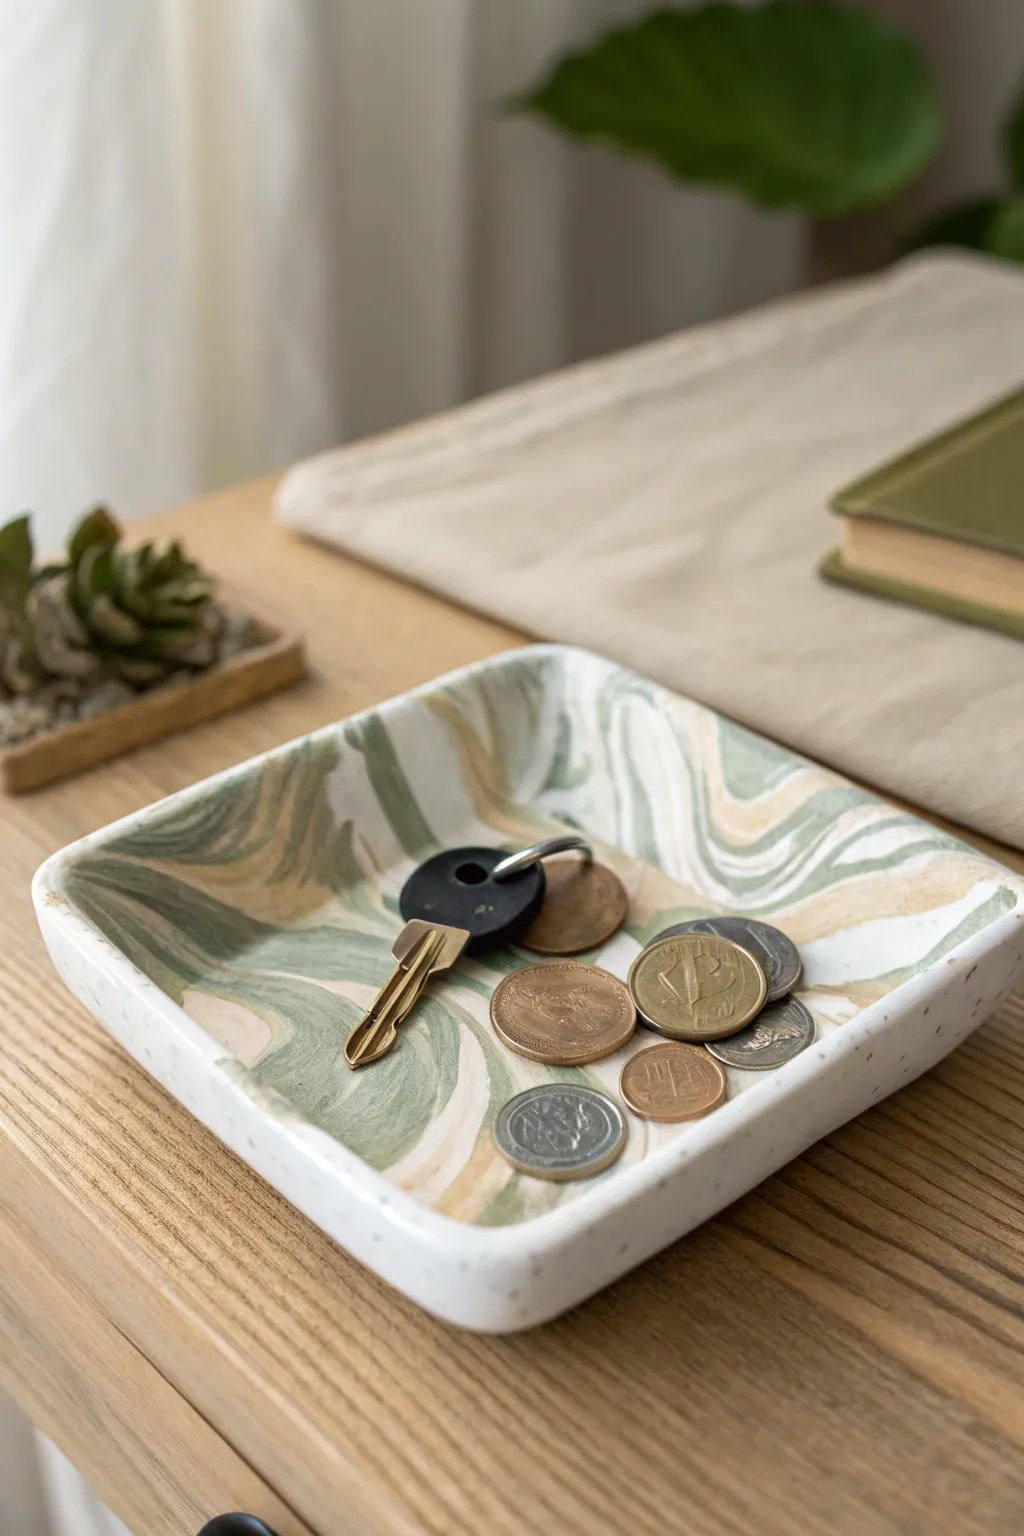
Keep scattered treasures like coins and keys in check with this stylish, rugged trinket dish. The marbled design mimics a soft desert camouflage pattern, featuring swirling layers of olive green, beige, and white clay for a sophisticated yet earthy look.
Step-by-Step
Materials
- Polymer clay (white, beige/tan, olive green, and speckled white/granite)
- Acrylic roller or pasta machine
- sharp crafting blade or tissue blade
- Square baking dish or oven-safe bowl (for forming)
- Sandpaper (fine grit)
- Glaze or matte varnish (optional)
- Oven
Step 1: Prepping the Clay
-
Condition the clay:
Start by thoroughly kneading each color of clay separately until they are soft and pliable. You’ll need roughly equal parts of white, beige, and olive green. -
Create snakes:
Roll each conditioned color into a long, snake-like rope about 5 inches long and half an inch thick. -
Twist together:
Gather your three colored ropes and twist them together gently to form one large, spiraled log.
Muddy Colors?
If your camo pattern looks grey or muddy, you likely over-mixed. Stop twisting earlier next time. The distinct streaks require barely-mixed clay to maintain definition.
Step 2: Marbling the Pattern
-
Fold and twist:
Fold the large twisted log in half, and twist it again. Repeat this folding and twisting process 2-3 times. Don’t overdo it, or the distinct colors will muddy into a single brown shade. -
Form a ball:
Roll the twisted clay between your palms to smooth it into a large ball, compressing any air bubbles out as you go. -
Initial flattening:
Place the ball on your work surface and press it down firmly with your palm to create a thick puck. -
Roll out the slab:
Using your acrylic roller, roll the clay out into a flat sheet, about 1/4 inch thick. Roll in different directions to help stretch the swirl pattern organically. -
Inspect the pattern:
Look at your slab. If you aren’t happy with the marble effect yet, you can fold the sheet in half and roll it out one more time to create finer lines.
Personalize It
Before baking, use small letter stamps to impress initials or a name into the center of the tray for a custom, personalized gift.
Step 3: Adding the Speckled Rim
-
Prepare the rim clay:
Take a separate piece of white granite or speckled clay. Roll this into a very long, thin snake, distinct from your main marbled slab. -
Cut the base shape:
Use a blade to cut your marbled slab into a clean square, roughly 5×5 inches. Round off the sharp corners slightly with your fingertips. -
Frame the square:
Take your speckled clay snake and wrap it around the perimeter of the square base. Press it gently against the edge so it adheres. -
Blend the seam:
Use your finger or a sculpting tool to gently smudge the seam on the *bottom* side and inside edge so the rim and base become one solid piece, while keeping the speckled exterior distinct.
Step 4: Shaping and Baking
-
Lift the edges:
Gently lift the edges of the square to create a shallow bowl shape. I find it helps to pinch the corners slightly to encourage the walls to stand up. -
Support the form:
Place your clay square into a slightly larger oven-safe dish or baking mold that will help it hold its curved shape while baking. Alternatively, use crumbled foil to prop up the sides. -
Smooth imperfections:
Do a final check for fingerprints. lightly buff them away with a drop of baby oil on your finger if needed. -
Bake:
Bake the tray according to your polymer clay package instructions (usually around 275°F or 135°C for 15-30 minutes per 1/4 inch of thickness). -
Cool down:
Let the tray cool completely inside the oven or on a wire rack before handling it, as warm clay is fragile. -
Sand and finish:
Once fully cooled, lightly sand any rough edges with fine-grit sandpaper. If desired, apply a thin coat of matte varnish to protect the surface.
Now you have a durable spot to stash your daily essentials
Glow-Style Galaxy Beads
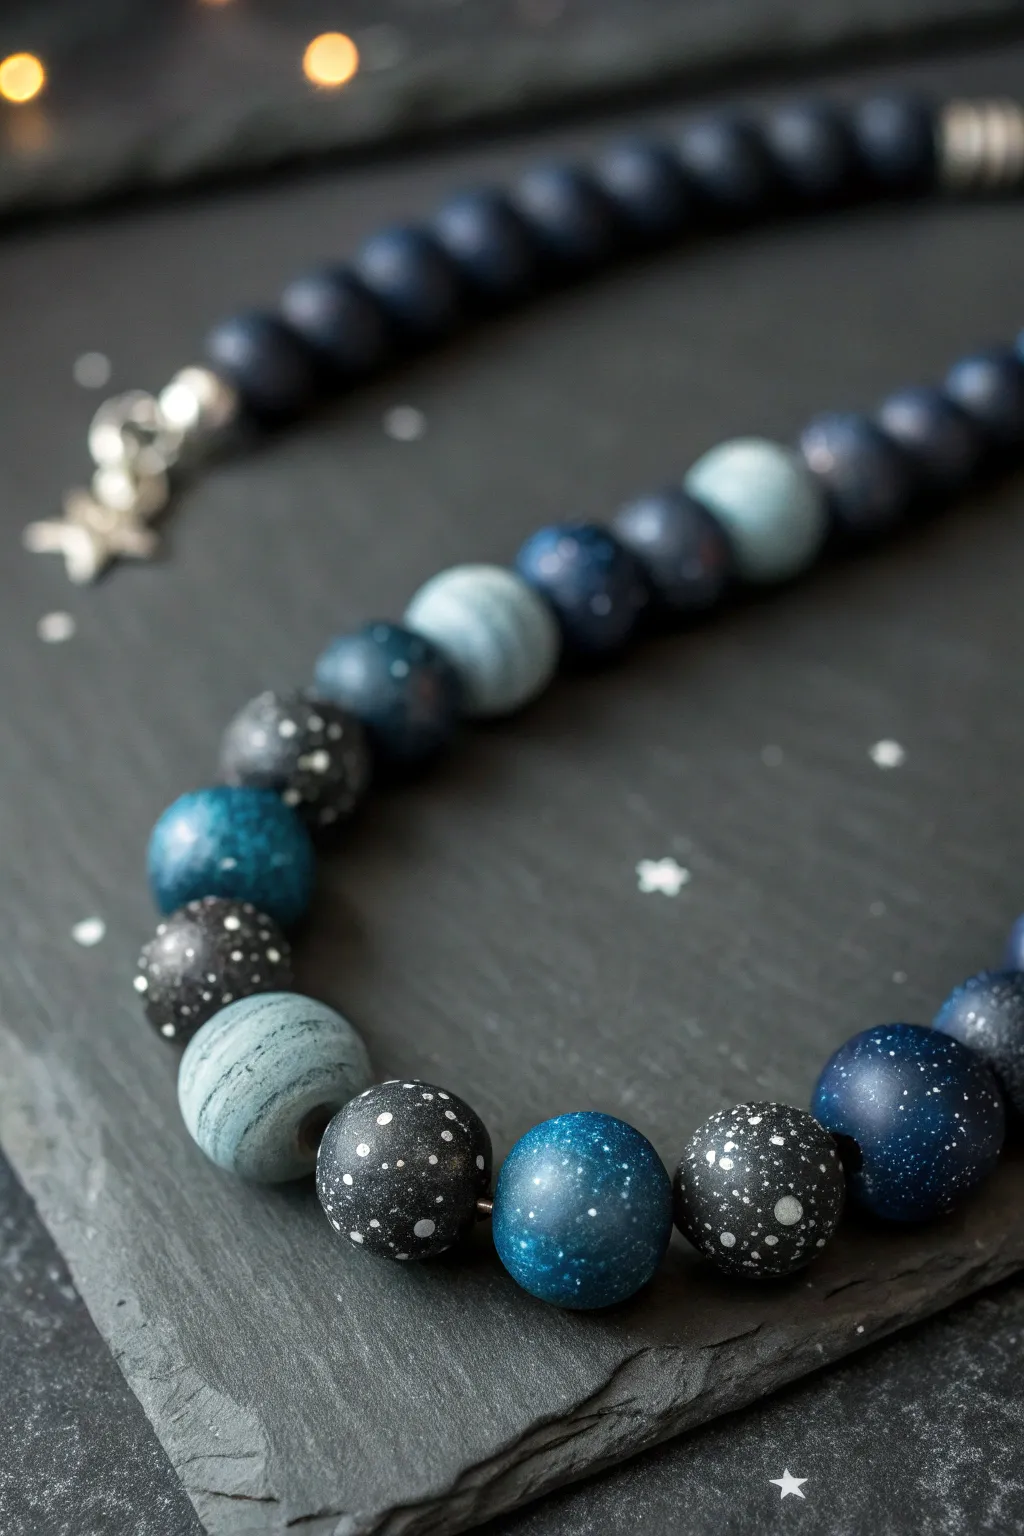
Capture the mysteries of the universe in a wearable format with these striking galaxy-themed beads. By combining deep space tones with clever painting techniques, you can create a necklace that looks like it was plucked straight from the stars.
How-To Guide
Materials
- Polymer clay in black, navy blue, translucent, and pearlescent white
- Acrylic paints (White, Silver, Light Blue, Deep Metallic Blue)
- Old toothbrush or stiff bristle brush
- Bead rolling tool or acrylic block
- Needle tool or bead pins
- Wet/dry sandpaper (400, 600, 1000 grit)
- Gloss glaze or polyurethane varnish
- Soft paintbrush
- Jewelry cording and clasp findings
- Baking sheet and oven
Step 1: Preparing the Base Colors
-
Condition the clay:
Start by warming up your black and navy blue polymer clay in your hands until it becomes soft and pliable. This step prevents cracking later on. -
Create the ‘Gas Giant’ mix:
For the swirled planetary beads, take equal parts of navy blue, translucent, and a tiny pinch of white clay. Twist them together into a rope, fold, and twist again. Do this sparingly; you want distinct swirls, not a solid blended color. -
Mix a deep space shimmer:
Create a subtle shimmer blend by mixing a large portion of black clay with a small amount of navy blue and a touch of metallic mica powder if your clay isn’t already sparkly. This will form the dark, starry night beads. -
Portion the clay:
Cut your clay logs into roughly equal segments to ensure your beads are consistent in size. You can use a ruler or visual estimation for this.
Step 2: Forming the Beads
-
Roll the spheres:
Take each segment and roll it primarily between your palms to form a smooth sphere. For extra smoothness, I sometimes give them a final roll on a flat acrylic surface using a circular motion. -
Create the hole:
Carefully pierce each unbaked bead with a bead pin or needle tool. Gently twist the tool as you push through to avoid distorting the sphere’s shape. -
Smooth the openings:
Inspect the entry and exit holes on your beads. If the clay has puckered, gently tap it back down or smooth it with a fingertip. -
Bake the beads:
Arrange your beads on a baking sheet, ideally resting on a bed of cornstarch or on a bead rack to prevent flat spots. Bake according to the manufacturer’s specific temperature instructions, usually for about 30-45 minutes to ensure durability. -
Cool down:
Allow the beads to cool completely to room temperature before handling them. The clay is fragile while hot and hardens as it cools.
Paint Consistency
Make sure your white paint is thinned to the consistency of heavy cream before splattering. If it’s too thick, you’ll get clumps instead of a fine mist.
Step 3: Painting the Galaxy Effects
-
Prepare the splatter station:
Set up a protected workspace with newsprint or a box to catch paint spray. Lay your solid black and navy beads out for decorating. -
Splatter the stars:
Dip an old toothbrush into slightly watered-down white acrylic paint. Run your thumb across the bristles to flick a fine mist of paint droplets onto the dark beads, mimicking distant star clusters. -
Add larger stars:
Using the very tip of a needle tool or toothpick, gently dot a few larger white or silver spots onto the beads to represent brighter planets or stars. -
Enhance with nebulae:
For a nebula effect on the black beads, use a nearly dry sponge or stiff brush with a tiny amount of metallic blue paint. Dab it lightly in uneven patches to create faint, cloudy clusters. -
Seal the design:
Once the paint is fully dry, apply a thin coat of gloss glaze or polyurethane varnish. This protects the paint and deepens the dark colors, making the ‘stars’ pop.
Glow-in-the-Dark
Mix glow-in-the-dark powder into your white paint or use glow clay for the lighter swirl beads. When the lights go out, a new galaxy will appear.
Step 4: Assembly
-
Layout the design:
Arrange your finished beads on a bead board or towel. Alternate the swirled ‘planet’ beads with the splattered ‘star field’ beads for visual rhythm. -
String the beads:
Thread your beads onto a durable jewelry cord or beading wire. Ensure the holes are clear of varnish before threading. -
Finish the ends:
Attach your clasp findings securely to the ends of the cord. A simple magnetic clasp or lobster claw works perfectly for this style.
Now you have a stunning set of celestial beads that capture the beauty of the cosmos around your neck
Mix-and-Match Monster Parts Set

Unleash creativity with this clever modular monster set, where basic body shapes can be endlessly customized with interchangeable eyes and textured accessories. Using a muted palette of sage greens, teals, and mustard yellows, these durable polymer clay pieces are perfect for open-ended play and storytelling.
Detailed Instructions
Materials
- Polymer clay (Sage Green, Teal, Mustard Yellow, White, Black, Dark Grey)
- Acrylic roller or pasta machine
- Circle cutters (various small sizes)
- Needle tool or toothpick
- Ball tool (small and medium)
- Blade or craft knife
- Texture tools (optional: flexible texture mats or toothbrush)
- Baking sheet with parchment paper
- Oven
Step 1: Sculpting the Monster Bodies
-
Condition and roll:
Start by conditioning your sage green and teal clay until soft. Roll out thick slabs, approximately 1/4 inch (6mm) thick, to ensure the bodies are sturdy enough for play. -
Cut basic shapes:
Using a blade, cut out various rectangles and rounded tombstone shapes. Soften the cut edges with your fingertip to remove sharpness and give them a friendly, organic feel. -
Form the limbs:
For standing monsters, gently pinch the bottom corners of your rectangle to suggest feet. For others, attach small log shapes for arms, blending the seams smooth so they won’t snap off later. -
Create texture:
On one of the bodies, use a needle tool to scratch overlapping ‘fur’ lines across a section. On another, use a small ball tool to press random dimples for a spotted skin effect. -
Add horns and spikes:
Roll tiny cones of mustard yellow or dark grey clay. Press these firmly onto the top corners or heads of your monster bodies. I find using a tiny dot of liquid clay here helps secure them permanently. -
Sculpt open-mouth details:
For open-mouthed monsters, press a small ball of dark grey clay onto the face and flatten it. Add a tiny white crescent or small white dots for teeth. -
Draw facial features:
Roll extremely thin snakes of black clay. Gently press them onto the faces to create smiles, grimaces, or squiggly mouths. Use a needle tool to add stitching marks across the mouths for a Frankenstein vibe.
Step 2: Crafting Interchangeable Eyes
-
Base discs:
Roll out white, orange, and light green clay. Use circle cutters to create a variety of flat discs in graduating sizes. -
Stack the eyes:
Layer a smaller colored circle onto a larger white circle (or vice versa). Place a tiny black dot in the center for the pupil. -
Variation: sleepy eyes:
Create some half-closed eyes by layering a standard eye, then placing a ‘lid’ of colored clay over the top half. -
Baking preparation:
These loose eye pieces are meant to be placed on top of the bodies during play, not baked onto them, so arrange them separately on your baking tile.
Smooth Operator
Fingerprints show easily on flat slabs. Before baking, lightly brush the surfaces with a tiny amount of baby oil or cornstarch to smooth them out perfectly.
Step 3: Making Gear & Gadget Accessories
-
Sun-gear shapes:
Roll a ball of mustard yellow clay and flatten it into a thick disc. Use a blade to make small cuts around the perimeter, pushing the clay inward to form gear teeth or sun rays. -
Dotted textures:
Use your needle tool to poke small patterns or ‘freckles’ onto the surface of these yellow accessories. -
Face details on gears:
Give some of these gear shapes personality by adding tiny black clay eyes and simple smiley mouths, turning them into little creatures themselves. -
Create feet grips:
Model small semi-circle shapes in green or teal that look like little feet or stands; these can be loose parts for the child to arrange near the monsters.
Magnetic Magic
Embed small, strong rare-earth magnets into the back of the eyes and the front of the bodies before baking to make them actually snap into place.
Step 4: Final Touches
-
Check all seams:
Before baking, give every joined piece (like horns on the main bodies) a final gentle press to ensure a strong bond. -
Bake:
Bake all pieces according to your polymer clay package instructions. Since the bodies are thick, ensure you bake long enough to cure the center fully. -
Cool and finish:
Allow the pieces to cool completely on the baking sheet to harden. Once cool, they are ready for mixed-and-matched fun.
Enjoy watching the endless combinations of silly and spooky creatures come to life on the tray