If you’re craving polymer clay projects that actually feel doable, you’re in the right headspace—tiny shapes, simple tools, and steady little wins. These step by step ideas are the kind I teach in my studio: start with basic balls and snakes, then build up details until you’ve got something you’re genuinely excited to show off.
Simple Terrazzo Slab Earrings
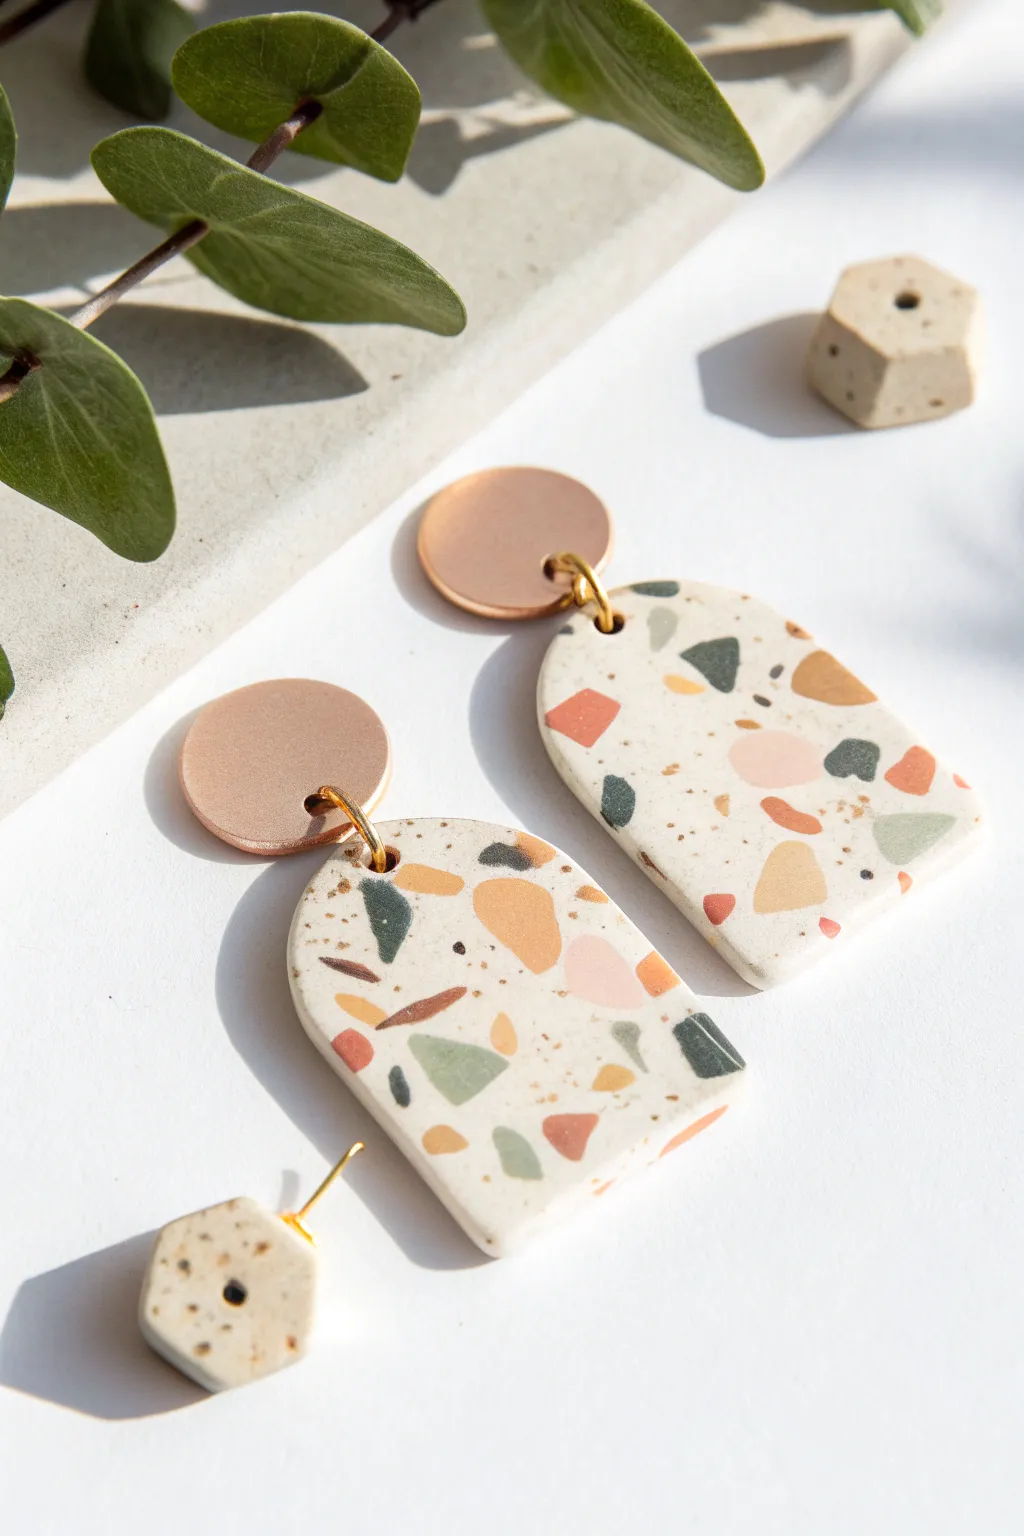
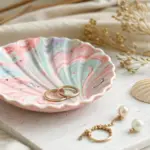
These stylish earrings feature a classic terrazzo look with a modern twist, using warm earth tones against a speckled creamy base. The organic shapes of the ‘chips’ make each pair completely unique, while the metallic stud adds a professional finish.
Detailed Instructions
Materials
- Polymer clay (colors: cream/beige for base, plus scraps of rust, mustard yellow, sage green, peach, and charcoal)
- Black pepper or sand (optional, for speckling the base)
- Acrylic rolling pin
- Tissue blade or X-Acto knife
- Small arch-shaped clay cutter
- Circular clay cutter (approx. 10-12mm)
- Two ball-post earring studs (rose gold or gold tone)
- Four large jump rings (gold tone)
- Jewelry pliers
- Hand drill or pin vibe with small bit
- Parchment paper or ceramic tile
Step 1: Preparing the Clay
-
Condition the base:
Start by conditioning your cream or beige clay until it’s soft and pliable. If you want that realistic stone effect shown in the photo, knead in a tiny pinch of ground black pepper or utilize a pre-mixed ‘granite’ color. -
Create the color palette:
Gather your accent colors—rust, mustard, sage, peach, and charcoal. Condition a small amount of each. You definitely don’t need much; pea-sized balls of each color will be plenty for a single pair. -
Make the chips:
Roll each accent color out into a very thin sheet. Use your blade to chop these thin sheets into tiny, irregular angular bits. These will be your terrazzo ‘aggregate.’ Keep the pile of chopped bits separate for now. -
Roll the base slab:
Roll your conditioned base clay out to a medium thickness, roughly 3mm to 4mm. This will be the canvas for your design.
Smudged Colors?
If your colored chips are smearing during the rolling phase, let the chopped bits sit for 10 minutes to ‘leech’ out oils on paper before applying to the base.
Step 2: Creating the Terrazzo Pattern
-
Scatter the chips:
Gently pick up your chopped color bits and sprinkle them randomly over the rolled-out base slab. Aim for a balanced distribution, but don’t overthink it—randomness is key to the natural look. -
Press them in:
Cover the slab with a piece of parchment paper. Use your rolling pin to gently roll over the paper, pressing the colorful chips down until they are flush with the base clay surface. -
Smooth the surface:
Remove the paper. If the surface looks uneven, roll it slightly more to ensure it’s completely flat and uniform in thickness. The slab should feel smooth to the touch.
Add Some Shine
For a glossy finish that mimics polished granite, coat the baked clay with a thin layer of UV resin and cure under a UV lamp for a glass-like surface.
Step 3: Cutting and Baking
-
Cut the main shapes:
Place your arch cutter onto the most pleasing section of your terrazzo pattern. Press down firmly to cut out two matching shapes. These will be the bottom dangles. -
Cut the studs:
If you want clay studs instead of metal ones, use your small circle cutter to punch out two circles from the remaining patterned slab or plain metal-colored clay. In the photo, metal disc studs are used, so you can skip this if you have those prefabricated findings. -
Pierce the holes:
Before baking, use a needle tool or toothpick to carefully poke a hole at the top center of each arch shape. Make sure the hole is large enough for your jump rings to wiggle freely. -
Bake the pieces:
Arrangement the clay pieces on a ceramic tile or baking sheet lined with parchment paper. Bake according to your specific brand of clay’s instructions—usually around 275°F (130°C) for 30 minutes.
Step 4: Finishing and Assembly
-
Cool and sand:
Let the pieces cool completely. Once cool, I like to use a high-grit sandpaper (around 1000 grit) to smooth any rough edges or fingerprints gently. -
Drill (if needed):
If you forgot to poke holes before baking, or if they shrank, use a small hand drill to carefully bore holes in the top center of the arches now. -
Prepare the jump rings:
Using two pairs of pliers, twist open your jump rings. Remember to twist them sideways (like opening a door), never pull them apart, to maintain their round shape. -
Connect the pieces:
Loop the open jump ring through the hole in your clay arch. Then, loop it through the hole or loop on your metal stud component. -
Close the ring:
Use your pliers to twist the jump ring back into a closed position, ensuring the ends meet perfectly flush so the earring doesn’t slip off. -
Secure the hex accents:
If you created the small hexagonal accents shown in the photo, glue earring posts to the back of them using strong jewelry adhesive like E6000.
Wear these artful dangles to add a pop of subtle color to any neutral outfit


Marbled Round Stud Earrings
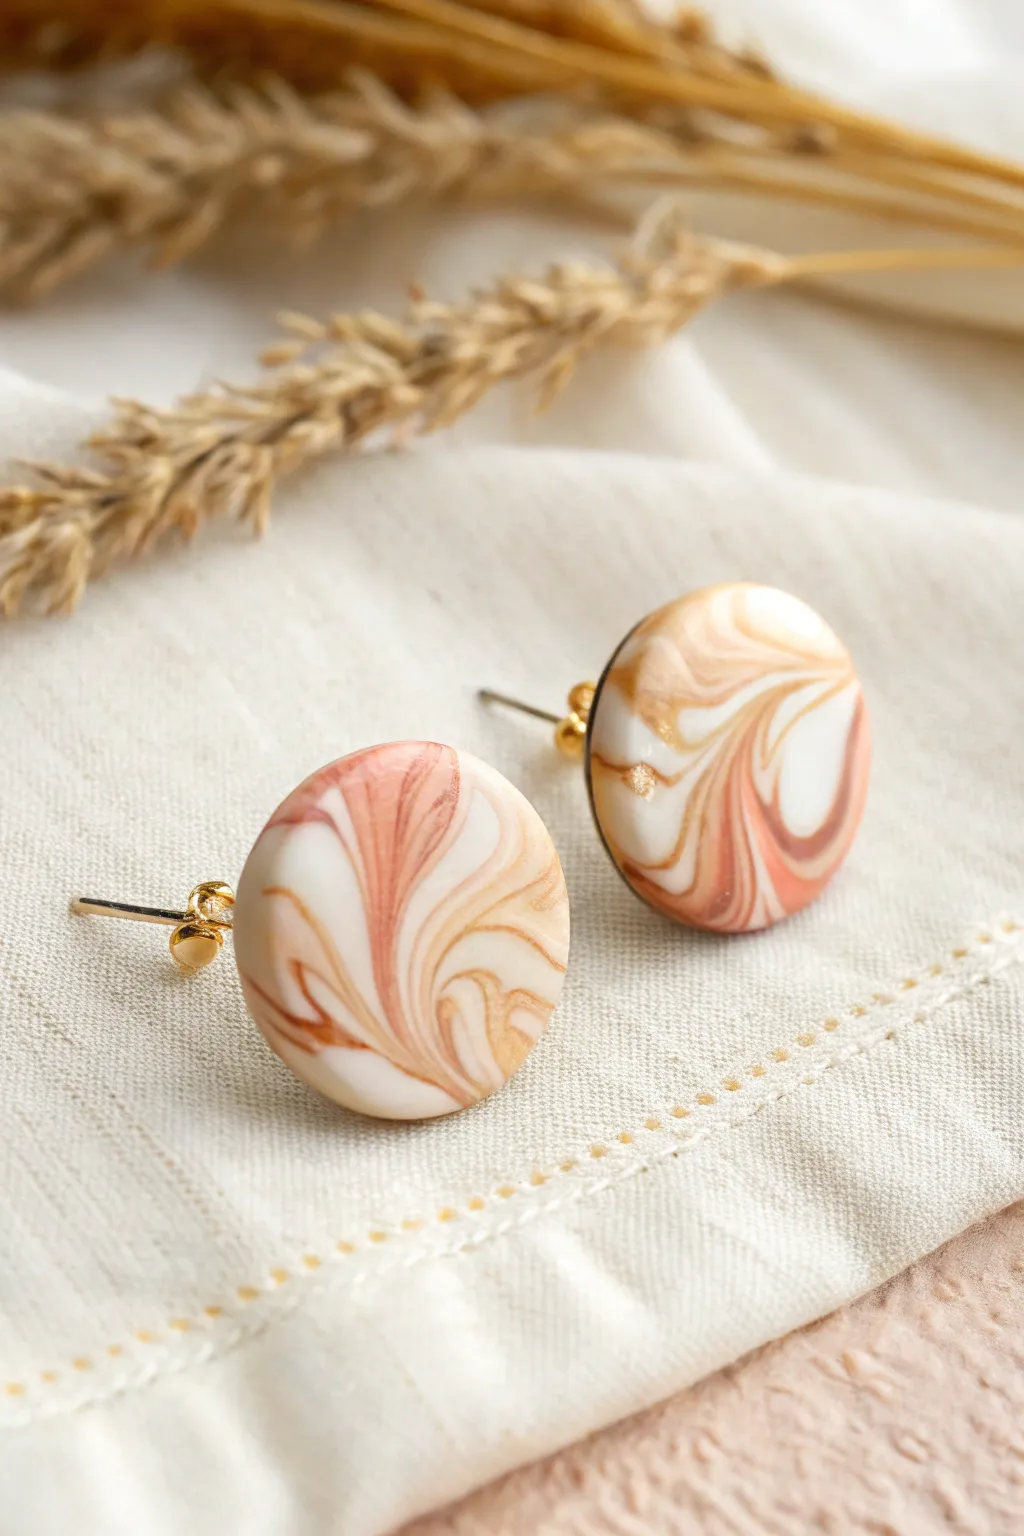
Capture the graceful patterns of natural stone with these chic, marbled polymer clay stud earrings. Using a palette of white, beige, and terracotta, you’ll create a sophisticated swirl design that looks effortlessly high-end.
How-To Guide
Materials
- Polymer clay (White, Beige/Tan, Terracotta/Rust)
- Gold leaf or metallic gold paint (optional for highlights)
- Acrylic roller
- Small round clay cutter (approx. 10-12mm)
- Tissue blade or X-Acto knife
- Earring posts (gold-plated or surgical steel)
- Super glue or E6000 adhesive
- Gloss glaze or resin (optional)
- Parchment paper or ceramic tile for baking
- Small paintbrush
Step 1: Preparing the Clay Palette
-
Condition the white clay:
Begin by taking a chunk of white polymer clay. Knead it thoroughly in your hands until it becomes soft, pliable, and warm to the touch. -
Condition the accent colors:
Repeat the conditioning process for your beige and terracotta clays. You’ll want about half as much of these colors compared to the white base. -
Form the logs:
Roll each color into a long, thin log or snake. Aim for the white log to be slightly thicker than the colored ones to maintain it as the dominant background.
Keep it Clean
White clay picks up dust easily. Wipe your work surface, hands, and roller with a baby wipe or alcohol before starting to keep your white bright.
Step 2: Creating the Marble Effect
-
Combine the colors:
Lay the terracotta and beige logs alongside the white log. Twist them together gently to form one large, candy-cane-like rope. -
Fold and twist:
Fold the twisted rope in half, and twist it again. Repeat this folding and twisting process 3-4 times. Be careful not to over-twist, or the colors will muddy together into a single brown shade. -
Roll into a ball:
Once you have distinct streaks of color, roll the entire mass into a smooth ball. -
Flatten the slab:
Place the ball on your work surface or parchment paper. Using your acrylic roller, flatten the ball into a slab about 3mm thick. This reveals the beautiful internal marbling. -
Add metallic touches:
For a bit of luxury, I like to tear off tiny flecks of gold leaf and press them randomly onto the surface of the clay slab. -
Smooth the surface:
Gently roll over the slab one last time to embed the gold leaf and ensure the surface is perfectly flat and even.
Step 3: Cutting and Baking
-
Select your pattern area:
Look closely at your slab and identify the areas with the most interesting swirls and color balance. -
Cut the shapes:
Press your round cutter firmly into the chosen areas. Give it a slight wiggle before lifting to ensure a clean cut. -
Remove excess clay:
Peel away the scrap clay from around your cut circles. Save this scrap for future projects—it makes a lovely neutral mix. -
Smooth the edges:
Gently pick up the circles and run your finger lightly along the rim to smooth out any sharp edges or cutting debris. -
Bake the pieces:
Place your clay rounds on a ceramic tile or baking sheet lined with parchment. Bake according to your clay package instructions (usually 275°F/135°C for 15-30 minutes). -
Cool down:
Allow the clay pieces to cool completely before moving to assembly. The clay hardens fully only after cooling.
Air Bubbles?
If you see a bubble while rolling the slab, gently prick it with a needle and smooth the air out with your finger, then roll over it again.
Step 4: Assembly and Finishing
-
Sand (Optional):
If the edges aren’t as smooth as you’d like, use fine-grit sandpaper to gently buff the rims. -
Apply finish:
Paint a thin layer of gloss glaze over the top for a polished, ceramic-like look. Let this dry completely. -
Attach the posts:
Put a small dab of strong adhesive (like E6000) on the flat pad of the earring post. -
Secure the backing:
Press the glued post firmly onto the center of the back of the clay circle. Let the glue cure for at least 24 hours for maximum durability.
Wear your new sophisticated studs with pride or gift a pair to a friend who loves minimalist style


Gradient “Ombre” Arch Earrings
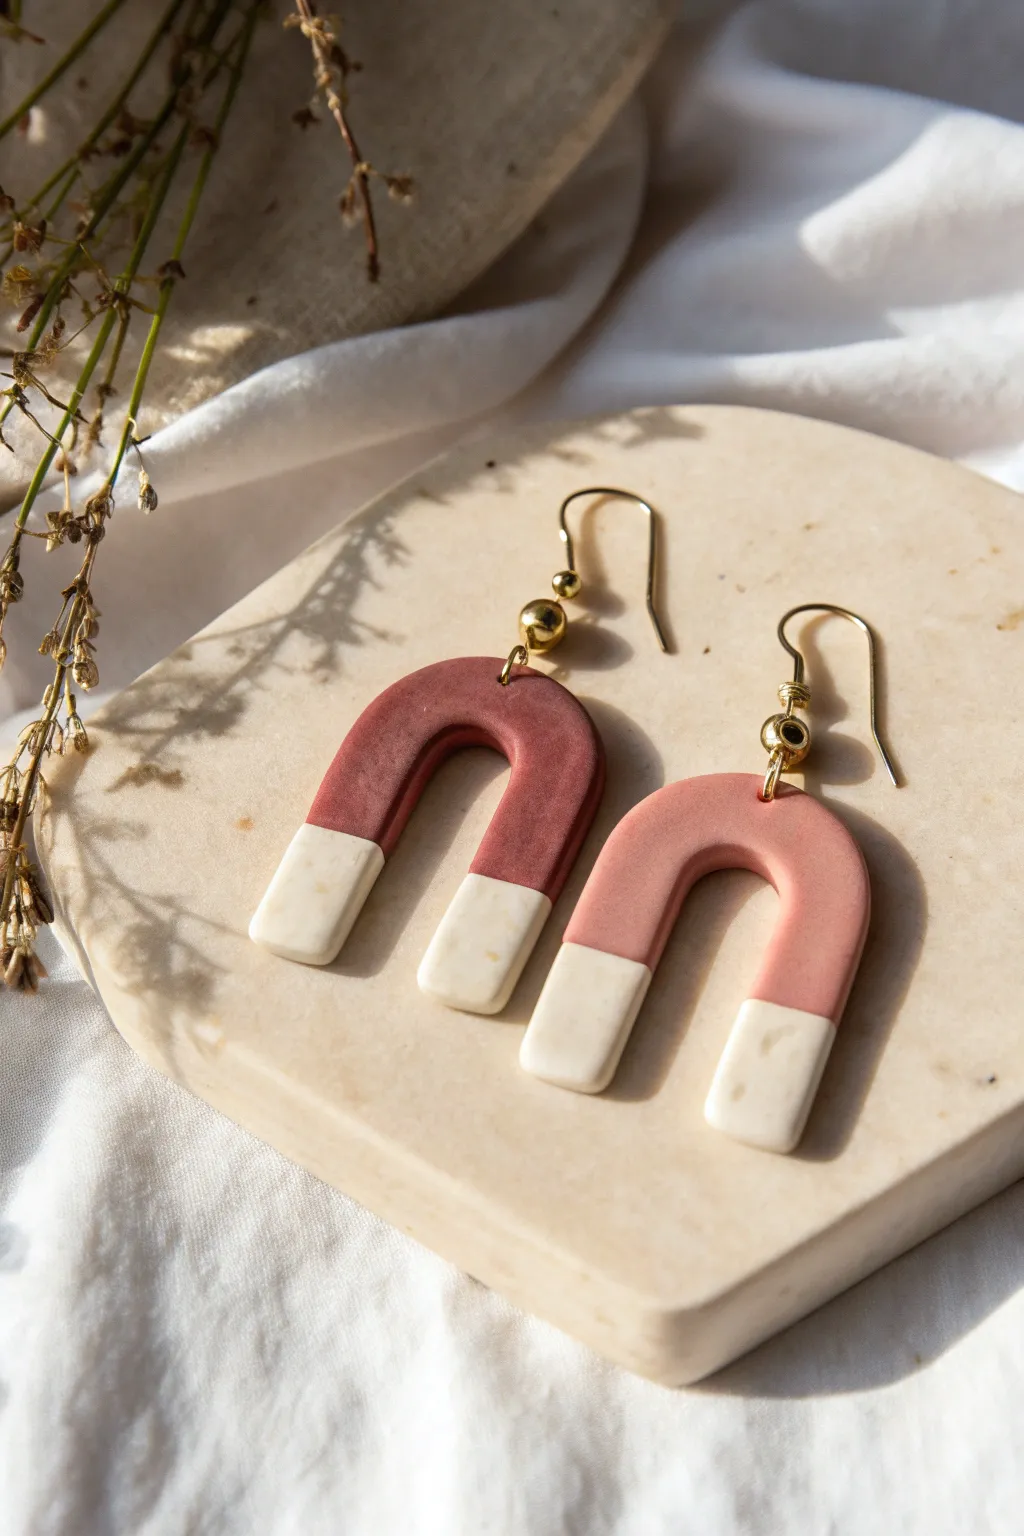
These stunning arch earrings feature a beautiful vertical gradient, transitioning from deep terracotta to soft maroon and finally to speckled cream. They make a sophisticated statement piece that looks incredibly high-end but is surprisingly simple to achieve at home.
Step-by-Step Guide
Materials
- Polymer clay (Deep Terracotta or Maroon)
- Polymer clay (White or Translucent)
- Speckled clay (or white clay with black pepper/sand mixed in)
- Acrylic rolling pin
- Pasta machine (optional)
- Arch-shaped clay cutters (medium size)
- Exacto knife or flexible tissue blade
- Smooth ceramic tile or glass workspace
- Earring hooks (gold finish)
- Jump rings and gold spacer beads
- Jewelry pliers
- Small hand drill or pin vise
- Fine grit sandpaper
Step 1: Creating the Ombre Blend
-
Condition your clay:
Start by thoroughly conditioning your main colors: the deep terracotta and a small amount of white. Warm the clay in your hands until it becomes soft and pliable to prevent cracking later. -
Create base colors:
To achieve the gradient seen in the photo, you will need three distinct shades. Keep a portion of pure terracotta for the top. Mix a second portion of terracotta with a tiny bit of white to create a mid-tone rose shade. -
Prepare the speckled tips:
Condition your speckled cream clay. If you don’t have pre-speckled clay, simply take white clay and knead in a small pinch of ground black pepper or craft sand for that organic texture. -
Form the gradient slab:
Arrange your three colors in a row: dark terracotta at the top, the lighter mix in the middle, and the speckled cream at the bottom. Smush the edges together gently so they adhere to one another. -
Blend the seams:
Using your acrylic roller or pasta machine, roll the joined clay into a sheet. Fold the sheet in half and roll again. Repeat this several times, rolling in the same direction as the color stripes, until the transition between colors is soft and blurred. -
Final roll out:
Once you are happy with the blend, roll the sheet out to your final thickness, usually around 3mm to 4mm. Ensure it is even so the earrings hang correctly.
Step 2: Cutting and Baking
-
Position the cutter:
Place your arch cutter over the clay slab. Position it so the curve of the arch captures the darker tones, while the legs of the arch extend down into the speckled cream section. -
Cut the shapes:
Press down firmly cut out your arch shapes. If the clay sticks to the cutter, I find a light dusting of cornstarch helps it release cleanly. Cut two identical arches for the pair. -
Smooth the edges:
Gently lift the shapes off your work surface. Use your finger or a silicone tool to smooth any rough edges or fingerprints before baking. This saves sanding time later. -
Pierce holes:
Using a needle tool or toothpick, carefully poke a hole at the very top center of each arch. Make sure the hole is big enough for your jump rings. -
Bake the pieces:
Place your shapes on a ceramic tile or baking sheet lined with parchment paper. Bake according to your clay manufacturer’s instructions (typically 275°F/130°C for 30 minutes). -
Cool down:
Allow the pieces to cool completely in the oven or on a wire rack. Polymer clay is still slightly soft when hot and hardens as it cools.
Smooth Operator
Before baking, wipe the surface of your unbaked clay with a little rubbing alcohol (isopropyl) on a q-tip. It removes lint, dust, and fingerprints instantly.
Step 3: Assembly
-
Sand for perfection:
Once cool, use fine-grit sandpaper to buff the edges creating a flawlessly smooth finish. Wipe away any dust with a damp cloth or baby wipe. -
Prepare the hardware:
Open your jump rings using two pairs of jewelry pliers. Twist them sideways to open—never pull them apart, as this weakens the metal. -
Attach the gold bead:
Thread a gold spacer bead onto the jump ring or a headpin if you prefer a dangle effect. This adds that elegant metallic touch visible in the reference image. -
Connect to the clay:
Loop the jump ring (with the bead) through the hole you made in the clay arch. -
Add the hook:
Slide the earring hook onto the jump ring before closing it. Ensure the hook is facing the correct direction so the front of the ombre arch faces forward. -
Secure the ring:
Use your pliers to twist the jump ring back into a closed position, ensuring the ends meet perfectly flush so the hardware doesn’t slip off.
Gloss It Up
For a ceramic look, coat the baked pieces in UV resin or a gloss glaze. This makes the colors pop and gives the jewelry a professional, fired pottery feel.
Now you have a stunning pair of custom ombre earrings ready to wear or gift


Easy Mushroom Figurines
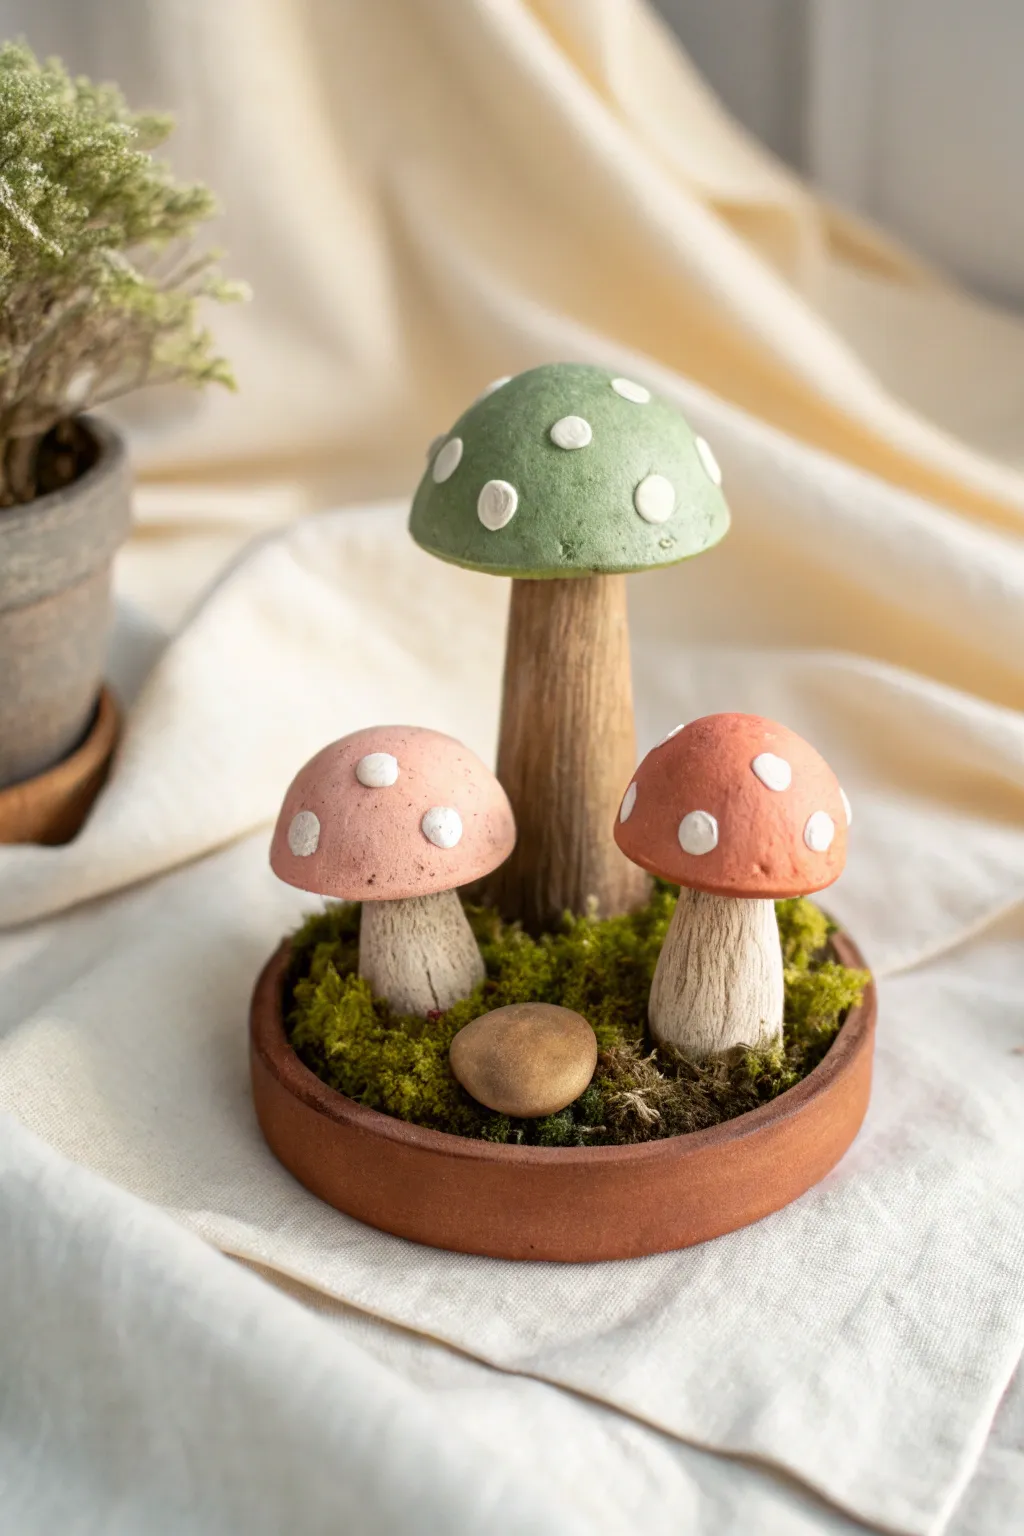
Capture the magic of a forest floor with this charming mushroom display featuring three distinct fungi in soft, earthy tones. Mounted in a shallow terracotta saucer with faux moss, these polymer clay creations make for enchanting home decor.
How-To Guide
Materials
- Polymer clay (green, dusty pink, terracotta/orange, white, beige/tan, dark brown)
- Small terracotta plant saucer (approx. 4-5 inches)
- Aluminum foil
- Liquid polymer clay or bake-and-bond
- Needle tool or texture tool
- Toothbrush (for texturing)
- Small craft knife
- Dried moss (preserved moss)
- Craft glue or hot glue gun
- Rolling pin or pasta machine
Step 1: Shaping the Stems
-
Form foil cores:
To save clay and reduce weight, scrunch aluminum foil into cone-like shapes for the mushroom stems. Make one tall and slender for the green mushroom, and two shorter, stout ones for the smaller mushrooms. -
Prepare stem clay:
Condition your beige or tan clay until soft. For the taller stem, mix in a tiny bit of dark brown to create a woodier, darker tone compared to the smaller ones. -
Cover the cores:
Roll the clay into thin sheets and wrap them around your foil armatures. Smooth the seams with your fingers so the foil is completely hidden. -
Add vertical texture:
Using a needle tool or a craft knife, drag uneven vertical lines down the length of each stem. This mimics the fibrous texture of real mushroom stalks. Don’t be afraid to make them slightly jagged.
Pro Tip: Matte Finish
Before baking, lightly dust the clay caps with cornstarch or baby powder. This removes fingerprints and prevents the clay from looking plasticky after baking.
Step 2: Creating the Caps
-
Shape the large cap:
Roll a ball of sage green clay. Press it into a dome shape. I like to hollow out the underside slightly with my thumb to ensure it fits snugly over the tall stem later. -
Texture the green cap:
Gently tap a clean toothbrush or piece of sandpaper over the green dome to give it a matte, organic surface rather than a shiny, smooth one. -
Shape the smaller caps:
Repeat the dome-shaping process with the dusty pink and terracotta orange clay for the two smaller mushrooms. These should be wider and flatter relative to their size. -
Add the spots:
Roll tiny, irregular balls of white clay. Press them flat onto the top of each mushroom cap. Vary the sizes and placement for a natural look; they shouldn’t look like perfect polka dots. -
Create the gills (optional):
If you want extra detail beneath the caps, use your needle tool to score fine lines radiating from the center to the edge on the underside of each cap.
Step 3: Assembly & Baking
-
Attach caps to stems:
Apply a drop of liquid polymer clay or bake-and-bond to the top of each stem. Press the corresponding cap firmly onto the stem. You can insert a small piece of wire or toothpick for extra stability if needed. -
Make the smooth stone:
Marble a small amount of tan and brown clay together, form it into a smooth, flattened pebble shape, and set it aside to bake with the mushrooms. -
Bake the pieces:
Place your three mushrooms and the small clay stone on a baking sheet or tile. Bake according to your specific clay brand’s instructions (usually 275°F/130°C for 15-30 minutes). -
Cool down:
Allow the pieces to cool completely in the oven before handling them to prevent cracking.
Level Up: Real Dirt Effect
Mix real dried coffee grounds or tea leaves into the liquid clay when attaching the moss. This adds gritty realism to the ‘soil’ near the mushroom bases.
Step 4: Creating the Scene
-
Prepare the base:
Take your terracotta saucer. If you want permanent placement, add a layer of waste clay or glue to the bottom to anchor the stems. -
Position the mushrooms:
Glue the tall green mushroom near the back center. Place the pink and orange mushrooms on the sides, slightly forward, to create depth. -
Add the moss:
Apply craft glue liberally around the base of the stems. Press clumps of preserved moss into the glue, covering the terracotta floor completely. -
Final touches:
Nestle the small clay stone into the moss near the front center to balance the composition.
Place your little fungus garden on a sunny shelf to enjoy a touch of nature indoors

What Really Happens Inside the Kiln
Learn how time and temperature work together inside the kiln to transform clay into durable ceramic.
Chubby Cat Mini Sculpture
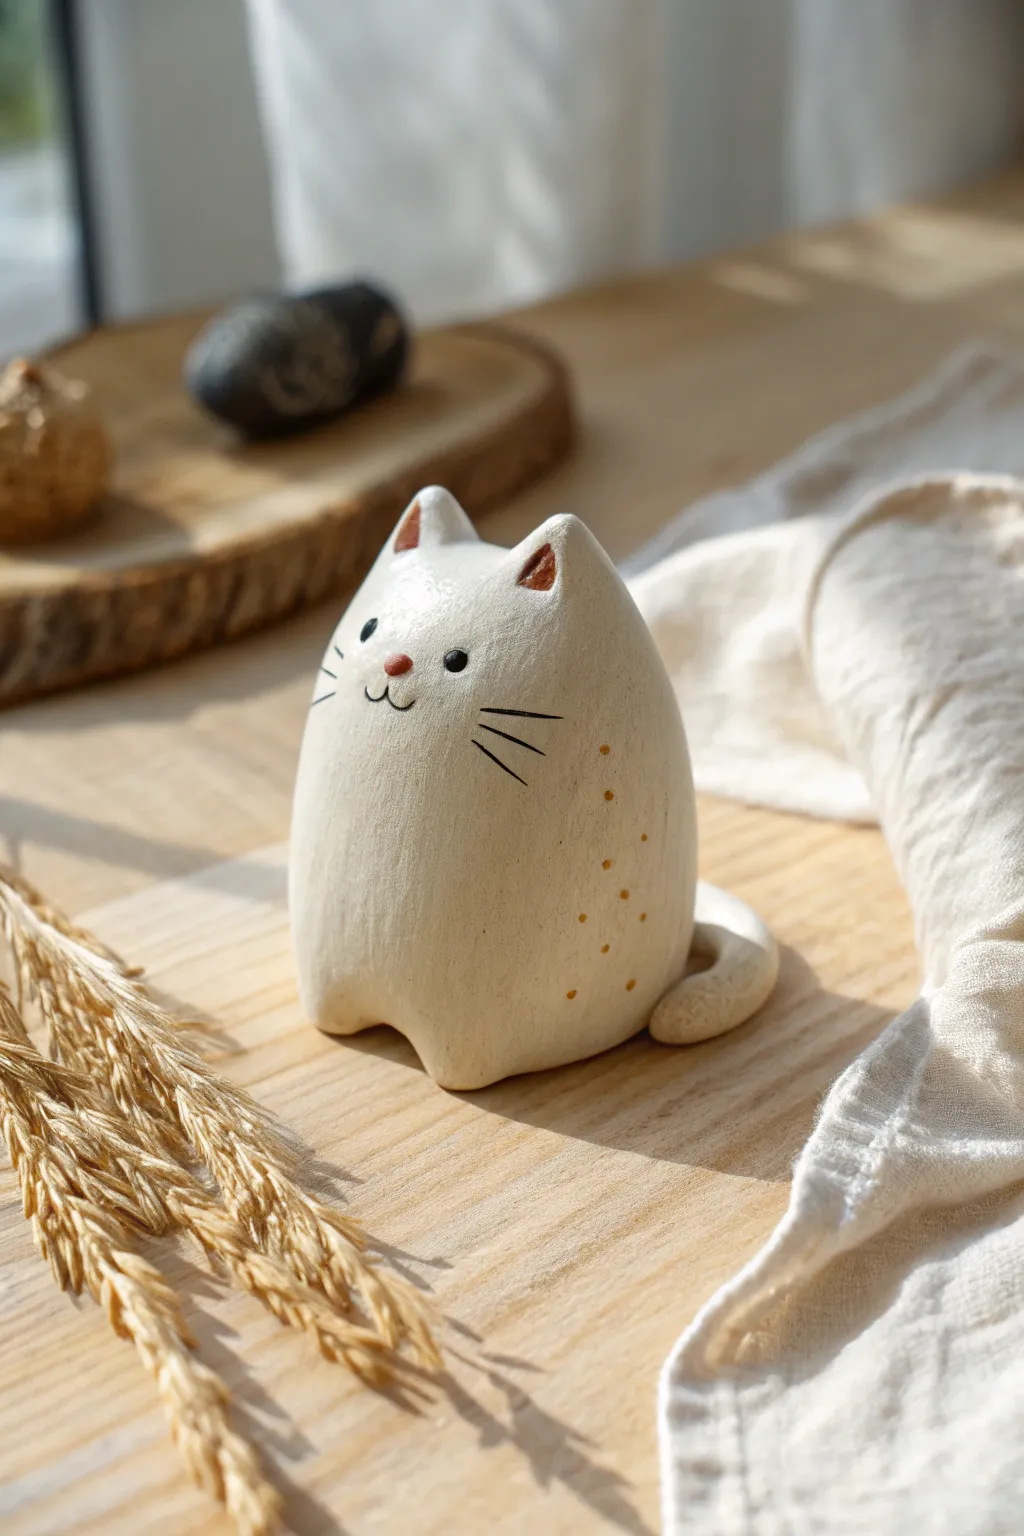
This charming, minimalist cat sculpture features a rounded, egg-like body and delicate painted details. Its textured, matte finish gives it a lovely, handmade ceramic feel without needing a kiln.
Step-by-Step Guide
Materials
- White polymer clay (approx. 2oz)
- Acrylic paints: Black, Terracotta or reddish-brown, and a soft Gold
- Fine-grit sandpaper or a stiff toothbrush for texturing
- Needle tool or toothpick
- Small ball tool
- Fine detail paintbrush (size 0 or 00)
- Matte varnish or sealant
- Clean work surface (ceramic tile or glass)
Step 1: Shaping the Base
-
Condition the clay:
Start by warming the white polymer clay in your hands. Knead and roll it until it is soft, pliable, and free of any air bubbles. -
Form the main body:
Roll your clay into a smooth ball, then gently taper the top half slightly to create a very subtle egg shape. The bottom should remain wider for stability. -
Flatten the bottom:
Press the wider end of your egg shape onto your work surface. Tap the bottom gently until the cat stands securely on its own without wobbling. -
Refine the shape:
Smooth out the sides with your fingers to remove fingerprints. Aim for a soft, streamlined silhouette that curves gently from the base up to where the head will be.
Step 2: Adding Features
-
Pinch the ears:
At the top of the tapered end, use your thumb and forefinger to gently pinch up two small points for ears. Space them slightly apart. -
Refine the ears:
Use a small ball tool or the smooth end of a paintbrush to create shallow indentations inside the ear shapes, giving them dimension. -
Create the tail:
Roll a small snake of clay, about 1/4 inch thick. Taper one end slightly. -
Attach the tail:
Wrap this clay snake around the base of the cat’s back side, blending the seam thoroughly where it connects to the body so it looks like one solid piece. -
Form the feet:
Using a needle tool or knife, make a very shallow notch at the front bottom center. Gently push the clay on either side of the notch to suggest two subtle paws. -
Texturize the surface:
To mimic the stone-like finish in the photo, gently tap the entire surface with a stiff toothbrush or very fine sandpaper before baking. This removes the ‘plastic’ shine.
Clean Clay Tip
White clay picks up dust easily! Keep baby wipes nearby to clean your hands and tools constantly while sculpting to keep the clay pristine.
Step 3: Baking and Painting
-
Bake the sculpture:
Follow the baking instructions on your specific brand of clay. Typically, bake at 275°F (135°C) for about 30 minutes. Let it cool completely. -
Paint the face details:
Using a fine detail brush and black paint, add two small dots for eyes. Paint thin, delicate lines for the whiskers—three on each side. -
Paint the nose and mouth:
Mix a tiny bit of terracotta paint. Paint a small oval nose between the eyes. Below that, paint a thin, black ‘w’ shape for the mouth. -
Add ear details:
Paint the inside indentations of the ears with the terracotta color to add warmth to the face. -
Add decorative spots:
Dip the non-brush end of your paintbrush into gold or light brown paint. Dot a vertical line of small spots running down the side of the cat’s body. -
Seal the piece:
Once the paint is fully dry, apply a coat of matte varnish. This protects the paint and enhances the ceramic look without making it glossy.
Try Speckled Clay
Instead of plain white, mix in some ‘granite’ effect polymer clay or black pepper to achieve an automatic stone texture.
Place your little feline friend on a shelf or desk where its serene expression can brighten your day
Flat Color-Block Pendant
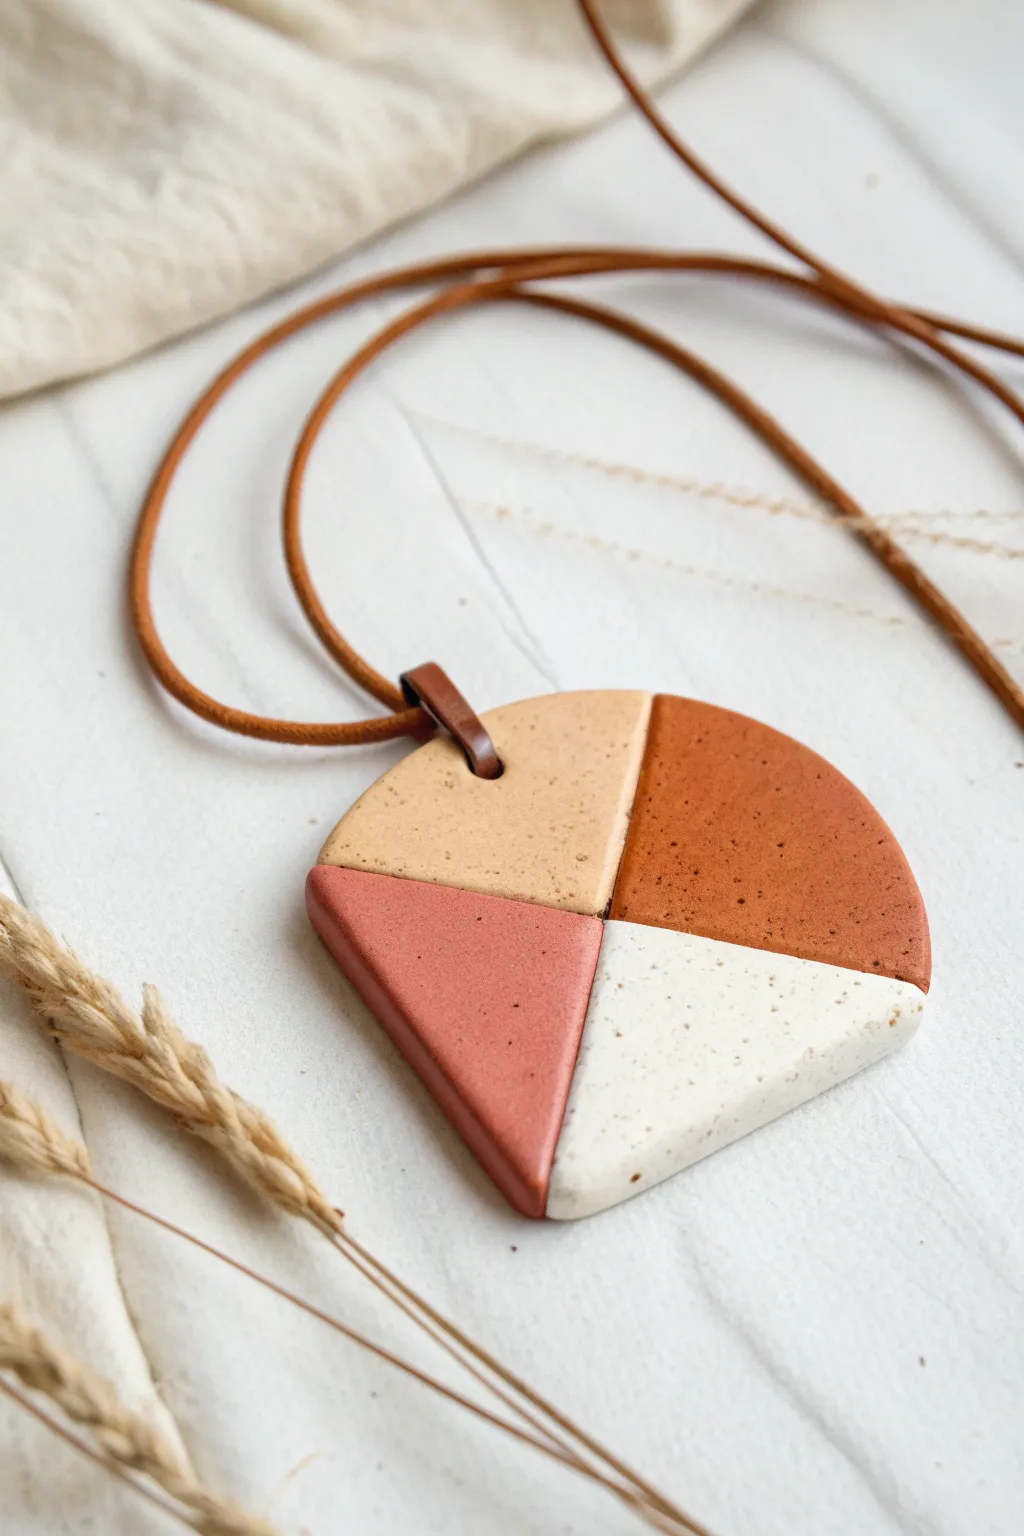
This striking pendant combines warmth with modern design, featuring a four-quadrant color block pattern in earthy shades of terracotta, rust, beige, and speckled white. The organic, speckled texture gives it a beautiful stone-like finish that pairs perfectly with a simple leather cord.
Detailed Instructions
Materials
- Polymer clay (white, beige, terracotta, rust red)
- Black pepper or dried coffee grounds (for speckling)
- Acrylic rolling pin
- Tissue blade or craft knife
- Square clay cutter or geometric shape template
- Small circle cutter (approx. 5mm) for the bail hole
- Sandpaper (various grits from 400 to 1200)
- Leather cord (brown)
- Small jump ring (optional) or leather strip for bail
- Oven for baking
Step 1: Preparing the Clay
-
Condition the clay:
Start by thoroughly conditioning each color of polymer clay—white, beige, terracotta, and rust red—until they are soft and pliable. Wash your hands between colors to avoid muddying the lighter shades. -
Create the speckled effect:
To achieve the stone-like texture seen in the photo, mix a very small pinch of ground black pepper or dried coffee grounds into the white and beige clays. Fold and knead the clay repeatedly until the specks are evenly distributed. -
Roll out sheets:
Roll each of the four colors into a sheet of equal thickness, roughly 3mm to 4mm thick. Ensure the surface is smooth and free of air bubbles or fingerprints. -
Cut initial triangles:
Use your tissue blade to cut a clean right-angled triangle from each color. The size of the triangles will determine the final size of your pendant; aim for legs about 1 inch long if you want a substantial statement piece.
Step 2: Assembling the Pattern
-
Join the quadrants:
Arrange the four triangles into a square or diamond shape on your work surface. Place the terracotta and beige opposite each other, and the rust red and white opposite each other. -
Fuse the seams:
Gently push the edges of the triangles together. I find using the side of a blade helps to press them firmly without distorting the straight lines. Ensure there are no gaps between the colors. -
Smooth the surface:
Place a piece of deli paper or baking paper over the assembled clay. Gently rub over the seams with your finger or roll lightly with your acrylic roller to bond the pieces into a single slab. -
Check the back:
Flip the slab over carefully and repeat the smoothing process on the back to ensure the structural integrity of the join.
Seamless Bond
Apply a tiny amount of liquid polymer clay to the raw edges before pressing the triangles together. This acts like glue and ensures the quadrants won’t separate after baking.
Step 3: Shaping and Refining
-
Cut the final shape:
Using a freehand technique or a paper template, cut the final perimeter of the pendant. The shape is like a softened diamond: straight edges on the bottom coming to a point, and a gently rounded curve across the top. -
Soften the edges:
Use your finger dipped in a little cornstarch or water to gently smooth the cut edges of the pendant, rounding them slightly so they aren’t sharp. -
Create the bail hole:
Using a small circle cutter or a straw, punch a hole near the top center of the pendant. Ensure it is centered on the vertical seam line and has enough clay above it (at least 3mm) to be strong. -
Texture check:
inspect the surface one last time. If you want more texture, you can lightly dab the surface with a toothbrush or coarse sponge to enhance the organic stone look.
Smudged Colors?
If lighter colors get dirty from darker clay during smoothing, use a cotton swab dipped in rubbing alcohol or acetone to gently wipe the surface clean before baking.
Step 4: Baking and Assembly
-
Bake the piece:
Place the pendant on a ceramic tile or a baking sheet lined with cardstock. Bake according to your clay manufacturer’s instructions—usually around 275°F (135°C) for 30-45 minutes. -
Cool down:
Allow the pendant to cool completely in the oven or on a cooling rack before handling it, as warm clay is fragile. -
Sand for finish:
Once cool, wet-sand the edges and surface with 400 grit sandpaper, moving up to 800 and 1200 grit. This reveals the speckles beautifully and gives the piece a professional, matte finish. -
Create the leather bail:
Cut a small, thin strip of leather or use a jump ring. Thread it through the hole in the pendant to create a loop for the main cord. -
Attach the cord:
Thread your main leather cord through the loop you just created. Tie the ends of the cord with a sliding knot or attach your preferred clasp. -
Final polish:
Buff the pendant vigorously with a soft denim cloth or a microfiber towel to give it a subtle, natural sheen without using glaze.
Wear your new geometric pendant proudly as a touch of handmade artistry for your everyday outfit


The Complete Guide to Pottery Troubleshooting
Uncover the most common ceramic mistakes—from cracking clay to failed glazes—and learn how to fix them fast.
Textured Leaf Imprint Necklace Charm
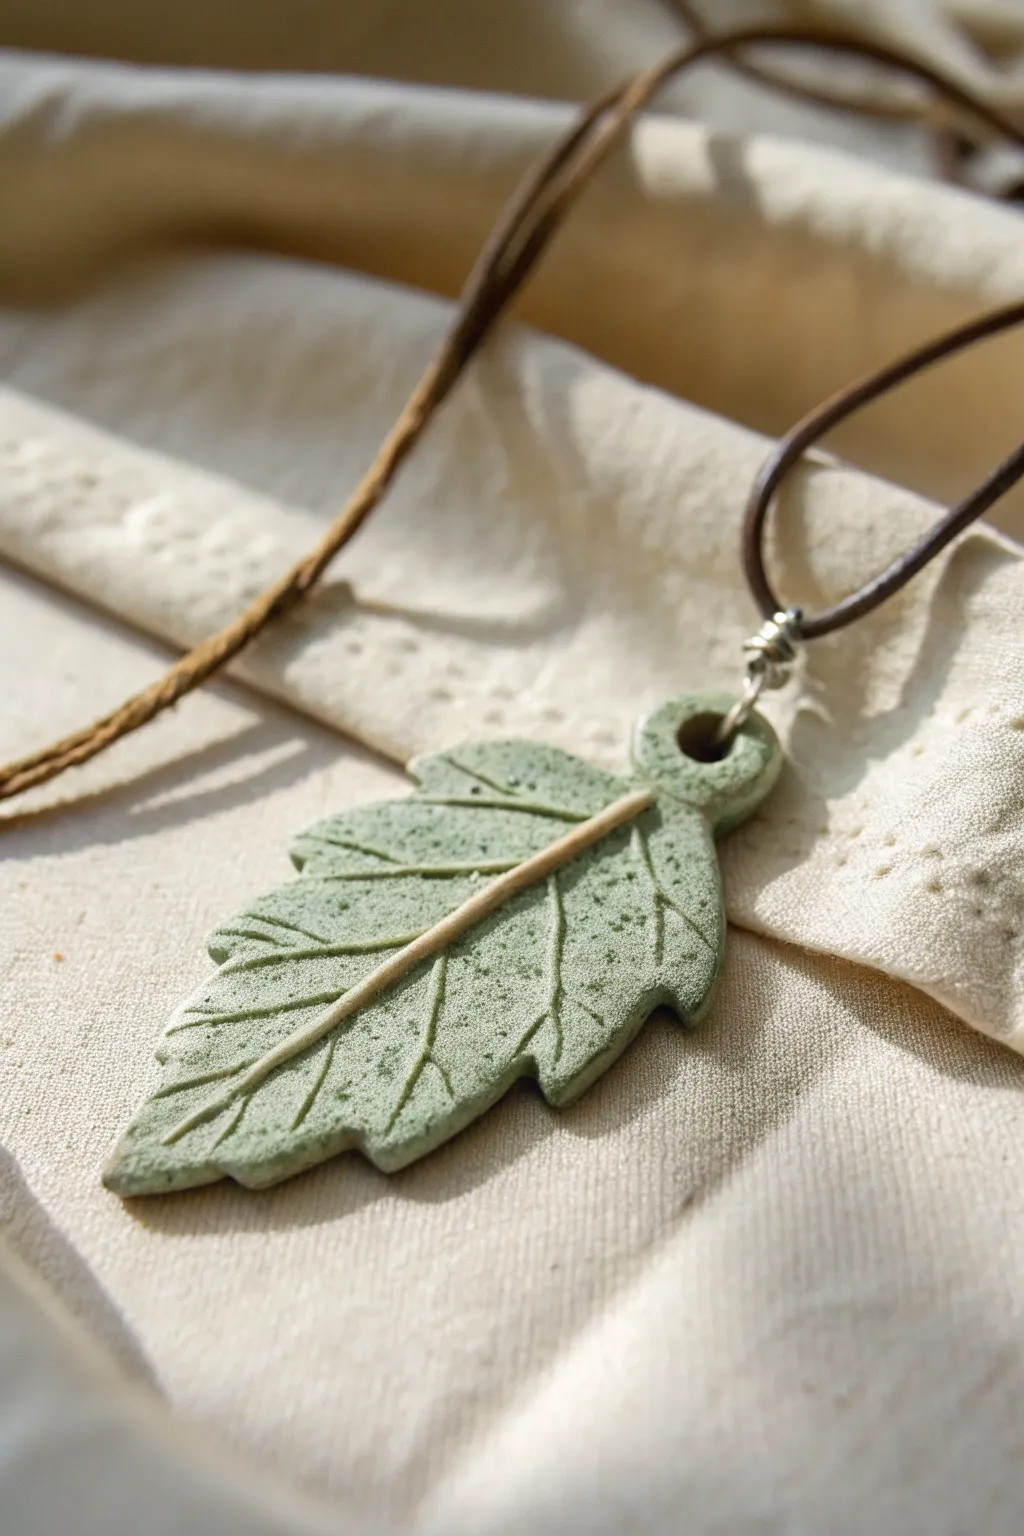
Capture the organic beauty of nature with this textured leaf pendant that mimics the look of weathered stone or sage-colored terra cotta. This project focuses on subtle coloring and realistic veining to create a botanically inspired accessory that looks fresh from the forest floor.
Step-by-Step Guide
Materials
- Polymer clay (Sage Green or mix Green, White, and a touch of Brown)
- Acrylic paints (Dark Green, Brown, White)
- Coarse salt or sand (for speckling, optional)
- Real leaf for texturing (deeply veined type like hydrated hydrangea or rose)
- Clay roller or pasta machine
- sharp craft knife or X-Acto blade
- Needle tool or toothpick
- Brown waxed cotton cord or leather cord
- Jewelry wire (20 gauge, silver)
- Round nose pliers and wire cutters
- Fine-grit sandpaper (optional)
- Matte varnish (optional)
Step 1: Preparing the Clay Base
-
Mix your color:
Start by conditioning your polymer clay until it is soft and pliable. If you don’t have the perfect sage green, mix roughly 4 parts white, 1 part green, and just a tiny pinch of brown to desaturate the tone. -
Add texture inclusions:
To achieve that stony, speckled look seen in the photo, kneed in a very small amount of coarse salt, sand, or even black pepper into the clay. This creates natural-looking imperfections. -
Roll the slab:
Roll out your clay to a thickness of about 1/4 inch (approx. 5-6mm). You want it substantial enough to hold the imprint without becoming fragile.
Natural Speckle Hack
Mix dried basil or used coffee grounds into the clay instead of paint speckling. It adds organic texture and won’t burn at standard baking temps.
Step 2: Texturing and Shaping
-
Imprint the leaf:
Select a fresh leaf with prominent veins on the backside. Place it face down onto your clay slab and roll over it firmly with your acrylic roller to transfer the pattern deep into the clay. -
Cut the shape:
Using your craft knife, carefully cut around the outline of the leaf imprint. Don’t worry about being perfectly jagged like a real leaf; a stylized, smoother edge often looks cleaner for jewelry. -
Refine the edges:
Gently smooth the cut edges with your finger to remove any sharp angles from the cutting process. -
Create the loop:
At the top of the stem area, flatten a small section slightly. Use a straw or a round cutter to punch a clean hole for the hardware. Ensure there is enough clay around the hole (at least 3mm) so it won’t break later. -
Enhancing veins:
If the leaf impression isn’t deep enough, use a needle tool to gently accentuate the main center vein and side tributaries. -
Simulate the stem:
Take a tiny snake of light brown clay (or mix a beige tone), roll it very thin, and press it gently into the central vein depression. This creates the contrasting woody stem effect shown in the image.
Step 3: Baking and Finishing
-
Bake the piece:
Place your leaf on a ceramic tile or parchment-lined baking sheet. Bake according to your brand’s specific instructions (usually 275°F/135°C for 15-30 minutes). -
Cool down:
Let the piece cool completely inside the oven if possible, or on a wire rack, to prevent thermal shock cracking. -
Apply a wash:
Mix a drop of dark green or brown acrylic paint with water. Brush it over the entire surface, ensuring it gets into the veins and speckles. -
Wipe back:
Immediately wipe the wet paint off the surface with a damp paper towel or baby wipe. The dark pigment will remain in the recesses, highlighting the texture. -
Prepare the hardware:
Cut a 3-inch piece of silver wire. Create a wrapped loop through the hole in the clay pendant using your round nose pliers. -
Thread the cord:
Slide your brown leather or cotton cord through the wrapped loop you just created. -
Finish the knots:
Tie sliding knots or attach end caps and a clasp to the cord ends to finish the necklace at your desired length.
Autumn Variations
Use burnt orange or mustard clay, and lightly dust the edges with gold mica powder before baking for a glowing, fall-inspired version.
Wear your new botanical necklace with a clear appreciation for the details found in nature
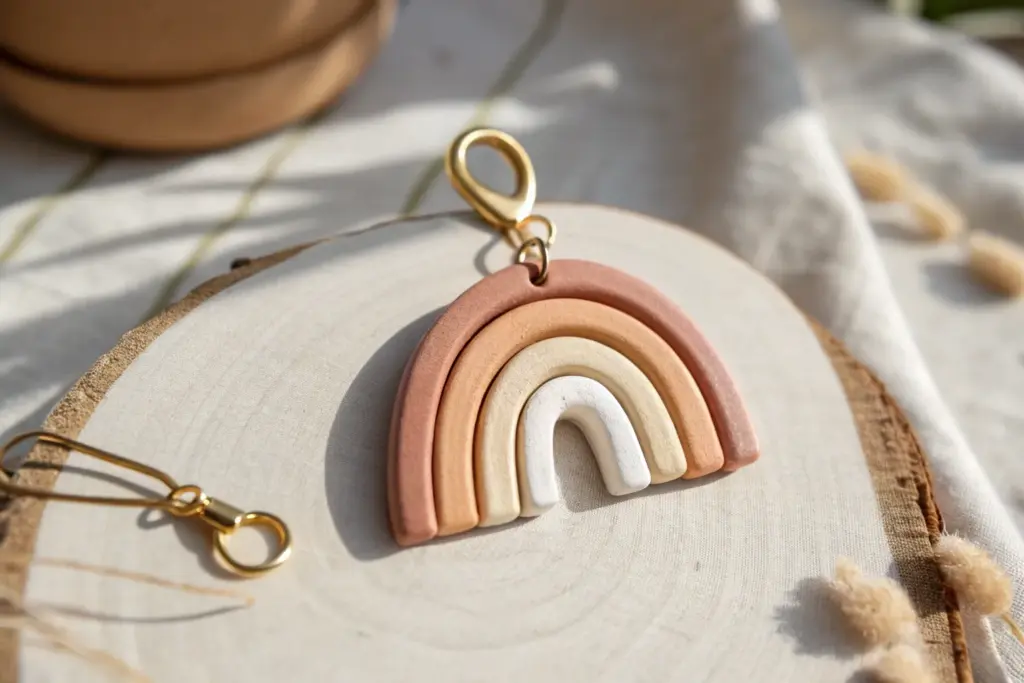
Striped Cane for Bold Pattern Cuts
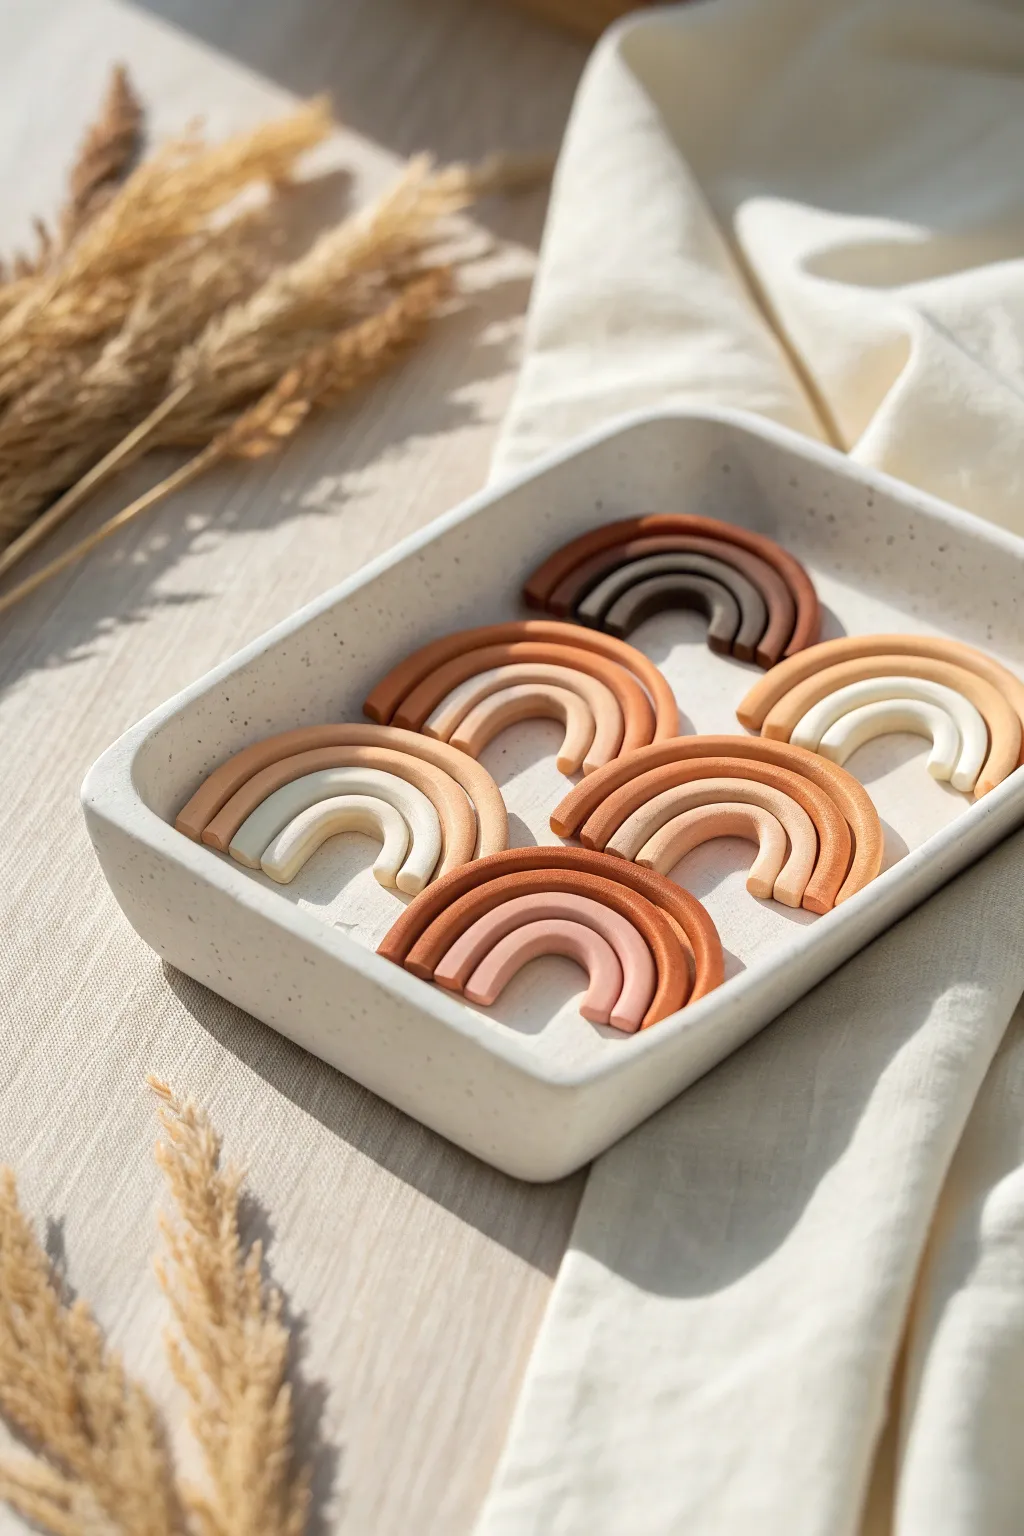
These minimalist, U-shaped clay rainbows capture the essence of bohemian decor with their warm, earthy color palette. They are simple to shape but make a stunning impact when displayed together in a tray or used as magnets and jewelry components.
How-To Guide
Materials
- Polymer clay in earth tones (terracotta, beige, chocolate brown, cream, muted orange)
- Acrylic rolling pin or clay machine
- Tissue blade or sharp craft knife
- Extruder tool (optional, for perfectly even snakes)
- Smooth ceramic tile or glass work surface
- Parchment paper
- Liquid polymer clay (Bake & Bond)
- Oven thermometer
- Baking tray
Step 1: Color Mixing & Preparation
-
Condition the clay:
Start by warming the clay in your hands. Knead each color separately until it is soft, pliable, and free of cracks. This conditioning step is crucial to prevent the clay from crumbling later. -
Create a palette:
If you don’t have pre-mixed boho colors, create your own. Mix white with a tiny dot of brown and orange specifically to get a nice creamy beige. For terra cotta, mix orange, red, and a touch of brown. -
Check consistency:
Ensure all your clay colors have roughly the same firmness. If one color is much softer than the others, leech it by placing it between sheets of plain paper for an hour to absorb excess oil.
Step 2: Rolling the Arches
-
Roll the logs:
Take a portion of your first color and roll it into a long, even snake (log) on your work surface. Aim for a thickness of about 5-6mm. Keep your palm flat and use gentle pressure to keep the thickness uniform. -
Alternative method:
If you struggle with hand-rolling, use a clay extruder with a large circle disc. This guarantees that every strand is exactly the same diameter, which gives the finished rainbows a very polished look. -
Cut to size:
Cut the long snake into shorter segments. You will need three segments for each rainbow: a small inner arch, a medium middle arch, and a large outer arch. -
Repeat for all colors:
Continue rolling snakes for all your chosen color combinations. I find it helpful to roll everything out first so I can play with color arrangements before committing to the shape.
Sticky Situation?
If your clay gets too soft and sticky while rolling, pop it in the fridge for 10 minutes. Cool clay holds its shape much better during assembly.
Step 3: Assembling & Shaping
-
Form the inner arch:
Take the shortest segment of clay and gently bend it into a tight ‘U’ shape. Place this on your ceramic tile or backing paper. -
Apply adhesive:
Brush a very thin layer of liquid polymer clay along the top outer edge of this inner arch. This acts as the glue to hold the rainbow layers together firmly after baking. -
Add the middle arch:
Bend the medium-length segment over the first one. Press it gently against the inner arch so they adhere, being careful not to flatten the rounded profile of the snakes. -
Complete the rainbow:
Apply another thin line of liquid clay on the middle arch, then wrap the longest segment over the top to form the final outer layer. -
Trim the bottoms:
Using your rigid tissue blade, make a straight, decisive cut across the bottom of the rainbow legs to make them perfectly flush and even. -
Smooth the edges:
Gently tap the cut ends with your finger to soften any sharp edges created by the blade. Check the overall shape and nudge it back into a perfect arch if handling distorted it.
Make it a Magnet
Turn these into functional decor by gluing a strong neodymium magnet to the back with E6000 glue after the clay is fully baked and cooled.
Step 4: Baking & Finishing
-
Prepare for baking:
Place your finished rainbows on a parchment-lined baking sheet or directly on a ceramic tile. -
Baking process:
Bake according to your clay manufacturer’s instructions (usually 265°F/130°C for 30 minutes per 1/4 inch thickness). Use an oven thermometer to ensure the temperature is accurate to prevent scorching lighter colors. -
Cool down:
Let the rainbows cool completely in the oven with the door slightly ajar. This gradual cooling helps strengthen the clay. -
Matte finish:
The image shows a matte, natural finish. If your clay looks too shiny after baking, you can lightly buff it with a soft denim cloth or very fine steel wool to restore that earthy texture.
Arrange your beautiful batch of rainbows in a tray or scatter them for a lovely decorative touch

TRACK YOUR CERAMIC JOURNEY
Capture glaze tests, firing details, and creative progress—all in one simple printable. Make your projects easier to repeat and improve.
Mini Mixed-Technique Charm With Embedded Details
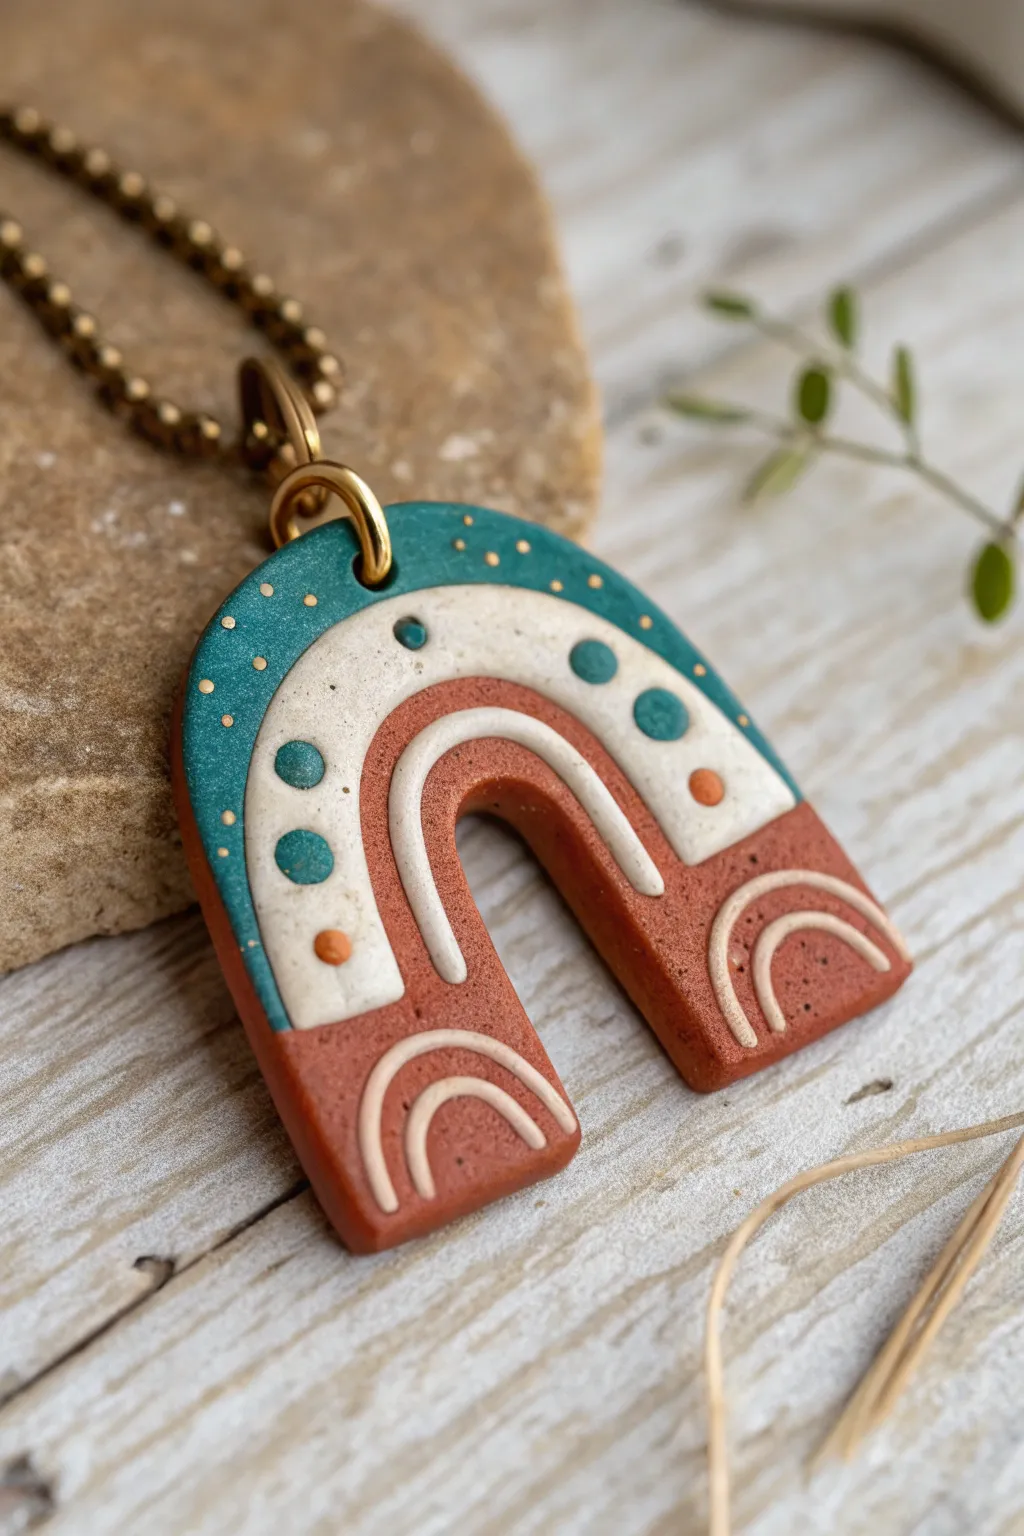
This earthy, U-shaped pendant combines distinct color blocking with delicate embedded patterns for a modern bohemian look. The matte finish and subtle textures make it a sophisticated accessory that works beautifully as a statement necklace.
How-To Guide
Materials
- Polymer clay in terracotta/rust, teal, and speckled cream/beige
- Liquid polymer clay or bake-and-bond
- Acrylic roller or pasta machine
- U-shaped clay cutter (or a craft knife and a paper template)
- Small circle cutter (micro size) or a small straw
- Extruder tool or a smooth surface for hand-rolling
- Needle tool or toothpick
- Gold acrylic paint and a fine detailing brush (optional)
- Jump rings and necklace chain
- Small jewelry pliers
Step 1: Creating the Base Shape
-
Condition the clay:
Start by conditioning your terracotta, teal, and cream clays separately until they are soft and pliable. Ensure your workspace is clean so colors don’t transfer, especially onto the cream clay. -
Roll out the slab:
Roll your terracotta clay into a sheet approximately 3-4mm thick. This will serve as the primary base for the bottom legs of the arch. -
Cut the arch stripes:
Roll out the teal and cream clays to the same thickness. Using a craft knife, cut curved strips that will fit together to form the rainbow arch shape. You want a wide terracotta section for the bottom, a medium cream strip for the middle, and a teal strip for the top. -
Assemble the slab:
Place the curved strips next to each other on your work surface. Gently press the seams together with your fingers so they adhere. Roll over the entire assembled sheet lightly with your acrylic roller to flatten the seams and create a unified surface. -
Cut the final shape:
Position your U-shaped cutter over the striped slab so the colors sit where you want them (teal at the top, cream in the middle, terracotta at the legs). Press down firmly to cut your pendant shape.
Dirty Clay Blues?
If lint gets on your light-colored clay, perform a ‘tape test.’ Press a piece of clear adhesive tape onto the clay and rip it off quickly to lift dust before baking.
Step 2: Adding Surface Details
-
Create the polka dots:
Roll a very thin sheet of teal clay and a tiny bit of terracotta. Use a micro circle cutter or the tip of a small straw to punch out tiny dots. Place larger teal dots onto the cream stripe and a few tiny terracotta dots near the edge for variety. -
Embed the dots:
Once positioned, gently roll over the pendant again with your acrylic roller. This ’embeds’ the dots into the surface so they become flush with the rest of the clay rather than sitting on top. -
Prepare the coils:
Using an extruder or by rolling very carefully with your fingers, create thin, even snakes of cream clay. You want them to be delicate, about 1mm thick. -
Apply the arches:
Cut short segments of the cream coil. Form small rainbow arches on the bottom terracotta legs of the pendant. Gently press them onto the clay so they stick without flattening completely. -
Add the central detail:
Take a slightly thicker cream coil and curve it along the seam between the terracotta and cream sections. Use a needle tool to trim the ends cleanly at the edges of the pendant. -
Pierce the hole:
Use a straw or a small circle cutter to create a clean hole at the very top center of the teal arch for your hardware.
Step 3: Finishing Touches
-
Bake the piece:
Place the pendant on a ceramic tile or a baking sheet lined with cardstock. Bake according to your brand of clay’s instructions (usually around 275°F/130°C for 30 minutes). -
Cool and inspect:
Allow the piece to cool completely. If there are any rough edges on the sides, you can lightly sand them with fine-grit sandpaper. -
Paint gold accents:
Using a very fine brush or a dotting tool, dab tiny specks of gold acrylic paint onto the teal section to mimic a starry sky look. Let the paint dry fully. -
Add hardware:
Open a jump ring using two pairs of pliers (twist sideways, don’t pull apart). Thread it through the top hole of the pendant. -
Attach the chain:
Loop your necklace chain through the jump ring before closing it tightly. Ensure the ring is sealed flush so the chain doesn’t slip out.
Texture Trick
For a stone-like finish, scrub the unbaked clay gently with an old toothbrush or a piece of denim before adding the raised coils. This removes fingerprints too.
Wear your new geometric charm with pride or slip it into a gift box for a handmade present