If you’re trying to turn polymer clay into a little income stream, the sweet spot is making pieces that feel artsy but stay easy to repeat. These are my favorite polymer clay ideas to sell—the kind of projects I’d happily batch on a cozy studio table without getting bored.
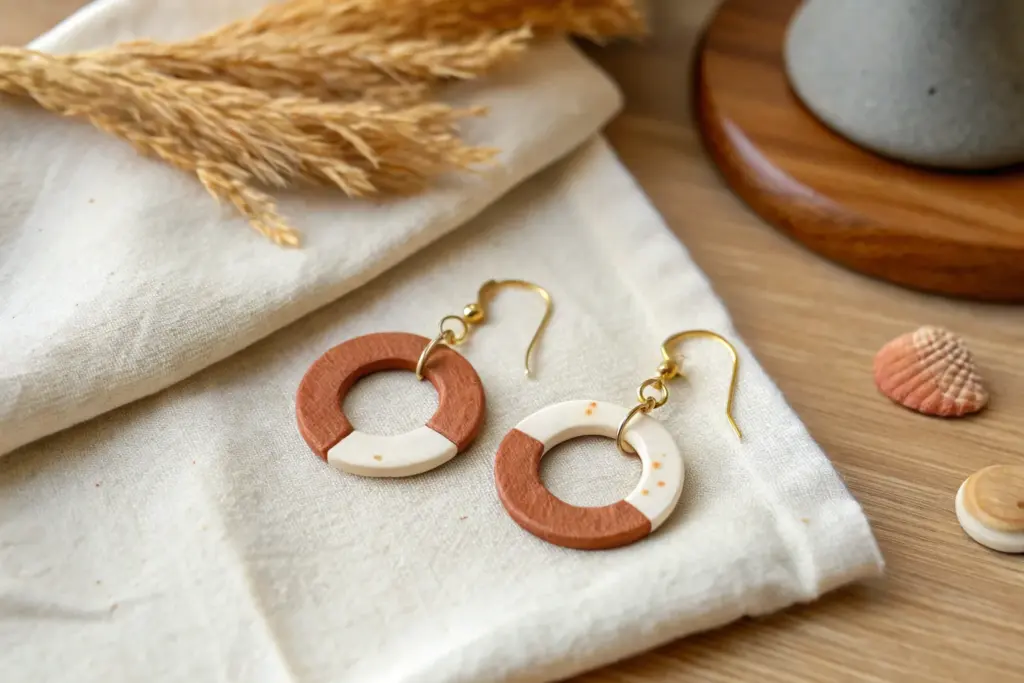
Best-Selling Polymer Clay Statement Earrings
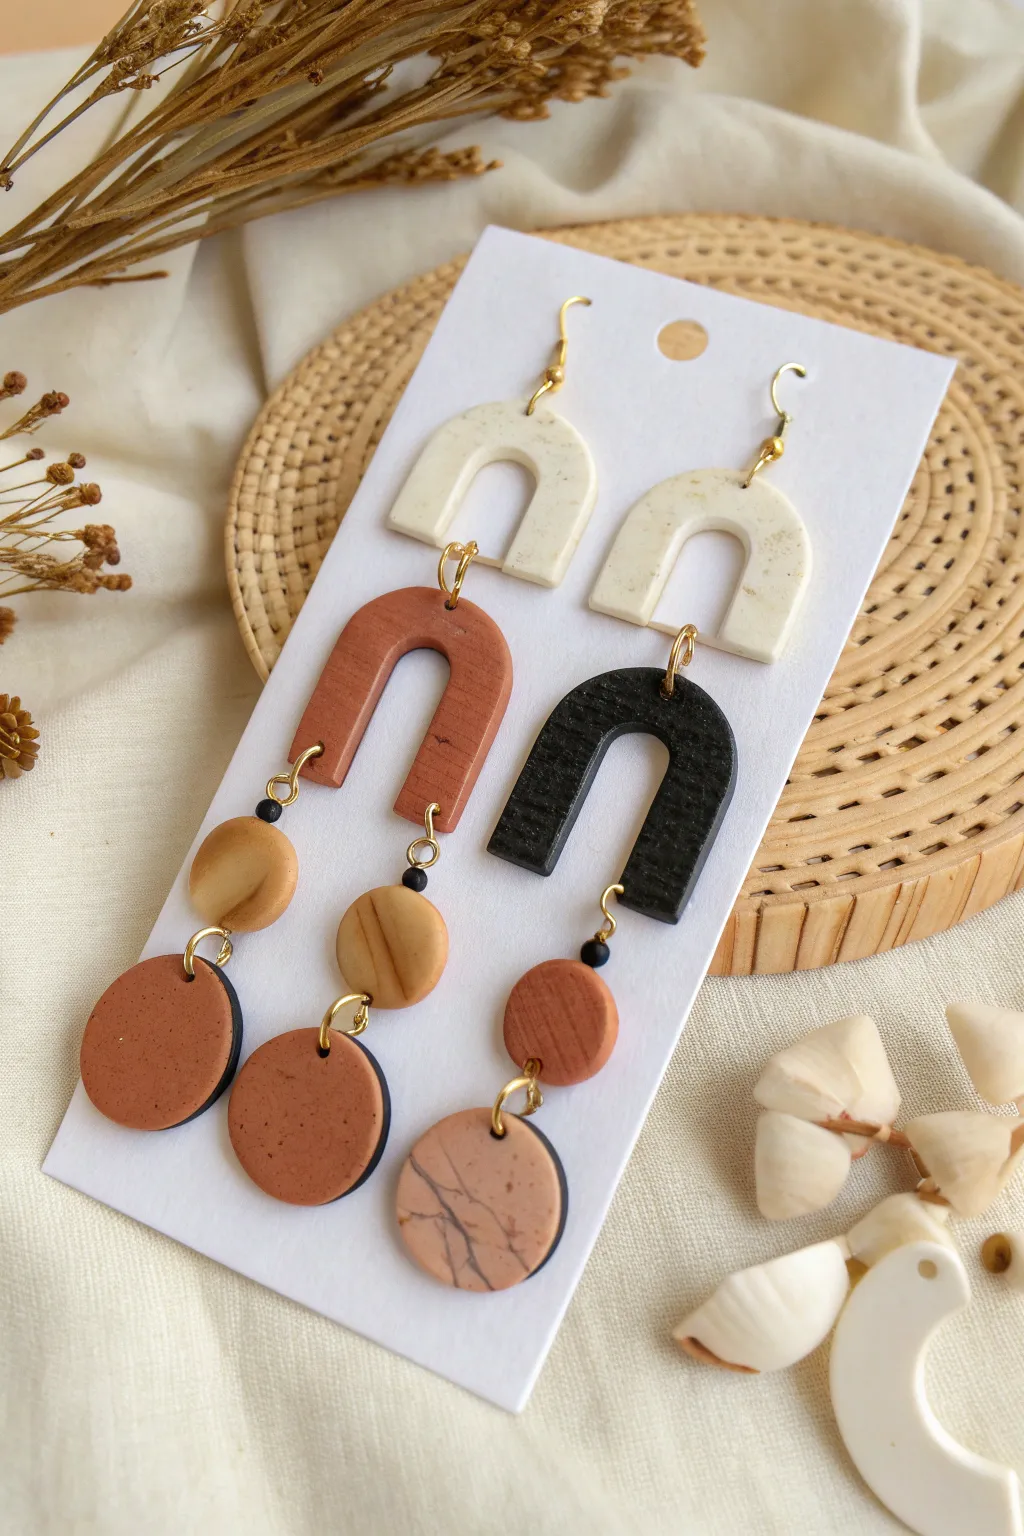
These statement earrings combine popular arch shapes with earthy tones and sleek geometric drops for a high-end boutique look. The asymmetrical pairing of textures—like the speckled cream against solid terracotta—makes these especially eye-catching for potential buyers.
Step-by-Step Guide
Materials
- Polymer clay (cream/white, terracotta/rust, black, beige)
- Ground black pepper or craft sand (for speckling)
- Small clay cutters (U-shaped arches in two sizes, small circles)
- Acrylic rolling pin or pasta machine
- Thin needle tool or toothpick
- Jump rings (gold finish, 6mm and 4mm)
- Earring hooks (gold finish)
- Jewelry pliers (flat nose and round nose)
- Liquid clay or bake and bond (optional)
- Fine-grit sandpaper (400 to 1000 grit)
- Gloss or matte varnish (optional)
Step 1: Prepping The Clay Slabs
-
Condition the clay:
Start by warming the polymer clay in your hands, kneading until it’s soft and pliable. Condition each color separately—cream, terracotta, beige, and black—to avoid color bleeding. -
Create the speckled cream:
Take your cream or white clay and mix in a tiny pinch of ground black pepper or specialized craft sand. Knead thoroughly until the specks are evenly distributed, giving it that trendy stone-like effect. -
Roll out the slabs:
Using an acrylic roller or pasta machine on a medium setting (approx. 3mm thick), roll out smooth slabs of the speckled cream, terracotta, and black clay. -
Mix a marbled slab:
For the bottom left accent, combine a chunk of beige with a tiny sliver of black. Twist them together, fold, and roll just enough to create thin marble veins without fully blending the colors into grey. -
Create a textured slab:
For the middle black arch, select your black slab. Use a piece of coarse sandpaper, a toothbrush, or a texture sheet to press a subtle woodgrain or rough texture into the surface.
Texturizing Tip
For the black arch’s wood texture, drag a needle tool lightly across the raw clay. Vary pressure to create natural-looking deep and shallow grooves.
Step 2: Cutting & Baking
-
Cut the top arches:
Use your smaller U-shaped clutter to punch out two arch shapes from the speckled cream slab. These will form the stud or hook base for the earrings. -
Cut the middle components:
Using a slightly larger arch cutter, cut one shape from the terracotta slab and one from the textured black slab. These are your main dangling statement pieces. -
Cut the circle accents:
Using small circle cutters, punch out your connecting pieces: one small beige circle, one small terracotta circle, and a larger marbled circle for the bottom drop. -
Pierce holes:
Before baking, use a needle tool to carefully poke holes at the top and bottom of your connecting pieces. Ensure the holes are large enough for your jump rings to move freely. -
Bake:
Arrange all pieces on a tile or parchment-lined baking sheet. Bake according to your brand’s specific package instructions (usually 275°F/135°C for 30 minutes). I usually tent foil over them to prevent the white clay from scorching.
Fixing Bubbles
If you see air bubbles after rolling, slice them gently with a craft knife or needle to release the air, then smooth the surface with your finger before cutting.
Step 3: Finishing & Assembly
-
Cool and sand:
Allow the clay to cool completely. Once hard, use fine-grit sandpaper to smooth any rough edges or fingerprints on the sides of the pieces. -
Attach the top hooks:
Open a small jump ring using two pairs of pliers (twist sideways, don’t pull apart). Thread it through the top hole of the speckled cream arch and attach your earring hook, then close the ring securely. -
Link the middle sections:
Use jump rings to connect the bottom of the cream arches to the tops of the terracotta and black arches respectively. Adding a small black bead onto the jump ring before closing it adds a nice professional detail seen in the reference. -
Assemble the drops:
Continue chaining the pieces downward using jump rings. For the complex left earring, link the terracotta arch to the beige circle, then the beige circle to the final terracotta disc. -
Final check:
Hold the earrings up to ensure all jump rings are fully closed and the pieces hang straight. If a piece twists, you may need to add a second small jump ring to rotate the orientation.
Once assembled, mount these beauties on a clean cardstock backing to showcase their professional quality


Minimal Polymer Clay Stud Sets for Everyday Wear
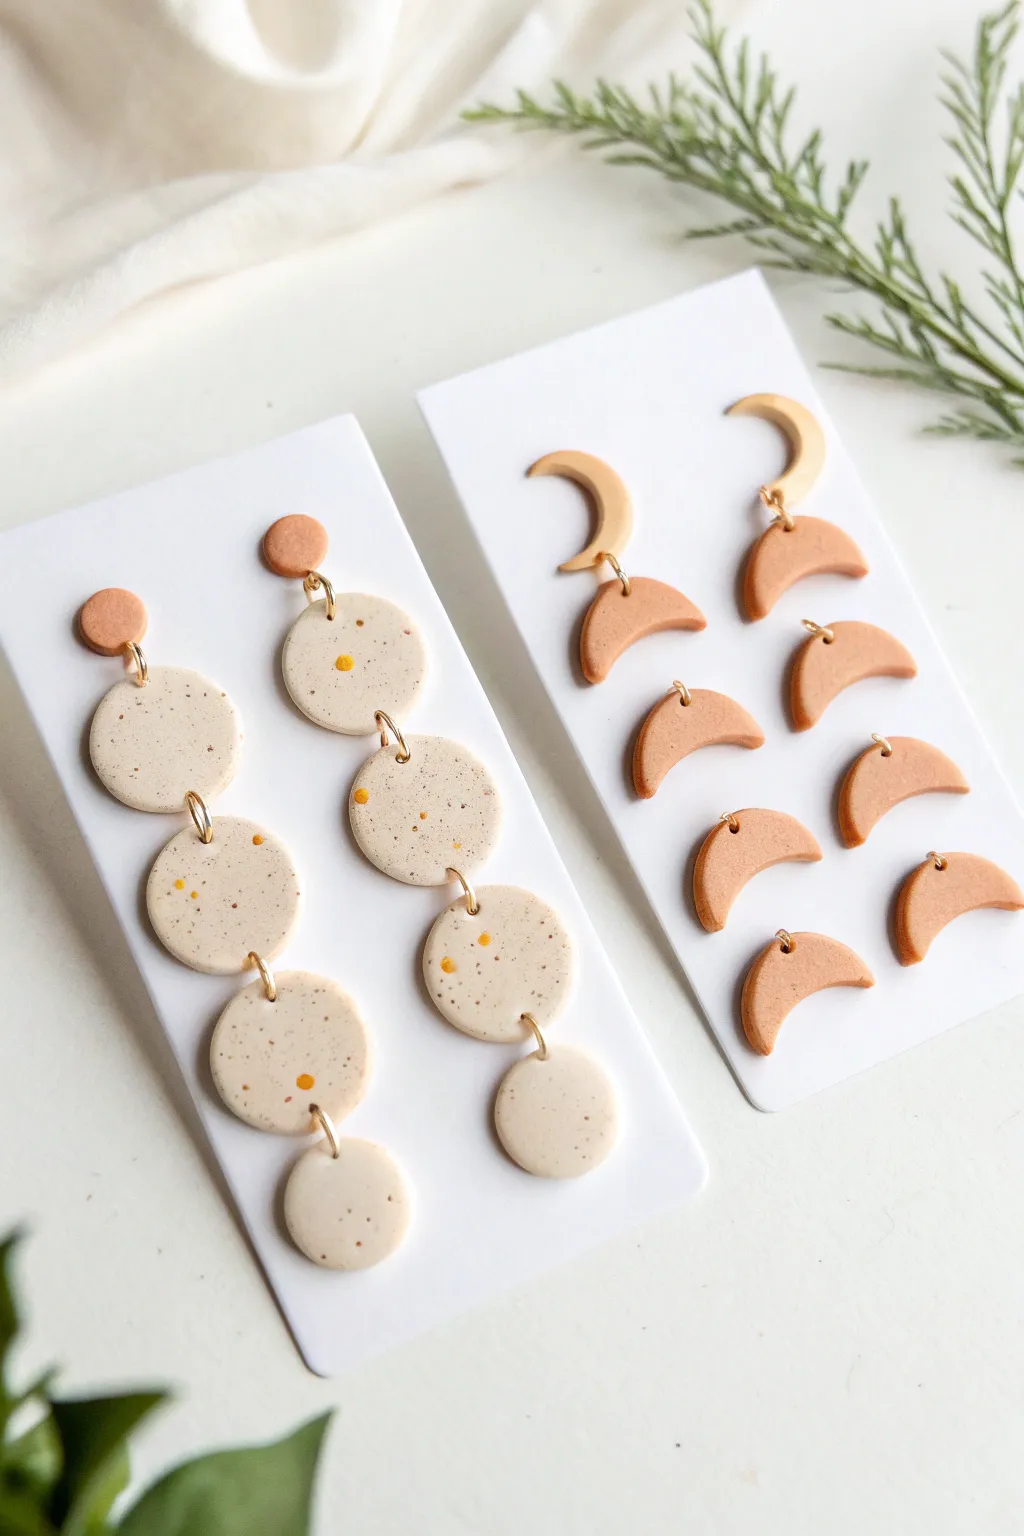
These elegant polymer clay earrings come in two variations: long, speckled linear dangles and warm, stacked crescent moon studs. With a soothing palette of sandy beige, terracotta, and subtle speckling, they capture a modern bohemian aesthetic perfect for everyday wear.
Detailed Instructions
Materials
- Polymer clay (white, beige/Ecru, terracotta/burnt orange)
- Black acrylic paint or pepper (for speckling)
- Circle cutters (various sizes)
- Crescent moon cutter (or a circle cutter used twice)
- Acrylic rolling pin or pasta machine
- Jump rings (gold finish)
- Earring posts and backs
- Hand drill or pin vibe
- Jewelry pliers (flat nose and round nose)
- Ceramic tile or glass baking sheet
- Old toothbrush (optional for speckling)
- Super glue or liquid clay
- Fine-grit sandpaper (400-1000 grit)
Step 1: Color Mixing & Prep
-
Condition the clay:
Start by warming the clay in your hands and kneading it until it is soft and malleable. You will need two main color groups: a solid terracotta for the moons and tops, and a creamy beige for the dangles. -
Create the speckled stone effect:
For the beige dangles, mix white clay with a small amount of beige. To add the speckles, you can either mix in actual ground pepper (a classic trick!) or splatter the rolled sheet later with diluted acrylic paint. I personally prefer mixing in a few tiny shavings of black and brown clay for a ‘granite’ look. -
Roll out slabs:
Use your acrylic roller or pasta machine to flatten the clay. Aim for a thickness of about 2-3mm. Keep the terracotta slab separate from the speckled beige slab to avoid color transfer.
Step 2: Cutting the Shapes
-
Cut the linear dangle components:
For the left pair (linear dangles), use circle cutters in descending sizes. Cut two small terracotta circles for the stud tops. Then, cut two large, two medium, and two small circles from the speckled beige slab. -
Shape the moon studs:
For the right pair (moon stacks), cut out multiple crescent shapes from the terracotta slab. If you don’t have a specific moon cutter, simply punch a circle, then offset the cutter slightly and punch again to remove a bite-sized piece, leaving a crescent. -
Create the top crescent connector:
Notice the top component is a lighter, yellowish beige. Mix a tiny bit of yellow into your white clay for this top moon, then cut two small crescents for the stud base. -
Add texture (optional):
If you want the subtle paint speckles seen in the photo, dip an old toothbrush into diluted black or brown acrylic paint. Run your thumb over the bristles to flick tiny droplets onto the unbaked clay shapes. -
Add accent dots:
The image shows faint yellow/orange dots on the beige circles. Take tiny bits of your terracotta clay, roll them into microscopic balls, press them onto the beige circles, and roll over them once gently to flatten them flush. -
Pierce the holes:
Before baking, use a needle tool or toothpick to poke holes for the jump rings. For the dangles, you need holes at the very top and bottom of the middle circles, and just the top of the smallest bottom circle. Make sure the holes are close to the edge but not too close to break.
Pro Tip: Consistent Thickness
Use playing cards as depth guides! Place an equal stack of cards on either side of your clay while rolling. This ensures your slab is perfectly even everywhere.
Step 3: Baking & Finishing
-
Bake the pieces:
Place all components on a ceramic tile. Bake according to your brand’s specific package instructions (usually 275°F/130°C for 30 minutes). I suggest covering them with a foil tent to prevent the light colors from scorching. -
Cool and sand:
Let the clay cool completely inside the oven or on a rack. Once hard, use fine-grit sandpaper with a little water to smooth out any rough edges or fingerprints on the sides. -
Drill if necessary:
If your pre-poked holes closed up during baking, use a small hand drill (pin vise) to reopen them carefully. -
Attach earring posts:
Flip the top components (the small terracotta circle and the pale yellow moon) over. Apply a strong glue or a dab of liquid clay to attach the metal earring posts. If using liquid clay, you will need to re-bake these pieces briefly to set the bond.
Troubleshooting: Lint Issues
Seeing dust or lint on your light clay? Dip a Q-tip in rubbing alcohol or acetone and gently wipe the unbaked clay surface to remove debris before baking.
Step 4: Assembly
-
Open jump rings:
Use your two pairs of pliers to twist the gold jump rings open laterally. Never pull them apart outward, as this weakens the metal circle. -
Assemble the linear dangles:
Connect the terracotta stud top to the largest beige circle. Then connect the large circle to the medium one, and the medium to the small one, creating a cascading chain. -
Assemble the moon clusters:
The image shows a unique assembly where several moons dangle or stack. Connect the top pale moon to the terracotta moon below it using a jump ring. Note that the other moons in the image are likely spare components on the card, but you can link multiple moons together for a longer mobile look if desired. -
Final check:
Double-check that all jump rings are closed tightly and aligned perfectly so the gap isn’t visible.
Now you have a stunning set of earthy, celestial jewelry ready to package or wear


Layered Pendant Necklaces With Polymer Clay Charms
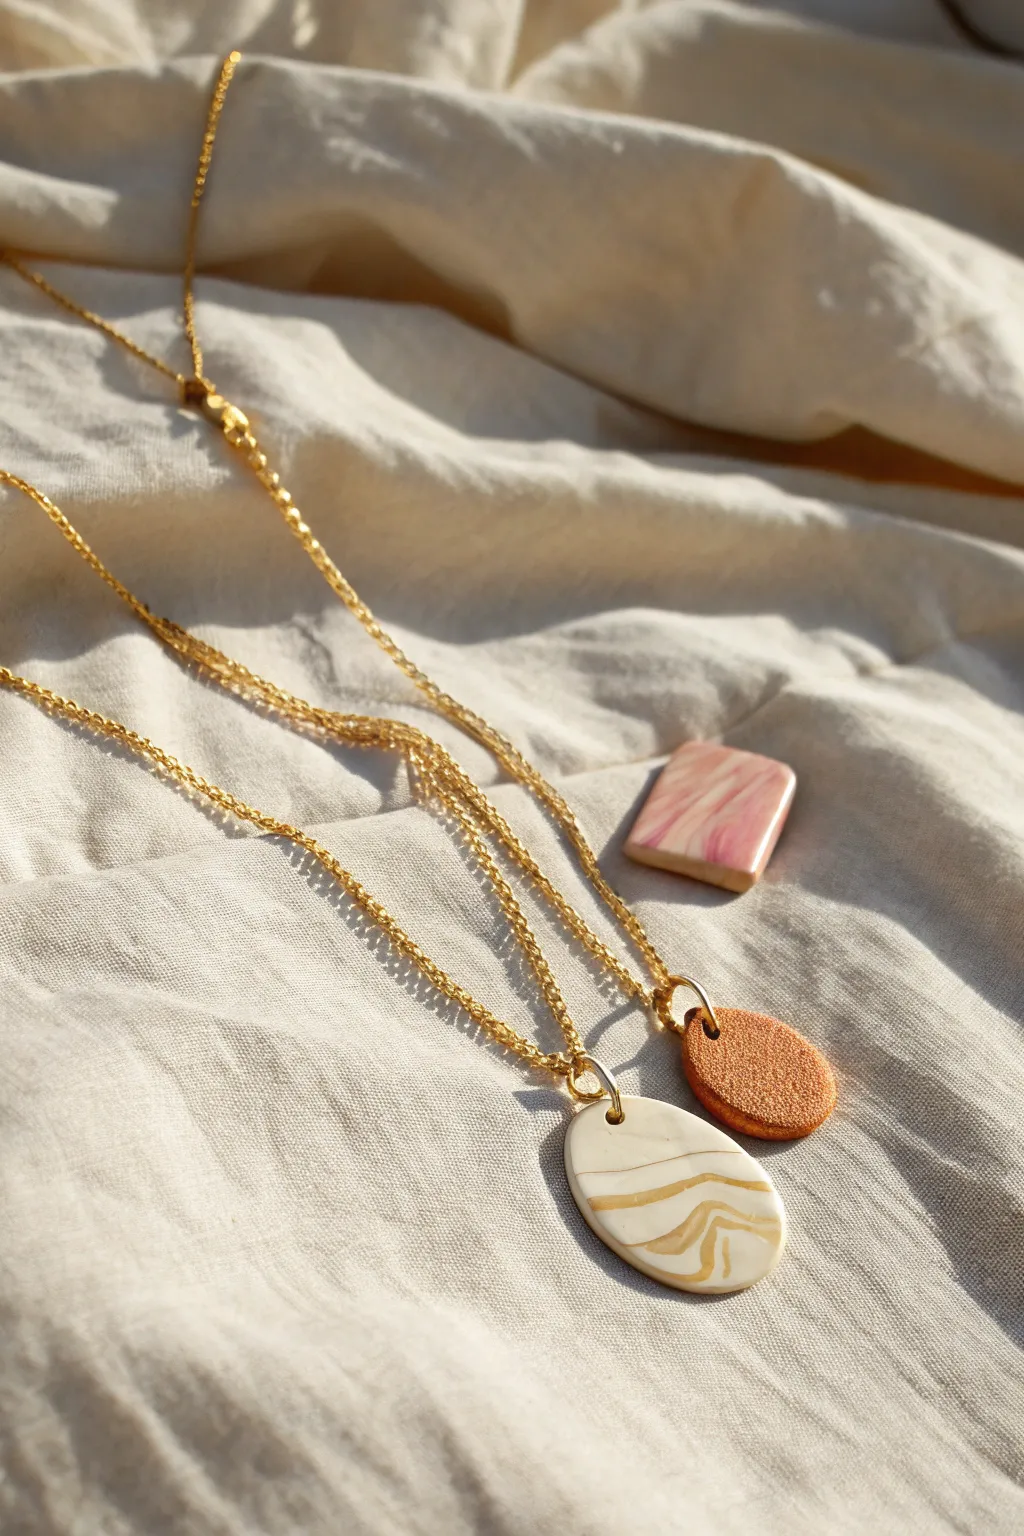
These sophisticated layered necklaces combine the classic appeal of gold chains with the modern, artisanal touch of polymer clay. Featuring a neutral faux-marble oval and a textured metallic accent, this project offers a high-end boutique look you can easily craft at home.
How-To Guide
Materials
- White polymer clay
- Beige or translucent amber polymer clay
- Metallic copper or bronze polymer clay
- Pink and white polymer clay (optional for third charm)
- Acrylic rolling pin or pasta machine
- Oval and small circle clay cutters
- Needle tool or toothpick
- Fine-grit sandpaper (400-800 grit)
- Two gold necklace chains (18-inch and 20-inch lengths)
- Jump rings (gold)
- Jewelry pliers (flat nose and round nose)
- Piece of sandpaper or texture sponge for surface detailing
- Baking sheet and parchment paper
Step 1: Creating the Faux-Marble Oval
-
Condition the Clay:
Begin by conditioning a block of white polymer clay until it is soft and pliable. Do the same with a much smaller amount of beige or translucent amber clay. -
Form the Base Log:
Roll the white clay into a thick log, approximately 3 inches long. -
Create Veins:
Roll the beige clay into very thin, snake-like strands. Lay these strands randomly along the length of the white log. -
Twist and Fold:
Twist the log like a candy cane to distort the lines. Fold the log in half, roll it back into a log, and twist again. Repeat this 2-3 times to create natural-looking swirls. -
Roll the Slab:
Roll the marbled log into a ball, then flatten it with your acrylic roller or pasta machine to a thickness of about 3-4mm. Check both sides to see which marbling pattern you prefer. -
Cut the Shape:
Use your oval cutter to punch out the main pendant shape. Lift away the excess clay carefully. -
Smooth the Edges:
Gently run your finger around the cut edge of the clay to smooth out any sharpness or drag marks from the cutter. -
Pierce the Hole:
Use a needle tool to create a hole near the top of the oval for the jump ring. Ensure the hole is wide enough to fit your hardware but not so close to the edge that it creates a weak point. -
Pink Variant (Optional):
If you wish to create the rectangular charm shown in the background, repeat the marbling process using pink and white clay, then cut into a small rectangle.
Step 2: Crafting the Textured Metallic Circle
-
Prepare Metallic Clay:
Condition a small amount of metallic copper or bronze polymer clay. -
Roll and Texture:
Roll the metallic clay out to the same thickness as your oval. Before cutting, press a piece of coarse sandpaper or a rough texture sponge firmly onto the surface to create a pitted, stone-like finish. -
Cut and Pierce:
Use the small circle cutter to punch out the shape. Add a hole near the top edge using your needle tool, mimicking the placement on your oval pendant.
Clean Edges Trick
Place a piece of plastic wrap over your clay slab before pressing down your cutter. This creates a beautifully rounded, domed edge that requires almost no sanding later.
Step 3: Baking and Assembly
-
Bake:
Arrange your clay pieces on a parchment-lined baking sheet. Bake according to the manufacturer’s instructions for your specific brand of clay—usually 275°F (135°C) for 15-30 minutes. -
Cool and Sand:
Allow the pieces to cool completely. If there are any rough spots on the edges, use fine-grit sandpaper to buff them smooth under running water. -
Open Jump Rings:
Using two pairs of pliers, twist open two gold jump rings. Remember to twist the ends away from each other sideways rather than pulling them apart, to maintain the circle shape. -
Attach Pendants:
Thread a jump ring through the hole of the marble oval and close it securely. Repeat for the textured copper circle. -
String the Chains:
Slide the marble oval onto the longer chain and the smaller metallic circle onto the shorter chain so they lay nicely when worn together.
Add Some Shine
To make the recessed textures pop, apply a thin wash of brown acrylic paint into the textured circle, wipe off the surface, and seal with a gloss glaze.
Wear your new layered textured set with a simple white tee to let the marbling and metallic details truly shine


Custom Color Palettes of Polymer Clay Beads
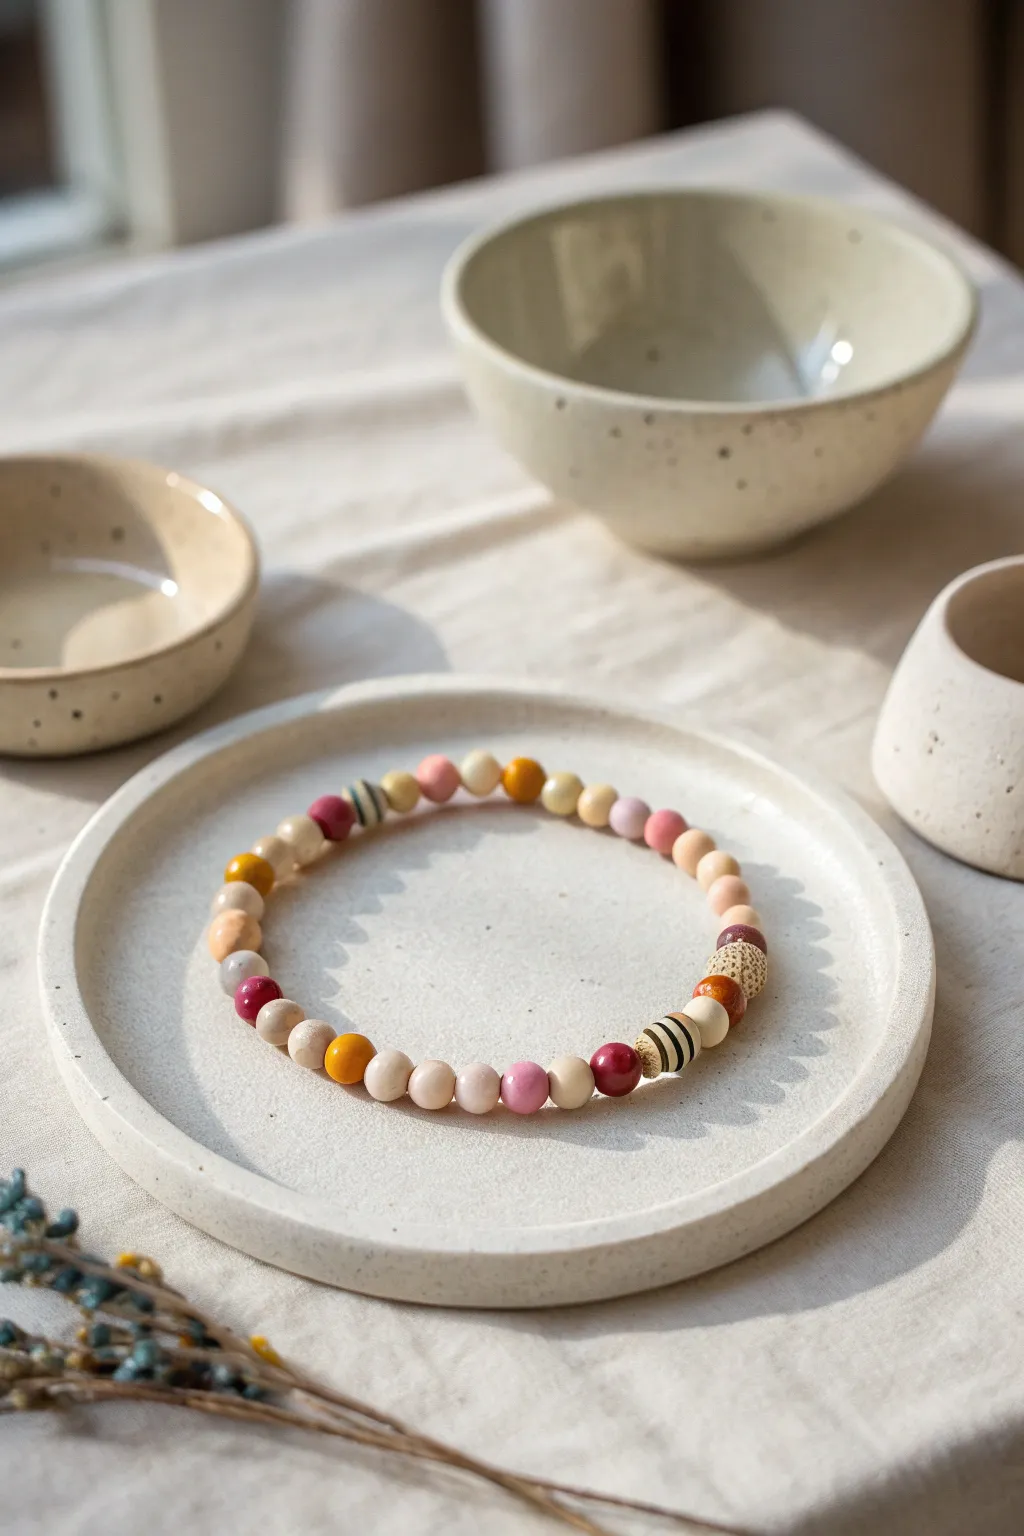
Create a stunningly understated accessory using custom-mixed polymer clay colors in warm earth tones. This project features a beautiful rhythm of smooth round beads, striped accents, and textured focal points that mimic natural stone and wood.
Step-by-Step
Materials
- Polymer clay (white, beige, terracotta, mustard yellow, dark pink, black)
- Bead rolling tool or clear acrylic block
- Toothpicks or needle tool
- Elastic beading cord (0.7mm or 0.8mm)
- Coarse sandpaper or salt (for texture)
- Super glue or jewelry adhesive
- Bead piercing pins or 1mm drill bit
- Oven for baking
- Parchment paper
Step 1: Mixing the Palette
-
Create the Base Tones:
Start by conditioning your white clay. Divide it into four equal parts to serve as the base for your pastel shades. -
Mix Blush Pink:
Take a tiny amount of dark pink clay—about the size of a lentil—and mix it thoroughly into one part of the white clay until you achieve a soft, consistent blush pink. -
Create Cream and Beige:
For the cream beads, mix a speck of yellow and a speck of brown into white clay. For the beige, increase the brown slightly, aiming for a ‘latte’ color. -
Prepare Accent Colors:
Condition your mustard yellow, terracotta, and dark burgundy clays. Keep these colors pure and saturated to provide contrast against the lighter beads.
Sticky Situation?
If clay gets soft and sticky while rolling, pop it in the fridge for 10 minutes. This firms it up, making it easier to pierce without deforming.
Step 2: Shaping the Beads
-
Measure Uniform Amounts:
Roll your conditioned clay colors into logs of equal thickness. Slice uniform segments to ensure your finished beads are roughly the same size. -
Roll Smooth Spheres:
Roll each segment between your palms to form a rough ball. Then, use a bead roller or an acrylic block on a flat surface to perfect the spherical shape, eliminating fingerprints. -
Create the Striped Bead:
Flatten a small ball of beige clay into a thick wandering shape. Add very thin strings of black clay around it. Roll it back into a ball to embed the stripes smoothly. -
Texture the Focal Bead:
For the textured beige bead seen in the design, roll the raw clay ball lightly over coarse sandpaper, or press rock salt into the surface (which can be washed away after baking). -
Pierce the Holes:
Using a bead pin or toothpick, carefully pierce the center of each bead. Twist the tool gently as you push through to avoid squashing the sphere.
Step 3: Baking and Assembly
-
Arrange for Baking:
Place your pierced beads on a baking sheet lined with parchment paper. To prevent flat spots, I sometimes string them on a wire suspended over a foil tray. -
Bake the Clay:
Bake the beads according to your manufacturer’s instructions (usually 275°F/130°C for 30 minutes). Let them cool completely before handling. -
Drill Check:
If any bead holes closed up slightly during baking, use a small hand drill or a 1mm bit to clean them out for easy stringing. -
Plan the Pattern:
Lay out your beads on a bead board or cloth. Mimic the photo’s pattern: grouping light pinks together, separating them with mustard or burgundy accents, and placing the striped and textured beads as mismatched focal points. -
Measure the Cord:
Cut a length of elastic cord about 10 inches long. This gives you plenty of extra room to tie the knot comfortably. -
String the Beads:
Thread the beads onto the elastic cord, maintaining your planned asymmetrical pattern. Pre-stretching the elastic gently before stringing helps prevent it from sagging later. -
Tie the Knot:
Tie a surgeon’s knot (right over left, left over right twice). Pull the elastic tight to secure the beads significantly. -
Secure and Trim:
Apply a tiny drop of super glue to the knot. Let it dry for a moment, then slide the knot inside the hole of a neighboring bead to hide it. Trim the excess cord close to the bead.
Matte Finish
To get that ceramic look, lightly buff baked beads with 0000 steel wool. It removes shine and gives a professional, stone-like matte texture.
Slip on your new custom-colored bracelet and enjoy the organic, handmade touch it adds to your outfit.

What Really Happens Inside the Kiln
Learn how time and temperature work together inside the kiln to transform clay into durable ceramic.
Marbled and Swirled Polymer Clay Bangles
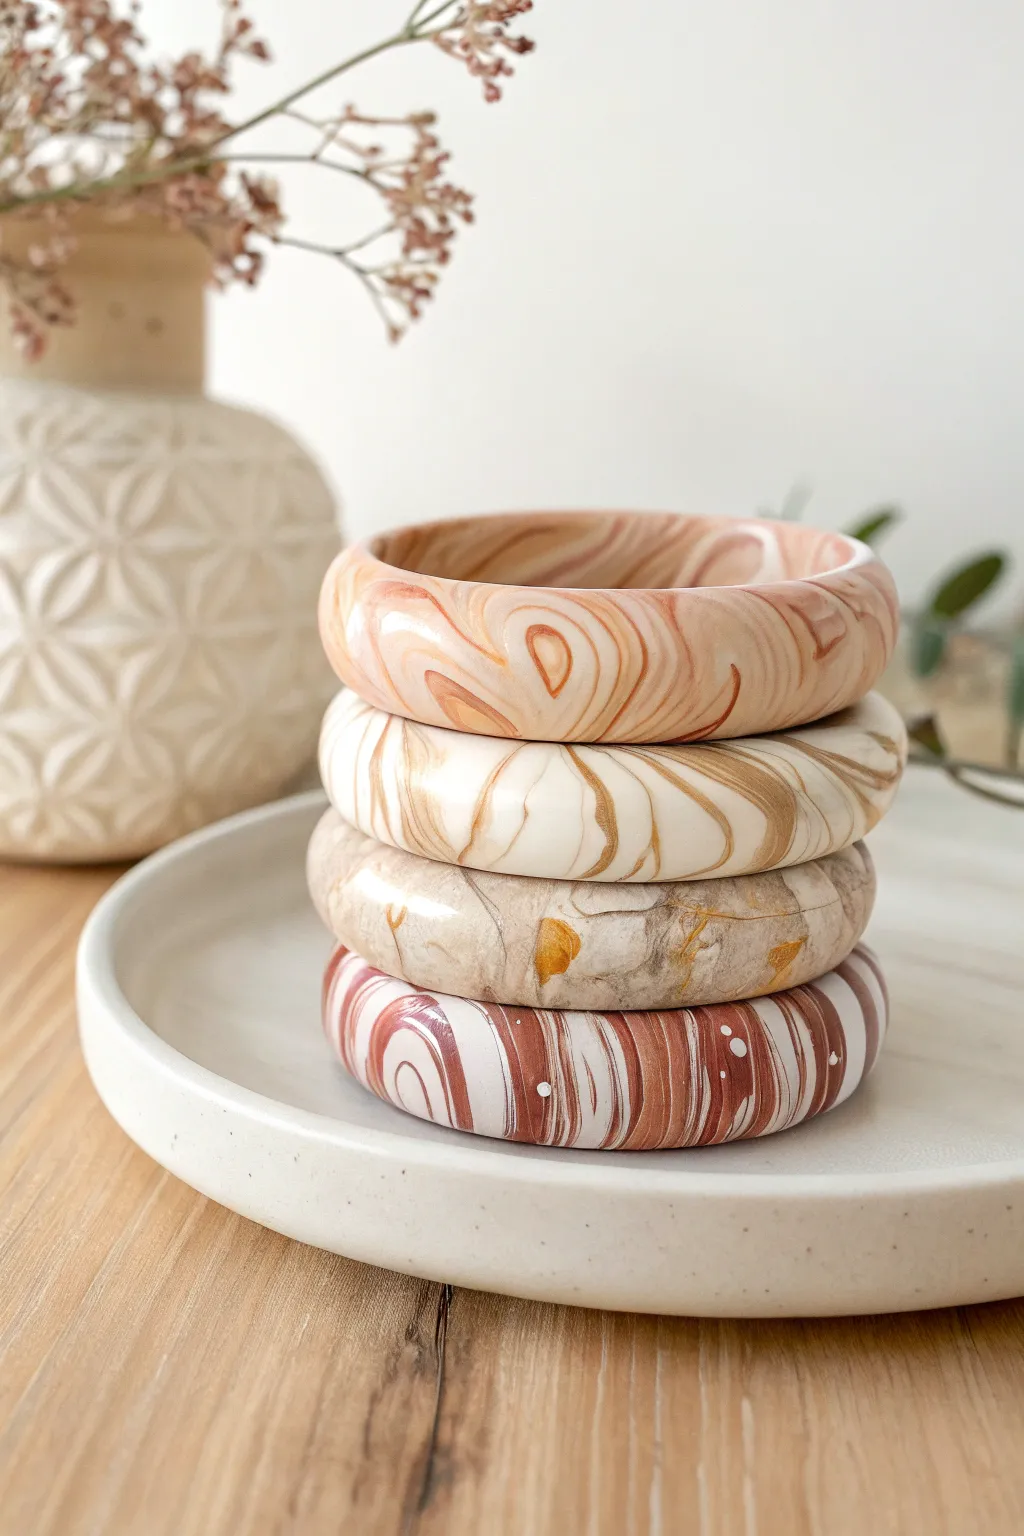
These chunky, marble-effect bangles are surprisingly lightweight and make a sophisticated addition to any jewelry collection. By mixing earthy tones like terracotta, cream, and brown, you can achieve a high-end organic look that mimics natural stone.
Step-by-Step Guide
Materials
- Polymer clay (white, translucent, terracotta, beige, dark brown)
- Gold leaf flakes (optional)
- Acrylic roller or pasta machine
- Tissue blade or sharp craft knife
- Metal bangle core or empty soda can (for shaping)
- Oven-safe glass jar or ceramic mug (for baking form)
- Wet/dry sandpaper (400 to 1000 grit)
- Buffing wheel or denim cloth
- UV resin or glossy varnish (optional)
Step 1: Creating the Marble Blend
-
Condition the clay:
Start by thoroughly conditioning your individual colors of clay until they are soft and pliable. For the warm terracotta look seen in the top bangle, prepare equal parts white, translucent, and peach/terracotta clay. -
Form snakes:
Roll each color into a long snake about 1/4 inch thick. For the second bangle (cream/tan), include a thinner snake of metallic gold or dark brown for contrast. -
Twist and combine:
Hold the snakes together in a bundle and twist them tightly like a candy cane. This begins the marbling process without muddying the colors. -
Fold and roll:
Fold the twisted rope in half and roll it smooth again. Repeat this ‘fold, twist, roll’ process 2-3 times. Stop before the colors blend completely; you want distinct striations. -
Incorporate gold leaf:
If recreating the third bangle down (stone effect), press small flakes of gold leaf onto your clay rope now before the final rolling.
Step 2: Shaping the Bangle
-
Size the log:
Roll your final marbled log until it is uniform in thickness, roughly 1/2 to 3/4 inch thick depending on how chunky you want the final piece. -
Determine length:
Measure the wrist size or use a template. Cut the clay log about 1/2 inch longer than the circumference of the baking form you intend to use. -
Cut the ends:
Use your tissue blade to slice both ends of the clay log at a precise 45-degree angle. This diagonal cut creates a larger surface area for a seamless join. -
Join the circle:
Wrap the clay around your baking form (like a straight-sided glass jar or a soda can). Press the angled ends together firmly. -
Smooth the seam:
Gently rub the seam with your finger or a clay tool to blend the clay across the join. I find using a tiny drop of baby oil helps smudge the line away completely.
Seamless Finish
Use a scrap piece of the same marbled clay to ‘patch’ the seam if the pattern gets disrupted during joining. Smear tiny bits over the line to hide it.
Step 3: Baking and Finishing
-
Bake:
Bake the bangles while still on the form to maintain their round shape. bake according to your clay manufacturer’s instructions, usually 275°F (130°C) for 45-60 minutes. -
Cool down:
Let the bangles cool completely on the form. Removing them while warm can warp the perfect circle shape. -
Sand for smoothness:
Once cool, wet sand the bangle under running water. Start with 400 grit to remove fingerprints and move up to 1000 grit for a silky finish. -
Buff to shine:
Vigorously rub the bangle with a piece of heavy denim or use a buffing wheel on a rotary tool to bring out the natural sheen of the clay. -
Optional glaze:
For the high-gloss look seen on the bottom bangle, apply a thin coat of UV resin or gloss varnish and cure.
Hollow Core Trick
To save weight and clay, wrap a thin sheet of your marbled clay around a metal bangle core or a snake of scrap clay instead of making it solid.
With these techniques, you can build a whole stack of fashionable arm candy ready for your shop or wardrobe
Batch-Friendly Polymer Clay Keychains in Trendy Shapes
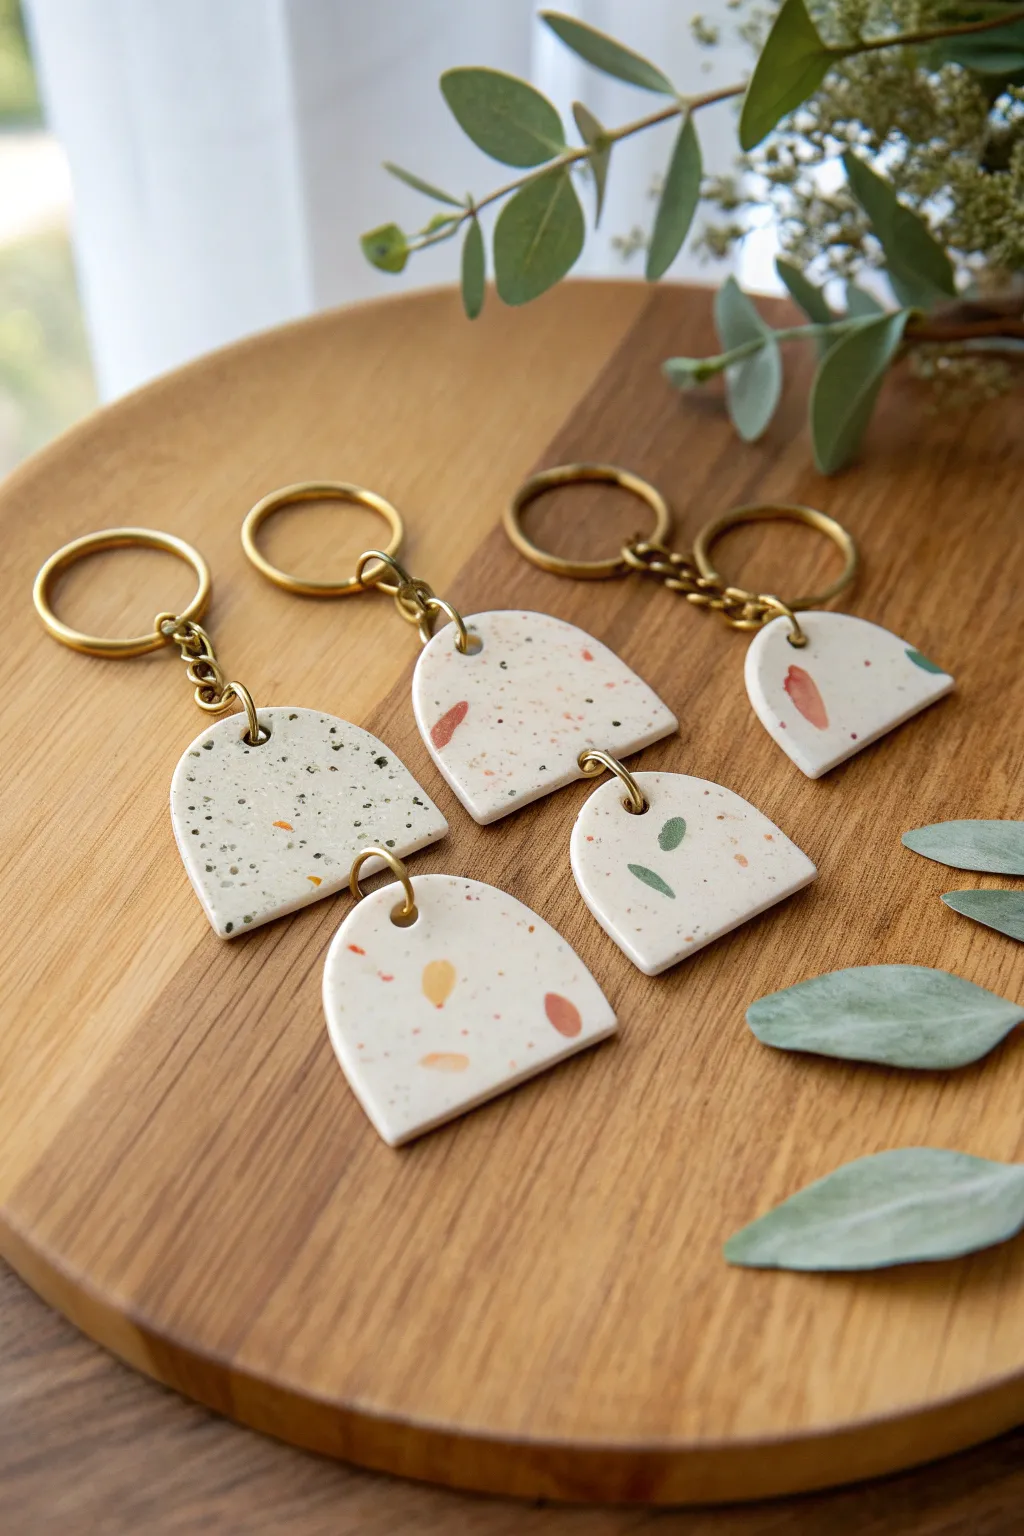
These trendy arch-shaped keychains feature a charming terrazzo pattern created with scattered flecks of color on a neutral base. They are perfect for batch-making, allowing you turn small scraps of clay into stylish, durable accessories.
Step-by-Step Tutorial
Materials
- White or cream polymer clay (base color)
- Assorted polymer clay colors (terracotta, mustard, sage green, speckled gray)
- Acrylic rolling pin or pasta machine
- U-shaped or Arch clay cutters (assorted sizes)
- Blade or craft knife
- Parchment paper or ceramic tile
- Hand drill or small hole cutters
- Jump rings (gold or brass finish)
- Keyring findings with chains
- Pliers (flat nose and chain nose)
- UV resin and UV lamp (optional, for sealing)
- Fine grit sandpaper (400-1000 grit)
Step 1: Preparing the Terrazzo Base
-
Condition the base:
Start by thoroughly conditioning your white or cream clay until it is soft and pliable. Roll it out into a slab that is approximately 3mm to 4mm thick. This thickness ensures the keychain is sturdy enough for daily use. -
Create color chips:
Take small amounts of your accent colors—terracotta, mustard yellow, sage green, and speckled gray. Roll these into very thin, flat sheets, much thinner than your base slab. -
Tear the chips:
Using your fingers, tear these thin colored sheets into tiny, irregular organic shapes. Aim for variety in size, but keep them generally small to mimic authentic terrazzo stone chips. -
Apply the pattern:
Gently place the torn colored fragments onto your white base slab. Scatter them randomly, leaving plenty of negative space between pieces. You can cluster a few together or spread them out depending on your desired look. -
Embed the chips:
Place a piece of parchment paper over the slab to prevent sticking. Use your rolling pin to gently roll over the slab, pressing the colored chips flat so they become flush with the white base surface.
Step 2: Cutting and Baking
-
Cut the shapes:
Position your arch-shaped cutters over the most pleasing sections of your pattern. Press down firmly to cut out your shapes. -
Smooth the edges:
Before lifting the shapes, create a cleaner edge by gently rubbing your finger over the plastic wrap on top of the clay, or carefully smooth the raw edges with a fingertip after cutting. -
Pierce the holes:
Use a small circular cutter or a needle tool to create a hole at the top center of each arch. If you are linking two pieces together, punch a hole at the bottom of the top piece and the top of the bottom piece. -
Bake:
Transfer your clay pieces to a ceramic tile or baking sheet lined with parchment. Bake according to your brand of clay’s instructions—usually around 275°F (135°C) for 30–45 minutes. Longer baking ensures strength. -
Cool down:
Allow the pieces to cool completely in the oven or on a wire rack. Polymer clay is slightly soft when hot and hardens fully as it cools.
Smooth Moves
Place cling film loosely over the clay slab before using cutters. This creates a lovely domed ‘pillow’ edge rather than a sharp, harsh angle.
Step 3: Finishing and Assembly
-
Sand the surface:
Dip your fine-grit sandpaper in water and sand the surface involved in circular motions. This reveals the crisp edges of your terrazzo chips and removes any fingerprints. -
Seal (Optional):
If you want a glossy, glass-like finish, apply a thin layer of UV resin to the front and cure it under a UV lamp. I find this extra step makes the colors pop beautifully, though a matte sanded finish is also very chic. -
Open jump rings:
Using two pairs of pliers, twist your jump rings open sideways (never pull them apart). This maintains the ring’s circular shape and strength. -
Attach findings:
Thread the jump ring through the hole in your clay arch. Add the keychain ring to the jump ring before closing. If connecting two clay pieces, use a jump ring to link them together. -
Secure the closure:
Twist the jump ring back into a closed position with your pliers, ensuring the two ends meet perfectly flush so the chain doesn’t slip out.
Metallic Magic
Mix small flakes of gold or copper leaf in with your colored clay chips before rolling them into the base for a luxe, high-end sparkle.
Clip your new handmade accessory onto a bag or set of keys to add a personalized pop of art to your day


The Complete Guide to Pottery Troubleshooting
Uncover the most common ceramic mistakes—from cracking clay to failed glazes—and learn how to fix them fast.
Personalized Initial Tags and Bag Charms in Polymer Clay
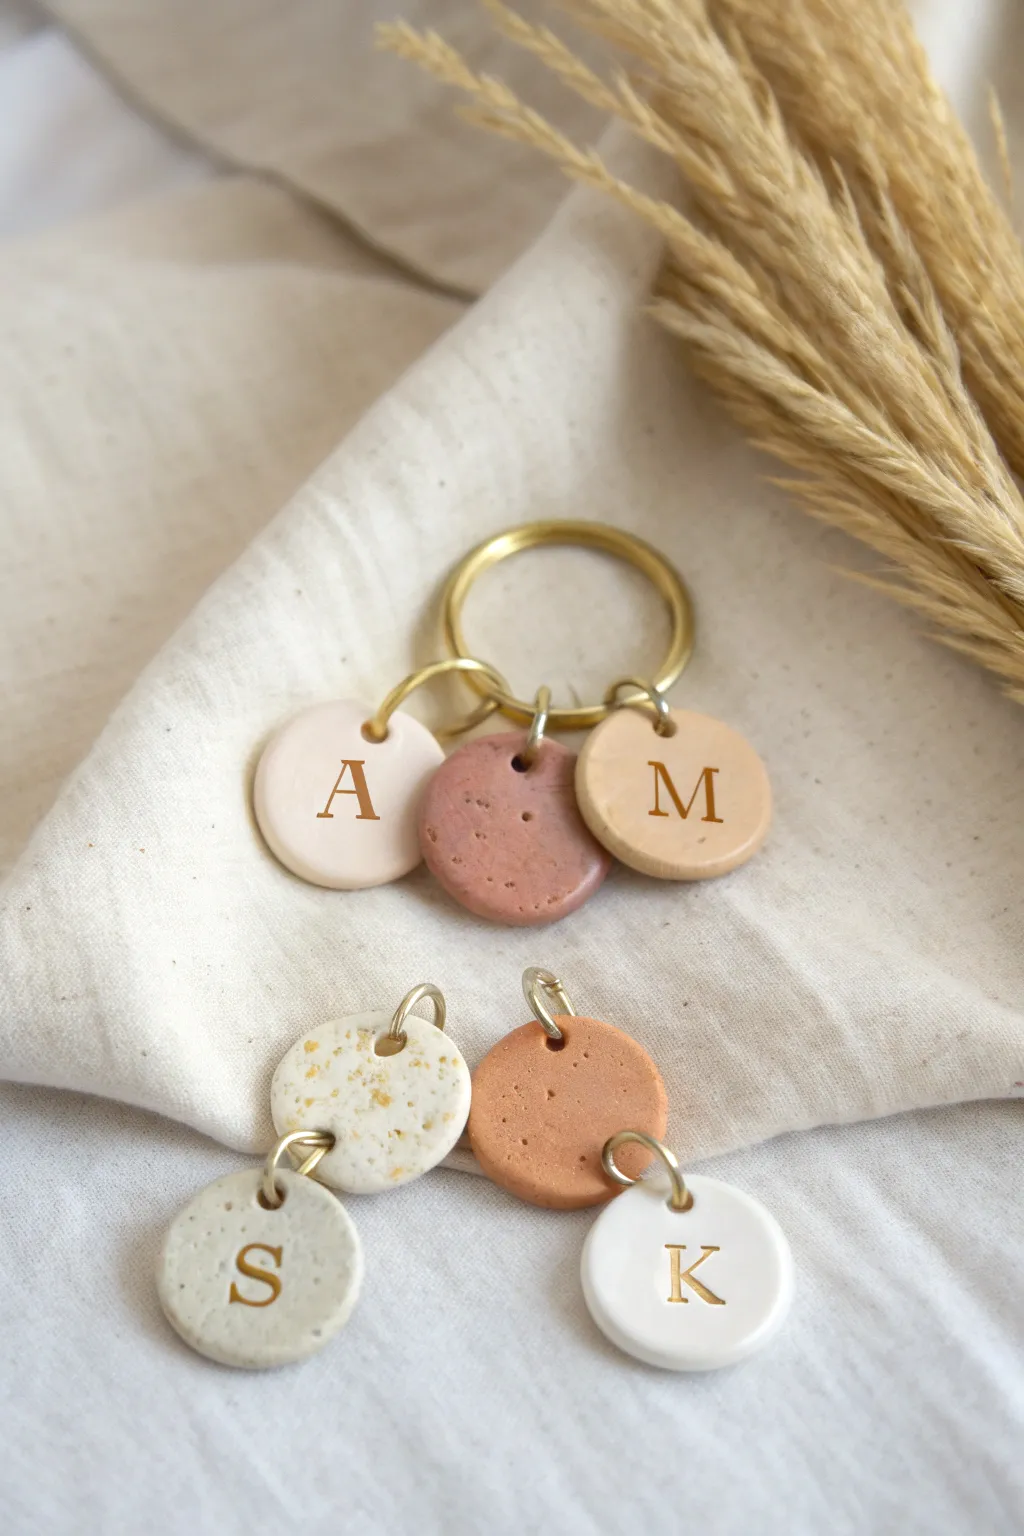
These minimalist, earthy-toned polymer clay tags are perfect for adding a personalized touch to keychains, zippers, or gift wrapping. Featuring stamped gold initials and a mix of solid and faux-stone finishes, they offer a sophisticated yet handmade aesthetic that is incredibly popular right now.
Step-by-Step Guide
Materials
- Polymer clay in assorted colors (white, beige, terracotta, granite effect)
- Acrylic rolling pin
- Small circle cutter (approx. 1 inch)
- Small eye screws or jump rings (gold finish)
- Gold keyring hardware
- Alphabet stamps (serif font)
- Gold acrylic paint
- Small detail paintbrush
- Fine-grit sandpaper (optional)
- Baby wipes or paper towel
- Parchment paper or ceramic tile
Step 1: Preparing the Clay
-
Condition the clay:
Start by taking a small portion of your chosen clay color. Warm it in your hands and knead it thoroughly until it creates a soft, pliable consistency. This conditioning step prevents cracks during baking. -
Roll out the slab:
Place the clay on a smooth work surface or tile. Using your acrylic rolling pin, roll the clay out to an even thickness of about 1/4 inch (6mm). You want these to be sturdy enough for daily use. -
Smooth the surface:
Before cutting, lightly run your finger over the surface to remove any fingerprints. If you see stubborn marks, a tiny drop of baby oil can help smooth them out instantly.
Step 2: Cutting and Stamping
-
Cut the shapes:
Press your small round cutter firmly into the clay slab. Give it a tiny wiggle to ensure it cuts all the way through, then lift it straight up. -
Refine the edges:
Gently gently rub the edges of your raw clay circles with your fingertip to soften the sharp cut lines, giving the tag a stone-like, tumbled appearance. -
Stamp the initial:
Center your chosen alphabet stamp over the clay circle. Press down evenly and firmly, but be careful not to push all the way through the clay. You want a distinct impression that acts as a reservoir for the paint later. -
Add the hardware mount:
Insert a small golden eye screw into the top edge of the circle. This is often more secure for keychains than punching a hole, but you can also use a small straw to create a hole for a jump ring if you prefer.
Clean Edges Pro-Tip
Place a piece of plastic wrap over the clay before using your cutter. This creates a beautifully domed, rounded edge instantly, saving you time smoothing harsh edges later.
Step 3: Baking and Decorating
-
Bake the pieces:
Transfer your pieces to a parchment-lined baking sheet. Bake according to your specific brand’s package instructions—usually around 275°F (135°C) for 30 minutes, but check the label. -
Cool down:
Allow the pieces to cool completely before handling. Polymer clay is slightly soft when hot and hardens as it cools. -
Apply gold paint:
Dip your fine detail brush into the gold acrylic paint. Dab the paint generously into the stamped letter groove. Don’t worry about being neat; it is actually easier if you overfill the impression slightly. -
Wipe away excess:
Wait about 10-20 seconds for the paint to settle, then take a slightly damp baby wipe or paper towel. Swiftly wipe across the surface of the tag to remove the paint on the top level, leaving the gold trapped perfectly inside the letter indentation.
Fixing “Dirty” Clay
Lint stuck in your white clay? Use a cotton swab dipped in rubbing alcohol or acetone to gently wipe the raw clay surface. This dissolves the top layer and the dust with it.
Step 4: Assembly
-
Attach to keyring:
Once the paint is fully dry, grasp the eye screw with pliers to ensure it is secure. If it feels loose, unscrew it, add a dab of superglue, and screw it back in. -
Combine tags:
Use jump rings to attach your initial tags to the larger gold keyring. I love mixing one initial tag with a plain or speckled tag for a layered, textured look.
Now you have a set of elegant, personalized charms ready to gift or sell
Cute Mini Charm Packs Made From Polymer Clay
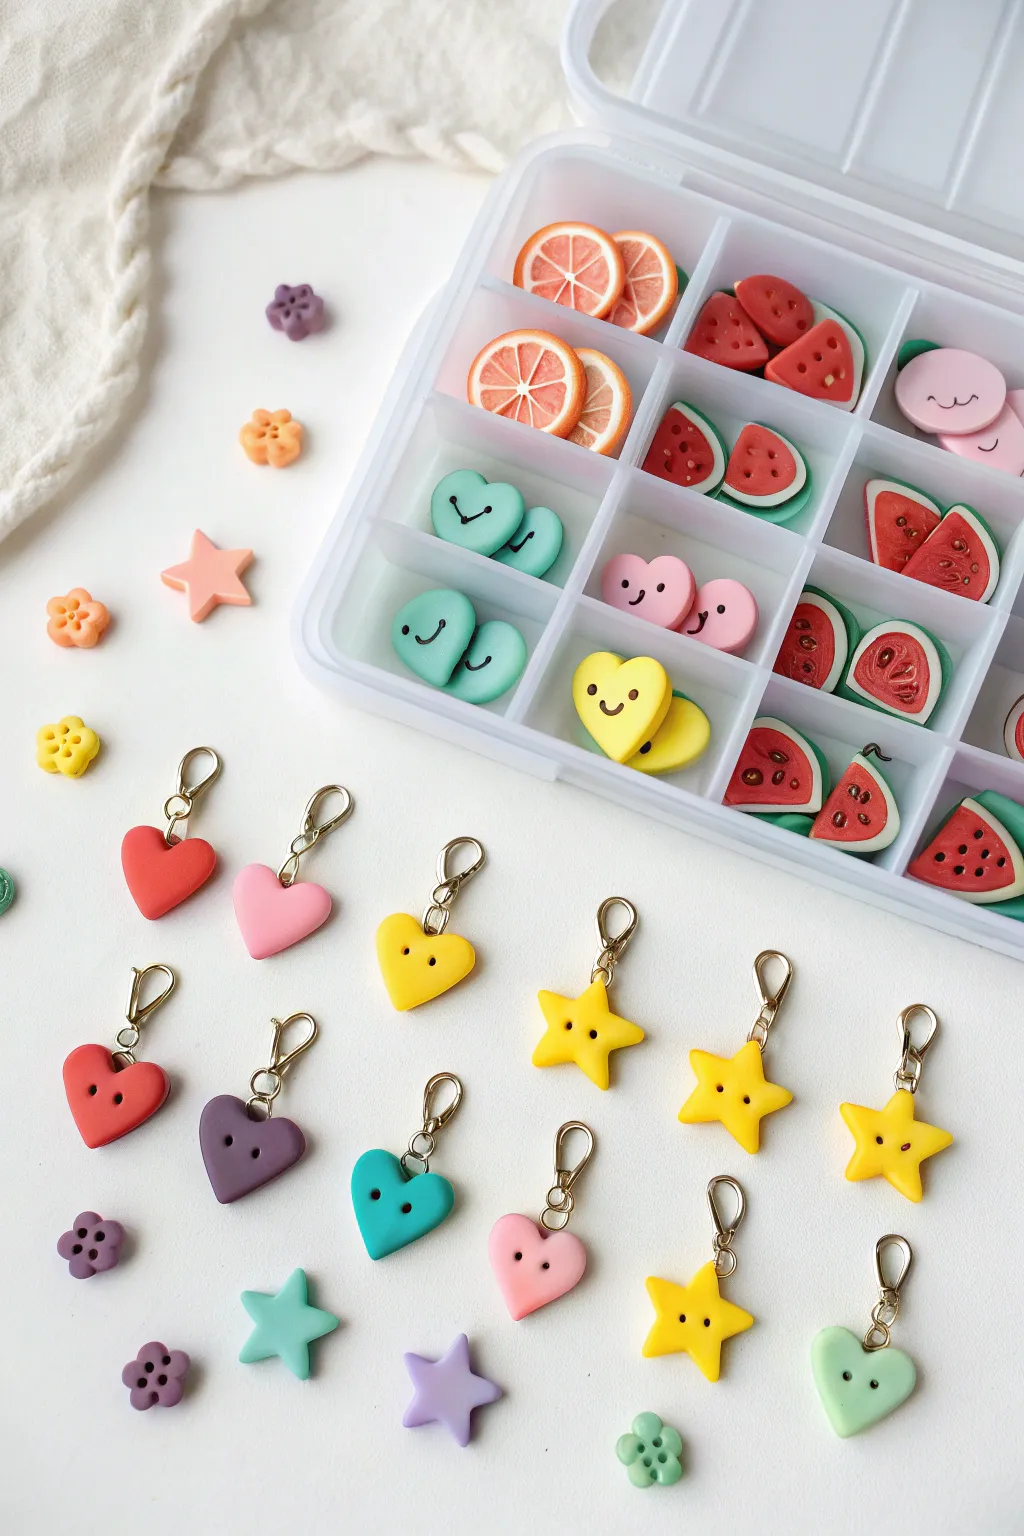
These adorable polymer clay charms double as stitch markers or zipper pulls, featuring tiny fruit slices and cheerful shapes. With their glossy finish and golden hardware, they look professionally made but are surprisingly simple to assemble in batches.
Step-by-Step
Materials
- Polymer clay (red, pink, orange, yellow, green, teal, purple, white, translucent)
- Small lobster clasps (gold)
- Jump rings (gold)
- Eye pins (gold; small size)
- Blade or craft knife
- Define needle tool or toothpick
- Rolling pin or pasta machine
- Cookie cutters (small heart, small star, small circle)
- Black acrylic paint or fine-tip permanent marker
- Gloss glaze (polyurethane or resin)
- Small jewelry pliers
- Oven for baking
Step 1: Citrus Slices
-
Prepare the Cane Center:
Start by creating a ‘cane’ for your citrus designs. Roll a log of translucent clay mixed with a tiny bit of orange (or pink/lime) to tint it. Wrap this log in a thin sheet of white clay. -
Shape the Wedges:
Cut the wrapped log into 6-8 equal lengths. Pinch each length into a teardrop or triangular wedge shape to mimic fruit segments. -
Assemble the Fruit:
Arrange the wedges in a circle with the points meeting in the center. Fill the center gap with a tiny snake of white clay if needed. Wrap the entire circle again with a thick sheet of white clay (the pith) and then a final layer of colored clay (the rind). -
Reduce the Cane:
Gently squeeze and roll the cane to reduce its diameter without distorting the pattern inside. Keep rolling until it’s about 1cm thick. I like to let the cane rest in the fridge for 20 minutes before slicing to keep the details sharp. -
Slice and Cut:
Use your sharpest blade to slice thin cross-sections. For half-moons, cut the slices in half.
Step 2: Watermelon Slices
-
Layer the Colors:
Roll a thick log of red or pink clay. Wrap it in a thin sheet of white clay, followed by a layer of green clay. -
Shape and Slice:
Reduce the log slightly by rolling it, then slice it into rounds. Cut each round in half to create semicircle wedges. -
Add Seeds:
Using a needle tool, poke tiny indentations for seeds. Roll incredibly tiny tapered teardrops of black clay and press them into these indentations.
Clean Cuts Only
Chill your clay canes in the refrigerator for 20 minutes before slicing. Firm clay resists squishing, giving you perfectly crisp fruit segments.
Step 3: Happy Hearts & Stars
-
Cut Shapes:
Roll out sheets of solid colors like yellow, teal, purple, and pink to a uniform thickness (about 3-4mm). Use small cookie cutters to punch out heart and star shapes. -
Smooth Edges:
Gently tap the edges of your cutouts with your finger to round them off and remove any harsh cutting lines. -
Add Facemarks:
Use a needle tool or small ball tool to indent two eyes. For the smiling mouth, press the side of a small straw or a curved tool into the clay. -
Add Hardware:
Carefully insert a small eye pin into the top center of each charm. Ensure it goes in straight and doesn’t poke through the sides.
Textured Treats
Before baking, gently dab the surface of your fruit slices with a clean toothbrush or sandpaper to mimic real fruit texture.
Step 4: Finishing Touches
-
Bake:
Arrange all pieces on a tile or parchment-lined baking sheet. Bake according to your clay manufacturer’s instructions (usually 275°F/130°C for 15-30 minutes). -
Cool and Paint:
Once fully cooled, use a fine dab of black paint to fill in the eyes of the smiley faces if you want them to pop. -
Glaze:
Brush a coat of gloss glaze over the pieces to give them a vibrant, candy-like shine and to protect the paint. -
Attach Clasps:
For the shapes with eye pins, use pliers to open the loop (twist sideways, don’t pull apart) and attach the lobster clasp directly. For the fruit slices, drill a tiny hole near the top, add a jump ring, and then attach the clasp.
Clip these cheerful charms onto your latest knitting project or zipper and enjoy the pop of color they bring.

TRACK YOUR CERAMIC JOURNEY
Capture glaze tests, firing details, and creative progress—all in one simple printable. Make your projects easier to repeat and improve.
Marble and Terrazzo Polymer Clay Ring Dishes
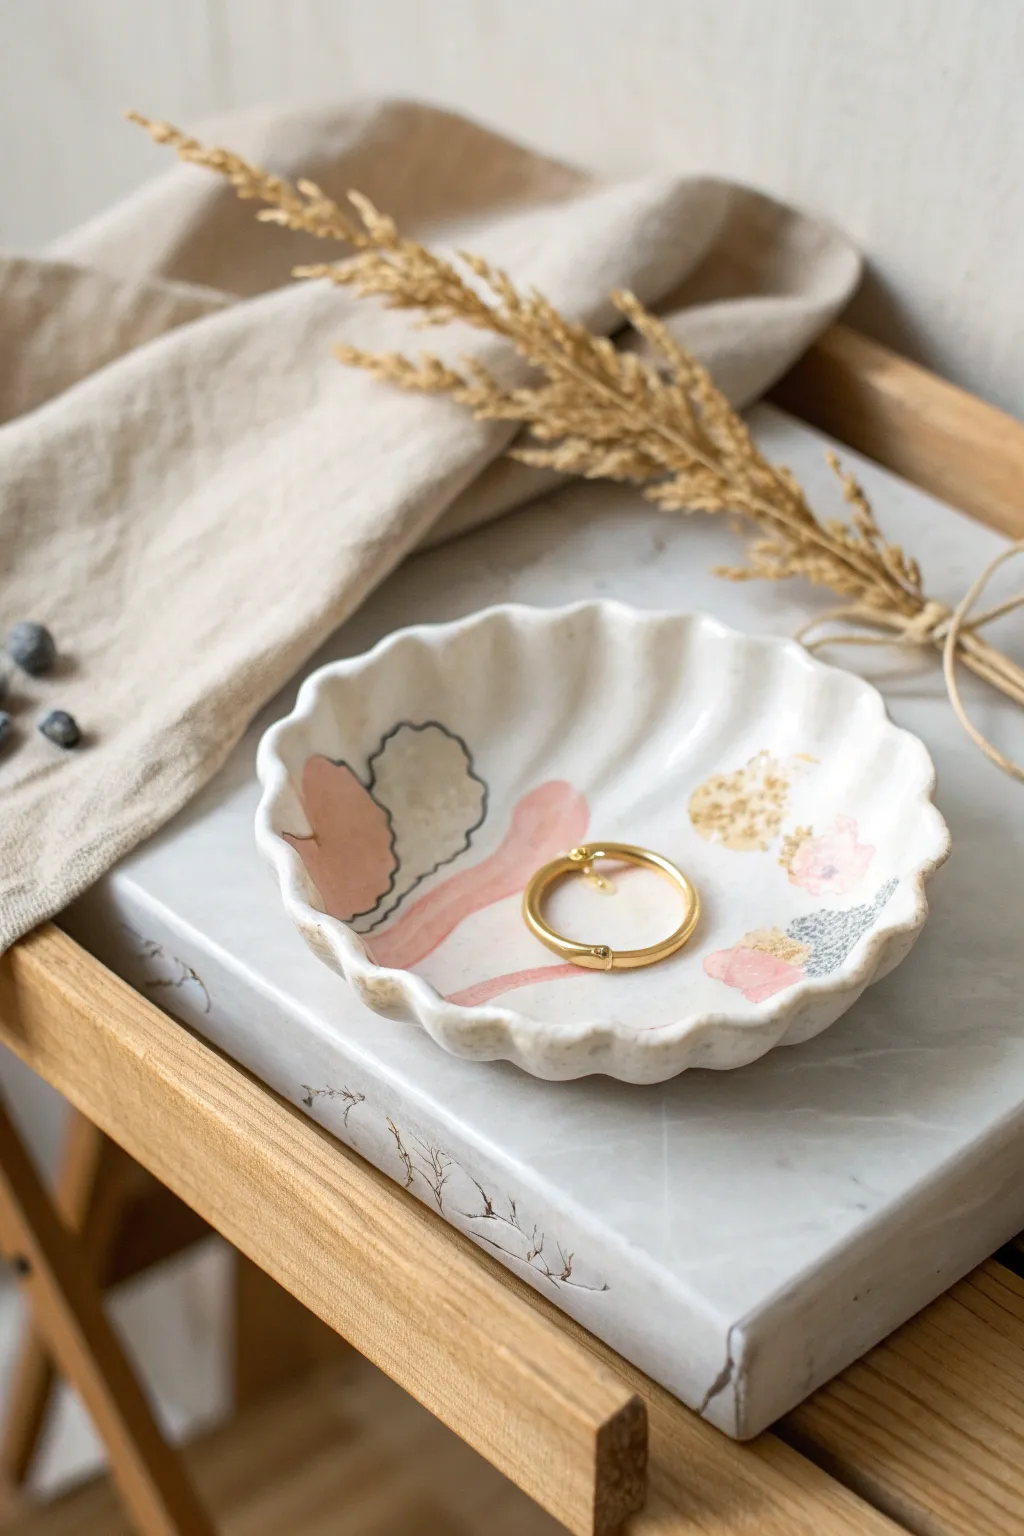
Create a delicate, shell-inspired jewelry holder perfect for featuring organic motifs. This project combines a softly scalloped rim with hand-painted abstract florals for a boutique-worthy finish that looks beautiful on any vanity.
How-To Guide
Materials
- White or translucent polymer clay
- Rolling pin or acrylic roller
- Scalloped cookie cutter (large, approx. 4 inches) or printout template
- Small bowl or ceramic dish (oven-safe) for shaping
- Acrylic paints (pastel pink, sage green, gold, gray)
- Fine detail paintbrushes
- Gloss glaze or varnish
- Sandpaper (fine grit)
- Clean work surface or ceramic tile
Step 1: Shaping the Base
-
Conditioning the clay:
Begin by warming your white polymer clay in your hands, kneading it thoroughly until it is soft and pliable. This prevents cracking later on. -
Rolling out the slab:
Roll the clay out on a smooth surface until it’s about 1/4 inch thick. Aim for an even thickness throughout for a professional look. -
Cutting the shape:
Use a large scalloped cookie cutter to press firmly into the clay. If you don’t have a cutter, place a paper template over the clay and carefully trace around the scalloped edges with a craft knife. -
Adding texture (optional):
Before shaping, you can gently press a real scallop shell or texture tool into the clay to create subtle ridges radiating from the center, giving it that ribbed shell effect seen in the photo. -
Smoothing the edges:
Dip your finger in a little bit of water or baby oil and run it along the cut edge of the clay to smooth out any roughness from the cutter. -
Forming the curve:
Gently lift your clay circle and place it inside your shaping bowl. Press it lightly so it takes on a shallow concave curve, ensuring the scalloped edges flair upwards naturally. -
Baking the form:
Place the bowl with the clay inside into your oven. Bake according to your specific clay package instructions (usually around 275°F or 130°C for 15-30 minutes). Let it cool completely before removing it from the mold.
Smooth Operator
To remove pesky fingerprints before baking, lightly brush the raw clay with a little baby oil or cornstarch. It acts like a buffer and smooths everything out perfectly.
Step 2: Decorating and Finishing
-
Sanding imperfections:
Once fully cooled, inspect the edges. Use a fine-grit sandpaper to gently buff away any sharp spots or fingerprints. -
Sketching the design:
Lightly outline your floral shapes with a pencil directly onto the baked clay. The design in the photo features abstract organic shapes—think cloud-like flowers and flowing stems. -
Painting base colors:
Using a small brush, fill in the large abstract shapes with pastel pink and a soft gray-green. Keep the paint application somewhat sheer or watery for a watercolor effect, or opaque for a modern look. -
Adding details:
Once the base colors are dry, use a very fine brush to add darker outlines. In the image, slate-gray lines define the scalloped flower shapes, adding a whimsical, illustrative touch. -
Gold accents:
Dip a detail brush into metallic gold paint. Add small stippled dots or clusters near the floral elements to mimic pollen or seeds, adding a bit of luxe texture. -
Drying time:
Allow the paint to dry completely. I usually give it at least an hour to ensure no moisture is trapped under the glaze. -
Sealing the dish:
Apply a thin, even coat of high-gloss varnish or glaze over the entire inside of the dish. This protects the paint from scratching and gives the clay a ceramic-like sheen. -
Final cure (if needed):
Some glazes require a quick re-bake or extended air-drying time; check your product’s label to finish the piece correctly.
Rim Gilding
For an extra high-end touch, paint the very edge of the scalloped rim with liquid gold leaf or a gold paint pen. It frames the artwork beautifully.
Now you have a charming, handmade piece ready to hold your favorite rings or trinkets
Polymer Clay Ring Cones and Ring Holders That Gift Well
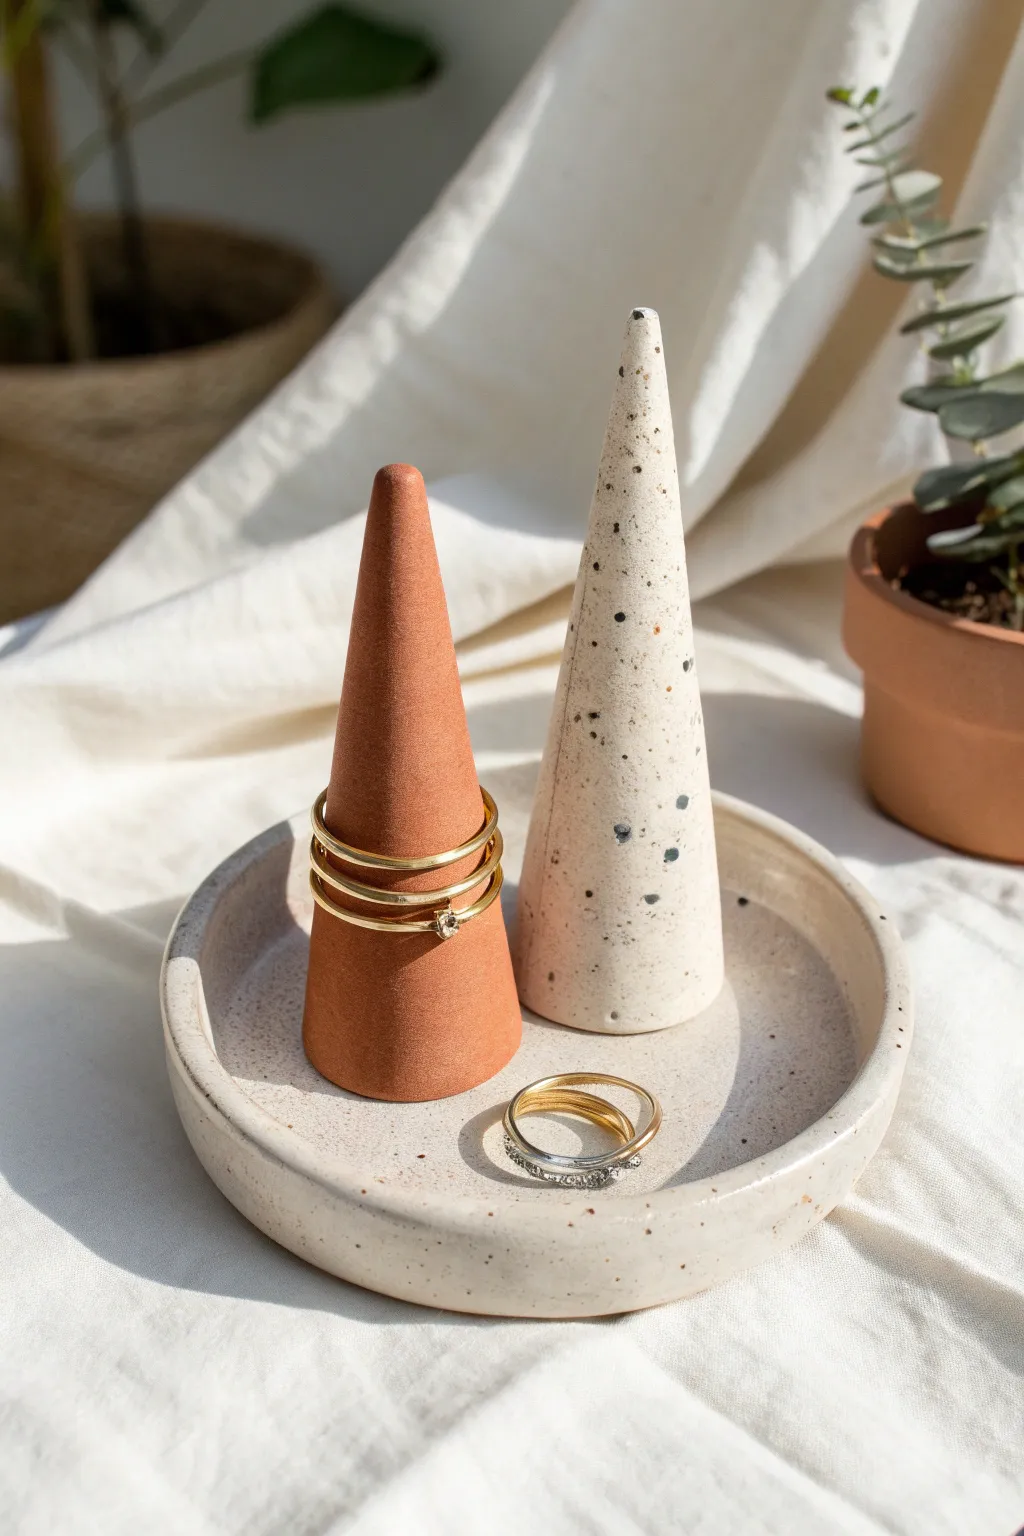
Create a sleek, modern jewelry display with this two-part set featuring a speckled catch-all dish and contrasting geometric ring cones. The pairing of earthy terracotta tones with granite-effect clay brings a sophisticated, boutique feel to your vanity.
Detailed Instructions
Materials
- Polymer clay (Terracotta or Rust color)
- Polymer clay (Granite or Speckled White)
- Acrylic rolling pin
- Circle clay cutter (approx. 4-5 inches)
- Flexible tissue blade or craft knife
- Sandpaper (various grits from 400 to 1200)
- Small ceramic tile or baking sheet
- Oven thermometer
- Gloss or matte varnish (optional)
Step 1: Shaping the Cones
-
Condition the clay:
Begin by thoroughly conditioning your terracotta clay until it is soft and pliable. Do the same for your speckled granite clay, keeping the colors separate to avoid contamination. -
Form the base log:
Take a portion of the terracotta clay and roll it into a thick log on your work surface. The thickness of the log will determine the base width of your cone. -
Taper the cone:
Using the palm of your hand and a flat acrylic block or rolling pin, roll one end of the log back and forth while applying more pressure to that side. This will naturally start to create a tapered, cone shape. -
Refine the height:
Stand the clay up on its flat base. Use your fingers to gently smooth the sides upward, elongating the tip until you reach your desired height—about 3 to 4 inches looks elegant. -
Level the bottom:
To ensure the cone stands distinctive and straight, slice the very bottom off with your flexible tissue blade to create a perfectly flat surface. -
Repeat for the second cone:
Repeat this entire process with the speckled granite clay. Try to make this cone slightly taller or shorter than the first one to create visual interest when they are displayed together.
Step 2: Creating the Catch-all Dish
-
Roll the slab:
Take a large ball of the speckled granite clay and roll it out into an even slab, approximately 1/4 inch thick. I find using depth guides helps keep it perfectly uniform. -
Cut the circle:
Use your large circle cutter to stamp out the base of your dish. If you don’t have a cutter that large, trace a bowl with a needle tool and cut it out manually. -
Create the rim:
Roll a long snake of the same speckled clay. It needs to be long enough to wrap around the entire circumference of your circle base. -
Attach the rim:
Place the snake on top of the circle’s edge. Gently press it down to adhere it to the base, ensuring there are no air gaps between the coil and the slab. -
Blend the seams:
Using a modeling tool or your thumb, smooth the clay from the coil down into the base on both the inside and outside. This blending is crucial for structural integrity. -
Shape the wall:
Once blended, pinch and smooth the wall upwards to create a vertical rim. Aim for a wall height of about half an inch to keep rings secure without hiding them.
Clean Edges Pro-Tip
Use a baby wipe or a q-tip dipped in rubbing alcohol to smooth out the transition seam inside the dish before baking. It saves tons of sanding time later.
Step 3: Baking and Finishing
-
Smooth the surfaces:
Before baking, give everything one last pass with a touch of cornstarch or baby oil on your finger to remove fingerprints. -
Bake the pieces:
Place the cones and the dish on a ceramic tile. Bake according to your polymer clay manufacturer’s instructions—usually around 275°F (130°C) for 30 minutes per 1/4 inch of thickness. -
Cool down:
Allow the pieces to cool completely in the oven with the door slightly ajar. This gradual cooling helps prevent cracks. -
Sand for smoothness:
Once cool, wet-sand the pieces under running water. Start with 400 grit to remove imperfections and work your way up to 1200 grit for a buttery smooth finish. -
Buff or seal:
Rub the pieces with a denim cloth to bring out a natural sheen. If you prefer a glossy look or want extra protection, apply a thin layer of polyurethane varnish.
Level Up: Marbling
Mix a tiny amount of the terracotta clay into the white granite clay but don’t fully blend it. Stop when you see streaks to create a beautiful, subtle marble effect.
Now you have a chic, handmade display set ready to organize your favorite pieces
Modern Catch-All Trays With Raised Polymer Clay Details
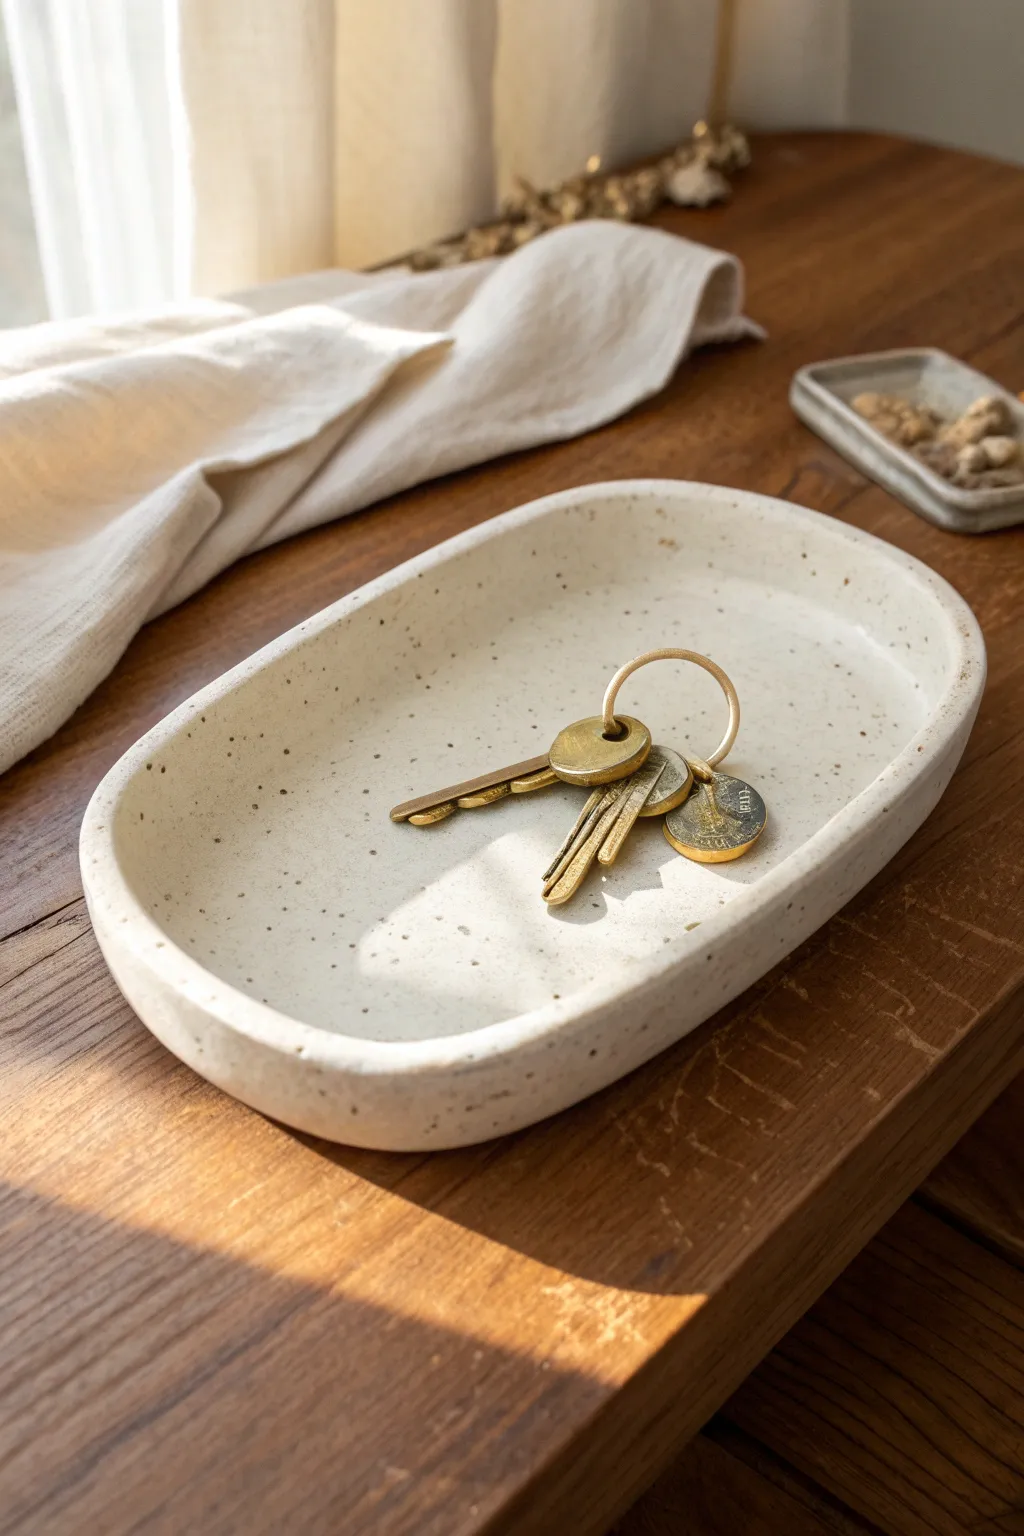
Achieve the high-end look of speckled ceramic or stone without the kiln by creating this minimalist catch-all tray. With its organic oval shape and subtle faux-granite texture, it’s the perfect stylish spot to drop your keys and coins at the end of the day.
Step-by-Step
Materials
- White or translucent white polymer clay (approx. 4oz)
- Black pepper or dried coffee grounds (for speckles)
- Acrylic rolling pin or pasta machine
- Oval template (paper or cardboard)
- Craft knife or clay blade
- Fine-grit sandpaper (400 and 600 grit)
- Matte polymer clay varnish or sealant
- Soft paintbrush
- Oven and baking sheet
- Parchment paper
Step 1: Preparing the Faux-Stone Clay
-
Condition the clay:
Start by warming the white polymer clay in your hands, kneading it thoroughly until it is soft, pliable, and free of cracks. -
Add texture inclusions:
Flatten the clay into a pancake and sprinkle a pinch of black pepper or dried coffee grounds onto the surface. I like to start with less than I think I need; you can always add more. -
Fold and mix:
Fold the clay over the inclusions and knead it again until the specks are evenly distributed throughout the batch, creating that random granite effect. -
Roll out the slab:
Using an acrylic roller or pasta machine on a wide setting, roll the clay out to a uniform thickness of about 1/4 inch (6mm). A bit of thickness gives the tray a substantial, stone-like feel.
Step 2: Shaping the Tray
-
Cut the base shape:
Place your oval paper template onto the rolled clay slab. Carefully trace around it with your craft knife to cut out the base shape. -
Create the rim strip:
Roll out the remaining clay scraps into a long snake, then flatten it slightly to create a long, rectangular strip about 1/2 inch tall. -
Attach the rim:
Place the strip along the edge of your oval base, standing it upright. Gently press it onto the base to adhere. -
Blend the seams:
Use your thumb or a modeling tool to smooth the clay on the inside where the wall meets the base, blending until the seam disappears completely. -
Reinforce the outside:
Repeat the blending process on the exterior seam, ensuring the wall is securely attached to the floor of the tray. -
Refine the lip:
Gently smooth the top edge of the rim with your finger to round it off, removing any sharp cutting marks for a softer, ceramic look.
Stone Effect Pro Tip
Mix a tiny amount of translucent clay into your white base. This adds depth to the material, making it look much more like real quartz or ceramic than opaque plastic.
Step 3: Baking and Finishing
-
Prepare for baking:
Place the shaped tray on a parchment-lined baking sheet. Double-check for fingerprints and smooth them out lightly. -
Bake the clay:
Bake according to your clay manufacturer’s instructions (usually 275°F/135°C) for roughly 30-45 minutes to ensure durability. -
Cool down completely:
Allow the tray to cool fully in the oven with the door cracked, or on a wire rack, before handling it to prevent warping. -
Sand for texture:
Once cool, wet-sand the piece under running water using 400-grit sandpaper to remove any rough spots, following up with 600-grit for a silky finish. -
Seal the surface:
Apply a thin coat of matte varnish to the entire surface. This protects the faux-stone inclusions and prevents the white clay from attracting dust.
Fixing Uneven Rims
If your tray wall looks wavy before baking, wrap a strip of cardstock around the outside and secure with tape to hold the oval shape perfectly while it cures.
Now your chic, minimal tray is ready to keep your essentials organized in style
Textured Polymer Clay Coasters With a Sealed Finish
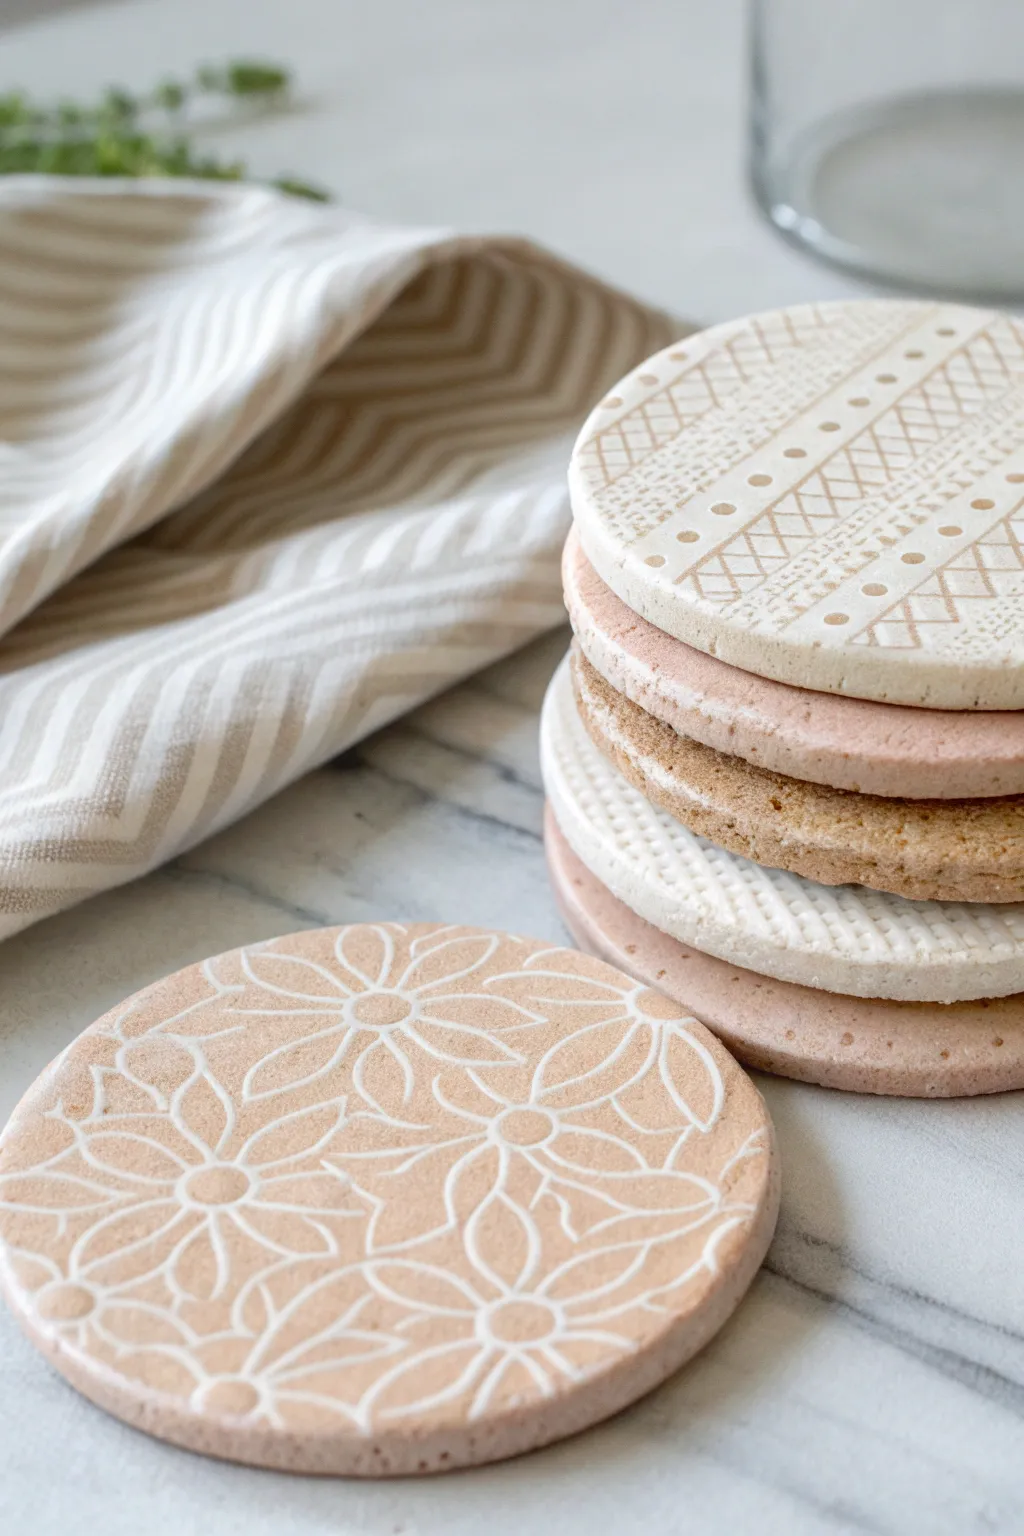
Bring an earthy, handmade touch to any coffee table with these elegant polymer clay coasters featuring white embossing and subtle patterns. The combination of warm terra-cotta tones and creamy whites creates a sophisticated look that is both modern and classic.
Step-by-Step
Materials
- Polymer clay (white, beige, and terra-cotta colors)
- Acrylic rolling pin
- Large round circle cutter (approx. 4 inches)
- Texture sheets or embossed rolling pin
- White acrylic paint
- Paper towels or soft cloth
- Fine-grit sandpaper (400 and 800 grit)
- Water-based polyurethane varnish or sealant
- Soft paintbrush
- Parchment paper
- Baking sheet
- Oven
Step 1: Preparation and Rolling
-
Condition the Clay:
Begin by thoroughly kneading your chosen colors of polymer clay until they are soft and pliable. If you want a marble effect like in the stack, mix small amounts of white into your beige or terra-cotta clay, stopping before the colors fully blend. -
Roll Out the Slab:
Place your conditioned clay on a clean surface or silicone mat. Use your acrylic rolling pin to roll the clay into a smooth, even sheet. Aim for a thickness of about 1/4 inch (6mm) to ensure the coasters are sturdy enough for daily use. -
Apply Texture:
Select your texture sheet or embossed rolling pin. Carefully press it into the clay slab with firm, even pressure. If using a sheet, roll over it once with your rolling pin to imprint the design deeply without thinning the clay too much. -
Cut the Shape:
Position your large round circle cutter over the textured area you like best. Press down firmly to cut out the coaster shape. If the clay sticks to the cutter, gently push it out from the back, being careful not to distort the circle.
Clean Cuts Pro Tip
Place a sheet of plastic wrap over your rolled clay before pressing the cutter down. This creates a beautifully rounded, beveled edge that looks professional and needs less sanding later.
Step 2: Baking and Finishing
-
Transfer to Baking Sheet:
Carefully lift your cut clay circle and place it onto a parchment-lined baking sheet. Smooth out any rough edges with your finger while the clay is still raw. -
Bake:
Bake according to the manufacturer’s instructions on your specific brand of clay. Typically, this is around 275°F (135°C) for 30 minutes per 1/4 inch of thickness. For durability, I prefer to bake these a little longer to ensure they are fully cured. -
Cool Down:
Remove the baking sheet from the oven and allow the coasters to cool completely on a flat surface. Do not attempt to sand or paint them while they are still warm. -
Sand the Edges:
Once cool, use fine-grit sandpaper (400 grit) to smooth the outer rim of the coaster. Dip the sandpaper in water to keep dust down and achieve a polished finish.
Step 3: Painting and Sealing
-
Apply White Wash:
Squeeze a small amount of white acrylic paint onto a palette. Using a paintbrush, cover the entire textured surface of the coaster, working the paint into all the deep grooves and impressed lines. -
Wipe Away Excess:
Before the paint dries completely, take a damp paper towel or soft cloth and wipe the surface of the coaster. Ideally, you want to remove the paint from the raised areas while leaving the white pigment settled in the recessed textures. -
Let Dry:
Allow the remaining paint in the grooves to dry completely. This usually takes about 10 to 15 minutes. -
Seal the Surface:
To protect your coaster from moisture and stains, apply a thin coat of water-based polyurethane varnish or a specialized polymer clay sealant. Use smooth brush strokes to avoid bubbles. -
Final Cure:
Let the sealant dry fully according to the bottle instructions. Apply a second coat if you desire extra protection for hot mugs.
Sticky Texture Fix
If your texture sheet sticks to the clay, lightly dust the clay surface with a tiny bit of cornstarch or spritz the texture sheet with water before pressing it down.
Stack your set of coasters and tie them with twine for a beautiful ready-to-sell package
Tea Light Holders With Polymer Clay “Glow” Styling
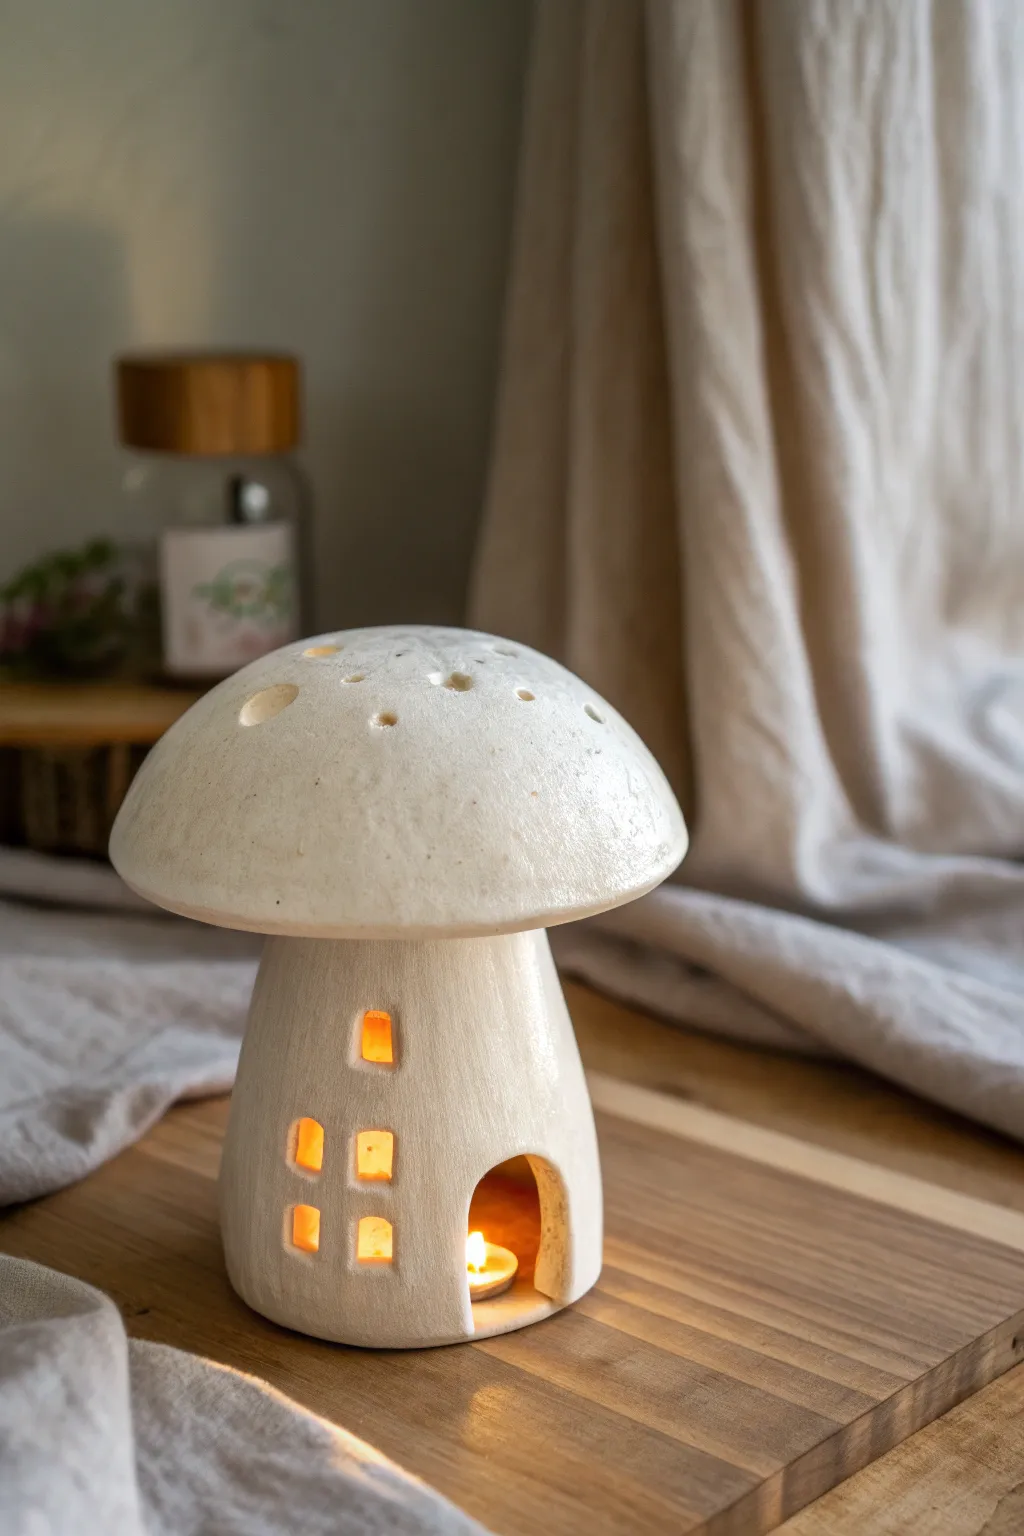
Transform simple white clay into an enchanting forest dwelling that glows from within. This mushroom-shaped tea light holder features charming cutout windows and a speckled cap that casts magical light patterns when illuminated.
Step-by-Step
Materials
- White polymer clay (approx. 4-6 oz)
- Speckled polymer clay (optional, or mix black pepper into white)
- Glass jar or metal cutter (for base sizing)
- Aluminum foil
- Rolling pin or acrylic roller
- Craft knife or scalpel blade
- Small round piping tip or straw
- Texture sponge or stiff brush
- LED tea light (battery operated)
- Oven thermometer
- Sandpaper (fine grit)
Step 1: Forming the Base
-
Prepare the foil armature:
Crumple aluminum foil into a cylinder shape slightly wider than your tea light but narrower than your jar. This will support the clay while baking and save material. -
Condition the clay:
Warm the white polymer clay in your hands until it becomes soft and pliable. If you want a natural stone look, this is the moment I like to mix in a tiny pinch of cracked black pepper or sand. -
Roll the slab:
Roll out a sheet of clay approximately 1/4 inch thick. It needs to be sturdy enough to stand on its own once baked. -
Wrap the cylinder:
Cut a rectangular strip and wrap it around your foil cylinder to create the stalk of the mushroom. Smooth the seam thoroughly with your finger or a clay tool so it disappears. -
Create the doorway:
Using your craft knife, carefully cut an arched doorway at the bottom of the cylinder. Make sure it’s tall and wide enough to easily slide an LED tea light inside.
Safety First
Only use LED battery-operated tea lights with polymer clay. Real flame candles get too hot and can burn the clay or release fumes.
Step 2: Crafting the Cap
-
Shape the mushroom cap:
Create a separate foil ball, flattened into a dome shape. Roll out a circle of clay and drape it over this dome, smoothing it down. -
Add size and overhang:
Ensure the cap is significantly wider than the base stalk. The overhang adds character and creates more surface area for the light holes. -
Texture the surface:
For that rustic, organic feel seen in the photo, gently pat the entire surface of both the base and cap with a coarse sponge or a stiff-bristled brush. -
Connect the pieces:
Place the cap onto the stalk. You can score the clay where they touch and use a little liquid polymer clay (Bake and Bond) to ensure a secure connection. -
Blend the connection:
Use a modeling tool to smooth the clay from underneath the cap onto the stalk so they become one solid unit.
Scorched Clay?
If your white clay yellows in the oven, you can paint the whole piece with white acrylics afterwards to restore the bright, clean finish.
Step 3: Detailing and Baking
-
Cut the windows:
Use the tip of your craft knife to cut small, irregular square or rectangular windows into the stalk. Varying their sizes slightly adds to the whimsical cottage aesthetic. -
Punch the light holes:
Using a small piping tip, straw, or detailing tool, punch random holes into the top of the mushroom cap. These ‘pores’ allow the heat and light to escape upwards. -
Smooth the edges:
Dip your finger in a tiny bit of rubbing alcohol or clay softener and gently rub any sharp edges around the windows and door to soften the look. -
Check stability:
Ensure the bottom is perfectly flat so it sits level on a table. Gently press it onto your work surface one last time. -
Bake carefully:
Bake according to your clay manufacturer’s instructions, usually around 275°F (130°C). I recommend tenting a piece of parchment paper over the mushroom to prevent white clay from scorching. -
Cool and remove foil:
Let the piece cool completely inside the oven. Once cold, carefully extract the aluminum foil from the inside using needle-nose pliers if it’s stuck. -
Final finish:
Lightly sand the bottom or any rough window edges with fine-grit sandpaper. Place your LED tea light inside and watch your cottage glow.
Enjoy the cozy atmosphere your handcrafted mushroom lights bring to any room
Mini Bud Vases Covered in Polymer Clay Slabs
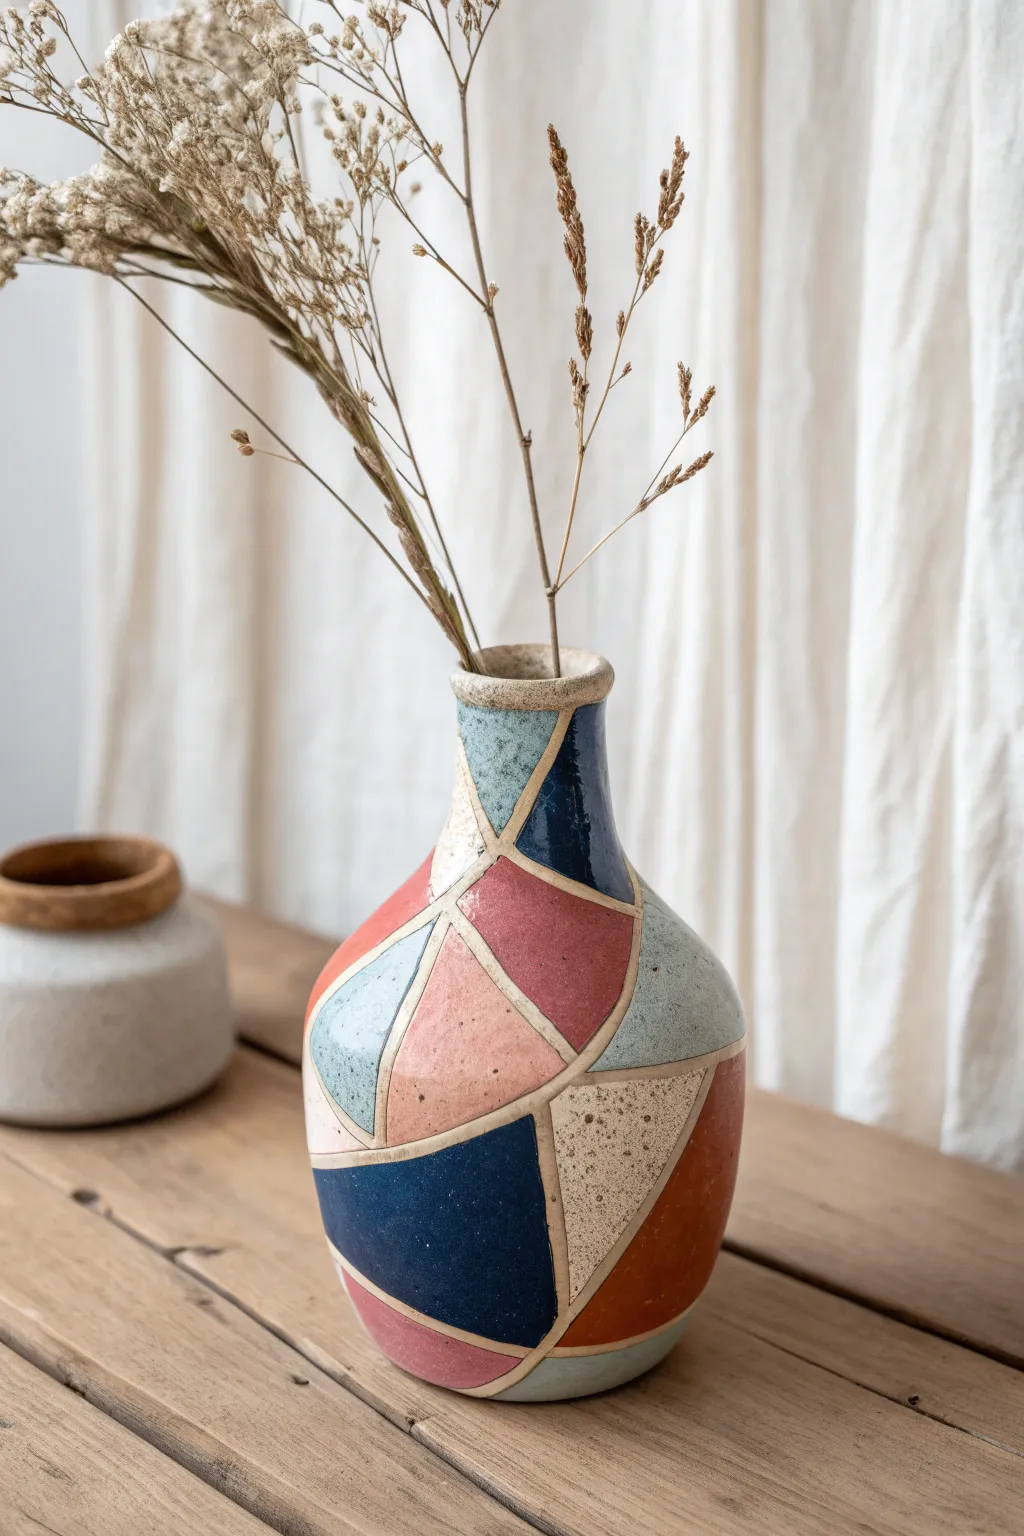
Transform a plain glass or ceramic bud vase into a stunning piece of modern decor using the polymer clay slab technique. This project mimics the look of high-end ceramic glazing with a playful, fragmented geometric pattern in soothing earthy tones.
Detailed Instructions
Materials
- Small glass or ceramic bud vase (thrifted is fine)
- Polymer clay in 5-6 colors (navy, terracotta, blush pink, light blue, cream, beige)
- Coarse black pepper or brown acrylic paint (for speckling)
- Acrylic rolling pin or pasta machine
- Sharp craft knife or tissue blade
- Liquid polymer clay (clear or translucent)
- Needle tool or toothpick
- Sandpaper (various grits)
- Matte varathane or polymer clay sealer
- Oven geared for polymer clay
Step 1: Prepping the ‘Ceramic’ Clay
-
Condition the clay:
Start by thoroughly conditioning each color of polymer clay until it is soft and pliable. This prevents cracking later on. -
Create the faux-ceramic texture:
To achieve that stony, speckled pottery look, mix a pinch of ground black pepper or dried herbs into your lighter clay colors (cream, pink, light blue). Knead it in until the speckles are evenly distributed. -
Roll out slabs:
Roll each color into a thin, even sheet, approximately 2-3mm thick. If you are using a pasta machine, a medium setting works best so the clay isn’t too fragile. -
Cut geometric shapes:
Using your craft knife, freehand cut random geometric shapes—triangles, trapezoids, and irregular quadrilaterals. Don’t worry about making them perfect; the organic variance adds to the charm.
Uneven Seams?
If your ‘grout’ lines look messy, don’t panic. After baking, a light sanding will level out the high spots and make the connection between tile and grout look seamless and professional.
Step 2: Assembling the Mosaic
-
Prepare the base:
Clean your glass or ceramic vase thoroughly with alcohol to remove any oils. Smear a very thin layer of liquid polymer clay over the surface to act as a glue. -
Place the first shape:
Press a clay shape onto the vase, starting near the widest part of the curve. Ensure full contact so no air bubbles are trapped underneath. -
Build the puzzle:
Continue adding shapes next to one another, leaving a consistent gap of about 1-2mm between them. This gap acts as the ‘grout’ line. -
Curve the corners:
As you work around the neck or base where the vase curves sharply, gently gently gently press the edges of the clay to conform to the shape. You can trim shapes smaller if they are too large to lie flat. -
Fill the gaps:
Roll out thin snakes of a neutral clay color (like beige or raw clay). Press these into the channels between your colored shapes to create the grout lines. -
Smooth the surface:
Once the entire vase is covered and grouted, gently roll the vase on your work surface to flatten the clay and merge the grout lines with the tiles. The surface should feel unified.
Level Up: Texture
Before baking, press a piece of coarse sandpaper or a stiff bristle brush onto the colored tiles. This creates a realistic stone-like texture that mimics unglazed ceramic pottery.
Step 3: Refining and Baking
-
Texturize the grout:
Run a needle tool or toothpick lightly over the grout lines to depress them slightly, giving the colored tiles a raised, relief effect. -
Clean up edges:
Check the rim and the bottom of the vase. Trim away any excess clay so the vase sits flat and the opening is clean. -
Bake the project:
Bake the vase in a preheated oven according to your manufacturer’s instructions (usually 275°F/130°C for 30 minutes per 1/4 inch thickness). Use an oven thermometer to ensure accuracy. -
Cool down:
Let the vase cool completely inside the oven with the door cracked open. This gradual cooling helps prevent the clay from cracking due to thermal shock.
Step 4: Finishing Touches
-
Sand the surface:
Once cool, wet sand the vase gently with high-grit sandpaper to smooth out any fingerprints or sharp edges. I prefer doing this under a trickle of water to keep dust down. -
Seal the work:
Apply a thin coat of matte sealer to protect the clay and enhance the colors without making it look plasticky.
Fill your new vase with dried botanicals or fresh blooms and enjoy the modern art vibe you’ve created
Decorative Cabinet Knobs and Drawer Pulls in Polymer Clay
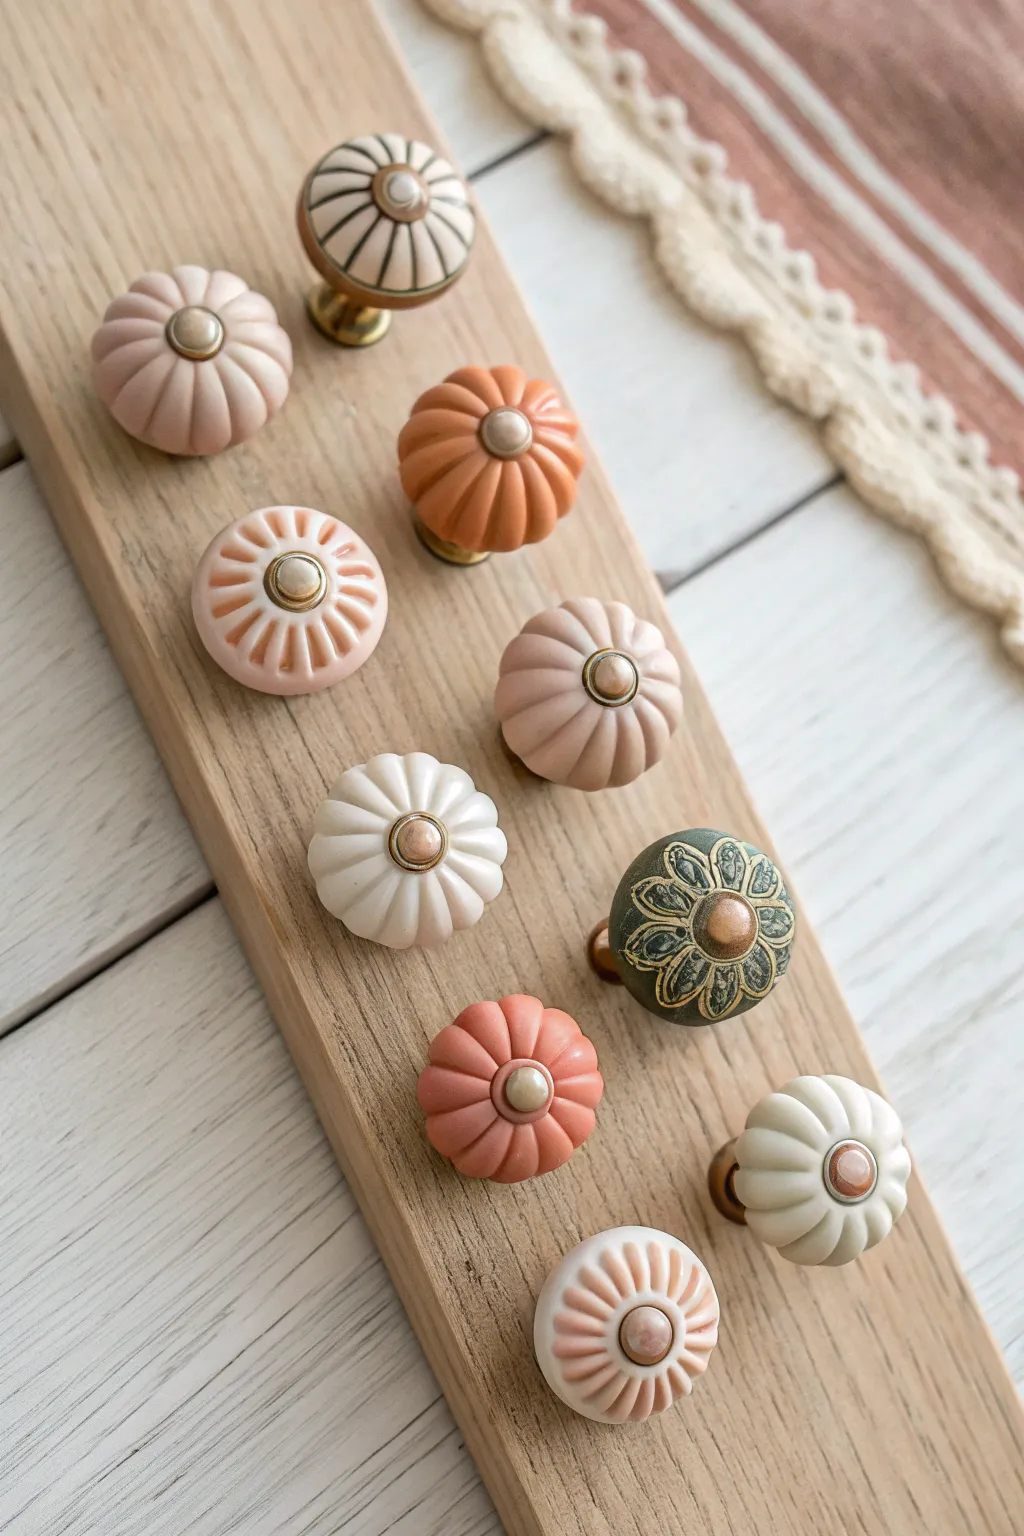
Transform ordinary furniture into boutique treasures with these sophisticated, lobed drawer pulls. Featuring soft matte finishes and earthy pumpkin shapes, this tutorial covers sculpting classic ridges and adding delicate painted details to create a high-end look.
Step-by-Step
Materials
- Polymer clay in various colors (blush pink, terracotta, antique white, dark olive green)
- Plain metal cabinet knob bases (brass or nickel finish)
- Liquid polymer clay (Bake & Bond)
- Acrylic roller or pasta machine
- Needle tool or toothpick
- Modeling tool (curved or ball-ended)
- Detail paintbrush
- Acrylic paints (black, gold)
- Gloss or matte varnish (optional)
- Oven for baking
Step 1: Preparing the Base
-
Condition the clay:
Start by warming your chosen polymer clay color in your hands, kneading it until it is soft and pliable. For the solid-colored knobs shown, mix colors like white and translucent with a touch of orange or brown to achieve those muted, earthy pastel tones. -
Prep the hardware:
Take your metal knob base and apply a thin layer of liquid polymer clay to the top surface. This acts as a powerful glue that bonds the raw clay to the metal during baking. -
Form the core:
Roll a ball of clay slightly larger than the metal knob head. Press it firmly onto the prepared metal base, smoothing the clay down the sides so it covers the top half or fully encases the head, depending on your preferred style. -
Smooth the surface:
Roll the attached clay gently against your work surface or between your palms to ensure it is perfectly round and smooth, removing any fingerprints.
Clean Hardware Tip
Wrap the stem / screw part of your metal knob with masking tape before adding clay. This prevents clay smear and keeps the threads clean for easy installation.
Step 2: Sculpting the Lobes
-
Mark the sections:
To create the pumpkin or melon shape, use a needle tool to lightly mark an ‘X’ at the very top center of the clay ball. Continue dividing the sections until you have 8 to 12 even wedges marked out. -
Deepen the grooves:
Using the side of a needle tool or a dull blade, press into your guide lines to create deep, vertical grooves running from the top center down the sides of the knob. -
Round the edges:
Use a curved modeling tool or your fingertip to gently soften the sharp edges of each slice. The goal is to make each section look like a plump, rounded lobe rather than a sharp slice. -
Add the center detail:
Press a small indentation into the very top center of the knob where all the lines meet. You can place a small flattened ball of contrasting clay (like gold or white) here, or leave it indented to hold the screw head if you are using a specific type of hardware.
Faux Stone Effect
Mix black pepper or dried tea leaves into translucent white clay before sculpting. This creates a realistic speckled granite or ceramic stoneware effect.
Step 3: Detailed Variations
-
Creating the striped knob:
For the striped design, sculpt a smooth, white round knob without deep lobes. Partially bake it for 10 minutes to set the shape so you don’t squish it while painting. -
Painting stripes:
Once cool, carefully paint thin vertical black lines following the curve of the knob, radiating from the center. Add a small gold circle at the apex for a finished look. -
Sculpting the floral knob:
For the green floral knob, form a dark olive ball. Instead of deep lobes, press a flower stamp or texture sheet onto the top surface, or hand-carve petal shapes using a small gouge tool. -
Highlighting with gold:
If you created the textured floral knob, lightly brush gold mica powder or gold acrylic paint over the raised details to make the pattern pop against the dark green background.
Step 4: Finishing Touches
-
Final smooth:
Before the final bake, check all your lobed knobs. I typically run a finger dipped in a little baby oil over the clay to remove any lingering fingerprints or dust specks. -
Full bake:
Bake all knobs according to your clay manufacturer’s instructions. Since the clay is thick around the metal core, you may need to bake for 45 minutes to an hour to ensure full curing. -
Cooling down:
Let the knobs cool completely inside the oven. This gradual cooling helps prevent cracks from forming where the metal meets the clay. -
Sealing:
If desired, apply a matte varnish to the pastel knobs for a soft ceramic look, or a gloss glaze to the patterned ones for durability.
Adding these custom knobs is a quick way to completely refresh an old dresser or cabinet with your personal artistic touch