Polymer clay magnets are my favorite quick-win project because you get something cute and useful in one sitting. I pulled together a mix of classic crowd-pleasers and a few studio-style twists so you can build a whole little magnet collection that feels totally you.
Kawaii Donut Magnets With Sprinkle Texture
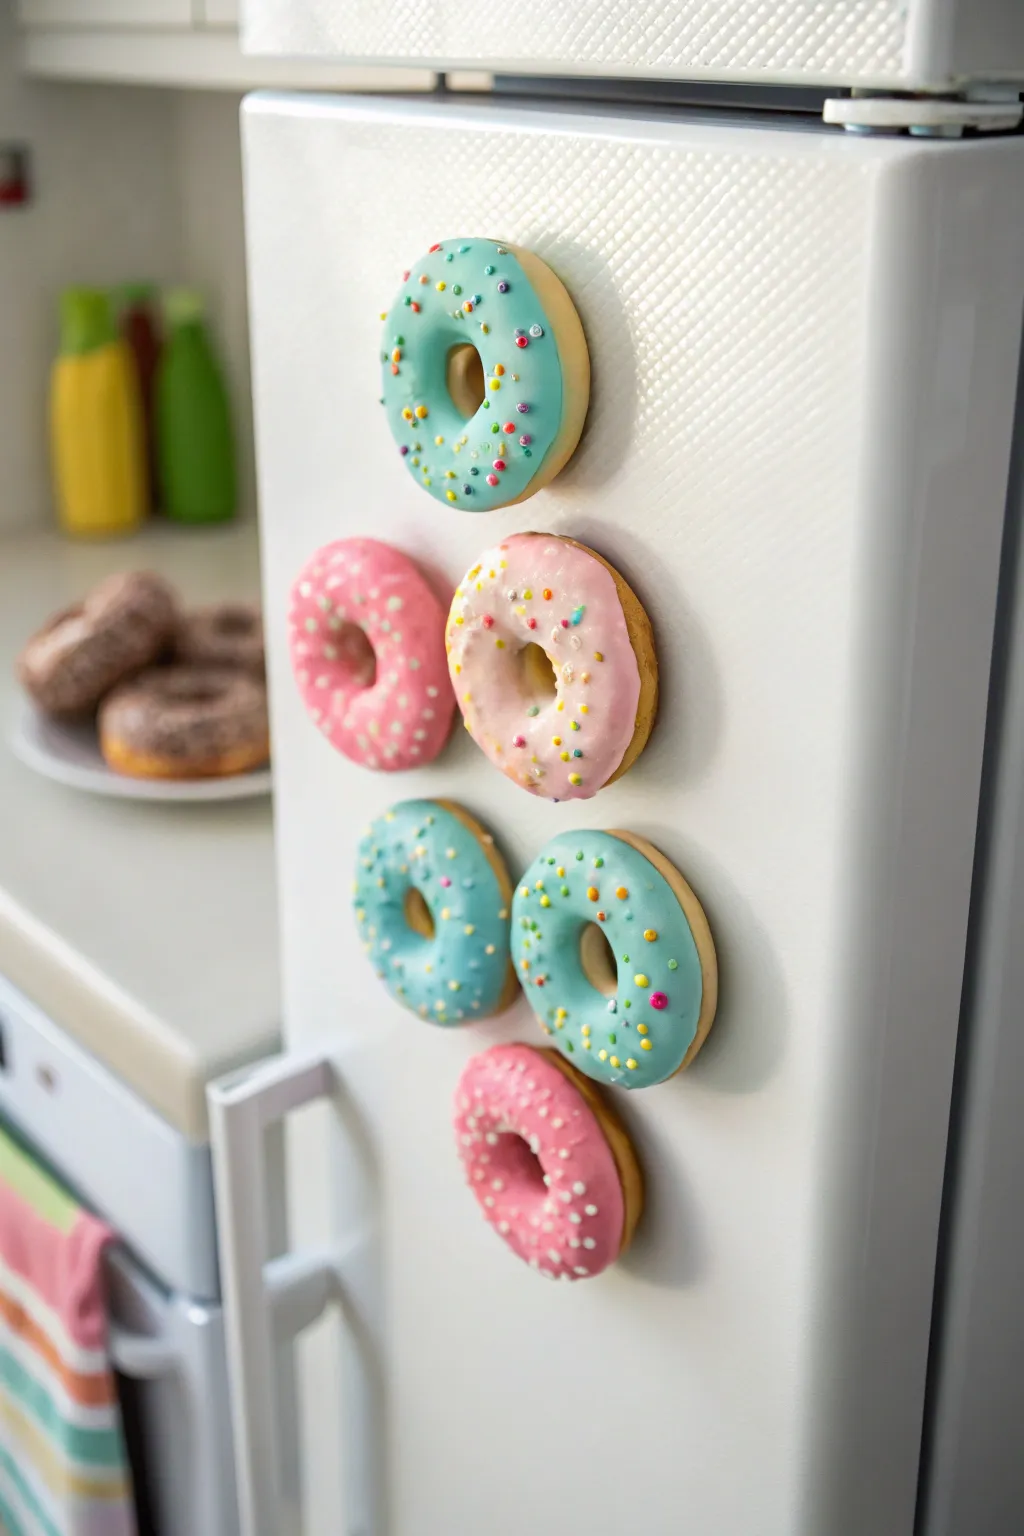
Transform your refrigerator into a sweet gallery with these realistic-looking polymer clay donut magnets. Featuring soft pastel glazes and delicate sprinkle textures, these zero-calorie treats add a playful touch to any kitchen decor.
Step-by-Step
Materials
- Polymer clay (tan/beige for dough)
- Polymer clay (pastel pink, teal/turquoise, hot pink for icing)
- Liquid polymer clay or TLS (Translucent Liquid Sculpey)
- Polymer clay in various colors for sprinkles (or pre-baked clay sprinkles)
- Ceramic magnets (round, strong)
- Superglue or E6000 adhesive
- Rolling pin or acrylic roller
- Small round cutter (approx. 1.5 – 2 inches)
- Mini round cutter (for donut holes)
- Soft pastel chalks (orange, light brown)
- Paintbrush for shading
- Needle tool or toothpick
- Gloss glaze (optional)
Step 1: Shaping the Dough Base
-
Condition the Clay:
Begin by conditioning the tan or beige polymer clay until it is soft and pliable. Warm hands make this process much faster. -
Form Smooth Balls:
Roll the tan clay into smooth balls, each about the size of a ping-pong ball. Ensure there are no cracks or seams. -
Flatten Slightly:
Gently press each ball down onto your work surface with your palm to create a thick, rounded disc. Don’t flatten it too much; you want the donut to look fluffy. -
Create the Donut Hole:
Use the mini round cutter to punch a hole directly in the center of each disc. Save the little cutout centers for making donut holes later if you wish. -
Soften the Edges:
The cutter leaves sharp edges, so use your finger to gently smooth and round off the inner and outer rims of the donut shape for a baked look. -
Add Realistic Texture:
Take a clean toothbrush or a ball of aluminum foil and lightly tap it over the surface of the dough to mimic the texture of fried pastry. -
Pre-Bake Shading:
To make them look golden brown, scrape a little orange and light brown soft pastel chalk into a powder. Dust this powder gently onto the edges and bottom of the donut using a soft paintbrush.
Sticky Icing Fix
If your icing mixture is too sticky on your tools, dip your needle tool or finger in a tiny bit of cornstarch or water before spreading it.
Step 2: The Icing & Sprinkles
-
Prepare the Frosting:
Mix your chosen icing color clay (teal or pink) with a few drops of liquid polymer clay. Mash and mix until you achieve a texture similar to tacky frosting or thick peanut butter. -
Apply the Base Layer:
Take a small portion of your softened icing mixture and spread it onto the top of the donut. I usually use a needle tool to drag the edges down slightly, creating distinct drips. -
Refine the Drips:
Ensure the icing looks organic by varying the length of the drips. Some should stop high up, while others can ooze further down the side. -
Make the Sprinkles:
Roll very thin snakes of various colored polymer clay. Bake these snakes for 5 minutes, let them cool, and chop them into tiny bits. Alternatively, you can form tiny rice-grain shapes from raw clay. -
Decorate the Donuts:
While the icing clay is still raw and sticky, gently press your sprinkles onto the surface. For the pink donuts with white dots, roll tiny white balls and press them flat into the icing. -
Texture Check:
Look over the donut one last time. If you smeared the dough texture while icing, re-texture the visible tan areas lightly with your toothbrush.
Step 3: Baking and Assembly
-
Bake the batch:
Place your decorated donuts on a baking sheet lined with parchment paper. Bake according to your clay manufacturer’s instructions (usually 275°F/135°C for about 20-30 minutes). -
Cool Down:
Allow the donuts to cool completely before handling. Moving them while hot can cause the clay to crack. -
Attach the Magnet:
Apply a dab of strong adhesive like E6000 or superglue to the back of the donut. Press the round ceramic magnet firmly into the glue. -
Sealing (Optional):
If you want a wet, glazed look, brush a coat of polymer clay gloss glaze over just the icing part, avoiding the dough area to keep the realistic contrast. -
Final Cure Time:
Let the glue cure fully (often 24 hours for E6000) before placing your new magnets on the fridge to ensure they hold securely.
Realistic Drip Tip
Don’t make the icing layer perfectly even. Make it slightly thicker near the top and thinner near the drips for true gravity effects.
Once the magnets are fully set, arrange them in a vertical pattern on your fridge for a sweet and colorful display


Smiling Avocado Half Magnets With Heart Pits
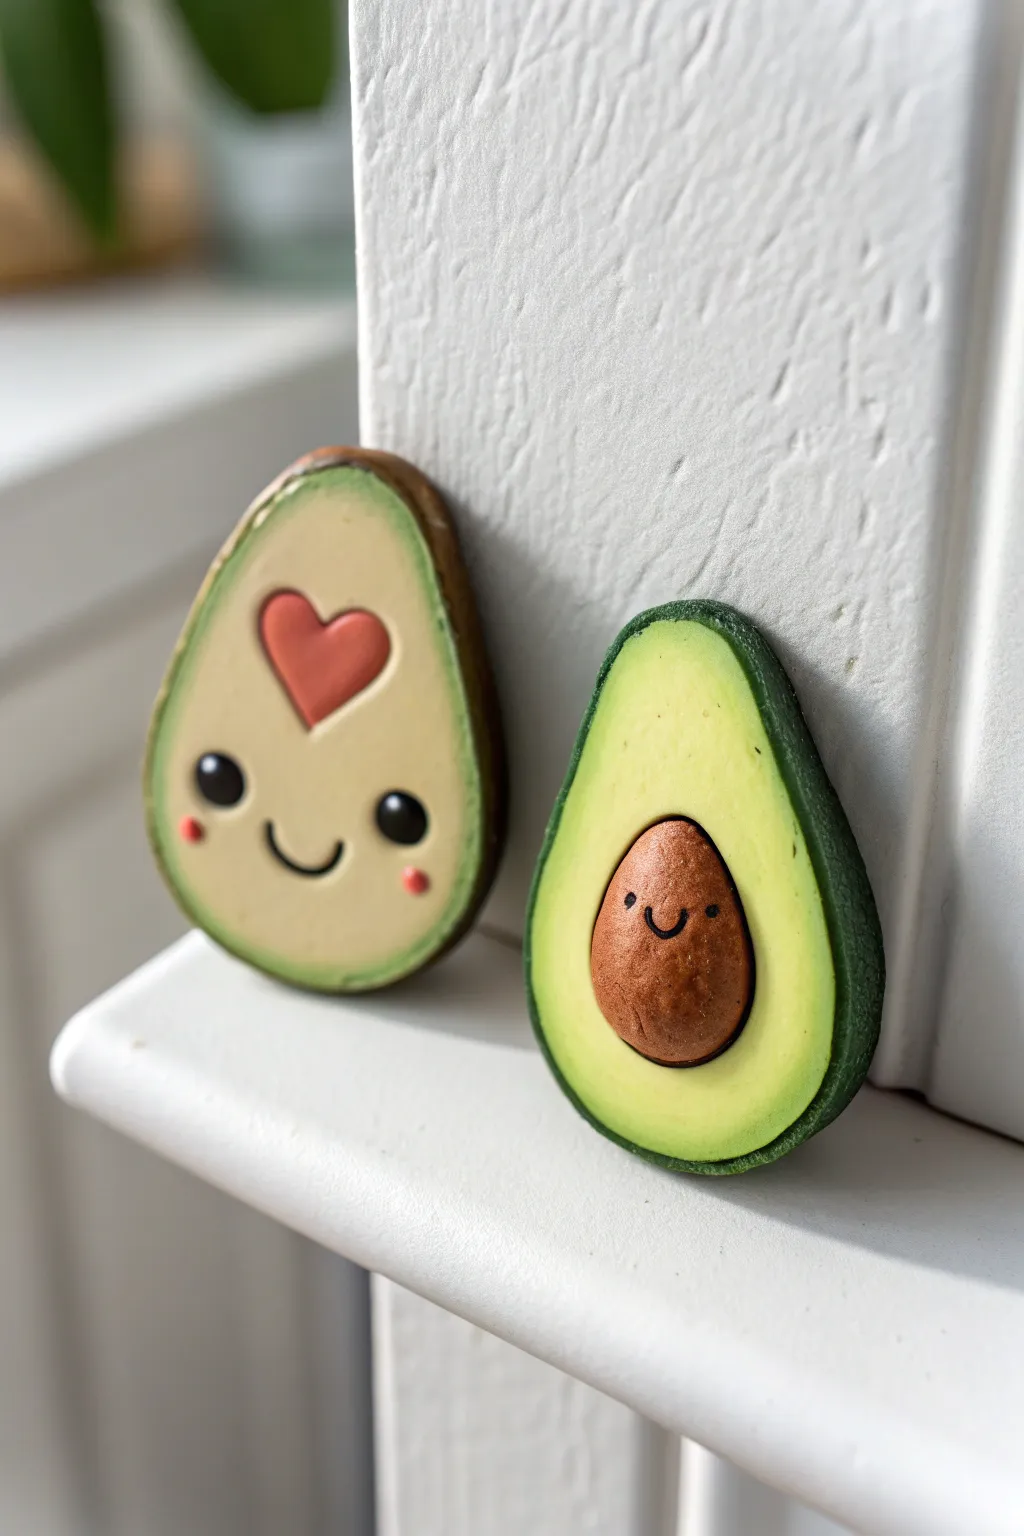
These adorable avocado magnets bring a double dose of happiness to your fridge, featuring one half with a smooth heart ‘pit’ outline and the other with a textured, smiling seed. Their distinct styles—one graphic and one more dimensional—make them a perfect pair for beginner sculptors looking to practice different techniques.
How-To Guide
Materials
- Polymer clay (light yellow-green/cream, medium green, dark green, brown/terracotta, bright pink, black)
- Small magnets (neodymium recommended)
- Blade or X-Acto knife
- Small ball tool or dotting tool
- Texture tool (toothbrush or stiff brush)
- Heart-shaped cutter (tiny) or needle tool
- Gloss glaze (optional)
- Baking sheet and parchment paper
- Acrylic roller or pasta machine
Step 1: Shaping the Avocado Bases
-
Mix the flesh color:
Start by mixing a very light yellow-green using a ratio of roughly 3 parts white to 1 part yellow and a tiny speck of green. We want a creamy, ripe avocado color for the interior. -
Form the teardrops:
Roll two equal-sized balls of your light green clay (about the size of walnuts) and shape them into teardrops. Flatten them gently onto your work surface until they are about 1/4 inch thick; keep the edges rounded, not sharp. -
Create the skin:
Condition dark green clay and roll it into a thin sheet or long snake. Wrap this carefully around the perimeter of each teardrop shape, smoothing the seam where the dark green meets the light green to create the outer skin. -
Refine the shape:
Gently roll the edges of the now skin-covered avocados against your work surface to ensure the dark green band is uniform and integrated with the inner flesh.
Step 2: Detailed Half: The Heart Pit
-
Indent the heart:
On the first avocado half, use a tiny heart-shaped cutter to gently press an indentation into the upper center. If you don’t have a cutter, use a needle tool to carefully draw and slightly depress a heart shape. -
Fill the heart:
Take a small amount of reddish-pink clay (or terracotta for a more natural look) and shape it into a matching heart. Press this inlay into your indentation until it sits flush with the surface. -
Add the face:
Using a small ball tool, create two eye sockets below the heart. Roll tiny balls of black clay and press them into the sockets. For the cheeks, add two minuscule flattened dots of pink clay just below the eyes. -
Create the smile:
Roll an incredibly thin thread of black clay. Cut a small curved section and gently press it between the eyes to form a happy smile.
Sticky Situation?
If your clay gets too soft and sticky while handling, pop it in the fridge for 10 minutes. This firms it up, making tiny details like the smile much easier to apply.
Step 3: Dimensional Half: The 3D Pit
-
Make the socket:
On the second avocado half, use your thumb or a large ball tool to press a deep, round indentation into the lower wide part of the teardrop. This is where the pit will sit. -
Form the pit:
Roll a ball of brown clay that fits snugly into that indentation but protrudes slightly, creating a 3D effect. I like to test the fit before committing to the texture. -
Texture the pit:
Before placing the pit permanently, use a toothbrush or stiff brush to tap over the surface of the brown ball, giving it a realistic, woody avocado seed texture. -
Give the pit a face:
This pit needs personality too! Use a needle tool or very small ball tool to indent two tiny eyes and a smile directly onto the brown clay. -
Fill the features:
Fill the tiny eye holes with microscopic specks of black clay. For the smile, you can either insert a tiny black thread like before or use black acrylic paint after baking. -
Assemble:
Place the finished brown pit firmly into the indentation on the green avocado base.
Make Them Besties
Instead of separate magnets, poke a horizontal hole through the sides before baking. String them together for a ‘Best Friends’ necklace or keychain set.
Step 4: Finishing Touches
-
Smooth fingerprints:
Check both avocados for fingerprints. You can gently buff them away with a drop of baby oil on your finger before baking. -
Bake:
Bake according to your clay manufacturer’s instructions (usually 275°F/135°C for 15-30 minutes per 1/4 inch thickness). Let them cool completely. -
Attach magnets:
Once cool, use a strong adhesive like E6000 or super glue (gel formula works best) to attach a magnet to the back of each avocado. -
Optional glaze:
For extra durability and shine, apply a coat of semi-gloss or gloss glaze to the avocados, avoiding the textured pit if you want to keep it matte.
Now you have a charming pair of permanent produce to brighten up your kitchen organization


Mini Pizza Slice Magnets With Easy Toppings
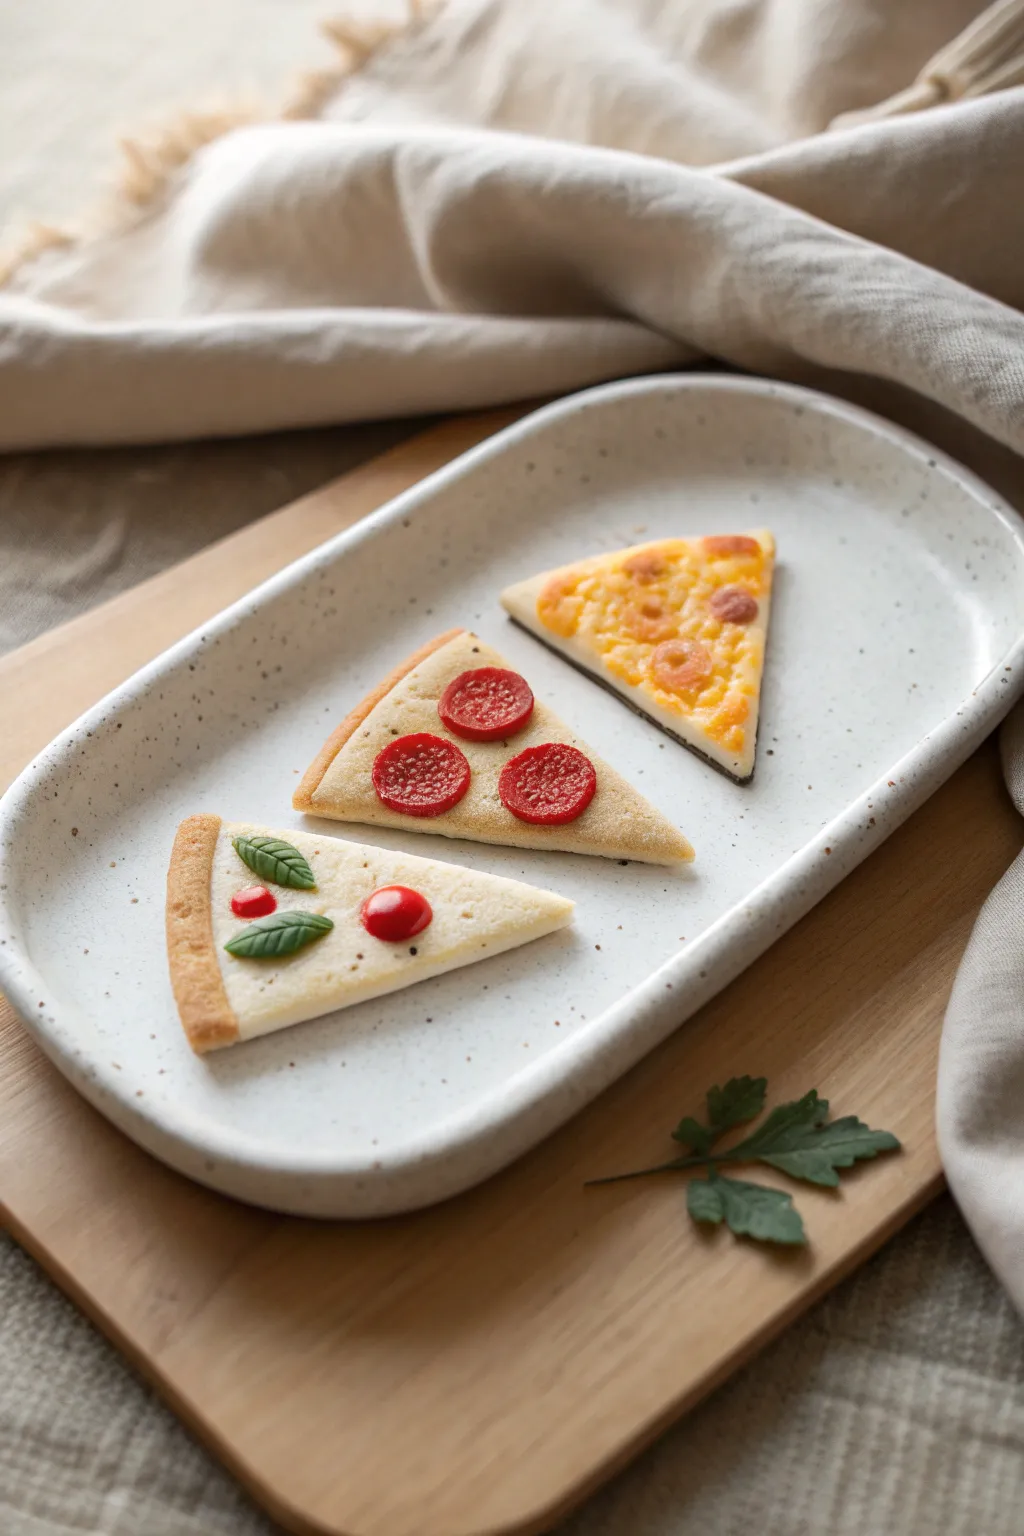
Create a trio of deliciously realistic miniature pizza slices that look good enough to eat but live on your fridge. This project uses basic polymer clay techniques to replicate textures like melted cheese, crispy pepperoni, and fresh basil.
Step-by-Step Guide
Materials
- Polymer clay in white, translucent, beige, red, dark red, green, and orange
- Liquid polymer clay (Translucent Liquid Sculpey or Fimo Liquid)
- Chalk pastels (orange, brown, yellow) for shading
- Soft paintbrush for shading
- Texture tools (needle tool, toothbrush, or crumpled foil)
- Small round cutter or straw (for pepperoni)
- Exacto knife or clay blade
- Magnets (neodymium or ceramic)
- Strong adhesive (E6000 or super glue)
- Gloss varnish (optional)
Step 1: Creating the Pizza Bases
-
Mix the Dough Color:
Blend beige clay with a small amount of white to achieve a light, raw dough color. You want it to look like a pale bread crust. -
Form the Slices:
Roll the dough clay into a sheet about 1/4 inch thick. Cut out three identical triangles. These will be the foundation for your slices. -
Add Texture:
Using a clean toothbrush or a ball of crumpled foil, gently tap the surface of the triangles to create a bread-like texture. Do this on the tops and sides. -
Create the Crust Rim:
Roll a thin snake of the dough-colored clay. Press it along the shortest edge of each triangle to form the crust rim. Blend the seam on the bottom so it attaches firmly, then re-texture the rim with your toothbrush. -
Pre-shade the Crust:
Scrape some brown and orange chalk pastel into a fine dust. Use a soft brush to gently dust the crust rim and the very edges of the slice to simulate baking.
Pro Texture Tip
For ultra-realistic pepperoni, mix a tiny pinch of translucent clay into your dark red. It mimics the fatty, cured look of real salami.
Step 2: Building the Pepperoni Slice
-
Mix the Sauce Base:
Mix a tiny bit of red clay with liquid clay or use a thin layer of red clay pressed into the dough. Apply this to the center of one triangle. -
Make the Pepperoni:
Roll out dark red clay very thinly. Use a small round cutter or a straw to punch out three circles. Texture the surface of each circle by stippling it with a needle tool to look like meat. -
Arrange the Toppings:
Place the three pepperoni slices onto the prepared base. Press them down slightly so they look embedded in the ‘sauce’ layer.
Level Up: Served Plated
Make a tiny rectangular plate from speckled granite clay to glue your slices onto before adding the magnet. It creates a complete miniature scene!
Step 3: Crafting the Caprese Slice
-
Apply Mozzarella:
Mix white clay with a touch of translucent clay. Spread a layer over the second triangle, keeping it smooth to resemble fresh mozzarella. -
Sculpt Basil Leaves:
Take tiny pinched balls of green clay and flatten them into teardrop shapes. Use a needle tool to gently press a central vein and small side veins into each leaf. -
Form Tomatoes:
Roll a small ball of red clay for a cherry tomato. Cut it in half for a flat bottom and place it on the slice. Add a tiny red dot of liquid clay for a sauce accent if desired. -
Assemble:
Place two basil leaves and your tomato elements onto the white cheese base.
Step 4: Making the Extra Cheesy Slice
-
Create the Cheese Mixture:
Mix liquid clay with shavings of yellow, orange, and white solid clay until you have a thick, gooey paste. I find this creates the most realistic melted texture. -
Apply the Cheese:
Spread your cheese paste generously over the third triangle. Swirl it slightly with a toothpick to mimic melted movement. -
Add Cheese Bubbles:
Place tiny balls of translucent orange clay on top of the liquid mixture. Press them down gently so they look like browned cheese bubbles.
Step 5: Finishing Touches
-
Final Shading:
Lightly dust the tops of the pepperoni and the cheese bubbles with a little more brown pastel to enhance the ‘cooked’ look. -
Bake:
Bake the slices according to your clay package instructions (usually 275°F / 130°C for 15-30 minutes). Let them cool completely. -
Varnish (Optional):
For a greasy or moist look, dab a little gloss varnish on the pepperoni slices and the tomato. -
Attach Magnets:
Apply a strong dab of E6000 or super glue to the back of each slice and press a magnet firmly into place. Allow to cure fully before placing on the fridge.
Now you have a delectable set of Italian-inspired magnets ready to hold up your grocery lists.


Cute Sushi Roll Magnets With Simple Faces
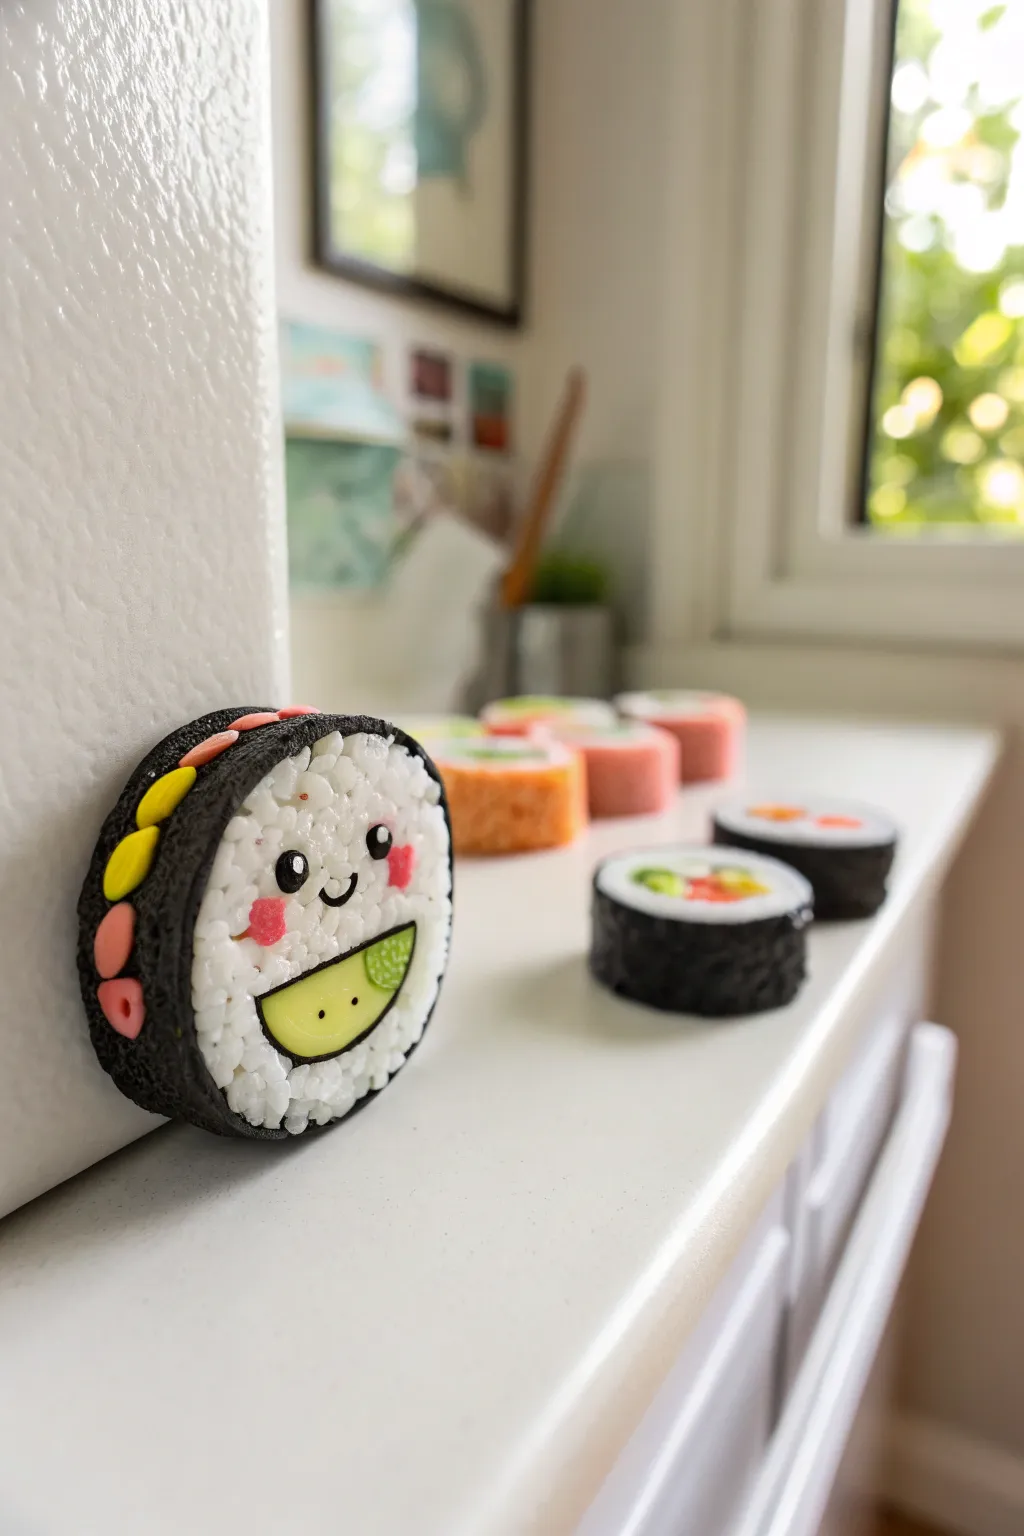
Brighten up your fridge with these adorable, oversized sushi roll magnets featuring textured rice and sweet, smiling faces. This project uses clever texturing techniques to create realistic-looking rice grains and nori for a charmingly deceptive finish.
Step-by-Step Tutorial
Materials
- Polymer clay (Black, White, Yellow, Pink, Salmon/Peach, Green, Lime Green)
- Strong round neodymium magnet
- Liquid clay or Bake & Bond
- Pointed sculpting tool or toothpick
- Texture sponge or toothbrush
- Rolling pin or clay machine
- Small round cutters (various sizes)
- X-acto knife or clay blade
- Gloss glaze (optional)
Step 1: Creating the Sushi Base
-
Form the core:
Start by conditioning a substantial amount of white polymer clay until it’s soft and pliable. Roll it into a thick, smooth cylinder about 1.5 to 2 inches in diameter and roughly 0.75 inches deep. -
Texture the rice face:
Using a pointed sculpting tool or toothpick, gently pick at the flat front surface of the white cylinder. Make tiny, shallow pulls and divots all over to simulate individual grains of rice. Repeat this on the sides if you want the rice visible there, though we’ll cover the edge soon. -
Wrap the nori:
Roll out a sheet of black clay to a medium thickness. Cut a long strip that is slightly wider than the depth of your sushi roll. -
Attach the seaweed:
Wrap the black strip around the circumference of your white rice cylinder. Trim any excess where the ends meet and smooth the seam with your finger or a clay tool. -
Texture the nori:
Take a coarse texture sponge, a ball of aluminum foil, or an old toothbrush and firmly press it all around the black outer ring. This gives the ‘seaweed’ that classic rough, organic texture.
Rice Texture Tip
Work in small circular motions with your needle tool when texturing the white clay. This creates a fluffier, more realistic rice grain look than simple pokes.
Step 2: Adding the Kawaii Face
-
Create the mouth shape:
For the smiling mouth, roll out a small piece of lime green clay. Cut a half-circle shape that fits comfortably on the lower half of the rice face. -
Add avocado detail:
Roll a very thin snake of darker green clay and outline the lime green half-circle to create the skin of an avocado slice. Place this entire piece onto the white rice face, pressing gently to adhere. -
Form the eyes:
Roll two small balls of black clay and flatten them slightly into ovals. Place them above the avocado mouth, spacing them wide apart for that cute effect. -
Add eye sparkles:
I find that adding tiny dots of white clay to the upper corners of the black eyes instantly brings the character to life. -
Make the cheeks:
Take small amounts of pink clay and shape two squishy ovals or circles. Press these onto the ‘cheeks’ right under the eyes. -
Sculpt the smile:
Roll a very thin snake of black clay. Curve it into a ‘U’ shape and place it centrally to connect the eyes or just above the avocado slice for a happy expression.
Step 3: Details & Finishing
-
Add side fillings:
To mimic colorful fillings peeking out, create small flattened teardrops or ovals from yellow, pink, and salmon-colored clay. Press these onto the black outer rim (the nori) as if the filling is bursting out the sides. -
Embed the magnet:
Turn the sushi roll over to the flat back. Press your neodymium magnet firmly into the center of the white clay to create a recessed indentation, then remove it. -
Secure the magnet:
Place a dab of liquid clay or Bake & Bond into the indentation and press the magnet back in. Smooth a thin layer of clay over the magnet edges if desired to lock it in place. -
Bake carefully:
Bake the piece according to your polymer clay manufacturer’s instructions, usually around 275°F (130°C) for 30 minutes per 1/4 inch of thickness. -
Glaze for shine:
Once completely cool, apply a coat of gloss glaze to the eyes and the avocado mouth to make them look wet and fresh, contrasting with the matte texture of the rice and nori.
Flavor Variations
Swap the avocado smile for a salmon slice (orange clay with white stripes) or tamago egg (yellow rectangle) to create a whole sushi platter set.
Now stick your charming sushi friend on the fridge and enjoy the smiles it brings to your kitchen

The Complete Guide to Pottery Troubleshooting
Uncover the most common ceramic mistakes—from cracking clay to failed glazes—and learn how to fix them fast.
Breakfast Set Magnets: Egg, Toast, and Bacon
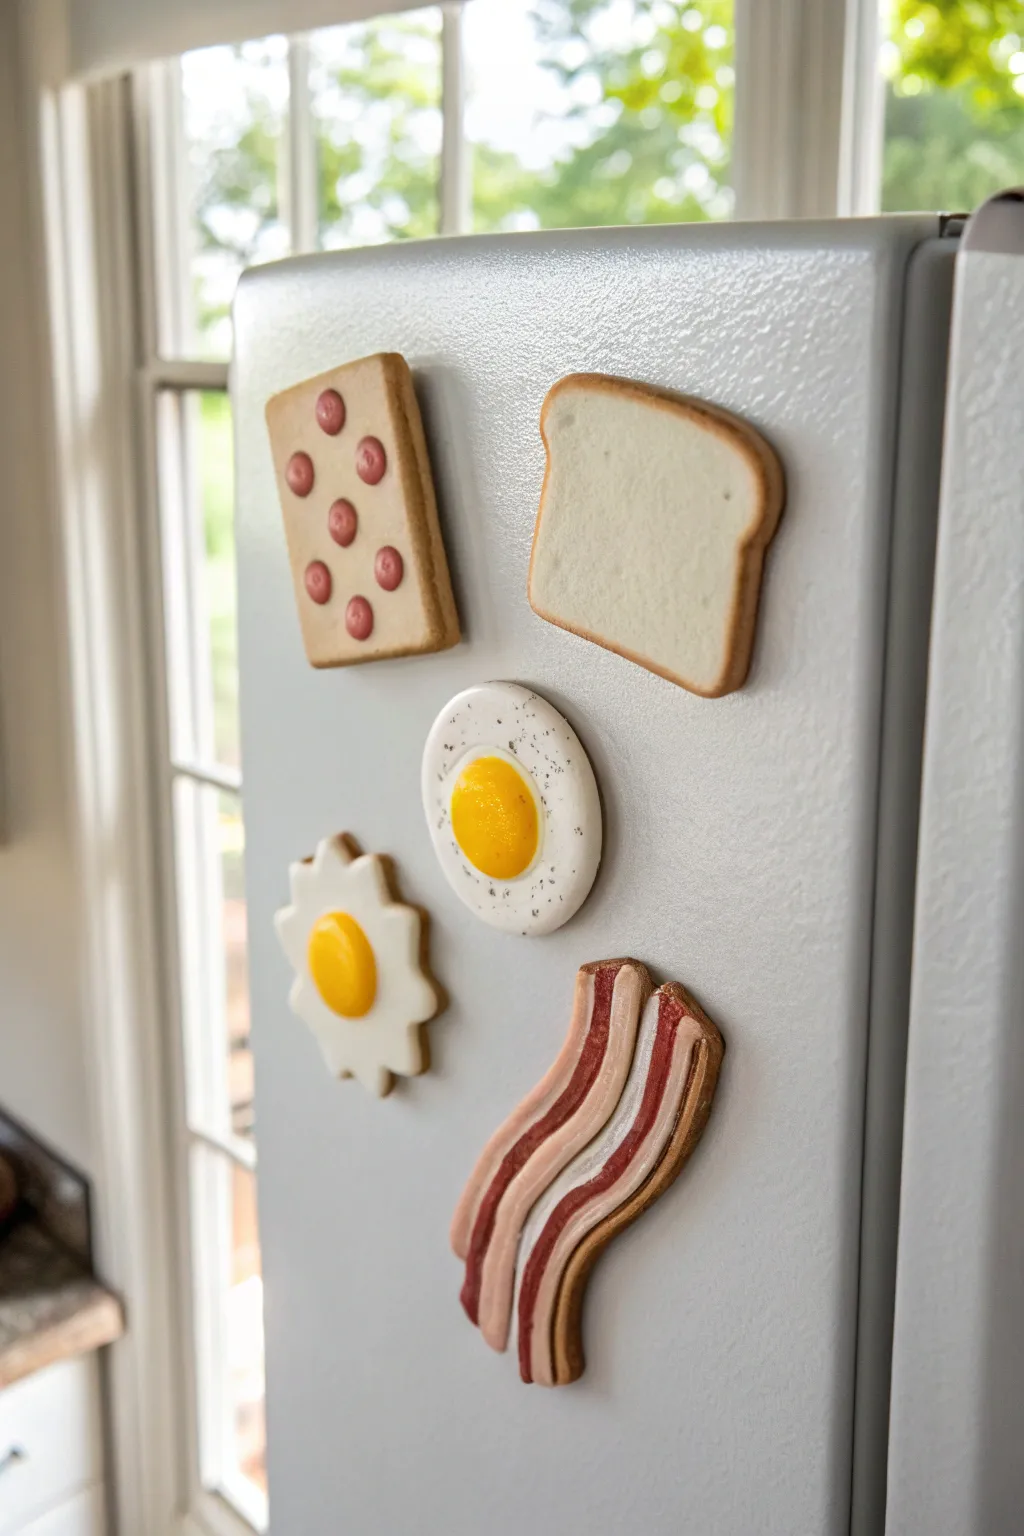
Brighten up your fridge door with this charming breakfast spread sculpted from polymer clay. This set features realistic textures and fun details, including a perfectly fried egg, crispy bacon, toast, and a nostalgic toaster pastry.
How-To Guide
Materials
- Polymer clay (white, translucent, beige, yellow, brown, burgundy, pink)
- Liquid polymer clay (translucent and white)
- Chalk pastels (orange, brown, ochre)
- Soft paintbrush for shading
- rolling pin or pasta machine
- Needle tool and ball tool
- Toothbrush or texturing sponge
- Black acrylic paint or pepper seasoning simulation
- Strong round magnets
- Superglue or E6000
- Gloss glaze (optional for yolk/jam)
Step 1: Toaster Pastry & Toast
-
Shape the pastry base:
Mix beige clay with a tiny amount of transclucent to get a baked dough look. Roll it out to about 1/4 inch thick and cut a neat rectangle, softening the corners slightly with your fingertip. -
Texture the dough:
Using a toothbrush or a crinkled ball of foil, gently press texture onto the surface and edges of the rectangle to simulate a baked crust. -
Shade the edges:
Scrape some brown and ochre chalk pastel into a powder. With a soft brush, dust the edges of the rectangle to give it a golden-brown baked appearance. -
Add the frosting:
Mix a small amount of liquid clay with beige clay to create a thick frosting paste. Spread a thin rectangular layer on top of your base, leaving a small border of ‘crust’ visible. -
Create jam dots:
Roll tiny balls of pink clay and press them flat onto the frosting in a 2×4 grid pattern. Alternatively, mix pink clay with liquid clay for a wetter jam look. -
Form the toast:
Roll out white clay (mixed with a dot of yellow for creaminess). Cut into a classic bread slice shape—straight on bottom, rounded top. -
Add the crust:
Roll a thin snake of brown clay. Wrap this smoothly around the entire edge of the white bread shape, blending the seam where the ends meet at the bottom. -
Texture the bread:
Use a needle tool to drag tiny circular motions across the white surface to mimic airy bread pores, then shade the center lightly with ochre pastel for a toasted effect.
Pro Tip: Translucency
Mix translucent clay into your bacon fat and egg white. It creates a depth that solid white lacks, making the ‘fat’ look authentically rendered when baked.
Step 2: Eggs & Bacon
-
Sculpt the egg white:
Flatten a ball of plain white clay into an irregular circle. Use your fingers to wave and pull the edges, making them look organic like a cooking egg white. -
Add the yolk:
Roll a ball of yellow clay and press it gently into the center of the white base. For the second egg variation shown, use a flower cutter on white clay for a stylized look before adding the yolk. -
Seasoning detail:
If you want the speckled look seen on the round egg, speckle the white clay with black acrylic paint splatters or mix in pre-baked black clay crumbs before shaping. -
Make bacon strips:
Roll thin snakes of burgundy/brown clay (meat) and translucent white clay (fat). Lay them side-by-side in an alternating pattern: meat, fat, meat, fat. -
Flatten and wave:
Gently roll over your striped snakes to flatten them into a single strip. Cut into lengths and ripple the clay into a wavy ‘S’ shape to mimic frying bacon. -
Texture the meat:
Take a toothbrush and tap it firmly over the darker meat sections to give it a rough, cooked texture, leaving the fat smoother.
Step 3: Baking & Assembly
-
Final shading:
Give the bacon and egg edges a final dusting of brown chalk pastel to make them look crispy and fried. -
Bake the pieces:
Bake all your clay pieces according to the manufacturer’s instructions (usually 275°F for 15-30 minutes). Let them cool completely. -
Glaze details:
For extra realism, paint a coat of gloss glaze over just the egg yolk to make it look runny, and over the bacon fat for a greasy shine. -
Attach magnets:
Flip the cooled pieces over. Apply a drop of strong adhesive (like E6000) to the back and press your round magnet firmly into place. Let the glue cure fully before sticking them to the fridge.
Troubleshooting: Fingerprints?
If you see fingerprints on your smooth egg yolk or toast crust, brush them lightly with a tiny amount of baby oil or clay softener before baking to smooth them out.
Now your kitchen has a charming touch that looks good enough to eat
Tiny Burger Stack Magnets With Sesame Bun Stippling
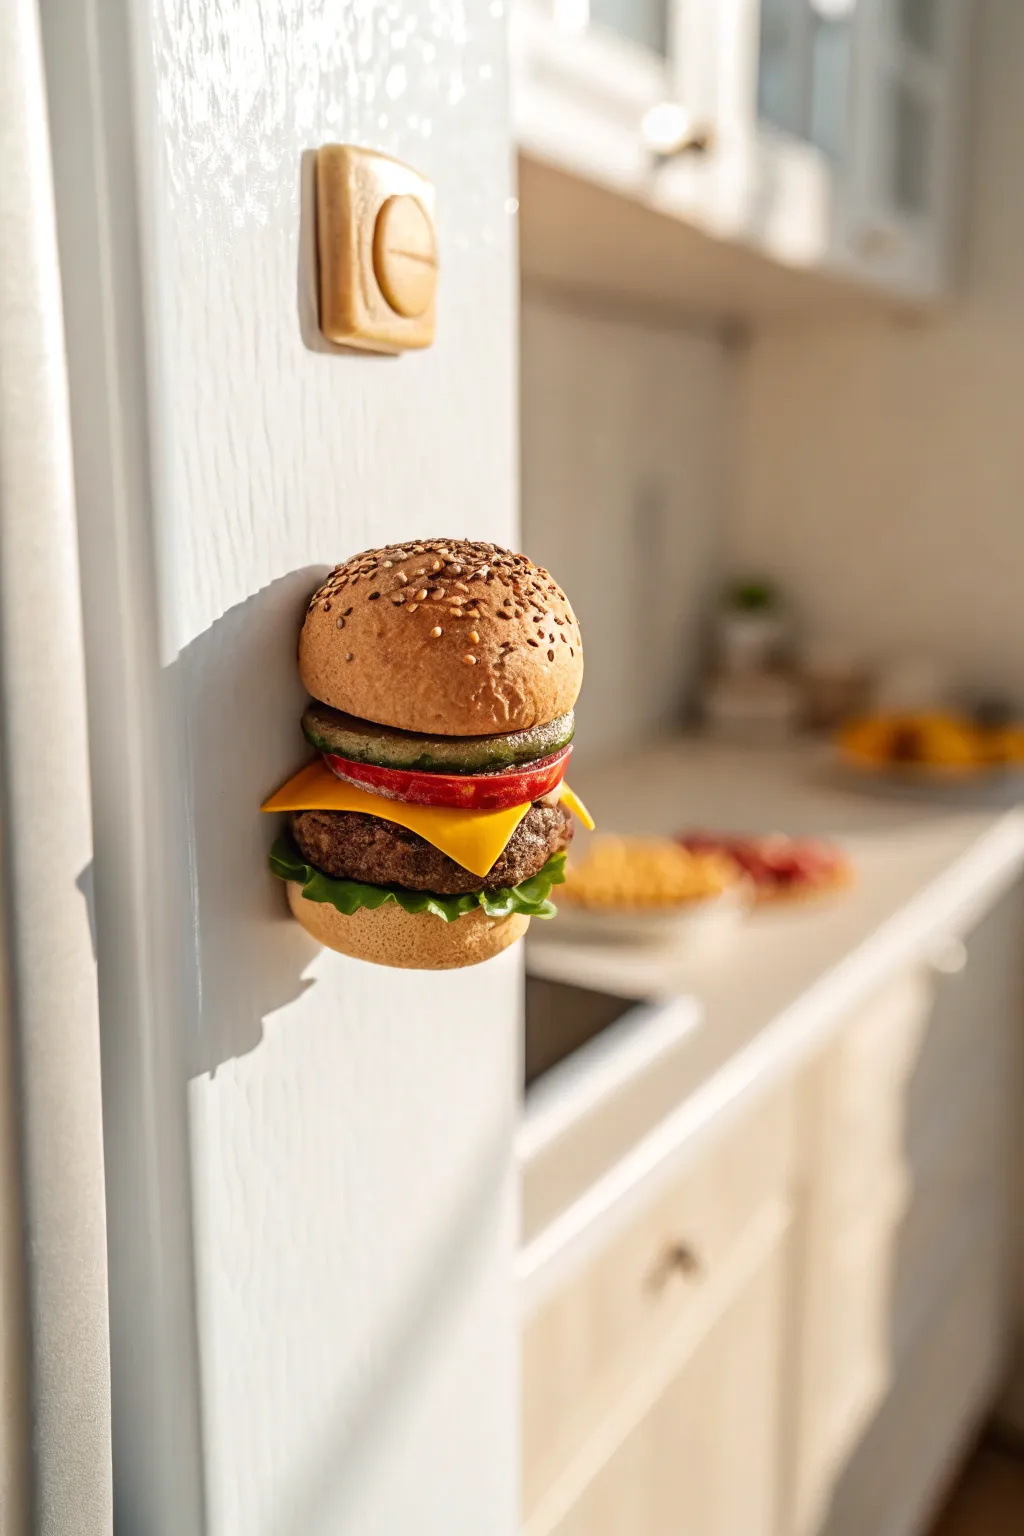
Bring the charm of your favorite diner right to your kitchen with this hyper-realistic polymer clay burger magnet. From the textured sesame seed bun to the melting cheese and fresh lettuce ruffles, every tiny layer adds mouth-watering detail to your fridge decor.
Detailed Instructions
Materials
- Polymer clay (colors: tan/ochre, dark brown, translucent green, red, yellow, bright green, white)
- Liquid polymer clay (translucent)
- Pastel chalks (brown, orange, yellow) for shading
- Soft-bristled craft brush
- Needle tool or toothpick
- Ball stylus tool
- Small round cutter (approx. 1 inch)
- Texture tools (toothbrush, sandpaper, or crumpled foil)
- Fimo gloss glaze (optional)
- Strong neodymium magnet
- Super glue (E6000 or similar)
Step 1: Baking the Buns
-
Mix the Dough Color:
Start by mixing a ‘baked bread’ color using mostly tan clay with a tiny touch of translucent and white to give it depth. It shouldn’t be too flat or plastic-looking. -
Form the Shapes:
Split the clay into two balls, one slightly larger for the top bun. Press the bottom one into a flat disc and shape the top one into a classic dome. -
Texture the Crust:
Roll a toothbrush or crumpled foil firmly over the surface of both buns. This mimics the porous texture of real bread rather than leaving it smooth. -
Add Golden Brown Shades:
Using a soft brush, gently dust shaved brown and orange pastel chalks onto the top and sides of the buns to simulate a baked crust. Focus the darker brown on the very top of the dome. -
Seed the Bun:
Roll incredibly tiny teardrop shapes from white clay for sesame seeds. Press them firmly onto the top bun, arranging them randomly but densely.
Floppy Lettuce?
If your lettuce droops too much while stacking, I suggest pre-baking the lettuce layer for 5 minutes firmly on the bun to set its shape before full assembly.
Step 2: Prepping the Toppings
-
Create the Patty:
Mix dark brown clay with a pinch of black for a charred look. Form a thick disc roughly the same width as your bun. -
Texture the Meat:
Vigorously texture the sides and edges of the patty using a needle tool, picking at the clay to create a rough, ground-beef consistency. -
Slice the Cheese:
Roll out yellow-orange clay very thinly. Cut a square that is slightly larger than the burger patty so the corners will drape over later. -
Form the Tomato:
Make a disc of red clay. Create a subtle rim around the edge and use a needle tool to drag faint lines from the center outward on the side profile for realism. -
Make the Pickles:
Mix translucent green with a little dark green. Roll a small log, slice it thinly, and press the edges to rough them up slightly. -
Prepare the Lettuce:
Roll bright green clay paper-thin. Tear the edges irregularly and ruffle them using a ball tool to create wavy, crisp-looking leaves.
Step 3: Assembly and Finish
-
Stack the Bottom:
Place the bottom bun down. Add the ruffled lettuce layer first, pressing it gently so it flares out slightly. -
Add the Essentials:
Place the textured patty on the lettuce, followed immediately by the cheese slice. Gently press the cheese corners down so they appear to ‘melt’ over the meat. -
Top It Off:
Stack the tomato slice and pickle slices. Finally, press the seeded top bun onto the stack, compressing the whole burger gently to bond the layers. -
Bake:
Bake the assembled burger according to your clay manufacturer’s instructions, usually at 275°F (130°C) for about 30 minutes. -
Glaze:
Once cool, apply a tiny amount of gloss glaze to just the tomato and pickle edges to give them a juicy, wet appearance. -
Attach Magnet:
Secure a strong neodymium magnet to the back or bottom of the bun using a dab of creating glue like E6000.
Shading Hack
Use a real unused toothbrush to texturize the bread. The stiff bristles create the perfect micropores found in baked goods.
Now your fridge has a delicious new addition that looks good enough to eat


What Really Happens Inside the Kiln
Learn how time and temperature work together inside the kiln to transform clay into durable ceramic.
Citrus Slice Magnets With Segmented Details
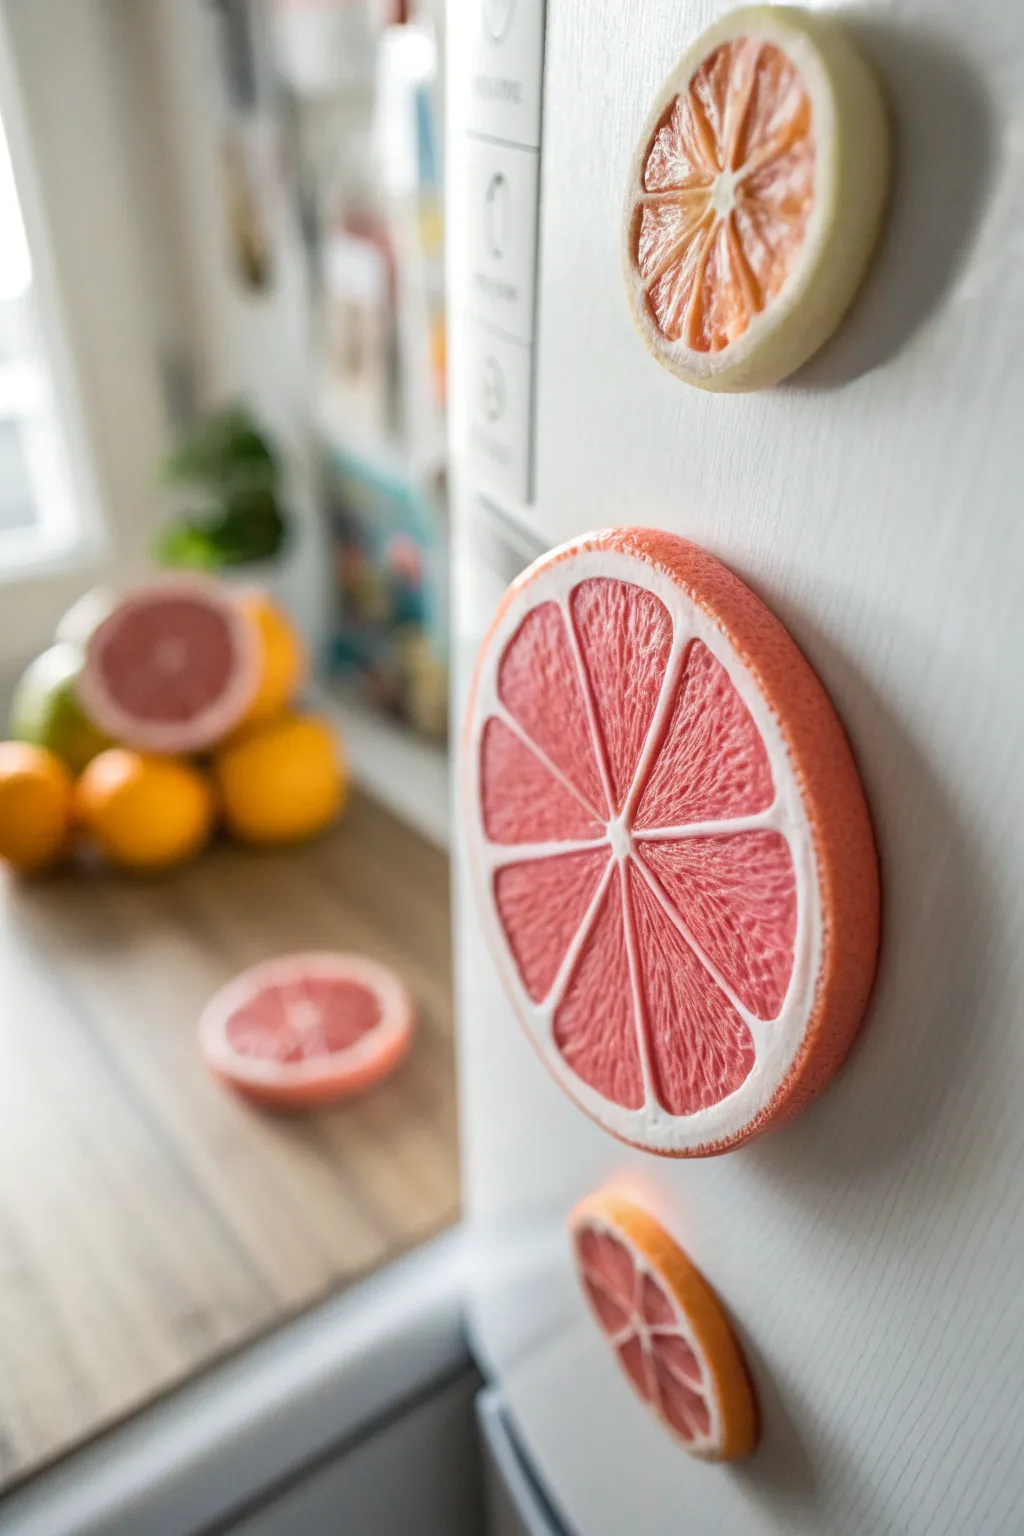
Brighten up your appliance with these deceivingly realistic citrus slice magnets. These polymer clay creations feature defined rinds, pithy white borders, and beautifully textured, juicy-looking segments that catch the light like the real thing.
Step-by-Step
Materials
- Translucent polymer clay
- Pink or coral polymer clay
- White polymer clay
- Orange polymer clay
- Texture sponge or toothbrush
- Needle tool
- Round clay cutter (approx. 3 inches)
- Liquid clay (translucent)
- Strong round magnets
- Gloss varnish or UV resin
- Pasta machine or rolling pin
Step 1: Creating the Citrus Cane
-
Mix the fruit color:
Start by mixing translucent clay with a small amount of pink or coral clay. You want the color to look juicy and semi-transparent once baked, so don’t overpower the translucent base with too much pigment. -
Form the segments:
Roll your fruit-colored mixture into a thick log, about 1 inch in diameter. Then, gently pinch one side of the log along its entire length to turn the cylinder into a teardrop shape. -
Prepare the pith:
Roll out a thin sheet of white polymer clay on a medium setting of your pasta machine. This will act as the bitter white pith between the fruit segments. -
Wrap the segment log:
Wait until the white sheet is cool to the touch, then wrap it completely around your teardrop-shaped fruit log, trimming away any excess and smoothing the seam. -
Reduce the cane:
Gently stretch and roll the log to reduce its size until the teardrop shape is roughly the size of a single fruit segment. Slice this long cane into 8 to 10 equal lengths. -
Assemble the center:
Roll a very thin snake of white clay to serve as the very center of the fruit. Arrange your teardrop segments in a circle around this central white core, with the pointed ends facing inward.
Step 2: Adding the Rind and Texture
-
Fill the gaps:
If there are tiny gaps between the wide ends of your segments, insert tiny triangular snakes of white clay to fill them, ensuring a perfect circle. -
Wrap with pith:
Roll out a slightly thicker sheet of white clay and wrap it around the entire circumference of your assembled segments to create the main pith layer. -
Add the zest layer:
Roll a sheet of orange clay—I like to texture this sheet slightly with a sponge first for realism—and wrap it around the white pith layer to create the outer skin. -
Slice the slab:
Gently compress the large cane to ensure layers are adhered. Use a sharp tissue blade to cut a slice about 1/4 inch thick. Don’t worry if it warps slightly; you can reshape it. -
Refine the shape:
Place your slice on your working surface and use a round cutter or your fingers to gently reshape it into a perfect circle, smoothing the outer edge. -
Texture the fruit:
Here is the key step: use a needle tool to scratch delicate radial lines into the pink fruit segments. Disturb the surface enough to mimic pulp fibers. -
Texture the rind:
Take a texture sponge or an old toothbrush and gently dab the outer orange rind to simulate the porous texture of citrus skin.
Juicy Realism
Mix a tiny drop of liquid clay with your fruit color before texturing. It creates a sticky, realistic pulp effect.
Step 3: Finishing Touches
-
Bake the clay:
Bake the slice according to your clay manufacturer’s instructions. Usually, this is around 275°F (130°C) for 30 minutes. Let it cool completely. -
Apply gloss:
Coat the pink fruit segments with a layer of UV resin or high-gloss varnish. This makes the translucent clay pop and gives that ‘wet’ look. -
Attach the magnet:
Using strong super glue or E6000, attach a strong round magnet to the back of the slice. Ensure the magnet is strong enough to hold the weight of the clay.
Smudged Colors?
If your red colors are bleeding into the white during slicing, chill the cane in the fridge for 20 minutes before cutting.
Once dry, stick these vibrant slices on your fridge for a permanent splash of summer freshness
Iced Cookie Magnets With Swirly “Frosting”

Create deceptively delicious-looking magnets with this polymer clay project that mimics the texture of gingerbread and royal icing. The swirled ‘frosting’ technique creates an elegant, bakery-style finish that looks beautiful on any fridge.
How-To Guide
Materials
- Polymer clay (colors: ochre/tan, white, translucent, soft pink, yellow)
- Liquid polymer clay (clear or white)
- Heart-shaped cookie cutters
- Old toothbrush or stiff bristle brush
- Pastels (brown/orange tones)
- Soft brush for pastels
- Fine-tipped needle tool or toothpick
- Small magnets (neodymium recommended)
- Gloss glaze or UV resin (optional)
- Super glue or strong craft adhesive
Step 1: Baking the Gingerbread Base
-
Mix the dough color:
Start by mixing ochre, tan, and a small amount of translucent clay to create a realistic baked cookie color. The translucent clay adds depth so it doesn’t look like flat plastic. -
Roll and cut:
Roll your clay out to a thickness of about 1/4 inch (6mm). Use your heart-shaped cutter to punch out your cookies. -
Texture the surface:
Gently tap the surface of the clay hearts with an old toothbrush. Use a circular motion to disturb the smoothness and mimic the crumb of a baked cookie. -
Create the baked edge:
Use a soft brush to dust the edges of the hearts with shaved brown and orange pastels. This shading creates that perfect ‘golden brown’ oven-baked look. -
First bake:
Bake these plain cookie bases according to your clay manufacturer’s instructions, but for only half the recommended time. We will bake them again later.
Clean Swirls Tip
Wipe your needle tool clean after every single drag through the liquid clay. This prevents muddy colors and keeps your white sections bright and crisp.
Step 2: Preparing the Faux Icing
-
Create the icing paste:
In small containers or on a glass tile, mix solid clay with liquid polymer clay. You want a consistency that holds its shape but can be spread—think toothpaste texture. -
Color your icings:
Prepare three separate batches of this paste: one white, one soft pink, and one pale yellow. -
Apply the base flood:
Spread a generous layer of white icing paste onto a cooled cookie base, leaving a small rim of ‘cookie’ visible at the edges. -
Add color dollops:
While the white is still wet, add drops or lines of the pink and yellow paste directly on top. Random placement works best for organic swirls.
Running Icing?
If your icing is dripping off the cookie edge, your mixture has too much liquid clay. Add more solid clay to thicken it up, or let the mix sit for 20 mins to firm up.
Step 3: Swirling and Decorating
-
Create the swirl:
Drag a needle tool through the wet clay pastes. Use curved motions to marble the colors together, creating heart-like shapes or vines within the icing. -
Adding texture dimension:
If you want a piped look (like the white heart in the background), use a tiny star tip to squeeze the paste onto the cookie rather than spreading it flat. -
Tiny floral details:
Roll extremely tiny balls of yellow and green clay. Press them gently into the swirled icing to form flower centers and leaves using the tip of your needle tool. -
Final bake:
Bake the decorated cookies again for the full recommended duration to cure the liquid clay icing completely.
Step 4: Assembly and Finishing
-
Glossing for realism:
Once cool, I like to brush a thin layer of satin or gloss glaze just over the ‘icing’ part. This makes it look like dried royal icing while keeping the cookie matte. -
Attach the magnet:
Flip the heart over. Place a drop of super glue in the center and press your magnet firmly into place. -
Secure the bond:
For extra security, you can place a small piece of scrap clay over the magnet (if it’s bakeable) and bake one last time, or simply rely on high-strength epoxy.
Once dried and glossed, these sweet little magnets are ready to hold up your grocery lists in style.

TRACK YOUR CERAMIC JOURNEY
Capture glaze tests, firing details, and creative progress—all in one simple printable. Make your projects easier to repeat and improve.
Ice Cream Cone Magnets With Drippy Toppings
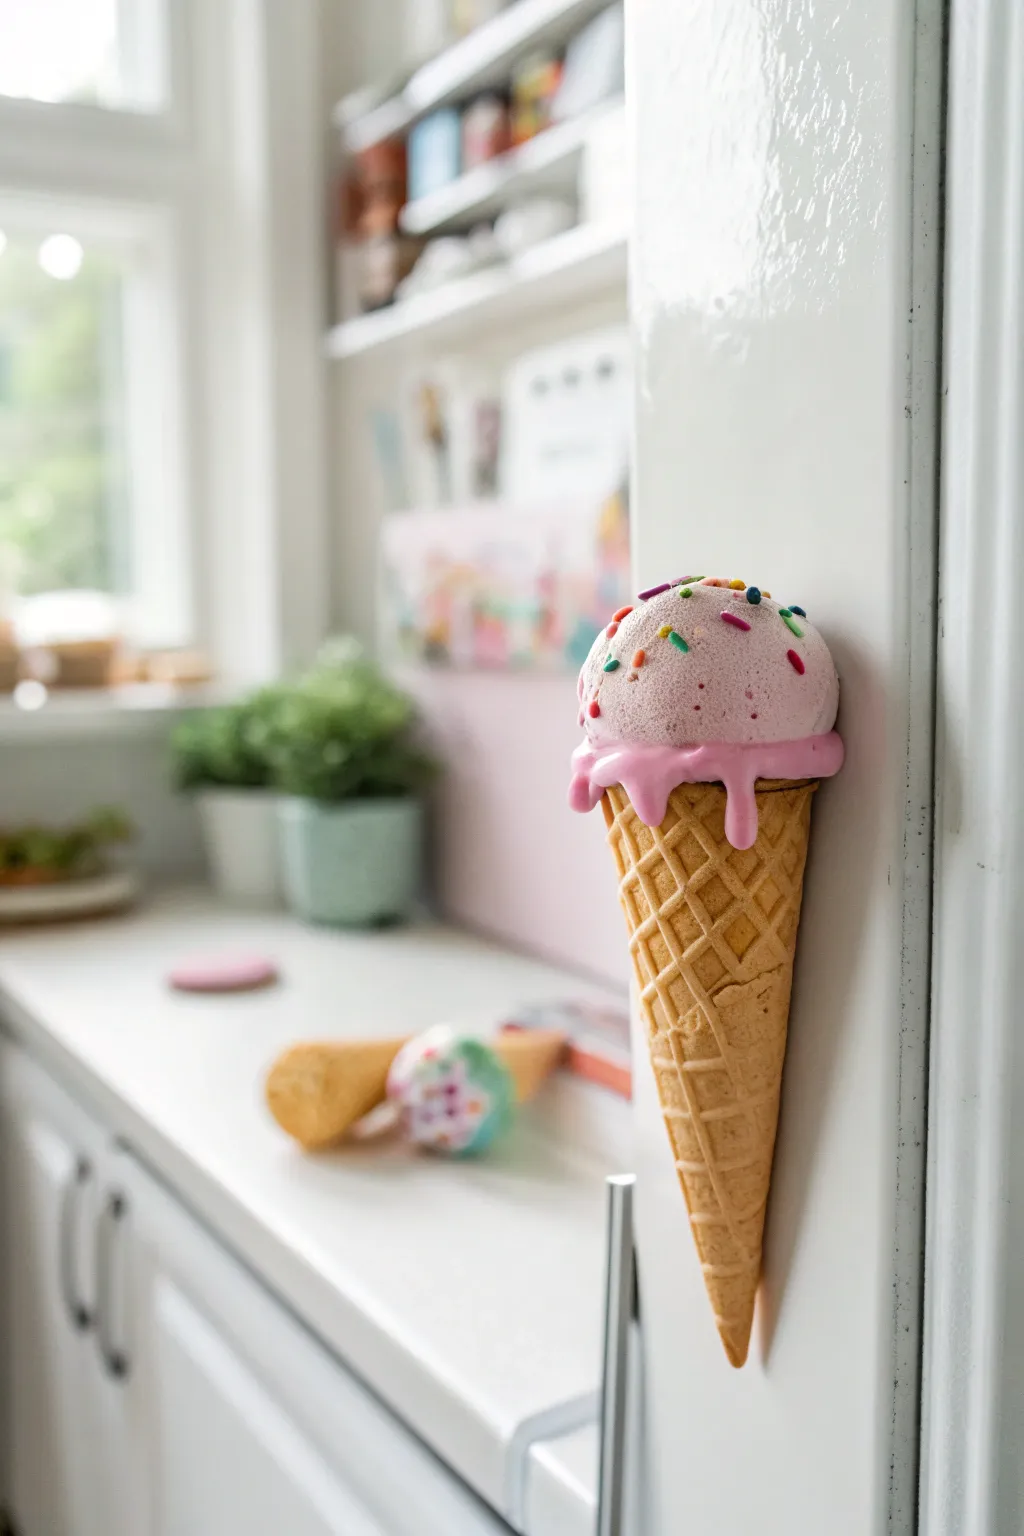
Capture the sweetness of summer with this hyper-realistic ice cream cone magnet made from polymer clay. The texturing on the scoop and the gravity-defying drip effect give this piece a playful illusion that looks good enough to eat.
Detailed Instructions
Materials
- Polymer clay (tan/beige, light pink, dark pink/magenta)
- Liquid polymer clay (translucent or white)
- Polymer clay adhesive (Bake & Bond)
- Strong round magnet (neodymium)
- Waffle pattern texture sheet or hobby knife
- Aluminum foil
- Toothbrush or texturing sponge
- Needle tool
- Ball tool
- Small craft brush
- Pastel chalks (brown/orange for shading)
- Gloss glaze (optional)
- Multi-colored polymer clay scraps (for sprinkles)
Step 1: Creating the Waffle Cone Base
-
Form the foil core:
Start by scrunching a piece of aluminum foil into a tight cone shape. This saves clay and keeps the magnet lightweight. Press the flat side of the cone onto a flat surface to create a dedicated space for the magnet later. -
Prepare the cone clay:
Condition your tan polymer clay until it is soft and pliable. Roll it out into a flat, even sheet, approximately 3mm thick. -
Texture the waffle pattern:
Press a waffle grid texture sheet firmly into your clay. If you don’t have a sheet, carefully score a diamond grid pattern used a ruler and the back of a hobby knife. -
Wrap the cone:
Cut a triangular shape from your textured clay and gently wrap it around the foil core. Trim any excess clay at the seam and blend it smoothly with a modeling tool so the back looks neat. -
Shade the cone:
To make the waffle cone look baked, use a brush to dust some orange and light brown chalk pastel powder into the crevices of the grid pattern.
Loose Sprinkles?
If sprinkles fall off after baking, dab a tiny bit of liquid clay or super glue onto the spot and reattach them using tweezers.
Step 2: Sculpting the Ice Cream Scoop
-
Form the scoop shape:
Roll a ball of light pink clay slightly larger than the opening of your cone. Flatten the bottom slightly so it sits well. -
Create the ‘feet’:
Using a needle tool, gently pull down small sections of clay along the bottom edge of the scoop to create that jagged, natural look where the ice cream meets the cone. -
Texture the surface:
For that realistic aerated ice cream look, firmly dab the entire surface of the pink ball with a stiff toothbrush or a dedicated texture sponge. Don’t be afraid to be a bit rough here. -
Add larger crevices:
Use a medium-sized ball tool to drag a horizontal indentation across the middle or top third of the scoop, simulating where an ice cream scooper would have pulled the cream.
Step 3: The Drip & Assembly
-
Mix the drippy sauce:
In a small cup, mix liquid polymer clay with a tiny amount of the dark pink solid clay. Mash and stir until you have a thick, icing-like consistency. -
Apply the drip:
Place the textured scoop onto the cone (using a dab of adhesive). Carefully spoon your liquid clay mixture along the rim where they meet, encouraging it to run down the sides of the waffle cone in 3-4 distinct drips. -
Make the sprinkles:
Take tiny scraps of yellow, blue, green, and red clay. Roll them into microscopic snakes and bake them for 5 minutes. Once cool, chop them into tiny bits with a blade. -
Add the toppings:
Press your pre-baked sprinkle bits into the soft pink scoop. Use a tool to push them in slightly so they look embedded rather than just sitting on top. -
Embed the magnet:
Turn the cone over. Press your magnet firmly into the flat spot you created on the back of the cone until it is flush with the surface. You can add a drop of Bake & Bond for security. -
Final bake:
Bake the entire piece according to your clay manufacturer’s instructions. Usually, this is around 275°F (130°C) for 30 minutes. Let it cool completely before moving it.
Make it Matte
Real ice cream isn’t shiny. If your clay cures with a sheen, lightly dust the scoop with cornstarch before baking to ensure a matte finish.
Pop this charming treat on your fridge and enjoy a dessert that never melts
Taco Magnets With Confetti Veggie Bits
These adorable taco magnets feature textured shells, ruffled lettuce, and the happiest little faces you’ve ever seen. Perfect for taco Tuesdays or just brightening up your fridge, they use simple shapes and texturing techniques to create realistic food details.
Step-by-Step
Materials
- Polymer clay (tan/beige, brown, green, yellow, red, black, pink)
- Liquid polymer clay or bake and bond
- Sandpaper or a stiff toothbrush (for texture)
- Needle tool or toothpick
- Ball tool (small)
- Rolling pin
- Circle cutter (approx. 2-3 inches)
- Crumpled aluminum foil
- Neodymium magnets
- Super glue (cyanoacrylate)
- Gloss glaze (optional)
Step 1: Creating the Shell
-
Mix the perfect color:
Start by mixing translucent clay into your tan clay if you have it; this gives the shell a slightly realistic, baked look. If not, plain tan works beautifully. -
Roll and cut:
Roll out the tan clay to a medium thickness, about 1/8th of an inch. Use your circle cutter to punch out a clean round shape for each taco you plan to make. -
Add texture:
Gently press sandpaper or a clean, stiff toothbrush over the entire surface of the circle. This creates that classic corn tortilla texture. -
Initial shaping:
Lightly fold the circle in half, but don’t crease the fold sharply. You want a U-shape that can stand open on its own to hold fillings.
Shell Too Soft?
If the taco shell flops closed while you are working, bake the folded shell for 10 minutes first to set the shape, then add raw clay fillings and bake again.
Step 2: The Fillings
-
Make the meat:
Take your brown clay and crumble it into tiny, irregular bits. I like to chop a log of clay finely with a blade to get random sizes. -
Fill the taco:
Apply a small amount of liquid clay inside the fold of the shell. Pack the crumbled brown clay into the bottom of the taco, filling it about halfway up. -
Create the lettuce:
Roll out green clay very thinly. Tear off small strips and ruffle them by pressing the edges with a needle tool or folding them like an accordion. -
Layer the greens:
Place the ruffled green strips on top of the brown meat, letting the textured edges peek out over the top of the shell.
Tex-Mex Twist
Use chalk pastels to brush burnt orange or brown shading on the edges of the shell before baking for a realistic ‘toasted’ tortilla effect.
Step 3: Toppings
-
Slice the cheese:
Roll out yellow clay into a thick sheet and cut a long, narrow curved strip. Place this piece so it arches over the lettuce, mimicking melted cheese or a pepper strip. -
Dice the tomatoes:
Cut a small block of red clay into tiny cubes or irregular chunks. Press these firmly onto the top of the lettuce and yellow strip. -
Secure the bits:
Use a tiny dot of liquid clay under the red chunks if they feel loose to ensure they don’t fall off after baking. -
Add spice details:
For extra detail, use a needle tool to add tiny dots or texture to the huge yellow strip to make it look porous.
Step 4: The Kawaii Face
-
Indent the eyes:
Use a small ball tool to make two divots on the front of the taco shell where you want the eyes to sit. -
Place the eyes:
Roll two tiny balls of black clay and press them into the divots. Flatten them slightly so they aren’t bulging too much. -
Add the smile:
Roll an incredibly thin snake of black clay. Cut a tiny U-shape and gently press it between the eyes with your needle tool. -
Rosy cheeks:
Make two small, flattened ovals of pink clay. Press them onto the shell just below and to the outside of the eyes.
Step 5: Baking and Finishing
-
Support the shape:
Prop the taco up against crumpled aluminum foil on your baking tray so it doesn’t tip over and lose its open shape in the oven. -
Bake:
Bake according to your polymer clay package instructions (typically 275°F/135°C for 15-30 minutes). Let it cool completely. -
Seal (optional):
If you want the toppings to look wet and fresh, brush a little gloss glaze on the tomato and cheese only, keeping the shell matte. -
Attach the magnet:
Once fully cured and cooled, use super glue to attach a strong neodymium magnet to the back side of the taco.
Now your fridge has a savory little friend to greet you every time you reach for a snack
Mini Fruit Pair Magnets: Strawberries and Cherries
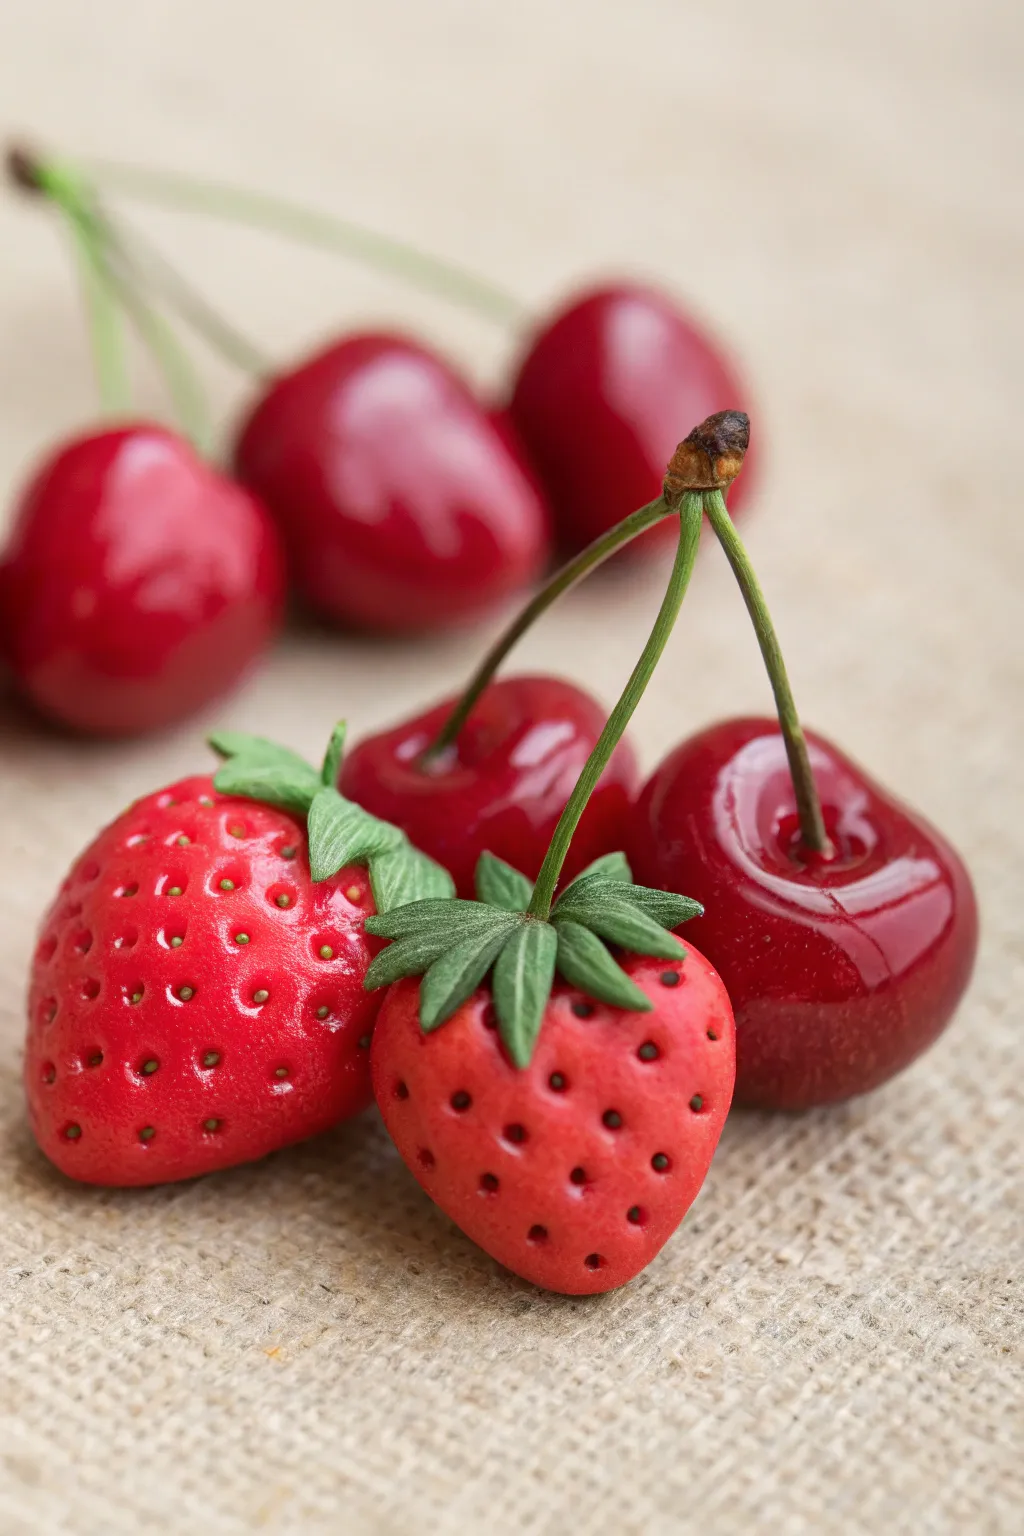
These hyper-realistic polymer clay magnets capture the juicy shine of summer fruits with stunning accuracy. You’ll sculpt a pair of vibrant cherries linked by a stem and two detailed strawberries, perfect for adding a pop of color to any magnetic surface.
How-To Guide
Materials
- Polymer clay: translucent red, opaque red, green, brown
- Liquid polymer clay (Fimo liquid or TLS)
- Gloss glaze (polyurethane or resin)
- Needle tool or toothpick
- Small ball stylus tool
- Green floral wire or thin craft wire
- Soft pastel chalks (dark red/brown)
- Strong neodymium magnets
- Super glue (cyanoacrylate)
- Craft knife
- Oven for baking
Step 1: Sculpting the Cherries
-
Prepare the Clay Colour:
Mix a small amount of translucent red clay with opaque red to achieve a deep, rich cherry color that mimics the depth seen in real fruit. -
Form the Base Shapes:
Roll two balls of the red mixture, approximately 1.5 cm in diameter. Gently press one side of each ball against your work surface to create a slightly flat spot for the magnet later. -
Create the Indentations:
Using a small ball stylus or the rounded end of a paintbrush, press into the top center of each cherry to create the dip where the stem will emerge. -
Add Subtle Shading:
Scrape a bit of dark red or brown soft pastel into a powder. With a soft brush, dust this powder into the indentation and slightly down the vertical crease line for realistic depth. -
Form the Stems:
Cut two pieces of floral wire, about 3-4 cm long. Wrap them thinly in green clay, leaving the very tips exposed at the bottom to insert into the fruit. -
Connect the Stems:
Create the knobby connector piece where the stems join using a mix of green and brown clay. Join the two wire stems at the top into this joint and texture it slightly with a needle tool to look woody. -
Assemble the Cherries:
Insert the bottom of the wire stems into the indentations on your cherries. Smooth the clay around the insertion point so it looks like the stem is growing out of the fruit.
Fixing Fingerprints
Smudged the smooth cherry surface? Before baking, lightly brush the raw clay with a little baby oil or clay softener to melt away fingerprints.
Step 2: Sculpting the Strawberries
-
Shape the Berries:
Using pure opaque red clay, form two cone shapes that are slightly rounded at the shoulders, resembling chubby strawberries. -
Texture the Surface:
Take your needle tool and gently press small holes all over the surface of the strawberry. Don’t just poke straight in; angle the tool slightly upwards to create pockets that catch the light. -
Add the Seeds:
Here I prefer to roll incredibly tiny snakes of yellow-green clay and slice off microscopic bits. Place one tiny bit into each hole you poked. This is tedious but makes all the difference. -
Create the Sepals (Leaves):
Roll out a thin sheet of green clay. Cut out small star shapes or individual leaf teardrops using a craft knife. Texture each leaf with vein lines using your needle tool. -
Attach the Leaves:
Press the green leaves onto the top (flat end) of the strawberry. Curve the tips upward slightly so they don’t look plastered down. -
Add the Central Stem:
Add a tiny stalk of green clay in the center of the leaves, blending it seamlessly into the greenery.
Hyper-Realism Hack
For maximum realism, mix a tiny amount of translucent clay into your green leaf color. It makes the calyx look less like plastic and more like organic plant matter.
Step 3: Finishing Touches
-
Prepare for Baking:
Double-check that the backs of all fruits are flat enough to hold a magnet. If they’ve rounded out during handling, press them gently onto the tile again. -
Bake the Clay:
Bake the pieces according to your specific clay brand’s manufacturer instructions (usually around 275°F/130°C for 15-30 minutes). Let them cool completely. -
High-Gloss Glaze:
This step is crucial for the ‘juicy’ look. Apply 2-3 coats of high-gloss polyurethane glaze or UV resin to the red fruit parts only. Avoid glazing the green stems and leaves to keep their matte texture. -
Attach Magnets:
Once the glaze is cured and dry, use a dot of super glue to attach a strong neodymium magnet to the flat spot on the back of each fruit piece.
Now your fridge will look fresh and colorful all year round with these delightful miniature fruits
Boba-Style Drink Cup Magnets With Tiny Pearls
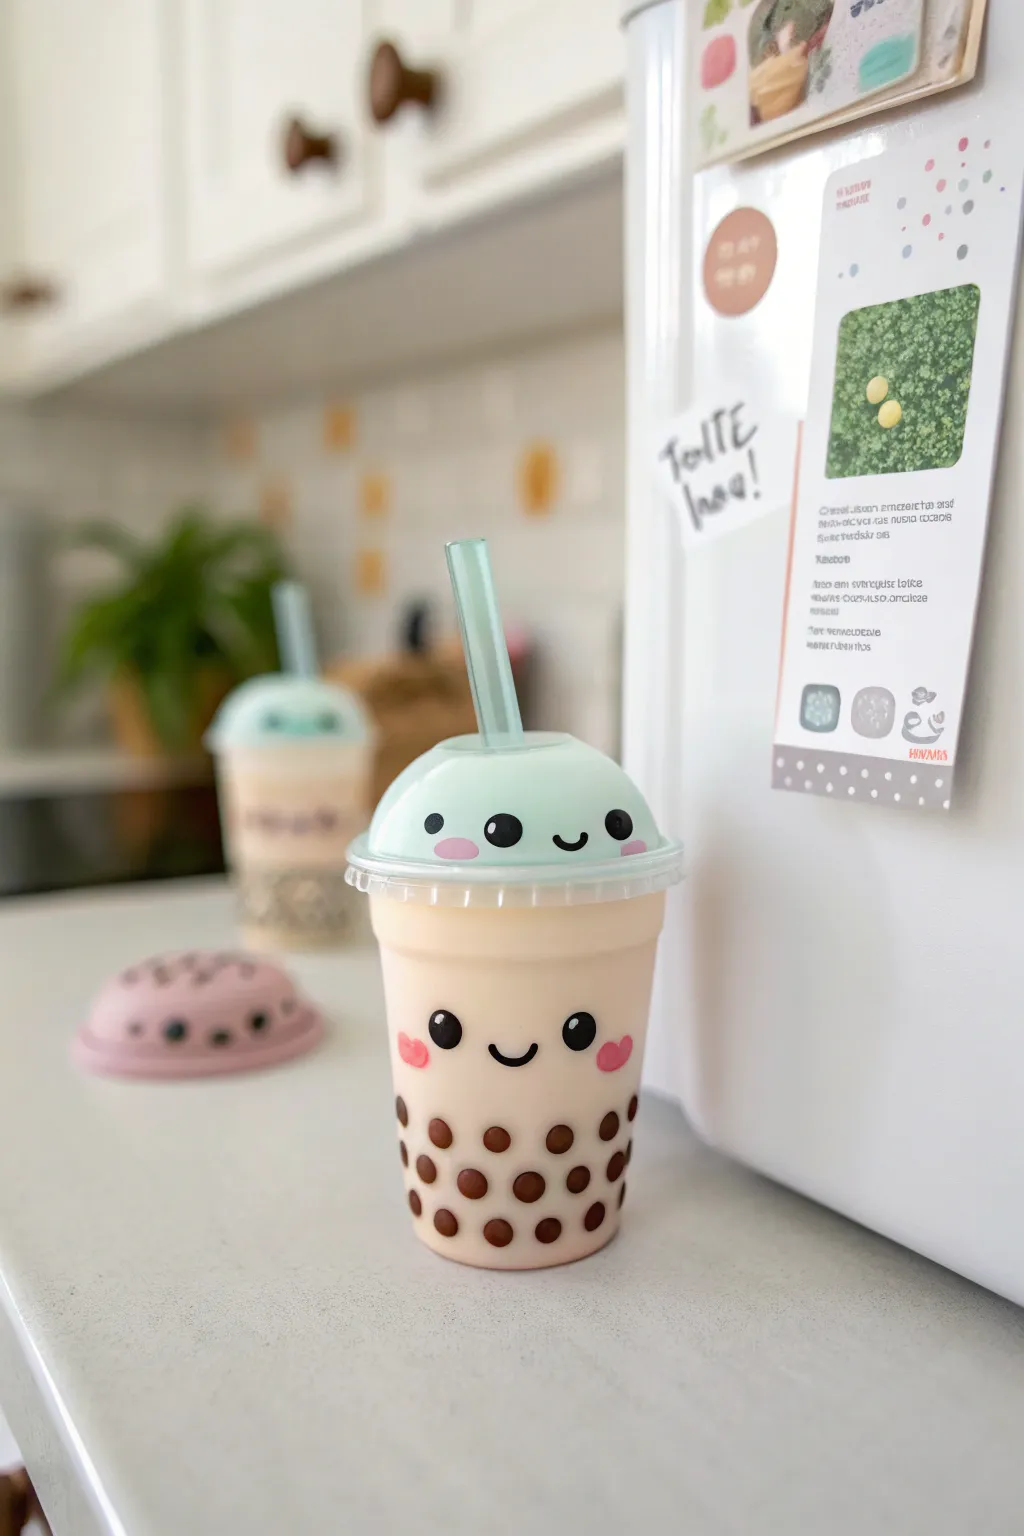
These adorable magnets capture the charm of bubble tea with a sweet, smiling face and tiny, realistic tapioca pearls visible through the “cup.” The translucent lid and pastel straw add a refreshing pop of color that looks perfect on any fridge.
Detailed Instructions
Materials
- Translucent polymer clay (frost or clear)
- Beige or light tan polymer clay (milky tea color)
- Dark brown polymer clay (boba pearls)
- Pastel mint or teal polymer clay (lid)
- Translucent blue or green polymer clay (straw)
- Black and pink acrylic paint (for faces)
- Fine detail paintbrush or dotting tool
- Liquid polymer clay (Fimo Liquid or TLS)
- Gloss glaze or UV resin
- Strong round magnets
- Super glue (cyanoacrylate)
- Rolling pin
- X-acto knife or clay blade
- Small round cutter (optional)
Step 1: Preparing the Boba Pearls
-
Roll the pearls:
Begin by taking a small amount of dark brown polymer clay. Roll it into a very thin snake, roughly 2-3mm in diameter. -
Cut tiny segments:
Use your clay blade to slice the snake into tiny, equal-sized segments. These will become your tapioca pearls. -
Shape the spheres:
Roll each tiny segment between your fingers into a perfect sphere. Make about 15-20 pearls for a single magnet. -
Pre-bake pearls (optional):
I find it helpful to pre-bake these tiny pearls for just 5-10 minutes at the recommended temperature. This ensures they don’t get squished when we press them into the cup later.
Cloudy Pearls?
If your pearls look foggy under the “tea” layer, use a thinner layer of translucent clay or mix less opaque beige into your base. More translucent clay equals better visibility.
Step 2: Constructing the Cup
-
Mix the cup color:
Condition your translucent clay and mix in a very small amount of beige or tan clay. You want a semi-opaque look that mimics milky tea, not solid plastic. -
Form the base shape:
Roll the beige mixture into a cylinder that tapers slightly toward the bottom, resembling a standard plastic takeaway cup. -
Add the pearls:
Press your pre-baked brown pearls into the bottom half of the cup shape. Push them in deep enough so the surface remains relatively smooth, as if they are inside the cup. -
Smooth the surface:
Gently roll the cup on your work surface or smooth it with your fingers to integrate the pearls. If needed, smear a very thin layer of translucent clay over the pearls to make them look submerged. -
Flatten the back:
Since this is a magnet, use your blade to slice off the back third of the cylinder vertically. This creates a flat surface for gluing the magnet later. -
Create the rim:
Roll a thin snake of clear or white translucent clay and wrap it around the top edge of the cup to create the plastic rim.
Step 3: Lid, Straw, and Details
-
Shape the dome lid:
Take your pastel mint clay and shape it into a half-sphere or a low dome that fits perfectly atop your cup base. -
Attach the lid:
Press the dome onto the rim of the cup. Blend the seam slightly or add a decorative rim if you prefer a cleaner break. -
Make the straw:
Roll a small snake of translucent blue or teal clay. Cut a short segment and insert it into the center of the dome lid. -
Add the lid face:
Before baking, you can add tiny balls of black clay for eyes and a tiny mouth to the lid, or wait to paint them later. The image shows a sculpted face on the lid for extra texture. -
Bake the project:
Bake the entire piece according to your clay manufacturer’s instructions, usually around 275°F (130°C) for 15-20 minutes.
Level Up: Shaker
Hollow out the cup and use a piece of acetate behind the front layer to create a real shaker magnet where the pearls move!
Step 4: Finishing Touches
-
Paint the cup face:
Once cool, use a fine brush or dotting tool dipped in black acrylic paint to draw the eyes and smile on the beige part of the cup. -
Add rosy cheeks:
Dip a dotting tool into pink paint and add small hearts or oval shapes for the cheeks on both the cup face and the lid face. -
Glaze for shine:
Apply a coat of gloss glaze or UV resin over the entire piece to give it that shiny, wet plastic look. This also protects the paint. -
Attach the magnet:
Use a drop of super glue to attach a strong round magnet to the flat back of your bubble tea cup.
Once dry, stick your refreshing creation on the fridge to hold up your most important notes
Mushroom Cap Magnets With Speckled Tops
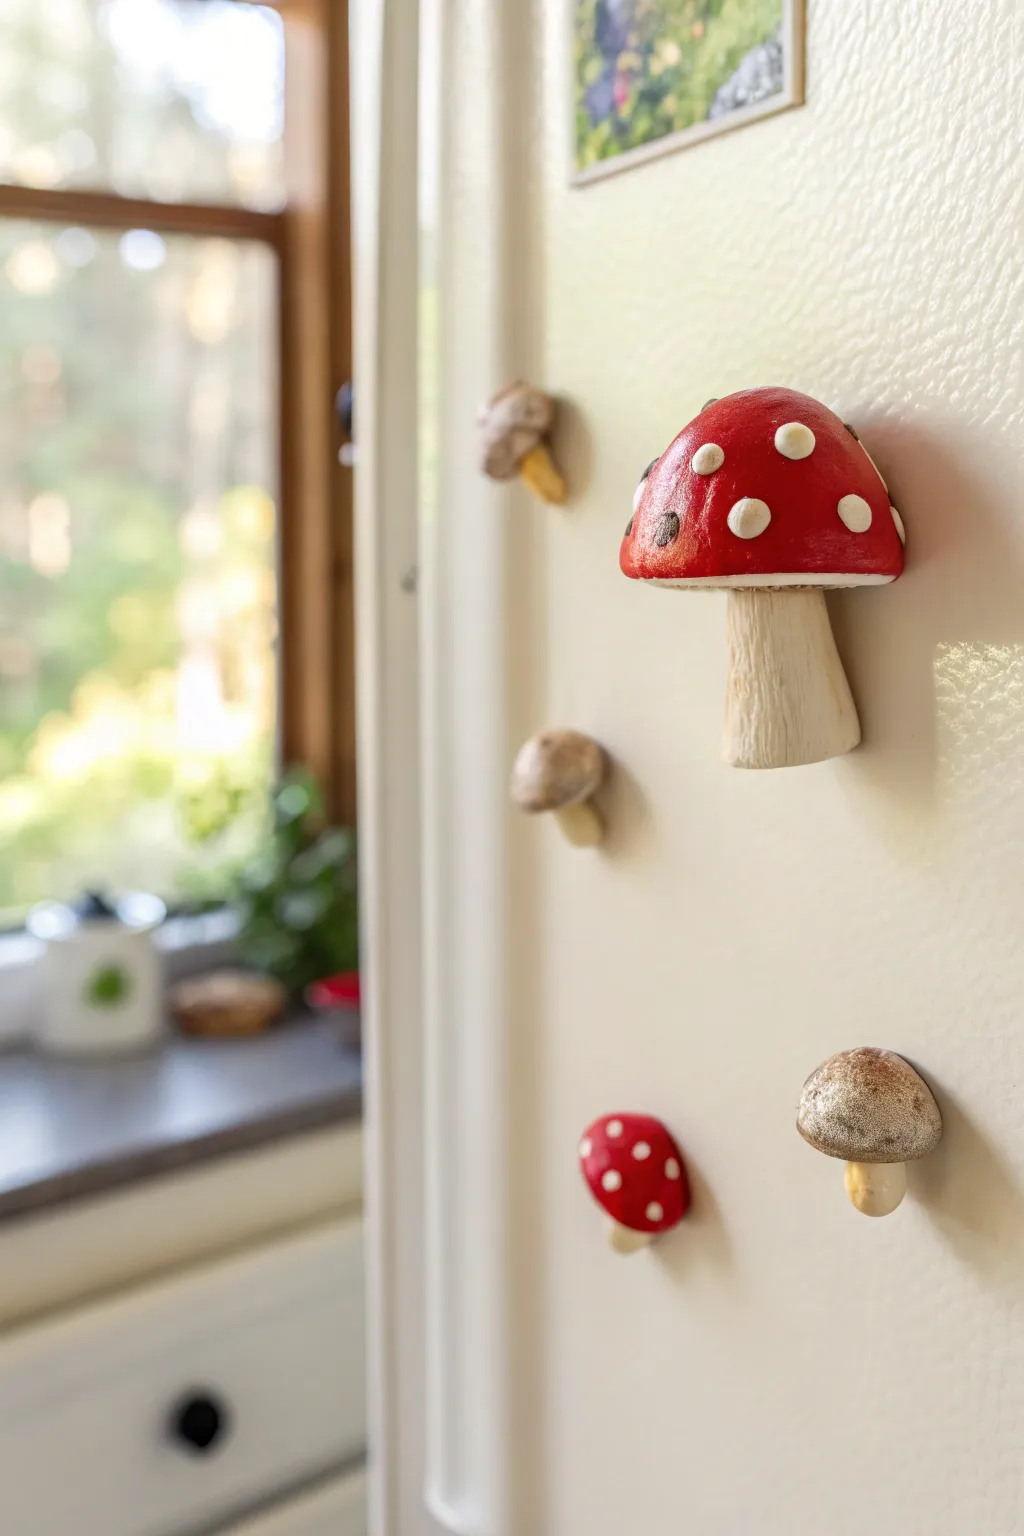
Bring a touch of the forest floor into your kitchen with these charming, hand-sculpted mushroom magnets. The standout red caps with their textured white spots and rustic stems create a whimsical, cottagecore aesthetic that is perfect for holding up photos or notes.
How-To Guide
Materials
- Polymer clay (Red, White, Beige/Translucent mix, Brown)
- Strong neodymium magnets (round disc shape)
- Basic clay sculpting tools (needle tool, ball tool)
- Liquid polymer clay or Bake & Bond
- Soft pastel chalks in brown and burnt umber (for shading)
- Small fluffy paintbrush
- Gloss glaze or polyurethane varnish (optional)
- Aluminum foil (for creating the core armature)
- Oven for baking
Step 1: Sculpting the Caps
-
Prepare the foil core:
Crumple a small piece of aluminum foil into a domed mushroom cap shape. This saves clay and keeps the magnet lightweight so it won’t slide down your fridge. -
Cover with red clay:
Condition your red polymer clay until it is soft and pliable, then flatten it into a sheet about 3mm thick. -
Shape the cap:
Drape the red sheet over your foil dome, smoothing it down the sides. Gather the excess at the bottom and trim it away so the underside is flat. -
Texture the surface:
Gently rub the surface with your finger to remove fingerprints, or tap it lightly with a toothbrush for a more organic, earthy texture. -
Create the white spots:
Roll tiny irregular balls of white clay. I prefer making them slightly different sizes for a natural look. -
Apply the spots:
Press the white balls onto the red cap, flattening them slightly so they look embedded rather than just sitting on top. -
Detail the spots:
Take a toothbrush or a stiff brush and texturize just the white spots to give them a crusty, realistic fungal appearance. -
Make the smaller brown cap:
Repeat the process with brown or beige clay for the smaller mushrooms seen in the background, omitting the strong white spots if you want a plainer variety.
Texturing Tip
For ultra-realistic white spots, press a piece of coarse sandpaper or a rough stone against the white clay dots. This creates a pitted, organic surface superior to smooth clay.
Step 2: Forming the Stems
-
Mix the stem color:
Blend white clay with a tiny amount of translucent and beige to get an off-white, creamy stem color. -
Shape the stalk:
Roll a thick cylinder of the clay, slightly wider at the base and narrower at the top where it joins the cap. -
Add stem texture:
Use a needle tool to scratch vertical lines up and down the stem, mimicking the fibrous texture of a real mushroom stalk. -
Attach stem to cap:
Apply a drop of liquid clay or Bake & Bond to the top of the stem and press it firmly against the flat underside of your cap. -
Insert the magnet:
Press your neodymium magnet into the back of the stem or the flat back of the cap (depending on your design preference), embedding it flush with the clay so it sits flat against surfaces.
Glow Up
Mix glow-in-the-dark powder into your white clay for the spots. Your mushrooms will look classic by day, but create a magical bioluminescent forest vibe in your kitchen at night.
Step 3: Shading and Finishing
-
Apply shading powder:
Scrape some brown and burnt umber soft pastel chalk into a powder. -
Brush on shadows:
Use a soft fluffy brush to dust the powder into the textured grooves of the stem and around the base of the cap to create depth and an ‘earthy’ feel. -
Bake the pieces:
Bake according to your clay manufacturer’s instructions, usually around 275°F (130°C) for 15-30 minutes. -
Cool and inspect:
Let the mushrooms cool completely inside the oven to prevent cracking. -
Glaze (optional):
If you want a wet, dewy look, apply a coat of gloss glaze to just the red cap, leaving the stem matte.
Once they are completely cool, stick them to your fridge to enjoy your own little patch of woodland charm
Panda Face Magnets With Clean Color Blocking
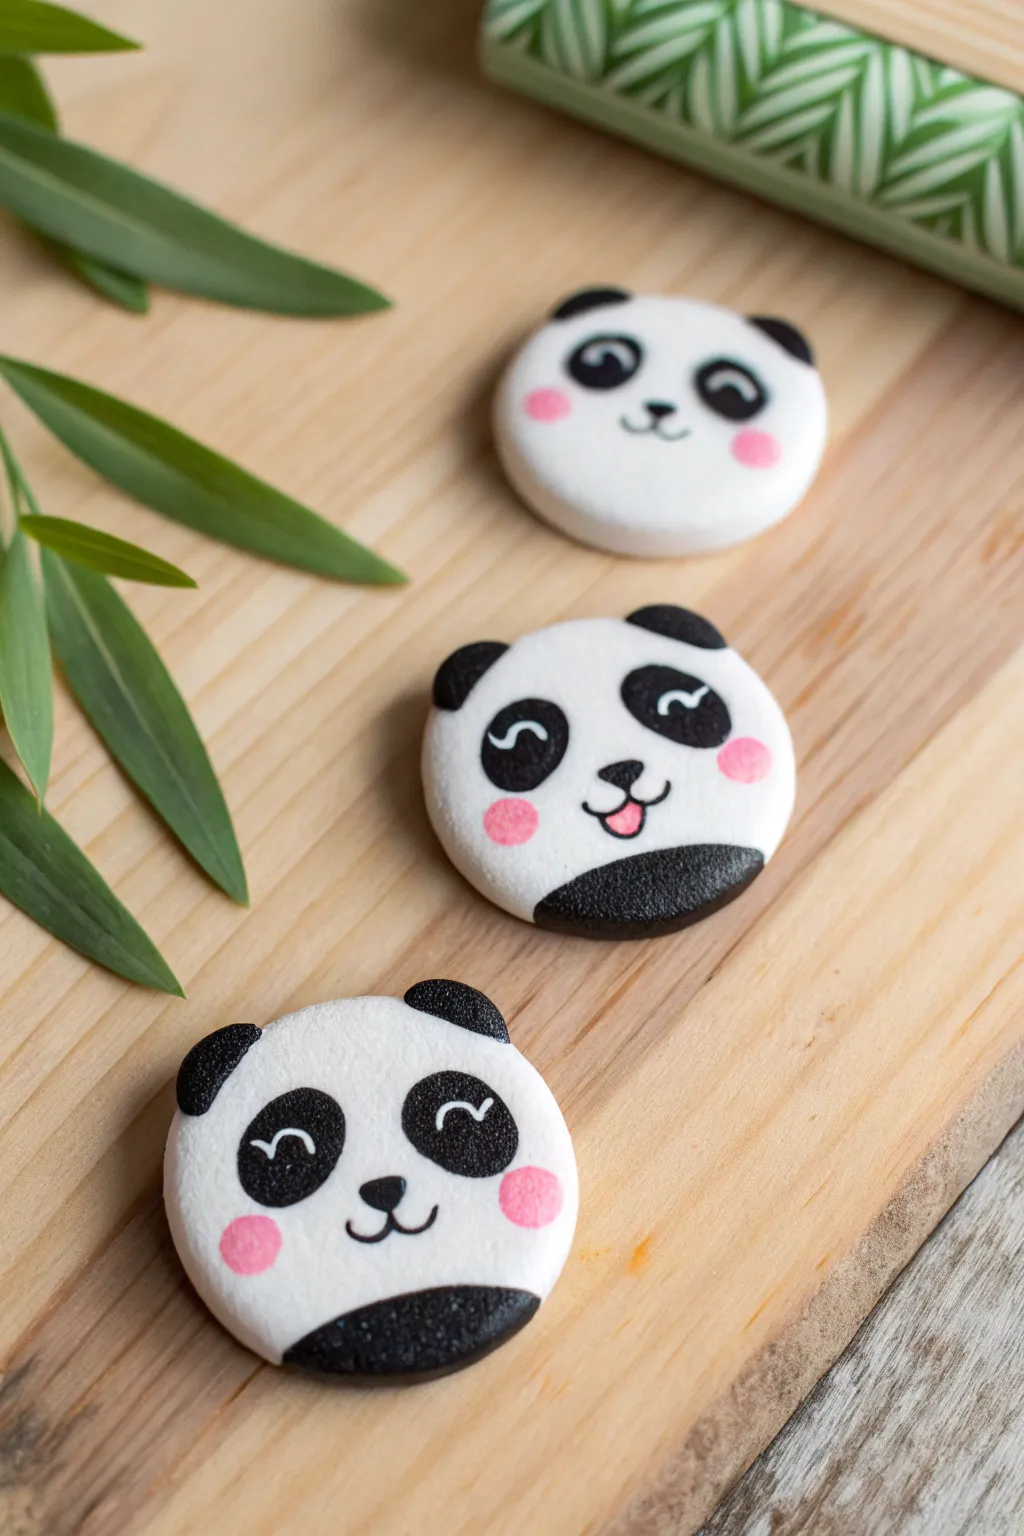
These adorable panda magnets rely on simple geometric shapes and crisp black-and-white contrast for a standout look. The clean color blocking gives them a modern, professional finish perfect for brightening up your fridge or workspace.
Step-by-Step Guide
Materials
- White polymer clay
- Black polymer clay
- Pink polymer clay (soft pastel shade)
- Round clay cutter (approx. 1.5 – 2 inches)
- Small ball stylus or dotting tool
- Detail needle tool or craft knife
- Acrylic rolling pin
- Strong craft glue (E6000 or similar)
- Round ceramic or ferrite magnets
- Parchment paper or ceramic tile (for baking)
Step 1: Creating the Base
-
Condition the clay:
Start by kneading the white polymer clay until it is soft and pliable. This prevents cracks and ensures a smooth surface for the face. -
Roll the sheet:
Using your acrylic rolling pin, roll the white clay into a sheet approximately 1/4 inch thick. You want it substantial enough to hold the magnet firmly. -
Cut the rounds:
Press your round cutter firmly into the white sheet to create perfect circles. Gently release them and smooth any rough edges with your fingertip.
Step 2: Adding Black Features
-
Form the ears:
Roll tiny balls of black clay, about the size of a peppercorn. Flatten them slightly into semicircles against your work surface. -
Attach the ears:
Press the black semicircles onto the top left and right curves of the white round. Smooth the seam gently with a modeling tool so they bond securely. -
Create the eye patches:
Roll slightly larger balls of black clay and flatten them into ovals. Place these on the face, angling them slightly downward toward the center to create that signature sad-panda look. -
Add the nose:
Roll a very tiny speck of black clay into a triangle or oval shape and place it centrally below the eyes. -
Optional bottom block:
For the panda appearing to peek over a ledge, cut a small segment of the white circle’s bottom away and replace it with a crescent of black clay, blending the seam thoroughly on the back.
Smudged Clay?
Black clay stains white clay easily! Wipe your hands and tools with a baby wipe or alcohol swab immediately after handling the black clay before touching the white parts.
Step 3: Refining Details
-
Sculpt the mouth:
Using a needle tool or a very fine blade, gently press a small ‘w’ or anchor shape under the nose to create the mouth lines. -
Add white eye highlights:
Roll hair-thin snakes of white clay. Curve them into ‘U’ shapes or small arches and press them gently onto the black eye patches to simulate smiling eyes. -
Apply the cheeks:
Take tiny amounts of soft pink clay, roll them into balls, and flatten them into thin disks. Press these onto the white cheeks, just below the outer edges of the eye patches. -
Texture check:
Before baking, inspect the surface for fingerprints. I like to lightly buff the surface with a bit of cornstarch on my finger to smooth it out if needed.
Level Up: Bamboo Texture
Create a companion magnet shaped like a bamboo stalk. Use green clay and press horizontal lines into it with a needle tool to mimic the segmented look of bamboo.
Step 4: Baking and Assembly
-
Bake the pieces:
Place your pandas on a ceramic tile or parchment-lined baking sheet. Bake according to your clay manufacturer’s instructions, usually around 275°F (135°C) for 15-20 minutes. -
Cool down:
Allow the pieces to cool completely inside the oven or on the counter. Do not handle them while hot as they are fragile until fully cured. -
Attach the magnets:
Once cool and hard, flip the pandas over. Apply a strong dab of E6000 glue to the center of the back. -
Set the magnet:
Press the magnet firmly into the glue. Let the adhesive cure for at least 24 hours to ensure a permanent hold.
Now you have a charming set of panda faces ready to hold up your most important notes
Mini Charcuterie Board Magnets With Tiny Toppings
Transform a sliver of polymer clay into a hyper-realistic mini charcuterie spread that looks good enough to eat right off your fridge. This project focuses on texturing and shading techniques to mimic the organic look of aged wood, soft cheeses, and fresh berries.
Detailed Instructions
Materials
- Polymer clay (wood tone, translucent white, yellow, pale yellow, red, dark purple, black, deep blue)
- Liquid polymer clay (translucent)
- Chalk pastels (browns, ochres, berry tones)
- Toothbrush or stiff bristle brush
- Needle tool and ball stylus tool
- Sandpaper or texture sponge
- X-acto knife or tissue blade
- Gloss glaze or UV resin
- Matte varnish
- Strong neodymium magnet
- Super glue (cyanoacrylate)
Step 1: Crafting the Wooden Board
-
Shape the base:
Start by conditioning wood-tone clay and shaping it into a long, rectangular plank with rounded corners. Create a ‘handle’ section by slightly narrowing one end. -
Add wood grain:
Use a needle tool or an awl to scribe long, gentle lines down the length of the board. Follow the natural flow of real wood grain, interrupting the lines occasionally with knots. -
Replicate natural variations:
If you want a two-tone wood effect like the photo, blend a slightly darker strip of clay onto one edge before texturing. Create a hole in the handle end using a cutter or straw. -
shade for depth:
Shave brown and black chalk pastels into a powder. Dry brush this powder into the textured grooves you created to make the grain pop. -
Pre-bake:
Bake the board alone according to your package instructions (usually 275°F/130°C for 15 minutes) to create a firm base for your toppings.
Berry Realism Hack
Mix translucent liquid clay with your berry colors. It creates a gelatinous, juicy look that solid clay can’t quite match for fruit.
Step 2: Creating the Cheese and Crackers
-
Form the brie wedge:
Mix white clay with a tiny amount of translucent and yellow to get a creamy cheese color. Shape a rectangular log. Add a thin layer of pure white on top for the rind. -
Texture the cheese:
Place the cheese wedge on the baked board. Use a needle tool to drag down the cut sides slightly, simulating the creamy texture of a soft cheese. -
Make swiss slices:
Roll out pale yellow clay very thinly. Cut two small, improper triangles. Use a small ball tool to poke various sized holes through the slices for that classic swiss look. -
Stack the slices:
Arranges the swiss slices casually near the bottom of the board, overlapping them slightly. -
Texture the crackers:
Mix a tan ‘biscuit’ color. Flatten small balls of clay into discs. Use a toothbrush or sandpaper to press a rough texture onto the surface. -
Add salt grains:
Using a needle tool, poke small dots into the cracker surface for a baked look. You can also sprinkle tiny bits of white clay as salt crystals.
Sticky Finger Prints?
If you leave fingerprints on the tiny fruit, lightly brush them with baby oil before baking to smooth the surface without squashing details.
Step 3: Sculpting the Fruit
-
Blackberry assembly:
Mix dark purple and black clay. Roll many tiny spheres (about the size of a poppy seed). Cluster these together carefully into an oval shape to form blackberries. -
Raspberry details:
Using red clay, repeat the tiny sphere process, but form them into a hollow cup shape or dome. Lightly dust them with white pastel powder for a ‘fuzzy’ bloom effect. -
Blueberry accents:
Roll small balls of deep blue clay. Flatten the top slightly and use a needle tool to create the small 5-point star or crown shape found on real blueberries. -
Placing the fruit:
Arrange your fruit on the board. Place some blueberries directly on top of the brie wedge for contrast. Position the blackberries and raspberries in a loose cluster in the center.
Step 4: Finishing Touches
-
Final shading:
Use burnt umber chalk pastel to lightly shade the edges of the crackers for a baked appearance. -
Final Bake:
Bake the entire assembled piece again for the full recommended time (typical 30 minutes per 1/4 inch thickness). -
Glazing:
Once cool, apply a matte varnish to the wood, crackers, and cheese rind. Use a gloss glaze on the cut part of the brie and the interior of the berries to make them look juicy. -
Magnet attachment:
Sand the back of the board slightly to roughen the surface. Secure your magnet with a dab of strong super glue.
Now you have a charming, rustic miniature that brings a touch of culinary art to your kitchen magnet collection
Spaghetti Plate Magnets With Coiled Noodle Texture
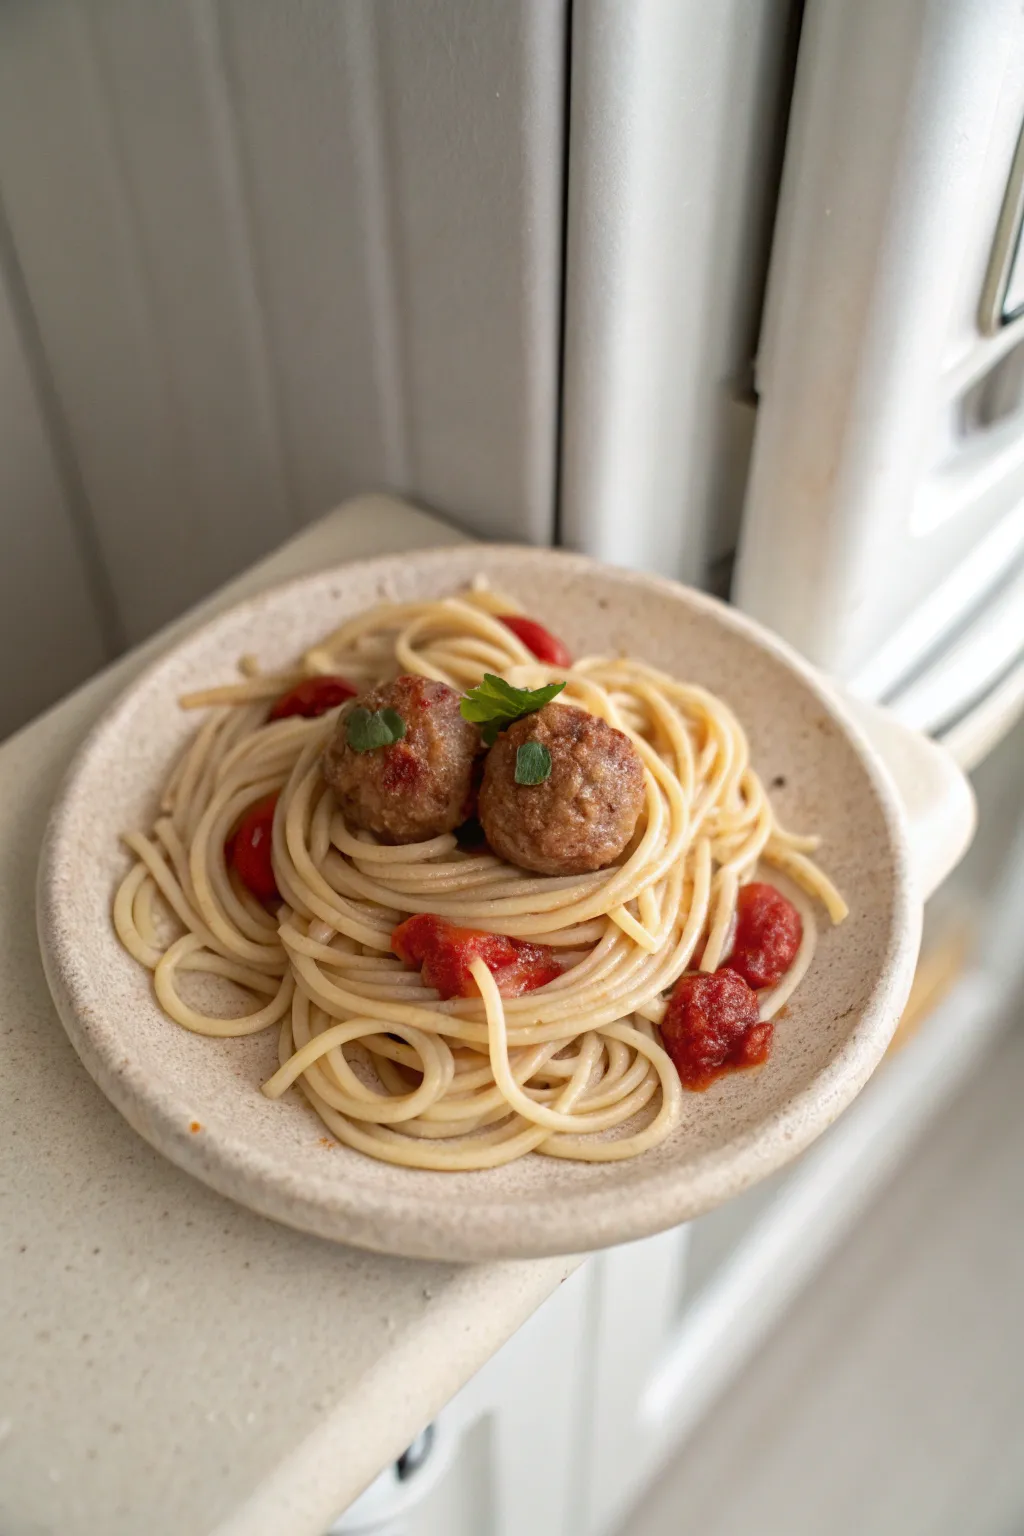
This deceptively realistic magnet resembles a hearty plate of spaghetti and meatballs right down to the textured sauce and garnish. It’s perfect for adding a touch of Italian-American comfort food charm to your refrigerator door.
Step-by-Step
Materials
- Polymer clay (translucent, beige, white, dark brown, red)
- Liquid polymer clay (translucent)
- Pastel chalks (brown, yellow ochre, red)
- Red acrylic paint (optional for vibrancy)
- Small ceramic plate or polymer clay circle base
- Clay extruder with small round die
- Pin tool or needle tool
- Toothbrush or balls of aluminum foil (for texturing)
- Green polymer clay or fake moss (for garnish)
- Strong round magnet
- Super glue (E6000 or similar)
Step 1: Preparing the Base and Noodles
-
Mix the Pasta Color:
Start by mixing translucent clay with a very small amount of white and beige. You want an off-white, slightly yellowish tint that mimics cooked pasta dough without being fully opaque. -
Extrude the Spaghetti:
Condition your clay thoroughly and load it into a clay extruder fitted with a small round die. Extrude a long, continuous noodle strand onto your work surface; having one long piece makes coiling easier than managing many short ones. -
Prepare the Plate:
If you are using a pre-made miniature ceramic plate, clean it well. If making your own, roll out beige speckled clay, cut a circle, and gently curve the edges up to form a shallow bowl shape. -
Arrange the Noodles:
Apply a thin layer of liquid clay to the bottom of the plate to act as adhesive. Gently drop your extruded clay strand onto the plate, letting it coil and mound naturally. Avoid pressing it down flat; you want air gaps and height to simulate a real pile of pasta. -
Refine the Arrangement:
Use a needle tool or pin to nudge specific loops into place. Ensure a few ‘rogue’ noodles hang slightly closer to the edge for a messy, authentic look, just like in the photo.
Step 2: Creating the Meatballs
-
Mix Meatball Color:
Combine dark brown clay with a touch of translucent and a speck of red. The translucent clay is key here—it prevents the ‘meat’ from looking like plastic and adds depth. -
Form the Shapes:
Roll two medium-sized balls of the brown mixture. They should be substantial enough to sit atop the spaghetti mound without sinking in completely. -
Texture the Meat:
This is the secret to realism. Gently tap the surface of each ball with a clean toothbrush or a crumpled ball of aluminum foil. You want a rough, porous surface, not a smooth one. -
Shade the Meatballs:
Shave some brown and black pastel chalk into a fine powder. Use a soft brush to dust this over the textured meatballs to enhance the ‘cooked’ appearance and deepen the crevices. -
Placement:
Nestle the two meatballs into the center of your pasta pile. Press them down gently so they look integrated with the noodles, not just floating on top.
Sauce Looking Too Pink?
If your liquid clay sauce looks pink instead of deep red, add tiny shavings of brown pastel chalk to the red mix. This deepens the hue to a cooked marinara color.
Step 3: Saucing and Finishing
-
Create the Marinara:
Mix translucent liquid polymer clay with a tiny bit of red clay or shavings of red pastel chalk. For a chunkier sauce look, I like to crumble tiny bits of semi-baked red clay into the mixture. -
Apply the Sauce:
Using a needle tool, drip the red liquid mixture strategically over the meatballs and onto sections of the pasta. Don’t cover everything; let plenty of the plain noodles show through. -
Add Tomato Chunks:
Take tiny scraps of solid red clay and tuck them near the sauce pools to represent chunks of stewed tomato. This adds great dimension to the dish. -
Garnish:
Roll tiny bits of green clay flat and cut rough leaf shapes, or use tiny snippets of dried craft moss. Place a small sprig directly on top of the meatballs for a pop of fresh basil color. -
Bake:
Bake the entire piece according to your clay manufacturer’s instructions (usually 275°F for 15-30 minutes). Let it cool completely before handling. -
Attach the Magnet:
Once cool, flip the plate over. Apply a drop of strong super glue (like E6000) to the center back and press your round magnet firmly into place. Let it cure for 24 hours.
Add Parmesan Cheese
For extra texture, grate a piece of baked white clay against sandpaper over the finished (unbaked) dish. The tiny dust falling on top looks perfectly like powdery parmesan.
Now you have a charmingly tiny meal ready to hold up your grocery list
Shaker-Window Magnets Filled With Loose Clay Sprinkles

Create a sleek, modern refrigerator magnet that mimics the look of trendy terrazzo stone without the weight. This project combines a clean, solid polymer clay frame with a textured, speckled interior for a sophisticated piece of functional decor.
How-To Guide
Materials
- Polymer clay (pale pink/peach for frame)
- Polymer clay (white/cream for background)
- Polymer clay scraps (terracotta, light pink, dark green, mustard)
- Acrylic rolling pin or pasta machine
- Square clay cutters (two sizes to create a frame)
- Clay blade or craft knife
- Smooth ceramic tile or glass work surface
- Liquid polymer clay (optional)
- Strong neodymium magnets
- Super glue (cyanoacrylate gel)
- Fine-grit sandpaper (400-800 grit)
- UV resin or gloss varnish (optional for finish)
Step 1: Making the Terrazzo Chips
-
Prepare chips:
Take your colored scrap clay (terracotta, green, mustard, etc.) and chop them finely with your clay blade until you have a pile of irregular, confetti-sized distinct pieces. -
Condition base:
Condition the white or cream clay thoroughly until soft and pliable, then flatten it into a thick sheet about 3mm thick. -
Apply chips:
Scatter the chopped colored clay chips onto the white sheet. Press them down gently with your fingers to ensure they stick to the surface. -
Roll flat:
Use your acrylic roller to flatten the chips into the base clay. Roll in multiple directions to ensure the surface is completely smooth and the chips are embedded flush with the white clay.
Step 2: Creating the Frame
-
Roll frame color:
Take your pale pink or peach clay and roll it out into a thick, even slab. You want this slightly thicker than your terrazzo base, perhaps around 4-5mm, to give the frame dimension. -
Cut outer shape:
Using the larger square cutter, punch a shape out of the pink slab. Leave the clay inside the cutter for a moment if possible to keep the shape distorted. -
Cut inner window:
Center the smaller square cutter inside the larger shape you just cut. Press down firmly to remove the center, creating a square frame. -
Smooth edges:
Gently gently rub the cut edges with your finger or a bit of cornstarch to smooth out any sharp ridges or cutter seams. I like to round the corners just slightly for a softer look.
Clean Cuts
cover the clay with a sheet of plastic wrap before using your cutters. This creates a beautifully rounded, beveled edge instantly.
Step 3: Assembly and Baking
-
Cut terrazzo insert:
Use the *smaller* square cutter (the same one used for the window) to cut a piece from your terrazzo sheet. -
Fit pieces together:
Place the pink frame on your baking tile. Insert the terrazzo square into the center. Ideally, the frame should sit slightly higher than the insert for a shadow-box effect. -
Secure seam:
On the backside, smudge the seam between the frame and the insert gently to bond them, or apply a thin line of liquid polymer clay to the edges before fitting them together. -
Bake:
Bake the piece according to your clay manufacturer’s instructions (usually 275°F/130°C for at least 30 minutes). Tent with foil to prevent scorching light colors. -
Cool down:
Allow the piece to cool completely on the tile before moving it to prevent warping.
Sticky Situation?
If clay sticks to your work surface or cutters, dust them lightly with cornstarch or dip cutters in water before slicing.
Step 4: Finishing Touches
-
Sand surface:
Once cool, lightly sand the terrazzo face (avoiding the frame if you want to keep its texture distinct) to reveal crisp edges on your colored chips. -
Clean up:
Wipe away any sanding dust with a damp cloth or baby wipe. -
Attach magnet:
Apply a drop of strong super glue gel to the back of the clay square and press your neodymium magnet firmly into place. -
Seal (optional):
If you want a glossy stone look, apply a thin layer of UV resin or polyurethane varnish to the terrazzo center.
Pop this stylish piece on your fridge to hold your favorite photos or grocery lists in style
Faux Vintage Tile Magnets With Terrazzo Speckles
Capture the charm of old-world ceramics with this delightful polymer clay magnet that mimics the look of a hand-painted vintage tile. Using a clever faux-terrazzo technique and precise layering, you’ll create a durable, glossy accent piece perfect for brightening up your refrigerator door.
Step-by-Step Guide
Materials
- White polymer clay (approx. 2oz)
- Black pepper or dried coffee grounds (for speckling)
- acrylic paints (terracotta, teal, mustard yellow, dark grey/black)
- Square clay cutter (2 inch)
- Acrylic rolling pin
- Fine detail paintbrush (00 or 000 size)
- Glossy polyurethane varnish or UV resin
- Strong round magnet
- Super glue (E6000 or similar)
- Ruler
- Pencil
- Sandpaper (400 and 800 grit)
Step 1: Creating the Base
-
Prepare the speckled clay:
Begin by conditioning your white polymer clay until it is soft and pliable. Flatten it into a pancake shape. -
Add the ‘terrazzo’ texture:
Sprinkle a heavy pinch of ground black pepper or dried coffee grounds onto the clay. Fold the clay over to trap the speckles and knead thoroughly until the particles are evenly distributed throughout the white block. -
Roll out the slab:
Using your acrylic rolling pin, roll the speckled clay out to a thickness of about 1/4 inch (6mm). You want it substantial enough to look like a real ceramic tile. -
Cut the tile shape:
Press your square cutter firmly into the clay slab. If the edges drag slightly, use your finger to smooth them down gently before lifting it away. -
Soften the edges:
Real ceramic tiles often have slightly rounded shoulders. Gently tap the sharp top edges of your square with your fingertip to round them off just a tiny bit. -
Bake the base:
Place your tile on a baking sheet lined with parchment paper. Bake according to your clay manufacturer’s instructions (usually 275°F/135°C for 15-30 minutes). Let it cool completely.
Ceramic Realism Tip
For ultra-realism, dip your finger in water and smooth the raw clay surface until it’s perfectly glass-smooth before baking. Texture ruins the ceramic illusion.
Step 2: Painting the Design
-
Mark the center:
Once cool, use a ruler and a very light pencil touch to find the center of your tile. Draw a faint diamond shape in the middle, leaving a wide border of white space around it. -
Paint the background diamond:
Fill in the large diamond shape with your terracotta or pinkish-brown acrylic paint. You may need two thin coats for full opacity. -
Add the inner diamond:
Inside the terracotta diamond, specificially in the center, paint a smaller mustard yellow diamond. Leave a band of the terracotta showing around it. -
Create the teal frame:
Carefully paint a teal border that frames the yellow diamond. This band should sit right between the yellow and the terracotta sections. -
Detail the teal border:
Using your finest brush and white paint (or the bare clay color if you have a steady hand to leave gaps), add tiny dots inside the teal band to mimic pattern details. -
Paint the outer border:
Moving to the white outer edge of the tile, dip the back end of your paintbrush (or a dotting tool) into the mustard yellow paint. -
Add yellow dots:
Stamp a border of yellow dots around the perimeter of the tile. Space them out evenly. -
Add final green accents:
Using a smaller dotting tool or toothpick, add tiny teal or dark green dots between the larger yellow ones on the border, and four tiny black dots in the very center of the yellow diamond.
Step 3: Finishing Touches
-
Seal the surface:
Once the paint is bone dry, apply a generous coat of glossy varnish or UV resin. This is crucial—it transforms the matte clay into something that looks like glazed ceramic. -
Cure or dry the finish:
Allow the varnish to dry (or cure under a UV lamp) completely. The surface should be hard and glassy. -
Attach the magnet:
Flip the tile over. Apply a dab of strong super glue to the back and press your round magnet firmly into the center. -
Final cure:
Let the glue set for at least an hour before placing the magnet on your fridge to ensure a secure bond.
Wobbly Lines?
If your painted geometric lines aren’t straight, wait for the paint to dry and use a toothpick to gently scrape away the excess paint and straighten the edge.
Now you have a charming piece of faux-pottery art ready to hold your grocery lists in style