If you’re craving polymer clay Mother’s Day ideas that feel heartfelt (not mass-produced), you’re in the right place. I pulled together my go-to gift projects that are sweet, personal, and totally doable at a kitchen table.
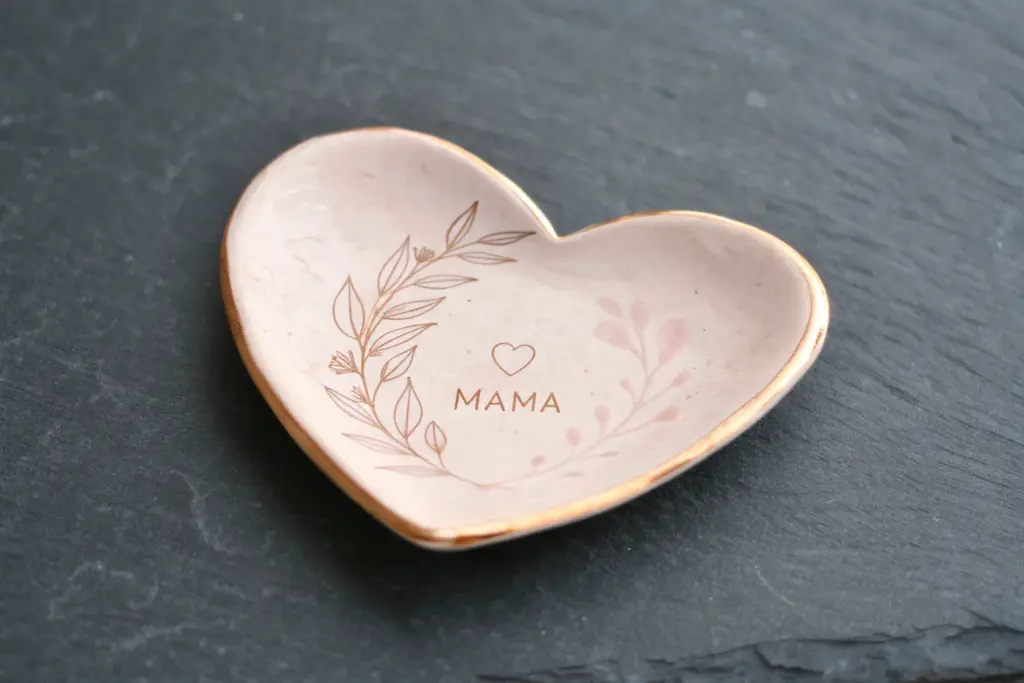
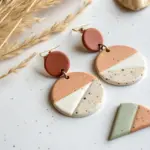
Marbled Trinket Dish for Mom’s Rings
Treat Mom to a beautiful bedside catchall for her jewelry with this elegant marbled bowl. Swirls of soft pink, seafoam green, and white come together in organic patterns, accented with a touch of gold for a sophisticated finish.
Step-by-Step Tutorial
Materials
- Polymer clay (white, peach/pink, sage green, and tan/beige)
- Acrylic rolling pin
- Large round cookie cutter (approx. 4-5 inches) or a bowl to trace
- Small oven-safe bowl (to use as a mold)
- Craft knife or clay slicer
- Fine-grit sandpaper (400 to 600 grit)
- Gloss varnish or glaze (optional)
- Paintbrush
- Baking sheet
- Parchment paper
Step 1: Preparing the Clay
-
Condition the clay:
Start by taking a block of white clay and smaller amounts of your colored clays (peach, sage green, and tan). Knead each color individually in your hands until they are soft, warm, and pliable. -
Create snakes:
Roll each color into a long, thin snake on your work surface. The white snake should be the thickest since it acts as the base color, while the colored snakes can be thinner. -
Twist them together:
Bundle the clay snakes together and twist them into one large rope. Continue twisting until the colors start to wrap tightly around each other like a candy cane. -
Fold and roll:
Fold the twisted rope in half and roll it out into a snake again. I like to repeat this twisting and folding process about 3-4 times to get nice, intricate layers without over-blending the colors into mud. -
Form a ball:
Once you are happy with the color distribution in your rope, scrunch it all up into a single ball. Knead it just once or twice to compact it.
Step 2: Shaping the Dish
-
Roll out the slab:
Place the ball on a clean surface or parchment paper. Use your acrylic roller to flatten the ball into a smooth slab, roughly 1/4 inch thick. You’ll see the beautiful marbling emerge as you roll. -
Check both sides:
Flip the slab over to see which side creates a pattern you prefer. Sometimes the underside hides the best swirls. -
Cut the circle:
Place your large circular cutter (or a guide bowl) onto the clay slab. Press down firmly to cut out a perfect circle. Remove the excess scraps around the edges. -
Smooth the edges:
Run your finger gently along the cut edge of the circle to smooth out any roughness or sharp marks from the cutter. -
Form the curve:
Take your oven-safe bowl and flip it upside down. Verify it is clean and dust-free. Gently drape your clay circle over the bottom of the bowl. -
Secure the shape:
Press the clay lightly against the curve of the bowl so it takes the shape. Be careful not to press too hard, or you might thin out spots in the clay or leave fingerprints.
Pro Tip: Clean Cuts
Before cutting your circle, lay a piece of cling wrap over the clay. Press the cutter down through the plastic. This creates a soft, rounded edge that requires way less sanding later.
Step 3: Baking and Finishing
-
Bake:
Place the bowl (with the clay on it) onto a baking sheet lined with parchment paper. Bake according to the manufacturer’s instructions for your specific brand of clay—usually 275°F (135°C) for about 15-30 minutes. -
Cool down:
Remove the project from the oven and let it cool completely before trying to separate the clay from the mold. Removing it while hot can warp the shape. -
Pop it off:
Once cool, the clay dish should pop easily off the mold bowl. -
Sand for perfection:
Take your fine-grit sandpaper and wet it slightly. Gently sand the rim of the dish to make it perfectly smooth and professional-looking. -
Add a gold rim (Optional):
For the look in the photo, you can paint a very thin line of liquid gold leaf or gold acrylic paint along the top rim for an extra touch of luxury. -
Seal:
If you want a glossy finish like ceramic, apply a coat of polymer clay glaze or varnish. Let it dry fully before wrapping it up for Mom.
Troubleshooting: Air Bubbles
If you see a bubble while rolling, pierce it gently with a needle tool or craft knife, then smooth the air out with your finger and roll over it again to seal the hole.
Now you have a stunning, handcrafted piece that looks far more expensive than it cost to make


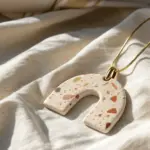
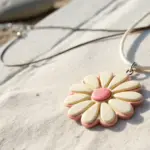
Heart Pendant Necklace With a Tiny Initial
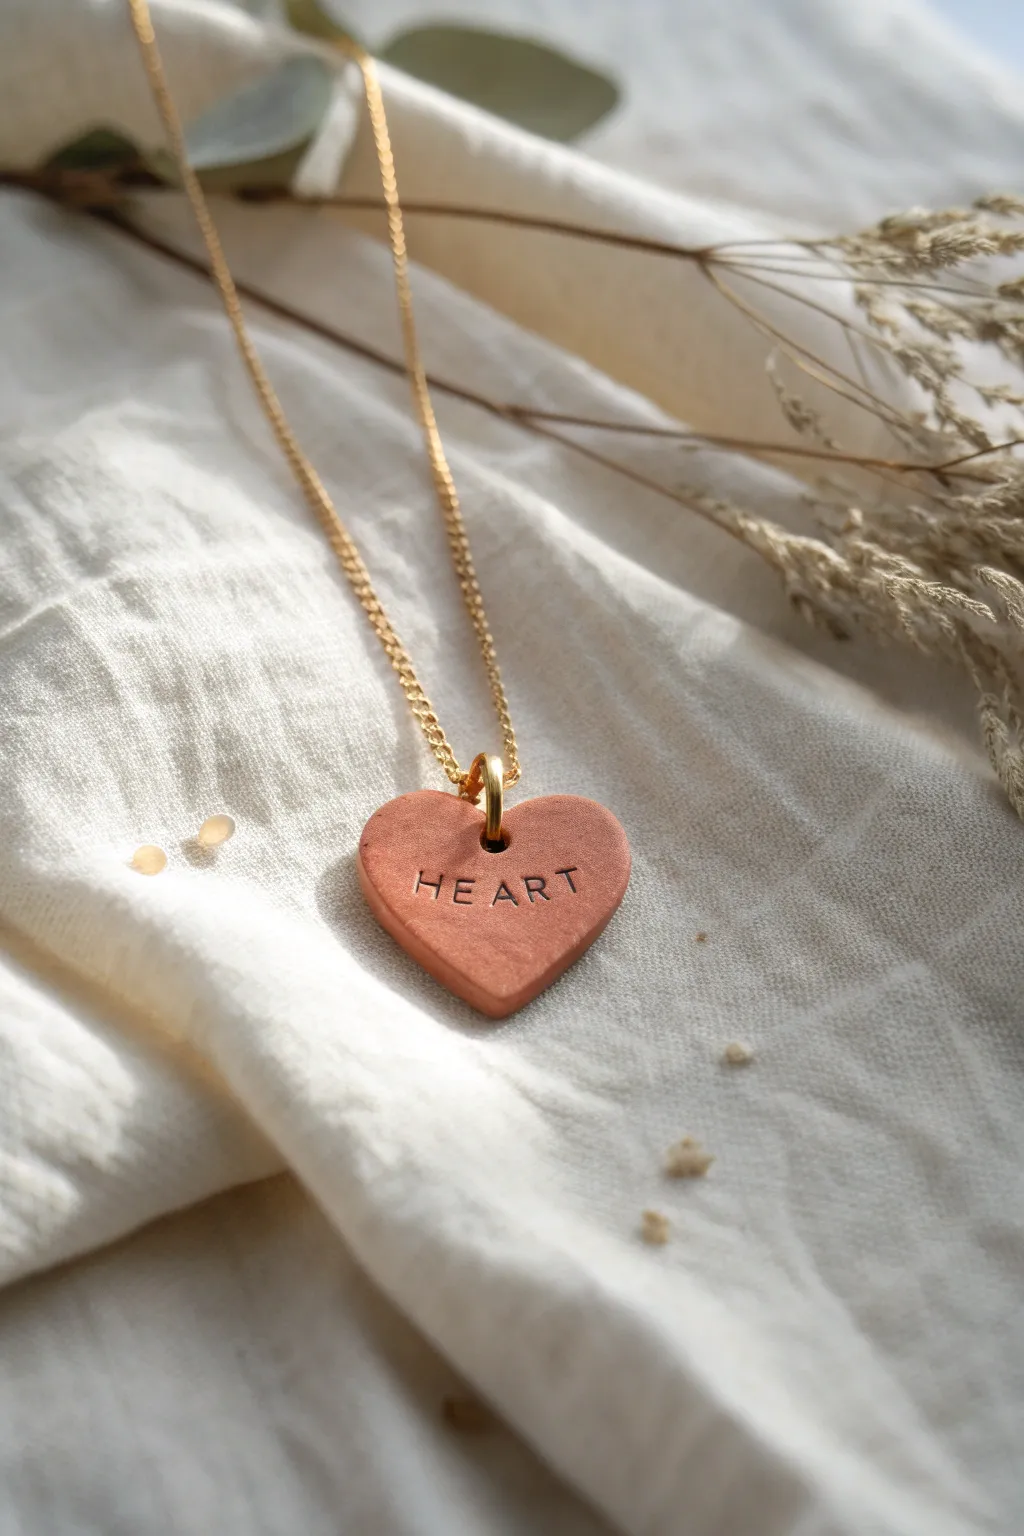
Embrace a rustic, earthy aesthetic with this simple terracotta polymer clay pendant. The personalized stamped lettering gives it a sweet, custom touch that makes it a perfect, heartfelt gift for Mom.
How-To Guide
Materials
- Terracotta colored polymer clay (or mix orange, brown, and translucent)
- Acrylic rolling pin or clay machine
- Heart-shaped clay cutter (approx. 1 inch)
- Small metal letter stamps (2-3mm size)
- Large sewing needle or toothpick
- Fine-grit wet/dry sandpaper (400-800 grit)
- Gold jump ring (6-8mm)
- Gold dainty chain necklace
- Two pairs of jewelry pliers
- Ceramic tile or baking sheet
- Parchment paper
Step 1: Shaping and Cutting
-
Condition the clay:
Begin by warming the terracotta polymer clay in your hands. Knead it thoroughly until it is soft, pliable, and free of any air bubbles. -
Roll out a slab:
Place the clay on a smooth surface or ceramic tile. Using your acrylic rolling pin, flatten the clay into a slab that is approximately 3mm to 4mm thick. You want it substantial enough to hold the stamp impression without warping. -
Cut the heart shape:
Position your heart-shaped cutter over a smooth section of the clay. Press down firmly and evenly to cut out the shape. -
Release the shape:
Gently wiggle the cutter slightly before lifting it to help release the clay. If the heart stays on the surface, carefully slide a thin blade underneath to lift it without distorting the edges. -
Smooth the edges:
Dip your finger in a tiny bit of water or cornstarch and gently smooth the cut edges of the heart to remove any harsh lines left by the cutter.
Clean Stamp Trick
To prevent the metal stamps from sticking to the raw clay and ruining your impression, lightly dust the stamp face with cornstarch or dip it in water before pressing down.
Step 2: Stamping and Piercing
-
Plan your spacing:
Before stamping the clay, line up your letter stamps on the table to check the length of your word. This helps visualize centering. -
Stamp the center letter:
To ensure perfect alignment, start with the middle letter of your word (like the ‘A’ in HEART). Press the stamp gently but firmly into the center of the heart shape. -
Stamp outward:
Working outward from the center letter, stamp the remaining letters on either side. I find this technique keeps the word much more centered than starting from the left. -
Create the hole:
Using a large needle or a toothpick, pierce a hole near the top center of the heart, right in the ‘dip’ of the shape. Ensure the hole is large enough for your jump ring to pass through freely. -
Refine the hole:
Give the needle a gentle wiggle to ensure the hole is clean on both the front and back sides.
Add a Speckle Effect
Mix tiny amounts of black pepper or translucent clay inclusions into your terracotta clay before rolling to create a realistic unwanted stone or granite texture.
Step 3: Baking and Assembly
-
Bake the pendant:
Place the tile with your clay heart onto a baking sheet. Bake according to the manufacturer’s instructions on your specific package of clay (usually 275°F/135°C for 15-30 minutes). -
Cool completely:
Allow the clay to cool completely in the oven or on a wire rack before handling it, as warm clay is fragile. -
Sand for finish:
Once cool, use a bit of water and your fine-grit sandpaper to lightly buff the edges and surface for a matte, professional finish. -
Highlight letters (optional):
If you want the letters to pop more, you can rub a tiny bit of dark brown acrylic paint into the impressions and wipe the surface clean immediately. -
Open the jump ring:
Using two pairs of pliers, twist the gold jump ring open sideways (never pull it apart). -
Attach the pendant:
Slide the open jump ring through the hole in the clay heart. Add the chain to the jump ring as well. -
Close the ring:
Use your pliers to twist the jump ring back into a closed circle, ensuring the ends meet perfectly flush so the chain doesn’t slip out.
This charming, handmade pendant is ready to be worn close to the heart or wrapped up beautifully for Mom


Floral Stud Earrings She Can Wear Daily
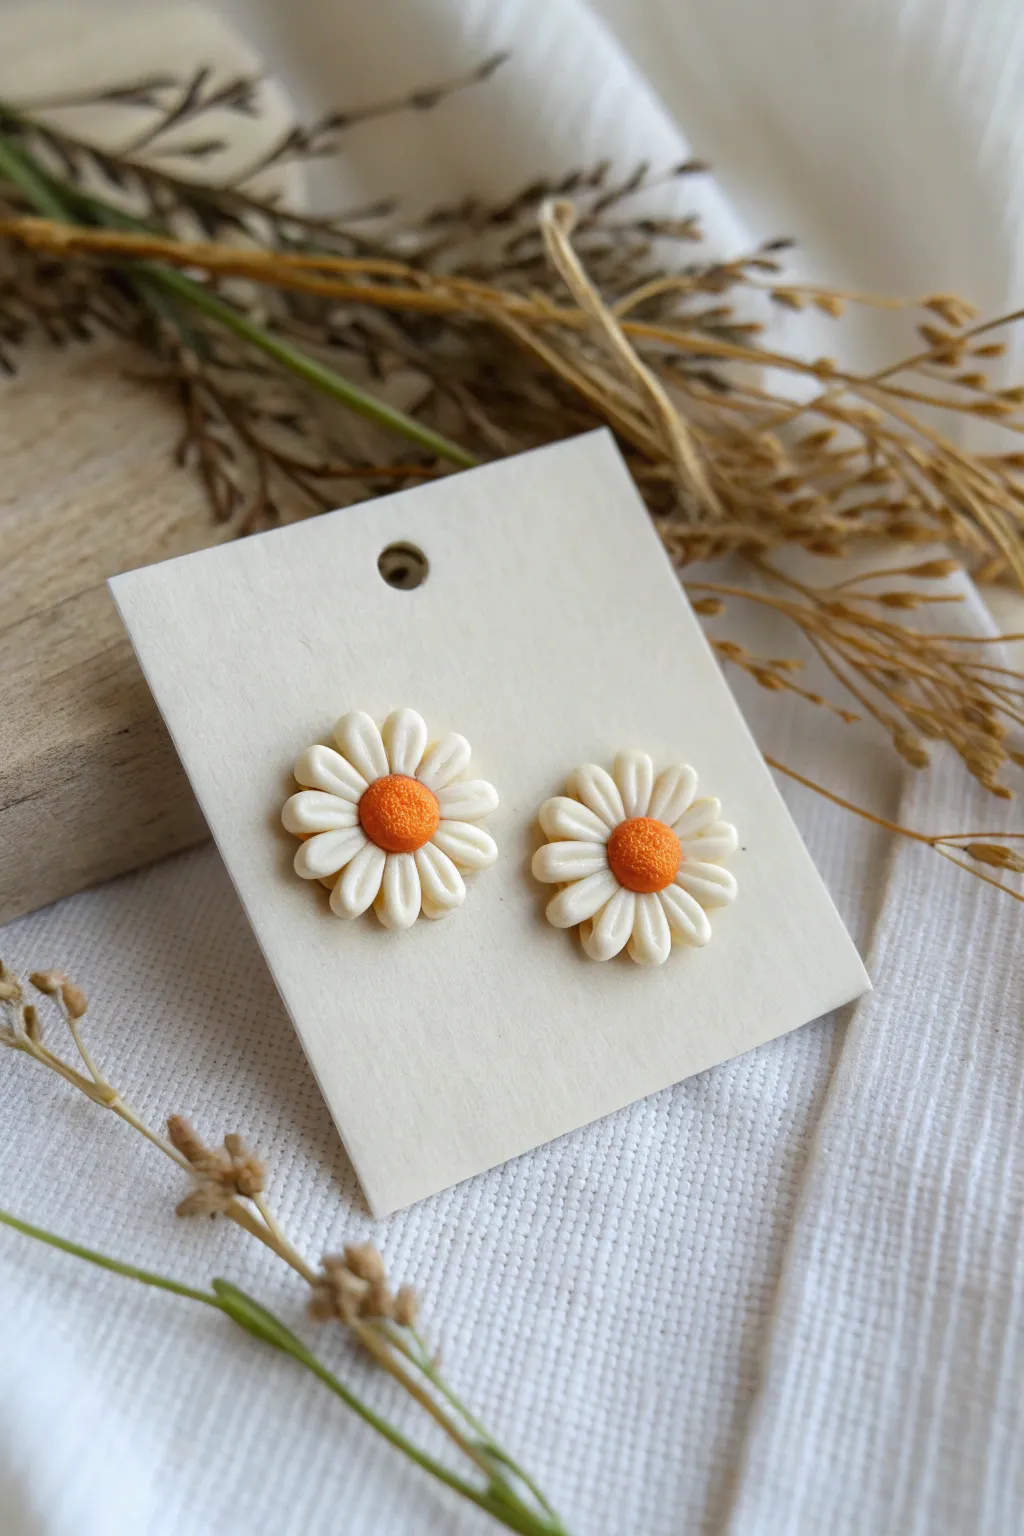
These charming daily-wear studs capture the simple elegance of a classic daisy using just two colors of polymer clay. The textured centers and individually sculpted petals give them a sweet, reliable handmade quality perfect for Mom.
How-To Guide
Materials
- White polymer clay
- Orange polymer clay
- Rolling pin or pasta machine
- Needle tool or toothpick
- Small ball tool
- Earring posts
- Strong jewelry glue (E6000 or similar)
- Small round cutter (approx. 1 cm) – optional, for base
- Oven for baking
- Ceramic tile or baking sheet
Step 1: Prepping Your Clay
-
Condition the clay:
Begin by kneading the white and orange clays separately until they are soft, pliable, and free of cracks. This conditioning step is crucial for ensuring your earrings don’t become brittle after baking. -
Create the base:
Roll out a small sheet of white clay, fairly thin. Use a small round cutter or cut two small circles by hand to serve as the hidden base for your flowers. These won’t be visible but provide stability.
Clean Clay Secret
White clay picks up everything! Wipe your hands and tools with a baby wipe or rubbing alcohol before handling the white clay to keep it pristine and dust-free.
Step 2: Sculpting the Petals
-
Roll small logs:
Take your white clay and roll it into a thin log or snake, roughly 3-4mm in thickness. Try to keep the thickness consistent for uniform petals. -
Section the clay:
Using a blade or your needle tool, slice the log into approximately 24-28 small, equal-sized segments. You’ll need about 12-14 petals for each earring. -
Form teardrops:
Roll each small segment into a ball between your fingers, then gently pinch and roll one end to creating a teardrop shape. -
Flatten slightly:
Place a teardrop on your work surface and gently press it down with your finger just enough to flatten it slightly without losing the rounded edges. -
Add detail:
Take your needle tool or a toothpick and press it gently down the center of the teardrop, starting from the rounded end and stopping before the pointed tip. This creates the characteristic petal groove. -
Repeat the process:
Continue forming and detailing until all your petal segments are shaped. I find it helpful to make a few extras just in case.
Step 3: Assembling the Flower
-
Arrange the first layer:
Place your base circle on your baking tile. Begin arranging the white petals in a circle on top of the base, pointing the tips inward so they touch in the center. -
Adjust the spacing:
Gently nudge the petals until they are evenly spaced around the circle. They should be touching side-by-side but not squished. -
Secure the center:
Once arranged, use a small ball tool to press down gently right in the center where all the tips meet. This helps bond the petals to the base.
Make Them Sparkle
Before baking, brush a tiny amount of pearl mica powder over the white petals. It gives a subtle, sophisticated shimmer that catches the light beautifully.
Step 4: Creating the Center
-
Roll the centers:
Take a small amount of orange clay and roll two balls that fit proportionally into the center of your petals. -
Texture the orange clay:
Before placing it on the flower, use a needle tool or an old toothbrush to tap the surface of the orange ball repeatedly, creating a pitted, pollen-like texture. -
Attach the center:
Place the textured orange ball into the center depression of your flower. Press down gently to secure it without flattening your nice texture work.
Step 5: Baking and Finishing
-
Bake:
Bake the clay pieces in a preheated oven according to the manufacturer’s instructions on your clay package (usually around 275°F or 130°C for 15-30 minutes). -
Cool down:
Allow the earrings to cool completely on the baking surface. Do not attempt to move them while hot as the clay is still fragile. -
Sand bottoms (optional):
If the back of your flower base isn’t perfectly flat, you can lightly sand it on a piece of sandpaper to ensure a good surface for gluing. -
Attach posts:
Apply a small dab of strong jewelry glue to the flat pad of the earring post and press it firmly onto the back of the clay flower. -
Dry completely:
Let the glue cure for the full time recommended on the glue packaging before wearing or gifting.
Wrap these floral beauties in a small box with some dried grass for a complete, rustic presentation she will adore.


Stamped Keychain With “Love You, Mom”
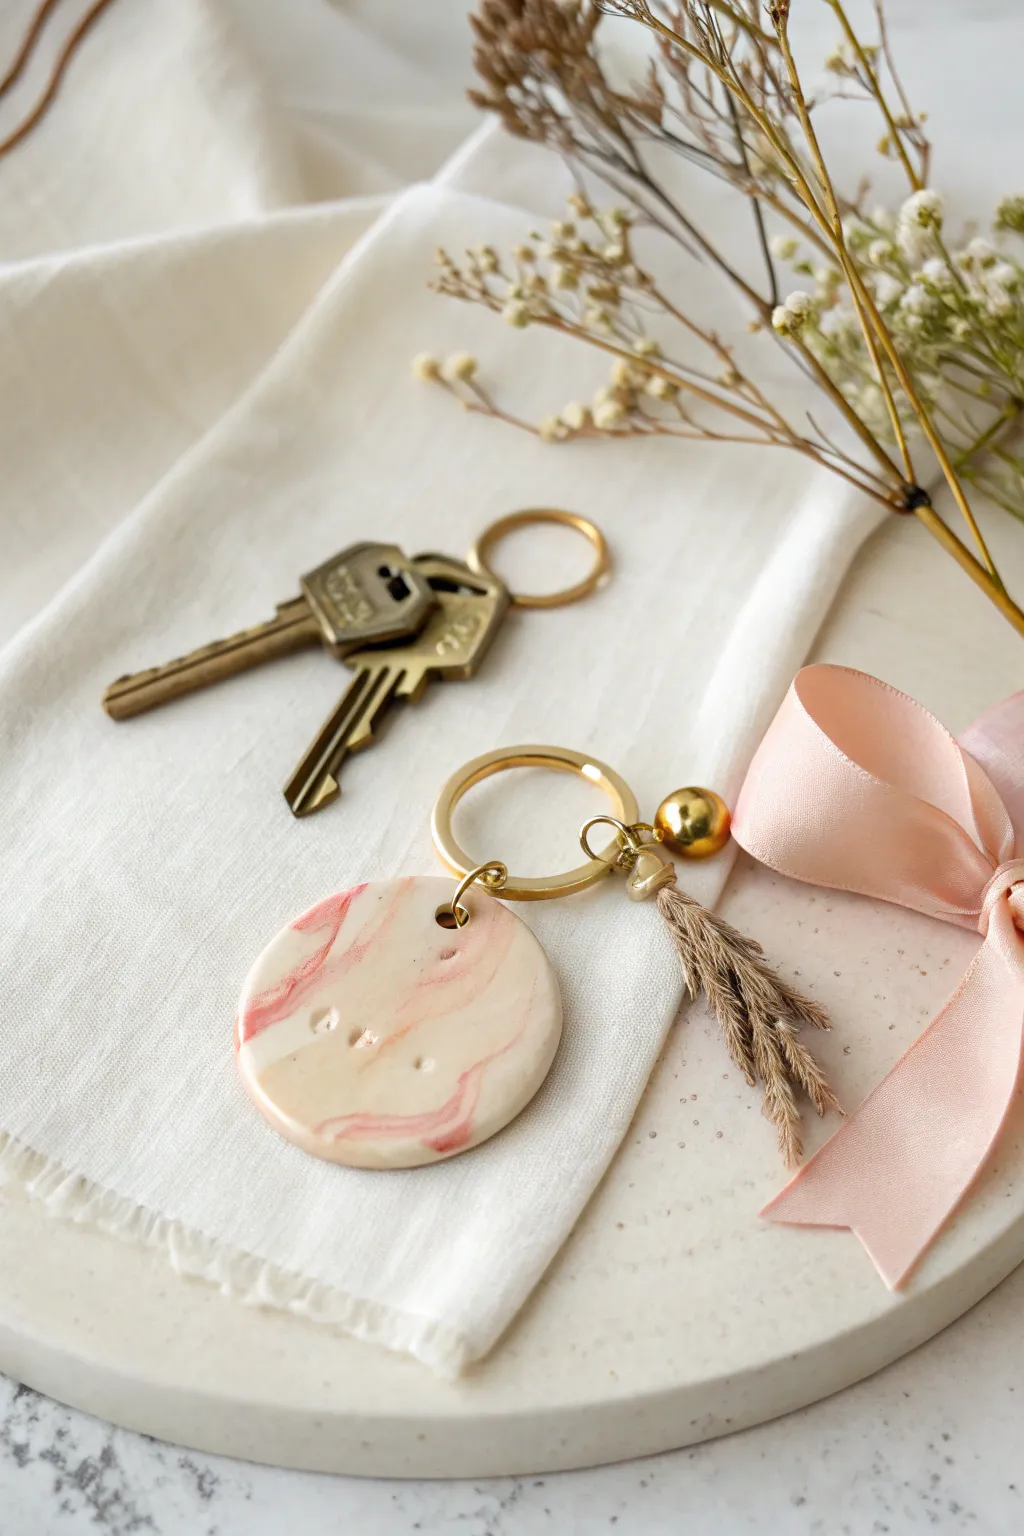
This elegant keychain blends cream and blush polymer clay into a subtle marbled design, perfectly accented with gold hardware and a delicate tassel. It’s a heartfelt, handmade gift that doubles as a practical everyday accessory for Mom.
Detailed Instructions
Materials
- White polymer clay
- Pink or salmon polymer clay
- Clay roller or pasta machine
- Round clay cutter (approx. 2 inches)
- Small metal letter stamps
- Gold keyring with chain
- Gold jump rings
- Small gold bead or ball charm
- Beige embroidery floss or pre-made tassel
- Hand drill or cocktail stick
- Pliers (needle nose and flat)
- Baking sheet and parchment paper
- Oven
Step 1: Marbling the Clay
-
Condition the base:
Start by taking a generous amount of white polymer clay. Knead it in your hands until it is soft, pliable, and free of cracks. -
Prepare the color:
Take a much smaller piece of pink or salmon clay—about one-quarter the amount of the white clay to keep the look subtle. Condition it well. -
Create snakes:
Roll both the white and pink clay pieces into long, thin snake shapes. -
Twist together:
Hold the two snakes together and twist them around each other to form a single, candy-cane-like rope. -
Fold and roll:
Fold this twisted rope in half, twist it again, and roll it smooth on your work surface. Repeat this folding and twisting process 3-4 times, but stop before the colors completely blend into a single new shade. -
Form a ball:
Roll your marbled clay into a smooth ball. You should see distinct swirls of pink running through the white. -
Flatten the slab:
Using an acrylic roller or a pasta machine, flatten the ball into a slab about 1/4 inch thick. I find turning the clay slightly as I roll helps keep the marbling organic.
Clean Cuts Only
To avoid fingerprints or lint, use baby wipes to clean your hands and tools often. Place cling wrap over the clay before cutting for a pleasantly rounded edge.
Step 2: Cutting and Stamping
-
Cut the shape:
Place your round clay cutter onto the slab. Press down firmly and twist slightly to cut a clean circle. Remove the excess clay. -
Smooth the edges:
Gently run your finger around the edge of the circle to smooth out any rough cut lines or fingerprints. -
Punch the hole:
Use a cocktail stick or a small straw to punch a hole near the top edge for the hardware. Make sure the hole isn’t too close to the edge to prevent tearing later. -
Stamp the sentiment:
Carefully position your metal letter stamps in the center of the circle. Press gently but firmly to imprint ‘MOM’ or initials. If you press too hard, the clay might distort, so use a light touch. -
Bake:
Place the clay circle on a parchment-lined baking sheet. Bake according to your clay manufacturer’s instructions (usually 275°F for 15-30 minutes depending on thickness). -
Cool down:
Allow the clay to cool completely on a flat surface before handling it further to ensure it hardens properly.
Step 3: Assembly
-
Prepare the tassel:
If making your own tassel, wrap beige embroidery floss around three fingers about 20 times. Tie off the top, cut the bottom loops, and trim evenly. -
Attach the jump ring:
Using two pairs of pliers, twist open a large gold jump ring. Thread it through the hole you created in the baked clay piece. -
Add the hardware:
Slide the gold keyring onto the open jump ring. At the same time, thread on your tassel and the small gold ball charm for extra flair. -
Secure the closure:
Twist the jump ring back into a closed position, ensuring the ends meet perfectly flush so nothing slips off. -
Final check:
Give the hardware a little jiggle to make sure everything is secure and the charm hangs freely alongside the clay disc.
Fixing Distortion
If stamping warped your circle shape, place the cutter back over the clay (without pressing down) and gently nudge the clay back into a perfect round.
Wrap this lovely piece in tissue paper for a gift that feels both modern and deeply personal

The Complete Guide to Pottery Troubleshooting
Uncover the most common ceramic mistakes—from cracking clay to failed glazes—and learn how to fix them fast.
Mother-and-Child Silhouette Charm
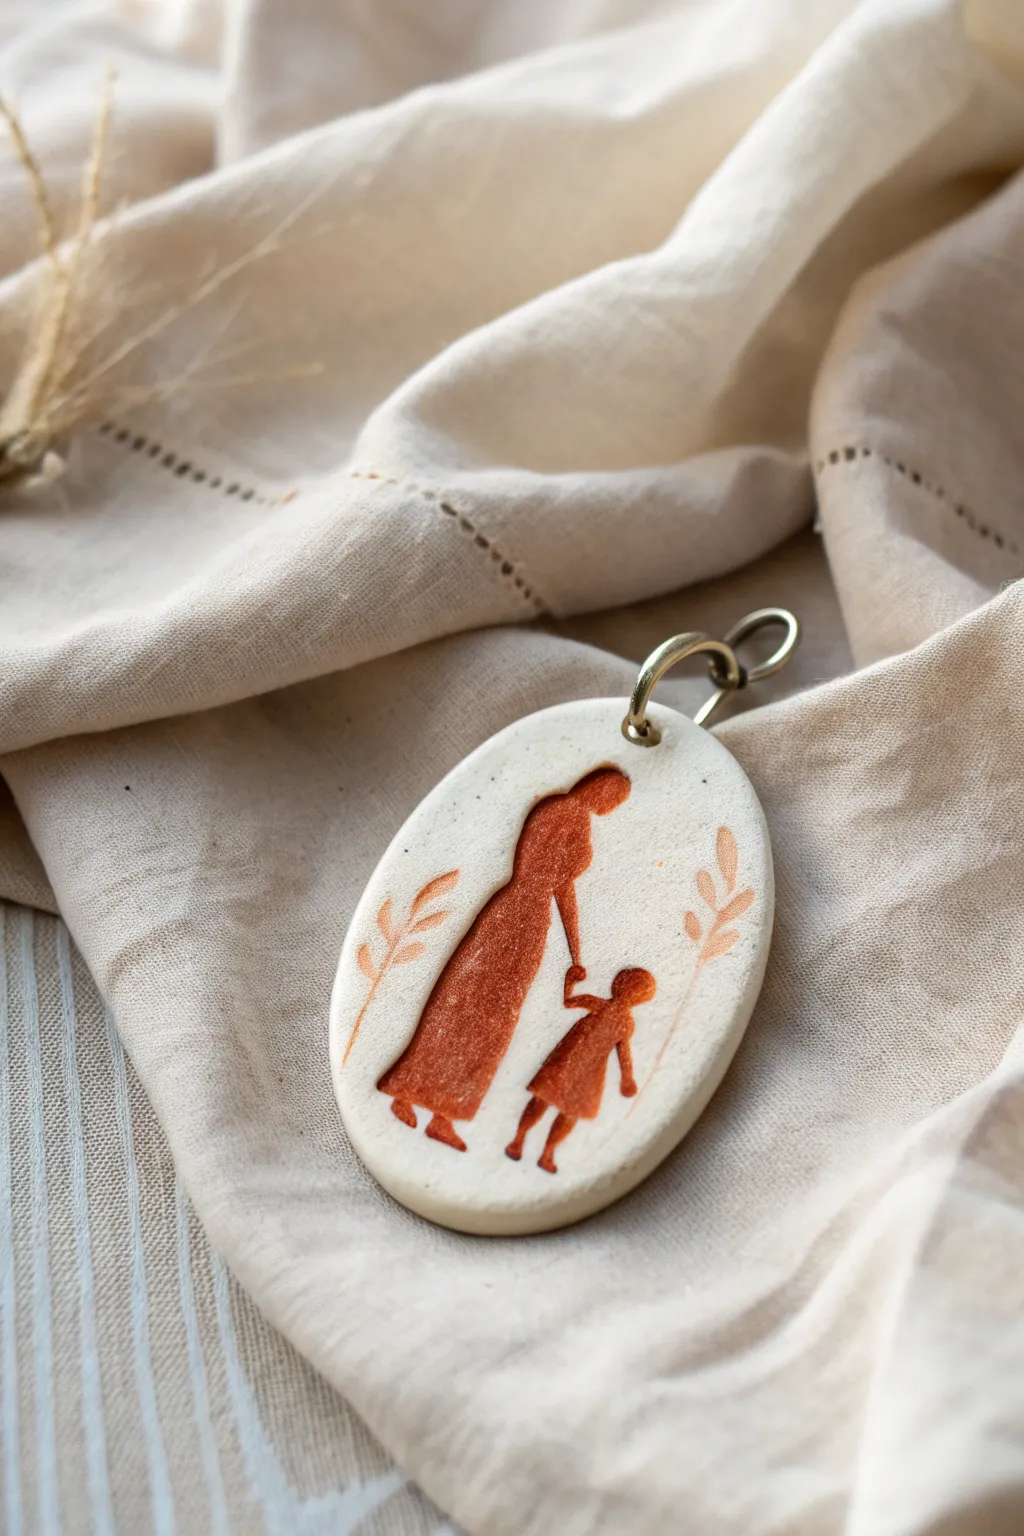
Capturing the tender bond between parent and child, this oval pendant features a warm, rust-colored silhouette on a creamy white background. The simple etched design and soft matte finish give it a timeless, heirloom quality perfect for Mother’s Day gifting.
Step-by-Step Guide
Materials
- White or beige polymer clay
- Burnt sienna or rust-colored acrylic paint
- Oval clay cutter (approx. 1.5 – 2 inches)
- Rolling pin or pasta machine
- Needle tool or fine-point etching tool
- Small paintbrush (size 0 or 00)
- Sandpaper (400 to 1000 grit)
- Parchment paper or ceramic tile
- Large jump ring (gold or brass)
- Drill bit or toothpick (for the hole)
- Matte varnish (optional)
Step 1: Preparing the Base
-
Condition the clay:
Start by warming the white or beige polymer clay in your hands, kneading it until it is soft and pliable. This prevents cracks during baking. -
Roll the slab:
Roll out the clay on a smooth surface or use a pasta machine to create an even slab that is roughly 1/8 to 1/4 inch thick. You want it substantial enough to be durable but light enough to wear. -
Cut the shape:
Press your oval cutter firmly into the clay slab. If your cutter has a seam, try to position it where you can easily smooth it out later. -
Smooth the edges:
Gently lift the oval from your work surface. Use your finger, dipped slightly in cornstarch or water, to gently round off the sharp top edges created by the cutter. -
Create the heavy hardware hole:
Use a toothpick or a small straw to pierce a hole at the very top center of the oval. Make sure the hole is large enough to accommodate your thick jump ring.
Paint Bleeding?
If acrylic paint stains the white clay where it shouldn’t, let it dry completely, then sand the surface gently with 1000-grit sandpaper to reveal clean white clay underneath.
Step 2: Designing the Silhouette
-
Sketch the outline:
Using a needle tool with very light pressure, sketch the outline of the mother and child figures directly onto the raw clay. Start with the mother’s head and skirt, then add the child reaching up. -
Carve the relief:
Once you are happy with the placement, press the needle tool slightly deeper to crave out the interior of the figures. You are essentially creating a shallow nesting area for the paint. -
Add botanical details:
On either side of the figures, lightly scratch in two simple branch stems. Add small, leaf-shaped indentations emanating from the stems to frame the scene. -
Texture the interior:
Inside the silhouette shapes, use the tip of your needle to create a rough, stippled texture. This roughness will help the paint adhere better and mimic the look of fabric or suede.
Add Dimension
Before baking, press real dried flower stems into the side areas instead of scratching them in. Remove them carefully to leave a realistic botanical impression to paint later.
Step 3: Baking and Finishing
-
Bake the piece:
Place the clay oval on a ceramic tile or parchment-lined baking sheet. Bake according to your brand’s specific package instructions (usually 275°F for 15-30 minutes). -
Cool down:
Allow the piece to cool completely inside the oven or on a wire rack. Don’t rush this step, as warm clay is fragile. -
Apply the wash:
Mix a small amount of burnt sienna acrylic paint with a tiny drop of water. Use your small brush to fill in the carved silhouette and leaf areas, ensuring the paint settles into the textured grooves. -
Wipe the surface:
While the paint is still slightly tacky but not fully wet, take a damp paper towel or baby wipe and gently swipe across the surface. This removes excess paint from the raised white areas while leaving the color inside the recessed carving. -
Refine the edges:
Once the paint is totally dry, use fine-grit sandpaper to smooth the outer rim of the oval and remove any stray paint smudges from the white background. -
Add protective coat:
For longevity, I usually brush on a thin layer of matte varnish over the painted areas to seal the pigment without making the charm look plasticky. -
Attach hardware:
Open your large metal jump ring using two pairs of pliers (twist, don’t pull apart). Thread it through the top hole and twist it closed securely.
Now you have a sentimental, handcrafted pendant ready to be strung on a chain or given as a heartfelt gift.
Coaster Set With Botanical Imprints
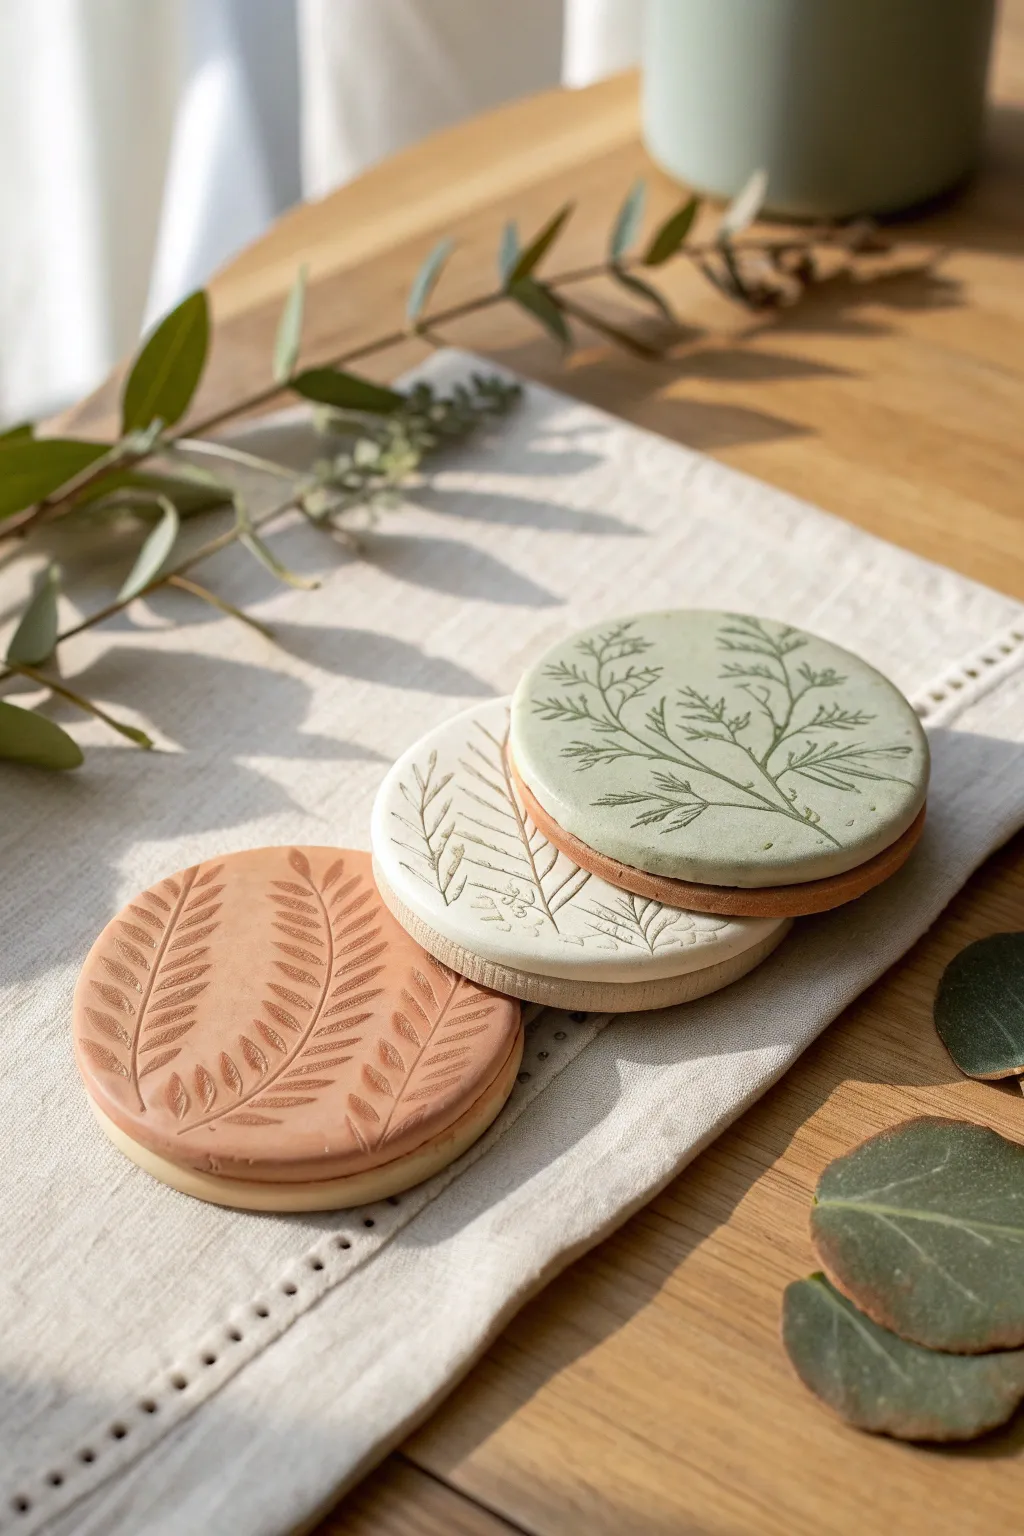
These sophisticated coasters bring the serene beauty of the outdoors inside with delicate, real-plant impressions. By layering contrasting clay tones, you’ll create a set of functional art pieces that feel both modern and organic, perfect for gifting.
Step-by-Step Tutorial
Materials
- Polymer clay (white, terracotta, sage green, and beige colors)
- Acrylic rolling pin
- Round clay cutter (approx. 3.5-4 inches diameter)
- Fresh or dried botanical sprigs (ferns, eucalyptus, or wildflowers)
- Sharp craft knife or scalpel
- Parchment paper or clay mat
- Sandpaper (fine grit)
- Matte or satin polymer clay varnish
- Soft paintbrush
- Oven baking sheet
Step 1: Preparing the Base
-
Condition the base clay:
Start by selecting your base color for the bottom layer of the coasters. I prefer using a neutral beige or terracotta for this foundation. Knead the clay thoroughly until it’s soft and pliable. -
Roll out the slab:
Using your acrylic rolling pin, roll the conditioned clay onto a mat or parchment paper. Aim for a thickness of about 1/4 inch (6mm) to ensure the coaster is substantial enough to hold a mug. -
Cut the circles:
Press your round cutter firmly into the rolled clay slab. Twist slightly to separate the shape and lift the cutter. Repeat this for as many coasters as you plan to make, setting aside the excess clay.
Leaves sticking?
If your plant material is tearing or sticking inside the clay, try lightly dusting the leaf with cornstarch or baby powder before rolling it in. Use a soft brush to remove powder after peeling.
Step 2: Creating the Botanical Layer
-
Prepare the top colors:
Choose your top colors—like the sage green, creamy white, and terracotta shown in the photo. Condition each color separately. -
Roll thin sheets:
Roll these colored clays much thinner than your base, aiming for about 1/8 inch (3mm). These will serve as the canvas for your impressions. -
Arrange the botanicals:
Select your plant sprig. Lay the plant material directly onto the thin colored clay sheet. Ensure the veins of the leaves are facing down into the clay for the best detail. -
Imprint the design:
Gently but firmly roll your acrylic rolling pin over the plant material once. Use steady, even pressure so the plant embeds into the clay without distorting the slab’s shape too much. -
Reveal the texture:
Carefully find the stem or edge of the plant and peel it away using tweezers or your fingernails. This is the most satisfying part, revealing the crisp, depressed image left behind. -
Cut the top circles:
Position your round cutter over the imprinted area to center the design exactly how you want it. Cut out the circle.
Gilded Edges
Paint the rim of the finished coaster with liquid gold leaf or metallic acrylic paint. This adds a luxurious, high-end finish that contrasts beautifully with the matte clay.
Step 3: Assembly and Finishing
-
Stack the layers:
Place the imprinted top circle directly onto one of your prepared base circles. The polymer clay should naturally adhere if both are raw, but you can add a tiny dab of liquid clay if needed. -
Smooth the edges:
Run your finger gently around the circumference of the stacked coaster to soften the seam between the two layers. You want them to look like a cohesive unit, essentially a heavy ‘sandwich’ cookie style. -
Final inspection:
Check for any air bubbles or fingerprints. Smooth them out lightly. If the shape warped during handling, gently tap the edges against a flat surface to make it perfectly round again. -
Bake the coasters:
Transfer the coasters to a parchment-lined baking sheet. Bake according to your brand of clay’s instructions (usually 275°F/135°C for 30 minutes per 1/4 inch of thickness). Let them cool completely in the oven. -
Sanding:
Once fully cooled, dampen a piece of fine-grit sandpaper. Lightly sand the edges and the flat surfaces (avoiding the deep imprint) to remove any lint or rough spots. -
Highlighting (Optional):
For extra depth, you can dilute a tiny bit of darker acrylic paint with water and wash it over the imprint, then wipe the surface clean, leaving color only in the crevices. -
Sealing:
Apply a thin layer of matte or satin varnish to protect the surface from moisture and stains. Allow the varnish to dry fully before using the coasters.
Wrap these in a stack with a simple twine bow for a handmade gift that looks professionally crafted


What Really Happens Inside the Kiln
Learn how time and temperature work together inside the kiln to transform clay into durable ceramic.
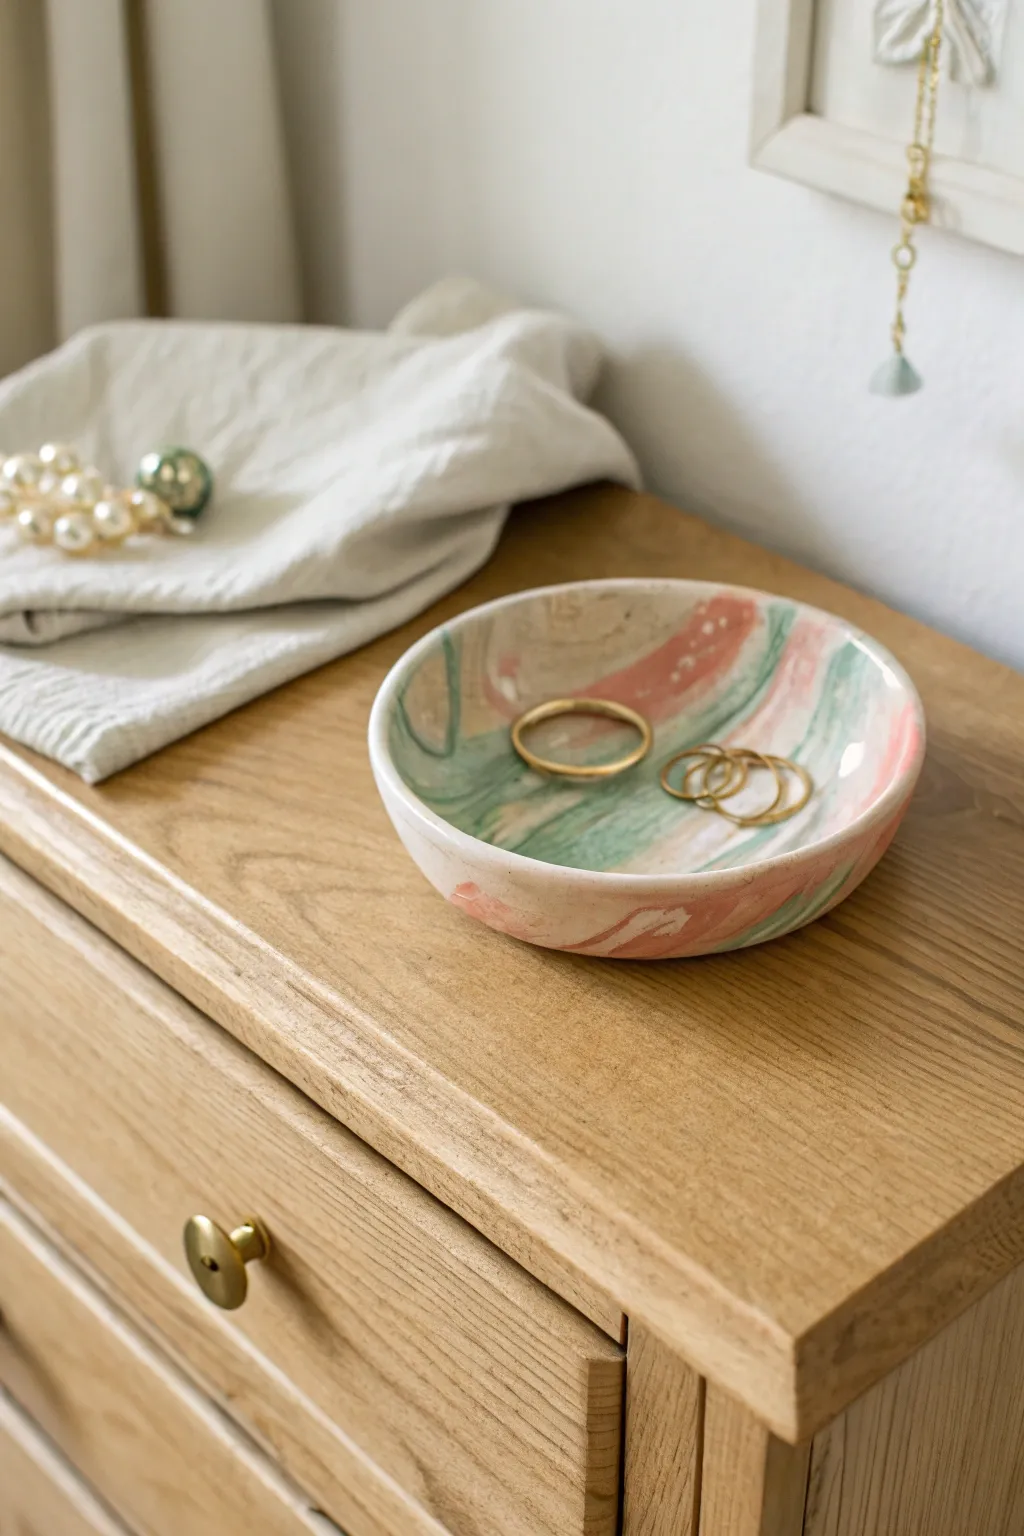
Mini Jewelry Bowl With Gold-Style Edging
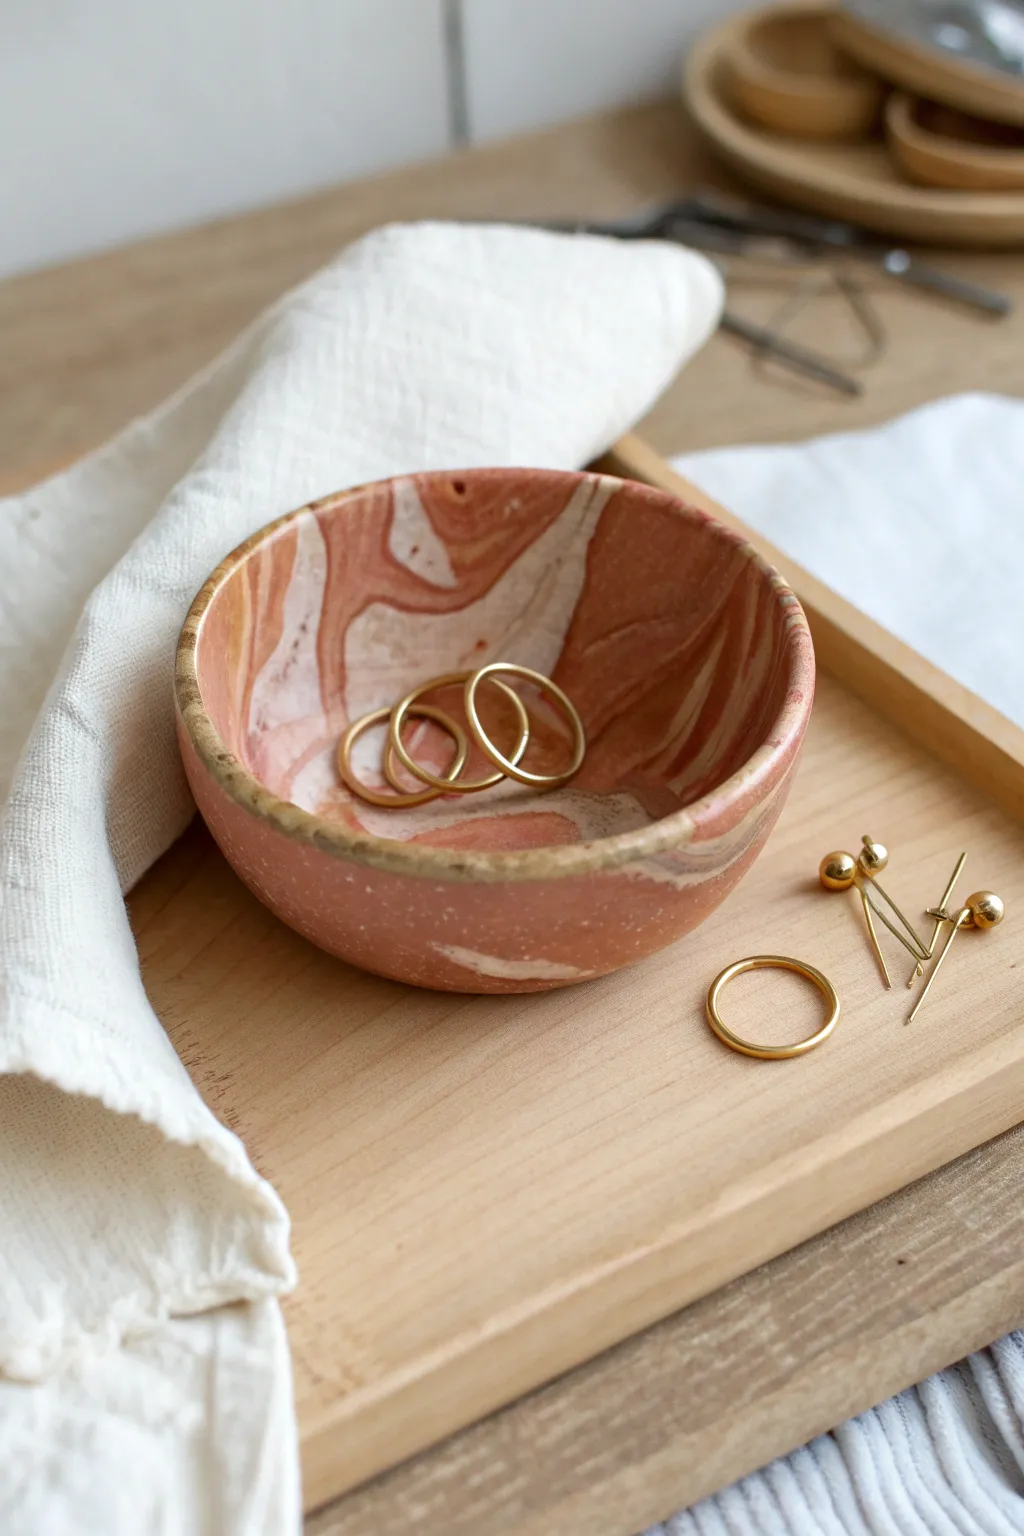
This elegant little jewelry bowl mimics the look of natural stone with swirls of terracotta and cream clay, finished with a chic metallic rim. It makes a sophisticated and personal landing spot for everyday rings and earrings.
How-To Guide
Materials
- Polymer clay (terracotta or reddish-brown color)
- Polymer clay (white or translucent white)
- Rolling pin or acrylic roller
- Circle cutter or a round bowl/cup for tracing
- Oven-safe bowl (glass or ceramic) to use as a mold
- Craft knife or scalpel
- Liquid gold leaf paint or gold gilding wax
- Fine detail paintbrush
- Sandpaper (fine grit, 400-600)
- Polymer clay varnish (optional)
Step 1: Creating the Marble Effect
-
Condition the Clay:
Begin by warming up both blocks of clay in your hands. Knead the terracotta color and the white color separately until they are soft and pliable. -
make Ropes:
Roll each color into a long, snake-like rope about 1/2 inch in diameter. You want roughly equal amounts of each color, or slightly more terracotta for a darker finish. -
Twist Together:
Place the two ropes side-by-side and twist them together tightly to form a single, spiraled candy-cane shape. -
Fold and Roll:
Fold the twisted rope in half and roll it out into a snake again. Repeat this twisting, folding, and rolling process 2-3 times. Be careful not to over-twist, or the colors will blend into a single muddy hue rather than distinct swirls. -
Form a Ball:
Smush the clay snake into a compact ball. This helps to randomize the pattern inside. -
Flatten the Slab:
Using your acrylic roller or rolling pin, flatten the ball into a sheet about 1/4 inch thick. Rotate the clay as you roll to ensure an even thickness throughout.
Step 2: Shaping and Baking
-
Cut the Circle:
Press your large circular cutter into the sheet, or place a bowl upside down on the clay and trace around it with a craft knife to cut out a clean circle. -
Smooth the Edges:
Gently run your finger around the cut edge of the circle to soften any sharp angles left by the knife. -
Mold the Shape:
Place your clay circle inside or over your oven-safe bowl. I prefer placing it inside a slightly larger bowl to get a deep curve, pressing gently so it conforms to the shape without stretching the pattern too much. -
Bake:
Follow the baking temperature instructions on your specific package of polymer clay. Generally, this will be around 275°F (135°C) for 15-30 minutes. Place the mold with the clay directly into the oven. -
Cool Down:
Remove from the oven and allow the clay to cool completely before trying to pop it out of the mold. It hardens as it cools.
Air Bubbles?
If you see a bubble while rolling over the mold, gently pierce it with a needle and smooth the air out with your finger before baking.
Step 3: Finishing Touches
-
Sand for Smoothness:
Once cool, use fine-grit sandpaper to lightly sand the rim and any rough spots on the surface. Wipe away the dust with a damp cloth. -
Prepare the Gold:
Shake your liquid gold leaf paint well or prepare your gilding wax. You want the metallic pigment to be rich and opaque. -
Paint the Rim:
Using a fine detail brush, carefully paint the top edge of the bowl. Allow the brush to glide along the rim, deliberately letting the line look a little organic and uneven for a handmade aesthetic. -
Dry and Seal:
Let the gold paint dry completely according to manufacturer instructions. If you plan to use this for items other than jewelry, apply a coat of polymer clay varnish to seal the surface.
Add Texture
Before baking, lightly press a piece of coarse sandpaper or fabric into the clay surface to give it a realistic stone-like texture.
Now you have a stunning, functional piece of art ready for gifting or keeping
Marbled Matching Gift Set Trio
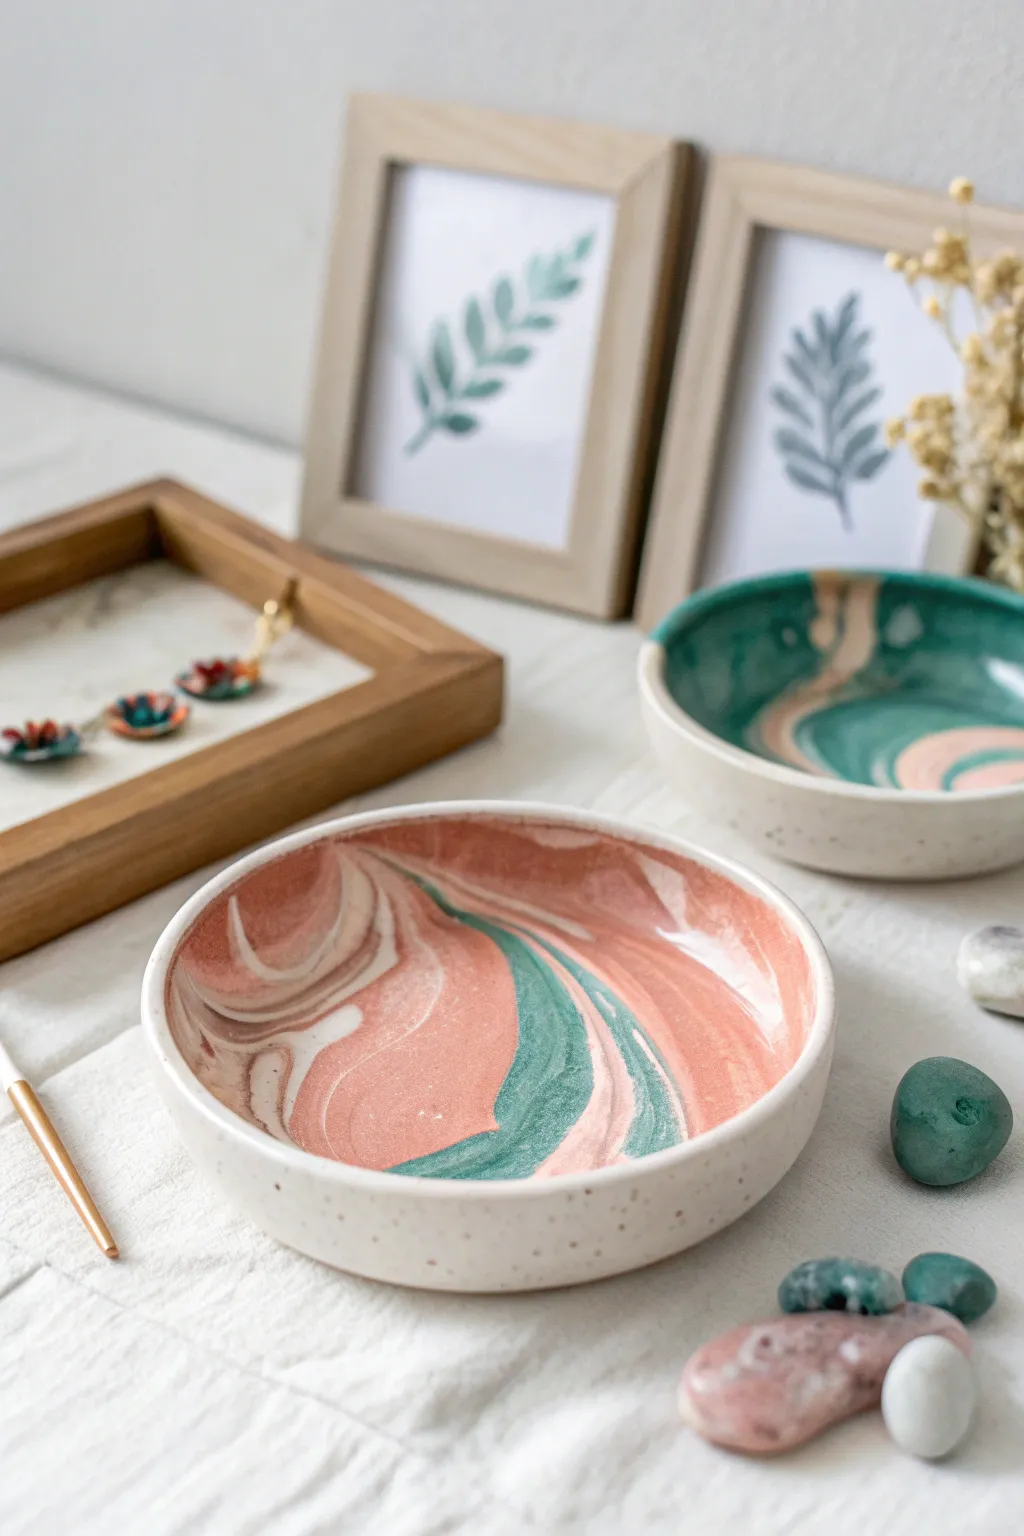
Create a sophisticated, cohesive gift set that looks high-end but is surprisingly simple to make at home. These shallow bowls feature a gorgeous, organic marbling of coral, teal, and cream that mimics the look of polished agate or ceramic glaze.
Detailed Instructions
Materials
- Polymer clay (coral/salmon, teal/emerald green, pearlescent white, and beige)
- Acrylic rolling pin or pasta machine
- Circle cutters or oven-safe bowls (for molds)
- Craft knife or tissue blade
- Parchment paper
- Sandpaper (various grits from 400 to 1200)
- Glossy polyurethane varnish or UV resin
- Soft paintbrush
- Cornstarch (optional release agent)
Step 1: Preparing the Clay
-
Condition the Clay:
Begin by conditioning each block of polymer clay separately. Knead the coral, teal, white, and beige clays until they are soft, pliable, and warm to the touch. This prevents cracking later. -
Create Base Logs:
Roll each color into a long, snake-like cylinder about 5 inches long and 1/2 inch thick. -
Design the Color Palette:
Decide on your dominant color. For the pink bowl shown, you’ll want more coral and white logs. For the green bowl, double up on the teal. This creates variety within the matching set. -
Twist and Combine:
Gather your clay snakes into a single bundle. Holding one end of the bundle in each hand, twist them together tightly like a candy cane until the colors start to merge. -
Fold and Roll:
Fold the twisted log in half and roll it smooth again. Repeat this twist-and-fold process 2-3 times. Be careful not to over-twist, or the colors will muddy into a single brown shade. -
Form a Block:
Squish your marbled log into a compact ball or rectangular block, ensuring there are no trapped air bubbles inside.
Clean Cuts Matter
Before cutting your final circle shape, chill the rolled clay sheet in the fridge for 10 minutes. The firmer clay cuts cleaner and won’t drag or distort your beautiful marble pattern.
Step 2: Shaping the Dishes
-
Roll out the Slab:
Using your acrylic roller or pasta machine, flatten the marbled block into a sheet about 1/4 inch thick. Roll in different directions to stretch the marbling pattern organically. -
Cut the Circles:
Use a large circle cutter or trace around a bowl with your craft knife to cut out smooth, perfect circles from your patterned slab. -
Smooth the Edges:
Dip your finger in a tiny bit of cornstarch or water and run it along the cut edge of the clay to smooth out any roughness before baking. -
Form the Curve:
Gently drape your clay circle inside an oven-safe bowl to give it a curved shape. Press it down lightly so it takes the form of the bowl. -
Create the Speckled Rim (Optional):
If you want the speckled stone look on the rim or underside, lightly sprinkle coarse black pepper or ground spices onto the beige clay before rolling, or paint specks on after baking.
Add Gold Accents
Mix small flakes of gold leaf directly into your translucent or white clay before twisting. The gold will peek through the marbling for a stunning, high-end geode effect.
Step 3: Baking and Finishing
-
Bake the Clay:
Place your bowl molds on a baking sheet. Bake according to your brand of polymer clay instructions (usually 275°F/135°C for 15-30 minutes). -
Cool Down:
Let the clay cool completely inside the mold. Removing it while hot can cause warping. -
Sanding for Smoothness:
Once cool, wet sand the edges and surface. Start with 400 grit to remove bumps, then move to 800 and 1200 grit for a silky smooth finish. -
Buff and Clean:
Wipe the bowls down with a damp cloth to remove any sanding dust. I like to let them air dry for a few minutes to ensure no moisture is trapped. -
Apply Varnish:
To get that ceramic-like shine, apply a thin coat of glossy polyurethane varnish. Let it dry, then add a second coat for extra durability and depth. -
Paint the Rim:
For a refined finish, carefully paint the very top edge of the bowl with gold leaf paint or a contrasting color if desired, though the natural marble edge is beautiful on its own.
Wrap these beautiful bowls in tissue paper for a handmade gift that any mom will cherish