A plain mug is basically a tiny curved canvas, and polymer clay lets you turn it into something totally you. Here are my favorite polymer clay mug ideas—from super beginner-friendly patterns to full-on little scenes you’ll want to hold with both hands.
Simple Confetti Sprinkle Mug
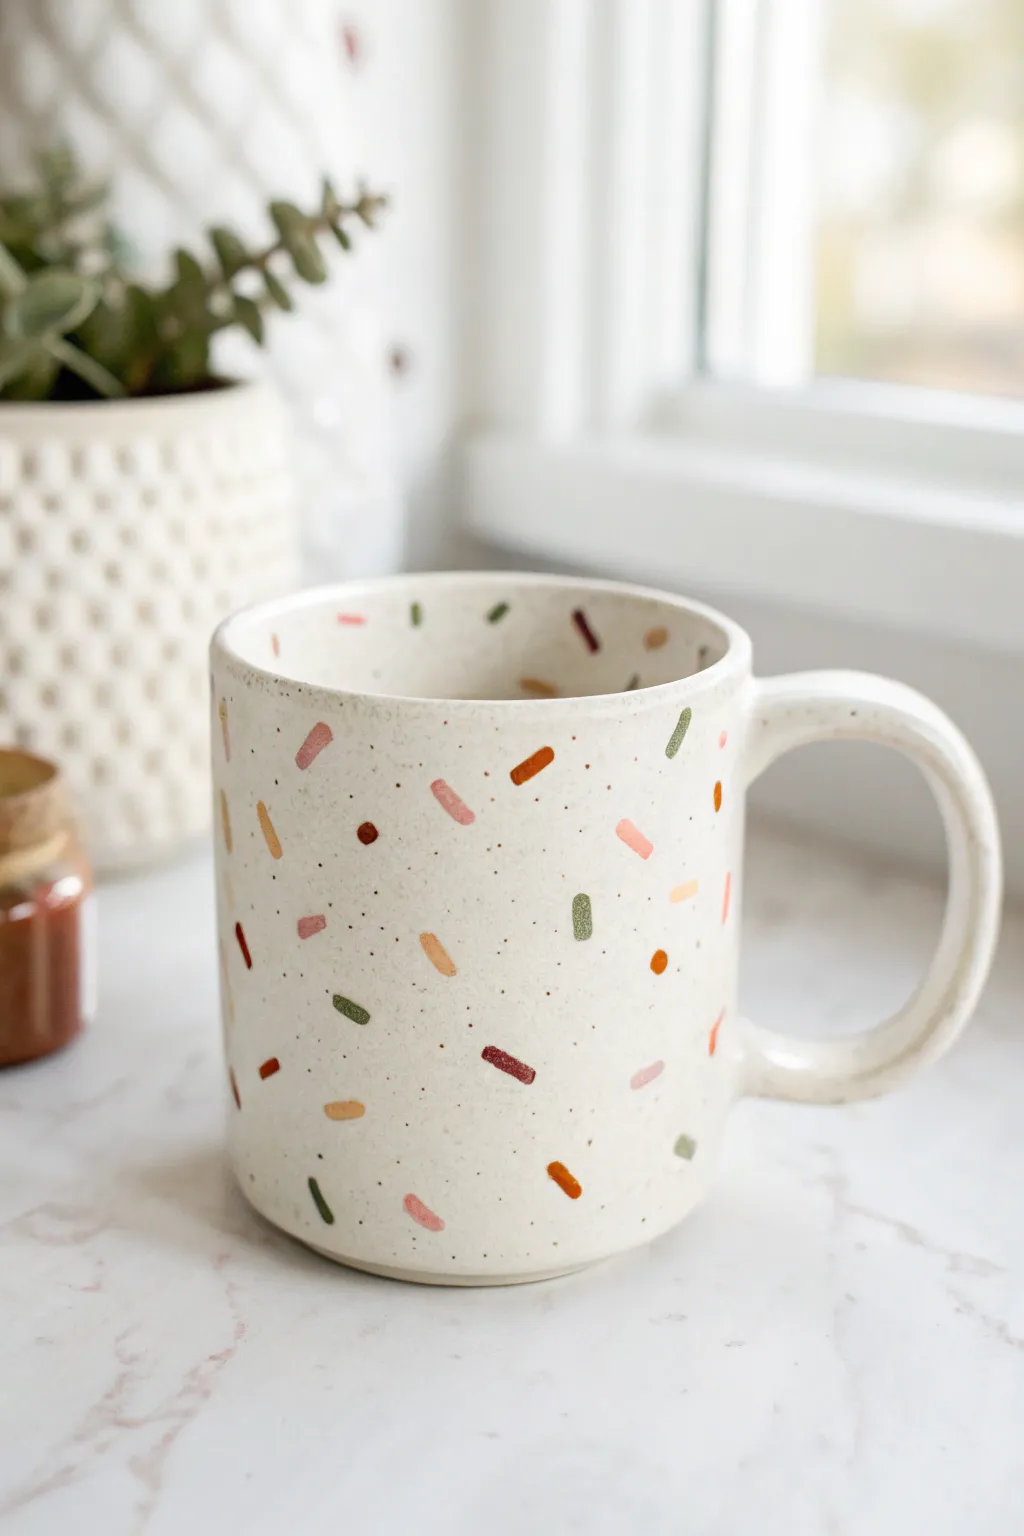
Transform a plain ceramic mug into a piece of modern art with this playful confetti design. Using small bits of polymer clay, you can achieve a high-end ceramic look that mimics terrazzo or hand-painted pottery without needing a kiln.
How-To Guide
Materials
- Plain ceramic mug (cream or white)
- Polymer clay (muted pink, burnt orange, sage green, deep red, mustard yellow, brown)
- Liquid polymer clay (e.g., Bake & Bond)
- Craft knife or clay blade
- Rolling pin or pasta machine
- Rubbing alcohol
- Cotton pads
- Oven thermometer
- Polyurethane gloss varnish (optional but recommended)
Step 1: Preparation
-
Clean the Surface:
Before starting, wipe your ceramic mug down thoroughly with rubbing alcohol and a cotton pad. This removes oils and fingerprints, ensuring the clay adheres properly during baking. -
Condition the Clay:
Take small amounts of each color of polymer clay and knead them until they are soft and pliable. Warm clay is much easier to work with and less prone to cracking. -
Flatten the Colors:
Roll out each color of clay into a thin sheet. Aim for a thickness of about 1mm to 1.5mm so the sprinkles don’t protrude too far from the mug surface.
Step 2: Creating the Sprinkles
-
Cut Rectangular Sprinkles:
Using your craft knife, cut tiny rectangular strips from your rolled clay sheets. Vary the lengths slightly for a more organic feel, but keep the width consistently narrow. -
Make Round Confetti:
For the circular dots, you can either punch tiny circles using a small straw or simply roll a tiny bit of clay into a ball and flatten it gently with your finger. -
Create Speckles:
To mimic the speckled ceramic look, take a very small amount of brown or black clay and chop it into almost dust-like particles. Set these aside for the final detailing.
Sticky Situation?
If your sprinkles slide down the mug before baking, your liquid clay layer is too thick. Wipe it off and use a barely-there smear instead.
Step 3: Applying the Design
-
Apply Adhesive:
Dab a tiny amount of liquid polymer clay onto the back of your first sprinkle using a toothpick or small brush. This acts as the glue to bond the clay to the ceramic. -
Place the First Sprinkle:
Press the sprinkle gently onto the mug. Start in the center and work your way out to avoid smudging existing pieces. -
Building the Pattern:
Continue adding sprinkles in random orientations. Rotate some vertically, horizontally, and diagonally to create movement. Leave plenty of negative space between them. -
Mixing Colors:
Try not to cluster the same colors together. I like to momentarily step back and look at the mug from a distance to ensure the color distribution feels balanced. -
Add Tiny Dots:
Interperse the rectangular sprinkles with the small circular dots you made earlier. These break up the linear pattern and add visual interest. -
Add the Speckles:
Take your tiny clay ‘dust’ particles and press them randomly into the blank spaces on the mug. This creates that authentic stoneware texture seen in the photo. -
Apply Inside Rim (Optional):
If you are feeling adventurous, place a few sprinkles just inside the top rim of the mug for a fun surprise detail while drinking. -
Smooth the Edges:
Gently tap down on all the applied pieces with a clean finger to ensure there are no lifted edges that could snag later. -
Final Clean Up:
Use a cotton swab dipped in a little rubbing alcohol to clean up any smudges of liquid clay or fingerprints on the ceramic surface around your design.
Texture Twist
Before baking, gently press a piece of coarse sandpaper over the sprinkles to give them a matte, stone-like texture instead of a smooth plastic finish.
Step 4: Baking and Sealing
-
Preheat Oven:
Preheat your oven according to the manufacturer’s instructions on your specific brand of clay. Use an oven thermometer to verify accuracy, as spikes in heat can scorch the colors. -
Bake the Mug:
Place the mug in the oven and bake for approximately 30 minutes. Let the mug cool down completely inside the oven with the door slightly ajar to prevent thermal shock to the ceramic. -
Seal (Optional):
Once fully cool, apply a coat of food-safe polyurethane gloss varnish over the sprinkles to protect them and give them a shiny, glazed finish. Avoid painting the rim where your lips will touch.
Enjoy your cozy new mug whenever you need a warm drink and a splash of color


Fruit Slice Wrap-Around Border
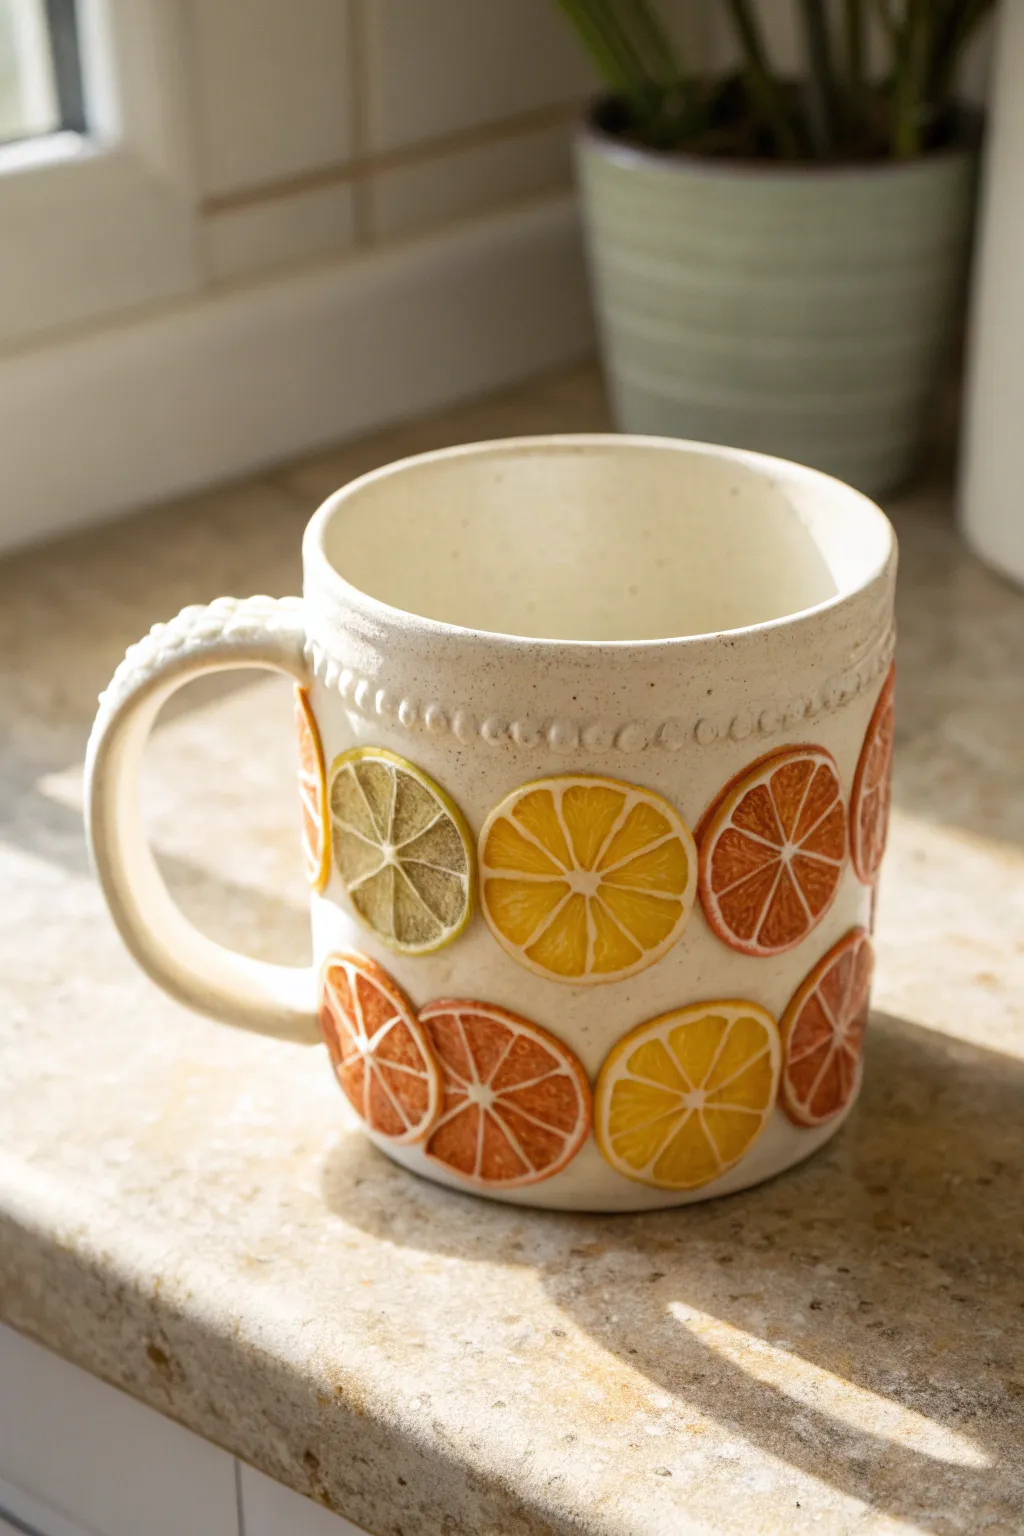
Brighten up your morning coffee routine with this deliciously detailed project that captures the translucency and zest of fresh citrus slices. By using polymer clay canes, you can create a playful, dimensional wrap-around design that transforms a plain ceramic mug into a summer-ready statement piece.
Step-by-Step Guide
Materials
- Plain ceramic mug (cream or white)
- Translucent polymer clay
- Opaque polymer clay (white, yellow, dark orange, light orange, lime green)
- Liquid polymer clay (clear or translucent)
- Polymer clay blade or tissue blade
- Rolling pin or pasta machine
- Needle tool or toothpick
- Small dotting tool
- Craft knife
- Oven-safe ceramic glue (if not baking directly onto mug)
- Gloss glaze or resin (optional)
Step 1: Creating the Citrus Canes
-
Mix Translucent Colors:
Begin by tinting your translucent clay. Mix a small amount of yellow into a larger block of translucent clay for the lemon interior. Repeat this process with orange for oranges, and a mix of green/yellow for limes. You want the color to be vibrant but still retain the clay’s translucent quality when baked. -
Form the Segments:
Take your tinted translucent clay and roll it into a thick log. Pinch one side of the log along its entire length to create a teardrop or triangular prism shape. This will form the juicy segments of the fruit. -
Wrap the Segments:
Roll out a very thin sheet of opaque white clay. Wrap this sheet around your teardrop-shaped log. This thin white line represents the pith (membrane) separating the fruit segments. -
Assemble the Cane:
Cut your long teardrop log into 8 equal lengths. Arrange these pieces in a circle with the pointy ends meeting in the center. Gently press them together to form the round interior of the fruit. -
Add the Rind:
Roll out a medium-thickness sheet of white clay and wrap it around the entire circle of segments. Then, wrap a final layer of colored opaque clay (yellow for lemons, orange for oranges) around the outside to create the rind or zest layer. -
Reduce the Cane:
Gently squeeze and roll the large cane to reduce its diameter. Start from the middle and work outwards to lengthen it without distorting the pattern inside. Aim for a diameter of about 1 to 1.5 inches.
Frosting the Cane
Chill your raw canes in the fridge for 20 minutes before slicing. Cold clay is much firmer and won’t smush or distort the intricate pattern.
Step 2: Decorating the Mug
-
Slice the Fruit:
Using a very sharp tissue blade, slice thin cross-sections from your canes. Aim for a consistent thickness of about 2-3mm so they adhere well to the mug surface. -
Prepare the Mug Surface:
Clean your mug thoroughly with rubbing alcohol to remove any oils. Apply a very thin layer of liquid polymer clay to the back of each slice to act as an adhesive agent. -
Apply the Slices:
Press the slices onto the mug. I like to arrange them in two staggered rows for a natural, tumbling look. Place different fruit varieties (lime, lemon, blood orange) next to each other for contrast. -
Texture the Fruit:
Using a needle tool, gently poke and scratch the translucent interior of each fruit slice. This simple step adds incredible realism, mimicking the juicy texture of citrus pulp. -
Create the Beaded Rim:
Roll a thin snake of white or cream clay. Apply a thin line of liquid clay around the top of the mug, just below the lip, and press the clay snake onto it. -
Detail the Rim:
Take a small dotting tool and press it into the clay snake at regular intervals to create a decorative beaded texture that frames the fruit design. -
Double Check Adhesion:
Go over every edge of your clay pieces, gently smoothing them down to ensure no air bubbles are trapped underneath, which is crucial for durability.
Preventing Pop-offs
If slices pop off after baking, don’t panic. Use a high-quality two-part epoxy glue to reattach them permanently. Superglue is too brittle for mugs.
Step 3: Baking and Finishing
-
Bake the Mug:
Place the mug in a cold oven. Set the temperature according to your clay manufacturer’s instructions (usually around 275°F/135°C). Allowing the mug to heat up with the oven prevents thermal shock to the ceramic. -
Cool Down:
Once the baking time is complete, turn off the oven and leave the door slightly ajar. Let the mug cool down completely inside the oven to prevent cracking. -
Add Shine (Optional):
For a ‘freshly sliced’ wet look, apply a coat of gloss glaze or UV resin specifically to the fruit pulp areas, leaving the rind matte for texture contrast.
Now you have a refreshing vibrant mug that captures the zest of summer in every sip


Polka Dots With Raised Texture
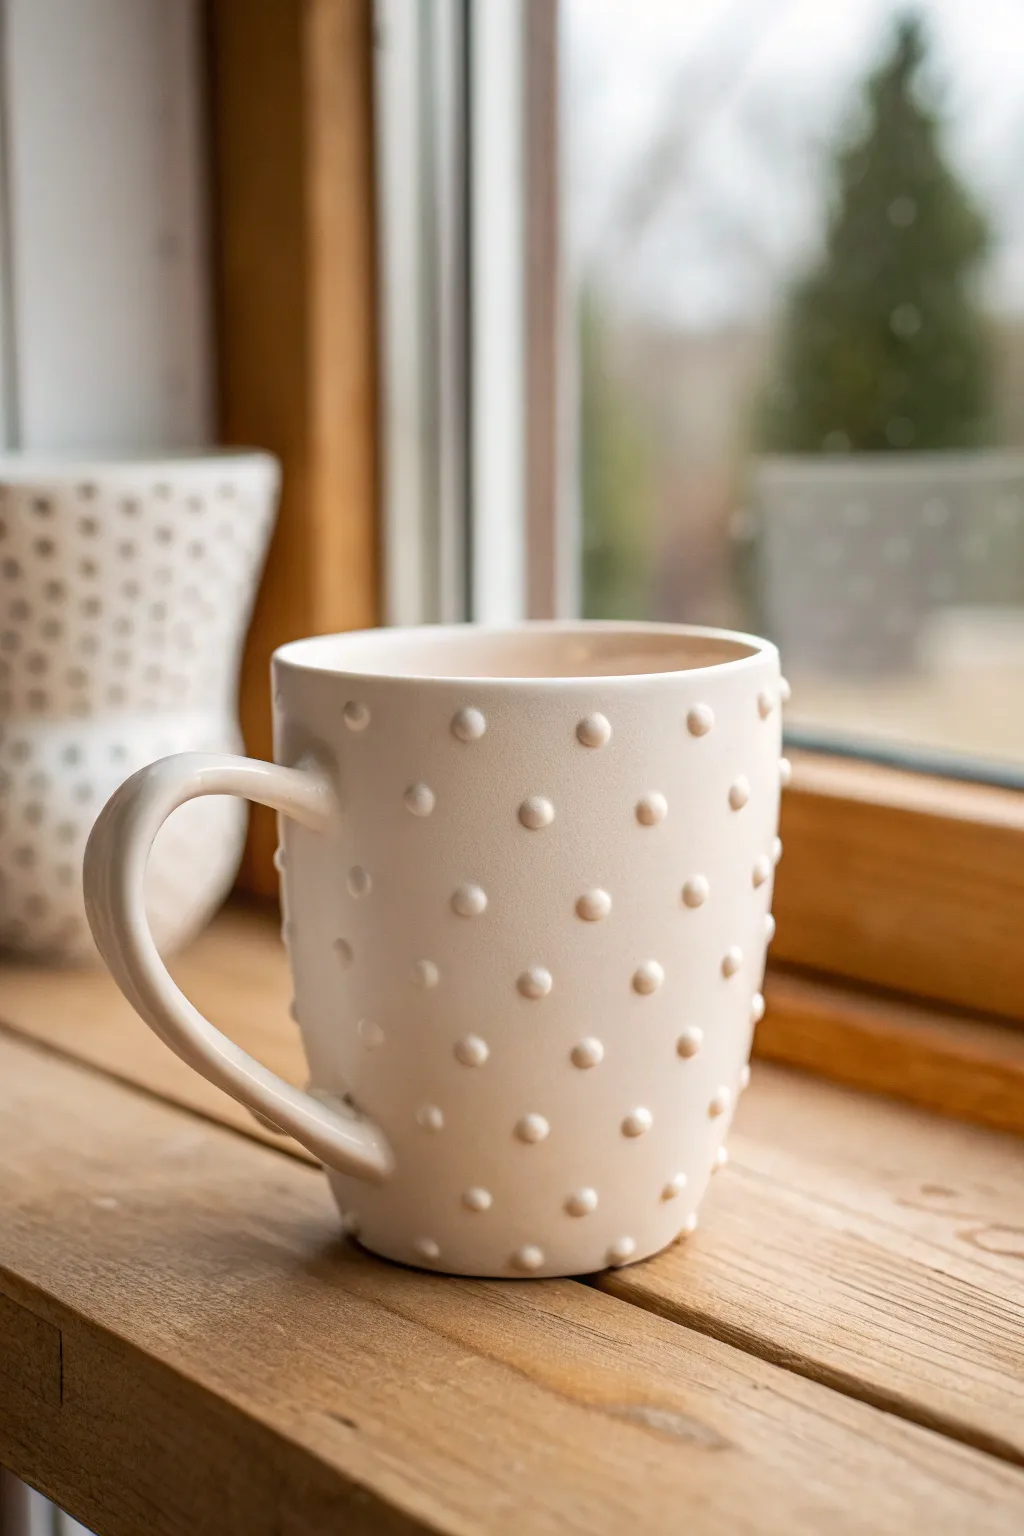
Transform a plain ceramic mug into a tactile delight with this elegant, raised-dot design. This monochrome project relies on texture rather than color to create a cozy, sophisticated look perfect for your morning coffee.
How-To Guide
Materials
- Plain white ceramic mug (straight-sided works best)
- White or cream polymer clay (like Premo or Fimo)
- Liquid polymer clay (Bake & Bond)
- Small circular cutter or a sturdy straw
- Acrylic rolling pin or pasta machine
- Ceramic tile or glass work surface
- Baby wipes or rubbing alcohol
- Oven thermometer
- Food-safe resin or glaze (optional, for sealing)
Step 1: Preparation & Base Layer
-
Clean the Surface:
Begin by thoroughly cleaning the outside of your ceramic mug with rubbing alcohol. This removes any oils or fingerprints that might prevent the clay from adhering properly. -
Condition the Clay:
Take your white polymer clay and condition it in your hands until it’s soft and pliable. If the clay is too stiff, add a tiny drop of baby oil. -
Roll a Sheet:
Roll the clay out into a long, thin sheet, approximately 2mm thick. You want it long enough to wrap around the entire circumference of the mug. -
Measure and Trim:
Measure the height of your mug, leaving about half an inch of space at the top rim for drinking comfort. Trim your clay sheet to this height. -
Apply Adhesive:
Smear a thin, even layer of liquid polymer clay all around the mug body where the clay will sit. This acts as the glue between the ceramic and the fresh clay. -
Wrap the Mug:
Carefully wrap the clay sheet around the mug, smoothing out air bubbles as you go. Gently press the seam together where the ends meet and smooth it with your finger or a clay tool until invisible. -
Clean the Edges:
Use a sharp blade to trim the top and bottom edges cleanly. I like to run a finger dipped in a little baby oil along the cut edges to soften them so they aren’t sharp after baking.
Uneven Dots?
If your dots are distorting when you pick them up, put the rolled clay sheet in the fridge for 10 minutes before cutting. Cold clay holds its shape much better.
Step 2: Creating the Hobnail Texture
-
Prepare Dots:
Roll out a fresh slab of the same white clay, slightly thicker than the base layer (about 3-4mm). This thickness ensures the dots stand out nicely. -
Cut Circles:
Using a very small circular cutter or the end of a bubble tea straw, punch out dozens of small circles. You will need roughly 40-50 dots depending on your mug size. -
Round the Tops:
Take each small circle and gently roll it between your fingers just slightly to round off the sharp cut edges, creating a soft dome shape rather than a flat cylinder. -
Map the Grid:
Lightly mark a grid on your wrapped mug using a needle tool to guide placement, or just eyeball it if you trust your estimation skills. -
Apply First Row:
Put a tiny dot of liquid clay on the back of a clay circle and press it onto the mug near the top edge. Continue placing dots in a horizontal row, spacing them about 1.5cm apart. -
Offset the Second Row:
For the next row down, place the dots in the spaces between the dots above (a brick-lay pattern). This offset look creates the classic hobnail aesthetic shown in the photo. -
Continue the Pattern:
Repeat this process until you reach the bottom of the mug. Be careful not to place dots too close to the very bottom edge so the mug still sits flat. -
Smoothing Check:
Look over the mug from all angles. If any dots look lopsided or loose, gently press them back into shape. Wipe away any excess liquid clay with a baby wipe.
Level Up: Ombré Effect
Mix a tiny bit of grey or beige into your white clay for the bottom rows of dots, gradually getting lighter as you move up for a subtle, sophisticated gradient.
Step 3: Baking & Finishing
-
Bake Instructions:
Place the mug in a cold oven and set it to the temperature recommended on your clay package (usually 275°F/130°C). Let it heat up with the oven preventing thermal shock to the ceramic. -
Cooling Down:
Bake for 30 minutes. Once the time is up, turn the oven off and leave the door slightly ajar. Let the mug cool completely inside the oven. -
Sealing (Optional):
Once fully cool, you can apply a coat of food-safe resin or polyurethane varnish to the clay parts to make it easier to hand-wash later.
Now you have a stunning, tactile mug that feels wonderful in your hands while you sip your tea


Mini Rainbow Handle Accent
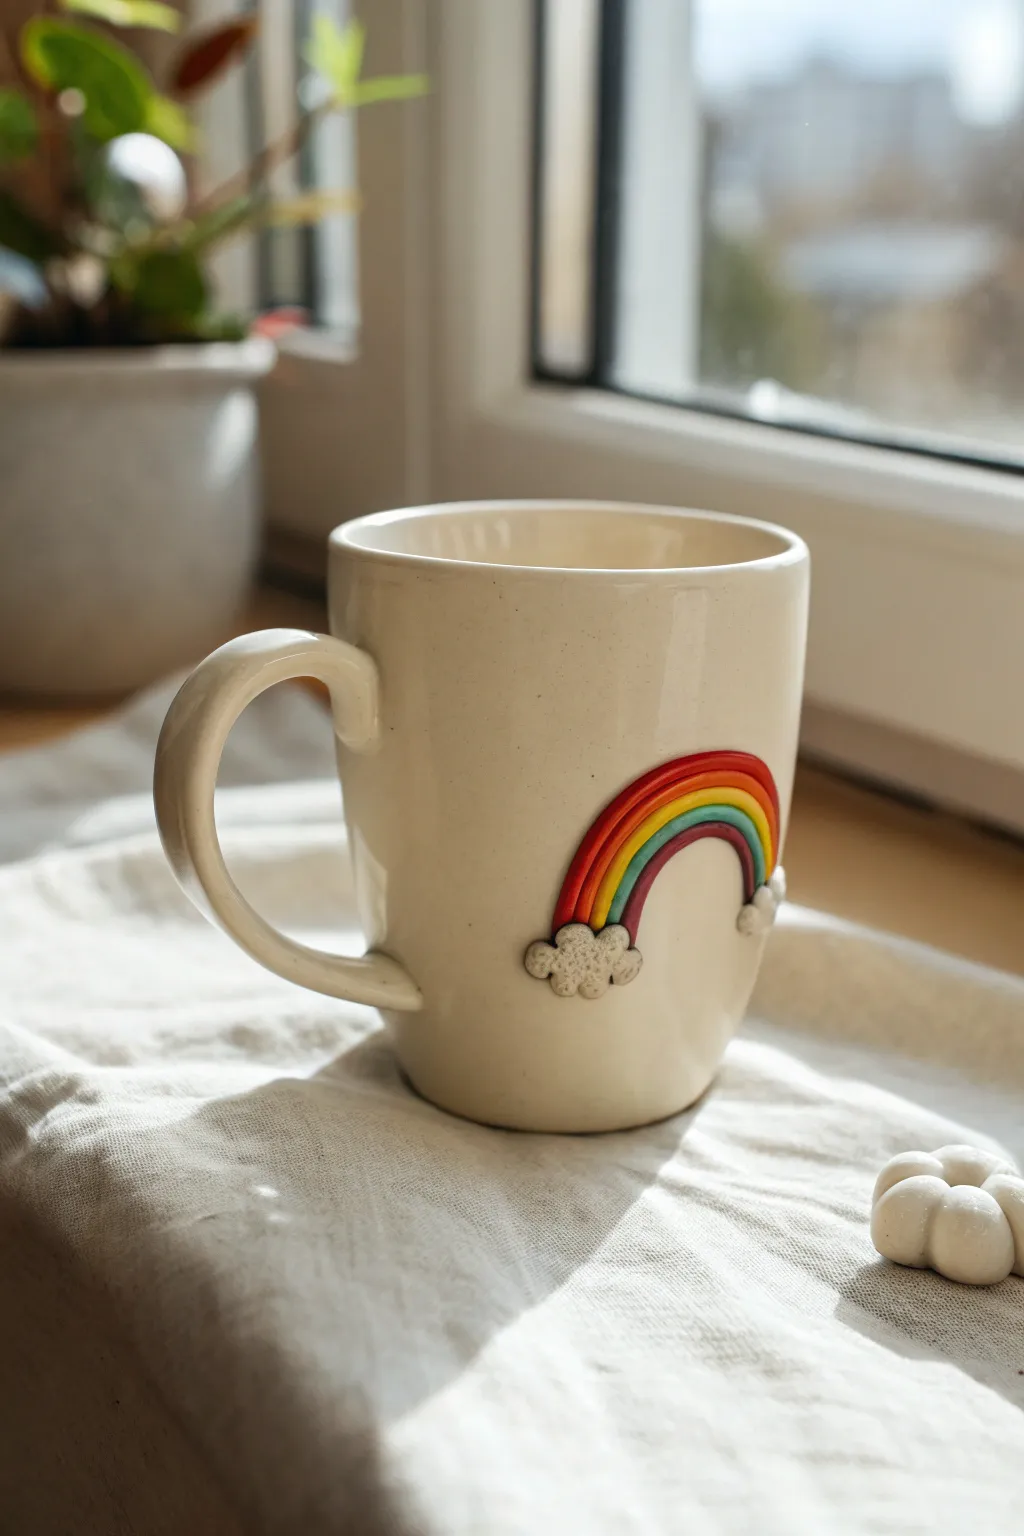
Add a touch of joy to your morning routine with this charming polymer clay mug tutorial. The raised, textured clouds and vibrant rainbow bands create a delightful 3D effect that feels just as sweet as it looks.
Step-by-Step Guide
Materials
- Plain ceramic mug (white or cream)
- Polymer clay (Red, Orange, Yellow, Green, Blue, Purple, White)
- Bake and Bond (or liquid polymer clay)
- Acrylic rolling pin
- Craft knife or scalpel blade
- Ball stylus tool/dotting tool
- Needle tool
- Wet wipes
- Oven (for baking)
- Epoxy shimmer glaze or polyurethane gloss varnish (optional)
Step 1: Preparation & Base
-
Clean the surface:
Before starting, wipe down the area of the mug you plan to decorate with rubbing alcohol or a wet wipe. This removes oils and ensures the clay adheres properly during the creation process. -
Condition the clay:
Knead each color of clay individually until soft and pliable. I prefer to start with white to keep it clean, then move to lighter colors before darker ones to avoid color transfer.
Clean Lines
Use a baby wipe to clean your hands between rolling each color coil. This prevents the red or blue clay from staining your yellow and white clay.
Step 2: Forming the Rainbow
-
Roll thin coils:
Roll each colored clay (red, orange, yellow, green, blue, purple) into long, thin snakes. Aim for a consistent thickness of about 2-3mm for each strand. -
Cut to length:
Decide on the size of your rainbow arch. Cut the purple (innermost) strand first to your desired length, then cut each subsequent color slightly longer so they can wrap around the previous one. -
Assemble the arch:
Prepare a small amount of Bake and Bond on your work surface or directly on the mug where the rainbow will sit. Carefully place the purple arch first. -
Layer the colors:
Apply a tiny bit of liquid clay between the strands to help them stick together. Place the blue strand snugly against the purple, followed by green, yellow, orange, and finally red on the outside. -
Trim the ends:
Once all strands are assembled into an arch on the mug, use your craft knife to slice across the bottom ends of the rainbow to ensure they are perfectly flush and even with each other.
Step 3: Creating the Clouds
-
Form cloud bases:
Roll two small balls of white clay, then flatten them slightly into ovals. These will act as the base for your fluffy clouds. -
Position the clouds:
Place a dab of Bake and Bond at the bottom of each rainbow leg. Press the white oval bases firmly over the raw ends of the rainbow strands to conceal them. -
Add texture:
Using a ball stylus tool or a needle tool, gently poke and swirl the surface of the white clay. This stippling technique creates the fluffy, cotton-like texture seen in the photo. -
Refine the edges:
Use the tool to pull small bits of the white clay slightly outward in rounded scallops to enhance the cartoony cloud shape.
Sparkle Finish
After baking, brush a thin layer of glitter glaze over just the clouds to make them shimmer like they are catching the sunlight.
Step 4: Baking & Finishing
-
Final check:
Smooth out any fingerprints on the rainbow bands with a tiny drop of baby oil on your finger. Ensure all edges are pressed flush against the ceramic. -
Bake carefully:
Place the entire mug into a cold oven. Set the temperature according to your clay manufacturer’s instructions (usually around 230°F/110°C to 275°F/135°C). Turn the oven on. -
Cool down:
Once the baking time is up (typically 30 minutes), turn the oven off and let the mug cool down completely inside the oven. This prevents the ceramic from cracking due to thermal shock. -
Seal for durability:
For a mug that will be hand-washed, seal the clay parts with a coat of dishwasher-safe gloss or resin. Coat only the clay, extending slightly onto the ceramic to form a watertight seal.
Now you have a cheerful companion for your coffee breaks that is sure to brighten even the gloomiest days

The Complete Guide to Pottery Troubleshooting
Uncover the most common ceramic mistakes—from cracking clay to failed glazes—and learn how to fix them fast.
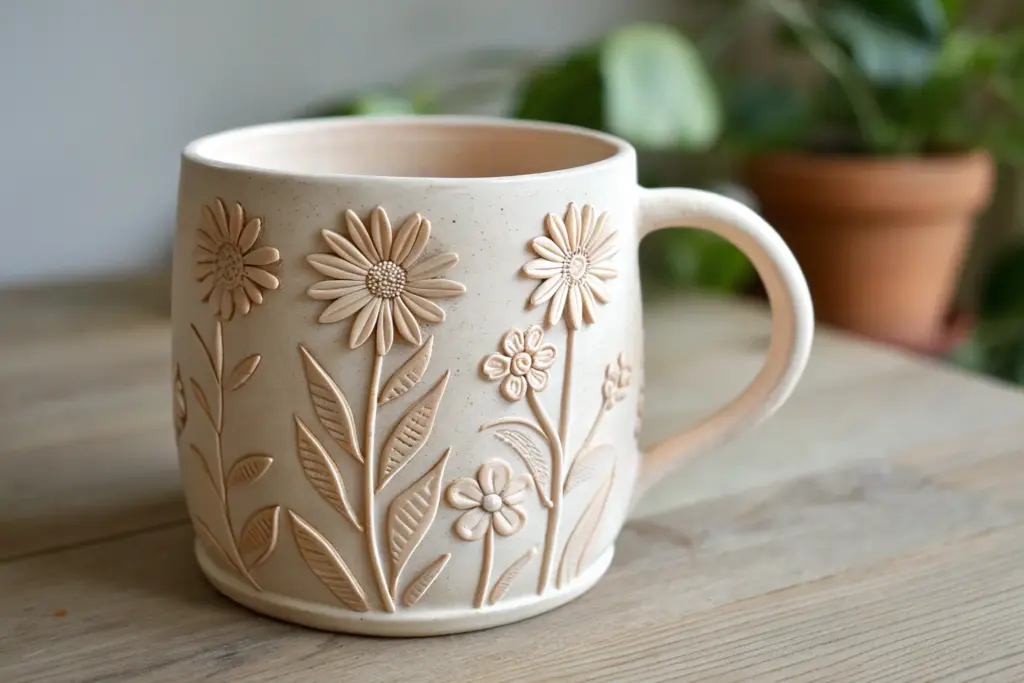
Cute Bee and Daisy Cluster
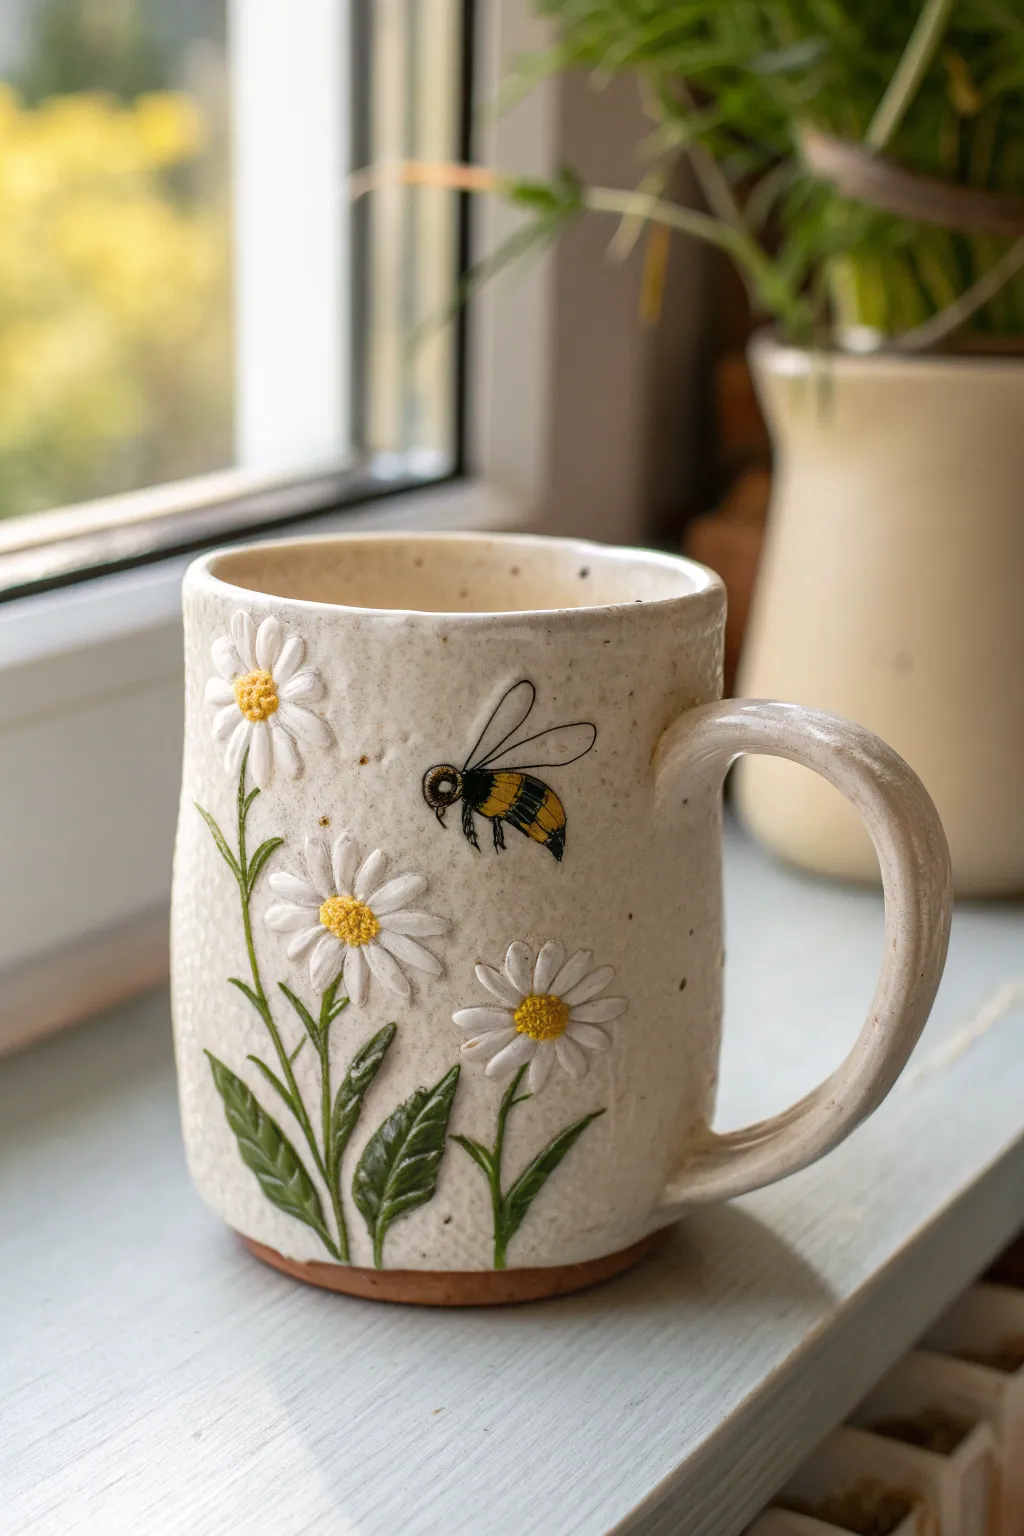
Transform a plain ceramic mug into a charming piece of functional art with this raised relief design capable of brightening any kitchen. Featuring delicate daisies and a buzzing bee, the project combines textured floral sculpting with fine details for a cozy, rustic finish.
Detailed Instructions
Materials
- Plain ceramic mug (cream or speckled finish preferred)
- Polymer clay: Opaque White, Leaf Green, Forest Green, Golden Yellow
- Liquid polymer clay (bakeable adhesive)
- Acrylic paints: Black, Yellow, White (for bee details)
- Fine detail paintbrush (size 0 or 00)
- Needle tool or toothpick
- Small ball stylus tool
- Gloss varnish or resin (optional for sealing)
- Rolling pin or pasta machine
- Rubbing alcohol and wipes
Step 1: Preparation & Stems
-
Clean surface:
Begin by thoroughly cleaning the outer surface of your mug with rubbing alcohol to remove any oils or fingerprints, ensuring a strong bond for the clay. -
Apply base adhesive:
Smear a very thin, translucent layer of liquid polymer clay onto the area where you plan to build your floral cluster; this acts as the glue during baking. -
Mix green tones:
Condition your Leaf Green and Forest Green clay, mixing a tiny amount together to create a natural, slightly variegated shade for realistic foliage. -
Create stems:
Roll extremely thin snakes of the green clay mixture. Gently press them onto the mug in slightly curved, organic lines to form the main stems for your three daisy positions.
Clay Slipping?
If clay petals slide down the sleek mug surface while working, let the clay sit on paper for 20 mins to leach out oils, or use a slightly tackier liquid clay.
Step 2: Sculpting the Daisies
-
Form petals:
Roll small balls of Opaque White clay into tiny teardrop shapes. Flatten them slightly between your fingers to create individual petals. -
Build the first flower:
Starting at the top stem, press the pointed ends of the petals into a central point, arranging them in a circle. Use your needle tool to press lightly down the center of each petal to create a vein texture. -
Add lower blooms:
Repeat the petal process for the middle and bottom flowers, varying the size slightly so the cluster looks natural and not overly uniform. -
Texture the centers:
Roll small balls of Golden Yellow clay. Press one into the center of each white flower cluster. -
Detail the pollen:
Use a needle tool or stiff brush to stipple the yellow centers vigorously, creating a fuzzy, pollen-like texture.
Make It Speckled
To mimic the pottery look in the photo, flick thinned brown acrylic paint over the white petals with an old toothbrush before sealing.
Step 3: Leaves & The Bee
-
Shape leaves:
Create larger teardrop shapes from your green clay. Flatten them onto the mug near the base of the stems. -
Vein texture:
Use your needle tool to draw a central vein down each leaf, then add angled side veins for a realistic ribbed look. -
Form the bee body:
Roll a small oval of yellow clay for the bee’s body and press it onto the mug near the top flower. Make a smaller black ball for the head if you have black clay, or simply paint it later. -
Bee wings:
For the wings, you can either sculpt very thin translucent clay teardrops or outline them with paint after baking. I prefer sketching them lightly into the clay surface with a needle tool first. -
First bake:
Bake the mug according to your clay manufacturer’s instructions (usually 275°F/135°C for 15-30 minutes). Let it cool completely in the oven.
Step 4: Finishing Touches
-
Painting the bee:
Once cool, use a fine brush to paint black stripes across the bee’s yellow body. Outline the wings carefully with thin black lines. -
Highlighting:
Add a tiny dot of white paint to the bee’s eye area for a reflection highlight, bringing it to life. -
Sealing:
Apply a coat of gloss varnish or UV resin over the clay parts only. This protects the paint and makes the design water-resistant for hand washing.
Enjoy sipping your favorite tea from your new hand-embellished garden mug
Puffy Heart Valentine Mug
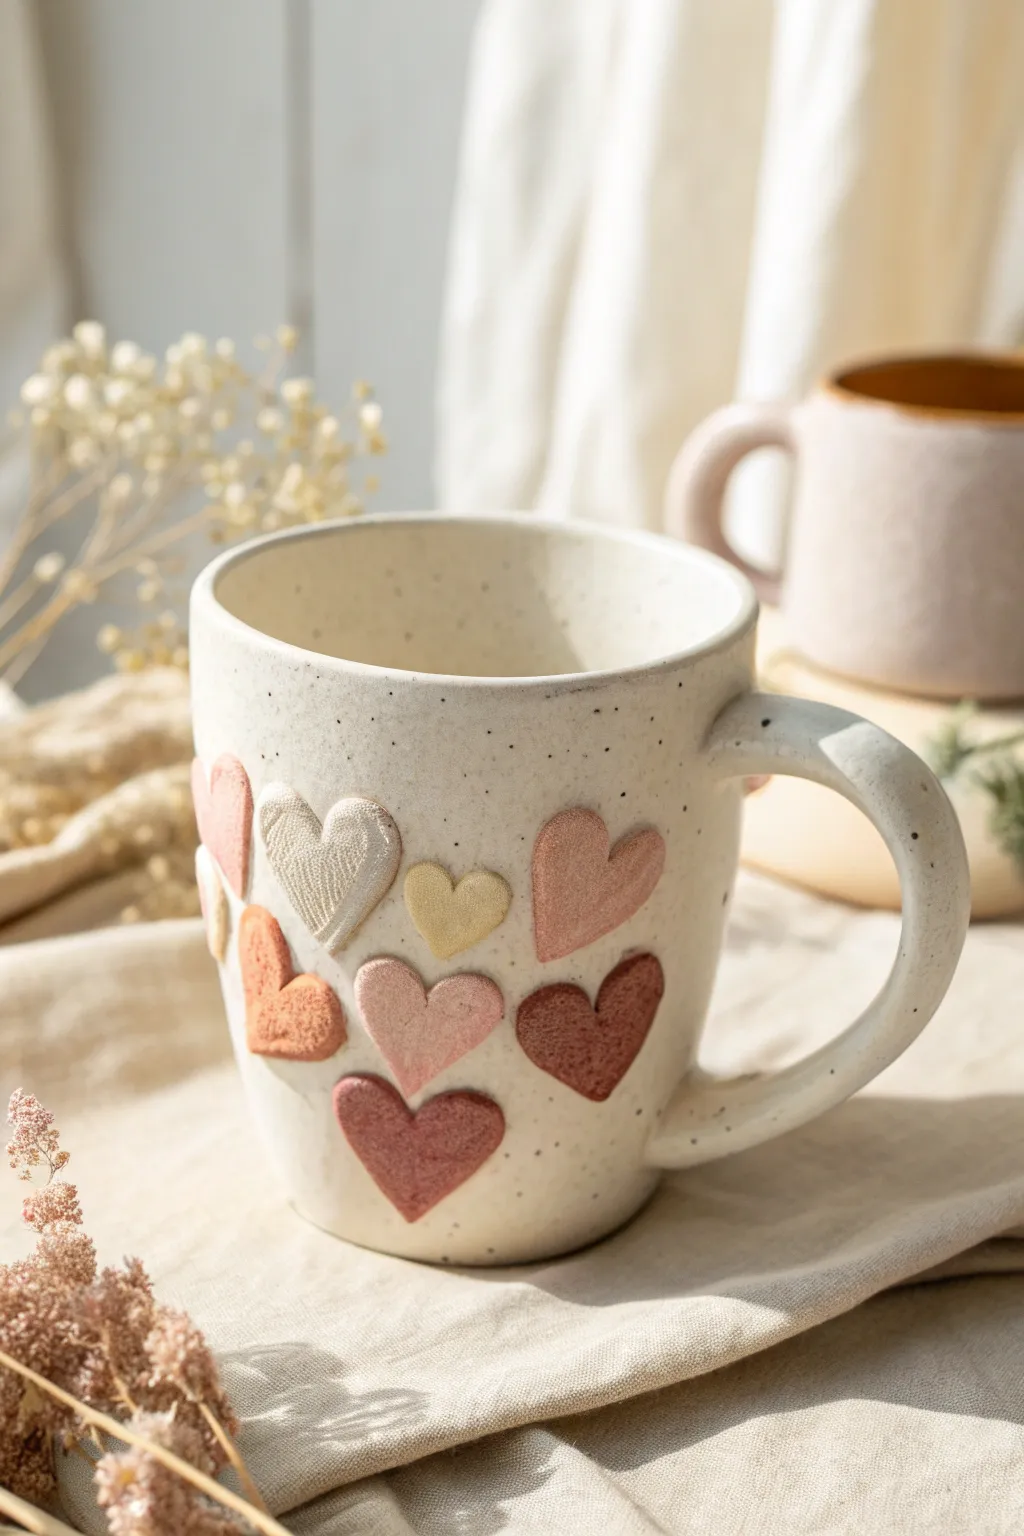
Transform a plain speckled mug into a cozy, heartwarming piece of drinkware with these adorable puffy hearts. Using soft, muted tones of polymer clay, this project adds a delightful tactile element to your morning coffee routine.
Step-by-Step Guide
Materials
- Pre-made speckled ceramic mug (white or cream)
- Polymer clay in muted pink, terracotta, white, and mustard yellow
- Liquid polymer clay (as adhesive)
- Small heart-shaped cutters (various sizes)
- Toothbrush or texture sponge
- Rolling pin or pasta machine
- Craft knife
- Isopropyl alcohol and cotton swabs
- Oven thermometer
- Gloss or matte varnish (optional)
Step 1: Clay Preparation
-
Condition the Clay:
Begin by thoroughly conditioning each color of polymer clay until it is soft and pliable. This step is crucial to prevent cracking later. -
Mix Custom Shades:
Create the soft color palette seen in the image by mixing small amounts of white into your terracotta and mustard clays to mute them. Aim for a cohesive look with varying shades of dusty pink and warm earth tones. -
Roll Out Sheets:
Roll each color into a sheet approximately 3-4mm thick. You want them thick enough to look ‘puffy’ on the mug surface, but not so heavy they slide down.
Adhesion Pro Tip
If you’re worried about durability, scuff the surface of the mug lightly with sandpaper where the hearts will go before cleaning it. This gives the liquid clay more ‘tooth’ to grip onto.
Step 2: Creating the Hearts
-
Cut Out Shapes:
Use your heart cutters to punch out several hearts in each color. If you don’t have multiple sizes, you can hand-trim some to vary the scale slightly. -
Soften the Edges:
Gently tap the raw edges of each heart with your fingertip to round them off. This removes the sharp ‘cookie-cutter’ look and enhances the puffy, fabric-like aesthetic. -
Add Texture:
For that cozy, stone-like finish, lightly press a clean toothbrush or texture sponge onto the surface of each heart. I find this subtle stippling makes the clay look more integrated with the speckled mug.
Step 3: Assembly and Baking
-
Clean the Mug Surface:
Wipe the exterior of your ceramic mug with isopropyl alcohol to remove any oils or fingerprints, ensuring a strong bond. -
Apply Liquid Clay:
Smear a thin, even layer of liquid polymer clay onto the back of your first heart. This acts as the glue between the cured ceramic and the raw clay. -
Position the Hearts:
Press the heart firmly onto the mug. Arrange the hearts in a random, scattered pattern, mixing the colors so no two identical shades are right next to each other. -
Secure the Edges:
Double-check that the edges of every heart are flush against the ceramic. Gaps can trap water later, so smooth them down gently without flattening the puffiness. -
Clean Up:
Use a cotton swab dipped in a tiny bit of alcohol to wipe away any excess liquid clay that might have oozed out from behind the hearts. -
Bake:
Place the mug in a cold oven and set it to the temperature recommended on your clay package (usually around 275°F/135°C). Let the oven heat up with the mug inside to prevent thermal shock to the ceramic. -
Cool Down:
Once the baking time is up (typically 30 minutes), turn off the oven and leave the door slightly ajar. Allow the mug to cool completely inside the oven.
Level Up: Pattern Play
Before cutting the hearts, try mixing translucent clay with black pepper or dried tea leaves. This creates a speckled faux-stone effect in the clay that perfectly matches the speckled mug.
Step 4: Finishing Touches
-
Seal (Optional):
If you want extra protection, apply a thin coat of water-based polyurethane varnish over just the clay hearts. A matte finish keeps the natural look, while gloss adds shine. -
Final Cure:
Let the varnish dry fully according to manufacturer instructions before washing or using.
Enjoy your beautiful new mug for warm drinks, remembering to hand wash it gently to keep those hearts safe


What Really Happens Inside the Kiln
Learn how time and temperature work together inside the kiln to transform clay into durable ceramic.
Textured Knit Sweater Mug Panel
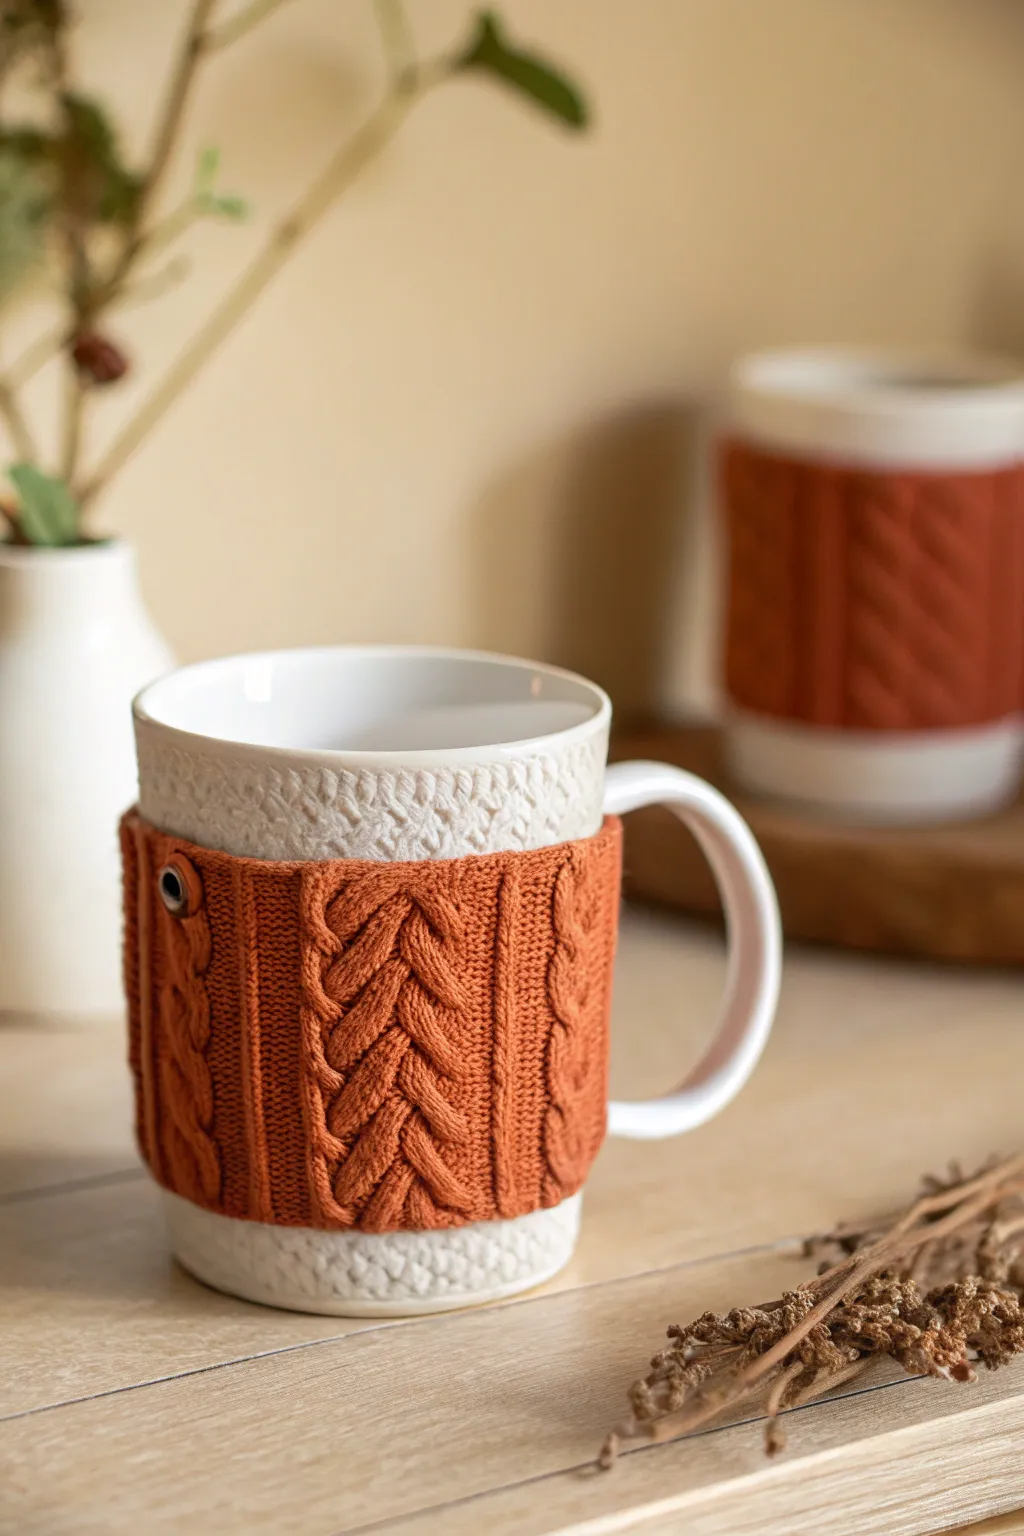
Transform a plain ceramic mug into a warm, tactile masterpiece that looks like it’s wearing a tiny sweater. This project features realistic faux-knit textures crafted from polymer clay, combining a subtle seed stitch base with a chunky, terracotta-colored cable panel.
Detailed Instructions
Materials
- Plain white ceramic mug (straight or gently tapered)
- White polymer clay
- Terracotta or burnt orange polymer clay
- Liquid polymer clay (bakeable adhesive)
- Clay extruder with small round discs (or just nimble fingers)
- Needle tool or toothpick
- Flexible tissue blade
- Small metal button or jump ring for detailing
- Pasta machine or acrylic rolling pin
- Rubbing alcohol
- Sponge or texture mat (optional)
Step 1: Preparing the Base Layer
-
Clean the Surface:
Before starting, wipe your ceramic mug down thoroughly with rubbing alcohol to remove any oils or fingerprints. This ensures the clay adheres properly during baking. -
Roll the White Clay:
Condition your white clay until soft and pliable. Roll it out into a thin, even sheet, roughly 2-3mm thick. It needs to be wide enough to cover the main body of the mug where you want the background texture. -
Apply the Base:
Coat the exterior of the mug with a thin layer of liquid polymer clay. Carefully wrap your white clay sheet around the mug, smoothing out any air bubbles, and trim the excess neatly at the top and bottom rims. -
Create the Seed Stitch:
Now for the texture. Using a needle tool or a small, blunt point, gently poke tiny indentations all over the white clay. Vary the angles slightly to mimic the nubby look of a seed stitch or moss stitch knit.
Fixing Smooth Braids
If your braided cables look too much like snakes and not enough like yarn, use a blunt needle tool to press small diagonal lines into each strand to mimic the twist of individual fibers.
Step 2: Crafting the Pumpkin Spice Panel
-
Determine Panel Size:
Your colored panel will sit on top of the white layer. Roll out your terracotta clay into a rectangular strip. It should be slightly shorter than the mug’s height but long enough to wrap around, leaving space for the handle. -
Create Vertical Ribbing:
Cut thin strips of terracotta clay and lay them vertically along the edges of your main rectangular panel. Use a needle tool to impress vertical lines, creating a ribbed cuff effect on the sides. -
Extrude Clay Strands:
For the cable knit, you need consistent snake-like strands. Use a clay extruder with a small round disc to produce long, even ropes of terracotta clay. If you don’t have an extruder, roll snakes by hand as evenly as possible. -
Twist the Braids:
Take two clay ropes and twist them together tightly to form a rope braid. Make two of these. Arrange them vertically in the center of your panel to form the classic V-shaped cable pattern. -
Refine the Cable:
Gently press the twisted ropes onto the panel so they stick. Use a modeling tool to tuck in the edges of the twists, making them look like authentic interlocking yarn loops. -
Add Filler Stitches:
Fill the gaps between your central cable and the side ribbing with smaller twisted ropes or simple vertical lines to complete the knitted look. -
Attach the Panel:
Apply a little liquid clay to the back of your finished terracotta panel. Carefully press it onto the center of the white textured mug, smoothing it slowly to conform to the curve.
Step 3: Final Details and Baking
-
Add the Button:
Create a faux button tab on one side of the panel. Fashion a small circle of clay, press a metal grommet or small button into the center, and attach it near the top edge for a realistic garment touch. -
Clean Up:
Check for any fingerprints or smudges. A light brush with baby oil or cornstarch can smooth out unwanted marks before baking. -
Bake:
Place the mug in a cold oven and set it to the temperature recommended on your clay package (usually 265°F-275°F). I prefer to bake for at least 45 minutes to ensure durability. -
Cool Down:
Turn the oven off and let the mug cool down completely inside the oven. This prevents the ceramic from cracking due to sudden temperature changes. -
Seal (Optional):
Because polymer clay has a natural matte finish that looks like fabric, you don’t need to glaze it. However, if you want extra protection, apply a matte water-based varnish.
Cozy Shading Effect
Before baking, lightly brush darker dry pastel powder or mica powder into the deepest crevices of the cable knit. This adds depth and shadows, making the ‘yarn’ look incredibly 3D.
Now you have a mug that looks as warm as the coffee you’ll pour into it
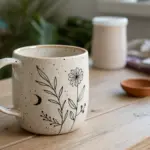
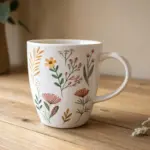
Cottage Garden Vines and Blooms
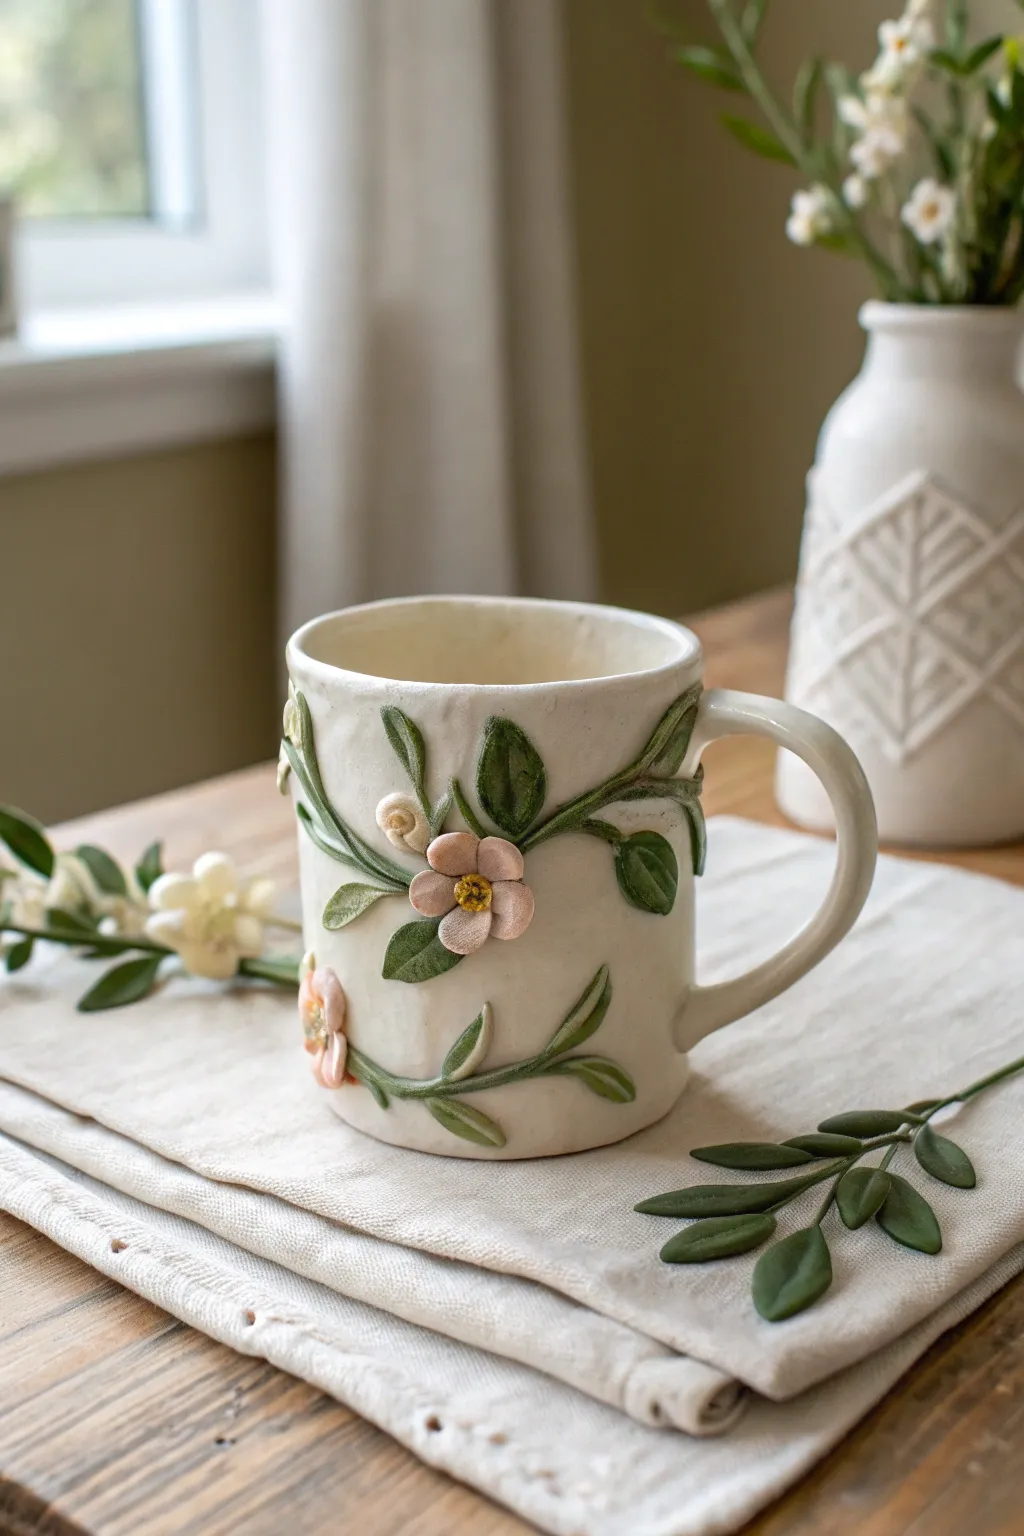
Transform a plain ceramic mug into a charming cottagecore keepsake with winding polymer clay vines and delicate blooms. This project features soft peach wildflowers and realistic green leaves that seem to grow organically around the cup, creating a delightful texture you’ll love holding.
Step-by-Step Tutorial
Materials
- Plain ceramic mug (white or cream)
- Polymer clay (olive green)
- Polymer clay (soft peach/pink)
- Polymer clay (golden yellow)
- Translucent liquid polymer clay (Bake & Bond)
- Clay sculpting tools (needle tool, small ball tool)
- Blade or X-Acto knife
- Rubbing alcohol and cotton swabs
- Oven for baking
- Water-based matte polyurethane varnish (optional)
Step 1: Preparation
-
Clean the surface:
Before styling, wipe your ceramic mug thoroughly with rubbing alcohol on a cotton swab. This removes any oils or fingerprints that might prevent the clay from adhering properly during the baking process. -
Condition the clay:
Knead your olive green, peach, and yellow clays separately until they are soft and pliable. Warm clay is much easier to shape and less prone to cracking as you work.
Sticky Situation?
If clay isn’t sticking to the shiny ceramic while you work, wipe the specific area with acetone. This removes localized glaze slickness for better grip.
Step 2: Sculpting the Vines
-
Roll the stems:
Take small pieces of the olive green clay and roll them into thin snakes or vines. Vary the thickness slightly to mimic natural growth—some parts thicker near the base, tapering off towards the ends. -
Apply the vines:
Apply a very thin layer of liquid polymer clay to the back of your rolled vines. Gentle press them onto the mug in a winding, organic pattern. I like to let them curve naturally, as if they are reaching for sunlight. -
Create texture:
Once the vines are placed, use a sculpting tool or needle tool to gently imprint faint lines along the length of the vines, adding a woody, realistic texture to the stems.
Step 3: Adding Foliage
-
Form the leaves:
Pinch off small bits of green clay and form them into teardrop shapes. Flatten them slightly between your fingers to create the leaf body. -
Attach leaves to vines:
Check the placement on your mug, then dab a tiny dot of liquid clay where you want a leaf. Press the rounded end of the teardrop onto the vine and the pointed end onto the mug surface. -
Detail the leaves:
Using a needle tool, carefully score a central vein down the middle of each leaf. You can add smaller side veins if you want extra detail, or gently curve the leaf tips for movement.
Morning Dew Effect
After baking, add tiny drops of UV resin or gloss varnish to a few leaves or petals. Cure it to create permanent, glistening dewdrops.
Step 4: Creating the Blooms
-
Make flower petals:
Roll five tiny balls of the peach-colored clay for each flower. Flatten them slightly to create rounded petal shapes. -
Assemble the flower base:
Choose a spot on the vine for a bloom. Apply a dot of liquid clay. Arrange the five petals in a circle, pressing them gently together at the center so they stick to the mug and each other. -
Shape the petals:
Use a small ball tool to transform the flat petals. Press into individual petals gently to cup them slightly, giving the flower a 3D, blooming effect rather than looking flat. -
Add the center:
Roll a tiny ball of golden yellow clay. Press this into the center of your flower arrangement. -
Texturize the center:
Stipple the yellow center repeatedly with a needle tool to create a pollen-like texture. -
Add buds:
For variety, add a few closed buds. Roll a small ball of peach clay, wrap a tiny piece of green clay around the bottom half, and attach it to a vine tip.
Step 5: Baking and Finishing
-
Final check:
Go over your artwork one last time. Smooth out any accidental fingerprints with a little baby oil or rubbing alcohol on your finger. -
Bake the mug:
Place the mug in a cold oven and set it to the temperature recommended on your clay package (usually around 275°F/130°C). Bake for 30 minutes. Letting the mug heat up with the oven prevents thermal shock. -
Cool down:
Turn the oven off and open the door slightly, but leave the mug inside to cool down gradually ensuring the ceramic doesn’t crack. -
Seal (Optional):
For extra durability during hand-washing, coat the clay parts with a water-based matte polyurethane varnish once fully cooled.
Now you have a enchanting, custom mug that brings a touch of spring to every sip of coffee or tea

TRACK YOUR CERAMIC JOURNEY
Capture glaze tests, firing details, and creative progress—all in one simple printable. Make your projects easier to repeat and improve.
Bird on a Branch Focal Scene
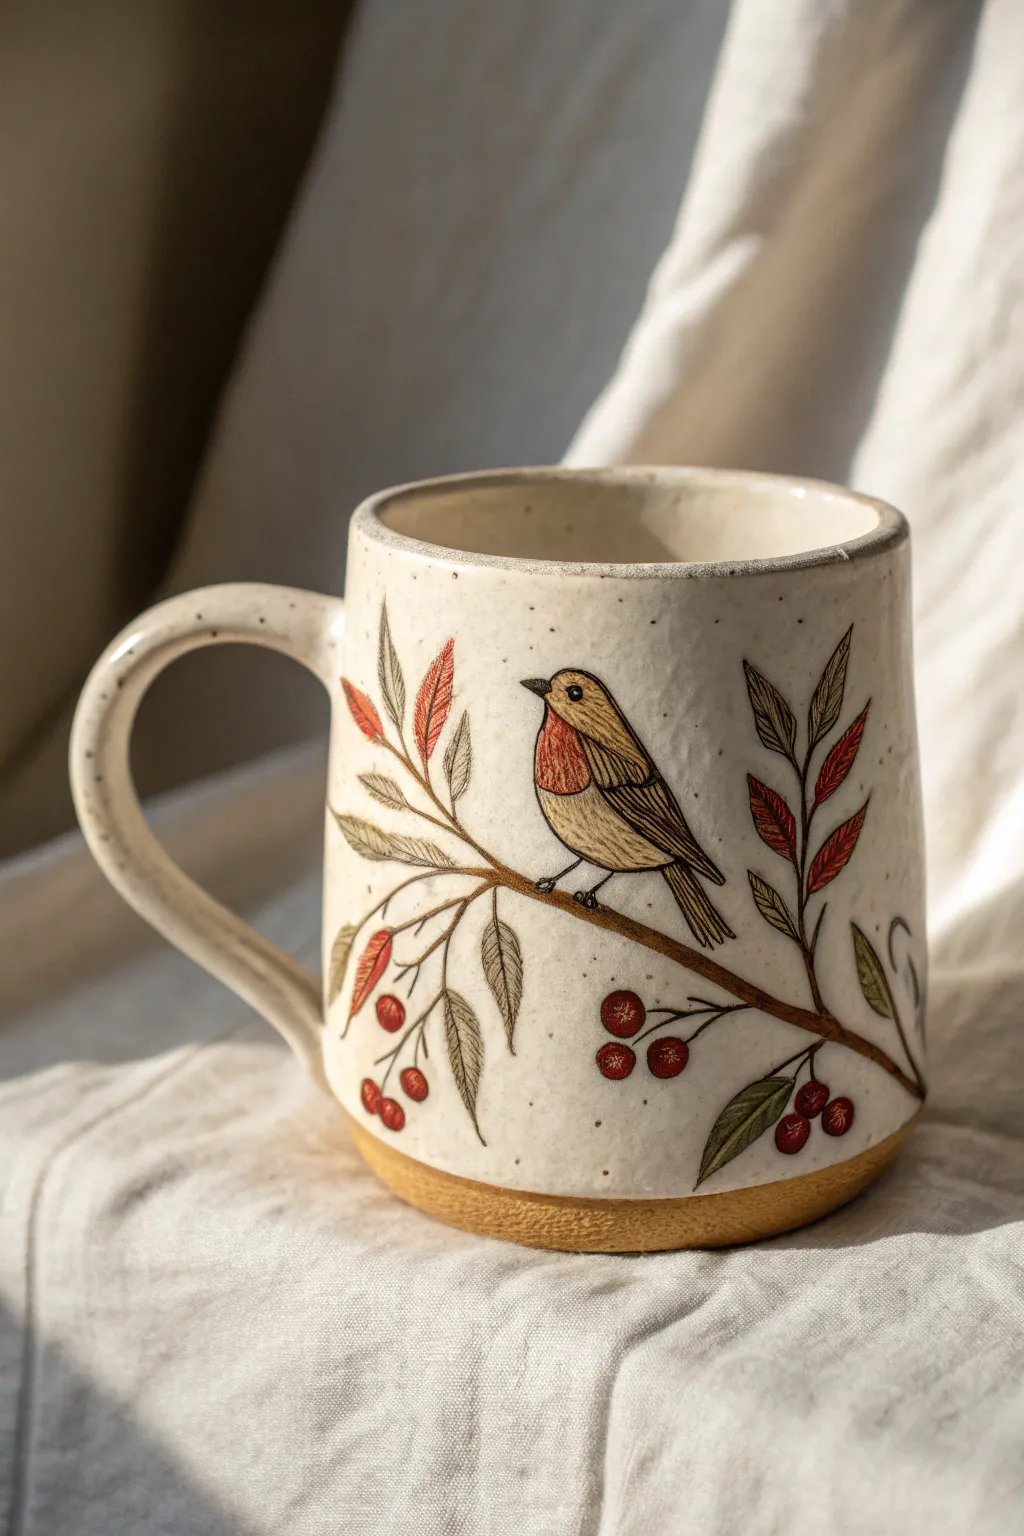
Capture the charm of a winter garden with this cozy, speckled mug design featuring a detailed robin perched among berries. Using layering techniques and careful surface treatments, you’ll achieve the look of high-end, hand-thrown ceramic pottery right from your home oven.
Step-by-Step
Materials
- Oven-bake polymer clay (Speckled cream or granite color)
- Oven-bake polymer clay (Terra cotta or tan color for base)
- Plain ceramic mug (straight-sided works best)
- Liquid polymer clay (clear)
- Acrylic paints (Red, brown, black, green, muted orange)
- Fine detail paintbrushes (00 or 000 size)
- Needle tool or fine embossing stylus
- Rolling pin or pasta machine
- Craft knife
- Matte or satin polyurethane varnish
- Sponge or texture tool
Step 1: Base Construction
-
Prepare the Mug Surface:
Begin by thoroughly cleaning your ceramic mug with rubbing alcohol to remove any oils. This ensures the clay adheres effectively during the baking process. -
Mix the Speckled Clay:
Condition your speckled cream clay until it is soft and pliable. If you don’t have pre-speckled clay, mix tiny amounts of black pepper or brown glitter into translucent and white clay to mimic the ceramic look shown. -
Sheet the Clay:
Roll out a sheet of the speckled clay about 1/8 inch thick. It needs to be long enough to wrap entirely around the mug and tall enough to cover from the top rim down to about a half-inch from the bottom. -
Apply the Base Layer:
Coat the ceramic mug with a thin layer of liquid polymer clay to act as an adhesive. Wrap your clay sheet around the mug, carefully smoothing out any air bubbles from the center outward. -
Create the Terra Cotta Bottom:
Roll a thick snake or strip of the terra cotta or tan-colored clay. Wrap this around the very bottom edge of the mug where the cream clay ends, blending the seam slightly upward to create that dipped, unglazed pottery aesthetic. -
Refine the Rim and Handle:
Trim the excess clay at the top rim with your craft knife for a clean edge. Cut carefully around the handle attachment points, smoothing the clay against the ceramic so the handle remains exposed.
Glaze Effect Tip
For a true ceramic glaze look, mix a tiny drop of translucent liquid clay into your acrylic paints. This adds depth and makes the paint bake permanently into the surface.
Step 2: Creating the Illustration
-
Sketch the Branch:
Using a very light touch with a needle tool, lightly etch the main branch line across the mug’s surface. This serves as a guide for your painting and prevents spacing errors later. -
Outline the Robin:
Lightly etch the oval shape of the robin’s body perched on the branch. Add the details for the tail feathers and the small beak. -
Paint the Branch Structure:
Mix a dark brown acrylic paint with a tiny drop of water to improve flow. Using your finest brush, paint the main branch over your etched line, varying the thickness to make it look organic. -
Add Base Colors to the Bird:
Paint the robin’s belly with a warm orange-red. Use a muted beige or light brown for the wings and back. Don’t worry about detailing the feathers yet; just block in the solid colors. -
Paint Leaves and Berries:
Using a muted olive green, paint simple leaf shapes extending from the branch. Add small clusters of circles in deep red for the berries. -
Detail the Feathers:
Once the base coat is dry, use a micro-fine brush or a fine-tip black ink pen (compatible with clay) to draw thin, scratchy lines on the wing and tail to represent feather texture. -
Add Leaf Veins:
With the same fine tool or brush, add delicate central veins to your green leaves. I find adding a touch of brown to the green paint helps these lines stand out naturally. -
Final Outline Work:
Go over the perimeter of the bird and major branch sections with a very fine, broken black line. This mimics the sketch-like quality of hand-drawn pottery glaze.
Step 3: Finishing Touches
-
Texture the Bottom:
Use a coarse sponge or sandpaper to gently tap the terra cotta bottom strip. This gives it a rough, sandy texture that contrasts beautifully with the smooth upper section. -
Bake the Mug:
Bake the project according to your polymer clay manufacturer’s instructions (usually 275°F for 15-30 minutes). Let the mug cool completely inside the oven to prevent cracking. -
Seal the Artwork:
Apply two thin coats of matte or satin polyurethane varnish over the painted areas and the speckled clay body. Leave the terra cotta bottom unvarnished to maintain the realistic raw clay texture.
Seasonal Switch
Swap the robin for a blue jay or cardinal, and change the red berries to white mistletoe or tiny pinecones to customize this design for different seasons.
Enjoy sipping your morning coffee from this beautiful, nature-inspired vessel that looks straight from a potter’s wheel
Mushroom and Moss Woodland Mug
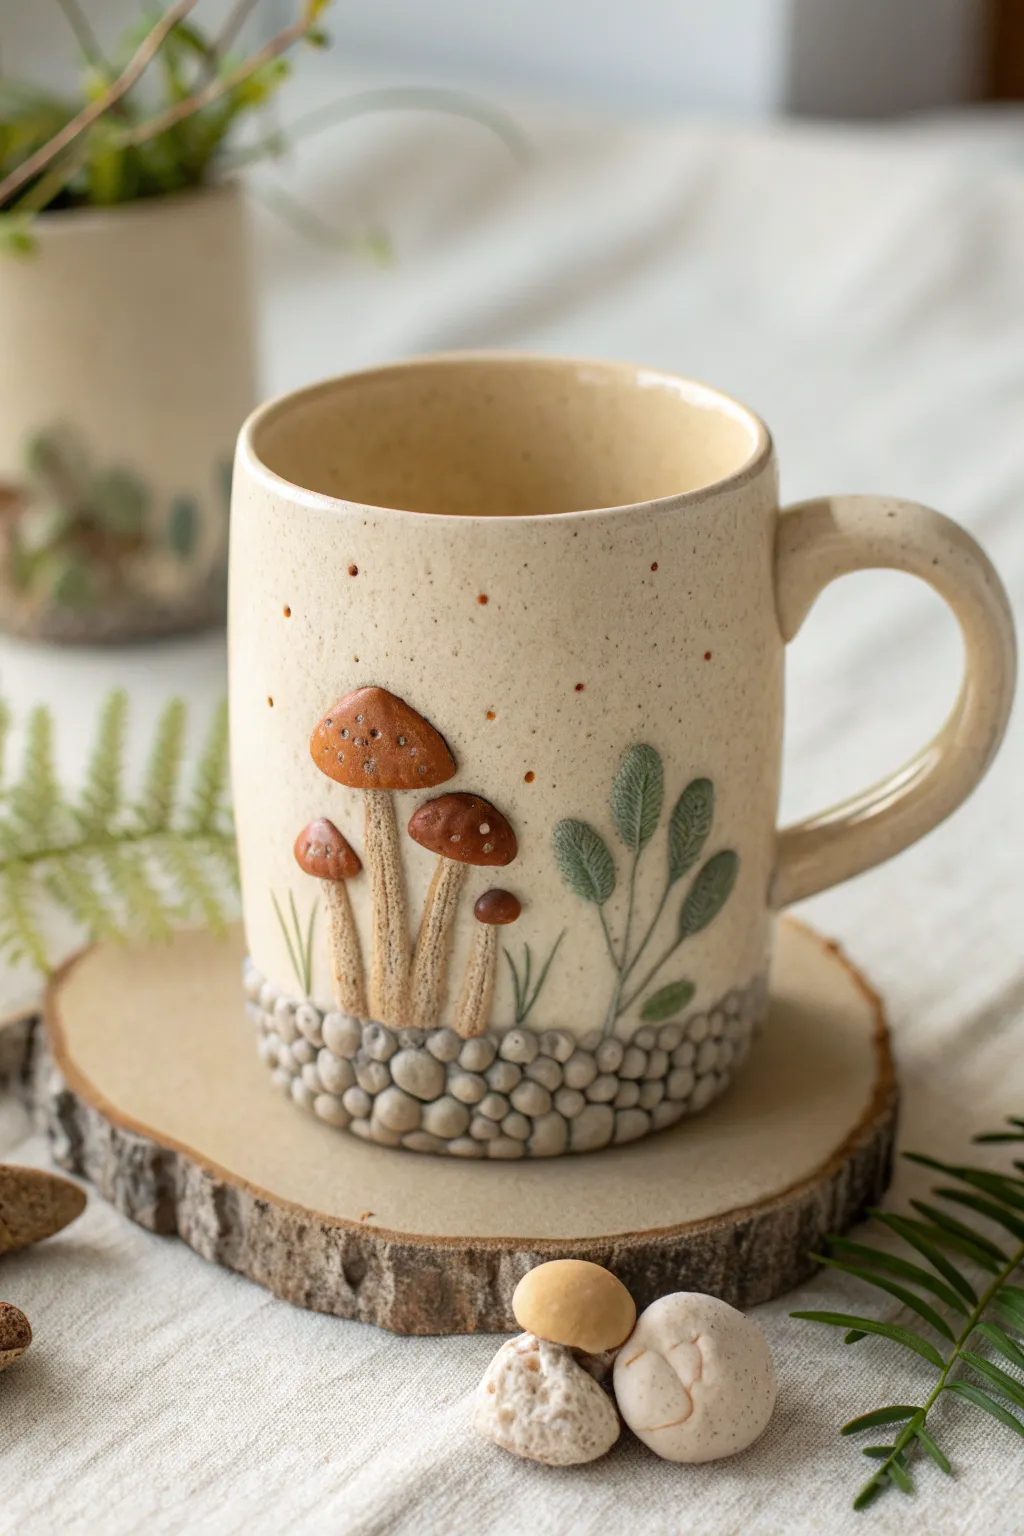
Transform a plain ceramic mug into a magical woodland keepsake with this textured polymer clay design. Featuring dimensional mushrooms, delicate greenery, and a tactile stone base, this project brings the forest floor right to your coffee table.
Step-by-Step Guide
Materials
- Plain beige ceramic mug
- Polymer clay (translucent white, brown, terracotta, copper, warm green, light grey)
- Liquid polymer clay (Bake & Bond)
- Needle tool or toothpick
- Small dotting tool
- Texture sponge or toothbrush
- Soft pastel chalks (brown and burnt sienna)
- Small paint brush
- Acrylic rolling pin
- Craft knife
- Gloss glaze (optional)
Step 1: Preparing the Base
-
Clean the surface:
Before starting, wipe your ceramic mug thoroughly with rubbing alcohol or glass cleaner to remove any oils or fingerprints. This ensures the clay adheres properly during the process. -
Create the pebble foundation:
Mix small amounts of light grey and translucent white clay to create varied shades of stone. Roll dozens of tiny balls, ranging from 2mm to 5mm in diameter. -
Apply the stones:
Smear a thin layer of liquid polymer clay around the bottom inch of the mug. Press the tiny clay balls onto this adhesive layer, creating a dense, cobbled texture that wraps entirely around the base. Vary the sizes to make it look natural.
Step 2: Sculpting the Mushrooms
-
Form the stems:
Roll thin snakes of beige or off-white clay. Cut them into varying lengths (around 1-1.5 inches). Press them gently onto the mug above the stone layer, ensuring the bottoms blend slightly into the pebbles. -
Texture the stems:
Using a needle tool, scratch vertical lines up and down the stems to mimic fibrous mushroom stalks. I like to twist the tool slightly to create deeper grooves. -
Shape the large caps:
Create flattened cone shapes using terracotta or warm brown clay. Place these atop the larger stems. Smooth the connection point at the back so it sits flush against the ceramic. -
Add detail to caps:
Use a small dotting tool to press indentations into the mushroom caps. For extra realism, press tiny bits of white clay into some of these indentations. -
Add the baby mushrooms:
Create smaller, rounder caps for the shorter stems using a slightly darker brown clay. Attach them nestled near the taller mushrooms.
Clay Falling Off?
If clay pieces detach after baking, don’t panic. Use a strong two-part epoxy glue to reattach them. It bonds ceramic to polymer more securely than superglue.
Step 3: Adding Greenery & Finishing Touches
-
Mix leaf colors:
Blend green clay with a tiny bit of grey or brown to get a muted, earthy olive tone. This looks more natural than bright green. -
Create the leaves:
Roll tiny teardrop shapes and flatten them. Arrange them in a spray pattern on the right side of the mug to resemble a small fern or sage plant. -
Texture the leaves:
Press a texture sponge or coarse sandpaper gently onto the leaves to give them a matte, organic surface. Use a needle tool to draw a central vein down each leaf. -
Add grass blades:
Roll extremely thin threads of green clay and place them sprouting up from the pebble base between the mushrooms and leaves. -
Add speckles:
Roll incredibly tiny crumbs of copper or brown clay. Press them randomly onto the background of the mug’s surface to create a speckled, pottery-glaze effect. -
Shade with pastels:
Scrape some brown pastel chalk into a fine powder. Use a dry brush to dust this powder into the crevices of the stones and the bottom of the mushroom stems to create depth and shadows. -
Bake the project:
Place the mug in a cold oven and set it to the temperature recommended on your clay package (usually 275°F/130°C). Bake for 30 minutes. Let it cool completely in the oven to prevent the ceramic from cracking due to thermal shock. -
Seal (Optional):
If you want a wet look for the mushroom caps, apply a thin layer of gloss glaze only to the brown caps, leaving the stems and stones matte.
Glow in the Dark
Mix glow-in-the-dark pigment into the white dots on the mushroom caps or the light grey stones. Your mug will turn into a glowing fairy garden at night.
Enjoy sipping your favorite warm drink from your new handcrafted piece of woodland art
Ladybug and Leaf Texture Mug
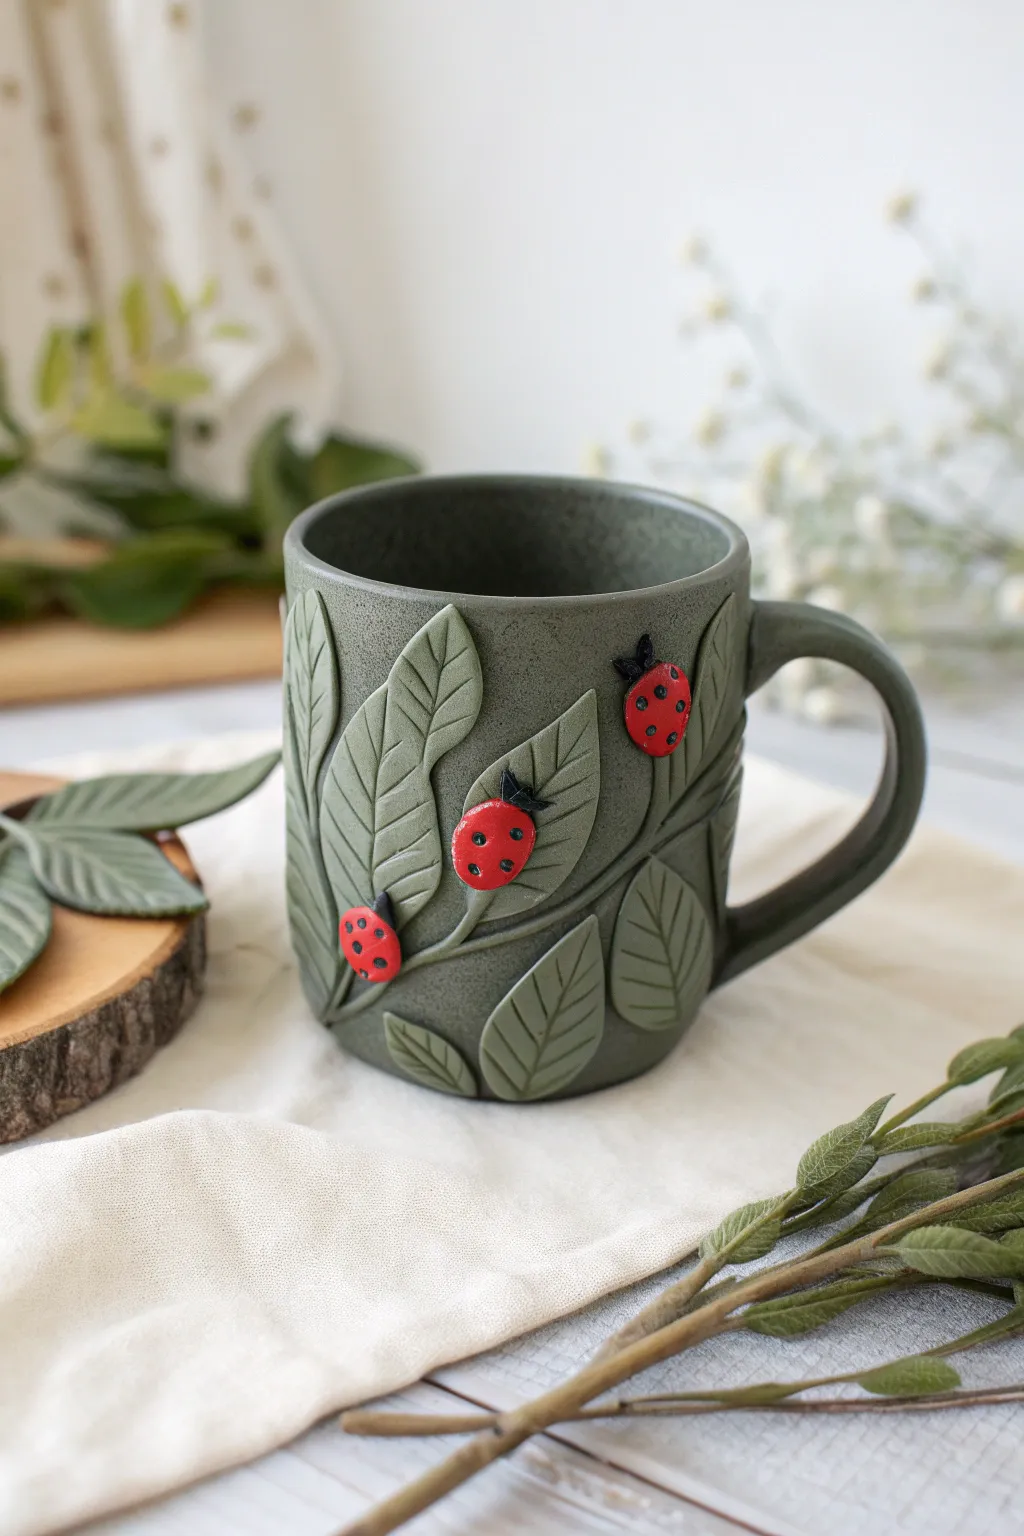
Transform a plain ceramic mug into a woodland treasure with this textured polymer clay design. Featuring deep sage green leaves and vibrant red ladybugs, this project adds a touch of whimsical nature to your morning coffee routine.
Step-by-Step
Materials
- Plain ceramic mug (dark grey or sage green preferred)
- Polymer clay (Sage Green, Forest Green, Bright Red, Black)
- Liquid polymer clay (clear or translucent)
- Polymer clay adhesive or bake-and-bond
- Detail needle tool or toothpick
- Small texture sponge or sandpaper
- X-acto knife or clay scalpel
- Small ball stylus tool
- Gloss varnish (optional, for ladybugs)
- Alcohol wipes
- Oven (for baking according to clay instructions)
Step 1: Preparing the Base
-
Clean surface:
Begin by thoroughly cleaning the exterior of your ceramic mug with alcohol wipes. This removes oils and ensures the clay adheres properly during the baking process. -
Mix green tones:
Condition your Sage Green clay. I like to mix a tiny bit of Forest Green into it to create a subtle marbling effect that looks more like natural leaves, rather than a flat color. -
Roll sheet:
Roll your green clay out into a thin sheet, approximately 2mm thick. You want it sturdy enough to handle but thin enough not to make the mug too heavy.
Sticky Situation
If leaves are sliding down the curved mug before baking, secure them temporarily with small pieces of masking tape until they go into the oven.
Step 2: Sculpting the Foliage
-
Cut leaf shapes:
Using your X-acto knife, freehand cut elongated oval shapes with pointed tips to mimic the leaves in the photo. Create various sizes, from small 1-inch leaves to larger 2.5-inch ones. -
Apply adhesive:
Apply a thin layer of liquid polymer clay or bake-and-bond to the back of a leaf cutout. Place it onto the mug, starting near the handle or base to anchor your design. -
Texture the edges:
Gently press the edges of the leaf onto the mug to seal it. Use a small texture sponge or a piece of coarse sandpaper to dab the surface of the clay, giving it a matte, organic texture similar to the mug’s finish. -
Create veins:
With your needle tool, draw a central vein down the middle of the leaf. Then, score angled lines branching out from the center to create the secondary veins. Press deep enough to see the texture but not cut through to the mug. -
Build the composition:
Repeat the process, layering leaves over one another slightly. For the stems seen in the image, roll thin snakes of green clay and connect the leaves, pressing them firmly onto the ceramic surface.
Step 3: Adding the Residents
-
Form ladybug bodies:
Roll small balls of Bright Red clay for the ladybug bodies. You’ll want about three distinct bugs. Slightly flatten the bottom of each ball so it sits flush against the leaves. -
Attach bodies:
Dab a tiny dot of liquid clay onto a leaf where you want a ladybug to sit. Press the red dome gently onto the spot. -
Create dividing line:
Use your needle tool to gently press a vertical line down the center of the red dome, suggesting the separation of the wings. -
Add heads:
Roll a very tiny ball of Black clay. Flatten it slightly and press it against the top of the red dome to create the ladybug’s head. -
Sculpt antennae:
This requires a steady hand; roll two microscopic threads of black clay for antennae. Attach them to the black head using the tip of your needle tool. -
Detail the spots:
Roll tiny specks of black clay into balls. Using your smallest ball stylus or needle tip, press these into the red wings to create the classic spotted pattern. -
Final texture check:
Before baking, look over the entire piece. Smooth out any accidental fingerprints with a little baby oil or water, and ensure all edges are flush with the mug.
Make It Bloom
Add tiny white polymer clay flowers between the leaves using small 5-petal balls to break up the green palette and add more delicacy.
Step 4: Baking and Finishing
-
Bake:
Place the mug in a cold oven and set it to the temperature recommended on your polymer clay package (usually around 275°F/135°C). Bake for 30 minutes. Letting it heat up with the oven helps prevent the ceramic from cracking. -
Cool down:
Turn off the oven and open the door slightly, letting the mug cool down completely inside. Sudden temperature changes can break the ceramic. -
Gloss the bugs:
Once cool, apply a small amount of gloss varnish specifically to the red parts of the ladybugs. This makes them look shiny and shell-like, contrasting beautifully with the matte leaves.
Enjoy sipping your favorite warm drink from your new handcrafted garden mug
Chubby Sheep With Wool Texture
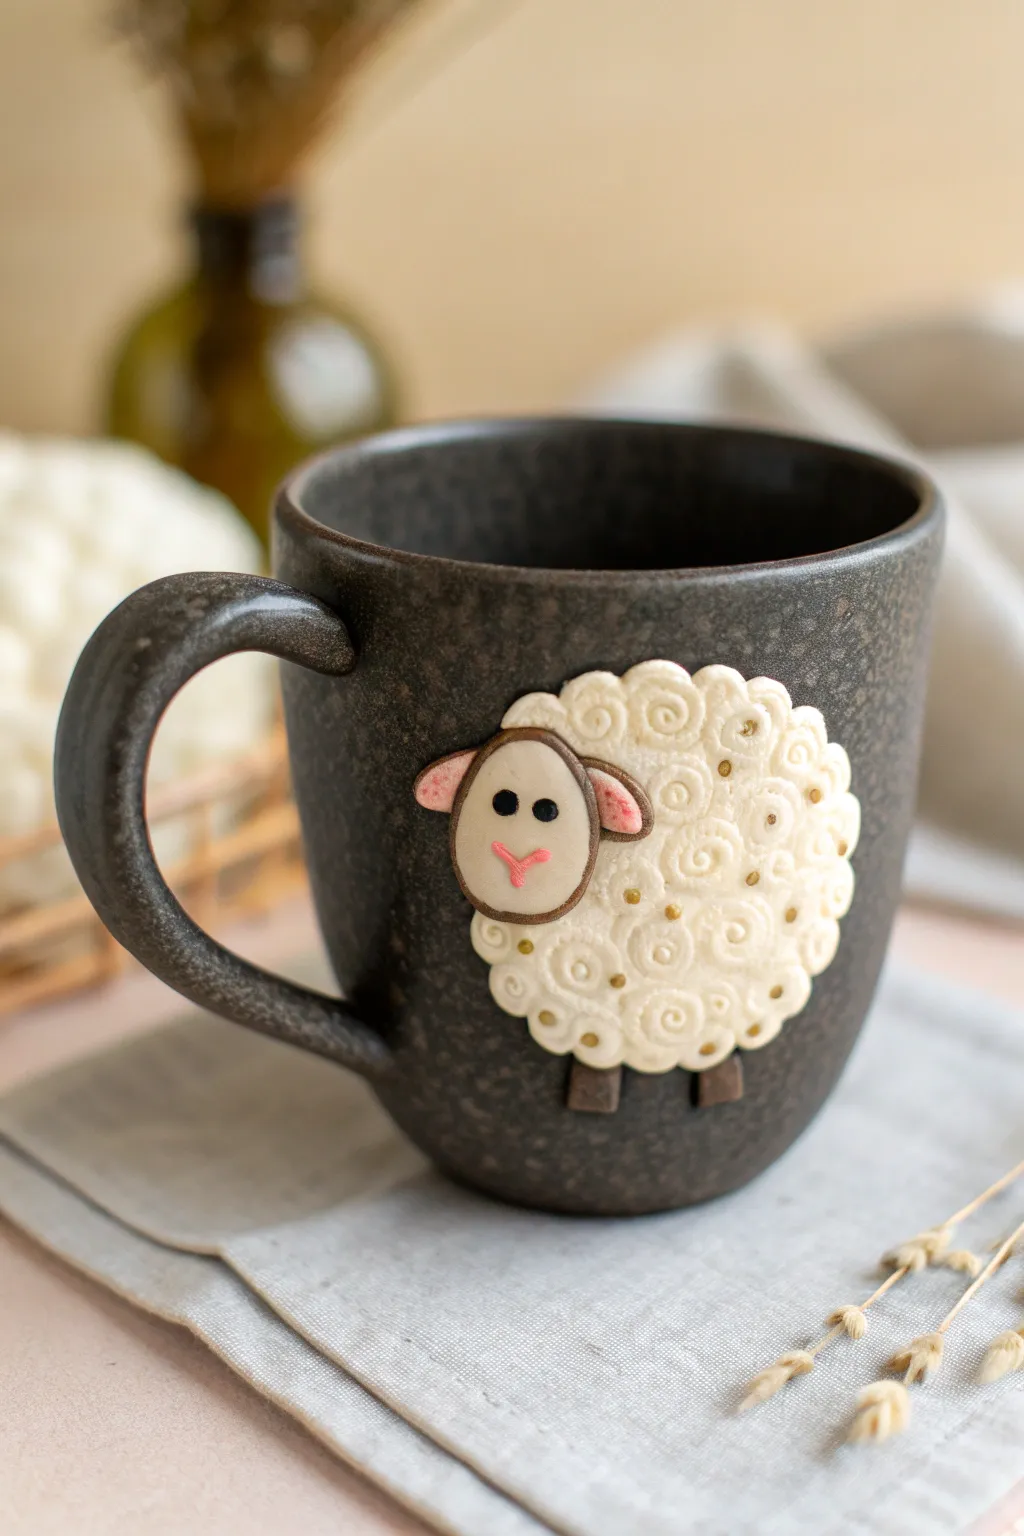
Transform a plain mug into a cozy companion with this adorable polymer clay relief project. The focus here is on creating a rich, swirly wool texture and a sweet, chubby expression that pops beautifully against dark stoneware.
Detailed Instructions
Materials
- Dark speckled ceramic mug
- White polymer clay
- Beige or light tan polymer clay
- Pink polymer clay (tiny amount)
- Black polymer clay (tiny amount)
- Small ball stylus tool
- Needle tool
- Liquid polymer clay (Fimo liquid or similar)
- Gold acrylic paint or gold mica powder
- Fine liner brush
- Craft knife or scalpel
- Oval cutter (optional, approx. 1 inch)
Step 1: Creating the Woolly Base
-
Prepare the mug surface:
Clean your chosen mug thoroughly with alcohol to remove any oils or fingerprints, ensuring the clay adheres properly during the design phase. -
Shape the body foundation:
Condition a large piece of white polymer clay until it is soft and pliable. Flatten it into a thick, organic oval shape—this will be the main body of the sheep. Press it gently onto the side of the mug to establish the placement. -
Define the perimeter:
Refine the edges of your white oval using your fingers or a silicone tool, rounding them off so the sheep looks puffy rather than flat. -
Create the swirls:
Using a small ball stylus or a needle tool, press spiral indentations directly into the white clay body. Work in a circular motion to create tight, swirly wool curls. -
Add density:
Continue adding swirls across the entire surface of the white clay. Vary the size slightly to make the texture look natural and fluffy, leaving no smooth spots except where the head will go.
Sticky Situation?
If the clay isn’t sticking to the glossy mug while you work, wipe the ceramic surface with a little acetone or use a thin layer of liquid clay as a primer before placing the main shape.
Step 2: Sculpting the Sheep
-
Form the head shape:
Take a portion of beige or light tan clay. Roll it into a ball and flatten it into a smooth egg shape for the face. -
Outline the face:
Roll a very thin snake of dark brown clay. Wrap this carefully around the edge of the beige face piece to create a defined outline, blending the seam where the ends meet. -
Attach the head:
Check the placement on the woolly body (usually slightly off-center to the left looks cute). Apply a tiny dot of liquid clay to the back of the head and press it firmly onto the textured body. -
Add the ears:
Make two small teardrops from the beige clay. Indent the centers with your ball tool and add a tiny speck of pink clay inside each for the inner ear. Attach these to the sides of the head. -
Create the feet:
Form two small rectangles from dark brown clay. Attach them to the bottom of the woolly body, spacing them out slightly so the sheep looks like it’s standing.
Step 3: Fine Details & Baking
-
Make the eyes:
Roll two minuscule balls of black clay. Press them gently onto the upper half of the face, spacing them wide apart for a kawaii look. -
Add the nose:
Roll a tiny strand of pink clay and shape it into a ‘Y’ or ‘V’ shape. Place this centered below the eyes to form the nose and mouth. -
Embellish the wool:
To match the reference, use a fine tool to add tiny gold dots (using mica powder or gold paint) into the centers of some of the wool swirls before baking, or plan to paint them after. -
Adhere securely:
I always use a little liquid polymer clay around the edges of the contact points between the main clay body and the mug to ensure a strong bond. -
Bake the project:
Place the entire mug into a cool oven. Set the temperature according to your clay manufacturer’s instructions (usually 230°F – 275°F) and bake for 30 minutes. Let the mug cool completely in the oven to prevent thermal shock. -
Final touches:
Once cool, if you didn’t add gold details earlier, dip a fine liner brush into gold acrylic paint and gently dab tiny dots into the center of the swirls for a magical sparkle.
Texture Twist
Instead of indenting swirls, try extruding thin strings of white clay and rolling them into tiny cinnamon-bun shapes, then sticking them individually onto the body for 3D volume.
Now you have a charming, textured mug ready for your favorite warm beverage
Mini Portrait of Two Friends

Capture the connection between two close friends with this charming sculpted mug, featuring stylized mini-portraits with serene expressions. The design combines earthy tones with a speckled ceramic finish for a cozy, handmade aesthetic that feels as warm as the coffee inside.
How-To Guide
Materials
- Oven-bake polymer clay (beige, terracotta/rust, dusty pink, brown)
- Plain ceramic mug (beige or cream)
- Liquid polymer clay (Bake & Bond)
- Sculpting tools (needle tool, ball stylus, rubber shaper)
- Rolling pin or pasta machine
- Craft knife
- Small circle cutter (approx. 1 inch)
- Acrylic paints (black, brown, white)
- Fine detail paintbrush
- Gloss or matte varnish (food safe if near rim, otherwise standard)
- Old toothbrush (for speckling)
- Rubbing alcohol
- Wet wipes
Step 1: Preparation and Base Layer
-
Prepare the Mug Surface:
Begin by cleaning your ceramic mug thoroughly with rubbing alcohol. This removes any oils or residue, ensuring the clay adheres properly during the baking process. -
Mix Custom Colors:
Before sculpting, mix your clay to match the aesthetic. I like to blend a bit of translucent clay into the beige skin tone to make it look more like natural ceramics rather than plastic. -
Create the Lower Band:
Roll out a strip of terracotta or rust-colored clay to create the bottom texture. Press it firmly around the base of the mug, smoothing the seams so it looks like a dipped glaze effect. -
Add Texture:
Use a toothbrush or a crumpled ball of aluminum foil to gently tap texture into the rust-colored base band, giving it a rough, stoneware feel.
Step 2: Sculpting the Figures
-
Shape the Heads:
Roll out a sheet of your beige skin-tone clay to about 3mm thickness. Use a small circle cutter or template one oval shape, then cut it in half vertically to create two distinct head shapes that will sit side-by-side. -
Attach to Mug:
Apply a thin layer of liquid polymer clay (Bake & Bond) to the back of your clay pieces. Press the two head shapes onto the mug, positioning them so they are slightly touching to symbolize closeness. -
Add Hair Base:
Roll out thin sheets of dark brown clay for the hair. Cut two semi-circles that are slightly larger than the tops of the heads to act as the back of the hair. -
Style the Bobs:
For the bob cuts, cut customized shapes to frame the faces. Layer these over the top of the head shapes, using a rubber shaper to smooth the transition where the hair meets the forehead. -
Refine the Hair:
Use a needle tool to gently scribe a few flow lines into the hair, suggesting movement and separation, particularly where the two hairstyles meet. -
Create the Bodies:
Form two flattened teardrop shapes for the torsos—one in rust (matching the base) and one in dusty pink. These should be proportionate to the heads. -
Dressing the Figures:
Attach the torsos directly below the heads using a dab of liquid clay. Flatten them gently so they contour to the curve of the mug without sticking out too far. -
Adding Collars:
Use a tiny ball stylus to indent a small ‘V’ or ‘U’ shape at the top of each shirt to mimic a collar or neckline. -
Button Details:
Roll extremely tiny snakes of brown clay and slice off minuscule dots. Place three dots vertically down the center of each shirt to serve as buttons.
Smooth Operator
Before baking, brush a tiny amount of baby oil or clay softener over the clay surface with your finger. This removes fingerprints and gives a professional, smooth finish.
Step 3: Facial Features and Finishing
-
Sculpt the Noses:
Take a tiny speck of skin-tone clay, roll it into a microscopic ball, and press it onto the center of each face. Use a tool to blend the edges downward for a subtle, relief-style nose. -
Pre-Bake Speckling:
To mimic the ceramic speckle seen in the image, dip an old toothbrush into diluted brown acrylic paint. Flick the bristles to spray fine speckles over the unbaked clay and the upper part of the mug. -
Baking:
Place the mug in a cold oven and set the temperature according to your clay manufacturer’s instructions (usually around 275°F/130°C). By heating gradually, you prevent thermal shock to the ceramic. -
Cooling Down:
Once the baking time is up, turn off the oven and leave the door slightly ajar. Let the mug cool completely inside the oven to prevent cracking. -
Painting the Faces:
Using a very fine detail brush and black acrylic paint, carefully paint two downward-curved lines for sleeping eyes and a tiny upward curve for a smiling mouth on each face. -
Sealing the Work:
Apply a coat of varnish over the clay parts to seal the paint and protect the sculpture. I recommend a matte varnish for the skin to keep it looking soft, and satin for the clothes.
Adhesion Issues?
If the clay pops off after baking, don’t panic. Use two-part epoxy glue to reattach the hardened piece to the ceramic. It creates a bond much stronger than liquid clay alone.
Now you have a touching tribute to friendship that makes every sip of coffee feel a little more special
Wrap-Around Story Scene Mug
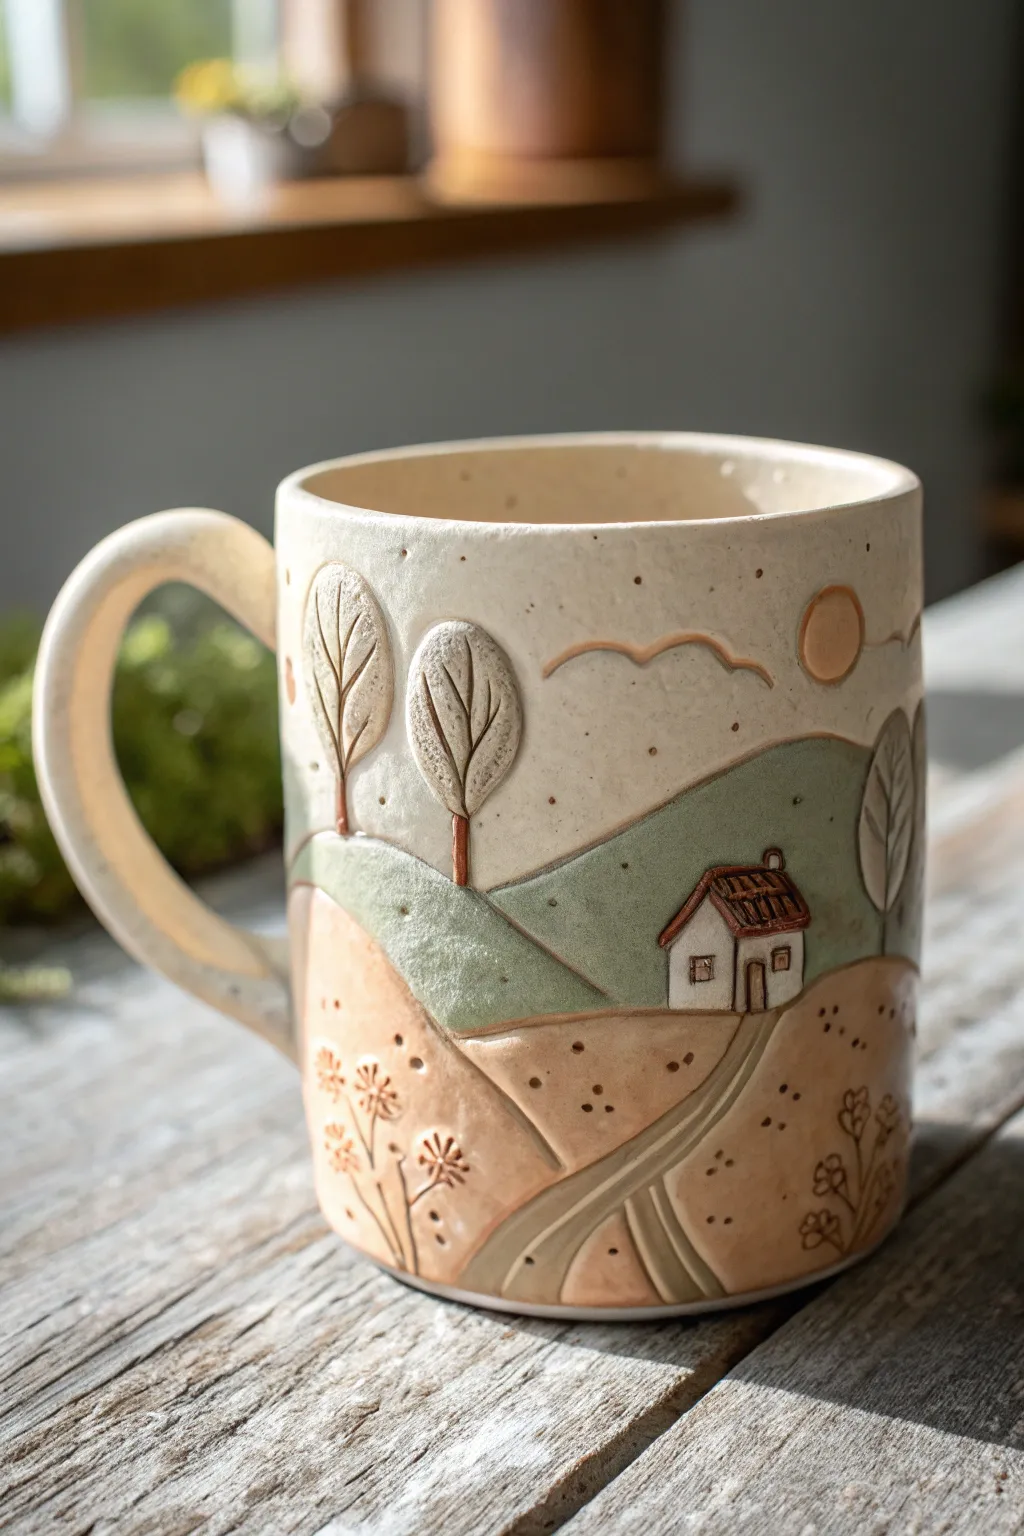
Bring a cozy, storybook landscape to life with this wrap-around polymer clay design that mimics the look of hand-thrown stoneware. The gentle rolling hills, distant cottage, and stylized trees create a serene pastoral scene perfect for your morning coffee.
Step-by-Step Tutorial
Materials
- Plain white ceramic mug
- Polymer clay (white, beige/tan, sage green, terracotta)
- Liquid polymer clay (clear or white)
- Speckled clay mix or black pepper/dried tea leaves
- Rolling pin or pasta machine
- Needle tool
- Ball stylus tools (various sizes)
- Exacto knife or clay blade
- Texture sponge or sandpaper
- Pastel chalks (browns and oranges) for shading
- Soft brush
- Matte varathane or polyurethane varnish
Step 1: Base Preparation
-
Clean surface:
Begin by thoroughly cleaning your ceramic mug with rubbing alcohol to remove any oils or residue, ensuring the clay adheres perfectly later. -
Prepare the speckle mix:
To achieve that authentic pottery look, mix a tiny amount of ground black pepper or dried tea leaves into your white and beige clay. This creates a faux-stoneware finish without needing special effect clays. -
Create the sky layer:
Roll out a sheet of your speckled white clay to about 2-3mm thickness. Cut a strip wide enough to cover the upper 2/3 of the mug and wrap it around, smoothing the seams gently with your finger or a clay shaper.
Seamless Smoothness
Use a tiny bit of liquid clay or baby oil on your finger to smooth out fingerprints before baking. It acts like a slip on real pottery.
Step 2: Landscaping the Scene
-
Form the background hills:
Roll out the sage green clay. Cut a long, wavy strip to represent the distant hills. Apply this over the bottom edge of the white sky layer, pressing gently to adhere. -
Add foreground terrain:
Using the beige/tan clay, cut another wavy section for the foreground. This should be taller in some spots to create depth. Layer this over the bottom of the green section. -
Blend the layers:
Use a rolling tool or your fingers to gently compress the layers together so they form a unified surface rather than sitting high on top of each other. I like to sponge the surface lightly here to create a uniform texture. -
Carve the path:
With a modeling tool, carve two parallel winding lines into the beige foreground clay to define a road leading toward where the cottage will sit. Depress the clay between the lines slightly to make it look sunken.
Dealing with Air Bubbles
If you see a bubble under the sheet of clay, pierce it with a needle tool and gently press the air out, then smooth the hole closed.
Step 3: sculpting Details
-
Construct the cottage:
Cut a tiny pentagon shape from white clay for the house body and press it onto the green hill line. Add a small textured rectangle of terracotta clay for the roof. -
Detail the house:
Use your needle tool to impress small windows and a door. You can fill the lines with a tiny bit of brown chalk dust to make them pop. -
Make the trees:
Roll teardrop shapes from the beige clay for tree canopies. Flatten them onto the sky area. Use a needle tool to drag lines from the bottom of the shape upward, mimicking branches. -
Add tree trunks:
Roll very thin snakes of terracotta or brown clay. Place them beneath the canopies as trunks, blending the bottom of the trunk into the hill it stands on. -
Create the sun:
Press a small disk of terracotta clay into the upper right sky. Smooth the edges so it looks inlaid rather than stuck on. -
Flying birds:
Roll two tiny, thin threads of clay and curve them into ‘M’ or ‘V’ shapes. Press them gently into the sky near the sun.
Step 4: Finishing Touches
-
Texturing the fields:
Use a small ball stylus to poke random dot patterns into the beige foreground and the white sky. This mimics the pitting found in rustic ceramics. -
Botanical impressions:
Press a star-shaped tool or carefully carve small asterisk shapes into the foreground hills to represent wildflowers. -
Apply shading:
Brush brown pastel chalk powder into the crevices, specifically around the trees, the house roof, and the edges of the path. This ‘antiques’ the piece. -
Clean seams:
Wipe the surface lightly with a baby wipe to remove excess chalk from the high points, leaving the color only in the carved lines. -
Baking:
Bake the mug according to your clay manufacturer’s instructions (usually 275°F/130°C for 30 minutes). Let it cool completely in the oven to prevent cracking. -
Sealing:
Finish with a coat of matte polyurethane varnish to seal the chalk and protect the clay during hand-washing.
Enjoy using your beautifully crafted countryside mug for a relaxing warm drink
Matching Spoon Topper Mug Set

Transform a plain ceramic mug and spoon into a rustic, garden-inspired set with custom polymer clay appliqués. The combination of teal daisies, terracotta lattice patterns, and speckled stoneware creates a charming, handmade aesthetic perfect for cozy mornings.
How-To Guide
Materials
- Plain, bake-safe ceramic mug (speckled beige preferred)
- Metal teaspoon
- Polymer clay (Teal, Terracotta/Coral, Light Pink, Cream)
- Liquid polymer clay (Bake & Bond)
- Acrylic paint (Brown/Burnt Umber for antiquing)
- Gloss or satin polyurethane varnish
- Sculpting tools (needle tool, small ball stylus, clay knife)
- Small circle cutter (approx. 1/4 inch)
- Wet wipes or rubbing alcohol
- Paintbrush
- Rolling pin or pasta machine
Step 1: Prepping the Base Layers
-
Clean surface:
Begin by thoroughly cleaning the mug and spoon handle with rubbing alcohol to remove any oils or fingerprints. This ensures the clay adheres properly during the baking process. -
Create the bottom band:
Condition the terracotta clay until soft. Roll it into a long, even strip approximately 3/4-inch wide. Wrap this around the very bottom of the mug, trimming the excess cleanly where the ends meet. Smooth the seam with your finger. -
Add the top scalloped band:
Roll another thin strip of terracotta clay, roughly 1/2-inch wide. Apply this around the top rim area of the mug. Use a small ball tool or your finger to gently push the bottom edge of this strip upwards at regular intervals to create a scalloped or wavy edge. -
Texture the bottom band:
Using a needle tool or a dull knife, carefully carve a diagonal cross-hatch or lattice pattern into the bottom terracotta band. Keep your pressure light so you don’t cut all the way through to the ceramic. -
Detail the top band:
With a needle tool or small dotting tool, press small details into the scalloped top band. The reference shows small ‘U’ shapes or tiny dots following the curve of the scallops for a folk-art feel.
Adhesion Pro Tip
Ceramic surfaces are slick! Use sandpaper to roughen the specific areas where clay will go before cleaning. The scratches give the clay a mechanical grip.
Step 2: Sculpting the Floral Appliqués
-
Form flower petals:
Condition your teal clay. Roll six small balls of clay for each flower. Flatten them slightly into teardrop shapes to form individual petals. -
Assemble flowers on the mug:
Apply a tiny dab of liquid polymer clay to the center of the mug where you want a flower. Arrange the teal petals in a circle directly onto the mug surface. Gently press the center of each petal with a modeling tool to secure it and add dimension. -
Add flower centers:
Roll small balls of terracotta or light pink clay. Press these into the center of each teal flower. Use a needle tool to texture the center for a pollen-like effect. -
Create the spoon topper:
For the spoon, create a larger flower using the terracotta clay for petals and a small cluster of teal balls for the center. I find it easiest to build this directly onto the spoon’s bowl or handle depending on where you want it to sit. -
Secure the spoon flower:
Ensure there is a layer of liquid clay between the metal spoon and your clay flower. Press the clay firmly against the metal so it contours to the curve. -
Refine details:
Check all edges. Use a clay knife to sharpen the petal shapes if they became too rounded, resembling the distinct cut-out look of the original design.
Level Up: Handle Detail
Don’t ignore the mug handle! Add a tiny matching vine or a single miniature leaf climbing up the handle to tie the whole design together seamlessly.
Step 3: Baking and Antiquing
-
Bake the set:
Place both the mug and the spoon in a cold oven. Set the temperature according to your clay manufacturer’s instructions (usually around 275°F/135°C). Turn the oven on and bake for 30 minutes once it reaches temperature. Letting it heat up with the oven prevents the ceramic from cracking. -
Cool down completely:
Turn off the oven and open the door slightly, but leave the pieces inside to cool down slowly. This gradual cooling is crucial for the longevity of the bond. -
Apply antique wash:
Dilute a small amount of brown acrylic paint with water. Brush it over the baked clay textures, especially the lattice work and flower centers. -
Wipe back paint:
Immediately use a damp paper towel or wet wipe to remove the excess paint from the raised surfaces. The dark paint will remain in the crevices, highlighting the textures and giving that rustic, aged look. -
Seal the work:
Once the paint is fully dry, apply two thin coats of water-based polyurethane varnish to the clay parts only. This protects the paint and makes the mug hand-wash safe.
Enjoy sipping your favorite tea from your beautiful, custom-crafted garden mug