If you’ve got some polymer clay and a little curiosity, you’ve got everything you need to make a necklace that feels totally you. Here are my go-to polymer clay necklace ideas, starting with the classics and ending with a few studio-favorite wild cards.
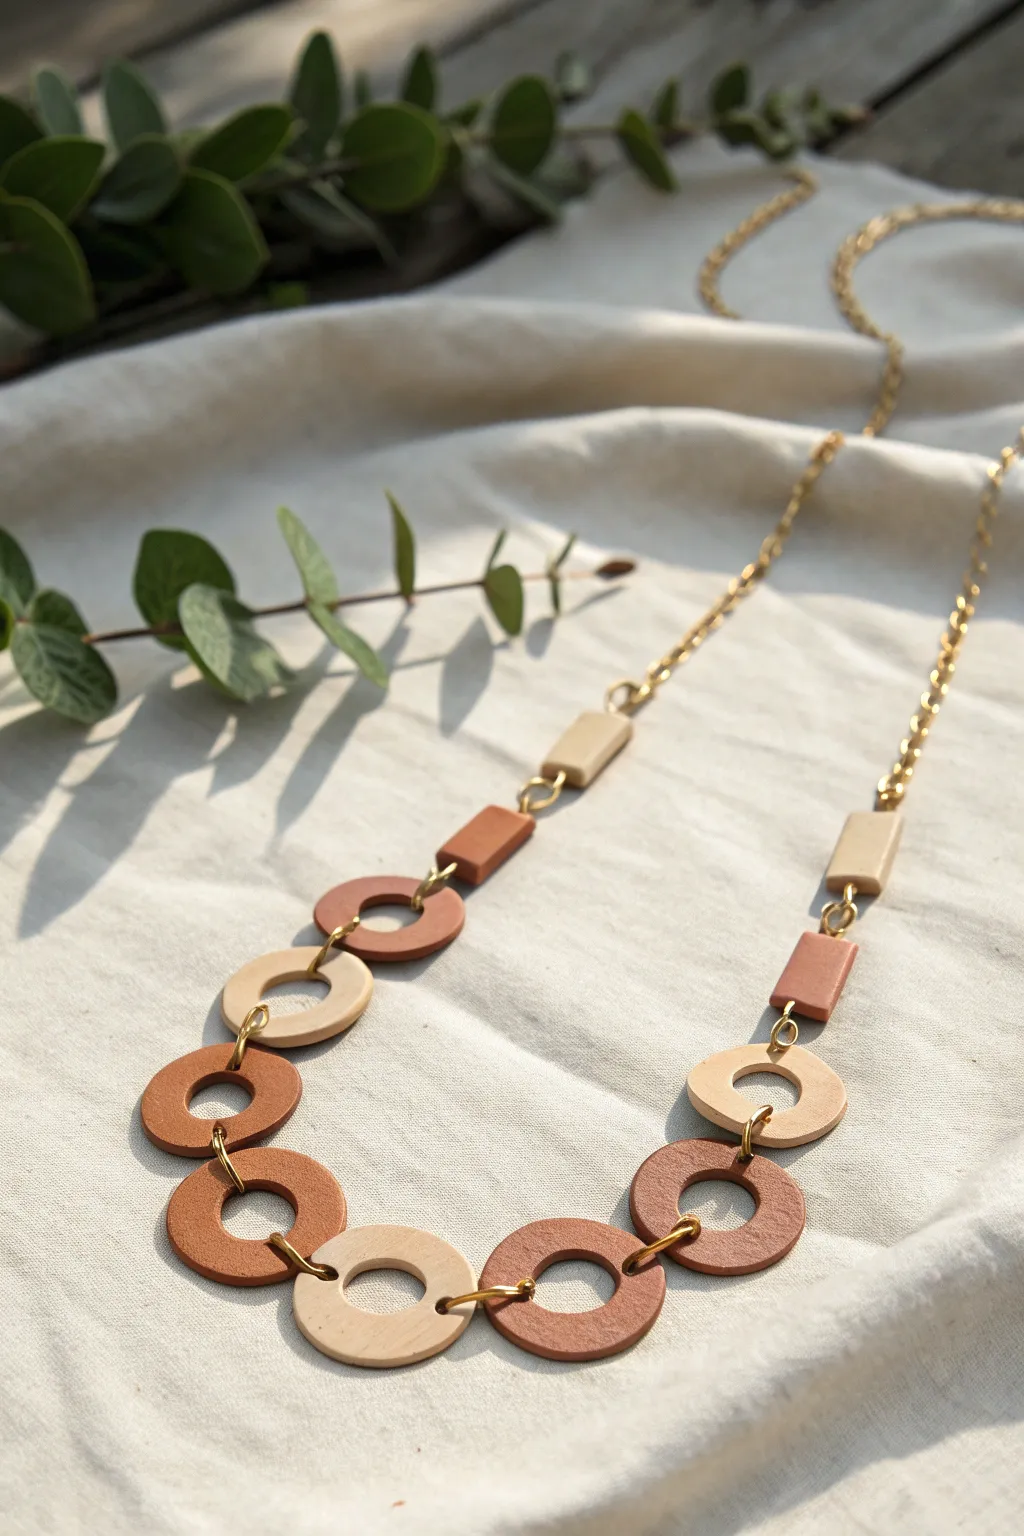
Simple Disc Bead Strand
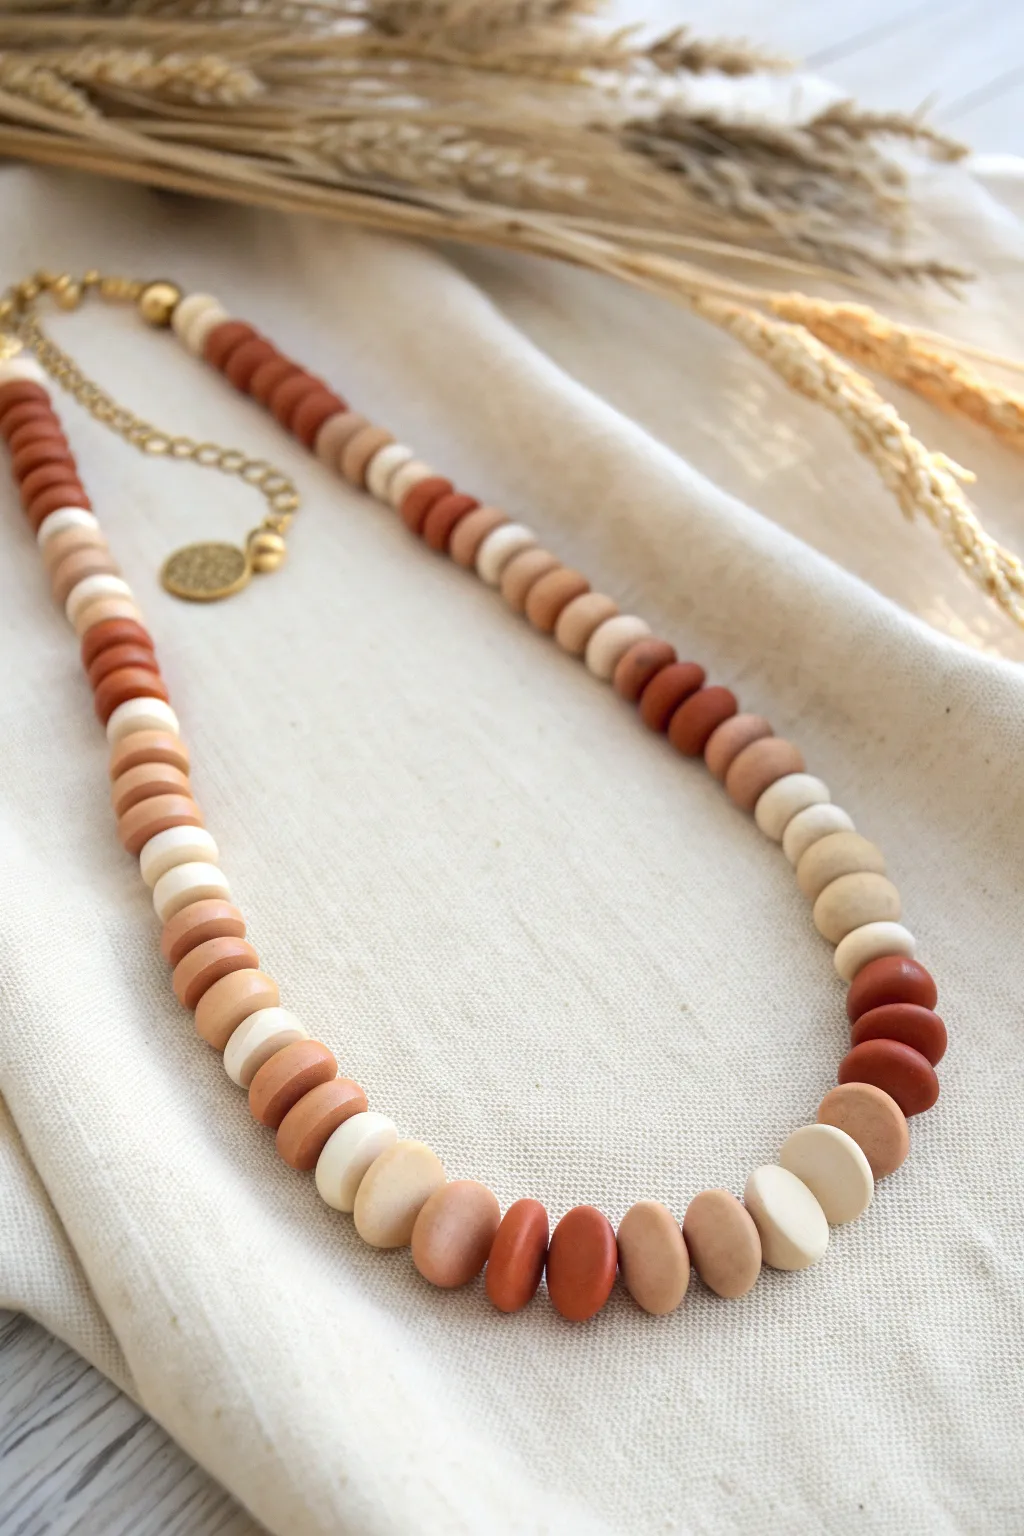
Embrace rustic elegance with this simple yet stunning disc bead necklace, featuring a warm palette of terracotta, beige, and cream. The organic shape of each handmade bead gives this piece a wonderful tactile quality that feels both modern and timeless.
Step-by-Step Tutorial
Materials
- Polymer clay (terracotta/rust, beige/tan, cream/white)
- Acrylic roller or pasta machine
- Small circle cutter (approx. 10-12mm)
- Needle tool or bead piercing pin
- Parchment paper-lined baking sheet
- Oven
- Beading wire or strong cord
- Crimp beads and crimp tool
- Gold jump rings
- Lobster clasp
- Chain extender with charm (optional)
- Jewelry pliers
Step 1: Creating the Clay Discs
-
Condition the Clay:
Begin by thoroughly conditioning each color of polymer clay separately. Knead the clay in your hands until it is soft, pliable, and free of cracks. I find that warming the clay in my hands for a few minutes makes a huge difference in smoothness. -
Roll out Sheets:
Using an acrylic roller or a pasta machine, roll each color into a flat sheet. Aim for a thickness of about 3mm to 4mm. You want them thick enough to be sturdy but not chunky. -
Cut the Circles:
Take your small circle cutter (around 10mm to 12mm diameter works best for this scale) and cut numerous circles from each color sheet. Dip your cutter in a little cornstarch if the clay sticks. -
Soften the Edges:
Gently pick up a clay circle and smooth the sharp cut edges with your fingertip. This gives the bead a more organic, stone-like appearance rather than a harsh mechanical cut. -
Shape into Discs:
Lightly press the circle between your thumb and forefinger to flatten it slightly into a lentil or disc shape, ensuring the center is slightly thicker than the edges. -
Pierce the Beads:
Ideally while the bead is still on your work surface or gently held, use a needle tool to pierce a hole through the center. Pierce from one side, then flip and pierce from the other to ensure a clean exit hole. -
Check the Hole Size:
Make sure your bead hole is wide enough to accommodate your specific beading wire or cord. Gives the needle a little wiggle to widen it slightly if necessary. -
Repeat the Process:
Continue this process until you have roughly 60-80 beads, depending on your desired necklace length. Vary the quantities of each color to create an irregular pattern later.
Step 2: Baking and Finishing
-
Arrange for Baking:
Place your pierced beads on a parchment-lined baking sheet. Arrange them flat so they don’t warp during the curing process. -
Bake the Clay:
Bake the beads according to the manufacturer’s instructions on your specific brand of clay. This is usually around 275°F (135°C) for 15-30 minutes. -
Cool Down:
Allow the beads to cool completely in the oven or on a wire rack before handling. They are fragile when hot but harden as they cool. -
Plan the Pattern:
Lay out your beads on a bead board or a towel. Experiment with color blocking—grouping several rust beads, followed by a mix of cream and beige, to replicate the random, organic pattern seen in the example.
Fixing Wonky Holes
If your bead holes closed up slightly during baking, use a small hand drill or a heated needle tool to gently re-open them without cracking the bardened clay.
Step 3: Assembly
-
String the Beads:
Cut a length of beading wire roughly 20 inches long. Attach a crimp bead and a jump ring to one end to act as a stopper, then begin threading your beads according to your layout. -
Check the Drape:
Once all beads are strung, hold the necklace up to ensure the discs sit nicely against each other without bunching too tightly. -
Close the Loop:
Thread a crimp bead onto the open end of the wire, followed by the loop of your lobster clasp or a jump ring. Thread the wire back through the crimp bead and pull tight. -
Secure the Crimp:
Use your crimping tool or flat-nose pliers to flatten the crimp bead securely. Trim any excess wire close to the crimp. -
Add the Extender:
Attach a short length of gold chain to the jump ring on the non-clasp side. This adds an adjustable element and a professional finish. -
Final Polish:
If desired, buff the beads lightly with a soft cloth (like denim) to give them a subtle sheen, finishing your beautiful handmade accessory.
Pro Texture Tip
Before cutting your circles, lightly sponge the clay sheet with a piece of sandpaper or a textured fabric to give the surface a realistic, stone-like matte finish.
Now you have a versatile, earth-toned necklace that adds a perfect touch of nature to any outfit


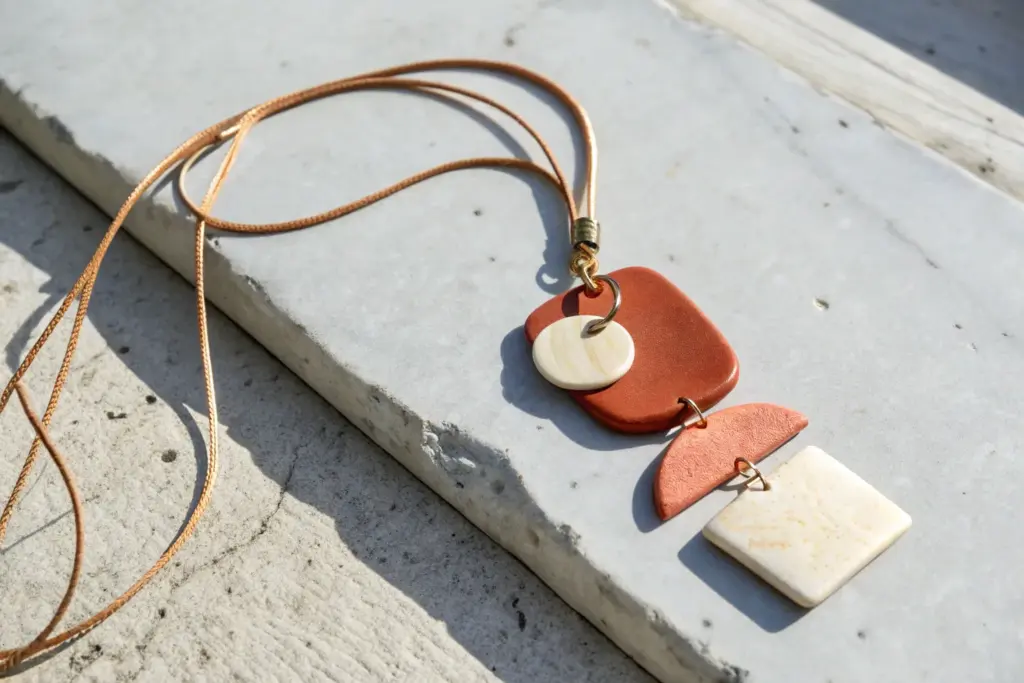
Minimal Pendant on a Cord
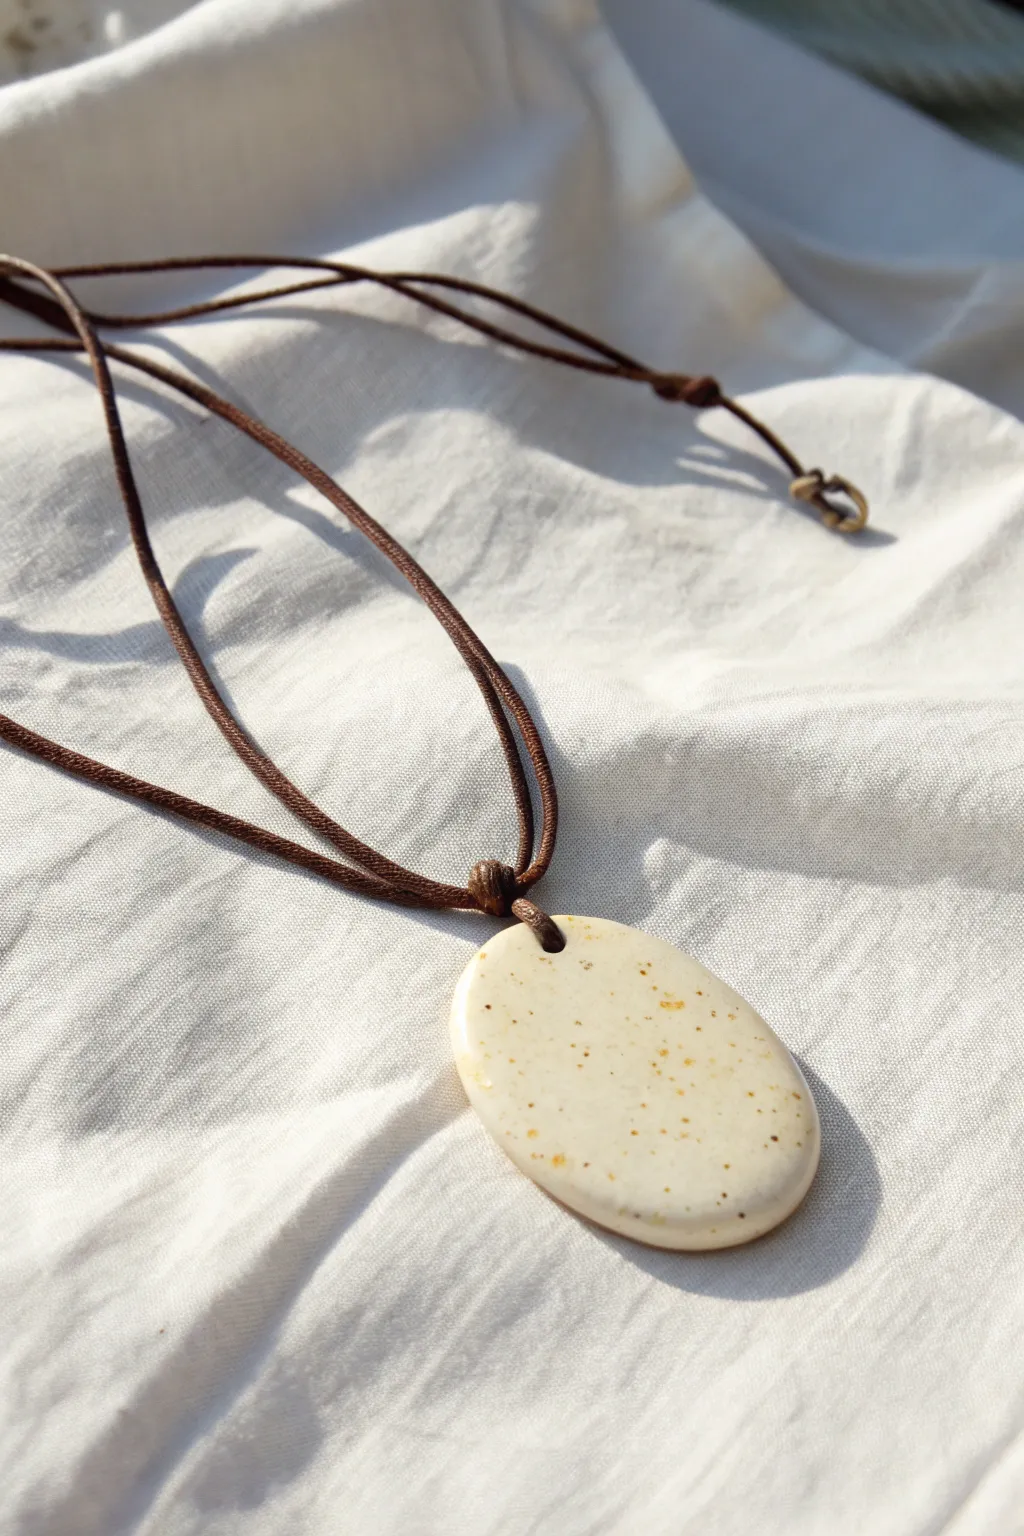
This minimalist pendant perfectly mimics the organic look of glazed stoneware pottery without the need for a kiln. With its subtle faux-stone speckling and simple cord finish, it adds an earthy, effortless touch to any outfit.
Step-by-Step
Materials
- White polymer clay (approx. 1/4 block)
- Translucent polymer clay (small amount)
- Ground black pepper or dried coffee grounds
- Gold or bronze mica powder (optional)
- Acrylic roller
- Oval or teardrop cutter (approx. 1.5 – 2 inches)
- Sandpaper (various grits, wet/dry)
- Drill bit or toothpick (3mm)
- UV resin or gloss glaze
- Brown waxed cotton cord (approx. 2mm)
- Jewelry findings (cord ends, clasp) – OR create a slip knot
Step 1: Mixing the Faux Stone Clay
-
Condition the base:
Begin by thoroughly conditioning your white polymer clay until it is soft and malleable. If the clay feels too stiff, you can add a drop of clay softener or baby oil to help it along. -
Add translucency:
Mix in a small amount of translucent clay (about 1 part translucent to 4 parts white). This adds depth and helps the final piece look less like plastic and more like polished stone. -
Create the speckles:
Sprinkle a pinch of ground black pepper or dried, used coffee grounds onto the flattened clay. Fold the clay over to trap the particles inside. -
Incorporate the texture:
Knead the clay repeatedly to distribute the specks evenly. You want a random, organic distribution, so keep folding and rolling until you don’t see any large clumps of pepper. -
Add a shimmer (optional):
For a subtle mineral effect like the one in the photo, dip your finger in bronze or gold mica powder and wipe it across the clay before a final fold. It shouldn’t change the base color, just add tiny metallic flecks.
Step 2: Shaping and Baking
-
Roll the slab:
Roll your mixed clay out on a smooth surface or tile. You want it relatively thick for a quality feel—aim for approximately 4mm to 5mm thickness. -
Cut the shape:
Use your oval or teardrop cutter to punch out the pendant shape. If you don’t have a cutter, you can hand-shape an oval and smooth the edges with your fingertips. -
Soften the edges:
Gently run your finger around the cut edge of the clay to round it off slightly. This mimics the soft, melted look of glazed ceramic rather than a sharp, machine-cut plastic edge. -
Create the hole:
Use a toothpick or a small straw to poke a hole near the top, centered horizontally. Make sure the hole is large enough (at least 3mm) to accommodate your cord comfortably. -
Bake:
Place the pendant on a tile or parchment-lined baking sheet. Bake according to your brand’s specific instructions (usually 275°F/135°C for 30-45 minutes). Longer baking makes the clay stronger. -
Cool down:
Allow the piece to cool completely in the oven or on a wire rack before handling it, as warm clay is fragile.
Uneven Glaze Finish?
If your glaze pools or pulls away from the edges, apply it in very thin layers. Surface tension can cause pulling; lightly sanding the surface before glazing helps it adhere better.
Step 3: Finishing and Assembly
-
Wet sanding:
Once cool, use wet/dry sandpaper under running water to smooth out any fingerprints or rough edges. Start with 400 grit and work up to 1000 grit for a silky finish. -
Glazing:
Apply a coat of UV resin or a high-gloss polymer clay glaze. This mimics a ceramic glaze and makes the speckles pop. If using resin, cure it under a UV lamp; if using glaze, let it air dry completely. -
Preparing the cord:
Cut a length of brown waxed cotton cord that fits comfortably over your head roughly 24-30 inches depending on preference. -
Attach the pendant:
Fold the cord in half to find the center. Push the folded loop through the hole in the pendant from front to back. -
Secure with a lark’s head knot:
Pull the two loose ends of the cord through the loop you just pushed through the hole. Tighten the cord so the knot sits snugly against the top of the pendant. -
Finish the closure:
Tie the two loose ends of the cord together using a simple overhand knot or attach metal cord ends and a clasp for a more polished look.
Ceramic Style Tip
To truly mimic ceramic, intentionally leave the very edges slightly less glossy or sand them matte after baking. This looks like the ‘unglazed’ foot of a pottery piece.
Now you have a stunning, simple piece of faux-stone jewelry ready to wear or gift


Terrazzo Speckle Bead Necklace

Capture the trendy look of terrazzo stone with this lightweight, playful polymer clay necklace. The irregular speckles of orange, teal, and black against a creamy white background create a modern, artistic accessory perfect for everyday wear.
Step-by-Step Tutorial
Materials
- White or cream polymer clay (for the base)
- Small amounts of orange, teal, and black polymer clay
- One large wooden bead (unfinished)
- Light beige or grey suede or faux suede cord (approx. 24 inches)
- Silver cord ends/clamshell tips
- Silver lobster clasp and jump rings
- Bead piercing tool or skewer
- Acrylic roller
- Craft knife or tissue blade
- Sandpaper (fine grit)
- Oven for baking
Step 1: Preparing the Terrazzo Chips
-
Condition the colored clay:
Start by thoroughly conditioning your orange, teal, and black polymer clays separately until they are soft and pliable. You only need a very small amount of each for this project. -
Roll thin sheets:
Roll each colored piece of clay into a very thin sheet. You can use your acrylic roller or a pasta machine on a thin setting. The thinner the sheet, the more delicate your speckles will look. -
Create the chips:
Use your craft knife or tissue blade to chop the thin sheets into tiny, irregular confetti-like pieces. Vary the sizes slightly, but keep them generally small. Keep the colors separated in little piles for now. -
Refrigerate briefly:
I find it helpful to pop these little piles of chips into the fridge for about 10 minutes. This hardens them slightly so they don’t smear when you press them into the base beads later.
Step 2: Forming the Beads
-
Condition the base clay:
Take your block of white or cream clay and condition it well. Divide it into seven equal portions. You can do this by rolling a log and cutting equal segments or weighing them for precision. -
Roll base spheres:
Roll each white portion into a smooth, round ball between your palms. Ensure there are no cracks or air bubbles trapped inside. -
Apply the speckles:
Take a base bead and gently roll it into your pile of colored chips. Pick up a random assortment of orange, teal, and black pieces. -
Embed the chips:
Once the chips are stuck to the surface, gently roll the bead between your palms again. Apply smooth, even pressure to push the colored fragments flush with the white surface. -
Smooth the surface:
Continue rolling the bead until it is perfectly round again and the surface feels seamless. The chips should look like part of the stone, not sitting on top of it. -
Pierce the holes:
Using your bead piercing tool or a skewer, carefully create a hole through the center of each bead. Twist the tool gently as you push through to avoid distorting the sphere’s shape. -
Final check:
Inspect each bead to ensure the hole is clear and the shape is still round. Gently reshape if necessary.
Clean Rolling Tip
To keep your white clay pristine, wash your hands thoroughly before rolling the base beads, and wipe your work surface with a baby wipe or alcohol to remove dust.
Step 3: Baking and Assembly
-
Bake the beads:
Arrange your seven speckled beads on a baking sheet lined with plain paper or cardstock. Bake according to the manufacturer’s instructions for your specific brand of clay—usually around 275°F (130°C) for 30 minutes. -
Cool and sand:
Allow the beads to cool completely. If there represent any rough spots or fingerprints, lightly sand them under running water with fine-grit sandpaper until they are buttery smooth. -
Prepare the cord:
Cut your suede cord to your desired length. Check the ends to ensure they are cut cleanly and not fraying. -
String the beads:
Thread your beads onto the cord. Arrange them so the plain wooden bead sits third from one end (or wherever you prefer for asymmetry), flanked by the speckled clay beads. -
Attach cord ends:
Place a silver cord end or clamshell tip over each end of the suede cord. Use flat-nose pliers to crimp them deeply and securely so the cord doesn’t slip out. -
Add the clasp:
Open a jump ring with your pliers and attach the lobster clasp to one cord end. Attach a plain jump ring to the other side to complete the closure.
Matte Finish
After baking, buff the beads vigorously with a piece of denim or heavy canvas. This gives them a professional, soft matte sheen without needing any varnish.
Now you have a stunning, artisan-style necklace ready to add a pop of color to your outfit


Ombre Gradient Beads
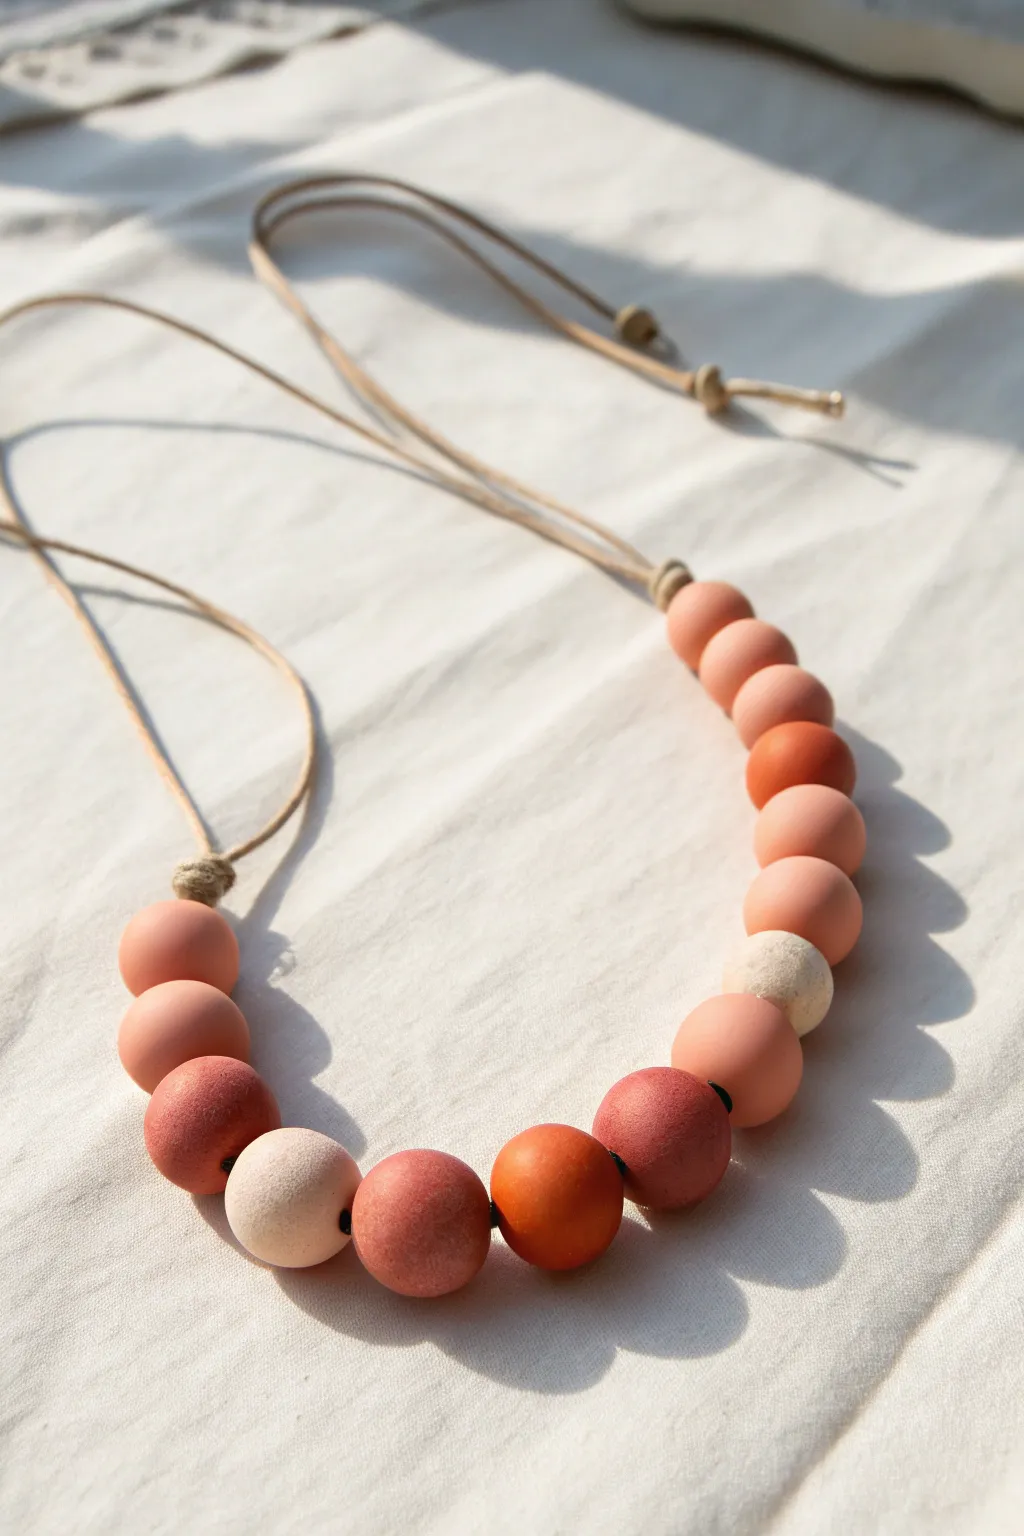
This project features soft, matte beads graduating from creamy ivory to deep terracotta, evoking the warm hues of a late summer sunset. The simple knotted cord design puts all the focus on the beautiful, custom-blended clay colors.
Step-by-Step Guide
Materials
- Polymer clay in White, Translucent, Burnt Orange, and Red/Magenta
- Acrylic rolling pin or clay blending machine
- Round bead roller tool (optional but helpful for uniformity)
- Bead piercing pins or toothpicks
- Baking sheet and parchment paper
- Wet/dry sandpaper (400, 600, 1000 grit)
- 1.5mm waxed cotton or hemp cord (natural beige)
- Scissors
Step 1: Color Mixing Strategy
-
Establish your base colors:
Start by conditioning your clay. You need a pure white, a deep terracotta (mix orange with a touch of brown), and a vibrant coral-pink. -
The gradient method:
To achieve the ombre effect, you won’t use just stock colors. Divide your white clay into five equal portions. -
Create the lightest shade:
Leave one white portion almost pure, but add a tiny speck of the terracotta clay to warm it up into a cream color. This corresponds to the cream bead shown in the image. -
Mix the mid-tones:
Take the next portion of white and add a pea-sized amount of coral. For the third portion, add a double amount of coral. This creates your soft peach and pink transitions. -
Mix the deepest shades:
For the darkest beads, use the terracotta straight, and create a second deep shade by mixing equal parts terracotta and coral. You should aim for about 5-6 distinct color variations.
Step 2: Forming the Beads
-
Portion control:
Pinch off equal amounts of clay for each bead. For the necklace in the photo, the beads look to be about 20mm in diameter. -
Rolling spheres:
Roll each portion vigorously between your palms to create a smooth ball. I prefer to use a bead roller here to ensure they are visually perfectly round. -
Refining the surface:
Examine each bead for fingerprints. Gently buff them lightly with your fingertip to smooth any ridges. -
Piercing the holes:
Using a bead pin or thick needle, pierce a hole through the center of each bead. Twist the pin as you push to avoid squishing the sphere. -
Check the exit point:
Once the pin pokes through the other side, remove it and re-insert it from that exit hole to ensure the channel is clean and wide enough for your cord.
Smooth Surface Secret
Before baking, lightly brush your raw clay beads with a little cornstarch or baby powder. It helps smooth out fingerprints and results in a soft, matte texture after baking.
Step 3: Baking and Finishing
-
Baking setup:
Place the beads on a bed of cornstarch or crimped parchment paper on your baking sheet. This prevents flat spots from forming on the bottom. -
Baking:
Bake according to your clay manufacturer’s instructions (usually 275°F/130°C for 30-45 minutes). Let them cool completely in the oven to prevent cracking. -
Sanding for matte texture:
Once cool, submerge the beads in a bowl of water. Sand each one using wet/dry sandpaper, starting with 400 grit and working up to 1000 grit. -
Buffing:
Dry the beads and buff them vigorously with a soft denim cloth or jeans scrap. This gives that velvety matte finish seen in the photo without adding artificial gloss.
Texture Twist
For a rustic look, gently roll your uncured beads over a piece of coarse sandpaper or a stone to imprint a subtle, organic texture before baking.
Step 4: Assembly
-
Cord preparation:
Cut a length of cord approximately 36 inches long. Fold it in half to find the center. -
Stringing the gradient:
Thread your beads onto the cord. Arrange them so the colors mirror each other or transition from light to dark to light across the neckline. -
Securing the beads:
Tie a simple overhand knot tightly against the last bead on both the left and right sides. This keeps the beads centered and stationary. -
Adjustable closure:
Tie the ends of the cord into sliding knots so you can adjust the necklace length easily.
Wear your new gradient necklace with a simple white tee to let those sunset colors truly pop

The Complete Guide to Pottery Troubleshooting
Uncover the most common ceramic mistakes—from cracking clay to failed glazes—and learn how to fix them fast.
Textured Medallion Pendant
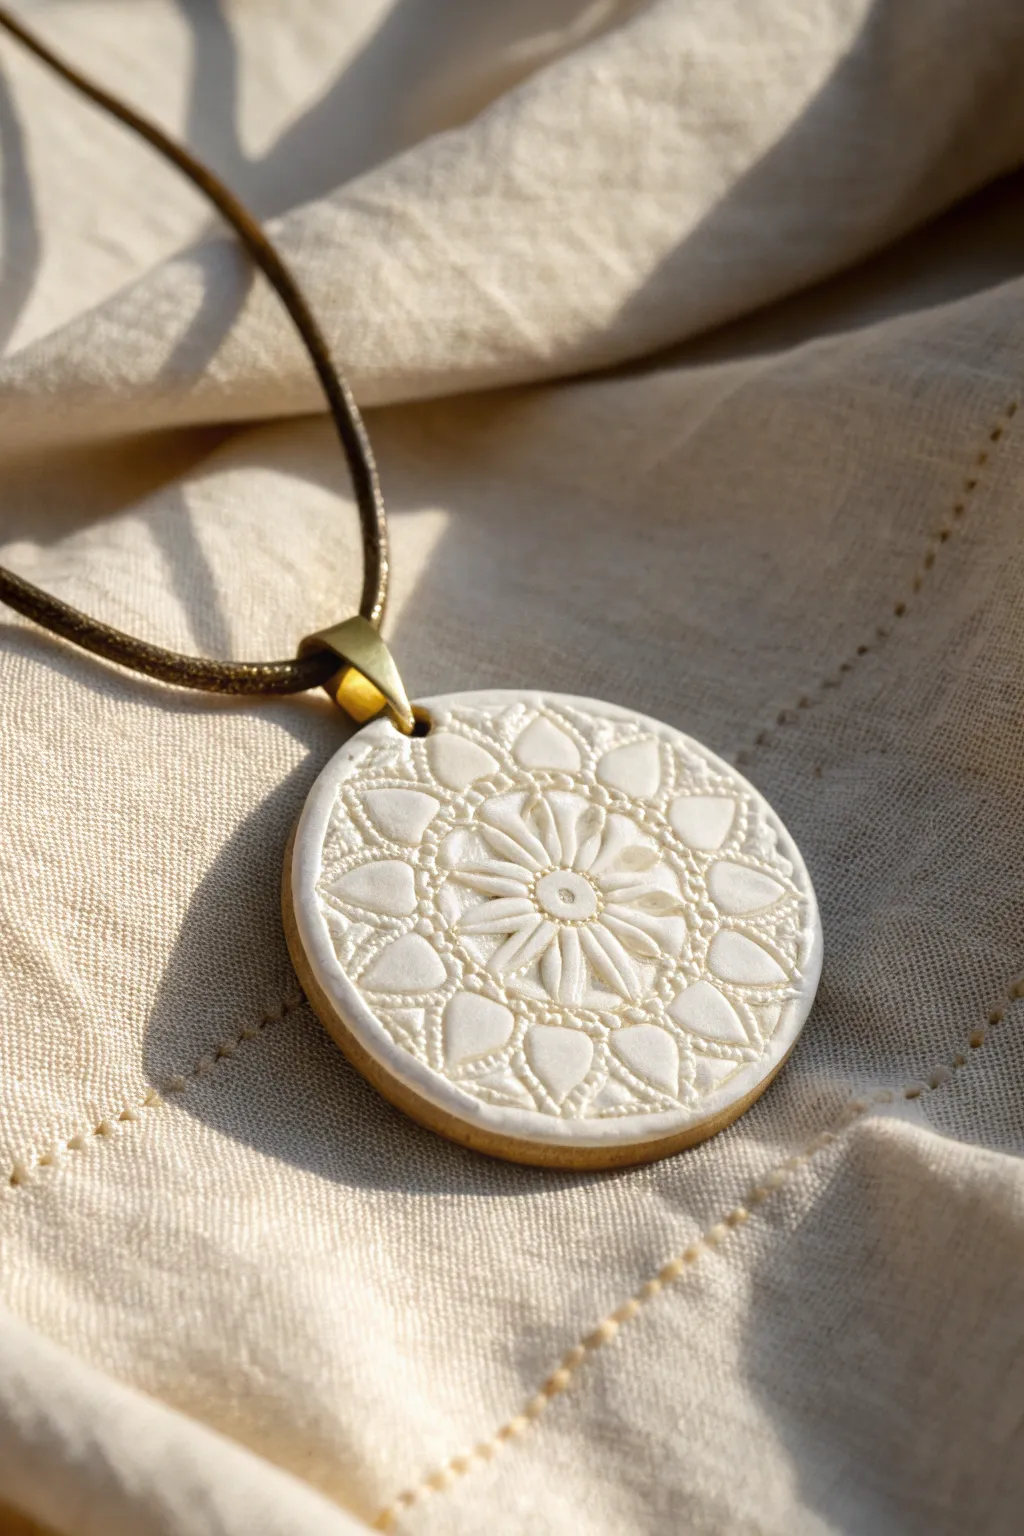
This elegant pendant combines the delicate look of lace with the durability of polymer clay. By capturing intricate textures in a sophisticated white-and-gold color palette, you’ll create a timeless accessory that looks far more complex than it actually is.
How-To Guide
Materials
- White polymer clay
- Gold polymer clay (or metallic gold paint)
- Texture sheet, rubber stamp, or piece of heavy lace (mandala pattern)
- Round clay cutter (approx. 2 inch diameter)
- Acrylic rolling pin
- Tissue blade or craft knife
- Gold jump ring (large)
- Pendant bail (gold)
- Dark brown leather or suede cord
- Liquid polymer clay (optional)
- Gloss or matte varnish (optional)
- Needle tool or toothpick
- Clay machine (pasta machine) – optional but helpful
Step 1: Preparing the Clay Base
-
Condition the white clay:
Start by warming the white polymer clay in your hands, kneading it until it is soft, pliable, and free of air bubbles or cracks. -
Roll the white slab:
Using your acrylic roller or pasta machine on a medium setting, roll the white clay into a smooth, even sheet about 3mm thick. -
Apply the texture:
Place your mandala texture sheet, stamp, or piece of lace face-down onto the white clay slab. If using lace, ensure it has a deep relief for the best impression. -
Imprint the design:
Firmly roll over the texture tool with your acrylic roller to embed the pattern deep into the clay. Lift the texture tool straight up carefully to reveal the raised white design. -
Cut the centerpiece:
Position your round cutter over the most pleasing part of the mandala design. Press down firmly to cut out your white textured circle, then carefully remove the excess clay around it. -
Prepare the gold backing:
Condition the gold polymer clay thoroughly. Roll it out into a sheet slightly thicker than the white layer, perhaps around 4mm, to provide a sturdy base.
Clean Slate Pro-Tip
White clay picks up dust easily. Clean your hands, work surface, and roller with a baby wipe or rubbing alcohol immediately before handling the white clay to keep it pristine.
Step 2: Assembly and Refining
-
Mount the white center:
Place the textured white circle onto the gold sheet. Usually, the clay is tacky enough to stick on its own, but a tiny drop of liquid clay can help ensure a permanent bond. -
Cut the backing:
Use the same round cutter to cut through the gold clay exactly around the white circle. Alternatively, cut slightly larger to create a visible gold rim, or cut flush and then wrap a thin snake of gold clay around the edge. -
Refining the edge:
If you cut the layers flush, roll a thin strip of gold clay and press it gently around the circumference to hide the seam. Smooth this gold rim with your fingertip so it looks like a solid metal bezel holding the white stone. -
Piercing the hole:
Use a needle tool or small straw to create a hole at the very top of the pendant for the jump ring. Ensure it goes cleanly through both layers. -
Check for fingerprints:
Before baking, examine the gold rim and back for any accidental fingerprints. I like to smooth these away gently with a bit of cornstarch on my finger or a soft brush.
Antique Effect Level-Up
Before baking, lightly brush darker powder pigment (like burnt umber) into the crevices of the white texture, then wipe the surface clean. This highlights the intricate pattern depth.
Step 3: Baking and Finishing
-
Bake the pendant:
Place the pendant on a ceramic tile or a parchment-lined baking sheet. Bake according to your clay manufacturer’s instructions (usually 275°F/130°C) for about 30 to 45 minutes to ensure strength. -
Cooling:
Allow the piece to cool completely in the oven or on a wire rack before handling, as the clay is fragile while hot. -
Optional painting:
If you didn’t use gold clay for the backing, paint the rim and back of the baked white clay with high-quality metallic gold acrylic paint. Apply 2-3 thin coats, drying between each. -
Varnishing:
To protect the white texture from dirt, apply a thin coat of matte varnish. A gloss varnish on the gold rim can mimic the shine of real metal. -
Adding hardware:
Open a large gold jump ring using two pairs of pliers (twist, don’t pull). Thread it through the hole you created and attach the gold bail. -
Stringing:
Thread your dark brown leather or suede cord through the bail to complete the necklace.
Wear your new medallion with a simple linen shirt to let the texture truly shine
Botanical Leaf-Imprint Charm
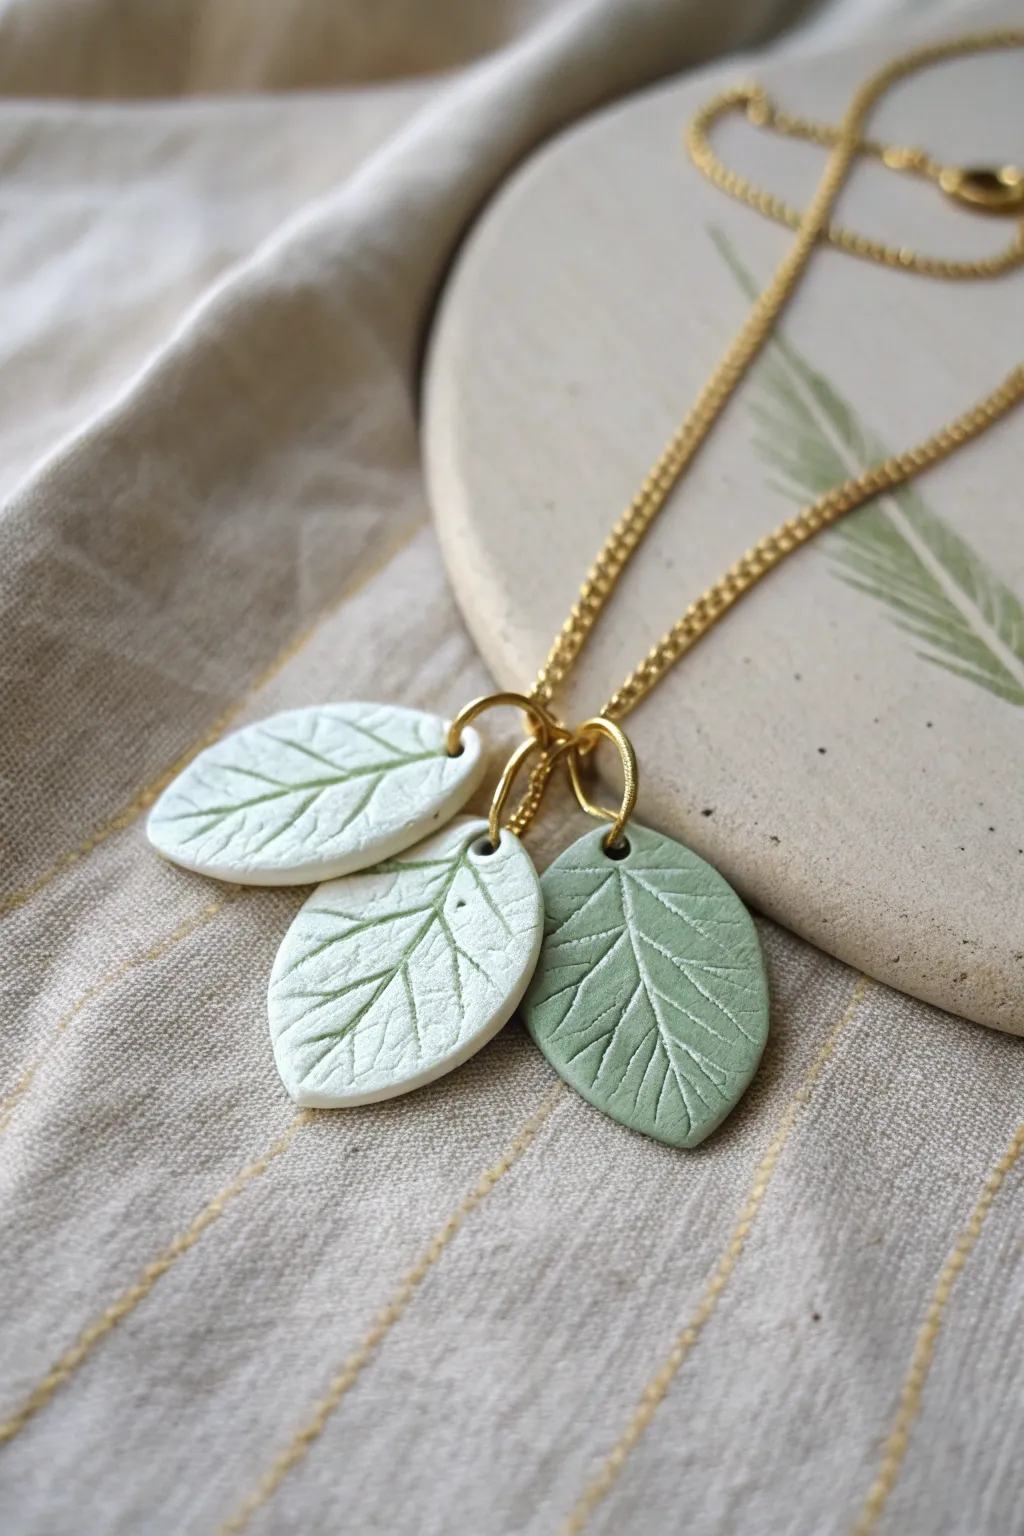
Bring the subtle elegance of nature to your jewelry collection with this necklace featuring three textured leaf charms. Using a simple imprint technique, you’ll create a sophisticated interplay of sage green and soft stone colors that hangs beautifully on a gold chain.
Detailed Instructions
Materials
- Polymer clay (white and sage green)
- Acrylic paint (sage green and white)
- Fresh leaves with prominent veins (e.g., mint, sage, or basil)
- Clay roller or acrylic rolling pin
- Craft knife or scalpel
- Small circle cutter or straw (for jump ring holes)
- Fine-grit sandpaper (optional)
- Medium round paintbrush and paper towel
- Gloss or matte varnish (optional)
- 3 large gold jump rings (approx 8-10mm)
- Gold delicate chain necklace
- Jewelry pliers
- Oven and baking tray
Step 1: Clay Preparation
-
Condition the Clay:
Begin by conditioning your polymer clay. Knead the white clay until it is soft and pliable, then do the same for the sage green clay. Wash your hands between colors to avoid transferring pigment. -
Roll the Slabs:
Roll out both colors of clay onto a clean work surface or tile. Aim for a thickness of about 3mm to 4mm—thick enough to be sturdy but thin enough to look delicate. -
Select Your Botanicals:
Choose small, fresh leaves with strong, raised vein structures on the back. Firm herbs working particularly well for this.
Cornstarch Release
Before rolling leaves into the clay, lightly dust the clay surface with cornstarch. This prevents the fresh leaf from sticking too aggressively and tearing during removal.
Step 2: Imprinting & Shaping
-
Make the Impressions:
Place your leaves vein-side down onto the clay slabs. Using your rolling pin, gently but firmly roll over the leaves once to embed them into the surface. -
Reveal the Texture:
Carefully peel back the leaf stems to reveal the intricate vein patterns stamped into the clay. -
Cut the Shapes:
Using a scalpel or craft knife, freehand cut around the leaf impression, leaving a small border to smooth out later. I like to make three leaves total: two white and one green. -
Smooth the Edges:
Gently tap the cut edges of the clay with your finger to round them off, removing any sharp angles from the cutting tool. -
Add Suspension Holes:
Use a small circle cutter or a drinking straw to punch a hole at the top of each leaf stem. Ensure the hole is large enough for your heavy-gauge jump rings. -
Bake:
Place the charms on a baking sheet lined with parchment paper. Bake according to the manufacturer’s instructions for your specific brand of clay (usually 275°F/130°C for 15-30 minutes). Let them cool completely.
Fixing Rough Edges
If your edges look ragged after baking, don’t worry. Use fine-grit sandpaper (400-600 grit) to wet-sand the edges under running water for a professional, smooth finish.
Step 3: Antiquing & Finishing
-
Prepare the Wash:
Dilute a small dab of sage green acrylic paint with a drop of water. Repeat this process with white acrylic paint in a separate palette well. -
Apply the Contrast:
Brush the watered-down green paint over the textured surface of the *white* leaves, ensuring it gets deep into the vein crevices. -
Wipe Back:
Immediately wipe the surface with a damp paper towel. The paint will stay in the imprinted veins but wipe off the raised smooth areas, highlighting the texture. -
Detail the Green Leaf:
Repeat the previous step on the green leaf charm, but this time use the white paint wash to make the veins pop against the darker background. -
Seal (Optional):
If you want extra durability or a specific finish, apply a thin coat of matte or satin varnish to seal the paint.
Step 4: Assembly
-
Open Jump Rings:
Using two pairs of jewelry pliers, twist the large gold jump rings open laterally (never pull them apart outward). -
Attach Charms:
Slide one jump ring through the hole of each clay leaf. Before closing, thread all three jump rings onto the center of your gold chain. -
Close and Secure:
Twist the jump rings back into a closed position, ensuring the ends meet perfectly flush so the leaves don’t slip off. -
Final Arrangement:
Arrange the leaves so they overlap naturally, with the green one slightly offset, creating that clustered botanical look.
Now you have a timeless piece of nature-inspired jewelry ready to wear or gift


What Really Happens Inside the Kiln
Learn how time and temperature work together inside the kiln to transform clay into durable ceramic.
Classic Lentil Bead Necklace
This earthy, handmade necklace combines warm terracotta tones with pops of deep teal for a stunning bohemian aesthetic. The focus is on crafting perfectly imperfect lentil beads from polymer clay, creating a piece that feels both organic and refined.
Step-by-Step
Materials
- Polymer clay in terracotta/salmon pink
- Polymer clay in deep teal/turquoise
- Polymer clay in cream or bone white
- Beading wire or strong nylon cord
- Gold or brass crimp beads and covers
- Gold jump rings and lobster clasp
- Chain extender with a logo tag (optional)
- Small teal seed beads (size 8/0 or 11/0)
- Acrylic roller or pasta machine
- Round cutter (approx. 1cm diameter)
- Thick needle or bead piercing pin
- Baking sheet and parchment paper
- Jewelry pliers (flat nose and cutting pliers)
Step 1: Prepping and Mixing Clay
-
Condition the clay:
Begin by conditioning each color of polymer clay separately. Knead the terracotta, teal, and cream clays in your hands until they are soft, pliable, and free of cracks. -
Roll out sheets:
Using an acrylic roller or pasta machine on a medium setting, roll the terracotta clay into a smooth, even sheet about 3-4mm thick. Do the same for the cream clay, though you’ll need much less of it. -
Color mixing tip:
If your terracotta color feels too bright, I like to mix in a tiny pinch of brown or translucent clay to give it that natural, earthenware look visible in the photo.
Fingerprint Freedom
To remove fingerprints from raw clay beads without squashing them, lightly brush them with a bit of cornstarch or baby oil before baking. It smooths the surface instantly.
Step 2: Forming the Beads
-
Cut the base circles:
Use your small round cutter to punch out numerous circles from the terracotta sheet. This ensures every bead starts with the exact same volume of clay. -
Shape the lentils:
Take a terracotta circle and roll it into a ball first. Then, gently press it between your palm and a flat surface (or an acrylic block) moving in a circular motion to flatten it slightly into a lentil or disc shape. -
Pierce the holes:
While the clay is still raw, carefully pierce a hole through the center of the lentil shape using your bead pin. twist the pin as you push through to avoid distorting the shape. -
Make the accent rounds:
Roll small balls of the teal clay. These should be truly spherical rather than flattened. Pierce them carefully through the center. -
Create the striped accents:
For the cream and teal striped beads, flatten a small ball of cream clay into a thick disc. Roll a very thin snake of teal clay and wrap it around the center groove of the cream bead, pressing it in gently to adhere.
Uniform Bead Holes
Pierce your beads, then let them sit in the fridge for 10 mins. Pierce them again before baking. The cold clay holds its shape better, preventing oval-shaped holes.
Step 3: Baking and Assembly
-
Bake the beads:
Arrange all your pierced beads on a parchment-lined baking sheet. Bake according to your clay manufacturer’s instructions (usually 275°F/130°C for 15-30 minutes). Let them cool completely before handling. -
Prepare the wire:
Cut a length of beading wire approximately 24 inches long. Attach a crimp bead and a jump ring to one end, securing it tightly with your pliers to start the strand. -
String the seed beads:
Begin by stringing a long section (about 3-4 inches) of the small teal seed beads. This creates the thinner, delicate back portion of the necklace. -
Begin the pattern:
Start the main pattern with a teal accent bead, followed by about 6-8 terracotta lentil beads. String the lentils so they stack closely against each other. -
Add a focal break:
After the first set of terracotta beads, add a teal round bead to break up the color. Continue with another segment of terracotta lentils. -
Incorporate striped beads:
As you move toward the center, thread on your special cream-and-teal striped beads. Place them asymmetrically or use them to frame a teal bead for visual interest. -
Mirror the design:
Replicate the pattern in reverse order for the second half of the necklace, finishing with another 3-4 inch section of teal seed beads. -
Finish the clasp:
Thread on a crimp bead and the lobster clasp. Loop the wire back through the crimp bead, pull it taut but not stiff, and flatten the crimp bead with pliers. Trim excess wire. -
Add extender chain:
Attach a small length of gold chain to the jump ring on the non-clasp side to make the length adjustable.
Now you have a stunning, bespoke accessory ready to elevate your favorite casual outfit
Tube and Bar Bead Minimalism

This elegant piece combines the warmth of natural cream tones with the sharp contrast of matte black, creating a versatile accessory perfect for everyday wear. The alternating rhythm of smooth cylindrical tubes and clusters of small spacer beads gives it a sophisticated, architectural feel.
How-To Guide
Materials
- Polymer clay in ‘Beige’ or ‘Ecru’
- Polymer clay in ‘Black’
- Acrylic roller or pasta machine
- Bead piercing pins or toothpicks
- Tissue blade or sharp craft knife
- Ruler
- Beading wire or strong nylon cord
- Crimp beads and crimp tool
- Clasp of your choice (lobster claw or toggle)
- Wet/dry sandpaper (400 to 1000 grit)
- Matte varnish (optional)
Step 1: Creating the Cream Tube Beads
-
Condition the ecru clay:
Start by thoroughly conditioning your beige or ecru polymer clay until it is soft and pliable. Warm hands make this process much faster. -
Roll a log:
Roll the clay into a smooth, even snake or log shape on your work surface. Aim for a diameter of about 6-8mm (roughly 1/4 inch). -
Measure the segments:
Using your ruler, lightly mark the clay log at 2cm (3/4 inch) intervals to ensure all your tube beads are consistent in length. -
Cut the tubes:
Use your tissue blade to slice straight down through the marks. Try to avoid sawing motions to keep the ends perfectly round. -
Pierce the beads:
Gently twist a bead piercing pin through the center of each tube. I find it helps to pierce halfway from one side, then flip the bead and meet the hole from the other side to prevent distortion. -
Smooth the surface:
With the bead still on the pin, gently roll it on your work surface to smooth out any fingerprints or flat spots created during cutting.
Fingerprint Fix
Avoid pesky prints by wearing latex finger cots or lightly dusting your fingertips with cornstarch before rolling the final shape for the tube beads.
Step 2: Creating the Black Spacer Beads
-
Condition the black clay:
Clean your hands and work surface thoroughly before switching to black clay, as dark pigments can stain quickly. -
Create a thin snake:
Roll the conditioned black clay into a much thinner snake than before, aiming for about 4mm in diameter. -
Cut small segments:
Slice tiny, even pieces from the snake—no more than 3-4mm wide. You will need a distinctively larger quantity of these compared to the tube beads. -
Round the spacers:
Roll each tiny segment between your thumb and forefinger to create imperfectly round spheres. Their slight irregularity adds to the organic charm. -
Pierce the spacers:
Carefully pierce each black bead. Since they are small, be gentle to avoid squishing them completely flat.
Step 3: Baking and Finishing
-
Bake the beads:
Arrangement the beads on a baking tile or parchment-lined tray. Bake according to your clay manufacturer’s instructions (usually 275°F/130°C for 15-30 minutes). -
Cool down:
Allow the beads to cool completely in the oven or on a wire rack before handling them to ensure they harden fully. -
Sanding (Optional):
For a smoother finish, wet sand the cream tube beads under running water using 400 grit sandpaper, moving up to 1000 grit for a silky feel. -
Varnish (Optional):
If you prefer a sealed look, apply a thin coat of matte varnish to the beads and let them dry completely.
Terrazzo Effect
Mix tiny scraps of black clay into the cream clay before rolling your tubes to create a subtle granite or terrazzo stone effect for the main beads.
Step 4: Assembly
-
Prepare the cord:
Cut a length of beading wire or nylon cord to your desired necklace length, plus about 4 inches extra for finishing. -
Start the pattern:
Tie a temporary knot or use a bead stopper at one end. Begin threading your beads. -
Follow the sequence:
String one cream tube bead, followed by a cluster of 3 to 5 black spacer beads. Repeat this alternating pattern for the entire length of the necklace. -
Attach the clasp:
Once you are happy with the length, slide a crimp bead onto the end, loop the wire through your clasp, thread it back through the crimp bead, and flatten it with pliers. Repeat for the other side.
Now you have a chic, handcrafted necklace that looks like it came straight from a boutique gallery

TRACK YOUR CERAMIC JOURNEY
Capture glaze tests, firing details, and creative progress—all in one simple printable. Make your projects easier to repeat and improve.
Arch and Half-Moon Links
This elegant statement necklace combines the earthy matte finish of polymer clay with the shine of gold hardware for a sophisticated bohemian look. Using simple circle and rectangular cutters, you will create a rhythmical pattern of terracotta, bronze, and cream tones that feels both modern and timeless.
Step-by-Step Tutorial
Materials
- Polymer clay in terracotta, metallic bronze, and beige/cream
- Acrylic rolling pin or pasta machine
- Circle cutters (approx. 1 inch and 0.5 inch diameter)
- Rectangular cutter or tissue blade
- Gold plated jump rings (approx. 8mm-10mm)
- Gold chain
- Jewelry pliers (flat nose)
- Needle tool or toothpick
- Baking tile or parchment paper
- Oven
- Fine grit sandpaper (optional)
Step 1: Preparing the Clay Components
-
Condition the Clay:
Begin by thoroughly kneading each color of polymer clay—terracotta, bronze, and beige—until they are soft and pliable. This conditioning step is crucial to prevent cracking later. -
Roll Out Sheets:
Using your acrylic roller or setting your pasta machine to a medium thickness (about 3-4mm), roll out sheets of each color. Aim for a consistent thickness across all colors so your necklace hangs evenly. -
Cut the Circles:
Use your larger circle cutter to punch out discs from the clay sheets. You will need roughly 3 beige circles, 4 terracotta circles, and 2 bronze circles based on the pattern in the photo, though you can adjust this to your taste. -
Create the Washer Shape:
Take the smaller circle cutter and center it carefully inside each large circle you just cut. Press down to remove the center, creating a flat ring or ‘washer’ shape. I find looking directly from above helps align the center perfectly. -
Cut the Rectangles:
From the remaining clay, cut small rectangular bars about 0.5 inches wide and 1 inch long. You’ll need two beige rectangles and two terracotta rectangles. -
Example Pattern Layout:
Before piercing holes, lay your cut shapes onto your work surface in the order shown: one beige rectangle, one terracotta rectangle, followed by the alternating ring shapes in a U-shape, finishing with the mirror image of rectangles on the other side.
Uneven Centers?
If your center cutouts are consistently off-center, try using a clear acrylic block to press the cutters. This lets you look straight down through the block for perfect alignment.
Step 2: Refining and Baking
-
Pierce the Holes:
Using your needle tool, pierce a hole at both narrow ends of each rectangular bar. For the rings, you don’t need holes; the jump rings will loop directly around the clay ring itself. -
Smooth the Edges:
Gently run a finger dipped in a little cornstarch or water around the cut edges of your clay pieces to smooth out any sharp ridges or imperfections before baking. -
Bake the Clay:
Arrange all your pieces on a baking tile or parchment paper. Follow the temperature and timing instructions on your specific brand of polymer clay packaging (usually around 275°F/135°C for 30 minutes). -
Cool and Sand:
Allow the pieces to cool completely inside the oven or on a wire rack. Once cool, if there are any rough spots, lightly buff them with fine-grit sandpaper.
Step 3: Assembly
-
Connect the Rings:
Open a jump ring by twisting it sideways with your pliers. Loop it around one clay ring and then around its neighbor to connect them. Close the jump ring securely. Repeat this until all your circular links form the central U-shape of the necklace. -
Attach the Rectangles:
Use jump rings to connect the end clay rings to the first rectangular bar (terracotta). Then use another jump ring to connect that bar to the second bar (beige). -
Prepare the Chain:
Cut your gold chain to your desired length. Since this is a long necklace, you might want about 24-28 inches of chain total, split into two equal lengths. -
Connect to Chain:
Attach one length of chain to the top hole of the beige rectangle on the left side using a jump ring. Repeat on the right side. -
Finish the Necklace:
If you want a clasp, attach a jump ring and lobster clasp to the free ends of the chain. Alternatively, if the chain is long enough to slip over your head, you can simply join the two chain ends together with a single jump ring.
Texture Tip
For a stone-like effect, mix some ground black pepper or dried herbs into your beige clay before rolling it out. It adds lovely speckling that mimics ceramic glazes.
Now you have a stunning, artisanal-style necklace ready to elevate a simple white tee or linen dress
Mixed-Shape Bead Sampler Necklace
Embrace the beauty of imperfection with this sampler-style polymer clay necklace, featuring a curated mix of shapes, textures, and earthy hues. From speckled granite squares to smooth terracotta rounds, this project is a wonderful way to experiment with bead forming techniques.
How-To Guide
Materials
- Polymer clay (white, terracotta/rust, beige/translucent, black for speckles)
- Acrylic roller or pasta machine
- Bead piercing pins or toothpicks
- Texture sponge or sandpaper (coarse grit)
- Blade or craft knife
- Oven for baking clay
- Sandpaper (various grits for finishing)
- Faux suede cord (beige or tan)
- Gold spacer beads (small round)
- Gold end caps or ribbon clamps (optional)
- Gold extender chain and lobster clasp
- Jewelry pliers
Step 1: Clay Mixing & Preparation
-
Create the base colors:
Begin by conditioning your polymer clay blocks until they are soft and pliable. You will need four distinct piles: pure white, a warm terracotta rust, a plain beige, and a granite-effect mix. -
Mix the granite stone effect:
To make the speckled granite clay, take a portion of white clay and mix in a very small amount of beige and black. You can use pre-made granite clay, or create your own by chopping black clay into tiny dust-like specks and folding them into the white base. Don’t overmix; you want distinct specks. -
Create the sandy stone mix:
For the textured sandy beads, mix beige with a touch of translucent clay. Add coarse black pepper or actual sand for gritty texture if desired, though a simple beige mix works well if we texturize the surface later.
Pro Tip: Surface Interest
Before baking, roll your ‘stone’ beads in a pinch of salt or sugar. After baking, wash the beads in water to dissolve the granules, leaving behind realistic pitting.
Step 2: Bead Forming
-
Roll spherical beads:
Start making your round beads. Roll small balls of the terracotta clay (about 1cm diameter). Create about 4-6 of these. Repeat with the plain beige clay to make slightly smaller rounds. -
Form the square granite bead:
Take a chunk of your granite-effect clay and shape it into a rough ball, then gently press it against your work surface on four sides to create a cube. Soften the corners with your finger so they aren’t sharp. -
Create the organic pebble shapes:
Using the white clay, form irregular, flattened organic shapes. Think of softly eroded sea stones—somewhat square but with very rounded, fluid edges. Make two or three of these. -
Make the elongated tube bead:
Roll a small snake of beige or light terracotta clay. Cut a segment about 1.5 cm long to create a short tube bead. Taper the ends slightly so they aren’t blunt cuts. -
Texture the sandy beads:
Take your beige round beads and the granite square. Gently roll them over coarse sandpaper or press a coarse sponge into their surface to give them a pitted, stone-like texture. -
Add striped detail:
Select one beige round bead. Use a craft knife or needle tool to gently score thin, parallel lines into the surface for a tribal-inspired detail. -
Pierce the beads:
Carefully pierce a hole through the center of each bead using a bead pin or toothpick. I find a slow twisting motion prevents the bead from squishing out of shape.
Troubleshooting: Lint
Fuzz on your clay? Keep a pack of baby wipes or acetone nearby. A quick wipe of unbaked clay removes dust and fingerprints instantly.
Step 3: Baking & Assembly
-
Bake the beads:
Arrange your beads on a baking sheet lined with paper or a ceramic tile. Bake according to the manufacturer’s instructions for your specific brand of clay (usually around 275°F/135°C for 15-30 minutes). -
Cool and finish:
Allow the beads to cool completely. If any fingerprints are visible, lightly sand them away with fine-grit wet/dry sandpaper. Buff with a soft cloth for a matte sheen. -
Plan the layout:
Lay out your finished beads on a table to finalize the pattern. The image uses an asymmetrical balance: create clusters of terracotta, white, and stone textures separated by small gold spacers. -
String the beads:
Cut a length of faux suede cord (approx. 24-28 inches depending on desired length). Thread the beads onto the cord, placing a small gold spacer bead between most clay beads to add a touch of shine and separation. -
Attach creating end knots:
If you prefer a simple finish, you can knot the cord ends securely. For a professional look shown here, place a cord end clamp or coil over each raw end of the suede and crimp it tight using pliers. -
Add the clasp:
Open a jump ring and attach the lobster clasp to one end clamp. Attach the extender chain to the other side.
Now you have a stunning, organic statement piece ready to wear.
Cane-Slice Flower Pendant
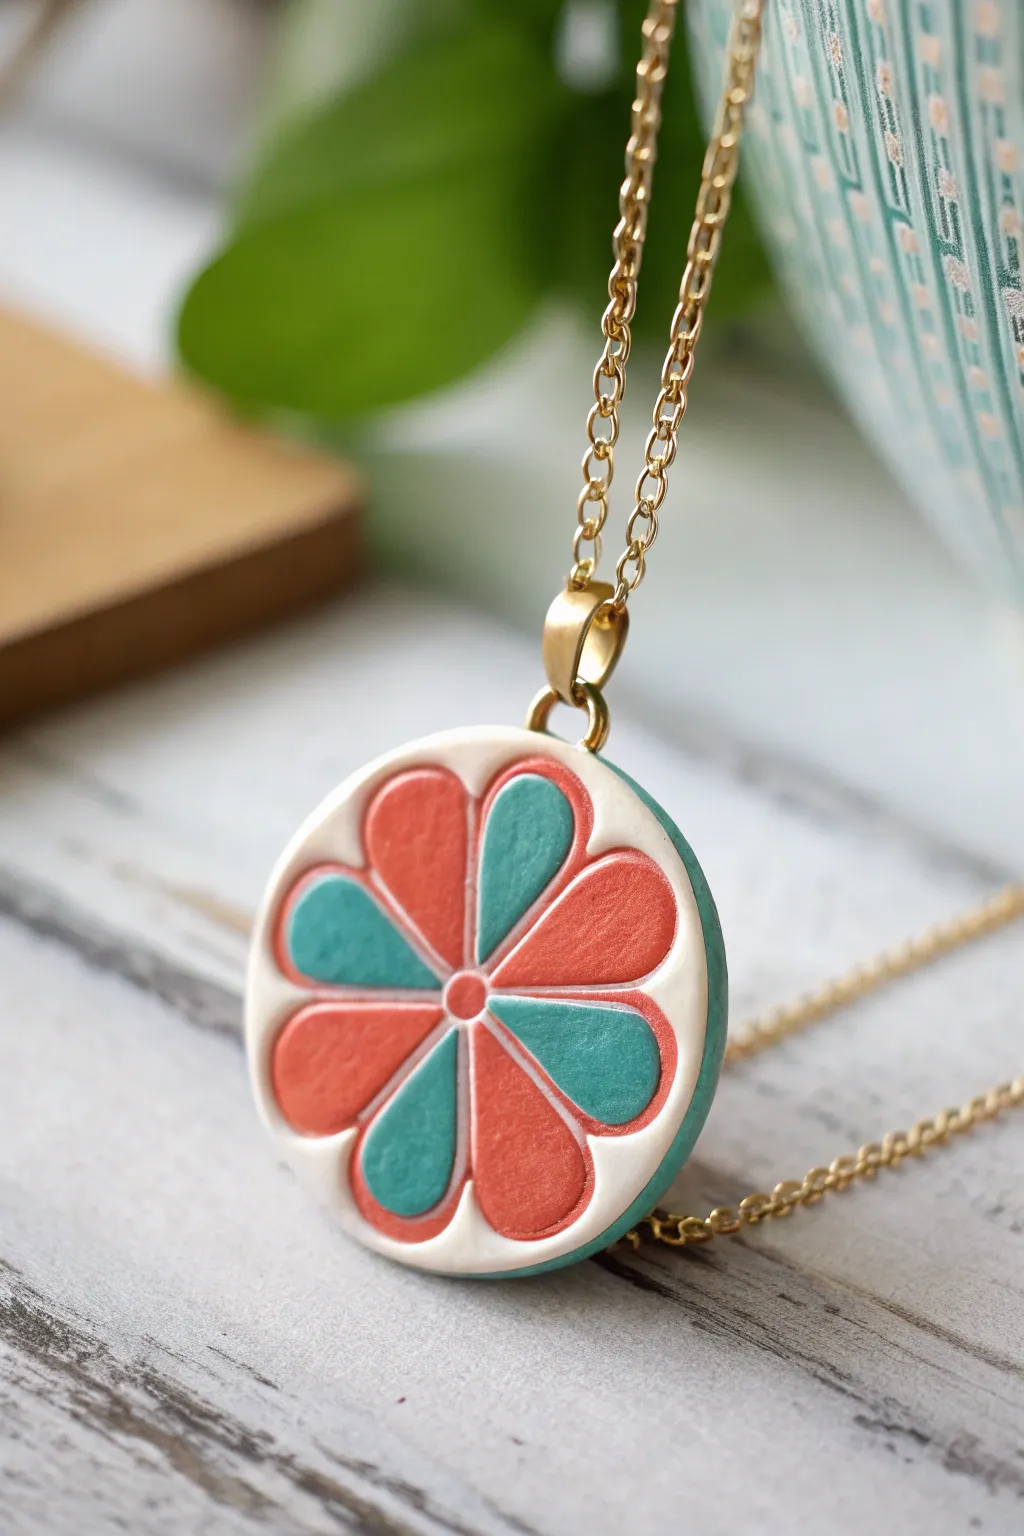
This striking pendant combines the freshness of citrus fruit with a stylized, geometric floral pattern. Using the classic cane-slice technique, you’ll create a perfectly symmetrical design in teal and coral that pops against bright white clay.
Step-by-Step Tutorial
Materials
- Polymer clay in teal, coral, and white
- Gold tone jump ring and bail
- Gold tone chain necklace
- Rolling pin or pasta machine
- Tissue blade or sharp clay slicer
- Round clay cutter (approx. 1.5 inch)
- Small round cutter (for the center)
- Sandpaper (various grits from 400 to 1000)
- Hand drill or pin vibe
Step 1: Creating the Petal Canes
-
Condition the colors:
Begin by conditioning your coral, teal, and white clay until they are pliable and soft. I find that warming the clay in your hands for a few minutes makes a huge difference in preventing cracks later. -
Form the teardrops:
Shape a log of coral clay and a log of teal clay. Pinch one side of each log along its entire length to turn the round cross-section into a teardrop shape. -
Wrap inside white:
Roll out a thin sheet of white clay on the thickest setting of your pasta machine. Wrap this sheet fully around your coral teardrop log and your teal teardrop log, trimming away any excess so the seams meet perfectly. -
Reduce the canes:
Gently squeeze and stretch (reduce) both logs until they are much longer and thinner. Aim for a diameter that will allow you to fit about 8 petals into your desired circle size. -
Slice the segments:
Cut the long canes into equal lengths. You will need four teal sections and four coral sections for the main design.
Step 2: Assembling the Pattern
-
Create the center:
Roll a very small snake of coral clay and wrap it in a thin layer of white clay to create the tiny central dot. -
Arrange the flower:
Place the center dot on your work surface. Arrange the alternating teal and coral teardrop canes around it, pointing the narrow ends inward toward the center dot. -
Fill the gaps:
You will notice small triangular gaps between the rounded outer edges of the petals. Roll small snakes of white clay and gently press them into these gaps to create a solid, circular form. -
Wrap the bundle:
Wrap this entire flower bundle in a thick sheet of white clay to create the background border. -
Final reduction:
Gently compress the entire large cane to ensure all the internal components adhere to each other. Let the cane rest for 30 minutes to cool down, which makes slicing much cleaner.
Cold Cuts Are Best
For crisp, distinct lines between colors, put your cane in the fridge for 20 minutes before slicing. Cold clay resists smearing and deformation under the blade.
Step 3: Finishing the Pendant
-
Slice the pendant:
Use your tissue blade to cut a slice from your cane, approximately 4mm to 5mm thick. Try to cut as straight as possible to avoid distortion. -
Add the backing:
Roll a sheet of teal clay (about 2mm thick) to match the rim color. Place your flower slice onto this backing sheet and gently roll over it to bond them. -
Cut the final shape:
Use your round cutter to cut the final pendant shape. Center the cutter over the flower design, capturing a thin rim of the teal backing clay if you want a visible edge. -
Bake:
Bake the pendant according to your clay manufacturer’s instructions. Usually, this means baking at around 275°F (130°C) for 30-45 minutes. -
Sand and buff:
Once cool, wet sand the surface using progressive grits from 400 up to 1000. This removes fingerprints and imparts the smooth, matte finish seen in the image. -
Assembly:
Drill a small hole near the top edge. Insert a large jump ring through the hole, and attach your decorative bail gold chain.
Fixing Gaps
If you see air pockets between petals after slicing, don’t squish the slice. Instead, gently rub the surface with a burnishing tool to move the clay and close the gap.
Enjoy wearing this vividly colored accessory that captures the essence of summer
Cute Charm Cluster Necklace
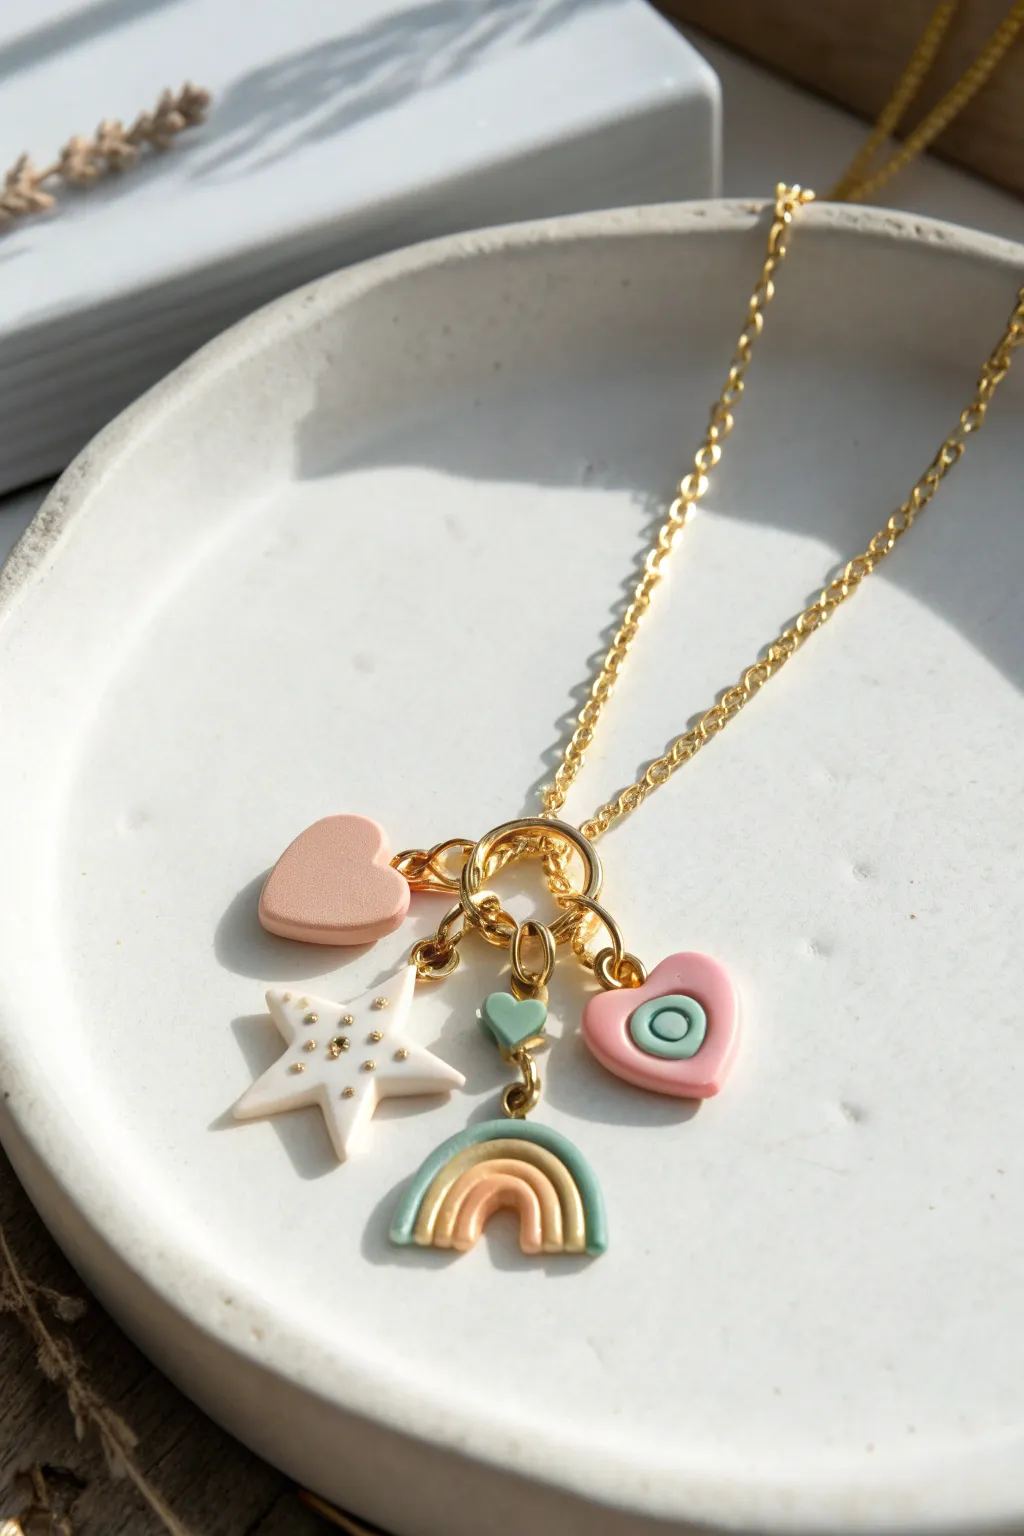
Embrace a touch of whimsy with this adorable cluster necklace featuring four distinct polymer clay charms. The soft pastel palette and gold accents create a cohesive, boutique-style piece that looks beautiful worn alone or layered.
How-To Guide
Materials
- Polymer clay (pale pink, white, mint green, peach, mustard yellow)
- Gold chain necklace with clasp
- Large gold jump ring (connector ring)
- Small gold jump rings (4-6mm)
- Gold eye pins (small size)
- Gold acrylic paint or metallic pigment powder
- Small detail paintbrush or needle tool
- Rolling pin or pasta machine
- Shape cutters (small heart, small star, small circle)
- X-acto knife or clay blade
- Gloss glaze or UV resin (optional)
- Round nose pliers and chain nose pliers
- Smooth ceramic tile or baking sheet
Step 1: Creating the Plain Heart Charm
-
Condition the Clay:
Start by conditioning your pale pink clay until it is soft and pliable. Roll it out to a thickness of about 3-4mm so the charm feels substantial. -
Cut the Shape:
Use your small heart cutter to punch out a clean shape. Smooth the edges with your fingertip to remove any harsh lines left by the cutter. -
Insert Attachment:
Gently insert a small gold eye pin into the top center of the heart. Ensure it goes in straight and doesn’t poke through the sides.
Clean Connections
To ensure your eye pins don’t pull out after baking, put a tiny dab of liquid polymer clay (Bake & Bond) on the pin shaft before inserting it into the raw clay.
Step 2: Crafting the Speckled Star
-
Cut the Star:
Roll out white polymer clay to the same thickness as the heart. Cut out a star shape using your cutter. -
Add Texture:
I like to use the tip of a needle tool or a very small dotting tool to create tiny indentations across the surface of the star where the gold specks will go later. -
Insert Eye Pin:
carefully insert an eye pin into one of the star’s points. If the point distorts, gently reshape it with your fingers.
Step 3: Assembling the Evil Eye Heart
-
Create the Base:
Cut another heart shape, this time using a slightly darker or brighter pink clay if you have it, or stick to the pale pink for unity. This base acts as the background. -
Layer the Eye Details:
Roll a very small ball of mint green clay and flatten it into a disc; press this onto the center of the heart. Add an even smaller ball of white clay on top, flattened, and finally a tiny dot of mint green in the very center. -
Impress the Shape:
Use a small circle cutter or a straw to gently press an indentation around the mint green eye center to define the layers cleanly.
Personalize It
Swap the rainbow for a crescent moon or use letter stamps to add an initial to the plain heart charm for a monogrammed touch.
Step 4: Building the Rainbow Charm
-
Roll the Arches:
Roll thin ‘snakes’ of clay in mint green, peach, and mustard yellow. Try to keep them consistent in thickness. -
Form the Rainbow:
Curve the mint green snake into a small arch. Fit the peach snake snugly inside the mint one, and the yellow snake inside the peach one. Trim the bottoms with your blade so they are perfectly flush. -
Add the Tiny Heart Connector:
The rainbow hangs from a tiny heart connector. Make a very small mint green heart and insert an eye pin into the top AND a trimmed eye pin into the bottom (creating a link). -
Connect Rainbow:
Insert the bottom pin of the tiny heart into the top center of your rainbow arch before baking so they fuse together.
Step 5: Baking & Finishing
-
Bake the Pieces:
Arrange all charms on a smooth tile or baking sheet. Bake according to your clay manufacturer’s instructions (usually 275°F/135°C for 15-30 minutes). -
Paint the Details:
Once cool, use a fine brush to dab gold paint into the indentations on the white star. Let the paint dry completely. -
Seal (Optional):
For extra durability and shine, coat the charms with a thin layer of gloss glaze or UV resin, curing as required. -
Assemble the Cluster:
Open a large gold jump ring. Slide all four finished charms onto this single ring. This creates the ‘cluster’ effect. -
Final Attachment:
While the large jump ring is open, hook it onto the center of your gold chain necklace. Close the ring securely using two pairs of pliers to ensure no gaps remain.
Wear your new handmade charm necklace with pride or gift it to a friend who loves cute accessories
Crackle Veneer Fan Necklace
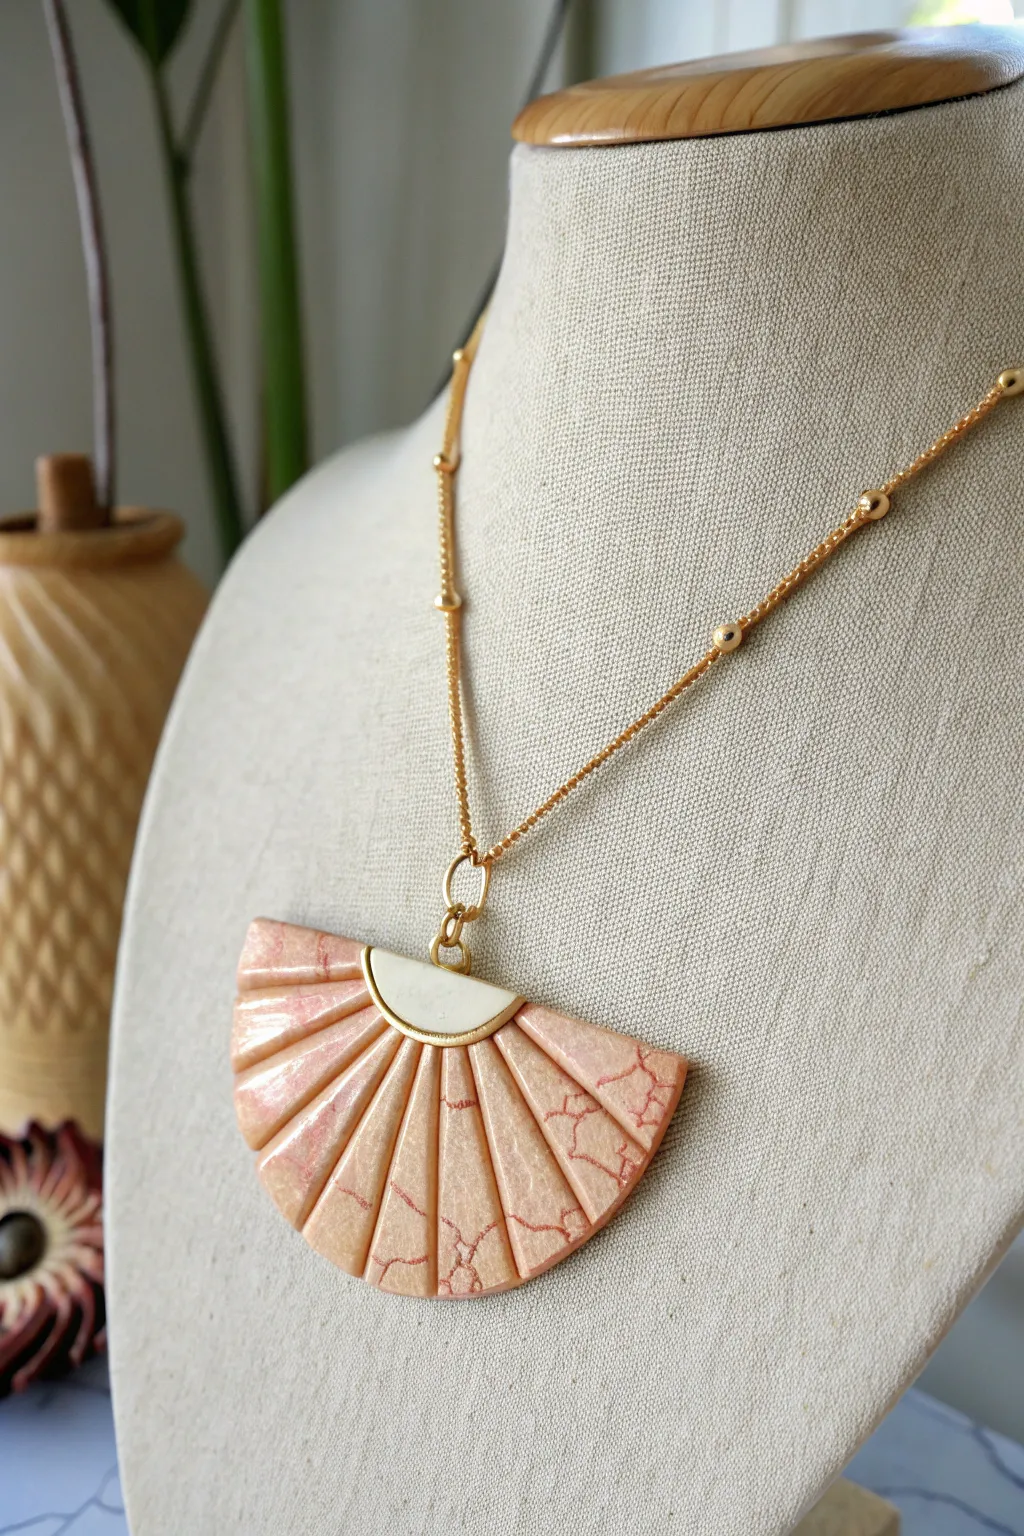
Capture the elegance of Art Deco design with a modern twist using this stunning polymer clay technique. The soft peach crackle finish paired with a cream accent creates a sophisticated fan pendant that looks deceptively complex to achieve.
Step-by-Step Guide
Materials
- Peach or coral polymer clay
- Translucent polymer clay
- White or cream polymer clay
- Gold leaf sheets (composition gold)
- Red or terracotta acrylic paint
- Polymer clay blade (tissue blade)
- Pasta machine or acrylic roller
- Fan-shaped cutter or template
- Small semi-circle cutter
- Liquid polymer clay (clear)
- Small jump rings and jewelry chain with gold beads
- Needle tool or small hand drill
- Wet/dry sandpaper (400-1000 grit)
- Gloss varnish or resin (optional)
Step 1: Creating the Crackle Veneer
-
Condition the base:
Start by conditioning your peach or coral polymer clay until it is soft and pliable. Run it through your pasta machine on a medium-thick setting (around #3 or #4). -
Apply gold leaf:
Lay a sheet of gold leaf carefully over the entire surface of your clay sheet. Gently burnish it down with your finger to ensure it adheres completely without air bubbles. -
Stretch for texture:
Run the clay sheet with the gold leaf through the pasta machine again on a slightly thinner setting. This will cause the gold leaf to crackle naturally. -
Apply the paint:
Brush a layer of red or terracotta acrylic paint over the cracked gold surface. Don’t worry about neatness; you want the paint to settle into the tiny fissures. -
Dry and wipe:
Allow the paint to dry completely to the touch. Once dry, take a damp paper towel or baby wipe and gently remove the surface paint, leaving color only in the cracks of the gold leaf.
Paint Not Sticking?
If the acrylic paint beads up on the gold leaf, lightly sand the cured gold surface or dab it with a tiny bit of alcohol before painting to give it ‘tooth’.
Step 2: Shaping the Fan
-
Cut the main shape:
Place your crackled veneer over a backing sheet of clay (scrap clay works fine). Use a large fan-shaped cutter or a paper template to cut out the main semi-circle body. -
Slice the segments:
Using your sharp tissue blade, cut the fan shape into tapered wedges. Start from the center point and slice outward to create the individual rays of the fan. -
Bevel the edges:
Take each wedge and gently pinch or smooth the edges with your fingers to soften the sharp cuts. I like to slightly bevel the sides so the gold crackle wraps just a tiny bit around the edge. -
Reassemble:
Arrange the wedges back into the fan shape on a fresh , thin sheet of backing clay, leaving a tiny, uniform gap between each slice to emphasize the segmented look. -
Trim the backing:
Carefully trim the excess backing clay away from the reassembled fan using your blade, ensuring the overall shape is clean and curved.
Clean Edges Pro Tip
Put your clay sheet in the fridge for 10 minutes before cutting the wedges. Cold clay is firmer and slices much cleaner, preventing the ‘drag’ marks from the blade.
Step 3: Adding Accents and Assembly
-
Create the top accent:
Condition a small amount of cream or white clay. Roll it out and use a small semi-circle cutter to create the ‘cap’ that sits at the top of the fan. -
Attach the cap:
Apply a tiny drop of liquid polymer clay to the back of the white semi-circle and press it firmly over the center point where all the fan wedges meet. -
Add gold detailing:
Roll a very thin snake of clay and cover it in gold pigment or use gold wire. Wrap this along the bottom curve of the white semi-circle for a finished border. -
Make the bail:
Form a small loop or bail using wire or clay at the top center of the cream piece so you can attach jump rings later. -
Bake:
Bake the piece according to your clay manufacturer’s instructions (usually 275°F/135°C for 30-45 minutes). Tent with foil to prevent scorching the white clay.
Step 4: Finishing Touches
-
Sand and buff:
Once cool, lightly sand the edges with wet/dry sandpaper if there are any rough spots. Buff the surface with a soft cloth to bring out the shine in the gold leaf. -
Seal (Optional):
If you want extra durability for the gold leaf, apply a thin coat of gloss varnish or resin to the surface. -
Assemble the necklace:
Insert a large gold jump ring through your bail. Thread your beaded gold chain through the ring to complete the necklace.
Wear your beautiful geometric pendant with a simple blouse to let those crackled details really shine.
Sculptural Twisted Branch Collar
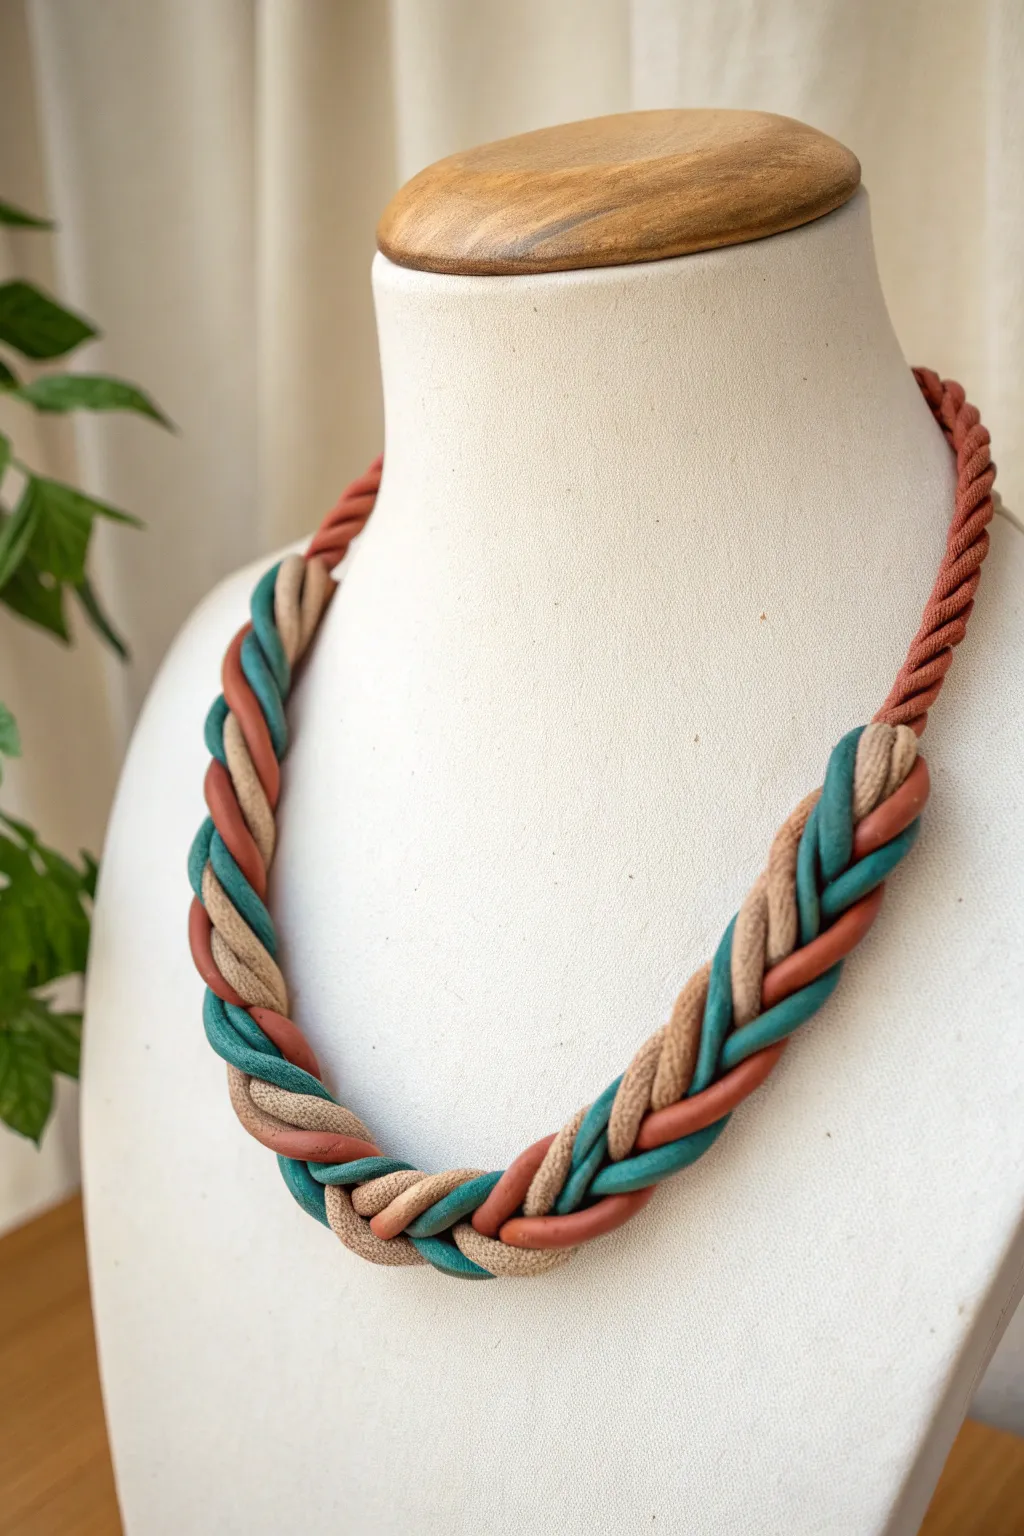
This striking necklace combines earthy terracotta, cool teal, and soft beige tones in a sophisticated twisted design that looks incredibly intricate but is surprisingly simple to achieve. The textured, rope-like effect adds a sculptural quality, making it a perfect statement piece for everyday wear.
Step-by-Step
Materials
- Polymer clay (Terracotta/Rust color)
- Polymer clay (Teal/Blue-green color)
- Polymer clay (Beige/Sand color)
- Extruder tool with a small round disc (approx. 2-3mm)
- Acrylic roller or pasta machine
- Tissue blade or craft knife
- Needle tool or toothpick
- Jewelry wire or strong beading cord
- Jewelry findings (clasp, jump rings, crimp beads)
- Oven for baking
- Wet wipes (for cleaning hands between colors)
Step 1: Preparing the Clay Strands
-
Condition the Clay:
Begin by thoroughly conditioning each color of polymer clay until it is soft and pliable. Warm clay is essential for smooth extrusions without cracking. -
Load the Extruder:
Select the terracotta clay first. Form a log that fits inside your extruder barrel. If you plan to make the back portion of the necklace terracotta as seen in the photo, you will need more of this color. -
Extrude the Strands:
Attach the small round disc to the extruder. Slowly crank or push the clay through to create long, thin spaghetti-like strands. You will need a significant length, so repeat this process several times. -
Extrude Remaining Colors:
Clean the extruder barrel thoroughly before switching colors to avoid streaking. Repeat the extrusion process for both the teal and beige clay, aiming for roughly equal amounts of strands for the main twisted section.
Cracking Clay?
If extruded strands crack or break while twisting, your clay is too dry. Mix in a drop of clay softener or baby oil and re-condition thoroughly before extruding again.
Step 2: Creating the Rope Texture
-
Group the Strands:
Take a cluster of about 4-6 extruded strands of the terracotta clay. Pinch them together at one end to secure them. -
Twist the Group:
Gently twist this group of strands together. You aren’t braiding them; simply twist the entire bundle in a clockwise direction to create a unified, textured rope. -
Repeat for All Colors:
create a similar twisted rope bundle for the teal strands and another for the beige strands. You should now have three distinct textured ropes. -
Create the Back Section:
For the back of the neck, create two additional, slightly thinner twisted ropes using only the terracotta clay. These will serve as the necklace straps.
Step 3: Assembling the Design
-
Begin the Main Braid:
Lay the three colored ropes (terracotta, teal, beige) side by side on your work surface. Pinch the tops together securely. -
Braid or Twist:
Loosely braid these three textured ropes together. Unlike a tight hair braid, you want this to be open and sculptural so the individual strand textures remain visible. -
Check the Shape:
I always curve the braid into a U-shape on the table as I work to ensure it lies flat and doesn’t kink weirdly when worn. -
Attach the Back Straps:
Trim the ends of your main braided section cleanly with a blade. Take your plain terracotta ropes prepared earlier and press them firmly against these raw ends to join them. -
Blend the Seams:
Use a needle tool to gently nudge the clay across the seam where the main braid meets the back strap, blending the clay so the connection is strong but hidden within the texture. -
Create End Loops:
At the very ends of the terracotta back straps, fold the clay over slightly to create a small loop or channel for your jewelry hardware later.
Pro Tip: Hollow Core
To make the necklace lighter, braid your clay ropes around a core of aluminum foil or wire mesh, though this works best for thicker, choker-style designs.
Step 4: Baking and Finishing
-
Final Inspection:
Check the entire piece for fingerprints or smudges. If you see any, you can lightly brush them with a little baby oil or use a soft brush to smooth them out. -
Bake:
Bake the necklace according to the manufacturer’s instructions on your clay package. Use an oven thermometer to ensure the temperature is accurate to prevent scorching. -
Cool Down:
Allow the necklace to cool completely in the oven or on a flat surface. Do not try to flex it while it is still warm. -
Add Hardware:
Thread your jewelry wire or cord through the loops you created. Attach your crimp beads and clasp securely to finish the piece.
Enjoy styling your new textural masterpiece with your favorite outfits