If you’ve got a little polymer clay and a free afternoon, you can make something seriously cute (and actually useful) without needing a full-on craft room. Here are my go-to polymer clay project ideas—starting with the classics and ending with a few studio favorites that always get a “wait, you MADE that?” reaction.
Statement Arch Earrings
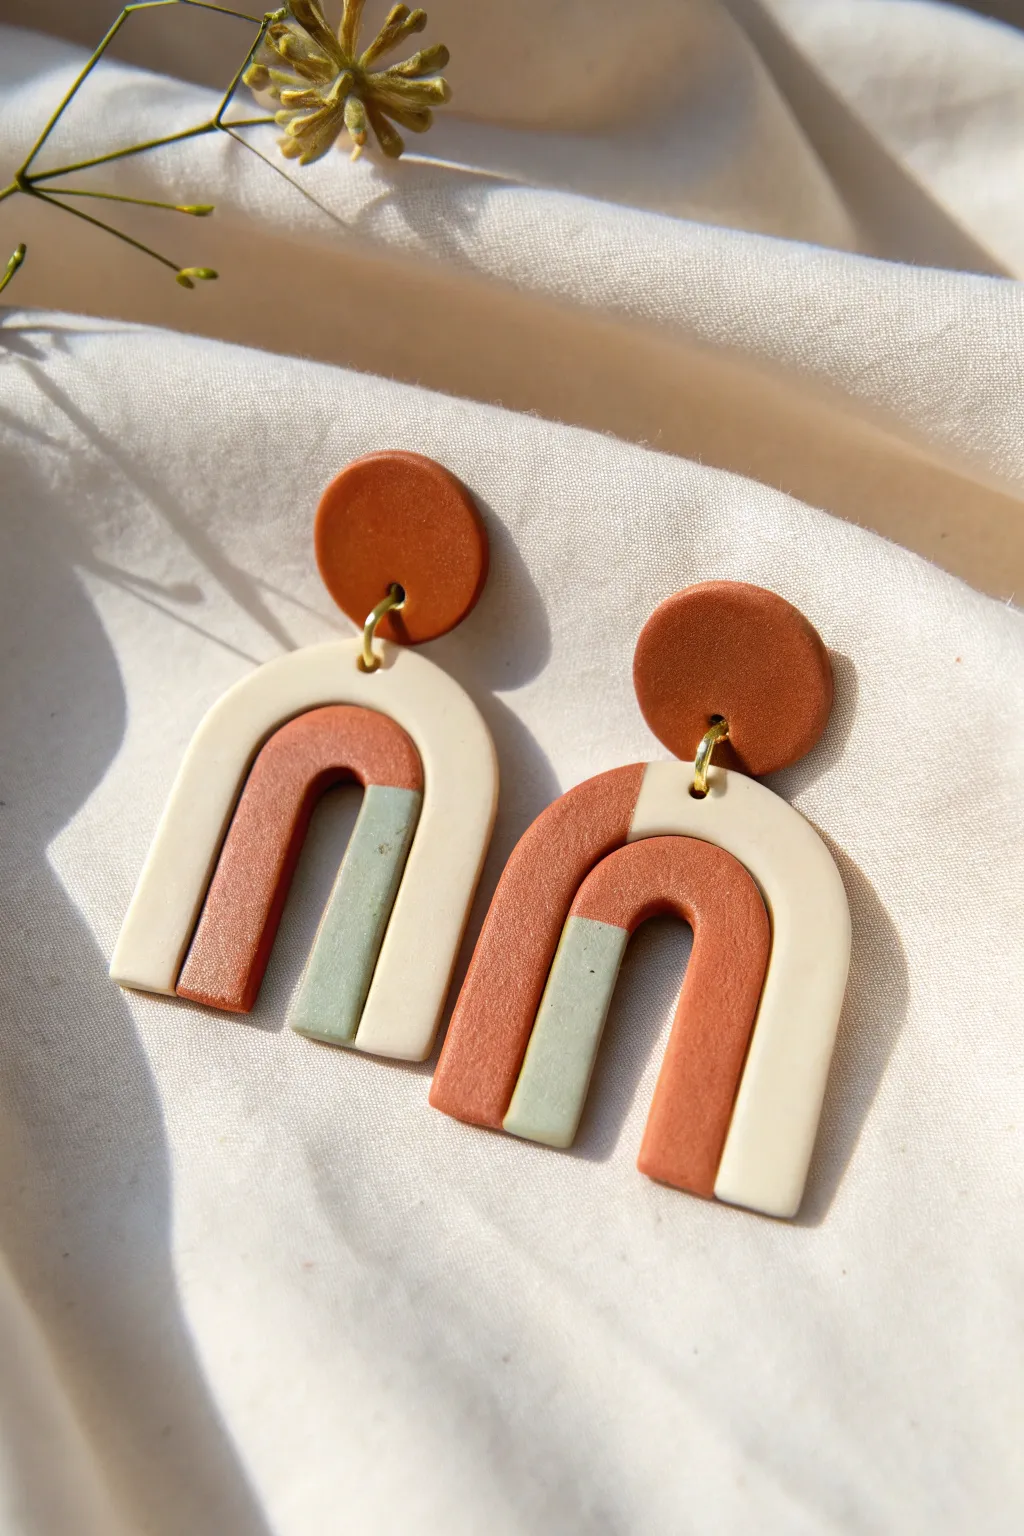
These striking statement earrings combine warm earthy tones with a modern, segmented arch design. The geometric blocking of terracotta, cream, and soft sage green creates a sophisticated look that pairs beautifully with neutral outfits.
How-To Guide
Materials
- Polymer clay (Terracotta/Burnt Orange, White, Sage Green)
- Clay roller or pasta machine
- Tissue blade or sharp craft knife
- Circle cutters (small approx. 10mm or 12mm)
- Arch cutter (medium size) OR paper template
- Hand drill or pin vibe
- Jump rings (gold, 6mm or 7mm)
- Earring posts and backs
- Superglue or liquid clay
- Piece of cardstock or paper
- Ceramic tile or baking sheet
- Medium grit sandpaper (optional)
Step 1: Prepping The Clay
-
Condition the colors:
Begin by conditioning each color of polymer clay separately. Knead the clay in your hands until it becomes soft, pliable, and warm to the touch. This prevents cracking later. -
Roll out slabs:
Using an acrylic roller or a pasta machine on a medium setting (around 3mm thick), roll out a slab for each of your three colors: terracotta, cream, and sage green. -
Create the stud components:
From the terracotta slab, use your small circle cutter to punch out two circles. These will be the top studs that sit on the earlobe. Set them aside on your baking tile.
Clean Cuts Pro-Tip
To prevent the clay from sticking to your cutter and distorting the shape, dip your cutter into a small pile of cornstarch or pat it with water before pressing into the clay.
Step 2: Constructing The Slab
-
Cut straight edges:
Using your tissue blade, cut a clean, straight edge on one side of each of your three color slabs. -
Join the seams:
Place the cream slab and the sage green slab side-by-side on your work surface so the straight edges touch. Use your fingers to gently push them together to close the gap. -
Add the third color:
Now place the terracotta slab next to the other side of the sage green or cream section, depending on how you want to orient your stripes. In the photo, the arches are mirrored, so you’ll need a large enough area of joined clay to cut from. -
Smooth the joins:
Place a piece of parchment paper over your joined clay. Use your roller to gently roll over the seams. This bonds the clay together and ensures a uniform thickness without smearing the colors.
Level Up: Texture
Before baking, use a toothbrush or a piece of rough sandpaper to gently dab the surface of the terracotta sections. This gives it a realistic stone-like texture.
Step 3: Cutting The Arches
-
Position the cutter:
Take your arch cutter and hover it over your striped slab. For the first earring, align the cutter so the arch spans across your chosen color blocks—for example, half cream, half terracotta. -
Cut the first shape:
Press down firmly to cut the first arch shape. Gently wiggle the cutter to release the clay. -
Cut the inner arch:
If you are using nested cutters, use a smaller arch cutter to remove the center, creating the rainbow shape. If doing it by hand, use a craft knife to carefully cut out the inner void. -
Create the mirrored pair:
For the second earring, you can either cut an identical pattern or rotate your cutter/slab to create a mirrored effect with the color blocking. This asymmetry often looks more dynamic. -
Refine the edges:
Before baking, gently run your finger along the edges of the cut clay to smooth out any harsh lines or burrs left by the cutter.
Step 4: Finishing Up
-
Pierce holes:
Use a needle or pin tool to make a small hole at the top center of each arch and at the bottom edge of each circle stud. Make sure the hole is big enough for your jump rings. -
Bake the pieces:
Place all components on a ceramic tile and bake according to your clay package instructions. I usually tent foil over them to prevent scorching the white clay. -
Cool and sand:
Let the pieces cool completely. If there are any rough spots on the edges, lightly sand them with fine-grit sandpaper available at hardware stores. -
Assembly:
Open a jump ring using two pairs of pliers. Thread it through the hole in the arch and the hole in the stud, then close it securely. -
Attach earring posts:
Flip the earrings over. Apply a tiny dot of superglue or liquid clay to the back of the terracotta circle and press the earring post into it. Allow to dry fully.
Enjoy wearing your sophisticated, handcrafted geometric art


Marbled Stud Earrings
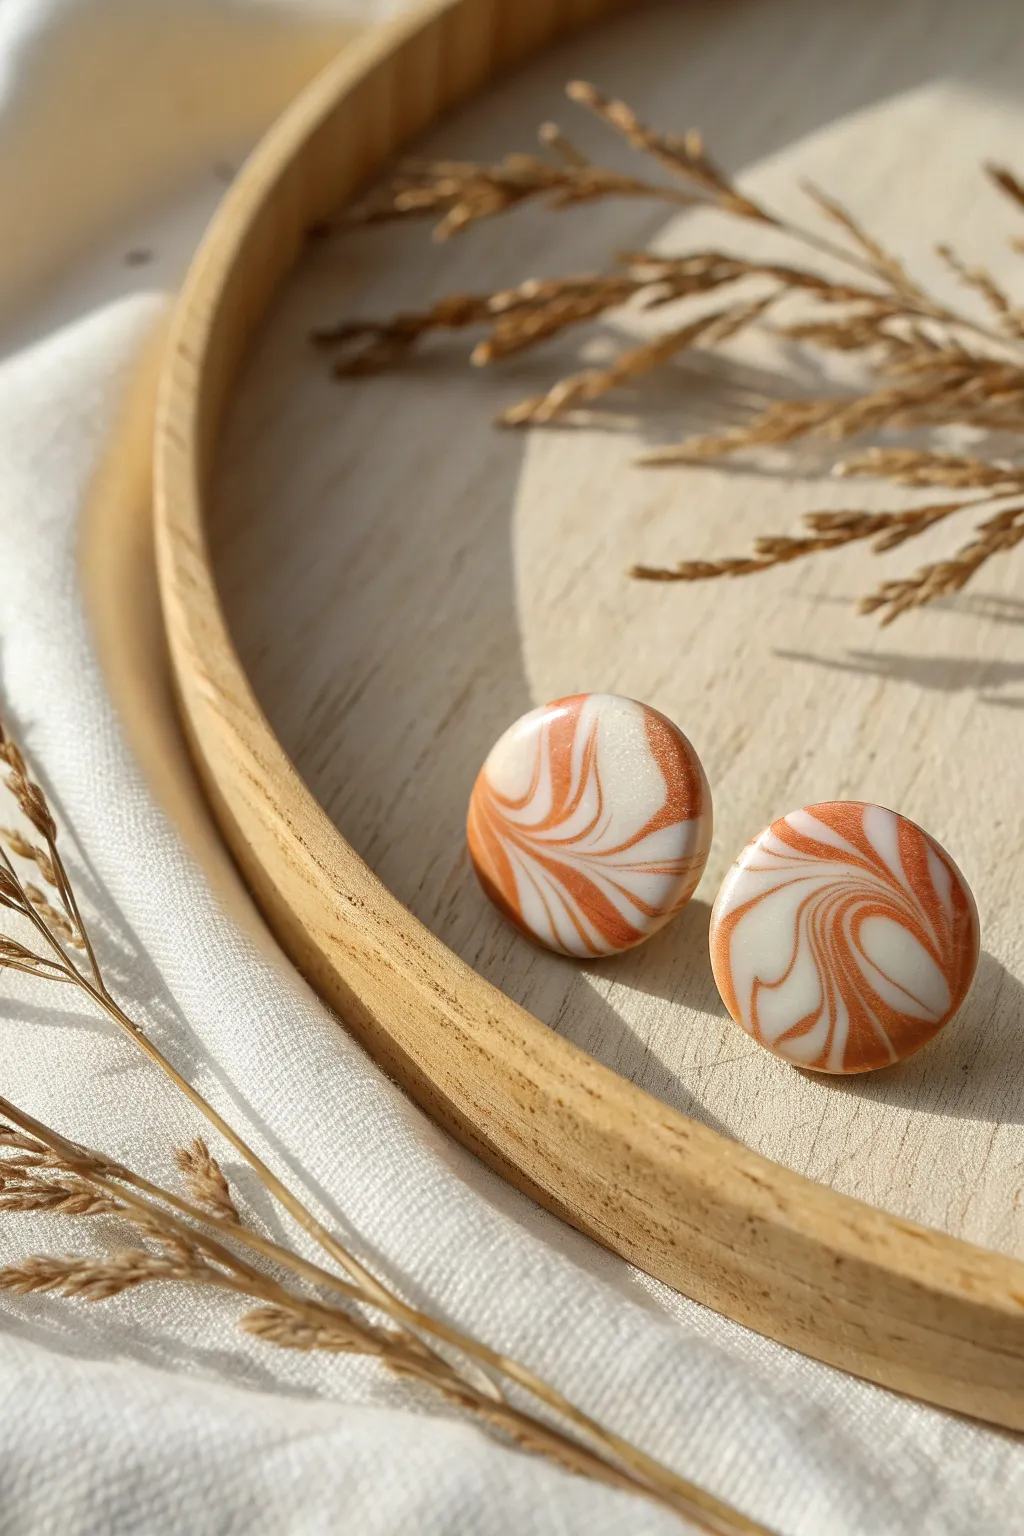
These elegant stud earrings feature a mesmerizing swirl of pearlescent white and metallic copper clay, creating a look that mimics polished agate. The glossy resin finish adds a sophisticated shine, making them perfect for both casual wear and special occasions.
Step-by-Step Tutorial
Materials
- White or pearl polymer clay
- Metallic copper or bronze polymer clay
- Tissue blade or X-Acto knife
- Small circular clay cutter (approx. 10-12mm)
- Acrylic rolling pin or pasta machine
- Ceramic tile or glass work surface
- Earring posts and backs
- Super glue or E6000
- UV resin and UV lamp (optional but recommended for shine)
- Fine grit sandpaper (400-1000 grit)
- Small paintbrush or toothpick
Step 1: Creating the Marble Blend
-
Condition the clay:
Begin by thoroughly conditioning both the white and the metallic copper clay separately. Knead them until they are soft, pliable, and warm to the touch. -
Roll into logs:
Once conditioned, roll each color into a distinct snake or log shape. Aim for logs that are roughly the same length and thickness, about 3 inches long and 1/4 inch thick. -
Twist together:
Place the two logs side-by-side and gently twist them together into a single rope, like a candy cane. -
Fold and roll:
take your twisted rope, fold it in half, and roll it out into a smooth log again. Be careful not to trap air bubbles in the fold. -
Repeat the twist:
Twist the newly formed log again to further combine the colors. I like to repeat this twist-fold-roll process about 3-4 times, but stop *before* the colors blend completely into a brown mud; you want distinct streaks. -
Form the marbled block:
Ball up your marbled clay and gently shape it into a thicker block or puck shape, compressing the swirls together.
Clean Cuts Only
Place a piece of plastic wrap over the clay before using your cutter. This creates a beautifully domed, rounded edge instantly, saving you sanding time later.
Step 2: Cutting and Baking
-
Slice the slab:
Using your acrylic roller or pasta machine, flatten the block into a slab about 3-4mm thick. This thickness ensures the earrings are sturdy but lightweight. -
Select the best pattern:
Look closely at your flattened slab and identify the areas with the most pleasing swirl patterns. -
Cut the shapes:
Press your small circular cutter firmly into the selected areas. Twist slightly before lifting to ensure a clean cut. -
Smooth the edges:
Gently tap the edges with your finger to round them off slightly and remove any harsh cutting ridges. -
Bake the pieces:
Place your clay circles on a ceramic tile or lines baking sheet. Bake according to the manufacturer’s instructions for your specific brand of clay—usually around 275°F (135°C) for 30 minutes. -
Cool down:
Allow the clay pieces to cool completely before moving them. Handling them while hot can warp the shape.
Step 3: Finishing Touches
-
Sand the surface:
Once cool, lightly sand the surface and edges with fine-grit sandpaper under running water to ensure they are perfectly smooth. -
Clean the dust:
Wash the pieces with soap and water to remove any sanding residue, then dry them thoroughly. -
Apply resin (Optional):
For that high-gloss glass look shown in the image, apply a thin layer of UV resin to the top surface. Use a toothpick to guide the resin to the edges without overflowing. -
Cure the resin:
Place the pieces under a UV lamp for 2-3 minutes until the surface is hard and non-tacky. -
Attach the posts:
Flip the earrings over. Apply a small dot of E3000 or super glue to the flat pad of an earring post. -
Secure the backing:
Press the glued post onto the center of the baked clay back. Let the glue cure fully (usually 24 hours for maximum strength) before wearing.
Muddy Colors?
If your colors blended into a solid shade rather than distinct swirls, you over-mixed. Stop twisting earlier next time. The colors should only fold over each other, not combine.
Enjoy styling these chic accessories that look far more expensive than the clay they were made from


Terrazzo Dangle Earrings
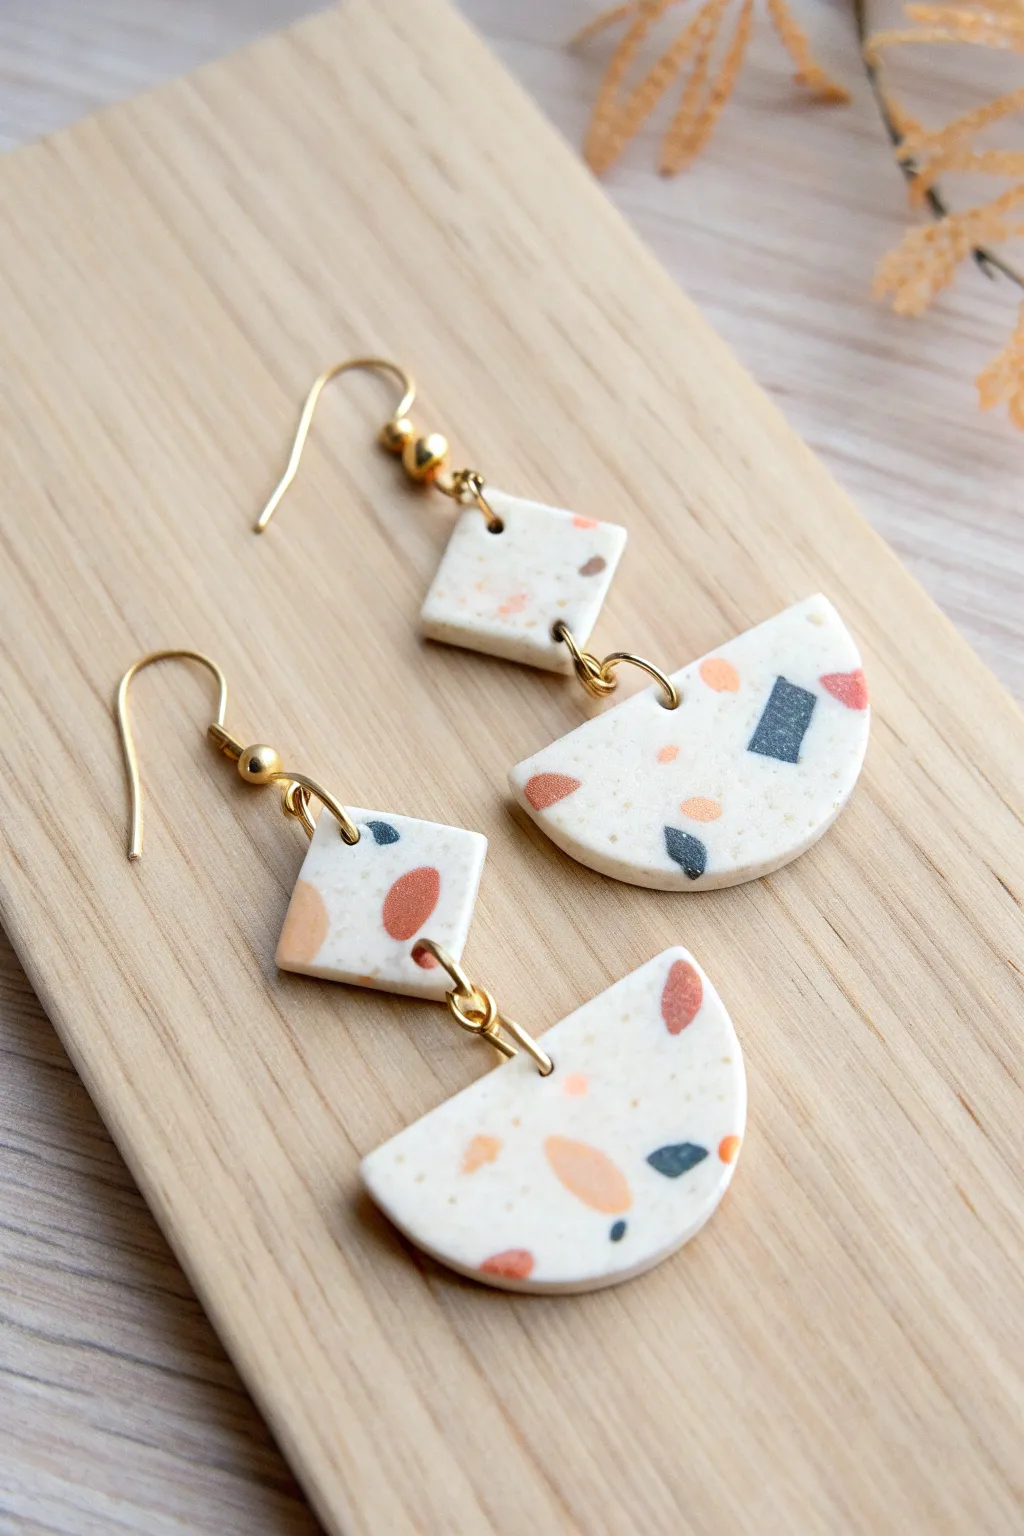
Embrace the modern, playful aesthetic of terrazzo with these delightful polymer clay earrings. Featuring a speckled white base with pops of peach, terracotta, and slate blue, these geometric dangles add an artistic touch to any outfit.
Detailed Instructions
Materials
- Polymer clay (White, Granite/Speckled White, Peach, Terracotta, Slate Blue, Black)
- Acrylic rolling pin
- Clay slicer or tissue blade
- Square clay cutter (approx. 1 cm)
- Circle clay cutter (approx. 3-4 cm)
- Hand drill or pin vibe with small bit
- Jump rings (gold, approx. 6mm)
- Earring hooks (gold)
- Jewelry pliers
- Parchment paper or ceramic tile
Step 1: Preparing the Terrazzo Chips
-
Condition the colors:
Start by conditioning your colored clays: Peach, Terracotta, Slate Blue, and a tiny amount of Black. Roll each color into a thin sheet. -
Chop the clay:
Using your tissue blade, chop these colored sheets into small, irregular fragments. Aim for a variety of sizes, from tiny specks to slightly larger chunks, to mimic real stone. -
Separate piles:
Keep your chopped piles somewhat separate initially so you can control the distribution of colors later.
Clean Cuts Pro Tip
Place a piece of plastic cling wrap over your clay slab before pressing down your cutters. This creates a beautifully domed, soft edge that requires minimal sanding later.
Step 2: Creating the Base Slab
-
Prepare the base:
Condition the White or Granite/Speckled White clay. If using plain white, you can mix in a tiny pinch of black pepper or black embossing powder for that subtle gritty texture seen in the photo. Roll it into a thick slab, about 3-4mm. -
Scatter the chips:
Sprinkle your colored clay fragments over the white slab. Be random but intentional—ensure you have a nice balance of the peach, terracotta, and blue pieces across the surface. -
Embed the pattern:
Cover the slab with a piece of parchment paper. Gently roll over the surface with your acrylic roller to press the colored chips flat into the white base. -
Smooth it out:
Continue rolling until the surface is completely smooth and level. The chips should be flush with the white clay, creating a seamless terrazzo effect.
Step 3: Cutting and Baking
-
Cut the shapes:
Place your slab on your working tile. Use the square cutter to cut two small squares for the top component. I like to rotate the cutter slightly to capture the best arrangement of chips. -
Create the semi-circles:
Use the large circle cutter to cut one circle. Then, use your straight blade to cut that circle exactly in half, creating two semi-circles for the bottom dangles. -
Refine the edges:
Gently smooth the cut edges with your finger to remove any stray bits of clay or sharp corners. -
Poke holes:
Before baking, use a needle tool or toothpick to poke holes for assembly. You’ll need holes at opposite corners of the squares (diamond orientation) and one hole in the top center of each semi-circle. -
Bake:
Bake the pieces on a tile according to your clay manufacturer’s instructions (usually 275°F/130°C for about 30 minutes).
Level Up: UV Resin
For a glossy, ceramic-like finish that makes the colors pop, coat the front of your baked pieces with a thin layer of UV resin and cure under a UV lamp.
Step 4: Finishing and Assembly
-
Sand and buff:
Once cool, lightly sand the edges and surface with high-grit wet/dry sandpaper if needed to reveal the sharp edges of your terrazzo chips. -
Drill if necessary:
If your holes closed up during baking, carefully re-drill them using a hand drill. -
Connect components:
Open a jump ring with your pliers. Thread it through the bottom hole of a square piece and the top hole of a semi-circle piece. Close the ring securely. -
Attach hooks:
Open the loop on your earring hook (or use a small jump ring if the hook loop is fixed). Attach it to the top hole of the square component. -
Final check:
Repeat for the second earring and ensure all jump rings are closed tightly so your pieces don’t slip off.
Wear your new handcrafted terrazzo earrings with pride or gift them to a friend who loves unique accessories


Color-Blocked Pendant Necklaces
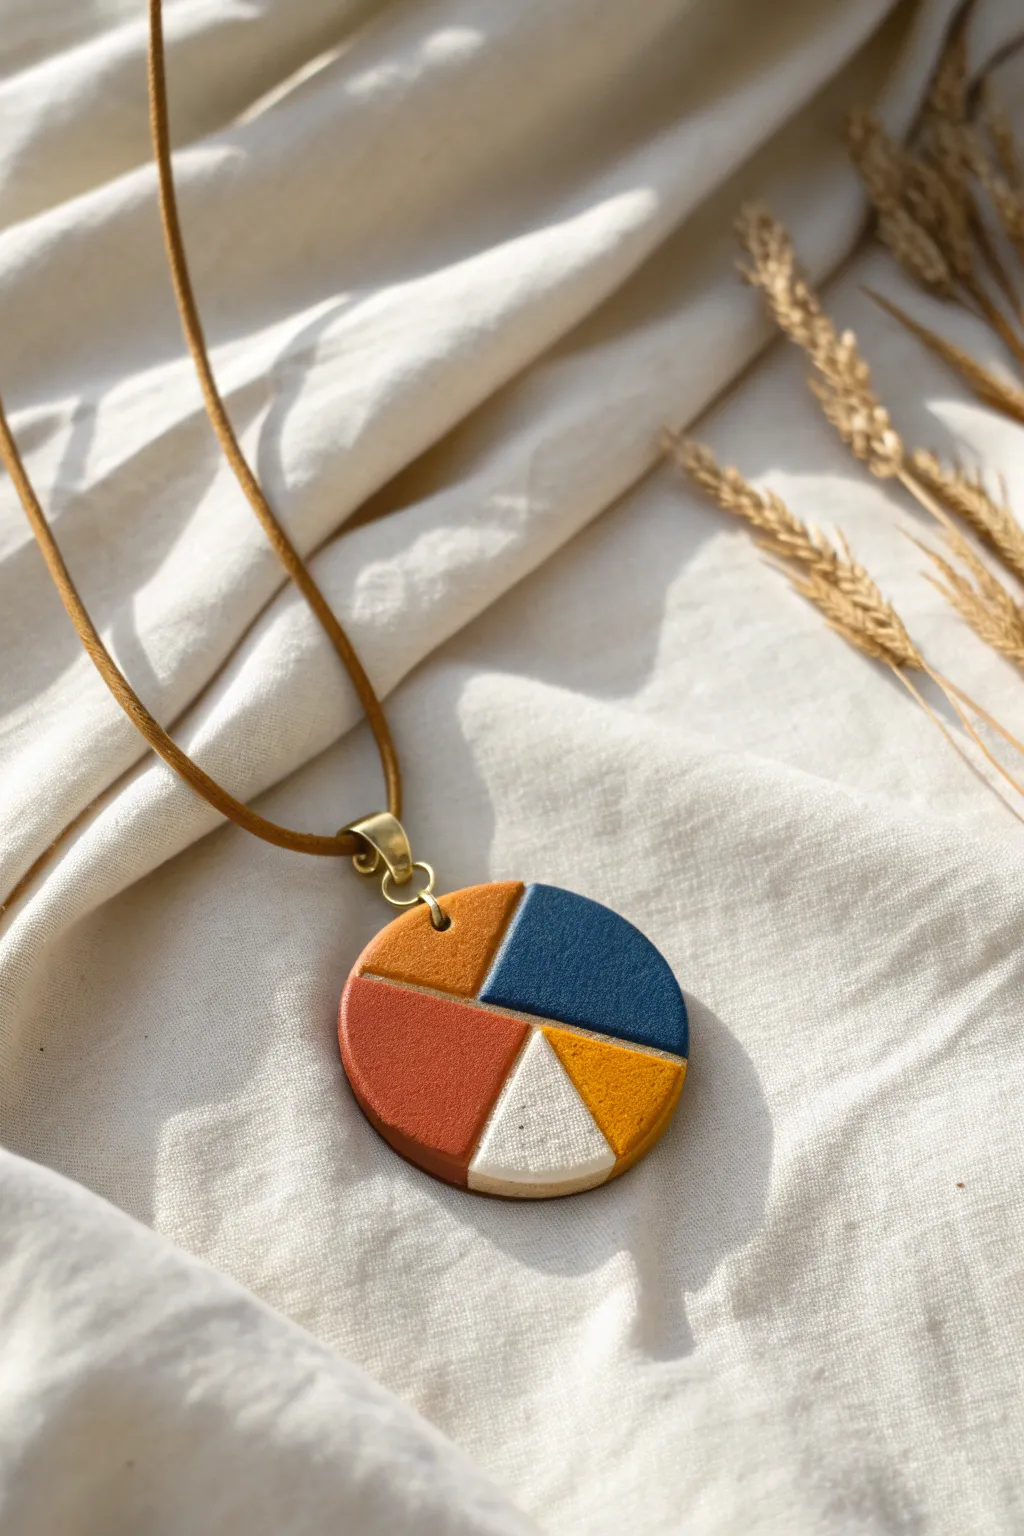
Embrace the beauty of abstract geometry with this stylish color-blocked pendant. Featuring a segmented circle design in earthy tones of rust, mustard, navy, and cream, this project mimics the look of high-end ceramic jewelry with the ease of polymer clay.
Step-by-Step Tutorial
Materials
- Polymer clay (rust red, navy blue, golden mustard, orange-tan, and white)
- Clay roller or pasta machine
- Circle clay cutter (approx. 1.5 – 2 inches diameter)
- Rigid tissue blade
- Gold polymer clay or thin strips of gold embossing foil (optional for grid lines)
- Gold jewelry bail
- Two jump rings (gold)
- Leather cord
- Needle tool or small drill bit
- Gloss or matte varnish (optional)
- Sandpaper (various grits)
Step 1: Preparing the Base and Grid
-
Condition the Clay:
Start by thoroughly conditioning each color of polymer clay until it is soft and pliable. This prevents cracking and ensures smooth cuts. -
Roll the Sheets:
Roll out a sheet of scrap clay or a neutral color to a thickness of about 3-4mm. This will serve as the hidden backing of your pendant. -
Cut the Base:
Use your circle cutter to punch out a perfect round shape from this backing sheet. -
Create Thin Dividers:
Roll out a very thin sheet of gold clay or the neutral backing color. Slice tiny, uniform strips using your tissue blade to act as the ‘grout’ or dividing lines between your colored sections.
Clean Lines Pro Tip
Chill your clay sheets in the fridge for 10 minutes before cutting. Cooler clay is firmer, allowing the blade to slice geometric shapes cleanly without dragging.
Step 2: Designing the Mosaic
-
Roll Colored Sections:
Roll out your five main colors (rust, navy, mustard, tan, white) to the same thickness, slightly thinner than your base layer. -
Cut Geometric Shapes:
Using your tissue blade, cut straight-edged geometric shards from each color. You’ll need triangles and trapezoids that can fit together like a puzzle. -
Arrange the Design:
Place your divider strips onto the round base first to create your segmented pattern. I find it easiest to lay them down in an interesting, asymmetrical grid. -
Fill the Sections:
Carefully place your colored clay shapes into the sections created by the dividers. Trim any excess clay that hangs over the edge of the circle base. -
Consolidate the Surface:
Place a piece of parchment paper over the pendant. Gently run your roller over the top to fuse the pieces together and flatten the surface without distorting the crisp lines.
Step 3: Refining and Assembly
-
Re-Cut the Edge:
If the circle distorted slightly during rolling, use your circle cutter one last time to shave off the uneven edges for a perfect round profile. -
Create the Hanger Hole:
Near the top edge of the pendant, pierce a hole using a needle tool or small awl. Ensure it is large enough to fit your jump ring. -
Texture (Optional):
For a stone-like finish, gently press a piece of coarse sandpaper or a toothbrush against the surface of the clay before baking. -
Bake:
Bake the pendant according to your specific brand of clay’s instructions, usually around 275°F (135°C) for 30 minutes. -
Sand and Finish:
Once cooled, wet sand the edges and surface lightly to remove fingerprints. Apply a thin coat of matte varnish if you want to protect the finish. -
Assemble the Hardware:
Open a jump ring with pliers and loop it through the hole in the clay. Attach this to the gold bail. -
Add the Cord:
Thread your leather cord through the bail to complete the necklace.
Level Up: Terrazzo
Instead of solid colors, mix tiny contrasting clay chips into the white section before rolling it out. This adds a trendy terrazzo stone effect to just one segment.
Now you have a striking, wearable piece of art that adds a pop of modern color to any outfit

What Really Happens Inside the Kiln
Learn how time and temperature work together inside the kiln to transform clay into durable ceramic.
Personalized Key Fobs
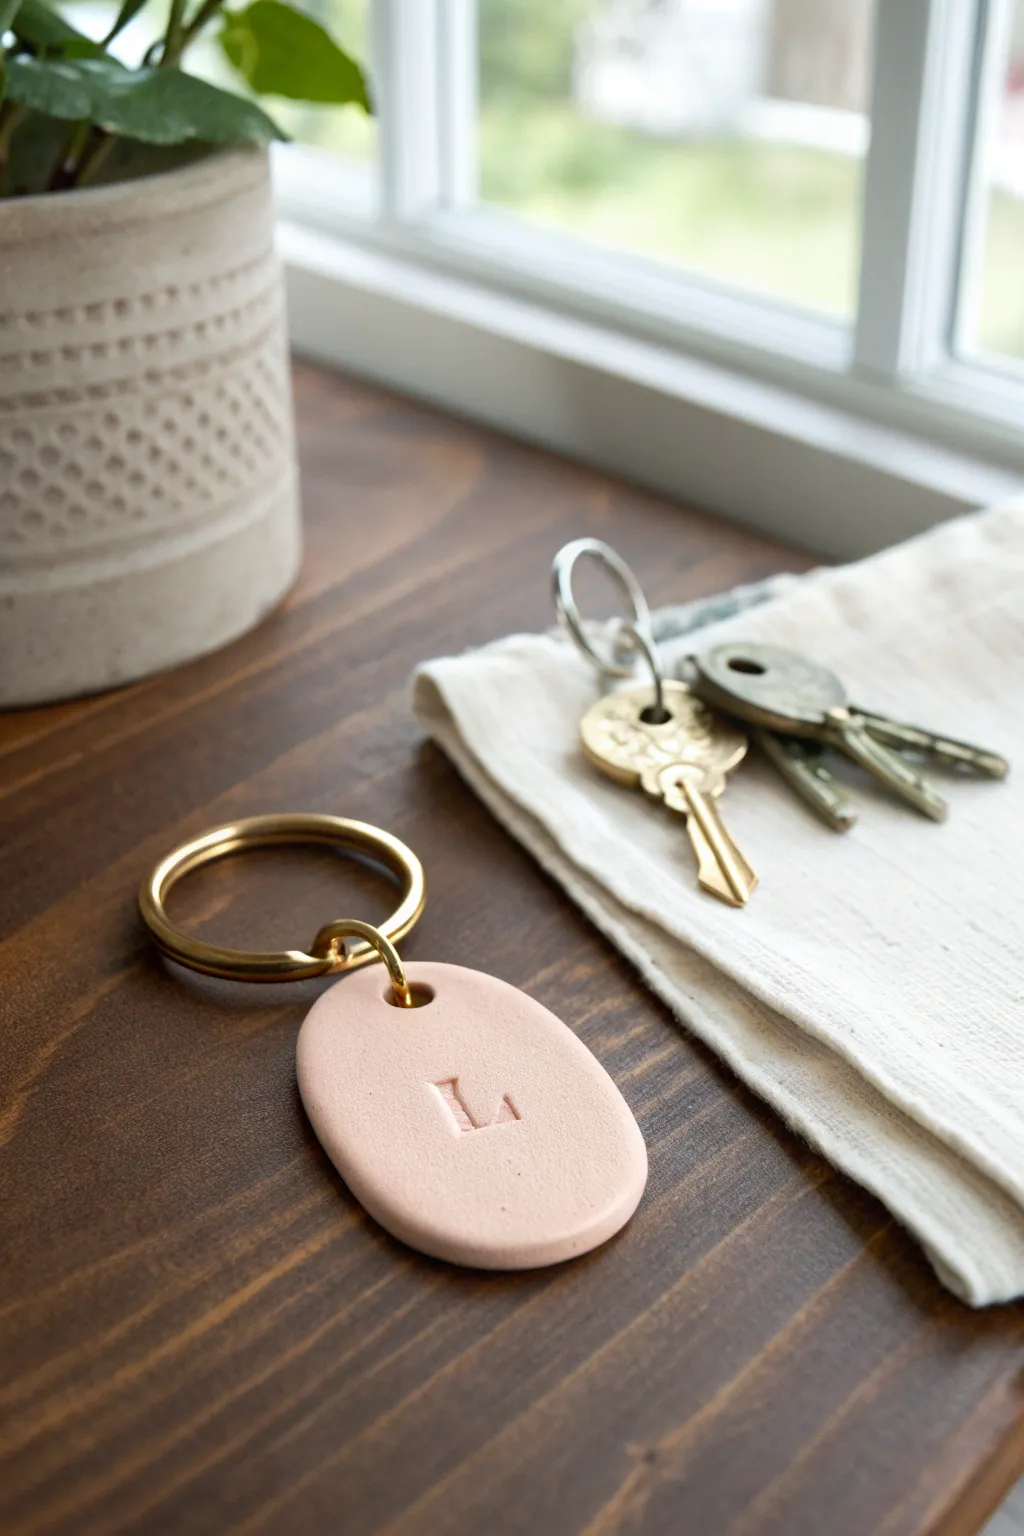
Create a sophisticated and functional accessory with this simple personalized key fob project. Featuring a soft matte finish and a stamped initial, it makes for a perfect handmade gift or a stylish way to organize your own keys.
Step-by-Step
Materials
- Polymer clay (blush pink or beige)
- Acrylic rolling pin or clay machine
- Oval clay cutter
- Letter stamp set
- Small round cutter or drinking straw (for the hole)
- Parchment paper or ceramic tile
- Fine-grit sandpaper (400-600 grit)
- Denim or coarse fabric scrap
- Gold jump ring (10mm)
- Gold split ring key ring
- Jewelry pliers
Step 1: Prepping and Shaping
-
Condition the clay:
Begin by warming the polymer clay in your hands, kneading it thoroughly until it is soft and pliable. This conditioning step is crucial to prevent cracks later on. -
Roll out the slab:
Place the conditioned clay on a flat surface or ceramic tile. Using your acrylic rolling pin, roll the clay out to an even thickness of about 1/4 inch (6mm). You want it substantial enough to be sturdy. -
Cut the shape:
Position your oval cutter over the smoothest part of the clay slab. Press down firmly and evenly to cut out your shape, then gently lift the cutter away. -
Create the hardware hole:
Use a small round cutter or a drinking straw to punch a hole near the top edge of the oval. Make sure to leave at least 3-4mm of clay between the hole and the edge for strength.
Step 2: Personalizing and Refining
-
smooth edges:
Dip your finger in a tiny bit of rubbing alcohol or cornstarch and gently gently run it along the cut edges of the oval to smooth out any sharpness left by the cutter. -
Position the stamp:
Select the letter you wish to use from your stamp set. Hover it over the center of the clay oval to visualize the placement before committing. -
Stamp the initial:
Press the stamp straight down into the clay with firm, even pressure. Don’t wiggle it, or the impression will be blurry. Lift straight up to reveal the monogram. -
Add texture (optional):
To achieve that stony, matte look seen in the photo, I sometimes gently press a piece of denim or coarse fabric onto the surface before baking to remove the glossy sheen of raw clay. -
Bake the piece:
Transfer the clay (on its tile or parchment) to a baking sheet. Bake according to the manufacturer’s instructions for your specific brand of clay—usually around 275°F (135°C) for 30 minutes. -
Cool down:
Once the baking time is up, turn off the oven and let the piece cool completely inside, or remove it and let it rest on a wire rack. Do not handle it while hot as it remains slightly soft until cool.
Stamp Stuck?
If your stamp tends to stick to the raw clay, lightly dust the stamp face with cornstarch or dip it in water before pressing it down. This acts as a release agent for a clean impression.
Step 3: Finishing Touches
-
Sand for smoothness:
If there are any rough spots or fingerprints, wet sand the cured piece using 400-600 grit sandpaper and a little water. Using circular motions ensures an ultra-smooth, matte finish. -
Buff and clean:
Rinse the piece under water to remove sanding dust and dry it thoroughly with a soft cloth. Buffing it briefly with a piece of denim can add a nice luster without making it shiny. -
Open the jump ring:
Using two pairs of pliers, grip the gold jump ring on either side of the split. Twist the ends away from each other (front to back) rather than pulling them apart to preserve the circle shape. -
Attach the hardware:
Slide the open jump ring through the hole in your clay tag, and then loop the large gold split ring onto the jump ring as well. -
Close the ring:
Use your pliers to twist the jump ring ends back together until they meet seamlessly, securing your new keychain.
Luxe Detailing
After baking, use a fine-tip paintbrush to fill the stamped letter impression with gold or white acrylic paint. Wipe away excess from the surface for a crisp, inlaid color effect.
Now you have a chic, personalized accessory ready to organize your keys or gift to a friend
Mini Fruit Charms
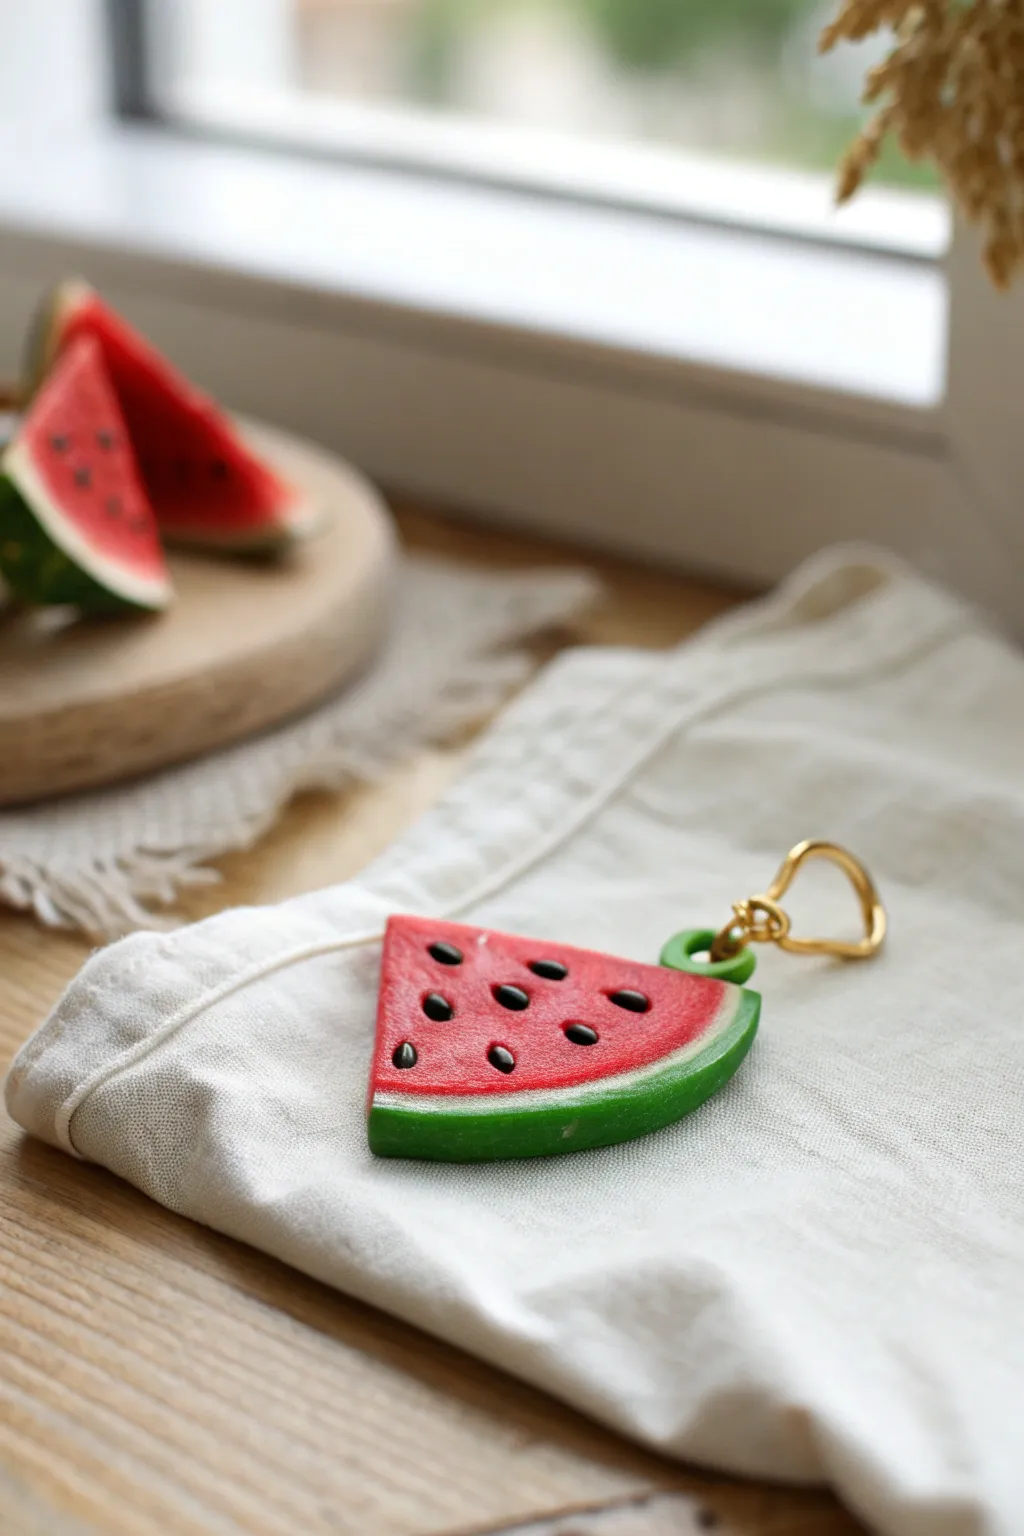
Capture the essence of summer with this delightful polymer clay watermelon slice charm. This project features a realistic layered rind and textured seeds, making it a perfect pendant for a necklace or a cute keychain addition.
Step-by-Step Guide
Materials
- Red polymer clay (translucent red blended with opaque red gives the best juicy look)
- White or translucent white polymer clay
- Green polymer clay (a mix of leaf green and a touch of yellow)
- Black polymer clay
- Acrylic roller or pasta machine
- Tissue blade or sharp clay knife
- Needle tool or dotting tool
- Small circle cutter (optional)
- Eye pin or gold jump ring
- Gloss glaze or UV resin (optional for a wet look)
- Oven for baking
Step 1: Creating the Layers
-
Prepare the Red Core:
Start by conditioning your red clay until it is soft and pliable. Roll it into a thick log, about 1 inch in diameter, or flatten it into a thick slab depending on how many slices you want to make. -
Shape the Wedge:
If using a log, flatten one side slightly to begin forming a semi-circle shape, but keep it thick. You want the final slice to have some substance. -
Roll the Rind Layers:
Condition the white clay and roll it into a thin sheet. Do the same with the green clay, aiming for a similar thickness. -
Wrap the White Layer:
Wrap the sheet of white clay around the curved bottom of your red clay shape. Trim any excess so it just covers the bottom curve, leaving the flat top red exposed. -
Add the Green Skin:
Repeat the previous step with the green clay sheet, placing it directly over the white layer. Smooth it down gently with your thumb to ensure no air bubbles are trapped between the layers.
Fixing Smudges
If red clay smears onto the white rind, use a cotton swab dipped in rubbing alcohol or nail polish remover to gently wipe the white area clean before baking.
Step 2: Slicing and Texturing
-
Slice the Wedge:
Using a sharp tissue blade, slice your layered log into triangular wedges. Aim for a thickness of about 5mm for a sturdy charm. -
Refine the Shape:
Gently tap the sides of your slice to soften the sharp cut edges slightly so it looks more organic. I prefer using my fingertip to slightly round the green rind edge. -
Texture the Red Flesh:
Take a stiff toothbrush or a texturing tool and gently tap the red area of the clay. This stippling effect mimics the fibrous texture of real watermelon flesh. -
Create Seed Indents:
Use a small ball tool or the end of a paintbrush handle to press small, teardrop-shaped indentations into the red clay where you want the seeds to sit.
Bite Mark Detail
Before baking, use a small flower cutter or scallop-edged tool to remove a chunk from the tip of the slice. It looks like someone took a bite out of it.
Step 3: The Seeds and Hardware
-
Make the Seeds:
Roll tiny snakes of black clay and cut off minuscule pieces. Roll these bits into tiny teardrop shapes. -
Place the Seeds:
Carefully place a black seed into each indentation you created earlier. Press them down gently so they are flush with the surface or slightly raised. -
Create the Loop:
Take a small snake of green clay and form a U-shape. Attach this loop to the top corner of the rind, blending the seams with a silicone tool so it’s secure. -
Secure the Loop:
Alternatively, if you prefer metal hardware, insert a screw eye pin into the top of the rind before baking. Adding a touch of liquid clay on the screw threads helps it hold.
Step 4: Baking and Finishing
-
Bake:
Place your charm on a ceramic tile or baking sheet lined with parchment paper. Bake according to your polymer clay manufacturer’s instructions (usually 275°F/135°C for 15-30 minutes depending on thickness). -
Cool Down:
Allow the piece to cool completely in the oven or on a cooling rack before handling to prevent fingerprints or warping. -
Add Shine:
For that juicy, fresh-cut look, apply a thin layer of gloss glaze or UV resin over just the red part and the seeds. Cure or dry as directed. -
Attach Hardware:
Once dry, open a gold jump ring (or use a heart-shaped clasp like the photo) and thread it through the green clay loop.
Now you have a refreshing slice of summer to wear all year round


The Complete Guide to Pottery Troubleshooting
Uncover the most common ceramic mistakes—from cracking clay to failed glazes—and learn how to fix them fast.
Tiny Animal Keychains
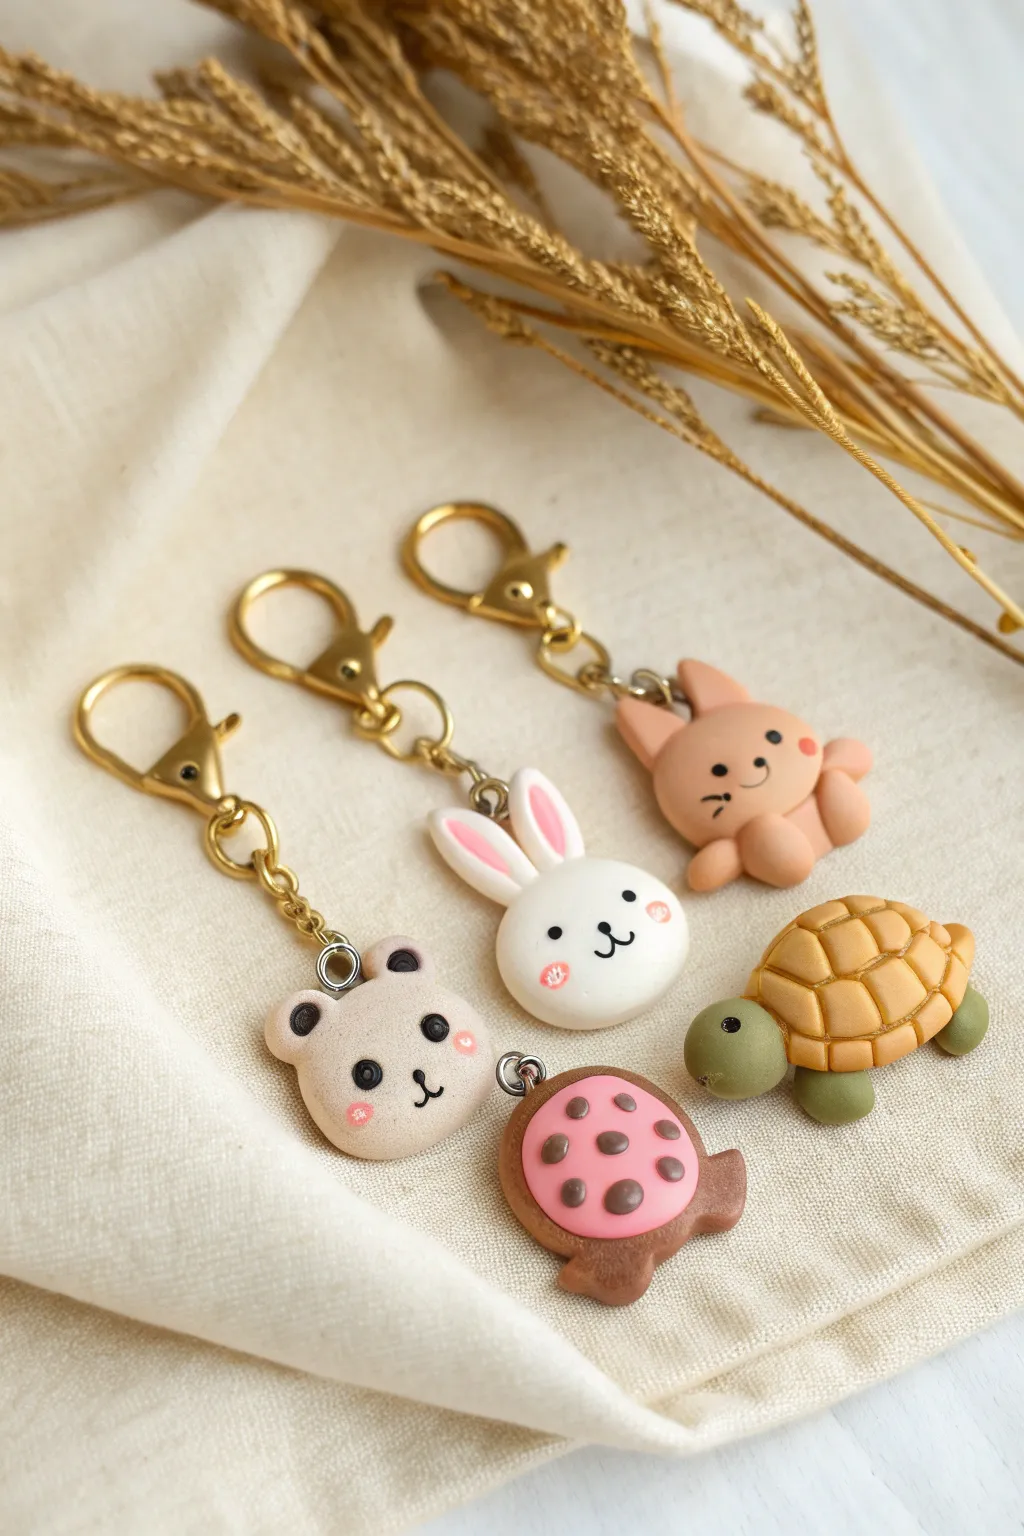
These adorable polymer clay charms are the perfect way to carry a little cuteness wherever you go. With their simple rounded shapes and golden hardware, they make delightful gifts or personal accessories that look professionally crafted.
Step-by-Step Guide
Materials
- Polymer clay (beige, white, tan, pink, black, green, brown)
- Gold lobster clasp keychains with jump rings
- Eye pins (screw-style or standard)
- Dotting tools (various sizes)
- Needle tool or toothpick
- Clay roller or clear acrylic block
- Liquid polymer clay (optional, for adhesion)
- Flush cutters and pliers
- Gloss or matte glaze (optional)
- Oven geared for clay baking
Step 1: Basic Head Shapes
-
Condition the clay:
Begin by thoroughly kneading your chosen base colors—beige for the bear, white for the rabbit, and tan for the cat—until soft and pliable. -
Form the spheres:
Roll three equal-sized balls of clay, roughly 1 inch in diameter, flattening them just slightly into rounded discs so the features will sit nicely on the face.
Step 2: Creating the Bear
-
Shape the ears:
Roll two small balls of beige clay and press them gently onto the top corners of the bear’s head, smoothing the seam at the back with a tool. -
Add facial details:
Use a medium dotting tool to make slight indentations where the eyes will go, then press tiny balls of black clay into these spots. -
Create the snout:
Roll a small, very thin snake of black clay to form the mouth and nose bridge, carefully pressing it into a ‘Y’ or anchor shape below the eyes. -
Add rosy cheeks:
Take the tiniest pinch of pink clay, roll into specks, and press them onto the cheeks for a blush effect.
Secure That Pin
For maximum durability, pull the eye pin out after baking, add a drop of superglue to the hole, and reinsert it immediately.
Step 3: Creating the Rabbit
-
Form the ears:
Shape two elongated teardrops from white clay and flatten them slightly. Press a smaller pink teardrop into the center of each for the inner ear. -
Attach the ears:
Firmly press the base of the ears onto the top of the white head, blending the clay at the join so they don’t snap off later. -
Apply the face:
Like the bear, add two black bead eyes and use a microscopic snake of black clay to create the wide ‘W’ mouth shape.
Turtle Power
Make a matching turtle by adding a textured beige shell dome onto a green body base, using a knife to score a grid pattern.
Step 4: Creating the Cat
-
Sculpt triangular ears:
Pinch two small triangles of tan clay and attach them to the head; I find blending the seams here is crucial since pointed ears are more fragile. -
Add paws:
Roll two balls of tan clay for paws and press them onto the bottom of the face, making the character look like it’s peeking over a ledge. -
Detail the face:
Apply the black eyes and mouth, then add tiny black whiskers using either very thin clay snakes or black acrylic paint after baking.
Step 5: Assembly and Baking
-
Insert hardware:
Screw a small eye pin into the top center of each head. If using smooth pins, bend the end into a hook before inserting for better grip. -
Double-check bonds:
Ensure all added pieces like ears and paws are secure; a tiny dab of liquid clay helps act as glue. -
Bake the pieces:
Place your charms on a tile or parchment-lined tray and bake according to your clay manufacturer’s instructions (usually 275°F for 15-30 minutes). -
Attach the keychains:
Once completely cool, use pliers to open the jump ring on your gold keychain hardware and loop it through the eye pin on the charm. -
Add a protective coat:
For durability, brush a thin layer of polyurethane glaze over the charms to seal the details and add a professional finish.
Clip these sweet little companions onto your keys or backpack and enjoy their cheerful company
Decorative Hair Clips
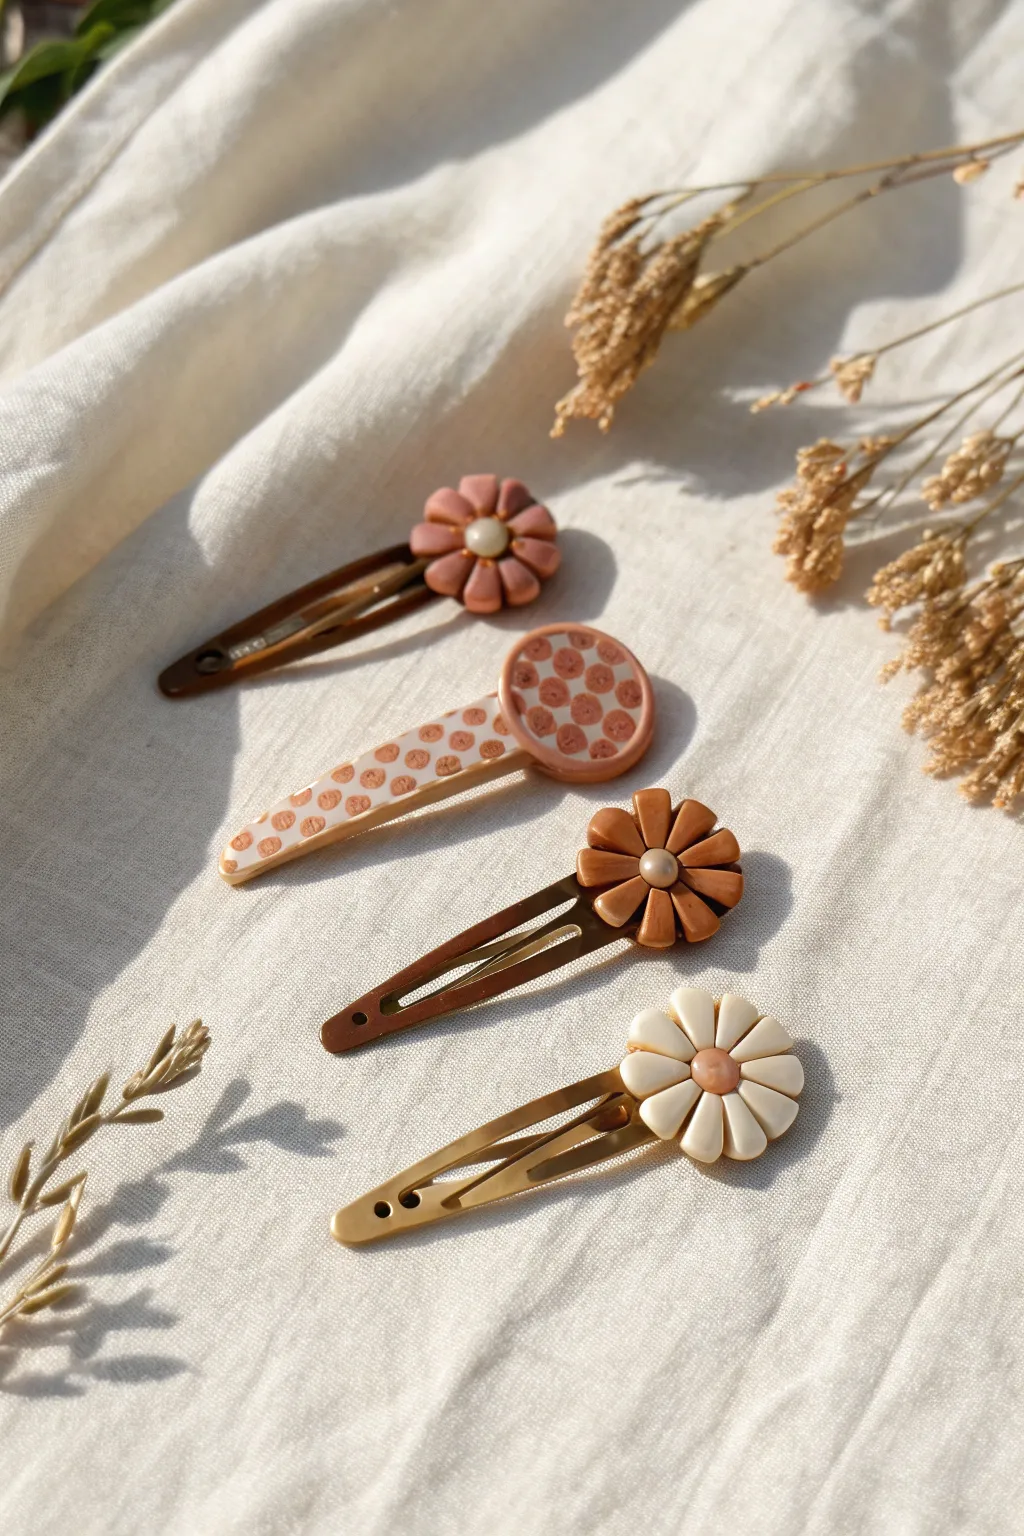
Embrace a touch of vintage charm with these delightful polymer clay hair clips. Featuring muted earth tones, simple daisy shapes, and playful polka dots, this project turns plain metal clips into wearable art perfect for a sunny day.
Step-by-Step Guide
Materials
- Polymer clay in muted tones (dusty rose, terracotta, cream, mustard, white)
- Metal alligator hair clips and snap clips (gold or bronze finish)
- Liquid polymer clay (clear or matching colors)
- Small round clay cutters (various sizes)
- Needle tool or toothpick
- Ball stylus tool
- Acrylic rolling pin
- Clay slicer blade
- Parchment paper or ceramic tile for baking
- Strong craft glue (E6000) or 2-part epoxy
- Gloss glaze (optional)
Step 1: Creating the Flower Motifs
-
Condition the clay:
Begin by thoroughly kneading your chosen colors of polymer clay until they are soft and pliable. For the cream daisy, roll out a sheet of cream clay to about 3mm thickness. -
Cut petals:
Use a small teardrop cutter to create eight individual petals. If you don’t have a teardrop cutter, cut small circles and gently pinch one end to form a petal shape. -
Arrange the daisy:
Arrange the petals in a circle on your work surface, points facing inward. Gently press the inner points together to adhere them. -
Add the center:
Roll a small ball of contrasting clay (like dusty pink) and flatten it slightly. Place it in the center of your petals. I create texture by pressing a small dot into the center using the ball stylus. -
Detail the petals:
For added dimension, use your needle tool or the back of a knife to press a single indentation down the center length of each petal, starting from the center and fading out toward the edge. -
Make the terracotta flower:
Repeat this process with terracotta clay for the darker flower, using a cream or pearl-colored center for contrast.
Sticky Situation?
If fingerprints are showing up on your raw clay, lightly dust your fingertips with cornstarch before handling, or wipe the unbaked clay with a little baby oil.
Step 2: Designing the Polka Dot Clip
-
Prepare the base:
Roll out a slab of white or cream clay. Trace the shape of your metal alligator clip onto the clay and cut it out with a craft knife, leaving a slight overhang to cover the metal edges. -
Create the pattern:
Roll a very thin snake of terracotta clay. Slice tiny discs from the snake to create miniature dots. -
Apply the dots:
Gently press these tiny terracotta discs onto your cream base in a random or grid pattern. Use your acrylic roller to lightly roll over the surface, embedding the dots flush with the base. -
Form the decorative circle:
Cut a larger circle from the remaining polka-dot clay slab. Use a slightly smaller cutter to cut a circle of solid terracotta clay and layer the patterned circle on top, creating a framed effect. -
Assemble the barrette piece:
Attach the decorative circle to the wide end of the clay strip you cut earlier. Smooth the seam on the back side to ensure it’s one solid unit.
Mix It Up
Add a luxe touch by brushing gold mica powder onto the petal edges before baking, or use a pearlescent clay for the flower centers to mimic pearls.
Step 3: Baking and Assembly
-
Bake the pieces:
Place all your clay components on parchment paper or a ceramic tile. Bake according to your brand’s specific package instructions (usually 275°F/135°C for 15-30 minutes). -
Cool down:
Allow the clay pieces to cool completely inside the oven or on a wire rack. They are fragile while hot, so patience here is key. -
Prepare the clips:
Scuff the surface of your metal hair clips slightly with sandpaper to help the glue adhere better. -
Glue the flowers:
Apply a dab of strong glue (E6000 works well) to the pad of the snap clip. Press the baked flower firmly onto the glue and hold for a few seconds. -
Attach the long piece:
For the polka dot alligator clip, run a thin line of glue along the length of the metal clip. Carefully align your clay strip and press down gently. -
Final cure:
Let the glue cure for at least 24 hours before wearing to ensure maximum durability.
Now you have a charming set of custom accessories ready to style or gift to a friend

TRACK YOUR CERAMIC JOURNEY
Capture glaze tests, firing details, and creative progress—all in one simple printable. Make your projects easier to repeat and improve.
Rainbow Magnets Set
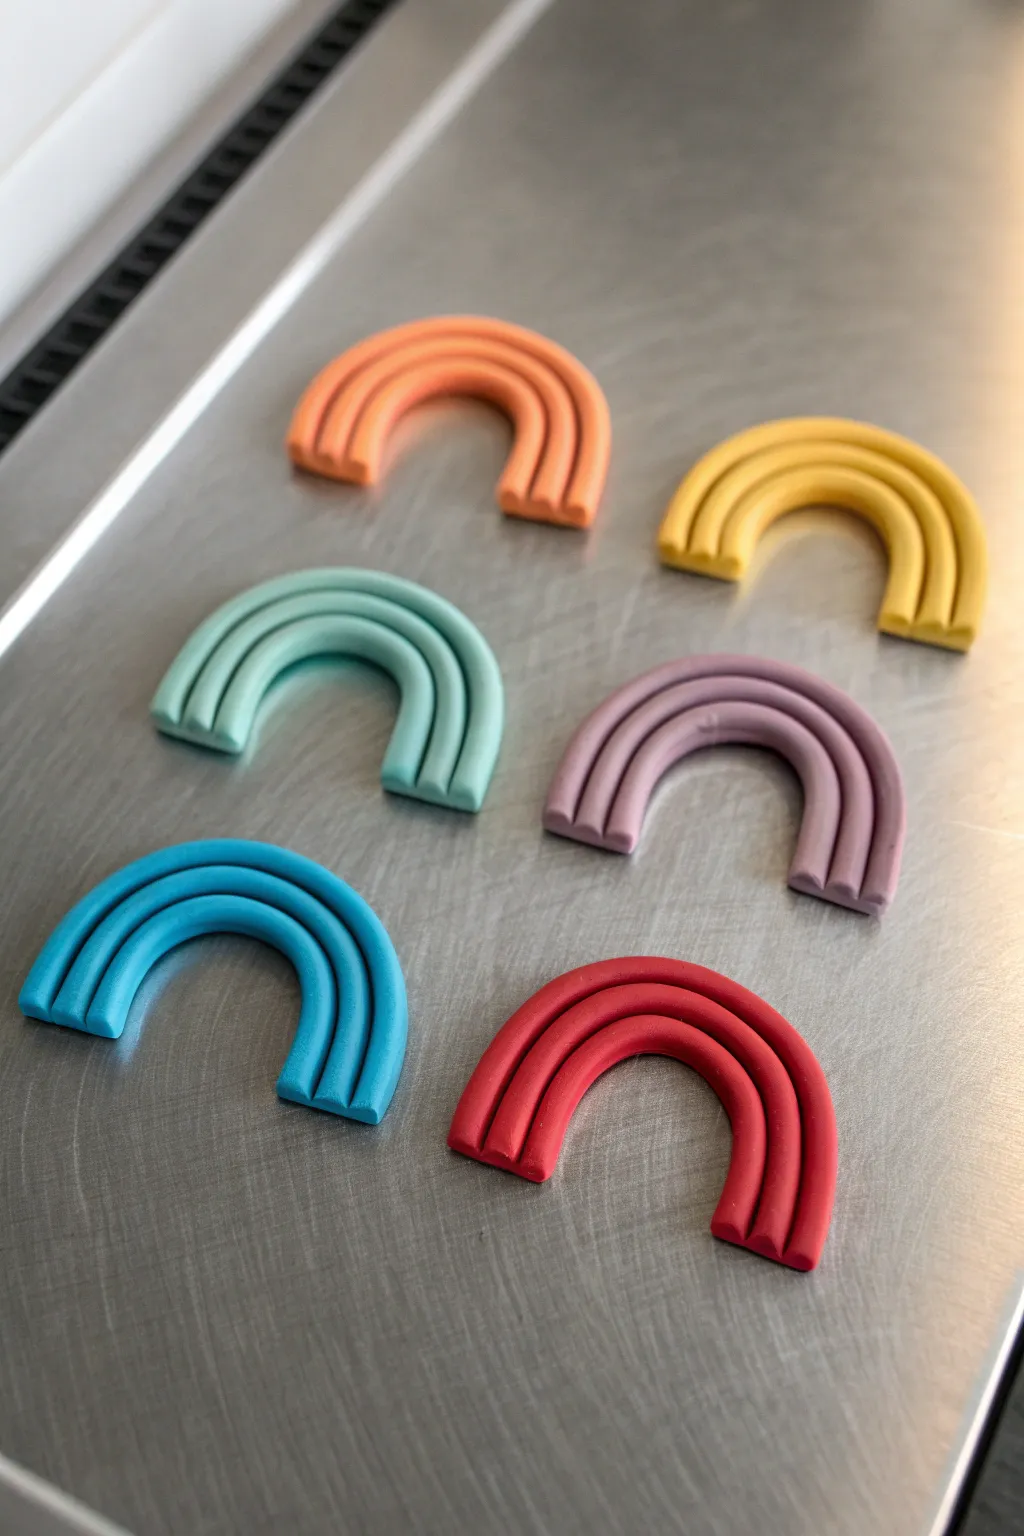
Brighten up your workspace or kitchen with these sleek, three-strand rainbow magnets inspired by modern Scandinavian design. These arches feature a smooth, matte finish and use solid colors for a bold, graphic look that’s surprisingly simple to achieve.
Step-by-Step Tutorial
Materials
- Polymer clay in six colors: deep orange, mustard yellow, mint green, dusty rose/purple, bright blue, and red
- Liquid polymer clay or bake-and-bond adhesive
- Rolling tool or acrylic roller
- Clay extruder (optional but helpful for uniform ropes)
- Sharp tissue blade or flexible craft blade
- Smooth ceramic tile or glass work surface
- Strong craft magnets (round neodymium recommended)
- Super glue or E6000 adhesive
Step 1: Prepping and Extruding
-
Condition the clay:
Start by thoroughly conditioning your first color of polymer clay until it is warm, soft, and pliable. Conditioning is crucial to prevent cracks later on, so take your time kneading it. -
Create uniform ropes:
Roll the conditioned clay into long, thin snakes. For the most professional look, I highly recommend using a clay extruder with a medium circle disc to get perfectly even thickness. If rolling by hand, use an acrylic block to roll back and forth for consistency. -
Repeat for all colors:
Process each of your six colors (orange, mustard, mint, purple, blue, red) into ropes. You will need enough length of each color to create three strands per rainbow. -
Cut equal lengths:
For each rainbow, you will need three segments of the *same* color. Cut three pieces of the clay rope, making the outer strand slightly longer than the inner ones.
Straight Cuts Tip
Chill the unbaked rainbows in the fridge for 10 minutes before trimming the bottom. Harder clay cuts cleaner and won’t smush as easily.
Step 2: Assembling the Arches
-
Check strand size:
Lay out your three strands side-by-side. The smallest strand will be the inner arch, the middle strand goes next, and the longest strand forms the outer arch. -
Apply adhesive:
Run a very thin bead of liquid polymer clay or bake-and-bond along the sides where the ropes will touch. This acts as a ‘grout’ to fuse them together strongly during baking. -
Form the curve:
Gently bend the smallest strand into a tight ‘U’ shape on your work surface. Take the second strand and curve it snugly over the first, pressing them gently together. -
Add the outer layer:
Take the final, longest strand and wrap it over the pair, pressing it inwards to bond with the middle strand. Ensure there are no gaps between the layers. -
Flatten the assembly:
Once the arch is formed, place an acrylic block or a flat object gently on top of the rainbow and press down lightly. This ensures the front and back are flat and the strands are leveled. -
Trim the ends:
Using your sharp tissue blade, cut straight across the bottom legs of the rainbow to create a clean, flat base. Make sure your cut is swift to avoid squishing the ropes.
Troubleshooting Gaps
If gaps appear between strands after baking, it means they weren’t pressed tight enough. Use liquid clay between strands next time.
Step 3: Baking and Finishing
-
Smooth imperfections:
Before baking, inspect the clay for fingerprints. I like to dip my finger in a tiny bit of cornstarch or baby oil and gently buff away any prints. -
Bake carefully:
Place your rainbows on a tile or baking sheet lined with parchment paper. Bake according to your brand’s instructions—usually around 275°F (135°C)—for about 30 minutes. Tent with foil to prevent scorching colors like yellow or white. -
Cool down:
Let the rainbows cool completely inside the oven first if possible, or on a wire rack. Polymer clay is fragile when hot and gains its final strength only after cooling. -
Attach the magnets:
Once fully cooled, flip the rainbows over. Apply a dab of super glue or E6000 to the back of the rainbow, near the top of the curve. -
Secure and cure:
Press a strong magnet firmly into the glue. Let the adhesive cure fully (check the glue package instructions) before sticking them to your fridge.
Arrange your colorful set on a magnetic board or fridge for an instant pop of joy
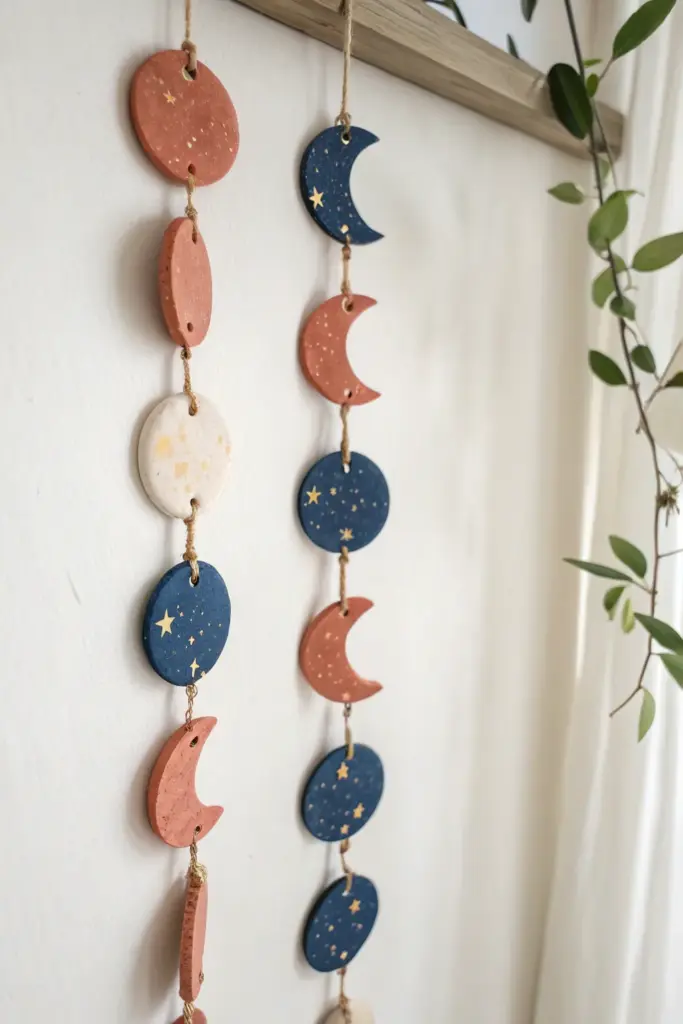
Moon Phase Garland

Bring the magic of the night sky indoors with this charming polymer clay wall hanging. Featuring alternating phases of the moon in earthy terracotta, creamy white, and deep midnight blue, this garland adds a bohemian touch to any room.
How-To Guide
Materials
- Polymer clay (terracotta/burnt orange, white, and deep metallic or navy blue)
- Acrylic rolling pin
- Circle cutters (various sizes)
- Toothpick or small skewer for piercing
- Gold acrylic paint
- Fine detail paintbrush
- Jute twine or hemp cord
- Gloss glaze (optional)
- Wooden dowel or branch for hanging
- Baking sheet and parchment paper
- Sandpaper (fine grit)
Step 1: Prepping and Shaping the Moons
-
Condition the Clay:
Begin by warming up your clay colors individually. Knead the terracotta, white, and blue clays in your hands until they are soft, pliable, and free of cracks. -
Roll out Slabs:
Using your acrylic roller, flatten each color of clay onto a clean work surface. Aim for a consistent thickness of about 1/4 inch (6mm) to ensure durability. -
Cut Full Moon Circles:
Use your main circle cutter to punch out full circles. For the garland shown, you’ll want a mix of terracotta, white, and blue circles to serve as your base shapes. -
Create Crescent Shapes:
To make the crescent moons, cut a circle first. Then, position the cutter slightly off-center over the punched circle and cut again, removing a sliver to leave behind a perfect crescent shape. -
Smooth the Edges:
Gently run your finger along the cut edges of each shape to soften any sharp ridges left by the cutter. This gives the final piece a more organic, finished look. -
Pierce Hanging Holes:
Before baking, use a toothpick or skewer to poke holes in each piece. Full circles need a hole at the top and bottom; crescents need holes at the top and bottom tips. Ensure the holes are large enough for your twine.
Step 2: Drying and Decorating
-
Bake the Clay:
Arrange your shapes on a parchment-lined baking sheet. Bake according to your brand’s specific package instructions (usually 275°F/135°C for 15-30 minutes). -
Cool and Sand:
Allow the pieces to cool completely on the tray. Once hard, use fine-grit sandpaper to buff away any fingerprints or rough spots on the edges. -
Splatter Effect:
For the subtle speckled texture seen on the white and terracotta pieces, dip an old toothbrush or stiff brush into diluted white or gold paint and flick the bristles over the clay to create tiny droplets. -
Paint Celestial Details:
Using a very fine detail brush and gold acrylic paint, hand-paint small stars, constellations, and speckles onto the dark blue moons. I find that varying the size of the stars adds lovely depth. -
Seal (Optional):
If you want a glossy finish or extra protection for your paint, apply a thin coat of polymer clay glaze or varnish and let it dry completely.
Uneven Surfaces?
If your clay retains fingerprints, dip your finger in a tiny bit of baby oil or cornstarch and gently rub the raw clay surface before baking to smooth it out.
Step 3: Assembly
-
Cut the Twine:
Measure and cut lengths of jute twine based on how long you want your garland to hang. You will need separate pieces to connect each moon phase. -
Tie the First Knot:
Start at the bottom of your garland strand. Thread the twine through the bottom hole of the lowest moon and tie a secure double knot. -
Connect the Phases:
Thread the twine up through the top hole of the first piece and knot it, leaving a small gap of exposed twine before tying it into the bottom hole of the next piece above it. -
Attach to Support:
Once all clay pieces are connected in vertical strands, tie the top of each strand securely onto your wooden dowel or branch. -
Final Adjustments:
Hang the dowel on the wall and gently rotate the clay pieces so they all face forward. Trim any excess twine tails near the knots for a clean finish.
Add Sparkle
Mix a pinch of gold mica powder or glitter directly into the blue clay before rolling it out to give the night sky pieces an embedded, galaxy-like shimmer.
Hang your new celestial creation near a window to catch the light and enjoy the peaceful vibes it brings to your space