Polymer clay is basically my favorite kind of tiny magic—soft in your hands, then sturdy once it’s baked. If you’re craving fresh polymer clay sculpting ideas, here are 20 projects that’ll take you from cute and classic to totally “how did you make that?” territory.
Kawaii Round Animal Charms
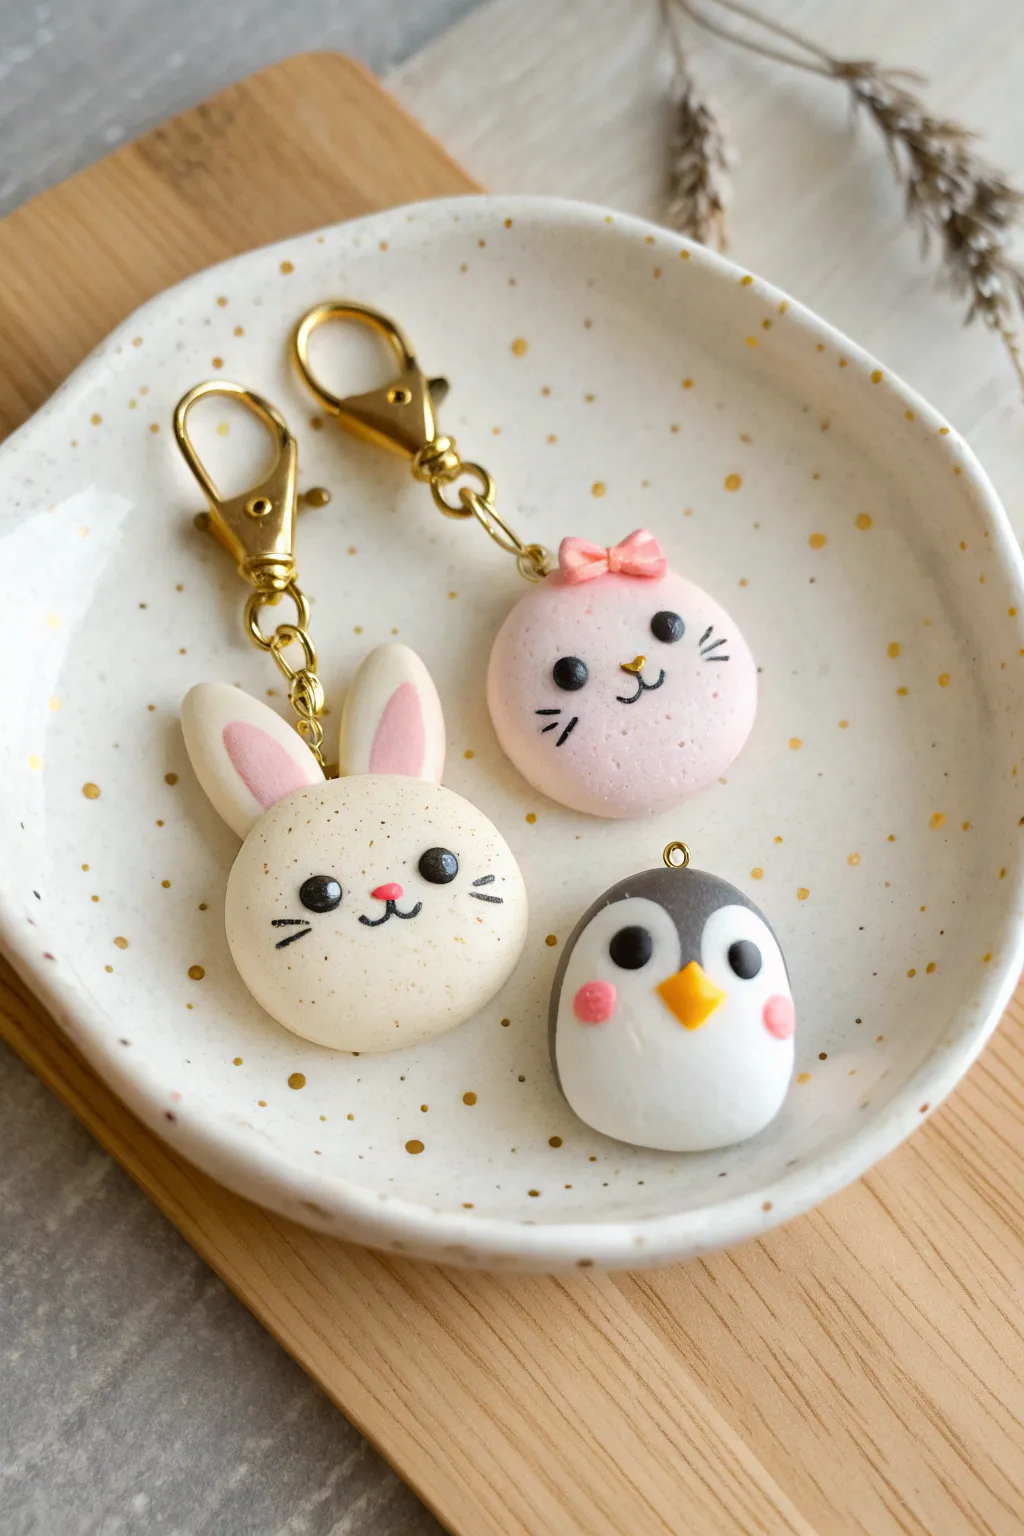
These adorable, macaron-style animal charms are the perfect introduction to creating kawaii characters with polymer clay. Featuring a sweet bunny, a blushing cat, and a tiny penguin, they make delightful keychains or gifts for friends.
Step-by-Step Guide
Materials
- Polymer clay (White, Pink, Black, Grey, Yellow/Orange)
- Clean ceramic tile or work surface
- Ball stylus tools (various sizes)
- Needle tool or toothpick
- Small eye pins (gold or silver)
- Gold keychain hardware and jump rings
- Soft pastel chalks (pink) and a soft brush
- Liquid polymer clay (optional, for adhesion)
- Oven for baking
Step 1: Shaping the Base Forms
-
Condition the clay:
Start by thoroughly conditioning your white, pink, and grey polymer clay until it is soft and pliable. This prevents cracking later on. -
Form the bunny base:
Roll a ball of white clay about the size of a large grape. Gently flatten it into a thick disc shape, smoothing the edges to mimic a macaron shell. -
Form the cat base:
Repeat the process with light pink clay to create a similar flattened disc shape for the cat character. -
Form the penguin base:
Roll a slightly oval-shaped ball of white clay. Take a smaller piece of grey clay, flatten it into specific shapes for the head and wings, and drape it over the top and back of the white oval to create the penguin’s markings. -
Smooth the seams:
Gently rub the seams where different clay colors meet, especially on the penguin, to ensure the bond is secure and the transition is smooth.
Clean Clay Tip
Keep wet wipes handy! Clean your hands and tools thoroughly when switching between colors, especially before touching white clay, to avoid murky stains.
Step 2: Adding Ears and Details
-
Create bunny ears:
Roll two small white logs and flatten them into teardrops. Press a smaller pink teardrop inside each for the inner ear. Attach these securely to the top of the white base. -
Make the cat bow:
With tiny bits of darker pink clay, form two small triangles and a center dot to create a little bow. press this onto the top of the pink base. -
Sculpt the penguin beak:
Form a tiny pyramid or cone from yellow or orange clay. Press it gently into the center of the penguin’s face. -
Insert eye pins:
Trim your eye pins if they are too long. Adding a dab of liquid clay to the shaft can help with grip. Push an eye pin deeply into the top center of each charm.
Step 3: Bringing Faces to Life
-
Add the eyes:
Roll tiny balls of black clay. Use a small ball tool to make slight indentations on the faces where the eyes will go, then press the black balls into place. -
Create noses:
For the bunny, add a tiny pink triangle nose. For the cat, you can add a small metallic or yellow nose, or paint it on later. -
Draw facial features:
Roll incredibly thin snakes of black clay for the bunny and cat whiskers and mouths. Carefully apply them with a needle tool. Alternatively, you can paint these details on with acrylic paint after baking. -
Apply blush:
Scrape a little pink pastel chalk into a powder. Use a soft brush or cotton swab to gently dust rosy cheeks onto the bunny and penguin.
Make it Sparkle
Mix a tiny pinch of fine glitter into a translucent glaze and apply it to just the blush cheeks or the inner ears for a subtle, magical shimmer.
Step 4: Finishing Touches
-
Inspect and clean:
Check your charms for any fingerprints or dust. You can smooth fingerprints with a little baby oil and remove dust with a piece of tape or a wet wipe. -
Bake the charms:
Place your creations on a ceramic tile or baking sheet. Bake according to your brand of clay’s instructions—usually around 275°F (130°C) for 15-30 minutes. -
Cool down:
Allow the charms to cool completely before handling them. They are fragile while hot. -
Glaze (optional):
For a glossy finish and extra protection, apply a coat of polymer clay glaze or UV resin to the charms, avoiding the matte texture if you prefer it. -
Attach hardware:
Using pliers, open a jump ring and thread it through the eye pin loop. Attach your gold lobster clasp keychain and close the jump ring securely.
Now your charming little animal trio is ready to brighten up your keys or become a lovely gift for a friend


Smiling Food Mini Sculptures
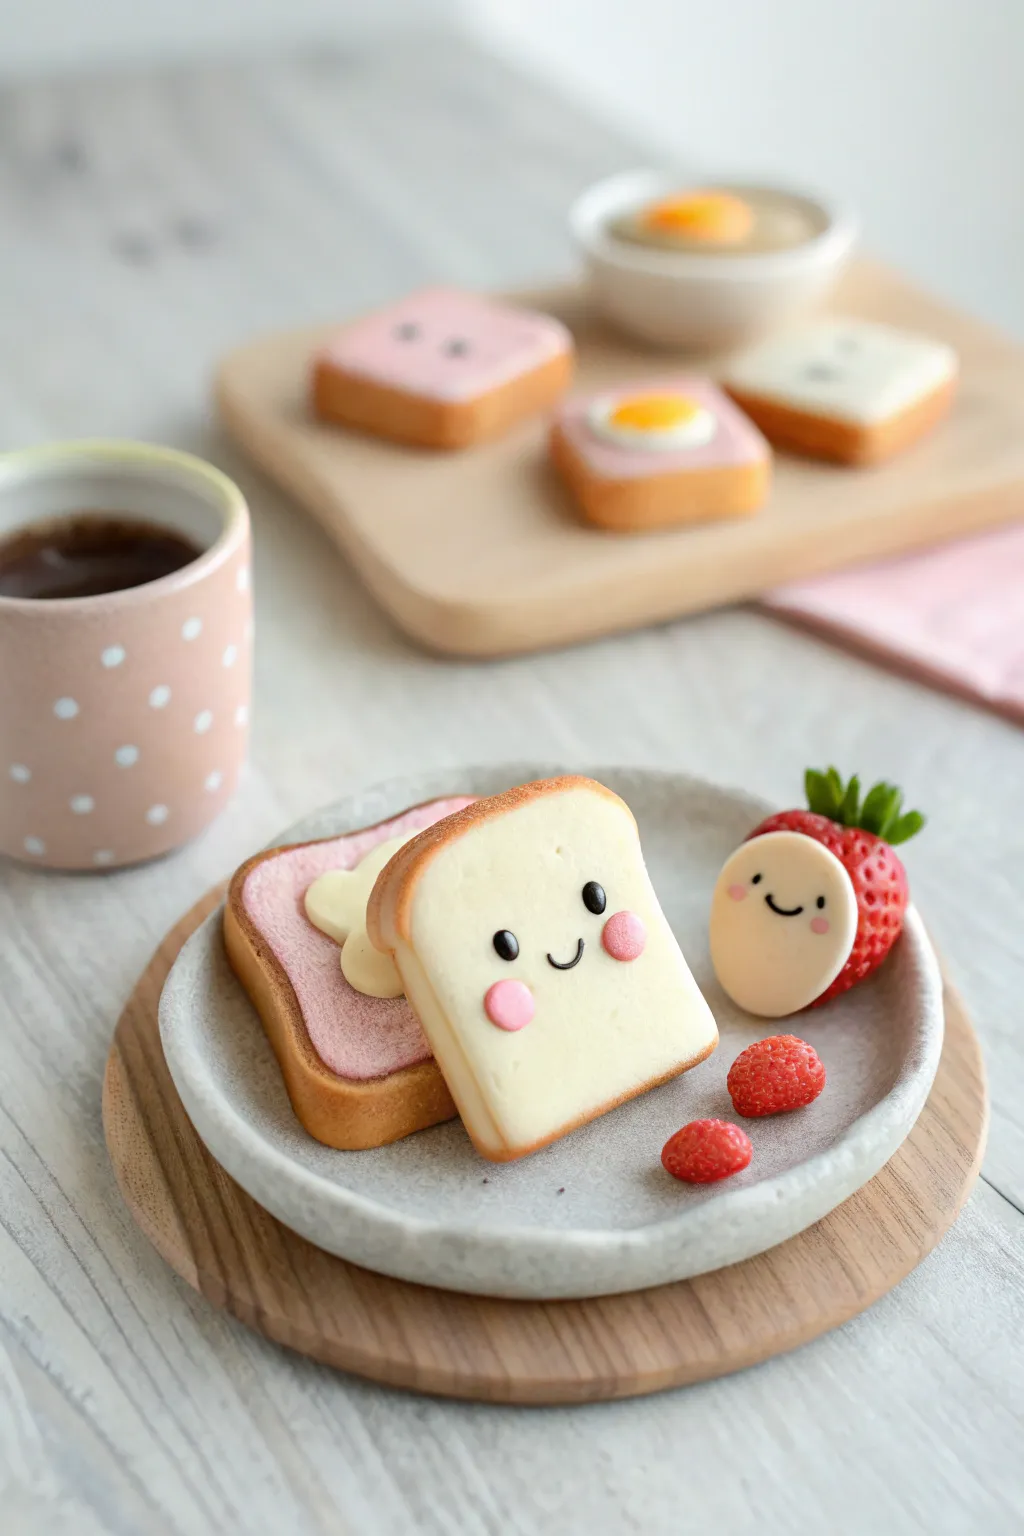
These delightfully realistic yet undeniably cute mini sculptures look good enough to eat but are designed to brighten your desk instead. You’ll learn to create the perfect toasted texture and adorable expressions that give these breakfast staples so much personality.
Step-by-Step
Materials
- Polymer clay (white, translucent, ecru/beige, red, pink, black, yellow)
- Soft pastels (various shades of brown, orange, and yellow)
- Liquid polymer clay (translucent or white)
- Needle tool and dotting tools
- Old toothbrush or sandpaper (for texturing)
- Craft knife or tissue blade
- Small paintbrush
- Gloss glaze (optional)
Step 1: Prepping the Bread Base
-
Mix the Dough Color:
Start by mixing white polymer clay with a small amount of translucent and just a pinch of ecru or beige. You want a creamy, off-white color that mimics the inside of white bread, not a stark paper-white. -
Shape the Loaf:
Roll your mixed clay into a thick log, then flatten it slightly to form a rectangular block. Pinch the top gently to create that signature ‘muffin top’ curve of a bread slice. -
Slice the Bread:
Using a sharp tissue blade, slice two even pieces from your block. Keep them relatively thick (about 1/4 inch) so they look plush and substantial. -
Crust Color:
Roll out a thin sheet of tannish-brown clay. Wrap this strip specifically around the edges of your bread slices, leaving the front and back faces exposed. Blend the seams gently with your finger or a rubber shaper. -
Texture Time:
This is crucial for realism: Take an old toothbrush or a piece of crumpled aluminum foil and tap it firmly all over the white face of the bread. Don’t be shy—real bread is full of air pockets.
Step 2: Toasting and Topping
-
The Perfect Toast:
Shave some brown and orange soft pastels into a powder. Using a dry paintbrush, gently dust the edges of the bread face, concentrating darker brown on the very rim and fading to orange/yellow towards the center. This creates that oven-baked gradient. -
Adding Jam:
Mix a small amount of liquid polymer clay with shaved red pastel chalk (or oil paint) to create a translucent jam. Spread a thin, uneven layer onto one of your toast slices, letting the texture show through. -
Butter Pat:
Mix yellow and white clay for a pale butter shade. Form a few distinctive, curvy dollops and place them on top of the jam layer, pressing down slightly so they look like they are melting. -
Strawberry Companion:
Shape a teardrop from red clay. Use a needle tool to poke tiny indents all over the surface for seeds. Add a small cap of green clay leaves on top. -
Strawberry Face:
Flatten a small oval of the original bread-dough color clay. Press this onto the front of the strawberry to act as the ‘face plate’ shown in the example.
Sticky Situation?
If your clay gets too soft and fingerprints are showing, pop the pieces in the fridge for 10 minutes. The cold clay is firmer and holds fine textures much better.
Step 3: Bringing Them to Life
-
Cheeky Details:
Roll tiny balls of pink clay and flatten them onto the cheeks of both the main toast slice and the strawberry face. Place them wide apart for maximum cuteness. -
Eyes and Mouth:
Roll extremely thin snakes of black clay for the mouths and tiny balls for the eyes. Use a needle tool or dotting tool to pick them up and press them gently onto the faces. I find using a tiny needle tip helps curve the mouth into a perfect ‘U’ shape. -
Mini Berries:
Create two or three minuscule red balls and texturize them heavily with a needle tool to create tiny raspberries to scatter on the plate. -
Final Bake:
Bake your pieces according to your clay manufacturer’s instructions (usually 275°F/130°C for 15-30 minutes). Let them cool completely before handling. -
Glossy Finishes:
Once cool, apply a thin coat of gloss glaze specifically to the jam and the tiny berry seeds to make them look wet and fresh, contrasting with the matte bread texture.
Shading Pro Tip
Apply the pastel shading in very light layers. You can always add more ‘toastiness,’ but you can’t erase it once the clay is stained. Build the color slowly.
Now you have a charming little breakfast scene that keeps smiling all day long


Simple Cat and Dog Figurines
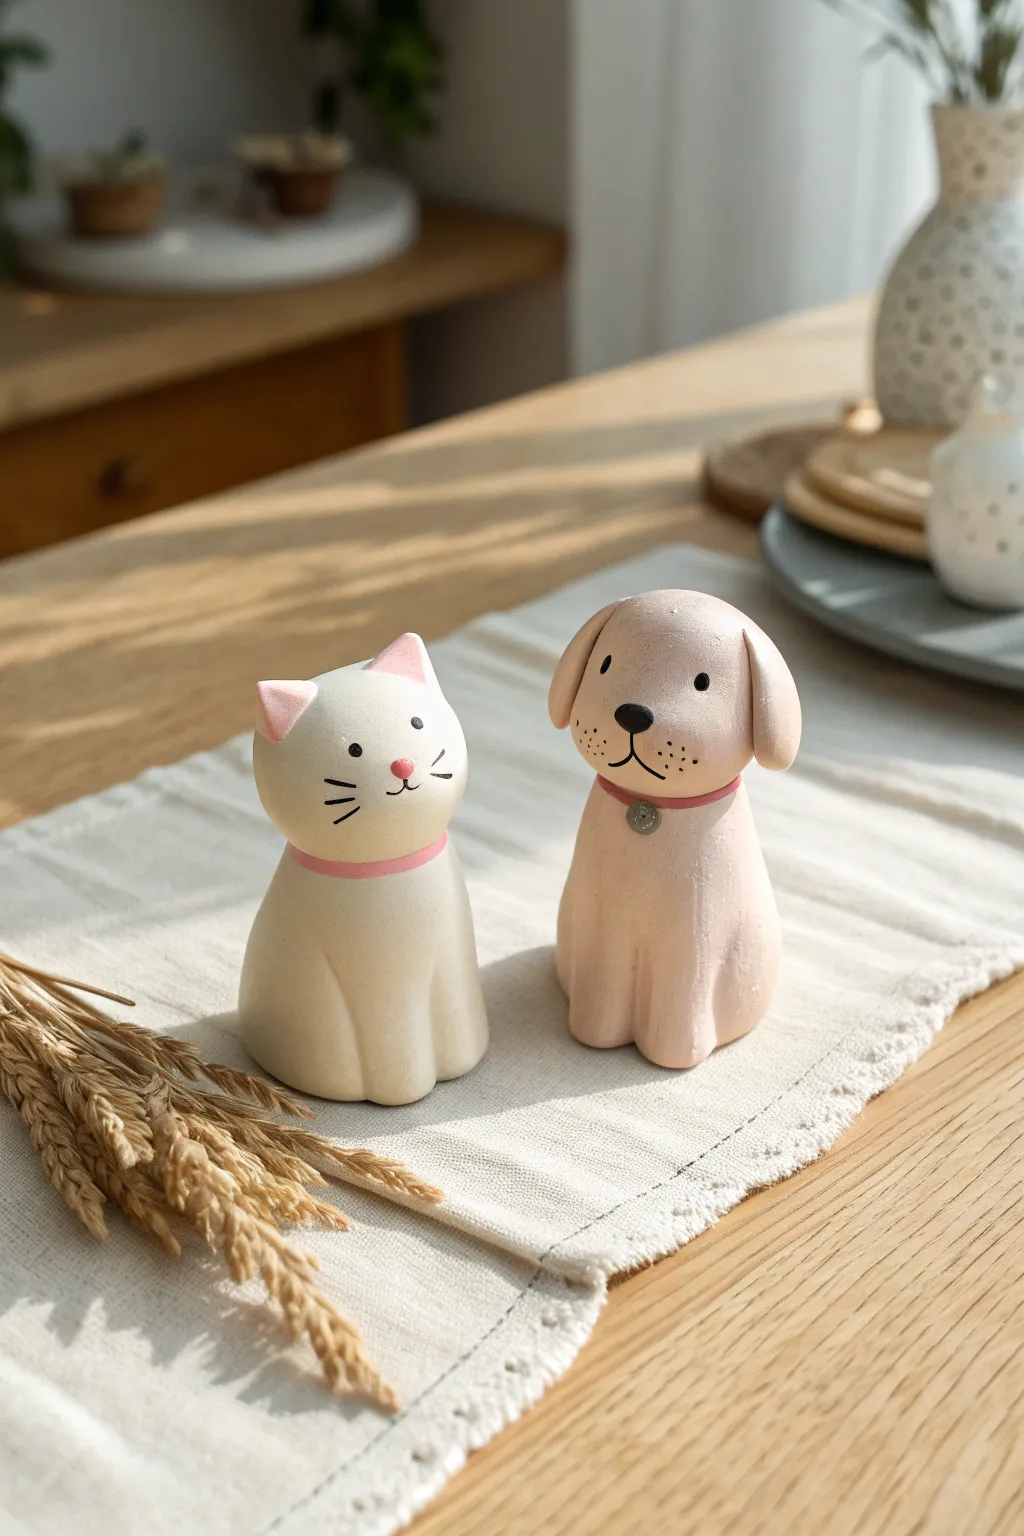
Capture the charm of your furry friends with these delightfully minimalist cat and dog figurines. Their smooth, rounded forms and soft pastel features make them a soothing addition to any desk or shelf, perfect for a beginner’s afternoon project.
How-To Guide
Materials
- White or cream polymer clay
- Soft pink polymer clay
- Light tan or beige polymer clay
- Black acrylic paint
- Silver metallic paint
- Fine detail paintbrush (size 00 or 000)
- Dotting tool or ball stylus
- Clay blending tool or silicone shaper
- Flexible clay blade provided
- Gloss glaze (optional)
Step 1: Shaping the Bodies
-
Condition the clay:
Start by kneading your white clay for the cat and the tan clay for the dog until they are soft and pliable. This prevents cracks during baking. -
Form the base cones:
Roll two large balls of clay, one white and one tan. Carefully shape each into a rounded cone form with a wide, flat bottom so they stand securely. -
Create the heads:
Roll two slightly smaller spheres for the heads. Gently press them onto the narrow tops of your body cones. Blend the seam at the neck just slightly for stability, but keep the definition between head and body distinct. -
Define the legs:
Using a silicone tool or the back of a knife, gently press vertical indentations into the front of the body cones to suggest front paws. Round off the bottom edges to create ‘toes’.
Smoother Seams
If fingerprints are visible, lightly brush the raw clay with a little baby oil or clay softener before baking to smooth everything out.
Step 2: Sculpting the Cat
-
Make the ears:
Pinch two tiny triangles of white clay. Indent the centers and fill them with a minuscule amount of pink clay, smoothing it flat. Attach these to the top of the white head. -
Add the collar:
Roll an extremely thin snake of pink clay. Wrap it around the cat’s neck where the head meets the body, pressing lightly to adhere. Cut off any excess at the back. -
Sculpt the nose:
Place a tiny, flattened oval of pink clay in the center of the face for the nose. I like to press it just firmly enough that it doesn’t fall off, but retains a little dimension.
Step 3: Sculpting the Dog
-
Form the snout:
Take a small ball of tan clay and flatten it slightly into an oval. Press this onto the lower half of the dog’s face to create a muzzle dimension. -
Attach the ears:
Shape two teardrops of tan clay and flatten them. Attach the narrow points to the sides of the head, letting the wider ends flop down naturally against the cheeks. -
Add the dog collar:
Similar to the cat, roll a thin snake of pink clay and wrap it around the dog’s neck. Smooth the join at the back. -
Create the tag:
Flatten a tiny ball of grey or silver clay (or paint it later) into a disc. Press a small indentation in it to mimic an engraving and attach it to the front of the collar. -
Add the nose:
Attach a small, rounded triangle of black clay to the top of the muzzle area.
Accessories
Make tiny clay accessories like a ball of yarn for the cat or a bone for the dog to sit next to them for an adorable vignette display.
Step 4: Finishing Touches
-
Bake the figures:
Bake your creations according to the instructions on your specific brand of polymer clay (usually around 275°F/135°C for 15-30 minutes). Let them cool completely. -
Paint the eyes:
Using your finest brush or a dotting tool dipped in black acrylic paint, add two small dots for eyes on both figures. Keep them wide-set for a cuter look. -
Detail the cat’s face:
With the finest brush tip, paint three delicate whiskers on each cheek and a small vertical line dropping from the nose to create the mouth. -
Detail the dog’s face:
Paint a small anchor shape (a line down from the nose curving into a smile) and add three tiny freckle dots on each side of the muzzle. -
Final glaze:
Optionally, add a touch of gloss glaze to the noses and eyes to make them look wet and lively.
Place your new ceramic-style pets on a sunny windowsill to enjoy their cheerful company


Cozy Mini Mug Buddy Figures
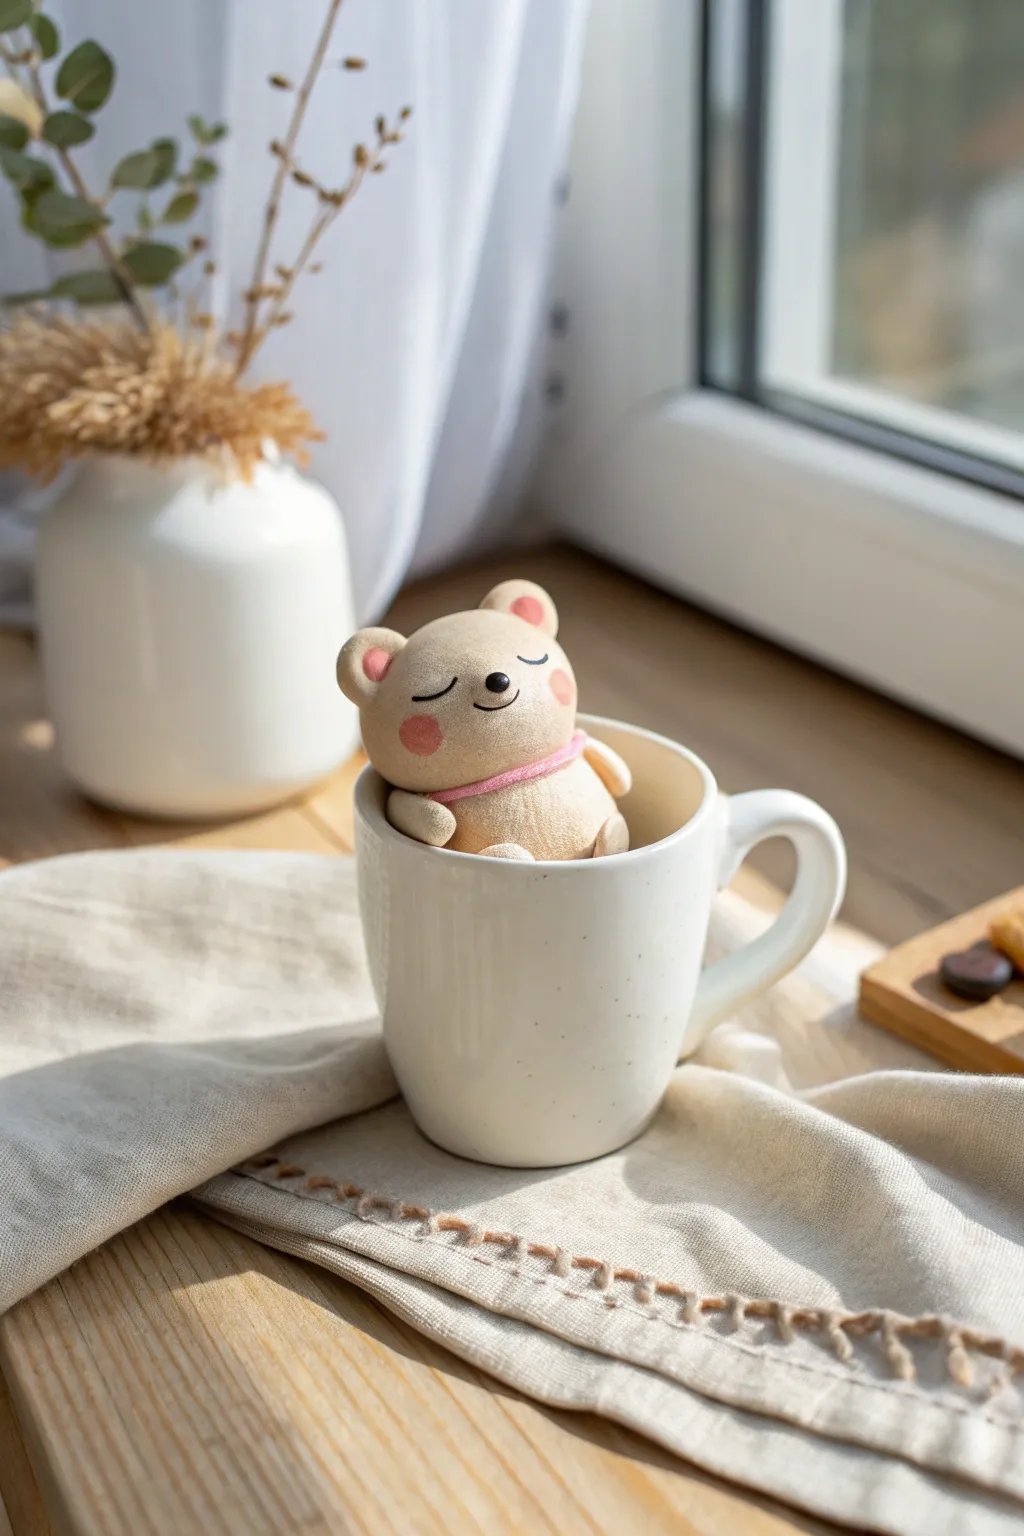
Create the ultimate cozy vibe with this adorable sleeping bear figurine designed to nestle comfortably inside your favorite mug. With its soft biscuit-colored finish and peaceful expression, this little buddy brings a sense of calm to your morning routine or desk décor.
Step-by-Step Guide
Materials
- Polymer clay (light tan/beige, baby pink, black)
- Small ball tool
- Needle tool or toothpick
- Soft pastel chalks (pink, light brown)
- Small fluffy paintbrush
- Texturing tool (stiff bristle brush or toothbrush)
- Clean ceramic mug (for sizing)
- Aluminum foil
- Liquid polymer clay or Bake & Bond
- Wet wipes
- Oven and baking tray
Step 1: Shaping the Base
-
Prepare the foil core:
Crumple a small piece of aluminum foil into a tight ball, roughly the size of a walnut. This reduces weight and baking time while saving clay. -
Condition the clay:
Warm up your light tan polymer clay by kneading it until it’s soft and pliable. Roll it into a smooth sheet about 3mm thick. -
Cover the core:
Wrap the clay sheet around your foil ball, smoothing out all seams until you have a perfect sphere for the head. Shape a slightly larger, oval-shaped lump of solid clay for the body since it needs weight to sit securely. -
Connect head and body:
Use a dab of liquid clay to attach the head to the body. Press them together firmly but gently to avoid distorting the shapes. -
Texture the surface:
Before adding features, tap a stiff toothbrush or stippling brush all over the surface of the bear. This creates that lovely, soft velvet-like texture seen in the photo.
Clean Clay Trick
Keep separate wet wipes for light and dark colors. Black clay residue ruins tan clay instantly, so wipe hands and tools aggressively before switching back to the light color.
Step 2: Facial Features
-
Create the muzzle:
Roll a small, flattened oval of tan clay and press it onto the lower center of the face. Blend the edges slightly so it looks integrated, then re-texture that area. -
Add the nose:
Roll a tiny speck of black clay into a soft triangular shape. Place it at the top center of the muzzle you just made. -
Sculpt the mouth:
Using a needle tool, carefully impress two small curves coming down from the nose to form a gentle ‘w’ shape for a smiling mouth. -
Add sleeping eyes:
Roll two impossibly thin snakes of black clay. Carefully curve them into ‘U’ shapes and place them above the muzzle to create closed, sleeping eyelids. -
Attach the ears:
Form two small balls of tan clay and press a smaller ball of pink clay into the center of each. Flatten them slightly and attach them to the top of the head. -
Blush the cheeks:
For those rosy cheeks, scrape a little pink soft pastel into a powder. Use a dry, soft brush to gently dust circles onto the bear’s cheeks. I like to build this color up slowly rather than applying too much at once.
Step 3: Limbs and Accessories
-
Make the arms:
Roll two sausage shapes from the tan clay. Round one end of each for the paw. -
Position the arms:
Attach the arms to the sides of the body. Here is the crucial part: place your bear inside the actual mug you plan to use. Adjust the arms so they rest over the rim or tuck in comfortably, ensuring the bear fits perfectly. -
Add the legs:
Create two shorter, thicker ovals for the feet. Attach them to the bottom front of the body, creating a seated posture. -
Create the scarf:
Roll a thin snake of pink clay. Flatten it gently. -
Dress the bear:
Wrap the pink strip around the bear’s neck, covering the seam between head and body. Use your needle tool to add small indentations to mimic fabric folds. -
Final check:
Do one last pass with your texturing brush to ensure no fingerprints remain and the ‘fur’ texture is consistent. -
Bake:
Bake the figurine according to your clay package instructions (usually 230°F – 275°F / 110°C – 135°C for 30 minutes). You can bake it directly in the ceramic mug to ensure it keeps its shape, provided the mug is oven-safe.
Make it Seasonal
Instead of a simple pink collar, sculpt a textured scarf with stripes for winter, or add a tiny holly leaf. You could even swap the colors to make a panda or polar bear.
Now you have a peaceful little friend to keep your tea company during quiet moments

The Complete Guide to Pottery Troubleshooting
Uncover the most common ceramic mistakes—from cracking clay to failed glazes—and learn how to fix them fast.
Mini Sea Creatures Collection
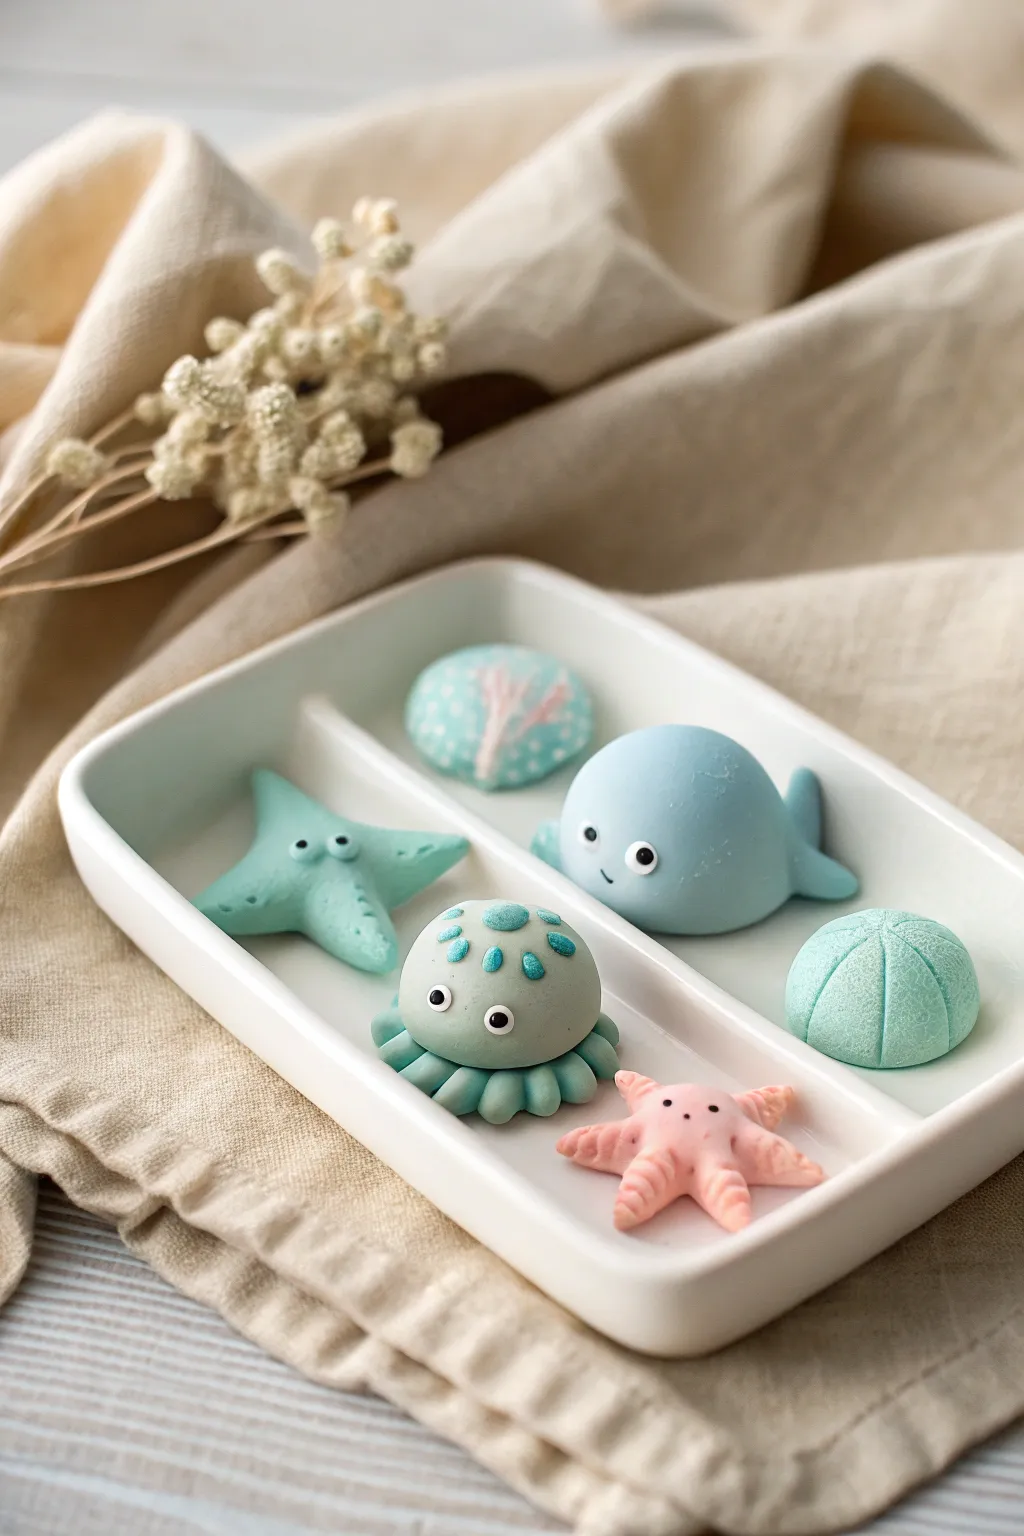
Create your own pocket-sized aquarium with this collection of kawaii sea creatures nestled in a divided tray. These soft pastel figures feature simple shapes and adorable expressions, making them perfect for beginners learning to model character details.
How-To Guide
Materials
- Polymer clay (baby blue, mint green, pale pink, white, black)
- Clean ceramic divided dish or rectangular tray
- Ball stylus tools (various sizes)
- Needle tool or toothpick
- Soft pastel chalks (pink for cheeks)
- Small soft brush
- Craft knife or clay blade
- Wet wipes (for cleaning hands between colors)
Step 1: The Gentle Whale
-
Body Form:
Start by conditioning a chunk of baby blue clay until soft. Roll it into a smooth ball, then gently pull one side to create a tapered teardrop shape for the tail, flattening the bottom slightly so it sits stable. -
Tail and Fins:
Shape two small triangles of blue clay. Attach one to each side of the body for pectoral fins, blending the seams with your finger or a silicone tool. For the tail flukes, shape a flattened heart and attach it to the tapered end. -
Face Details:
Use a small ball tool to make two indentations for eyes. Press tiny balls of black clay into these sockets, adding microscopic white dots for ‘shine’ highlights. Use a needle tool to press a tiny smile between the eyes.
Step 2: The Mint Octopus
-
Head and Tentacles:
Roll a smooth ball of mint green clay for the head. For the tentacles, roll 8 small teardrops of the same color and arrange them in a circle, points facing inward. Place the head firmly onto the center of this ring. -
Texture Spots:
Flatten tiny balls of lighter blue or teal clay and press them onto the top of the head for spots. Use a needle tool to add texture to the center of each spot. -
Sweet Expression:
Just like the whale, add two wide-set black eyes with white highlights. Position them low on the head for maximum cuteness.
Clean Clay Pro-Tip
Lighter pastel colors show dust easily. Keep a pack of baby wipes nearby and clean your hands and tools thoroughly when switching between blue, green, and pink clay to keep colors crisp.
Step 3: Starfish Duo
-
Classic Pink Star:
Roll pale pink clay into a ball and flatten it slightly. Pinch out five points to create the star shape. Gently curve the arms to make it look like it’s crawling. -
Star Texture:
Use a needle tool or small ball tool to create rows of textures running down each arm. Add two tiny black eyes near the center. -
Green Sea Star:
Repeat the process with mint green clay. For this one, try making the arms slightly more slender and curved. Add eyes near the center junction.
Level Up: Texture
For a ‘sandy’ texture on the shells or starfish, gently tap the raw clay with an old toothbrush or a crumpled ball of aluminum foil before baking. This adds realistic matte detail.
Step 4: Shells & Finishing
-
Round Coral Shell:
Flatten a disc of light blue clay. Taking a tiny sausage of pink clay, create a branching coral pattern on the surface. Gently roll over it to embed the pattern flush with the surface. -
Sea Urchin Bun:
Roll a ball of mint clay and flatten the bottom. Use a dull knife or a credit card edge to press vertical indentation lines from the bottom to the top center, resembling a dumpling or sea urchin test. -
Blushing Cheeks:
Before baking, scrape a little pink pastel chalk into a powder. Use a soft dry brush to gently dust rosy cheeks onto the whale, octopus, and starfish. -
Baking:
Arrange all your creatures in your ceramic dish (if oven-safe) or on a tile. Bake according to your clay manufacturer’s instructions, usually at 275°F (130°C) for 15-30 minutes.
Once cooled, your mini ocean collection is ready to bring a calming seaside vibe to your desk
Frog or Snail Desk Organizer
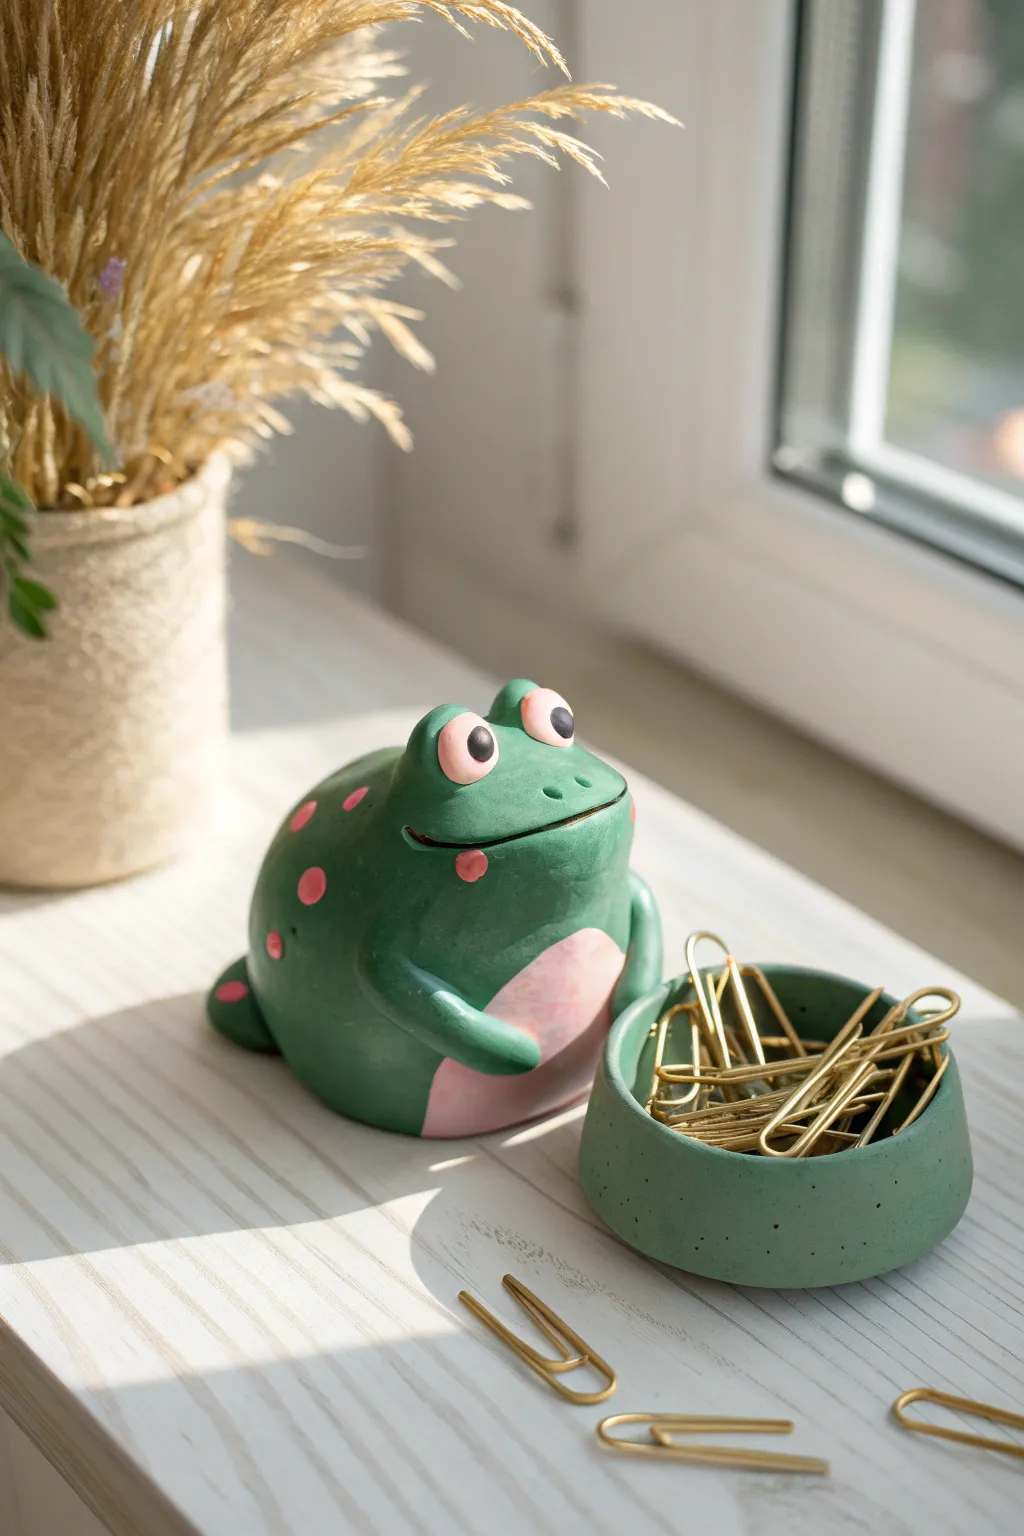
Bring a touch of whimsical charm to your workspace with this adorable frog and bowl organizer set. Sculpted from polymer clay, this functional duo features a cheerful spotted frog companion and a matching speckled bowl perfect for corralling paperclips or small trinkets.
Step-by-Step
Materials
- Polymer clay in grass green, light pink, black, and white
- Aluminum foil
- Acrylic roller or pasta machine
- Ball stylus tools (various sizes)
- Needle tool or toothpick
- Modeling tools (silicone shapers)
- X-Acto knife or clay blade
- Soft bristle brush (for texture)
- Baking sheet and parchment paper
- Oven
- Gloss or matte varnish (optional)
Step 1: Sculpting the Frog Base
-
Create the core:
Start by crumpling a piece of aluminum foil into a tight ball, roughly the size of a tangerine. This creates a lightweight core and saves clay. Compact it firmly so it holds its shape. -
Sheet the green clay:
Condition your grass green clay until it’s soft and pliable. Roll it out into a sheet about 1/4 inch thick using your acrylic roller or pasta machine. -
Cover the core:
Wrap the green clay sheet around the foil ball. Smooth the seams together with your fingers or a silicone tool until the surface is completely seamless and round. Gently shape it into a slightly squat, gumdrop-like mound. -
Shape the legs:
Roll two thick logs of green clay for the hind legs. Flatten them slightly and press them against the lower sides of the body, blending the back edges into the main body so they look attached. -
Add the arms:
Create two smaller, thinner logs for the front arms. Attach them starting from the ‘shoulder’ area, curving them down so the hands rest gently on the belly area. Use a needle tool to impress small lines for fingers.
Step 2: Adding Details and Personality
-
Form the eyes:
Roll two small balls of green clay and place them on top of the head for eye sockets. Press a smaller ball of light pink clay into the center of each green mound. Add a tiny black pupil to the center of the pink for a wide-eyed look. -
Sculpt the mouth:
Use a needle tool or a thin clay blade to slice a wide, curved smile into the face. Gently deepen the cut to create a shadow, giving the frog a happy expression. -
Apply the belly patch:
Roll a thin piece of light pink clay into a semi-circle or oval shape. Press this onto the lower front of the frog, between the arms, to create the soft underbelly. Smooth the edges so it sits flush with the green skin. -
Decorate with spots:
Pinch off tiny pieces of pink clay and roll them into small balls. Flatten them onto the frog’s back and sides to create scattered polka dots. -
Refine the texture:
I like to gently tap the surface of the green clay with a clean, soft toothbrush or texture sponge to remove fingerprints and give it a slightly matte, skin-like finish.
Uneven Bowl Walls?
If your bowl walls keep slumping, wrap the clay around a small glass jar or cookie cutter covered in cornstarch. Bake the clay directly on this form to ensure a perfect circle.
Step 3: Making the Organizer Bowl
-
Form the bowl base:
Roll a ball of green clay—slightly smaller than the frog—and flatten it into a thick disk for the bottom of the bowl. -
Build the walls:
Roll a long, even snake of green clay. Coil or place this snake around the edge of the base disk to form the wall. Use your fingers to drag the clay up and down, blending the wall to the base seamlessly. -
Smooth and shape:
Pinch the walls to an even thickness all the way around. Use your thumb to smooth the inside curve and a flat tool to straighten the outside walls. Aim for a simple, modern cylindrical shape. -
Add speckles (optional):
To match the reference, you can add tiny black specks. You can either mix tiny bits of black clay into the green before sculpting or use a needle tool to add minute texture points.
Make it Magnetic
Embed a strong neodymium magnet into the bottom of the bowl before baking (cover it with a thin layer of clay). This will keep your paperclips neatly upright and magical
Step 4: Baking and Finishing
-
Pre-bake check:
Give both the frog and the bowl a final inspection. Smooth out any accidental nail marks with a drop of baby oil on your finger. -
Bake the set:
Place both pieces on parchment paper on a baking sheet. Bake according to your customized polymer clay package instructions (usually 275°F/135°C for 15-30 minutes per 1/4 inch of thickness). -
Cool down:
Let the pieces cool completely in the oven or on the counter. Do not handle them while hot, as the clay is still fragile. -
Varnish:
Once fully cool, apply a thin coat of matte or satin varnish to protect the surface and give the eyes a little shine.
Place your golden paperclips in the bowl and let your new amphibian friend guard your desk supplies


What Really Happens Inside the Kiln
Learn how time and temperature work together inside the kiln to transform clay into durable ceramic.
Mini Diorama on a Tiny Base
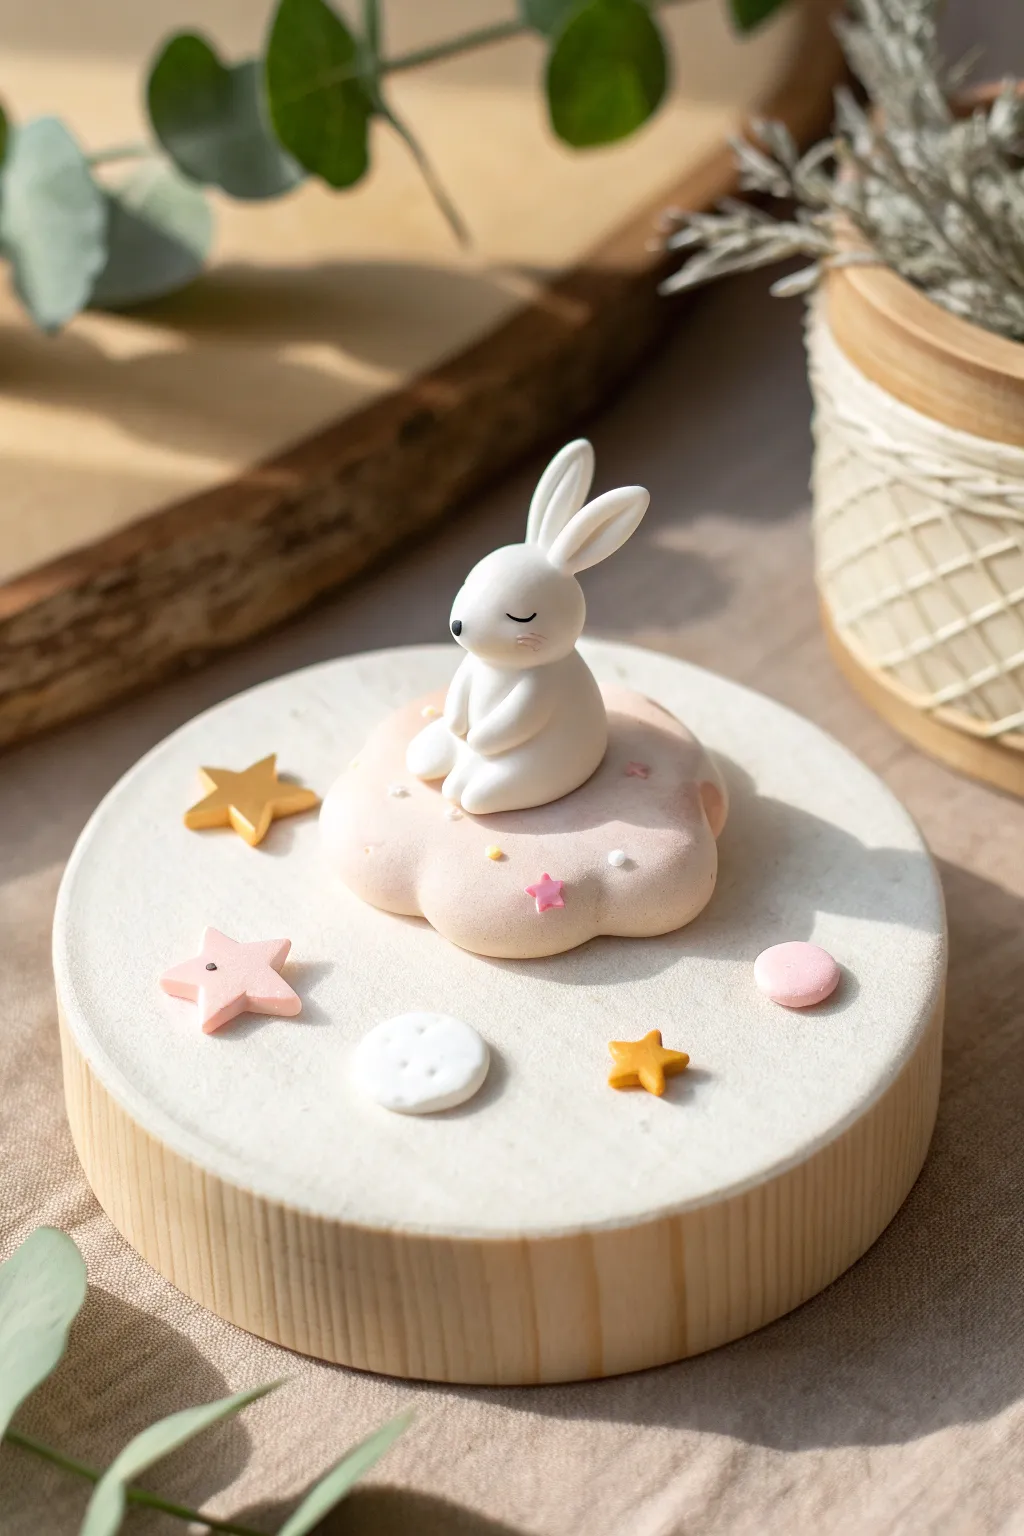
Capture the serenity of slumberland with this adorable polymer clay scene featuring a sleepy bunny resting on a fluffy cloud. The soft pastel palette and wooden base give it a polished, gallery-ready finish that looks perfect on any desk or shelf.
Detailed Instructions
Materials
- White polymer clay
- Soft pink polymer clay
- Gold or yellow polymer clay
- Round wooden display base (approx. 3-4 inches diameter)
- Felt or flocked paper (off-white/cream) for the base covering
- Needle modeling tool
- Ball stylus tool
- Black acrylic paint (or fine tip marker) for details
- Soft pastel chalks (pink) for blushing
- Small star cutter (optional)
- Strong craft glue (e.g., E6000 or super glue)
- Oven for baking
Step 1: Preparing the Base
-
Texture the surface:
Begin by covering the top of your wooden base. Cut a circle of cream-colored felt or flocked paper exactly the size of the wood top. Glue it down smoothly to create a soft, carpet-like texture for your scene. -
Create the cloud foundation:
Condition a lump of soft pink clay mixed with a large amount of white to achieve a very pale, blush color. Roll it into a thick, irregular pancake shape about 1.5 inches wide. -
Fluff the edges:
Use your fingers to gently pinch and round the edges of the clay pancake, creating the lobed look of a cloud. Smooth out any fingerprints with a drop of baby oil if needed. -
Make the seat:
Press a slight indentation into the center of the cloud with your thumb. This depression will ensure the bunny sits securely later on.
Clean Clay Pro-Tip
White clay picks up everything! Keep a pack of baby wipes nearby. Clean your hands and tools diligently before handling the white clay, especially after touching darker colors or the wood base.
Step 2: Sculpting the Bunny
-
Form the body:
Condition white clay and roll a ball roughly the size of a large marble. Gently taper the top slightly to form a pear shape, which will act as the bunny’s body. -
Add the feet:
create two small oval shapes from white clay. Attach them to the front bottom area of the body, flattening them slightly against the cloud so the bunny looks settled. -
Shape the head:
Roll a slightly smaller ball for the head. Press it gently onto the tapered top of the body. You can use a small piece of wire or toothpick inside the neck for extra stability. -
Sculpt the ears:
Roll two teardrop shapes of white clay. Flatten them gently and use a tool to create a shallow indentation insde the ear. Attach them to the top of the head. -
Pose the ears:
I like to tilt the ears slightly back or to the side to give the bunny a relaxed, sleepy expression rather than an alert one. -
Refine the face:
Smooth the connection points where the clay joins. Use a ball tool to verify the shape of the snout is rounded and cute.
Step 3: Details & Decoration
-
Make the stars:
Roll out thin sheets of yellow and pink clay. Use a small star cutter or a craft knife to cut out three to five small stars. -
Create circular accents:
Make a small pink circle and a textured white circle (use a needle tool to create pockmarks like a moon surface) to place on the base. -
Embed decorations into the cloud:
Take tiny scraps of colored clay (pink, yellow, white) and create micro-stars or dots. Press these gently into the surface of the cloud seat for pattern. -
Attach the bunny:
Place the bunny into the indentation on the cloud. Ensure the clay bonds by gently pressing down. -
Arrange the floor:
Visualize where the cloud will sit on the base, but don’t glue it yet. Arrange the ancillary stars and circles around the main cloud piece.
Fixing Falling Ears
If the bunny’s ears keep drooping while you sculpt, use a tiny piece of paper towel or a makeup sponge as a prop behind them during baking. Remove it once the clay is cured.
Step 4: Baking and Finishing
-
Bake the clay:
Place all clay pieces (bunny on cloud, and separate stars/circles) on a tile or parchment paper. Bake according to your manufacturer’s instructions, usually at 275°F (130°C) for 15-20 minutes. -
Paint the face:
Once fully cooled, draw two small arched lines for closed eyes and a tiny dot for the nose using a fine-tip black marker or paint. -
Add blush:
Scrape a little pink pastel chalk into dust. Use a soft dry brush to gently apply rosy cheeks to the bunny. -
Final assembly:
Use strong craft glue to adhere the cloud (with bunny) and the scattered stars/circles onto the felt-covered wooden base.
Place your dreamy little scene on your nightstand to keep you company while you sleep
Cottagecore Mushroom Animal Hybrid
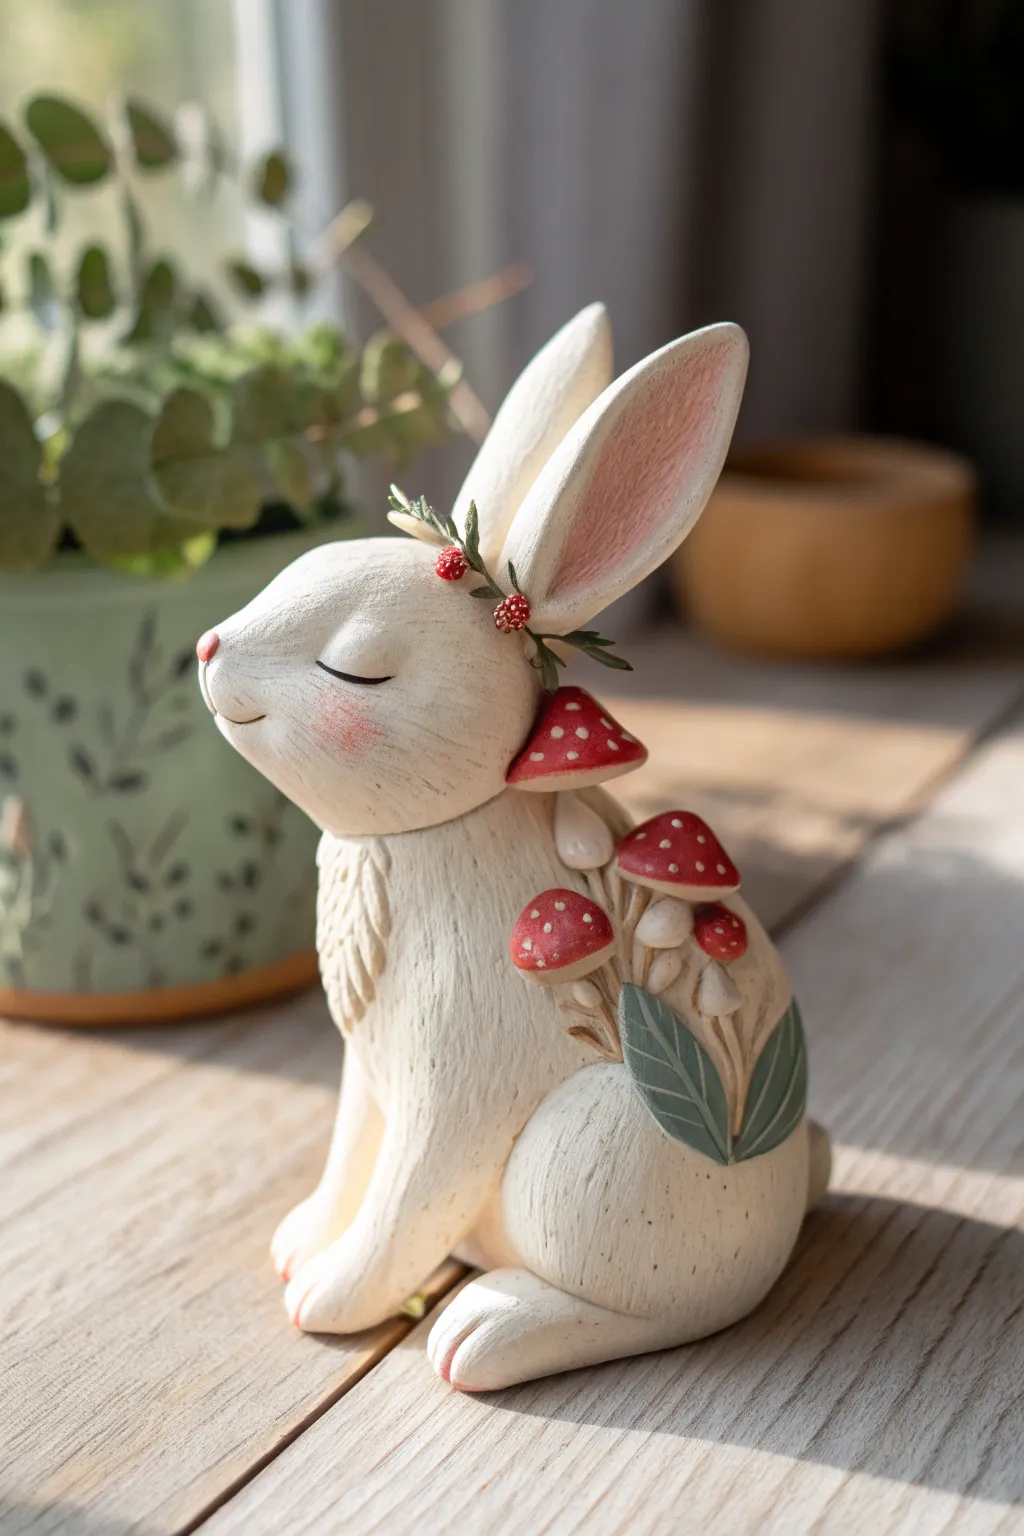
This adorable cottagecore project features a peaceful white rabbit with mushrooms blooming directly from its back. With its textured fur finish and delicate painted details like blushing cheeks and spotted caps, this figurine brings a touch of woodland magic to any shelf.
How-To Guide
Materials
- White polymer clay (approx. 2-3 blocks)
- Aluminum foil (for armature)
- Sculpting tools (needle tool, ball stylus, rubber shaper)
- Texturing brush or stiff bristled brush
- Soft pastel chalks (pink, red, brown)
- Acrylic paints (Red, White, Green, Brown, Black)
- Fine detail paintbrushes
- Liquid polymer clay or Bake & Bond
- Matte varnish
Step 1: Shaping the Base
-
Form the armature:
Crumple aluminum foil into a pear shape for the body and a slightly smaller oval for the head. Compress the foil tightly to remove big air pockets; this saves clay and makes the sculpture lighter. -
Cover the body:
Condition your white clay until soft. flatten a sheet and wrap it completely around the foil pear shape, smoothing the seams until invisible. Shape the bottom so the bunny sits flat and stable. -
Sculpt the hind legs:
Roll two large teardrop shapes of white clay. Press these onto the sides of the lower body, blending the upper thigh area into the torso while leaving the rounded haunch distinct. -
Create the paws:
Use a knife or needle tool to press three indentations into the front of the haunches for the back feet. Add two smaller columns in front for the forelegs, blending them seamlessly at the chest. -
Attach the head:
Cover the foil head armature with a sheet of white clay. Insert a toothpick or bit of wire into the neck area of the body, add a drop of liquid clay, and press the head firmly partly onto the body, tilting it slightly upward.
Step 2: Facial Features & Fur
-
Add the ears:
Shape two long, tapered logs of clay. Flatten them slightly and use a large ball tool to create the inner ear depression. Attach them to the top of the head using liquid clay, blending the seams completely smooth. -
Sculpt the face:
Add a tiny triangle of clay for the nose. Use a needle tool to drag curved lines outward from the nose to create the closed eye slits. Add a subtle smile line underneath the nose. -
Texture the fur:
I find using a needle tool works best here. Systematically scratch short, directional lines all over the white clay surfaces to mimic fur. Pay attention to direction—fur flows down the back and around the curves of the legs. -
Apply shading:
Before baking, use a soft brush to dust pink pastel powder inside the ears and on the cheeks for a blush effect. Dust a tiny amount of light brown in the deepest fur crevices for depth.
Sticky Situation
If the mushroom stems keep drooping while you work, bake the bunny body first (a partial bake), then add the raw clay mushrooms and bake again to finish.
Step 3: The Mushroom Garden
-
Create stems:
Roll several small cylinders of white clay in varying thicknesses. Attach them in a cluster on the bunny’s back, blending the bases into the fur texture. Curve them slightly for a natural look. -
Add mushroom caps:
Form several red clay domes (or paint white clay red later). Press these onto the tips of the stems. Flatten them slightly so they look like classic toadstools. -
Sculpt the wreath:
Roll a very thin snake of green clay (or white to be painted later). Wrap it gently around the base of the ears. Create tiny red balls for berries and press them into the vine. -
Add foliage:
Cut leaf shapes from a thin sheet of clay. Score a central vein on each leaf and attach two or three large leaves at the base of the mushroom cluster on the back. -
Baking:
Bake the sculpture according to your clay manufacturer’s instructions (usually 275°F/130°C for 30 minutes per 1/4 inch thickness). Let it cool completely inside the oven to prevent cracking.
Texture Magic
For ultra-realistic fur, try using a stiff, old toothbrush to stipple the clay before using the needle tool. It adds a fuzzy base texture underneath the deeper lines.
Step 4: Detailed Painting
-
Paint the caps:
If you didn’t use colored clay, paint the mushroom caps red. Use a fine detail brush to add tiny white dots to the caps once the red paint is dry. -
Paint the greenery:
Paint the leaves on the back and the wreath stem a muted sage green. Paint the tiny berries on the head wreath deep red. -
Define the face:
Dilute a tiny bit of dark brown or black paint effectively making a wash. carefully line the closed eye slits and the nose to make them pop against the white fur. -
Seal the piece:
Once all paint is fully dry, coat the entire sculpture with a matte varnish to protect the surface and unify the sheen.
Place your finished bunny near a potted plant or window sill to enjoy its serene vibe

TRACK YOUR CERAMIC JOURNEY
Capture glaze tests, firing details, and creative progress—all in one simple printable. Make your projects easier to repeat and improve.
Little Monster With Big Eyes
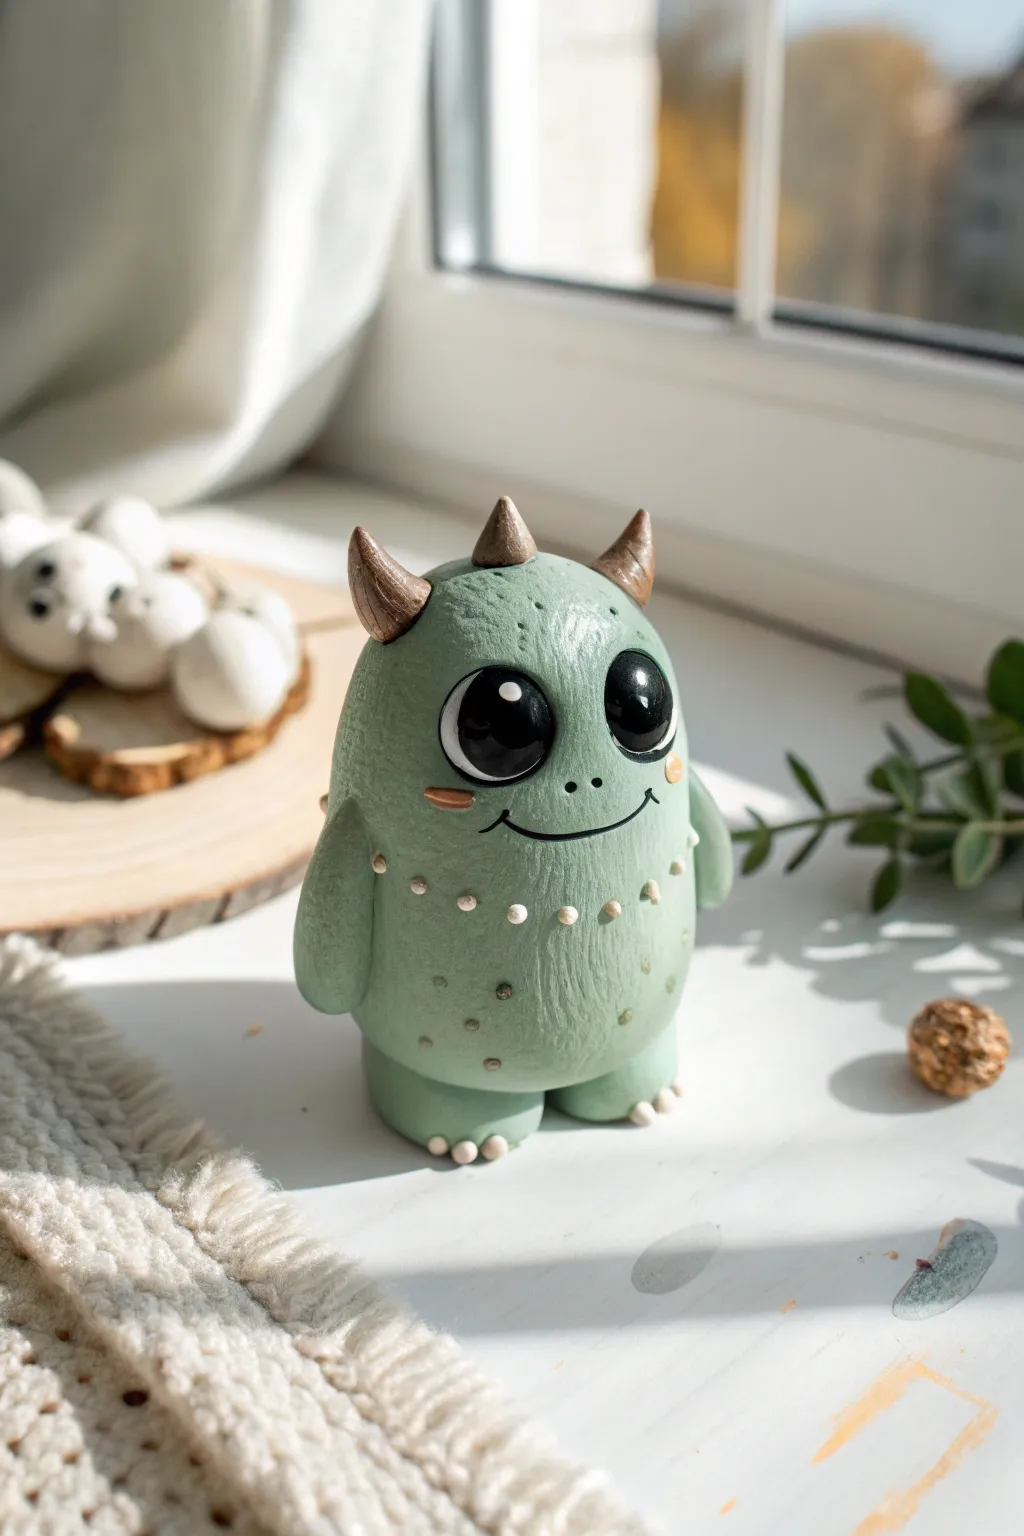
This adorable little monster features an endearing expression, oversized eyes, and a pleasingly chubby silhouette. Its textured green surface and tiny bronze horns give it a whimsical, forest-dwelling vibe that’s impossible not to love.
Step-by-Step Guide
Materials
- Sage green or mint polymer clay
- Bronze or metallic brown polymer clay
- Black polymer clay
- White or translucent white polymer clay
- Small ball stylus or dotting tool
- Needle tool or toothpick
- Stiff-bristled toothbrush or texture sponge
- Glossy varnish or UV resin (for eyes)
- Baking sheet and parchment paper
- Soft pastel chalk (pink/blush) – optional
Step 1: Shaping the Body
-
Form the base:
Begin with a large ball of sage green clay. Roll it until it is smooth and crack-free, then gently shape it into an elongated egg or potato shape. Flatten the bottom slightly against your work surface so it stands upright on its own. -
Add texture:
Before adding limbs, gently tap a stiff toothbrush or a textured sponge all over the green surface. This creates that lovely organic, slightly fuzzy look rather than a slick plastic finish. -
Create the legs:
Roll two smaller balls of the same green clay for the feet. Flatten them slightly into discs and press them securely onto the bottom of the body. Blend the seams slightly if desired, or leave them distinct for a segmented look. -
Sculpt the toes:
Roll very tiny balls of white or light beige clay. Place three on the front edge of each foot to act as little claws or toes. Press them gently to adhere.
Uneven Texture?
If you accidentally squish the skin texture while attaching arms, don’t panic. Gently re-tap the area with your toothbrush or sponge tool to blend the smooth spot back into the textured surface.
Step 2: Bringing the Face to Life
-
Make eye sockets:
Using your thumbs or a large ball tool, press two deep indentations into the upper half of the face where the eyes will go. Deep sockets help the large eyes sit naturally. -
Insert the eyes:
Roll two balls of black clay that fit snugly into your indentations. Press them in firmly; they should bulge slightly but sit securely within the sockets. -
Add the eye shine:
This is crucial for the ‘cute’ factor. Place a tiny dot of white clay in the upper right corner of each black eye pupil. It instantly breathes life into the character. -
Create the smile:
Use a needle tool or a thin clay blade to carefully carve a curved smile line below the eyes. At the corners of the mouth, press in tiny dimples for extra character. -
Blushing cheeks:
For the rosy cheeks, you can either attach tiny flattened ovals of pink clay or brush on a little pink pastel dust beneath the eyes.
Step 3: Horns and Arms
-
Forming the horns:
Take your bronze or metallic brown clay and roll three small cones. One should be slightly larger for the center, and two slightly smaller for the sides. -
Attaching the horns:
Place the larger horn on the very top of the head and the two smaller ones on either side. Press them down gently to bond the clay. I recommend swirling them slightly as you press to get a good grip. -
Shape the arms:
Roll two sausage shapes of green clay. Taper one end of each roll to blend into the body. The arms should look like simple, drooping appendages hanging by the monster’s sides. -
Attach the arms:
Press the tapered ends of the arms onto the sides of the body, just below the eye level. Blend the clay at the shoulder joint so it looks seamless.
Level Up: Accessories
Give your monster personality by scuplting a tiny accessory for it to hold, like a heart, a flower, or a tiny coffee mug. Just slip it under one of the arms before baking.
Step 4: Final Details
-
Ornate details:
Roll tiny spheres of white or beige clay. Apply a line of these small dots across the chest like a necklace, giving the monster a decorative touch. -
Belly texture:
Add a few random, smaller dots of the same light clay on the lower belly area to break up the green space. -
Bake the monster:
Place your creation on parchment paper. Follow the baking temperature and time instructions specific to your brand of polymer clay (usually around 275°F/130°C for 15-30 minutes per 1/4 inch thickness). -
Glossing:
Once the piece has fully cooled, apply a coat of glossy varnish or UV resin specifically to the black part of the eyes. This mimics wetness and makes the expression pop.
Now you have a charming little guardian ready to watch over your workspace
Textured Dragon Hatchling

Sculpt a whimsical little companion using textured polymer clay in shades of teal and cream. This tutorial guides you through shaping, detailing, and assembling a miniature dragon complete with tiny wings and floral accents.
How-To Guide
Materials
- Polymer clay (Teal)
- Polymer clay (Cream or White)
- Black glass beads or small balls of black clay (for eyes)
- Ball stylus tools (various sizes)
- Needle tool or toothpick
- Texture sponge or coarse sandpaper
- Detail knife (X-Acto)
- Fine-grit sandpaper
- Liquid polymer clay (fimo liquid or similar)
- Acrylic rolling pin
- White acrylic paint and fine liner brush (optional for floral detail)
Step 1: Body and Head Base
-
Shape the main body:
Start with a golf-ball-sized chunk of teal clay. Roll it into a smooth sphere, then gently elongate the top portion to create a pear shape. This wider bottom will be the dragon’s seated belly. -
Form the head:
Roll a slightly smaller ball of teal clay for the head. Press it gently to flatten the bottom slightly where it will join the neck. Use your thumb to create slight indentations on the sides for the eye sockets. -
Texturize the skin:
Before assembling, I like to add texture now. Gently press a clean texture sponge or a piece of coarse sandpaper all over the teal surfaces of both the head and body to create a leathery, scale-like skin effect. -
Attach head to body:
Insert a short piece of toothpick or wire into the neck of the body for stability. Apply a tiny dot of liquid clay, then press the head firmly onto the body, smoothing the seam at the back of the neck with a silicone tool.
Fixing Cracks
If you see cracks forming around the neck or tail while smoothing, apply a tiny drop of baby oil or clay softener to your finger and gently massage the area until the clay melds back together.
Step 2: Facial Features and Belly
-
Create the belly patch:
Roll out a thin sheet of cream-colored clay. Cut an oval shape and press it onto the front of the dragon’s belly, extending up towards the neck. Texture this cream clay with your sponge as well. -
Detail the belly scales:
Using the back of your knife tool or a needle tool, press horizontal lines across the cream belly patch to create segmented belly plates. Lightly round the edges of these lines to make them look soft. -
Add the eyes:
Press two black glass beads or small balls of black clay into the eye sockets you made earlier. Use a needle tool to drag a tiny bit of teal clay over the top of the bead to form a subtle eyelid. -
Shape the snout:
Use a ball tool to press nostrils into the front of the snout. With your knife tool, carefully carve a horizontal line for the mouth, curving it slightly upward at the ends for a gentle smile.
Level Up: Glossy Eyes
After baking, apply a coat of UV resin or high-gloss polymer varnish strictly to the black eyes. This makes them look wet and alive, contrasting beautifully with the matte, textured skin.
Step 3: Limbs and Tail
-
Form the tiny arms:
Roll two small sausage shapes of teal clay. Flatten one end of each to create paws, and use your knife to mark three little fingers. Texture the arms with your sponge. -
Attach the arms:
Press the arms onto the upper sides of the belly. Bend them slightly at the ‘elbow’ so the hands rest comfortably on the dragon’s stomach. -
Create the tail:
Roll a tapered cone of teal clay. Curl the tip upwards. Attach the wider end to the lower back of the dragon, wrapping it around the side of the body so the curled tip sits near the foot area. -
Add tail details:
Apply tiny, flattened dots of cream clay along the spine of the tail to create small ridge spikes. Blend the base of the tail into the body using a modeling tool.
Step 4: Wings and Final Details
-
Shape the wings:
Flatten two triangles of teal clay. Use your needle tool to press deep grooves radiating from one corner to simulate wing bones. The texture here should be smoother than the body. -
Attach the wings:
Dab liquid clay on the back of the dragon and press the wings into place. Curve them slightly around the body as if the dragon is tucking them in. -
Add head spikes:
Roll tiny cones of cream clay. Apply a row of these starting from the top of the forehead and running down the back of the neck. Press them down firmly so they bond. -
Paint the floral accent:
Once the sculpture is fully baked and cooled according to your clay’s package instructions, use a fine liner brush and white acrylic paint to draw a delicate stem and leaves on the dragon’s hip.
Enjoy displaying your adorable dragon hatchling on a shelf or giving it as a handmade gift
Crystal Cluster Fantasy Critter
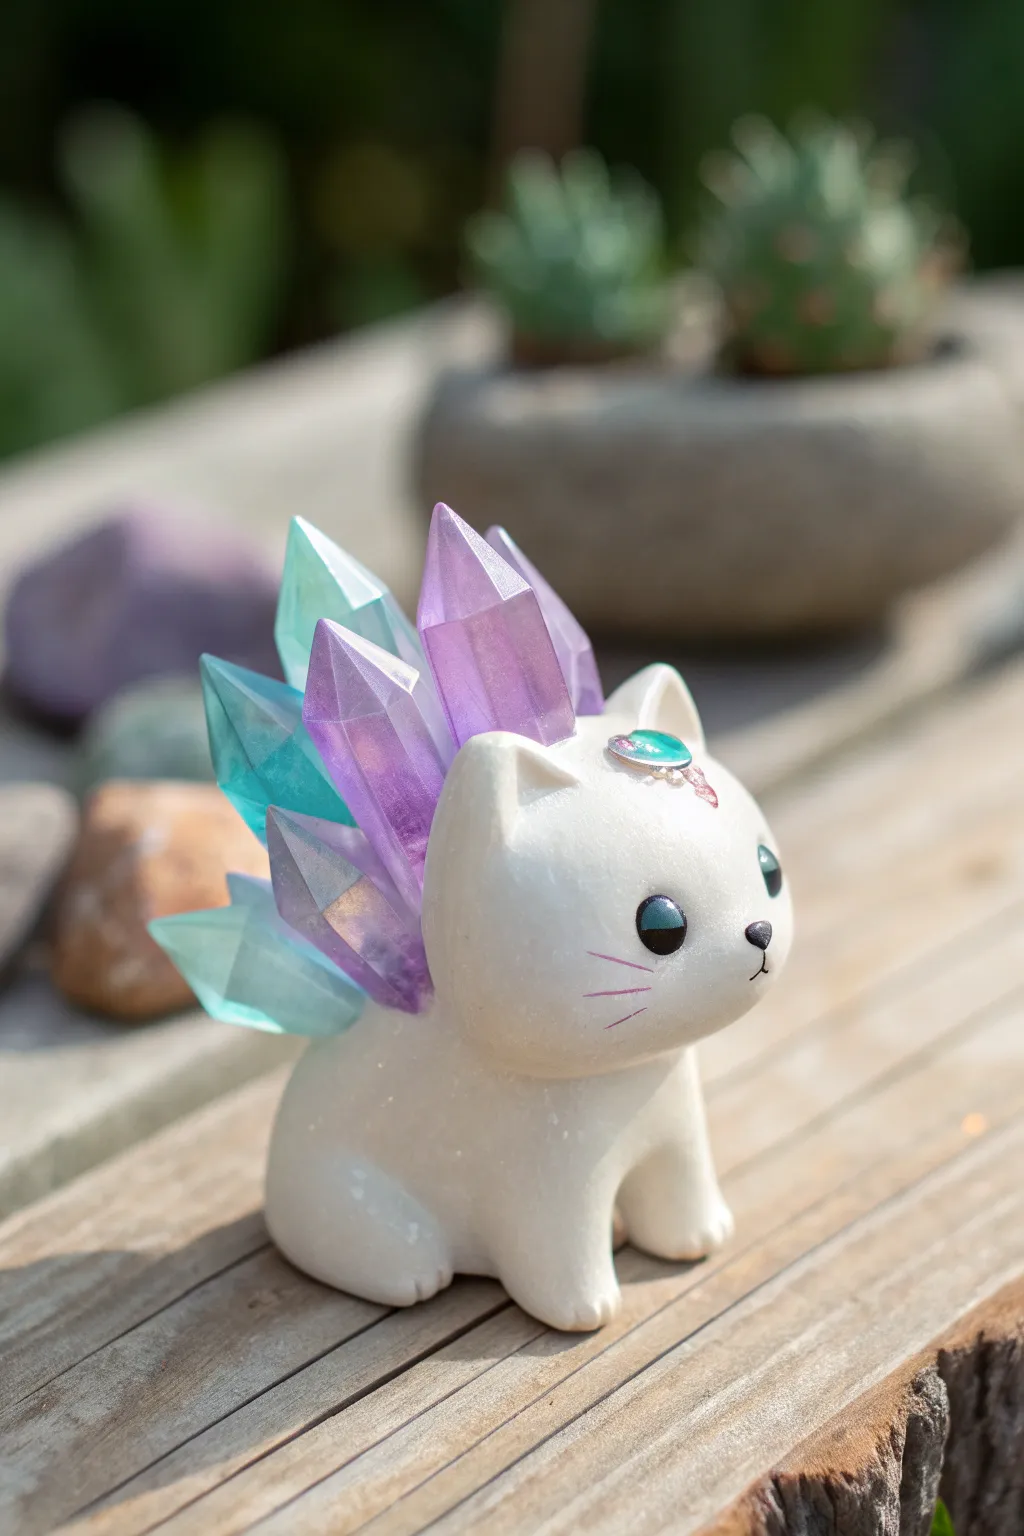
Blend nature and fantasy with this adorable polymer clay creature featuring translucent, gem-like spikes. This project combines simple organic sculpting with the unique challenge of incorporating resin or faux-crystal elements.
Step-by-Step
Materials
- White or pearl white polymer clay
- Translucent polymer clay (optional, for custom crystals)
- Pre-made resin crystals or quartz points (teal, purple, blue)
- Small round rhinestone (teal or aqua)
- Tiny pink rhinestone or glitter glue
- Glossy glaze or UV resin
- Black acrylic paint
- Pink acrylic paint
- Fine detail brush
- Ball stylus tool
- Blade or craft knife
- Aluminum foil (for armature core)
Step 1: Crystal Preparation
-
Crystal Selection:
If using pre-made resin crystals or quartz points, select about 5-7 pieces in varying sizes. You want a mix of teal, deep purple, and light blue. Clean them thoroughly with rubbing alcohol so the clay adheres properly. -
Optional: Handmade Crystals:
Alternatively, shape translucent clay into faceted points with a sharp blade. Bake these separately first and let them cool completely before embedding them into the main sculpture.
Loose Crystals?
If a crystal falls out after baking, don’t panic. Use a dab of superglue or 2-part epoxy to reattach it into the pre-made indentation
Step 2: Sculpting the Body
-
Armature Core:
Crumple a small ball of aluminum foil, roughly the size of a walnut, to serve as the core. This saves clay and prevents cracking during baking. -
Base Layer:
Condition your white clay until soft. flatten a sheet and wrap it entirely around the foil ball, smoothing all seams until you have a perfect sphere for the body. -
Shaping the Torso:
Gently gently roll the sphere into a rounded teardrop shape. The wider bottom will be the sitting haunches, and the slightly narrower top will support the head. -
Creating Legs:
Form two small logs of white clay for the front legs. Attach them to the front of the body, blending the top seams smoothly into the chest. Round off the paws slightly. -
Back Legs:
Add two rounded mounds of clay to the sides of the base to suggest the folded back legs of a sitting animal. Blend the edges seamlessly into the main body.
Glow Up
Mix glow-in-the-dark powder into your translucent clay for the crystals, or paint the finished spikes with glow paint for a night-light effect
Step 3: Embedding the Crystals
-
Mapping the Cluster:
Mark light indentations on the back of the figure where the crystals will go. They should fan out like a crest. -
Insertion:
Press the base of your chosen crystals firmly into the clay back. I find it helps to add a tiny drop of oven-bake clay adhesive (like Bake & Bond) into the hole before inserting the crystal for extra security. -
Securing the Base:
Use a small snake of white clay to wrap around the base of the crystal cluster where it meets the back. Smooth this extra clay down to create a seamless transition from fur to gem.
Step 4: Head and Details
-
Head Shape:
Roll a slightly smaller ball of white clay for the head. Flatten the bottom slightly and press it onto the neck area. Blend the clay at the neck so the head is secure. -
Ears:
Shape two small triangles of clay. pinch them slightly to curve them, then attach them to the top of the head. Smooth the seams with your ball stylus. -
Forehead Gem:
Press a small round indent into the center of the forehead. Place your teal rhinestone here, adding a tiny dot of liquid clay or glue to hold it. -
Flower Detail:
Add a tiny speck of pink clay or a pink rhinestone just below or beside the forehead gem to mimic the floral detail seen in the image. -
Baking:
Bake the sculpture according to your clay manufacturer’s instructions (usually 275°F/130°C for 15-30 minutes). If using real crystals, let them cool slowly in the oven to prevent cracking.
Step 5: Finishing Touches
-
Cooling:
Let the piece cool completely before painting. The clay will be slightly soft while hot and hardens as it cools. -
Painting Eyes:
Using a fine detail brush and black acrylic paint, paint two large circles for eyes. Once dry, add a tiny crescent of teal at the bottom for color and a white dot at the top for a highlight. -
Nose and Whiskers:
Paint a tiny triangular nose in black. Use diluted pink paint and a very steady hand to paint three delicate whisker lines on each cheek. -
Glazing:
Finish by brushing a coat of high-gloss glaze or UV resin over the eyes and the gems to make them shine. You can also brush a pearl powder over the white clay for a magical shimmer.
Place your finished crystal critter on a sunny windowsill where the light can catch the translucent spikes
Glow-In-The-Dark Galaxy Creatures
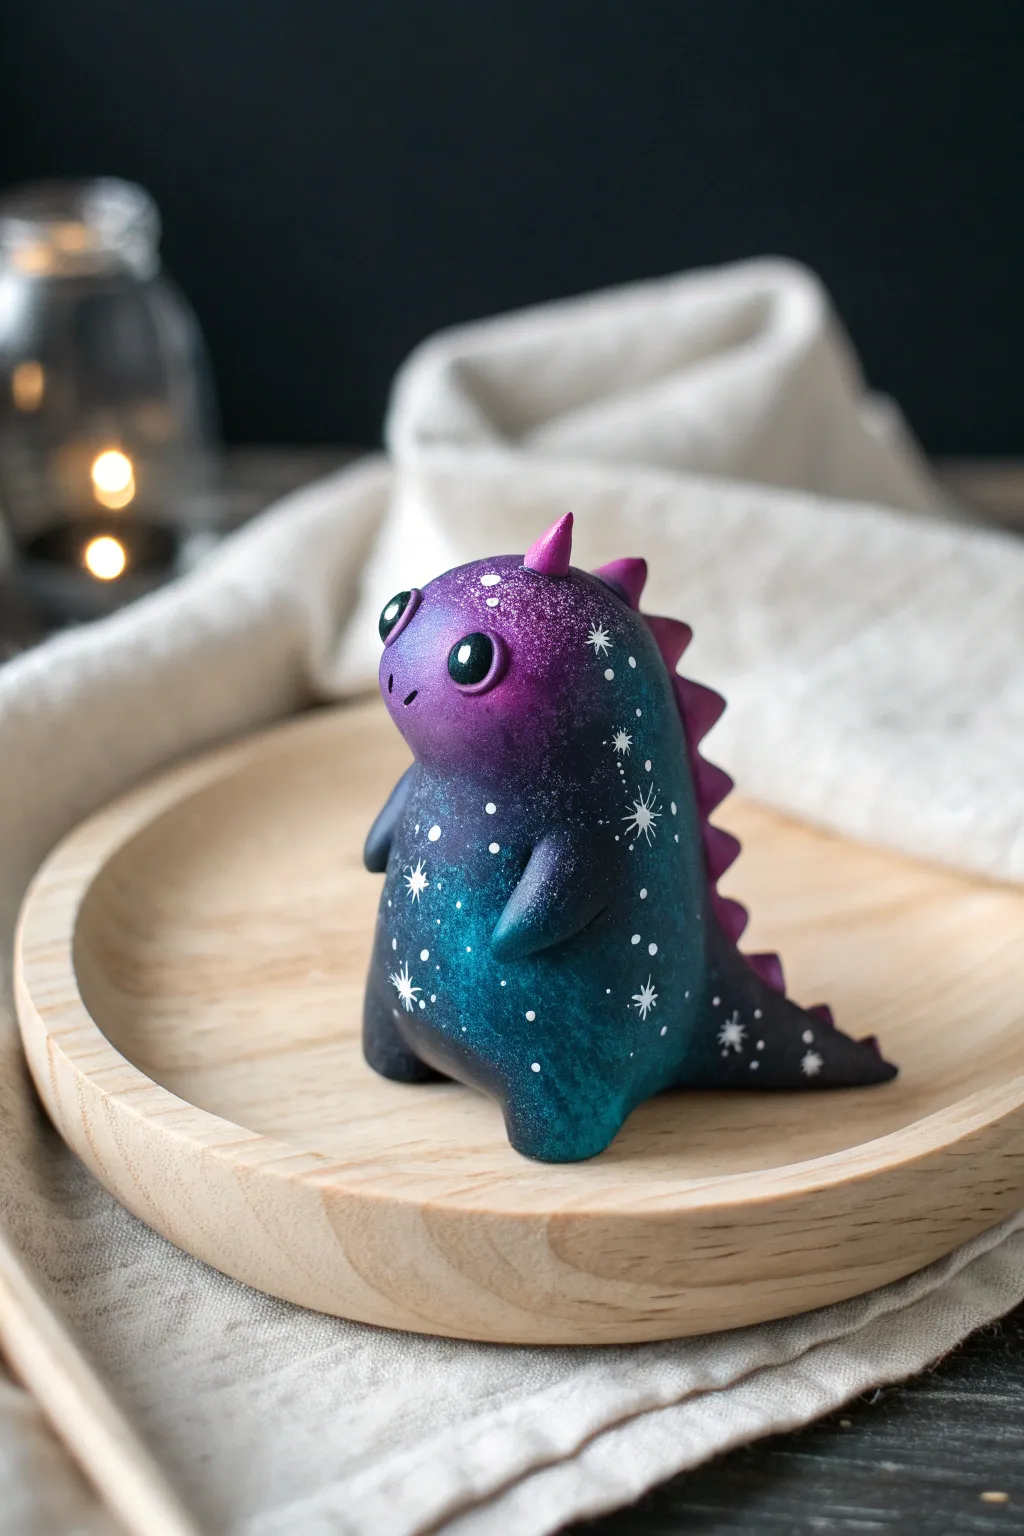
This adorable little dinosaur brings the cosmos down to earth with a stunning celestial paint job and glowing star details. Sculpted from polymer clay, its soft gradient body transitions from deep void black to nebulae purple, speckled with tiny constellations to light up your shelf.
Step-by-Step
Materials
- Polymer clay (Black or Dark Grey recommended)
- Acrylic paints: Black, Teal/Turquoise, Purple, Magenta
- Glow-in-the-dark acrylic paint or pigment powder (White/Green glow)
- Fine detail paintbrush (00 or 000 size)
- Makeup sponge or soft foam wedge
- Dotting tools or toothpicks
- Gloss varnish or UV resin
- Sculpting tools (specifically a silicone blender)
- Aluminum foil (for the core)
- Oven for baking
Step 1: Sculpting the Base Form
-
Prepare the Core:
Start by scrunching a small piece of aluminum foil into a teardrop shape. This saves clay and makes the figure lighter. It should be slightly smaller than you want the finished body to be. -
Cover the Core:
Condition your black polymer clay until it’s soft and pliable. Flatten a sheet of clay and wrap it completely around the foil core, smoothing out any seams or air bubbles. -
Shape the Body:
Roll the clay-covered form on your work surface to create a smooth, rounded pear shape. The bottom needs to be slightly flatter so the creature sits stable without tipping over. -
Create the Legs:
Form two small balls of clay for the feet. Press them gently onto the bottom front of the body and blend the seams upwards using a silicone tool so they look integrated, not just stuck on. -
Add Tiny Arms:
Roll two small teardrop shapes for the arms. Attach them to the sides of the body, just below where the ‘neck’ would be. Curve them slightly inward so they rest against the belly. -
Attach the Tail:
Roll a cone of clay for the tail. Press the wider end onto the lower back of the figure. Blend the clay seams thoroughly into the body for a strong bond.
Step 2: Adding Details
-
Sculpt the Spines:
Create a series of small, flattened triangles for the dorsal spines. Start attaching the largest ones at the top of the head and work your way down the back to the tail, getting smaller as you go. -
Form the Eyes:
Use a ball tool to make two indentations on the face. Roll two small balls of black clay and press them into the sockets. Keep them slightly convex/bulging for cuteness. -
Facial Features:
Use a needle tool or toothpick to poke two tiny nostrils on the snout. If you want a mouth, use the edge of a tool to press a small smile, though this design looks sweet without one. -
Bake the Figure:
Bake your creation according to the clay manufacturer’s instructions (usually 275°F/135°C for 15-30 minutes depending on thickness). Let it cool completely before painting.
Muddy Galaxy Colors?
If your purple and teal turn brown where they mix, let the first color dry completely before sponging the second layer on top. Dry layering keeps colors distinct.
Step 3: The Galaxy Paint Job
-
Base Sponge Layer:
Squeeze a small amount of teal and purple paint onto a palette. Using a makeup sponge, dab the teal paint focusing on the lower body and belly area. Use a light pouncing motion to create texture. -
Building the Gradient:
While the teal is drying, sponge purple paint onto the upper head and back spines. Where the purple meets the teal, dab lightly to blend them creating a soft transition zone. -
Deepening the Cosmos:
Take a tiny bit of black paint on your sponge and dab around the very edges and bottom of the figure to create depth and shadow, making the colors pop more. -
Adding Stars:
This is my favorite part: dip a toothbrush in thinned white paint and flick the bristles to spray tiny stars over the body. For larger stars, use a toothpick to place specific dots. -
Glow Details:
Using a fine detail brush and your glow-in-the-dark paint, paint specific larger stars or ‘cross’ shapes over the white dots. Add glow paint to the spines for extra flair. -
Finishing the Eyes:
Add a small white reflection dot to the upper corner of each eye. This spark brings the character to life instantly. -
Seal Protection:
Once all paint is fully dry, coat the entire figure with a gloss varnish. For the eyes specifically, I sometimes use a drop of UV resin to make them look like glass.
Supercharge the Glow
Mix glow powder directly into your white paint for the stars. The white base reflects light, making the glow pigment appear much brighter in the dark.
Place your little galaxy guardian near a light source during the day so it can charge up for its nightly watch