If you’ve got a little bit of polymer clay and a craving to make something adorable, you’re in the right headspace. These polymer clay sculpture ideas are all about simple shapes that turn into mini characters and tiny worlds you’ll want to keep on your desk forever.
Chubby Animal Figurines
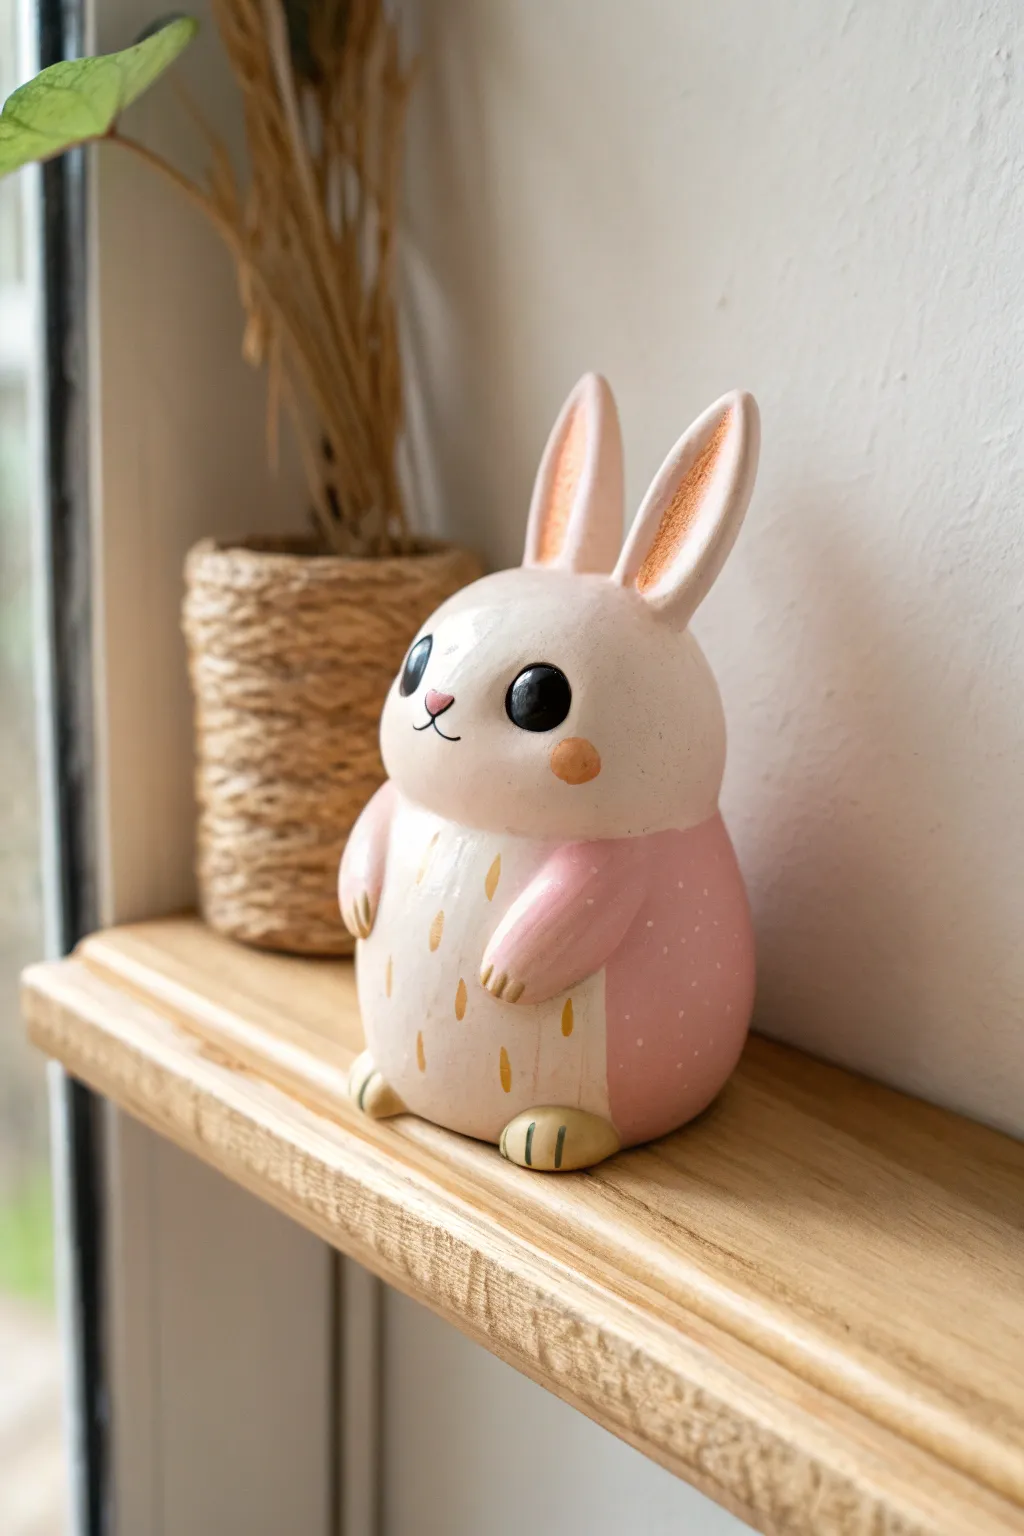
Capture the sweetness of spring with this delightfully chubby bunny figurine, featuring smooth, rounded curves and a unique two-toned coat. With its soft pink accents and delicate raindrop markings, this sculpture makes a charming addition to any windowsill or shelf.
Step-by-Step
Materials
- Polymer clay: White, soft pink
- Acrylic paints: Black, gold/mustard yellow, earthy orange
- Fine detail paintbrushes (size 0 and 00)
- Ball stylus tools (various sizes)
- Clay blending tool or rubber shaper
- Blade or craft knife
- Needle tool
- Matte varnish
- Oven and baking tray
Step 1: Shaping the Base Body
-
Condition the clay:
Start by thoroughly conditioning your white polymer clay until it is soft and pliable. Roll a large portion into a smooth, seamless ball about the size of a tangerine. -
Form the pear shape:
Gently roll the ball on your work surface using the palm of your hand, applying slightly more pressure to the top third. You want to create a subtle pear shape—narrower at the head and wider at the base—without creating a distinct neck crease. -
Flatten the base:
Review the shape to ensure it looks pleasantly plump. Tap the bottom firmly against your work surface to create a flat base so the figurine stands securely on its own. -
Apply the pink pants:
Roll out a thin sheet of soft pink clay. Cut a strip that is wide enough to cover the bottom half of the bunny’s body. Wrap this around the lower section, gently smoothing the seam where it meets the white clay so they look like one continuous surface rather than a layer on top.
Smooth Seams
When joining the pink and white clay body sections, roll the entire shape gently on your table after attaching. This helps fuse the clays without distorting the roundness.
Step 2: Adding Features and Limbs
-
Shape the ears:
Create two medium teardrops from white clay. Flatten them slightly and use a large ball tool to create an indentation in the center of each. Fill this indentation with a small piece of pink clay, smoothed flush. -
Attach the ears:
Attach the ears to the top of the head. I like to position them slightly close together for a cuter look. Use a blending tool to seamless merge the clay at the base of the ears into the head. -
Create the arms:
Roll two small cones of pink clay for the arms. Adhere them to the sides of the body right where the pink and white sections meet. Curve them slightly forward so they rest on the belly. -
Add the feet:
Form two small, flattened ovals from white clay (or a very light beige if you prefer a contrast). Place them tucked under the front of the belly to form the feet. Use a needle tool to impress two or three lines for toes. -
Sculpt the tail:
Roll a small ball of pink clay and attach it to the lower back of the bunny for a fluffy tail. -
Refine the surface:
Check the entire sculpture for fingerprints. Gently buff them out with a tiny bit of baby oil on your finger or a smoothing tool before baking. -
Bake:
Bake the figurine according to your clay manufacturer’s instructions (usually 275°F/135°C for 15-30 minutes depending on thickness). Let it cool completely.
Seasonal Switch
Change the belly motif for different seasons! Try painting tiny carrots for Easter, snowflakes for winter, or little flowers for summer instead of the rain pattern.
Step 3: Painting the Details
-
Paint the eyes:
Using black acrylic paint and a medium ball stylus or the handle end of a paintbrush, dot two large, wide-set eyes onto the face. While the black is wet, add a tiny white highlight dot for life. -
Add facial features:
Paint a tiny triangular nose in pink between the eyes. Use a very fine liner brush to paint a thin ‘w’ shape for the mouth and delicate whiskers. -
Add the rosy cheeks:
Mix a small amount of earthy orange paint. Paint a perfect circle on the cheek area to give the bunny a warm, blushing expression. -
detail the belly pattern:
Using a gold or mustard yellow paint, add small, vertical teardrop shapes—painting them like falling rain—onto the white belly area. Keep them spaced irregularly for a whimsical feel. -
Add texture to the pink:
Dip a toothpick or fine dotting tool into white paint. Add tiny, subtle dots over the pink ‘pants’ area to simulate a fabric texture. -
Varnish:
Once all paint is thoroughly dry, apply a coat of matte varnish to protect the surface and unify the sheen of the clay and paint.
Place your finished bunny near a potted plant to complete the sweet, nature-inspired vignette


Mini Food Sculptures With Faces
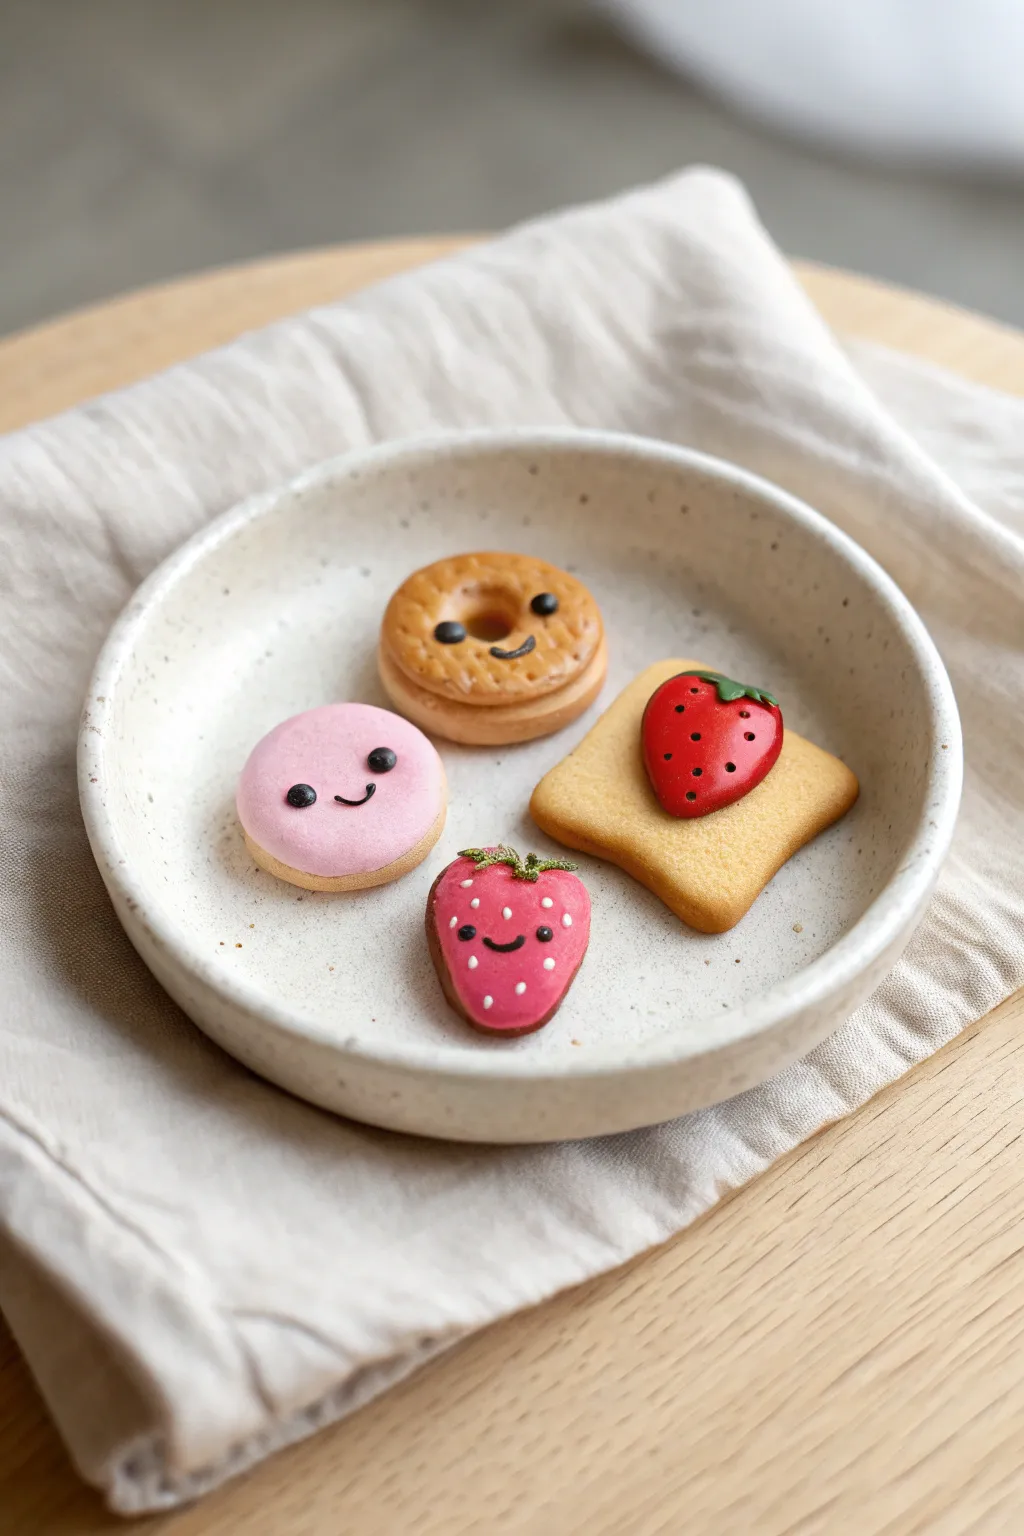
These adorable edible-inspired friends bring a smile to anyone’s face with their tiny expressions and realistic textures. This project involves sculpting four distinct miniature treats: a pink frosted cookie, a jam-filled sandwich biscuit, a strawberry-topped toast, and a happy little strawberry.
Step-by-Step Guide
Materials
- Polymer clay (beige/tan, pink, red, green, black)
- Liquid polymer clay (translucent or white)
- Soft pastel chalks (orange, golden brown)
- Needle tool and dotting tools
- Small round cutter (approx. 2cm)
- Small square cutter (approx. 2.5cm)
- Craft blade
- Soft paintbrush for shading
- Gloss glaze (optional)
Step 1: The Pink Frosted Cookie
-
Base creation:
Start by conditioning a small ball of beige clay. Flatten it gently into a thick disc shape, smoothing the edges with your finger to remove fingerprints. -
Adding texture:
Use a toothbrush or a ball of crinkled aluminum foil to tap texture onto the sides and bottom edge of the beige disc, mimicking a baked cookie texture. -
Pink icing:
Take a smaller amount of pink clay and flatten it into a thin circle slightly smaller than your beige base. Press this gently onto the top of the cookie so it looks like smooth icing. -
Face details:
Use a small dotting tool to make two indentations for eyes. Press tiny balls of black clay into these spots. Roll a microscopic snake of black clay and curve it into a smile, pressing it gently between the eyes.
Step 2: Jam Sandwich Biscuit
-
Cutting shapes:
Roll out tan clay to about 3mm thickness. Use a small round cutter to punch out two identical circles. One will be the bottom, and one the top. -
Top biscuit detail:
On one of the circles, use a smaller round tool or straw to punch a hole in the absolute center. Use a needle tool to press tiny decorative lines around this center hole. -
Filling and assembly:
Place a flattened ball of red clay (the jam) onto the bottom biscuit. Place the detailed top biscuit over it, pressing gently so they adhere without squashing the texture. -
Personality:
Just like the pink cookie, add a tiny face. This time, place the black eyes and smile near the center, maneuvering around the ‘jam’ hole for a quirky look. -
Shading:
Scrape some golden brown pastel chalk into dust. Brush this gently over the edges and top ridges of the biscuit to give it a perfectly baked appearance.
Smudged clay?
If dust or fingerprints smudge your light clay, dip a cotton swab in rubbing alcohol or nail polish remover and gently wipe the raw clay surface clean before baking.
Step 3: Strawberry Toast Biscuit
-
Toast base:
Shape a piece of light tan clay into a rounded square or use a cutter. Gently press the center to make it slightly concave. -
Baking effect:
Generously shade the edges of the square with orange and brown chalk dust. I like to concentrate the color on the corners to make it look crispy. -
Strawberry slice:
Form a teardrop shape from red clay and flatten it. Place it in the center of the toast. Add tiny indentations with a needle tool for seeds. -
Leaf accent:
Add a tiny speck of green clay at the top of the strawberry slice to represent the stem or leaf.
Magnet Magic
Turn these into functional art by gluing small, strong neodymium magnets to the backs after baking. They make the cutest refrigerator set!
Step 4: The Happy Strawberry
-
Forming the body:
Roll a ball of red clay into a chubby teardrop shape. Flatten the back slightly so it sits flat on a tray without rolling away. -
Adding seeds:
Use a needle tool or toothpick to poke small holes all over the red surface. Fill these holes with tiny bits of white clay or paint them white after baking. -
Greenery:
Create three or four tiny teardrops of green clay. Flatten them and arrange them on the wide top of the strawberry. Use a needle tool to add vein textures. -
Finishing touches:
Add the signature wide-set eyes and smiling mouth using black clay. Bake all your pieces according to your clay package instructions (usually 275°F/130°C for 15-30 minutes).
Arrange your tiny bakery on a shelf or turn them into jewelry charms to enjoy your handiwork.


Tiny Mushroom Friends
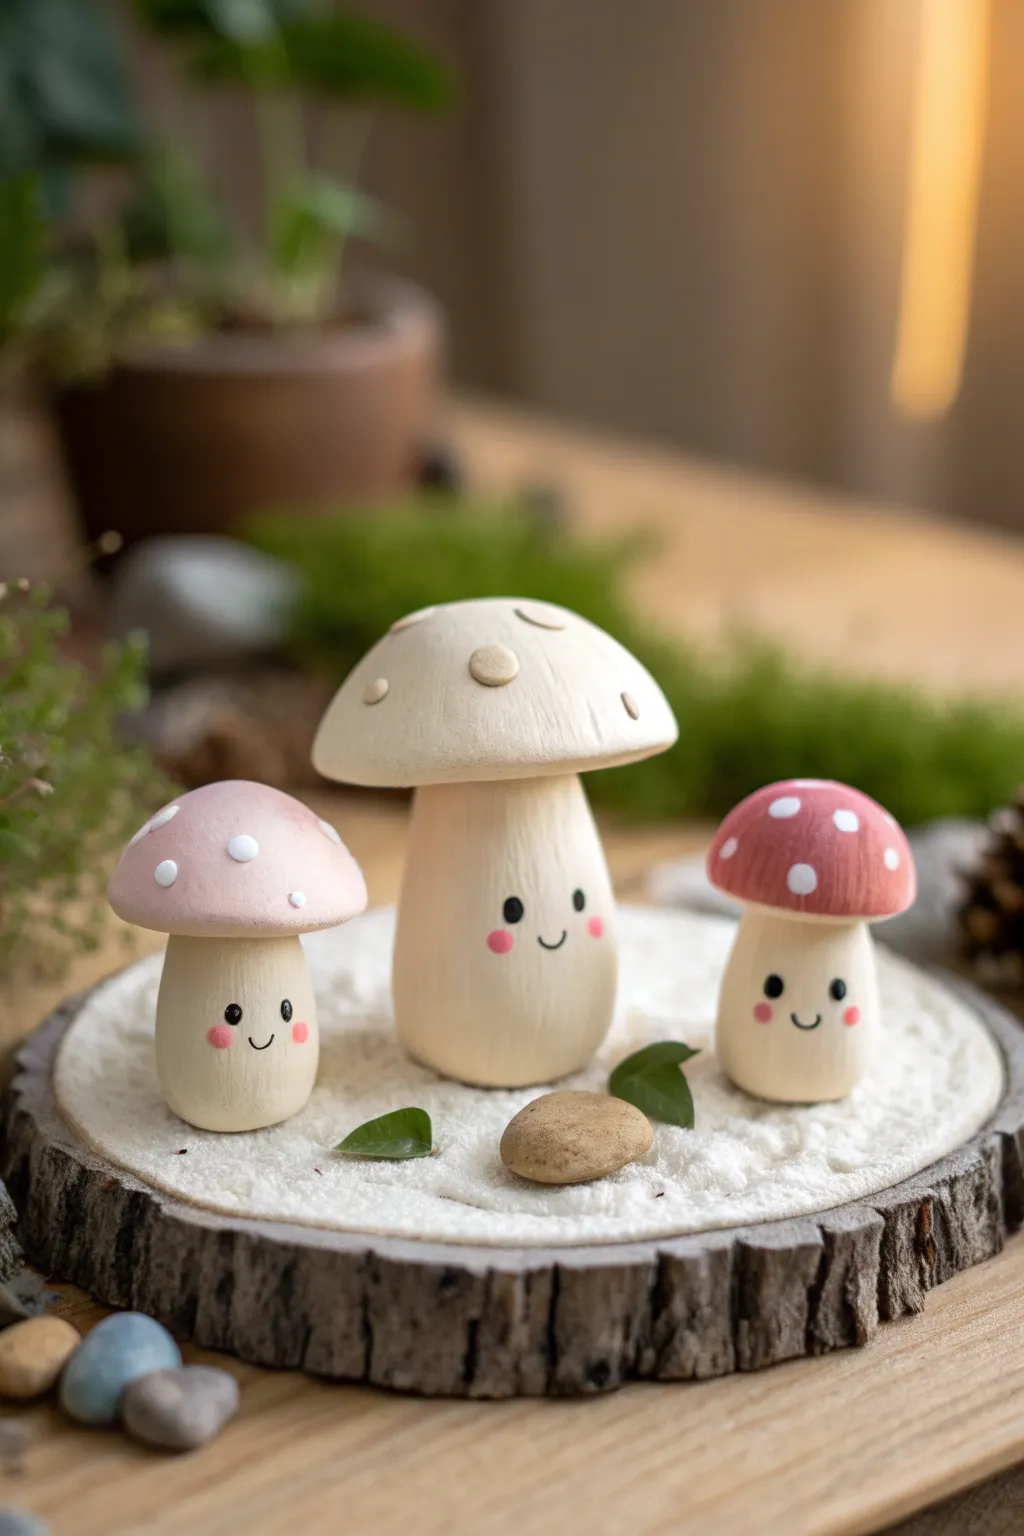
Create a charming set of three miniature mushroom characters with distinct personalities and sweet, smiling faces. These stylized fungi feature smooth, rounded caps and sturdy stems, making them a perfect beginner-friendly project for adding a touch of forest magic to your desk or shelf.
How-To Guide
Materials
- Polymer clay (white, beige/ecru, pastel pink, earthy red)
- Acrylic paints (black, pink/rosy cheeks)
- Fine detail paintbrush or dotting tool
- Ball stylus tool
- Aluminum foil (for armatures)
- Liquid clay or Bake and Bond
- Wooden slice base
- Gloss glaze (optional)
Step 1: Shaping the Stems
-
Condition the clay:
Start by thoroughly conditioning your beige or ecru polymer clay until it is soft and pliable. This prevents cracking later on. -
Form the base shapes:
Roll three balls of clay in varying sizes for the stems. The center mushroom should be the largest, with two smaller companions. -
Create the taper:
Roll each ball into a thick cylinder, gently tapering the top so it’s slightly narrower than the base. The bottoms should be flattened so they stand independently. -
Add foil cores:
For the largest mushroom, I recommend crumpling a small ball of aluminum foil and wrapping the clay around it. This saves clay and ensures the thickest part creates properly. -
Smooth the surface:
Use your fingertips to smooth out any fingerprints on the stems. A little cornstarch on your fingers can help buff them to a matte finish.
Uneven Standing?
If your mushrooms wobble after baking, glue a small disc of sandpaper to a table and gently rub the base of the mushroom against it in a circular motion until flat.
Step 2: Crafting the Caps
-
Mix your colors:
Prepare your cap colors. You’ll need a creamy white for the center mushroom, a soft pastel pink for the left one, and an earthy red for the right one. -
Shape the domes:
Roll balls of each color, proportional to their stems. Press your thumb gently into the center of each ball to create a domed cap shape, hollowing out the underside slightly. -
Texture the large cap:
For the large center mushroom, take small bits of the beige stem clay, flatten them into irregular discs, and press them onto the white cap to create raised spots. -
Detail the side caps:
For the pink and red mushrooms, roll tiny spheres of white clay. Press these flat onto the caps to create the classic polkadot toadstool look. -
Attach caps to stems:
Apply a small drop of liquid clay or Bake and Bond to the top of each stem. Press the caps firmly onto the stems, blending the seam underneath if desired, or leaving it distinct for a cartoonish look.
Create a Scene
Make a diorama! Use a wood slice, glue down dried moss, and add small pebbles. Sprinkle white sand or baking soda for a ‘snowy’ look around their feet.
Step 3: Bringing Them to Life
-
Sculpting the features:
Before baking, you can gently use a needle tool to mark where the eyes will go, but do not paint yet. -
Baking:
Bake the mushrooms according to your clay manufacturer’s instructions (usually 275°F/130°C for 15-30 minutes). Let them cool completely before handling. -
Painting the eyes:
Using a fine detail brush or a larger dotting tool, dab two circles of black acrylic paint for the eyes. Space them widely for a cute, ‘kawaii’ appearance. -
Adding the smiles:
With the finest brush tip or a fine-liner pen, draw a tiny, shallow ‘U’ shape between the eyes for the mouth. -
Rosy cheeks:
Dip a Q-tip or a dry brush into pink paint, wipe most of it off, and gently dab rosy circles just under the eyes. -
Final highlights:
Add a tiny white dot reflecting light inside the black pupils to make the eyes sparkle and look alive. -
Sealing:
If you want a protective finish, coat the mushrooms in a matte varnish, or use gloss specifically on the eyes to make them shine.
Set up your trio on a sunny windowsill where their smiles can greet you every morning


Pocket-Sized Cats and Dogs
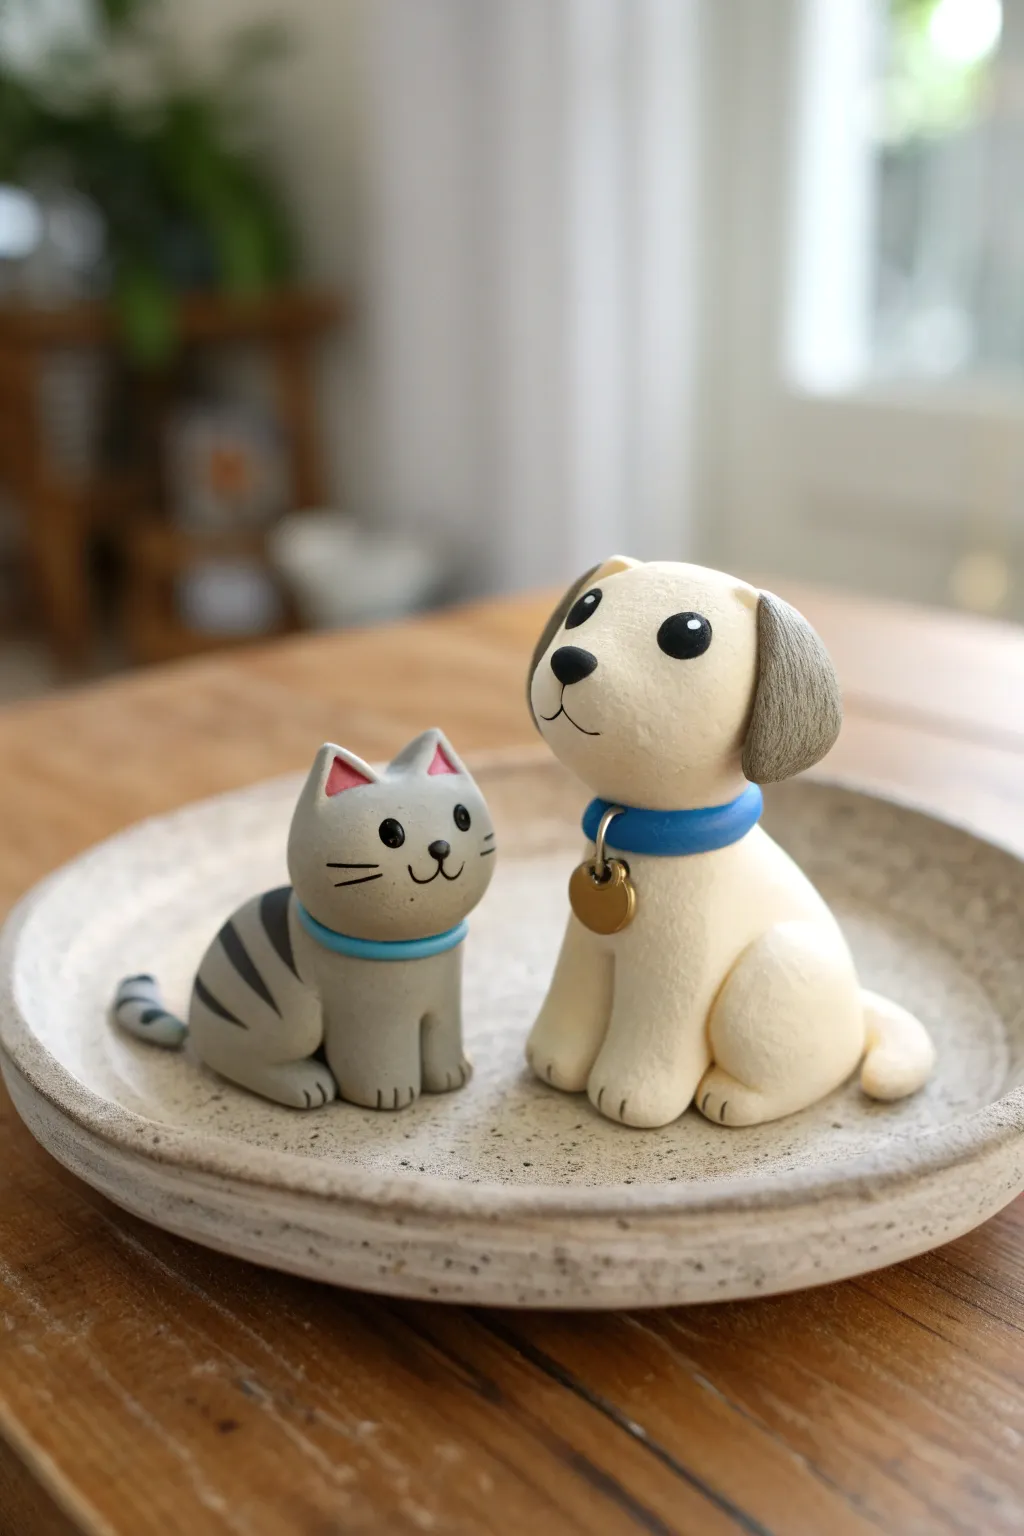
Create this adorable pair of pocket-sized pets featuring a striped grey kitty and a floppy-eared pup. These smooth, cartoon-style figurines capture sweet expressions and are perfect for beginners looking to practice simple shapes and clean joins.
Step-by-Step
Materials
- Polymer clay (white, grey, black, pink, blue, gold/yellow)
- Small ball tool or dotting tool
- Detailing needle tool or toothpick
- Clay roller (acrylic)
- Flexible blade or craft knife
- Small oven-safe tile or baking sheet
- Wet wipes (for cleaning hands between colors)
Step 1: Sculpting the Cat
-
Body Basics:
Start by conditioning a ball of grey clay about the size of a walnut. Roll it into a smooth, slightly tapered gumdrop shape to form the seated body and head as one continuous unit, or create a separate round head and attach it firmly to a teardrop body. -
Legs and Paws:
Roll two small sausages of grey clay for the front legs. Press them vertically against the front of the body, blending the top seam so they look integrated. Use your needle tool to press two small indentations into the bottom of each leg for toes. -
Ear Details:
Shape two tiny triangles of grey clay. Press a smaller pink clay triangle into the center of each. Attach these to the top of the head, blending the back seams down to secure them. -
The Face:
Roll two tiny black balls for eyes and press them gently into the face. Create a very small mouth by impressing a ‘3’ shape with a needle tool or rolling a tiny thread of black clay. Add whiskers by lightly pressing thin lines of black clay onto the cheeks. -
Stripes and Tail:
Roll very thin, tapered snakes of dark grey or black clay. Press these gently onto the sides of the body to create tabby stripes. Roll a tail, add a stripe near the tip, and wrap it around the side of the body. -
Collar Detail:
Roll a thin snake of blue clay. Wrap it around the cat’s neck area, trimming the excess at the back and smoothing the seam to create a neat collar.
Sticky Situation?
If clay gets too soft and sticky while you work, pop it in the fridge for 10 minutes. This firms it up, making tiny details like the ears much easier to handle without distortion.
Step 2: Sculpting the Dog
-
Seated Stance:
Condition a ball of cream or off-white clay. Create a larger pear shape for the body, slightly flattening the bottom so it sits stably. Make a separate, slightly rounded sphere for the head. -
Back Legs:
Form two balls of cream clay and flatten them into rounded discs.Attach these to the lower sides of the body to create the haunches of the seated dog. -
Front Paws:
Roll two thick cylinders for the front legs. Place them between the haunches, standing upright. Use your needle tool to mark three toe lines on all four feet. -
Head and Neck:
Attach the head to the body. If the clay is soft, you might want to strengthen the neck with a small piece of toothpick inside. Smooth the connection point gently. -
Floppy Ears:
Mix a little grey or brown into your cream clay to get a darker shade. Shape two flattened teardrops and attach them to the sides of the head, letting them flop down naturally. -
Expressive Face:
Add two black beads of clay for eyes—placing them slightly wider apart makes for a cuter look. Press a larger black oval on the tip of the muzzle for the nose. Use a needle tool to draw a simple curved mouth line. -
Canine Collar:
Create a thicker blue snake of clay for the dog’s collar and wrap it around the neck. For the tag, flatten a tiny ball of gold or yellow clay into a disc and press it onto the front of the collar. -
Adding the Tail:
Roll a small cone of cream clay and attach it to the back of the body, curling it slightly to the side so it’s visible from the front.
Make It Glossy
After baking and cooling, apply a coat of UV resin or water-based gloss varnish solely to the eyes and nose. This ‘wet look’ makes the characters feel much more alive.
Step 3: Finishing Touches
-
Smoothing:
Before baking, check for fingerprints. You can dip your finger in a little baby oil or cornstarch and rub the clay very lightly to remove prints. -
Baking:
Bake the figurines according to your polymer clay package instructions (usually 275°F/130°C for 15-30 minutes per 1/4 inch of thickness). Let them cool completely before handling.
Now you have a charming pair of clay friends ready to guard your desk or bookshelf

The Complete Guide to Pottery Troubleshooting
Uncover the most common ceramic mistakes—from cracking clay to failed glazes—and learn how to fix them fast.
Sea Creature Minis
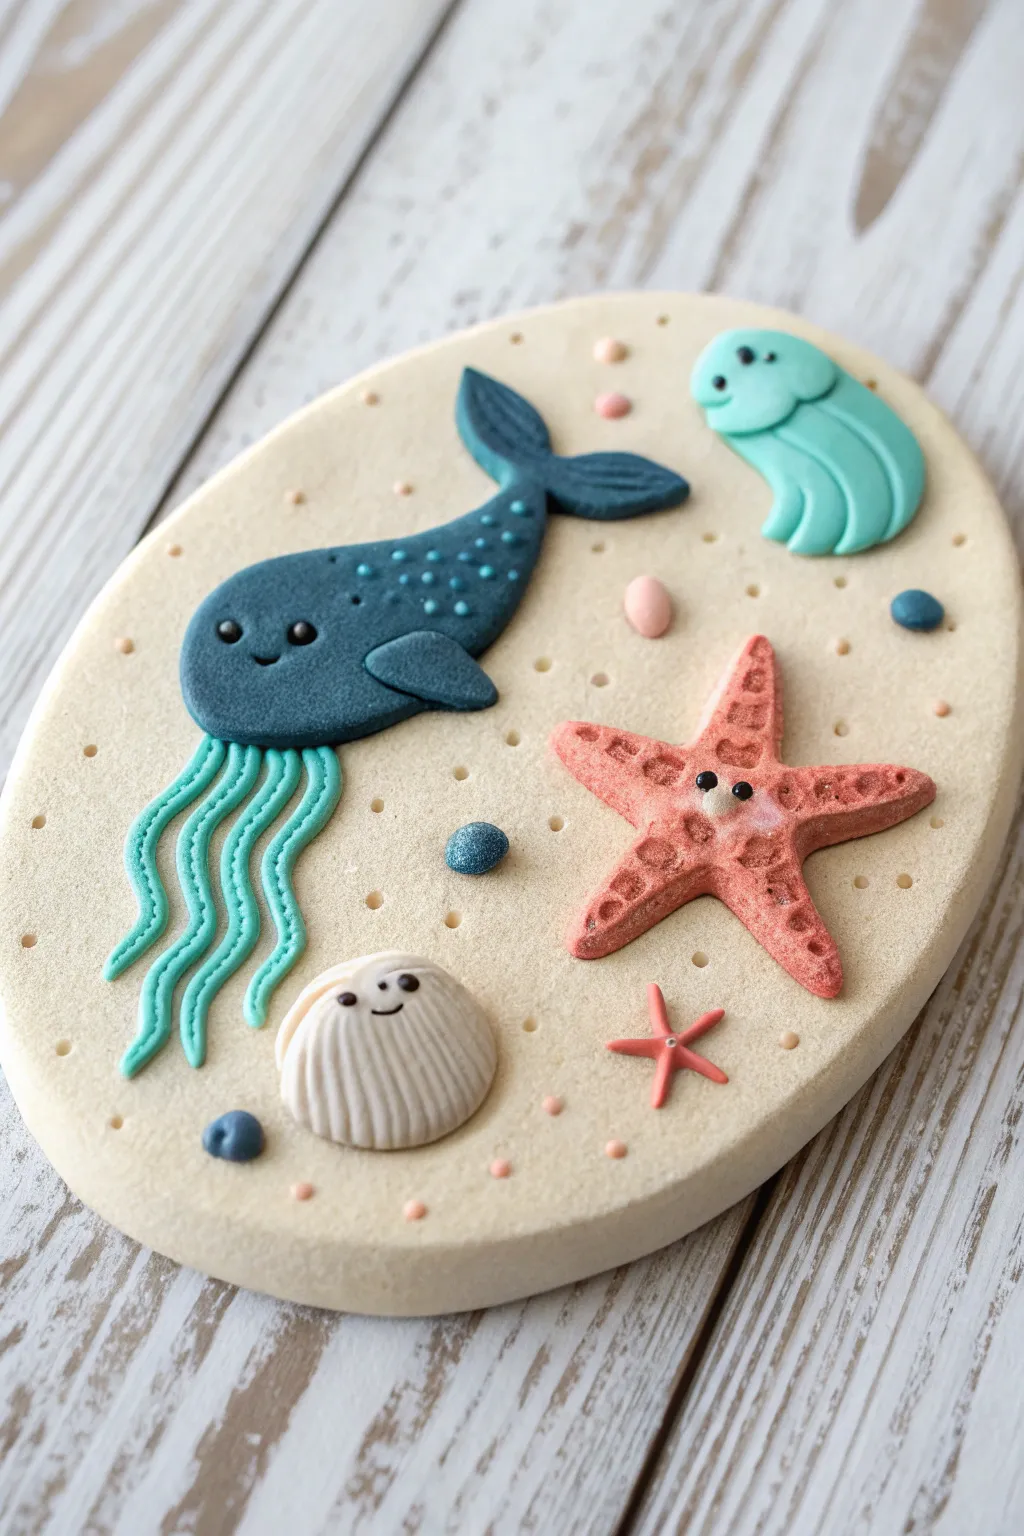
Dive into sculpting with this adorable ocean-themed relief plaque featuring a gentle whale-jellyfish hybrid, a smiling starfish, and other tiny sea friends. Perfectly textured to resemble the sandy sea floor, this project combines simple shapes with charming details for a delightful finish.
Detailed Instructions
Materials
- Polymer clay in beige/sand, dark blue, teal/aqua, coral pink, white, soft pink, and black
- Rolling pin or pasta machine
- Oval cutter (approx. 4-5 inches) or craft knife
- Needle tool or toothpick
- Small ball tool
- Soft bristles toothbrush or texture sponge
- Liquid polymer clay (translucent or matching colors)
- Gloss glaze (optional)
Step 1: Creating the Sandy Base
-
Prepare the sand color:
Condition your beige or sand-colored polymer clay until soft. If you want a speckled sand look, mix in tiny flecks of brown or translucent clay, or use a pre-mixed effect clay. -
Shape the base:
Roll the clay out to a sturdy thickness of about 1/4 inch. Use a large oval cutter to punch out your base shape. If you don’t have a cutter, trace an oval onto paper, lay it over the clay, and carefully cut around it with a craft knife. -
Texture the surface:
To mimic the ocean floor, gently press a toothbrush or a texture sponge over the entire surface of the oval. This stippling effect gives it that perfect sandy grain without needing real sand. -
Add background details:
Use a small ball tool to make random indentations scattered across the background for extra depth. Roll tiny balls of pink and blue clay and press them gently into the sand as pebbles.
Smudge Patrol
Dark blue clay stains light colors easily! Clean your hands or switch to baby wipes before touching the white shell or beige sand to keep colors crisp.
Step 2: Sculpting the Sea Creatures
-
Form the whale body:
For the main creature, roll a smooth teardrop of dark blue clay. Flatten it slightly and curve the tail upwards. Place this on the left side of your base, pressing gently to adhere. -
Detail the whale:
Add a small, flattened triangle for the side fin. Use a needle tool to impress lines on the tail fluke. With a small ball tool, create eye sockets and insert tiny black clay balls for eyes. Use a needle tool to carve a happy smile. -
Add the tentacles:
Roll very thin snakes of teal or aqua clay. Attach four or five wavy strands coming from underneath the whale’s head, pressing them into the base in a flowing motion to simulate movement. -
Decorate the whale:
Roll tiny balls of light blue or teal clay and press them onto the whale’s back for a spotted pattern. I find that using the tip of a needle tool helps pick up and place these minuscule dots precisely. -
Sculpt the starfish:
Take coral pink clay and shape a five-pointed star. Texture the surface by pressing a small tool or coarse sandpaper against it to give a bumpy, organic feel. Position it on the right side of the plaque. -
Starfish face:
Give the starfish personality by adding two tiny black distinct eyes close together and a little carved mouth. Add a slightly lighter pink shading to the tips if you have chalk pastels, or blend a lighter clay. -
Create the jellyfish:
Shape a small semi-circle of mint or light teal clay for the jellyfish head and place it near the top right. Add three short, thick tentacles underneath, curving them slightly. -
Make the scallop shell:
Roll a ball of white clay, flatten it into a fan shape, and use a needle tool to press deep vertical grooves radiating from the bottom center. Add a tiny face just like you did for the others.
Step 3: Final Details and Baking
-
Add tiny fauna:
Create a miniature red starfish using very thin snakes of red clay and place it near the bottom. Add extra tiny bubbles or pebbles using scrap clay to fill any empty negative space. -
Secure the pieces:
Check that all attachments are secure. A tiny dab of liquid polymer clay behind larger pieces like the whale body can ensure they don’t pop off after baking. -
Bake carefully:
Bake the project according to your clay manufacturer’s instructions (usually 275°F/135°C for 15-30 minutes). Tent with foil to prevent scorching the light sand color. -
Finishing touches:
Once cool, you can highlight the eyes with a tiny dot of white paint for a ‘sparkle’ or add a coat of gloss glaze to the creatures to make them look wet, leaving the sand matte.
Wall Hanging Hack
Before baking, poke two holes at the top of the oval or embed a wire loop into the back. This turns your sculpture into a hangable wall decoration instantly.
Display your adorable underwater scene on a shelf or gift it to a beach-loving friend to brighten their day
Cute Owl Desk Buddy
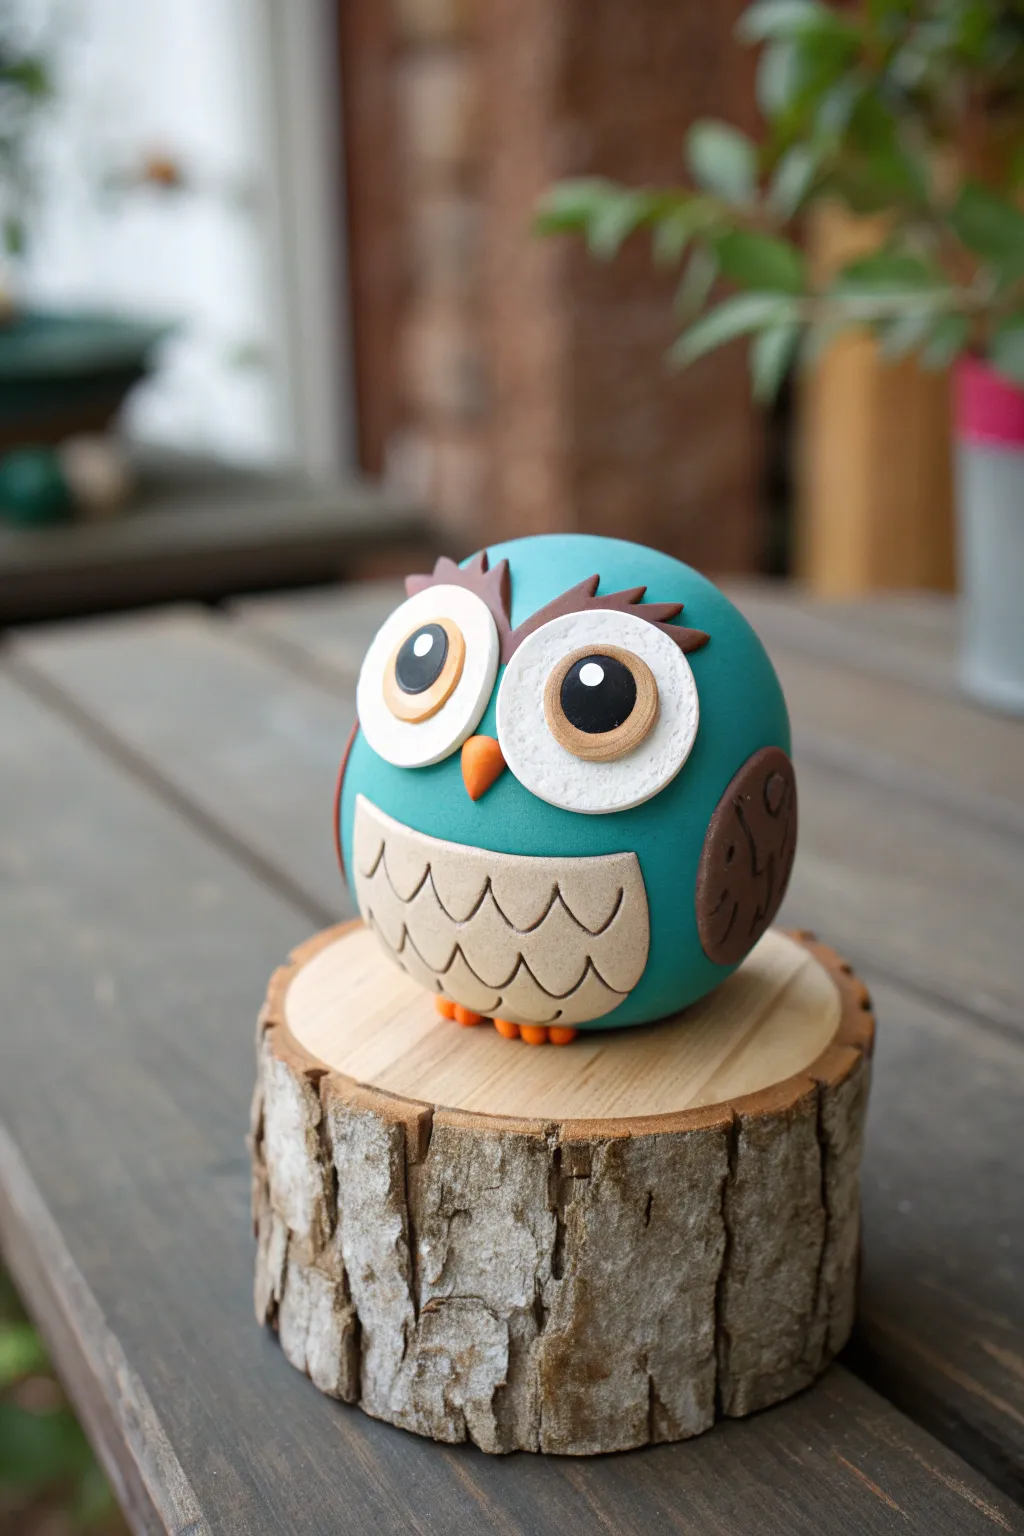
Brighten up your workspace with this irresistibly round owl sculpture, featuring a vibrant teal body and stylized feathers. This project uses basic sphere shapes and simple clay layering techniques to create a smooth, clean-looking desk companion.
Step-by-Step Tutorial
Materials
- Polymer clay in teal, beige/light tan, dark brown, white, and black
- Small amount of orange clay
- Aluminum foil (for armature core)
- Small rolling pin
- Circle cutters (various small sizes)
- Needle tool or toothpick
- Modeling tool with a small curved blade
- Smooth work surface (ceramic tile or glass)
- Oven for baking
Step 1: Forming the Body
-
Prepare the Core:
Compress a ball of aluminum foil into a tight sphere roughly the size of a golf ball. This saves clay and makes the figure lighter. -
Condition the Clay:
Take your primary teal clay and condition it by kneading until it’s soft and pliable. Roll it into a smooth sheet about 3-4mm thick. -
Wrap the Core:
Wrap the teal sheet around your foil ball, carefully smoothing the seams until you have a perfect, seamless teal sphere. Roll it gently between your palms to remove fingerprints. -
Create the Belly:
Roll out the beige/light tan clay into a thin sheet. Use a large circle cutter or cut a semi-circle shape by hand that will fit the lower front of your owl. -
Attach and Texture the Belly:
Press the beige piece onto the lower front of the teal sphere. Use your curved modeling tool to impress rows of ‘U’ shapes creates the look of breast feathers.
Step 2: The Big Eyes
-
White Bases:
Roll out white clay and cut two large circles. Place them side-by-side on the upper face area, slightly overlapping the top of the belly patch. -
Adding Irises:
For the iris, flatten small balls of tan or orange clay (depending on your preference) and place them in the center of the white circles. -
Pupils:
Add smaller black circles on top of the tan ones. I like to position them slightly cross-eyed or looking up to increase the cuteness factor. -
The Spark of Life:
Place a teeny-tiny dot of white clay on the upper right side of each black pupil to create a light reflection. -
The Beak:
Shape a tiny cone of orange clay. Press it gently between the eyes at the bottom edge, pointing downward.
Uneven Eyes?
If your circle cutouts distort when you lift them, let the rolled clay sheet sit on a piece of paper for 10 minutes to cool and firm up before cutting.
Step 3: Feathers & Details
-
Eyebrows Base:
Roll a thin snake of dark brown clay. Cut two segments and curve them over the top of the white eye circles. -
Feather Tuffs:
Using your needle tool or blade, cut small notches into the top of these brown eyebrows to simulate tufted feathers sticking up. -
Wings:
Form two teardrop shapes from dark brown clay. Flatten them slightly and press them onto the sides of the teal body. -
Wing Texture:
Use your needle tool to draw curved lines or ‘C’ shapes into the brown wings to suggest flight feathers. -
Tiny Feet:
Create six tiny balls of orange clay. Group them into two sets of three and press them under the front of the belly for the toes. -
Final Smoothing:
Check the whole piece for lint or accidental nail marks. Use a drop of baby oil on your fingertip to smooth out imperfections if needed. -
Baking:
Bake the owl according to your polymer clay manufacturer’s instructions (usually 275°F/130°C for 15-30 minutes).
Seamless Finish
To remove fingerprints before baking, lightly brush the raw clay with cornstarch or baby powder. This leaves a velvety matte finish after baking.
Once cooled, your round little owl is ready to perch on your desk or a rustic wood slice


What Really Happens Inside the Kiln
Learn how time and temperature work together inside the kiln to transform clay into durable ceramic.
Mini House Diorama
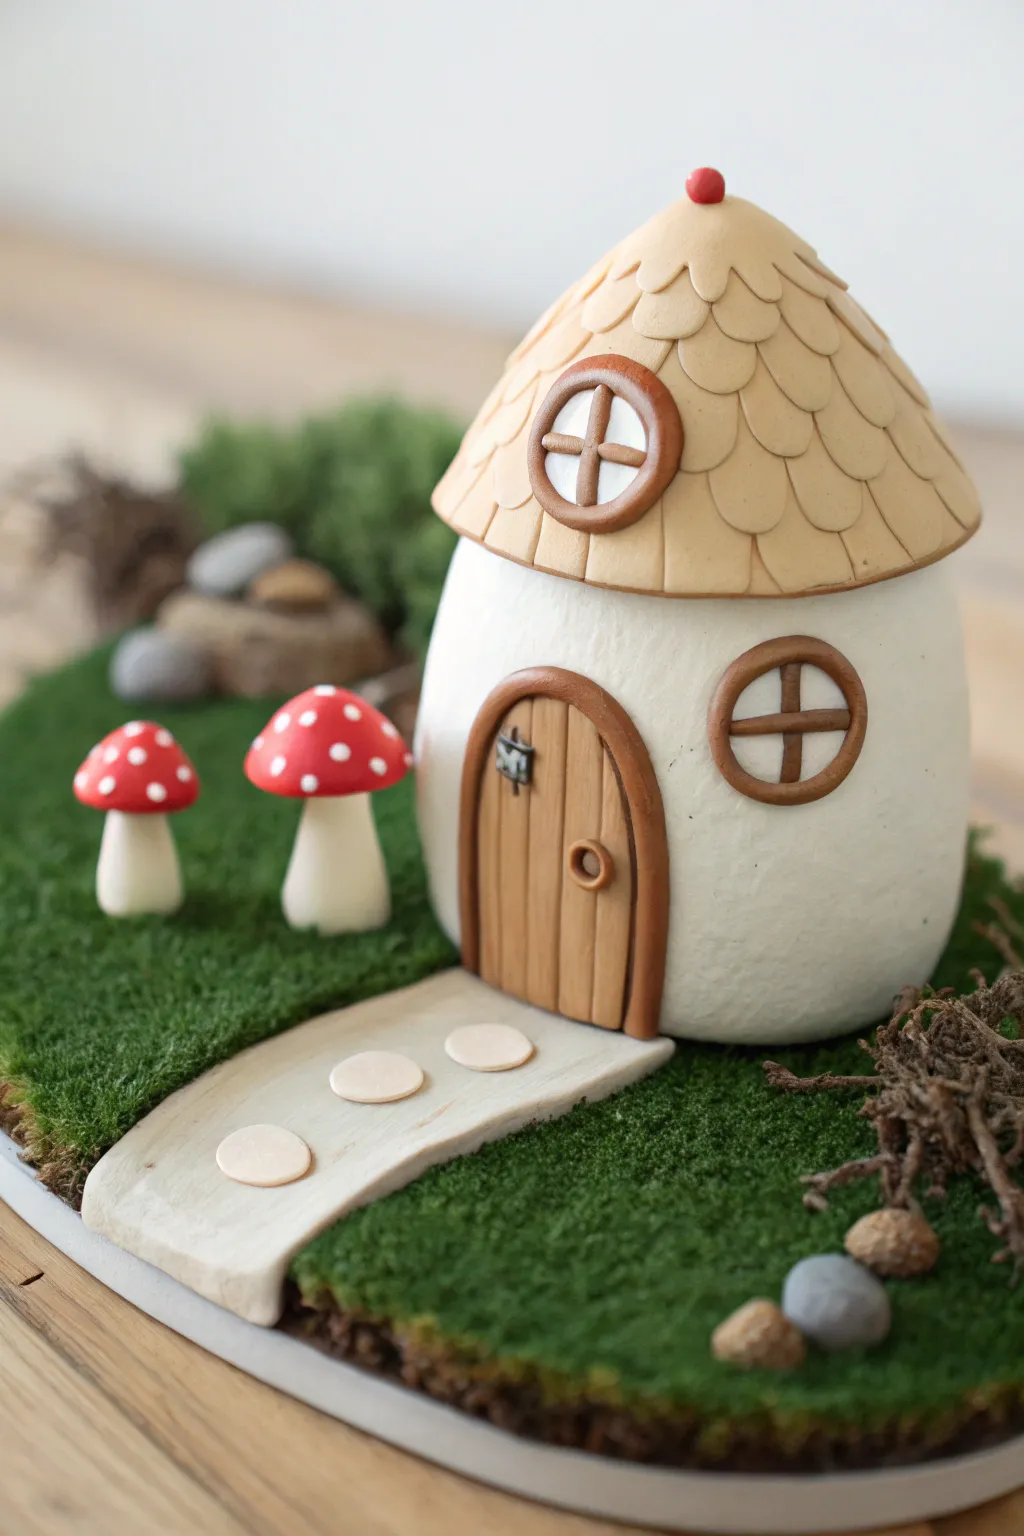
Step into a fairy tale with this adorable polymer clay mushroom house, featuring a textured stucco-style base and a charming tiled roof. This miniature diorama is perfect for beginners, combining basic sculpting techniques with fun landscaping elements like moss and mushrooms.
Step-by-Step
Materials
- Polymer clay (White, Tan/Beige, Brown, Red, Grey)
- Aluminum foil (for armature)
- Small round cutter (approx. 1 cm)
- Needle tool or toothpick
- Rolling pin or pasta machine
- Texture sponge or stiff toothbrush
- Liquid polymer clay (Bake and Bond)
- Acrylic paints (various greens, browns)
- Artificial moss or scenic flocking
- Craft glue or superglue
- Cardboard or wooden base
- Gloss glaze (optional)
Step 1: Sculpting the Cottage Base
-
Create the Armature:
Begin by crumpling aluminum foil into a large egg shape with a flattened bottom. This saves clay and keeps the sculpture lightweight while preventing cracking during baking. -
Cover with White Clay:
Condition your white clay and roll it into a sheet about 3mm thick. Wrap this sheet around the foil armature, smoothing out the seams so the foil is completely hidden. -
Add Texture:
Using a texture sponge, a stiff toothbrush, or even a ball of crumpled foil, gently press into the soft white clay to create a stucco or rough plaster effect all over the surface. -
Form the Roof Cone:
Roll a separate piece of aluminum foil into a wide cone shape that fits atop your base. Cover this cone with a smooth sheet of tan or beige clay.
Sticky Clay Issues?
If your clay gets too soft or sticks to your fingers, pop it in the fridge for 10 minutes. This firms it up, making tiny details like shingles much easier to handle.
Step 2: Roofing and Details
-
Make Roof Tiles:
Roll out a thin sheet of tan clay. Use a small round cutter to punch out many circles. If you don’t have a cutter, you can hand-roll small balls and flatten them. -
Apply the Shingles:
Starting at the bottom rim of the roof cone, press the clay circles onto the surface, overlapping them slightly as you move upward toward the peak. I find it helpful to offset the rows like fish scales. -
Add the Finial:
Once you reach the top, roll a tiny ball of red clay and place it at the very peak of the roof for a pop of color. -
Join Roof to Base:
Apply a small amount of liquid polymer clay to the top of the white base and press the finished roof firmly onto it.
Realistic Shading
Before baking, brush a tiny bit of dark brown soft pastel dust into the cracks of the door and roof tiles. This adds instant depth and an aged look.
Step 3: Windows and Door
-
Create the Door Shape:
Roll out light brown clay and cut an arch shape. Use a needle tool to score vertical lines into it to mimic wood planks. -
Add Door Frame and Hardware:
Roll a thin snake of darker brown clay to frame the arch. Add a tiny ball for a doorknob and a small rectangle for a hinge or knocker. -
Attach the Door:
Press the door assembly onto the front of the white base. Use a dot of liquid clay if it doesn’t stick immediately. -
Make the Windows:
Create two small circles of white clay. Frame them with thin snakes of brown clay and add a cross shape in the middle for panes. Attach one to the roof and one to the side of the house.
Step 4: Landscaping the Scene
-
Prepare the Base:
Position your house on your chosen baseboard. Roll out a thin, irregular strip of beige or grey clay to form a path leading to the door. -
Add Stepping Stones:
Press small flattened circles of lighter clay into the path to create stepping stones. -
Sculpt Mushrooms:
Roll thick white cylinders for stems and red hemispheres for caps. Attach the caps to the stems and press tiny white clay dots onto the red caps. -
Bake the Project:
Place the house, path, and mushrooms (if they aren’t attached to the base yet) into the oven. Follow the package instructions for temperature and time, usually baking for 15-30 minutes. -
Apply Moss and Finish:
Once cooled, glue the path and mushrooms onto the baseboard. Spread craft glue over the remaining empty areas of the base and press down artificial moss or flocking to create a lush, grassy lawn.
Display your charming cottage on a shelf or windowsill to bring a little magic into your room
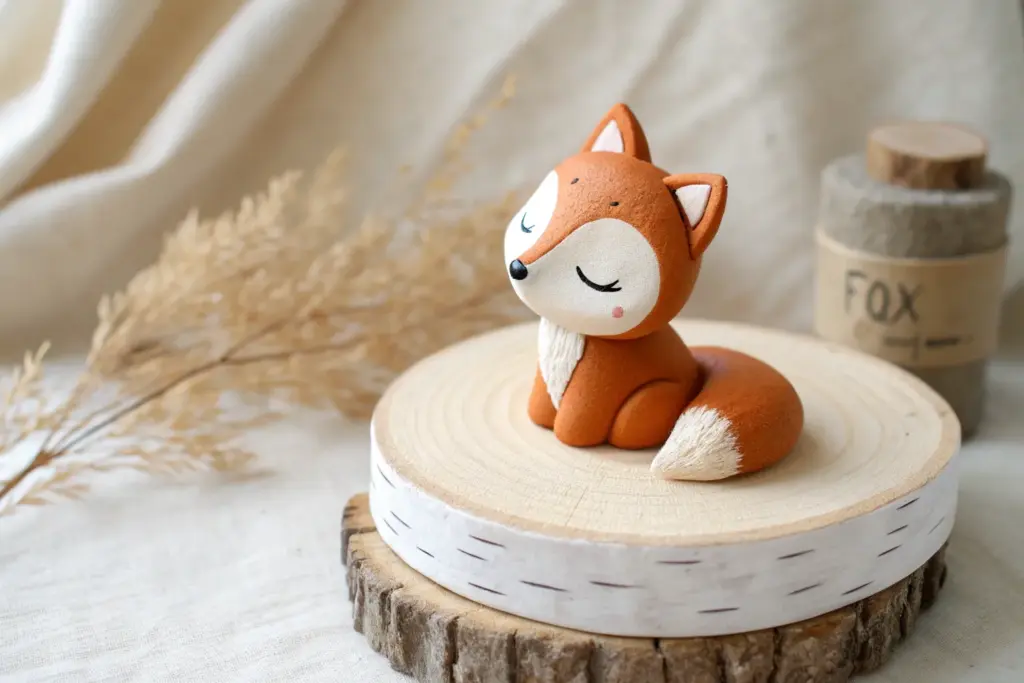
Forest Spirit Animal Mashup
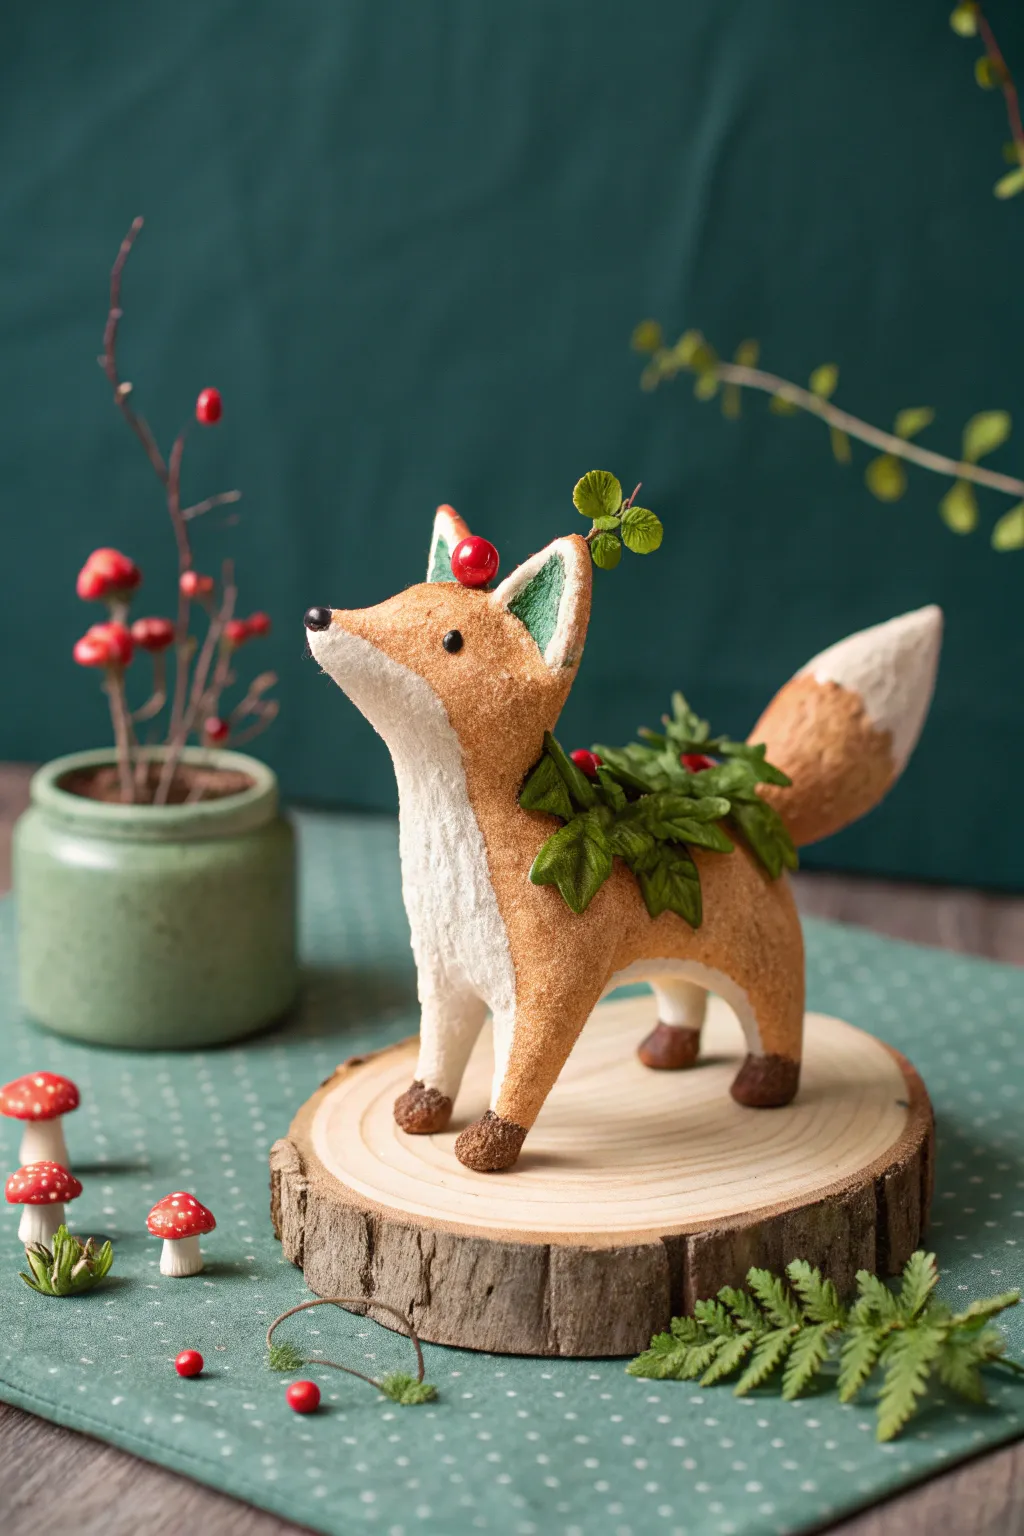
Capture the magic of an enchanted forest with this charming fox sculpture, featuring a unique textured finish that mimics soft fur. This project combines classic animal sculpting with adorable botanical details for a true forest spirit mashup.
Step-by-Step Guide
Materials
- Polymer clay (terracotta/orange, white, dark brown, green, red)
- Aluminum foil (for armature)
- Needle tool or stiff toothbrush (for texturing)
- Ball stylus tools
- Liquid polymer clay (Bake and Bond)
- Small wood slice base
- Wire cutters and floral wire
- Acrylic paints (black, white) and fine brush
- Matte varnish
Step 1: Forming the Core
-
Create the foil armature:
Start by crumpling aluminum foil into two main shapes: a larger oval for the body and a smaller, slightly triangular teardrop for the head. Compress the foil tightly to remove air pockets. -
Connect head and body:
Insert a short piece of floral wire into the neck area of the body and push the head onto the other end. Secure the connection with a drop of liquid polymer clay or superglue to prevent spinning. -
Cover with base clay:
Condition your terracotta or orange clay until pliable. Roll it into a thin sheet and wrap the entire foil armature, smoothing out the seams with your fingers until you have a seamless base shape.
Uneven Texture?
If the toothbrush texture looks too uniform, go back over specific areas (like the neck ruff and tail) with a needle tool to drag deeper fur lines for variety.
Step 2: Sculpting the Fox
-
Shape the legs:
Roll four cylinders of orange clay. Blend them onto the body to form legs, making the back legs slightly thicker at the top for thighs. Flatten the bottoms so the fox stands securely. -
Add the white chest:
Take a piece of white clay and flatten it into a rough bib shape. Carefully press this onto the chest and underbelly area, smoothing the edges into the orange clay so the transition looks natural. -
Form the tail:
Shape a generous amount of orange clay into a fluffy tail shape. Add a white clay tip to the end, blending the seam. Attach the tail to the rear of the body, curving it slightly upward for a lively expression. -
Sculpt the ears:
Create two small triangles of orange clay. Press a smaller, flattened triangle of green clay inside each one for a magical inner-ear look. Attach these to the top of the head. -
Refine the snout:
Gently pinch and pull the clay at the front of the face to elongate the snout slightly. Add a tiny ball of dark brown clay to the very tip for the nose.
Pro Tip: Clean Colors
Work with the white clay first, or wash your hands thoroughly before handling it. Orange and red pigments stain fingers easily and will ruin the pristine white chest.
Step 3: Texturing and Details
-
Create the fur texture:
This is the crucial step for that textured look. Take a needle tool or a stiff toothbrush and gently stipple the entire surface of the orange and white clay. I find circular motions work best to avoid neat rows of holes. -
Add the paws:
Roll four small balls of dark brown clay. Flatten them slightly and attach them to the bottom of each leg to create little paws. Texture these to match the body. -
Face details:
Use a small ball stylus to make indentations for the eyes. Insert small beads of black clay. Add a tiny highlight with white paint later, or use a speck of white clay now.
Step 4: Botanical Embellishments
-
Sculpt the back foliage:
Roll small pieces of green clay into teardrops and flatten them to make leaves. Use a needle tool to score veins down the center. Layer these leaves over the fox’s back, creating a lush ‘saddle’ of greenery. -
Add berries:
Roll tiny balls of red clay. Place one distinct berry on top of the head between the ears, and scatter a few smaller ones among the leaves on the back. -
Create the head sprout:
Twist a very thin piece of green clay or coated wire for a stem. Attach 3-4 tiny green leaves to the top and plant this ‘sprout’ just behind the right ear.
Step 5: Finishing Touches
-
Baking:
Preheat your oven according to the clay manufacturer’s instructions. Place the fox on a ceramic tile or cardstock and bake for the recommended time (usually 15-30 minutes per 1/4 inch of thickness). -
Mounting:
Once cool, use strong craft glue or epoxy to attach the fox’s feet securely to the wood slice base. -
Sealing:
Determine if you want a glossy or natural look. A matte varnish protects the texture without making it look plastic.
Now you have a little forest guardian ready to watch over your desk or shelf

TRACK YOUR CERAMIC JOURNEY
Capture glaze tests, firing details, and creative progress—all in one simple printable. Make your projects easier to repeat and improve.
Stacked Animal Totem
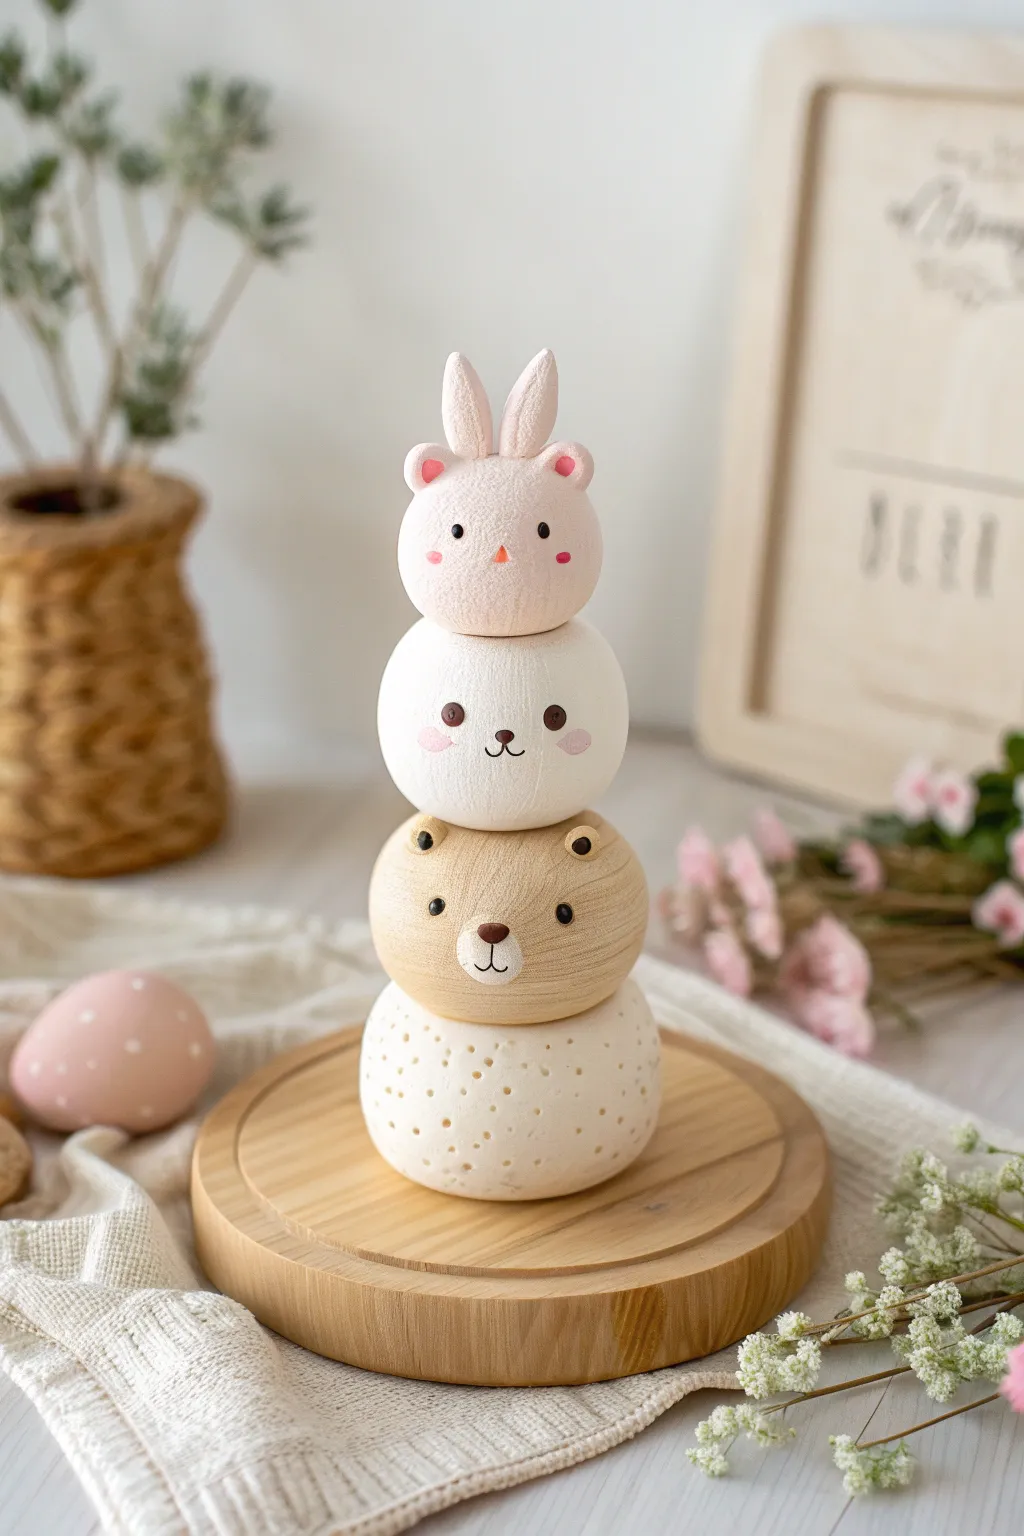
This adorable stacked totem features four distinct rounded characters, including a bunny, a bear, and a textured base, all balanced in perfect harmony. The soft pastel color palette and gentle textures make this polymer clay sculpture a sweet addition to any nursery or shelf decor.
How-To Guide
Materials
- Polymer clay in white, beige/tan, light pink, and speckled/granite effect
- Ball stylus tools (various sizes)
- Needle tool or toothpick
- Acrylic paint (black, pink, brown)
- Small detail paintbrush
- Aluminum foil (for armature cores)
- Liquid polymer clay or Bake & Bond
- Texturing tool (stiff brush or sandpaper)
- Soft pastel chalks (pink) for blushing
Step 1: Creating the Textured Base
-
Form the core:
Begin by crumpling a small ball of aluminum foil into a tight sphere about 1.5 inches in diameter. This saves clay and ensures even baking. -
Cover with speckled clay:
Sheet out your speckled or granite-effect polymer clay to a medium thickness. Wrap it completely around the foil ball, smoothing the seams until you have a perfect sphere. -
Flatten slightly:
Gently press the sphere onto your work surface to create a flat bottom for stability. Press the top lightly to create a resting place for the next tier. -
Add pierced texture:
Using a needle tool or small awl, pierce the surface of the clay repeatedly with shallow holes. Vary the spacing to create an organic, porous stone look.
Step 2: Sculpting the Bear Tier
-
Shape the bear head:
Roll a ball of beige or tan clay slightly smaller than your base. Smooth it into a slightly flattened sphere shape. -
Add texture:
Before adding features, gently roll the surface of the clay over a piece of sandpaper or tap it with a stiff toothbrush to give it a matte, fur-like texture. -
Create the ears:
Roll two tiny balls of the same beige clay. Press a small ball tool into the center of each to cup them, then attach them to the top sides of the head. -
Form the muzzle:
Flatten a small oval of white or lighter beige clay and press it onto the lower center of the face for the snout area. -
Attach nose:
Place a tiny triangle of dark brown clay on the muzzle for the nose. I usually press this in firmly so it doesn’t knock off later. -
Stack securely:
Apply a drop of liquid clay to the top of the speckled base and center the bear head on top.
Structure Secret
Insert a wooden skewer or strong wire vertically through the center of all four spheres before baking. This acts as an internal spine so your totem doesn’t topple over.
Step 3: Sculpting the White Animal Tier
-
Form the white head:
Create a sphere from white clay, slightly smaller than the bear head below it. -
Add facial features:
There are no protruding ears for this middle tier in the image, keeping the silhouette clean. Simply stack this sphere onto the bear head using liquid clay. -
Paint the face:
Using a fine detail brush or a needle tool dipped in paint, carefully dot two eyes in dark brown. Paint a tiny triangular nose and a small ‘w’ mouth just below it. -
Apply blush:
Scrape a little pink pastel chalk into dust. Use a soft brush to gently apply rosy cheeks to the sides of the face.
Level Up: Accessories
Give each character a tiny accessory to hold or wear! Try adding a miniature clay scarf on the bear or a tiny flower crown around the bunny’s ears for extra charm.
Step 4: Top Bunny and Finishing
-
Sculpt the bunny head:
Roll a small ball of pale pink clay for the final tier. Texture it lightly with a toothbrush for a soft, plush look. -
Make the bunny ears:
Shape two elongated teardrops from pink clay. Press an indentation into the center of each with a tool to separate the inner ear. Attach these upright to the top of the head. -
Add bunny cheeks:
Roll two miniscule balls of darker pink clay and press them onto the cheeks for a dimensional blushing effect. -
Face details:
Add tiny black beads or clay dots for eyes, and a small pink triangle for the nose. -
Final assembly:
Use liquid clay to secure the bunny to the white tier. Push a long wire or toothpick down through the center of all unexpected tiers before baking if you need extra structural stability. -
Bake:
Bake the entire stack according to your clay manufacturer’s instructions. Usually, this means around 275°F (130°C) for 30-45 minutes depending on thickness.
Once cooled, display your charming totem on a wooden coaster or shelf for a touch of handmade sweetness
Teacup Creature Pop-Out
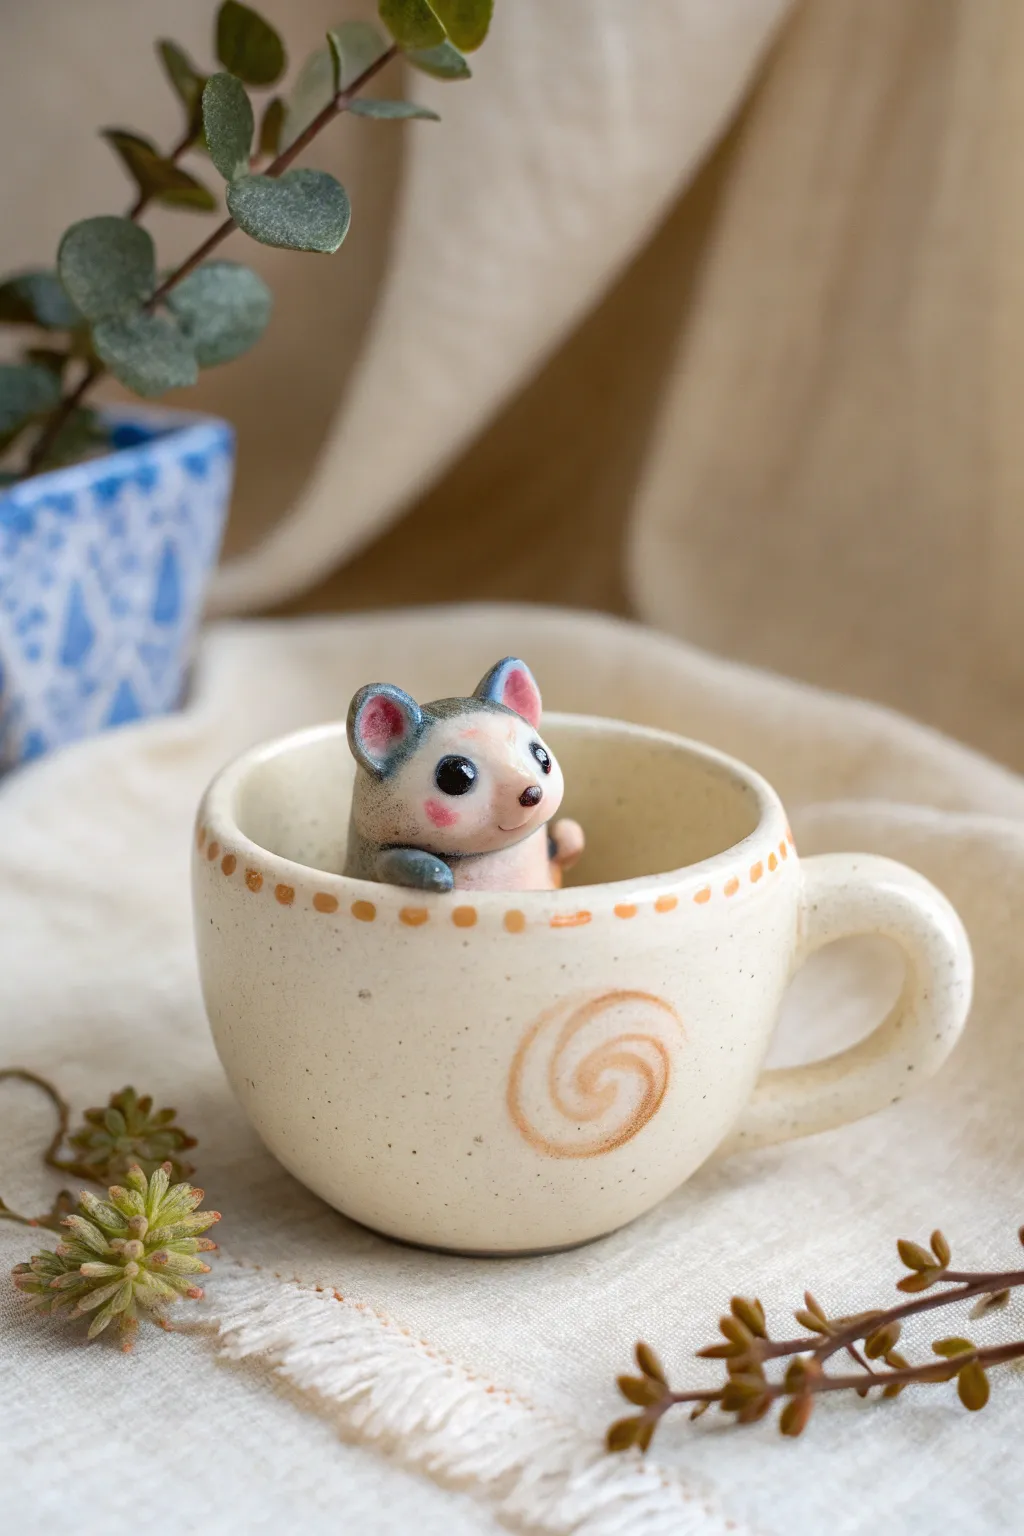
This adorable project features a tiny, wide-eyed opossum peeking curiously over the rim of a handmade-style teacup. With soft blushing cheeks and delicate paws gripping the edge, this sculpture captures a moment of whimsical surprise perfect for a desk buddy or plant shelf decoration.
Step-by-Step Tutorial
Materials
- Polymer clay: white, light gray, translucent, black, and coral pink
- Liquid polymer clay (Translucent or Bake & Bond)
- Small ceramic teacup or a ramekin (oven-safe) to use as a form
- Soft pastel chalks in pink and light brown
- Small fluffy paintbrush
- Needle tool
- Ball stylus tools (various sizes)
- X-acto knife or clay blade
- Gloss glaze or UV resin
- Cornstarch or baby powder (release agent)
Step 1: Shaping the Creature Base
-
Prepare the rough form:
Start by conditioning your light gray clay until it is soft and pliable. Roll a ball about the size of a walnut, then gently taper the top half into a slight pear shape to form the head and upper body. -
Create the face mask:
Roll a smaller ball of white clay and flatten it into a thin oval. Press this onto the front of the gray head shape, smoothing the edges with your finger or a silicone tool so the white blends seamlessly into the gray. -
Add the muzzle:
Take a tiny pea-sized amount of white clay and press it onto the center of the face mask to create a slight protrusion for the snout. Smooth the seams carefully. -
Position in the cup:
Dust the inside of your ceramic teacup lightly with cornstarch. Place your clay body inside to ensure it fits snugly and the head peeks over the rim at the correct height. Leave it in the cup for the next sculpting steps to maintain the curve.
Step 2: Adding Character Details
-
Sculpt the ears:
Form two small triangles from gray clay. Indent the centers with a ball tool. Mix a tiny bit of coral pink clay into translucent clay for a soft fleshy tone, place a small dot inside each ear, and attach them to the top of the head. -
Create the nose:
Roll a microscopic bit of dark brown or black clay into a triangle shape. Press this onto the tip of the white muzzle. -
Insert the eyes:
Use a medium ball tool to press two sockets into the face mask. Roll two small balls of black clay and press them firmly into the sockets. I like to press them in slightly deep to make the creature look wider-eyed. -
Add the cheeks:
Scrape a little pink soft pastel into dust. Use a small, soft brush to gently apply the powder to the creature’s cheeks, right under the eyes, and a little inside the ears for depth. -
Form the paws:
Create two small teardrops of gray clay. Flatten the wider end slightly and use a needle tool to press in three lines for toes. Attach these to the rim of the cup, positioning them so the creature looks like it is pulling itself up. -
Attach the arms:
Roll two small snakes of gray clay to connect the paws to the body inside the cup. Smooth these connections well so the arms look natural.
Clean Clay Tips
White clay picks up dust easily. Keep baby wipes nearby to clean your hands and tools before handling the white facial features.
Step 3: Optional: Creating the Clay Cup
-
Note on the vessel:
If you aren’t using a pre-made ceramic cup, you can sculpt the beige cup shown in the photo using polymer clay formed over a small glass votive holder. -
Cup decoration:
If making the clay cup, add the dotted rim detail by pressing a small tool into the clay edge and painting the indentations with diluted brown acrylic paint after baking.
Level Up: Contents
Make it look like liquid is in the cup! Pour a thin layer of colored UV resin around the base of the creature to simulate tea or coffee.
Step 4: Finishing Touches
-
Final texture check:
Before baking, give the gray fur areas a very subtle texture using a toothbrush or stiff brush, tapping gently to remove fingerprints. -
Bake the piece:
Bake the sculpture (inside the ceramic cup if using one) according to your clay package variations—typically 275°F (135°C) for 30 minutes. Let it cool completely inside the cup. -
Glaze the eyes:
Once cool, apply a drop of gloss glaze or UV resin to the black eyes and the nose to give them a wet, lifelike shine. -
Secure the sculpture:
If the creature is loose in the cup after baking, use a dab of superglue or E6000 at the bottom to secure it permanently in place.
Place your little peeking friend on a shelf or windowsill to bring a smile to anyone who spots him.
Whimsical Candle Buddy Holder

Create a charming companion to brighten your windowsill with this speckled bear tealight holder. This project focuses on simple shapes and texturing techniques to achieve a faux-ceramic, stoneware look using polymer clay.
Step-by-Step Guide
Materials
- Beige or oatmeal-colored polymer clay (approx. 3-4 blocks)
- Small amount of brown and terracotta clay for speckling
- Gold polymer clay or acrylic paint
- Tealight candle (for sizing)
- Aluminum foil
- Coarse sandpaper or an old toothbrush
- Needle tool
- Blade or craft knife
- Small blush shading tool or soft pastel chalks (pink)
- Black acrylic paint and fine detail brush
- Gloss varnish (optional)
Step 1: Preparing the Speckled Clay
-
Condition the base:
Start by thoroughly conditioning your beige or oatmeal clay until it is soft and pliable. If you want a larger figure without using too much clay, create a tight ball of aluminum foil as a core armature. -
Create the faux-stone effect:
To get that speckled pottery look, take tiny pinch-sized bits of brown and terracotta clay. Chop them into tiny, dust-like crumbles using your blade. -
Mix the speckles:
Fold these tiny colored crumbs into your beige clay. Knead and twist the clay repeatedly until the specks are evenly distributed throughout the batch, mimicking natural stoneware.
Uneven Seams?
If you struggle to blend the arms or ears seamlessly, use a drop of clay softener or baby oil on your finger. Rub gently in circles over the seam until the clay merges perfectly.
Step 2: Sculpting the Body
-
Form the main shape:
Roll the clay into a large, smooth pear shape. This will be the body and head combined. If using a foil core, wrap a thick sheet of your speckled clay around the foil ball, smoothing all seams completely so no air is trapped. -
Define the head:
Gently pinch the narrower top part of the pear to define the snout area. It shouldn’t be a separate ball, but rather a seamless extension of the body that tapers forward slightly. -
Add the feet:
Create two small flattened ovals of clay. Attach them firmly to the bottom front of the body so the bear sits stably. Use a modeling tool to press in two small lines on each foot to suggest toes. -
Create the ears:
Roll two small balls of clay and pinch them into triangles. Press a small indentation into the center of each with a ball tool. Attach these to the top of the head using a little liquid clay for a strong bond, blending the seams downward.
Seasonal Switch
Make the candle cup detachable! Sculpt the bear’s arms to hold a generic empty space, then create interchangeable inserts: a pumpkin for autumn, a heart for Valentine’s, or the gold pot.
Step 3: Making the Candle Cup
-
Size the holder:
Take a separate ball of clay—you can use gold clay here or paint it later—and flatten it slightly. Press your actual tealight candle into it to create the perfect-sized indentation, wiggling it slightly to ensure a loose fit. -
Shape the bowl:
Refine the walls of this cup so they are even and smooth. If you used body-colored clay, this is the time to ensure the walls are uniform before attaching. -
Attach the cup:
Position the cup on the bear’s belly area. Score the back of the cup and the belly surface with your needle tool for better adhesion, then press them firmly together. -
Sculpt the arms:
Roll two sausage shapes for arms. Attach one end to the darker ‘shoulder’ area of the bear and curve the other end around the candle cup, as if the bear is hugging it. Blend the shoulder seams smoothly into the body.
Step 4: Texturing and Details
-
Add stone texture:
I like to gently tap the entire surface of the bear (avoiding the candle cup if it’s metallic) with a toothbrush or coarse sandpaper. This removes fingerprints and enhances the ceramic feel. -
Face details:
Use a needle tool or a small blade to slice a curved line for the smiling mouth. Use a small ball tool to make tiny indentations for the eyes. -
Pre-bake shading:
Brush a tiny amount of pink pastel powder or blush onto the cheek area for a soft, rosy glow before baking. -
Baking:
Bake the sculpture according to your clay package instructions (usually 275°F/130°C for 15-30 minutes per 1/4 inch thickness). Let it cool completely in the oven to prevent cracking.
Step 5: Finishing Touches
-
Painting the cup:
If you didn’t use gold clay, paint the candle holder cup with metallic gold acrylic paint now. You may need two coats for full opacity. -
Defining the features:
Take a fine detail brush and black acrylic paint to fill in the eye indentations and carefully trace the mouth line. You can also add tiny faux ‘freckles’ with diluted brown paint if your clay speckles aren’t visible enough. -
Sealing:
Ideally protect your work with a matte varnish for the body to keep the stone look, and a gloss varnish for the gold cup and eyes to make them shine.
Place a tea light in the golden cup and enjoy the cozy glow of your new handcrafted friend
Sculpted Trinket Dish With a Creature Rim
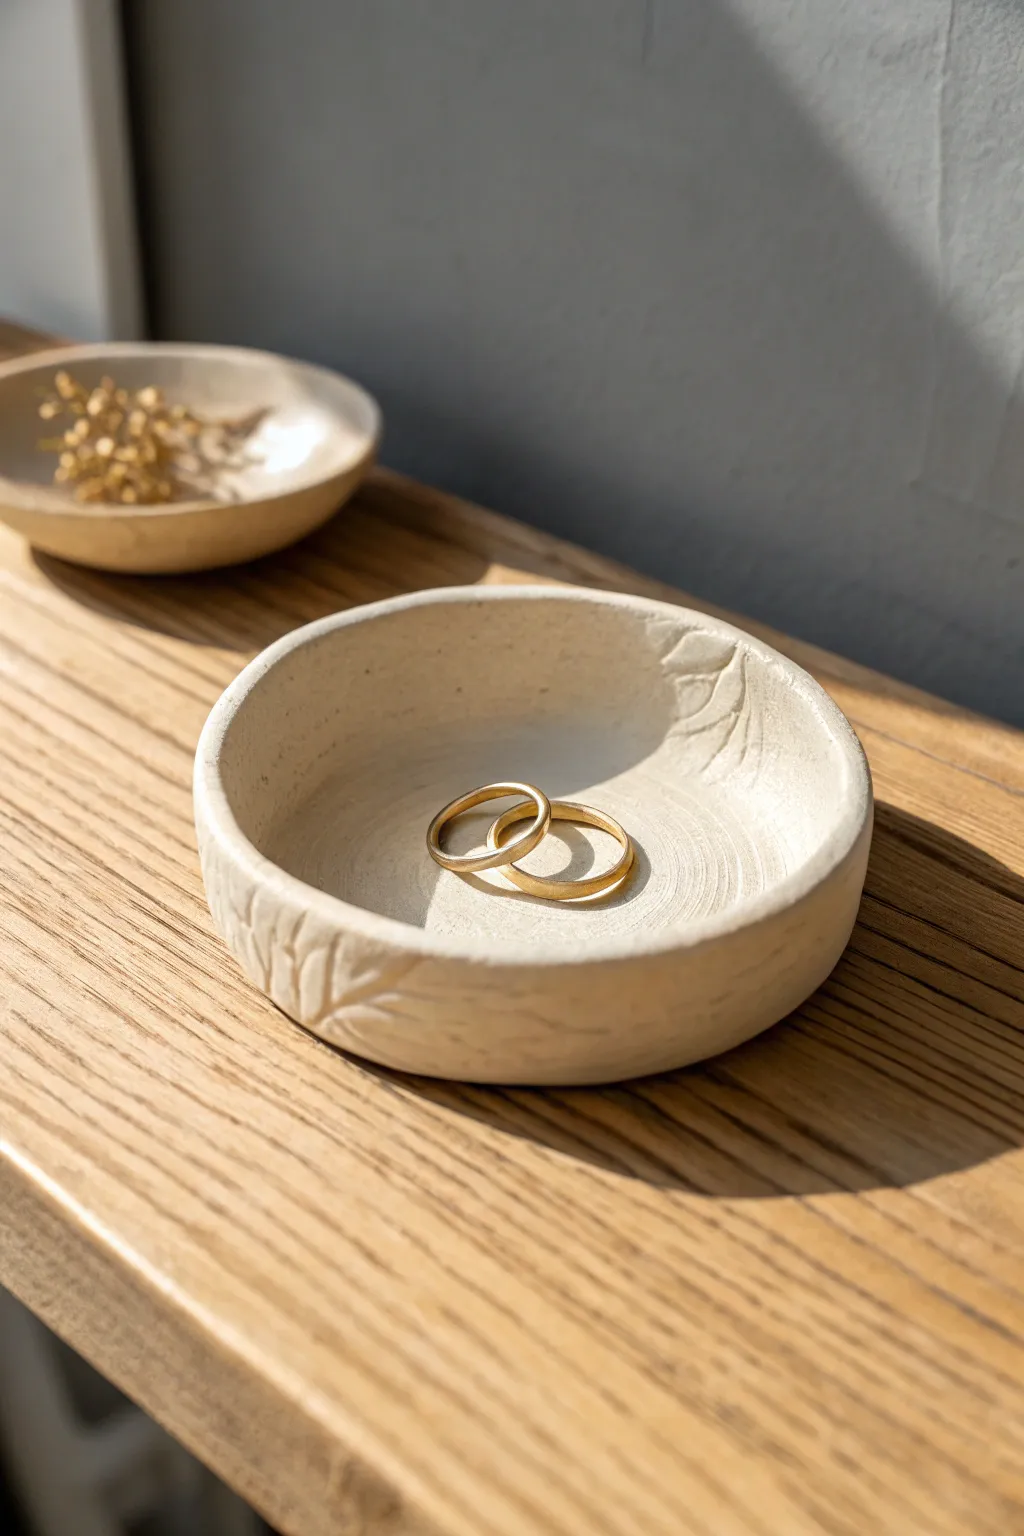
This minimalist, beige trinket dish adds a touch of organic elegance to any dresser or shelf with its subtle leaf impressions and matte finish. It’s the perfect size for holding your most precious rings or studs, blending rustic texture with a delicate form.
Step-by-Step Tutorial
Materials
- Light beige or ivory polymer clay (approx. 2 oz)
- Conditioning machine or acrylic roller
- Small circle cutter or a bowl to use as a template (approx. 3-4 inch diameter)
- Modeling tool with a small spoon end or a rounded burnishing tool
- Needle tool or a sharp clay carving tool
- Small sponge (optional for texture)
- Baking tile or parchment paper
- Oven
Step 1: Preparation and Base Formation
-
Condition the clay:
Begin by thoroughly conditioning your beige polymer clay until it is soft and pliable. Warm clay is less likely to crack during the shaping process. -
Roll out a slab:
Roll your clay into a slab that is approximately 1/4 inch thick. You want it substantial enough to hold a shape but not too chunky. -
Cut the base circle:
Use your circle cutter or place a small bowl upside down on the clay to cut out a perfect circle. This will form the main body of your dish. -
Smooth the edges:
Gently run your finger around the cut edge of the circle to soften any sharp corners left by the cutter. A smooth rim looks more finished.
Step 2: Shaping the Dish
-
Initial cupping:
Place the clay circle in the palm of your hand. Gently press the center with your thumb while curving the edges upward to create a shallow bowl shape. -
Define the walls:
Work your way around the perimeter, pinching gently to raise the walls. Keep the walls relatively low and vertical, almost like a straight-sided tart pan. -
Refine the interior:
Set the dish on your work surface. Use a rounded modeling tool or your knuckle to smooth the interior floor, ensuring it meets the walls in a gentle curve rather than a sharp angle. -
Check symmetry:
Spin the dish slowly to check that the walls are even in height all the way around. Adjust by pressing down high spots or gently pulling up lower areas. -
Add surface texture:
This rustic look benefits from not being perfectly smooth. I sometimes lightly tap the exterior with a dry sponge or a crumpled piece of parchment paper to give it a stone-like texture.
Clean Lines Pro Tip
Dip your needle tool in a tiny bit of cornstarch or water before carving the leaves. This prevents the clay from dragging and keeps your carved lines crisp and clean.
Step 3: Carving the Leaf Motifs
-
Plan your placement:
decide where you want your leaf details. The image shows them wrapping over the rim, partially inside and partially outside. -
Carve the center vein:
Using a needle tool, gently drag a line from the outside of the bowl, over the rim, and down into the inner wall. This is the main vein of your leaf. -
Add side veins:
Carve small, angled lines branching off the main vein. Press slightly harder at the start of the stroke and lift up as you move away to create a tapered look. -
Shape the leaf outline:
Use the needle tool to lightly sketch or impress the outer edge of the leaf around your veins, giving it definition against the rest of the bowl wall. -
Repeat the motif:
Add 2-3 more leaf impressions around the bowl. Vary their angles slightly to keep the design looking natural and organic. -
Clean up burrs:
Carving often leaves tiny crumbs of clay called burrs. Very gently brush these away with a soft paintbrush or smooth them down with a fingertip.
Make It Gilded
After baking, paint the carved leaf grooves with liquid gold leaf or metallic acrylic paint. Wipe away the excess on the surface to leave gold only in the recesses.
Step 4: Finishing and Baking
-
Final inspection:
Give the dish one last look. Ensure the bottom is flat so it sits stable on a table. If needed, press it gently onto your tile. -
Bake:
Bake the dish according to the manufacturer’s instructions for your specific brand of polymer clay. Usually, this is around 275°F (135°C) for 15-30 minutes. -
Cool down:
Let the dish cool completely in the oven with the door slightly ajar. Sudden temperature changes can sometimes weaken the clay. -
Optional sanding:
Once fully cool, if the rim feels too sharp, you can lightly sand it with fine-grit wet/dry sandpaper for a buttery smooth finish.
Place your finished dish on a sunny windowsill to catch the light and hold your favorite rings