I’m obsessed with how a little polymer clay can turn a plain vase into a full-on statement piece. Here are my favorite polymer clay vase ideas—starting with the classics everyone loves and drifting into the fun, weird, artsy stuff.
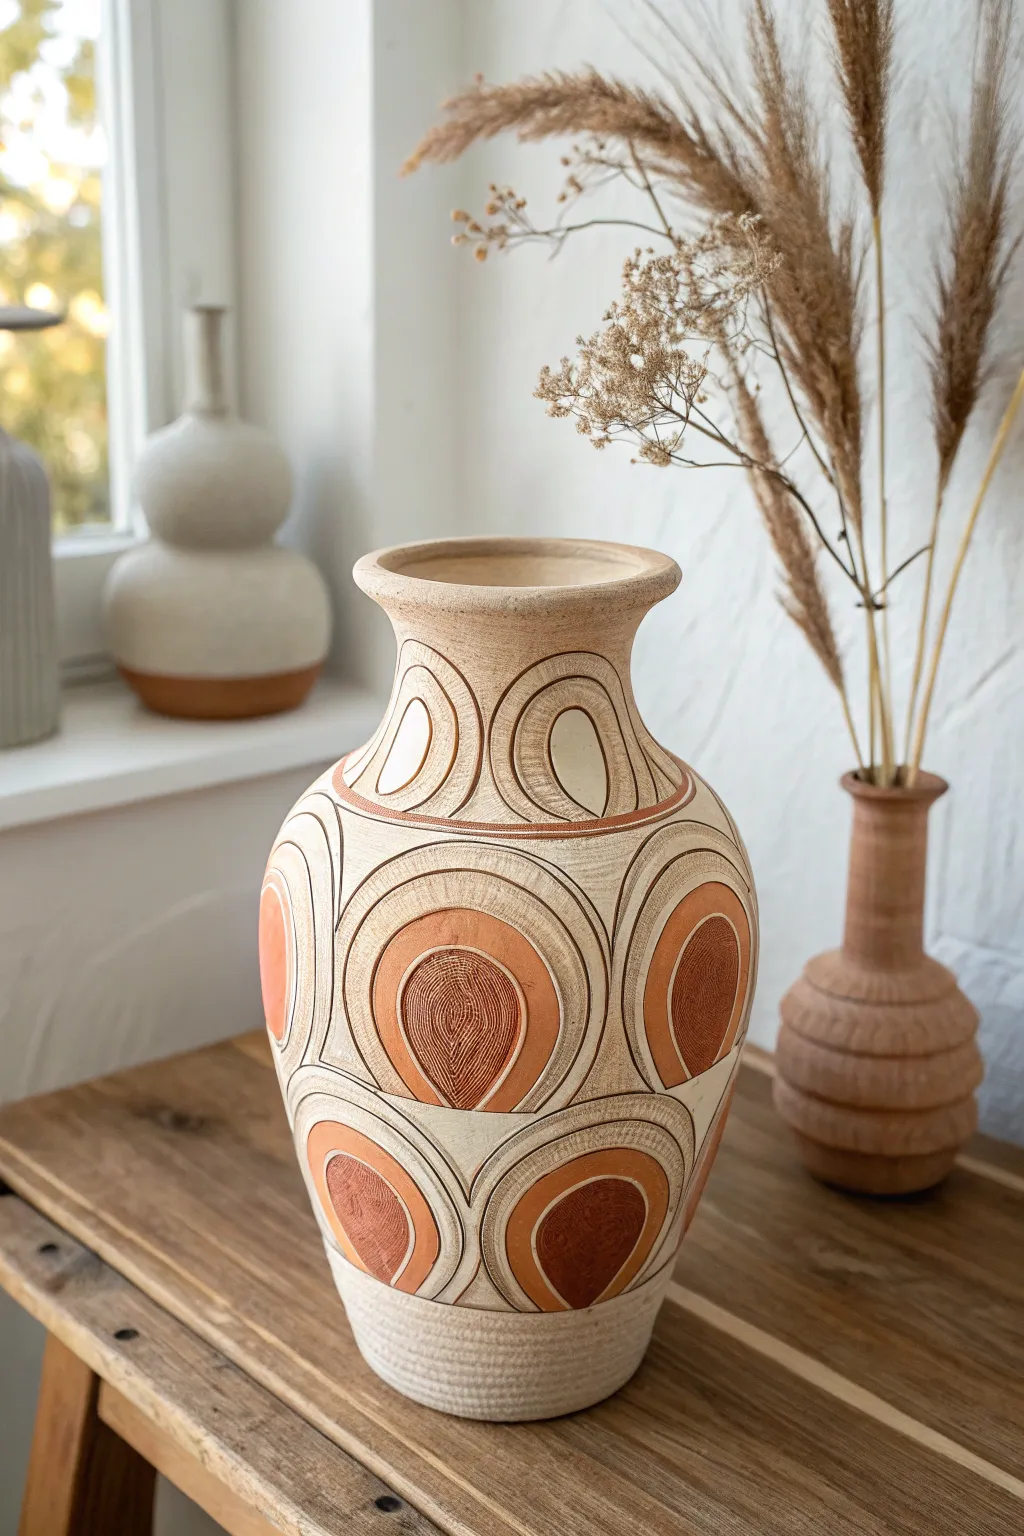
Squiggle Wrap Over a Simple Glass Vase
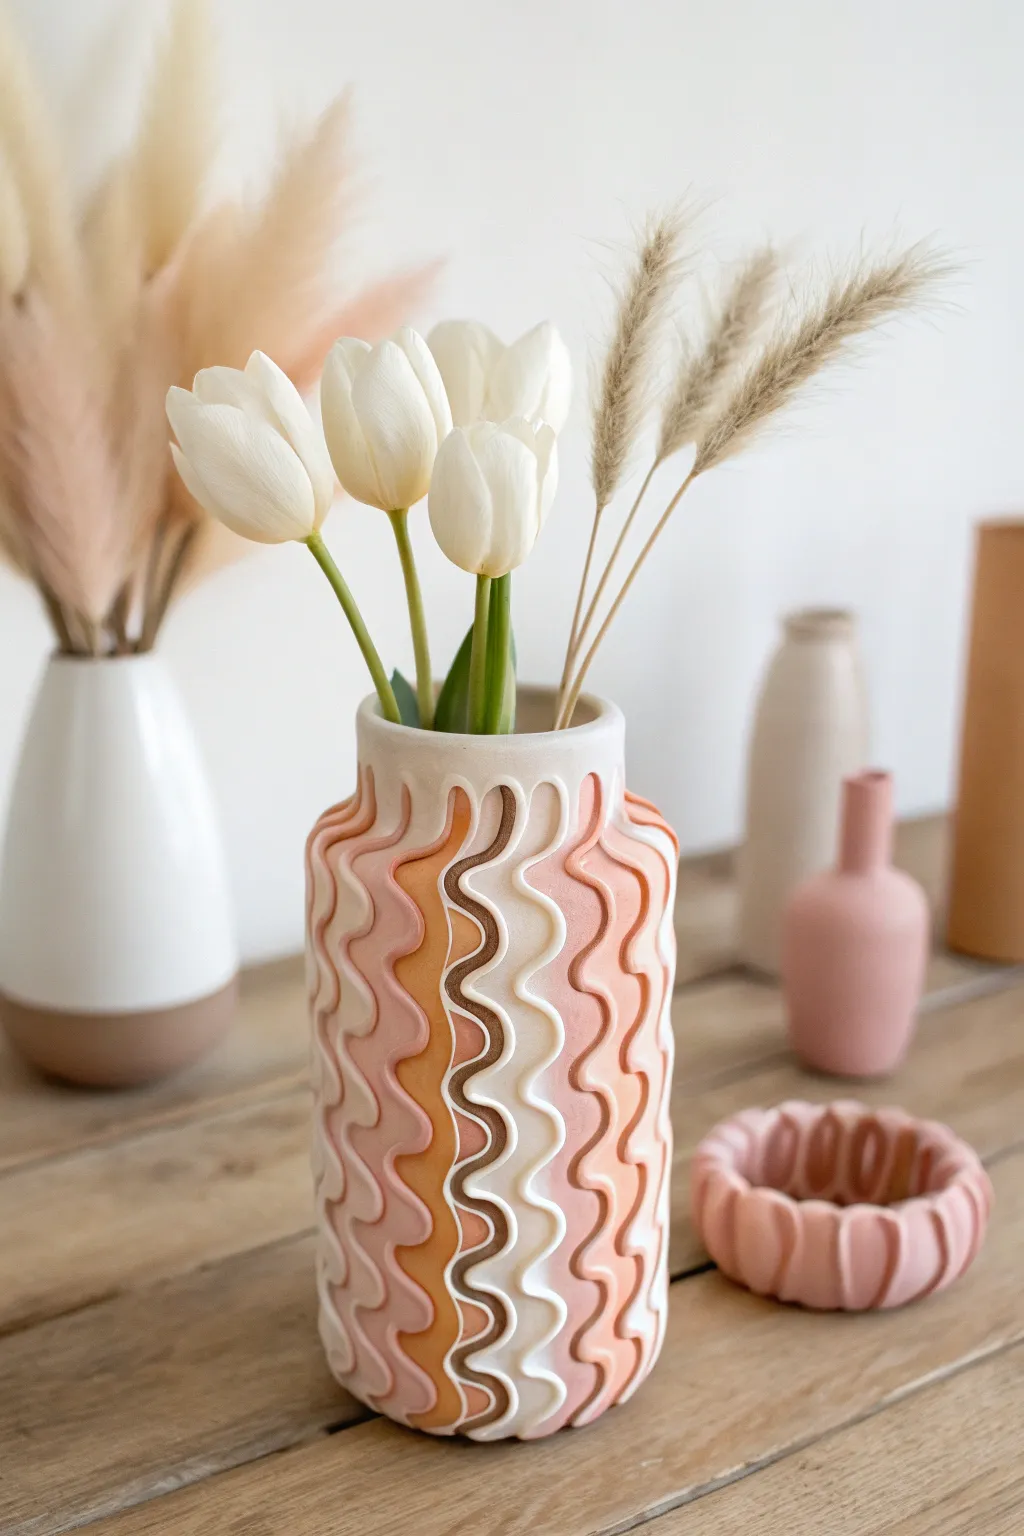
Transform a plain glass cylinder into a statement piece with this retro-inspired texture project. By layering extruded polymer clay coils in a vertical wave pattern, you’ll create a tactile, sculptural surface that mimics high-end ceramic art without need for a pottery wheel.
Step-by-Step Guide
Materials
- Straight-sided cylindrical glass vase (thoroughly cleaned)
- Polymer clay in a palette of warm neutrals: soft peach, coral pink, terracotta, white, and mocha brown
- Clay extruder (essential for even coils)
- Extruder disc with a medium round opening
- Liquid polymer clay (Bake & Bond)
- Craft knife or tissue blade
- Acrylic roller or pasta machine
- Rubbing alcohol
- Lint-free cloth
- Oven thermometer
- Ceramic tile or glass work surface
Step 1: Base Preparation
-
Clean the glass:
Before touching any clay, wipe down your glass cylinder vase with rubbing alcohol and a lint-free cloth. This removes oils and fingerprints, ensuring the clay adheres properly during baking. -
Condition the base clay:
Choose a neutral color, like white or cream, for your base layer. Condition the clay by kneading it until it is soft and pliable, then run it through your pasta machine on a medium-thick setting (about 2-3mm). -
Wrap the vase:
Apply a thin layer of liquid polymer clay to the outside of the glass vase. Carefully wrap your conditioned sheet of clay around the cylinder, smoothing it down as you go to avoid trapped air bubbles. -
Seam smoothing:
Where the clay sheet edges meet, trim the excess with a craft knife to create a butt joint. Use your finger or a clay tool to gently blend this seam until it disappears completely. -
Trim the edges:
Slice away any excess clay from the top rim and the bottom edge of the vase. I prefer to leave the clay just slightly below the rim so your lips don’t touch clay if you were drinking from it, though for a vase, just a clean edge is perfect.
Step 2: Creating the Squiggles
-
Prepare your palette:
Condition all your accent colors—peach, coral, terracotta, and mocha. You want them very soft so they extrude easily without crumbling. -
Extrude coils:
Load your clay extruder with one color at a time using a medium round disc. Squeeze out long, uniform snakes of clay. You’ll need enough length to span the height of your vase multiple times. -
Apply the first wave:
Brush a very thin layer of liquid clay over the base layer you applied earlier. Take your first extruded coil (perhaps the white or peach) and press it vertically onto the vase. Instead of a straight line, gently manipulate the clay into a recurring ‘S’ wave as you press it down. -
Nested waves:
Take a second color (like the dark brown) and place it directly next to your first squiggle. Follow the exact curve of the first line, nesting the waves together so there are no gaps between the coils. -
Vary the width:
For visual interest, use the extruder to make some coils slightly thicker, or twist two thin strands of the same color together before applying them for a subtle texture variation. -
The color rhythm:
Continue adding vertical squiggles around the entire circumference. Create a loose pattern, such as: peach, pink, peach, white, brown, white. The repetition doesn’t need to be mathematically perfect; the slight organic variation adds charm. -
Closing the gap:
As you approach the starting point, you might need to adjust the width of your final waves slightly to make them fit perfectly. Gently squishing or stretching the curve can help close the loop seamlessly.
Keep it Clean
Keep a pack of baby wipes nearby. Wipe your hands and the extruder barrel thoroughly between colors—especially before switching to white—to prevent color contamination.
Step 3: Finishing Touches
-
Trim the ends:
Once the vase is fully covered in squiggles, use your sharp tissue blade to trim the coils flush with the top and bottom of the vase base layer you created earlier. -
Smooth the rim:
Use your finger dipped in a tiny bit of baby oil to smooth the cut tops of the coils, blending them slightly into the rim so there are no sharp edges. -
Texture check:
Look over the vase for any lint or fingerprints. Use a soft brush with a little rubbing alcohol to sweep away debris and smooth out any accidental nail marks. -
Baking:
Place the vase upright on a ceramic tile. Bake according to your clay manufacturer’s instructions (usually 275°F/130°C) for 45-60 minutes. Longer baking makes the clay stronger. -
Cooling down:
Turn off the oven and open the door slightly, letting the vase cool down inside completely. This prevents the glass from experiencing thermal shock and cracking. -
Optional sealing:
The matte look of the clay is beautiful as is, but if you want extra durability, you can apply a layer of matte polyurethane varnish once the vase is completely cool.
Texture Twist
Instead of smooth coils, try twisting two colors together before applying them to the vase for a marbled candy-cane effect on specific waves.
Fill your new sculptural vase with dried pampas grass or fresh tulips for an instant modern art display


Soft Terrazzo Speckle Polymer Clay Cover
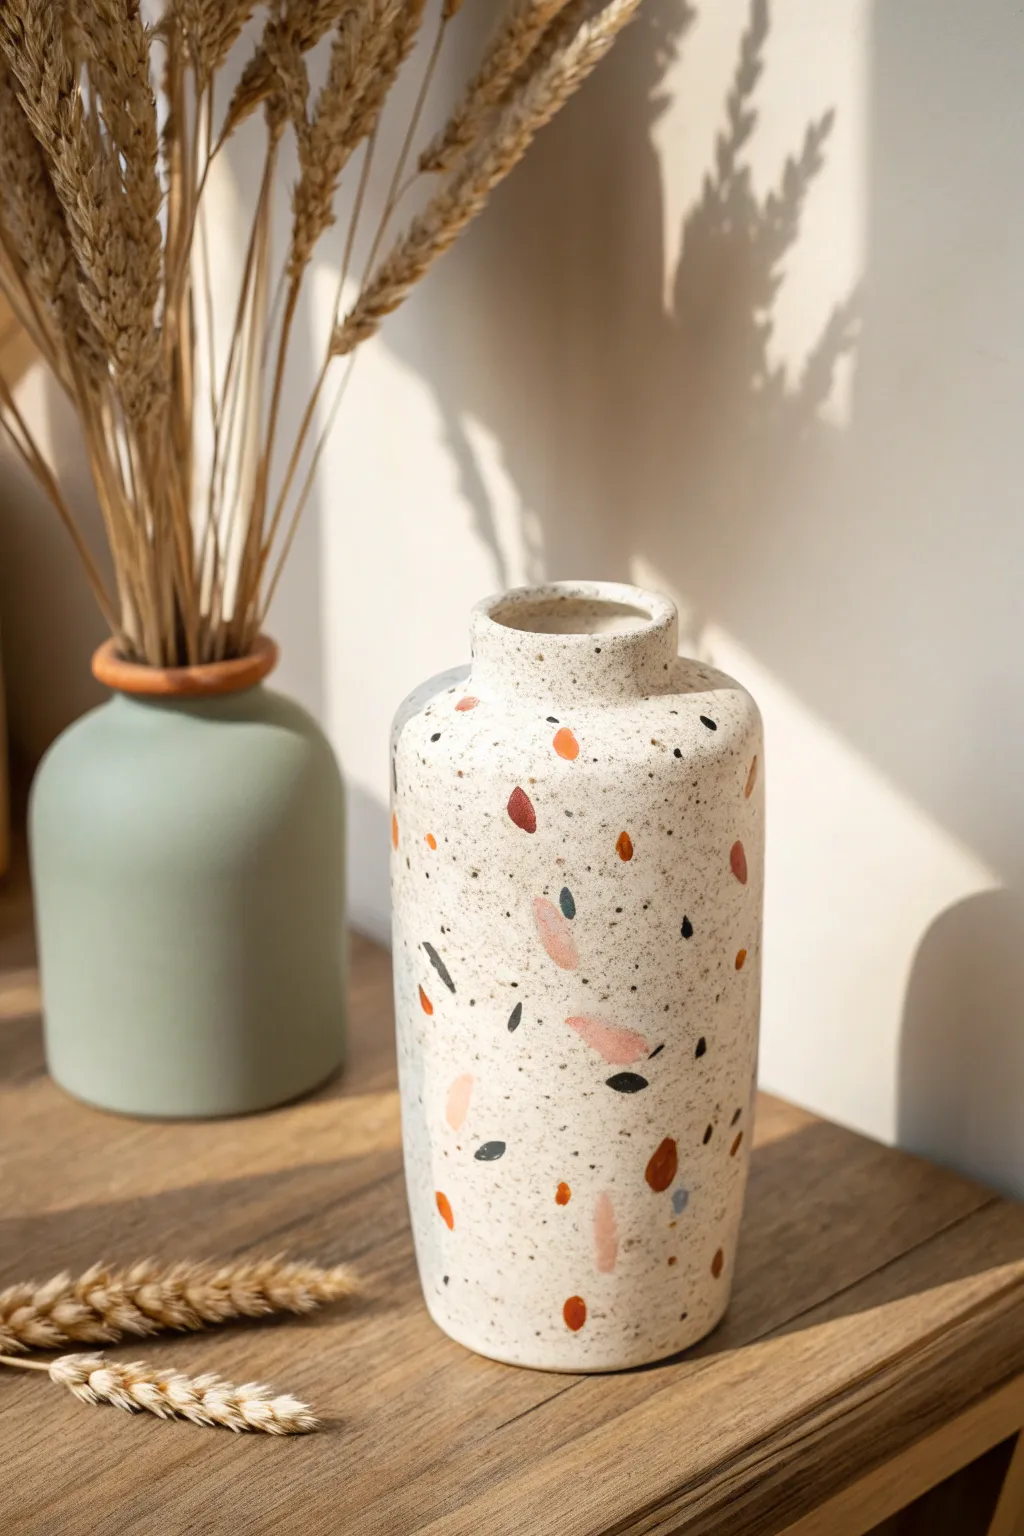
Transform a plain glass vessel into a trendy home decor piece with this soft terrazzo polymer clay project. The design mimics the look of composite stone with a creamy, speckled base punctuated by organic chips of rust, blush, and charcoal.
How-To Guide
Materials
- Glass vase or jar (clean and dry)
- Polymer clay (White, translucent, and granite/speckled beige)
- Polymer clay in accent colors (Rust orange, blush pink, black, navy blue)
- Acrylic rolling pin or pasta machine
- Liquid polymer clay or Bake and Bond
- Craft knife or tissue blade
- Parchment paper
- Ceramic tile or glass work surface
- Oven (for baking)
- Fine grit sandpaper (400 to 1000 grit)
- Matte or satin varnish (optional)
Step 1: Creating the Terrazzo Chips
-
Prepare accent colors:
Condition small amounts of your accent clays—rust orange, blush pink, black, and navy blue—until they are soft and pliable. I find that warming the clay in your hands for a few minutes makes a huge difference in workability. -
Flatten the clay:
Roll each color out into a very thin sheet, roughly 1mm thick or the thinnest setting on your pasta machine. -
Create uneven edges:
Tear the edges of these thin sheets to create organic, non-uniform shapes rather than perfect squares. -
Chop the chips:
Using your craft knife or tissue blade, chop these sheets into tiny, jagged confetti-like pieces. Vary the sizes from mere specks to larger 5mm chunks for a natural stone look. -
Separate and set aside:
Keep the colors somewhat separated on a piece of parchment paper so you can control the distribution later.
Seamless Seams
When smoothing the vertical seam, use a small piece of parchment paper between your finger and the clay. Buffing over the paper reduces drag and prevents new fingerprints.
Step 2: Preparing the Base Slab
-
Mix the base color:
Combine white clay with a small amount of granite or speckled beige clay. If you don’t have pre-speckled clay, mix in a tiny pinch of ground black pepper or black embossing powder into white clay to create that subtle granite texture. -
Condition the base:
Knead the mixture thoroughly until the speckles are evenly distributed and the clay is smooth. -
Roll the sheet:
Roll this base clay out into a large, even sheet about 2-3mm thick. Ensure the sheet is large enough to wrap around the circumference of your chosen glass vase. -
Distribute the chips:
Sprinkle your prepared colored chips randomly over the surface of the white sheet. Don’t overthink it; randomness is key to the terrazzo aesthetic. -
Embed the chips:
Cover the sheet with parchment paper and use your rolling pin to gently press the chips into the base clay. Roll until the surface is completely flat and the chips are flush with the white background.
Stone Texture
After baking, gently buff the surface with denim cloth or a piece of heavy jeans. This gives a subtle, natural sheen that looks more like polished stone than plastic.
Step 3: Covering the Vase
-
Prep the glass:
Wipe down your glass vase with alcohol to remove any oils. Apply a thin layer of liquid polymer clay or Bake and Bond to the exterior; this acts as the glue. -
Apply the slab:
Carefully lift your terrazzo sheet and wrap it around the glass vase. I like to start from the middle and smooth outwards to avoid trapping air bubbles. -
Join the seam:
Where the clay ends meet, slice through both overlapping layers with a sharp blade. Remove the excess scraps and press the cut edges together. -
Smooth the seam:
Gently rub the seam with your finger or a clay tool until it disappears. The terrazzo pattern helps hide imperfections here nicely. -
Trim edges:
Trim the excess clay at the top rim and bottom base of the vase. Smooth the rim with your finger for a polished look.
Step 4: Finishing Touches
-
Bake the project:
Place the covered vase on a baking sheet or tile. Bake according to the manufacturer’s instructions for your specific brand of clay—usually around 275°F (130°C) for 30 minutes. -
Cool completely:
Allow the vase to cool down completely inside the oven with the door slightly ajar to prevent thermal shock to the glass. -
Wet sand for smoothness:
Once cool, use wet sandpaper (start with 400 grit) to sand the surface under running water. This removes fingerprints and makes the terrazzo pattern pop. -
Polish (optional):
Move up to finer grits (600, then 1000) for a silky smooth finish. Rinse and dry the vase. -
Seal (optional):
Ideally, leave the finish raw for a matte stone feel, but if you want durability, apply a very thin coat of matte varnish.
Pop in some dried wheat or bunny tails to complement the earthy tones of your new faux-stone vase


Sweet Scalloped Rim Accent
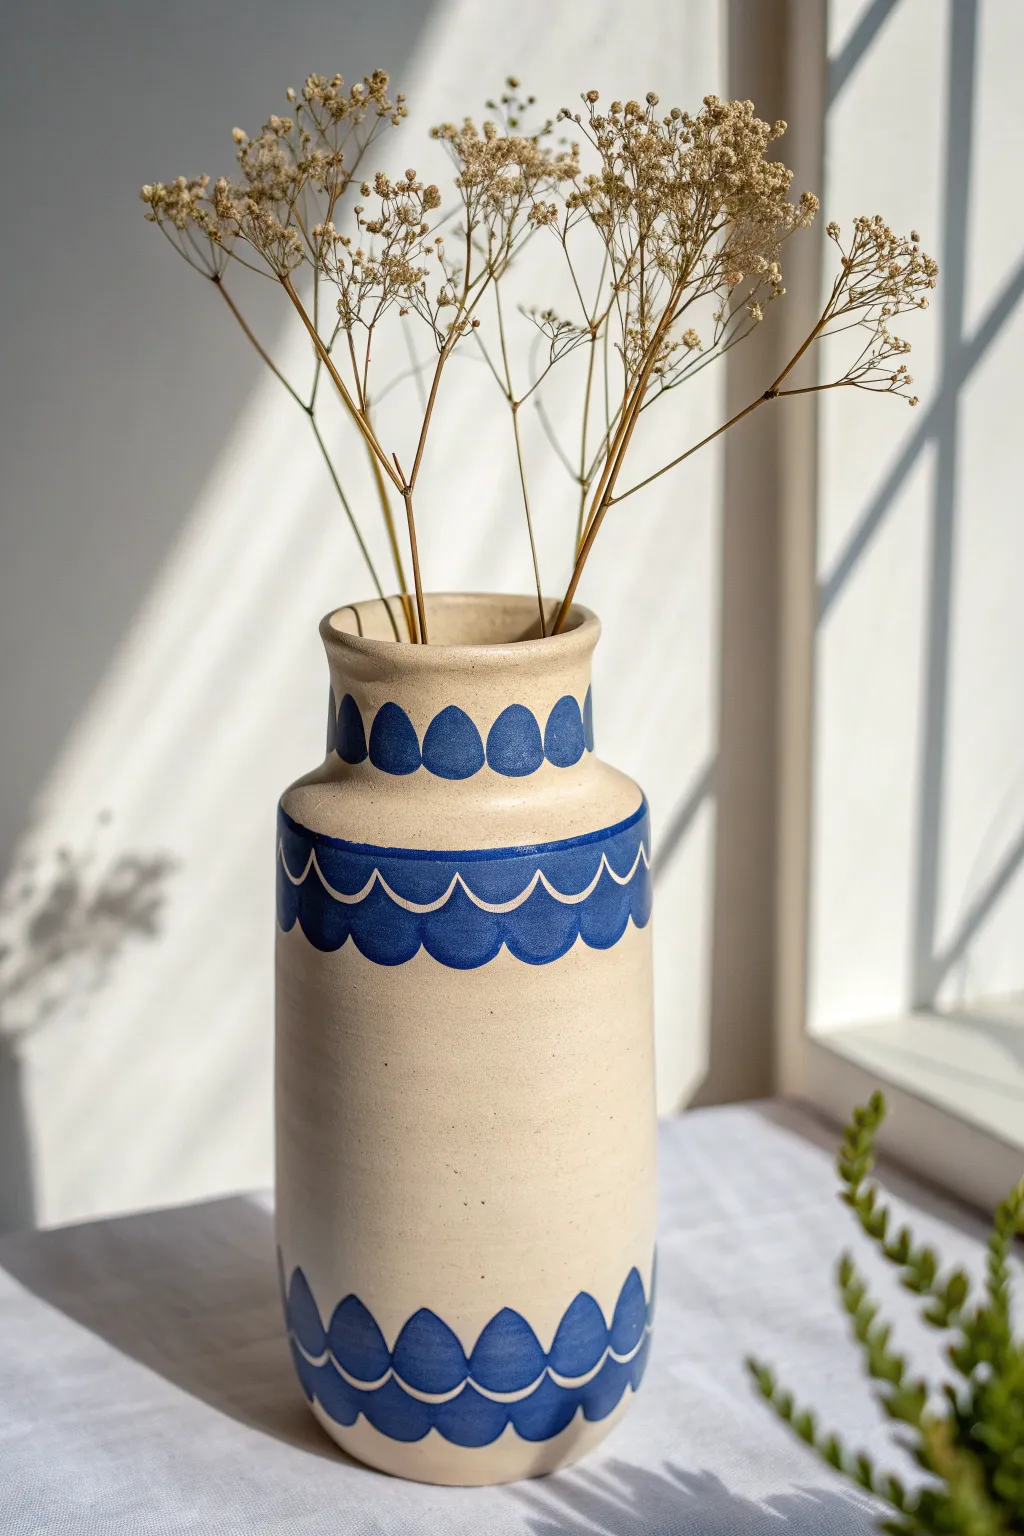
Transform a simple glass cylinder into a faux-ceramic masterpiece using polymer clay and clever detailing. This project features elegant blue scalloped accents that mimic hand-painted pottery glazing.
Step-by-Step Tutorial
Materials
- Straight-sided glass vase or cylinder (heat-safe)
- Beige or oatmeal speckled polymer clay (approx. 3-4 blocks)
- Deep cobalt blue polymer clay
- Liquid polymer clay (translucent)
- Pasta machine or rolling pin
- Small round circle cutter (approx. 1 inch)
- Sharp craft knife
- Needle tool
- Cornstarch (for release)
- Oven thermometer
Step 1: Prepping the Base
-
Clean the armature:
Thoroughly wash your glass cylinder with rubbing alcohol to remove any oils or residue, ensuring the clay adheres properly. -
Condition the main clay:
Condition your beige or oatmeal clay until it is soft and pliable. If you want that speckled pottery look and only have plain beige, mix in a tiny pinch of black pepper or dried used coffee grounds. -
Create a base sheet:
Roll the beige clay into a large, even sheet about 3mm thick. It needs to be wide enough to wrap around the entire glass cylinder. -
Wrap the cylinder:
Apply a thin layer of liquid polymer clay to the glass. Carefully wrap your beige sheet around the vase, pressing firmly to release trapped air bubbles. -
Create a seamless join:
Trim the excess clay where the edges meet. Use a modeling tool to smooth the seam together until it disappears, blending the clay downwards. -
Form the neck:
If your glass vase doesn’t have a flared rim, add a thick snake of beige clay to the top rim. I like to smooth this outwards to create a gentle curve, mimicking a thrown pottery shape.
Smooth Seams
Use a tiny amount of baby oil or clay softener on your finger to smooth out the blue scallops. It melts the fingerprints away without destroying the sharp edges.
Step 2: Adding the Scalloped Accents
-
Prepare the blue clay:
Condition the cobalt blue clay and roll it out into a thin sheet, setting your pasta machine to a thin setting (approx. 1-2mm). -
Cut the shapes:
Use your small circle cutter to punch out numerous blue circles. Cut each circle exactly in half to create semi-circles. -
Apply the neck detail:
Place a row of semi-circles upside down around the neck of the vase, ensuring the spacing is even. Press them gently onto the beige base. -
Create the shoulder band:
For the wider band near the shoulder, roll a strip of blue clay about 1 inch wide. Wrap this around the vase first. -
Scallop the shoulder:
Add a row of downward-facing semi-circles directly over the bottom edge of the blue strip you just applied. Blend the seams so it looks like one single layer of glaze. -
Outline the scallops:
Roll a very thin snake of beige clay. Carefully trace the bottom edge of the blue shoulder scallops with this snake to create a defined outline. -
Apply the base detail:
Repeat the scalloped pattern at the very bottom of the vase with a row of upward-facing blue semi-circles. -
Add white accents:
If desired, roll ultra-thin threads of beige clay and outline the top curves of the blue scallops at the base for extra definition.
Step 3: Finishing Touches
-
Texture the surface:
Lightly pat the beige areas with a coarse sponge or crumpled aluminum foil. This removes fingerprints and adds a realistic stoneware texture. -
Bake carefully:
Tent the vase with aluminum foil to prevent scorching. Bake according to your clay manufacturer’s instructions, usually 275°F (130°C) for 45-60 minutes. -
Cool down:
Let the vase cool completely inside the oven. Sudden temperature changes can sometimes crack the glass core. -
Optional matte varnish:
For a true ceramic feel, apply a coat of matte varnish to the beige areas and a satin varnish to the blue areas to mimic glaze.
Air Bubble Blues?
If you see a bubble under the clay after wrapping the glass, prick it with a needle tool and press the air out, then smooth the hole closed.
Fill your new vessel with dried botanicals to complete the rustic, handmade aesthetic

Modern Color-Block Bands
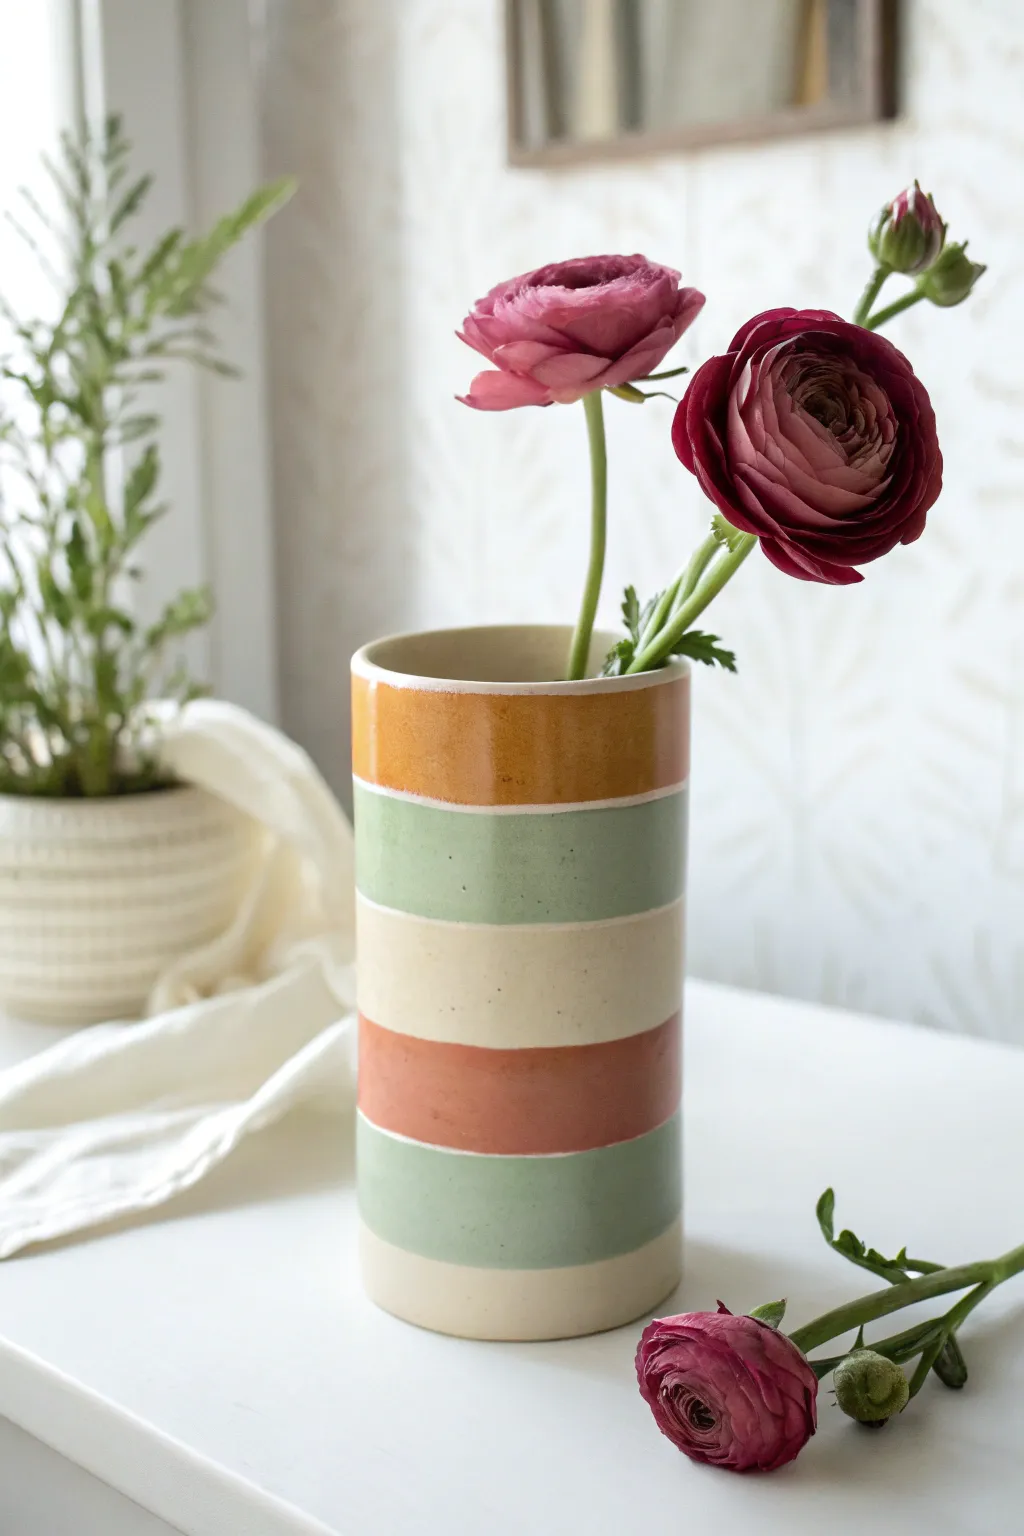
Transform a plain glass cylinder into a stunning piece of modern decor using simple bands of polymer clay. The alternating earthy tones of mustard, sage, cream, and terracotta create a cozy, color-blocked aesthetic that perfectly mimics high-end ceramic glazing.
Step-by-Step
Materials
- Cylindrical glass vase (straight-sided)
- Polymer clay in mustard yellow, sage green, terracotta, and cream/beige
- Acrylic rolling pin or pasta machine
- Flexible tissue blade/slicer
- Ruler
- Toothbrush or texture sponge (optional)
- Rubbing alcohol
- Oven thermometer
- Wet/dry sandpaper (600 and 1000 grit)
- Matte or satin polyurethane varnish (optional)
Step 1: Preparation and Conditioning
-
Clean the base:
Begin by thoroughly wiping down your glass cylinder vase with rubbing alcohol. This removes any oils or fingerprints that might prevent the clay from adhering properly to the glass surface. -
Condition the clay:
Start with your cream-colored clay. Knead it in your hands until it becomes soft, pliable, and warm. Repeat this process separately for the mustard, sage, and terracotta colors, ensuring your hands are clean between colors to avoid staining. -
Roll out sheets:
Using an acrylic rolling pin or a pasta machine on a medium-thick setting (about 2-3mm), roll each color into a long, even strip. I find it helpful to make the strips slightly longer than the circumference of your vase so they overlap easily.
Air Bubble Blues?
If you see a bump under the clay, it’s trapped air. Prick it gently with a needle tool or pin, then smooth the air out towards the hole with your finger until flat.
Step 2: Creating the Color Bands
-
Measure and cut:
Decide on the height of your bands. For the look in the photo, aim for strips that are approximately 1.5 inches wide. Use your ruler and flexible blade to cut straight, parallel edges on all your clay sheets. -
Apply the bottom band:
Start at the bottom of the vase with a cream strip. Wrap it around the glass, pressing firmly to adhere. Where the ends meet, slice through both layers with a sharp blade and remove the excess to create a perfect butt joint. -
Smooth the seam:
Gently rub the vertical seam with your finger or a clay tool until it disappears. Ensure the bottom edge is flush with the bottom of the glass. -
Add the first green band:
Place a sage green strip directly above the cream one. Carefully align the bottom edge of the green clay so it just touches the top edge of the cream clay without overlapping. Press onto the glass. -
Add the terracotta band:
Continue the pattern by placing the terracotta orange strip next. Again, ensure the horizontal seam between colors is tight. You can gently push the new strip down onto the previous one to bond them slightly. -
Continue the pattern:
Follow with another cream band, then a sage green band, and finally the mustard yellow band at the very top. Adjust the widths if you are running out of space, but try to keep them uniform. -
Trim the top rim:
Once the top yellow band is applied, use your blade to trim any excess clay flush with the top rim of the glass vase for a clean, professional finish.
Seamless Joints
Cut your clay strips at a 45-degree angle where they overlap on the back of the vase. This creates a broader surface area for adhesion and makes the seam much easier to blend invisibly.
Step 3: Refining and Finishing
-
Blend the horizontal seams:
Very gently run your finger over the horizontal lines where the colors meet. You want them to stick together, but don’t smudge the colors into each other too much if you want crisp lines. -
Add subtle texture:
To mimic the speckled, stone-like ceramic look in the photo, you can lightly tap the surface with an old toothbrush or a dry sponge. This removes visible fingerprints and adds an organic feel. -
Bake:
Place the vase upright on a baking sheet. Bake according to your brand of clay’s instructions (usually 275°F/130°C) for 30–45 minutes. Let it cool completely in the oven to prevent the glass from cracking due to thermal shock. -
Initial sand:
Once fully cooled, take the vase to a sink. Using wet/dry 600 grit sandpaper and a little water, lightly sand the surface to remove any bumps or lint. Be careful not to sand too aggressively over the seams. -
Final polish:
Follow up with 1000 grit sandpaper for a silky smooth finish. Rinse the vase and dry it thoroughly. -
Seal (optional):
While many polymer clays are durable without sealer, a thin coat of matte varnish can enhance colors and protect the surface from dust, giving it that finished ceramic appearance.
Now you have a custom vase that adds a warm, handmade touch to any corner of your home

The Complete Guide to Pottery Troubleshooting
Uncover the most common ceramic mistakes—from cracking clay to failed glazes—and learn how to fix them fast.
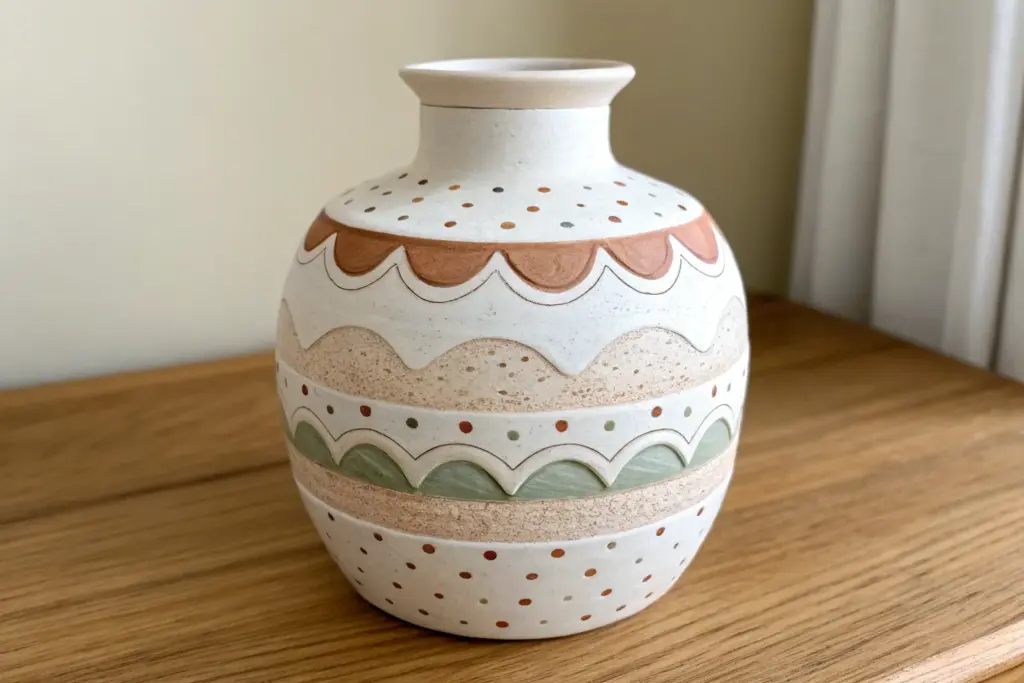
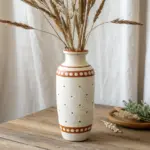
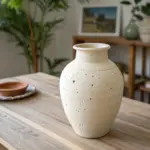
Raised Polka Dot Texture
Transform a plain glass or ceramic vessel into a trendy, textured statement piece with this raised polka dot technique. The combination of sandy beige clay and crisp white dots creates a natural, bohemian aesthetic that perfectly complements dried florals.
Step-by-Step Tutorial
Materials
- Clean glass or ceramic vase (cylinder or bottle shape)
- Beige or tan polymer clay
- White polymer clay
- Rolling pin or pasta machine
- Liquid polymer clay (Bake & Bond)
- Small round cutter (or a straw)
- Rubbing alcohol
- Craft knife
- Cornstarch (optional)
- Oven thermometer
- Baking sheet
Step 1: Preparation and Base Layer
-
Clean the surface:
Before starting, wipe down your glass or ceramic vessel thoroughly with rubbing alcohol. This removes oils and dust, ensuring the clay adheres properly to the surface. -
Condition the beige clay:
Take your beige or tan polymer clay and condition it by kneading it in your hands until it is soft and pliable. If you have a pasta machine, I usually run it through a few times on the widest setting. -
Roll out a sheet:
Roll the beige clay into a large, even sheet about 1/8 inch thick. It needs to be long enough to wrap around the entire circumference of your vase. -
Apply adhesive:
Brush a thin layer of liquid polymer clay onto the outside of your vessel. This acts as a glue to keep the sheet from sliding during baking. -
Wrap the vase:
Carefully lift your clay sheet and wrap it around the vase. Smooth it down gently from the center outwards to release any trapped air bubbles. -
Trim and seam:
Where the clay ends meet, use your craft knife to cut a straight line through both overlapping layers. Remove the excess clay and press the two edges together, smoothing the seam with your finger until it disappears. -
Refine the edges:
Trim any excess clay from the top rim and the bottom edge. Smooth the top rim nicely so it looks finished, folding it slightly over the lip if desired.
Stone Effect
Mix a pinch of ground black pepper or dried herbs into your beige clay before rolling it out. This adds a realistic, speckled pottery effect.
Step 2: Creating the Polka Dots
-
Prepare white clay:
Condition your white polymer clay until soft. Roll it out into a slab that is slightly thicker than your base layer to ensure the dots stand out. -
Cut the circles:
Use a very small round cutter to punch out numerous small circles. If you don’t have a cutter small enough, a stiff drinking straw works perfectly here. -
Round the edges:
Pick up each small white circle and gently tap the edges with your finger to soften the sharp cut marks, giving them a more organic, bead-like look. -
Plan your spacing:
Visualize a grid on your vase. You want the dots to be evenly spaced but not mechanically perfect. An offset or diamond pattern usually looks best. -
Attach the dots:
Place a tiny dot of liquid polymer clay on the back of a white circle and press it firmly onto the beige base. Start near the top rim and work your way down. -
Continue the pattern:
Repeat the process, placing the next row of dots in the spaces between the dots of the row above. Keep checking your alignment as you rotate the vase. -
Texture the surface (optional):
For that grainy, stone-like texture seen in the photo, you can gently dab a toothbrush or a crumpled ball of foil over the beige areas between the dots before baking.
Step 3: Baking and Finishing
-
Check the temperature:
Preheat your oven according to the clay manufacturer’s instructions (usually 275°F or 130°C). Use an oven thermometer to ensure accuracy, as spikes in heat can scorch white clay. -
Bake the vase:
Place the vase upright on a baking sheet and bake for 30 to 45 minutes. The glass or ceramic core takes a while to heat up, so a longer bake ensures the clay cures fully. -
Cool down slowly:
Turn off the oven and crack the door, letting the vase cool down inside. This prevents the glass core from cracking due to sudden temperature changes. -
Final inspection:
Once fully cool, check that all dots are secure. If any pop off, simply superglue them back into their spot.
Uneven Seams
If your vertical seam won’t smooth out perfectly, try to position it so a column of white dots covers most of the join line.
Fill your new textured vase with tall grasses or dried flowers to complete the organic look
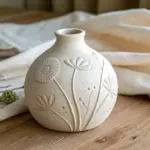
Simple Daisy Appliqué Garden Vase
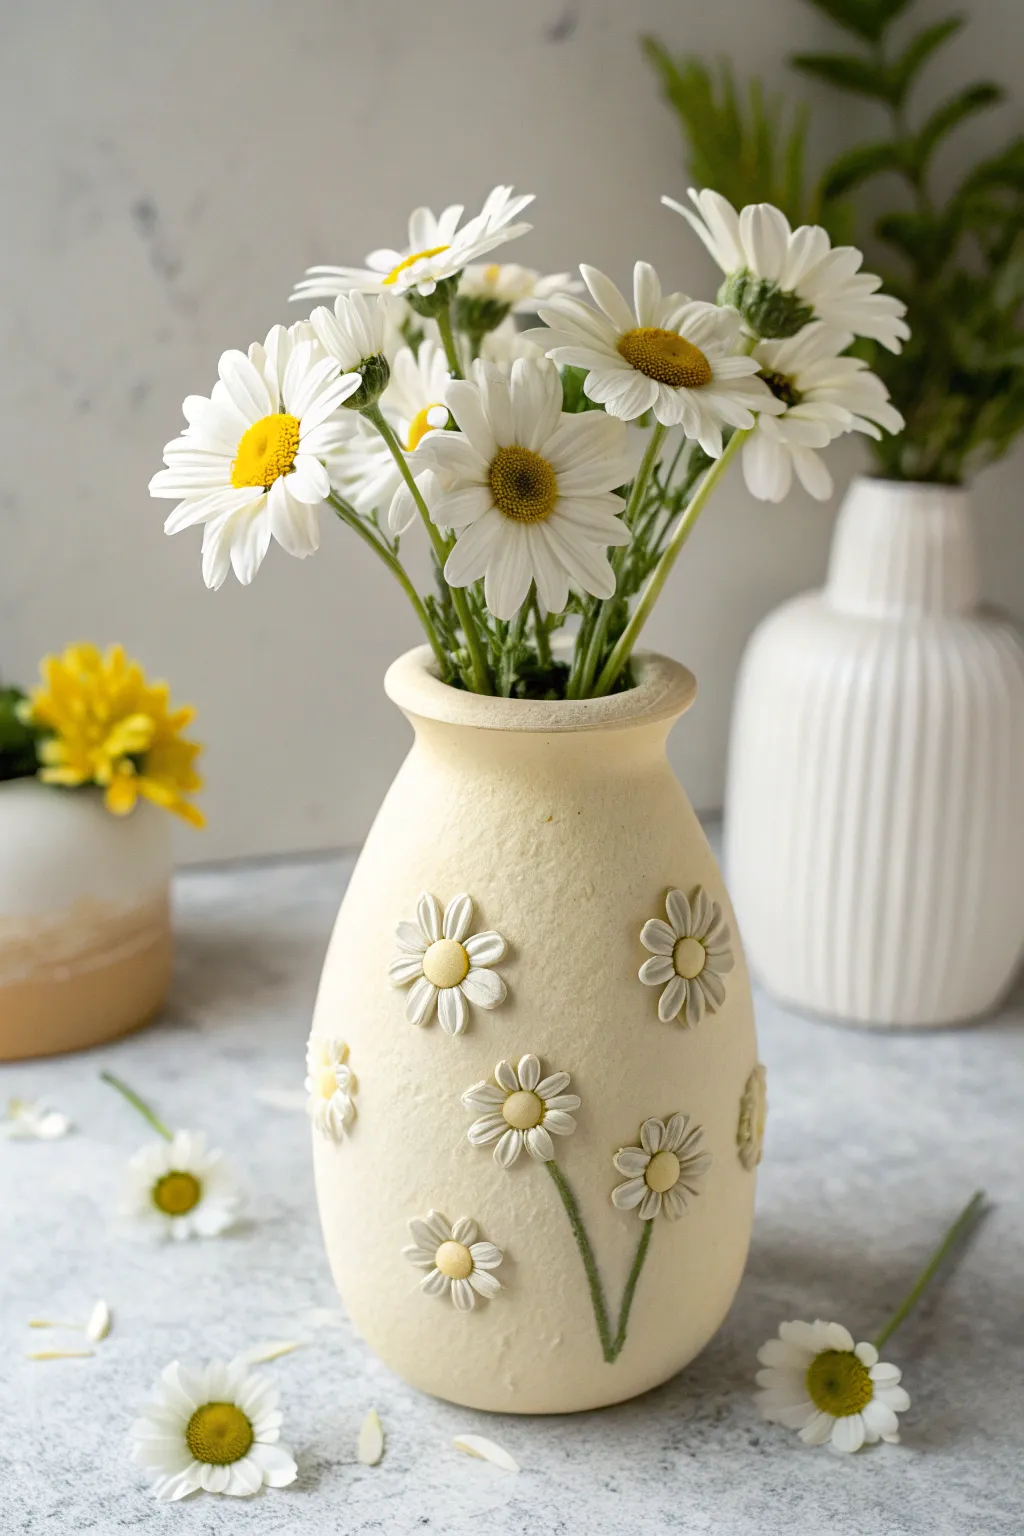
Transform a plain glass vessel into a textured garden centerpiece with this delightful daisy appliqué project. The soft, creamy finish and raised floral details create a tactile, three-dimensional look that feels both rustic and refined.
Step-by-Step
Materials
- Clean glass jar or plain ceramic vase (curved shape preferred)
- Polymer clay (Cream/Pale Yellow for base)
- Polymer clay (White for petals)
- Polymer clay (Lemon Yellow for flower centers)
- Polymer clay (Sage Green for stems)
- Acrylic roller or pasta machine
- Liquid polymer clay (bakeable adhesive)
- Texture sponge or stiff brush
- Detail needle tool or toothpick
- Small ball stylus tool
- Clay blade
- Oven
Step 1: Preparing the Base
-
Surface Prep:
Begin by thoroughly cleaning your glass or ceramic base with rubbing alcohol to remove any oils. This ensures the clay will adhere properly during baking. -
Rolling the Base Layer:
Condition your cream-colored polymer clay until pliable. Roll it out into a large, consistent sheet about 3mm thick. It needs to be large enough to wrap entirely around your chosen vessel. -
Cladding the Vase:
Apply a thin layer of liquid polymer clay to the exterior of the vase. Carefully wrap the clay sheet around it, pressing firmly to eliminate trapped air bubbles. -
Seaming and Smoothing:
Where the clay edges meet, slice through both layers with your blade to create a clean butt joint. Remove the excess, press the edges together, and smooth the seam with your finger or a tool until invisible. -
Adding Texture:
To achieve that organic, stone-like finish seen in the photo, gently pat the entire surface of the unbaked clay with a texture sponge or the bristles of a stiff brush. Don’t press too hard; just create a surface matte effect.
Texturing Tip
For a hyper-realistic gritty texture on the vase body, mix a small amount of baking soda or fine sand into your cream clay before rolling out the base sheet.
Step 2: Creating the Daisy Appliqués
-
Rolling Petal Cane:
Condition the white clay and roll it into a thin log or ‘snake’ about 4mm in diameter. Slice this log into small, equal-sized segments—you will need about 7-9 segments for each flower. -
Shaping Petals:
Take each small white segment and roll it into a teardrop shape. Flatten slightly with your finger to create a petal form. -
Impressing Detail:
Using your needle tool, press a single line down the center of each petal, starting from the wider end and stopping just before the point. -
Forming Centers:
Roll tiny balls of lemon yellow clay. Flatten them slightly into discs to serve as the flower centers. Use a needle tool to poke tiny texture dots all over the yellow surface. -
Making Stems:
Roll extremely thin snakes of sage green clay for the stems. I find that twisting the clay slightly while rolling helps prevent it from breaking.
Air Bubble Trouble
If you see a bubble under the base clay layer, pierce it with a needle tool and press the air out, then smooth the hole closed before texturing.
Step 3: Assembly and Baking
-
Placing Stems:
Apply a tiny dot of liquid clay where you want your lower flowers to sit. Press the green stems onto the vase base first, arranging them in natural, slightly curved lines. -
Attaching Flowers:
Apply a dab of liquid clay at the top of a stem (or floating freely for upper blooms). Arrange your white petals in a circle, points facing inward. Press gently to adhere. -
Adding Centers:
Place a yellow textured center directly over the meeting point of the petals. Press down firmly with a ball tool to secure the entire flower structure to the vase. -
Adding Side Blossoms:
For variety, create a few ‘side view’ daisies. Use only 3-4 petals fanned out in a semi-circle, and place a flattened oval of yellow at the base where they join the stem. -
Final Inspection:
Check the vase from all angles. Smooth out any accidental fingerprints on the base layer using a bit of baby oil on your finger if needed. -
Baking:
Bake the vase according to your clay manufacturer’s instructions (usually 275°F/130°C for 30 minutes per 1/4 inch of thickness). Let it cool completely in the oven to prevent thermal shock to the glass.
Now fill your lovely handcrafted vase with fresh blooms and enjoy a touch of spring in your home


What Really Happens Inside the Kiln
Learn how time and temperature work together inside the kiln to transform clay into durable ceramic.
Minimal Line-Face Relief Vase
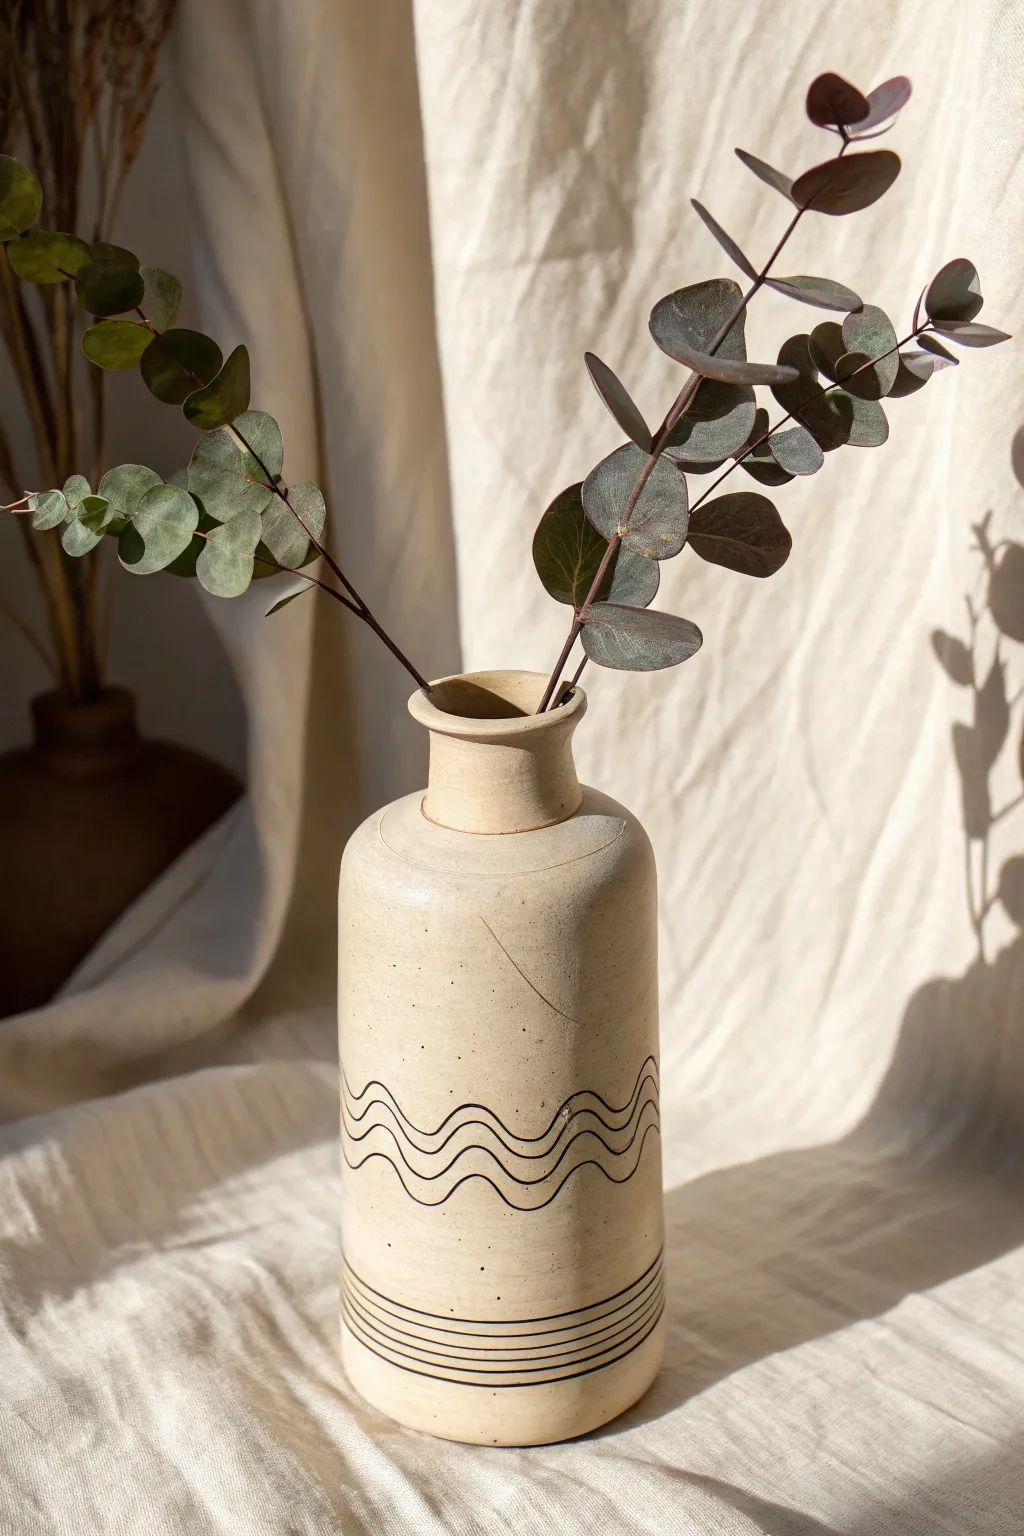
Replicate the calming, grounded aesthetic of speckled stoneware without the kiln using simple polymer clay techniques. This tall, slender vase features crisp black wave patterns and horizontal banding that contrast beautifully against a rustic cream background.
Step-by-Step Guide
Materials
- Glass bottle or jar (for the structure)
- Beige or cream polymer clay (approx. 2-3 blocks)
- Coarse black pepper or dried coffee grounds
- Rolling pin or pasta machine
- Liquid polymer clay (Bake & Bond)
- Black acrylic paint
- Fine liner paintbrush (size 0 or 00)
- X-acto knife or clay blade
- Sandpaper (various grits)
- Matte varnish
Step 1: Preparing the Faux Stoneware
-
Condition the clay:
Begin by thoroughly kneading your beige or cream polymer clay until it is soft and pliable. -
Add texture:
To achieve that authentic ceramic speckled look, sprinkle a pinch of coarse black pepper or dried coffee grounds onto the flattened clay. -
Mix gently:
Fold the clay over the speckles and roll it out again. Repeat this folding and rolling process until the speckles are evenly distributed throughout the block. -
Create a sheet:
Roll the speckled clay into a large, even sheet about 1/8 inch thick. Ensure the sheet is wide and tall enough to cover your chosen glass bottle.
Fixing Wobbly Lines
Can’t get straight lines? Use thin painter’s tape or washi tape to mask off the areas for the bottom stripes, painting between the tape for crisp edges.
Step 2: Building the Vase Structure
-
Prep the armature:
Clean your glass bottle thoroughly with alcohol to remove oils. Apply a thin layer of liquid polymer clay to the glass to help the solid clay adhere. -
Wrap the bottle:
Carefully lift your clay sheet and wrap it around the bottle. Smooth it down as you go to prevent air bubbles from getting trapped underneath. -
Seam blending:
Where the clay edges meet, slice through both layers with your blade for a clean join. Remove the excess, press the edges together, and smooth the seam with your finger or a clay tool until it disappears. -
Form the neck:
If your bottle has a screw top you want to hide, build up extra clay around the rim to create a flared, smooth ceramic-style mouth. -
Smooth the surface:
I find that lightly rolling the clay-covered bottle on a smooth work surface helps even out any lumps and bumps. -
Bake the base:
Bake the covered bottle according to your clay manufacturer’s instructions (usually 275°F/130°C for 15-30 minutes). Let it cool completely.
Carved Alternative
Instead of painting, use a U-shaped carving tool to gouge the lines out of the baked clay before adding a dark wash into the grooves for a textured relief.
Step 3: Decorating and Finishing
-
Sand for texture:
Once cool, lightly sand the surface. This removes fingerprints and exposes more of the pepper/coffee speckles for a realistic stone effect. -
Plan the design:
Lightly sketch your wave pattern and bottom stripes with a pencil. The design features a double wave line in the middle and a stack of five straight lines at the base. -
Paint the waves:
Using a fine liner brush and black acrylic paint, trace your wave lines. Keep your hand steady and aim for fluid, continuous strokes. -
Paint the bands:
For the bottom stripes, you can place the vase on a turntable or lazy Susan. Hold your brush steady in one spot while rotating the vase to get clean horizontal lines. -
Clean up edges:
If any paint lines look wobble, gently scrape away the excess paint with a craft knife once it’s dry. -
Seal the piece:
Apply a coat of matte varnish over the entire vase to protect the paint and give the clay that finished, fired pottery sheen.
Fill your new vessel with dried eucalyptus or grasses to complete the organic, modern display
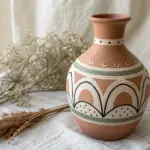
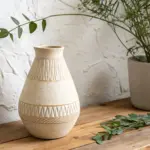
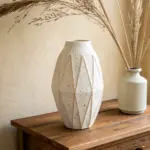
Chunky Arch and Circle Cutout Motifs
This stunning DIY vase captures the essence of modern bohemian decor with its warm terracotta tones and striking repetitive arch motifs. By layering thin sheets of polymer clay over a glass base, you’ll create a textured, high-end ceramic look without needing a kiln.
How-To Guide
Materials
- Tall glass cylinder vase (as a base form)
- Polymer clay (colors: white/cream, terracotta, dark rust/brown)
- Acrylic rolling pin or pasta machine
- Clay carving tools (needle tool, small loop tool)
- Tacky glue or Bake & Bond
- Coarse sandpaper or texture sponge
- Hobby knife (X-ACTO)
- Ruler
- Matte spray varnish (optional)
Step 1: Preparing the Base Layer
-
Condition the Clay:
Begin by conditioning your white or cream polymer clay. Knead it thoroughly until it is soft and pliable, which prevents cracking later. -
Roll the Base Sheet:
Roll the cream clay into a large, even sheet about 3mm thick. If you have a pasta machine, use a medium setting to ensure consistent thickness. -
Apply Adhesive:
Clean your glass vase with alcohol to remove oils. Apply a thin, even layer of oven-safe glue (like Bake & Bond) to the exterior of the glass to help the clay adhere firmly. -
Cover the Vase:
Wrap the cream clay sheet around the glass vase. Trim the excess with a blade and smooth the vertical seam with your finger or a clay shaper until it disappears. -
Create Texture:
Before the clay hardens/bakes, gently press coarse sandpaper or a texture sponge over the entire surface. This gives the ‘stone’ finish seen in the background clay.
Adhesion Issues?
If clay pulls away from the glass after baking, the glue layer was likely too thick or thin. Next time, use a very thin layer of liquid clay (PVA) as your adhesive.
Step 2: Designing the Motifs
-
Mix Color Gradients:
Prepare your accent colors. You will need a soft terracotta orange, a deeper rust brown, and more of the cream clay. -
Roll Thin Sheets:
Roll out the colored clays into thin sheets (approx 1-2mm). You want these slightly thinner than your base layer so they don’t add too much bulk. -
Cut the Base Arches:
Using a U-shaped cutter or a paper template and knife, cut out large arch shapes from the cream clay. These will form the outer halo of the design. -
Add Inner Layers:
Cut slightly smaller arch shapes from the terracotta clay and the dark rust clay. I like to lay these out on a piece of parchment paper first to visualize the stacking order. -
Assemble the Motifs:
Layer the colored arches on top of the cream base arches. Place the dark rust oval or teardrop shape in the very center to create the ‘eye’ of the pattern. -
Attach to Vase:
Gently transfer your assembled arch motifs onto the clay-covered vase. Press them down firmly to ensure no air bubbles are trapped underneath. Arrange them in alternating rows or a grid pattern.
Texturing Tip
Use an old toothbrush to stipple the clay surface. It creates a realistic, gritty ceramic texture that hides fingerprints perfectly.
Step 3: Detailing and Finishing
-
Carve Outlines:
Use a needle tool or a small carving tool to etch distinct lines around each colored section. This separation mimics the ‘cutout’ or sgraffito look. -
Add Scratch Texture:
Take a needle tool and scratch vertical or curved lines inside the dark rust center pieces. This fine texture adds depth and simulates hand-thrown pottery. -
Define the Rim:
Add a strip of cream clay around the top rim. Flaunt the edge slightly outwards to create a traditional vase lip, smoothing the transition into the main body. -
Separate Sections:
Use a modeling tool to press horizontal grooves separating the neck pattern from the main body pattern, creating distinct visual zones. -
Final Texture Inspection:
Look over the vase for fingerprints. Buff them out or re-apply your sponge texture to any smooth spots. -
Baking:
Bake the vase vertically in a home oven according to your clay manufacturer’s instructions (usually 265°F-275°F for 30-45 minutes). Let it cool completely in the oven to prevent thermal shock to the glass. -
Sealing (Optional):
If you want extra protection, spray a light coat of matte varnish over the finished piece to seal the textures without adding unwanted shine.
Place your dried grasses or faux stems inside and enjoy the warm, earthy vibes of your new geometric vase

TRACK YOUR CERAMIC JOURNEY
Capture glaze tests, firing details, and creative progress—all in one simple printable. Make your projects easier to repeat and improve.
Swirly Marbled Polymer Clay Vase Skin

Transform a plain glass or ceramic vessel into a stunning piece of faux-stone decor using this marbled polymer clay technique. The result features organic swirls of terracotta, sandstone, and white that mimic the natural beauty of agate or marble.
Step-by-Step
Materials
- Polymer clay (White)
- Polymer clay (Beige or Ecru)
- Polymer clay (Terracotta or Dusty Rose)
- Polymer clay (Chocolate Brown)
- Smooth glass jar or old ceramic vase (cylindrical shape works best)
- Acrylic rolling pin
- Tissue blade or craft knife
- Cornstarch or baby powder (for release)
- Oven (for baking)
- Fine grit sandpaper (400-800 grit)
- Matte varnish (optional)
Step 1: Prepping the Clay Colors
-
Condition the clay:
Start by thoroughly conditioning each block of polymer clay in your hands until it becomes soft and pliable. This warmth is crucial for blending later. -
Create base logs:
Roll each color into a long, snake-like cylinder about 1/2 inch in diameter. You’ll want more white and beige than the darker accent colors. -
Assemble the bundle:
Gather your clay snakes together, twisting them gently around each other to form one large, thick log. It doesn’t need to be neat; randomness helps the final look.
Step 2: Creating the Marble Pattern
-
Twist and roll:
Hold the ends of your large log and twist in opposite directions like you are wringing out a towel. This action creates the initial swirls. -
Fold and roll again:
Fold the twisted log in half, bringing the ends together, and roll it back into a smooth cylinder on your work surface. Repeat this twist-fold-roll process 2-3 times. -
Stop at the right moment:
Be careful not to over-mix, or the colors will turn muddy. Look for defined ribbons of color rather than a blended solid shade. -
Form a block:
Squish your marbled log into a rectangular block shape. This makes it easier to slice uniform pieces in the next phase.
Air Bubble Trouble?
If you see a bump under the clay, prick it with a needle and press the air out immediately. Trapped air expands in the oven and causes ugly bubbles.
Step 3: Applying the Skin
-
Slice the clay:
Using your tissue blade, slice thin, even sheets (about 1/8 inch thick) from your marbled block. Each slice will reveal a unique cross-section of the swirl pattern. -
Prepare the vessel:
Clean your glass or ceramic vase with rubbing alcohol to ensure it is free of oils or dust, which helps the clay adhere. -
Tiling the slices:
Begin placing the patterned slices onto the vase, pressing them gently against the surface. Butt the edges of the slices up against each other as closely as possible. -
Seaming the edges:
Once the vase is covered, use your thumb or the acrylic roller to gently smooth the seams where the slices meet. The warmth of your hand will help melt the lines away. -
Wrap the rim:
Fold the clay slightly over the top rim of the vase and trim the excess neatly on the inside for a professional, finished lip. -
Trim the base:
Use your craft knife to trim any excess clay at the very bottom so the vase sits flat on the table.
Add Some Texture
Before baking, gently press a coarse sandpaper or a toothbrush against the clay surface to give it a realistic, pitted stone texture.
Step 4: Baking and Finishing
-
Bake the project:
Place the vase in your oven according to the manufacturer’s instructions for the specific brand of clay you used (usually around 275°F/130°C for 15-30 minutes). -
Cool down:
Let the vase cool completely in the oven with the door slightly ajar. Sudden temperature changes can sometimes crack the glass core. -
Sand for smoothness:
Once cool, take the vase to a sink and wet-sand the surface lightly with fine-grit sandpaper. This removes fingerprints and makes the surface feel like real stone. -
Final touch:
Buff the vase with a soft denim cloth for a natural sheen, or apply a thin coat of matte varnish if you prefer a sealed look.
Fill your new vase with dried pampas grass or wheat for an instant decor upgrade
Tiny Cane Slice Mosaic Wrap
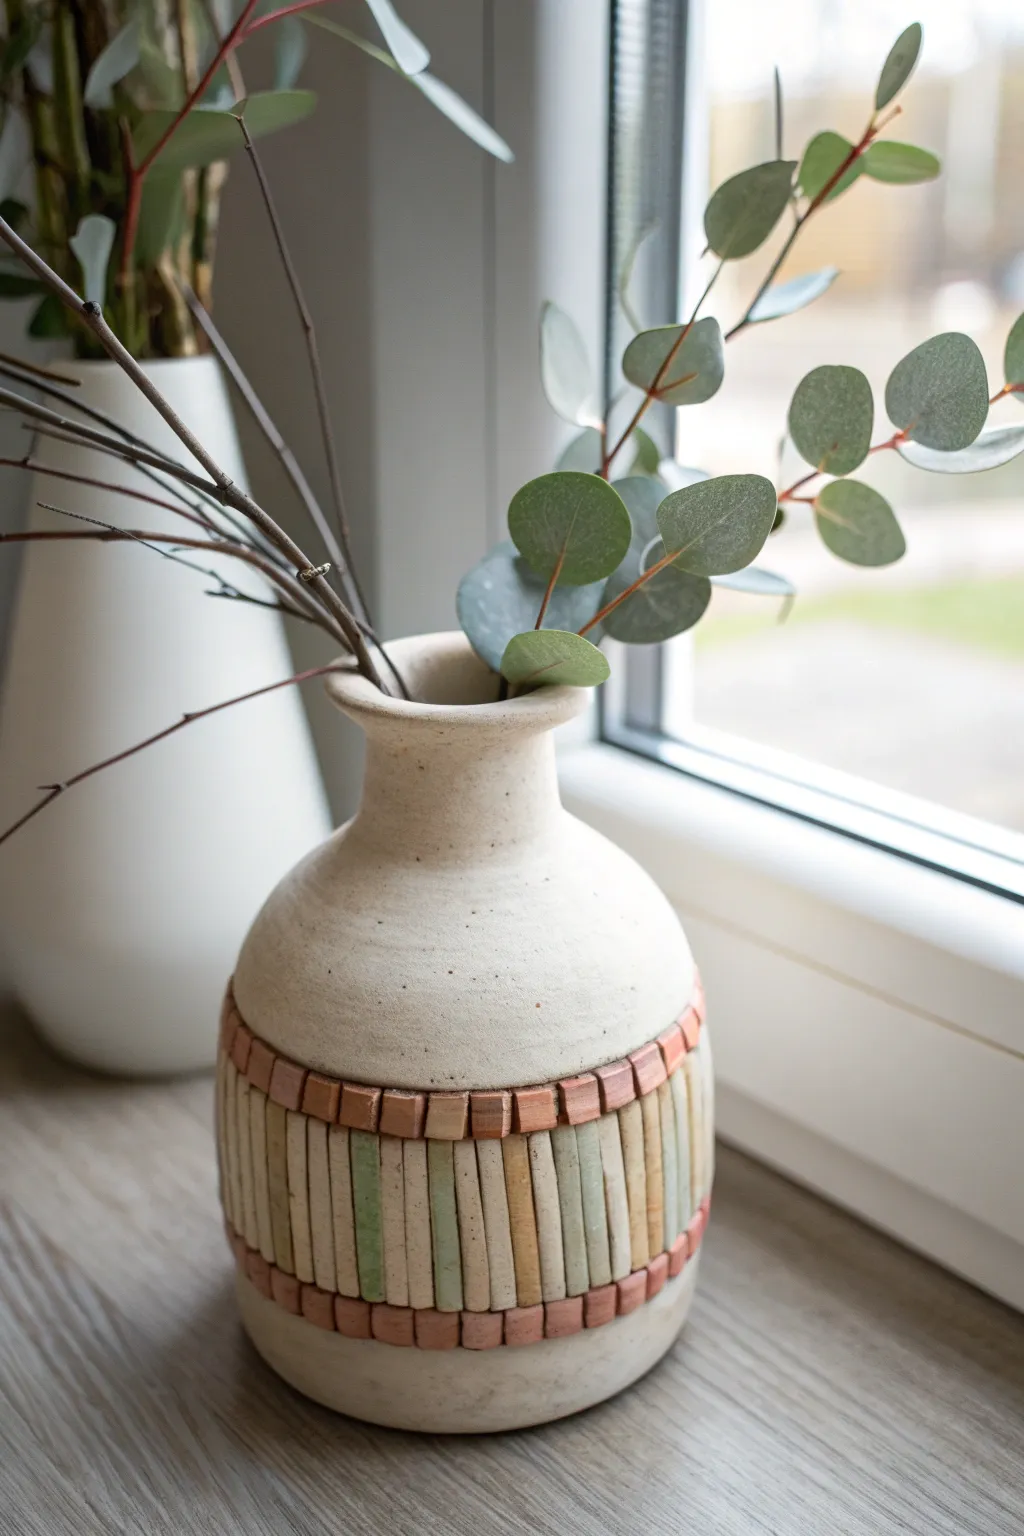
Transform a plain glass or ceramic vessel into a textured, artisan-style piece with this clever polymer clay technique. By creating a custom mosaic of tiny, rectangular tiles in muted earthy tones, you’ll achieve a high-end pottery look without needing a kiln.
Step-by-Step Guide
Materials
- Plain thrifted vase (glass or ceramic with a smooth surface)
- Polymer clay in terracotta/brick red
- Polymer clay in sage green
- Polymer clay in beige/light tan
- Polymer clay in cream/off-white
- Granite or speckled effect polymer clay (optional, for the main body)
- Liquid polymer clay (Bake & Bond)
- Acrylic paint (cream/stone color)
- Baking soda or fine sand (for texture)
- Paintbrush
- Sharp craft blade or tissue blade
- Acrylic roller
- Oven for baking
Step 1: Prepping the Base
-
Clean surface:
Thoroughly wash and dry your vase to remove any oils or dust. Wipe it down with rubbing alcohol for extra adhesion. -
Texture mix:
Mix your cream acrylic paint with a teaspoon of baking soda or fine sand. This creates the speckled, ceramic-like texture seen in the photo. I like to test a small patch first to ensure the grit level is just right. -
Base coat application:
Paint the entire vase with your textured mixture, avoiding the center area where the clay band will go if you want a flush look, or paint the whole thing if you want the band to sit on top. Let it dry completely.
Sticky Situation
If your clay tiles keep sliding down the smooth glass before you can bake them, let the liquid clay sit for 10 minutes to get tacky, or wrap a piece of masking tape loosely over the finished section.
Step 2: Creating the Tile Canes
-
Condition clay:
Condition your terracotta, sage green, and beige clays separately until they are soft and pliable. -
Form logs:
Roll each color into a long, square log (a ‘cane’) about 0.5 cm thick. Use your work surface to flatten the sides to ensure they are rectangular rather than round. -
Create the border logs:
For the top and bottom borders, roll out a slightly thinner square log of the terracotta clay. -
Slicing tiles:
Using your sharp blade, slice the terracotta border log into small, even square chunks (about 0.5cm long). Slice the green, beige, and cream logs into longer rectangular strips (about 2-3 cm long).
Step 3: Assembling the Mosaic
-
Apply adhesive:
Smear a thin layer of liquid polymer clay around the circumference of the vase where you want your decorative band to sit. -
Bottom border placement:
Begin placing your small terracotta square chunks in a single row around the bottom edge of the adhesive band. Press them gently but firmly against the glass. -
Vertical stripe pattern:
Above the bottom border, start placing your long rectangular slices vertically. Alternate colors randomly—sage, beige, cream—to create that organic, varied look shown in the image. -
Tight fit:
Ensure the vertical strips are touching each other closely with minimal gaps. If a gap appears, gently nudge the clay over or slice a custom-sized piece to fit. -
Top border placement:
Finish the mosaic band by placing a final row of small terracotta square chunks along the top edge of the vertical strips, aligning them roughly with the bottom row.
Level Up: Faux Grout
For a true mosaic feel, rub white or grey clay softener or paste into the crevices between tiles after baking, then wipe the surface clean, leaving the ‘grout’ in the gaps.
Step 4: Finishing Touches
-
Texture blending:
Use a light touch with a sponge or your finger to gently tap the clay tiles. This removes fingerprints and gives them a slightly weathered, stone-like surface. -
Final baking:
Place the vase in a cold oven and set it to the temperature recommended on your clay package (usually around 275°F/130°C). Bake for 30 minutes. Starting cold helps prevent the glass from cracking due to thermal shock. -
Cool down:
Turn the oven off and let the vase cool down completely inside the oven with the door closed. This is crucial for glass safety. -
Protective seal:
Once cool, create a watered-down wash of brown acrylic paint. Brush it over the clay tiles and immediately wipe it off with a rag. This will settle into the cracks and enhance the vintage, grouted appearance.
Fill your new artisan vessel with dried eucalyptus or branches for a stunning, organic display piece
Rustic Faux Stone Pebble Texture
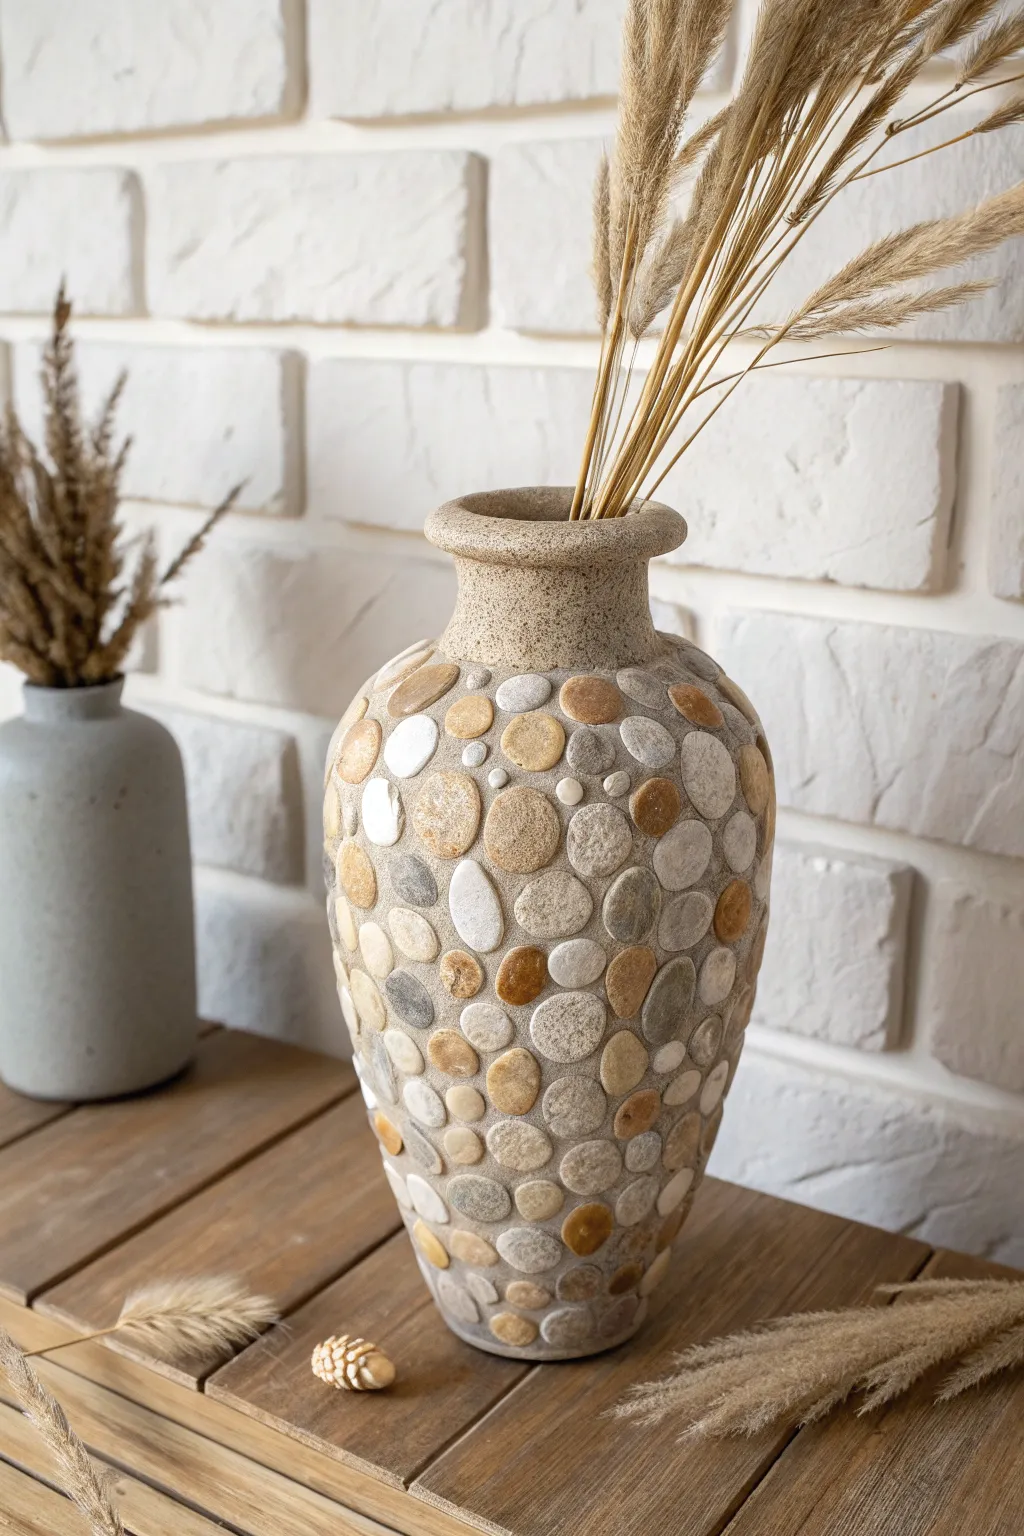
Transform a simple glass vase into a rustic masterpiece that looks like it was plucked from a riverbed. This project uses polymer clay to simulate smoothed stones and sandstone textures, bringing an organic, earthy element to your home decor.
How-To Guide
Materials
- Glass vase (recycling an old jar or thrifted vase works perfectly)
- Polymer clay in various stone colors (white, translucent, beige, light grey, dark grey, brown, tan)
- Coarse sandpaper or a stiff toothbrush for texturing
- Liquid polymer clay (bakeable adhesive)
- Black and brown acrylic paint
- Paper towels
- Water spray bottle
- Clay roller or pasta machine
- Round cutters (various small sizes) or just your fingers
- Craft knife
- Oven
Step 1: Preparing the Base
-
Clean the Surface:
Start by thoroughly cleaning your glass vase with rubbing alcohol to remove any oils or residue. This ensures the clay bonds securely to the glass surface. -
Apply Adhesive:
Brush a thin layer of liquid polymer clay over the entire outer surface of the vase. This acts as the glue that will hold your clay creation in place during baking. -
Create the Sandstone Neck:
Mix beige clay with a small amount of white and translucent clay to create a speckled sandstone look. Condition the clay and roll it into a sheet about 3mm thick. -
Wrap the Neck:
Wrap this beige sheet around the neck and the very top rim of the vase. Use your fingers to smooth the seam where the clay meets, blending it until it disappears. -
Detail the Rim:
Roll a thick snake of the beige clay and press it onto the rim to create a flared, rounded lip. Smooth this into the existing neck clay for a seamless transition. -
Texture the Sandstone:
Take your coarse sandpaper or a stiff toothbrush and vigorously tap it all over the beige neck and rim. This creates that gritty, realistic stone texture.
Stone Realism Tip
Add black pepper or dried tea leaves into your lighter clay colors before rolling. These inclusions mimic mineral deposits found in real granite or sandstone.
Step 2: Creating the Faux Stones
-
Mix Stone Colors:
Prepare your ‘stones’ by mixing your darker clay colors. Don’t mix them fully; leave them slightly marbled. I like to mix a little translucent clay into some colors to mimic the depth of real quartz or river rocks. -
Form the Pebbles:
Roll small balls of clay in varying sizes, ranging from pea-sized to about the size of a quarter. You want a good variety of earth tones: slate greys, warm browns, creams, and tans. -
Flatten and Attach:
Take a clay ball, flatten it slightly between your thumb and finger into an oval or irregular round shape, and press it firmly onto the body of the vase, starting just below the textured neck. -
Build the Pattern:
Continue adding flattened distinct ‘stones’ closely together, fitting them like a puzzle. Vary the colors and sizes as you go to avoid repetitive patterns. -
Fill the Gaps:
As you cover the vase, tiny gaps will remain between the larger stones. Roll very tiny balls of neutral grey or beige clay to fill these interstices, resembling grouting or smaller pebbles. -
Define the Shapes:
Once the vase is covered, re-texturize the stones individually. Use your thumb to smooth any fingerprints, ensuring each ‘stone’ maintains its rounded, domed profile rather than looking completely flat.
Level Up: Mossy Effect
After baking, dab tiny bits of craft glue in the deep crevices between stones and sprinkle on static grass or green flocking powder for an aged, moss-covered look.
Step 3: Finishing Touches
-
Texture the Stones:
Lightly texture select stones with your sandpaper or a crumpled ball of aluminum foil. Real river rocks aren’t perfectly smooth, so adding a few pits and scuffs adds realism. -
Bake the Vase:
Bake the vase according to your polymer clay manufacturer’s instructions (usually 275°F/130°C for 15-30 minutes). Let it cool completely in the oven to prevent the glass from cracking due to thermal shock. -
Apply an Antiquing Wash:
Mix a small amount of black and brown acrylic paint with water. Brush this dark wash over the entire pebble section, making sure it gets into all the cracks and crevices. -
Wipe Away Excess:
Before the paint dries, use a damp paper towel or sponge to wipe the paint off the surface of the stones. This leaves the dark color in the deep recesses, highlighting the individual shapes. -
Final Seal (Optional):
If you want a wet-stone look, apply a satin or gloss varnish to just the stones. For a dry, matte look like the reference image, leave the clay raw or use a matte varnish.
Fill your new rustic vessel with dried grasses or wheat to complete the warm, natural aesthetic.
Dramatic Metallic Patina Faux Raku Finish

Recreate the ancient, fire-forged look of Raku pottery using polymer clay and clever surface techniques. This project combines rich turquoise hues with flashes of burnished copper to transform a simple glass form into a dramatic, time-worn artifact.
Step-by-Step Guide
Materials
- Glass vase (bulb bottom, narrow neck)
- Black polymer clay (approx. 2-3 blocks)
- Liquid polymer clay (clear or black)
- Acrylic paints (turquoise, teal, black, burnt umber)
- Metallic wax pastes (antique gold, copper, bronze)
- Sea sponge or coarse texture sponge
- Rolling pin or pasta machine
- Craft knife
- Sandpaper (medium and fine grit)
- Gloss varnish or resin (optional)
Step 1: Preparing the Form
-
Prepare the glass:
Begin by cleaning your glass vase thoroughly with rubbing alcohol to remove any oils or residue, ensuring a strong bond with the clay. -
Apply adhesive layer:
Brush a thin layer of liquid polymer clay over the entire exterior surface of the glass vase. This acts as the glue between the slippery glass and the solid clay. -
Sheet the clay:
Condition your black polymer clay until soft, then roll it out into a medium-thickness sheet, roughly 3mm thick. You want it sturdy enough to hide the glass but thin enough to manipulate. -
Cover the vase:
Wrap the clay sheet around the vase, pressing firmly to eliminate air trapped between the glass and clay. Smooth the seams with your fingers or a modeling tool until they disappear completely. -
Refine the shape:
Pay special attention to the rim and the base. Roll the clay slightly over the top lip of the vase for a finished look, and ensure the bottom is flat and stable.
Texturing Tip
Press coarse sandpaper onto the raw clay before baking. This micro-texture grabs the metallic wax beautifully later on, creating a convincing pottery grit.
Step 2: Texturing and Curing
-
Add weathered texture:
Before baking, take a coarse sea sponge or a crumpled ball of aluminum foil and press it randomly all over the clay surface. Focus effectively on the belly of the vase to create organic pits and craters. -
Create horizontal ridges:
Using a needle tool, lightly score a few horizontal rings around the neck area. These don’t need to be perfect; a shaky hand actually adds to the hand-thrown pottery aesthetic. -
Bake the vessel:
Bake the covered vase according to your polymer clay manufacturer’s instructions—usually around 275°F (130°C) for 30-45 minutes. Let it cool completely in the oven to prevent the glass from cracking due to thermal shock.
Uneven Coverage?
If the paint looks too uniform, spritz it with water while wet. The drips create natural streaks and separation that look exactly like fluid pottery glaze.
Step 3: The Faux Raku Finish
-
Base coat layering:
Sponge on a mixture of black and burnt umber acrylic paint. Dab it into the textures you created, but don’t aim for perfect coverage; we want a dark, sooty base. -
Applying the verdigris:
While the dark base is still slightly tacky or just dry, sponge on your turquoise and teal paints. Concentrate these colors in the upper and middle sections, letting them fade out towards the bottom. -
Distressing the paint:
Here I prefer to take a damp paper towel and immediately wipe back some of the teal paint. This reveals the black clay and brown paint underneath, simulating worn glaze. -
Dry brush technique:
Once the previous layers are fully dry, use a very dry brush with a tiny amount of light teal or white to highlight the raised texture points, giving the surface depth.
Step 4: Metallic Accents
-
Apply bronze wax:
Dip your finger into metallic bronze or copper gilding wax. Rub this gently over the highest points of the texture, specifically focusing on the bottom third of the vase and random patches in the teal area. -
Deepen the contrast:
Add touches of antique gold wax near the rim and neck rings. The metal wax catches the light and mimics the metallic flashes found in real Raku firing. -
Buff and seal:
Allow the waxes to cure for at least 12 hours. Finally, gently buff the metallic areas with a soft cloth to increase their shine. If you want a wet, glazed look, apply a coat of gloss varnish, but matte varnish keeps it looking more earthy.
Place your strikingly aged vase near a window where the light can catch those brilliant copper accents
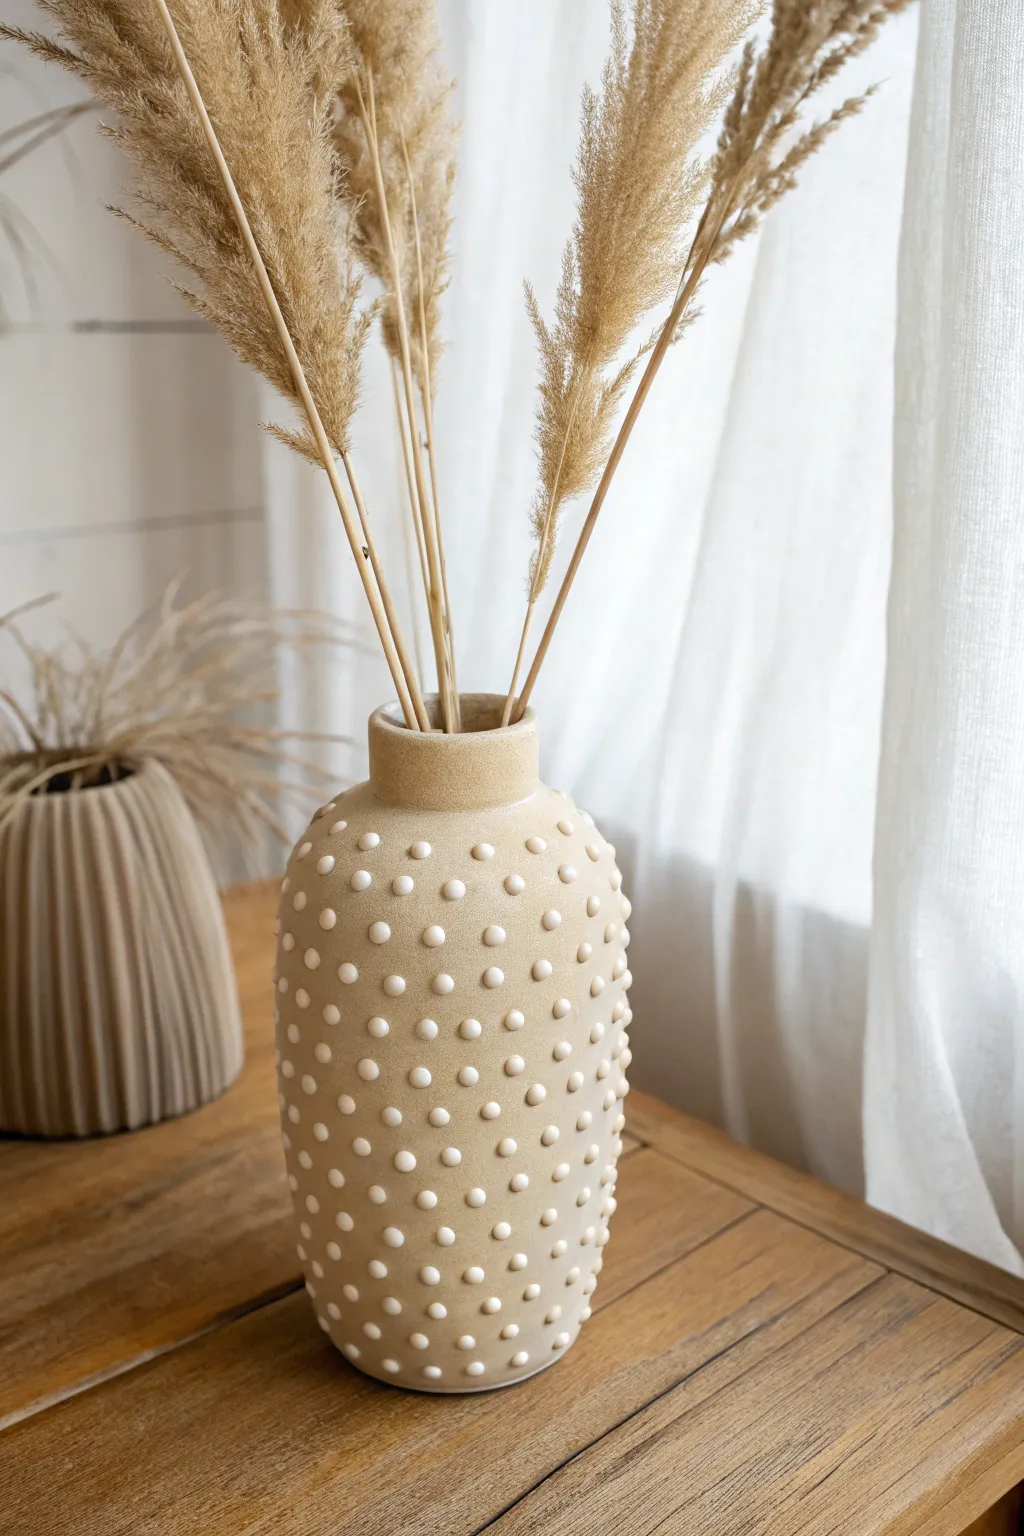
Vertical Ribbed Lines With Clay Coils
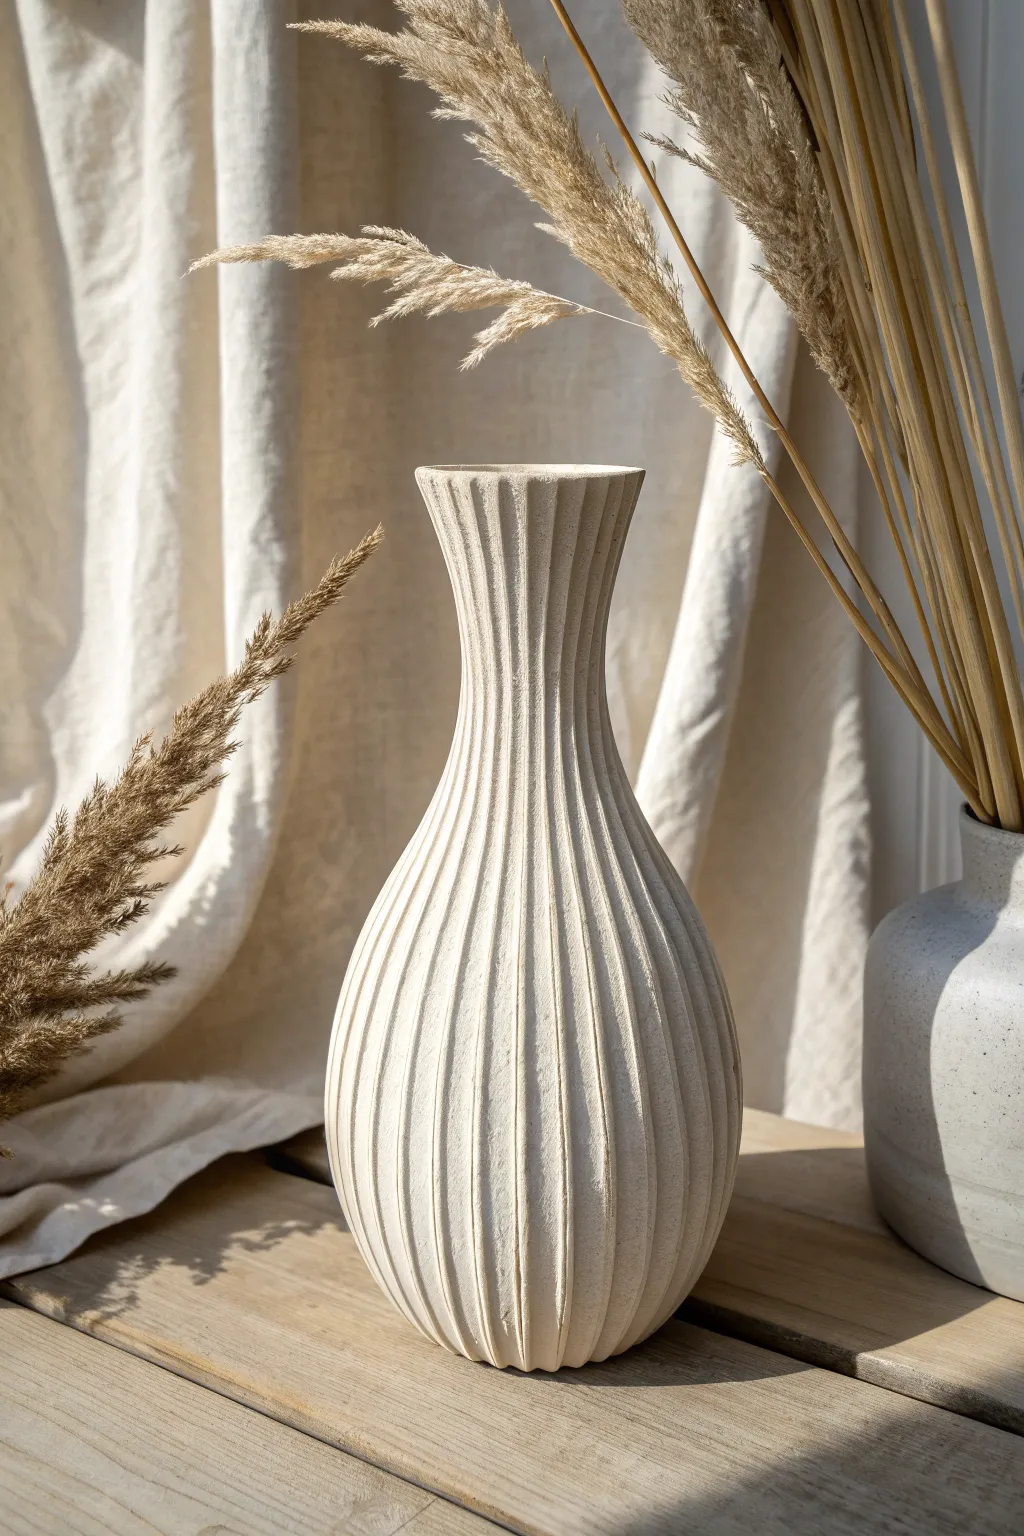
Transform a simple glass container into a stunning piece of faux-ceramic decor using polymer clay coils. This project captures the trendy organic look of textured pottery with its matte finish and gentle vertical ribbing.
Detailed Instructions
Materials
- Old glass vase or bottle (for the armature)
- White or beige polymer clay (plenty of it)
- Granite or speckled polymer clay (optional, for texture)
- Clay extruder with a small round disc (or a rolling pin)
- Liquid polymer clay (Bake & Bond)
- Acrylic paint (cream, baking soda)
- Paintbrush
- Cornstarch (for smoothing)
- Blade or craft knife
- Oven
Step 1: Prepping the Base
-
Clean the glass:
Start by thoroughly washing and drying your glass vessel to remove any oils or labels. Alcohol wipes work wonders for getting a squeaky-clean surface. -
Apply adhesive:
Brush a thin layer of liquid polymer clay all over the exterior of the glass. -
Create a base layer:
Roll out a thin sheet of your mixed clay (I like a mix of white and granite for subtle speckles) and wrap it around the glass. Smooth the seams with your fingers so the glass is completely covered.
Seamless Spacing Tip
Work in quadrants. Place a coil at 12, 3, 6, and 9 o’clock first. Then fill the spaces in between. This prevents your lines from gradually becoming diagonal.
Step 2: Creating the Ribs
-
Extrude coils:
Using a clay extruder fitted with a small round disc, press out long, even strings of clay. If you don’t have an extruder, roll thin snakes by hand, trying to keep the thickness consistent. -
Attach the first coil:
Apply a tiny bit more liquid clay to your base layer to act as glue. Press your first coil vertically from the rim down to the base. -
Add consecutive coils:
Place the next coil directly beside the first one, touching it slightly. Continue adding coils one by one around the entire circumference of the vase. -
Trim the excess:
Once a coil is placed, use your craft knife to trim the excess clay at the top rim and the bottom edge for a clean line. -
Manage the taper:
If your vase curves significantly (like the bulbous bottom in the photo), the coils might naturally gap or overlap. Gently press them closer together at the neck and allow them to flatten slightly at the widest part. -
Smooth the texture:
Once the vase is covered, lightly run your finger or a smoothing tool down the valleys between the ribs to ensure they are adhered well, but don’t flatten the ridges too much.
Sticky Clay Fix
If your coils are sticking to your fingers or getting mushy, pop the clay in the fridge for 10 minutes or dust your hands lightly with cornstarch.
Step 3: Refining and Baking
-
Refine the rim:
Roll a final coil or flat strip and place it around the very top rim to hide the cut ends of your vertical ribs. Blend this into the inside of the vase for a seamless look. -
Add texture (optional):
For that stone-like feel, lightly tap the surface with a stiff toothbrush or a ball of aluminum foil to take away the glossy ‘plastic’ look of the raw clay. -
Bake:
Bake the vase according to your package directions. Usually, this is around 275°F (130°C) for 30-45 minutes. Let it cool completely in the oven to prevent cracking.
Step 4: The Stone Finish
-
Mix the paint:
To achieve that ultra-matte, sandy texture shown in the photo, mix cream acrylic paint with a teaspoon of baking soda. -
Apply the first coat:
Paint the entire vase, working the bristles into the deep grooves between the ribs. The baking soda mix will create a gritty, ceramic feel. -
Dry and repeat:
Let the first coat dry fully. Apply a second coat if needed for full opacity. -
Final touches:
If desired, diluted brown paint can be flicked onto the surface with a toothbrush for added speckling before sealing with a matte varnish.
Fill your new textured vessel with dried grass or wheat to complete that earthy, calming aesthetic
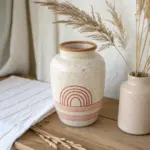
Smooth Ombre Gradient From Neck to Base
This project transforms simple polymer clay into a stunning piece of modern decor with a sunset-inspired gradient. The textured, speckled finish mimics high-end stoneware, bringing an earthy and calming vibe to any windowsill.
How-To Guide
Materials
- White or translucent polymer clay (large block)
- Terracotta or rust-colored polymer clay
- Peach or blush polymer clay
- Dried oregano or coarse black pepper (for speckling)
- Glass bottle or jar (as an armature)
- Rolling pin or acrylic roller
- Craft knife or clay blade
- Sandpaper (medium and fine grit)
- Matte spray varnish
Step 1: Preparing the Clay Base
-
Clean Your Station:
Begin with a completely clean work surface to prevent dust from marring your white clay. Wipe down your roller and hands thoroughly. -
Condition the White Clay:
Warm up the white clay by kneading it until it is pliable and smooth. This prevents cracks later on. -
Create the Speckle Effect:
Flatten your white clay and sprinkle a small pinch of dried oregano or coarse pepper over it. Fold the clay over and knead it until the specks are evenly distributed throughout the batch. -
Roll the Base Sheet:
Roll out a large sheet of the speckled white clay, aiming for about 1/4 inch thickness. Ensure it’s large enough to cover the top two-thirds of your glass armature.
Seamless Blends
For a smoother gradient, smear the clay vertically with your thumb across the color seams before the final rolling step. This blurs the hard lines.
Step 2: Creating the Ombre Gradient
-
Prepare the Colored Clays:
Condition your peach and terracotta clays separately. You want roughly equal width strips for the gradient effect. -
Form the Gradient Blends:
To achieve that soft transition, create a ‘Skinner blend’ or simply overlap thin tapered sheets of white to peach, and peach to terracotta, rolling them together until the lines blur slightly. -
Arrange the Layers:
Lay out your clay sheets. The top section should be pure speckled white, transitioning downward into the peach/blush tone, and finally into the deep terracotta at the bottom. -
Stack and Compress:
Gently press the edges of your color zones together on your work surface. Use your roller to flatten the seams, creating one cohesive tri-color sheet.
Step 3: Sculpting the Vase
-
Apply Clay to Armature:
Wrap your large clay sheet around the glass bottle. I find it easiest to start from the center and smooth outwards to trapped air bubbles. -
Seal the Seam:
Cut away excess clay where the ends meet. Use your fingers or a smoothing tool to merge the seam until it becomes invisible, blending the colors horizontally to maintain the gradient. -
Shape the Neck:
Carefully mold the clay over the neck of the bottle. Create a slightly flared, rounded rim at the top to give it that hand-thrown pottery look. -
Refine the Bottom:
Fold the terracotta clay under the base of the bottle and trim any excess. Smooth it flat so the vase sits perfectly level. -
Establish Texture:
Before baking, lightly pat the entire surface with a sponge or a crumpled ball of aluminum foil. This removes fingerprints and adds a stone-like texture.
Make It Stone
Mix baking soda into your acrylic paint and dab it onto the finished fired vase for an even rougher, authentic ceramic texture.
Step 4: Baking and Finishing
-
Bake the Piece:
Bake the vase upright according to your clay manufacturer’s instructions (usually 275°F or 130°C for 15-30 minutes per 1/4 inch of thickness). -
Cool Down:
Let the vase cool completely inside the oven with the door slightly ajar. Sudden temperature changes can cause cracking. -
Dry Sanding:
Once cool, use medium-grit sandpaper to smooth out any rough bumps or uneven areas on the rim. -
Buff the Surface:
Switch to fine-grit sandpaper to create a velvety smooth finish. Depending on the look you want, you can sand firmly to reveal more of the speckled inclusions. -
Seal the Work:
Finish with a light coat of matte spray varnish to protect the surface and enhance the colors without making it glossy. -
Final Styling:
Arrange your dried baby’s breath or pampas grass inside to complete the rustic, natural aesthetic.
Now you have a beautiful custom vase that captures the warmth of a sunset on your shelf
Playful Patchwork Tile Vase
Transform a plain glass or ceramic vessel into a stunning piece of modern decor with this textured polymer clay technique. The result is a tactile, geometric surface that mimics the look of hand-laid ceramic tiles in soft, earthy pastels.
Step-by-Step Tutorial
Materials
- Glass or ceramic vase (cylindrical or gently curved)
- Polymer clay (white, beige, terracotta, navy blue, dusty pink, sage green)
- Coarse grit sandpaper or sanding sponge
- Liquid polymer clay (Bake & Bond)
- Acrylic rolling pin or pasta machine
- Sharp craft knife or clay blade
- Texture sponge or old toothbrush
- Ruler
- Oven (for curing)
- Matte varnish (optional)
Step 1: Base Preparation
-
Clean surface:
Thoroughly wash and dry your base vase to remove any oils or dust. Wipe it down with a little rubbing alcohol to ensure the strongest bond possible. -
Condition base clay:
Condition a large batch of beige or cream-colored polymer clay. This will form the grout lines and the textural base of the vase. -
Texture the clay:
Roll out the beige clay into a thin sheet, approximately 2-3mm thick. Before applying it, press a coarse sanding sponge or stiff toothbrush firmly into the clay surface to create a rough, stone-like texture. -
Apply base layer:
Apply a thin layer of liquid polymer clay to the vase exterior. Carefully wrap your textured beige clay sheet around the vase, smoothing seams with your fingers or a sculpting tool so they disappear into the texture. -
Trim edges:
Trim the excess clay from the top rim and bottom edge. I like to fold the clay slightly over the top rim for a finished pottery look.
Step 2: Creating the Tiles
-
Mix custom colors:
Prepare your colored clays. Mix white into your primary colors to achieve muted, chalky pastel tones like the ones in the photo. -
Roll colored sheets:
Roll each color into sheets of uniform thickness, slightly thinner than your base layer. Texture these sheets gently with your sponge for a matte, ceramic feel. -
Cut geometric shapes:
Using a ruler and sharp blade, cut long strips of clay about 1.5 inches wide, then cross-cut them at angles to create varied triangles. Imperfection adds character here, so don’t worry about mathematical precision. -
Plan your pattern:
Lay out your triangles on your work surface first to balance the colors. Ensure you don’t have too many dark blues or pinks clustered in one spot.
Stone Grout Effect
Mix a small amount of black pepper or fine sand into your beige base clay before rolling it out. This creates a realistic speckled grout effect visible between the tiles.
Step 3: Assembly and Finishing
-
Apply the first tile:
Apply a tiny dot of liquid clay to the back of a triangle and press it onto the beige base layer. Start near the bottom or visible center. -
Build the mosaic:
Continue placing triangles, leaving a consistent gap of about 2-3mm between them. This gap allows the textured beige base to show through, acting as the ‘grout’. -
Work in rounds:
Work your way around and up the vase. You may need to trim some triangles to fit as the vase curves or narrows toward the neck. -
Detail the grout:
Once all tiles are placed, use a needle tool or the back of a knife to gently press down into the gaps (grout lines), ensuring the base clay is firmly attached and enhancing the depth. -
Refine the rim:
Leave the neck of the vase free of tiles, or add a simple band of beige clay to frame the top as seen in the inspiration image. -
Final texture check:
Give the entire surface one last gentle dab with your texture sponge to unify the look and remove any fingerprints. -
Bake:
Bake the vase according to your polymer clay manufacturer’s instructions (usually roughly 275°F/130°C for 30 minutes, but check your package). -
Cool and seal:
Let the vase cool completely inside the oven to prevent cracking. Once cool, you can leave it raw for a stony finish or brush on a matte varnish for protection.
Metallic Accent
After baking, highlight specific random triangles by brushing on gold leaf or metallic wax to add a touch of luxe glamour to the rustic design.
Now you have a unique vessel ready to display your favorite dried florals or fresh blooms
Removable Vase Collar for Quick Swaps
Recreate the rustic charm of speckled ceramic ware using polymer clay and a clever upcycling technique. This project transforms a simple glass vessel into an artisanal-style vase featuring a removable terracotta-hued collar and a convincing stone-like texture.
Step-by-Step
Materials
- Glass bottle or vase (for the base)
- White polymer clay
- Terracotta or rust-colored polymer clay
- Coarse black pepper or dry ground coffee
- Rolling pin or pasta machine
- Craft knife
- Liquid polymer clay (optional)
- Sandpaper (medium and fine grit)
- Matte varnish or sealant
- Oven
Step 1: Creating the Speckled Clay Base
-
Condition the white clay:
Start by conditioning your white polymer clay until it is soft and malleable. You will need enough to fully cover your chosen glass vessel, so combine multiple blocks if necessary. -
Add the speckles:
To achieve the organic, speckled pottery look, knead in a generous pinch of coarse black pepper or dry used coffee grounds. Fold the clay repeatedly until the specks are evenly distributed throughout the white base. -
Roll out the sheet:
Roll the speckled clay into a large, even sheet about 1/8 inch (3mm) thick. Use a pasta machine on a medium setting if you have one, or a rolling pin with guide rings for consistency. -
Wrap the vessel:
Carefully wrap the clay sheet around your glass jar or bottle. Trim the excess with a craft knife where the edges meet, creating a clean butt joint rather than overlapping. -
Smooth the seams:
Gently rub the vertical seam with your finger or a clay tool to blend the edges together until the line disappears. Do the same for the bottom edge, folding the clay slightly underneath the glass base. -
Detail the rim:
Bring the clay over the top rim of the glass and smooth it down into the inside neck about half an inch. This ensures the glass is completely hidden even when looking from above.
Seamless Transitions
Use a little cornstarch or baby powder on your finger when smoothing seams; it reduces friction and prevents drag marks, making blending effortless.
Step 2: Forming the Terracotta Accents
-
Prepare the bottom accent:
This project features a ‘dipped’ look at the bottom. Roll out a sheet of terracotta-colored clay. You can mix orange, brown, and a touch of red to get that perfect earthy hue. -
Apply the bottom layer:
Cut a strip of the terracotta clay wide enough to cover the bottom third of your vase. Wrap it directly over the white layer at the base, smoothing the seam and the bottom edge. -
Blend the transition:
Unlike the main body seam, you want the horizontal line where the terracotta meets the white to remain distinct but flush. Gently roll over the entire vase to press the layers together without blurring the color line too much. -
Create the collar ring:
Roll a thick snake or log of the terracotta clay. Flatten it slightly so it becomes a rounded strip, approximately 1/4 inch thick and 1/2 inch wide. -
Attach the collar:
Wrap this strip around the neck of the vase where it begins to flare out. Cut the ends at an angle to join them seamlessly. Use a tiny dab of liquid polymer clay underneath if it needs help sticking to the speckled layer.
Trapped Air Bubbles
If you see a bubble under the clay before baking, pierce it with a needle tool and gently press the air out, smoothing the hole closed.
Step 3: Firing and Finishing
-
Texture the surface:
Before baking, lightly tap the entire surface with a toothbrush or crumpled aluminum foil. This removes fingerprints and adds a stone-like texture that mimics unglazed ceramic. -
Bake the vase:
Bake the covered vessel according to your clay manufacturer’s instructions—usually around 275°F (130°C) for 15-30 minutes depending on thickness. Let it cool completely in the oven to prevent cracks. -
Sand for realism:
Once cool, create a slight contrast by sanding the white speckled areas lightly giving them a smoother feel, while leaving the terracotta collar slightly rougher. -
Seal the piece:
Apply a coat of matte varnish to the entire piece. This protects the pepper/coffee inclusions and gives the vessel that high-end, finished pottery sheen without being glossy.
Fill your new faux-ceramic vessel with dried grasses or wheat to complete the warm, neutral aesthetic.