When I’m craving that smooth, dreamy finish, I always reach for porcelain clay (especially cold porcelain) because it makes even simple shapes look extra polished. Here are my favorite small, feel-good project ideas—perfect for quick wins, gifts, and cute little desk companions.
Classic Trinket Dishes With Smooth Rims
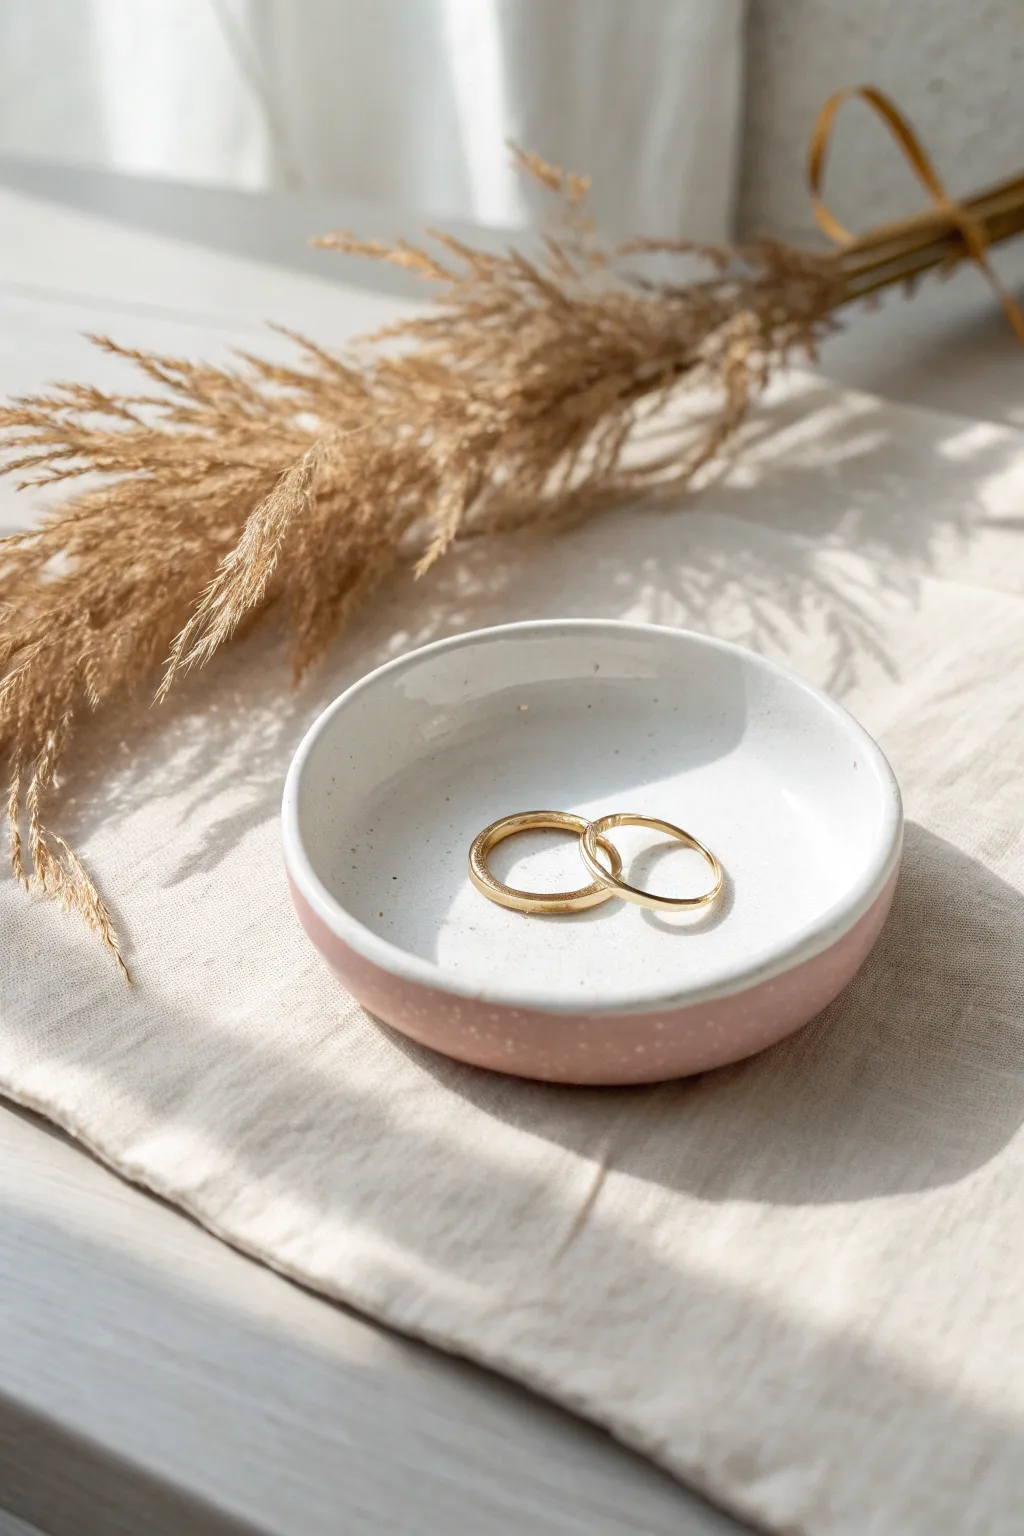
This elegant trinket dish combines a soft blush pink exterior with a classic creamy white interior, finished with subtle speckling for a modern touch. Its smooth, rounded rim and gentle depth make it the perfect resting place for your most treasured rings.
Step-by-Step Guide
Materials
- White porcelain or stoneware clay (speckled variety preferred)
- Rolling pin
- Two guide sticks (approx. 1/4 inch thick)
- Round cookie cutter or bowl (approx. 4-5 inches diameter)
- Small bowl or foam mold for shaping
- Sponge
- Needle tool or fettling knife
- Clear glossy glaze
- Lesson/Pink underglaze or glaze
- Soft paintbrush
- Rib tool (optional)
Step 1: Shaping the Clay Body
-
Prepare the slab:
Begin by wedging a fist-sized ball of white speckled clay to remove air bubbles. Place it on a canvas mat or cloth to prevent sticking. -
Roll to thickness:
Set your guide sticks on either side of the clay. Roll the clay out into a smooth, even slab until the rolling pin rests on the guides, ensuring a consistent thickness of about 1/4 inch. -
Compress the surface:
Take a rubber or metal rib tool and gently glide it over the surface of the clay slab. This compresses the particles, minimizing warping later and creating that super-smooth finish we want for ring dishes. -
Cut the circle:
Using a round cookie cutter or placing a bowl upside down as a template, cut out a perfect circle. If using a template, trace around it carefully with a needle tool. -
Smooth the edges:
Dip your finger or a small sponge in water and run it along the cut edge of the circle. Round off the sharp corners so the rim feels soft and organic rather than mechanically cut.
Step 2: Forming the Dish
-
Lift the edges:
Gently lift the clay circle and place it into a shallow plaster mold or a small bowl lined with plastic wrap or cheesecloth to prevent sticking. -
Establish the curve:
Press a damp sponge into the center of the clay, working in a spiral motion towards the edges. You want to conform the clay to the bowl’s curve without stretching it too thin. -
Refine the rim:
Inspect the rim again. Since this design features a prominent, smooth lip, lightly tap the rim with a wooden paddle or your finger to ensure it is level and uniform all around. -
Controlled drying:
Let the clay sit in the mold until it reaches a ‘leather hard’ state. This usually takes a few hours depending on humidity. It should be firm enough to hold its shape but not bone dry. -
Remove and clean:
Pop the dish out of the mold. Use a barely damp sponge to smooth away any texture marks on the exterior left by the mold or cloth.
Rim Warping?
If your rims warp during drying, try drying the bowls upside down on a flat board for the first few hours once they are leather hard, or cover them loosely with plastic to slow the process.
Step 3: Glazing and Firing
-
Bisque fire:
Once the piece is bone dry (completely chalky and room temperature to the touch), fire it in the kiln to cone 04 (or your clay’s specified bisque temperature). -
Masking the interior:
After the bisque firing, wipe the piece with a damp sponge to remove dust. If you want a sharp line between the pink and white, you can apply liquid wax resist to the top rim and interior, but for this organic look, freehand painting works well. -
Apply exterior color:
Turn the dish upside down. Using a soft fan brush, apply 2-3 coats of a blush pink underglaze or glaze to the exterior walls and bottom. I like to stop just at the curve where the bottom meets the side to keep it neat. -
Glaze the interior:
For the inside, pour a small amount of clear glossy glaze into the dish, swirl it to coat the entire inner surface and rim, and pour out the excess. This allows the natural speckles of the clay to show through. -
Clean the foot:
Use a sponge to wipe any glaze off the very bottom of the dish where it will touch the kiln shelf. This creates a dry ‘foot’ so your piece doesn’t fuse to the kiln. -
Final fire:
Load the kiln for the glaze firing, typically cone 5 or 6 for stoneware. Ensure no pieces are touching. -
Cooling:
Allow the kiln to cool completely before opening. Thermal shock can crack the fine porcelain, so patience here really pays off.
Add a Gold Rim
For an extra luxe touch, apply a small amount of gold luster to the rim after the glaze firing and fire it a third time at a much lower temperature (cone 018).
Place your finished dish on a vanity or beside the kitchen sink to keep your rings safe in style


Minimal Ring Cones and Ring Holders
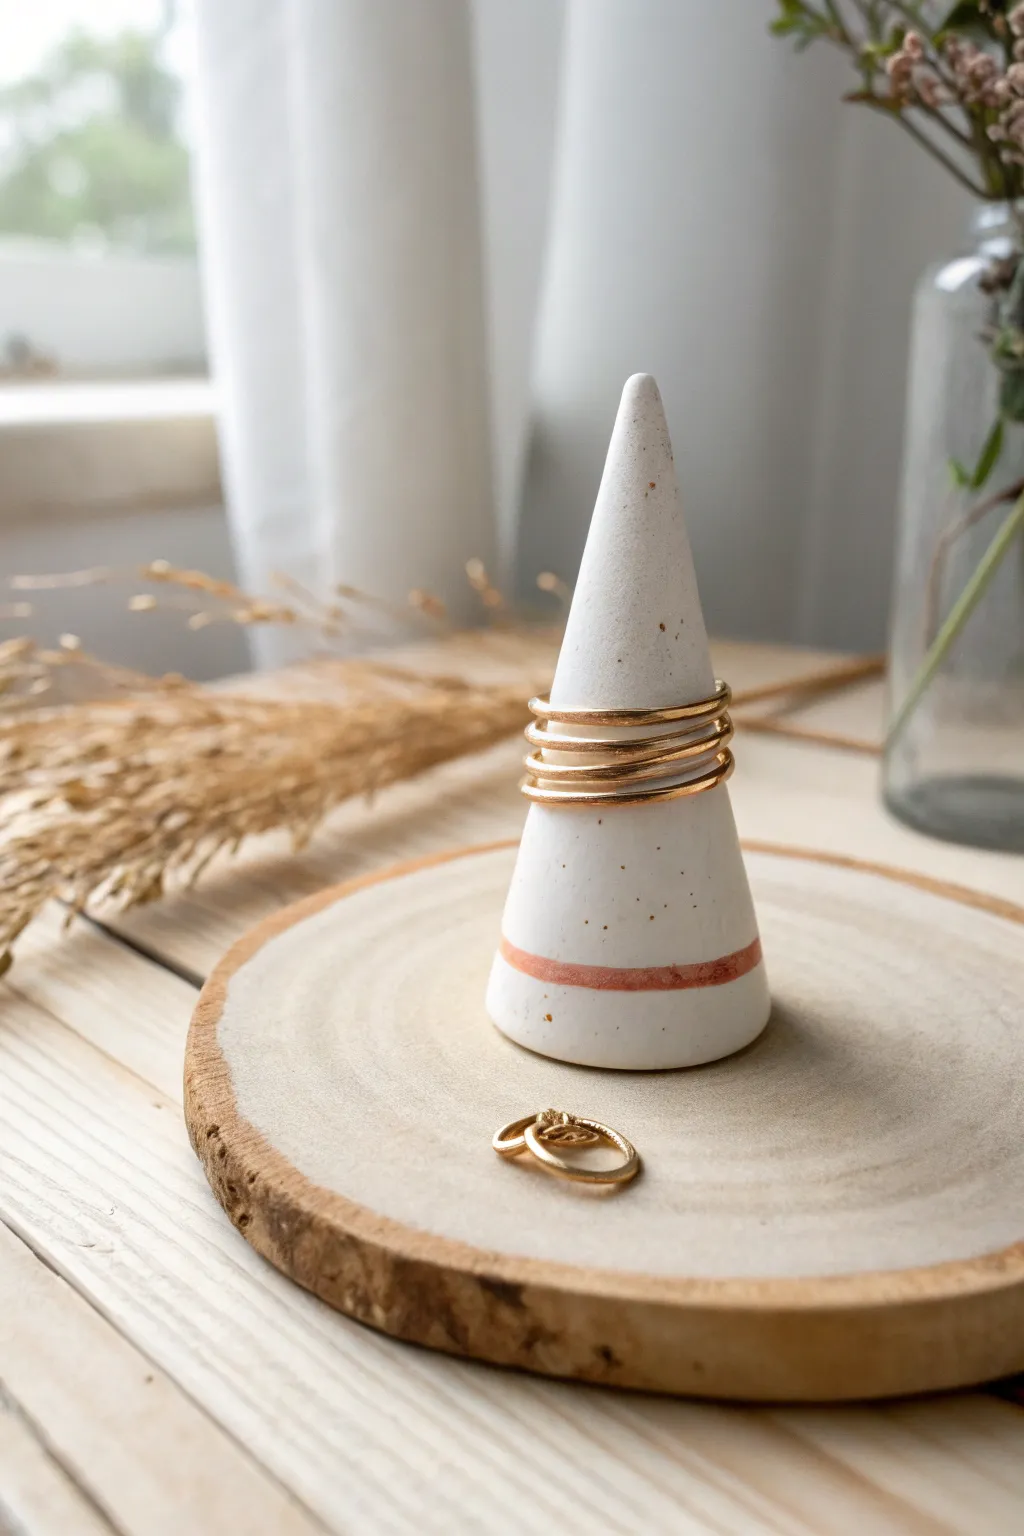
Achieve organized elegance with these sleek, porcelain-style ring cones featuring a subtle speckled finish and a modern accent stripe. This project perfectly balances simplicity with utility, creating a beautiful home for your favorite gold bands.
Detailed Instructions
Materials
- White polymer clay or porcelain clay (air-dry or oven-bake)
- Speckle inclusions (dried coffee grounds, black pepper, or faux granite clay)
- Rolling pin or acrylic roller
- Craft knife or clay blade
- Smooth work surface (ceramic tile or glass)
- Sandpaper (fine grit, 400-600)
- Painter’s tape or wash tape
- Copper, terracotta, or rose gold acrylic paint
- Small flat paintbrush
- Gloss or matte varnish (optional)
Step 1: Preparing the Clay
-
Condition the clay:
Begin by warming up your white clay in your hands. Knead it thoroughly until it is soft, pliable, and free of any air bubbles. -
Add the speckled effect:
To mimic the stone look in the photo, flatten your clay slightly and sprinkle a very small amount of dried coffee grounds or coarse black pepper onto it. I find that less is more here—start small. -
Incorporate the speckles:
fold the clay over the speckles and knead again until the particles are evenly distributed throughout the white base. -
Form a ball:
Roll the prepared clay into a smooth, crack-free sphere roughly the size of a golf ball. This ensures your cone starts without structural weaknesses.
Clean Lines Pro-Tip
For the sharpest painted line, run a quick layer of clear matte varnish or white paint over the tape gap first. This seals the tape edge so the color won’t bleed.
Step 2: Shaping the Cone
-
Roll a tapered log:
Place the ball on your work surface. applying uneven pressure with the palm of your hand, roll it back and forth to create a thick log that is slightly narrower at one end. -
Refine the point:
Focus your rolling on just the top half of the log. Continue rolling back and forth while angling your hand to elongate the top into a distinct point. -
Flatten the base:
Once you have a general cone shape, stand it upright. Gently tap the wide bottom against your work surface to create a perfectly flat base so it stands stable. -
Smooth the sides:
With the cone standing, use your fingers to smooth out any fingerprints or lumps. The transition from base to tip should be a straight, clean line. -
Check the height:
Ensure the cone is roughly 3 to 4 inches tall—high enough to stack multiple rings but stable enough not to tip over. -
Final shaping:
Do one final roll on the surface to ensure roundness, then press the base flat one last time.
Level Up: Marbling
Instead of speckles, twist grey and white clay together before rolling the cone to create a sophisticated Carrara marble effect for your jewelry display.
Step 3: Curing and Finishing
-
Bake or dry:
Follow the specific instructions for your clay type. If using oven-bake polymer clay, bake at the recommended temperature (usually 275°F/130°C) for about 15-20 minutes. If using air-dry clay, let it sit undisturbed for 24-48 hours. -
Cool completely:
Allow the cone to cool completely before handling. It is fragile while warm. -
Sand for smoothness:
Use fine-grit sandpaper to gently buff the surface of the cone. This removess any fingerprints and gives it that high-end porcelain texture. -
Wipe clean:
Use a slightly damp cloth or paper towel to remove all sanding dust. The surface must be perfectly clean for the paint to adhere.
Step 4: Decorating
-
Mask the stripe:
Apply two parallel strips of painter’s tape or washi tape near the bottom of the cone. Leave a gap of about 1/4 inch between them where you want the colored stripe to be. -
Seal the edges:
Press the edges of the tape down firmly with your fingernail to prevent paint from bleeding underneath. -
Paint the accent:
Using a small flat brush, apply your copper or terracotta paint in the gap. You may need two coats for full opacity; let the first coat dry before adding the second. -
Reveal the design:
While the paint is still slightly tacky (not fully bone dry), carefully peel away the tape. This ensures a crisp, sharp line. -
Seal (Optional):
If you want a glossy finish or extra durability, apply a thin coat of varnish over the entire cone once the paint is completely dry.
Place your new ring cone on your vanity and enjoy the simple beauty of your handmade organization


Cute Animal Charms With Oversized Heads
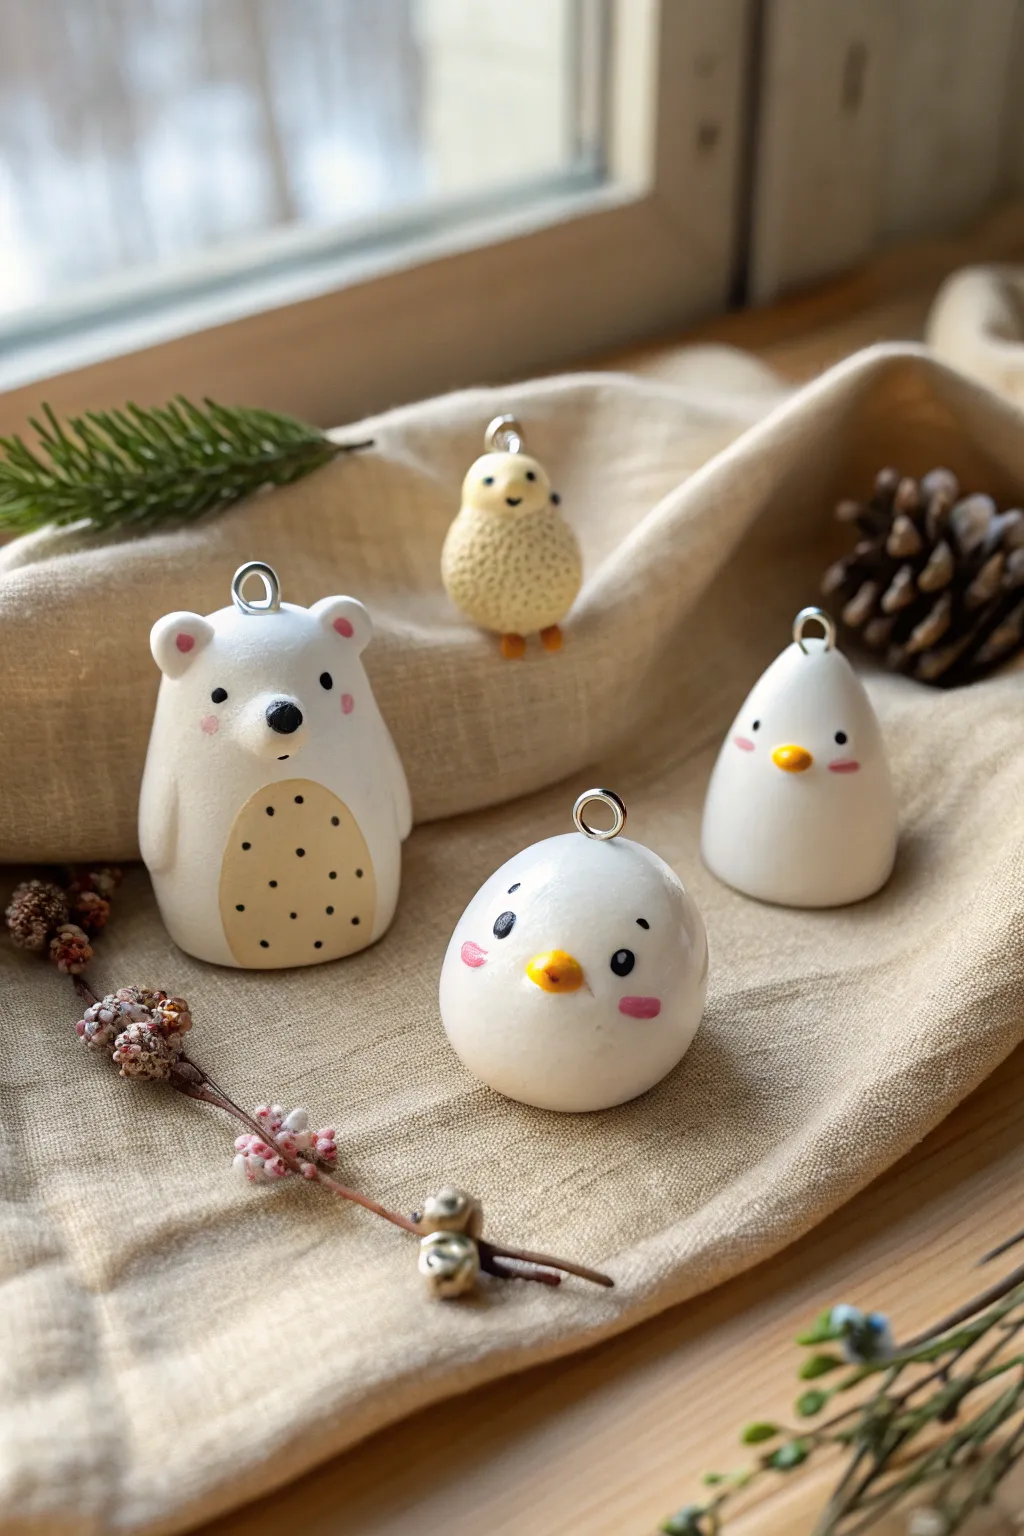
These delightful ceramic charms—a polite polar bear, a fleecy penguin, a round chick, and a classic snowy bird—bring a touch of handmade warmth to any winter display. Their simple, oversized shapes and minimalist painted features make them perfect for beginner sculptors looking to create adorable, professional-looking keepsakes.
How-To Guide
Materials
- White polymer clay or porcelain clay (air-dry or oven-bake)
- Small metal eye pins or jump rings
- Acrylic paints (White, Black, Peach/Pink, Mustard Yellow, Beige)
- Fine-point black permanent marker (optional)
- Detail paintbrush (00 or 000 size)
- Dotting tool or toothpick
- Gloss glaze or satin varnish
- Sandpaper (fine grit)
- Needle tool or stiff toothbrush (for texturing)
Step 1: Shaping the Base Forms
-
Prepare the Clay:
Begin by conditioning your white clay until it is soft and pliable. Divide it into four roughly equal portions, rolling each between your palms to create smooth, crack-free spheres about the size of a walnut. -
Form the Bear:
Take one sphere and gently roll it into an oblong, gumdrop shape with a flattened base so it stands up on its own. Pinch two small pieces of clay for ears and attach them near the top, blending the seams with a smoothing tool or your finger. -
Create the Penguin:
Shape a second sphere into a wider cone, keeping the bottom very flat. This shape should be more tapered at the top than the bear. Smooth the surface so there are no fingerprints visible. -
Sculpt the Round Birds:
For the two birds, roll the remaining spheres. Leave one perfectly round. For the ‘chick,’ pinch the top slightly to suggest a head division, though keeping it mostly spherical adds to the charm. -
Add Textural Details:
For the chick character (the yellowish one in the back), use a needle tool or an old stiff toothbrush to stipple the surface gently, creating a fluffy, feathery texture all over the body. -
Refine the Snouts:
For the bear, add a tiny flattened ball of clay to the center of the face for a muzzle. For the birds and penguin, shape minuscule triangles of clay into beaks and press them securely into the center of their faces.
Uneven Surfaces?
If you struggle with fingerprints, wear latex gloves while sculpting or lightly buff the raw clay with a little bit of cornstarch. This acts like a silky powder creating a flawless surface.
Step 2: Hardware and Curing
-
Insert Eye Pins:
Take your metal eye pins and trim the stems if they are too long. Insert one screw eye or pin directly into the center top of each figure. If the clay is soft, you can add a dab of liquid clay or glue for extra security. -
Smooth and Check:
Give each figure a final inspection. I like to smooth out any fingerprints using a tiny bit of water (for air-dry clay) or baby oil (for polymer clay) before the final cure. -
Cure or Dry:
Follow the instructions for your specific clay type. If baking polymer clay, create a tent with aluminum foil to prevent scorching the white surface. If using air-dry clay, allow 24-48 hours for complete drying. -
Sanding:
Once fully cured and cooled, use fine-grit sandpaper to buff away any rough spots, especially on the bottom or near the ears, ensuring a porcelain-smooth finish.
Eye Pin Security
Bend the bottom end of the wire pin into a small ‘L’ or hook shape before inserting it into the wet clay. This anchors it inside the body so it can’t be pulled straight out later.
Step 3: Painting and Finishing
-
Base the Bear’s Belly:
Mix a soft beige or diluted mustard paint. Paint an oval patch on the bear’s tummy. Let this layer dry completely before adding patterns. -
Paint the Beaks:
Using your smallest brush, paint the beaks a bright mustard yellow. For the textured chick, give the entire body a wash of very diluted yellow ochre to highlight the texture, wiping away excess. -
Add Facial Features:
Using a dotting tool or the back of a paintbrush dipped in black paint, dab on the eyes. Keep them wide-set for a cuter look. Paint the bear’s nose black on its raised muzzle. -
Blushing Cheeks:
Mix a tiny amount of pink paint. Dab sweet little rosy cheeks onto the bear and the front-facing white bird. You can also add tiny pink ovals near the eyes of the penguin connection. -
Detailing the Belly:
Once the bear’s beige belly is dry, use a fine-point marker or a toothpick with black paint to add small, random polka dots. -
Seal the Charms:
Apply a coat of satin or matte varnish to protect the paint. Avoid using a high-gloss finish unless you want a very shiny, wet ceramic look; a satin finish usually looks more high-end for these critters.
Now you have a set of sweet, snowy companions ready to hang on a tree or gift to a friend


Tiny Pendant Necklaces With Pressed Texture
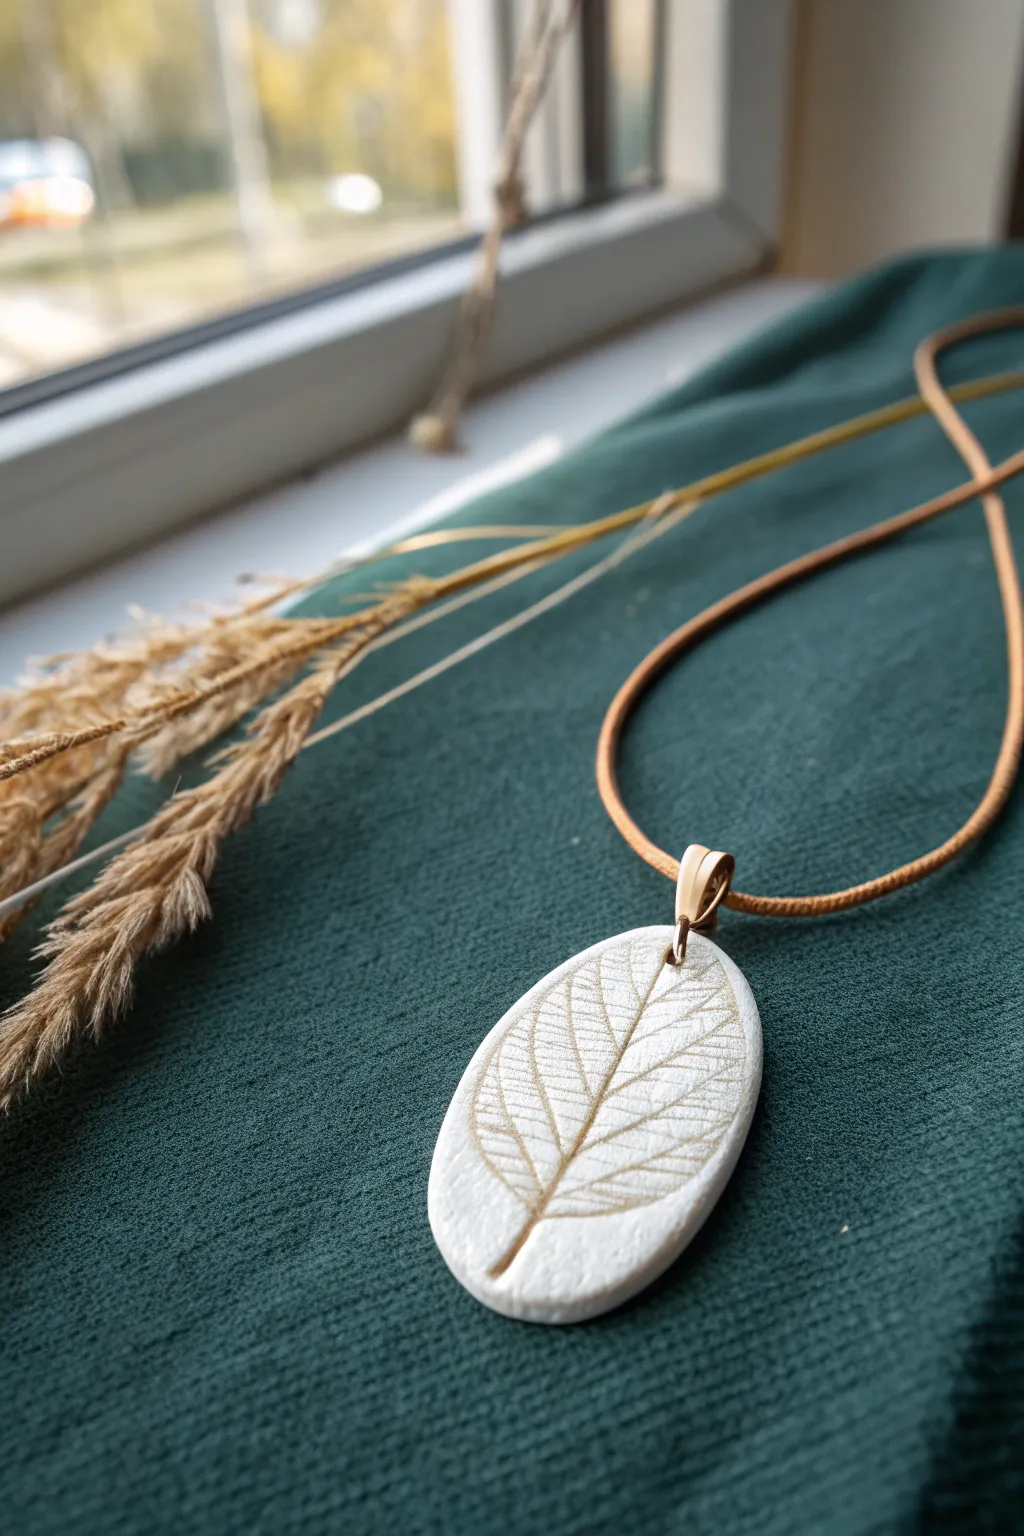
Capture nature’s intricate details with this elegant oval pendant, featuring a delicate golden-hued leaf skeleton pressed into pristine white clay. The result is a sophisticated piece of jewelry that combines organic texture with a minimalist aesthetic.
Step-by-Step
Materials
- White porcelain clay (air-dry or kiln-fire)
- Small rolling pin
- Oval clay cutter (approx. 1.5 – 2 inches)
- Fresh leaf with prominent veins (e.g., beech or elm)
- Metallic gold acrylic paint or Rub ‘n Buff
- Fine grit sandpaper (400-600 grit)
- Small paintbrush
- Jump ring (gold)
- Pendant bail (gold)
- Leather jewelry cord (tan or brown)
- Needle tool or toothpick
- Clear matte varnish (optional)
Step 1: Shaping the Base
-
Prepare the Clay:
Begin by conditioning a small ball of white porcelain clay in your hands until it becomes pliable and smooth, eliminating any cracks. -
Roll the Slab:
Place the clay on a smooth work surface and roll it out to an even thickness of approximately 1/4 inch (about 4-5mm). Ensure the surface is perfectly flat. -
Cut the Shape:
Position your oval cutter over the smoothest section of the clay and press down firmly to cut out your pendant shape. -
Smooth the Edges:
Gently lift the oval shape and use your finger dipped in a tiny bit of water to smooth down the sharp edges created by the cutter, giving it a soft, rounded finish.
Sharper Impressions
Place a piece of cling film or plastic wrap over the leaf before rolling. This prevents the roller from getting dirty and helps press the leaf deeper without flattening the clay too much.
Step 2: Creating the Texture
-
Select Your Botanical:
Choose a leaf slightly smaller than your oval. The back of the leaf usually has more prominent veins, which creates a better impression. -
Make the Impression:
Center the leaf vein-side down onto the clay oval. Gently roll over it once with your rolling pin using firm, even pressure to embed the texture. -
Peel and Pierce:
Carefully lift the leaf away to reveal the design. I like to use a needle tool right after to create a clean hole at the top center for the jump ring. -
Drying Phase:
Allow the clay to dry completely according to the manufacturer’s instructions. For air-dry clay, this usually takes 24-48 hours; turn it over halfway through to prevent warping.
Fixing Warped Clay
If your pendant curls while drying, slightly dampen the concave side and place it under a heavy book between two sheets of paper towel for several hours to flatten it back out.
Step 3: Refining and Assembly
-
Sand for Smoothness:
Once fully dry (and fired if using kiln clay), use fine grit sandpaper to gently buff the edges and surface, avoiding the textured leaf area. -
Highlight the Veins:
Dip a fine brush into metallic gold paint. Wipe most of the paint off on a paper towel, then lightly dry-brush over the leaf impression to catch only the raised details. -
Define the Groove:
For deeper definition, you can paint a diluted wash of gold int the grooves and wipe the surface clean with a damp cloth, leaving pigment only in the recesses. -
Clean Up:
Check the back and edges for any stray paint smudges and gently sand them away or wipe them clean before the paint cures. -
Seal (Optional):
If you want extra durability, apply a thin coat of clear matte varnish over the pendant, paying attention to the painted area. -
Add Hardware:
Open a gold jump ring with pliers and thread it through the hole you created earlier. Attach the decorative gold bail to this ring and close it securely. -
String the Necklace:
Thread your tan leather cord through the bail to complete the rustic yet refined look.
Wear your new botanical necklace as a subtle nod to the beauty of the outdoors

What Really Happens Inside the Kiln
Learn how time and temperature work together inside the kiln to transform clay into durable ceramic.
Simple Stud Earrings in Soft Pastels
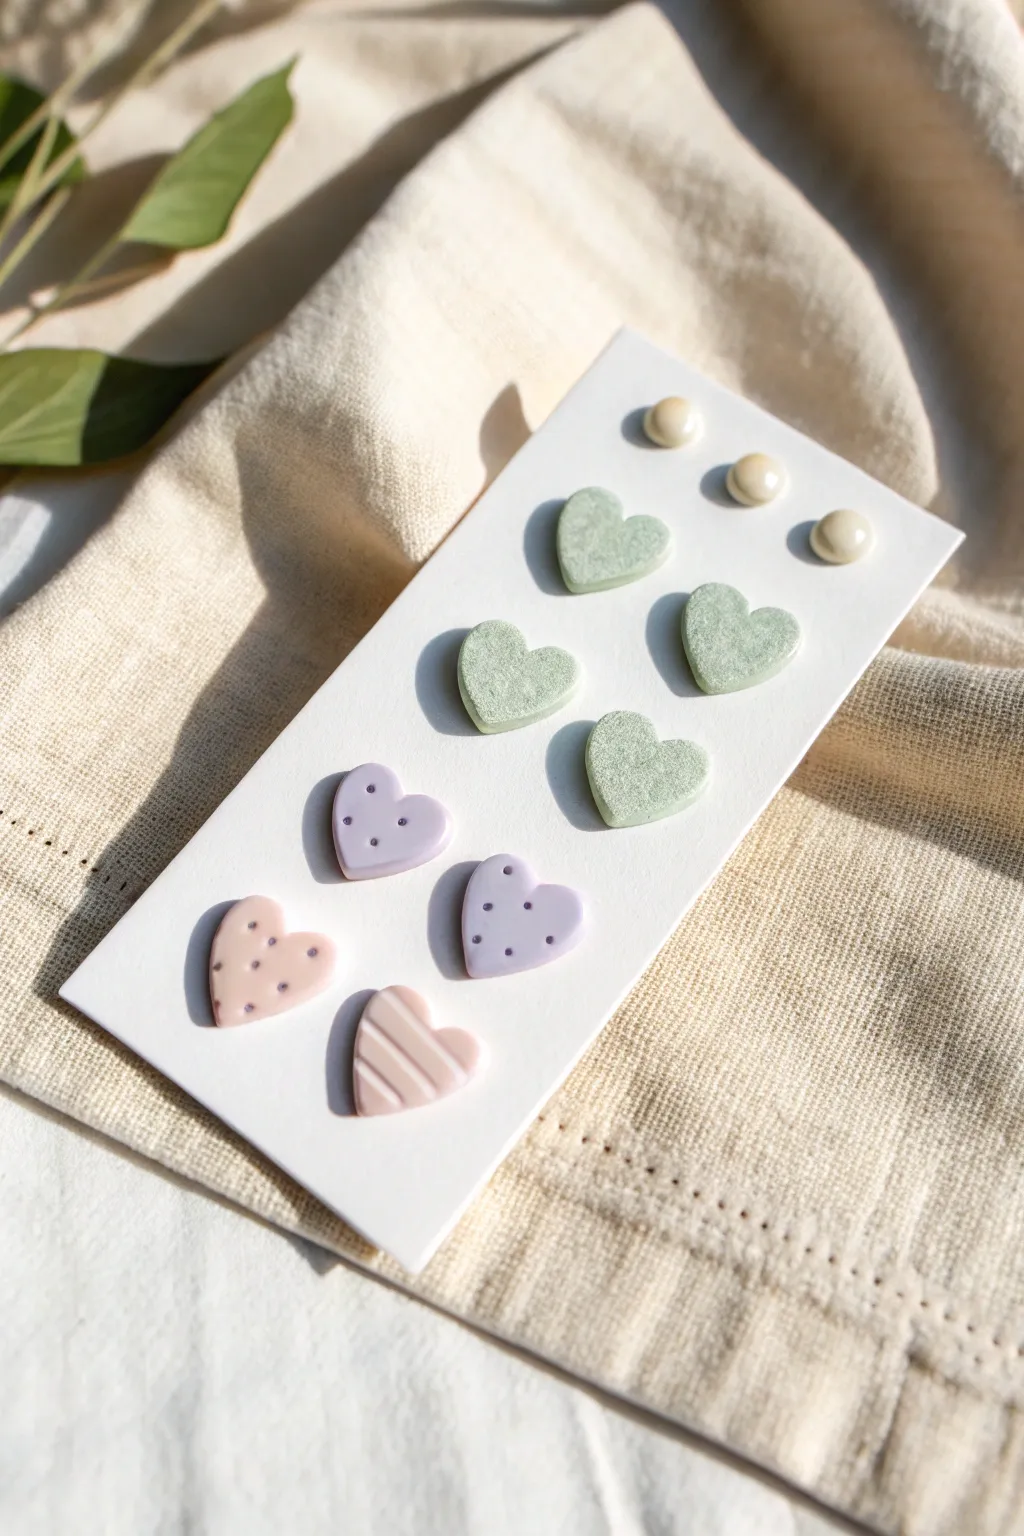
Create a charming collection of everyday earrings featuring soft textures and sweet pastel hues. This set includes faux-pearl studs, textured sage hearts, and playful patterned designs in lavender and blush using porcelain or polymer clay.
Step-by-Step Tutorial
Materials
- White, Sage Green, Lavender, and Blush Pink polymer or porcelain clay
- Small heart-shaped clay cutter (approx. 1 cm)
- Small circle cutter (approx. 0.5 cm)
- Texture sponge or sandpaper (fine grit)
- Needle tool or toothpick
- Gloss glaze or resin (optional)
- Earring posts and backs
- strong jewelry glue (like E6000)
- Clean ceramic tile or baking sheet
- Rolling pin or pasta machine
Step 1: Preparation & Pearl Studs
-
Condition the white clay:
Begin by thoroughly conditioning a small amount of white clay until it is soft and pliable. If you want a pearlescent finish like the photo, mix in a tiny amount of pearl mica powder or use pre-mixed pearl effect clay. -
Cut the circles:
Roll the clay out to a thickness of about 3mm. Use your smallest circle cutter to punch out three identical circles. I find working on a ceramic tile helps keep the shapes from distorting when you lift them. -
Shape the domes:
Gently smooth the edges of the cut circles with your fingertip to round them off, creating a soft, domed cabochon shape.
Fingerprint Fix
If you notice fingerprints on your smooth clay pieces before baking, lightly brush them with a little baby oil or cornstarch to smooth the surface without ruining the shape.
Step 2: Textured Sage Hearts
-
Roll the green clay:
Condition your sage green clay and roll it into a sheet roughly 3mm thick. -
Apply texture:
Before cutting, press a texture sponge, a piece of sandpaper, or semi-rough fabric firmly onto the surface of the clay sheet. This creates that lovely organic, stone-like pitted texture seen in the reference. -
Cut the heart shapes:
Position your heart cutter over the textured areas and press down firmly to cut out six hearts. Wiggle the cutter slightly before lifting to ensure clean edges. -
Check the edges:
Inspect the sides of each heart. If the cutting process created any jagged bits, smooth them very gently with your finger without pressing down on the textured top.
Step 3: Patterned Pastel Hearts
-
Prepare lavender clay:
Roll out a small slab of lavender clay, keeping it smooth. Cut out two heart shapes. -
Add dot details:
Using the tip of a needle tool or a toothpick, gently press a pattern of five small dots onto the surface of the lavender hearts—one in the center and four surrounding it. -
Design the blush heart:
Roll out the blush pink clay and cut one heart shape. For the striped one seen at the bottom, take a needle tool and gently press horizontal lines across the surface, spacing them evenly. -
Variation option:
For the second blush heart shown with dots, repeat the dotting process used on the lavender hearts.
Clean Cuts Every Time
Dip your clay cutters into cornstarch or water before pressing into the clay. This acts as a release agent, preventing the clay from sticking inside the cutter and damaging delicate edges.
Step 4: Baking & Assembly
-
Bake the batch:
Arrange all your clay pieces on your baking surface. Bake according to the manufacturer’s instructions for your specific brand of clay—usually around 275°F (130°C) for 15-30 minutes. -
Cool down:
Allow the pieces to cool completely before handling. Moving them while warm can cause warping. -
Glaze the pearls:
Once cool, apply a thin layer of gloss glaze or UV resin only to the three white circle studs to give them a shiny, pearl-like finish. Cure or let dry. -
Attach posts:
Apply a small dot of strong jewelry glue to the flat pad of an earring post. -
Secure the backings:
Press the glued post firmly onto the center of the back of each clay piece. Let the glue cure fully (usually 24 hours) for maximum durability. -
Final display:
Once everything is set, arrange your new collection on a card punched with holes to keep the sets organized and ready for gifting or wearing.
Now you have a versatile set of delicate studs ready to match any softer outfit in your wardrobe
Mini Planters With Sweet Little Faces
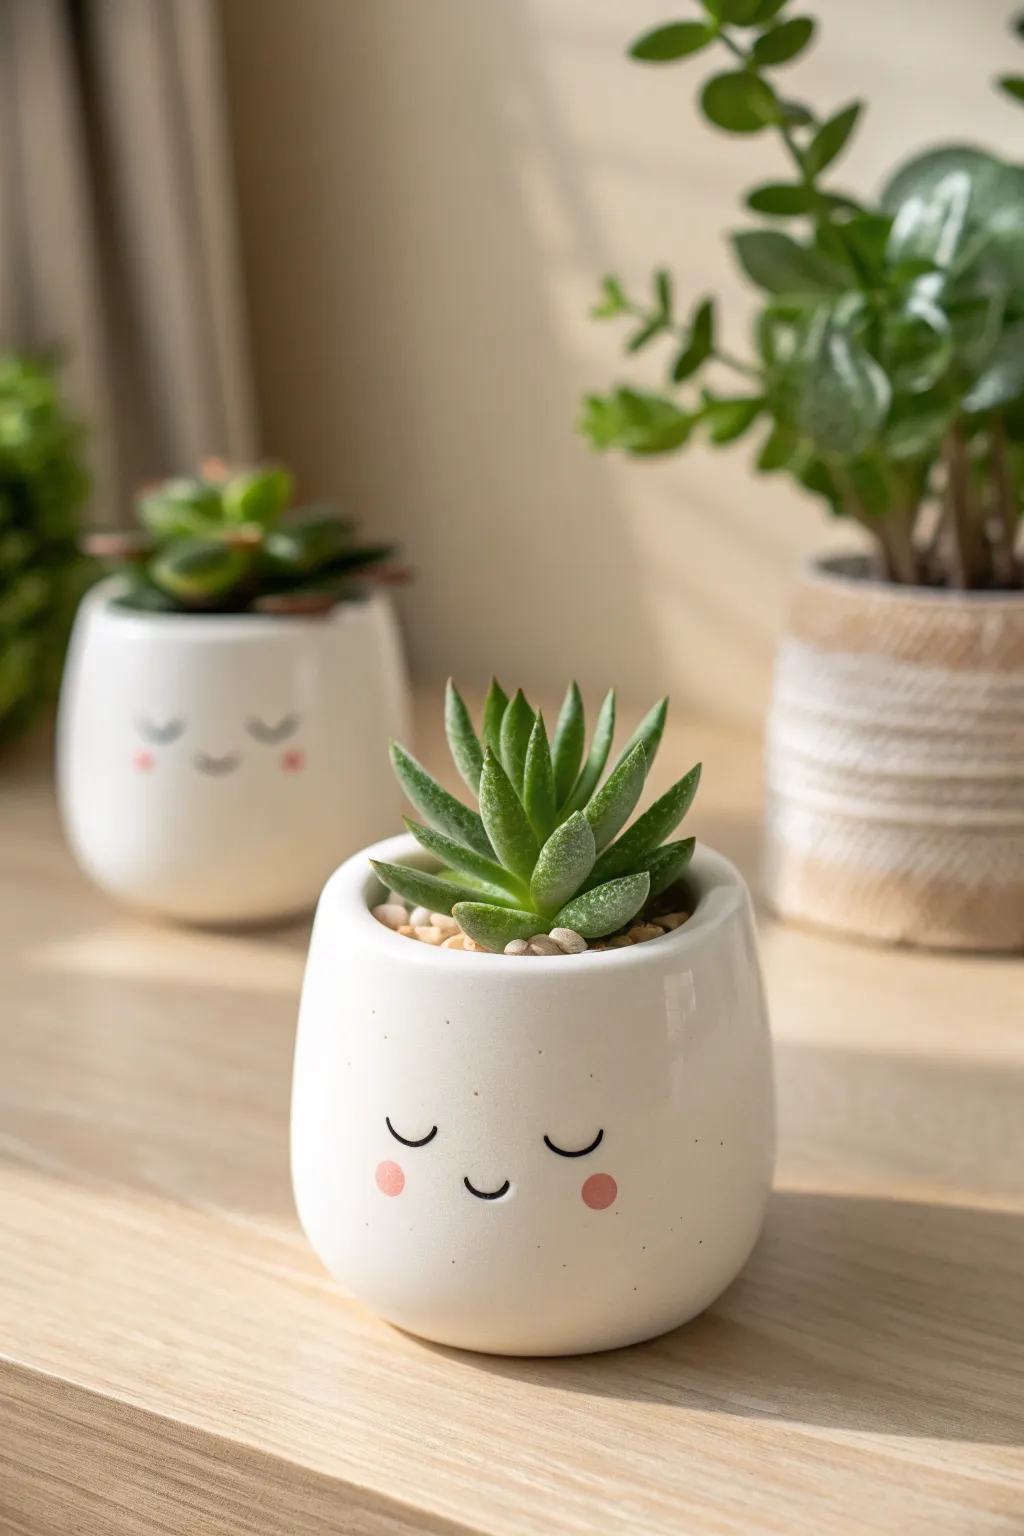
These adorable mini planters bring a touch of whimsy to any windowsill with their smooth porcelain finish and charming, sleepy expressions. Their rounded, egg-like shape is perfectly sized for small succulents, making them a sweet and simple project for clay enthusiasts.
Step-by-Step Guide
Materials
- White porcelain clay or high-fire white stoneware
- Small rolling pin
- Pottery wheel (optional, can be hand-built)
- Needle tool
- Small curved rib tool (rubber or wood)
- Sponge
- Pottery trimming tools
- Underglaze (black and rosy pink)
- Fine detail paintbrush (00 or 000 size)
- Small round paintbrush
- Clear glossy glaze
- Kiln
Step 1: Forming the Shape
-
Prepare the clay:
Begin by wedging a small ball of porcelain clay, roughly the size of a tennis ball, to ensure there are no air bubbles. -
Center and open:
If throwing on a wheel, center your clay and open it up, leaving the floor about a quarter-inch thick. -
Pull the walls:
Pull the walls up gently. Porcelain can be finicky, so use steady, even pressure to avoid slumping. -
Establish the curve:
Using a curved rib tool inside the pot, gently push the belly of the pot outward to create a rounded, egg-like profile. -
Collar the rim:
Slightly collar the rim inward so the opening is narrower than the widest part of the belly, enhancing that cozy, rounded look. -
Alternative: Pinch pot method:
If hand-building, form a smooth ball and insert your thumb. Pinch evenly while rotating to create the walls, smoothing the outside with a rib as you go. -
Refine the surface:
Use a damp sponge to smooth out any finger marks or throwing lines. The goal is a super-smooth, modern finish. -
Dry to leather hard:
Set the pot aside until it reaches a leather-hard state, where it is firm enough to handle without deforming.
Porcelain Smoothness
Burnish the clay with a soft cloth or a smooth stone at the leather-hard stage before firing. This compresses the particles for a glass-like surface.
Step 2: Trimming and Painting
-
Trim the base:
Flip the pot over and trim the bottom to create a neat foot ring. This lifts the pot slightly and gives it a professional finish. -
Add drainage:
Don’t forget to use a hole cutter tool to create a drainage hole in the center of the bottom. -
Sand smooth:
Once fully bone dry, gently sand any rough spots with a fine-grit sanding sponge (wear a mask!) to ensure a perfect canvas for the face. -
Sketch the face:
Lightly sketch the sleepy eyes and smile with a pencil. The graphite will burn off in the kiln, so don’t worry about mistakes. -
Paint the eyes:
Using the fine detail brush and black underglaze, carefully paint the two curved lines for the closed eyes. I find steadying my hand against the table helps get crisp lines. -
Add the smile:
Paint a tiny, sweet curve for the mouth right between and slightly below the eyes. -
Add the cheeks:
Dip the small round brush into the pink underglaze. Dab two soft circles underneath the eyes for the blushing cheeks. -
Bisque fire:
Load the pot into the kiln for a bisque firing according to your clay body’s specifications (usually Cone 04 or 06).
Step 3: Glazing and Finishing
-
Apply clear glaze:
Wipe the bisque ware with a damp sponge to remove dust. Dip the entire pot rapidly into a clear glossy glaze. -
Clean the foot:
Wipe the bottom foot ring completely clean of glaze with a sponge to prevent it from sticking to the kiln shelf. -
Glaze fire:
Fire the kiln again to the maturation temperature of your porcelain and glaze (often Cone 5, 6, or 10). -
Final assembly:
Once cool, fill with a gritty succulent soil mix and plant your favorite rosette succulent to complete the ‘hair’ of the character.
Wobbly Lines?
If you struggle with painting fine lines on curved surfaces, try using an underglaze pencil or a needle-tip applicator bottle instead of a brush.
Place your little finished friend in some scattered sunlight and enjoy the peaceful vibe it brings to your space


The Complete Guide to Pottery Troubleshooting
Uncover the most common ceramic mistakes—from cracking clay to failed glazes—and learn how to fix them fast.
Marble-Swirled Soap Dishes and Coasters
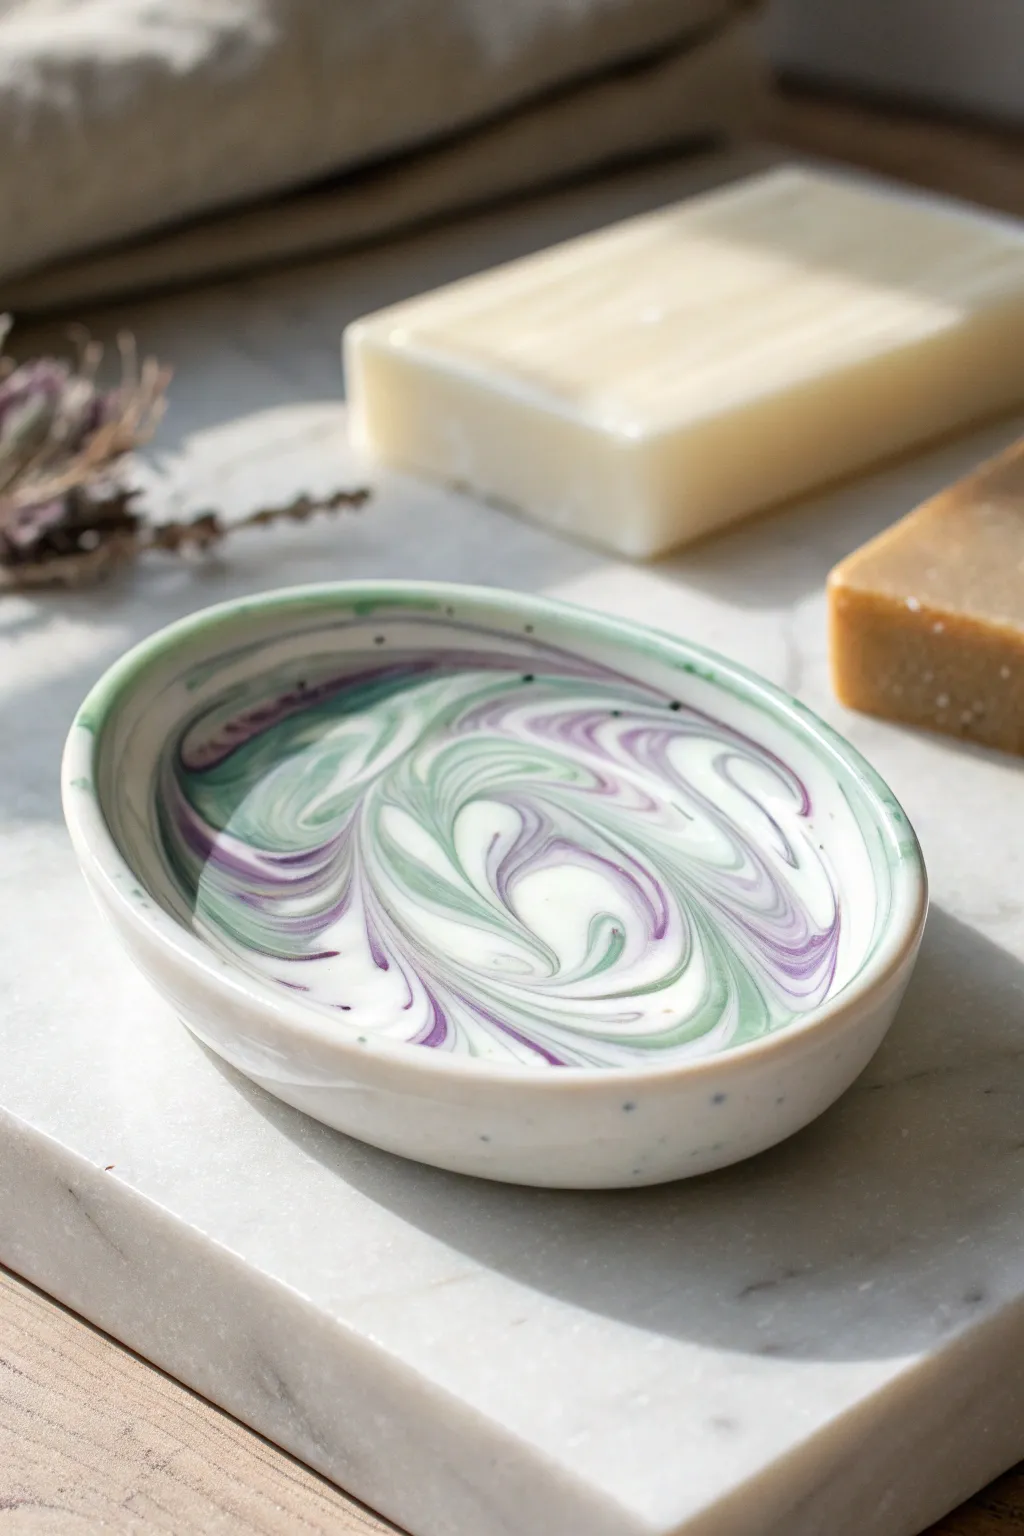
Capture the elegance of fluid movement with this stunning marbled pottery project. By gently swirling green and purple stained clay into a white porcelain base, you create a functional piece of art that looks right at home in a spa-like bathroom.
Step-by-Step Guide
Materials
- High-fire white porcelain clay body
- Mason stains (Purple and Sage Green)
- Small rolling pin
- Oval template or cookie cutter (approx 4-5 inches)
- Fettling knife or needle tool
- Smooth work surface or canvas mat
- Sponge and water bowl
- Shallow slumped mold (or a small bowl for forming)
- Clear glossy glaze
- Pottery kiln
Step 1: Preparing the Clay Colors
-
Portion the Clay:
Begin by separating your white porcelain clay. You will need one large ball (about the size of a grapefruit) for the white base, and two smaller balls (golf ball size) for the colored sections. -
Mix the Green:
Take one of the small clay balls and create a divot in the center. Add a small amount of sage green Mason stain powder. Fold the clay over the powder and knead thoroughly until the color is uniform. -
Mix the Purple:
Repeat the process with the second small ball, adding purple Mason stain. Be sure to wipe your hands clean between colors to avoid muddying the pigments. -
Create Coils:
Roll your colored clays into thin, snake-like coils. Do the same with a portion of the white clay, making slightly thicker coils.
Muddy colors?
Avoid over-kneading the colors together. Stop twisting the moment you see nice streaks. If you work it too long, the colours blend into a single, dull grey hue.
Step 2: Creating the Marbled Slab
-
Bundle the Colors:
Gather your coils together, alternating white, green, and purple strands. Twist them together gently into a single, thick rope, but don’t over-blend just yet. -
Fold and Twist:
Fold the twisted rope in half and twist it again. I like to repeat this folding and twisting motion just two or three times—too much manipulation will turn the colors grey rather than distinct swirls. -
Form a Ball:
Gently compress your twisted rope into a rough ball, ensuring trapped air is pushed out without squishing the distinctive color lines too much. -
Roll the Slab:
Place the ball on your canvas mats. Using a rolling pin, roll the clay out into a slab approximately 1/4 inch thick. Roll in different directions to stretch the marble pattern organically. -
Check the Pattern:
Inspect both sides of your slab. Often, the underside reveals a more dramatic swirl pattern than the top, so choose the side you prefer to be the face of your dish. -
Cut the Shape:
Place your oval template on the slab over the most interesting section of marbling. Trace around it with a needle tool or fettling knife to cut out your dish shape.
Step 3: Forming and Finishing
-
Smooth the Rim:
Dip your finger or a small piece of sponge in water and run it gently along the cut edge to round it off. Porcelain can be sharp after firing, so a smooth rim is essential. -
Shape the Curve:
Carefully lift your clay oval and place it into a shallow slump mold or a gently curved bowl lined with plastic wrap. Press lightly to ensure it takes the shape of the mold. -
Add Texture Details:
If desired, slightly pinch the rim between your thumb and forefinger to give it an organic, hand-built feel, or keep it perfectly smooth for a modern look. -
Slow Drying:
Cover the mold loosely with plastic and allow the dish to dry slowly to the leather-hard stage. This prevents warping, which porcelain is prone to. -
Bisque Fire:
Once bone dry, fire the piece in your kiln to a bisque temperature (usually cone 04) to prepare it for glazing. -
Glaze Application:
Apply a clear, glossy glaze to the entire piece. Because the decoration is in the clay body itself, a clear glaze will make the colors pop and provide a hygienic, easy-to-clean surface. -
Final Firing:
Fire the piece again to the maturation temperature of your specific porcelain clay body (often cone 6 or cone 10).
Add specks
For the speckled look seen in the photo, kneading a pinch of granular ilmenite or manganese into the white clay body before marbling adds lovely dark flecks.
Place your finished dish by the sink to enjoy a daily splash of handmade art
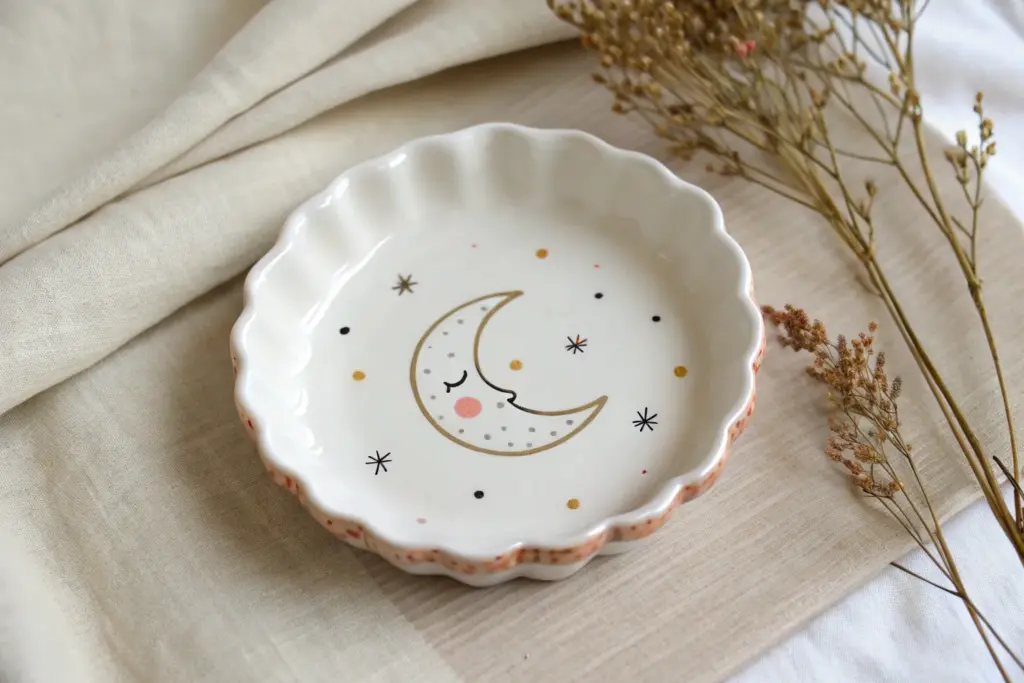
Celestial Moon-and-Sun Jewelry Plates
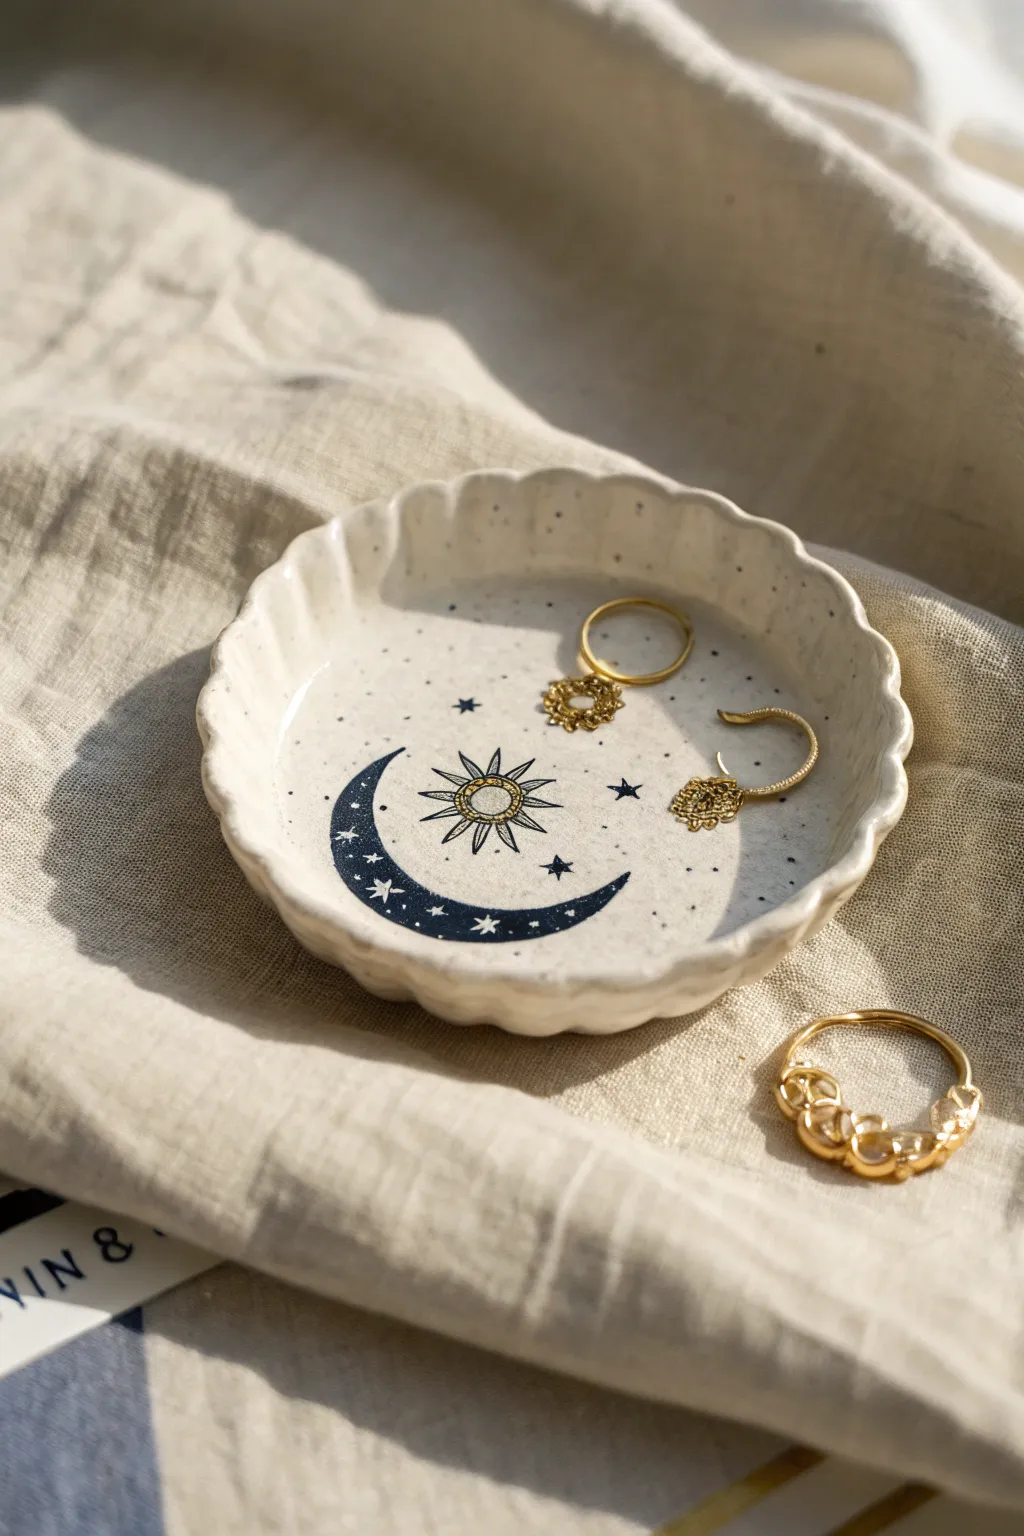
Capture the magic of the night sky with this charming scalloped jewelry dish, perfectly sized for your favorite rings and studs. The subtle celestial design combines a deep blue crescent moon with a radiant sunburst on a creamy, speckled clay body.
Step-by-Step Tutorial
Materials
- Speckled porcelain clay (or stoneware with speckles)
- Small rolling pin
- Rolling slats or guide sticks (approx. 5-6mm)
- Circle cookie cutter or template (approx. 4 inches)
- Fluted tart tin (miniature size) or scalloped cookie cutter
- Soft sponge
- Underglaze (Dark Navy Blue, deep Yellow/Gold)
- Fine detail paintbrush (size 0 or 00)
- Clear transparent glaze
- Kiln (access required)
Step 1: Shaping the Form
-
Prepare the Clay:
Begin by wedging a small ball of speckled porcelain clay to remove air bubbles. Since porcelain can be finicky, ensure the clay is pliable but not sticky. -
Roll out a Slab:
Place the clay between two guide sticks on a canvas board. Roll it out into a smooth, even slab about 5-6mm thick. I like to flip the slab once during rolling to ensure the texture is consistent on both sides. -
Cut the Circle:
Use a circular cutter or trace around a circular template to cut out your base shape. -
Create the Scalloped Edge:
Gently lift the clay circle and press it into a small fluted tart tin to mold the edges. Alternatively, if working flat without a mold, use your fingers to gently pinch and wave the rim into a scalloped pattern. -
Smooth the Rim:
Dip a small sponge in water and wring it out almost completely. Run it very gently along the rim to soften any sharp cutting marks from your tool. -
Drying Phase:
Allow the dish to dry slowly to the leather-hard stage. This is crucial for porcelain to prevent warping. Cover it loosely with plastic if your room is very dry.
Warping Worries?
Porcelain has a memory. If you bend the rim too much while shaping, it may warp back in the kiln. Dry it very slowly under plastic to keep the shape true.
Step 2: Painting the Celestial Design
-
Sketch the Design:
Once leather-hard, lightly sketch your moon and sun placement using a dull pencil. The graphite will burn off in the kiln, leaving only your painted lines. -
Paint the Crescent Moon:
Using a fine detail brush and dark navy underglaze, carefully outline the crescent moon shape on the left side of the dish. -
Fill in the Moon:
Fill the moon shape with navy underglaze. Apply two to three coats for solid opacity, letting each coat dry briefly in between. -
Add Moon Stars:
While the blue is drying, dip the tip of a very fine brush or a needle tool into white underglaze (or simply scrape away the blue to reveal clay) to create tiny stars inside the dark moon body. -
Paint the Sunburst:
In the center, paint a small circle with yellow-gold underglaze, outlining it with a very thin black or navy line if you want the crisp definition seen in the photo. -
Add Sun Rays:
Draw radiating triangles and lines outward from the sun center. Keep your hand steady and use only the very tip of your brush. -
Scatter the Stars:
Paint tiny scattered stars and dots around the sun and moon using the navy underglaze to balance the composition. -
Bisque Fire:
Once the underglaze is completely dry, fire the piece to bisque temperatures (usually Cone 04 or 06) according to your clay’s specifications.
Pro Tip: Liquid Gold
For extra luxury, apply a real gold luster overglaze to the sun and rim after the glaze firing. You’ll need a third, lower-temperature firing (Cone 018).
Step 3: Glazing and Finishing
-
Cleaning:
Wipe the bisque-fired dish with a damp sponge to remove any dust that settled during firing, which can cause glaze crawling. -
Apply Clear Glaze:
Dip the dish into a clear transparent glaze, or brush on three even coats. Ensure the speckled clay body shows through clearly. -
Wipe the Foot:
Thoroughly wipe the bottom of the dish with a sponge to ensure no glaze remains where it sits on the kiln shelf. -
Glaze Fire:
Fire the piece again to the final maturity temperature for your clay and glaze combination (typically Cone 5/6 for mid-fire porcelain).
Place this little celestial treasure on your nightstand to keep your daily jewelry safe and sound

TRACK YOUR CERAMIC JOURNEY
Capture glaze tests, firing details, and creative progress—all in one simple printable. Make your projects easier to repeat and improve.
Glossy “Porcelain” Finish With Clear Topcoats
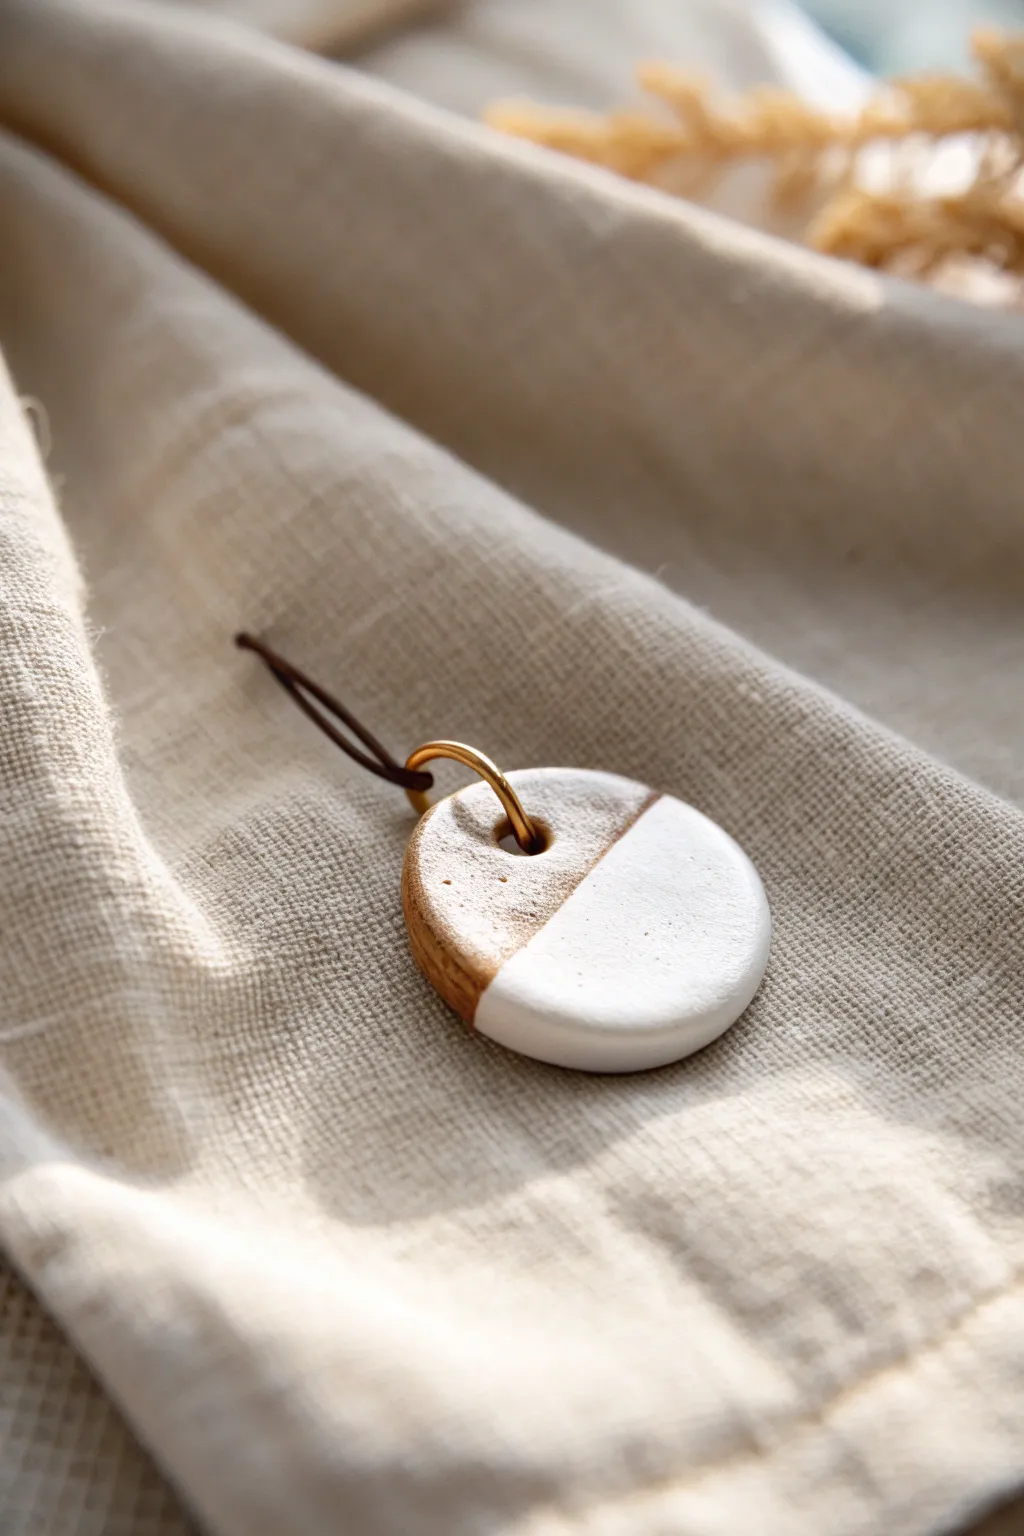
Achieve the high-end look of glazed ceramics without a kiln using this clever polymer clay technique. This minimalist pendant features a striking contrast between raw, textured earth tones and a glossy, smooth white finish that perfectly mimics dipped porcelain.
Step-by-Step Guide
Materials
- White polymer clay
- Translucent liquid polymer clay (or TLS)
- Brown acrylic paint (burnt umber or sienna)
- Gold alcohol ink or gold leaf paint
- High-gloss polyurethane varnish or UV resin
- Circle clay cutter (approx. 1.5 inch)
- Texture sponge or toothbrush
- Rolling pin or pasta machine
- Small paintbrush
- Gold jump ring (10mm or larger)
- Leather or waxed cotton cord
- Drill bit or toothpick
- Fine grit sandpaper (400 and 800 grit)
- Ceramic tile or glass baking surface
Step 1: Shaping the Base
-
Condition the Clay:
Begin by warming the white polymer clay in your hands until it becomes soft and pliable. This conditioning step is crucial to prevent cracks during baking. -
Create the Stone Effect:
Mix a very small amount of brown acrylic paint or shaved brown pastel chalk into the white clay. Don’t mix it completely uniform; leave it slightly streaky to mimic natural stone or earthenware. -
Roll the Slab:
Roll your conditioned clay out onto a smooth work surface or ceramic tile. Aim for a thickness of about 1/4 inch (6mm) to give the pendant a substantial, high-quality feel. -
Add Texture:
Gently press a texture sponge, a piece of sandpaper, or an old toothbrush over the entire surface of the clay slab. This creates the ‘raw ceramic’ texture that will contrast beautifully with the glossy side. -
Cut the Shape:
Press your circle cutter firmly into the textured clay. Lift the cutter and gently peel away the excess clay from the outside. -
Smooth the Edges:
inspect the edges of your circle. If there are any sharp drag marks from the cutter, gently smooth them down with your fingertip or a silicone tool. -
Create the Hole:
Using a toothpick or a small straw, poke a hole near the top edge for the jump ring. Make sure the hole is large enough to accommodate your specific hardware. -
Bake the Piece:
Bake the clay circle according to the manufacturer’s instructions on the package (usually around 275°F/135°C for 15-30 minutes). Let it cool completely before moving to the next phase.
Step 2: The Porcelain Finish
-
Prepare the ‘Dip’:
Use painter’s tape or masking tape to mark off a diagonal line across the pendant. Press the tape down firmly, especially at the texture points, to prevent bleeding. -
Apply the White Layer:
Paint the exposed half (the lower section) with white acrylic paint. You may need 2-3 thin coats for full opacity. I find allowing each layer to dry for 10 minutes gives the smoothest result. -
Remove Tape:
Carefully peel back the tape while the final coat of paint is still slightly tacky but not wet. This helps ensure a crisp line. -
Add the Gold Detail:
Using a very fine detail brush, paint a thin strip of gold alcohol ink or gold leaf paint directly along the dividing line where the white paint meets the textured clay. -
High Gloss Application:
This is the ‘porcelain’ magic step. Apply a thick, doming layer of UV resin or several coats of high-gloss polyurethane varnish ONLY over the white painted section. -
Cure or Dry:
If using UV resin, cure under a UV lamp for 2-4 minutes until rock hard. If using varnish, let it dry overnight in a dust-free box to achieve that glass-like sheen.
Don’t Trap Bubbles
When applying the glossy topcoat to the white section, use a lighter quickly over the surface (if using resin) or breathe gently on it (if using varnish) to pop micro-bubbles before it dries.
Step 3: Assembly
-
Sand the Back:
Once the front is fully cured, check the back of the pendant. If it’s rough, briefly sand it with fine-grit sandpaper for a professional finish. -
Attach Hardware:
Open your large gold jump ring using two pairs of pliers (twist sideways, don’t pull apart). Thread it through the hole you made earlier. -
Secure the Ring:
Close the jump ring securely, ensuring the gap is tight so the cord can’t slip through. -
String the Cord:
Thread your leather or waxed cotton cord through the jump ring. Tie a simple knot at the ends or add a clasp to finish your necklace.
Marbled Effect
Before baking, mix a tiny speck of black clay into your white base clay but don’t blend fully. This creates faint grey veins for a realistic Carrara marble look under the gloss.
Now you have a sophisticated piece of jewelry that mimics artisan ceramics without needing a pottery studio
Painted Folk Patterns on Mini Tiles
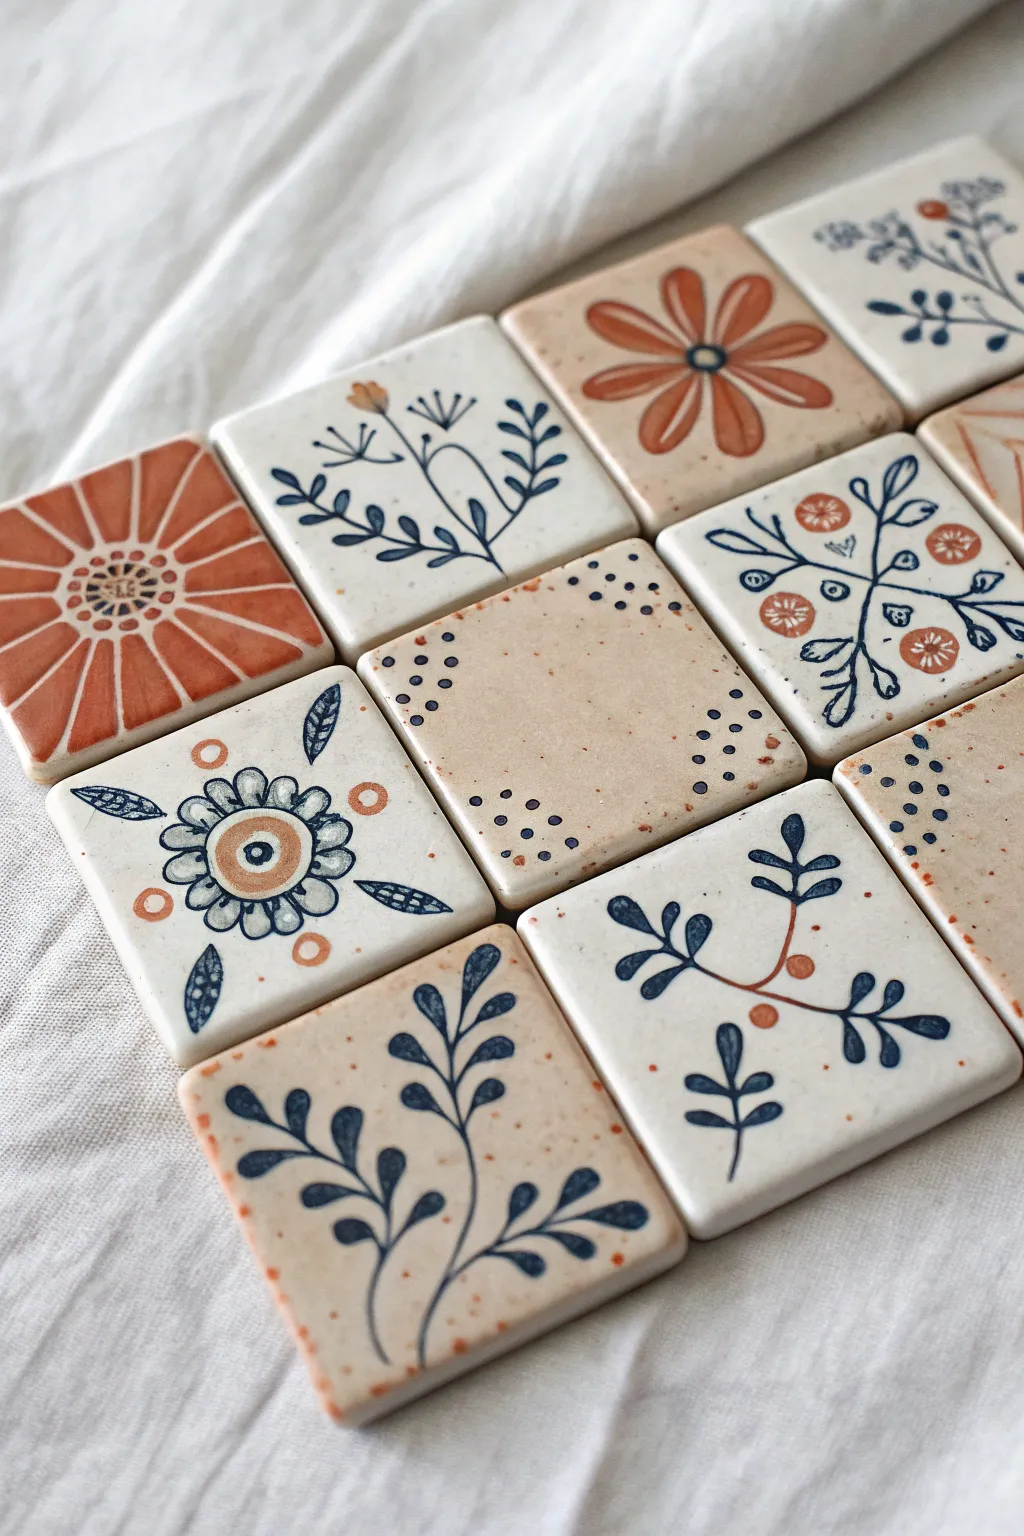
These miniature porcelain tiles feature charming, hand-painted folk art botanicals in a warm, rustic palette of terracotta, indigo, and cream. The simple, repetitive patterns create a cohesive grid that is perfect for magnets, mosaic accents, or tiny coasters.
Step-by-Step Tutorial
Materials
- White porcelain clay or high-fire white stoneware
- Rolling pin
- Square cookie cutter (approx. 2×2 inches) or knife and ruler
- Wooden guide strips or slats (1/4 inch thick)
- Small sanding sponge or smoothing rib
- Underglazes: Deep indigo blue, terracotta orange/rust
- Fine detail brushes (sizes 00 and 0 round)
- Clear transparent glaze (glossy or satin)
- Kiln for firing (bisque and glaze firings)
- Clean sponge and water bucket
Step 1: Shaping the Canvas
-
Prepare the Clay:
Wedge your porcelain clay thoroughly to remove any air bubbles. Because porcelain has a ‘memory,’ ensure the clay is well-integrated to prevent warping later. -
Roll the Slabs:
Place the clay between two 1/4 inch wooden guide strips. Roll the clay out into a smooth, even slab. I like to flip the slab once midway through rolling to ensure even compression on both sides. -
Cut the Squares:
Using a square cookie cutter or a ruler and sharp knife, cut out your tiles. Aim for precise 2-inch squares, but remember they will shrink during firing. -
Smooth the Edges:
Once leather hard, run a damp sponge or a soft finger along the sharp edges of each tile to round them slightly. This ‘softening’ prevents chipping and gives the finished piece a nice hand-feel.
Warping Woes?
Porcelain loves to warp. Dry your tiles very slowly by covering them loosely with plastic for the first 24 hours to ensure they stay perfectly flat.
Step 2: Painting Folk Patterns
-
Plan Your Designs:
Sketch out simple botanical motifs on paper first. The image features radiating flowers, symmetrical branch patterns, and simple dotted borders. -
Paint the Indigo Lines:
Using a size 00 brush and indigo underglaze, paint the stems and leaves. Keep your pressure light to create thin, delicate lines. For the leafy branches, press down slightly at the base of the leaf and lift as you pull outward to create a taper. -
Add Terracotta Accents:
Switch to your rust-colored underglaze. Add circular flower centers, petals, or small berries to the branch designs. For the large radiating flower, paint solid blocky petals filling the square. -
Create the Dotted Tile:
For the center tile shown, use the back of your paintbrush handle dipped in indigo underglaze to stamp perfect dots in the corners, then create a field of lighter speckles by flicking a toothbrush with diluted terracotta paint. -
Detailing the Flowers:
Add fine details over the larger terracotta shapes once they are dry to the touch. Use the blue liner brush to add centers to the orange flowers or outline specific petals for contrast. -
Bisque Fire:
Allow the greenware tiles to dry completely for several days. Fire them to cone 04 (or your clay’s specific bisque temperature).
Step 3: Glazing and Finishing
-
Clean the Bisque:
Wipe the fired bisque tiles with a damp sponge to remove any kiln dust. This ensures the glaze adheres properly without crawling. -
Apply Clear Glaze:
Dip each tile into a clear transparent glaze. If you prefer a more rustic look, dipping is better than brushing as it provides a smoother, glass-like surface. -
Wipe the Backs:
Thoroughly sponge off any glaze from the bottom of the tiles. Any glaze left on the bottom will fuse the tile to your kiln shelf. -
Final Fire:
Fire the tiles to cone 5/6 (or your clay’s maturity temperature). Ensure the tiles aren’t touching each other in the kiln. -
Final Sanding:
Once cool, use fine-grit sandpaper wet-sanding on the unglazed bottoms to ensure they are perfectly smooth and won’t scratch table surfaces.
Make Them Magnetic
Use strong E6000 glue to attach round ceramic magnets to the backs. These make incredibly strong, high-end refrigerator magnets.
Group these beauties together as a set or scatter them individually around your home for tiny touches of handmade charm
Holiday Ornaments in Icy Whites and Reds
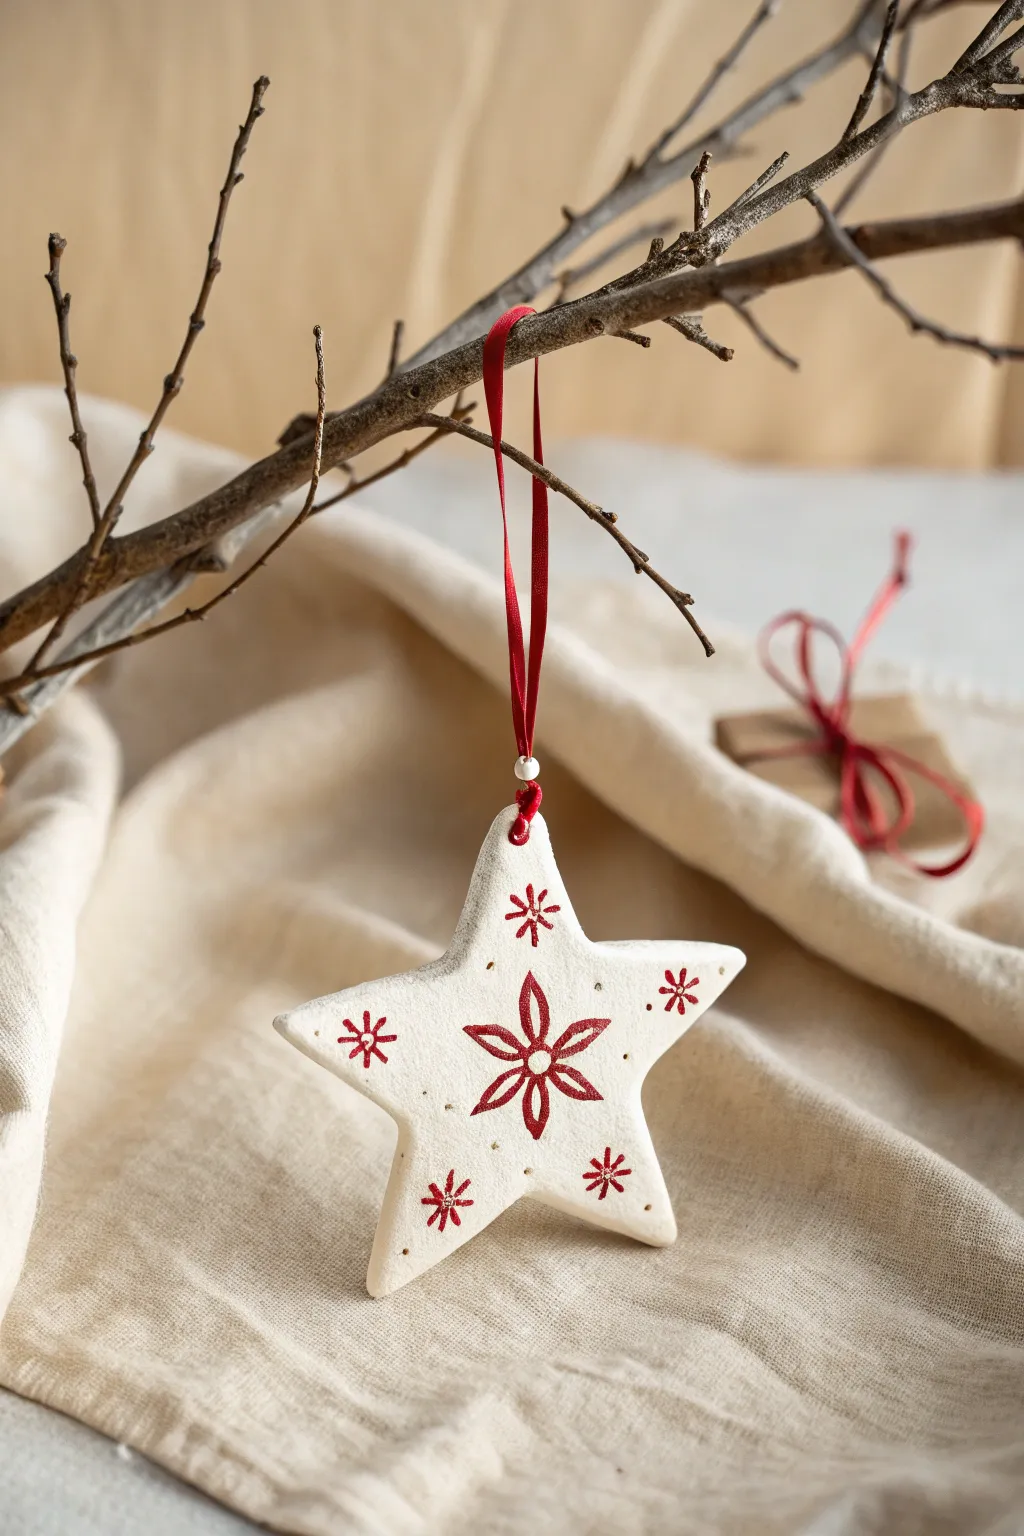
Capture the crisp charm of a Scandinavian winter with this elegant porcelain clay star ornament. Featuring a delicate ruby red snowflake motif against a pure white background, this project brings a sophisticated, handmade touch to your holiday decor.
Detailed Instructions
Materials
- White cold porcelain clay or air-dry polymer clay
- Rolling pin
- Star-shaped cookie cutter (approx. 3-4 inches wide)
- Sandpaper (fine grit)
- Acrylic paint (Deep Red or Berry Red)
- Fine detail paintbrush (size 0 or 00)
- Small wooden skewer or toothpick
- Red satin ribbon (1/8 inch wide)
- Small white pearl bead
- Matte varnish (optional)
Step 1: Shaping the Base
-
Condition the Clay:
Begin by taking a handful of your white porcelain clay and kneading it gently in your hands until it becomes warm, pliable, and free of any cracks. -
Roll it Out:
Place the clay on a clean, smooth surface. Using a rolling pin, flatten the clay to an even thickness of about 1/4 inch. If you want a perfectly uniform look, place guide sticks on either side of your dough. -
Cut the Star:
Position your star-shaped cookie cutter over the clay and press down firmly. Give it a tiny wiggle to ensure clean edges before lifting the cutter away. -
Smooth the Edges:
Dip your finger in a tiny bit of water and run it gently along the cut edges of the star. This softens any harsh lines or jagged bits left by the cutter. -
Create the Hole:
While the clay is still wet, use a wooden skewer or toothpick to pierce a hole near the top point of the star. Make it slightly larger than your ribbon, as clay sometimes shrinks when drying. -
Drying Time:
Lay the star on a flat surface lined with parchment paper. Let it dry completely according to package instructions—usually 24 to 48 hours. Flipping it halfway through helps it dry evenly without warping.
Clean Lines Pro-Tip
For ultra-crisp painted lines, steady your painting hand by resting your pinky finger on a dry part of the star while you work on the details.
Step 2: Painting the Motif
-
Sand for Smoothness:
Once fully cured and hard, check the edges again. If there are any rough spots, lightly buff them away with fine-grit sandpaper for a professional finish. -
Plan the Center Design:
Using a very light pencil touch, mark the center of the star. Sketch a simple six-petaled flower shape radiating from this center point to guide your painting. -
Paint the Central Flower:
Load your fine detail brush with deep red acrylic paint. Carefully paint six long, teardrop-shaped petals radiating outward. I like to start from the center and pull the brush outward to get a tapered point. -
Add the Center Dot:
Dip the non-brush end of your paintbrush into the red paint and dot it right in the middle of your flower petals to anchor the design. -
Paint the Outer Snowflakes:
On the five arms of the star, paint smaller snowflake or asterisk shapes. These act as accents to the main flower. Keep lines thin and delicate. -
Add Tiny Dots:
To fill the negative space and add texture, dip a toothpick into the red paint and add very small, random dots around the central flower motive. -
Let Paint Dry:
Allow the paint to dry completely. If you want to protect your work, apply a thin coat of matte varnish over the front face of the star.
Step 3: Final Assembly
-
Prepare the Ribbon:
Cut a length of red satin ribbon, about 8 to 10 inches long. Thread one end through the hole you created earlier. -
Add the Pearl:
Before tying the loop, thread both ends of the ribbon through a small white pearl bead. Slide the bead down so it rests right at the top of the star. -
Secure the Loop:
Tie the ends of the ribbon into a knot to create a hanging loop. Your ornament is now ready to hang.
Warping Woes?
If the star curls while drying, place a heavy book on top of it (with parchment paper in between) once it is partially dry but still slightly flexible.
Hang this striking ornament on a branch or use it as a sophisticated gift topper to spread holiday cheer
Duo Figurines for Gifts and Cake Toppers
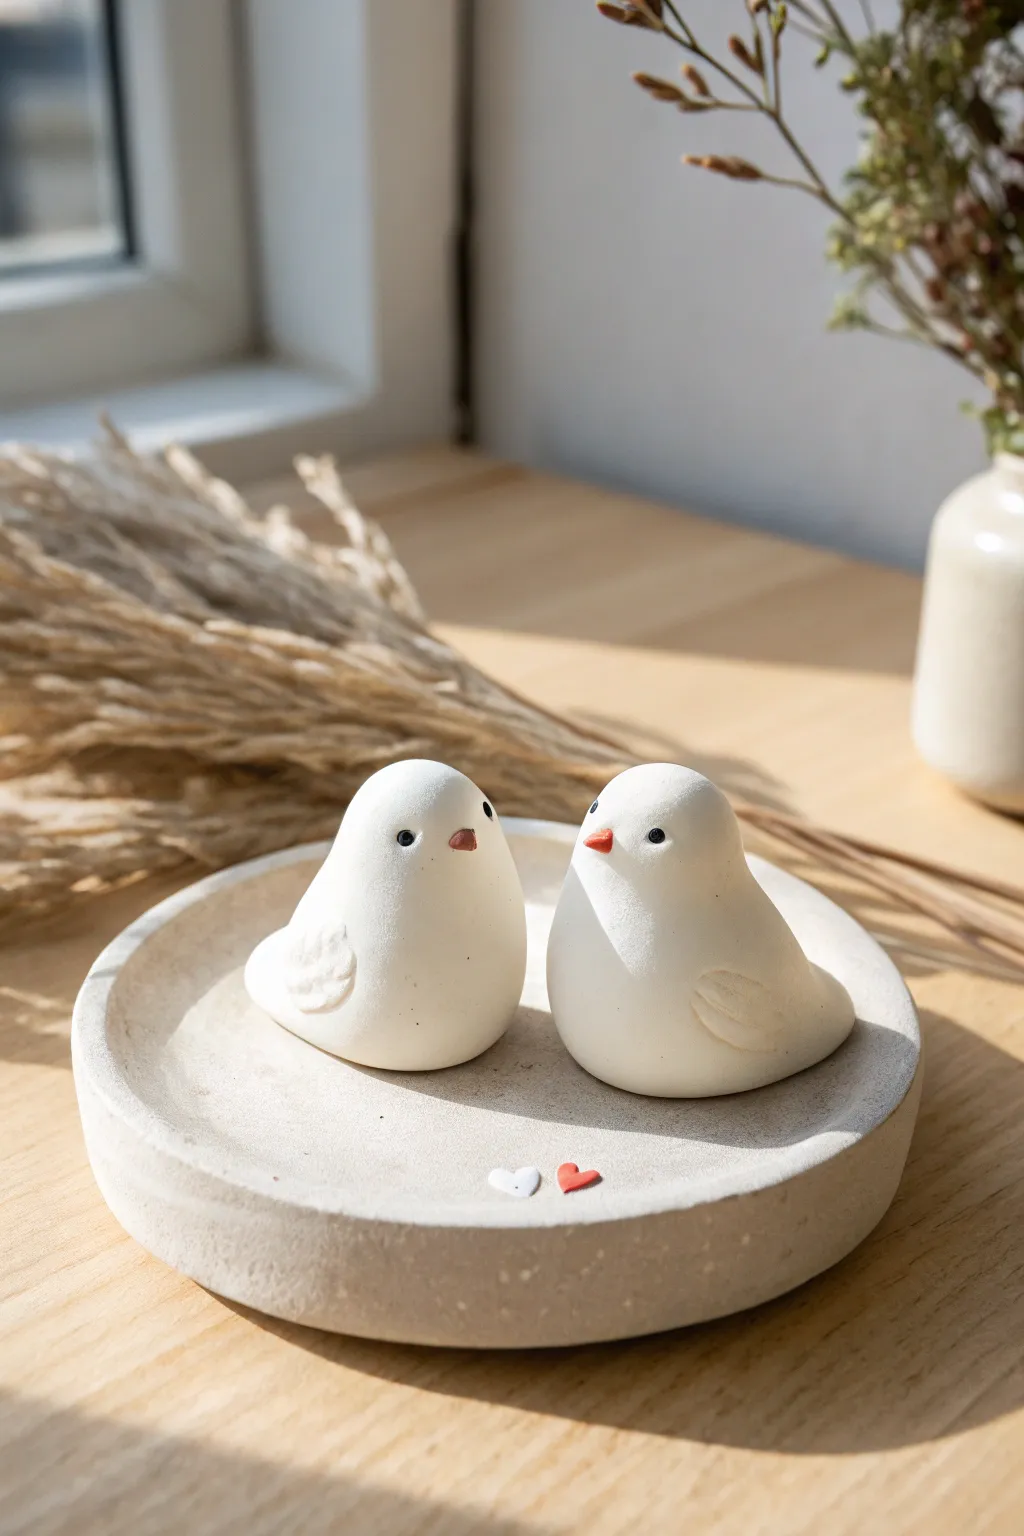
Create a serene and minimalist display with this charming pair of white clay birds nestled on a matching textured dish. The smooth, matte finish of porcelain clay gives these figurines a timeless elegance perfect for wedding gifts or sweet home decor.
Step-by-Step Tutorial
Materials
- White air-dry porcelain clay or polymer clay
- Rolling pin
- Circle cutter (approx. 4-5 inches diameter)
- Small amount of red and white clay for hearts (or acrylic paint)
- Clean water in a small cup
- Modelling tools (needle tool, small ball stylus)
- Fine-grit sandpaper (400-600 grit)
- Matte spray varnish
Step 1: Shaping the Bird Bodies
-
Prepare the clay:
Begin by conditioning two balls of white porcelain clay in your warm hands until they are pliable and crack-free. Aim for balls about the size of a golf ball, or slightly smaller depending on your desired scale. -
Form the basic teardrop:
Roll each ball into a smooth sphere, then gently roll one side against your palm to taper it into a fat teardrop shape. This tapered end will become the tail. -
Define the head:
On the rounded, wider end of the teardrop, use your thumb and forefinger to gently pinch and pull the clay upward to distinguish the head from the body. You want a subtle curve, not a distinct neck. -
Creating the beak:
Pinch a tiny amount of clay at the very front of the face to form a small, pointed beak. Smooth the connection points so it looks seamless and organic. -
Shaping the tail:
Flatten the tapered tail section slightly and curve it upward effectively. Use your finger to smooth out any fingerprints, ensuring a fluid line from the back to the tail tip.
Step 2: Adding Details & The Tray
-
Sculpting the wings:
Roll two very small balls of clay for each bird, flatten them into ovals, and shape them into wings. Attach them to the sides of the body using a tiny bit of water or slip. -
Texturing wings:
Using a needle tool or modelling knife, gently press curved indentations into the attached wings to simulate feathers. Keep the lines soft and minimal to match the clean aesthetic. -
Making the eyes:
For the eyes, you can either press small black beads into the clay or use a small ball stylus to make indentations that you will paint black later. I find painting them offers more control over the expression. -
Coloring the beaks:
If using polymer clay, mix a tiny bit of orange or terracotta clay and replace the white beak you formed earlier, or simply paint the existing beak carefully after drying. -
Rolling the tray base:
Roll out a slab of white clay to about 1/4 inch thickness. Use your circle cutter or a bowl as a template to cut a perfect circle. -
Forming the rim:
Roll a long snake of clay and thoroughly score and slip it onto the edge of your circle base to create a rim. Blend the clay downwards with your thumb so the wall becomes one with the base. -
Refining the tray:
Smooth the rim with a damp sponge or finger. The goal is a slightly organic, handmade look, so don’t worry if it isn’t mechanically perfect. Let the tray dry until it is leather hard.
Smooth Surface Secret
Use a tiny amount of baby oil on your fingertips while smoothing the raw clay. It eliminates fingerprints instantly and leaves a velvety finish.
Step 3: Finishing Touches
-
Adding miniature hearts:
Create two tiny hearts—one white and one red—out of scrap clay. Adhere them near the front edge of the tray using a dab of water or liquid clay adhesive. -
Drying or baking:
If using air-dry clay, let the pieces sit undisturbed for 24-48 hours. If using polymer clay, bake according to the manufacturer’s package instructions (usually 275°F for 15-30 mins). -
Sanding for smoothness:
Once fully cured or dry, take your fine-grit sandpaper and very gently buff the surface of the birds and the tray rim to remove any lingering fingerprints or rough texture. -
Painting details:
If you didn’t use colored clay, use a fine detail brush to paint the beaks terracotta and the eyes black. Add the red heart detail now if it wasn’t pre-colored clay. -
Sealing the piece:
Finish by spraying the entire set with a matte varnish. This protects the porous clay and unifies the sheen without making it look plasticky.
Date Night Variation
Before baking or drying, stamp the couple’s initials or a special date into the clay base of the tray for a personalized anniversary memento.
Place this sweet duo on a windowsill or shelf where the light can catch the soft curves of the porcelain
Whimsical Mushroom House Desk Decor
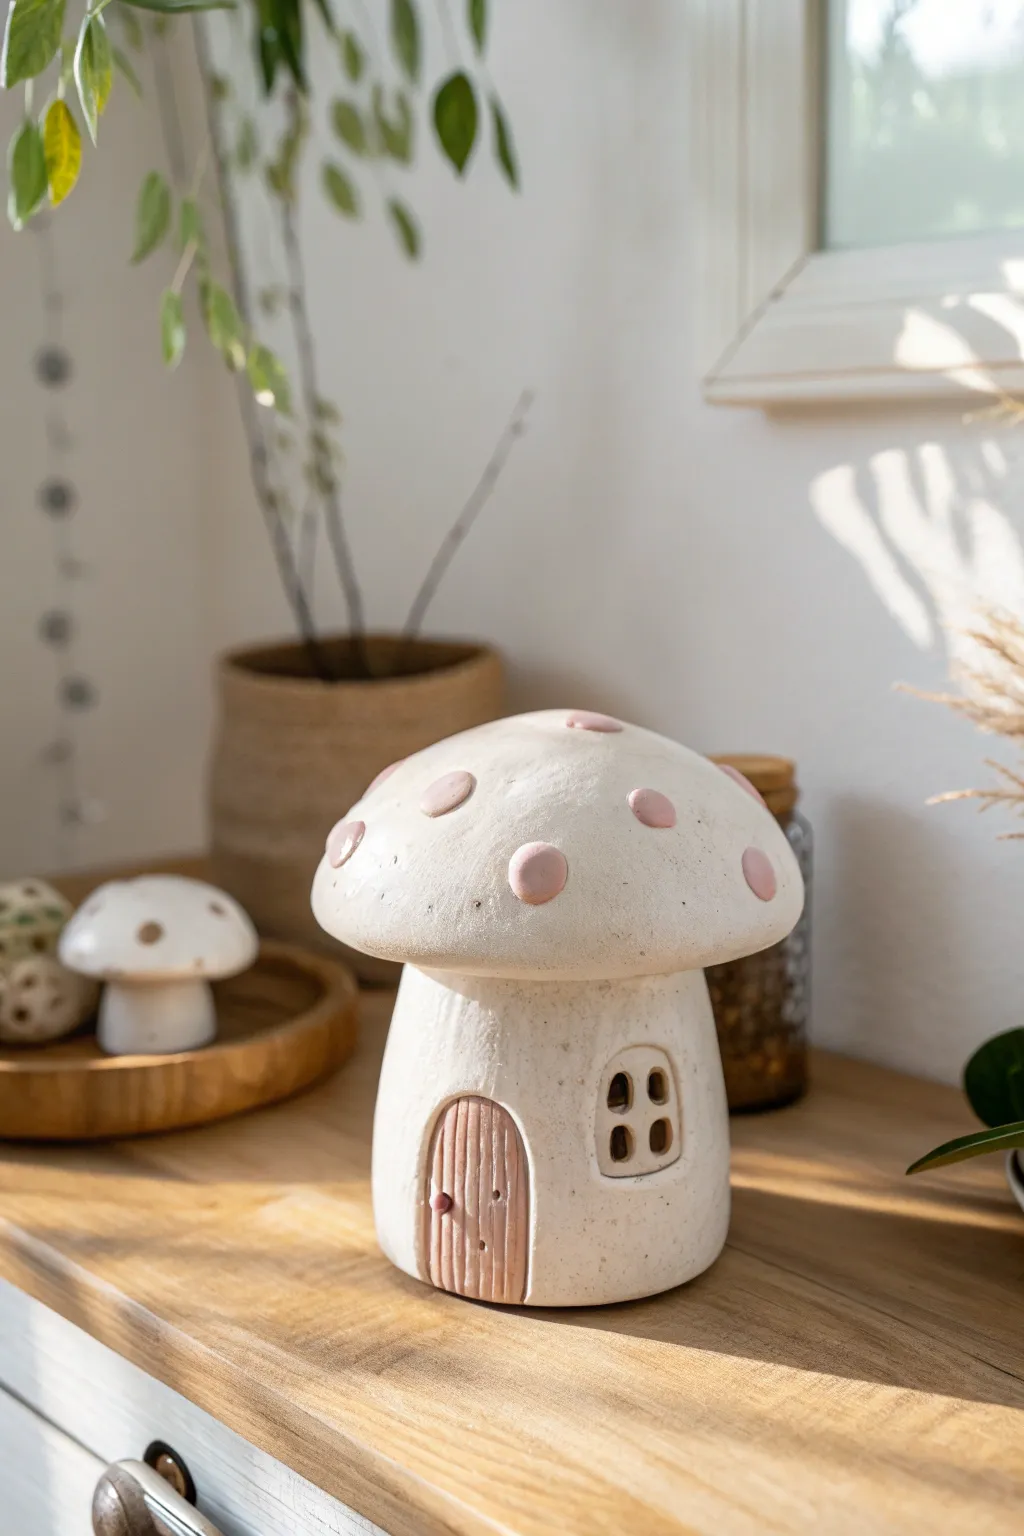
Create a cozy, fairytale atmosphere on your desk with this charming two-piece mushroom house. Crafted from smooth porcelain clay, this little dwelling features a removable spotted cap and a detailed door, perfect for hiding small treasures or serving as a tea light cover.
How-To Guide
Materials
- white porcelain clay (or smooth white stoneware)
- underglaze (dusty pink or coral)
- rolling pin
- canvas work surface
- needle tool
- fettling knife
- scoring tool (or serrated rib)
- slip (clay and water mixture)
- small round sponge
- small paintbrush
- bowl or Styrofoam ball (roughly 4-5 inches diameter) for mold
- plastic wrap
Step 1: Sculpting the Base
-
Roll the slab:
Begin by rolling out a medium-sized ball of porcelain clay into a slab about 1/4 inch thick. Porcelain can be fussy, so ensure your movements are smooth to avoid memory warps. -
Form the cylinder:
Cut a rectangular strip from your slab, approximately 4 inches high and 10 inches long. Wrap this around a cylindrical form (like a soda can wrapped in paper) or freehand it into a tube slightly wider at the bottom than the top. -
Seam and smooth:
Score the connecting edges thoroughly, apply slip, and press firmly to join. Smooth the seam inside and out until it is invisible, gently tapering the top rim inwards slightly. -
Carve the window:
Using a needle tool, cut out a small arched window shape. I find it easiest to cut the main hole first, then gently add a tiny vertical and horizontal strip of clay back in to create the windowpane cross. -
Create the door:
Roll a small, separate oval of clay for the door. Use your needle tool to scribe vertical wood grain lines into it, giving it a rustic texture. -
Attach the door:
Score the back of the door and the spot on the cylinder where it will sit. Slip and attach it, pressing gently so you don’t flattening the wood grain texture. Add a tiny ball of clay for the doorknob.
Step 2: Creating the Cap
-
Prepare the mold:
Cover a small bowl or a Styrofoam half-sphere with plastic wrap to prevent sticking. This will support the mushroom cap’s shape. -
Drape the cap:
Roll out a round slab of clay, slightly thicker than the base. Drape it over your mold, gently smoothing it down to create a domed shape. Let the edges overhang slightly and curve naturally. -
Trim the rim:
Once the clay has stiffened slightly (leather hard), trim the bottom edge of the cap so it is even. Use a damp sponge to round off any sharp edges. -
Fit the flange:
Roll a coil of clay and attach it to the *inside* ceiling of the cap. Measure it against your base cylinder to ensure it fits snugly inside the rim, preventing the lid from sliding off.
Porcelain Polish
To get that ultra-smooth finish, burnish the bone-dry clay with the back of a spoon or a soft cloth before the first firing. This compresses the particles for a soft sheen.
Step 3: Refining and Decorating
-
Smooth the surface:
Use a barely damp sponge to wipe down the entire piece. Porcelain looks best when perfectly smooth, so remove any fingerprints or canvas texture now. -
Add the spots:
Roll small, flat discs of clay in varying sizes. Score and slip them onto the mushroom cap in a random, natural pattern. Press them down so they look integrated, not just stuck on. -
Painting details:
Using a small brush, apply your dusty pink underglaze to the spots on the cap. Apply 2-3 coats for opaque coverage. -
Accent the door:
Paint the wood-grained door and the tiny doorknob with the same pink underglaze to tie the color palette together. -
Drying:
Place the cap on the base (with a piece of paper towel between them to prevent sticking) and wrap the whole piece loosely in plastic. Dry very slowly over several days to prevent porcelain warping. -
Bisque fire:
Fire the piece to cone 04 (or according to your clay body’s specs). Since the finish in the image is matte and stone-like, you may choose to leave the white clay unglazed. -
Final firing:
If you want a sealed finish, apply a clear matte glaze to the inside only, or leave the exterior raw for that textured, organic look shown. Fire to the maturity temperature of your porcelain (usually cone 6 or 10).
Cracking Seams?
Porcelain shrinks significantly. If seams crack during drying, score deeper and use a thicker slip (vinegar slip works wonders) to mend it immediately, then dry slower.
Place a battery-operated tea light inside to see the warm glow spill through the tiny window
Mini Food Sculptures for Keychains
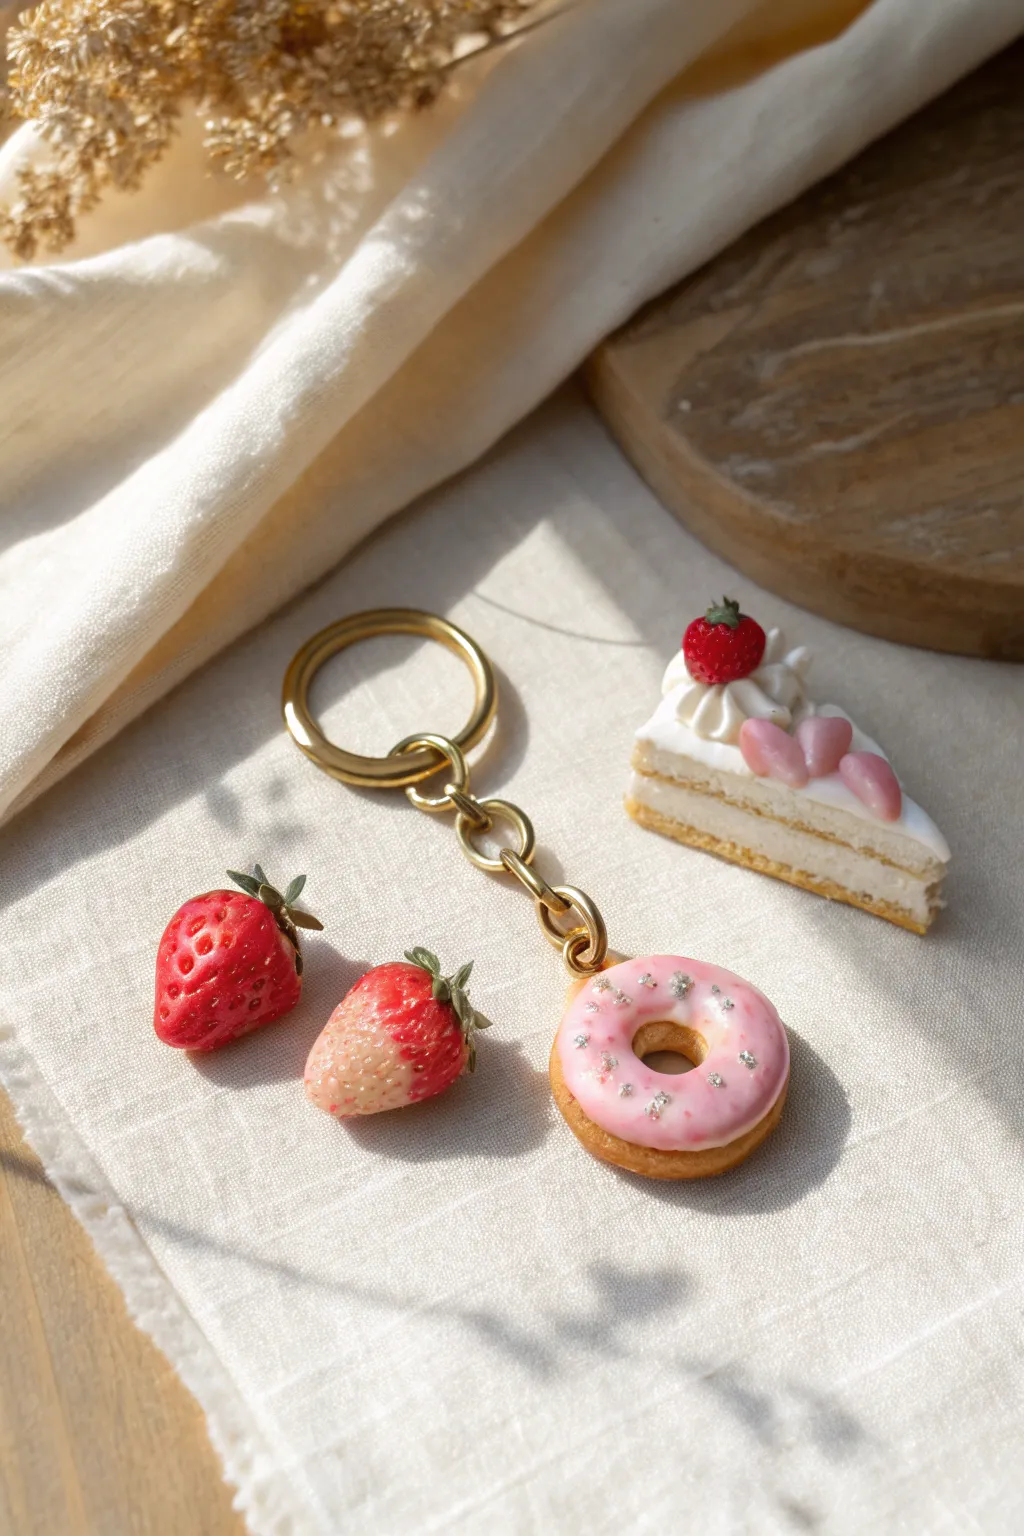
Create a delightful assortment of miniature sweets including a pink frosted donut involved in a keychain, a layered cake slice, and realistic strawberries. This project uses porcelain clay to achieve a translucent, delicate finish perfect for tiny food sculptures.
Detailed Instructions
Materials
- White cold porcelain clay (or polymer clay)
- Acrylic paints (red, yellow ochre, white, pink, burnt sienna)
- Gold keychain distinct hardware with jump rings
- Liquid clay or white glue
- Glossy varnish or UV resin
- Modeling tools (needle tool, ball tool)
- Toothbrush or texturing foil
- Silver glitter or micro-beads
- Small eye pins
Step 1: Sculpting the Strawberries
-
Base Shape:
Mix a small amount of yellow ochre into white clay to create a pale base. Roll two teardrop shapes, varying the sizes slightly for realism. -
Seed Texture:
Using a needle tool, carefully press small indentations all over the surface of the teardrops to mimic seed pockets. Don’t go too deep, just enough to catch the paint later. -
Adding Leaves:
Mix a tiny bit of dark green clay. flatten tiny specks to create the calyx (leaves) and press them onto the top fat end of the berry. -
Gradated Coloring:
Once dry, dry-brush red acrylic paint starting from the bottom tip, fading upward so the top remains pale or yellowish, just like a ripening berry.
Fixing Cracks
Porcelain clay shrinks as it dries, which can cause cracks. Fill them with a wet paste of fresh clay and water, then smooth.
Step 2: The Pink Donut Keychain
-
Dough Base:
Color a ball of clay with yellow ochre and a touch of burnt sienna for a ‘baked’ look. Flatten it slightly into a thick disk and create a hole in the center with a larger ball tool. -
Texture:
Gently tap a clean toothbrush or crumpled foil over the surface to create a realistic baked bread texture. I prefer to soften this texture slightly with my finger so it isn’t too rough. -
Hardware Prep:
Insert a small eye pin into the top edge of the donut before baking or drying. Secure it with a dab of glue or liquid clay. -
Pink Frosting:
Mix liquid clay with pink paint (or use a creamy mixture of glue, paint, and cornstarch). Carefully apply it to the top of the donut, letting it curve naturally over the edges without dripping too far. -
Sparkle Time:
While the frosting is still wet, sprinkle a pinch of silver glitter or tiny silver micro-beads randomly over the surface. -
Assembly:
Once the donut is fully cured and hardened, attach the gold chain and keyring to the eye pin using needle-nose pliers.
Scented Charms
Mix a drop of strawberry or vanilla fragrance oil into the clay before sculpting for a multi-sensory keychain experience.
Step 3: Layered Cake Slice
-
Creating Layers:
Roll out a sheet of ‘baked’ colored clay and a sheet of white ‘cream’ clay. Stack them: cake, cream, cake, cream. Cut a triangular slice from this stack. -
Texturing the Sponge:
Use a needle tool to gently pick at the exposed yellow cake layers on the sides to create a fluffy, porous crumb texture. -
Icing Decoration:
Pipe or sculpt small dollops of white clay on the back edge of the slice to simulate whipped cream rosettes. -
Fruit Topping:
Fashion tiny heart shapes from pink clay and a miniscule strawberry from red clay. Nestle these into the whipped cream. -
Final Glaze:
Coat the tiny strawberry topping with gloss varnish to make it look juicy.
Enjoy your charming set of miniature sweets, ready to sweeten up any bag or key ring
Woven Clay Baskets Filled With Tiny Flowers
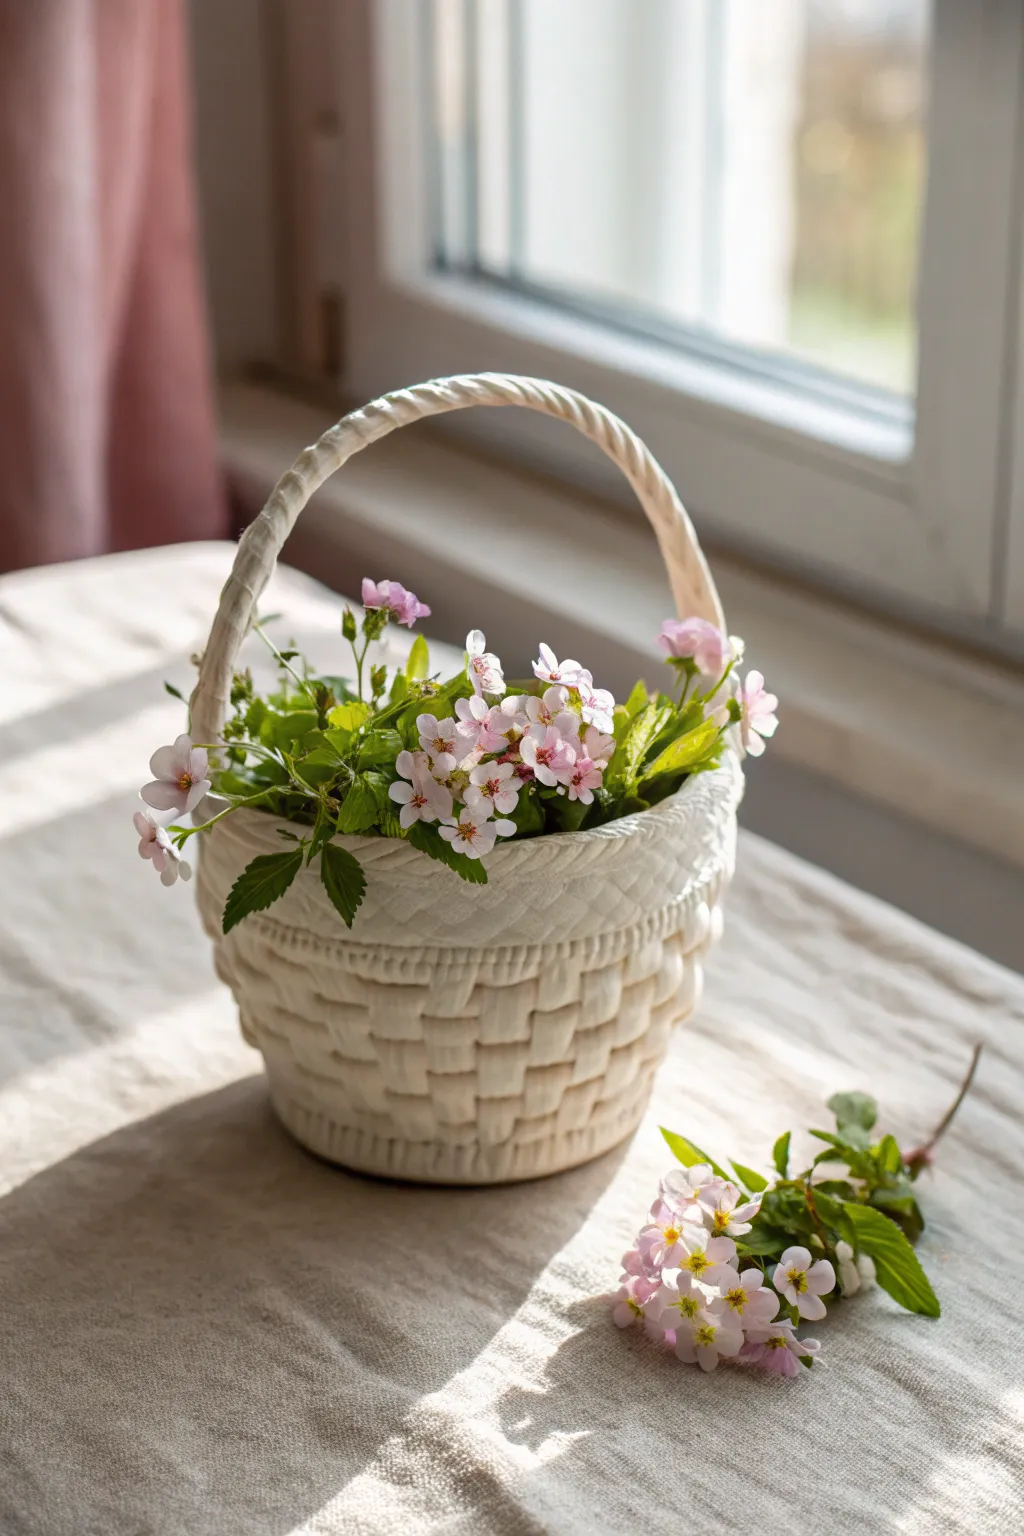
This delicate project transforms porcelain clay into a convincing faux-wicker basket, complete with a braided handle and intricate texturing. Filled with handmade or preserved tiny blooms, it creates a serene, everlasting floral arrangement perfect for a sunny windowsill.
Step-by-Step Guide
Materials
- High-quality porcelain clay or cold porcelain
- Extruder tool with flat strip and round discs
- Small bowl or cup (as a mold form)
- Cornstarch or baby powder
- Plastic wrap
- Liquid clay or casting slip (for joining)
- Sharp craft knife
- Small paintbrush
- Floral wire and tape
- Fine-point sculpting tools
- Soft pink and green chalk pastels (for tinting)
Step 1: Preparing the Base
-
Prepare the mold:
Select a small bowl or cup that matches your desired basket size. Cover the exterior tightly with plastic wrap to prevent sticking, smoothing out as many wrinkles as possible. -
Roll the base slab:
Roll out a smooth, even slab of porcelain clay about 1/4 inch thick. Cut a circle that matches the bottom diameter of your mold form. -
Secure the base:
Place the clay circle onto the bottom of your inverted, plastic-wrapped mold. Lightly dust with cornstarch if the day is humid.
Slumping Sides?
If vertical strips sag while weaving, the clay is too soft. Let your extruded strips air-dry for 10-15 minutes before weaving. They should be flexible but firm.
Step 2: Weaving the Basket Structure
-
Extrude vertical supports:
Use your extruder to create several long, flat strips of clay. Attach these vertically radiating from the base of the mold, spacing them evenly. You want an odd number of spokes for continuous over-under weaving. -
Begin the weave:
Extrude a very long, continuous flat strip. Attach one end to the base and begin weaving in an alternating over-under pattern around the vertical spokes. -
Tighten the rows:
As you weave, gently push the new row down against the previous one using a flat tool. This eliminates gaps and creates that tight, basket-like tension. -
Add texture:
For a realistic wicker look, I like to lightly scratch fine lines along the length of the strips using a needle tool before the clay stiffens too much. -
Create the rim:
Once you reach the desired height, trim the vertical spokes flush with the top weave. Roll two thin coils of clay, twist them together like a rope, and adhere this to the top edge using liquid clay.
Step 3: Creating the Braided Handle
-
Form the core:
Cut a piece of thick floral wire to your desired handle length. This acts as an armature to support the clay. -
Twist the clay:
Roll a long snake of clay and carefully wrap it spirally around the wire. Alternatively, twist two snakes together and press the wire into the underside where it won’t show. -
Shape the arch:
Bend the wire into a graceful arch shape. Let it dry separately for a few hours until it holds its shape but isn’t fully brittle. -
Attach the handle:
Score the attachment points on the inner rim of the basket. Apply liquid clay and press the handle ends firmly in place, supporting them with crumpled paper towels while they bond.
Seamless Handle
When attaching the handle, wrap a tiny, thin ribbon of fresh clay around the connection point to hide the seam and mimic how real baskets are bound.
Step 4: Sculpting Tiny Blooms
-
Tint the clay:
Mix a tiny shaving of pink chalk pastel into a ball of white clay to create a soft blush color. Keep a portion green for leaves. -
Form petals:
Roll five tiny tear-drop shapes for each flower. Press them together at the points to form a simple bloom. Use a ball tool to cup the center slightly. -
Add centers:
Place a minuscule dot of yellow-tinted clay or a seed bead in the center of each flower for contrast. -
Create leaves:
Shape small diamonds from green clay and vein them with a craft knife. Attach flowers and leaves to thin wires using floral tape. -
Assemble the arrangement:
Once the basket is fully fired or dried (depending on your clay type), arrange the clay flowers inside. You can use a small block of floral foam at the bottom to hold the wires upright.
Place your petite basket in a sunlit spot to highlight the delicate texture of the weave
Colorful Relief-Wrapped Bud Vases
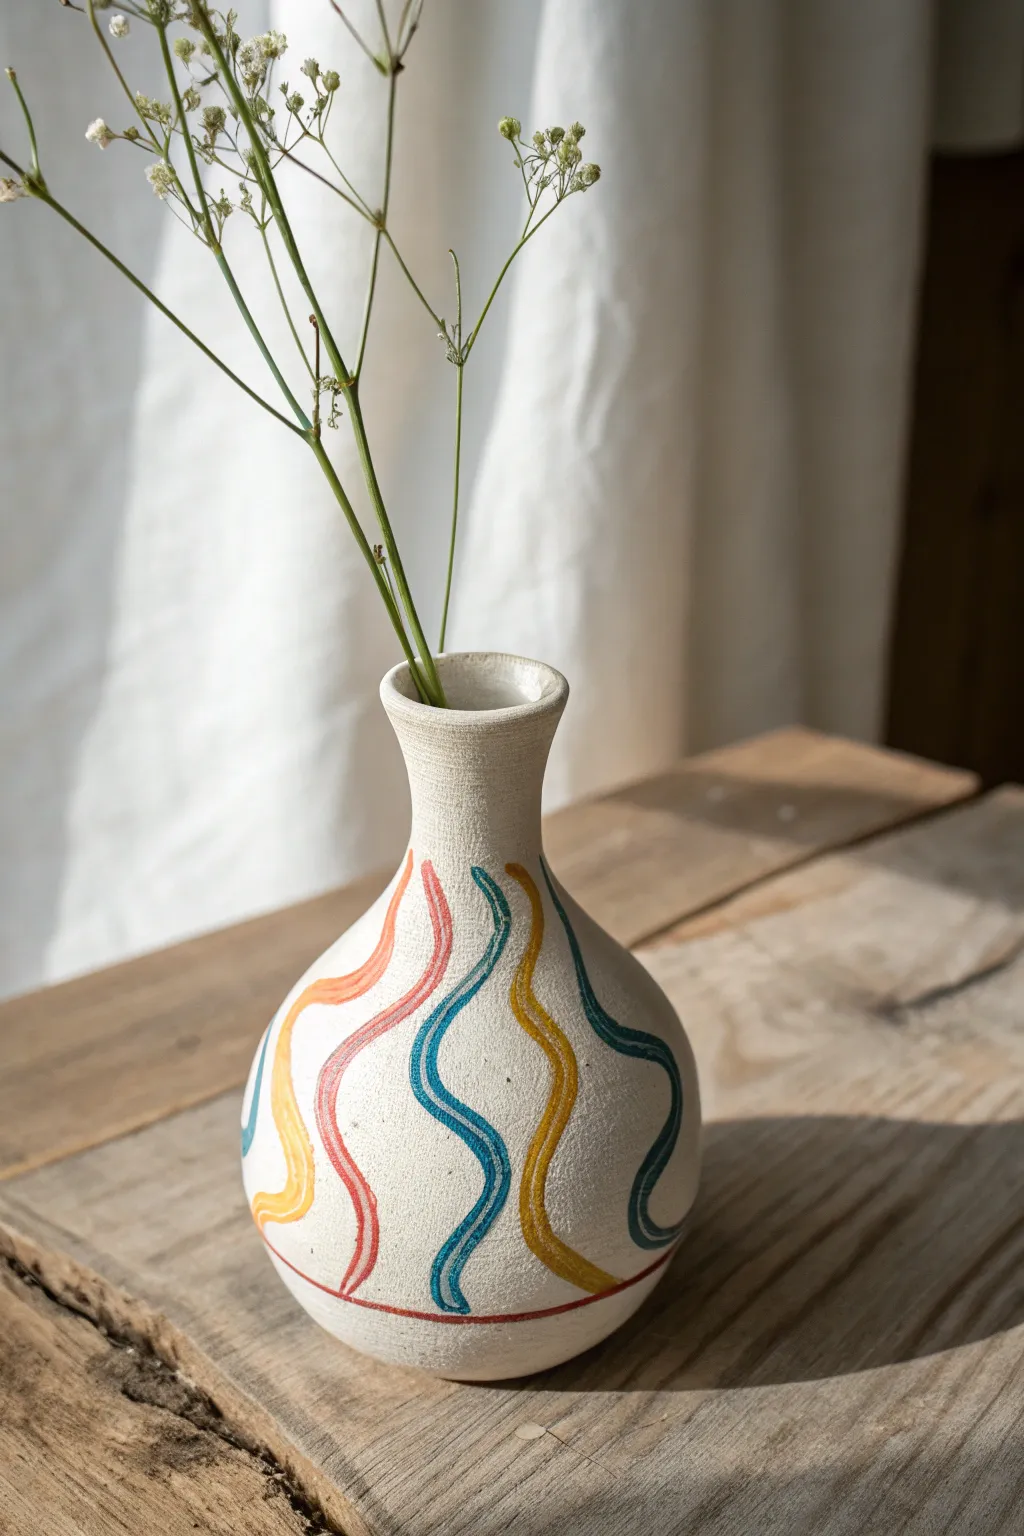
Bring a touch of organic warmth to your decor with this textured bud vase, featuring playful, raised squiggles of color against raw white porcelain. The matte finish and slight grit of the clay give it a lovely rustic feel, perfect for holding a few stems of dried baby’s breath.
Step-by-Step
Materials
- Cone 6 porcelain clay body
- Underglaze (Red, Orange, Yellow, Teal/Blue, Dark Blue)
- Small pottery wheel (or tools for pinch/coil building)
- Rubber kidney rib
- Sponge
- Slip trailer bottle with fine nozzle
- Carving tool or needle tool
- Fine grit sandpaper
- Clear matte glaze (optional, for interior only)
- Cutting wire
Step 1: Shaping the Vessel
-
Prepare the clay:
Begin with a ball of well-wedged porcelain clay, roughly the size of a large orange. Porcelain can be finicky, so ensure there are absolutely no air bubbles. -
Center and open:
Throw the clay on the wheel, centering it firmly. Open the interior, leaving the floor about a quarter-inch thick to provide stability for the narrow base. -
Pull the walls:
Pull the walls upward into a cylinder first. Aim for even thickness from bottom to top, keeping the walls relatively thick at first to allow for shaping later. -
Form the belly:
Using your inside hand to push out and your outside hand to support, gently swell the bottom half of the cylinder into a rounded, bulbous belly shape. -
Collar the neck:
Gently embrace the upper portion of the clay with both hands, squeezing slowly to collar the neck inward. Increase your wheel speed slightly and keep the clay well-lubricated to prevent twisting. -
Refine the rim:
Flare the very top rim outward slightly to create a welcoming opening for flowers. Use a chamois cloth or a soft sponge to compress the rim so it’s smooth and durable. -
Smooth the surface:
While the wheel is spinning slowly, run a flexible metal or rubber rib up the exterior. This removes throwing lines and creates a smooth canvas for your decoration.
Clogged Trailer?
If the underglaze sputters, use a sewing needle or thin wire to clear the nozzle tip. Keep the bottle upside down in a cup of water when pausing to prevent drying.
Step 2: Decorating and Firing
-
Leather hard drying:
Allow the vase to dry to a leather-hard state. It should be firm enough to handle without deforming but still cold to the touch and able to accept slip. -
Prepare the slip trailer:
Fill your slip trailer bottles with your chosen underglaze colors. I prefer to thin the underglaze slightly with a drop of water so it flows like heavy cream. -
Map the design:
Lightly trace vertical wavy lives around the belly of the vase using a needle tool or pencil. This guide helps ensure your spacing is even before you commit with color. -
Apply the relief lines:
Squeezing the slip trailer with consistent pressure, trace over your guidelines. Start from the bottom and move upward, allowing the underglaze to bead up slightly for that raised, tactile texture. -
Alternate colors:
Switch colors for each adjacent wave—orange, red, teal, yellow—creating a rhythmic pattern. If a line creates a sharp peak, tap it very gently with a finger to round it over once it’s slightly set. -
Add the footer ring:
While holding the vase steady (or spinning the banding wheel slowly), carefully drag a line of red underglaze around the very bottom edge to ground the design. -
Bisque fire:
Let the vase dry completely until bone dry. Fire it to Cone 04 for the bisque firing to harden the clay and set the underglaze design. -
Glaze the interior:
Pour a clear glaze inside the vase, swirl it to coat the entire inner surface, and pour out the excess. This makes the vase functional and water-tight. -
Final cleaning:
Wipe the exterior with a damp sponge to remove any stray glaze droplets. We want to keep the raw, matte finish of the porcelain and underglaze on the outside. -
Glaze fire:
Fire the piece to Cone 6 (or the temperature appropriate for your specific clay body). Once cool, lightly sand the bottom with fine-grit sandpaper if there is any roughness.
Mix it Up
Instead of full waves, try dotted lines or ‘stitched’ dashed lines for the relief pattern. Varying the nozzle size creates different line weights.
Place your finished vase near a sunny window where the natural light can catch the texture of those colorful waves.