A good potter’s bench is basically your studio sidekick—it holds your tools, takes the mess, and makes every session feel easier. Here are my favorite potter’s bench ideas that balance real-life function with that calm, tidy studio vibe we all crave.
Classic Heavy-Duty Pottery Bench
This project builds a substantial, heirloom-quality workbench that balances rugged functionality with refined joinery. The design features a thick top, sturdy square legs, a lower utility shelf, and two streamlined drawers for essential tools.
How-To Guide
Materials
- Solid oak lumber (4×4 for legs, 1x boards for aprons/shelf)
- Hardwood plywood for drawer boxes
- Wood glue
- Pocket hole screws
- Biscuits or dowels
- Clear matte polyurethane finish
- Sandpaper (80, 120, 220 grit)
- Drawer slides (side-mount)
- Simple finger-pull hardware or router bit
Step 1: Building the Frame Structure
-
Cut legs to size:
Begin by cutting four lengths of 4×4 oak lumber for the legs. Aim for a standard comfortable height, usually around 30 to 34 inches depending on your preference. -
Create the side aprons:
Cut two shorter apron pieces from 1-inch thick oak stock that will connect the front and back legs. Drill pocket holes on the inside faces of these aprons to hide joinery later. -
Assemble side frames:
Attach the side aprons to the legs. Ensure the apron is flush with the outside face or slightly inset depending on your desired aesthetic; the image shows a slight inset for dimension. -
Construct the lower shelf supports:
Cut two lower stretchers for the sides. Install these about 4-6 inches from the bottom of the legs to support the lower shelf later. -
Connect the sides:
Cut the long back apron and the front rail pieces. Because this bench has drawers, the front will need a top rail and a bottom rail (or a divider system) rather than a solid apron. -
Final frame assembly:
Join the two side assemblies together using the long back apron and the front rails. Check heavily for squareness here, as a twisted frame will make drawer installation a nightmare.
Sticky Drawers?
If drawers bind, check your frame for squareness. Shim the slides carefully with thin cardboard or veneer strips to align them perfectly parallel.
Step 2: Top and Shelf Installation
-
Prepare the tabletop:
Laminate solid oak boards together to create the deep top surface. Use heavy clamps and plenty of glue to ensure tight seams, alternating grain direction to prevent warping. -
Construct the lower shelf:
Similar to the top, edge-glue boards to create the lower shelf panel. You may need to notch the corners to fit around the legs, or simply rest it on long stretchers installed between the legs. -
Install the lower shelf:
Slide the lower shelf into place. Secure it from underneath through the side stretchers or using corner braces so no fasteners are visible from above. -
Attach the tabletop:
Fasten the tabletop to the frame. I prefer using Z-clips or figure-8 fasteners here to allow the wood to expand and contract with humidity changes without cracking.
Step 3: Drawers and Finishing
-
Build drawer boxes:
Construct two simple drawer boxes using plywood. They should be just slightly narrower than your openings to accommodate the slides. -
Install drawer slides:
Mount the runners inside the bench frame and the corresponding slides onto your drawer boxes. Test the fit to ensure they glide smoothly. -
Cut drawer fronts:
Cut two solid oak drawer fronts. These should be sized to fit the opening with a uniform 1/8-inch gap all around. -
Detailed finger pull:
Drill a simple recessed finger pull into the center of each drawer front using a large Forstner bit or a hole saw, creating that classic utilitarian look seen in the photo. -
Attach fronts:
Use double-sided tape to temporarily position the fronts on the boxes while they are closed. Once aligned, screw them permanently from the inside of the drawer box. -
Sand thoroughly:
Sand the entire piece, starting with 80 grit and working up to 220. Pay special attention to the sharp corners of the legs and top, easing them slightly. -
Apply finish:
Apply a coat of matte polyurethane. Oak has an open grain that looks beautiful when sealed but not plastic-coated, so keep the layers thin. -
Buff and recoat:
Sand lightly with fine-grit sandpaper between coats to knock down any raised grain. Three coats should provide excellent durability for a working bench.
Customize It
Add a vertical divider in the lower shelf area to create cubbies for storing clay bags or large mixing bowls, keeping them organized and upright.
Now you have a stunning, robust piece of furniture ready for your studio work or hallway display


Built-In Wedging Surface
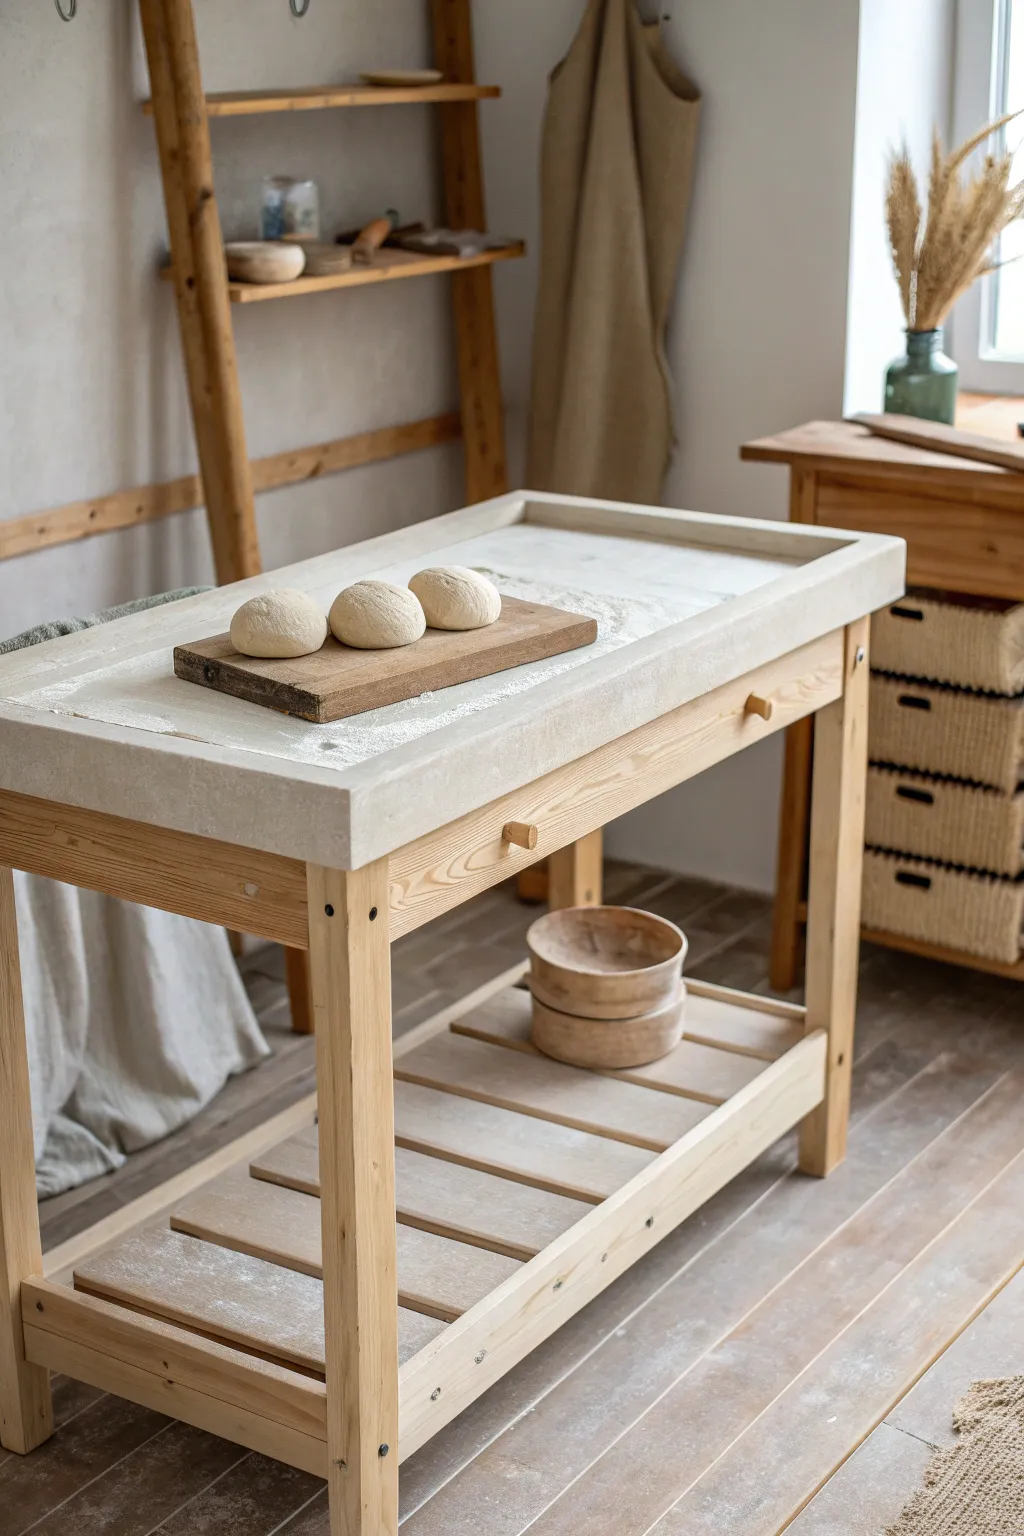
This heavy-duty pottery bench features a sturdy pine frame topped with a custom-cast concrete surface ideal for wedging clay. Its open slat shelving and minimalist design bring a functional, airy aesthetic to your studio space.
Step-by-Step Guide
Materials
- Construction grade pine (2x4s and 1x4s)
- Melamine board (for casting form)
- Concrete mix (high-strength)
- Wire mesh reinforcement
- Silicone caulk
- Wood screws (various lengths)
- Wood glue
- Sandpaper (80 to 220 grit)
- Concrete sealer
- Wooden dowels (for handle accents)
- Matte polyurethane varnish
Step 1: Building the Base Frame
-
Cut the legs:
Begin by cutting four sturdy legs from your 2×4 lumber. Measure them to your ideal standing work height, typically around 30 to 34 inches, keeping in mind the concrete top will add thickness. -
Construct the aprons:
Cut 1×4 pine boards to form the rectangular apron that connects the legs. Create two long sides and two shorter sides based on your desired table dimensions. -
Assemble the leg structure:
Attach the aprons to the legs using pocket holes and screws hidden on the inside faces. Ensure the legs are perfectly square to the apron for stability. -
Add dummy drawer details:
To mimic the look in the photo, attach a false drawer front to the center of the long apron using a small piece of 1×4. Drill holes and glue in two short wooden dowels as faux knobs.
Smooth Operator
Vibrating the concrete mold is crucial. If you have a palm sander, run it (without sandpaper) along the outside of the mold walls to bring bubbles to the surface.
Step 2: Creating the Interior Shelving
-
Install lower supports:
Measure about 6 inches up from the floor on each leg. Install horizontal supports between the front and back legs to hold the lower shelf. -
Cut the slats:
Rip down 1×4 boards into uniform slats for the bottom shelf. The spacing should allow dust to fall through, which is perfect for a pottery studio. -
Attach the shelf slats:
Screw the slats into the lower supports, using a spacer block to keep the gaps consistent. I find a 1-inch gap works best for easy cleaning.
Canvas Cover
For a traditional wedging surface, staple heavy-duty canvas tightly inside the recessed area of the concrete top instead of sealing it, providing better grip for clay.
Step 3: Casting the Concrete Top
-
Build the mold:
Construct a mold from melamine board. The interior dimensions should match the outer footprint of your wooden base plus a 1-inch overhang on all sides. -
Create the raised rim:
To create the recession shown in the image, perfect for containing mess, secure a smaller rectangle of melamine inside the main mold, leaving a 2-inch border around the perimeter. -
Seal the mold:
Run a bead of silicone caulk along every interior seam of the mold. Smooth it with your finger to create a rounded edge for the concrete. -
Mix and pour:
Mix your concrete to a peanut butter consistency. Pour it into the mold, pressing it firmly into the corners and around the wire mesh reinforcement. -
Vibrate and cure:
Tap the sides of the mold repeatedly with a mallet to release air bubbles. Cover with plastic and let it cure slowly for at least 48 hours.
Step 4: Assembly and Finishing
-
Demold the top:
Carefullyunscrew the side walls of the mold and flip the concrete slab over. Remove the inner melamine block to reveal the recessed work surface. -
Sand the wood:
Sand the entire wooden base, starting with rough grit and moving to fine. Soften the sharp edges of the legs and shelves for a worn look. -
Install the top:
Apply a generous amount of construction adhesive to the top of the wooden frame. With a helper, lift the heavy concrete slab and place it onto the base. -
Seal the concrete:
Apply a food-safe concrete sealer to the top surface. This prevents clay from sticking and makes cleanup much easier. -
Seal the wood:
Brush a matte polyurethane over the wooden frame to protect it from studio moisture and clay dust while keeping the natural pine color.
Now you have a solid, professional-grade workstation ready for your next ceramics project


Canvas-Topped Work Zone
Transform a basic utility table into a professional-grade potter’s surface by adding a durable canvas work zone. This project focuses on securing a heavy-duty canvas top that prevents clay from sticking while adding a serene, studio-ready aesthetic to your creative space.
Detailed Instructions
Materials
- Heavy-duty cotton canvas duck cloth (10-12 oz weight)
- Wooden workbench with slatted lower shelf
- Staple gun with 3/8-inch staples
- Fabric scissors or rotary cutter
- Iron and ironing board
- Measuring tape
- Pencil or fabric chalk
- Masking tape (low tack)
- Sandpaper (medium grit)
Step 1: Preparation and Measuring
-
Clean surface:
Begin by thoroughly cleaning the top of your wooden workbench. Remove any dust, old clay, or debris. -
Smooth the wood:
Run your hand over the surface to check for splinters or rough patches. If you find any, lightly sand these areas down so they don’t snag the fabric later. -
Measure the top:
Measure the exact length and width of your table’s top surface. Do not include the overhang yet. -
Calculate fabric size:
Add approximately 4 to 6 inches to both the length and width measurements. This extra allowance is crucial for wrapping underneath the table edge securely.
Wrinkle Rescue
If the canvas loosens or wrinkles after heavy use, spritz it lightly with water and use a hair dryer to shrink it back to a tight fit.
Step 2: Preparing the Canvas
-
Wash the fabric:
Pre-wash your canvas duck cloth in warm water and dry it on high heat. This pre-shrinking step is vital so your cover doesn’t warp if it gets wet during pottery work. -
Iron out creases:
Once dried, iron the canvas on a high cotton setting. You want the surface completely flat and free of wrinkles. -
Cut to size:
Lay the canvas on a flat cutting surface and mark your calculated dimensions. Use sharp fabric scissors or a rotary cutter to get clean, straight edges. -
Center the fabric:
Drape the cut canvas over your workbench. Adjust it until there is an equal amount of overhang on all four sides. -
Temporary hold:
Use small strips of masking tape to temporarily hold the fabric in place at the center of each side. This prevents shifting while you begin securing it.
Level Up: Tool Slots
Before stapling the front edge, sew a strip of canvas loops along the overhang to create a handy holder for your clay tools directly at waist height.
Step 3: Securing the Work Surface
-
Anchor the front:
Start at the front edge of the table. Pull the canvas taut and wrap it under the lip of the table top. -
Staple the center:
Place one staple in the center of the front edge, underneath the table lip. Repeat this directly opposite on the back edge, pulling tightly before stapling. -
Work outward:
Move to the left and right of your center staple on the front edge, placing staples every 2-3 inches, always pulling the fabric taut as you go. -
Secure the back:
Repeat the stapling process primarily on the back edge. I find it helps to stand on the opposite side to get better leverage when pulling the fabric tight. -
Finish sides:
Move to the shorter side edges. Wrap the corners neatly—similar to wrapping a gift—and staple the sides securely underneath. -
Trim excess:
Once all sides are stapled and the surface is drum-tight, use your scissors to trim away any bulky excess fabric underneath for a clean finish. -
Style the shelf:
For the lower slatted shelf, simply fold a smaller piece of canvas or a textured linen towel and drape it over the slats to catch clay dust or hold tools.
Your new canvas-topped workbench is now ready to support all your clay throwing and hand-building projects


Plaster Drop Zone for Reclaim
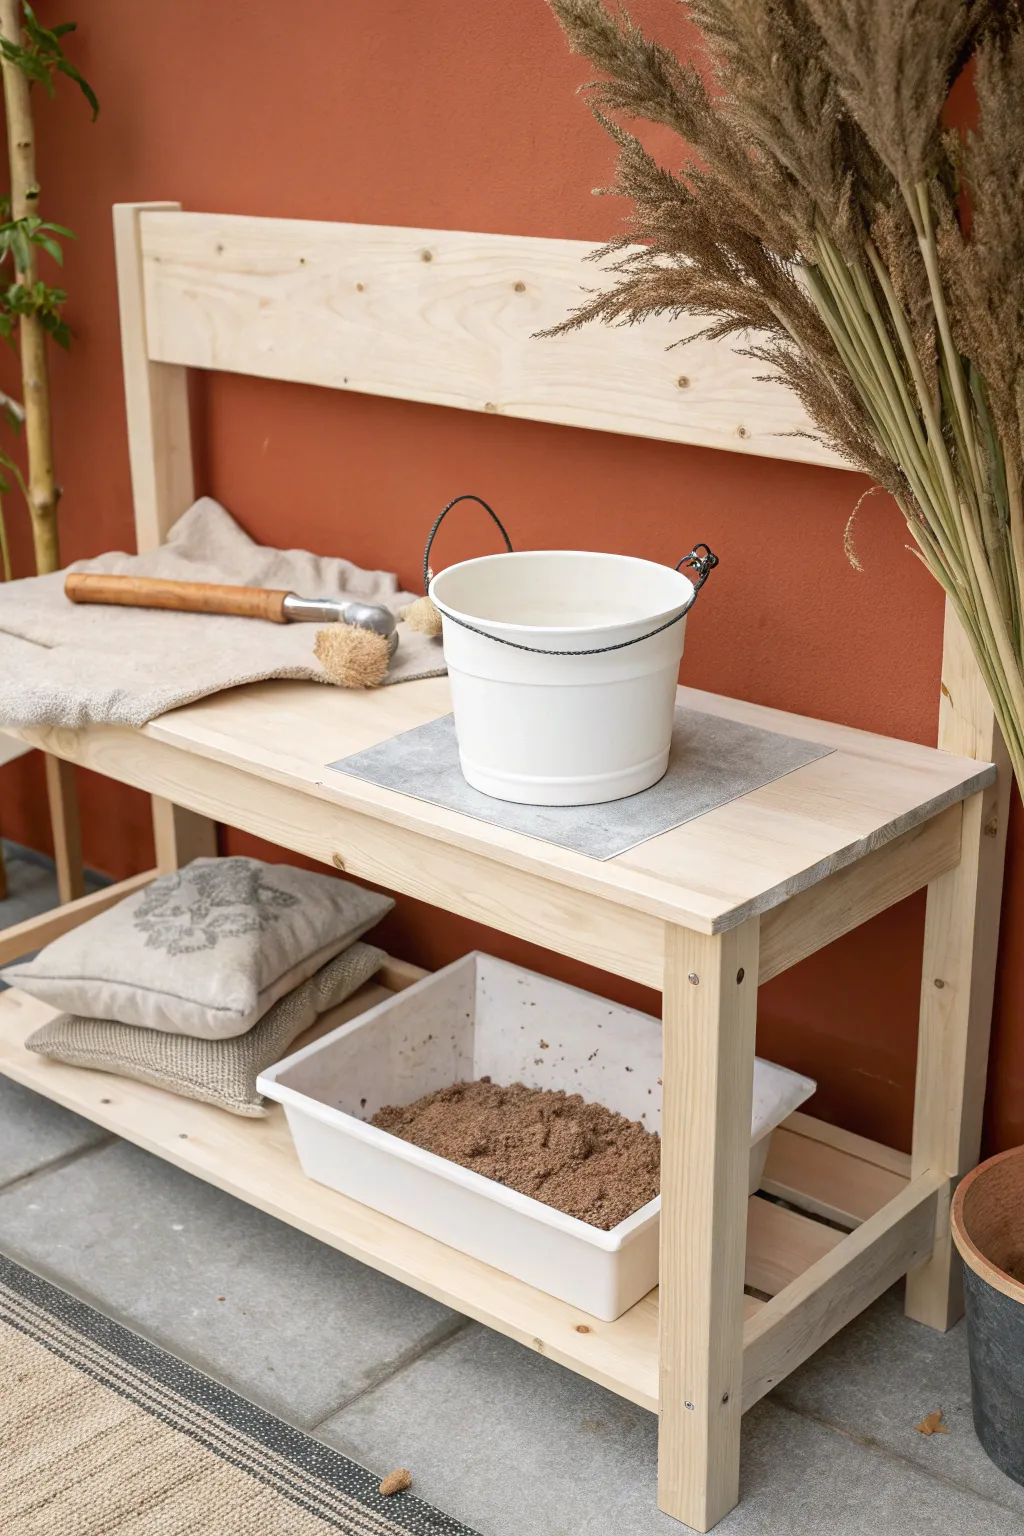
Every potter needs a distinct zone for recycling clay, and this simple plaster slab creates the perfect surface for drying out wet reclaim. It is a functional, minimalist addition to your potting bench that helps draw moisture away from your slurry so you can wedge it back into usable clay.
How-To Guide
Materials
- Pottery plaster (e.g., USG No. 1 or similar)
- Clean, cool water
- Wooden mixing stick or large whisk
- 2-gallon bucket for mixing
- Square mold (melamine wood frame, silicone cake pan, or a plastic bin)
- Murphy’s Oil Soap or mold release spray
- Scale for weighing plaster and water
- Sandpaper (medium and fine grit)
- Respirator mask (for mixing plaster powder)
Step 1: Preparing the Mold
-
Select your form:
Choose a square mold that fits comfortably on your bench shelf. A pre-made silicone square cake pan is easiest, but creating a temporary frame from melamine strips allows for custom sizing. -
Check for leaks:
If building a wooden frame, use clay ropes or hot glue on the outside seams to ensure the liquid plaster won’t seep out during the pour. -
Apply mold release:
Liberally coat the inside of your mold with Murphy’s Oil Soap or a dedicated mold release agent. This is crucial for wooden or plastic molds to ensure the slab pops out cleanly later.
Step 2: Mixing the Plaster
-
Calculate quantities:
Refer to the manufacturer’s instructions for the correct water-to-plaster ratio. A typical mix is often roughly 2.75 lbs of plaster to 1 quart of water, but always weigh your materials for consistency. -
Prepare the water:
Pour the measured cool water into your mixing bucket first. Never add water to the powder, as this creates impossible clumps. -
Sift the plaster:
Wearing your respirator, gently sift the plaster powder over the surface of the water. Do this slowly, letting hills form and sink. -
Finish sifting:
Continue adding powder until a small island forms in the center of the water and sits there for a few seconds without sinking. -
Soak period:
Let the mixture sit undisturbed for 2-3 minutes. This allows the plaster particles to fully hydrate before you introduce any agitation. -
Mix smoothly:
Insert your hand or mixing stick and gently stir from the bottom up. Avoid whisking vigorously, as you want to minimize air bubbles. -
Check consistency:
Continue mixing until the plaster feels creamy and tracks slightly, similar to a heavy cream or a loose pancake batter.
Clean Edges Only
Only sand the slab when it is bone dry. Sanding damp plaster clogs sandpaper instantly and often results in a gouged, uneven surface.
Step 3: Pouring and Finishing
-
The pour:
Pour the mix steadily into one corner of your mold, allowing it to flow and fill the space naturally. This technique helps push trapped air out ahead of the flow. -
Release bubbles:
Immediately tap the sides of the mold or vibrate the table gently. You’ll see air bubbles rise to the surface; pop them lightly if necessary. -
Initial set:
Wait for the plaster to go through its heating phase. It will become quite warm to the touch as the chemical reaction occurs. -
Demold:
Once the plaster has cooled completely (usually after 45-60 minutes), carefully remove the mold sides or pop the slab out of the silicone form. -
Curing time:
Although solid, the slab is still full of water. Place it on a wire rack and let it dry out completely for 3-5 days in a warm, dry spot. -
Sand edges:
Once fully dry, use sandpaper to bevel the sharp corners and smooth the top face. This prevents plaster chips from breaking off and contaminating your clay later. -
Installation:
Place your finished slab on the potters bench, perhaps on a non-slip mat, ready to receive your wet clay scraps.
Sticky Situation
If the plaster won’t release from a rigid mold, try using compressed air. Aim the nozzle at the seam between the plaster and the mold wall to force separation.
With your new plaster zone installed, recycling clay becomes a seamless part of your studio workflow

The Complete Guide to Pottery Troubleshooting
Uncover the most common ceramic mistakes—from cracking clay to failed glazes—and learn how to fix them fast.
Lower Shelf for Clay and Heavy Stuff
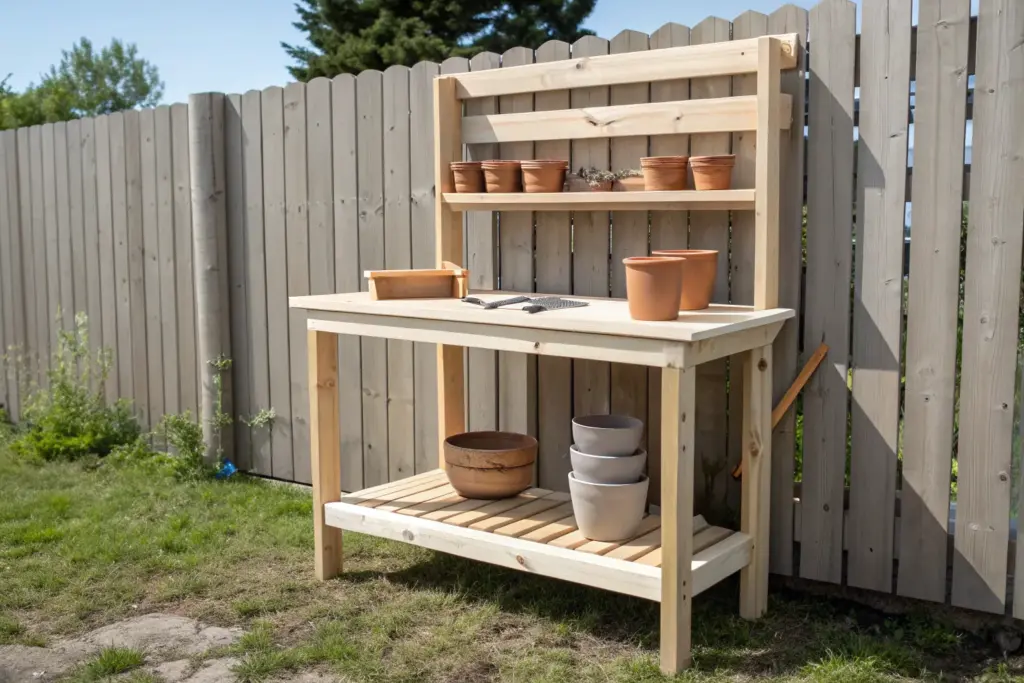
This project features straight lines, a warm natural finish, and sturdy slat shelving designed to hold heavy clay or gardening tools. The result is a timeless, functional console table that brings an organic feel to any workspace or greenhouse.
Step-by-Step Guide
Materials
- 4×4 lumber (for legs)
- 1×4 lumber (for aprons and top frame)
- 1×6 lumber (for tabletop planks)
- 1×2 lumber (for slatted lower shelf)
- Pocket hole screws (1 1/4 inch and 2 1/2 inch)
- Wood glue
- Sandpaper (80, 120, and 220 grit)
- Matte polyurethane or tung oil finish
- Miter saw
- Drill with pocket hole jig
- Orbital sander
- Measuring tape
- Clamps
Step 1: Constructing the Frame
-
Cut the Legs:
Start by cutting your 4×4 lumber into four equal lengths for the legs. Determine your ideal working height (usually 30-34 inches) and make precise square cuts. -
Prepare the Aprons:
Cut the 1×4 lumber for the side and front/back aprons. The side aprons determine the depth of your bench, while the longer pieces determine the total width. -
Drill Pocket Holes:
Set your pocket hole jig for 3/4-inch material. Drill two pocket holes on each end of all your apron pieces. This method hides the joinery for a clean, professional look. -
Assemble Side Panels:
Attach the side aprons to the legs using 1 1/4 inch pocket hole screws and wood glue. Ensure the apron is inset slightly (about 1/4 inch) from the face of the leg for a dimensional detail. -
Determine Shelf Height:
Mark the position for the lower shelf support rails on the inside of the legs. I like to place this about 4-6 inches off the floor to keep clay bags dry but accessible. -
Connect the Sides:
Join the two side assemblies together by attaching the long front and back aprons with glue and pocket screws, creating the full table skeleton.
Clean Joinery Trick
When attaching aprons, clamp a scrap block to the outside of the leg. This acts as a stop block to keep your apron perfectly flush or set back exactly where you want it while screwing it in.
Step 2: The Top and Lower Shelf
-
Install Shelf Rails:
Attach 1×2 support cleats to the inside of the longer bottom rails. These will act as a ledge for your slatted shelf pieces to rest on. -
Cut and Space Slats:
Cut your 1×2 lumber into slats that span the depth of the lower shelf. Lay them out on the support cleats with even spacing—using a scrap piece of wood as a spacer works perfectly here. -
Secure the Slats:
Brad nail or screw the slats into the support cleats. If screwing, pre-drill to prevent the thin wood from splitting. -
Assemble the Tabletop:
Cut your 1×6 boards to length for the top. Join them edge-to-edge using pocket holes underneath or simply secure them directly to the apron frame from below. -
Trim the Overhang:
Ensure the tabletop has a slight, consistent overhang on the front and sides (about 1 inch) to enhance the traditional cabinetry look.
Make it Modular
Instead of fixing the bottom slats permanently, build two removable ‘pallets’ of slats. This makes it much easier to deep clean the floor beneath the bench without moving the whole heavy unit.
Step 3: Finishing Touches
-
Initial Sanding:
Begin with 80-grit sandpaper to level out any uneven joints on the tabletop or shelf slats. Move to 120-grit to smooth the entire piece. -
Round the Edges:
Using 120-grit paper or a router with a round-over bit, gently soften the sharp corners of the legs and tabletop. This makes the bench more comfortable to lean against while working. -
Final Sanding Pass:
Finish with 220-grit sandpaper. Vacuum off all sawdust and wipe the wood down with a tack cloth or mineral spirits to prepare for the finish. -
Apply the Finish:
Apply a coat of matte polyurethane or penetrating tung oil. A matte finish preserves the raw wood look shown in the photo without adding artificial shine. -
Sand Between Coats:
Once the first coat is dry, lightly hand-sand with high-grit steel wool or very fine sandpaper to knock down any raised grain. -
Final Coat:
Apply a second (and optionally third) coat of finish to ensure the surface is durable enough to handle water splashes and heavy pots.
Now you have a sturdy, beautiful workspace ready to handle your next creative project
Pull-Out Boards and Bat Storage

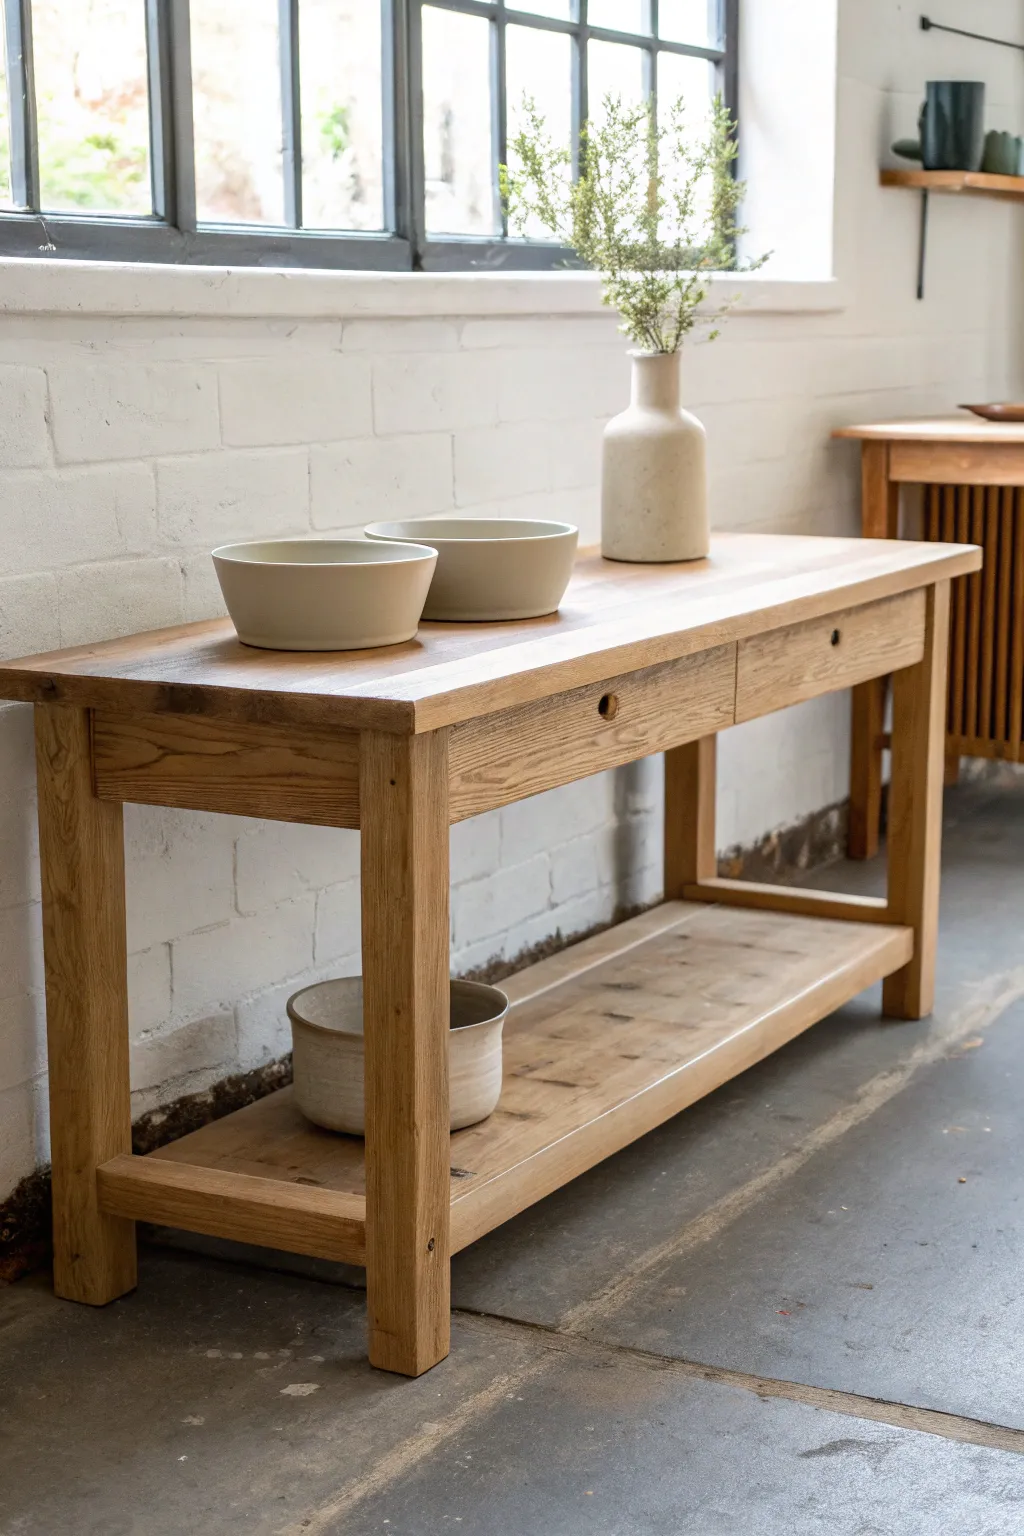
This project centers on building a refined, compact potter’s bench that functions beautifully as a dual-purpose console table for smaller studios. With its clean lines, warm oak finish, and cleverly slatted lower shelf for bat storage drying, it offers both aesthetic appeal and practical workspace.
Step-by-Step Tutorial
Materials
- Solid oak lumber (1×4, 1×6, and 2×2 boards)
- Hardwood plywood (for drawer bottoms)
- Wood glue
- Pocket hole screws
- Drawer slides (12-inch)
- Black metal knobs (rounded)
- Sanding sealer
- Matte polyurethane varnish
- Table saw or circular saw
- Miter saw
- Kreg jig (pocket hole jig)
- Drill/driver
- Clamps (various sizes)
- Orbital sander with 120-220 grit discs
Step 1: Building the Frame Structure
-
Cut the legs:
Begin by cutting your 2×2 oak stock into four identical legs, each measuring 34 inches in length. Sand the faces smooth before assembly to save time later. -
Prepare the aprons:
Cut 1×4 oak boards for the side and rear aprons. The side aprons should be roughly 14 inches long, and the rear apron should be around 38 inches long. -
Drill pocket holes:
Using your Kreg jig, drill pocket holes on the inside faces of all apron pieces—two holes on each end of the boards. -
Assemble the side frames:
Attach the side aprons to the legs using wood glue and pocket hole screws. Ensure the apron is flush with the outside face of the leg or inset slightly for a reveal. -
Connect the front and back:
Join the two side assemblies by attaching the long rear apron. For the front, use a narrower strip of oak (approx. 1.5 inches wide) to span the top front, leaving room below for the drawers. -
Add the drawer divider:
Cut a vertical manufacturing strip and install it in the exact center of the front opening to separate where the two drawers will go.
Clean Glue Lines
Wipe glue squeeze-out with a wet rag immediately. For corners, let the glue gel slightly (about 20 mins) then peel it off with a sharp chisel for zero residue.
Step 2: Constructing the Drawers and Top
-
Build the drawer boxes:
Measure the openings carefully. Build simple open-top boxes using 1/2-inch plywood or thinner oak stock, ensuring they are 1 inch narrower than the opening to accommodate slides. -
Cut the drawer fronts:
Cut two pieces of your solid oak 1×6 material to serve as the drawer fronts. These should be cut from the same board if possible so the grain flows across both drawers. -
Install slides and boxes:
Mount the drawer slides to the inside of the frame and the outside of the drawer boxes. Test the fit to ensure smooth operation. -
Attach the drawer fronts:
Using double-sided tape or clamps, position the oak fronts onto the boxes with an even 1/8-inch gap around the edges, then screw them in from the inside of the drawer box. -
Create the tabletop:
Glue up 1×6 oak boards to create a solid panel for the top, or cut a high-quality hardwood plywood sheet to size. Edge band it with solid oak strips if using plywood. -
Secure the top:
Attach the top to the frame using Z-clips or figure-eight fasteners. This allows the wood to expand and contract with humidity changes without cracking.
Step 3: The Slatted Shelf and Finishing
-
Cut the lower rails:
Cut two long 2×2 rails that will span the length of the bench near the bottom. Drill pocket holes underneath to attach them to the legs. -
Prepare the slats:
Rip 1×4 oak boards into slats approximately 2.5 inches wide. You will need enough to cover the length of the shelf with about 1 inch of spacing between them. -
Install the slats:
Lay the slats across the lower rails. I find using a scrap block of wood as a spacer ensures perfectly consistent gaps. Glue and brad nail them into place. -
Final sanding:
Sand the entire piece, moving from 120 grit up to 220 grit. Pay special attention to the edges of the top and the legs to ensure they are soft to the touch. -
Apply the finish:
Wipe away all dust. Apply a coat of sanding sealer, let dry, and sand lightly. Follow with two coats of matte polyurethane for a durable, natural look. -
Install hardware:
Mark the center of each drawer front. Drill pilot holes and screw in the black rounded metal knobs.
Add a Work Board
Install a pull-out board directly under the top surface using heavy-duty slides. Use melamine for this board to create an easy-clean clay wedging surface.
Now you have a sturdy, beautiful workspace ready for your next creative session


What Really Happens Inside the Kiln
Learn how time and temperature work together inside the kiln to transform clay into durable ceramic.
Pegboard Tool Wall Above the Bench
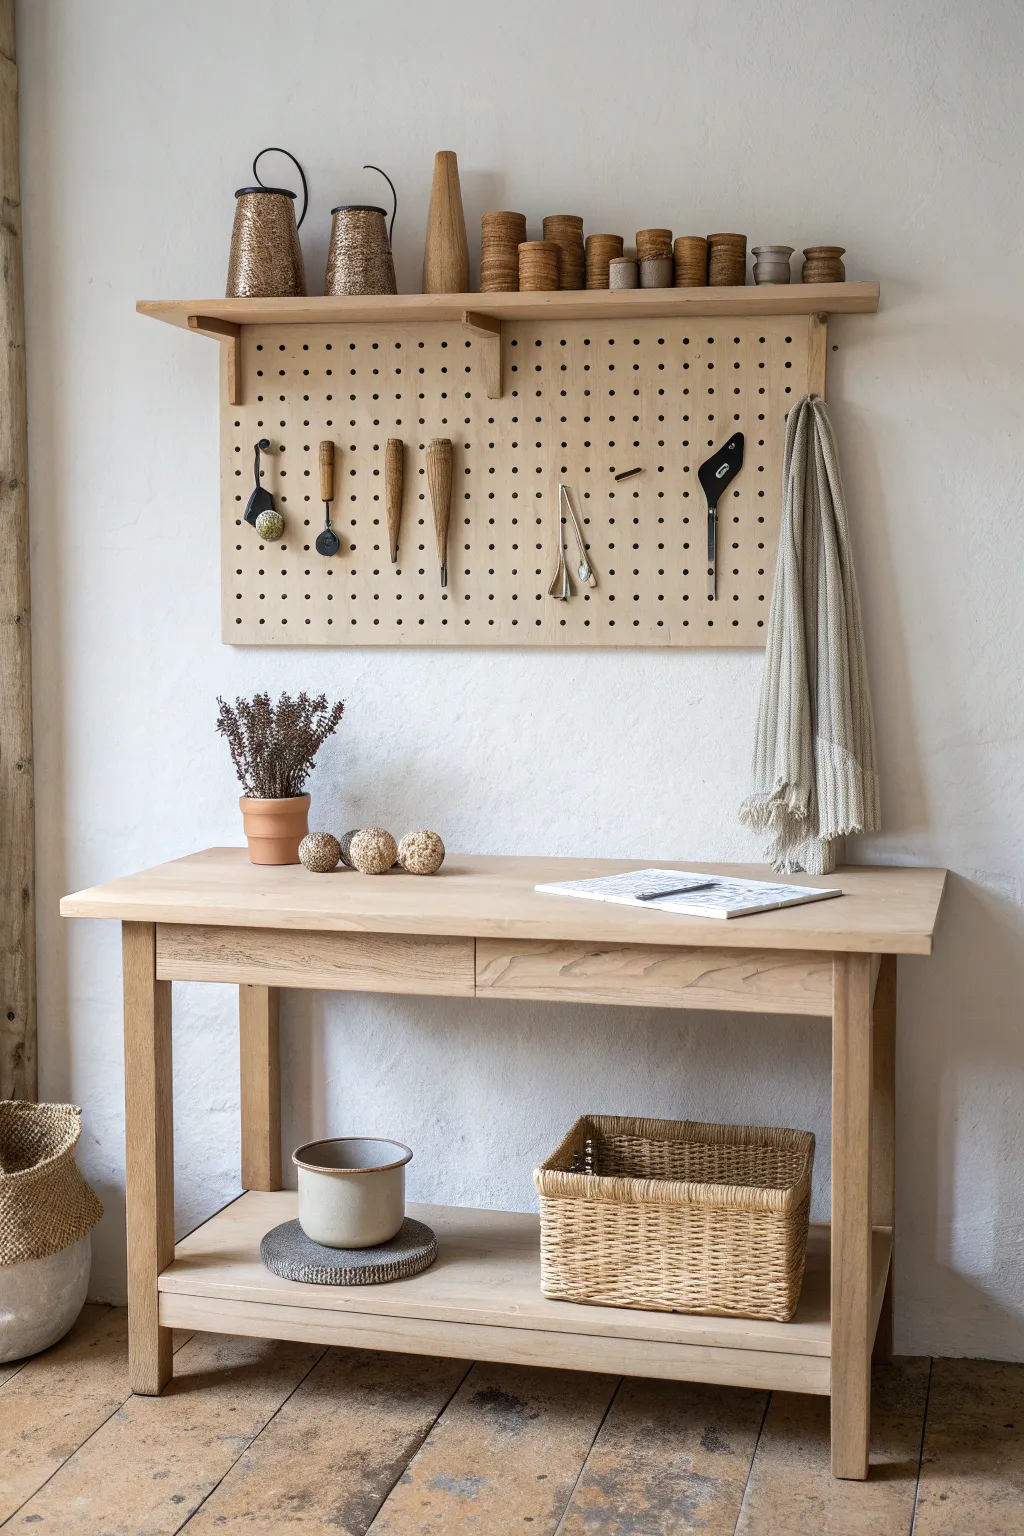
This custom pegboard combines minimal shaker style with practical workshop organization. Framed in warm, unfinished wood, it features a handy top shelf for displaying vessels and a grid system for keeping your essential pottery tools within arm’s reach.
Detailed Instructions
Materials
- 3/4-inch birch plywood (standard 4×8 sheet is plenty)
- Hardwood plank (oak or ash) for the top shelf (approx. 1×6 inch)
- Wooden dowels (1/4 inch or similar, matching pegboard holes)
- Drill with brad-point bit (matching dowel diameter)
- Table saw or circular saw with guide
- Jigsaw
- Sandpaper (120 and 220 grit)
- Wood glue
- Pocket hole jig and screws (or L-brackets)
- Wall mounting cleat or heavy-duty anchors
- Measuring tape and T-square
- Pencil
Step 1: Planning and Cutting
-
Measure your space:
Determine the desired dimensions for your pegboard backplate. The example shown is roughly 36 inches wide by 24 inches high, but you should scale this to fit centered above your specific workbench. -
Cut the backplate:
Using a table saw or circular saw, cut your plywood sheet to your determined dimensions. Ensure the corners are perfectly square, as this will be the foundation of your grid. -
Prepare the top shelf:
Cut your hardwood plank to be slightly longer than the width of your plywood backplate. An overhang of about 2-3 inches on each side adds a nice aesthetic balance. -
Cut the shelf supports:
From scrap hardwood or plywood, cut two triangular corbels or simple L-shaped supports. These will hold the shelf onto the backplate. The angle doesn’t need to be complex; a simple 90-degree bracket shape works well.
Tear-out Trouble?
If drilling causes the wood to splinter on the back, clamp a piece of scrap wood tightly underneath your plywood. This ‘backer board’ supports the fibers as the bit exits.
Step 2: Drilling the Grid
-
Mark the grid pattern:
Lay the plywood flat. Using a T-square and pencil, lightly draw a grid. For a standard look, space your lines 1 inch apart horizontally and vertically. The intersections will be your drill points. -
Test drill a scrap piece:
Before committing to the main board, drill a few holes in a scrap piece using your chosen bit size. Test the fit of your dowels; they should be snug but removable without pliers. -
Drill the peg holes:
Using a brad-point bit for clean entry, drill holes at every intersection on your grid. Keep the drill perfectly perpendicular to the wood surface to ensure pegs sit straight later. -
Sand the surface:
Once all holes are drilled, use an orbital sander with 120-grit paper to remove any pencil marks and tear-out around the holes. Follow up with 220-grit for a smooth finish.
Step 3: Assembly and Finishing
-
Attach supports to backplate:
Position your two wooden supports near the top corners of the plywood backplate. Secure them from the back of the plywood using screws and wood glue to hide the fasteners. -
Mount the top shelf:
Place the hardwood plank on top of the supports and the top edge of the plywood. Secure it by screwing down through the shelf into the supports, or using pocket holes from the back if you want invisible joinery. -
Final sanding:
Hand-sand the edges of the shelf and backplate to soften any sharp corners. I prefer to slightly round over the front edge of the shelf for a worn, friendly feel. -
Apply finish (optional):
To maintain the raw look from the photo, you can leave the wood bare. However, a clear matte water-based polyurethane will protect it from clay dust without altering the color significantly.
Add a Magnetic Strip
For metal rib tools that don’t hang easily on pegs, glue strong neodymium magnets into a few of the holes from the back side before mounting the unit to the wall.
Step 4: Installation
-
Install a French cleat:
The strongest way to hang this heavy unit is a French cleat. Screw one half of the cleat to the back of the plywood (near the top) and the matching half to your wall studs. -
Hang the unit:
Lift the pegboard assembly and lock the cleats together. Check that it is level before fully loading it with tools. -
Cut custom pegs:
Cut your dowel rod into 2-inch and 3-inch lengths. Sand the ends slightly to remove burrs. -
Arrange your tools:
Insert pegs into the grid to accommodate your specific tools. Use two pegs to support wide items like wire cutters or ribs, and single pegs for hanging items with loops.
Now you have a serene and organized workspace ready for your next pottery session
Shallow Drawers for Small Tools
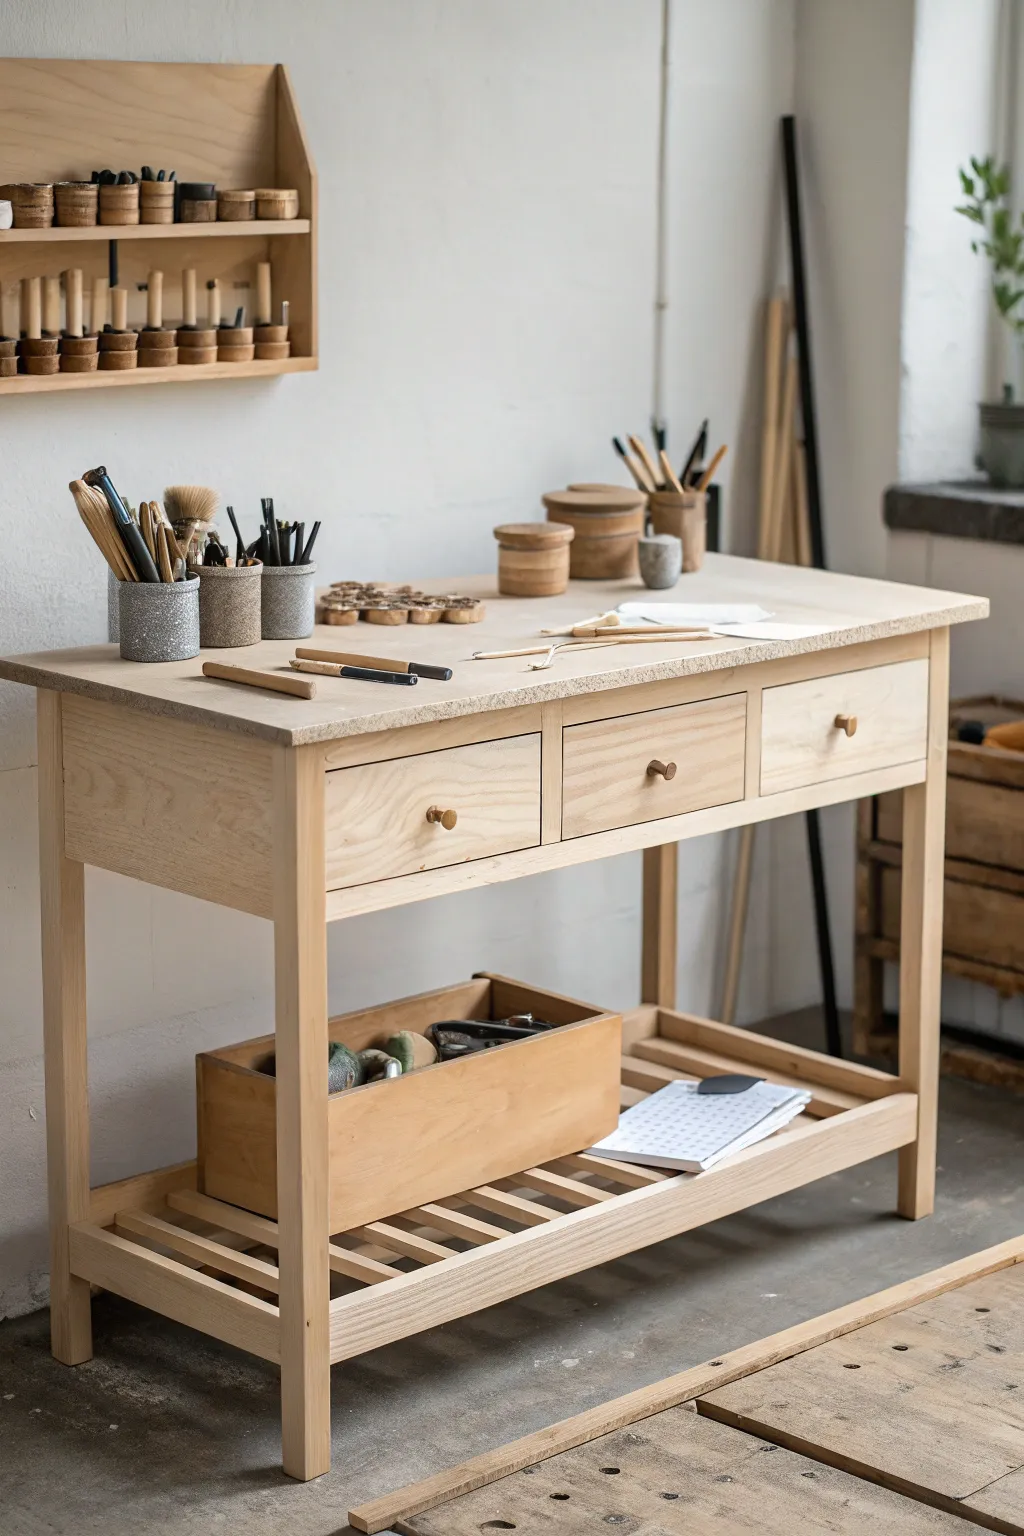
This elegant potter’s bench combines clean lines with serious functionality, featuring a durable work surface and essential shallow storage. The light wood finish and open lower shelf keep your studio feeling airy while ensuring your most-used tools are always within arm’s reach.
Step-by-Step Tutorial
Materials
- Hardwood lumber (White Oak or Maple suggested)
- Plywood for drawer bottoms
- Stone or composite countertop slab (custom cut)
- Wooden drawer knobs
- Pocket hole screws
- Wood glue
- Drawer slides (side-mount)
- Sandpaper (80 to 220 grit)
- Matte polyurethane finish or Danish oil
- Table saw
- Drill/Driver
- Pocket hole jig
- Clamps
Step 1: Building the Frame
-
Cut the legs:
Begin by cutting four sturdy legs from your hardwood stock. Aim for a finished height of about 34-36 inches, but adjust this based on your preferred standing work height. -
Prepare the aprons:
Cut the side and back aprons, as well as the front frame pieces that will divide the drawer openings. The front needs a top rail and vertical dividers to create three distinct spaces. -
Assemble the side panels:
Using pocket hole joinery on the inside faces, attach the side aprons to the legs. Ensure the outside faces remain flush and clean. -
Connect the frame:
Join the two side assemblies by attaching the back apron and the complex front drawer rail assembly. Clamp everything squarely to prevent any racking during the screwing process. -
Install lower shelf supports:
Measure about 6 inches up from the floor and attach horizontal support rails to the inside of the legs on the front and back. These will hold your slatted shelf.
Step 2: Creating the Drawer System
-
Build drawer boxes:
Construct three shallow drawer boxes using simple butt joints or rabbets. The height should be no more than 3-4 inches—just enough for carving tools and wires without becoming a catch-all. -
Install the bottoms:
Cut plywood panels to fit the drawer bottoms. Glue and nail them into place, or slide them into a groove if you routed one earlier. -
Mount the slides:
Attach the drawer slides to the interior dividers of the bench frame and the sides of your drawer boxes. Test the fit to ensure they glide smoothly without binding. -
Prepare drawer fronts:
Cut three drawer fronts from your nicest grain stock. Aim for a tight reveal—about 1/16th of an inch gap around the edges looks professional. -
Attach the fronts:
Use double-sided tape or clamps to temporarily position the drawer fronts on the boxes. Once aligned, screw them on from the inside of the drawer box.
Grain Matching
For a cohesive look, cut all three drawer fronts from a single long board. Number them as you cut so the grain pattern flows uninterrupted across the front.
Step 3: Shelving and Surface
-
Cut the slats:
Rip narrow strips of wood for the lower shelf. I like to chamfer the edges slightly here; it softens the look and prevents clay dust from getting trapped in sharp corners. -
Install the shelf:
Space the slats evenly across the lower supports you installed earlier. Secure them with brad nails or screws from underneath for a hidden look. -
Sand everything down:
Work through your sandpaper grits, starting at 80 for rough spots and finishing at 220 for a silky touch. Pay special attention to the leg corners. -
Apply the finish:
Wipe on a matte polyurethane or a hardening oil. Several thin coats provide better protection against water and clay spills than one thick coat. -
Attach the hardware:
Drill centered holes in your drawer fronts and screw in the simple wooden knobs to match the aesthetic. -
Mount the top:
Apply a construction adhesive or silicone to the top of the wooden frame. Carefully lower your stone or composite slab onto the frame, ensuring an even overhang on all sides.
Add Tool Wells
Make the bench even more functional by routing shallow grooves into the drawer dividers or the side of the tabletop frame to hold pens and needle tools securely.
Now you have a dedicated, beautiful workspace ready for your next throwing session

TRACK YOUR CERAMIC JOURNEY
Capture glaze tests, firing details, and creative progress—all in one simple printable. Make your projects easier to repeat and improve.
Rolling Bench on Locking Casters

This versatile rolling bench combines a sleek, white-painted frame with a warm, natural wood top, perfect for a mobile crafting station or kitchen island. Its airy, slatted shelves and locking casters offer both functional storage and effortless mobility for your workspace.
Detailed Instructions
Materials
- Hardwood board for top (approx. 24 x 36 inches, 1-inch thick)
- 2×2 lumber for legs
- 1×2 or 1×3 lumber for frame supports and shelf slats
- Semi-gloss white paint (furniture grade)
- Clear matte polyurethane or wood wax
- Four 2-inch locking casters with mounting screws
- Kreg Jig for pocket holes
- Pocket hole screws (1 1/4 inch)
- Wood glue
- Sandpaper (120 and 220 grit)
- Cordless drill
- Clamps
Step 1: Building the Frame
-
Cut the legs:
Start by cutting your 2×2 lumber into four equal lengths for the legs. A standard height is around 34 inches, but remember to subtract the height of your casters and the thickness of the top to get the final standing height right. -
Prepare the side aprons:
Cut four pieces of 1×3 lumber to serve as the short side aprons. These will connect the front and back legs. Drill two pocket holes into each end of these boards on the inside face. -
Assemble the side panels:
Attach the top and bottom aprons to two legs using wood glue and pocket hole screws to create a ladder-like side panel. Ensure the aprons are inset slightly (about 1/8 inch) from the face of the legs for a professional looking reveal. -
Connect the sides:
Cut four longer apron pieces for the front and back supports. Drill pocket holes on each end and connect your two pre-assembled side panels together, ensuring the frame is perfectly square. -
Add shelf supports:
Install horizontal cleats on the inside of the lower apron frames. These narrow strips will act as a ledge for your slatted shelves to rest on.
Step 2: Creating the Shelves
-
Cut the slats:
Cut your 1×2 or 1×3 lumber into slats that span the depth of the cart. You will need enough to cover both the middle and bottom shelf levels. -
Space and attach slats:
Lay the slats onto your shelf supports. Use a spare piece of wood or a spacer tile to keep the gaps between them consistent. Glue and nail them down using a brad nailer for a clean look. -
Smooth the edges:
Run 120-grit sandpaper over all sharp edges of the frame and slats. I always take extra time here to round over the corners where hands commonly touch.
Wobbly Frame?
If the cart rocks on uneven floors, loosen the caster screws slightly, place weight on the cart to settle it square, then retighten everything.
Step 3: Finishing and Assembly
-
Prep the frame for paint:
Wipe down the entire frame with a tack cloth to remove dust. Fill any visible nail holes with wood filler and sand smooth once dry. -
Paint the base:
Apply a coat of primer followed by two coats of durable semi-gloss white paint. A small foam roller works wonders for getting a smooth finish on the flat surfaces, while a brush handles the corners. -
Sand the top:
While the paint dries, sand your hardwood top panel. Start with 120-grit and finish with 220-grit until it feels silky to the touch. -
Seal the wood top:
Apply three coats of a clear matte polyurethane or a food-safe wax to the wooden top. Sand lightly with high-grit sandpaper between coats for the smoothest finish. -
Install casters:
Flip the painted frame upside down. Pre-drill holes into the center of each leg bottom and screw in the locking casters securely. -
Attach the top:
Place the finished wood top face down on a soft surface and center the frame on it upside down. Attach the frame to the top using Z-clips or pocket holes drilled upwards through the top aprons. -
Final inspection:
Flip the cart upright, lock the casters, and give everything a final wipe down. Your rolling bench is now ready to be styled with baskets and bowls.
Add a Towel Bar
Attach a sleek metal bar or a leather strap handle to one side of the wooden top for hanging cloths or s-hooks for tools.
Now you have a stylish and functional mobile island ready to serve anywhere in your home
Adjustable-Height Workbench Setup
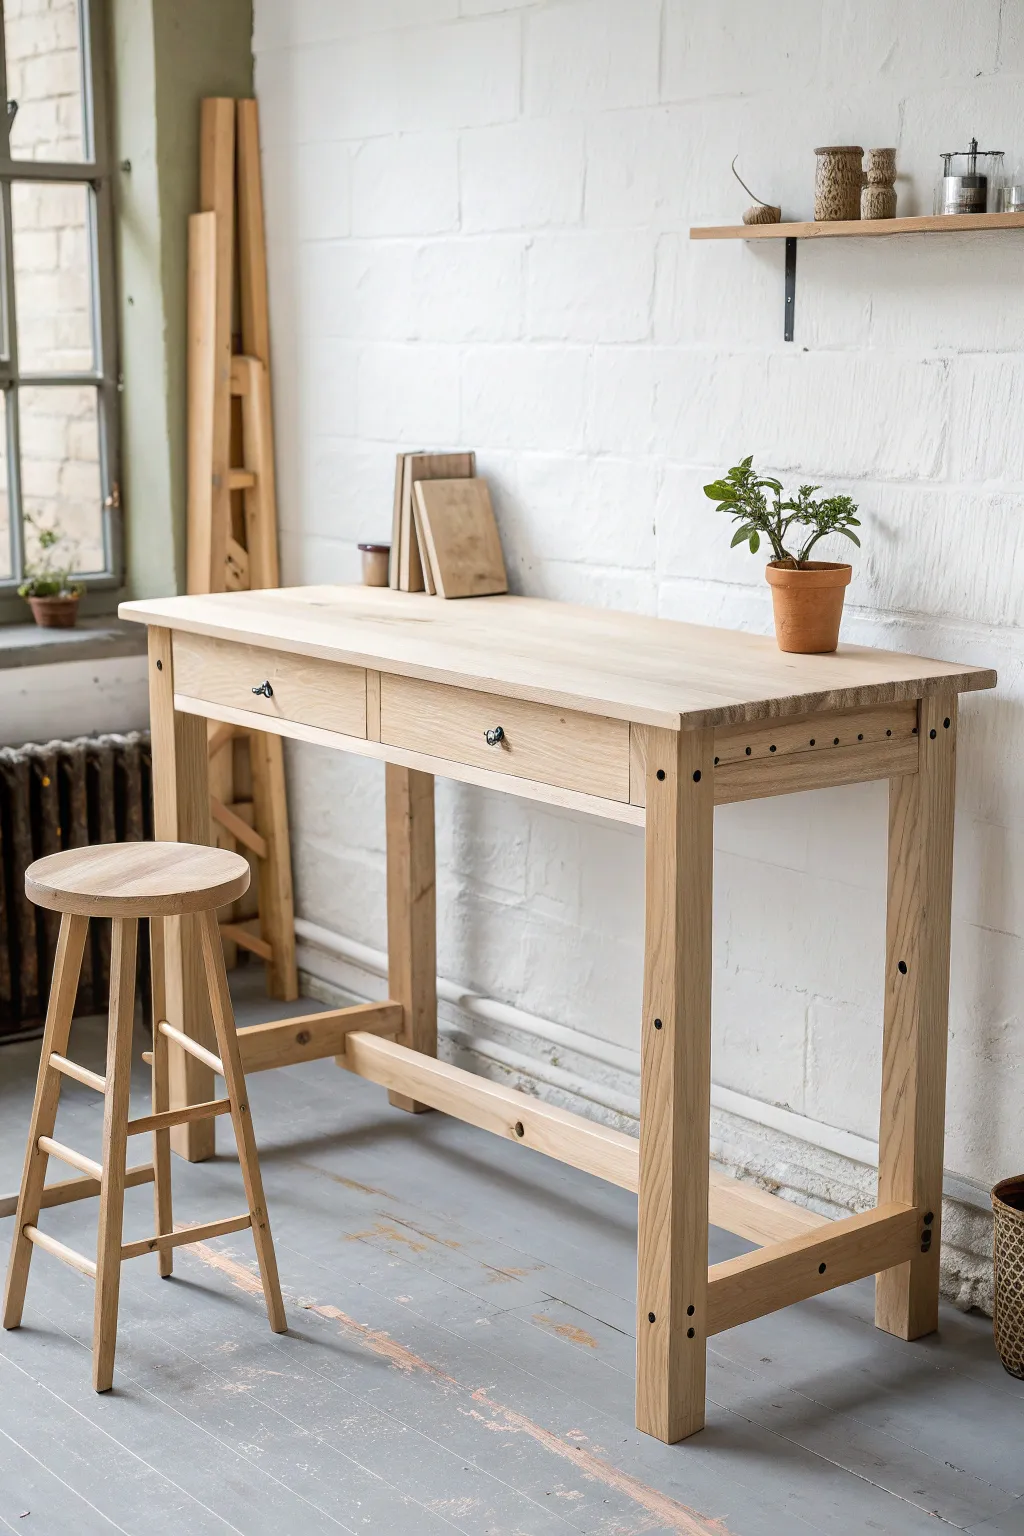
This custom height-adjustable workbench combines sleek, minimalist design with the heavy-duty stability needed for pottery work. Crafted from light hardwood with clever peg-adjustable legs, it allows you to shift from sitting at a wheel to standing for wedging or hand-building. Its narrow profile fits smaller studios while offering ample workspace and essential drawer storage.
How-To Guide
Materials
- Hardwood lumber (White Oak or Ash recommended for durability)
- 4×4 lumber for legs (approx. 8 feet total)
- 1×6 or 1×8 boards for tabletop (approx. 12 feet total)
- 1×4 lumber for apron and stretcher bars
- Plywood for drawer bottoms (1/4 inch thick)
- Wooden dowels or strong metal pins (3/4 inch diameter)
- Wood glue
- Pocket hole screws
- Table saw or circular saw
- Drill with 3/4 inch spade bit or Forstner bit
- Orbital sander with 120-220 grit discs
- Drawer slides (side-mount preferred)
- Drawer knobs (cast iron or brass)
- Polyurethane or Tung Oil finish
Step 1: Building the Adjustable Leg Frames
-
Cut the primary leg posts:
Begin by cutting four lengths of your 4×4 material. These need to be tall enough for your maximum standing height preference, typically around 36-40 inches. Ensure the ends are perfectly square. -
Drill the adjustment holes:
This is the critical step for adjustability. Measure and mark vertically along the center of each leg post at 2-inch intervals. Using a drill press or a very steady hand with a 3/4 inch Forstner bit, drill holes straight through the legs. These will house the metal pins that support the adjustable stretcher bars. -
Create the lower stretcher supports:
Cut your lower stretcher bars from sturdy 2×4 material. These will connect the front and back legs on each side. Precisely drill coordinating holes through the ends of these stretchers so they can slide and lock into place with the legs using bolts or dowels. -
Assemble the side frames:
Connect the front and back legs using a fixed top apron piece. Use pocket hole joinery or mortise and tenon joints here for maximum rigidity, as this upper joint won’t move.
Drilling Pro Tip
To prevent ‘tear-out’ when drilling the adjustment holes, clamp a scrap piece of wood tightly to the back of the leg where the drill bit exits.
Step 2: Constructing the Tabletop & Drawers
-
Glue up the tabletop panel:
Select your best 1×6 or 1×8 boards. Arrange them to alternate the grain direction to prevent warping. Apply wood glue to the edges and clamp them tightly together, wiping away squeeze-out immediately. I prefer to let this cure overnight for maximum strength. -
Cut the top apron frame:
Build a rectangular frame that matches the dimensions of your tabletop, minus a 1-inch overhang. This frame will house the drawers. -
Build the drawer boxes:
Construct simple box frames for your two drawers using 1/2 inch lumber, cutting grooves to slide in the plywood bottom. Keep the joinery simple with butt joints and screws, or box joints if you’re feeling fancy. -
Install drawer slides and faces:
Mount the drawer runners inside the upper apron cavity. Attach the drawer faces last to ensure an even gap around the edges, shimming them into place before screwing them to the drawer boxes. -
Attach the table assembly to sides:
Secure the long apron assembly (with drawers) to the two leg side frames you built earlier. Use long structural screws or lag bolts, countersinking the heads for a cleaner look. -
Mount the tabletop:
Attach the solid wood top to the base using z-clips or figure-8 fasteners. This is crucial—it allows the wood top to expand and contract with humidity without cracking.
Step 3: Finishing Touches
-
Add the stability cross-brace:
Measure the distance between your lower side stretchers. Cut a long 2×4 to fit snugly between them as a central footrest and stabilizer. Secure it with long lag screws purely through the center of the side stretchers. -
Thorough sanding:
Sand the entire piece, starting with 120 grit to remove rough spots and moving up to 220 grit for a silky smooth feel. Pay extra attention to the tabletop edges and corners. -
Seal and protect:
Because this is a potter’s bench, water protection is key. Apply 3-4 coats of a durable polyurethane or Waterlox finish. Sand lightly between coats. -
Install hardware:
Once the finish is fully cured, drill pilot holes and attach your chosen drawer pulls. Cast iron drops look particularly good against pale oak. -
Insert adjustment pins:
Place your heavy-duty metal pins or thick hardwood dowels into the leg holes at your desired height to set the lower shelf or footrest position.
Wobbly Bench?
If the bench rocks on uneven floors, install leveling feet hardware into the bottom of each leg post. They adjust individually for a rock-solid base.
This sturdy, custom bench will naturally age and gain character with every pot you throw on it
Corner Bench for Small Studios
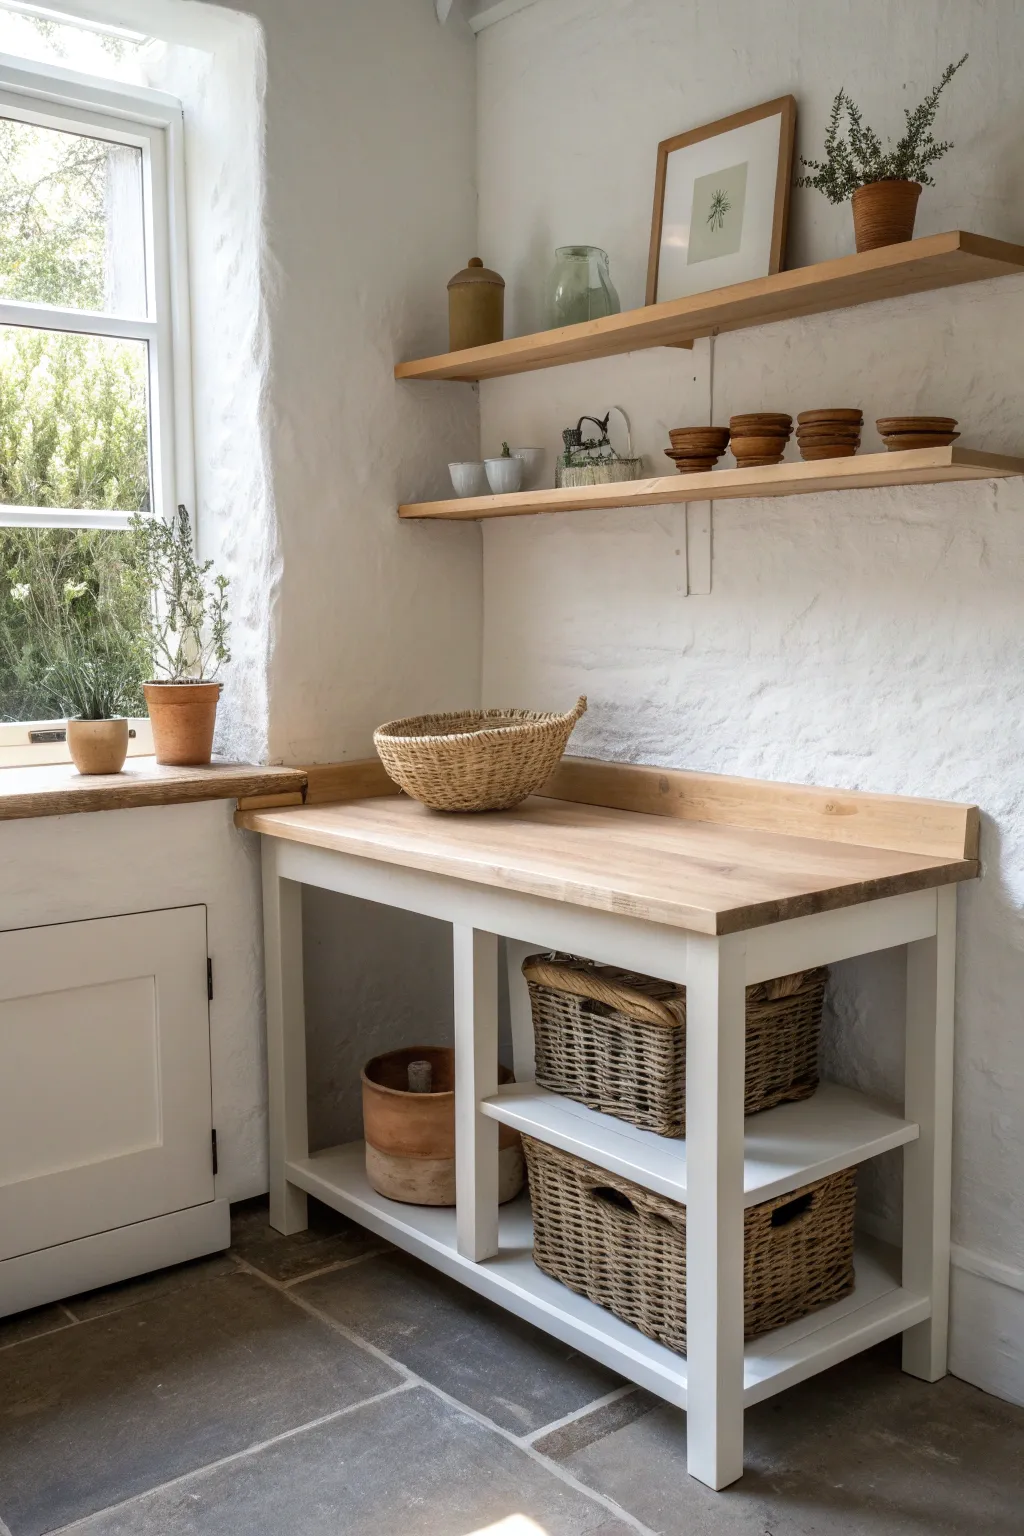
Maximize your studio space with this charming corner potter’s bench that blends farmhouse aesthetics with practical storage. The crisp white base and warm natural wood top create an inviting workspace perfect for wedging clay or glazing small pieces.
Step-by-Step
Materials
- Hardwood butcher block countertop (oak or beech)
- Pine lumber for framing (2x4s and 2x2s)
- Plywood for shelving
- Pocket hole jig and screws
- Wood glue
- Bright white satin furniture paint
- Matte polyurethane varnish
- Sandpaper (120, 220, and 320 grit)
- Drill and impact driver
- Circular saw or table saw
- Paint rollers and high-quality brushes
Step 1: Building the Frame
-
Measure and cut legs:
Begin by determining your ideal working height. For wedging clay, a slightly lower bench is often better, but standard counter height (36 inches) works well for general tasks. Cut four legs from your 2×4 lumber to length. -
Create the aprons:
Cut the horizontal apron pieces that will connect the legs. Since this is a simple rectangular table pushed into a corner, you’ll need two long aprons for the front and back, and two shorter ones for the sides. -
Join the frame:
Drill pocket holes on the inside faces of your apron pieces. Apply wood glue to the ends and attach them to the legs using pocket hole screws, ensuring the outer faces are flush. -
Add lower supports:
Measure up about 4-6 inches from the floor for your bottom shelf. Cut and install support rails between the legs at this height, mirroring the apron structure above. -
Install the center divider:
To create the partitioned storage look seen in the photo, install a vertical divider in the center of the frame, connecting the top apron to the bottom shelf support.
Step 2: Shelving and Top
-
Cut the plywood shelves:
Measure the interior spaces of your lower frame carefully. Cut your plywood to fit these spaces. I find it helpful to cut them slightly undersized—about 1/16th of an inch—to make installation easier. -
Install the shelves:
Secure the plywood pieces to the lower support rails using glue and brad nails or small screws countersunk into the wood. -
Prepare the countertop:
Cut your butcher block to size. If you are fitting this into a specific corner, check your walls for squareness first; you may need to scribe the back edge of the wood for a tight fit against uneven stone or plaster. -
Sand the wood top:
Sand the butcher block thoroughly, starting with 120 grit and moving up to 220 grit to remove any mill marks and create a smooth surface. -
Adding the backsplash:
Cut a strip of matching wood (about 3-4 inches tall) to serve as a backsplash running along the wall edge. This prevents clay scraps from falling behind the bench.
Wobbly bench?
If the bench rocks on uneven stone floors, install adjustable leveling feet into the bottom of each leg before painting. This ensures a stable surface for wedging clay.
Step 3: Finishing Touches
-
Check for imperfections:
Fill any visible screw holes or gaps in the base frame with wood filler. Once dry, sand the filler smooth and give the entire base a light sanding to help the paint adhere. -
Paint the base:
Apply a high-quality primer to the base frame. Follow this with two coats of bright white satin furniture paint, sanding lightly between coats for a professional finish. -
Seal the countertop:
Apply a coat of matte polyurethane to the butcher block top. Allow it to dry completely before lightly sanding with 320 grit sandpaper. -
Apply final topcoats:
Repeat the sealing process for at least two to three more coats. Clay dust and water are tough on wood, so a durable, multi-layer finish is essential for longevity. -
Attach the top:
Once everything is fully cured, place the top onto the base. Secure it by driving screws up through the apron pocket holes into the underside of the butcher block. -
Install in corner:
Move the bench into position. If your floor is uneven like the stone floor in the image, use shims under the legs to ensure the table doesn’t rock while you work.
Add a cleaning station
Cut a hole in the countertop to drop in a stainless steel sink or a plastic bucket for recycling clay water. Use silicone sealant under the rim to prevent water damage.
Now you have a sturdy, beautiful workspace ready for your next pottery session
L-Shaped Bench With Task Stations
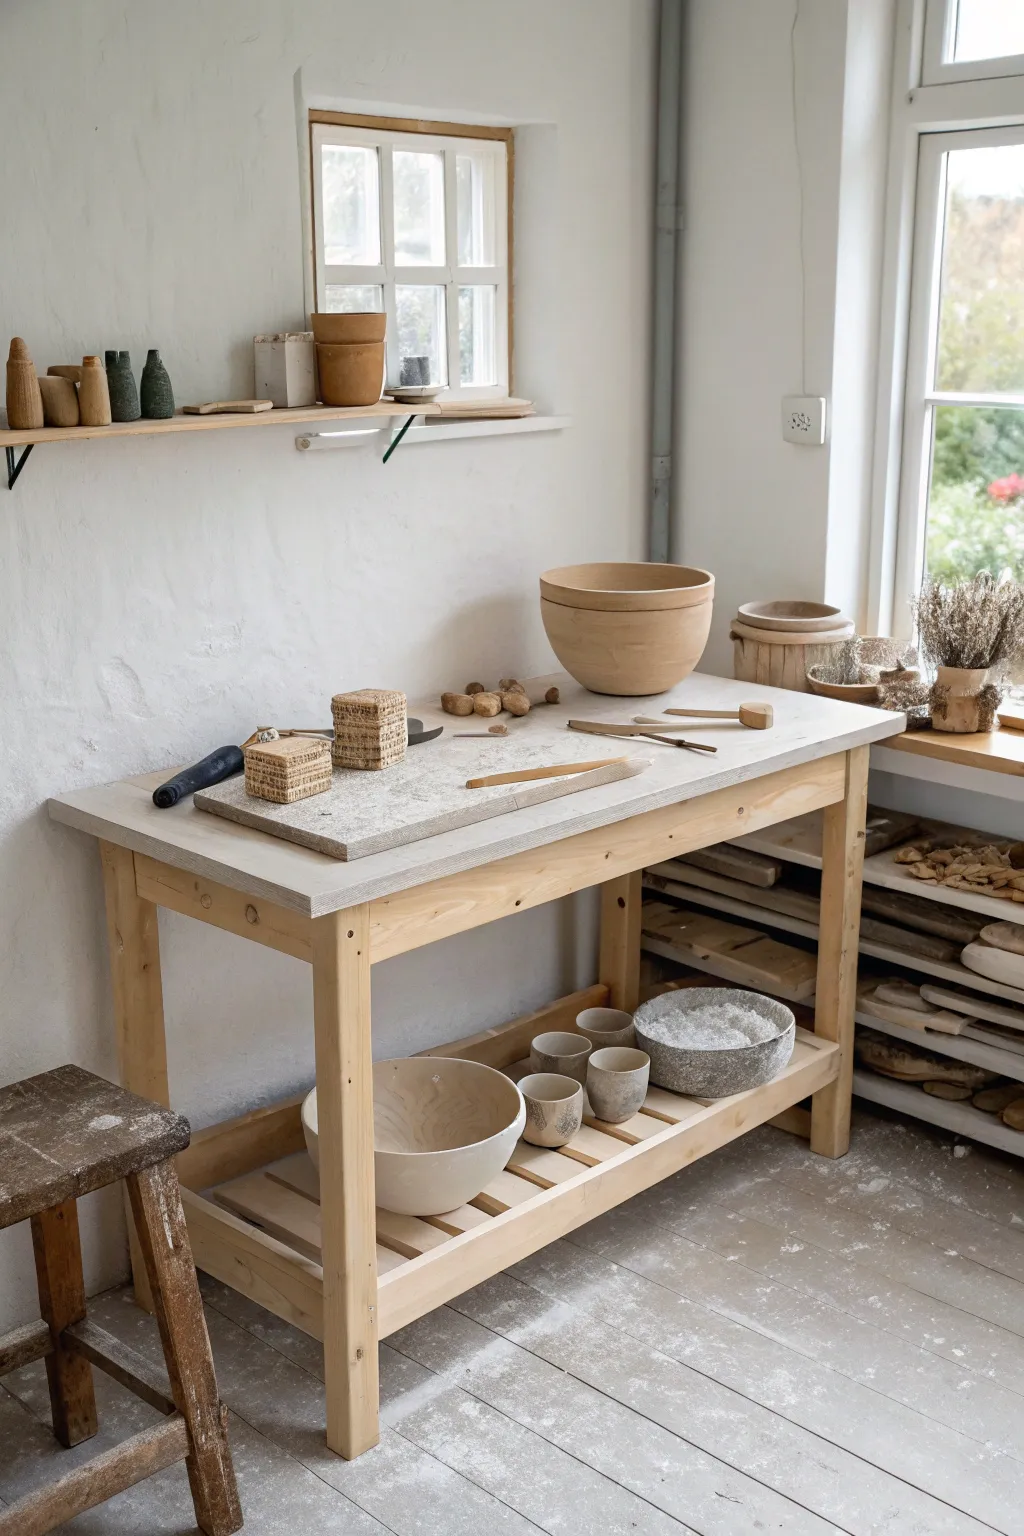
Recreate this serene and functional potter’s bench, featuring a sturdy pine base and a poured concrete-style top. This project brings a clean, Scandinavian aesthetic to your studio while providing a durable surface for Wedging and hand-building.
Step-by-Step Guide
Materials
- Construction lumber (2x4s) for base frame
- 4×4 lumber for legs
- Pine boards for lower slats
- Plywood for tabletop base
- Concrete backer board (durock or hardiebacker)
- Concrete countertop mix or overlay
- Wood screws
- Wood glue
- Sandpaper (80 through 220 grit)
- Matte polyurethane varnish (for wood)
- Concrete sealer (food safe if using for serving)
- Circular saw
- Drill/Driver
- Trowel
Step 1: Building the Frame Base
-
Cut the Legs:
Begin by cutting your 4×4 lumber into four equal lengths for the legs. A standard comfortable height is usually around 30 to 36 inches, but measure what works best for your standing posture. -
Prepare the Aprons:
Cut your 2×4 lumber to create the upper apron frame. You will need two long pieces for the length and two shorter pieces for the width of your table. -
Assemble the Upper Frame:
Assemble the apron rectangle by screwing the 2x4s into the legs. I like to countersink these screws slightly so they can be filled later for a cleaner look. -
Add Lower Supports:
Measure about 6-8 inches up from the bottom of the legs. Cut and install 2×2 or 2×4 supports running along the length of the table. These will hold the shelf slats. -
Install Shelf Slats:
Cut pine boards to span the width of the lower supports. Screw them down with even spacing—using a scrap piece of wood as a spacer helps keep the gaps consistent.
Step 2: Creating the Concrete Top
-
Attach Substrate:
Cut a piece of thick plywood to match the dimensions of your top frame plus a slight overhang if desired. Screw this securely into the top apron frame. -
Install Backer Board:
Cut the concrete backer board to the exact same size as the plywood. Apply construction adhesive to the plywood and screw the backer board down on top. -
Form the Edges:
You can either use a melamine form to cast a thick top or simply use pine lattice strips to create a lip around the edge if you plan to pour a thinner overlay. -
Mix and Pour:
Mix your concrete countertop mix according to the package instructions. Pour it onto the backer board, spreading it evenly. -
Trowel Smooth:
Use a steel trowel to smooth the surface. Work the material to the edges, ensuring no air bubbles are trapped. A vibrating sander held against the frame can help settle the concrete. -
Cure:
Allow the concrete to cure for at least 48 hours. Keep it slightly moist or covered with plastic to prevent cracking if the air is dry. -
Sand the Top:
Once fully cured, sand the top lightly to remove any rough trowel marks or sharp edges. Wipe away all dust thoroughly. -
Seal the Surface:
Apply several coats of concrete sealer. This is crucial for a pottery bench as it prevents clay water from staining the porous surface.
Smoother Concrete
Vibrate the wet concrete by tapping the table sides with a rubber mallet to release trapped air bubbles.
Step 3: Finishing Touches
-
Sand the Wood Frame:
Go back to the wooden base and give everything a thorough sanding. Pay attention to the corners of the legs to soften them. -
Apply Wood Finish:
Apply a matte polyurethane varnish to the wooden legs and shelf. This keeps the natural pale wood look but protects it from studio dust and water splashes. -
Optional: Add Hooks:
Install small hooks or a rail on the side of the apron for hanging tools like wire cutters or towels. -
Final Setup:
Once everything is dry, position your bench in your studio. Place a canvas wedging board on top if you prefer a softer surface for certain clays.
Mobile Station
Add heavy-duty locking caster wheels to the legs so you can easily reconfigure your studio layout.
You have built a beautiful, durable workspace ready for years of creative pottery making
Built-In Drying Cubby Rack
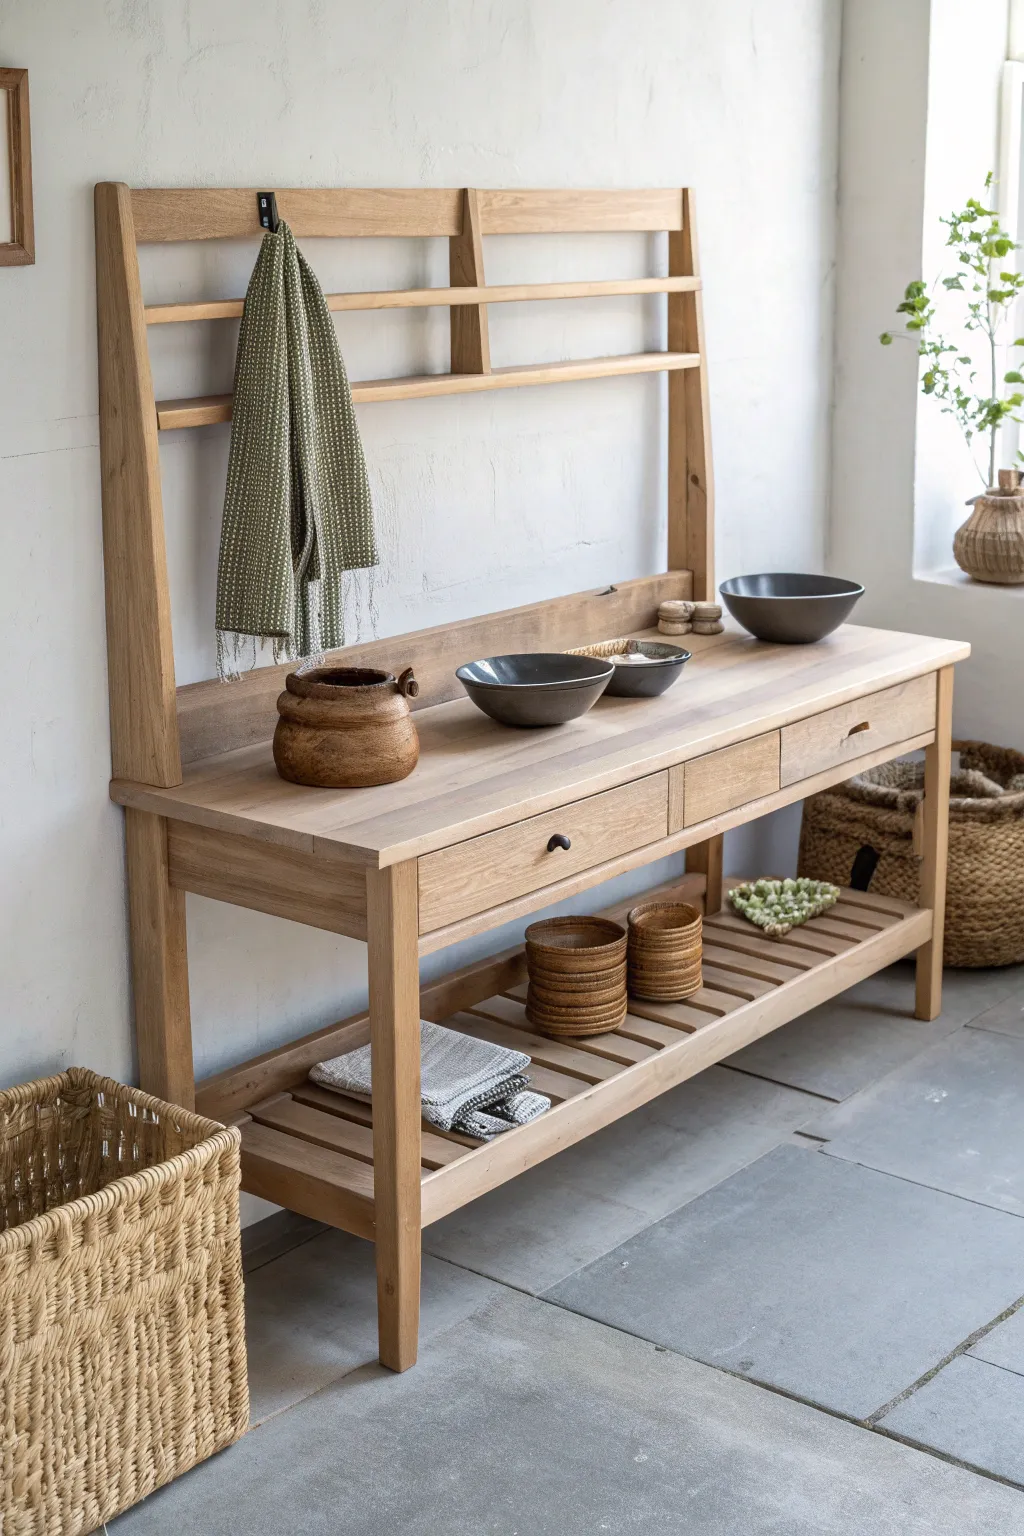
This elegant yet sturdy potting bench brings the warmth of raw oak into your workspace, featuring a practical upper drying rack and lower slat shelf. Its clean lines and functional drawers make it the perfect intermediate woodworking project to organize your gardening or pottery tools in style.
How-To Guide
Materials
- White Oak or Ash lumber (various widths for legs, top, and slats)
- 3/4-inch oak plywood (for drawer boxes)
- Wood glue
- Pocket hole screws
- Iron-on edge banding (matching wood species)
- Drawer slides (side-mount)
- Matte black drawer pulls
- Matte black hook
- Matte clear polyurethane or hardwax oil
- Sandpaper (80, 120, 220 grit)
Step 1: Building the Base Structure
-
Cut the Legs:
Begin by cutting your four main legs from 2×2 stock. The front legs should be standard table height (around 34 inches), while the back legs need to extend upwards to form the support for the drying rack (approximately 60-65 inches total). -
Construct the Apron:
Cut the side and back apron pieces that will support the tabletop. Join these to the legs using pocket holes drilled on the inside faces to hide the joinery, ensuring the front is left open for the drawers. -
Install the Lower Rails:
Measure and cut the lower stretcher bars that will hold the bottom shelf. Attach these to the legs about 6 inches from the floor, creating a sturdy frame for the slats. -
Create the Slat Shelf:
Rip 1×3 boards to length for the bottom shelf. Lay them across the lower rails with uniform spacing—I usually use a scrap piece of wood as a spacer—and secure them with brad nails and glue.
Wobbly Legs?
If the bench rocks on a flat floor, use a sanding block on the bottom of the longer leg to slowly remove material until all four feet sit 100% flush.
Step 2: Crafting the Top and Drawers
-
assemble the Tabletop:
Glue up several 1×6 or 1×8 oak boards to create a solid panel for the main work surface. Clamp tightly and let cure overnight, then sand flat once dry. -
Build Drawer Boxes:
While the top dries, construct three simple drawer boxes using the plywood. The fronts will be attached later, so focus on square corners and sturdy bottoms. -
Install Runners and Dividers:
Add vertical dividers within the front apron space to separate the drawer cavities. Install your side-mount drawer slides onto these dividers and the outer legs. -
Attach the Drawer Fronts:
Cut solid oak pieces for the drawer faces. To get that perfect, even gap, use playing cards as shims to hold the front in place while you screw it to the drawer box from the inside. -
Secure the Tabletop:
Attach the finished tabletop to the base frame using figure-eight fasteners or Z-clips. This allows the wood to expand and contract with humidity changes without cracking.
Pro Tip: Hidden Strength
Add a hidden vertical support leg in the center rear of the slat shelf if you plan to store very heavy bags of clay or soil to prevent sagging over time.
Step 3: The Drying Rack and Finishing
-
Add the Top Rail:
Connect the two tall back legs with a horizontal top rail. This stabilizes the entire upper structure. -
Install the Drying Dowels:
For the rack feature, install two horizontal rails between the back legs. Before attaching, drill through-holes or pockets depending on your aesthetic preference to hold horizontal dowels or simply use thin slats as shown in the inspiration. -
Sand Everything Smooth:
Go over the entire piece with a random orbital sander. Start with 120 grit to remove scratches and finish with 220 grit for a furniture-grade feel. -
Apply the Finish:
Wipe away all dust with a tack cloth. Apply a matte clear coat or hardwax oil. I prefer hardwax oil here because it keeps the wood looking natural and raw while offering water resistance. -
Install Hardware:
Once the finish is fully cured, drill holes for the matte black drawer pulls and screw them in. Add a single hook on the upper rail for hanging towels or aprons.
Now you have a stunning, dedicated space that makes every potting session feel like a professional studio experience
Splash-Safe Cleanup End Cap
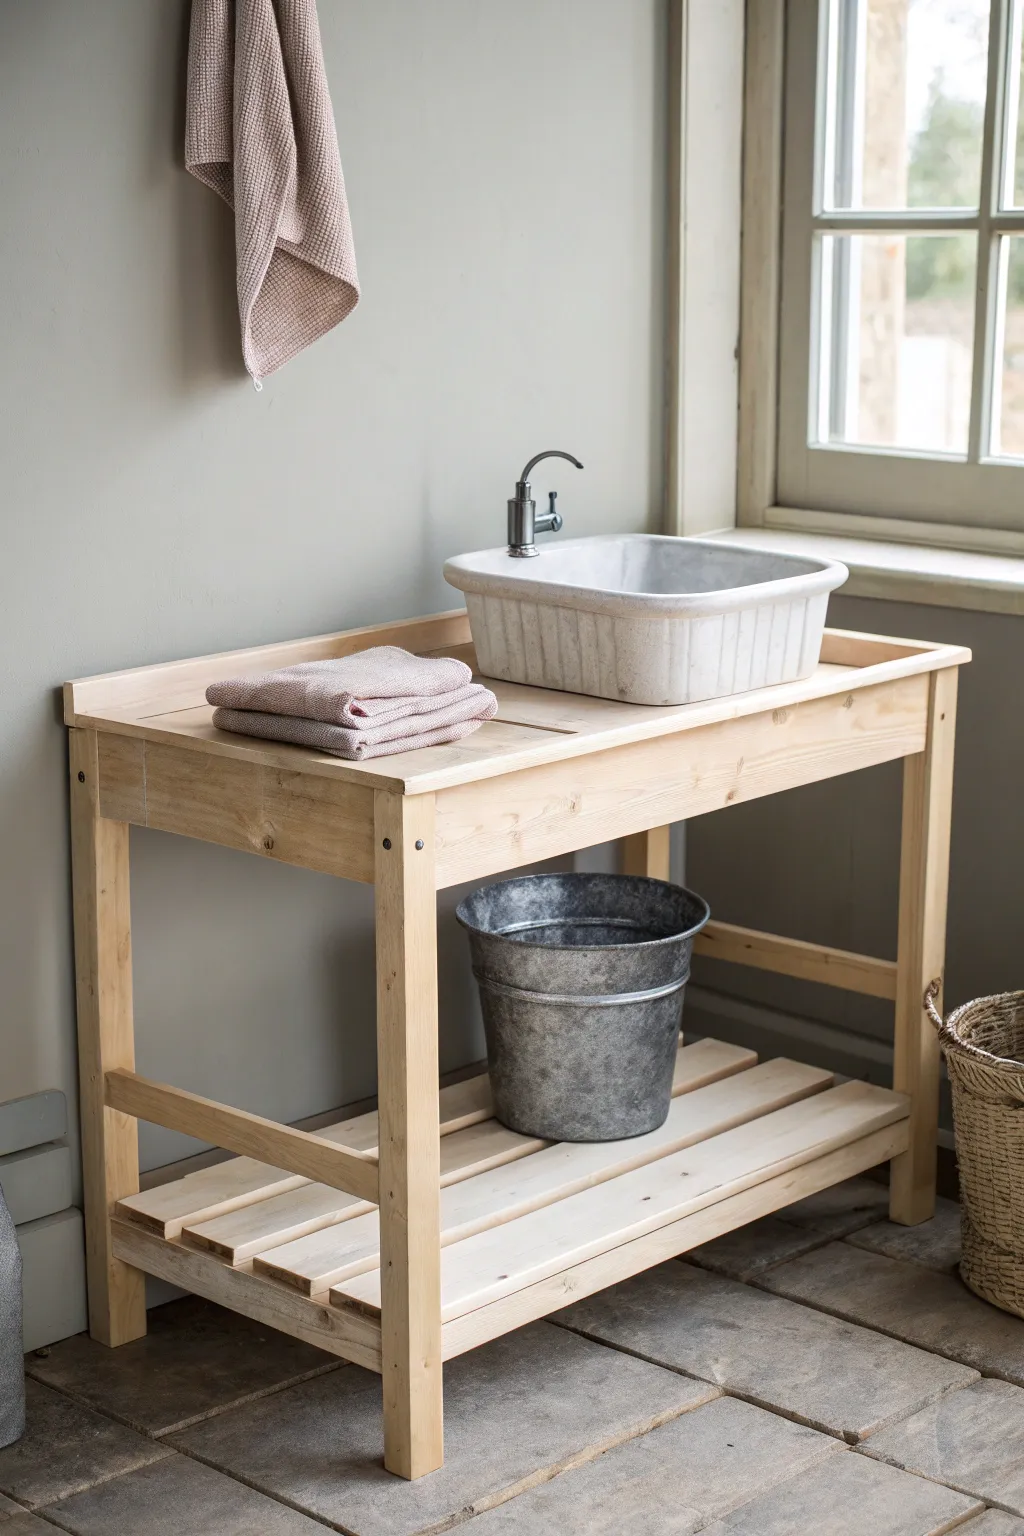
This charming, rustic washstand serves as the perfect cleanup station for any pottery studio or garden shed. Built from raw pine with a clean, farmhouse aesthetic, it features a sturdy slatted shelf and a custom cutout for a vessel sink.
Step-by-Step Tutorial
Materials
- 2×4 lumber (for legs and frame)
- 1×4 lumber (for shelf slats)
- 1×6 lumber (for tabletop planks)
- 1×2 trim board (for edges)
- Rectangular vessel sink
- Wall-mount or deck-mount faucet
- Pocket hole jig and screws
- Wood glue
- Jigsaw
- Sander with 120 and 220 grit paper
- Clear matte polyurethane sealant
- Metal bucket (for drainage system)
Step 1: Building the Frame
-
Cut the legs:
Begin by cutting four lengths of your 2×4 lumber to your desired counter height. Standard height is usually around 34-36 inches, but adjust it to fit your specific sink vessel height. -
Prepare the aprons:
Cut four additional pieces of 2×4 to create the top apron frame. The length depends on your available space, but a 36-inch width by 18-inch depth is a good starting point for a compact station. -
Drill pocket holes:
Using your pocket hole jig, drill two holes into each end of your apron pieces. This ensures a clean look with no visible screw heads on the outside faces. -
Assemble the box:
Attach the apron pieces to the legs using wood glue and pocket screws. I find it helpful to clamp the pieces together first to ensure the corners remain perfectly square while screwing. -
Add lower supports:
Measure up about 6 inches from the bottom of each leg and mark a line. Install horizontal 2×4 supports between the legs at this height to create the base for your bottom shelf.
Waterproofing Tip
For extra longevity near the sink, use a marine-grade varnish instead of standard poly. It resists standing water much better and prevents the wood from graying over time.
Step 2: Creating the Surfaces
-
Layout the shelf slats:
Cut 1×4 boards to span the width of the lower supports. Arrange them with roughly a half-inch gap between each board to allow for airflow and drainage. -
Secure the shelf:
Screw or nail the slats directly into the lower supports. Sand the edges of these slats beforehand so you don’t have to reach into tight gaps later. -
Assemble the countertop:
Join your 1×6 planks together using pocket holes or biscuits to create a solid top panel. Cut this panel to fit flush with the outer edge of your leg frame. -
Cut the sink opening:
Flip your vessel sink upside down on the countertop and trace the outline. Draw a second line about 1/2 inch inside that perimeter (or measure your sink’s drain hole if it sits on top) and cut out the opening with a jigsaw. -
Attach the backsplash:
Cut a piece of 1×4 to the full length of the back of the table. Screw it into the back edge of the tabletop to create a small backsplash lip that prevents items from rolling off. -
Install trim:
Wrap the side and front edges of the tabletop with 1×2 trim to hide the end grain of the planks. Miter the corners for a professional finish.
Step 3: Finishing Touches
-
Sand everything smooth:
Go over the entire piece with an orbital sander. Start with 120 grit to remove rough spots and finish with 220 grit for a furniture-grade feel. -
Soften the edges:
Hand-sand the sharp corners of the legs and tabletop slightly to give them a worn, friendly look that matches the rustic aesthetic. -
Apply sealant:
Since this bench will see water, apply three coats of a high-quality matte polyurethane. Ensure you coat the underside of the countertop near the sink opening as well. -
Install the sink:
Run a bead of clear silicone along the bottom edge of your sink vessel and press it firmly into place over your cutout. -
Connect plumbing:
Install the faucet hardware. For a true splash-safe setup, run the drain pipe directly into a large galvanized bucket placed on the shelf below for easy disposal.
Wobbly Legs?
If your floor is uneven, install adjustable leveling feet into the bottom of each leg. Drill a hole in the center of the leg base and hammer in a T-nut to accept the threaded foot.
With your workbench complete, you now have a dedicated spot to clean tools without tracking mud inside
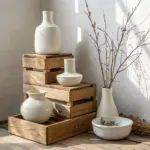
Reclaim Bins Tucked Underneath
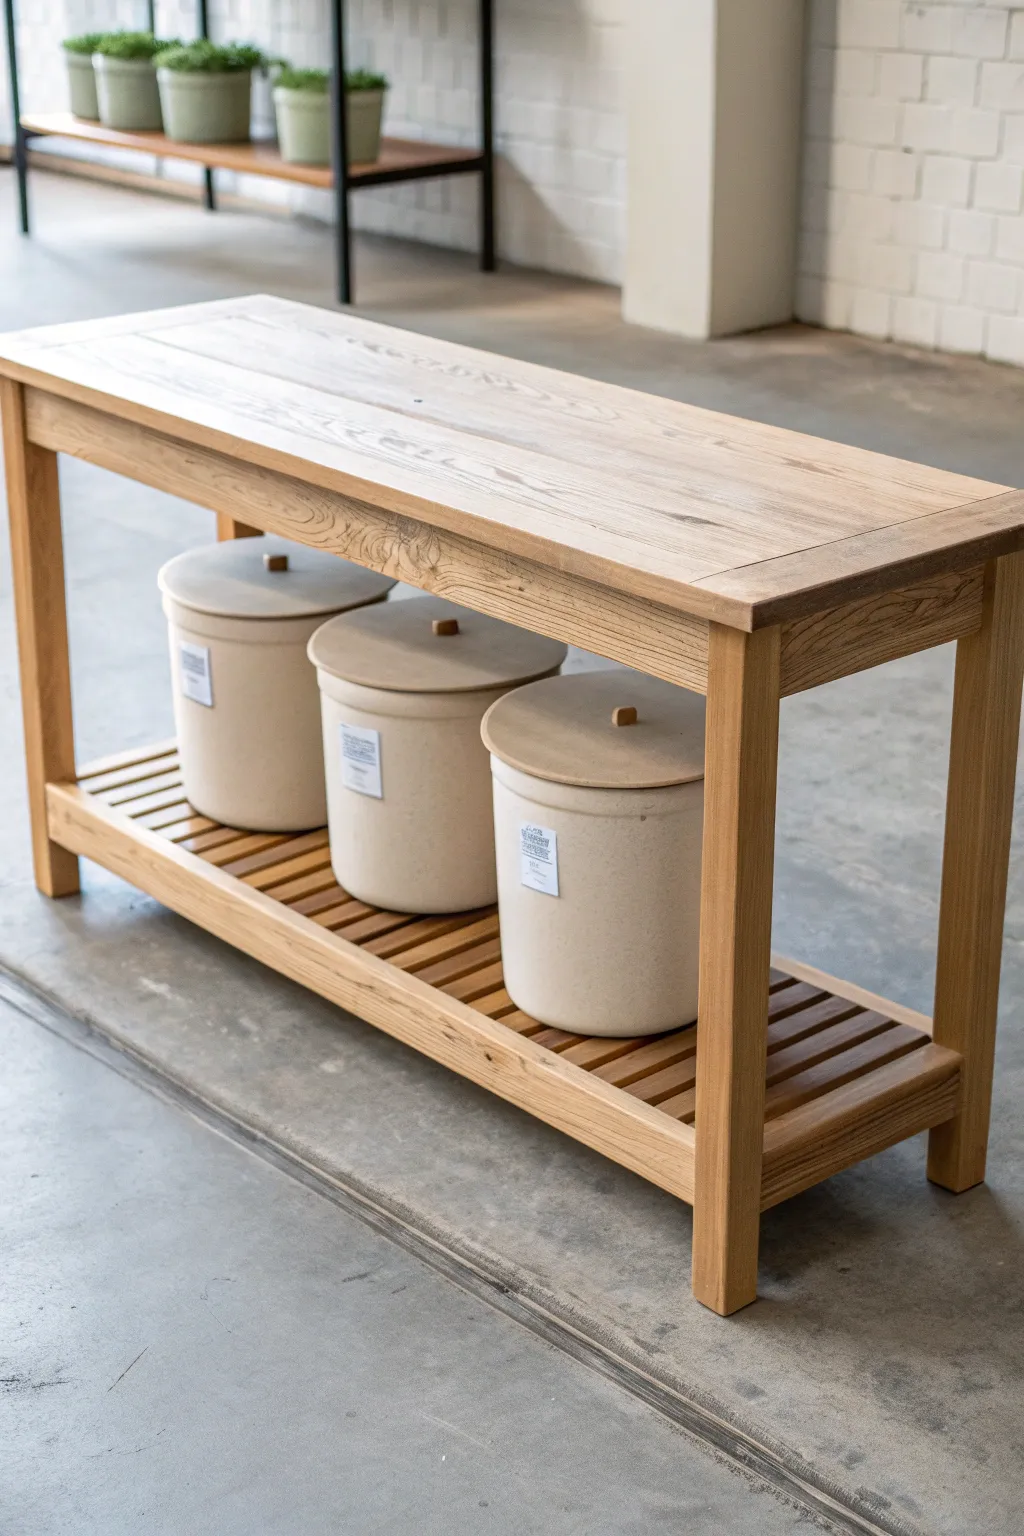
This project centers on building a sturdy, clean-lined functional console with a slatted lower shelf perfect for storing clay or soil bins. The design features substantial oak lumber and simple joinery for a timeless, workshop-ready aesthetic.
How-To Guide
Materials
- White oak lumber (4×4 posts for legs)
- White oak lumber (1×4 or 1×6 for aprons and top)
- White oak slats (1×2 for the bottom shelf)
- Pocket hole jig and screws
- Wood glue
- Orbital sander with 120-220 grit discs
- Clear matte polyurethane or Danish oil
- Table saw or circular saw
- Clamps (various sizes)
- Measuring tape
- Drill/driver
Step 1: Constructing the Frame
-
Cut the legs:
Begin by cutting four legs from your 4×4 stock to a standard counter height, around 34 to 36 inches. Ensure the ends are perfectly square for stability. -
Prepare the aprons:
Cut the side and front apron pieces from 1×6 lumber. The length will depend on your desired total width, but a typical potting bench is around 48 to 60 inches long. -
Drill pocket holes:
Set your pocket hole jig for the thickness of your apron material. Drill two holes at each end of the apron boards, on what will be the inside face. -
Assemble the side panels:
Attach a short apron piece between two leg posts using wood glue and pocket screws. Repeat this for the other side to create two ‘H’ style leg assemblies. I find clamping the pieces to a flat workbench ensures the faces remain flush. -
Connect the sides:
Join the two side assemblies by attaching the long front and back aprons. Use clamps to hold the structure square while you drive in the pocket screws.
Choosing Lumber
Seek out rift-sawn or quarter-sawn white oak if possible. The grain pattern is straighter and more stable, giving the bench that high-end, clean look shown in the image.
Step 2: Adding the Slatted Shelf
-
Install shelf supports:
Cut two rails to run the length of the bench on the inside of the legs, about 6 inches off the floor. Attach these securely to the legs; they will support the weight of the slats. -
Cut the slats:
Rip down 1x material or use 1×2 furring strips for the shelf slats. Cut them to fit the depth of the bench, leaving a small gap for overhang if desired. -
Position the slats:
Lay out the slats on the supports. Use a spacer (like a spare piece of 1/4 inch plywood) between each slat to ensure uniform gaps, which allow dirt and debris to fall through. -
Secure the shelf:
Brad nail or screw the slats into the support rails. Pre-drilling is wise here to prevent the narrow wood strips from splitting.
Add Hidden Storage
Install shallow drawers within the front apron section. It maintains dimensions but adds a perfect spot for hiding potting tags, permanent markers, and seed packets.
Step 3: Top and Finish
-
Create the tabletop:
Cut your tabletop boards to length. You can join them using pocket holes underneath or biscuit joints for a seamless look. Leave a slight overhang of about 1 inch regarding the frame. -
Attach the top:
Place the frame upside down on the underside of your tabletop. Secure the top to the frame using Z-clips or pocket screws driven up through the aprons to allow for wood movement. -
Initial sanding:
Sand the entire piece with 120-grit sandpaper to remove any mill marks or glue squeeze-out. Pay special attention to the corners, slightly rounding them over to soften the look. -
Final smoothing:
Step up to 220-grit paper for a furniture-grade smoothness. Wipe away all dust with a tack cloth or mineral spirits. -
Apply finish:
Apply a clear matte polyurethane or a penetrative oil like Danish oil. This protects the wood while keeping the natural, raw oak appearance visible. -
Dry and cure:
Let the finish cure fully according to the manufacturer’s instructions before placing heavy ceramic bins on the shelf.
Now you have a durable, beautiful workspace ready to help you organize your gardening tasks
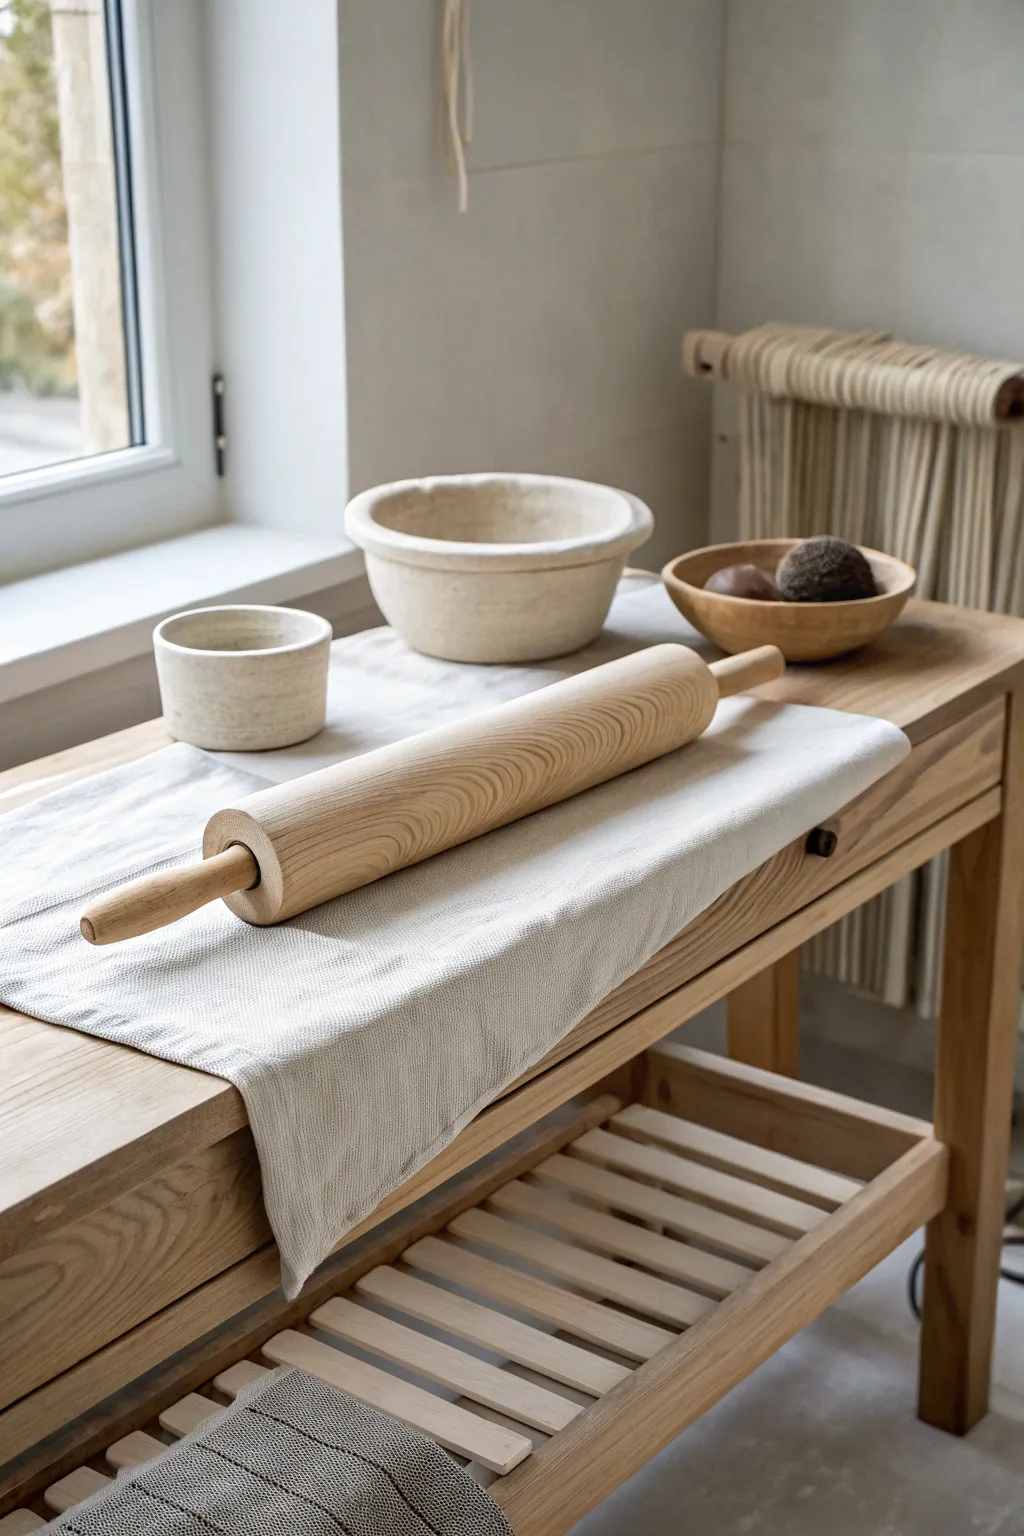
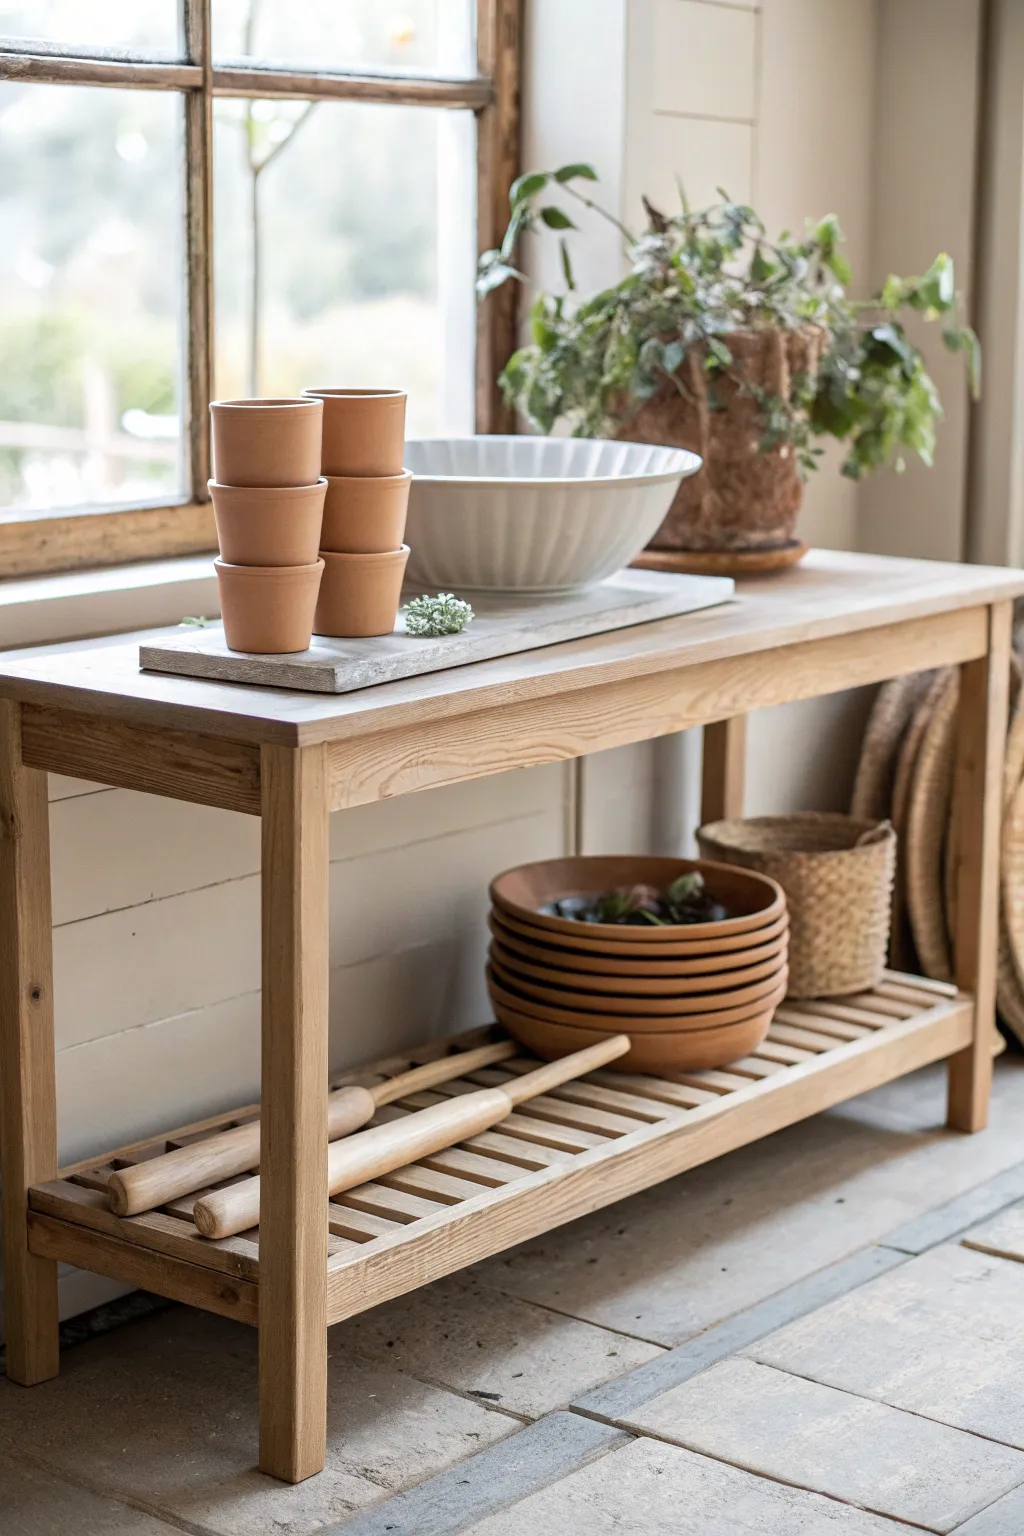
Soft-Pad Trimming Station
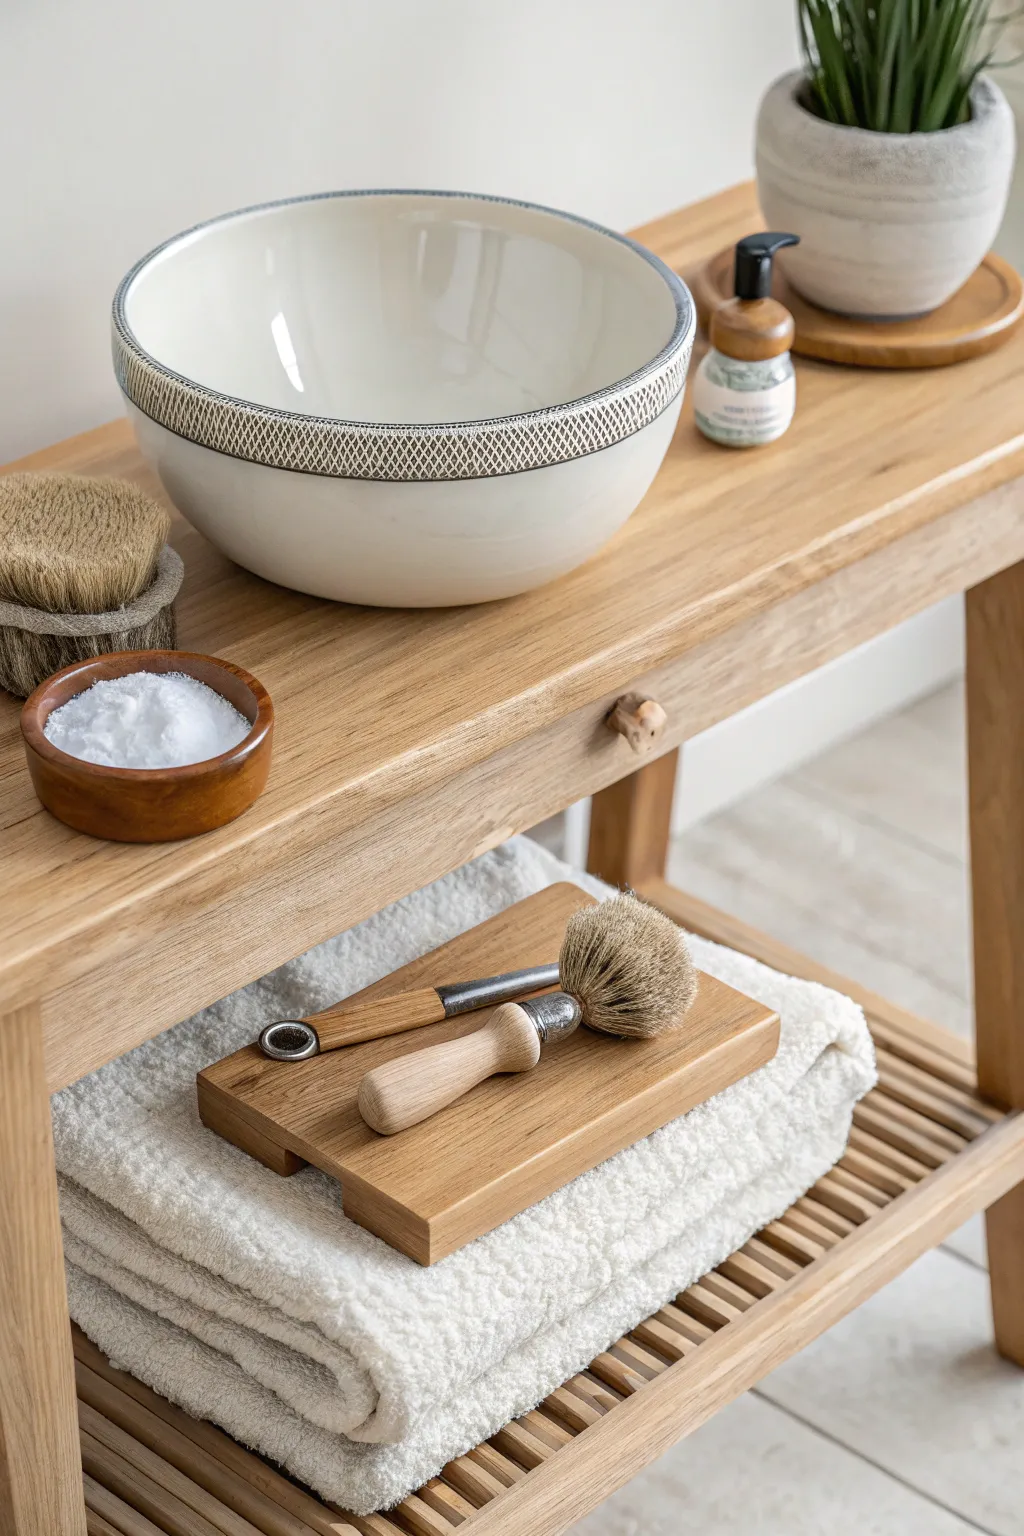
Transform a simple wooden console into a functional and aesthetically pleasing trimming station that doubles as a serene display. This setup combines the warmth of natural oak with the clean utility of ceramic tools, creating a dedicated space for refining your pottery forms.
Step-by-Step Tutorial
Materials
- Unfinished wooden console or bench (oak or ash)
- Large ceramic bowl (serving as a basin or water reservoir)
- Small wooden turning tools or trimming knives
- Natural fiber brushes (shaving style or soft bristle)
- A small wooden block or elevated trimming bat
- Thick, plush towel or foam pad
- Small wooden dish or pinch pot
- Baking soda or pottery clay dust
- Fine-grit sandpaper (220 and 400 grit)
- Clear matte wood sealer or tung oil
Step 1: Preparing the Wooden Base
-
Select the Foundation:
Begin with a sturdy wooden bench or console table. Look for one with a lower slat shelf similar to the image, which is perfect for drying greenware or storing textiles. If building from scratch, use light oak lumber for that spa-like aesthetic. -
Sand for Smoothness:
Since this surface will handle delicate clay pieces, the wood needs to be impeccably smooth. Sand the entire top surface and the lower shelf with 220-grit sandpaper, following the grain. -
Final Surface Polish:
Switch to 400-grit sandpaper for a final pass. You want a finish that feels soft to the touch so it won’t snag any fabric or scratch leather-hard clay. -
Seal the Wood:
Apply a thin coat of clear matte sealer or tung oil. This is crucial for a potter’s station, as it protects the wood from inevitable water splashes and clay dust without altering the natural color too much.
Step 2: Creating the Soft Trimming Pad
-
Establish the Cushion:
Fold a thick, white towel into a neat rectangular stack and place it on the lower shelf. This acts as your ‘soft pad’—a crucial component for resting pots upside down without damaging their rims. -
Add Elevation:
Place a small, flat wooden board or block on top of the towel stack. This provides a rigid surface for tools while keeping them accessible and off the potentially damp towel. -
Tool Arrangement:
Lay out your primary trimming tools on this wooden block. In the image, we see a loop tool and a soft bristle brush. Keeping them here prevents them from rolling onto the floor.
Pro Tip: Tool Care
Rub a small amount of linseed oil on the wooden handles of your trimming tools once a month. This prevents them from cracking after repeated exposure to water and clay slurry.
Step 3: Setting Up the Water Basin
-
Position the Bowl:
Place a large, wide-rimmed ceramic bowl on the main tabletop. This isn’t just decoration; in a trimming station, this serves as your water source for dampening sponges or reclaiming clay scraps. -
Check for Stability:
Ensure the bowl sits flat. If the bottom is rounded and wobbly, create a small ‘donut’ from a twisted towel or use a rubber ring underneath to stabilize it during work. -
Detail the Rim:
If you are making the bowl yourself, consider adding a textured band near the rim like the one shown. This grip helps when moving the heavy bowl with wet, slippery hands.
Level Up: Custom Chucks
Create foam-lined wooden ‘chucks’ or cups to hold narrow-necked vases upside down securely. Store them on the lower shelf alongside the towels for a truly professional setup.
Step 4: Accessorizing for Function
-
Add a Dusting Dish:
Place a small wooden pinch pot near the workspace. Fill it with a white powder—either baking soda for cleaning tools or cornstarch/clay dust to prevent sticking when trimming sticky clay. -
Select Brushes:
Incorporate varied brushes. A large round brush is excellent for sweeping away trimmings, while smaller brushes help with surface decoration. Store large ones upright or flat depending on drying needs. -
Incorporate Greenery:
Add a small potted plant, like the grass in the ceramic pot shown. I find this adds a necessary touch of life and humidity to the workspace, which can keep clay workable slightly longer. -
Organize Lotions:
Pottery dries out your skin. Keep a dispenser of heavy-duty hand lotion nearby on a coaster to avoid oil stains on the wood, ensuring self-care is part of your workflow. -
Final wipe down:
Give the entire setup a wipe with a microfiber cloth to remove any remaining sanding dust before you begin your first project.
Your station is now ready to support your creative process with both style and utility
Template and Slab Drawer Storage

This classic wooden potting bench combines rustic charm with practical studio storage, offering a sturdy workspace for clay work or gardening. With its warm timber tones, three spacious drawers, and a slatted lower shelf, it’s a beautiful piece of furniture that brings organization to your creative corner.
Step-by-Step
Materials
- Hardwood lumber (Teak, Oak, or Acacia recommended)
- 3/4-inch plywood (for drawer bottoms)
- 1×2 wooden slats (for bottom shelf)
- Wooden dowels or biscuit joiner
- Wood glue
- Pocket hole jig and screws
- 3 drawer pulls (black metal ring style)
- Sandpaper 3-pack (80, 150, 220 grit)
- Wood stain (Natural or Golden Oak)
- Polyurethane sealer (satin finish)
- Table saw or circular saw
- Clamps
- Drill and bits
Step 1: Constructing the Frame
-
Cut the legs:
Begin by cutting four sturdy legs from your hardwood stock. The back legs should be taller to accommodate the upper hutch, while the front legs should stop at counter height. -
Assemble side panels:
Create the side structures by connecting a front and back leg with horizontal aprons at the top (just below the future countertop) and lower rails for the shelf support. -
Connect the sides:
Join the two side assemblies together using long horizontal aprons for the front and back. Use pocket hole screws on the interior faces to keep the joinery invisible. -
Add cross supports:
Install internal dividers between the front and back aprons to create three distinct compartments for the drawers. This adds rigidity to the main frame.
Step 2: The Work Surface & Hutch
-
Create the countertop:
Glue and clamp hardwood boards together to form the main work surface. Once dry, sand strictly flat. I like to overhang the front edge slightly for a traditional look. -
Build the hutch back:
Cut a wide plank for the backboard of the upper hutch section. It should span the width between the extended rear legs. -
Install the top shelf:
Add a narrower shelf across the very top of the rear legs. This creates that handy upper ledge for small tools or decorative items. -
Attach the slanted sides:
Cut two triangular or trapezoidal side pieces for the hutch area. Secure them to the countertop sides and the rear legs to enclose the workspace
Clean Joinery Hack
Use a cabinet scraper instead of sandpaper to remove dried glue squeeze-out. It slices the glue off cleanly without clogging the wood pores, ensuring your stain absorbs evenly later.
Step 3: Drawers & Shelf
-
Construct drawer boxes:
Build three simple boxes using 1/2-inch stock for sides and plywood for bottoms. Ensure they slide smoothly into your frame openings. -
Attach drawer fronts:
Cut three drawer fronts that match your main wood grain. Attach these to your boxes, leaving a consistent 1/8-inch reveals gap around the edges. -
Drill hardware holes:
Mark the exact center of each drawer front and drill a hole for your ring pulls. Don’t install the hardware just yet. -
Install the slat shelf:
Cut your 1×2 slats to length. Space them evenly across the bottom rails, leaving gaps for airflow and drainage, and secure them with finish nails or screws from underneath.
Add a Zinc Top
For heavy-duty pottery work, cover the wooden countertop with a sheet of zinc or galvanized steel. It’s easier to scrape clay off and adds a distinct industrial vibe.
Step 4: Finishing Touches
-
Sand everything smooth:
Work through your sandpaper grits from 80 up to 220. Pay special attention to the countertop and edges where your hands will rest. -
Apply stain:
Wipe on your chosen wood stain with a lint-free cloth. Work in the direction of the grain and wipe off excess to prevent splotches. -
Seal for durability:
Apply 2-3 coats of satin polyurethane. Sand lightly with very fine grit between coats for a professional, buttery finish. -
Add hardware:
Once the finish is fully cured, screw in the black metal ring pulls to complete the vintage craftsman aesthetic.
You now have a timeless, heirloom-quality bench ready for years of creative projects
Bright Task Lighting and Shelf Rail
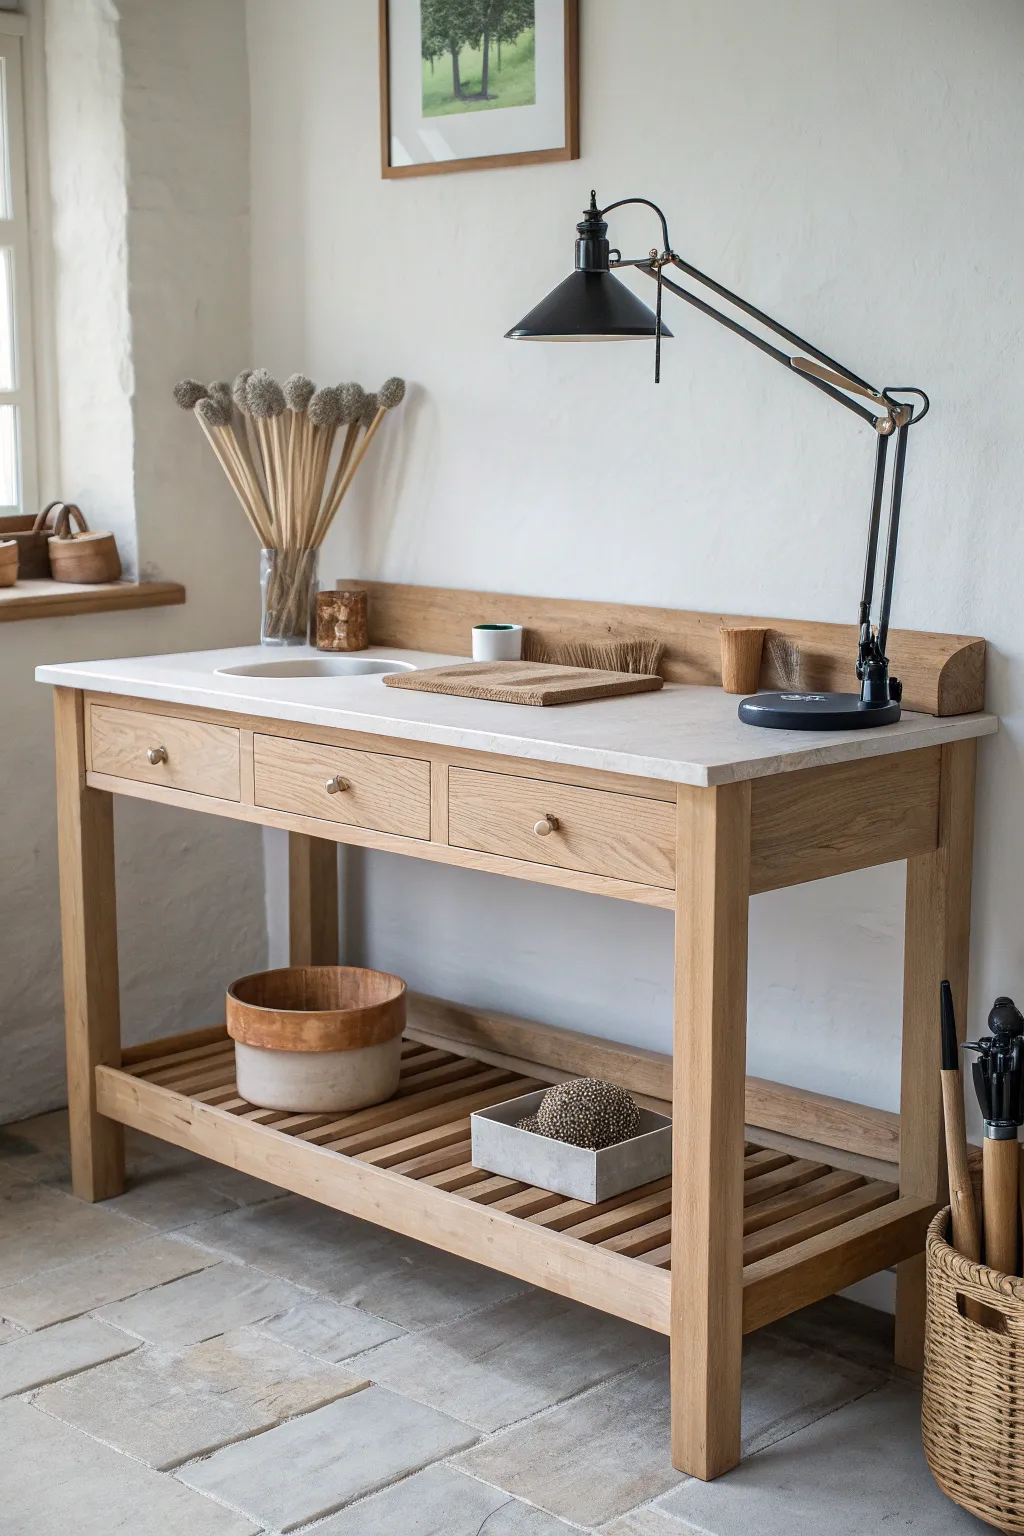
Bring the serene functionality of a Scandinavian-style workspace into your home with this clean-lined oak potter’s bench. Featuring a durable stone countertop, integrated shelf rail, and ample open storage, this piece combines robust utility with understated elegance.
Step-by-Step Guide
Materials
- White oak lumber (4×4 posts, 1×4 and 1×6 planks)
- Engineered quartz or honed limestone slab (custom cut)
- Undermount sink basin (small, round or oval)
- Drawer slides and hardware
- Wooden drawer knobs (oak)
- Pocket hole jig and screws
- Wood glue
- Clear matte polyurethane finish
- Sandpaper 120-220 grit
- Jigsaw and circular saw
- Drill and driver set
Step 1: Building the Base Structure
-
Cut the legs:
Begin by cutting four lengths of 4×4 white oak for the main legs. Measure to standard counter height minus the thickness of your stone slab to ensure a comfortable standing work surface. -
Create the aprons:
Cut 1×6 oak planks for the front, back, and side aprons. These will connect the legs and house the drawer mechanisms later. -
Assemble the frame:
Use a pocket hole jig to drill holes on the inside faces of your apron pieces. Apply wood glue to the ends and secure them to the legs using pocket screws, ensuring the outer faces are flush or slightly recessed depending on your design preference. -
Add the lower shelf supports:
Measure about 6-8 inches from the floor on the inside of the legs. Install horizontal support rails running the length of the bench to hold the slatted shelf.
Choosing Your Oak
Select ‘quartersawn’ white oak if possible. It’s more stable and features beautiful ray fleck patterns that elevate the simple joinery.
Step 2: Installing the Slatted Shelf
-
Prepare the slats:
Rip 1×4 oak boards into narrower strips, approximately 2 inches wide. You’ll need enough to cover the length of the lower shelf with about a 1-inch gap between each. -
Space and secure:
Lay out the slats on the lower support rails. I find it helpful to use a scrap piece of wood as a spacer to keep the gaps consistent. Glue and nail them down using a brad nailer for a clean look.
Step 3: Drawer Construction
-
Build drawer boxes:
Construct three simple drawer boxes using 1/2-inch plywood. Ensure they are sized correctly to fit the openings in your front apron. -
Install slides:
Mount side-mount drawer slides to the interior dividers and the sides of your drawer boxes. Test the fit to ensure they glide smoothly. -
Attach drawer fronts:
Cut solid oak pieces for the drawer faces. With the boxes inserted, use double-sided tape to position the faces perfectly, then screw them in from the inside of the drawer box. -
Drill for hardware:
Mark the exact center of each drawer front. Drill carefully and attach the simple round oak knobs.
Uneven Drawers?
If a drawer face looks crooked, loosen the screws connecting it to the drawer box slightly, shim it into the correct position, and retighten.
Step 4: Countertop and Backsplash
-
Prepare the stone:
Have your stone slab professionally cut to size, including the cutout for your specific undermount sink. A honed finish gives that soft, non-reflective look shown in the photo. -
Mount the sink:
Flip the slab upside down on a padded surface. adhere the sink basin to the underside using silicone adhesive and mounting clips. -
Install the top:
Apply a generous bead of construction adhesive to the top edge of the wooden frame. Carefully lower the heavy stone slab into place. -
Craft the shelf rail:
Cut a wide plank of oak for the backsplash. Round over the top edge with a router or sander for a soft curve. Attach a narrow shelf ledge if desired, though the image shows a simple leaned plank style. -
Secure the rail:
Position the wooden backsplash piece against the wall, resting on the back edge of the stone. You can secure this to the wall studs or adhere it to the stone surface.
Step 5: Finishing Touches
-
Sand everything smooth:
Go over the entire wooden structure with 120 grit sandpaper, followed by 220 grit. Pay special attention to corners and the drawer fronts. -
Seal the wood:
Apply a clear, matte water-based polyurethane. This protects the wood from moisture without darkening it too much, preserving the raw oak aesthetic. -
Accessorize:
Once fully cured, clamp your adjustable task lamp to the side or back rail, place your tools in the drawers, and arrange your potting essentials.
Now you have a serene and sturdy workspace ready for your next creative project
Covered Outdoor Potter’s Bench for Messy Days
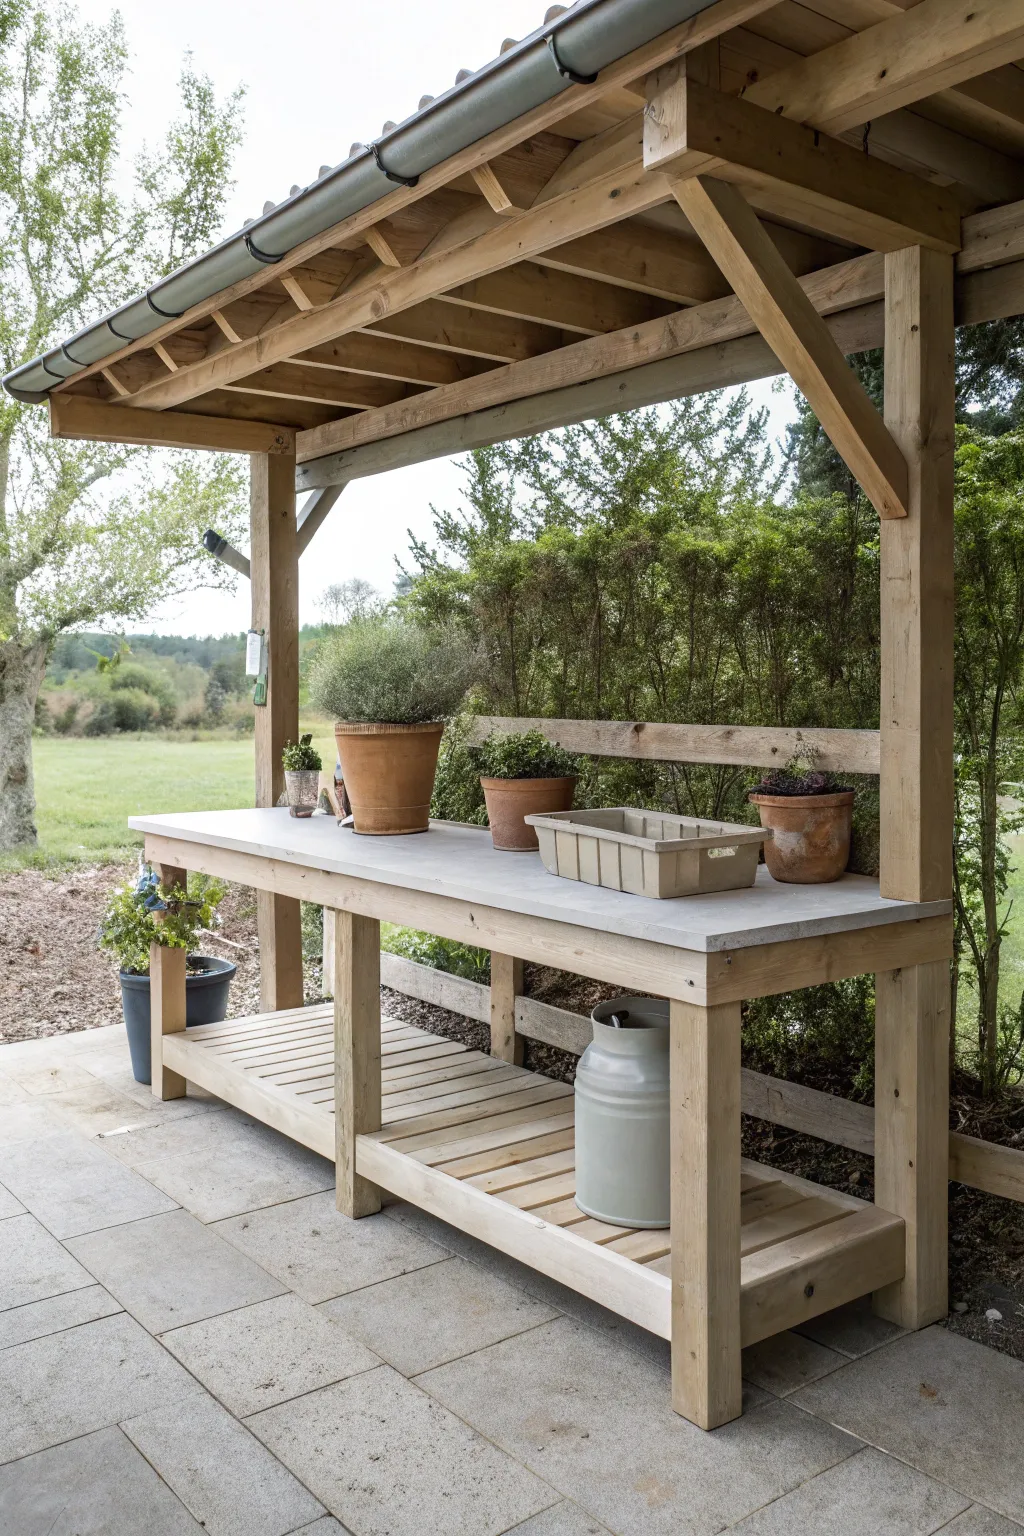
Embrace the outdoors regardless of the weather with this robust, covered potting bench. Featuring a sleek concrete-look top and a sturdy timber frame complete with a protective roof, this station blends heavy-duty utility with charming garden aesthetics.
How-To Guide
Materials
- 4×4 Pressure-treated lumber (posts and main beams)
- 2×4 Lumber (roof bracing, lower shelf supports)
- 2×6 Lumber (roof rafters)
- Corrugated roofing sheets (metal or PVC)
- Pre-cast concrete countertop slab (or concrete mix, melamine form, wire mesh)
- 1×3 Cedar or pine slats (for lower shelf)
- Galvanized gutters and downspout kit
- Exterior grade wood screws (3-inch and variable lengths)
- Structural wood screws or lag bolts
- Outdoor wood stain or sealer
- Drill/Driver
- Circular saw
- Level
- Measuring tape
Step 1: Building the Base Structure
-
Cut the main posts:
Begin by cutting four main vertical posts from your 4×4 lumber. The two rear posts should be significantly taller to support the roof structure (approx. 7-8 feet depending on desired clearance), while the front two posts should be counter-height (approx. 36 inches). -
Assemble the side frames:
Construct the two side frames first. Connect a front post to a rear post using horizontal 4×4 cross-braces at the top and bottom. Secure these with heavy-duty structural screws or lag bolts for maximum stability. -
Connect the sides:
Stand your two side assemblies up and connect them with long horizontal beams at the front and back. The lower beams will support your shelf, while the upper front beam supports the countertop. -
Install the countertop supports:
Add additional cross-bracing between the front and back rails where the countertop will sit. If you are using a heavy concrete slab, ensure these supports are spaced no more than 12-16 inches apart to prevent sagging.
Stone-Cold Style
Can’t find a pre-cast slab? Pour your own concrete top into a melamine mold with wire mesh reinforcement for a custom, ultra-durable fit.
Step 2: Constructing the Roof
-
Create the roof pitch:
Cut angled rafter beams from your 2×6 lumber. The angle should slope downwards from the back of the structure towards the front to direct rain away from the user. I usually aim for a gentle 15-degree slope. -
Attach the main header:
Install a heavy header beam across the top of the two tall rear posts. This will serve as the anchor point for your rafters. -
Install the rafters:
Secure the rafters to the rear header and the front roof beam. Space them evenly to support the weight of the roofing material. -
Add diagonal bracing:
To prevent the structure from racking in the wind, cut and install diagonal knee braces connecting the vertical posts to the horizontal roof beams. This adds that classic timber-frame look and essential rigidity. -
Mount the roofing:
Lay your corrugated roofing sheets across the rafters. Secure them with roofing screws that possess neoprene washers to ensure a watertight seal.
Wobbly Legs?
If the ground is uneven, use adjustable metal post feet or shims under the legs before the struct is fully loaded to ensure a perfectly level work surface.
Step 3: Shelving and Finishing
-
Install the lower shelf slats:
Cut your 1×3 cedar slats to fit the depth of the lower frame. Lay them across the bottom supports, leaving a small gap (about 1/2 inch) between each for drainage and airflow. -
Secure the slats:
Screw each slat down into the support beams using exterior grade trim screws. Pre-drilling the ends of the slats is a smart move to prevent splitting. -
Position the countertop:
Carefully lift your pre-cast concrete slab or heavy stone top onto the main workbench frame. Use construction adhesive on the wooden supports to keep the top from shifting. -
Install the gutter system:
Attach a gutter along the front edge of the roof to catch runoff. Connect a downspout and direct it towards a rain barrel or away from your feet. -
Sand and smooth:
Go over all exposed wooden edges with sandpaper to remove splinters and sharp corners. -
Apply protective finish:
Treat all the wood with a high-quality exterior stain or clear sealer to protect it from rot and UV damage. Reapply this every couple of years.
Now you have a dedicated, weatherproof space to nurture your seedlings and get your hands dirty all year round