If you’ve ever carved into leather-hard clay and felt that little curl peel away, you already know how addictive it is. Here are my go-to pottery carving ideas—starting with the classics and ending with the fun, unexpected stuff that always gets people talking.
Classic Vertical Fluting on Cups and Vases
Achieve a timeless, minimalistic aesthetic with this tutorial on carving classic vertical flutes into your pottery. These two distinct vessel shapes showcase how simple, repetitive lines can add incredible depth and shadow to a matte-glazed surface.
Step-by-Step Tutorial
Materials
- Stoneware clay (speckled or buff)
- Pottery wheel
- Throwing tools (rib, sponge, wire cutter)
- Carving tool (U-gouge or fluting tool)
- Loop tool (small)
- Straight edge or flexible ruler
- Sponge or brush for smoothing
- Matte white or cream glaze
Step 1: Throwing the Forms
-
Center and cylinder:
Begin with the tall vessel on the left. Center roughly 2-3 pounds of speckled stoneware clay on the wheel and open it up, keeping the base flat. -
Pull height:
Pull the walls straight up to create a tall cylinder. Focus on keeping the walls an even thickness, but leave them slightly thicker than usual (about 1/4 inch) to account for the material you will remove during carving. -
Finish the rim:
Compress the rim with a shammy or sponge to ensure it is smooth and sturdy, then cut the cylinder from the bat and set aside to firm up. -
Throw the bottle shape:
For the smaller vessel, center a smaller amount of clay (1-1.5 pounds). Pull it into a cylinder first, then belly out the bottom section while collaring in the neck to create a narrow opening with a flared rim. -
Dry to leather hard:
Allow both pieces to dry slowly until they reach a solid leather-hard state. This is crucial; if the clay is too soft, the carving tool will drag and distort the form.
Keep it Clean
Don’t try to smooth the carved channels while the clay is wet. Wait until bone dry! Smoothing wet clay just pushes the crumbs back into the grooves.
Step 2: Carving the Fluting
-
Mark vertical guides:
Starting with the tall cylinder, you may want to lightly mark vertical guide lines with a needle tool to ensure your spacing stays consistent around the circumference. -
Select your gouge:
Choose a U-shaped loop tool or a dedicated fluting tool. The width of the tool will determine the width of your flutes. -
Carve the first line:
Start your cut just below the rim. Pull the tool downward in a steady, confident motion, maintaining consistent pressure. Stop the cut about an inch from the bottom. -
Detail the endpoint:
At the bottom of the cut, lift the tool gently to create a tapered end, or create a small decorative texture by pressing slightly deeper before lifting, giving it a ‘chiseled’ stop. -
Repeat around the cylinder:
Continue carving parallel lines around the entire vessel. Leave a small ridge of uncarved clay between each flute to define the texture. -
Carve the bottle neck:
For the smaller vase, handle the neck area delicately. Carve short, vertical flutes from just under the rim down to the shoulder of the pot. -
Carve the bottle body:
On the rounded belly of the smaller vase, carve a second tier of flutes. You can add a horizontal incised line to separate the neck design from the body design for visual interest.
Step 3: Finishing and Glazing
-
Clean up burrs:
Once the pots are bone dry, gently brush away any ‘crumbs’ or clay burrs created by the carving tools. I like to use a barely damp sponge for this to avoid creating dust. -
Bisque fire:
Load your kiln and bisque fire the pieces to Cone 04 (or your clay body’s specific bisque temperature). -
Apply glaze:
Choose a matte white or satin cream glaze. These finishes are excellent for carved textures because they don’t pool too heavily and allow shadows to define the form. -
Wipe back (optional):
If your glaze is too thick, quickly wipe the raised ridges with a damp sponge immediately after dipping. This exposes the speckled clay body on the high points. -
Final fire:
Glaze fire to maturity (likely Cone 5 or 6 depending on your clay). The heat will fuse the glaze and bring out the iron speckles in the clay.
Inlay Variation
After carving, fill the grooves with a colored slip or underglaze, then scrape the surface clean. This creates bold, colored stripes flush with the surface.
Place your finished vessels near a window where natural light can play across the fluted ridges


Carved Chevron Bands for Instant Rhythm
Embrace the natural warmth of unglazed clay with this rustic, textured mug design. Featuring a distinct band of carved arrows above rhythmic chevron waves, this project combines traditional sgraffito-style carving with the simplicity of raw stoneware.
How-To Guide
Materials
- Wheel-thrown or hand-built mug (leather hard)
- Speckled buff stoneware clay
- Carving tool (V-tip or loop tool)
- Needle tool
- Ruler or measuring tape
- Sponge
- White matte glaze (interior)
- Clear or semi-transparent glaze (exterior, optional)
- Wax resist
Step 1: Preparation & Mapping
-
Throw and trim:
Begin by throwing a cylinder on the wheel with speckled buff clay. Aim for straight sides with a slight taper near the rim. Once leather hard, trim the foot to create a distinct bottom edge. -
Attach the handle:
Pull a strap handle and attach it firmly to the side. Ensure the connection points are smoothed out and the handle loop is generous enough for comfortable holding. -
Measure the bands:
Using a needle tool and a turning wheel or ruler, lightly score three horizontal lines around the circumference of the mug. One line should be about 1/3 down from the rim, and another about ½ inch below that to create the top band. -
Define the bottom section:
Score a final horizontal line about ½ inch up from the foot ring. These guidelines will contain your two distinct pattern areas: the arrow band and the chevron waves.
Step 2: Carving the Patterns
-
Mark the segments:
For the top band, use your needle tool to lightly mark vertical ticks every half-inch around the mug. This ensures your arrows stay evenly spaced. -
Carve the arrow band:
Using a V-tip carving tool, carve distinct ‘V’ shapes sideways within the top band. Orient them pointing to the right to create a sense of forward movement. -
Deepen the relief:
Go over the arrow lines a second time if needed. You want the clay color inside the cut to be deep enough for contrast, but be gentle so you don’t pierce the wall. -
Clean the edges:
Use a slightly damp sponge to smooth down any rough burrs or clay crumbs created by the carving tool on the arrow band. -
Sketch the lower chevrons:
In the large bottom section, lightly sketch a zigzag pattern with your needle tool. The peaks should reach the bottom of the arrow band, and valleys should hit the line near the foot. -
Carve main chevron lines:
Take your carving tool and commit to the zigzag lines. Carve deeply and confidently to create the primary structure of the lower pattern. -
Add the echo lines:
Inside each large chevron ‘V’, carve smaller, nested V-shapes. I usually fit about two or three inner lines to create that dense, vibrating effect shown in the original piece. -
Refine the foot:
Carve a slight indentation or groove right above the foot ring to give the pattern a visual endpoint.
Keep it clean
Brush away clay crumbs with a soft makeup brush as you carve. Don’t press them into the surface, or they’ll fuse during firing and ruin the texture.
Step 3: Finishing & Glazing
-
Bisque fire:
Once the mug is bone dry, bisque fire it according to your clay body’s specifications (usually cone 04 or 06). -
Wax the exterior:
Apply wax resist to the entire exterior carved surface and the foot ring. This technique leaves the raw, toasted clay exposed after the final firing. -
Glaze the interior:
Pour a matte white glaze inside the mug. Pour it out quickly to ensure an even coat without drips running down the outside. -
Clean the rim:
Use a damp sponge to wipe any glaze off the very top rim, allowing a sliver of the raw clay to frame the opening. -
Glaze fire:
Fire the mug to maturity (likely cone 5 or 6). The unglazed exterior will turn a warm, toasty color, and the specks in the clay will bloom through the white interior glaze. -
Sand the bottom:
After firing, use high-grit sandpaper to smooth the unglazed foot ring so it won’t scratch your table surfaces.
Uneven spacing?
If your chevron zigzag doesn’t meet perfectly at the end, simply adjust the width of the last two peaks slightly; the eye rarely notices small variations in repeating patterns.
Now you have a beautifully tactile mug that celebrates the raw beauty of the clay itself

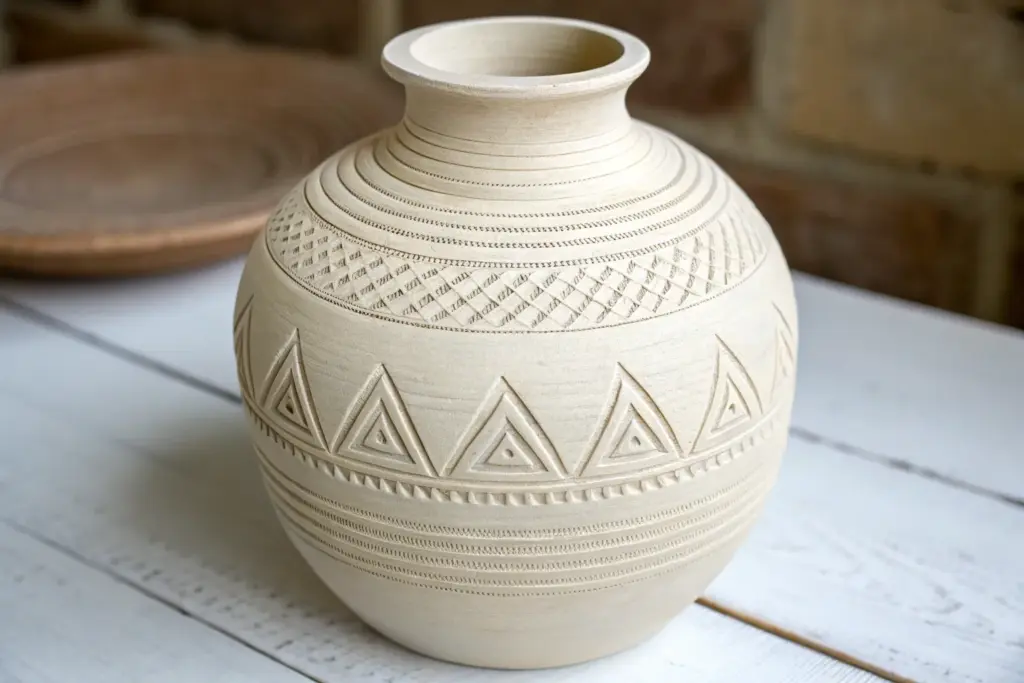
Crosshatch “Sweater” Texture You Can Feel
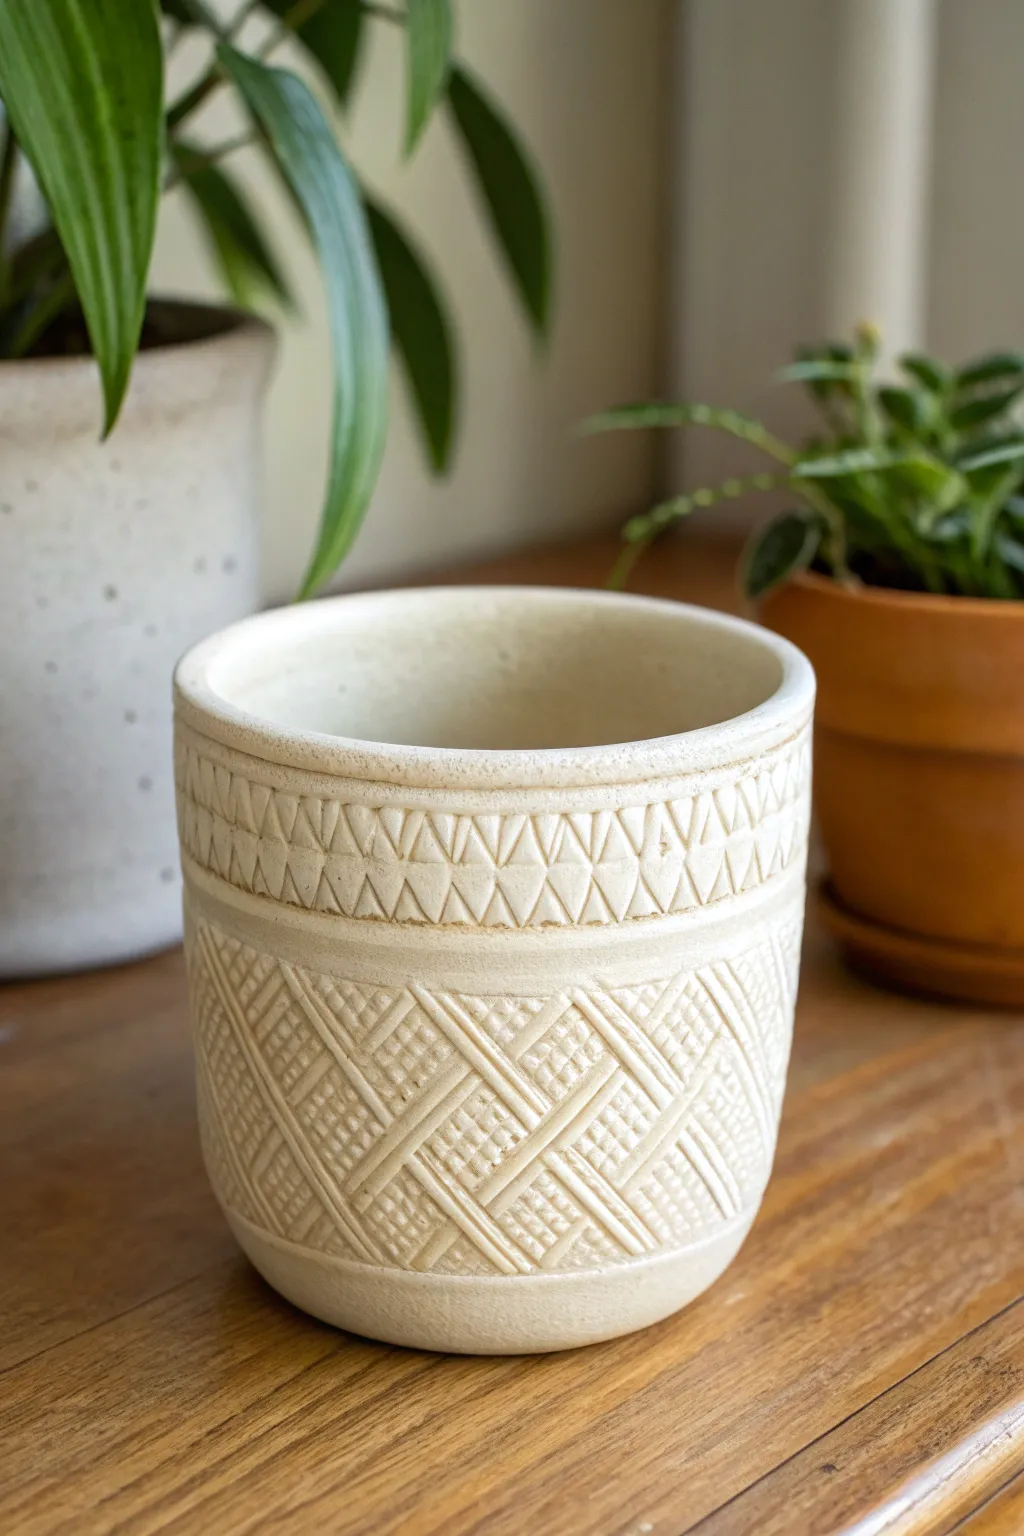
Bring a cozy, tactile feel to your plant collection with this intricately carved vessel that mimics the warmth of a knit sweater. The design features a geometric upper band and a lower section dominated by a satisfying lattice pattern filled with tiny crosshatch details.
Detailed Instructions
Materials
- Leather-hard clay cylinder (wheel-thrown or slab-built)
- Small loop tool or carving stylus
- Pointed needle tool
- Metal rib
- Sponge
- Clear or light cream matte glaze
- Banding wheel
Step 1: Preparation & Layout
-
Assess clay state:
Ensure your cylinder is at a perfect leather-hard stage. It should be firm enough to handle without warping but soft enough to carve cleanly without chipping. -
Smooth the surface:
Run a metal rib gently over the exterior to compress the clay particles and create a pristine canvas for your carving. -
Define the sections:
Place your pot on a banding wheel. While spinning slowly, use a needle tool to lightly scribe two parallel horizontal lines about an inch and a half down from the rim. This creates the ‘band’ for the upper geometric pattern. -
Mark the lower section:
Scribe another horizontal line just below the first band to define the start of the main body texture area.
Step 2: Carving the Upper Band
-
Draft the triangles:
Using your needle tool or a dull pencil, sketch a repeating row of triangles within the upper band border. Aim for triangles that alternate pointing up and down to fill the space. -
Carve the outlines:
Use a small loop tool or V-tip carver to gouge out the lines defining these triangles. Keep your pressure consistent for a uniform depth. -
Create vertical texture:
Inside each carved triangle, use a sharp needle tool to scratch vertical hatch marks. I find doing all the upward-pointing triangles first helps maintain a rhythm. -
Finish the band:
Fill the downward-pointing triangles with similar vertical hatching, ensuring the lines are densely packed for visual contrast.
Burr Control
If you are creating too many jagged crumbs while carving, the clay is too wet. Let it dry for 30 more minutes. If it crumbles or chips, it’s too dry—mist it lightly and wrap it in plastic.
Step 3: Creating the Lattice Body
-
Draw the grid:
Lightly sketch a large diagonal diamond grid across the main body of the pot. These lines will become the raised ‘ribs’ of the sweater pattern. -
Double the lines:
Add a second parallel line to each grid line you just drew, creating a definitive width for the raised lattice structure. -
Carve the lattice channels:
Use your loop tool to carve deeply along the *outside* edges of your double lines. You want the lattice itself to remain raised while the space inside the diamonds is recessed. -
Refine the intersections:
Pay close attention to where the lattice lines cross. Clean up these intersections so the over-under weaving effect looks deliberate.
Add an Oxide Wash
Before glazing, wipe a dark iron oxide wash over the bisque and sponge it off. The dark oxide will stay in the tiny hatch marks, making the texture pop.
Step 4: The Crosshatch Texture
-
Fill the diamonds:
Now for the ‘sweater’ detail. In the recessed diamond spaces between the lattice, use your needle tool to impress a grid of tiny square indentations. -
Vary the texture direction:
To enhance the woven look, try alternating the orientation of your tiny tool marks slightly, or keep them consistent for a uniform mesh look. -
Clean up burrs:
Once carving is complete, let the pot dry slightly more until it’s bone dry. Gently brush away the little clay crumbs (burrs) with a stiff brush or a scouring pad; don’t use water or you’ll muddy the details. -
Bisque fire:
Fire the piece to bisque temperature (usually Cone 04) to prepare it for glazing. -
Glaze application:
Apply a breaking glaze or a translucent matte cream glaze. This type of glaze will pool in the deeper recesses and break over the sharp edges, highlighting all your hard carving work.
Now you have a stunning vessel that invites everyone to touch it and admire the details
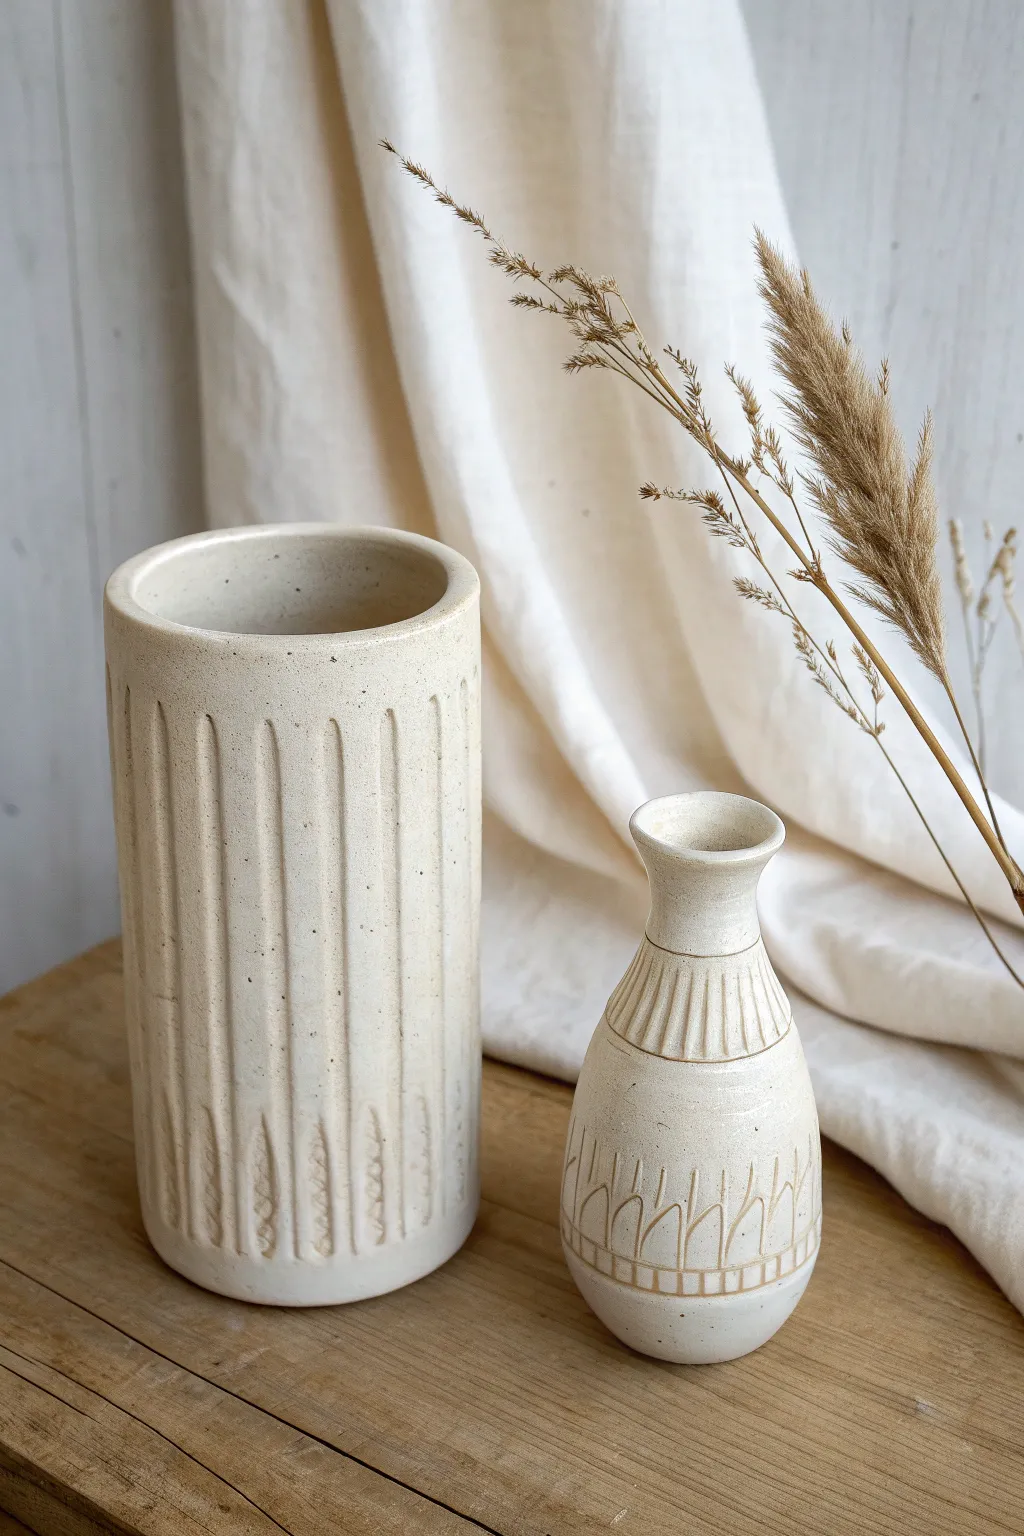
Clean Carved Linework Stripes (Thin and Thick Mix)
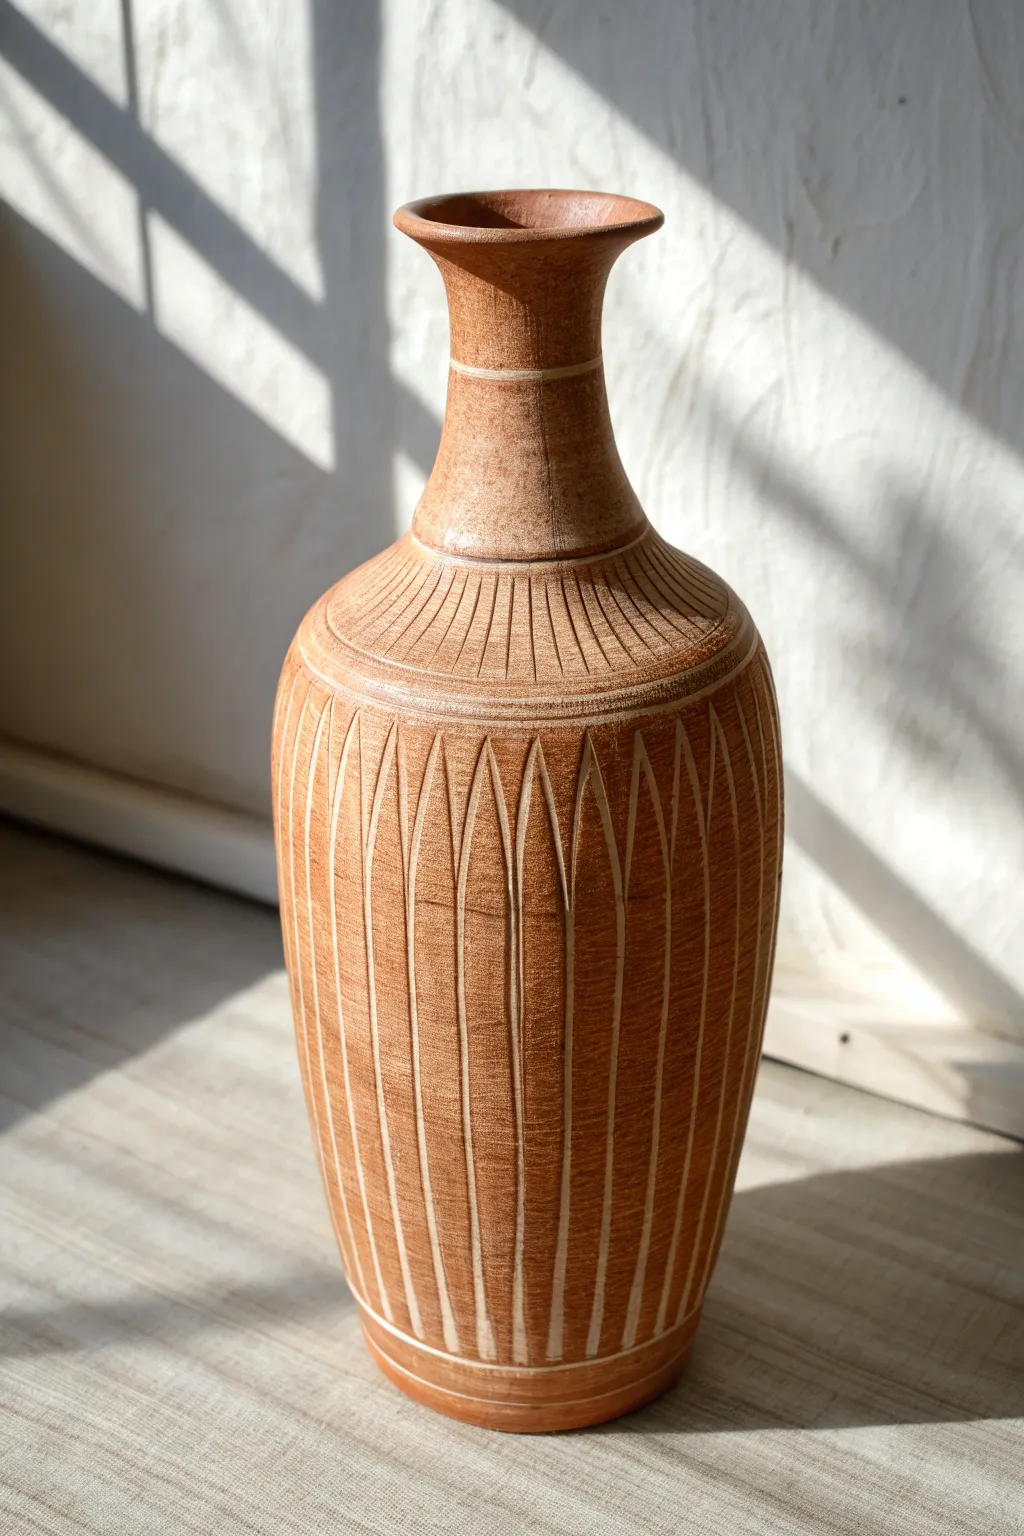
This project transforms a classic bottle form into a textural masterpiece using the sgraffito technique. By carving clean lines through a contrasting slip or directly into the clay body, you’ll create a striking geometric pattern that emphasizes the vessel’s verticality and elegant curves.
Step-by-Step
Materials
- Stoneware clay (red or terracotta)
- White underglaze or slip
- Pottery wheel
- Throwing tools (rib, sponge, wire)
- Trimming tools
- Sgraffito tool or fine loop tool
- Flexible ruler or measuring tape
- Needle tool
- Clear matte glaze
Step 1: Throwing the Form
-
Center and open:
Begin with about 3-4 pounds of well-wedged red stoneware clay. Center it firmly on the wheel and open the interior, aiming for a relatively narrow floor to support a tall form. -
Pull the cylinder:
Pull the walls up into a tall, even cylinder. Focus on maintaining height rather than width. Keep the walls consistent in thickness, slightly tapering inward as you go up. -
Shape the belly:
Using a rib on the outside against your hand on the inside, gently belly out the bottom two-thirds of the form to create a soft, elongated curve. -
Collar the neck:
Slowly collar the top third of the clay inward to form a long, slender neck. Do this in several passes, compressing the clay to prevent buckling. -
Refine the rim:
Flare the very top opening slightly to create a delicate, welcoming rim. Use a chamois to compress and smooth this edge. -
Smooth the surface:
Run a metal rib over the entire exterior surface while the wheel spins to remove throwing rings and create a canvas-smooth texture for your carving. Let the piece dry to leather-hard.
Uneven Lines?
If your vertical lines are wobbling, rest your pinky finger against the pot’s surface as a stabilizer while you pull the carving tool downward.
Step 2: Mapping and Carving
-
Apply slip (Optional):
If your clay isn’t naturally contrasting when carved, apply a layer of white slip or underglaze now. If relying on the raw clay texture contrast like the example, skip this step. -
Trim the foot:
Once leather-hard, center the vase upside down and trim a neat foot ring. This defines the bottom curve where your lines will terminate. -
Mark vertical guides:
Turn the pot right-side up. Using a flexible ruler, lightly mark vertical guide lines around the belly with a needle tool to ensure your spacing stays even. -
Carve the main body:
Using a sharp sgraffito tool or small loop tool, carve long vertical lines from the shoulder down to the foot. Press firmly to create a deep, clean groove. -
Create the arches:
Between every other pair of vertical lines, carve an inverted ‘V’ shape near the shoulder. I find it helps to connect the tops of two vertical lines to create that pointed arch look. -
Detail the shoulder:
The transition from the belly to the neck needs a distinct pattern. Carve a horizontal ring around the base of the neck to define the section. -
Radiating lines:
Carve short, straight lines radiating outward from the neck ring down toward the shoulder. These should act like a collar, sitting above the main body pattern. -
Texture the neck:
Leave the neck primarily smooth to provide visual rest, but add a very faint horizontal scribe line halfway up using a needle tool for subtle detail.
Level Up: Inlay
After carving, fill the lines with a white mishima slip, wipe away the excess, and then glaze. This creates a flush, smooth surface with crisp white lines.
Step 3: Finishing
-
Clean up burrs:
Once the clay is bone dry, gently rub the surface with a green kitchen scour pad or a stiff brush to remove any sharp clay crumbs or burrs created by the carving. -
Bisque fire:
Load the vase into the kiln for a bisque firing to cone 04 (or your clay’s specific bisque temperature). -
Wipe down:
After firing, sponge the piece with a damp sponge to remove any kiln dust. This ensures the glaze adheres properly. -
Glaze application:
Dip the entire vase into a clear matte glaze. A matte finish is crucial here as a glossy glaze might obscure the tactile quality of the carvings. -
The final fire:
Fire the piece to maturity (likely cone 5 or 6 for stoneware). The clear glaze will seal the pot while letting the warm clay body and carved white lines shine through.
Now you have a stunning vessel that balances rustic warmth with precise geometric elegance, ready to display or hold dry florals

The Complete Guide to Pottery Troubleshooting
Uncover the most common ceramic mistakes—from cracking clay to failed glazes—and learn how to fix them fast.
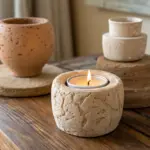
Faceted Carving for a Soft Geometric Look
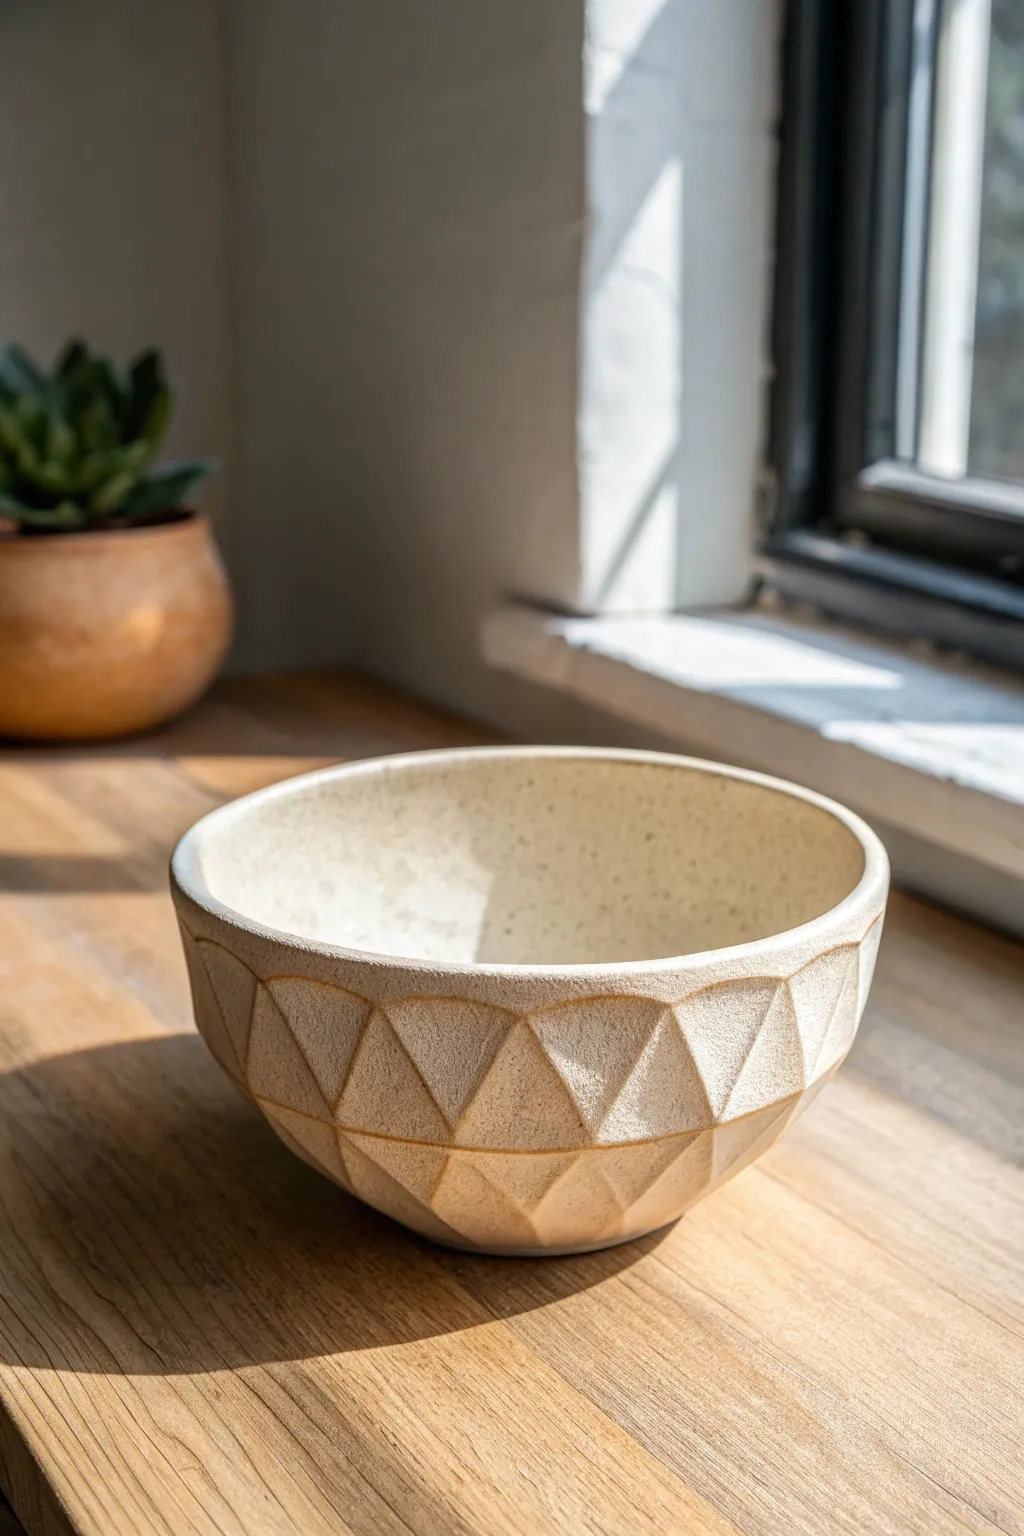
This project captures the warmth of natural light through soft, geometric repetition, transforming a simple bowl into a tactile delight. By carving triangular facets into the clay surface, you create a hive-like texture that loves to catch glaze and shadow in equal measure.
Detailed Instructions
Materials
- High-quality stoneware clay (lighter body preferred)
- Potter’s wheel
- Throwing tools (rib, sponge, wire cutter)
- Loop tool or carving tool (flat-edged)
- Flexible metal rib
- Trimming tools
- Matte white or warm oatmeal glaze
- Sponge or chamois
Step 1: Throwing and Shaping
-
Center and open:
Begin by centering your clay on the wheel. Open it up, aiming for a medium-sized bowl shape, perhaps slightly deeper than a standard cereal bowl to allow vertical space for the carving. -
Pull the walls:
Pull the walls up, keeping them slightly thicker than you would for a plain bowl. You need that extra millimeter or two of clay thickness to carve into later without punching through. -
Define the curve:
Use a rib to smooth the interior curve. The exterior shape should be a gentle, continuous curve from the foot to the rim, not too straight, to enhance the faceted effect. -
Refine the rim:
Compress the rim well with a chamois or sponge. A slightly rounded or beveled rim works nicely to frame the geometric texture below. -
Wire off and wait:
Cut the bowl from the bat with your wire tool. Let it dry slowly to a firm leather-hard stage. This stiffness is crucial; if it’s too soft, the carving will drag.
Uneven Spacing?
If your triangles aren’t meeting up perfectly at the end of a row, don’t panic. Gently fudge the width of the last 2-3 facets to absorb the gap. The variety looks organic.
Step 2: Mapping and Carving
-
Trim the foot:
Once leather hard, center the bowl upside down on the wheel and trim a neat foot ring. Clean up the exterior surface so it’s smooth and ready for mapping. -
Mark horizontal guides:
Lightly trace two or three horizontal lines around the circumference of the bowl using a needle tool while the wheel spins slowly. These will help keep your rows of triangles level. -
Plan the grid:
Visually divide the circumference into even sections. You don’t need to be mathematically perfect, but aiming for consistency helps the pattern flow. -
Carve the first row:
Starting just below the rim, use a flat-headed loop tool or carving tool. Slice downwards at an angle to create the first inverted triangle. I like to keep the tool steady and let the curve of the bowl dictate the depth. -
Complete the top band:
Continue around the bowl, carving adjacent inverted triangles. Leave a thin ridge of uncarved clay between each facet to define the grid. -
Begin the second row:
For the row below, shift your placement so the new triangles nest between the ones above, like a brick pattern. These should be pointing upwards (or diamond-shaped depending on your overlapping preference). -
Carve the relief:
Remove the clay within your marked triangle shapes. Varying the depth slightly—deeper in the center of the triangle, shallower at the edges—creates that beautiful concave shadow. -
Work towards the base:
Continue this alternating pattern down the vessel. As the bowl curves inward toward the foot, your triangles will naturally need to become slightly smaller.
Highlight the Ridge
To emphasize the geometry, gently wipe the glaze off the raised ridges with a damp sponge before firing. This exposes the raw clay body for contrast.
Step 3: Finishing and Glazing
-
Soften the edges:
Once all carving is complete and the heavy burrs are picked off, run a damp sponge or a soft finger over the sharp ridges. You want them defined but not sharp enough to cut someone. -
Bisque fire:
Let the bowl dry fully (bone dry) before loading it into the kiln for a bisque firing. -
Wipe down:
After the bisque, wipe the bowl with a damp sponge to remove dust, focusing on the crevices of the carving where debris likes to hide. -
Apply glaze:
Dip or pour a matte, oatmeal or speckled white glaze. These glazes break beautifully over texture, highlighting the ridges while pooling slightly in the recesses. -
Glaze firing:
Fire to the maturity temperature of your clay and glaze combination. The matte finish is key to achieving that soft, stone-like aesthetic.
Now you have a beautifully textured bowl that feels as good in the hand as it looks on the table
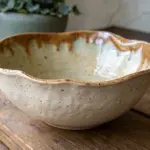
Scalloped Carving for a Petal-Like Rim or Belly
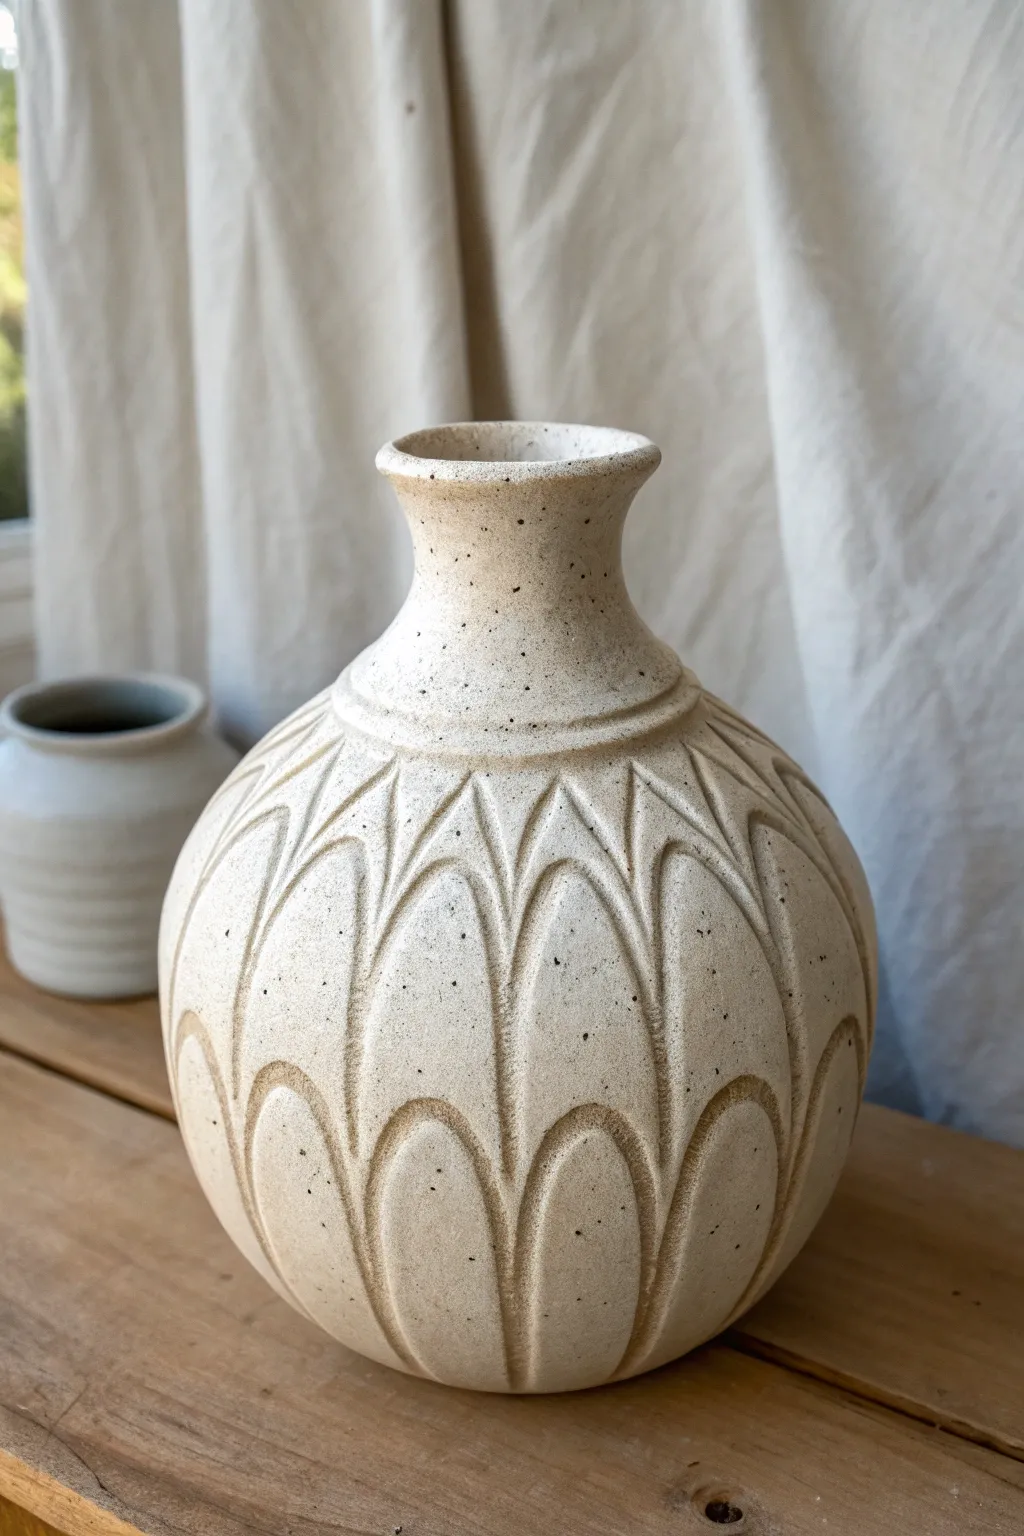
Transform a simple round vessel into a textural masterpiece featuring deep, overlapping scalloped carvings that mimic the organic flow of flower petals. This project creates a stunning interplay of light and shadow, highlighting the raw beauty of speckled clay with a matte finish.
Step-by-Step Tutorial
Materials
- Speckled clay body (stoneware recommended)
- Pottery wheel
- Throwing tools (ribs, sponge, wire)
- Loop carving tool (medium teardrop shape)
- Flexible metal kidney
- Sponge
- Matte white or clear glaze
Step 1: Throwing the Form
-
Center and open:
Begin by centering about 3-4 pounds of speckled clay on your wheel. Open the mound, leaving a floor thickness of roughly half an inch to support the eventual height. -
Create the cylinder:
Pull the walls up into a tall cylinder. Focus on keeping the walls slightly thicker than usual (around 1/4 to 3/8 inch), as you’ll need extra material depth for the deep carving later. -
Shape the belly:
Using a rib and pressure from the inside, gently balloon the walls outward to create a full, round belly. The widest point should be just below the center of the pot. -
Collar the neck:
Slow the wheel down and carefully collar the top third inward to form a distinct shoulder and a narrower neck. -
Refine the rim:
flare the rim out slightly for a classic vase profile, smoothing it with a chamois or sponge. I like to leave a small definition line where the neck meets the shoulder to frame the carved area. -
Initial drying:
Cut the pot from the bat but leave it on a ware board until it reaches a firm leather-hard state. It needs to be sturdy enough to withstand carving pressure without warping.
Pro Tip: Moisture Management
Keep the pot covered with plastic on the bottom half while carving the top. This prevents the lower section from drying out too much before you can carve it.
Step 2: Carving the Design
-
Map the grid:
Lightly sketch vertical lines around the pot to divide it into even sections—8 or 12 sections work well for this scale. This ensures your petals stay symmetrical. -
Start the top row:
Using a teardrop-shaped loop tool, start just below the neck line. Carve a downward arching stroke, removing clay to create the top curve of the first petal layer. -
Deepen the relief:
Go back into that same stroke and carve deeper at the edges, tapering out as you move downward. The deepest part of the cut should define the border between petals. -
Stagger the second row:
Move down the pot. Position the peak of the next petal directly between the two petals above it, creating a brick-lay or scale pattern. -
Carve the second row:
Execute the same downward, arching scooping motion. Connect the top of this cut to the bottom points of the row above, creating a continuous flow. -
Continue to the base:
Repeat this staggered pattern until you reach the bottom of the belly. As the pot curves inward near the foot, you may need to shorten your strokes slightly to fit the form. -
Refining ridges:
Use a damp sponge or a soft rib to gently smooth the sharp ridges created between the cuts. You want the edges to feel soft to the touch, not jagged.
Troubleshooting: UnevenSpacing
If your petals aren’t meeting up perfectly, don’t panic. Gently smudge the ridge with your thumb to create a more organic transition; nature isn’t perfectly symmetrical either.
Step 3: Finishing
-
Clean up debris:
Once fully dry (bone dry), use a soft brush to sweep away any clay crumbs or burrs hiding in the deep recesses of the carving. -
Bisque fire:
Fire the piece to cone 04 (or your clay’s bisque temperature). -
Glazing:
Apply a thin coat of matte white or clear glaze. Avoid thick, runny glazes, as they will pool in the texture and obscure the crisp carving lines. -
Wipe back (optional):
For maximum definition, you can wipe the glaze off the high points with a damp sponge, leaving glaze only in the recessed carved areas to accentuate the relief. -
Final firing:
Glaze fire to maturity (likely cone 5 or 6 depending on your stoneware).
Place your finished vase near a window to let the natural light emphasize those lovely carved curves

What Really Happens Inside the Kiln
Learn how time and temperature work together inside the kiln to transform clay into durable ceramic.
Carved Spiral Grooves That Wrap Like a Ribbon
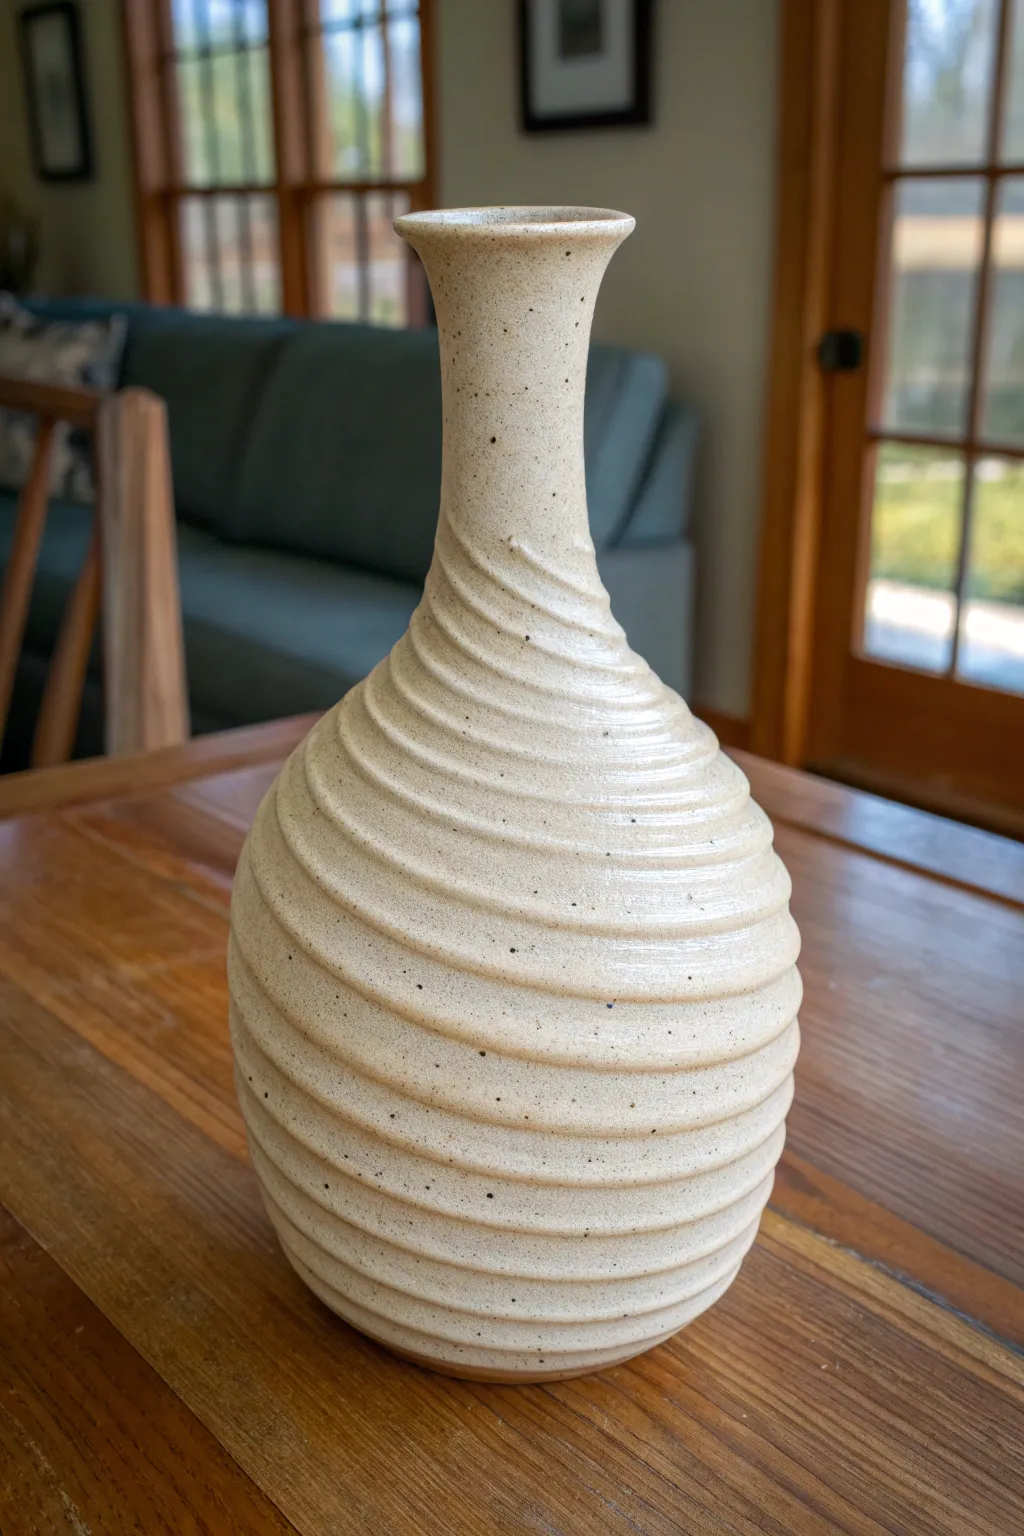
This elegant bottle features a continuous, carved spiral that wraps around the form like a tightened ribbon, adding tactile movement to a classic silhouette. The subtle ridges catch the glaze beautifully, while the speckled clay body adds organic warmth to the finished piece.
Step-by-Step
Materials
- Speckled stoneware clay (approx. 2-3 lbs)
- Pottery wheel
- Throwing tools (sponge, rib, needle tool, wire)
- Carving tool (small loop tool or fluting tool)
- Calipers (optional, for measuring neck)
- Matte white or clear satin glaze
- Kiln
Step 1: Throwing the Form
-
Center and open:
Begin by centering your speckled stoneware clay on the wheel. Open the mound, leaving the floor roughly 1/4 to 1/3 inch thick to support the height of the bottle. -
Pull the cylinder:
Pull the walls upward to create a tall cylinder. Don’t worry about the final shape yet; focus on getting an even wall thickness from bottom to top, keeping enough clay at the rim for later collaring. -
Shape the belly:
Using a rib tool inside the vessel, gently push the clay outward while supporting the outside to create the bulbous bottom section. Aim for a smooth, rounded curve that transitions gradually into the upper section. -
Collar the neck:
Begin collaring (squeezing) the upper portion of the clay inward to form the bottleneck. Do this in several passes, wetting your hands slightly to reduce friction, and pull upward after each collar to lengthen the neck. -
Refine the profile:
Use a metal or wooden rib to smooth the exterior, removing throwing lines and refining the transition from the belly to the long neck. The surface needs to be fairly smooth before you begin the texture work. -
Detail the rim:
Finish the rim by flaring it slightly outward for a delicate lip. Use a chamois or a piece of plastic to compress the rim, ensuring it’s smooth and inviting. -
Dry to leather hard:
Cut the pot from the wheel and let it dry slowly to a sturdy leather-hard stage. The clay needs to be firm enough to hold its shape during carving but soft enough to carve cleanly without chipping.
Wheel Speed Trick
When carving spirals on the wheel, keep a slow, consistent rotational speed. If the wheel spins too fast, your spiral angle will flatten out; too slow, and it becomes vertical.
Step 2: Carving the Texture
-
Plan the spiral:
Place the leather-hard pot back on the wheel (or a banding wheel). Visualize where your spiral will start at the base. I usually like to do a faint practice line with a needle tool to map out the spacing. -
Start the groove:
Using a small loop tool or a dedicated fluting tool, begin carving at the very bottom of the pot. Press the tool gently into the clay to create a shallow, rounded groove. -
Carve the continuous line:
Slowly rotate the wheel or banding wheel while moving your hand gradually upward. The goal is to create one single, continuous spiral line that wraps around the belly and travels up the neck. -
Maintain spacing:
As you carve upward, try to keep the ridges between the grooves equal in width. The organic variation is part of the charm, but consistent spacing helps the piece look cohesive. -
Negotiate the neck curve:
As you transition from the wide belly to the narrow neck, you may need to adjust your hand speed. The spacing often naturally tightens slightly here, which visualizes the tension of the ‘ribbon.’ -
Finish at the rim:
Continue the spiral all the way up the neck, letting it fade out gently just below the flared rim. -
Clean the burrs:
Once the carving is complete, use a damp sponge or a soft brush to gently wipe away any sharp clay burrs or crumbs left by the tool. Don’t press too hard or you might muddy the crisp lines.
Try a colored slip
Before bisque firing, apply a dark oxide wash or colored slip into the grooves, then wipe the ridges clean with a sponge. This creates high contrast and deepens the texture.
Step 3: Glazing and Firing
-
Bisque fire:
Allow the pot to dry completely to bone dry before loading it into the kiln for a bisque firing. -
Glaze application:
Choose a glaze that breaks over texture. A translucent white or a satin matte glaze works best here, as it will pool slightly in the grooves and thin out on the ridges, highlighting the spiral. -
Dip or spray:
Dip the bottle into the glaze, holding it by the foot (or using tongs). If dipping isn’t possible due to the size, careful pouring or spraying ensures an even coat over the texture. -
Check the thickness:
Ensure the glaze isn’t applied too thickly, or it might fill in the grooves and obscure your carving work. A medium application is ideal. -
Final wipe:
Wipe the foot ring clean with a damp sponge to prevent the pot from sticking to the kiln shelf. -
Glaze fire:
Fire the piece to the maturity temperature of your clay and glaze (likely Cone 5/6 or Cone 10, depending on your materials).
Once fired, the finish will reveal the rhythmic dance of the spiral, ready for a single stem or display on its own
Carved Medallion Panels Framed by Smooth Borders
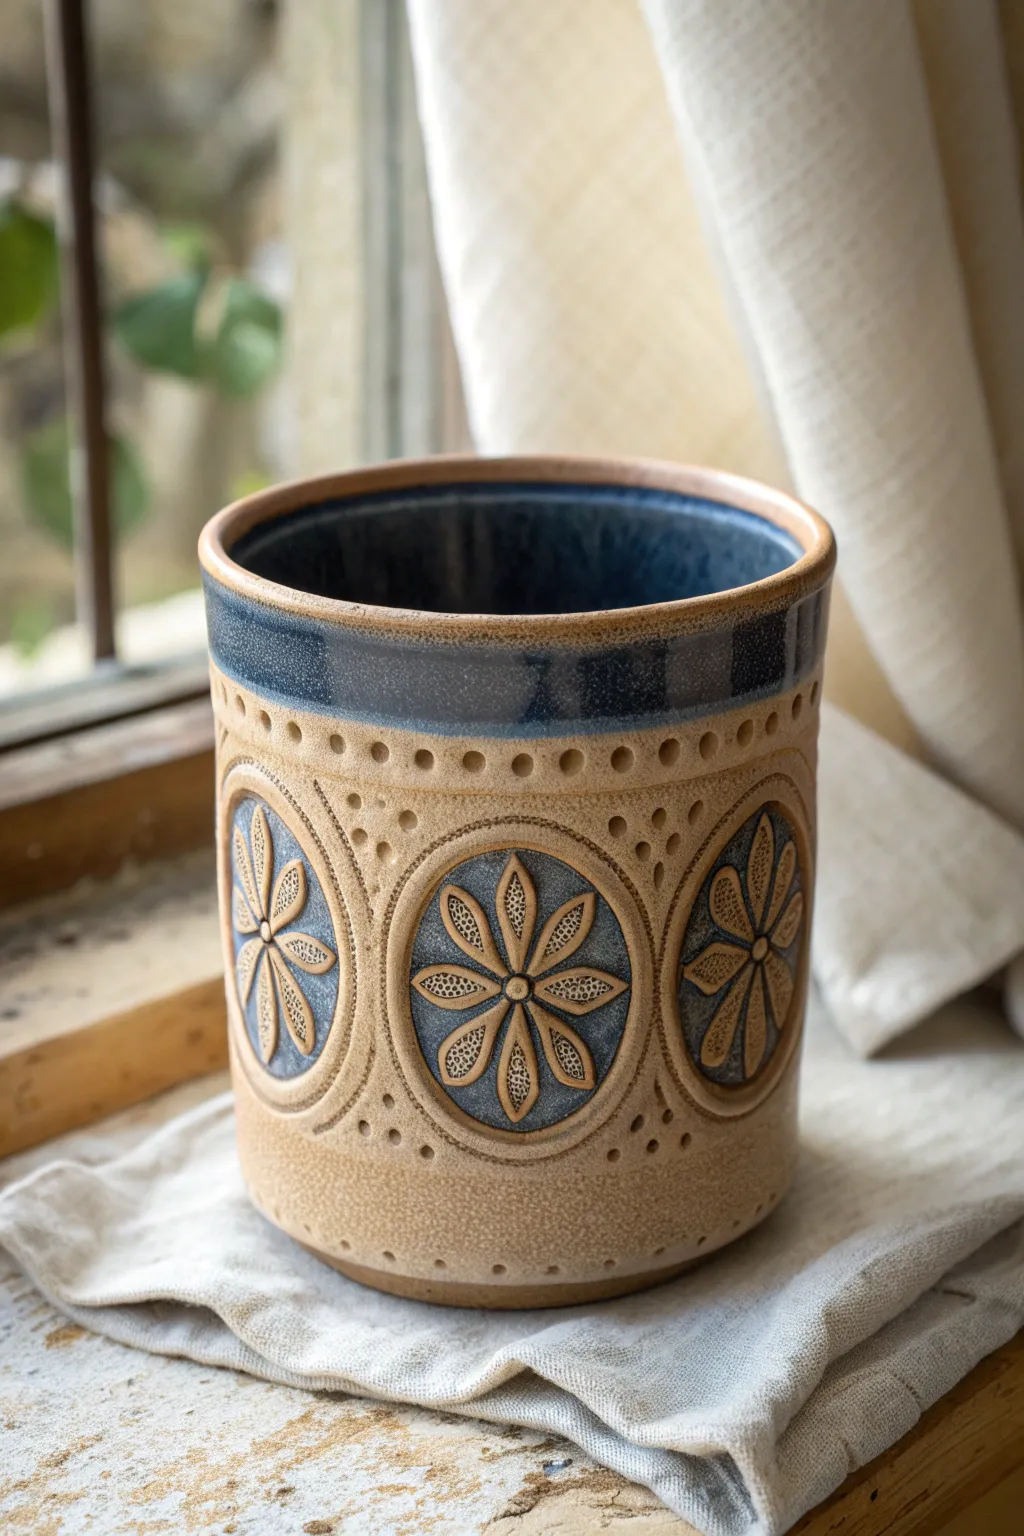
This classic pottery project combines clean wheel-thrown lines with intricate surface decoration. The alternating smooth borders and recessed floral medallions create a stunning texture contrast, emphasizing the raw beauty of speckled clay against deep blue glaze.
Detailed Instructions
Materials
- Speckled stoneware clay (approx. 3-4 lbs)
- Pottery wheel and throwing tools
- Trimming tools (sharp loop tool, rib)
- Needle tool
- Carving tools (small U-gouge and V-gouge)
- Slip trailer or small brush
- Sponge
- Dark matte blue glaze
- Clear or semi-matte transparent glaze (optional)
- Wax resist
- Soft bristle brush
Step 1: Throwing and Shaping
-
Center and throw:
Begin by centering your speckled clay on the wheel. Open the clay and pull a cylinder to your desired height, aiming for roughly 6-7 inches tall with straight, vertical walls. -
Refine the rim:
The rim on this piece is substantial. Compress it well with your chamois or sponge, leaving it slightly rounded and thick enough to withstand daily use. -
Define the blue band:
While the wheel represents a slow spin, use a wooden tool or rib to gently press an indentation about 1.5 inches down from the rim. This demarcation line will separate the upper glazed band from the carved body. -
Dry to leather hard:
Wire the pot off the bat and let it dry slowly to a consistent leather-hard state. This firmness is crucial for clean carving without warping the walls.
Keep it Clean
Glaze sticking to your wax resist? Before the glaze dries completely, use a damp sponge tip or a rubber shaper tool to gently wipe the beads of glaze off the waxed petals for crisp lines.
Step 2: Mapping the Medallions
-
Divide the circumference:
Using a decorator’s wheel or simple math, divide the outside of your cylinder into equal sections. For this design, three or four large oval medallions work best depending on the diameter. -
Sketch the ovals:
Lightly sketch large vertical ovals onto the clay surface using a needle tool or pencil. Leave ample negative space between them for the textured column borders. -
Draw the border concentrics:
Sketch a second, slightly smaller oval inside your first one to create a defined frame. This double-line guide ensures your carving stays neat. -
Draft the central flower:
Locate the center of the oval and sketch an eight-petaled flower. The petals should be teardrop-shaped and extend almost to the inner oval border.
Mishima Accents
For added depth, apply a black underglaze wash into the stippled dots on the petals before waxing, then wipe back. This makes the texture pop even more against the raw clay.
Step 3: Carving and Texturing
-
Relieve the background:
Using a sharp loop tool, carefully carve away the negative space between the flower petals and the inner oval border. You want the flower and the frame to stand raised while the background sits recessed by about 1/8th inch. -
Texture the petals:
Take a fine-point stylus or needle tool and apply a stippling texture (tiny dots) to the surface of each petal. This creates a lovely organic contrast against the smooth clay. -
Refine the frames:
Use a small carving tool to create a distinct groove or step between the main clay body and the medallion frame, sharpening the outline. -
Add border dots:
In the smooth space between the medallions (the columns) and directly under the rim band, press a small, round tool into the clay to create even rows of impressed dots. I find a drill bit end works perfectly for this. -
Clean up burrs:
Once the clay is bone dry, gently wipe the surface with a barely damp sponge to remove any sharp clay crumbs or burrs left from carving. Bisque fire the piece to cone 04.
Step 4: Glazing Strategy
-
Wax the raw clay areas:
Apply wax resist carefully to the raised flower petals, the oval frames, and the main body of the pot including the dotted sections. You want these areas to remain bare clay. -
Focus the wax application:
Be very precise when waxing the flower petals. The goal is to inhibit glaze from sticking to the raised texture, allowing the speckles to show through. -
Apply the blue glaze:
Brush or pour a dark matte blue glaze into the recessed background of the medallions. Because you waxed the petals, the glaze perfectly fills the negative space around the flower. -
Glaze the rim band:
Dip or brush the top 1.5-inch rim section with the same blue glaze. Ensure a clean line where the glaze meets the raw clay body. -
Glaze the interior:
Pour a functional liner glaze (glaze of choice, usually a dark blue or black here to match) inside the vessel, swirl to coat, and pour out excess. -
Wipe and fire:
Use a damp sponge to wipe any stray glaze droplets off the waxed areas (wax resists glaze, but beads can sit on top). Fire to your clay body’s maturity temperature (usually Cone 5 or 6).
Once fired, the rich blue glaze will frame your hand-carved details beautifully, creating a functional piece that feels wonderful to hold

TRACK YOUR CERAMIC JOURNEY
Capture glaze tests, firing details, and creative progress—all in one simple printable. Make your projects easier to repeat and improve.
Simple Leaf Silhouettes in Low Relief
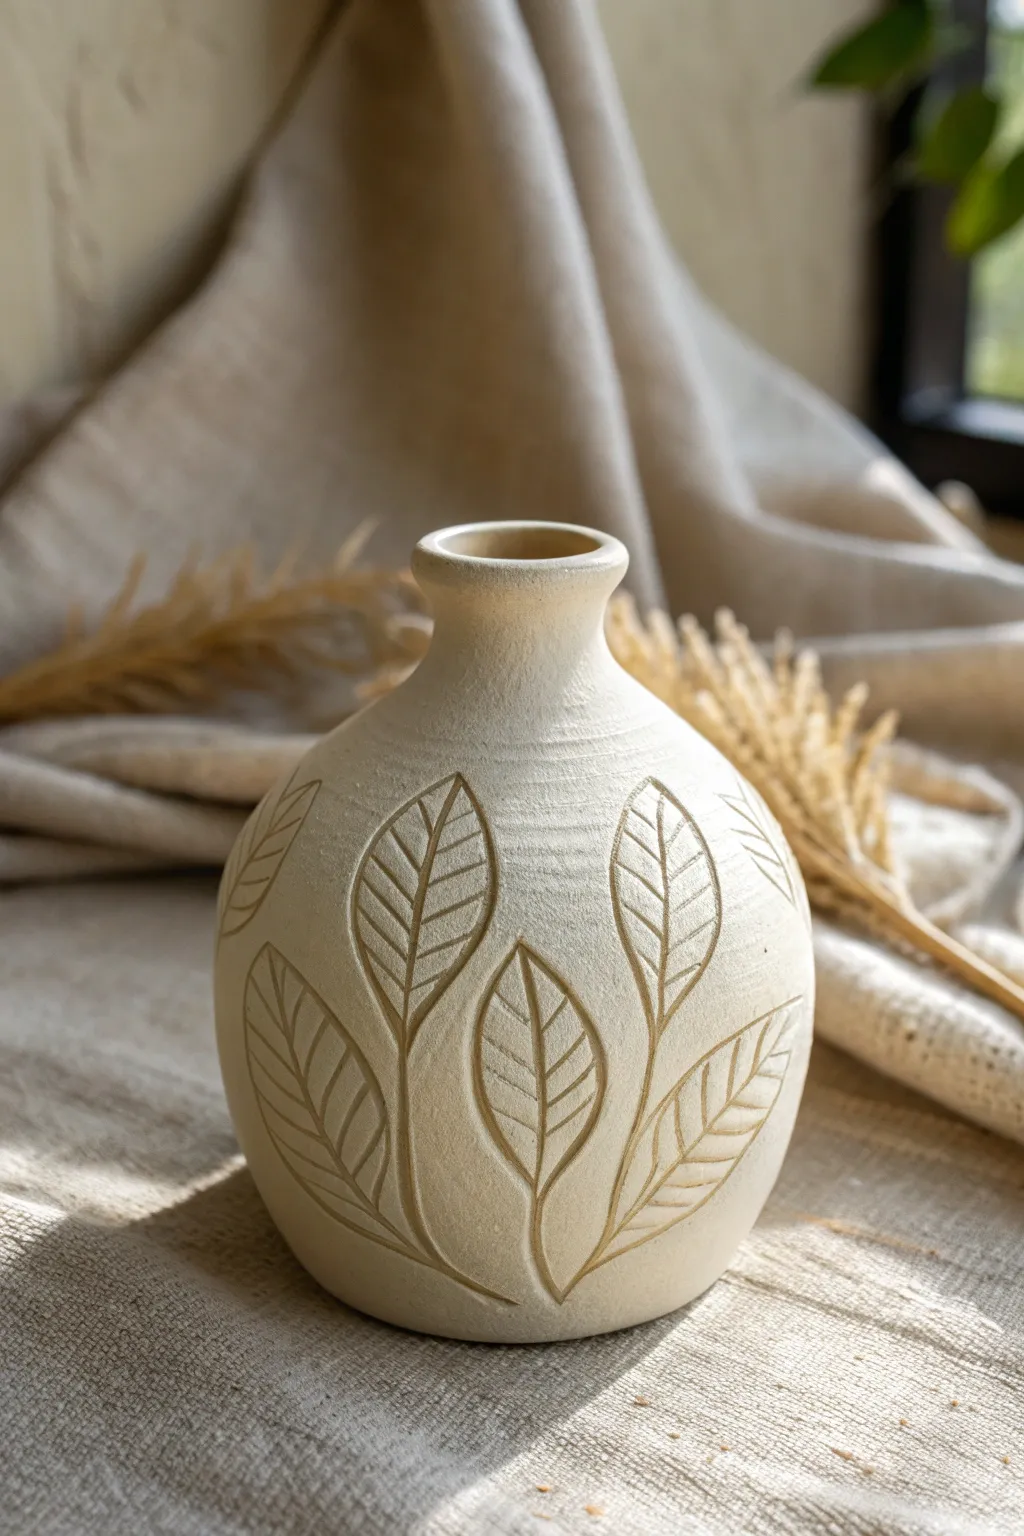
This project transforms a standard pottery vessel into a botanical statement piece using simple carving techniques. The result is a beautifully textured, matte-finished vase featuring organic leaf motifs carved in low relief, perfect for adding a touch of nature to your home decor.
Step-by-Step Tutorial
Materials
- Stoneware clay (buff or cream-colored)
- Pottery wheel (or coil/slab building tools)
- Ribbon carving tool (small loop)
- Needle tool or pencil for sketching
- Metal or rubber rib for smoothing
- Sponge
- Clear matte glaze (optional, for interior only) or raw firing
Step 1: Shaping the Vessel
-
Wedge and Center:
Start by thoroughly wedging about 1-1.5 lbs of stoneware clay to remove air bubbles. Center the clay firmly on your wheel head. -
Open and Pull:
Open the clay and begin pulling the walls. Aim for a bulbous bottom shape, curving inward as you rise. -
Form the Neck:
Collar the top section inward significantly to create a narrow neck. Keep the rim slightly flared or rolled for a soft finish akin to the reference image. -
Refine the Surface:
While the wheel is spinning slowly, use a metal rib to smooth the exterior, removing throwing rings. This creates a clean canvas for your carving. I find that compressing the surface here really helps the carving tools glide later. -
Leather Hard Drying:
Allow the vase to dry to a ‘leather hard’ stage. The clay should be firm enough to handle without deforming but soft enough to carve into easily.
Burrs Stuck?
Don’t try to brush off carving crumbs while the clay is wet; you’ll just smudge them back in. Wait until the vase is bone dry, then stiffly brush or sand them away cleanly.
Step 2: Designing the Leaves
-
Plan the Layout:
Visualize where your leaves will sit. The design works best with 3-4 clusters of leaves rising from the base. -
Sketch Lightly:
Using a needle tool or a dull pencil, very lightly scratch the outline of simple, ovate leaves onto the surface. Don’t dig deep yet; these are just guide lines. -
Draw Central Veins:
Mark a central vein line running up the middle of each leaf shape, curving naturally with the form of the vase.
Step 3: Carving the Relief
-
Outline Carving:
Take your small ribbon or loop tool. Carve along the exterior outline of each leaf. Go slightly deeper than your sketch lines to define the shape. -
Carving the Veins:
Use the edge of your loop tool or a specialized sgraffito tool to carve the central vein. Make this line clear and confident. -
Adding Texture:
Carve the side veins (venation) radiating from the center line. Angle these upward. Press slightly harder near the center vein and lift up as you reach the leaf edge to taper the line. -
Refining the Edges:
Go back over your main outlines. If you want the leaves to pop, slightly carve away the negative space immediately surrounding the leaf to create a shadow line. -
Cleanup:
Once the carving is complete, use a soft, slightly damp brush or your finger to gently rub away any clay burrs or crumbs produced by the carving tools.
Depth Control
Keep your ribbon tool sharp. A dull tool drags and tears the clay rather than slicing it. For clean vein lines, pull the tool toward your body rather than pushing away.
Step 4: Finishing and Firing
-
Bone Dry:
Let the piece dry completely to the bone-dry stage. It will become very fragile and lighter in color. -
Bisque Fire:
Load the vase into the kiln for a bisque firing (usually cone 04 or 06). -
Glazing Decision:
To maintain the raw, earthy look of the photo, leave the exterior unglazed. However, pour a clear glaze inside if you intend to use it for fresh flowers. -
Final Fire:
Fire the piece to maturity (Cone 5, 6, or 10 depending on your clay body). The unglazed clay will vitrify and take on its final stone-like texture.
Place your finished vase near a window where the natural light can play across the carved textures
Botanical Vein Carving for Natural Detail
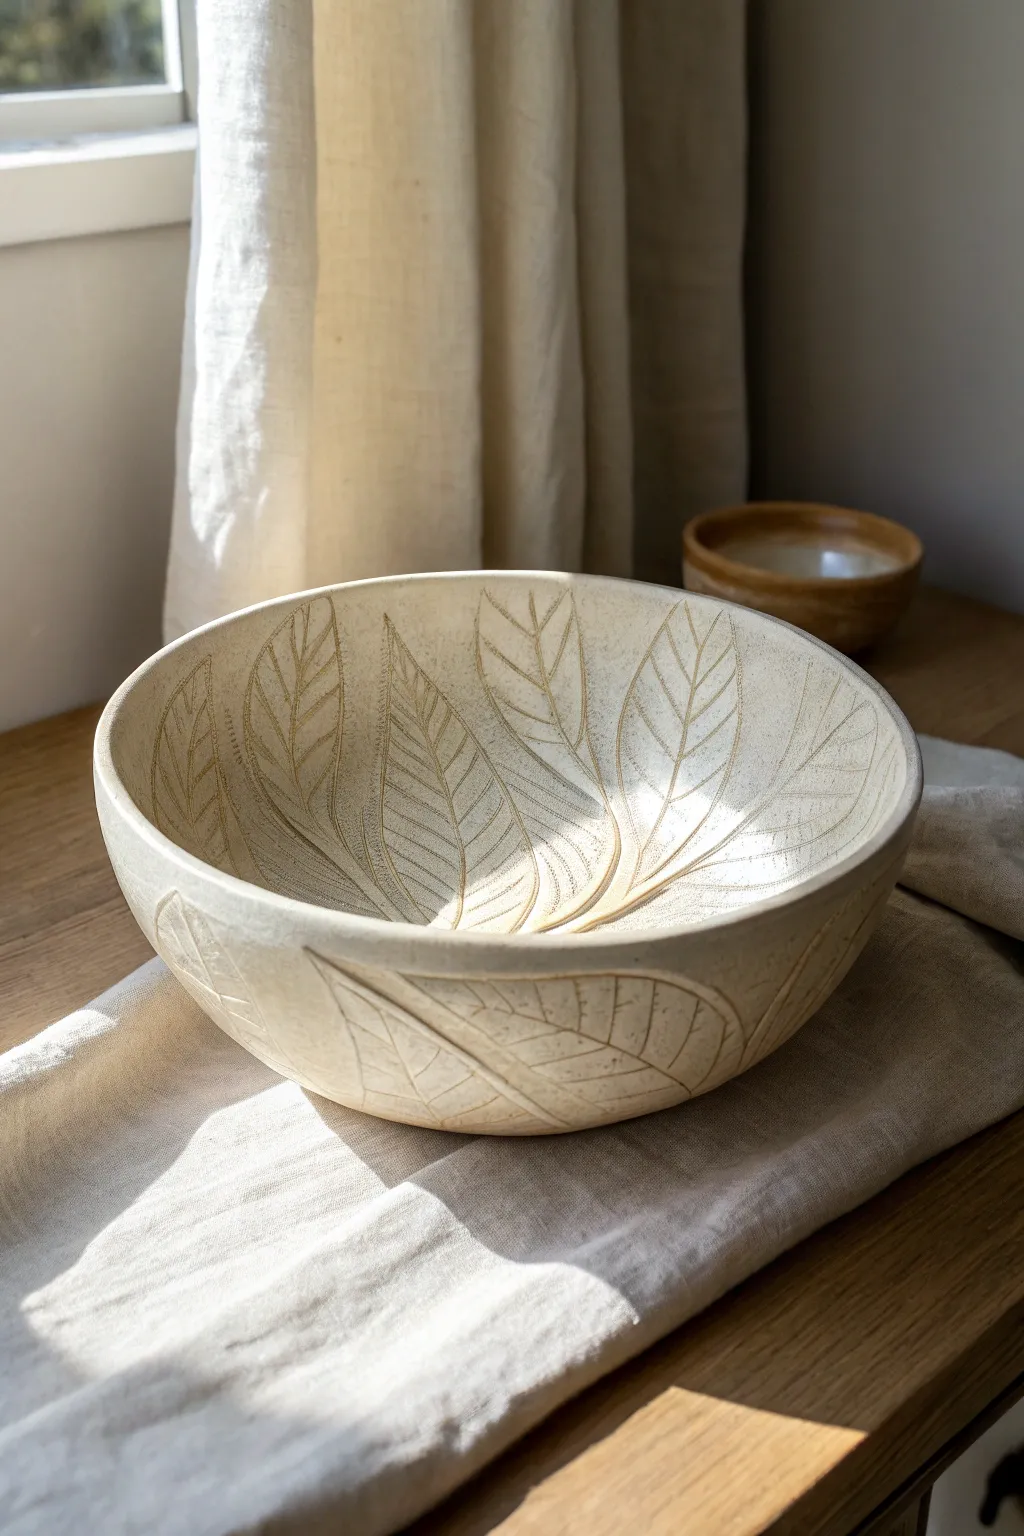
Capture the organic beauty of nature with this leaf-patterned bowl, featuring deep, sweeping carvings that mimic the structure of foliage. The contrast between the creamy glaze and the raw clay body beneath highlights every delicate vein.
Detailed Instructions
Materials
- Leather-hard stoneware bowl (preferably a light clay body)
- Loop tool (small to medium)
- Fine point carving tool or needle tool
- Pencil (soft graphite)
- Sponge
- Soft-bristled brush
- Matte white or cream glaze
- Wax resist (optional)
Step 1: Preparation and Mapping
-
Assess the dryness:
Ensure your thrown or hand-built bowl is at the perfect leather-hard stage. It should be firm enough to handle without warping, but soft enough to carve into easily without chipping. -
Clean the surface:
Use a slightly damp sponge to smooth out any throwing lines or grog that might interfere with your sketching. This creates a clean canvas for these large botanical shapes. -
Sketch the main veins:
Take a soft pencil and lightly sketch the central spines of your leaves. Start from the base of the bowl and sweep upwards towards the rim. I like to let them curve naturally, varying the direction slightly to create movement. -
Outline leaf shapes:
Around each central spine, lightly draw the outer perimeter of the leaves. Allow some leaves to overlap slightly or run off the edge of the rim for a dynamic composition. -
Repeat on the interior:
Don’t stop at the outside. Carry the design over the rim and down into the interior of the bowl, ensuring the visual flow connects the inside and outside surfaces.
Step 2: Carving the Veins
-
Start with the spine:
Using a small loop tool, carve out the central spine of each leaf first. Apply steady, moderate pressure to create a groove that is deeper than the subsequent veins. -
Carve the outline:
Switch to a slightly finer tool to carve the perimeter of each leaf shape. This defines the boundaries of your botanical forms against the negative space. -
Add secondary veins:
With a fine point carving tool or a very small loop tool, carve the diagonal veins branching out from the spine. Keep these lines consistently spaced but slightly varied in curvature to look natural. -
Detail the negative space:
You can leave the background smooth, or gently texture the negative space slightly to make the smooth leaves pop. For this specific look, aim to keep the background relatively quiet. -
Clean the burrs:
As you carve, little crumbs of clay (burrs) will accumulate. Don’t brush them away while wet, or you’ll smear the lines. Let them dry for 10-15 minutes until crumbly. -
Brush away debris:
Once the burrs are chalky, use a soft, dry paintbrush to gently sweep them out of the carved grooves. This reveals the crispness of your lines.
Depth Perception
Vary your carving pressure. Press harder near the stem and lighten up toward the leaf tips to create a sense of dimension.
Step 3: Finishing and Glazing
-
Smooth rough edges of the carving:
Run a fingertip or a very slightly damp sponge over the high points of the carving to soften any sharp ridges created by the tools. -
Slow drying process:
Cover the bowl loosely with plastic to let it dry very slowly. Because you’ve removed material, the walls vary in thickness and need time to even out to prevent cracking. -
Bisque fire:
Fire the piece to bisque temperature (usually cone 04 or 06) to prepare it for glazing. -
Apply wash (optional):
To enhance the depth seen in the photo, you can apply an iron oxide wash into the grooves and wipe it back with a sponge, leaving the dark color only in the recesses. -
Glazing technique:
Dip or spray the bowl with a matte cream or white glaze. If the glaze is distinctively thick, it might fill the fine lines, so ensure your layer is thin enough to let the texture break through. -
Final firing:
Fire to the maturation temperature of your specific clay and glaze combination.
Dry Clay Trouble
If the clay is too dry and chipping, mist it lightly with water and wrap it tightly in plastic for an hour to regain carving moisture.
Now you have a stunning, nature-inspired vessel ready to hold fruit or stand alone as a centerpiece
Carved Dot-and-Dash Textures for Subtle Sparkle
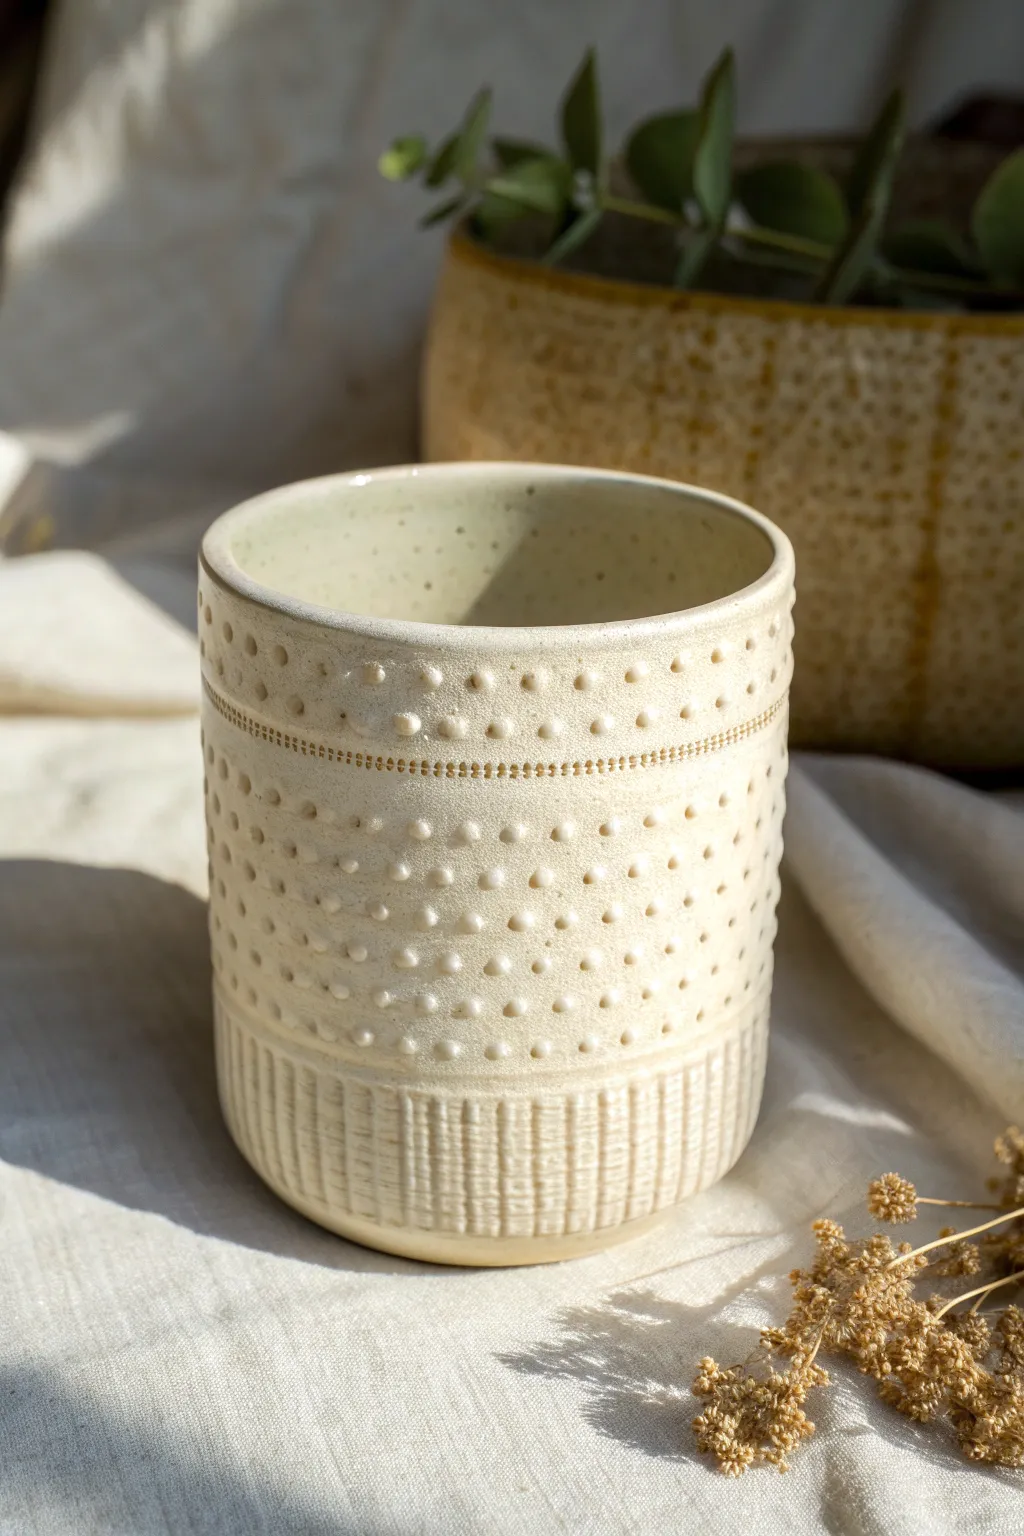
This elegant tumbler combines rhythmic carving with raised slip details to create a tactile surface that catches the light beautifully. The finished piece features a creamy glaze that pools slightly in the recesses, highlighting the delicate interplay between the incised vertical lines and the added slip dots.
Step-by-Step
Materials
- White stoneware or porcelain clay body
- Pottery wheel
- Loop turning tools (small and medium)
- Slip trailer bottle with a fine nozzle
- Thick slip (made from your clay body)
- Fettling knife or needle tool
- Comparison calipers
- Sponge
- Wire cutter
- Creamy transparent or semi-opaque glaze (cone 6 or 10)
Step 1: Throwing the Form
-
Center and open:
Begin with about 1 – 1.5 lbs of wedged white stoneware clay. Center it firmly on the wheel head and open the clay to create a flat inside bottom. -
Pull the walls:
Pull the walls up into a simple cylinder shape. Aim for straight vertical sides with a very slight taper inward at the rim. -
Refine the rim:
Compress the rim with a chamois or your finger to ensure it is smooth and pleasant to drink from. The rim should be slightly rounded. -
Establish the foot:
Use a wooden rib or angled tool to clean up the base of the cylinder, creating a slight undercut to make trimming easier later. Wire the pot off the wheel and let it dry to leather-hard.
Slip Consistency Tip
Deflocculate your slip slightly with a drop of sodium silicate. This allows it to flow smoothly from the nozzle while remaining thick enough to stay raised and distinct.
Step 2: Trimming and Carving Base Texture
-
Trim the foot:
Once leather-hard, center the pot upside down on the wheel. Trim the bottom to create a defined foot ring, ensuring the wall thickness is even throughout. -
Mark your sections:
Turn the pot right-side up. Using a needle tool and a banding wheel, lightly score three horizontal lines around the circumference. One line should be about an inch from the bottom, and another about 1.5 inches from the top rim, creating a middle band for your dot texture. -
Carve the bottom band:
For the bottom section (the ‘dash’ texture), use a small, U-shaped carving tool. Carve short, vertical lines closely together. Varying pressure slightly creates that organic, hand-carved look. -
Create the belt:
Just above the vertical lines, create a narrow distinct band. Use a needle tool to impress tiny, dense vertical dashes or perforations along this horizontal line, acting as a border between the bottom carving and the main dot section. -
Add upper border:
Repeat this same narrow ‘belt’ texture at the top line you marked earlier, framing the central canvas where the dots will go.
Troubleshooting: Dots Pop Off
If dots fall off after drying, your slip was too dry or your cup too wet. Score the spot lightly with a needle tool and use a drop of vinegar to re-attach or fill the gap.
Step 3: Applying Slip Dots
-
Prepare the slip:
Fill your slip trailer with a thick, creamy slip made from the same clay body. The consistency should be like smooth frosting or stiff yogurt—it needs to hold a peak without running. -
Practice your flow:
Test the slip flow on a scrap piece of clay first to ensure air bubbles are gone and the dot size is consistent. -
Apply the main dots:
Working in the wide middle band, apply rows of small slip dots. I prefer to work vertically or in offset rows to create a ‘polka dot’ grid pattern. Keep the spacing consistent but organic. -
Detail the rim:
In the smooth space between the upper border belt and the actual rim of the cup, apply smaller, more delicate dots if desired, or leave it smooth for contrast. -
Dry slowly:
Because you’ve added wet slip to leather-hard clay, cover the piece loosely with plastic to let the moisture equalize. This prevents the dots from cracking off.
Step 4: Glazing and Firing
-
Bisque fire:
Once bone dry, bisque fire the tumbler to cone 04 (or your clay body’s specifications). -
Clean the surface:
Wipe the bisque ware with a damp sponge to remove any dust, which can cause pinholing in the glaze. -
Glaze application:
Dip the entire cup into a semi-opaque creamy white glaze. A glaze that breaks over texture is essential here; it should be thinner on the raised dots (showing the clay color) and thicker in the carved recesses. -
Check the foot:
Wipe the foot ring completely clean of glaze to prevent it from sticking to the kiln shelf. -
Final fire:
Glaze fire to maturity (likely cone 6 or cone 10 depending on your clay). Allow the kiln to cool naturally before unloading.
The result is a stunning, tactile vessel that feels wonderful in the hand and elevates your morning coffee routine
Sgraffito Bands Through Colored Slip for High Contrast
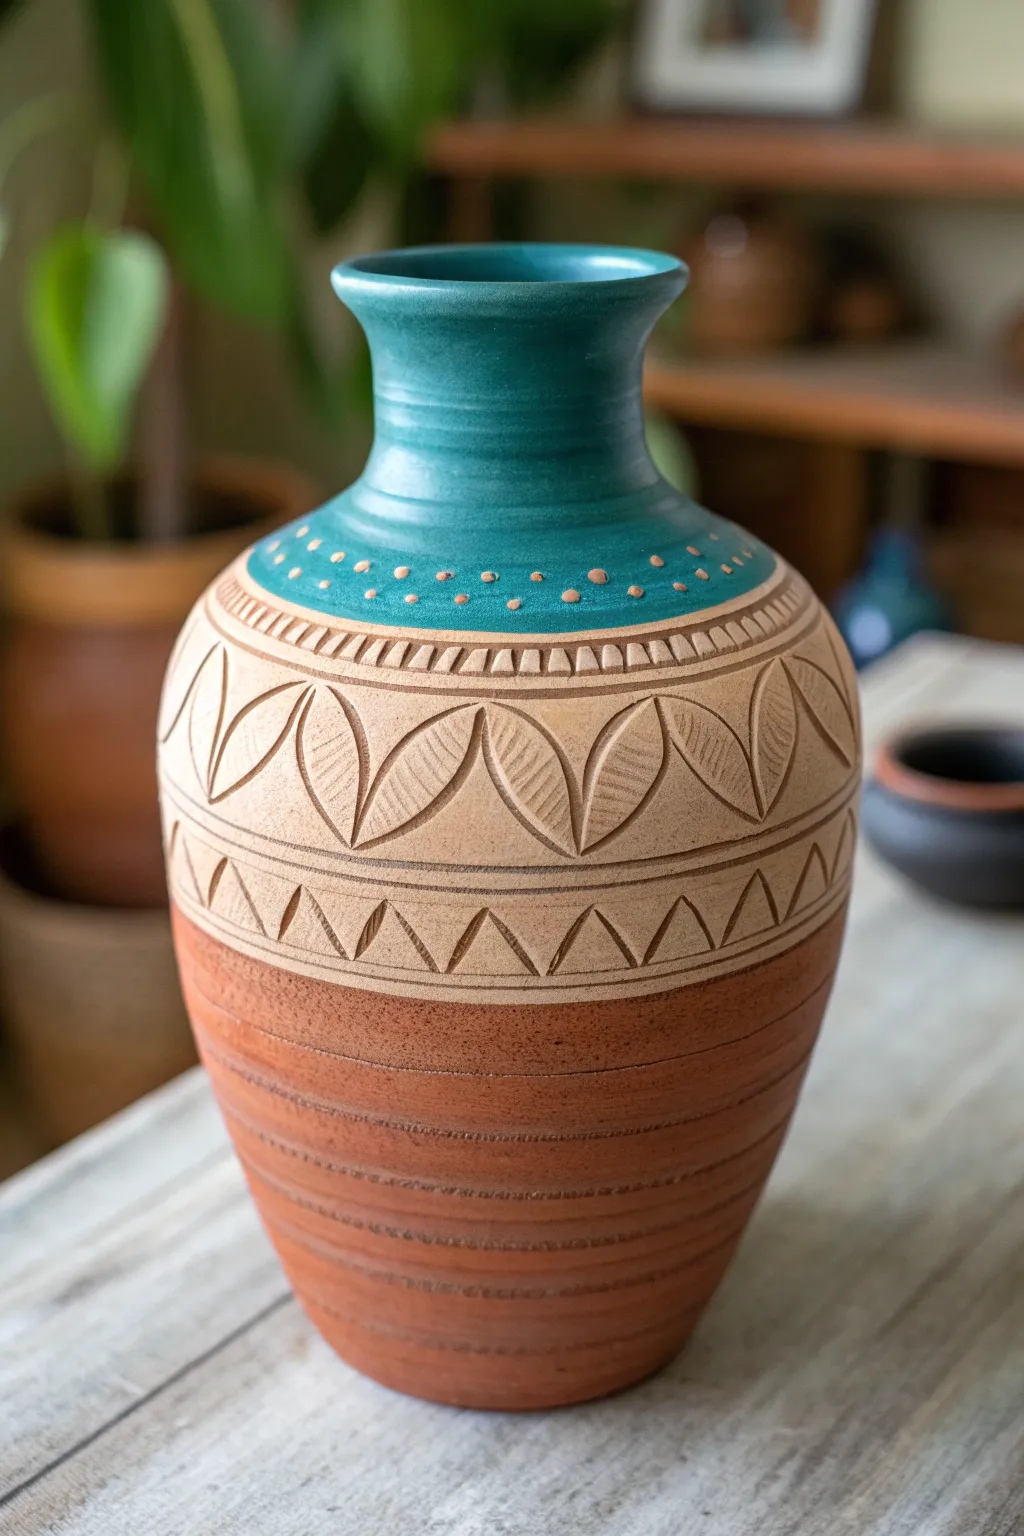
This striking vase combines glazed elegance with raw clay texture, featuring a vibrant teal neck that transitions into intricate carved bands of leaves and geometric shapes. The three distinct zones highlight the beauty of contrast between colored slip, bare clay, and deep texture.
Detailed Instructions
Materials
- Leather-hard stoneware clay vase (wheel-thrown or coiled)
- Teal or turquoise underglaze or colored slip
- Pointed loop carving tool (small)
- Small round loop tool
- Slip-trailing bulb or precision applicator
- Needle tool
- Banding wheel
- Sponge
- Clear glaze (for the inside and neck)
- Ruler or measuring tape
Step 1: Planning the Zones
-
Center the piece:
Place your leather-hard vase onto a banding wheel. Ensure it spins true so your horizontal lines will be straight and even. -
Mark the sections:
Using a needle tool, lightly score horizontal lines to divide the vase into three main sections: the neck/shoulder, the central decorative band, and the base. The central band should be the widest to accommodate the leaf motif. -
Define the borders:
Add smaller parallel lines within the central band area to create narrow borders for the geometric zig-zags and triangle patterns found at the top and bottom of the main frieze.
Step 2: Applying Color and Details
-
Apply the teal slip:
Brush three even coats of teal underglaze or colored slip onto the top section (neck and shoulder). Allow each coat to dry until it’s no longer shiny before applying the next. -
Add the dot border:
Fill a slip trailer with a rust-colored or contrasting clay slip. Carefully dot a pattern along the bottom edge of the teal section, right where it meets the unpainted clay. -
Carve the top border:
Just below the teal section, use a small carving tool to cut a band of vertical ‘piano key’ dashes. Keep them uniform in width to create a rhythmic border.
Clean Lines
Wait until the pot is bone dry to brush off carving crumbs. Brushing while damp can smudge the clay back into the grooves you just cut.
Step 3: Carving the Central Leaf Motif
-
Sketch the leaves:
Lightly scratch the outline of the repeating leaf pattern into the central band using your needle tool. The leaves should alternate in direction, creating V-shapes. -
Carve the outlines:
Use a V-tip or small U-tip carving tool to deepen the outlines of the leaves. I prefer to pull the tool towards me for better control over the curve. -
Add texture to leaves:
Inside each leaf outline, carve fine diagonal lines to represent veins. This adds depth and emphasizes the organic feel against the geometric borders. -
Clear background:
If you want extra contrast, verify that the background space between the leaves is smooth, or lightly texture it to make the leaves pop.
Slip Smearing?
If teal slip smears onto the beige area while carving, wait for it to dry completely, then gently scrape the smudge away with an X-Acto knife.
Step 4: Finishing the Lower Sections
-
Carve the geometric band:
In the narrow band below the leaves, carve a continuous zig-zag or triangle pattern. Deep, sharp distinct straight lines work best here. -
Texture the base:
For the bottom third of the vase, create a ribbed texture. While spinning the banding wheel slowly, press a loop tool or rib gently into the clay to create subtle horizontal grooves. -
Refine and smooth:
Once all carving is done, gently brush away clay burrs with a soft brush. Don’t use a wet sponge yet, as it might blur your crisp lines. -
Bisque fire:
Allow the vase to dry completely to the bone-dry stage, then bisque fire it according to your clay body’s specifications. -
Glaze application:
After bisque firing, apply a clear glaze to the inside of the vase and over the teal neck section to make the color vibrant. Leave the carved beige and red clay sections unglazed for a matte, tactile finish. -
Final firing:
Fire the piece a final time to the glaze temperature appropriate for your stoneware.
Place your finished vase near a window to let natural light emphasize the beautiful contrast between the smooth glaze and the deep carving.
Tile-Inspired Geometric Carving in Repeating Blocks
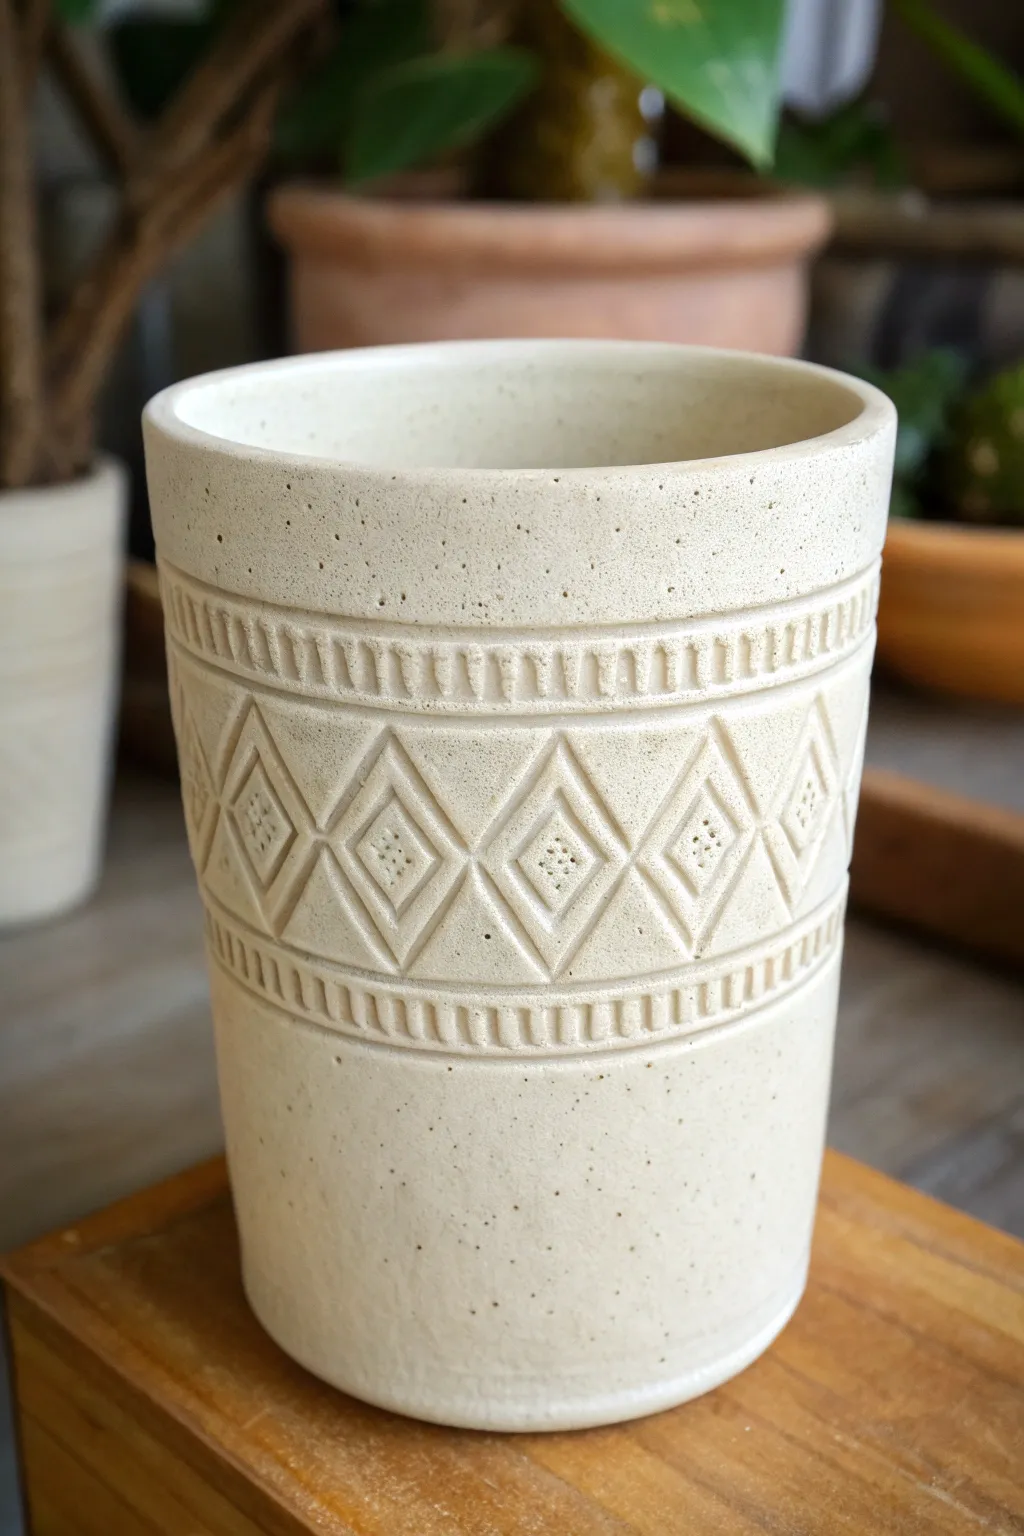
Embrace the beauty of repetition with this speckled beige tumbler featuring a classic diamond motif. The clean lines and dotted accents create a structured yet rustic texture that feels wonderful in the hand.
How-To Guide
Materials
- Stoneware clay body (preferably speckled)
- Pottery wheel
- Trimming tools (loop tool)
- Small carving tool (v-gouge or fine ribbon)
- Needle tool
- Flexible rib (rubber or metal)
- Sponge
- Matte white or transparent glaze
Step 1: Throwing the Form
-
Center and open:
Begin with about 1 pound of speckled clay. Center it firmly on the wheel head and open it up, creating a flat internal floor. -
Pull the walls:
Pull the walls up into a tall, straight cylinder. Aim for a height of about 4-5 inches and an even rim. I like to keep the walls slightly thicker than a standard mug (about ¼ inch) to allow depth for carving later. -
Compress the rim:
Use a chamois or your sponge to compress the rim, ensuring it is smooth and rounded. Clean up any slip from the exterior with a rib. -
Dry to leather hard:
Cut the cylinder from the bat and let it dry slowly until it reaches a sturdy leather-hard stage. It needs to be firm enough to handle without warping but soft enough to carve easily.
Sticky Burr Fix
If clay crumbs stick while carving, the pot is too wet. Wait 1 hour. If edges chip, it’s too dry; mist lightly with water and wrap in plastic for a bit.
Step 2: Mapping the Design
-
Trim the foot:
Invert the pot on the wheel and trim the bottom to create a neat foot ring or a flat bottom, smoothing the transition to the walls. -
Mark horizontal bands:
While the pot is spinning slowly on the wheel, use a needle tool to lightly scribe three horizontal lines around the circumference. These will define the top and bottom borders of your central diamond band. -
Divide the circumference:
Using a decorating disk or by eye, mark vertical guidelines to divide the cylinder into even segments. This ensures your diamonds will be uniform in width. -
Sketch the diamonds:
Lightly scratch in the diamond shapes between your guide lines using the needle tool. Connect the points carefully to form a continuous chain around the middle of the cup.
Step 3: Carving the Patterns
-
Carve the upper border:
Using a small U-shaped or V-shaped gouge, carve short vertical dashes continuously around the top guideline. Try to keep the spacing consistent for a ‘zipper’ effect. -
Repeat for the lower border:
Mirror the top design by carving an identical row of vertical dashes along the bottom horizontal guideline. -
Define the diamonds:
Use your carving tool to deepen the outlines of the diamonds you sketched earlier. Go over the lines firmly to create a distinct groove. -
Add inner details:
Inside each large diamond, carve a smaller diamond shape. Work carefully here, as the space is tighter. -
Create texture with dots:
Use the tip of a dull needle tool or a small drill bit to press clusters of 4-5 small dots into the center of every other inner diamond. This creates a lovely tactile contrast.
Inlay Option
Before bisque firing, paint a colored underglaze into the carved lines and wipe away the excess with a damp sponge to make the geometric pattern pop.
Step 4: Finishing and firing
-
Smooth the burrs:
Once the clay is bone dry, gently rub the carved areas with a scour pad or stiff brush to knock off any sharp clay crumbs or burrs. -
Bisque fire:
Load the piece into the kiln for a bisque firing (usually to cone 04). -
Glaze application:
Dip the cup into a matte white or semi-transparent satin glaze. A glaze that breaks over edges is ideal, as it will pool in the carvings and highlight the darker clay body underneath. -
Final wipe:
Wipe the foot clean and fire the piece to the maturity temperature of your clay (typically cone 5 or 6 for stoneware).
Now you have a beautifully textured vessel perfect for your morning coffee or a small plant
Topographic Map Carving for Flowing Contour Lines
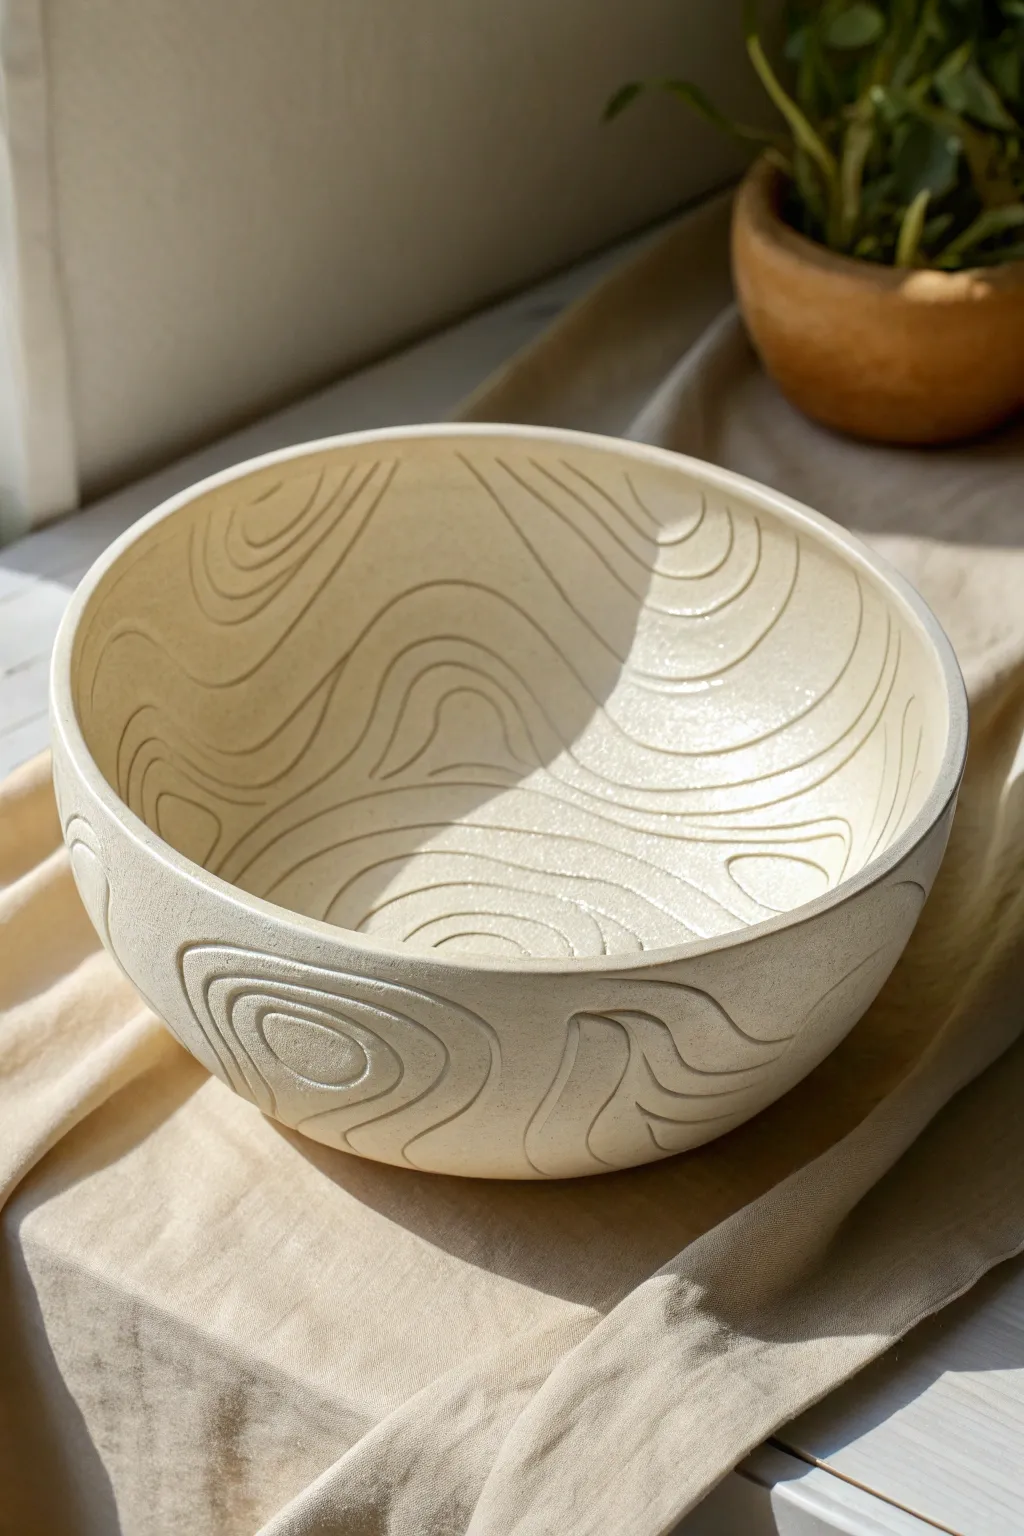
This project transforms a simple vessel into a tactile landscape inspired by topographic maps. By carving flowing, parallel lines across both the interior and exterior surfaces, you create a mesmerizing sense of movement and depth.
Step-by-Step Tutorial
Materials
- Stoneware clay (smooth body preferred)
- Pottery wheel
- Throwing tools (sponge, wire, rib)
- U-tip carving tool (small/medium width)
- Leather-hard stage vessel
- Soft bristle brush
- Damp sponge
- Matte or satin clear glaze
Step 1: Forming the Base
-
Throw your vessel:
Begin by throwing a medium-sized bowl on the wheel. Aim for a wall thickness slightly thicker than usual—about 1/4 inch or a tiny bit more—to accommodate deep carving without piercing through. -
Refine the curve:
Use a smooth metal or rubber rib to ensure the interior and exterior curves are continuous and free of throwing rings. A smooth canvas is essential for the carving to stand out. -
Dry to leather hard:
Allow the piece to dry slowly until it reaches a perfect leather-hard state. It should be firm enough to hold its shape but soft enough that carving creates ribbons of clay rather than crumbles.
Uneven Lines?
If your tool drags or stutters, the clay is too dry. Spray it lightly with water, wrap it in plastic, and wait an hour. If clay pulls or smears, it’s too wet—let it air out.
Step 2: Mapping the Design
-
Visualize the topography:
Before touching tool to clay, look at your bowl as a landscape. Decide where your ‘peaks’ (concentric circles) and ‘valleys’ (flowing connecting lines) will be. You don’t need a pencil sketch, but having a general flow in mind helps. -
Carve the first focal point:
Select a spot—either inside or outside—to start your first topographic ‘hill’. Use your U-tip tool to carve a small irregular circle or oval. -
Create the concentric ripples:
Carve a second line surrounding the first, mirroring its shape but allowing the distance between them to vary slightly for an organic feel. Maintain a steady, confident hand speed. -
Expand the pattern:
Continue adding concentric rings radiating outward. As they get larger, allow the lines to stretch and warp, just like elevation lines on a map.
Depth Perception
Vary the line proximity! Placing lines very close together creates visual ‘steepness’ and darker shadows, while wider spacing creates ‘flat’ areas, enhancing the 3D effect.
Step 3: Connecting the Landscape
-
Start a second elevation:
Pick a new location on the bowl divergent from your first set of rings. Begin a new small circle and ripple pattern there. -
Merge the flows:
As the lines from your two focal points meet, curve them around each other. This is where the ‘saddle’ of the topography forms. Instead of intersecting, the lines should run parallel and nestle together. -
Carve the rim:
Don’t stop at the edge. Let your lines flow over the rim, wrapping from the exterior to the interior. This continuity connects the inside and outside visually. -
Check line depth:
Ensure your carving depth is consistent. I like to keep the depth at about 1/3 of the wall thickness for distinct shadows without compromising structural integrity. -
Address tight spaces:
Fill in any awkwardly shaped negative spaces with smaller, warped ovals or teardrop shapes that mimic smaller hills or depressions in the terrain.
Step 4: Refining and Finishing
-
Soften the burrs:
Once the carving is complete, let the piece dry just a bit longer. Then, gently brush the surface with a soft dry brush to knock off the sharp clay crumbs or ‘burrs’ left by the tool. -
Smooth with a sponge:
Take a barely damp sponge and lightly wipe the surface. This softens the sharp edges of the carved channels, giving the piece the weathered, eroded look of natural stone. -
Bisque fire:
Fire the piece to cone 04 (or your clay body’s bisque temperature) once completely bone dry. -
Glaze application:
Dip or spray the bowl with a matte or satin finish glaze. Avoid high-gloss or thick, runny glazes, as these can pool in the crevices and obscure the crispness of your topographical lines. -
Glaze firing:
Load the kiln for the final glaze firing, ensuring the foot is clean.
Now you have a stunning vessel that invites touch and exploration of its unique terrain
Hidden Surprise Carving Under the Foot Ring
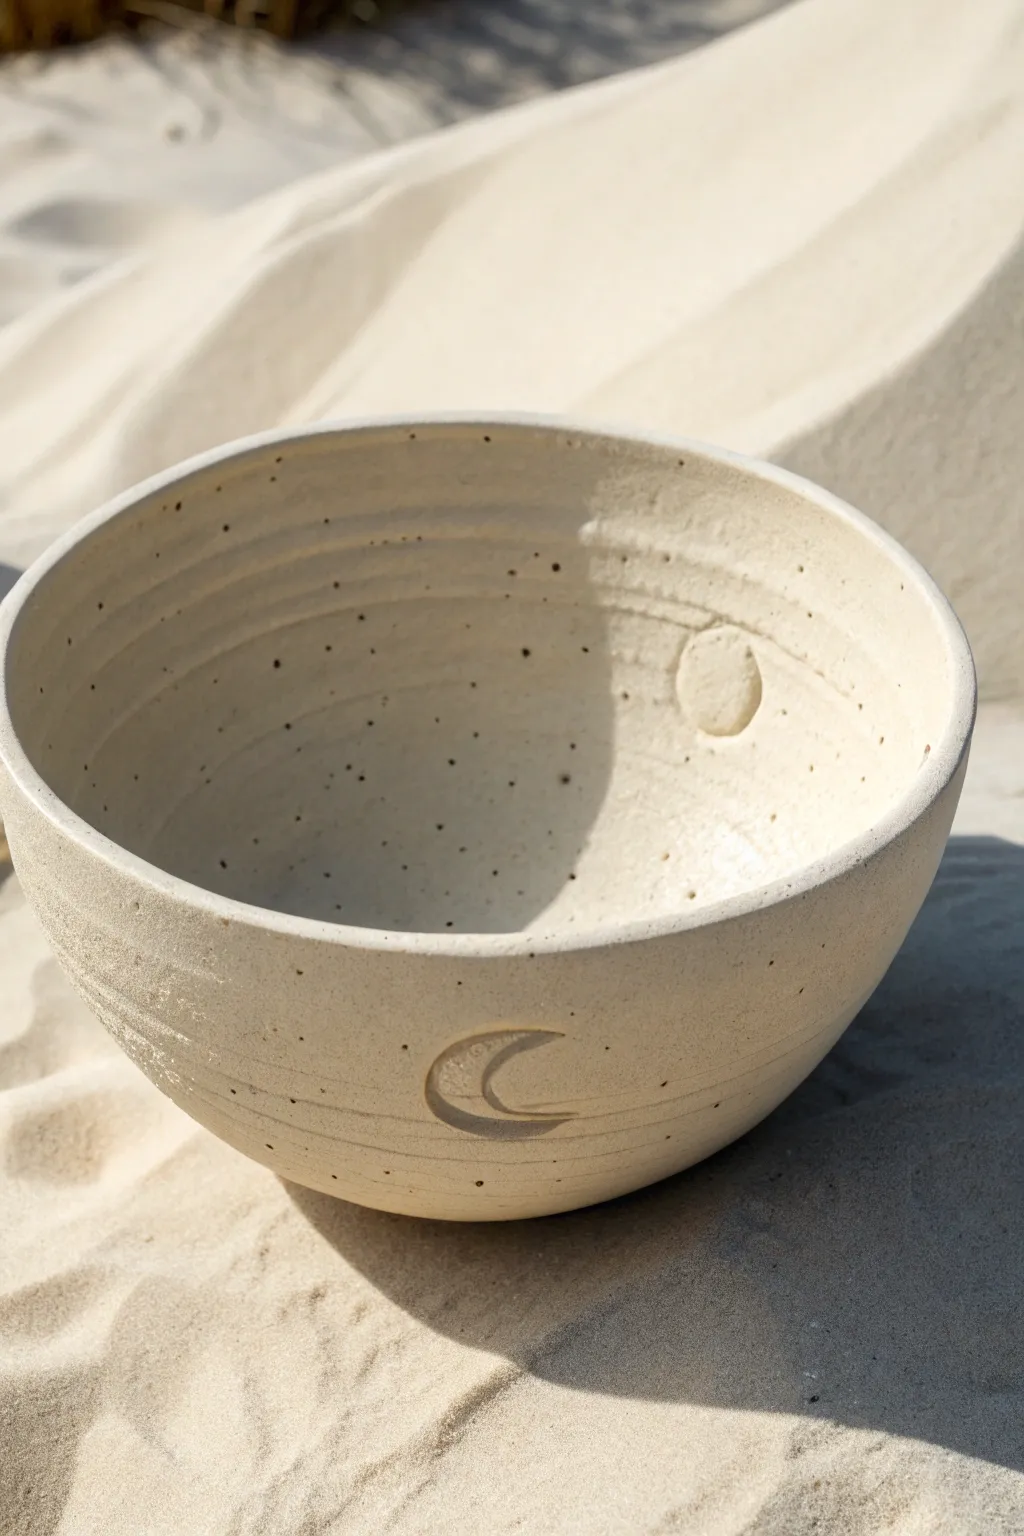
Reflect the phases of the moon with this serene, speckled ceramic bowl that features delicate relief carvings. The subtle texture of the clay body combined with negative space designs creates a tactile, earthy vessel perfect for rituals or daily use.
Step-by-Step
Materials
- Speckled clay body (stoneware recommended)
- Pottery wheel
- Throwing tools (sponge, wire cutter, rib)
- Trimming tools (loop tools)
- Pencil or needle tool
- Small carving loop tool (mini ribbon tool)
- Smoothing sponge
- Clear matte glaze or satin white glaze
Step 1: Throwing and Shaping
-
Center the clay:
Begin with about 1.5 to 2 pounds of well-wedged speckled clay. Secure it firmly to the wheel head and center it using steady pressure and water for lubrication. -
Open and pull walls:
Open the centered mound to create the floor, compressing it well to prevent cracks. Pull the walls upward and outward to form a classic hemispherical bowl shape. -
Refine the curve:
Use a kidney rib on the interior to smooth the curve and remove excess slip. The goal is a gentle, continuous arc from the rim down to the center. -
Create exterior texture:
Instead of smoothing the exterior perfectly, leave subtle throwing lines or ‘finger ridges’ visible as you pull. This adds organic character that mimics ripples in sand. -
Cut and dry:
undercut the base with a wooden knife, wire the pot off the wheel, and set it aside to dry until it reaches a sturdy leather-hard state.
Clay Cracking?
Work carefully when carving leather-hard clay. If it’s too dry, it will chip; if too wet, it smooshes. Mist lightly with water and wrap in plastic for an hour to rehydrate if needed.
Step 2: Trimming and Carving
-
Trim the foot:
Center the leather-hard bowl upside down on the wheel. Use a large loop tool to trim away excess weight from the bottom, carving a distinct foot ring that defines the bowl’s lift. -
Smooth the exterior:
While the bowl is still on the wheel (or in your lap), gently burnish the exterior surface with a soft rib if you want it smoother, or leave the raw texture. -
Sketch the moon:
Using a pencil or a very light touch with a needle tool, sketch the outline of a crescent moon on the exterior wall near the base. Keep the design simple and clean. -
Carve the relief:
Using a small carving loop tool, gently carve *around* the crescent shape or carve *into* it depending on your preference. For the look in the image, carve the crescent shape deeply into the clay body. -
Detail the carving:
Refine the edges of your crescent moon. Use the back of a small paintbrush or a rubber shaper to smooth out any sharp burrs created by the carving tool. -
Interior surprise:
Turn the bowl upright. On the upper interior wall, lightly sketch a full circle to represent the full moon. Carve this area out slightly to create a recessed circle, mirroring the exterior motif. -
Hidden foot ring carving:
Flip the bowl over again. In the center of the trimmed foot ring (the ‘hidden’ area), carve a small star or a third phase of the moon for a secret detail only the user will see when washing the pot. -
Final smoothing:
Use a barely damp sponge to wipe down the entire piece, softening any sharp edges on the rim and around your carvings without washing away the crisp lines.
Step 3: Firing and Glazing
-
Bisque fire:
Allow the bowl to dry completely (bone dry) before loading it into the kiln for a bisque firing to roughly cone 04. -
Select your glaze:
Choose a glaze that allows the speckles to show through. A matte clear or a very translucent satin white is ideal for this sandy aesthetic. -
Wax resist (optional):
If you want the raw clay texture to remain on the exterior (as seen in the photo), apply wax resist to the entire outer surface except for the inside of the carved moon. -
Glaze application:
Pour glaze into the interior of the bowl, swirl to coat, and pour out. If you didn’t wax the outside, dip the exterior now, shaking off excess drips securely. -
Rim clean-up:
I always wipe the rim with a sponge after glazing. This highlights the clay body color at the lip and creates a nice definition between inside and outside. -
Final fire:
Fire the piece to the maturity temperature of your clay (likely cone 5 or 6). Once cool, sand the bottom of the foot if needed for a smooth finish.
Cosmic Upgrades
Fill the carved moon crevices with a bright gold luster overglaze after your final firing. The metallic shine against the matte sandy clay creates a stunning, luxurious contrast.
Now you have a tranquil vessel that captures the quiet beauty of the cosmos in your hands