Whenever I’m craving fresh pottery clay art ideas, I like to start with forms that feel friendly in my hands and end up useful in my space. These projects are the kind you can realistically finish in a few sessions, with plenty of room to add your own texture and personality.
Pinch Pot Trinket Bowls With Texture
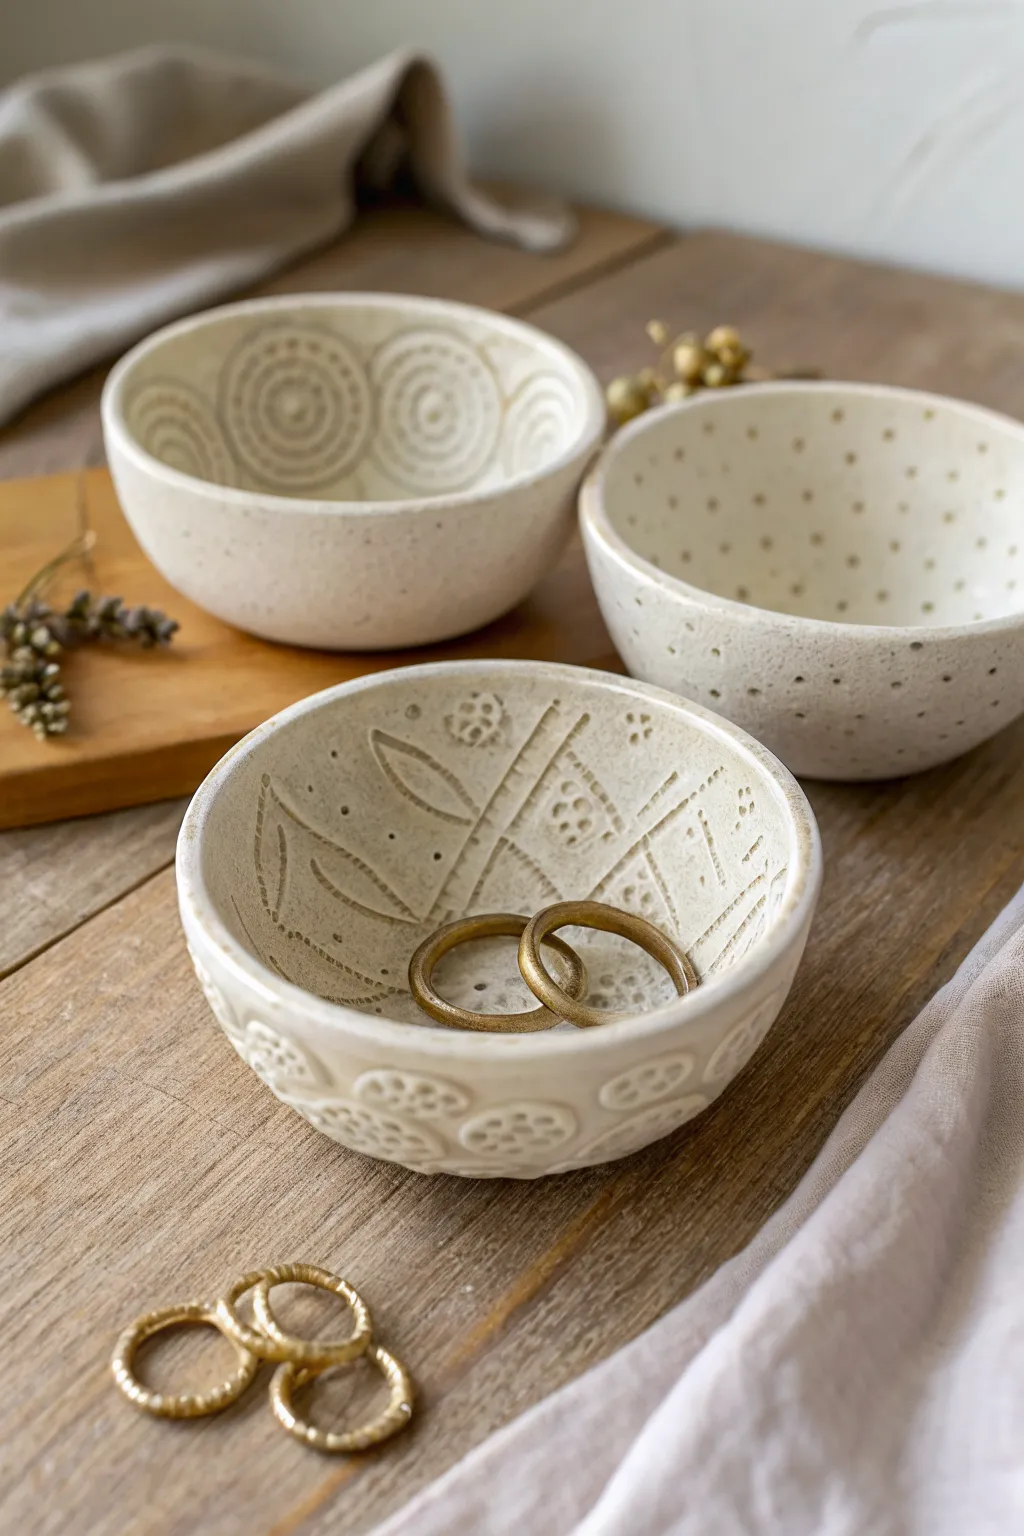
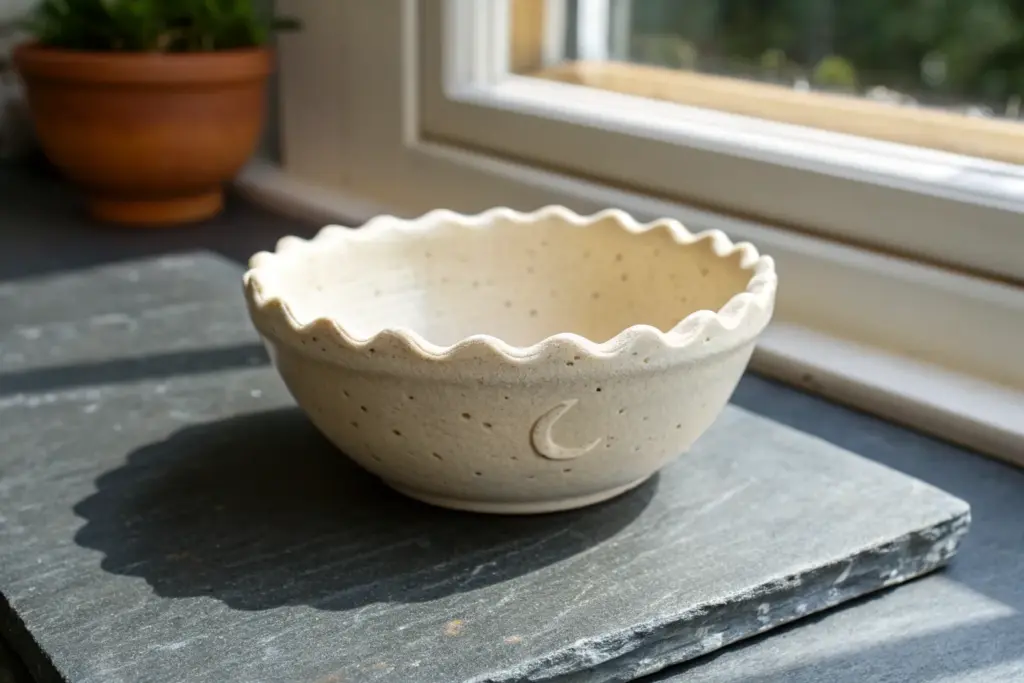
These charming, hand-built trinket bowls demonstrate the simple elegance of the pinch method combined with thoughtful surface design. With three distinct texture styles—spirals, stippling, and botanical etching—this project creates a cohesive yet varied set perfect for holding rings or small treasures.
Detailed Instructions
Materials
- Speckled stoneware clay or air-dry clay (plain white works too)
- Wooden sculpting tools or a simple wooden skewer
- Small sponge
- Rubber kidney rib (optional)
- Small loop tool
- Needle tool
- Matte white or cream glaze (if firing) or acrylic paint and matte sealer
- Bowl of water
- Canvas or cloth work mat
Step 1: Forming the Pots
-
Prepare clay balls:
Start by cutting your clay into three equal portions, each roughly the size of a tangerine. Roll them in your hands until they form smooth, round spheres to ensure your bowls start even. -
Begin the pinch:
Take one ball and hold it in your non-dominant hand. Press your thumb gently into the center, leaving about a half-inch of clay at the bottom for the base. -
Shape the walls:
Slowly rotate the ball while gently pinching the clay between your thumb (inside) and fingers (outside). Work your way from the bottom up to the rim in a spiral motion. -
Refine the thickness:
Continue pinching until the walls are an even thickness, roughly 1/4 inch. Aim for a slightly rounded, organic cup shape rather than perfectly straight sides. -
Smooth the exterior:
Use a damp sponge or a rubber kidney rib to smooth out any deep fingerprints or cracks on the outside and inside surfaces. Repeat this process for the other two clay balls.
Cracks on the rim?
Pinch pot rims often split. If you see tiny hairline cracks, score the crack with a needle tool, add a drop of water or slip, and compress the clay back together immediately.
Step 2: Adding Texture
-
Create the spiral bowl:
For the first bowl, take a small loop tool or even the rounded end of a paintbrush. Carve gentle spirals into the interior walls, varying their size. Press firmly enough to create a distinct groove but not so hard that you warp the bowl’s shape. -
Refine spirals:
Smooth any jagged clay crumbs from your carving with a barely damp finger. -
Design the stippled bowl:
For the second bowl, use a needle tool or a skewer to poke small holes all over the interior and exterior. I like to vary the spacing, grouping some dots closer together for a gradient effect. -
Detail the rim:
Don’t forget the rim of the stippled bowl; adding a few tiny dots there gives it a finished look. -
Carve the botanical bowl:
For the third bowl (the one in the foreground), use a needle tool to lightly sketch a geometric layout of intersecting lines on the inside. -
Deepen the lines:
Go back over your sketched lines with a slightly thicker tool to define the sections. Inside some sections, carve simple leaf shapes. -
Add floral stamps:
Use the end of a chopstick or a small specialized clay stamp to press small flower motifs into the remaining open sections of the design. You can also press a similar texture into the exterior base of the bowl for continuity.
Step 3: Finishing
-
Slow drying:
Place your finished bowls on a board and cover them loosely with plastic. Let them dry slowly over 24-48 hours to prevent cracking, eventually uncovering them to dry completely to the ‘bone dry’ stage. -
Bisque fire (if using kiln clay):
Fire the pieces to bisque temperature (usually cone 04) to prepare them for glazing. -
Glazing:
Dip or brush your bowls with a matte white or cream glaze. If using speckled clay, a slightly translucent white glaze is perfect because it lets those lovely iron speckles show through the texture. -
Final fire or seal:
Glaze fire the pieces according to your clay’s instructions (often cone 5/6). If you used air-dry clay, paint with white acrylics now and seal with a matte varnish once dry.
Make it functional
Turn these into wax melt warmers! Just ensure the walls are slightly thicker and melt a small amount of beeswax into the plain bottom after the final firing.
Once fired or sealed, arrange your trio together to hold your favorite jewelry pieces in style


Leaf-Imprint Slab Trinket Trays
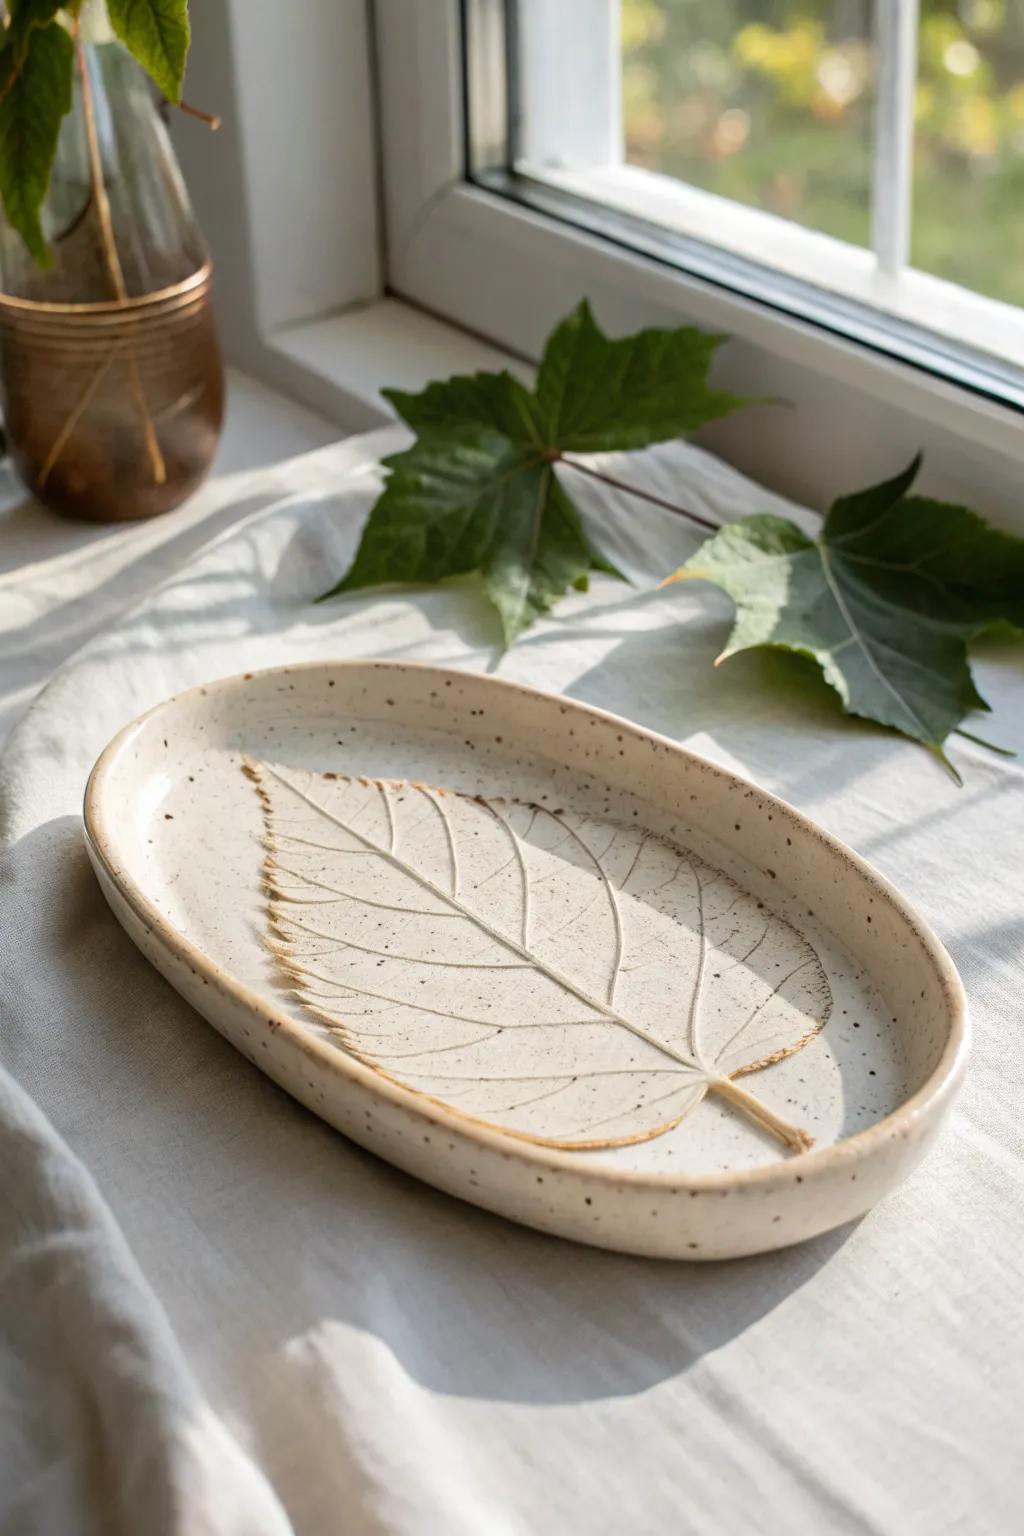
Capture the delicate details of nature forever with this elegant, speckled trinket tray. The subtle texture of a real leaf pressed into smooth clay creates a functional piece of art that brings a calm, organic aesthetic to any tabletop.
How-To Guide
Materials
- Speckled cream stoneware clay
- Rolling pin
- Canvas working mat or slab roller
- Large, fresh leaf with prominent veins (e.g., Linden or Maple)
- Needle tool or fettling knife
- Oval paper template (approx. 5″ x 9″)
- Small sponge
- Rib tool (flexible metal or rubber)
- Clear or translucent white glossy glaze
- Kiln
Step 1: Slab Preparation & Imprinting
-
Prepare the slab:
Begin by wedging your speckled stoneware clay to remove air bubbles. Roll it out into a smooth, even slab that is roughly 1/4 inch thick. I find that using guide sticks on either side of the rolling pin helps keep the thickness perfectly consistent. -
Smoothing the surface:
Take your rib tool and gently compress the clay surface. Run it back and forth to remove the canvas texture and align the clay particles, creating a pristine canvas for your leaf. -
Position the leaf:
Select your fresh leaf and place it vein-side down onto the center of the slab. The vein side is crucial because it holds the most texture and will create a deeper impression. -
Roll the impression:
Gently roll over the leaf with your rolling pin. Apply firm, even pressure to push the leaf flush with the clay surface, but be careful not to thin the slab too much further. -
Cut the shape:
Place your oval paper template over the embedded leaf, centering it so the leaf stem points toward one of the narrow ends. Using a needle tool, cut vertically around the template to create your oval shape.
Vein Definition
If your leaf isn’t making a deep enough mark, try placing a piece of paper over the leaf before rolling. This prevents the rolling pin from sliding and helps press the veins down vertically.
Step 2: Forming & Refining
-
Remove the leaf:
carefully peel away the leaf by lifting the stem. Do this slowly to ensure no organic material is left behind in the deep crevices of the veins. -
Lift the rim:
slide your fingers under the edge of the oval slab. Gently lift the edges upward to create a shallow curve. You can pinch the clay slightly or support it with small pieces of foam if the clay is too soft to hold its shape immediately. -
Smooth the edges:
Dip a small sponge in water and wring it out well. Run the damp sponge along the cut rim of the tray to round off the sharp edges left by the needle tool. This prevents sharpness after firing. -
Refine the form:
Check the underside of the lifted rim. If you see any cracking or unevenness, smooth it with your finger or the rib tool. The curve should be gentle and continuous. -
Slow drying:
Cover the tray loosely with plastic to let it dry slowly. This is vital for flat pieces like trays to prevent warping. Let it dry to the bone-dry stage over several days.
Step 3: Firing & Glazing
-
Bisque fire:
Load the thoroughly dried tray into the kiln and fire to cone 04 (or your clay’s specific bisque temperature). This hardens the clay and prepares it for glazing. -
Clean surface:
Once cool, wipe the bisque-fired tray with a damp sponge to remove any kiln dust. Dust can prevent the glaze from adhering properly. -
Glaze application:
Pour or dip a clear or translucent white glaze over the entire piece. A translucent glaze is essential here, as it will pool slightly in the leaf veins to highlight the texture while letting the clay’s natural speckles show through. -
Wipe the foot:
Make sure to wipe away any glaze from the very bottom of the tray where it will touch the kiln shelf. Use a wax resist on the bottom beforehand if you prefer a cleaner line. -
Final firing:
Fire the piece again to the maturity temperature of your clay and glaze (typically cone 5 or 6 for stoneware). This melts the glaze into that glossy, smooth finish seen in the photo.
Oxide Wash Detail
Before the final clear glaze, brush a diluted iron oxide wash into the leaf impression and wipe it back with a sponge. This will darken the veins and make the leaf pop dramatically.
Once cooled, your tray is ready to hold jewelry or simply act as a beautiful reminder of the outdoors on your windowsill


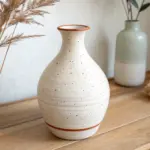
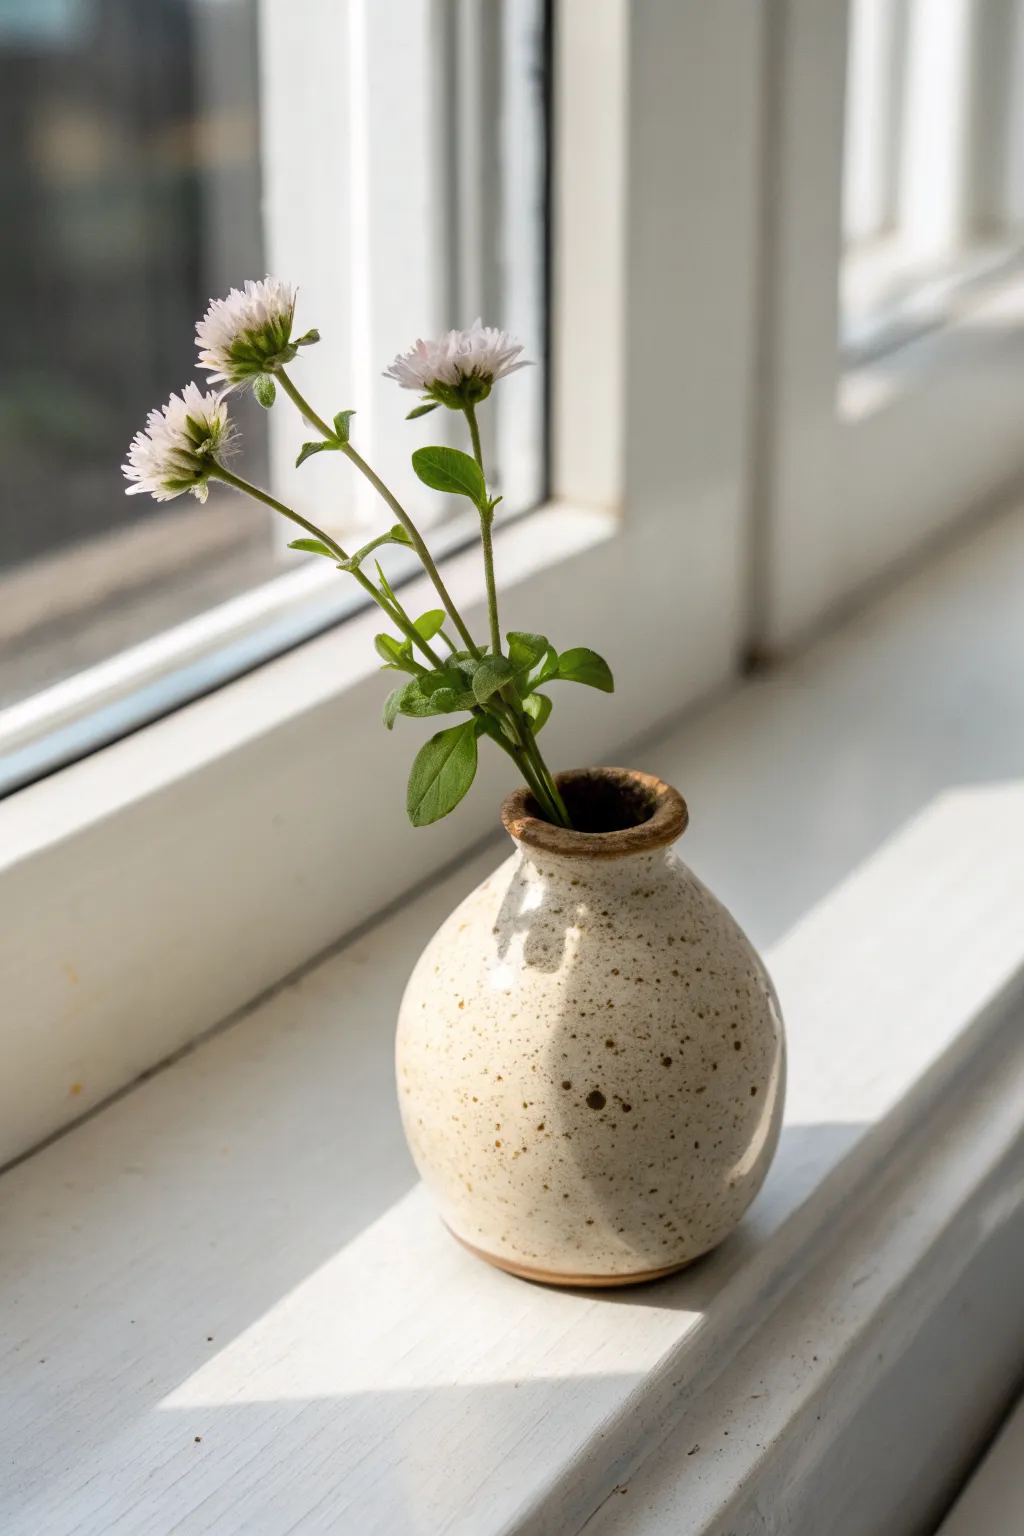
Coil-Built Bud Vases
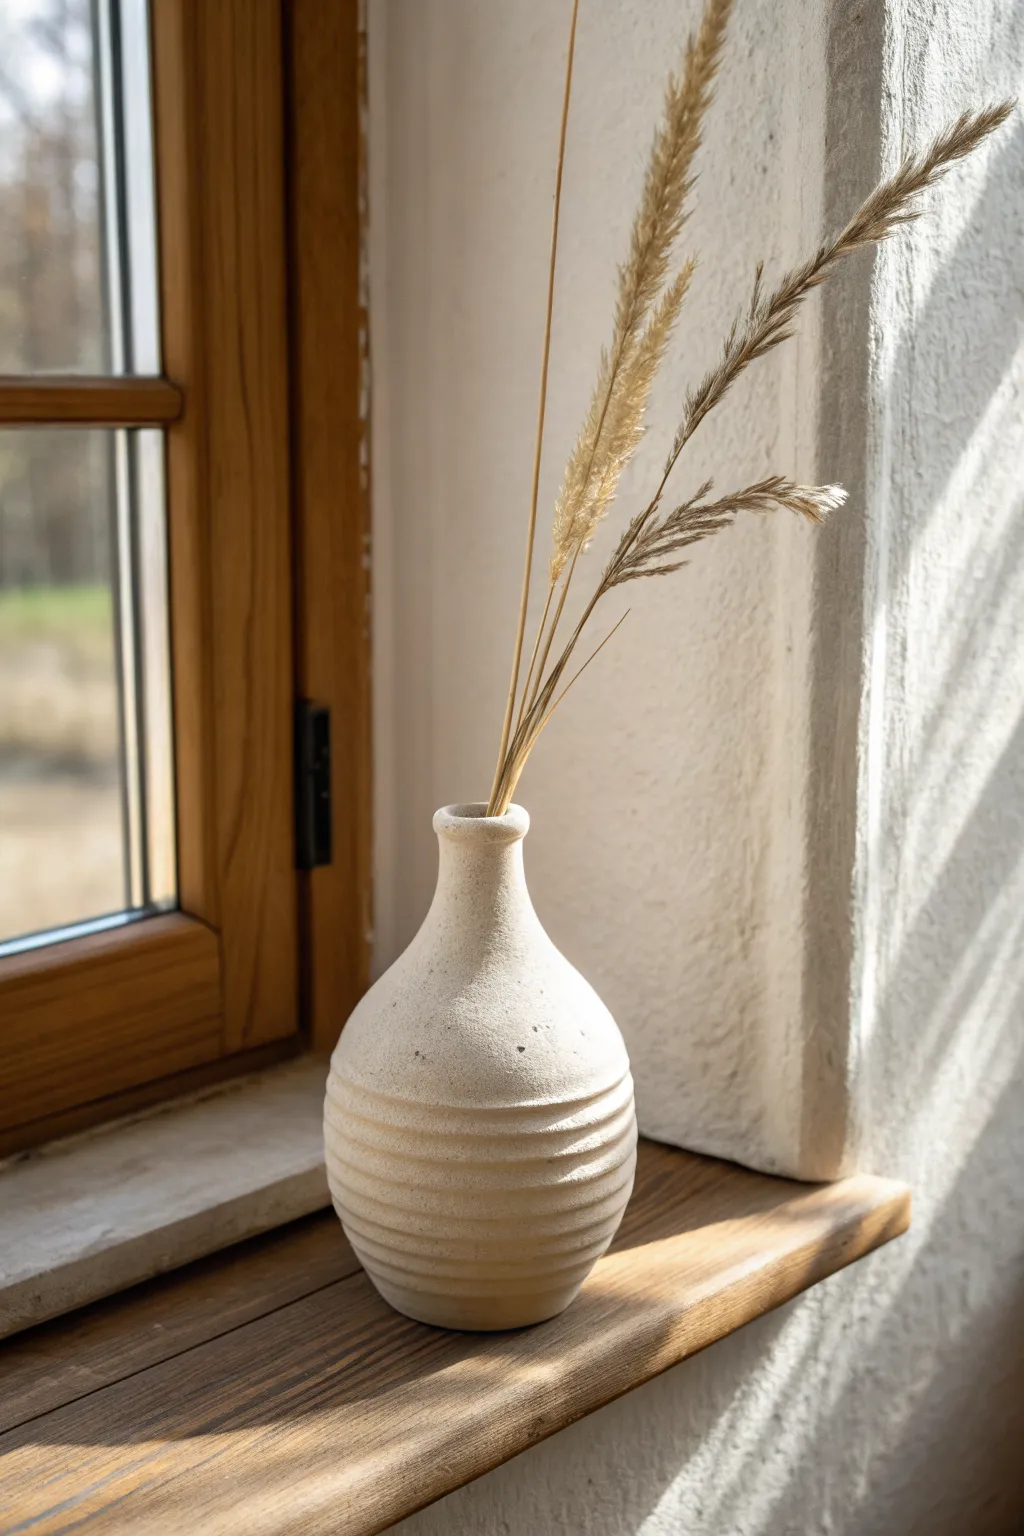
Capture the essence of rustic minimalism with this elegant bud vase. Featuring tactile horizontal ribs and a creamy, speckled matte glaze, this project perfectly balances organic warmth with clean, modern lines.
Step-by-Step
Materials
- Stoneware clay (speckled or buff)
- Potter’s needle tool
- Scoring tool or serrated rib
- Slip (clay and water slurry)
- Wooden modeling tool
- Sponge
- Serrated metal rib (optional for texture)
- Matte white or cream glaze
- Rolling pin (optional)
- Canvas work surface
Step 1: Forming the Base
-
Prepare the Base Slab:
Start by flattening a small ball of clay into a circular slab about 1/4 inch thick. This will be the floor of your vase. Use a circular cookie cutter or trace around a jar lid to get a perfect circle, roughly 2.5 to 3 inches in diameter. -
Roll Your First Coils:
Take a chunk of clay and roll it out on your canvas into a long, even snake. Aim for a thickness similar to your pinky finger. Keep your hands moving from the center outward to ensure even thickness without flat spots. -
Score and Slip:
Using your needle tool or serrated rib, rough up the outer edge of your base slab. Apply a generous dab of slip. Score one side of your first coil as well. -
Attach the First Layer:
Place the coil onto the base deeply into the slip. Cut the excess coil at an angle and join the ends together seamlessly. -
Smooth the Interior:
With your thumb or a wooden tool, smear the inside edge of the coil down onto the base floor. This interior blending is crucial for structural integrity, even though we are leaving the outside textured.
Cracking Seams?
If horizontal cracks appear during drying, your coils weren’t blended enough on the inside. Score deeply and use plenty of slip next time to ensure a strong bond.
Step 2: Building the Body
-
Build Outwards:
Continue rolling coils. For the next 3-4 layers, place each coil slightly to the *outer* edge of the one below it. This will cause the vase to widen and create that nice, rounded belly shape visible in the photo. -
Blend the Inside Only:
After every single coil layer, stop to smooth the inside seam. Support the outside wall gently with your other hand while you do this so you don’t distort the ridges. -
Refine the Outer Texture:
The image shows distinct horizontal grooves. If your coils are naturally rounded, you can leave them as is. However, to match the photo, gently press the outside of the coils with a flat wooden paddle or your finger to slightly flatten them while keeping the deep groove between layers. -
Start Tapering In:
Once you hit the widest point of the belly (about 3-4 inches high), begin placing your coils slightly on the *inner* edge of the layer below. This begins the shoulder slope. -
Narrow and Raise:
Continue tapering inwards sharply until the opening is quite small, roughly 1 inch wide. This creates the transition from the belly to the neck.
Clean Lines
To get uniform ridges like the photo, try flattening your coils slightly *before* stacking them. This creates a more controlled, architectural ribbing.
Step 3: Neck and Finishing
-
Build the Vertical Neck:
For the final section, stack 2-3 small coils directly on top of each other vertically to create the narrow neck. Do not flare these out; keep them straight. -
Create the Rim:
For the very top lip, I like to create a slightly thicker coil. Attach it, smooth it, and then use a damp chamois or sponge to round over the rim so it feels soft to the touch. -
Enhance the Grooves:
Wait until the clay is leather hard. Take a wooden modeling tool and gently run it through the exterior seams to deepen and clean up the horizontal lines, giving it that deliberate ribbed look. -
Sponge Finish:
Gently wipe the exterior with a damp sponge to remove any sharp crumbles of clay, but be careful not to wash away the texture. -
Dry and Bisque:
Allow the vase to dry slowly under loose plastic to prevent cracking at the seams. Once bone dry, fire it to bisque temperature (Cone 04 typically). -
Glaze Application:
Pour a matte white or cream glaze inside the vase and pour it out to coat the interior. For the exterior, brush or dip the vase. The glaze should break slightly over the high points of the coils. -
Final Firing:
Fire to the maturity temperature of your clay and glaze (likely Cone 5 or 6 for stoneware). The speckles in the clay body will show through the matte glaze for a beautiful organic finish.
Now step back and admire how a simple repeated motion creates such a sophisticated, timeless vessel.


Simple Mugs With Carved Bands
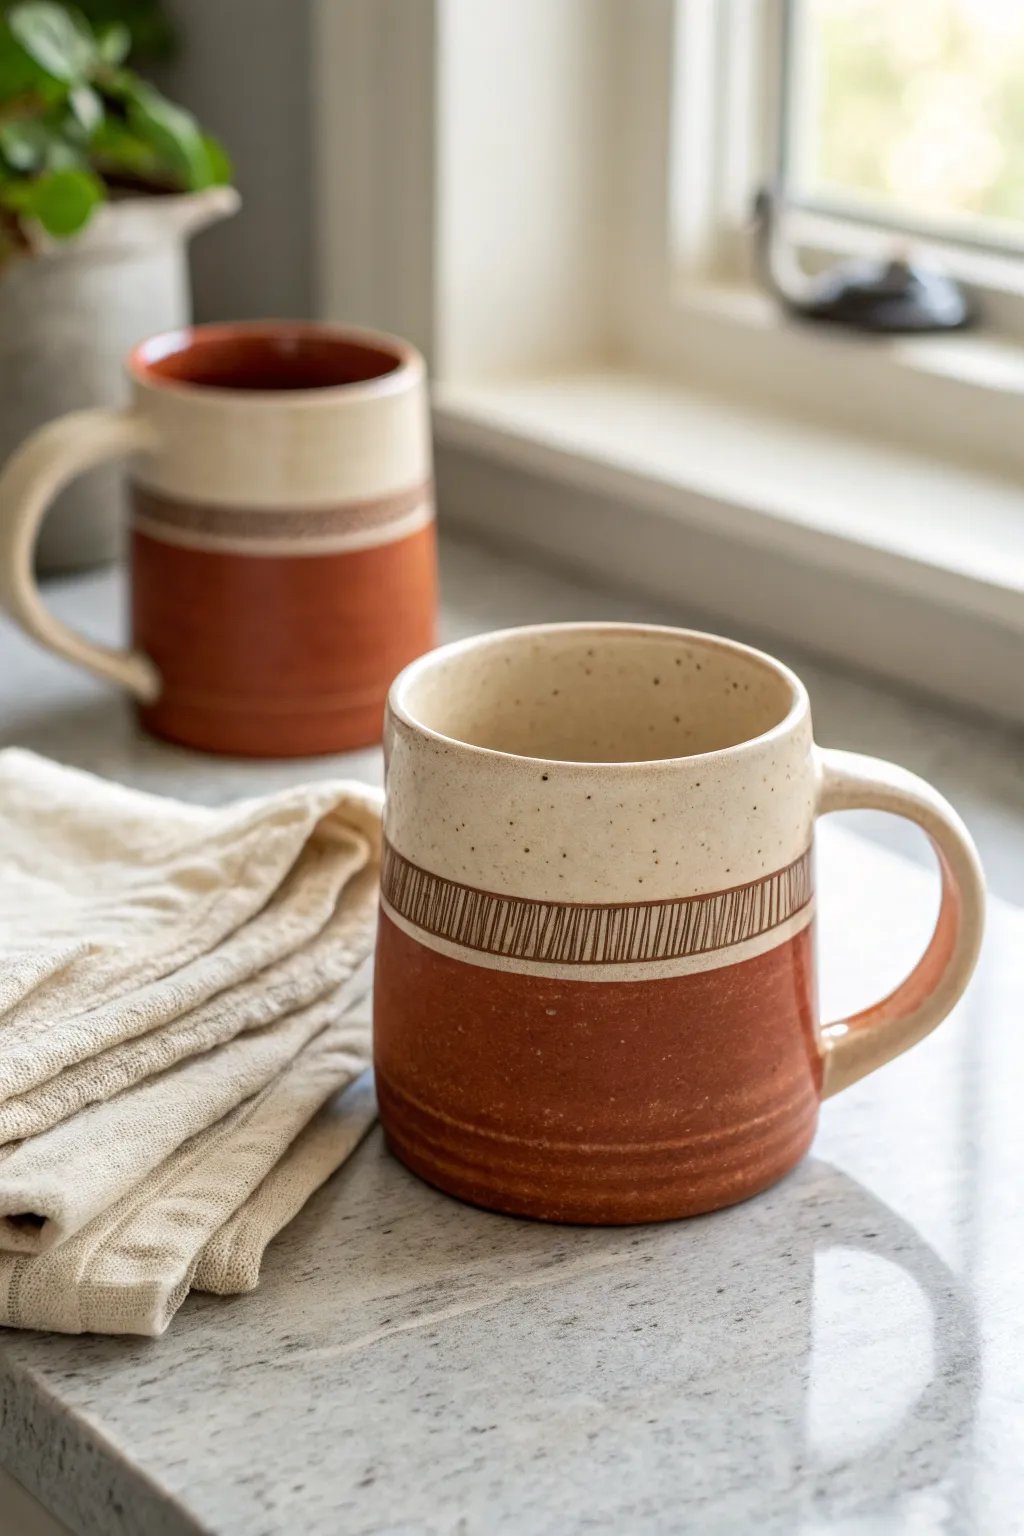
Embrace the beauty of raw clay with these rustic mugs featuring a distinctive carved band. The contrast between the warm terracota base and the creamy speckled glaze creates a timeless, artisanal look that feels wonderful in your hands.
Step-by-Step Guide
Materials
- Red stoneware clay (with grog for texture)
- Pottery wheel
- Throwing tools (sponge, wire cutter, ribs)
- Trimming tools
- Carving tool or sgraffito loop tool
- Ruler or measured paper strip
- Creamy matte speckled glaze
- Wax resist
- Glaze brush
- Kiln
Step 1: Throwing and Shaping
-
Center the clay:
Start with about 1 to 1.5 pounds of well-wedged red stoneware clay. Secure it firmly to the wheel head and center it using consistent pressure and water. -
Open the form:
Create your opening and pull the base out to your desired width, keeping the floor flat but compressing it well to prevent cracks. -
Pull the walls:
Pull the walls up into a cylinder shape. Aim for a straight, consistent vertical profile, slightly tapering inward at the very top rim for a comfortable drinking edge. -
Refine the shape:
Use a metal or wooden rib to smooth the outside walls, removing throwing lines and excess slurry. This smooth canvas is crucial for the carving step later. -
Wire off and dry:
Cut the mug from the wheel using a wire tool. Let it dry to a firm leather-hard stage—it needs to be sturdy enough to handle but soft enough to carve.
Uneven Wax Lines?
If your wax line is shaky, place the mug on a banding wheel. Spin the wheel and hold your brush steady against the spinning pot for a perfect circle.
Step 2: Trimming and Handle Attachment
-
Trim the foot:
Secure the mug upside down on the wheel. Trim excess clay from the bottom to create a clean foot ring. I like to add a subtle indentation near the base for visual weight. -
Pull a handle:
Using a separate lump of clay, pull a strip for the handle. Taper it slightly and ensure it has a comfortable curve. Let it stiffen slightly before attaching. -
Attach the handle:
Score and slip both the attachment points on the mug and the handle ends. press firmly to join, smoothing the seams for a secure bond.
Step 3: Carving the Design
-
Mark the band area:
Identify the midpoint of the mug. Lightly score two horizontal parallel lines around the circumference to define the band’s width (about 0.5 to 0.75 inches). -
Carve the borders:
Use a sharp trimming tool or carving loop to deepen these horizontal boundary lines. This creates a recess that will frame your vertical etchings. -
Etch potential patterns:
Within the horizontal band, use a fine-point stylus or sgraffito tool to carve closely spaced vertical lines. Vary the pressure slightly for a hand-drawn, organic feel. -
Burnish surrounding clay:
Gently rub the uncarved areas with a soft cloth or plastic bag to smooth out any burrs created during carving. -
Bisque fire:
Allow the mug to dry completely to the bone-dry stage. Load it into the kiln for a bisque firing (usually cone 04 or 06).
Highlight the Texture
Rub an iron oxide wash into the carved band before glazing. Wipe it back with a sponge so the dark color stays only in the crevices for high contrast.
Step 4: Glazing
-
Apply wax resist:
The key to this look is resisting the glaze on the bottom half. Paint liquid wax resist carefully over the bottom section, stopping exactly at the bottom edge of your carved band. -
Protect the band (optional):
If you want the carved lines to remain raw clay color, wax over the band as well. If you want the glaze to settle into the lines (like the photo), leave the band unwaxed. -
Dip the mug:
Holding the mug by the foot (or using glazing tongs), dip the entire piece into your creamy speckled glaze. The wax will repel the glaze from the bottom. -
Clean up drips:
Immediately wipe away any glaze beads that form on the waxed areas using a damp sponge. Clean the foot ring completely so it doesn’t stick to the kiln shelf. -
Glaze firing:
Load the glazed mug into the kiln for the final glaze firing (tpyically cone 5 or 6 depending on your clay body).
Once cooled, your mug is ready for a warm beverage and a cozy morning by the window

What Really Happens Inside the Kiln
Learn how time and temperature work together inside the kiln to transform clay into durable ceramic.
Mini Succulent Planters With Feet
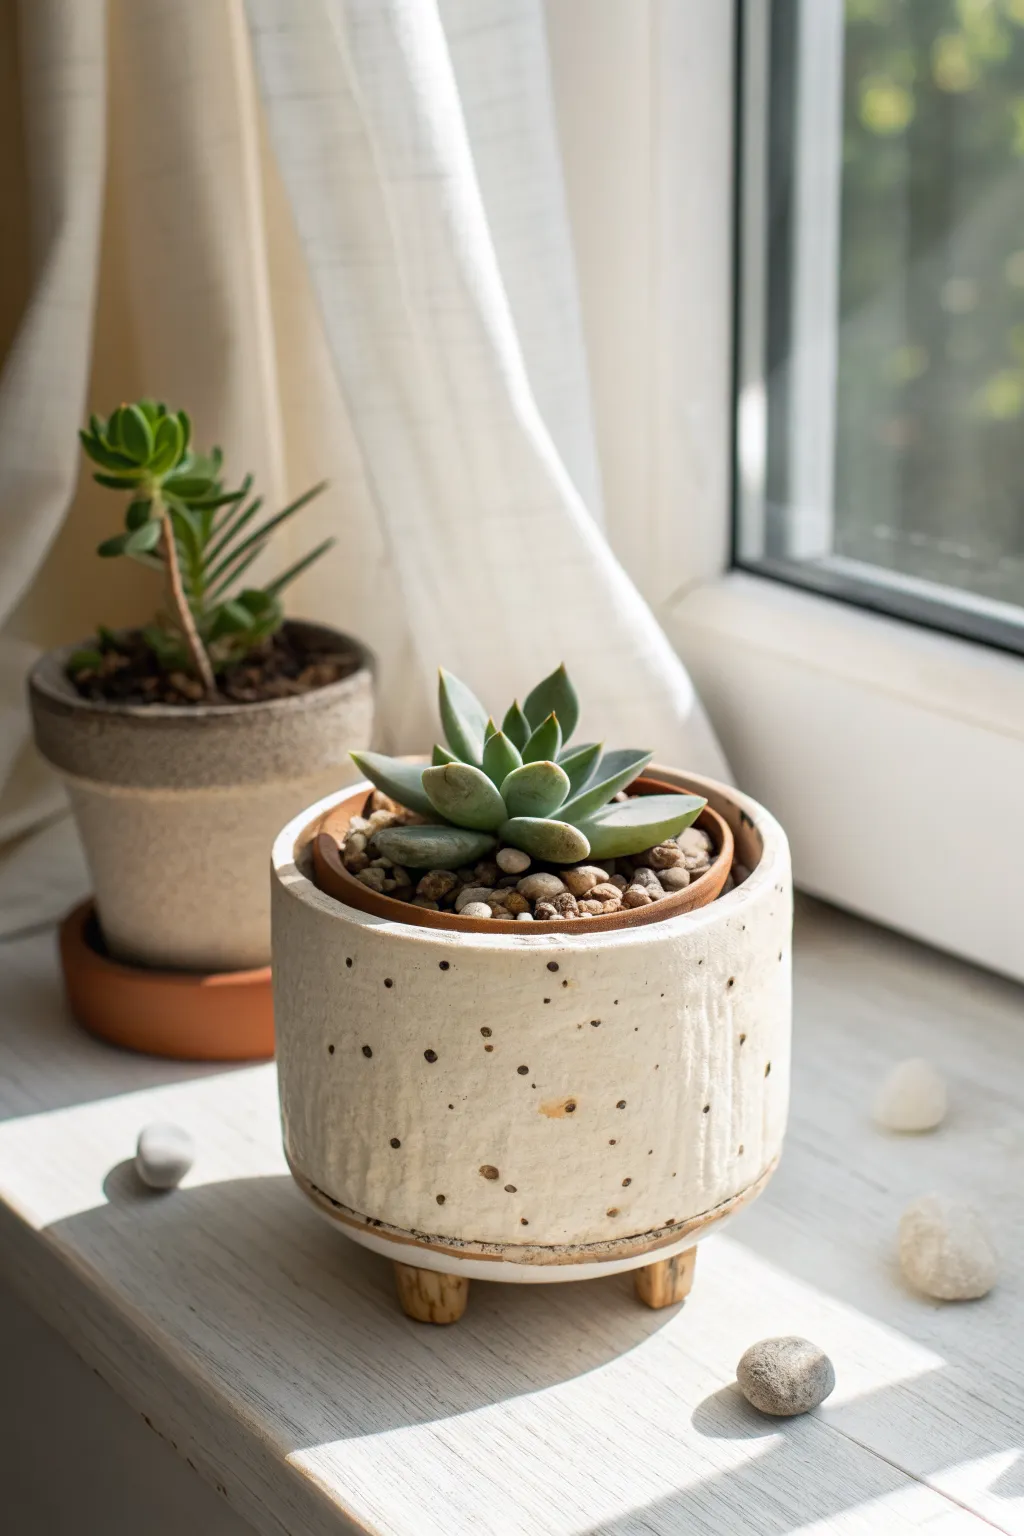
This charming mini planter elevates your succulents—literally—with its adorable tripod feet and rustic, speckled finish. The creamy white glaze accented by natural clay spots and grooved texture gives it a cozy, handcrafted feel that fits perfectly on any windowsill.
Detailed Instructions
Materials
- Speckled buff stoneware clay or standard clay with grog
- Rolling pin
- Canvas work surface
- Needle tool or fettling knife
- Rib tool (kidney scraper)
- Slip (clay and water mixture)
- Soring tool or serrated rib
- Small wooden craft stick or modeling tool
- Satin white glaze (food safe recommended)
- Small sponge
- Kiln access
Step 1: Forming the Main Body
-
Roll your slab:
Begin by rolling out a slab of speckled stoneware clay on your canvas surface. Aim for an even thickness of about 1/4 inch, ensuring it’s uniform so your pot dries evenly. -
Texturing the surface:
Before cutting, gently drag a serrated rib or a fork vertically down the slab. This creates the subtle, vertical grooves seen on the exterior wall. Use a light hand; you want texture, not deep cuts. -
Cut the rectangle:
Measure and cut a long rectangle from your textured slab. The length will determine the circumference of your pot, and the width will be the height (around 3-4 inches works well for succulents). -
Form the cylinder:
Carefully lift the rectangle and curl it into a cylinder, overlapping the ends slightly. It’s crucial to score (scratch) both touching surfaces and apply generous slip before pressing them together. -
Smooth the seam:
On the inside of the cylinder, use a wooden tool or your finger to smooth the seam completely so it disappears. On the outside, blend it carefully to maintain the vertical texture you added earlier.
Step 2: Adding the Base and Feet
-
Cut the base:
Place your cylinder on the remaining slab and trace around the bottom with a needle tool. Cut out this circle—this will be your floor. -
Attach the base:
Score and slip the bottom edge of your cylinder and the outer rim of the circle base. Press them firmly together. I prefer to roll a tiny coil of clay and press it into the interior seam for extra reinforcement. -
Shape the feet:
Roll three small balls of clay, approximately the size of large marbles. Gently tap them against the table to flatten the tops and bottoms slightly, creating short, sturdy cylinders. -
Attach the feet:
Flip your pot upside down. Mark three equidistant spots on the bottom base. Score and slip both the feet and the base spots, then press the feet firmly into place so the pot stands level. -
Refine the rim:
Turn the pot right-side up. Use a slightly damp sponge to smooth the top rim. If you like the look in the photo, you can leave the rim slightly unglazed later, or smooth it perfectly now for a clean finish. -
Drainage hole check:
Don’t forget to poke a drainage hole in the center of the bottom using a straw or hole cutter tool. Succulents hate wet feet.
Spotlighting The Speckles
If using standard white clay without speckles, add granular manganese or iron oxide ‘grog’ into your clay body before rolling. This creates those lovely faux-rust spots.
Step 3: Glazing and Finishing
-
Bisque fire:
Allow your piece to dry slowly under plastic for a day or two, then uncover it until bone dry. Fire it in the kiln to the bisque stage (usually Cone 04). -
Wax resist application:
Apply wax resist to the bottom of the pot and specifically to the three little feet. This keeps the clay raw in those areas, mimicking the wooden look seen in the project photo. -
Glaze application:
Dip your pot into a satin white glaze. The key here is not to go too thick; a thinner coat allows the iron speckles in the clay body to burn through the white during firing. -
Wipe back imperfections:
If glaze dripped onto the waxed feet or base, wipe it away cleanly with a damp sponge. -
Glaze fire:
Fire the piece again to the maturation temperature of your clay and glaze (often Cone 5 or 6 for stoneware). -
Potting up:
Once cool, place a smaller plastic nursery pot inside, or plant directly with cactus soil.
Wobbly Pot Syndrome?
If the pot isn’t sitting flat after attaching legs, gently tap the pot straight down onto the table while the clay is still soft to level all three feet simultaneously.
Now your little green friend has a stylish new home that looks professionally made
Ring Dishes With Scalloped Rims
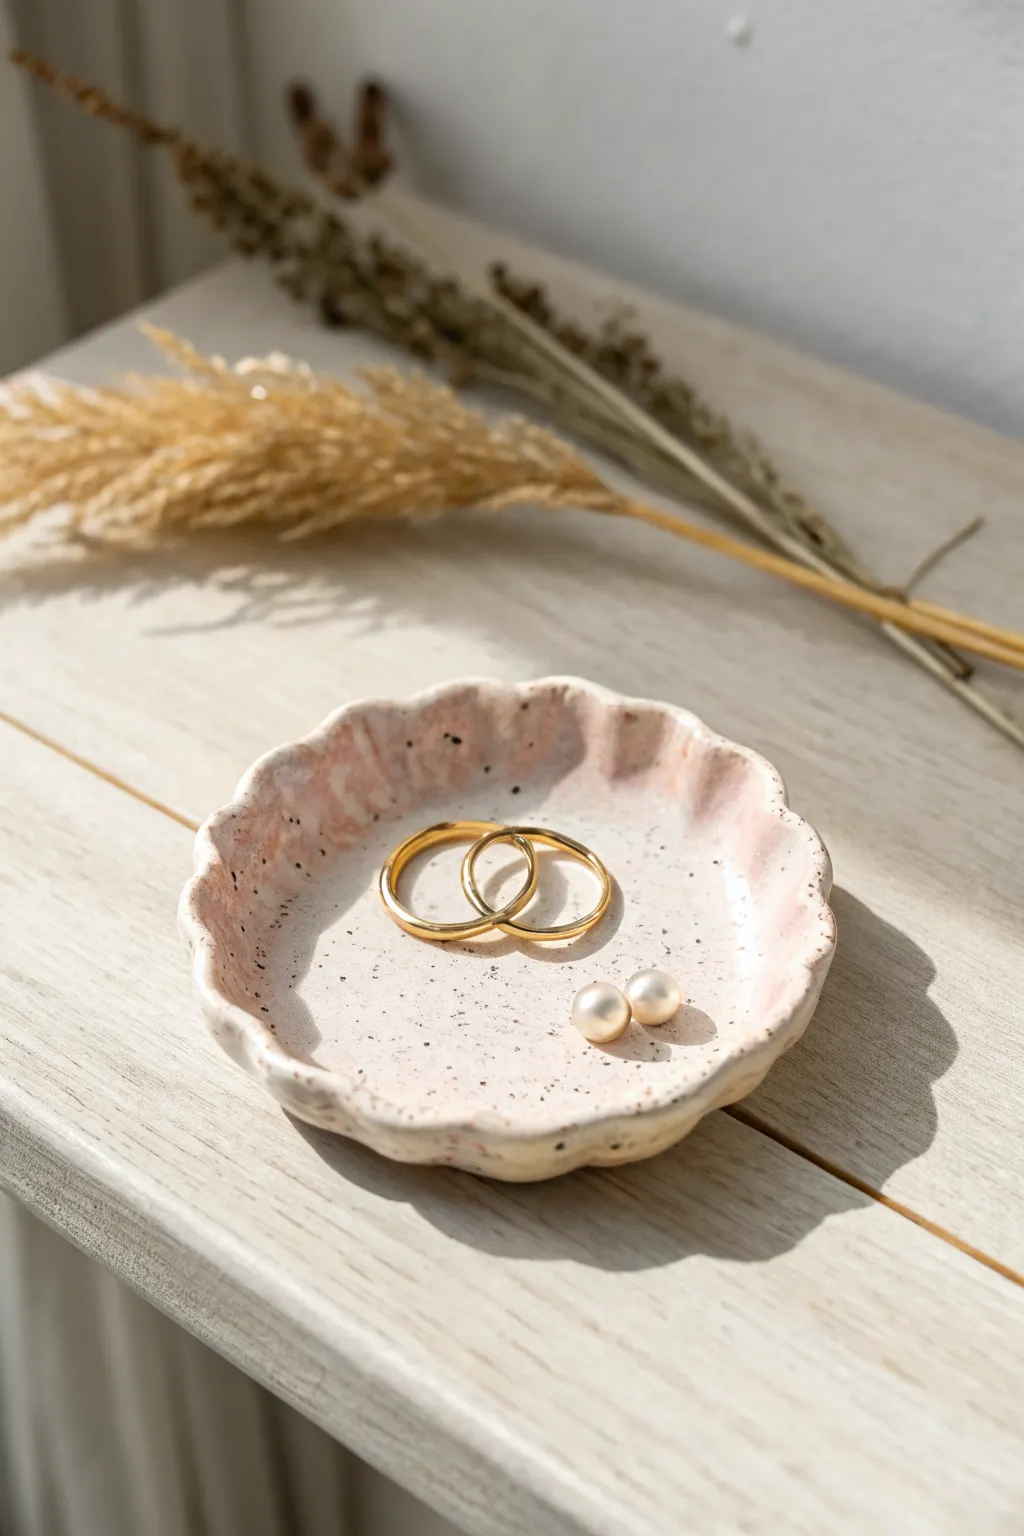
This delicate trinket dish combines a romantic scalloped edge with a modern speckled finish, perfect for safeguarding your favorite rings and studs. The soft blush tones and earthy texture make it a beautiful, understated addition to any bedside table.
How-To Guide
Materials
- Speckled stoneware clay (white or light buff)
- Small rolling pin
- Canvas mat or cloth work surface
- Circular cookie cutter (approx. 4-5 inches)
- Small bowl or hump mold (for shaping)
- Modeling tool or smooth stick
- Sponge
- Clear glaze
- Blush pink underglaze (optional)
Step 1: Shaping the Base
-
Prepare the clay:
Begin with a ball of speckled stoneware clay about the size of a tangerine. Wedge it briefly to remove air bubbles and ensure consistency. -
Roll out the slab:
On your canvas mat, roll the clay out into an even slab. Aim for a thickness of about 1/4 inch—not too thin, or the rim might crack later. -
Cut the circle:
Press your circular cookie cutter firmly into the slab to create a perfect round disc. Peel away the excess clay and save it for another project. -
Smooth the edges:
Dip your finger or a small sponge in water and gently run it along the cut edge of the circle. This softens the sharp angle left by the cutter.
Warping Rims?
If the scalloped edges start to flatten out while drying, prop them up with small wedges of foam or balled-up plastic wrap until the clay becomes leather hard.
Step 2: Forming the Scallops
-
Create the curve:
Place your clay circle over a small hump mold or inside a shallow bowl lined with plastic wrap. Gently press the center so it takes on a slightly concave, dish-like shape. -
Mark the rim:
Visualize the rim divided into equal sections. You can lightly mark 8 to 10 points around the edge to guide your spacing. -
Pinch the edges:
Using your thumb and forefinger, gently push the clay inward at each marked point to create a valley. -
Refine the waves:
Between each valley, use the side of your finger or a thick modeling tool to press the clay outward, emphasizing the ‘hill’ of the scallop. -
Smooth the shape:
Go around the rim one more time with a slightly damp sponge, smoothing out any fingerprints or sharp ridges created during the pinching process.
Gold Rim Upgrade
For an extra touch of luxury, apply a thin line of gold luster over-glaze to the very edge of the rim after the glaze firing, then fire one last time at a very low temperature.
Step 3: Drying and Firing
-
Slow drying:
Let the dish dry slowly on the mold for a few hours until it is leather hard. This ensures it holds the curved shape. -
Remove from mold:
Once leather hard, remove the dish from the mold and let it dry completely on a flat surface. I like to cover mine loosely with plastic for the first day to prevent warping. -
Bisque fire:
Fire the bone-dry piece in a kiln to cone 04 (or according to your clay’s specific instructions) to prepare it for glazing.
Step 4: Glazing
-
Apply blush accents:
If you want that soft pink hue shown in the photo, dilute a little blush underglaze with water. Brush it loosely on the inside of the dish, letting the natural speckles show through. -
Wipe back:
Use a damp sponge to wipe away some of the underglaze from the high points of the texture, leaving more color in the recesses for depth. -
Clear coat:
Dip the entire dish into a clear glaze to seal it and give it a glossy, finished surface that highlights the clay’s speckles. -
Clean the foot:
Wipe the bottom of the dish completely clean of glaze with a sponge to prevent it from sticking to the kiln shelf. -
Final fire:
Fire the piece again to the temperature required for your glaze and clay body (typically cone 5 or 6 for stoneware).
Place your new dish on your dresser and enjoy the simple elegance it brings to your jewelry organization


The Complete Guide to Pottery Troubleshooting
Uncover the most common ceramic mistakes—from cracking clay to failed glazes—and learn how to fix them fast.
Paint Palette Dishes for Glazes
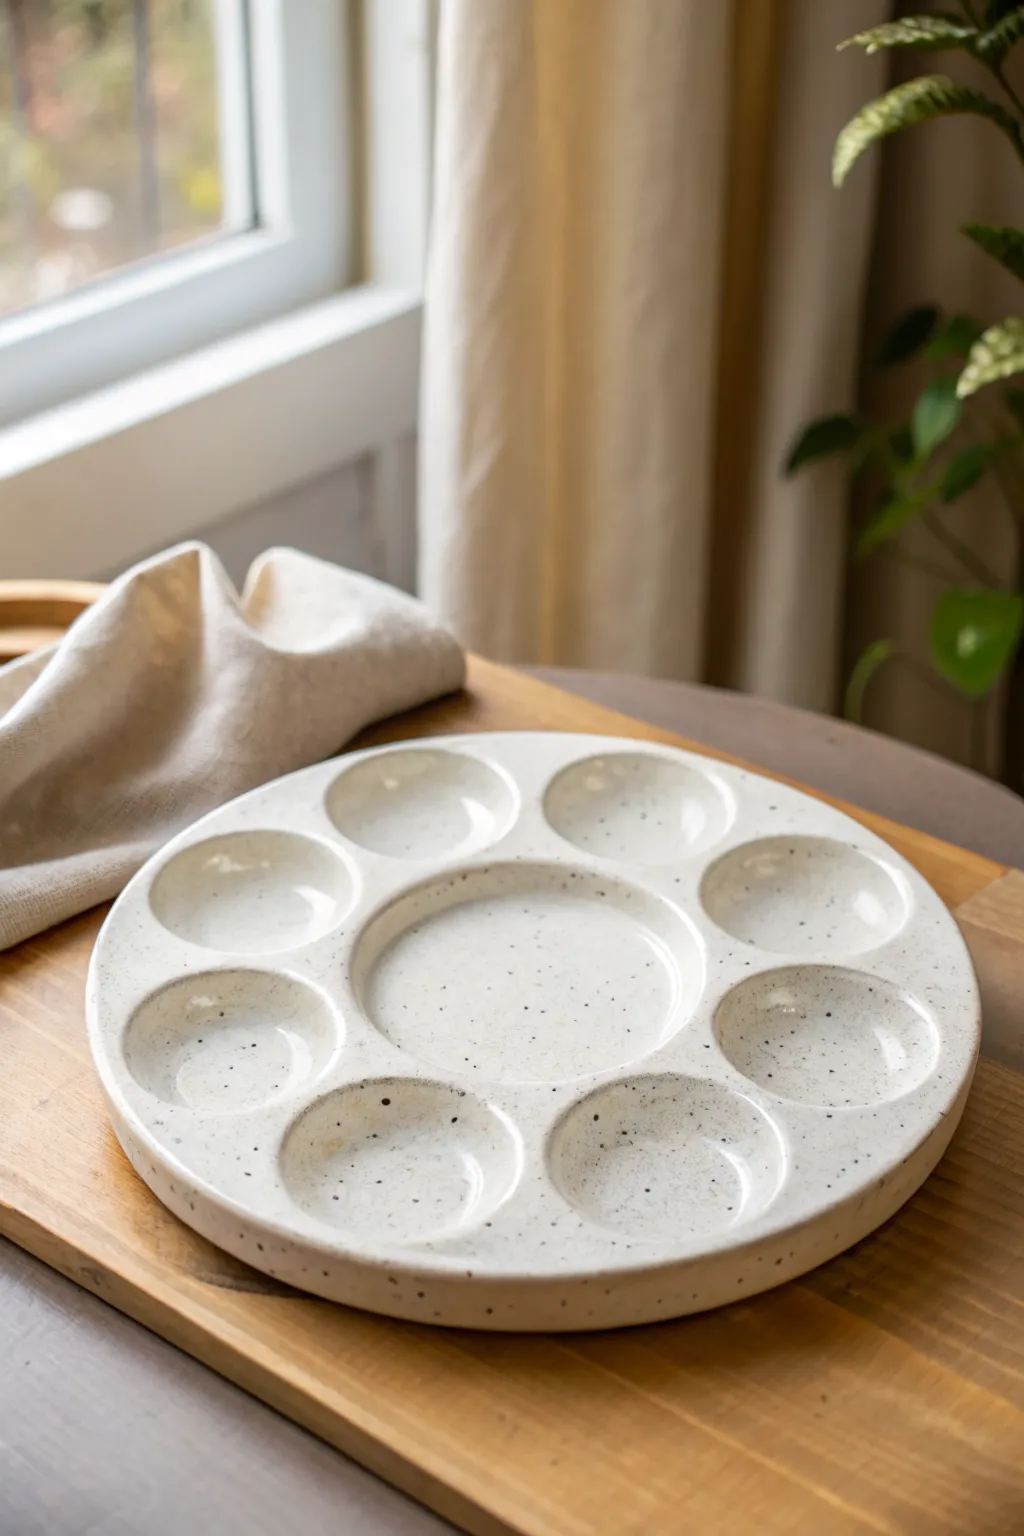
This elegant ceramic palette features a central mixing well surrounded by eight smaller compartments, perfect for organizing your glazes or watercolors. The finish is a creamy white with subtle, earthy speckles that give it a sophisticated, organic feel.
Step-by-Step Guide
Materials
- White stoneware clay (preferably with grog or speckles)
- Rolling pin
- Guide sticks (approx. 1/4 inch thick)
- Round cookie cutters (one large, one medium)
- Clean sponge
- Pottery needle tool
- Rib tool (wooden or silicone)
- Speckled white dipping glaze (or brush-on)
- Fettling knife
- Small bowl of water
- Measuring tape or ruler
- Sandpaper (for bisque stage)
Step 1: Planning and Base Creation
-
Wedging the Clay:
Begin by thoroughly wedging about 2-3 pounds of clay to remove air bubbles and ensure a consistent texture. This is crucial for preventing cracks during firing. -
Rolling the Slab:
Set up your guide sticks on either side of your working surface. Roll the clay out into a thick, even slab, using the sticks to maintain a thickness of at least 1/4 inch to support the weight of the palette. -
Smoothing the Canvas:
Run a rib tool firmly across the surface of the clay slab in multiple directions. This compresses the clay particles and creates a buttery smooth surface for your wells. -
Cutting the Main Shape:
Use a large plate or a pre-made template (approx. 10-12 inches in diameter) to trace a perfect circle onto the slab. Cut around it carefully with your needle tool. -
Checking the Rim:
Lift the circular slab gently and smooth the cut edge with a damp sponge. If you want a sharper look, you can bevel the bottom edge slightly with a fettling knife.
Weighted Tool
Instead of using thumbs, find a rounded object like a pestle or a large rhythmic shaker to press the wells. This creates perfectly uniform, smooth indentations every time.
Step 2: Forming the Wells
-
Marking the Layout:
Lightly trace a center circle using a medium cookie cutter. Then, arrange 8 smaller circles evenly around it. Don’t cut through; just mark the clay lightly to ensure spacing is symmetrical. -
Creating the Center Well:
I find it easiest to start in the middle. Gently press your thumbs into the center marked circle, compressing the clay downwards to create an indentation. Be careful not to push all the way through the base. -
Refining the Center:
Use a damp sponge or a rounded sculpting tool to smooth the inside of the center well, ensuring the walls slope gently upwards. -
Indenting the Perimeter:
Move to the outer circles. Using the same thumb-press technique, create the eight surrounding wells. Press down firmly and rotate your thumb to flare the edges slightly outward. -
Defining the Ridges:
As you press the wells down, the clay between them will naturally rise. Use a wet finger to smooth these ridges, creating clean, definitive walls between each paint compartment. -
Checking Depth:
Ensure all outer wells are roughly the same depth. This visual consistency is key to the professional look of the finished piece.
Add a Brush Rest
While the clay is leather hard, carve small notches into the rim between the wells. This creates a convenient spot to rest your wet paintbrushes while you work.
Step 3: Finishing and Firing
-
Drying Process:
Loosely cover the palette with plastic for the first 24 hours to let the moisture redistribute. Then, uncover it and let it dry slowly until bone dry to prevent warping. -
Refining Edges:
Once bone dry, take a slightly damp sponge or very fine greenware sanding pad to knock off any sharp crumbs of clay on the rims of the wells. -
Bisque Firing:
Fire the piece in the kiln to cone 04 (or your clay’s specific bisque temperature). This prepares it for glazing. -
Sanding the Bottom:
After the bisque fire, briefly sand the bottom flat if it warped slightly, ensuring it sits perfectly steady on a table. -
Glazing:
Dip the entire piece into a speckled white stoneware glaze. Hold it upside down for a few seconds to let excess glaze drip off, ensuring the wells don’t fill up too much. -
Wiping the Foot:
Use a wet sponge to completely wipe the glaze off the bottom surface that will touch the kiln shelf. Any glaze left here will fuse the palette to the shelf. -
Final Firing:
Fire the piece to maturity (usually cone 6 for stoneware). Allow the kiln to cool completely before removing your new studio tool.
Once cooled, your durable ceramic palette is ready to hold colorful glazes or paints for years to come
Spoon Rests With Botanical Motifs
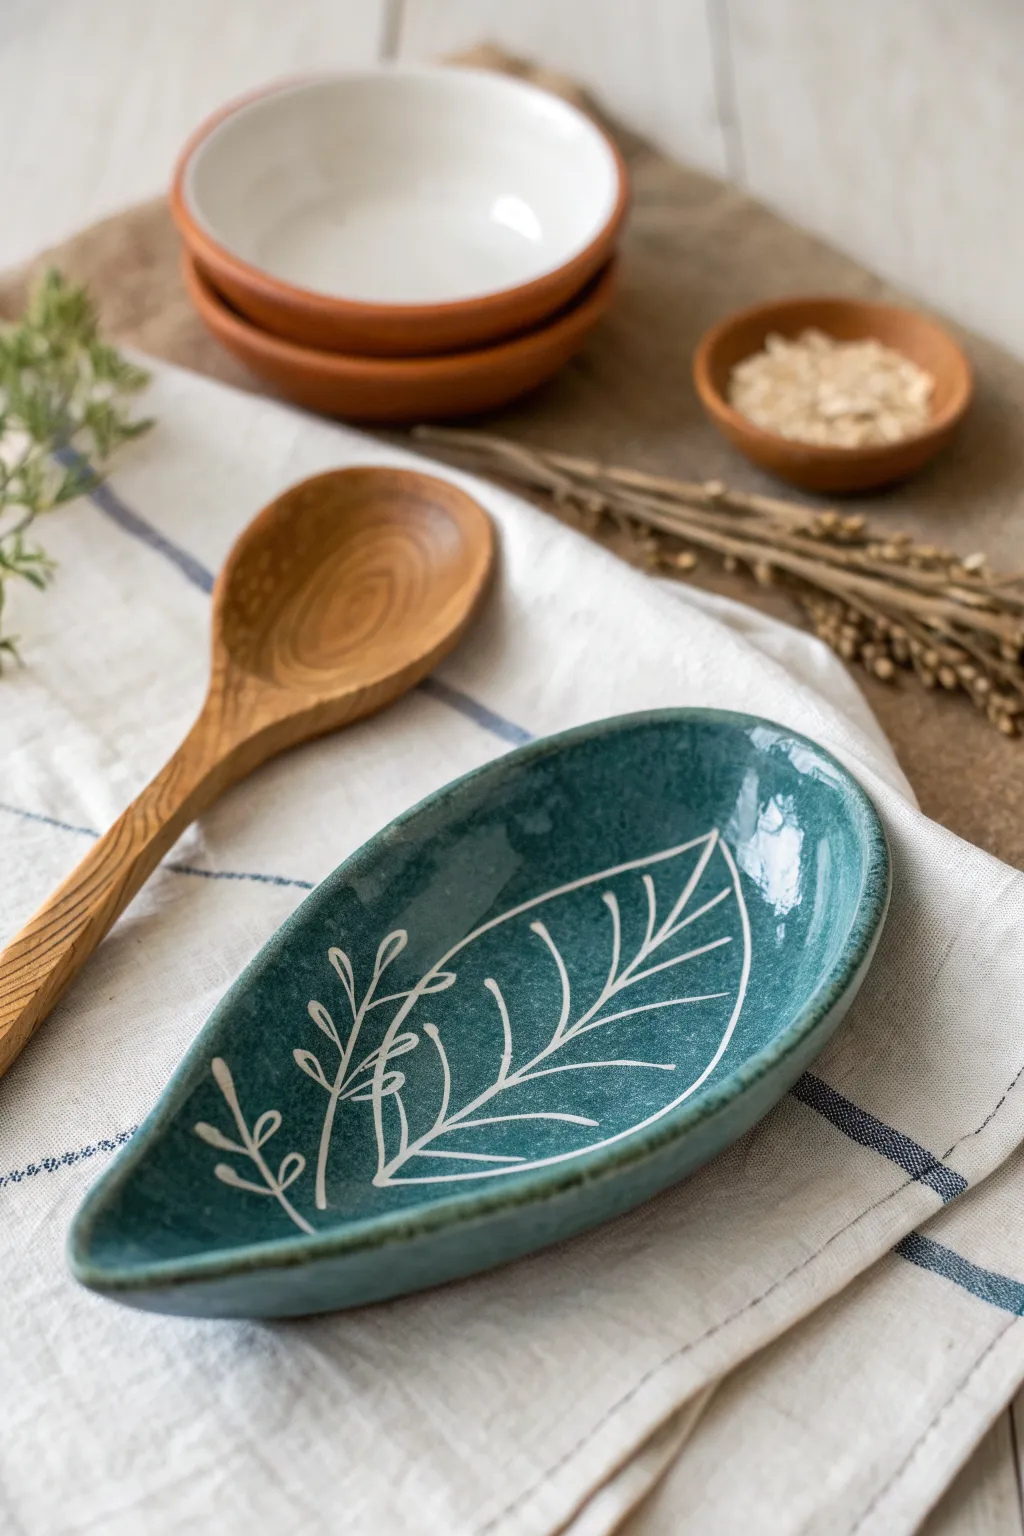
Bring a touch of nature to your kitchen counter with this organically shaped ceramic spoon rest. The deep teal glaze contrasts beautifully with the crisp white sgraffito lines, creating a functional piece of art that catches messy drips in style.
Step-by-Step
Materials
- White stoneware clay or porcelain
- Rolling pin
- Guide sticks or slab roller
- Leaf template (paper or cardstock)
- Fettling knife or needle tool
- Smooth rib tool (rubber or silicone)
- Teal underglaze or slip
- Sgraffito carving tool (fine loop or sharp needle)
- Clear transparent glaze
- Sponge
- Small bowl or hump mold (optional)
Step 1: Forming the Base
-
Roll your slab:
Start by wedging your white stoneware clay thoroughly to remove air bubbles. Roll it out into a smooth, even slab about 1/4 inch thick. I find using guide sticks on either side helps keep the thickness perfectly consistent. -
Cut the shape:
Place your paper leaf or teardrop template onto the clay slab. Using a fettling knife or needle tool, trace around the template to cut out your basic form. Lift away the excess clay. -
Smooth the edges:
Run a damp sponge or your finger along the cut edges to compress the clay particles and smooth out any sharpness. This prevents cracking later. -
Create the curve:
Gently lift the edges of your clay leaf to create a shallow bowl shape. You can do this by hand-shaping it or by draping it into a shallow bowl or over a hump mold to support the curve while it stiffens. -
Refine the surface:
Use a soft rib tool to smooth the interior surface one last time, erasing any fingerprints or canvas texture marks. Let the piece dry until it reaches the leather-hard stage.
Step 2: Decorating and Carving
-
Apply the color:
Once leather-hard, apply 2-3 even coats of teal underglaze or slip to the interior surface. Allow the underglaze to become touch-dry between coats so you don’t drag the brush through the previous layer. -
Plan your design:
Visualize where your central vein will go. It doesn’t need to be perfectly varying; a slight curve adds organic movement. You can lightly scratch the surface to mark it if you’re nervous about freehanding. -
Carve the main vein:
Using a fine sgraffito tool, carve the central line running from the bottom point toward the top curve. Apply steady pressure to cut through the teal layer and reveal the white clay body underneath. -
Add secondary veins:
Carve the branching veins radiating outward from the center line. Keep your strokes fluid and confident. Notice in the example how the veins bow slightly to mimic the leaf’s shape. -
Detail the edges:
Add the smaller, sprig-like botanical details near the bottom left area. These little vine shoots add visual interest and balance the composition. -
Clean up burrs:
After carving, you’ll likely have little crumbs of clay (burrs) clinging to the lines. Wait until the piece is bone dry, then gently brush them away with a soft, dry brush. attempting to remove them while damp often smudges the design.
Oops! Smudged Lines?
If you accidentally smudge the teal slip into your white carved lines, wait for it to dry. Then, gently scrape the white line clean again with your tool tip.
Step 3: Firing and Glazing
-
Bisque fire:
Once the spoon rest is completely bone dry, load it into the kiln for a bisque firing (typically Cone 04). This hardens the clay and prepares it for the final glaze. -
Wipe down:
After the kiln cools, wipe the bisque piece with a clean, damp sponge to remove any kiln dust that could prevent the glaze from adhering properly. -
Clear coat application:
Dip the piece into a clear transparent glaze, or brush it on if you prefer. Ensure the coat is even but not too thick, as cloudiness can obscure your beautiful carving. -
Clean the foot:
Wipe the bottom of the spoon rest strictly clean of any glaze to prevent it from fusing to the kiln shelf during the final firing. -
Glaze fire:
Fire the piece again to your clay body’s maturity temperature (e.g., Cone 5 or 6). Let the kiln cool naturally before removing your finished spoon rest.
Pro Tip: Line Quality
Vary your pressure slightly as you carve. Pressing harder at the start of a vein and lifting off at the end creates a tapered, more natural-looking line.
Place your new spoon rest near the stove and enjoy the pop of botanical color every time you cook

TRACK YOUR CERAMIC JOURNEY
Capture glaze tests, firing details, and creative progress—all in one simple printable. Make your projects easier to repeat and improve.
Incense Holders With Curved Channels
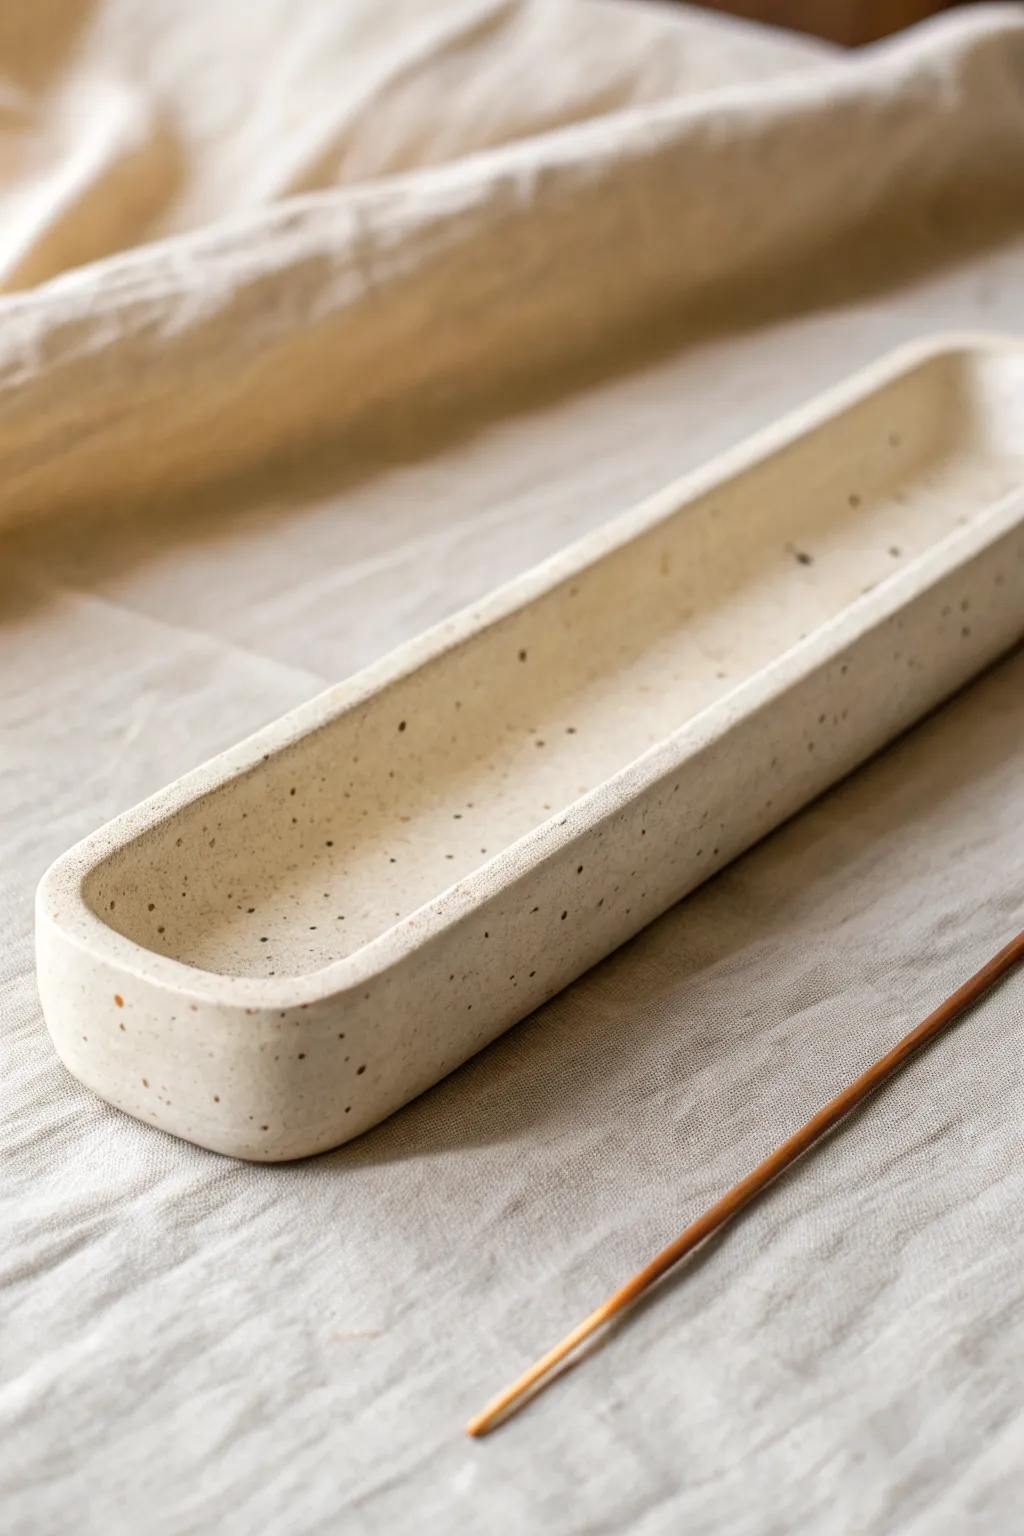
This elegant incense holder features a clean, elongated rectangular form with gently rounded corners and a distinctive speckled finish. Its shallow, walled design catches ash perfectly while offering a modern, minimalist aesthetic that complements any peaceful corner of your home.
Step-by-Step Tutorial
Materials
- Speckled stoneware clay (mid-fire)
- Rolling pin
- Two wooden guide sticks (approx. 1/4 inch thick)
- Canvas or slab mat
- Fettling knife or craft knife
- Rectangle paper template (approx. 10 x 2 inches)
- Rubber kidney rib
- Scoring tool or serrated rib
- Slip (clay mixed with water)
- Modeling tool or wooden spoon handle
- Sponge
- Clear matte glaze (optional)
Step 1: Creating the Base Slab
-
Prepare the Clay:
Begin by wedging your speckled clay thoroughly to remove air pockets and ensure an even consistency. -
Roll the Slab:
Place your clay between two wooden guide sticks on your canvas. Roll it out using the rolling pin until the pin rests flat on the guides, ensuring a perfectly uniform thickness. -
Compress the Surface:
Take your rubber kidney rib and firmly smooth the surface of the clay in all directions. This compression aligns the clay particles, preventing warping later, and brings the beautiful speckles to the surface. -
Cut the Base:
Lay your paper template onto the slab. Using your fettling knife held vertically, cut out the long rectangular base shape.
Clean Corner Tip
When wrapping the wall strip around the corner, thin the clay slightly at the bend. This prevents the corner from becoming too bulky or cracking during drying.
Step 2: Building the Walls
-
Cut Strips for Walls:
From the remaining slab (re-roll if necessary), cut long strips that are about 3/4 inch to 1 inch wide. These will become the vertical walls of the tray. -
Score the Edges:
Rough up the outer perimeter of your base rectangle using a scoring tool. Do the same to the bottom edge of your wall strips. -
Apply Slip:
Dab a generous amount of slip onto the scored areas of the base to act as glue. -
Attach the Walls:
Place the strips on top of the base edge. I find it easiest to work with one long strip that wraps around the corners, but separate pieces work too if joined well. -
Smooth the Joint:
Using a modeling tool, blend the clay from the wall down onto the base on the inside seem. Then, blend the base up onto the wall on the outside seam to create a unified piece.
Add Functionality
Before the clay dries, create a small hole or mound of clay at one end of the channel specifically sized to hold your favorite incense stick upright.
Step 3: Refining and Finishing
-
Shape the Corners:
Gently press and smooth the corners with your fingers to create that soft, rounded radius shown in the image, rather than a sharp 90-degree angle. -
Level the Rim:
Flip the piece upside down gently onto a flat board to ensure the top rim is perfectly level. Tap lightly if needed. -
Smooth the Interior:
Use a slightly damp sponge to wipe the inside channel, smoothing out any tool marks and rounding the interior transition where the floor meets the wall. -
Refine the Rim:
Run a damp chamois or your finger along the top rim to soften the edge so it isn’t sharp to the touch. -
Final Drying:
Loosely cover the piece with plastic for the first day to let the moisture equalize, then uncover to dry slowly to the bone-dry stage. -
Bisque Fire:
Fire the piece in a kiln to cone 04 (or your clay’s specific bisque temperature). -
Glazing:
Apply a clear matte glaze to highlight the natural speckles, or leave the exterior unglazed for a raw texture, glazing only the interior for easy cleaning. -
Final Firing:
Glaze fire the piece to the maturation temperature of your specific clay body (likely cone 5 or 6 for stoneware).
Once fired, place your favorite incense stick inside and enjoy the calm atmosphere your handcrafted piece creates
Photo Holders With a Clean Slot
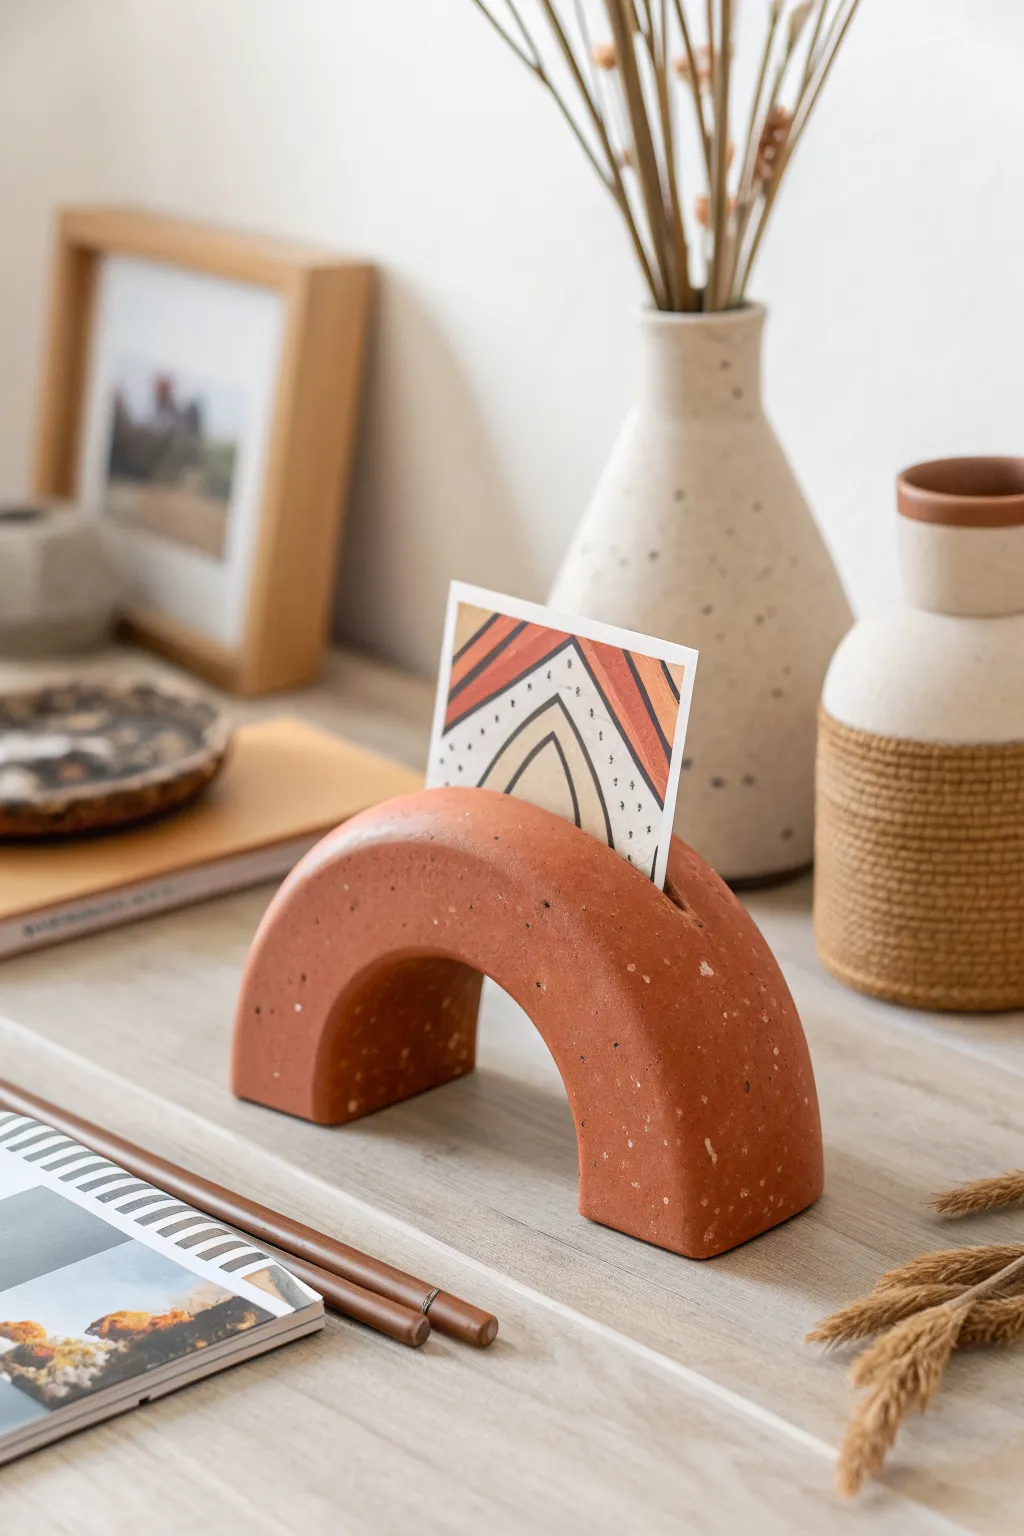
This minimalist photo holder brings a warm, earthy touch to your desk with its terracotta finish and smooth, arched silhouette. It’s a functional piece of sculpture that securely cradles your favorite prints or postcards in a clean, centered slot.
Detailed Instructions
Materials
- Terracotta-colored polymer clay or air-dry clay (approx. 300g)
- Acrylic rolling pin
- Flexible tissue blade or craft knife
- Metal ruler
- Cardstock or thin cardboard (for template)
- Flecking tool or stiff toothbrush (optional for texture)
- White or cream acrylic paint (for speckles)
- Sandpaper (fine grit)
- Clay sculpting tool or shim (for slot)
- Matte varnish
Step 1: Shaping the Arch
-
Condition the Clay:
Begin by kneading your terracotta clay thoroughly until it is soft, pliable, and free of air bubbles. If using polymer clay, the warmth of your hands is key here. -
Create a rectangular block:
Form the conditioned clay into a thick, rectangular log. You want it substantial enough to stand on its own without tipping over. -
Roll it out:
Using your acrylic rolling pin, flatten the log into a thick slab, aiming for a consistent thickness of about 1 inch (2.5 cm). This thickness gives the piece its sturdy, modern feel. -
Cut the length:
Use your flexible blade to trim the ends of the slab so you have a clean rectangle approximately 6 to 7 inches long. -
Form the arch shape:
Gently pick up the slab and carefully bend it into a ‘U’ shape. Place it on your work surface so the two ends are supporting the curve. -
Refine the curve:
Use your fingers to smooth out any kinks in the bend. The top should be a perfect semi-circle, and the legs should be straight and parallel. -
Square the edges:
If the bending caused the edges to bulge, gently tap the sides of the arch against your work surface or use a flat tool to square them back up.
Slumping arches?
If your clay is too soft to hold the arch shape, crumple a ball of aluminum foil or paper and place it underneath the curve for support while it bakes or dries.
Step 2: Detailing and Finishing
-
Mark the center:
Using your metal ruler, find the exact center of the top of the arch. Make a tiny guide mark. -
The Slot Incision:
Take your tissue blade or a thin metal shim. Press straight down into the center mark to create the slot for the photo. Go about half an inch deep. -
Widen the slot slightly:
Wiggle the blade very slightly back and forth to ensure the slot is wide enough to hold a thick cardstock print but tight enough to grip it. -
Smooth the cut:
If the clay dragged during the cut, use a dampened finger or a sculpting tool to smooth the clay right at the opening of the slot. -
Add speckle texture (Optional):
To mimic specialized ceramic clay, dip a stiff toothbrush into thinned white acrylic paint and flick tiny droplets onto the raw clay surface. -
Bake or Dry:
Follow the manufacturer’s instructions for your specific clay. If baking polymer clay, tent it with foil to prevent scorching the terracotta color. -
Cool down:
Allow the piece to cool completely (or dry fully for air-dry clay) before handling it further. -
Sanding:
Once hard, take fine-grit sandpaper and lightly buff the bottom feet so it stands perfectly flat without wobbling. -
Check the slot:
Test the slot with a piece of paper. If it tightened up during drying, carefully run a folded piece of sandpaper through the slot to open it up. -
Seal the piece:
Apply a coat of ultra-matte varnish to protect the clay while maintaining that natural, stony look shown in the photo.
Natural Speckles
Mix dried coffee grounds or coarse black pepper directly into the raw clay before shaping. This gives an authentic, embedded texture rather than just surface paint.
Slide your favorite art print into the top and enjoy the clean, modern look of your new display
Magnet Bud Vases for Tiny Stems
This charming, petite bud vase features a creamy, speckled glaze and a classic spherical form perfect for showcasing tiny wildflowers. Its flat back conceals a strong magnet, turning any fridge or metal surface into a gallery for nature’s smallest blooms.
Step-by-Step Guide
Materials
- Speckled stoneware clay (or white clay with grog)
- Small spherical mold (like a ping pong ball or wooden bead)
- Needle tool
- Small kidney rib tool
- Scoring tool (or serrated rib)
- Slip (clay and water mixture)
- Strong round ceramic craft magnet (neodymium is best)
- Two-part epoxy glue
- Clear or transparent cream glaze
- Sponge
- Kiln access
Step 1: Forming the Body
-
Prepare the clay:
Start by wedging a small ball of speckled stoneware clay, about the size of a walnut, to remove air bubbles and ensure consistency. -
Create a pinch pot:
Gently press your thumb into the center of the ball and pinch around the sides, rotating as you go to create a hollow spherical shape. Keep the walls somewhat thick for now. -
Refine the shape:
Use your fingers to smooth the exterior into a neat round bulb. If you want a perfectly uniform shape, you can gently press the clay into a small spherical mold. -
Flatten the back:
Tap one side of the sphere against your work surface to create a totally flat plane. This is crucial for the magnet attachment later. -
Flatten the bottom:
Tap the bottom lightly so the vase can stand on a sill if you choose not to hang it.
Step 2: Neck and Magnet Well
-
Roll a coil:
Roll a small, thin worm of clay for the neck. It should be proportional to your base, roughly the thickness of a pencil. -
Attach the neck:
Score the top opening of your pinched sphere and the bottom of your coil. Add a dab of slip and press the coil firmly onto the opening. -
Blend the seams:
Use a small tool or your pinky finger to smooth the clay downward from the neck to the body, blending the seam until it’s invisible. I like to support the inside with a tool handle while doing this. -
Shape the rim:
Gently pinch and flare the top of the coil slightly outward to create a delicate rim. -
Carve the magnet well:
On the flat back side, use a loop tool or spoon to carve a shallow indentation. This recess should be just slightly larger than your magnet so it sits flush later. -
Smooth the surface:
Wipe the entire piece down with a slightly damp sponge to remove fingerprints and reveal the grog or speckles in the clay.
Glue Grip Check
Before gluing, rough up the back of the magnet and the ceramic indentation with sandpaper. This gives the epoxy more surface area to grip, ensuring the vase doesn’t fall off the fridge.
Step 3: Firing and Finishing
-
Let it dry:
Allow the vase to dry slowly to the bone-dry stage. This usually takes a few days depending on humidity. -
Bisque fire:
Fire the piece in the kiln to a bisque temperature (usually cone 04) to prepare it for glazing. -
Apply glaze:
Dip the vase into a transparent cream or clear glaze. Shake off excess drops. Ensure you wipe the bottom and the flat back clean so it doesn’t stick to the kiln shelf. -
Glaze fire:
Fire the piece again to the maturity temperature of your clay body (e.g., cone 5 or 6) to vitrify the clay and melt the glaze. -
Attach the magnet:
Once the ceramic is fully cooled, mix a small amount of two-part epoxy. -
Final assembly:
Apply the epoxy into the rear indentation and press the magnet firmly into place. Let it cure completely according to the glue instructions before use.
Oxide Wash Trick
To highlight the speckles even more, wipe a thin iron oxide wash over the bisque ware before glazing. This settles into textures and adds a rustic, earthy depth to the finished piece.
Pop in a few stems of clover or tiny wildflowers to bring a breath of fresh air to your kitchen space
Beaded-Edge Coasters and Mini Plates
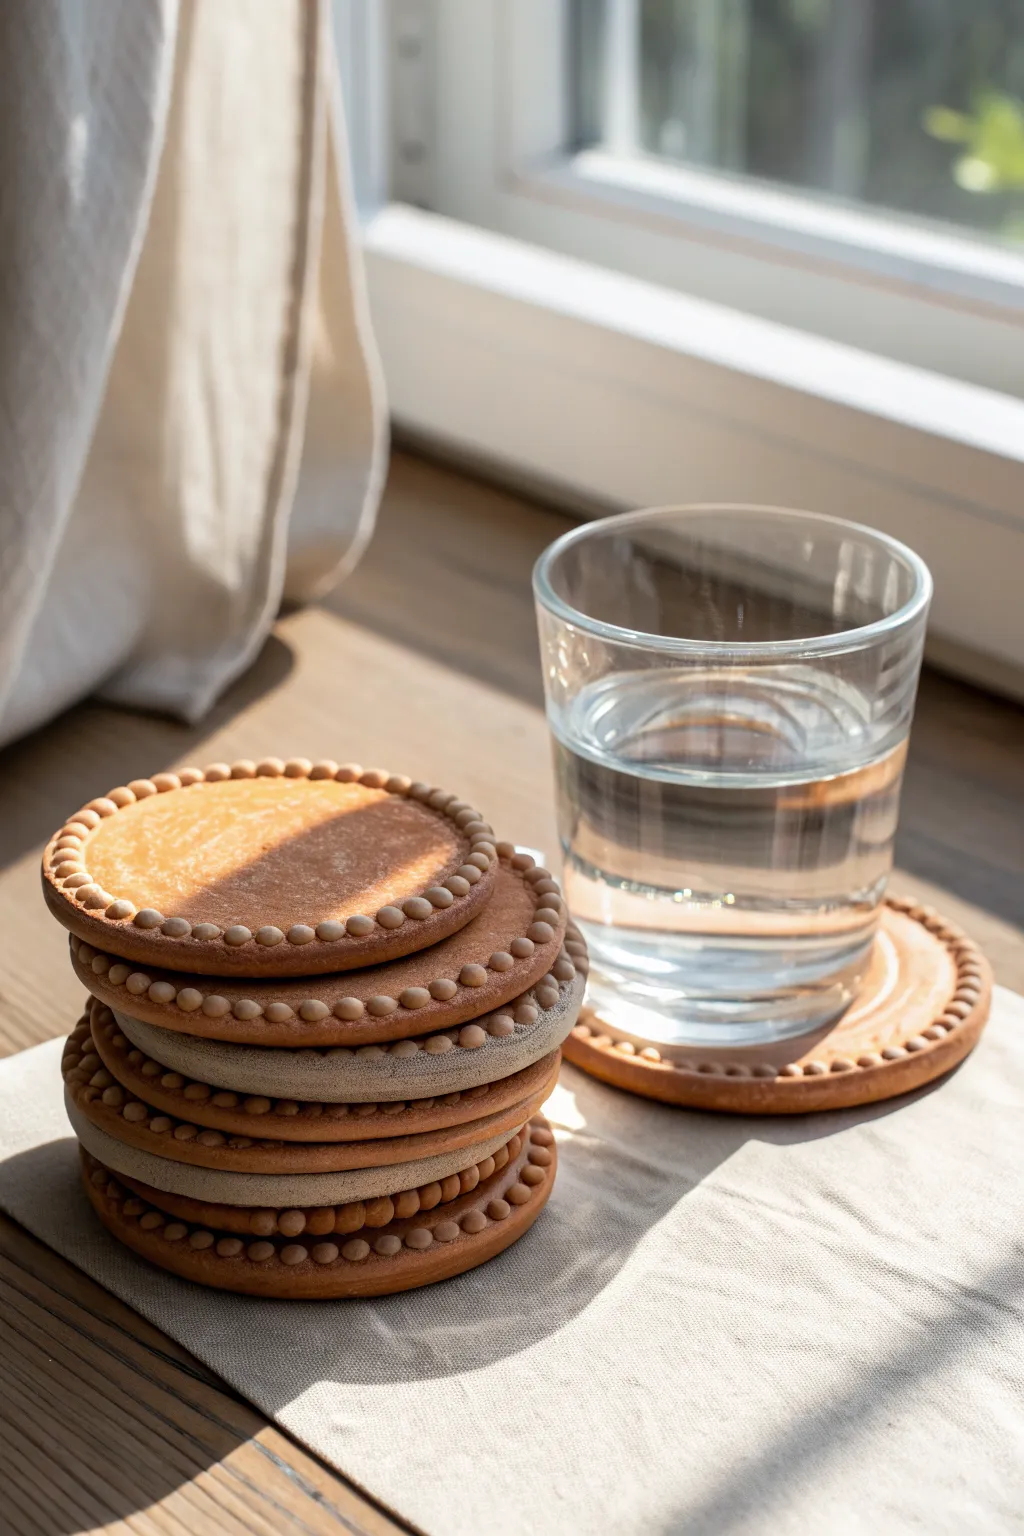
Elevate your coffee table with this stack of simple yet stunning coasters featuring a tactile beaded rim. The warm, terracotta-like finish combined with the precision of the repetitive dot pattern creates a modern artifact vibe that looks beautiful stacked or in use.
Step-by-Step Tutorial
Materials
- Terracotta or stoneware clay (without grog is best for smooth rolling)
- Rolling pin with guide sticks (approx. 5-6mm thickness)
- Circular cookie cutter (approx. 9-10 cm diameter)
- Small bowl or sponge for water
- Pottery ribs or an old credit card
- Canvas or wooden board for working
- Needle tool or toothpick
- Pottery kiln (if firing) or air-dry clay sealant (if using air-dry clay)
- Clear matte glaze (optional)
Step 1: Preparation and Cutting
-
Wedge the clay:
Begin by thoroughly wedging your clay to remove any air bubbles and ensure an even consistency. This is crucial to prevent your flat coasters from warping later. -
Roll out the slab:
Set up your guide sticks on your canvas or board. Roll the clay out into a smooth, even slab. I like to flip the clay over once or twice during rolling to ensure the texture is consistent on both sides. -
Smooth the surface:
Before cutting, take a damp sponge or a soft rib tool and gently compress the clay surface. This removes the canvas texture and aligns the clay particles. -
Cut the circles:
Using your circular cutter, press firmly into the slab to cut out your coaster bases. Depending on how many you want in your set, cut 4 to 6 circles. -
Clean the edges:
Once lifted from the board, gently run a damp finger along the sharp raw edge of each circle to soften it slightly, preparing it for the attachment phase.
Consistent Size Tip
To make every bead identical, roll a single long coil and cut it into equal tiny segments before rolling them into balls.
Step 2: Creating the Beaded Rim
-
Roll small coils:
Take a fresh piece of clay and roll it into a very thin, consistent coil—think spaghetti thickness. Keep these coils moist under plastic if you make many at once. -
Score and slip:
Using a needle tool or an old toothbrush, rough up the very outer edge of the coaster surface (about 3mm in). Dab a small amount of water or slip onto this scored area. -
Form the beads:
You can do this two ways: either roll tiny individual balls of clay, or place the long thin coil onto the rim and use a tool to press indentations. For the exact look in the photo, rolling individual tiny spheres (about 3-4mm wide) yields the best result. -
Attach the first beads:
Place your tiny clay spheres onto the slipped rim, pressing them down gently so they adhere but don’t flatten completely. -
Continue the pattern:
Work your way around the entire circumference. Ensure the beads touch each other snugly to create that continuous ‘pearl necklace’ effect. -
Secure the decorative edge:
Once all beads are placed, use the back of a small paintbrush or a modeling tool to gently press the center of each bead slightly, or blend the bottom of the bead into the base on the *inside* edge only. This ensures they don’t pop off during drying.
Step 3: Drying and Finishing
-
Slow drying:
Place the coasters on a flat drywall board or unwarped wooden ware board using a sheet of newsprint. Cover them loosely with plastic for the first 24 hours to let moisture even out. -
Weight them down:
Flat objects love to warp. Once they are leather hard, you can stack them or place a light board on top of them (sandwiching them) to encourage flatness as they finish drying. -
Sand imperfections:
When bone dry, use a fine sanding sponge to smooth the bottom and the outer rim edge (careful not to break the beads). Always wear a mask when sanding dry clay. -
Bisque fire:
Fire the coasters to bisque temperature (Cone 04 usually) in your kiln. -
Glazing:
For the look in the image, keep the clay raw (unglazed) on the outside or apply a very thin wash of iron oxide to enhance the warmth. If you need them to be waterproof, dip just the top face in a clear matte glaze, wiping the beads clean so the texture pops. -
Final firing:
Fire again to your clay body’s maturity temperature (e.g., Cone 6). If you opted for air-dry clay earlier, simply apply a waterproof acrylic sealant now instead of firing.
Preventing Warping
If the edges start lifting while drying, flip the coasters upside down on the board (resting on the beads) for a few hours.
Now stack your handmade creations next to a sunny window and enjoy the beautiful shadow play across the textured rims
Animal Pinch Pot Planters With Big Eyes
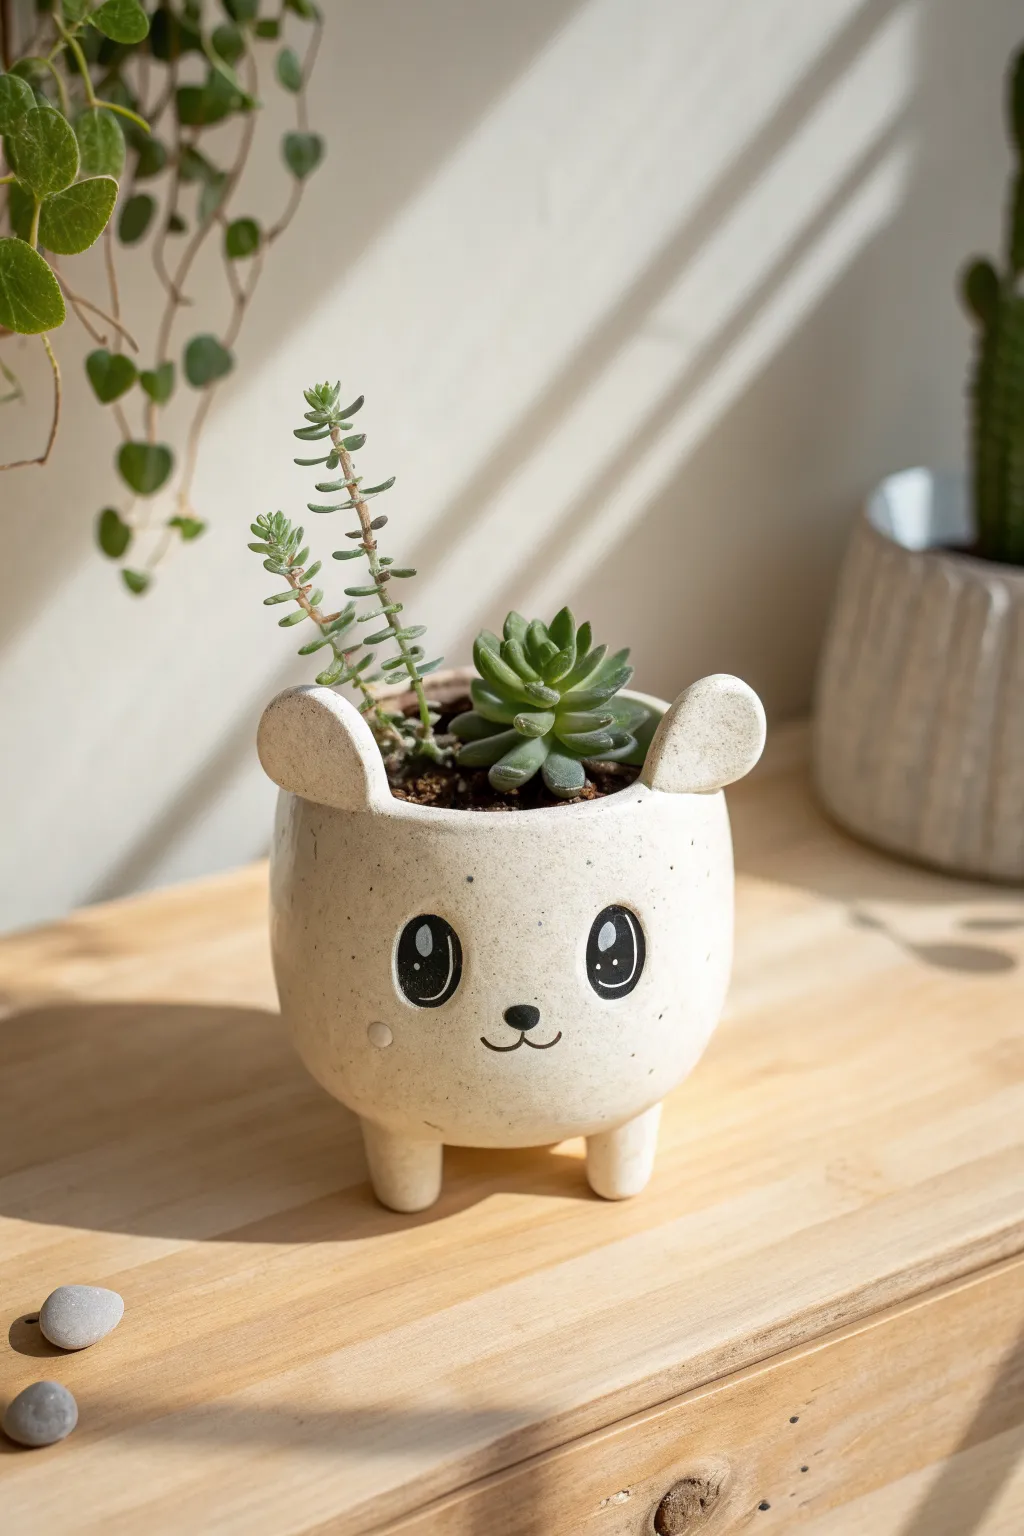
This adorable creature planter adds a dose of whimsy to any windowsill with its oversized anime-style eyes and speckled stoneware finish. Molded from a simple pinch pot base, this project is perfect for housing small succulents or air plants.
How-To Guide
Materials
- Speckled stoneware clay (white or light clay body)
- Pottery tools: sponge, needle tool, rib tool
- Slip (clay mixed with water)
- Black underglaze
- Fine detail paintbrush
- Clear transparent glaze
- Kiln (required for firing)
- Rolling pin (optional)
- Scoring tool or old toothbrush
Step 1: Forming the Body
-
Prepare the Clay:
Start with a ball of speckled clay about the size of a large orange. Wedging it thoroughly removes air bubbles, which is crucial for preventing cracks during firing. -
Start the Pinch Pot:
Hold the ball in one hand and press your thumb into the center, leaving about half an inch of clay at the bottom for the base. -
Open the Walls:
Gently pinch and rotate the clay between your thumb and fingers, working your way up the sides to create a rounded, bowl-like shape. Aim for a consistent wall thickness of roughly 1/4 inch. -
Refine the Shape:
Use a damp sponge or a rubber rib tool to smooth the interior and exterior walls. I like to gently tap the bottom on a flat surface to create a stable base, though we will add legs later. -
Level the Rim:
If the rim has become uneven during pinching, trim it with a needle tool while slowly rotating the pot, or gently paddle it flat for a smooth, finished edge.
Step 2: Adding Features
-
Create the Ears:
Roll two small balls of clay, then flatten them slightly into rounded tabs or semicircles. Ensure they are proportional to your pot size. -
Attach the Ears:
Score the top rim where you want the ears to sit and score the bottom of the ear pieces. Apply a dab of slip to both scratched areas and press the ears firmly onto the rim. Smooth the seams with a modeling tool so they look seamless. -
Make the Tiny Legs:
Roll four small, equal-sized nuggets of clay into short cylinders or tapered cones for the feet. -
Attach the Legs:
Flip the pot upside down gently. Score and slip the bottom of the pot and the tops of the four legs. Press them on firmly, ensuring the pot stands level when flipped back over. -
Drill Drainage Hole:
While the clay is still leather-hard, use a hole cutter or a drinking straw to punch a drainage hole in the center bottom. This is essential for succulent health. -
Final Smoothing:
Give the entire piece a final pass with a slightly damp sponge to remove any fingerprints or rough tooling marks. Let the piece dry slowly to the bone-dry stage.
Smoother Surfaces
Use the back of a spoon to burnish the clay when leather-hard. This compresses the particles for a silkier finish before you even glaze it.
Step 3: Decoration & Glazing
-
Bisque Fire:
Fire the bone-dry piece in a kiln to cone 04 (or according to your clay’s specific bisque temperature). -
Paint the Eyes:
Using a fine detail brush and black underglaze, paint two large, vertical ovals for the eyes. Leave a small unpainted circle (or paint over later with white) inside the black for that classic ‘sparkle’ highlight. -
Add Nose and Mouth:
Paint a small, rounded triangular nose between the eyes and add a simple ‘w’ shape beneath it for the smiling mouth. -
Optional Blush:
I prefer to add faint, rosy cheeks using a very watery pink underglaze or a light dusting of blush-colored mason stain, though this is optional. -
Apply Clear Glaze:
Once the underglaze is dry, dip or brush a coat of clear transparent glaze over the entire piece (except the bottom of the feet). This will make the speckles in the clay pop and seal the surface. -
Glaze Fire:
Fire the piece again, this time to the maturity temperature of your clay and glaze (often cone 5 or 6 for stoneware).
Textured Fur Effect
Before drying, gently pat the exterior with a stiff-bristled toothbrush or a crumpled ball of aluminum foil to give your animal a fuzzy texture.
Once cooled, fill with sandy soil and your favorite trailing plant for a charming new desk companion
Clay Whistles as Tiny Sculptures
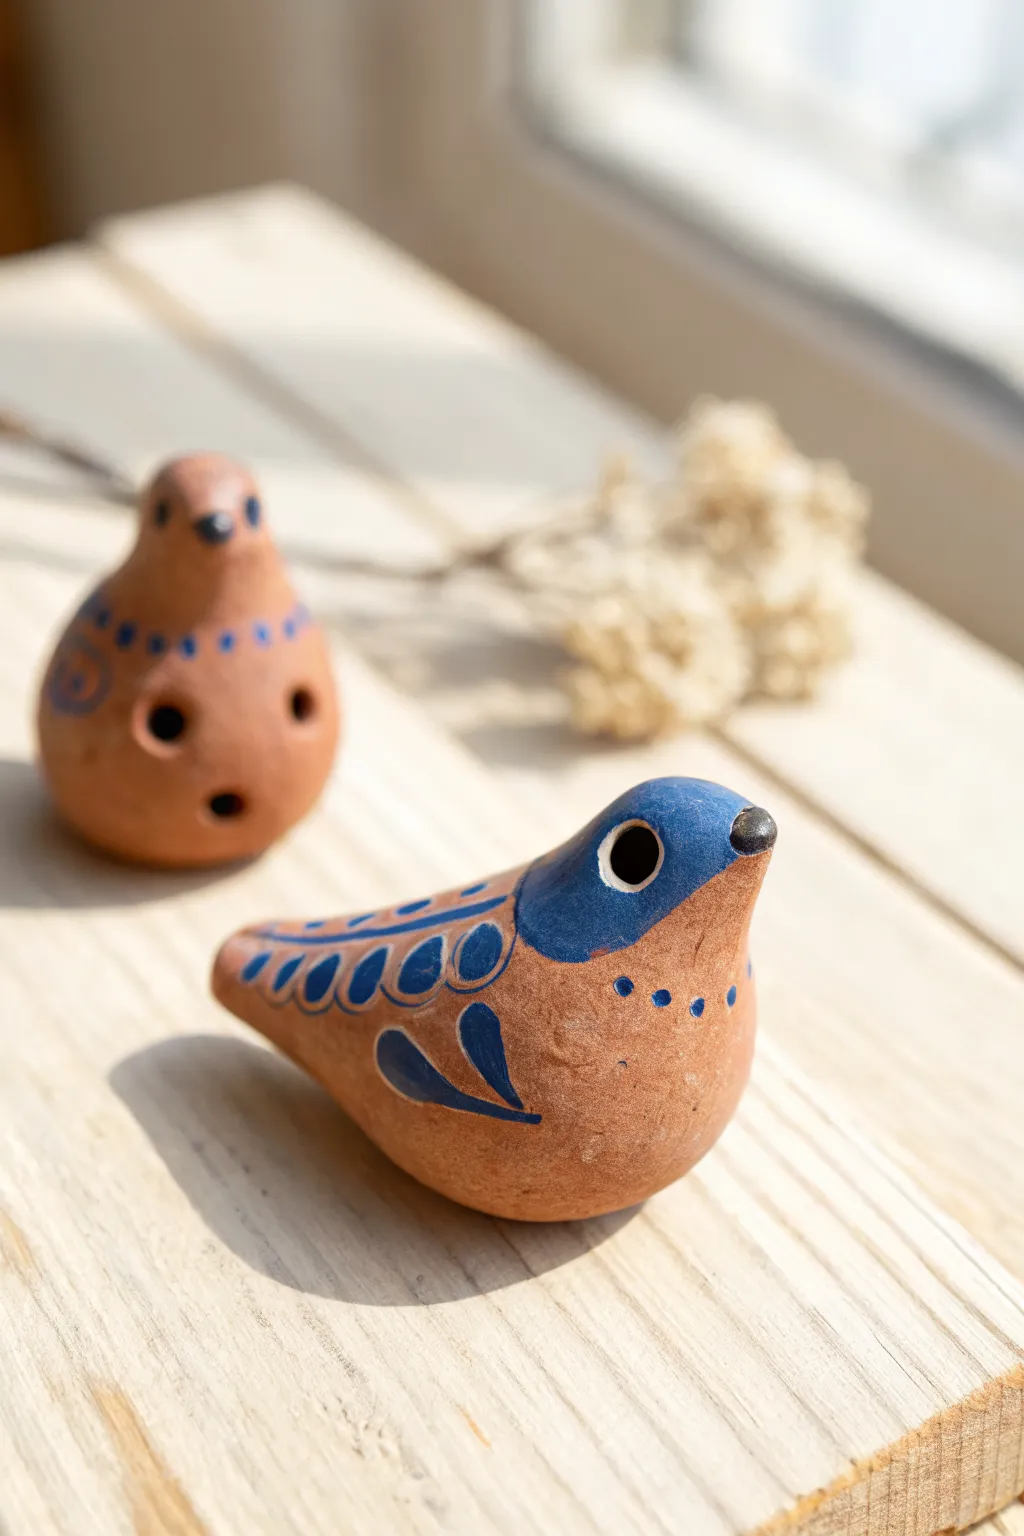
These charming clay whistles combine the ancient art of sound-making with folk-art aesthetics. Crafted from simple terracotta clay and accented with striking cobalt blue details, they function as both tiny sculptures and working musical instruments.
Step-by-Step Guide
Materials
- Terracotta air-dry clay or low-fire earthenware clay
- Wooden modeling tools (skewer, popsicle stick)
- Small palette knife
- Bowl of water and sponge
- Cobalt blue acrylic paint (or underglaze if firing)
- Small round detail brush (size 0 or 1)
- Popsicle stick or fettling knife (for making the airway)
Step 1: Shaping the Bird Body
-
Form the base pinch pot:
Start with a ball of well-wedged clay about the size of a golf ball. Push your thumb into the center to create a simple pinch pot, keeping the walls relatively thick (about 1/4 inch) to support the structure. -
Close the form:
Gently curve the walls of the pinch pot inward until they meet, trapping air inside. Score and slip the edges to seal them securely, creating a hollow egg shape. -
Sculpt the head and tail:
Hold the hollow egg in your palm. Gently pull and pinch one end to elongate it into a tapered tail. On the opposite end, pull the clay upward and round it to form the bird’s head. -
Refine the beak:
Pinch a very small amount of clay at the front of the head to form a tiny, pointed beak. Smooth the transition from the beak to the head with a damp finger so it looks organic. -
Smooth the surface:
Use a damp sponge or your fingers to smooth out any lumpy areas or fingerprints. The body should be sleek and aerodynamic.
Step 2: Creating the Whistle Mechanism
-
Create the mouthpiece:
At the tip of the tail, flatten the end slightly. Insert a flat popsicle stick or specific voicing tool straight into the tail to create the windway. -
Cut the fipple window:
On the underside of the bird (belly side), measure about an inch in from the tail tip. Cut a small square or rectangular hole. Remove the clay carefully. -
Form the splitting edge:
This is the crucial step. Looking into the square window, use a tool to sharpen the edge of the hole closest to the body (not the tail). This sharp edge splits the air to create sound. -
Align the airway:
Re-insert your stick into the mouthpiece. Look through the mouthpiece to ensure the air channel aims directly at the sharp splitting edge you just created. -
Test the sound:
Blow gently into the tail. If you hear a clear whistle, stop immediately. If it sounds airy, adjust the angle of the splitting edge slightly. -
Add finger holes (optional):
If you want to change pitch, carefully drill 2-4 holes on the sides or top of the body using a small circular tool. Ensure the shavings don’t fall back inside.
Clearer Sound Tip
Make the splitting edge (the sharp ramp inside the window) as sharp as a knife blade. A dull edge creates a windy, breathy sound rather than a crisp whistle.
Step 3: Painting and Finishing
-
Initial drying or firing:
If using air-dry clay, let the bird dry completely (24-48 hours). If using ceramic clay, fire to bisque temperature now. -
Paint the head cap:
Using your cobalt blue paint, carefully outline a curved ‘cap’ over the bird’s head and eyes. Fill this area in completely with opaque color. -
Add the wing details:
Paint a large teardrop shape on the side to represent the wing. Inside this shape, paint scalloped lines or rows of small U-shapes to mimic feathers. -
Detail the eyes:
Inside the blue head cap, paint a small white circle (or leave the clay bare if light enough) and add a black do representing the pupil. This brings the creature to life. -
Add decorative dots:
Using the tip of your brush handle or a dotting tool, dab small blue dots around the neck area like a necklace, similar to the pattern seen in the foreground bird. -
Highlight the beak:
Paint the very tip of the beak black or dark grey to make it stand out against the terracotta color. -
Final sealing:
Once the paint is fully dry, apply a matte or satin varnish to protect the surface, especially if the whistle will be handled frequently.
No Sound?
If it won’t whistle, the air usually isn’t hitting the splitting edge directly. Re-insert your stick into the mouthpiece and gently angle it up or down until the sound clears.
Give your little clay bird a gentle blow to hear its unique song
Pierced Luminary Lanterns With Cutouts
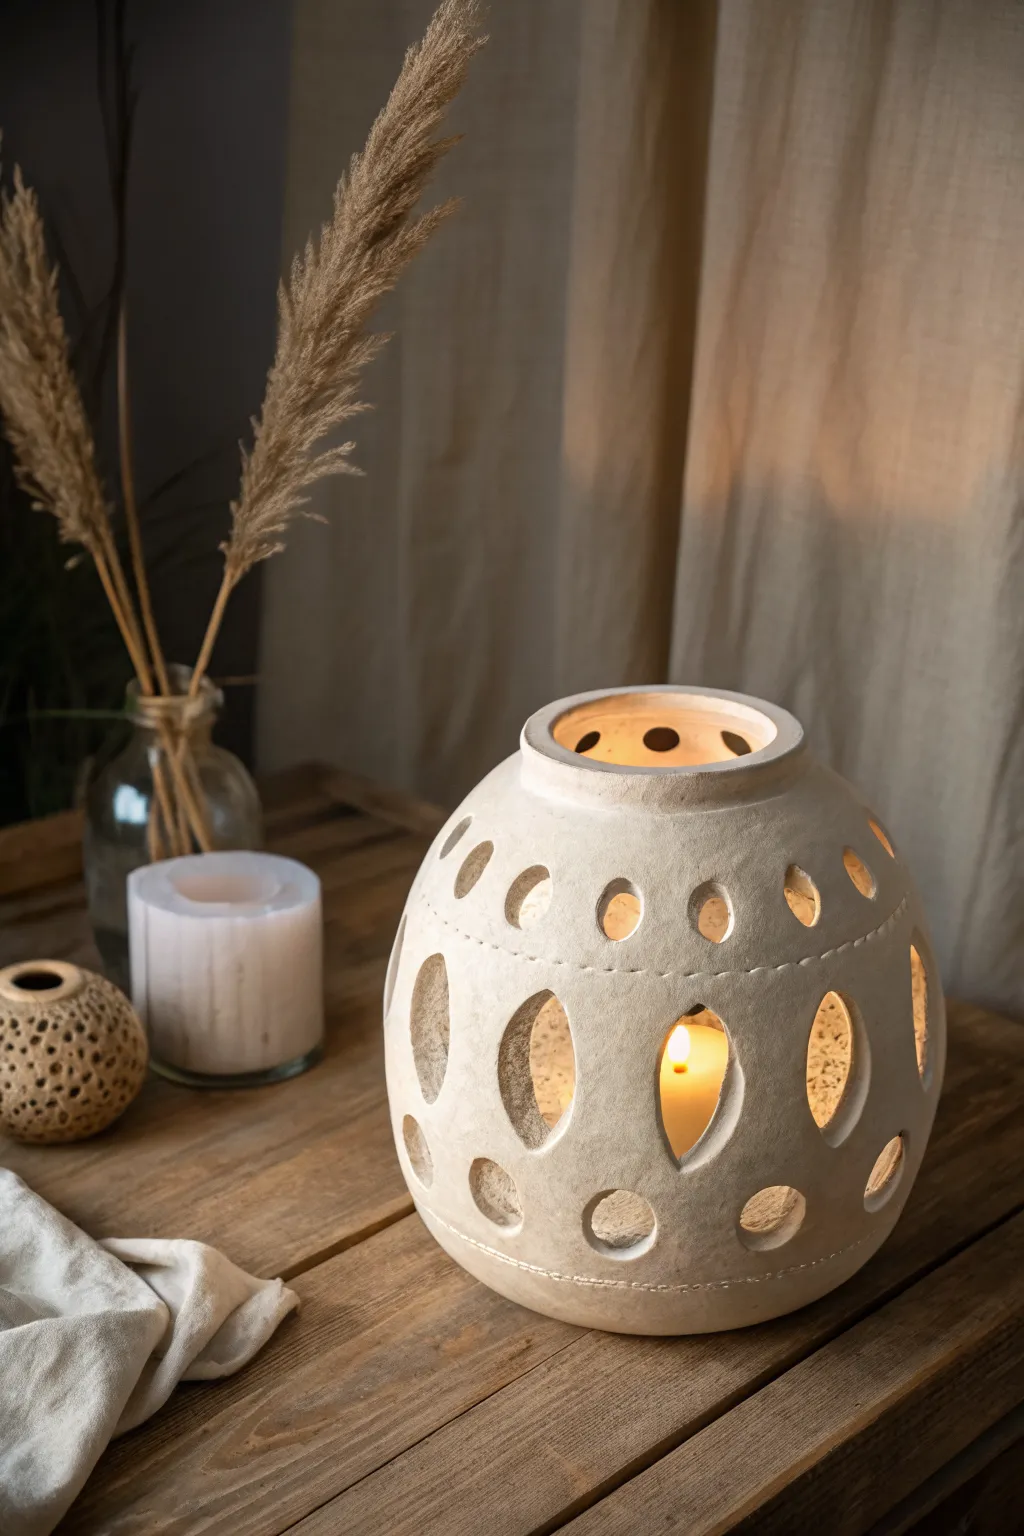
Illuminate your space with the warm glow of this handcrafted clay luminary, featuring a pleasingly rounded belly and rhythmic geometric cutouts. This project balances structural hand-building or wheel-throwing with the delicate art of subtractive decoration, resulting in a cozy, artisanal piece.
How-To Guide
Materials
- Stoneware clay (smooth or with fine grog)
- Pottery wheel (optional) or coil-building supplies
- Kemper hole cutters (various sizes)
- Small oval cookie cutter or template
- Potter’s knife or X-Acto blade
- Sponge
- Rib tool
- Loop tool (for trimming)
- Plastic wrap
Step 1: Forming the Vessel
-
Prepare your clay:
Wedge about 3-4 pounds of clay thoroughly to remove air bubbles. This ensures the walls will support the cutouts without cracking later. -
Build the base form:
If using a wheel, center your clay and throw a bulbous, enclosed form. Aim for a shape that balloons out in the middle and tapers in at the top, leaving a rim about 3-4 inches wide. -
Alternative method: Coil build:
If hand-building, create a circular slab base. Score and slip coils, stacking them outward to create the belly, then tapering inward to form the shoulder and neck. -
Refine the curve:
Use a rib tool on the outside while supporting the inside wall to smooth the curve and compress the clay. You want a consistent wall thickness of about 1/4 inch. -
Create the rim:
Form a distinct, slightly raised rim at the top opening. This adds structural integrity and gives the piece a finished look. -
Let it firm up:
Allow the piece to dry to a ‘leather-hard’ state. This is crucial—if the clay is too wet, it will slump when you cut; too dry, and it will crack.
Step 2: Designing and Cutting
-
Plan your spacing:
Lightly sketch horizontal guide lines around the vessel to mark where your three rows of patterns will go: top shoulder, mid-belly, and lower section. -
Mark the quadrants:
Divide the circumference into equal sections to ensure your symmetrical pattern meets up perfectly at the end. -
Cut the central ovals:
For the middle row, use a large oval cutter or trace a template. Carefully slice out the large vertical ovals. I find supporting the wall from the inside with a soft sponge helps prevent deformation. -
Create the upper accents:
Above the main ovals, punch a row of smaller circular holes or smaller ovals using a hole cutter tool. These should sit on the shoulder of the pot. -
Add the lower details:
Repeat the process for the bottom row, adding circular cutouts beneath the main ovals to anchor the design visually. -
Detail the rim:
Don’t forget the very top—add a ring of small circular cutouts around the flat surface of the rim or just below the neck for extra light projection.
Slumping Walls?
If the clay starts to buckle while cutting, stop immediately. Stuff the inside gently with newspaper or plastic bags to support the shape, and let it stiffen for another hour.
Step 3: Finishing Touches
-
Clean the edges:
Once the clay is slightly stiffer, use a damp sponge or a soft brush to smooth the sharp edges of every cutout. This prevents snagging later. -
Add texture (optional):
If you want the subtle horizontal line visible in the image, gently press a fettling knife or wire tool into the clay surface between the rows of cutouts. -
Slow drying:
Cover the pot loosely with plastic to let it dry very slowly. Uneven drying around the holes can cause tension cracks. -
Bisque fire:
Fire the piece to cone 04 (or your clay’s specific bisque temperature). -
Glaze or leave raw:
For the natural look in the photo, leave the exterior unglazed or apply a matte, stone-texture wash. Glaze the interior if desired for contrast. -
Final firing:
Fire to the final maturity temperature of your clay body.
Flickering Shadows
Experiment with the angle of your cuts. Beveling the edges of the holes inward (undercutting) allows more candlelight to spill out, creating wider patterns on your walls.
Place a beeswax candle inside your new lantern and enjoy the dancing light patterns it casts on your walls