I love how the right pottery display can turn everyday bowls and mugs into little works of art you get to live with. Whether you’re styling a cozy shelf at home or setting up a market booth, these ideas help your pieces look intentional, balanced, and easy to browse.
Open Kitchen Shelves With Everyday Ware
Transform a blank wall into a functional gallery with these sturdy wooden floating shelves, perfectly highlighting the warmth of handmade pottery against a crisp, textured backdrop. This project balances the raw beauty of natural wood grain with the clean lines of modern ceramics for an effortlessly styled kitchen corner.
Step-by-Step Guide
Materials
- Three pieces of 2×10 lumber (cut to desired length, e.g., 36-48 inches)
- Floating shelf hardware brackets (heavy-duty)
- Medium-grit sandpaper (120-grit)
- Fine-grit sandpaper (220-grit)
- Wood stain (light oak or natural finish)
- Matte polyurethane sealant
- Paintbrushes or staining rags
- Drill with masonry bits (if installing on brick/concrete as shown)
- Level
- Stud finder
- Pencil
- White masonry paint (optional, for wall texture)
- Speckled ceramic spray paint (optional, for pottery customization)
Step 1: Preparing the Wood
-
Select your timber:
Choose lumber with interesting grain patterns and knots, as these imperfections add character to the final rustic look. -
Cut to size:
Cut your three boards to identical lengths using a miter saw or circular saw to ensure perfect uniformity when stacked vertically. -
Initial sanding:
Use the medium-grit sandpaper to remove any rough sawmill marks and smooth out the sharp edges of the wood. -
Refining the surface:
Switch to fine-grit sandpaper to create a silky-smooth finish that’s pleasant to touch but still retains the wood’s visual texture. -
Condition the wood:
Wipe away all sawdust with a tacky cloth, then apply a pre-stain wood conditioner if you are using softwoods like pine to prevent blotchy staining.
Knotty details
Don’t fill in large knots with wood filler. Leave them raw or fill slightly with clear epoxy to highlight the rustic imperfection.
Step 2: Staining and Finishing
-
Apply the stain:
Using a clean rag or brush, apply your chosen light oak stain with the grain. I find wiping off excess stain almost immediately keeps the color natural and prevents it from getting too dark. -
Let it cure:
Allow the stain to dry completely according to the manufacturer’s instructions, usually overnight. -
Seal the deal:
Apply a thin coat of matte polyurethane. Matte is crucial here to match the organic, earthy vibe of the pottery without adding artificial shine. -
Sand between coats:
Once the first coat is dry, lightly hand-sand with high-grit paper to knock down any raised grain, then apply a second coat for durability.
Step 3: Installation
-
Mark the layout:
Determine the vertical spacing between your shelves. Ensure there is enough height for your tallest mugs or stacked bowls, typically 12-15 inches apart. -
Locate supports:
Use a stud finder to mark secure mounting points. If installing on white-washed brick like the photo, you’ll need masonry anchors and a hammer drill. -
Install brackets:
Mount your floating shelf brackets to the wall, checking constantly with a level to ensure they are perfectly horizontal. -
Slide on shelves:
Slide your prepared wooden boards onto the bracket rods. If the fit is tight, use a rubber mallet to gently tap them flush against the wall.
Hidden brackets?
If you don’t have a jig to drill perfectly straight holes for floating brackets, use heavy-duty L-brackets and paint them white to blend into the wall.
Step 4: Styling the Display
-
Group by height:
Arrange items like tall mugs and shorter bowls in clusters. Vary heights on each shelf to keep the eye moving. -
Balance the colors:
Mix the earthy tones of unglazed bottoms with the soft pastels of glazed ceramics. The beige bowls act as a nice neutral anchor in the middle. -
Add greenery:
Place a small planter on the top and bottom shelves. The green leaves provide a pop of life that contrasts beautifully with the white brick and wood. -
Create breathing room:
Don’t overcrowd the shelves. Leave negative space between object groups, allowing the white wall texture to show through, which keeps the look airy and intentional.
Enjoy styling your new shelves with your favorite everyday ceramics and watching the morning light hit the textures


Vintage Hutch or Glass-Front Cabinet Styling
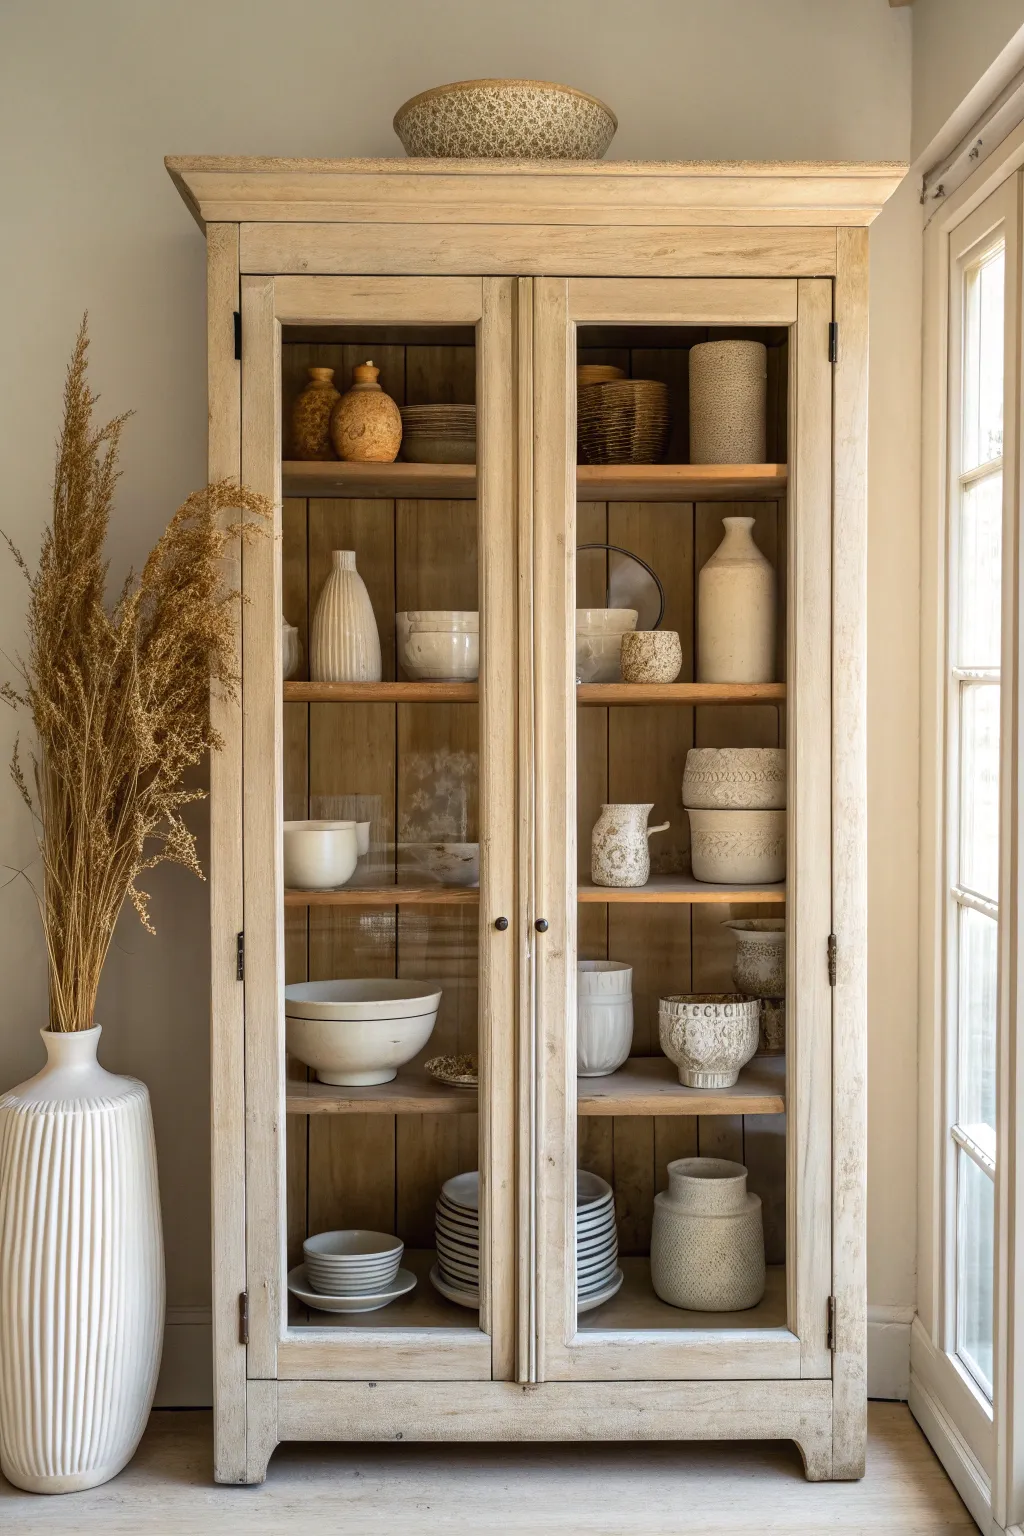
Transform a simple glass-front cabinet into a stunning gallery for your ceramics collection by focusing on balance, texture, and a cohesive color palette. This project is less about making the physical hutch and more about the art of composition, teaching you how to arrange disparate pottery pieces into a harmonious visual story. The result is a warm, inviting display that feels both collected and effortlessly curated.
Detailed Instructions
Materials
- Glass-front hutch or cabinet (light wood or stripped finish preferred)
- Collection of ceramic vases (various heights/textures)
- Assorted ceramic bowls (stackable sizes)
- Dinner plates and saucers for stacking
- Small textured pinch pots or cups
- Large floor vase (for exterior styling)
- Dried pampas grass or wheat stems
- Cleaning cloth and gentle wood cleaner
- Optional: Museum wax (for stability)
Step 1: Preparation & Foundation
-
Clean the canvas:
Begin by removing everything from your cabinet. Wipe down the shelves and glass thoroughly; dust and fingerprints will distract from your pottery, so start with a pristine surface. -
Check shelf stability:
Before loading heavy ceramics, ensure all shelf pins are secure and the shelves are level. Ceramics can be surprisingly heavy when grouped, particularly stacks of plates. -
Sort your collection:
Group your pottery on a nearby table by type (vessels, flatware, bowls) and then by color tone. For this specific look, you want to filter for creams, beiges, warm greys, and earthy browns to maintain that serene, monochromatic palette.
Step 2: Anchor Pieces & Lower Shelves
-
Establish the bottom shelf:
Start at the bottom since it visually anchors the piece. Place your heaviest visual items here. I like to create two distinct stacks of plates on either side to create symmetry. -
Create plate stacks:
Stack about 6-8 dinner plates on one side, and perhaps a mix of bowls or smaller plates on the other. This mirrors the image where stacks of striped or solid plates provide a solid foundation. -
Add a central vessel:
Place a sturdy, wide-mouthed vase or a large textured jar in the middle of the bottom shelf or just off-center to break up the horizontal lines of the plate stacks.
It looks too cluttered!
Remove 30% of the items. Negative space is crucial. Try grouping small items onto a tray or removing them entirely to let the hero pieces breathe.
Step 3: Layering the Middle Shelves
-
The rule of thirds:
Move to the shelf directly above the plates. Instead of centering one item, place a large bowl on the left and a grouping of upright vessels on the right. This asymmetry keeps the eye moving. -
Mix texture and form:
On the next shelf up, introduce variety. Pair a smooth, glazed pitcher with a rough, unglazed pot. The contrast in finishes prevents the neutral colors from looking flat. -
Create partial overlap:
Don’t line everything up perfectly straight. Push larger items slightly back and pull smaller, textured cups or bowls forward. This depth makes the cabinet feel full but not cluttered. -
Utilize vertical space:
Dedicate one section, like the middle-right shelf in these images, to tall, slender vases. A tall white bottle vase or a ribbed cylinder draws the eye upward. -
Stacking bowls:
Create a stack of 2-3 nesting bowls on a middle shelf. This mimics the horizontal lines of the plates below but with a softer, curved silhouette.
Add Subtle height
Use old hardcover books (with jackets removed to show neutral spines) as risers under smaller pottery pieces to vary the height levels on a single shelf.
Step 4: Top Shelf & Finishing Touches
-
Lighten the load at the top:
Save your lighter-looking pieces for the top shelf. Small textured jars, a single elegant vase, or a delicate woven bowl work well here to keep the cabinet from feeling top-heavy. -
Add a topper:
Place a single, wide, shallow bowl on the very top exterior of the cabinet. This adds height and softens the hard, straight line of the cabinet’s cornice. -
Style the exterior:
To connect the cabinet to the room, place a large, tall floor vase next to the unit. Fill it with tall dried grasses or wheat that reach at least halfway up the cabinet door. -
Refine the composition:
Close the doors and step back about five feet. Look for ‘holes’ or awkward spacing. You may need to shift a stack of plates slightly left or rotate a vase to show its best side. -
Check for color balance:
Ensure you haven’t clustered all the dark brown items in one corner. Distribute darker earthy tones diagonally across the shelves to guide the viewer’s eye across the entire collection. -
Secure the items:
If you live in an earthquake zone or have active pets, apply a tiny pea-sized amount of museum wax to the bottom of unstable or precious vases to keep them firmly in place.
Now step back and enjoy a display that turns your everyday ceramics into a calm, gallery-worthy focal point

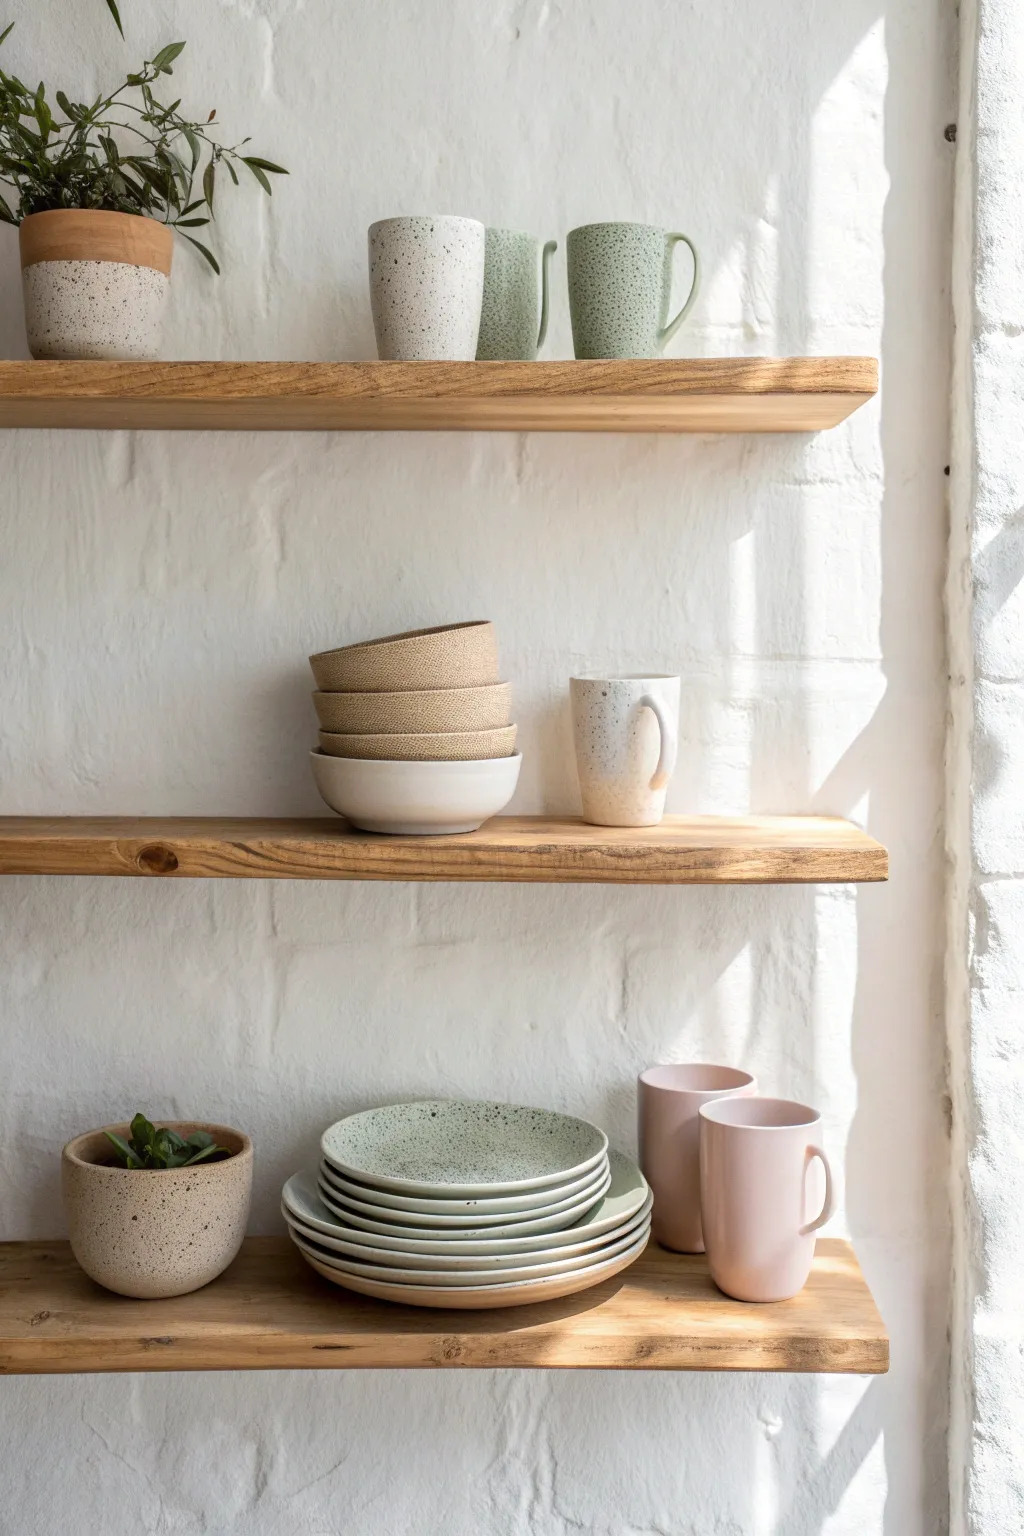
Group by Color for a Clean Look
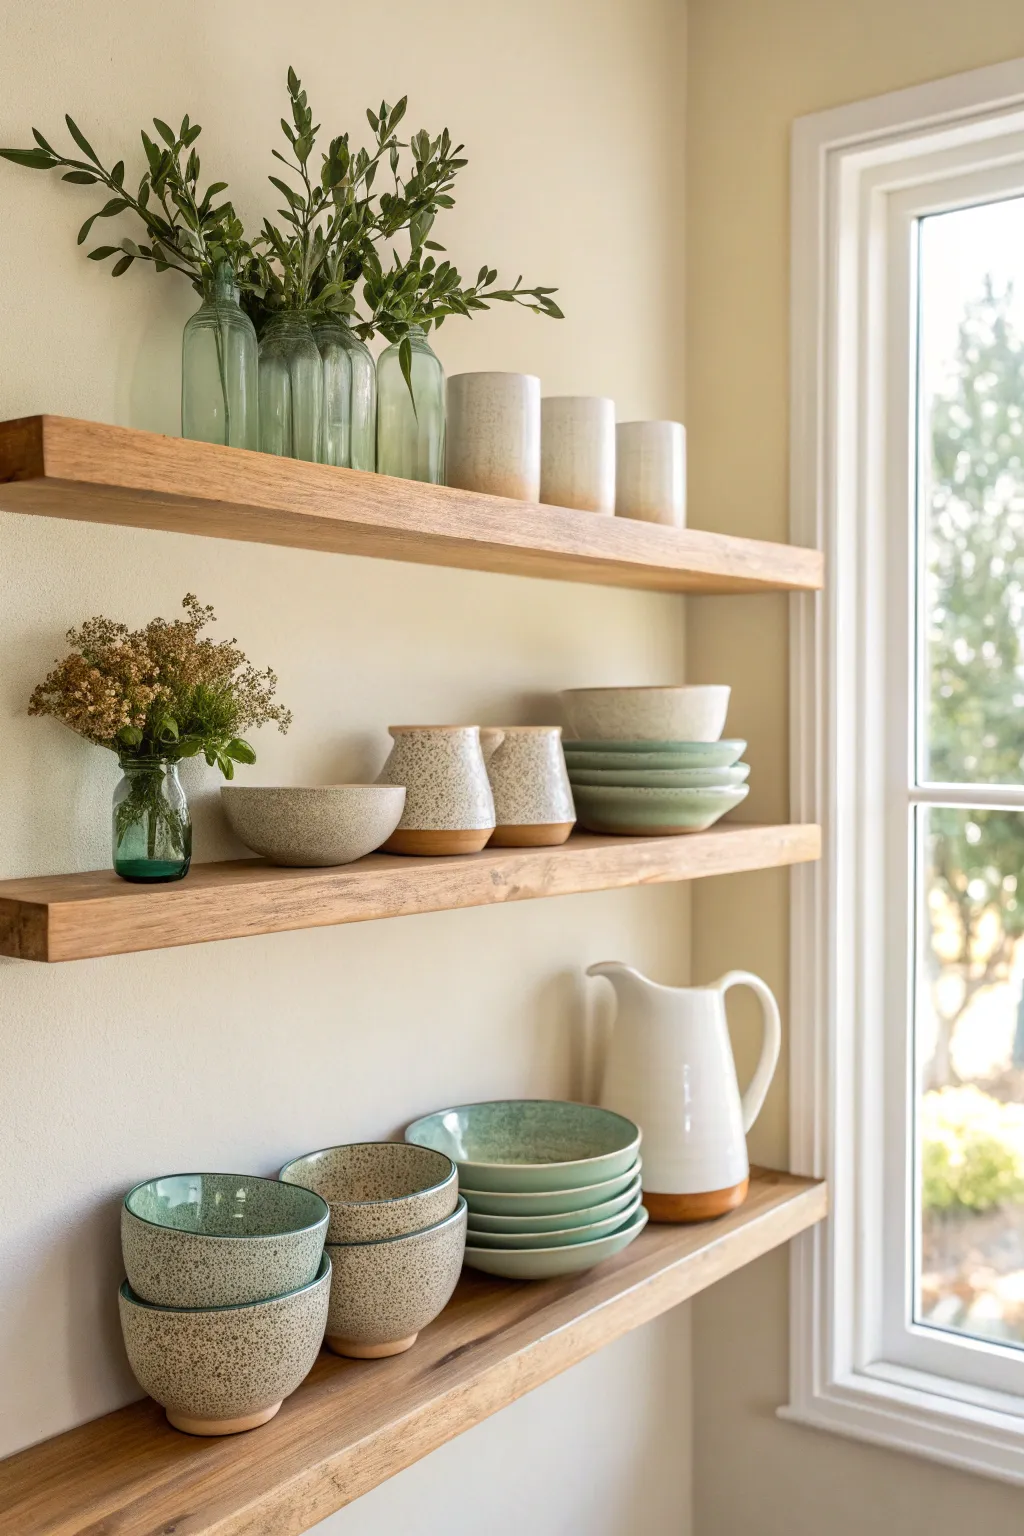
Achieve a harmonious and textured kitchen display by grouping ceramics in a soft, nature-inspired palette. By mixing speckled stoneware, pale sage greens, and warm creams, you can turn functional shelving into a calming visual focal point.
How-To Guide
Materials
- Three floating wooden shelves (installed)
- Collection of speckled beige bowls
- Sage green nesting bowls
- Two-tone cream and terracotta mugs or pitchers
- Large white ceramic pitcher
- Green glass bottles (various heights)
- Small green glass bud vase
- Fresh or dried greenery (olive branches, dried wildflowers)
- Cleaning cloth
- Sturdy wall anchors (if installing shelves)
Step 1: Setting the Foundation
-
Clear and clean:
Begin with completely empty shelves. Wipe down the wooden surfaces with a dry or slightly damp cloth to remove dust, ensuring a clean slate for your arrangement. -
Sort your ceramics:
Gather all your pottery pieces on a nearby table. Separate them by color family: speckled oatmeal tones, soft sage greens, milky whites, and glass accents. This helps you visualize the color balance before placing anything.
Uneven Spacing?
If a shelf feels too heavy on one side, add a small, dense object like a stacked saucer or a solid mug to the lighter side to regain visual balance.
Step 2: Styling the Top Shelf
-
Anchor with glass:
On the far left of the top shelf, place a cluster of three to four green glass bottles. Varying their heights adds interest, while keeping them grouped creates a strong visual weight. -
Add vertical greenery:
Insert tall sprays of greenery, like olive branches or eucalyptus, into the glass bottles. The leaves should reach upward and outward, breaking the straight lines of the shelves. -
Balance the right side:
On the right side of the top shelf, arrange three ceramic tumblers or canisters. I like to choose pieces with a subtle gradient—perhaps cream fading into a darker base—to echo the earthy tones below. -
Leave negative space:
Ensure there is a comfortable gap between the glass bottles and the ceramic tumblers. This empty space prevents the shelf from looking cluttered and lets the wall color breathe.
Texture Play
Mix finishes! Pair glossy glazed interior bowls with raw, unglazed exterior ceramics to confuse the eye and add tactile depth to your stacks.
Step 3: Arranging the Middle Shelf
-
Create a floral vignette:
Place a small green glass bud vase on the left side. Fill it with a textured dried bouquet, like dried yarrow or wildflowers, to introduce an organic, rustic element. -
Center the texture:
Position a single, medium-sized speckled bowl just to the right of the vase. Its low profile contrasts nicely with the height of the flowers. -
Group functional pitchers:
Place two matching ceramic pitchers or creamers next to the bowl. Their handles should be angled slightly for a casual, ready-to-use feel. -
Stack for height:
On the far right, create a neat stack of shallow bowls or plates. Use sage green items here to pick up the color from the glass vase on the left, creating a visual connection across the shelf.
Step 4: Anchoring with the Bottom Shelf
-
Establish a heavy right anchor:
Place the largest item, such as a tall white pitcher, on the far right. This tall, solid object visually supports the items above it. -
Nest the bowls:
On the left side, stack two speckled bowls. Nesting them adds depth and shows off the interior glaze or texture. -
Create a central stack:
Arrange a stack of 4-5 wide, shallow pasta bowls in the center. I prefer mixing colors here—alternating a sage green bowl with a speckled one creates a beautiful layered effect. -
Check the flow:
Step back and look at the shelving unit as a whole. Your eye should move in a zigzag pattern: from the greenery top-left, to the stack middle-right, down to the pitcher bottom-right. -
Final adjustments:
Shift items slightly to ensure no two objects are perfectly aligned vertically, which can look stiff. A little asymmetry makes the display feel organic and curated.
Enjoy the calm atmosphere your newly organized and color-coordinated pottery display brings to the room


Stacked Sets for That Pottery-Shop Feel
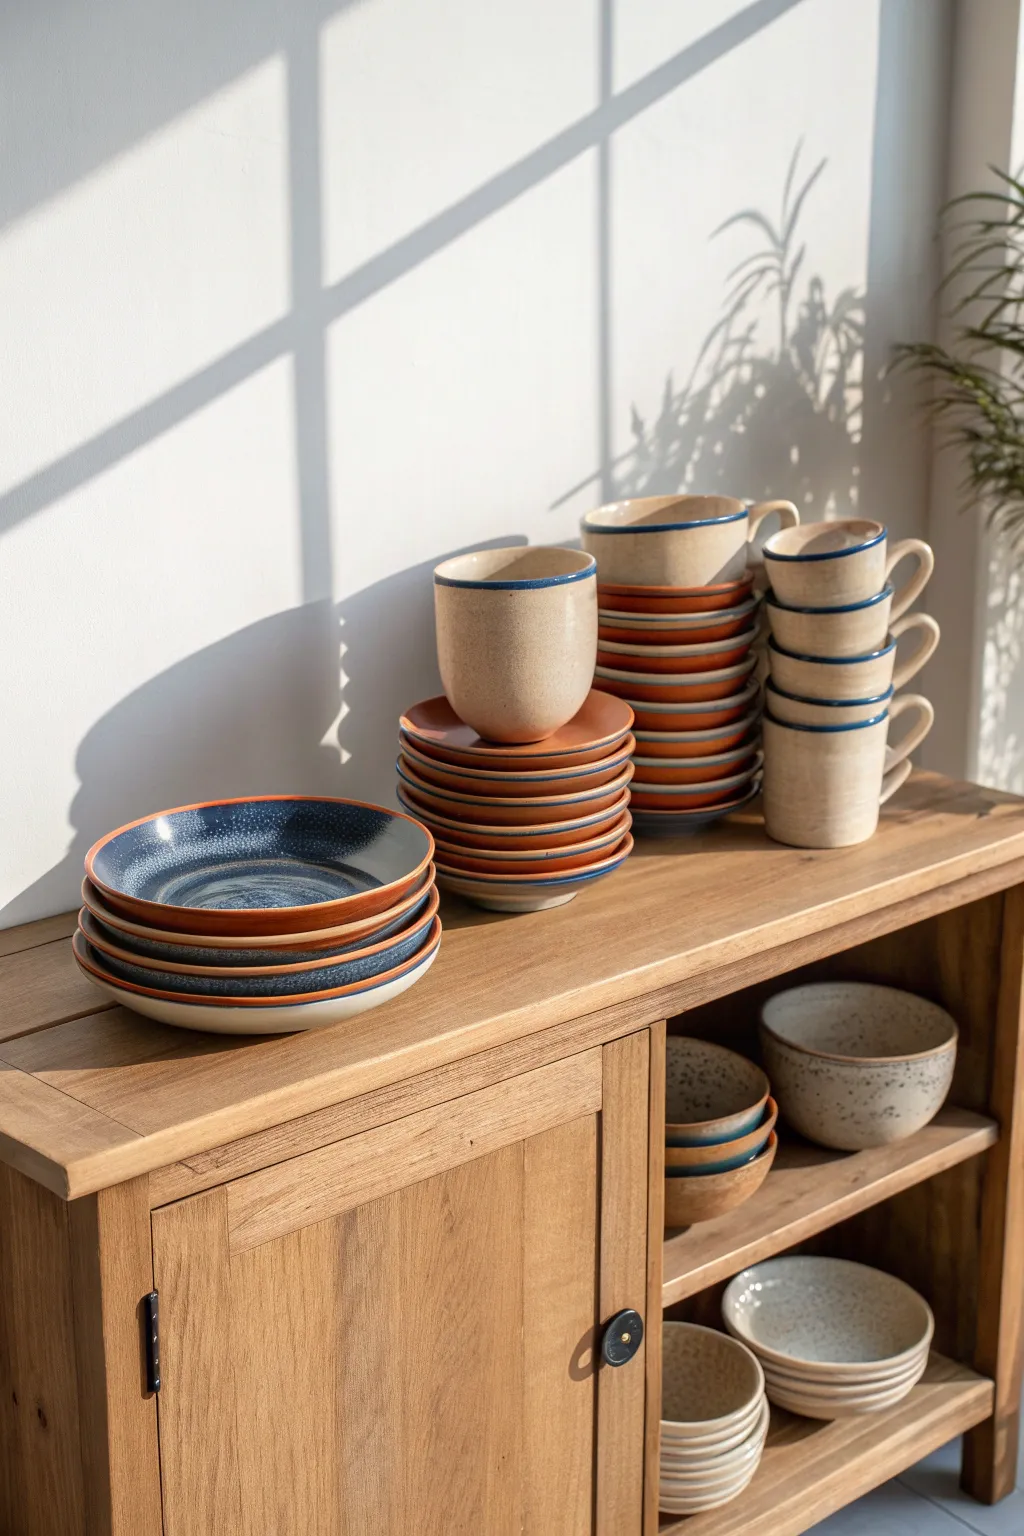
Recreating the charm of a boutique pottery studio is easier than you think with this stylish stacking arrangement. By grouping handcrafted ceramics in varied heights and textures on a warm wooden surface, you’ll instantly elevate your storage into a visual feature.
Step-by-Step Tutorial
Materials
- Wooden sideboard or console table (oak or similar warm grain)
- Set of shallow soup/pasta bowls (blue glazed interior, raw clay rim)
- Set of small side plates or saucers (terracotta or reddish-brown)
- Set of coffee mugs (ivory/beige speckled glaze with blue rim)
- Set of deep cereal bowls (speckled cream/beige)
- Damp cloth for dusting
Step 1: Setting the Stage
-
Clear and Clean:
Begin by completely clearing the top surface and the open shelves of your wooden sideboard. Wipe down the wood with a damp cloth to remove dust, ensuring a clean slate for your display. -
Positioning:
Ensure the sideboard is placed in a spot with good natural light, preferably near a window where shadows can play across the ceramics, as seen in the inspiration image.
Rim Alignment Tip
For a pro look, align the handles of your stacked mugs vertically in a straight line. It makes the stack look intentional and tidy rather than precarious.
Step 2: Arranging the Top Surface
-
Anchor with Wide Bowls:
Start on the left side of the sideboard top. Take your wide, shallow bowls with the blue interiors. Stack them neatly, ensuring the rims align perfectly. -
Create the Saucer Tower:
Move slightly to the right of your bowl stack. Build a tall tower using your small plates or saucers. Aim for a height that exceeds the bowl stack to create visual variety. -
Top the Tower:
Place a single mug right on top of your saucer stack. This not only saves space but adds a ‘pottery studio’ quality, as if the pieces are fresh from the kiln. -
The Mug Column:
To the right of the saucer tower, create a stack of mugs. Place stacking mugs directly onto the wooden surface. Alternatively, nest them if they are tapered. -
Secondary Mug Stack:
If you have more mugs, create a second, taller stack right next to the first one. In the image, we see a stack of four mugs next to a stack of saucers topped with cups. -
Aligning the Heights:
Step back and check the silhouette. You want a wave-like effect: low bowls on the left, rising to the saucer stack, and maintaining height with the mug stacks on the right.
Step 3: Styling the Shelves below
-
Upper Shelf Sorting:
On the top open shelf, place a stack of medium-sized, deep bowls. Speckled cream or beige glazes work beautifully here to contrast with the darker wood in the shadow. -
Nesting Bowls:
To the left on the same shelf, nest smaller bowls inside larger ones. This creates a cozy, informal look and maximizes storage. -
Lower Shelf Balance:
On the bottom shelf, place a stack of salad or dinner plates. Keep the stack relatively low to allow breathing room above it. -
Additional Bowls:
Add another stack of bowls next to the plates on the lower shelf. I find mixing textures here—like raw clay exteriors next to fully glazed pieces—adds depth. -
Checking Spacing:
Ensure items aren’t pushed too far back into the shadows; bring them forward slightly so the rims catch the light.
Wobbly Stacks?
If your hand-thrown ceramics are uneven and rock when stacked high, use small felt separators or paper doilies between each piece for stability.
Step 4: The Final Flourish
-
Light and Shadow:
If possible, adjust window treatments or move the furniture slightly so natural light casts interesting grid-like shadows across the display, mimicking the photo’s atmosphere. -
Greenery Accent:
Place a tall houseplant on the floor to the right of the sideboard. The organic leaves will cast detailed shadows and soften the hard edges of the ceramics. -
Final Adjustment:
Do a final walkthrough. Rotate any bowls or mugs so their most attractive glazed side or handle faces outward.
Enjoy the serene and curated atmosphere your new pottery display brings to the room

The Complete Guide to Pottery Troubleshooting
Uncover the most common ceramic mistakes—from cracking clay to failed glazes—and learn how to fix them fast.
Mix Pottery With Wood and Linen Textures
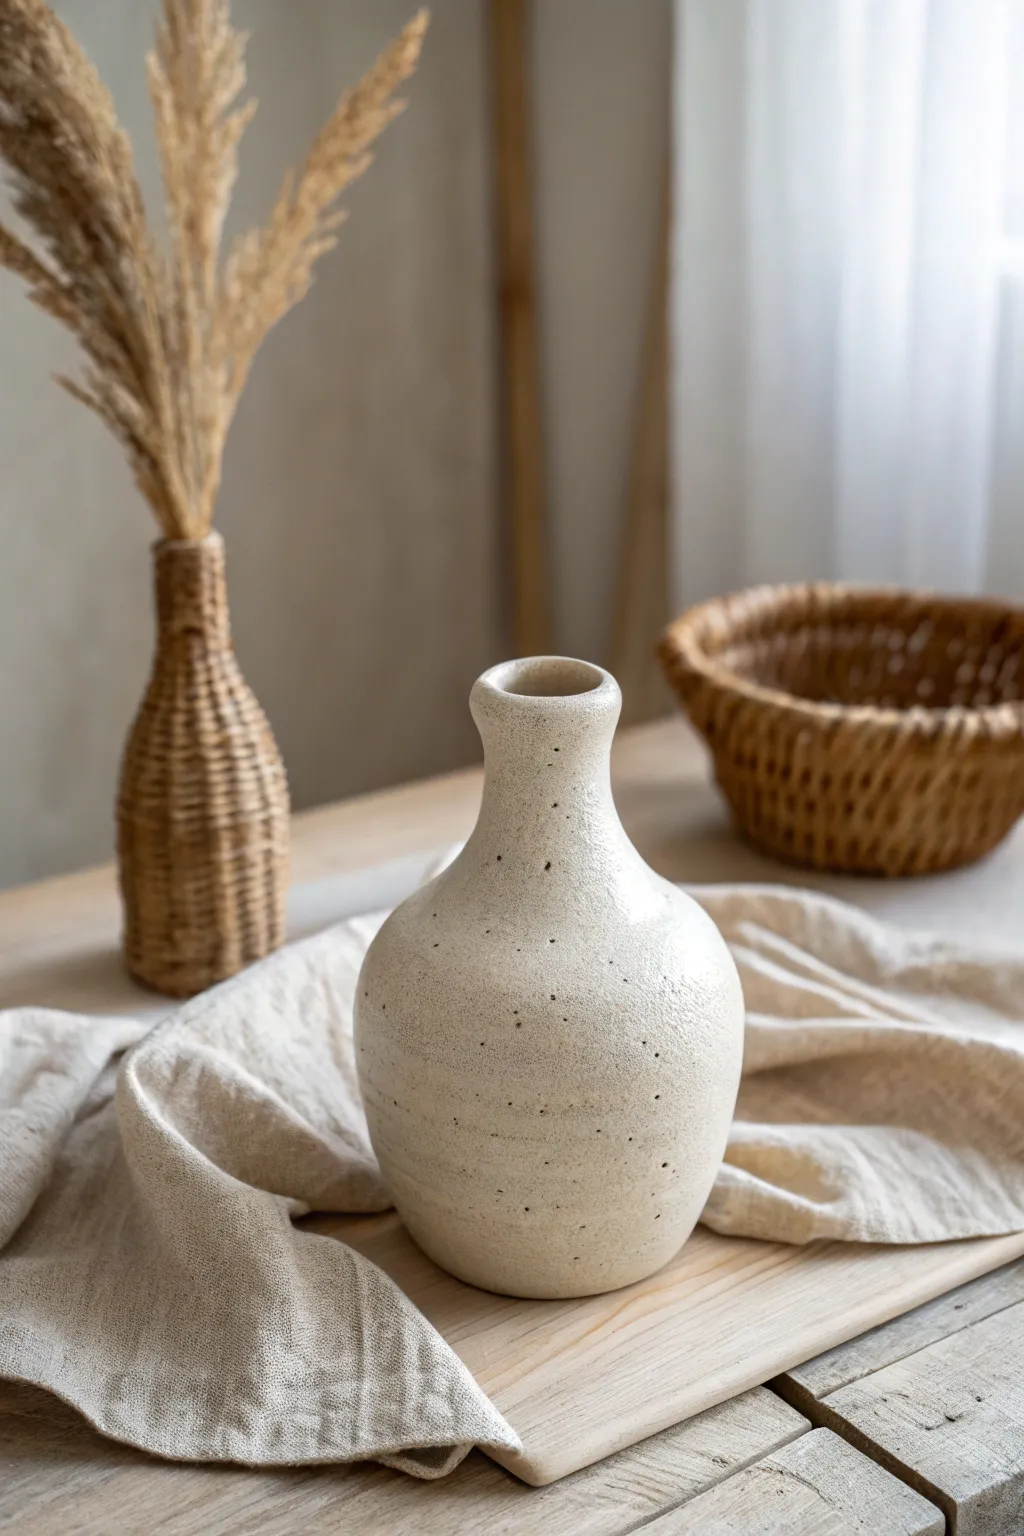
Embrace the beauty of wabi-sabi with this handmade pottery project that focuses on organic shapes and tactile surfaces. By combining speckled clay with a soft, matte glaze, you can create a timeless vessel that perfectly complements wood and linen accents.
Detailed Instructions
Materials
- Speckled stoneware clay (approx. 3-4 lbs)
- Potter’s wheel
- Throwing sponge
- Wire cutter
- Needle tool
- Wooden throwing rib
- Metal kidney scraper
- Trimming tools (pear-shaped and loop)
- Chamois leather strip
- Matte white or cream glaze
- Kiln access
Step 1: Throwing the Form
-
Center the clay:
Begin by slamming your ball of speckled clay onto the center of the wheel head. Use wet hands to cone the clay up and push it back down until it spins perfectly smooth and centered without any wobble. -
Open the vessel:
Press your thumbs into the center of the spinning mound, opening it up to create the floor. Compress the floor with your fingers or a sponge to prevent future cracking. -
Pull the first cylinder:
Slow the wheel down slightly. With one hand inside and one outside, squeeze the clay wall and gently pull it upward to create a basic cylinder shape, keeping the walls even. -
Belly out the form:
To achieve that rounded bottom section, gently push the clay wall outward from the inside using your fingertips or a rib, letting the belly swell while keeping the top slightly narrower. -
Collar the neck:
Wrap your hands around the upper portion of the clay. Gently squeeze inward as the wheel spins to narrow the opening, creating a distinct neck separate from the rounded body. -
Refine the lip:
Use a piece of soft chamois leather to compress and smooth the rim. I like to fold the lip over slightly for a thicker, more finished look that feels substantial. -
Smooth the surface:
Run a wooden rib along the outside of the pot while it spins. This removes excess slip and reveals the natural grit or grog in the clay, which adds to that lovely texture. -
Cut from the wheel:
Run a wire cutter tightly along the wheel head to sever the pot. Carefully lift it off using pot lifters or dry hands and set it on a ware board to dry to leather-hard.
Step 2: Trimming and Finishing
-
Center for trimming:
Once leather-hard, place the vase upside down on the wheel. Center it perfectly and secure it with three small coils of soft clay. -
Define the foot:
Using a sharp loop tool, trim away the excess clay from the bottom curve to silhouette the vase’s shape. Carve a distinct foot ring to give the piece visual lift. -
Enhance the texture:
If your clay isn’t speckled enough, you can gently flick iron oxide specks onto the surface now, or lightly drag a serrated kidney tool over the surface for extra tactile quality. -
Bisque fire:
Allow the vase to dry completely (bone dry). Load it into the kiln and bisque fire it to Cone 04 (or your clay’s specific bisque temperature). -
Prepare the glaze:
Mix your matte white or cream glaze thoroughly. If you want the clay’s natural speckles to pop through, ensure the glaze consistency isn’t too thick. -
Glaze application:
Pour glaze inside the vase, swirl to coat, and pour out. Then, hold the vase by the foot and dip the exterior into the bucket for a swift, even count of three. -
clean the foot:
Use a damp sponge to meticulously wipe all glaze off the bottom foot ring. Any glaze left here will fuse the pot to the kiln shelf. -
Final firing:
Fire the glazed piece to your clay body’s maturity temperature (likely Cone 5 or 6 for stoneware). Let the kiln cool naturally before opening.
Wobbly Neck?
If the neck twists while collaring, the clay is too thin or the wheel is too slow. Speed up slightly and use plenty of water to reduce friction.
Spotting Success
Use a clay body with Manganese speckles explicitly mixed in. A standard white clay won’t achieve this look underneath a translucent white glaze.
Now you have a stunning, earthy vessel ready to display dried botanicals or stand beautifully on its own.
A Single Hero Vase as a Statement
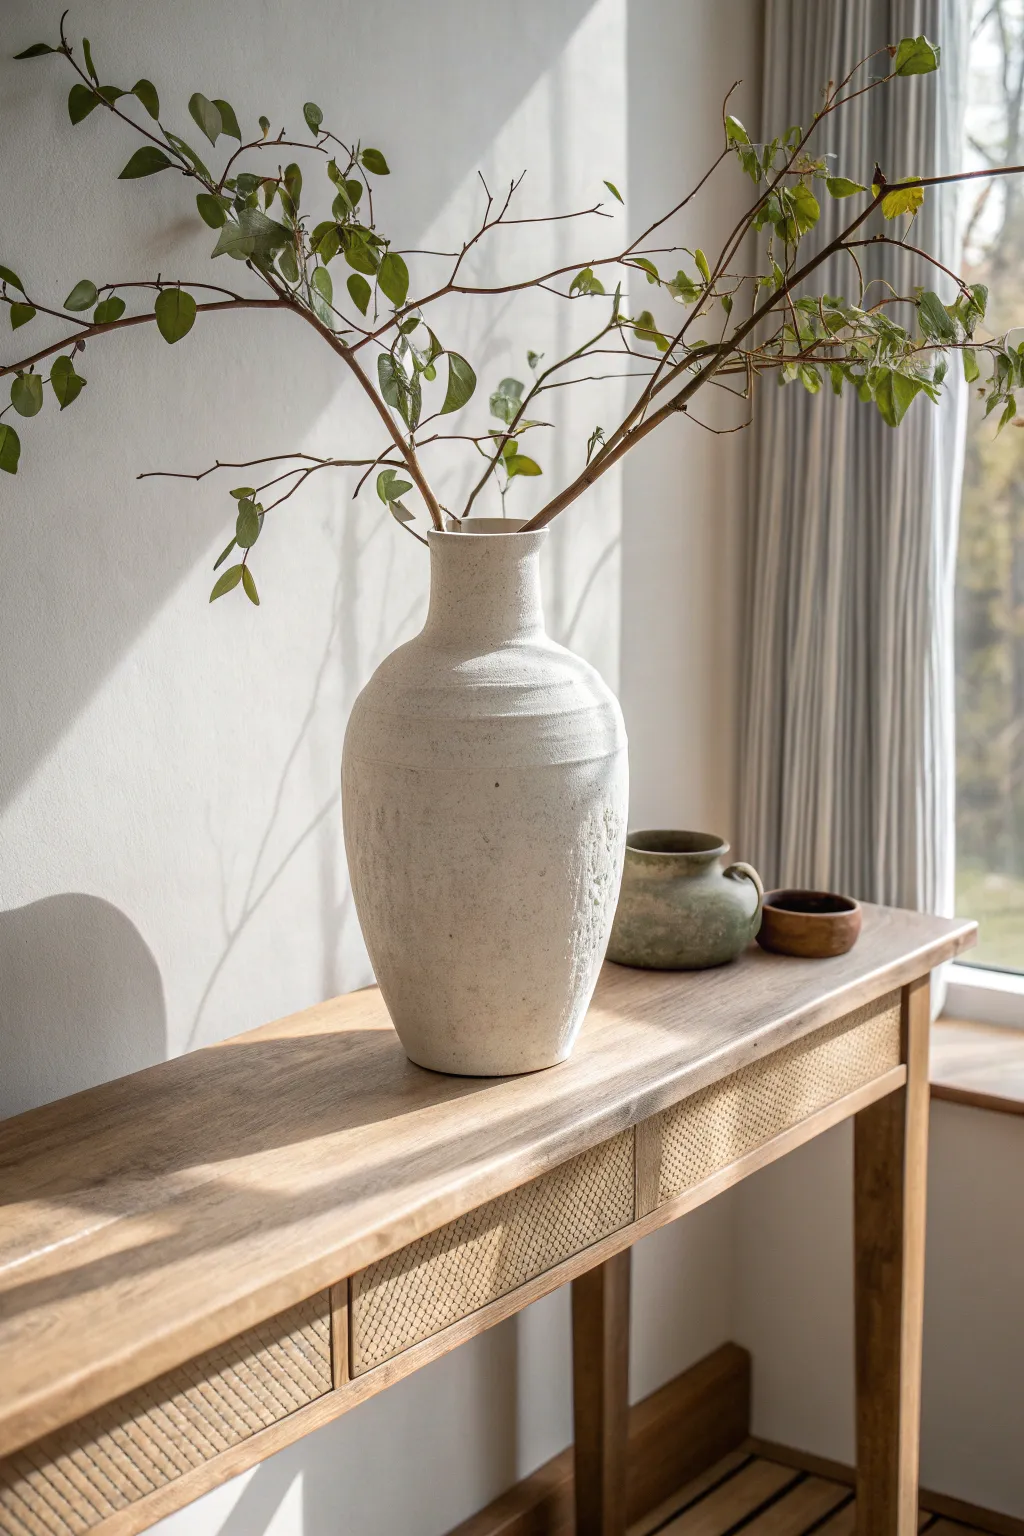
Learn to construct this substantial, organic statement vase using the coil-building technique. Its imperfect, stone-like texture and gently sloping neck make it the perfect vessel for minimalist branch arrangements.
Step-by-Step Guide
Materials
- High-grog stoneware clay (white or buff)
- Potter’s wheel (optional, for centering base)
- Banding wheel
- Rolling pin
- Various ribs (serrated metal, smooth wood)
- Sponge
- Cutting wire
- Scoring tool
- Slip
- Matte white glaze
Step 1: Fomring the Base and Body
-
Prepare the Base:
Start by rolling out a thick slab of clay, roughly 1/2 inch thick, and cut a circle with a diameter of about 5 inches to serve as the stable foot of your vase. -
Roll Your Coils:
Roll out several long, even coils of clay approximately the thickness of your thumb; keeping them consistent helps ensure your walls rise evenly. -
Score and Slip:
Score the outer edge of your base and apply a generous amount of slip, then press your first coil firmly onto the base. -
Build the Walls:
Continue adding coils one atop the other, offsetting them slightly outward with each layer to create the widening belly of the vase. -
Smear and Blend:
As you build, blend the coils together on both the inside and outside using your thumb or a wooden rib; smooth vertical strokes work best to knit the clay together. -
Shape the Belly:
Once you reach the widest point of the vase (about halfway up), use a large wooden rib to belly out the form from the inside while supporting the exterior with your other hand. -
Begin Tapering:
Start offsetting your coils slightly inward to narrow the form towards the neck; proceed slowly here to prevent the clay from collapsing.
Step 2: Refining and Texturing
-
Form the Neck:
Build the neck vertically for about 3-4 inches; I find that keeping the neck slightly thicker adds visual weight and stability to the piece. -
Rim Definition:
Finish the top rim by smoothing it with a chamois or sponge, leveling it off but keeping a slight organic undulation for character. -
Create Texture:
Using a serrated metal rib, scrape the exterior surface vertically and horizontally to create a rough, cross-hatched texture resembling hewn stone. -
Highlight the Neck:
Use a modeling tool to gently indent a horizontal line or groove right where the shoulder meets the neck, adding a purposeful detail. -
Dry Slowly:
Cover the vase loosely with plastic to dry very slowly over several days; this is crucial for coil pots to prevent cracking at the seams.
Coil Consistency
Work in batches of 3-4 coils at a time. If you build too high too fast with wet clay, the walls will slump under their own weight.
Step 3: Firing and Glazing
-
Bisque Fire:
Once fully bone dry, fire the piece to a bisque temperature (typically cone 04 or 06) to prepare it for glazing. -
Apply Glaze:
Dip or pour a matte white glaze over the vase; a matte finish is essential to allow the serrated texture to show through rather than being filled in. -
Wipe the Texture:
For added depth, lightly sponge off some glaze from the high points of the texture, letting the raw clay body peek through slightly. -
Final Fire:
Fire the vase to the maturity temperature of your clay body (likely cone 5/6 or cone 10). -
Sand and Finish:
After firing, use wet sanding paper to smooth the bottom of the foot so it won’t scratch your furniture.
Change the Tone
Mix a small amount of mason stain (like burnt umber) into your white slip before texturing to create an antique, weathered look.
Place your finished hero vase on a console and fill it with tall, dramatic branches to complete the look


What Really Happens Inside the Kiln
Learn how time and temperature work together inside the kiln to transform clay into durable ceramic.
Mantel or Console “Gallery Line” Display
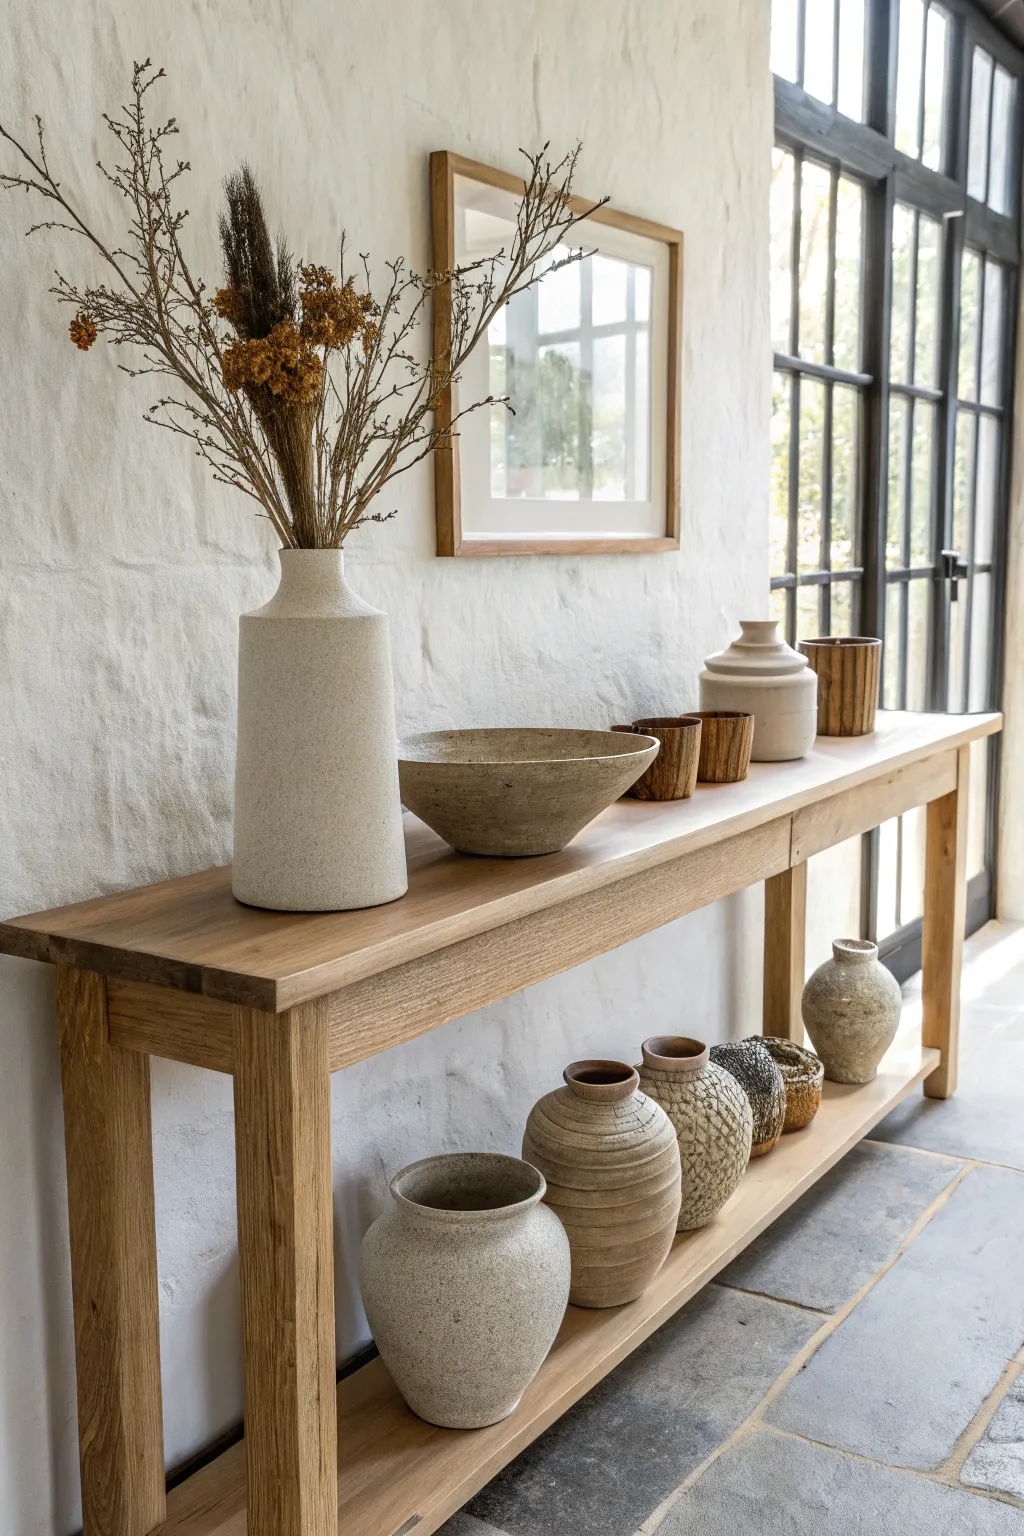
Transform a simple console table into a serene gallery space by arranging tonal stoneware and organic elements. This display relies on the interplay of texture, varying heights, and a cohesive earthy palette to create a calming, minimalist focal point.
How-To Guide
Materials
- Long wooden console table (light oak or raw finish)
- Large tall cylindrical ceramic vase (speckled cream/white)
- Wide, shallow ceramic bowl (unglazed, sandy texture)
- Set of small wooden or ceramic cups (earth tones)
- Lidded ceramic jar (cream/beige)
- Various round ceramic vessels for bottom shelf (textured, ribbed, or speckled)
- Dried botanical arrangement (tall grasses, brown florals, twigs)
- Wall art with light wood frame (abstract or minimalist)
- Putty or museum wax (optional for stability)
Step 1: Planning and Foundation
-
Assess the Space:
Begin with a blank canvas. Clear your console table completely and ensure the wall behind it is clean. This display works best against a textured or white-washed wall, so consider the backdrop before placing items. -
Establish the Anchor:
Identify your largest piece, which is the tall, speckled cylindrical vase. Place this on the left side of the top surface. It acts as the primary vertical anchor for the entire composition. -
Create Height with Florals:
Insert your dried botanical arrangement into the tall anchor vase. You want height and volume here without visual weight. Arrange the twigs and dried blooms so they fan out asymmetrically, reaching up and slightly towards the center.
Wobbly Vases?
If a handmade vessel sits unevenly on the wood surface, stick small felt furniture pads or a ring of museum putty underneath to level it instantly without damage.
Step 2: Balancing the Top Shelf
-
Position the Centerpiece:
Place the wide, shallow bowl slightly off-center to the right of the tall vase. Leave a few inches of breathing room between them. The low profile of this bowl contrasts beautifully with the vertical lines of the vase. -
Add Intermediate Heights:
On the far right side of the console, place the lidded ceramic jar. This object provides a medium height that bridges the gap between the low bowl and the tall floral arrangement. -
Cluster Small Objects:
Fill the visual gap between the shallow bowl and the lidded jar with a small grouping of cups or tiny vessels. I like to group two or three similar items here, staggering them slightly back-to-front rather than in a straight line. -
Hang the Artwork:
Center your framed artwork on the wall above the console. Hang it so the bottom frame line sits just below the top of your floral arrangement, creating a layered effect where the botanicals partially obscure the art frame.
Add Organic Softness
Drape a sheer, neutral linen runner casually under the pottery on the top shelf to introduce fabric texture and soften the straight lines of the wood.
Step 3: Styling the Lower Shelf
-
Establish the Bottom Anchor:
On the bottom shelf, place a large, rotund vessel directly below the grouping of small cups on the top shelf. This creates a diagonal visual line from the top left (florals) to the bottom right. -
Create a Gradient:
Arrange the remaining round vessels in a line to the left of your bottom anchor. Order them loosely by size or texture, but keep the spacing tight. The idea is to create a ‘heavy’ collection that grounds the lighter, airier top display. -
Mix Textures:
While arranging the bottom shelf, alternate smooth, ribbed, and heavily textured surfaces. For example, place a ribbed vase next to a smooth speckled one. This subtle contrast keeps the monochromatic color scheme from feeling flat. -
Check for Negative Space:
Step back and look at the empty space on the bottom shelf’s left side. This emptiness is crucial; it balances the visual weight of the tall vase directly above it.
Step 4: Final Adjustments
-
Refine the Palette:
Ensure all pottery pieces share a similar tonal family—creams, beiges, light browns, and soft grays. Remove any piece that disrupts this harmony with a jarring color. -
Adjust Angles:
Rotate your vessels to show their ‘best side.’ Handmade pottery often has one side with better texture or speckling. Turn them until they catch the light just right. -
Secure the Pieces:
If your console is in a high-traffic area, place a small pea-sized amount of museum wax under the more precarious items like the tall vase or the stacked bowls to prevent tipping. -
Lighting Check:
Observe how natural light hits the textures. If possible, position the arrangement near a window where side-light will emphasize the ribs and speckles of the ceramics.
Enjoy the peaceful atmosphere your curated gallery display brings to the room
Plate Rails and Ledges for Upright Display
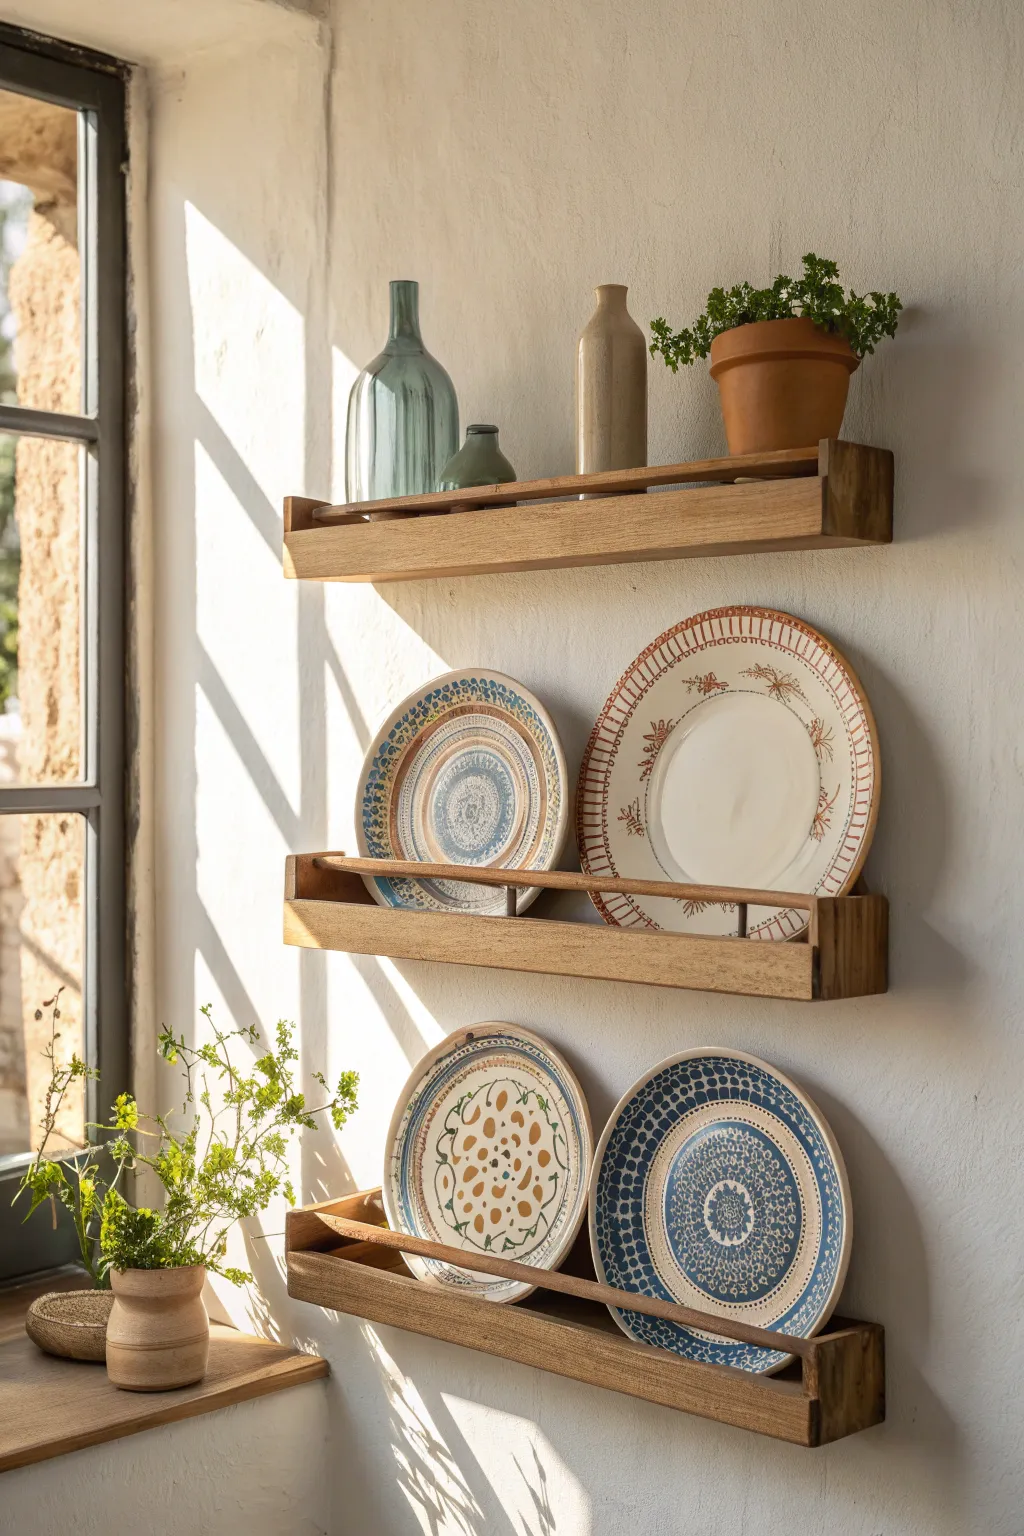
Showcase your favorite pottery pieces with these charming, rustic-style wooden plate rails that allow plates to stand upright securely. The shallow depth and front retaining bar create a perfect gallery wall effect, bathing your collection in natural light without taking up valuable floor space.
Step-by-Step Tutorial
Materials
- Hardwood boards (e.g., Oak or Walnut) – 1×4 inch for the back and bottom
- Hardwood strips – 1×2 inch for the front lip (or 1/2 inch dowels)
- Wood glue
- Clamps
- Brad nailer and nails (or finish nails and hammer)
- Sandpaper (120 and 220 grit)
- Wood stain (e.g., Early American or Jacobean)
- Matte polyurethane varnish
- Drill with countersink bit
- Wall anchors and mounting screws
- Level
- Stud finder
Step 1: Creating the Shelf Base
-
Measure and Cut:
Determine your desired length for the shelves; the example uses approximately 24-30 inches. Cut two pieces of 1×4 hardwood board for each shelf layout: one for the back plate (which mounts to the wall) and one for the bottom shelf base. -
Cut the Front Rail:
For the front retainer, cut either a 1×2 strip or a wooden dowel to the exact same length as your shelf boards. This piece is crucial for keeping the circular plates from rolling off. -
Assemble the L-Shape:
Run a bead of wood glue along the long edge of the bottom shelf piece. Place the back plate perpendicular to it, creating an ‘L’ shape. I find it easiest to use corner clamps here to ensure a perfect 90-degree angle. -
Secure the Joint:
While the glue is wet, drive brad nails through the back of the rear board into the edge of the bottom board. Space them every 4-6 inches for a sturdy hold.
Plate Slipping?
If plates slide forward, add a small strip of clear adhesive rubber bumper tape inside the front lip or along the bottom groove for extra grip.
Step 2: Adding the Retaining Lip
-
Position the Front Piece:
If using a flat 1×2 board (as seen on the top and bottom shelves), apply glue to the front edge of the shelf base and attach the 1×2 upright. If mimicking the middle shelf, you’ll need to drill small holes in the side end-caps or use a small block to support a dowel rod. -
Add Side Stops (Optional):
To close off the ends, cut small rectangles of wood to cap the L-shape profile. Glue and nail these into place to give the shelf a solid, box-like appearance and added structural integrity. -
Create the Safety Groove:
If you aren’t using a high front lip, use a router or table saw to cut a shallow V-groove or dado along the top face of the bottom board. This gives the plate edge a ‘track’ to sit in so it doesn’t slip forward.
Custom Spacing
Before mounting, lay your shelves and largest plates on the floor to visualize the perfect vertical gap without drilling unnecessary holes.
Step 3: Finishing the Wood
-
Initial Sanding:
Once the assembly is fully dry, sand the entire piece with 120-grit sandpaper to remove any dried glue squeeze-out and smooth sharp edges. -
Fine Sanding:
Follow up with 220-grit sandpaper for a furniture-grade smooth finish. Pay special attention to the front lip where hands might touch. -
Staining:
Apply your chosen wood stain with a clean rag. Wipe it on, let it sit for a few minutes depending on the desired darkness, and then wipe off the excess. Aim for a warm, natural tone to complement the pottery. -
Sealing:
Protect the wood with a coat of matte polyurethane. This prevents the unglazed bottoms of pottery from scratching the wood or leaving marks.
Step 4: Installation
-
Pre-drill Mounting Holes:
Drill pilot holes through the backboard of the shelf. Countersink these holes so the screw heads will sit flush or below the surface of the wood. -
Locate Wall Studs:
Using a stud finder, mark the vertical studs on your wall. Because pottery can be heavy, anchoring into studs is much safer than relying solely on drywall anchors. -
Level and Mount:
Hold the first shelf against the wall, place a level on top, and drive long mounting screws through your pilot holes into the studs. -
Spacing the Shelves:
Measure the diameter of your largest plate to determine the vertical spacing between shelves. Ensure enough clearance to lift the plates up and over the front lip comfortably. -
Final Styling:
Arrange your pottery. Place taller vases on the top shelf where there is no overhead obstruction, and lean your decorative plates on the lower rails, overlapping them slightly for a casual look.
Now you have a stunning, gallery-worthy display that turns your dishware into wall art

TRACK YOUR CERAMIC JOURNEY
Capture glaze tests, firing details, and creative progress—all in one simple printable. Make your projects easier to repeat and improve.
Bookcase Styling With Pottery “Breathers”
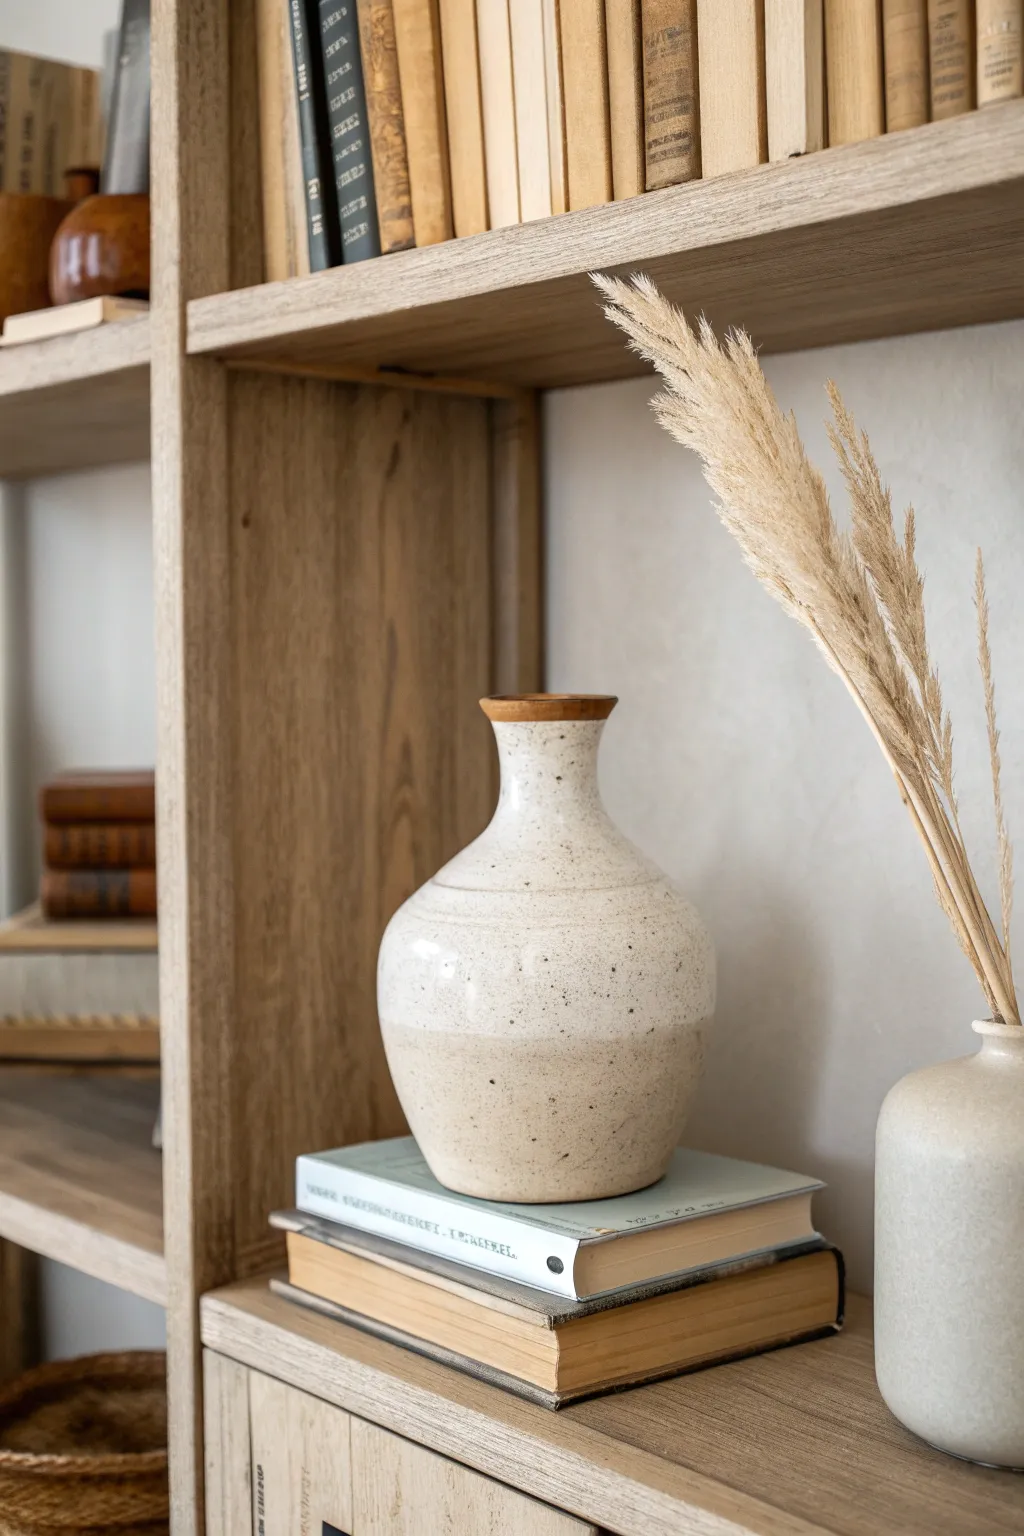
Create your own artisanal pottery piece with this two-tone, speckled vase project that mimics the look of high-end boutique ceramics. The design features a smooth cream glaze transition over a textured, raw-looking base, accented with delicate organic speckles.
Step-by-Step
Materials
- Air-dry clay (white or cream)
- Pottery wheel (optional) or coil-building tools
- Sponge and water
- Clay smoothing tool (rib)
- Acrylic paints (warm white, cream/beige, dark brown)
- Matte finish sealant spray
- Satin finish sealant spray
- Stiff bristle brush (e.g., old toothbrush)
- Fine grit sandpaper
- Painters tape
- Rolling pin (if hand-building)
Step 1: Shaping the Vessel
-
Prepare the base:
Start by wedging your clay to remove air bubbles. Create a circular base about 4-5 inches in diameter, ensuring it lies perfectly flat. -
Build the body:
If hand-building, roll out coils and stack them, blending the seams thoroughly. Build outwards to create a wide belly, then taper inward as you move up towards the neck. -
Form the neck:
Once the belly is distinct, narrow or ‘choke’ the form significantly to create a graceful, slender neck. Flare the very top slightly for a subtle rim. -
Refine the silhouette:
Use a damp sponge and a rib tool to smooth the outside walls. Focusing on the transition from the wide body to the narrow neck is key for that elegant profile. -
Dry thoroughly:
Allow the vase to dry completely. This can take 24-48 hours depending on humidity. Rotate it occasionally so it dries evenly. -
Sand for texture:
Gently sand the dried clay to remove rough fingerprints, but don’t polish it too much; a little texture adds to the organic feel.
Uneven Speckles?
Work efficiently but carefully. If you get a large bloat of paint while flicking, quickly dab it gently with a dry paper towel to blend it into a softer, aged spot rather than a harsh blob.
Step 2: Painting & Glazing Effect
-
Apply the base coat:
Paint the bottom third of the vase with a warm beige or sand-colored acrylic paint. This simulates the look of raw, unglazed stoneware. -
Paint the upper glaze:
Paint the upper two-thirds of the vase using a creamy white or off-white acrylic. You can overlap the beige section slightly for a natural transition. -
Create the dipped look:
To mimic a dipped glaze line, you don’t need a hard tape edge unless you prefer it. I find freehanding a slightly uneven horizontal line where the colors meet looks more authentic. -
Add a darker wash (optional):
If you want the bottom section to look more textured, water down a tiny bit of brown paint and wash it over the beige area, then wipe most of it off immediately with a paper towel. -
Paint the rim:
Carefully paint the very top rim with a copper or warm brown tone to create a defined contrast ring.
Level Up: Texture
Before the clay dries, gently press a rough linen cloth or canvas against the bottom third of the vessel. This imitates the heavy grain often seen on the unglazed foot of wheel-thrown pottery.
Step 3: Detailing & Sealing
-
Prepare the speckle mix:
Mix a small amount of dark brown paint with water until it is the consistency of ink. -
Apply the speckles:
Dip a stiff bristle brush (or toothbrush) into the thin paint. Use your thumb to flick the bristles, spraying tiny dots over the entire vase to create the stoneware speckle effect. -
Let the paint cure:
Allow all paint layers to dry fully before moving to sealing. -
Seal the bottom:
Tape off the white upper section. Spray the beige bottom section with a matte sealant to keep that raw clay appearance. -
Seal the top:
Once the matte spray is dry, tape off the bottom section. Spray the top white section with a satin or semi-gloss sealant to mimic the sheen of fired glaze.
Place your finished vase atop a stack of vintage books to complete the curated shelf aesthetic
Corner Shelves for a Pottery Nook
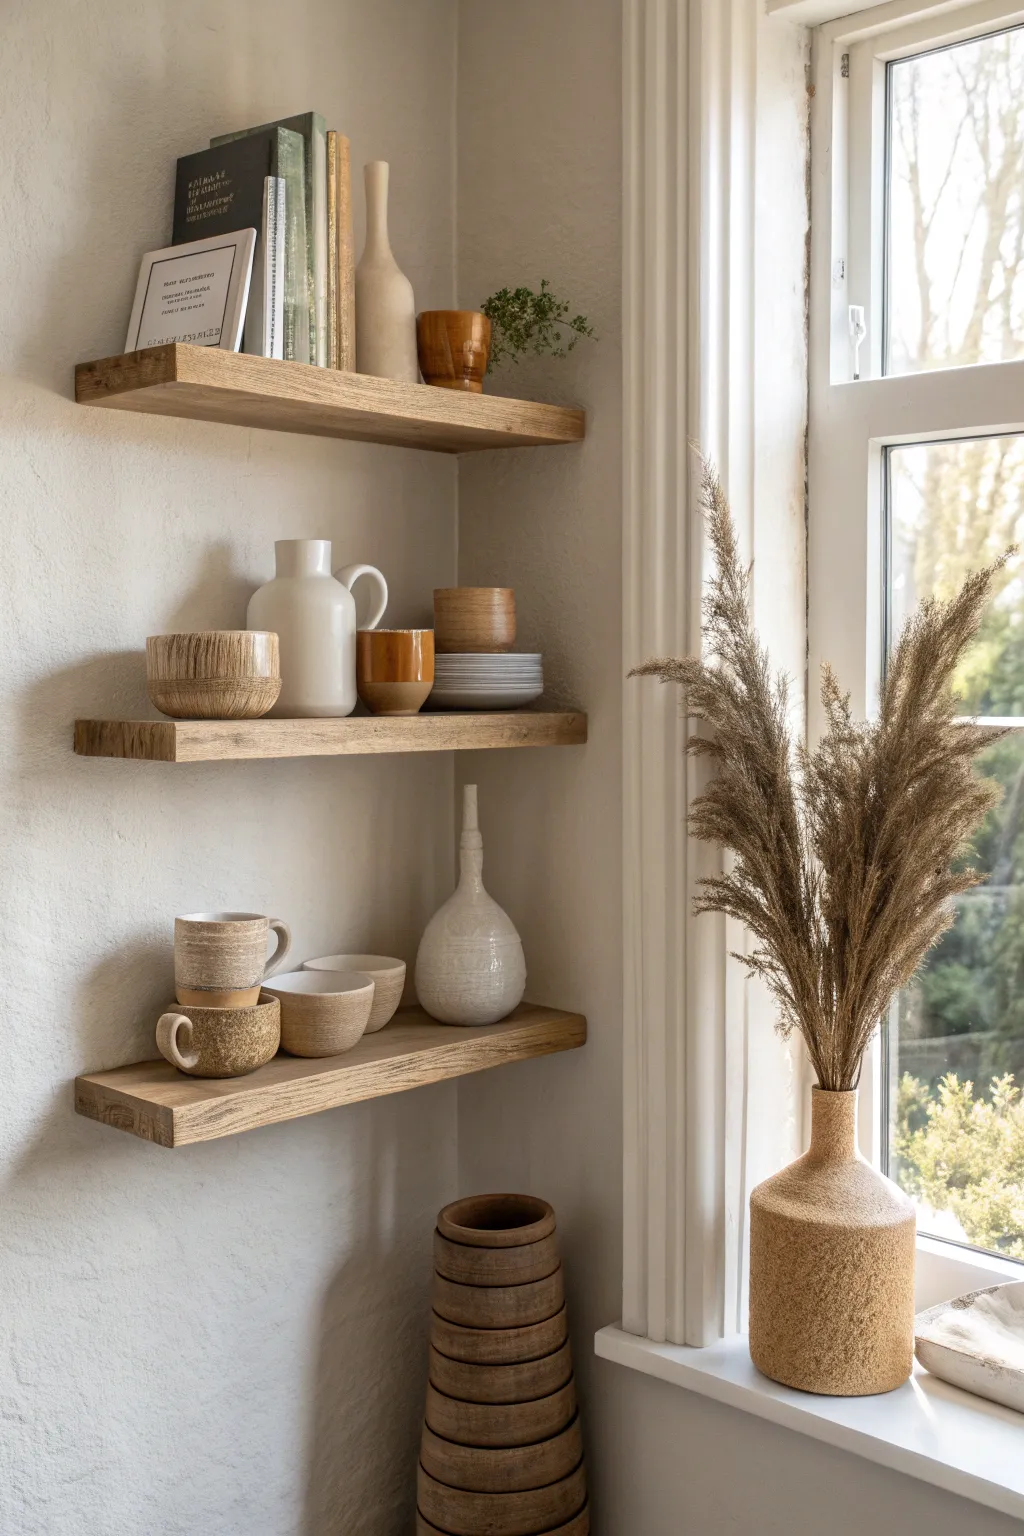
Transform an unused corner into a stunning gallery for your ceramics collection with these custom floating shelves. The natural wood tones and varied pottery textures create a warm, curated look that feels both minimalist and lived-in.
How-To Guide
Materials
- Three solid oak or ash wood planks (cut to size)
- Floating shelf hardware brackets (heavy duty)
- Stud finder
- Level
- Power drill
- Wall anchors (if studs aren’t available)
- Sandpaper (120 and 220 grit)
- Natural wood stain or Danish oil
- Clean rag
- Pencil
- Tape measure
Step 1: Preparing the Wood
-
Measure and cut:
Begin by measuring the precise width of your corner space. Cut your three wooden planks to your desired length; for a balanced look, lengths between 24 and 30 inches work well. Ensure the depth is sufficient for your largest pottery pieces, typically around 8-10 inches. -
Sand the surfaces:
Using an orbital sander or block, start sanding all sides of the wood with 120-grit sandpaper to remove rough spots. Follow up with 220-grit for a buttery smooth finish. -
Create a rustic edge:
To mimic the organic feel in the photo, slightly round off the sharp front corners and edges with your sandpaper. Avoid making it too uniform; slight imperfections add character. -
Apply the finish:
Wipe away all sawdust with a clean cloth. Generously apply a natural wood stain or Danish oil using a rag, working with the grain. I find lighter stains help the pottery colors pop without competing for attention. -
Let it cure:
Allow the wood to dry completely according to the manufacturer’s instructions before installation, usually 24 hours.
Pro Tip: Weight Distribution
Keep heaviest items (like stacks of plates) near the wall anchors. Place lighter items (dried flowers, single mugs) toward the shelf edge to prevent sagging.
Step 2: Installation
-
Determine placement:
Decide on the vertical spacing. For this look, allow about 12-14 inches between shelves to accommodate taller vases and book stacks. Mark the desired height of each shelf on the wall with a pencil. -
Find the studs:
Use a stud finder to locate the wall studs. Since pottery is heavy, anchoring into studs is crucial for safety. Mark these locations clearly. -
Level the lines:
Using a long level, draw a straight horizontal line at each shelf height marker to guide your bracket installation. -
Mount the brackets:
Hold your floating shelf bracket against the wall, aligning it with your level line and stud marks. pre-drill pilot holes, then secure the brackets tightly to the wall using heavy-duty screws. -
Prep shelves for hardware:
If using a blind shelf support system, drill corresponding holes into the back edge of your wood planks. This requires precision, so measure twice. -
Slide onto brackets:
Slide the wood planks onto the mounted brackets. They should fit confusingly; if there’s a gap, you may need to adjust the mounting screws slightly.
Troubleshooting: Uneven Walls
If your walls aren’t perfectly flat, the shelf might wobble. Place a small shim or washer behind the bracket to square it up before sliding the shelf on.
Step 3: Styling the Nook
-
Anchor with books:
On the top shelf, place a small stack of fabric-bound books vertically. Lean a framed print or card against them strictly for height variation. -
Layer textures:
Add a smooth, tall ceramic bottle next to the books, and balance it with a small wooden cup or bowl. The mix of paper, ceramic, and wood is key. -
Create the middle focal point:
On the middle shelf, place your largest white pitcher or vase off-center. Flank it with a smaller textured bowl on one side and a stack of plates on the other. -
Group by color:
For the bottom shelf, cluster earthy tones together. A stack of two varying mugs next to a simple bowl creates an inviting, ‘ready for tea’ vignette. -
Floor styling:
Don’t ignore the floor space. Stack large, rustic nesting bowls or planters vertically to draw the eye down. -
Add verticality:
Place a large floor vase with tall dried pampas grass or branches near the window to bridge the gap between the floor and the shelves, completing the composition.
Now you have a serene corner that perfectly highlights the beauty of your handmade collection
Minimal “White Shelf” Gallery Spacing
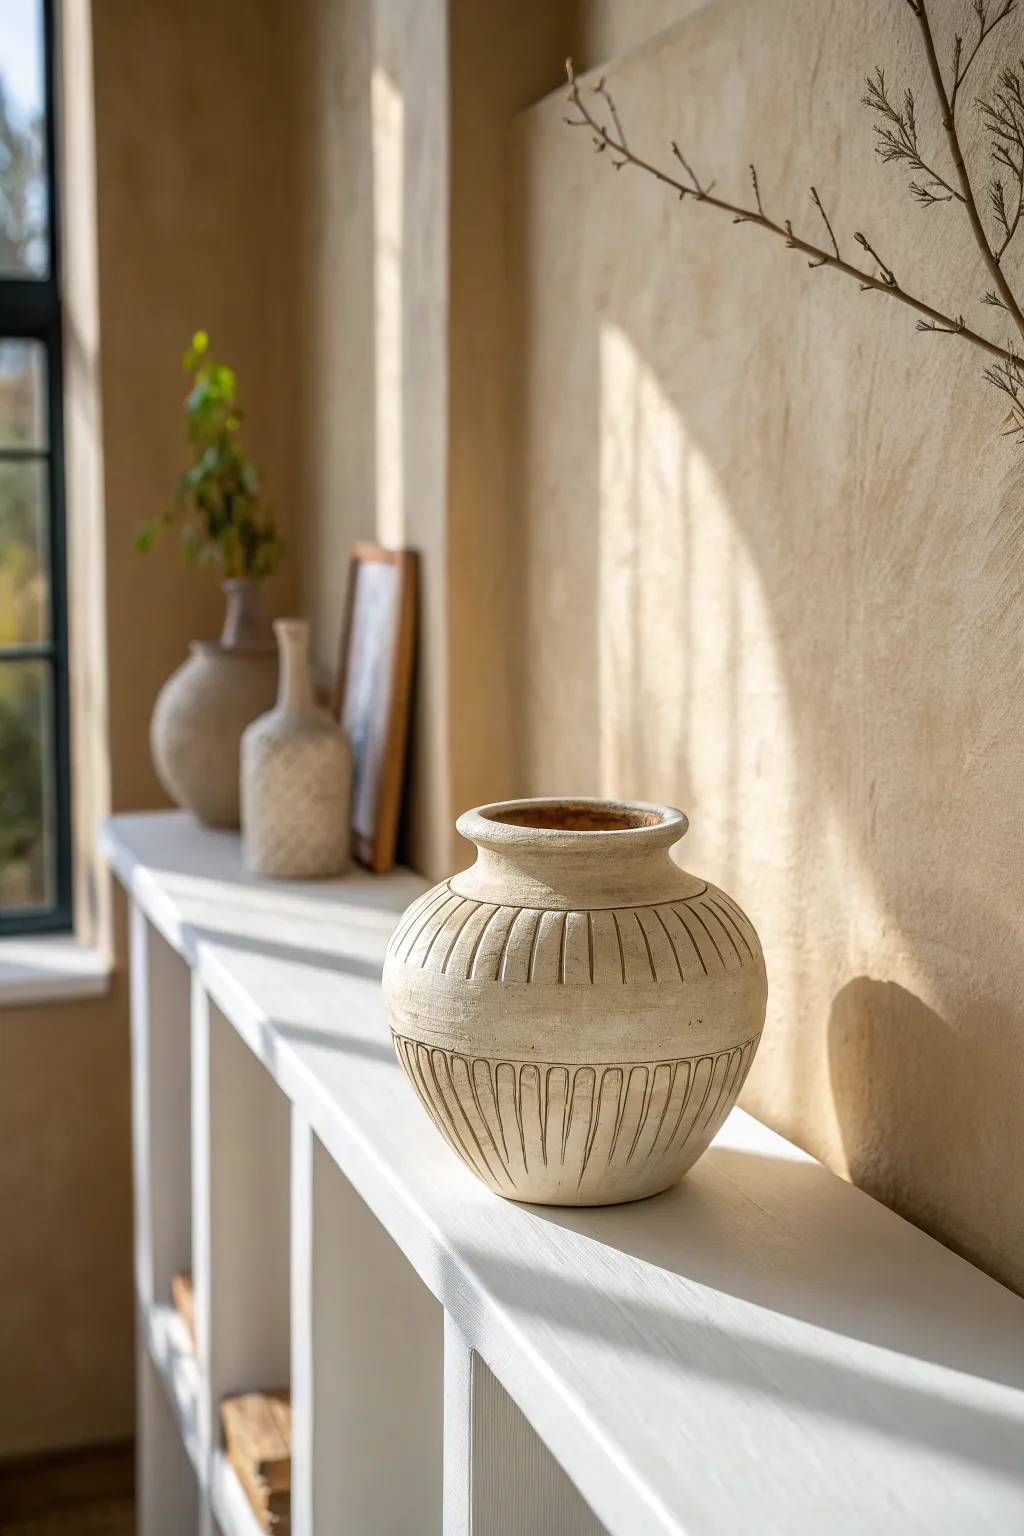
This tutorial guides you through transforming a plain, thrifted vase into a stunning, sun-washed piece of faux pottery. The final result features a warm, sandy tone with handcrafted carving and a weathered matte finish that perfectly suits a minimal, light-filled shelf display.
Detailed Instructions
Materials
- Plain ceramic or glass vase (preferably with a rounded belly)
- Baking soda or plaster of Paris
- Acrylic paint (warm beige, cream, and darker brown)
- Matte mod podge or clear matte sealer
- Medium grit sandpaper
- Palette knife or craft stick
- Sponge brush
- Fine detail brush
- Dull pencil or carving tool
Step 1: Texturing the Base
-
Prepare the mixture:
Begin by creating your texturing paste. Mix approximately one cup of warm beige acrylic paint with a half cup of baking soda. You want a consistency similar to fluffy frosting—thick enough to hold peaks but spreadable. -
Apply the first coat:
Using a sponge brush, dab the mixture all over your vase. Don’t brush it on smoothly; the dabbing motion creates that essential organic, stone-like texture. Let this layer dry completely for about an hour. -
Thicken the surface:
Apply a second, thicker coat of your paint and baking soda mixture. This time, I like to use a palette knife to build up slightly uneven areas, mimicking hand-thrown clay. -
Add detail bands:
While the second coat is still wet, use your fingers or a craft stick to smooth out a horizontal band around the neck and the belly of the vase where you intend to add carved details later. -
Initial drying:
Allow the vase to dry until it is tacky to the touch but not fully hardened. This usually takes 30-45 minutes depending on humidity.
Sticky Situation
Work quickly during the carving phase. If the paint dries too fast, mist it lightly with water to soften the surface again for easier carving.
Step 2: Carving the Details
-
Mark horizontal guides:
Using a dull pencil, lightly etch two horizontal lines around the upper shoulder of the vase to define the top carving zone. Repeat this process for the lower section of the belly. -
Carve vertical fluting:
With the edge of a craft stick or clay tool, press into the semi-dry paint within your marked zones. Create vertical indentations spaced evenly apart to form a fluted pattern. -
Refine the lines:
Go back over your vertical lines to deepen them slightly. The paint mixture might push up at the edges; leave this ruggedness as it adds to the authentic, aged look. -
Create the mid-line:
Carve a single, steady horizontal line separating the upper and lower fluted sections, giving the vase structure and visual interest. -
Full cure:
Set the vase aside in a warm, dry spot and let it cure fully overnight. The baking soda mixture needs to be completely hard before the next steps.
Cracking Up?
Small cracks may appear as the baking soda dries. Don’t fill them! These hairline fractures add incredible realism to the ‘ancient pottery’ look.
Step 3: Finishing and Aging
-
Sand for smoothness:
Once fully dry, take medium-grit sandpaper and very lightly scuff the surface. Focus on the high points of your texture to knock down any overly sharp peaks. -
Prepare the wash:
Mix a small amount of darker brown paint with water (about 1 part paint to 4 parts water) to create a watery antiquing wash. -
Apply the antique wash:
Brush the dark wash over the carved areas, ensuring the liquid settles deep into the grooves of the fluting and horizontal lines. -
Wipe back:
Immediately use a slightly damp cloth to wipe the dark paint off the raised surfaces. This leaves shadows in the crevices, highlighting your carved design. -
Add highlighting:
Dry brush a tiny amount of cream or white paint on the very top ridges of the vase neck and the widest part of the belly to catch the light. -
Seal the piece:
Finish by applying a coat of matte Mod Podge or a spray matte sealer. This protects the textured paint from chipping and gives it a unified, soft sheen.
Place your newly textured vase on a shelf where it can catch natural light to emphasize the beautiful carved details
Tiered Risers for Craft-Fair Tables
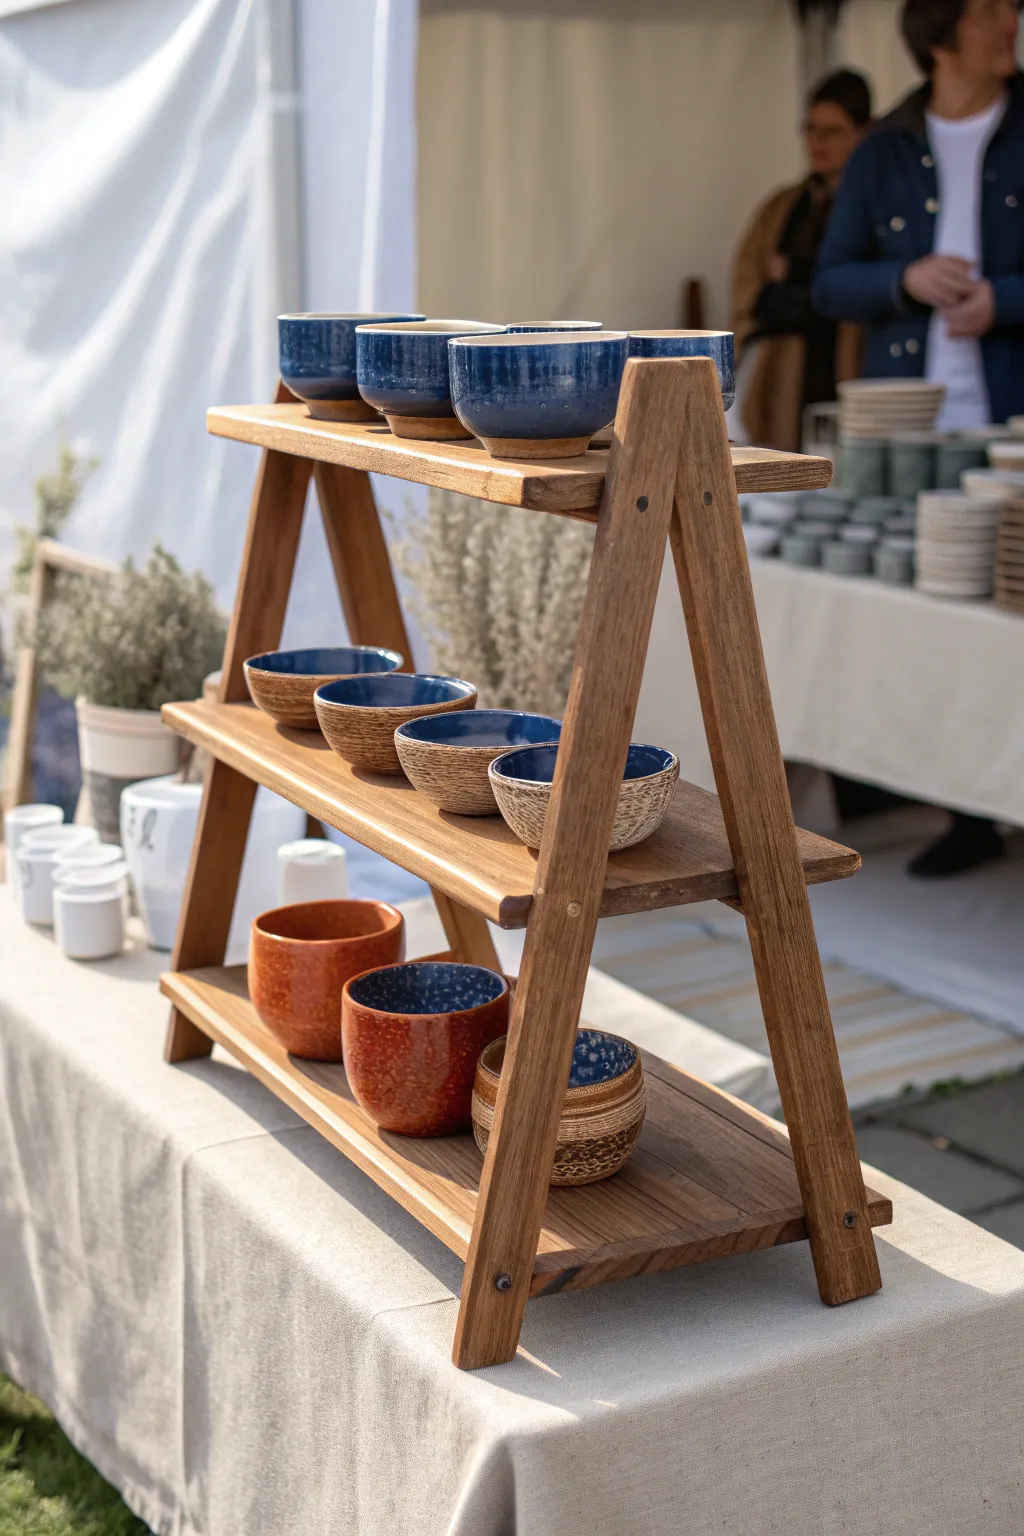
Elevate your pottery display literally and figuratively with this sturdy, handcrafted A-frame riser. Its warm wood tones and tiered open design allow natural light to filter through, perfectly highlighting the textures of your ceramic work without overshadowing it.
Step-by-Step Tutorial
Materials
- 4 lengths of 1×2-inch hardwood lumber (oak or walnut works beautifully)
- 3 lengths of 1×6-inch lumber (for the shelves)
- Wood glue
- 8 carriage bolts with washers and wing nuts
- Wooden dowels (optional, for shelf stops)
- Sandpaper (120 and 220 grit)
- Drill with bits matching your bolt size
- Saw (miter saw or hand saw)
- Matte wood finish or Danish oil
- Clamps
- Measuring tape and pencil
Step 1: Constructing the A-Frames
-
Cut the Legs:
Begin by cutting your 1×2 lumber into four equal lengths for the legs. A length of about 30-36 inches usually provides a good height for tabletop displays. -
Angle the Feet:
Set your miter saw to a 15-degree angle. Cut the bottom of each leg so they will sit flush against the table surface when the A-frame is open. -
Round the Tops:
On the opposite end of the angled cut, use a jigsaw or coping saw to round over the top corners of the legs for a softer, finished look. I find tracing a small jar lid helps get a perfect curve. -
Drill Pivot Holes:
Measure about 2 inches down from the rounded top of each leg. Mark the center point and drill a hole through the face of the board that perfectly matches the diameter of your carriage bolts. -
Create the Hinge Mechanism:
Pair the legs up. Insert a carriage bolt through the top holes of two legs, place a washer in between the wood pieces to prevent friction, and secure with a wing nut. Repeat for the second A-frame.
Wobbly Frame?
If the stand rocks, check your leg lengths. You can sand down the longer leg slightly, or add self-adhesive felt furniture pads to the bottom of all legs to absorb small unevenness.
Step 2: Preparing the Shelves
-
Cut Shelf Lengths:
Cut your 1×6 lumber into three distinct lengths to create the pyramid effect shown in the image. Try 36 inches for the bottom, 28 inches for the middle, and 20 inches for the top. -
Smooth the Edges:
Sand all cut edges of your shelves thoroughly, starting with 120 grit and finishing with 220 grit to remove any splinters. -
Mark Shelf Positions:
Open your A-frames to the desired width. Stand them up and use a level to mark horizontal lines across the legs where you want each shelf to rest. -
Create Supports:
You have two options here: you can glue and screw small wooden storage blocks (cleats) on the inside of the legs at your marked lines, or drill holes for thick dowel pegs that the shelves will sit on. -
Adding Safety Stops:
To prevent shelves from sliding off, I like to glue small, thin strips of wood to the underside of the shelves, just inside where they rest on the A-frame supports.
Make It Portable
Replace the shelf cleats with removable dowel pins. This allows you to completely dismantle the shelves and fold the A-frames flat, making the whole unit fit into a single tote bag.
Step 3: Assembly and Finishing
-
Sand Everything:
Give the entire structure a final sanding. Pay special attention to the A-frame legs where hands will touch them during setup. -
Apply Finish:
Wipe away all dust with a tack cloth. Apply a generous coat of Danish oil or a matte clear coat to bring out the grain. Let it penetrate, then wipe off the excess. -
Dry and Cure:
Allow the finish to cure fully according to the manufacturer’s instructions before assembling. -
Test Assembly:
Set up the frames on a flat surface, open them, and slide the shelves into place on their supports. Check for wobbles and adjust the wing nuts for stiffness.
Once assembled, this collapsible unit provides a professional, gallery-style backdrop that makes setup at your next fair a breeze.
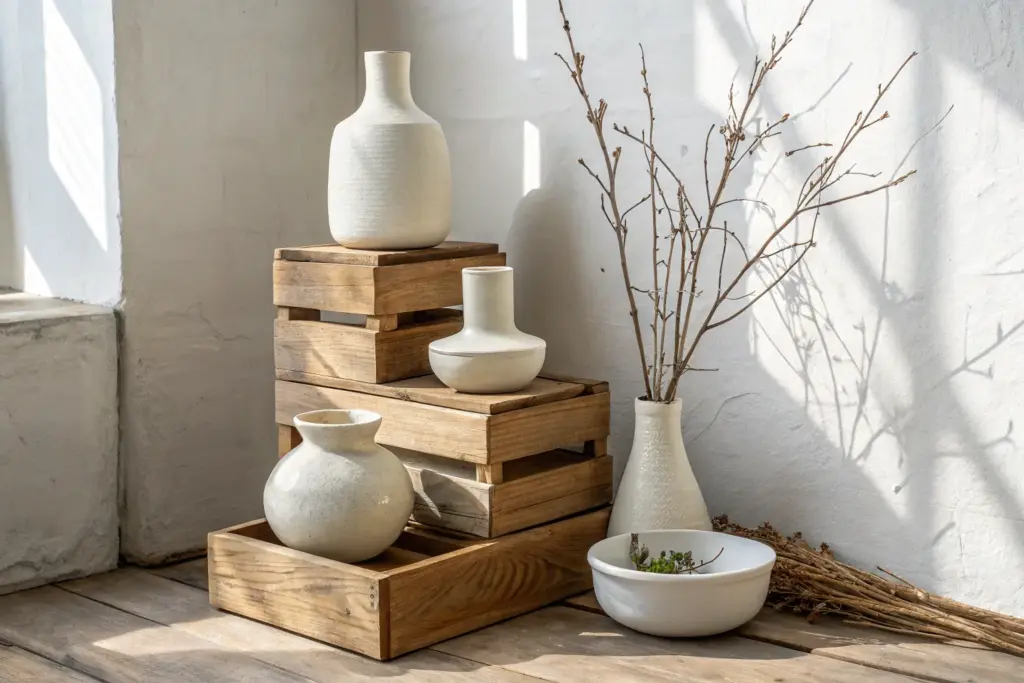
Stacked Wooden Crates as Modular Cubbies
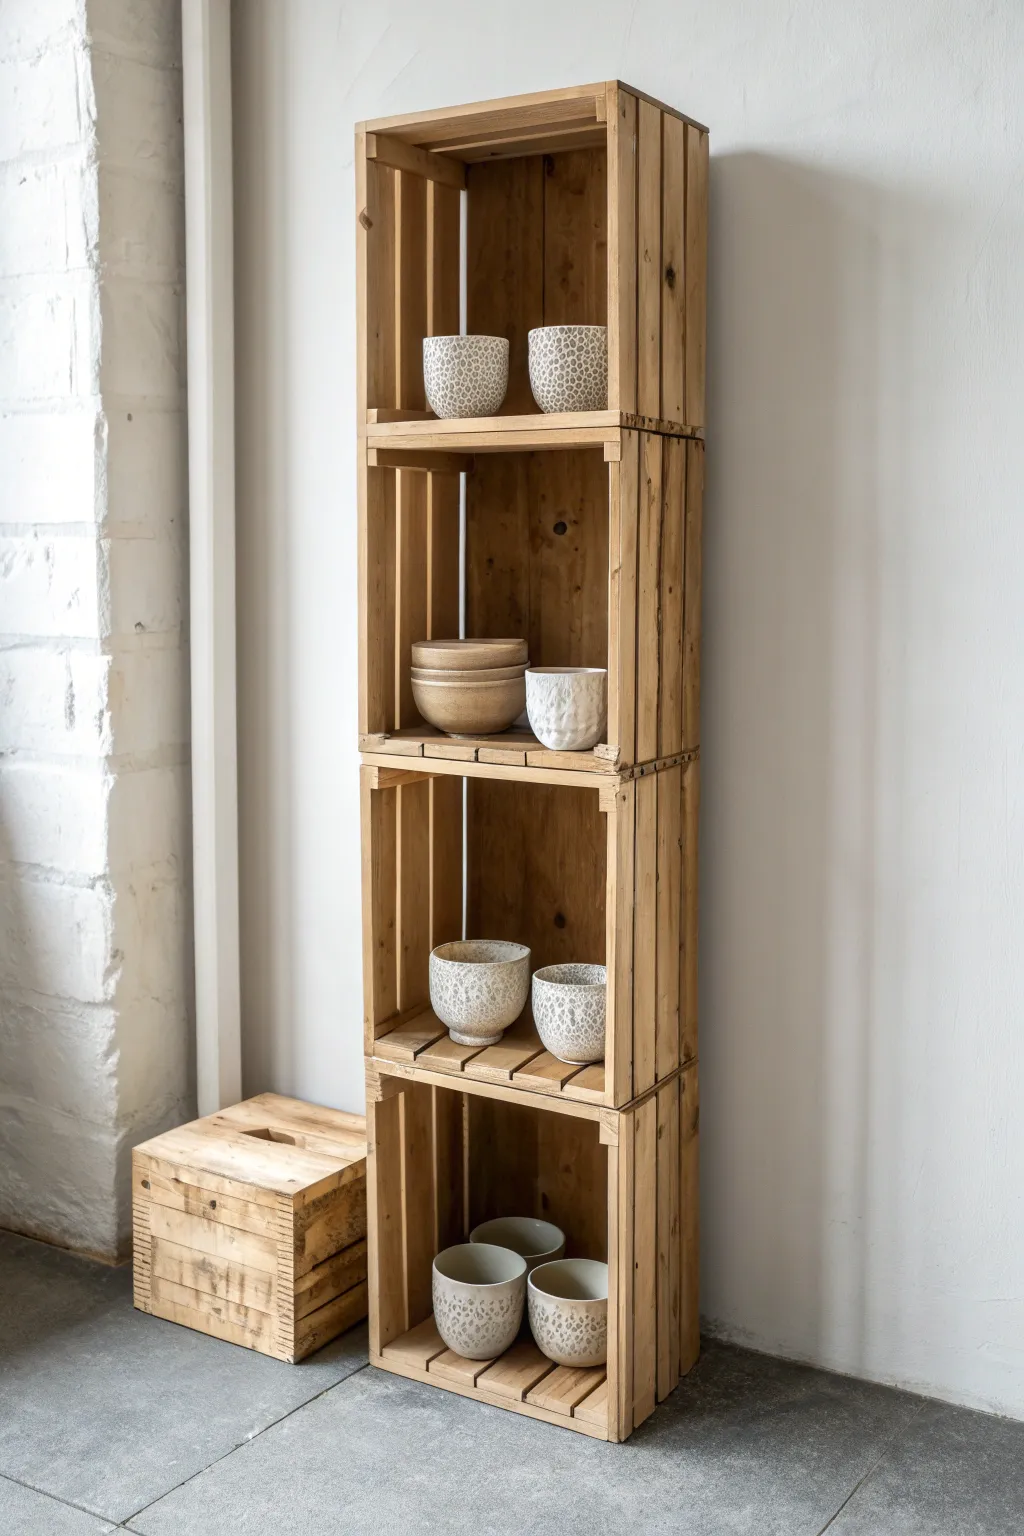
Transform simple wooden fruit crates into a vertical, rustic display tower perfect for showcasing your handmade pottery collection. This modular solution offers an airy, open feel while providing sturdy storage that fits into narrow spaces with ease.
How-To Guide
Materials
- 4 Wooden crates (approx. 50cm x 30cm x 40cm)
- Sandpaper (120 and 220 grit)
- Wood stain (light oak or natural pine finish)
- Clean rags or staining sponge
- Wood glue
- Small bar clamps (at least 4)
- Drill and small drill bit (optional)
- Short wood screws (optional for extra stability)
- Felt furniture pads
- Matte spray varnish
Step 1: Preparation & Finishing
-
Inspect the crates:
Examine your wooden crates for any loose staples, rough splinters, or dirt. Remove staples with pliers and brush away loose debris to ensure a clean starting surface. -
Initial sanding:
Using the 120-grit sandpaper, thoroughly sand all surfaces of the crates. Focus heavily on the top and bottom edges where the crates will meet, ensuring they are flat and flush. -
Refine the surface:
Switch to 220-grit sandpaper for a final pass. This smooths the wood grain, which is crucial for preventing snags on delicate pottery later. -
Wipe down:
Use a tack cloth or slightly damp rag to remove every speck of sawdust. This step ensures your stain applies evenly without trapping grit. -
Apply stain:
Dip a clean rag or sponge into your light oak wood stain. Rub it into the wood in the direction of the grain, working on one crate at a time to maintain a wet edge. -
Wipe excess:
After letting the stain penetrate for about 5-10 minutes (check your can for specifics), wipe away any excess liquid. I find this prevents dark, sticky patches from forming. -
Seal the wood:
Once the stain is completely dry, apply a light coat of matte spray varnish. This protects the wood from moisture if you place plant pots or freshly washed ceramics inside.
Wall Anchor Safety
Since this tower is tall and narrow, anchor the top crate to the wall using a simple L-bracket. This prevents tipping, which is crucial if you have pets or kids.
Step 2: Assembly
-
Dry run stacking:
Stack your four crates vertically on a flat floor to test the alignment. Rotate or rearrange them until you find the configuration where the edges sit most flush against each other. -
Add floor protection:
Stick felt furniture pads to the four corners of the bottom-most crate. This allows you to slide the finished tower without scratching your floors. -
Bottom crate placement:
Place your base crate in its final working spot or on your workbench. Apply a generous bead of wood glue along the top four corners and the side rails. -
Stack the second tier:
Carefully lower the second crate onto the base, aligning the corners perfectly. Press down firmly to seat the glue. -
Clamp tight:
Use bar clamps to hold the two crates together while the glue sets. Place one clamp on each side, squeezing the top rail of the lower crate to the bottom rail of the upper one. -
Repeat for upper tiers:
Continue this process for the third and fourth crates. Ensure the tower remains vertical and isn’t leaning forward or backward as you add height. -
Optional reinforcement:
For a permanent bond, you can pre-drill pilot holes and drive short wood screws through the inside bottom rail of the upper crate into the top rail of the crate below. -
Final drying time:
Let the entire structure sit undisturbed for at least 24 hours to allow the wood glue to cure completely before loading it with weight. -
Styling the tower:
Arrange your pottery pieces. Place heavier, larger bowls on the bottom shelves for visual and physical stability, and lighter cups or small vases on the top tiers.
Create a shadow box effect
Paint the inside back slats of each crate a dark charcoal or soft sage green before assembly. This creates a contrasting background that makes light-colored ceramics pop.
Now you have a charming, gallery-style display unit ready to highlight your favorite ceramic pieces
Ladder-Style Shelves for Portable Height
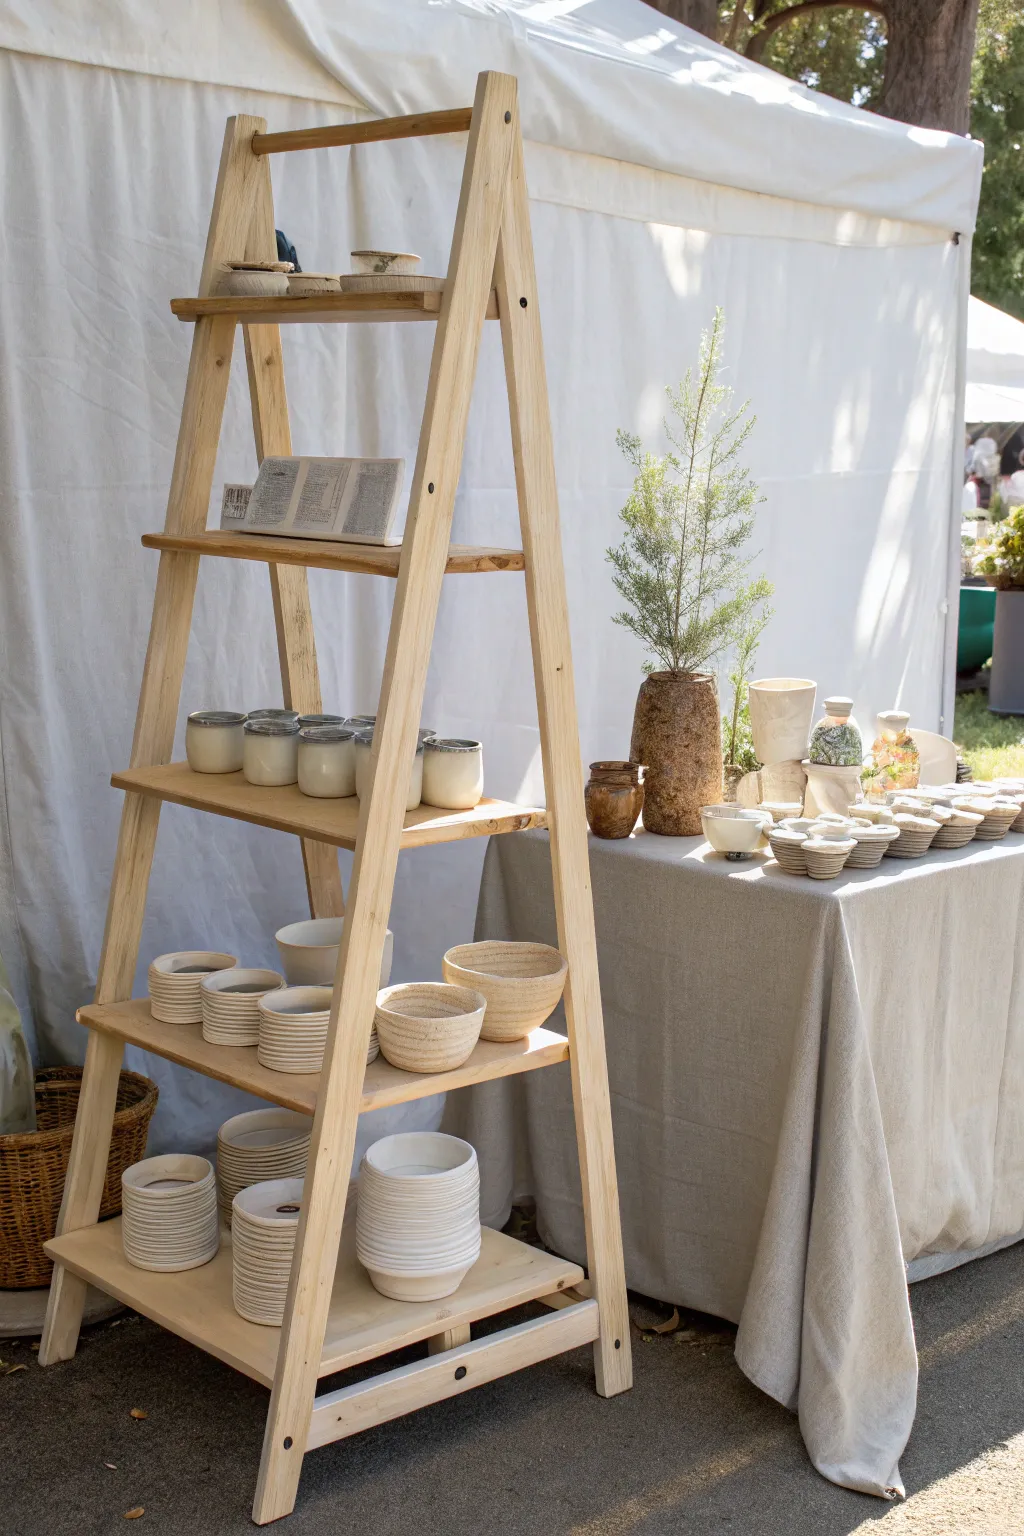
Elevate your market display with this minimalist, collapsible A-frame shelving unit that combines the warmth of natural pine with functional portability. Its clean lines and open structure allow your pottery to take center stage, while the sturdy design ensures your delicate wares are safe and secure.
Step-by-Step Guide
Materials
- Four 1×3 inch pine boards (6-7 feet long) for the legs
- Assorted 1×8 or 1×10 inch pine boards for shelves (varying lengths)
- Four heavy-duty strap hinges
- Wood glue
- 1.5-inch wood screws
- Sandpaper (80, 120, and 220 grit)
- Circular saw or miter saw
- Power drill and drill bits
- Measuring tape and pencil
- Clamps
- Matte polyurethane sealant (optional)
Step 1: Constructing the Ladder Frames
-
Cut the legs:
Begin by cutting your four 1×3 pine boards to your desired total height; around 6 feet is usually perfect for a market tent. Cut the bottom of each board at a 10-15 degree angle so the feet sit flush on the ground when the ladder is open. -
Measure shelf spacing:
Lay two leg boards flat on the ground, parallel to each other. Mark the positions for your shelf supports. I like to start the bottom shelf about 12 inches from the floor and space the remaining three shelves roughly 14-16 inches apart. -
Cut the cross-braces:
Cut horizontal support pieces (rungs) from the 1×3 scrap or extra stock. These will connect the two legs and hold the shelves. Ensure the width matches your desired shelf depth plus a little extra for stability. -
Assemble the first ladder side:
Position your rungs between the two leg boards at your marked locations. Pre-drill holes to prevent splitting the pine. -
Secure the rungs:
Apply a dab of wood glue to the ends of the rungs, then screw through the outside of the leg boards into the rung ends. Use two screws per connection point for rigidity. -
Build the mirror image:
Repeat the entire process to build the second ladder frame. Important: Ensure your rung heights match the first frame exactly so your shelves sit level.
Wobbly Wonder?
If the ladder feels unstable on uneven festival grass, bring wood shims. Simply wedge a shim under the floating leg until stable, or attach adjustable screw-in feet to the bottom of the legs.
Step 2: Assembly and Finishing
-
Connect the frames:
Stand the two ladder frames up and bring the tops together. You may need to sand or cut a slight bevel at the very top of the legs where they meet to ensure a flush fit. -
Install the hinges:
Place your heavy-duty strap hinges at the very top, connecting the two frames. Screw them in securely so the unit can open and close like a classic step ladder. -
Prepare the shelves:
Cut your 1×8 or 1×10 boards to length. The bottom shelf should be the longest, with each subsequent shelf getting shorter as you move up the A-frame. Measure the distance between rungs on the open ladder to get exact lengths. -
Sand everything down:
Sand all the frames and shelf boards thoroughly. Start with 80 grit to remove rough saw marks, then move to 120, and finish with 220 for a smooth feel that won’t scratch your pottery. -
Round the edges:
Pay special attention to the corners of the shelf boards. Gently rounding them off with sandpaper protects customers from sharp edges as they browse.
Step 3: Final Touches and Setup
-
Test the fit:
Open the ladder frame and slide your shelves onto the rungs. They should rest freely without being screwed down, allowing for easy disassembly during transport. -
Add safety stops:
To prevent the shelves from sliding side-to-side, you can nail small wooden blocks on the underside of each shelf, just inside the ladder rungs. -
Seal the wood:
Apply a coat of clear matte polyurethane if you expect to be outdoors often. This protects the raw pine color without making it look glossy or artificial. -
Attach a limiter chain:
Screw a small eye hook into the inside of a leg on each frame, about halfway down. Connect them with a light chain to prevent the A-frame from doing the splits on slippery floors. -
Check stability:
Set up the unit on a flat surface and give it a gentle shake. If it rocks, sand the bottom of the longer leg until it sits dead flat.
Pro Tip: Quick Pack-up
Number the underside of your shelves (1-4) with a pencil. Since they are different lengths, this saves you from playing a guessing game during the frantic setup phases of a market.
Once fully assembled, arrange your ceramic pieces by color or size to create an inviting visual flow up the shelves
A Bold Backdrop Wall to Frame Your Pieces
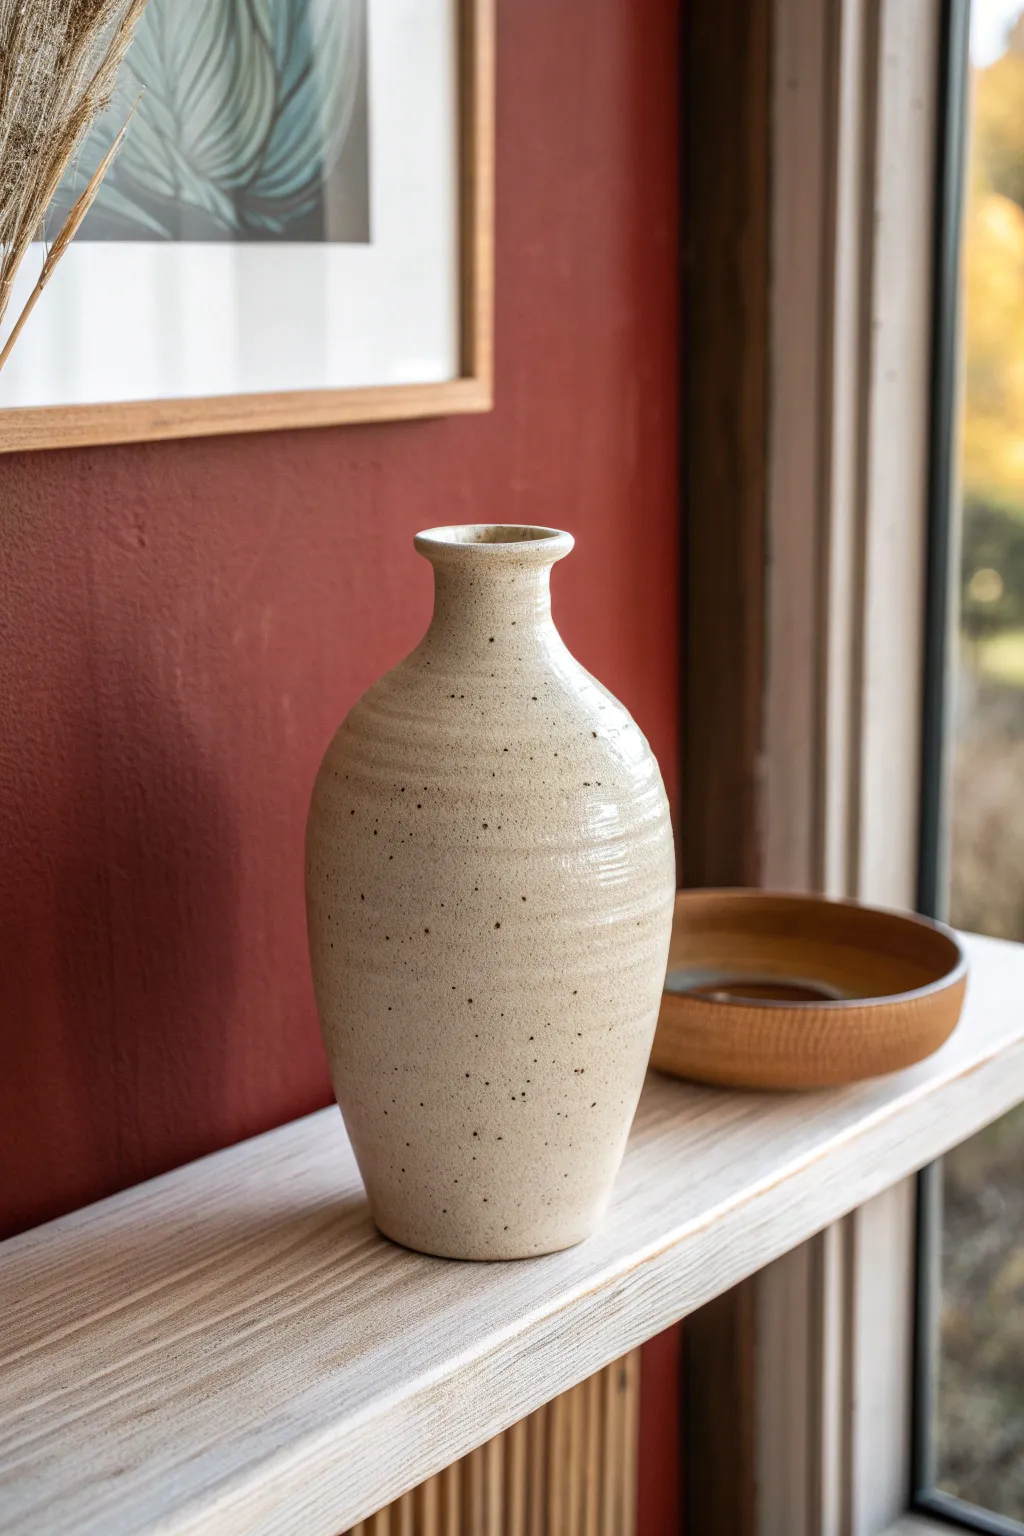
Transform a simple shelf into a gallery-worthy display by painting the wall behind it in a rich, deep color. This specific shade of reddish-brown creates a warm, dramatic contrast that makes cream speckled pottery and natural wood tones pop beautifully.
Step-by-Step Tutorial
Materials
- Interior latex paint (matte or eggshell finish) in ‘Barn Red’ or ‘Deep Terracotta’
- Painter’s tape (high-quality)
- Drop cloth or masking paper
- Spackling paste and putty knife (if needed)
- Fine-grit sanding sponge
- Microfiber tack cloth
- Angled sash brush (2-inch)
- Small foam roller or 4-inch roller with fine nap cover
- Paint tray
- Mild detergent and water
Step 1: Preparation
-
Clear and Clean:
Remove all items from the shelf and the surrounding area. If the shelf is removable, take it down to make painting easier; if it’s built-in like the one in the photo, you’ll need to work around it carefully. -
Wash the Wall:
Using a mild detergent and warm water, gently wipe down the section of the wall you intend to paint. This removes dust and oils that could prevent the paint from adhering properly. -
Repair Imperfections:
Inspect the wall for nail holes or dents. Fill them with a small amount of spackling paste, let it dry completely, and then sand it smooth with your fine-grit sanding sponge. -
Remove Dust:
Wipe away any sanding dust with a microfiber tack cloth to ensure a perfectly smooth surface for your new color. -
Protect Surfaces:
Lay down your drop cloth on the floor. If you are painting around a window frame or molding, apply painter’s tape firmly along the edges to protect the wood. -
tape the Shelf:
If your shelf is staying in place during painting, apply painter’s tape precisely along the back edge where the shelf meets the wall. Run your finger along the tape edge to seal it tight and prevent paint bleed.
Crisp Line Secret
To prevent bleeding on textured walls, paint a thin line of the base trim color along the tape edge first to seal it before applying the red.
Step 2: Painting
-
Cut In Edges:
Open your paint can and stir thoroughly. Dip your angled sash brush about halfway into the paint and carefully ‘cut in’ around the borders—painting the corners, along the ceiling line, and right up against the tape on the shelf or window trim. -
Feather Out:
While the cut-in paint is still wet, feather the edges slightly outward so you don’t end up with a hard ridge distinct from the rolled area. -
Load the Roller:
Pour paint into your tray. Load your small roller evenly, rolling it back and forth on the ribbed part of the tray to remove excess paint. It shouldn’t be dripping. -
Apply First Coat:
Roll the paint onto the wall in a ‘W’ or ‘M’ pattern to distribute it, then roll back over it vertically. Work in small sections to keep a wet edge. -
Get Close to Trim:
Carefully roll as close to the brush-painted edges as possible without hitting the trim or shelf. This helps blend the texture between the brush marks and the roller stipple. -
Let Dry:
Allow this first coat to dry completely according to the manufacturer’s instructions. Dark colors often look patchy after one coat, so don’t worry if it looks uneven at this stage. -
Apply Second Coat:
Repeat the cutting-in and rolling process for a second coat. Bold reds and terracotta tones often require this second layer to achieve full opacity and depth. -
Check Coverage:
Inspect the wall while wet. I like to view it from an angle to check for any missed spots or roller streaks, lightly touching them up immediately if needed.
Step 3: Finishing Touches
-
Remove Tape:
The crucial moment: remove the painter’s tape while the second coat of paint is still slightly tacky (not soaking wet, but not stone dry). Pull the tape away from the painted area at a 45-degree angle for a crisp line. -
Touch Up:
If any paint bled onto the shelf or trim, carefully wipe it away with a damp cloth if wet, or gently scrape it with a fingernail if dry. Use a tiny artist’s brush to fix any wall spots. -
Final Cure:
Let the wall cure for at least 24 hours before placing any pottery back against it. This prevents items from sticking to the fresh paint or marring the finish. -
Style the Shelf:
Arrange your cream vase and wooden bowl. Notice how the deep red background instantly warms up the neutrals and highlights the textures of your pottery.
Add Texture
For an old-world look, look into limewash paint in a similar terracotta hue. The subtle brushstrokes add incredible depth behind smooth ceramics.
Enjoy the dramatic transformation this splash of color brings to your pottery collection
Pedestals and Plinths for Wow-Factor Pots
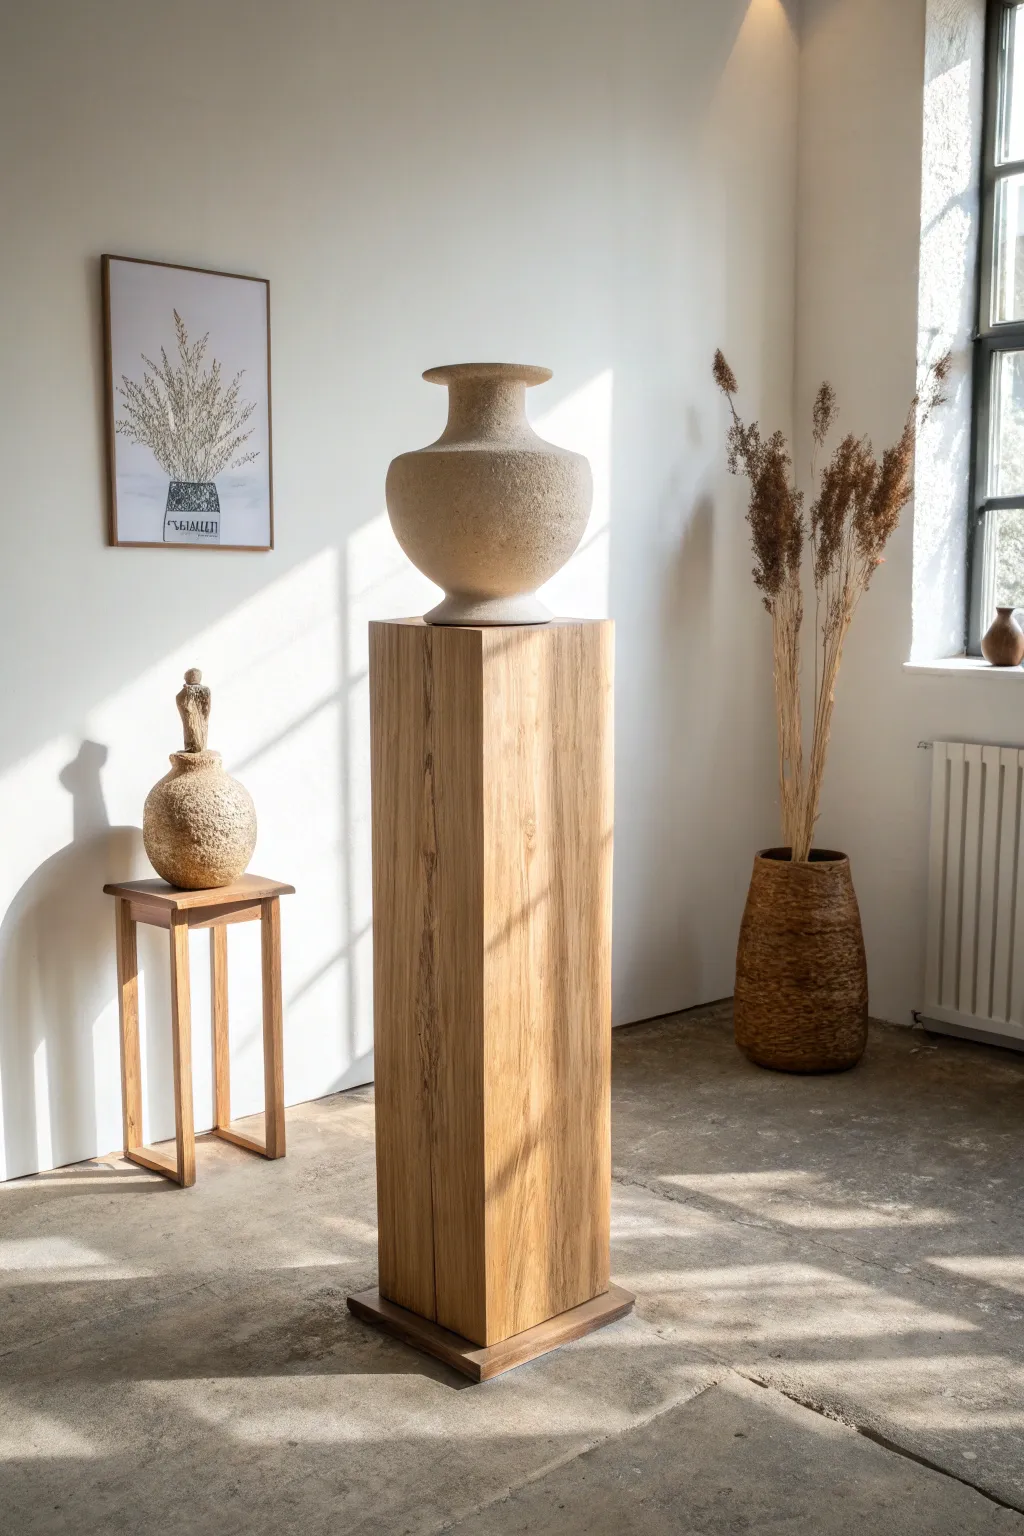
Elevate your favorite pottery with this minimalist, gallery-style pedestal that radiates natural warmth and stability. Crafted from solid wood beams joined together, this sturdy plinth creates a striking vertical element that draws the eye straight to your ceramic masterpiece.
Detailed Instructions
Materials
- 4 pieces of 4×4 or 6×6 solid lumber (oak or pine recommended, length depends on desired height)
- Wood glue (high strength)
- Bar clamps (at least 4 large ones)
- Digital caliper or measuring tape
- Table saw or circular saw with guide rail
- Planer (optional but recommended for seamless joints)
- Orbital sander
- Sandpaper (80, 120, 220 grit)
- Wood filler (matching the wood tone)
- Dark wood piece for base (walnut or stained pine)
- Clear matte polyurethane or wood oil/wax
- Clean rags
Step 1: Preparing the Wood Beams
-
Select your lumber:
Choose straight, dry lumber with minimal warping or twisting. For the substantial look in the photo, 6×6 beams work best, but joined 4x4s are lighter and easier to source. -
Cut to length:
Determine your desired height (standard plinths are often 30-40 inches). Cut all four main beams to be about 1 inch longer than your final dimension to allow for trimming later. -
Square the edges:
To get that seamless ‘solid block’ appearance, the rounded factory edges of construction lumber must go. Run each side of every beam through a table saw or jointer to remove just enough material to create perfectly flat, sharp 90-degree corners. -
Dry fit the arrangement:
Stand your four beams together in a square column shape. Arrange them to put the most attractive grain patterns on the outside faces and check for any gaps between the touching surfaces.
Gaps in joints?
If your beams weren’t perfectly square, you might see hairline gaps. Run a screwdriver over the gap (burnishing) to crush fibers together before final sanding.
Step 2: Assembly and Gluing
-
Apply the glue:
Working quickly, apply a generous, even layer of high-strength wood glue to the interior mating surfaces of the beams. A silicone brush or roller helps spread it uniformly. -
Clamp the column:
Press the four beams together. Use large bar clamps spaced every 6-8 inches along the length of the column. Apply significant pressure to close the seams tight. -
Check for square:
Before the glue sets, use a framing square to ensure the overall column isn’t twisting. Wipe away any glue squeeze-out immediately with a damp rag, as dried glue is hard to sand later. -
Let it cure:
Leave the assembly clamped for at least 24 hours. The mass of wood can create tension, so a full cure is vital for stability.
Step 3: Refining and Base
-
Trim the ends flush:
Once unclamped, use a large crosscut sled on a table saw or a circular saw with a straight edge guide to trim the top and bottom of the glued block perfectly flat and to your final height. -
Create the floating base:
Cut a square piece of darker contrasting wood (like walnut) that is 1 inch wider than your column on all sides. This darker ‘shadow gap’ base elevates the visual weight. -
Sand the surfaces:
Start with 80-grit sandpaper on an orbital sander to level out any uneven joints between beams. Progress to 120-grit, and finish with 220-grit for a silky smooth feel. -
Fill imperfections:
If there are knot holes or small gaps in the seams, mix sawdust from your sanding with a little wood glue to create a perfectly matching filler. Press it in, let dry, and sand flush.
Pro Tip: Hidden Weight
If using lighter wood like pine, rout out a cavity in the bottom before attaching the base and glue in heavy washers. This lowers the center of gravity for safety.
Step 4: Finishing Touches
-
Attach the base:
Center the column onto the dark wood base plate. Secure it from beneath the base using countersunk heavy-duty screws, ensuring they are long enough to bite into the column but not poke through. -
Apply the finish:
For the raw look seen in the photo, use a clear matte oil or wax. Rag it on generously, let it soak for 10-15 minutes, and wipe off the excess. -
Buff properly:
Don’t skip the buffing stage. Use a clean, lint-free cloth to buff the wax or oil once dry. This brings out the grain depth without adding artificial shine. -
Final placement:
Position your plinth near natural light to highlight the wood texture, ensuring the floor is level so your pottery sits securely.
Place your favorite vessel on top and enjoy the museum-quality atmosphere you’ve created in your own home