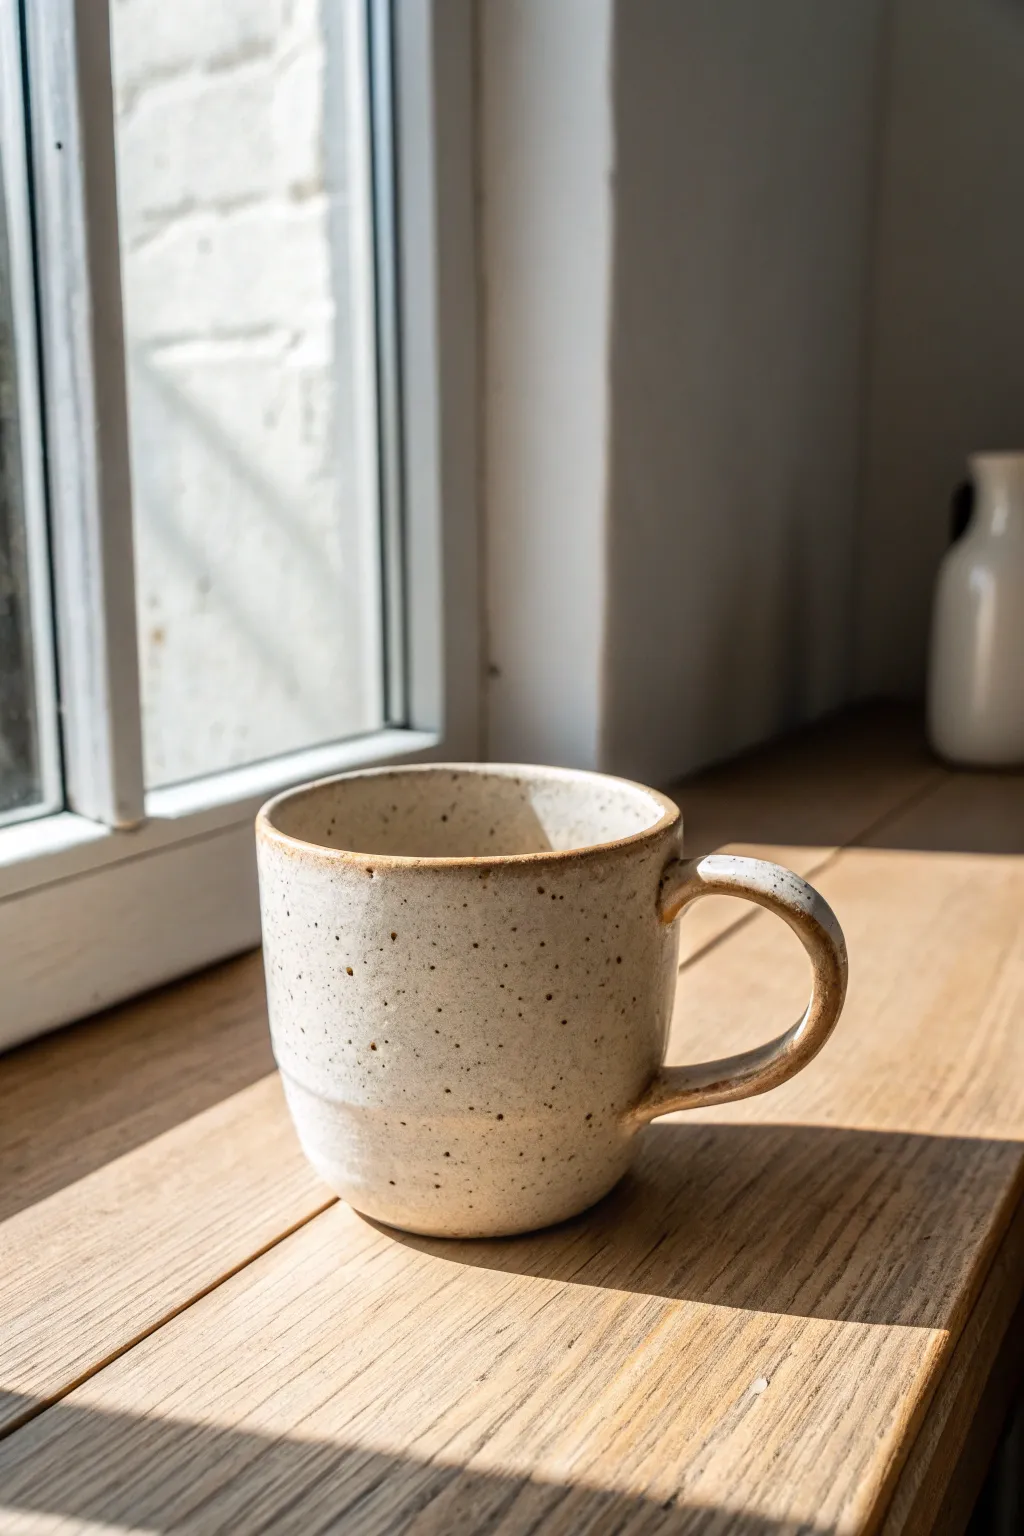
If you’ve ever made a cute mug and then stalled out at the “now I need a handle” part, you’re in good company. These pottery handle ideas are the kinds I reach for when I want something that feels comfy in your hand and looks like it truly belongs on the piece.
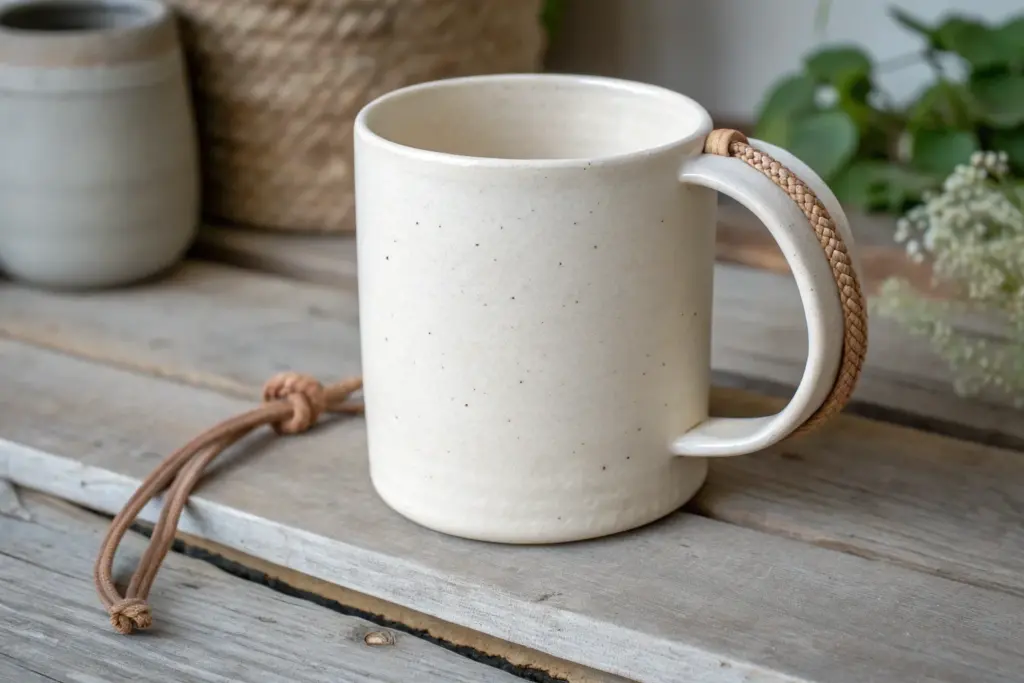
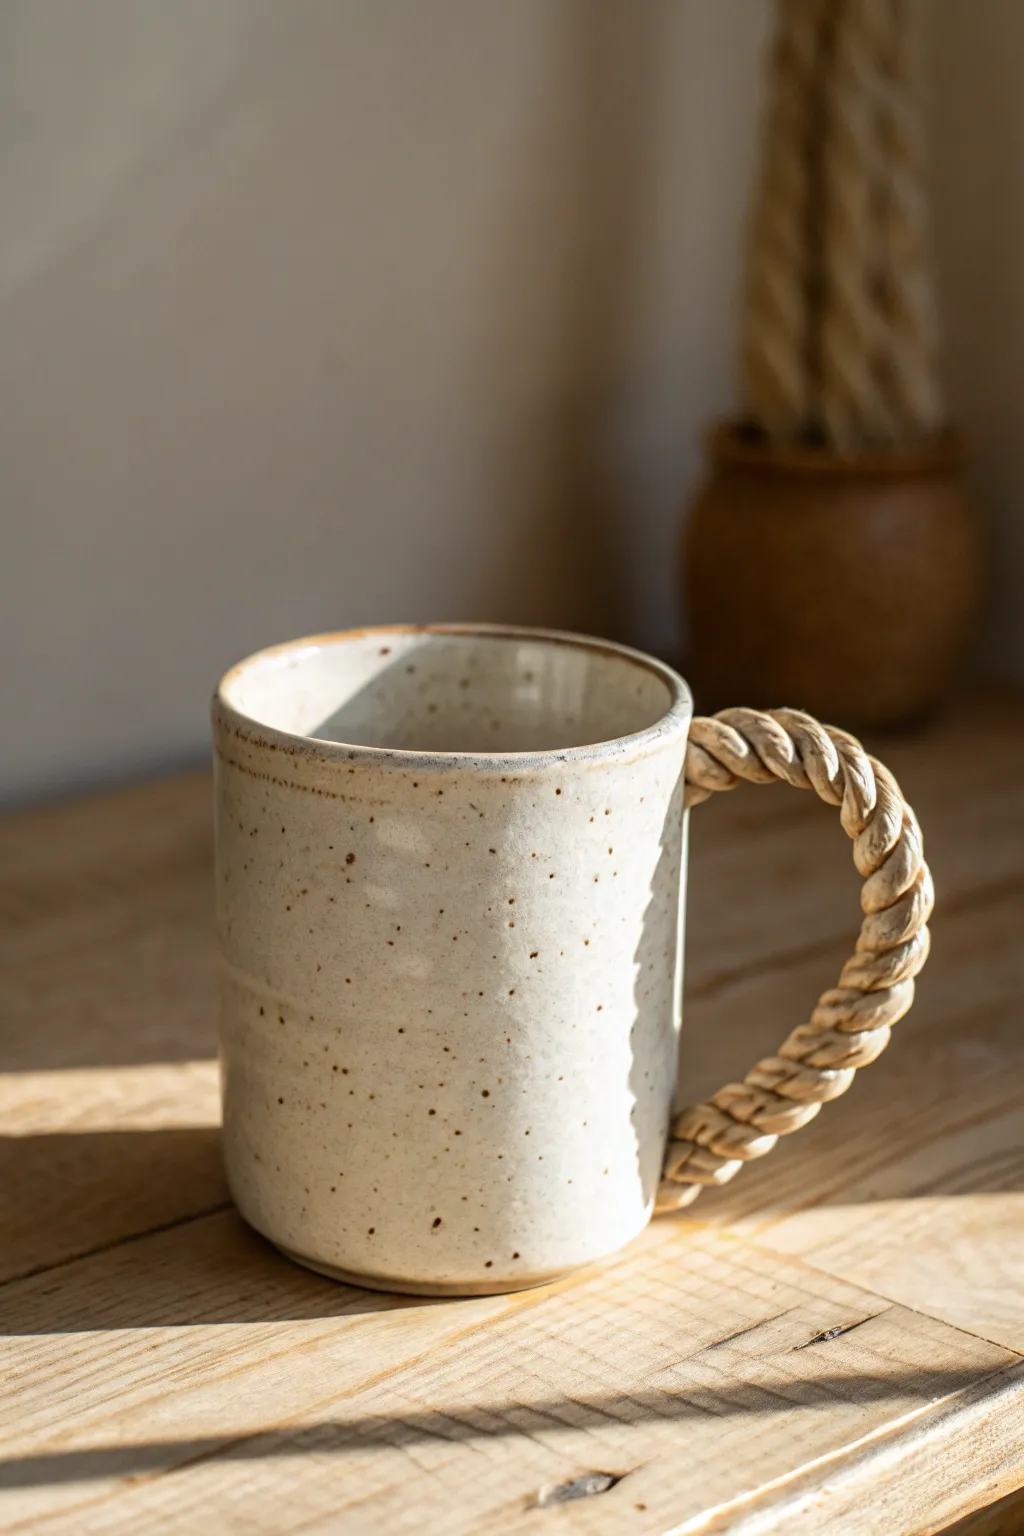
Classic Pulled C-Handle
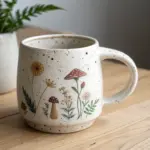
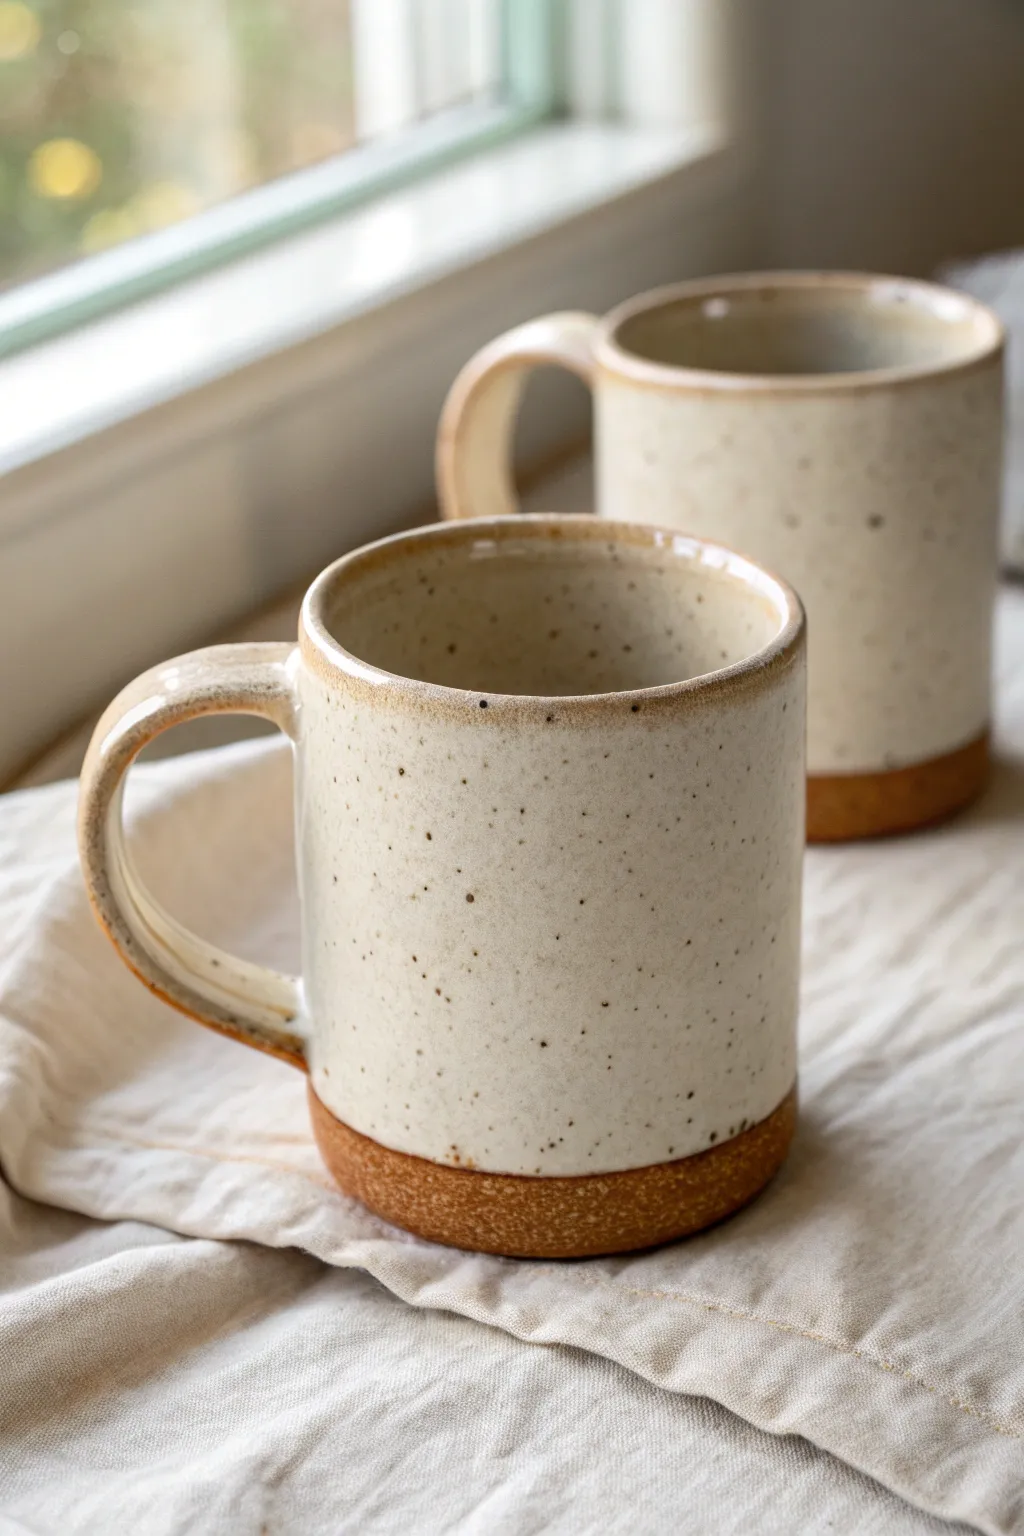
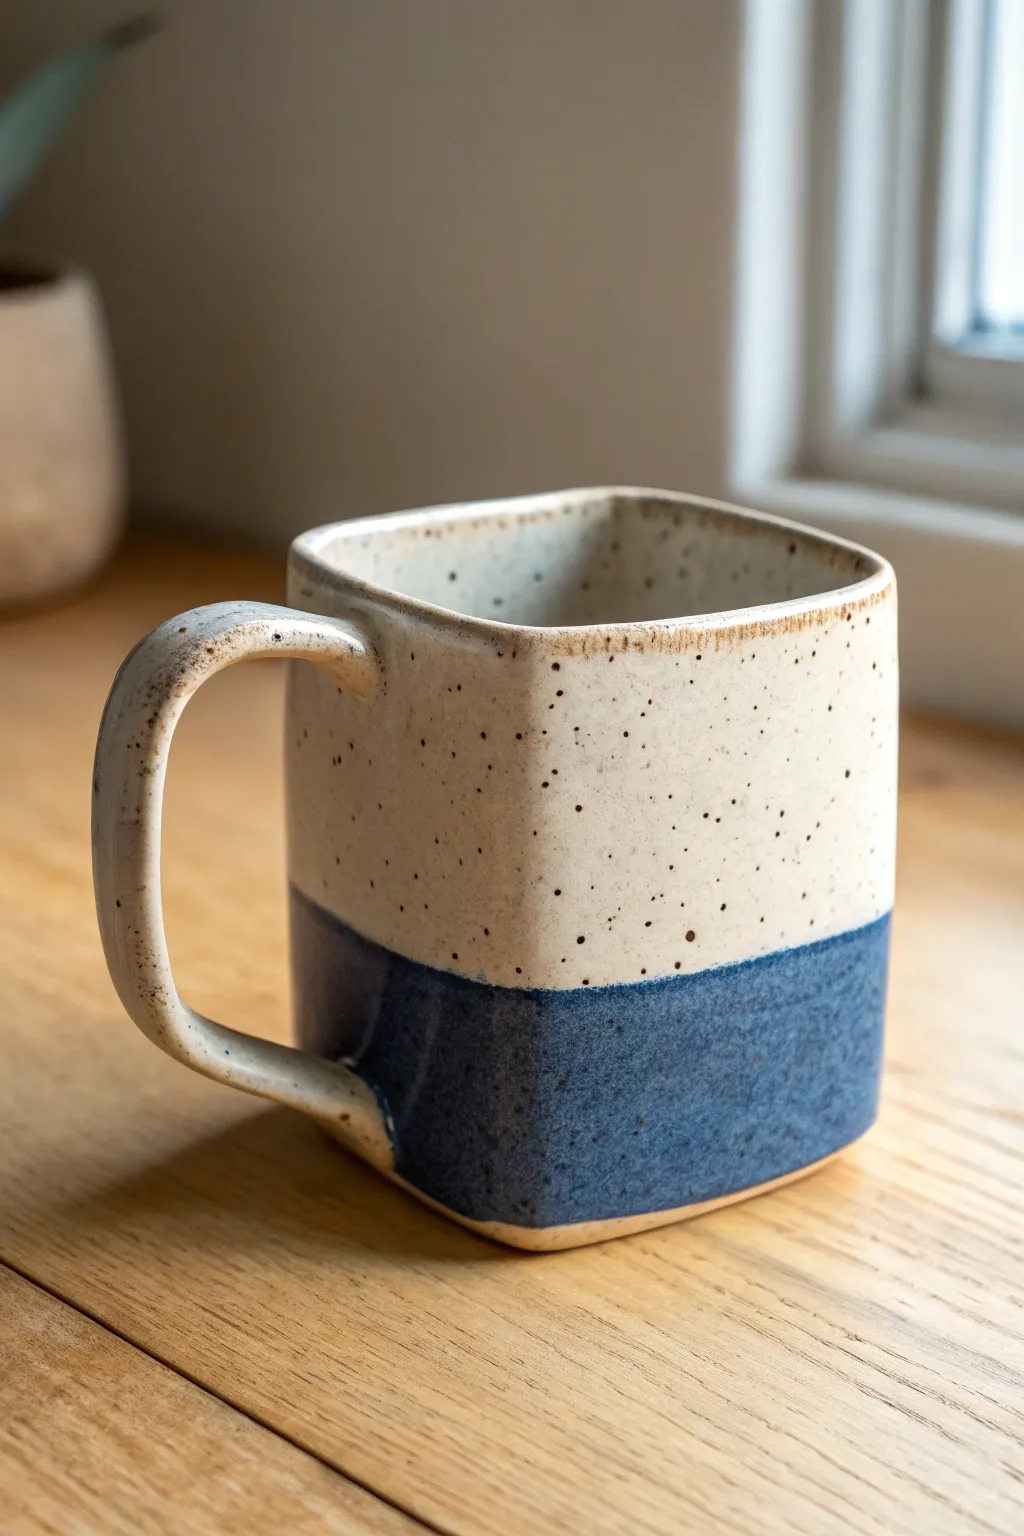
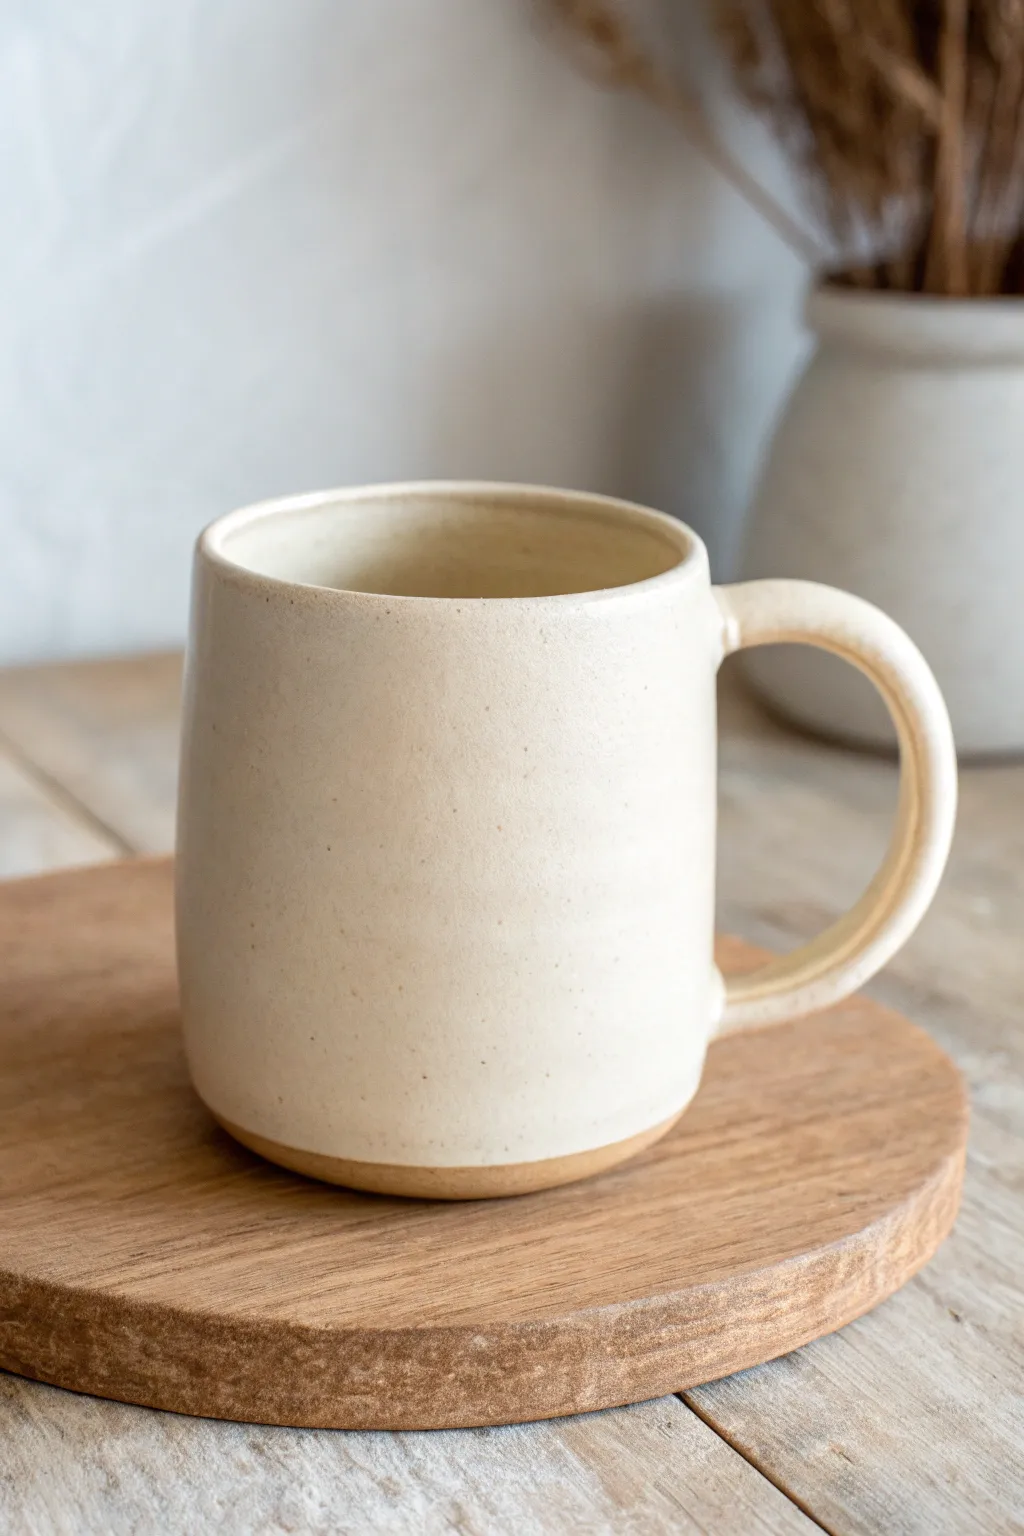
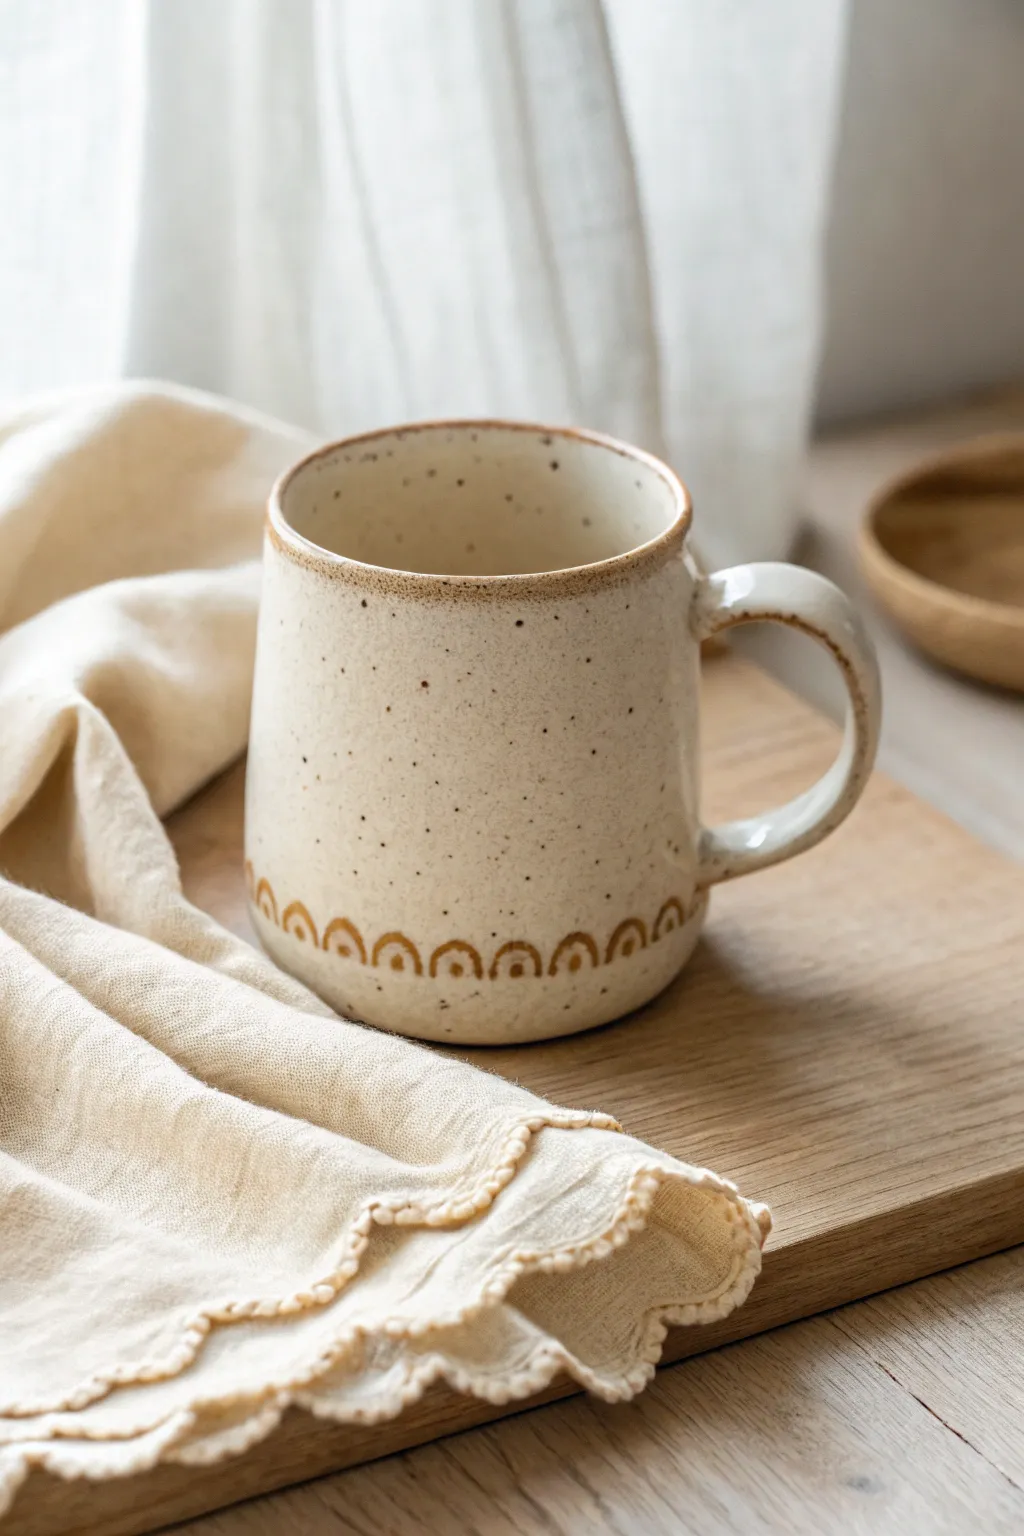
This project features a cozy, speckled cream mug with a classic pulled handle that fits the hand perfectly. The exposed raw clay base and subtle throwing lines add rustic charm to this everyday essential.
Detailed Instructions
Materials
- Stoneware clay (speckled or buff)
- Pottery wheel
- Throwing tools (rib, sponge, wire)
- Small bucket of water
- Needle tool
- Scoring tool or serrated rib
- Clay slip
- Cream/White speckled glaze
- Wax resist
- Kiln
Step 1: Throwing the Body
-
Center and Open:
Begin with about 1 pound of wedged clay. Throw it onto the wheel head and center it firmly. Open the clay, leaving a floor thickness of about a quarter-inch. -
Pull the Walls:
Pull the walls up into a cylinder. For this specific shape, aim for slightly convex walls—wider in the middle and tapering just slightly inward at the rim to hold heat. -
Leave Texture:
Don’t over-smooth the outside. Leave faint finger ridges from your pull to create that handmade tactile quality seen in the photo. -
Undercut the Foot:
Use a wooden knife tool to undercut the base, creating a visual separation between the mug body and the table. Wire off the mug and set it aside to stiffen to leather hard.
Cracking Handles?
If the handle cracks where it joins the body, the moisture levels were likely too different. Ensure both pieces are at the exact same leather-hard stage before attaching.
Step 2: Creating the Handle
-
Prepare the Lug:
Take a carrot-sized piece of clay and shape it into a thick coil. Hold the thick end in one hand and wet the other hand. -
Pulling the Clay:
Gently stroke the clay downward with wet fingers, rotating it occasionally to keep it round. Let gravity do the work to elongate and taper the clay. -
Flattening the Profile:
Once you have the length, use your thumb and forefinger to slightly flatten the clay into a strap shape rather than a perfect cylinder. This makes for a more comfortable grip. -
Arching:
Cut the pulled strap from the larger lump. Gently curve it into a ‘C’ shape and lay it on a ware board to stiffen until it holds its arch without sagging.
Step 3: Assembly and Finishing
-
Trim the Body:
Once the mug body is leather hard, center it upside down on the wheel. Trim a clean foot ring, defining the unglazed band at the bottom. -
Score and Slip:
Hold the handle up to the mug to check proportions. Mark the attachment points near the rim and the lower body. Vigorously score both the mug and the handle ends, then apply generous slip. -
Attach the Handle:
Press the handle firmly onto the scored areas. Wiggle it slightly to lock the clay particles together. I always support the wall from the inside to prevent warping. -
Shape the Curve:
With the handle attached, run a damp finger down the curve one last time to ensure a fluid, graceful ‘C’ shape that creates nice negative space. -
Clean Connections:
Use a small brush or sponge to wipe away excess slip at the seams. Smooth the transition points so the handle looks like it grew out of the mug. -
Bisque Fire:
Slow dry the mug under plastic to ensure even shrinkage, then load it for a bisque firing.
Make it Your Own
Try pressing your thumb into the top of the handle attachment while the clay is soft. This ‘thumb stop’ adds comfort and a distinct handmade detail.
Step 4: Glazing
-
Wax the Foot:
Apply wax resist to the bottom half-inch of the mug exterior. This reserves the raw clay band shown in the image. -
Dip Glazing:
Dip the mug swiftly into a cream or oatmeal-colored speckled glaze. Shake off excess drips immediately. -
Clean the Rim:
Check the rim for any glaze burrs and smooth them with a finger. Ensure the unexpected band at the bottom is perfectly clean of glaze. -
Final Fire:
Fire the mug to maturity (Cone 6 or 10 depending on your clay body). Let cool completely before handling.
Once fired, fill your new favorite mug with coffee and enjoy the feel of a perfectly pulled handle.


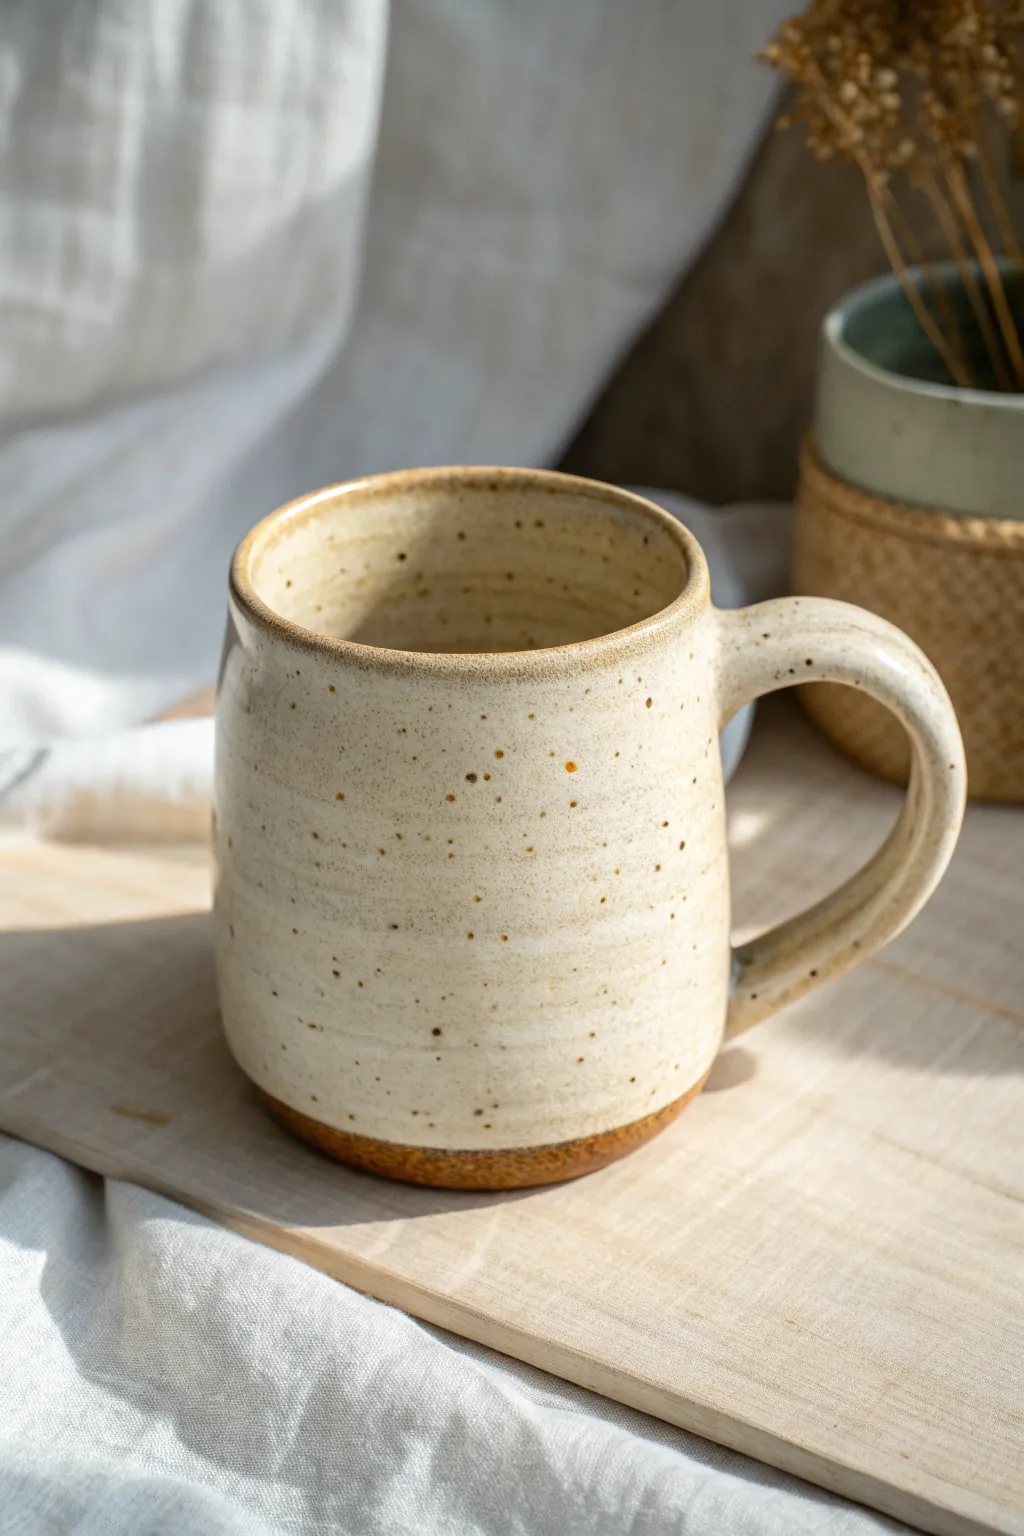
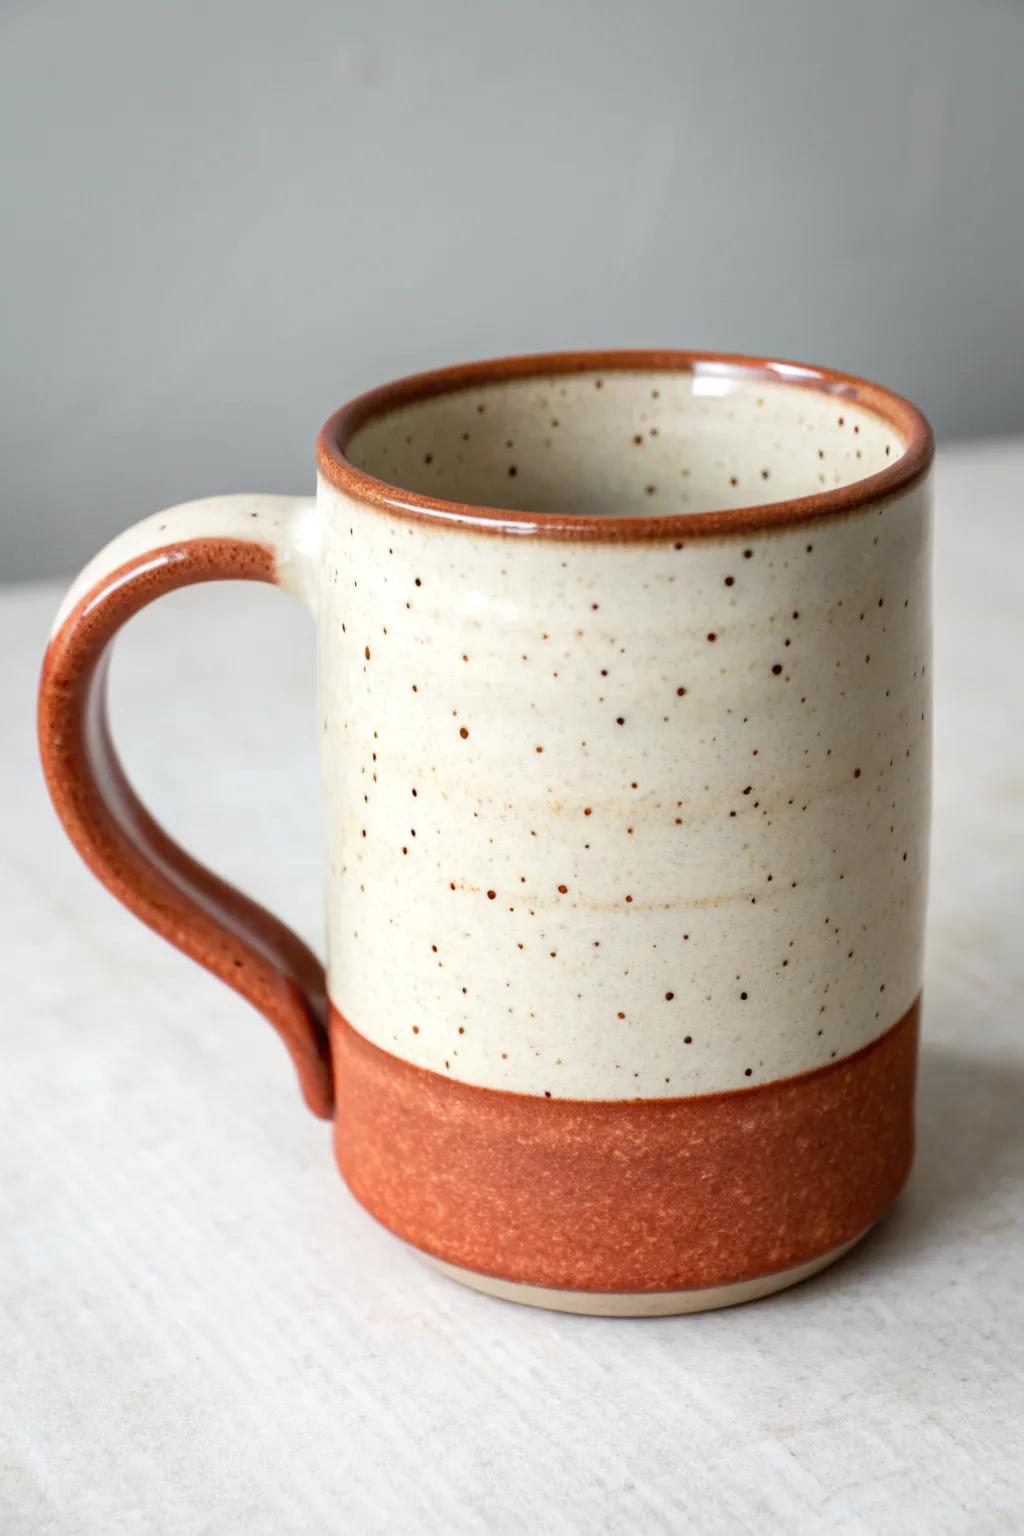
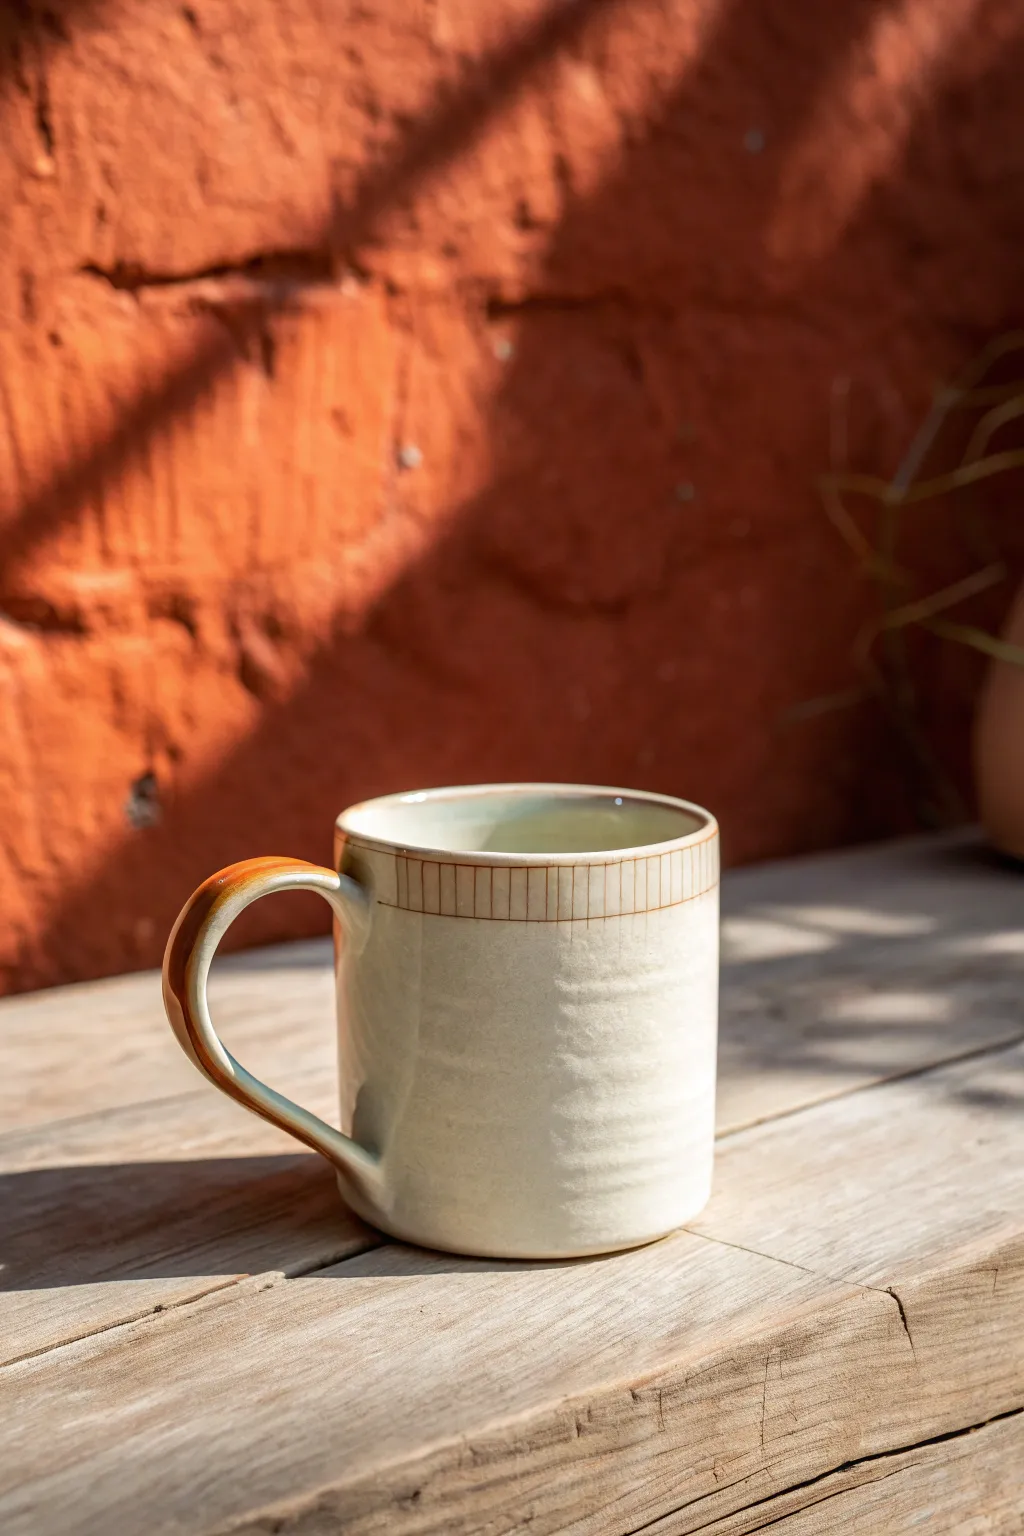
Simple Strap Handle
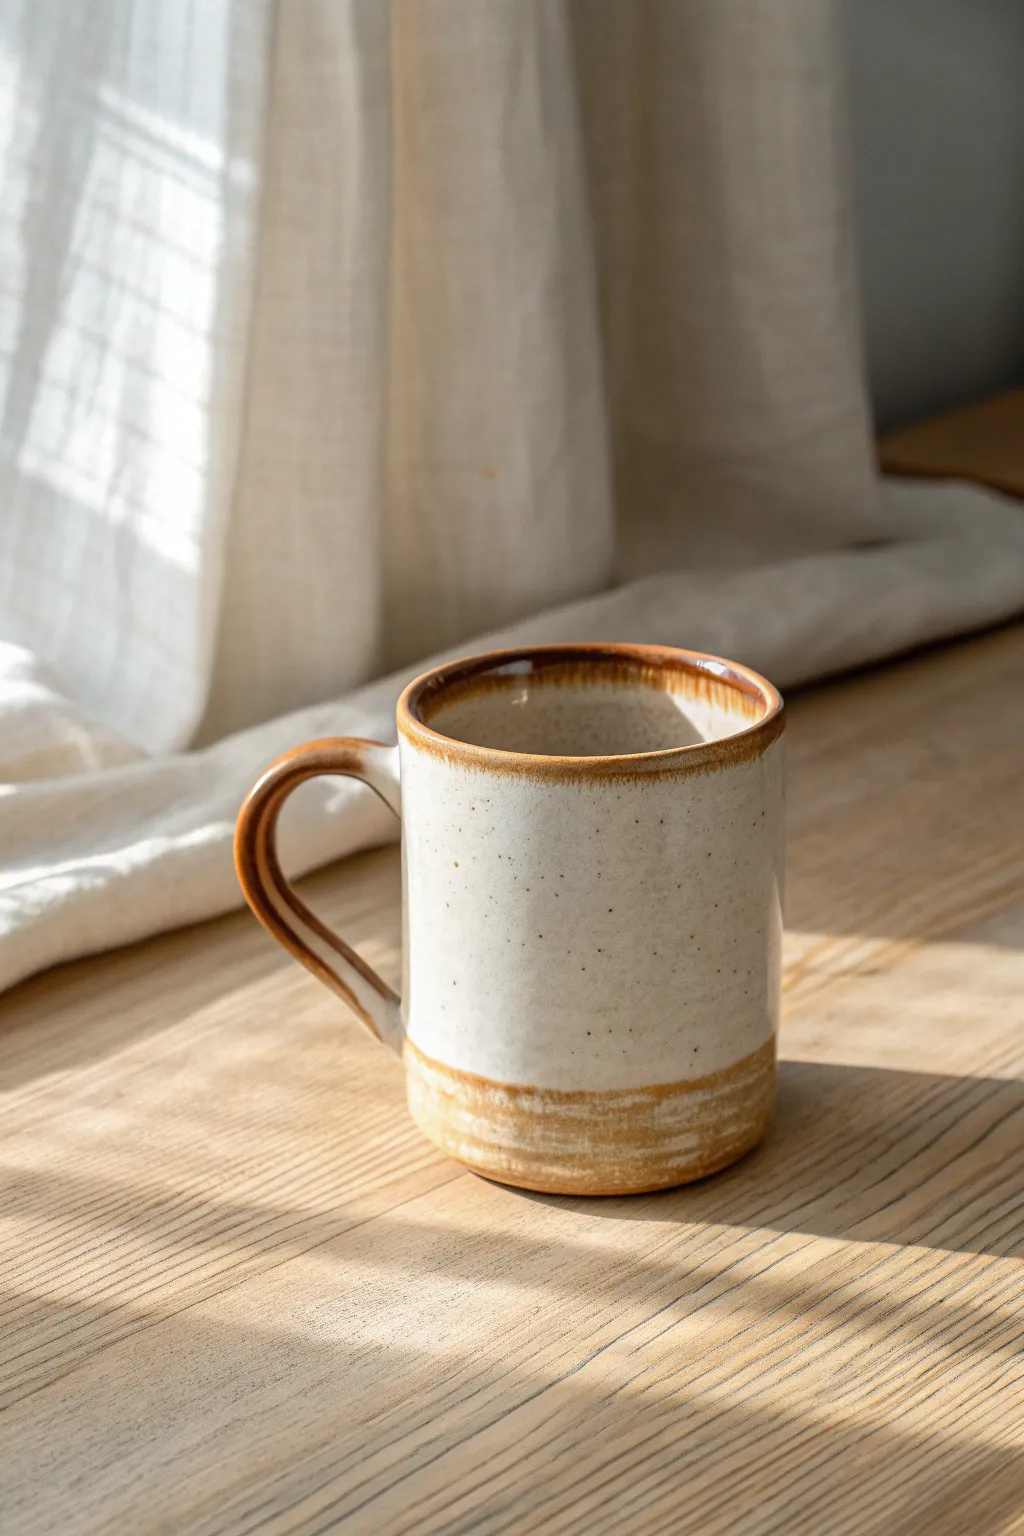
This project focuses on crafting a timeless, rustic mug featuring a sturdy, comfortable strap handle. The finish combines a speckled oatmeal glaze with warm amber accents on the rim and base for a cozy, handcrafted aesthetic.
Step-by-Step Tutorial
Materials
- Stoneware clay (speckled or buff)
- Pottery wheel
- Throwing tools (sponge, needle tool, wire cutter)
- Rib tool (wooden or metal)
- Fettling knife
- Serrated rib or scoring tool
- Slip
- Wooden modeling tool
- Sponge
- Bucket of water
- Oatmeal/White speckled glaze
- Warm amber/brown breaking glaze
Step 1: Throwing the Body
-
Center the clay:
Start with about 1 pound of wedged stoneware clay on your wheel. Use firmly braced hands to center the clay until it runs smooth without wobbling. -
Open and pull:
Open the centered mound and compress the floor. Pull the walls straight up to create a cylinder, aiming for a consistent vertical profile with no belly. -
Refine the rim:
Using a chamois or a wet sponge tip, gently compress the rim to ensure it’s rounded and pleasant to drink from. -
Trim the base:
Use a wooden knife or rib to define the bottom undercut while the wheel spins, establishing where the glaze line will eventually be. -
Cut off:
Run a wire cutter underneath the pot and set it aside on a ware board until it reaches a soft leather-hard state.
Help! Handle Drooping?
If your strap handle sags immediately after attaching, the clay was too wet. Prop up the curve with a small piece of foam or crumpled paper towel while it dries to leather hard.
Step 2: Creating the Strap Handle
-
Prepare the slab:
Roll out a small slab of clay, or simply flatten a coil with the heel of your hand. You want a thickness of about 1/4 inch. -
Cut the strap:
Using a fettling knife and a ruler, cut a strip of clay. For this classic look, aim for about 3/4 inch wide and 5 inches long. -
Refine the edges:
Run a damp sponge along the sharp cut edges of your strap to round them over. This ensures the handle feels soft in the hand later. -
Curve the clay:
Gently bend the strap into a ‘C’ or ear shape. I like to let this stiffen up for 10-15 minutes so it holds its arch better during attachment.
Step 3: Attachment & Finishing
-
Mark placement:
Hold the handle up to the mugs side to check proportions. Mark the attachment points near the top rim and lower body with a needle tool. -
Score and slip:
Aggressively score both the attachment points on the mug and the ends of the handle using a serrated rib. Apply a generous dab of slip to the scored areas. -
Attach the handle:
Press the handle firmly onto the mug. Support the wall from the inside with one hand while pressing from the outside to prevent warping. -
Smooth the joins:
Use a wooden modeling tool to blend the clay from the handle onto the mug body, ensuring a seamless, strong connection. -
Clean up:
Wipe away excess slip with a damp sponge. Run your moistened finger down the inside curve of the handle to smooth it perfectly. -
Bisque fire:
Allow the mug to dry slowly to prevent handle cracks, then bisque fire to cone 04 (or your clay body’s specifications).
Level Up: Thumb Rest
Add a small ball of clay to the top of the handle attachment and press your thumb into it. This creates a custom ergonomic thumb rest that adds comfort and character.
Step 4: Glazing
-
Wax the foot:
Apply wax resist to the bottom of the mug and slightly up the side, creating a sharp line where the exposed clay will show. -
Dip the base glaze:
Dip the entire mug into a speckled oatmeal or creamy white glaze using tongs. Hold it for 3 seconds and lift out, shaking off the last drips. -
Clean the rim/base:
Once the main glaze is dry to the touch, use a damp sponge to wipe the glaze completely off the rim (about 1/4 inch down) and the bottom inch near the foot. -
Apply the accent color:
Brush a warm amber or iron-rich brown glaze onto the exposed rim, the handle, and the exposed band near the foot. -
Final wipe:
Ensure the bottom of the foot is perfectly clean of glaze before loading it into the kiln for the final glaze firing.
Now you have a sturdy, beautifully glazed mug ready for your morning coffee routine


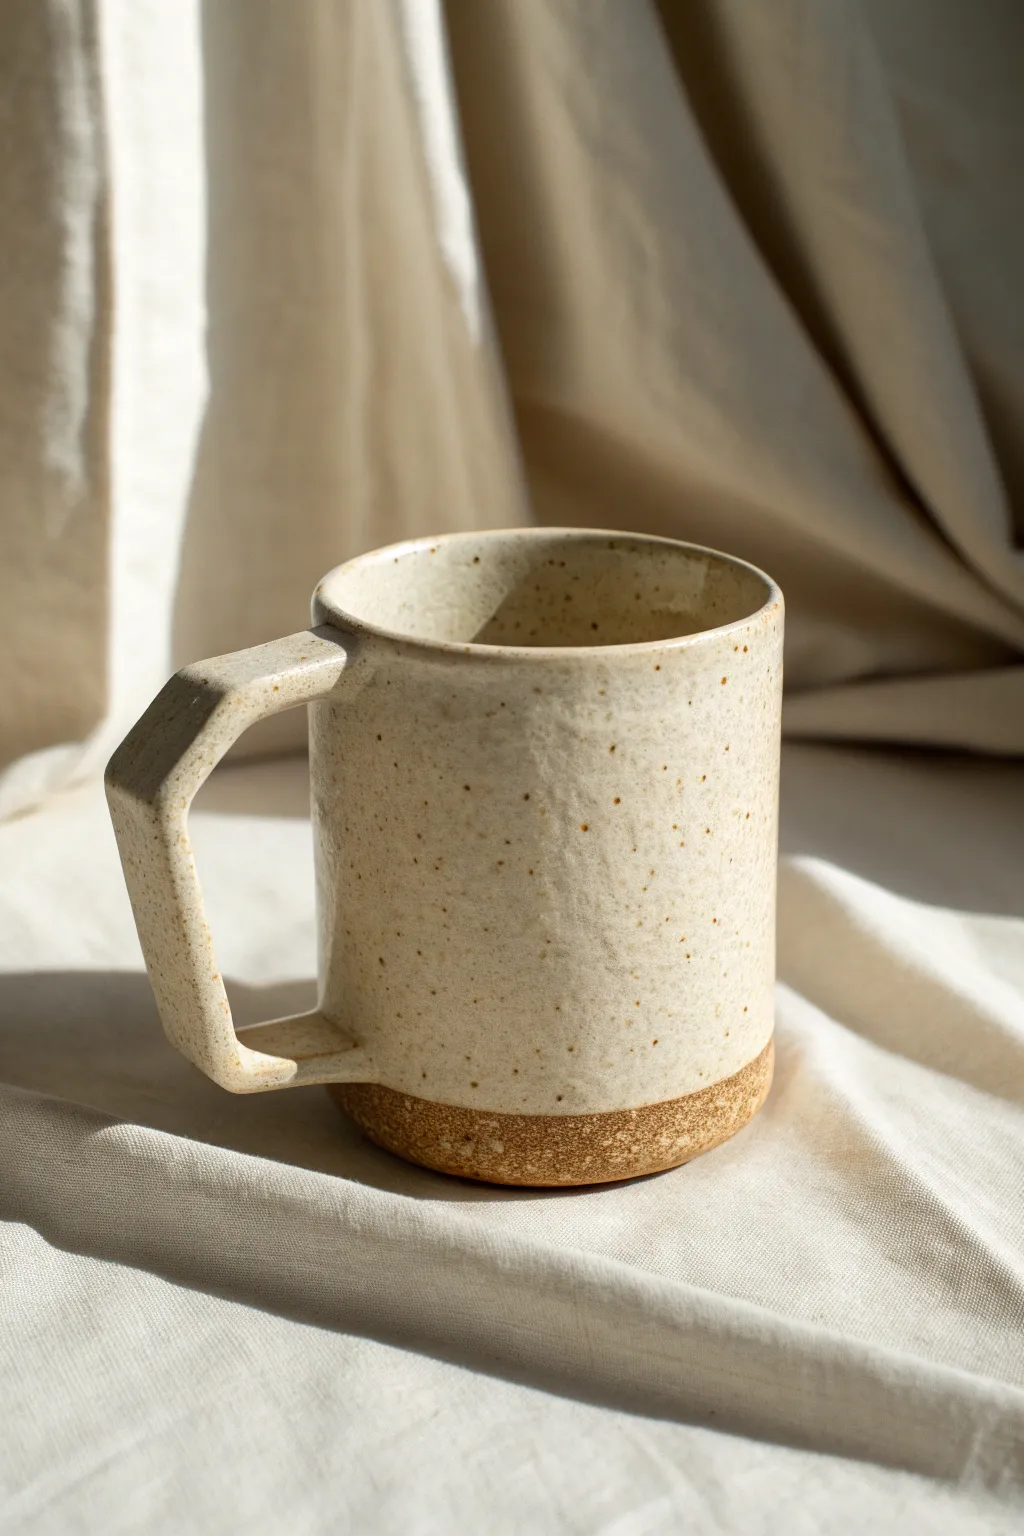
Rounded Extruded Handle
These cozy, cafe-style mugs feature a distinctive raw clay base and a smooth, speckled glaze that feels wonderful in the hands. The star of the show is the comfortable, rounded handle created with a simple extruder technique for a perfectly uniform grip.
Step-by-Step Guide
Materials
- Stoneware clay body (speckled or buff)
- Clay extruder tool
- Round extruder die (approx. 1/2 inch)
- Pottery wheel
- Throwing tools (sponge, ribs, wire tool)
- Pin tool or serrated rib for scoring
- Slip
- Creamy white speckled matte glaze
- Wax resist
- Trim tools
Step 1: Throwing the Cylinder
-
Center and open:
Begin with about 1 pound of stoneware clay wedged well to remove air bubbles. Center the clay on the wheel and open it up, leaving about a 1/4 inch thickness for the floor. -
Pull the walls:
Pull the walls up into a straight cylinder. Aim for a height of about 4-5 inches, keeping the walls even from bottom to top. It helps to compress the rim after every pull to keep it strong. -
Shape the body:
Using a metal or wooden rib, gently press from the inside to create a straight profile with just a subtle curve if desired. Clean up the base with a wooden knife tool to create a clear separation where the glaze line will eventually end. -
Wire off and dry:
Wire the pot off the bat and let it dry to a leather-hard state. The lip should be firm enough to handle without warping, but the body still dark with moisture.
Step 2: Extruding and Attaching the Handle
-
Prepare the extruder:
Load a small handheld extruder with fresh, soft clay. Select a round die shape—this is key for achieving that tubular, modern look seen in the photo. -
Extrude the coil:
Push the plunger to extrude a long, smooth snake of clay. Catch it gently so it doesn’t deform. Cut a segment about 5-6 inches long for your handle. -
Shape the curve:
Bend the extruded coil into an ear shape or half-heart. I like to do this immediately after extruding while the clay is most flexible to avoid surface cracking. -
Let it stiffen:
Allow the shaped handle to sit for 10-15 minutes until it is no longer sticky but still pliable enough to manipulate. -
Cut attachment angles:
Hold the handle up to the leather-hard mug to check the proportions. Use a fettling knife to cut the ends of the handle at an angle that matches the curve of the mug wall. -
Score and slip:
aggressively score the attachment points on both the mug body and the handle ends. Apply a generous amount of slip to both surfaces. -
Attach firmly:
Press the handle onto the mug with firm pressure. Wiggle it slightly to lock the clay particles together. Use a small modeling tool or your pinky finger to smooth the seam where the handle meets the cup. -
Refine the connection:
Wipe away excess slip with a damp sponge, ensuring the transition looks seamless. Run a damp finger over the handle one last time to smooth any fingerprints.
Cracking at the Seams?
If the handle pulls away during drying, your clay moisture levels were mismatched. Ensure the mug and handle are equally leather-hard before joining.
Step 3: Glazing and Finishing
-
Bisque fire:
Once bone dry, fire the mug to bisque temperature (usually cone 04) to prepare it for glazing. -
Wax the base:
This step is crucial for the two-tone look. Apply wax resist to the bottom 1/2 inch to 3/4 inch of the mug’s exterior wall. This reserves the raw clay texture seen in the reference image. -
Dip in glaze:
Stir your creamy white speckled glaze thoroughly. Holding the mug by the foot (or using tongs), dip the entire piece into the bucket for 3 seconds. -
Clean the resist:
Immediately use a damp sponge to wipe any glaze beads off the waxed area at the bottom. The line should be crisp and straight. -
Final fire:
Glaze fire to maturity (likely cone 5/6 depending on your clay body). Ensure the kiln is well-vented to allow the speckles in the clay or glaze to develop properly.
Smooth Extrusions
Warm the clay in your hands before loading the extruder. Cold or stiff clay creates jagged edges on the coil known as “shark skinning.”
Enjoy your morning coffee in these beautiful handmade vessels knowing you crafted them from scratch


Slab-Cut Rectangle Handle
This project features a uniquely shaped square mug that combines structural geometry with the softness of speckled stoneware. The standout element is the slab-cut handle, which echoes the boxy form of the body while offering a sturdy and comfortable grip.
How-To Guide
Materials
- Speckled stoneware clay (approx. 1.5 – 2 lbs)
- Slab roller or rolling pin
- Wooden guide strips (3/8 inch thickness)
- Fettling knife or X-Acto blade
- Ruler or square tool
- Scoring tool (serrated rib or needle tool)
- Slip (clay mixed with water)
- Sponge
- Chamois strip
- Satin oatmeal/white glaze
- Glossy navy blue dipping glaze
- Wax resist
Step 1: Forming the Square Body
-
Roll the main slab:
Begin by rolling out a generous slab of speckled stoneware clay. Use your guide strips to ensure an even thickness of about 3/8 of an inch, which provides enough stability for the square walls without being too heavy. -
Cut the walls and base:
Using a ruler and fettling knife, cut a long rectangle for the walls (approx. 4 inches high by 12 inches long) and a separate 3.5-inch square for the base. Let these pieces stiffen to soft leather-hard so they can hold their shape. -
Construct the cylinder:
Score the short ends of your long rectangle and apply slip. Bring the ends together to form a cylinder first, compressing the seam firmly from both the inside and outside. -
Shape the square:
Gently shape the cylinder into a square by inserting your hand and pressing the corners outward. I find it helpful to tap the flat sides against the table to sharpen the geometry. -
Attach the base:
Score the bottom edge of your square tube and the perimeter of the square base. Apply slip and press the body onto the base. Use a modeling tool to blend the clay together seamlessly on the exterior. -
Refine the rim:
Smooth the rim with a damp sponge or a chamois strip. While the body is square, you want the drinking edge to feel soft and rounded against the lips.
Step 2: Creating the Slab-Cut Handle
-
Cut the handle strip:
Roll a smaller slab, slightly thicker than the walls. Slice a uniform strip about 1/2 inch wide and 5 inches long. The beauty of this handle lies in its sharp, precise edges. -
Shape the “ear”:
Bend the strip into a rectangular ‘D’ shape or half-ear profile. Instead of a smooth curve, create subtle angles that mimic the corners of the mug body. -
Dry fit the handle:
Hold the handle against the mug to check the proportions. The top attachment should sit near the rim, and the bottom should land just above the lower third of the mug. Trim any excess length carefully. -
Score and slip attachments:
Mark where the handle meets the body. Thoroughly score the attachment points on both the mug and the handle ends, then apply a generous amount of slip. -
Secure the handle:
Press the handle firmly onto the mug wall. Wiggle it slightly to lock the clay particles together. Use a small wooden tool to smooth the seam where the handle meets the body, ensuring there are no gaps. -
Clean up:
Wipe away any excess slip with a barely damp sponge. Run a wet finger along the inner and outer edges of the handle to soften any sharpness left from the cutting knife.
Square Stability
When shaping a square mug, leave the corners slightly thicker than the flat walls. This extra clay reinforcement helps prevent the corners from slumping or cracking during the drying process.
Step 3: Glazing and Finishing
-
Bisque fire:
Allow the mug to dry slowly to prevent warping, covering it loosely with plastic if necessary. Once bone dry, bisque fire it to Cone 04 (or your clay’s specified bisque temperature). -
Wax the foot:
Apply wax resist to the bottom of the mug and up the sides about 1/4 inch to leave a neat unglazed foot ring. -
Dip the top section:
Hold the mug by the foot and dip the entire piece into the satin oatmeal glaze. Shake off excess drops and let this layer dry completely. -
Dip the bottom section:
Once the first glaze is dry to the touch, hold the mug by the rim. Dip the bottom third straight down into the glossy navy blue glaze to create the horizon line. Hold it there for 2-3 seconds. -
Final wipe:
Check the foot ring for any stray glaze drips and wipe them clean. If the glazes overlap too thickly, gently rub the overlap area with a finger to thin it slightly. -
Glaze fire:
Fire the finished piece to Cone 6 (mild oxidation or reduction depending on your clay body). The iron specks in the clay will bleed through the oatmeal glaze, creating the texture seen in the photo.
Thumb Rest Trick
Before attaching, gently press your thumb into the top corner of the handle strip. This subtle indentation creates a natural resting spot for the user’s thumb without ruining the geometric look.
Once fired, fill your new architectural mug with coffee and enjoy the comfortable grip of your custom handle.

What Really Happens Inside the Kiln
Learn how time and temperature work together inside the kiln to transform clay into durable ceramic.
Soft D-Shape Handle
This project features a timeless, cozy speckled stoneware mug with a perfectly balanced ‘soft D’ handle. The focus here is on creating a handle that mimics the natural curve of the hand, offering both comfort and rustic elegance.
Step-by-Step Guide
Materials
- Speckled buff stoneware clay
- Pottery wheel
- Needle tool
- Rib tool (wooden or silicone)
- Sponge
- Wire cutter
- Scoring tool (or fork)
- Slip
- Bucket of water
- Clear or semi-transparent glaze (food safe)
- Kiln
Step 1: Throwing the Cylinder
-
Wedging:
Start by thoroughly wedging about 1 to 1.5 pounds of speckled buff clay to remove air bubbles and ensure consistency. -
Centering:
Throw your ball of clay onto the wheel head and center it firmly. Establish a base width of approximately 3.5 inches. -
Opening the Well:
Create the opening for your mug, pressing down until you are about a quarter-inch from the bat. Pull the base outwards to establish the interior floor. -
Pulling the Walls:
Slowly pull up the walls of the cylinder. Aim for an even thickness throughout. For this specific shape, you want a very subtle taper inward at the rim, giving it that cozy feel. -
Refining the Shape:
Using a rib tool, smooth the exterior while gently pressing outward from the inside to create a slight belly at the bottom third of the mug, tapering back in slightly at the very bottom foot. -
Rim Finishing:
Use a chamois or a wet sponge to compress and round the rim. This ensures it feels comfortable against the lips later. -
Trimming Prep:
Wire the mug off the bat and let it dry to a ‘leather hard’ state. This usually takes a day or two depending on humidity.
Cracking Handles?
If your handle cracks where it joins the mug, it likely dried faster than the body. Wrap the handle in wax resist or extra plastic during drying to slow it down.
Step 2: Creating the Handle
-
Pulling a Slug:
While the body dries, take a fresh lump of clay. Hold it in one hand and use water to pull a thick, tapered ‘carrot’ shape (slug) downward with the other hand. -
Forming the Strap:
Flatten the slug slightly between your thumb and forefinger as you pull, creating a strap that is oval in cross-section rather than perfectly round. Aim for about 3/4 inch width. -
Shape Setting:
Curve the pulled strap into a ‘D’ shape and lay it on its side on a ware board to stiffen up. I like to let this setup until it holds its curve without sagging.
Toasted Rim Trick
To get that lovely browned rim effect, brush a thin layer of iron oxide wash just on the very edge of the lip before dipping in your clear glaze.
Step 3: Assembly and Finishing
-
Trimming the Foot:
Once the mug body is leather hard, center it upside down on the wheel and trim the bottom to create a neat shadow line or foot ring. -
Marking Attachment Points:
Hold your handle up to the mug to visualize the placement. The top of the ‘D’ should sit about an inch below the rim. Mark the spots lightly with a needle tool. -
Scoring and Slipping:
Score (scratch) the marked areas on the mug and the ends of the handle aggressively. Apply a generous dab of slip to both surfaces. -
Attaching the Handle:
Press the handle firmly onto the mug. Support the wall from the inside so you don’t warp the cylinder shape. -
Smoothing the Joins:
Use a small damp sponge or your wooden tool to blend the clay seams. Ensure there is a seamless transition between the handle and the mug body. -
Drying:
Cover the mug loosely with plastic to ensure the handle and body dry at the same rate. Uneven drying is the enemy of handles. -
Bisque Fire:
Once bone dry, fire the piece in a bisque kiln (usually cone 04 or 06). -
Glazing:
Dip the mug into a clear or transparent glaze to let the speckles show through. Wipe the foot clean. -
Final Fire:
Fire to the maturity temperature of your clay (likely Cone 5 or 6 for stoneware). The heat will draw the iron speckles out to the surface.
Enjoy your handmade mug with your morning coffee, knowing the handle was perfectly crafted for your grip
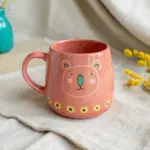
Thumb-Rest Comfort Handle
This rustic, speckled mug features a sturdy, pulled handle designed specifically for ergonomic comfort. The subtle depression at the top curve provides the perfect resting spot for your thumb, making your morning coffee ritual feel even more grounded and secure.
Step-by-Step Tutorial
Materials
- Stoneware clay (speckled buff or similar)
- Pottery wheel (or slab roller for hand-building)
- Throwing sponge
- Pin tool
- Wire cutter
- Rib tool (wooden or metal)
- Small bucket of water
- Scoring tool (serrated rib or needle tool)
- Slip (clay slurry)
- Matte white or cream dipping glaze
Step 1: Throwing the Mug Body
-
Center the clay:
Start with about 1 pound of speckled clay. Slam it onto the wheel head and center it using steady pressure and water until it spins perfectly smooth. -
Open the form:
Create the opening by pressing your thumbs into the center, leaving about a half-inch for the floor. Pull the floor out to your desired width, compressing it well to prevent cracks. -
Pull the walls:
Begin pulling up the walls. Aim for a cylinder with straight, vertical sides. Keep your pulls consistent to maintain an even thickness from bottom to top. -
Shape the profile:
Using a rib tool on the inside, gently belly the form out slightly while keeping the rim vertical. Clean up the base with a wooden knife tool to create a slight undercut. -
Refine the rim:
Use a chamois or your sponge to compress and smooth the rim gently. This ensures it’s comfortable to drink from later. -
Wire off:
Run a wire tool under the base to separate the mug from the wheel head. Carefully lift it onto a ware board and let it dry to a leather-hard state.
Uneven Drying?
Handles often dry faster than bodies, leading to cracks. Wrap the handle tightly in plastic or wax the handle joints to slow down its drying rate to match the mug.
Step 2: Creating the Handle
-
Prepare the lug:
While the mug dries, grab a carrot-shaped lug of fresh clay. Dip your hand in water and begin pulling the clay downwards, using the ‘milking’ motion to elongate and taper it. -
Form the cross-section:
Flatten the strip slightly as you pull, aiming for a rounded rectangle profile. It should be wider than it is thick for stability. -
Curve and stiffen:
Once pulled to length, cut the handle strip free and lay it on your board in a curved ‘C’ shape. Let it stiffen up until it can hold its shape without slumping.
Pro Tip: Comfort Test
Test the thumb depression while the clay is soft. Hold the mug as if drinking; your thumb should naturally fall into the curve without stretching.
Step 3: Assembly and Finishing
-
Score the attachment points:
Hold the handle up to the mug to gauge placement. Score the mug surface aggressively where the top and bottom of the handle will attach, about an inch below the rim. -
Apply slip:
Dab a generous amount of slip onto the scored areas. I like to score the ends of the handle as well for a really secure bond. -
Attach the top:
Press the top of the handle firmly onto the upper scored mark. Support the mug wall from the inside with your other hand to prevent warping. -
Create the thumb rest:
Before attaching the bottom, use your thumb to press a gentle indentation into the very top curve of the handle. This is the crucial ergonomic step. -
Secure the bottom:
Guide the handle down in a graceful loop and attach the bottom end. Smooth the clay around both connection points, blending firmly so it looks seamless. -
Bisque fire:
Allow the mug to dry slowly under plastic to even out moisture. Once bone dry, bisque fire it to Cone 04 (or your clay body’s specifications). -
Glaze application:
Wax the bottom inch of the mug to leave the raw clay exposed. Dip the rest into a matte cream glaze. The iron speckles in the clay will bleed through during firing, creating that lovely texture. -
Final firing:
Glaze fire the piece to the maturity temperature of your clay (likely Cone 5 or 6) to reveal the finished speckled surface.
Enjoy your new favorite mug, perfectly tailored to fit your hand


The Complete Guide to Pottery Troubleshooting
Uncover the most common ceramic mistakes—from cracking clay to failed glazes—and learn how to fix them fast.
Bell-End Attachment Handle
Master the art of creating a perfectly balanced mug featuring a graceful bell-end attachment handle. This project highlights the beauty of speckled stoneware with a clean glaze line and an ergonomically pleasing, C-shaped curve.
Step-by-Step
Materials
- Speckled stoneware clay (approx. 1 lb lump plus smaller piece for handle)
- Potter’s wheel
- Throwing tools (sponge, rib, wire cutter)
- Trimming tools
- Serrated rib or scoring tool
- Slip
- Bucket of water
- Wooden modeling tool
- Matte cream/off-white glaze
- Wax resist (optional)
Step 1: Throwing the Cylinder
-
Center the clay:
Begin by firmly wedging your stoneware to remove air bubbles. Center the lump on the wheel head, coning up and down until it feels perfectly stable and smooth. -
Open and pull:
Open the center to create the floor, leaving it slightly thicker than the walls to allow for trimming later. Compress the floor with a rib or sponge to prevent S-cracks. -
Establish the height:
Pull the walls up vertically to create a straight-sided cylinder. The form in the image is slightly barrel-shaped, so gently belly the walls out from the inside while collaring slightly at the very rim. -
Finish the rim:
Smooth the lip with a chamois or your finger to ensure it’s comfortable for drinking. Cut the pot from the wheel using a wire tool and allow it to dry to a leather-hard state.
Smoother Joins
Wrap a damp paper towel around the handle attachment points for an hour after joining. This equalizes moisture and prevents cracking as the handle shrinks.
Step 2: Creating the Handle
-
Pull a carrot:
While the body firms up, take a smaller lump of clay and roll it into a thick cone or ‘carrot’ shape. Hold the thick end and wet your other hand. -
Pull the strap:
Using plenty of water, stroke the clay downward with a milking motion, creating a long, even strap. Rotate the clay occasionally to keep it round or slightly oval in cross-section. -
Form the curve:
Once pulled to the desired thickness (slightly thicker than a pencil), lay it on a board in a C-shape curve that mimics the final look. Let this stiffen until it holds its shape but is still flexible. -
Cut the angles:
Cut the top and bottom of your handle strap at angles that will sit flush against the curved wall of the mug. The top cut is crucial for that ‘bell’ look—make it slightly wider.
Thumb Rest
Flatten the very top curve of the handle slightly with your thumb while the clay is soft. It adds a subtle ‘level up’ for ergonomic comfort.
Step 3: Attachment and Refinement
-
Trim the body:
Place your leather-hard mug back on the wheel (or use a chuck) to trim the foot. Create a clean, flat bottom edge and remove excess weight from the lower curve. -
Score the connection points:
Hold the handle up to the mug to find the perfect placement. Mark the spots, then vigorously score both the mug wall and the handle ends with a serrated tool. -
Apply slip:
Dab a generous amount of slip onto the scored areas. This acts as the glue for your join. -
Attach the top (The Bell):
Press the top of the handle firmly against the rim area. Use your thumb to smudge the clay from the handle onto the mug body, flaring it out slightly to create that seamless, bell-like transition. -
Secure the bottom:
Curve the handle down and attach the bottom point. Unlike the top, keep this join tighter and cleaner, blending it subtly without too much flare. -
Align and smooth:
Look at the mug from above and effectively straighten the handle so it isn’t crooked. Use a damp sponge or brush to clean up excess slip around the joins.
Step 4: Glazing and Firing
-
Bisque fire:
Once the mug is bone dry, load it into the kiln for a bisque firing. -
Wax the foot:
Apply wax resist to the bottom half-inch of the mug, creating a straight line where the raw clay meets the glazed area. This creates the two-tone aesthetic. -
Dip into glaze:
Hold the mug by the foot and dip it upside down into your matte cream glaze. Ensure the glaze covers the entire handle and interior. -
Check the line:
I always wipe any rogue droplets off the wax line with a damp sponge to ensure a crisp transition. -
Final fire:
Fire the mug to maturity (likely Cone 6 or 10 depending on your clay body) to bring out the speckles through the translucent cream glaze.
Enjoy your morning coffee in the warm, handmade comfort of your new favorite mug
Tapered Handle With Slim Tail
This rustic, elegant mug features a creamy speckled glaze that highlights the warmth of the raw red clay below. The standout feature is its handle, which starts sturdy at the top and tapers into a slender, delicate tail at the bottom connection point.
Detailed Instructions
Materials
- Red stoneware clay (speckled variety preferred)
- Pottery wheel
- Throwing tools (rib, sponge, wire cutter)
- Bucket of water
- Scoring tool or serrated rib
- Slip (clay slurry)
- Fettling knife
- Modeling tool or wooden skewer
- Matte cream/white glaze
Step 1: Throwing and Trimming the Cylinder
-
Center and open:
Begin with about 1 pound of well-wedged red stoneware clay. Center it firmly on the wheel and open the clay to create a flat, even floor. -
Pull the walls:
Pull the walls vertically to create a straight-sided cylinder. Aim for a height of about 4-5 inches, keeping the rim slightly thicker than the walls for durability. -
Refine the shape:
Use a metal or wooden rib to smooth the exterior, removing throwing lines if you want a clean surface like the example. Alternatively, leave subtle finger marks for texture. -
Dry to leather hard:
Wire the pot off the bat and let it dry slowly until it reaches a leather-hard state. It should be firm enough to handle without deforming but still cool to the touch. -
Trim the foot:
Place the mug upside down on the wheel head, secure it with lugs, and trim a clean foot ring. Define a clear break point near the bottom where the glaze line will eventually stop.
Cracked Tail?
If the thin tail cracks away from the body during drying, the handle dried too fast. Wrap the handle in thin plastic or wax the join immediately after attaching to slow moisture loss.
Step 2: Pulling and Attaching the Tapered Handle
-
Prepare the handle lug:
Take a separate carrot-shaped piece of clay. Holding the thicker end, wet your hand and stroke the clay downward to elongate it, maintaining a slightly flattened oval cross-section. -
Create the taper:
As you pull, intentionally apply slightly more pressure as you move down the length of the clay, creating a distinct taper where the bottom third becomes significantly thinner than the top. -
Curve and stiffen:
Cut the pulled handle free and lay it on a ware board in a curve (like a question mark) to stiffen up. I usually wait about 20-30 minutes so it holds its arch. -
Score the attachment points:
Hold the handle up to the mug to gauge placement. Use a serrated rib or needle tool to scratch the surface of the mug at the top and bottom attachment sites. Apply a dab of slip. -
Attach the top:
Press the thick end of the handle firmly onto the top scored area. wiggle it slightly to lock it in, then smooth the clay from the handle onto the mug body for a seamless transition. -
Attach the tail:
Gently curve the handle down. The thinner tail shouldn’t just mash into the wall; press the very end of the tapered tail into the bottom attachment point, keeping the connection dainty. -
Clean the connection:
Use a small modeling tool or a damp sponge to clean up any excess slip around the tail. The goal is to make it look like the handle is growing effortlessly out of the pot. -
Final drying:
Cover the mug loosely with plastic to ensure the handle and body dry at the same rate. This prevents cracking at the delicate tail connection.
Step 3: Glazing and Finishing
-
Bisque fire:
Once bone dry, fire the mug in a bisque kiln (usually Cone 04 or 06) to prepare it for glazing. -
Wax the bottom:
Apply wax resist to the bottom third of the mug’s exterior and the entire foot ring. The wax line should be straight and crisp, sitting just below where the handle tail attaches. -
Dip the glaze:
Stir your matte cream glaze well. Hold the mug by the foot and dip it into the glaze bucket, stopping exactly at the wax line. Hold for 3 seconds and lift. I tilt it slightly to let excess run off. -
Glaze the interior:
Pour glaze inside the mug, roll it around to coat the interior fully, and pour the excess back out. Wipe the rim with a damp sponge if the dip created any drips. -
Clean the bare clay:
Use a damp sponge to wipe any stray glaze droplets off the waxed red clay section. The exposed clay needs to be completely clean to get that sharp contrast. -
Glaze fire:
Fire the mug to maturity (likely Cone 5 or 6 depending on your clay body). The heat will interact with the iron in the clay, creating those lovely dark speckles through the cream glaze.
Thumb Rest
Before the clay hardens, press your thumb gently into the top curve of the handle. This creates a comfortable depression that adds ergonomic function without ruining the tapered look.
Enjoy the tactile contrast between the smooth glaze and the raw clay on your finished mug

TRACK YOUR CERAMIC JOURNEY
Capture glaze tests, firing details, and creative progress—all in one simple printable. Make your projects easier to repeat and improve.
Double-Loop Figure-Eight Handle
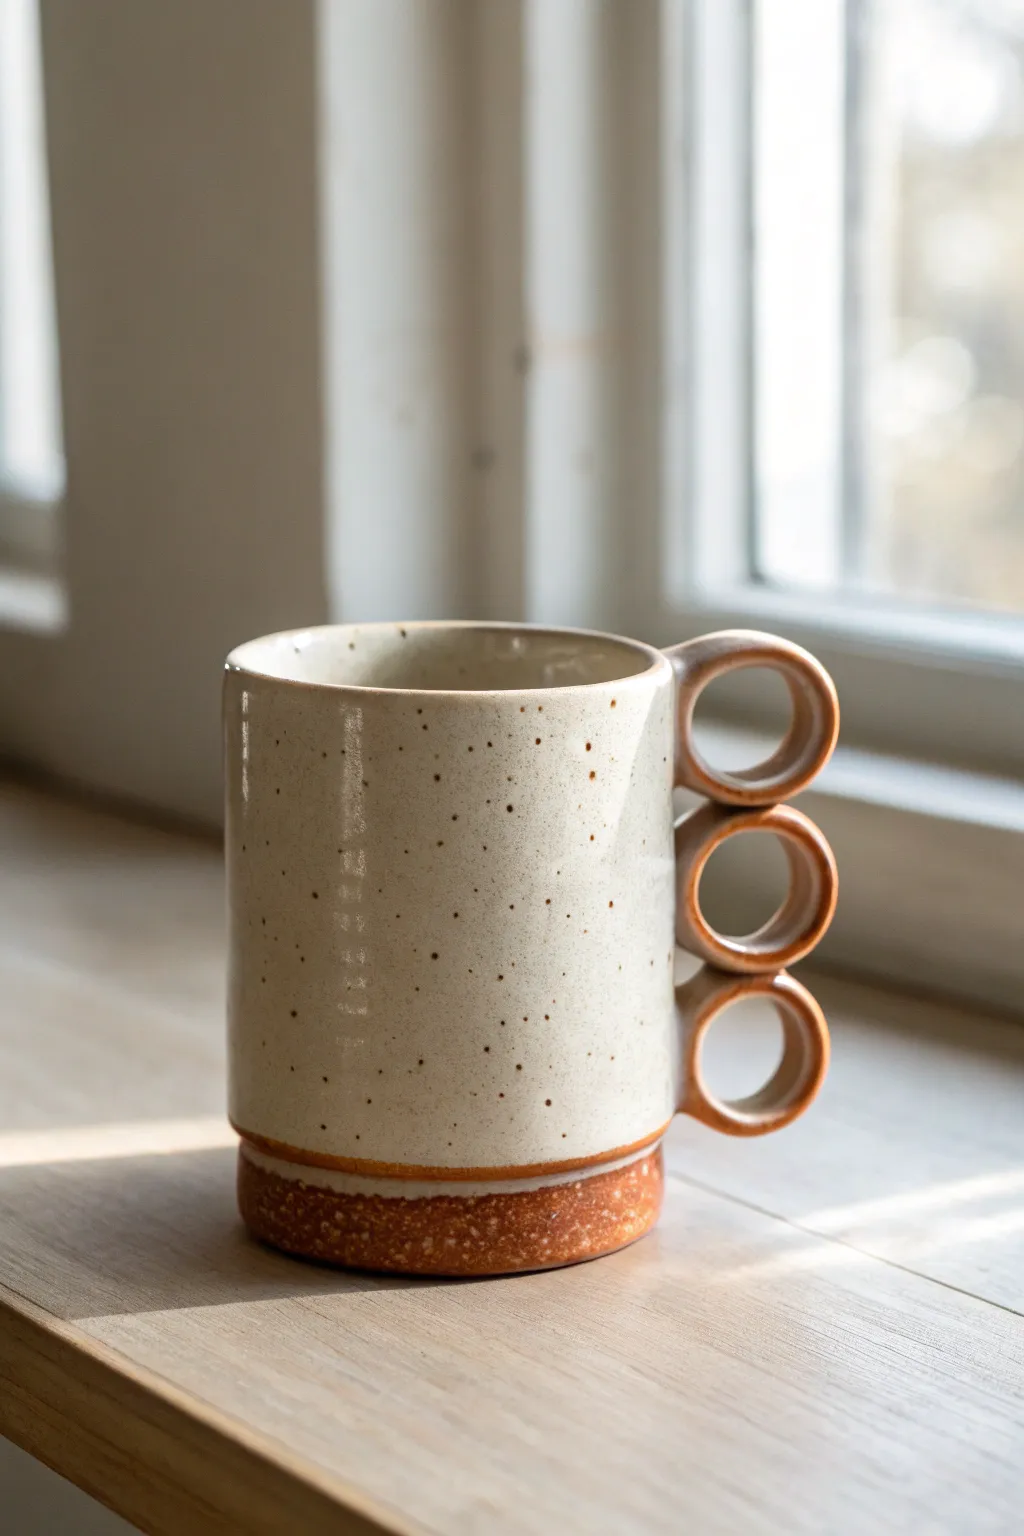
Elevate a simple cylinder vessel by transforming the handle into a structural focal point. This project features three small, distinct rings stacked vertically, creating a playful yet functional grip that mimics a chain link.
Step-by-Step Guide
Materials
- Stoneware clay (speckled or iron-rich)
- Pottery wheel (or slab rolling equipment)
- Needle tool
- Scoring tool (serrated rib)
- Slip or magic water
- Sponge
- Wooden modeling tool
- Creamy white speckled glaze
- Clear or transparent glaze (optional)
- Paintbrush or glaze dipping tongs
Step 1: Forming the Body
-
Throw the Cylinder:
Begin by centering about 1 pound of clay on the wheel. Open the center and pull up the walls to create a straight-sided cylinder, aiming for a consistent thickness of about 1/4 inch. -
Refine the Rim:
Smooth and compress the rim with a chamois or sponge. A slightly rounded rim feels much better on the lips. -
Create the Foot Detail:
Use a wooden rib or tool to define a distinct line near the bottom of the mug, about an inch up from the base. This will mark the transition between the glazed body and the raw clay foot later. -
Wire Off and Dry:
Wire the mug off the bat and set it aside to dry until it reaches a leather-hard state. It needs to be firm enough to handle without warping.
Sagging Circles?
If your rings turn into ovals while attaching, the clay is too wet. Let the rings dry to a firm leather-hard state before attaching them to the mug for better shape retention.
Step 2: Creating the Triple-Loop Handle
-
Extrude or Roll Coils:
Roll out a consistent coil of clay, approximately 3/8 inch thick. If you have a clay extruder, this is perfect for getting uniform thickness, but hand-rolling works perfectly fine too. -
Form the Rings:
Cut the coil into three equal lengths. Wrap each length around a dowel or simply form them into circles by hand. Each ring should be roughly 1 inch in diameter. -
Join the Ring Ends:
Score the ends of each coil segment, apply a dab of slip, and press them together to close the circle. smooth the join completely so no seam is visible. I like to let these stiffen up just slightly before attaching. -
Test the Layout:
Hold the three rings against the side of your leather-hard mug to gauge the spacing. They should stack vertically, touching each other. -
Score the Attachment Points:
Mark where the top, middle, and bottom rings will touch the mug body. Score these areas on the mug and the corresponding contact points on the rings aggressively. -
Stack and Attach:
Apply slip to the scored areas. Attach the bottom ring first, pressing firmly. Then add the middle ring (scoring where it touches the bottom ring), and finally the top ring. -
Reinforce Connections:
Where the rings touch the mug body and where they touch each other, use a tiny coil of clay or a modeling tool to fill gaps and smooth the transitions. Strong connections are crucial here. -
Clean Up:
Use a damp sponge or brush to clean up any excess slip around the connection points. Check the alignment from all angles to ensure the handle is straight.
Smooth Seams Tip
Use a soft paintbrush dipped in water to run over the seams between the rings. It smooths the clay without removing texture like a sponge might.
Step 3: Glazing and Finishing
-
Bisque Fire:
Once the mug is bone dry, load it into the kiln for a bisque firing (usually Cone 04). -
Wax the Foot:
Apply wax resist to the bottom inch of the mug (up to the line you defined earlier) and the bottom of the foot. This preserves the raw clay texture shown in the image. -
Glaze Application:
Dip the mug into a creamy white speckled glaze. Ensure the glaze gets inside the loops of the handle but doesn’t pool too thickly in the crevices. -
Clean the Line:
If glaze dripped onto the waxed area, wipe it clean with a damp sponge to maintain that crisp line between the glaze and the raw clay base. -
Glaze Fire:
Fire the mug to maturity (likely Cone 5 or 6, depending on your clay body). Ensure no glaze touches the kiln shelf. -
Sand the Bottom:
After firing, use a sanding block or diamond pad to smooth the unglazed foot ring so it won’t scratch your table surface.
Now you have a geometric, tactile mug that is as fun to hold as it is to look at
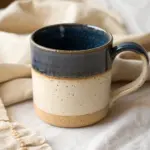
Twisted Rope Handle
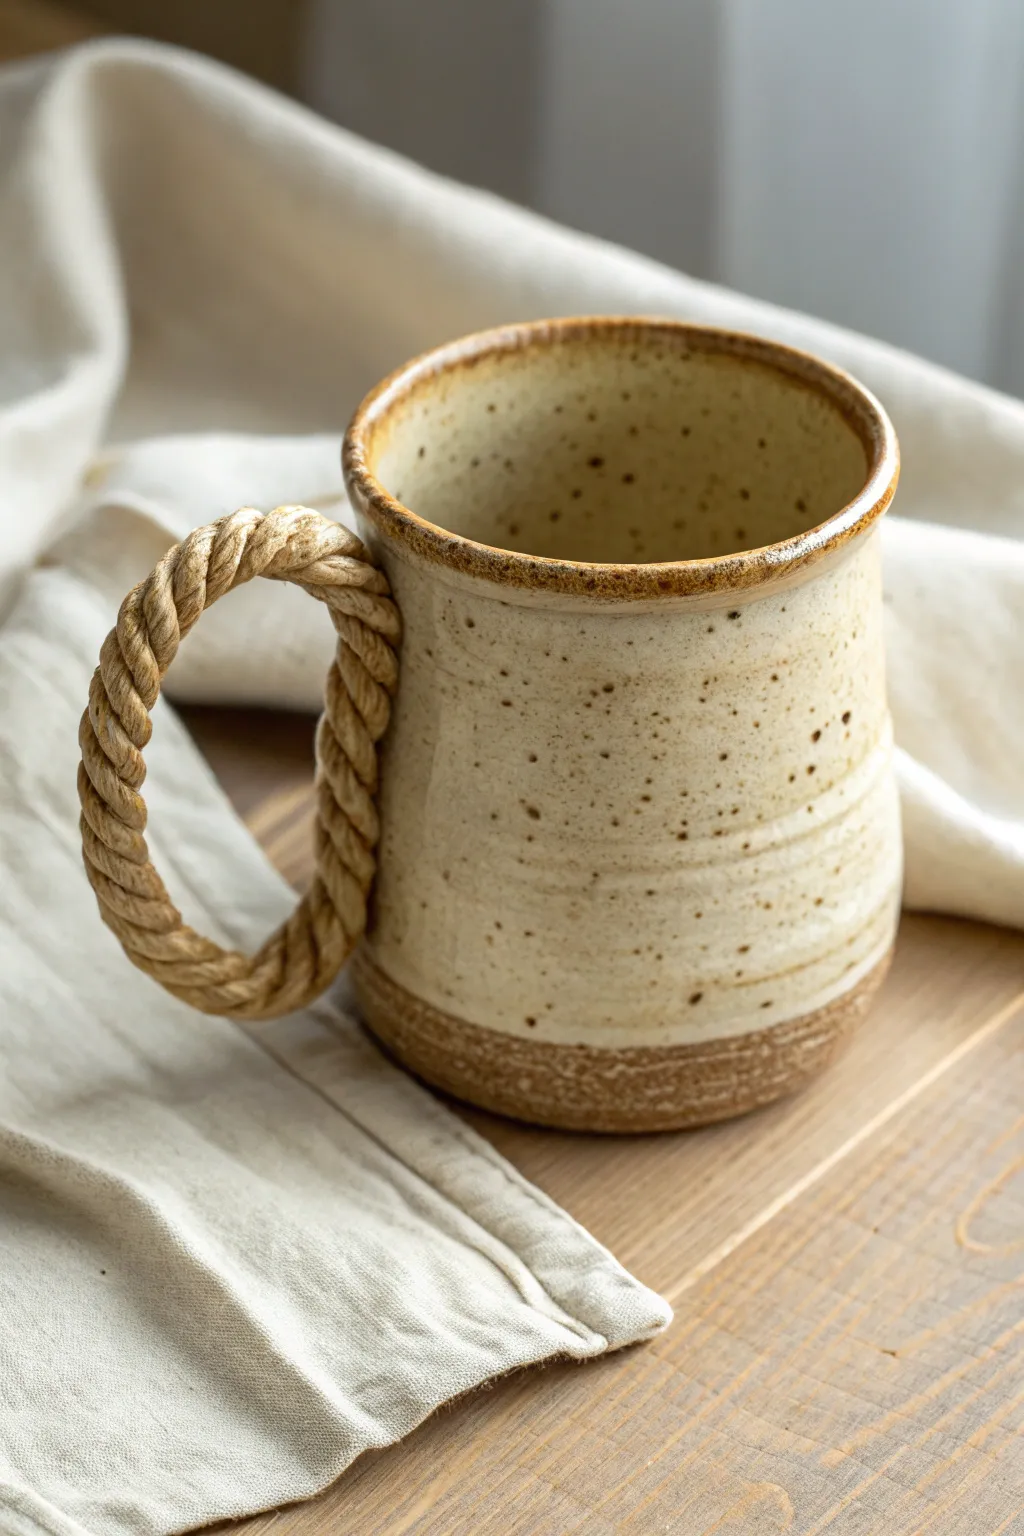
This project creates a charmingly tactile experience, replacing a standard strap handle with a clay coil twisted to mimic thick, nautical rope. The speckled glaze and bare clay base give the final piece an earthy, handmade warmth that feels comforting in the hand.
Step-by-Step Tutorial
Materials
- Speckled stoneware clay (mid-fire)
- Pottery wheel or slab roller (for mug body)
- Needle tool
- Serrated rib or scoring tool
- Slip (made from the same clay body)
- Sponge
- Cutting wire
- Wooden modeling tool
- Clear or transparent glossy glaze
- Wax resist (optional)
Step 1: Forming the Mug Body
-
Throw the cylinder:
Begin by throwing a standard cylinder on the pottery wheel using speckled stoneware clay. Aim for a slightly tapered shape that widens just a bit at the bottom for stability. -
Refine the rim:
While the wheel is spinning slowly, compress the rim with a chamois or sponge. For this rustic look, leave the rim slightly rounded rather than sharp. -
Add texture (optional):
As you finished the throw, your fingers likely left gentle throwing rings. Leave these visible rather than ribbing them perfectly smooth; they complement the rope texture we will add later. -
Trim the foot:
Once the body is leather hard, trim a distinct foot ring at the bottom. Expose the raw clay at the base to define where the glaze line will stop.
Step 2: Creating the Rope Handle
-
Roll primary coils:
Roll out two even coils of clay on your table. They should be roughly the thickness of a large pencil to start, as they will thicken when twisted. -
Begin the twist:
Lay the two coils side-by-side. Pinch them together at one end to anchor them. -
Execute the rope twist:
Gently twist the two coils around each other. Use consistent pressure to ensure the gaps between the twists are uniform. -
Check the thickness:
The twisted ‘rope’ should feel substantial but not overly heavy. If it’s too thick, gently roll the twisted braid on the table to lengthen and thin it out slightly. -
Shape the arch:
Cut a segment of your rope coil to the desired handle length (about 4-5 inches depending on mug size). Immediately curve it into an ear shape and set it down to stiffen slightly; usually, I like to let it sit for about 10-15 minutes so it holds its shape during attachment.
Unraveling Rope?
If your coils separate while bending the handle, the clay is too dry. Spritz the coils lightly with water, re-twist tightly, and bend immediately while the clay is plastic.
Step 3: Attachment and Glazing
-
Score the attachment points:
Hold the handle up to the mug to visualize placement. Mark the spots, then aggressively score both the mug body and the ends of the rope handle with a serrated tool. -
Apply slip:
Dab a generous amount of slip onto the scored areas of the mug. -
Attach the handle:
Press the rope handle firmly onto the mug. Wiggle it slightly to ensure the clay particles interlock. Be careful not to flatten the rope texture on the outside. -
Blend the seams:
Use a small wooden modeling tool to blend the clay from the handle ends onto the mug body. Since the handle is textured, you can keep the attachment points somewhat distinct or smooth them into a seamless transition. -
Dry slowly:
Cover the mug loosely with plastic. Slow drying is critical here because the twisted coils create differing thicknesses that can crack if dried too fast. -
Bisque fire:
Once bone dry, bisque fire the mug to your clay body’s recommended temperature (usually Cone 06/04). -
Wax the base:
Apply wax resist to the bottom inch of the mug and the foot ring. This creates the ‘dipped’ aesthetic where the raw speckled clay shows through. -
Glaze application:
Dip the mug into a transparent or semi-transparent cream glaze. The transparency is key to letting the speckles and the rope definition show through. -
Clean up:
Wipe away any glaze droplets that may have beaded up on the waxed areas. -
Final firing:
Glaze fire to maturity (likely Cone 5 or 6). This final firing brings out the iron speckles in the clay.
Deepening the Definition
After glazing, wipe a damp sponge gently over the handle’s ridges. This thins the glaze on the high points, making the rope texture pop after firing.
Enjoy the satisfying grip of your new nautical-inspired mug during your morning coffee routine
Braided Coil Handle
This charming handle style brings a noticeable tactile quality to your mug, mimicking the look of natural rope frozen in clay. The tight, consistent braid offers a comfortable grip while adding a gorgeous sculptural element that pairs beautifully with speckled clay bodies.
Detailed Instructions
Materials
- Speckled stoneware clay (matching your mug body)
- Clay scoring tool or serrated rib
- Slip (made from your clay body)
- Fettling knife
- Small sponge
- Modeling tool or wooden stick
- Leather-hard cylinder/mug body
Step 1: Preparing the Coils
-
Roll primary coil:
Start by rolling out a long, even coil of clay on a clean work surface. You want the thickness to be slightly thinner than your pinky finger found on your hand, as doubling it will create bulk. -
Check consistency:
Ensure the coil is smooth and free of cracks. If the clay feels too dry, roll it over a damp sponge to reintroduce a little surface moisture before braiding. -
Create the loop:
Take your long coil and fold it in half so the two ends meet. You don’t need to cut it yet; keeping it as one long folded piece often makes the initial twisting easier to manage. -
Begin the twist:
Holding the looped end in one hand and the loose ends in the other, gently begin twisting the two strands over each other. Aim for a tight, consistent rotation. -
Check the tightness:
Continue twisting until the entire length looks like a unified rope. I prefer to twist slightly tighter than necessary, as the pattern tends to relax a bit when you bend it into the handle arch. -
Compress the braid:
Gently roll the twisted rope on your table. Do not roll it out like a fresh coil; just tap it down to slightly flatten the back side (where it will touch the mug) and to ensure the strands bonds together.
Twist Direction
Twist the rope strands clockwise, but bend the handle arch counter-clockwise (or vice versa). This opposing tension helps the braids pop visually.
Step 2: Attaching the Handle
-
Cut to size:
Curve the twisted rope to gauge the size against your leather-hard mug. Cut the attachment points at a slight angle using your fettling knife to match the curve of the pot. -
Score the mug:
Mark where the handle will attach on the mug body. Score these areas thoroughly with your serrated tool to create a rough surface for bonding. -
Score the handle ends:
Score the cut ends of your braided handle as well. Apply a generous dab of slip to both the mug and the handle connection points. -
Initial attachment:
Press the top of the handle firmly onto the top scored mark. Support the mug wall from the inside with your other hand to prevent warping the cylinder. -
Forming the arch:
Guide the handle down to form your desired curve—ensure there is enough room for fingers—and press the bottom end firmly into the lower scored mark. -
Clean connections:
Use a small modeling tool to blend the very edges of the rope into the mug wall. Be careful not to smudge the braid pattern itself, just the contact points. -
Reinforce the join:
Take a tiny, tiny coil of soft clay and wrap it around the attachment points if there are gaps. Smooth this wet clay down with a brush or tool to create a seamless transition. -
Align the handle:
Hold the mug at eye level to ensure the handle is vertically straight. Gently nudge it left or right if it looks crooked.
Step 3: Drying and Finishing
-
Smooth the surface:
Wipe a barely damp sponge over the braid to soften any sharp ridges created during twisting. This makes the finished handle much more comfortable to hold. -
Slow drying:
Cover the mug loosely with plastic. Because the handle is thicker than the wall, slow drying is crucial to prevent cracking where the braid meets the body.
Knot the Bottom
Instead of a flush cut at the bottom attachment, leave excess rope length and curl it into a decorative spiral or visual ‘knot’ against the mug body.
Once glazed and fired, the glaze will break beautifully over the twisted texture, highlighting the depth of your craftsmanship
Folded Ribbon Handle
This elegant handle design mimics the fluid drape of a leather strap or folded ribbon, adding both visual interest and ergonomic comfort to a simple cylinder mug. The contrasting unglazed clay body of the handle against a creamy glazed mug creates a warm, tactile finish perfect for morning coffee.
Step-by-Step Guide
Materials
- Stoneware clay (warm/toasty body)
- Pottery wheel
- Throwing tools (sponge, rib, needle tool)
- Fettling knife
- Scoring tool or serrated rib
- Slip
- Rolling pin
- Measuring tape
- Cream/White breaking glaze (semi-opaque)
- Wax resist
- Sponge for wiping
Step 1: Throwing the Base Form
-
Center and throw:
Begin with about 1 lb of clay centered on the wheel. Open the ball and pull up a standard cylinder, aiming for straight walls with a very slight curve inward at the waist. -
Refine the rim:
Compress the rim well. Use a flat rib to ensure the outside walls are smooth, removing distinct throwing lines to match the sleek look of the example mug. -
Trim and dry:
Wire the pot off the wheel. Once it reaches leather hard, trim a shallow foot ring. Ensure the walls are an even thickness before moving to the handle.
Cracking at the Join?
Handles often crack where they join the body if they dry too fast. Wrap the handle tightly in plastic for 24 hours after attaching to equalize moisture.
Step 2: Creating the Ribbon Handle
-
Roll a slab:
Roll out a small slab of clay, approximately 4-5mm thick. I find this thickness provides strength without feeling clunky in the hand. -
Cut the strap:
Using a fettling knife and a ruler, cut a long, rectangular strap about 1.5cm wide and roughly 12-14cm long. Smooth the sharp cut edges with a damp finger immediately. -
Form the curve:
Gently bend the strap into a large ‘C’ shape. Instead of a traditional ear shape, think of how a leather belt loops back on itself. -
Prepare attachment points:
Hold the handle up to the mug to gauge placement. Verify the proportions; the top attachment should be about an inch below the rim. -
Score and slip:
Thoroughly score the attachment points on both the mug and the handle ends. Apply a generous amount of slip to the scored areas. -
Attach the top:
Press the top of the ribbon strap firmly onto the mug wall. Use a small wooden modeling tool to blend the clay just enough to seal it, but leave the visual ‘edge’ of the strap distinct. -
Loop and attach bottom:
Guide the strap down in a graceful arc. Attach the bottom end, tucking it slightly inward rather than smashing it flat, preserving the volume of the curve. -
Clean up:
Remove excess slip with a small brush. Run a damp finger along the spine of the handle to ensure it is perfectly smooth and pleasant to touch.
Try colored slips
Before bisque firing, paint the handle with a black or dark blue underglaze/slip. Wax over it before glazing for a high-contrast modern look.
Step 3: Decoration and Glazing
-
Sgraffito the rim:
Before the mug is bone dry, use a needle tool to scratch delicate vertical lines into the top 1cm of the rim, creating the textured band seen in the image. -
Bisque fire:
Once fully bone dry, bisque fire the mug to the appropriate cone (usually Cone 04 or 06). -
Applying wax resist:
This is the crucial step for the look: carefully paint wax resist over the entire handle and the top textured rim band. This prevents glaze from adhering to these areas. -
Glaze dip:
Dip the entire mug into a semi-opaque cream or white glaze. Hold it for 3-4 seconds to get good coverage. -
Wipe back:
As soon as the wax repels the glaze, use a damp sponge to wipe any stray beads of glaze off the handle and the rim decoration to reveal the raw clay color. -
Final cleaning:
Clean the foot ring completely. Check the handle corners one last time to ensure the unglazed aesthetic is sharp and clean. -
Glaze fire:
Fire the piece to maturity (Cone 5/6 or 10, depending on your clay body). The unglazed handle will toast to a warm red-brown, contrasting with the cool white glaze.
Once fired, you will have a beautifully tactile mug that invites you to hold it by the warm, unglazed clay handle
Faceted Angular Handle
This project explores the modern appeal of architectural lines with a sharp, faceted handle that offers a surprisingly comfortable grip. The speckled clay body and angular silhouette create a beautiful contrast between organic texture and precise form.
Detailed Instructions
Materials
- Stoneware clay (speckled or sand-coloured)
- Pottery wheel
- Pin tool
- Wire cutter
- Metal rib
- Wooden modeling tool
- Serrated rib or scoring tool
- Slip
- Sponge
- Cutting board or bat
Step 1: Forming the Body
-
Throw the cylinder:
Center your clay on the wheel and open it up to create a flat floor. Pull the walls straight up to create a simple, vertical cylinder shape, aiming for clear, straight sides rather than a curved belly. -
Refine the rim:
Compress the rim with a chamois or sponge to ensure it is smooth and pleasant to drink from, keeping the lip slightly tapered. -
Clean the base:
Use a wooden knife tool to undercut the base of the mug, removing excess clay and defining where the foot will eventually be. -
Wire off and dry:
Run a wire cutter under the cylinder and set it aside on a ware board. Allow it to dry to a leather-hard state, where it’s firm enough to handle without warping. -
Trim the foot:
Once leather-hard, center the mug upside down on the wheel. Trim the bottom to create a clean, distinct foot ring, exposing the raw clay texture at the base.
Sharp Corners
Wait until the handle is stiff leather-hard before the final smoothing. Soft clay will sag and lose those crisp, geometric lines.
Step 2: Constructing the Angular Handle
-
Pull the strap:
Roll out a slab or pull a thick strap of clay. You want a rectangular cross-section for this handle, flat on the top and bottom faces, roughly 1.5 cm wide. -
Cut the segments:
I prefer to let the strap stiffen slightly on a board until it’s no longer sticky. Then, using a sharp blade or fettling knife, cut the strap into distinct lengths to form the three sides of the handle. -
Miter the joints:
Cut the ends of your segments at 45-degree angles (miters) where they will join together to form the sharp corner turns. -
Score and slip the segments:
Score the mitered faces thoroughly and apply slip. Press the segments together firmly to create the angular C-shape of the handle. -
Reinforce the corners:
Roll tiny distinct coils of clay and press them into the inner corners of the joints. Smooth them out with a wooden tool to reinforce the connection without losing the sharp exterior angle. -
Initial refinement:
Use a flat paddle or the side of a wooden tool to tap the exterior planes of the handle, ensuring they remain flat and the angles stay sharp.
Step 3: Attachment and Finish
-
Mark attachment points:
Hold the assembled angular handle up to the mug body to check the scale. Mark lightly where top and bottom attachment points will land. -
Score the mug:
Score the marked areas on the mug body aggressively and apply a generous dab of slip. -
Attach the handle:
Press the handle firmly onto the mug body. The top leg should come out horizontally, and the bottom leg should return to the mug just above the foot. -
Smooth the connections:
Unlike pulled handles where you smear the clay down, keep the attachment points crisp. Use a small tool to seal the seam around the attachment points without rounding off the square profile of the handle. -
Final shaping:
Check the mug from all sides to ensure vertical alignment. Run a damp sponge very lightly over the sharp edges to remove burrs, but be careful not to round over the ‘faceted’ look. -
Slow drying:
Cover the handle specifically with wax resist or wrap the whole mug loosely in plastic to allow for slow, even drying to prevent cracking at the angular joints. -
Bisque fire:
Once bone dry, bisque fire the piece to prepare it for glazing. -
Glazing:
Dip the mug in a creamy, semi-matte glaze, leaving the bottom inch and the foot unglazed to show off the raw clay texture.
Angle Play
Experiment with the handle’s profile by tapering the width of the strap segments slightly, making the handle wider at the top and narrower at the bottom.
Your modern mug is now ready for firing and will make a striking addition to your cupboard
Texture-Matched Handle
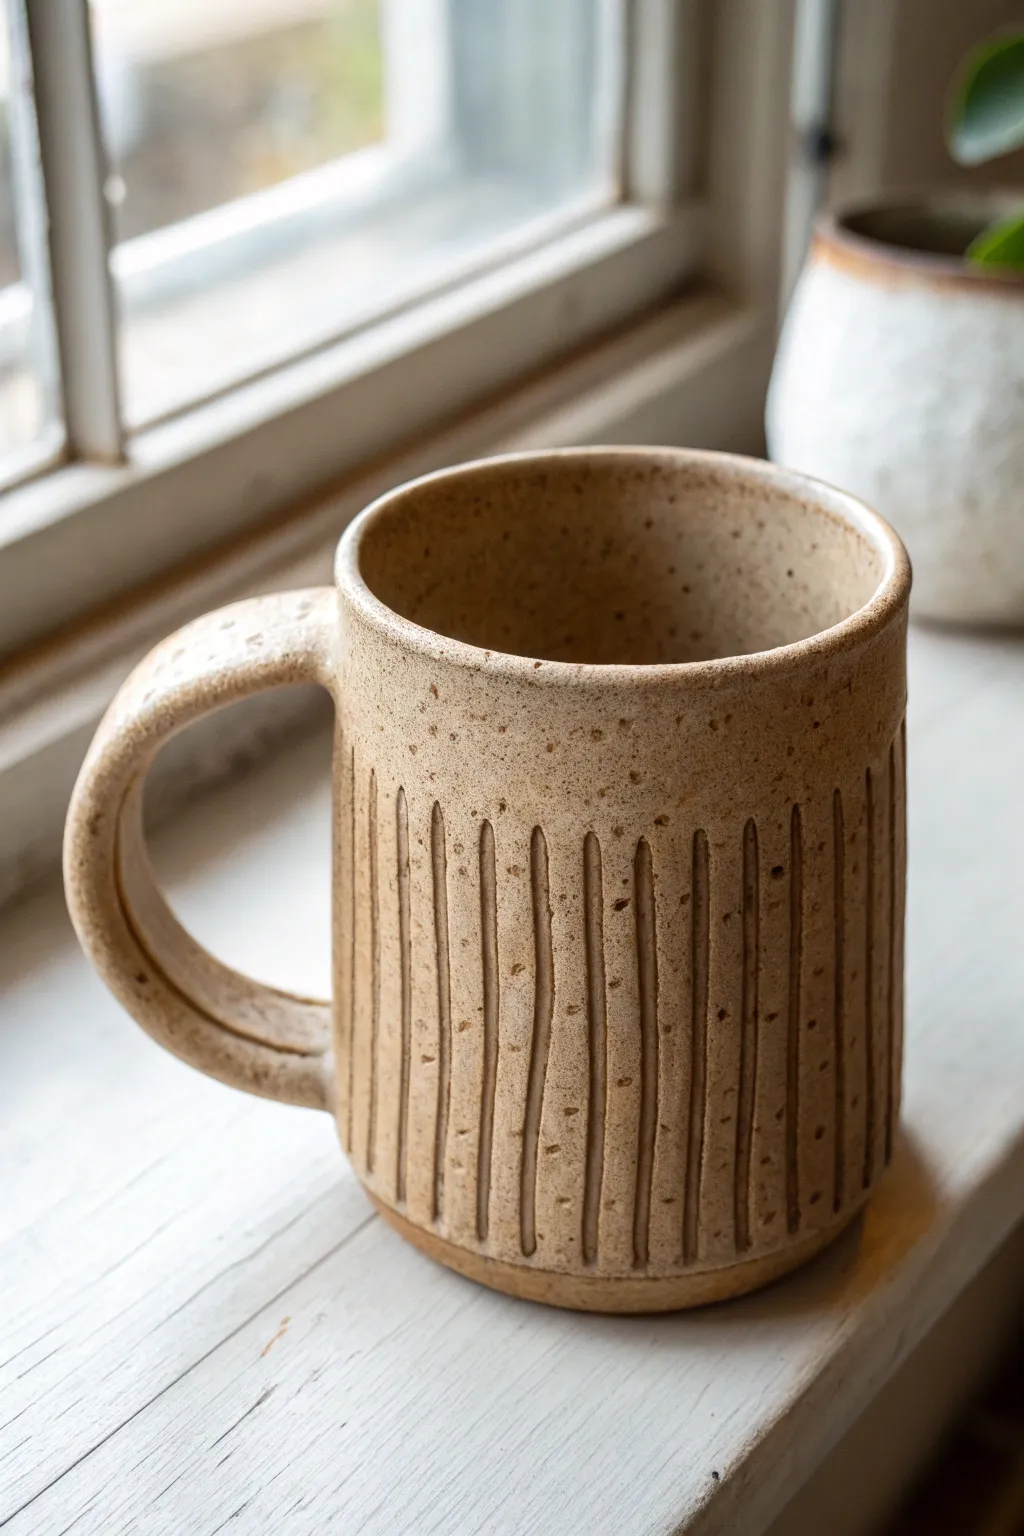
This project explores the harmony of connecting a handle to a mug body not just through attachment, but through shared texture. By carrying the vertical fluting pattern from the mug wall seamlessly onto the handle, you create a cohesive, rustic piece that feels incredible in the hand.
Step-by-Step Guide
Materials
- Speckled stoneware clay (mid-fire)
- Pottery wheel
- Loop tool or carving tool
- Wire cutter
- Serrated rib or scoring tool
- Slip
- Wooden modeling tool
- Sponge
- Needle tool
Step 1: Throwing and Shaping
-
Center and open:
Begin with about 1 pound of speckled stoneware clay. Center it firmly on the wheel head and open up the clay to create a flat, even floor about 3 inches wide. -
Establish the cylinder:
Pull up the walls to form a straight-sided cylinder. Aim for a height of roughly 4-5 inches. Keep the walls slightly thicker than usual (about 1/4 inch minimum) to account for the carving later. -
Compress the rim:
Use a chamois or your sponge to compress and round the rim. A strong rim is crucial since the body will be carved. -
Trim the base:
Once the cylinder is leather hard, trim the bottom to create a neat foot ring. This lifts the form and gives a stopping point for your carved lines.
Step 2: Carving the Texture
-
Mark vertical guides:
Lightly mark vertical lines around the cylinder with a needle tool if you want perfect spacing, though freehanding yields that organic look seen in the photo. -
Carve the body fluting:
Using a small loop tool, carve vertical channels from just below the rim to just above the foot. Vary the pressure slightly to create natural imperfections. I like to leave small ridges between cuts. -
Determine handle placement:
Hold the mug and identify where a handle feels most balanced. Mark the attachment points on the textured surface.
Cracks at the Join?
Carved surfaces are tricky to attach to. If cracks appear at the handle join during drying, wrap the handle tightly in plastic while leaving the body exposed to equalize moisture content.
Step 3: Matches Handle Creation
-
Pull a strap:
Pull a handle strap from a lug of clay. Make it generous in width and thickness—it needs volume to accept the carving. -
Curve and set:
Curve the pulled strap into a ‘C’ or ear shape and set it aside until it matches the leather-hard consistency of the mug body. -
Carve the handle:
Before attaching, use the same loop tool to carve vertical channels down the length of the handle strap. This mimics the body texture. Be careful not to carve too deep and weaken the structure.
Pro Tip: Depth Control
Don’t carve the handle grooves quite as deep as the body grooves. The handle endures more stress, and deep cuts create weak points that can snap during use.
Step 4: Assembly and Finishing
-
Score the attachment zones:
Score the marked areas on the mug body thoroughly. Because the surface is uneven from carving, you need to be aggressive with scoring to ensure a good bond. -
Attach the handle:
Apply slip to the scored areas and press the textured handle firmly onto the body. Support the wall from the inside to prevent warping. -
Blend the seams:
Use a wooden tool to blend the clay at the attachment points. However, try to preserve the carved lines as they meet the body, rather than smoothing them away completely. -
Clean up burrs:
Once the mug is bone dry, gently rub the surface with a green scrubbing pad or a dry sponge to knock off any sharp clay burrs created by the carving tool. -
Bisque fire:
Load the mug into the kiln for a bisque firing to cone 04 (or your clay body’s preference). -
Glaze application:
To achieve the look in the photo, apply a matte or satin clear glaze. Alternatively, leave the exterior unglazed if the clay is vitrified, only glazing the interior and rim for functionality. -
Final firing:
Fire to the maturity temperature of your clay (likely cone 6 or 10).
Enjoy your morning coffee with the satisfaction of holding a completely handmade texture
Scalloped Edge Strap Handle
This charming mug combines a speckled stoneware body with delicate, hand-painted details along the base. The simple strap handle complements the cozy, earthy aesthetic, making it a perfect project for intermediate potters looking to refine their form and surface decoration skills.
Step-by-Step Tutorial
Materials
- Speckled stoneware clay (approx. 1 lb)
- Pottery wheel
- Throwing tools (sponge, rib, wire cutter)
- Trimming tools
- Needle tool
- Scoring tool or serrated rib
- Slip
- Small round brush
- Iron oxide wash or dark brown underglaze
- Clear or matte white glaze
Step 1: Throwing the Body
-
Center the Clay:
Begin with about 1 pound of well-wedged speckled stoneware clay. Center it firmly on the wheel head, ensuring a stable base before opening. -
Open and Pull:
Open the clay to create a flat floor about 3 inches wide. Pull the walls up into a cylinder, aiming for an even thickness of about 1/4 inch throughout. -
Shape the Belly:
From the inside, gently push the clay outward to create a slight curve or ‘belly’ in the lower half of the mug, tapering it slightly inward at the rim to help retain heat. -
Refine the Rim:
Compress the rim with a shammy or sponge to round it off comfortably for drinking. This also helps prevent future chipping. -
Cut and Dry:
Wire the mug off the wheel batt and set it aside to dry until it reaches a sturdy leather-hard state.
Smudged Oxide?
If your painted oxide lines look messy or smudge during glazing, try mixing the oxide with a tiny bit of gum solution or wax resist before painting. This helps lines stay crisp.
Step 2: Creating and Attaching the Strap Handle
-
Pull a Lug:
With a separate lump of clay, pull a thick lug or carrot shape. Flatten it slightly to create a strap profile rather than a round coil. -
Shape the Curve:
Bend the strap into a pleasing ‘C’ or ear shape, ensuring the top curve has enough rise for a comfortable grip. -
Score and Slip:
Identify where you want the handle attachment points on your leather-hard mug. Thoroughly score these areas and the ends of your handle, then apply slip. -
Attach Firmly:
Press the handle firmly onto the mug body. Use your thumb to smooth the clay from the handle onto the mug, ensuring a seamless connection. I like to reinforce the join with a tiny coil of soft clay blended in. -
Clean Up:
Wipe away excess slip with a damp sponge and ensure the handle is vertically aligned.
Step 3: Decoration and Glazing
-
Paint the Scallops:
Using a small round brush and iron oxide wash (or dark underglaze), carefully paint a row of small arches along the very bottom edge of the mug. -
Add Inner Dots:
Inside each painted arch, place a small dot of the same oxide or underglaze to complete the scalloped motif. -
Detail the Rim:
Run a banded line of oxide or underglaze along the rim of the mug to frame the piece. -
Bisque Fire:
Allow the mug to dry completely (bone dry) before loading it into the kiln for a bisque firing (usually cone 04 or 06). -
Apply Glaze:
Dip the entire mug into a clear or semi-opaque matte white glaze. The glaze needs to be translucent enough to let the speckles and your painted iron oxide design show through clearly. -
Check the Foot:
Wipe the foot ring completely clean of glaze to prevent it from fusing to the kiln shelf. -
Final Fire:
Fire the mug to maturity (Cone 5, 6, or 10 depending on your clay body). This will vitrify the clay and melt the glaze into a smooth, durable surface.
Level Up: Texture
Before the clay dries, gently press a texture tool or stamp into the scalloped area to add physical relief to the painted design, making the pattern tactile.
Now you have a beautifully custom mug ready for your morning coffee routine
Finger-Groove Handle
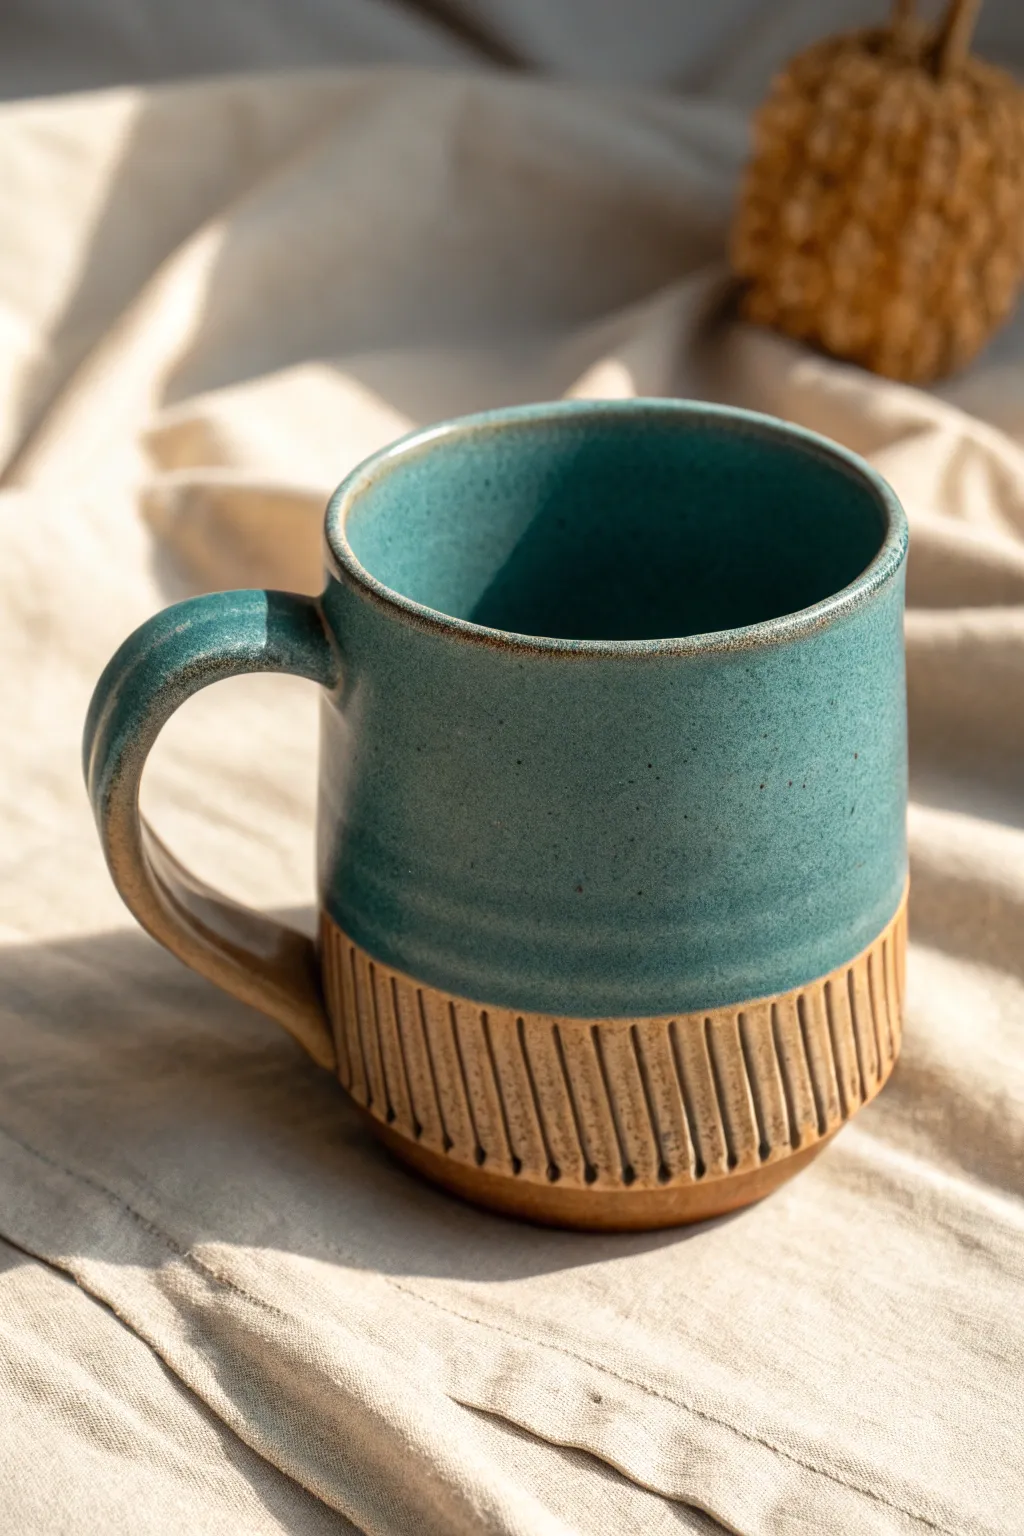
This project combines a classic cylinder form with a unique textural twist on the bottom and a comfortable, ergonomic handle. The deep teal glaze contrasts beautifully with the raw, grooved clay body, highlighting the hand-carved details.
Step-by-Step Guide
Materials
- Stoneware clay (speckled or warm-toned works best)
- Pottery wheel
- Throwing tools (sponge, rib, wire cutter)
- Trimming tools
- Carving tool (small loop or v-tip)
- Bucket of water
- Teal or turquoise glaze (cone 6)
- Wax resist
- Small sponge or brush
Step 1: Throwing the Form
-
Center the clay:
Start with about 1 to 1.5 lbs of clay on the wheel. Center it firmly, creating a low, wide mound to ensure stability before opening. -
Open and pull:
Open the clay and pull the walls up into a cylinder. Aim for straight sides with a very slight inward taper toward the rim to keep the visual weight balanced. -
Refine the shape:
Use a metal or wooden rib to smooth the outside walls, removing throwing lines. Compress the rim with a chamois or your thumb for a professional, durable edge. -
Cut and dry:
Run a wire underneath the pot. Let it dry to leather-hard consistency—this is crucial for the carving step later.
Step 2: Creating the Handle
-
Pull a strap:
While the mug dries, pull a medium-thick strap of clay for the handle. I like to make this slightly wider than a standard handle to accommodate the groove. -
Shape the curve:
Curve the strap into a ‘C’ shape or ear shape and set it aside to stiffen until it can hold its own weight without sagging. -
Press the groove:
Once the handle is firm but still pliable, use your thumb or a rounded tool to gently press a continuous indentation down the center spine of the outer curve. Run a damp sponge over it to smooth any harsh edges.
Cracking Handles?
If the handle cracks at the join during drying, wrap the handle in plastic while leaving the body exposed. This slows the drying so the handle matches the mug’s moisture level.
Step 3: Trimming and Carving
-
Trim the foot:
Center the leather-hard mug upside down on the wheel. Trim the bottom to create a clean, defined foot ring. -
Mark the glaze line:
While the pot is spinning slowly, use a needle tool to lightly mark a horizontal line about one-third of the way up from the bottom. This separates the glazed area from the textured area. -
Carve the vertical lines:
Using a carving tool, cut vertical grooves into the bottom third of the mug, stopping exactly at your marked line. Space them evenly to create a ribbed effect.
Level Up: Oxide Wash
Before glazing, rub a red iron oxide wash into the carved grooves and wipe it back with a sponge. This deepens the shadows and highlights usage marks.
Step 4: Assembly and Finishing
-
Score and slip:
Score the attachment points on both the mug and the handle. Apply slip generously. -
Attach the handle:
Press the handle firmly onto the mug body. Use a small wooden tool to blend the seams, ensuring the groove on the handle flows naturally. -
Bisque fire:
Let the piece dry slowly and completely before bisque firing to cone 04. -
Apply wax resist:
Brush wax resist carefully over the carved bottom section and the foot ring to prevent glaze from adhering to the raw clay texture. -
Glaze dip:
Dip the top two-thirds of the mug into your teal glaze. Only dip up to the wax line; if any glaze beads on the wax, wipe it off quickly with a damp sponge. -
Final fire:
Fire the mug to maturity (likely cone 6, depending on your clay and glaze).
Enjoy your morning coffee with the tactile satisfaction of that custom-grooved handle
Cutout Handle From the Wall
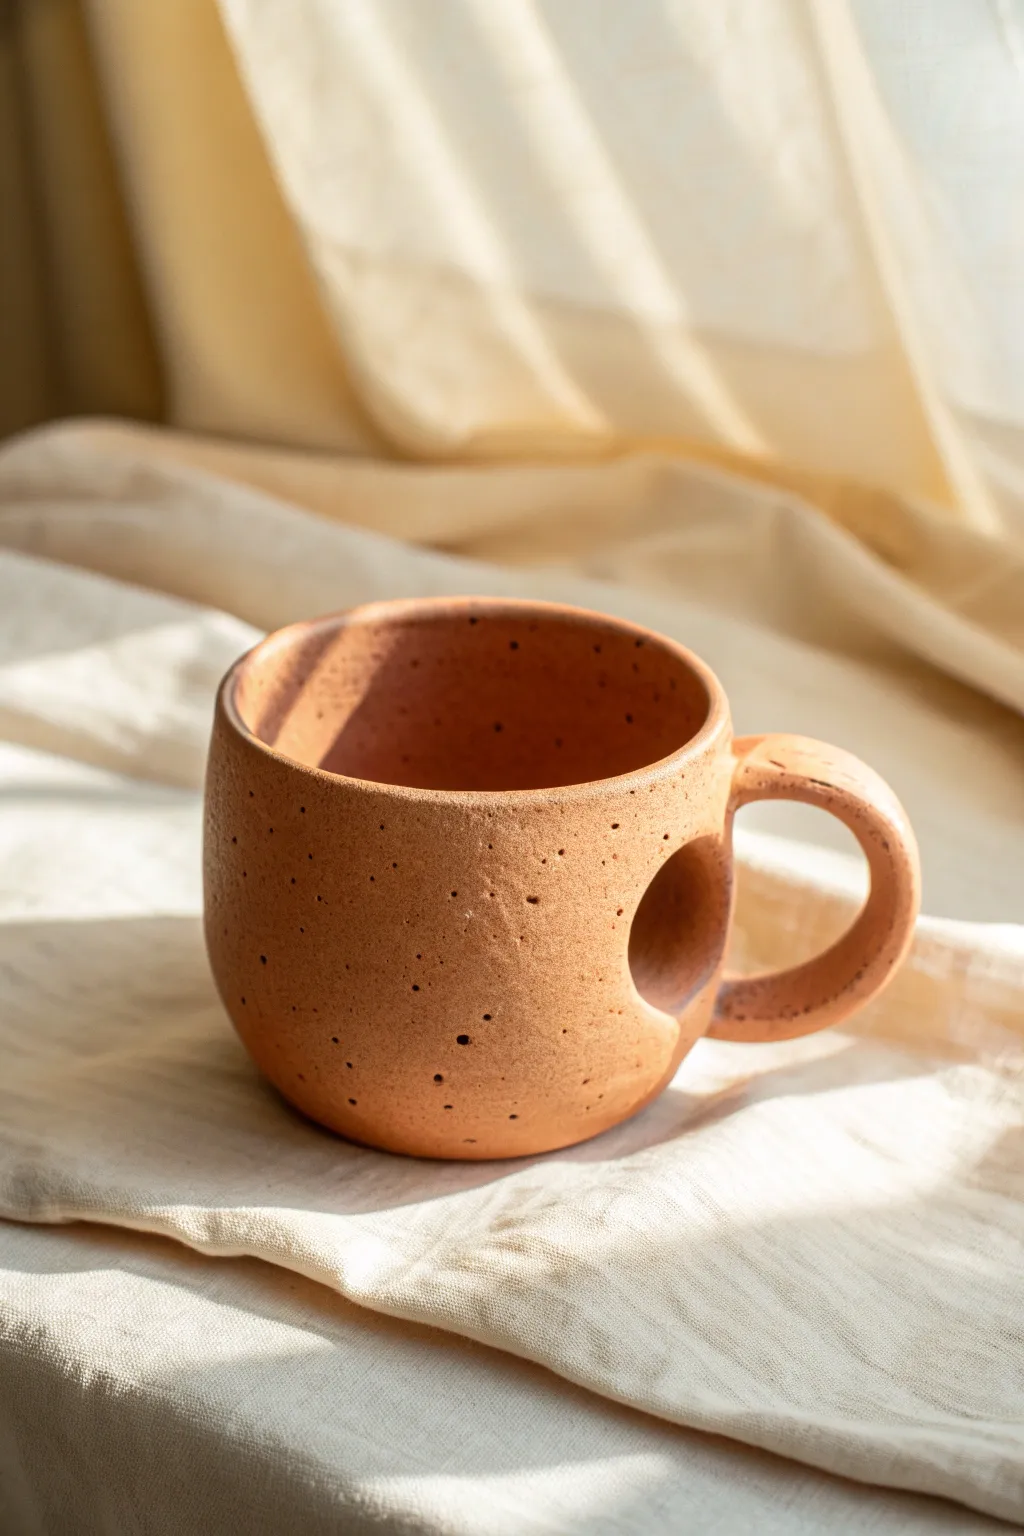
This project explores a modern twist on the classic mug by integrating the handle directly into the vessel’s silhouette. With its warm terracotta clay and speckled finish, this piece features a seamless negative space cutout that invites your fingers to nestle right into the cup’s wall.
Step-by-Step Tutorial
Materials
- Terracotta or warm stoneware clay with grog/speckles
- Pottery wheel
- Throwing tools (sponge, rib, wire cutter)
- Needle tool
- Fettling knife
- Trimming tools
- Scoring tool or serrated rib
- Slip
- Small circular cookie cutter (approximately 1-1.5 inches)
- Sponge for smoothing
- Clear matte glaze
Step 1: Throwing the Base Form
-
Prepare the Clay:
Begin by wedging roughly 1-1.5 lbs of speckled terracotta clay. Ensure it is free of air bubbles, as walls need to be consistent for the cutout later. -
Center and Open:
Center the clay on your wheel head. Open it up, focusing on creating a flat inner floor rather than a rounded bowl shape. -
Create a Cylindrical Pull:
Pull the walls up into a stout cylinder. Aim for a slightly thicker wall than usual (about 1/4 inch or slightly more) on the bottom half, as you will be pressing into this area. -
Shape the Belly:
Use a rib to gently belly out the form, creating a rounded bottom that tapers slightly toward the rim. Keep the rim smooth and level. -
Refine the Surface:
Smooth the exterior with a flexible metal rib to remove throwing lines, giving it that clean, modern look seen in the photo. -
Cut and Dry:
Wire the pot off the bat and let it dry to a firm leather-hard stage. It needs to be sturdy enough to handle cutting and manipulation.
Seamless Blending Tip
When attaching the handle inside the cutout, push from the inside of the mug while blending on the outside. This counter-pressure prevents the wall from warping.
Step 2: Creating the Cutout Handle
-
Trim the Foot:
Place the mug back on the wheel (or use a Giffin Grip) to trim a clean, rounded foot ring. -
Mark the Cutout:
Choose the best side of your mug. Using a small circular cutter or freehanding with a needle tool, lightly mark a circle about halfway down the wall where the negative space will be. -
Indent the Wall:
Instead of cutting the hole immediately, gently press the marked circle inward with your thumb to create a concave depression in the wall. This reinforces structural integrity and creates a comfortable resting spot for knuckles. -
Cut the Opening:
Now, carefully cut out the circle within that depression using a sharp fettling knife. Save the excess clay for the handle loop. -
Pull a Small Loop:
Pull a short, thick strap handle from a lug of fresh clay. It should perfectly match the width of your cutout circle. -
Shape the Arc:
Bend the pulled handle into a tight ‘C’ shape. The curve needs to mimic the rounded nature of the mug’s body. -
Score and Slip:
Score the edges of your cutout heavily. Do the same to the ends of your handle loop. Apply a generous amount of slip. -
Attach the Handle:
Insert the handle ends into the cutout. Instead of attaching to the *surface* of the mug, attach the handle ends to the *rim* of the hole you cut, creating a seamless transition from wall to handle. -
Blend the Seams:
I find using a small wooden modeling tool works best here to blend the clay from the handle into the interior wall of the mug. The connection should look invisible. -
Smooth the Transition:
Use a damp sponge to round over the edges of the cutout and the handle join. The goal is a soft, organic look, not sharp mechanical edges.
Step 3: Retouching and Glazing
-
Final Surface Check:
Once the handle is firmly attached, do a final pass over the entire mug with a slightly damp sponge to expose the grog/speckles slightly. -
Bisque Fire:
Slow dry the mug under plastic to ensure the handle and wall dry at the same rate, then bisque fire to cone 04. -
Glaze Application:
Dip or spray the mug with a clear matte glaze. This highlights the natural color of the clay and the dark speckles without obscuring the form. -
Final Firing:
Glaze fire to maturity (likely cone 5 or 6 depending on your clay body).
Preventing Cracks
Because the wall is thin at the cutout, cracks happen easily. Cover the handle area with wax resist during the drying phase to slow down evaporation.
Now you have a stunning, sculptural mug that feels as interesting to hold as it looks on the shelf
Side-Pull Mini Handle
This project features a charmingly speckled mug with a distinctive handle that is pulled directly from the side of the vessel, creating a seamless and organic connection. Ideally suited for cozy mornings, the finish highlights the natural beauty of speckled clay with a simple, transparent or semi-opaque white glaze.
Step-by-Step
Materials
- Speckled stoneware clay (e.g., Lagunitas or similar)
- Pottery wheel
- Throwing tools (sponge, needle tool, rib, wire cutter)
- Trimming tools
- Water bucket
- Sponge for smoothing
- Transparent or milky white glaze
- Kiln
Step 1: Throwing the Cylinder
-
Center and Open:
Begin with about 1 to 1.5 lbs of well-wedged speckled clay. Center it firmly on the wheel and open the well, leaving a floor about 1/4 inch thick. -
Pull the Walls:
Pull up the walls to create a straight-sided cylinder. Aim for a height of about 4 inches. Keep the walls even, but leave the rim slightly thicker to support the handle later. -
Create the Profile:
Using a rib on the inside and your hand on the outside, gently belly out the form slightly, then collar it back in for a subtle taper toward the bottom. This creates that modern, slightly angled silhouette. -
Refine the Rim:
Compress the rim with a chamois or your sponge to ensure it is smooth and pleasant to drink from. I find spending extra time here makes the final piece feel much more professional. -
Wire Off:
Use your wire cutter to slice the mug from the bat. Let it stiffen to a soft leather-hard stage.
Clean Transitions
Use a wet paint brush to run over the ‘seams’ where the handle meets the mug. This erases finger marks and ensures a truly seamless look.
Step 2: Creating the Side-Pull Handle
-
Trim the Base:
Once leather hard, trim the bottom to create a neat foot ring. Smooth any rough edges from the trimming tool. -
Prepare the Attachment Point:
Identify a spot on the side of the mug, about 1.5 inches below the rim. Score this area deeply and add a dab of slip. -
Attach the Clay Lug:
Take a small nugget of clay (roughly the size of a walnut) and firmly attach it to the scored area. Smooth the edges of the nugget onto the mug body so it looks like a bump growing out of the wall. -
Pulling from the Pot:
Wet your hand. With the mug held sideways in your lap or on a banding wheel, begin pulling the handle directly from that attached lug. Use your thumb and forefinger to stroke the clay outward. -
Shape the Curve:
As the clay lengthens, gently guide it into an arch. Maintain a tapered thickness—thicker at the attachment, thinner at the tail. -
Attach the Tail:
Once the handle constitutes a comfortable loop (sized for 2-3 fingers), curve the tail back toward the mug body. Score the lower attachment point and press the handle tail firmly into place. -
Refine the Connection:
Smooth the lower attachment point with your thumb so it melds seamlessly with the wall. The handle should look like a continuous ribbon of clay.
Expose the Speckles
For more dramatic speckling, try wiping the rim with a damp sponge immediately after dipping in glaze to thin the coating and reveal more raw clay texture.
Step 3: Finishing and Glazing
-
Dry Slowly:
Cover the mug loosely with plastic to ensure the handle and body dry at the same rate. This prevents cracking at the attachment points. -
Bisque Fire:
Once bone dry, fire the piece to Cone 04 (or your clay body’s bisque temperature). -
Check for Sharpness:
After bisque firing, lightly sand any sharp spots on the handle or rim with 400-grit sandpaper. -
Glaze Application:
Dip the mug into a transparent or milky semi-opaque white glaze. This specific look relies on the glaze breaking over the iron speckles in the clay, so avoid opaque solid colors. -
Clean the Foot:
Wipe the foot ring completely clean of glaze with a damp sponge. -
Final Fire:
Glaze fire to Cone 6 (or appropriate temp for your clay/glaze combo) in an oxidation atmosphere to keep the clay body bright.
Enjoy your morning coffee knowing the handle was sculpted perfectly for your own hand
Scroll-End Handle Detail
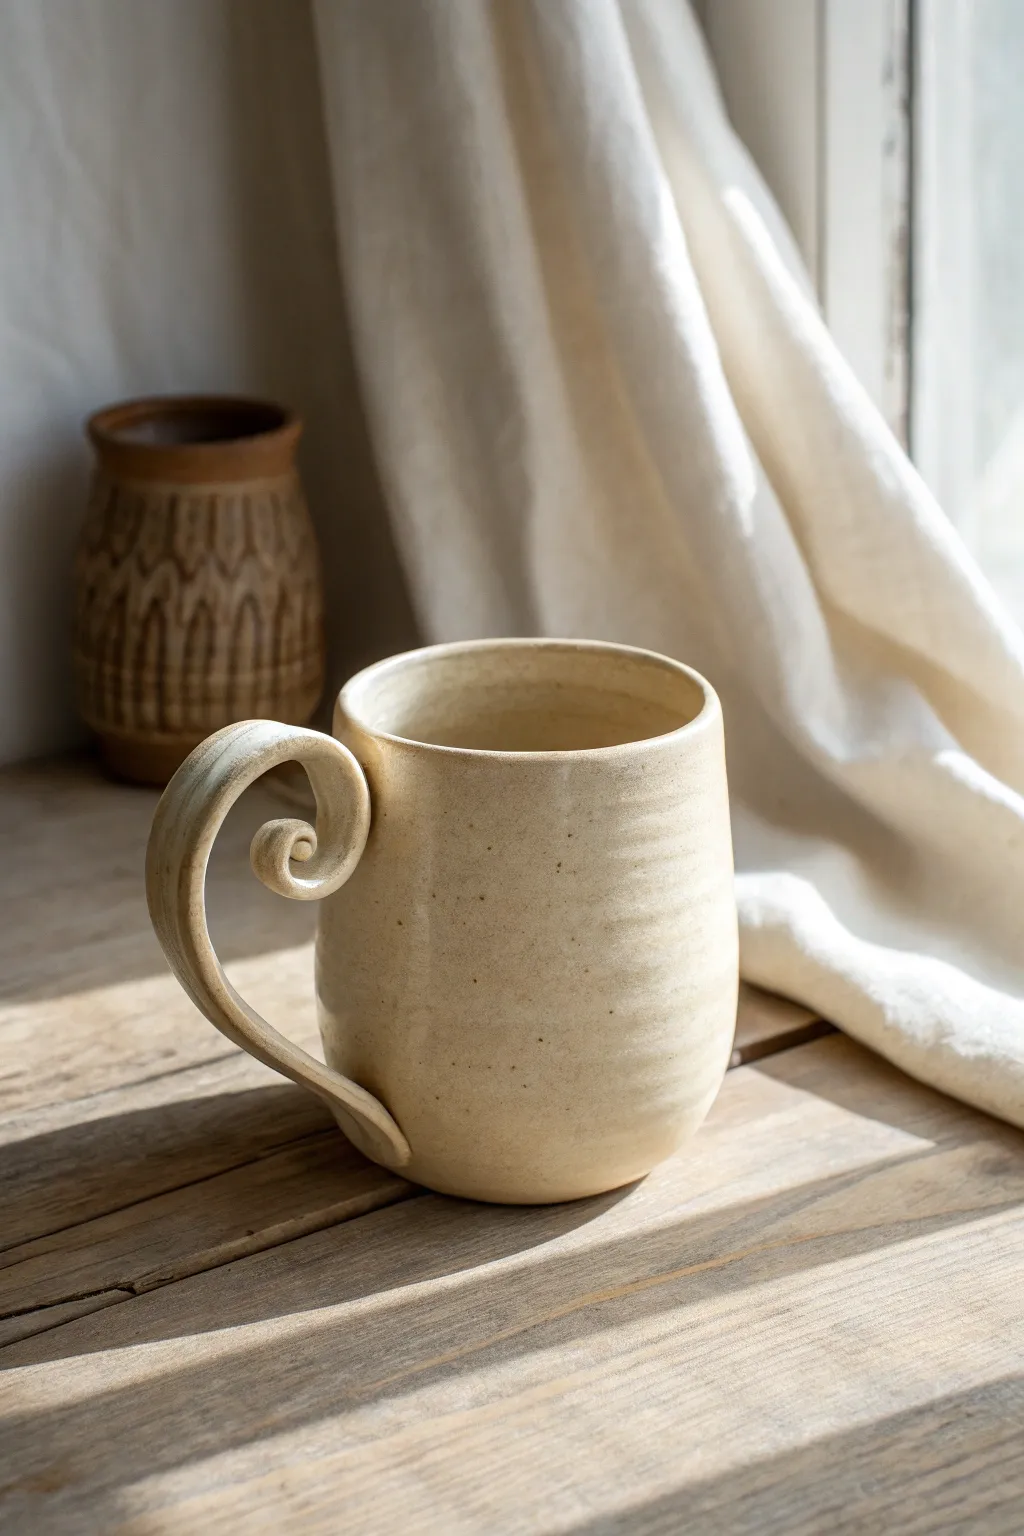
This project features a charming, handmade ceramic mug defined by its distinctive handle, which curls into a delicate scroll at the top. The form is simple and slightly tapered, enhanced by a specked oatmeal glaze that gives it a warm, earthy character perfect for cozy mornings.
How-To Guide
Materials
- Stoneware clay (preferably with speckles)
- Pottery wheel
- Throwing tools (sponge, rib, wire cutter)
- Trimming tools
- Needle tool
- Serrated rib or scoring tool
- Slip
- Small wooden modeling tool
- Sponge for smoothing
- Oatmeal/Cream dipping glaze (food safe)
- Small brush (optional for touch-ups)
Step 1: Throwing the Body
-
Prepare the clay:
Begin by wedging about 1 to 1.5 pounds of stoneware clay to ensure there are no air bubbles for a smooth throwing experience. -
Center and open:
Center the clay on your wheel and open it up, compressing the floor well to prevent future cracking. -
Pull the walls:
Pull the clay up into a cylinder. Aim for a slightly bottom-heavy distribution to allow for shaping later. -
Shape the belly:
Using a rib on the inside, gently push the walls outward to create a subtle curve or ‘belly’ that tapers slightly inward toward the rim. The form should be sturdy but elegant. -
Refine the rim:
Use a sponge or chamois to smooth and compress the rim, ensuring it’s comfortable for drinking. -
Cut and dry:
Wire the pot off the bat and set it aside to dry to a leather-hard state.
Step 2: Creating the Scroll Handle
-
Pull a strap:
Take a lug of clay and pull a traditional handle strap. You want it wider at the attachment point and tapering slightly. -
Shape the curve:
Let the pulled handle set up slightly until it can hold its shape but is still flexible. Bend it into a question mark shape. -
Form the scroll:
At the top end (the thicker part typically), roll the clay tightly inward toward the curve to create the scroll detail. This is the signature element, so take your time to get a tight, clean spiral. -
Trim to fit:
Hold the handle up to the leather-hard mug body to check proportions. Trim the bottom attachment point at an angle so it meets the mug wall cleanly.
Supporting the Scroll
The heavy scroll top can make the handle sag while wet. Prop a small piece of foam or a rolled-up sponge under the curve while it dries to maintain the perfect arch.
Step 3: Attachment and Finishing
-
Score surfaces:
Identify where the handle will attach. Score the mug body and the contact points on the handle deeply with a serrated tool. -
Apply slip:
Add a generous amount of slip to the scored areas on both pieces. -
Attach the top:
Press the scrolled top section firmly against the upper wall of the mug. The scroll itself usually acts as part of the connection point, but ensure the clay behind the scroll creates a strong bond. -
Attach the bottom:
Curve the handle down and attach the tail end near the base of the mug, smoothing the clay downward into the body for a seamless transition. -
Clean connections:
Use a small wooden tool to reinforce the seams and clean up excess slip. I find a slightly damp brush works wonders here to smooth the join without removing the texture. -
Dry slowly:
Cover the mug loosely with plastic to ensure the handle and body dry at the same rate, preventing cracks. -
Bisque fire:
Once bone dry, fire the piece to bisque temperature (usually cone 04/06). -
Glaze and final fire:
Dip the mug into a creamy oatmeal glaze that breaks over textures. Clear the foot ring and fire to maturity (likely cone 5/6 depending on your clay).
Fixing Hairline Cracks
If you see a tiny crack forming at the scroll join during drying, score it immediately, add slip, and compress it with a wooden tool. Slow down the remaining drying time.
Enjoy the satisfying weight and balance of this handle every time you reach for your morning coffee
Floral Join Handle Accent
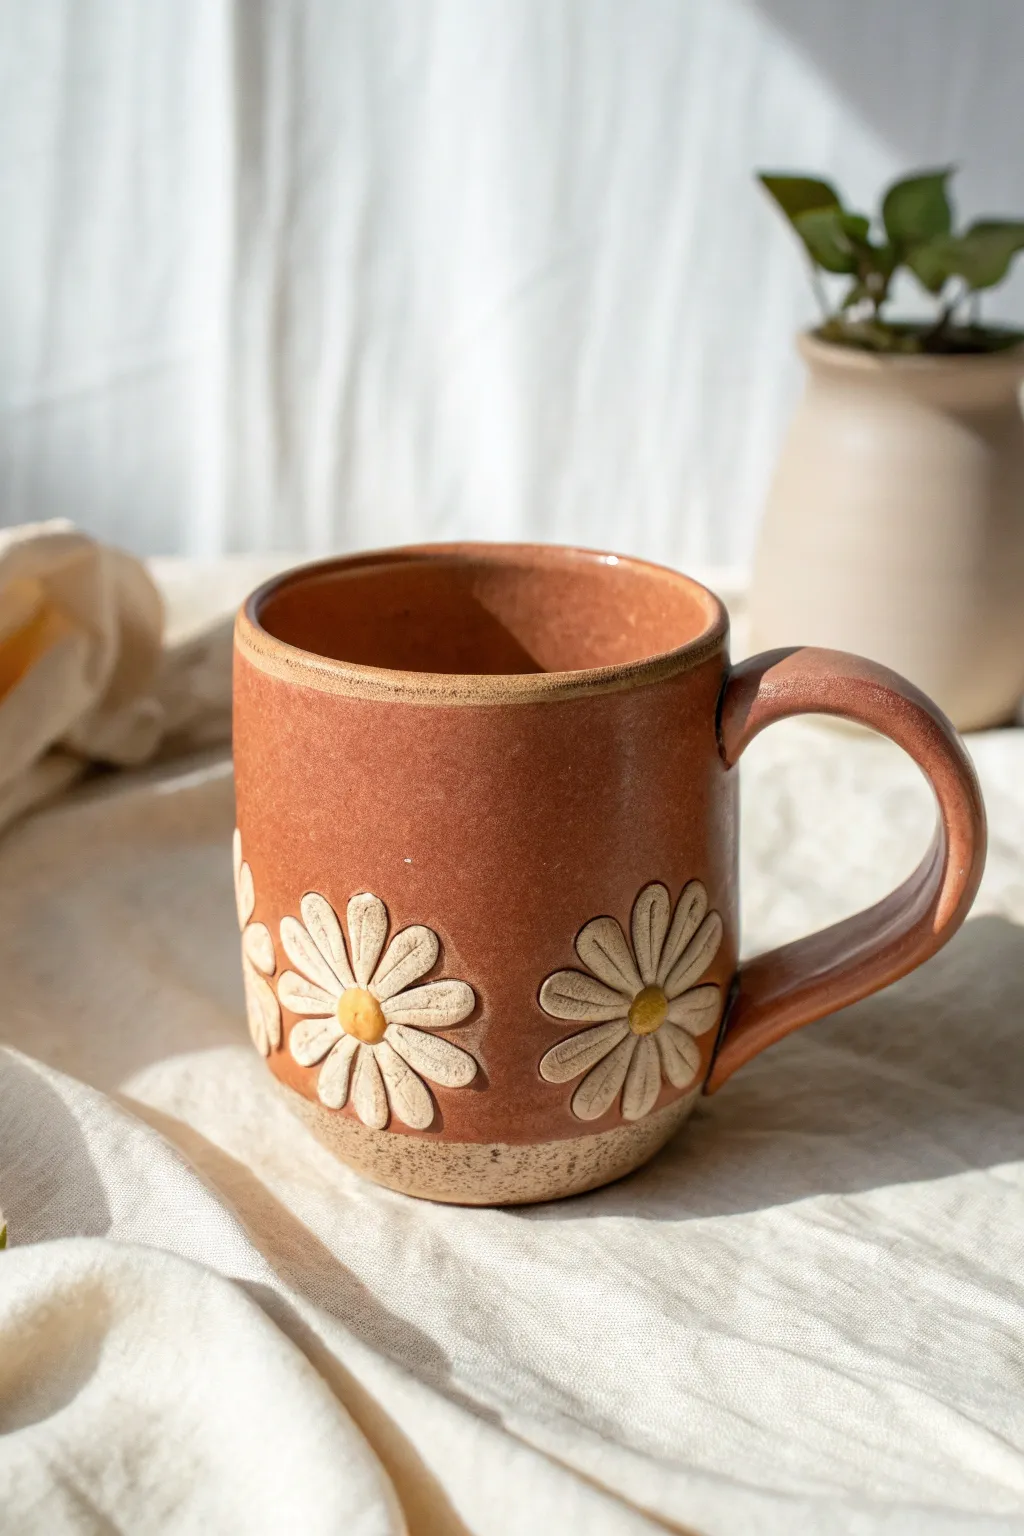
Embrace the warmth of nature with this charming terracotta-hued mug, featuring a delightful band of embossed daisies. The raised floral texture adds a wonderful tactile experience to your morning coffee ritual, while the earthy tones ground the piece beautifully.
Step-by-Step Guide
Materials
- Stoneware clay (speckled or red clay recommended)
- Pottery wheel
- Throwing tools (sponge, rib, needle tool, wire)
- Trimming tools
- Slip and scoring tool
- Small carving tool or detail needle
- Underglaze (white and yellow)
- Clear or translucent amber glaze
- Paintbrush
- Small floral stamp (optional)
Step 1: Throwing the Body
-
Center and open:
Begin with about 1 pound of clay. Center it firmly on the wheel head and open the clay to create a flat, even floor about 3 inches wide, compressing the bottom well to prevent cracking. -
Pull the walls:
Pull the clay upward to form a cylinder. Aim for a height of about 4-5 inches. Keep the walls even, slightly tapering the rim inward to hold heat. -
Shape the profile:
Using a rib tool on the outside and your hand on the inside, gently belly out the form slightly if desired, but keep the silhouette mostly straight and cylindrical with a clean, defined rim. -
Refine the base:
Use a wooden knife tool to undercut the base slightly, removing excess clay. This will make trimming easier later. Wire the pot off the wheel and set it aside until it reaches leather-hard consistency.
Sticky Petals
Petals popping off as they dry? Always score and slip both surfaces thoroughly. If the mug is too dry compared to the fresh petals, wrap the whole piece in plastic for a day to equalize moisture.
Step 2: Adding the Floral Texture
-
Trim the foot:
Once leather hard, center the mug on the wheel upside down. Trim away the excess clay at the bottom, creating a clean foot ring. Smooth the trimmed area with a damp sponge. -
Prepare floral additions:
Roll out a very thin slab of clay (about 1/8 inch thick). You can cut small petal shapes individually with a knife, or use the ‘sprig’ method by pressing clay into a plaster daisy mold if you have one. -
Sculpt petals directly:
Alternatively, and for the look in the photo, take small balls of soft clay and press them directly onto the leather-hard mug surface near the base. Flatten them into ovals to form petals arranged in a circle. -
Refine the flowers:
Use a modeling tool or the back of a small paintbrush to press an indentation into the center of each petal, giving them definition and dimension. Add a small, flattened ball of clay to the center of each arrangement for the pistil. -
Score and slip:
Ensure all added clay pieces are securely attached by scoring the mug surface and the back of the petals, adding a dab of slip, and pressing firmly. Smooth the edges of the petals down onto the mug body so they don’t catch on anything.
Glaze Clarity
Test your clear glaze thickness on a tile first. If it’s too thick, it might turn milky or cloudy over the red clay, obscuring the warm terracotta tone you want.
Step 3: Handle and Glazing
-
Pull the handle:
Pull a strap handle from a carrot-shaped lump of clay. Wet your hand and stroke the clay downward until it is long, tapered, and approximately the thickness of your finger. -
Form the curve:
Cut the strap free and gently curve it into a ‘C’ shape or the question-mark shape seen here. Lay it on its side to stiffen up slightly until it can hold its shape without drooping. -
Attach the handle:
Score and slip the attachment points on the mug and handle. Press the handle firmly onto the mug body. I usually blend the clay at the attachment points with my thumb for a seamless strong join. -
First firing:
Allow the mug to dry slowly under loose plastic to prevent the handle from cracking away. Bisque fire the piece to Cone 04 (or according to your clay’s specific schedule). -
Apply underglaze:
Once bisqued, paint the raised daisy petals with two to three coats of white underglaze. Paint the center dots with yellow underglaze. Wipe away any smudges on the main body with a damp sponge. -
Wax resist (optional):
If you want the speckled raw clay to show at the very bottom (as usually seen on foot rings), apply wax resist to the bottom inch of the mug and the underside. -
Glaze application:
Dip the entire mug into a transparent amber or clear glaze. The glaze should be thin enough to let the clay body color show through, turning the red clay into that rich terracotta brown. -
Final firing:
Glaze fire the piece to the maturity temperature of your clay body (typically Cone 5 or 6 for stoneware). Let the kiln cool completely before unloading.
Once cooled, your floral mug is ready to bring a touch of garden whimsy to your kitchen cabinet