If you’re in the mood to paint flowers on pottery, you’re in the best kind of creative territory—relaxing, forgiving, and always pretty in the end. I pulled together my favorite pottery painting flower ideas, starting with the classics and moving into some fun, unexpected flower designs you can totally make your own.
Classic Daisies on a Dinner Plate
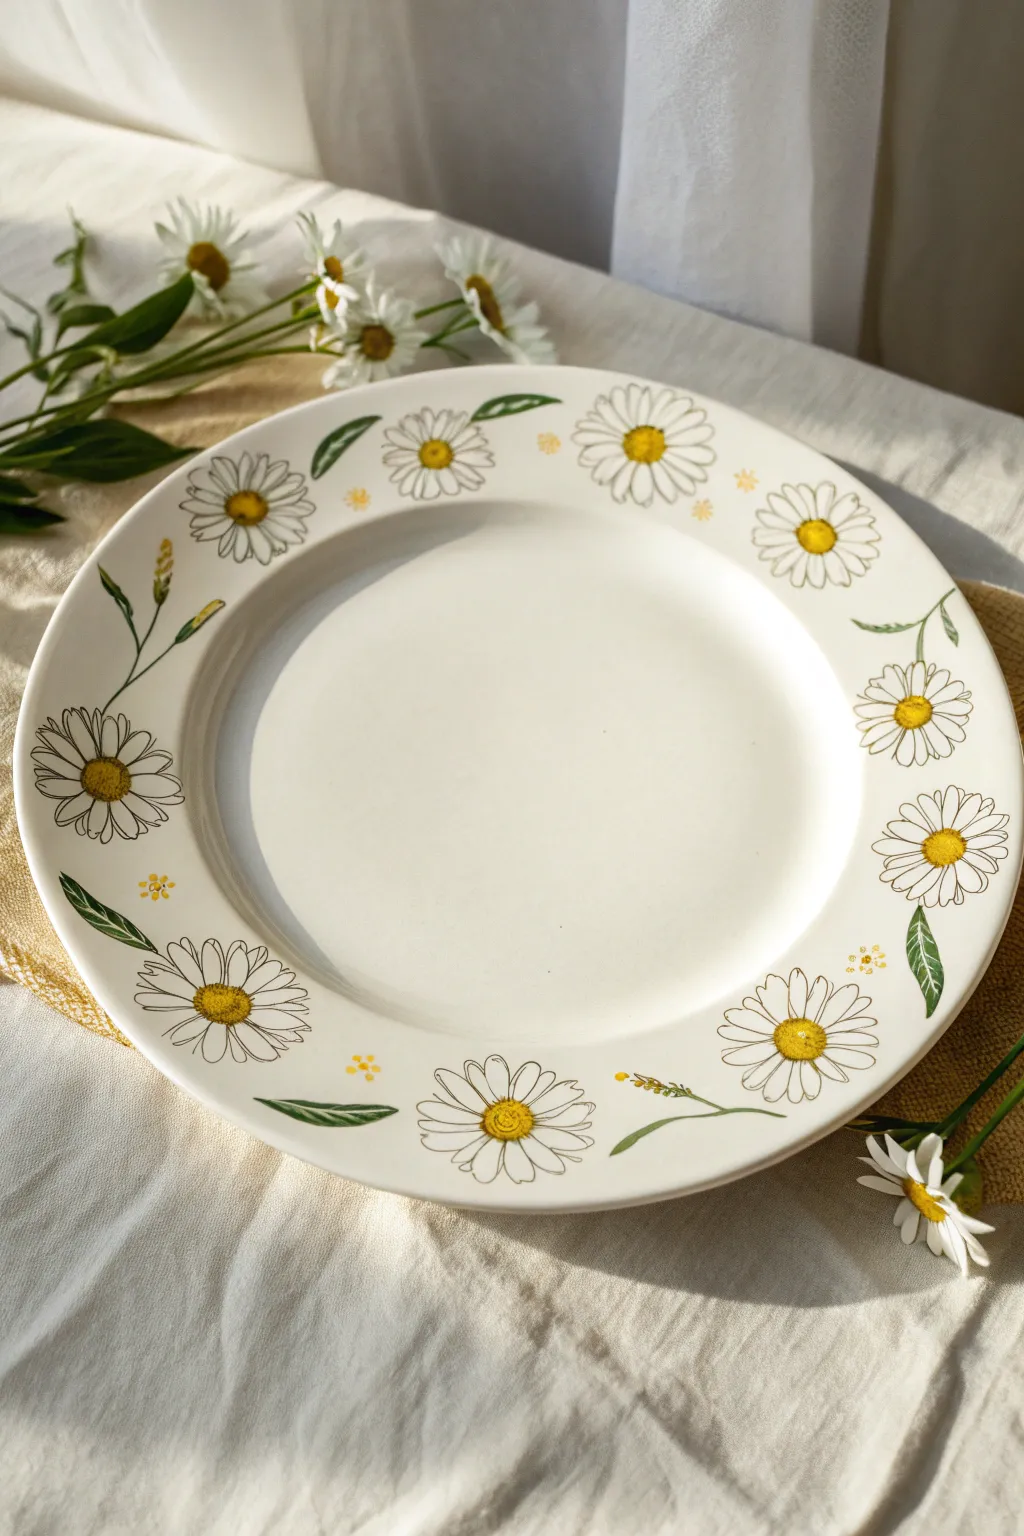
Brighten up your table setting with this cheerful, vintage-inspired plate design. The pattern relies on delicate linework and sunny bursts of color to create a classic daisy chain that feels both elegant and handwritten.
Detailed Instructions
Materials
- Bisque dinner plate (rimmed style)
- Underglaze pencil or fine liner bottle (black or dark grey)
- Yellow underglaze
- Green underglaze
- Small round brush (size 2 or 4)
- Very fine liner brush (size 0 or 00)
- Damp sponge
- Pencil (for sketching)
- Clear dipping glaze
Step 1: Planning the Layout
-
Clean the bisque:
Start by wiping down your bisque plate with a damp sponge. This removes any dust that could prevent the glaze from adhering properly. -
Mark placement:
Using a regular pencil, lightly mark roughly eight to ten evenly spaced spots around the rim of the plate. These marks will serve as the centers for your main daisy flowers. -
Sketch the flowers:
Lightly sketch the flower heads over your placement marks. Don’t worry about being perfect; the pencil lines will burn off in the kiln. -
Add leaves and extras:
Between the main flowers, sketch simple leaf shapes and the occasional smaller bud or sprig to fill the negative space without crowding.
Smudged Lines?
If your black outline smudges while wet, don’t wipe it! Let it dry completely, then gently scratch the mistake off with a toothpick or a cleanup tool before glazing.
Step 2: Painting the Color
-
Paint the centers:
Dip your small round brush into the yellow underglaze. Dab a solid circle into the center of each sketched flower. -
Add dimension:
To give the centers more depth, you can dab a second coat of yellow just on the bottom half of the circle once the first layer is dry to the touch. -
Paint the leaves:
Using the green underglaze and the round brush, fill in the leaf shapes. Paint with a sweeping motion, starting at the stem and lifting pressure towards the tip for a pointed look. -
Add filler details:
Using the tip of the brush or a detail tool, add the tiny clusters of yellow dots or small yellow buds sketched between the main flowers.
Add a Gradient
Mix a tiny drop of orange into your yellow underglaze and paint tiny dots on one side of the flower centers. This creates a subtle shadow effect for more realism.
Step 3: Detailed Linework
-
Prepare the liner:
This is the most critical step for the illustrative look. If using a liner bottle, ensure the tip is not clogged. If using a brush, thin your black underglaze slightly with water so it flows like ink. -
Outline the petals:
Carefully draw the petals around the yellow centers. Keep the lines thin and loose—they don’t need to be perfectly symmetrical. I find it easier to pull the stroke from the outside in toward the center. -
Detail the centers:
Add texture to the yellow centers by stippling tiny black dots or drawing small ‘c’ shapes within the yellow paint to mimic pollen. -
Outline leaves:
Outline your green leaves with the same thin black line. Add a central vein down the middle of each leaf for extra detail. -
Connect with stems:
Draw thin, sweeping stem lines to connect any floating buds or leaves to the imagined vine structure, keeping the movement flowing around the rim. -
Final check:
Look for any gaps in the design. If a space feels too empty, add a small trio of yellow dots or a tiny floating petal.
Step 4: Finishing
-
Let it dry:
Wait for the underglaze to dry completely. It should feel chalky and look matte before you proceed. -
Glaze application:
Dip the entire plate into clear dipping glaze using glazing tongs. Shake gently to remove excess drips. -
Fire:
Place the plate in the kiln and fire according to the specifications of your clay and glaze, typically to cone 06 or cone 6 depending on your materials.
Enjoy serving your next meal on this delightful field of handmade flowers


Sunny Sunflowers With Bold Centers
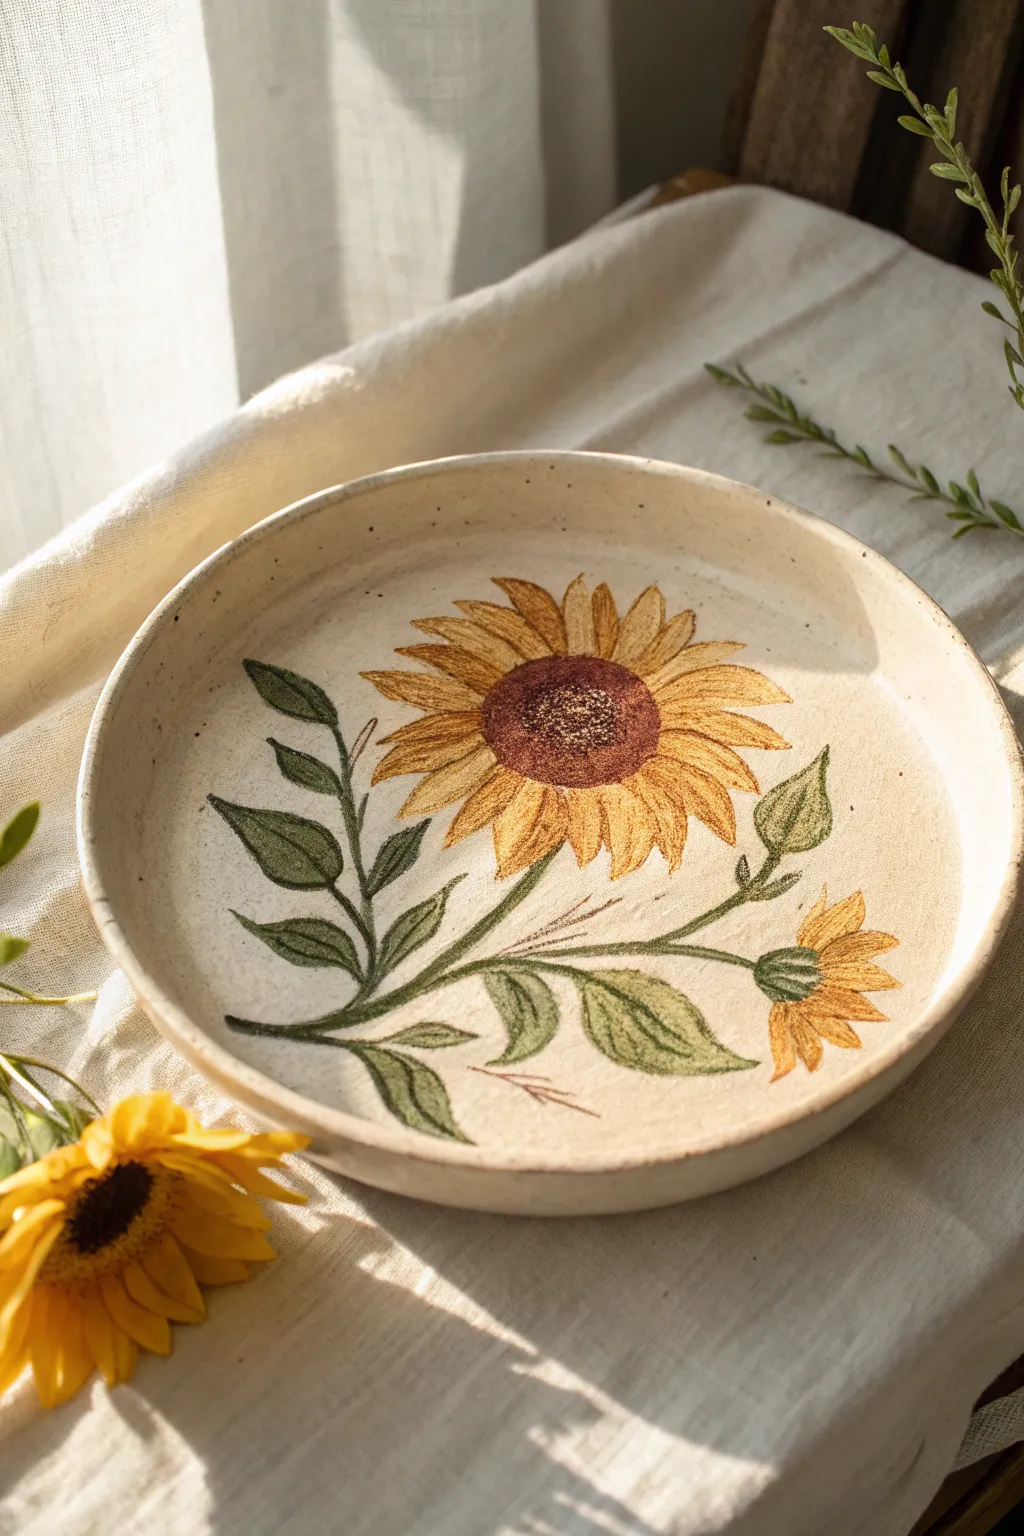
Capture the warmth of late summer with this charming ceramic plate featuring a lively sunflower illustration. The design uses natural, earthy tones and delicate brushwork to create a piece that feels both rustic and refined.
Step-by-Step Guide
Materials
- Bisque-fired ceramic plate or shallow bowl (preferably stoneware)
- Speckled clay body or speckled underglaze
- Underglazes: Lemon Yellow, Golden Ochre, Dark Brown, Forest Green, Olive Green
- Clear dipping glaze or brush-on clear glaze
- Round watercolor brushes (sizes 2, 4, and 6)
- Fine liner brush (size 0 or 00)
- Standard pencil for sketching
- Palette or tile for mixing
- Water container and sponge
Step 1: Planning and Sketching
-
Surface Preparation:
Begin by wiping your bisque-fired plate with a damp sponge. This removes any dust or debris that could interfere with glaze application and gives you a pristine canvas. -
Composition:
This design features one large bloom as the focal point, slightly off-center to the left, with a stem curving rightward and a smaller bud on the side. Visualize where these elements will sit in the well of your plate. -
Sketching the Outline:
Lightly sketch your design directly onto the bisque using a regular pencil. Start with a large circle for the main flower center and radiate lines out for petal placement. Remember, the pencil lead will burn off in the kiln, so don’t worry about erasing mistakes perfectly. -
Defining Leaves:
Draw the swooping main stem and attach lance-shaped leaves. Add veins lightly to guide your painting later. Include the smaller secondary flower structure on the right side of the stem.
Step 2: Painting the Blooms
-
Base Yellow Layer:
Using a size 4 round brush, load up your Lemon Yellow underglaze. Paint the petals of the main sunflower, starting from the center and pulling outwards to create a tapered tip. Apply two thin coats for solid coverage. -
Adding Dimension:
While the base yellow is dry to the touch, mix a little Golden Ochre with the Lemon Yellow. Paint streaks at the base of each petal (nearest the center) to create depth and shadow. -
The Flower Center:
For the large center disk, use Dark Brown underglaze. Stipple the color on using the tip of a stiff brush rather than stroking it smooth; this mimics the texture of seeds. -
Center Highlights:
Once the brown base is dry, gently stipple a lighter tan or watered-down ochre in the very middle of the seed head to show where the light hits the texture. -
Secondary Flower:
Repeat the yellow petal process for the smaller flower on the right, ensuring the petals point away from their green base. Keep the colors slightly more muted here to keep focus on the main bloom.
Layering Lighter
Underglazes act like watercolors on bisque. Build color slowly with thin, watery washes rather than thick blobs to achieve that delicate, hand-painted botanical look.
Step 3: Painting Greenery
-
Stem Work:
Switch to your size 2 brush and the Olive Green underglaze. Carefully trace the lines of your stems. I find that pulling the brush towards you allows for a steadier line than pushing it away. -
Leaf Base Color:
Fill in the leaf shapes with a wash of Olive Green. You don’t need solid opacity here; a slightly translucent application looks more like watercolor and shows off the clay texture. -
Shadows and Veins:
Mix a bit of Dark Brown into your Forest Green. Use your fine liner brush to paint the central vein of each leaf and add shading to one side of the leaves for a 3D effect. -
Texture Details:
Add tiny serrated edges to the leaves using the tip of your smallest brush and the darker green mixture to give them that characteristic sunflower foliage look.
Level Up: Sgraffito
Paint a dark rectangle of underglaze first, let it dry, then scratch your sunflower design through it to reveal the white clay beneath for a striking negative-space variation.
Step 4: Refining and Glazing
-
Outline Polish:
Take a moment to look at your edges. If you want a crisp illustrative style, you can use a very fine brush with diluted brown underglaze to loosely outline some petals and leaves. -
Speckle Check:
If you are not using a speckled clay body, you can now flick a stiff toothbrush loaded with diluted brown underglaze across the piece to mimic the pottery spots seen in the reference image. -
Final Drying:
Allow the underglaze design to dry completely, preferably overnight, to ensure no moisture is trapped before the clear glaze application. -
Clear Glaze Application:
Dip the entire plate into a clear glaze to seal the design. Alternatively, apply three even coats of a brush-on clear glaze, letting each coat dry in between. -
Firing:
Fire the piece according to your clay and glaze specifications (usually Cone 5 or 6 for stoneware) to reveal the glossy, durable finish.
Once fired, you will have a beautiful, durable piece of art perfect for serving your favorite summer salads


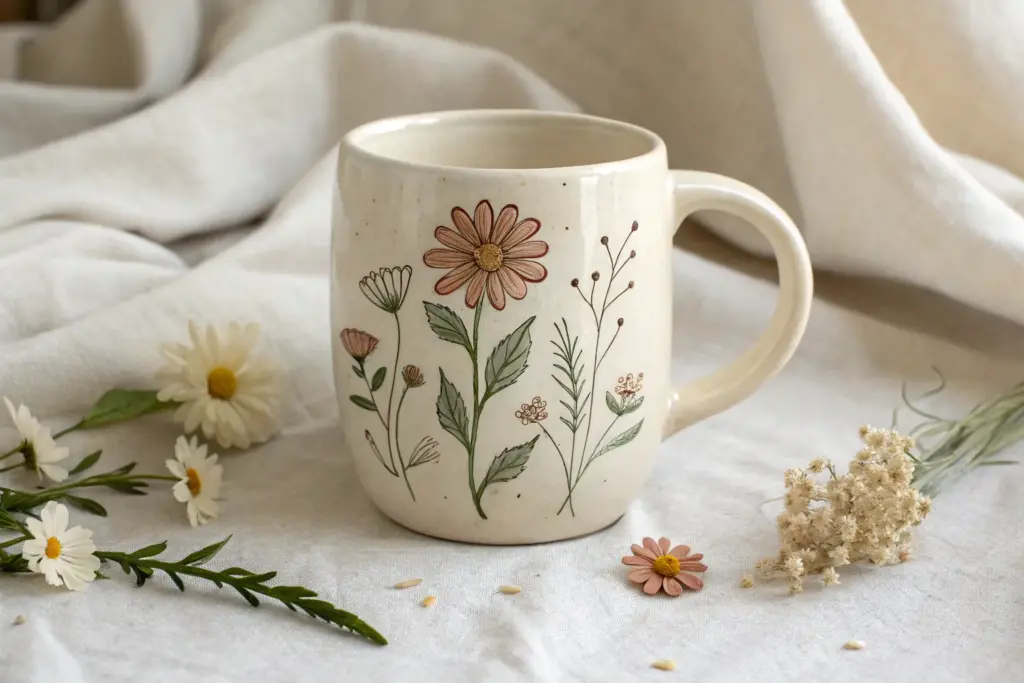
Lavender Sprigs Climbing Up a Mug
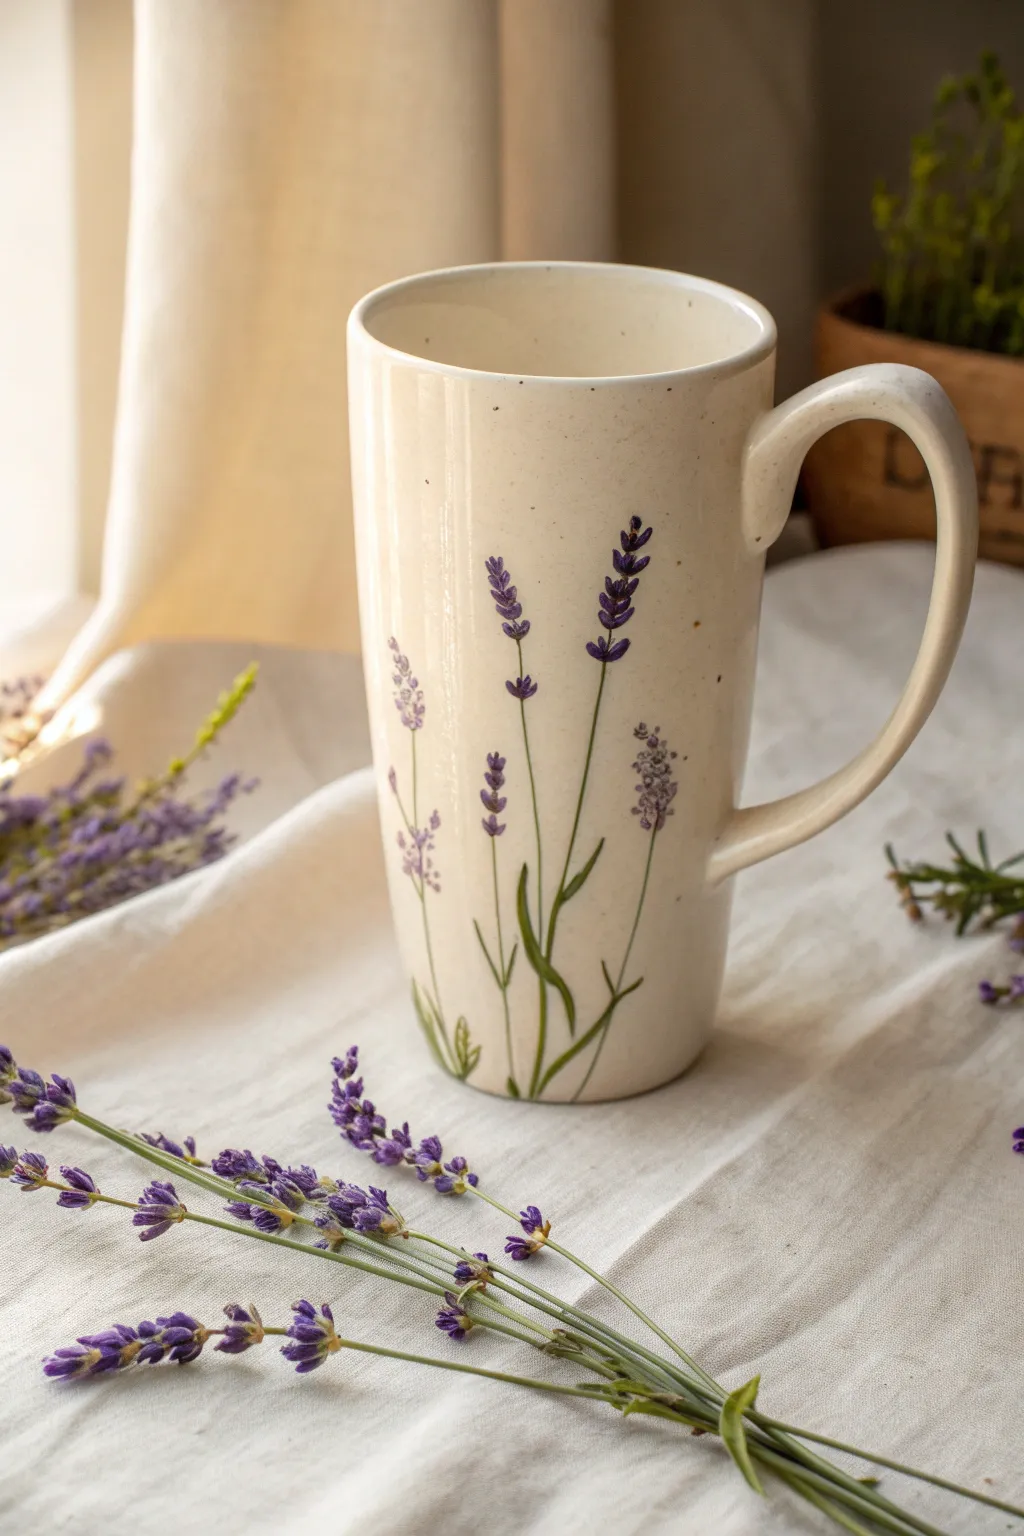
Bring the calming elegance of the French countryside to your morning coffee with this delicate lavender design. The tall verticality of this mug perfectly mimics the growth of lavender stalks, creating a serene and organic look.
Step-by-Step Tutorial
Materials
- Tall ceramic bisqueware mug (creamy white clay body preferred)
- Underglaze pencil (light grey or brown)
- Underglaze paints: Deep Violet, Lilac/Soft Purple, Sage Green, and Forest Green
- Detail liner brush (size 0 or 00)
- Small round brush (size 2)
- Clear dipping glaze
- Sponge and water bowl
- Palette or tile for mixing
Step 1: Preparation and Planning
-
Clean your canvas:
Begin by wiping down your bisque mug with a damp sponge. This removes any kiln dust or oils from your hands that might resist the glaze. -
Sketch the stems:
Using an underglaze pencil, lightly sketch three to four long, vertical lines rising from the bottom rim of the mug. Vary the heights—make one or two reach almost to the rim, while others stay lower for a natural composition. -
Plan the blooms:
Mark faint dots along the top third of each stem line where you want your flower clusters to sit. Don’t worry about perfection; lavender grows wild and unevenly.
Brush Pressure Tip
For the thinnest stems, exhale slowly as you make the stroke. Start with zero pressure, press down slightly, then lift off quickly at the end to taper the line naturally.
Step 2: Painting the Greenery
-
Mix your greens:
On your palette, put a pea-sized amount of Sage Green and Forest Green. I like to add a tiny drop of water to improve the flow for long lines. -
Draft the main stems:
Load your liner brush with Sage Green. Starting from the absolute bottom of the mug, pull the brush upward following your sketched lines. Use light pressure to keep the line thin and delicate. -
Add foliage:
Lavender leaves are thin and lance-shaped. Using the same green, paint small, slender strokes branching off the main stems near the base. Keep these leaves mostly in the bottom third of the design. -
Create depth:
Once the Sage Green is dry to the touch, use the very tip of your liner brush with the Forest Green. Add extremely thin shadow lines along one side of the main stems and at the base of the leaves to give them dimension.
Rustic Texture Hack
Mix a tiny pinch of clean sand into your green underglaze. When fired, the stems will have a slight gritty texture, mimicking the woody feel of real lavender stalks.
Step 3: Blossoming the Lavender
-
Start the buds:
Switch to your Detail liner brush and the Deep Violet underglaze. Lavender flowers grow in stacked clusters. Paint tiny, teardrop-shaped dabs on opposite sides of the stem near the top. -
Build the structure:
Work your way down from the tip of the stem, leaving small gaps between the clusters of purple dabs. The clusters should get slightly larger as you move down the stem, but stop before you reach the leafy section. -
Vary the saturation:
Reload your brush frequently for dark, opaque purple spots. For a faded look on some sprigs, add a little water to your brush to make the underglaze semi-transparent. -
Add soft highlights:
Clean your brush thoroughly. Dip into the Lilac or Soft Purple shade. Carefully dab this lighter color on top of the dried Deep Violet clusters, focusing on the tips of the ‘buds’ to simulate sunlight hitting the flowers. -
Create scattered blooms:
To make the design feel less rigid, paint a few stray purple dots floating near the main stalks, as if a gentle breeze is shaking the pollen loose.
Step 4: Finishing Touches
-
Speckle the background (Optional):
For that rustic, stoneware look seen in the photo, dip a stiff toothbrush into watered-down brown or grey underglaze. Point it at the mug and run your thumb across the bristles to flick tiny specks onto the white space. -
Check the rim:
Ensure no stray paint has smudge on the drinking rim. Wipe it clean with a damp sponge if necessary for a crisp, professional finish. -
Glaze application:
Once all underglaze is bone dry, dip the entire mug into a clear transparent glaze using tongs. Hold it upside down for a few seconds to let excess glaze drip off. -
Stilt and fire:
Wipe the bottom foot of the mug completely clean of glaze to prevent sticking to the kiln shelf. Fire the piece according to the clay and glaze specifications (usually cone 06 or cone 6).
Your finished mug will now serve as a permanent botanical display for your kitchen shelf


Simple Rose Bouquet in One Corner

Capture the timeless elegance of an English garden with this delicate rose cluster design. Featuring soft pink blooms and trailing greenery, this motif adds a romantic, hand-painted touch to any simple ceramic mug.
Step-by-Step Guide
Materials
- Bisque ceramic mug (smooth surface preferred)
- Underglaze paints: light pink, dark dusty rose, sage green, forest green, dark brown
- Round brushes: size 0, size 2, and size 4
- Liner brush (size 00 or smaller)
- Pencil (for sketching)
- Palette or small tile
- Water cup and sponge
- Clear dipping glaze
Step 1: Planning the Composition
-
Clean surface:
Begin by wiping down your bisque mug with a slightly damp sponge to remove any kiln dust, which can prevent glaze adhesion. -
Position the design:
Choose a focal point on the front-facing curve of the mug. You want the stems to start near the bottom and reach upward, fanning out slightly as they rise. -
Light sketch:
Using a pencil, very lightly sketch a stick figure layout of your stems. Mark circles where the main rose blooms will sit and small ovals for the buds. Don’t worry about graphite marks; they burn off in the kiln.
Step 2: Painting the Greenery
-
Base stems:
Load your size 0 round brush with sage green thinned slightly with water. Trace over your pencil stem lines, keeping the pressure light to maintain thin, delicate lines. -
Leaf placement:
Along the stems, paint slender, almond-shaped leaves using the sage green. Press the belly of the brush down to widen the leaf and lift as you pull away to create a sharp point. -
Darker details:
While the sage is still a bit damp, take a tiny amount of forest green on your liner brush and add a thin vein down the center of each leaf for depth. -
Leaf shadows:
Add tiny strokes of forest green to the underside of where the leaves attach to the stems to ground them visually.
Loose Brushwork
Don’t try to make every petal perfect. Wiggle your brush slightly as you paint the outer C-curves of the rose; the irregular edges make the flower look more organic and blooming.
Step 3: Creating the Roses
-
Main bloom shape:
For the open roses, paint a loose circle using the light pink underglaze and a size 4 brush. Don’t fill it in perfectly solid; a little translucency is lovely here. -
Rose buds:
Paint the small, tight buds using a teardrop shape in light pink at the tips of the upper stems. -
Defining the center:
Switch to your size 2 brush and the dusty rose color. In the center of your open pink circle, paint a tight spiral or a ‘C’ shape to represent the tightly packed inner petals. -
Swirling petals:
Working outward from that center spiral, paint curved, C-shaped strokes with the dusty rose. These should hug the center, getting slightly larger and more spaced out as they reach the edge of the flower. -
Bud details:
Add a single sweep of dusty rose to one side of each pink bud to give it roundness and shadow. -
Sepals:
Using the liner brush and forest green, paint the sepals—the little green leaves clutching the base of the rose buds—dragging the paint slightly up the sides of the pink bud.
Add a Speckle Finish
Before clear glazing, load a stiff brush with diluted brown paint and flick the bristles to spatter tiny dots over the whole mug for a trendy speckled stoneware effect.
Step 4: Final Touches & Glazing
-
Deepening contrast:
Mix a tiny dot of dark brown into your dusty rose. Use the liner brush to add very selective, thin accents in the deepest crevices of the rose center for maximum contrast. -
Rim accent:
Dip a sponge or a stiff brush into a watered-down brown or dark beige. Lightly dab or drag it along the rim of the mug to create that rustic, aged pottery look. -
Inspection:
Check for any smudges or unwanted drips. Use a clean, damp stiff brush to ‘erase’ any mistakes by scrubbing them gently. -
Dry time:
Allow the underglaze design to dry completely—it should look chalky and matte. -
Clear glaze:
Once fully dry, dip the entire mug into clear glaze according to the manufacturer’s instructions. -
Firing:
Fire the piece in the kiln based on the clay and glaze specifications (usually cone 06 or cone 6).
Once fired, fill your new favorite mug with hot tea and enjoy the permanent blooms

The Complete Guide to Pottery Troubleshooting
Uncover the most common ceramic mistakes—from cracking clay to failed glazes—and learn how to fix them fast.
Cherry Blossom Branch Wrap-Around
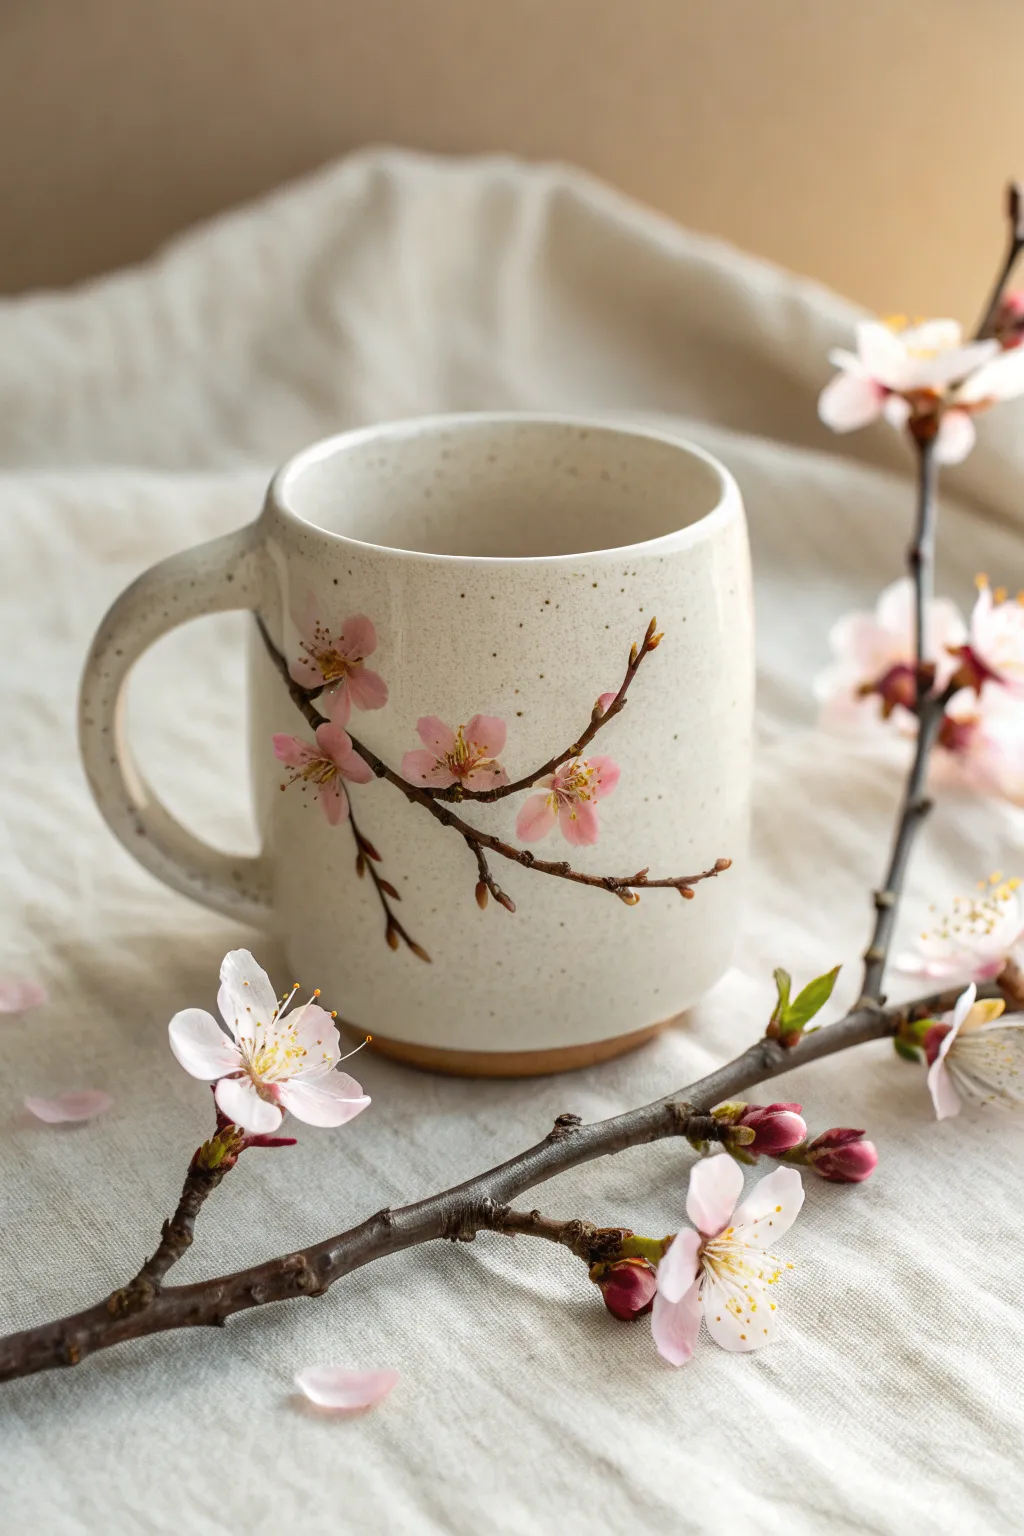
Capture the delicate beauty of spring with this serene cherry blossom design that naturally wraps around your mug. The speckled clay background enhances the organic feel, making the soft pink petals and winding branches truly pop.
Step-by-Step Tutorial
Materials
- Bisque-fired ceramic mug (speckled clay body recommended)
- Underglaze (Dark Brown or Mocha)
- Underglaze (Soft Pink)
- Underglaze (Darker Pink/Magenta)
- Underglaze (Yellow)
- Fine liner brush (size 0 or 00)
- Small round brush (size 2)
- Clear dipping glaze
- Pencil for sketching
- Palette or small tile
- Water cup and paper towels
Step 1: Planning and Sketching
-
Clean Your Canvas:
Begin by wiping down your bisque mug with a slightly damp sponge. This removes any kiln dust or oils from your hands that might resist the glaze later. -
Plan the Flow:
Look at the shape of your mug. Visualize how a branch might naturally grow across the surface, perhaps starting near the handle and reaching across the belly of the cup. -
Light Sketching:
Using a regular pencil, very lightly sketch the main line of your branch. Don’t worry about erasing mistakes; graphite burns off completely in the kiln, so feel free to refine your lines until you’re happy.
Step 2: Painting the Branch Structure
-
Mix Your Brown:
Pour a small amount of dark brown underglaze onto your palette. If it feels too thick, add a tiny drop of water to improve the flow, which helps create smoother lines. -
Main Branch Stroke:
Load your fine liner brush with the brown underglaze. Starting from the thicker base of the branch (near the handle or bottom), paint the main wood line using disjointed, slightly jagged strokes to mimic natural bark texture. -
Adding Twigs:
Extend smaller, thinner twigs off the main branch. Let your hand shake just a little bit—nature isn’t perfectly straight, and these irregularities make the wood look realistic. -
Bud Nodes:
Paint tiny little nubs or bumps along the branches where you plan to place your flowers later. These serve as the calyxes from which the blooms will emerge.
Natural Line Work
Roll the brush between your fingers as you pull the stroke for the branch. This naturally creates variable thickness and skips that look like real bark.
Step 3: Creating the Blooms
-
Base Petal Layer:
Switch to your size 2 round brush and the soft pink underglaze. Paint five teardrop shapes arranging them in a circle to form a flower. Don’t worry if they overlap the branch lines slightly; underglaze is opaque enough to cover. -
Varying Angles:
Paint some flowers fully open (facing you), but paint others from the side using just three visible petals. This variety gives the composition depth and realism. -
Second Coat:
Once the pink is dry to the touch, apply a second coat to ensure the color is solid and won’t look streaky after firing. I find three thin coats is usually the magic number for solid coverage. -
Adding Buds:
Using the same pink, add small oval shapes at the tips of the smallest twigs to represent unopened buds.
Falling Petals
Paint 2-3 single pink petals ‘floating’ detached in the empty space below the branch. It implies movement and a gentle breeze.
Step 4: Detailed Embellishments
-
Deepening the Center:
Take a tiny amount of the darker pink or magenta underglaze on your fine liner brush. Gently dab the very center of the open flowers to add depth. -
Stamen Filaments:
With the finest tip of your detail brush and the dark pink (or brown), flick very delicate lines radiating outward from the center of the flower into the petals. -
Pollen Dots:
Dip the very tip of your brush (or use a toothpick) into the yellow underglaze. Place tiny dots at the ends of the filaments you just painted to create the pollen-covered anthers. -
Bud Details:
Add a tiny touch of the darker pink at the base of the flower buds where they connect to the branch, giving them a sense of volume.
Step 5: Finishing Touches
-
Review and Refine:
Check your work for any smudges. You can gently scratch away stray drop of underglaze with a clean toothpick or a stiff brush. -
Drying:
Allow the underglaze design to dry completely, preferably overnight, so moisture doesn’t get trapped. -
Glazing:
Dip the entire mug into a clear dipping glaze. Ensure the coating is even—not too thick, or it might cloud the delicate details of your painting. -
Firing:
Fire the mug in the kiln according to the clay and glaze specifications (usually Cone 5 or 6 for stoneware).
Now you have a permanent piece of spring to enjoy with your morning coffee
Wildflower Meadow Around a Bowl
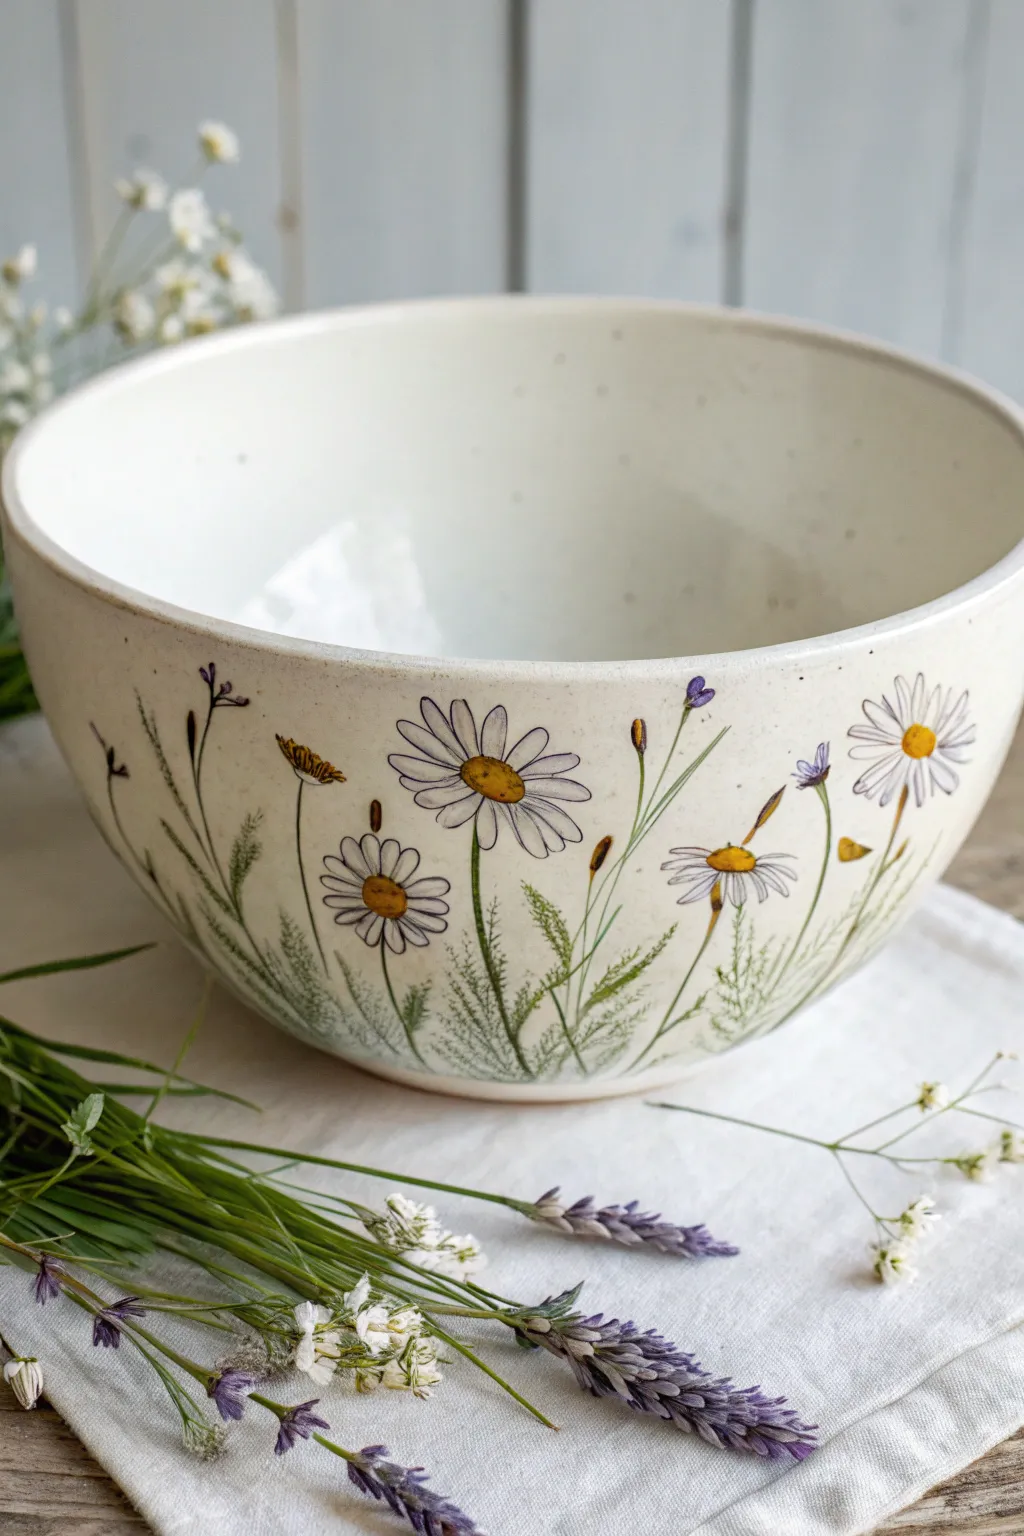
Capture the delicate beauty of a summer field with this charming wildflower bowl design. Featuring hand-painted daisies, wispy grasses, and tiny purple accents against a creamy, speckled background, this piece brings a breath of fresh air to your table.
Step-by-Step
Materials
- Bisque fired ceramic bowl (large)
- Underglaze paint: Cream or warm white (for base)
- Underglaze paint: Pure white, yellow/ochre, sage green, forest green, lavender/purple
- Underglaze pencil or fine liner brush (dark grey or black)
- Fan brush (large)
- Fine detail brushes (sizes 0 and 00)
- Liner brush
- Clear dipping glaze
- Sponge and water bowl
- Old toothbrush (for speckling)
Step 1: Base Preparation
-
Clean the bisque:
Start by wiping down your bisque bowl with a damp sponge. This removes any dust or oils that might repel the glaze and ensures a smooth canvas. -
Apply the base coat:
Using a large fan brush, apply three even coats of a cream or warm white underglaze to the entire exterior of the bowl. Allow each coat to dry until it’s chalky to the touch before adding the next. -
Add the speckles:
Mix a tiny amount of black or dark grey underglaze with water to create a thin, inky consistency. Dip an old toothbrush into the mixture, aim it at the bowl, and run your thumb across the bristles to flick subtle speckles over the cream base. Keep the density light.
Brush Technique Tip
For the finest grass lines, thin your green underglaze with water until it’s like ink. Hold the brush vertically and pull up quickly for a tapered tip.
Step 2: Painting the Flowers
-
Outline the daisy centers:
Once the base is dry, use a very fine liner brush or a specialized underglaze pencil to lightly sketch the oval centers of your main daisies. Place them at varying heights around the bowl’s circumference. -
Paint the petals:
Load a size 0 brush with pure white underglaze. Paint thin, elongated petals radiating from your centers. Don’t worry about making them perfect; slight irregularities make them look more like real wildflowers. -
Second coat for opacity:
White underglaze can be translucent. Once the first layer of petals is dry, carefully apply a second coat to ensure the bright white stands out against the cream background. -
Fill the centers:
Use a yellow-ochre underglaze to fill the centers. Dab the paint on rather than stroking it to create a textured, pollen-like appearance. -
Shadowing the centers:
Add a tiny dot of brown or orange to the bottom edge of each yellow center to give the flower dimension.
Step 3: Adding Foliage and details
-
Draw the main stems:
Using a liner brush and sage green underglaze, paint thin, curving stems connecting to your flower heads. Let them meander naturally down to the base of the bowl. -
Add grassy texture:
Mix a forest green underglaze with a little water. Using quick, upward flicking motions with your liner brush, create clusters of grass blades at the bottom of the bowl, interspersed between the main flower stems. -
Paint feathery greens:
To mimic the fern-like leaves seen in the image, use the very tip to paint tiny, angled dashes along some of the lower stems. -
Incorporate colored buds:
Paint small, teardrop shapes on the ends of tall, thin stems using lavender or purple underglaze to represent wildflower buds or lavender sprigs. -
Outline details:
This step makes the design pop. Using a very fine liner brush and watered-down black underglaze (or an underglaze pencil), outline the daisy petals and centers loosely. The lines should be delicate and broken, not heavy loops. -
Final inspection:
Check your design for any smudges. You can gently scratch away small mistakes with a toothpick or a clean, stiff brush and a little water.
Make it Personal
Hide a small bee or ladybug among the grasses on one side of the bowl. It creates a delightful surprise for whoever is holding the bowl during a meal.
Step 4: Glazing and Firing
-
Dry thoroughly:
Let the painted underglaze dry completely, ideally overnight, to ensure the design is stable. -
Clear glaze application:
Dip the entire bowl into a clear dipping glaze. If brushing clear glaze, apply two coats in cross-hatching directions to avoid streaks. -
Kiln firing:
Fire the piece in a kiln according to the clay and glaze specifications (usually cone 06 or cone 6 depending on your materials).
Now you have a stunning, nature-inspired bowl ready for your morning cereal or soup


What Really Happens Inside the Kiln
Learn how time and temperature work together inside the kiln to transform clay into durable ceramic.
Tulip Rows for Clean, Modern Florals
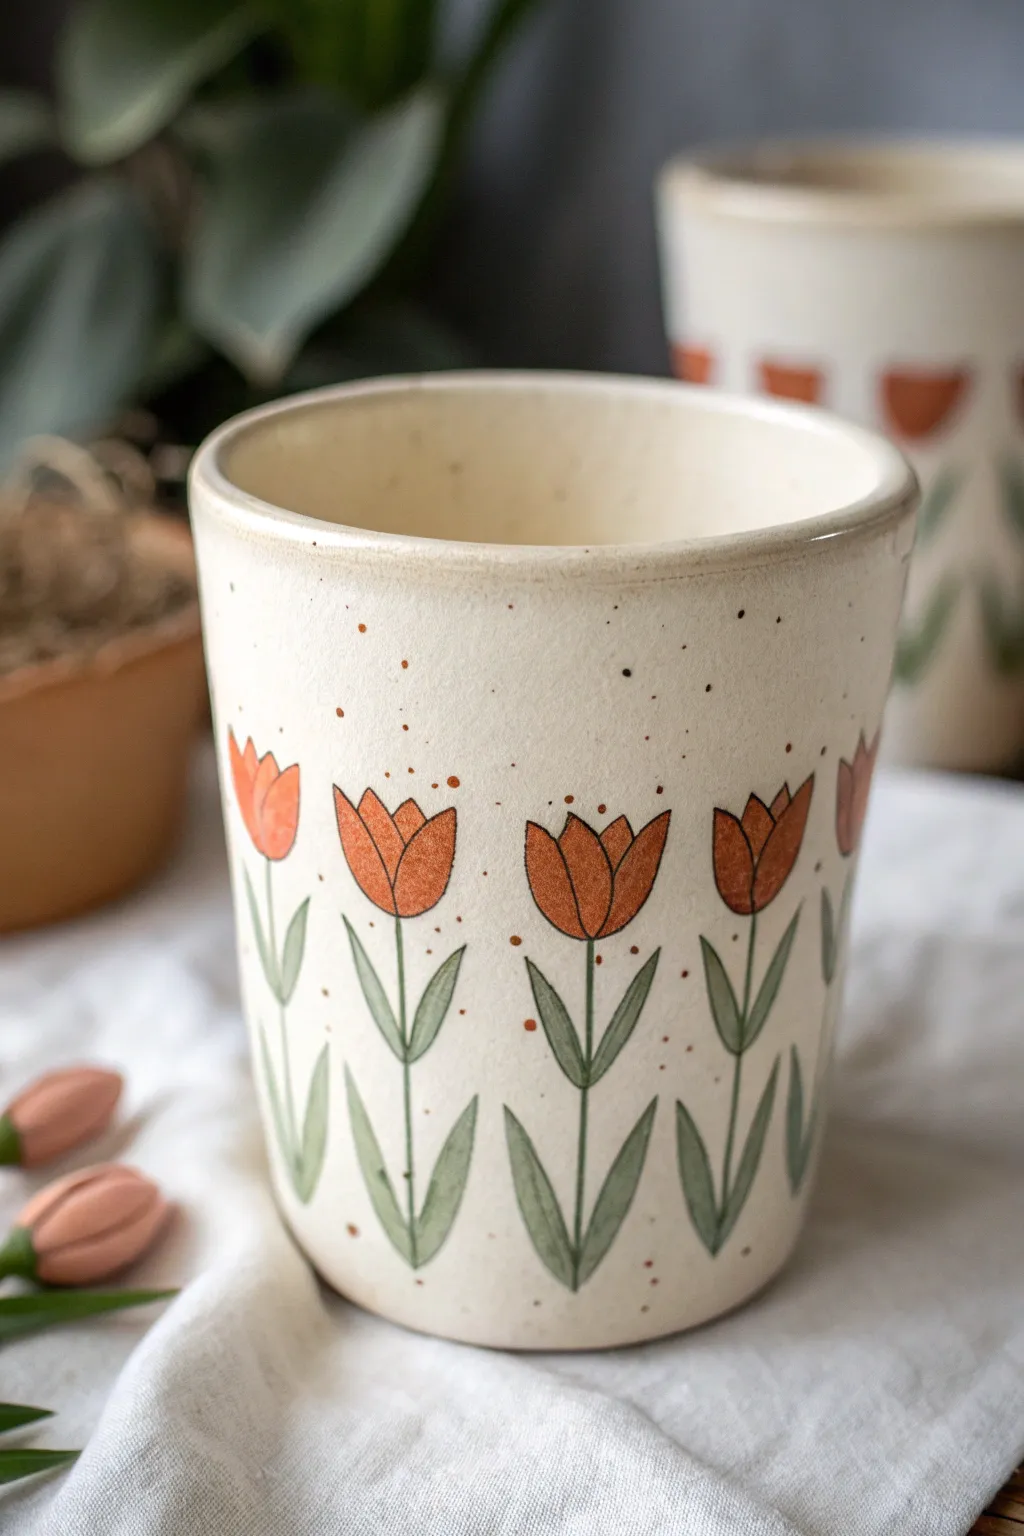
Embrace the charm of simplicity with this ceramic tumbler featuring repeating rows of stylized orange tulips. The design combines clean, illustrative lines with warm glazes for a modern yet handcrafted look, perfectly accentuated by scattered speckles.
Step-by-Step Guide
Materials
- Bisque-fired ceramic tumbler (straight-sided)
- Underglazes: Burnt Orange, Sage Green, and Jet Black
- Speckled cream or oatmeal glaze (translucent)
- Clear dipping glaze (if using a solid base glaze)
- Fine liner brush (size 00 or 000)
- Small round brush (size 2 or 4)
- Pencil (for sketching)
- Sponge
- Water cup
- Clean toothbrush (optional for speckling)
Step 1: Preparation & Sketching
-
Clean the bisque:
Begin by wiping down your bisque ware with a damp sponge. This removes any dust that could prevent the glaze from adhering properly. -
Mark the horizon line:
Using a pencil, lightly draw a horizontal guideline around the lower third of the cup. This will help keep your flower stems at a uniform height. -
Space the flowers:
Mark unevenly spaced vertical ticks along your guideline where each tulip stem will go. Aim for about 1.5 to 2 inches apart. -
Sketch the blooms:
Above each tick mark, lightly sketch a simple three-point tulip shape. Think of a central oval with two petal tips curling out on the sides. -
Add the leaves:
Draw two long, slender leaves curving upward from the base of each stem. One on the left, one on the right, framing the central stalk.
Step 2: Painting the Florals
-
Apply the orange base:
Load your small round brush with Burnt Orange underglaze. carefully fill in the tulip heads. -
Layer for opacity:
Let the first coat dry until it loses its sheen (usually 5-10 minutes), then apply a second coat for solid, rich color. -
Paint the stems:
Switch to Sage Green underglaze. Using a steady hand and just the tip of your round brush, paint the central vertical stem line. -
Fill the leaves:
Fill in the leaf shapes with Sage Green. I find it helpful to start at the base and pull the brush upward to create a natural tapered point. -
Second coat of green:
Applying a second layer of green ensures the leaves don’t look streaky after firing.
Smudged Lines?
If your black outlines smudge, wait for them to dry fully, then gently scratch the smudge away with a toothpick or a stiff clean brush instead of wiping.
Step 3: Detailing & Glazing
-
Outline the blooms:
Once the color blocks are bone dry, use your finest liner brush and Jet Black underglaze (slightly thinned with water) to outline the tulip petals. -
Outline the greenery:
Continue with the liner brush to trace the stems and leaves. Don’t worry if the lines aren’t perfectly uniform; a little variation adds character. -
Add the center line:
Draw a single vertical black line down the center of each leaf to suggest a vein and add dimension. -
Create speckles:
Dilute a tiny amount of brown or rust oxide wash. Dip a toothbrush in it, stand back, and flick the bristles to create a fine mist of speckles across the design. -
Bisque fire (optional significance):
If your studio requires it, do a secondary bisque firing to set the underglaze. Otherwise, proceed to glazing. -
Apply the overglaze:
Dip the entire cup into a clear glaze or a semi-translucent oatmeal glaze. If using a colored transparent glaze, ensure it won’t obscure your detailed painting. -
Final firing:
Fire the piece in the kiln according to the clay and glaze specifications (typically Cone 5 or 6 for stoneware).
Pro Tip: Consistency
Thin your black liner underglaze until it has the consistency of ink or light cream. This allows for long, fluid strokes without constant reloading.
Enjoy your beautiful new hand-painted vessel with your morning coffee or tea
Peony Blooms With Soft Layered Petals
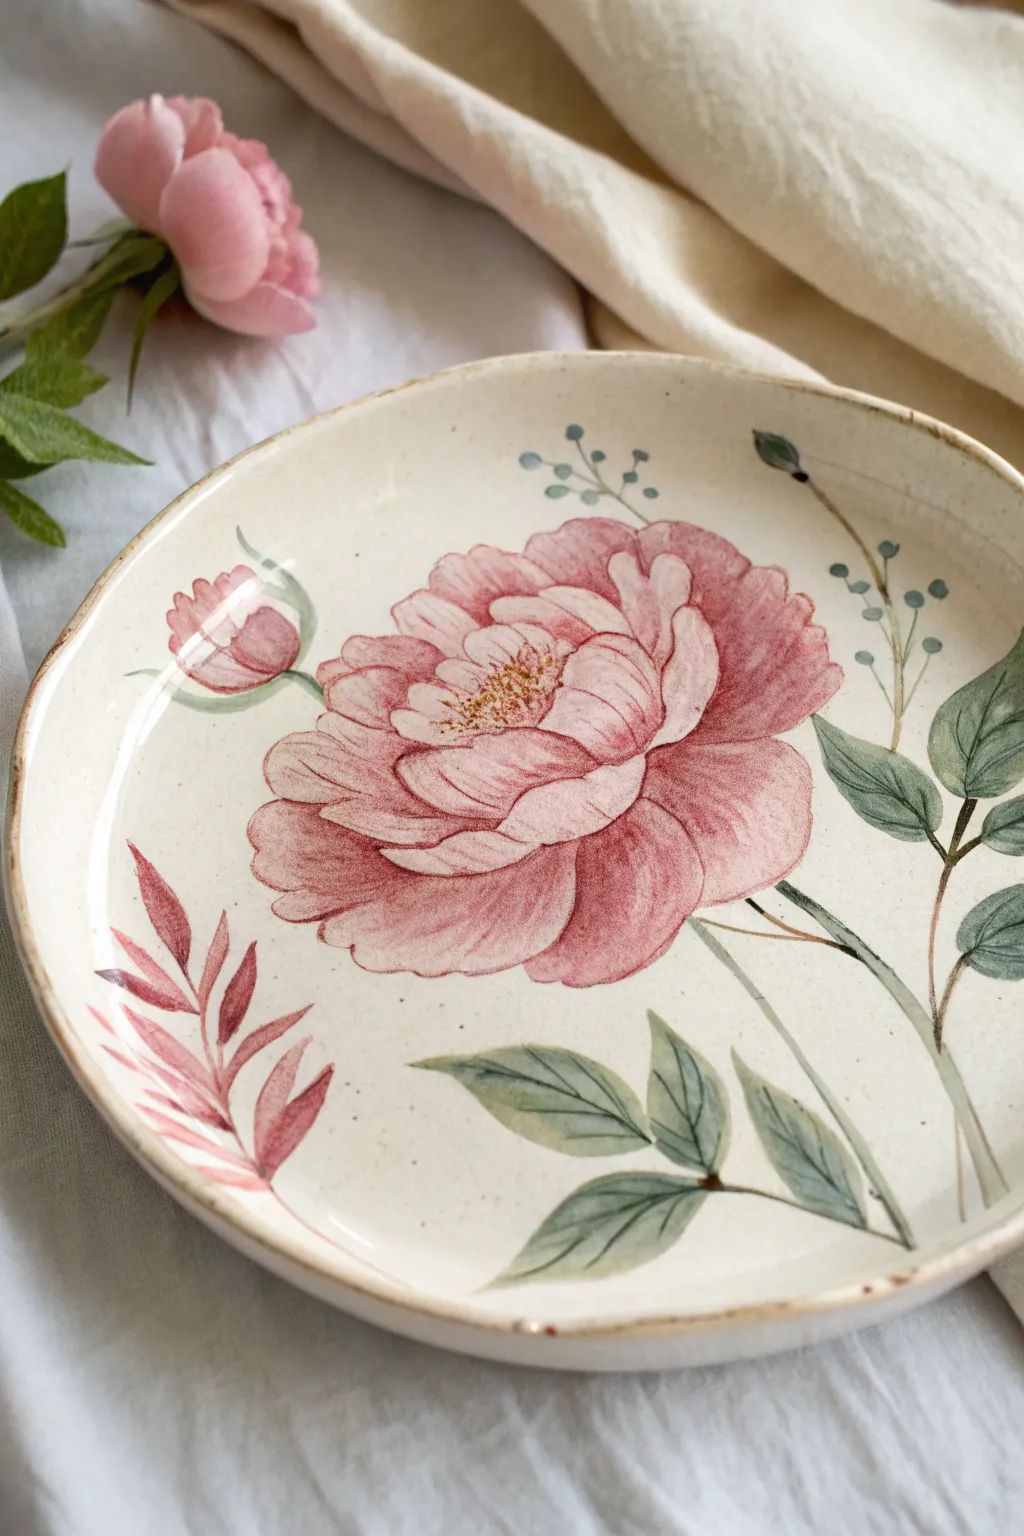
Capture the delicate beauty of a blooming peony on ceramics with this layered, watercolor-style painting technique. The design features soft pink petals that seem to unfold right on the plate, accented by sage green leaves and a rustic rim.
Step-by-Step
Materials
- Bisque-fired ceramic plate (salad or dinner size)
- Underglazes: Light Pink, Deep Rose/Burgundy, Sage Green, Dark Forest Green, Golden Yellow, Light Brown/Tan
- Clear dipping glaze
- Round brushes (sizes 2, 6, and 10)
- Fine liner brush (size 00 or 0)
- Sponge
- Pencil (for sketching)
- Palette or small dishes for mixing
- Water cup
Step 1: Preparation & Sketching
-
Clean the bisque:
Wipe down your bisque plate with a damp sponge to remove any dust or ceramic particles. Let it dry completely for a minute or two. -
Map out the flower:
Using a pencil, lightly sketch the large central peony bloom. Start with a small oval for the center and draw loose, overlapping C-shaped curves radiating outward to form the petals. -
Add foliage and buds:
Sketch a small bud to the upper left of the main flower. Draw curved stems extending towards the right and bottom, adding leaf shapes along them. Don’t press too hard; the pencil lines will burn off in the kiln.
Step 2: Painting the Peony
-
Base coat the petals:
Water down your Light Pink underglaze slightly to create a translucent, watercolor effect. Using the size 10 round brush, fill in the petal shapes. It doesn’t need to be perfectly solid; variation adds to the look. -
Add depth to the center:
While the base is still slightly damp or just dry, take the Deep Rose color on a size 6 brush. Paint the inner base of each petal where it meets the flower center to create shadow and depth. -
Defining the petals:
Switch to your fine liner brush with the Deep Rose underglaze. Carefully outline each petal with thin, delicate lines. Add faint veins inside the larger petals to emphasize the texture. -
Paint the bud:
Use the same Light Pink and Deep Rose combination for the small bud on the left, ensuring the darker color is at the base of the bud where the sepals will go. -
The stunning center:
Dab small dots of Golden Yellow in the very center of the flower using the tip of a small brush. Add tiny brown speckles over the yellow for realistic pollen texture.
Water Control Pro-Tip
Treat underglaze like watercolor. Diluting it heavily allows the white of the clay to shine through, creating those soft, glowing highlights on the petal edges without needing white paint.
Step 3: Leaves & Stems
-
Base coat the greenery:
Mix a little water into your Sage Green underglaze. Paint the leaves and stems with a size 6 brush, using fluid strokes to keep them looking organic. -
Shading the leaves:
I like to add depth by applying Dark Forest Green to one side of the leaves or at the base where they attach to the stem. Blend this gently while the underglaze is still wet. -
Veining the foliage:
Once the green base is dry, use the fine liner brush and Dark Forest Green (or a mix of green and brown) to draw thin central veins and outlines on the leaves. -
Adding delicate sprigs:
Paint fine, wispy stems extending upward with a mix of blue-green or grey-green. Add tiny round dots at the ends to resemble berries or small filler flowers. -
The feathery fern:
On the bottom left, paint a stylized, fern-like leaf using a reddish-brown or muted pink wash to balance the color composition.
Level Up: Texture
Before painting, use a needle tool to gently scratch the veins into the clay surface. The glaze will pool slightly in these recesses, adding tactile dimension to your floral design.
Step 4: Finishing Touches
-
Speckling the background:
Dilute a small amount of light brown underglaze with water. Load a toothbrush or stiff brush and flick tiny speckles across the white space of the plate for a vintage, organic feel. -
Rim the plate:
Using a sponge or a brush held sideways, apply a Light Brown or oxide wash to the very rim of the plate. Let it be uneven to look rustic. -
Clean up:
Check the back of the plate for any stray underglaze marks and wipe them off with a damp sponge. -
Glaze and fire:
Once fully dry, dip the plate in clear glaze. Fire according to your clay and glaze specifications (usually cone 06 or cone 6 depending on the studio).
This lovely plate will bring a touch of eternal spring to your table setting

TRACK YOUR CERAMIC JOURNEY
Capture glaze tests, firing details, and creative progress—all in one simple printable. Make your projects easier to repeat and improve.
One-Stroke Petal Flowers for Beginners
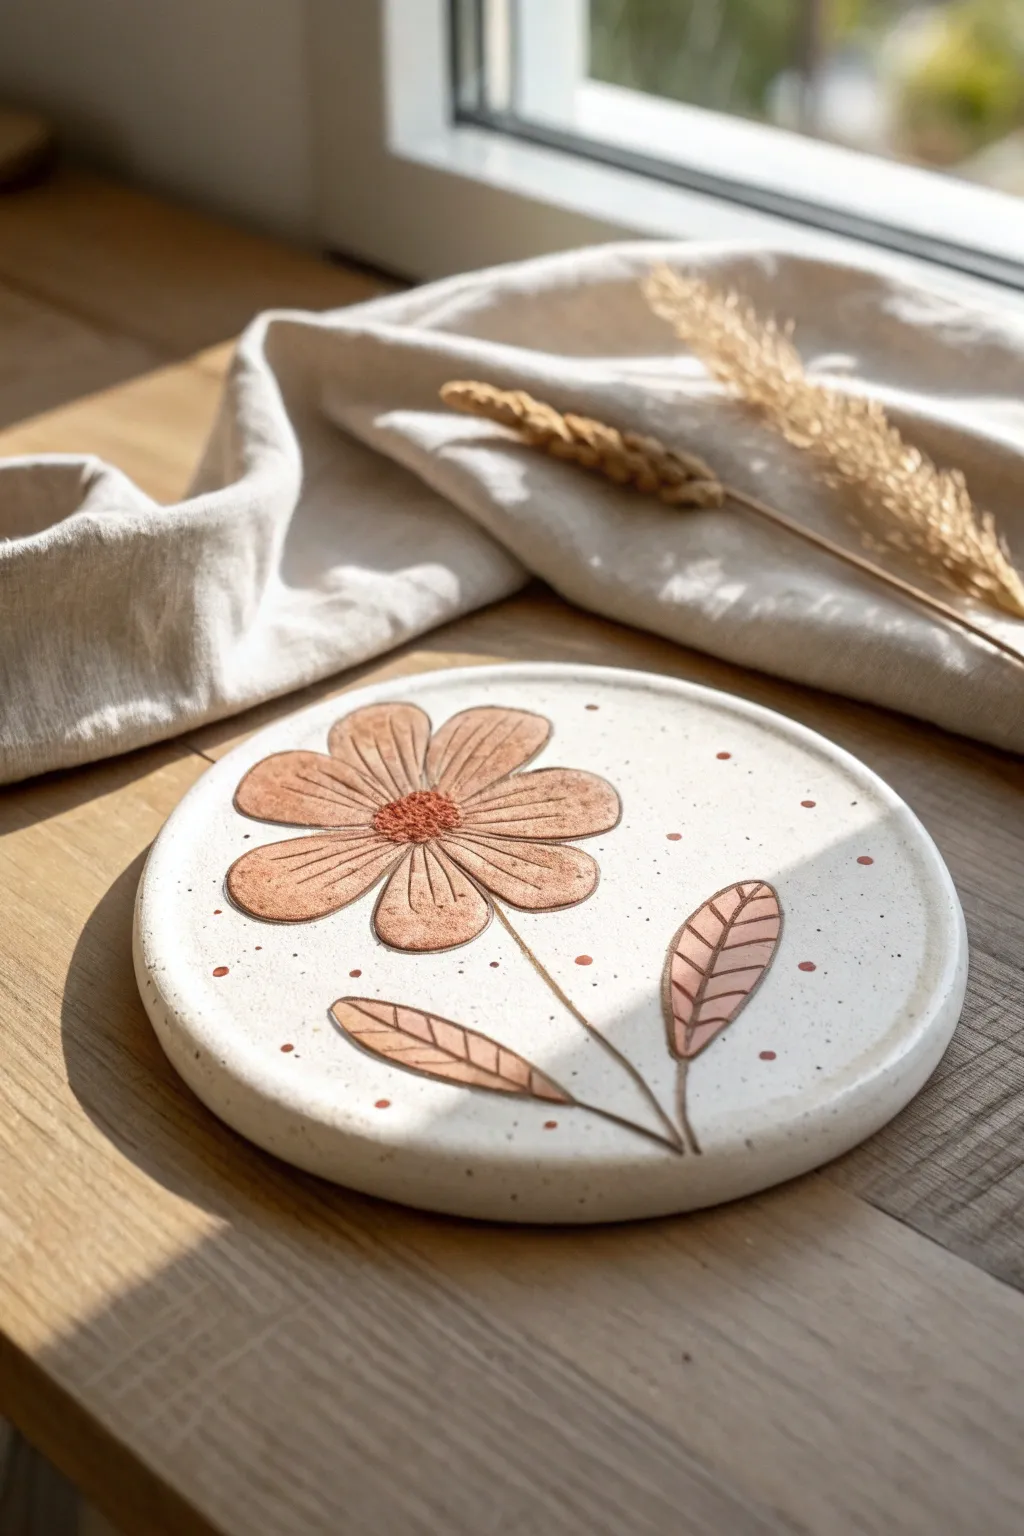
Embrace the charm of simplicity with this earthy, minimalist flower design on a speckled clay plate. The raised texture of the carving combined with warm terracotta tones creates a cozy, artisanal feel that’s perfect for beginners.
Step-by-Step Tutorial
Materials
- Round bisque ceramic plate or trivet (speckled clay body recommended)
- Underglaze pencil or charcoal for sketching
- Carving tool (sgraffito tool or needle tool)
- Terracotta or warm brown underglaze
- Dark brown underglaze (for the flower center)
- Small round paintbrush (size 2 or 4)
- Fine liner brush
- Clear matte or satin glaze
- Damp sponge
Step 1: Preparation & Sketching
-
Clean the surface:
Begin by wiping down your bisque plate with a slightly damp sponge. This removes any dust or oils that might repel the glaze. -
Map out the stem:
Using your sketching pencil, lightly draw a curved line starting from the bottom center, leaning slightly to the right, to act as your main stem. -
Position the flower head:
Draw a circle near the top left of the plate where the flower head will sit. It doesn’t need to be perfectly round; a slight oval adds organic character. -
Sketch the petals:
Around your center circle, sketch eight large, rounded petals. Keep them slightly separated from the center circle so they look distinct. -
Add the leaves:
Draw two almond-shaped leaves branching off the stem—one lower down on the left, and one slightly higher on the right.
Messy lines?
b: If paint bleeds into the carved grooves, wait for it to dry completely, then gently scrape the groove clean with a needle tool.
Step 2: Carving & Creating Texture
-
Outline the shapes:
Take your carving tool and gently scratch into the bisque along your pencil lines. You want a groove deep enough to feel but not so deep it weakens the plate. -
Carve petal details:
Inside each petal, carve 2-3 straight lines radiating from the center outward to mimic the vein texture. I like to vary the length of these lines for a more natural look. -
Detail the leaves:
Carve a central vein down the middle of each leaf, then add smaller diagonal veins branching off to the sides. -
Texture the center:
For the flower center, use the tip of your tool to create small stippling dots or tight little circles, giving it a pollen-like texture. -
Clean up debris:
Use a soft, dry brush to sweep away all the little clay crumbs created by your carving.
Step 3: Painting the Design
-
Fill the petals:
Load your round brush with the terracotta underglaze. Carefully fill in the petals, painting right up to—but not over—your carved outlines. -
Paint the leaves:
Using the same terracotta color, fill in the two leaf shapes. Apply 2-3 coats as needed for solid opacity, letting each coat dry briefly. -
Darken the center:
Switch to the dark brown underglaze and dab it into the textured center of the flower. The texture helps hold more pigment, creating depth. -
Add the stem:
With your fine liner brush and dark brown underglaze, trace the carved line of the stem, connecting the flower head to the leaves. -
Outline details:
Very lightly trace the carved outlines of the petals and leaves with the dark brown using the liner brush to make them pop.
Pro Tip: Depth
Water down a tiny bit of dark brown underglaze and wash it over the carved petal veins, then sponge it back to highlight the texture.
Step 4: Finishing Touches
-
Add decorative dots:
Dip the non-brush end (the handle tip) of your paintbrush into the terracotta underglaze. -
Stamp the background:
Randomly stamp small dots around the background empty space. Keep them sparse to maintain the minimalist aesthetic. -
Check carefully:
Look over the piece for any stray slip or smudges and gently scrape them away with an X-Acto knife or clean tool. -
Glaze application:
Once the underglaze is bone dry, apply a clear matte glaze over the entire piece. A matte finish complements the rustic vibe better than a high gloss. -
Fire it:
Fire the piece according to the clay and glaze manufacturer’s instructions, typically to cone 5 or 6 for stoneware.
Place your finished plate near a sunny window to enjoy how the light catches the carved textures
Dot-Painted Blooms in a Pointillism Style
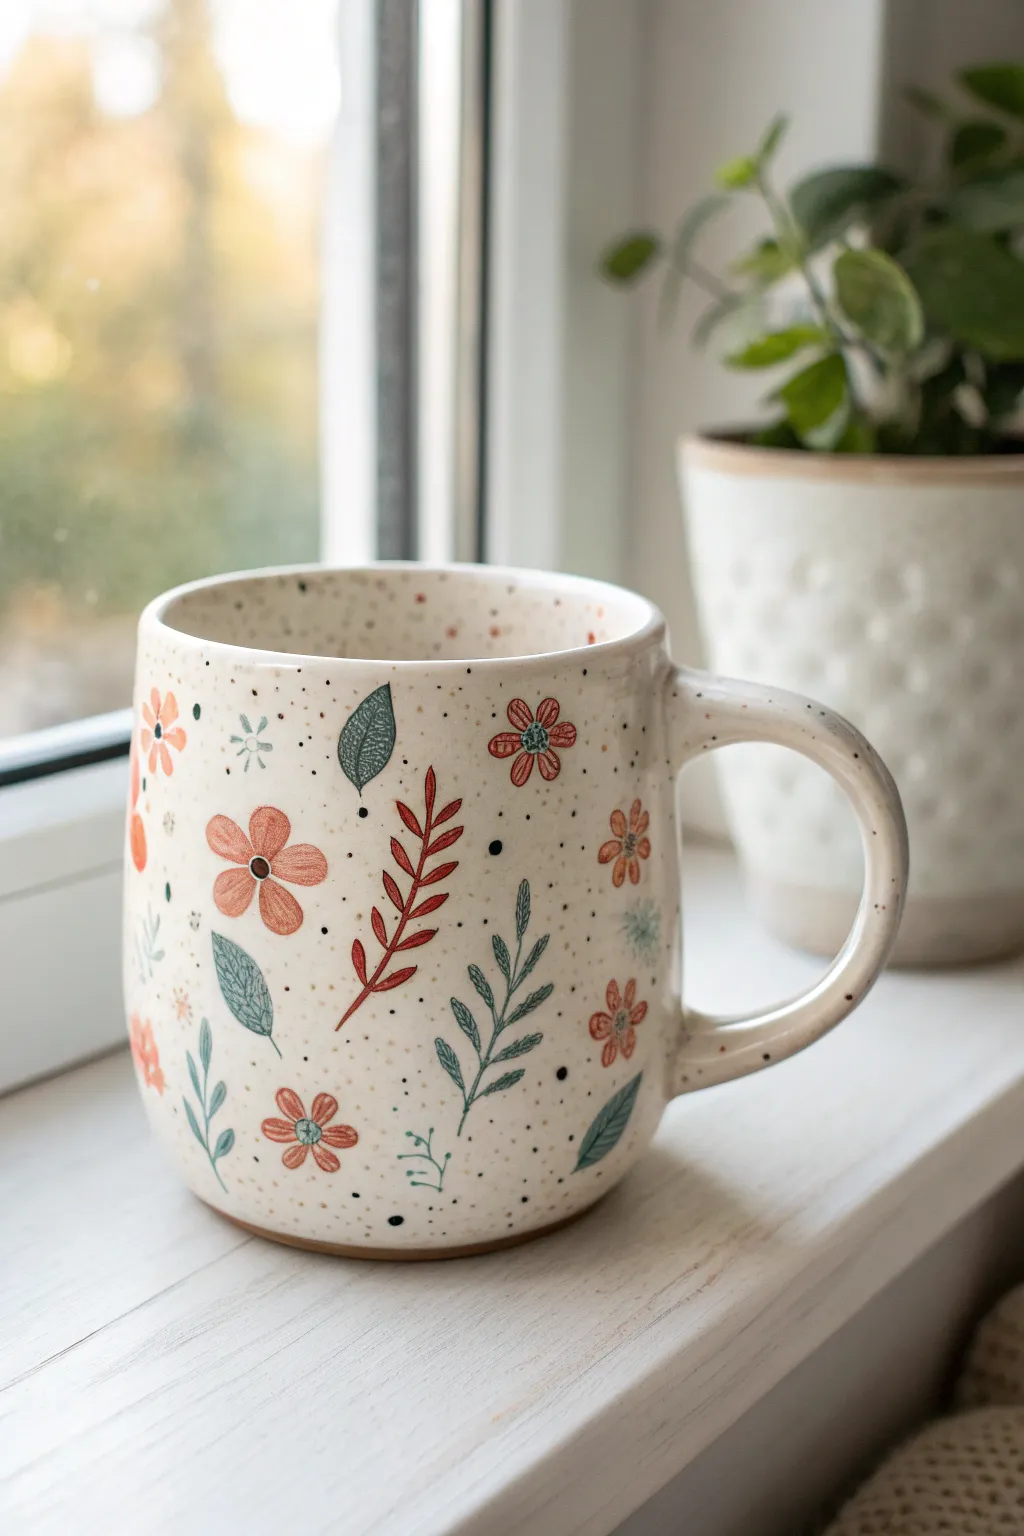
Transform a plain ceramic mug into a cozy, cottage-style masterpiece featuring delicate hand-painted wildflowers and leaves. The speckled background and simple, folk-art inspired floral motifs give this piece a charming, earthy feel that looks professionally handmade.
Step-by-Step
Materials
- Bisque-fired ceramic mug (cream or off-white clay body preferred)
- Underglaze paints: Peach, Terracotta/Burnt Orange, Sage Green, Dark Teal, Black
- Clear dipping glaze or brushing glaze
- Small round paintbrush (size 2 or 4)
- Fine liner brush (size 0 or 00)
- Old toothbrush (for splattering)
- Palette for mixing
- Pencil (optional for sketching)
- Water cup and paper towels
Step 1: Planning and Background
-
Prepare the surface:
Wipe down your bisque mug with a slightly damp sponge to remove any kiln dust. This ensures the underglaze adheres properly to the porous surface. -
Map out the pattern:
If you are nervous about free-handing, lightly sketch the placement of your largest flowers using a pencil. Don’t worry about perfection; the pencil marks will burn off completely in the kiln. -
Create the speckled base:
Before painting the flowers, we want to establish the speckled texture. Dilute a tiny amount of black or dark brown underglaze with water until it’s inky. -
Splatter technique:
Dip an old toothbrush into the diluted dark underglaze. Hold it a few inches from the mug and run your thumb across the bristles to flick tiny specks onto the surface. Rotate the mug to get even, random coverage.
Oops, skipped a spot?
If you smudge a flower while painting, let it dry completely, then gently scrape the mistake off with a craft knife or toothpick before trying again.
Step 2: Painting the Flowers
-
Paint the peach blooms:
Using the peach underglaze and a small round brush, paint simple five-petal flower shapes. Keep the petals slightly separated or just touching at the center. You’ll need 2-3 coats for solid opacity. -
Add terracotta accents:
Switch to your terracotta or burnt orange color. Paint smaller, star-shaped flowers interspersed between the peach ones. These add a nice warmth to the color palette. -
Detail the flower centers:
Once the base petals are dry to the touch, use the liner brush and a dark color (like chocolate brown or black) to add a simple dot in the center of the peach flowers. -
Inner petal details:
For the smaller terracotta flowers, paint a tiny ring or a lighter dot in the center to give them dimension.
Brushwork Pro-Tip
For the finest lines on the stems and veins, dilute your underglaze slightly with water. It should flow like ink, preventing the brush from dragging.
Step 3: Adding Foliage
-
Paint long stems:
Load your liner brush with sage green. Paint thin, slightly curved vertical lines rising from the bottom edge of the mug to act as stems or standalone grass blades. -
Create leafy branches:
Using the dark teal color, paint fern-like leaves. Start with a central stem, then use quick, short strokes to add leaves angling upward on both sides. -
Add solid leaves:
Paint solid, oval-shaped leaves using the sage green. Make sure to vary the direction they point—some up, some sideways—to keep the pattern dynamic. -
Incorporate warm foliage:
To tie the colors together, paint a few leafy branches using the terracotta color. I find this unexpected pop of red in the leaves really makes the design feel cohesive. -
Layering the glaze:
Ensure all leaf designs have at least 2 coats of underglaze so the color remains vibrant after firing.
Step 4: Refining and Finishing
-
Add decorative dots:
Using the handle end of a paintbrush or a dotting tool, dip into black or dark brown underglaze. Place deliberate dots around the flowers and leaves to fill empty negative space. -
Detail the leaf veins:
If you want extra detail, use your finest liner brush to scratch through the dry paint of the solid leaves (sgraffito) or paint thin veins on top with a contrasting color. -
Check the rim:
Inspect the rim of the mug. You can choose to leave it plain or run a very thin line of brown underglaze along the edge for a framed look. -
Clear glaze application:
Once the underglaze is bone dry, apply a clear dipping glaze or three coats of clear brushing glaze over the entire mug. -
Final fire:
Fire the mug in the kiln according to the clay and glaze specifications (usually Cone 06 or Cone 6) to vitrify the piece and make it food safe.
Now you have a charming, dishwasher-safe mug perfect for your morning coffee or tea
Loose Wild Roses With Sketchy Outlines
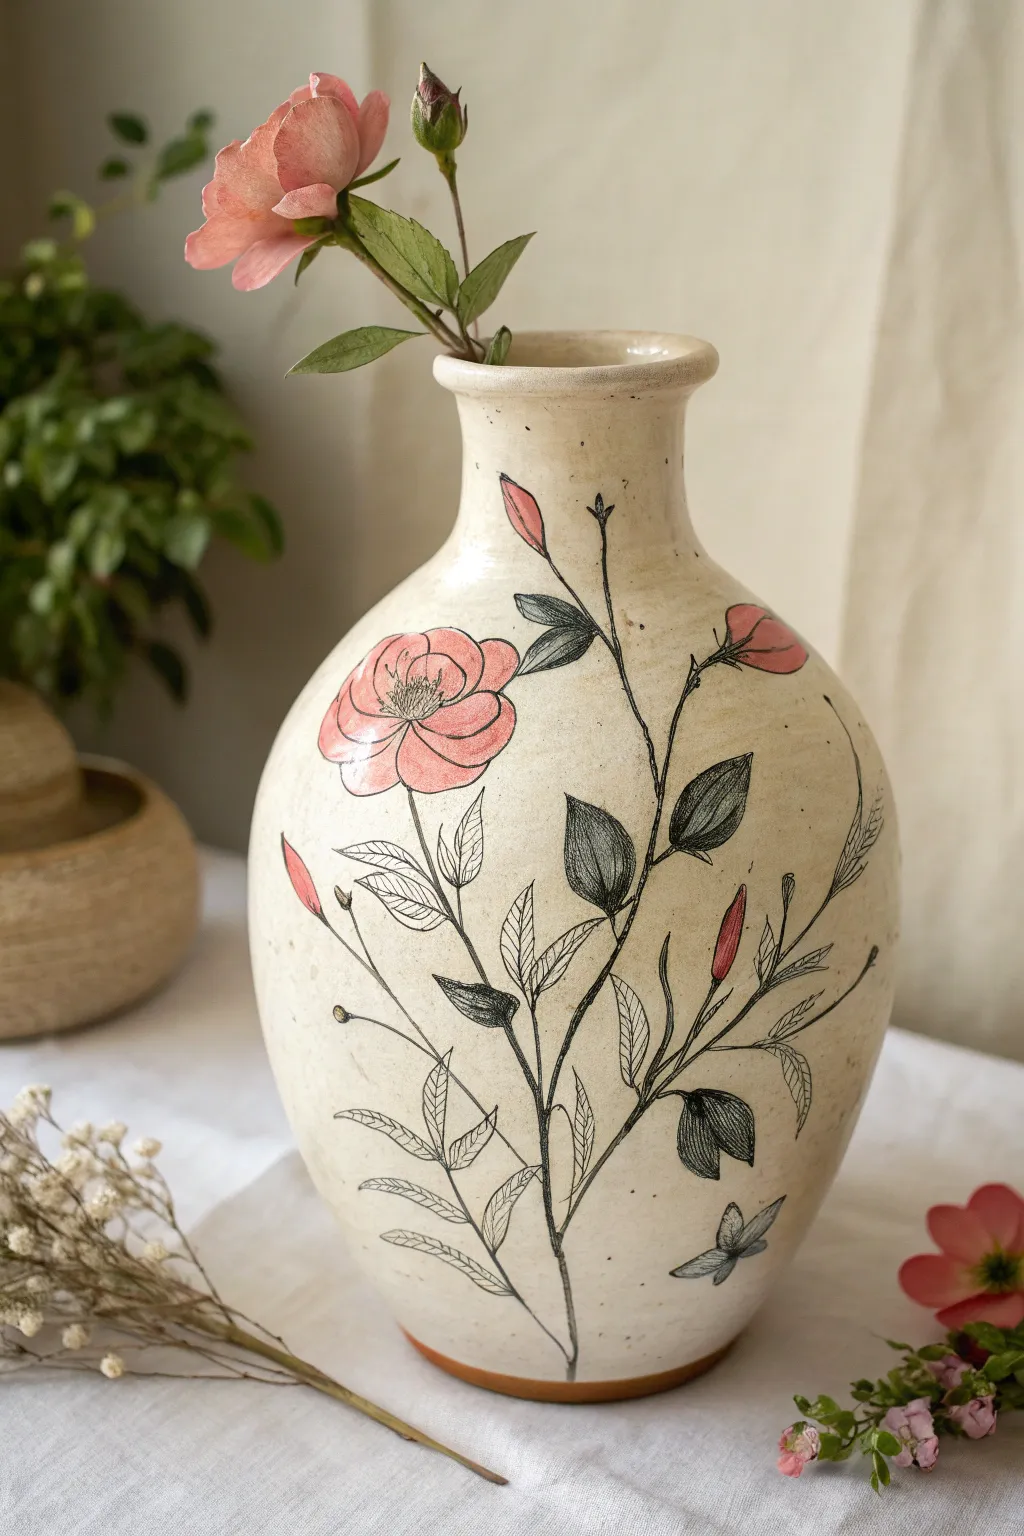
This elegant project combines the rustic charm of unglazed pottery with the delicate precision of botanical illustration. By pairing loose washes of pink underglaze with fine, sketchy black lines, you’ll create a vase that looks like a page torn from a vintage sketchbook.
Step-by-Step Guide
Materials
- Bisque-fired ceramic vase (smooth surface preferred)
- Black underglaze pencil or fine liner bottle with black underglaze
- Pink artistic glaze or underglaze (watered down)
- Small round detail brush (size 1 or 2)
- Clear matte or satin glaze (optional, for dipping)
- Pencil (standard HB for initial sketching)
- Sponge and water bowl
Step 1: Preparation and Sketching
-
Surface Prep:
Begin by wiping down your bisque ware with a slightly damp sponge. This removes any dust that might interfere with the glaze adhering and gives you a clean slate. -
Planning the Composition:
Visualize a curving line that snakes up the vase to serve as your main stem. I like to aim for an S-curve shape, which looks organic and leads the eye naturally from the base to the neck. -
Light Pencil Outline:
Using a standard pencil, very lightly sketch the placement of your main flowers and buds. Don’t worry about perfection; graphite burns off in the kiln, so these guide lines are just for you.
Loose is Best
Don’t stress about coloring perfectly inside the lines. Letting the pink wash “miss” the outline slightly mimics offset printing and looks artsy.
Step 2: The Ink-Style Outlines
-
Drawing the Main Stem:
Using your black underglaze pencil (or a fine liner bottle for a bolder look), draw the central stem. Press lightly to get a thin, scratchy line rather than a thick marker-like stroke. -
Adding Leaves:
Draft the leaves branching off the stem. Notice how some leaves in the reference image are fully shaded, while others just have veins. Alternate these styles for visual interest. -
Shading Technique:
For the darker leaves, use a scribbling or heavy hatching motion with your tool to fill them in. You want the texture to look like a pencil sketch, not a solid block of color. -
Drawing the Buds:
Add elongated tear-drop shapes for the rose buds at the ends of upper branches. Keep the lines quick and energetic. -
Petal Details:
Outline the open rose blossoms. Focus on overlapping curves for the petals. The beauty here is in the ‘sketchy’ quality, so if your lines overlap or don’t connect perfectly, it adds to the charm. -
Detailing the Veins:
Go back into your open leaves and draw a central vein with smaller veins branching out. Quick flicks of the wrist work best here. -
Adding the Butterfly:
If you have empty space near the bottom right, sketch a small butterfly or moth. Use the same hatching technique on its wings to tie it into the botanical style.
Antique Wash Effect
Before painting, wipe the whole vase with a very watered-down tea-colored stain to make the bright clay body look like aged parchment paper.
Step 3: Adding Color Washes
-
Diluting the Pink:
Take your pink underglaze and dilute it slightly with water on a palette. You want a watercolor consistency, not a thick opaque paint. -
Painting the Buds:
Dip your round brush into the pink wash and fill in the buds. It’s okay if the color goes slightly outside the lines—this enhances the ‘loose’ watercolor aesthetic. -
Coloring the Blooms:
Apply the pink wash to the open flower petals. Concentrate slightly more pigment in the center of the flower and let it fade out toward the edges. -
Adding Depth:
While the first layer is still damp, dab a tiny bit of undiluted pink into the very center of the rose and the base of the buds to create a shadow gradients. -
Dry Time:
Allow the underglaze and pencil work to dry completely. It should be dry to the touch and chalky looking before moving to the final glazing step.
Step 4: Finishing Touches
-
Speckling (Optional):
To mimic the look of aged paper or stoneware, dip a stiff brush in watered-down grey or brown underglaze and flick the bristles to create tiny speckles across the white space. -
Clear Glaze Application:
If you want a sealed finish, dip the vase into a clear matte or satin glaze. A glossy glaze works too, but a matte finish looks more like paper. -
Firing:
Fire the piece according to the specific temperature requirements of your chosen clay body and underglazes.
Once fired, fill your new vase with real wildflowers to complement the painted ones and bring nature indoors
Folk-Art Oilcloth-Inspired Florals

This charming project captures the nostalgic feel of vintage oilcloth prints with bold, colorful blooms on simple cream bisque. The black outline method really makes the primary colors pop, giving it a playful yet polished finish perfect for your morning coffee.
Step-by-Step
Materials
- Bisque ceramic mug (straight-sided works best)
- Underglazes: Bright Red, Golden Yellow, Deep Blue, Black, Bright White (optional)
- Small round brushes (size 2 and 4)
- Fine liner brush (size 0 or 00) or a glaze writer bottle with fine tip
- Pencil (light graphite)
- Clean water and sponge
- Clear dipping glaze
Step 1: Design & Base Layers
-
Clean the surface:
Wipe down your bisque mug with a damp sponge to remove any dust or oils from your hands, ensuring the underglaze adheres perfectly. -
Lightly sketch the stems:
Using a pencil, very lightly draw the main curved stem lines. Don’t worry about perfection; the pencil marks will burn off in the kiln. These lines act as the ‘skeleton’ for your floral arrangement. -
Map out the flower heads:
Sketch circles or ovals where the main flowers will go. Place the large red flower low and central, the yellow daisy higher up, and leaves filling the gaps. -
Block in the red flower:
Load a size 4 brush with Bright Red underglaze. Fill in the petals of the large bottom flower. You may need 2-3 coats for solid opacity, letting each coat dry until matte before adding the next. -
Paint the yellow blooms:
Switch to your Golden Yellow. Paint the petals of the upper daisy-like flower and the center of the red flower. Keep the edges relatively crisp. -
Add blue accents:
Use Deep Blue to paint the small leaves, the center of the yellow flower, and the smaller poppy-like flower near the bottom. -
Create the two-tone leaves:
For the larger leaf shapes, I like to split them visually. Paint one half of the large leaf with Deep Blue and the large leaf near the red flower with Bright Red.
Step 2: Detailing & Line Work
-
Mix the black liner:
If using brush-on underglaze, slightly water down a small amount of Black underglaze on your palette until it has an ink-like consistency. -
Outline the main stems:
Using your fine liner brush (size 0), carefully trace over your original pencil stem lines with black. Keep the pressure steady for a smooth flowing line. -
Outline the flower petals:
Outline each painted flower petal. Don’t worry if you don’t stay perfectly on the color edge; a little offset adds to the hand-drawn folk charm. -
Add leaf veins:
Draw a central line down the leaves and add diagonal veins. On the half-blue leaves, use these lines to separate the colored part from the unpainted bisque part. -
Detail the flower centers:
Add small concentric circles or dots inside the flower centers. For the red flower, add a ring of white or unpainted space around the yellow center if you can, then outline. -
Add whimsical filler dots:
Dip the handle end of a paintbrush into black paint and dot it around the flowers in groups of three or five to fill empty negative space. -
Include fern accents:
Paint small fern-like sprigs using just black lines branching off the main stem or floating near the edges. -
Final inspection:
Check for any smudges. You can gently scratch away small mistakes with a toothpick once the paint is dry. -
Glaze and fire:
Once fully dry, dip the mug into clear glaze and fire according to the clay and glaze manufacturer’s instructions.
Clean Lines
If your black lines look shaky, try using a slip trailer or a glaze precision applicator bottle instead of a brush for steadier flow.
Texture Twist
Use a sgraffito technique: paint a solid color patch, let it dry, then scratch the floral design through to reveal the white biscuits underneath.
Your finished mug will have a vibrant, timeless appeal that makes any beverage feel a little more special
Black Background Florals That Pop
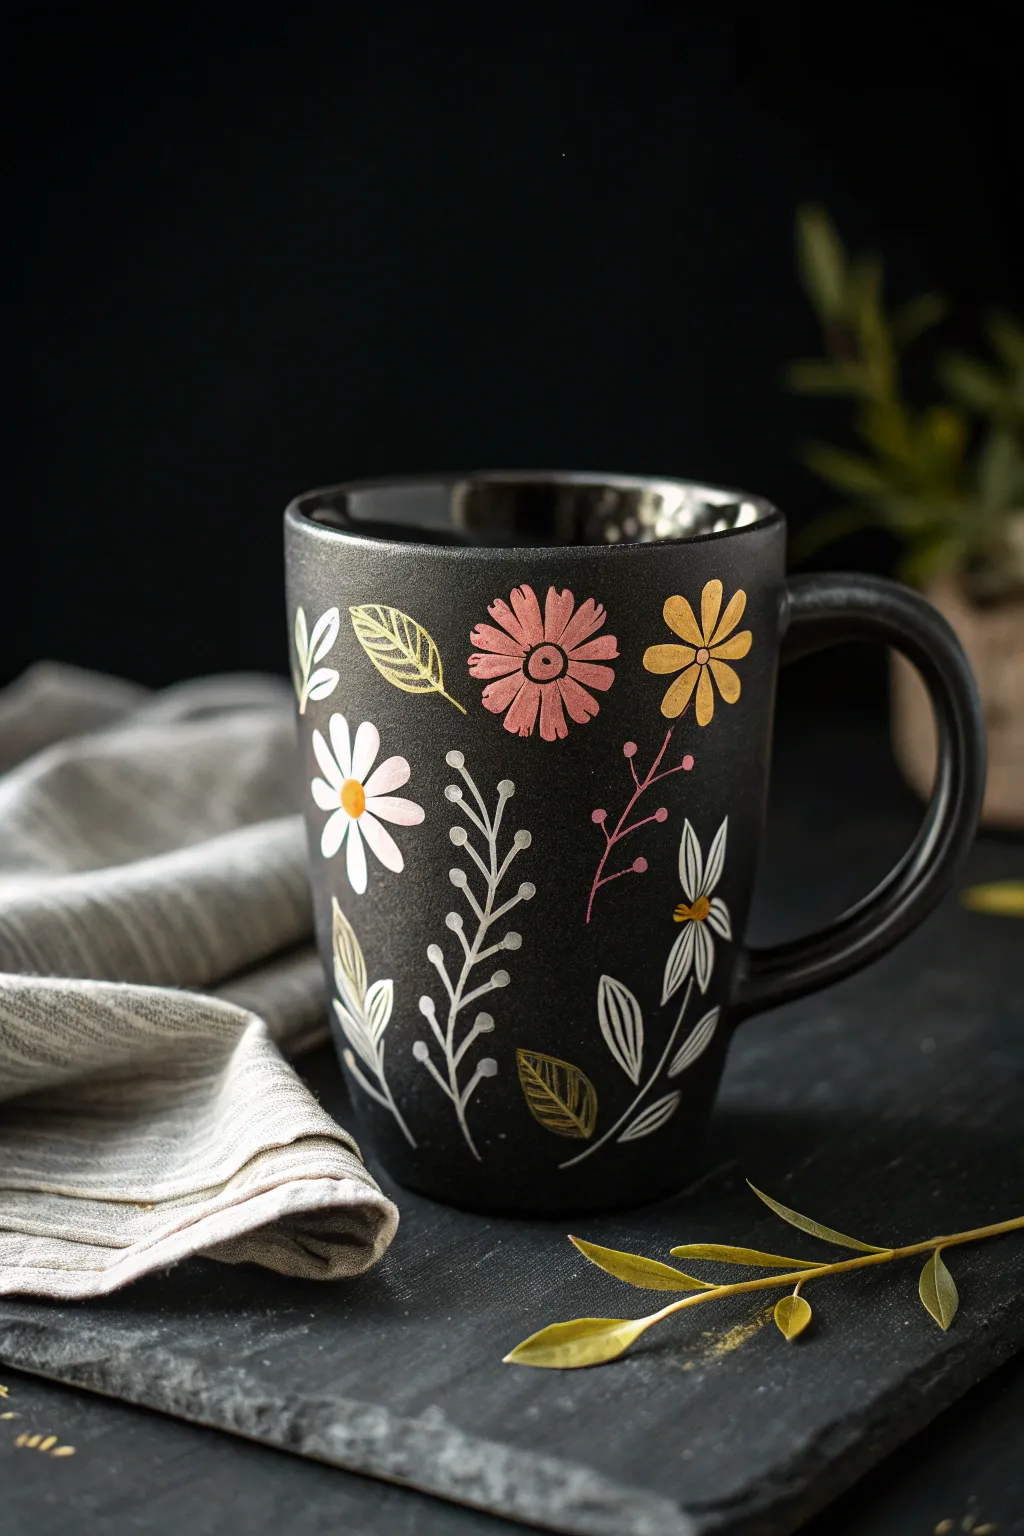
Transform a plain black mug into a blooming masterpiece with this striking floral design. Using a dark matte background makes the pastel pinks, sunny yellows, and crisp whites pop with incredible vibrancy.
Step-by-Step Guide
Materials
- Bisque ceramic mug (or a plain black glazed mug for non-kiln paints)
- Matte black underglaze (if using bisque)
- Opaque underglazes or enamel paints: Soft pink, golden yellow, bright white, sage green
- Small round brush (size 2 or 4)
- Fine liner brush (size 00 or 0)
- Clean water cup
- Paper towels
- Pencil (optional)
Step 1: Base Preparation
-
Surface check:
Begin by wiping down your mug with a damp sponge to remove any dust or oils that might repel the paint. -
Apply the background:
If you are working with bare bisque, apply three solid coats of matte black underglaze to the exterior. Allow the surface to dry until it’s chalky and cool to the touch between each coat. -
Full coverage:
Ensure you get full coverage near the rim and handle; a patchy background will distract from your delicate flowers later. -
Dry completely:
Let the black base coat dry completely before attempting any designs. It should feel room temperature and look flat, not shiny.
Paint looking transparent?
Light colors on black need layers. Let the first coat dry fully, then dab—don’t drag—the second coat on top to build opacity without lifting the layer below.
Step 2: Painting the Blooms
-
Plan your placement:
Visualize three main focal points for your larger flowers. I like to stagger them—one high near the rim, one lower, and one near the handle—to encourage the eye to travel around the mug. -
The pink cosmos:
Using your small round brush and soft pink paint, create the large cosmos flower. Press the brush down and lift as you pull toward the center to create petal shapes. -
Second coat for opacity:
The black background is hungry and will eat up light colors. Apply a second or third coat of pink to the petals once the first is dry to ensure they stand out. -
The yellow daisy:
Rinse your brush well. With the golden yellow paint, paint a simple five-petal flower shape or a multi-petal daisy near the top rim. -
The white daisy:
Using the bright white paint, add a third main flower. White looks especially stark against black, so it acts as a great highlight. -
Adding centers:
Once the petals are dry, add contrasting centers. Use a dot of yellow for the white flower, and a small dark circle (or black unpainted space) for the pink and yellow flowers.
Sketching Trick
Use a regular graphite pencil to sketch your design directly onto the dry black surface. The graphite shines silver against the matte black so it’s easy to see, and it burns off in the kiln.
Step 3: Foliage & Details
-
Switch brushes:
Switch to your fine liner brush for the delicate stems and leaves. This step requires a steady hand, so rest your pinky against the mug for stability. -
Fern fronds:
Paint a long, varying white line vertically. Add small teardrop shapes coming off the sides to create a fern-like stem. -
Leaf outlines:
Using a very pale yellow or cream, draw simple leaf outlines. Don’t fill them in completely; instead, draw lines inside to suggest veins. -
Delicate sprigs:
Mix a tiny bit of pink with white to make a very pale blush. Use the liner brush to paint thin, twiggy stems with tiny dots at the ends for filler flowers. -
Refining leaves:
Add a few solid sage green leaves or bold outline leaves in gold to fill any empty negative space. -
Final touches:
Check for any smudges on the black background. Since the base is black, you can easily ‘erase’ mistakes by painting over them with a dab of black underglaze. -
Firing or sealing:
If using ceramic glazes, dip in clear glaze and fire according to studio instructions. If using non-fire paints, cure in a home oven per the bottle’s directions.
Enjoy your morning coffee in a garden that blooms beautifully even in the dark
Vintage Botanical Specimen Plate Layout
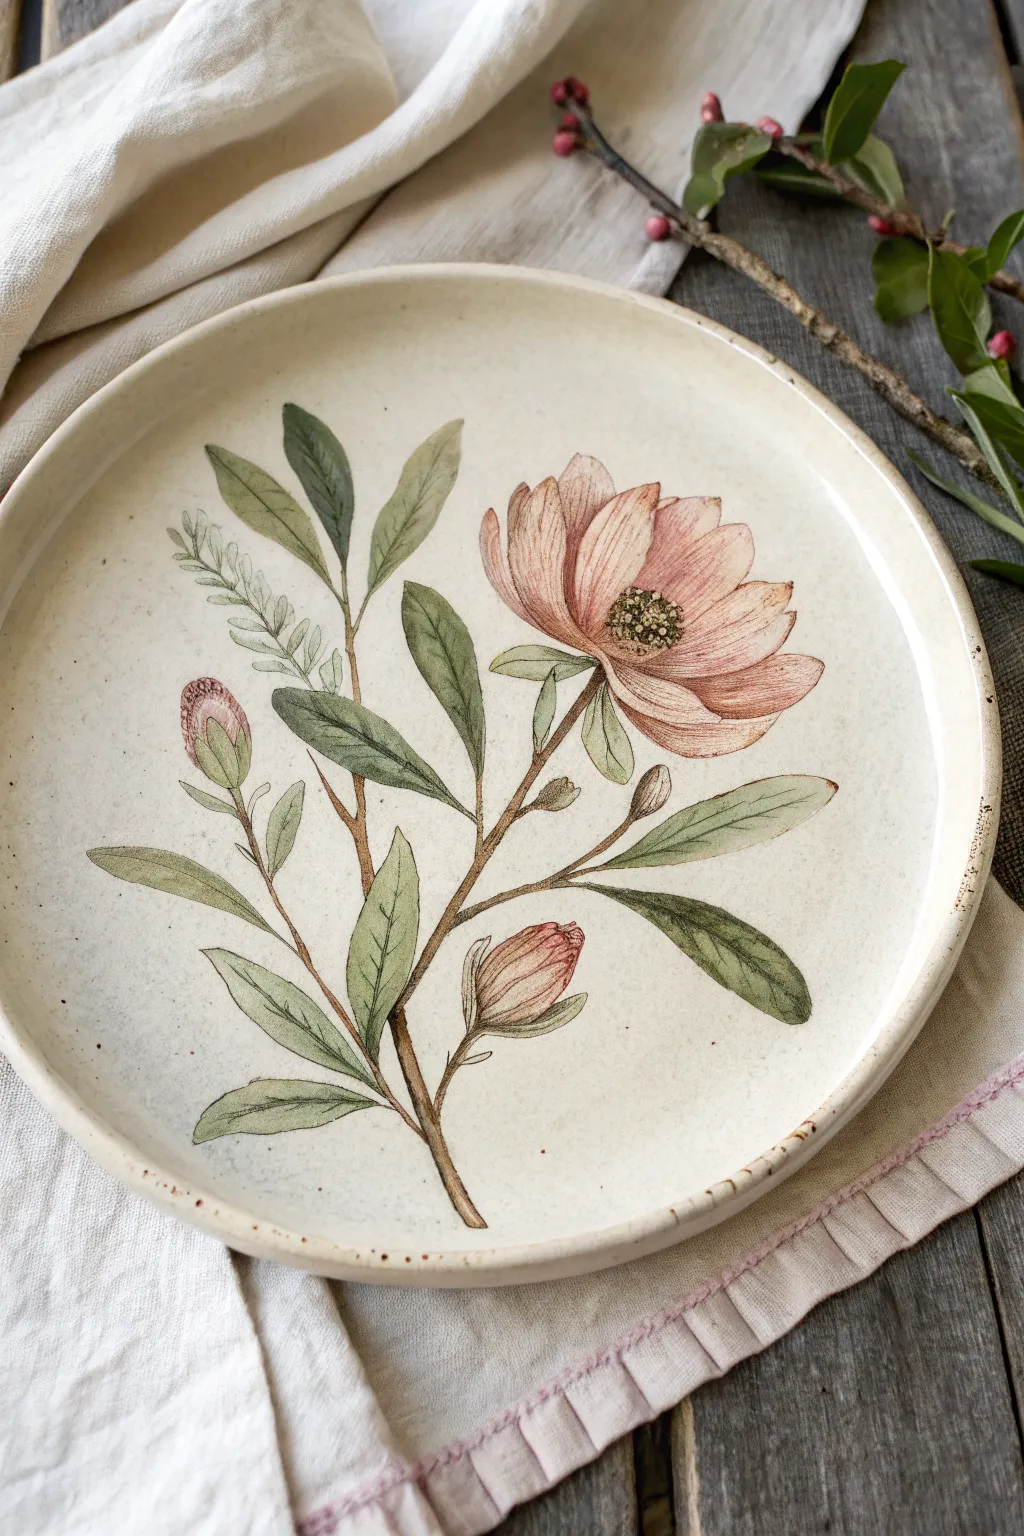
Capture the delicate elegance of an antique field guide with this botanical plate design. Using fine lines and muted washes, you’ll create a sophisticated magnolia branch that looks like a preserved specimen.
Step-by-Step
Materials
- Bisque-fired ceramic dinner plate (cream or speckled clay body preferred)
- Underglaze pencil (dark brown or charcoal)
- Underglazes: Dusty Rose, Burnt Orange, Olive Green, Sage Green, Dark Brown, White
- Fine liner brush (size 00 or 000)
- Small round brush (size 2 or 4)
- Palette for mixing
- Clear matte dipping glaze
- Sponge and water
- Carbon paper (optional)
- Printed botanical reference photo
Step 1: Preparation & Sketching
-
Surface Prep:
Begin by wiping down your bisque plate with a slightly damp sponge. This removes any dust that could prevent the underglaze from adhering properly. -
Transfer the Design:
You can freehand the branch structure, but for accuracy, I usually place a sheet of carbon paper under my reference image and trace lightly onto the plate. Focus on the main stem and the angles of the leaves. -
Initial Outline:
Using a very sharp underglaze pencil in dark brown or charcoal, gently trace over your transferred lines or sketch the primary shapes. Keep these lines faint; they serve as a guide but shouldn’t overpower the delicate painting later. -
Refining Shapes:
Sketch in the large open bloom on the right side and the two smaller buds on the left and lower center. Pay attention to the petals’ curvature.
Step 2: Painting the Flora
-
Mixing the Stem Color:
Mix a small amount of Dark Brown underglaze with a tiny drop of water to improve flow. Using your fine liner brush, paint the main woody stem. -
Stem Details:
While the brown is wet, you can lift tiny bits of color with a dry brush to create a wood-grain texture, or add a second coat to the shadowed side of the branch for dimension. -
Base Leaf Color:
Create a wash of Sage Green by diluting the underglaze slightly. With the round brush, fill in the leaf shapes. Don’t worry about perfect coverage; a watercolor effect enhances the vintage look. -
Leaf Variation:
While the Sage Green is still damp, drop in small touches of Olive Green near the base of the leaves and the veins. This wet-on-wet technique creates soft, natural gradients. -
Fern Accent:
For the faint, fern-like sprig behind the main branch, use a very watery wash of Sage Green mixed with a touch of White. Paint this with quick, light strokes so it appears to recede into the background. -
Blossom Petals:
Mix Dusty Rose with a little White to get a soft vintage pink. Paint the petals of the main flower and the tight buds. Keep your brush strokes following the direction of the petal growth, from center to tip. -
Petal Depth:
Once the pink base is touch-dry, use undiluted Dusty Rose or a tiny bit of Burnt Orange to add shading at the base of the petals where they meet the center. -
Painting the Stamen:
In the center of the open bloom, dab tiny dots of Olive Green and Dark Brown to create the textured center (carpels and stamens).
Fixing Smudges
If you smear underglaze on the raw bisque, don’t wipe it immediately! Let it dry, then scratch it off gently with an X-Acto knife or sandpaper to avoid staining the clay.
Step 3: Fine Details & Finishing
-
Detailing Veins:
Switch back to your smallest liner brush and the Dark Brown underglaze. Carefully paint the central veins on the leaves. Keep the line thin and break it occasionally for a more organic feel. -
Petal Texture:
Use a very dry liner brush with Burnt Orange to add extremely fine striations on the petals. These should look like delicate pencil shading. -
Bud details:
Add hatch marks or small dots of Dark Brown on the sepals (the green casing) of the unopened flower buds to suggest texture. -
Clean Up:
Check the surrounding ceramic for any accidental smudges. Use a clean, damp brush or a precision wiping tool to gently erase any stray marks. -
Glazing:
Allow the underglaze to dry completely (at least an hour). Dip the entire plate into a Clear Matte glaze. A glossy glaze works too, but matte finishes feel more authentic to old botanical prints. -
Firing:
Fire the plate according to the clay and glaze specifications (typically Cone 5 or 6 for stoneware).
Antique Tint
To age the plate further, sponge a very watered-down wash of light tan or tea-colored underglaze around the rim before glazing to mimic aged paper edges.
Once fired, your plate will carry the timeless charm of a 19th-century naturalist’s sketchbook, ready for display or dinner.
Watercolor-Wash Florals on a Vase

Transform a simple ceramic bisque vase into a piece of botanical art with a soft, translucent watercolor effect. This project embraces the beauty of diluted glazes to create ethereal petals and leaves that look as though they were painted with watercolors on paper.
Step-by-Step Guide
Materials
- Small ceramic bisque vase
- Ceramic underglazes (Rose pink, dusty green, sage green, plum purple, ochre yellow)
- Palette or small tray for mixing
- Water cups
- Watercolor brushes (clean, synthetic bristles in sizes #2 and #4 round, #0 detail liner)
- Pencil (light sketch)
- Clear dipping glaze (cone 04 or 06 compatible)
- Kiln access
Step 1: Preparation and Sketching
-
Clean surface:
Begin by wiping down your bisque ware with a slightly damp sponge to remove any dust. This ensures the underglaze adheres properly to the ceramic surface. -
Plan composition:
Visualize where your main floral cluster will sit. I like to place the largest bloom slightly off-center near the bottom third, allowing stems and buds to reach upward. -
Light sketch:
Using a regular pencil, very lightly sketch the placement of your main flowers and the flow of the stems. Don’t worry about erasing mistakes; the graphite will burn off completely in the kiln.
Step 2: Painting the Blooms
-
Dilute the pigments:
To achieve that signature watercolor look, you need thin layers. Mix your rose pink underglaze with water on your palette until it has the consistency of skim milk. -
Base petals:
With a #4 round brush, paint the outer petals of the large central rose. Use a wash of the diluted pink, keeping the edges soft. -
Layering depth:
While the first layer is still slightly damp, drop in a slightly more concentrated pink near the center of the flower. Allow the water to pull the pigment outward for a natural gradient. -
Painting buds:
Using the same diluted pink mix, paint the small tear-drop shaped buds extending upwards. Add a tiny dot of darker pink at the tips for dimension. -
Secondary flowers:
Mix a small amount of plum purple with plenty of water. Paint the smaller, open flower to the right of the main rose, using loose strokes to suggest petals without hard outlines.
Water Control Pro-Tip
Bisque absorbs water instantly. To keep your ‘watercolor’ flow going longer, dampen the specific area of the bisque with clean water just before applying your paint.
Step 3: Adding Foliage and Stems
-
Mixing greens:
Create two shades of green: a warm, dusty olive and a cooler sage. Dilute both significantly with water. -
Drawing stems:
Switch to your #0 detail liner brush. Dip it into the dusty green and paint very thin, meandering lines connecting your buds and flowers. -
Leaf structures:
Use the sage green for the larger, broader leaves. Press the belly of a #2 round brush down and lift up as you drag to create a tapered leaf shape. -
Fern accents:
For the fern-like sprigs on the left side, use the very tip of your detail brush with the palest green wash to create wispy, delicate fronds. -
Layering leaves:
Let the first layer of leaves dry, then overlap a few darker, more concentrated green leaves. The transparency of the underglaze creates a beautiful depth where they overlap.
Fixing Hard Edges
If a petal edge looks too harsh, dampen a clean brush with water and gently gently scrub the edge while the underglaze is still wet to soften and feather it out.
Step 4: Final Details and Glazing
-
Flower centers:
Dip the very tip of your detail brush into undiluted ochre yellow. Stipple tiny dots into the center of the main rose and the purple flower to create the stamens. -
Deepening contrast:
Mix a tiny bit of dark brown or black into your green. Add very fine veins to just a few of the larger leaves to anchor the composition. -
Final drying:
Allow the underglaze painting to dry completely. Since we used a lot of water, give it a bit longer than usual—perhaps an hour—to ensure the moisture has evaporated from the bisque. -
Clear glaze application:
Dip the entire vase into a clear glaze. A dipping glaze is best here to avoid smearing your delicate brushwork, but if you must brush it on, dab it gently rather than dragging. -
Firing:
Fire the piece in the kiln according to the clear glaze manufacturer’s instructions (usually cone 06 or 04).
Once fired, the translucent layers will reveal a soft, romantic finish perfect for holding wild blooms
Vines and Tiny Blooms as a Rim Border
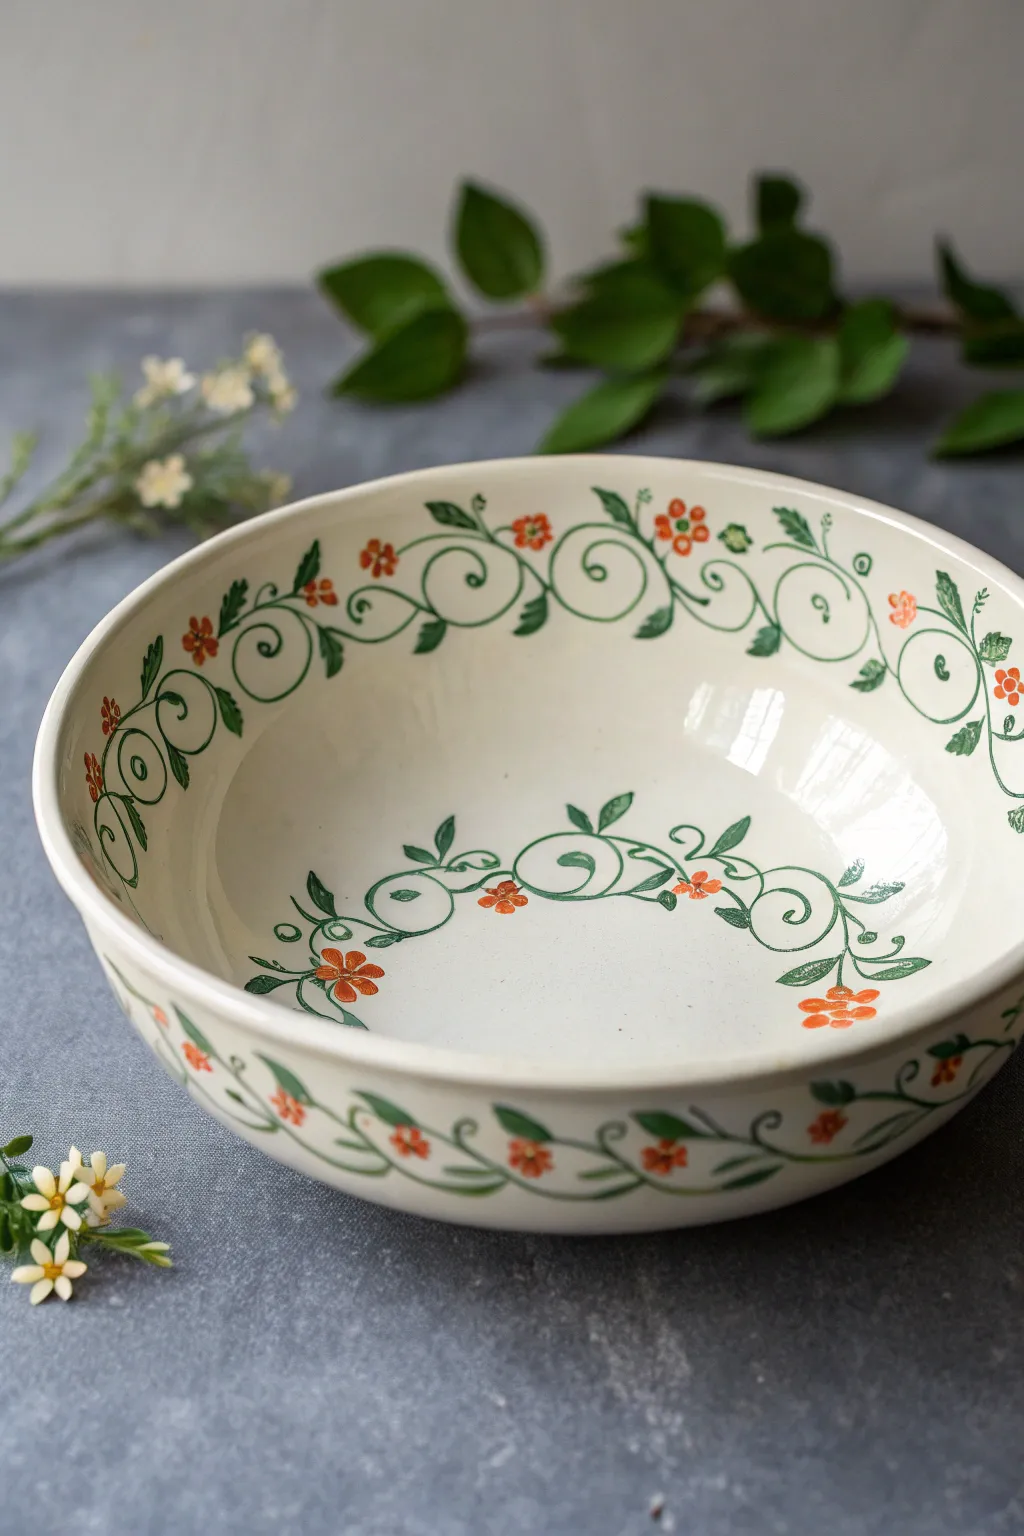
This elegant design features scrolling green vines and dainty orange blossoms that dance along the rim and settle gracefully in the center of the bowl. The look is airy and classic, making use of negative space to let the cream-colored ceramic shine through.
Step-by-Step Tutorial
Materials
- Bisque fired ceramic bowl (wide rim shape)
- Underglaze pencil (optional, for sketching)
- Deep hunter green underglaze
- Bright orange-red underglaze
- Fine liner brush (size 0 or 00)
- Small round brush (size 2)
- Sponge
- Clean water
- Clear dipping glaze
Step 1: Preparation & Sketching
-
Clean the bisque:
Begin by wiping down your entire ceramic bowl with a slightly damp sponge. This removes any kiln dust or oils from your hands that might repel the glaze. -
Map out the border:
Using a light pencil (or a specialized underglaze pencil), lightly mark four equidistant points around the inside rim. This helps ensure your scrolling pattern stays evenly spaced rather than getting crowded at the end. -
Sketch the center vines:
In the very center of the bowl, sketch a loose circle of connecting S-curves. Don’t worry about perfection; the charm lies in the organic flow.
Step 2: Painting the Greenery
-
Load your liner brush:
Thoroughly mix your hunter green underglaze. Dip your fine liner brush in, rolling the tip on your palette to create a sharp point. The paint should be fluid, like ink, to allow for long strokes. -
Paint the main stems:
Starting at the inside rim, paint a continuous, scrolling vine. Think of drawing a series of connected loops or waves that run parallel to the bowl’s edge. -
Add the curlicues:
Where the vine dips or crests, add smaller spiral flourishes that curl inward. These decorative tendrils add that classic Victorian feel to the design. -
Repeat on the outside:
Flip the work to the exterior. Recreate a similar scrolling vine pattern along the bottom curve of the bowl, just above the foot ring, mirroring the rhythm of the interior pattern. -
Paint the center motif:
move to the inside bottom of the bowl. Paint the circular vine motif you sketched earlier, ensuring the lines are delicate and not too heavy. -
Add leaves:
Switch to your small round brush or stick with the liner if you have a steady hand. Paint small, almond-shaped leaves attached to the main vines. Vary the direction—some pointing up, some down—for a natural look. -
Leaf details:
For the larger leaves, you can leave the center slightly open or stroke them solid green, depending on your preference. The example shows solid, simple leaf shapes.
Flow like a vine
For smoother vine lines, mix a literal drop of water into your green underglaze. It helps the paint glide off the liner brush without skipping or dragging on the dry bisque.
Step 3: Adding the Blooms
-
Prepare the orange color:
Clean your brush thoroughly. Load the small round brush with the bright orange-red underglaze. -
Place the flowers:
Identify the ’empty’ spots in your vine loops where a pop of color is needed. Paint simple five-petal flowers at these junctions. -
Petal technique:
To make the petals, simply press the belly of the brush down and lift up toward the center. Do this five times in a circle for each flower. -
Center details:
Once the orange petals are dry to the touch (usually just a minute or two), use the very tip of your liner brush with a tiny dot of yellow or leaving it unpainted to define the flower center. -
Add flower buds:
Paint tiny single or double dots of orange at the ends of some of the smaller green tendrils to represent flower buds about to open.
Shaky hands?
If your hands shake while painting fine lines, anchor your pinky finger against the bowl’s rim for stability. It acts like a kickstand for your hand.
Step 4: Finishing Touches
-
Check for gaps:
Rotate the bowl slowly. If any section looks too sparse, add a tiny green spiral or an extra leaf to balance the negative space. -
Clean up sketch lines:
If you used a regular graphite pencil for sketching, the kiln will burn it off. However, if you see any heavy smudges, gently dab them with a damp sponge, being careful not to smear the green paint. -
Clear glaze application:
Once the underglaze is bone dry, the piece needs to be dipped in clear glaze. If you are doing this at home, brush on two to three even coats of clear brushing glaze. -
Fire the piece:
The bowl is now ready for the kiln firing, which will make the colors vibrant and the surface food-safe.
Enjoy using your lovely new bowl, as perfect for serving salad as it is for display
Lotus or Water Lily in a Shallow Dish
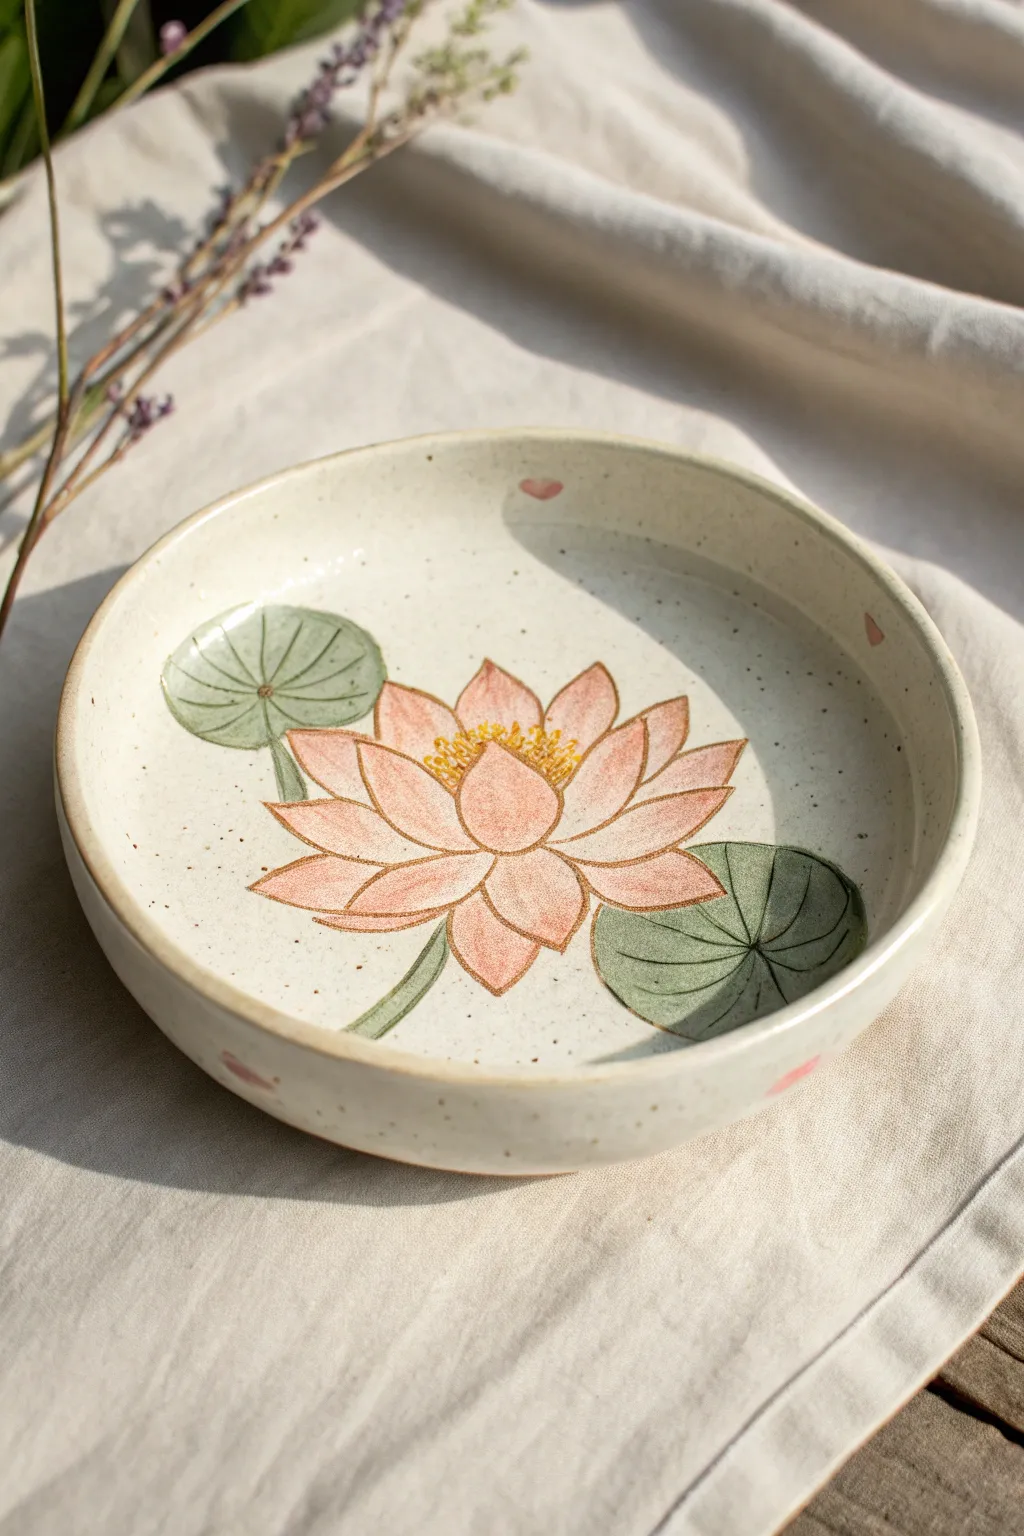
Capture the tranquil beauty of a water garden with this delicate lotus design on a creamy, speckled dish. Soft pink petals and detailed lily pads create a balanced composition perfect for a decorative centerpiece or serving bowl.
Detailed Instructions
Materials
- Shallow bisque ware bowl or deep plate
- Underglazes: Cream/Speckled White (base), Light Pink, Medium Coral/Peach, Deep Green, Light Green, Yellow, Brown
- Clear dipping glaze
- Pencil for sketching
- Fine liner brush (size 00 or 0)
- Round brushes (size 2 and 4)
- Sponge
- Bowl of water
Step 1: Preparation & Base Coat
-
Clean the bisque:
Begin by wiping down your bisque piece with a damp sponge. This removes any dust that could prevent the glaze from adhering properly. -
Apply base color:
Using a wide soft brush, apply three even coats of a cream or speckled white underglaze to the entire interior of the dish. Allow each coat to dry until it loses its sheen before applying the next. -
Let it set:
Let the base coats dry completely. The surface should feel chalky and dry to the touch before you begin any detail work.
Step 2: Sketching the Design
-
Find the center:
Lightly mark the center of your dish with a pencil. This will be the anchor point for your main lotus blossom. -
Sketch the central petals:
Draw a central, teardrop-shaped petal pointing upwards. Flank this with two slightly wider petals on either side to form the tightly closed center of the flower. -
Expand the bloom:
Sketch a second row of larger, more open petals curving outward beneath the first set. Keep the shapes organic and slightly irregular. -
Add lily pads:
Draw two large, circular lily pads on either side of the flower. Give them a small ‘V’ notch where the stem connects, and sketch gently waving edges. -
Connect the stems:
Draw thin, curving stems that gather towards the bottom of the composition, visually anchoring the flower and leaves.
Glazing Success
When applying clear glaze over detailed brushwork, dab the glaze on first rather than brushing heavily. This prevents smearing your fine lines before they are fired.
Step 3: Painting the Lotus
-
Base pink layer:
Using a size 2 round brush, fill in the petals with a very watered-down wash of light pink underglaze. This establishes a soft, translucent glow. -
Petal shading:
While the pink is still slightly damp, take your Medium Coral/Peach color and paint the base of each petal, blending upward into the lighter pink. This creates depth and a natural gradient. -
Paint the center:
Dab bright yellow underglaze into the very center of the flower, just peeking out from the inner petals. Use a stippling motion to suggest texture. -
Detail the stamens:
With your finest brush, add tiny dots and short lines of brown or dark orange around the yellow center to represent the flower’s reproductive parts.
Speckled Effect
Don’t have speckled clay? Mix a teaspoon of granular manganese or commercial ‘speckle additive’ into your white base underglaze to mimic that organic, stony look.
Step 4: Leaves & Outlining
-
Fill the leaves:
Paint the lily pads with a wash of Light Green. Don’t worry about perfect coverage; a little variation adds to the watercolor effect. -
Add leaf shading:
Blend a small amount of Deep Green into the bottom edge of the lily pads and near the center notch to give the leaves dimension. -
Paint the stems:
Use the liner brush and Deep Green to trace over your pencil lines for the stems. Keep the pressure light for a thin, elegant line. -
Outline the petals:
I prefer to use a thinned brown underglaze for this step. Carefully outline each pink petal with your smallest liner brush. The line should be delicate, not bold. -
Detail the leaf veins:
Using the same fine brush and brown or deep green, paint thin veins radiating from the center of each lily pad to the outer edges. -
Add final accents:
Paint tiny, scattered heart shapes or petal fragments near the rim using the pink underglaze to frame the composition playfully.
Step 5: Finishing Touches
-
Burn off pencil:
Don’t worry about erasing your sketch marks; the graphite will burn away completely in the kiln. -
Clear glaze application:
Once the underglaze design is bone dry, carefully dip the entire piece into a clear glaze. Shake off excess drops gently. -
Final fire:
Fire the piece according to your clay and glaze specifications (typically cone 06 or cone 6) to reveal the glossy, finished surface.
Enjoy the peaceful vibe your new lotus dish brings to your table setting
Blue-and-White Floral Motifs With a Classic Feel
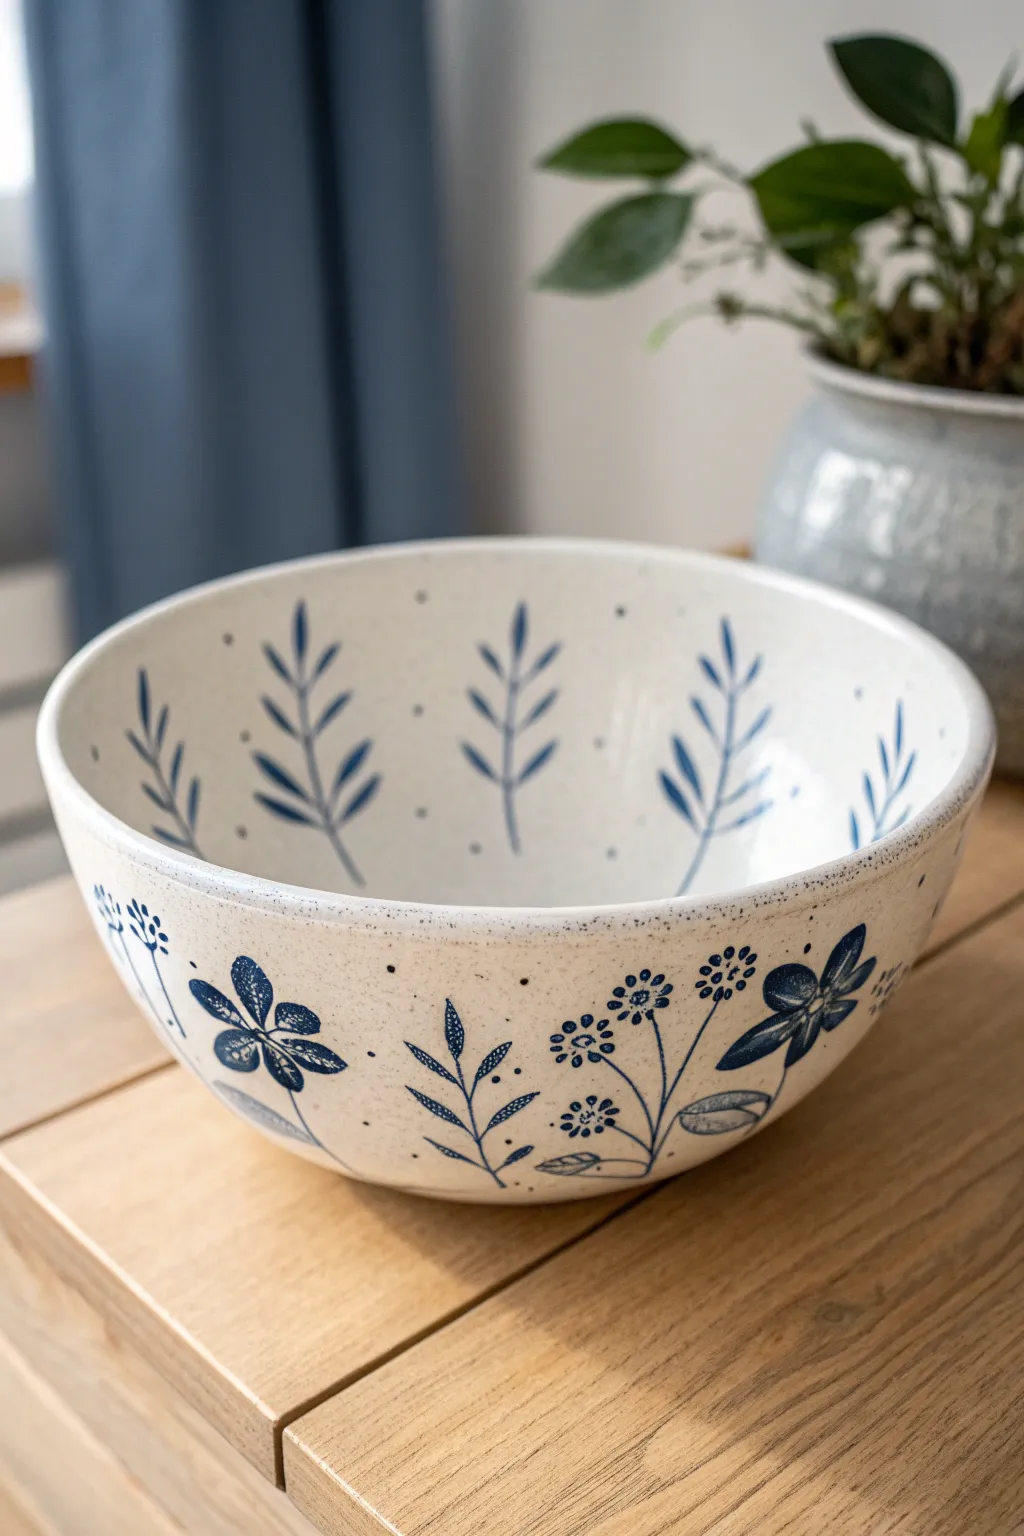
This project combines the timeless elegance of blue-and-white porcelain with a modern, speckled twist. You will transform a plain bisque bowl into a stunning piece of tableware featuring delicate ferns on the interior and whimsical floral sprigs on the exterior.
How-To Guide
Materials
- Large bisque ceramic bowl
- Underglaze pencil (dark blue)
- Cobalt blue underglaze
- Speckled cream or ‘oatmeal’ brush-on glaze
- Fine liner brush (size 0 or 00)
- Round brush (size 4 or 6)
- Fan brush
- Sponge
- Clear transparent glaze (if your speckled glaze isn’t glossy)
- Pencil (for sketching)
Step 1: Interior Design
-
Clean the bisque:
Wipe down your entire bisque bowl with a slightly damp sponge to remove any dust or oils that might repel the glaze. -
Mark repeat points:
Using a regular pencil, lightly mark 6 to 8 evenly spaced points around the inside rim of the bowl. These marks will guide where your fern stems typically end. -
Paint the central stems:
Load your fine liner brush with cobalt blue underglaze. Starting from the bottom center of the bowl, paint a thin, curving line up toward each of your pencil marks. Vary the heights slightly for a natural look. -
Add the leaves:
Switch to a slightly thicker round brush if desired, or stick with the liner. Along each stem, paint pairs of small, elongated oval leaves. Start at the bottom of the stem and work upward. -
Taper the leaves:
As you move toward the tip of the stem, paint the leaves slightly smaller. This mimics how ferns naturally grow. -
Fill the gaps:
If there are large empty spaces between the main ferns, paint shorter, simpler stalks or single floating leaves to balance the composition. -
Add detailed dots:
Dip the wooden end of your brush into the blue underglaze. Dot scattered spots between the fern leaves on the white background to add texture and fill negative space.
Smudged Lines?
If you smear the blue underglaze, let it dry completely. Then, scratch the mistake off gently with a wooden toothpick or a stiff brush rather than wiping it.
Step 2: Exterior Floral Motifs
-
Sketch the flowers:
Lightly sketch your flower placement on the outside of the bowl with a pencil. Aim for three to four large focal flowers and fill the rest with sprigs. -
Paint the main blooms:
Using your round brush and cobalt blue, paint the petals of the larger flowers. Press the brush down and pull up to create a petal shape. Leave a small unpainted circle in the center. -
Detail the flower centers:
Once the petals are dry to the touch, use your fine liner brush to add tiny dots or a cross-hatch pattern inside the flower centers and on the petals themselves for that stamped-block look. -
Create dainty stems:
Paint thin, wandering stems connecting your flowers. I find that keeping these lines slightly wavy makes the design feel more organic and less rigid. -
Add leaves and sprigs:
Paint small, alternating leaves along the stems. For variety, add some standalone sprigs that look like wheat or lavender by painting tiny clusters of dots or dashes. -
Balance with dots:
Just like the interior, use the back of your brush to add small blue dots around the exterior flowers. This ties the inside and outside designs together.
Add Variety
Mix a tiny drop of black underglaze into your blue for the stems. The subtle color shift creates depth and makes the bright blue flowers pop even more.
Step 3: Glazing and Finishing
-
Check for errors:
Use a clean, stiff brush or a specialized cleanup tool to gently scratch away any smudged blue paint. -
Apply the speckled glaze:
Stir your speckled cream glaze thoroughly. Using a fan brush, apply 2-3 coats over the entire bowl (inside and out), covering your blue designs. Ensure each coat is dry before adding the next. -
Verify transparency:
Check your glaze instructions; most speckled glazes are semi-transparent and will let the blue show through once fired. If using an opaque cream glaze, paint around the blue designs instead. -
Wipe the foot:
Use a damp sponge to completely wipe any glaze off the bottom foot ring of the bowl so it doesn’t stick to the kiln shelf. -
Fire the piece:
Fire the bowl according to the clay and glaze specifications (usually Cone 5/6 for stoneware or Cone 06 for earthenware).
Once fired, the speckles will emerge, giving your classic blue florals a wonderfully earthy and handmade finish perfect for any table
Oversized Abstract Bloom With Color Blocking
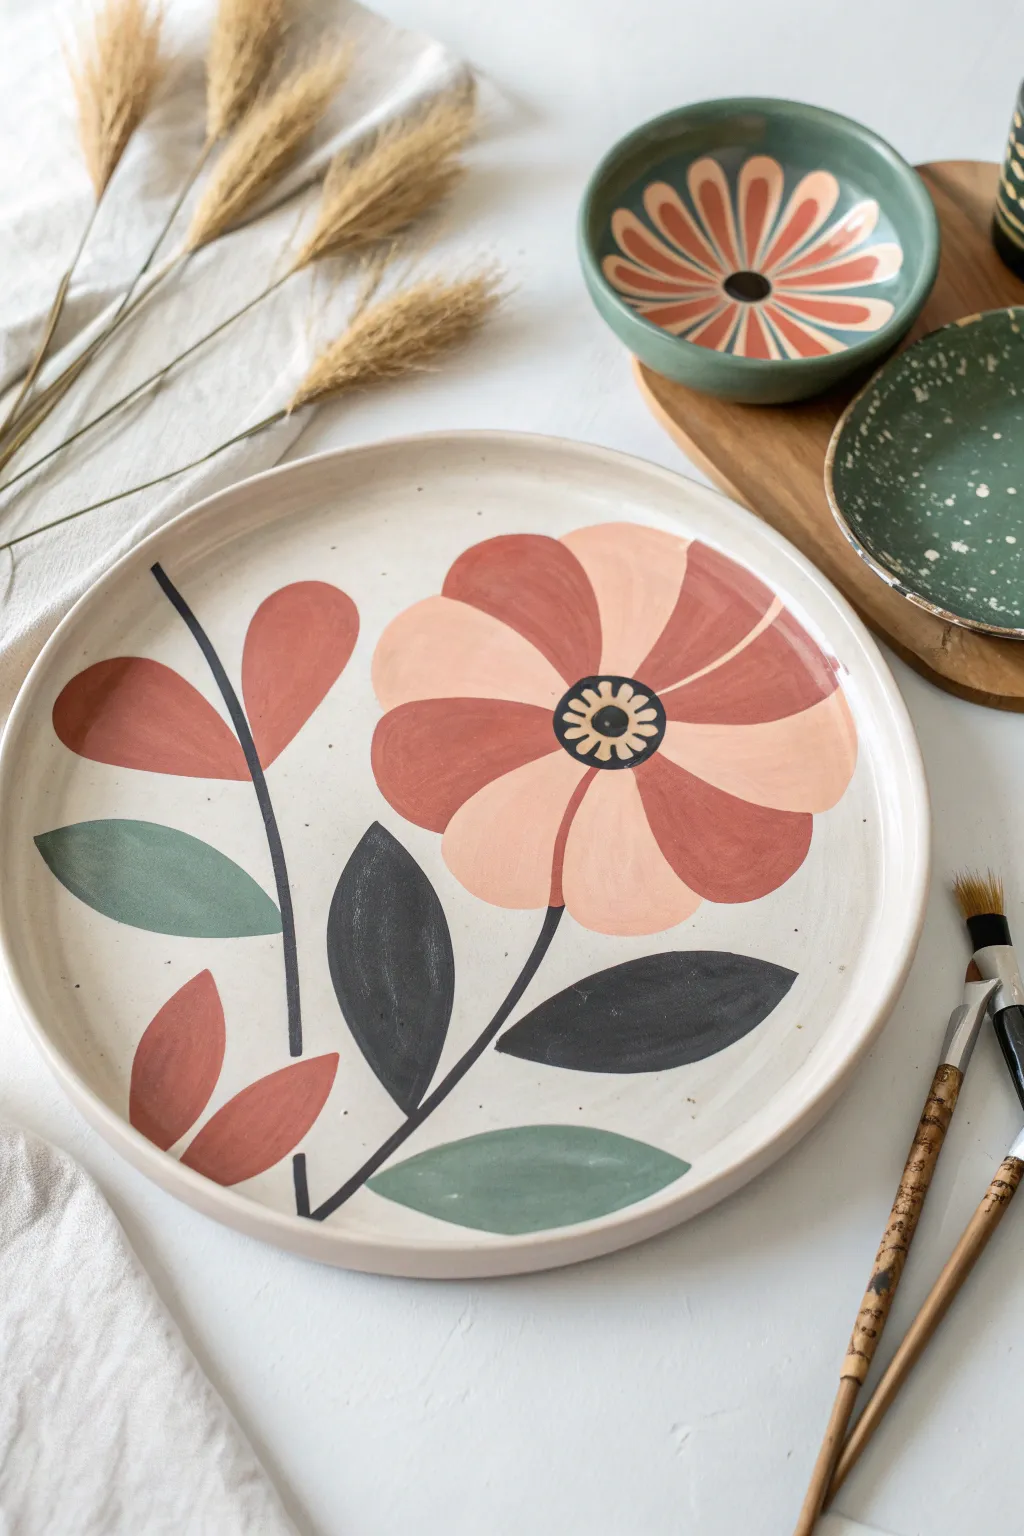
Embrace bold florals with this graphic, oversized flower design that makes a stunning centerpiece for any table. The combination of alternating peach and rust petals with dark charcoal leaves creates a modern, slightly retro aesthetic that feels fresh and artistic.
Step-by-Step Guide
Materials
- Large ceramic bisque dinner plate
- Peach underglaze
- Rust/Terracotta underglaze
- Dark sage green underglaze
- Charcoal or soft black underglaze
- Clear dipping glaze
- Pencil for sketching
- Medium round brush
- Small liner or detail brush
- Sponge and water bowl
Step 1: Preparation & Sketching
-
Prepping the surface:
Before you start, wipe down your bisque plate with a clean, damp sponge to remove any dust or oils that might resist the glaze. -
Mapping the main bloom:
Using a pencil, lightly sketch the large flower head. Position it off-center, slightly to the right, allowing the petals to dominate the space. Draw a central circle for the stigma, then fan out large, curved petals around it. -
Adding the stem and leaves:
Draw the main stem curving diagonally from the bottom left toward the flower. Add large, almond-shaped leaves branching off this main stem. -
Secondary foliage:
Sketch a second, thinner stem rising on the left side of the plate. Add smaller, tear-drop shaped leaves or buds to this branch to balance the composition.
Uneven Coverage?
If your petal colors look streaky after the first coat, cross-hatch your brush strokes on the second layer. Painting perpendicular to the previous layer ensures a solid, opaque finish.
Step 2: Blocking in Color
-
Painting the peach petals:
Start with your peach underglaze. Paint every other petal on the main flower, using smooth strokes to fill the shapes completely. Apply 2-3 coats for solid opacity, letting each coat dry matte before applying the next. -
Painting the rust petals:
Fill the remaining petals with the rust or terracotta underglaze. Be careful where the edges meet the peach petals to keep the lines crisp. Apply your standard 3 coats here as well. -
Adding sage greens:
Select a few leaves to be green—specifically the large bottom, middle left, and the bottom leaf of the main stem. Fill these with your dark sage green underglaze. -
Adding charcoal accents:
Use the charcoal/black underglaze to paint the remaining large leaves on the right side. This high-contrast color blocking is key to the design’s modern look. -
Painting the secondary buds:
Return to your rust color and paint the smaller tear-drop leaves on the left-hand stem. Use the peach color for the tiny accent bud near the bottom left.
Step 3: Detailing & Finishing
-
Stem work:
Switch to your small liner brush and the charcoal underglaze. Carefully paint over your pencil lines for the stems. Keep the lines relatively thin but confident. -
Painting the center:
Paint the very center circle of the flower with a solid coat of charcoal underglaze. -
Adding the inner ring:
I find it easiest to paint the decorative ring around the center now. Paint a thick ring of cream or leave the bisque bare if it’s white, encircling the black center. -
Stamen details:
Using your finest brush, paint tiny tick marks or small dots radiating from the black center into the cream ring to create the look of pollen or stamens. -
Cleaning up:
Once the underglaze is fully dry, gently scratch away any stray paint marks with a toothpick or a clean, stiff brush. -
Glazing and firing:
Dip the entire plate in a clear glaze. Follow the firing instructions for your specific clay body and glaze combination to finish the piece.
Speckled Effect
To mimic the green plate in the photo background, flick a toothbrush loaded with thinned white underglaze over the finished painting before the clear dip for a trendy splatter effect.
Now you have a bold, graphic plate that looks right at home in a modern kitchen