If you’ve been itching to make a pottery platter that feels special (but still totally doable), I’ve got you. Platters are my favorite kind of “big canvas,” so you can play with shape, texture, and glaze in a way that really shows off your style.
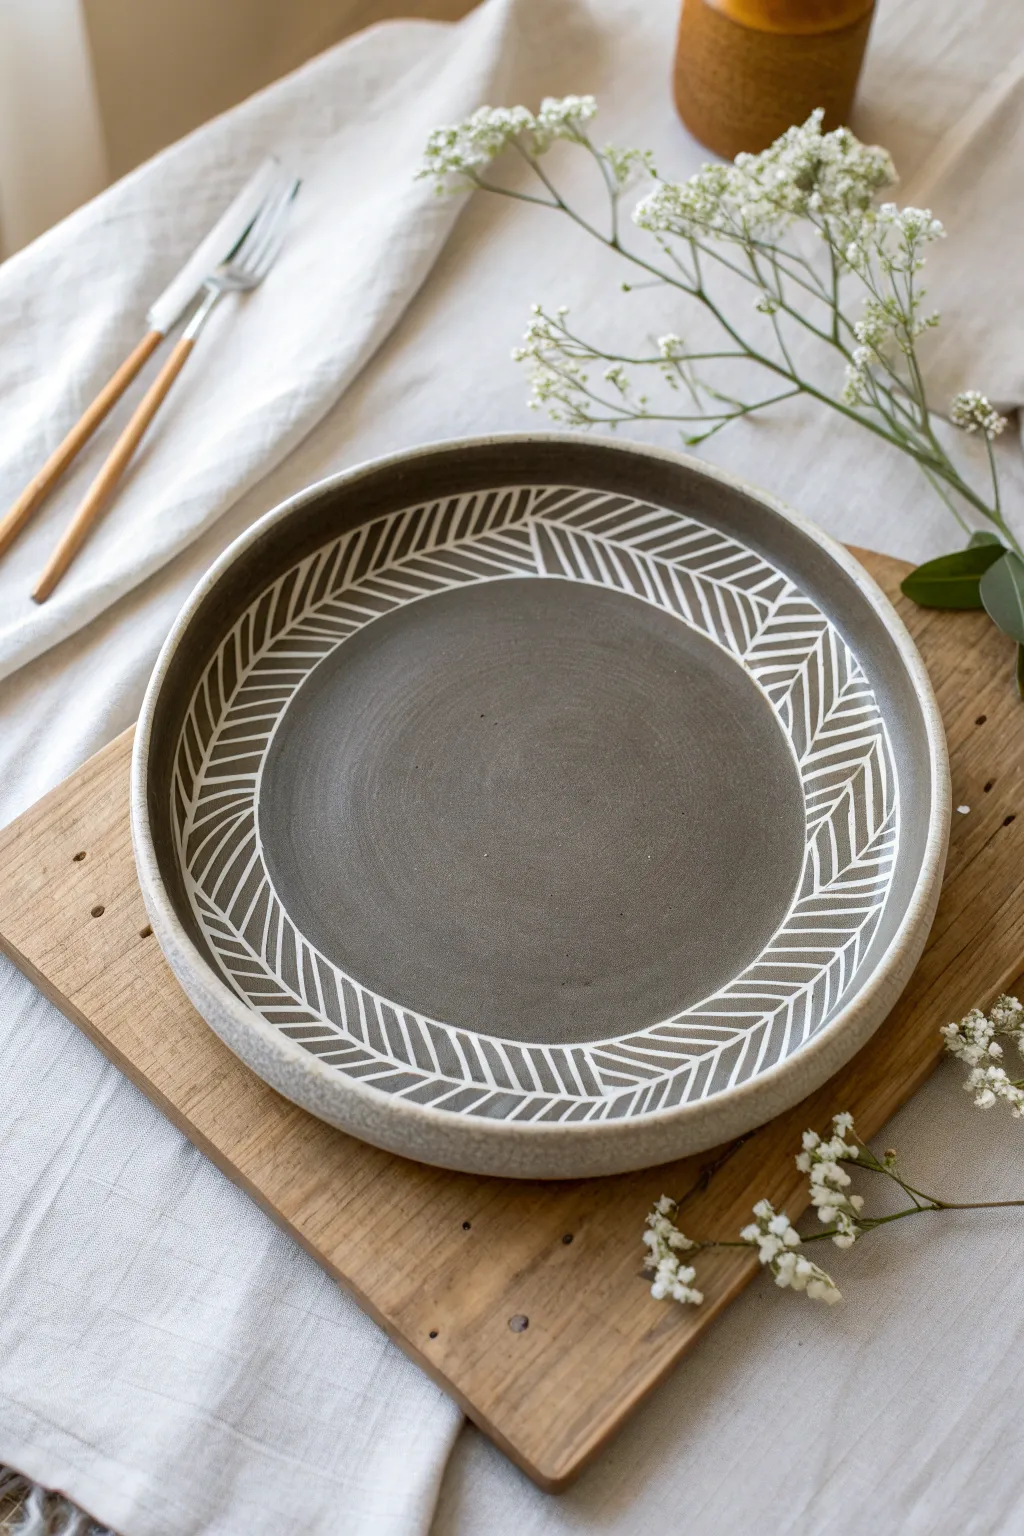
Classic Round Platter With a Wide Rim
This elegant everyday platter combines the simplicity of clean lines with the warmth of rustic textures. With its speckled cream interior and a sharply defined, toasted brown rim, it creates the perfect canvas for showcasing home-cooked meals.
Step-by-Step Guide
Materials
- Speckled stoneware clay (mid-fire)
- Potter’s wheel
- Throwing sponge
- Wooden rib tool
- Metal kidney rib
- Wire cutter
- Trimming tools
- Chamois or plastic strip
- Satin cream/white glaze
- Iron oxide wash or dark tan underglaze
- Wax resist
- Brushes
Step 1: Throwing the Form
-
Center the Clay:
Begin with about 3-4 pounds of well-wedged speckled stoneware clay. Center it on the wheel head, ensuring a wide, flat puck shape since we are aiming for a platter rather than a tall vessel. -
Establish the Base:
Open the clay wider than usual, leaving about half an inch of thickness for the floor. Compress the floor thoroughly with a wooden rib to prevent S-cracks during drying, moving from the center outward. -
Pull the Walls:
Pull the remaining clay outward and slightly upward. Instead of pulling tall walls, focus on extending the radius. You want a distinct transition between the flat eating surface and the rim. -
Define the Rim:
Shape the rim so it stands up slightly but remains relatively flat and wide. Use a wooden rib on the inside of the rim to create a sharp, distinct angle where the food surface meets the edge. -
Refine the Profile:
Use a metal kidney rib to smooth the interior curve. The transition from the flat center to the gentle upward slope of the rim should be seamless but structural. -
Compress the Edge:
I like to take a small piece of chamois leather or a strip of plastic and run if gently over the very lip of the rim. This rounds the edge slightly, making it more durable against chipping.
Step 2: Trimming and Finishing
-
Dry to Leather Hard:
Wire the platter off the wheel using a clean, slicing motion. Let it dry slowly until it reaches a solid leather-hard state. Platters can warp easily, so ensure even airflow. -
Trim the Foot:
Center the platter upside down on the wheel. Trim away excess weight from the bottom, carving a distinct foot ring. A double foot ring can help support the span of a wide platter to prevent sagging in the kiln. -
Smooth the Surface:
Burnish the trimmed areas slightly with a smooth stone or the back of a spoon if you want a very smooth tactile finish on the raw clay portions. -
Bisque Fire:
Once bone dry, fire the piece to bisque temperature (usually cone 04) to prepare it for glazing.
Keep it Flat
Platters love to warp. Dry your piece slowly between two heavy boards (drywall works great) to ensure the rim stays perfectly level.
Step 3: Glazing the Detail
-
Clean the Bisque:
Wipe the entire platter with a damp sponge to remove any dust that might interfere with glaze adhesion. -
Apply the Base Glaze:
Pour or dip the platter in a satin cream or soft white glaze. Ensure an even coat. If pouring, rotate the platter quickly to distribute the glaze before pouring off the excess. -
Clean the Foot:
Wipe the foot ring completely clean of glaze using a wet sponge or a piece of carpet remnant. -
Highlight the Rim:
There are two ways to achieve the brown rim. The easiest is to wipe the cream glaze *off* the very edge with a damp sponge, revealing the clay body underneath (if the clay fires brown). -
Option B: Oxide Wash:
To get the specific look in the photo, dip a small brush into iron oxide wash. Carefully paint a thin, steady line right along the unglazed edge of the rim. The oxide will bleed slightly into the glaze for that rustic effect. -
Final Fire:
Load the platter into the kiln carefully. Fire to the maturity temperature of your clay and glaze (typically cone 5 or 6). Allow the kiln to cool completely before unloading.
Texture Play
Before glazing, lightly sand the raw clay rim. The contrast between rough clay and smooth interior glaze makes the piece feel more handmade.
Now you have a stunning centerpiece platter ready for your next dinner party


Simple Oval Slab Platter
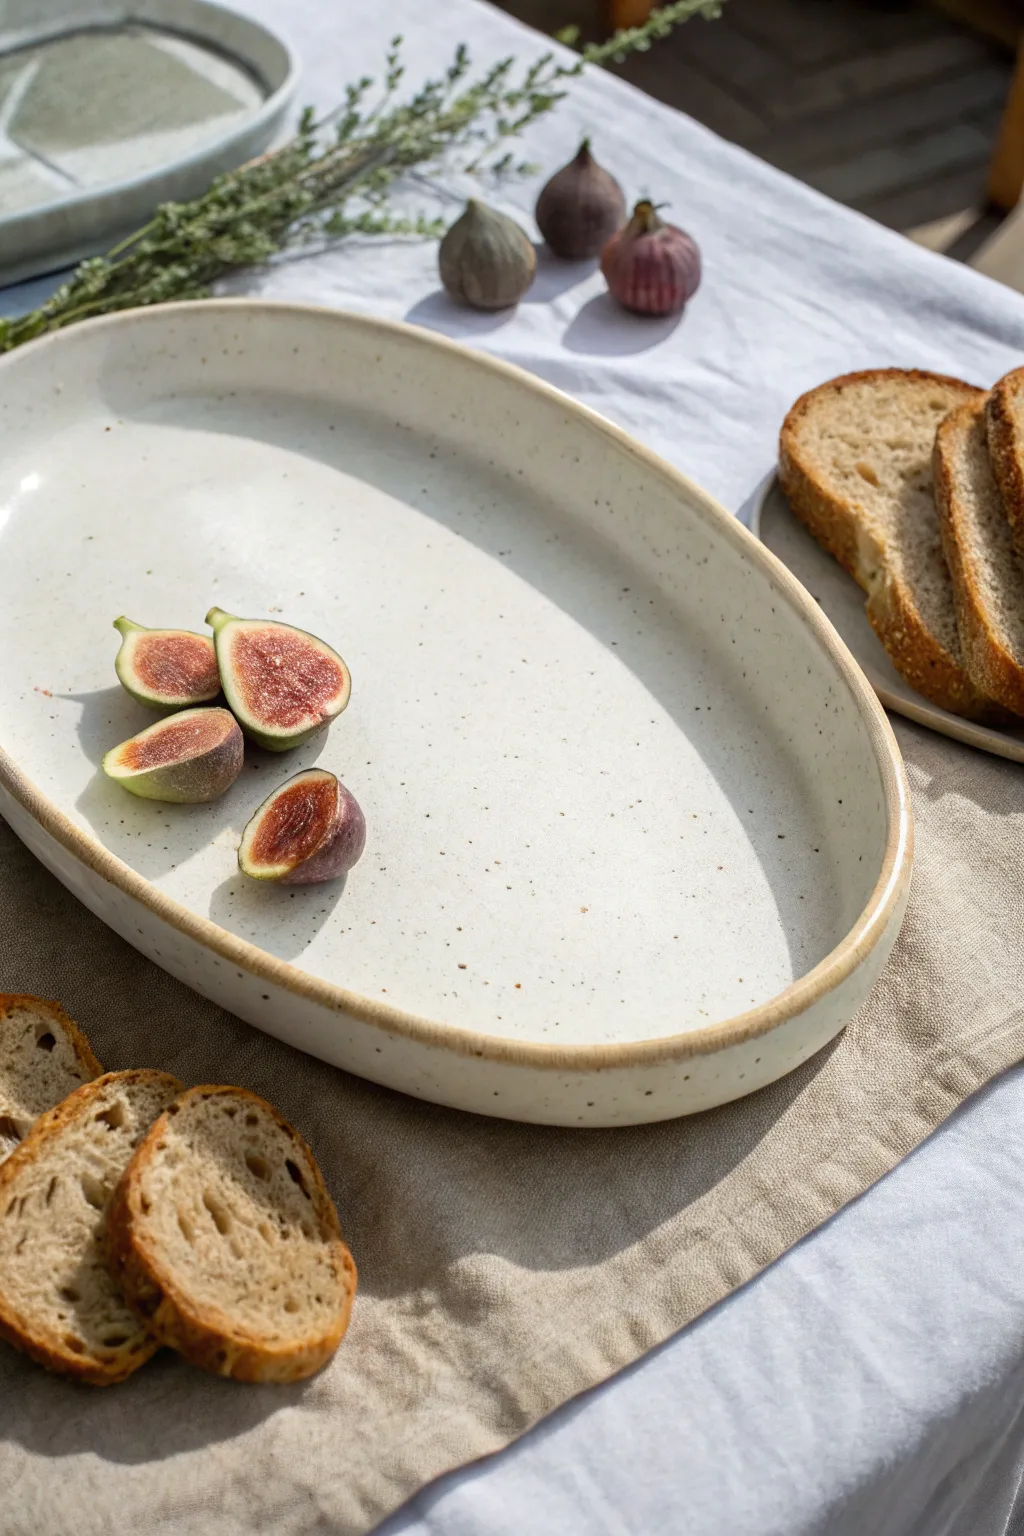
This minimalist platter highlights the beauty of simple forms and speckled clay, making it a perfect canvas for serving fresh fruit or bread. The gentle oval shape and understated raised rim create a rustic yet elegant piece suitable for everyday dining.
How-To Guide
Materials
- Speckled stoneware clay (white or buff)
- Oval template (paper or craft foam)
- Rolling pin
- Canvas or slab mat
- Needle tool
- Rib tool (soft kidney)
- Sponge
- Scoring tool or serrated rib
- Slip
- Clear or transparent matte glaze
Step 1: Creating the Base
-
Prepare the slab:
Begin by wedging your speckled stoneware clay thoroughly to remove any air bubbles. Roll it out into a consistent slab about 1/4 to 3/8 inch thick on your canvas or slab mat. Make sure to compress the slab on both sides with a rib tool to align the clay particles and prevent warping later. -
Cut the shape:
Place your oval template onto the smooth slab. Using a needle tool, trace around the template, holding the tool perpendicular to the table for a clean, straight cut. Remove the excess clay. -
Refine the edges:
Once cut, run a damp finger or a small piece of chamois leather around the sharp cut edge of the oval base to smooth it out. This saves sanding time later.
Warping Warning
Flat platters love to warp. Dry very slowly and weight down the center with a sandbag while drying if the clay has memory.
Step 2: Building the Rim
-
Roll a coil:
Take a portion of the leftover clay and roll out a long, even coil. You want this coil to be slightly thicker than you want the final rim to be, as you’ll be compressing it. -
Flatten the coil:
Gently flatten the coil with your hand or a small rolling pin so it becomes a long, narrow strip rather than a round snake. -
Score the connection points:
Score the top edge of your oval base all the way around using a serrated rib or scoring tool. Apply a generous amount of slip to the scored area. -
Attach the rim:
Place the flattened coil strip onto the slipped edge of the base. As you work your way around, gently press it down to secure it. Overlap the ends slightly, cut through both layers at an angle, and join them seamlessly. -
Blend the interior:
Using your thumb or a wooden modeling tool, blend the inside seam where the rim meets the base. I like to support the outside of the rim with my other hand while doing this to maintain the shape. -
Smooth the transition:
Take a damp sponge or a soft rib tool and run it over the interior seam you just blended. The goal is to make the transition from the flat base to the raised rim look like one continuous piece of clay.
Step 3: Refining and Drying
-
Shape the exterior:
Check the outside of the platter. Blend the exterior seam if you prefer a seamless look, or leave a slight indentation if you want to emphasize the construction. Smooth the outer rim with a rib. -
Level the rim:
Look at the platter from eye level to ensure the rim height is consistent all the way around. Gently paddle down high spots or press up from the bottom on low spots. -
Final smooth:
Give the entire piece a final wipe with a barely damp sponge to remove any tool marks or fingerprints. Pay special attention to the lip of the rim, ensuring it’s rounded and pleasant to touch. -
Slow drying:
Place the platter on a piece of drywall or a wooden board. Loosely cover it with plastic to ensure the rim and the center dry at the same rate, which prevents the base from cracking or curling up.
Rim Variation
Instead of adding a coil, simply cut your initial slab larger and gently curve the edges upward using foam bolsters for a seamless look.
Step 4: Glazing and Finishing
-
Bisque fire:
Once the piece is bone dry, bisque fire it according to your clay body’s specifications (usually Cone 04 or 06). -
Wax the foot:
Apply wax resist to the bottom of the platter to prevent glaze from adhering to the area that will sit on the kiln shelf. -
Apply glaze:
Dip or brush on a clear or milky white semi-transparent glaze. This type of glaze is essential to let the natural speckles of the clay body shine through, similar to the reference image. -
Glaze fire:
Fire the platter to the final temperature required by your clay and glaze combination (often Cone 5 or 6 for stoneware). -
Sanding:
After firing, check the bottom for any rough spots. Briefly sand the foot with wet-dry sandpaper or a diamond pad to ensure it won’t scratch your table.
Enjoy using your beautifully understated platter for your next gathering


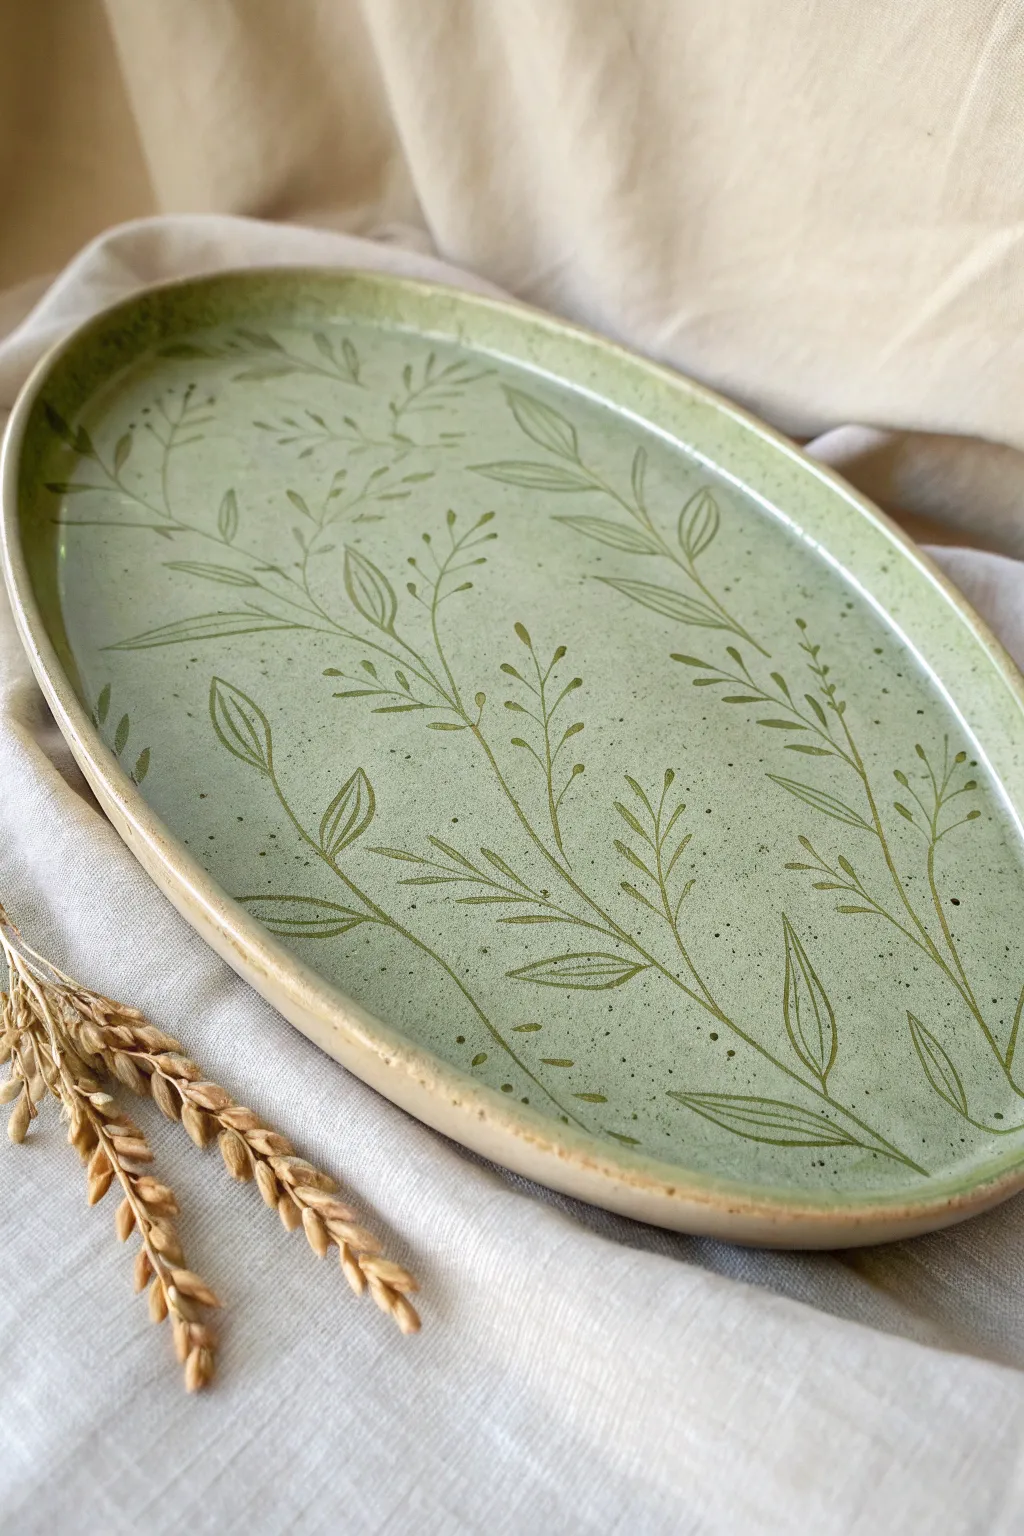
Long Rectangular Appetizer Platter
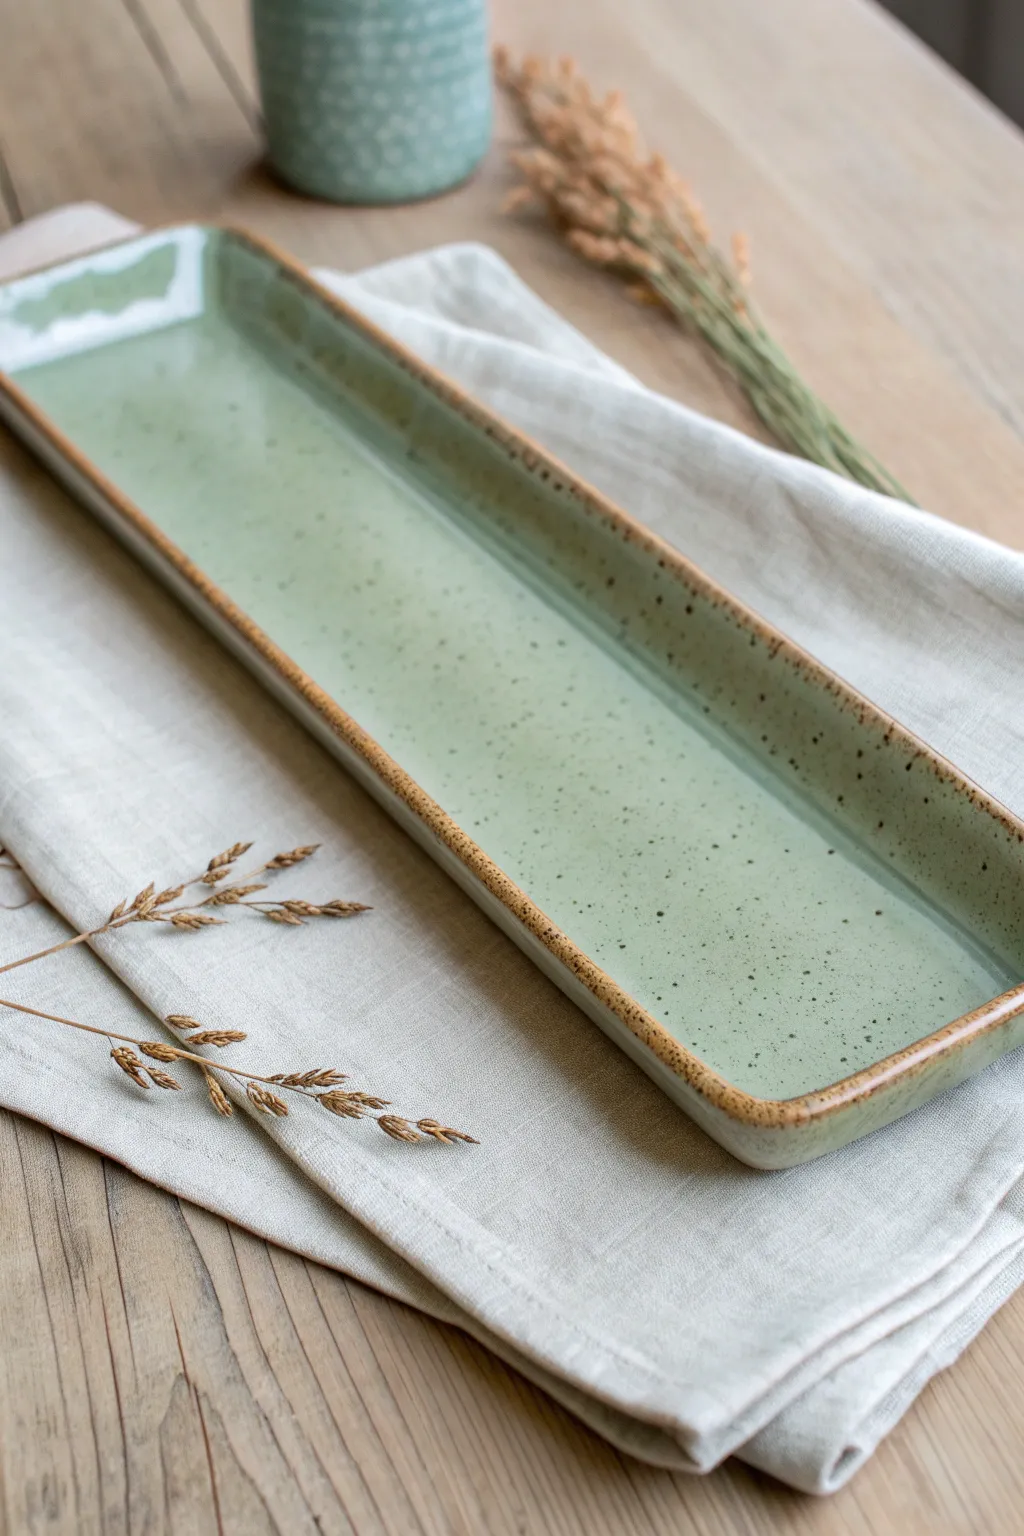
This elegant serving piece features a soothing sage green interior glaze punctuated by delicate speckling and a warm, toasted rim. Its long, rectangular form creates a sophisticated canvas perfect for arranging appetizers or displaying decorative items.
Detailed Instructions
Materials
- Stoneware clay (speckled or buff)
- Rolling pin
- Canvas or slab mat
- Rectangular paper template (approx. 6” x 16”)
- Fettling knife or needle tool
- Rib tool (wooden or silicone)
- Sponge
- Serrated rib or scoring tool
- Slip
- Sage green glossy glaze (Celadon recommended)
- Wax resist (optional)
Step 1: Forming the Slab
-
Prepare the Clay:
Begin by wedging your stoneware clay thoroughly to remove any air pockets and ensure a consistent texture. A good wedge prevents warping later. -
Roll Out the Slab:
Using your rolling pin and canvas, roll the clay out into a large, even slab. Aim for a thickness of about 1/4 inch to 3/8 inch. Flip the slab occasionally as you roll to keep the clay particles aligned. -
Smooth the Surface:
Take a soft rib tool and compress the surface of the slab on both sides. This step is crucial for preventing cracks during drying and gives you a professional, smooth finish. -
Cut the Base:
Place your rectangular paper template onto the slab. Using a fettling knife held vertically, cut around the template to create your base. -
Cut the Walls:
From the remaining slab, cut four long strips for the walls. These should be approximately 1 inch tall. Ensure they are long enough to wrap around the perimeter of your base.
Warping Worries?
If your long platter warps in the kiln, try drying it on a drywall board next time. The board absorbs moisture evenly from the bottom, keeping the slab perfectly flat as it shrinks.
Step 2: Assembling the Platter
-
Score the Edges:
Using a serrated rib or needle tool, rough up the outer edges of the base where the walls will attach. Do the same to one long edge of each wall strip. -
Apply Slip:
Brush a generous amount of slip onto the scored areas. This acts as the glue that bonds your clay pieces together. -
Attach the Walls:
Place the strips onto the base edge, pressing firmly to secure them. Make sure the corners meet neatly. I find mitering the corners at a 45-degree angle creates the cleanest look. -
Reinforce the Seams:
Use a small wooden tool or your finger to smooth the inside seam where the wall meets the floor. A tiny coil of clay added here can provide extra strength if needed. -
Refine the Rim:
Once the walls are attached, use a damp sponge to smooth the top rim. Round it over slightly so it feels soft to the touch, mimicking the toasted edge seen in the photo.
Add Texture
Before assembling, roll a textured fabric or lace into the slab for the interior floor. The glaze will pool in the impressions, highlighting the pattern beautifully.
Step 3: Drying and Bisque
-
Slow Drying:
Loosely cover the platter with plastic to let it dry slowly. Uneven drying is the enemy of long, flat forms and can cause warping. -
Weighting (Optional):
If corners start to lift, place small sandbags on them during the leather-hard stage to keep the profile flat. -
Bisque Fire:
Once bone dry, fire the piece to Cone 04 (or your clay body’s bisque temperature) to prepare it for glazing.
Step 4: Glazing
-
Prepare for Glazing:
Wipe the bisque-fired platter with a damp sponge to remove dust. Wax the bottom of the platter to prevent glaze from sticking to the kiln shelf. -
Apply the Interior Glaze:
Pour a sage green glaze into the interior of the platter, swirl it to coat the bottom and inner walls evenly, and pour out the excess. Alternatively, you can brush on 2-3 coats. -
Clean the Rim:
Use a damp sponge to carefully wipe the glaze off the very top edge of the rim. This exposes the raw clay body, which creates that beautiful brown contrasting border. -
Check for Pinholes:
Inspect the glaze surface. If you see tiny bubbles, gently rub them with your finger to smooth them out before firing. -
Glaze Fire:
Fire the platter to the maturity temperature of your clay and glaze (typically Cone 5 or 6 for stoneware) to achieve the final glossy, speckled finish.
Once cooled, your custom platter is ready to bring a touch of earthy elegance to your table setting


Organic Wavy-Edge Platter
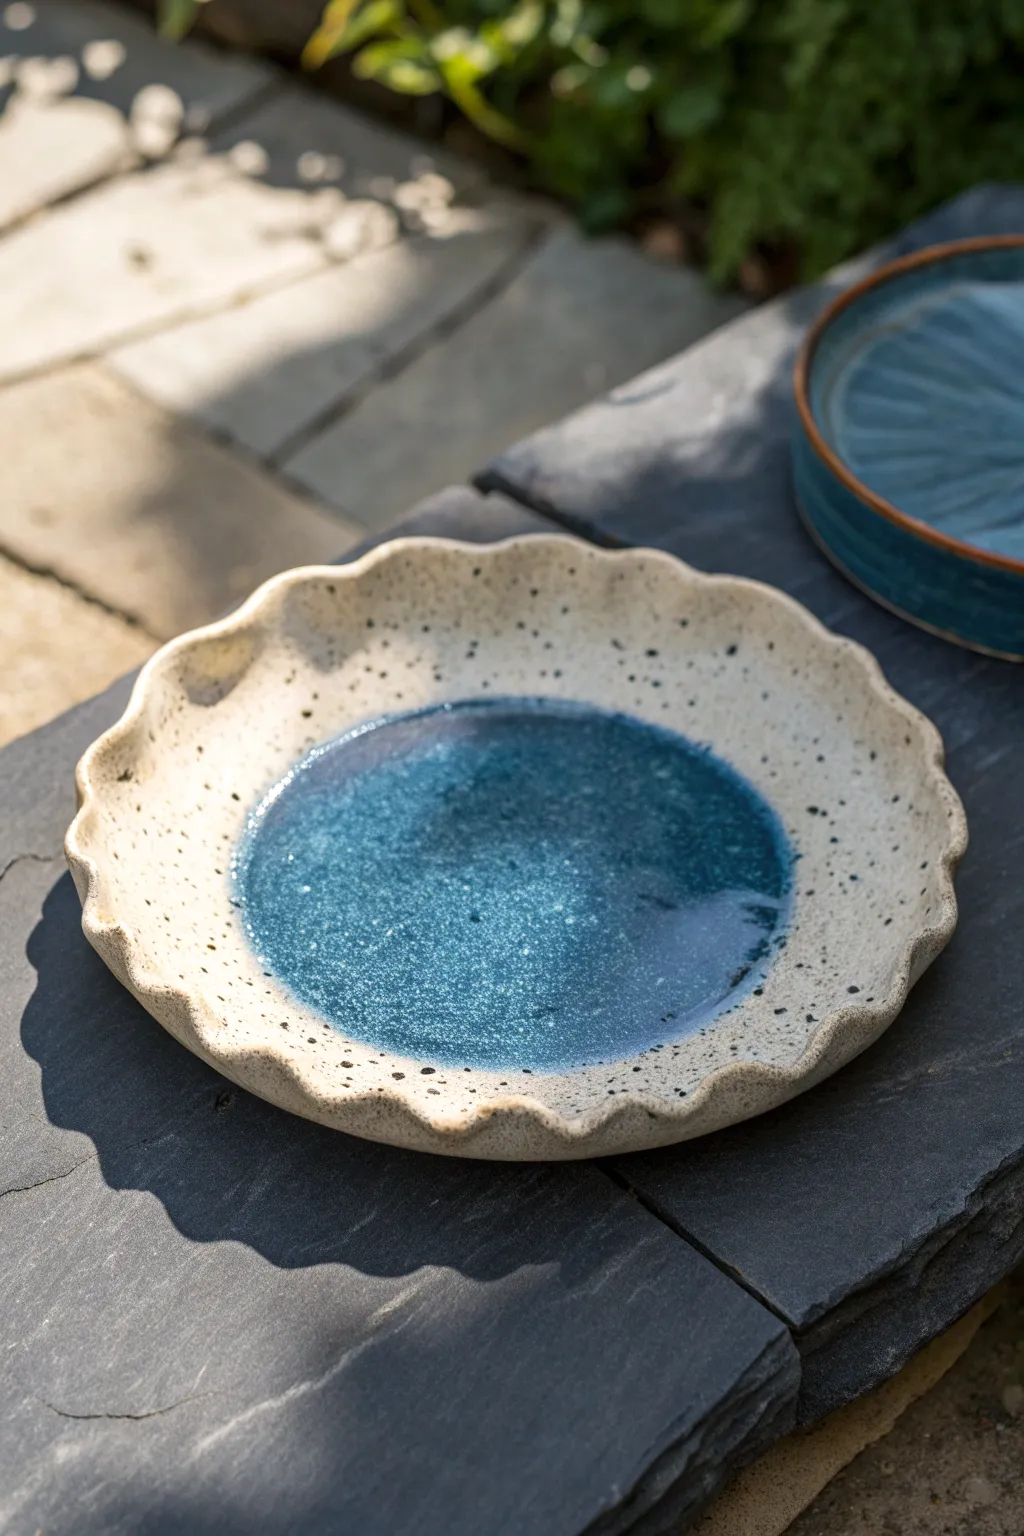
Capture the essence of a serene coastal tide pool with this organic, wavy-edged platter. Featuring speckled stoneware clay and a stunning pool of deep teal glaze, this piece balances rustic texture with elegant, glass-like color.
Step-by-Step Tutorial
Materials
- Speckled buff stoneware clay
- Rolling pin
- Guide sticks (1/4 inch thickness)
- Circular bat or template (approx. 10-12 inches)
- Fettling knife or needle tool
- Sponge
- Rib tool (wooden or silicone)
- Foam cushion or thick towel
- Deep teal or crystalline blue glaze
- Clear glaze (optional)
Step 1: Forming the Platter
-
Roll the slab:
Begin by wedging your speckled clay to remove air bubbles, then slam it onto your canvas. Use a rolling pin and guide sticks to roll out a slab with an even 1/4 inch thickness. -
Compress the clay:
Using a rib tool, thoroughly compress the surface of the slab. I find this crucial for preventing warping later on. -
Cut the circle:
Place your circular template or bat onto the clay. Trace around it with a needle tool to cut out your perfect circle base. -
Smooth the edges:
Run a damp sponge or your finger along the cut edge to soften the sharp angle created by the knife. -
Lift the rim:
Place the slab onto a bat or a foam cushion. Gently lift the edges of the circle upward to create a shallow bowl or plate profile.
Natural Texture
Don’t over-sponge the raw clay rim. Leaving a slightly gritty texture enhances the contrast between the matte stone lip and the glossy, glass-like center pool.
Step 2: Creating the Wavy Rim
-
Mark the intervals:
Lightly mark even points around the rim where you want your waves to peak and dip, though precise measurement isn’t strictly necessary for an organic look. -
Shape the undulations:
Using your thumb and forefinger, gently push down at one point while supporting the clay on either side to create a dip. -
Refine the waves:
Move to the next section and gently pull the clay upward to create a peak. Repeat this push-and-pull motion around the entire circumference. -
Adjust the curve:
Step back and look at the silhouette. Smooth out any kinks so the waves flow naturally into one another. -
Dry slowly:
Cover the piece loosely with plastic to ensure the rim doesn’t dry faster than the thick base. Let it dry to bone dry state. -
Bisque fire:
Load the kiln and bisque fire the platter to Cone 04 (or your clay body’s specific bisque temperature).
Step 3: Glazing and Finishing
-
Clean the bisque:
Wipe the fired piece with a damp sponge to remove any kiln dust that could interfere with glaze adhesion. -
Wax the bottom:
Apply wax resist to the foot or bottom surface of the platter to prevent glaze from running onto your kiln shelf. -
Glaze the center:
Pour a generous amount of deep teal glaze into the center well of the platter. -
Swirl and coat:
Tilt the platter gently to swirl the glaze just up to the edge where the rim begins to rise, leaving the speckled rim bare. -
Clean the rim:
If any glaze splashed onto the wavy rim, sponge it off carefully to expose the raw speckled clay texture. -
Glaze firing:
Fire again to Cone 6 (or your glaze’s maturation point). Allow the kiln to cool completely before opening to prevent thermal shock.
Uneven Drying?
If the rim starts drying too fast while shaping, lightly mist it with water and cover the center with a damp paper towel to equalize moisture levels.
Once cooled, your platter is ready to serve as a stunning centerpiece that brings a touch of the ocean to your table

The Complete Guide to Pottery Troubleshooting
Uncover the most common ceramic mistakes—from cracking clay to failed glazes—and learn how to fix them fast.
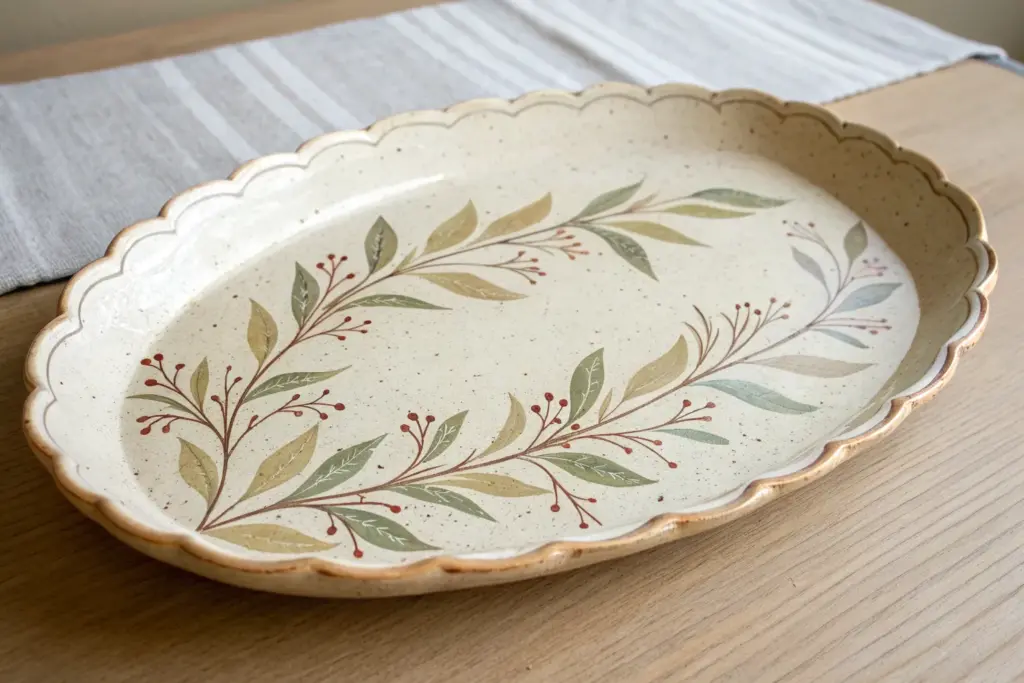
Fluted or Scalloped Rim Platter
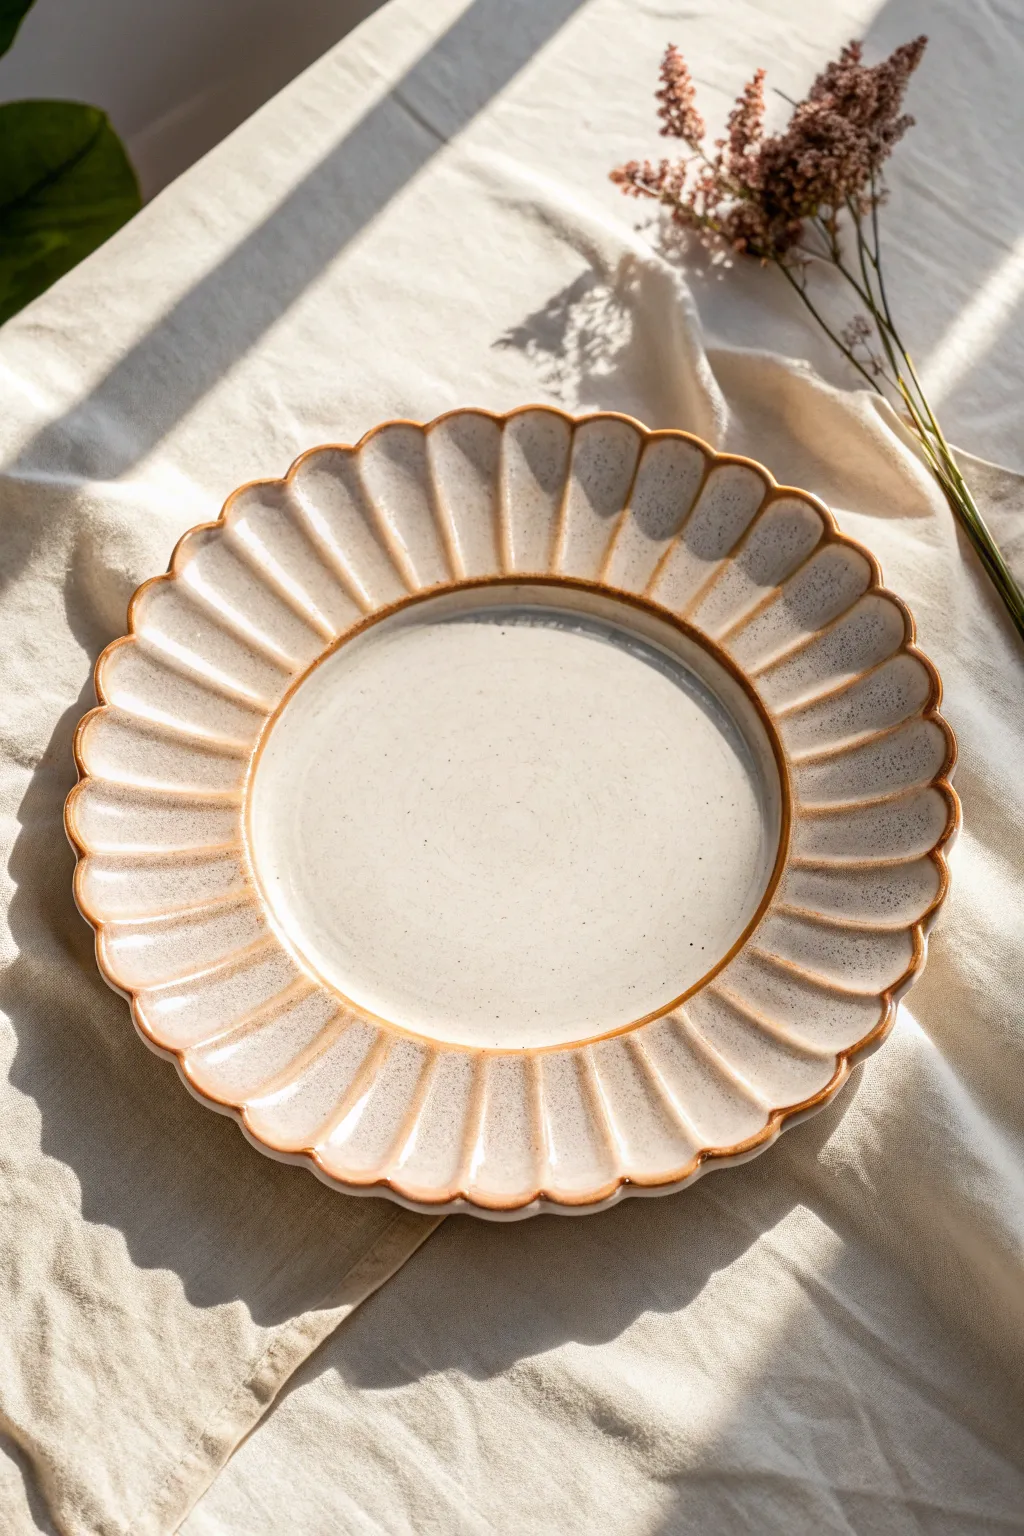
This elegant pottery project features a classic fluted rim that catches the light beautifully, highlighting the subtle speckles in the creamy glaze. The warm, toasted ridges create a vintage farmhouse aesthetic that elevates any table setting.
Step-by-Step Guide
Materials
- Speckled buff stoneware clay (mid-fire)
- Pottery wheel
- Throwing bat
- Large sponge
- Wooden rib tool
- Needle tool
- Wire cutter
- Trimming tools (large loop)
- Fluting tool or rounded wooden stick
- Creamy matte white glaze (translucent)
- Sea sponge or chamois
- Heat gun (optional)
Step 1: Throwing the Form
-
Center the Clay:
Begin with about 3-4 pounds of speckled buff clay. Wedge it thoroughly to remove air bubbles, then slam it onto your wheel bat. Center the clay using firm pressure, ensuring it runs completely smooth against your hands. -
Open the Platte:
Open the centered clay wide, compressing the floor repeatedly to prevent S-cracks later. Leave the floor slightly thicker than a standard plate to allow for deeper trimming, about 3/8 of an inch. -
Pull the Rim:
Pull the clay outward to form a wide, flat disk. Unlike a bowl, you want horizontal expansion. Leave a distinct ridge of clay at the perimeter where the rim will be pulled up. -
Define the Well:
Using a wooden rib or your finger, create a clear delineation where the flat eating surface ends and the rim begins. This inner circle needs to be sharp to catch the glaze later. -
Lift the Rim:
Gently lift the outer rim to a 45-degree angle. Use a rib to compress and smooth this angled surface, ensuring the curve is graceful and the wall thickness is even from the inner circle to the lip.
Consistent Spacing
To get perfectly even scallops without measuring, divide the rim visually into quarters, then divide each quarter into thirds or halves before you start pressing.
Step 2: Sculpting the Scallops
-
Marking Segments:
Once the rim is thrown and smoothed, let it stiffen slightly—I like to use a heat gun for just a minute here to firm it up while spinning. Lightly mark even segments around the rim with a needle tool to guide your fluting. -
Creating the Flutes:
Support the underside of the rim with one hand. With your other hand, use a fluting tool or a rounded wooden dowel to press gently downward into the rim at your marked intervals, creating the depressed valleys of the scallops. -
Shaping the Ridges:
As you press down to make the valleys, the clay between them will naturally rise. Enhance this by running a damp finger or chamois along these high points to round them off, creating a soft, pillowy scallop effect. -
Refining the Edge:
Go around the very outer edge of the rim. Where the flute dips, gently curve the clay inward; where the ridge peaks, let it flare slightly. This creates the flower-petal silhouette. -
Cleaning the Well:
Run your sponge one last time over the central eating surface to ensure no debris from the sculpting process remains, then wire the platter off the bat but leave it in place to dry to leather-hard.
Rim Variation
Brush a layer of iron oxide wash just on the very edge of the rim before glazing. This enhances the contrast and gives a darker, more rustic ‘burnt’ edge effect.
Step 3: Trimming and Glazing
-
Trimming the Foot:
Flip the leather-hard platter onto a foam bat or chuck. Trim a wide, stable foot ring that mirrors the transition point between the rim and the plate floor on the top side. -
Bisque Fire:
Slowly dry the piece to prevent warping—weights on the rim can help. Once bone dry, bisque fire to Cone 04 (or your clay’s specific bisque temperature). -
Waxing:
Apply wax resist to the foot ring and sign your work. Keep the foot clean to prevent stilt marks. -
Glaze Application:
Pour a creamy, semi-translucent matte white glaze over the platter. You want a glaze that breaks over textures. Swirl it to cover the entire surface evenly and pour out the excess. -
Revealing the Texture:
Immediately after pouring, use a slightly damp sponge to gently wipe the glaze off the high points of the scalloped ridges and the sharp transition line of the inner well. This thinning allows the toasted clay color to burn through during firing. -
Final Fire:
Glaze fire the piece to Cone 5 or 6 in an oxidation atmosphere. Ensure ample space between shelves as platters can sometimes warp if heat distribution is uneven.
Now you have a stunning, functional piece of art ready for your next dinner party
Footed Platter With a Clean Ring Base
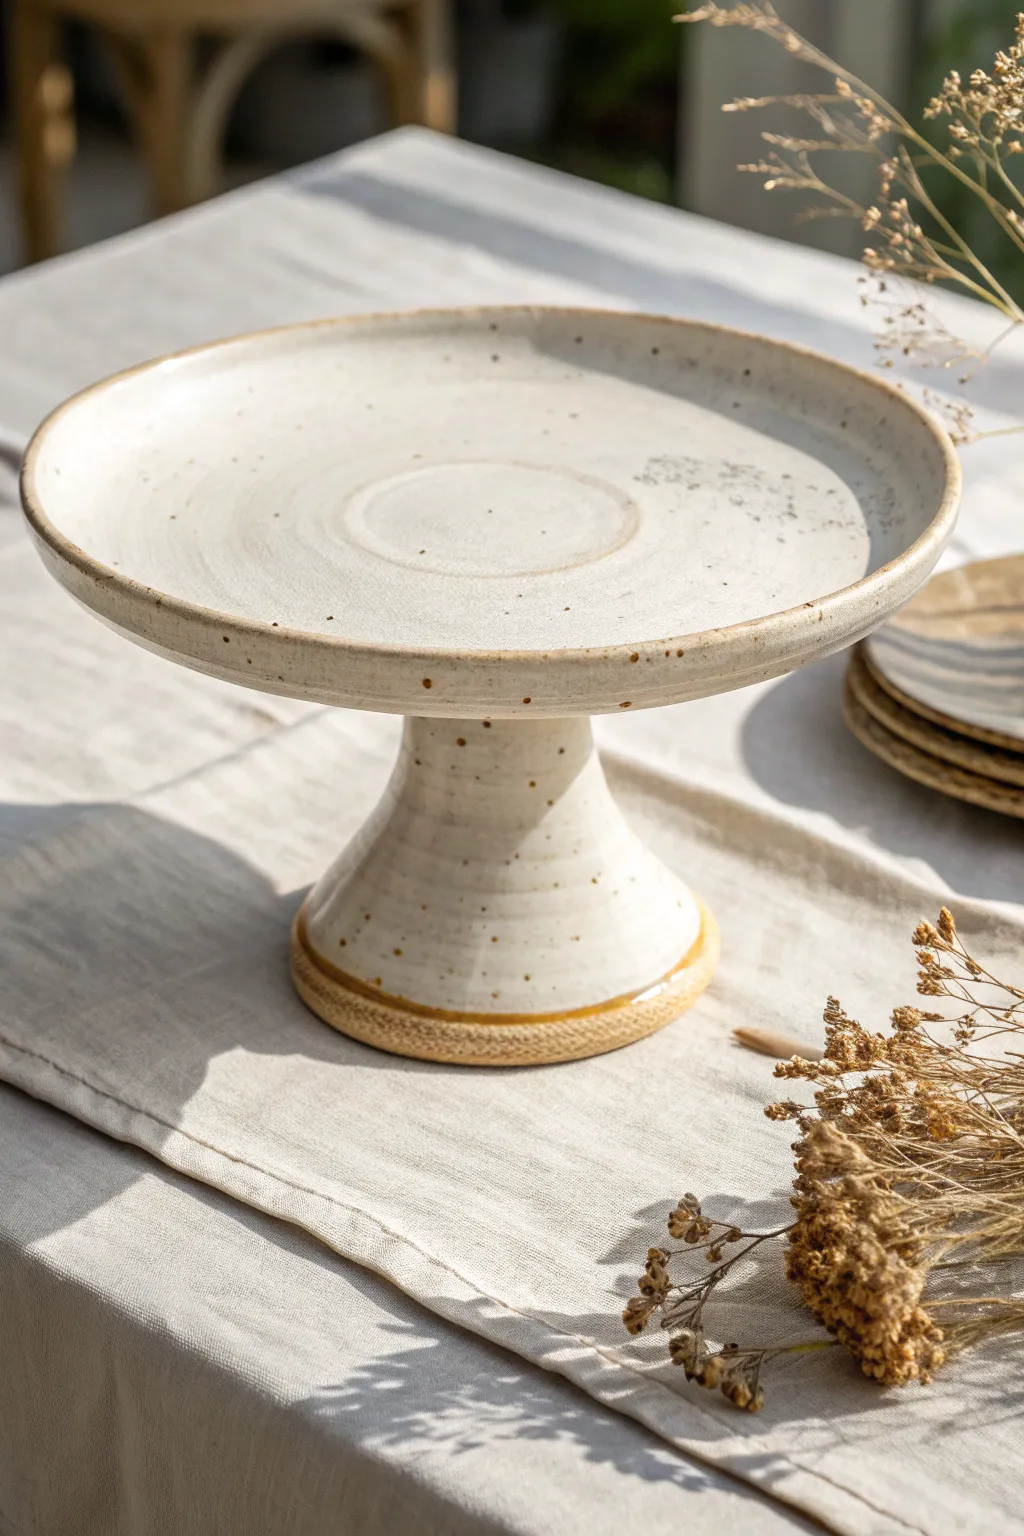
This project combines the rustic charm of speckled stoneware with the refined shape of a classic cake stand. The result is a slightly elevated, footed platter with a smooth, glazed finish and subtle raw clay accents that feels simultaneously modern and timeless.
Detailed Instructions
Materials
- Speckled stoneware clay (approx 2-3 lbs)
- Potter’s wheel
- Throwing sponges
- Wooden ribs (various profiles)
- Metal kidney rib
- Wire cutter
- Needle tool
- Trimming tools (loop tools)
- Scoring tool (or serrated rib)
- Slip
- Glossy white glaze
- Sponge for wiping
- Calipers (optional but helpful)
Step 1: Throwing the Platter Top
-
Center the clay:
Start with about 1.5 to 2 lbs of wedged speckled clay. Center it on the wheel head, keeping the form relatively low and wide like a hockey puck. -
Open the form:
Open the clay all the way down, leaving about a 1/4 inch thickness for the floor. Instead of pulling up a cylinder, pull the clay outwards across the wheel head to establish the width of your platter. -
Raise the rim:
Once you have your flat disc, gently pull up the outer edge to create a low rim, about 3/4 of an inch high. This keeps food from sliding off later. -
Compress the base:
Using a flat wooden rib, compress the flat interior surface thoroughly. You can create a subtle spiral texture here if desired, or keep it perfectly smooth. -
Refine the rim profile:
Use a sponge or a piece of chamois leather to round over the lip of the rim so it is smooth and pleasant to touch. -
Cut and dry:
Wire the platter off the bat but leave it in place to firm up to leather-hard. This prevents warping that happens if you try to move a flat platter too soon.
Step 2: Throwing the Pedestal Base
-
Center a smaller lump:
While the top dries, take about 1 lb of clay for the base. Center it into a taller, more vertical cone shape. -
Open and shape:
Open the center down to the wheel head (creating a ring). Pull the walls up and slightly inward to create a tapered, hollow cone shape. -
Flare the top and bottom:
Gently flare the bottom edge for stability, and flare the top rim slightly so it will have a good surface area to attach to the platter. -
Measure and finish:
Use calipers to ensure the top of your pedestal isn’t wider than the flat center of your platter. Wire it off and let it dry to leather-hard.
Rim Stability
When drying the assembled piece, dry it upside down (resting on the platter rim). This puts weight on the rim to keep it flat while the moisture creates tension.
Step 3: Trimming and Assembly
-
Trim the platter:
Once leather hard, center the platter upside down on the wheel. Trim the bottom flat and smooth, removing excess weight, but don’t carve a foot ring—the pedestal will be the foot. -
Score the attachment points:
Center the platter upside down again. Place the pedestal upside down on top of it to mark the connection ring. Score this area heavily on the platter, and score the top rim of the pedestal. -
Apply slip:
Add a generous amount of joining slip to both scored areas. -
Join the pieces:
Press the pedestal firmly onto the platter base. I find that wiggling it slightly helps lock the clay particles together. -
Smooth the seam:
Use a modeling tool or your finger to smooth the seam where the two pieces meet. You want it to look like one continuous piece of clay. -
Trim the pedestal foot:
With the whole piece centered and spinning upside down, use a trimming tool to refine the bottom of the pedestal, creating a clean bevel or ‘ring’ foot. -
Refine the texture:
Add slight horizontal grooves or texture to the pedestal with a trimming tool if you want that hand-thrown aesthetic shown in the image.
Raw Clay Accent
Instead of wiping glaze off, leave the bottom inch of the pedestal completely unglazed. This highlights the speckled clay body and adds a tactile, earthy grip.
Step 4: Glazing and Finishing
-
Bisque fire:
Allow the assembled piece to dry slowly upside down (to prevent rim warping) until bone dry, then bisque fire to cone 04/06. -
Wax the foot:
Apply wax resist to the very bottom ring of the pedestal and the outer rim of the base where you want the raw clay to show. -
Apply glaze:
Dip or pour a glossy white glaze over the entire piece. The iron specks in the clay will burn through the white glaze during firing. -
Wipe the rim:
For that beautiful contrast, gently wipe the glaze off the very top edge of the platter rim with a damp sponge, exposing a thin line of raw clay. -
Final fire:
Glaze fire to cone 6 (or whatever temperature your clay/glaze requires) in an oxidation atmosphere.
Once fired, this sturdy yet delicate stand is ready to showcase your next baking triumph


What Really Happens Inside the Kiln
Learn how time and temperature work together inside the kiln to transform clay into durable ceramic.
Chip-and-Dip Platter With Attached Bowl
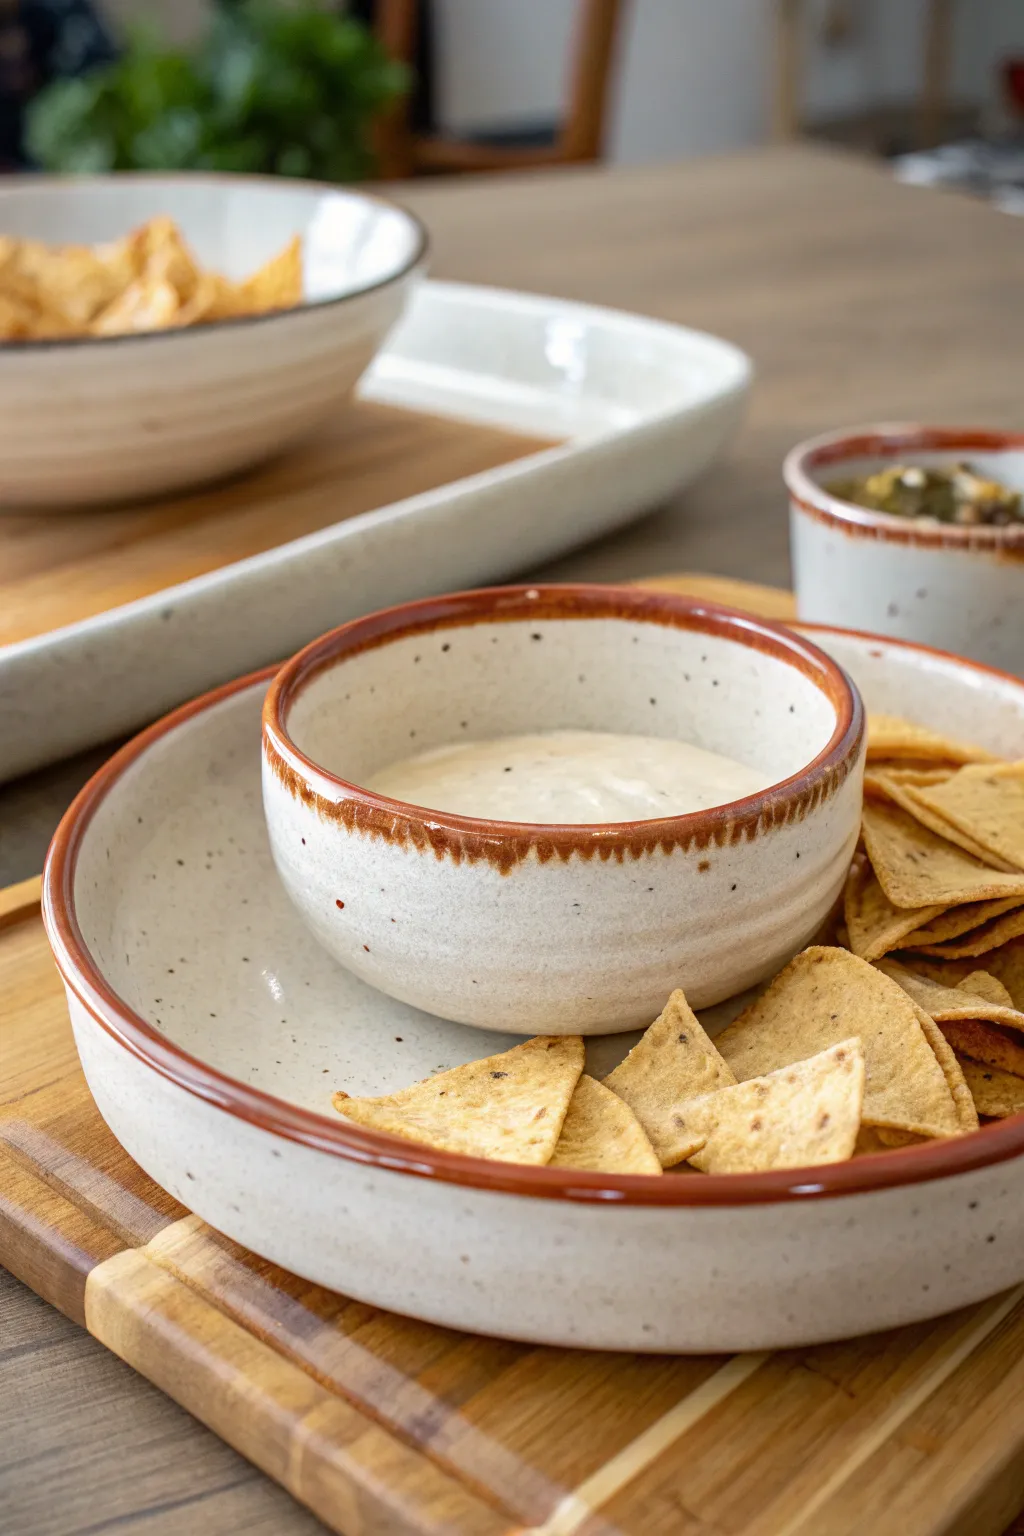
This charming chip-and-dip platter brings a cozy, restaurant-style feel right to your table with its creamy speckled glaze and warm, rust-colored accents. The integrated bowl design ensures your dip stays perfectly centered while providing ample space for crunchy tortilla chips.
How-To Guide
Materials
- Stoneware clay body (white with grog or speckles recommended)
- Pottery wheel
- Throwing tools (sponge, needle tool, rib, wire cutter)
- Trimming tools
- Scoring tool and slip
- Cream/Oatmeal speckled glaze
- Iron oxide wash or rust-colored glaze
- Wax resist
- Small paintbrush
- Kiln
Step 1: Throwing the Platter Base
-
Prepare the Clay:
Begin by wedging about 3-4 pounds of clay to remove air bubbles. Center the clay firmly on the wheel head, flattening it into a wide, low disc rather than a tall cylinder. -
Open the Form:
Open the clay all the way down to the bat, leaving about a 1/4 to 1/2 inch floor thickness. Pull the clay outward to create a flat, wide plate surface, leaving a thicker ring of clay at the perimeter for the rim. -
Shape the Rim:
Pull the outer ring of clay up vertically about 1.5 inches to create the platter’s wall. Use a rib to smooth the floor and define the transition between the floor and the wall. -
Finish the Edge:
Use a chamois or a wet sponge to round off the top lip of the platter. This makes it comfortable to hold and prevents chipping later. Cut the platter from the bat with a wire tool.
Pro Tip: Seamless Joins
For the strongest attachment, create a tiny ‘snake’ or coil of clay. Wrap it around the base of the bowl where it meets the platter and blend it in with a modeling tool.
Step 2: Creating the Dip Bowl
-
Throw the Bowl:
With a separate 1-pound ball of clay, throw a small, thick-walled bowl. Aim for a diameter of about 4-5 inches and a height matching the platter’s rim. Keeping the walls slightly thicker helps with attachment. -
Refine the Shape:
Round out the interior of the bowl for easy scooping. Create a slight decorative groove on the exterior if desired, mimicking the lines seen in the reference image. -
Dry to Leather Hard:
Allow both the large platter and the small bowl to dry to a leather-hard state. I generally wait until they are firm enough to handle without deforming but still retain moisture.
Level Up: Texture Play
Before drying, gently press a textured rolling pin or fabric onto the platter floor to create a subtle pattern that the glaze will break over beautifully.
Step 3: Assembly and Trimming
-
Trim the Platter:
Place the platter on the wheel upside down. Trim the bottom to create a clean foot ring, removing excess weight from the center. -
Trim the Bowl:
Trim the bottom of the small bowl so it is flat. There is no need for a foot ring on the bowl since it will be attached directly to the platter. -
Score the Surfaces:
Mark the exact center of the platter. Thoroughly score (scratch) this area and the bottom of the small bowl. Apply slip generously to both scored areas. -
Attach the Bowl:
Press the bowl firmly onto the center of the platter. Give it a slight wiggle to lock the clay particles together. Clean up excess slip with a damp brush or sponge to create a seamless connection point. -
Final Drying:
Cover the assembled piece loosely with plastic to ensure the thick join dries at the same rate as the rims. Once bone dry, bisque fire the piece.
Step 4: Glazing and Firing
-
Wax the Foot:
Apply wax resist to the bottom foot ring of the platter to prevent glaze from sticking to the kiln shelf. -
Apply the Base Glaze:
Dip the entire piece into a bucket of cream or oatmeal-colored speckled glaze. Ensure the glaze covers the inside of the bowl and the platter surface evenly. -
Clean the Rims:
While the glaze is still powdery but dry, use a damp sponge to carefully wipe the glaze off just the very top edge of both the platter rim and the bowl rim. -
Apply the Rim Detail:
Using a small brush, paint a band of iron oxide wash or a rust-colored glaze onto the exposed raw clay rims. Allow the brush to naturally skip slightly for a rustic, uneven look. -
Final Fire:
Load the kiln and fire to the maturity temperature of your clay and glaze (typically Cone 5 or 6 for stoneware). Allow the kiln to cool completely before unloading.
Your finished chip-and-dip set is now ready to be the centerpiece of your next snack spread
Sectioned Platter With Built-In Dividers
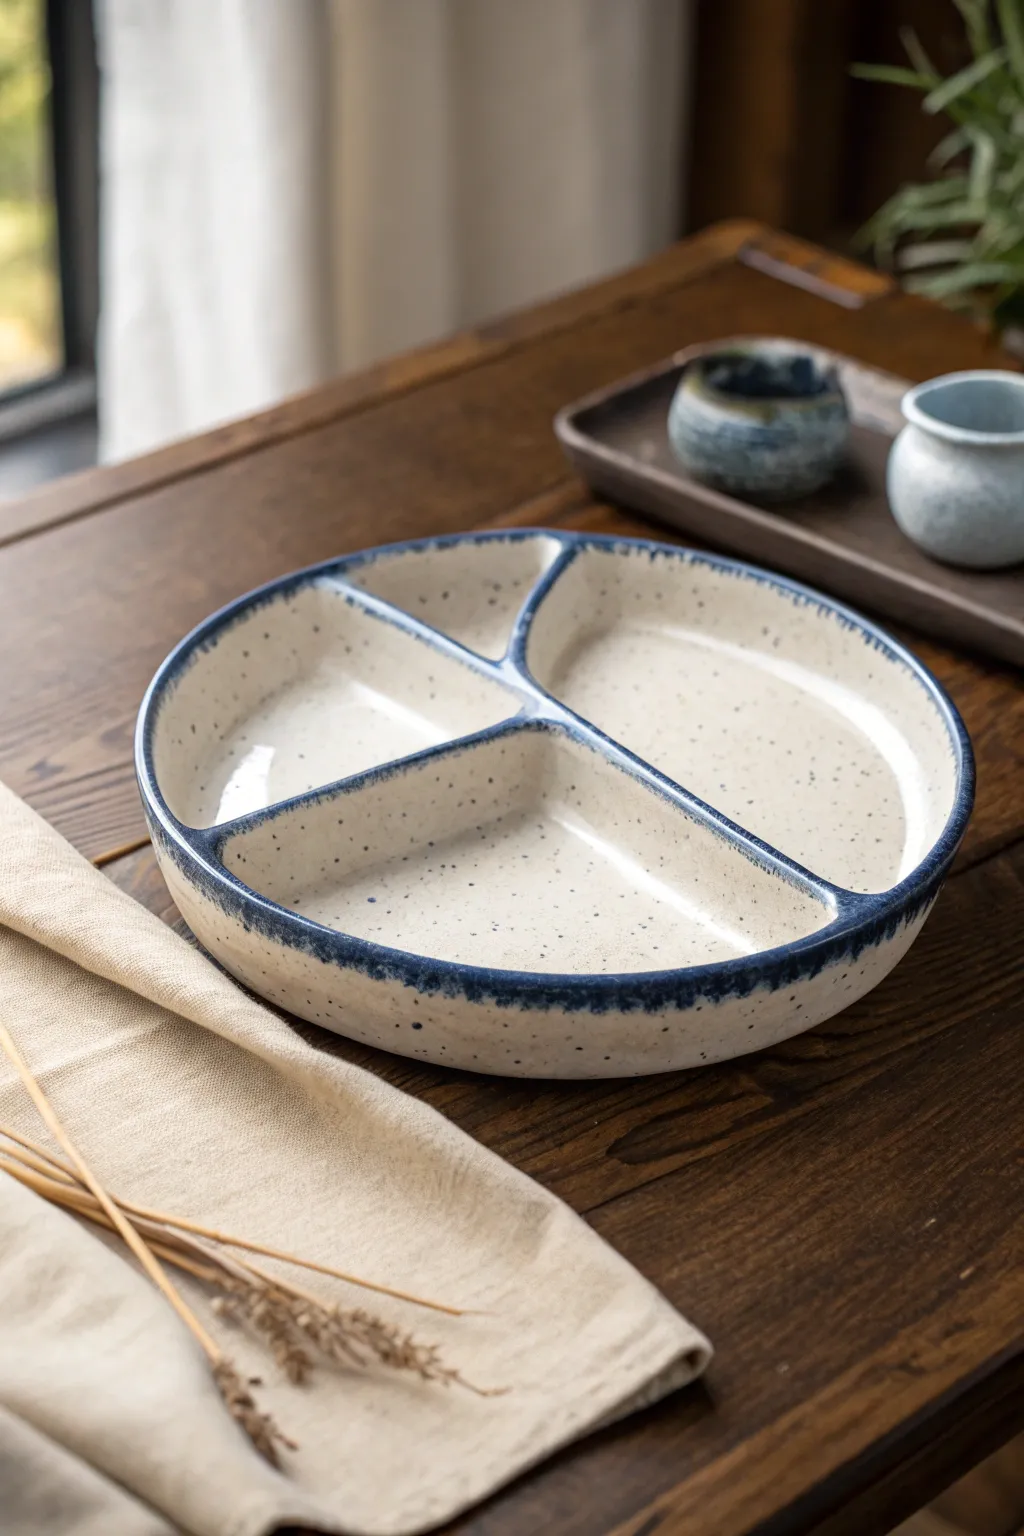
This rustic, functional platter features a classic three-part division perfect for serving dips and snacks. The charm lies in its creamy, speckled stoneware finish contrasted with a deep, flowing navy blue rim that highlights the organic, hand-built dividers.
Detailed Instructions
Materials
- Speckled stoneware clay (approx. 3-4 lbs)
- Rolling pin
- Canvas work surface
- Round plaster slump mold or large bowl (approx. 10-12 inches)
- Rib tool (wooden and rubber)
- Needle tool
- Scoring tool or serrated rib
- Slip (made from your clay body)
- Sponge
- Creamy white dipping glaze (gloss or satin)
- Deep glossy navy blue glaze (brushable)
- Sumi brush or bamboo brush
- Pottery wheel (optional, for throwing the base instead of slab building)
Step 1: Forming the Base
-
Prepare your slab:
Begin by wedging your speckled clay thoroughly to remove air bubbles. Roll out a consistent slab about 3/8 inch thick on your canvas, turning the clay frequently to ensure even compression. -
Cut the circle:
Place your mold or a template onto the slab and cut a large circle, leaving about an inch of excess if using a slump mold to account for the depth of the curve. -
Shape the platter body:
Gently drape your clay slab into your plaster slump mold or large bowl. Use a rubber rib to smooth the clay against the mold’s curve, compressing the bottom and sides to prevent warping later. -
Refine the rim:
Trim any excess clay from the rim with your needle tool while the clay is still in the mold. Use a damp chamois or your finger to round over the sharp cut edge. -
Stiffen slightly:
Allow the base to firm up to a soft leather-hard state. It needs to be sturdy enough to support the dividers without sagging, but wet enough to join well.
Cracking Dividers?
If dividers crack away from the base during drying, you likely didn’t score deep enough or the clay was too dry. Compress the connections firmly with a wooden tool.
Step 2: Building the Dividers
-
Create divider coils:
Roll out thick coils or cut strips from your remaining slab for the dividers. These should be roughly the same height as the platter’s rim. -
Map the layout:
Lightly trace a ‘Y’ shape inside your platter using a needle tool to mark where the three sections will go. Aim for equal thirds, or vary them if you prefer a custom layout. -
Score and slip:
Thoroughly score the traced lines on the base and the undersides of your divider coils. Apply a generous amount of slip to the scored areas. -
Attach the dividers:
Press the coils firmly into place. Use a wooden modeling tool to blend the clay from the coil down into the platter floor, ensuring a seamless, strong connection. -
Shape the walls:
Pinch the divider walls gently to thin them upward. I like to taper them slightly at the top to match the delicate feel of the outer rim. -
Smooth the transitions:
Use a damp sponge to smooth out all attachment points. The corners where the dividers meet the floor and rim should be rounded and clean, making them easier to glaze and wash later.
Flux for Flow
To enhance the blue rim’s ‘drippy’ effect, dab a clear flux or a fluid glaze booster directly over the blue paint before firing. It pulls the color down beautifully.
Step 3: Drying and Bisque
-
Slow drying:
Cover the piece loosely with plastic to let it dry slowly. Uneven drying can cause the dividers to pull away from the base, cracking midway. -
Bisque fire:
Once bone dry, load the platter into the kiln and bisque fire it to Cone 04 (or your clay body’s recommendation).
Step 4: Glazing
-
Wax the foot:
Apply wax resist to the bottom foot ring of your bisque-fired platter to prevent glaze from sticking to the kiln shelf. -
Apply the base glaze:
Dip the entire platter into the creamy white glaze. Hold it upside down for a few seconds to let excess glaze drip off, then turn it right side up and check for pinholes. -
Clean the rim:
Before the white glaze dries completely, you can gently wipe the very top edge of the rims with a damp sponge if you want the blue to interact directly with the clay, or leave it to layer the glazes. -
Apply the blue rim:
Using a bamboo or sumi brush loaded with deep navy glaze, carefully paint the top edge of the outer rim and the internal dividers. Apply enough glaze so that it naturally pools and wants to run slightly. -
Encourage the bleed:
Dab the blue glaze slightly down the sides of the dividers and rim at random intervals to create uneven, organic drips. -
Final smooth:
Check the foot ring one last time for any stray glaze droplets and wipe them clean. -
Glaze fire:
Fire the piece to maturity (likely Cone 5 or 6 depending on your stoneware). The heat will cause the blue rim to melt and bleed beautifully into the cream base.
Once cooled, your platter is ready to be the centerpiece of your next gathering, showing off your handmade dividers with pride

TRACK YOUR CERAMIC JOURNEY
Capture glaze tests, firing details, and creative progress—all in one simple printable. Make your projects easier to repeat and improve.
Two-Tone Glaze Rim-and-Center Contrast
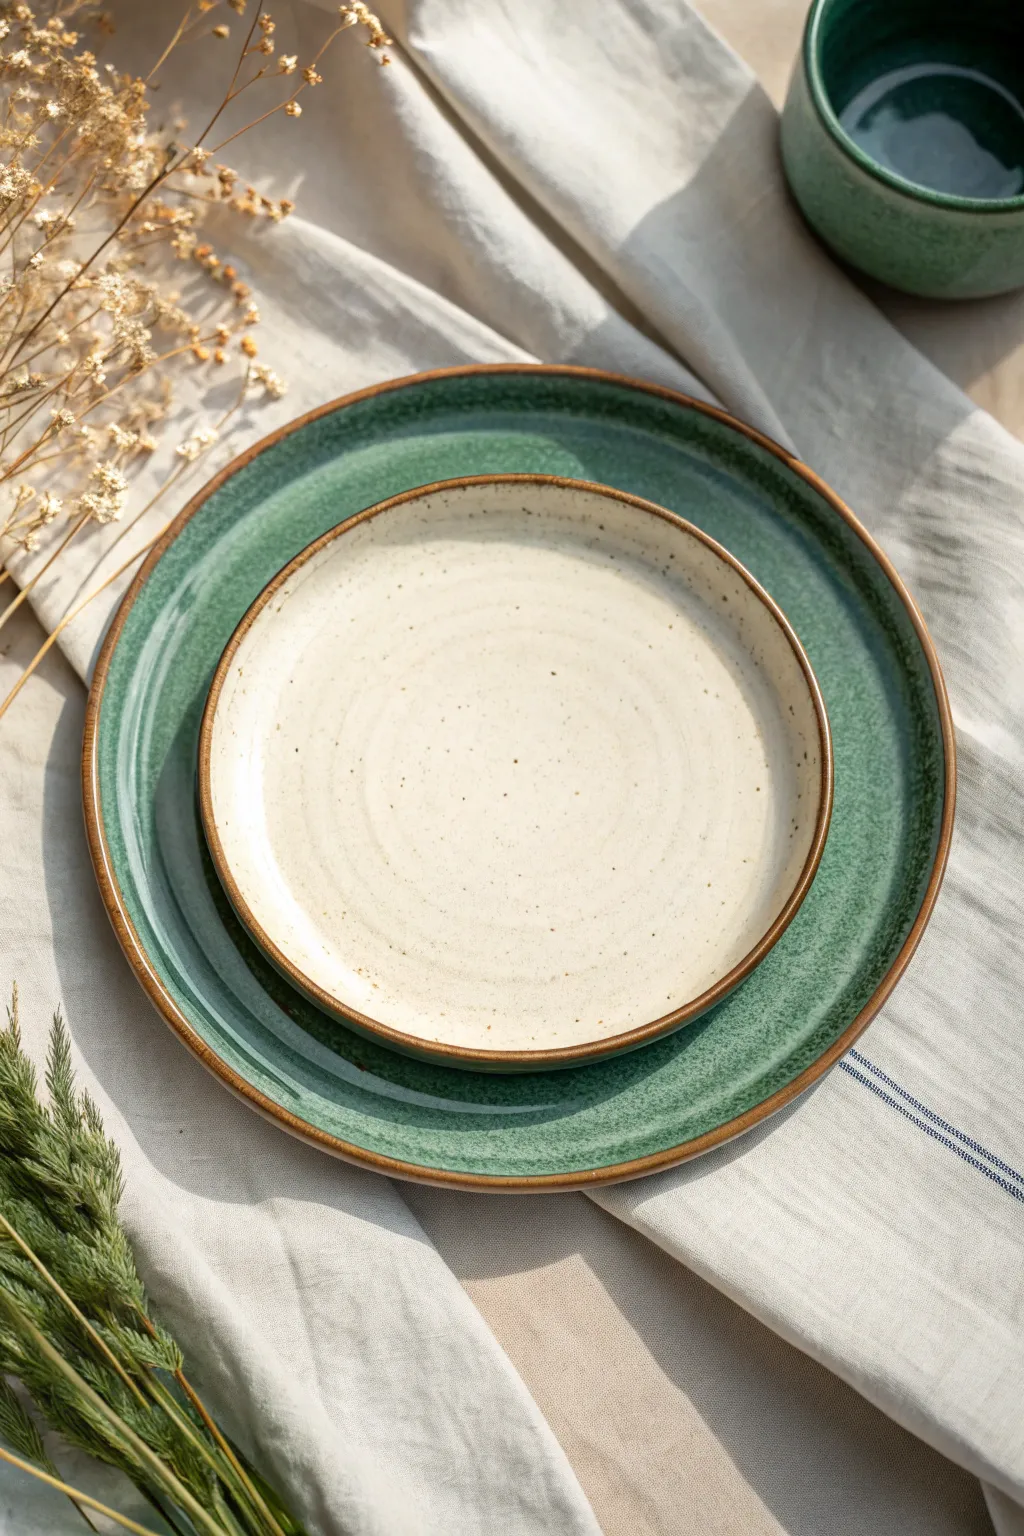
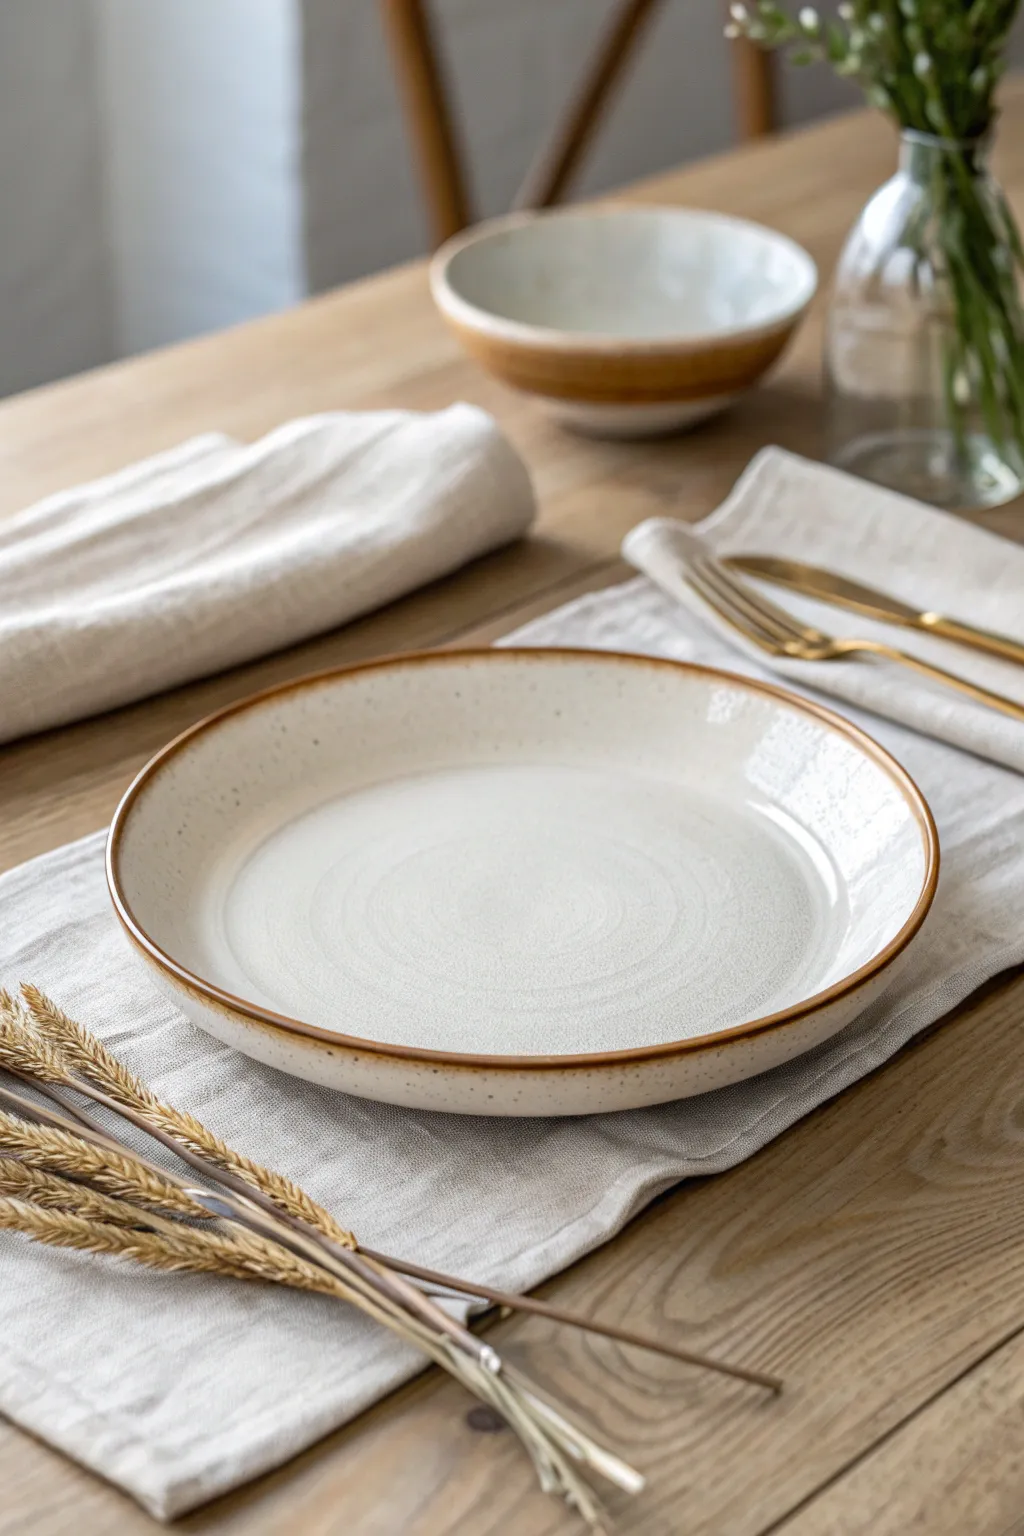
This project captures the soulful beauty of handmade pottery by pairing a speckled creamy white dessert plate with a deep, moss-green dinner plate. The unifying element is the rustic iron-oxide rim that beautifully frames each piece, creating a cohesive set despite the varying base colors.
Step-by-Step Tutorial
Materials
- Stoneware clay body (smooth or lightly grogged)
- Pottery wheel
- Throwing tools (sponge, needle tool, rib, wire cutter)
- Trimming tools
- Wooden bat
- Bisque kiln
- Glaze kiln (Cone 6-10 depending on clay)
- Cream/Oatmeal speckled glaze (matte or satin)
- Moss green reactive glaze
- Iron oxide wash or a dark brown breaking glaze
- Small brush or banding wheel for rim application
- Wax resist
Step 1: Forming the Dual Plates
-
Prepare the Clay:
Wedge two balls of stoneware clay thoroughly to remove air pockets. For a standard dinner plate, use about 2.5–3 lbs of clay. For the smaller dessert plate, aim for approximately 1.5–2 lbs. -
Center the Large Plate:
Secure the larger ball of clay to the wheel head. Center it wide and low, compressing the base repeatedly to prevent future S-cracks—this compression is crucial for flatware. -
Open and Pull the Floor:
Open the clay to the desired diameter (remembering clay shrinks about 12-14%). Pull the floor out flat, using a rib to smooth and compress the surface until it is perfectly level. -
Raise the Rim:
Pull up the rim gently. For this specific style, you want a relatively shallow, angled rim rather than a high wall. Use a rib to define the transition between the flat eating surface and the rising rim. -
Refine the Lip:
To mimic the featured look, slightly round and thicken the very edge of the lip. This extra thickness will catch the oxide wash beautifully later. -
Throw the Small Plate:
Repeat the previous steps with the smaller clay ball. Ensure the angle of the rim mirrors the larger plate so they look like a family when stacked. -
Wire Off and Dry:
Wire the plates off the bat but leave them on the bat to dry until leather hard. Plates warp easily, so slow, even drying away from drafts is best.
Rim Drips?
If the iron oxide wash runs down the side, your mixture is too watery. Aim for a heavy cream consistency. You can also add a pinch of CMC gum to the wash to help it stay put during firing.
Step 2: Trimming and Bisque
-
Trim the Foot:
Once leather hard, center the plates upside down on the wheel. Trim a clean, defined foot ring on each. Remove excess weight from the center but check thickness frequently by tapping. -
Smooth the Edges:
After trimming, run a damp sponge or piece of chamois over the rim and foot to remove any sharp grog or burrs. -
Bisque Fire:
Let the greenware dry completely to bone dry. Load them into the kiln for a bisque firing (usually Cone 04 or 06). Stack them carefully if tumbling, but for plates, flat loading is safest.
Step 3: Glazing the Two-Tone Look
-
Clean the Bisque:
Wipe the bisque-fired plates with a damp sponge to remove dust, ensuring the glaze adheres properly. -
Wax the Foot:
Apply wax resist to the foot rings and the very bottom center of the exterior if you prefer a bare clay bottom. -
Glaze the Large Plate:
Pour or dip the large plate into the Moss Green reactive glaze. If pouring, move quickly to ensure an even coat without drip marks. Shake gently to level the surface. -
Glaze the Small Plate:
Apply the Cream/Oatmeal speckled glaze to the smaller plate. I often find pouring the center and dipping the rim works best for even coverage on flatware. -
Clean the Rims:
Before the glaze dries completely, use a slightly damp sponge to carefully wipe just the very edge of the rim on both plates. You want to expose a thin line of clay or just thin the glaze significantly at the lip. -
Apply the Oxide Contrast:
Mix a small amount of iron oxide wash (iron oxide and water). Using a small brush—or by spinning the banding wheel—carefully paint this dark wash over the wiped rim area on both plates. -
Check the Underside:
Ensure no glaze has dripped onto the foot ring. Clean up any wayward droplets with a sponge.
Level Up
Try leaving the exterior of the plate unglazed raw clay (sand it smooth!) and only glazing the interior eating surface. The contrast between raw clay and glossy glaze is stunning.
Step 4: Final Firing
-
Load the Kiln:
Place the glazed plates into the kiln. Do not stack glazed ware; each piece needs its own shelf space. -
Glaze Fire:
Fire to the maturity temperature of your clay and glaze (typically Cone 6 or Cone 10). A slow cool down can help matte glazes develop a nicer crystal structure.
Stack your finished set and enjoy serving a meal on your own handmade canvas
Wax Resist Stripe Platter
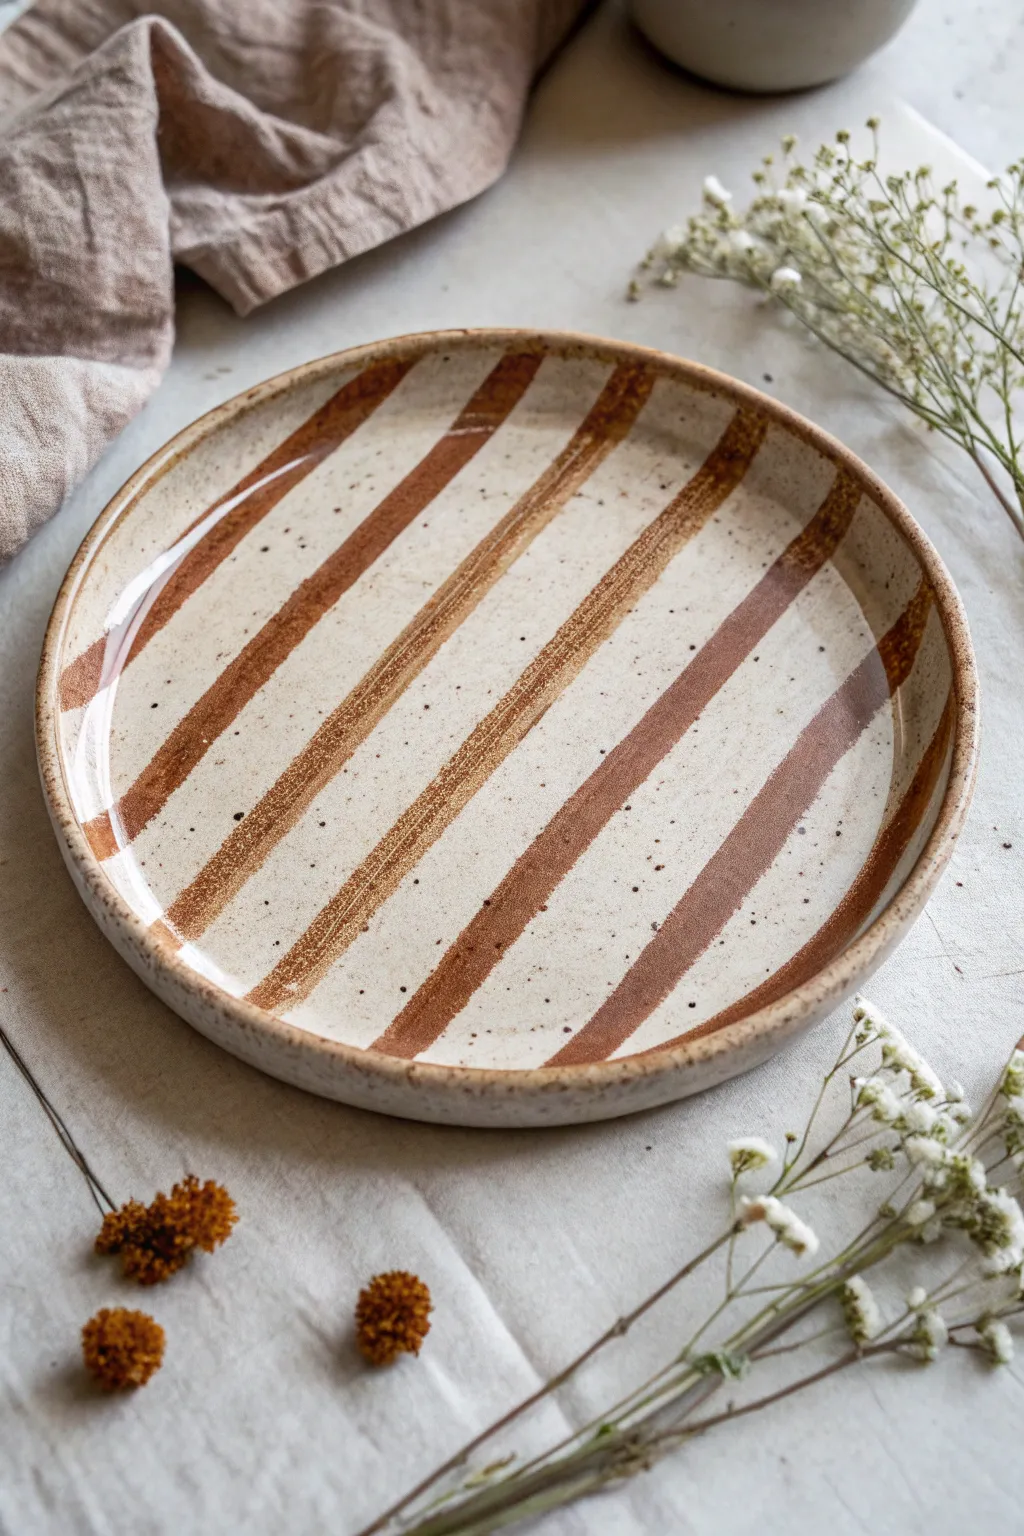
This project leans into the rustic charm of exposed clay body contrasted with crisp glaze lines. The result is a stunning platter with warm, diagonal stripes that feels both modern and pleasantly earthy.
Step-by-Step
Materials
- Speckled stoneware clay (approx. 2-3 lbs)
- Slab roller or rolling pin with guide sticks
- Rib tool (flexible metal or rubber)
- Platter mold or drape mold (shallow)
- Pottery sponge
- Wax resist emulsion
- Medium soft-bristle brush (for wax)
- Warm brown/rust colored glaze (food safe)
- Wide hake brush or fan brush (for glaze)
- Fettling knife
- Wire cutter
- Damp sponge for cleanup
Step 1: Forming the Slab
-
Roll the clay:
Begin by wedging your speckled stoneware clay thoroughly to remove air pockets. Roll it out into a consistent slab about 1/4 inch thick. If you’re hand-rolling, rotate the slab frequently to ensure even thickness throughout. -
Compress the slab:
Use a flexible rib tool to compress the clay surface on both sides. This aligns the clay particles, reducing the chance of warping later, and creates a smooth canvas for those beautiful stripes. -
Cut the shape:
Place your mold or template onto the slab to gauge the size. Cut a large circle, leaving about an inch of extra margin around the edge if you plan to trim later, or cut to your exact desired diameter now. -
Shape the platter:
Gently lift the slab and drape it over your mold (if using a slump mold) or press it into the form (if using a bisque mold). Use a soft sponge to gently press the clay to the mold’s contour, ensuring a defined rim. -
Define the rim:
While the clay is still soft, run a damp chamois or sponge around the rim to soften any sharp angles. A slightly rounded lip is much more durable against chipping.
Use Colored Slip
Instead of wax resist on bare clay, try painting the whole platter with white slip before bisque firing. Then wax pattern lines and glaze over it for a brighter contrast.
Step 2: Drying and Bisque
-
Slow drying:
Allow the platter to dry slowly to leather hard. Cover it loosely with plastic sheeting for the first day to prevent the rim from drying too fast compared to the center. -
Refining the foot:
Once leather hard, flip the platter. If you want a trimmed foot ring, center it on the wheel and trim now. Alternatively, for a slab-built look, simply smooth the bottom and ensure it sits flat without rocking. -
Bone dry:
Let the piece dry completely to the bone-dry stage. It should feel room temperature to the touch, not cool. -
Bisque fire:
Load the platter into the kiln for a bisque firing (typically Cone 04 or 06). This prepares the clay to accept the wax and glaze.
Brush Technique
Load your wax brush fully for each stripe. Starting with a full brush creates a confident line and prevents the ‘dry brush’ stutter that can make edges look messy.
Step 3: Waxing and Glazing
-
Clean and prep:
Wipe the bisque-fired platter with a damp sponge to remove any kiln dust. This helps the wax resist adhere properly. -
Plan your stripes:
Visualize your pattern. For this look, we want bold, diagonal stripes. You don’t need a ruler; hand-painting the lines adds to the organic, rustic aesthetic. -
Apply the wax:
Dip your medium brush into the wax resist. Paint diagonal stripes directly onto the raw bisque. These waxed areas will remain unglazed, showing the raw speckled clay in the final piece. -
Vary the width:
Don’t stress about perfect uniformity. I actually prefer when the wax lines have slightly organic edges or vary a tiny bit in thickness—it makes the piece feel more handmade. -
Dry the wax:
Let the wax resist dry completely. It usually darkens slightly or becomes transparent when dry, depending on the brand. Be patient here; wet wax will smear if you glaze too soon. -
Glaze application:
Mix your warm brown glaze thoroughly. Using a wide hake or fan brush, apply a generous coat of glaze over the entire face of the platter, going right over the wax lines. -
Wipe back:
The glaze will bead up on the waxed areas. Taking a damp sponge, gently wipe the excess glaze droplets off the wax stripes. Be careful not to wipe so hard that you remove the glaze from the non-waxed sections. -
Check the rim:
Use a clean, damp sponge to wipe the very edge of the rim if you want visible clay there, or ensure your glaze coat is neat around the edge. -
Final fire:
Load the platter into the glaze kiln. Make sure the bottom is perfectly free of glaze so it doesn’t stick to the shelf. Fire to the maturity temperature of your clay and glaze combination (e.g., Cone 5/6).
Once cooled, your platter is ready to serve up your favorite dishes with a beautiful handmade touch
Sgraffito Botanical Platter
This elegant oval platter features delicate botanical illustrations carved through a soft sage green underglaze, revealing the warm stoneware clay beneath. The organic vine motif and speckled finish give it a timeless, earthy charm perfect for serving or display.
Step-by-Step Tutorial
Materials
- Stoneware clay (buff or light brown speckle)
- Rolling pin and guide sticks (approx. 1/4 inch)
- Oval template or platter mold
- Rib tool (smooth wood or silicone)
- Sponge
- Sage green underglaze
- Wide soft bristle brush (hake or fan brush)
- Sgraffito tool (small looped carving tool or needle tool)
- Pencil (optional)
- Clear transparent glaze
Step 1: Forming the Platter
-
Roll the slab:
Begin by wedging your stoneware clay thoroughly to remove air bubbles. Roll it out into a consistent slab about 1/4 inch thick using guide sticks to ensure evenness. -
Compress the clay:
Use a rib tool to compress the clay slab on both sides. This aligns the clay particles, preventing future warping, and creates a pristine canvas for your carving. -
Cut the shape:
Place your oval template onto the slab and cut around it with a needle tool. If you are using a drape mold, carefully lift the slab and place it over the mold now. -
Refine the rim:
While the clay is still soft, use a damp sponge to smooth the cut edges of the rim. You want a rounded, comfortable edge rather than a sharp angle. -
Dry to leather hard:
Allow the platter to dry slowly until it reaches a sturdy leather-hard stage. It should be firm enough to hold its shape perfectly but still cool to the touch and able to be carved.
Step 2: Applying Underglaze
-
Clean surface:
Wipe the interior surface gently with a slightly damp sponge to remove any dust or debris that might interfere with the underglaze adhesion. -
First coat:
Using a wide, soft brush, apply an even coat of sage green underglaze to the interior face of the platter. Use long, sweeping strokes to minimize brush marks. -
Layering color:
Let the first coat dry until it’s matte (no longer shiny). Apply a second, and potentially third, coat to ensure solid, opaque coverage. Avoid making it too thick, or it may chip during carving. -
Leave the rim:
Be mindful to leave the very edge of the rim unglazed, or wipe it back with a sponge later, to create that lovely contrast frame seen in the original piece.
Clean Lines Pro-Tip
Carve when the underglaze is barely dry rather than bone dry. This reduces chipping and creates smoother, more confident lines.
Step 3: Carving the Botanicals
-
Sketch the design:
Lightly sketch your vine design directly onto the dry underglaze using a soft pencil. Don’t worry about mistakes; the pencil lead will burn off in the kiln. -
Begin the main stems:
Using a fine-point sgraffito tool or a sharp needle tool, firmly scratch through the green layer to reveal the clay body. Start with the long, flowing central stems of the vines. -
Add leaves:
Carve the outline of the leaves extending from the stems. For the larger leaves, add a central vein line to give them dimension. -
Detailed buds:
Add the smaller details, like the tiny clusters of buds or seeds at the ends of the finer stems. These small dots add great texture to the visual flow. -
Create movement:
Ensure your vines curve and overlap slightly to create a natural, organic composition rather than a stiff pattern. I find creating ‘S’ curves helps the design flow across the oval shape. -
Clean up crumbs:
As you carve, ‘burrs’ of clay will accumulate. Do not brush them away with your hand, as this can smear the color. Instead, use a large, dry fluffy brush to gently sweep the crumbs away once the underglaze is bone dry. -
Add speckles (optional):
If your clay body isn’t naturally speckled, you can flick a stiff toothbrush dipped in iron oxide or diluted dark underglaze over the surface to mimic the speckled look of the example.
Level Up: Depth
Apply a dark green or brown wash into the carved lines before the clear glaze to maximize contrast and make the drawing pop.
Step 4: Finishing
-
Bisque fire:
Once the piece is bone dry, fire it to cone 04 (or your clay’s bisque temperature). This sets the shape and makes the underglaze permanent. -
Clear glaze:
Dip or brush a clear transparent glaze over the entire piece. This will make the green vibrant and the raw clay lines rich and dark. -
Final fire:
Glaze fire the platter to the maturation temperature of your specific stonware clay (typically cone 5 or 6).
Your finished platter will be a durable, functional piece of art ready for your next dinner party
Leaf-Imprint Nature Platter
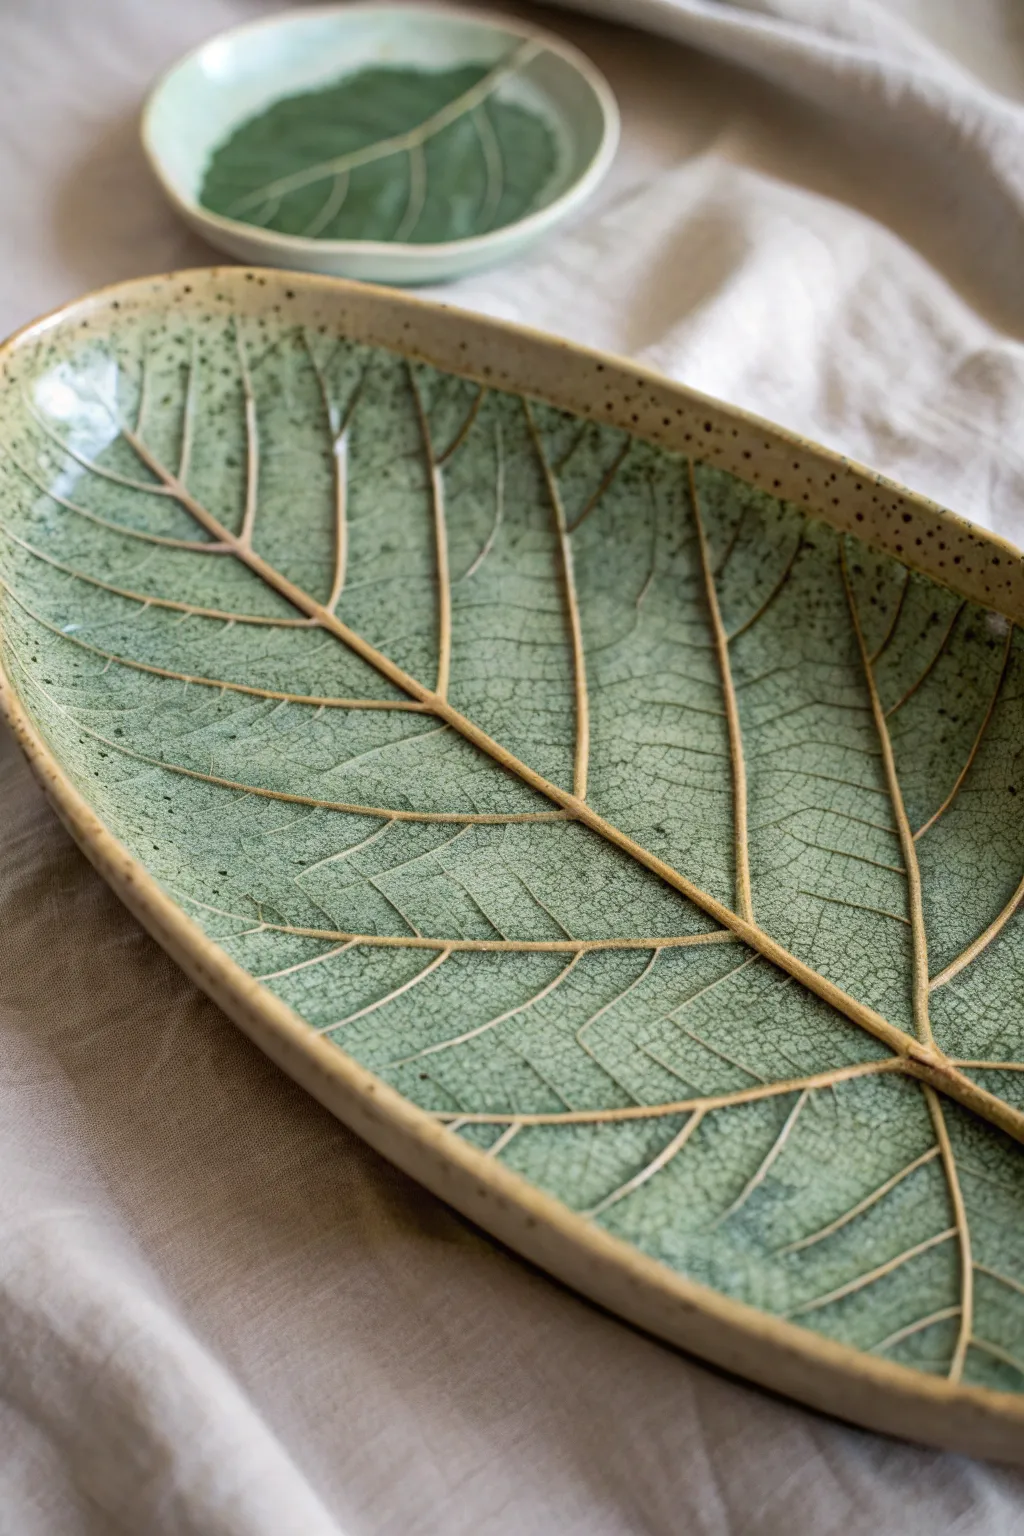
Capture the delicate details of nature with this impressive stoneware serving dish, featuring a realistic leaf texture and a crackled green finish. The organic shape and exposed clay rim give it a grounded, earthy aesthetic perfect for showcasing seasonal sides.
How-To Guide
Materials
- Speckled stoneware clay (mid-fire)
- Large, fresh leaf with prominent veins (e.g., hosta, hydrangea, or oversized tobacco leaf)
- Rolling pin
- Canvas mat or slab roller
- Needle tool or fettling knife
- Rib tool (smooth wood or rubber)
- GR Pottery Form (oval) or a slump mold
- Sponge
- Iron oxide wash or dark underglaze
- Transparent celadon or light green crackle glaze
- Wax resist
- Kiln
Step 1: Slab Preparation
-
Roll the Clay:
Begin by rolling out a medium-sized slab of speckled stoneware clay. Aim for a consistent thickness of about 3/8 of an inch, which provides enough stability for a platter this size. -
Compress the Surface:
Use a rib tool to smooth and compress the clay slab on both sides. This removes canvas texture and aligns the clay particles to prevent warping later. -
Position the Leaf:
Select your large leaf and place it vein-side down onto the clay slab. The vein side usually has the most texture, which is crucial for the final look.
Step 2: Creating the Texture
-
Roll the Impression:
Use a rolling pin to firmly press the leaf into the clay. Roll once in a single direction to avoid shifting the leaf and creating a double image. -
Refine the Edges:
Before removing the leaf, check the perimeter. If you want the platter to follow the exact leaf shape, cut around it now. For the oval shape shown in the photo, place a paper template or your mold guide over the leaf area and cut a smooth oval, letting the leaf pattern run off the edges. -
Reveal the Texture:
Carefully peel back the leaf by the stem to reveal the intricate vein network impressed into the clay.
Vein Definition Tip
If your leaf veins aren’t popping, go over the impressed lines gently with a modeling tool to deepen them before the clay dries. Deep grooves catch more glaze.
Step 3: Shaping and Drying
-
Form the Curve:
Lift your slab and drape it over an oval slump mold or press it onto an oval pottery form. Gently smooth the clay against the mold to establish a shallow, even curve. -
Refine the Rim:
While on the mold, use a damp sponge to smooth the cut edge of the rim. I like to round it off slightly so it feels comfortable to the touch after firing. -
Slow Dry:
Let the platter dry slowly to leather-hard stage before removing it from the mold. Once removed, allow it to dry completely to bone dry, covering edges loosely with plastic if they dry too fast. -
Bisque Fire:
Load the bone-dry platter into the kiln for a bisque firing to roughly Cone 04.
Try Colored Clay
Instead of speckles, use a red clay body and a white tin-glaze. The red veins will show through the white for a stunning high-contrast alternative.
Step 4: Glazing and Finishing
-
Apply Oxide Wash:
Mix iron oxide with water (or use a dark brown underglaze). Brush this wash into all the impressed veins and textures of the leaf design. -
Wipe Back:
Using a damp, clean sponge, wipe away the oxide from the high points of the surface. You want the dark color to remain only in the deep veins to accentuate the pattern. -
Wax the Rim:
Apply a band of wax resist to the very edge of the rim if you want that raw, speckled clay contrast seen in the photo. Alternatively, simply be careful when brushing on the glaze. -
Apply Main Glaze:
Pour or brush a translucent celadon or faint green crackle glaze over the entire interior. The translucency is key—it allows the dark oxide veins to show through clearly. -
Clean the Foot:
Ensure the bottom of the platter is free of glaze so it doesn’t stick to the kiln shelf. -
Glaze Fire:
Fire the piece to the maturation temperature of your clay and glaze, typically Cone 5 or 6 for stoneware.
Once cooled, your platter will be ready to bring a touch of the forest to your dining table
Minimal Underglaze Line Art Platter
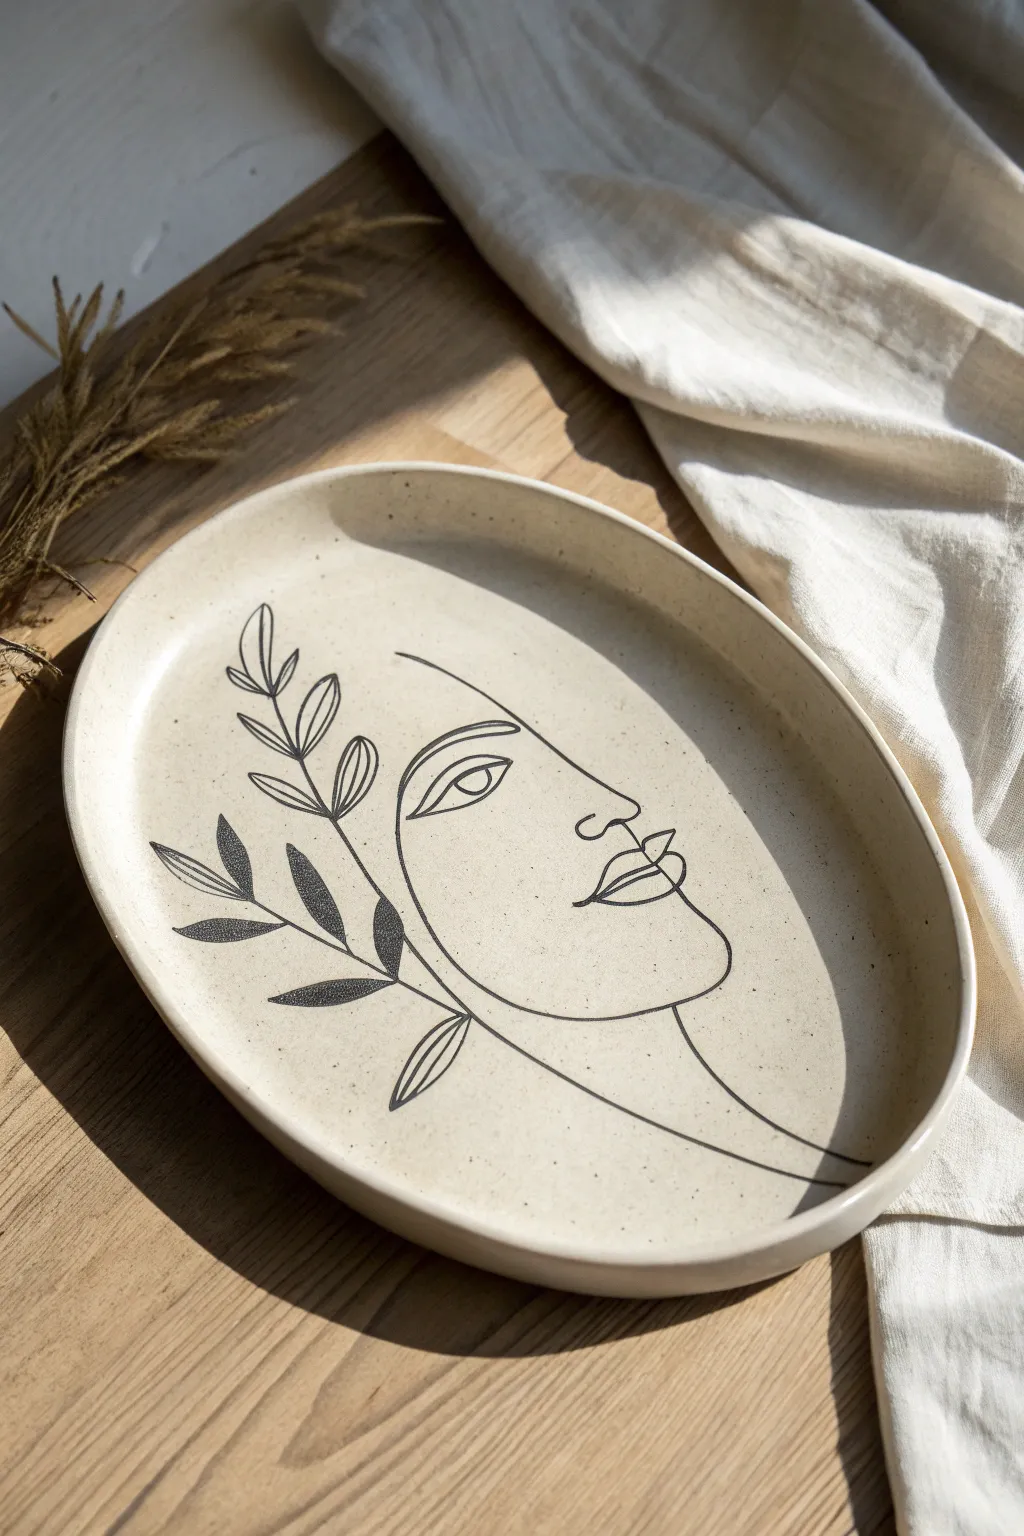
Capture the essence of modern simplicity with this elegant ceramic platter featuring fluid line art and botanical touches. Using a speckled clay body and crisp black underglaze, this project creates a piece that feels both organic and thoughtfully curated.
Detailed Instructions
Materials
- Speckled buff stoneware clay
- Rolling pin & canvas work surface
- Oval slump mold (or DIY cardboard template)
- Kidney rib (soft rubber)
- Potter’s knife or needle tool
- Sponge
- Black underglaze (fine liner applicator or detail brush)
- Pencil (optional for sketching)
- Clear matte or satin glaze
- Kiln
Step 1: Forming the Platter
-
Roll the slab:
Begin by wedging your speckled clay to remove air bubbles. Roll it out into a smooth slab approximately 1/4 inch thick. I like to check thickness frequently to ensure it’s uniform. -
Compress the surface:
Use a soft rubber kidney rib to compress both sides of the slab. This aligns the clay particles to prevent warping and creates that perfectly smooth canvas you’ll need for drawing later. -
Cut the oval shape:
Place your oval template or slump mold onto the clay. Trace around it with a needle tool or fettling knife to cut out your platter shape. -
Smooth the rim:
Before shaping, take a damp sponge and run it along the cut edge. Soften the harsh angles into a rounded, finished rim. -
Form the curve:
Gently lift the slab and place it into your slump mold or onto your hump mold to give it a shallow, curved profile. Press lightly to ensure it takes the shape without stretching the clay. -
Dry to leather hard:
Allow the piece to dry slowly until it reaches a sturdy ‘leather hard’ stage. This is crucial—if it’s too wet, the underglaze might bleed; too dry, and it won’t absorb well.
Step 2: The Art of the Line
-
Sketch the design:
Lightly sketch your face and leaf design directly onto the leather-hard clay using a regular pencil. Don’t worry about mistakes; the graphite will burn away completely in the kiln. -
Design composition:
Position the face profile on the right side, looking inward. Draw a continuous line for the forehead, nose, and lips. Add the botanical sprig on the left, letting the leaves gently curve toward the face. -
Prepare the underglaze:
Shake your black underglaze thoroughly. Transfer a small amount to a bottle with a fine metal applicator tip for the steadiest lines, or load a very thin liner brush. -
Trace the profile:
Carefully trace over your pencil lines with the black underglaze. Keep your hand relaxed to maintain a fluid, continuous look for the facial features. -
Detail the eye:
Draw the stylized eye with a confident almond shape and a circle for the iris. This is the focal point, so take your time here. -
Fill the leaves:
Outline the leaves on the left. For visual interest, fill in only some of the leaves solidly with black underglaze, leaving others as simple outlines. This negative space creates a lovely balance. -
Clean up smudges:
If you make a small error, wait for the underglaze to dry slightly, then gently scratch it off with a sharp tool or a barely damp clean brush.
Drawing Confidence
Nervous about freehanding? Draw your design on tissue paper first. Place the tissue on the clay and trace over the lines with a firm pencil to leave a faint impression in the clay.
Step 3: Finishing Fire
-
Bisque fire:
Let the platter dry completely to the bone-dry stage. Load it into the kiln for a bisque firing (usually to cone 04) to harden the ware. -
Apply clear glaze:
Once cool, wipe the bisque ware with a damp sponge to remove dust. Dip or brush on two even coats of a clear matte or satin glaze. Using a matte finish enhances the ‘illustration on paper’ vibe. -
Final glaze fire:
Fire the piece a second time to the maturation temperature of your specific clay body (typically cone 5 or 6 for stoneware). -
Final inspection:
After the kiln cools, check the rim for any sharp spots (sand them down with a vitrified sanding pad if needed) and admire how the specks in the clay shine through the glaze.
Gilded Touch
For a luxe upgrade, apply gold luster overglaze to the ‘eye’ or just the lips after the final glaze firing. It requires a third, lower-temp firing but adds stunning contrast.
This sophisticated platter is now ready to serve appetizers or stand alone as a stunning piece of modern home decor
Watercolor-Style Underglaze Wash Platter
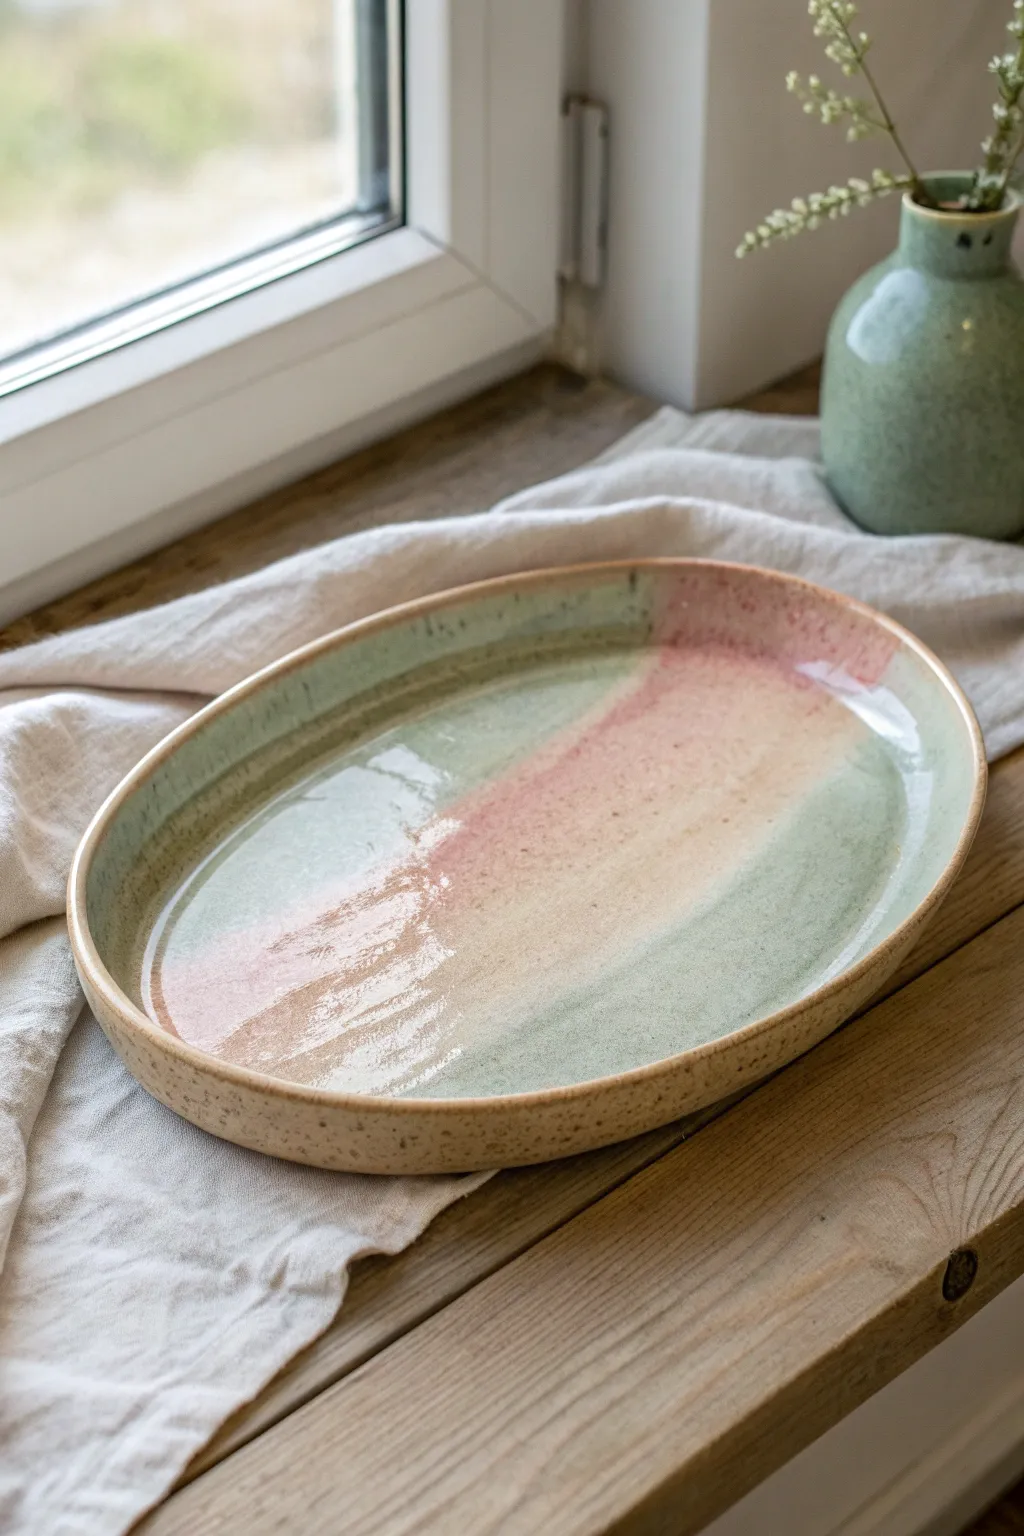
Soft, ethereal washes of pastel glaze transform a simple slab-built oval into a calming centerpiece that evokes a sunrise over mist. By layering watered-down underglazes on speckled clay, you can achieve a delicate, painterly effect that feels both modern and organic.
Step-by-Step
Materials
- Speckled buff stoneware clay
- Rolling pin and guide sticks (approx. 1/4 inch)
- Oval paper template or large oval bisque mold
- Potter’s knife or needle tool
- Basic rib tool (kidney)
- Soft sponge
- Sage or Mint Green underglaze
- Blush or Rose Pink underglaze
- Wide, soft fan brush (hake brush works well)
- Clear transparent gloss glaze
- Small cup of water for blending
Step 1: Shaping the Slab
-
Roll the clay:
Begin by rolling out your speckled buff stoneware clay on a canvas board. Use guide sticks to ensure an even thickness of about 1/4 inch, rolling from the center outwards to compress the clay platelets. -
Smooth the surface:
Take a rubber rib tool and gently compress the surface of the slab. This aligns the clay particles and removes any canvas texture, creating a smooth canvas for your future glaze painting. -
Cut the shape:
Place your oval template on the slab. Using a needle tool or potter’s knife, trace around the template or mold to cut out your oval shape. Hold the knife perpendicular to the table for a clean edge. -
Lift the rim:
If using a slump mold, drape the clay into the mold now. If you are hand-building freely, gently lift the edges of the oval upward using your thumbs and fingers to create a shallow wall about 1 inch high. -
Refine the lip:
Use a barely damp sponge to smooth the rim of the platter. Round it off gently so it isn’t sharp; this rim will remain unglazed to show off the beautiful speckles, so take your time here. -
Slow drying:
Allow the platter to dry slowly to a leather-hard state under a loose sheet of plastic. This prevents warping, which is common with flat slab pieces. -
Bisque fire:
Once fully bone dry, fire the piece to bisque temperature (usually cone 04) to prepare it for glazing.
Step 2: Painting the Watercolor Effect
-
Prepare the palette:
Pour a small amount of your sage green and blush pink underglazes into separate dishes. Dilute them slightly with water—about a 2:1 ratio of paint to water—to increase transparency. -
Clean surface:
Wipe your bisque-fired platter with a damp sponge to remove any kiln dust. This also primes the porous surface to accept the color more smoothly. -
Apply the green wash:
Dip your wide fan brush into the watered-down sage green. Start at one short end of the oval and sweep toward the center using long, fluid strokes. Lift the brush as you reach the middle to feather the edge. -
Apply the pink wash:
Rinse your brush thoroughly. Now, pick up the diluted blush pink. Start from the opposite end of the oval and work your way toward the center, mirroring the green side. -
Blend the intersection:
Where the two colors meet in the middle, apply a very light stroke of pink over the fading green edge. I find that layering the lighter color over the darker one usually creates the softest transition. -
Check the opacity:
Let the first layer dry for a minute. If the color looks too faint, apply a second, very transparent wash. You want the speckles of the clay to show through, so don’t make it solid. -
Clean the rim:
Take a damp sponge and carefully wipe the very top edge and the outside wall of the platter. You want to remove any stray underglaze so the raw, speckled clay frames the painted interior. -
Dip in clear:
Once the underglaze is bone dry, dip the entire platter into a clear, transparent gloss glaze. Alternatively, brush on three even coats of a brush-on clear glaze. -
Wipe the foot:
Ensure the bottom of the platter is completely free of glaze so it doesn’t stick to the kiln shelf. -
Final firing:
Fire the piece to the maturity temperature of your clay body (likely cone 5 or 6 for stoneware). The heat will melt the clear glaze, sealing the underglaze and making the colors pop.
Pro Tip: Soft Edges
Pre-wet the bisque ware slightly more in the center before painting. Damp clay absorbs glaze slower, giving you more time to blend the gradient smoothly.
Level Up: Wax Resist
Paint a pattern with liquid wax resist over the underglaze before the final clear coat. The wax will repel the glaze slightly, creating a unique matte texture.
Now you have a stunning, food-safe platter ready to serve appetizers or simply admire as a piece of functional art
Mishima Inlay Pattern Platter
This stunning platter showcases the traditional Korean technique of Mishima, where delicate lines are inlaid with contrasting slip to create sharp, graphic patterns. The rich charcoal grey slip against the natural clay body creates a modern, sophisticated look perfect for table service or wall display.
Step-by-Step Guide
Materials
- Stoneware clay (speckled or buff)
- Black or charcoal underglaze or slip
- Pottery wheel
- Throwing bat
- Rib tool (metal and rubber)
- Needle tool or X-Acto knife
- Carving tool (fine loop or sgraffito tool)
- Dense sponge
- Clear matte glaze
- Wax resist (optional)
Step 1: Throwing the Form
-
Center the clay:
Start with a generous designated amount of clay (about 3-4 lbs) on your wheel. Center it low and wide, similar to a plate but with slightly more substance for the rim. -
Open the floor:
Open the clay all the way to your desired floor width, leaving about 1/4 inch thickness for the base. Compress the floor thoroughly with a rib to prevent S-cracks later. -
Pull the rim:
Pull up a shallow, vertical rim about 1.5 to 2 inches high. Keep the transition from floor to wall distinct and sharp rather than gradual. -
Refine the shape:
Use a rib to smooth the interior floor until it is perfectly flat. Carefully define the rim to be uniform in thickness, perhaps slightly tapering at the very top edge. -
Dry to leather hard:
Cut the platter from the bat with a wire tool but leave it on the bat to dry. Cover loosely until it reaches a sturdy leather-hard stage—firm enough to carve without burrs, but soft enough to cut easily.
Step 2: Carving the Inlay
-
Mark your boundaries:
Place the platter back on the wheel. Using a needle tool, lightly score two concentric circles on the interior floor: one defining the central plain circle and one defining the outer edge of the pattern band. -
Divide the band:
Divide the band between your two circles into equal segments. I like to lightly mark 8 or 12 distinct sections to help guide the herringbone direction changes. -
Carve the main lines:
Carve the dividing lines between your sections first. Use a fine loop tool or specific Mishima tool to carve shallow channels, removing the clay cleanly. -
Create the herringbone pattern:
Within each section, carve parallel diagonal lines that meet the dividing lines. Alternate the direction of the diagonals in each neighboring section to create the chevron or herringbone effect. -
Clean up burrs:
After carving, lightly brush away any loose clay crumbs. Do not sponge it yet, as you want crisp edges for the inlay.
Clean Lines
When scraping slip, move your metal rib perpendicularly to the carved lines. Scraping parallel to them can accidentally scoop the slip out of the channel.
Step 3: Applying Slip and Finishing
-
Apply the contrasting slip:
Generously paint your black or charcoal slip (or underglaze) over the entire carved area. Ensure the liquid fills every incised line completely. -
Fill the center:
Paint the central circle with the same dark slip for a solid, grounding focal point. Let the piece dry until the slip loses its sheen. -
Scrape back the excess:
Once the slip is firm (stiff leather hard), use a sharp metal rib to carefully scrape away the surface layer of slip. This reveals the clay body again while leaving the dark slip trapped in the carved lines. -
Sponge clean:
Wipe the surface with a clean, damp sponge to remove any remaining haze, ensuring the white lines of the clay body are distinct against the dark inlay. -
Bisque fire:
Allow the platter to dry completely before bisque firing to cone 04 (or your clay’s specific bisque temperature). -
Glaze application:
Apply a clear matte glaze to the entire interior. This protects the inlay and enhances the contrast without adding distracting shine. -
Clean the foot:
Wipe any glaze off the foot ring or use wax resist beforehand to ensure a clean firing. -
Final firing:
Fire the piece to maturity (Cone 5, 6, or 10 depending on your clay body) to vitrify the stoneware.
Smearing Issues
If the dark slip smears endlessly while scraping, it’s too wet. Wait 20 more minutes. The slip should peel away in dry curls, not sludge.
Serve your favorite meal on this handmade beauty and enjoy the texture of the inlay under your fingertips
Nerikomi Marble Clay Platter
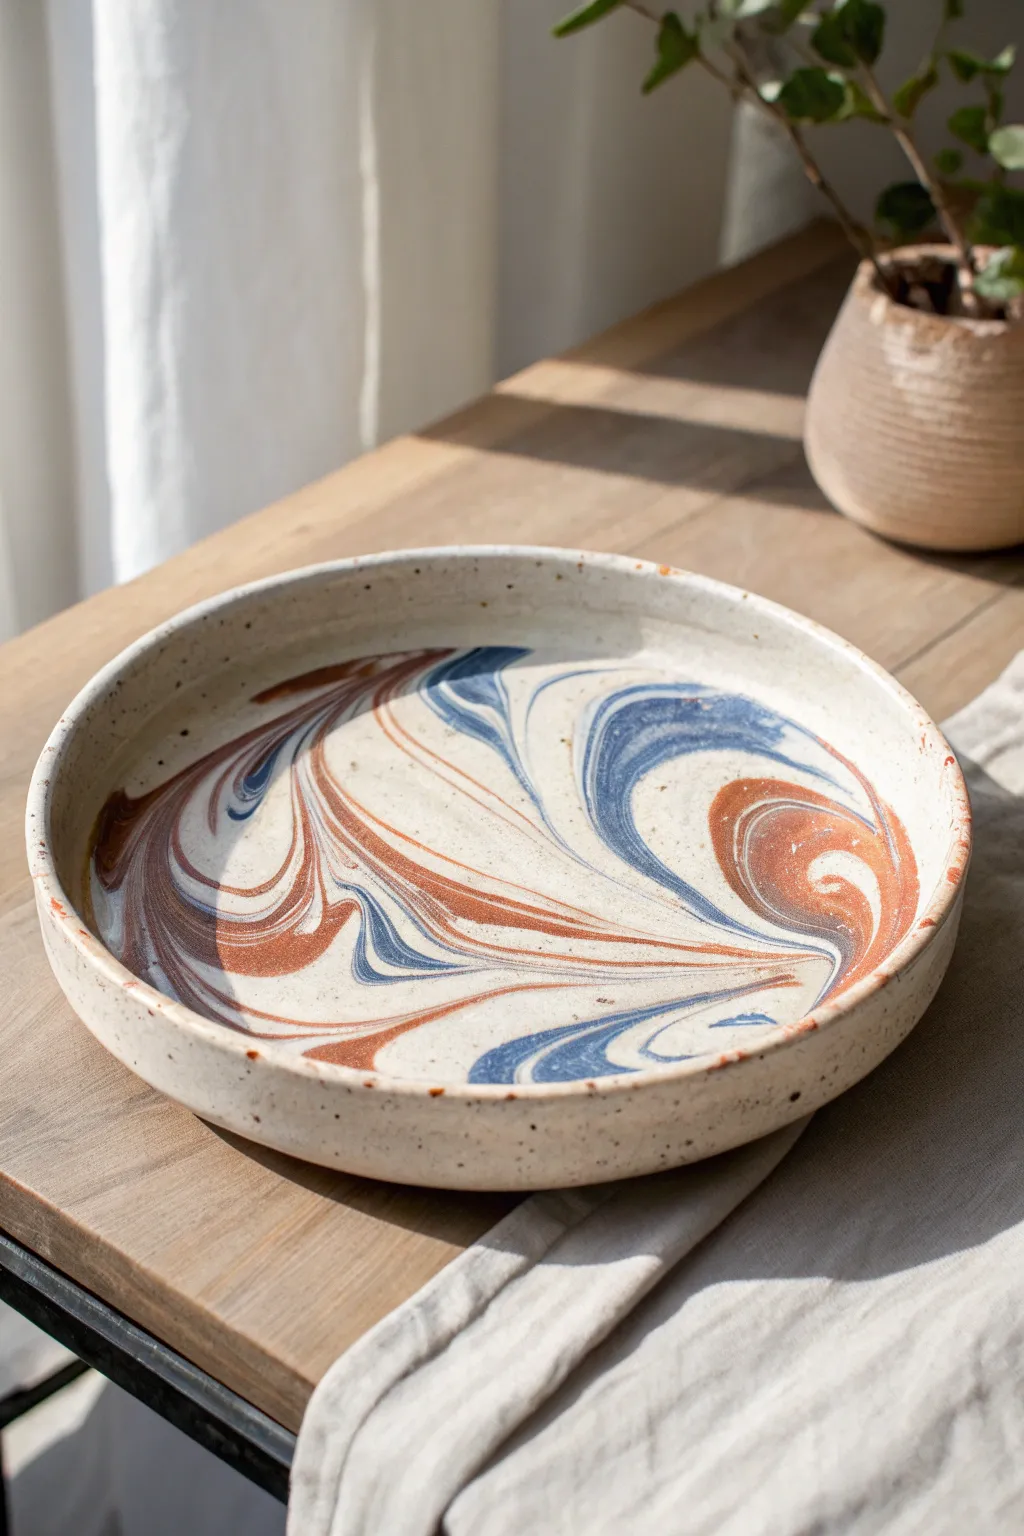
Capture the organic beauty of swirling tides and layered earth with this marbled nerikomi platter. By combining different colored clays before throwing or slab-building, you create a mesmerizing, one-of-a-kind pattern that is embedded directly into the ceramic body rather than painted on top.
Step-by-Step Tutorial
Materials
- White stoneware clay (speckled variety recommended)
- Red stoneware clay or terracotta
- Blue mason stain (or pre-colored blue clay)
- Pottery wheel (or slab roller/rolling pin for hand-building)
- Wire cutter
- Rib tool (metal and rubber)
- Sponge
- Trimming tools
- Clear glaze
Step 1: Preparing the Clay Body
-
Color your clay:
Start with your base speckled white clay. If you don’t have pre-mixed blue clay, take a portion of the white clay and knead in your blue mason stain until the color is uniform. You’ll want roughly 60% white, 25% red/terracotta, and 15% blue. -
Form logs:
Roll each color of clay into thick, sausage-like logs. Vary the thickness slightly to create more natural, less uniform stripes. -
Stack and slice:
Gather the logs together, alternating colors. Twist them together slightly like a candy cane, then fold the clay over on itself. Don’t over-knead, or the colors will blend into a muddy grey; you want distinct striations. -
Create the working ball:
Gently pat your twisted clay mass into a ball shape suitable for throwing, being careful to trap as few air bubbles as possible without homogenizing the colors.
Step 2: Throwing the Platter
-
Center carefully:
Secure the marbled ball to the wheel head. When centering, use efficient, strong movements to minimize the amount of revolutions, as excessive friction can smear the surface pattern. -
Open wide:
Open the clay typically, but move outwards quickly to establish the floor. For a platter, you want a wide, flat base with plenty of clay left for the rim. -
Compress the floor:
Use a flat rib or your fingers to thoroughly compress the floor. This is crucial for avoiding S-cracks in platters and helps reveal the marble pattern on the interior. -
Pull the walls:
Pull up the walls, keeping them relatively vertical at first. You will push them down into the platter shape later. -
Shape the rim:
Gently use a rib to push the walls outward into a low, shallow curve. Create a distinct, upright lip at the edge to frame the marbled design.
Muddy Colors?
If your pattern looks blurry or grey, you likely over-wedged or centered for too long. Scrape the surface deeper with a metal rib; often the crisp pattern is hiding just 1mm below the surface slurry.
Step 3: Refining the Surface
-
Scrape the surface:
The throwing process often creates a ‘slurry’ of mixed mud that hides the pattern. Take a metal rib and gently scrape away the top layer of slime from the floor and walls while the wheel spins slowly to reveal the crisp lines underneath. -
Smooth the lip:
Use a chamois or a piece of plastic to softly compress the rim, ensuring it is smooth and comfortable to the touch. -
Wire off:
Run a wire tool under the bat or platter base to release it, but leave it on the bat to dry to leather-hard consistency.
Shrinkage Rates
Ensure all your clay bodies have the same shrinkage rate (e.g., all 12%). Mixing clays with different shrinkage rates often leads to cracking during drying or firing.
Step 4: Trimming and Finishing
-
Trim the foot:
Once leather hard, flip the platter and trim a clean, defined foot ring. As you trim away the outer layer, more of the beautiful marbled pattern will emerge on the exterior. -
Bisque fire:
Dry the platter slowly to prevent warping, especially with the mixed clay bodies. Fire to bisque temperature (usually cone 04/06). -
Glaze application:
Apply a clear, glossy glaze. Using a clear glaze is essential here, as it intensifies the contrast between the clay bodies and makes the red and blue pop without obscuring the design. -
Final firing:
Fire correctly for your specific clay body (usually cone 6 or 10). I usually put a cookie under swirled ware just in case the flux varies between clays.
Now you have a stunning functional centerpiece that displays the raw, natural beauty of the clay itself
Textured Platter With Lace or Fabric Impressions
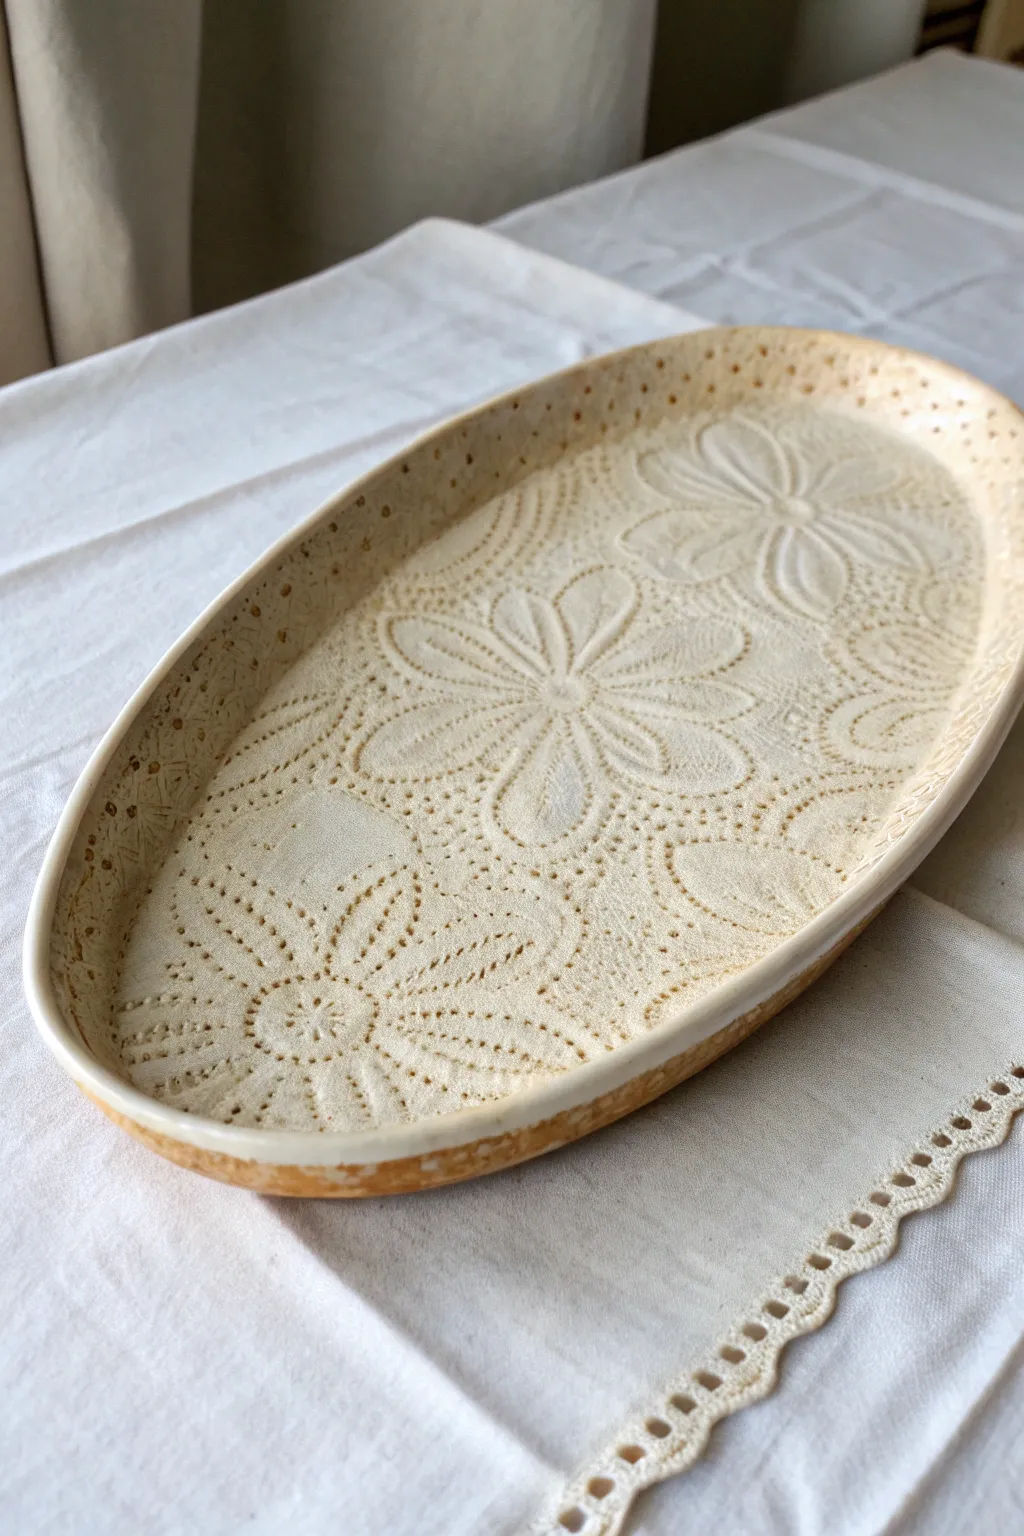
This stunning oval serving platter captures the delicate intricacy of vintage textiles forever in clay. By pressing lace into soft stoneware and highlighting the texture with a wash, you’ll create a functional centerpiece that feels both rustic and refined.
Detailed Instructions
Materials
- Light-colored stoneware or porcelain clay
- Rolling pin
- Guide sticks (about 1/4 inch thick)
- Cotton canvas or ware board
- Vintage knitted lace doily or table runner (thick texture works best)
- Oval paper template or oval slump mold
- Fettling knife or needle tool
- Yellow ochre / iron oxide wash or underglaze
- Clear glaze
- Sponge
- Soft brush
- Rib tool (flexible polymer or metal)
Step 1: Preparing the Slab
-
Roll the clay:
Begin by wedging your clay thoroughly to remove air bubbles. Place it on a piece of canvas and roll it out into a slab using guide sticks to ensure an even thickness of about 1/4 inch. -
smooth surface:
Before adding texture, take a soft rib tool and gently compress the clay surface. This removes canvas marks and aligns the clay particles, preventing future warping. -
Position the lace:
Lay your knitted lace or doily onto the slab. Ensure the fabric is flat and free of wrinkles; this specific design uses a pattern with large floral motifs, which transfer beautifully. -
Transfer the texture:
Use your rolling pin to firmly press the fabric into the clay. You only get one good pass, so use steady, even pressure so the lace embeds deeply without slicing through the slab. -
Reveal the pattern:
Find the edge of your fabric and peel it back carefully. I love this moment—seeing the negative impression of the fibers revealed in the clay is always magical.
Sticky Situation?
If the lace sticks to the wet clay, dust the fabric lightly with cornstarch before rolling. It acts as a release agent and burns off completely.
Step 2: Shaping the Platter
-
Cut the shape:
Place your oval template over the most interesting part of the texture. Using a fettling knife held vertically, cut around the oval shape. Remove excess clay. -
Smooth the edges:
Run a damp finger or a small slightly wet sponge along the sharp cut edge to round it over. A sharp rim is prone to chipping later, so take time here. -
Form the curve:
If using a slump mold, gently lift the slab and place it textured-side-up into the mold. If forming by hand, place the slab on a board and gently lift the edges, propping them up with small pieces of foam or rolled clay to create a shallow bowl shape. -
Dry slowly:
Cover the platter loosely with plastic to dry slowly. This helps prevent warping as the rim and center shrink at different rates.
Level Up Your Detail
Try layering textures! Before adding the lace, gently paddle the rim or use a stamp to add small ‘stitches’ or dots for a defined border.
Step 3: Surface Decoration
-
Bisque fire:
Once bone dry, fire the piece to bisque temperature (usually cone 04) to prepare it for glazing. -
Apply the wash:
Mix a thin wash of yellow ochre oxide or a golden-brown underglaze. Using a soft brush, paint this liberally over the entire textured surface, ensuring it gets into every tiny recessed dot. -
Wipe back:
Take a damp, clean sponge and wipe across the surface of the platter. This removes the color from the high points of the clay while leaving the pigment trapped in the deep lace impressions. -
Clean the rim:
Pay special attention to the rim; you can leave a little extra oxide here to frame the piece, as seen in the example image. -
Apply clear glaze:
Once the oxide wash is dry, brush or dip a coat of clear glaze over the entire piece. A glossy or satin clear glaze works best to make the texture pop and ensure food safety. -
Final wipe:
Clean the distinct foot or bottom of the platter with a wax resist or sponge to prevent it from sticking to the kiln shelf. -
Glaze fire:
Fire the platter to the final maturity temperature for your specific clay body (typically cone 5 or 6 for stoneware).
Once cooled, your platter will be ready to serve as a stunning conversation piece at your next gathering