Whenever I need a creativity boost, I reach for pottery clay because it turns everyday shapes into something personal and a little magical. Here are my favorite clay art ideas—starting with the classics you’ll actually use, then sliding into the fun, quirky stuff that makes a studio day feel extra inspiring.
Classic Pinch Pot Bowls
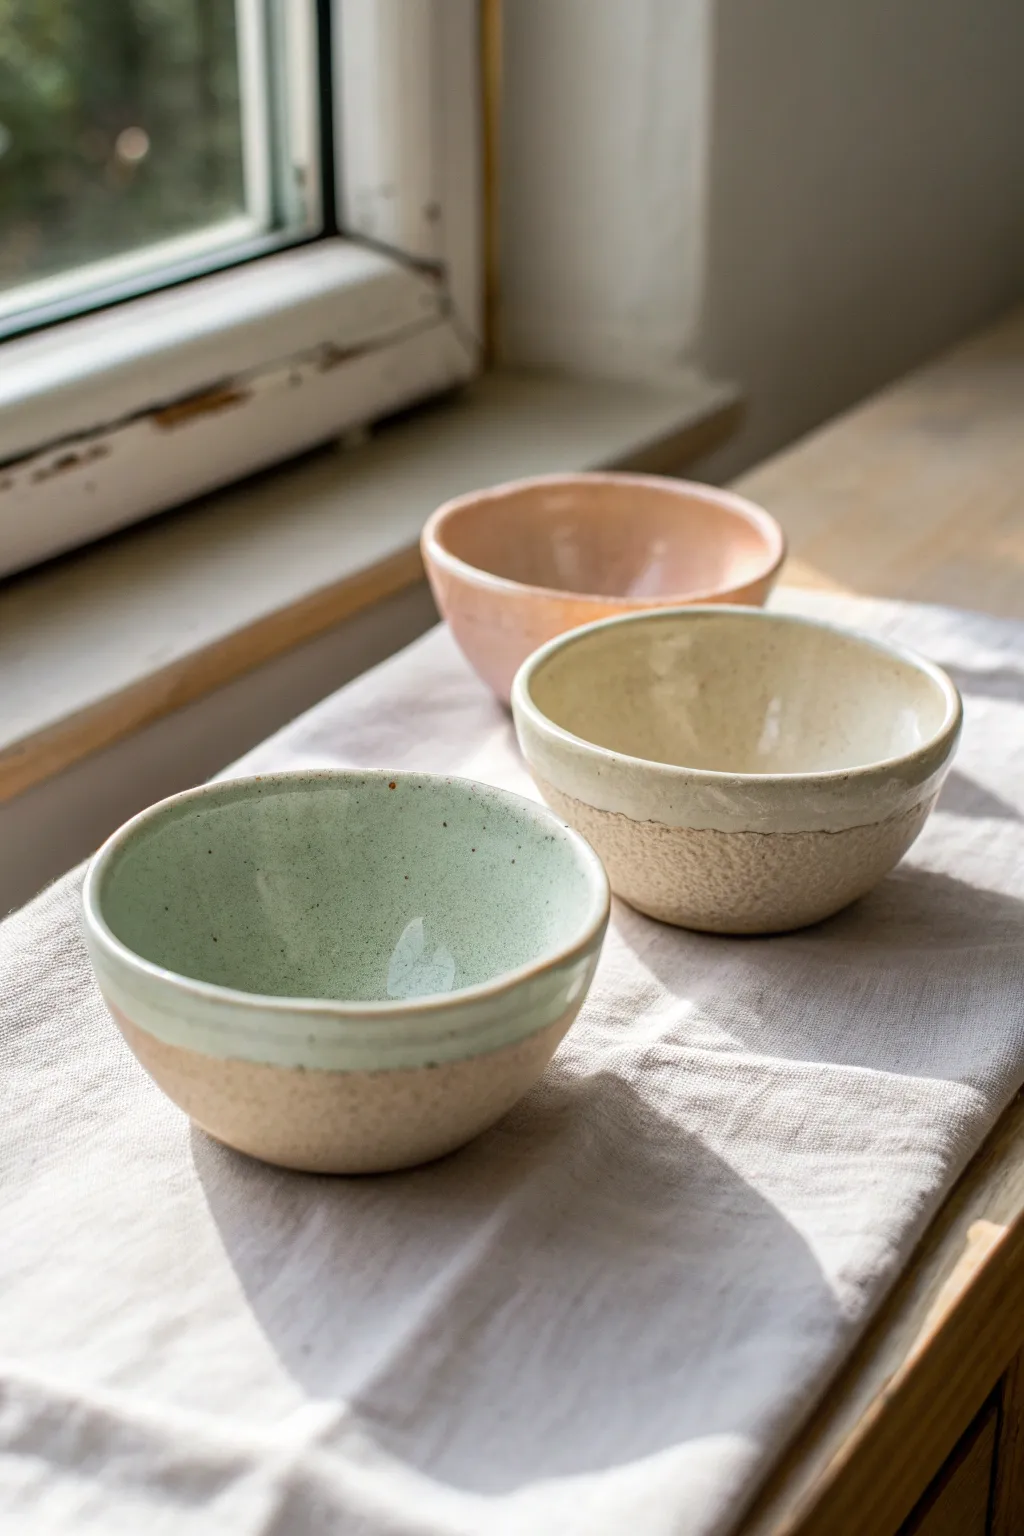
These charming, rustic bowls showcase the natural beauty of raw clay against soft, glossy pastels. Perfect for holding trinkets or serving snacks, this project teaches you how to create classic pinch pots with a modern, partially glazed finish.
Step-by-Step
Materials
- Speckled buff stoneware clay (mid-fire)
- Pottery sponge
- Pin tool or needle tool
- Rib tool (kidney)
- Canvas or wooden work board
- Bowl of water
- Pastel gloss glazes (Mint Green, Cream, Pale Pink)
- Wax resist (optional)
- Kiln access
Step 1: Forming the Pinch Pots
-
Prepare your clay:
Start by cutting three equal portions of speckle buff clay. Wedge each piece thoroughly to remove air bubbles, then roll them into smooth spheres roughly the size of a tennis ball. -
Open the form:
Hold a clay ball in your non-dominant hand. Gently press your thumb into the center of the ball, stopping about a half-inch from the bottom. This base thickness is crucial for stability. -
Pinch the walls:
Starting at the bottom and working upwards, rhythmically pinch the clay between your thumb and fingers. Rotate the ball slightly with each pinch to ensure even wall thickness. -
Shape the curve:
Continue pinching until the walls remain about 1/4 inch thick. Gently curve the walls outward to create an open bowl shape rather than a straight-sided cup. -
Smooth the interior:
Use a damp sponge or a soft rib tool to smooth the inside of the bowl, compressing the clay to remove finger marks and prevent future cracking. -
Refine the lip:
Gently tap the rim with a damp sponge or piece of chamois leather to round it off. A smooth, rounded rim is much more pleasant to touch and use later. -
Create a stable foot:
Tap the bottom of the bowl flat against your work surface. This creates a small, flat sitting area so your bowl won’t rock.
Uneven Walls?
If one side feels thicker while pinching, focus pressure only on the thick spots. Use a needle tool to gauge thickness if you aren’t sure.
Step 2: Drying and Bisque Firing
-
Slow drying:
Loosely cover your three bowls with plastic and let them dry slowly for a day or two. Then, uncover them and allow them to become bone dry. -
Refine the dry surface:
Once bone dry, take a slightly damp sponge and gently wipe the exterior bottom third of the bowl to expose the clay’s grainy texture. This enhances the raw look. -
Bisque fire:
Load the bone-dry bowls into the kiln for a bisque firing (usually to Cone 04). This hardens the clay and prepares it for glazing.
Step 3: Glazing and Final Firing
-
Clean the bisque:
Wipe the bisque-fired bowls with a damp sponge to remove any kiln dust. Dust can prevent glaze from adhering properly. -
Prepare the dip line:
You can use wax resist on the bottom third of the bowl for a perfectly crisp line, or I prefer to freehand the dip for a more organic feel. -
Mix your glazes:
Stir your pastel glazes thoroughly. You want the consistency of heavy cream to ensure an even coat that isn’t too runny. -
The dip method:
Hold a bowl by its foot and dip it upside down into the glaze. Submerge it until the glaze covers the top two-thirds of the exterior. Hold for 3 seconds, then lift straight up. -
Shake off excess:
Give the bowl a gentle shake while it’s still upside down to remove drips, then quickly flip it right-side up to dry. -
Clean the interior rim:
If you poured glaze inside first, ensure the interior glaze meets the exterior glaze at the rim smoothly. If you just dipped, ensure the inside is fully coated by pouring glaze in, swirling, and pouring out. -
Glaze firing:
Once the glaze is dry, fire the bowls to the maturity temperature of your clay and glaze (likely Cone 5 or 6 for stoneware).
Pro Tip: Texture
Don’t over-smooth the outside! Leaving some subtle finger impressions on the raw clay bottom adds tactile contrast against the smooth glaze.
Place your finished trio on a windowsill to catch the light and enjoy the simple elegance of your handmade pottery


Simple Slab Trinket Dishes
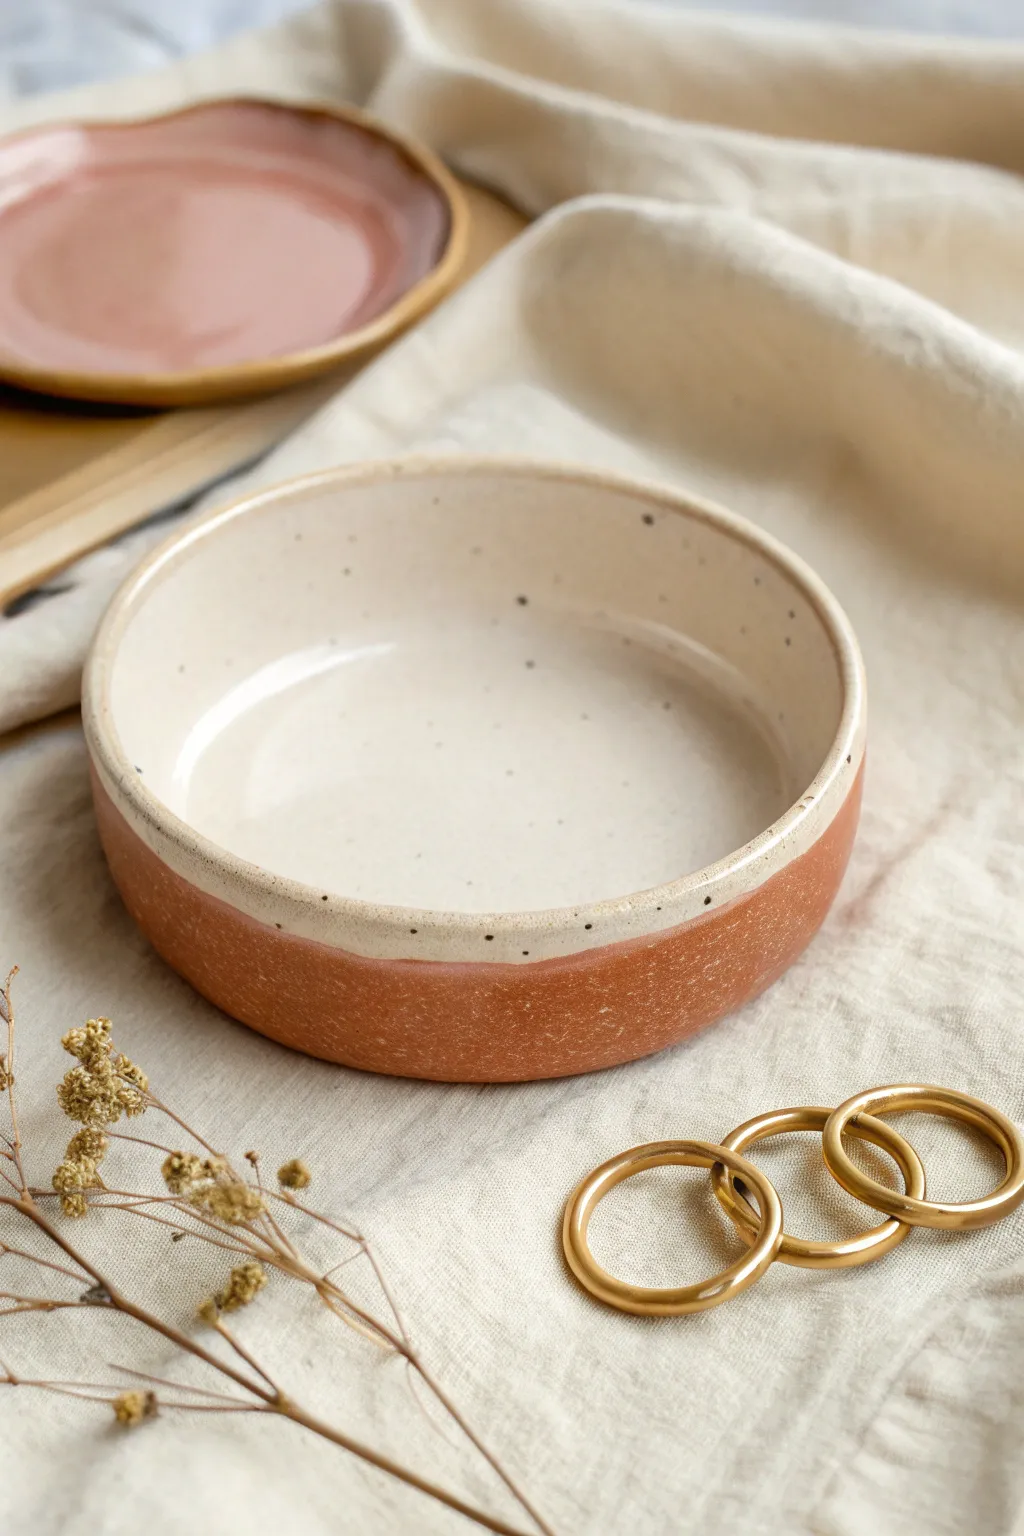
This rustic trinket dish combines the warmth of raw red clay with a smooth, speckled cream interior for a modern, earthy aesthetic. Perfect for holding jewelry or small treasures, the straight-walled cylinder shape adds a contemporary touch to your handmade pottery collection.
How-To Guide
Materials
- Red stoneware or terracotta clay (low fire or mid-fire)
- Speckled white/cream glaze (compatible with your clay choice)
- Clay rolling pin
- Two wooden guide strips (approx. 1/4 inch thick)
- Needle tool or fettling knife
- Circular cookie cutter or template (approx. 4 inches)
- Ruler
- Scoring tool (serrated rib or needle tool)
- Slip (clay dissolved in water)
- Smoothing sponge
- Wax resist (optional)
- Kiln access
Step 1: Creating the Base and Walls
-
Roll the Slab:
Begin by wedging your red clay thoroughly to remove air bubbles. Place the clay between your two wooden guide strips on a canvas surface and roll it out into a smooth, even slab about 1/4 inch thick. -
Cut the Base:
Using your circular cutter or a paper template, cut a perfect circle from the slab. This will be the floor of your dish. Set the excess clay aside but keep it moist. -
Measure the Wall Length:
To determine the length of the strip needed for the wall, you can gently wrap a piece of string around your base circle or calculate the circumference (diameter × 3.14). Add about half an inch for the overlap. -
Cut the Wall Strip:
From the remaining slab, use a ruler and needle tool to cut a long, rectangular strip. For this specific look, aim for a height of about 1.5 to 2 inches. Ensure the top and bottom edges are perfectly straight/parallel. -
Dry Until Leather Hard:
Let both the circular base and the rectangular strip dry slightly until they reach a soft leather-hard stage. They should hold their shape when lifted but still be flexible enough to bend without cracking.
Clean Bevel Cuts
When cutting the wall seam overlap, slice through both layers at once with a sharp knife. This creates perfectly matching angles that join invisibly.
Step 2: Assembling the Form
-
Score the Edges:
Use your scoring tool to scratch up the outer edge of the circular base (the top surface) and one long edge of your rectangular strip (the face that will touch the base). -
Apply Slip:
Generously apply clay slip to the scored areas on both the base and the wall strip. The slip acts as the glue. -
Attach the Wall:
Carefully wrap the rectangular strip around the top edge of the circular base. I find it easiest to work on a banding wheel if you have one, turning the piece as you go. Ideally, the wall sits *on top* of the base for a clean 90-degree angle. -
Join the Overlap:
Where the two ends of the wall meet on the side, cut through both layers at a diagonal angle (bevel cut). Remove the excess bits, score, slip, and press the angled ends together for a seamless join. -
Reinforce the Seams:
Use a modeling tool or your finger to smooth the clay where the wall meets the floor on the inside. You can add a tiny coil of clay into the interior seam and smooth it out to ensure a watertight bond. -
Refine the Rim:
Use a damp sponge to smooth the top rim of the dish. You can leave it flat or slightly round it over with your fingers for a softer feel. -
Bisque Fire:
Allow the piece to dry completely (bone dry). Fire it in the kiln to the bisque temperature appropriate for your clay body (usually Cone 04 or 06).
Make It a Set
Make three dishes of varying circumferences but identical heights. They stack beautifully together for a cohesive vanity set.
Step 3: Glazing and Finishing
-
Clean the Bisqueware:
Wipe the fired piece down with a damp sponge to remove any kiln dust, which can cause glaze defects. -
Wax the Exterior:
This step is crucial for the two-tone look. Apply liquid wax resist to the bottom of the dish and up the exterior walls, stopping about halfway up. This prevents glaze from sticking to the raw clay section. -
Pour the Interior Glaze:
Pour your speckled cream glaze inside the pot. Swirl it around carefully to coat the entire interior surface and the floor, then pour the excess back into your glaze bucket. -
Dip the Rim:
Turn the pot upside down and dip the top rim into the glaze bucket. Submerge it just deep enough so the glaze meets the wax line you painted earlier. This creates the overlap effect. -
Clean Up:
Once the glaze is dry to the touch, use a damp sponge to wipe any stray droplets of glaze off the waxed bottom section. The wax helps, but a final wipe ensures a crisp line. -
Glaze Fire:
Load the piece into the kiln for the final glaze firing (follow the temperature guidelines for your specific glaze and clay, usually Cone 5/6 or Cone 10).
Once cooled, your dish is ready to bring a touch of earthy elegance to your dresser or table.


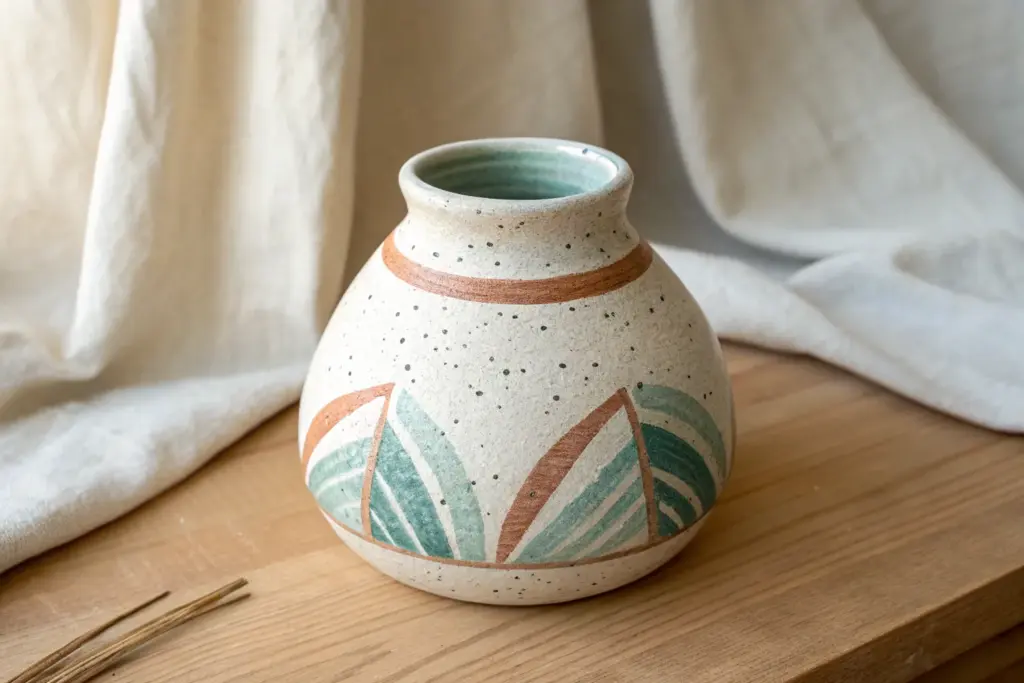
Coil-Built Bud Vases
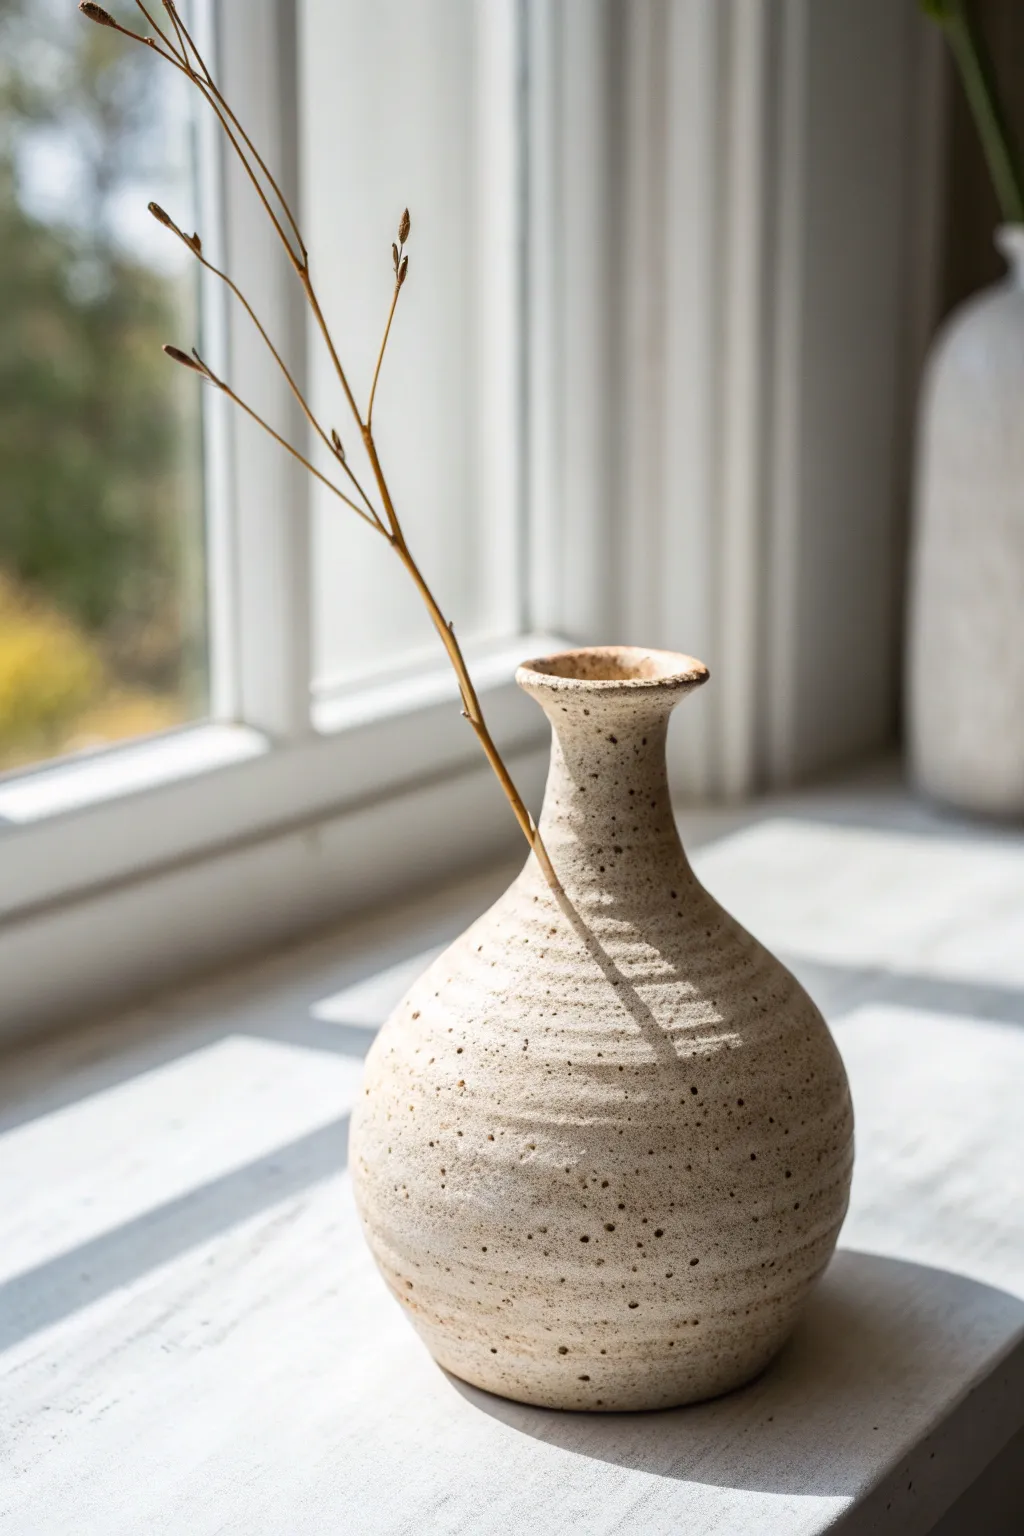
This charming bud vase features a delightfully earthy aesthetic, characterized by its speckled clay body and organic, ridged texture. The coil-building technique used here creates natural horizontal lines that catch the light beautifully, making it a perfect home for a simple dried stem.
Step-by-Step
Materials
- Speckled stoneware clay (mid-fire)
- Scoring tool or serrated rib
- Slip (clay and water mixture)
- Wooden modeling tool
- Sponge
- Cutting wire
- Canvas or ware board
- Clear matte glaze
Step 1: Forming the Base
-
Prepare the slab:
Begin by rolling out a small slab of your speckled clay to about 1/4 inch thickness. This will serve as the foundation of your vase. -
Cut the circle:
Use a needle tool or a cookie cutter to cut out a circle approximately 3 inches in diameter. Smooth the edges with your finger to remove any sharp burrs. -
Score the edge:
Take your serrated rib or scoring tool and rough up the outer 1/4 inch of the circle’s top surface. Apply a generous dab of slip to the scored area.
Step 2: Building the Body
-
Roll the first coils:
Roll out several snake-like coils of clay on your canvas. Aim for an even thickness, roughly the width of your pinky finger. -
Attach the first layer:
Place your first coil onto the scored edge of the base. Cut the ends at an angle where they meet to ensure a seamless join. -
Smooth the interior:
Using your thumb or a wooden tool, smear the clay from the coil downward onto the base on the *inside* of the pot only. This bonds the clay while leaving the outside texture visible. -
Build outward:
Continue adding coils, stacking each slightly towards the outside of the previous ring. This expands the form to create that bulbous belly shape. -
Create the texture:
As you stack, gently press the coils together but don’t smooth the exterior completely. I like to run a wet finger lightly over the outside seams to soften them while keeping the distinct horizontal ridges seen in the reference image. -
Curve inward:
Once the vase reaches about 3 inches in height, begin placing your coils slightly toward the *inside* of the previous ring to narrow the form.
Coil Consistency
Keep your hands slightly damp—but not wet—while rolling coils to prevent cracking. If coils crack when bending, the clay is too dry
Step 3: Neck and Rim
-
Form the neck:
Continue narrowing until the opening is about 1 inch wide. Stack 2-3 coils directly vertically to create the straight neck section. -
Flare the rim:
For the final coil, place it so it overhangs slightly outward. Use your fingers to gently pinch and flare this top ring, creating a soft, welcoming lip. -
Refine the surface:
Wait until the clay is leather hard. Use a slightly damp sponge to tidy up the rim, ensuring it is smooth and pleasant to touch. -
Accentuate the speckles:
If your clay body has grog or speckles, wipe the exterior firmly with a damp sponge. This exposes the grit and enhances the rustic, stony look.
Go Geometric
Instead of leaving the coils round, use a flat paddle to gently beat the exterior when leather hard. This creates faceted, geometric planes
Step 4: Finishing
-
Dry slowly:
Loosely cover the vase with plastic to let it dry slowly over a few days. This prevents the coils from cracking apart as they shrink. -
Bisque fire:
Once bone dry, fire the piece to the appropriate cone for your specific clay body (usually Cone 06 or 04 for initial bisque). -
Glaze application:
Dip the piece into a clear matte glaze. A transparent glaze is crucial here because it protects the vessel while letting the natural clay speckles and coil texture shine through. -
Final fire:
Fire the glazed piece to its maturity temperature (often Cone 5 or 6 for stoneware). Check usually for any sharp spots on the bottom before using
Place your finished vase on a sunny sill and enjoy the way the light catches those handmade ridges


Easy Wheel-Thrown Tumblers
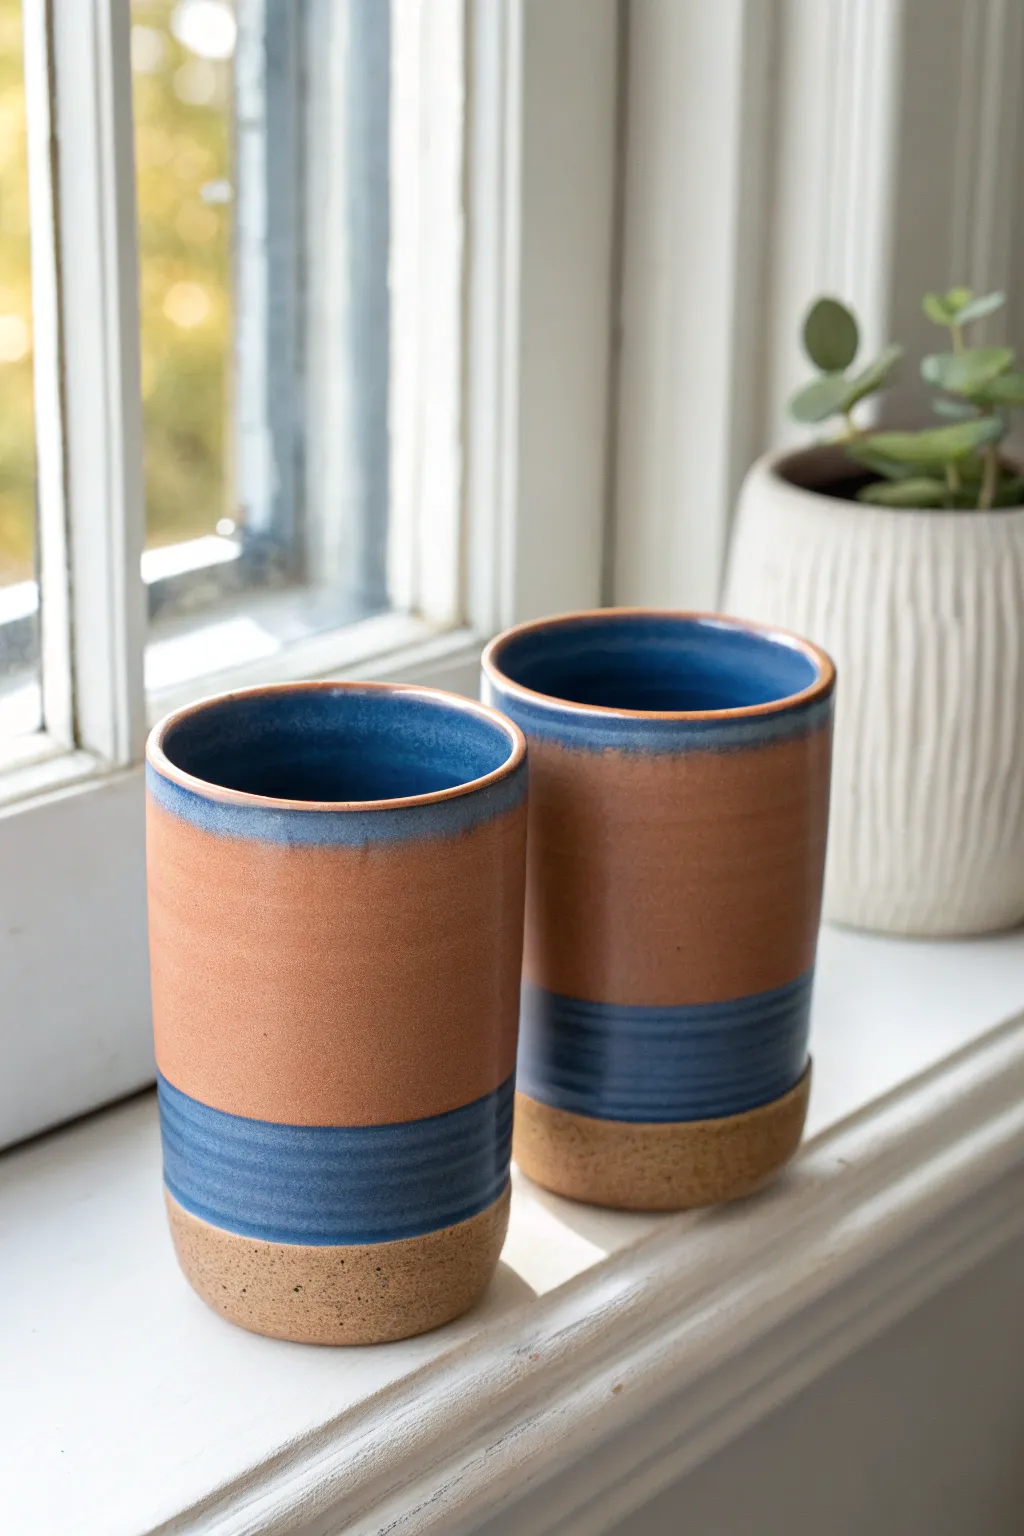
Create a pair of stunning, earthy tumblers that balance raw clay texture with rich cobalt hues. These tall, cylindrical vessels feature a distinct unglazed base that highlights natural speckling, while deep blue bands provide a striking modern contrast.
Detailed Instructions
Materials
- Speckled buff stoneware clay (approx. 1 lb per tumbler)
- Pottery wheel
- Throwing sponge
- Wooden rib tool
- Wire cutter
- Trimming tools
- Deep cobalt blue glaze
- Warm reddish-brown matte glaze (or iron wash)
- Wax resist
- Glaze brush
- Kiln
Step 1: Throwing the Cylinder
-
Prepare the Clay:
Wedge about 1 pound of speckled buff clay thoroughly to remove air bubbles. Center the ball of clay firmly on the wheel head, ensuring it spins true without wobbling. -
Open and Center:
Drill your thumbs into the center to open the clay, stopping about a half-inch from the bat to leave a sturdy floor. Compress the floor with a flat tool or sponge to prevent S-cracks later. -
Pull the Walls:
Begin pulling the walls upward. For a tumbler shape, focus on gaining height while keeping the diameter relatively narrow, roughly 3 inches wide. Aim for straight, vertical walls. -
Shape and Refine:
Use a wooden rib against the outside of the spinning pot while supporting the inside with your hand. This scrapes away excess slurry or ‘throwing slip’ and creates the clean, straight sides seen in the reference. -
Finish the Rim:
Compress the rim gently with a chamois or sponge. A slightly rounded rim feels better on the lips and is less prone to chipping. -
Cut and Release:
Undercut the base slightly with a wooden tool, then use your wire cutter to slice the pot from the wheel. Carefully transfer it to a ware board to dry to leather-hard.
Step 2: Trimming and Bisque
-
Trimming the Foot:
Once leather-hard, center the tumbler upside down on the wheel. Use a loop tool to trim away excess weight from the bottom, creating a clean corner where the wall meets the future exposed clay foot. -
Adding Texture (Optional):
Depending on your preference, you can leave slight throwing rings near the base for tactile interest, as seen in the blue band area. -
Bisque Fire:
Let the tumblers bone dry completely. Load them into the kiln for a bisque firing (usually cone 04 or 06).
Glaze Drip Fix
If the middle glaze is runny, leave a larger gap above the wax line. Gravity pulls glaze down during firing; a ‘safety zone’ prevents it from ruining the raw base or sticking to the shelf.
Step 3: The Glazing Process
-
Wax the Base:
Clean the bisque ware with a damp sponge. Apply wax resist to the bottom inch and a half of the tumbler. This preserves the raw speckled clay look at the base. -
Interior Glazing:
Pour the cobalt blue glaze into the interior of the mug. Swirl it quickly to coat the entire inside and pour out the excess immediately to avoid uneven thickness. -
Dip the Rim:
Hold the tumbler by the base and dip the top rim (about 1 inch deep) into the same blue glaze. This creates the dark band at the top. -
Glaze the Body:
Brush or dip the middle section in a warm, reddish-brown matte glaze. This glaze needs to be applied carefully between the blue rim and the waxed base area. -
Create the Lower Band:
For the lower blue accent, carefully brush a band of the cobalt glaze right where the glaze meets the wax line. The wax will repel the glaze from the foot, keeping that line sharp. -
Blending the Seams (Optional):
If the transition between the top blue rim and the brown body looks too harsh, I sometimes dab a little more blue glaze over the overlap to encourage a subtle meld during firing. -
Final Clean Up:
Use a damp sponge to wipe any stray glaze droplets off the waxed bottom section. Even with wax, spots can cling and ruin the raw clay aesthetic. -
Glaze Fire:
Load the glazed tumblers into the kiln and fire to the maturity temperature of your clay and glaze (typically cone 5/6 for stoneware).
Thumb Grip
While throwing, press a small indentation into the side wall where a thumb naturally rests. It makes a handle-less tumbler much more comfortable and secure to hold.
Enjoy your morning coffee or evening tea in a vessel that feels as good as it looks

What Really Happens Inside the Kiln
Learn how time and temperature work together inside the kiln to transform clay into durable ceramic.
Cute Animal Planter Pots
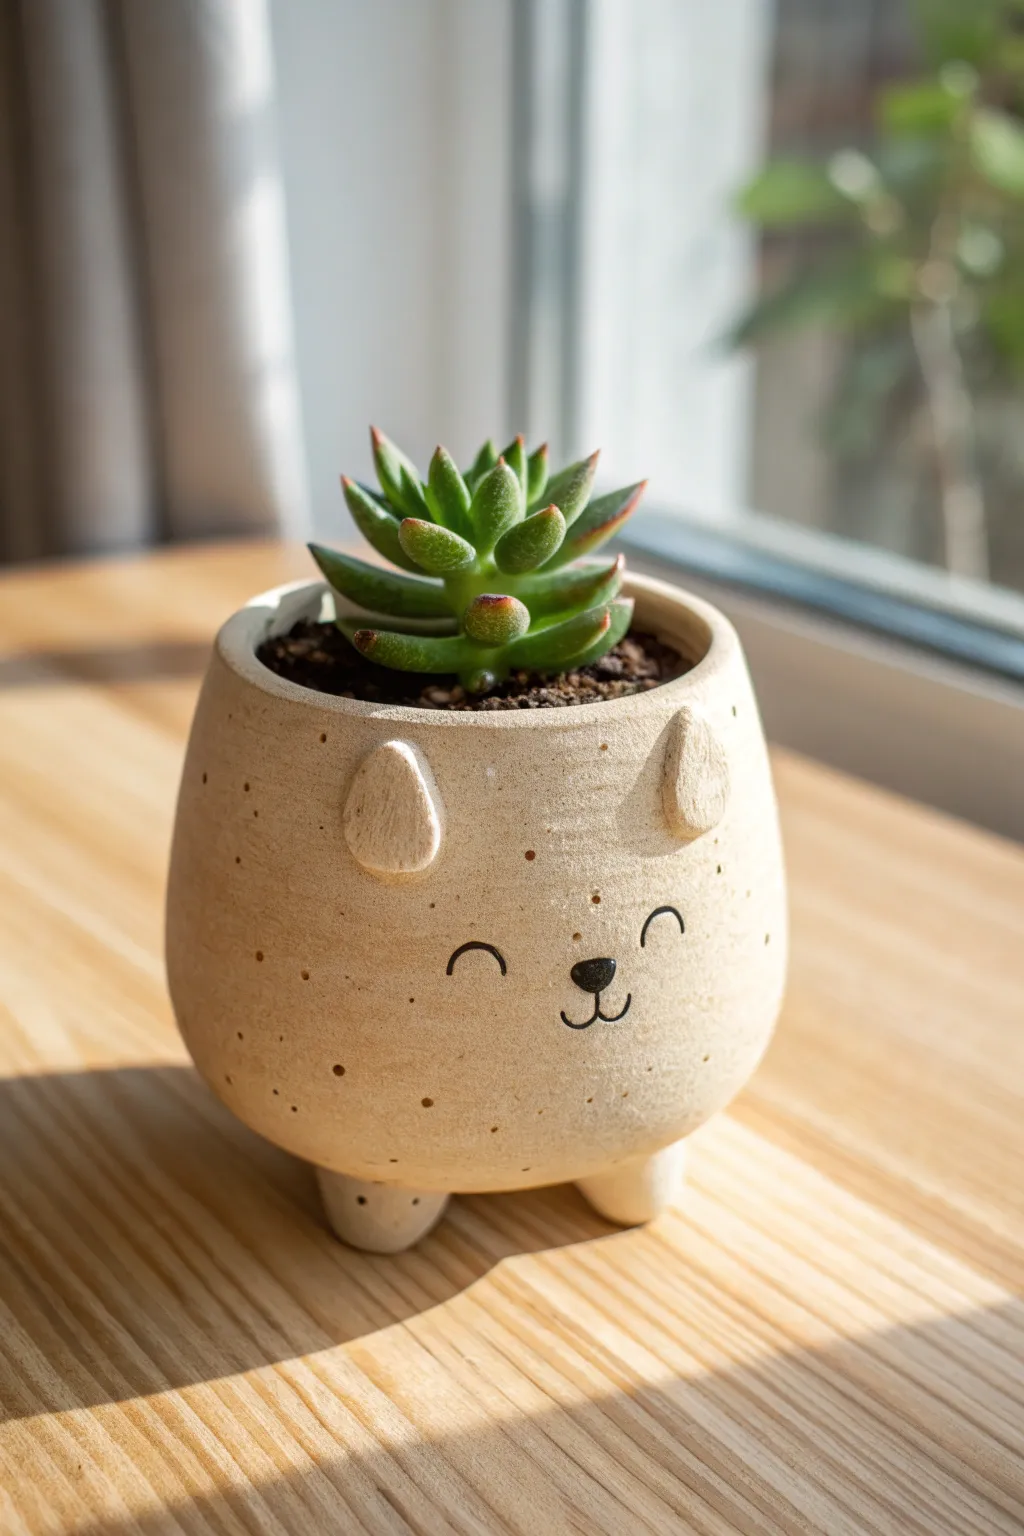
Bring a touch of sweetness to your succulent collection with this adorable animal-themed planter. Featuring a natural speckled clay body, tiny tripod feet, and a minimalist smiling face, this project combines simple hand-building techniques with charming details.
Step-by-Step Tutorial
Materials
- Speckled stoneware clay (pyrite or grog mix)
- Pottery wheel (optional, can be pinch-pot style)
- Needle tool
- Small kidney scraper (metal or rubber)
- Sponge
- Scoring tool (or serrated rib)
- Slip (clay mixed with water)
- Black underglaze
- Fine detail paintbrush
- Clear matte glaze (optional)
- Rolling pin (if hand-building)
Step 1: Forming the Body
-
Prepare the clay:
Begin with a ball of speckled stoneware clay roughly the size of a large orange. Determine if you want to throw on the wheel or hand-build. -
Create the base form:
If wheel-throwing, center your clay and open it up to create a bowl shape with slightly curved walls that taper inward at the rim. If using the pinch pot method, gently press your thumb into the center of the ball and pinch the walls evenly as you rotate. -
Refine the shape:
Aim for a rounded, organic sphere shape with the top cut off. Use a kidney scraper to smooth the exterior walls, removing any finger marks or throwing ridges to create a sleek surface. -
Trimming the base:
Once the pot is leather hard, trim or smooth the bottom to ensure it’s rounded. This pot relies on added feet for stability, so the bottom itself doesn’t need a flat foot ring.
Step 2: Adding the Features
-
Shape the feet:
Roll three small balls of clay, each about the size of a large marble or a grape. Gently tap them on a flat surface to create a slight cone shape. -
Attach the feet:
Flip your leather-hard pot upside down. Arrange the three feet in a tripod formation. Score the bottom of the pot and the top of the feet, apply slip, and press firmly to attach. -
Blend the seams:
Use a modeling tool or your finger to smooth the clay where the feet meet the body, ensuring a seamless transition. Stand the pot up and tap it gently on the table to level it. -
Form the ears:
Create two small triangular tabs of clay. Flatten them slightly and use your thumb to create a subtle indentation in the center of each, giving them a cupped shape. -
Secure the ears:
Score and slip the attachment points near the rim of the pot. Press the ears on, ensuring they are spaced evenly apart on the ‘front’ face of the pot. Clean up any excess slip with a damp sponge.
Wobbly Pot?
If the pot rocks after attaching the feet, gently tap the pot against a flat board while the clay is still soft to flatten the bottom of the feet evenly.
Step 3: Refining and Decorating
-
Smooth the surface:
Wait until the added parts stiffen slightly. Go over the entire piece with a barely damp sponge to expose the beautiful speckles in the clay and create a soft, stone-like texture. -
Bisque fire:
Allow the pot to dry completely (bone dry) before loading it into the kiln for a bisque firing. -
Paint the face:
Using a fine liner brush and black underglaze, carefully paint the facial features. Draw two small arches for closed, smiling eyes. -
Add the nose and mouth:
Paint a small, solid inverted triangle for the nose centered below the eyes. extend a fine ‘J’ shape and a backwards ‘J’ shape from the bottom tip of the nose to create the mouth. -
Glaze application:
Dip the inside of the pot into a clear glaze to make it waterproof. For the outside, you can either leave it unglazed to enjoy the raw clay texture or apply a thin matte clear coat. -
Final firing:
Fire the piece again to the maturation temperature of your specific stoneware clay and glaze.
Pro Design Tip
For better drainage, punch a hole in the bottom center before attaching the feet. Place the tripod feet wide enough so they don’t block the hole.
Once fired, fill your new little friend with potting soil and your favorite succulent for a desk companion that is sure to make you smile
Face Pots With “Hair” Plants
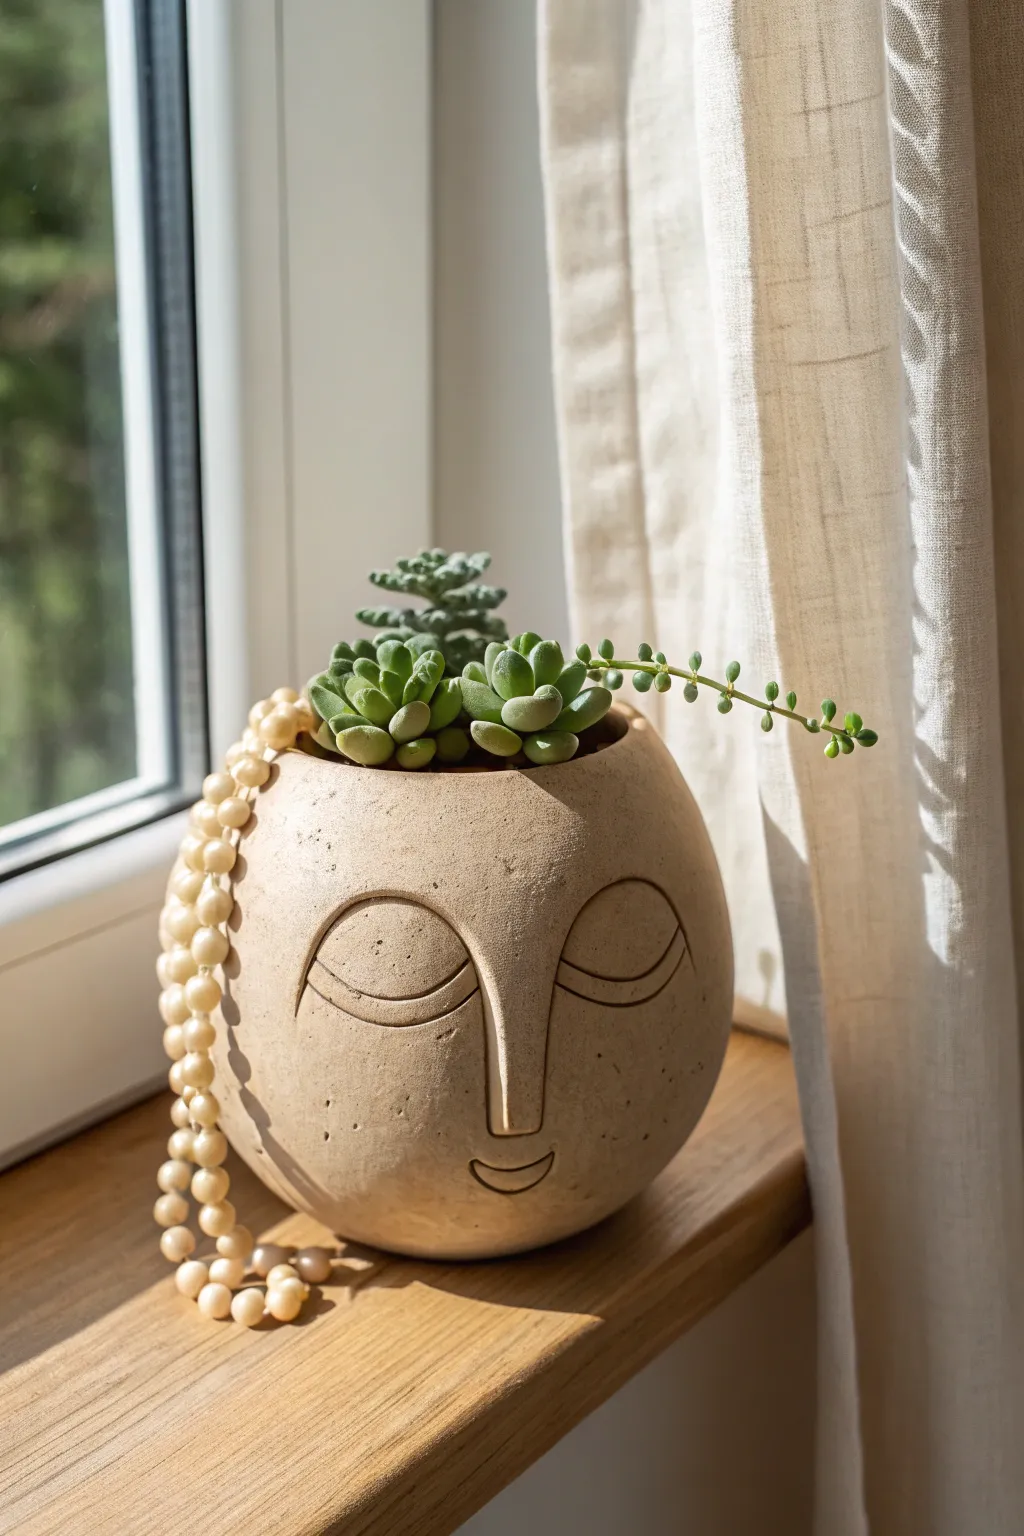
This tranquil face planter combines a modern spherical form with stylized, minimalist features to create a calming home for your succulents. The rough, speckled stoneware texture gives it an organic feel, while the string-of-pearls and rosette succulents act as a playful, living hairstyle.
How-To Guide
Materials
- Speckled buff stoneware clay (with grog for texture)
- Potter’s wheel (or coil building supplies if hand-building)
- Needle tool
- Loop trimming tool
- Small sponge
- Kidney rib (wood or metal)
- Wooden modeling tool with a rounded tip
- Fettling knife
- Clear matte glaze (optional, for interior only)
Step 1: Forming the Sphere
-
Throwing the base:
Begin by centering a substantial ball of clay on your potter’s wheel. Open it up and pull the walls into a cylinder first, keeping the rim slightly thicker than usual to support the inward curve later. -
Shaping the belly:
Using a rib on the outside against your fingers on the inside, gently push the belly of the pot outward to create a voluminous, round shape. Aim for a distinct globe form. -
Closing the form:
Gradually collar the neck inwards to close the sphere. Unlike a vase, you want the opening to remain somewhat wide for planting, but ensure the curve continues inward before stopping. It should look like a ball with the top sliced off. -
Refining the curve:
Use a flexible metal or rubber rib to smooth the exterior, erasing your finger ridges and perfecting that continuous spherical curve. I find spending extra time here makes the face carving much easier later.
Pro Tip: Depth Perception
Make your carved lines deeper than you think necessary. Glaze and firing shrinkage can soften shallow lines, making the face look blurry.
Step 2: Sculpting the Features
-
Leather hard stage:
Allow the pot to dry to a firm leather-hard stage. The clay needs to be sturdy enough to withstand carving without denting the sphere shape. -
Mapping the face:
Lightly sketch the features with a needle tool. Draw two large semi-circles for eyelids, a long vertical line for the nose bridge that connects to the brows, and a small curve for the mouth. -
Carving the nose bridge:
Using a loop tool, carefully carve away clay *around* the nose bridge area to make it slightly raised. You want the nose to emerge from the surface rather than being stuck on. -
Defining the eyes:
Use a dull wooden modeling tool or the back of a loop tool to incise the deep grooves for the eyelids. Press firmly to create a decisive, shadowy line rather than a scratch. -
Adding the double eyelid:
Carve a second, parallel curve completely inside the first eye line. This double-line detail gives the face its sleepy, meditative expression. -
Sculpting the mouth:
Carve a simple, shallow upward curve for the smile. Keep it small and low on the face to maintain the stylized proportions. -
Smoothing texture:
Use a slightly damp sponge to soften any sharp burrs or crumbs from your carving, but avoid washing away the crisp definition of your lines.
Troubleshooting: Flat Face
If the face looks too flat, try gently pushing from the inside of the pot (if your hand fits) behind the nose area to pop it outward slightly before carving.
Step 3: Finishing and Firing
-
Adding drainage:
Flip the pot over and cut a drainage hole in the bottom center. This is crucial for succulent health. -
Drying:
Let the piece dry slowly and evenly, covered loosely with plastic if necessary, until it is bone dry. -
Bisque fire:
Fire the piece to cone 04 (or your clay’s bisque temperature). -
Interior glazing (optional):
If you want the pot to be watertight, pour a liner glaze inside the pot, roll it around, and pour it out. Leave the outside unglazed to show off the natural speckled clay texture. -
Final firing:
Fire to the maturity temperature of your clay body (likely cone 5 or 6 for stoneware). -
Planting:
Once cool, fill with cactus soil. Plant rosette succulents (like Echeveria) on top for volume, and trailing plants (like String of Pearls) on the side to mimic long hair strands, draping a string of beads over the side for extra styling.
Place your finished planter on a sunny windowsill where the sunlight can cast dramatic shadows across the carved features


The Complete Guide to Pottery Troubleshooting
Uncover the most common ceramic mistakes—from cracking clay to failed glazes—and learn how to fix them fast.
Leaf-Imprint Serving Platters
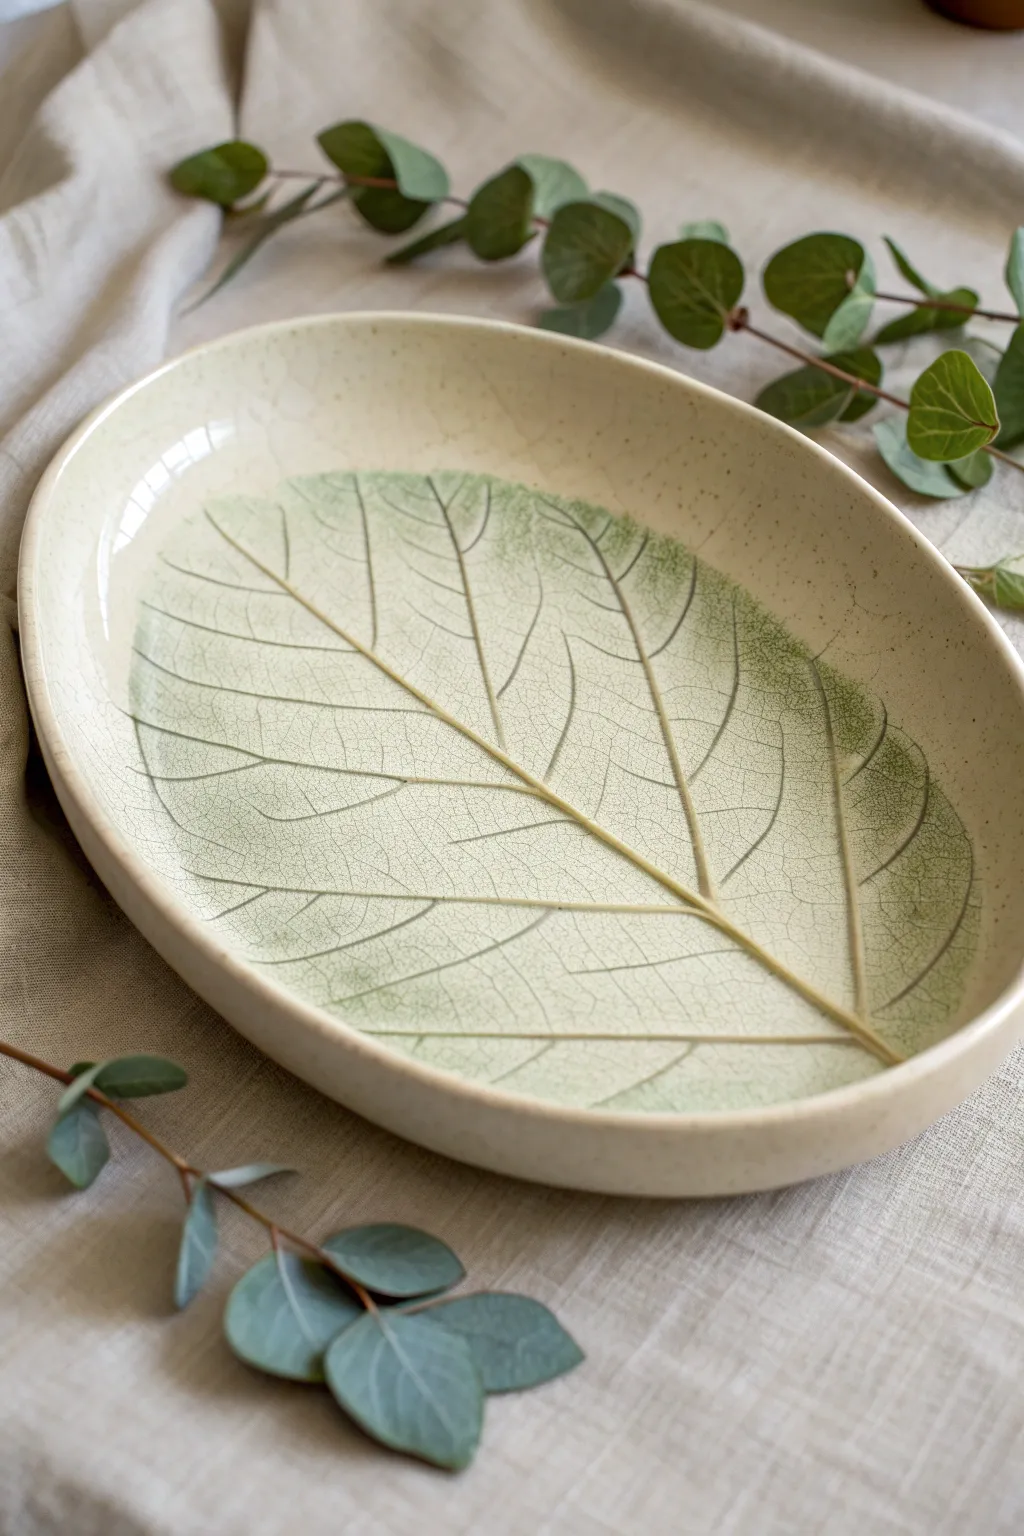
Capture the delicate details of nature with this elegant oval serving dish, featuring a stunningly realistic leaf imprint. The speckled cream clay body pairs perfectly with soft olive green underglaze that highlights tiny veins, creating a piece that feels both rustic and refined.
Step-by-Step Tutorial
Materials
- Speckled stoneware clay (mid-fire)
- Large, fresh leaf with prominent veins (e.g., Hydrangea, Hosta, or Fig)
- Rolling pin
- Canvas board or slab roller
- Fettling knife or needle tool
- Rib tool (smooth wood or rubber)
- GR Pottery Form (oval) or a slump mold
- Sponge
- Dark green or olive underglaze
- Clear glossy glaze
- Soft fan brush
- Clean wiping sponge
Step 1: Slab Preparation
-
Wedge the clay:
Begin with about 2-3 pounds of speckled stoneware clay. Wedge it thoroughly to remove any air bubbles and ensure the particles are aligned, which helps prevent warping later. -
Roll the slab:
Roll your clay out into a large, consistent slab. You want a thickness of approximately 1/4 to 3/8 of an inch. If you are rolling by hand, flip the slab and roll in multiple directions to compress the clay platelets. -
Smooth the surface:
Using a soft rubber rib, compress the surface of the clay slab completely smooth. This removes canvas texture and gives you a pristine canvas for your leaf print.
Step 2: Leaf Impression
-
Position the leaf:
Select your fresh leaf and place it vein-side down onto the center of your smooth slab. The vein side usually has the most texture, which is crucial for a detailed print. -
Roll the impression:
With the leaf in place, use a brayer or your rolling pin to firmly press the leaf into the clay. Roll just once with steady pressure to avoid creating a ‘ghost’ image. -
Cut the shape:
Place your oval template or GR Form over the impressed area to frame the composition. Using a needle tool or fettling knife, cut vertically around the template to create your oval platter shape. -
Peel and reveal:
Carefully lift the edge of the leaf stem and peel it away from the clay to reveal the intricate network of veins impressed into the surface.
Vein Definition Tip
If your leaf is flimsy or the veins are soft, roll the back of the leaf with a brayer before placing it on the clay. This bruises the veins, making them stiffer for a deeper impression.
Step 3: Forming and Refining
-
Shape the platter:
If using a slump mold, gently lift your slab and place it inside the mold. If using a drape mold (like a GR Form), place the form on the slab, flip everything over, and gently press the clay down the sides to create the rim. -
Refine the rim:
While the clay is still pliable, run a damp sponge or a chamois cloth along the cut rim to round off sharp edges and create a professional finish. -
Dry slowly:
Let the platter dry to leather-hard status on the mold. Once stiff enough to hold its shape, remove it from the mold to allow even drying. Bisque fire the piece to cone 04 once completely bone dry.
Make It a Set
Create a nesting set by using three different sizes of oval forms. Use the same leaf species but vary the placement—center heavy on the large platter, off-center on the smaller ones.
Step 4: Glazing Technique
-
Apply underglaze wash:
Mix a small amount of water into your olive green underglaze to create a wash. Brush this generously over the entire leaf impression, ensuring the liquid gets into every tiny vein. -
Wipe back:
As soon as the underglaze loses its wet sheen, take a clean, damp sponge and gently wipe the surface. You want to remove the color from the high points of the clay while leaving the green pigment settled deep in the veins. -
Check the contrast:
Evaluate the look. If the green is too faint, re-apply and wipe again. I like to leave a little extra shading near the outer edges of the leaf for a vignette effect. -
Clear glaze application:
Once the underglaze is dry, dip the entire platter into a clear glossy glaze. Alternatively, brush on three even coats of a brush-on clear glaze. -
Clean the foot:
Wipe the bottom of the platter firmly with a sponge to ensure no glaze remains on the foot ring, preventing it from sticking to the kiln shelf. -
Final firing:
Fire the piece to glaze temperature (typically cone 5 or 6, depending on your clay body) to seal the surface and bring out the speckles.
Enjoy using your beautiful, nature-inspired platter for serving fresh salads or appetizers at your next gathering
Lace-Textured Bowls
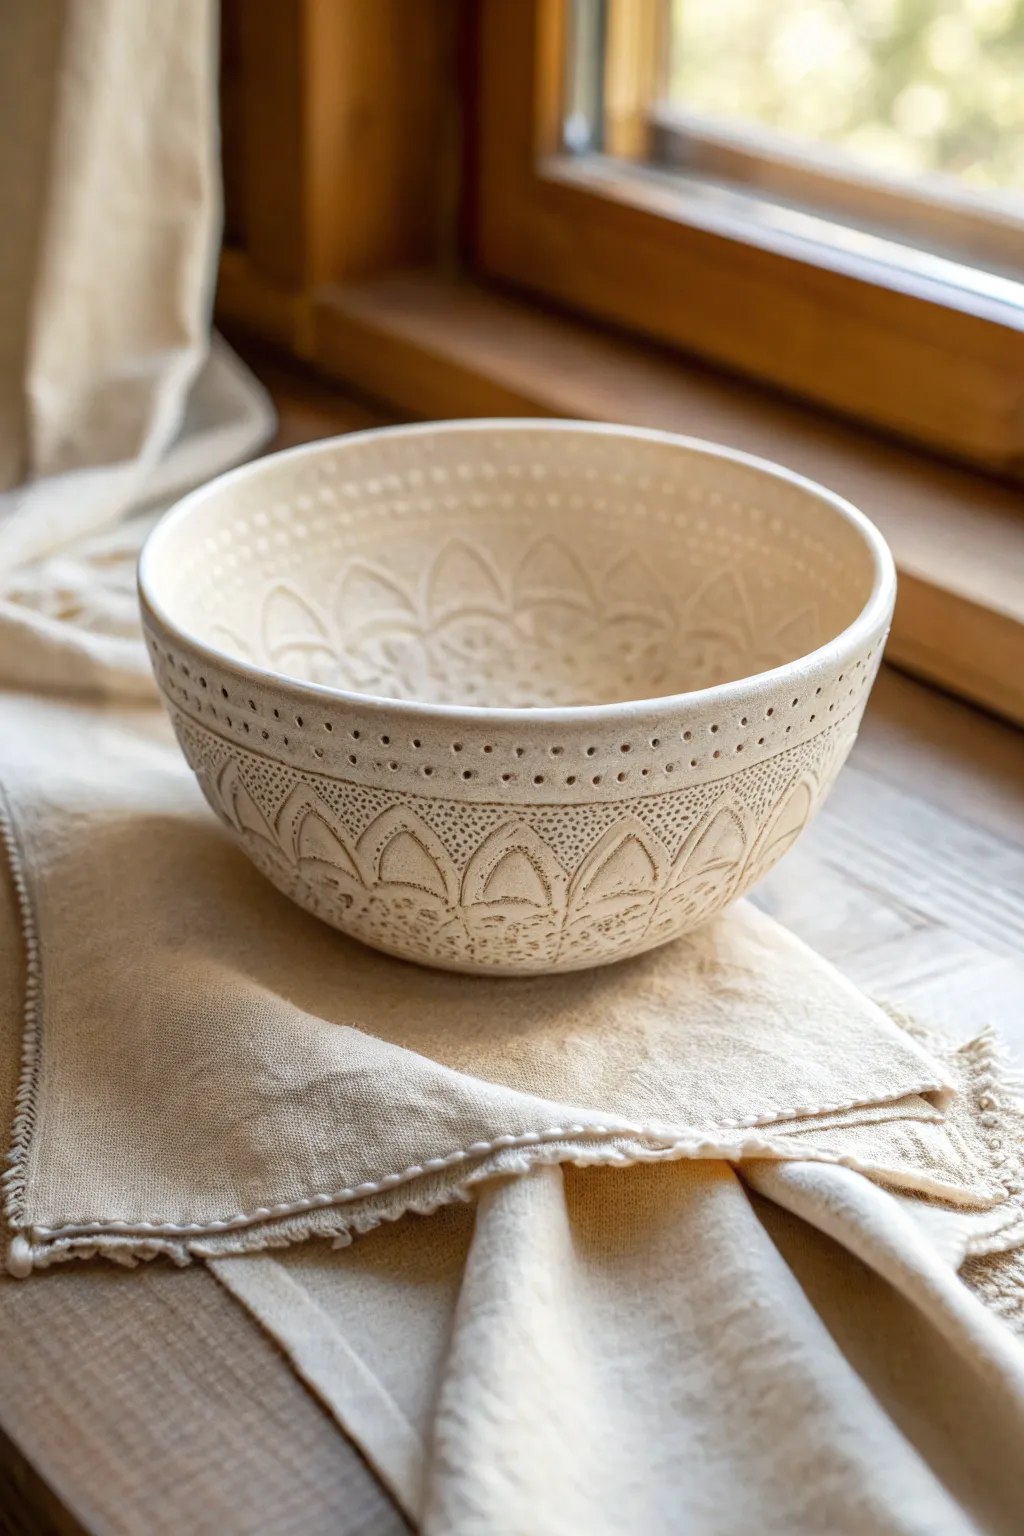
Capture the delicate elegance of vintage textiles in permanent form with this lace-textured bowl project. Using simple slab-building techniques and found objects, you’ll create a functional piece of art featuring intricate arched patterns and rhythmic dotted borders.
How-To Guide
Materials
- White stoneware or porcelain clay body
- Rolling pin
- Two thickness strips (canvas or wood, approx. 1/4 inch)
- Cotton lace or crocheted doily (with distinct scalloped edges)
- Smooth bowl mold (plaster, plastic, or metal)
- Cornstarch or cheesecloth (for mold release)
- Needle tool
- Flexible rib (rubber or metal)
- Wooden modeling tool or small drill bit (for dots)
- Sponge
- Clear or translucent white glaze
Step 1: Preparing the Slab
-
Wedge the Clay:
Begin by thoroughly wedging your white stoneware clay to remove any air bubbles and ensure an even particle distribution, which is crucial for preventing cracks during drying. -
Set Up Thickness Guides:
Place your clay on a canvas-covered work surface. Position your thickness strips on either side of the clay ball to ensure a uniform slab thickness. -
Roll the Primary Slab:
Roll the clay out into a large, even circle or oval, roughly 1/4 inch thick. Make sure the slab is wide enough to drape over your chosen mold with extra room for the rim. -
Compress the Surface:
Take your flexible rib and gently drag it across the surface of the clay in multiple directions. This compression aligns the clay particles and creates a pristine canvas for your texture.
Clean Impressions
If the lace sticks to the wet clay, dust the fabric lightly with cornstarch before placing it on the slab. It acts as a release agent and burns off in the kiln.
Step 2: Adding Texture
-
Position the Lace:
Lay your strip of lace or doily across the clay slab. For the specific design in the image, you want a pattern that includes prominent scalloped arches. -
Impress the Pattern:
Using the rolling pin, roll firmly over the lace one single time. Do not roll back and forth, as this can create a ghost image or double impression. Use enough pressure to embed the texture deeply. -
Reveal the Design:
Carefully peel back the lace to reveal the impressed design. If any small bits of lint remain, pick them out carefully with a needle tool. -
Enhance with Dots:
Use the blunt end of a small drill bit or a round wooden tool to manually press a row of dots just above the scalloped arches, mimicking the perforated border seen in the reference image.
Highlighting Texture
Use a subtle celadon or breaking glaze instead of plain clear. These glazes naturally thin on edges and pool in textures, making the lace pattern pop significantly.
Step 3: Forming the Bowl
-
Prepare the Mold:
Dust your bowl mold lightly with cornstarch or cover it with a thin layer of cheesecloth to prevent sticking. -
Drape the Clay:
Lift your textured slab carefully and drape it into (or over, depending on your mold type) the mold. I generally prefer draping into a concave mold to protect the exterior texture. -
Shape the Walls:
Gently press the clay against the mold walls, working from the center bottom spiraling outward. Be careful not to smudge or flatten your beautiful lace impression. -
Trim the Rim:
Using a needle tool, cut away the excess clay at the rim. hold the tool perpendicular to the mold edge for a clean cut. -
Refine the Edge:
Smooth the cut rim with a slightly damp sponge or a chamois cloth to round it off, ensuring it will be pleasant to touch after firing.
Step 4: Finishing and Firing
-
Slow Drying:
Cover the bowl loosely with plastic and let it dry slowly to the leather-hard stage. Once firm enough to hold its shape, remove it from the mold. -
Bisque Fire:
Allow the piece to become bone dry, then bisque fire it to Cone 04 (or according to your clay body’s instructions). -
Glaze Application:
Dip the bisque-fired bowl into a clear or semi-translucent white glaze. A translucent glaze is essential here, as it will pool slightly in the deep textures, highlighting the lace pattern. -
Wipe Back (Optional):
For extra definition, you can gently wipe the raised areas of the texture with a damp sponge just after dipping, leaving more glaze in the recesses. -
Final Firing:
Glaze fire the piece to the maturity temperature of your clay (typically Cone 5 or 6 for stoneware). This final step vitrifies the clay and makes the surface durable and food-safe.
Once cooled, fill your new bowl with fruit or yarn and enjoy the interaction of light and shadow on the surface

TRACK YOUR CERAMIC JOURNEY
Capture glaze tests, firing details, and creative progress—all in one simple printable. Make your projects easier to repeat and improve.
Bold Painted Pattern Pots
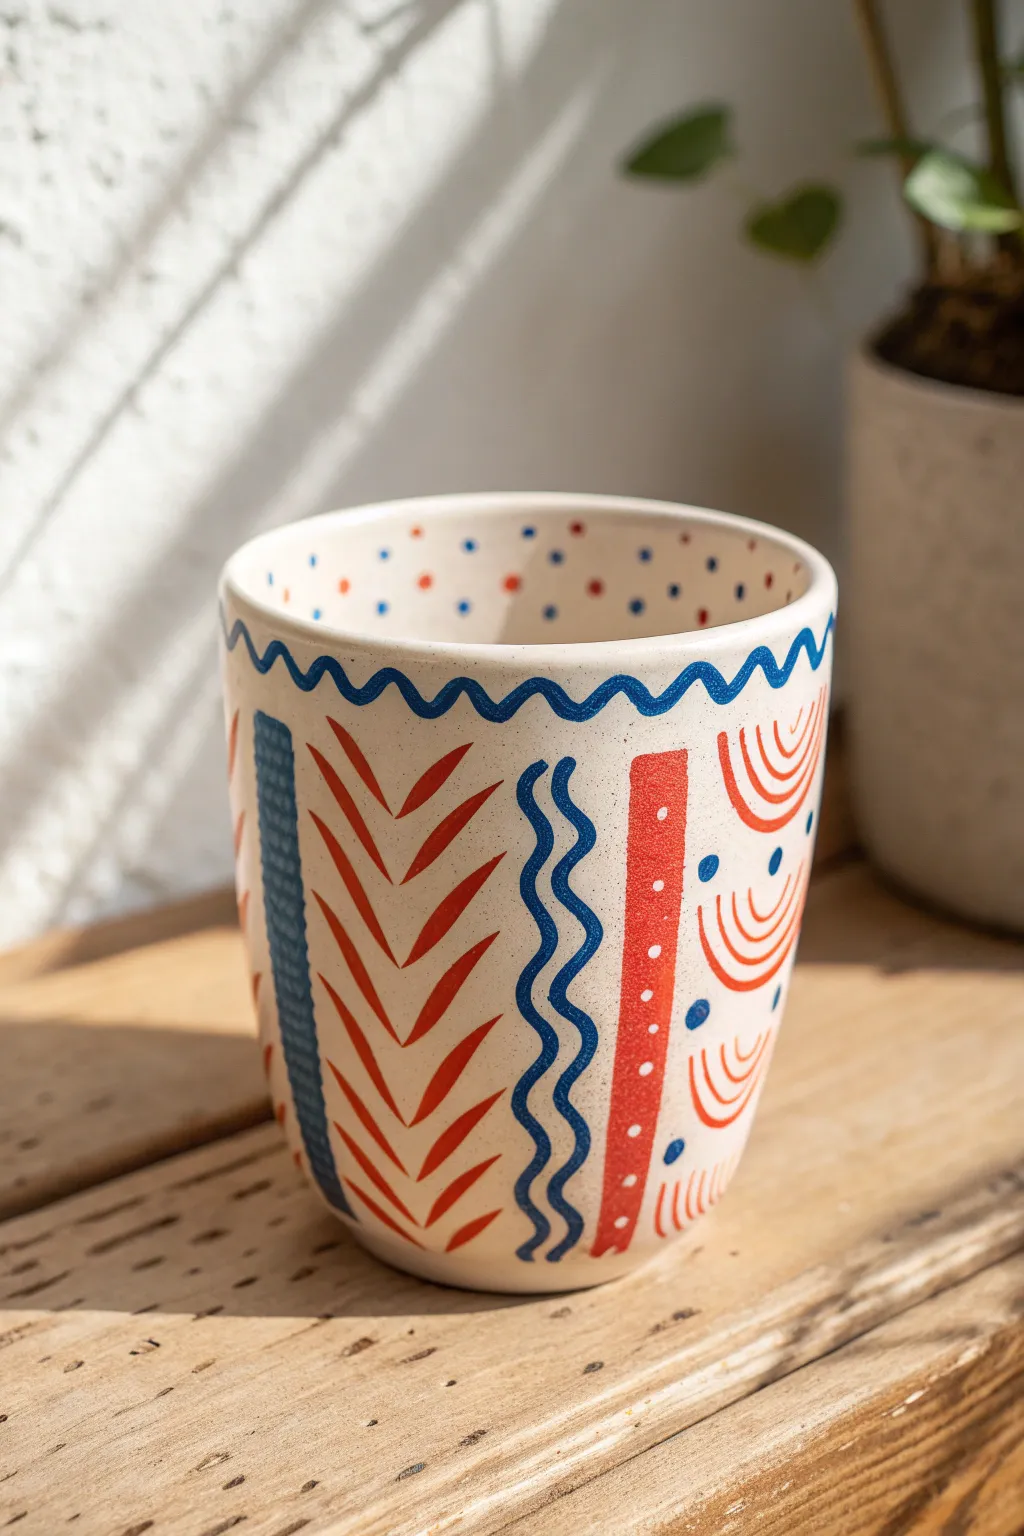
Bring a splash of playful modern art to your morning coffee with this bold, patterned cup design. Combining structured geometric lines with organic freehand waves in classic red and blue creates a timeless piece of functional pottery.
Step-by-Step
Materials
- Bisque-fired ceramic cup or mug
- Underglaze (Dark Blue)
- Underglaze (Bright Red)
- Fine liner brush (size 0 or 00)
- Small round brush (size 2)
- Clear transparent glaze
- Pencil for sketching
- Damp sponge
- Kiln access
Step 1: Preparation & Sketching
-
Clean the bisque:
Start by gently wiping your bisque-fired cup with a damp sponge. This removes any kiln dust or oils from your hands that might resist the underglaze. -
Plan your segments:
Using a pencil, lightly mark vertical guidelines around the outside of the cup to divide the surface into sections. The pencil marks will burn off in the kiln, so don’t worry if they get messy. -
Sketch the main motifs:
Lightly sketch the vertical red bars, the blue wavy lines, and the central chevron/leaf pattern within your segmented spaces to ensure everything fits evenly.
Smudged Lines?
If you smudge a line, don’t panic. Let it dry completely, then gently scratch the mistake off with a needle tool or stiff brush before trying again.
Step 2: Painting the Exterior
-
Paint the top wave:
Load your fine liner brush with dark blue underglaze. Carefully paint a continuous wavy line around the very top rim of the cup. Keep your wrist steady or brace your hand against the table for stability. -
Create the vertical blue wave:
Move to the body of the cup. Using the same blue, paint two parallel wavy lines vertically. These should snake down the side, creating a ribbon-like effect. -
Add the blue dotted bar:
Next to your wave section, paint a vertical column of small, tight blue dots. These should be densely packed to create a textured, bar-like appearance. -
Paint the red bar:
Switch to your bright red underglaze and the size 2 round brush. Paint a solid vertical stripe. I like to do two coats here to ensure the red is opaque and vibrant. -
Decorate the red bar:
Once the red stripe is dry to the touch, use the back of a paintbrush handle or a dotting tool to dip into the blue underglaze (or scrape away the red) to add the white or blue dots down the center. -
Paint the red chevrons:
For the leaf-like chevron pattern, use your liner brush with red underglaze. Paint V-shapes stacked on top of each other. Thicken the strokes slightly in the middle of each ‘leaf’ for a hand-painted feel. -
Fill the gaps:
Examine the remaining empty spaces. Add free-floating elements like curved blue semi-circles or scattered blue dots to balance the composition.
Wax Resist Trick
Apply liquid wax resist over your finished underglaze patterns before dipping in clear glaze. This keeps the design crisp and prevents blurring.
Step 3: Interior Details & Finishing
-
Dot the interior:
Don’t forget the inside! Using the tip of your brush, add a random confetti pattern of small red and blue dots to the interior walls of the cup. -
Let it dry completely:
Allow the underglaze to dry fully. It should look chalky and matte when it is ready for the next step. -
Apply clear glaze:
Dip the entire cup into a clear transparent glaze, or brush on three even coats if you are using a brushing glaze. This will seal your design and make it food-safe. -
Check the foot:
Wipe the bottom foot of the cup clean with a sponge to prevent it from sticking to the kiln shelf. -
Final firing:
Fire the piece in the kiln according to the clay and glaze manufacturer’s instructions (usually Cone 5 or 6 for stoneware).
Once fired, you’ll have a stunning, graphic vessel ready for your favorite hot drink
Terrazzo-Style Clay Coasters
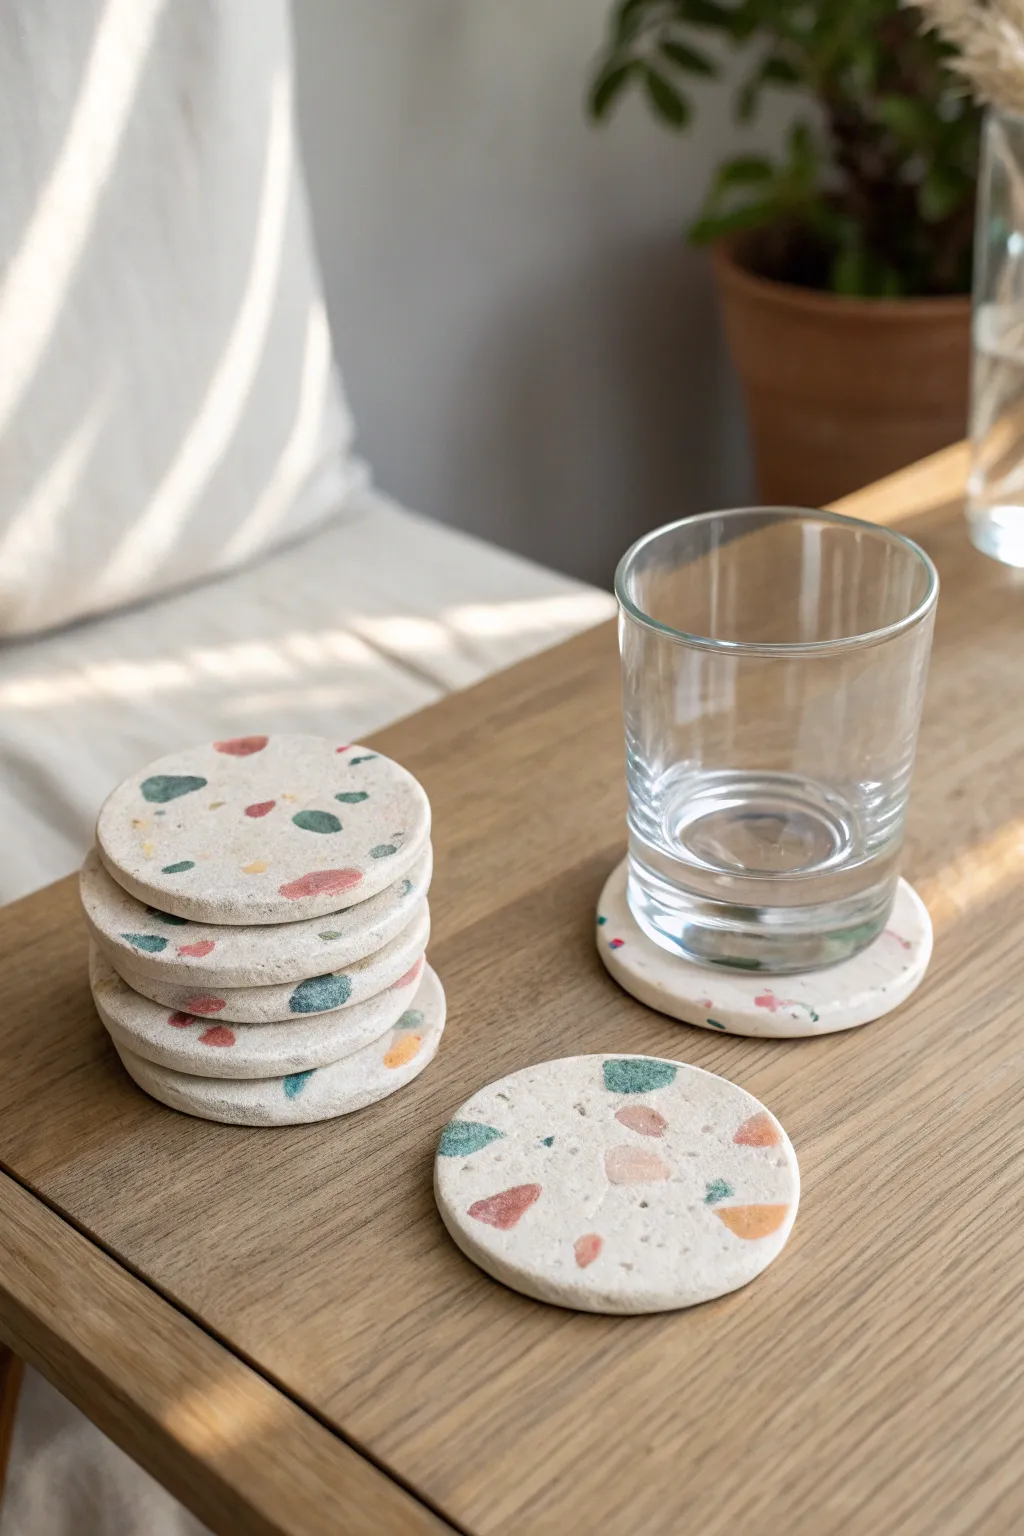
Using small chips of colored clay scraps, you can replicate the classic Italian ‘terrazzo’ stone look right at your kitchen table. These modern, speckled coasters feature a warm off-white base studded with organic shapes of terracotta, sage blue, and mustard yellow.
Step-by-Step Tutorial
Materials
- White or beige air-dry clay (for the base)
- Colored polymer or air-dry clay (terracotta, teal/blue, yellow)
- Rolling pin or smooth glass jar
- Circle cookie cutter (approx. 4 inches) or a bowl to trace
- Sharp craft knife
- Fine-grit sandpaper (200-400 grit)
- Acrylic rolling pin or slab roller
- Matte varnish or sealant for waterproofing
- Parchment paper or non-stick craft mat
Step 1: Creating the Chips
-
Prepare the colored clays:
Take your colored clay portions—terracotta red, sage blue, and mustard yellow work beautifully for this palette. Roll each color out individually until you have very thin sheets, roughly 1-2mm thick. -
Irregular cutting:
Using a craft knife or just your fingers, tear or slice these thin colored sheets into small, random geometric shards. Aim for variety; you want some tiny speckles and some chunkier triangles or rough squares. -
Dry the chips:
Lay these small colored fragments out on parchment paper. If you are using air-dry clay, let them firm up for about 30 minutes so they hold their shape; if using polymer clay, they can be used immediately.
Step 2: Forming the Base
-
Condition the white clay:
Take a large ball of your white or beige base clay. Knead it thoroughly in your hands to warm it up and remove any potential air bubbles, which ensures a smooth, crack-free surface later. -
Initial rolling:
Place the white clay on your non-stick surface or parchment paper. Roll it out into a slab that is slightly thicker than your desired final coaster, perhaps around 1/4 inch thick. -
Scattering the pattern:
Genously sprinkle your prepared colored chips over the surface of the white slabs. Don’t overthink the placement; random scattering creates the most authentic stone look. -
Embedding the chips:
Gently press the chips down with your palm so they stick to the base. Then, take your rolling pin and roll over the slab again with firm, even pressure. This forces the chips into the clay to create a flat, unified surface.
Smart Sanding Hack
Use a damp sanding sponge instead of dry paper. It keeps hazardous clay dust out of the air and polishes the surface simultaneously without scratching.
Step 3: Cutting and Refining
-
Cut the circles:
Position your circular cutter or bowl template over the most interesting sections of your patterned slab. Press down firmly to cut out your coaster shapes. -
Lift and smooth:
Carefully peel away the excess clay from around your circles. I find using a thin blade to help lift the coaster off the work surface prevents it from warping. -
Add texture (optional):
For a more rustic, stone-like feel, you can lightly tap the surface with a toothbrush or rough sponge to remove the synthetic smoothness of the rolling pin. -
Smooth the edges:
Dip your finger in a little water and run it along the cut edge of each coaster to round it off slightly and remove any sharp ridges left by the cutter.
Level Up: Gold Standard
After the clay is dry but before sealing, paint the vertical rim of the coaster with metallic gold liquid leaf for a chic, high-end finished look.
Step 4: Finishing Touches
-
Drying phase:
Place the coasters on a flat board to dry. To prevent curling edges, flip them over every few hours during the first day of drying. Allow them to cure fully for 24-48 hours depending on humidity. -
Sanding for exposure:
Once bone dry, take your fine-grit sandpaper and sand the surface in circular motions. This is the magic step: it removes the top film of white clay and makes the colors of the embedded chips pop vividly. -
Clean up dust:
Wipe the coasters thoroughly with a slightly damp cloth to remove all sanding dust. -
Sealing:
Apply two to three thin coats of a matte varnish or dedicated clay sealant. This is crucial for coasters, as it protects the clay from condensation and moisture rings.
Now you have a stylish set of faux-stone coasters ready to protect your tabletops with artisan flair
Soap Dishes With Drainage Slots
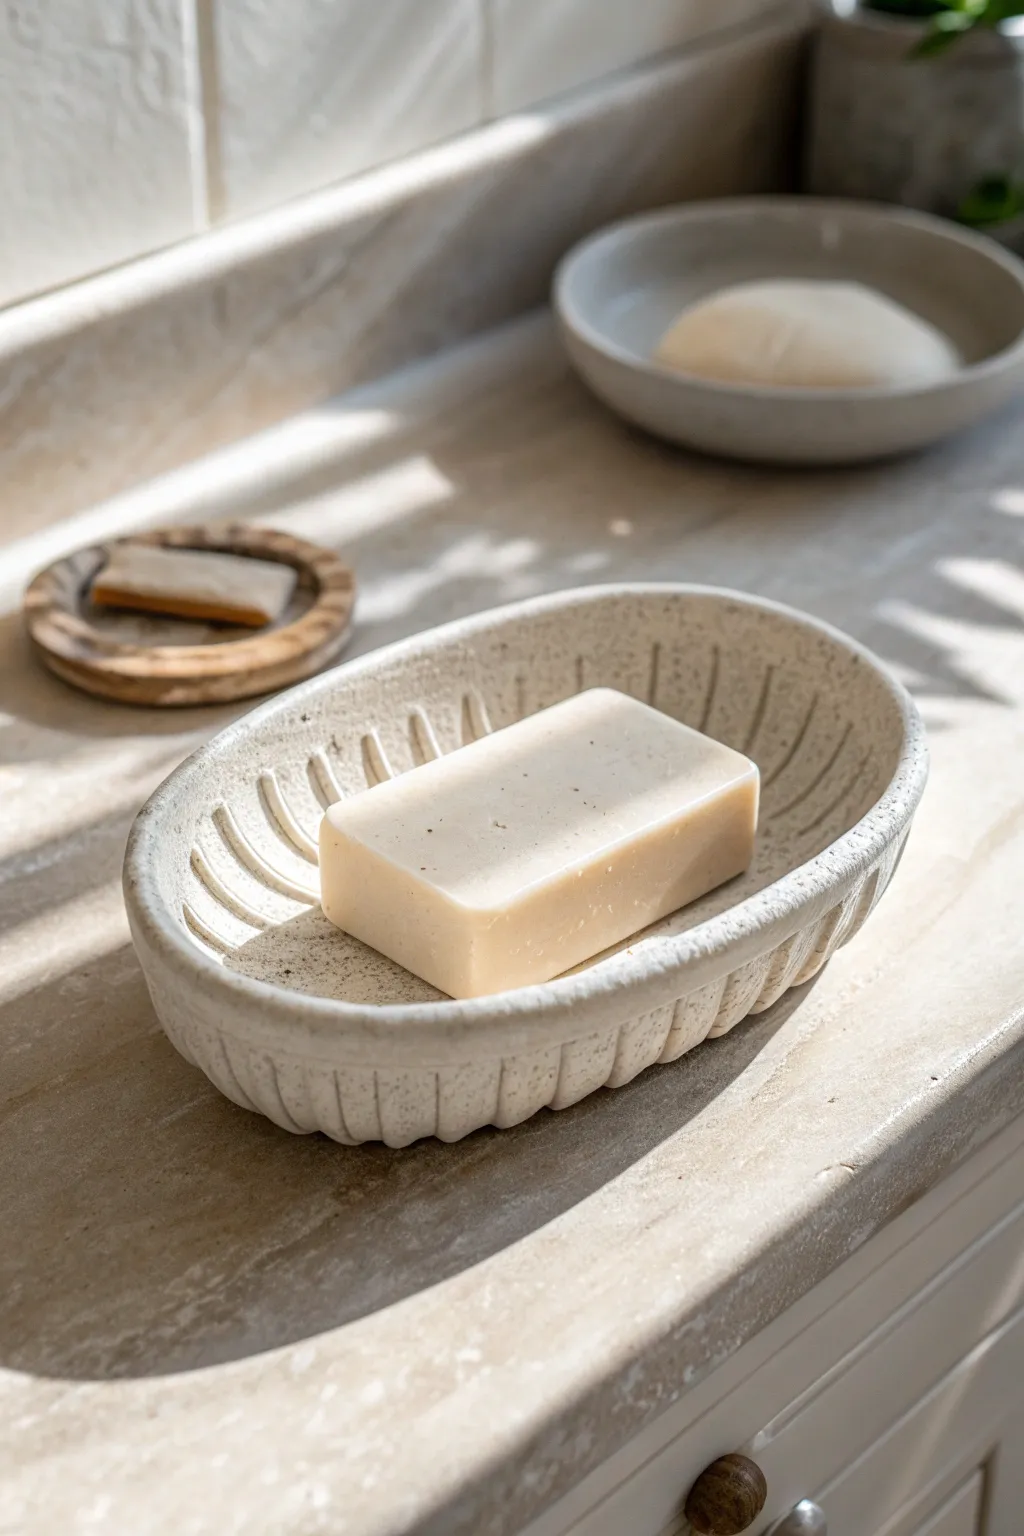
This charming, rustic soap dish features a classic oval shape with functional interior ridges to keep your soap dry and lasting longer. The textured exterior and speckled clay body give it a beautifully natural, earthy aesthetic that elevates any bathroom sink.
How-To Guide
Materials
- Speckled stoneware clay (mid-fire)
- Oval template (paper or craft foam)
- Slab roller or rolling pin
- Canvas board or work surface
- Needle tool
- Rib tool (flexible metal or rubber)
- Small carving loop tool
- Damp sponge
- Clay knife or fettling knife
- Clear matte glaze
Step 1: Forming the Base
-
Roll the slab:
Begin by rolling out a medium-sized slab of speckled stoneware clay to a uniform thickness, roughly 1/4 inch. Ensure the clay is compressed on both sides to prevent warping later. -
Cut the shape:
Place your oval template onto the slab. Using your needle tool, cut cleanly around the perimeter. Remove the excess clay but keep it nearby for the next step. -
Smooth the edges:
Run a damp sponge or your finger along the cut edge of the oval base to soften the sharp corner left by the needle tool. This makes the next phase of attaching the wall much cleaner.
Keep it Clean
Use a damp paintbrush to smooth the deep carved ridges inside. Fingers are often too big to reach the bottom of the grooves without smudging the sharp edges.
Step 2: Building the Walls
-
Prepare the wall coil:
Take your leftover clay and roll out a long, even coil or strip. For the look in the photo, I prefer cutting a strip from the slab about 1 inch tall, rather than rolling a round coil, as it gives a more consistent wall height. -
Score and slip:
Score the outer edge of your oval base and one side of your clay strip thoroughly. Apply a small amount of slip or water to the scored areas to create a glue-like bond. -
Attach the wall:
Gently press the strip onto the base edge, wrapping it around the oval. Overlap the ends slightly, cut through both layers at an angle, and join the seam securely. -
Blend the seams:
Use a modeling tool or your finger to firmly blend the clay strip down onto the base on both the interior and exterior. The connection needs to be seamless to ensure the dish is watertight. -
Shape the rim:
Support the wall with one hand while using a damp sponge to round off the top rim. Gently flare the walls outward slightly to mimic the open shape in the image.
Step 3: Adding Texture & Ridges
-
Carve exterior texture:
Using the side of a wooden tool or a carving tool, press vertical indentations around the outside of the wall at regular intervals. These ribs give the dish its distinctive tactile finish. -
Mark interior ridges:
Lightly sketch the placement of the interior drainage ridges with a needle tool. You want them running perpendicular to the long side of the oval. -
Carve the valleys:
Using a small loop tool, carve out the ‘valleys’ between the ridges. Remove clay to create deep grooves, leaving the raised portions high enough to lift the soap. -
Refine the ridges:
Smooth the carved channels with a damp brush or fingertip to remove clay burrs. Ensure the ridges slope slightly down toward the center to catch water. -
Final drying check:
Set the piece aside to dry slowly under loose plastic to leather hard. Check that the base remains flat; if it bows, gently press it back down.
Elevate It
Add small feet to the bottom of the dish using small balls of clay. This lifts the dish off the counter, helping air circulate and preventing water rings underneath.
Step 4: Finishing
-
Bisque fire:
Once bone dry, fire the piece to bisque temperature (usually cone 04) to prepare it for glazing. -
Glaze application:
Dip or brush a clear matte glaze over the entire piece. This allows the natural speckles of the clay body to remain the star of the show while sealing the surface. -
Wipe the foot:
Before the final firing, meticulously wipe any glaze off the very bottom of the dish to prevent it from sticking to the kiln shelf. -
Glaze fire:
Fire the dish to the final temperature required by your clay and glaze combination (typically cone 5 or 6 for stoneware).
Place your favorite artisan soap on the ridges and enjoy the functional beauty you’ve created
Incense Holder Catch-All Trays
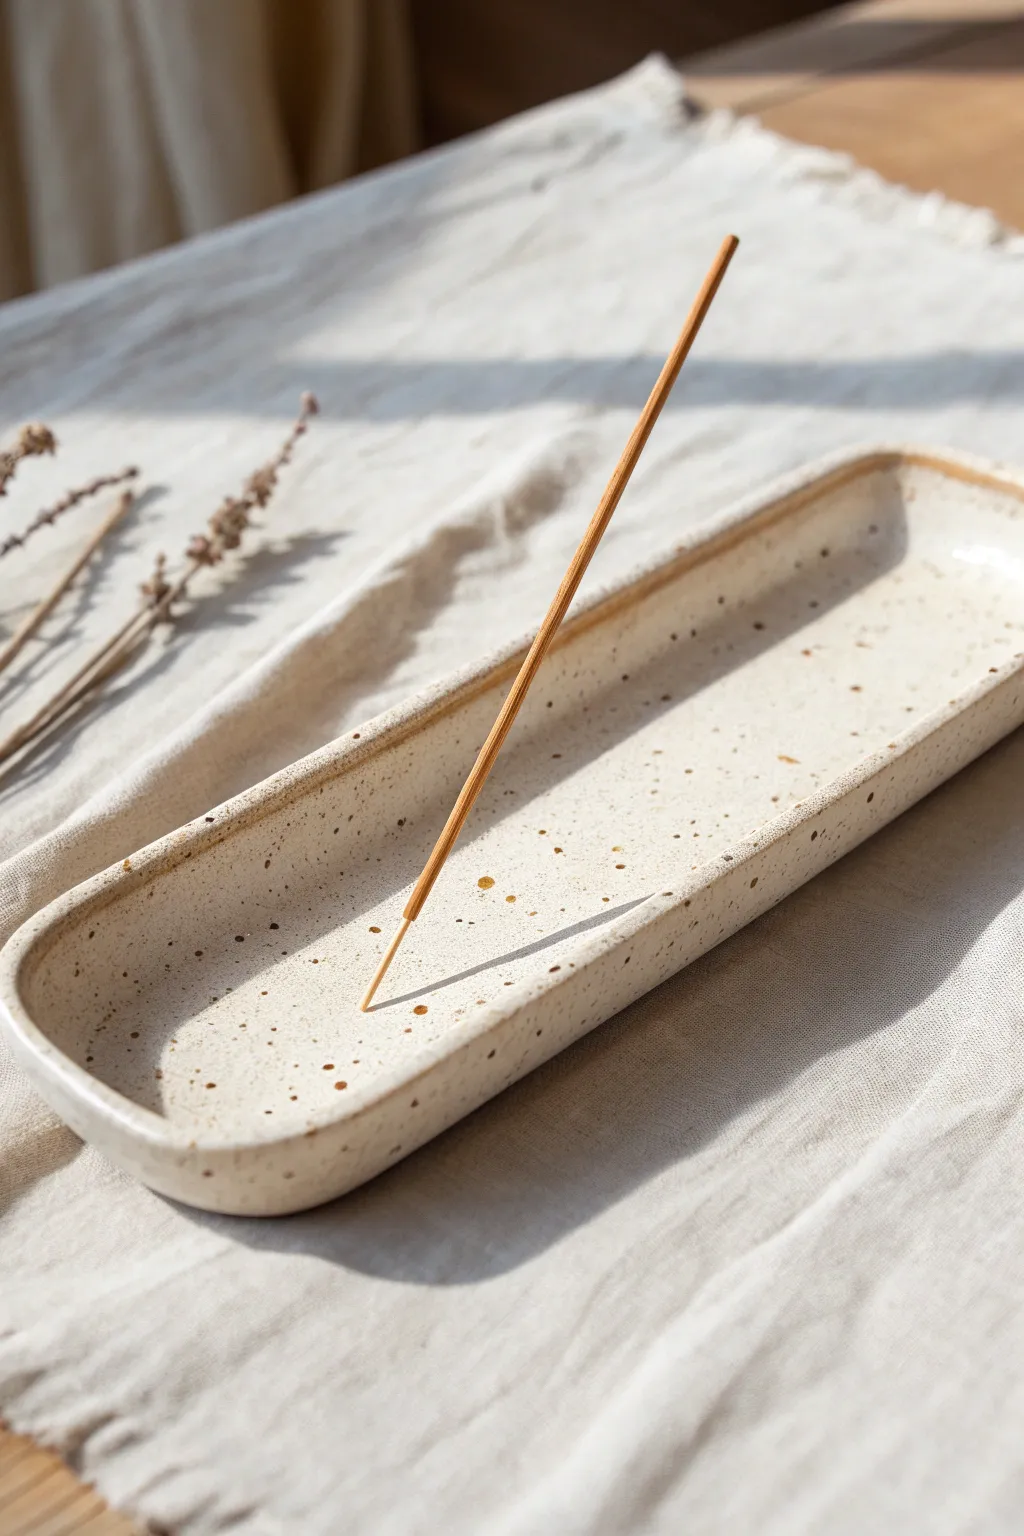
This elegant catch-all tray doubles as an incense holder, featuring a clean, elongated oval shape and a charming speckled finish. The creamy glaze and subtle earthy spots give it a modern yet rustic feel perfect for a minimalist home.
Step-by-Step
Materials
- Speckled Stoneware Clay (or white clay with grog)
- Rolling Pin
- Canvas Mat or Slab Roller
- Needle Tool
- Kidney Rib (rubber or metal)
- Sponge
- Modeling Tool or Smooth Rock
- Clear or Creamy White Glaze (cone 6 or appropriate for your clay)
- Oval Template (paper or cardstock)
- Kiln
Step 1: Preparing the Slab
-
Wedge the clay:
Start by thoroughly wedging about 1-2 lbs of speckled stoneware clay to remove air bubbles and ensure an even consistency. -
Roll the slab:
Roll out a slab of clay to a uniform thickness, approximately 1/4 inch. Use guide sticks if you have them to keep the thickness perfectly even. -
Smooth the surface:
Before cutting, compress the slab on both sides using a rubber rib. This aligns the clay particles which helps prevent warping later and creates a pristine surface for the glaze.
Angle Advice
When poking the incense hole, angle it so the stick will hang over the longest part of the tray. If the angle is too steep, ash will fall outside the rim.
Step 2: Shaping the Form
-
Cut the oval base:
Place your elongated oval paper template (about 8-10 inches long) onto the slab. Trace around it with a needle tool and remove the excess clay. -
Create the walls:
From the leftover slab, cut a long strip of clay, roughly 3/4 inch tall. This will become the raised rim of your tray. -
Score the edges:
Using a serrated rib or needle tool, score the entire outer edge of the oval base and one long edge of your wall strip. Apply a small amount of slip or water to the scored areas. -
Attach the wall:
Gently place the strip onto the base, wrapping it around the perimeter. Overlap the ends slightly, cut through both layers at an angle, and join the seam together firmly. -
Blend the seams:
Use a modeling tool to blend the clay from the wall down onto the base on the inside, and from the base up onto the wall on the outside. Ensure the connection is seamless.
Step 3: Refining Characteristics
-
Smooth the rim:
Take a damp sponge and run it over the top edge of the rim to round it off slightly. You want a soft, organic edge rather than a sharp, machine-cut look. -
Shape the interior curve:
Use your finger or a rounded tool to gently press the inside corner where the wall meets the floor, creating a soft curve rather than a sharp 90-degree angle. This makes cleaning ash easier later. -
Add the incense hole:
Find the visual center of the tray or choose a spot slightly off-center for a modern look. Pierce the clay with a needle tool at an angle (roughly 45 degrees) pointing toward the long end of the tray. -
Check the hole size:
Give the needle tool a tiny wiggle to enlarge the hole slightly, accounting for glaze thickness and clay shrinkage. Test it with a real incense stick if possible to ensure the angle catches ash. -
Final smooth:
Once the clay is leather hard, give the entire piece a final polish with a slightly damp sponge to remove any fingerprints or grog that has surfaced.
Make it Match
Create a matching set by using the same clay and glaze to make a small cylindrical match holder that sits inside the tray.
Step 4: Firing and Glazing
-
Bisque fire:
Allow the piece to dry slowly and completely before loading it into the kiln for a bisque fire (usually Cone 04). -
Apply the glaze:
Dip the piece into a glossy cream or clear glaze. Because the clay body is speckled, a sheer or semi-opaque glaze works best to let those iron spots show through. -
Clean the foot:
Wipe the bottom of the tray completely clean of glaze with a wet sponge to prevent it from sticking to the kiln shelf. -
Glaze fire:
Fire the piece to the maturity temperature of your clay body (likely Cone 5 or 6). I personally love how high firing brings out the iron speckles in the clay.
Now you have a serene, functional piece of art ready to hold your favorite scents
Pressed-Botanical Candle Holders

These charming candle holders combine the warmth of raw stoneware with a delicate botanical motif and a creamy, speckled glaze. The recessed leaf design reveals the natural clay body beneath, creating a lovely textural contrast perfectly suited for cozy taper candles.
Step-by-Step Guide
Materials
- Speckled stoneware clay (white or light buff)
- Rolling pin and guide sticks (approx. 1/4 inch thick)
- Circular template or cookie cutter (approx. 4 inches diameter)
- Fettling knife or needle tool
- Slip and scoring tool
- Carving tools (small ribbon tool or sgraffito loop)
- Sponge
- Wax resist
- Creamy matte white glaze (translucent or speckled)
- Taper candle for sizing (standard 7/8 inch)
Step 1: Forming the Cylinder Body
-
Roll the Slab:
Start by wedging your speckled stoneware clay thoroughly to remove air bubbles. Roll it out into an even slab using your guide sticks to ensure a consistent thickness of about a 1/4 inch. -
Cut the Rectangle:
Measure and cut a rectangular strip from your slab. For a holder similar to the image, aim for a strip about 2.5 inches tall and roughly 8.5 to 9 inches long, depending on how wide you want the final cylinder. -
Bevel the Edges:
To create a seamless join, cut 45-degree bevels on the two short ends of your rectangle. Bevel one end facing up and the other facing down so they overlap perfectly when curled. -
Form the Cylinder:
Gently curl the slab into a circle, bringing the beveled edges together. Score the beveled surfaces, apply a generous amount of slip, and press them firmly together to close the loop. -
Smooth the Seam:
Use a rib tool or your finger to smooth the seam inside and out until it is invisible. I like to gently compress the rim at this stage to ensure the circle is perfectly round.
Clean Lines Pro Tip
When applying wax resist, use a very fine brush. If you accidentally get wax on the main body, sand it off gently after the wax dries but before glazing, or the glaze spot will remain bare.
Step 2: Creating the Candle Well
-
Making the Top Insert:
Roll a small piece of slab slightly thicker than the walls. Cut a circle that fits precisely inside your cylinder. You can use the cylinder itself as a cookie cutter to get the initial size, then trim slightly to fit inside. -
Positioning:
Place this circular disc inside the cylinder toward the top, leaving a rim of about 1/4 inch above it. This creates the ‘cup’ look seen in the photo rather than a solid block. -
Secure the Insert:
Score the inside walls and the edge of the disc, add slip, and press the disc into place. Smooth the interior join with a modeling tool or finger so it looks like one cohesive piece. -
Add a Solid Bottom:
Cut another circle for the base of the cylinder. Score and slip the bottom rim of your cylinder and attach it to this base disc. Trim away excess clay flush with the walls. -
Create the Candle Socket:
In the center of the top insert, gently press a hole. You don’t need to cut all the way through; just create a deep enough well to hold a taper candle securely. Use an actual candle to test the width, making the hole slightly larger to account for clay shrinkage.
Step 3: Carving and Decorating
-
Leather Hard Stage:
Allow the piece to dry slowly until it reaches a leather-hard state. The clay should be firm enough to carve without warping but still hold moisture. -
Sketch the Design:
Lightly sketch a simple leaf or sprig pattern onto the exterior walls using a pencil or needle tool. Keep the design symmetrical or alternating around the cylinder. -
Carving the Leaves:
Using a small ribbon tool or loop tool, carefully carve out the leaf shapes. You want to remove the top layer of clay to create a recessed relief, roughly 1/8 inch deep. -
Refine the Edges:
Once the carving bits are brushed away, use a damp sponge or soft brush to smooth the sharp edges of your carved leaves. This softens the look and prepares it for glazing. -
Dry and Bisque:
Let the piece dry completely to bone dry, covering it loosely with plastic if the air is very dry to prevent cracking. Fire it to bisque temperature (usually cone 04).
Make it a Set
Vary the heights! Make a trio of holders at 2.5, 4, and 5.5 inches tall. Just ensure the base width remains consistent for stability, and use the same carving motif to tie them together.
Step 4: Glazing and Finishing
-
Wax Resist Application:
This is crucial for the look: carefully paint wax resist into the recessed carved leaf areas. This prevents the glaze from adhering there, keeping the raw, toasted clay color visible. -
Dip Glazing:
Dip the entire candle holder into a creamy white or speckled matte glaze. Hold it for 3-5 seconds to get an even coat. -
Sponging Back:
Once the glaze is dry to the touch, use a damp sponge to wipe away any glaze beads that are sitting on top of the wax resist in the leaf carvings. The leaves should look clean and clay-colored. -
Final Fire:
Fire the piece to your clay body’s maturity temperature (likely Cone 5 or 6). The glaze will melt around the wax-resisted areas, leaving the crisp botanical design exposed.
Place your finished holders on a mantle or table setting and enjoy the warm, organic glow they bring to your space
Ceramic Paint Palettes
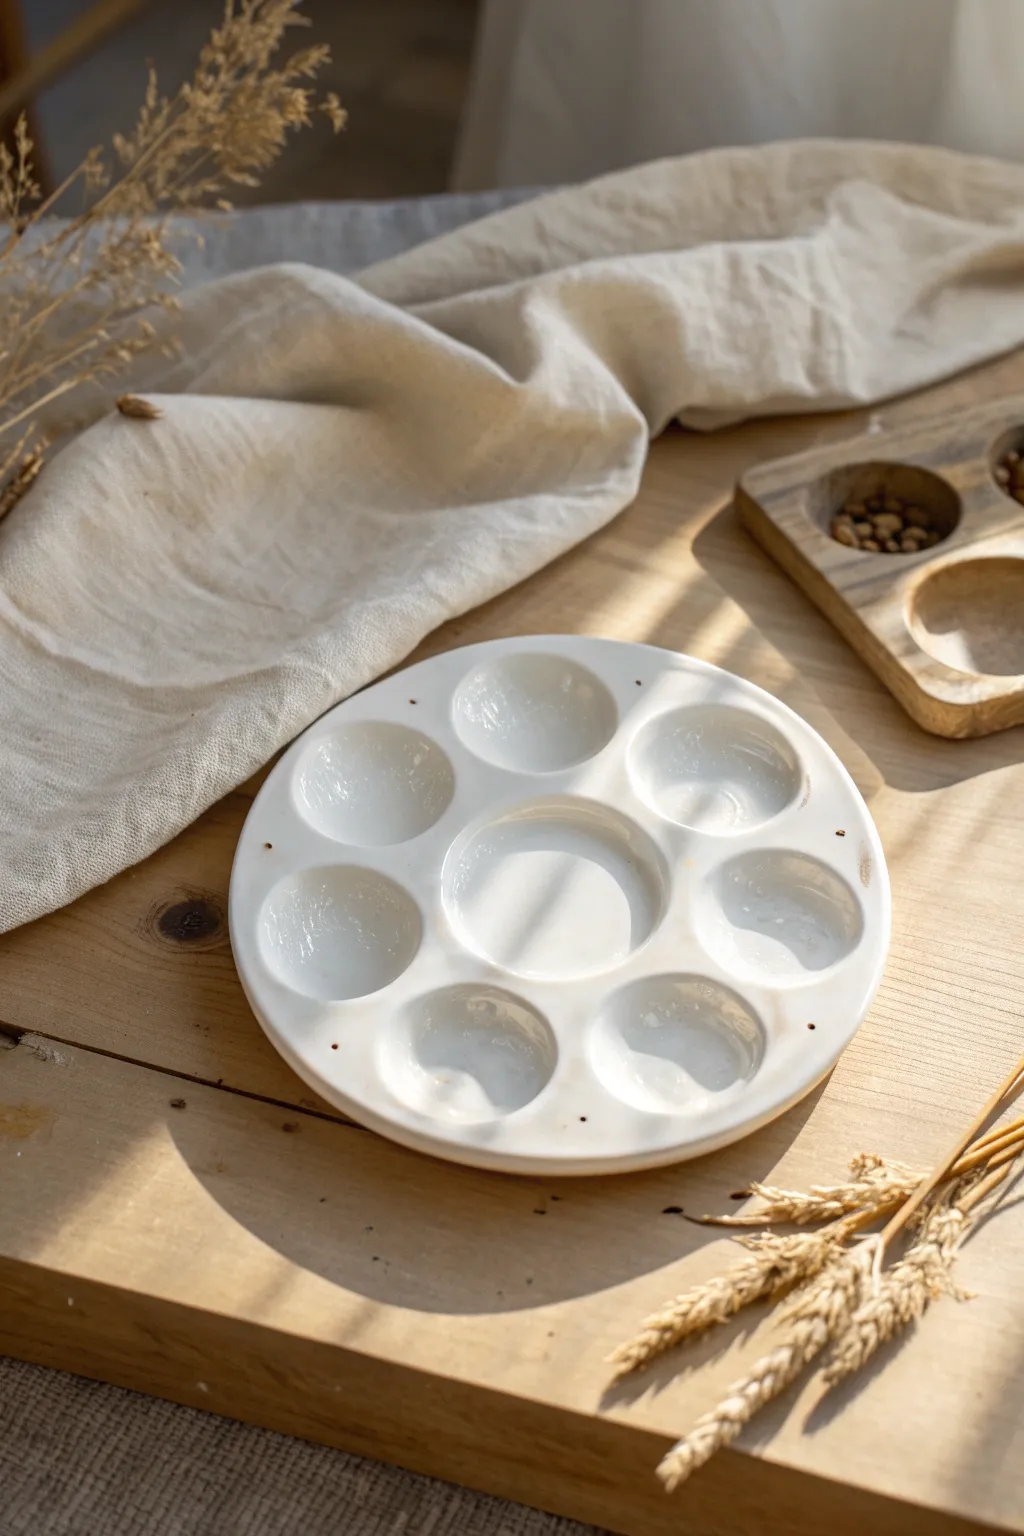
Create a timeless and functional tool for your studio with this glazed ceramic paint palette. Featuring a classic circular design with a generous central mixing well, the finished piece shines with a clean, milky-white glaze that lets your watercolors pop.
Step-by-Step Tutorial
Materials
- White stoneware or porcelain clay
- Rolling pin
- Guide sticks (optional)
- Circular template (approx. 6-7 inches)
- Needle tool
- Sponge
- Rib tool (wooden or silicone)
- Loop carving tool (large round profile)
- Fettling knife
- Milky white or clear dipping glaze
- Kiln
Step 1: Forming the Base
-
Prepare the slab:
Begin by wedging your white stoneware clay thoroughly to remove air pockets. Roll it out into a smooth, even slab about 3/8 to 1/2 inch thick. I find that leaving it slightly thicker than a standard plate helps give the wells enough depth later. -
Cut the circle:
Place your circular template onto the clay slab. Using a needle tool held vertically, trace around the template to cut out your perfect circle. Remove the excess clay. -
Smooth the edges:
Take a damp sponge and gently run it along the cut rim of the circle to soften the sharp edge. You want a rounded, comfortable feel. -
Compress the surface:
Use a rib tool to compress both the top and bottom surfaces of the slab. This aligns the clay particles and prevents future warping in the kiln.
Step 2: Carving the Wells
-
Map out the design:
Lightly sketch your layout onto the clay surface using a needle tool. Mark a large circle in the exact center, and then evenly space 6 or 7 smaller circles around the perimeter. -
Begin the central well:
Using a large loop tool, gently carve out the central mixing area. Start shallow and work your way deeper, leaving about 1/4 inch of clay at the bottom. -
Refine the center:
Smooth the interior curve of the central well significantly with your thumb or a damp sponge. The transition from the floor to the wall should be seamless for easy mixing. -
Carve the perimeter wells:
Move to the outer circles. Carve these individually using the loop tool. Try to make them uniform in depth, though slight handmade variations add charm. -
Detail the rims:
Carefully smooth the clay ridges between the wells. These ‘walls’ should be rounded, not sharp, so your brush can glide over them without getting damaged. -
Check the depth:
Ensure all wells are deep enough to hold a good amount of liquid paint but not so deep that you risk breaking through the bottom of the slab.
Smooth Operator
Use the back of a spoon to burnish the inside of all your carved wells while the clay is leather hard. This makes the surface incredibly smooth for easy cleaning later.
Step 3: Finishing and Glazing
-
Slow drying:
Place the palette on a ware board and cover it loosely with plastic. Let it dry slowly to the leather-hard stage to prevent the edges from curling up. -
Final sponge:
Once bone dry (greenware), go over the entire piece with a barely damp sponge to remove any final burrs or rough spots. -
Bisque fire:
Load the palette into the kiln for a bisque firing (usually Cone 04 or 06). This prepares the clay to accept glaze. -
Wax the foot:
Apply wax resist to the bottom of the palette to prevent glaze from sticking to the kiln shelf. I prefer to wax just slightly up the side rim as well for a clean line. -
Apply the glaze:
Dip the entire palette into a bucket of milky white glaze. Hold it there for 3-4 seconds to get an even coat. Shake it gently as you pull it out to handle the drips. -
Clean the wells:
Check the wells for excess pooled glaze. If the glaze looks too thick in the depressions, dab a little out with a brush to ensure it doesn’t crave or crawl during firing. -
Final smooth:
Once the glaze is dry, rub out any pinholes or finger marks on the rim with a dry swirling motion of your fingertip. -
Glaze fire:
Fire the palette to the maturity temperature of your clay and glaze (typically Cone 5 or 6 for stoneware). Allow the kiln to cool completely before opening.
Brush Rests
Before the clay dries, gently press a chopstick or brush handle into the rim between two wells to create divots where your paintbrush can rest securely while you work.
Now you have a stunning, professional-grade mixing surface ready for your next watercolor masterpiece
Desk Organizers In Clay Blocks
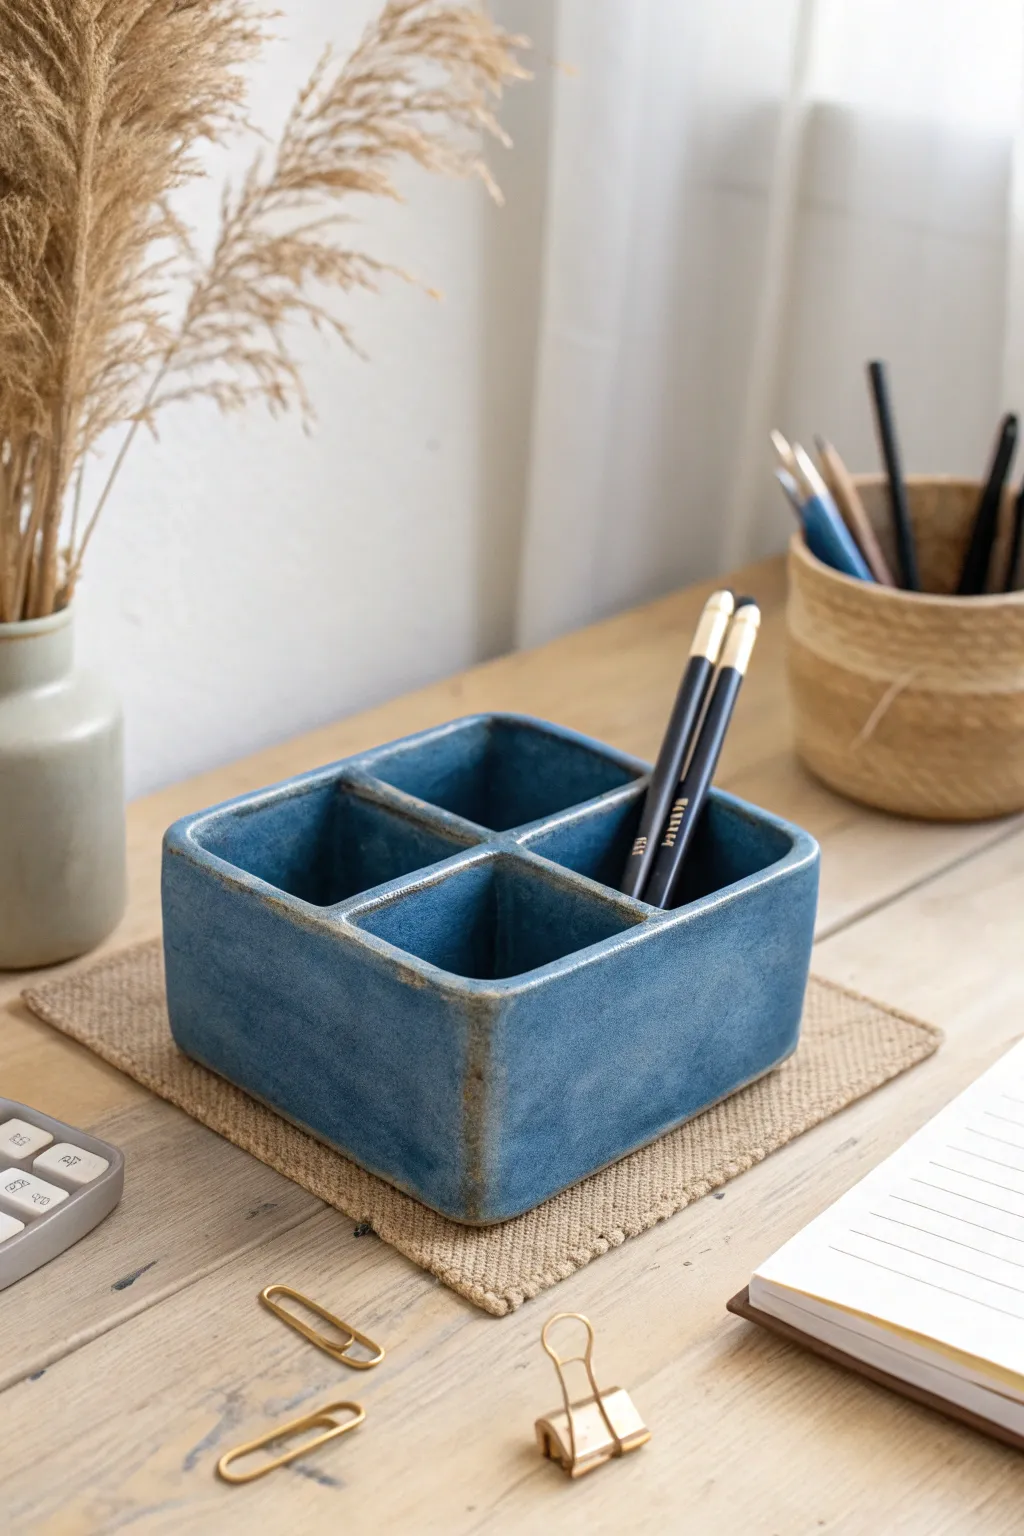
This charming desk organizer features a classic four-compartment grid, perfect for separating pens from pencils or keeping small tools tidy. The deep, mottled blue glaze and exposed clay edges give it a warm, handmade character that adds personality to any workspace.
Detailed Instructions
Materials
- Stoneware clay (medium grog reccomended)
- Rolling pin
- Two long wooden guide strips (thickness of desired clay walls, approx 1/4 inch)
- Fettling knife or craft knife
- Ruler
- Scoring tool (serrated rib or needle tool)
- Slip (clay mixed with water)
- Wooden modeling tool
- Sponge
- Canvas or ware board
- Kiln
- Reactive blue glaze (stoneware temperature)
- Wax resist
Step 1: Preparing the Slabs
-
Wedge the clay:
Begin by wedging your clay thoroughly to remove any air bubbles, as trapped air can cause cracks or explosions in the kiln. -
Set up guides:
Place your wooden guide strips on either side of your clay ball on a canvas surface. These ensure your slab is perfectly even in thickness. -
Roll the main slab:
Using the rolling pin, roll the clay out until the pin rests flat on both guide strips. You want a consistent 1/4 inch thickness for stability. -
Condition the slab:
Take a rubber rib or a damp sponge and smooth both sides of the slab to compress the clay particles, which helps prevent warping later.
Warping Walls?
If your walls are leaning in or out, your clay was likely too wet during construction. Use props (like small boxes) to hold walls square while drying.
Step 2: Cutting Components
-
Measure the template:
Decide on your final dimensions. For a square box like this, you’ll need one large square for the base (e.g., 5×5 inches), four outer walls (e.g., 5 inches long by 3 inches tall), and two internal divider pieces. -
Cut the base and walls:
Using your ruler and fettling knife, precisely cut out the base square and the four outer wall rectangles. Keep your knife perpendicular to the table for straight edges. -
Cut internal dividers:
Cut two rectangular strips for the inside cross. One should be the full interior width, and the other will need to be cut in half to slot around the center, or you can use a halving joint method. -
Leather hard stage:
Let all your cut pieces sit out until they are leather hard—firm enough to hold their shape without bending, but soft enough to score.
Step 3: Assembly
-
Score and slip base:
Rough up the edges of your base slab and the bottom edges of your wall pieces using your scoring tool. Apply a generous amount of slip to the scored areas. -
Attach outer walls:
Press the walls onto the base. I like to reinforce the inside corners with a tiny coil of clay, blending it smooth with a wooden tool. -
Secure the corners:
Score and slip the vertical edges where the walls meet. Press them firmly together and smooth the outside seams so they become invisible. -
Insert the long divider:
Score the interior walls where the divider will go. Slide the long divider piece in, ensuring it fits snugly, and blend the clay at the connection points. -
Add cross dividers:
Attach the remaining smaller divider pieces perpendicular to the first one to create the four-section grid. Use a tool to smooth the intricate inside corners.
Make it Modular
Make three of these at different heights (tall for brushes, medium for pens, shallow for clips) to create a tiered landscape on your desk.
Step 4: Finishing and Glazing
-
Refine the rim:
Use a damp sponge to round over the top sharp edges of the box and the dividers. The visual softness comes from these slightly rounded, organic rims. -
Bisque fire:
Allow the piece to dry slowly and completely (this may take a week). Fire it in the kiln to a bisque temperature (usually cone 04). -
Wax the foot:
Apply wax resist to the bottom of the pot and slightly up the side edges to create that exposed clay border seen in the image. -
Apply glaze:
Pour your reactive blue glaze inside each compartment and swirl to coat, then pour it out. Dip the exterior or brush heavily. Avoid the waxed edges. -
Enhance edges:
If your glaze is very thick, lightly sponge it off the very sharpest top corners to encourage the ‘breaking’ effect where the brown clay shows through the blue. -
Glaze fire:
Fire the piece again to the maturation temperature of your specific clay and glaze combination (likely cone 5 or 6 for stoneware).
Once cooled, your durable ceramic organizer is ready to bring a touch of artisan style to your daily tasks
Handmade Clay Domino Set
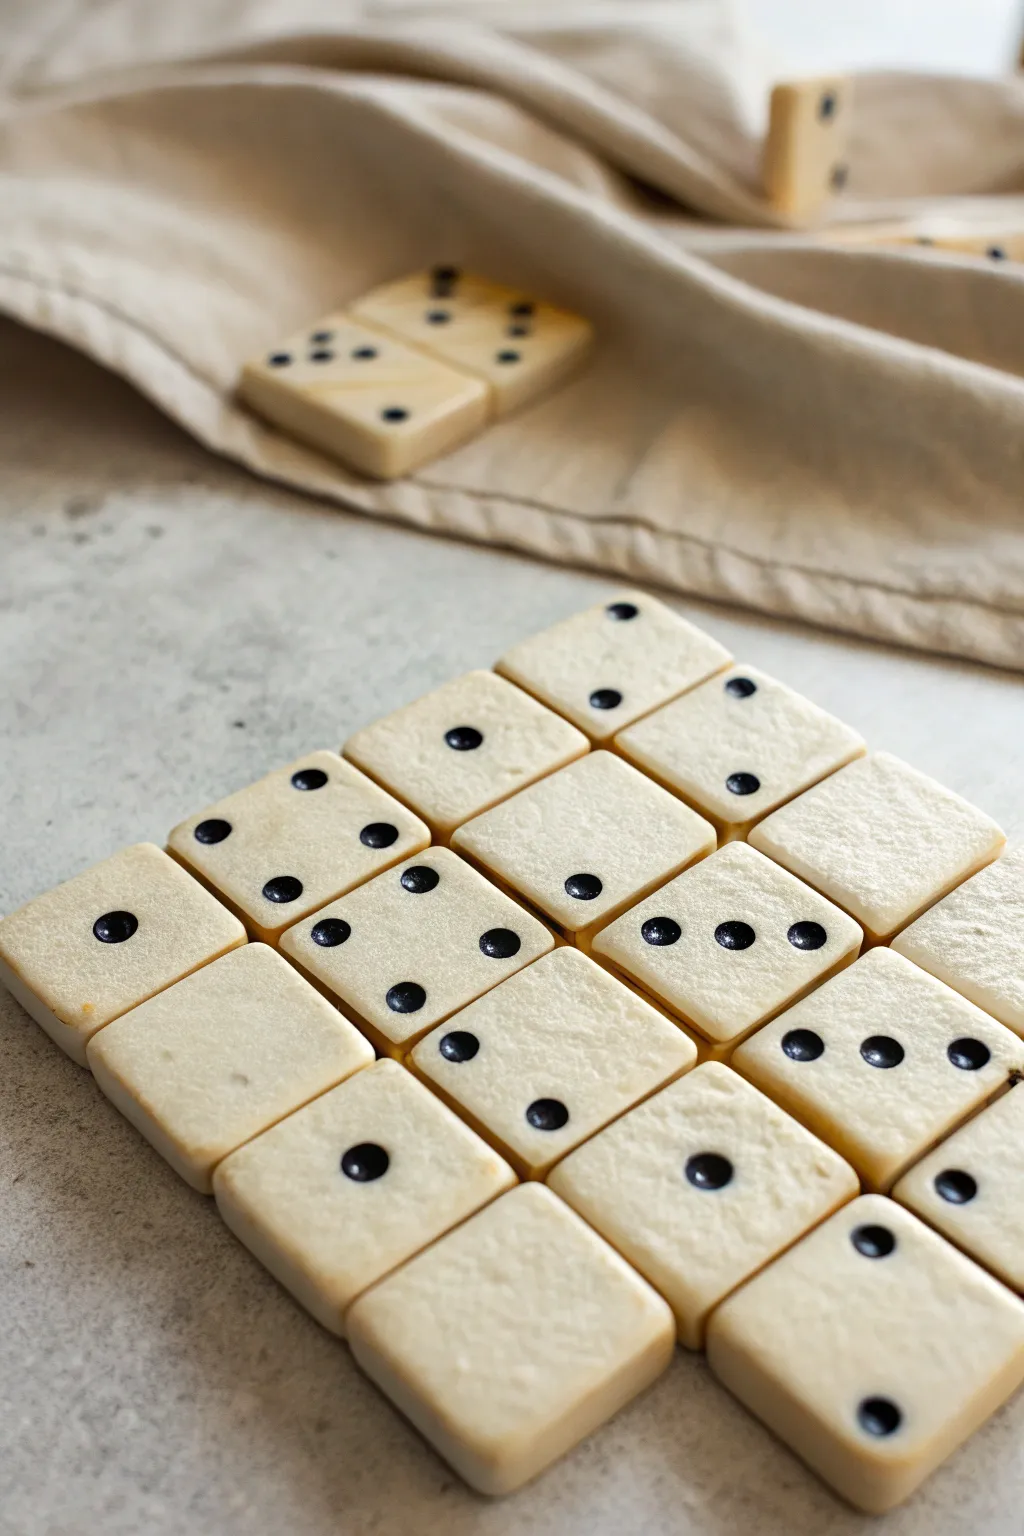
Create a sophisticated, customized gaming set with these tactile, creamy white clay dominoes. The soft, matte finish and perfectly recessed pips give this handmade set a timeless, heirloom quality that plastic store-bought versions simply can’t match.
How-To Guide
Materials
- White polymer clay (or cold porcelain clay for a similar look)
- Black polymer clay
- Rolling pin or pasta machine
- Square clay cutter (approx. 1 inch) or a rectangular domino cutter
- Ball stylus tool (small to medium size)
- Smooth work surface (ceramic tile or glass)
- Cornstarch or baby powder (for release)
- Fine grit sandpaper (400-800 grit)
- Oven (if using polymer clay)
Step 1: Preparing the Clay Base
-
Condition the white clay:
Begin by thoroughly kneading your white polymer clay until it is soft and pliable. This conditioning step is crucial to prevent cracks during baking. -
Roll out the slab:
Roll the clay out into a thick, even sheet. Aim for a thickness of about 1/4 inch (6mm) to give the dominoes a nice weight and sturdy feel. Using a pasta machine on the widest setting ensures consistency. -
Cut the tiles:
If you have a rectangular cutter, press firmly to cut out 28 tiles. Alternatively, use a square cutter to cut two squares and gently merge them, or measure and cut rectangles (1×2 inches) using a sharp blade. -
Soften the edges:
Once cut, the edges will be sharp. Gently tap the sides of each tile against your work surface and lightly run your finger along the edges to create that soft, rounded look seen in the photo.
Clay sticking?
If your clay sticks to the table or cutter, dust your tools and surface lightly with cornstarch. This acts as a release agent and burns off invisibility during baking.
Step 2: Creating the Pips
-
Plan your numbers:
Lay out all 28 tiles on your baking surface. It helps to have a reference chart for a standard double-six domino set to ensure you don’t miss any number combinations. -
Condition the black clay:
Knead a small amount of black clay until soft. Roll it into a very thin snake, roughly the diameter of the dots you want to create. -
Cut tiny black pellets:
Slice the black snake into tiny, equal-sized little discs or pellets. You will need quite a few of these for the full set. -
Indent the tiles:
Using your ball stylus tool, press gently into the white tiles to create rounded shallow divots where the pips will go. This pre-indentation helps the black clay sit flush later. -
Insert the black dots:
Place a tiny black clay pellet into each indentation. I find it easiest to use the tip of a craft knife or a needle tool to pick them up. -
Flatten and secure:
Use the ball stylus again to press the black clay down into the divot. Press firmly enough that the black clay fills the hole and becomes slightly concave, just like real dominoes.
Make it Luxe
Mix a tiny amount of translucent clay into your white base. This creates a faux-ivory or bone effect that looks incredibly high-end compared to solid opaque white.
Step 3: Finishing Touches
-
Create the center divider:
For the dividing line across the center of the domino, gently press the straight edge of a credit card or a dull blade across the middle. Don’t cut through; just leave a shallow impression. -
Final smoothing:
Check each tile for fingerprints. Lightly buff the surface with a bit of cornstarch on your finger to smooth out any imperfections before baking. -
Bake the batch:
Bake the tiles according to your specific clay manufacturer’s instructions. Usually, this means 275°F (135°C) for about 30-45 minutes for this thickness. -
Cool slowly:
Turn the oven off and let the tiles cool down inside the oven. This prevents thermal shock and keeps the tiles flat and strong. -
Sand for perfection:
Once fully cool, lightly sand the bottoms and sides with fine-grit sandpaper to remove any shine or sharp spots, giving them a matte, stone-like feel.
Gather your friends for a game night and enjoy the satisfying click of your new handmade set