If you’re itching to sculpt something in clay but don’t want a project that feels intimidating, you’re in the right spot. These pottery sculpture ideas range from classic crowd-pleasers to delightfully weird studio experiments—so you can pick a vibe and start shaping.
Pinch-Pot Animal Figurines
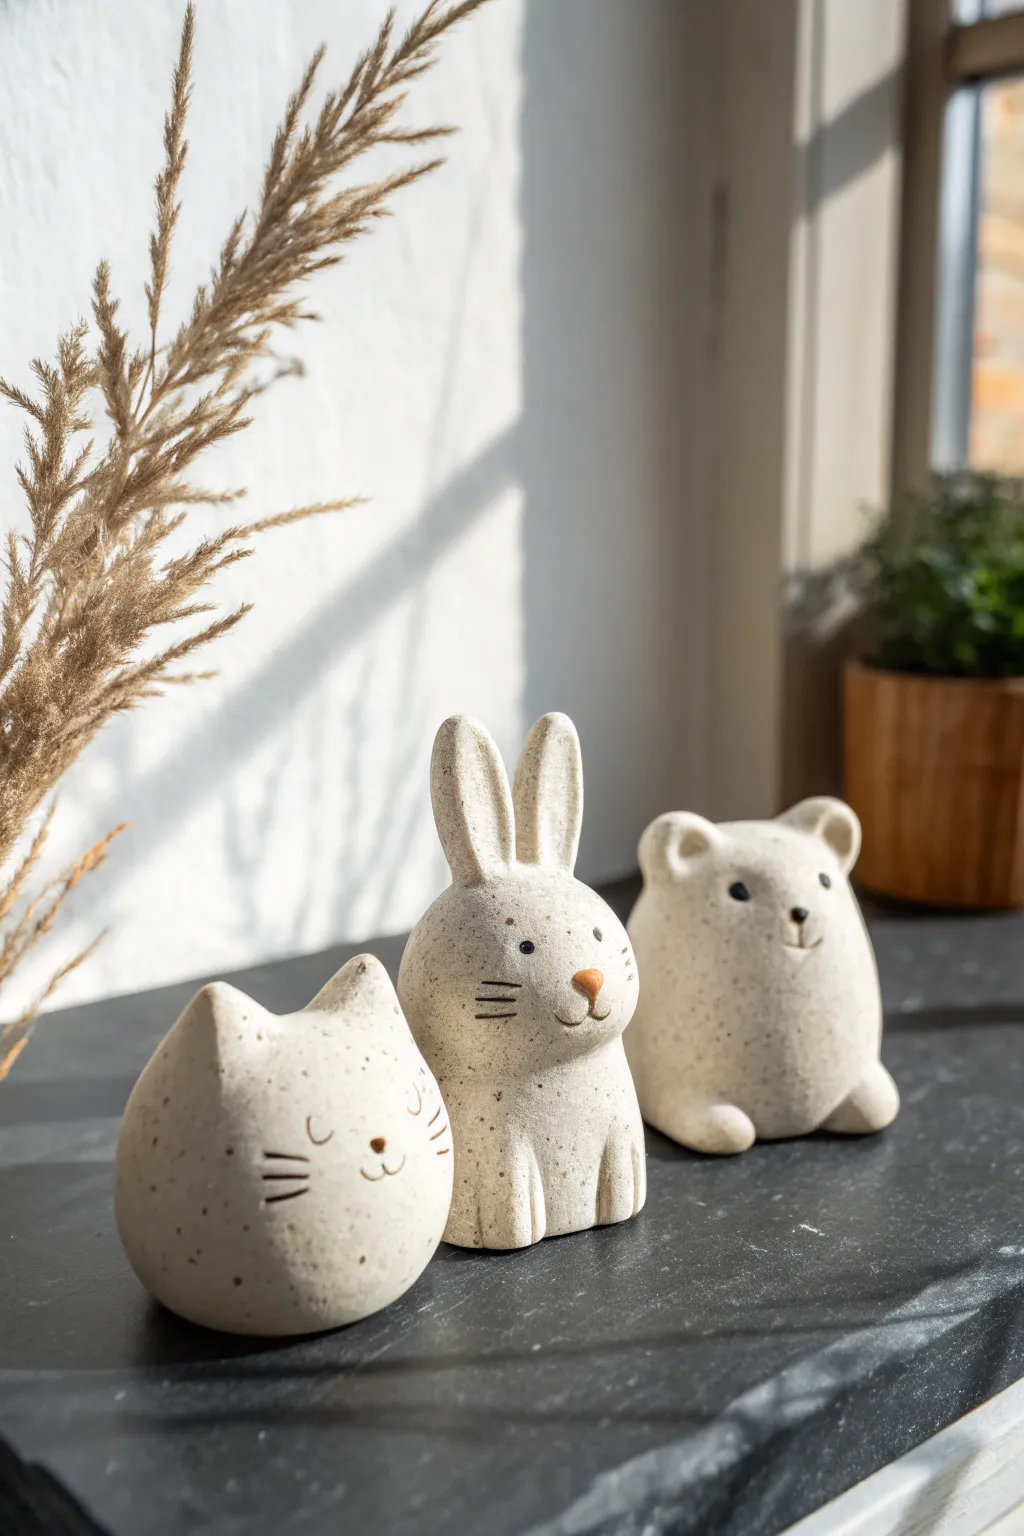
These charming ceramic companions—a cat, rabbit, and bear—are crafted using simple pinch-pot techniques to create rounded, organic forms. Their speckled, matte finish and minimalist faces give them a modern, Scandinavian-inspired aesthetic perfect for a windowsill display.
Step-by-Step Tutorial
Materials
- Speckled buff stoneware clay (or polymer clay with faux granite effect)
- Small sponge
- Pin tool or needle tool
- Modeling tool (wooden or silicone)
- Black underglaze (or acrylic paint)
- Small round paintbrush (size 0 or 00)
- Clear matte glaze (optional, depending on clay type)
- Scoring tool (or an old toothbrush)
- Slip (liquid clay and water mixture)
Step 1: Forming the Base Bodies
-
Prepare the clay:
Start by wedging your speckled clay thoroughly to remove air bubbles. Divide the clay into three equal portions, each roughly the size of a tennis ball. -
Create the pinch pots:
Take one ball and press your thumb into the center, stopping before you push through the bottom. Gently pinch and rotate the clay walls between your thumb and fingers to thin them out. -
Close the forms:
Unlike a bowl, you want these to be closed forms. Gently curve the walls inward as you pinch upward until the opening at the top is very small. -
Seal the top:
Pinch the remaining hole shut completely. Roll the form gently on your work surface to smooth out the seam and create a clean, egg-like or rounded teardrop shape. This hollow sphere creates a lightweight body. -
Shape the individual characters:
For the rabbit and bear, keep the body slightly more upright and cylindrical. For the cat (which is just a head), shape the sphere into a slightly flattened, perfect round shape.
Step 2: Adding Ears and Limbs
-
Sculpt the rabbit ears:
Roll two small coils of clay. Flatten them slightly and taper the ends. Score and slip the attachment points on top of the rabbit’s head, then firmly press the ears on. Use a modeling tool to blend the clay seams until invisible. -
Create bear ears:
Make two tiny balls of clay and flatten them into discs. Attach these to the sides of the bear’s head area, blending the seams smoothly so they look like organic bumps. -
Make the cat ears:
Instead of attaching separate pieces, I prefer to gently pinch the top corners of the round cat form to pull triangular ears directly from the main body of clay. -
Add feet:
For the standing rabbit and sitting bear, create small, flattened oval shapes for feet. Score and slip them to the base of the bodies to provide stability and cuteness.
Air Vent Pro-Tip
Since you created closed hollow forms, punch a tiny, hidden hole in the bottom of each figurine with a needle tool. This allows expanding air to escape during firing and prevents explosions.
Step 3: Details & Finishing
-
Smooth the surface:
Use a slightly damp sponge to wipe down all figures. This removes fingerprints and exposes the grog (speckles) in the clay, which adds texture. -
Carve the whiskers:
Using a sharp needle tool, carefully incise three lines on each cheek of the cat and rabbit. Keep the pressure light but consistent so the lines are clean. -
Add nose relief:
For the rabbit and bear, add a tiny extra bit of clay for the nose bridge and snout to give dimension, blending it seamlessly into the face. -
Dry and fire (Bisque):
Let pieces dry slowly under plastic for a day, then uncovered until bone dry. Fire to bisque temperature (usually Cone 04) if using ceramic clay. -
Apply facial features:
Using a fine brush and black underglaze, paint simple dots for eyes and a small line for the mouth. Paint a small pink or terracotta triangle for the noses. -
Glaze application:
For the natural stone look shown here, leave the raw clay unglazed on the outside if the clay body is vitrified and beautiful on its own. Alternatively, apply a very thin coat of matte clear glaze. -
Final Firing:
Fire the pieces a second time to the maturation temperature of your specific clay body (e.g., Cone 5 or 6). This will set the underglaze and harden the clay.
Level Up: Texture
If using plain clay without speckles, flick watered-down brown acrylic paint or iron oxide onto the raw surface using an old toothbrush to mimic the natural stoneware look.
Arranging these three friends together on a shelf brings a sweet, quiet harmony to any room


Tiny Bird Shelf Sculptures
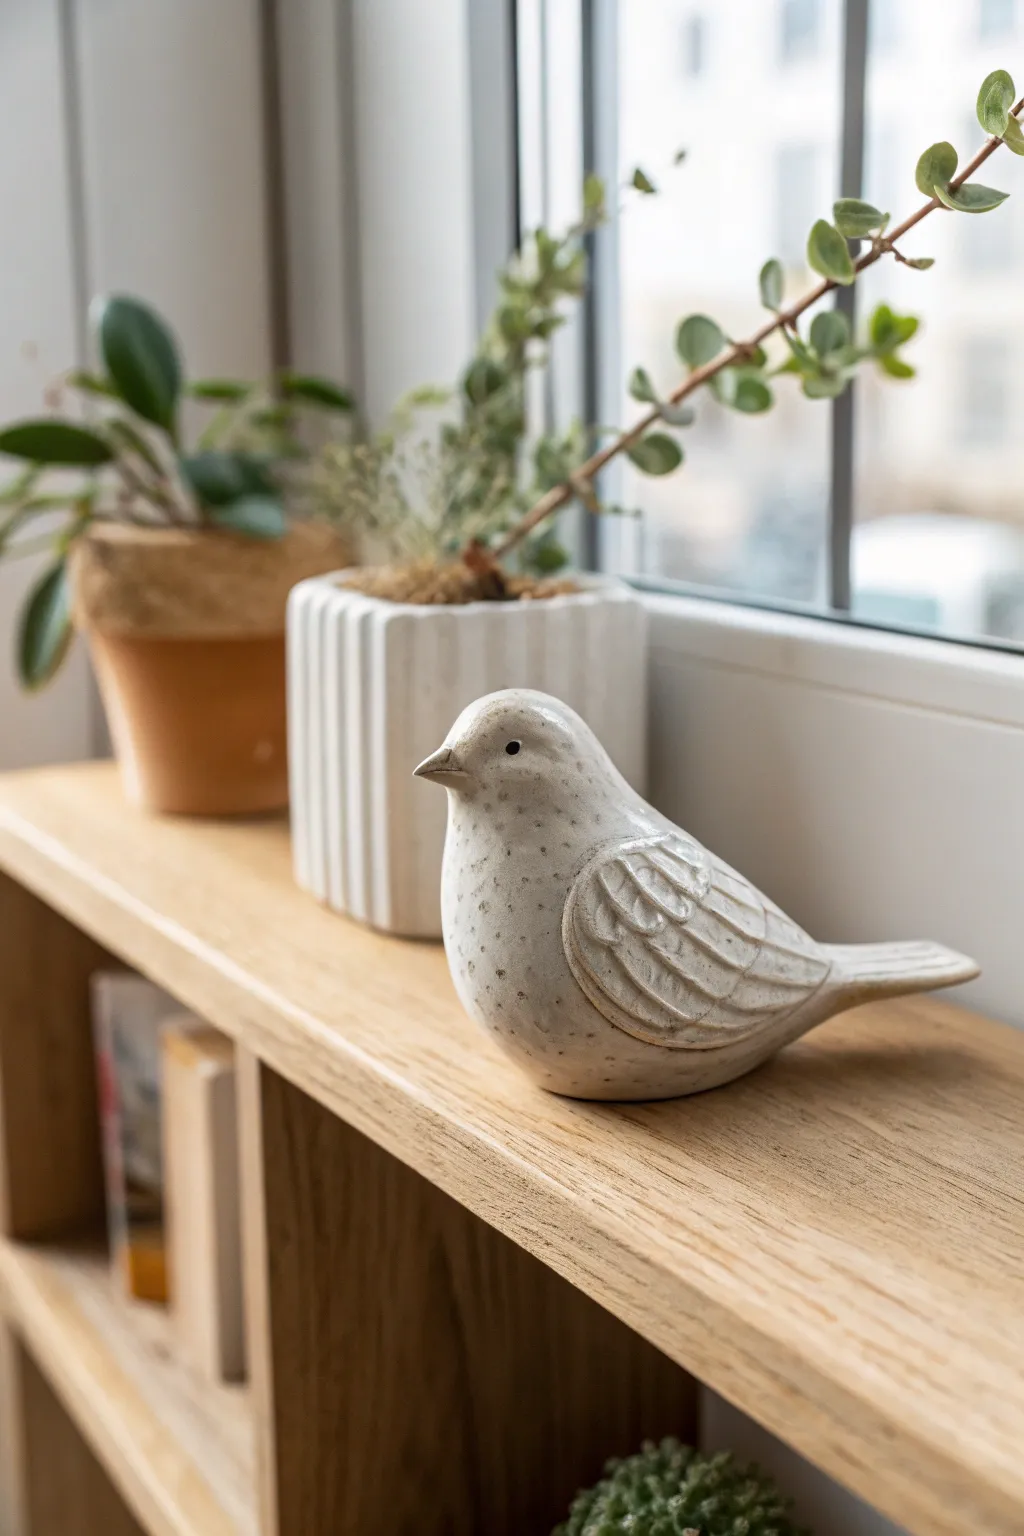
This charming, minimalist bird sculpture brings a touch of nature indoors with its gentle curves and speckled ceramic finish. Its stylized form and relief-carved wings make it an approachable project for beginners looking to practice hand-building techniques.
Step-by-Step
Materials
- Speckled stoneware clay (white or light grey)
- Potter’s needle tool
- Loop tool (small)
- Smoothing rib (rubber or wood)
- Sponge
- Slip (clay mixed with water)
- Scoring tool or fork
- Clear matte or satin glaze
- Kiln access
Step 1: Forming the Body
-
Prepare the Clay:
Start with a ball of well-wedged speckled clay about the size of a large orange. Ensure there are no air bubbles trapped inside. -
Shape the Basic Form:
Gently gently squeeze the clay into a teardrop shape. This will form the core of the bird, combining the head, body, and tail into one cohesive mass. -
Delineate the Head:
Using your thumb and forefinger, gently pinch slightly about one-third of the way down from the rounded end to distinguish the head from the main body, keeping the transition smooth. -
Pull the Beak:
At the front of the head, pinch a very small amount of clay forward to create a pointed beak. Shape it carefully so it integrates naturally with the curve of the forehead. -
Extend the Tail:
At the tapered end of the teardrop, gently flatten and elongate the clay to form the tail feathers. Keep it thick enough to avoid cracking during drying. -
Flatten the Base:
Tap the bottom of the bird firmly against your work surface. This creates a stable, flat base so your sculpture creates its own stand and won’t roll over.
Pro Tip: Eye Placement
Place the eyes slightly lower than the center of the head curve. This gives the bird a sweeter, more docile expression compared to eyes placed higher up.
Step 2: Sculpting Details
-
Outline the Wings:
Use your needle tool to lightly sketch the oval shape of the wings on both sides of the body. I find it helpful to look at the bird from above to ensure symmetry. -
Add Wing Volume:
Roll two small, flat oval slabs of clay. Score and slip the area on the body where the wings will go, then attach these slabs to create raised relief wings. -
Blend the Edges:
Use a modeling tool or your finger to smooth the edges of the added wing clay into the body, leaving the top edge distinct to show the wing’s thickness. -
Carve Feather Textures:
Using a small loop tool or a wooden modeling tool, carve deep, curved lines into the wing pads to represent individual feathers. Vary the length for visual interest. -
Detail the Tail:
Add subtle linear grooves along the tail section to suggest long tail feathers, matching the style of the wing carving. -
Create the Eyes:
Use a small, round tool or the back of a drill bit to press a small circular indentation on each side of the head for the eyes.
Troubleshooting: Warping
If the tail droops while the clay is wet, prop it up with a small piece of sponge or foam until the clay stiffens to leather-hard.
Step 3: Finishing and Firing
-
Smooth the Surface:
Once the clay is leather-hard, use a damp sponge to smooth out any fingerprints or rough textures on the main body, being careful not to erase your carving. -
Hollow Out (Optional):
If your bird is quite thick (more than an inch), flip it over and carefully hollow out the excessive clay from the bottom using a loop tool to ensure even drying. -
Allow to Dry:
Cover the bird loosely with plastic for a day, then uncover to let it dry completely to the bone-dry stage. This slow drying prevents the beak and tail from cracking. -
Bisque Fire:
Fire the piece in the kiln to cone 04 (or your clay’s specific bisque temperature). -
Glaze Application:
Dip the entirely bisqued bird into a clear matte or satin glaze. This allows the natural speckles of the clay body to shine through as the primary decorative element. -
Final Firing:
Fire the glazed piece to the maturity temperature of your clay (usually cone 5 or 6 for stoneware).
Place your finished speckled friend on a sunny windowsill near your houseplants for a delightful vignette


Elephant Ring and Necklace Holder
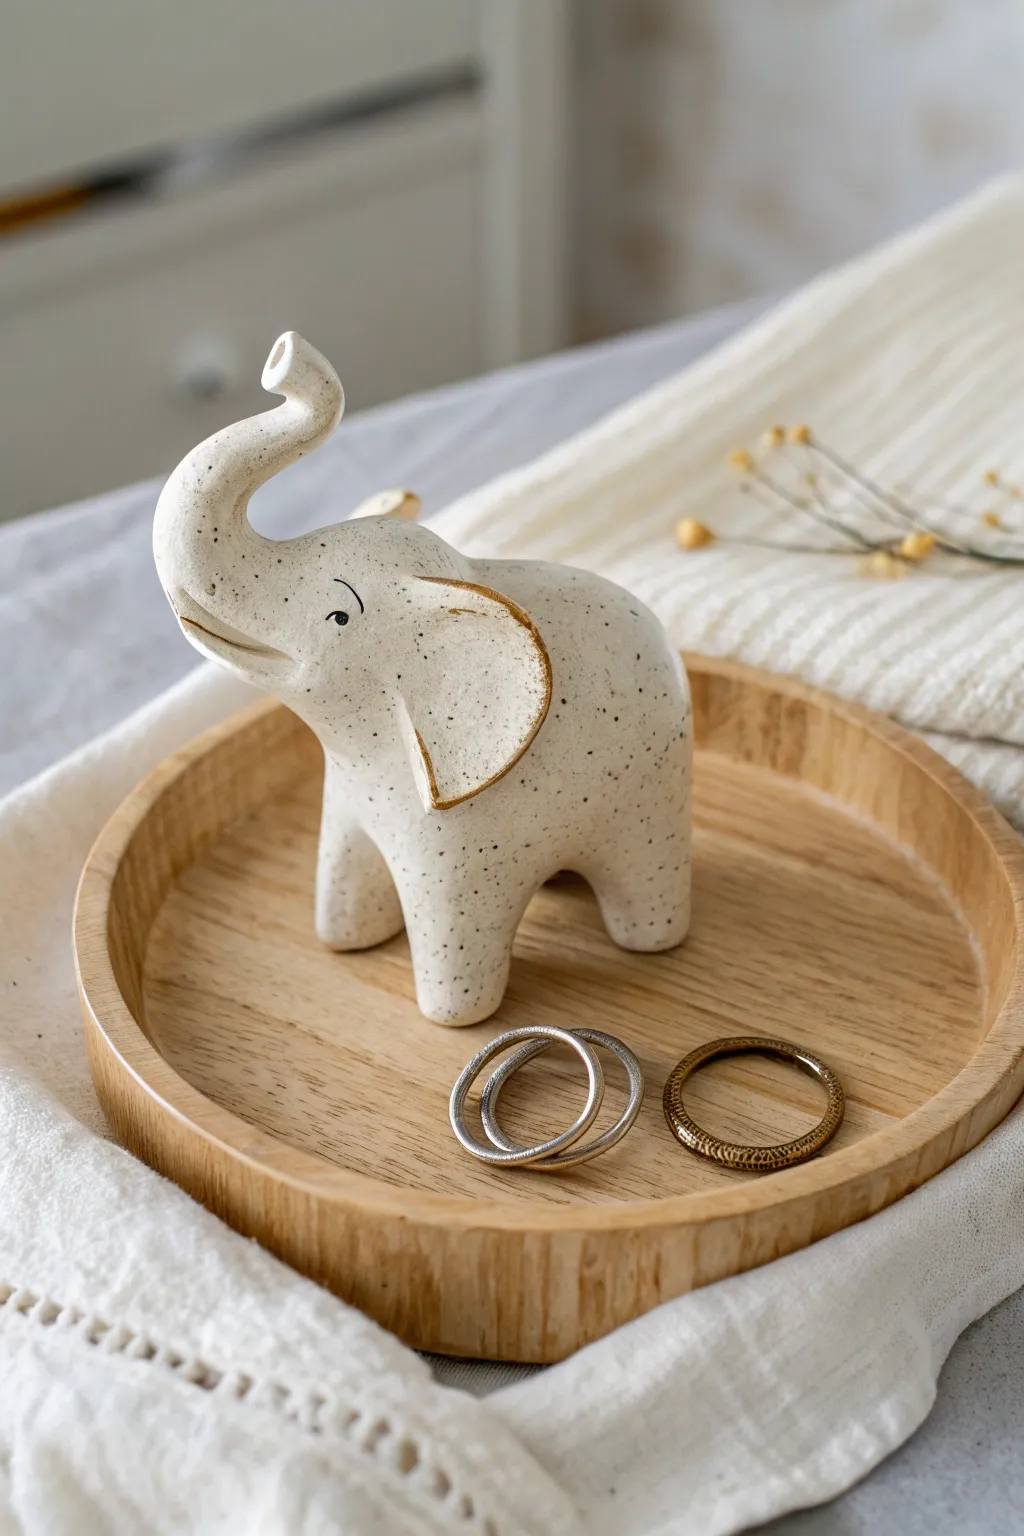
This charming little elephant is both a delightful sculpture and a functional jewelry organizer, perfect for keeping your rings safe on its upturned trunk. Crafted from speckled clay with elegant gold accents, its simple, rounded form brings a touch of playful sophistication to any dresser.
Detailed Instructions
Materials
- Speckled stoneware clay (white or buff)
- Pottery tools (needle tool, rib tool, modeling tool)
- Slip and scoring tool
- Sponge and water
- Black underglaze (for eyes)
- Clear or creamy transparent glaze
- Gold luster or gold leaf paint
- Kiln (if firing) or air-dry clay sealant (if using air-dry alternatives)
Step 1: Forming the Body
-
Shape the torso:
Begin with a ball of clay roughly the size of a tangerine. Gently roll it into a smooth oval shape to form the main body of the elephant, keeping the bottom slightly flattened so it sits stability. -
Form the legs:
Roll four smaller coils of clay, about the thickness of your thumb. These will be the legs. Attach them to the underside of the body using the score and slip method, blending the clay upwards into the body for a seamless connection. -
Refine the stance:
Stand the elephant on a flat surface and gently press down to ensure all four feet are level. You want a sturdy stance that won’t wobble when holding jewelry. -
Create the head:
Form a slightly smaller ball for the head. Attach this to the front of the body oval, blending the clay at the neck area until the seam disappears completely. I like to smooth this area with a damp sponge to keep the curves gentle.
Step 2: Sculpting Details
-
Pull the trunk:
From the front of the head, gently pinch and pull the clay outwards and upwards to form the trunk. Curve it into an ‘S’ shape, ensuring the tip points up—this upward curve is crucial for holding rings securely. -
Add the ears:
Roll out a small slab of clay and cut two rough D-shapes for ears. Attach these to the sides of the head. Curve them slightly forward to give the elephant a relaxed, listening expression. -
Define the face:
Use a modeling tool to verify the connection of the ears, blending the back edge into the head while leaving the front edge slightly raised for dimension. -
Carve the mouth:
With a needle tool or a small knife, carve a simple curved line below the trunk for the mouth. Keep it subtle and happy. -
Poke the eye holes:
Use a small, round tool to create slight indentations where the eyes will go. This helps with painting later. -
Smooth the surface:
Take a slightly damp sponge and go over the entire piece. This removes fingerprints and exposes the grog or speckles in the clay, which gives it that lovely texture.
Trunk Slumping?
If the trunk droops while wet, prop it up with a small piece of sponge or crumpled paper towel until the clay stiffens enough to hold its own weight.
Step 3: Finishing and Decoration
-
Bisque fire:
Allow the piece to dry slowly and completely before firing it in a bisque kiln to prepare it for glazing. -
Apply details:
Using a fine brush and black underglaze, paint a small dot for the eye and carefully trace the mouth line you carved earlier. Add a tiny eyebrow arch for character. -
Glaze application:
Dip the elephant into a clear or semi-transparent creamy glaze. This allows the natural speckles of the clay to show through while providing a glossy, protective finish. -
Glaze fire:
Fire the piece again according to your clay and glaze specifications (usually Cone 5 or 6 for stoneware). -
Apply gold accents:
Once the piece is fired and cool, apply gold overglaze (luster) to the rim of the ears. Be very steady here, following the natural curve of the clay. -
Final luster fire:
Place the piece in the kiln for a third, low-temperature firing to set the gold. If you are using non-fired gold leaf paint, simply paint it on and let it cure fully.
Make it a Set
Create a larger ‘mama’ elephant to hold bracelets or watches on her trunk, making an adorable family set for your vanity.
Place your new ceramic friend on a vanity tray and let it look after your favorite accessories


Textured Fish Figurine
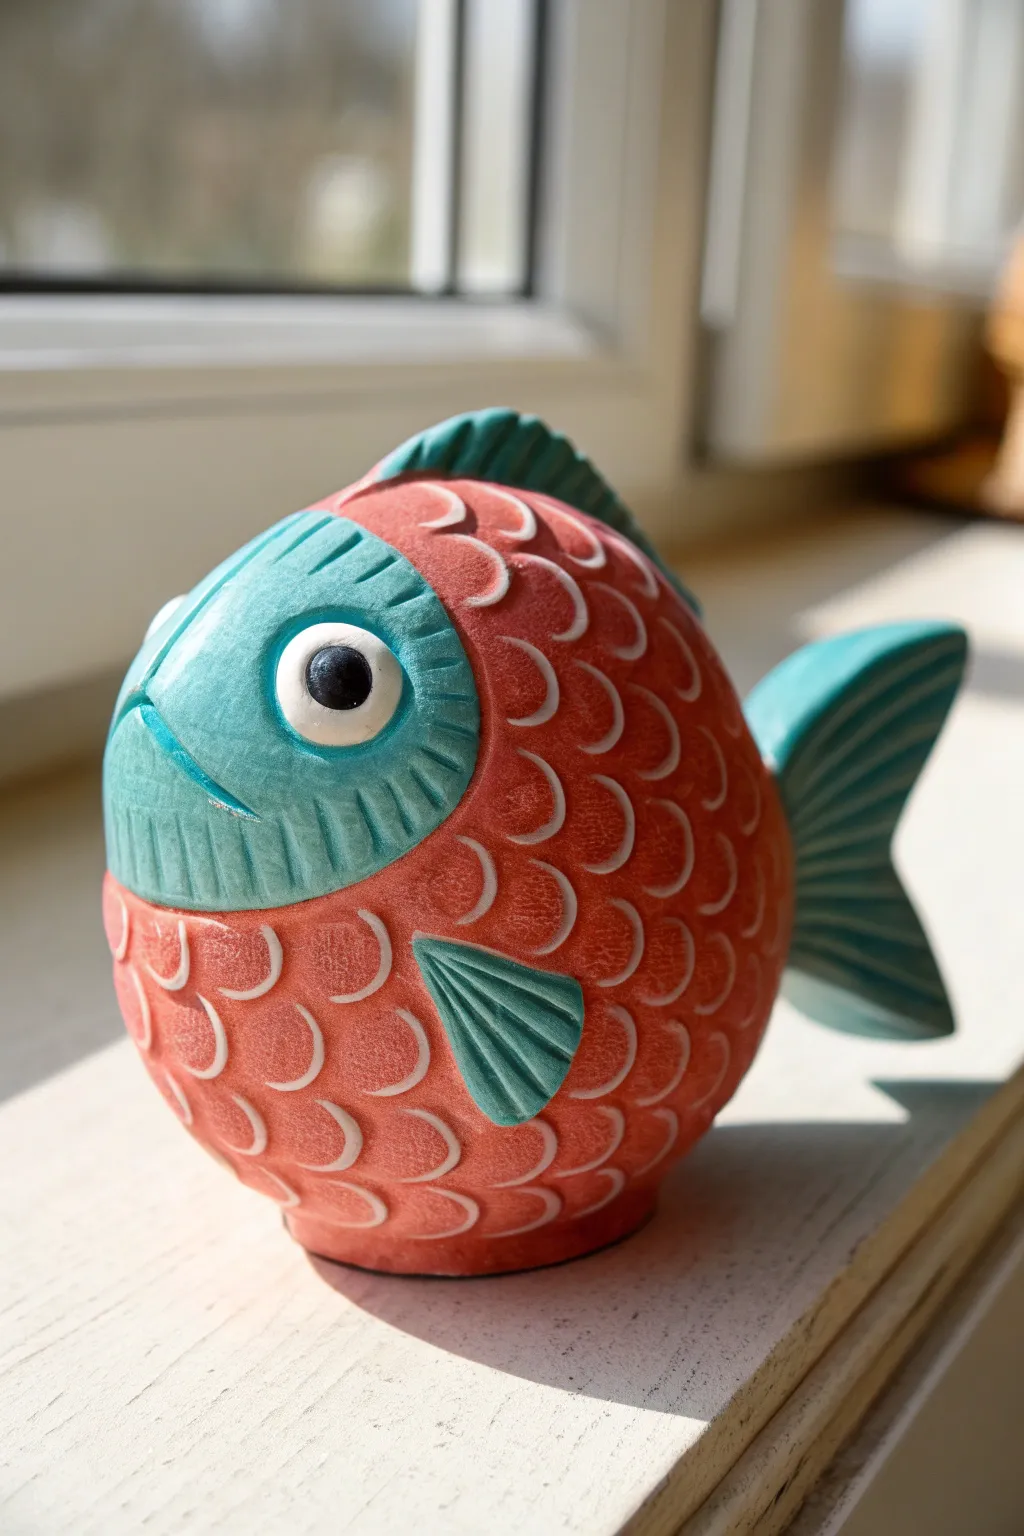
This charming, rotund fish figurine combines bold sgraffito carving with a striking matte color palette. The contrast between the deep terracotta body and bright turquoise accents creates a playful, folk-art aesthetic perfect for any windowsill.
Step-by-Step Guide
Materials
- Red earthenware or white stoneware clay
- Underglazes: Terracotta/Red-Orange, Turquoise, Black, White
- Clear matte glaze (optional)
- Loop tools for trimming
- Needle tool
- Small carving gouges (U-shaped)
- Slip and scoring tool
- Soft paintbrush
- Sponge
Step 1: Forming the Body
-
Create the base form:
Start with two equal balls of plastic clay. Pinch two deep bowls and join them together securely to form a hollow sphere. Be sure to score and slip the edges well so trapped air doesn’t burst the seam later. -
Shape the sphere:
Paddle the joined sphere gently into a slightly flattened, egg-like shape. Create a flat spot on the bottom by tapping it on your work surface so the fish will stand stably on its own. -
Vent the form:
Use a needle tool to poke a hidden hole in the bottom of the fish. This allows air to escape during firing, preventing explosions.
Clean Lines
If your carving leaves jagged burrs, don’t brush them off while wet. Wait until the clay is bone dry, then gently rub with a stiff brush or a scouring pad to remove crumbs completely.
Step 2: Adding Features
-
Sculpt the fins:
Roll out a slab of clay about 1/4 inch thick. Cut out a dorsal fin (top), a tail fin, and two smaller pectoral fins (side). Shape them into gentle curves rather than leaving them flat. -
Attach the fins:
Score and slip the attachment points on the body and the fins. Press the dorsal fin onto the top center and the tail fin to the back. Add the side fins just below the midline. -
Refine the face:
Smooth the front area where the face will be. You can lightly press in to define the gill line, separating the head from the scaley body. -
Add eyes:
Roll two small balls of clay, flatten them slightly, and attach them to the face. These should be prominent and bulbous.
Go Big
Scale up! Used the same pinch-pot method with larger bowls to create a massive garden sculpture version. Just ensure your walls are an even thickness to prevent cracking.
Step 3: Surface Decoration
-
Apply base color:
Once the clay is leather hard, apply 2-3 coats of red-orange underglaze to the body and turquoise underglaze to the face and fins. Let each coat dry to the touch before adding the next. -
Carve the scales:
Using a U-shaped gouge, carve semi-circular scales into the red body. I find it easiest to start from the tail and work forward. Press just deeply enough to reveal the white clay body underneath the underglaze. -
Detail the fins:
Carve linear grooves into the turquoise fins to simulate texture. These lines should radiate outward from the body connection point. -
Define the face:
Carve vertical lines under the mouth area to suggest a chin or gills. Carefully carve around the eye to create a crisp white outline. -
Detail the eyes:
Paint the center of the eye pupil black, leaving a tiny dot of white clay (or paint on a white dot later) for the highlight.
Step 4: Firing and Finishing
-
Bisque fire:
Once bone dry, bisque fire the piece to cone 04 (or your clay body’s specification). -
Glazing check:
If you want a shiny finish, apply a clear glaze now. However, for the matte look shown in the image, you can leave the underglaze raw or use a specialized matte sealant. -
Final fire:
Fire again if using a glaze. If leaving it as unglazed bisque ware, you are finished after the first firing.
Place your colorful fish in a sunny spot to let the carved textures catch the light

The Complete Guide to Pottery Troubleshooting
Uncover the most common ceramic mistakes—from cracking clay to failed glazes—and learn how to fix them fast.
Face Planter Sculpture
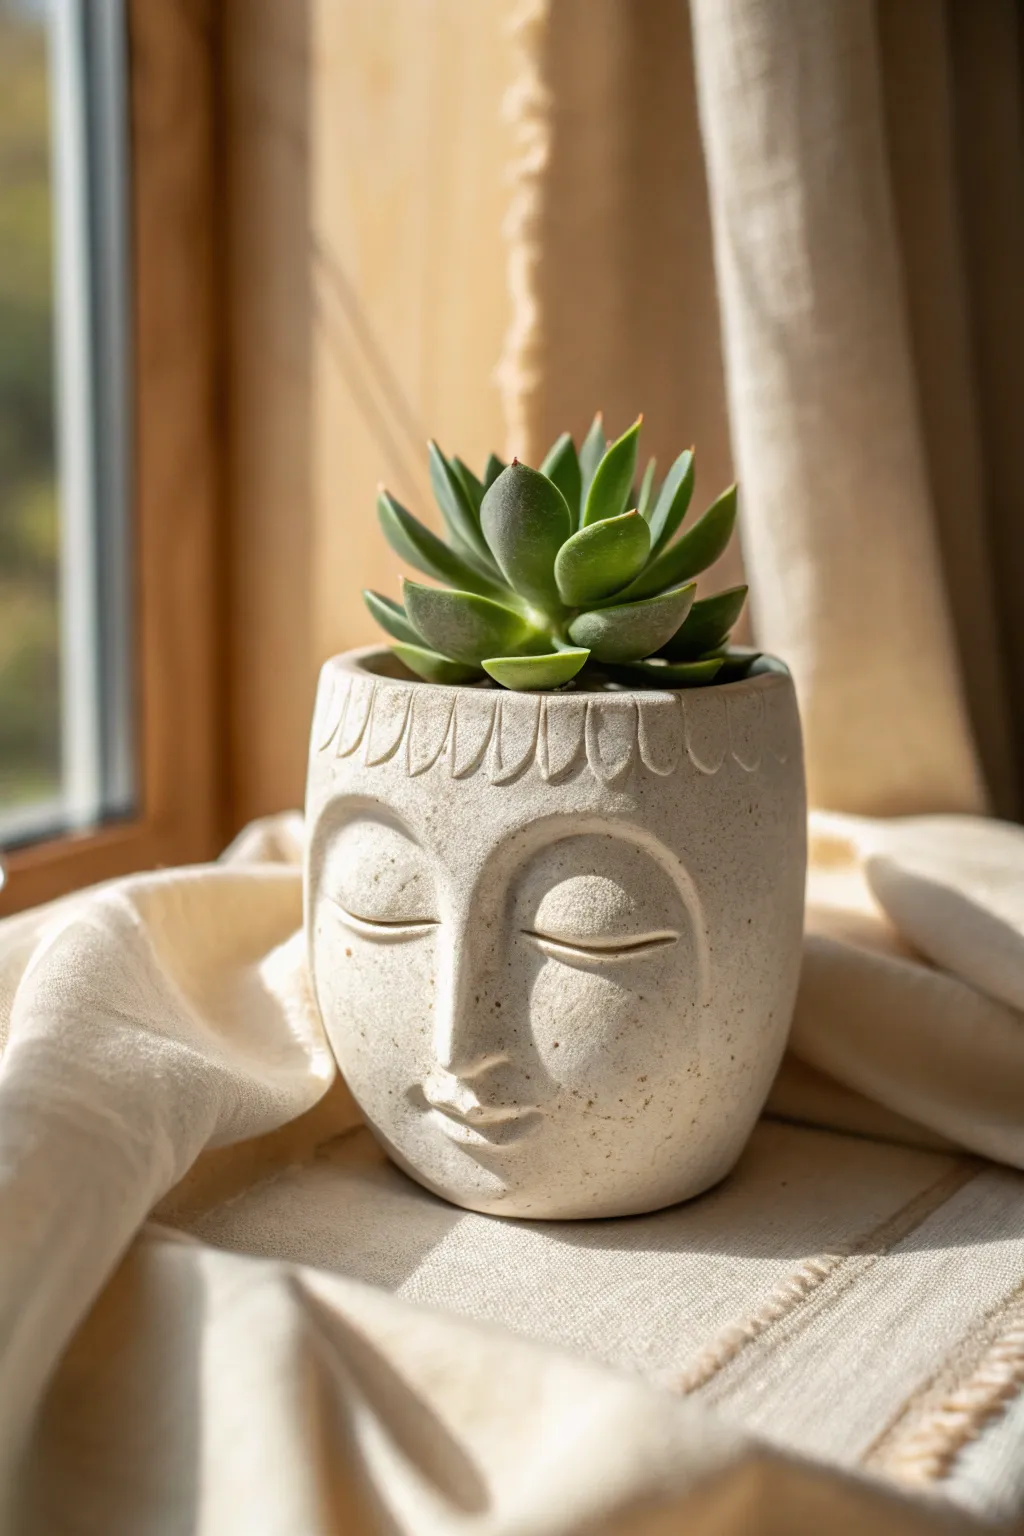
Bring a sense of calm to your windowsill with this meditative face planter. Carved from speckled clay and featuring stylized hairline details, this vessel combines functional gardening with sculptural serenity.
Detailed Instructions
Materials
- Stoneware clay (speckled or sand-coloured)
- Pottery wheel (or coil-building supplies)
- Modeling tools (loop tool, needle tool, wooden rib)
- Sponge
- Water
- Clear matte glaze
- Succulent plant and potting soil
Step 1: Forming the Base
-
Throw the Cylinder:
Begin by centering your clay on the wheel and opening it up. Pull the walls to create a cylinder that is roughly 5-6 inches tall and 4-5 inches wide. -
Shape the Belly:
In the middle section of the cylinder, gently push the walls outward from the inside to create a slight curve or ‘belly.’ This creates the basic volume for the head. -
Refine the Rim:
Compress the rim with a chamois or your sponge to ensure it is smooth and sturdy. You want a flat, slightly thick rim to support the carving details later. -
Trim the Foot:
Once the pot is leather hard, flip it over and trim a clean foot ring. This elevates the calm expression and gives the piece a professional finish.
Step 2: Sculpting the Features
-
Map the Face:
Using a needle tool, very lightly sketch a vertical centerline and horizontal eye line. This helps ensure symmetry for the meditative expression. -
Build the Nose:
Create a small, triangular coil of clay. Score and slip the center area where the nose belongs, attach the coil, and smooth the edges down until the nose emerges seamlessly from the surface. -
Define the Brow:
Above the eye line, gently press the clay inward with your thumb to create the subtle recess of the eye sockets. This naturally makes the brow bone protrude slightly. -
Sculpt Closed Eyes:
Roll two small, tapered coils for the eyelids. Attach them in the eye sockets in a downward curve. Smooth the top edge into the brow bone, but leave the bottom edge distinct to look like a lash line. -
Refine the Slit:
Take a thin modeling tool and press a clean, curved line just under the eyelid coil to emphasize the ‘closed eye’ look. -
Shape the Lips:
Add a tiny amount of clay below the nose. Sculpt a small, pursed mouth by pressing a horizontal indentation and defining the cupid’s bow. Keep the expression neutral and relaxed.
Pro Tip: Soft Features
When blending added clay features, use a soft paintbrush dipped in water instead of your finger. It smooths the transition seamlessly without flattening the delicate shapes you just sculpted.
Step 3: Adding Details & Finishing
-
Carve the Hairline:
Around the top rim, use a small U-shaped loop tool to carve a repeating pattern of arches. These should look like stylized bangs or petals framing the forehead. -
Refine Texture:
Smooth out any harsh tool marks with a barely damp sponge. I find this helps unify the added clay features with the wheel-thrown body. -
Drainage Hole:
Don’t forget to punch a drainage hole in the bottom center. Succulents hate sitting in water, so this step is crucial for plant health. -
Bisque Fire:
Allow the piece to dry completely slowly to avoid cracking properly. Fire it to bisque temperature (usually cone 04). -
Glazing:
Apply a clear matte glaze to the exterior to let the natural speckles of the clay shine through. You can glaze the interior with a liner glaze if desired. -
Glaze Fire:
Fire the piece again to the final maturity temperature for your specific clay body (usually cone 5 or 6 for stoneware). -
Planting:
Add potting soil and your chosen succulent, nestling it in so the leaves look like a green, spiky hairstyle.
Troubleshooting: Cracking
If facial features crack away during drying, the base pot was likely too dry when you attached them. Wrap the whole piece in plastic for 2 days to equalize moisture before letting it fully dry.
Now you have a tranquil companion for your morning coffee that brings a touch of art to your plant collection
Moon Face Wall Medallion
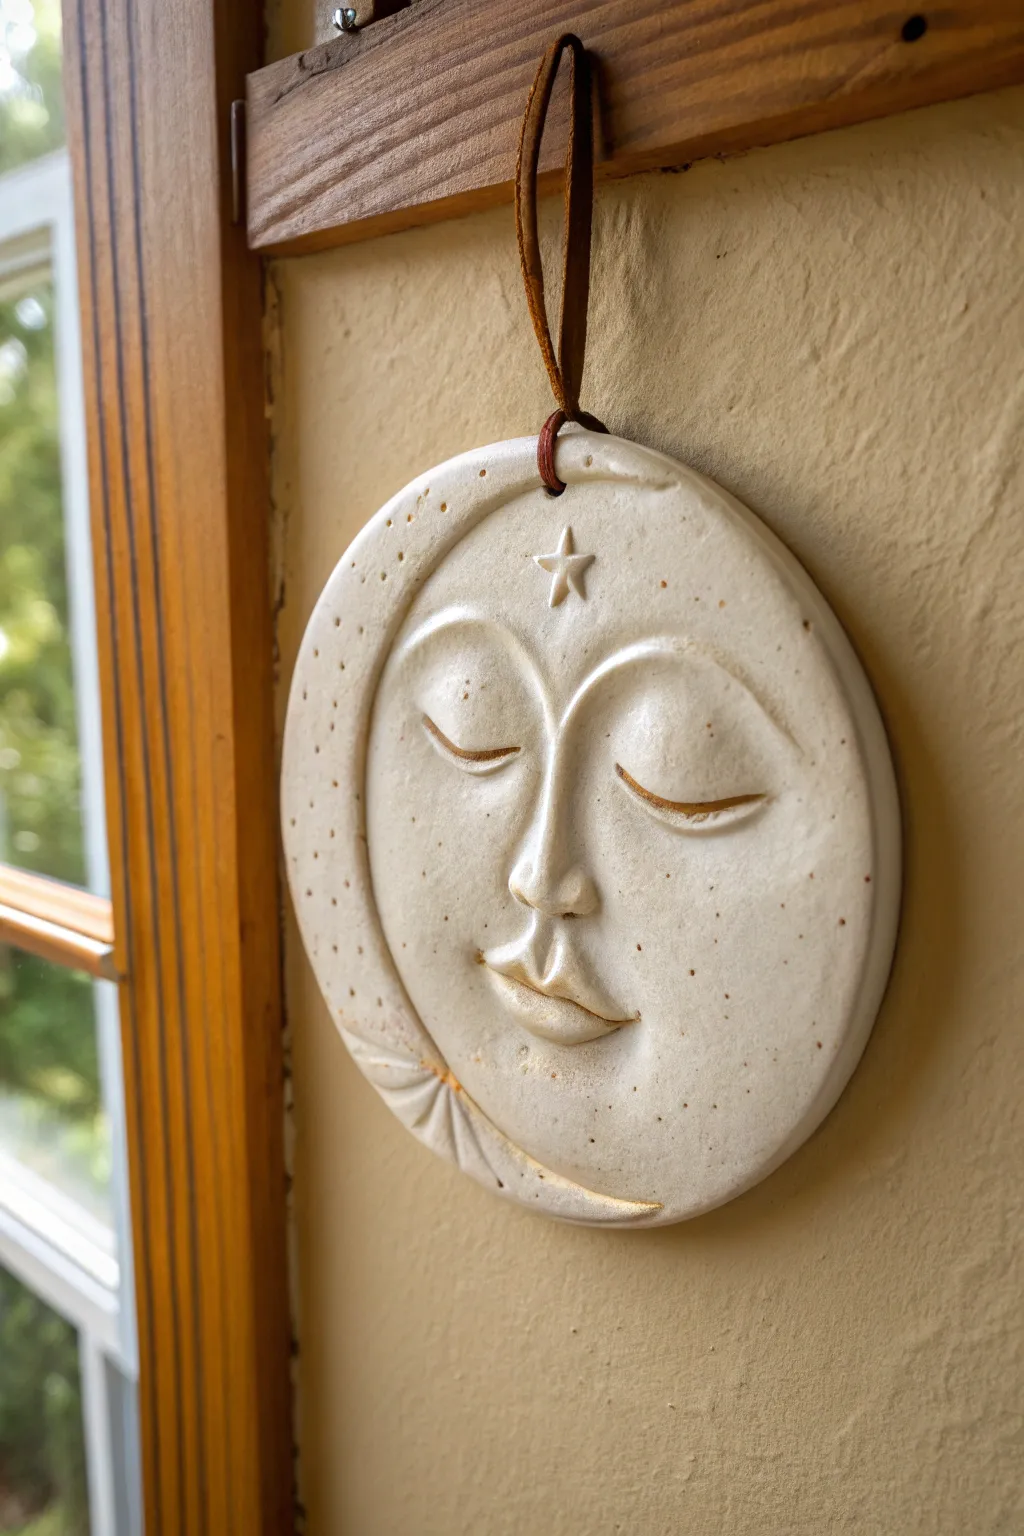
Capture the calm beauty of the night sky with this relief-style wall hanging. This ceramic medallion features a tranquil sleeping moon face nestled within a crescent, finished with a soft, speckled white glaze that mimics the texture of ancient stone.
How-To Guide
Materials
- White or speckled stoneware clay (approx. 1 lb)
- Rolling pin
- Two wooden guide strips (approx. 1/4 inch thick)
- Circle cutter or template (approx. 5-6 inches)
- Needle tool
- Loop tool or carving tools
- Small sponge
- Slip (clay mixed with water)
- Satin white or matte speckled glaze
- Leather cord or twine
- Small star cutter (optional)
- Kiln
Step 1: Forming the Base
-
Prepare the slab:
Begin by wedging your clay thoroughly to remove air pockets. Place the clay between two wooden guide strips and roll it out into a smooth, even slab about 1/4 to 3/8 inch thick. -
Cut the circle:
Use a circle cutter or place a round template (like a bowl or lid) on the clay and trace around it with a needle tool to create your perfect disc. -
Smooth the edges:
Dip your finger or a small sponge in water and gently run it along the cut edge of the circle to compress the clay and remove any sharp burrs. -
Mark the crescent:
Lightly sketch a curved line on the left side of the circle with your needle tool to demarcate where the crescent moon shape will overlap the face. Don’t cut through; this is just a guide for building texture.
Warping Worries?
Flat discs love to warp in the kiln. Dry yours very slowly between two pieces of drywall or place a small sandbag on the center while it dries to keep it perfectly flat.
Step 2: Sculpting the Relief
-
Build the nose bridge:
Roll a small coil of clay and attach it to the center of the face area using the score-and-slip method. Blend the edges outward to form the bridge of the nose and the brow ridge. -
Form the cheeks and brows:
Add small pads of clay for the cheeks and the area above the eyes. Smooth these down so they rise gently from the flat surface, creating distinct high points for the light to catch. -
Define the eyes:
Using a modeling tool, carve the curved lines for the sleeping eyelids. The shape should look like two upside-down ‘U’s. Press gently to create the depth of the eye socket without piercing the slab. -
Sculpt the mouth:
Add a tiny triangle of clay for the upper lip and a smaller oval for the lower lip. Blend them onto the face, then use a needle tool to softly separate them. Shape the lips into a small, peaceful pout.
Gilded Touch
After the final firing, use a small brush and ceramic-safe gold luster or gold leaf paint to highlight the star, the eyelids, and the lips for a touch of magical shimmer.
Step 3: Details & Texture
-
Refine the crescent:
Along the crescent line you marked earlier, press a tool to create a slight indentation or groove. You can also add small dots or texture marks along the moon’s curve using a blunt tool to simulate craters or decorative stippling. -
Add the star:
Cut a small star from a scrap piece of slab (or use a tiny cutter). Score and slip the back, then attach it to the forehead area, slightly off-center. -
Create the hanging hole:
At the very top of the medallion, use a straw or a hole punch tool to create a clean hole for the cord. Make sure it is centered so the piece hangs straight, and not too close to the edge to prevent cracking. -
Final smoothing:
Take a slightly damp sponge and wipe the entire surface very gently. This softens any harsh tool marks and gives the face that dreamy, soft-focus appearance. -
Slow drying:
Place the medallion on a flat board covered with newsprint. Cover loosely with plastic for the first day to ensure even drying, then uncover to let it dry completely to the bone-dry stage.
Step 4: Firing & Finishing
-
Bisque fire:
Load the bone-dry piece into the kiln and fire to Cone 04 (or your clay’s specific bisque temperature). -
Glazing:
Dip the piece into a satin white or matte speckled glaze. Avoid glossy glazes, as they can obscure the subtle sculpted details. Shake off excess glaze and wipe the foot (back) clean. -
Glaze fire:
Fire the piece again to the maturity temperature of your clay and glaze (typically Cone 5 or 6 for stoneware). -
Add the cord:
Once cool, thread a strip of brown leather cord through the top hole. Tie a knot securely near the top of the loop for a rustic finish.
Hang your sleepy moon near a window or bed to add a sense of quiet magic to your room


What Really Happens Inside the Kiln
Learn how time and temperature work together inside the kiln to transform clay into durable ceramic.
Mushroom Cluster Table Sculpture
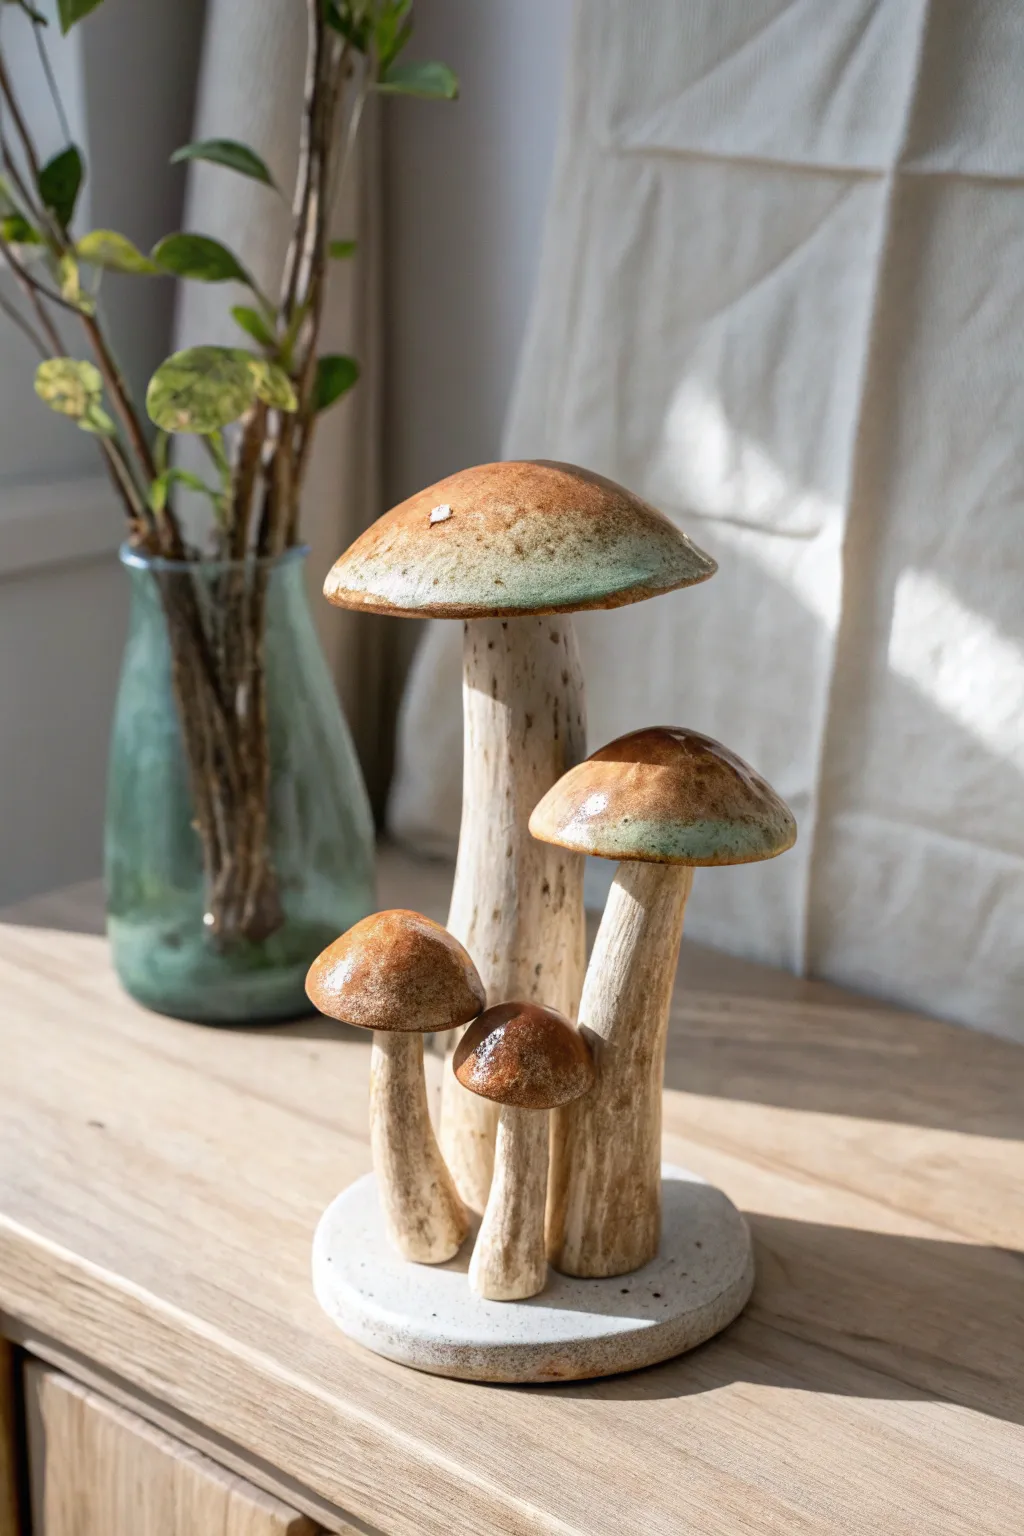
Bring a touch of the forest floor into your home with this ceramic mushroom cluster. The piece features four mushrooms of varying heights with textured stems and glazed caps, all anchored to a sturdy, circular base.
Step-by-Step Tutorial
Materials
- Stoneware clay (groggy for texture)
- Clay scoring tool or serrated rib
- Slip (clay mixed with water)
- Wooden modeling tool
- Needle tool
- Rolling pin
- Sponge
- Underglaze (brown/rust tones)
- Glossy glaze (clear or semi-transparent)
- Oxide wash (optional, for stems)
Step 1: Forming the Base & Stems
-
Roll the Base:
Begin by rolling out a slab of clay to about 1/2 inch thickness. Cut out a circle approximately 6 inches in diameter to serve as the foundation for your cluster. -
Smooth the Edges:
Compress and smooth the outer rim of your circular base with a damp sponge to prevent warping or sharp edges later. -
Shape the Main Stem:
Take a large lump of clay and roll it into a thick coil. Taper it slightly so it is wider at the bottom and narrower at the neck, creating the tallest stem. -
Texture the Clay:
Before attaching, drag a serrated rib or a stiff brush vertically up the stem to create those deep, bark-like striations seen in the reference image. -
Create the Smaller Stems:
Repeat the rolling and texturing process for three additional stems of varying heights—one medium and two small—to create a balanced composition. -
Attach Stems to Base:
Score the bottom of each stem and the corresponding spots on the base vigorously. Apply slip and press them firmly into place, ensuring the tallest one is slightly off-center. -
Reinforce Connections:
Use a wooden modeling tool to blend the clay from the bottom of the stems onto the base, ensuring a seamless and strong bond.
Air Escape Hole
Use a needle tool to poke a hidden hole from beneath the cap into the hollow stem. This allows expanding hot air to escape and prevents explosions.
Step 2: Sculpting the Caps
-
Form Pinch Pots:
For the mushroom caps, start by making four separate balls of clay corresponding to the size of your stems. -
Shape the Domes:
Gently press your thumb into each ball and pinch the clay outward to create a shallow, dome-like pinch pot shape. Keep the walls even. -
Refine the Edges:
Smooth the rims of the caps so they are rounded, not sharp. I like to gently tap the rim on a table surface to flatten the underside slightly. -
Score and Slip:
Score the top of each stem and the center underside of each cap. Apply a generous amount of slip to both connection points. -
Attach the Caps:
Place the caps onto the stems. Give them a gentle wiggle to lock the clay particles together, then smooth the underside connection with a small tool. -
Add Imperfections:
Gently dent or tap the tops of the caps to give them an organic, non-uniform look. Real mushrooms aren’t perfect spheres.
Step 3: Glazing and Finishing
-
Bisque Fire:
Allow the sculpture to dry slowly under plastic to prevent cracking. Once bone dry, bisque fire it to your clay body’s recommended temperature (usually cone 04). -
Apply Stem Wash:
Wipe a diluted iron oxide or brown underglaze onto the stems and wipe it back with a sponge. This leaves color in the texture grooves while keeping high points light. -
Glaze the Caps:
Apply a rust or caramel-colored glaze to the tops of the caps. Brushing works best here to control the drip. -
Add Green Accents:
Dab a small amount of reactive green glaze or copper oxide near the rims of the caps to imitate mossy growth or lichen. -
Glaze the Base:
Coat the circular base in a matte white or speckled grey glaze to create a neutral ground for the mushrooms. -
Final Firing:
Glaze fire the piece to the appropriate temperature (likely cone 5/6 for stoneware), ensuring no glaze is on the very bottom touching the kiln shelf.
Wobbly Stems?
If tall stems are sagging, prop them up with crumpled newspaper or foam blocks while drying. Let them stiffen to leather-hard before attaching caps.
Once fired, this charming sculpture adds a perfect organic element to any shelf or tabletop display
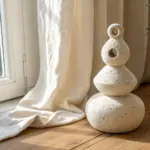
Stacked Totem Sculpture
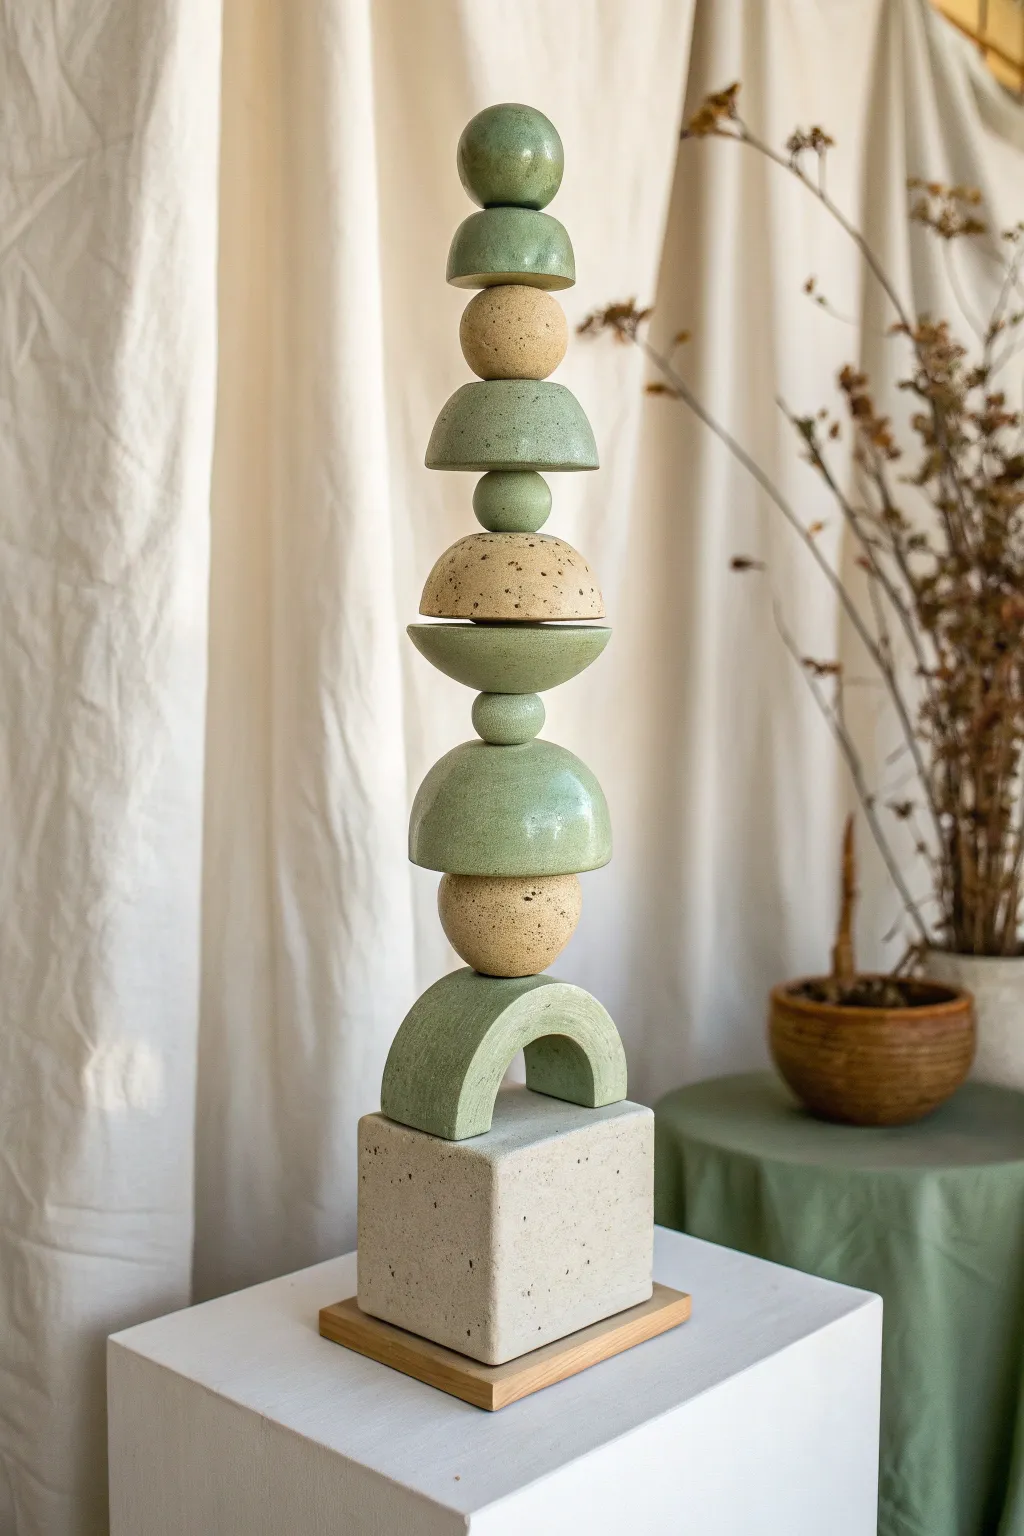
Achieve a sense of serene equilibrium with this vertical stacked sculpture, featuring alternating shapes of soft sage green and speckled sandstone. The interplay of spheres, hemispheres, and arches creates a modernist silhouette that feels both grounded and uplifting.
Step-by-Step Guide
Materials
- Stoneware clay (buff or speckled body)
- Pottery wheel or slab roller
- Rolling pin and guide sticks (if hand-building)
- Circle cutters of various sizes
- Fettling knife
- Needle tool
- Rib tool (smooth metal or rubber)
- Wooden dowel or metal rod (for internal structure)
- Sage green matte glaze
- Speckled matte beige/sandstone glaze
- Wooden display base
- Epoxy adhesive
Step 1: Forming the Base Components
-
Construct the cube base:
Roll out a slab of clay to about 1/4 inch thickness. Cut six equal squares (approx. 4×4 inches) and assemble them into a hollow cube using scoring and slipping on all joints. Leave a small hole in the bottom for air to escape. -
Smooth the cube:
Once assembled, paddle the sides gently to sharpen the corners and use a rib tool to ensure the faces are perfectly flat. Create a vertical hole through the top center large enough for your support rod. -
Create the arch:
Extrude or roll a thick coil of clay and flatten it into a rectangular block. Bend this block over a cylindrical form (like a PVC pipe) to create a perfect U-shape arch that fits the width of your cube. -
Refine the arch:
Slice the bottom legs of the arch so it stands flat. Drill a vertical hole through the center apex of the arch aligned with where the rod will pass.
Wobbly stack?
If pieces rattle or spin on the rod, add small rubber O-rings or a dab of clear silicone between each ceramic component. This acts as a shock absorber and keeps them snug.
Step 2: Throwing or Molding the Round Forms
-
Prepare spheres:
Create three hollow spheres. You can do this by pinching two small pinch pots and joining them rim-to-rim. Make one large (bottom), one medium (center), and one small (very top). -
Shape the hemispheres:
Create four hemispherical domes. These can be slumped over a plaster mold or thrown on the wheel as closed forms and cut in half later. Vary the sizes slightly for visual interest. -
Form the connector spheres:
Roll small solid balls of clay to act as visual ‘beads’ between the larger shapes. You will need two or three of these. -
Drill alignment holes:
While the clay is leather hard, carefully bore a hole through the vertical center of every single component (spheres, hemispheres, and connectors). Ensure the hole is slightly larger than your final metal rod to account for clay shrinkage. -
Refine surfaces:
Once leather hard, burnish or sponge all pieces smooth. Pay special attention to the rims of the hemispheres and the surface of the cube.
Pro Tip: Shrinkage Math
Remember clay shrinks 10-14%! Make your central rod holes 20% larger than the rod’s actual diameter to ensure pieces still fit after high-firing.
Step 3: Glazing and Assembly
-
Bisque fire:
Load all components into the kiln carefully and fire to cone 04 (or your clay’s specific bisque temperature). -
Sort for glazing:
Separate your pieces into two groups. Group A (Cube, some hemispheres, small top sphere) will be speckled beige. Group B (Arch, some hemispheres, connector beads) will be sage green. -
Apply the glazes:
Dip or brush the appropriate glaze onto each piece. I find that dipping ensures the most even coat for geometric shapes. Wipe any glaze out of the vertical rod holes to prevent clogging. -
Glaze fire:
Fire the pieces to maturity (usually cone 6 for stoneware). Make sure to stilt the glazed pieces so they don’t stick to the kiln shelf. -
Prepare the base:
Cut a flat wooden square slightly larger than your ceramic cube. Drill a hole in the center and insert your metal rod or wooden dowel, securing it with strong epoxy. -
Final assembly:
Slide the ceramic pieces onto the rod one by one. Start with the cube, then the arch, followed by the large sphere, and continue stacking upward, alternating shapes and colors as shown in the reference image.
Step back and admire how the simple repetition of shapes creates a sophisticated sculptural statement for your home

TRACK YOUR CERAMIC JOURNEY
Capture glaze tests, firing details, and creative progress—all in one simple printable. Make your projects easier to repeat and improve.
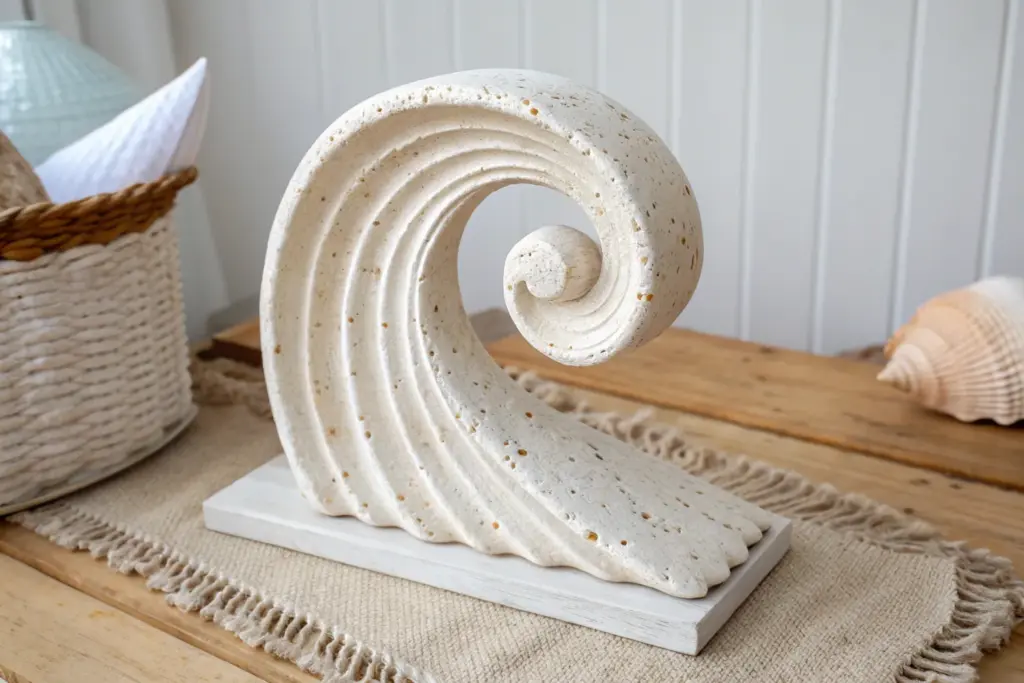
Carved Wave Motion Sculpture
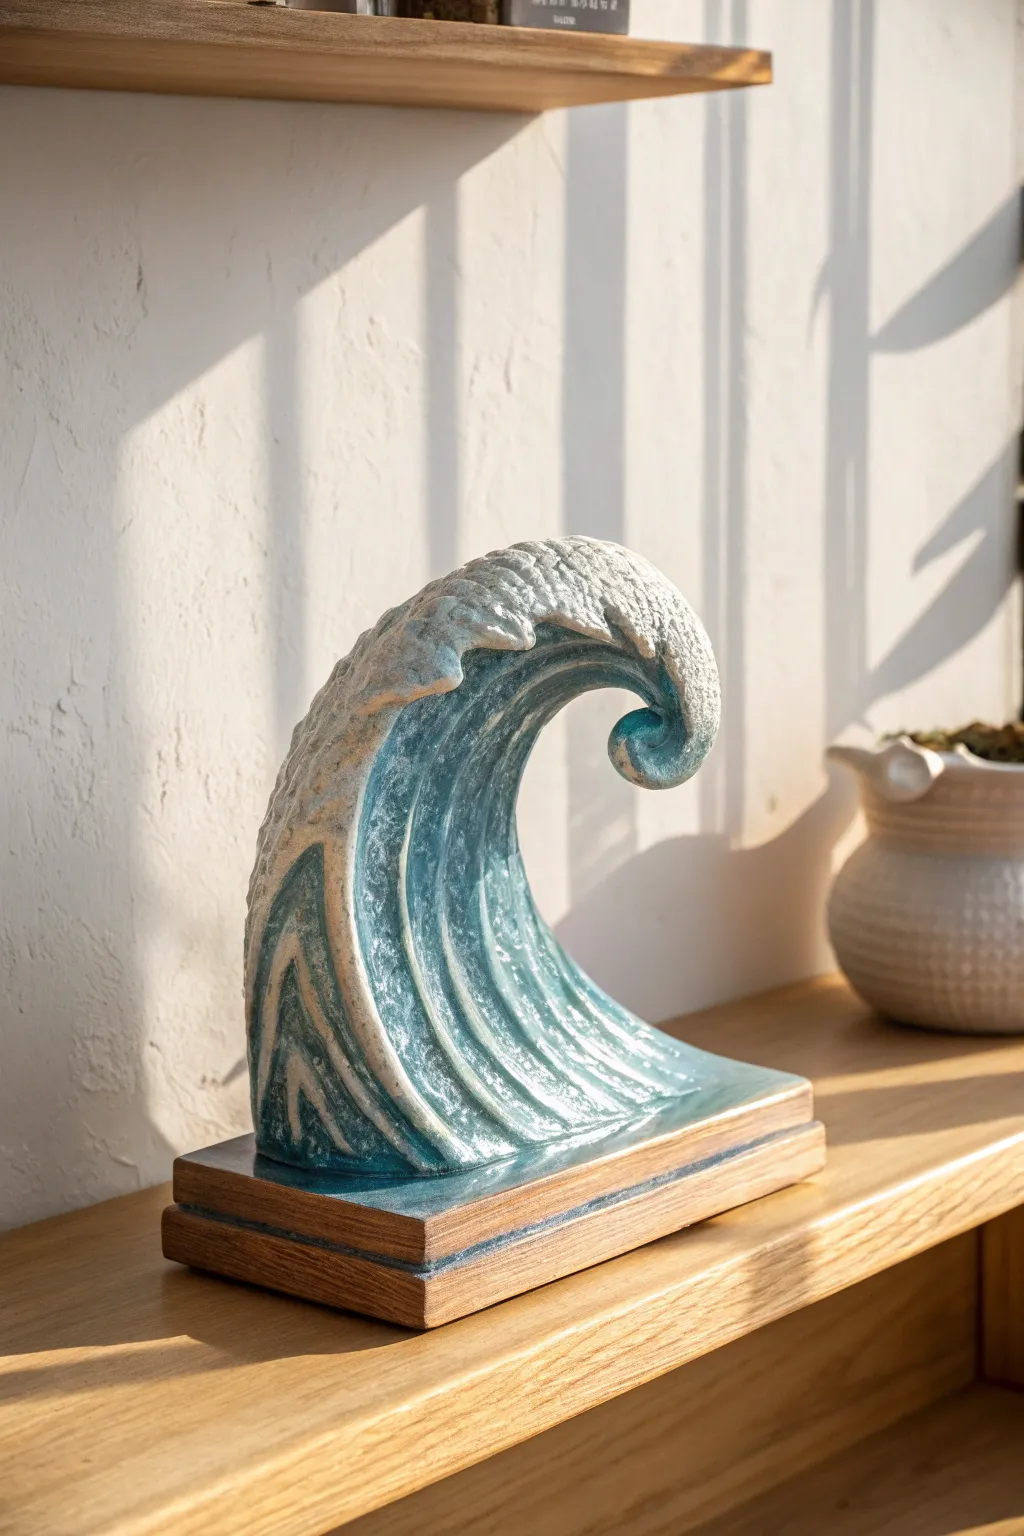
Capture the raw power of the ocean in clay with this stylized wave sculpture, featuring deep, rhythmic grooves and a frothy, textured crest. The turquoise glaze pooling in the recesses contrasts beautifully with the matte white foam, creating a piece that feels both dynamic and serene.
Step-by-Step
Materials
- Stoneware clay (smooth body recommended)
- Fettling knife
- Loop tools (large and medium)
- Needle tool
- Rib tool (serrated and smooth)
- Sponge
- Underglaze (White)
- High-gloss transparent turquoise glaze
- Wax resist
- Slab roller or rolling pin
- Wooden base plinth (pre-made or cut to size)
- Strong epoxy adhesive
- Scoring tool
- Slip
Step 1: Forming the Base Shape
-
Prepare the block:
Begin by wedging a substantial block of clay to remove air bubbles. Shape it into a rough, thick wedge or ‘fin’ shape that is wider at the bottom and tapers slightly towards the top. It should stand stably on its own. -
Draft the curve:
Using a needle tool, lightly sketch the profile of the wave onto the side of your clay block. You want a dramatic ‘C’ curve where the top curls over. -
Cut the profile:
Take your fettling knife and cut away the excess clay to define the primary wave shape. Don’t worry about the hollow inside just yet; focus on getting the solid silhouette right. -
Hollow the curl:
Use a large loop tool to carefully hollow out the underside of the wave’s curl. Remove clay gradually to create the negative space, following the curve you established with the silhouette. -
Refine the curl tip:
Shape the very tip of the wave into a tight spiral. You may need to add a small coil of clay here to get that perfect scroll shape if the block wasn’t thick enough.
Slumping Wave?
If the wave curl starts to sag during carving, prop it up with a gentle support made of crumpled newspaper or a sponge until the clay stiffens.
Step 2: Texturing and Carving
-
Map flow lines:
With the needle tool, lightly draw long, sweeping lines that follow the curvature of the wave from the base up into the curl. These will guide your deep carving. -
Carve the channels:
Using a medium loop tool, carve deep grooves along your guide lines. Press harder in the middle of the stroke and lighter at the ends to create fluid, tapered channels that mimic water movement. -
Texture the foam:
At the very top of the crest and along the outer back edge, add texture for the sea foam. I find using a serrated rib or even a stifled brush works well here to create a chaotic, bumpy surface. -
Smooth the channels:
Use a damp sponge or your finger to smooth the ridges between your carved grooves. You want the ‘water’ parts to look slick and fluid, contrasting with the rough foam. -
Dry slowly:
Cover the piece loosely with plastic. Because the thickness varies between the base and the thin curl, slow drying is crucial to prevent the top from cracking off. -
Bisque fire:
Once bone dry, fire the piece to bisque temperature (usually cone 04) to prepare it for glazing.
Level Up: Opalescent Finish
Add a Mother of Pearl luster overglaze to the white foam area for a shimmering, wet look. This requires a third, lower-temperature firing.
Step 3: Glazing and Assembly
-
Apply wax resist:
Apply wax resist to the bottom of the ceramic piece to prevent glaze from sticking to the kiln shelf. -
Paint the foam:
Brush two to three coats of white underglaze onto the textured crest and foam areas. Leave the surface rough so it stays matte after firing. -
Glaze the water:
Apply the high-gloss turquoise glaze to the smooth, carved channel sections. Ensure the glaze gets into the deep recesses, as pooling there will create that beautiful depth of color. -
Wipe back highlights:
Before the glaze dries completely, gently wipe the high ridges of the water channels with a damp sponge. This reveals a bit of the clay body beneath and enhances the 3D effect. -
Glaze fire:
Fire the piece again to the maturation temperature of your glaze and clay body. -
Prepare the wood base:
While the kiln cools, sand and stain your wooden plinth. A warm oak tone complements the cool blue glaze nicely. -
Final assembly:
Once the ceramic is cool, mix a strong two-part epoxy. Apply it to the bottom of the wave and press firmly onto the center of the wooden base. Allow to cure fully before moving.
Place your finished sculpture near a window where sunlight can catch the translucent glaze and illuminate the movement of the water
Octopus Wrap Vessel Sculpture
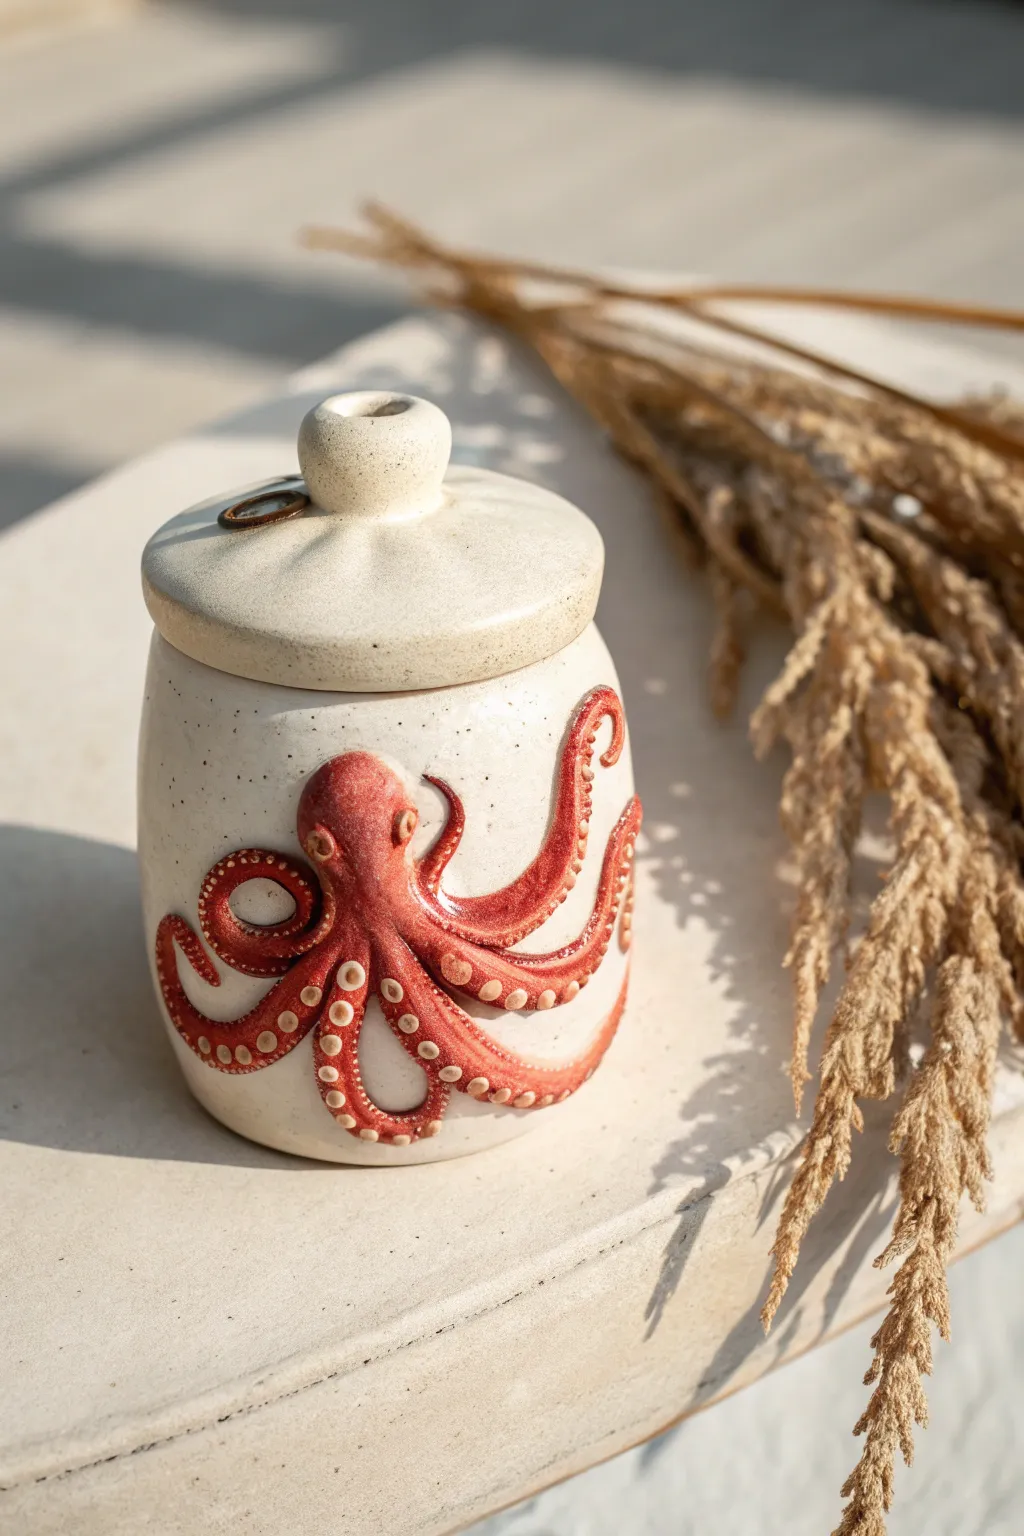
Bring the mysteries of the deep to your shelf with this charming ceramic jar, featuring a playful octopus wrapping its arms around the vessel. The contrast between the speckled cream clay and the vibrant rust-red cephalopod creates a striking, tactile piece perfect for storing small keepsakes.
Detailed Instructions
Materials
- Stoneware clay (speckled or buff)
- Pottery wheel (or coil/slab building tools)
- Ribs (wooden and metal)
- Needle tool
- Small loop tool or carving tool
- Slip and scoring tool (serrated rib)
- Underglaze (Red Iron Oxide or Terracotta color)
- Clear or Cream glaze (semi-matte suggested)
- Small round paintbrush
- Sponge
Step 1: Throwing the Vessel and Lid
-
Center and open:
Begin by centering about 1-1.5 lbs of clay on the wheel. Open the clay to form a flat floor, keeping it relatively narrow to encourage a cylindrical shape suitable for a jar. -
Pull the walls:
Pull the walls up to create a gentle, rounded cylinder. Aim for a slightly barrel-shaped profile—wider in the middle and slightly tapered at the top and bottom—to give the octopus a nice surface to hug. -
Form the gallery:
At the rim, use a wooden tool or your finger to split the clay and create a gallery (a small ledge) that will hold the lid. Smooth the rim with a chamois for a professional finish. -
Throw the lid:
Using a smaller amount of clay (approx. 0.5 lbs), throw a simple domed lid upside down. Ensure the flange measurement matches your jar’s gallery. Add a small, solid knob at the top for easy lifting.
Suction Cup Shortcut
Instead of rolling tiny balls, use a small hollow tube (like a coffee stirrer) to press rings directly into the soft coils for instant suction cups.
Step 2: Sculpting the Cephalopod
-
Roll coils:
Once the jar is leather hard, roll out several tapered coils of clay. These will become the octopus tentacles. Vary their lengths and thicknesses to make the movement look organic. -
Form the body:
Shape a small, rounded oval of clay for the octopus head (mantle). Score and slip the area on the upper portion of the jar where you want the head to sit, then press it firmly into place. -
Attaching tentacles:
Score and slip pathways for the tentacles first. Attach the coils, arranging them in winding, curling patterns around the jar. I usually like to have legs overlapping each other to create depth. -
Blend the seams:
Use a modeling tool to firmly blend the edges of the tentacles and head onto the jar body. This ensures they won’t pop off during firing and makes the octopus look like part of the vessel. -
Add the eyes:
Create two small balls of clay for eyes. Attach them to the head, then use a small sculpting tool to shape eyelids or pupils for expression. -
Create suction cups:
Roll tiny balls of clay—dozens of them. Press them onto the underside of the tentacles. Use the back of a small paintbrush or a detail tool to make a small indentation in the center of each ball.
Level Up: Hidden Details
Carve a small crab or fish on the back of the jar, or inside the lid, as if the octopus is hunting a hidden snack.
Step 3: Glazing and Finishing
-
Bisque fire:
Allow the entire piece to dry slowly to prevent cracking, especially around the added sculpture. Bisque fire to your clay body’s recommended temperature (usually cone 04). -
Apply underglaze:
Using a rust-red or terracotta underglaze, carefully paint the octopus body and tentacles. You can wipe back slightly with a sponge if you want to highlight the texture of the suction cups. -
Wax resist:
Apply wax resist carefully over the painted octopus. This prevents the dipping glaze from covering your detailed sculpture work. -
Dip glazing:
Dip the jar and lid into a creamy, speckled white glaze. The wax will protect the octopus, though you may need to wipe away any stray droplets that bead up on the wax. -
Final wipe:
Clean off the foot of the jar and the flange where the lid sits to ensure they don’t fuse to the kiln shelf or each other during the final firing. -
Glaze fire:
Fire the piece to the final temperature (e.g., cone 5/6). The heat will mature the clay and melt the glaze into a smooth, durable finish.
Now you have a unique, ocean-inspired vessel ready to hold your treasures
Draped Cloth Over Form Sculpture
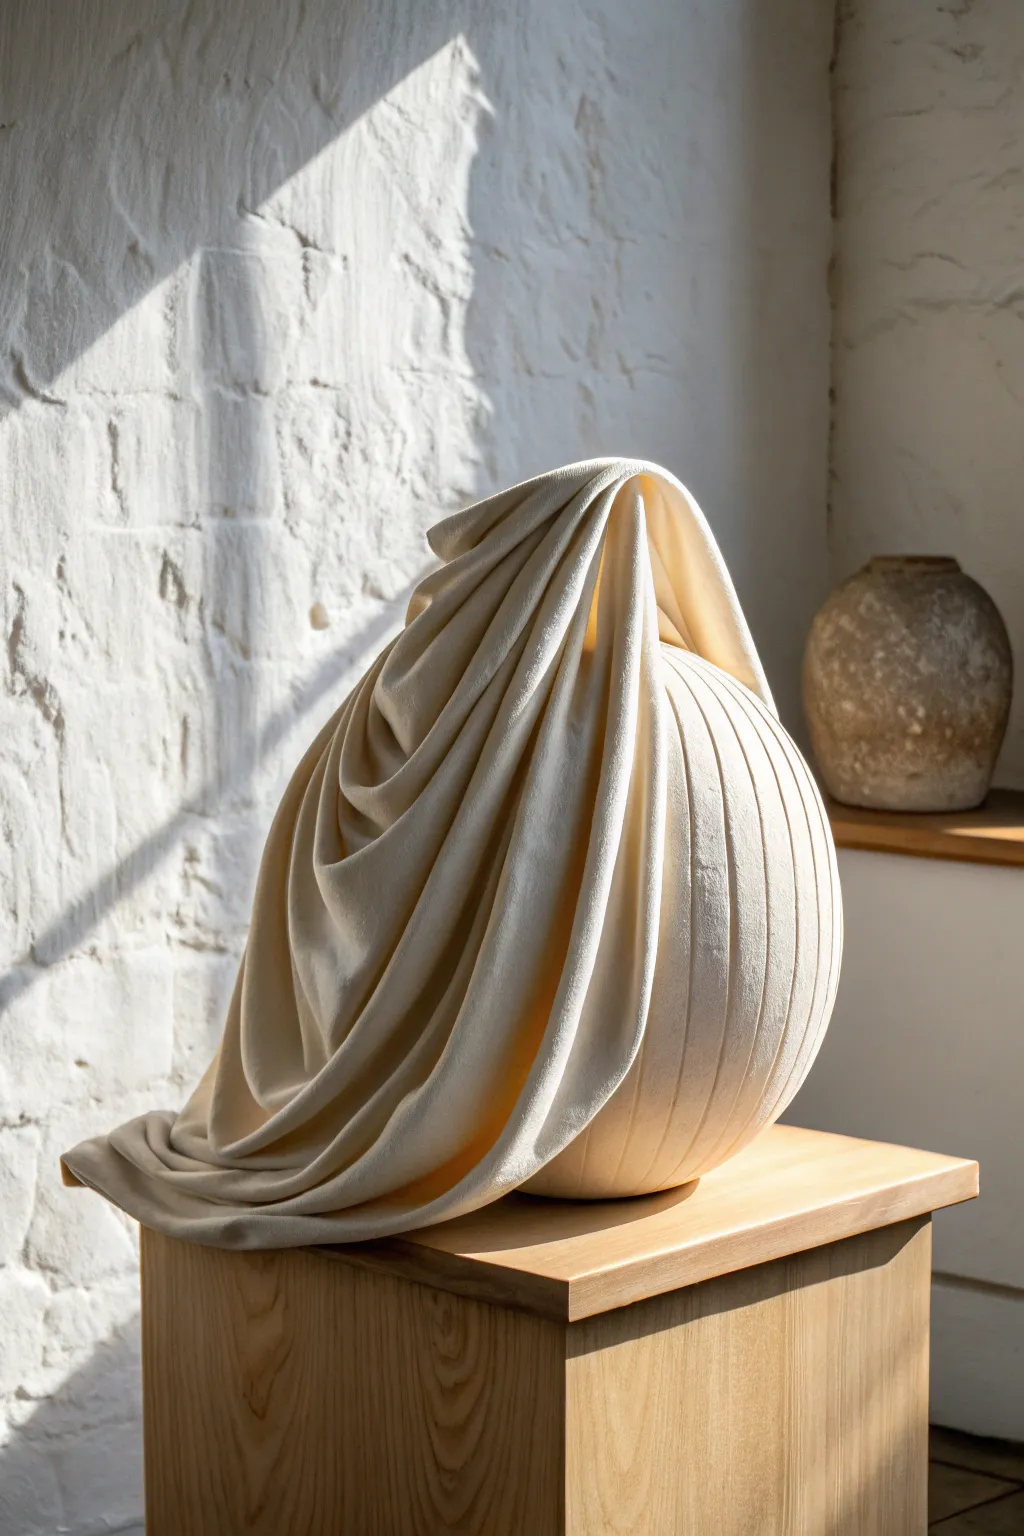
This project captures the mesmerizing trompe-l’œil effect of soft fabric sculpted from rigid clay, freezing a moment of gravity in time. You will create a perfectly spherical base that seemingly bursts through a heavy, draped veil, resulting in a striking piece of modern ceramic art.
Step-by-Step
Materials
- White stoneware or porcelain clay body (smooth)
- Spherical plaster mold or balloon for support
- Rolling pin
- Canvas or slab mat
- Ribs (metal and wooden)
- Needle tool
- Fettling knife
- Scoring tool
- Slip
- Sponge
- Soft bristle brush
Step 1: Creating the Base Sphere
-
Prepare the slabs:
Begin by wedging your white stoneware clay thoroughly to remove air pockets. Roll out a large, even slab approximately 1/4 inch thick on your canvas. I find that keeping this layer slightly thicker helps support the weight of the upcoming ‘fabric’ layer without collapsing. -
Form the hemisphere:
If using a plaster hump mold, drape the slab over it and gently compress the clay downward with a rubber rib to conform to the shape. Trim the excess clay at the base with a needle tool. -
Close the form:
Repeat the process to make a second hemisphere. Once both halves are leather-hard, score and slip the rims aggressively. Join them together to create a full sphere, paddling the seam gently to ensure a perfect roundness. -
Refine the surface:
Use a flexible metal rib to scrape away the join line and smooth the entire surface. You want the visible part of the sphere—the ‘exposed’ area—to be flawless. -
Vent the sphere:
Use a needle tool to poke a discrete hole in the very bottom of the sphere. This is critical to allow air to escape during firing so your piece doesn’t explode.
Fabric Realism Tip
Before draping your slab, texture it lightly with a piece of linen or canvas. This subtle weave transfer catches the light and sells the illusion of fabric.
Step 2: Sculpting the Drapery
-
Roll the fabric slab:
Roll out a second, thinner slab of clay, aiming for about 1/8 inch thickness. This needs to look delicate, like real cloth. Compress it on both sides with a rib to align the clay particles and prevent cracking. -
Create the initial fold:
Cut a large, irregular shape from your thin slab. Lift it carefully and drape it over the top one-third of your leather-hard sphere. Don’t press it down flat; allow gravity to create natural, deep folds. -
Arrange the pleats:
Gently manipulate the hanging sections of the slab. Pinch ridges together to create sharp peaks and use the handle of a paintbrush to gently press indentation valleys, mimicking heavy velvet or linen. -
Secure the contact points:
Identify where the ‘fabric’ touches the sphere securely. Lift those spots slightly, browse a little slip underneath, and press back down firmly to bond the two pieces without flattening your beautiful folds. -
Refine the edges:
Trim the bottom of the draped clay so it pools naturally at the base of the sculpture. I like to slightly curl the hem or let it bunch up on the table surface to enhance the illusion of weight. -
Smooth the transition:
Use a damp sponge to smooth the edges of your ‘cloth.’ Sharp, ragged clay edges look like broken ceramic, but rounded, soft edges look like hemmed fabric.
Fixing Hairline Cracks
If tiny cracks appear in the deep folds during drying, maximize humidity immediately. Apply ‘paper clay’ slip (vinegar + toilet paper + clay) to fill the gap.
Step 3: Drying and Finishing
-
Slow drying process:
Tent the sculpture loosely with plastic. Because the sphere and the drape vary in thickness, you must dry this very slowly over 5-7 days to prevent the drape from cracking away from the base. -
Bisque fire:
Once bone dry, bisque fire the piece to Cone 04. Load it carefully, ensuring the delicate folds aren’t touching the kiln shelves or posts. -
Apply finish:
To maintain the raw, stone-like aesthetic shown in the image, skip the glaze. Instead, sand the bisque ware with high-grit sandpaper for a buttery smooth finish, or apply a very thin wash of white terra sigillata before the final firing. -
Final firing:
Fire the piece to maturity (likely Cone 5 or 6 depending on your clay body). Since there is no glaze to run, you don’t need to worry about the base sticking to the shelf.
The final result is a stunning study in contrast that invites viewers to reach out and touch the impossible softness of the clay
Relief Portrait Tile Sculpture
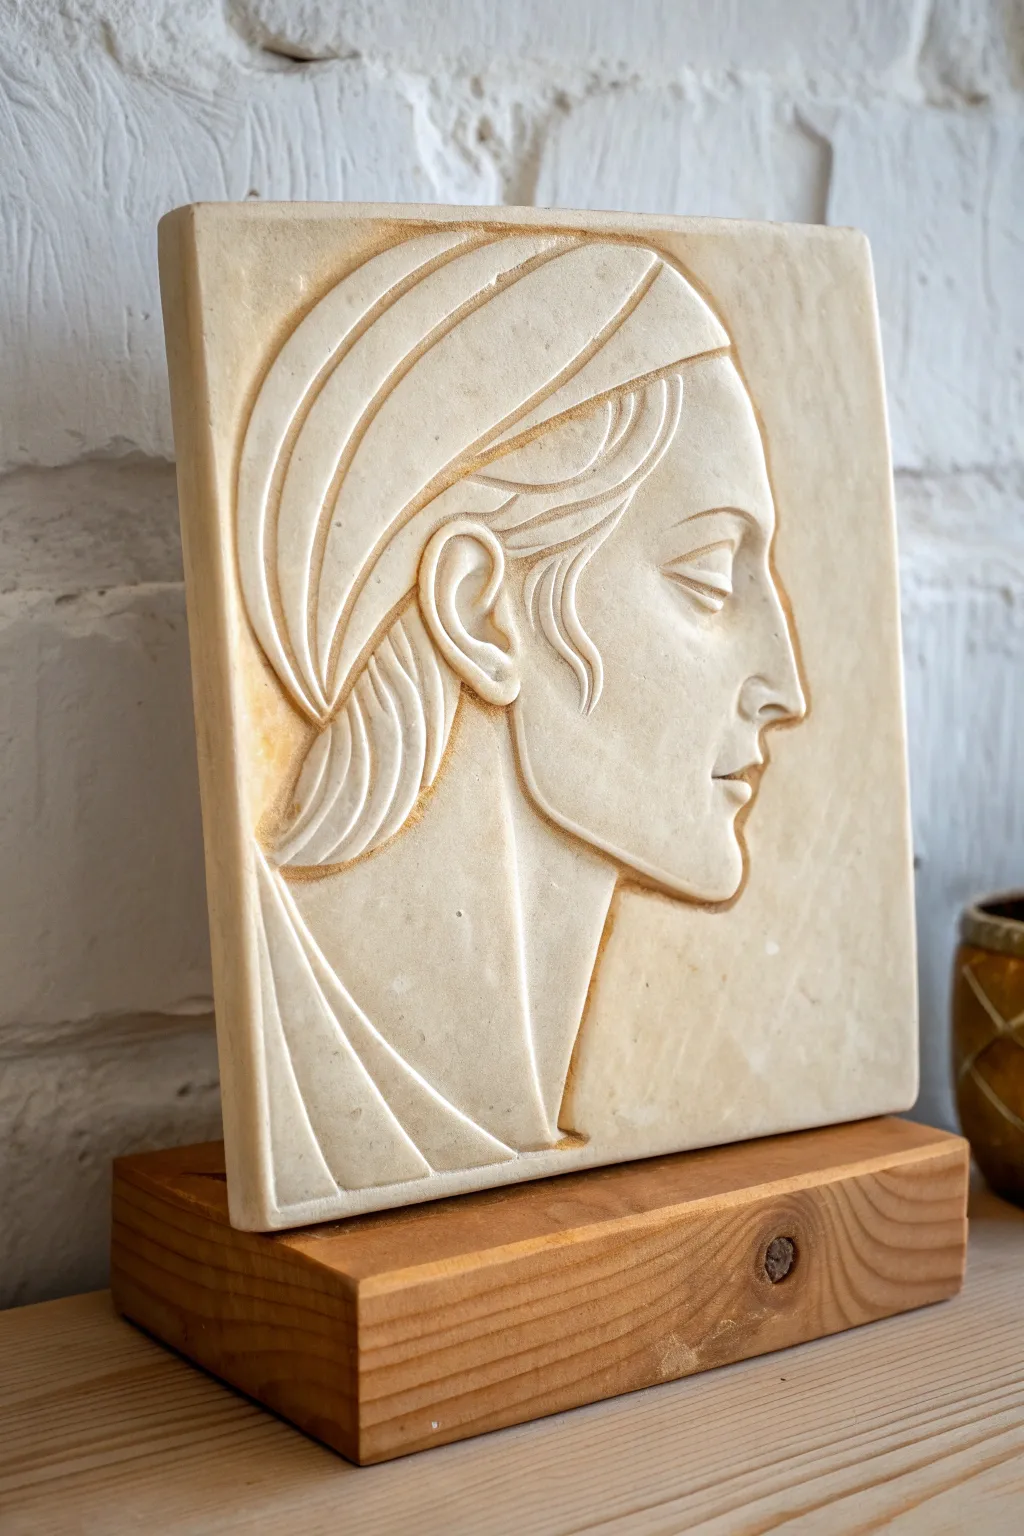
Capture the elegance of ancient artistry with this sophisticated low-relief portrait tile. By focusing on clean lines and subtle depth, you will create a timeless sculptural piece that mimics the look of carved marble or limestone.
Step-by-Step Tutorial
Materials
- Cone 5-6 stoneware clay (smooth, light-colored body)
- Square tile cutter or ruler and knife
- Tracing paper and pencil
- Reference image of a classical profile
- Needle tool
- Wire loop tools (small and medium)
- Small carving gouges or ribbon tools
- Rubber kidney rib
- Sponge
- Wooden base for mounting
- Strong epoxy adhesive
- Optional: Iron oxide wash for antiquing
Step 1: Slab Preparation
-
Roll the Slab:
Begin by rolling out a slab of smooth stoneware clay to an even thickness of approximately 3/4 inch to 1 inch. This thickness provides enough depth for carving without making the tile too heavy. -
Compress the Surface:
Use a rubber kidney rib to compress the clay surface thoroughly on both sides. This aligns the clay particles, preventing warping during drying, and creates a pristine canvas for your carving. -
Cut the Shape:
Measure and cut a perfect square, roughly 8×8 inches, or your desired dimension. Ensure the edges are crisp and upright, smoothing them gently with a damp sponge to remove any sharp burrs.
Uneven Background?
If your excavated background looks scratchy, use the back of a spoon to burnish and compress the clay while it’s leather hard. This creates a smooth, finished surface without adding water.
Step 2: Drafting the Design
-
Prepare the Sketch:
Using your classical reference, sketch the profile onto tracing paper. Focus on the continuous lines of the forehead, nose, and the flowing drapery of the headscarf. -
Transfer to Clay:
Once the clay has stiffened to a ‘leather-hard’ state—firm to the touch but still carveable—place your tracing paper over the tile. Gently trace over your lines with a stylus or dull pencil to indent the design into the clay surface. -
Reinforce Lines:
Remove the paper and carefully go over the faint indentations with a needle tool to clarify your map. Don’t dig too deep yet; just establish the primary shapes.
Step 3: Carving the Relief
-
Outline the Silhouette:
Using a small V-tip gouge or a needle tool, carve a deeper channel around the main outline of the face. This creates the foundational separation between the subject and the background. -
excavate the Background:
Use a medium wire loop tool to carefully shave away the background clay outside the profile. I prefer to remove just 1/8 to 1/4 inch of depth; keep the surface closest to the profile line lowest, sloping slightly upward toward the tile edge to create an illusion of greater depth. -
Define the Features:
Carve the interior details of the ear, the eye, and the nostril using small loop tools. Remember, this is low relief, so you are drawing with shadow rather than creating full 3D volume. -
Sculpt the Hair and Drapery:
Use a rounded gouge to carve the flowing channels of the hair and the folds of the headscarf. Keep these lines fluid and rhythmic, varying the width of the cut to suggest tension in the fabric. -
Smooth the Transitions:
Use a damp artist’s brush or your finger to smooth the sharp edges of your cuts. The goal is to make the facial features look soft and organic, contrasting with the flatter background.
Ancient Artifact Look
Before firing, gently tap the edges of the leather-hard tile with a wooden paddle to create small chips and imperfections. This gives the piece the feel of a weathered archaeological find.
Step 4: Finishing and Mounting
-
Refine the Surface:
Once the carving is complete, check for any tool marks in the background area. Smooth these out carefully with a rib or slightly damp sponge for a polished, stone-like finish. -
Slow Drying:
Sandwich the tile between two pieces of drywall or cover loosely with plastic to dry very slowly. This is crucial for preventing the corners of the flat tile from curling upward. -
Bisque Fire:
Fire the piece to cone 04 (or your clay’s specific bisque temperature). The unglazed, matte finish contributes significantly to the classical stone aesthetic. -
Optional Antiquing:
To enhance the carving, wash a diluted iron oxide or a darker stain over the piece and wipe it back with a sponge. The color will remain in the recesses, highlighting the linear details. -
Mount to Base:
Select a solid block of wood slightly wider than your tile’s thickness. Sand and seal the wood, then secure the finished ceramic tile into a routed groove or flush against the top using strong epoxy.
Display your modern artifact on a console table or shelf where the lighting will catch those elegant carved shadows.
Abstract Loop Desktop Sculpture
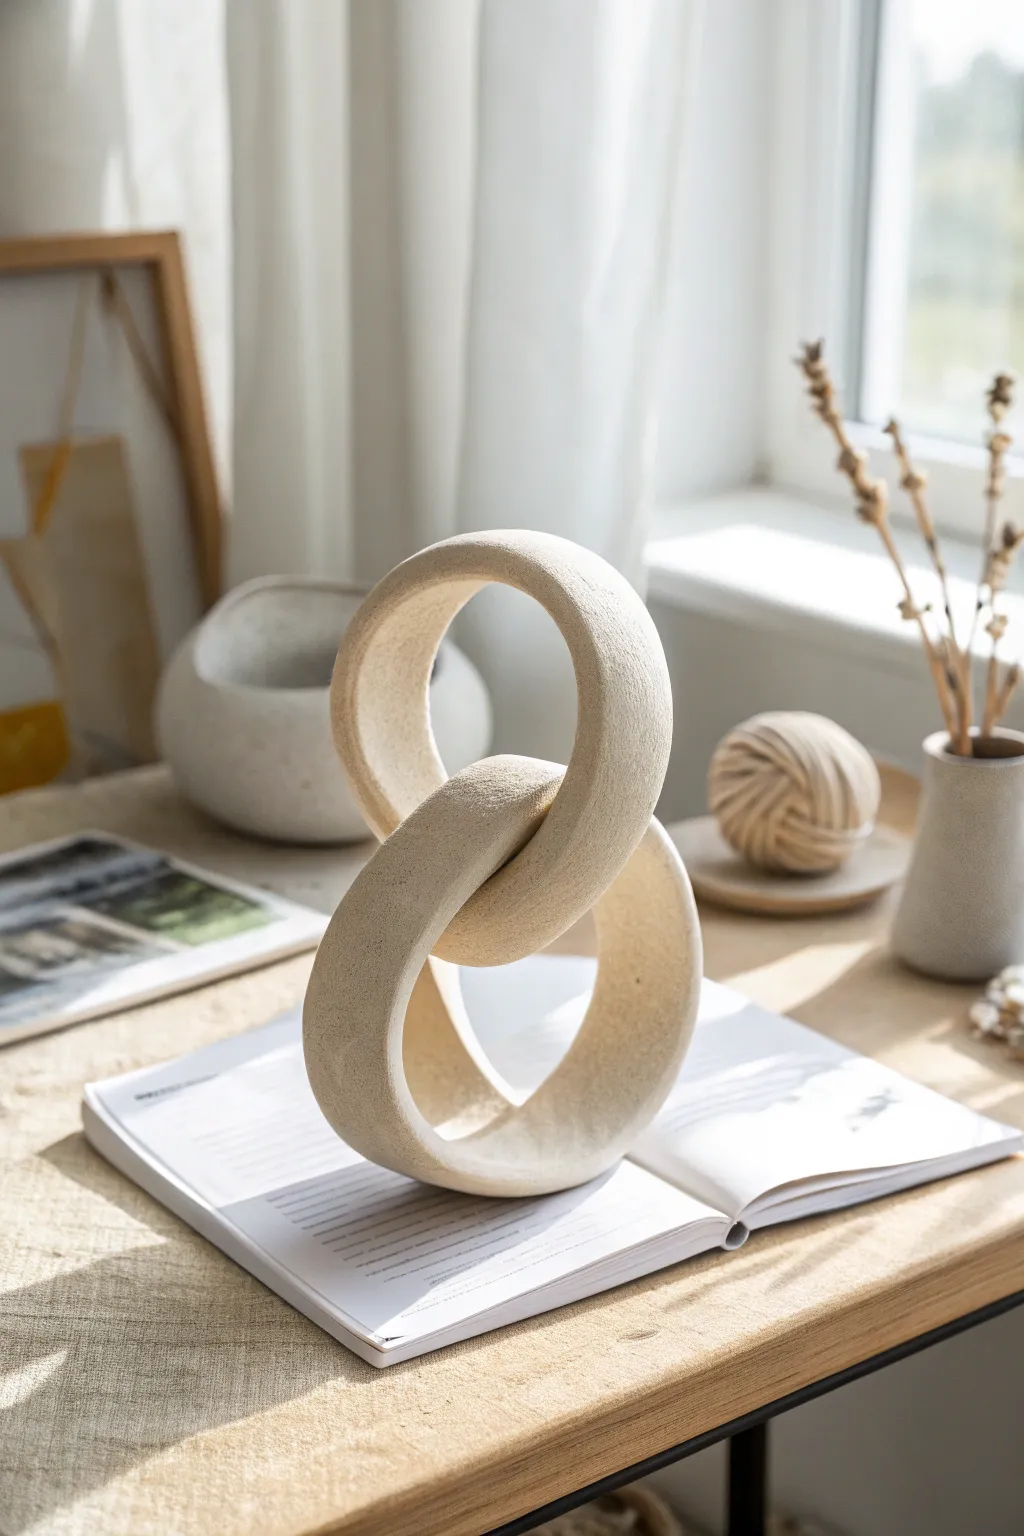
This minimalist sculpture features two thick, interlocking rings with a beautiful, raw stone texture that brings an organic feel to any desktop. The piece achieves a sense of impossible balance, though constructing it is actually quite straightforward with the right support techniques.
Step-by-Step
Materials
- White stoneware clay with grog (for texture and strength)
- Pottery wire cutter
- Rolling pin
- Two 4-inch diameter cardboard tubes or PVC pipes (forms)
- Newspaper or paper towels
- Serrated rib tool
- Rubber kidney tool
- Scoring tool or fork
- Slip (clay and water mixture)
- Sponge
- Wooden modeling tool
- Large plastic bag for drying
Step 1: Forming the Rings
-
Prepare your clay:
Start by wedging your stoneware clay thoroughly to remove air bubbles. Since we want a gritty, stone-like texture in the final piece, avoid smoothing the clay too much during this initial phase. -
Roll the coils:
Roll out two very thick coils of clay. Aim for a diameter of about 1.5 to 2 inches. They need to be substantial enough to support their own weight later. -
Prepare the forms:
Take your cardboard tubes or PVC pipes and wrap them loosely in newspaper. This prevents the clay from sticking to the form and allows for shrinkage as the clay dries. -
Shape the first ring:
Wrap one coil around the first paper-covered tube to create a circle. Where the ends meet, cut through both ends simultaneously at a 45-degree angle to create more surface area for the join. -
Join the first ring:
Score the cut edges deeply and apply a generous amount of slip. Press the ends firmly together to seal the ring. Smooth the seam with your wooden tool so it becomes invisible. -
Initial firming:
Let this first ring sit on the form until it reaches a ‘soft leather hard’ stage. It needs to be firm enough to hold its shape but flexible enough to be manipulated slightly.
Step 2: Interlocking and texturing
-
Position the second coil:
This is the tricky part. Take your second coil and thread it *through* the first ring (which should still be supported by its form if possible, or resting gently on its side). -
Close the second loop:
Wrap the second coil around its own paper-covered form, ensuring it loops through the center of the first ring. Just like before, cut the ends at an angle, score, slip, and join them securely. -
Stabilize the structure:
You now have two interlocked rings on supports. Arrange them on your work surface in the final desired pose. Use extra wads of clay or foam blocks to prop them up so they don’t slump while drying. -
Refine the shape:
Once the sculpture is leather hard and can support itself without the internal tubes, carefully remove the forms. Use a paddle or flat board to gently tap any rounded areas that have become misshapen. -
Create the texture:
Now for the fun part. Take your serrated rib tool and scrape it across the surface of the rings in various directions. Don’t be afraid to be a bit rough; this creates that raw, carved-stone look. -
Soften the edges:
I prefer to use a slightly damp sponge to knock back the sharpest burrs created by the serrated tool, but don’t smooth it completely. You want to leave the ‘tooth’ of the texture visible. -
Final drying check:
Inspect the joints one last time. If any hairline cracks have appeared due to stress during the texturing phase, score and compress them now.
Cracking at the Join?
If seams crack during drying, it’s usually uneven shrinkage. Make a ‘magic water’ mix (water, soda ash, sodium silicate) to mend the crack, then wrap tightly in plastic for 2 days.
Step 3: Firing and Finishing
-
Slow drying:
Cover the sculpture loosely with a plastic bag. Let it dry very slowly over the course of a week to prevent warping at the connection points. -
Bisque fire:
Once bone dry, bisque fire the piece to Cone 04. This will set the shape permanently. -
Glazing choice:
To replicate the image accurately, we aren’t using a glossy glaze. Instead, apply a matte white wash or a very dry, matte glaze. Alternatively, leave the raw clay unglazed if your clay body fires to a nice white cream color. -
Final firing:
Fire to the maturity temperature of your clay (likely Cone 5/6 or Cone 10). If you left the bottom unglazed, you can fire it directly on the kiln shelf.
Level Up: Dynamic Angle
Instead of round rings, shape your coils into soft ovals or organic kidney shapes. When interlocked, these irregular shapes create more interesting negative space and shadows.
Place your finished sculpture in a spot with good natural light to highlight that beautiful gritty texture
Cutout Orb Lantern Sculpture
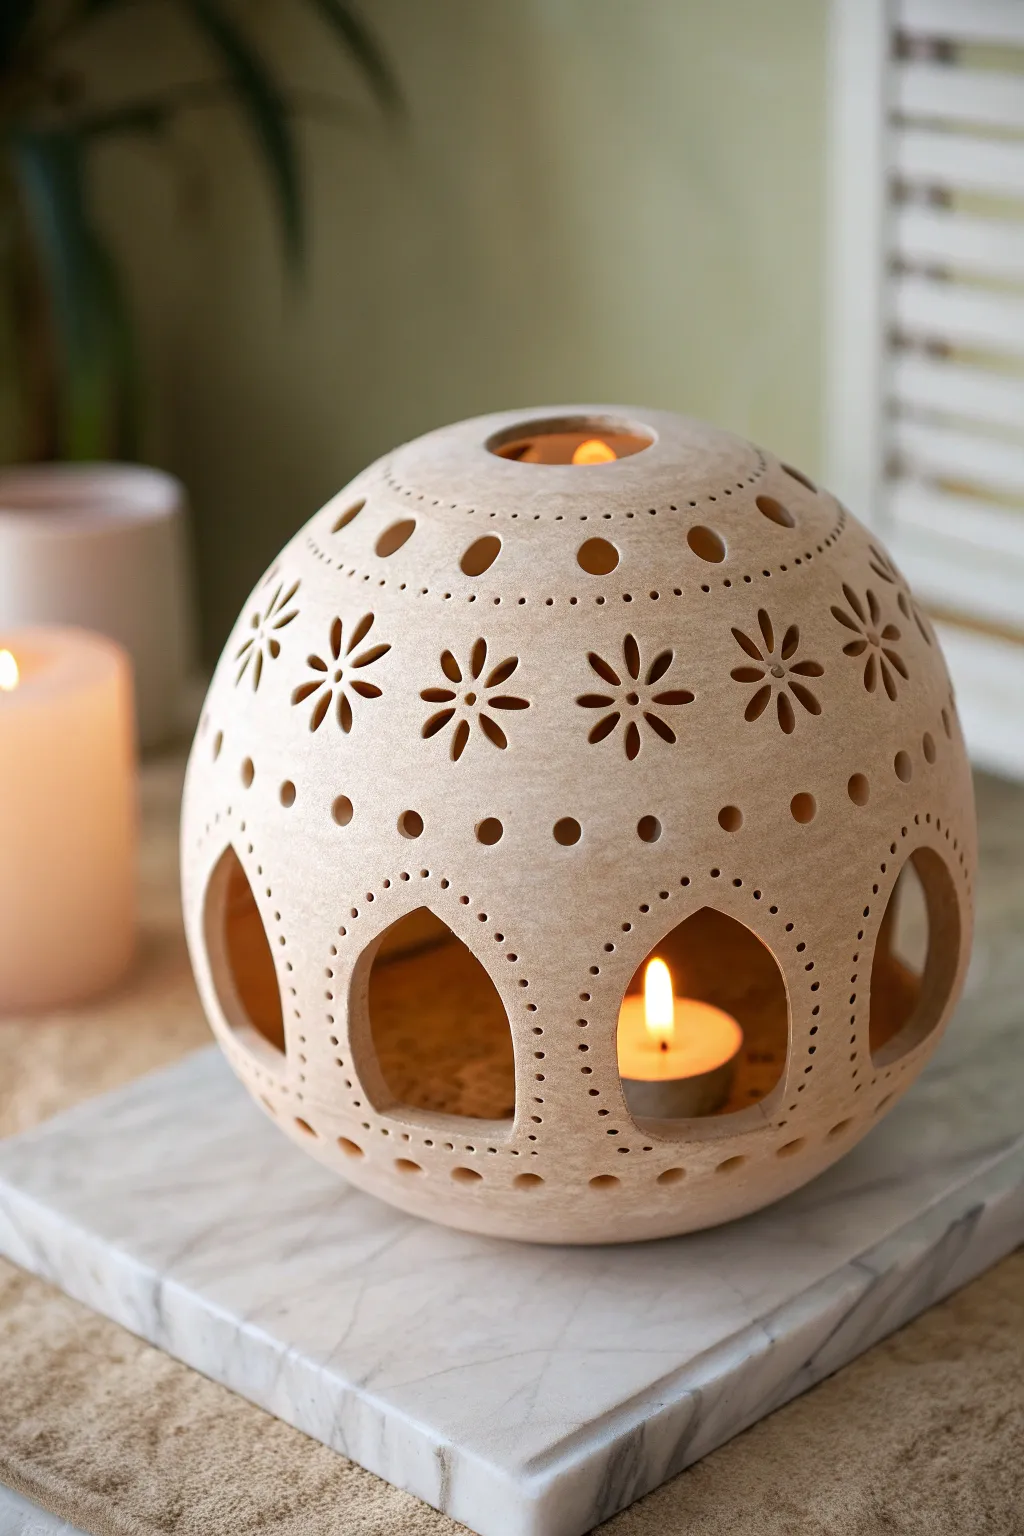
Transform raw clay into a glowing centerpiece with this intricate spherical lantern project. By utilizing precise cutout techniques and stamped details, you’ll create a structured yet airy vessel that casts beautiful shadows when lit from within.
Step-by-Step Guide
Materials
- Stoneware clay (buff or white)
- Spherical mold (styrofoam ball or balloon)
- Rolling pin
- Guide sticks (1/4 inch thickness)
- Fettling knife
- Small flower cookie cutter or fondant cutter
- Small circular hole cutter (straw or metal tube)
- Large teardrop or arch cutter
- Needle tool
- Flexible metal rib
- Sponge
- Tea light candle
Step 1: Forming the Sphere
-
Prepare the Clay Slab:
Begin by rolling out a medium-sized slab of stoneware clay. Use 1/4 inch guide sticks on either side to ensure an even thickness throughout, which is crucial for structural integrity during the drying phase. -
Drape Over Mold:
Since we are making a hollow sphere, use two half-sphere molds (like a Styrofoam ball covered in plastic wrap) or drape the clay over a balloon. Gently smooth the clay down over the curve, removing excess from the bottom edge. -
Join the Halves:
Wait until the clay becomes leather-hard so it holds its shape. If you used two half-molds, score and slip the edges thoroughly, then press them together to form a complete sphere. If using a balloon, ensure the clay is firm enough to support itself before popping the balloon. -
Smooth the Seam:
Use a flexible metal rib to compress the join seam fully. Drag the rib across the surface in multiple directions until the sphere looks seamless and perfectly round. -
Create the Top Opening:
Using a small circular cutter or a steady hand with a needle tool, cut a clean circle at the very top of the sphere. This acts as a chimney for heat to escape.
Clean Cuts Pro Tip
Let the clay reach a firm leather-hard stage before cutting complex shapes. If the clay is too wet, the flower petals will distort and drag when you pull the cutter out.
Step 2: Carving and Detailing
-
Mark Guidelines:
Ideally, place the sphere on a banding wheel. Lightly etch horizontal guidelines around the circumference with a needle tool to divide the space into three main sections: upper dots, middle flowers, and lower arches. -
Upper Dot Border:
Just below the top curvature, use a small hole cutter or a tool with a rounded tip to pierce a row of evenly spaced medium-sized circles. -
Piercing the Dotted Line:
Beneath the medium circles, create a very fine line of tiny texture dots. You don’t need to punch all the way through for these; a slight indentation or piercing with a small needle tool creates a delicate border. -
Cut the Flower Band:
In the central band of the sphere, use a small flower-shaped cutter. Press firmly to cut through the leather-hard clay, removing the clay plug carefully. Space these flowers evenly around the entire equator of the orb. -
Define the Lower Arches:
For the bottom section, cut large, arched windows. You can use a specific cutter or create a paper template to trace around. These large openings are essential for inserting the candle later. -
Frame the Arches:
Using your smallest hole tool or a needle, create a decorative border of tiny dots following the upper curve of each arched window. -
Add Texture Accents:
Between the main design elements, use a secondary tool to add larger decorative dots—one between the upper circles and one between the lower arches—to unify the pattern. -
Smooth the Edges:
Once all cuts are made, wait for the clay to stiffen slightly more. Then, take a slightly damp sponge and gently wipe specifically around the cut edges to remove any sharp burrs or crumbs.
Uneven Spacing?
If your pattern doesn’t meet perfectly at the back, just slightly adjust the spacing of the last two flowers or arches; the visual rhythm usually hides small discrepancies.
Step 3: Finishing
-
Dry Slowly:
Cover the sphere loosely with plastic to ensure even drying. Spheres are prone to cracking if they dry too fast, so give it several days to reach bone dry status. -
Bisque Fire:
Fire the piece to cone 04 (or your clay body’s specifications). Ensure the kiln shelf is level so the sphere doesn’t roll or warp. -
Glaze or Leave Bare:
For the look in the photo, leave the exterior unglazed to show the natural stone texture, or apply a very matte, sandy wash. If you glaze the inside, it will reflect more candlelight. -
Final Fire:
Complete the final firing according to your clay and glaze requirements.
Place a tea light inside your finished lantern and enjoy the warm, patterned glow it casts on your surroundings
Mini Architectural Arch Sculpture

These charming, stacked architectural forms resemble porous stone or airy biscuits, playing with balance and texture. The project uses a high-grog or speckled clay body to achieve a natural, earthy finish that highlights the beauty of raw material.
Step-by-Step Tutorial
Materials
- Speckled or groggy white stoneware clay
- Rolling pin
- Canvas work surface or cloth
- Needle tool or fettling knife
- Straight edge or ruler
- Two long wooden guide strips (approx 1/2 inch thick)
- Various cylindrical forms (PVC pipe, rolling pin, or sturdy cardboard tubes) in graduated sizes
- Plastic wrap
- Sponge
- Rib tool
- Scoring tool or fork
- Slip (clay mixed with water)
Step 1: Preparation and Slab Rolling
-
Wedge the clay:
Begin by thoroughly wedging your speckled clay to remove air bubbles and distribute moisture evenly. This is crucial for structural integrity. -
Set up guides:
Place your canvas on a flat table. Lay your wooden guide strips parallel to each other, slightly wider than the width of your desired slab. -
Roll the slab:
Place the clay between the guides and roll it out until the rolling pin rests on the strips. This ensures an even thickness of about 1/2 inch, which gives the arches their chunky, biscuit-like look. -
Compress the slab:
Using a rib tool, gently compress the clay surface on both sides. This aligns the clay particles and creates a smooth, canvas-textured finish while preventing warping later.
Step 2: Forming the Arches
-
Measure your strips:
Cut long, rectangular strips from your slab using a needle tool and a straight edge. You will need three strips of varying lengths but uniform width (approx 1.5 to 2 inches wide). -
Prepare the molds:
Select three cylindrical objects of different diameters to act as your arch molds. Cover them lightly with plastic wrap or paper to prevent sticking. -
Shape the large arch:
Drape the longest clay strip over the largest cylinder. Press it gently to conform to the curve, ensuring the ‘legs’ of the arch hang straight down. -
Trim the feet:
Once the clay has stiffened slightly but is still on the form, use your needle tool to cut the bottom of the legs flat so the arch will stand level. -
Create the medium and small arches:
Repeat the draping and trimming process with the medium and small strips on their respective smaller cylinders. I usually like to check them side-by-side to ensure the proportions look visually pleasing. -
Initial drying:
Let the clay dry to a ‘leather-hard’ state while still on the forms. This is when the clay is firm enough to hold its shape without slumping but can still be carved or sponged.
Uneven Wobble?
If the arches wobble after drying, rub the feet gently in a circular motion on a sheet of fine-grit sandpaper placed on a flat surface until they sit flush.
Step 3: Refining and Assembly
-
Remove from forms:
Carefully slide the stiffened arches off their cylindrical molds. Handle them gently to avoid distorting the curve. -
Soften edges:
Use a damp sponge to round over the sharp cut edges of the clay. This enhances the soft, organic ‘marshmallow’ aesthetic of the piece. -
Enhance texture:
If your clay isn’t porous enough, you can gently tap the surface with a coarse sponge or a crumpled ball of foil to exaggerate the stone-like texture. -
Dry slowly:
If you plan to fire these as separate stacking pieces (recommended for flexibility), let them dry completely at a slow pace under loose plastic to prevent cracking. -
Option to join:
If you want a permanently stacked sculpture, score and slip the top of the large arch and the feet of the medium arch, then repeat for the smallest one. Press them firmly together. -
Bisque fire:
Fire the Bone Dry pieces in a kiln to bisque temperature (usually Cone 04 or 06). This prepares the clay for the final steps. -
Final look:
For the look in the photo, you likely don’t need glaze. Fire to your clay body’s maturity (e.g., Cone 6 or 10) to bring out the natural speckles and toastiness of the raw clay.
Level Up: Hollow It
Make the arches hollow by building with coils or extrusions instead of slabs. This makes the sculpture lighter and allows for larger scales without heaviness.
Enjoy the meditative process of stacking and restacking your new architectural forms
Bust Sculpture Study
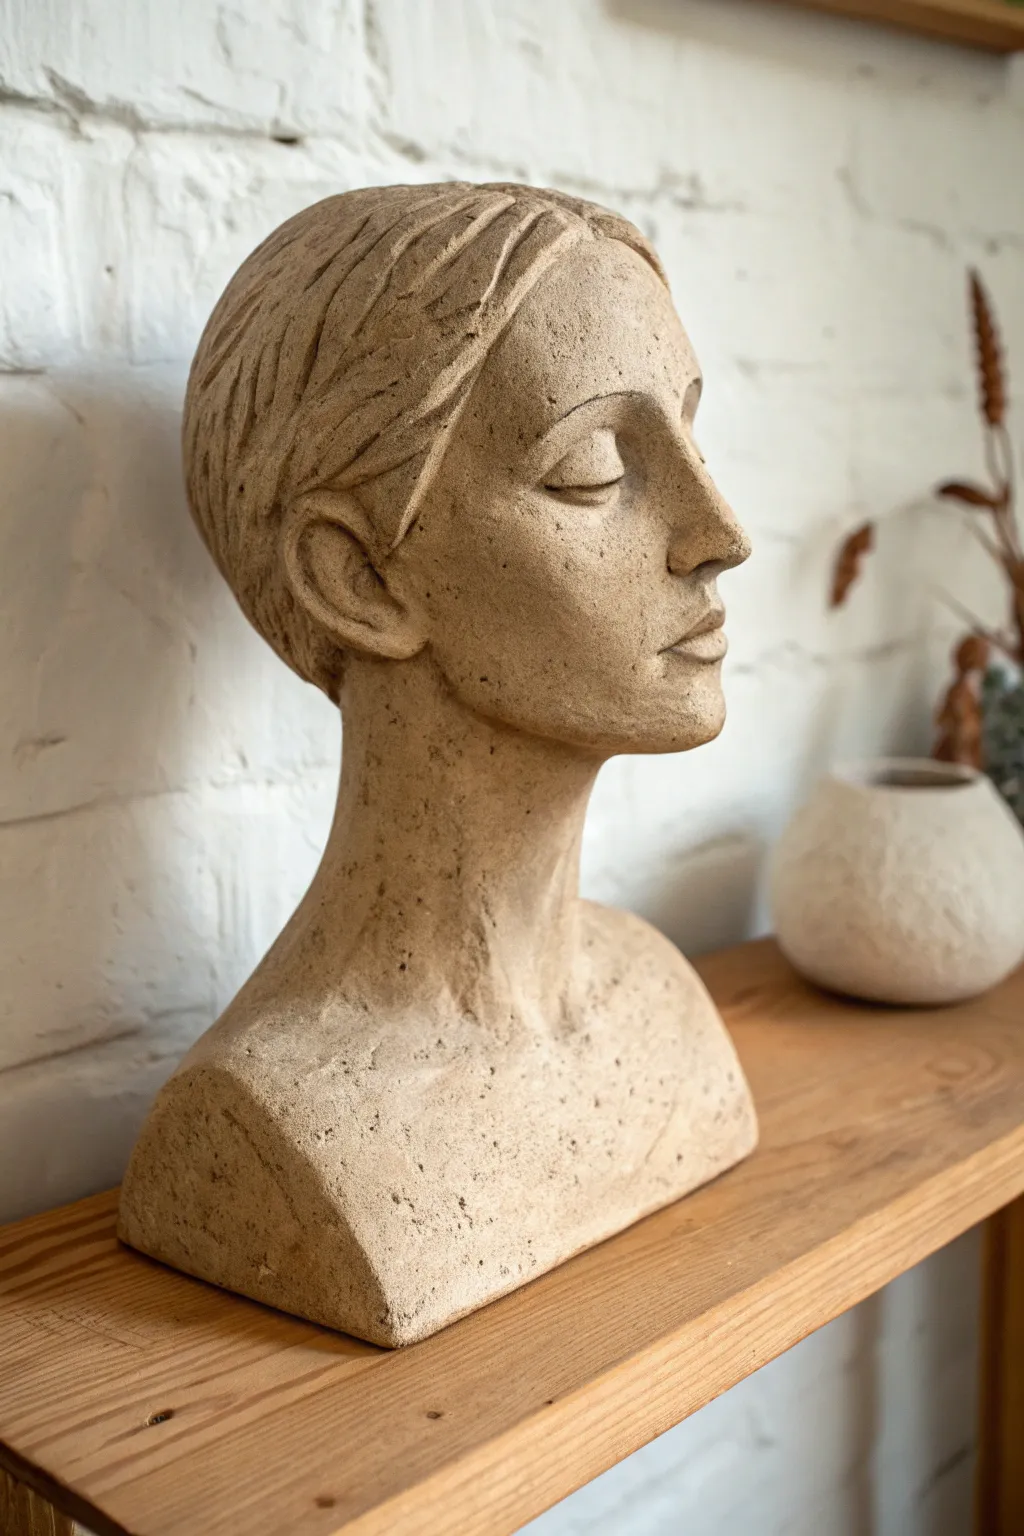
Capture a moment of quiet contemplation with this elegant bust sculpture featuring a raw, stone-like texture. The piece combines classical proportions with a rougher, tactile finish that gives it a timeless, excavated quality.
Step-by-Step
Materials
- Grogged stoneware clay (buff or toasted color)
- Armature stand (wood base with pipe/dowel)
- Newspaper and masking tape
- Wooden modeling tools
- Wire clay cutter
- Visual caliper or basic measuring tool
- Needle tool
- Serrated metal rib
- Sponge
- Plastic bag (for covering)
Step 1: Building the Core
-
Prepare the armature:
Begin by setting up your sturdy armature stand. Crumple newspaper tightly into a rough egg shape for the head and a cylindrical shape for the neck, securing them firmly to the central post with masking tape. This paper core reduces weight and ensures the clay doesn’t crack while shrinking around a solid rigid post. -
Establish the neck:
Roll out thick slabs of clay or flatten chunks by hand. Wrap the first layer around the neck area of your armature, pressing firmly to adhere. Build this cylinder up until it can support the weight of the head. -
Form the cranium base:
Add slabs around the newspaper egg to form the basic skull shape. Focus on creating a solid oval volume first, without worrying about facial features yet. -
Join the volumes:
Blend the clay from the head down into the neck thoroughly. A strong connection here is vital; I usually score and drag clay across the seam deep into the form to prevent separation later. -
Rough out the shoulders:
Add extra clay at the base of the neck to create the slope of the trapezius muscles and the collarbone area. For a bust cut like this, create a clean, angled termination at the bottom rather than full shoulders.
Preventing Sagging
If facial features start drooping, your clay is too wet. Pause and let the piece firm up uncovered for 30 minutes, or use a heat gun on low to stiffen the surface.
Step 2: Modeling Features
-
Marking face proportions:
Using a needle tool, lightly draw a vertical center line down the face and horizontal lines for the eyes, nose base, and mouth. The eyes should be roughly halfway down the head. -
Blocking in the nose:
Add a wedge of clay for the nose. Don’t detail it yet; just establish the projection and the bridge. -
Defining the eye sockets settings:
Press your thumbs in to create the hollows for eye sockets under the brow bone. This creates the necessary shadow and depth before adding the eyelids. -
Sculpting closed eyes:
Roll small balls of clay and press them into the sockets for eyeballs. Then, add thin coils for the upper and lower lids, smoothing them over the curve of the ball to look like sleeping eyes rather than just slits. -
Refining the mouth:
Build up the muzzle area (the rounded part where teeth would be). Add clay for the lips, shaping the upper lip like a flattened ‘M’ and the lower lip as a fuller curve. -
Shaping the jaw and chin:
Add definition to the jawline. Ensure it connects logically from the ear (which we will add next) down to the chin. -
Placing the ear:
Construct the ear using a ‘C’ shaped coil located between the eye line and the nose base level. Keep the details simple and stylistic to match the rough texture.
Step 3: Refining and Texturing
-
Sculpting the hair:
The hair in this piece is stylized and flat against the skull. Use a wooden tool to carve sweeping, rhythmic lines that follow the curvature of the head, representing strands pulled back. -
Anatomy check:
Look at the profile view. Ensure the back of the skull extends far enough back and the neck has a natural forward slope. -
Creating the stone texture:
Take a serrated metal rib or a rough stone and drag it gently across the skin surface. Cross-hatch lightly to remove tool marks and unify the surface. -
Adding intentional imperfections:
To mimic aged stone, create small pits or pockmarks by twisting a coarse tool into random spots on the cheeks and neck. Resist the urge to smooth these out with water. -
Hollowing out (Crucial Step):
Once the clay is leather hard, carefully slice the top of the head off (like a lid). Remove the newspaper and dig out excess clay from the inside until the walls are about 3/4 inch thick. Score, slip, and reattach the ‘lid’. -
Finishing touches:
Blend the seam from reattaching the head top. Do a final pass with a damp sponge to soften edges without losing the gritty texture.
Antique Wash Finish
After bisque firing, apply a wash of iron oxide mixed with water. Wipe it back with a sponge so the dark color stays only in the textures and details, enhancing the aged look.
Allow your sculpture to dry very slowly under plastic to prevent cracks before firing or letting it air-dry completely