
If you’ve been itching to make a pottery tray, you’re in for the most satisfying kind of project: quick to form, endlessly customizable, and actually useful. Here are my favorite pottery tray ideas—from classic everyday shapes to more playful, “how did you make that?” finishes.
Classic Oval Trinket Tray
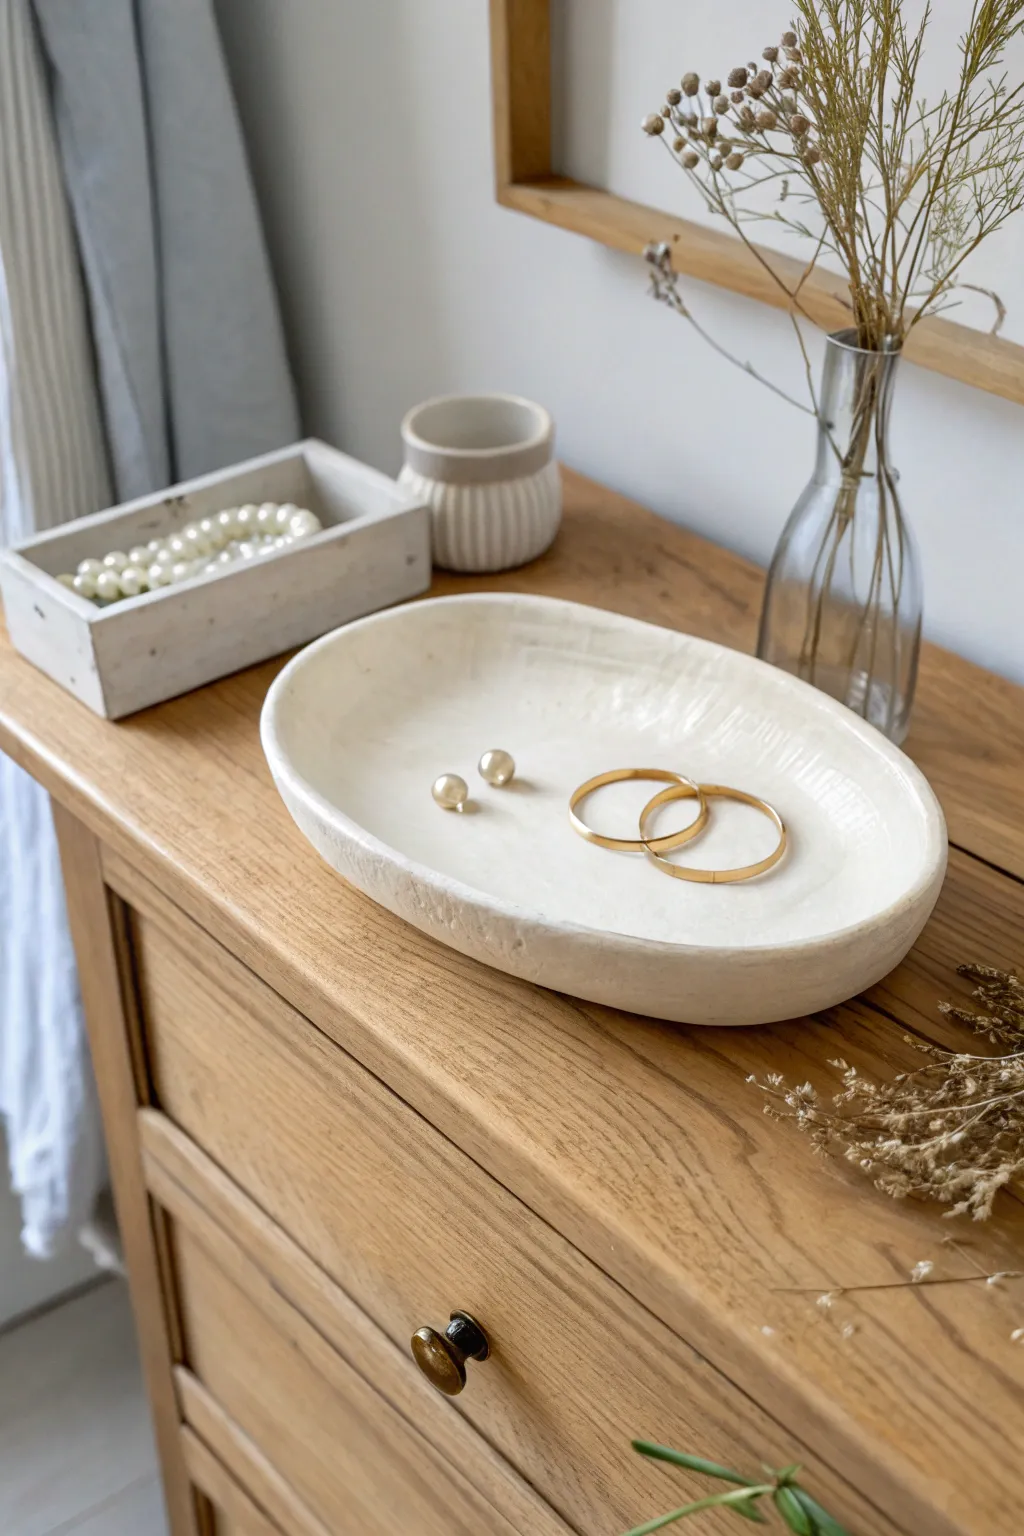
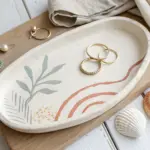
Bring a touch of organic minimalism to your dresser with this hand-built clay tray. Its gentle oval shape and subtly textured white finish make it the perfect resting spot for your favorite gold loops and pearl studs.
Step-by-Step
Materials
- Air-dry clay (white) or polymer clay
- Rolling pin
- Canvas mat or parchment paper
- Pottery rib tool or old credit card
- Oval template (paper or cardboard)
- Small bowl with water (slip)
- Sponge
- White acrylic paint (if using air-dry clay)
- Matte varnish or sealant
- Sandpaper (fine grit)
Step 1: Shaping the Base
-
Prepare your workspace:
Lay down your canvas mat or parchment paper to prevent sticking. Take a generous handful of clay and knead it until it’s pliable and warm, ensuring there are no air bubbles trapped inside. -
Roll out the slab:
Using your rolling pin, flatten the clay into an even slab. You want it to be about 1/4 inch thick—thick enough to be sturdy but thin enough to look delicate. -
Cut the oval shape:
Place your paper oval template gently on top of the clay slab. Using a needle tool or a small knife, trace around the template to cut out your base shape. -
Smooth the edges:
Dip your finger in a little water and run it along the cut edge of the oval base to smooth down any sharp corners or roughness left by the knife.
Step 2: Building the Walls
-
Roll a coil:
Take a separate piece of clay and roll it into a long snake or coil. Try to keep the thickness consistent, roughly the width of your pinky finger. -
Score the connection points:
Use a needle tool or an old toothbrush to scratch up the outer edge of your oval base. Do the same to one side of your long coil. -
Add slip or water:
Dab a small amount of water or slip (a mixture of clay and water) onto the scratched areas. This acts as the glue. -
Attach the coil:
Place the coil on top of the oval base’s edge, aligning the scored sides. Press down firmly but gently to adhere them together, trimming off any excess length. -
Blend the seams:
Using your thumb or a modeling tool, drag the clay from the coil down onto the base on the inside of the tray to merge them. Then, do the same on the outside, dragging the clay up from the base. -
Refine the walls:
Pinch the walls gently between your thumb and forefinger to pull them up slightly, creating that shallow dish height shown in the photo.
Keeping It Wonky
Don’t aim for factory perfection. The charm of this tray comes from the slight unevenness of the rim and visible finger marks, which give it that artisan vibe.
Step 3: Texturing and Drying
-
Level the rim:
Look at the tray from eye level. If the rim is too wavy, gently tap it upside down on your table or slice off high points for a cleaner look. -
Add texture:
I like to use a barely damp sponge here to smooth over the blended seams, intentionally leaving faint drag marks or sponge indentations to mimic that rustic, handmade stone look. -
Initial drying:
Let the tray dry slowly away from direct heat or sunlight. If using air-dry clay, cover it loosely with plastic wrap for the first few hours to prevent warping. -
Full cure:
Allow the piece to dry completely for 24-48 hours until it is hard and lighter in color. -
Light sanding:
Once fully dry, take your fine-grit sandpaper and gently rub away any unintentional sharp jagged bits on the rim, but keep the overall texture organic.
Faux Stone Effect
Mix baking soda into your white acrylic paint before applying. This adds a gritty, realistic stone texture that catches the light beautifully.
Step 4: Finishing Touches
-
Apply base coat:
Paint the entire tray with unbleached white or cream acrylic paint. The specific piece in the image has a soft, chalky white appearance. -
Create depth:
Mix a tiny amount of diluted grey or beige paint and wash it over the inside, then immediately wipe most of it away. This leaves pigment in the textures and mimics natural stone veining. -
Seal the piece:
Finish with a coat of matte varnish. This removes the plastic-looking shine of the acrylics and gives it a high-end ceramic feel.
Place this on your bedside table to keep your daily jewelry organized and accessible


Long Rectangular Vanity Tray
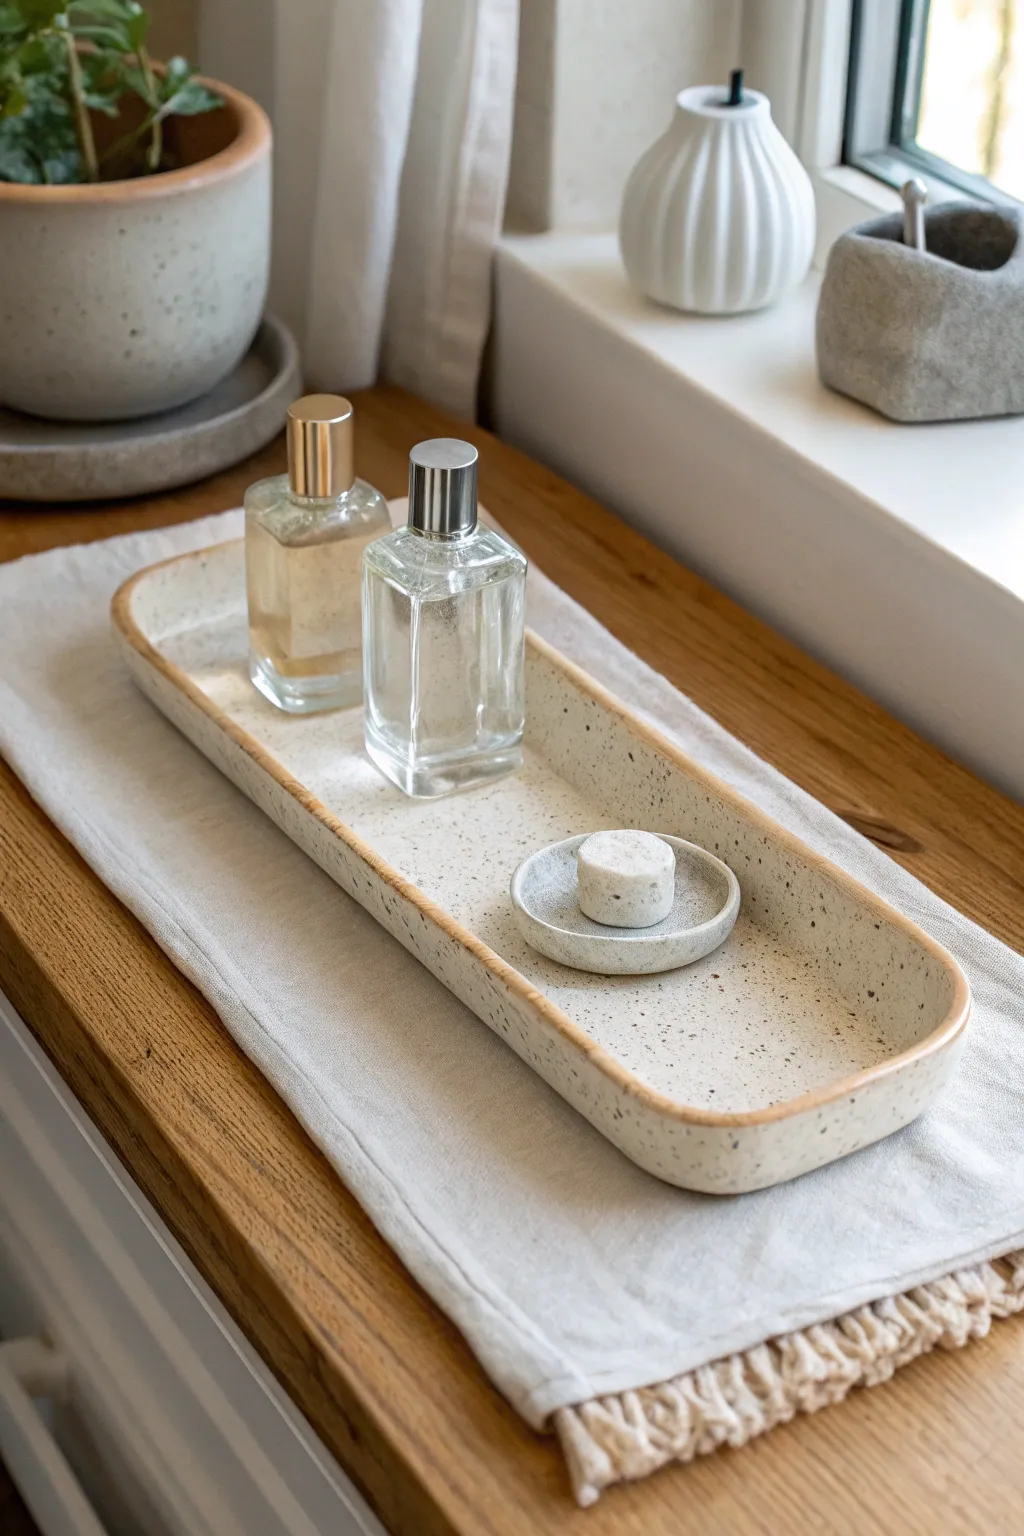
Create a sleek, minimalist home for your favorite perfumes and skincare with this elegant slab-built pottery project. The finished tray features gentle curves, a subtle speckled glaze, and a distinctive raw clay rim that adds a touch of organic warmth.
How-To Guide
Materials
- Speckled stoneware clay body (e.g., Laguna Speckled Buff)
- Canvas work surface or slab mat
- Rolling pin
- Two long wooden guide strips (approx. 1/4 inch thick)
- Rectangular paper template (approx. 4″ x 12″)
- Needle tool or fettling knife
- Rib tool (soft rubber)
- Sponge
- Ware board
- Matte white or cream dipping glaze
- Wax resist
- Clear glaze (optional)
Step 1: Preparing the Slab
-
Wedge the clay:
Begin by thoroughly wedging about 2-3 pounds of speckled stoneware clay to remove air bubbles and ensure an even consistency. -
Set the guides:
Place your wooden guide strips on either side of your canvas work surface. These will ensure your slab is a uniform thickness. -
Roll the slab:
Using the rolling pin, roll the clay out between the guides. Make sure to roll in multiple directions to compress the clay particles, flipping the slab once or twice during the process. -
Smooth the surface:
With a soft rubber rib, compress the surface of the slab firmly. This aligns the clay particles and creates the smooth finish we need for this clean design.
Straight Edge Secret
To keep long edges from warping, let the slab stiffen to soft leather-hard before attaching the walls. A slightly firmer base supports the walls much better.
Step 2: Building the Form
-
Cut the base:
Place your rectangular paper template onto the slab. Using your needle tool, cut cleanly around the template to create the base shape. -
Create the walls:
From the remaining slab, cut long strips approximately 1 inch wide. These will become the vertical walls of the tray. -
Round the corners:
Gently tap or smooth the sharp corners of your rectangular base to give them a softer, rounded radius matching the reference photo. -
Score the edges:
Using a serrated rib or needle tool, score the top edge of the base and the bottom edge of your wall strips. Apply a small amount of slip or water to the scored areas. -
Attach the walls:
Place the wall strips onto the base. Where the strips meet, cut them at a 45-degree angle (a bevel cut) to create a seamless join. -
Blend the seams:
Support the wall from the outside with one hand while smoothing the clay downward on the inside with your finger or a tool to adhere the wall to the base. Repeat on the outside, smoothing upward.
Step 3: Refining and Drying
-
Refine the rim:
Use a damp sponge or a piece of chamois leather to compress and round the top rim. It should feel smooth to the touch. -
Reshape visually:
Look at the tray from above. If the long straight edges have warped during handling, gently use a straight edge or ruler to push them back into true straight alignments. -
Slow drying:
Place the tray on a ware board. Loosely cover it with plastic to allow it to dry slowly over several days to prevent warping. -
Bisque fire:
Once bone dry, fire the piece to bisque temperature (usually cone 04) based on your clay specifications.
Warping Woes
If the tray curls up while drying, place a small weight (like a sandbag) in the center while it dries to keep the floor flat against the board.
Step 4: Glazing
-
Wax the rim:
To achieve the raw edge look seen in the photo, careful apply wax resist to the very top edge of the rim. I find a steady hand and a fine brush work best here. -
Wax the foot:
Apply wax resist to the bottom of the tray to prevent it from sticking to the kiln shelf. -
Glaze application:
Dip the entire tray into a matte cream or white glaze. The speckles in the clay body will show through nicely. Shake gently to remove excess drips. -
Clean up:
Once the glaze is dry carefully wipe any droplets off the waxed rim with a damp sponge so the raw clay is perfectly exposed. -
Final firing:
Fire the tray to maturity (usually cone 5 or 6). The heat will melt the glaze and highlight the iron speckles in the clay body.
Once cooled, your custom tray is ready to bring a sense of calm organization to your vanity or bedside table


Round Ring Dish Tray With Pinched Rim
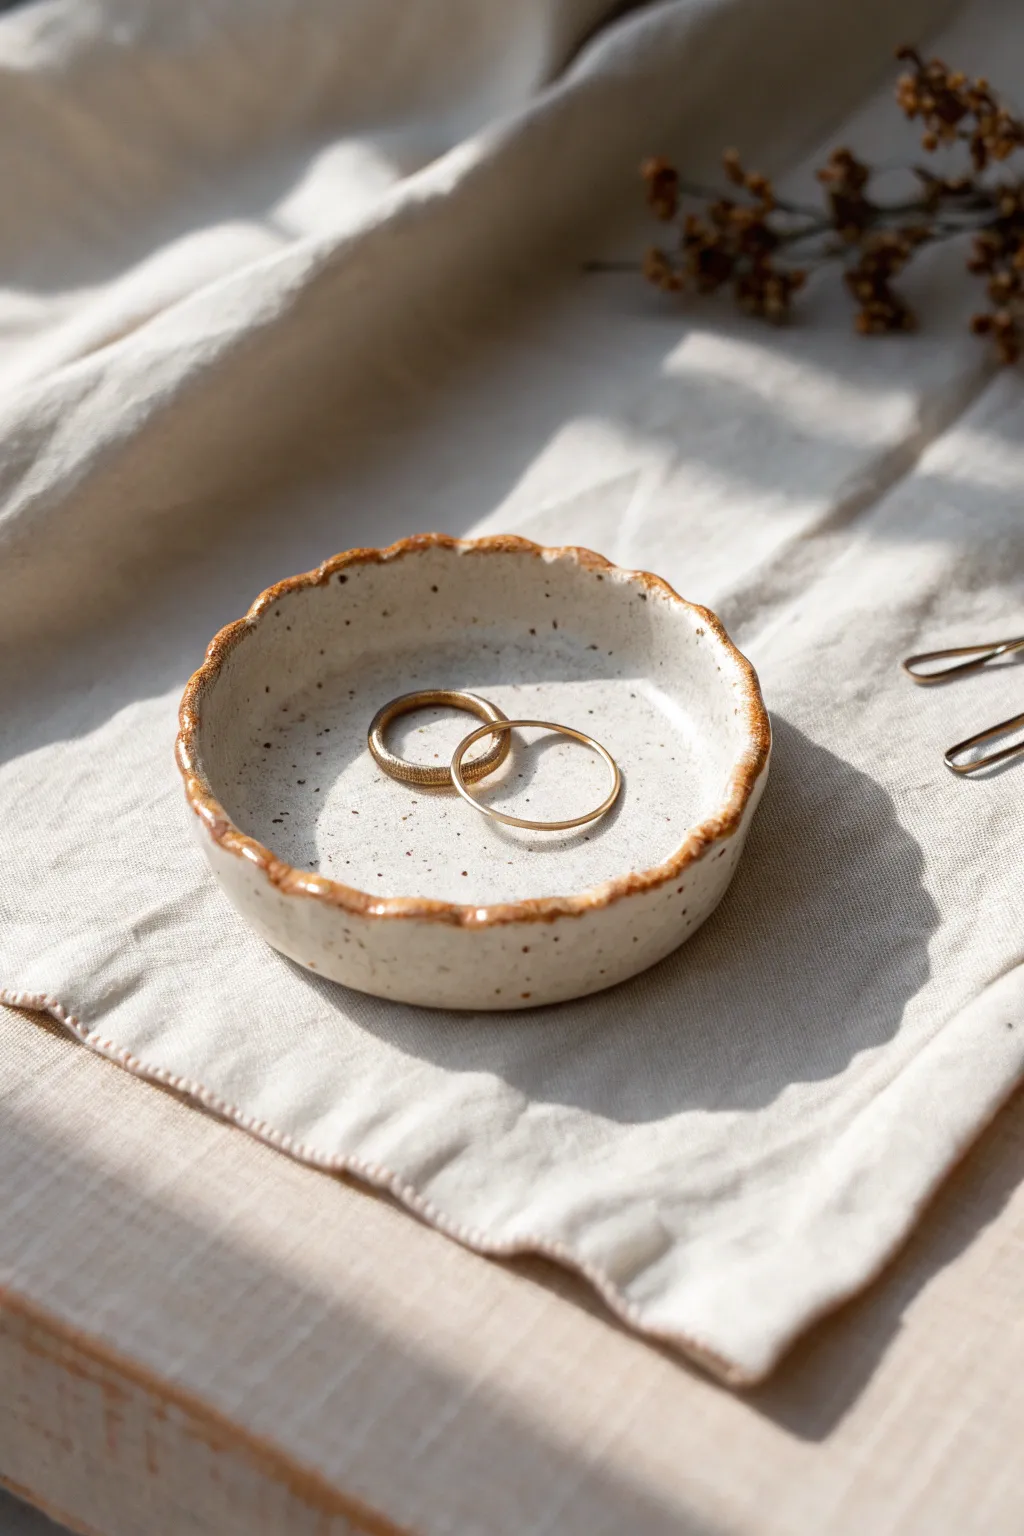
This charming, rustic ring dish features a soft speckled stoneware body and a distinctive, organically ruffled rim accented with warm oxide. It’s the perfect beginner-friendly project that celebrates the beauty of hand-building and makes for a lovely bedside accessory.
Step-by-Step Guide
Materials
- Speckled stoneware clay (white or light buff)
- Rolling pin
- Canvas working mat or slab mat
- Round cookie cutter or template (approx. 4-5 inches)
- Small sponge
- Rib tool (silicone or wood)
- Fettling knife or needle tool
- Iron oxide wash or a toasted brown underglaze
- Clear transparent glaze
- Small paintbrush
Step 1: Forming the Base
-
Prepare your clay:
Cut a manageable chunk of speckled stoneware clay. Wedge it thoroughly to remove air bubbles and ensure the particles are aligned, which helps prevent warping later. -
Roll the slab:
Place your clay on the canvas mat. Using your rolling pin, roll out a flat slab. You want an even thickness of about 1/4 inch—not too thin, or the rim will be fragile. -
Smooth the surface:
Take your rib tool and gently compress the clay slab on both sides. This aligns the clay platelets and creates a lovely smooth surface for the eventual glaze. -
Cut the circle:
Place your round cutter or template onto the slab. Press down firmly to cut your circle. If using a template, trace around it carefully with your needle tool. -
Soften the edge:
Once the circle is cut, the edge will be sharp. Tightly wrap a small piece of plastic or chamois around your finger and run it along the cut edge to round it off slightly.
Step 2: Creating the Rim
-
Curve the sides:
Place the clay circle in the palm of your hand or on a piece of foam. Gently press your thumb into the center while pulling the edges upward to create a shallow bowl shape. -
Refine the curve:
Use a damp sponge to smooth the interior curve, ensuring there is a seamless transition from the flat bottom to the rising walls. -
Pinch the ruffle:
Support the outside of the rim with your index finger. With your thumb and middle finger of the other hand, gently squeeze the rim to create a small undulation. Repeat this every half-inch around the circumference. -
Soften the peaks:
The pinching process can make the rim uneven. Gently tap the high points with your sponge to ensure they aren’t sharp, maintaining that organic, soft look seen in the photo. -
Slow drying:
Loosely cover the dish with plastic and let it dry slowly to the leather-hard stage. This prevents the rim from warping as it shrinks.
Rim Perfection
When pinching the rim, keep your fingers slightly damp but not wet. This prevents cracking at the stress points of the ruffles.
Step 3: Decoration and Firing
-
Bisque fire:
Once the piece is bone dry, fire it in the kiln to cone 04 (or your clay’s specific bisque temperature). This prepares it for glazing. -
Apply the rim accent:
Mix your iron oxide wash or brown underglaze. Using a small brush, carefully paint fully over the ruffled rim edge. I like to let the brush skip slightly for a more natural effect. -
Wipe back:
If the rim color looks too heavy, take a slightly damp sponge and dab the rim. This leaves the pigment in the texture of the clay but softens the line. -
Clear glaze application:
Dip the entire dish into a clear transparent glaze. Alternatively, you can brush on three even coats of a brush-on clear glaze, letting each coat dry in between. -
Clean the foot:
Make sure you wipe any glaze off the very bottom of the dish so it doesn’t fuse to your kiln shelf during firing. -
Final firing:
Fire the piece to maturity (usually cone 5 or 6 for stoneware). The clear glaze will reveal the speckles in the clay, and the rim will turn a rich, toasty brown.
Level Up: Texture Pop
Before the first firing, gently press a piece of coarse linen into the damp clay interior for a subtle fabric texture under the glaze.
Now you have a delicate, custom-made dish ready to catch your favorite jewelry pieces


Nesting Mini Tray Set
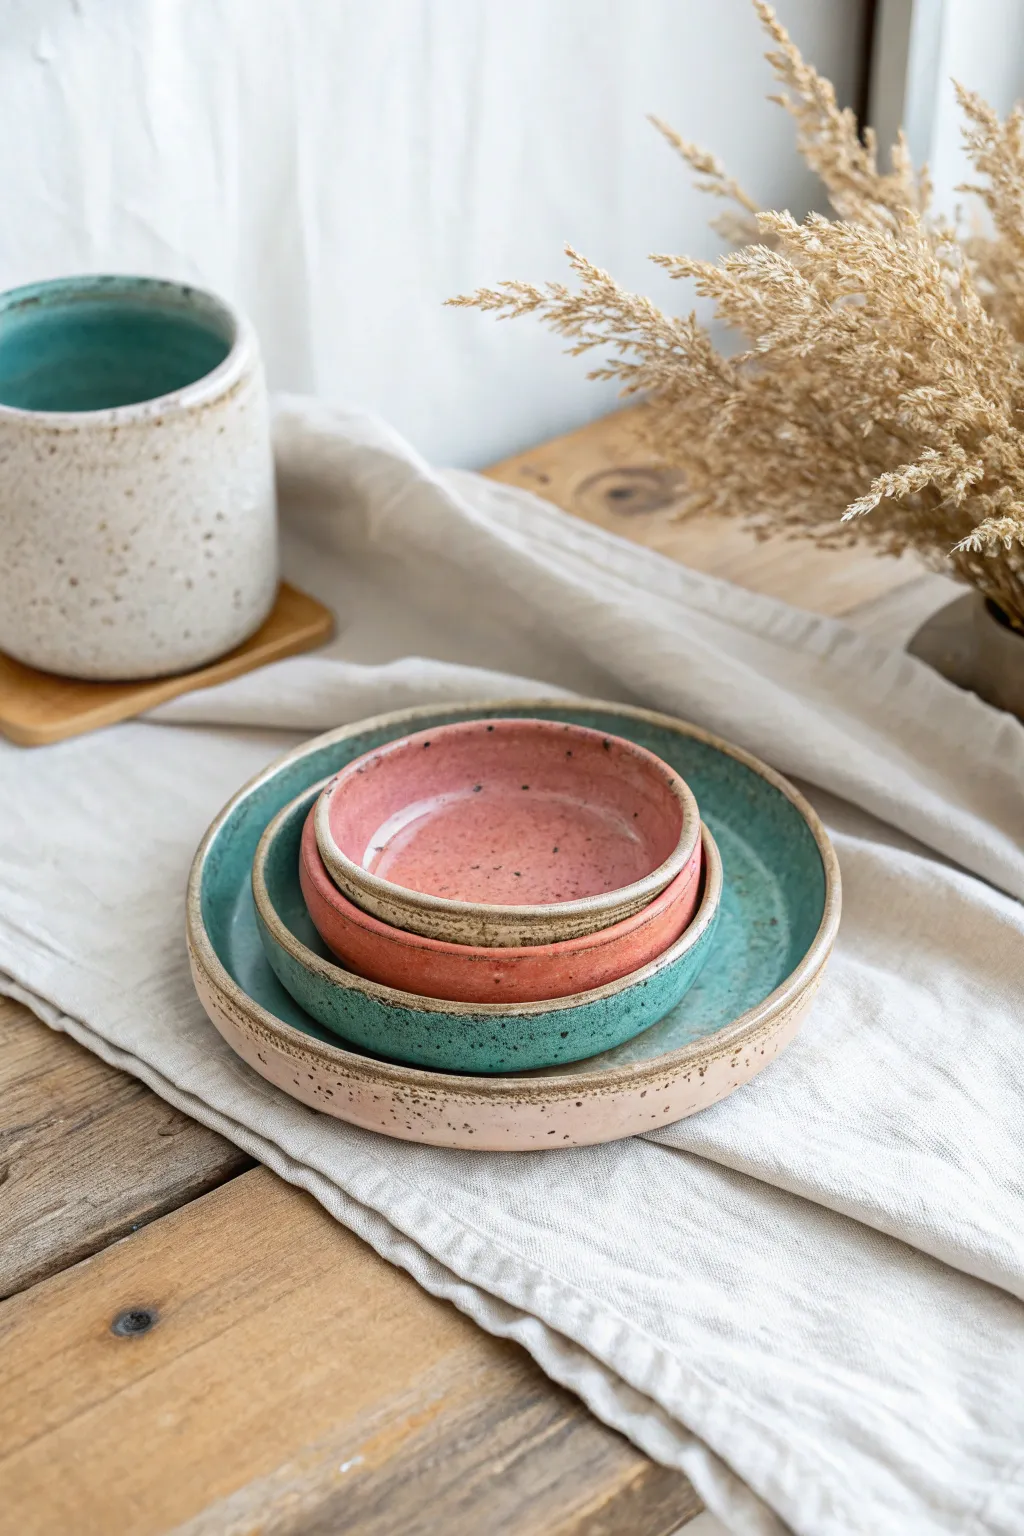
These charming, stackable mini trays combine earthy texture with pops of teal and coral glaze for a look that is both rustic and refined. Perfect for organizing jewelry or serving small snacks, this trio relies on simple slab-building techniques to achieve organic, nesting forms.
Step-by-Step Tutorial
Materials
- Speckled stoneware clay (mid-fire)
- Rolling pin
- Canvas work surface or slab mat
- Guide sticks or slats (approx. 1/4 inch thick)
- Three nesting circle templates (paper or bowls varying by 1-1.5 inches)
- Needle tool or fettling knife
- Soft rib (polymer or rubber)
- Sponge
- Modeling tool or wooden stick
- Teal/Turquoise glaze
- Coral/Pink glaze
- Clear glaze (optional)
Step 1: Forming the Slabs
-
Wedge the clay:
Start by thoroughly wedging a ball of speckled stoneware clay to remove air bubbles and ensure consistency. -
Set up your workspace:
Place your canvas on a flat table and position your guide sticks on either side of the clay. These sticks ensure your slab has a perfectly even thickness. -
Roll out the slab:
Using the rolling pin, roll the clay out until the pin rests on the guide sticks. I like to flip the clay over once or twice during rolling to prevent it from sticking to the canvas. -
Compress the slab:
Take your soft rib and gently run it over the surface of the clay in multiple directions. This aligns the clay particles and prevents warping during firing.
Warping Woes?
If your trays warp during drying, place a small, weighted bag of sand or rice in the center while they are leather-hard to hold the base flat.
Step 2: cutting and Shaping
-
Cut the circles:
Place your large, medium, and small circle templates onto the slab. Using a needle tool, cut vertically around each template to create three distinct discs. -
Smooth the rims:
Once cut, run a damp sponge or your finger along the sharp edge of each disc to round it off slightly. This prevents chipping later. -
Lift the edges:
Take the largest disc. Gently pinch and lift the outer edge upward to create a low wall, roughly 0.5 to 0.75 inches high. Rotate the piece as you work to keep the height consistent. -
Refine the curve:
Use a modeling tool or your thumb to smooth the transition from the flat base to the raised wall on the inside. You want a soft, seamless curve rather than a sharp 90-degree angle. -
Form the smaller trays:
Repeat the lifting and smoothing process for the medium and small discs. Test the fit by holding them over one another—don’t stack them directly while wet, or they will stick. -
Add texture (optional):
If adjustments made the exterior too smooth, lightly pat the outside walls with a wooden paddle or stiff sponge to bring back some of that organic character. -
Dry slowly:
Place the trays under a loose sheet of plastic to dry slowly to the leather-hard stage, then uncover to bone dry before bisque firing.
Step 3: Glazing and Finishing
-
Bisque fire:
Fire the bone-dry pieces in the kiln to bisque temperature (usually cone 04 or 06). -
Wax the bottoms:
Apply wax resist to the bottom foot of each tray and slightly up the exterior side if you want an exposed clay rim like the example. -
Glaze the largest tray:
Pour your teal glaze into the interior of the largest tray, swirl to coat, and pour out the excess. For the exterior, brush or dip the teal glaze just over the rim, leaving the bottom unglazed. -
Glaze the medium tray:
For the middle tray, apply the teal glaze to the exterior walls first. Then, glaze the interior with the coral/pink color, being careful not to let the colors overlap muddily at the rim. -
Glaze the smallest tray:
Glaze the entire interior of the smallest bowl in coral/pink. Leave the exterior raw clay or apply a thin clear matte glaze if you prefer a sealed surface. -
Clean the rims:
Use a damp sponge to wipe back any glaze that may have dripped onto the specific bands of exposed clay you wanted to highlight. -
Glaze fire:
Load the kiln, ensuring the trays are not touching each other, and fire to the maturity temperature of your clay and glaze (likely cone 5 or 6).
Rim Definition
Wipe a damp sponge along the very top edge of the rim after glazing. This exposes the speckled clay body and creates a beautiful, defined outline.
Once cooled, stack your new handmade set on a coffee table or vanity for a functional piece of art

The Complete Guide to Pottery Troubleshooting
Uncover the most common ceramic mistakes—from cracking clay to failed glazes—and learn how to fix them fast.
Soap Tray With Drain Grooves
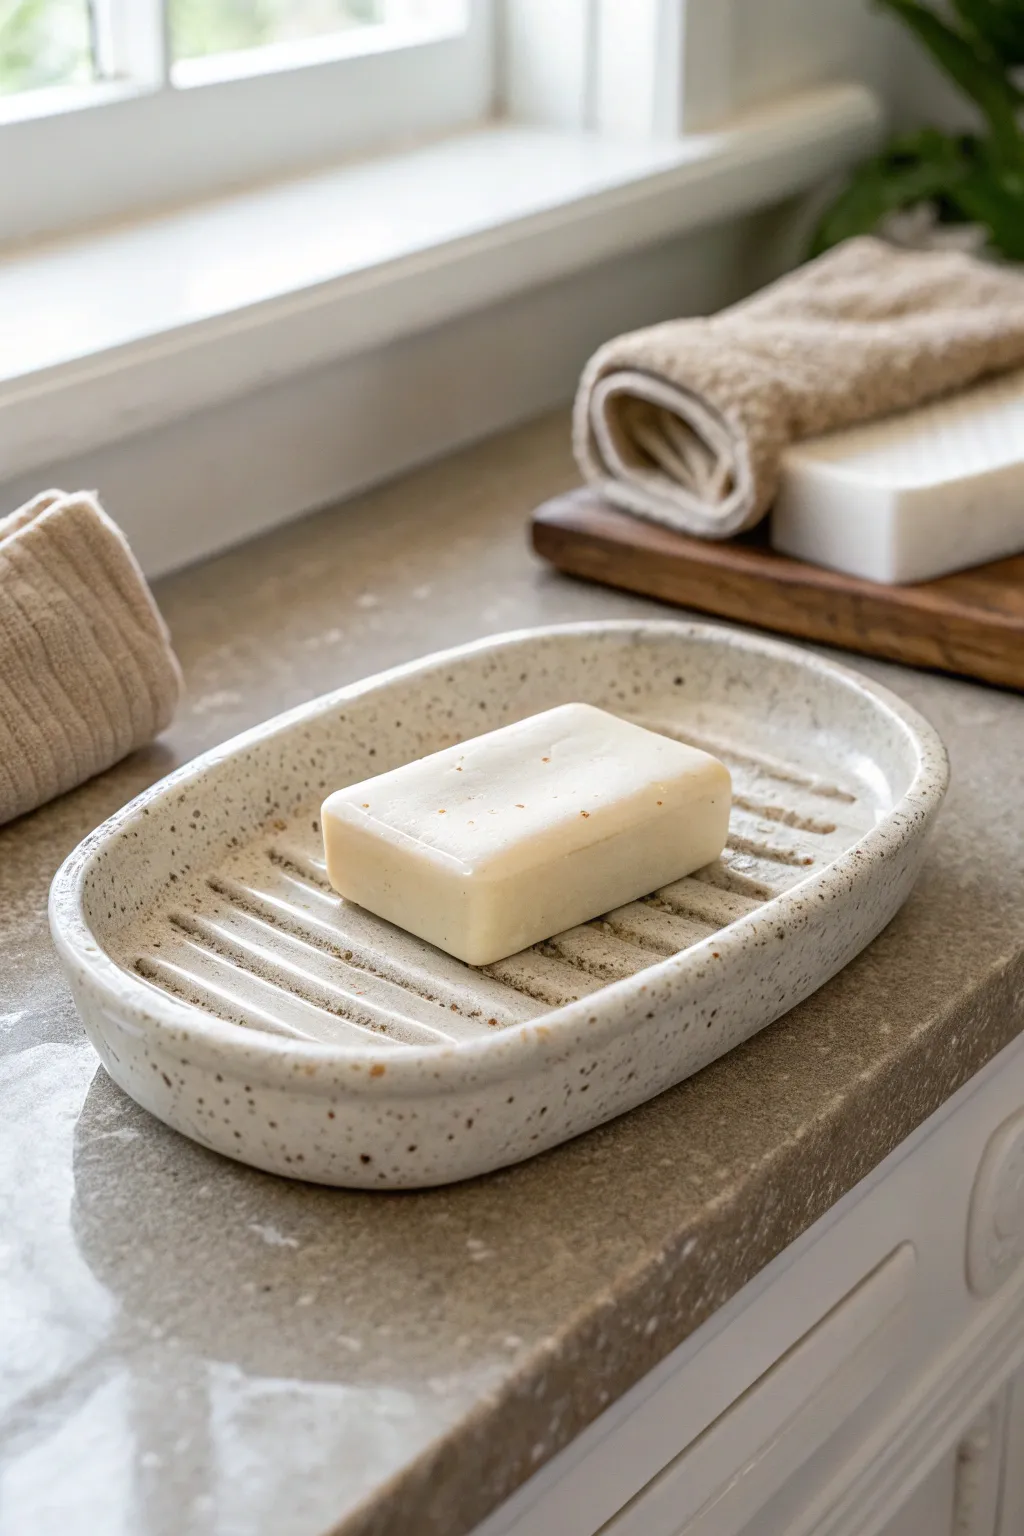
This minimalist soap tray combines functional design with the organic beauty of speckled clay. Its gentle oval shape and carved drainage grooves make it a practical yet stylish addition to any bathroom sink.
How-To Guide
Materials
- Speckled stoneware clay (white or cream base)
- Rolling pin
- Canvas working surface or mat
- Oval paper template or cookie cutter
- Fettling knife or needle tool
- Small carving loop tool (for grooves)
- Rib tool (wood or rubber)
- Sponge
- Clear glaze (compatible with your clay cone)
Step 1: Preparation and Forming
-
Prepare the Clay:
Begin by wedging a softball-sized amount of speckled stoneware clay to remove air bubbles and ensure clear consistency. -
Roll out a Slab:
On your canvas board, roll the clay out into an even slab. Aim for a thickness of about 1/4 inch to 3/8 inch. Keep the pressure even to avoid thin spots. -
Smooth the Surface:
Use a rubber rib to compress the clay slab on both sides. This aligns the clay particles, preventing warping later, and creates that ultra-smooth finish visible in the photo. -
Cut the Shape:
Place your oval template on the slab. Using your needle tool or fettling knife, cut vertically around the template to create your base shape. -
Create the Walls:
Roll a long, thin coil of clay, roughly the thickness of a pencil. Score and slip the outer edge of your oval base. -
Attach the Coil:
Place the coil on the scored edge. Gently pinch and smooth the coil upwards to form a low wall, blending the clay downwards into the base on both the inside and outside so no seam remains. -
Refine the Rim:
Use a damp sponge or piece of chamois leather to smooth the rim of the wall, ensuring it’s rounded and comfortable to the touch. -
Lift the Edges:
Alternatively, if you prefer a seamless look, you can gently lift the edges of the slab itself and use small foam supports underneath to hold the curved shape while it sets to leather-hard.
Groove Smoothness
After carving grooves, run a wet finger or a paintbrush dipped in water along each channel. This smooths sharp edges that could otherwise trap soap scum.
Step 2: Detailing and Finishing
-
Wait for Leather Hard:
Let the piece dry slowly under plastic until it reaches a leather-hard state. It should be firm enough to hold its shape but soft enough to carve. -
Mark Guidelines:
Using a needle tool, very lightly sketch parallel lines across the interior bottom surface where your drainage grooves will go. -
Carve the Grooves:
Take a small wire loop tool and carefully carve out the clay following your guidelines. Press deep enough to create ridges for the soap to sit on, but be careful not to cut all the way through the bottom. -
Clean Up Carvings:
Wait for the clay to dry a little more, then use a stiff brush or a slightly damp sponge to smooth any sharp burrs or crumbs created by the carving tool. -
Final Smooth:
Give the entire piece a final wipe with a damp sponge to expose the beautiful speckles in the clay body and ensure the surface is silky smooth. -
Bisque Fire:
Allow the tray to dry completely (bone dry) before loading it into the kiln for a bisque firing. -
Glazing:
Once bisque fired, apply a clear or transparent glaze. This will seal the clay for water resistance while letting the natural speckles show through. -
Wipe the Base:
Thoroughly wipe any glaze off the bottom foot of the tray to prevent it from sticking to the kiln shelf. -
Final Fire:
Fire the piece again to the temperature recommended for your specific clay and glaze combination.
Add Drainage Holes
For a dish that sits on a shower shelf, poke 2-3 small holes through the lowest points of the grooves so water can drain completely away.
Enjoy the simple elegance of your handmade pottery every time you reach for the soap
Spoon Rest Tray With a Deep Well
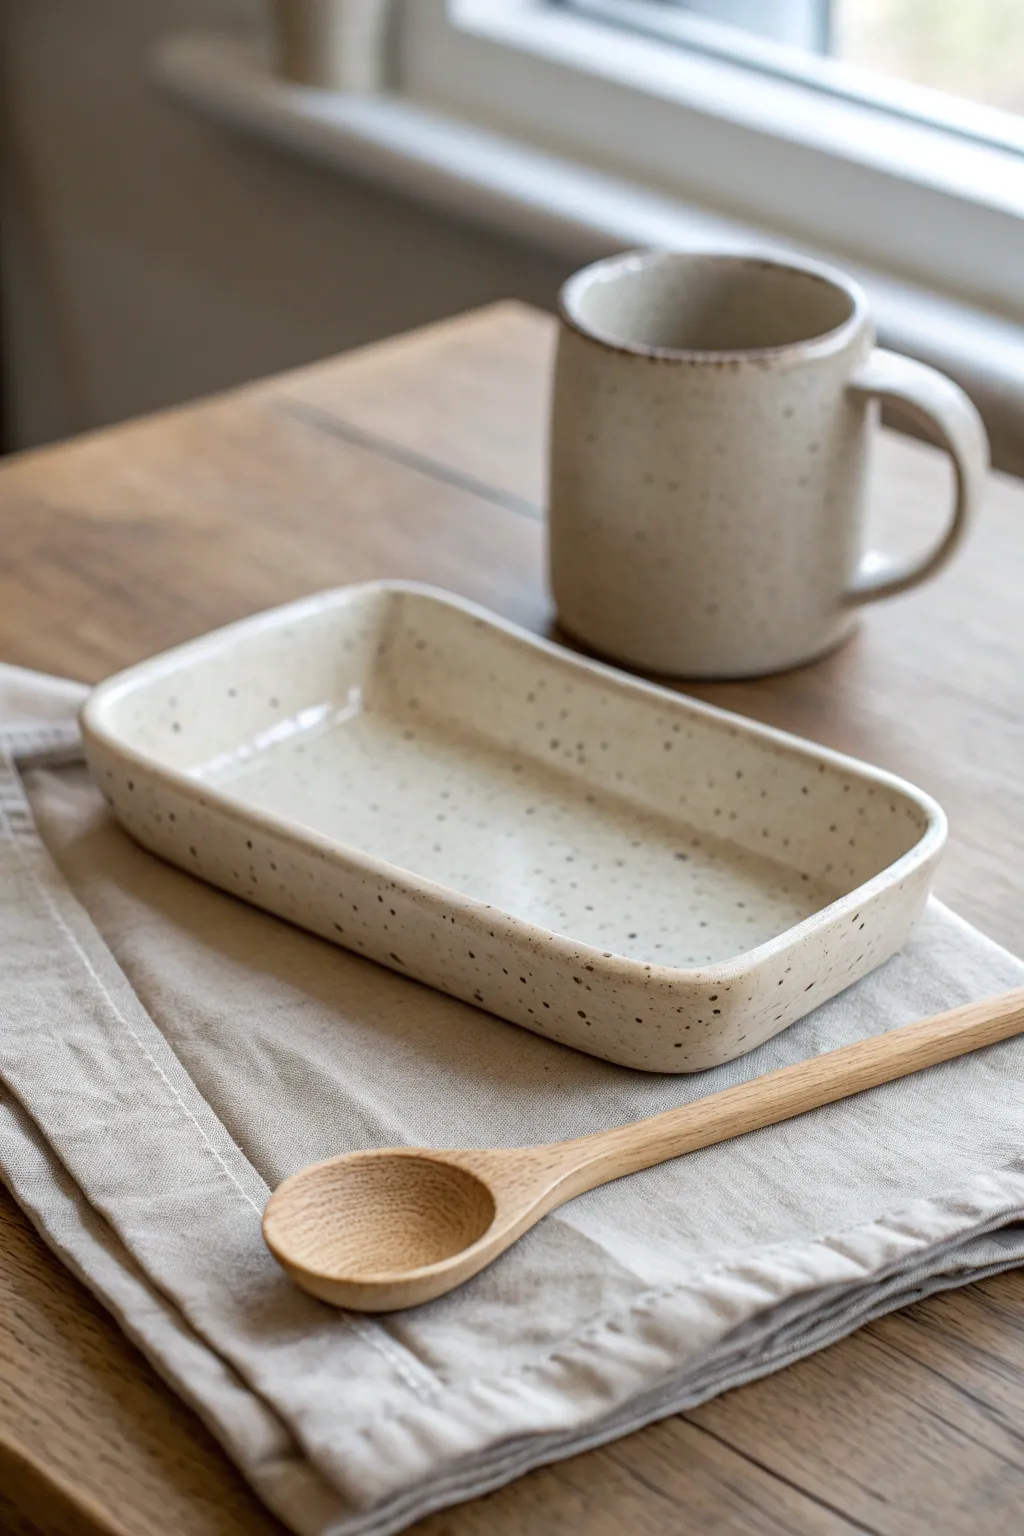
This minimalist rectangular tray features a clean, cream-colored glaze accented by natural iron speckles, offering both warmth and modern simplicity. Its deep walls make it incredibly functional as a spoon rest, sauce dish, or catch-all tray for your desk.
Step-by-Step Guide
Materials
- White stoneware clay body
- Rolling pin
- Wooden guide strips (approx. 1/4 inch thick)
- Rectangular template (paper or flexible plastic)
- Needle tool or fettling knife
- Sponge
- Rib tool (wooden or silicone)
- Speckled cream glaze (cone 6)
- Canvas work surface
- Loop tool for trimming (optional)
Step 1: Slab Construction
-
Prepared the clay:
Begin by wedging your white stoneware clay thoroughly to remove air bubbles. Since we want a speckled look, you can either knead in granular manganese or iron oxide chips now, or simply rely on a speckled glaze later. For beginners, using a pre-speckled clay body or a speckled glaze is much easier. -
Roll out the slab:
Set up your canvas workspace with guide strips on either side. Roll the clay out into an even slab about 1/4 inch thick. I find that flipping the slab once or twice during rolling helps keep the clay particles aligned and prevents warping later. -
Compress the slab:
Using a soft rib tool, gently compress the surface of the slab. Drag the rib across the clay in multiple directions to align the particles and create a smooth, perfect canvas for your tray. -
Cut the base shape:
Place your rectangular template onto the slab. Using a needle tool or fettling knife, cut around the template to create the base. For the size shown, aim for approximately 4×7 inches, but feel free to adjust to your needs. -
Create the walls:
From the remaining slab, cut long strips of clay that are about 1 to 1.5 inches tall. These will form the deep walls of the tray. Be sure to cut the ends of these strips at a 45-degree angle (beveling) where they will join at the corners for a cleaner seam.
Step 2: Assembly and Refining
-
Score and slip:
Deeply score the outer edge of your rectangular base and the bottom edge of your wall strips. Apply a generous amount of slip (liquid clay) to the scored areas. -
Attach the walls:
Press the wall strips firmly onto the base. Work your way around the rectangle, joining the beveled corners together as you go. Ensure the walls stand perpendicular to the base, not flaring out too much. -
Reinforce the seams:
On the inside seam where the wall meets the floor, roll a very thin coil of clay and press it into the corner. Smooth this coil out completely with your finger or a modeling tool to ensure a watertight bond. -
Smooth the exterior:
Use a wooden paddle or a flat rib to smooth the outside connection points. You want the wall to look seamless, as if it grew out of the base rather than being stuck on top. -
Round the rim:
Using a slightly damp sponge, run it over the top rim of the tray. The goal is to soften the hard edges into a gentle curve, which is crucial for the tactile feel of the finished piece. Round the sharp corners of the rectangle slightly as well. -
Drying phase:
Loosely cover the tray with plastic and let it dry slowly to the leather-hard stage. Once firm, you can tidy up the bottom or sign your work. Then, let it dry completely to bone dry.
Warp Watch
Rectangular shapes love to warp. Dry very slowly under plastic for the first 2-3 days. Placing a small weighted bag of sand inside the tray while drying can help keep the floor flat.
Step 3: Glazing and Firing
-
Bisque fire:
Load the bone-dry tray into the kiln for a bisque firing (usually Cone 04). This hardens the clay and prepares it to accept glaze. -
Prepare the glaze:
Mix your speckled cream glaze thoroughly. If the specks have settled at the bottom, make sure to agitate the bucket well so you get an even distribution of spots. -
Apply the glaze:
Dip the entire tray into the glaze bucket for about 3 seconds, ensuring full coverage. Alternatively, you can pour the glaze inside, swirl to coat, pour it out, and then dip the exterior. Shake off any excess drips immediately. -
Clean the foot:
Use a waxing resist on the bottom beforehand, or simply wipe the foot of the tray clean with a sponge after glazing. The tray must sit flat on the kiln shelf without fusing to it. -
Final firing:
Fire the piece to the maturity temperature of your clay and glaze (likely Cone 5 or 6). Allow the kiln to cool naturally before unloading to avoid thermal shock cracks.
Set the Table
Make a complete breakfast set by creating a matching mug using the same clay body and glaze. Use the remaining slab scraps to pull a handle for a cohesive look.
Now you have a durable, beautifully speckled piece ready to catch messy spoons or display your trinkets


What Really Happens Inside the Kiln
Learn how time and temperature work together inside the kiln to transform clay into durable ceramic.
Serving Tray With Soft Slab Handles
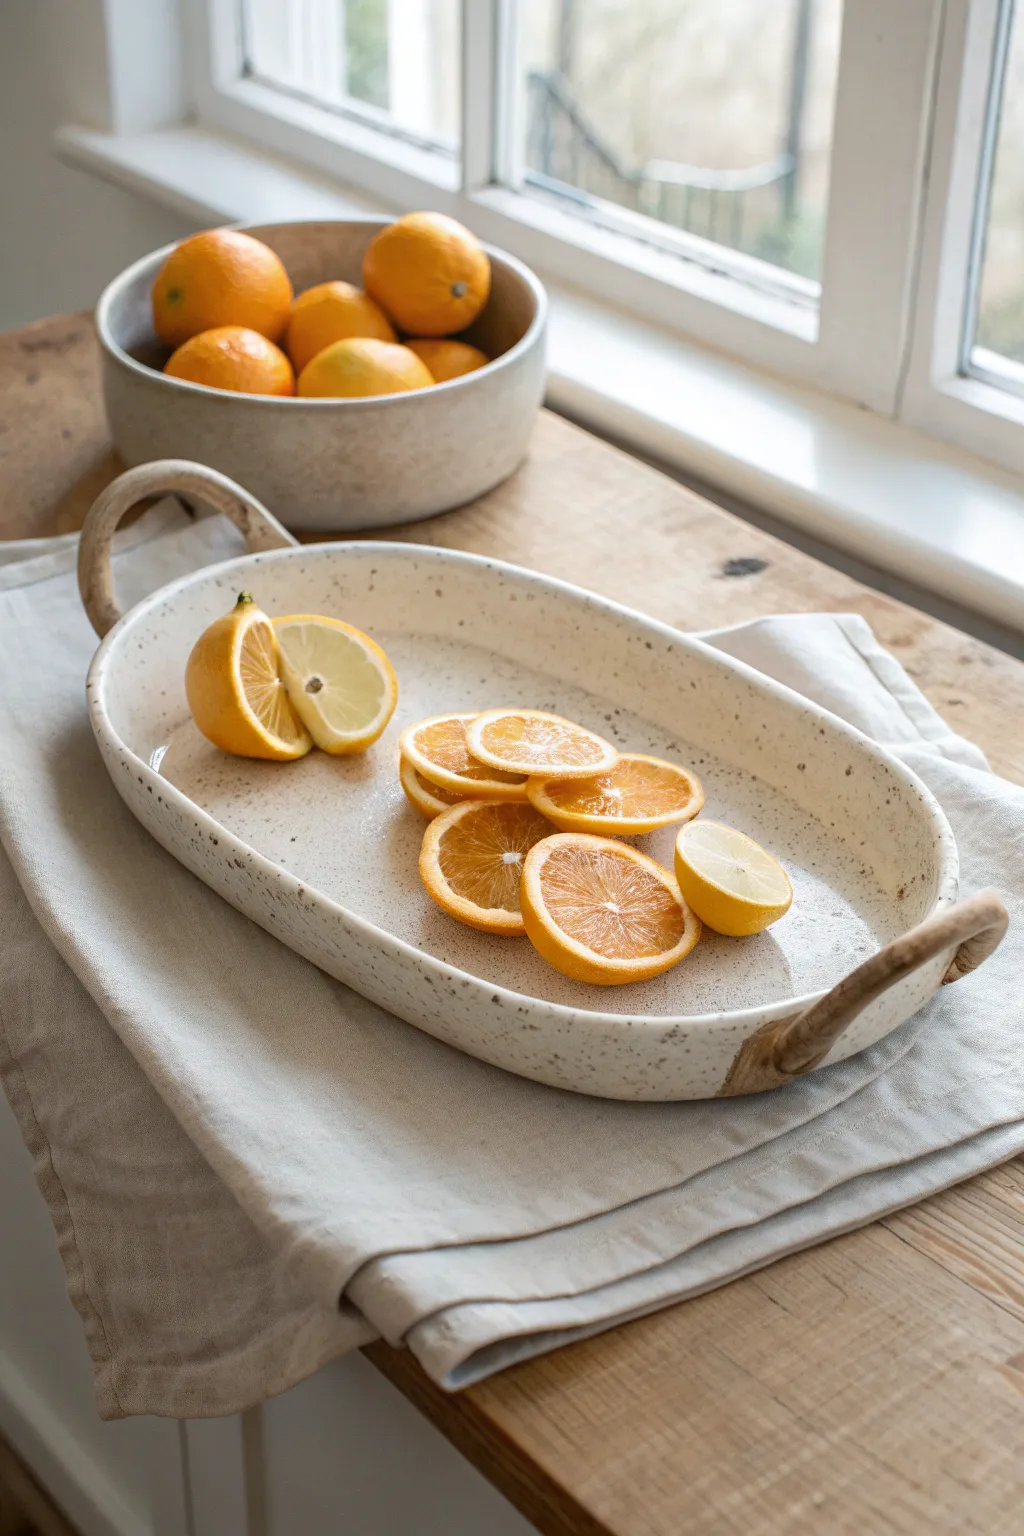
This rustic, elegant serving tray features a shallow oval form and distinctive looped handles that add fluid movement to the piece. The speckled clay body and soft matte white glaze give it a timeless, farmhouse-inspired aesthetic perfect for gathering.
Step-by-Step Tutorial
Materials
- Speckled stoneware clay (mid-fire)
- Rolling pin
- Canvas work surface or slab mat
- Oval template (paper or craft foam)
- Needle tool
- Fettling knife
- Metal or rubber rib
- Sponge
- Scoring tool (serrated rib)
- Slip or magic water
- Matte white glaze
- Wax resist (optional)
Step 1: Forming the Main Body
-
Roll the Slab:
Begin by wedging your speckled clay to remove air bubbles. Roll out a large slab to a consistent thickness of about 3/8 inch. Using slab sticks or guides helps ensure the thickness is even across the entire surface. -
Compress the Clay:
Take a rubber or metal rib and compress the slab on both sides. This aligns the clay particles, reducing the chance of warping later, and creates a smooth canvas for the glaze. -
Cut the Shape:
Place your oval template onto the slab. Using a needle tool held perpendicular to the table, trace around the template to cut out the base shape. -
Lift the Rim:
Wait for the slab to stiffen slightly to leather-hard so it can hold its shape. Gently lift the edges of the oval upward to create a shallow rim. Placing the slab on a piece of foam or a shallow hump mold can help support this curve while it sets. -
Refine the Edge:
Smooth the cut rim with a damp sponge or a chamois cloth. Make sure the edge is rounded and comfortable to the touch.
Rim Slumping?
If the rim flops down while you work, prop it up with coils of newspaper or pieces of foam under the edge until the clay stiffens enough to hold the curve on its own.
Step 2: Creating and Attaching Handles
-
Cut Handle Strips:
From the remaining slab (or a fresh one rolled slightly thicker), cut two long strips about 3/4 inch wide and 5 inches long. -
Shape the Strips:
Gently roll the strips between your palms or on the table to round out the sharp edges, making them look like thick, flattened coils. -
Form the Loops:
Bend each strip into an arch shape. Check the fit against the short ends of your tray to ensure the proportions look balanced. -
Score the Attachment Points:
Mark where the handles will attach on the rim. Score these areas thoroughly with a serrated rib or needle tool, and do the same to the ends of the handle strips. -
Apply Slip:
Dab a generous amount of slip or magic water onto the scored areas. -
Attach the Handles:
Press the handle ends firmly onto the rim. I like to blend the clay from the handle down onto the underside of the rim for extra security using a modeling tool. -
Smooth the Joints:
Use a small, damp sponge to wipe away excess slip at the connection points, ensuring a seamless transition that looks like the handle grew out of the rim.
Step 3: Finishing and Glazing
-
Slow Drying:
Loosely cover the entire piece with plastic. Because the handles are exposed to air regarding more surface area, they dry faster than the base; slow drying prevents cracks where they join. -
Bisque Fire:
Once bone dry, fire the tray to a bisque temperature (usually cone 04 or 06). -
Clean and Prep:
Wipe the bisqued tray with a damp sponge to remove kiln dust. If you want a raw clay bottom, apply wax resist to the foot or underside. -
Apply Glaze:
Pour a matte white glaze over the interior and handles, or dip the piece if you have a large enough container. The glaze should be thin enough to let the brown specks from the clay body show through. -
Wipe the Handles (Optional):
To achieve the look in the photo where the handles reveal raw clay, gently wipe the glaze off the very top of the handles with a damp sponge, leaving a washed-out or completely bare effect. -
Glaze Fire:
Fire the piece to the maturity temperature of your clay and glaze (typically cone 5 or 6 for stoneware). -
Sanding:
After firing, use wet sanding paper or a diamond sanding pad to smooth the unglazed bottom so it won’t scratch your table.
Texture Twist
Before cutting your oval, roll a piece of lace or a textured fabric into the slab. The matte glaze will break beautifully over the subtle patterns.
Serve fresh fruit or warm bread on your new tray and enjoy the handmade touch it brings to your table
Scalloped Edge Dessert Tray
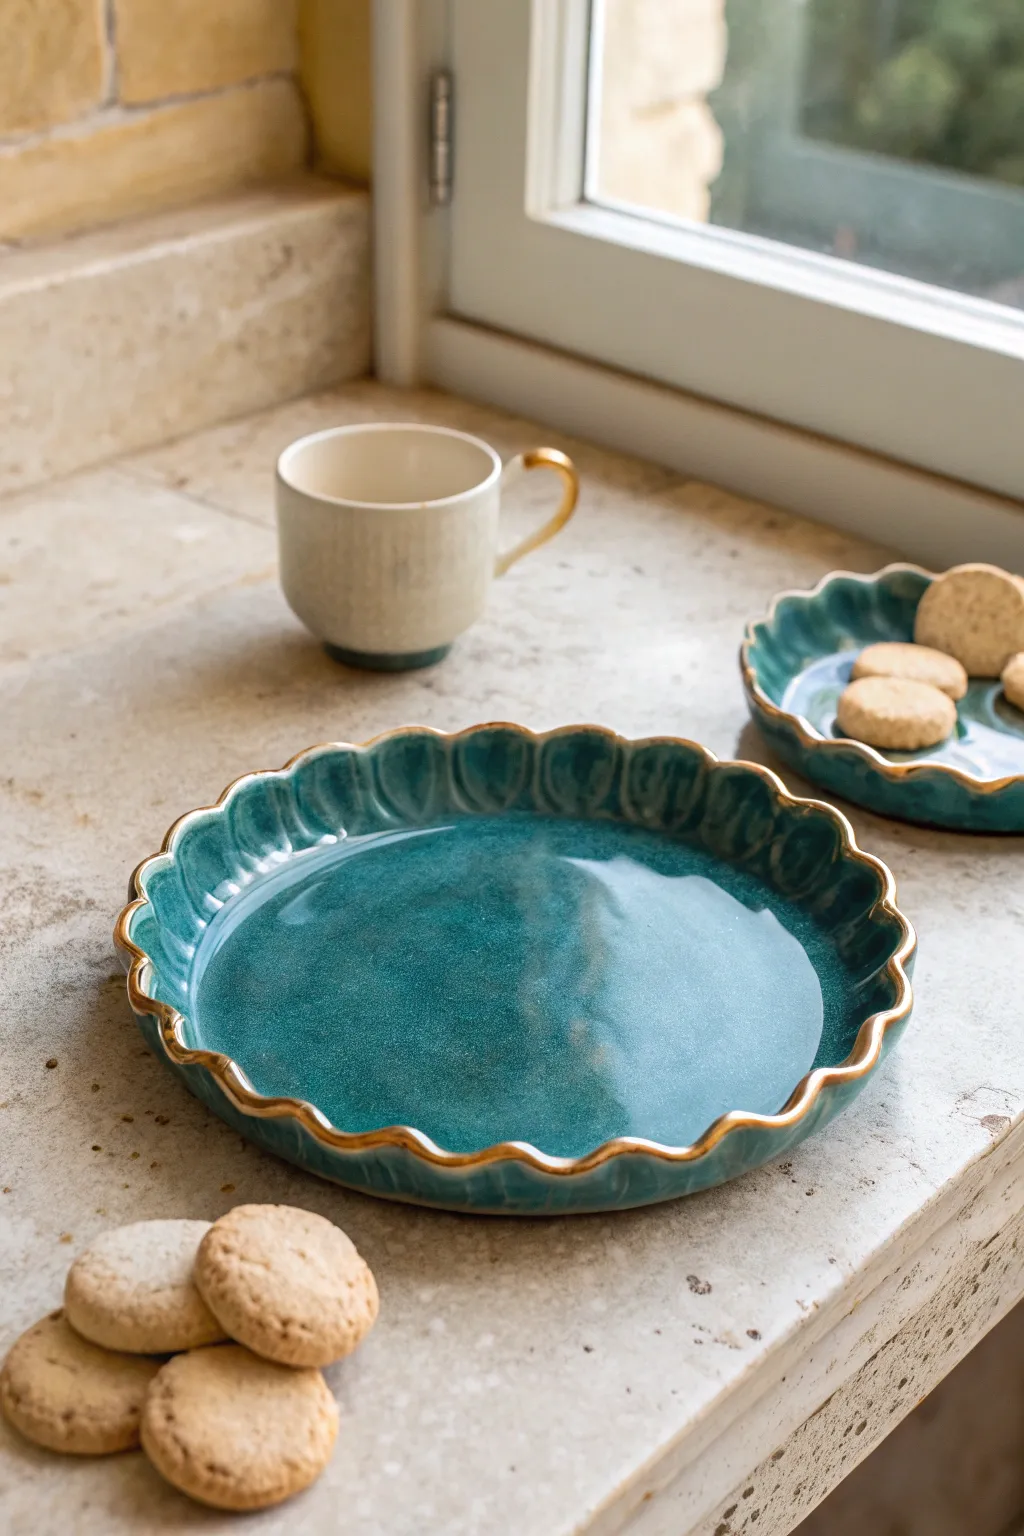
This elegant ceramic project combines a deep, oceanic teal glaze with a classic scalloped form for a sophisticated dessert presentation. The addition of a genuine gold luster rim elevates the piece from simple pottery to a luxurious serving tray.
Step-by-Step Guide
Materials
- White stoneware clay or porcelain
- Rolling pin
- Canvas work surface or slab mat
- Needle tool
- Rib tool (soft silicone or rubber)
- Circle template or compass
- Sponge
- Teal reactive glaze (cone 5/6 compatible)
- Gold overglaze luster (e.g., Duncan or Mother of Pearl)
- Small dedicated brush for luster
- Kiln
Step 1: Forming the Base
-
Roll the slab:
Begin by rolling out your clay on a canvas surface to a consistent thickness of about 1/4 inch. Ensure you roll in multiple directions to compress the clay particles, which helps prevent warping later. -
Smooth the surface:
Take your rib tool and gently compress the surface of the slab. This removes the canvas texture and aligns the clay platelets for a smoother finish. -
Cut the circle:
Using a large circle template or a compass, lightly trace your desired tray diameter onto the clay. Once satisfied, cut cleanly through the clay using a needle tool. -
Shape the rim:
Gently lift the edges of the circle to create a shallow bowl or tray shape. You can place the slab into a shallow slump mold or simply use your fingers to pinch the walls up about 1 inch high.
Warped Tray?
To fix a wobble, place bone-dry weights (or sandbags) gently in the center of the tray during the initial drying phase to keep the bottom perfectly flat.
Step 2: Creating the Scallops
-
Mark the intervals:
Lightly mark even intervals around the top edge of the rim where you want your scallops to be. Visualizing a fluid wave pattern helps with spacing. -
Form the curves:
Using your thumb and forefinger, gently push the clay rim outward at your marked intervals while pushing inward in the spaces between them. I find using a damp sponge during this step keeps the clay from cracking. -
Refine the fluting:
Go back around the rim and deepen the curves to make the fluting more pronounced. Smooth the transitions so the scallops look organic and flowing rather than sharp or geometric. -
Smooth the lip:
With a slightly damp chamois or sponge, run your finger along the very top edge of the rim to round it off perfectly. This ensures the gold rim will apply smoothly later. -
Dry slowly:
Cover the tray loosely with plastic and allow it to dry very slowly to the bone-dry stage. Uneven drying is the enemy of flat trays.
Glaze Variation
Layer a second, lighter glaze just on the high points of the scallops before firing. This emphasizes the texture as the glazes interact and melt.
Step 3: Glazing and Firing
-
Bisque fire:
Fire the greenware tray to cone 04 (or your clay body’s bisque temperature). -
Clean the bisque:
Wipe the bisqueware down with a damp sponge to remove any kiln dust, which can cause pinholes in your glaze. -
Apply the glaze:
Brush or dip the tray with your chosen teal reactive glaze. For the depth seen in the photo, apply 2-3 flowing coats, allowing each to dry in between. -
Glaze fire:
Fire the piece to cone 5 or 6, depending on your glaze instructions. Let the kiln cool completely before opening.
Step 4: The Gold Accent
-
Prepare the luster:
Work in a well-ventilated area for this phase. Dip a small, dedicated brush into your gold overglaze luster. -
Paint the rim:
Carefully paint a thin, steady line of gold along the very top edge of the scalloped rim. Focus on following the undulating curve precisely. -
Correct mistakes:
If you drip any gold, clean it up immediately with a cotton swab dipped in luster thinner or essence. Do not use water. -
Final firing:
Place the tray back in the kiln for a third firing, usually to cone 018 or 019 (check your luster bottle for specifics). This fuses the gold permanently to the glaze.
Once the kiln cools after the luster firing, your tray is ready to showcase cookies or trinkets with a touch of handmade luxury

TRACK YOUR CERAMIC JOURNEY
Capture glaze tests, firing details, and creative progress—all in one simple printable. Make your projects easier to repeat and improve.
Textured Rim Catchall Tray
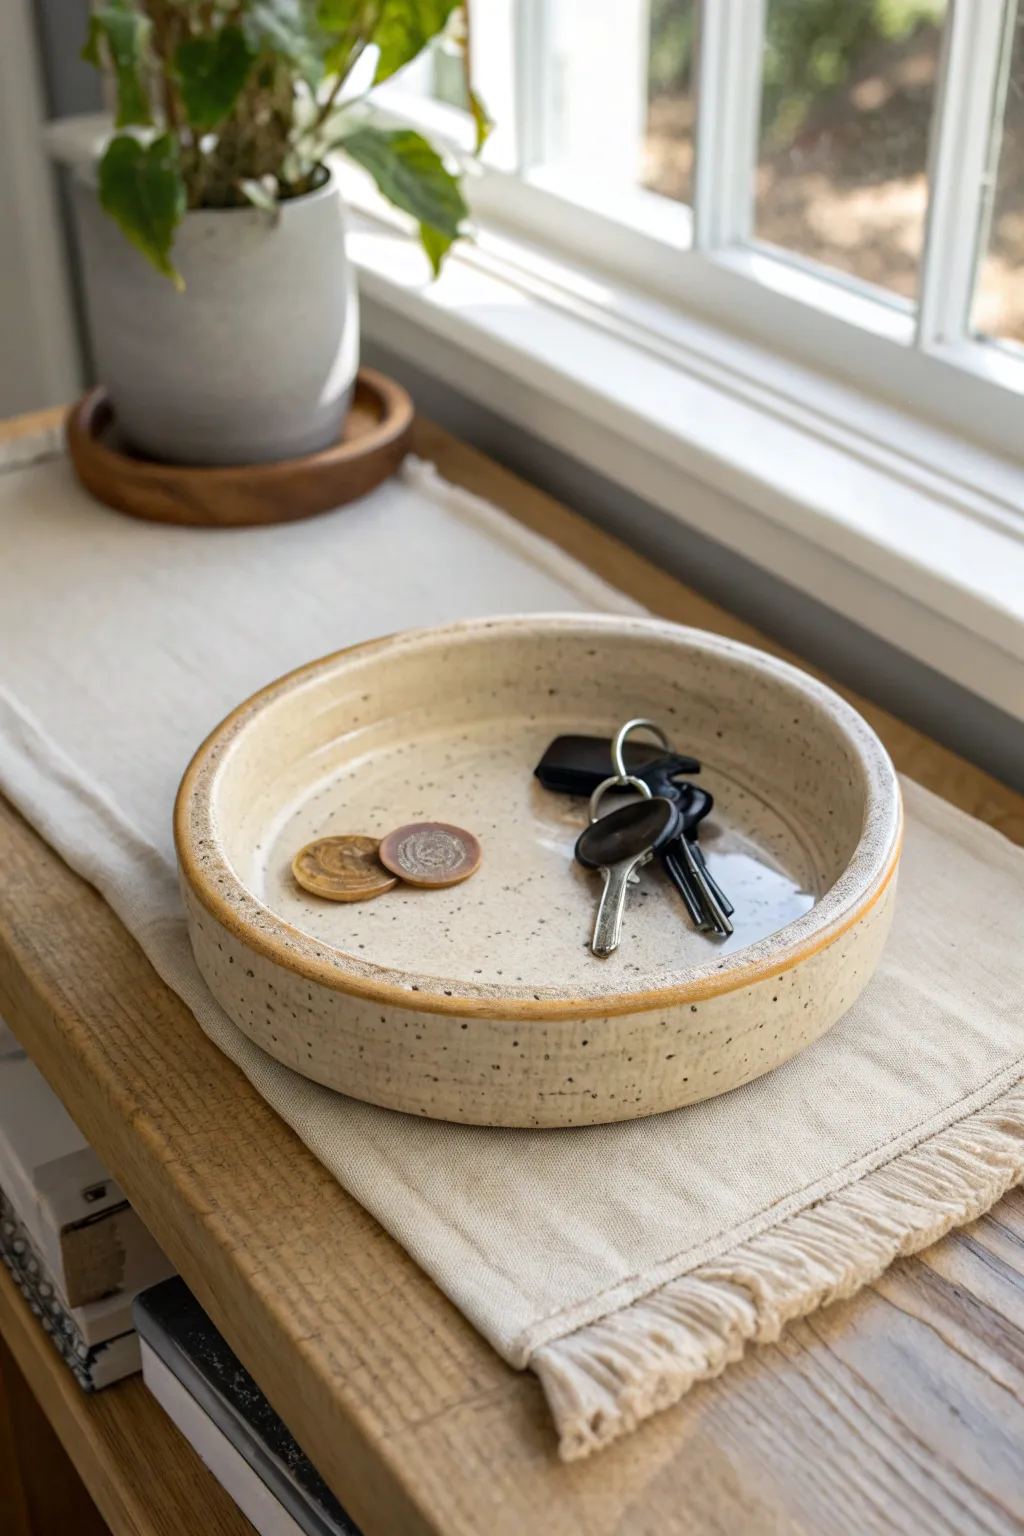
This charming, low-profile tray features a beautiful speckled clay body and a distinctively textured, golden-hued rim. It’s the perfect size for holding keys and coins near an entryway, combining rustic warmth with modern simplicity.
Step-by-Step
Materials
- Speckled stoneware clay (mid-fire)
- Rolling pin
- Canvas work surface or slab mat
- Needle tool
- Circular template or plate (approx. 8-9 inches)
- Potter’s wheel (optional, can be hand-built)
- Loop tool for trimming
- Sponge
- Clear glossy glaze
- Oxide wash (rutile or iron) or amber glaze for the rim
- Paintbrush
- Kiln
Step 1: Preparation & Forming the Base
-
Wedge the Clay:
Begin with a ball of speckled stoneware clay about the size of a large grapefruit. Wedge it thoroughly to remove air bubbles and ensure particle alignment, which prevents cracking later. -
Roll the Slab:
Using a rolling pin on a canvas surface, roll out a slab of clay to an even thickness of about 1/4 inch. If you want a perfectly flat bottom, avoid rolling it too thin. -
Cut the Circle:
Place your circular template or an overturned dinner plate onto the clay slab. Trace around it with a needle tool to create your base disc. -
Prepare the Wall Strip:
From the remaining clay, roll a long rectangular strip that is approximately 1.5 inches tall and long enough to wrap around the circumference of your base circle. I like to cut this slightly longer than needed so I can trim it to a precise fit. -
Score and Slip:
Thoroughly score (scratch) the outer edge of your circular base and one long edge of your rectangular strip. Apply slip or water to the scored areas to act as glue.
Rim Definition
Wiping the rim before adding the accent color prevents the colors from running together, keeping that crisp, golden definition visible.
Step 2: Assembly & Shaping
-
Attach the Wall:
Carefully stand the strip up onto the edge of the base circle. Press it firmly into the base, working your way around the circle. -
Close the Seam:
Where the two ends of the wall strip meet, cut them at a 45-degree angle for a cleaner join. Score, slip, and press the ends together, smoothing the clay over the seam so it disappears. -
Reinforce the Join:
Roll a very thin coil of clay and press it into the interior corner where the floor meets the wall. Smooth this coil upward into the wall and downward into the floor to create a seamless, strong transition. -
Refine the Rim:
Using your thumb and forefinger, compress the top rim of the tray. This tray has a slightly thickened, rounded lip, so don’t pinch it too sharp. -
Smooth Surfaces:
Use a slightly damp sponge to wipe down the entire piece, softening any harsh fingerprints and revealing the natural grog or grit in the clay.
Step 3: Glazing & Finishing
-
The Bisque Fire:
Let the tray dry slowly under plastic for a few days to prevent warping, then uncover it until bone dry. Fire it in the kiln to a bisque temperature (usually cone 04). -
Wax the Bottom:
Once the bisque firing is complete and the piece is cool, apply wax resist to the bottom foot of the tray to keep glaze from adhering there and ruining your kiln shelves. -
Apply the Base Glaze:
Dip the entire tray into a clear, glossy glaze. Shake off any excess gently. The clear glaze will allow the natural speckles of the clay body to show through prominently. -
Clean the Rim:
Immediately after dipping, use a damp sponge to carefully wipe the clear glaze off just the top rim, exposing the raw bisque clay along that strip. -
Accent the Rim:
Using a small brush, apply an oxide wash (like rutile or iron oxide) or a honey-amber colored glaze specifically to the wiped rim. This creates that warm, toasted halo effect seen in the photo. -
Glaze Fire:
Load the tray into the kiln for the final glaze firing, typically to cone 5 or 6 depending on your clay body and glaze specifications.
Stamp It Up
Before the clay dries, impress a textured fabric, leaf, or custom makers mark into the interior floor for subtle, hidden tactile detail.
Place your finished tray on a console table or nightstand to stylishly organize your daily essentials
Terrazzo Speckled Pottery Tray
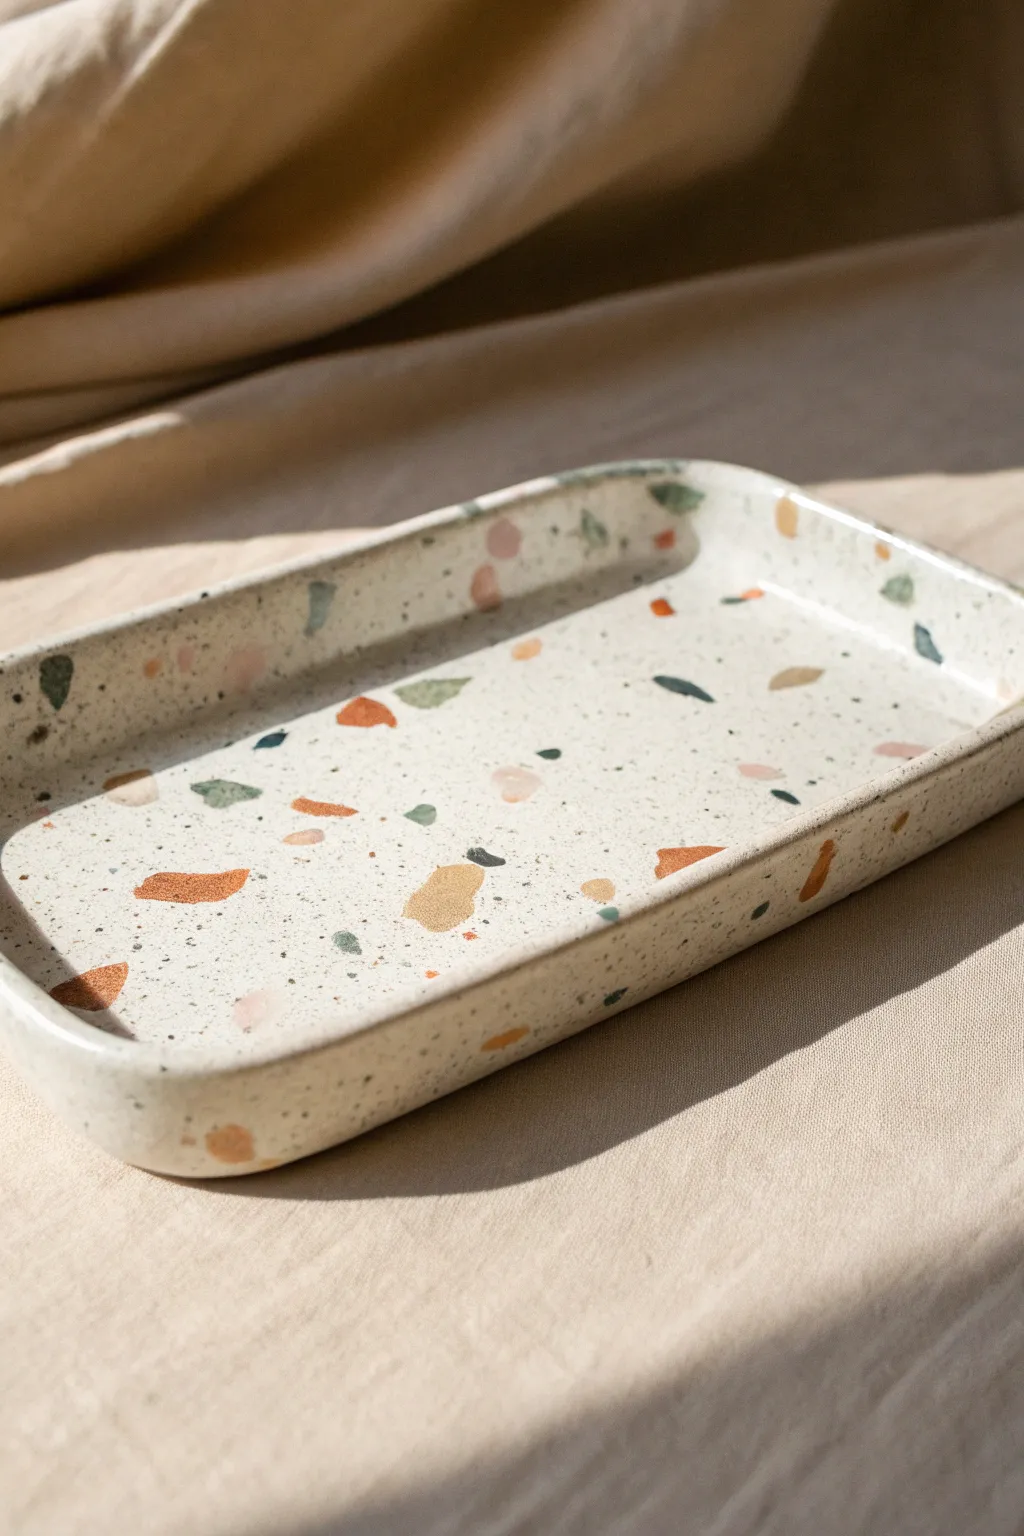
Capture the playful and modern feel of terrazzo stone in a functional, handcrafted ceramic piece. This rectangular tray features scattered, colorful “chips” embedded in a creamy, speckled clay body, perfect for holding jewelry or keys.
How-To Guide
Materials
- White stoneware clay (speckled variety preferred)
- Underglazes (terracotta, dusty pink, sage green, slate blue, mustard)
- Clear transparent glaze
- Rolling pin
- Two wooden guide slats (approx. 1/4 inch thick)
- Needle tool or fettling knife
- Flexible metal or rubber rib
- Sponge
- Rectangular paper template (optional)
- Small flat brush
- Kiln access
Step 1: Forming the Base
-
Prepare the slab:
Begin by wedging your white speckled stoneware clay to remove air bubbles. Place the clay between two wooden guide slats on a canvas work surface and roll it out into an even slab. -
Smooth the surface:
Before cutting, take a flexible rib tool and compress the clay slab on both sides. This aligns the clay particles, preventing warping later, and creates that ultra-smooth canvas we need for painting. -
Cut the rectangle:
Using a needle tool and a ruler (or a pre-cut paper template), slice a rectangle out of your slab. For the tray shown, aim for approximately 6×9 inches to account for shrinkage. -
Softening the edges:
Run a slightly damp sponge or your finger along the cut edges. You want to round them off gently so they aren’t sharp or jagged.
Clean Lines Trick
To keep your painted terrazzo shapes sharp, wait until the underglaze is dry, then gently scratch the edges with a needle tool to clean up messy borders.
Step 2: Building the Rim
-
Create the walls:
Roll out a long, thin coil of clay—about the thickness of a pencil. Measure it against the perimeter of your rectangular base to ensure you have enough length. -
Score and slip:
Rough up the edges of your base slab and the underside of your coil using a needle tool or serrated rib. Apply a generous amount of clay slip (liquid clay) to the scored areas. -
Attach the coil:
Place the coil onto the edge of the base. Press it down firmly to adhere it, ensuring there are no air gaps between the wall and the floor of the tray. -
Blend the seams:
Use a modeling tool or your thumb to blend the clay coil downward into the base on both the inside and outside. I find dragging the clay down creates a stronger bond than just smoothing constantly. -
Refine the shape:
Pinch the wall gently to create a consistent height (about 0.75 inches). Use a damp sponge to smooth the rim connection so it looks seamless, like one solid piece rather than an attached coil.
Step 3: Creating the Terrazzo Effect
-
Bisque fire:
Allow your tray to dry slowly under plastic for a few days before uncovering it to dry completely. Once bone dry, fire it in the kiln to cone 04 (bisque). -
Clean surface:
Wipe the bisque-fired tray with a damp sponge to remove any kiln dust. This ensures the underglaze adheres properly. -
Paint the shapes:
Using a small flat brush and your underglazes, paint random geometric shapes onto the tray. Think irregular triangles, soft blobs, and jagged shards. -
Color distribution:
Work one color at a time. Paint five or six rust-colored shapes scattered across the surface, clean your brush, and then move to the slate blue. Keep the spacing random but balanced. -
Layering intensity:
Apply 2-3 coats for each colored shape to ensure the color is opaque and vibrant after firing. Let each coat dry for a few moments in between. -
Adding tiny details:
For the smallest speckles, you can dilute a dark grey or black underglaze slightly and flick it onto the tray with a stiff toothbrush, or manually paint tiny dots between the larger shapes.
Level Up: Texture
Instead of painting, press actual small colored clay chips into the soft slab during the rolling phase for a true inlaid terrazzo texture.
Step 4: Final Glazing
-
Clear coat:
Once the underglaze design is completely dry, dip the entire tray into a transparent clear glaze. Alternatively, brush on three even coats of brush-on clear glaze. -
Wipe the foot:
Use a sponge to wipe all glaze off the very bottom of the tray so it doesn’t stick to the kiln shelf. -
Final fire:
Load the tray into the kiln and fire it to the maturation temperature of your specific clay and glaze (likely cone 5 or 6).
Now you have a chic, speckled catchall that brings a modern artistic touch to your bedside table or desk
Marbled Swirl Clay Tray
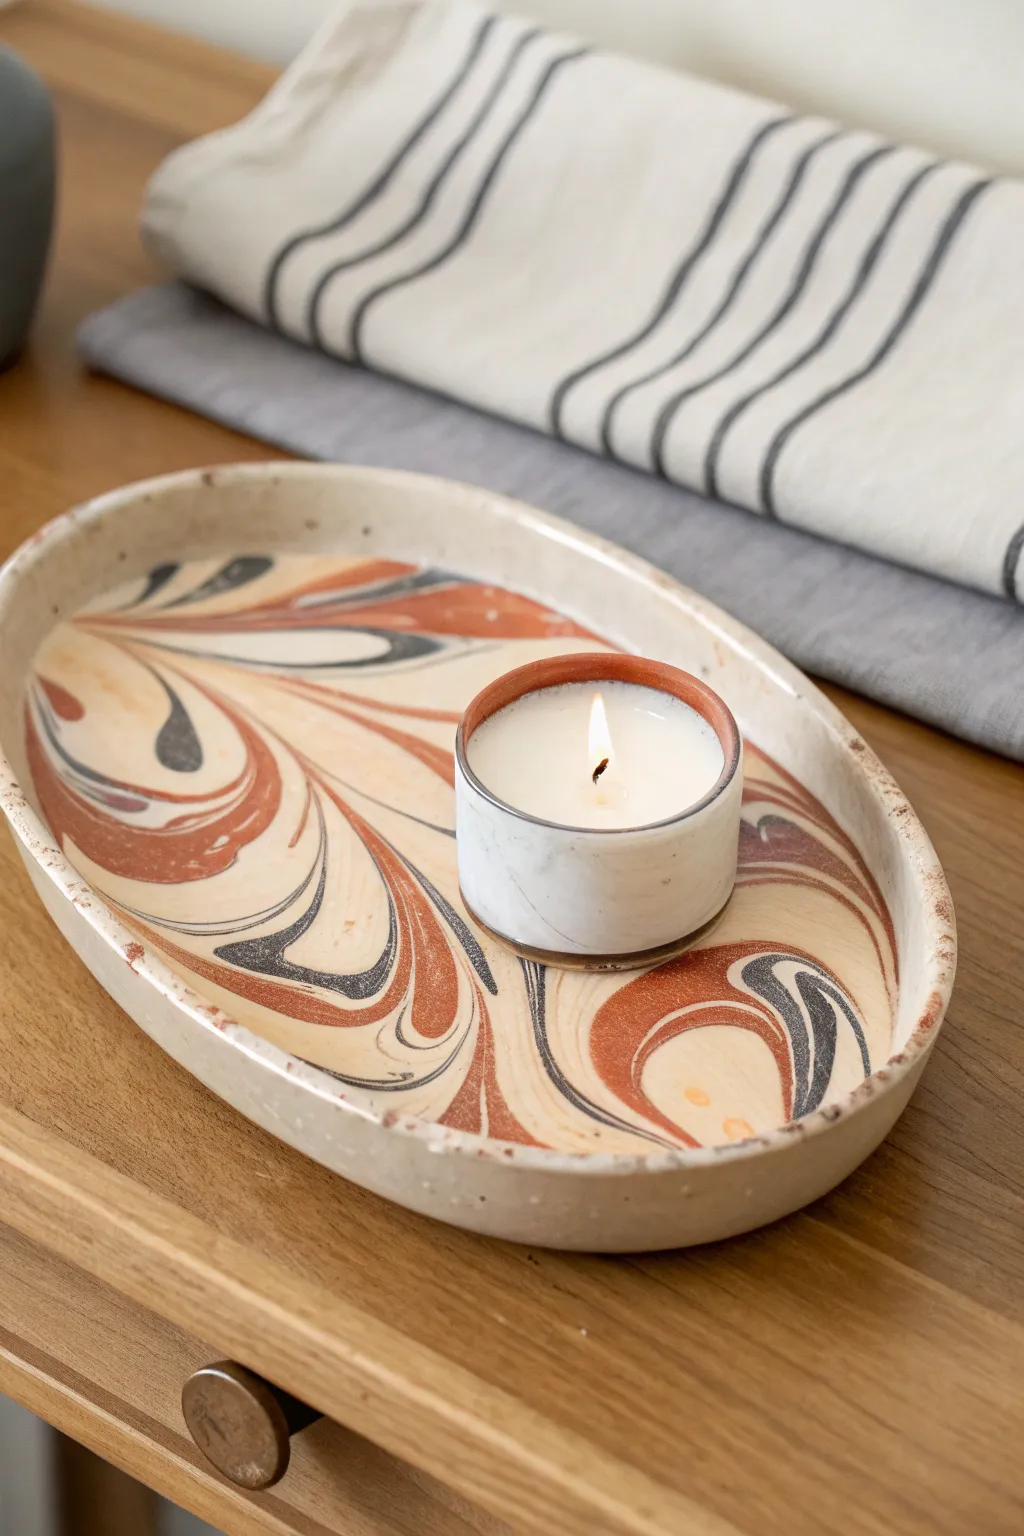
Achieve the sophisticated look of agate or patterned stone with this surprisingly simple marbled clay tray. Using polymer oven-bake clay in earthy tones like terracotta, charcoal, and cream, you will create a functional decor piece perfect for holding candles or trinkets.
Step-by-Step
Materials
- Polymer clay (white, terracotta/burnt orange, black)
- Acrylic rolling pin or glass bottle
- Oval template (paper) or large oval cutter
- Craft knife or clay blade
- Oven-safe bowl or baking dish (for shaping)
- Fine-grit sandpaper (400 to 1000 grit)
- Gloss or matte polyurethane varnish (optional)
- Parchment paper
Step 1: Preparing the Clay
-
Condition the base:
Start by taking a large block of white or cream polymer clay. This will be your primary color. Knead it in your hands until it is soft, pliable, and free of any stiffness. -
Prepare accent colors:
Take smaller amounts of terracotta and black clay. Condition them separately by kneading until soft. Roll each color into thin snakes resembling distinct cords. -
Combine the ropes:
Roll your white base clay into a thick log. Place the thin snakes of terracotta and black lengthwise along the white log. Gently twist the entire bundle like a candy cane to begin merging the colors. -
Fold and twist:
To create the marbled effect, fold the twisted log in half and twist it again. Repeat this process 3-4 times. Be careful not to over-twist, or the colors will muddy into a single grey-brown shade instead of distinct swirls.
Step 2: Creating the Slab
-
Form a ball:
Roll your marbled log into a smooth ball. You should already see nice striations regarding where the colors interact. -
Roll out the slab:
Place the ball on parchment paper. Using your acrylic roller, roll the clay out to a uniform thickness of about 1/4 inch. As you roll, the pressure will stretch the swirls into the beautiful, organic pattern shown in the photo. -
Check the pattern:
Inspect your slab. If you aren’t happy with the pattern surface, you can fold the clay and roll it out one more time, but remember that less is often more with marbling. -
Cut the shape:
Lay your oval paper template lightly on top of the clay slab. Use a sharp craft knife or clay blade to trace around the template, cutting cleanly through the clay. Remove the excess clay scraps.
Muddy Colors?
If colors blend too much, stop twisting sooner. Chill the clay in the fridge for 10 mins before rolling; firm clay keeps color separation better.
Step 3: Shaping and Baking
-
Smooth the edges:
Run your finger gently along the cut edge of the oval to soften any sharp corners left by the blade. This gives the tray a more finished, ceramic look. -
Form the rim:
To create the raised lip seen in the image, carefully pinch the edges upward slightly. I find using a gentle pinching motion while rotating the tray helps keep the wall height consistent. -
Add texture (optional):
For the slightly rustic, speckled texture visible on the rim in the photo, you can lightly tap the edges with a toothbrush or a crumpled piece of aluminum foil. -
Prepare for baking:
Transfer the clay oval (still on its parchment paper if possible to avoid distortion) onto a baking sheet. If you want a slight curve to the bottom, you can bake it resting inside an oven-safe casserole dish. -
Bake the tray:
Bake according to your clay manufacturer’s instructions—typically around 275°F (135°C) for 15-30 minutes depending on thickness. Ensure good ventilation in the kitchen during this step. -
Cool down:
Allow the tray to cool completely in the oven with the door cracked open. This gradual cooling helps prevent cracking.
Gold Vein Accent
For a luxe touch, add small flecks of gold leaf into the clay log before the final twist. It creates metallic veins that shimmer in the finished piece.
Step 4: Finishing Touches
-
Sand the surface:
Once cool, use fine-grit wet/dry sandpaper under running water to gently sand the rim and any rough spots on the surface. This creates a professional, smooth finish that feels like real stone. -
Seal (optional):
If you plan to use the tray for items that might stain, apply a thin coat of matte or satin varnish to seal the surface. Let it dry completely before use.
Place your favorite candle on your new tray and enjoy the warm, handmade atmosphere it brings to your space
Sgraffito Botanical Tray
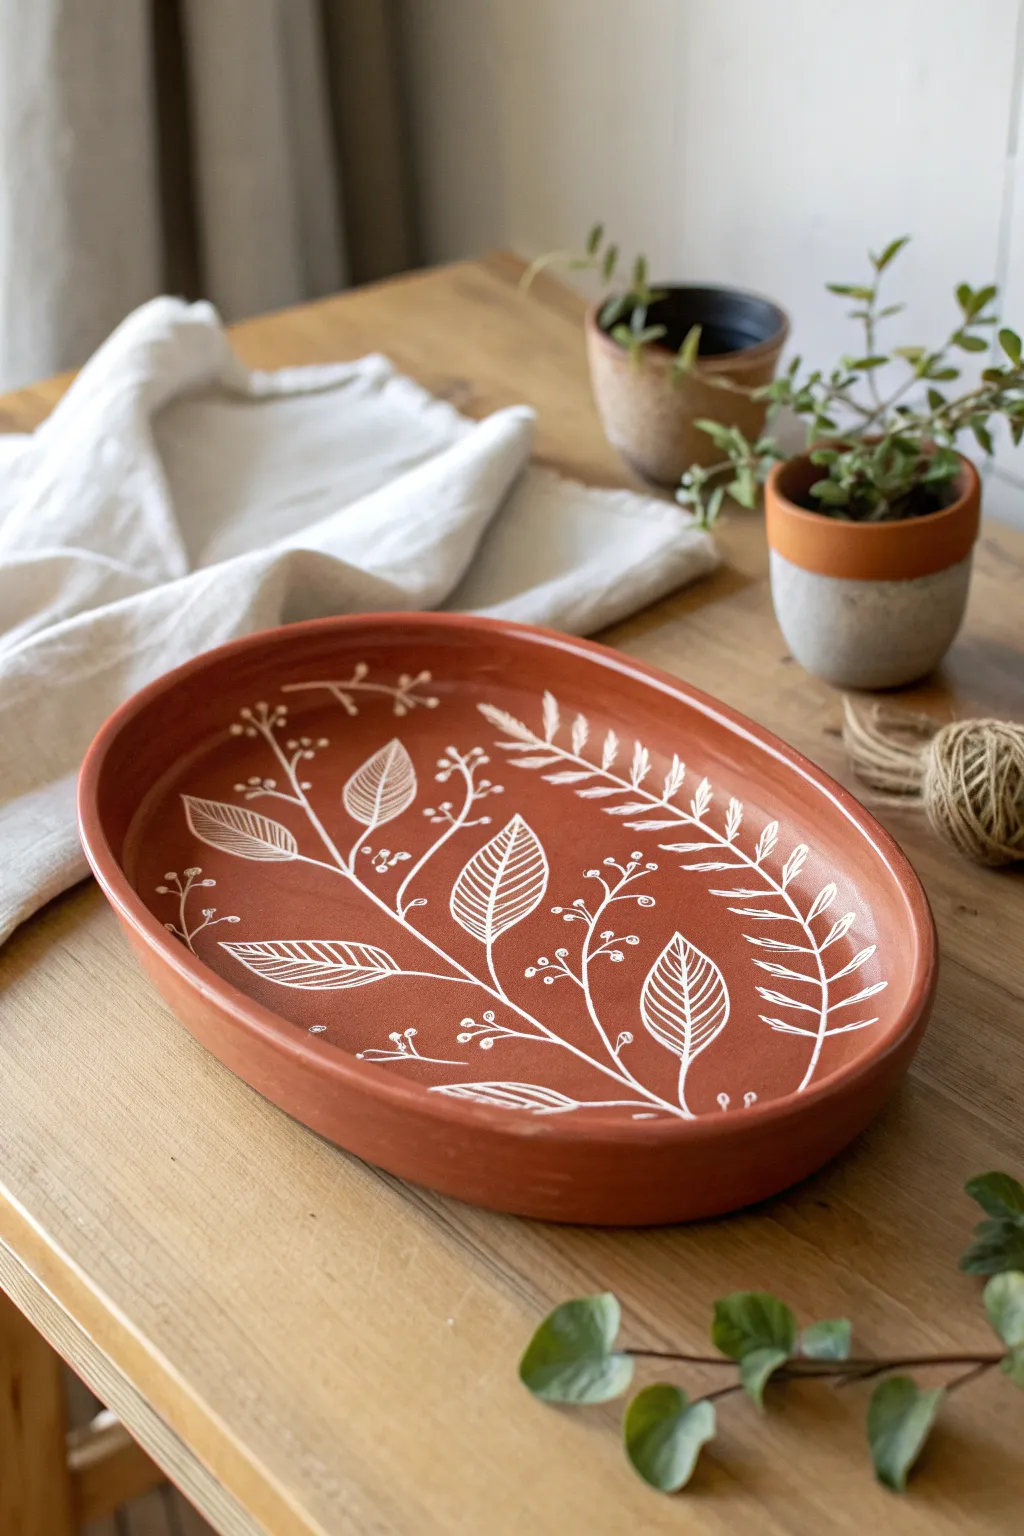
This terra cotta tray features delicate white botanical illustrations created using a technique called slip casting or underglaze transfer, giving it a stunning, high-contrast look that feels both rustic and refined. The simple leaf and berry patterns stand out beautifully against the warm, earthy clay body.
How-To Guide
Materials
- Red stoneware or terra cotta clay body
- Rolling pin and guide sticks (approx. 1/4 inch)
- Oval slump mold or a large oval bowl to use as a form
- Rib tool (kidney shaped)
- White underglaze or white slip
- Fine-point sgraffito tool or needle tool
- Small soft bristle brush
- Damp sponge
- Clear matte or satin glaze
- Kiln access
Step 1: Forming the Tray
-
Roll the Slab:
Begin by wedging your red clay thoroughly to remove air bubbles. Roll it out into a smooth, even slab about 1/4 inch thick, using guide sticks to ensure consistent thickness throughout. -
Cut the Shape:
Place your oval template or mold lightly on top of the slab to trace the shape, then cut roughly an inch wider than the mold to allow for the rim depth. -
Smooth the Surface:
Before shaping, use a soft rib tool to compress the clay surface. Run the rib gently over the slab in multiple directions to align the clay particles, which helps prevent warping later. -
Mold the Form:
Gently drape your clay slab into your slump mold or over a hump mold. Press the clay softly against the form to establish the curve, being careful not to stretch it too thin in spots. -
Refine the Rim:
Once the tray has stiffened slightly to leather-hard, trim the excess clay from the rim with a needle tool or fettling knife to create a clean, even edge. Smooth the rim with a slightly damp sponge.
Crisp Lines Pro-Tip
For the sharpest sgraffito lines, carve when the underglaze is ‘leather hard’ on the pot. Too wet and it smears; too bone-dry and it chips.
Step 2: Applying the Design
-
Apply White Underglaze:
Once the tray is leather-hard but still cool to the touch, apply the white design. You can freehand paint this using white underglaze and a fine liner brush. -
Outline the Main Stem:
Start by painting a long, curving central stem that sweeps across the oval from bottom-left to top-right. Keep the line fluid and organic rather than perfectly straight. -
Add Large Leaves:
Paint large, teardrop-shaped leaves branching off the main stem. Fill them in solid white initially if you plan to carve details later, or paint just the outlines as seen in the finer fern-like sections. -
Detail the Veins (Sgraffito):
If you painted solid white leaves, wait until the underglaze is dry to the touch. Then, use a fine sgraffito tool to scratch away the white layer, revealing the red clay underneath to create the vein patterns. -
Paint Berry Sprigs:
Using the very tip of your brush, add delicate, thinner stems branching out into small clusters. Dot the ends to create tiny berries or buds. -
Add Fern Elements:
On the opposite side or filling empty spaces, paint fern-style fronds with repeated, small dashes for leaves. These provide a nice textural contrast to the larger broad leaves. -
Clean Up:
If any white underglaze smudged onto the background, gently scrape it away with a clean tool or wipe carefully with a barely damp detailed sponge.
Step 3: Firing and Glazing
-
Bisque Fire:
Allow the tray to dry slowly and completely. Bisque fire it to cone 04 (or your clay’s specific bisque temperature) to harden the form. -
Sponge and Prep:
After the bisque fire, wipe the tray with a damp sponge to remove any kiln dust. This ensures the clear glaze will adhere properly without crawling. -
Apply Clear Glaze:
Pour or brush a clear glaze over the entire interior of the tray. I prefer a matte finish for this project to keep that natural, earthy feel, but satin works well too. -
Wipe the Foot:
Ensure the bottom of the tray is completely free of glaze. Wipe it with a sponge or use wax resist before glazing to protect your kiln shelves. -
Glaze Fire:
Fire the piece a second time to the maturation temperature of your specific clay and glaze combination (typically Cone 5 or 6 for stoneware).
Uneven Drying Fix
If your tray starts warping while drying, weight the center down gently with a small sandbag or rice bag to keep the bottom flat.
Once cooled, your botanical tray will be ready to serve as a stunning centerpiece or a catch-all for your treasures.
Stamped Mandala Texture Tray
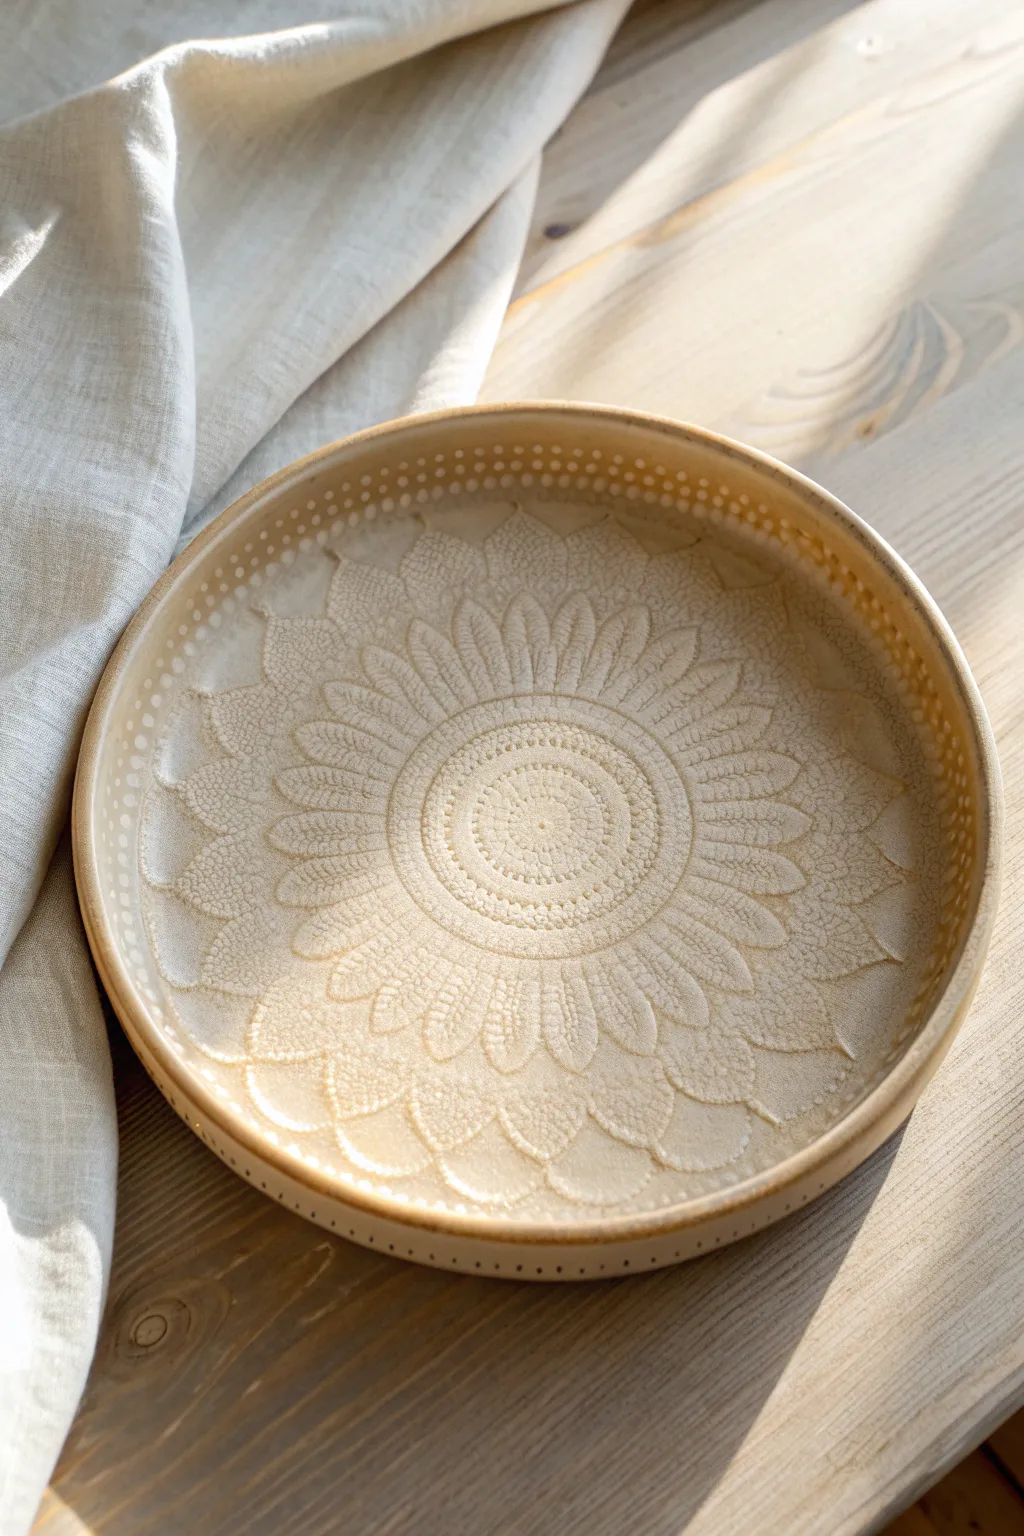
Capture the warmth of sunlight in clay with this textured tray featuring a radiating mandala design. The gentle, creamy glaze breaks beautifully over the stamped impressions, creating a piece that feels both earthy and elegant.
Step-by-Step
Materials
- Light-colored stoneware clay (smooth body recommended)
- Large rolling pin
- Wooden guide strips (approx. 1/4 inch thick)
- Mandala stamp or textured lace doily
- Circle template or large plate
- Needle tool
- Fettling knife
- Sponge
- Small carving tool or chopstick for dots
- Rib tool
- Pottery wheel (optional, for rim finishing) or banding wheel
- Light transparent glaze (celadon or clear)
Step 1: Preparing the Slab
-
Wedge the clay:
Begin by thoroughly wedging your stoneware clay to remove any air bubbles. A smooth clay body works best here to capture the fine details of the mandala pattern. -
Roll out the slab:
Place the clay between your wooden guide strips and roll it out with the rolling pin. You want an even thickness of about 1/4 inch to ensure stability without excessive weight. -
Smooth the surface:
Use a flexible rib tool to compress the clay surface on both sides. This removes the canvas texture and strengthens the slab, creating a pristine canvas for your stamping.
Uneven Texture?
If the stamp isn’t pressing evenly, the slab might be uneven. Roll from the center outward next time, and check thickness with a needle tool.
Step 2: Stamping and Shaping
-
Position the texture:
Place your large mandala stamp or lace doily exactly in the center of the slab. If using lace, gently roll over it with a pony roller or small rolling pin to press the design deep into the clay. -
Cut the circle:
Place your circle template over the stamped area. Using a needle tool, cut cleanly around the template. I prefer to hold the needle tool vertical to get a nice, sharp edge. -
Smooth the edges:
Run a damp sponge or your finger along the cut edge to soften any sharpness. This prevents the rim from becoming brittle or sharp after firing. -
Lift the rim:
Place the clay circle on a banding wheel. Gently lift the outer edge of the slab upwards to create a shallow wall, about 1 inch high. You can use a foam mold underneath for support if the clay is too soft. -
Detail the rim:
While the rim is still soft, use a small, round-ended tool or a dull pencil to press a row of tiny dots along the inner edge of the wall. This frames the mandala beautifully. -
Add rim perforations:
Carefully poke a series of small, evenly spaced holes or impressions along the very top edge of the rim for additional texture, mirroring the inner dot pattern.
Step 3: Drying and Glazing
-
Slow drying:
Cover the perimeter of the tray with plastic to let the rim dry slowly, which prevents warping. Once the rim is leather hard, you can uncover the center to dry evenly. -
Bisque fire:
Once the tray is bone dry, fire it to cone 04 (or your clay body’s bisque temperature) to prepare it for glazing. -
Select the glaze:
Choose a translucent glaze, such as a honey flux or a light celadon. An opaque glaze will hide all your hard work, so transparency is key. -
Apply the glaze:
Dip or brush the glaze onto the tray. Be careful not to let the glaze pool too thickly in the deep recesses of the mandala, as this can obscure the crisp lines. -
Wipe back:
If the glaze looks too thick over the texture, gently wipe the raised areas with a clean, damp sponge. This technique highlights the texture by leaving more glaze in the depressions. -
Clean the foot:
Ensure the bottom of the tray is completely free of glaze. Use a wax resist before glazing or wipe it clean with a sponge afterward to save your kiln shelves. -
Final firing:
Fire the piece to the maturity temperature of your clay and glaze combination (usually cone 5 or 6 for stoneware).
Stamp Release Trick
Dust your intricate stamps or lace with a tiny bit of cornstarch before pressing. This ensures the clay releases cleanly without tearing the fine details.
Now you have a stunning, textured centerpiece ready to hold fruit or simply catch the light on your table
Minimalist Line Art Tray
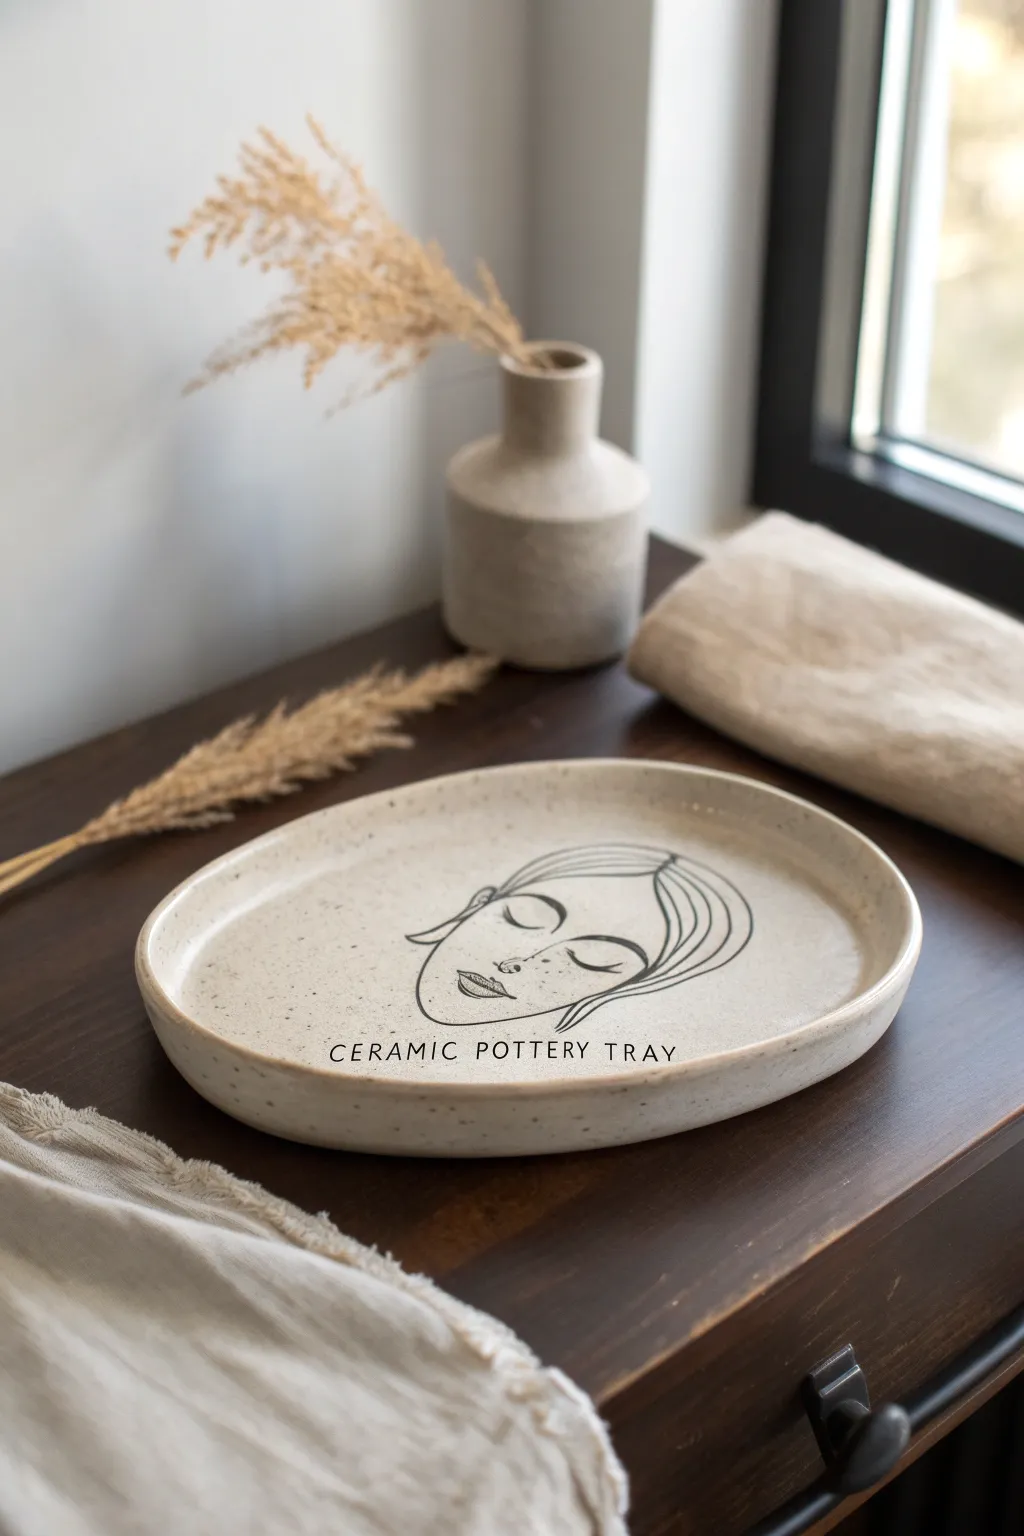
Embrace the understated beauty of modern ceramics with this oatmeal-speckled oval tray featuring a serene minimalist face illustration. This project combines simple slab-building techniques with delicate underglazing to create a functional piece of art perfect for holding trinkets or standing alone as decor.
How-To Guide
Materials
- Speckled buff stoneware clay (or white clay with speckles added)
- Black underglaze
- Clear transparent glaze (food safe if using for food)
- Fine liner brush (size 0 or 00)
- Rolling pin
- Canvas mat or slab roller
- Oval paper template
- Needle tool or fettling knife
- Rib tool (soft kidney)
- Sponge
- Carbon paper (optional for tracing)
- Pencil
Step 1: Forming the Base
-
Prepare the Clay:
Begin by wedging your speckled buff clay thoroughly to remove air pockets and align the particles. This ensures your tray won’t crack during firing. -
Roll the Slab:
Roll your clay out onto a canvas mat until it is an even slab, approximately 1/4 inch thick. Rotate the clay periodically as you roll to keep the circular shape and prevent sticking. -
Cut the Shape:
Place your oval paper template lightly onto the slab. Using a needle tool or fettling knife, trace around the template to cut out your base shape. -
Compress the Surface:
Use a damp sponge or a soft rib tool to smooth the surface of the clay. This compression helps prevent warping and creates a pristine canvas for your illustration. -
Lift the Rim:
Gently lift the edges of the oval slab with your fingers to create a slight rim. You can prop up the edges with small pieces of foam or rolled clay coils underneath to hold the shape while it stiffens. -
Refine the Edges:
Once the rim is lifted, use a damp sponge to round off any sharp edges cut by the knife. I find that taking extra time here really gives the piece a professional finish. -
Dry to Leather Hard:
Allow the tray to dry slowly until it reaches a ‘leather hard’ stage. The clay should be firm enough to hold its shape perfectly but still cool to the touch and receptive to painting.
Step 2: Adding the Illustration
-
Plan the Design:
Sketch your minimalist face design on paper first. If you aren’t confident freehanding, place carbon paper over the leather-hard clay and gently trace your design onto the surface with a pencil. -
Prepare the Underglaze:
Shake your black underglaze well and pour a small amount onto a palette. You want a consistency similar to heavy cream for smooth lines. -
Paint the Outlines:
Load your fine liner brush. holding it perpendicular to the clay surface, begin painting the flowing lines of the hair and face contour. Use a steady hand and consistent pressure. -
Detail the Face:
Carefully paint the closed eyes and lips. These features are delicate, so you might want to switch to your smallest brush size here. Keep the lines crisp and unconnected for that airy, minimalist style. -
Clean Up Mistakes:
If you smudge a line, wait for the underglaze to dry completely, then gently scratch the mistake away with a needle tool or stiff brush.
Uneven Lines?
If your underglaze lines are trailing off, your brush is likely too dry. Add a tiny drop of water to your underglaze or reload the brush more frequently.
Step 3: Firing and Glazing
-
Bisque Fire:
Once the tray is bone dry (completely dry and room temperature), fire it in a kiln to cone 04 (or your clay’s specific bisque temperature). -
Apply Clear Glaze:
After the bisque firing, wipe the tray with a damp sponge to remove dust. Brush or dip the entire piece in a clear transparent glaze. This will make the speckles in the clay pop and protect the black lines. -
Glaze Fire:
Load the kiln again for the final glaze firing, typically to cone 5 or 6 depending on your stoneware clay body. -
Final Inspection:
Once the kiln cools, remove your tray. Check for any sharp spots on the bottom and sand them down if necessary.
Gold Accent
After the final glaze firing, apply ceramic gold luster to the rim or the lips and fire a third time at a lower temperature for a luxurious metallic touch.
Enjoy the calm ambiance this handmade tray brings to your space as it holds your favorite items
Celestial Sun and Moon Tray
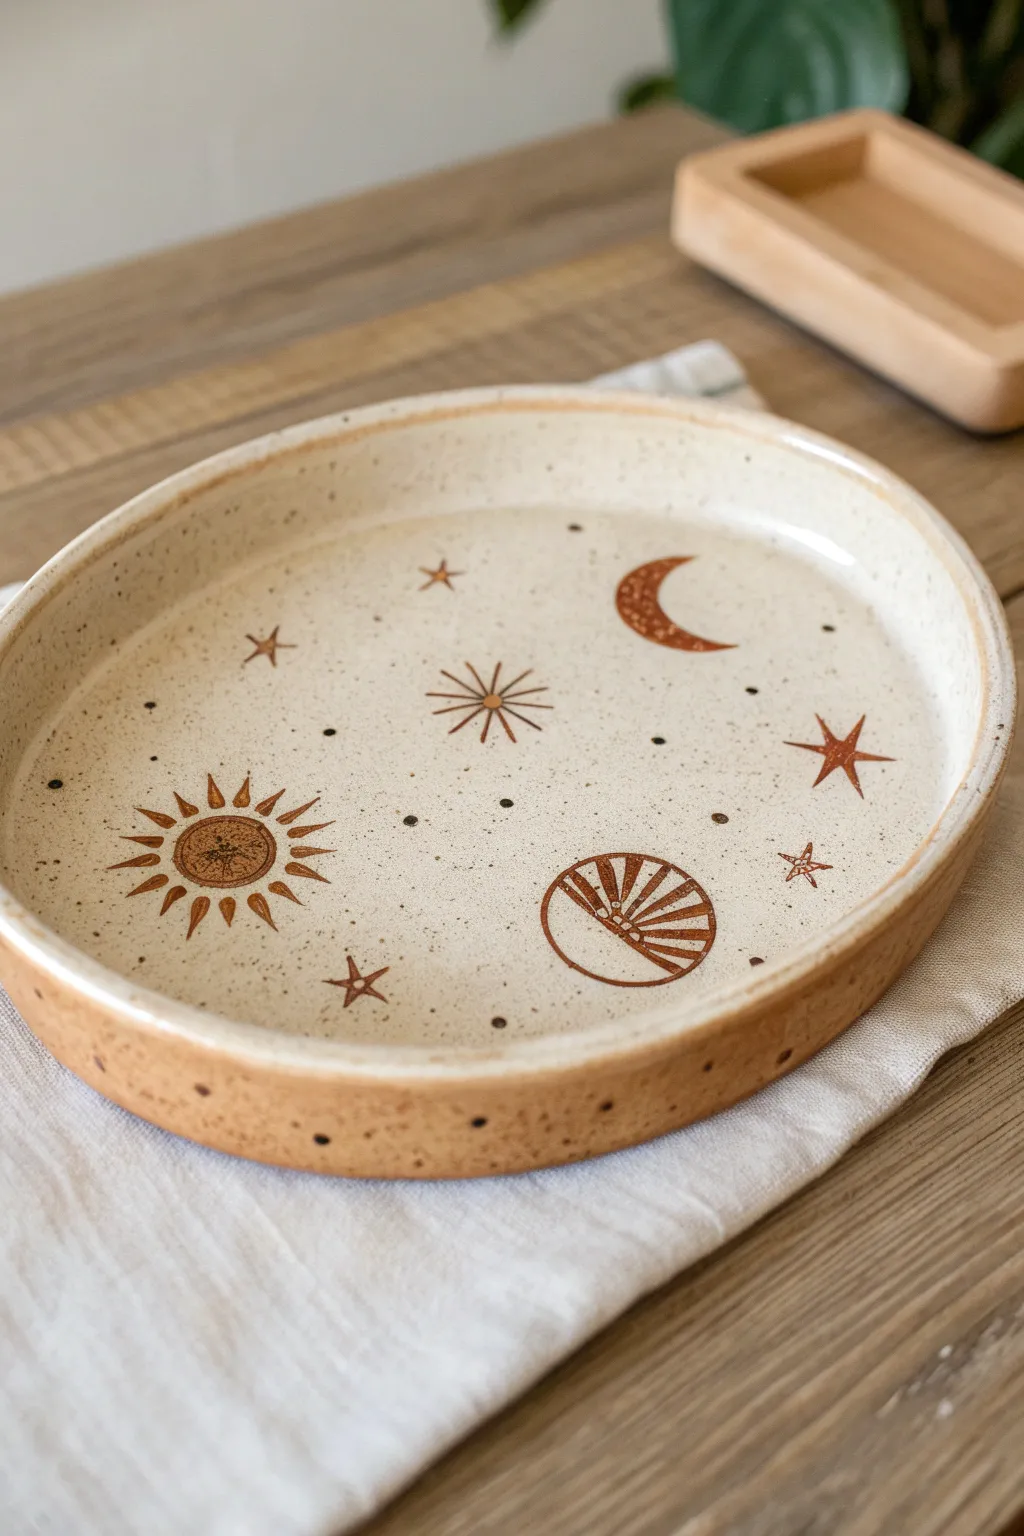
Capture the magic of the night sky with this simple yet stunning oval tray featuring rust-colored celestial motifs. The natural speckled clay body provides the perfect starry backdrop for hand-painted suns, moons, and stars.
Detailed Instructions
Materials
- Speckled stoneware clay body (light beige firing)
- Oval drape mold or slab roller template
- Rolling pin and canvas or slab roller
- Pottery knife or needle tool
- Smoothing rib (rubber or metal)
- Underglaze in ‘Rust’ or ‘Terracotta’ color
- Fine detail paintbrush (liner brush)
- Clear matte or satin food-safe glaze
- Yellow underglaze (optional, for center of sun)
- Sponge and water bucket
- Kiln (or access to a firing service)
Step 1: Forming the Tray
-
Prepare the Clay Slab:
Begin by rolling out your speckled stoneware clay into an even slab. Aim for a thickness of about 1/4 inch to ensure sturdiness without excessive weight. If you are rolling by hand, flip the clay often to prevent it from sticking to your canvas. -
Cut the Oval Shape:
Place your oval template or mold onto the slab. Using your needle tool held vertically, trace around the shape to cut out your base. Save the excess clay scraps for future projects. -
Smooth the Surface:
Before shaping, take a damp sponge or a soft rib and compress the clay surface. This removes the canvas texture and brings the beautiful natural speckles to the forefront. -
Create the Rim:
Cut a long strip of clay from your remaining slab, approximately 1 inch tall. Score the edge of your oval base and one edge of the strip, apply slip, and attach the strip to create the vertical wall of the tray. -
Blend the Seams:
Use a modeling tool or your finger to firmly smudge the clay from the wall down onto the base on the inside, and from the base up onto the wall on the outside. Ensure the seam disappears completely for structural integrity. -
Refine the Edges:
Run a damp chamois or sponge over the top rim to soften any sharp angles. I like to gently round this edge so it feels smooth to the touch after firing.
Smudged Underglaze?
If you accidentally smear your design while painting, let it dry completely. Then, gently scratch the mistake off with a needle tool or stiff brush before reapplying.
Step 2: Painting the Motifs
-
Drying to Leather Hard:
Allow the tray to dry slowly until it reaches a leather-hard state. The clay should be firm and cool to the touch but no longer flexible. -
Sketching the Design:
Lightly sketch your placement for the sun, moon, and stars using a dull pencil. The graphite will burn off in the kiln, so don’t worry about making mistakes. -
Painting the Sun:
Load a fine liner brush with rust-colored underglaze. Paint the circle for the sun first, then carefully add the alternating straight and wavy rays. If desired, dot the center with a hint of yellow underglaze for contrast. -
Adding the Moon:
Paint a crescent moon shape opposite the sun. Use two to three thin coats of underglaze to ensure the color is opaque and vibrant. -
Starry Details:
Fill the empty spaces with various star shapes. Create variety by painting some as simple four-point crosses, others as five-point stars, and a few as tiny dots to represent distant galaxies. -
Painting the Horizon Semi-Circle:
Near the bottom, paint a semi-circle with radiating lines inside, mimicking a setting sun or a shell motif. Keep your lines steady and deliberate. -
Rim Decoration:
For a cohesive look, use the back of a paintbrush dipped in the rust underglaze to stamp small, evenly spaced dots along the exterior vertical wall of the tray.
Use a Stencil
Not confident in your freehand drawing? Cut shapes out of newsprint, wet them slightly, and stick them to the clay as a resist. Paint over them, then peel away.
Step 3: Firing and Glazing
-
Bisque Fire:
Once the tray is bone dry—completely moisture-free—load it into the kiln for a bisque fire (typically Cone 04). This hardens the clay and sets the underglaze. -
Apply Clear Glaze:
After the tray cools, wipe it down with a damp sponge to remove dust. Pour a clear matte or satin glaze over the interior, coating the painted designs. Dip or brush the exterior as well. -
Wipe the Foot:
Clean the bottom of the tray thoroughly with a sponge to ensure no glaze remains where it touches the kiln shelf. -
Glaze Fire:
Fire the piece a final time to the temperature required by your specific clay and glaze (often Cone 5 or 6 for stoneware).
Now you have a piece of functional art that brings a touch of celestial wonder to your daily routine
Desert Landscape Horizon Tray
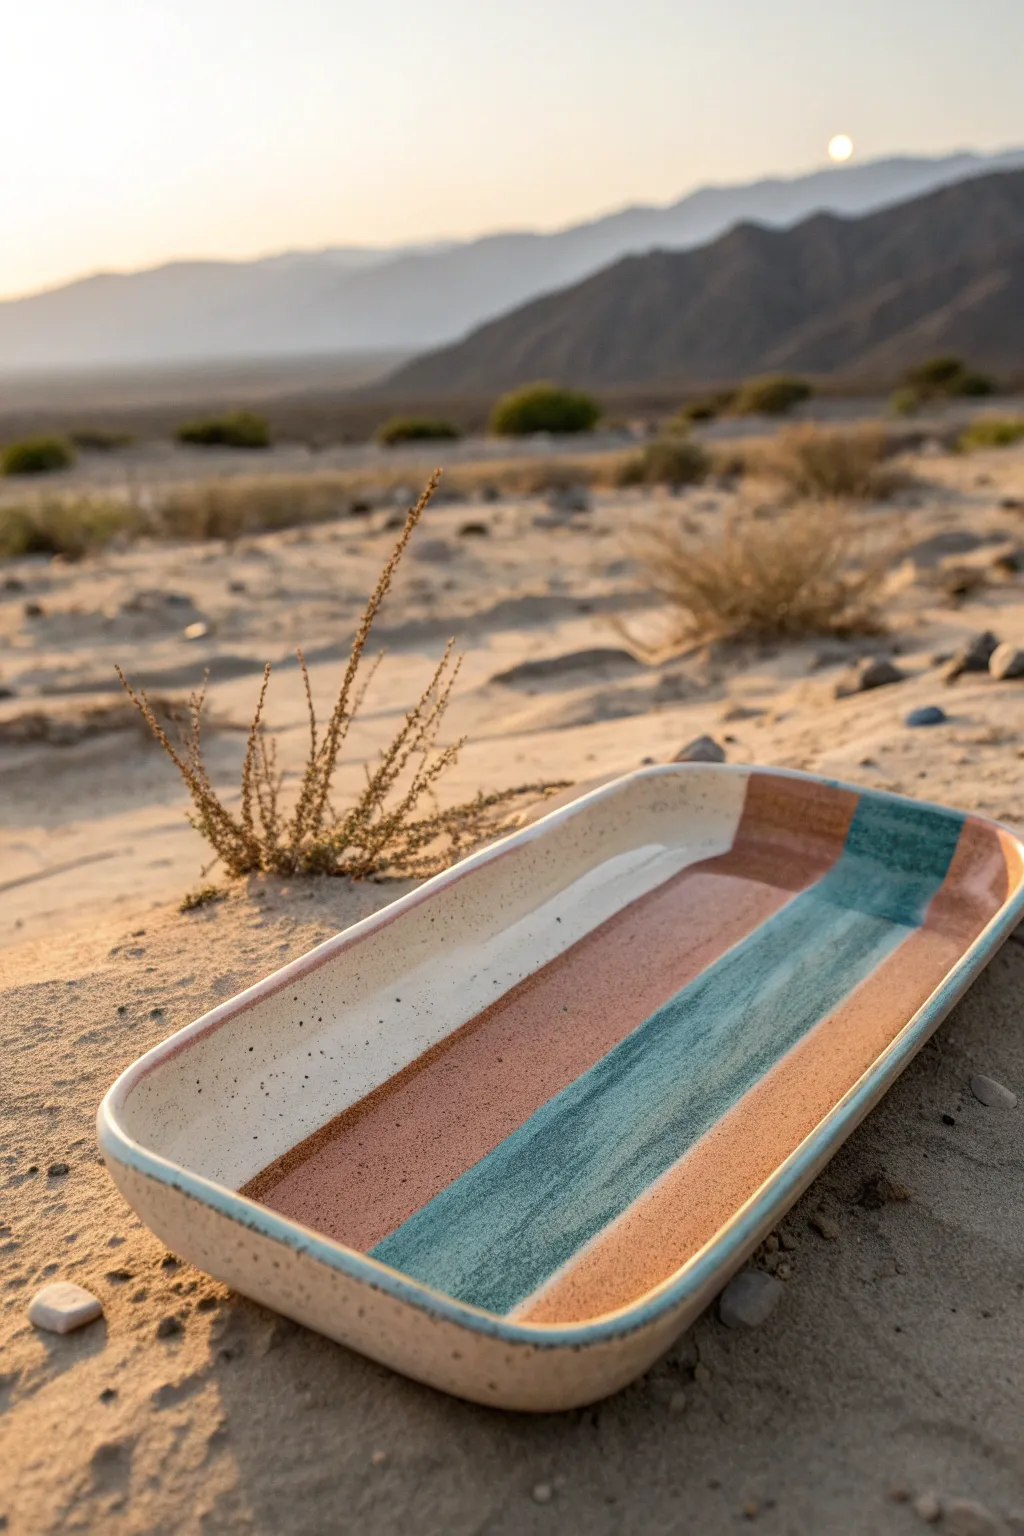
Capture the serene palette of a desert sunset with this rectangular ceramic tray, featuring distinct bands of creamy white, terracotta, and teal. Its functional shape and soothing color scheme make it a perfect centerpiece for holding trinkets or serving snacks.
Step-by-Step Guide
Materials
- White or speckled stoneware clay (approx. 2-3 lbs)
- Rolling pin
- Guide sticks or slab roller (approx. 1/4 inch thickness)
- Rectangular slump mold or template
- Fettling knife or needle tool
- Modeling tool or rib (wood and rubber)
- Damp sponge
- Masking tape or wax resist (optional for crisp lines)
- Ceramic glazes: Speckled Cream/White, Terracotta/Burnt Orange, Teal/Turquoise
- Flat glazing brushes (1-inch width)
- Kiln access
Step 1: Forming the Tray
-
Prepare the clay slab:
Begin by wedging your stoneware clay thoroughly to remove air bubbles. Flatten it onto a canvas workspace and roll it out into a consistent slab about 1/4 inch thick using guide sticks. -
Cut the shape:
Place your rectangular template or mold onto the slab. Using a needle tool or fettling knife, cut a clean rectangle, allowing an extra inch on all sides if using a slump mold to account for the depth. -
Smooth the surface:
Take a rubber rib and compress the clay on both sides. This aligns the clay particles to prevent warping and creates that smooth canvas needed for the stripes later. -
Shape the edges:
Lift the slab onto your mold. Alternatively, if building by hand without a mold, turn up the edges deeply to create a rim approximately 1 inch high. Use your thumbs to gently curve the transition from the base to the wall. -
Refine the rim:
Once the basic form is set, use a damp sponge to round over the sharp top edge of the rim. This makes the finished piece much more pleasant to hold. -
Slow drying:
Cover the tray loosely with plastic to let it dry slowly to the leather-hard stage. This prevents the corners from curling up as the clay shrinks.
Uneven Glaze Lines?
If you struggle with freehand straight lines, apply thin automotive masking tape (creating barriers) to the bisque ware before glazing. Peel it off immediately after painting each section.
Step 2: Bisque & Glazing
-
Bisque fire:
Once bone dry, fire the tray in the kiln to cone 04 (or your clay’s specific bisque temperature). Wipe the fired piece down with a damp sponge to remove dust. -
Planning the stripes:
Visualize the layout: a wide cream section on the left, followed by a wide terracotta band, a teal stripe, and a final terracotta edge on the right. -
Apply the base cream:
Dip or brush the cream/white speckled glaze onto the far-left section, covering about one-third of the tray’s interior. I like to overlap slightly into the next section to ensure no raw clay shows through. -
Paint the terracotta bands:
Using a clean flat brush, apply the burnt orange glaze. Paint a wide central band right next to the cream, and a thinner strip on the far-right edge. -
Add the teal accent:
Carefully paint the teal or turquoise glaze in the gap between the terracotta sections. If your glazes are stable, touch the edges together; if they run, leave a hair-thin gap that will fill in during firing. -
Glaze the exterior:
Rotate the tray and apply the cream speckled glaze to the entire exterior wall and base for a uniform look that contrasts with the colorful interior. -
Clean the foot:
Wipe away any glaze from the very bottom of the tray where it will touch the kiln shelf to prevent it from sticking. -
Final glaze fire:
Fire the tray again to the maturation temperature of your clay and glaze (typically Cone 5 or 6 for stoneware). Allow the kiln to cool completely before removing your finished artwork.
Textural Twist
Before the first firing, press a piece of linen or burlap into the exterior of the clay slab. The subtle texture on the outside will contrast beautifully with the smooth, glossy stripes inside.
Now you have a stunning, modern tray that brings a touch of desert warmth into your home
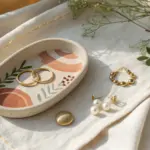
Raised Clay Accent Charm Tray

This charming, hand-built oval tray features delicate raised floral motifs and whimsical speckles. Its soft vanilla glaze and warm clay accents create a cozy, vintage-inspired piece perfect for holding jewelry or serving treats.
How-To Guide
Materials
- Light-colored stoneware clay (smooth body)
- Rolling pin
- Guide sticks or canvas cloth
- Oval paper template
- Fettling knife or needle tool
- Rib tool (soft, flexible rubber)
- Sponge
- Stamp press molds (daisy/floral designs)
- Slip (clay slurry)
- Scoring tool
- Underglaze (warm brown or ochre)
- Clear or semi-opaque milky white glaze
- Small paintbrush for detail work
Step 1: Slab & Shape Construction
-
Roll the Slab:
Begin by wedging your clay thoroughly to remove air bubbles. Roll it out into a consistent slab about 1/4 inch thick, using guide sticks if necessary to keep the thickness even across the entire surface. -
Cut the Shape:
Place your oval paper template onto the slab. Using a needle tool or fettling knife, carefully trace around the template to cut out the base shape. -
Compress the Surface:
Use a soft rib tool to gently compress the clay surface on both sides. This aligns the clay particles, preventing cracking later, and creates that smooth, professional finish we want. -
Form the Rim:
Gently lift the edges of the oval slab with your fingers to create a shallow curve. I like to use a small, elongated foam mold underneath to help it hold its concave shape while working, but you can also pinch the edges upward slightly. -
Smooth the Edge:
Run a damp sponge along the rim to round off any sharp cuts or rough textures, ensuring the edge feels soft to the touch.
Step 2: Creating Raised Accents
-
Mold the Flowers:
Take small balls of fresh clay and press them into your floral press molds. Make sure to press firmly to catch all the petal details. -
Release and Refine:
Carefully pop the clay flowers out of the molds. If there are any jagged edges, smooth them down gently with a fingertip. -
Score the Attachment Points:
Before attaching, determine where you want your flowers on the tray. Score (scratch) both the back of the flower and the spot on the tray where it will go. -
Slip and Stick:
Apply a dab of slip to the scored areas. Press the flower firmly onto the tray, ensuring a tight bond so no air is trapped underneath. -
Clean Up:
Use a small, damp brush to wipe away any excess slip that may have squished out from under the flowers.
Sprigging Success
When attaching the flowers (‘sprigs’), twist them slightly as you press down. This suction helps lock the clay particles together better than just pushing straight down.
Step 3: Decorating & Glazing
-
Bisque Fire:
Allow the tray to dry slowly and completely under loose plastic. Once bone dry, fire it to bisque temperature (usually cone 04). -
Apply Detail Color:
Using a fine brush, apply a warm brown or ochre underglaze specifically into the grooves of the flower petals and the centers. This highlights the relief work. -
Add Speckles:
Dip a stiff-bristled brush or toothbrush into the same underglaze. Hold it over the tray and flick the bristles to create a random, speckled pattern across the surface and rim. -
Wipe Back:
If the underglaze on the flowers looks too heavy, gently wipe the raised surfaces with a damp sponge, leaving the color only in the deep recesses. -
Glaze Application:
Dip the entire tray into a clear or semi-opaque milky white glaze. A semi-opaque glaze works beautifully here as it softens the underlying clay color. -
Clean the Foot:
Wipe the bottom of the tray completely clean of glaze to prevent it from sticking to the kiln shelf. -
Final Firing:
Fire the piece to the maturity temperature of your clay and glaze (often cone 5 or 6 for stoneware) to achieve that glossy, durable finish.
Rim Variation
Instead of a smooth rim, use a damp sponge to gently undulate the edge as you form it. This creates a more organic, handmade ruffle that complements the floral theme.
Now you have a sweet, customized tray ready to brighten up any dresser or coffee table
Glaze-Pooled Carved Pattern Tray
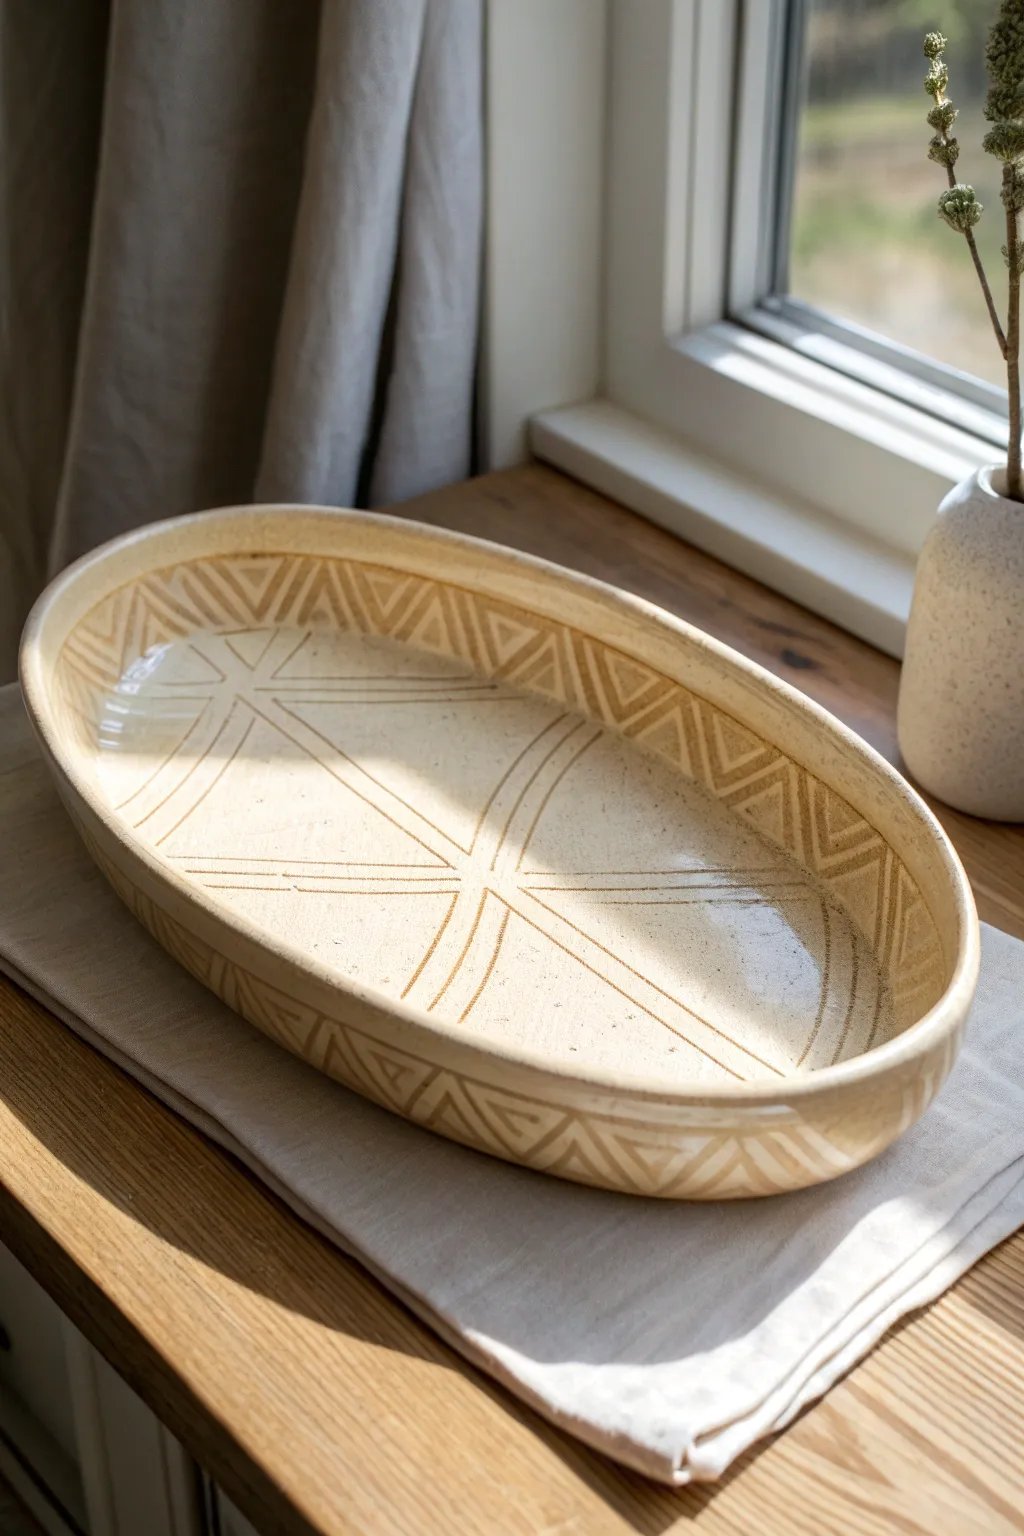
This elegant oval tray features a satisfyingly geometric sgraffito-style pattern carved directly into the clay body. The translucent cream glaze pools beautifully in the recessed lines, creating a subtle contrast that highlights your hand-carved design without shouting.
Step-by-Step
Materials
- Stoneware clay (buff or speckled)
- Rolling pin
- Oval slump mold or template
- Fettling knife
- Rib tool (wooden or silicone)
- Carving tools (loop tool or stylus)
- Sponge
- Cream or translucent white dipping glaze
- Clear ruler or straight edge
Step 1: Forming the Tray
-
Roll the Slab:
Begin by rolling out a slab of stoneware clay to a uniform thickness, approximately 1/4 to 3/8 inch thick. Compress the clay on both sides with a rib tool to align the particles and prevent warping later. -
Cut the Shape:
Place your oval template onto the slab. Using a fettling knife, cut vertically around the template to create your base shape. Remove the excess clay. -
Shape the Rim:
If using a hump mold, drape the slab over it to form the curve. If working without a mold, gently lift the edges of the oval slab and prop them up with varied pieces of foam or rolled clay coils to create a lifted rim. Let the clay stiffen to a soft leather-hard state. -
Refine the Edge:
Once the form holds its shape, use a damp sponge or a chamois cloth to smooth the rim edge, ensuring it feels soft to the touch and has no sharp burrs.
Pro Tip: Line Depth
Carve your lines slightly deeper and wider than you think necessary. Thick glazes can fill shallow scratches easily, making your hard work disappear after firing.
Step 2: Carving the Design
-
Map the Verticals:
With the clay at a firm leather-hard stage, lightly scratch a vertical centerline and a horizontal centerline across the tray using a ruler. This will anchor your geometric pattern. -
Carve the Central Star:
Using a stylus or small loop tool, carve the intersecting diagonal lines that radiate from the center point, creating the main star-like structure shown in the basin of the tray. I like to double these lines to give the pattern more visual weight. -
Define the Border:
Carve a continuous line following the interior curve of the rim, separating the central basin design from the border area. -
Create the Chevron Rim:
Along the raised rim, carve a repeating zigzag or chevron pattern. Try to keep the spacing consistent, but embrace the slight irregularities that show it’s handmade. -
Add Interior Triangles:
Add nested triangles inside your rim chevrons to create the multi-layered linear look. Use firm, confident strokes to keep the lines clean. -
Clean Up Burrs:
Wait until the clay is bone dry, then gently brush away any clay crumbs or sharp bits created during carving. Don’t use water here, or you’ll wash away your crisp lines.
Step 3: Glazing and Firing
-
Bisque Fire:
Load the tray into the kiln for a bisque firing (usually cone 04 or 06) to prepare it for glazing. -
Wipe Down:
Once fired, wipe the bisqueware with a damp sponge to remove any kiln dust that might repel the glaze. -
Dip or Pour Glaze:
Using a translucent cream or ‘oatmeal’ style glaze, dip the entire tray or pour the glaze over it. Tilt the tray to ensure excess glaze runs off, preventing it from obscuring the carving. -
Check the Thickness:
Since we want the glaze to pool in the lines, a slightly heavier application is okay, but ensure the high points aren’t so thick that the texture disappears. -
Clean the Foot:
Wipe the bottom of the tray completely clean of glaze to prevent it from fusing to the kiln shelf. -
Glaze Fire:
Fire the tray to maturity (typically cone 5 or 6 for stoneware). The heat will cause the glaze to melt into the carved recesses, creating that beautiful darker definition.
Troubleshooting: Warping
Long, flat trays love to warp. Dry your tray very slowly under loose plastic for several days to ensure even shrinkage before exposing it to open air.
Now you have a stunning, functional centerpiece ready to hold fruit or keys on your table
Faceted Geometric Pottery Tray
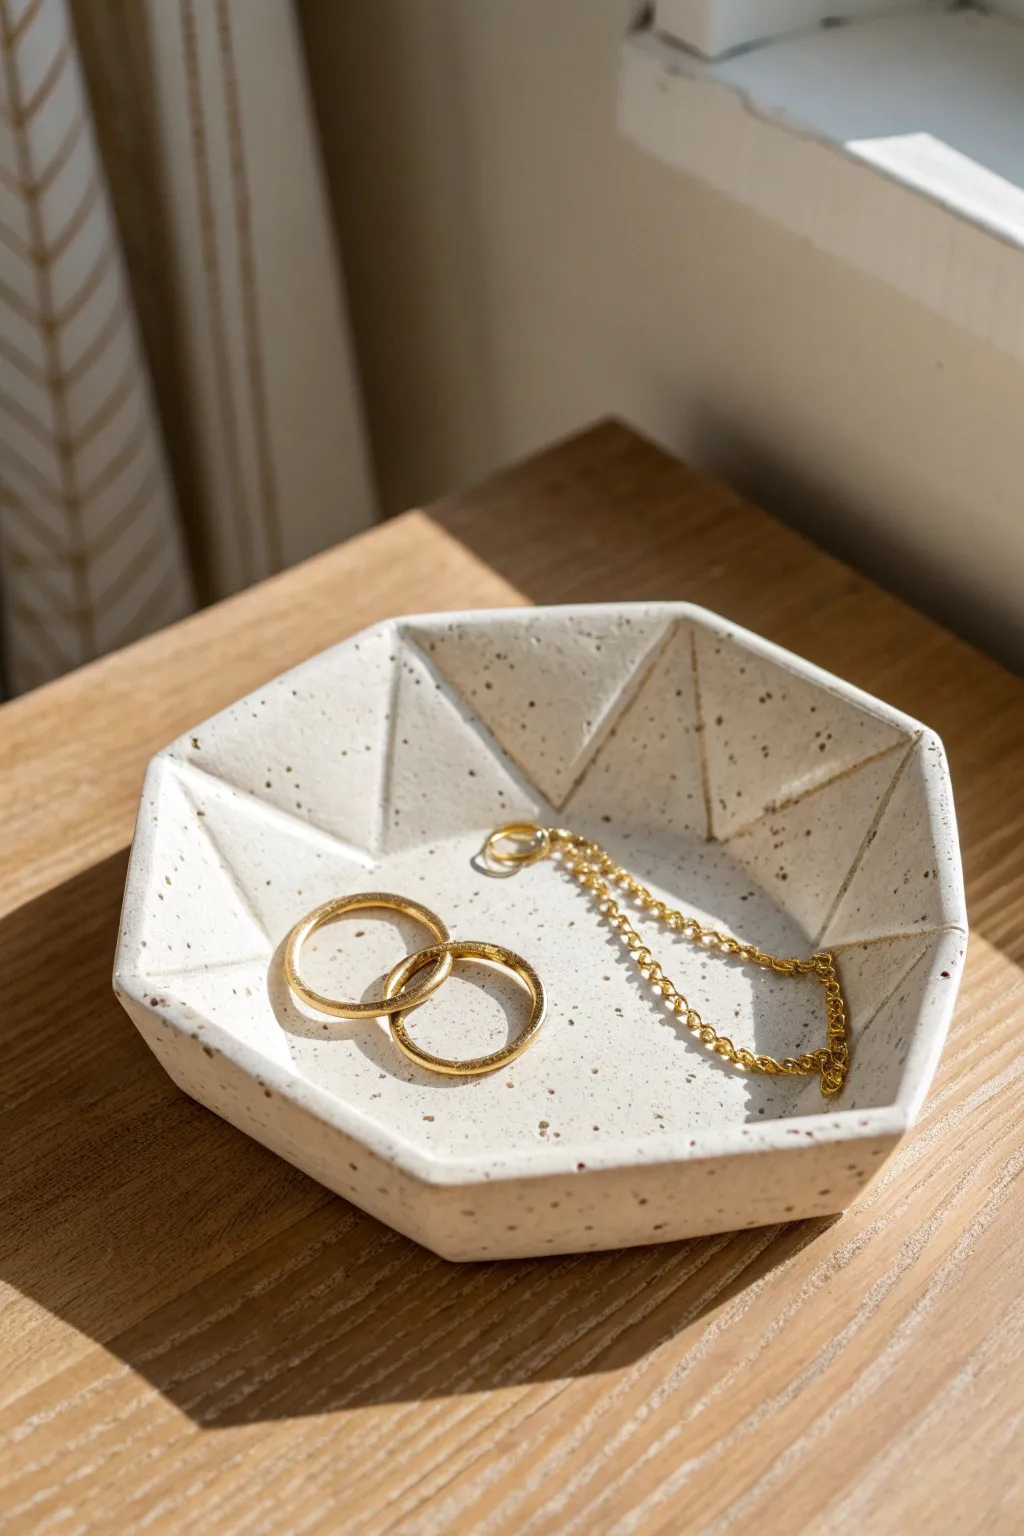
This modern geometric tray features a striking faceted interior that looks complex but is surprisingly approachable to build. The subtle speckled cream glaze enhances the crisp lines, creating a perfect minimalist spot for your daily rings and chains.
How-To Guide
Materials
- White stoneware clay (preferably with speckles or add grog)
- Rolling pin
- Canvas mat or slab roller
- Needle tool
- Fettling knife or X-Acto knife
- Paper template (hexagon shape)
- Ruler or straight edge
- Scoring tool (or serrated rib)
- Slip (clay and water slurry)
- Smoothing sponge
- Semi-matte cream or white speckled glaze
- Kiln
Step 1: Preparing the Slab
-
Roll out the clay:
Begin by wedging your clay to remove air bubbles. Roll out a smooth slab to a thickness of approximately 1/4 inch. Ensure the thickness is consistent throughout so your tray dries evenly. -
Compress the slab:
Use a flexible rib to compress the clay on both sides. This aligns the clay particles, reducing the chance of warping later, and creates a nice smooth canvas for your geometric cuts.
Sharp Lines Secret
Wait until the clay is leather hard before doing your final cleanup. Use a damp sponge on a stick or a sharp rib to redefine the interior angles for that crisp, gem-like appearance.
Step 2: Cutting the Geometry
-
Make a template:
Draw a perfect hexagon on a piece of cardstock or paper and cut it out. This will ensure your base is symmetrical. -
Cut the base:
Place your template on the slab and cut around it using a needle tool held perpendicular to the surface. Clean up the edges gently with your finger. -
Create triangle walls:
You will need 6 equilateral triangles for the rim. Measure the length of one side of your hexagon base; this will be the bottom length of your triangle. Decide on the height you want (around 1-1.5 inches) and cut out six identical triangles from the remaining slab. -
Bevel the edges:
This step is crucial for the faceted joinery. Cut a 45-degree angle (bevel) on the bottom edge of each triangle and along all sides of the hexagon base where the walls will attach. I find using a wire bevel cutter helps, but a steady hand with a knife works too. -
Bevel the side seams:
Bevel the side edges of the triangles as well so they will fit snugly against their neighbors without gaps.
Cracking Seams?
If seams crack during drying, your slip wasn’t wet enough or the clay was too dry when joining. Patch with a mix of vinegar and clay (magic water) and re-compress the area.
Step 3: Assembly
-
Score and slip:
Thoroughly score (scratch) all the beveled surfaces you just cut. Apply a generous amount of slip to these rough areas. -
Attach the first wall:
Press the first triangle onto one side of the hexagon base. Wiggle it slightly to lock the scored separation together. -
Continue building:
Attach the remaining five triangles one by one. As you place them, ensure the side seams of the triangles also meet properly, applying slip between those joints too. -
Reinforce the seams:
Once all walls are up, roll a very thin coil of clay. Press this into the interior valleys where the triangles meet the base and each other to reinforce the structure. -
Refine the facets:
Use a straight-edged wooden tool or rib to smooth the inside seams. The goal is to keep the lines sharp and crisp, emphasizing the geometric faceted look rather than rounding it over. -
Clean the rim:
Even out the top rim where the points of the triangles might be slightly uneven. You can leave them pointy for drama or gently sand them flat once leather hard.
Step 4: Finishing and Firing
-
Dry slowly:
Loosely cover the tray with plastic to let it dry slowly to the leather-hard stage. This prevents the seams from cracking as the clay shrinks. -
Bisque fire:
Once bone dry, load the tray into the kiln for a bisque firing (usually Cone 04 or 06, depending on your clay body). -
Glaze application:
Wipe the bisque ware with a damp sponge to remove dust. Pour a speckled cream glaze inside and swirl to coat, or dip the entire piece. Avoid thick glaze pooling in the bottom angles to keep the geometry sharp. -
Wipe the foot:
Clean the bottom of the tray with a sponge to ensure no glaze touches the kiln shelf. -
Glaze fire:
Fire the piece again to the maturation temperature of your glaze and clay (typically Cone 5 or 6 for stoneware).
Once cooled, your geometric tray is ready to display your favorite treasures with modern elegance