If you’re itching for fresh pottery wheel ideas, you’re in the right headspace—there’s something so satisfying about turning a simple lump into a clean, wheel-thrown form. I pulled together a mix of classics and playful twists you can actually make (and repeat) when you sit down at the pottery wheel.
Simple Vases With One Great Curve
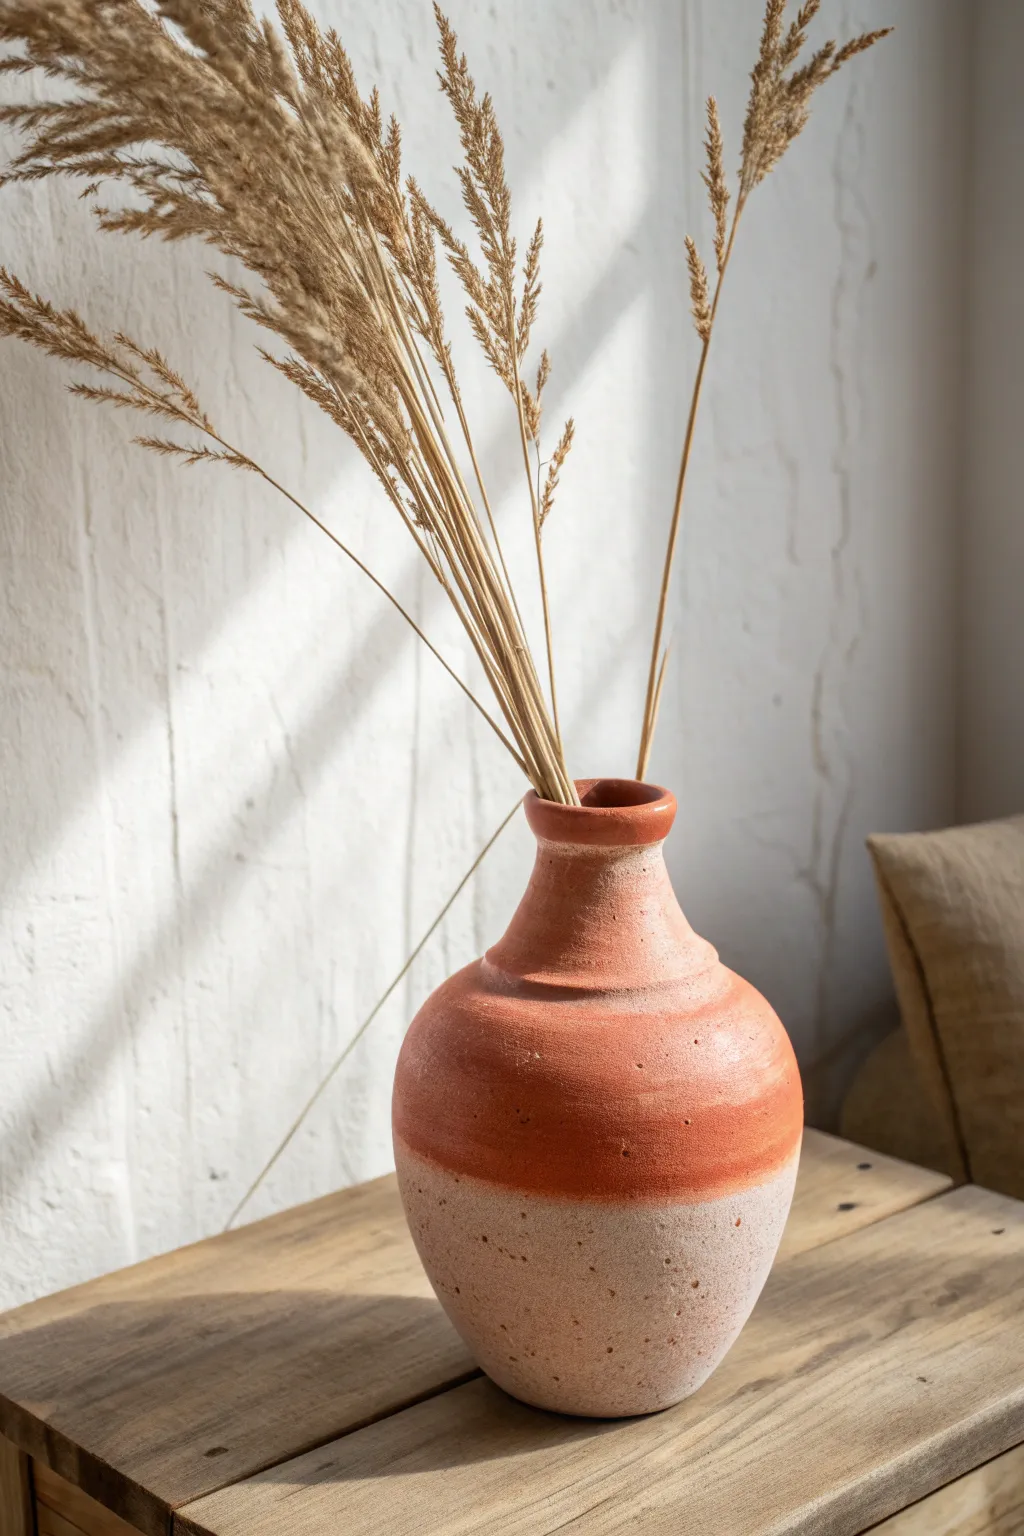
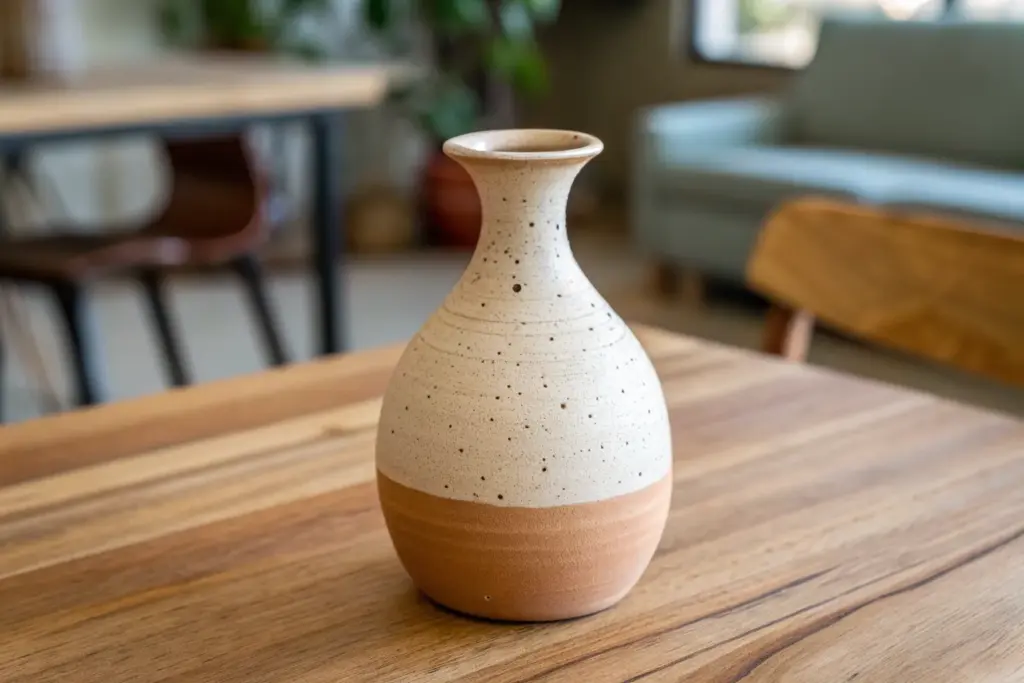
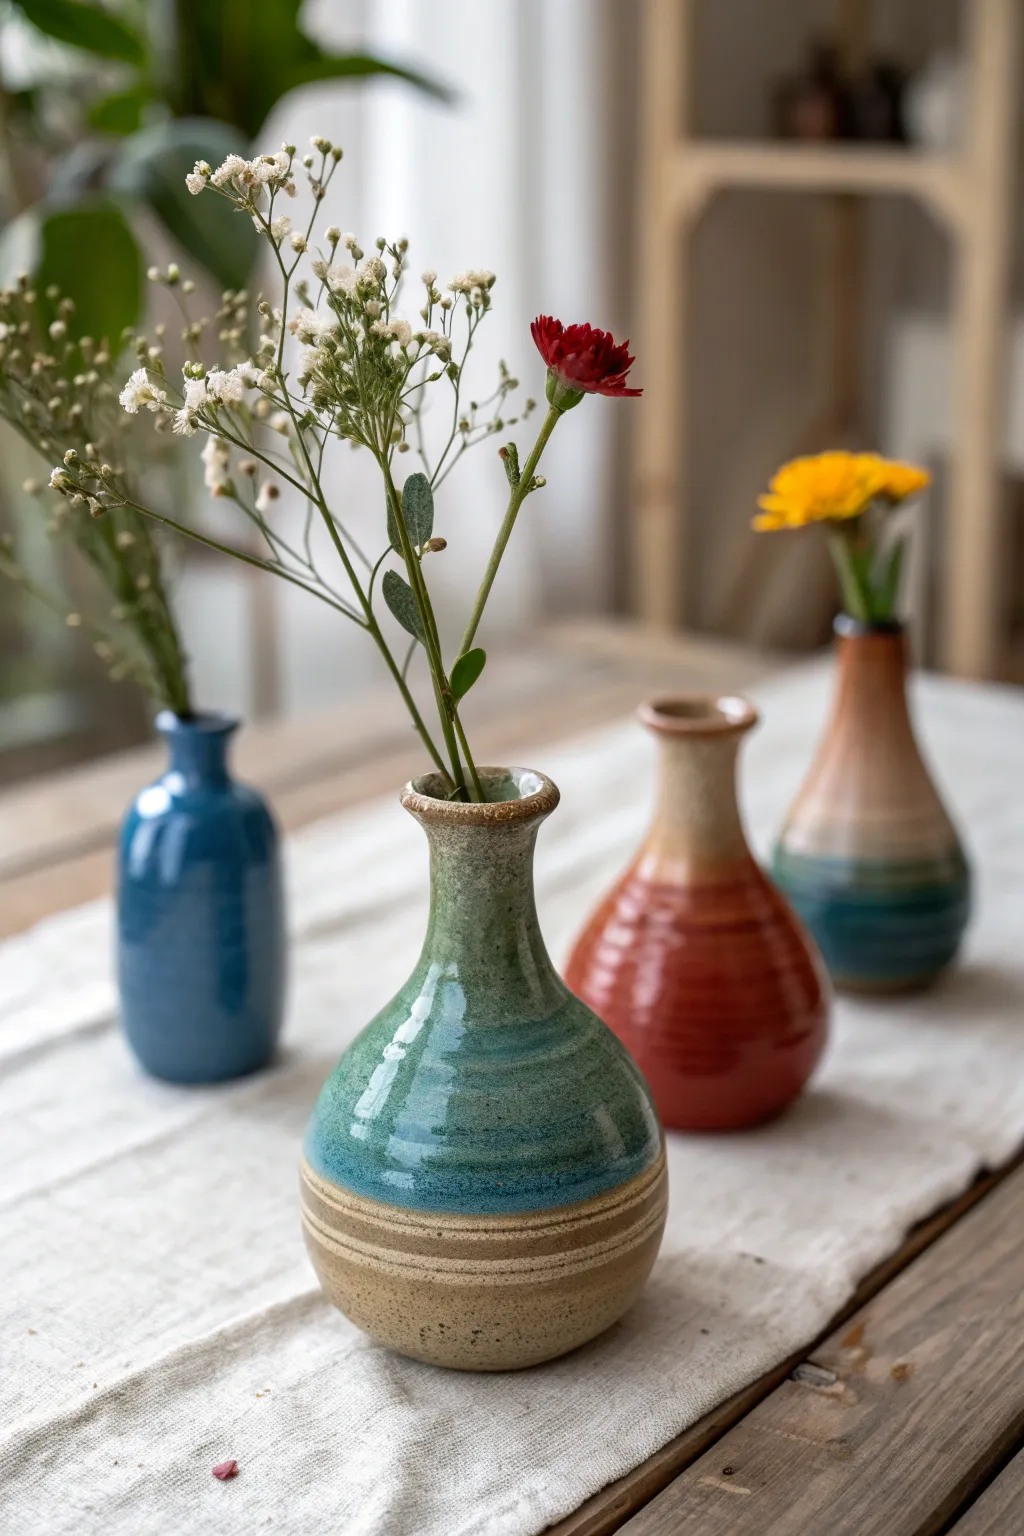
This rustic, elegant vase emphasizes a single, beautiful curve from the weighted bottom to the slender neck. The design relies on a striking contrast between the smooth, glazed upper section and the raw, textured clay body below, creating a piece that feels both grounded and refined.
Step-by-Step Tutorial
Materials
- 3-4 lbs Stoneware or terracotta clay (a groggy clay works best for texture)
- Pottery wheel
- Throwing sponge
- Needle tool
- Wooden throwing rib
- Metal kidney rib
- Wire cutter
- Trimming tools
- Wax resist
- Warm terracotta-colored gloss glaze
Step 1: Throwing the Form
-
Center the clay:
Begin by slamming your ball of clay onto the wheel head. Using plenty of water and firm pressure from your palms, center the clay into a low, wide mound rather than a tall cone, which sets a stable foundation for the wide belly. -
Open the vessel:
Press your thumbs into the center to create the opening, stopping about a half-inch from the bottom. Pull the floor out fairly wide—about 4-5 inches—to establish the base of your curve. -
Pull the cylinder:
Slow the wheel down slightly. Compress the rim and begin your first pulls. Aim for a thick cylinder, keeping the walls relatively even. Don’t worry about the shape yet; just get the height and wall consistency right. -
Belly out the form:
From the inside, apply gentle pressure with your fingers pushing outward as you move up from the base. I like to use a wooden rib on the outside to support the clay as I push against it, creating that distinctive round bottom. -
Collar the neck:
Once the belly is established, collar the upper third of the clay inward. Use both hands to form a circle around the clay and gently squeeze as you rise up, narrowing the opening significantly to create the bottle neck. -
Refine the curve:
Use a metal kidney rib to smooth the transition between the round belly and the narrow neck. Remove any throwing lines in the bottom half if you want a cleaner look, or leave them for texture depending on your preference. -
Detail the rim:
At the very top, gently flare the clay outward with your fingertips or a chamois cloth to create a soft, rounded lip. This small detail balances the visual weight of the bottom. -
Cut and dry:
Undercut the base with a wooden tool to create a shadow line. Run your wire cutter underneath and set the piece aside to dry slowly until leather hard.
Smooth Transitions
When collaring the neck, keep the clay very wet to reduce friction. Too much drag can twist the clay and cause the neck to torque or collapse.
Step 2: Trimming and Finishing
-
Trim the foot:
Once leather hard, center the vase upside down on the wheel (you may need a chuck or a foam bat because of the narrow neck). Trim a neat, rounded foot that mirrors the curve of the belly. -
Enhance the texture:
While the clay is still leather hard, look at the bottom half. If your clay isn’t naturally groggy enough, you can gently tap the surface with a stiff brush to create that speckled, stone-like texture seen in the photo. -
Bisque fire:
Allow the vase to dry completely (bone dry) before loading it into the kiln for the bisque firing. Fire according to your clay body’s specifications (usually Cone 04 or 06).
Make it Pop
For more contrast, use a dark stoneware or chocolate clay body. The natural dark brown of the unglazed bottom will make the orange glaze on top look even brighter.
Step 3: Glazing
-
Apply wax resist:
This is the most critical step for this design. Paint a line of wax resist around the equator of the vase—right where the belly starts to curve inward toward the neck. Paint everything below this line with wax to keep it raw. -
Mix the glaze:
Prepare a warm, rust-orange or terracotta colored gloss glaze. Ensure it is mixed thoroughly so the color is opaque and vibrant. -
Pour or dip:
Pour the glaze into the interior of the vase first, swirl, and pour out. Then, holding the vase by the foot, dip the top half into the glaze bucket upside down. The wax resist will stop the glaze in a perfect line. -
Clean up:
Use a damp sponge to wipe any stray droplets off the wax resist area. The bottom half should be completely bare clay. -
Final firing:
Fire the piece to maturity (Cone 5, 6, or 10 depending on your clay). The glaze will melt and finish smooth, creating a beautiful tactical contrast against the rough, unglazed bottom.
Fill your finished vase with dried pampas grass or wheat stalks to complete the warm, organic aesthetic


Lidded Jars for That Satisfying Perfect Fit
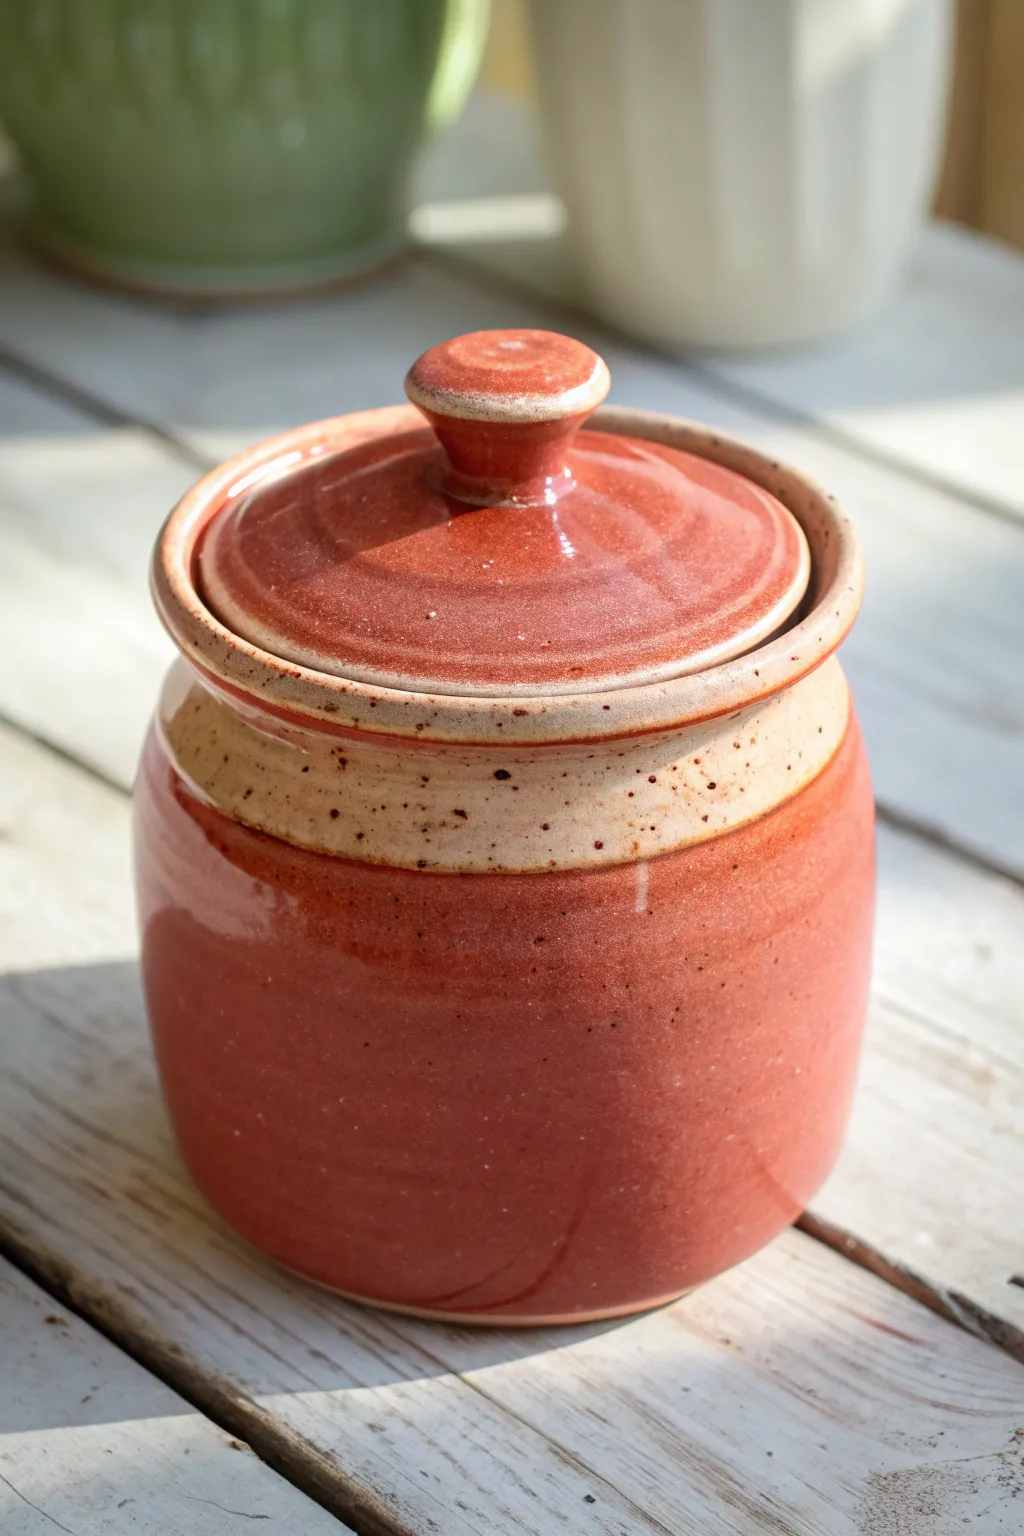
This charming lidded jar combines a warm, glossy reddish-brown glaze with a raw, speckled clay band for a beautiful textural contrast. Its snug-fitting lid and sturdy knob make it perfect for storing everything from sugar to trinkets, offering that deeply satisfying “clink” when closed.
How-To Guide
Materials
- Speckled stoneware clay (approx. 2-3 lbs)
- Pottery wheel
- Throwing sponge
- Wooden rib
- Metal kidney rib
- Needle tool
- Wire cutter
- Calipers
- Trimming tools
- Red-brown glossy glaze (e.g., Temmoku or Iron Red)
- Wax resist
- Brush for wax
Step 1: Throwing the Gallery Jar Body
-
Center the clay:
Begin with about 1.5 to 2 lbs of wedged speckled clay. Secure it to the wheel head and center it into a low, wide mound before pulling it up into a cone and pressing it back down to align particles. -
Open the vessel:
Drill your thumbs into the center, leaving a floor thickness of about 1/4 to 3/8 of an inch. Open the floor to your desired width, roughly 4 inches for a jar of this proportion. -
Pull the walls:
Perform your initial pulls to gain height, keeping the shape purely cylindrical at first. Aim for even wall thickness from bottom to top. -
Shape the belly:
From inside the pot, gently push the clay outward while supporting the outside with a rib or your hand to create a soft, rounded belly. Bring the neck back in slightly at the top. -
Create the gallery:
At the rim, use the side of your finger or a wooden tool to split the rim slightly. Press down on the inner half to create a flat shelf (the gallery) inside the neck. This sits about 1/4 inch below the top rim. -
Measure with calipers:
Use your calipers to measure the exact diameter of the gallery shelf (where the lid will sit). Lock the calipers in place—do not bump them. -
Refine the surface:
Run a wooden rib along the outside to remove throwing lines and smooth the surface, preparing that band near the top to be left unglazed later.
Wobbly Lids?
If the lid rattles, the gallery shelf on the jar usually isn’t flat. Use a square-edged trimming tool to re-flatten the gallery when the pot is leather hard.
Step 2: Throwing the Lid
-
Prepare the lid clay:
Using the remaining clay (approx. 0.5-1 lb), center a small, low mound on the wheel. You will likely throw this ‘off the hump’ or just as a small singular piece. -
Establish width:
Flatten the mound. Check your locked calipers against the clay. You want the main width of the lid to match the caliper measurement plus a tiny fraction for shrinkage/trimming. -
Form the flange and knob:
Shape the lid upside down if throwing off the hump, or right-side up if you prefer trimming later. Create a small dome shape and pull a distinct knob in the center. -
Refine the fit:
Ensure the edge of the lid is clean and sharp so it sits flat in the gallery. Use a metal rib to smooth the curve of the lid. -
Cut and dry:
Wire the lid off the wheel. Let both the jar and lid dry to leather hard. I usually check the fit gently once they firm up just slightly to ensure they’re warping together.
Step 3: Trimming and Finishing
-
Trim the jar bottom:
Center the leather-hard jar upside down on the wheel. Trim away excess weight from the bottom and create a clean foot ring. -
Trim the lid:
Trim the underside of the lid to remove excess weight and refine the flange that will slot into the gallery. Test the fit frequently against the jar. -
Smooth the surfaces:
Burnish the area near the rim of the jar and the underside of the lid with a smooth stone or the back of a spoon if you want the raw clay to feel extra smooth. -
Bisque fire:
Fire both pieces to cone 04 (or your clay’s specific bisque temperature). -
Apply wax resist:
Using a brush, apply a band of wax resist around the shoulder of the jar (the speckled area seen in the photo) and the gallery shelf itself. This keeps the glaze off these areas. -
Glaze application:
Pour the red-brown glaze inside the jar and coat the outside, stopping exactly where your wax line begins. Dip or brush the lid, avoiding the contact points. -
Clean and fire:
Wipe away any stray glaze droplets on the waxed areas with a damp sponge. Fire to maturity (likely cone 5/6).
Pro Tip: Caliper Check
Measure your gallery when the clay is wet, but don’t throw the lid immediately. Wait 20 minutes. Usually, the rim slumps slightly wider, giving you a more accurate measurement.
Once cooled, slide that lid into place and enjoy the satisfaction of a perfectly fitted handmade jar


Pitchers With a Crisp Spout and Big Personality
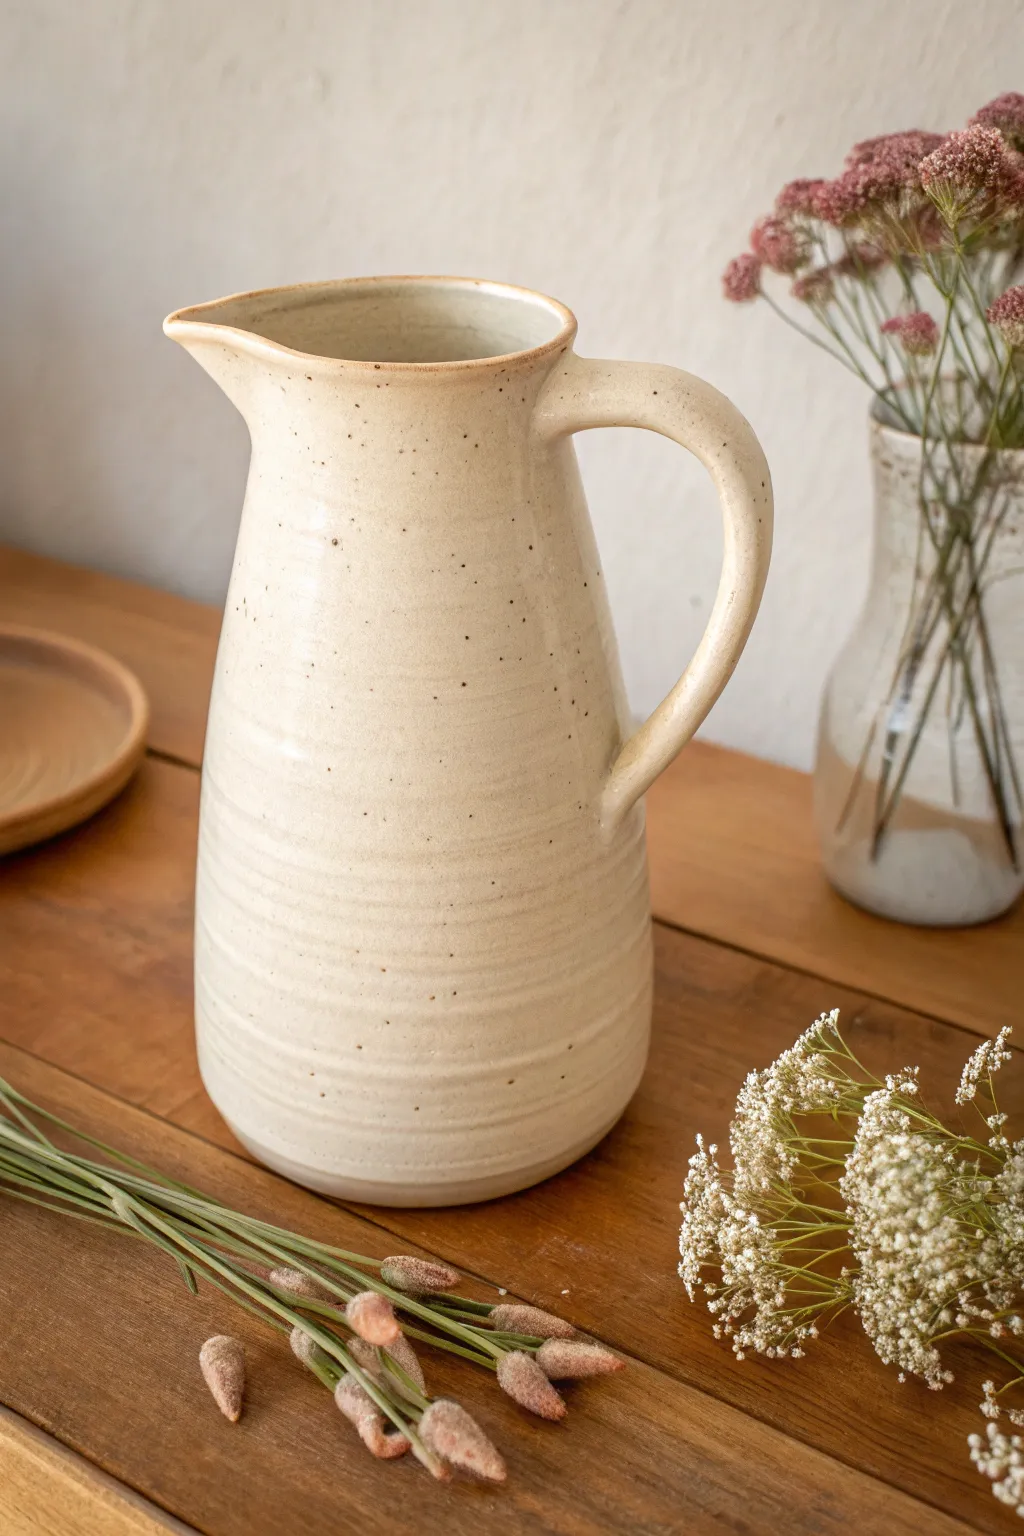
This charming, farmhouse-style pitcher combines a creamy, speckled finish with organic throwing lines for a piece that feels both modern and timeless. The generous handle and confident spout make it as functional as it is beautiful, perfect for serving icy drinks or holding a fresh bouquet.
Detailed Instructions
Materials
- Speckled stoneware clay (approx. 3-4 lbs)
- Pottery wheel
- Throwing sponge
- Bucket of water
- Wooden throwing rib
- Metal kidney rib
- Needle tool
- Wire cutter
- Trimming tools
- Serrated rib (for scoring)
- Creamy semi-matte glaze (cone 5/6 recommended)
Step 1: Throwing the Body
-
Center the clay:
Begin by slamming your wedge of speckled stoneware onto the wheel head. Cone the clay up and down a few times to ensure the particles are aligned, then center it into a low, wide puck shape. -
Open the floor:
Open the clay to create a flat floor, leaving about a half-inch of thickness for the bottom. Compress the floor thoroughly with your fingers or a flat tool to prevent S-cracks later. -
Pull the first cylinder:
Establish the walls by pulling the clay upward into a basic cylinder. Keep your hands steady and move slowly. Don’t worry about the final shape yet; focus on getting height and even thickness. -
Belly out the form:
Once you have sufficient height (aim for 8-9 inches), gently push from the inside with your left hand while supporting the outside to create a slight belly at the base, narrowing gradually toward the neck. -
Add texture:
This pitcher features distinct throwing lines on the bottom half. Instead of smoothing them away, use your fingertips or the corner of a throwing sponge to intentionally accentuate these spiral ridges as you make your final upward pass. -
Refine the neck and rim:
Collar the neck slightly to create a definition between the body and the rim. Use a chamois or your sponge to soften and round the rim so it’s pleasant to the touch.
Drip Prevention
To stop the spout from dripping, ensure the very edge is sharp, not rounded. After pulling, run a finger under the lip to create a slight undercut that breaks the water tension.
Step 2: Forming the Spout
-
Prepare the pulling area:
Stop the wheel. Identify where you want the spout to be. Support the outside of the rim with your fingers in a ‘V’ shape. -
Pull the spout:
With a wet finger or a very wet small sponge, gently stroke the clay between your supporting fingers outward. Use a confident, sweeping motion to create a sharp, crisp beak that will cut off the flow of liquid cleanly.
Step 3: Handle and Assembly
-
Pull a strap handle:
Take a separate lump of clay and pull a long, thick strap for the handle. For a pitcher this size, you want a handle that is substantial and comfortable to grip. I like to taper it slightly so it looks elegant. -
Shape the curve:
Let the handle stiffen slightly until it holds its shape but is still flexible. Curve it into a large ‘C’ shape that complements the pitcher’s silhouette. -
Attach the handle:
Score the pitcher body at the neck and the belly where the handle will attach. Add slip, then press the handle firmly onto the pot. Smooth the connection points so they look seamless. -
Dry slowly:
Cover the pitcher with plastic loosely to let it dry slowly. This is crucial for handled pots to prevent cracking where the thicknesses vary.
Handle Alignment
Before attaching the handle, look vertically down at the pot. Ensure the handle is placed exactly 180 degrees opposite the spout for perfect visual and physical balance.
Step 4: Finishing and Glazing
-
Bisque fire:
Once bone dry, load the piece into the kiln for a bisque firing (usually Cone 04). -
Wax the foot:
Apply wax resist to the bottom of the pitcher and about 1/4 inch up the side to keep the foot ring clean. -
Pour the interior:
Pour your creamy white glaze inside the pitcher, roll it around ensuring full coverage, and pour the excess out. -
Dip the exterior:
Using tongs or your hand (wear a glove), dip the exterior into the extensive glaze bucket. Hold it just long enough for an even coat, but not so thick that it obscures the throwing ridges. -
Final fire:
Fire the piece to maturity (Cone 5 or 6 depending on your clay). The heat will interact with the iron speckles in the clay, causing them to bleed through the milky glaze for that signature rustic look.
Now you have a stunning, handmade pitcher ready to be the centerpiece of your next gathering


Mini Bud Vases for Practicing Precision
Embrace the challenge of working small with this charming bud vase, featuring a classic bulbous form and a distinct tri-tone glaze design. These miniature vessels are perfect for practicing your precision throwing and make delightful homes for single stems or tiny wildflowers.
Detailed Instructions
Materials
- Stoneware clay (smooth body, 500g-750g ball)
- Pottery wheel
- Small bowl of water
- Sponge
- Throwing stick or chopstick
- Pin tool
- Wire cutter
- Rib tool (wooden or metal)
- Trimming tools
- Deep teal or blue glaze
- Sage green or celadon glaze
- Wax resist (optional)
Step 1: Throwing the Form
-
Center the clay:
Start with a small ball of well-wedged clay, about the size of a tennis ball or slightly larger. Secure it to the wheel head and center it meticulously; minor wobbles become major issues on small pots. -
Open the clay:
Drill down into the center, leaving about a half-inch of clay at the bottom. Open the floor narrowly—since this is a bud vase, you don’t need a wide interior. -
Pull the first cylinder:
Collar the clay in slightly before you start pulling. Establish a basic cylinder shape, keeping the walls relatively thick at the bottom to support the belly later. -
Belly out the form:
Using your inside hand (or a sponge on a stick if your fingers don’t fit), gently push the clay outward from the bottom, creating a rounded, bulbous shape. Be careful not to stretch the clay too thin. -
Collar the neck:
As you move upward, use both hands on the outside to gently squeeze and collar the clay inward to form a narrow neck. This requires steady hands and a fairly wet surface to prevent twisting. -
Refine the contour:
Use a rib tool on the exterior to smooth the curve of the belly and remove throwing lines. Ensure the transition from the round body to the vertical neck is fluid. -
Finish the rim:
Trimming the top with a pin tool if it’s uneven, then use a chamois or a wet sponge to round off and compress the rim for a professional finish. -
Cut and dry:
Run a wire tool under the base to release it. Allow the piece to dry to a firm leather-hard stage before handling it again.
Step 2: Trimming and Glazing
-
Trim the foot:
Center the leather-hard vase upside down on the wheel. Trim away excess weight from the bottom and carve a neat foot ring, creating a slight undercut to give the vase visual lift. -
Bisque fire:
Once fully bone dry, fire the piece in a bisque kiln according to your clay body’s specifications. -
Prepare for glazing:
Wipe the bisque ware with a damp sponge to remove dust. If you want the bottom third to remain unglazed as shown in the main vase, apply wax resist to the bottom section and the foot ring. -
Apply the bottom glaze:
Dip the middle section of the vase into a deep teal or blue glaze. You can do this by holding the neck and dipping the body sideways or angled, overlapping slightly with the unglazed area provided you didn’t wax it too high. -
Apply the top glaze:
Once the first layer is dry to the touch, hold the vase by the foot and dip the neck and shoulder into a sage green or celadon glaze. Let this second glaze overlap the top edge of the blue glaze. -
Encourage the drip:
The overlap creates that beautiful interaction where the green flows over the blue. If your glazes are stable, the overlap will naturally create a third color or texture. -
Clean the foot:
I always double-check the bottom at this stage. Sponge off any glaze droplets on the foot ring or the bare clay section at the base to ensure a clean line. -
Glaze fire:
Load the vase into the glaze kiln. Ensure it doesn’t touch other pots, as the overlapping glazes might run slightly.
Pro Tip: Throwing Sticks
Since your hand won’t fit inside a mini vase, use a sponge on a chopstick or a specific ‘throwing stick’ tool to apply pressure from the inside while shaping the belly.
Level Up: Texture Play
Before the clay dries, use a carving tool to etch horizontal groove lines around the unglazed base area. The glaze will break beautifully over these ridges.
Fill your new collection of vases with dried flowers or fresh blooms to brighten up any windowsill

The Complete Guide to Pottery Troubleshooting
Uncover the most common ceramic mistakes—from cracking clay to failed glazes—and learn how to fix them fast.
Agateware and Marbled Clay Forms for a Wow Finish
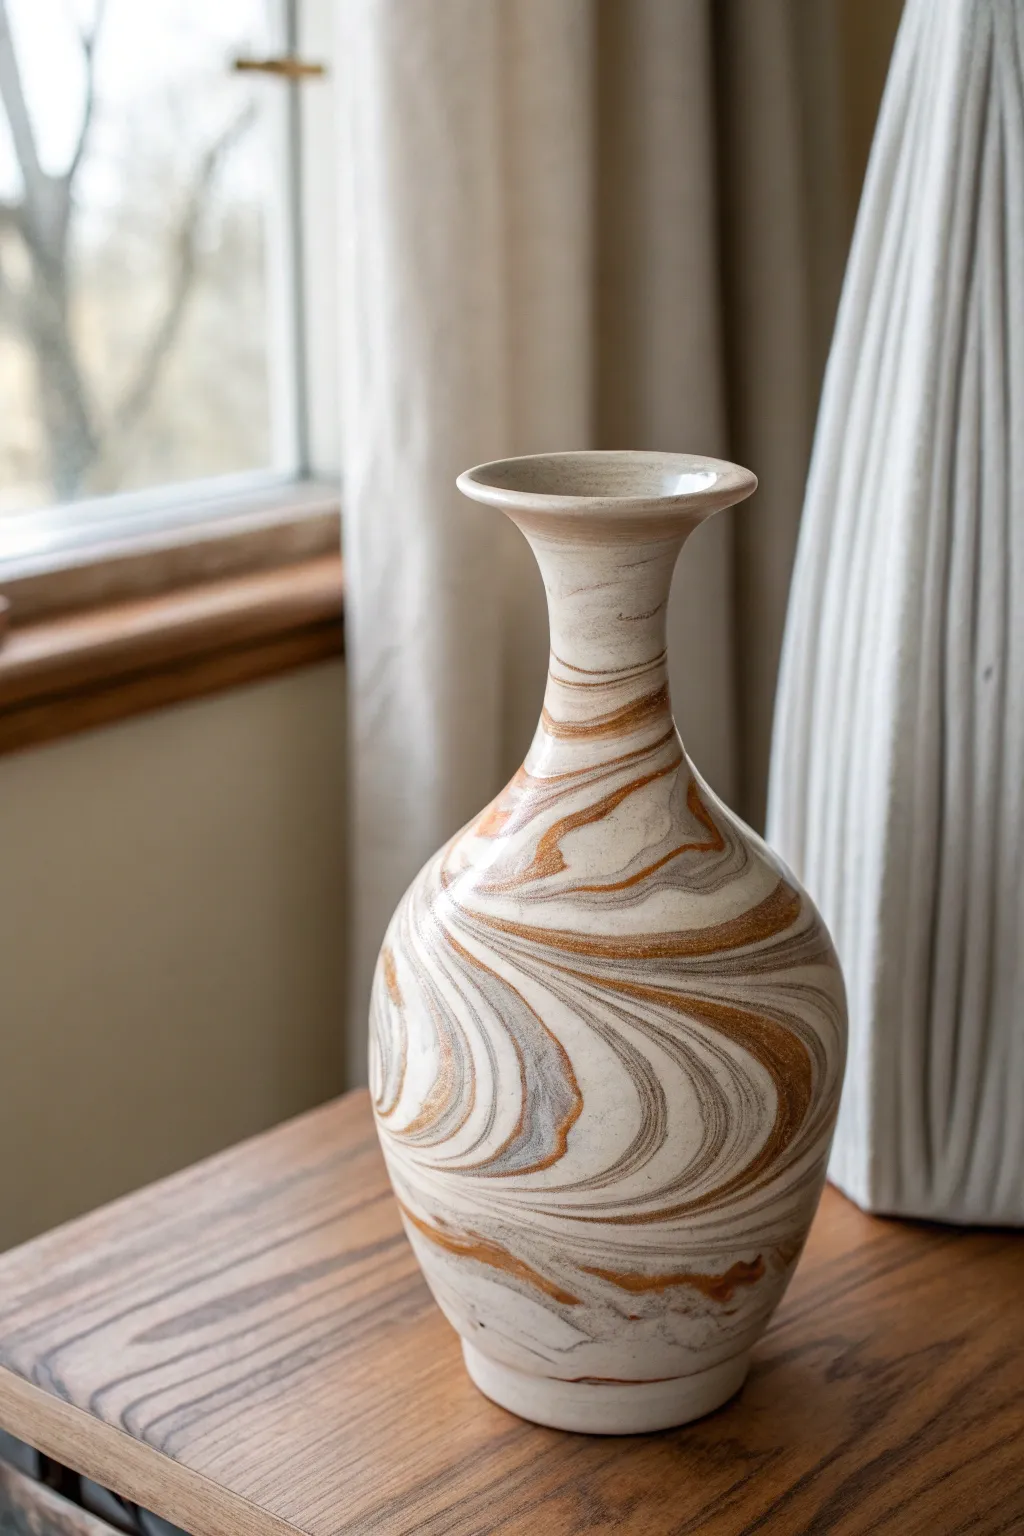
This elegant bottle vase showcases the mesmerizing beauty of agateware, where distinct clay bodies swirl together to mimic natural stone strata. The form features a bulbous body that tapers gracefully into a long, slender neck with a flared rim, perfectly displaying the organic movement of the mixed clays.
Step-by-Step Guide
Materials
- White stoneware clay (mid-fire)
- Red or terracotta stoneware clay
- Dark grey or black stoneware stain (mason stain)
- Pottery wheel
- Wire cutting tool
- Needle tool
- Metal kidney rib
- Sponge
- Throwing bat
- Trimming tools
- Clear glossy glaze
Step 1: Preparing the Marbled Clay
-
Color the clay:
Start by wedging a small amount of mason stain into a portion of your white clay to create a grey tone. You should now have three distinct colors: white, red/brown, and grey. -
Create clay slabs:
Flatten each clay color into thick patties or slabs about 1 inch thick. You don’t need to be precise here; organic variation helps the final look. -
Stack the layers:
Stack the slabs on top of one another in an alternating pattern (e.g., white, brown, grey, white). Create a block of clay slightly larger than what you need for the vase. -
Slice and slam:
Using your wire tool, slice the stack vertically. Pick up one half and slam it down onto the other half, slightly offset. This begins the marbling process without muddying the colors. -
Gentle wedging:
Wedge the clay very lightly—only about 5 to 10 times. I find if you over-wedge at this stage, the distinct lines will blend into a singular muddy color. You want striations, not a blend.
Reveal the Grain
Don’t skip the ribbing step! While throwing, the surface gets muddy. Shaving off that top millimeter of wet clay with a metal rib is the secret to getting sharp, defined lines.
Step 2: Throwing the Form
-
Center carefully:
Place your marbled ball on the wheel head. Center the clay quickly to preserve the pattern. Use efficient, firm movements rather than prolonged centering. -
Open the clay:
Open the hole down to the bat, leaving about a half-inch floor. As you pull the floor out, compress it well to prevent cracks. -
Cone up the clay:
Begin pulling the walls up into a tall cylinder. Don’t worry about the shape yet; focus on getting height and even wall thickness. -
Belly out the form:
From the inside, gently push the clay outward at the bottom third to create the bulbous base. Use a rib on the outside to smooth the curve as you expand. -
Collar the neck:
Using both hands, gently squeeze the upper two-thirds of the cylinder inward to narrow it. Keep the wheel speed moderate to maintain stability while collaring. -
Refine the neck:
Use your fingertips or a throwing stick to pull the neck taller and thinner. This requires patience; dampen your fingers often to prevent dragging on the twisting clay. -
Flare the rim:
At the very top, gently press outward with your thumb to create a delicate, flared opening that balances the visual weight of the base. -
Shave the surface (crucial step!):
Take a sharp metal rib and scrape the outer surface of the pot while it creates a slurry. This removes the smeared outer layer of clay (called ‘slurry smear’) to reveal the crisp agate lines underneath.
Step 3: Finishing and Glazing
-
Dry slowly:
Because different clays shrink at slightly different rates, wrap the vase loosely in plastic to let it dry very slowly over several days to prevent cracking. -
Trim the foot:
Once leather hard, trim a neat foot ring at the bottom. This also reveals the marbling on the underside of the pot. -
Bisque fire:
Fire the piece to bisque temperature (usually cone 04 or 06) according to your clay body specifications. -
Apply clear glaze:
Coat the interior and exterior with a clear glossy glaze. A clear coat is essential as it makes the clay colors pop and adds depth to the marbling. -
Final firing:
Glaze fire the piece to the maturity temperature of your clay body (likely cone 5/6).
Level Up: Neriage Slicing
For a geometric look, slice faceting marks into the belly of the vase at the leather-hard stage. This cuts through the layers at different angles, creating a stunning topographic map effect.
Now you have a unique statement piece where the material itself provides the decoration