
If you love that preppy look, clay disc beads are basically your ticket to easy, colorful stacks that feel put-together without trying too hard. Here are my favorite clay bead bracelet ideas—the classic patterns first, then the fun “wow, I need to make that” twists.
Classic Pink, White, and Gold Stack
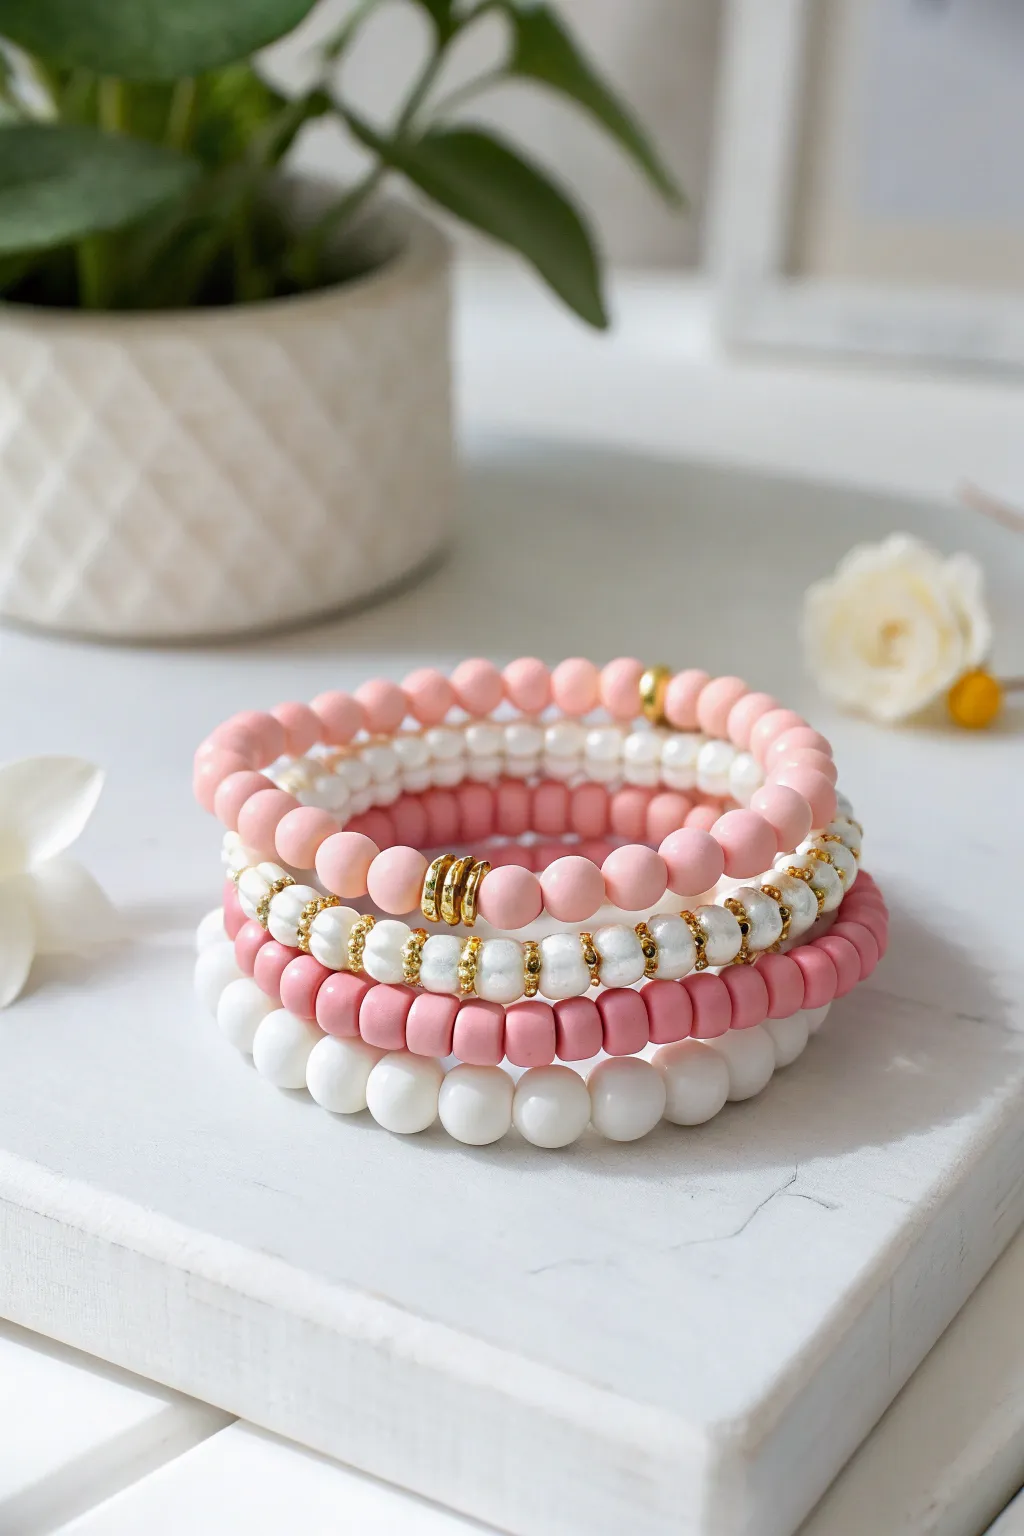
This classic stack combines soft pink hues with creamy whites and luxurious gold accents for a timeless preppy look. By varying bead sizes and textures across five separate strands, you’ll create a cohesive set that feels professionally curated.
Step-by-Step Guide
Materials
- Elastic stretch cord (0.8mm or 1mm thickness)
- 6mm matte light pink round beads
- 8mm matte rose pink round beads
- 6mm matte white round beads
- 4mm shiny white glass pearls or spacer beads
- Small gold spacer beads (heishi or flat disc style)
- Gold round spacer beads (approx 3-4mm)
- Gold accent charms or focal beads (like the gold rings shown)
- Scissors
- Jewelry glue or clear nail polish
- Bead stopper or masking tape
Step 1: Preparation
-
Measure and Cut:
Cut five strands of elastic cord, each about 10-12 inches long. This extra length makes tying the final knots much easier. -
Secure the Ends:
Attach a bead stopper or a piece of masking tape to one end of each cord to prevent your beads from sliding off while you work.
Bumpy Knots?
If your knot won’t hide inside a bead, cover it with a crimp cover or simply add a large-hole gold spacer bead specifically to house the knot.
Step 2: Strand 1: The Top Pink Classic
-
Start Beading:
Thread approximately 20-25 of the 8mm matte rose pink round beads onto your first cord. -
Insert Accents:
Halfway through, incorporate a focal element. Slide on three gold flat disc spacers or a single gold focal bead to break up the color. -
Finish the Strand:
Continue adding pink beads until the bracelet measures about 6.5 to 7 inches, or your desired wrist size.
Step 3: Strand 2: Small White & Gold
-
Pattern Setup:
For the second bracelet, use the smaller 6mm matte white beads. -
Create Sections:
String about 10 white beads, then add a small gold round spacer. Repeat this pattern around the entire circumference for a delicate look.
Level Up Your Stack
Add a personalized touch by swapping the gold center rings on Strand 3 with letter beads to spell out a name or initials.
Step 4: Strand 3: The Focal Center
-
Main Pink Beads:
Using the 6mm light pink matte beads, fill the majority of the strand. -
Add the Centerpiece:
In the very center, thread on three to five flat gold spacer rings huddled together. This draws the eye to the middle of the stack.
Step 5: Strand 4: Textured Gold & White
-
Alternating Pattern:
This strand adds texture. Thread two 4mm shiny white pearls/spacers, followed by a textured gold spacer bead. -
Repeat the Rhythm:
Continue this 2-white, 1-gold pattern for the entire length of the bracelet. This creates the ‘sparkle’ layer of the stack.
Step 6: Strand 5: The Chunky Bottom Layer
-
Solid Foundation:
For the final bracelet, use large 8-10mm white beads (either shiny or matte depending on preference). -
Simple Stringing:
String these beads simply without spacers to create a bold, grounding element at the bottom of your stack.
Step 7: Finishing Touches
-
Pre-stretch the Cord:
Before tying, give each bracelet a gentle tug to pre-stretch the elastic. This prevents it from loosening up later during wear. -
The Surgeon’s Knot:
Remove the bead stoppers and tie the ends of each bracelet using a strong surgeon’s knot (right over left, left over right twice). -
Secure the Knot:
Add a tiny dab of jewelry glue to each knot. I usually let this dry for at least 15 minutes before trimming. -
Hide the Evidence:
Trim the excess cord close to the knot, and if the bead holes are large enough, gently tug the knot inside a neighboring bead to hide it.
Slip on your beautiful new stack and enjoy the mix of textures and classic colors


Sunset Ombré Heishi Bracelet
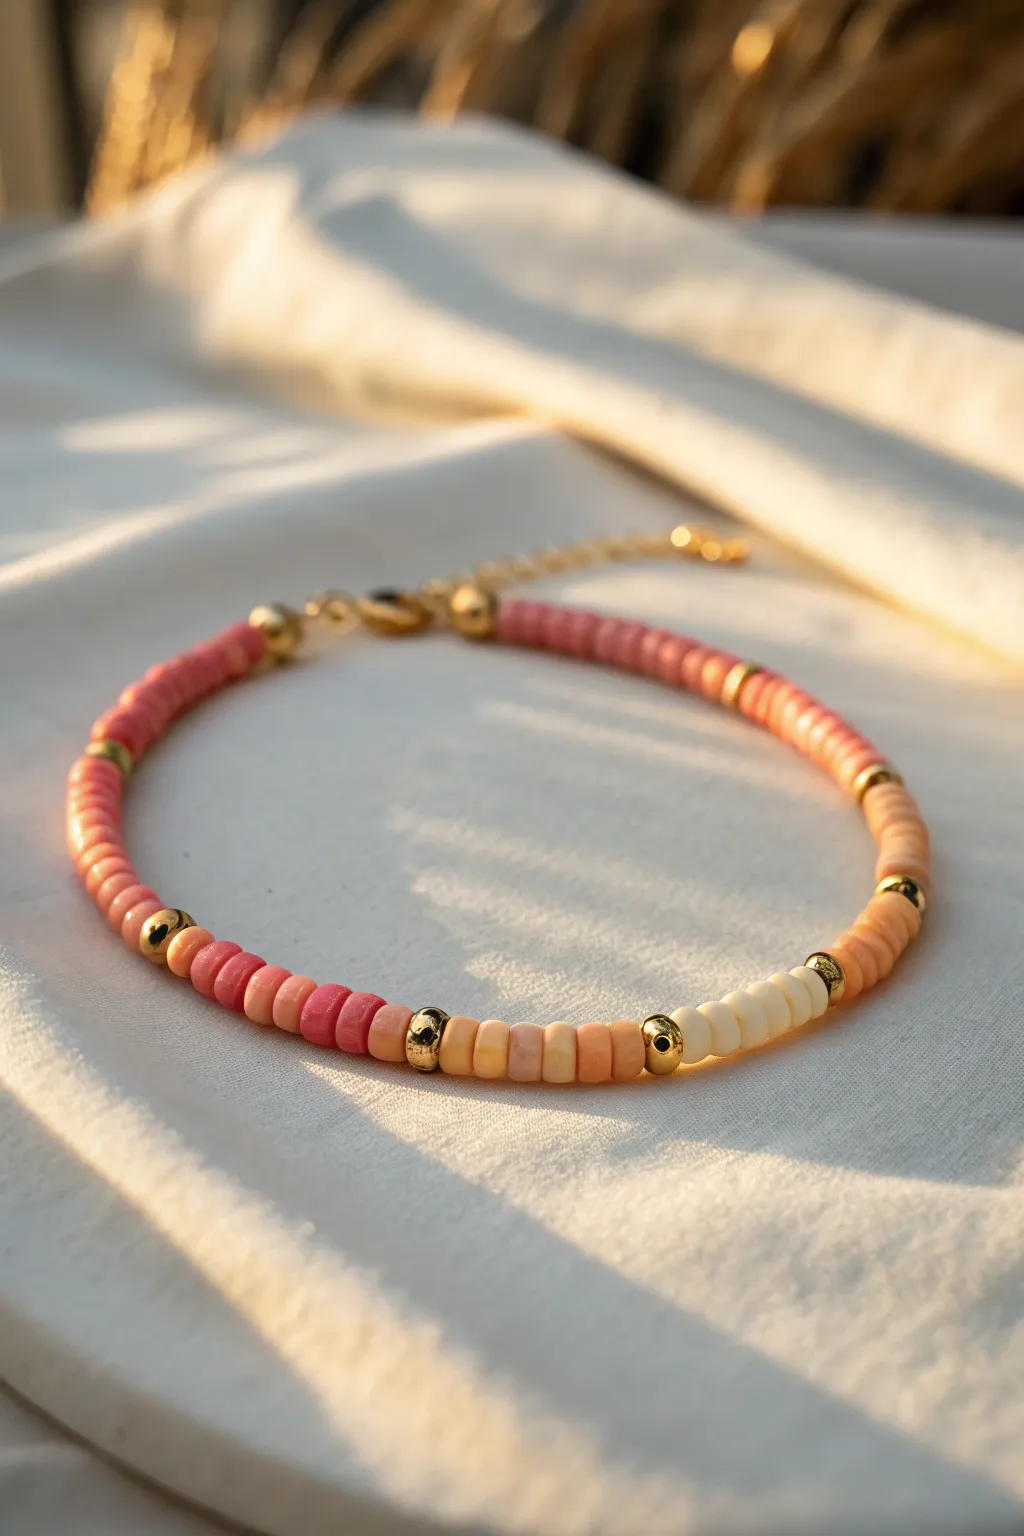
Capture the magic of golden hour on your wrist with this stunning gradient bracelet. Using flat polymer clay beads in warming tones of rose, peach, and cream, punctuated by elegant gold accents, you’ll create a sophisticated piece perfect for stacking or wearing solo.
How-To Guide
Materials
- 6mm Clay Heishi beads (Deep Rose/Mauve)
- 6mm Clay Heishi beads (Coral/Salmon)
- 6mm Clay Heishi beads (Pale Peach/Apricot)
- 6mm Clay Heishi beads (Cream/Off-White)
- 3-4mm Gold metal spacer beads (round or saucer shape)
- Elastic stretch cord (0.8mm clear)
- Gold finish crimp beads covers
- Gold tone lobster clasp
- Gold tone jump rings (4mm or 5mm)
- Gold tone extender chain
- Jewelry pliers (flat nose and chain nose)
- Scissors or bead snips
- Bead design board or tape
Step 1: Planning the Gradient
-
Measure your materials:
Cut a piece of elastic cord about 10-12 inches long. This generous length gives you plenty of room to knot comfortably later. I like to prestretch the elastic gently by pulling on it a few times to prevent the bracelet from loosening after wear. -
Secure the end:
Place a piece of masking tape over one end of your cut cord, or attach a bead stopper clip. This is a lifesaver for preventing beads from sliding off while you focus on your pattern. -
Establish the color order:
Lay out your bead colors on a design board or a piece of felt to visualize the flow. The pattern shown moves from darkest to lightest: Deep Rose, Coral, Pale Peach, then Cream. -
Determine segment length:
For this specific look, aim for about 8-10 clay beads per color block. This creates distinct sections without making the transitions too abrupt.
Step 2: Beading the Pattern
-
Start with the darkest shade:
Thread on your first block of Deep Rose beads. Count out exactly 9 beads to match the reference image closely, ensuring they sit flat against each other. -
Add the gold accent:
Slide on one gold spacer bead. This metallic pop act as a visual palate cleanser between the color shifts. -
Transition to the next tone:
Add your block of Coral/Salmon beads. Use the same number (9 beads) to keep the symmetry consistent. -
Insert the second spacer:
Place another gold spacer bead onto the cord. -
Lighten the palette:
Thread on the Pale Peach/Apricot section. You should start seeing the lovely sunset gradient taking shape now. -
Add the third spacer:
Slide on the next gold spacer bead. -
Finish the gradient:
Add your block of Cream/Off-White beads. This completes one full ombré cycle. -
Reverse or repeat the pattern:
Slide on a gold spacer. Now, reverse the color order to go back to dark (Cream -> Peach -> Coral -> Rose) or simply restart the pattern depending on your preference. The image shows a repeating cycle separated by gold. -
Check the fit:
Continue this pattern until the beaded section covers about 6 to 6.5 inches (for an average wrist). Wrap it around your wrist to check; the clasp assembly will add about a half-inch of length.
Disc Perfection
Clay beads can sometimes be varying thicknesses. Discard any visibly thin or wedge-shaped beads as you work to keep your color blocks uniform and straight.
Step 3: Finishing the Closure
-
prepare the first crimp:
Slide a crimp bead onto the end of the elastic, followed by a jump ring or the loop of your jump ring wire guard. -
Loop and secure:
Thread the elastic back through the crimp bead to create a loop. Pull it snug but not so tight that the jewelry stiffens. Flatten the crimp bead with your pliers. -
Hide the crimp:
Place a crimp cover over the flattened crimp bead and gently squeeze it shut using your pliers until it looks like a round gold bead. -
Attach the hardware:
On one end, use a jump ring to attach your lobster clasp. Open the jump ring by twisting it sideways with pliers, hook on the clasp, and twist it closed. -
Add the extender:
Repeat the crimping process on the other end of the bracelet. Attach a jump ring and your extender chain to this side. -
Trim excess cord:
Carefully snip away any remaining tail of the elastic cord, getting as close to the crimp bead as possible without cutting your knot or loop.
Chain Reaction
Add a tiny charm, like a gold star or a single pearl, to the very end of your extender chain for a professional, boutique-style finishing touch.
Enjoy the warm glow of your new accessory as it catches the late afternoon light


Color-Blocked Prep Bands
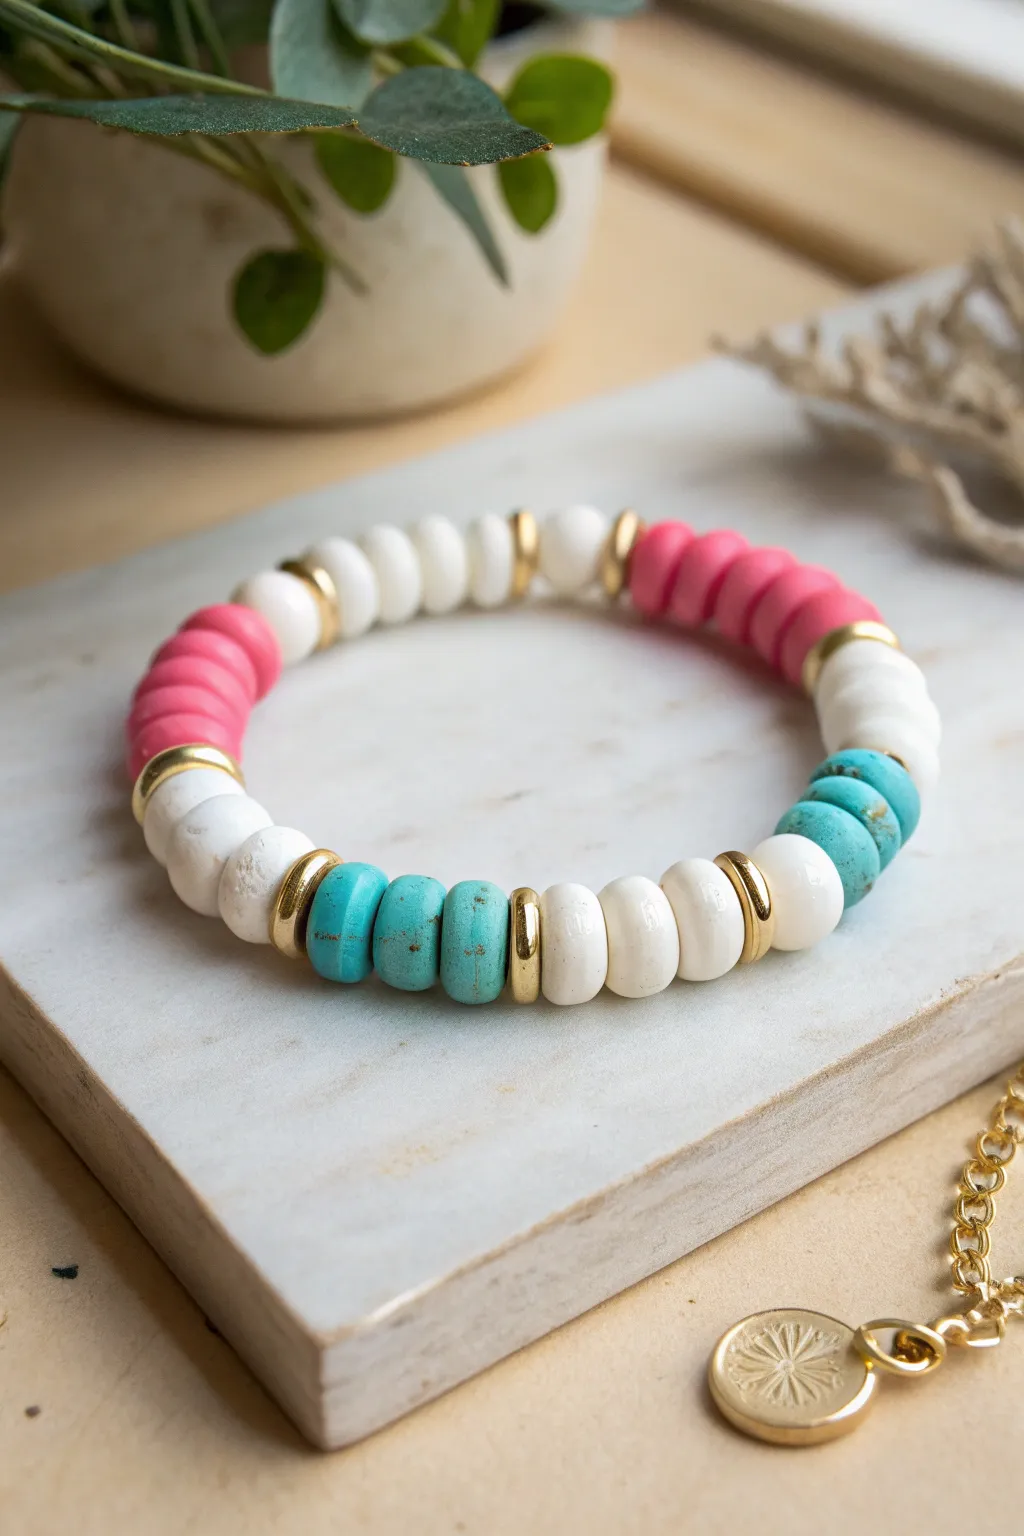
This vibrant bracelet captures the essence of a preppy summer with its classic color-blocked design in hot pink, white, and turquoise. The addition of gold spacers adds a touch of polish, turning simple clay and stone beads into a chic accessory stack staple.
Step-by-Step
Materials
- Hot pink polymer clay disc beads (heishi style, approx. 6mm)
- White bone or shell rounded disc beads (approx. 8mm)
- Turquoise gemstone or composite rondelle beads (approx. 8mm)
- Gold plated brass spacer discs (flat, approx. 6-7mm)
- Strong elastic stretch cord (0.7mm or 0.8mm)
- Super glue or jewelry adhesive (E6000)
- Scissors or bead snips
- Beading needle (optional but helpful)
- Bead design board or masking tape
Step 1: Planning and Prep
-
Measure your wrist:
Before cutting any cord, wrap a measuring tape around your wrist. Add about half an inch to your measurement for a comfortable fit, then add another 3-4 inches to the total cord length to give you plenty of room for tying knots later. -
Secure the cord:
Cut your elastic cord to the calculated length. To stop beads from sliding off while you work, place a piece of masking tape over one end of the cord or attach a bead stopper. -
Lay out the pattern:
Using a bead board or a towel, lay out your beads to visualize the color blocking. This design uses large blocks of color rather than a random mix, separated by gold accents.
Step 2: Stringing the Beads
-
Start with the turquoise block:
Begin by threading on the turquoise rondelle beads. For the section shown, string three turquoise beads followed by a single gold spacer disc. -
Add the first white section:
Thread on three of the white rounded beads. These act as a neutral buffer between the bright colors. -
Insert a gold transition:
Slide on another gold spacer disc. These metal accents are crucial for that ‘expensive’ boutique look, defining the boundaries of your color blocks. -
Create the pink block:
Thread on your hot pink heishi beads. Since these are thinner than the stone beads, use about 6-8 of them to match the length of the other color sections. -
Repeat the gold spacer:
Add another gold spacer disc to close off the pink section. -
Thread the second white section:
Add another group of three white rounded beads, followed by a gold spacer. I like to check the symmetry here to ensure the blocks feel balanced. -
Continue the pattern:
Repeat the previous steps—turquoise block, spacer, white block, spacer, pink block—until the strand creates a full circle covering your wrist measurement. -
Check the fit:
Carefully wrap the unfinished strand around your wrist. It should sit comfortably without pinching or gaps. Add or remove a bead or two from the final section if adjustments are needed.
Knot Slipping?
If your elastic knot feels slick and won’t hold, try rubbing the ends of the cord with a little bit of beeswax or even roughing them slightly with sandpaper before tying.
Step 3: Finishing the Bracelet
-
Pre-stretch the cord:
Before tying, give the ends of the elastic a gentle tug. This ‘pre-stretching’ helps prevent the bracelet from loosening up the first time you wear it. -
Tie the first knot:
Remove the tape or stopper. Bring the two ends together and tie a simple overhand knot, pulling it tight against the beads. -
Secure with a surgeon’s knot:
For the second knot, make a loop as if tying a standard knot, but pass the cord end through the loop twice instead of just once. Pull tight; this double-loop friction keeps it secure. -
Apply adhesive:
Dab a tiny drop of super glue or jewelry cement directly onto the knot. Be careful not to get glue on the neighboring beads, as it can cloud the finish. -
Hide the knot:
While the glue is still slightly tacky but not wet, slide the nearest large-hole bead (one of the white or turquoise ones works best) over the knot to conceal it. -
Trim the excess:
Once the glue is completely dry, snip the excess cord ends as close to the bead hole as possible without cutting the knot itself.
Clean Color Blocks
To keep the ‘preppy’ look crisp, ensure your gold spacers are always placed between different colors. Never let pink touch turquoise directly without a white or gold buffer.
Enjoy styling your new color-blocked accessory with your favorite summer outfits


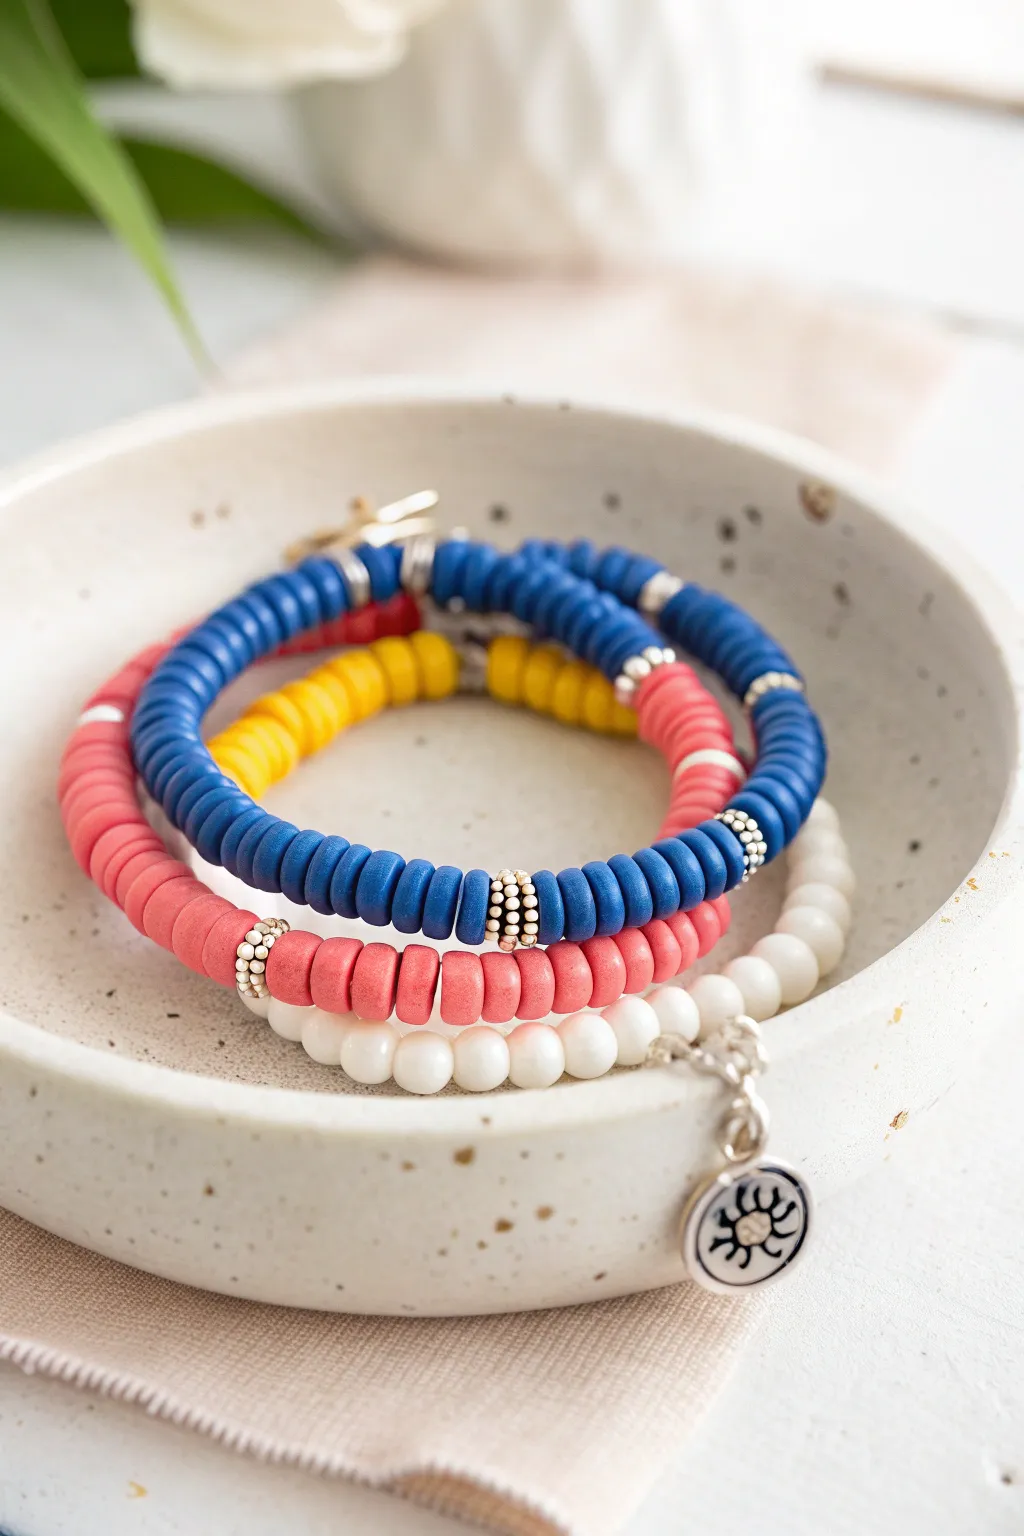
White Base With Bright Accent Stripes
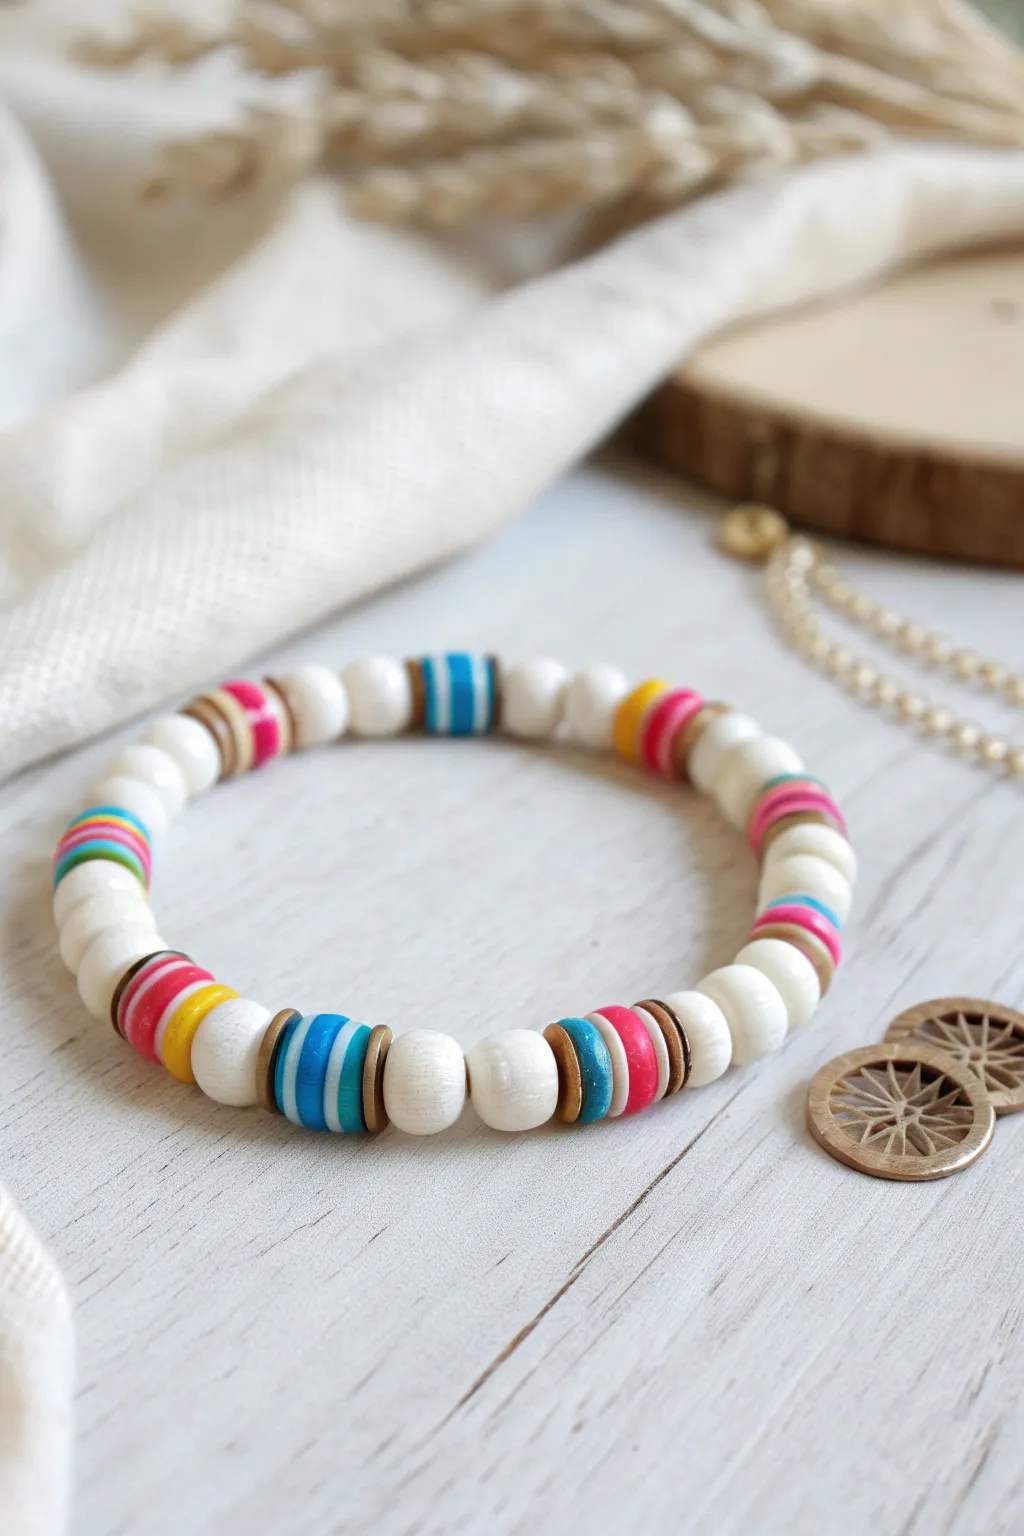
Capture the essence of a sun-soaked afternoon with this crisp white bracelet featuring vibrant pops of Heishi bead color. The natural texture of the white wood beads provides the perfect canvas for playful stripes of blue, pink, and yellow, making it a versatile accessory for any stack.
Detailed Instructions
Materials
- 8mm White round wood beads
- 4mm-6mm Polymer clay Heishi disc beads (Pink, Bright Blue, Yellow, Turquoise, White)
- Gold saucer or spacer disc beads (approx. 4mm)
- Elastic beading cord (0.7mm or 0.8mm)
- Super glue or jewelry cement
- Scissors
Step 1: Planning Your Pattern
-
Measure your wrist:
Before cutting any cord, wrap a piece of string around your wrist to find your size, then add about an inch for comfort. This bracelet relies on a repeating pattern, so knowing your length helps determine how many segments you’ll need. -
Conceptualize the segments:
This design alternates between solid sections of round white beads and colorful ‘striped’ sections made of flat Heishi discs. I like to lay my beads out on a bead board or a towel first so they don’t roll away while I’m designing.
Step 2: Stringing the Beads
-
Prepare the cord:
Cut a length of elastic cord about 10-12 inches long. This extra length makes tying the final knot much easier. Pre-stretch the elastic by pulling it gently a few times to prevent the finished bracelet from sagging later. -
Start with white wood:
Begin by threading two of the 8mm white round wood beads onto the cord. These will act as the spacer between your colorful focal points. -
Create the first color block:
Add a gold saucer spacer bead. Then, slide on your first set of Heishi beads. For a ‘blue stripe’ look, try this sequence: one turquoise disc, one darker blue disc, one white disc, one darker blue disc, and one turquoise disc. -
Cap the color block:
Finish this colorful segment by adding another gold saucer spacer bead. This gold framing really elevates the look and separates the flat discs from the round beads. -
Add the neutral spacer:
String on two more 8mm white wood beads. This resets the pattern for the next color burst. -
Build the second color block:
Add a gold saucer again. This time, switch up the color palette. Try a ‘warm’ stripe: one pink disc, one white disc, and one yellow disc. Finish with the closing gold spacer. -
Continue the pattern:
Repeat the sequence—two white wood beads followed by a Heishi color block—until you reach your desired length. Feel free to mix up the stripe patterns within the Heishi sections; some can be just pink and white, others can mix blue and turquoise. -
Check the fit:
Wrap the strung beads around your wrist to check the sizing. The ends should meet comfortably without showing gaps or stretching the cord too tight.
Knot Security Tip
Use a bead stopper or simple tape on one end of your elastic while stringing. This prevents beads from sliding off the back end while you work on your pattern.
Step 3: Finishing Touches
-
Tie the knot:
Bring the two ends of the elastic together. Tie a standard surgeon’s knot: loop the ends over each other once, then loop them over each other again twice before pulling tight. -
Secure the bond:
Gently pull the elastic from all sides to tighten the knot firmly. Dab a tiny drop of super glue or jewelry cement directly onto the knot to ensure it never slips. -
Hide the knot:
While the glue is still slightly tacky but not wet, slide one of the large hole wood beads over the knot to conceal it. This gives your bracelet a seamless, professional finish. -
Trim the excess:
Once the glue is fully dry, use sharp scissors to trim the excess cord ends close to the bead. Be careful not to nick the main knot.
Texture Twist
Swap the smoothness of Heishi vinyl for gemstone chips or tiny freshwater pearls in the colored sections for a more organic, high-end boho feel.
Slip your new bracelet on and enjoy the effortless style it adds to your outfit

The Complete Guide to Pottery Troubleshooting
Uncover the most common ceramic mistakes—from cracking clay to failed glazes—and learn how to fix them fast.
Gold Spacer Rhythm Pattern
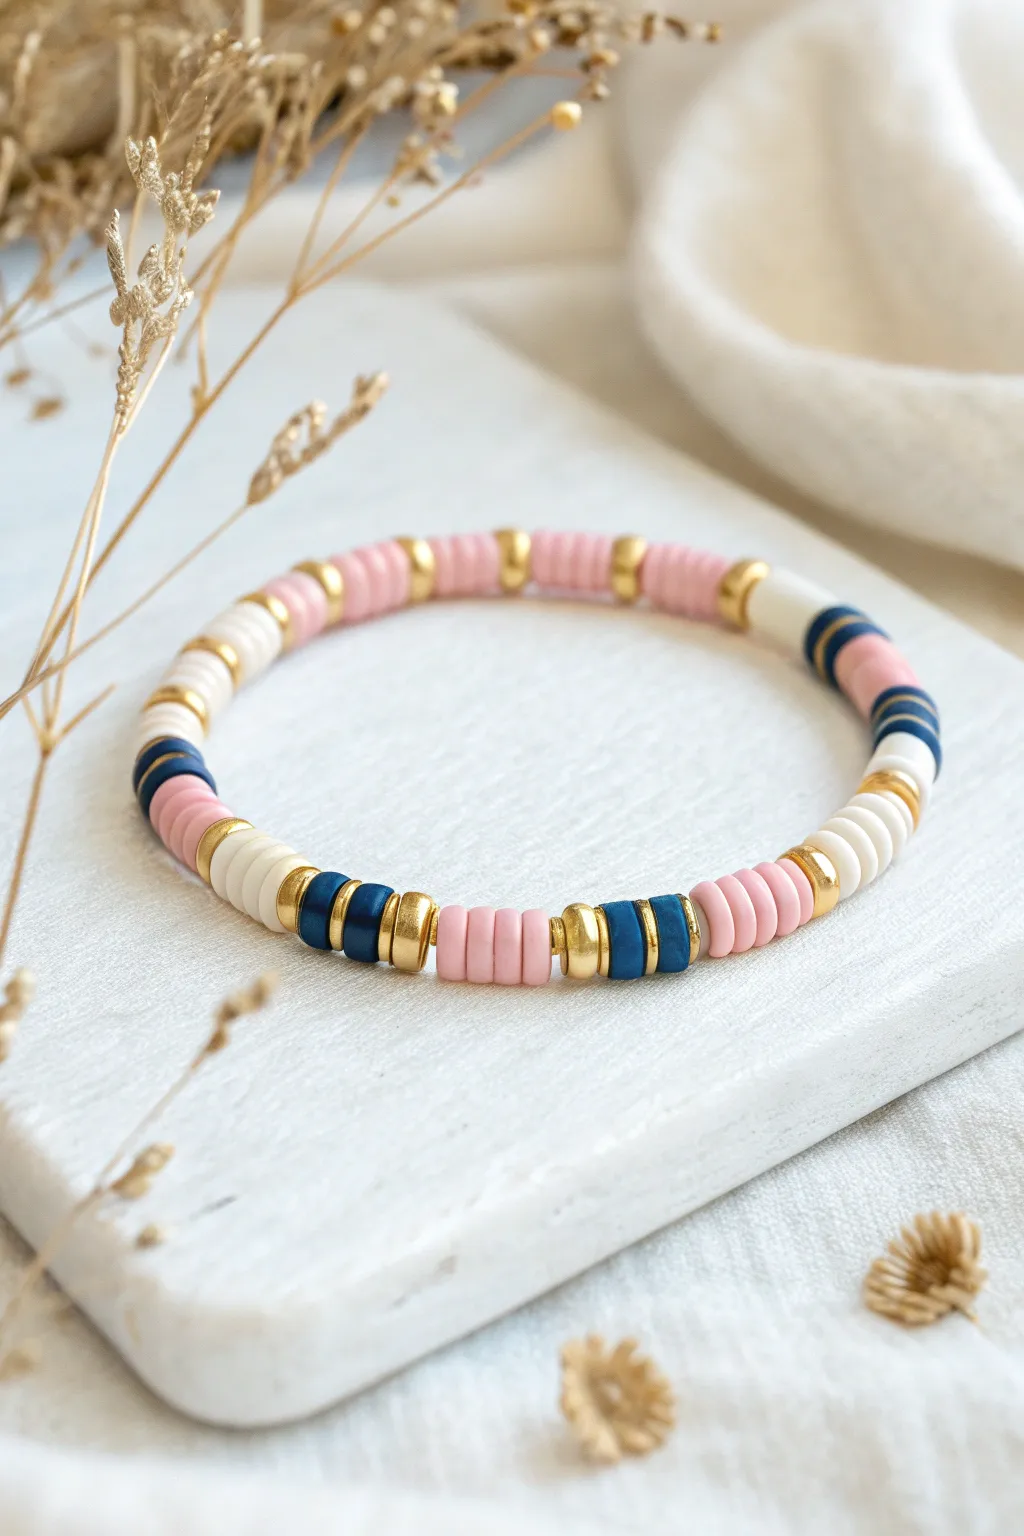
This classic preppy bracelet combines the softness of pink and white clay Heishi beads with bold navy accents, all tied together by shining gold spacers. The pattern relies on a repeating sequence that uses metallic elements to break up the matte blocks of color, creating a sophisticated and balanced look.
Step-by-Step Guide
Materials
- Polymer clay Heishi disc beads in light pink (approx. 6mm)
- Polymer clay Heishi disc beads in white or cream (approx. 6mm)
- Polymer clay Heishi disc beads in navy blue (approx. 6mm)
- Gold tone spacer beads (barrel or disc shape, slightly thicker than the clay beads)
- Elastic stretch cord (0.8mm clear)
- Super glue or jewelry cement
- Scissors or bead snips
- Bead stopper or tape
- Measuring tape
Step 1: Preparation
-
Measure your wrist:
Wrap a measuring tape comfortably around your wrist to determine the circumference. Add about half an inch to this measurement to ensure the bracelet isn’t too tight and can roll over your hand easily. -
Cut the cord:
Cut a length of elastic cord about 10-12 inches long. This extra length is crucial for tying secure knots later without struggling. -
Secure the end:
Attach a bead stopper clip to one end of your cord. If you don’t have one, a piece of masking tape folded over the end works perfectly to keep beads from sliding off. -
Pre-stretch the elastic:
Gently tug on the elastic cord a few times. I find this helps prevent the bracelet from stretching out permanently after you wear it for the first time.
Pro Tip: Gold Longevity
To keep your gold spacers shining bright, coat them with a thin layer of clear nail polish before stringing. This prevents tarnishing from sweat or water.
Step 2: Creating the Pattern
-
Understanding the sequence:
This design uses blocks of color separated by gold. The main sequence is: Pink Block → Gold → White Block → Gold → Navy Block → Gold. You will repeat a variation of this around the bracelet. -
Start with a pink block:
Thread approximately 5 to 6 pink clay beads onto the cord. Consistency in the count is key for this rhythmic look. -
Add the first gold accent:
String on one gold spacer bead. Notice how the metallic sheen immediately brightens the matte pink. -
Create a white block:
Add a section of white clay beads. Use the same number as your pink section (5-6 beads) to maintain symmetry. -
Insert the second gold spacer:
Slide on another single gold spacer bead to close off the white section. -
Add the navy contrast:
Thread on a small group of navy blue beads. For this specific look, make the darker section slightly shorter—use about 3 or 4 beads instead of 6. -
Finish the sequence:
Add one final gold spacer after the navy beads. This completes one full ‘rhythm’ unit. -
Repeat the pattern:
Start over with 5-6 pink beads. Continue repeating the full sequence (Pink-Gold-White-Gold-Navy-Gold) until you reach your desired length. -
Check sizing:
Periodically wrap the beaded cord around your wrist to check the fit. You want the ends to meet comfortably without pulling the elastic tight. -
Adjust the final section:
If you need a little extra length but not a full sequence, simply extend the length of your final pink or white section slightly.
Step 3: Finishing Touches
-
Prepare to tie off:
Once the length is perfect, carefully remove the bead stopper or tape while holding both ends of the cord securely. -
Tie the first knot:
Cross the ends and make a simple overhand knot. Pull it tight, ensuring there are no gaps between the beads, but don’t pull so hard the layout buckles. -
Secure with a surgeon’s knot:
Make another loop like you are tying a shoelace, but loop the end through twice before pulling tight. This extra friction holds the elastic much better. -
Apply adhesive:
Dab a tiny drop of super glue or jewelry cement directly onto the knot. Let it dry for a minute or two. -
Hide the knot:
Trim the excess cord ends close to the knot (leave about 1-2mm). Gently pull the cord so the knot slides inside one of the larger beads or gold spacers to hide it.
Level Up: Pattern Shift
Instead of equal blocks, try ‘ombre’ spacing: start with 8 pink beads, then 6, then 4, separating each group with a gold spacer for a tapering effect.
Now you have a chic, versatile accessory that looks lovely stacked with other gold jewelry or worn solo
Pearl-and-Clay Preppy Mix
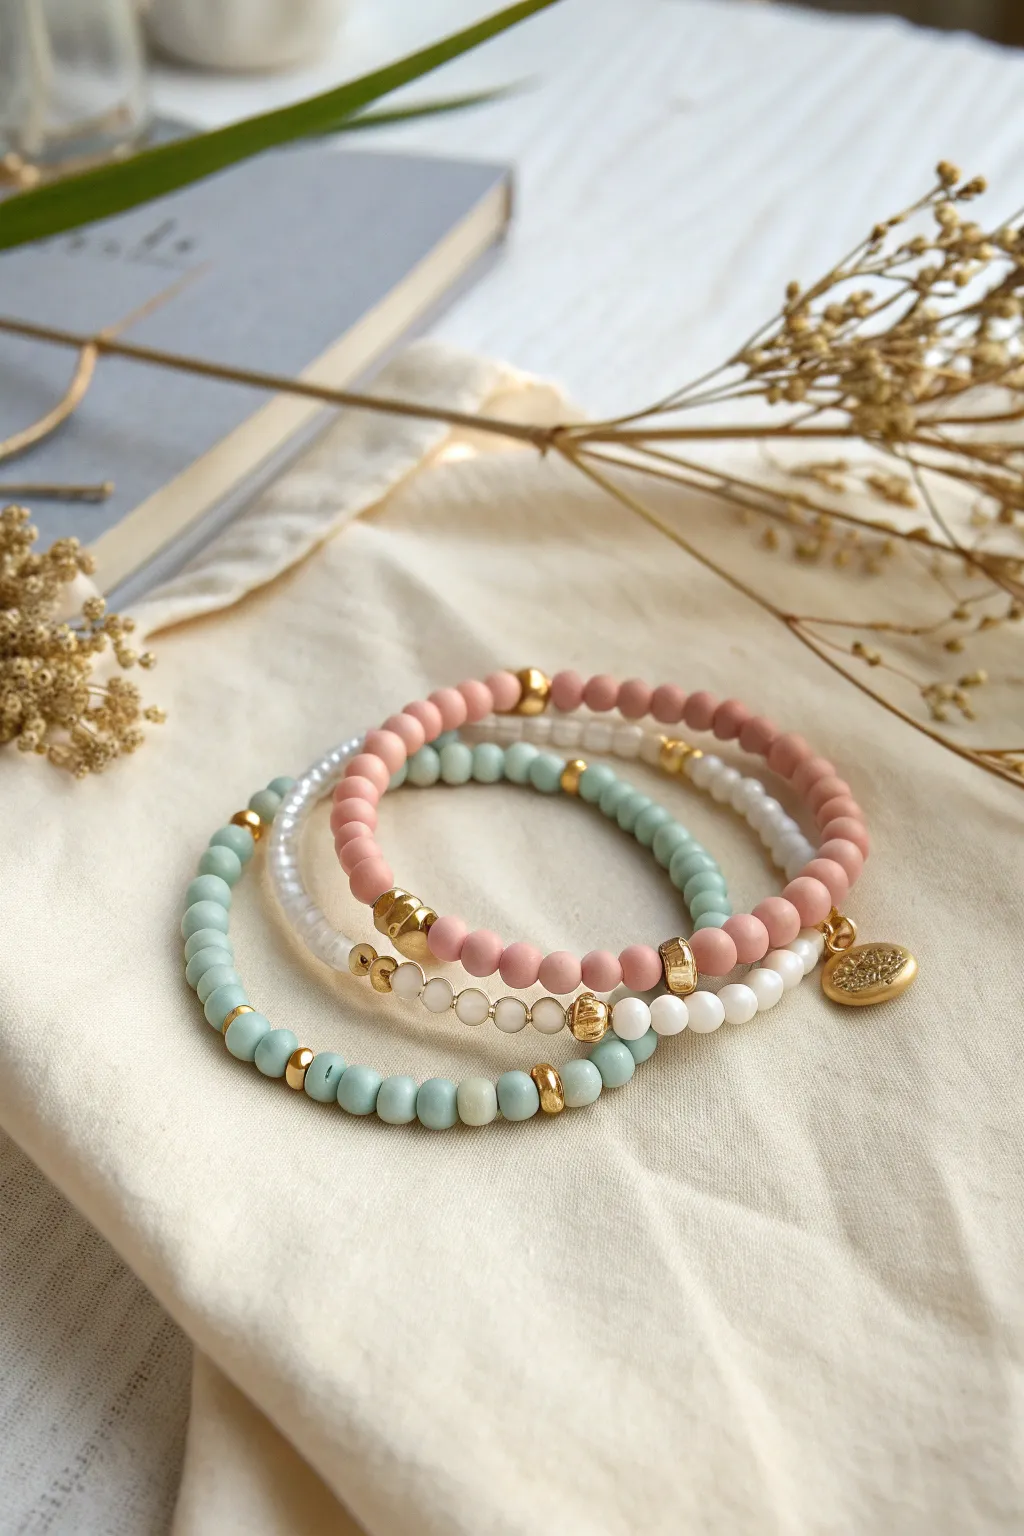
This charming bracelet set combines the smooth matte finish of clay or stone beads with the classic luster of pearls and bright gold accents. The soft palette of mint, blush pink, and creamy white creates a polished yet relaxed aesthetic perfect for stacking.
Step-by-Step Tutorial
Materials
- 6mm matte round beads in mint green (Amazonite, turquoise, or polymer clay)
- 6mm matte round beads in blush pink (polymer clay or matte ceramic)
- 4-6mm white freshwater pearls or mother-of-pearl shell beads
- Elastic stretch cord (0.7mm or 0.8mm clear)
- Small gold spacer beads (smooth round)
- Assorted gold accent beads (textured spacers, nuggets, or small hoops)
- Gold charm (coin style) with jump ring
- Super glue or jewelry adhesive
- Scissors
Step 1: Planning Your Stack
-
Measure and cut:
Begin by measuring your wrist and adding about 3-4 inches to determine your cord length. Cut three separate pieces of elastic cord to this size to work on all three designs simultaneously. -
Pre-stretch:
Before adding any beads, firmly tug on each piece of elastic cord several times. This pre-stretching step is crucial to prevent the bracelets from sagging or loosening after you’ve worn them a few times. -
Secure the ends:
Place a piece of tape or a bead stopper on one end of each cord. This simple precaution saves you the frustration of beads sliding right off while you are focused on your design.
Step 2: Creating the Mint Bracelet
-
Start the pattern:
Thread approximately 10-12 mint green matte beads onto your first cord. The matte finish gives that lovely soft texture seen in the photo. -
Insert gold spacers:
Slide on a small gold spacer bead. These gold interruptions break up the color and add a touch of shine. -
Continue the rhythm:
Continue adding sections of 3-5 mint beads followed by a gold spacer. Vary the spacing slightly if you want an organic look, or keep it uniform for symmetry. -
Check the length:
Wrap the strand around your wrist to check the fit. Add or remove mint beads until the two ends meet comfortably without stretching the cord.
Knot Slipping?
If your elastic knot feels slippery, try coating the knot area with clear nail polish if you don’t have jewelry glue. Let it dry completely before hiding it.
Step 3: Creating the Blush Bracelet
-
Focus on texture:
For the pink bracelet, string your blush pink beads. About halfway through the bracelet, I like to add a larger, textured gold nugget bead or a gold charm carrier. -
Add the charm:
If you are using a gold coin charm as shown, slide it onto the cord now, positioning it so it will sit centrally on the wrist. -
Finish the strand:
Complete the rest of the pink strand with blush beads until it matches the length of your first mint bracelet.
Level Up: Lettering
Personalize the stack by replacing a section of the mint or pink beads with gold-lettered alphabet beads to spell out a name or initials.
Step 4: Creating the Pearl Mix Bracelet
-
Mix elements:
For the middle white bracelet, alternate between your white pearl beads and tiny gold spacers. A pattern of two pearls followed by one gold spacer creates a delicate, high-end look. -
Incorporate accents:
To mimic the image, add a few larger gold focal beads—like a gold rondelle or a textured bead—spaced irregularly among the pearls. -
Final sizing:
Ensure this third bracelet matches the size of the previous two so they stack perfectly together.
Step 5: Final Assembly
-
Tie the knots:
Remove the tape/stopper. Bring the two ends of the first bracelet together and tie a surgeon’s knot (loop the right side over the left twice, then pull tight). -
Secure with glue:
Place a tiny dab of jewelry glue or super glue directly onto the knot. Be careful not to get glue on the neighboring beads. -
Hide the knot:
While the glue is still slightly tacky but not wet, slide the nearest bead over the knot to hide it inside. This creates a seamless professional finish. -
Trim excess:
Once the glue is fully dry, use sharp scissors to trim the excess cord ends as close to the bead hole as possible. -
Repeat:
Repeat the knotting, gluing, and hiding process for the remaining two bracelets to complete your set.
Enjoy styling your new stack of preppy, handcrafted bracelets


What Really Happens Inside the Kiln
Learn how time and temperature work together inside the kiln to transform clay into durable ceramic.
Smiley Charm Pop Bracelet
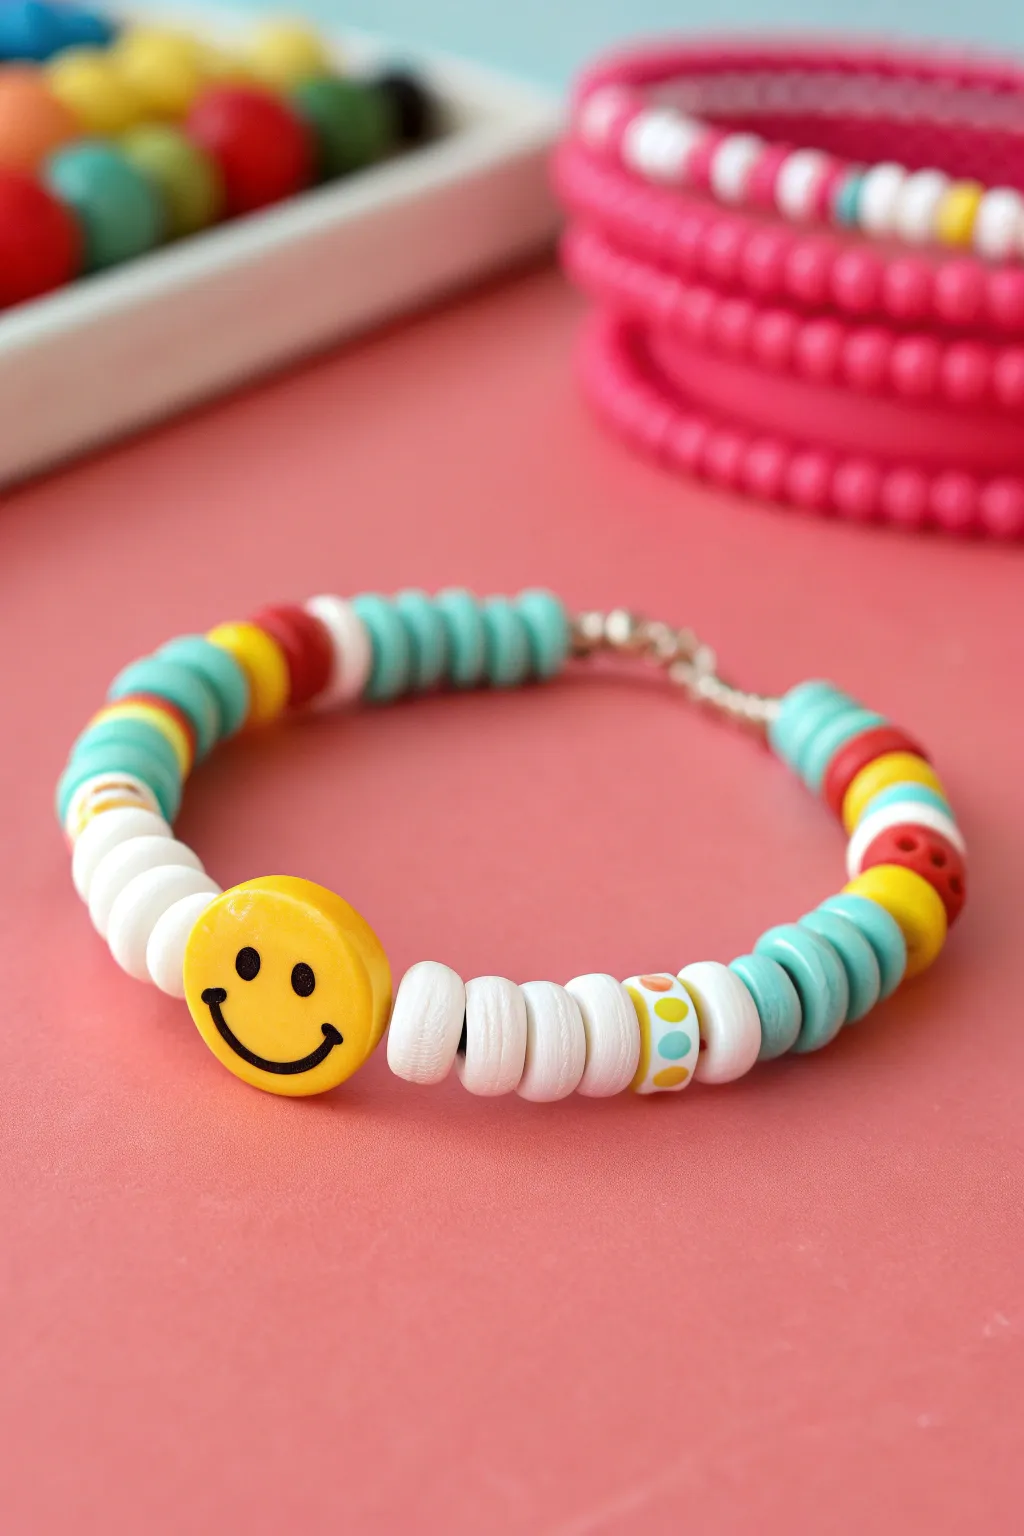
Brighten your wrist stack with this cheerful design that centers around a classic yellow smiley face. Using iconic heishi clay beads in a vibrant primary color palette, this bracelet balances fun patterns with bold blocks of color.
Step-by-Step
Materials
- A yellow smiley face bead (flat disc style)
- 6mm Heishi clay disc beads in White
- 6mm Heishi clay disc beads in Teal or Aqua
- 6mm Heishi clay disc beads in Red
- 6mm Heishi clay disc beads in Yellow
- 2 Polka dot polymer clay beads (white with colorful dots)
- Elastic stretch cord (0.7mm or 0.8mm)
- Scissors
- Jewelry glue or clear nail polish
- Tape or a bead stopper clip
- Optional: Crimp beads and jump rings if adding a clasp (though this tutorial focuses on a stretch tie)
Step 1: Setting the Foundation
-
Measure and cut:
Cut a piece of elastic cord about 10-12 inches long. This gives you plenty of extra room for tying knots later without struggling with short ends. -
Secure the end:
Place a piece of tape or a bead stopper clip on one end of the cord to prevent your colorful creations from sliding right off as you work. -
Start the center:
Thread the yellow smiley face bead onto the cord first. Slide it down to the middle, but don’t worry about perfect placement yet as we will build outwards from it.
Knot Slipping?
If your elastic knot feels insecure, try a surgeon’s knot: wrap the cord through the loop twice instead of once before pulling tight.
Step 2: Building the Right Side
-
Add white spacers:
On the right side of the smiley face, thread on four white heishi disc beads. -
Insert pattern:
Slide on one of the white polka dot beads. This adds a playful break in the texture. -
Add more white:
Follow the polka dot bead with two more white heishi discs to frame it neatly. -
Teal section:
String on three teal (or aqua) heishi beads to introduce the first pop of cool color. -
Yellow pop:
Add two yellow heishi beads. -
Red accent:
Thread on two red heishi beads. Notice how this primary color sequence really makes the design pop. -
Color repetition:
Add one more white bead, then repeat a teal secton of about 3-4 beads.
Step 3: Building the Left Side
-
Mirror the white section:
Now, working on the other side of the smiley face (the left side), thread on four white heishi beads to match the start of the right side. -
Add pattern bead:
Add your second polka dot bead here. I prefer checking that the dots are facing outward if the pattern is directional. -
Teal transition:
Add two white beads, followed by three teal beads. -
Primary colors:
String on two yellow beads, followed by two red beads. -
Finish the pattern:
Add a single white bead, then finish with a larger block of teal beads to cover the back of the wrist comfortably.
Make it Luxe
Swap the random colored clay spacers for small 4mm gold-filled beads between the color blocks for a more expensive jewelry store look.
Step 4: Closing the Loop
-
Check the fit:
Wrap the unfinished strand around your wrist to check the size. Add or remove teal beads from the very ends until it fits comfortably without stretching. -
Pre-stretch:
Give the elastic ends a gentle tug. Pre-stretching helps prevent the cord from loosening up after you’ve worn the bracelet a few times. -
Tie the knot:
Remove the tape/stopper and tie a surgical knot (left over right, right over left). Make sure there are no gaps between the beads. -
Secure and trim:
Dab a tiny drop of jewelry glue on the knot. Let it dry completely, then trim the excess cord ends close to the knot.
Now you have a happy, vibrant accessory ready to add a splash of optimism to your outfit
Citrus Slice Summer Stack
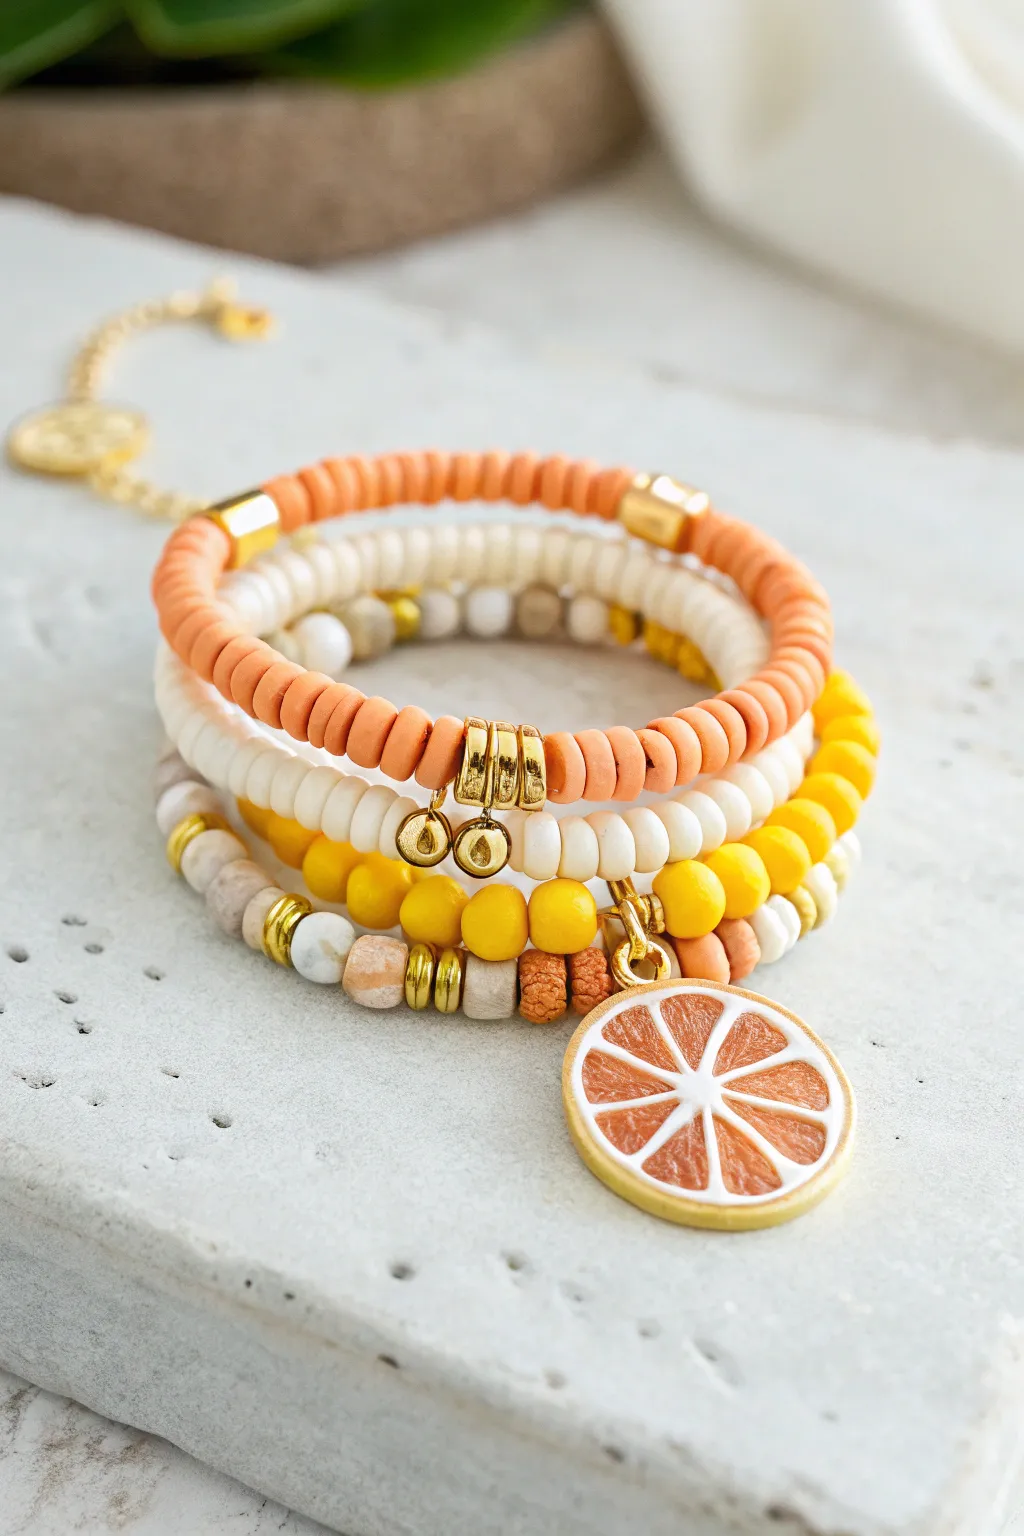
Capture the zest of summer with this vibrant four-piece bracelet set. Featuring a cheerful mix of orange and yellow tones, white accents, and a juicy citrus charm, this stack is the perfect sunny accessory for any wrist.
How-To Guide
Materials
- Orange polymer clay heishi beads (6mm)
- White or cream polymer clay heishi beads (6mm)
- Bright yellow round beads (acrylic or glass, approx. 6mm)
- Beige/tan spotted gemstone beads (approx. 4mm-6mm)
- Small white marble-effect beads (6mm)
- Gold disc spacer beads (heishi style)
- Gold tube beads or large crimp covers
- Small gold charm rings
- Gold jump ring (approx. 6mm or 8mm)
- Enamel orange slice charm
- Strong elastic cord (0.7mm or 0.8mm)
- Jewelry adhesive
- Scissors
Step 1: The Orange Heishi Strand
-
Measure the cord:
Cut a piece of elastic cord about 10-12 inches long. Is gives you plenty of extra room for tying secure knots without struggling with tension. -
Start the pattern:
Begin threading your orange heishi beads. This bracelet is simple but impactful, relying on a solid block of color. -
Add gold accents:
After your first section of orange beads (about 1/3 of the bracelet length), thread on a small gold tube or a cube spacer bead to break up the texture. -
Complete the length:
Continue adding orange beads until you reach the desired wrist size, adding one more gold accent bead on the opposite side for balance. Tie off with a secure surgeon’s knot and a dab of glue.
Knot Security
Pre-stretch your elastic cord before beading! Pull it firmly a few times to prevent the bracelet from loosening and sagging after you wear it.
Step 2: The Creamy White Strand
-
Prepare the cord:
Cut another length of elastic cord, ensuring it matches the length of your first strand for consistency. -
Thread the base:
String on your cream or white heishi beads. This layer acts as a neutral palate cleanser between the bright citrus colors. -
Insert charm loops:
At the center point of the strand, slide on two small gold charm rings. You aren’t attaching charms to them right now; they act as decorative visual weight, almost like little golden droplets. -
Finish the strand:
Fill the rest of the cord with white beads until it matches the size of your orange bracelet. Secure the knot firmly, hiding it inside a neighboring bead hole if possible.
Step 3: The Sunshine Yellow Strand
-
Select your beads:
For this strand, switch bead shapes. Use round yellow beads (matte or polished) to add dimension and height to the stack. -
Create the pattern:
Thread the yellow beads continuously. If your beads have large holes, you might want to double-check your knot size later or use a hidden crimp bead. -
Check the fit:
Since round beads sit differently on the wrist than flat heishi beads, wrap this one around your wrist or a sizing cone to ensure it sits comfortably with the others before knotting.
Fresh Scent Twist
Use porous lava beads for the orange accents on the bottom bracelet. Add a drop of citrus essential oil for a bracelet that smells as good as it looks.
Step 4: The Mixed Texture Strand & Charm
-
Mix your materials:
This final bracelet is the most eclectic. Start by alternating small beige spotted stone beads with gold disc spacers. -
Introduce variety:
Intersperse a few white marble beads and textured orange lava or clay beads to tie all the colors of the previous bracelets together. -
Attach the focal point:
Open a gold jump ring using two pairs of pliers (twist sideways, don’t pull apart). Slide on your enamel orange slice charm. -
Secure the charm:
Hook the jump ring onto the center of your mixed bead strand and close it tightly. I secure the jump ring between two gold spacers to keep it sliding smoothly. -
Final assembly:
Tie your final knot, apply adhesive, and trim the excess cord once dry. Stack all four bracelets together for the full fruity effect.
Enjoy wearing your refreshing stack that brings a pop of vitamin C to any outfit

TRACK YOUR CERAMIC JOURNEY
Capture glaze tests, firing details, and creative progress—all in one simple printable. Make your projects easier to repeat and improve.
Seashell Centerpiece Coastal Prep
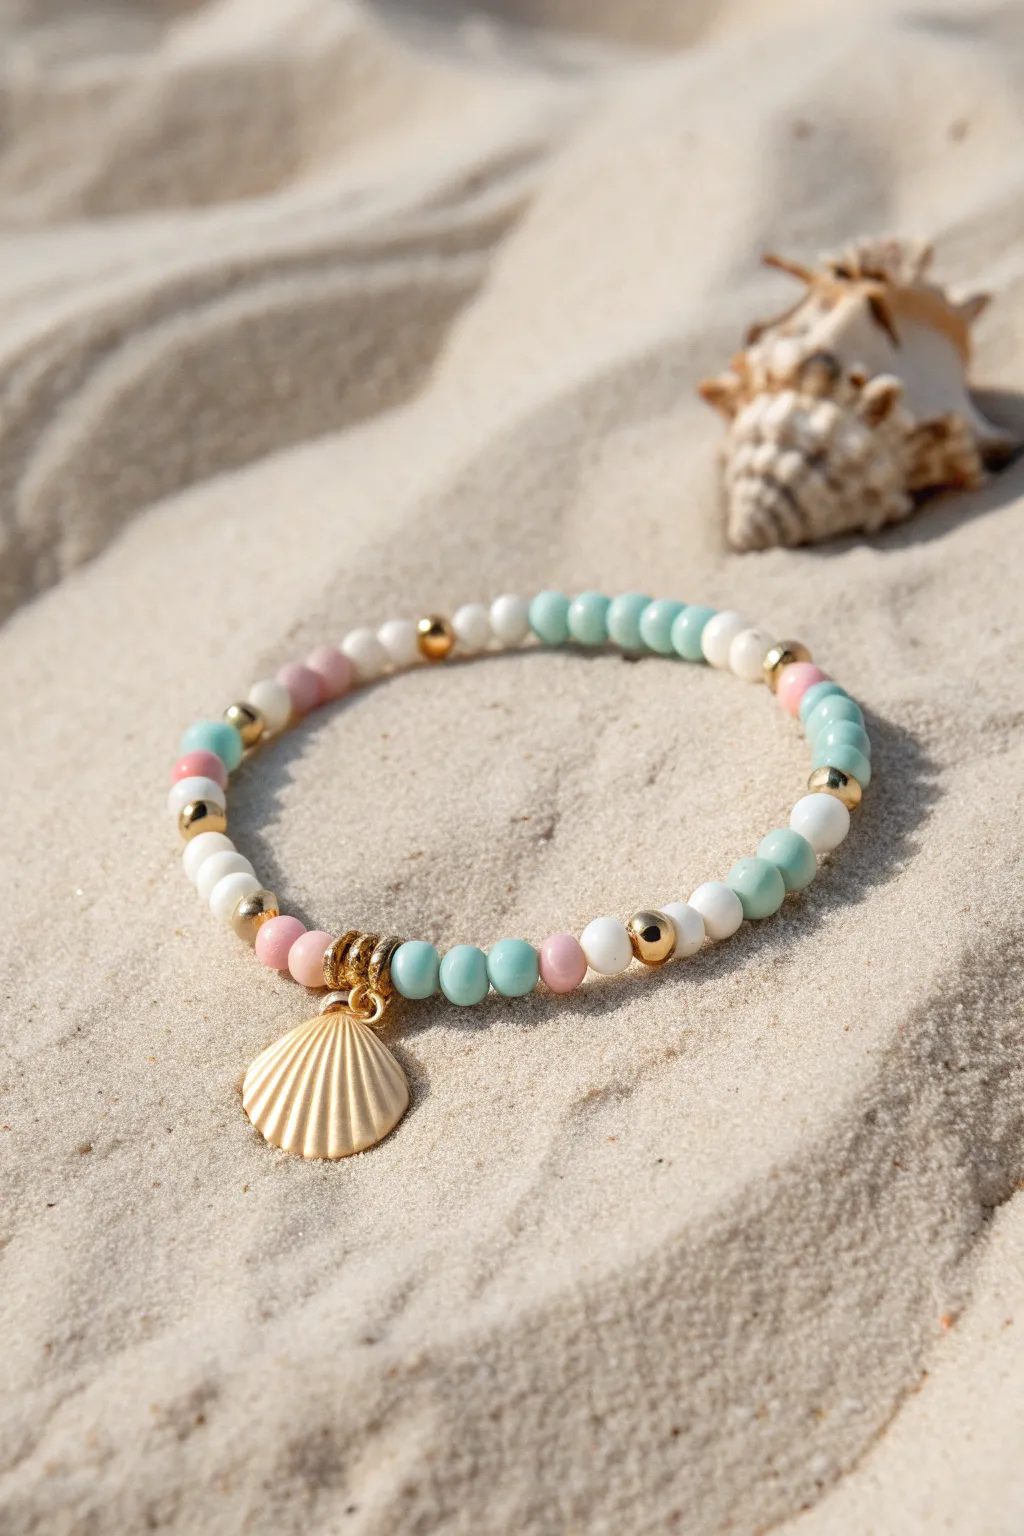
Capture the essence of a beach day with this elegant yet playful beaded bracelet featuring a striking gold seashell charm. The soft pastel palette of seafoam green, blush pink, and white mimics the colors of the shoreline, while gold accents add a touch of preppy sophistication.
Step-by-Step
Materials
- Elastic stretch cord (0.7mm or 0.8mm)
- 6mm round beads in seafoam green/light blue (approx. 20)
- 6mm round beads in white (approx. 15)
- 6mm round beads in blush pink (approx. 10)
- 4mm gold spacer beads (approx. 10)
- Large gold seashell pendant/charm with jump ring
- Gold tone jump rings (5-6mm)
- Super glue or jewelry cement
- Scissors
- Bead stopper or tape
- Optional: 3-4 decorative textured gold jump rings (for the focal point)
Step 1: Planning the Pattern
-
Measure your wrist:
Before cutting anything, wrap a piece of string around your wrist to find your comfortable size. Add about 2-3 inches to this measurement for your elastic cord length to allow room for tying the knot later. -
Secure the end:
Cut your elastic cord to the measured length. Place a bead stopper on one end, or simply tape it down to your table to prevent beads from slipping off while you work. -
Map out the color scheme:
Lay your beads out on a bead board or soft cloth. The pattern shown uses blocks of color rather than a simple 1-2-1 repitition. Notice the sequence: blocks of 3-4 colored beads, separated by white beads and accented with gold spacers.
Step 2: Stringing the Beads
-
Start with the centerpiece:
Thread the gold seashell charm onto the center of your cord. To give it more presence and texture, flank the charm with two or three textured gold jump rings directly on the cord, sitting right on top of the seashell’s bail. -
Build outward from the charm:
On the left side of the charm cluster, thread three seafoam green beads. On the right side, mirror this with three more seafoam green beads. This creates a solid foundation for your focal point. -
Add first gold accents:
Add a single blush pink bead next to the green section on both sides. Follow this immediately with a small gold spacer bead on each side. -
Introduce the white sections:
After the gold spacer, add two white beads. Then, add another gold spacer. This creates a ‘framed’ white section that brightens the bracelet. -
Create the repeating pattern:
Now, establish the main rhythm for the rest of the strand. Add a block of three seafoam green beads, followed by a gold spacer, a pink bead, a white bead, and another gold spacer. -
Check the fit:
Bring the two ends of the cord together around your wrist to check the size. If you have gaps, continue the pattern: use small groups of 2-3 beads (mixing pink and white) separated by single gold spacers until the ends meet comfortably. -
Balance the colors:
Ensure visually that you don’t have too much of one color clumped at the back. I generally like to finish the ends with gold spacers so the knot is flanked by metal, which hides it slightly better.
Knot Slipping?
If your elastic is satiny and the knot won’t hold, try a ‘square knot’ followed by a ‘granny knot’, pulling tight between each. The extra friction helps lock it before gluing.
Step 3: Finishing Touches
-
Pre-stretch the elastic:
Gently pull on both ends of the elastic cord several times. This ‘pre-stretching’ prevents the bracelet from sagging or loosening immediately after you wear it for the first time. -
Tie the knot:
Remove the bead stopper and bring the ends together. Tie a standard surgeon’s knot: cross right over left, then wrap it twice; pull tight. Then cross left over right and pull tight again. -
Secure the knot:
Place a tiny drop of super glue or jewelry cement directly onto the knot. Be very careful not to get glue on the surrounding beads, as it can cloud their finish. -
Hide the mechanics:
Once the glue is tacky but not fully hard, slide one of the adjacent beads (ideally a beads with a larger hole if possible) over the knot to conceal it. -
Trim the excess:
Wait for the glue to cure completely according to the package instructions. Then, use sharp scissors to trim the excess cord tails as close to the bead as possible without snipping the knot.
Add More Texture
Swap the standard round gold spacers for heishi-style disc spacers or faceted gold beads. This adds extra sparkle and makes the bracelet feel more expensive.
Slip on your new creation and enjoy that effortless summer vibe all year round
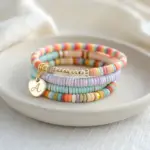
Pastel Sorbet Rainbow Heishi Bracelet
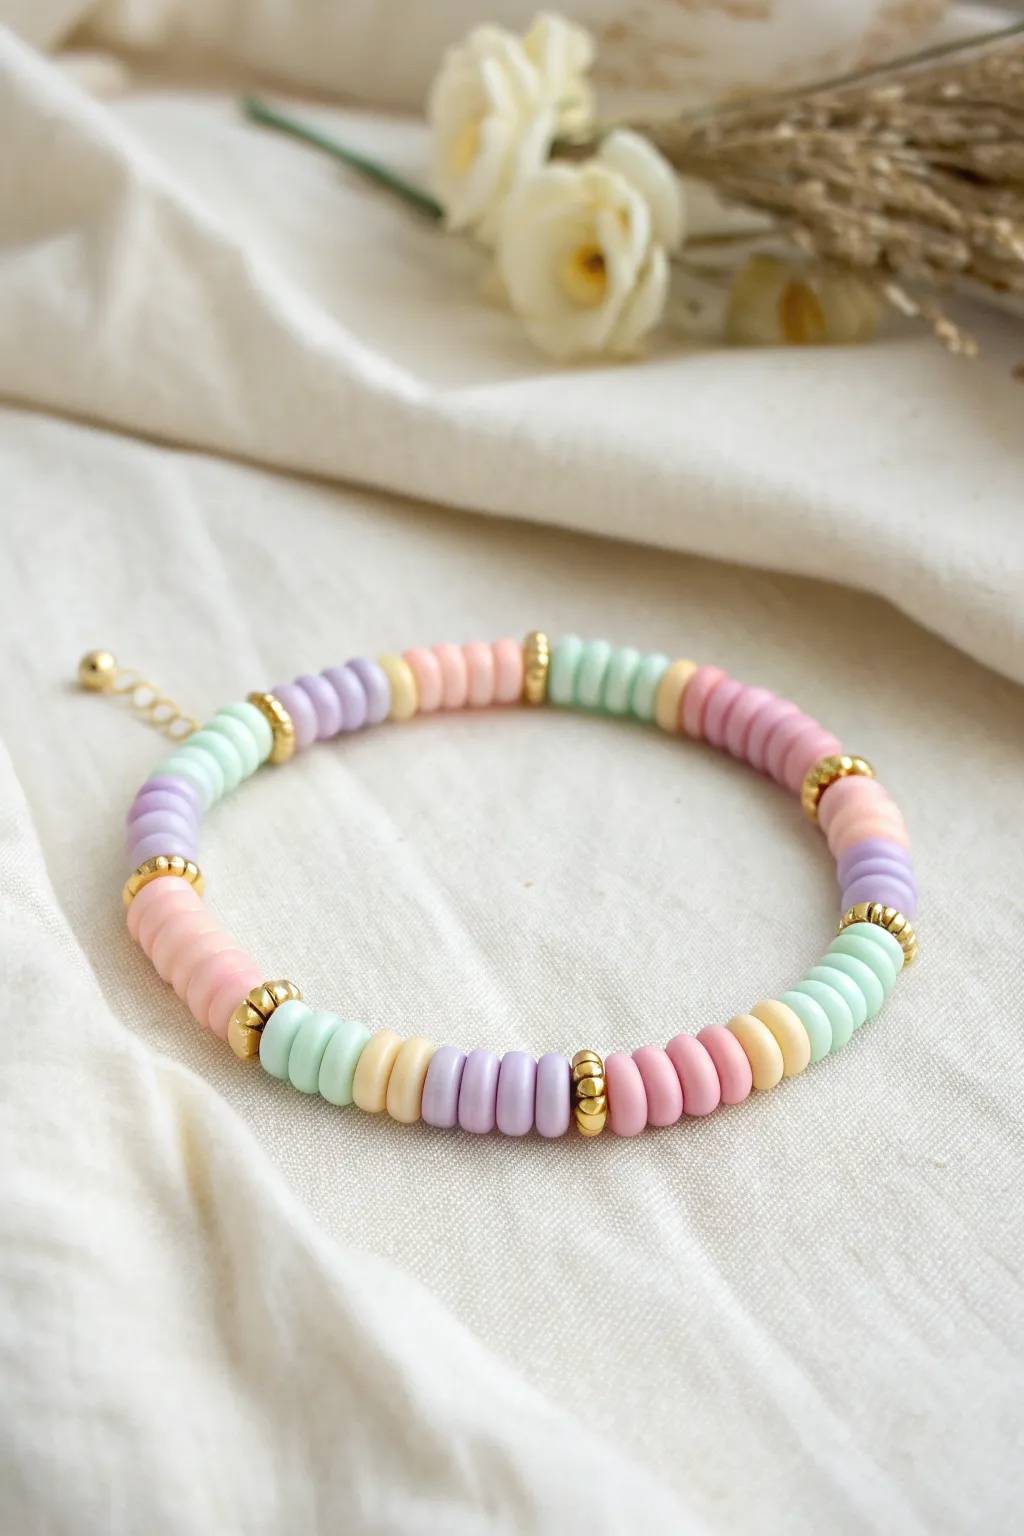
Capture the soft sweetness of summer sorbet with this delightful pastel bracelet. Featuring a gentle rainbow of polymer clay heishi beads accented by gleaming gold spacers, it’s a perfect accessory for stacking or wearing as a dainty solo piece.
Step-by-Step Guide
Materials
- 6mm Heishi (polymer clay) disc beads in pastel pink
- 6mm Heishi disc beads in pastel peach/coral
- 6mm Heishi disc beads in pastel yellow
- 6mm Heishi disc beads in mint green
- 6mm Heishi disc beads in lilac or lavender
- Gold tone metallic spacer beads (rounded disc or rondelle shape)
- Strong elastic bead cord (0.8mm or 1mm recommended)
- Jewelry glue (e.g., G-S Hypo Cement)
- Scissors
- Gold crimp bead cover (optional, to hide knot)
- Gold bead stopper or binder clip
- Small jump ring and charm (optional, seen in photo near clasp area)
Step 1: Preparation & Planning
-
Measure your wrist:
Wrap a piece of string around your wrist to find your comfortable size. Add about 1/2 inch to this measurement to account for the thickness of the beads. -
Cut the cord:
Cut a length of elastic cord about 10-12 inches long. Having extra length makes tying the final knot much easier than struggling with short ends. -
Pre-stretch the elastic:
Hold the cord firmly at both ends and give it several gentle tugs. This is a crucial step I always do to prevent the bracelet from stretching out permanently after you wear it. -
Secure the end:
Place a bead stopper or a simple binder clip on one end of the cord so your beads don’t slide off while you work.
Uneven Blocks?
Don’t stress if bead thicknesses vary. Instead of counting beads, measure blocks by eye (e.g., 0.5cm of pink) to keep color distinct segments visually consistent.
Step 2: Beading the Pattern
-
Start the sequence:
Begin by threading on a gold spacer bead. This will act as the divider between your color sections. -
Add the first color block:
The pattern uses blocks of roughly 4 to 6 beads of a single color. Start with your pastel pink heishi beads, threading 4 or 5 of them onto the cord. -
Insert a gold spacer:
Slide on another gold metallic spacer bead to cap off the pink section. -
Create the second block:
Add 2 pastel yellow beads. Notice in the design that the yellow segments are sometimes shorter, acting as accent bridges between larger color blocks. -
Continue the rainbow:
Thread on 4 mint green beads, followed by a gold spacer. -
Add purple tones:
Add a block of 4 lilac beads, followed by another gold spacer. -
Complete the cycle:
Finish the color rotation with a block of peach/coral beads, then a gold spacer. Repeat this entire sequence (Pink – Yellow/Accent – Green – Lilac – Peach) until you reach your desired length.
Pro Tip: Seamless Look
Use a gold crimp cover instead of just hiding the knot. Place it over your knot and squeeze it shut with pliers to make it look just like another gold spacer bead.
Step 3: Finishing Touches
-
Check the fit:
Wrap the unfinished strand around your wrist to ensure it fits comfortably without gaps or pinching. -
Tie the knot:
Remove the bead stopper. Tie the two ends together using a surgeon’s knot (loop the clear cord through twice before pulling tight) for extra security. -
Secure with glue:
Dab a tiny drop of jewelry glue onto the knot. Let it dry for a specific moment before trimming—usually just a minute or two helps the glue set. -
Hide the knot:
If possible, gently tug the cord so the knot slides inside one of the gold spacer beads or the adjacent clay bead to hide it. -
Optional charm:
If you wish to replicate the dangling detail shown on the left side of the image, attach a small gold jump ring and existing charm chain to the loop before tying, or attach it to a jump ring placed between beads. -
Trim excess cord:
Once the glue is fully cured, snip off the excess elastic tails as close to the knot as possible without cutting the knot itself.
Now you have a refreshing wrist accessory that brings a pop of soft color to any outfit
Monochrome With One Bold Punch Color
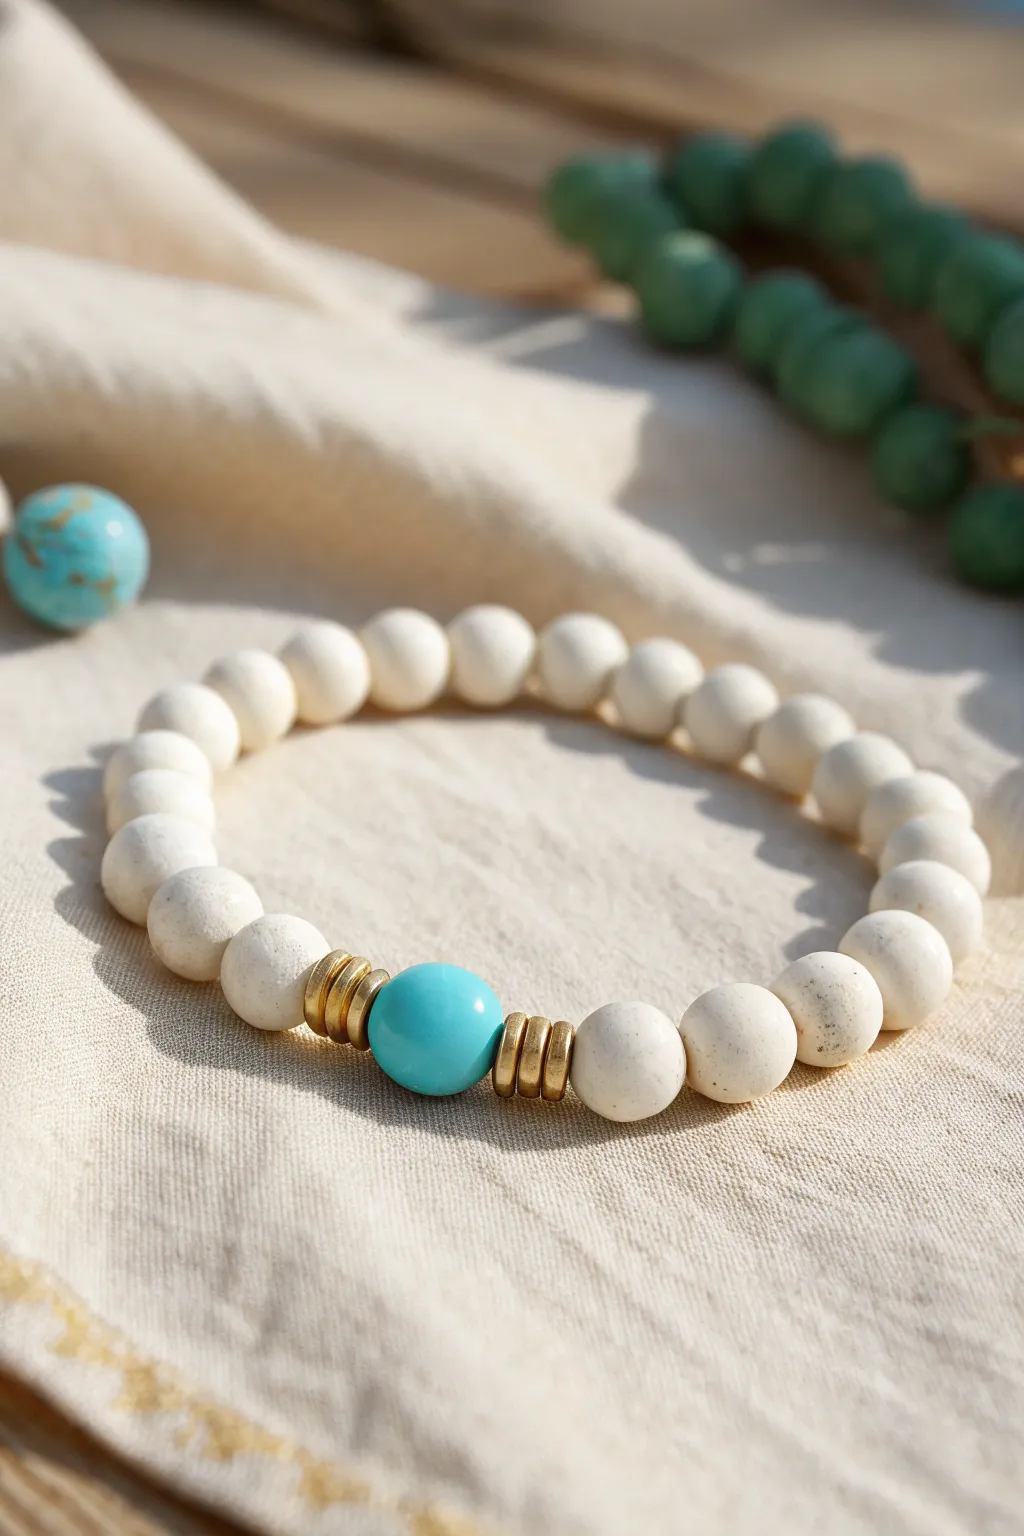
This elegant bracelet balances a creamy monochrome palette with a single, vibrant punch of turquoise for a sophisticated touch. The matte finish of the white beads contrasts beautifully with the shine of the gold spacers, creating a versatile accessory perfect for stacking.
Detailed Instructions
Materials
- Matte white stone beads (8mm or 10mm), also known as white turquoise or magnesite
- One large turquoise bead (10mm or 12mm)
- Six gold disc spacer beads (heishi style)
- Strong elastic cord (0.8mm or 1.0mm recommended)
- Jewelry glue or clear nail polish
- Scissors
Step 1: Preparation
-
Measure your wrist:
Wrap a flexible measuring tape around your wrist to find your size. Add about half an inch to this measurement to ensure the bracelet fits comfortably without pinching. -
Cut the cord:
Cut a piece of elastic cord roughly 10 inches long. I like to cut a little extra length just to make the final knotting process easier to manage. -
Pre-stretch the elastic:
Hold the cord at both ends and give it several firm tugs. This pre-stretching step helps prevent the bracelet from sagging or loosening after you’ve worn it a few times.
Step 2: Stringing the Beads
-
Start the base row:
Begin threading the matte white stone beads onto the elastic. You will want to string about half of the total white beads needed for your wrist size first. -
Check symmetry:
Lay the strung section against a ruler or your wrist. You want the focal point to sit roughly in the middle, so pausing here helps you gauge the halfway point. -
Add the first spacers:
Thread three gold disc spacer beads onto the cord. Ensure they sit flush against the last white bead. -
Place the focal bead:
Slide on your single bright turquoise bead. This is the ‘bold punch’ of the design, so make sure it is free of blemishes. -
Finish the focal section:
Add the remaining three gold disc spacer beads immediately after the turquoise bead. -
Complete the circle:
Continue threading the rest of your matte white beads until the strand reaches your desired total length. -
Test the fit:
Wrap the unfinished strand around your wrist one last time to double-check the sizing before you commit to the knot.
Knot Keeps Slipping?
If the elastic feels too slick, try coating the knot area with a little beeswax or roughening the cord ends slightly before tying for better grip.
Step 3: Finishing Touches
-
Tie the knot:
Bring the two ends of the elastic together. Tie a simple overhand knot, but don’t pull it tight yet. -
Secure with a surgeon’s knot:
Follow up with a surgeon’s knot—this is like a standard shoelace knot, but you loop the end through twice before pulling tight. This extra loop adds significant security. -
Tighten firmly:
Pull the cords firmly away from each other to tighten the knot close to the beads. You should see the elastic stretch slightly as the knot secures. -
Apply adhesive:
Dab a tiny drop of jewelry glue or clear nail polish directly onto the knot. Let this dry for a few minutes to ensure it won’t slip. -
Trim the ends:
Once dry, use your scissors to trim the excess elastic cord. Leave about 1mm of tail to prevent the knot from unraveling. -
Hide the knot:
Gently pull the elastic until the knot slides inside the hole of the nearest white bead, hiding it completely from view.
Mix Up The Metallics
Swap the gold spacers for copper or antiqued silver discs to change the vibe from preppy to rustic while keeping the same layout.
Enjoy styling your new bracelet solo or as part of a cheerful stack
Nautical Stripe Clay Bead Bracelet
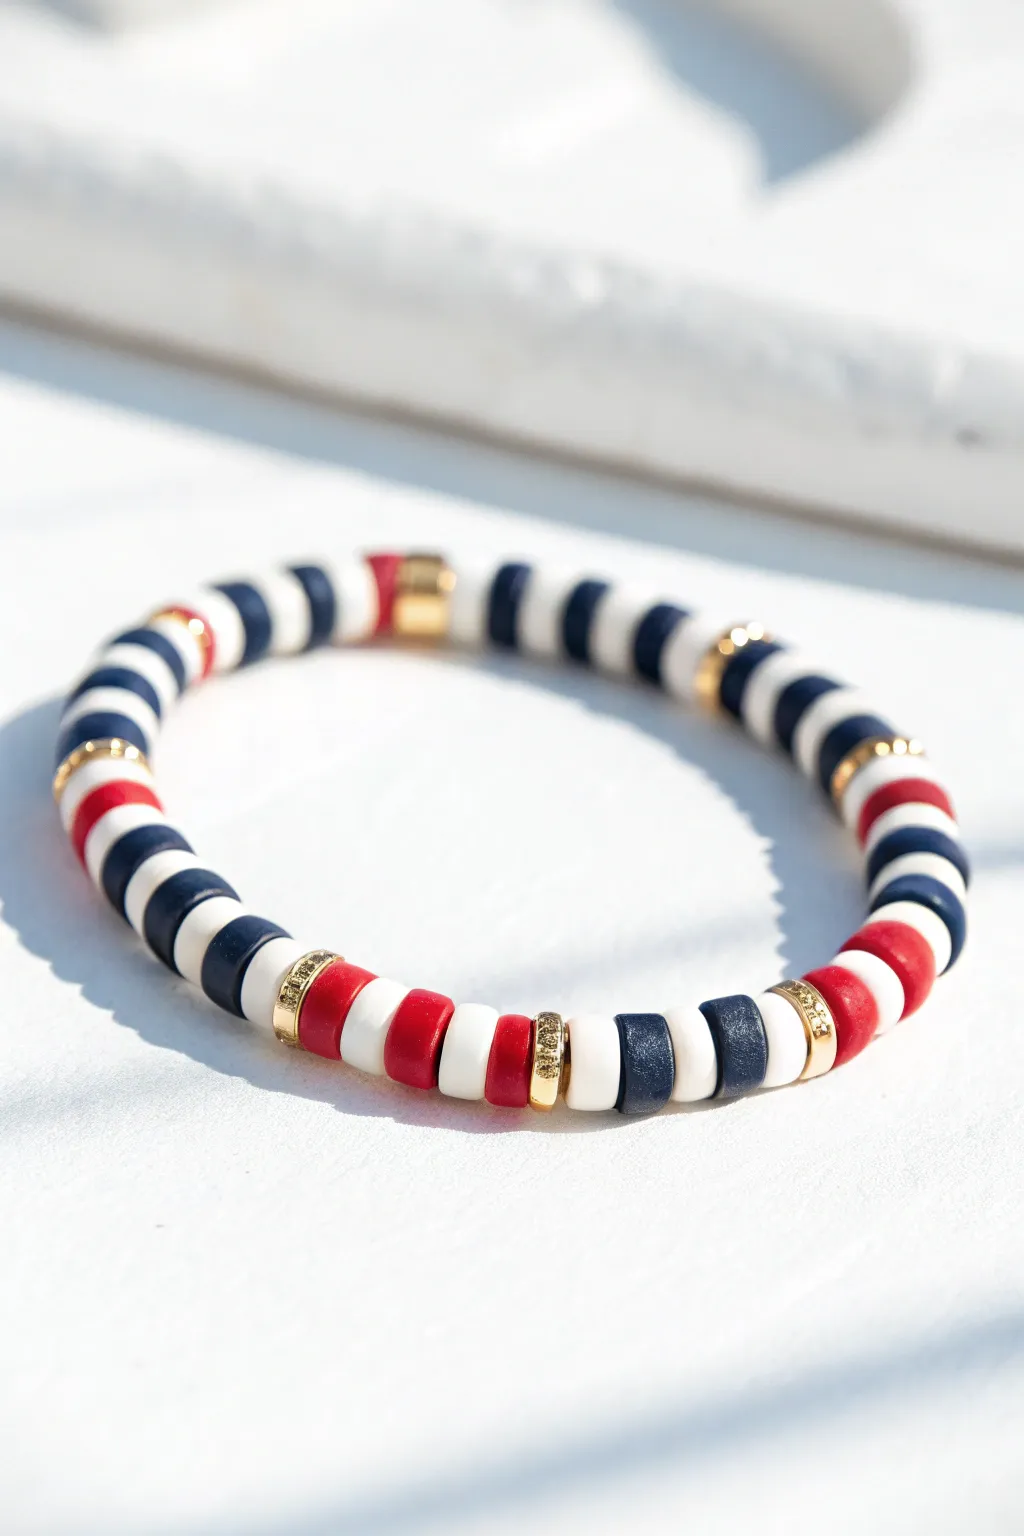
Bring a touch of coastal prep to your wrist with this classic nautical stripe design. The pattern alternates crisp navy and white clay beads with pops of red and elegant gold spacers for a timeless summer look.
Step-by-Step Guide
Materials
- Navy blue polymer clay heishi beads (6mm)
- White or cream polymer clay heishi beads (6mm)
- Red polymer clay heishi beads (6mm)
- Gold tone disc spacer beads (some plain, some cubic zirconia pave if available)
- Elastic cord (0.8mm or 1mm thickness)
- Jewelry crafting glue or clear nail polish
- Scissors
Step 1: Preparation
-
Measure your wrist:
Wrap a piece of string or a soft measuring tape around your wrist to find your size. Add about half an inch to this measurement for a comfortable fit that isn’t too tight. -
Cut the cord:
Cut a piece of elastic cord roughly 10-12 inches long. Having extra length makes it much easier to tie the final knot securely without fumbling. -
Pre-stretch the elastic:
I always pre-stretch my cord by pulling it gently a few times. This prevents the bracelet from stretching out and becoming loose immediately after you wear it. -
Secure the end:
Place a piece of tape over one end of the cord or attach a binder clip. This acts as a stopper so your beads don’t slide right off while you are stringing.
Step 2: Creating the Pattern
-
Start with the navy base:
Begin the pattern by threading on five navy blue clay beads. This establishes the dark stripe section. -
Add the first white stripe:
Follow the navy section with a single white clay bead. -
Create the main contrast:
Thread on five more navy blue beads to complete the first significant dark block. -
Insert a gold accent:
Slide on one gold disc spacer. You can use a textured or pave spacer here for extra sparkle, or keep it simple with a plain gold disc. -
Build the red accent section:
The red section is the focal point. String on one red bead, followed by one white bead, then another red bead. This creates a mini-stripe within the color pop. -
Close the accent with gold:
Add another gold spacer bead to frame the red and white section symmetrically. -
Repeat the pattern structure:
Now, return to the base colors. Add five navy beads, one white bead, and five navy beads again. -
Add a single gold spacer:
Place a single gold spacer bead after your navy block. -
Create a white block:
String on three white beads, followed by one red bead, and three more white beads. This varies the pattern slightly for visual interest. -
Continue beading:
Repeat these alternating sequences—blocks of navy separated by white tick marks, and blocks of red/white framed by gold—until you reach your desired length. -
Check the fit:
Wrap the unfinished strand around your wrist to check the size. Ideally, the ends should meet comfortably without gaps or stretching. Add or remove a few beads if necessary.
Knot Slipping?
If your elastic knot feels slippery, pull it very tight so the elastic thins out, then tie one more standard overhand knot on top before gluing. This locks the tension.
Step 3: Finishing Up
-
Prepare to tie:
Remove the tape or clip from the end. Hold both ends of the elastic cord firmly. -
Tie the knot:
Tie a surgeon’s knot. This is like a standard shoelace knot, but you loop the cord through twice before pulling tight. Repeat this knot 2-3 times for security. -
Secure with glue:
Dab a tiny drop of jewelry glue or clear nail polish directly onto the knot. This prevents it from slipping undone over time. -
Hide the knot:
Once the glue is tacky but almost dry, slide the nearest bead over the knot to hide it inside the bead’s hole. This gives the bracelet a professional, seamless finish. -
Trim the excess:
Use your scissors to trim the remaining tails of the elastic cord close to the bead, being careful not to cut the main knot.
Pattern Play
Swap the red beads for emerald green or mustard yellow to change the vibe from nautical to varsity prep while keeping the same stripe layout.
Wear your new nautical bracelet stacked with a gold watch or other bead strands for the ultimate summer accessory
Gingham-Inspired Checker Pattern Stack
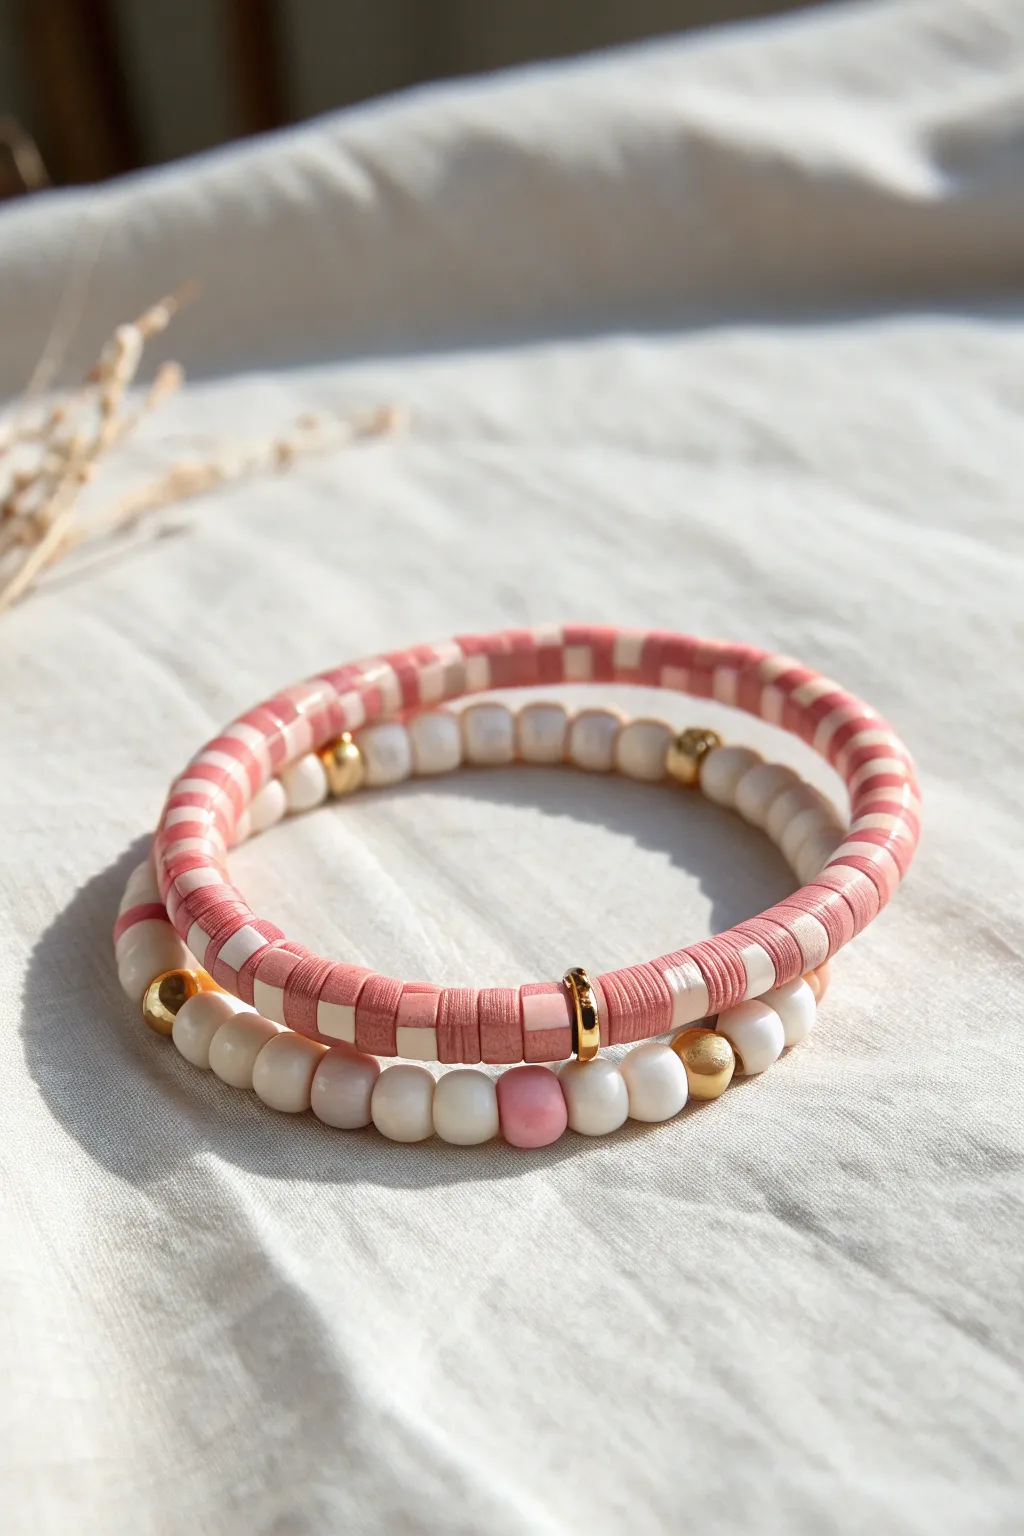
This adorable bracelet duo features a clever take on the classic gingham print using alternating clay heishi beads, paired perfectly with a simple beaded strand. It’s a sweet, summery stack that combines texture and pattern for a preppy, polished look.
How-To Guide
Materials
- Flat clay heishi beads in dark rose pink
- Flat clay heishi beads in light blush pink
- Flat clay heishi beads in cream/white
- Small square tile beads in white or cream
- Small round glass beads in white/cream (approx 4mm)
- Medium round pony beads or similar round beads in cream (approx 6-8mm)
- Accent round bead in pink (approx 6-8mm)
- Gold spacer beads (heishi style and round)
- Strong elastic cord (0.8mm recommended)
- Jewelry glue or clear nail polish
- Scissors
Step 1: Planning and Prep
-
Measure your wrist:
Before you start stringing, wrap a piece of string around your wrist to find your comfortable size. Add about half an inch to this measurement so the bracelets aren’t too tight. -
Cut the elastic:
Cut two lengths of elastic cord, each about 10-12 inches long. Having extra length makes tying the final knots much easier than struggling with short ends. -
Pre-stretch the cord:
Give each piece of elastic a few gentle tugs. This pre-stretching prevents the bracelets from sagging or stretching out permanently after you’ve worn them a few times.
Step 2: Creating the Gingham Bracelet
-
Start the pattern:
Thread a single gold heishi spacer onto your first elastic cord to act as a focal point or knot cover later. This adds a subtle metallic shine to the design. -
Build the dark blocks:
String about 6-8 dark rose pink heishi beads. This creates the ‘solid’ block of the gingham pattern. -
Add the lighter element:
Thread on 3-4 cream or light blush heishi beads next. This variation in color creates the visual check effect. -
Insert the check accent:
Unlike standard stripes, this design uses a small white square tile bead occasionally to mimic the intersection of a plaid pattern. Slide one onto the cord now. -
Continue the sequence:
Repeat the pattern: a block of dark pink, a block of light blush, and the occasional white square tile. Feel free to vary the pattern slightly as seen in the photo to make it organic. -
Check the length:
Wrap the strand around your wrist periodically. Continue adding sections until the ends meet comfortably without stretching the cord.
Knot Slipping?
If your elastic is slippery, try sanding the very ends of the cord lightly with a nail file before tying. The rough texture helps the knot grip tightly.
Step 3: Creating the Cream Beaded Companion
-
Start the second strand:
Take your second piece of elastic. We will alternate bead sizes to create texture. Start with a gold round spacer bead. -
String the base beads:
Thread on your cream-colored round beads. For this design, you can mix standard smooth round beads with slightly smaller glass beads for variety. -
Create the pattern:
Alternate between the larger cream pony-style beads and the smaller white spacer beads. Adding a gold spacer bead every inch or so ties it visually to the first bracelet. -
Add the pop of pink:
Halfway through the strand, insert a single round pink bead centered between two cream beads. This small detail connects the color palette to the gingham bracelet. -
Finish stringing:
Continue the pattern until this bracelet matches the length of your first one.
Mix It Up
Swap the pinks for navy and light blue for a nautical gingham look, or try sage green and white for an earthier aesthetic.
Step 4: Finishing Touches
-
Tie the first knot:
Take the ends of the gingham bracelet and tie a simple overhand knot. Pull it tight, but be careful not to snap the elastic. -
Secure with a surgeon’s knot:
Tie a second knot, but this time loop the elastic through twice before pulling tight (a surgeon’s knot). I find this holds much better than a standard square knot. -
Glue the knot:
Apply a tiny dot of jewelry glue or clear nail polish to the knot. Let it dry completely before trimming the excess cord close to the knot. -
Repeat for the second bracelet:
Tie, secure, and glue the cream beaded bracelet in the same manner. -
Hide the knots:
If possible, gently tug the elastic so the knot slides inside one of the larger beads or adjacent to a gold spacer to hide it from view.
Now you have a charming, coordinated set ready to stack or share with a friend
Argyle Diamond Illusion With Heishi Beads
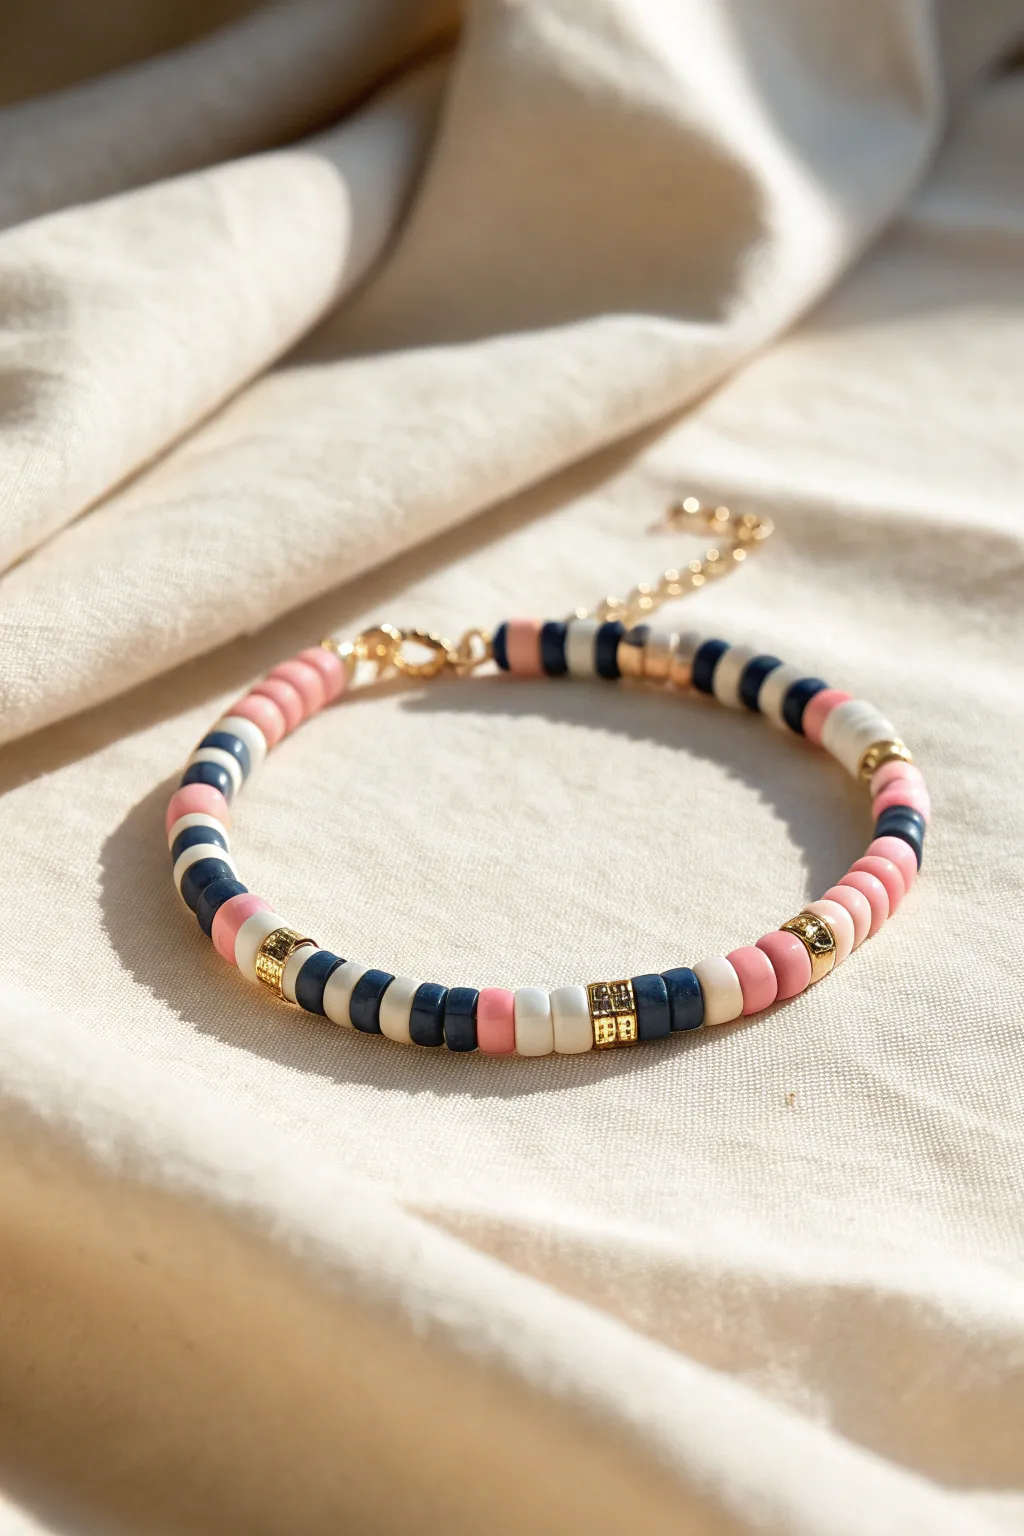
Capture the classic preppy aesthetic with this crisp color-blocked design featuring navy, pink, and white clay disc beads. The addition of textured gold spacers elevates the look from casual summer craft to stylish accessory.
Step-by-Step
Materials
- Polymer clay heishi beads (6mm or 4mm) in: Navy Blue
- Polymer clay heishi beads (6mm or 4mm) in: Pastel Pink
- Polymer clay heishi beads (6mm or 4mm) in: White/Cream
- Gold tone square spacer beads (rhinestone or textured)
- Gold tone round spacer beads
- Elastic beading cord (0.8mm recommended)
- Gold tone lobster clasp
- Gold tone jump rings and chain extender
- Jewelry glue (GS Hypo Cement recommended)
- Scissors
Step 1: Planning and Prep
-
Measure your wrist:
Wrap a measuring tape loosely around your wrist to determine the desired length. Add about 0.5 inches to this measurement to account for the thickness of the beads. -
Cut the cord:
Cut a piece of elastic cord that is at least 4-5 inches longer than your target length. This extra length makes tying the final knots much easier. -
Pre-stretch the elastic:
Give the elastic cord a few firm tugs. This pre-stretching prevents the bracelet from loosening up and sagging after you wear it for the first time. -
Secure the end:
Place a piece of tape on one end of the cord or attach a binder clip so your beads don’t slide off while you work.
Spacer Strategy
Don’t skip the tiny round gold spacers between color changes. They act like visual punctuation marks, making each color block look deliberate and clean rather than messy.
Step 2: Beading the Pattern
-
Start the center sequence:
Begin roughly in the middle of your design to establish the pattern. Thread on a square gold spacer, followed by two navy beads. -
Add contrast:
Add one thin gold round spacer, then a single white bead, then another gold round spacer. -
Continue the sequence:
Finish this sequence block with two more navy beads, followed by another square gold spacer. -
Transition to pink:
String on two white beads to act as a buffer zone. Then, add a block of three to four solid pink beads. -
Create the repeating pattern:
Now, recreate the navy section: two navy beads, a gold round spacer, a white bead, a gold round spacer, and two navy beads. -
Mix up the lengths:
The charm of this bracelet is irregular blocking. I like to switch between short bursts of color (2-3 beads) and longer sections (5-6 beads) of solid pink or stripes. -
Add stripe details:
Create a ‘stripe’ section by alternating single beads: Navy, White, Navy, White, Navy. This mimics the lines found in preppy patterns. -
Incorporate more gold:
Interperse the square gold spacers roughly every 1.5 to 2 inches to keep the metallic elements balanced around the wrist. -
Check the fit:
Wrap the unfinished strand around your wrist. Continue adding bead sections until the two ends meet comfortably without stretching the cord.
Mix & Match Stack
Make two companion bracelets: one solid navy with gold accents, and one solid pink. Wearing all three together creates a curated, high-end ‘arm party’ look.
Step 3: Finishing Touches
-
Attach the hardware:
String on a crimp bead (optional) and your jump ring or clasp loop at one end. Loop the elastic back through the crimp bead/last bead. -
Tie the knot:
If not using crimps, simply tie a surgeon’s knot (right over left, left over right) to join the two ends of the elastic together tightly. -
Secure the knot:
Apply a tiny dab of jewelry glue specifically to the knot. Let it dry completely before trimming the excess cord. -
Attaching the clasp:
Use jump rings to attach the lobster clasp to one side and the chain extender to the other if you didn’t string them directly onto the elastic. -
Hide the knot:
Ideally, gently pull the glued knot inside the hole of a neighboring bead to hide it from view for a professional finish.
Now you have a chic customized accessory that pairs perfectly with denim or sundresses
Preppy Stack With Mixed Bead Shapes
This vibrant stack combines classic flat clay discs with smooth round beads for gorgeous textural contrast. The mix of bold blue, coral, and yellow alongside pearly whites creates a perfectly collected look that feels effortless.
Step-by-Step Guide
Materials
- Flat clay heishi beads (Dark Blue, Coral Pink, Mustard Yellow)
- 6mm or 8mm round glass or porcelain beads (White/Milky)
- Silver ornate spacer beads (various patterns)
- Silver daisy spacer beads
- Silver jump rings (4mm and 6mm)
- Silver sun or celestial charm
- Elastic stretch cord (0.8mm clear)
- Jewelry glue or clear nail polish
- Scissors
Step 1: Planning the Stack
-
Measure your wrist:
Wrap a piece of string around your wrist to find a comfortable fit, then add about half an inch to that measurement. -
Cut the cord:
Cut three lengths of elastic cord, making each one about 10-12 inches long. Having extra length makes tying the final knots much less frustrating. -
Pre-stretch the elastic:
Gently tug on each piece of cut elastic several times. This pre-stretching step prevents the bracelets from stretching out and becoming loose after the first wear.
Step 2: The Blue & Yellow Bracelets
-
Secure the end:
Place a piece of tape or a bead stopper on one end of your first cord to stop beads from sliding off while you work. -
Start the blue strand:
Begin threading the dark blue clay heishi beads. Aim for a section about 1.5 inches long. -
Add metal accents:
Slide on a decorative silver spacer bead. I like to sandwich these between two slightly different beads or just place them as standalone highlights. -
Create a focal section:
For the bracelet showing the yellow section underneath, create a block of mustard yellow heishi beads in the middle of your strand, flanked by silver spacers. -
Complete the blue pattern:
Continue adding blue clay beads until you reach your desired length, inserting a silver spacer every inch or so for rhythm. -
String the coral strand:
Repeat the process for the second cord using coral pink beads. To mimic the photo, use grouping of three delicate daisy spacers occasionally instead of single larger spacers.
Knot Slipping?
If your elastic knot feels insecure, try wetting the knot slightly with water before tightening it. This friction helps the knot grip itself better before gluing.
Step 3: The White Round Bead Strand
-
Switch bead texture:
For the third bracelet, use the round white beads. This change in shape is key to the ‘mixed stack’ aesthetic. -
String the beads:
Thread the round beads continuously. Because these are larger than the flat discs, this strand will fill up much faster. -
Add the charm connection:
When you have strung all the white beads, slide on a closed silver jump ring or a large-hole bail bead before tying it off. This will hold your charm later.
Mix It Up
Add alphabet beads into the flat clay bead sections to spell out a name or word for a personalized touch.
Step 4: Finishing Touches
-
Tie the knots:
For each bracelet, remove the tape/stopper and bring the ends together. Tie a surgeon’s knot (looping the elastic through twice) and pull tight. -
Secure with adhesive:
Place a tiny drop of jewelry glue or clear nail polish directly onto the knot. Let it dry completely before trimming. -
Hide the knot:
Once dried and trimmed close, gently tug the elastic to pull the knot inside one of the adjacent beads if the hole is large enough. -
Attach the charm:
Open a small jump ring using pliers (twist, don’t pull). Hook it through your silver sun charm and then onto the connection point on the white bracelet. -
Close the ring:
Twist the jump ring back until closed completely so the charm stays secure.
Stack them all together and enjoy your casual, beachy new accessory set
Double-Strand Twisted Preppy Clay Bracelet
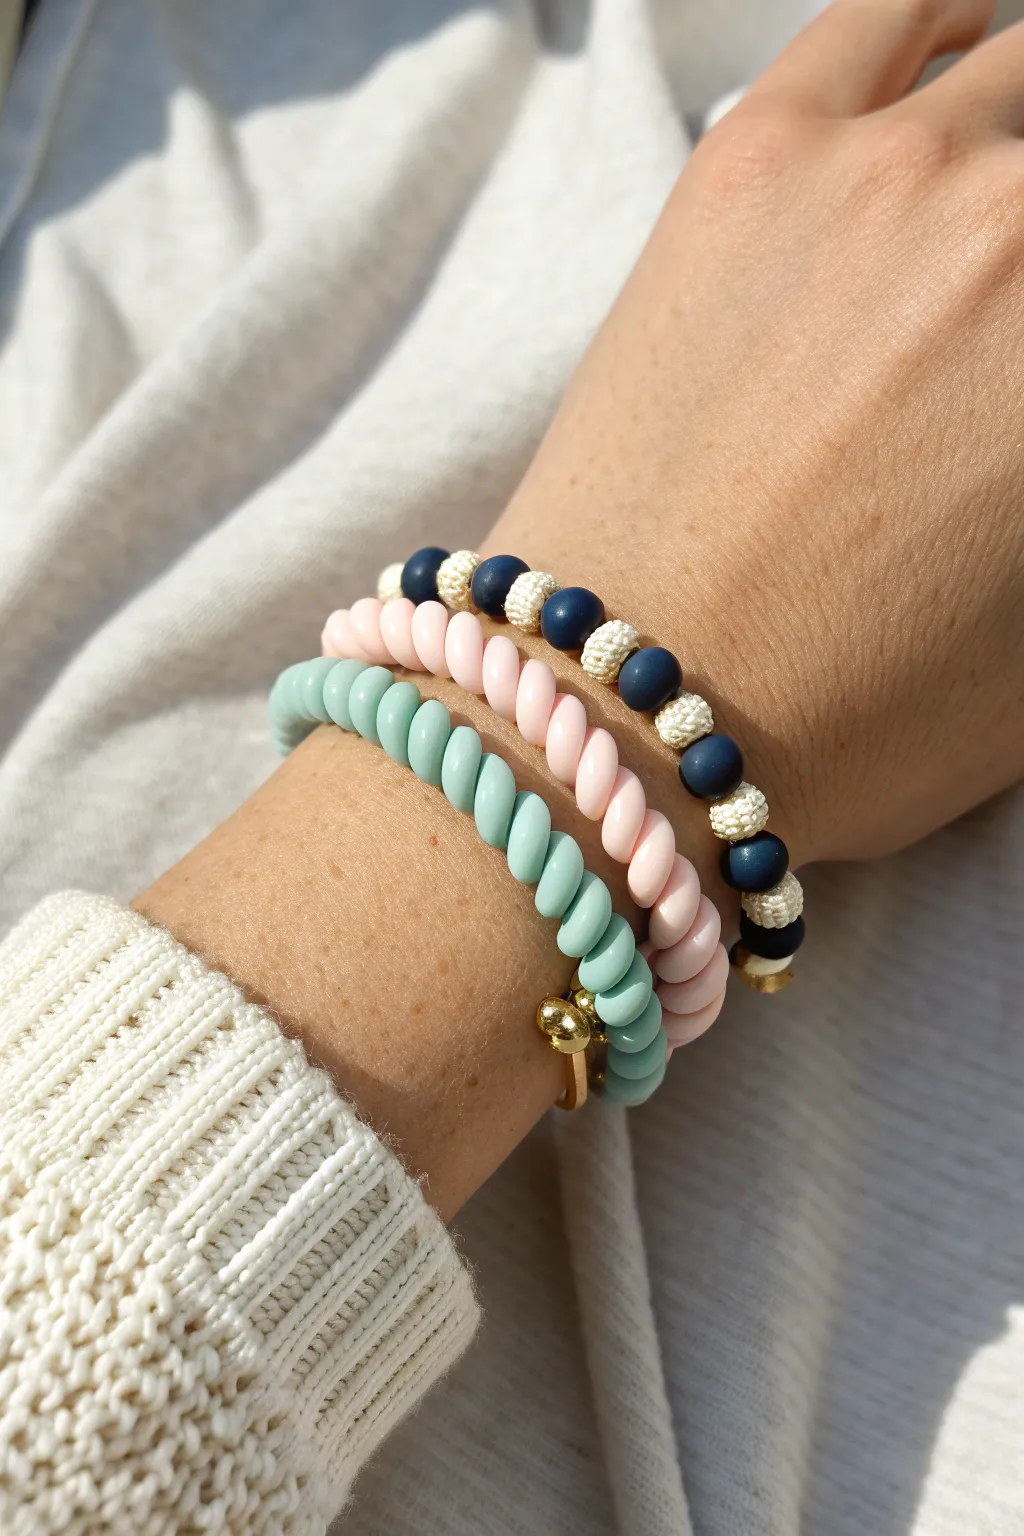
Achieve a chic, mixed-texture look with this perfectly coordinated bracelet stack featuring unique twisted telephone-cord style bands alongside a classic beaded accent. The combination of mint, soft pink, and navy creates a sophisticated yet playful preppy aesthetic that works for any season.
Detailed Instructions
Materials
- Thick silicone twisted ‘telephone cord’ style beads or pre-made bands (Mint Green)
- Thick silicone twisted ‘telephone cord’ style beads (Light Pink)
- Matte round beads, 8mm (Navy Blue)
- Textured woven or ‘monkey fist’ knot beads, 8mm (Cream/Off-white)
- Gold tube spacer beads (curved)
- Gold ball beads (4mm or 6mm)
- Strong elastic cord (0.8mm or 1mm thickness)
- Super glue or jewelry adhesive
- Scissors
Step 1: The Beaded Accent Strand
-
Measure and Cut:
Begin by wrapping your elastic cord loosely around your wrist to find your size. Cut a length of cord that is about 3-4 inches longer than your wrist measurement to allow plenty of room for tying the knot later. -
Pre-stretch the Cord:
Before adding any beads, give your elastic cord a few firm tugs. This pre-stretching step helps prevent the bracelet from sagging or loosening immediately after you wear it for the first time. -
Start the Pattern:
Thread on one matte navy blue bead. Follow this immediately with one cream textured woven bead. This alternating pattern creates the classic nautical contrast seen in the top bracelet. -
Continue Beading:
Repeat the alternating pattern—navy, cream, navy, cream—until you have reached the desired length. Check the fit against your wrist periodically; it should sit comfortably without pinching. -
Secure the Strand:
Tie the ends together using a surgeon’s knot (loop the elastic twice instead of once on the first crossover). Pull it tight. Add a tiny dot of jewelry glue to the knot, let it dry, and trim the excess cord.
Knot Hiding Trick
If using a gold tube bead, try to position your final knot so it can be pulled inside the tube. This completely conceals the mechanics for a professional finish.
Step 2: The Twisted Silicone Strands
-
Prepare the Mint Strand:
For the thick twisted bracelets, you are essentially stringing large, continuous spiral segments. Cut a piece of heavy-duty elastic cord (1mm is best here for stability). -
Thread the Twisted Beads:
Thread the mint green twisted silicone segments onto the cord. These beads interlock to look like a continuous phone cord. -
Add Metal Accents:
To break up the texture and add a focal point, slide on a curved gold tube spacer followed by a gold ball bead. This adds that touch of polish seen at the bottom of the stack. -
Check the Fit:
Wrap the strand around your wrist. Because the twisted material is chunky, you might need a slightly larger circumference than the beaded bracelet to ensure it fits comfortably. -
Tie and Glue:
Secure this bracelet with a strong double knot. Because the hole in these twisted beads is large, try to hide the knot inside the gold tube bead or one of the silicone segments if possible. -
Prepare the Pink Strand:
Repeat the process for the pink bracelet. Cut a new length of heavy-duty elastic cord. -
String the Pink Segments:
Thread on your light pink twisted silicone segments. I find it helpful to lay this next to the mint one to ensure they will lay nicely together on the wrist. -
Add Pink Accents:
If desired, add similar gold hardware to this strand, or keep it simple with just the twisted texture to let the color stand out. -
Final Secure:
Knot the pink strand securely, add a dab of glue for extra security, and trim the ends close to the knot once dry. -
Stack and Style:
Slide all three bracelets onto your wrist. Arrange them with the beaded strand at the top (furthest from the hand) and the two twisted strands below for the complete look shown in the image.
Level Up: Charm Addition
Attach a small gold initial charm or a tiny tassel to the gold bead section on the mint bracelet to personalize the stack.
Wear your new textured trio with a cozy sweater to show off that perfect preppy contrast