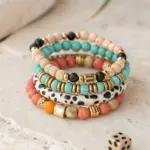
Blue just has that clean, coastal, preppy energy—especially when you build it up in clay heishi beads and let the sunshine do the rest. Here are my favorite blue bracelet ideas to copy, mix, and stack until your wrist looks like a tiny summer mood board.
Classic Navy and White Prep Stack
This classic color combination brings a crisp, nautical vibe to your wrist with alternating blocks of navy and cream. The stack is elevated by a standout floral bracelet that adds a delicate touch of texture to the bold stripes.
Step-by-Step
Materials
- Navy blue polymer clay heishi beads (6mm)
- Cream or off-white polymer clay heishi beads (6mm)
- Small round gold spacer beads (optional)
- Elastic jewelers cord (0.8mm gauge)
- Super glue or jewelry cement
- Scissors
- Bead stopper or masking tape
- Ruler or measuring tape
Step 1: Planning Your Stack
-
Measure your wrist:
Wrap a measuring tape specifically around the part of your wrist where you want the bracelets to sit. Add about 0.5 to 1 inch to this measurement depending on how loose you like your fit. -
Cut the cord:
Cut five lengths of elastic cord, making each one about 10 inches long. This extra length is crucial for tying secure knots later without struggling. -
Secure the ends:
Attach a bead stopper or simply fold a piece of masking tape over one end of each cord to prevent your hard work from sliding off as you bead.
Step 2: Creating the Striped Bracelets
-
Start the first solid block:
For the first bracelet, begin by threading about 1 inch of cream beads onto the cord. -
Switch colors:
Switch to the navy beads and thread another 1-inch section. I like to visually check these against a ruler occasionally to keep the blocks consistent. -
continue the pattern:
Repeat this alternating 1-inch pattern until you reach your desired bracelet length. End with the color opposite to the one you started with so the pattern flows seamlessly when tied. -
Vary the block sizes:
For the subsequent three striped bracelets, try varying the pattern slightly. Make one with longer 1.5-inch sections, or create an asymmetrical look with short navy bursts (5 beads) and long cream sections.
Sticky Situation
If your knot won’t slide into a bead hole, use a toothpick to gently widen the opening of the nearest bead, or simply hide the knot between two beads of the same color.
Step 3: Crafting the Daisy Chain Bracelet
-
Base pattern:
For the center bracelet, start with a section of navy beads (about 15 beads). -
Begin the flower:
Thread 4 cream beads onto the string. These will form the petals of your first half-flower. -
Add the center:
Thread one navy bead (or a gold spacer if preferred) to act as the flower center. -
Loop back:
Take the end of your cord and thread it back through the very first cream bead you added for this flower, going in the same direction you originally beaded. Pull tight to form a loop. -
Complete the petals:
Add 2 or 3 more cream beads to ‘close’ the circle around the center bead. -
Finish the flower:
Thread the cord through the cream bead immediately next to the center bead on the other side to lock the shape into a circle. -
Repeat the motif:
Add another section of 10-15 navy spacer beads, then create another flower. Repeat this until the bracelet is full.
Add Some Shine
Replace the center bead of your clay flowers with a small 3mm gold or silver round bead. The metallic flash adds a luxe, jewelry-store finish to the stack.
Step 4: Finishing Touches
-
Pre-stretch the cord:
Before tying, gently give each bracelet a little stretch. This ‘pre-stretching’ helps prevent the elastic from sagging after the first time you wear it. -
Tie the knot:
Remove the tape or stopper. Tie a standard surgeon’s knot: right over left and under, then left over right and under. Pull the cord ends firmly. -
Secure with glue:
Apply a tiny dab of jewelry cement or super glue directly onto the knot. Let this dry completely before moving it. -
Hide the knot:
Trim the excess cord close to the knot, leaving about 2mm. Gently tug the beads so the knot slides inside the hole of a neighboring bead, making it invisible.
Stack them all together on your wrist for a coordinated, beautifully handcrafted look.


Ocean Gradient Ombré Bracelet
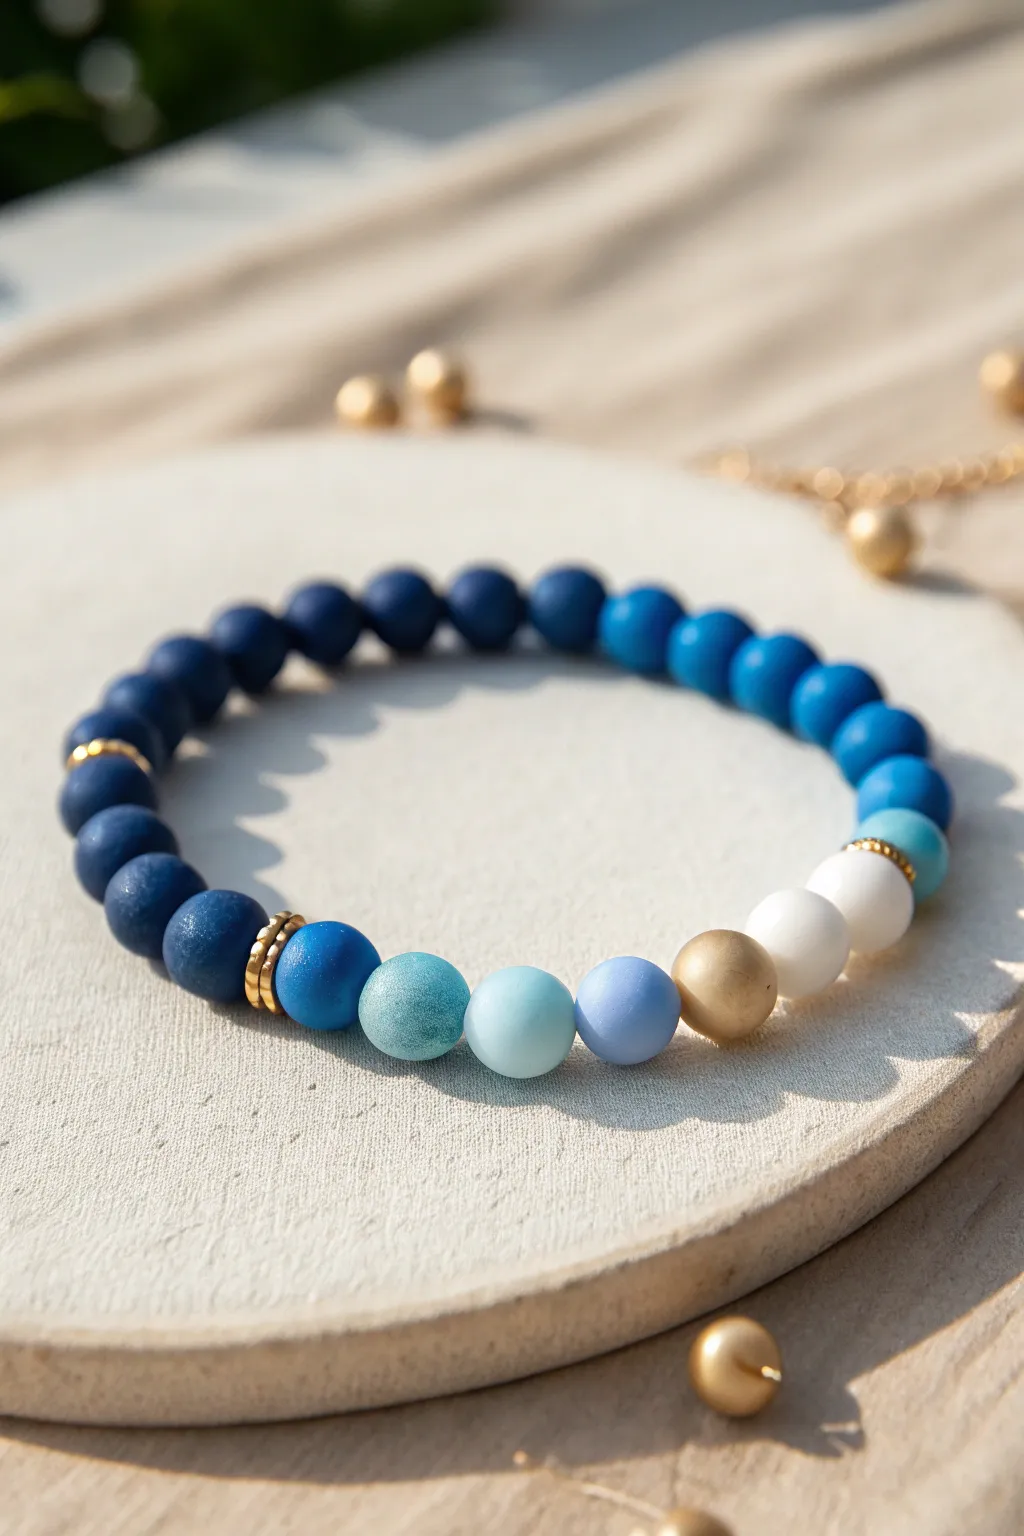
This stunning bracelet captures the depths of the sea with its seamless gradient from midnight blue to frothy white foam. The matte finish of the beads adds a sophisticated touch, making it a perfect preppy accessory that transitions effortlessly from beach days to evening outings.
Step-by-Step Tutorial
Materials
- Matte round beads (8mm or 10mm) in: Navy Blue, Royal Blue, Teal/Aqua, Baby Blue, Pale Lavender/Periwinkle, White
- One large matte gold round bead (feature bead)
- Small gold spacer beads (heishi or thin rondelle shape)
- Small gold spherical bead (optional, for end accent)
- Strong elastic jewlery cord (0.8mm recommended)
- Jewlery glue or clear nail polish
- Scissors
- Bead design board or masking tape
Step 1: Planning the Gradient
-
Lay out the palette:
Begin by sorting your matte beads by color on a bead board or a soft towel. From darkest to lightest, you should have Navy, Royal Blue, Teal, Baby Blue, Periwinkle, and White. -
Establish the pattern:
To recreate the specific look in the photo, you will need approximately 12-14 Navy beads for the back half of the bracelet. -
arrange the transition:
For the front gradient section, arrange one of each color in this specific order: Royal Blue, Teal/Aqua, Baby Blue, Periwinkle, Gold Feature Bead, White, White.
Step 2: Stringing the Beads
-
Prepare the cord:
Cut a piece of elastic cord about 10-12 inches long. Pre-stretch the cord by pulling it gently a few times; this prevents the bracelet from loosening up later. -
Secure the end:
Place a piece of masking tape over one end of the cord or attach a binder clip so beads don’t slip off while you work. -
Start with the dark side:
Thread on your 12-14 Navy Blue beads first. These will sit on the underside of your wrist. -
Add first gold accents:
Slide on three small gold spacer beads. These act as a glamorous separator between the solid navy section and the gradient feature. -
Begin the color shift:
Thread the Royal Blue bead, followed by the Teal/Aqua bead. Notice how the colors are starting to lighten. -
Continue the fade:
Add the Baby Blue bead and then the Periwinkle bead. The matte texture really helps these colors blend softly. -
Insert the focal point:
Place the large matte Gold bead next. This adds a warm contrast to the cool tones. -
Finish the gradient:
Thread on two White beads to represent the ocean foam. -
Final accent:
Add one small gold spacer bead, followed by a final medium blue or teal bead to balance the transition back to the start if needed, though the design usually ends cleanly after the white section.
Knot Slipping Out?
If the knot keeps popping out of the bead hole, the hole might be too small. Try hiding the knot inside the larger gold bead instead, or simply dab clear polish on the knot without hiding it.
Step 3: Finishing Touches
-
Check the fit:
Wrap the unfinished strand around your wrist to check the size. If it’s too tight, add another Navy bead to the back section; if too loose, remove one. -
Tie the knot:
Bring the two ends of the cord together. Tie a standard square knot (right over left, left over right). -
Reinforce the knot:
Pull the cord ends firmly to tighten the knot. I like to tie a second surgeon’s knot (looping through twice) on top for extra security. -
Secure with glue:
Apply a tiny dab of jewelry glue or clear nail polish directly onto the knot. Let it dry for a few minutes. -
Hide the knot:
Once the glue is tacky but not fully hard, slip the knot inside the hole of the nearest large bead (usually a Navy one) to hide it. -
Trim excess cord:
Use sharp scissors to trim the remaining cord tails as close to the bead hole as possible without cutting the knot itself.
Matte Magic
To maintain the ‘frosted’ glass look of matte beads, avoid getting lotions or oils directly on them, as this can make spotty shiny areas appear over time.
Enjoy wearing your new ocean-inspired accessory that brings a calm, seaside vibe to any outfit


Blue and Gold Spacer Pop
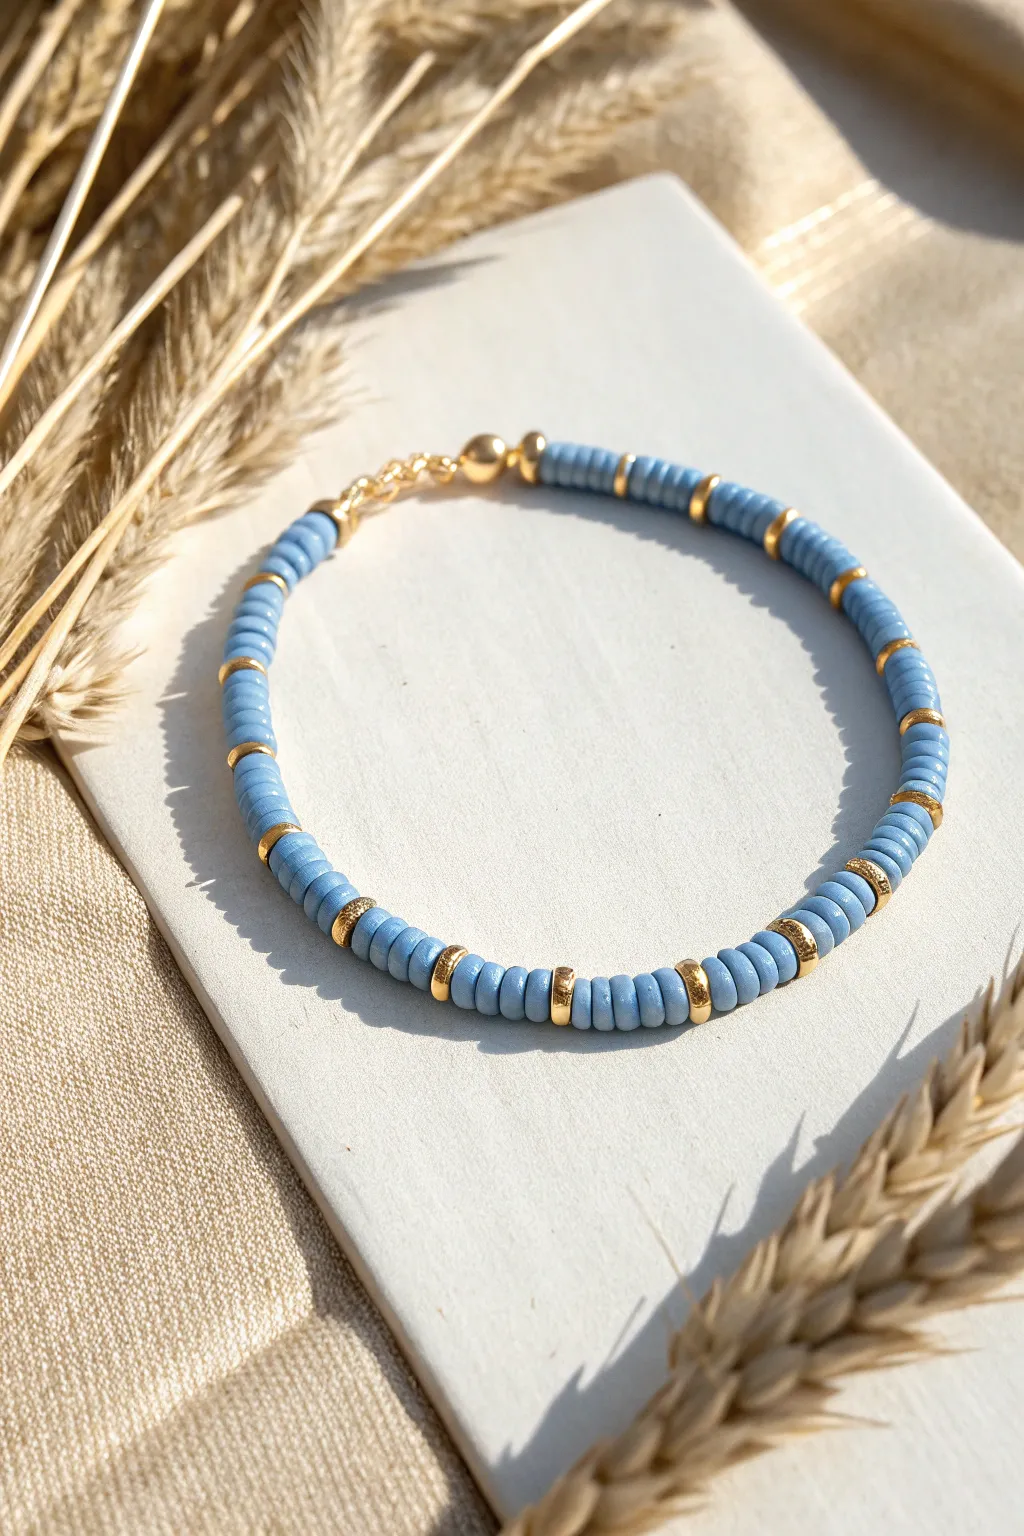
Capture the serene hues of a beach day with this elegant combination of matte blue clay beads and rich gold accents. The rhythmic spacing of gold nuggets breaks up the cool blue tones, creating a sophisticated piece perfect for stacking or wearing solo.
Detailed Instructions
Materials
- 6mm polymer clay disk beads (heishi beads) in cornflower blue or sky blue
- 3-4mm gold spacer beads (nugget style or rondelle)
- Stretch cord (0.8mm clear elastic)
- Gold crimp beads or knot covers (optional)
- Small gold lobster clasp
- Gold jump rings
- Gold extension chain (optional)
- Super glue or jewelry cement
- Scissors
- Tape or bead stopper
- Chain nose pliers
- Ruler
Step 1: Preparation
-
Measure your wrist:
Wrap a flexible measuring tape around your wrist to find your size. Add about 0.5 inches to this measurement for a comfortable fit that isn’t too tight. -
Prepare the cord:
Cut a length of stretch cord about 10-12 inches long. This generous length gives you plenty of room to tie knots later without struggling. -
Secure the end:
Place a piece of tape or a bead stopper on one end of your cord. This prevents your beads from sliding off while you design your pattern.
Step 2: Beading the Pattern
-
Start the sequence:
Begin by threading on four of the blue polymer clay heishi beads. This creates your first block of color. -
Add first accent:
Slide on one gold spacer bead. I prefer using the slightly irregular ‘nugget’ style spacers as they catch the light beautifully and add organic texture. -
Establish the rhythm:
Thread on another segment of four blue heishi beads, followed by another gold spacer. -
Check the pattern:
Repeat this ‘4 blue, 1 gold’ pattern continuously. Pause occasionally to ensure your bead counts remain consistent—it’s easy to lose count in the rhythm. -
Test the length:
Wrap the beaded section around your wrist periodically. Continue the pattern until the beaded strand reaches your desired length minus the length of your clasp. -
End symmetrically:
Try to finish with a set of four blue beads so both ends of the bracelet match visually near the clasp.
Clean Lines
Use a clear nail polish or fabric fray check on cut cord ends before threading. This stiffens the tip, effectively turning it into a needle, making it much faster to pick up the disc beads.
Step 3: Attaching the Clasp
-
Add a crimp bead:
On the working end (remove the tape first), thread a small gold crimp bead. -
Thread the clasp component:
Thread the cord through the loop of your jump ring (which is attached to your lobster clasp). -
Loop back:
Pass the cord back through the crimp bead creating a small loop around the jump ring. -
Secure the crimp:
Use your pliers to flatten the crimp bead tightly, securing the cord in place. Alternatively, tie a surgeon’s knot if you aren’t using crimps, adding a dab of glue. -
Finish the other side:
Repeat the crimping process on the other end of the bracelet, attaching a jump ring or extension chain instead of the clasp. -
Trim excess:
Once the glue is dry or crimps are secure, carefully trim the excess cord ends close to the beads. -
Final check:
Give the bracelet a gentle tug to ensure all connections are secure before wearing.
Pattern Play
Vary the segment lengths for a different vibe. Try 8 blue beads for a more dominant color block, or alternate 2 blue and 1 gold for a richer, more metallic-heavy look.
Now you have a stunning, beach-ready accessory to add a pop of color to your wrist stack


Preppy Pearl Breaks in Blue
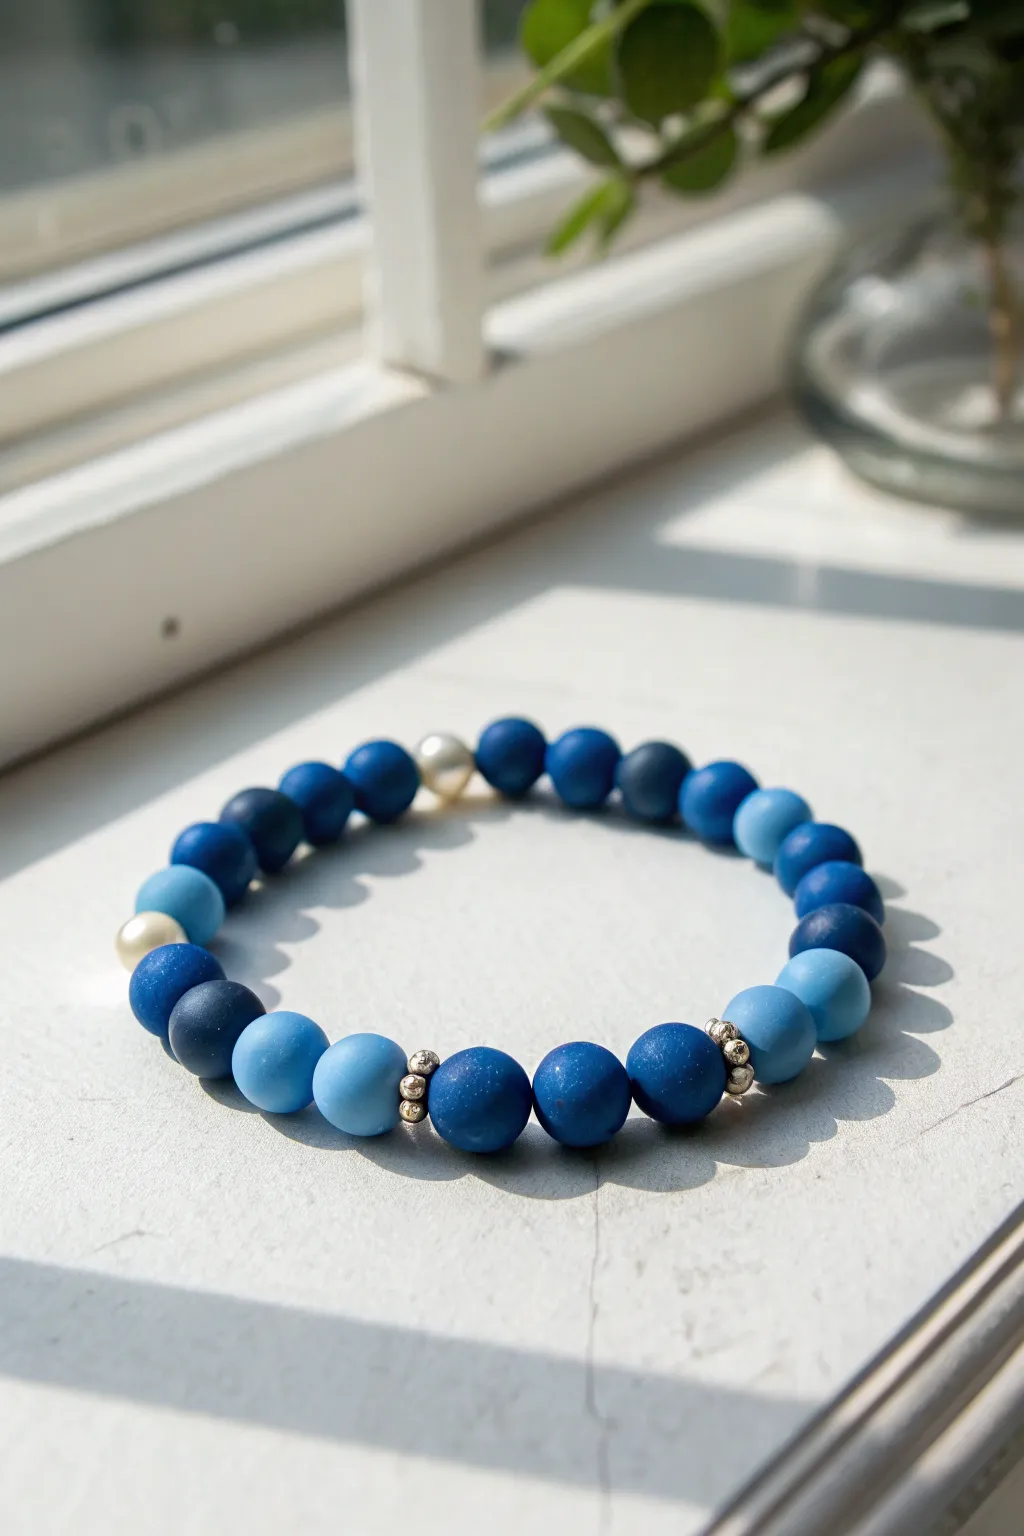
This preppy-inspired stretch bracelet mixes matte finish beads in varying shades of ocean blue with elegant pearl accents. The design features a thoughtful rhythm of color blocking broken up by small metallic spacers for a polished, ready-to-wear look.
Step-by-Step
Materials
- 10mm matte acrylic or polymer clay beads (Navy Blue)
- 10mm matte acrylic or polymer clay beads (Royal Blue)
- 10mm matte acrylic or polymer clay beads (Sky Blue/Light Blue)
- 8mm or 10mm faux pearl beads (white or cream)
- Small silver disc spacer beads or daisy spacers
- 0.8mm clear elastic string
- Scissors
- Super glue or jewelry cement (optional)
- Beading needle (optional but helpful)
- Bead design board or masking tape
Step 1: Planning Your Pattern
-
Measure your wrist:
Before you begin, wrap a piece of string around your wrist to find your size, then add about half an inch for a comfortable fit. -
Prepare your workspace:
Lay out a bead design board or simply place a piece of masking tape sticky-side up on your table to catch any rolling beads. -
Sort your blues:
Separate your matte blue beads into three distinct piles: the darkest navy, the medium royal blue, and the lightest sky blue. -
Establish the main sequence:
This bracelet uses a recurring pattern of three beads. Arrange a sequence on your board starting with a royal blue, then a navy blue, and finally a sky blue. -
Create the focal pearl section:
Locate the center of your design. Here, place two pearl beads fairly close to each other, separated by a section of blue beads. -
Add metallic accents:
Identify the section that will sit opposite the pearls (the underside of the wrist). Plan to place silver spacers between three specific blue beads here for a little shine.
Step 2: Stringing the Design
-
Cut the elastic:
Cut a piece of elastic string about 10-12 inches long. This generous length makes tying the final knot much easier. -
Pre-stretch the cord:
I always give the elastic a few firm tugs before starting; this prevents the bracelet from stretching out permanently after the first wear. -
Start with the spacer section:
Thread on a royal blue bead followed immediately by a silver spacer. This begins the detailed bottom section seen in the photo. -
Continue the metallic details:
Add a navy blue bead, another silver spacer, and then a royal blue bead. This creates that specific cluster of metallic accents shown in the reference. -
Begin the color gradient:
Move into the main color pattern by stringing a sky blue bead, followed by a royal blue, then a navy blue. -
Add a single pearl:
Thread on your first white pearl bead. This acts as a bright ‘break’ in the sea of blue tones. -
Build the side section:
Continue your pattern with a navy bead, royal blue, sky blue, and another royal blue to create distance between the pearls. -
Place the second pearl:
Add your second pearl bead now. The asymmetry of having pearls placed randomly rather than perfectly opposite adds to the casual preppy vibe. -
Fill in the remaining length:
Finish stringing the rest of your blue beads in random order until the bracelet reaches your desired length. -
Check the fit:
Wrap the unfinished strand around your wrist to ensure the size is correct. Add or remove a blue bead if necessary.
Matte Texture Safety
Matte acrylic beads can sometimes show scratches. Avoid using metal pliers directly on them; use fingers to push beads.
Step 3: Finishing Touches
-
Prepare to knot:
Bring both ends of the elastic together and remove any slack so the beads are touching but not overly tight. -
Tie a surgeon’s knot:
Cross the ends, wrap one side under twice, and pull tight. Repeat this process to secure the knot firmly. -
Secure with glue:
Place a tiny drop of super glue or jewelry cement directly on the knot. Let it dry for a minute. -
Hide the knot:
Trim the excess elastic close to the knot, then gently slide an adjacent bead over the knot to conceal it inside.
Knot Slipping?
If the elastic feels slippery, dab the knot with clear nail polish if you don’t have super glue handy.
Slip on your new bracelet and enjoy the cool, coastal vibes it adds to your outfit

The Complete Guide to Pottery Troubleshooting
Uncover the most common ceramic mistakes—from cracking clay to failed glazes—and learn how to fix them fast.
Dainty Evil Eye in Blue Tones
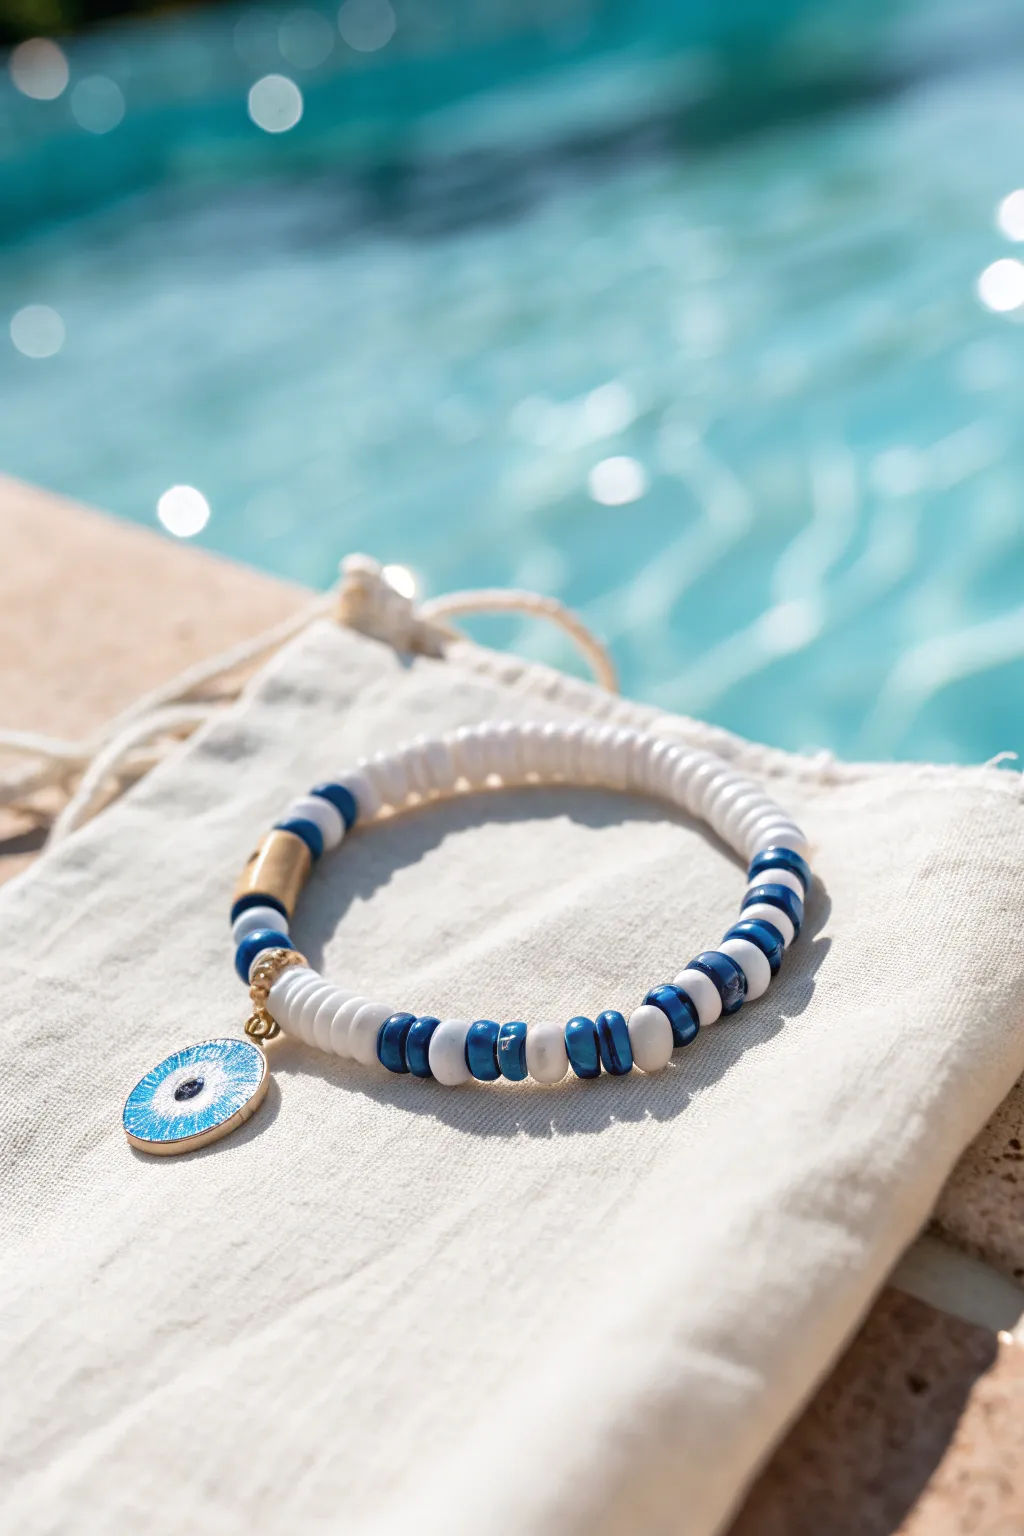
Capture the essence of summer with this breezy beaded bracelet featuring a crisp nautical palette and a protective evil eye charm. The mix of flat heishi beads and gold accents creates a polished, high-end look perfect for stacking or wearing solo.
Step-by-Step Tutorial
Materials
- White polymer clay heishi disc beads (6mm)
- Navy blue polymer clay heishi disc beads (6mm)
- Gold tube spacer bead (approx. 6-8mm)
- Small gold round spacer beads (3mm)
- Gold jump ring (4-6mm)
- Enamel evil eye charm (blue and white w/ gold rim)
- Elastic stretch cord (0.8mm clear)
Step 1: Planning and Preparation
-
Measure your wrist:
Cut a piece of elastic cord about 10-12 inches long. This gives you plenty of extra room for tying knots later without struggling. -
Pre-stretch the cord:
Give your elastic cord a few firm tugs. This pre-stretching technique is crucial because it prevents the bracelet from sagging or expanding permanently after you wear it the first time. -
Secure the end:
Attach a bead stopper or simply tape one end of your cord to your work surface so your beads don’t slide right off while you work.
Step 2: Creating the Pattern
-
Start the white base:
Begin by threading approximately 2 inches of solid white heishi beads. This section will sit opposite the charm. -
Begin the alternating pattern:
Transition into the striped section by adding one navy blue bead followed by one white bead. -
Continue the stripes:
Repeat this alternating blue-white pattern for about 1.5 inches. The contrast here creates that classic nautical vibe. -
Add the focal charm section:
Slide on a small gold round spacer bead. -
Attach the charm:
Open your gold jump ring with pliers, loop it through the evil eye charm, and close it securely. Then, slide the jump ring onto your elastic cord. -
Balance with gold:
Add a second small gold round spacer bead immediately after the charm to frame it symmetrically. -
Mirror the stripes:
Create a mirror image of your previous pattern by threading alternating navy and white beads for another 1.5 inches. -
Add the gold tube accent:
Slide on the gold tube spacer bead. This breaks up the pattern and adds a dash of luxe texture. -
Return to the stripe:
Add a small section of alternating blue and white beads—about 4 or 5 pairs. -
Finish with white:
Complete the strand with solid white beads until the bracelet reaches your desired length (usually around 7 inches total for an average wrist).
Knot Security Pro-Tip
For maximum durability, try a surgeon’s knot—loop the elastic through twice on the first pass before pulling tight. It holds slippery cord much better.
Step 3: Finishing Touches
-
Check the fit:
Wrap the unfinished strand around your wrist to ensure it sits comfortably. Remember to leave a tiny bit of slack so the elastic doesn’t pinch. -
Tie the knot:
Remove the tape or bead stopper. Tie a standard square knot (right over left, left over right) and pull it tight. -
Secure with glue:
I like to add a tiny drop of jewelry glue or clear nail polish directly onto the knot for extra security. Let this dry for a minute. -
Hide the knot:
Trim the excess cord ends close to the knot, then gently pull the cord so the knot slides inside the hole of the nearest large bead to hide it.
Level Up: Texture Mix
Swap the plain gold tube for a paved crystal tube bead or a textured hammered gold bead to add sparkle and dimension to the design.
Slip on your new bracelet and enjoy the instant vacation vibes it brings to your outfit
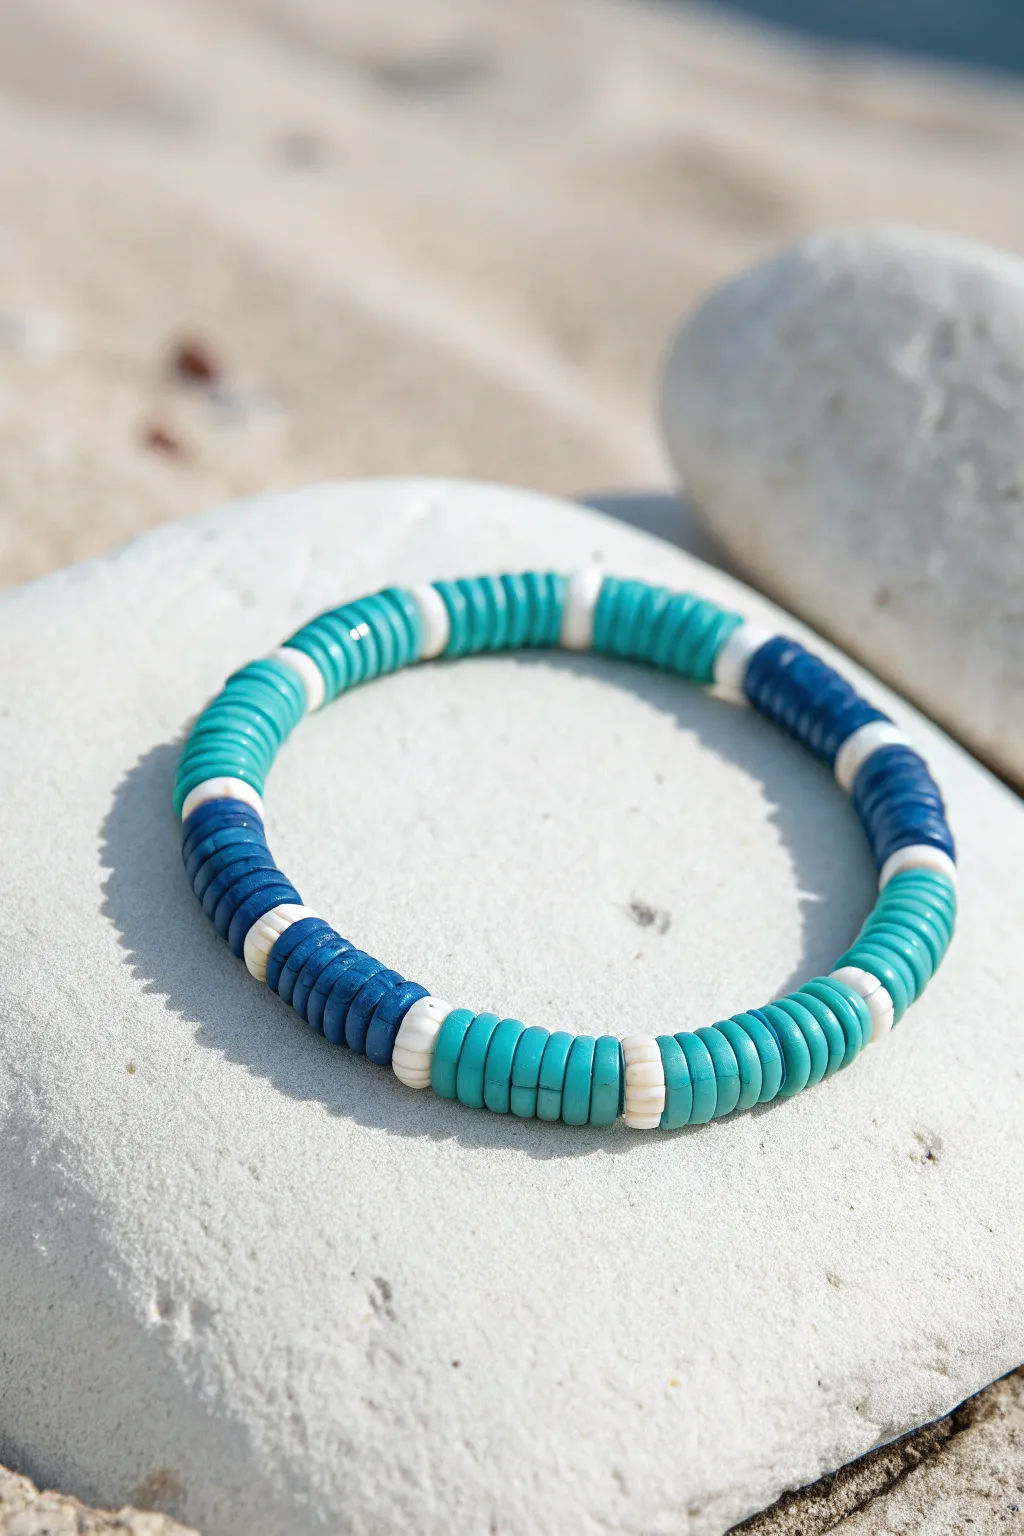
Nautical Stripes With Tiny White Blocks
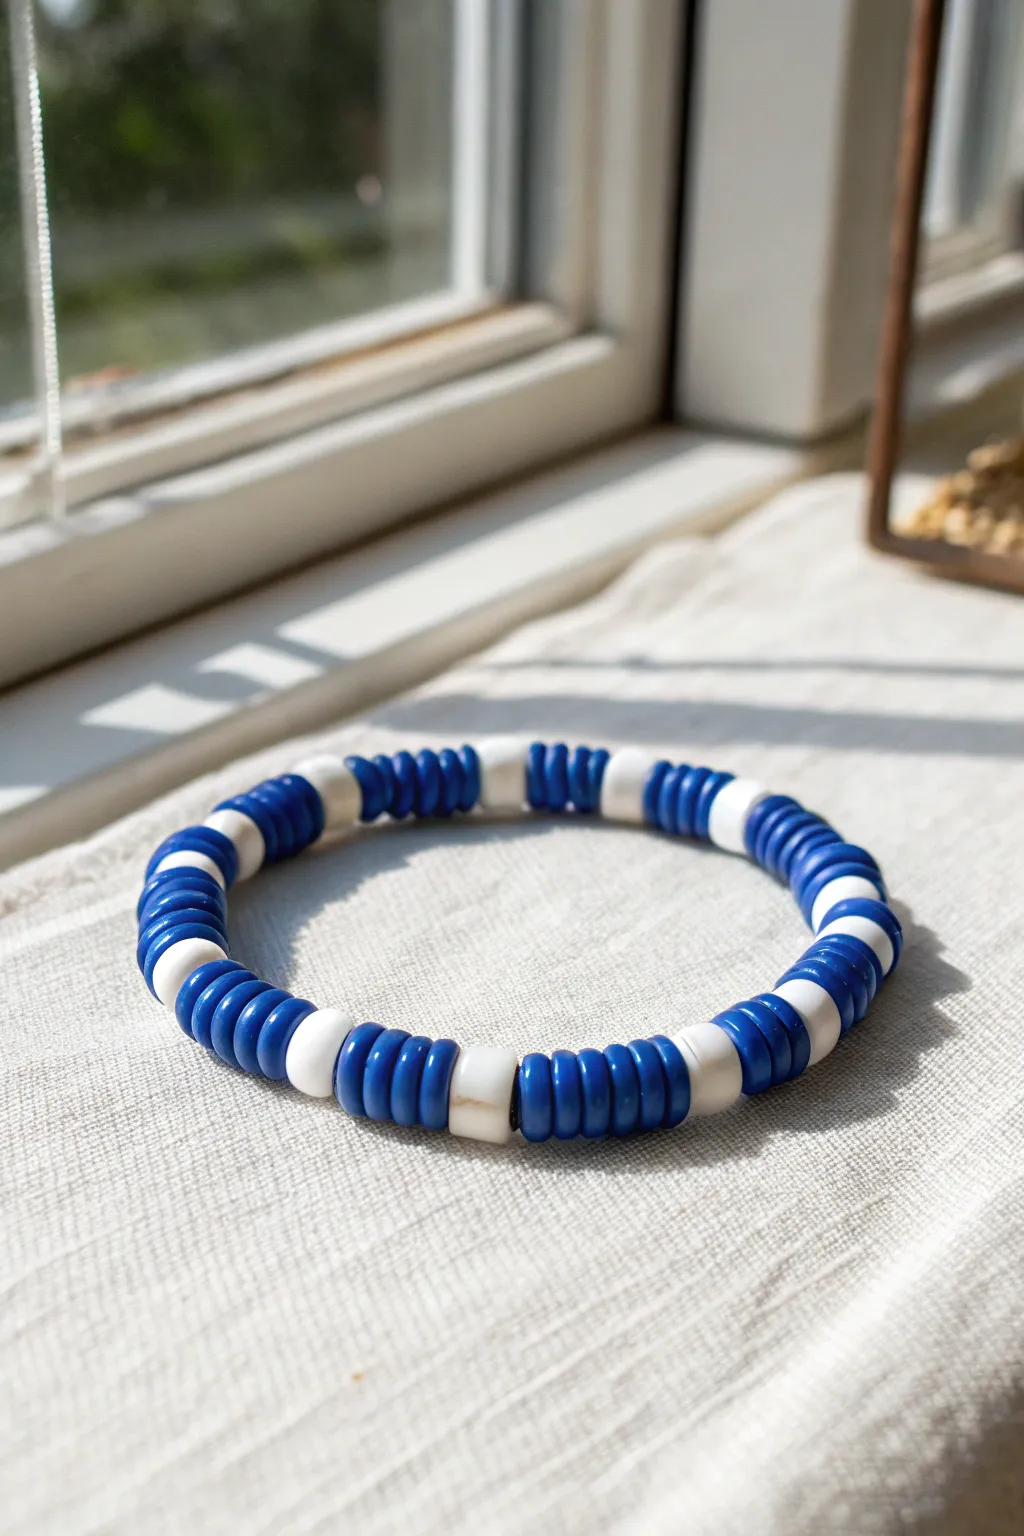
Capture the essence of a seaside summer with this crisp blue and white block pattern bracelet. The clean lines created by the white spacer beads give this simple piece a sophisticated, modern nautical vibe perfect for stacking.
Step-by-Step
Materials
- Royal blue polymer clay flat disc beads (approx. 6mm)
- White cylindrical or heishi clay beads
- Strand of elastic cord (0.8mm recommended)
- Super glue or jewelry adhesive
- Scissors
- Bead stopper or painter’s tape
- Ruler or measuring tape
Step 1: Preparation
-
Measure your wrist:
Wrap a measuring tape comfortably around your wrist to find your size, then add about half an inch for a comfortable fit. -
Cut the cord:
Cut a length of elastic cord about 10-12 inches long. This generous length gives you plenty of room to tie knots without struggling. -
Stretch the elastic:
Pre-stretch your elastic cord by pulling on it gently a few times. This crucial step prevents the finished bracelet from stretching out and becoming loose after you wear it. -
Secure the end:
Attach a bead stopper to one end of the cord, or tape it down to your table with a piece of painter’s tape to stop beads from sliding off.
Keep it Snug
When tying your final knot, pull the elastic taut so there are no gaps between beads, but not so tight that the bracelet buckles or won’t lie flat.
Step 2: Beading the Pattern
-
Start with blue:
Begin your pattern by threading on a block of the royal blue heishi beads. -
Count the stack:
Aim for a stack of about 5 or 6 blue beads. You want this block to be approximately 1/4 inch thick to create distinct visual segments. -
Add a spacer:
Slide on a single white bead. This acts as the crisp divider that creates the signature segmented look. -
Establish the rhythm:
Repeat the process: thread another block of 5-6 blue beads followed by one white bead. -
Check consistency:
Pause occasionally to hold the sections next to each other. While minor variations are okay, keeping the blue blocks relatively uniform makes the design sharper. -
Continue beading:
Keep repeating this pattern until the beaded section matches your wrist measurement. -
Finish the pattern:
End your pattern with a blue block so that when you tie the ends together, the pattern continues seamlessly (since you started with a blue block, you might actually want to end with a white bead so it connects to the first blue block, or vice versa—just check the connection before tying). -
Verify sizing:
Wrap the beaded strand around your wrist one last time to ensure it fits comfortably without pinching.
Step 3: Finishing Touches
-
Prepare to tie:
Remove the bead stopper or tape carefully, holding both ends of the elastic firmly. -
Tie the first knot:
Cross the ends and tie a simple overhand knot, pulling it tight to bring the beads together without bunching them. -
Secure with a surgeon’s knot:
Tie a second knot, looping the end through twice before pulling tight (this is a surgeon’s knot) which holds much better on slippery elastic. -
Apply adhesive:
I prefer to place a tiny dab of super glue or jewelry cement directly onto the knot. Be careful not to glue the beads to the cord. -
Hide the knot:
While the glue is still slightly tacky but not wet, slide a bead over the knot to hide it inside. -
Trim the excess:
Once the glue is completely dry, snip off the excess elastic tails with your scissors as close to the bead as possible.
Mix & Match
Create a matching stack by swapping the colors in a second bracelet—use white blocks with single blue spacers for a negative-space effect.
Slip on your new nautical bracelet and enjoy the breezy coastal style it brings to your outfit


What Really Happens Inside the Kiln
Learn how time and temperature work together inside the kiln to transform clay into durable ceramic.
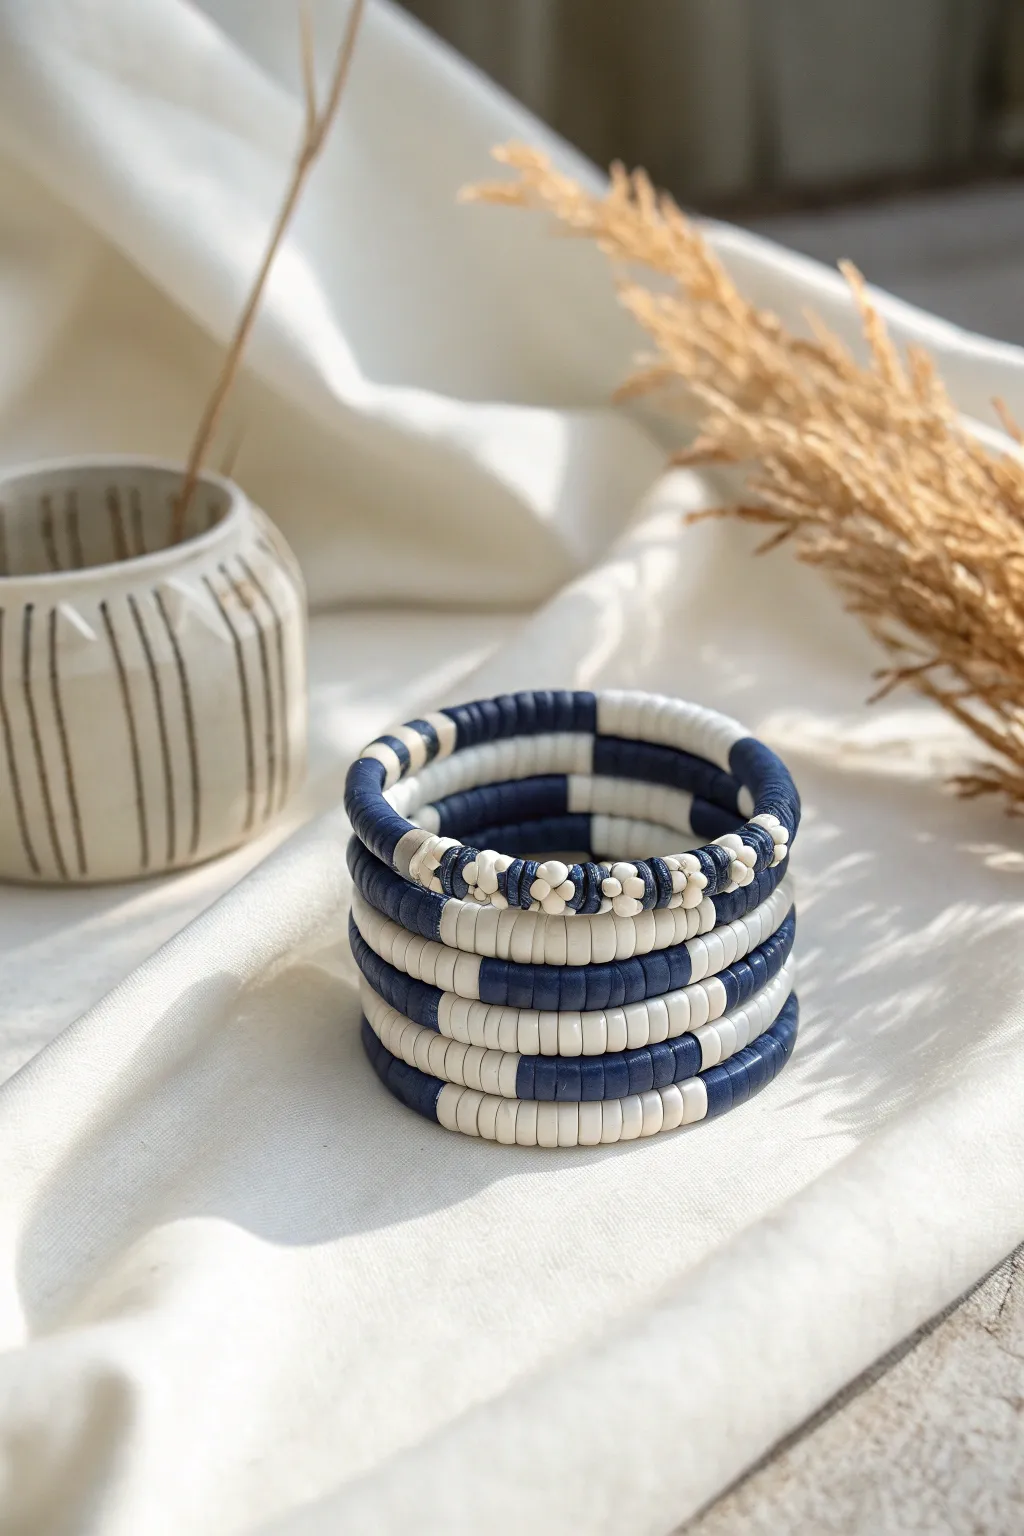
Blue Checkerboard Pattern Beads
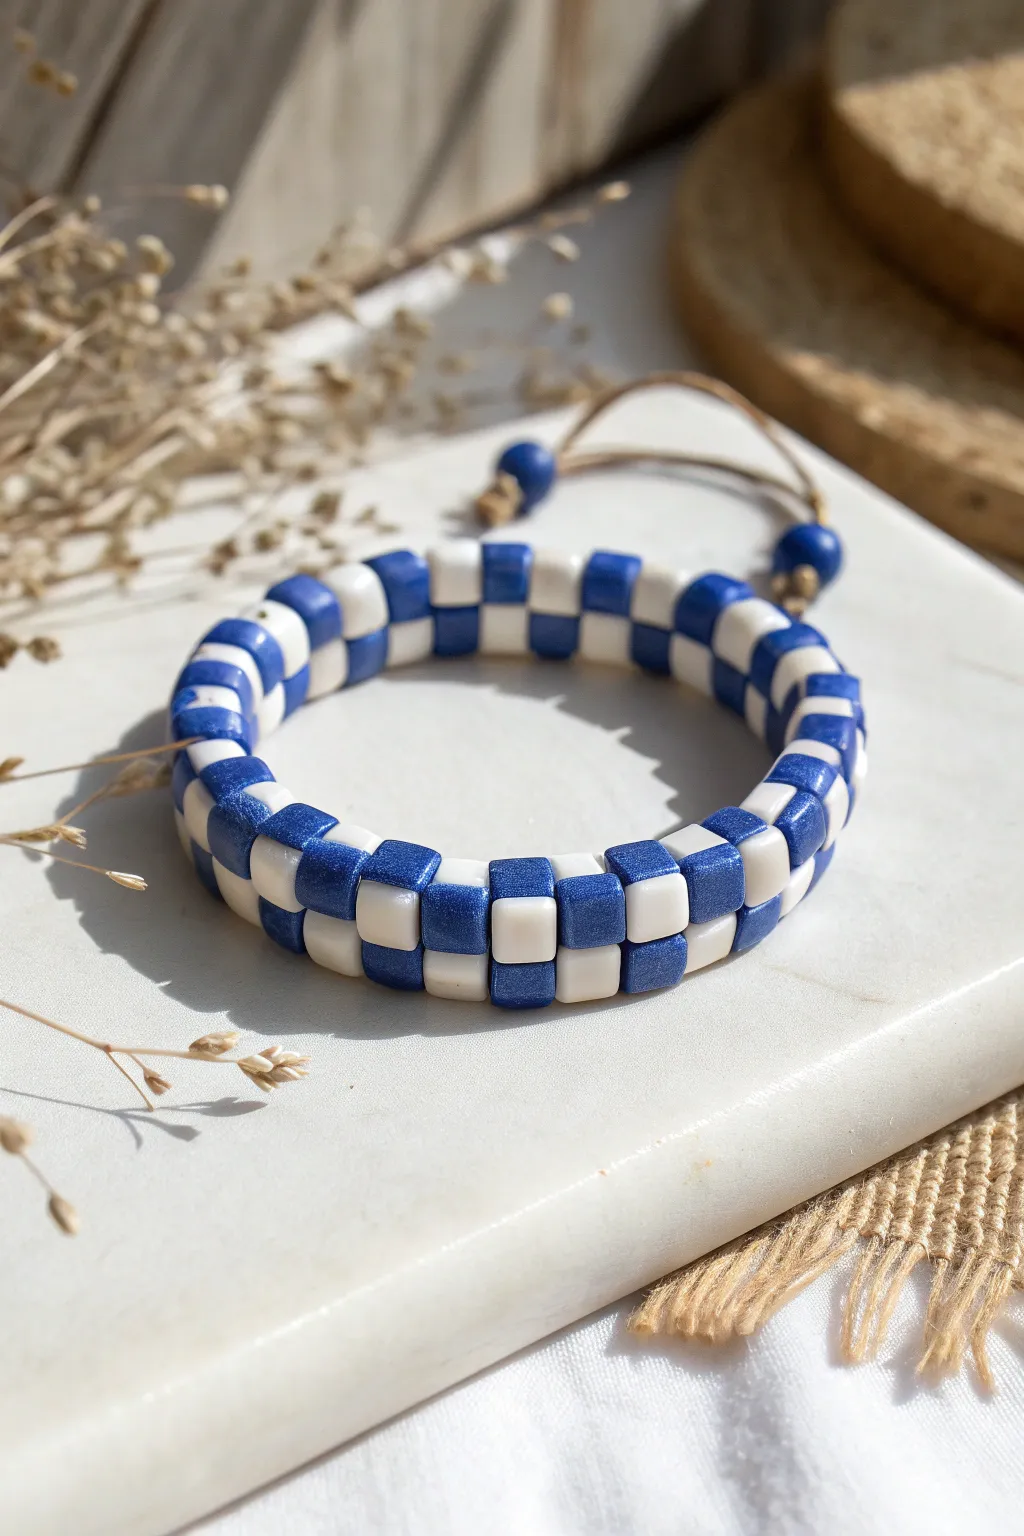
Recreate this bold, graphic look using cubed polymer clay beads for a perfectly preppy accessory. This two-row design mimics a classic checkerboard pattern with striking royal blue and creamy white squares, finished with a rustic cord tie.
How-To Guide
Materials
- Square/cube polymer clay beads in royal blue (approx. 6mm)
- Square/cube polymer clay beads in cream or off-white (approx. 6mm)
- Strong beading elastic (0.8mm or 1mm thickness)
- Light brown waxed cotton cord (1mm)
- 2 large wooden or blue accent beads for the tassel ends
- Scissors
- Super glue or jewelry adhesive
- Tape or bead stopper
Step 1: Preparation and Row One
-
Measure and Cut Elastic:
Cut a piece of beading elastic roughly 24 inches long. You will need extra length because this weave uses a single continuous strand to create two rows. -
Secure the End:
Place a bead stopper or a piece of tape about 4 inches from one end of your elastic to prevent beads from sliding off while you work. -
Establish the Pattern:
Thread your first row of beads onto the elastic. Alternate one blue cube and one white cube until you reach your desired wrist size. -
Checking length:
Wrap the strand around your wrist to check the fit. Since this will be a double-wide bracelet, make it slightly looser than a single strand to account for the thickness. -
Final Count Check:
Ensure you end with a bead color that is different from your starting bead. For example, if you started with blue, end with white. This is crucial for the checkerboard pattern to align correctly when joined.
Uneven Tension?
If gaps appear between your rows, your elastic is too loose. Pull the cord firmly after adding every 2-3 beads in the second row to snap them into a tight grid.
Step 2: Creating the Second Row
-
Turn the Corner:
Thread the workings end of your elastic back through the very first bead you strung. This creates a loop or circle. -
Start the Stack:
Add a new bead onto the string. The color must act as the ‘checker’ to the bead it sits next to. If the bead below is blue, add a white bead. -
The Stitching Technique:
Pass the elastic through the next bead in the original bottom row to anchor the new top bead in place. -
Continuing the Weave:
Add the next bead (altering the color again), and pass the string through the subsequent bead on the bottom row. I find keeping tension tight here helps the squares sit flat against each other. -
Repeat Around the Loop:
Continue this ‘add a bead, pass through bottom bead’ motion all the way around the bracelet until a second row is fully formed. -
Align the Squares:
Pause occasionally to nudge the squares with your fingers, ensuring they are sitting directly on top of one another like a brick wall.
Use Metallic Spacers
For a luxe twist, place a tiny gold flat spacer bead between every vertical pair of squares. It adds shimmer and helps separate the checkerboard colors.
Step 3: Finishing and Tassel
-
Tie the Elastic:
Bring your two elastic ends together. Tie a strict surgeon’s knot (right over left, left over right) and pull very focused, tight tension. -
Secure the Knot:
Add a tiny dab of super glue to the knot. Let it dry completely before trimming the excess elastic close to the beads. -
Prepare the Decorative Chord:
Cut a 6-inch piece of waxed cotton cord. Loop it around the bracelet between two bead columns. -
Knot the Cord:
Tie an overhand knot close to the beads so the cord stays attached but dangles freely. -
Add Accent Beads:
Thread a blue or wooden accent bead onto each end of the cotton cord. -
Final Knots:
Tie a bulky knot at the very end of each cord tail to trap the accent beads, then trim any fraying ends for a clean finish.
Now you have a structured statement piece ready to stack with your other summer favorites
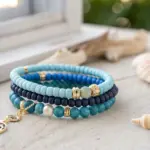
Coastal Shell Charm With Blue Heishi
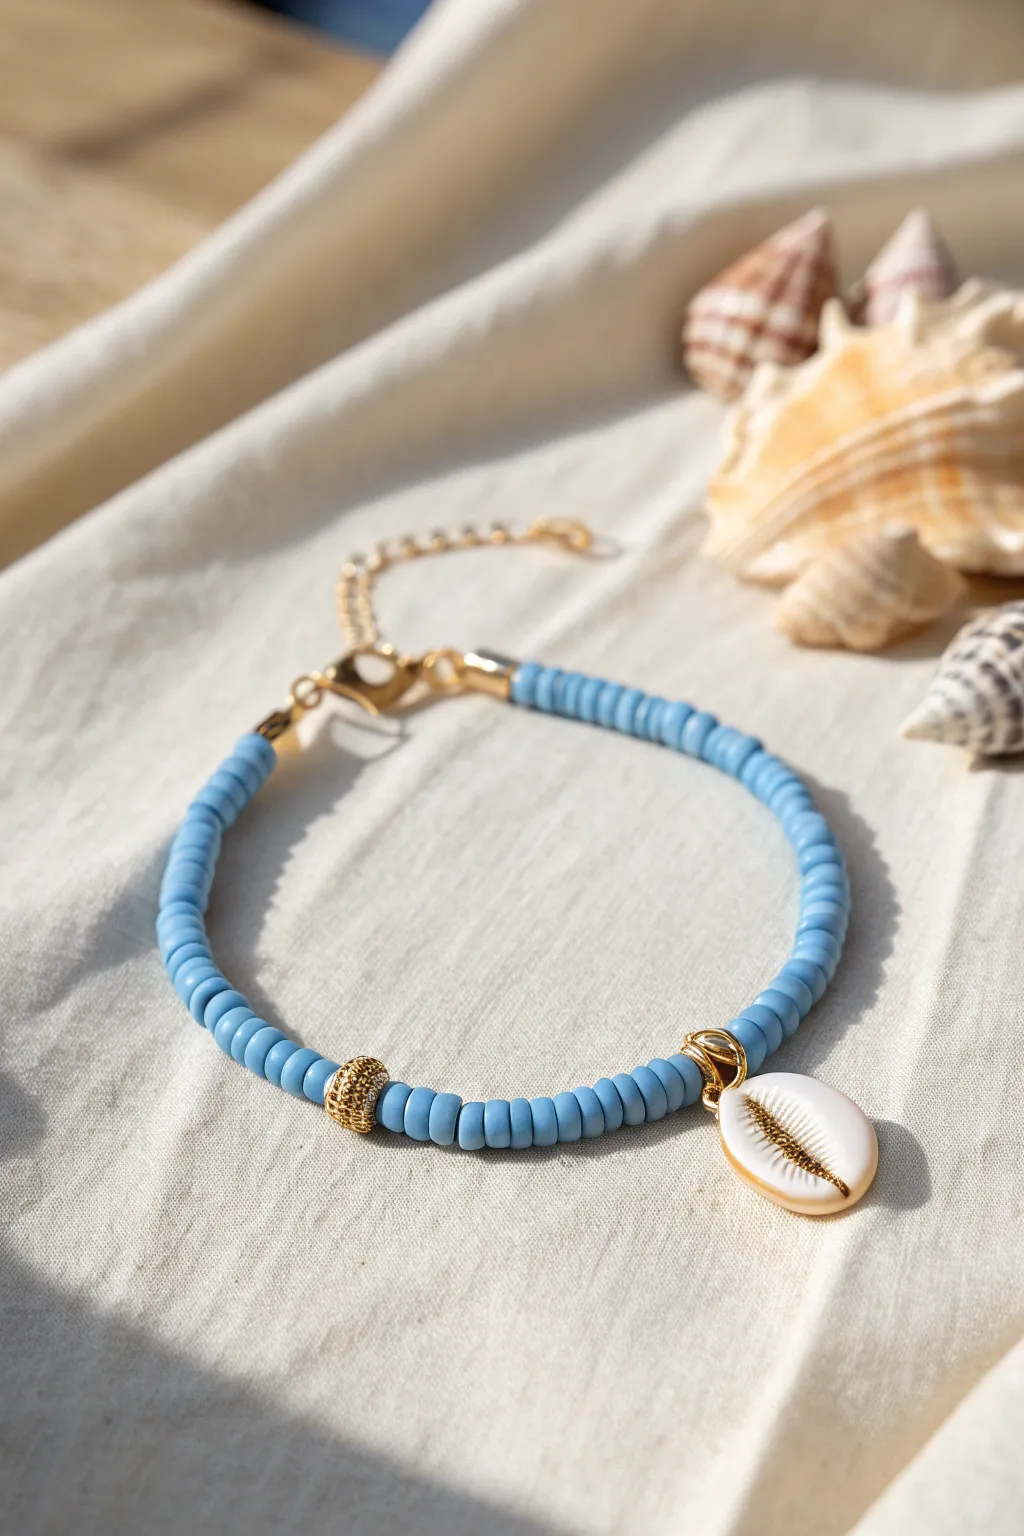
Capture the essence of a beach day with this serene beaded bracelet. Combining matte blue heishi beads with a striking gold-rimmed cowrie shell charm creates a piece that feels both preppy and effortlessly coastal.
Step-by-Step Tutorial
Materials
- Matte light blue polymer clay heishi beads (6mm)
- Gold-rimmed cowrie shell charm
- Gold textured focal bead (barrel or round shape)
- Elastic beading cord (0.8mm clear)
- Two gold ribbon crimp ends (cord clamps)
- Two gold jump rings (4mm or 5mm)
- Gold lobster claw clasp
- Gold extension chain
- Jewelry pliers (flat nose and chain nose)
- Scissors or wire cutters
- Jewelry glue (optional)
Step 1: Preparing the Base
-
Measure and Cut:
Cut a length of elastic cord about 9-10 inches long. This gives you plenty of extra slack to work with, which I find makes attaching the clasps much less frustrating than working with a short piece. -
Attach First Crimp:
Take one end of your elastic cord and lay it inside the channel of a gold ribbon crimp end. Use your flat nose pliers to firmly press the metal flaps down over the cord. For extra security, add a tiny dot of jewelry glue inside the crimp before closing.
Loose Beads?
If the crimp end slides off the elastic, the cord is too thin. Tie a small knot at the very end of the cord before placing it inside the crimp to create an anchor point.
Step 2: Beading Sequence
-
Start the Blue Base:
Begin threading the blue heishi beads onto the cord. String enough beads to cover approximately one-third of your desired bracelet length. -
Add the Gold Focal:
Slide on the textured gold focal bead. This adds a lovely touch of warmth and breaks up the solid blue color. -
Continue Beading:
Add more blue heishi beads until you reach the center point of the bracelet. Hold it around your wrist to check the spacing if you’re unsure. -
Attach the Charm:
String the gold-rimmed cowrie shell charm onto the cord. Ensure the open side of the shell is facing the direction you prefer, though these charms usually spin freely. -
Finish the Strand:
Continue stringing the remaining blue heishi beads until the beaded section measures about 6 to 6.5 inches, or fits comfortably around your wrist.
Make it a Set
Create a matching stack by making two more bracelets: one entirely of gold spacer beads and another using white heishi beads to complement the cowrie shell.
Step 3: Adding Hardware
-
Secure the End:
Place the second gold ribbon crimp end onto the open tail of the elastic cord, snug against the last bead. -
Crimp to Close:
Using your flat nose pliers, fold the metal flaps down tightly to secure the beads in place. Trim any excess elastic cord sticking out of the crimp. -
Open Jump Ring:
Take two pairs of pliers to twist open a gold jump ring. Attach this ring to the loop on your first crimp end. -
Attach Clasp:
Before closing the jump ring, slide on the lobster claw clasp. Close the jump ring securely by twisting it back into place so there is no gap. -
Add Extension Chain:
Open the second jump ring and attach it to the loop on the opposite crimp end. Slide on the gold extension chain. -
Final Check:
Close the second jump ring. Give the bracelet a gentle tug to ensure all connections are secure and the crimps are holding tight.
Now you have a breezy everyday accessory that brings a bit of summer to any outfit

TRACK YOUR CERAMIC JOURNEY
Capture glaze tests, firing details, and creative progress—all in one simple printable. Make your projects easier to repeat and improve.
Dolphin or Sea-Life Charm Accent
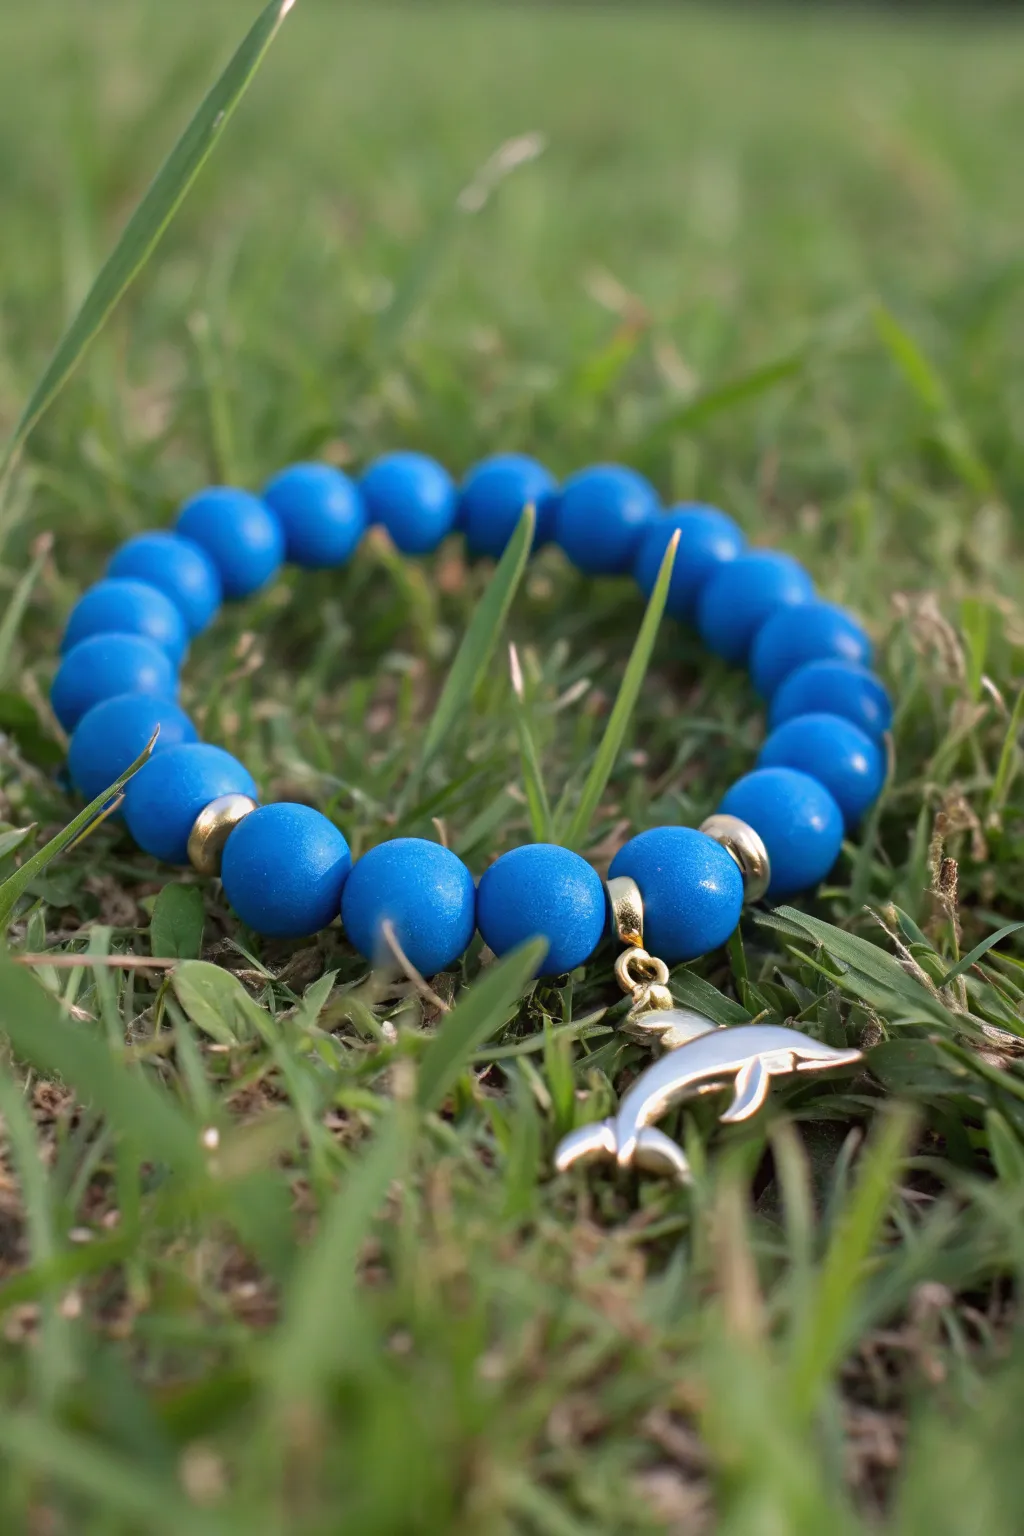
Capture the spirit of the sea with this vibrant, electric blue beaded bracelet that features a playful dolphin charm. The combination of matte silicone-style beads and gold accents creates a high-contrast look perfect for summer adventures.
How-To Guide
Materials
- Matte electric blue round beads (approx. 8mm or 10mm)
- Elastic stretch beading cord (0.8mm clear)
- Two gold curved tube spacer beads or wide gold rings
- One gold jump ring (6mm or 8mm)
- Gold or silver dolphin charm
- Jewelry adhesive or clear nail polish
- Scissors
Step 1: Planning and Prep
-
Measure your wrist:
Wrap a piece of string or measuring tape comfortably around your wrist to determine the circumference. Add about half an inch to this measurement to ensure the bracelet isn’t too tight once the bulky beads are added. -
Cut the cord:
Cut a length of elastic cord about 10-12 inches long. Having this extra length makes tying the final knot much easier than struggling with short ends. -
Pre-stretch the elastic:
Hold both ends of the cord and give it several firm tugs. This crucial step prevents the bracelet from stretching out permanently after you wear it a few times. -
Organize your layout:
Lay out your beads on a towel or bead board. For an average adult wrist, you will likely need between 20 to 24 of the 8mm blue beads, depending on fit preference. -
Attach the charm:
Open your jump ring using pliers or your fingers if it’s pliable enough. Slide the loop of the dolphin charm onto the jump ring. -
Secure the charm:
Close the jump ring securely so there is no gap for the charm to slip through later.
Knot Security
Use a surgeon’s knot (looping through twice) rather than a standard square knot. It holds distinctively better with slick elastic cord.
Step 2: Stringing the Beads
-
Begin the pattern:
Start by threading the majority of your blue beads onto the elastic cord. Leave out three blue beads for the focal section. -
Check the length:
Wrap the strung beads around your wrist to check the fit. Remember you still have the charm section to add, which adds length. -
Start the focal point:
Thread on one gold spacer ring or curved tube bead. This metallic accent frames the charm area beautifully. -
Add the central beads:
Slide on two blue beads. These will sit directly next to the charm. -
Insert the charm hanger:
Thread the elastic through the jump ring holding your dolphin charm. The charm should dangle freely. -
Finish the focal section:
Add one more blue bead after the charm. -
Complete the frame:
Slide on the second gold spacer ring to mirror the first one, completing the symmetrical focal design.
Ocean Ombré Upgrade
Instead of solid blue, use three shades of blue beads ranging from navy to teal to mimic the changing colors of deep ocean water.
Step 3: Finishing Touches
-
Prepare to tie off:
Bring both ends of the elastic cord together, ensuring there are no gaps between beads but not pulling so tight that the bracelet buckles. -
Tie a surgeon’s knot:
Cross the ends, wrap one end under the other twice, and pull tight. Repeat this process: cross again, wrap twice, and pull firmly to secure. -
Secure with glue:
Place a tiny drop of jewelry adhesive or clear nail polish directly onto the knot. I usually let this dry for a few minutes before moving to the next step. -
Trim the excess:
Using sharp scissors, trim the excess cord ends close to the knot, leaving about 1mm to ensure it doesn’t unravel. -
Hide the knot:
Gently pull adjacent beads until the knot slips inside the hole of one of the blue beads, making the finish invisible.
Slip on your new nautical accessory and enjoy a touch of beachside style wherever you go
Blue and Aqua Surf-Inspired Mix
Capture the essence of a day at the beach with this refreshing surf-inspired bracelet design. Using a rhythmic pattern of deep ocean blue, bright aqua, and crisp white spacer beads, you’ll create an accessory that feels like sunlight on water.
Step-by-Step Guide
Materials
- 6mm flat Heishi beads (polymer clay or vinyl) in Dark Blue
- 6mm flat Heishi beads in Turquoise/Aqua
- 6mm flat Heishi beads (or shell spacers) in White
- 0.8mm elastic stretch cord (clear)
- Beading needle (optional but helpful)
- Scissors
- Super glue or jewelry cement
- Tape or a bead stopper
Step 1: Planning and Setup
-
Measure your cord:
Cut a piece of elastic cord about 10-12 inches long. You want plenty of extra room on both ends for tying the final knot comfortably. -
Pre-stretch the elastic:
Hold the cord firmly at both ends and give it a few gentle but firm tugs. This pre-stretching prevents the bracelet from becoming loose after the first few times you wear it. -
Secure the end:
Place a piece of tape over one end of the cord or attach a bead stopper clips. This simple step saves you from the heartbreak of beads sliding right off as you work. -
Sort your palette:
Lay out small piles of your dark blue, aqua, and white beads. Having them separated makes the counting process much smoother and faster.
Pro Tip: Seamless Look
Use a larger-hole metal or shell bead next to your knot. This allows you to tuck the knot fully inside for a completely invisible finish.
Step 2: Creating the Pattern
-
Start with Dark Blue:
Begin your pattern by threading on approximately 8 to 10 dark blue Heishi beads. Group them tightly together so they form a solid block of color. -
Add a spacer:
Slide on a single white bead. This white accent acts as the ‘seafoam’ breaker between your wave colors. -
Transition to Aqua:
Now, thread on a block of the aqua/turquoise beads. Aim for about 10-12 beads here to make the brighter sections slightly longer than the dark ones. -
Insert the second spacer:
Add another single white bead after the aqua section to close off that color block. -
Repeat the Dark Blue block:
Return to your dark blue beads and add another set of 8-10. Try to keep the count consistent with your first block for symmetry. -
Continue the sequence:
Keep repeating this pattern: White Spacer -> Aqua Block -> White Spacer -> Dark Blue Block. I usually check the length against my wrist periodically as I go. -
Check for consistency:
Pause occasionally to push all beads down towards the stopper. Ensure there are no gaps and that your color blocks look balanced. -
Finish the length:
Continue until the beaded section measures your desired wrist size (standard is usually around 6.5 to 7 inches). End the pattern ideally on a white spacer bead so the connection point is seamless.
Step 3: Finishing Touches
-
Prepare to tie:
Carefully remove the tape or bead stopper while holding the open ends of the cord securely. Bring the two ends together to form a circle. -
Tie the first knot:
Make a simple overhand knot, pulling the elastic tight enough that the beads sit snug against each other, but not so tight that the bracelet buckles. -
Secure with a surgeon’s knot:
Tie a second knot, but loop the cord through twice before pulling tight (this is a surgeon’s knot). Pull the cords firmly to lock it in place. -
Apply adhesive:
Dab a tiny drop of super glue or jewelry cement directly onto the knot. Be careful not to glue the beads themselves; you just want to fuse the elastic strands. -
Hide the knot:
While the glue is still tacky but not wet, slide one of the beads (preferably a larger hole bead if possible, or just the nearest one) over the knot to conceal it. -
Trim excess cord:
Once the glue is fully dry (typically 5-10 minutes), use sharp scissors to trim the excess cord ends as close to the knot as possible.
Troubleshooting: Curling?
If the bracelet curls or twists, your tension is too tight. The beads need a tiny bit of breathing room to sit flat on the wrist.
Slip on your new bracelet and enjoy that cool, coastal vibe wherever you go
Monochrome Cobalt With Texture Mix
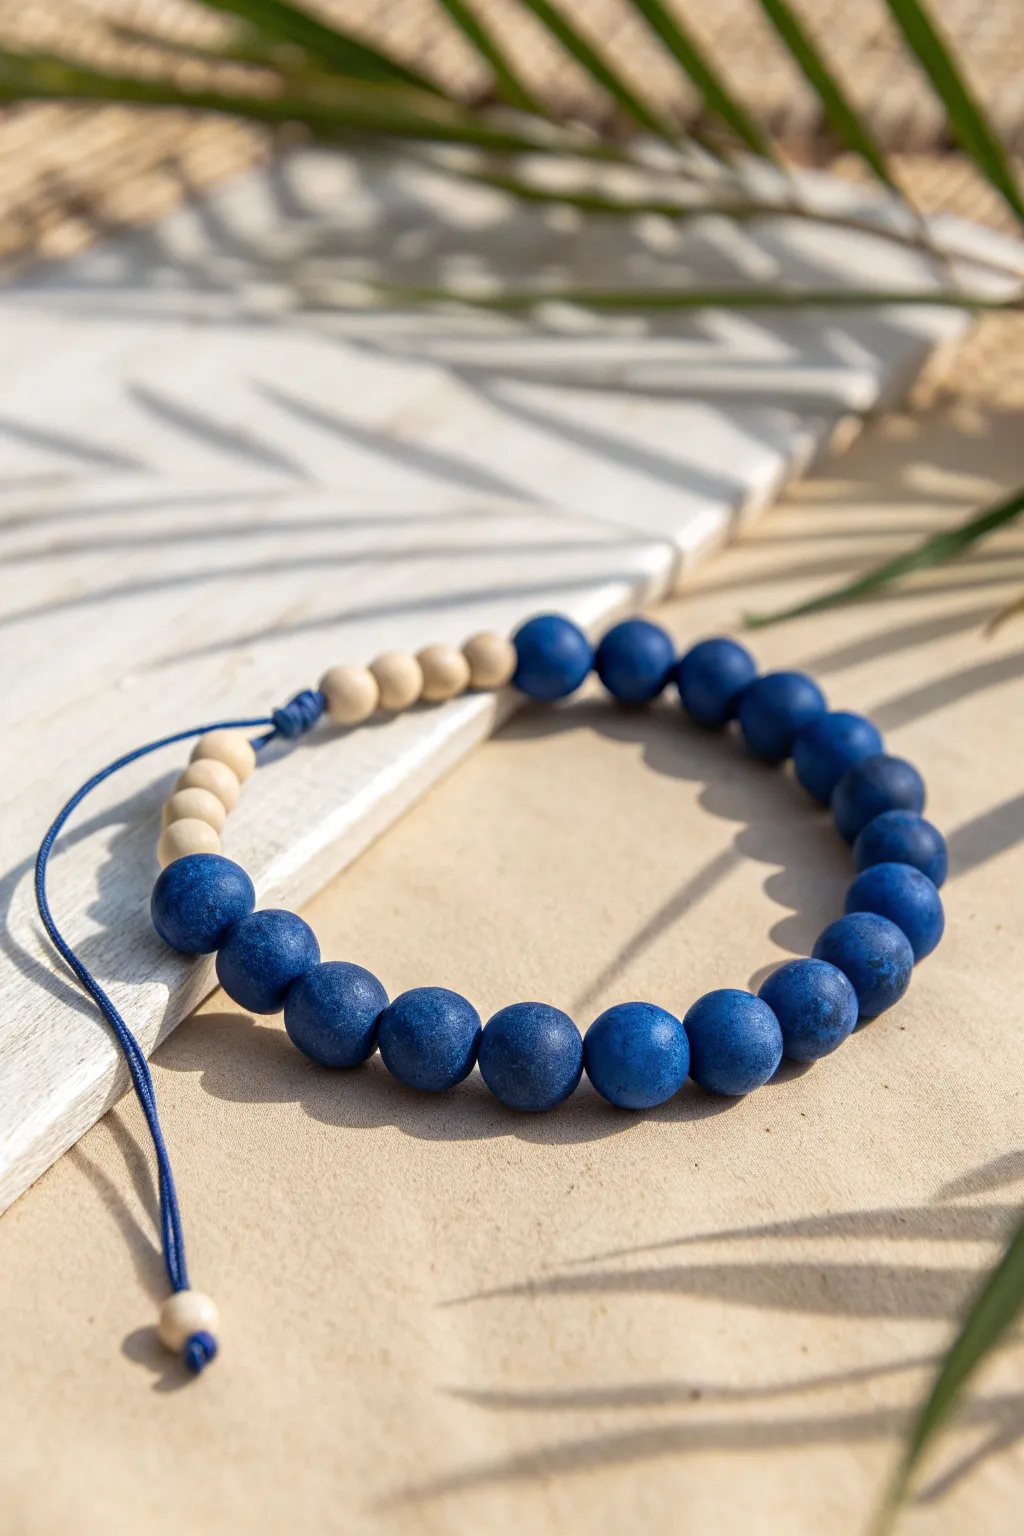
This striking bracelet balances deep, matte cobalt blue beads with soft cream accents for a look that’s both beachy and sophisticated. The design features a simple adjustable sliding knot closure, making it perfect for gifting or stacking with other favorites.
Step-by-Step
Materials
- 10mm round matte cobalt blue beads (looks like wood or ceramic)
- 6mm round light wood or cream bone beads
- Blue nylon cord (0.8mm or 1mm thickness)
- Scissors
- Lighter or thread burner
- Tape or a clipboard (optional, for holding the cord)
Step 1: Preparation
-
Measure the cord:
Cut a piece of blue nylon cord approximately 24 inches long. This generous length gives you plenty of room to work the knots comfortably. -
Seal the ends:
Quickly pass the ends of your cord through a lighter flame to melt them slightly. Roll them between your fingers (carefully!) to create a needle-like point, which makes stringing much easier without a needle.
Knot Security
Add a tiny drop of clear nail polish or jewelry glue to the center of your final knots. This keeps the nylon from slipping over time without leaving a visible residue.
Step 2: Stringing the Design
-
Start with the focal beads:
Begin threading your large 10mm cobalt blue beads onto the cord. I like to count them out first; this design uses about 16 to 18 blue beads depending on wrist size. -
Add texture contrast:
String 4 of the smaller 6mm cream wooden beads onto the cord after the last blue bead. -
Complete the loop:
String another set of 4 cream wooden beads onto the *other* end of the cord, so the large blue section is bookended by these lighter tones. -
Center the design:
Slide all beads to the center of your cord length so you have equal tails of cord hanging off each side. -
Create the first securing knot:
Take the tail end on the right side (next to the cream beads) and tie a simple overhand knot. Push this knot as close to the beads as possible before tightening. -
Create the second securing knot:
Repeat this process on the left side. Tie an overhand knot flush against the cream beads. This creates a secure ‘beaded section’ that won’t slide around.
Step 3: The Closure
-
Form the overlap:
Bring the two cord tails together so they overlap and lay parallel to each other, forming a circle with the bracelet. -
Start the sliding knot:
Cut a separate scrap piece of blue cord, about 10 inches long. Place this scrap piece underneath the two parallel overlapping tails. -
Tie the square knots:
Using the scrap cord, tire a series of 3 to 4 square knots (macrame flat knots) around the two main bracelet cords. Ensure they are tight but still allow the main cords to slide through. -
Trim the knot:
Cut off the excess tails of the *scrap* cord (the one you just knotted), leaving about 2-3mm. -
Melt to secure:
Carefully burn the short 2mm ends you just cut, pressing the melted nylon flat against the knot with the side of your lighter. Be very careful not to burn the main sliding cords.
Ocean Ombré Upgrade
Give the design depth by swapping the solid blue beads for a gradient. Use dark navy, transition to cobalt, and finish with light denim blue beads before the cream section.
Step 4: Finishing Touches
-
Adjust the tails:
Pull the sliding knot open to the maximum width needed to fit over your hand. Determine how long you want your dangling tassel ends to be. -
Add tassel beads:
Thread one small cream bead onto the end of one tail cord. -
Knot the end:
Tie an overhand knot securely below the bead at your desired length. -
Repeat opposite side:
Add a cream bead to the other tail cord and knot it at the exact same length as the first one for symmetry. -
Final trim:
Snip off any excess cord below your tassel knots and carefully melt the very tips to prevent fraying.
Slip on your new accessory and enjoy the tactile contrast between the matte blue and smooth wood finishes
Blue Initial Bead Preppy Personalization
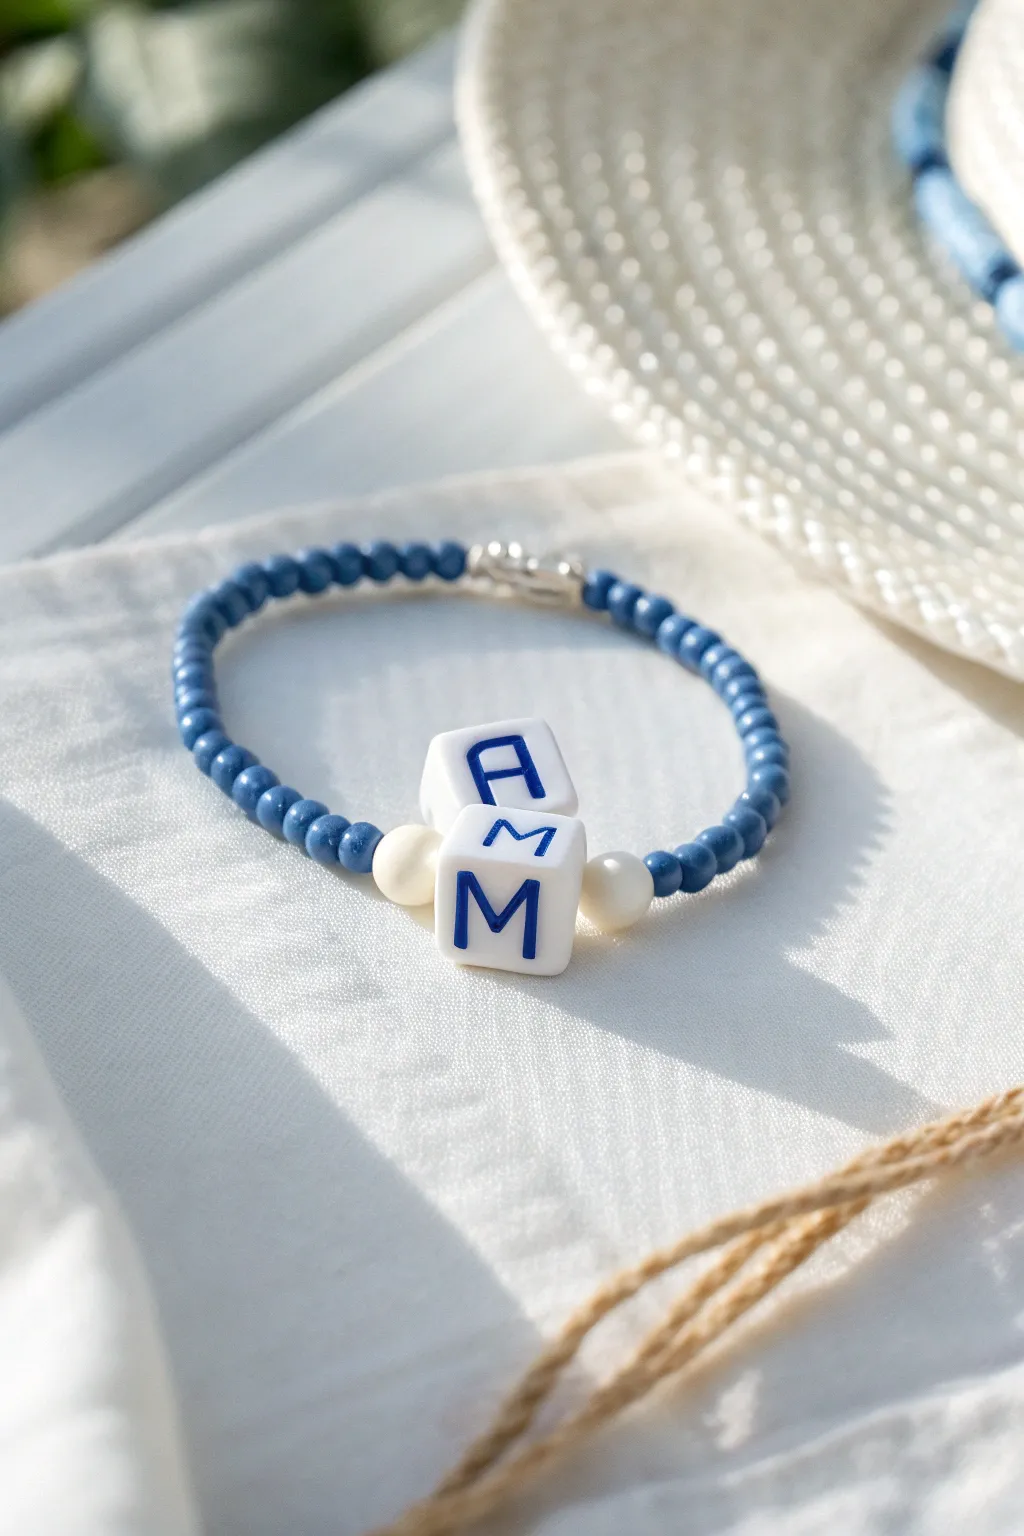
Embrace the crisp, seaside energy of this personalized bracelet, featuring matte blue seed beads flanking simple white letter cubes. It’s a classic example of preppy style with a customized twist, perfect for stacking or wearing as a solo statement piece.
Step-by-Step Guide
Materials
- Matte blue glass seed beads (size 6/0 or 8/0)
- Two white cube letter beads (letters ‘A’ and ‘M’ shown, or your choice)
- Two creamy white round accent beads (approx. 6mm)
- Elastic beading cord (0.7mm or 0.8mm)
- Scissors
Step 1: Planning Your Design
-
Measure your wrist:
Before cutting any string, wrap a measuring tape around your wrist to find your size. Add about half an inch to this measurement for a comfortable fit that isn’t too tight. -
Prepare your cord:
Cut a piece of elastic cord about 10-12 inches long. Having this extra length makes it much easier to tie the finishing knots securely without fumbling. -
Pre-stretch the elastic:
Gently pull the elastic cord a few times to pre-stretch it. This crucial step prevents the bracelet from sagging or stretching out permanently after your first wear. -
Anchor the end:
Place a piece of tape or a bead stopper on one end of your cord so your beads don’t slide off while you are working.
Loose Letters?
If initials spin too much, add small spacer beads or wafers between the cubes to add friction and keep them facing forward.
Step 2: Stringing the Beads
-
String the first half:
Begin adding your matte blue seed beads. Continue stringing until you have covered slightly less than half of your desired total bracelet length. -
Check symmetry:
I like to count the beads at this stage to ensure I can match the number perfectly on the other side later. -
Add first accent bead:
Slide on one of the creamy white round accent beads. This acts as a soft visual buffer between the blue strand and the focal letters. -
Place the initials:
Thread your two cube letter beads. Make sure they are facing the correct direction so they are readable when worn. -
Add second accent bead:
Slide on the second creamy white round bead to frame the letters symmetrically. -
Complete the blue strand:
Finish stringing the rest of your matte blue seed beads. Try to match the exact count from the first side so your initials sit perfectly centered on your wrist.
Pro Tip: Matte Textures
To get the exact look in the photo, search specifically for “matte” or “frosted” opaque glass beads rather than shiny or pearl finishes.
Step 3: Finishing Touches
-
Check the fit:
Carefully wrap the unfinished strand around your wrist to verify the size. Add or remove a few blue beads if the fit needs adjusting. -
Tie the first knot:
Remove the tape or bead stopper. Bring both ends together and tie a simple overhand knot, pulling it tight against the beads without causing them to buckle. -
Secure with a surgeon’s knot:
Tie a surgeon’s knot for extra security. To do this, cross the threads as usual but loop one end through twice before pulling tight. -
Hide the knot:
If possible, pull the knot gently inside one of the adjacent beads to hide it. Adding a tiny dab of jewelry glue to the knot before hiding it will keep it permanently secure. -
Trim excess cord:
Once the glue is dry, trim the excess elastic cord close to the knot, being careful not to cut your main bracelet strand.
Enjoy wearing your new custom accessory stacked with other summer favorites
Blue Confetti Speckle Bead Pattern
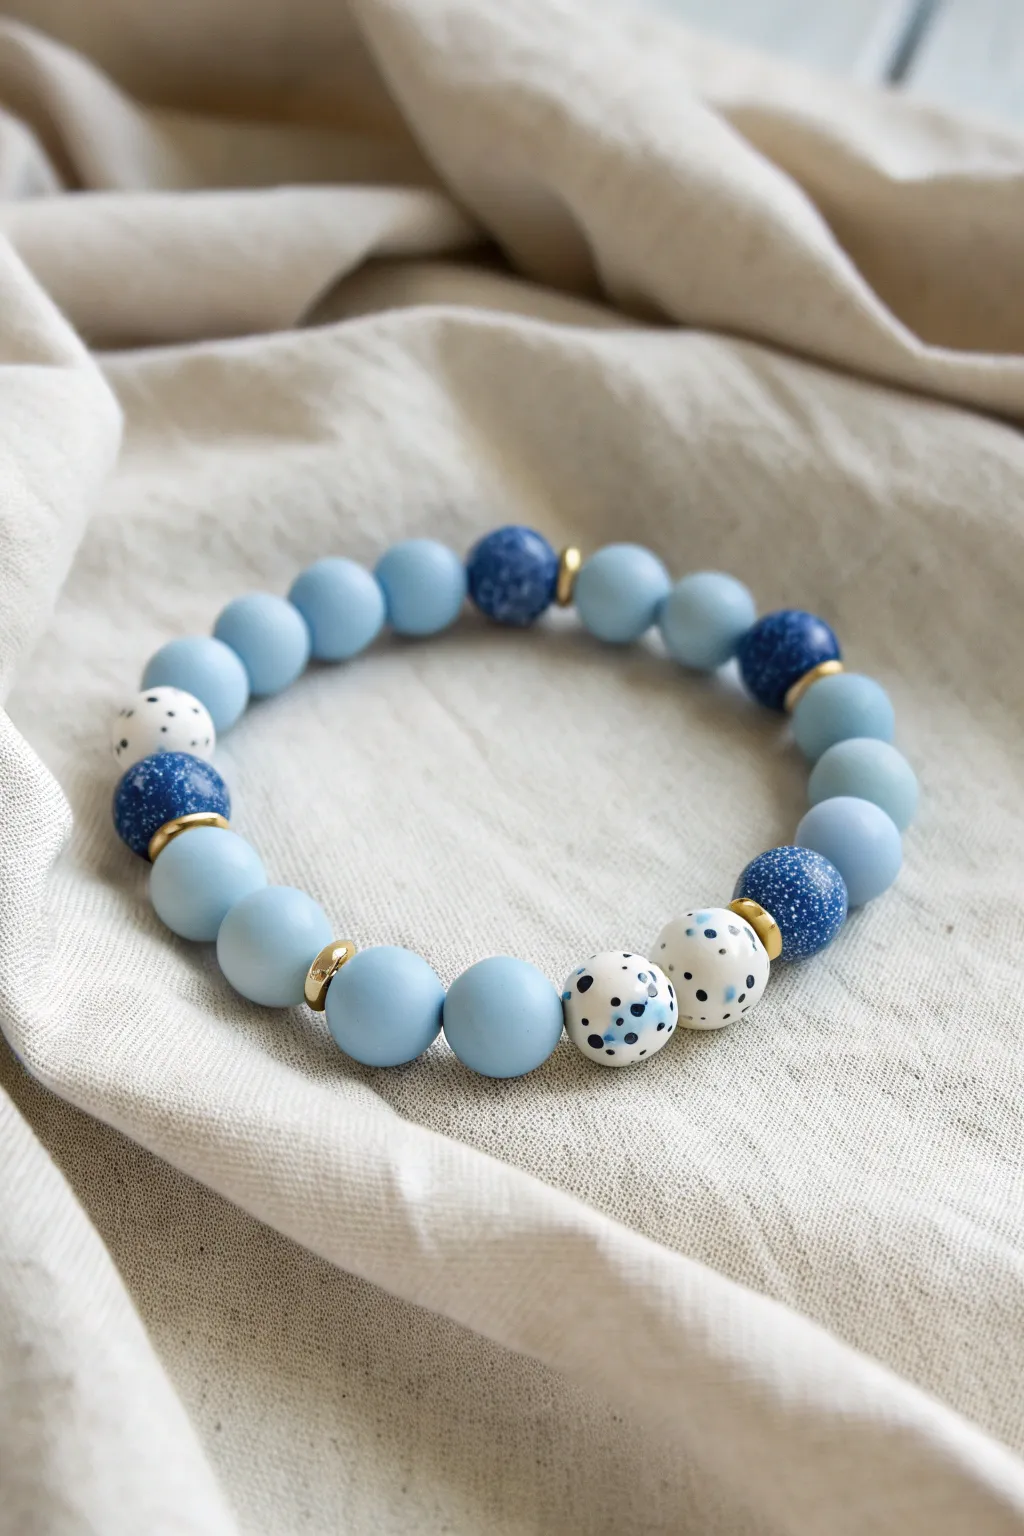
This charming bracelet combines matte baby blue spheres with deep indigo glitter and playful confetti-speckled white beads for a sophisticated yet fun accessory. The alternating pattern is broken up by gleaming gold spacers that add just the right amount of shine to the cool-toned palette.
How-To Guide
Materials
- 10mm matte baby blue polymer clay or acrylic beads (approx. 12-14 beads)
- 10mm dark blue glitter/speckled beads (approx. 4 beads)
- 10mm white beads with black and blue splatter pattern (3 beads)
- Small gold disc spacer beads (approx. 5-6)
- Strong elastic bead cord (0.8mm or 1mm thickness)
- Jewelry glue or clear nail polish
- Scissors
Step 1: Preparation
-
Measure your wrist:
Wrap a piece of string or a flexible measuring tape around your wrist to find your size. Add about 0.5 to 1 inch to this measurement depending on how loose you like your fit. -
Cut the cord:
Cut a piece of elastic cord about 10-12 inches long. Having extra length makes tying the final knot much easier than struggling with short ends. -
Pre-stretch the elastic:
Hold the cord firmly at both ends and give it a few gentle tugs. This pre-stretching step helps prevent the bracelet from loosening up permanently after you wear it a few times. -
Secure one end:
Place a piece of tape over one end of the cord or attach a bead stopper clip so your beads don’t roll off while you’re working.
Knot Slipping?
If your elastic knot feels loose, try tying it while the elastic is slightly stretched. The tension helps grip the cord material against itself tightly.
Step 2: Beading the Pattern
-
Start the sequence:
Begin by threading on two of the matte baby blue beads. This solid color acts as the foundation for the bracelet’s design. -
Add the first accent:
Slide on one gold spacer bead, followed by a dark blue glitter bead. The gold spacer creates a clean visual break before the texture change. -
Continue the blue section:
Add three more matte baby blue beads. This grouping separates the dark accent from the upcoming confetti section. -
Create the confetti focal point:
Thread on your three white speckled ‘confetti’ beads. I like to group these together to create a distinct focal section rather than scattering them. -
Add a gold separator:
Place a gold spacer bead after the confetti trio to frame this special section. -
Symmetry check:
Add two more matte baby blue beads. At this point, check your length against your wrist; the pattern is asymmetrical, but visual balance is key. -
Insert the second dark accent:
Thread a gold spacer, a dark blue glitter bead, and another gold spacer. This sandwiches the dark bead for extra definition. -
Finish the loop:
Continue adding groups of 2-3 baby blue beads separated by the remaining dark glitter beads until you reach your desired length. -
Final verify:
Wrap the unfinished strand around your wrist one last time to ensure the beads meet comfortably without gaps or pinching.
Design Twist
Swap the matte blue beads for frosted white quartz to make the confetti beads blend in, turning the dark blue glitter beads into the main stars.
Step 3: Finishing Touches
-
Tie the first knot:
Remove the tape/stopper. Bring the two ends of the cord together and tie a single overhand knot, pulling it tight so the beads sit snugly against each other. -
Secure with a surgeon’s knot:
Loop the ends again, but this time pass one end through the loop twice before pulling tight. This surgeon’s knot is much more secure than a standard square knot. -
Glue the knot:
Apply a tiny dab of jewelry glue or clear nail polish directly onto the knot. Be careful not to get glue on the prominent visible beads. -
Hide the mechanics:
While the glue is still tacky but not wet, gently pull the cord so the knot slides inside the hole of the nearest large bead. -
Trim the excess:
Once the glue is fully dry (wait at least 15 minutes), use your sharp scissors to trim the excess cord ends as close to the bead hole as possible.
Slip on your new bracelet and enjoy how the mixed textures catch the light perfectly
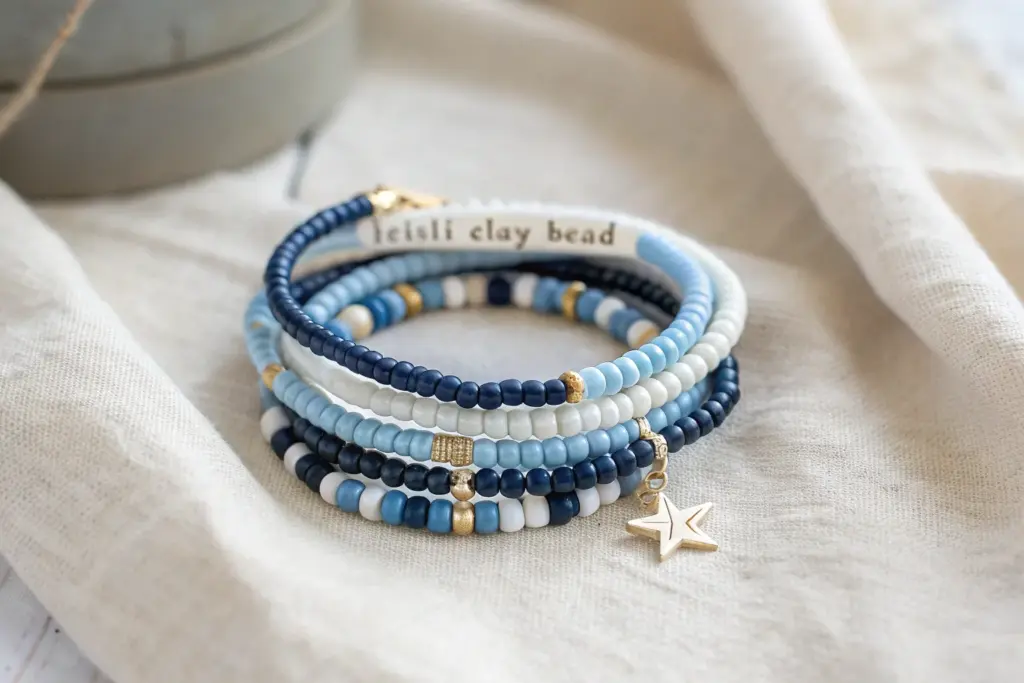
Preppy Stack Set With One Statement Charm
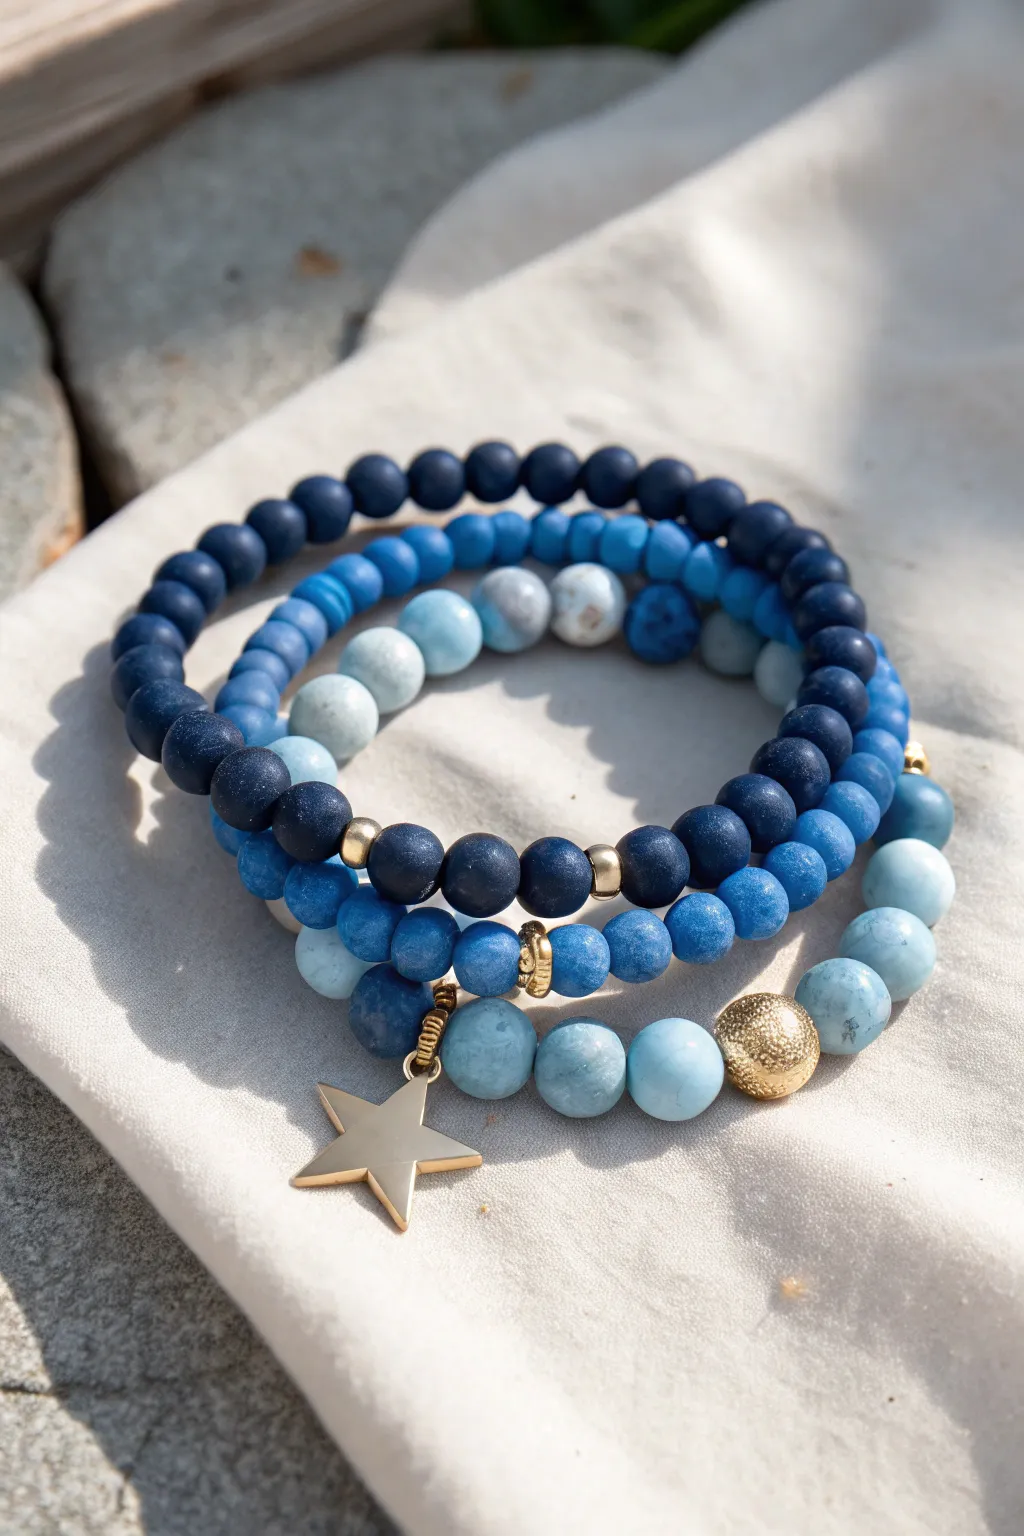
Capture the serene beauty of the night sky with this stunning trio of blue beaded bracelets. Featuring a mix of matte, marbled, and polished textures accented by a golden star, this stack is the perfect blend of preppy chic and celestial charm.
Step-by-Step Tutorial
Materials
- Dark navy matte round beads (6mm or 8mm)
- Medium blue round beads (slightly textured or matte, 6mm or 8mm)
- Pale blue/white marbled round stone beads (8mm or 10mm)
- Gold star charm with jump ring
- Gold corrugated or textured accent bead (large hole)
- Small gold space beads or discs
- Gold tube bail or charm hanger
- Strong elastic display cord (0.7mm or 0.8mm)
- Jewelry glue or clear nail polish
- Scissors
Step 1: The Navy Matte
-
Measure and Cut:
Cut a piece of elastic cord about 10-12 inches long. This gives you plenty of extra room for tying knots without struggling. -
Start Beading:
Begin stringing your dark navy matte beads. String about one-third of your total desired length. -
Add Accents:
Slide on a small gold spacer bead, followed by three more navy beads, and then another gold spacer bead. This creates a subtle visual break in the darker color. -
Finish the Strand:
Continue adding navy beads until the bracelet fits comfortably around your wrist. The matte texture looks best when it’s not too tight. -
Secure the Knot:
Tie a surgeon’s knot (right over left, left over right, and loop through an extra time). Pull tightly to secure. -
Seal:
Dab a tiny drop of jewelry glue on the knot. Let it dry completely before trimming the excess elastic close to the knot.
Knot Slipping?
If your elastic knot feels loose or slippery, try pre-stretching the cord firmly before beading. This removes the ‘slack’ and helps the knot bite into itself better.
Step 2: The Celestial Star
-
Prepare the Charm:
If your star charm isn’t already attached to a jump ring or bail, attach it now using pliers. -
Measure Cord:
Cut another length of elastic cord, keeping it consistent with the previous bracelet length. -
String Pattern:
Thread on your medium blue beads. I like to check the fit against the first bracelet periodically to ensure they will stack nicely together. -
Center the Charm holder:
Once you have strung about half of your beads, slide on a gold tube bail or a gold ring connector that will hold your charm. -
Attach the Star:
Hook your star charm onto the bail loop. Ensure it hangs freely and faces outward. -
Complete the Circle:
Finish stringing the rest of the medium blue beads. Tie off with a strong surgeon’s knot, glue, dry, and trim the ends.
Step 3: The Marbled Statement
-
Prep the Elastic:
Cut your third piece of elastic. Since these beads might be slightly larger, you may want a slightly longer cord to accommodate the bulk. -
Create the Mix:
Begin stringing the pale blue and white marbled beads. The natural variation in these stone beads adds lovely depth to the stack. -
The Focal Bead:
At the halfway point, add your large, textured gold accent bead. This gold sphere acts as a counterweight to the marbling and ties into the star charm. -
Finish Up:
Fill the rest of the cord with the marbled beads until you reach the desired size. -
Final Knotting:
Tie your final surgeon’s knot securely. Apply glue to the knot. -
Hide the Knot:
If the hole of a neighboring bead is large enough, gently tug the elastic so the knot slides inside the bead to hide it.
Texture Twist
Swap the matte navy beads for lava stone beads. You can add a drop of essential oil to the porous lava stones to turn your bracelet stack into a subtle diffuser.
Enjoy wearing your celestial-inspired stack separately or all together for a complete look
Poolside Color Match With Icy Blues
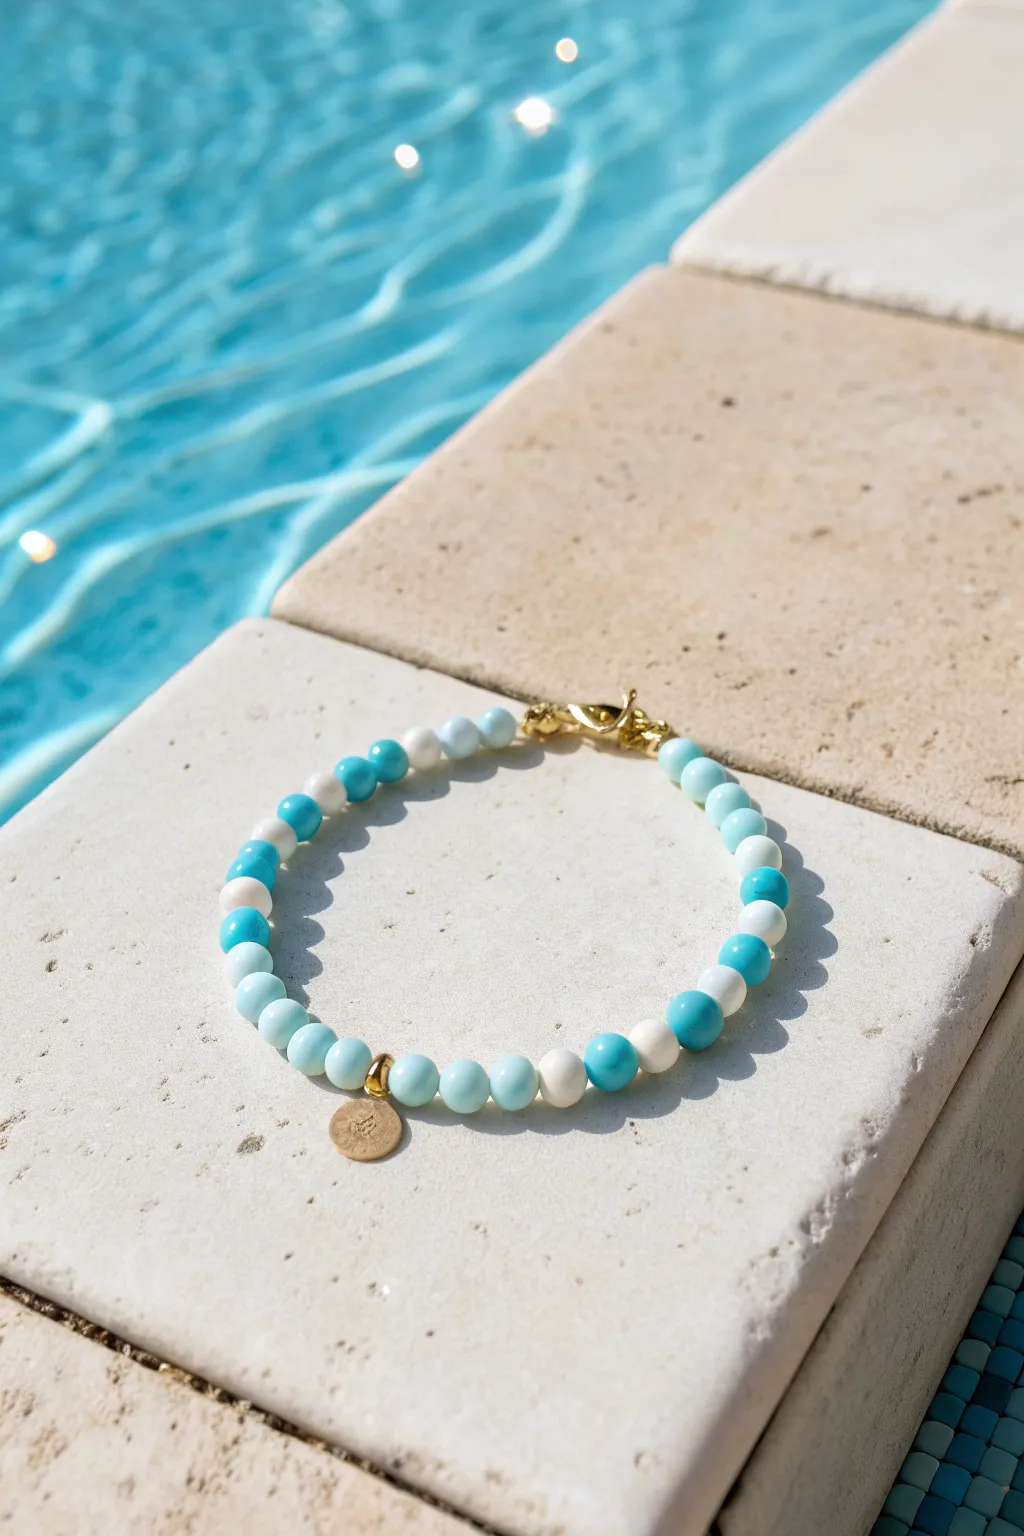
Capture the refreshing vibes of a summer pool day with this elegant beaded bracelet. Combining cool tones of white, icy blue, and teal with gold accents creates a versatile accessory perfect for sunny weather.
Step-by-Step
Materials
- 6mm round beads in white
- 6mm round beads in icy blue (matte or frosted finish works well)
- 6mm round beads in bright turquoise/teal
- Gold lobster clasp
- Gold jump rings (open)
- Small gold disc charm (stamped or plain)
- Gold crimp beads
- Flexible beading wire (gold or clear)
- Wire cutters
- Flat nose pliers
- Crimping tool (optional but recommended)
Step 1: Preparation & Pattern Planning
-
Measure your wrist:
Before cutting any wire, wrap a measuring tape around your wrist to find your size, then add about one inch to determine the final bracelet length. -
Cut the wire:
Cut a piece of beading wire that is 3-4 inches longer than your target length to ensure you have plenty of room to work with the clasp. -
Lay out the pattern:
The pattern follows a consistent sequence: one white, three icy blue, one bright turquoise. Lay your beads out on a bead board or towel to test this sequence. -
Refine the sequence:
Looking at the finished piece, you can alternate the pattern slightly if you prefer a random look, but keep the white beads as the separators between the blue gradients.
Step 2: Stringing the Bracelet
-
Secure the first end:
Thread a crimp bead onto one end of the wire, followed by a jump ring. Loop the wire back through the crimp bead. -
Crimp the bead:
Use your flat nose pliers or crimping tool to verify the loop is snug but not tight against the jump ring, then flatten the crimp bead securely. -
Start beading:
Begin stringing your beads. Thread the first few beads over the short tail of the wire to hide it. -
Build the gradient:
Continue your pattern: White, Icy Blue, Icy Blue, Icy Blue, Turquoise. Repeat this until you reach about halfway point of your desired length. -
Add the charm:
Pause at the midpoint. This is where you will eventually attach the charm, so identify the center-most bead. I like to mark this spot mentally or with a tiny piece of tape. -
Finish the strand:
Continue the pattern until the bracelet reaches your measured length, ensuring the pattern ends symmetrically if possible.
Uneven Tension?
If the bracelet feels stiff or curls up when laid flat, you likely pulled the wire too tight before crimping. Leave a tiny bit of wiggle room next time.
Step 3: Finishing Touches
-
Add the closing hardware:
Thread a crimp bead onto the remaining wire, followed by the gold lobster clasp. -
Loop and secure:
Pass the wire back through the crimp bead and into the last bead or two on the strand. -
Tighten the slack:
Pull the wire gently to remove extra space between beads, ensuring the bracelet is flexible and not stiff. -
Final crimp:
Flatten the crimp bead securely with your pliers. -
Trim excess wire:
Use your wire cutters to snip off the remaining tail of the wire as close to the beads as possible. -
Attach the charm:
Open a small gold jump ring using two pairs of pliers (twist side-to-side, don’t pull apart). Slide on your gold disc charm. -
Position the charm:
Locate that center point you noted earlier. Hook the jump ring around the wire between two beads near the center and close the ring securely.
Add Extra Sparkle
Replace the single white bead in the pattern with a small freshwater pearl or a gold spacer bead to give the bracelet a more luxurious, high-end finish.
Slide this bracelet on for an instant splash of cool color that coordinates perfectly with poolside lounging.