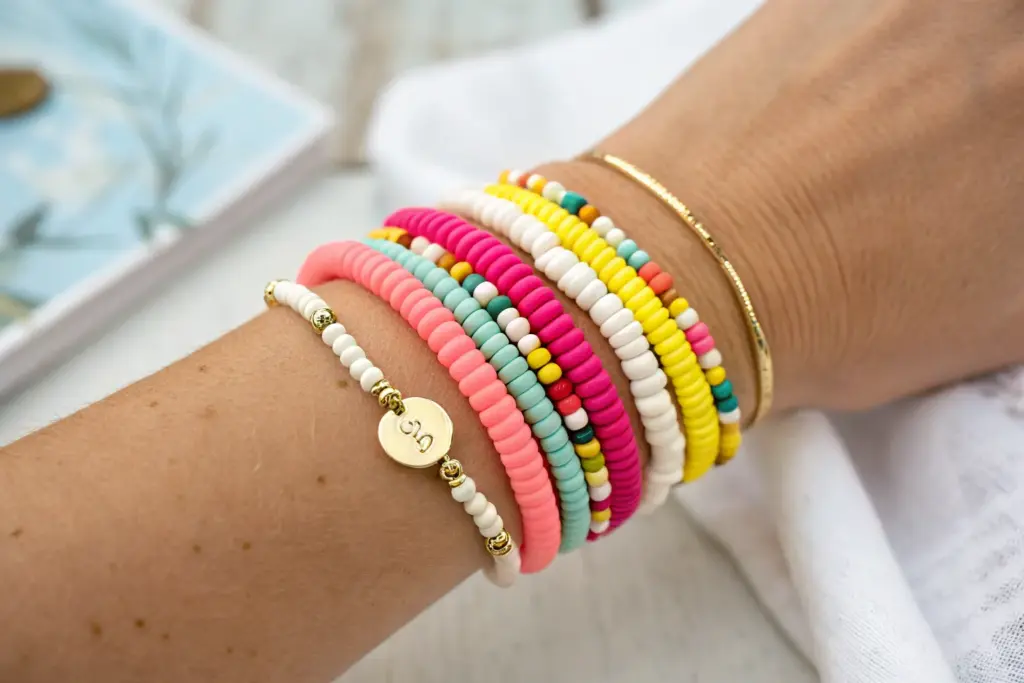
If you’re craving that bright, put-together preppy clay bead look, it really comes down to playful color combos, neat patterns, and a little bit of shine. Here are my go-to ideas for building bracelet stacks (and a few extras) that feel sunny, sporty, and totally wearable.
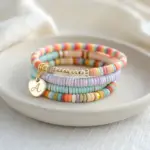
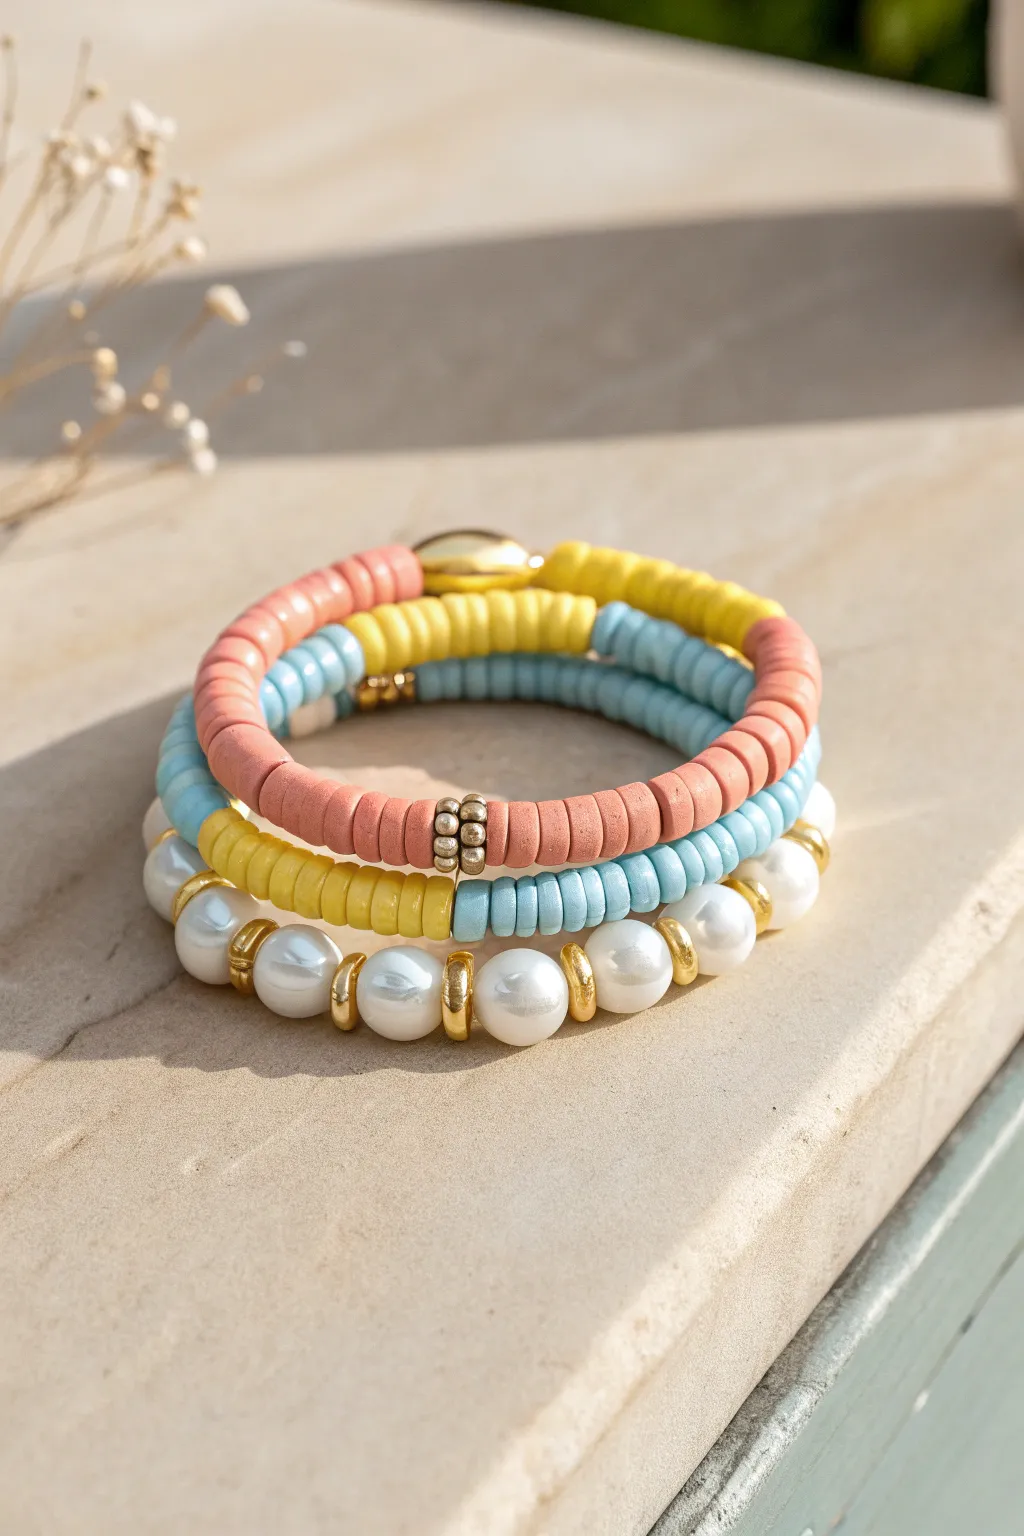
Pastel + White Heishi Stack
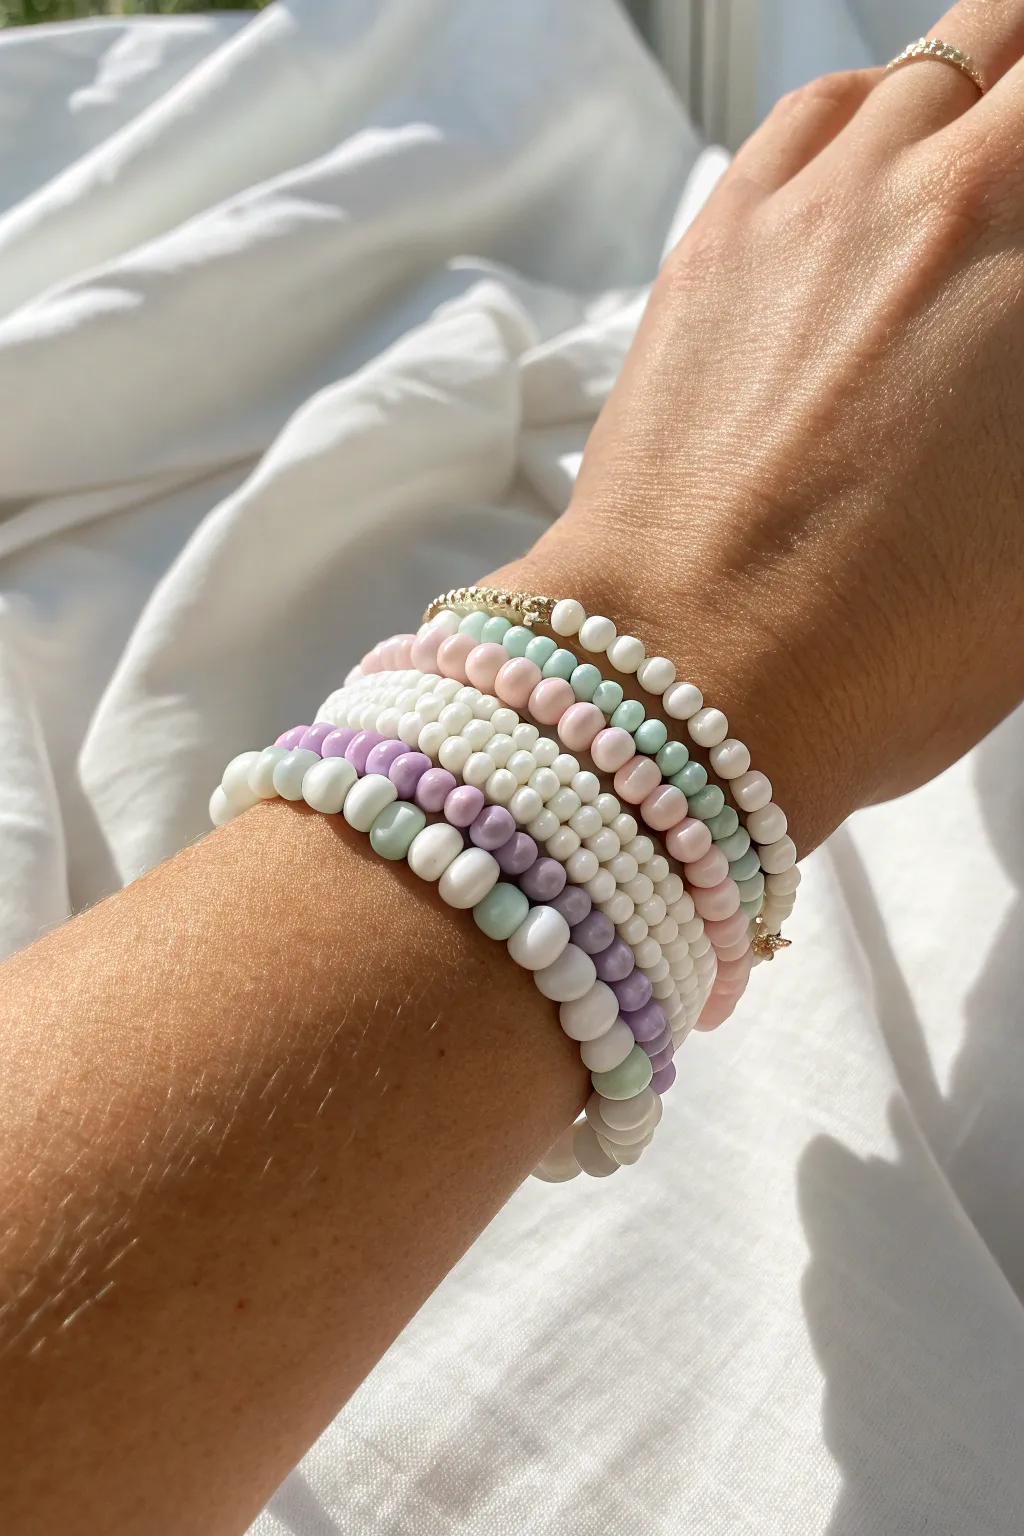
Embrace a soft and airy aesthetic with this stack of pastel and white beaded bracelets that perfectly captures a carefree, preppy vibe. Combining milky whites, soft pinks, mint greens, and lilacs, this set is ideal for sunny days and layered styling.
Step-by-Step Guide
Materials
- Elastic stretch cord (0.7mm or 0.8mm)
- 6mm round white ceramic or glass beads
- 4mm round pastel pink beads
- 4mm round mint green beads
- 4mm round white seed beads
- 6mm-8mm chunky mixed pastel beads (lilac, mint, white)
- Small gold spacer beads (optional)
- Gold accent bead or charm (optional)
- Beading needle (optional but helpful)
- Scissors
- Jewelry glue or clear nail polish
Step 1: Planning Your Stack
-
Measure your wrist:
Before cutting any cord, wrap a measuring tape around your wrist to find your size. Add about 0.5 to 1 inch to this measurement depending on how loose you want the fit, and then add a few extra inches for knotting. -
Cut the elastic:
Cut four to five lengths of elastic cord, each about 10-12 inches long. Having extra length makes tying the final knots much less frustrating than working with short ends. -
Pre-stretch the cord:
Hold each piece of elastic and give it a gentle tug a few times. Pre-stretching helps prevent the bracelets from sagging or stretching out permanently after you wear them for the first time.
Knot Slipping?
If your elastic knots keep coming undone, try the ‘surgeon’s knot’. Wrap the elastic through the loop an extra time before pulling tight for extra friction and hold.
Step 2: Creating the Solid White Strand
-
Secure the end:
Place a piece of tape or a binder clip on one end of your first cord to stop beads from sliding off as you work. -
String white beads:
Thread your medium-sized (approx. 6mm) milky white round beads onto the cord. Continue until the beaded section matches your wrist measurement. -
Add a gold accent:
If you like a bit of sparkle, slip on a single gold spacer bead or a small gold charm in the center of the strand or near where the knot will be hidden.
Texture Play
Mix bead finishes! Combine matte pastel beads with glossy white ones or pearlescent beads. The contrast in sheen makes the stack look high-end and curated.
Step 3: Creating the Pastel Pattern Strand
-
Start the pattern:
For the second bracelet, you will create a repeating pattern. Start with three 4mm white beads, then add one mint green bead, followed by one soft pink bead. -
Repeat the sequence:
Continue this 3-white, 1-mint, 1-pink sequence. The white sections act as a clean spacer that makes the pastel colors pop without overwhelming the design. -
Check the length:
Wrap the strand around your wrist periodically to ensure it sits comfortably next to your first white bracelet.
Step 4: Creating the Mixed Chunkier Strand
-
Select larger beads:
This bracelet serves as the statement piece of the stack. Use slightly larger (6-8mm) beads in white, lilac, and mint green. -
Randomize the flow:
Instead of a strict pattern, try stringing these in color blocks—like five whites, three lilacs, then five whites and three mints. This organic look adds texture to the stack.
Step 5: Creating the Small Seed Bead Strand
-
Thread small beads:
For a delicate texture contrast, thread your smallest white seed beads onto a new cord. This thin bracelet acts as a refined filler between the chunkier ones. -
Incorporate gold accents:
Every inch or so, swap a white seed bead for a tiny gold spacer bead to tie the whole metallic theme together across the stack.
Step 6: Finishing Touches
-
Tie the surgeon’s knot:
Remove the tape or clip. Cross the ends of the elastic, loop one end under twice, and pull tight. Make a second regular knot on top to secure it. -
Secure with glue:
Put a tiny dot of jewelry glue or clear nail polish on the knot. I usually let this dry for about 10 minutes to ensure it won’t slip undone. -
Hide the knot:
Trim the excess elastic close to the knot, but not too close. Gently pull the elastic so the knot slides inside the hole of a neighboring bead, making it invisible.
Layer your new pastel creations together for a fresh, summery look that brightens up any outfit


Color-Blocked Bracelets With Gold Spacers
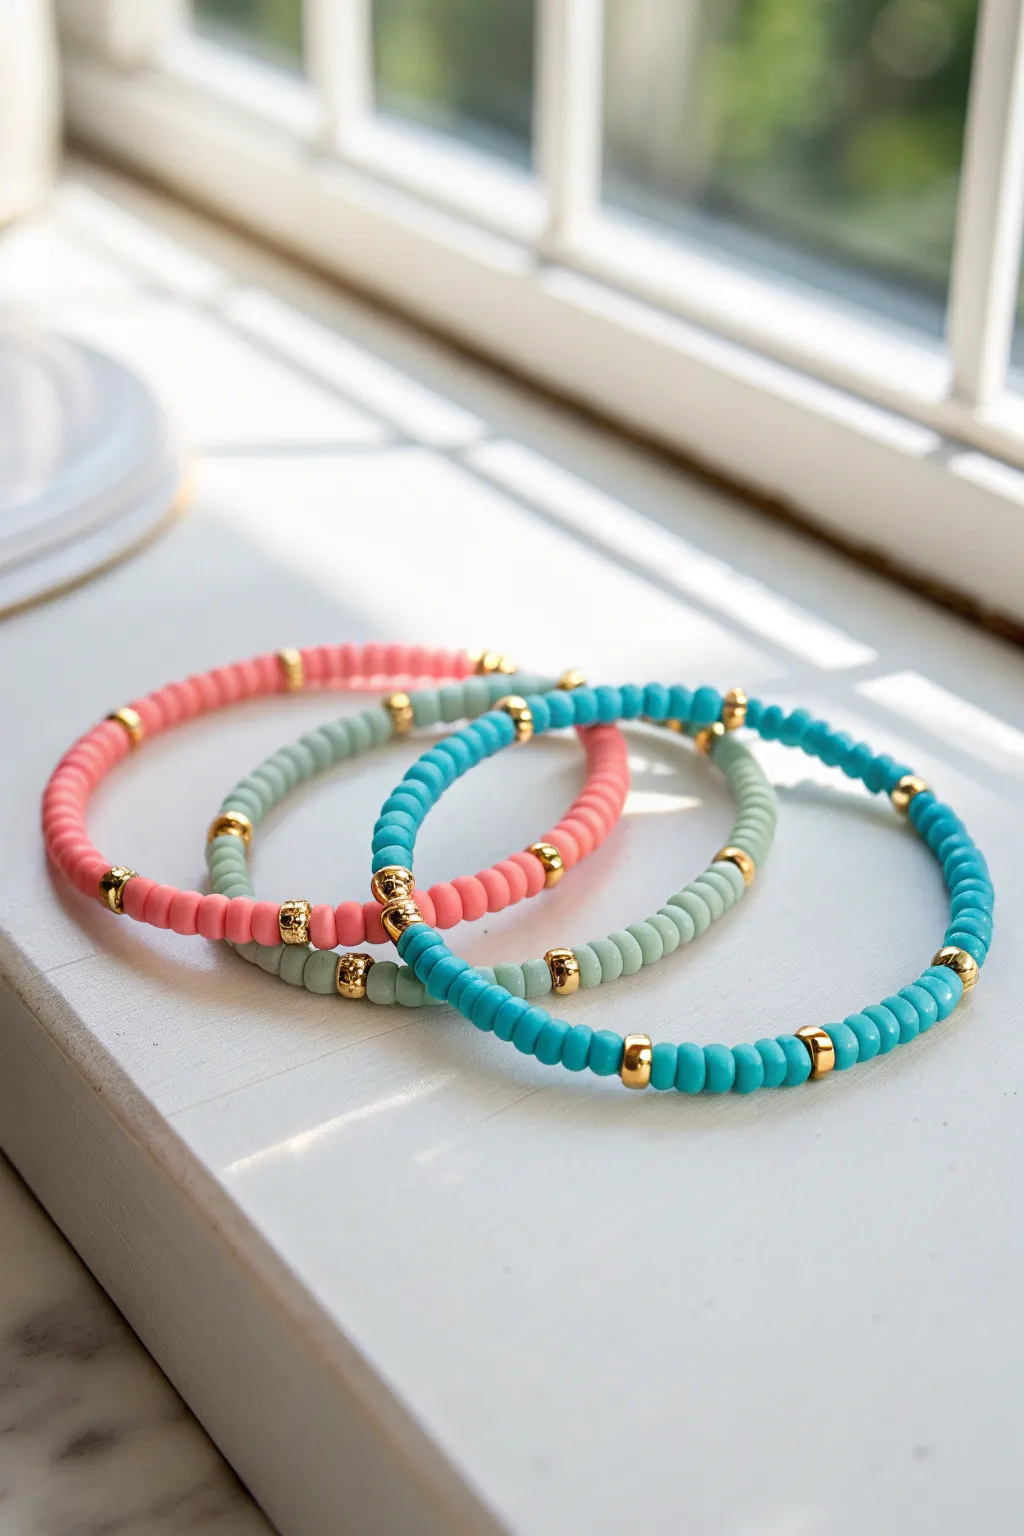
These chic bracelets elevate simple clay Heishi beads by introducing regular intervals of shining gold, creating a sophisticated yet playful stack. The combination of coral, sage, and turquoise offers a fresh, preppy palette perfect for brightening up any outfit.
Step-by-Step
Materials
- 6mm flat clay Heishi beads (coral pink, sage green, bright turquoise)
- 4mm-6mm gold accent beads (barrel or round shape)
- 0.8mm clear elastic stretch cord
- Jewelry glue or clear nail polish
- Scissors
- Bead stopper or tape
- Ruler or measuring tape
Step 1: Planning and Prep
-
Measure your wrist:
Wrap a measuring tape comfortably around your wrist to find your size, then add about half an inch to ensure the bracelet isn’t too tight. -
Cut the cord:
Cut three pieces of elastic cord, each about 10-12 inches long. This extra length is crucial for tying secure knots later without struggling. -
Secure the ends:
Attach a bead stopper or simply place a piece of tape on one end of each cord to prevent your beads from sliding off while you work. -
Sort your spacers:
Gather your gold spacer beads. For this specific look, you want spacers that have a bit of visual weight, like a small gold barrel bead rather than a tiny flat disc.
Spacer Selection
Use gold barrel beads or round beads that are slightly larger (4-6mm) than the flat clay discs. This adds dimension and prevents the gold from getting ‘lost’ in the stack.
Step 2: Stringing the Pattern
-
Start the coral bracelet:
Begin with the coral pink beads. Thread on approximately 10 to 12 clay beads onto the elastic cord. -
Add the first accent:
Slide on one gold spacer bead. This creates the first break in the solid color. -
Establish the rhythm:
Continue the pattern: string another set of 10-12 coral beads, followed by a gold spacer. I prefer to count the beads exactly for the first few sections to ensure symmetry. -
Check the length:
Repeat this pattern until the beaded strand reaches your measured wrist size. End with a section of clay beads rather than a gold spacer so the knot can be hidden more easily. -
Create the sage strand:
Moving to the second cord, replicate the same process with the sage green beads. Try to keep the same count (e.g., 10 green beads, 1 gold spacer) to make the stack look cohesive. -
Create the turquoise strand:
Finally, string the turquoise bracelet using the same repeating pattern. Visual consistency is key here, so double-check that your gold spacers align roughly with the other bracelets when laid side by side. -
Pre-stretch the cord:
Before tying, hold both ends of a strung bracelet and give the cord a gentle tug. This pre-stretching prevents the elastic from sagging immediately after you wear it.
Mix Up The Rhythm
Instead of equal spacing, try an asymmetrical pattern like 5 beads, 1 gold, 15 beads, 1 gold. This creates a more dynamic, modern look.
Step 3: Finishing Touches
-
Tie the first knot:
Remove the tape or stopper. Bring the two ends of the cord together and tie a simple overhand knot, pulling it tight against the beads. -
Secure with a surgeon’s knot:
Tie a second knot, but loop the end through twice before pulling tight. This is a surgeon’s knot and is much more secure for elastic jewelry. -
Apply adhesive:
Dab a tiny drop of jewelry glue or clear nail polish directly onto the knot. Be careful not to glue the beads to the cord, just the knot itself. -
Hide the knot:
While the glue is still slightly tacky but not wet, slide a nearby gold spacer bead or a clay bead over the knot to conceal it inside. -
Trim the excess:
Once the glue is fully dry, use sharp scissors to trim the excess cord ends as close to the bead as possible without snipping the knot. -
Repeat for the set:
Follow the tying and gluing steps for the remaining two bracelets to complete your colorful trio.
Enjoy wearing your new handmade stack individually or all together for a pop of personalized color


Confetti Mix “Sprinkle” Strand
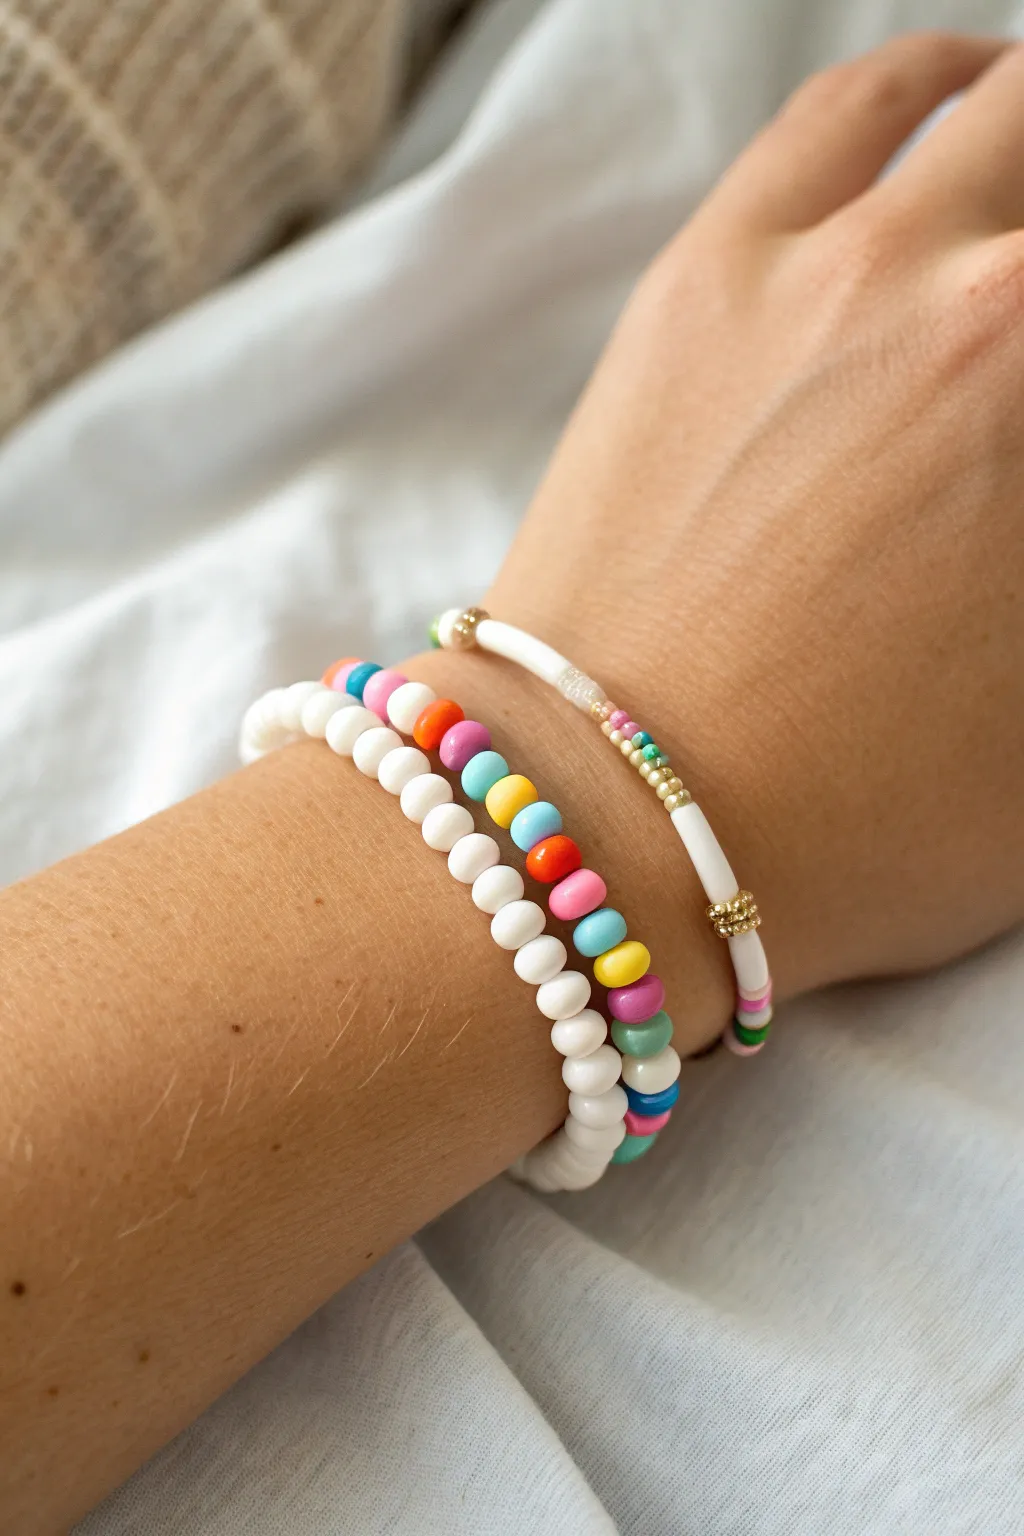
This cheerful stack combines crisp white with vibrant bursts of color to capture the fun of a frosted cupcake with sprinkles. Three distinct strands layer together perfectly: a classic solid white, a rainbow-beaded strand, and a delicate gold-accented mix.
How-To Guide
Materials
- White clay heishi beads (6mm)
- Colorful pony beads or round acrylic beads 4-6mm (yellow, pink, blue, orange, purple, green)
- White tubular or cylinder beads (curved tube beads)
- Small gold spacer beads or crimp covers
- Tiny colorful seed beads (assorted rainbow)
- Elastic stretch cord (0.7mm or 0.8mm)
- Super glue or jewelry cement
- Scissors
- Bead stopper or tape
Step 1: Strand 1: The Rainbow Row
-
Measure and Cut:
Cut a piece of elastic cord about 10-12 inches long. This gives you plenty of room to tie knots later. -
Secure the End:
Attach a bead stopper or a piece of tape to one end of the cord so your beads don’t slide off while you work. -
Start the Pattern:
Thread on about 10-15 white clay heishi beads to form the solid white base section that will sit on the underside of your wrist. -
Add Color Pops:
Begin your main pattern by adding one colorful round bead (like a bright yellow), followed by a single white clay heishi bead. -
Continue the Sequence:
Add a pink round bead, then a white spacer. Continue this alternating pattern—color, white spacer, color—cycling through blue, orange, purple, and green beads. -
Check Length:
Wrap the strand around your wrist to check the size. If you need more length, add more white clay beads to the ends rather than disrupting the colorful pattern. -
Tie Off:
Tie a secure surgeon’s knot (right over left, left over right), dab a tiny drop of glue on the knot, let it dry, and trim the excess cord.
Knot Slipping?
If your elastic knots unravel, pull the cord tight to pre-stretch it before tying. A surgeon’s knot with a dab of G-S Hypo Cement is the strongest hold.
Step 2: Strand 2: Simple White Classic
-
Prepare Cord:
Cut another length of elastic cord and secure the end just as before. -
String the beads:
Simply thread white clay heishi beads continuously onto the cord. I prefer to double-check for any chipped beads here and remove them for a cleaner look. -
Finish the Strand:
Once the strand fits comfortably around your wrist (matching the length of the first bracelet), tie your knot, glue, and trim.
Step 3: Strand 3: The Delicate Accent
-
Set the Base:
Cut your third piece of elastic. Thread on a long white curved tube bead. -
Create Gold Detail:
Add three small gold spacer beads immediately after the tube bead to create a metallic divider. -
The Sprinkle Section:
Thread on a mix of about 15-20 tiny seed beads in random rainbow colors. This creates the ‘sprinkle’ effect. -
Repeat Elements:
Add a single white tube bead, followed by three gold spacers, and then another small section of colorful seed beads. -
Complete the Circle:
Continue this pattern until the bracelet is the correct size. Tie off securely, glue the knot, and trim the ends to complete your stack.
Mix It Up
Swap the white tube beads for clear or frosted ones to give the ‘sprinkle’ strand a lighter, airy look that makes the seed beads pop even more.
Now you have a perfectly coordinated set ready to mix and match with your other favorites


Sunset Ombré Gradient Bracelet
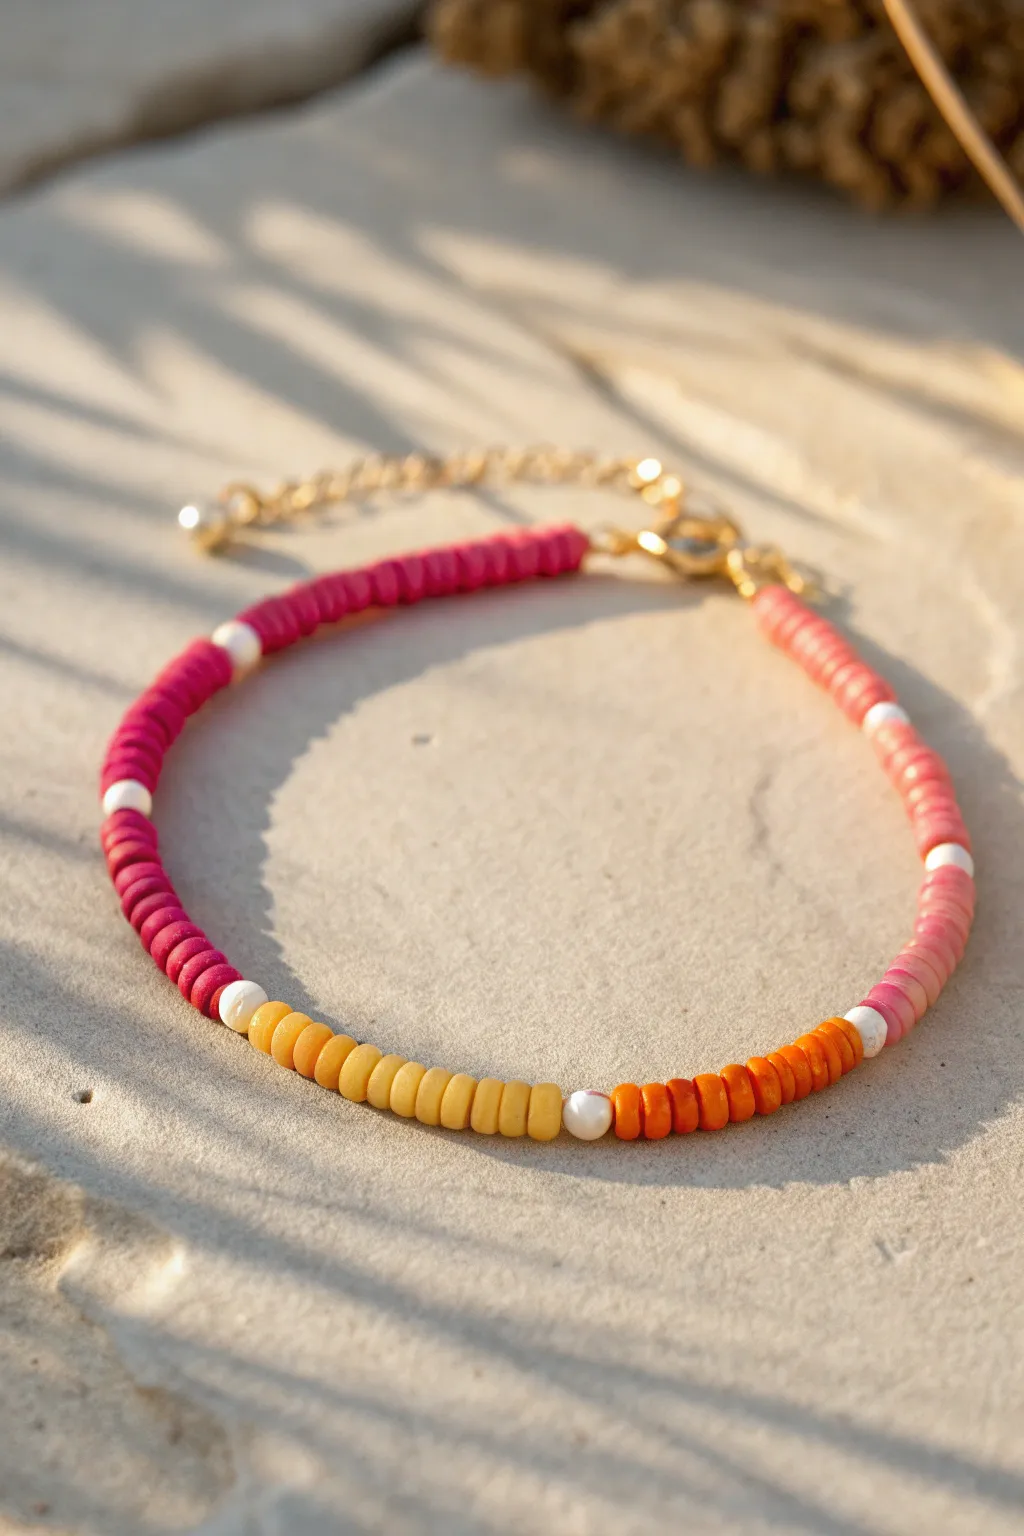
Capture the warmth of a fading summer sky with this vibrant clay heishi bead bracelet. The design transitions smoothly from deep magenta to soft yellow, punctuated by delicate white spacers for a polished finish.
Step-by-Step
Materials
- 6mm clay heishi beads (magenta/dark pink)
- 6mm clay heishi beads (coral/medium pink)
- 6mm clay heishi beads (bright orange)
- 6mm clay heishi beads (mustard yellow)
- 4mm round white glass or pearl spacer beads
- Stretch cord (0.8mm recommended)
- Gold lobster clasp and extender chain set
- 2 Gold jump rings
- 2 Gold crimp beads (or knot covers)
- Jewelry pliers
- Scissors
Step 1: Planning and Preparation
-
Measure your wrist:
Wrap a piece of string around your wrist to find a comfortable fit, then add about an inch to account for the clasp and ease of movement. -
Cut the cord:
Cut a piece of stretch cord about 10-12 inches long. It’s always better to have too much cord than to struggle with a piece that’s too short during the knotting phase. -
Secure the end:
Place a piece of tape on one end of the cord or attach a binder clip. This simple trick prevents your beads from sliding off while you work on your pattern. -
Sort your gradient:
Layout your clay bead colors in order: Magenta, Coral, Orange, and Mustard Yellow. Seeing the gradient laid out helps visualize the ombré effect before threading.
Uneven Twist?
If your bracelet twists or won’t lay flat, the crimp might be too close to the beads. Leave a tiny 1-2mm gap of cord near the clasp for flexibility.
Step 2: Creating the Ombré Pattern
-
Start with Magenta:
Thread approximately 1.5 inches of the dark magenta clay beads onto the cord. This will form the darkest section of your sunset gradient. -
Add a spacer:
Slide on one small white round spacer bead. This distinct break acts as a palate cleanser between color transitions. -
Transition to Coral:
Thread on about 1.5 inches of the coral or medium pink beads. Notice how the colors begin to shift and lighten like the sky. -
Second spacer:
Add another white round spacer bead after the coral section is complete. -
Add the Orange section:
String approximately 1 inch of the bright orange beads. You can slightly vary the length of sections to make the bracelet feel more organic. -
Third spacer:
Place your next white round spacer bead onto the cord. -
Finish with Mustard Yellow:
Add the mustard yellow beads. Thread about 1 inch of them, or continue until the beaded portion matches your measured wrist size minus the clasp length. -
Final spacer check:
Ensure there is a white spacer bead at both the very beginning and the very end of your bead strand for symmetry.
Step 3: Finishing Touches
-
Add crimp beads:
Remove the tape/clip. Thread a gold crimp bead onto one end of the cord, followed by a jump ring attached to your lobster clasp. -
Loop and secure:
Loop the cord back through the crimp bead. Pull it snug but not tight enough to warp the bracelet shape. -
Crimp it down:
Use your jewelry pliers to flatten the crimp bead firmly, locking the cord in place. I prefer to tug it gently to ensure it holds. -
Repeat on the other side:
Repeat the crimping process on the other end, this time attaching the jump ring with the extender chain. -
Trim excess:
Carefully trim the excess stretch cord close to the crimp beads using your scissors. -
Optional reinforcement:
If you aren’t using crimps and plan to knot instead, tie a surgeon’s knot (right over left twice, then left over right twice) and secure with a dab of jewelry glue.
Gold Accents
Replace the white round spacer beads with gold plated metal beads or small freshwater pearls for a more sophisticated, beach-chic aesthetic.
Enjoy wearing your personal sunset on your wrist all year round

The Complete Guide to Pottery Troubleshooting
Uncover the most common ceramic mistakes—from cracking clay to failed glazes—and learn how to fix them fast.
Pink and Green Preppy Pop Combo
Capture the essence of summer fun with this vibrant bracelet stack that mixes classic gold textures with playful clay beads. The combination of minty green, bright white, and bubblegum pink creates a refreshing “preppy pop” look perfect for sunny days.
How-To Guide
Materials
- Polymer clay heishi beads (6mm or 8mm) in Mint Green
- Polymer clay heishi beads (6mm or 8mm) in Bubblegum Pink
- White glass pearl or ceramic round beads (4mm or 6mm)
- Small gold rhinestone rondelle spacer beads (approx 6mm)
- Elastic stretch cord (0.8mm clear)
- Delicate gold chain bracelet with a textured disc charm (pre-made or chain + charm + jump ring + clasp)
- Jewelry glue (GS Hypo Cement recommended)
- Scissors
Step 1: The Chain & Charm Layer
-
Measure and cut:
Measure your wrist and cut a length of thin gold chain that fits comfortably with a little movement. If you are making this from scratch, you’ll need jewelry pliers. -
Attach the clasp:
Using jump rings, attach a lobster clasp to one end of the chain and a jump ring to the other end to serve as the catch. -
Add the focal point:
Find the center point of your chain. Open a small jump ring, slide on your textured white or gold disc charm, and attach it to the center link so it sits right on top of your wrist.
Step 2: The Mixed Bead Layer
-
Prepare the cord:
Cut a piece of elastic cord about 10-12 inches long. I like to pre-stretch the cord by pulling it firmly a few times to prevent sagging later. -
Secure the end:
Place a piece of tape on one end of the cord or attach a bead stopper so your beads don’t slide off while you work. -
Start the pattern:
Thread on approximately 8-10 white round beads. This section will sit on the side or bottom of your wrist. -
Transition to green:
Add a single gold rhinestone rondelle spacer, followed by a section of 5-8 Mint Green clay heishi beads. -
Create the center detail:
Add another gold rhinestone spacer, then thread on roughly 10-15 Mint Green heishi beads to form the main colored section. -
Mirror the pattern:
Finish the sequence by reversing your steps: add a gold spacer, a small section of matching green heishi beads, another gold spacer, and fill the rest of the length with white round beads until it fits your wrist.
Knot Slipping?
If your elastic knots feel slippery, tighten them while the cord is taut. A surgeon’s knot is best! Avoid cutting tails too short until the glue is fully cured.
Step 3: The Solid Color Layers
-
String the green solid:
Cut a new length of cord. Thread exclusively Mint Green heishi beads onto the string until you reach your desired length (usually about 6.5 to 7 inches for an average wrist). -
String the pink solid:
Repeat the process with a new cord and Bubblegum Pink heishi beads. This bracelet is thickest and boldest, acting as the anchor for the visual stack.
Mix Your Metals
Don’t be afraid to swap the gold spacers for rose gold to match the pink beads, or silver for a cooler tone. The spacer texture adds necessary sparkle.
Step 4: Finishing the Set
-
Check the fit:
Wrap each beaded strand around your wrist to ensure they aren’t too tight or too loose before tying. They should roll over your hand comfortably. -
Tie the knots:
For each elastic bracelet, tie a surgeon’s knot (right over left, left over right twice). Pull the knot tight. -
Secure with glue:
Dab a tiny drop of GS Hypo Cement or super glue onto the knots to keep them secure. Let this dry completely before moving them. -
Trim and hide:
Trim the excess clear cord close to the knot. If the beads allow, gently tug the cord so the knot slides inside one of the heishi beads to hide it.
Slide on your new stack and enjoy the upbeat splash of color on your wrist
Blue and White Coastal Prep Stripes
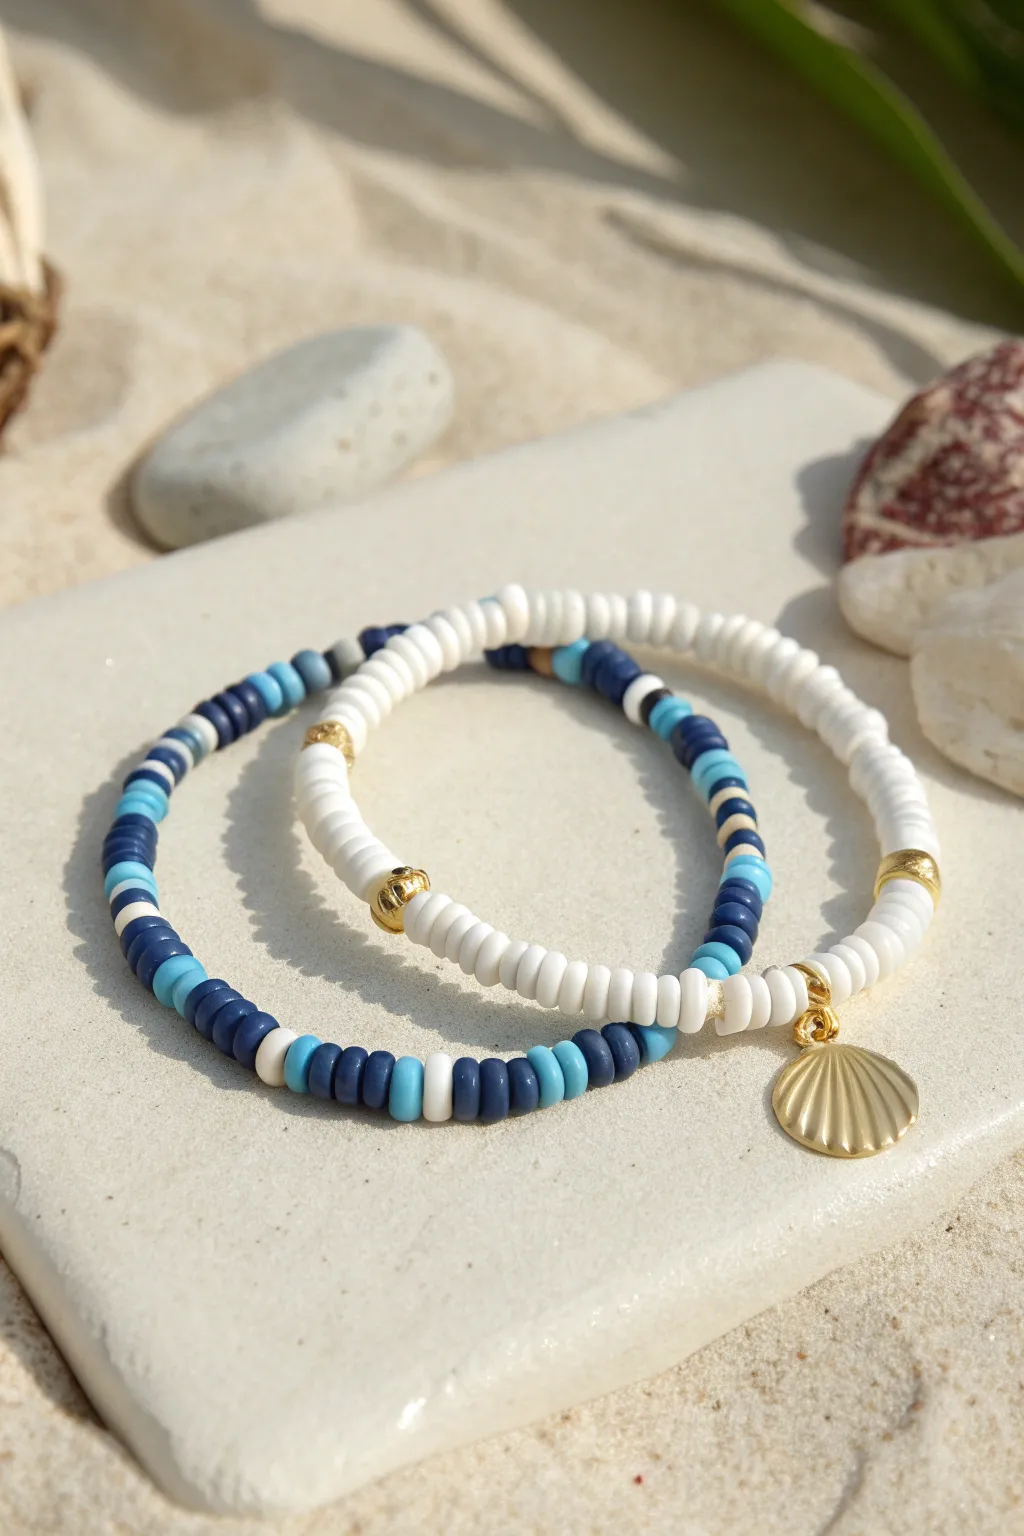
These two coordinating bracelets capture the essence of a day at the seaside with crisp white, deep navy, and sea-glass blue heishi beads. Combining a classic striped pattern with a solid white focal piece featuring a gold shell charm creates the perfect stack for summer adventures.
Step-by-Step
Materials
- 6mm polymer clay heishi beads (White)
- 6mm polymer clay heishi beads (Navy Blue)
- 6mm polymer clay heishi beads (Light/Turquoise Blue)
- Small gold spacer beads (round or gold heishi)
- Gold seashell charm with jump ring
- 0.8mm clear elastic crystal string
- Super glue or jewelry cement
- Scissors
Step 1: Planning and Setup
-
Measure your wrist:
Wrap a piece of string around your wrist to find your comfortable size, then add about half an inch for a comfortable fit. Cut two pieces of elastic about 3-4 inches longer than this measurement to give yourself plenty of room for tying knots later. -
Secure the ends:
Since heishi beads have larger holes, it’s wise to place a piece of tape on one end of your elastic string or attach a bead stopper clip. This prevents your beads from sliding right off as you work.
Knot Mastery
Hide your knot inside a large-hole bead or a bead cover crimp for a truly seamless, professional finish that won’t scratch your wrist.
Step 2: Creating the Striped Bracelet
-
Start the pattern:
Begin your first bracelet by threading on a pattern of blue hues. I like to alternate between the navy and light blue beads to create a varied, oceanic texture. -
Build color blocks:
Create small sections of 3-5 blue beads mixed together, then interrupt them with a single white heishi bead. This mimics the look of cresting waves. -
Establish the rhythm:
Continue this pattern: a small block of mixed blues followed by a white spacer. Occasionally swap the white bead for a gold spacer bead to add a hint of shine to the darker strand. -
Check the length:
Wrap the strand around your wrist periodically. Once the beaded section meets comfortably without stretching the elastic, you’ve reached the perfect length.
Step 3: Creating the White Shell Bracelet
-
Begin the white base:
For the second bracelet, start threading only the white heishi beads. This bracelet relies on a clean, monochromatic look to make the gold pop. -
Insert gold accents:
After about every inch or inch-and-a-half of white beads, slide on a gold spacer bead. This breaks up the solid white line and coordinates with the other bracelet. -
Add the focal point:
Once you have strung exactly half the length of your bracelet, slide on the gold seashell charm. It should dangle freely in the center. -
Finish the strand:
Continue threading the remaining white beads and occasional gold spacers until this bracelet matches the length of your first one.
Stiff Strand?
If the bracelet feels rigid, you’ve strung the beads too tightly. Leave a tiny gap (1-2mm) of exposed string before tying the knot for flexibility.
Step 4: Finishing Touches
-
Pre-stretch the cords:
Before tying, give both ends of the elastic a gentle tug. This pre-stretching prevents the bracelets from loosening up after the first few times you wear them. -
Tie the surgeon’s knot:
Remove the tape or stopper. Cross the ends, loop one under twice, and pull tight. Repeat this knotting process 2-3 times to ensure a very secure hold. -
Secure with glue:
Place a tiny drop of super glue or jewelry cement directly onto the knot. Let it dry completely before touching it to avoid weakening the elastic. -
Hide the knot:
Trim the excess string close to the knot, leaving about 1mm. If possible, gently tug the bracelet so the knot slides inside the hole of a nearby bead.
Slip on your new bracelet stack and enjoy the effortless beach vibes wherever you go


What Really Happens Inside the Kiln
Learn how time and temperature work together inside the kiln to transform clay into durable ceramic.
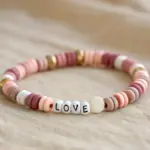
Cute Motto Bracelet With Letter Beads
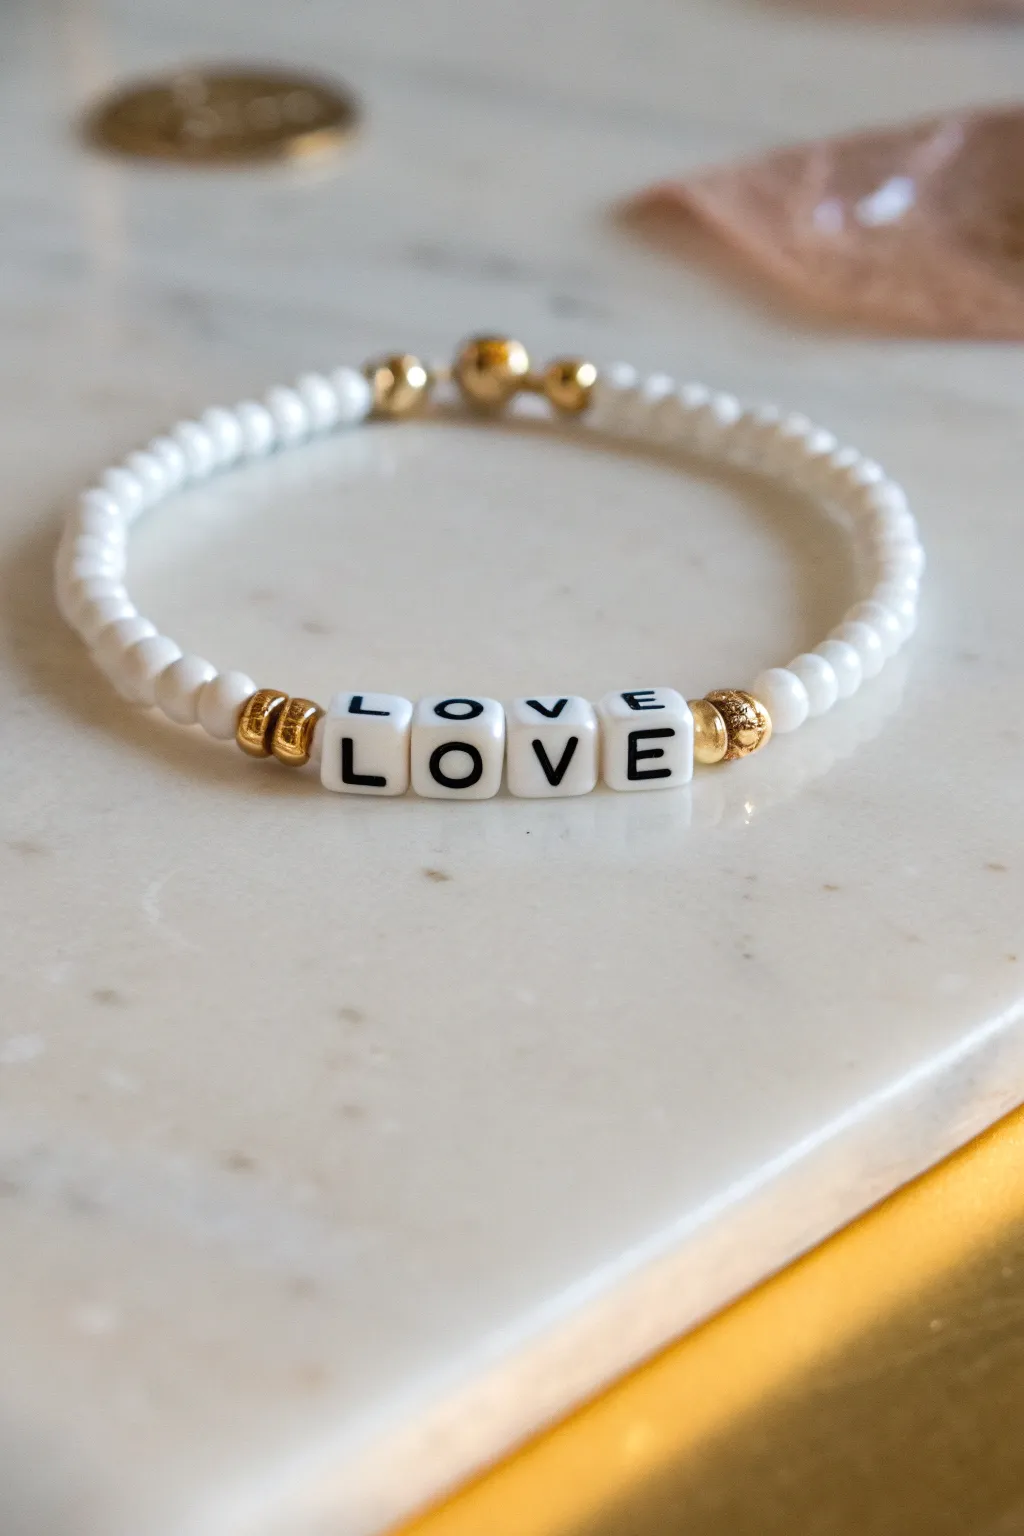
Create a sophisticated yet sweet accessory with this minimalistic bracelet design. Featuring milky white beads accented by gold hardware and bold block letters, this piece perfectly balances trendy preppy aesthetics with timeless elegance.
Step-by-Step Guide
Materials
- Stretch cord (0.8mm or 1mm thickness)
- White spherical beads (6mm or 8mm, glass or acrylic)
- Square white letter beads with black text (L, O, V, E)
- Gold tone spacer beads (small rondelle or disc shape)
- Gold tone round accent beads (larger size, approx 6-8mm)
- Jewelry glue or clear nail polish
- Scissors
- Bead stopper or tape
- Optional: Crimp beads and cover
Step 1: Preparation
-
Measure the cord:
Cut a piece of stretch cord about 10-12 inches long. This generous length gives you plenty of room to tie knots without struggling. -
Secure the end:
Place a bead stopper or a piece of tape on one end of the cord to prevent your beads from sliding off while you work. -
Pre-stretch the cord:
Give your elastic cord a few gentle tugs before threading perfectly. This helps minimize stretching out later so your bracelet sizes accurately. -
Lay out the design:
Before threading, arrange your beads on a bead board or soft cloth. Place your ‘L-O-V-E’ beads in the center, flanked by gold spacers, then the white beads outwards.
Step 2: Creating the Focal Point
-
Start the center sequence:
Thread two gold spacer beads onto the cord first. These will frame the left side of your word. -
Add the letters:
Thread the letter beads in order: L, O, V, E. Ensure they are all facing the same direction so the word reads clearly. -
Finish the focal section:
Add two more gold spacer beads immediately after the ‘E’ block to mirror the other side. -
Add texture:
Slide on a textured gold bead (like the filigree or hammered style shown in the photo) next to the plain spacers on both sides of the word.
Knot Hiding Trick
Make sure the hole of the final gold bead is large enough to accommodate the knot. If it’s too tight, hide the knot inside one of the larger white beads instead.
Step 3: Completing the Band
-
Start the white beads:
Begin threading the milky white round beads onto one side of the cord. Add about 10-12 beads, depending on wrist size. -
Balance the other side:
Repeat the process on the other side of the central motif, adding the same number of white beads to keep the word centered. -
Check the sizing:
Wrap the unfinished strand around your wrist to check the fit. Add or remove white beads symmetrically until the ends meet comfortably. -
Add back accents:
Thread three small gold round beads onto one end. These will sit at the back of the wrist opposite the ‘LOVE’ text.
Wonky Letters?
If your letter beads keep flipping while wearing, the holes might be too large for the cord. Use a slightly thicker elastic cord (1mm) to create friction.
Step 4: Finishing Touches
-
Remove the stopper:
Carefully take off the tape or bead stopper while holding both ends of the cord firmly. -
Tie the first knot:
Cross the ends and tie a simple overhand knot. Pull it tight, bringing the beads together snugly without buckling. -
Secure with a surgeon’s knot:
Tie a second knot, but this time loop the cord through twice before pulling tight. This extra loop adds significant security I always rely on. -
Apply adhesive:
Dab a tiny drop of jewelry glue or clear nail polish directly onto the knot. Let it dry completely before moving. -
Hide the knot:
Once dry, trim the excess cord close to the knot. Gently pull the adjacent gold bead over the knot to hide it inside.
Enjoy wearing your custom keepsake or gift it to someone special to remind them they are loved
Smiley Charm Pop Bracelet

Brighten your wrist stack with this cheerful duo featuring a classic yellow smiley face charm and a soft, airy color palette. The combination of minty blues, pale pinks, and white heishi beads creates a preppy, summer-ready look that is simple enough for beginners to master quickly.
Step-by-Step Tutorial
Materials
- Polymer clay heishi beads (6mm or similar) in mint green, light blue, white, pale pink, and lavender
- One flat yellow smiley face bead (wooden or polymer clay)
- Small yellow seed beads or spacer beads (optional)
- Gold seed beads (optional accent)
- Small wooden spacer bead (optional)
- Elastic stretch cord (0.8mm recommended)
- Scissors
- Super glue or jewelry cement (optional)
- Beading needle (optional but helpful)
- Tape or a bead stopper clip
Step 1: Planning Your Stack
-
Measure your wrist:
Wrap a flexible measuring tape around your wrist to find your size. Add about half an inch to this measurement so the bracelets sit comfortably without pinching. -
Cut the cord:
Cut two lengths of elastic cord, each about 10-12 inches long. Having extra length makes tying the finishing knots much easier. -
Secure the ends:
Place a piece of tape or a bead stopper on one end of each cord to prevent your beads from sliding off while you work.
Knot Slipping?
stretch your elastic cord firmly several times *before* beading. This pre-stretching stops the cord from relaxing later, which creates gaps and makes knots come undone.
Step 2: The Smiley Charm Bracelet
-
Start the pattern:
Begin threading your heishi beads. This bracelet uses a striped pattern. Thread about 3-4 beads of one color (like mint green), followed by 3-4 beads of white. -
Continue the stripes:
Keep repeating this segmented pattern—alternating colors like light blue, white, and pale pink—until you have filled nearly half the length of your bracelet. -
Add the focal point:
Slide on your yellow smiley face bead. Orient it so the face is looking outward if it has a specific front and back. -
Finish the strand:
Resume your striped pattern on the other side of the smiley face. Try to mirror the color order you used on the first half for a symmetrical look. -
Check the fit:
Wrap the strand around your wrist to verify the length. Add or remove a few beads near the ends if needed to get the perfect fit.
Step 3: The Pastel Mix Bracelet
-
Begin the second strand:
For the companion bracelet, create a more random or color-blocked pattern. Thread sections of pink, lavender, and white. -
Add subtle accents:
Intersperse a single yellow bead occasionally to tie in with the smiley face from the first bracelet. This creates visual cohesion between the two pieces. -
Create a gold detail:
Near one end, thread a small cluster of 4-5 gold seed beads followed by a small natural wood spacer bead. This adds a nice textural break in the smooth clay beads. -
Complete the length:
Continue threading until this second bracelet matches the length of your smiley bracelet.
Add a Personal Touch
Swap the random gold accent section for letter beads to spell out a name, initials, or a short word like ‘HAPPY’ to match the smiley vibe.
Step 4: Finishing Up
-
Tie the first knot:
Remove the tape/stopper. Bring the two ends of the elastic together and tie a simple overhand knot, pulling tight to close any gaps between beads. -
Secure with a surgeon’s knot:
Tie a surgeon’s knot (loop the elastic through twice before pulling tight) over your first knot. This is much stronger than a standard square knot. -
Add glue:
I always put a tiny dab of jewelry cement or super glue directly on the knot to ensure it never slips. -
Hide the knot:
Once the glue is tacky or dry, trim the excess cord ends close to the knot. If the hole of a neighboring bead is large enough, gently tug the knot inside to hide it. -
Repeat:
Follow the same tying and gluing process for your second bracelet.
Wear your new bracelet stack together for a fun pop of color, or share one with a friend as a matching set

TRACK YOUR CERAMIC JOURNEY
Capture glaze tests, firing details, and creative progress—all in one simple printable. Make your projects easier to repeat and improve.
Heart Charm Stations in a Stack

Embrace a sweet, romantic aesthetic with this set of four coordinated beaded bracelets. Featuring soft pastel matte beads and shining gold heart charms, this stack is perfect for daily wear or gifting to a best friend.
Detailed Instructions
Materials
- 4mm round matte glass seed beads or ceramic beads (in cream, blush pink, mint green, and sky blue)
- Gold heart connector beads/charms (horizontal hole)
- 3mm gold spacer beads
- 0.8mm clear elastic stretch cord
- Jewelry glue or clear nail polish
- Scissors
- Tape or bead stopper
- Beading needle (collapsible eye, optional but helpful)
Step 1: Preparation
-
Measure your wrist:
Wrap a piece of string around your wrist to find your comfortable size, then add about half an inch for a little movement. Cut four strands of elastic cord, making each about 10-12 inches long to give yourself plenty of room for tying knots later. -
Secure the ends:
Place a piece of tape or a bead stopper on one end of each elastic strand. This simple step saves you the frustration of beads sliding right off while you work. -
Design your palette:
Lay out your four bead colors. We’re aiming for a gradient effect: one cream strand, one blush pink strand, one mint green strand, and one sky blue strand. Group your gold spacers and hearts nearby.
Step 2: Creating the Cream Heart Bracelet
-
Start the base:
Begin threading the cream-colored matte beads onto your first elastic strand. Continue until you have covered about half of your desired length. -
Add the first spacer:
Slide on one small 3mm gold spacer bead. This acts as a frame for the heart charm and adds a professional touch. -
Thread the heart:
Thread your elastic through the gold heart charm. Ensure the hole runs horizontally so the heart sits flat against the wrist rather than dangling. -
Complete the focal point:
Add a second 3mm gold spacer bead immediately after the heart. -
Finish the strand:
Resume threading cream beads until the bracelet reaches your measured length. Wrap it around your wrist to double-check the fit before tying.
Knot Security Tip
When trimming elastic, leave about 1mm of tail rather than cutting perfectly flush. This tiny buffer prevents the knot from slipping undone under tension.
Step 3: Creating the Blue Heart Bracelet
-
Repeat the process:
Grab your sky blue beads. Just like the first bracelet, bead halfway around the strand. -
Add the gold center:
Add a gold spacer, followed by a gold heart charm, and another gold spacer. I like to visually compare this to the first bracelet to make sure the hearts will align when worn together. -
Close the loop:
Finish stringing the blue beads and set this strand aside next to the cream one.
Add Personalized Initials
Swap the central gold heart on one bracelet for a gold letter bead to add your initial, making the stack uniquely yours without losing the style.
Step 4: Creating the Plain Bands
-
Pink strand:
For the blush pink bracelet, string the beads continuously without a charm. This breaks up the metal elements in the stack. -
Green strand:
Repeat the continuous stringing process with the mint green beads. These solid color bands provide a calming balance to the charm bracelets.
Step 5: Finishing Touches
-
Pre-stretch the cord:
Before tying, give each bracelet a few gentle tugs. This pre-stretches the elastic so it won’t sag after the first time you wear it. -
Tie the knots:
Remove the tape and bring the ends together. Tie a surgeon’s knot (right over left, left over right, and loop through an extra time) for maximum security. -
Secure with glue:
Place a tiny drop of jewelry glue or clear nail polish directly onto the knot. Let it dry completely for at least 15 minutes. -
Hide the mechanism:
Carefully trim the excess elastic tails close to the knot. If possible, gently slide a nearby bead over the knot to hide it inside.
Enjoy mixing and matching these delicate pastel layers with your other favorite jewelry pieces
Texture Breaks With Freshwater Pearls
This elegant stack combines the classic charm of freshwater pearls with the playful matte finish of polymer clay discs for a refined yet casual look. The trio features three distinct designs—single color, tri-color block, and gold-accented pearl—that perfectly complement each other.
Step-by-Step Guide
Materials
- Matte polymer clay disc beads (heishi beads): coral pink, pastel yellow, light blue
- Large imitation or freshwater pearls (approx. 8-10mm)
- Small gold spacer beads (discs or rondelles)
- Gold ball spacer beads (approx. 3-4mm)
- Elastic beading cord (0.7mm or 0.8mm recommended)
- Beading needle (optional but helpful)
- Super glue or jewelry cement
- Scissors
Step 1: The Pearl & Gold Strand
-
Cut the Cord:
Cut a piece of elastic cord about 10-12 inches long. Pre-stretch the cord firmly a few times to prevent it from sagging later. -
Start the Pattern:
Thread one gold disc spacer, followed by a large white pearl. I find that using a collapsible eye needle makes threading these larger pearls much smoother. -
Repeat Sequence:
Continue adding beads in this sequence: one gold disc spacer, one pearl, one gold disc spacer, one pearl. The gold spacers act as bead caps, framing each pearl beautifully. -
Check Length:
Wrap the strand around your wrist to check the fit. Add or remove pearl-and-gold units until it fits comfortably but isn’t too loose. -
Secure the Knot:
Tie a secure surgeon’s knot (right over left, left over right). Pull tight, add a tiny dot of super glue to the knot, let it dry, and trim the excess cord before hiding the knot inside a pearl.
Sticky Situation
If your knot slips while tying, use a bead stopper or tape one end of the cord to the table. Don’t pull the elastic so tight that the clay beads buckle.
Step 2: The Tri-Color Colorblock Strand
-
Prepare the Cord:
Cut and pre-stretch another length of elastic cord. -
Thread Pink Section:
String on about 1.5 to 2 inches of coral pink clay disc beads. Consistency is key here to get clean blocks of color. -
Add Texture Break:
Thread a single small gold ball spacer, followed by two clay beads, and another gold ball spacer. -
Thread Yellow Section:
String on 1.5 to 2 inches of the pastel yellow clay beads. -
Add Second Break:
Insert another gold accent sequence: gold ball, two clay beads, gold ball. -
Thread Blue Section:
Finish the color pattern with 1.5 to 2 inches of light blue clay beads to complete the circumference. -
Tie and Finish:
Check the size against the pearl bracelet. Tie off with a surgeon’s knot, glue, and trim.
Mix It Up
Swap the solid pink strand for a mixed confetti style using leftover beads from the colorblock strand to reduce waste and add whimsy.
Step 3: The Solid Pink & Gold Strand
-
Start the Third Bracelet:
Prepare your final piece of elastic cord. -
Create the Focal Point:
Instead of a charm, create a subtle focal point using gold textures. Thread three small gold ball spacers onto the cord first. -
Fill with Color:
Fill the rest of the bracelet strand entirely with the coral pink clay disc beads. -
Sizing Check:
Hold this strand up to the previous two to ensure all three bracelets are the exact same diameter for a cohesive stack. -
Final Knot:
Tie your final surgeon’s knot near the gold beads. The gold beads have larger holes than the clay discs, making them perfect for hiding your knot.
Slide on your new stack and enjoy the effortless mix of elegant pearls and playful color
Shell Accent for Beachy Preppy Vibes
Capture the essence of a sun-soaked holiday with this effortless heishi bead bracelet. The bright white clay discs punctuated by soft pinks and gold create a sophisticated beach-ready accessory that stacks perfectly with other preppy jewelry.
Detailed Instructions
Materials
- 6mm white polymer clay heishi beads (flat discs)
- 6mm pink polymer clay heishi beads (flat discs)
- Small gold spacer beads (discs or rings)
- Gold tone metal shell charm
- Gold jump ring (4mm to 6mm)
- Stretch cord (0.8mm clear elastic)
- Scissors or bead nippers
- Jewelry glue or clear nail polish
- Tape or bead stopper
- Flat nose pliers (optional, for jump ring)
Step 1: Setting Up and Stringing the Base
-
Measure your wrist:
Before cutting any cord, wrap the elastic around your wrist to find your size. Add about 3-4 inches of extra slack to allow for easy tying later. -
Secure the end:
Cut your length of cord. Place a piece of tape over one end or attach a bead stopper so your beads don’t slide off while you work. -
Start with white beads:
Begin threading the white polymer clay heishi beads onto the cord. You will need a significant number of these as they form the main body of the bracelet. -
Check the length:
Continue adding white beads until the strand covers about 80% of your wrist circumference. Hold it up to your wrist occasionally to gauge the fit, keeping in mind the focal section will add length.
Knot Security Tip
When tightening your knot, pull the elastic ends firmly but slowly. If you pull too fast, you risk snapping the cord or creating a loose knot that won’t hold.
Step 2: Creating the Focal Section
-
Add first gold spacer:
Once your white base is ready, slide on a single gold spacer bead to mark the beginning of the accent pattern. -
String the first pink section:
Add three pink heishi beads. Ensure they sit flush against the gold spacer for a neat block of color. -
Insert the center gold spacer:
Thread on a larger gold spacer bead or a small gold ring bead. This central piece will serve as the anchor point for your charm. -
Complete the pink section:
Add three more pink heishi beads to mirror the first side of the accent. -
Finish the focal point:
Slide on one final gold spacer bead to close off the pink section, creating a symmetrical design. -
Fill the gap:
Finish the strand by adding more white heishi beads until the bracelet reaches your desired total length.
Step 3: Attaching the Charm and Finishing
-
Prepare the jump ring:
If your jump ring isn’t attached to the shell yet, use your pliers to gently twist it open side-to-side (never pull it apart). -
Attach the charm:
Hook the open jump ring through the loop of the gold shell charm. -
Connect to the bracelet:
Loop the jump ring around the central gold spacer bead you placed in the middle of the pink section earlier. Close the jump ring securely with pliers. -
Pre-stretch the cord:
Before tying, give the ends of the elastic a gentle tug. I find this helps relax the cord so it doesn’t stretch out and sag immediately after the first wear. -
Tie the knot:
Remove the tape or stopper. Tie a standard surgeon’s knot (right over left, left over right) and pull it very tight. -
Secure with glue:
Dab a tiny drop of jewelry glue or clear nail polish onto the knot to prevent it from slipping. -
Hide the knot:
Once the glue is tacky but dry, trim the excess cord close to the knot. Gently slide a nearby bead over the knot to conceal it inside.
Mix Up The Metals
For a cooler tone, swap the gold spacers and shell for silver components, and replace the pink beads with light blue or mint for an icy aesthetic.
Enjoy styling your new beach-inspired accessory for a sunny day out
Starfish-Inspired Charm Moment
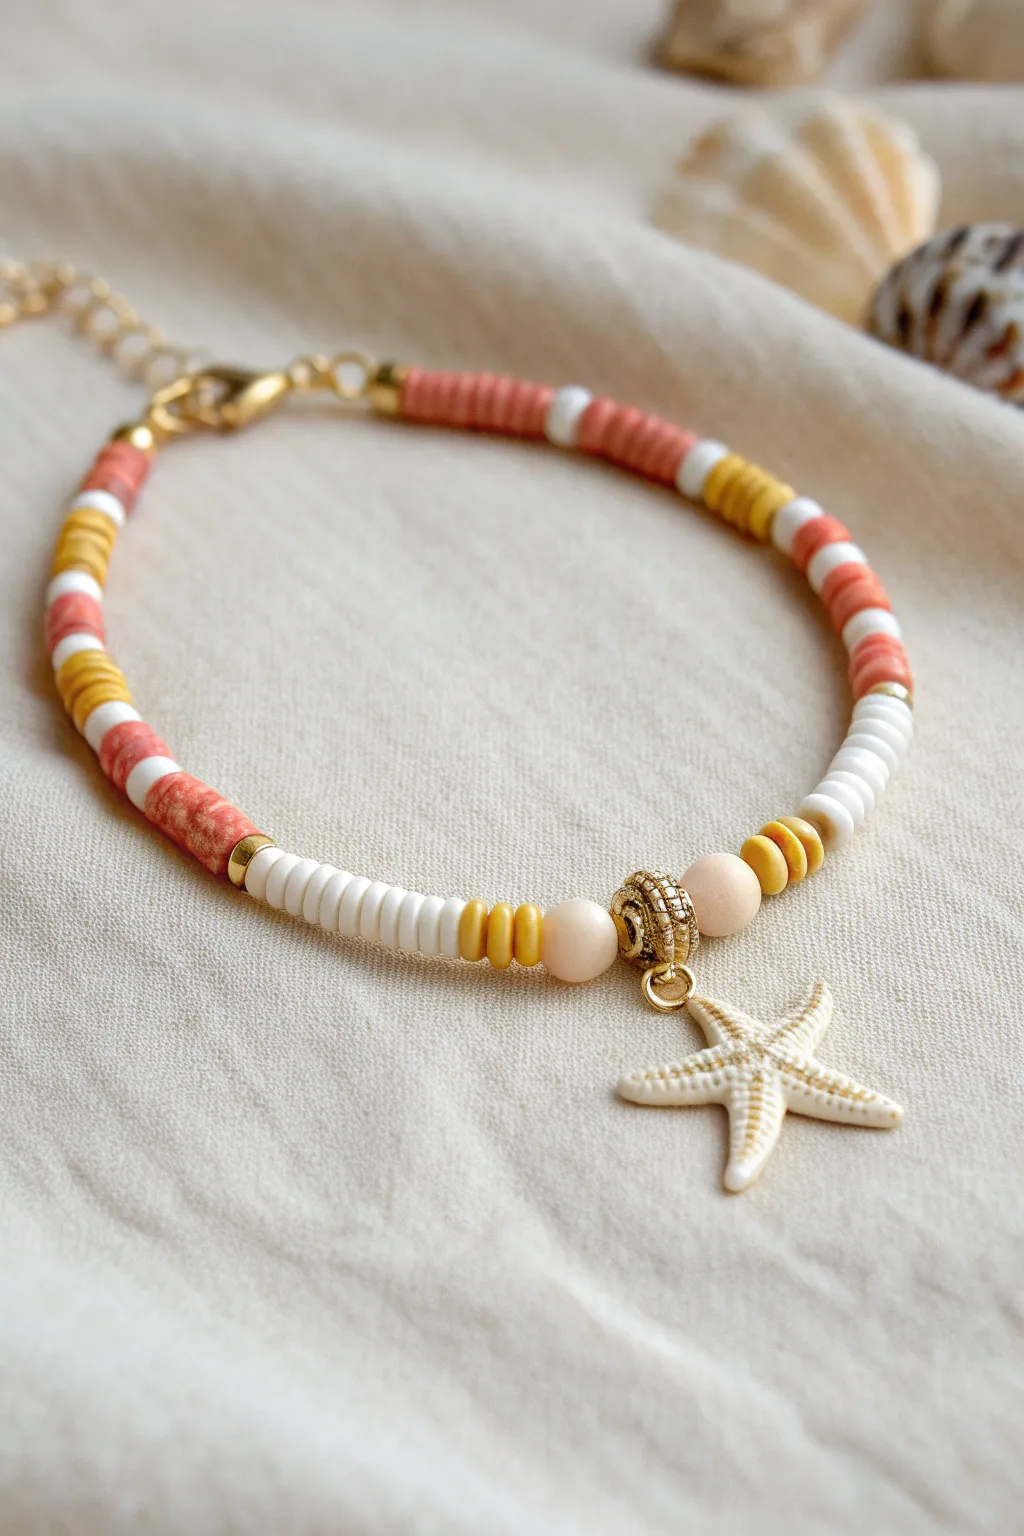
Capture the essence of a beach day with this vibrant clay bead anklet featuring warm coral, sunny yellow, and crisp white hues. The centerpiece is a delicate starfish charm that dangles playfully, making it the perfect accessory for your next seaside adventure.
Step-by-Step Tutorial
Materials
- Polymer clay heishi beads (coral pink, mustard yellow, white)
- Gold tone crimp beads and covers
- Gold tone jump rings (4mm or 5mm)
- Small gold spacer beads (flat disc shape)
- Gold decorative bail bead (wide hole, textured)
- Two round matte accent beads (peach or light pink, 6mm)
- White enamel starfish charm
- Clear elastic beading cord (0.8mm) or beading wire with clasp assembly
- Jewelry pliers (flat nose and round nose)
- Scissors or wire cutters
- Lobster clasp and extension chain (if using wire)
- Bead stopper or tape
Step 1: Planning and Preparation
-
Measure your fit:
Before stringing, measure your ankle or wrist to determine the needed length. Add about 0.5 to 1 inch to this measurement to account for the thickness of the beads and to ensure a comfortable fit. -
Layout the pattern:
On a bead board or soft cloth, lay out your beads to visualize the pattern. For this look, plan for segments of solid colors separated by contrasting stripes, working from the center outwards to maintain symmetry. -
Prepare the cord:
Cut a length of beading wire or elastic cord about 4 inches longer than your measured size. Secure one end with a bead stopper or a piece of tape to prevent beads from sliding off as you work.
Pro Tip: Tension Check
Before crimping, curve the bracelet into a circle. If crimped while straight, it might be too stiff to wear comfortably. The curve ensures wiggle room.
Step 2: Beading the Centerpiece
-
Attach the charm:
Using your pliers, carefully open a jump ring and thread it through the loop of your white starfish charm. Close the jump ring securely, then attach it to the loop of your gold decorative bail bead. -
Start the center sequence:
Thread one round matte peach bead onto your cord. Next, slide on the gold bail bead with the attached starfish charm. -
Complete the focal point:
Add the second round matte peach bead after the charm bail. This frames the starfish perfectly and acts as a transition to the flat heishi beads.
Level Up: Shell Accents
Replace the matte round beads with tiny real cowrie shells drilled with holes for an even more authentic beachcomber aesthetic.
Step 3: Creating the Color Pattern
-
First color transition:
On either side of your central matte beads, add a small section of mustard yellow heishi beads. Thread about 3 to 4 beads on each side to create a small pop of yellow. -
Building the white segments:
Following the yellow, add a longer segment of white heishi beads. I find that using about 8-10 white beads helps balance the brightness of the colored sections. -
Adding gold accents:
Insert a flat gold spacer bead after the white segment. These small metallic touches elevate the design from simple craft to jewelry. -
The coral section:
Thread on a substantial section of coral pink beads. Aim for a segment length of about half an inch to establish the primary color of the piece. -
Establishing the repeat:
Create a pattern by adding a short segment of alternating colors. Try a sequence of 3 white, 3 yellow, then 3 white beads to create a striped effect. -
Continuing the strand:
Resume with another long block of coral pink beads. Repeat the pattern of segments—coral, striped section, white block—working symmetrically on both sides of the central charm until you reach your desired length.
Step 4: Finishing Touches
-
Check the symmetry:
Hold the bracelet up by the charm to ensure both sides of beads are even in length and pattern before you commit to closing it. -
Add crimps:
Thread a crimp bead onto the end of the wire, followed by a wire guardian or just the loop of your lobster clasp. Loop the wire back through the crimp bead. -
Secure the ends:
Pull the wire taut but leave enough slack for the beads to move freely. Use your flat nose pliers to flatten the crimp bead firmly. Repeat this process on the other end to attach the extension chain. -
Hide the crimps:
Place a crimp cover over the flattened crimp bead. Gently squeeze it closed with pliers so it looks like a round gold bead, giving your piece a professional finish. -
Trim excess wire:
Snip off any excess wire sticking out from the crimp beads, tucking the tiny tail into the adjacent beads if possible so it doesn’t scratch your skin.
Now you have a stunning, beach-ready accessory that brings a touch of summer to any outfit
Citrus Slice Charm Bracelet
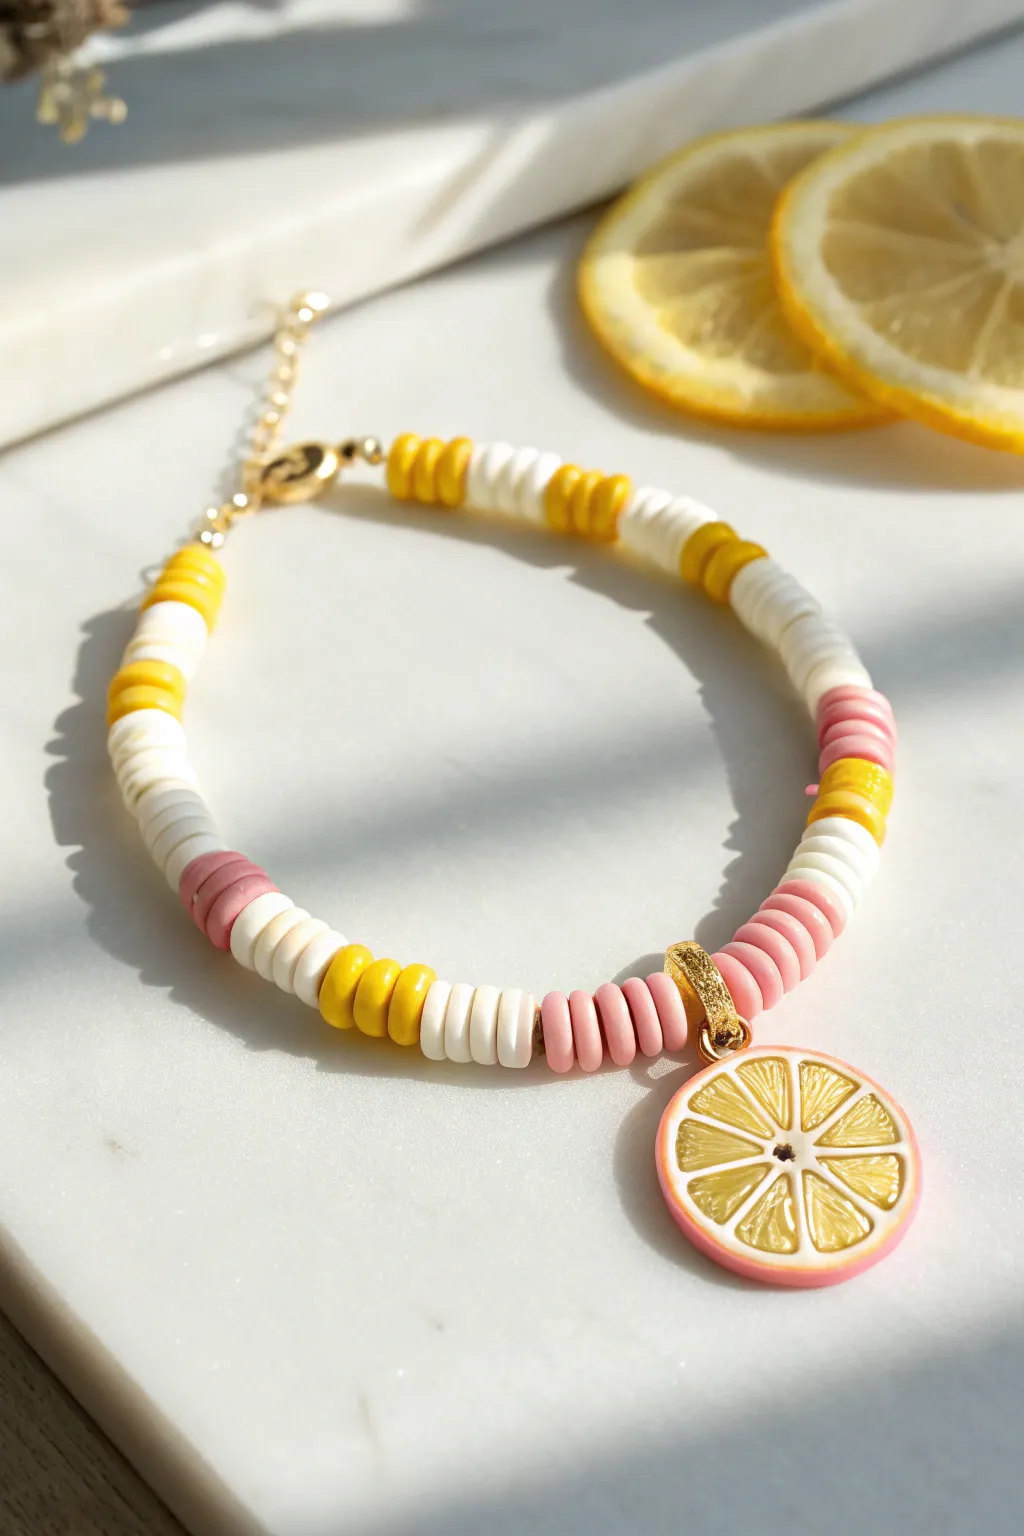
Capture the refreshing vibes of summer with this delightful beaded bracelet inspired by pink lemonade. Featuring alternating sections of white, yellow, and coral heishi beads, this accessory is anchored by a juicy citrus slice charm.
Step-by-Step Guide
Materials
- 6mm flat clay heishi beads (white, yellow, muted coral/pink)
- Small citrus slice charm (enamel or resin with gold rim)
- Gold tone jump ring (approx. 6-8mm)
- Clear elastic bead cord (0.8mm recommended)
- Two gold crimp covers or clam shell bead tips
- Gold extension chain with lobster clasp
- Jewelry pliers (flat nose and round nose)
- Scissors or jewelry cutters
- Jewelry glue (optional)
Step 1: Preparing Your Materials
-
Measure and Cut:
Begin by measuring your wrist to determine the desired length of your bracelet. Cut a piece of clear elastic cord that is at least 4-5 inches longer than your wrist measurement to allow plenty of room for knotting and finishing. -
Stretch the Cord:
Before you start threading, gently stretch your elastic cord a few times. This pre-stretching prevents the bracelet from loosening up after you’ve worn it for a while. -
Secure the End:
Attach a piece of tape or a bead stopper to one end of your cord. This simple step saves you the frustration of beads sliding right off while you’re working.
Seamless Pattern
Use white sections as ‘buffers’ between colors. This makes the yellow and pink pop individually without clashing.
Step 2: Creating the Bead Pattern
-
Start with Coral:
Begin threading your beads. I like to start near the center point to visualize the pattern, but for assembly, start from one end. Thread on about 6-8 coral pink heishi beads to begin a color block. -
Add a White Section:
Follow the coral section with a block of approximately 5-6 white clay beads. Keep the tension consistent but not too tight. -
Introduce Yellow:
Add a pop of brightness with a section of 5-6 yellow beads. This establishes your primary tri-color sequence. -
Repeat the Pattern:
Continue adding beads in this repeating order: White, Yellow, White, Coral. Note that the pattern in the reference isn’t perfectly symmetrical; it uses white as a spacer between the colors. A good rhythm is Coral -> White -> Yellow -> White. -
Check Length:
Pause periodically to wrap the cord around your wrist. You want to stop beading when you are about half an inch short of your total desired length, as the clasp and charm area will add space.
Step 3: Adding the Charm
-
Locate the Center:
Identify the center point of your bead strand. The design looks best if the charm hangs from a section of coral beads. -
Prepare the Jump Ring:
Using two pairs of pliers, gently twist your gold jump ring open. Slide your citrus slice charm onto the ring. -
Instert the Charm:
If you are strictly following the image, the charm sits on a specialized bail or large jump ring strung directly onto the cord between beads. Slide this ring onto the cord exactly in the middle of a coral bead section. -
Close the Ring:
Use your pliers to twist the jump ring closed securely so the charm cannot slip off.
Gaping Beads?
If gaps appear between beads when bent, string them tighter. If the bracelet is stiff, loosen the stringing slightly.
Step 4: Finishing Touches
-
Add Clam Shell Tips:
Once all beads are strung, thread each loose end of the elastic cord through the hole of a clam shell bead tip (or calotte), so the cup part faces the beads. -
Knot the Ends:
Tie a secure double or surgeon’s knot at each end of the cord, nestled right inside the clam shell cup. Apply a tiny dot of jewelry glue to the knot for extra security. -
Close the Tips:
Trim the excess clear cord close to the knot. Use your flat nose pliers to gently close the clam shell tips over the knots, hiding them completely. -
Attach Hardware:
Open the small loop on one clam shell tip and attach your lobster clasp. Close the loop securely. -
Attach Extension Chain:
On the other end, attach the gold extension chain to the loop of the second clam shell tip. This allows the bracelet size to be adjustable.
Now you have a zesty, summer-ready accessory perfect for stacking or wearing solo
“Rugby Stripe” Repeating Band Pattern
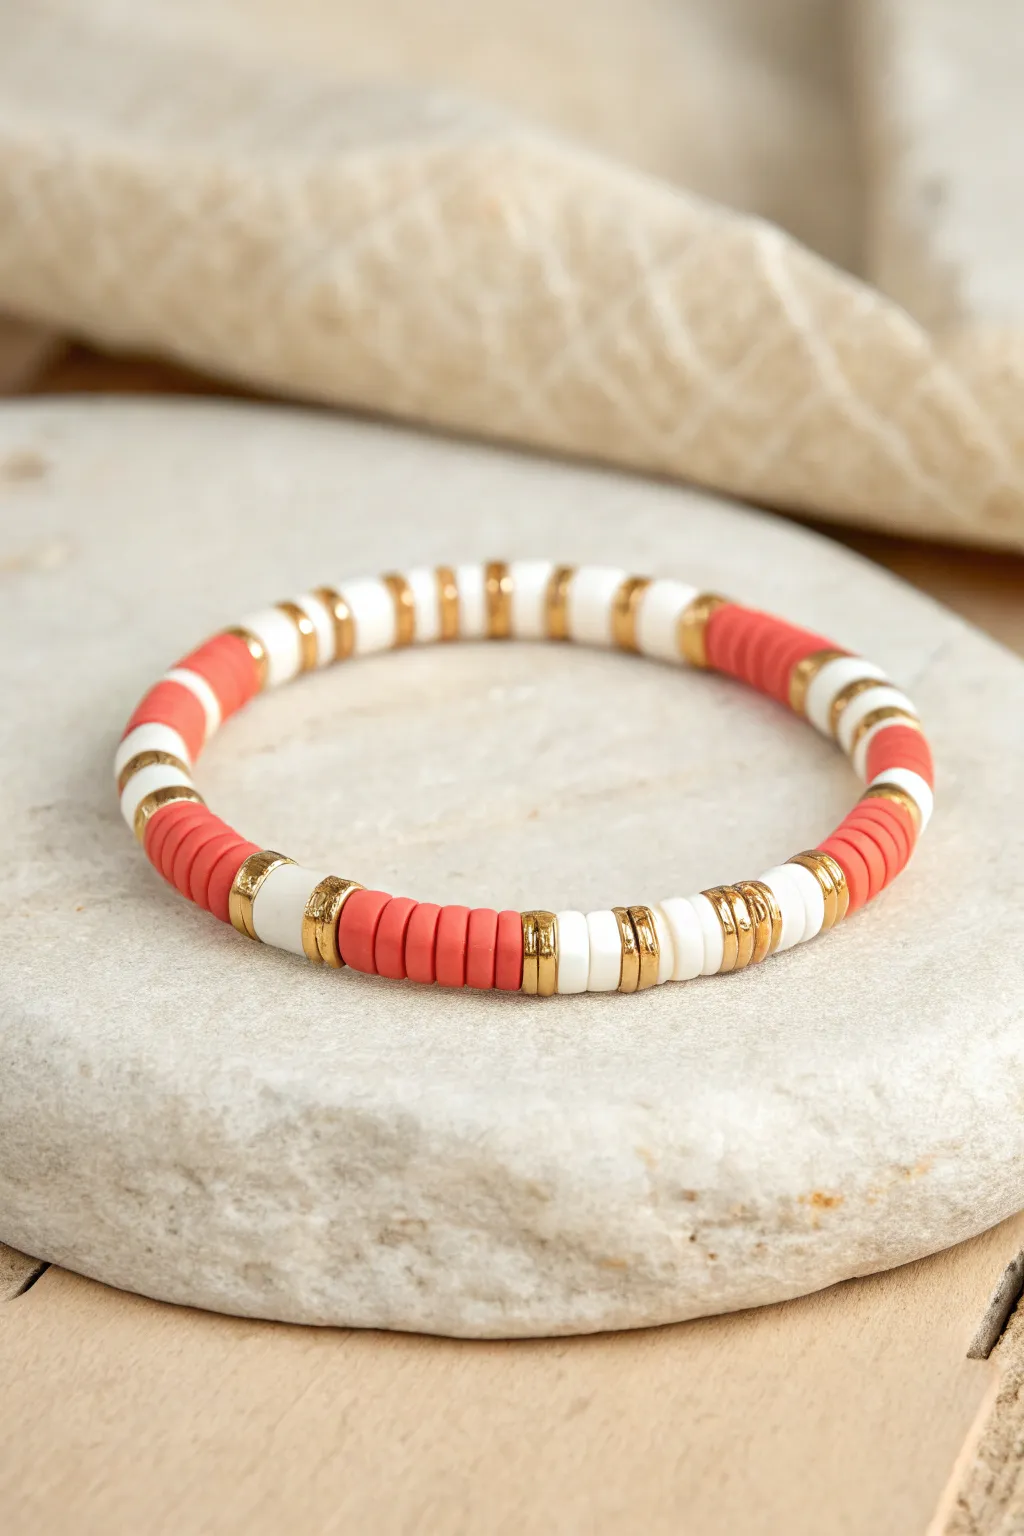
Capture the essence of preppy sport style with this crisp, repeating band pattern that alternates bold blocks of coral with elegant white and gold spacers. This “Rugby Stripe” design uses flat heishi beads to create a uniform, textured look perfect for stacking or wearing casually.
Detailed Instructions
Materials
- 6mm polymer clay heishi beads (coral/red)
- 6mm polymer clay heishi beads (white)
- 6mm gold spacer beads (disc or flat heishi shape)
- 0.8mm clear elastic stretch cord
- Jewelry glue or clear nail polish
- Scissors
- Bead stopper or tape
- Ruler or measuring tape
Step 1: Preparation
-
Measure your wrist:
Wrap a measuring tape loosely around your wrist to find your size. Add about half an inch to this measurement to ensure the bracelet fits comfortably without pinching. -
Cut the cord:
Cut a piece of elastic cord about 10-12 inches long. Having extra length makes tying the final knot significantly easier than struggling with short ends. -
Secure the end:
Attach a bead stopper or a piece of tape to one end of your cord so your beads don’t slide off while you work.
Pro Tip: Seamless Stripes
Ensure your clay beads are uniform in thickness. Thinner beads might need 8-9 discs to match the visual length of the ‘7 bead’ coral sections.
Step 2: Creating the Pattern
-
Start with a gold spacer:
Thread a single gold spacer bead onto the cord to begin your first section. -
Add the white segment:
String on three white polymer clay heishi beads. Follow these immediately with another single gold spacer bead. -
Build the coral block:
Add seven coral (or red-orange) heishi beads. This creates the wider, dominant ‘stripe’ in the rugby pattern. -
Cap with gold:
Finish this pattern repeat by adding one gold spacer bead, followed by three white beads, and another gold spacer bead. -
Verify the sequence:
Check your work: you should have a pattern that looks like Gold-White(3)-Gold-Coral(7)-Gold-White(3)-Gold. -
Create the alternating section:
For the next segment, string on a long block of white beads intertwined with gold. Thread: Gold, White(3), Gold, White(3), Gold, White(3), Gold. -
String the second coral block:
Repeat the coral sequence: add seven coral beads to create the next bold stripe. -
Repeat the pattern:
Continue alternating between these blocks. I generally find that 5 or 6 full repetitions covers an average wrist size, but adjust based on your earlier measurement. -
Check the fit:
Wrap the beaded cord around your wrist to check the length. The ends should meet comfortably without gaps, but without stretching the elastic yet.
Step 3: Finishing
-
Pre-stretch the cord:
Gently pull on both ends of the elastic a few times. This pre-stretching prevents the bracelet from sagging later on. -
Tie the knot:
Remove the tape or stopper. Tie a standard square knot (right over left, left over right) and pull it tight. -
Secure with glue:
Dab a tiny drop of jewelry glue or clear nail polish onto the knot to seal it permanently. -
Hide the knot:
While the glue is still slightly tacky, slide one of the beads (preferably a larger hole bead like the clay ones) over the knot to hide it. -
Trim excess:
Once the glue is fully dry, trim the excess cord ends carefully with your scissors, getting as close to the bead as possible without cutting the knot.
Level Up: Mix Metals
Swap the gold spacers for silver or rose gold, or use faceted geometric metal beads instead of smooth discs for extra sparkle.
Enjoy styling your new bracelet and try mixing up the color blocks for different seasons
Gingham-Inspired Checker Heishi Pattern
This cheerful bracelet combines playful pink gingham patterns with elegant gold accents for a perfect preppy accessory. The mix of printed cylinder beads and classic round spacing creates a unique texture that looks professionally made but is surprisingly simple to string together.
Step-by-Step
Materials
- Pink and white gingham pattern polymer clay cylinder beads (approx. 6-8mm)
- Pink round seed beads or glass pearls (approx. 4mm)
- White round seed beads or glass pearls (approx. 4mm)
- Small gold cube spacer beads (approx. 3mm)
- Gold tone crimp beads (2mm)
- Gold tone wire guardians (optional but recommended)
- Gold lobster clasp
- Gold extension chain
- Clear jewelry beading wire (e.g., Beadalon 49 strand)
- Wire cutters
- Chain nose pliers
- Crimping pliers
Step 1: Preparation
-
Measure your wrist:
Before cutting any wire, wrap a piece of string around your wrist to find your comfortable size. Add about an inch to this measurement to account for the beads’ thickness. -
Cut the wire:
Cut a length of jewelry wire based on your measurement, plus at least 3-4 extra inches on each side. Having excess wire makes it much easier to finish the ends securely later. -
Set the first end:
String a crimp bead onto one end of the wire, followed by a wire guardian if you are using one. Loop the wire through the jump ring attached to your extension chain, then back through the crimp bead. -
Secure the start:
Use your crimping pliers to flatten the crimp bead securely, locking the wire in place. Trim the very short tail of the wire, or leave a tiny bit to tuck into the first few beads.
Loose Beads?
If your crimp bead ends up slipping, don’t just squash it harder. It may be too large for the wire gauge. Try folding the flattened crimp in half gently with pliers for extra grip.
Step 2: Creating the Gingham Section
-
Start the pattern:
Begin stringing the pink and white gingham cylinder beads. Because these beads are larger focal points, you want them to make up the majority of the bracelet’s visual weight. -
Continue stringing:
Add enough gingham beads to cover roughly two-thirds of your desired bracelet length. For a standard fit, this is usually about 10 to 12 of these cylinder beads. -
Check consistency:
Ensure all the cylinder beads are sitting flush against each other without gaps. I usually run my fingers along them to check that the wire isn’t kinked inside. -
Transition bead:
After your last gingham bead, add a gold spacer bead. If you have gold disc spacers or large gold rounds, place one here to act as a decorative ‘bookend’ between the two design sections.
Match Your Style
Customize this by swapping the round pink spacing beads for alphabet letter beads to spell out a name or word within the accent section for a personalized touch.
Step 3: Designing the Accent Section
-
Begin the bead salad:
Now switch to your smaller accent beads. Start with a white round bead, followed immediately by a pink round bead. -
Add gold cubes:
String a gold cube spacer bead. This adds a geometric flash of shine that breaks up the round shapes. -
Repeat pattern:
Continue this pattern: White Round, Pink Round, Gold Cube. Repeat this sequence until you have filled the remaining length of the wire. -
Double check length:
Wrap the bracelet around your wrist again to verify the fit. The two sections should meet comfortably without pinching your skin. -
Final symmetry:
Try to end this section with a gold bead or a simple round bead so it connects cleanly to the clasp hardware.
Step 4: Finishing Touches
-
Prepare the closure:
String a crimp bead onto the open end of the wire. Thread the wire through the loop of your lobster clasp. -
Loop back:
Pass the wire tail back down through the crimp bead and through the first one or two accent beads adjacent to it. -
Tighten the slack:
Pull the wire tail taut so the beads are snug, but leave just a tiny bit of wiggle room (about 1mm) near the clasp so the bracelet remains flexible and doesn’t become stiff. -
Crimp and trim:
Flatten the crimp bead with your pliers to lock everything in place. Use flush cutters to trim the excess wire tail as close to the beads as possible.
Enjoy wearing your trendy new accessory stacked with other bracelets or all on its own
Half-and-Half Split Color Bracelet
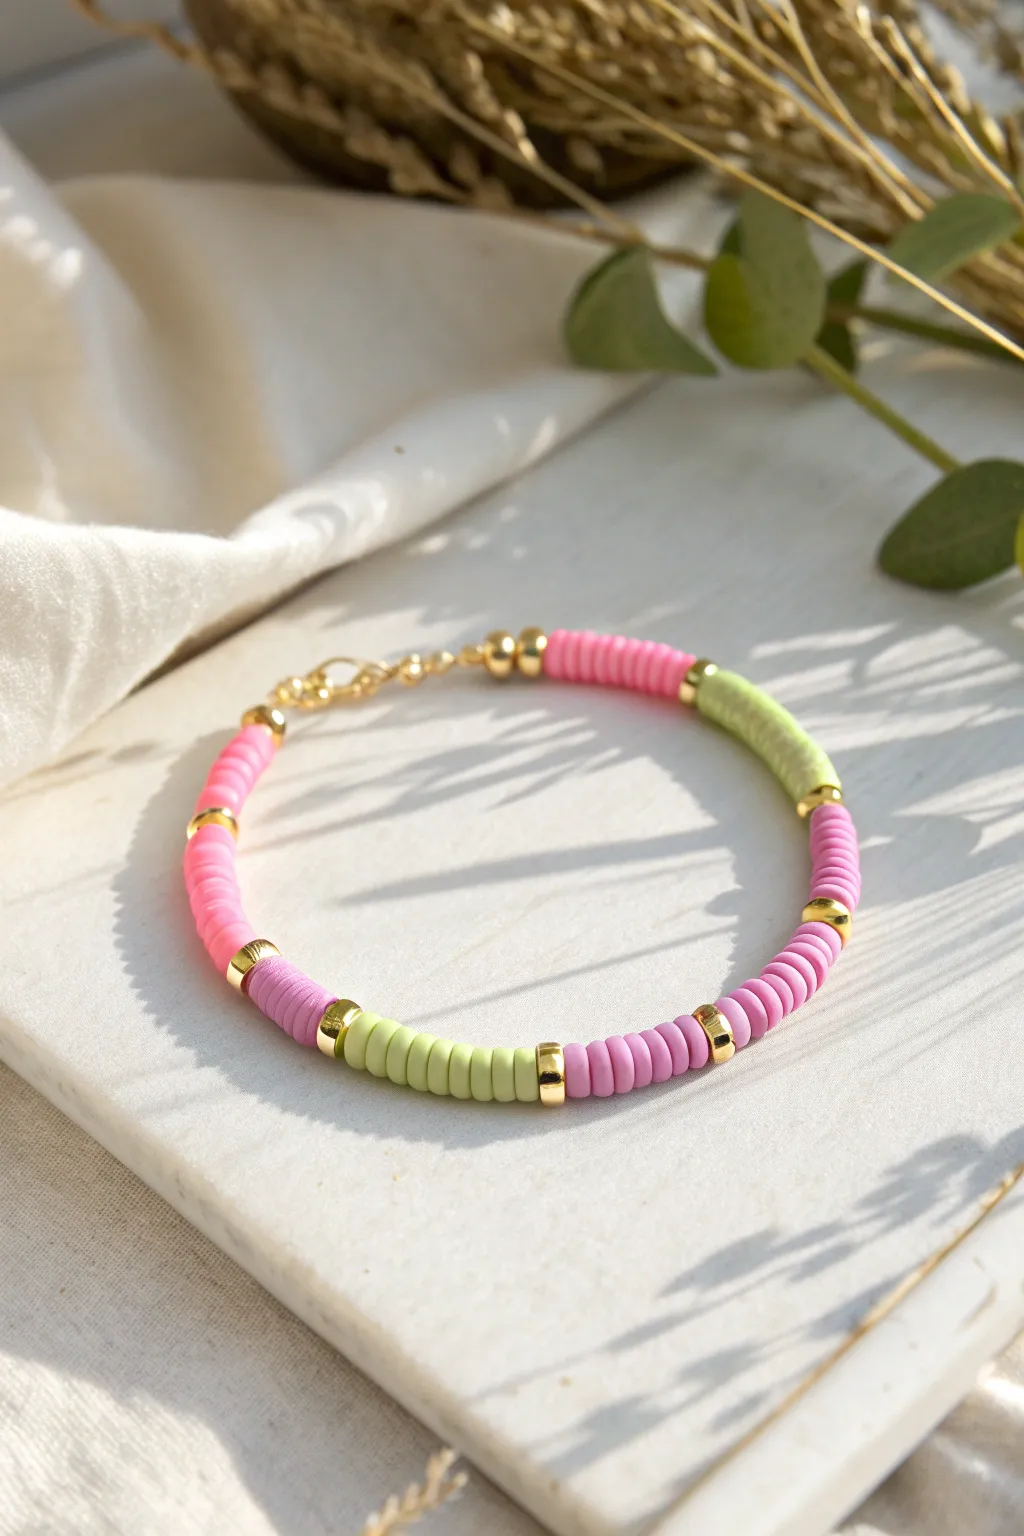
Embrace a fresh, preppy aesthetic with this delightful half-and-half split color bracelet. Combining vibrant pink and zesty lime green clay beads with elegant gold accents, this accessory perfectly balances fun and sophistication.
How-To Guide
Materials
- Pink polymer clay heishi beads (6mm)
- Lime green polymer clay heishi beads (6mm)
- Gold tone heishi spacer beads (small brass or plated)
- Gold crimp beads (2mm)
- Gold wire guards (2)
- Gold lobster clasp
- Gold jump rings (4mm or 5mm)
- Elastic beading cord or beading wire (0.8mm)
- Jewelry pliers (flat nose and cutting pliers)
- Small dab of jewelry glue (optional)
Step 1: Preparation and First Section
-
Measure and cut:
Begin by measuring your wrist to determine the desired length. Cut a piece of elastic cord or beading wire about 4 inches longer than your measurement to give yourself plenty of room to tie knots or attach clasps. -
Secure the start:
Thread one gold crimp bead onto the wire, followed by a wire guard. Loop the wire through the guard and back down through the crimp bead. Use your flat nose pliers to flatten the crimp bead securely, leaving a small tail of wire. -
Add the clasp:
Open a jump ring with your pliers, hook it onto the wire guard you just secured, and attach the lobster clasp before closing the ring. -
Start the pink section:
Begin threading your pink heishi beads. I usually count out about 10–12 beads for the first block of color to established a solid base. -
Insert first gold spacer:
Slide on one gold spacer bead. This creates the first visual break in the color block. -
Continue pink segment:
Add another block of pink beads. For this specific asymmetrical look, make this section slightly longer than the first, perhaps 15–18 beads. -
Add second gold spacer:
Place your second gold spacer bead onto the cord.
Step 2: Creating the Color Split
-
Transition segment:
Add a short segment of pink beads, roughly 8–10 discs, to finish the predominantly pink side of the bracelet. -
The center gold break:
Slide on a gold spacer bead. This specific bead acts as the halfway marker where the color palette shifts. -
Introduce the lime green:
Switch to your lime green heishi beads. Thread on a medium-length section matching the last pink section you did (about 12–15 beads). -
Gold accent:
Add another gold spacer bead to maintain the rhythm of the design. -
Main green section:
Thread the largest block of lime green beads now. This mirrors the heavy pink section on the opposite side. -
Final spacer:
Add the last gold spacer bead before completing the beading. -
Finish green block:
Add the final few lime green beads until the bracelet reaches your desired total length.
Spacer Bead Gaps
If your gold spacers are slipping over the clay beads, the hole in the spacer is too large. Add tiny gold seed beads on either side of the spacer to hold it in place without swallowing the clay.
Step 3: Finishing Touches
-
Prepare the end:
Thread on a crimp bead and the second wire guard. -
Secure the loop:
Pass the wire back through the crimp bead. Pull it taut so there are no gaps between beads, but not so tight that the bracelet becomes stiff and won’t curve. -
Crimp and trim:
Flatten the crimp bead firmly with your pliers. Trim the excess wire flush against the bead. -
Attach final hardware:
Open a final jump ring, loop it onto the wire guard, and attach a short extender chain or a closed jump ring for the clasp to grab onto.
Pattern Planning
Before stringing, lay your beads out on a bead board or a piece of felt. This lets you visualize the exact ratio of pink to green and ensure the gold accents are spaced evenly.
Enjoy styling your vibrant new accessory alongside your favorite summer outfits
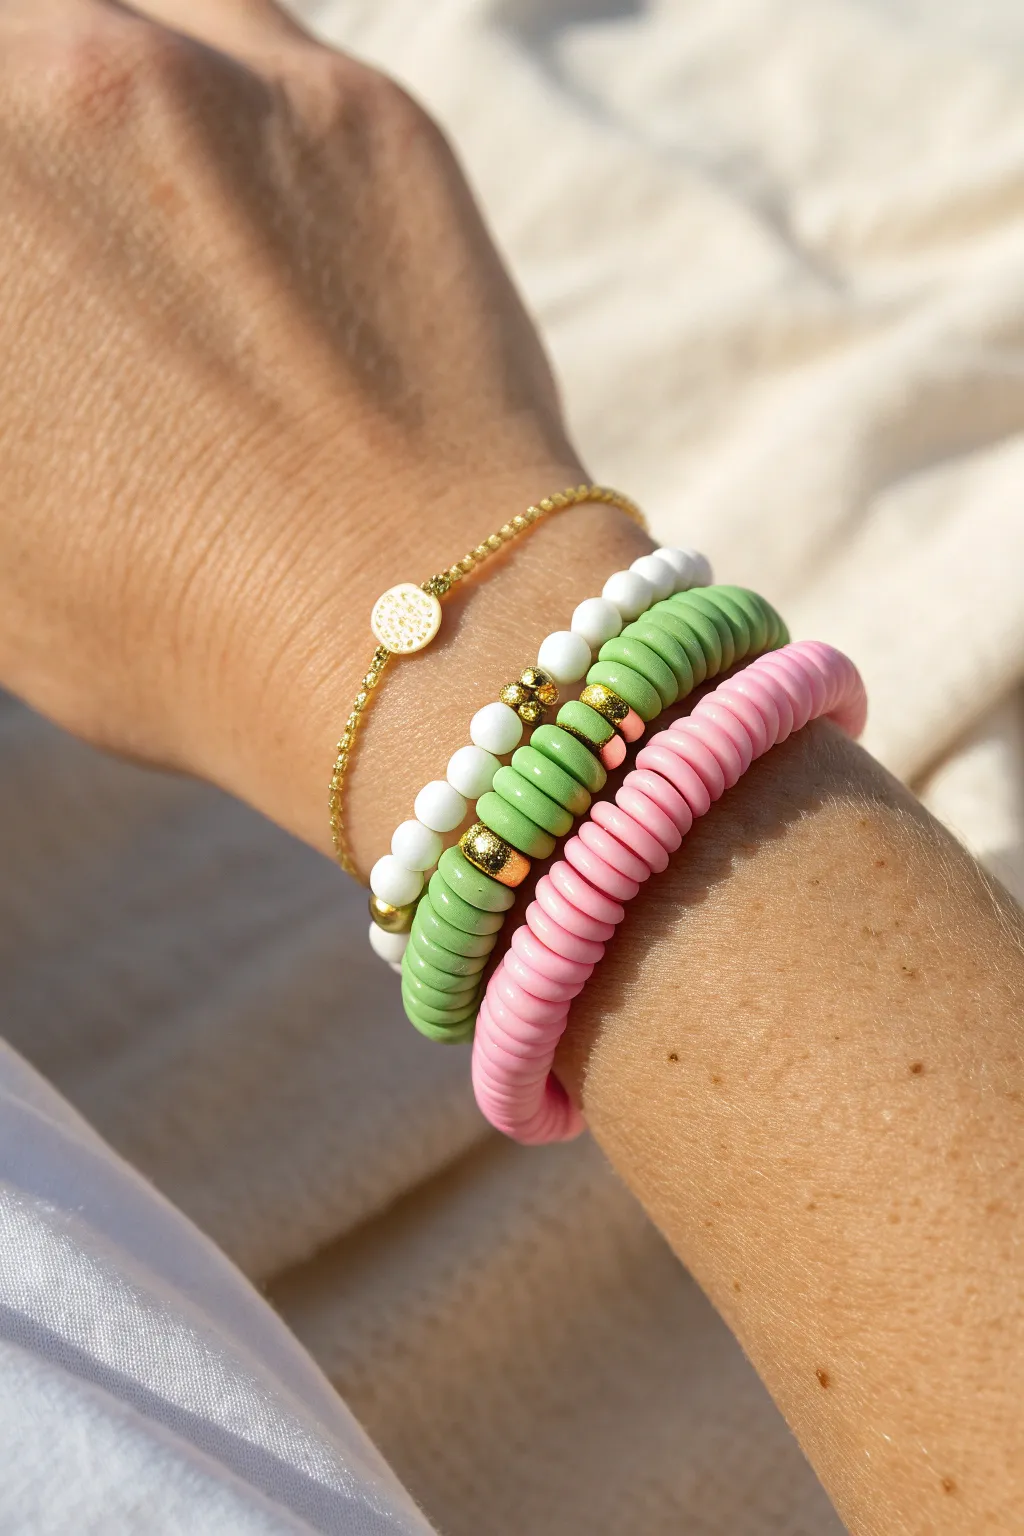
Preppy Matching Anklet and Bracelet Set
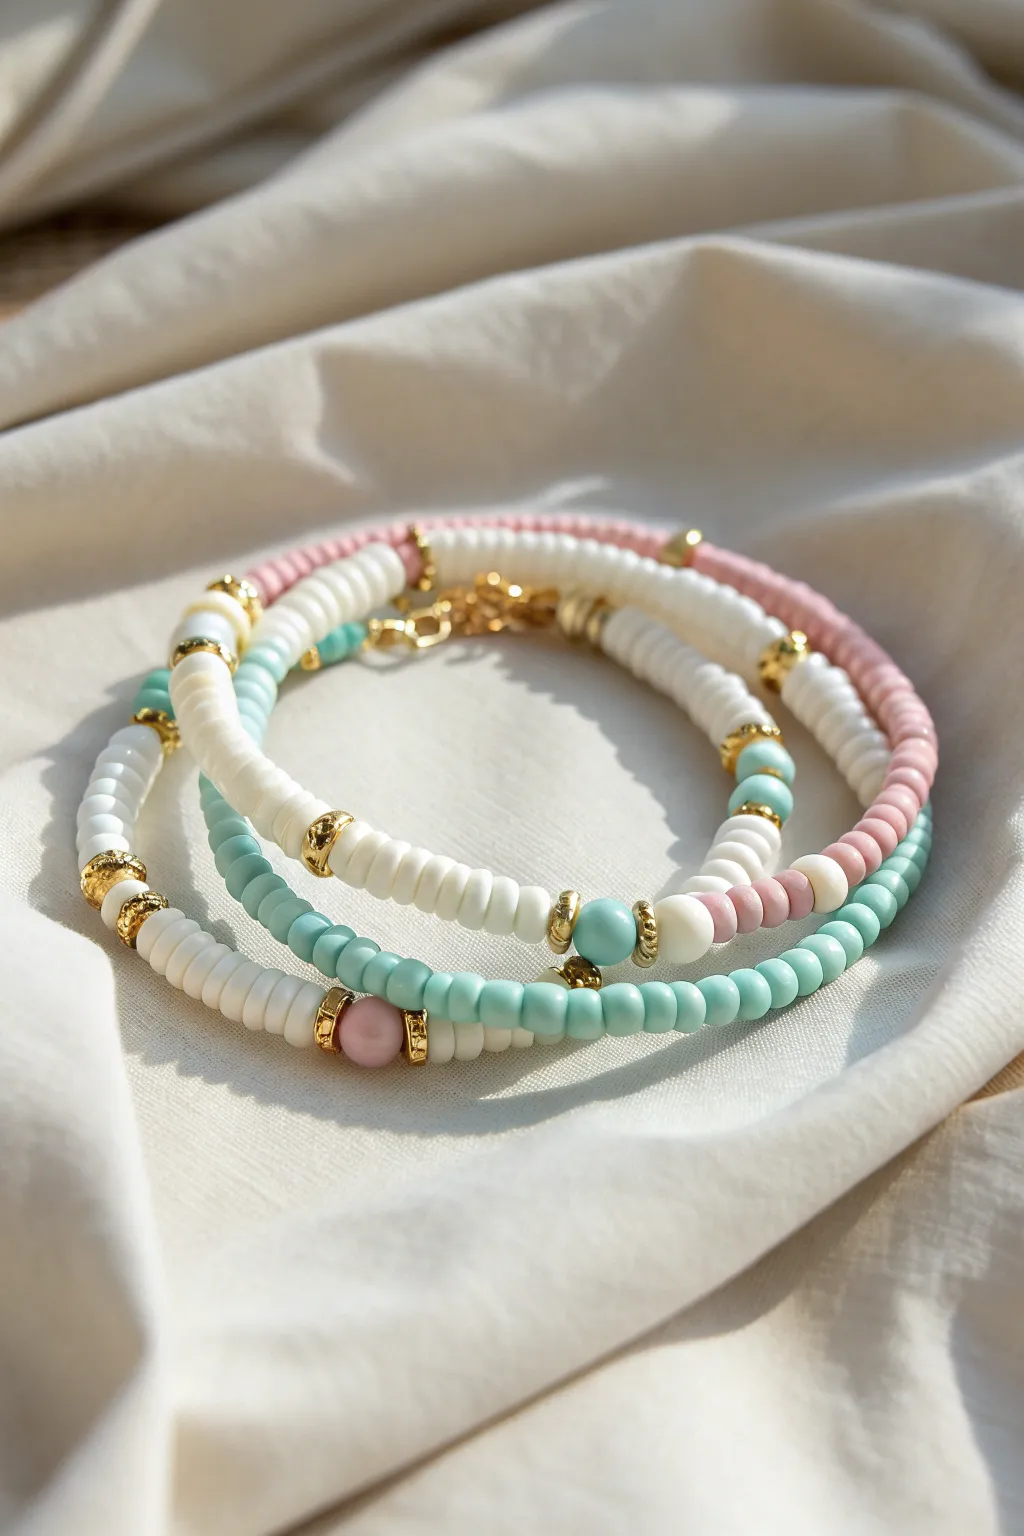
These breezy bracelets combine the classic preppy aesthetic of white heishi discs with soft pops of pastel pinks, mint greens, and rich gold accents. The mixed textures of flat clay beads and smooth round beads create a layered look that feels polished yet effortless for everyday wear.
Step-by-Step Guide
Materials
- White flat polymer clay heishi beads (6mm)
- Mint green round beads (matte or acrylic, 4-6mm)
- Pastel pink round beads (matte or acrylic, 4-6mm)
- White or cream round beads (matching the colored ones)
- Gold tone spacer beads (various: small discs, faceted rondelles, and larger textured rings)
- Elastic beading cord (0.8mm clear)
- Jewelry glue or clear nail polish
- Scissors
Step 1: Planning and Prep
-
Measure your wrist:
Cut a length of elastic cord about 10-12 inches long. This gives you plenty of extra room for tying knots later without losing beads. -
Pre-stretch the cord:
Give the elastic a few gentle tugs. This crucial step prevents the finished bracelet from stretching out and becoming loose after you wear it a few times. -
Secure the end:
Attach a piece of tape or a bead stopper to one end of your cord so your beads don’t slide right off while you work.
Knot Slipping?
If the elastic feels slippery, try a surgeon’s knot instead. Loop the cord through twice on the first pass of the knot for extra friction.
Step 2: Creating the Solid White Heishi Strand
-
Start the base pattern:
Begin threading the flat white heishi beads. Thread about an inch of solid white to start the strand. -
Add first gold accent:
Slide on a textured gold donut spacer, followed by a faceted gold spacer, and then another textured gold donut spacer to create a bold metallic focal point. -
Continue the pattern:
Return to the white heishi beads. Create sections of white about 1.5 inches long, separated by single gold spacers or the larger gold cluster you just made. -
Incorporate color (optional):
If you want to mimic the mixed strand shown, interrupt the white sections with a short segment (about 0.5 inch) of mint green heishi beads.
Step 3: Crafting the Mixed Round Bead Strands
-
Start the second strand:
Cut a new cord. This strand focuses on the round matte beads. Begin with a sequence of mint green round beads. -
Insert gold spacers:
Between every 5-6 mint beads, place a small gold disc spacer to break up the color and add shine. -
Transition colors:
In the center of the bracelet, switch from mint beads to white round beads. Use a larger gold textured ring bead as the transition point. -
Add pink accents:
On the third strand (or integrated into the second), use the pastel pink round beads. Create a pattern of three white round beads, one gold spacer, and three pink round beads. -
Create a focal bead:
For a standout look, place one large pink round bead flanked by two thick gold spacers right in the center of a section of white heishi beads.
Level Up
Add a small gold charm, like a star or a shell, to the center of the mint green bracelet for extra personalized beachy flair.
Step 4: Finishing Touches
-
Check the fit:
Wrap the unfinished strands around your wrist to check the size. Add or remove beads until the ends meet comfortably without gaps. -
Tie the knot:
Remove the tape/stopper. Tie a standard square knot (right over left, left over right). Pull it tight gently. -
Secure carefully:
I always add a tiny drop of jewelry glue or clear nail polish directly onto the knot. Let it dry for a few minutes before trimming the excess cord. -
Hide the knot:
If possible, tuck the knot inside one of the larger beads or gold spacers for a professional, seamless finish.
Stack all three bracelets together for a coordinated pastel look that brings a soft touch of summer to any outfit
Mini Set: Necklace + Bracelet Color Story
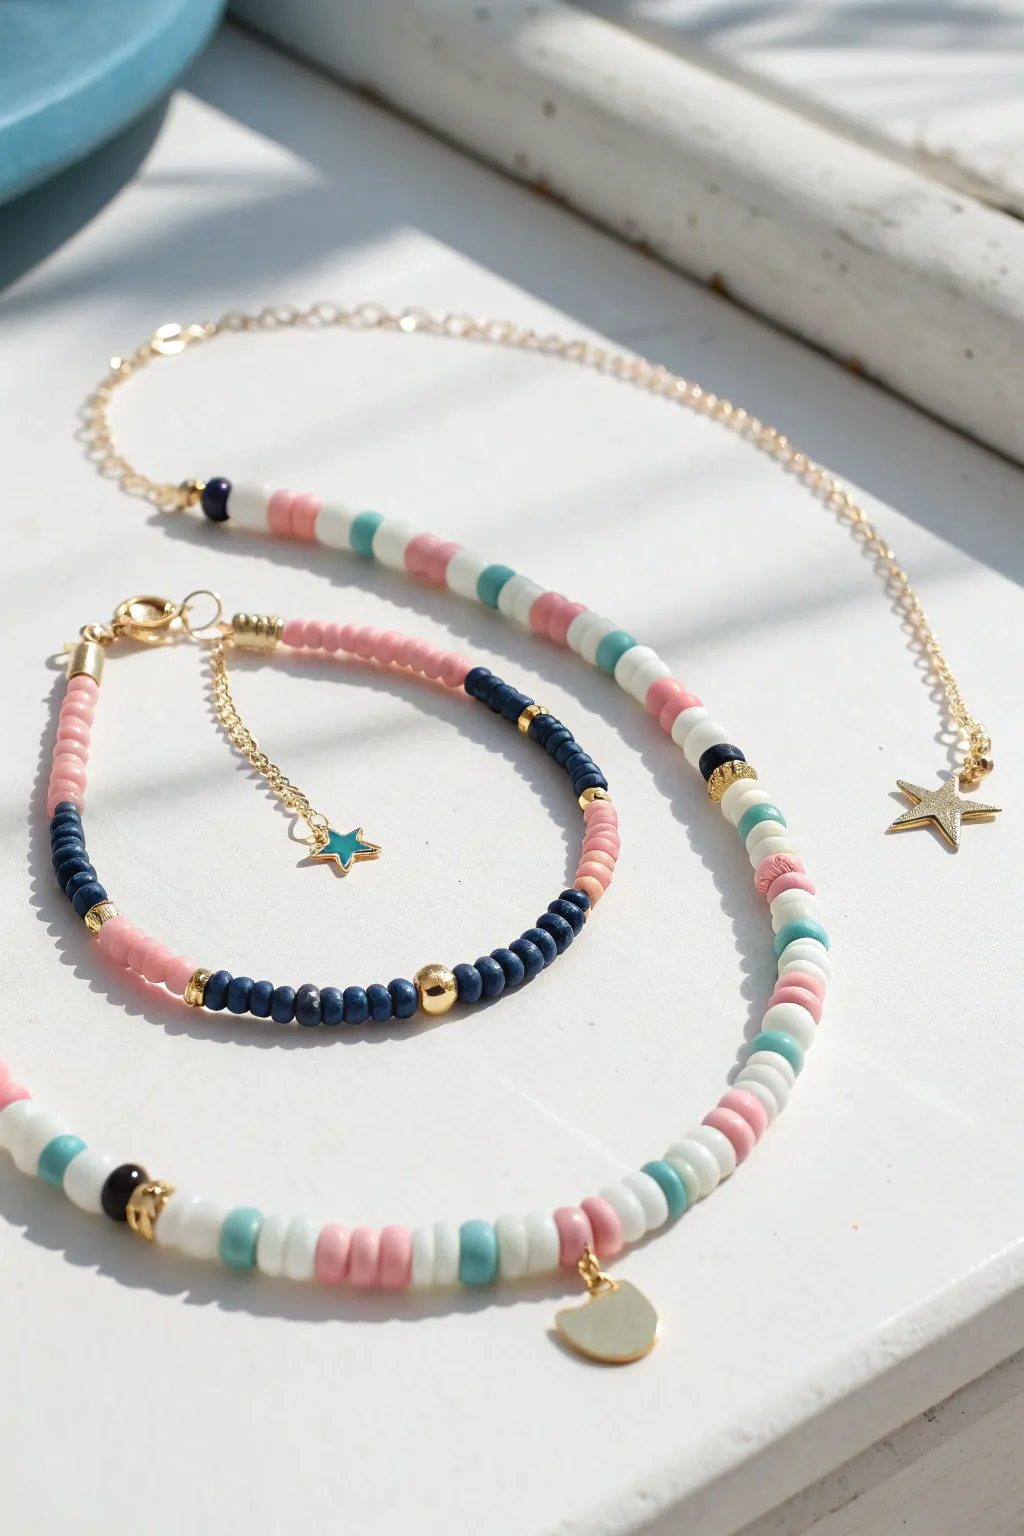
Embrace the coastal grandmother vibe with this matching necklace and bracelet duo featuring a soft, nostalgic color palette. The combination of matte clay heishi beads with delicate gold charms creates a sophisticated yet playful summer accessory.
Step-by-Step
Materials
- Polymer clay heishi beads (6mm or 4mm): White, pastel pink, teal/aqua, navy blue
- Gold spacer beads: small rounds and flat discs
- Gold beading wire or strong nylon cord
- Gold crimp beads and covers
- 2 Gold lobster clasps
- Gold extension chain
- Gold jump rings (4mm and 6mm)
- Gold charms: 1 medium heart, 1 small star (teal enamel inlay), 1 gold star outline
- Wire cutters
- Needle-nose pliers
- Crimping pliers
Step 1: Designing the Bracelet
-
Measure and cut:
Cut a piece of beading wire about 9 inches long. This gives you plenty of extra room to work with crimps on both ends without feeling cramped. -
Secure the start:
Thread a crimp bead onto one end, loop the wire through a jump ring, and pass it back through the crimp. Flatten the crimp bead securely with your pliers, then snap a crimp cover over it for a polished look. -
Begin the pattern:
Start threading your beads. Begin with a section of pink beads (about 1.5 inches) followed by a few navy blue beads to create a distinct color block. -
Add gold accents:
Place a gold flat disc spacer, followed by a section of pink, then transition into the main navy blue section. Breaking up the solid colors with gold adds a touch of elegance. -
Create the focal point:
In the center of the navy blue section, add a larger gold round spacer bead as a centerpiece, then continue with navy beads to mirror the other side. -
Finish the strand:
Once you’ve reached your desired wrist length (usually 6-7 inches), finish the pattern with a final section of pink beads. -
Attach the clasp:
Add a crimp bead on the end, loop the wire through the ring of a lobster clasp, and back through the crimp. Tighten the wire, crimp it flat, trim the excess, and add a crimp cover. -
Add the charm:
Find the middle of your chain extender. Open a small jump ring, attach the small teal star charm, and hook it onto the extender chain for a dangling detail.
Step 2: Crafting the Necklace
-
Prepare the wire:
Cut a length of beading wire approximately 18-20 inches long, depending on how low you want the necklace to sit. -
Start the crimp:
Just like the bracelet, secure one end with a crimp bead and cover, attaching it to a jump ring or directly to the chain extender right away. -
Establish the rhythm:
This pattern creates a ‘dashed’ look. Thread a repeating sequence: 3 white beads, 3 teal beads, 3 white beads, 3 pink beads. -
Insert gold transitions:
Occasionally insert a small gold spacer bead or a single navy blue bead between the color segments to tie it visually to the bracelet. -
String the full length:
Continue this alternating pattern until the entire beaded section is complete. I find it helpful to lay the strand next to a ruler to ensure symmetry. -
Add the centerpiece:
In the exact visual center of your necklace (or wherever it will hang lowest), slip on a gold flat heart charm using a jump ring so it dangles freely between two beads. -
Final connection:
Secure the final end with a crimp bead and clasp. Trim any excess wire flush against the bead. -
The finishing touch:
On the very end of the necklace’s extension chain, attach the gold star outline charm using a jump ring. This adds a cute surprise detail at the back of the neck.
Loose Beads?
If your beads slide too much or the wire buckles, you may be stringing too tightly. Leave a tiny 1-2mm gap of bare wire before final crimping to allow flexibility.
Clean Cuts
Use memory wire shears or high-quality nippers for the wire. Dull cutters can fray nylon cord or flatten metal wire, making it hard to thread through tiny bead holes.
Now you have a perfectly coordinated set ready for sunny days and beach outings