When I’m craving that extra-fun, extra-colorful look, I reach for preppy clay bead bracelets—the kind you can stack high and still feel totally effortless. Below are my favorite heishi bead “recipes” and styling twists that keep the vibe playful, polished, and very preppy.
Preppy Pink, Purple, and White With Gold Spacers
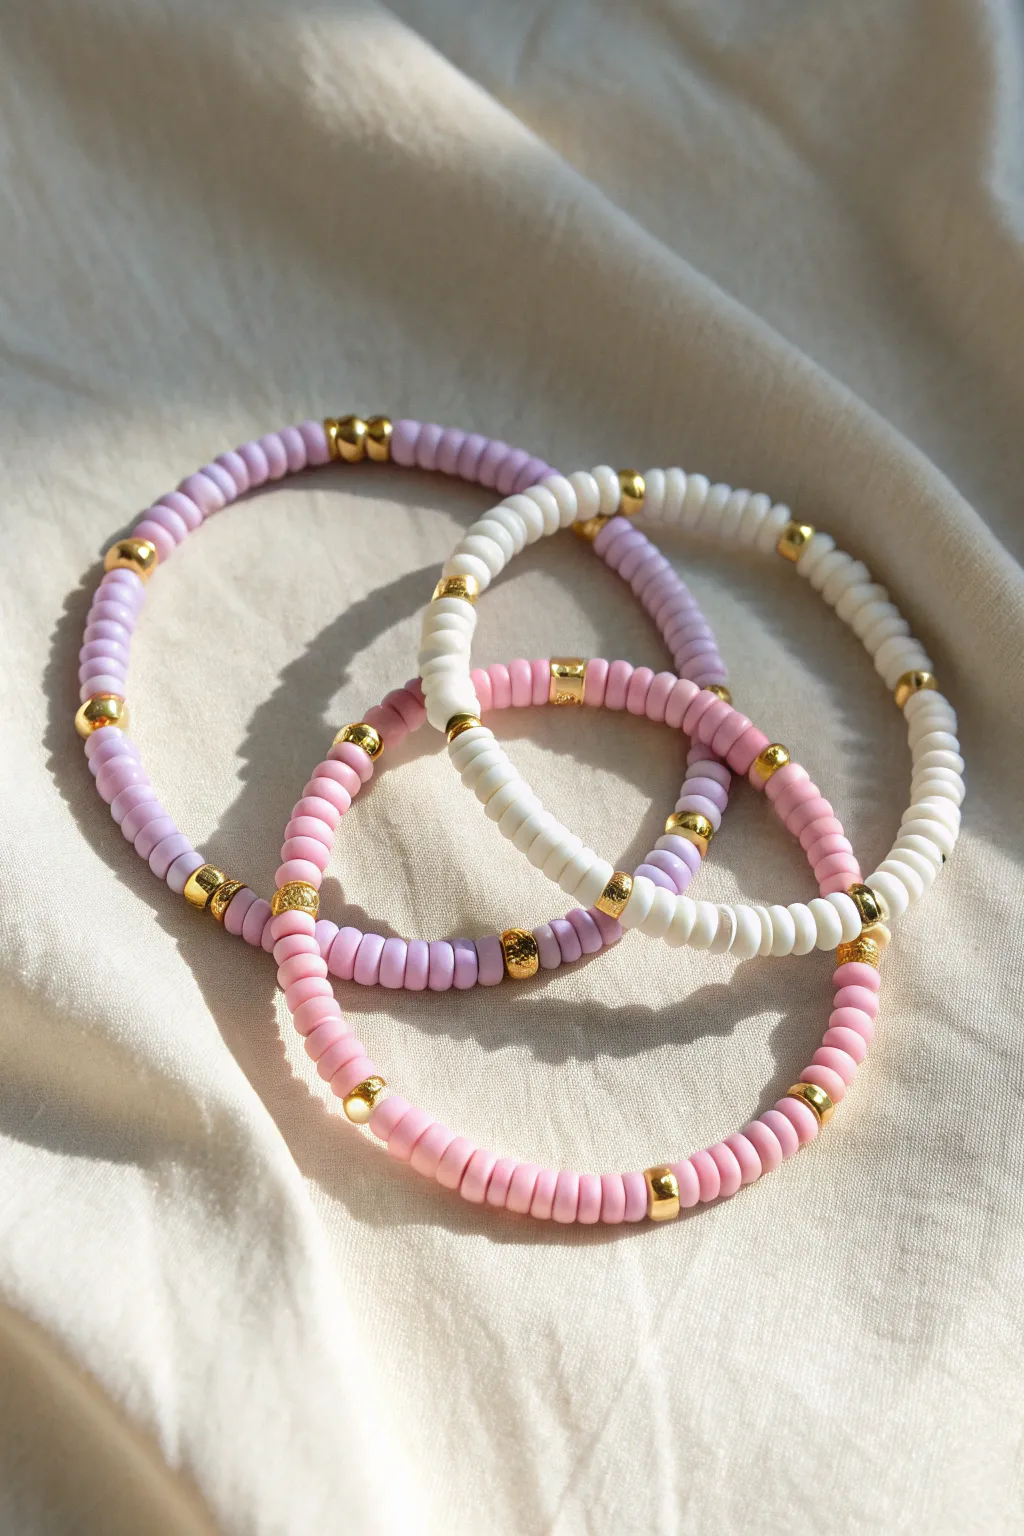
Embrace the soft, dreamy vibes of spring with this set of three complementing clay bead bracelets. Combining delicate pink, lavender, and white heishi beads with gleaming gold accents creates a polished, preppy look perfect for stacking or sharing.
Step-by-Step Tutorial
Materials
- 6mm flat clay heishi beads (pastel pink)
- 6mm flat clay heishi beads (pastel lavender/purple)
- 6mm flat clay heishi beads (white)
- 4mm gold spherical spacer beads
- 4mm gold flat cylinder or disc spacer beads
- 0.8mm clear elastic stretch cord
- Super glue or jewelry cement
- Scissors
- Bead design board (optional but helpful)
- Tape or binder clip
Step 1: Preparation
-
Measure your wrist:
Wrap a piece of string or a flexible measuring tape around your wrist to find your size. Add about 0.5 inches to this measurement for a comfortable fit that isn’t too tight. -
Cut the cord:
Cut three pieces of elastic cord, making each one about 10-12 inches long. Having this extra length makes tying the finishing knots much easier later on. -
Secure the ends:
Attach a piece of tape or a binder clip to one end of each cord. This simple step prevents your carefully strung beads from sliding right off while you work.
Keep Them Gold
To prevent your gold spacers from tarnishing quickly, avoid wearing these bracelets in the shower or pool, and put them on after applying lotion or perfume.
Step 2: Lavender & Gold Bracelet
-
Start the pattern:
Begin by threading approximately 6 to 8 lavender clay beads onto your first cord. This creates your base color section. -
Add the gold accent:
Slide on one gold spherical spacer bead. This gold pop breaks up the color and adds that classic jewelry look. -
Repeat the sequence:
Continue the pattern: 6-8 lavender beads followed by one gold spacer. Repeat this until you reach your desired bracelet length, ending with a section of lavender beads. -
Check sizing:
Wrap the strand around your wrist to double-check the fit before tying off. It should sit comfortably without pinching.
Step 3: White & Gold Bracelet
-
Create the white base:
For the second bracelet, use the white heishi beads. Thread on a section of roughly 6 to 8 white beads. -
Insert gold spacers:
Add a gold spherical spacer bead, just like the previous bracelet. Keeping the spacing consistent creates a cohesive set. -
Complete the strand:
Repeat the pattern of white sections and gold spacers until this strand matches the length of your lavender bracelet.
Knot Slipping?
If your elastic knot keeps coming undone before you glue it, try rubbing the ends of the cord with a little piece of beeswax or sandpaper to give it more grip.
Step 4: Pink & Gold Bracelet
-
Begin the pink strand:
Grab your third cord. Thread on a section of 6 to 8 pink clay beads. -
Switch up the gold:
For this bracelet, use the gold cylinder or flat disc spacers instead of the spheres. This subtle variety adds texture to your stack. -
Finish the pattern:
Continue alternating the pink bead sections with the gold cylinder spacers until the bracelet is complete.
Step 5: Finishing Touches
-
Pre-stretch the cord:
Before tying, give each bracelet a gentle tug. This pre-stretching prevents the elastic from sagging immediately after you wear it. -
Tie the knot:
Remove the tape or clip. Bring the two ends together and tie a surgeon’s knot (loop the clear cord through twice before pulling tight) for extra security. -
Secure with glue:
Dab a tiny drop of super glue or jewelry cement directly onto the knot. I usually let this dry for at least 15 minutes to be safe. -
Hide the knot:
Once dry, trim the excess cord close to the knot. If the hole of a nearby bead is large enough, carefully tuck the knot inside for a seamless finish.
Now you have a stunning pastel stack ready to wear separately or all together for maximum effect


Preppy Sunset Ombré Gradient Stack
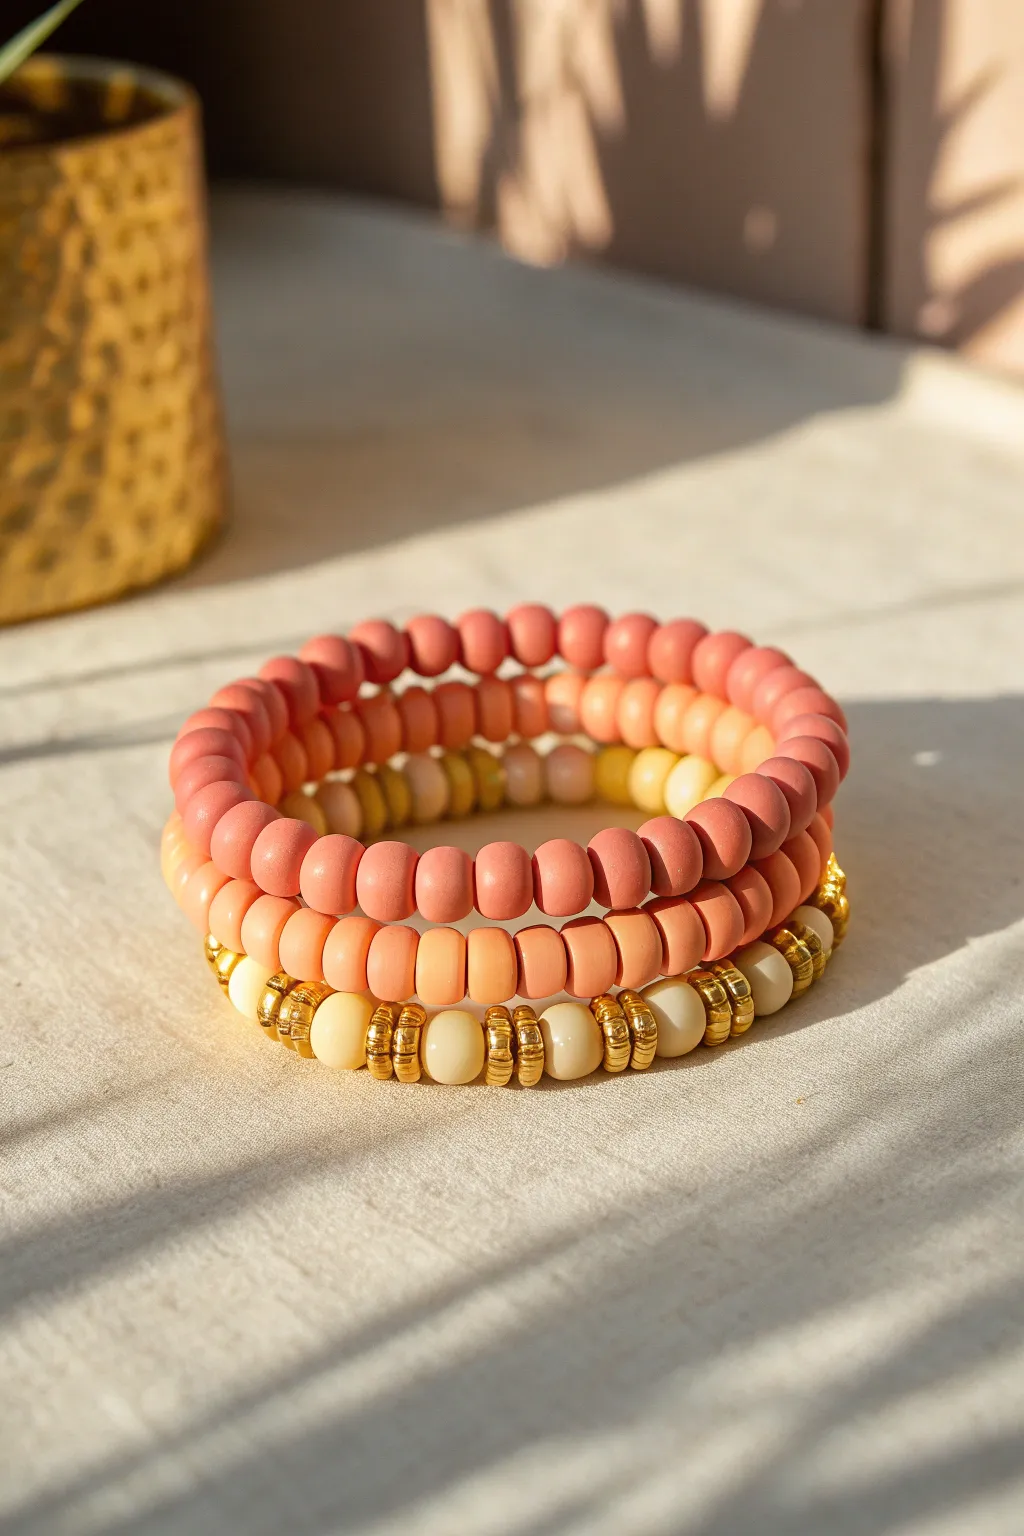
Capture the golden hour on your wrist with this warm, sun-drenched bracelet stack. Featuring soft matte clay beads in a gradient of coral and peach paired with creamy accents and gold spacers, this set radiates effortless preppy charm.
How-To Guide
Materials
- Matte polymer clay disc beads (coral pink)
- Matte polymer clay disc beads (soft peach/light salmon)
- Round beads (cream or off-white, approx. 6mm or 8mm)
- Gold tone metallic spacer/heishi beads (approx. 4mm-6mm)
- Elastic clear beading cord (0.7mm or 0.8mm)
- Jewelry glue or clear nail polish
- Scissors
- Bead stoppers or binder clips
- Ruler or measuring tape
Step 1: Planning & Measure
-
Measure your wrist:
Start by wrapping a measuring tape around your wrist to find your exact size. Add about 0.5 inches to this measurement for a comfortable fit that isn’t too tight. -
Cut the cord:
Cut three strands of elastic cord, each about 10-12 inches long. Having extra length makes tying the final knots significantly easier than struggling with short ends. -
Secure the ends:
Attach a bead stopper or a piece of tape to one end of each cord strand to prevent your beads from sliding off while you work.
Knot Security Tip
When tightening your knot, pull all four strands (the two ‘tails’ and the two loop sides) simultaneously to create the tightest, smallest knot possible.
Step 2: Creating the Solid Color Strands
-
Start the coral bracelet:
Begin threading the coral pink clay beads onto your first cord. These matte beads sit flush against each other, creating a smooth, rope-like texture. -
String until length is reached:
Continue adding coral beads until the beaded portion matches your target wrist measurement. Periodically wrap it around your wrist to check the fit. -
Create the peach strand:
Repeat the process on the second cord using the lighter peach or salmon-colored clay beads. Keep the tension even but not too tight so the bracelet stays flexible. -
Double check consistency:
Lay the coral and peach strands side-by-side. Ensure the beaded sections are roughly the same length before moving on to the patterned strand.
Make It Glossy
Want a shinier look? Use gloss glaze polymer clay beads instead of matte ones, or mix in faceted crystal beads to catch the sunset light.
Step 3: Assembling the Patterned Strand
-
Begin the pattern:
On the third cord, start your pattern. Thread one round cream bead followed by a stack of gold spacers. -
Determine spacer height:
For the look in the photo, use about 3 to 4 gold disc spacers between each round bead. This creates a rich metallic segment that stands out against the cream. -
Establish the rhythm:
Continue the pattern: one round cream bead, four gold spacers, one round cream bead, and so on. The gold spacers should act like small metallic columns separating the spheres. -
Refine the length:
Continue beading until this strand matches the length of your solid color bracelets. You may need to adjust the number of spacers in the final section to make the ends meet perfectly.
Step 4: Finishing Touches
-
Pre-stretch the cord:
Before tying, gently give each bracelet a little tug. This ‘pre-stretching’ helps prevent the elastic from sagging or loosening immediately after you wear it. -
Tie the knots:
Remove the bead stopper and tie the ends of the first bracelet together using a surgeon’s knot (loop the clear cord through twice before pulling tight). Repeat for the other two bracelets. -
Secure with glue:
Dab a tiny drop of jewelry glue or clear nail polish onto each knot. Let this dry completely before trimming any tails. -
Hide the knot:
Once the glue is dry, trim the excess cord carefully. On the clay bead bracelets, try to slide the knot inside the hole of a neighboring bead for a seamless finish. -
Final arrangement:
Stack them up on your wrist with the darker coral on top, peach in the middle, and the patterned cream-and-gold strand at the bottom for the full ombré effect.
Enjoy wearing your new sunset-inspired stack all summer long


Preppy Ocean Blues With Crisp White Breaks
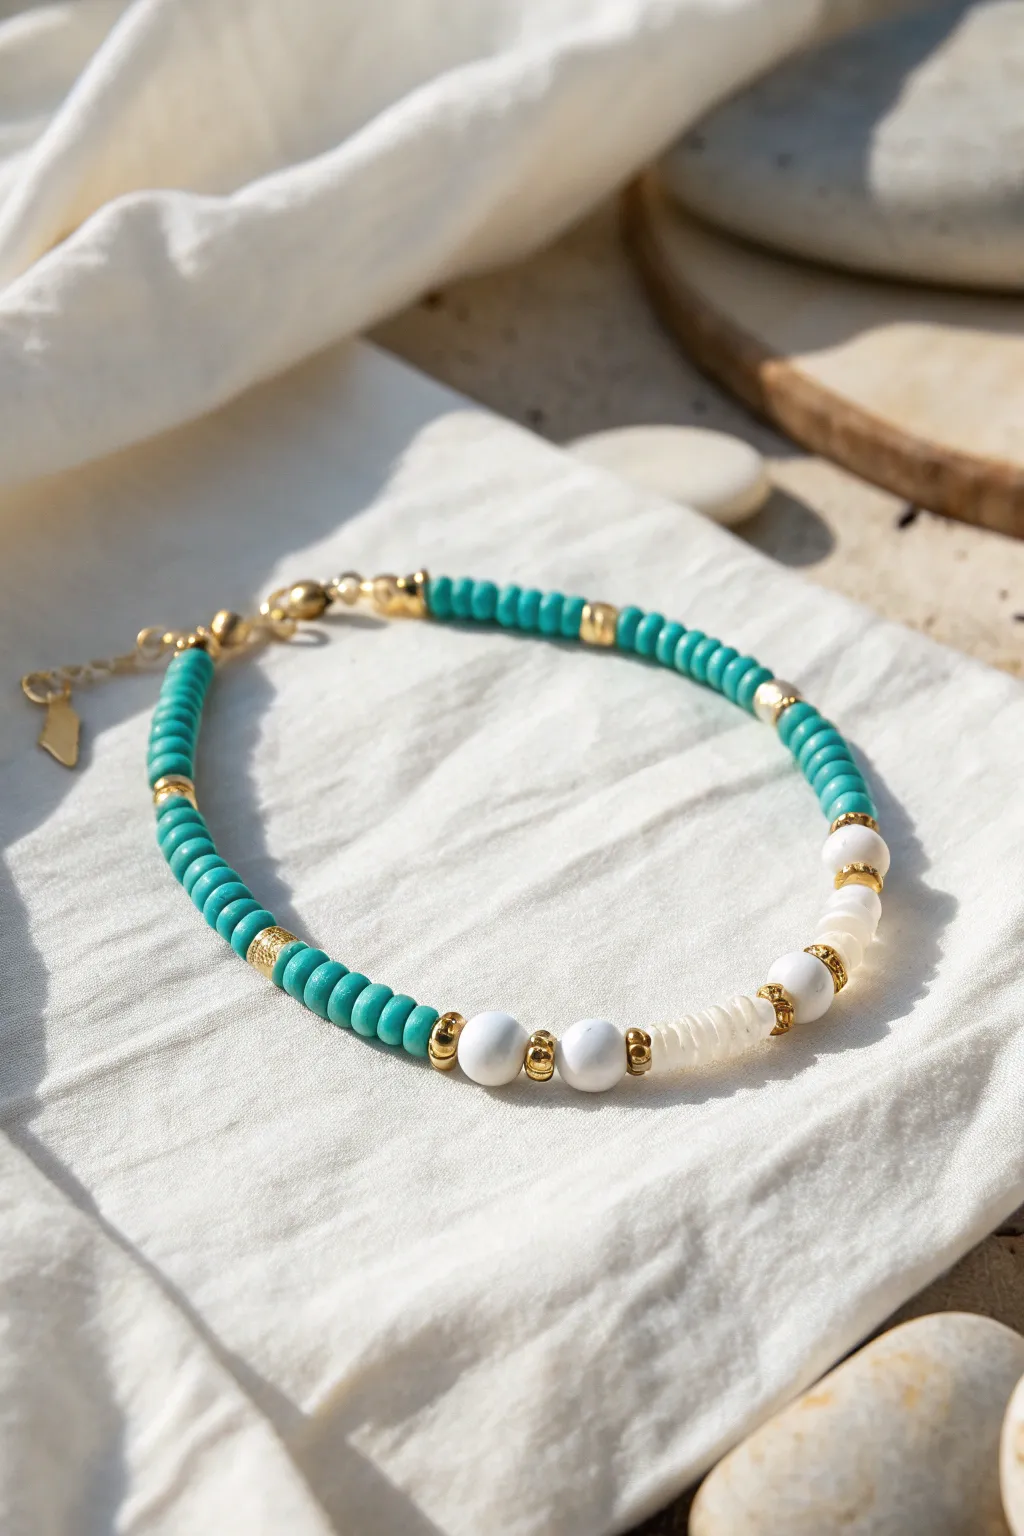
Capture the breezy essence of a beach day with this elegant anklet or bracelet design. The vibrant turquoise Heishi beads paired with crisp white agate and warm gold accents create a sophisticated yet relaxed accessory perfect for summer styling.
Step-by-Step Tutorial
Materials
- Turquoise Heishi beads (approx. 4mm, polymer clay or gemstone)
- White agate or howlite round beads (6mm)
- Ivory or white shell Heishi beads (4mm)
- Gold tone spacer beads (cylindrical or rondelle)
- Gold tone crimp beads (2mm)
- Gold tone wire guards
- Gold tone lobster clasp
- Gold tone extension chain
- Flexible beading wire (0.015 – 0.018 inch)
- Crimping pliers
- Wire cutters
- Measuring tape
Step 1: Planning and Preparation
-
Measure your fit:
Before cutting any wire, measure your ankle or wrist with a flexible measuring tape. Add about 1 inch to this measurement to account for the clasp and the bulk of the beads. -
Cut the wire:
Cut a length of flexible beading wire about 3 inches longer than your calculated length. This extra length gives you room to work comfortably with the crimps. -
Secure the first end:
Thread one crimp bead onto the wire, followed by a wire guard. Loop the wire through the guard and back down through the crimp bead. -
Attach the clasp:
Before tightening, slide the loop of your gold lobster clasp into the curve of the wire guard. I prefer to pull the wire snug so the guard hugs the clasp securely. -
Crimp firmly:
Use your crimping pliers to flatten the crimp bead securely. Give it a gentle tug to ensure it holds before moving on.
Gold Preservation Pro-Tip
Coat metal spacer beads with clear nail polish or a jewelry shield spray before stringing. This simple step prevents tarnishing from sweat or ocean water.
Step 2: Creating the Pattern
-
Start with turquoise:
Begin stringing your turquoise Heishi beads. You’ll need a fairly long section here, approximately 1.5 to 2 inches of solid turquoise. -
Add a gold accent:
Slide on one gold spacer bead. This marks the transition from the solid color block to the more intricate pattern sections. -
The second turquoise section:
String another section of turquoise Heishi beads. Make this section slightly shorter than the first, perhaps around 1 inch in length. -
Insert gold separator:
Place another gold spacer bead onto the wire to cap off this second block of color. -
Create the white focal point:
Now, add your larger white round bead (agate or howlite). Follow this immediately with a gold saucer or rondelle spacer. -
Add texture with shell:
String about four to five flat ivory or white shell Heishi beads. These offer a different texture compared to the smooth clay beads. -
Complete the white sequence:
Add another gold spacer, followed by a second large white round bead. This creates a symmetrical centerpiece for the design. -
Mirror the pattern:
After the white focal section, add a gold spacer bead and then return to your turquoise Heishi beads. -
Continue the sequence:
Continue creating sections of turquoise separated by gold spacers. Adjust the length of these turquoise sections to ensure the white beads sit where you want them on your ankle or wrist.
Step 3: Finishing Touches
-
Check the length:
Wrap the strand around your ankle or wrist to verify the fit. Remember that the extension chain will add adjustable length, so don’t make the beaded portion too loose. -
Prepare the final crimp:
Thread a crimp bead onto the end of the wire, followed by a wire guard. -
Attach the chain:
Loop the wire through the guard and attach the loop of your extension chain before passing the wire back down through the crimp bead. -
Secure the design:
Pull the wire taut so there are no gaps between beads, but leave just a tiny bit of slack so the bracelet remains flexible and doesn’t stiffen up. -
Final crimp and trim:
Flatten the crimp bead firmly with your pliers. Check the hold one last time, then trim the excess wire tail flush with the crimp bead using your wire cutters.
Stiff Bracelet Troubleshooting
If the finished piece feels rigid or kinks, you crimped too tightly against the beads. Leave a 1-2mm gap of exposed wire at the end to allow movement.
Now you have a stunning, boutique-quality accessory ready for your next seaside adventure

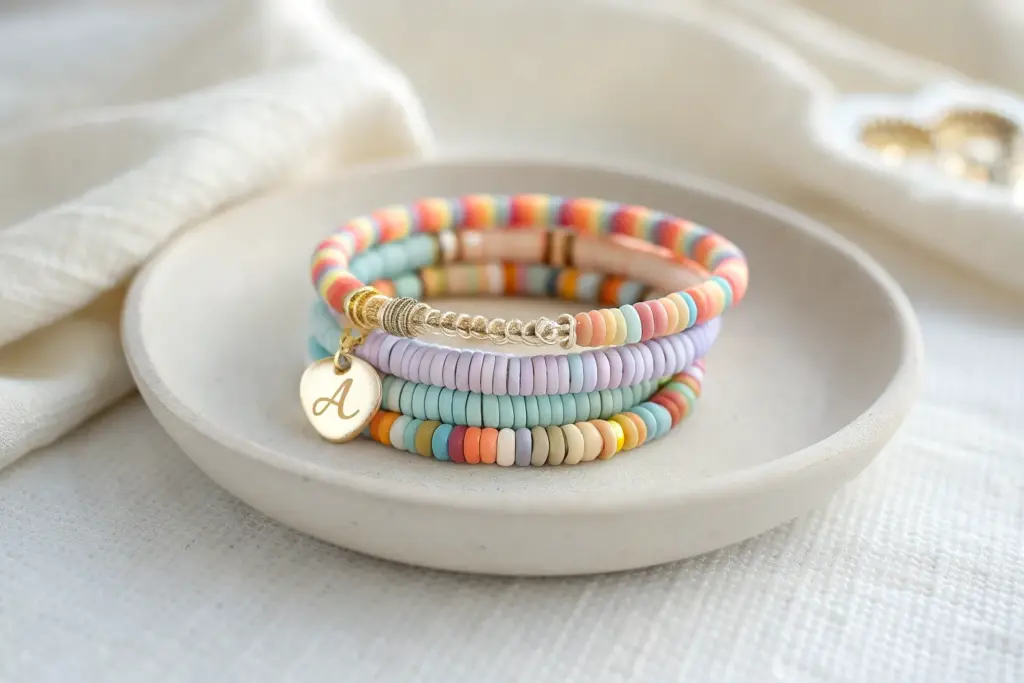
Preppy Pastel Rainbow Sorbet Mix
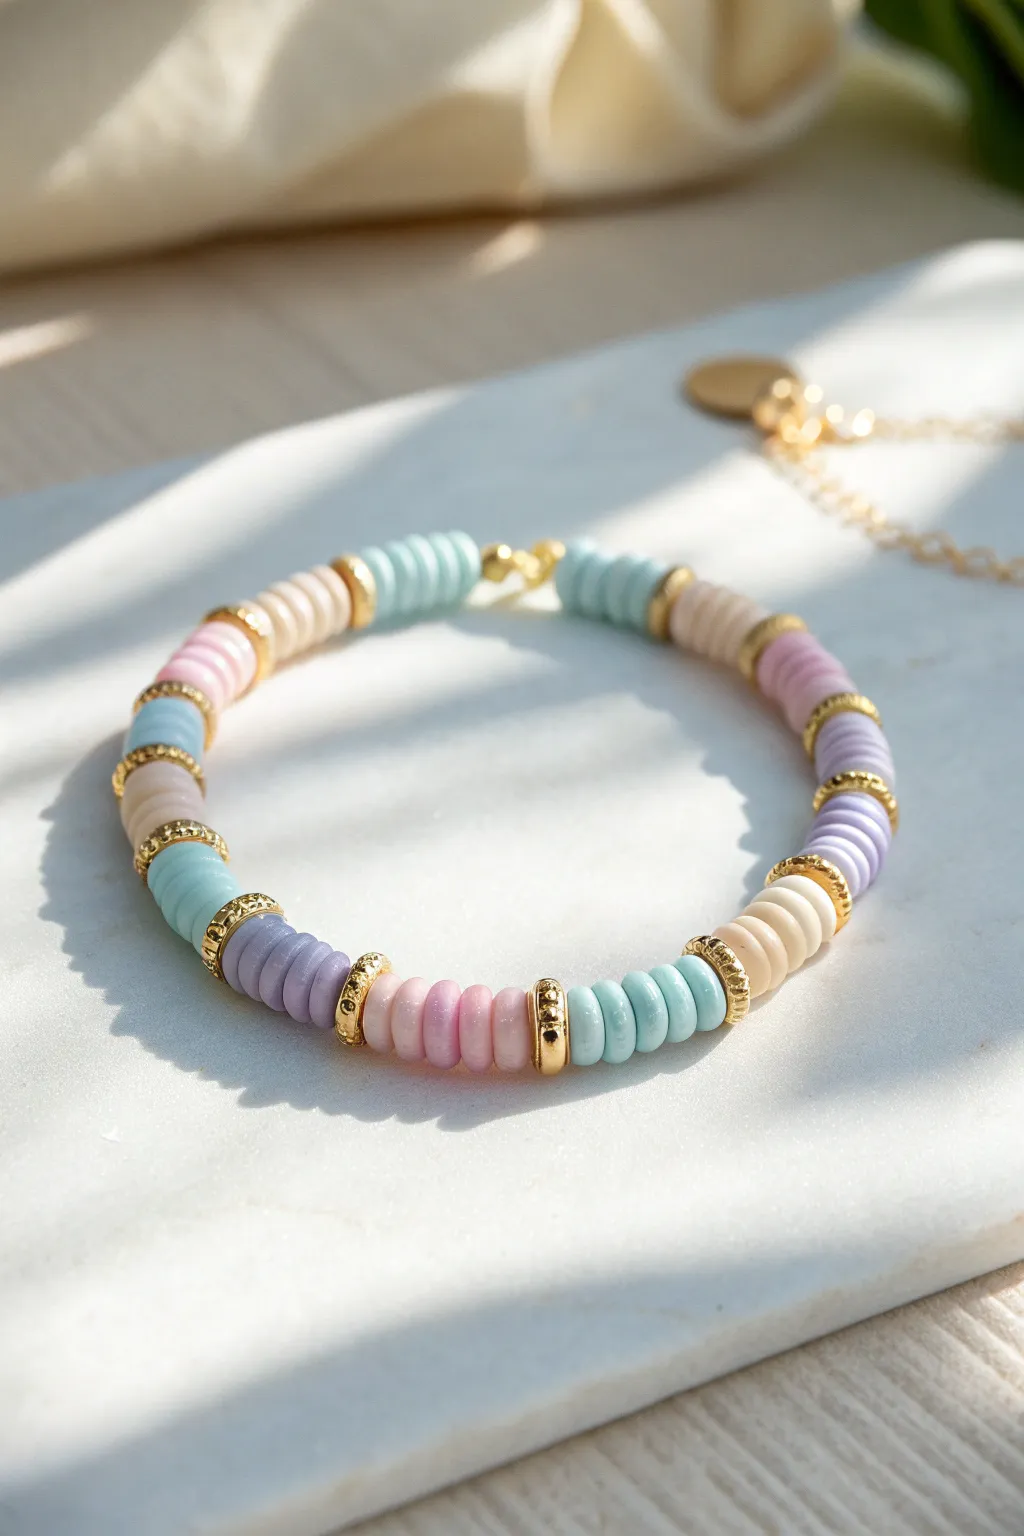
Capture the sweetness of summer all year round with this delightful pastel bracelet, featuring a dreamy mix of soft pinks, blues, and lilacs accented by rich gold spacers. The “sorbet” color palette creates a sophisticated yet playful accessory that looks stunning on its own or stacked with other wrist candy.
Step-by-Step
Materials
- 6mm polymer clay disc beads (Heishi) in pastel blue
- 6mm polymer clay disc beads in pastel pink
- 6mm polymer clay disc beads in lavender/purple
- 6mm polymer clay disc beads in cream/beige
- Gold tone ornate spacer beads (heishi/wheel style)
- Small gold round beads (for crimping/finishing)
- Stretch cord (0.8mm recommended)
- Jewelry glue or clear nail polish
- Scissors
Step 1: Planning and Preparation
-
Measure your wrist:
Cut a piece of stretch cord about 10-12 inches long. This gives you plenty of extra length for knotting later on. -
Pre-stretch the cord:
Hold the cord ends and give it a few gentle tugs. This helps prevent the bracelet from stretching out permanently after you wear it the first time. -
Secure the end:
Tape one end of the cord to your work surface or clamp it with a binder clip so your beads don’t slide off while you work. -
Pattern check:
Familiarize yourself with the color rotation: Pastel Blue → Cream → Pink → Lavender → Cream (repeat). Notice that Cream appears more frequently as a gentle neutralizer.
Step 2: Beading the Pattern
-
Start the first segment:
Begin by threading on four to five pastel blue clay discs. -
Add the gold accent:
Slide on one gold ornate spacer bead. These structured gold beads add a nice texture contrast to the smooth clay. -
Transition to cream:
Thread on four to five cream-colored clay discs, followed by another gold spacer. -
Introduce the pink:
Add your next color block: four to five pastel pink discs, capping this section with a gold spacer. -
Add the lavender tone:
Continue the pattern with four to five lavender discs and another gold spacer. -
Repeat with rhythm:
Repeat this sequence (Blue, Gold, Cream, Gold, Pink, Gold, Lavender, Gold) until the bracelet reaches your desired length. -
Check for consistency:
Pause occasionally to ensure your color blocks are roughly the same width. I find that inconsistent block sizes can make the design look a bit messy. -
The final check:
Wrap the beaded strand around your wrist. The ends should touch comfortably without stretching the cord yet.
Keep It Tidy
Use a bead design board or a piece of felt on your table. This stops round beads from rolling away and helps you visualize the pattern before stringing.
Step 3: Finishing Touches
-
Prepare to tie:
Remove the tape or clip making sure to hold both ends firmly. You may want to slide a small gold crimp bead on now if you plan to hide the knot. -
Knot the cord:
Tie a standard square knot (right over left, left over right). Pull tight, but be careful not to snap the elastic. -
Secure the knot:
Tie a second or third tight overhand knot for extra security. The knot needs to be small enough to hide inside a bead. -
Apply adhesive:
Dab a tiny drop of jewelry glue or clear nail polish onto the knot. This fuses the fibers and prevents slipping. -
Let it set:
Allow the glue to dry completely—usually just a few minutes—before trimming. -
Trim the excess:
Using sharp scissors, trim the cord tails close to the knot, leaving about 1mm. -
Hide the mechanism:
Gently pull the cord so the knot slides inside the nearest gold spacer bead or clay disc, making the finish invisible.
Knot Unraveling?
If your elastic knots slip, try a surgeon’s knot: loop the cord through twice on the first pass (instead of once) before tightening, then finish with a square knot.
Now you have a refreshing splash of color ready to brighten up any outfit

The Complete Guide to Pottery Troubleshooting
Uncover the most common ceramic mistakes—from cracking clay to failed glazes—and learn how to fix them fast.
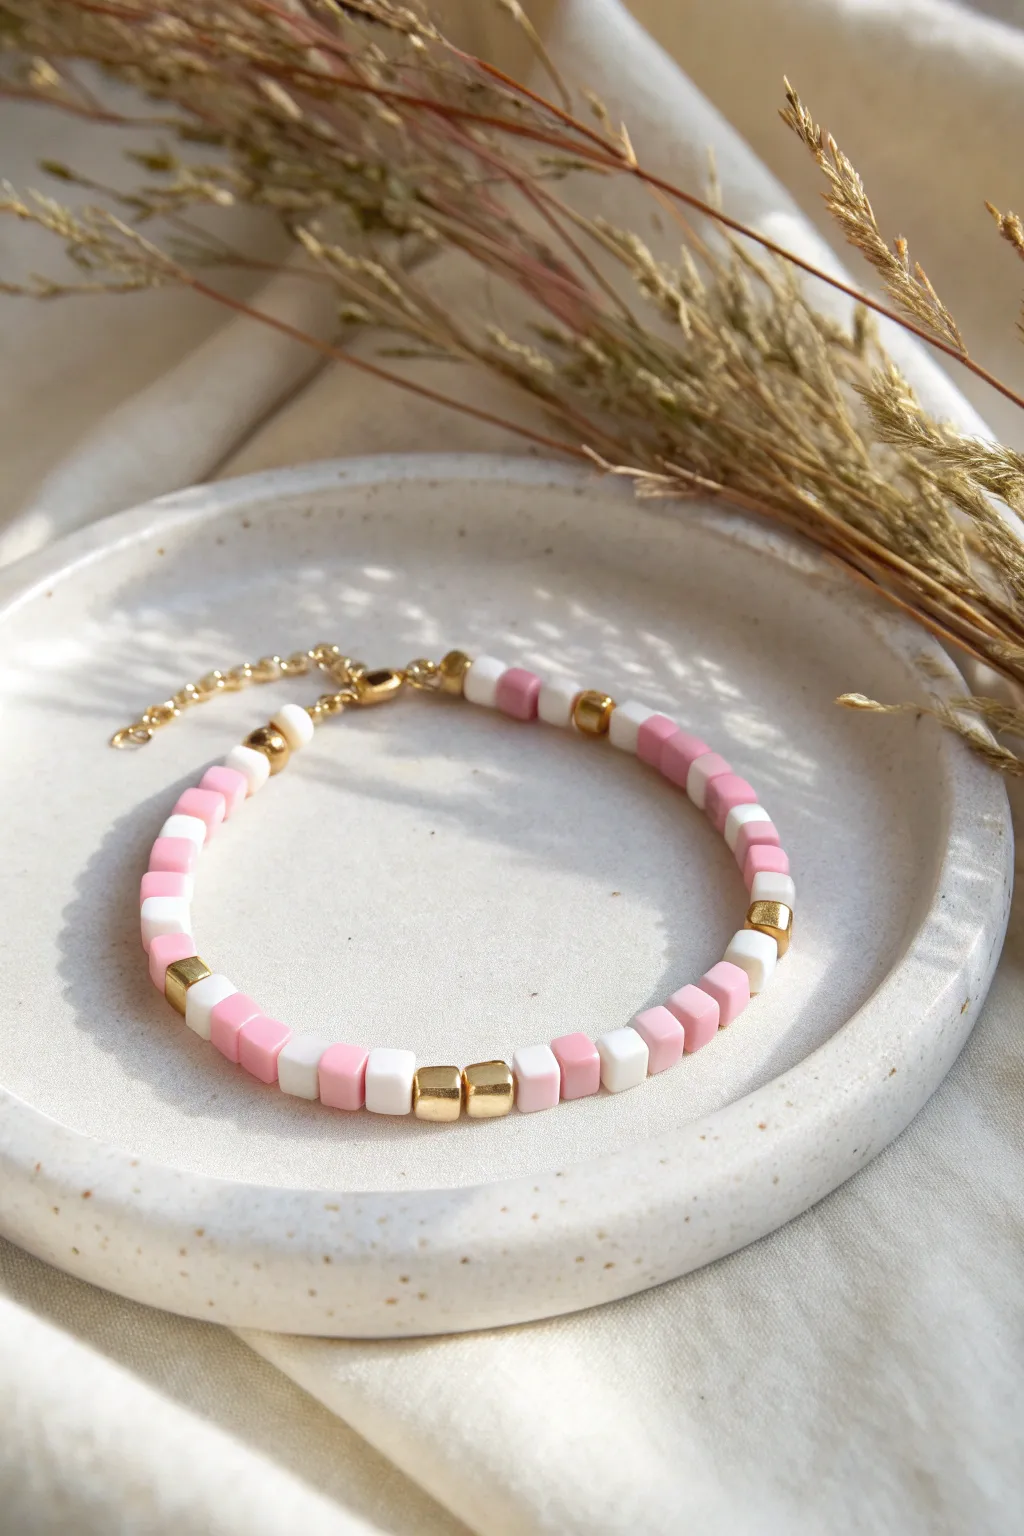
Preppy “Pop” Bracelet With Bold Pink Center Band

This chic design balances minimalist white with bold pops of hot pink, creating a classic preppy accessory perfect for stacking. The gold accents bracket the color sections, giving the piece a polished, jewelry-store finish that elevates simple clay beads.
Step-by-Step Guide
Materials
- 6mm White polymer clay heishi beads (flat disc beads)
- 6mm Hot pink polymer clay heishi beads
- 4mm-6mm Gold spacer beads (flat disc or smooth rondelle style)
- Stretch cord (0.8mm or 1mm thickness recommended)
- Small gold clam shell bead tips or knot covers (optional)
- Gold tone jump rings and lobster clasp
- Scissors
- Jewelry pliers (flat nose)
- Super glue or jewelry adhesive
- Beading needle (optional, for easier threading)
- Bead board or soft cloth
Step 1: Preparation & Planning
-
Measure your wrist:
Wrap a piece of string or a flexible measuring tape around your wrist to find your size. Add about half an inch to this measurement to ensure the bracelet fits comfortably without pinching. -
Cut the cord:
Cut a length of stretch cord about 10-12 inches long. Having this extra length makes it much easier to tie secure knots later without struggling with tiny ends. -
Review the pattern:
Take a moment to study the pattern: a long section of white, followed by a small pink accent, a medium white section, a bold pink center block, another medium white section, a small pink accent, and finally the rest of the white band. Each pink section is bracketed by gold spacers. -
Pre-stretch the cord:
Gently pull on your cut piece of elastic cord a few times. This pre-stretching step helps prevent the bracelet from sagging or loosening immediately after you wear it for the first time.
Step 2: Stringing the Core Pattern
-
Start the white base:
Begin threading your white heishi beads. You’ll want to string enough to cover about one-third of your total bracelet length. A binder clip on the end of the string can stop beads from sliding off while you work. -
Add the first accent:
Slide on one gold spacer bead, followed by three or four hot pink clay beads, and seal the section with another gold spacer bead. -
Create the bridge:
String a smaller section of white beads, approximately 1 inch in length. This creates the gap between your side accent and the main focal point. -
Build the center focal point:
Thread on a gold spacer bead. Now add a longer block of hot pink beads—aim for about 8 to 10 beads here to make this segment stand out as the ‘center’ of the design. -
Finish the focal point:
Close this bold pink section with a matching gold spacer bead. -
Mirror the pattern:
Add another 1-inch section of white beads to match the ‘bridge’ you created on the other side. -
Add the final pink accent:
Create the second small accent by adding a gold spacer, three to four pink beads (matching your first pink group), and a final gold spacer. -
Complete the length:
Fill the rest of the string with white beads until you reach your measured length. Wrap it around your wrist to check the fit before tying off.
Pro Tip: Gold Longevity
To keep your gold spacers shiny, coat them with a thin layer of clear nail polish before stringing. This simple barrier prevents tarnishing from skin oils and sweat.
Step 3: Finishing Touches
-
Prepare to knot:
Remove your binder clip or stopping tape. Bring the two ends of the elastic cord together, ensuring there are no gaps between the beads. -
Tie a surgeon’s knot:
Cross the ends like a standard knot, but loop the top string through the bottom loop twice instead of once. Pull tight. Repeat this knotting process 2-3 times to guarantee security. -
Secure with glue:
Place a teeny tiny dot of jewelry glue or super glue directly onto the knot. I find using a toothpick to apply the glue gives me better control than squeezing from the tube. -
Hide the knot (Method A):
If the hole of your nearest bead is large enough, gently tug the elastic so the knot slides inside the bead, hiding it from view. -
Add hardware (Method B – Optional):
Alternatively, if you prefer a clasp (as seen in the inspiration), tie your cord ends onto crimp covers or clamshell tips at both ends instead of knotting into a continuous circle, then attach jump rings and a lobster clasp using your pliers. -
Let it cure:
Allow the glue to dry completely—usually at least 15 minutes—before trimming the excess cord close to the knot.
Level Up: Initial It
Personalize the central pink band by swapping the middle few pink discs for a gold or white letter bead. It adds a custom touch without disrupting the color blocking.
Slip on your new bracelet for an instant pop of color that looks professional and stylish
Preppy Color-Blocked Segments With Spacer Dividers
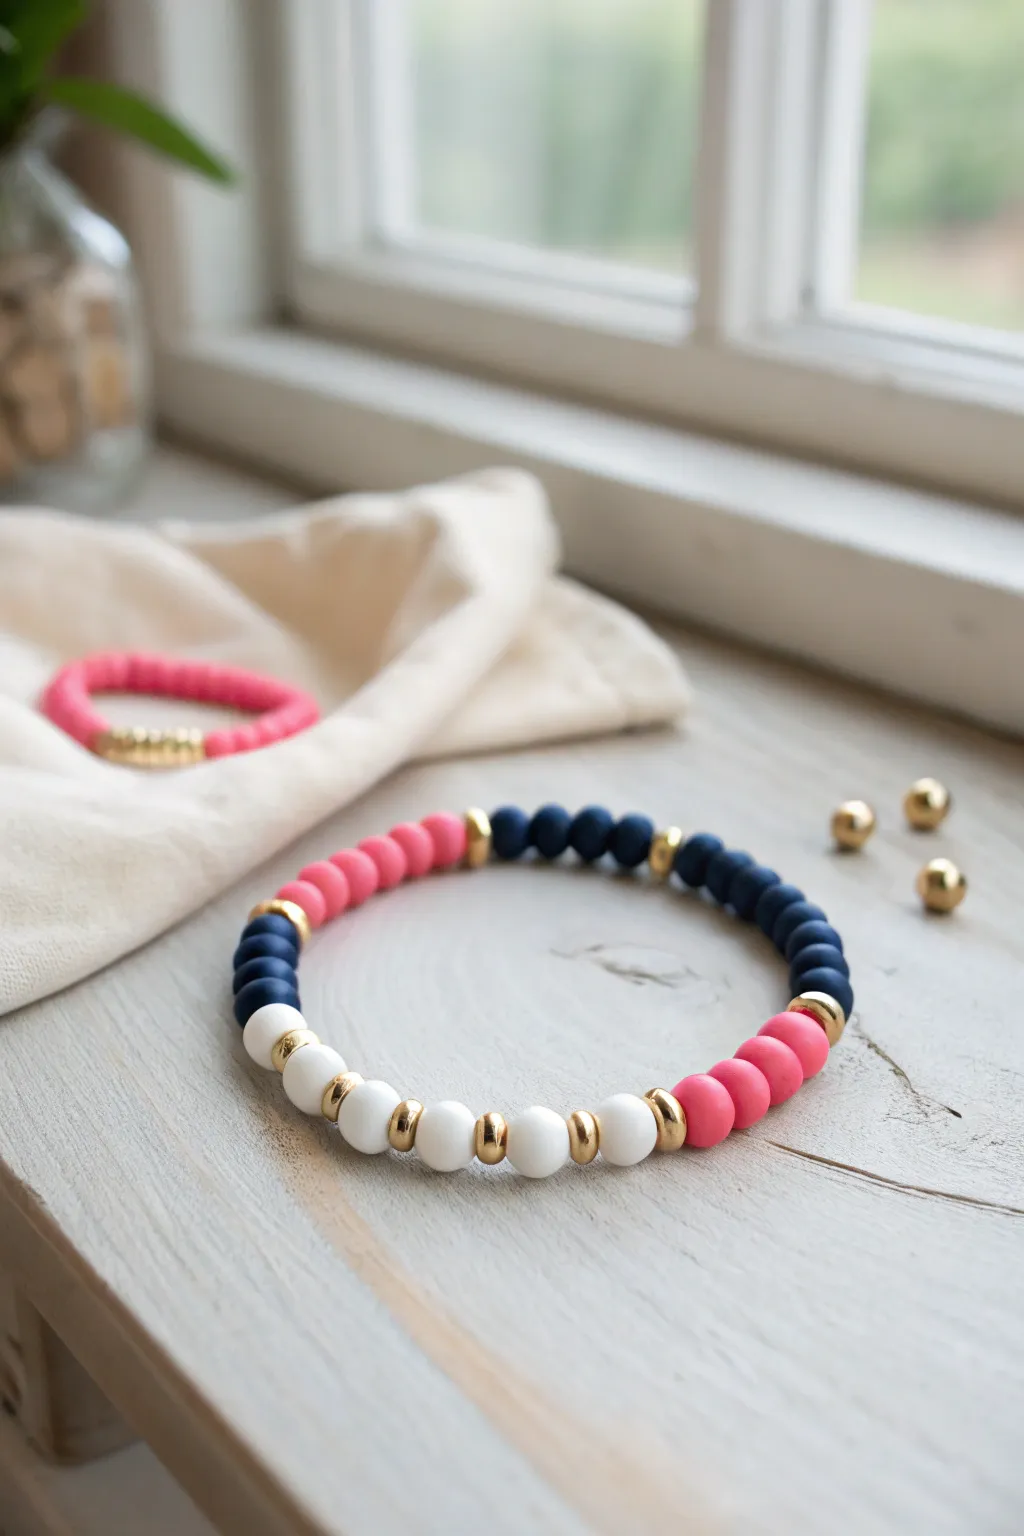
This chic bracelet features a classic preppy color palette of navy, hot pink, and crisp white arranged in distinct blocks. The design is elevated by gold spacer beads that act as elegant dividers between the color segments, giving it a sophisticated finish.
How-To Guide
Materials
- Matte round beads (6mm or 8mm) in navy blue
- Matte round beads (6mm or 8mm) in hot pink
- Matte round beads (6mm or 8mm) in white
- Gold tone metallic spacer beads (rounded/donut shape)
- Strong elastic cord (0.8mm or 1mm)
- Jewelry glue or clear nail polish
- Scissors
Step 1: Planning and Setup
-
Measure your wrist:
Before you begin stringing, measure your wrist to determine the total length needed. A standard bracelet is about 7 inches, but aiming for a slightly looser fit works best with these larger beads. -
Cut the elastic:
Cut a piece of elastic cord about 10-12 inches long. This extra length ensures you have plenty of room to tie a secure knot later without struggling. -
Pre-stretch the cord:
Hold both ends of your cut elastic and give it a few gentle tugs. Pre-stretching helps prevent the bracelet from loosening up and sagging after you’ve worn it a few times. -
Sort your beads:
Separate your beads into piles by color. Having your navy, pink, white, and gold spacers organized on a bead mat or tray will make the patterning process much faster.
Step 2: Stringing the Pattern
-
Start with the navy section:
Begin by threading the navy blue beads onto the elastic. Looking at the design, you’ll need about 10 to 12 navy beads to form the largest color block. -
Add the first gold accent:
Slide one gold spacer bead onto the cord right after the navy section. This metallic shine acts as a divider before the next color shift. -
Create the pink segment:
Thread on 5 hot pink beads. This shorter segment adds a pop of bright color that contrasts beautifully with the deep blue. -
Place the second gold spacer:
Add another gold spacer bead. Ensure the orientation matches the first one so the bracelet looks uniform. -
Build the white section:
This section is slightly different. Instead of a solid block, alternate your beads. Thread one white bead, followed by one gold spacer bead. -
Continue the alternating pattern:
Repeat the previous step: add another white bead, then a gold spacer, then a third white bead, and a final gold spacer. You should have three white beads separated by gold. -
Finish the color blocks:
After the white and gold section, add 3 to 4 more pink beads to balance the design. Finish this segment with one last gold spacer bead. -
Complete the circle:
Add a small final block of about 3 navy beads to connect back to your starting point, ensuring the total length fits comfortably around your wrist.
Knot Slipping?
If your elastic knot feels slippery, dust it lightly with a bit of cornstarch or baby powder before pulling it tight to add grip and friction.
Step 3: Securing the Bracelet
-
Check the fit:
Carefully wrap the unknotted strand around your wrist to check the size. Add or remove a bead from the larger navy section if you need to adjust the tightness. -
Tie the first knot:
Bring the two ends of the elastic together and tie a simple overhand knot. Pull it tight, but be careful not to snap the cord. -
Tie a surgeon’s knot:
For extra security, tie a surgeon’s knot. This is like a regular knot, but you loop the cord through twice before pulling tight. I find this holds much better than a square knot. -
Secure with glue:
Place a tiny drop of jewelry glue or clear nail polish directly onto the knot. Let it dry for a moment to ensure it won’t slip. -
Hide the knot:
Trim the excess elastic cord close to the knot. Then, gently tug the bracelet to slide the knot inside the hole of the nearest bead to hide it from view.
Mix It Up
Swap the alternating white section for a word or name! Replace the white beads with letter beads and remove the spacers between them.
Enjoy styling your new color-blocked accessory with your favorite outfits


What Really Happens Inside the Kiln
Learn how time and temperature work together inside the kiln to transform clay into durable ceramic.
Preppy Confetti Sprinkle Mix on a White Base
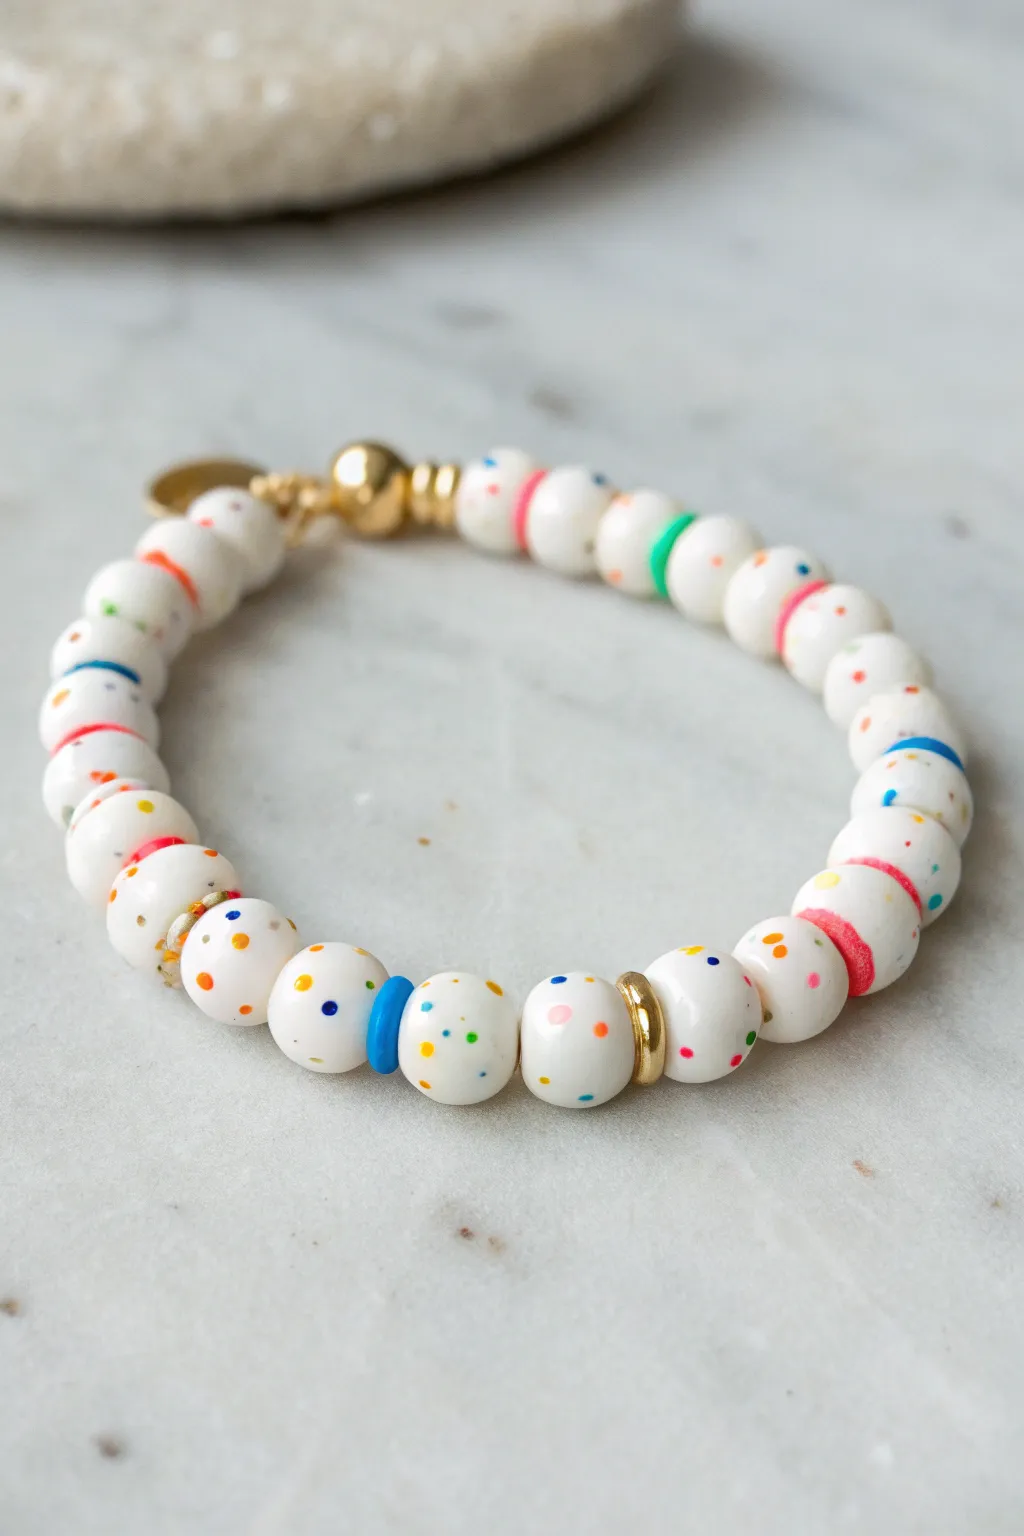
This cheerful bracelet captures the fun of a birthday cake with its white, sprinkle-flecked beads. Accented by bright color discs and gleaming gold touches, it’s a playful accessory that adds a pop of joy to any stack.
Step-by-Step
Materials
- White round beads with multi-colored speckles (approx. 8mm)
- Small flat disc spacer beads (heishi) in bright pink, blue, and green
- Gold round spacer beads or thick gold rings
- Gold crimp beads
- Gold crimp bead covers
- Gold magnetic clasp or toggle clasp
- Elastic beading cord (0.8mm or 1mm depending on bead hole size)
- Beading needle (optional but helpful)
- Scissors or jewelry wire cutters
- Flat nose pliers
Step 1: Planning and Stringing
-
Measure your wrist:
Before cutting your cord, wrap a piece of string or measuring tape around your wrist to find your size. Add about 1/2 inch to this measurement for a comfortable fit, then cut a length of elastic cord about 3-4 inches longer than that total to give yourself plenty of tying room. -
Pre-stretch the cord:
Hold your cut piece of elastic cord firmly at both ends and give it several gentle tugs. This helps prevent the bracelet from stretching out and becoming loose after only a few wears. -
Secure the first end:
Attach a bead stopper or simply tape down one end of the cord to your workspace. This prevents beads from sliding off while you work on your design. -
Plan your pattern:
Lay out your beads on a bead board or soft cloth. The main pattern consists of the white speckled beads, interrupted occasionally by color accents. I like to place a spacer bead after every 3 or 4 main beads to keep it balanced. -
Start stringing:
Begin threading the white speckled beads onto the cord. Start with about 3 or 4 of these main beads. -
Add a gold accent:
After your first small group of white beads, slide on a gold round spacer bead. This adds a nice metallic break in the pattern. -
Continue the white base:
Add another group of 3 to 4 white speckled beads. Variation is okay here; an irregular pattern can feel organic and fun. -
Insert a color pop:
Slide on one of the bright heishi disc beads—try a blue one first. Sandwich it between the white beads so it acts like a colorful washer. -
Resume main beading:
String another set of white speckled beads. Keep checking the length against your wrist as you go. -
Add a second color pop:
Now, use a different color disc spacer, like pink. Slide it onto the cord just like the blue one before. -
Alternate accents:
Continue this rhythm—white bead groups separated by either a gold spacer or a colored disc bead—until you reach your desired length. Ensure you end with a few white beads to match the beginning.
Step 2: Finishing Touches
-
Prepare the clasp:
Thread a crimp bead followed by one half of your gold magnetic clasp onto the end of the cord. -
Create the loop:
Loop the cord back through the crimp bead to create a secure anchor for the clasp. Don’t pull it too tight; the clasp needs to wiggle slightly. -
Secure the crimp:
Use your flat nose pliers to flatten the crimp bead firmly. Make sure it has a solid grip on the elastic. -
Hide the crimp:
Place a gold crimp cover over the flattened crimp bead and gently squeeze it closed with pliers until it looks like a regular round gold bead. -
Repeat on the other side:
Remove your tape or bead stopper from the start of the cord. Add a crimp bead and the other half of the clasp, loop back through the crimp, and pull everything snug so there are no gaps between beads. -
Final secure:
Flatten the second crimp bead and cover it with a crimp cover just like before. -
Trim excess cord:
carefully snip off the excess elastic tail close to the crimp covers. Be careful not to cut your main knot or the bracelet cord itself.
Loosey Goosey
If gaps appear between beads when wearing, you likely didn’t pull the elastic tight enough before crimping. Ensure the beads sit snugly against each other before securing.
Double the Fun
Layer two different sizes of heishi discs together for a thicker pop of color, or stack this bracelet with a solid gold bangle for an upscale preppy look.
Slip on your new confetti bracelet and enjoy the dash of color it brings to your day
Preppy Heart Centerpiece With Symmetrical Color Mirroring
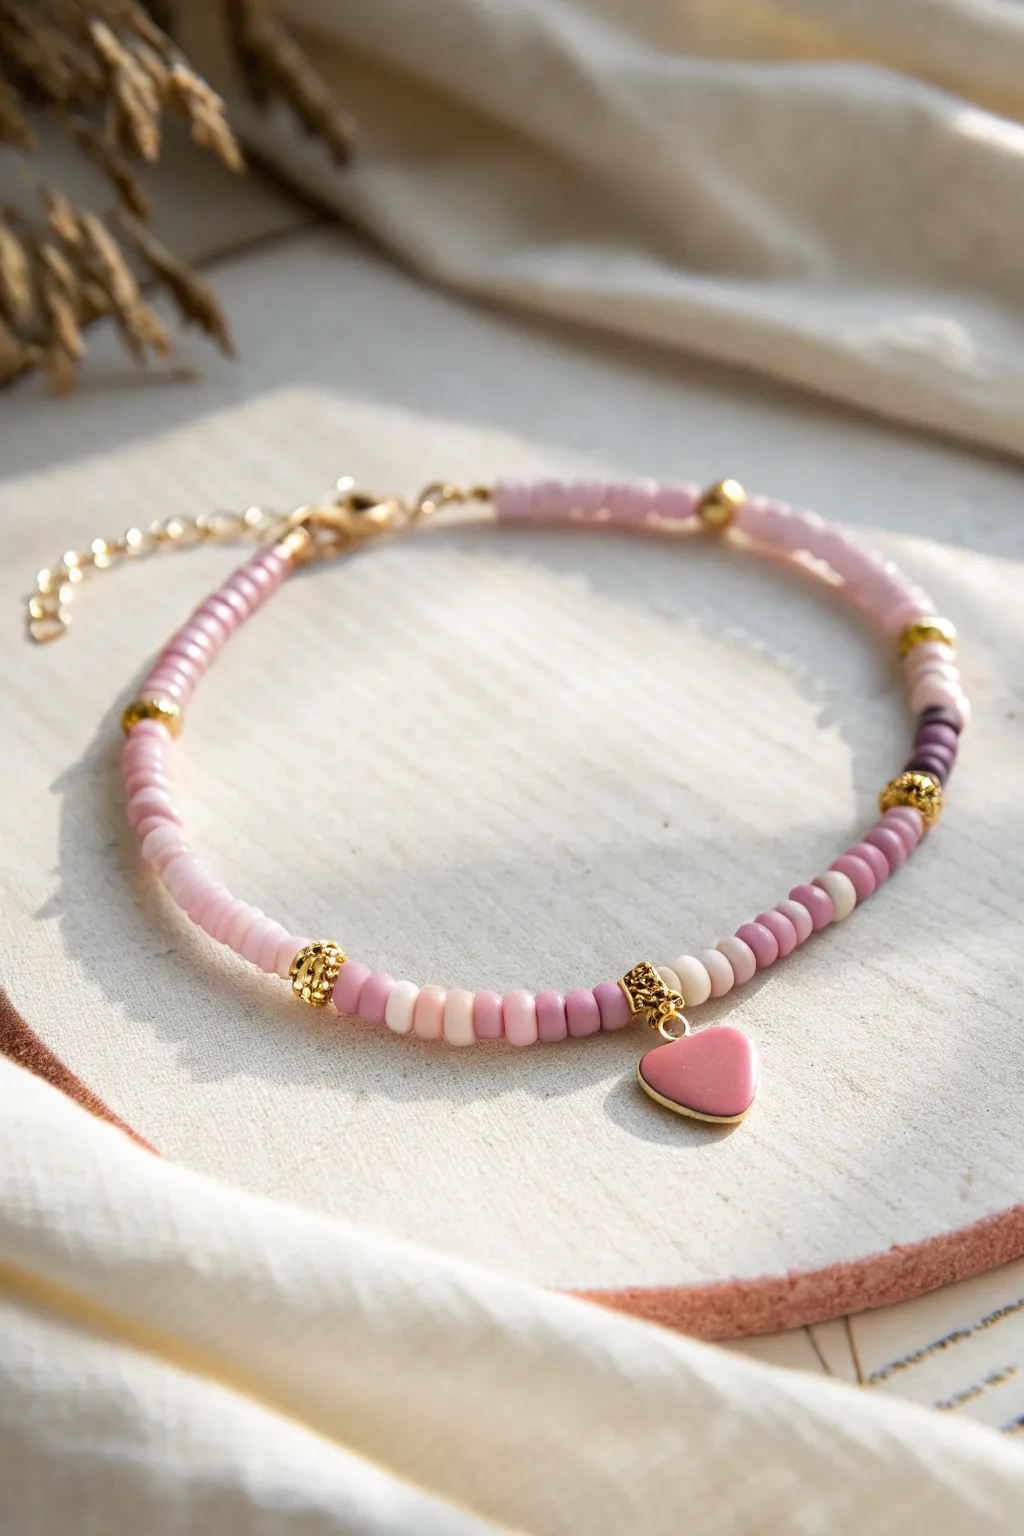
This charming project combines the popular aesthetic of preppy jewelry with a delicate, romantic touch. Featuring a symmetrical gradient of pinks and mauves centered around a gold-rimmed heart charm, this anklet or bracelet is perfect for adding a soft pop of color to any outfit.
Step-by-Step Tutorial
Materials
- Elastic beading cord (0.5mm clear)
- Small heishi beads (pink, mauve, white, beige/cream, lilac)
- Gold tone spacer beads (lantern or round textured shape)
- Gold tone heart charm with pink enamel center
- Gold jump ring (4-6mm)
- Crimp beads or knots covers (optional)
- Gold lobster clasp and extender chain set
- Jewelry pliers (flat nose)
- Scissors
- Beading needle (optional but helpful)
- Jewelry glue or clear nail polish
Step 1: Planning and Preparation
-
Measure your wrist:
Before cutting any cord, wrap a string loosely around your wrist or ankle to determine the desired length. Add about 4-5 inches of extra slack to give yourself plenty of room for tying knots later. -
Cut the cord:
Snip your elastic cord to the measured length. If you are worried about the beads sliding off while you work, simply place a piece of tape or a loose knot at one end. -
Attach the clasp first:
String on a crimp bead followed by the lobster clasp. Loop the cord back through the crimp bead and use your flat nose pliers to squash it flat, securing the clasp. Alternatively, tie a secure double knot if you aren’t using crimp beads. -
Prepare the charm:
While your tools are out, open your gold jump ring using two pairs of pliers (or your fingers if the wire is soft enough). Slide on the pink heart charm and a gold textured carrier bead (like the one shown directly above the heart in the image). Close the jump ring securely so the charm dangles from this specific gold bead.
Keep it Snug
Pre-stretch your elastic cord by pulling it gently a few times before beading. This prevents the bracelet from sagging or loosening permanently after the first time you wear it.
Step 2: Creating the Bead Pattern
-
Start with the base color:
Begin threading your beads from the clasp end. Start with a solid section of the light pink heishi beads. This section will sit at the back of the wrist, so the length depends on your total size. -
Add a gold accent:
Once you have about an inch or two of pink, slide on one of your textured gold spacer beads. -
Begin the color blocking:
After the gold spacer, switch to a darker mauve or lilac color. Add about 5-8 beads of this shade to create a distinct segment. -
Create the gradient transition:
Thread on a small section of mixed lighter tones—perhaps 3 beige followed by 3 white beads—to soften the transition toward the center. -
Add the second gold accent:
Slide on another textured gold spacer bead. This creates a framed look leading up to the centerpiece. -
Build the center gradient:
Now, create the pattern leading directly to the charm. Use a darker pink or berry color (about 4-5 beads), followed by a lighter cream or white (2-3 beads). -
Place the centerpiece:
Thread on the special gold bead that has your heart charm attached to it. Every bead you place after this point needs to be a mirror image of what you just did. -
Mirror the center gradient:
Immediately follow the charm with the same 2-3 cream beads, then the 4-5 dark berry pink beads. -
Place the third gold accent:
Add the matching gold textured spacer bead here to close the central frame. -
Mirror the transition:
Add your section of white and beige beads, followed by the lilac/mauve section to match the first half. -
Add the final gold accent:
Slide on the last gold spacer bead. -
Finish the base color:
Fill the rest of the cord with your initial light pink heishi beads until the bracelet reaches the correct total length.
Personalize the Pattern
Replace the symmetrical color sections with Morse code! Use the gold spacer beads as dots and the colored clay sections as dashes to spell out a hidden name or secret message.
Step 3: Finishing Touches
-
Add the extender chain:
Thread on a crimp bead followed by the loop of your extender chain. Feed the cord back through the crimp bead. -
Check the fit:
Before securing everything permanently, carefully lift the bracelet around your wrist to ensure the symmetry sits correctly and the size is comfortable. -
Secure the end:
Pull the cord taut (but don’t overstretch the elastic) and flatten the crimp bead with your pliers. -
Knot for security:
For extra peace of mind, I always like to tie a surgeon’s knot with the tail end of the elastic around the main cord right next to the crimp bead. -
Apply adhesive:
Dab a tiny drop of jewelry glue or clear nail polish on the knot. Let it dry completely before trimming any excess cord close to the bead.
You now have a beautiful, symmetrical accessory ready to stack or wear solo

TRACK YOUR CERAMIC JOURNEY
Capture glaze tests, firing details, and creative progress—all in one simple printable. Make your projects easier to repeat and improve.
Preppy Smiley-and-Stars Charm Moment
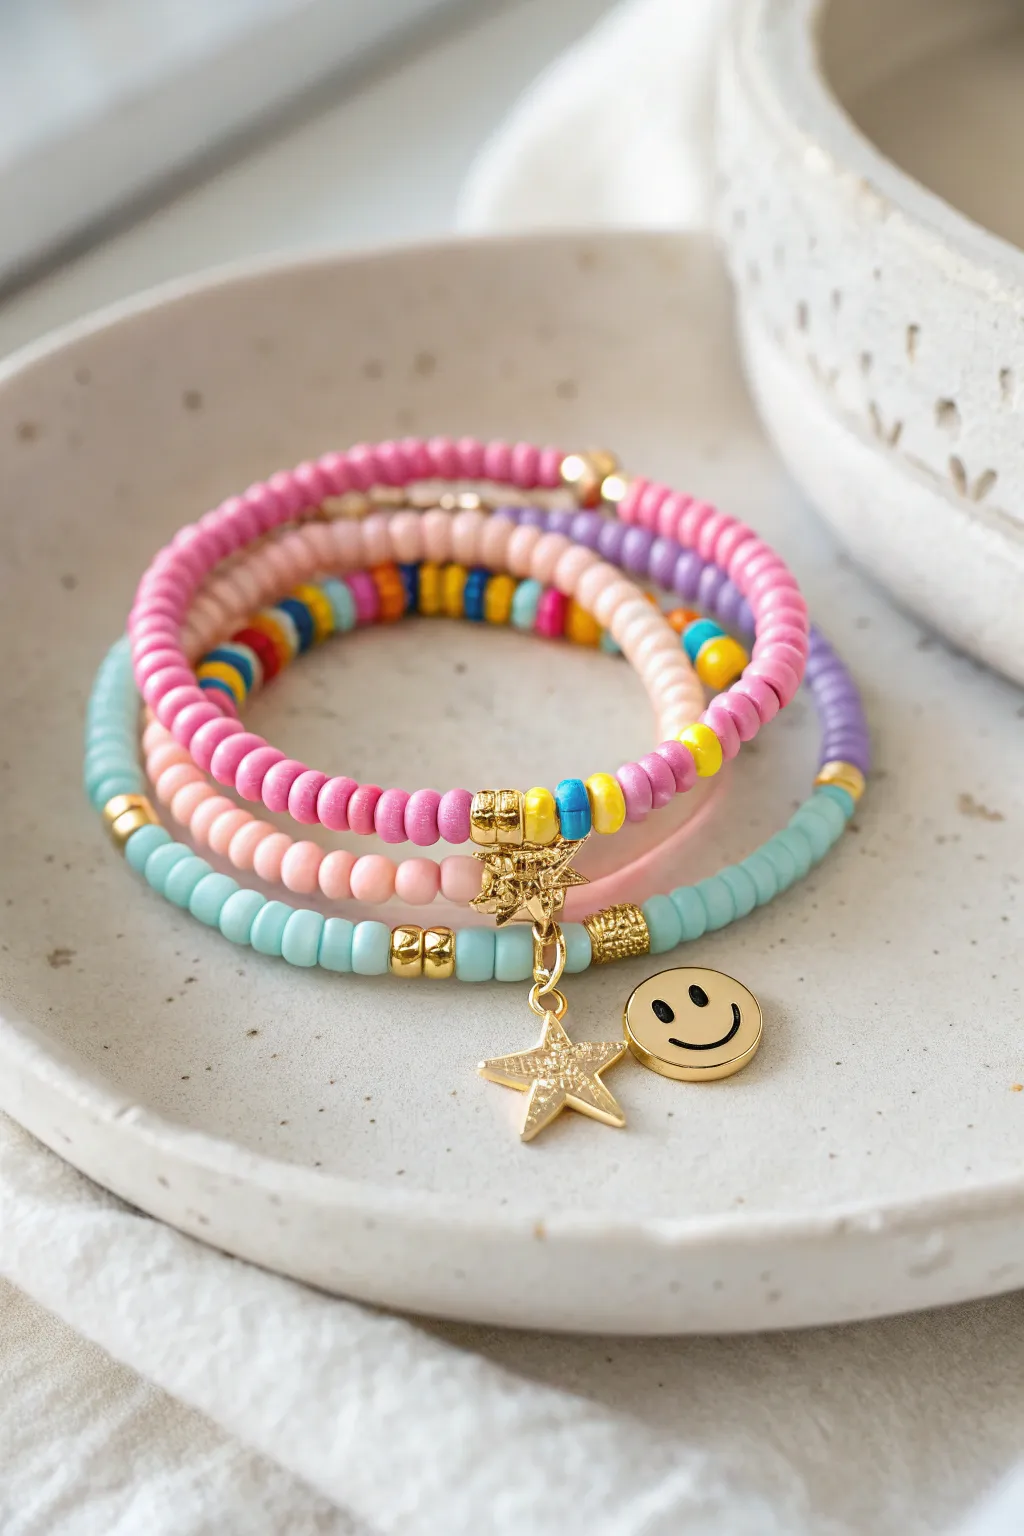
Brighten up your wrist with this cheerful stack of four clay bead bracelets featuring a mix of happy hues and golden accents. The playful combination of smiley faces, stars, and vibrant color blocking captures that quintessential preppy aesthetic perfectly.
Step-by-Step Guide
Materials
- Polymer clay heishi beads (6mm or 4mm) in pink, peach, light blue, purple, yellow, orange, and royal blue
- Gold tone spacer beads (small rounds and textured/faceted cylinders)
- Gold tone jump rings (4mm and 6mm)
- Gold tone star charm (outline style)
- Small gold smiley face charm
- Gold tone multi-star connector charm
- Elastic stretch cord (0.7mm or 0.8mm)
- Super glue or jewelry cement
- Scissors
Step 1: The Light Blue Charm Bracelet
-
Measure and Cut:
Cut a piece of elastic cord about 10-12 inches long. This gives you plenty of extra room to tie knots later without struggling. -
Start Beading:
Thread on your light blue clay beads until you’ve covered about a third of your desired wrist length. -
Add Gold Accents:
Slide on a textured gold cylinder spacer, followed by a small gold round spacer. This creates a nice metallic break in the color. -
Attach the Star:
Thread on your gold outline star charm directly onto the cord, letting it dangle freely. -
Add the Smiley:
Immediately after the star, thread on the gold smiley face charm so the two charms sit side-by-side. -
Finish the Pattern:
Add a small gold round spacer and another textured cylinder spacer to mirror the other side, then finish beading with the light blue beads until the bracelet fits your wrist.
Step 2: The Pink Star Centerpiece
-
Setup the Center:
For the hot pink bracelet, we are building around a central connector. Cut your string and thread one end through a loop of the multi-star connector charm. -
Create Patterns:
On this strand, create a small pattern segment: one yellow bead, one blue bead, one yellow bead, and a gold textured spacer. -
Fill the Strand:
Fill the rest of the strand with solid hot pink clay beads. -
Tie and Hide:
Bring the ends together. Tie a surgeon’s knot (looping twice before pulling tight), add a dot of glue, and trim the ends. If possible, tuck the knot inside one of the larger gold spacers.
Knot Security
When tying elastic, pull the cord tight, then release, then pull tight again. Do this ‘pre-stretch’ before the final knot to ensure the bracelet doesn’t loosen up after the first wear.
Step 3: The Rainbow Mix & Peach Solids
-
The Rainbow Strand:
For the most colorful bracelet in the stack, start beads in a repeating pattern: purple, pink, yellow, blue, and orange. -
Add Variety:
Break up the rainbow sections with small gold round spacers every inch or so to keep it looking polished rather than chaotic. -
The Peach Strand:
For the final bracelet, string solid peach or light coral clay beads. This softer tone balances the bright pinks and blues. -
Mix in Gold:
Randomly disperse 3-4 gold round spacers throughout the peach strand for a subtle glimmer.
Mix Your Textures
Swap out a few plain gold spacers for crystal rondelle beads or pearl spacers. Adding a different texture elevates the ‘preppy’ look and catches the light beautifully.
Step 4: Final Assembly
-
Secure All Knots:
Ensure all four bracelets are tied securely with surgeon’s knots. I really like to pre-stretch the cord slightly before measuring to prevent it from sagging later. -
Glue the Knots:
Apply a tiny dab of jewelry cement or super glue to each knot. Let them dry completely—usually about 15 minutes—before trimming the excess string close to the knot.
Now you can stack these together for a full arm party or wear them individually for a pop of color
Preppy Pearl-and-Heishi Mix for a “Polished Summer” Look
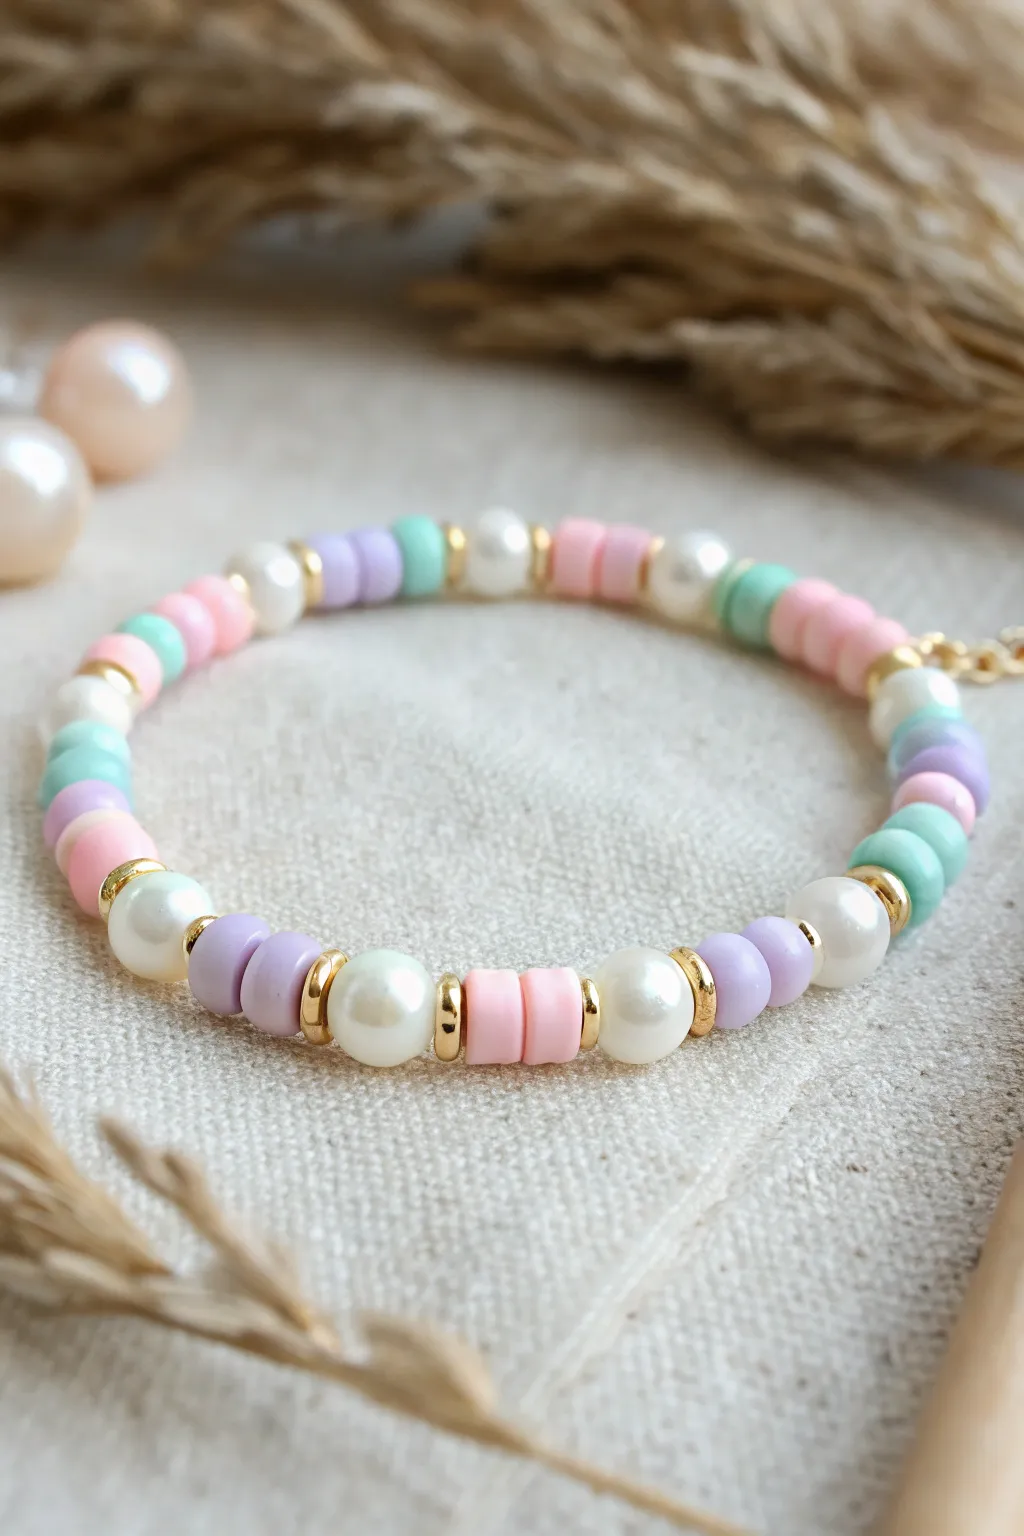
Achieve that perfectly polished ‘clean girl’ aesthetic with this delicate mix of textures. Combining the casual vibe of polymer clay heishi beads with the elegance of faux pearls and gold accents creates a versatile accessory for sunny days.
Step-by-Step Tutorial
Materials
- Polymer clay heishi beads (6mm or 4mm) in pastel pink, mint green, and lavender
- Faux pearl beads (6mm), round, white or ivory
- Gold tone spacer beads (flat disc or small round type)
- Elastic beading cord (0.8mm clear)
- Jewelry glue (GS Hypo Cement recommended)
- Scissors
- Tape or a bead stopper
- Optional: Gold jump ring and small chain extension
Step 1: Preparation & Planning
-
Measure the Cord:
Cut a piece of elastic cord about 10-12 inches long. This extra length might seem excessive, but it makes tying the final knot much easier without losing tension. -
Secure the End:
Place a piece of tape over one end of the cord or attach a bead stopper. This prevents your beads from sliding off while you design the pattern. -
Sort Your Palette:
Separate your heishi beads by color—pink, mint, and lavender. Having them in distinct piles speeds up the threading process significantly.
Knot Slipping?
If your elastic knot feels slippery, try a surgeon’s knot instead. Loop the cord through twice on the first pass before tightening for extra grip.
Step 2: Creating the Pattern
-
Establish the Pattern Unit:
This bracelet relies on a symmetrical pattern unit. The core sequence is: Gold Spacer -> 2 Clay Beads -> Gold Spacer -> 1 Pearl. Memorize this rhythm, as you will repeat it. -
Start with Lavender:
Thread on a Gold Spacer, followed by two lavender clay beads. Slide them down to your stopper. -
Add the First Pearl:
Add another Gold Spacer, then thread one white pearl bead. This completes your first color segment. -
Switch to Pink:
Begin the next segment with a Gold Spacer, then add two pastel pink heishi beads. -
Anchor with Pearl:
Follow the pink beads with a Gold Spacer and another white pearl bead. -
Introduce Mint Green:
For the third color, add a Gold Spacer, then thread two mint green heishi beads. -
Complete the Trio:
Finish the mint section with a Gold Spacer and a white pearl bead. -
Repeat the Sequence:
Continue repeating the full sequence (Lavender unit -> Pink unit -> Mint unit) until the bracelet reaches your desired length. -
Check the Fit:
Wrap the strand around your wrist. It should sit comfortably without pinching. I find that adding one extra pattern unit usually accounts for the space the knot takes up.
Luxe Upgrade
Swap the standard faux pearls for genuine uneven freshwater pearls. Their organic shape adds a high-end, boutique feel to the simple design.
Step 3: Finishing Touches
-
Pre-stretch the Cord:
Hold both ends of the cord and give it a few gentle tugs. This pre-stretches the elastic so the finished bracelet won’t sag after you wear it a few times. -
Tie the Knot:
Remove the tape or stopper. Tie a standard square knot (right over left, left over right). Pull the tails firmly to tighten. -
Secure with Glue:
Apply a tiny dab of jewelry glue directly onto the knot. Let it dry for a few minutes before cutting. -
Hide the Knot:
Trim the excess cord tails close to the knot. Gently pull the adjacent pearl bead over the knot to hide it inside for a seamless finish. -
Optional: Add Hardware:
If you prefer a non-stretchy version or want a decorative dangle (as seen on the right side of the image), use pliers to attach a jump ring and a small chain extension between two gold spacers.
Now you have a custom-fitted accessory that perfectly blends playful color with classic elegance
Preppy Shell Accent Bracelet With Coastal Pastels
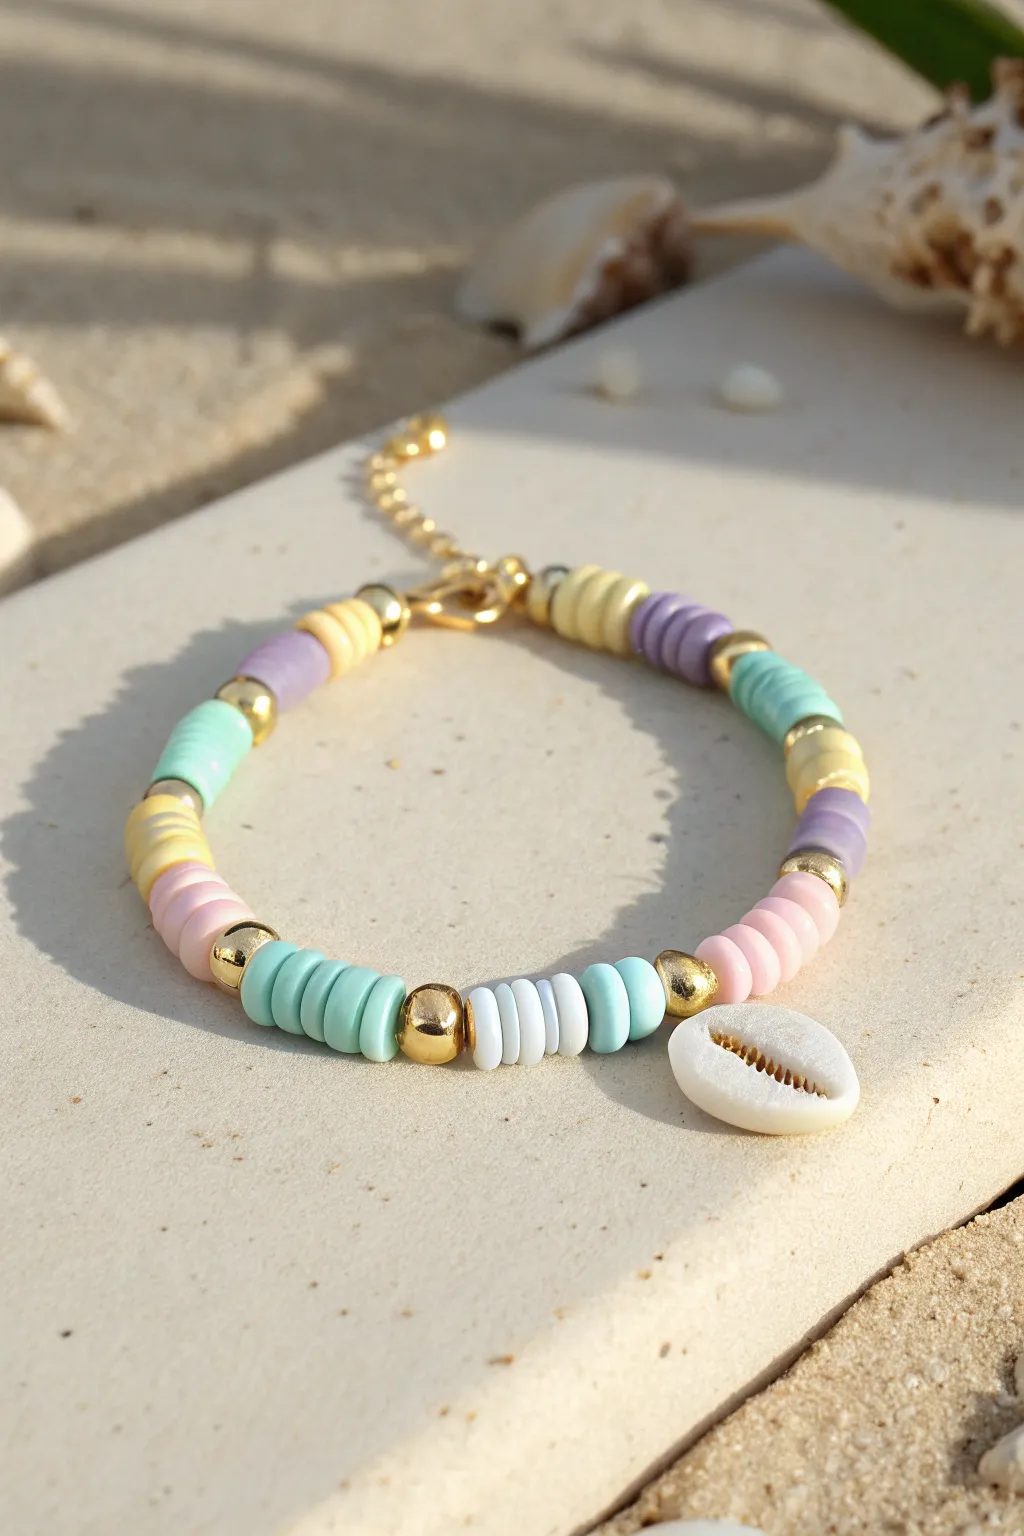
Capture the essence of a serene beach day with this beautiful preppy bracelet featuring soft pastel heishi beads and a classic cowrie shell centerpiece. The subtle gold accents elevate the design, making it a perfect accessory for summer outfits or a stackable arm party.
How-To Guide
Materials
- Polymer clay heishi beads (pastel green, lilac, light pink, lemon yellow, white)
- Gold round spacer beads (approx. 4-5mm)
- Natural or imitation cowrie shell charm (gold-plated back or drilled)
- Clear elastic beading cord (0.7mm or 0.8mm)
- Gold lobster clasp
- Gold jump rings
- Gold extension chain
- Jewelry glue (optional)
- Scissors or wire cutters
- Beading needle (optional)
Step 1: Planning and Preparation
-
Measure your wrist:
Cut a piece of elastic cord about 10-12 inches long. This gives you plenty of extra room for tying knots later without struggling. -
Determine the pattern:
Observe the image carefully. The pattern isn’t strictly repetitive but follows a rhythm: blocks of color separated by gold spacers. The sequence shown is roughly: 4-5 discs of color, 1 gold bead, switch color. -
Prepare the shell:
If your cowrie shell doesn’t have a hole or a loop, drill a small hole carefully or use a jump ring threaded through the natural openings to make it hang correctly.
Step 2: Stringing the Beads
-
Secure the end:
Attach a piece of tape to one end of your elastic cord or attach your gold jump ring and extension chain immediately to stop beads from sliding off as you work. -
Start the sequence:
Begin threading your beads. Following the photo, start with a section of lilac beads (about 4-5 discs) followed by a single gold round bead. -
Continue the pattern:
Add a section of pastel green beads (4-5 discs), then a gold bead. Next, add a section of yellow beads, followed by another gold bead. -
Add the pink section:
Thread on 4-5 light pink clay beads, followed by a gold spacer bead. -
Create the centerpiece:
This is the focal point. Thread 3-4 pastel blue/green beads, then a gold spacer. Now, thread on 3-4 white clay beads. This white section sits directly next to the shell charm. -
Attach the shell:
Slide your cowrie shell charm onto the cord. Ensure it faces outward correctly. -
Mirror the center:
Immediately after the shell, place a gold spacer bead. Then, to balance the white section on the other side, add the small section involving light pink beads (about 4 discs). -
Complete the loop:
Continue the pattern around the rest of the bracelet, alternating your pastel colors (lilac, mint, yellow, pink) and separating each block with a gold spacer until you reach your desired length.
Keep It Tidy
Use a bead design board or a piece of felt fabric on your table. This prevents the lightweight flat clay discs from rolling away while you lay out your color pattern.
Step 3: Finishing Touches
-
Check the fit:
Wrap the unfinished strand around your wrist to ensure it fits comfortably. Remember that the clasp will add about half an inch to the customized length. -
Prepare for closure:
If you taped the end, remove the tape. Ensure there is a jump ring attached to the start of the strand (for the extension chain) and slide a crimp bead (if using) or prepare to knot. -
Attach hardware:
Tie onto the jump ring of your lobster clasp on one end using a secure surgeon’s knot. I prefer to pull the elastic quite tight here to pre-stretch it slightly. -
Secure the knot:
Apply a tiny dot of jewelry glue to the knot for extra security. Let it dry for a few moments before trimming the excess cord close to the knot. -
Hide the knot:
If possible, gently tug the cord so the knot slides inside the hole of the nearest gold bead or clay bead to conceal it. -
Double check:
Verify that your extension chain is securely attached to the opposite end via a jump ring, allowing for size adjustments.
Mix & Match Accents
Swap the gold round beads for tiny freshwater pearls or square gold spacers. This small change keeps the beachy vibe but adds a unique, high-end texture to your stack.
Now you have a stunning piece of jewelry that brings a bit of summer sunshine to your wrist year-round
Preppy Gingham-Inspired Bead Pattern (Easy Checker Blocks)
Achieve that classic preppy aesthetic with this sweet, geometric design that pairs soft pinks and crisp whites with luxurious touches of gold. The alternating cube pattern mimics a deconstructed gingham look, making it a perfect accessory for stacking or wearing solo.
Step-by-Step Tutorial
Materials
- 4mm polymer clay heishi cube beads (light pink)
- 4mm polymer clay heishi cube beads (hot pink/rose)
- 4mm polymer clay heishi cube beads (white)
- 4mm metallic gold cube spacer beads
- 0.8mm clear elastic stretch cord
- Gold tone crimp beads or knot covers
- Gold tone jump rings (4mm or 5mm)
- Gold tone lobster clasp
- Gold tone extension chain (optional but recommended)
- Jewelry pliers (chain nose and flat nose)
- Scissors or bead snips
- Bead design board or tray
- Super glue or jewelry adhesive (E6000)
Step 1: Preparation and Planning
-
Measure and Cut Cord:
Begin by cutting a piece of your elastic stretch cord. You’ll want about 10-12 inches of length, which gives you plenty of excess room for knotting or attaching hardware without struggling against tension. -
Pre-stretch the Elastic:
Give the cut piece of elastic a few gentle tugs. Pre-stretching helps prevent the bracelet from sagging or loosening up significantly after the first few wears. -
Secure the End:
Attach a piece of tape or a bead stopper to one end of the cord. This simple safety measure saves you the heartache of beads sliding right off while you work. -
Lay Out the Pattern:
Before threading, lay out your beads on a design board. The core motif for this bracelet is a sequence of cubes. Observe the photo: the main pattern relies on groups of pink and white separated by gold accents.
Gold Preservation
Coat your metallic gold beads with clear nail polish or a spray sealant before stringing. This simple step prevents them from tarnishing or turning brassy over time due to skin oils.
Step 2: Beading the Pattern
-
Start the Sequence:
Begin threading your beads. Start with the ‘checkerboard’ section. Thread one hot pink cube, one white cube, one hot pink cube, and one white cube. -
Add the Gold Highlight:
Slide on a single gold metallic cube. This acts as a luxurious punctuation mark between your color blocks. -
Create the Pink Block:
Now, thread three pink cubes in a row. I like to alternate shades here if I have them, perhaps doing light pink, hot pink, light pink, or sticking to a solid block of one shade for simplicity. -
Add Second Gold Accent:
Place another gold metallic cube bead onto the string. -
Create the White Block:
Thread two or three white cubes next. This variation in block size gives the bracelet an organic, handmade feel rather than a factory-perfect rigidity. -
Repeat the Highlight:
Add your gold cube spacer. -
Continue the Pattern:
Repeat these sequences (Pink/White mix -> Gold -> Pink Block -> Gold -> White Block -> Gold) until you reach your desired wrist length. For an average wrist, you’ll need roughly 6.5 to 7 inches of patterned beads. -
Double Check the Design:
Wrap the strand around your wrist to check the fit. Ensure the pattern ends symmetrically if possible, ending just before a gold bead would start a new section.
Uneven Blocks?
If your pattern doesn’t fit perfectly around your wrist, don’t force the sequence. Add extra gold spacer beads near the clasp ends to extend the length without disrupting the main visual motif.
Step 3: Finishing the Clasp
-
Prepare for Hardware:
Unlike basic knot bracelets, this one uses a clasp. Thread a gold crimp bead onto the end of the elastic, followed by a jump ring. -
Loop and Secure:
Loop the elastic back through the crimp bead. Pull it tight (but not so tight the pattern buckles) so the loop holds the jump ring securely. -
Crimp the Bead:
Use your flat nose pliers to smash the crimp bead flat, locking the wire in place. For a cleaner look, you can gently cover this with a crimp cover if you have one. -
Attach the Clasp:
Open the jump ring using two pairs of pliers (twist sideways, don’t pull apart) and slide on your lobster clasp. Close the jump ring securely. -
Finish the Other Side:
Repeat the crimping process on the other end of the bracelet. Instead of a clasp, attach a short length of extension chain or a simple jump ring for the clasp to hook into. -
Final Trim:
Trim any excess elastic tail sticking out from your crimp beads. Add a tiny dot of super glue to the crimped area for extra security if desired.
Slip on your new geometric bracelet and enjoy the subtle pop of color it adds to your wrist stack
Preppy Varsity Stripe Bracelet in Two or Three Colors
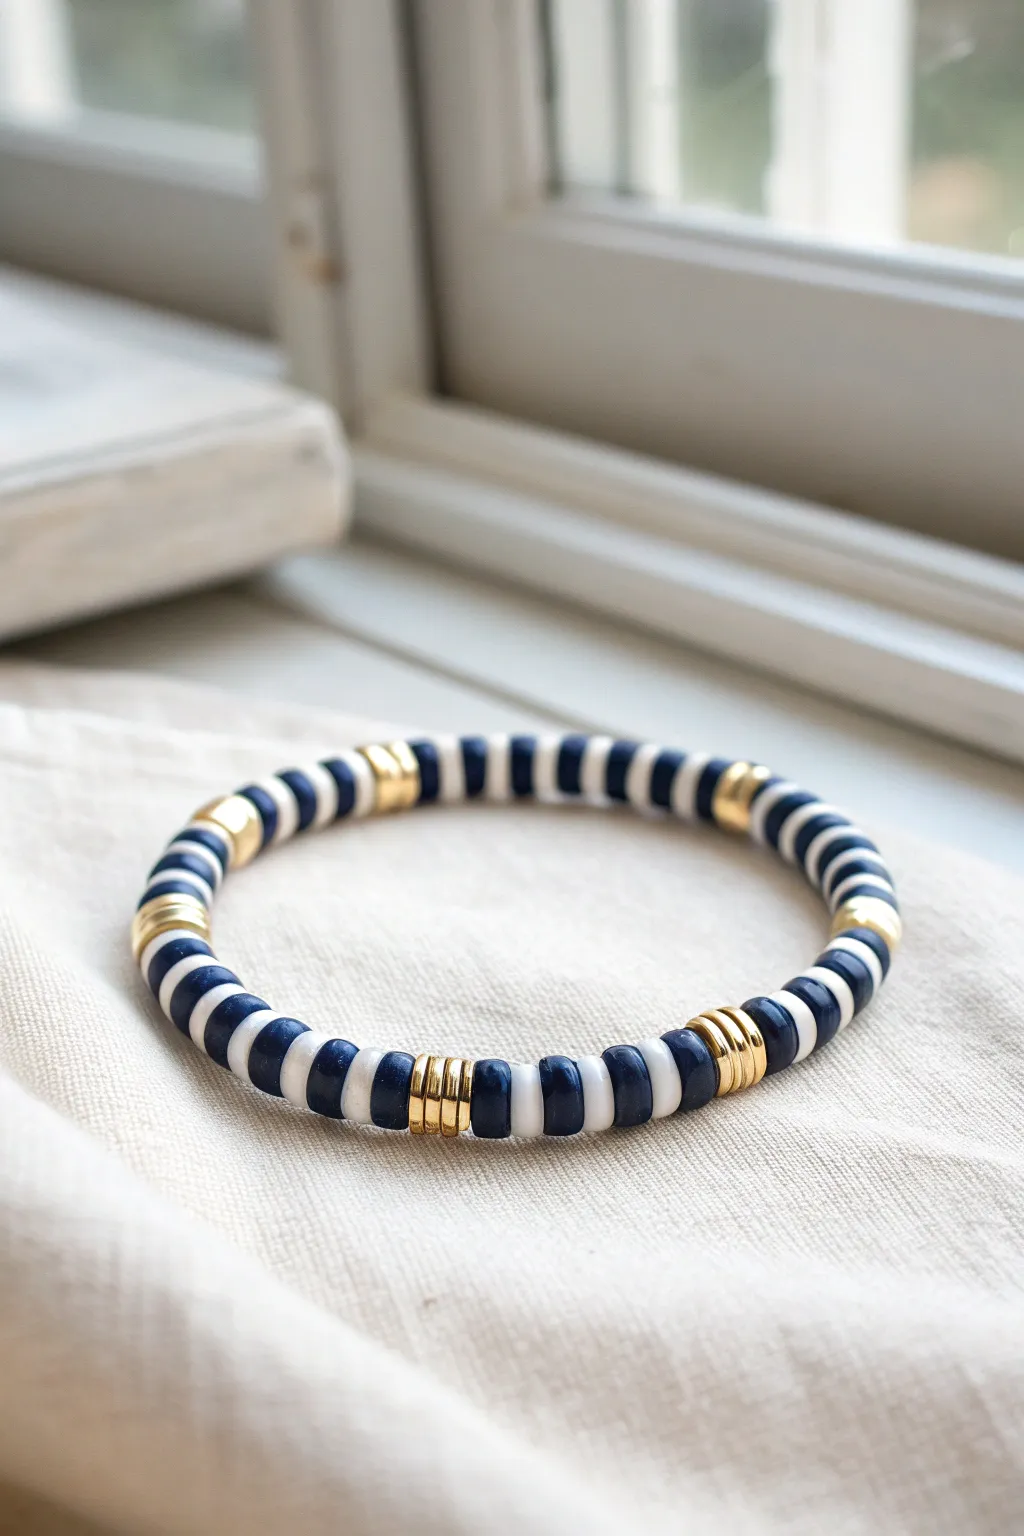
Channel classic collegiate style with this sophisticated navy and white stripe bracelet. Accented with sleek gold spacers, this design uses flat clay disc beads to create a high-contrast, preppy look that pairs perfectly with denim or school colors.
Detailed Instructions
Materials
- 6mm flat clay heishi beads in Navy Blue
- 6mm flat clay heishi beads in White
- 6mm gold flat spacer beads or heishi beads (metallic finish)
- 0.8mm clear elastic stretch cord
- Super glue or jewelry cement
- Scissors
- Bead stopper or binder clip
- Ruler or tape measure
Step 1: Preparation & Planning
-
Measure Your Wrist:
Wrap a flexible measuring tape around your wrist to find your size. Standard sizes are usually between 6.5 to 7 inches for an adult wrist. -
Cut the Cord:
Cut a piece of elastic cord about 10-12 inches long. Having extra length makes tying the final knot significantly easier so you aren’t struggling with tiny ends. -
Pre-stretch the Cord:
Give your elastic cord a few gentle tugs before you begin stringing. I always do this to remove the initial slack, which helps prevent the bracelet from stretching out immediately after you wear it. -
Secure the End:
Attach a bead stopper or a simple binder clip to one end of your cord to stop beads from sliding off while you work.
Keep It Uniform
Clay beads vary slightly in thickness. Sifting through your pile to pick beads of identical thickness ensures your stripes stay perfectly even.
Step 2: Creating the Stripe Pattern
-
Start the Base Sequence:
Begin by stringing 2 navy blue clay beads followed by 2 white clay beads. This two-by-two pattern creates the crisp varsity stripe effect shown in the photo. -
Establish the Rhythm:
Continue this pattern: 2 navy, 2 white, 2 navy, 2 white. Repeat this until you have a segment roughly 1.5 inches long. -
Add the First Gold Accent:
To break up the stripes, add a cluster of gold spacers. Thread on 3 flat gold beads. This metallic flash adds a touch of luxury to the sporty stripes. -
Resume Striping:
Return to your main pattern. Thread 2 navy beads, then 2 white beads, repeating this sequence for another segment of the same length as the first. -
Insert Second Gold Accent:
Add your next cluster of 3 gold spacer beads. Try to space these gold sections evenly around the bracelet—usually about 3 or 4 gold clusters total will look balanced. -
Check Consistency:
Pause occasionally to push the beads together snugly. Check that your navy and white sections are alternating correctly and that no beads are flipped sideways. -
Finish the Pattern:
Continue the pattern until the beaded section matches your desired wrist measurement perfectly.
Step 3: Finishing Touches
-
Test the Fit:
Wrap the beaded strand carefully around your wrist to check the size. Ideally, the ends should meet comfortably without gaps, but not be tight enough to pinch. -
Tie the First Knot:
Remove the bead stopper, holding both ends of the elastic firmly. Tie a simple overhand knot and pull it tight, bringing the beads together. -
Secure with a Surgeon’s Knot:
For maximum security, tie a surgeon’s knot next. Loop the cord through twice before pulling tight. This extra loop prevents slipping. -
Apply Glue:
Dab a tiny drop of super glue or jewelry cement directly onto the knot. Be careful not to get glue on the surrounding beads, as it can stain the clay. -
Hide the Knot:
Let the glue dry for a few minutes. Then, gently tug on the bracelet so the knot slides inside the hole of a nearby bead, hiding it from view. -
Trim Excess Cord:
Using sharp scissors, trim the remaining tails of the elastic cord close to the bead, ensuring you don’t accidentally snip the knot itself.
Knot Slipping?
If your knot won’t stay tight while gluing, have a friend hold a finger on the knot, or use a piece of tape to hold the first loop down while you tie the second.
Now you have a stylish accessory to stack or wear solo for a timeless collegiate vibe
Preppy “Tennis Club” Green-and-White With Gold Highlights

Channel the classic, sporty aesthetic of the tennis court with this sophisticated clay bead bracelet. The rich grass green heishi beads paired with crisp white and elegant gold accents create a perfectly preppy accessory.
Step-by-Step
Materials
- Green polymer clay heishi beads (approx. 4-6mm)
- White polymer clay heishi beads (approx. 4-6mm)
- Gold tone metal spacer beads (round or saucer shape)
- Elastic stretch cord (0.8mm recommended)
- Jewelry glue or clear nail polish
- Scissors
Step 1: Planning and Setup
-
Cut the cord:
Start by cutting a piece of elastic cord about 10-12 inches long. You want plenty of excess length to make tying the final knot easier without fumbling, especially since the elasticity can make it tricky. -
Pre-stretch the elastic:
Before you adding any beads, give the cord a few gentle tugs. This pre-stretching technique prevents the bracelet from loosening up and sagging after the first time you wear it. -
Secure the end:
Place a piece of tape over one end of the cord or attach a binder clip. This acts as a ‘bead stopper’ so your beautiful pattern doesn’t slide right off the other side while you work.
Step 2: Creating the Pattern
-
Observe the color blocks:
This design relies on repeating segments. Look closely at the pattern: it generally consists of a long section of green, followed by a highlight section of white and gold. -
String the first green section:
Thread on approximately 8 to 10 green heishi beads. This establishes the main ‘body’ color of the bracelet. -
Add the first highlight:
Slide on one white heishi bead. This creates a sharp, clean barrier between the green and the gold. -
Insert the gold accent:
Place one gold metal spacer bead next. Depending on your supplies, you can use a single larger gold bead or two smaller disc spacers for extra shine. -
Close the highlight:
Add another white heishi bead after the gold one. This mirrors the pattern and frames the gold beautifully. -
Repeat the sequence:
Go back to your green beads. String another set of 8-10 green beads to match your first section. -
Create the second highlight:
Add the white-gold-white combination again. I find visually checking the length of the green sections as I go helps keep the symmetry consistent, even if bead thickness varies slightly. -
Add variation (optional):
Notice in the reference design, some sections have two gold beads side-by-side or slightly different white spacing. Feel free to add a ‘double gold’ accent in one section for visual interest. -
Continue beading:
Repeat the pattern (Green Section -> White -> Gold -> White) until the beaded length measures about 6.5 to 7 inches, or comfortably fits around your wrist. -
Check the fit:
Wrap the unfinished strand around your wrist. The ends should meet comfortably without gaps, but the elastic shouldn’t be stretched tight yet.
Knot Slipping?
If the elastic feels slippery, try a surgeon’s knot: loop the cord through twice on the first pass instead of once before tightening.
Step 3: Finishing Touches
-
Prepare for the knot:
Remove the tape or clip from the end carefully. Bring both ends of the cord together, ensuring no beads slip off. -
Tie the square knot:
Cross the right end over the left and pull under. Then, cross the left end over the right and pull under. This create a secure square knot. -
Tighten securely:
Pull all four strands (the two tail ends and the two bracelet sides) firmly to tighten the knot. You want the beads to just touch without puckering the line. -
Secure with glue:
Dab a tiny drop of jewelry glue or clear nail polish directly onto the knot. This is crucial for preventing the elastic from slipping undone over time. -
Hide the knot:
While the glue is still slightly tacky, try to slide the knot inside the hole of one of the gold metal beads if the opening is large enough. This hides the mechanics for a professional finish. -
Trim the excess:
Once the glue is fully dry, use your scissors to snip the excess cord ends as close to the knot as possible without cutting the knot itself.
Racket Ready
Add a tiny tennis racket charm to the gold section for a literal nod to the sport, or mix in a few clay alphabet beads to spell ‘ACE’.
Slip on your new bracelet and enjoy the effortless country club vibe it brings to your outfit
Preppy Neon-Luxe Stack With Black-and-White Contrast
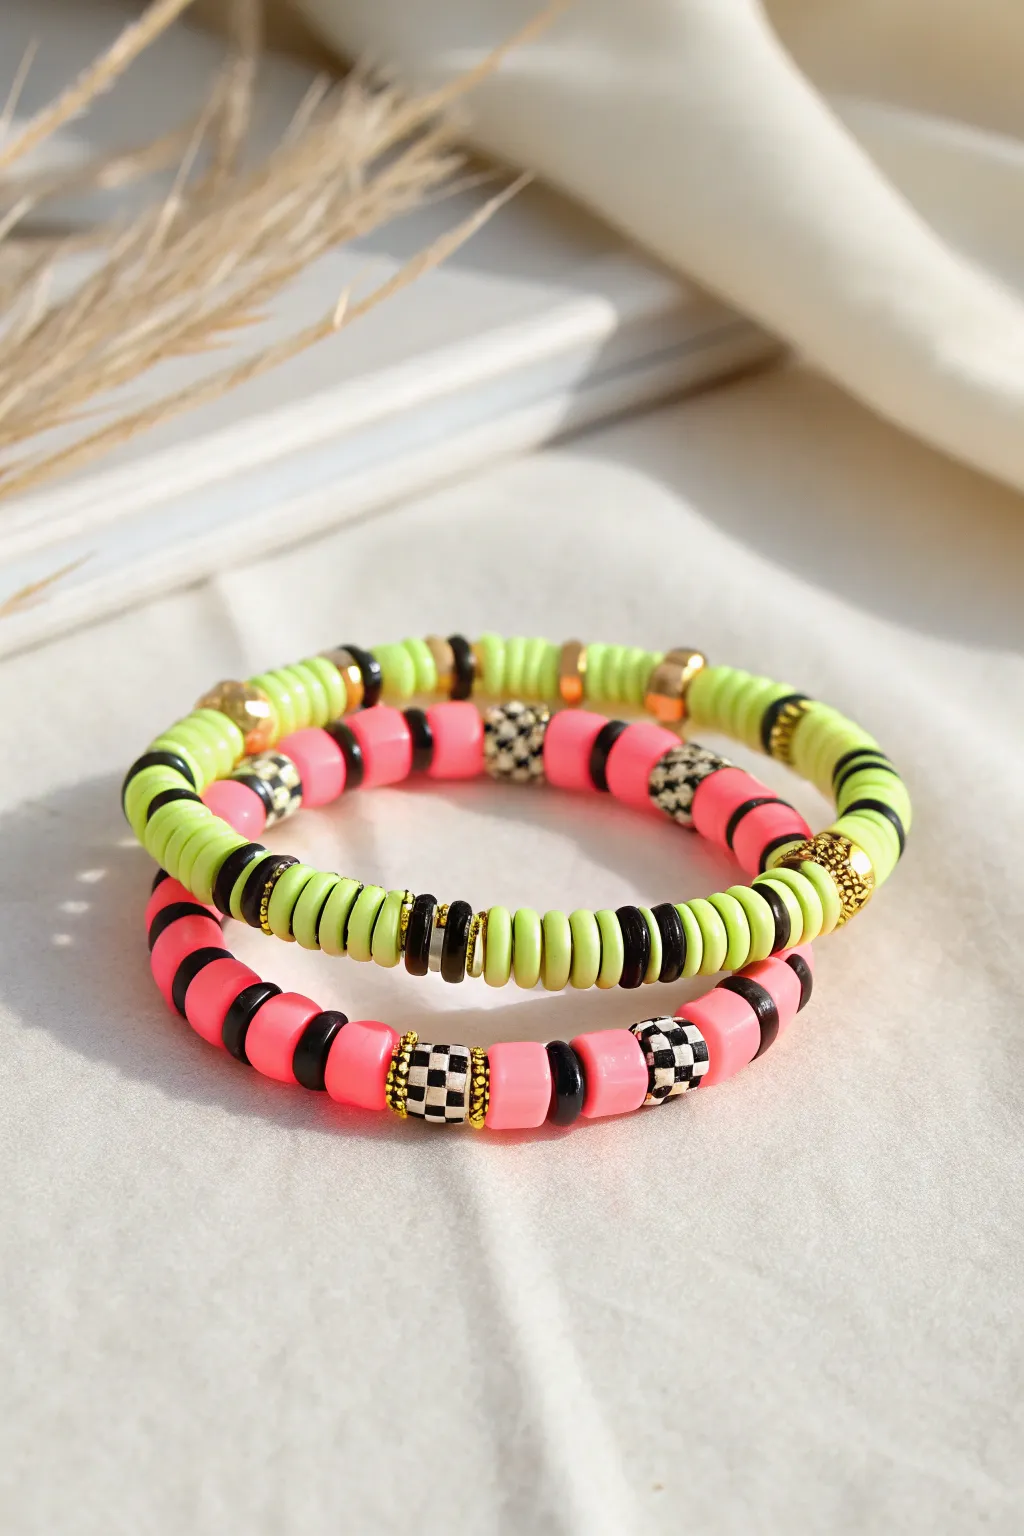
These two coordinating bracelets combine high-energy neon clay heishi discs with sophisticated black-and-white accents for a preppy, modern look. The mix of textures—smooth clay, faceted plastic, and shiny gold—creates a stack that feels both playful and polished.
How-To Guide
Materials
- Neon lime green polymer clay heishi beads (6mm)
- Hot pink/coral polymer clay heishi beads (6mm)
- Black polymer clay heishi beads (6mm)
- Black-and-white checkered focal beads (approx 8mm)
- Small gold rhinestone spacer rings or rondelles
- Gold faceted geometric spacer beads (approx 4-6mm)
- Strong elastic bead cord (0.8mm recommended)
- Jewelry glue or clear nail polish
- Scissors
Step 1: Preparation
-
Measure and Cut:
Measure your wrist and add about 3-4 inches to that number to determine your elastic length. Cut two strands of elastic cord to this length to ensure you have plenty of room for knotting later. -
Pre-stretch the Cord:
Firmly pull the ends of the elastic cord multiple times. This pre-stretching prevents the finished bracelet from sagging or becoming loose after the first time you wear it. -
Prepare Your Workspace:
Lay out a bead design board or a piece of felt fabric. This keeps your round beads from rolling away while you plan your pattern.
Step 2: The Pink Contrast Bracelet
-
Create the Checkered Focal Point:
Start by threading a black-and-white checkered bead. Flank it on both sides with a gold rhinestone spacer ring to make it pop. -
Add Color Segments:
Add about 4-5 hot pink heishi beads, followed by a single black heishi bead, and then another 4-5 hot pink beads. -
Insert Gold Highlight:
Place one gold faceted geometric spacer bead on the cord. This breaks up the repetitive clay texture with a metallic shine. -
Repeat the Color Block:
Thread another segment of 4-5 pink beads, one black bead, and 4-5 pink beads. -
Continue the Pattern:
Continue alternating between these color blocks and your distinct focal beads—either the checkered beads with rhinestone rings or standalone gold spacers—until the strand reaches your desired wrist size.
Knot Security
If you can’t hide the knot inside a bead, ensure it sits next to a metal spacer or a larger bead, as clay heishi beads have small holes that can’t accommodate bulky knots.
Step 3: The Lime Green Bracelet
-
Start the Green Base:
For the second strand, begin by threading a long segment of neon lime green heishi beads. -
Create a Striped Pattern:
Create a bold contrast section by threading beads in a specific order: one black, two green, one gold faceted spacer, two green, and one black. -
Add the Checkered Accent:
Thread on a section of pink beads (about 3 or 4) to tie it to the first bracelet, then add a black-and-white checkered bead flanked by rhinestone spacers. -
Mirror the Design:
Pattern the rest of the bracelet similarly to the pink one but use lime green as the dominant color, occasionally interrupted by small clusters of 2-3 black heishi beads for a ‘striped’ effect. -
Check fit:
Wrap the unfinished strand around your wrist to check the size. It should fit comfortably without gaps showing the elastic.
Texture Twist
Swap the standard gold spacers for pearl beads or small tassel charms to soften the sporty look and give the stack a more bohemian preppy vibe.
Step 4: Finishing Touches
-
Secure the First Knot:
Take the ends of your first bracelet and tie a simple overhand knot, pulling the elastic tight so there are no spaces between beads. -
Tie the Surgeon’s Knot:
Perform a surgeon’s knot by looping the elastic through twice before pulling tight. This is the most secure knot for stretchy jewelry. -
Apply Adhesive:
Dab a tiny drop of jewelry glue or clear nail polish directly onto the knot to seal it permanently. -
Hide the Knot:
Once the glue is tacky but not fully hard, slide the knot inside the hole of the nearest large bead (like the checkered bead or gold spacer) if possible. -
Trim Excess:
Once dry, use sharp scissors to trim the excess elastic tails as close to the bead as possible without nicking the knot itself. -
Final Stretch Test:
Give both bracelets a gentle tug to ensure everything is secure and the knots are holding firm before wearing them.
Now you have a vibrant, custom-fit stack ready to brighten up any outfit