I’m obsessed with how clay heishi beads can look super sweet and polished at the same time—especially when you play with color and a little shine. Here are my go-to pretty clay bead bracelet ideas I’d happily make (and wear) on repeat in the studio.
Classic Rainbow Heishi Stack
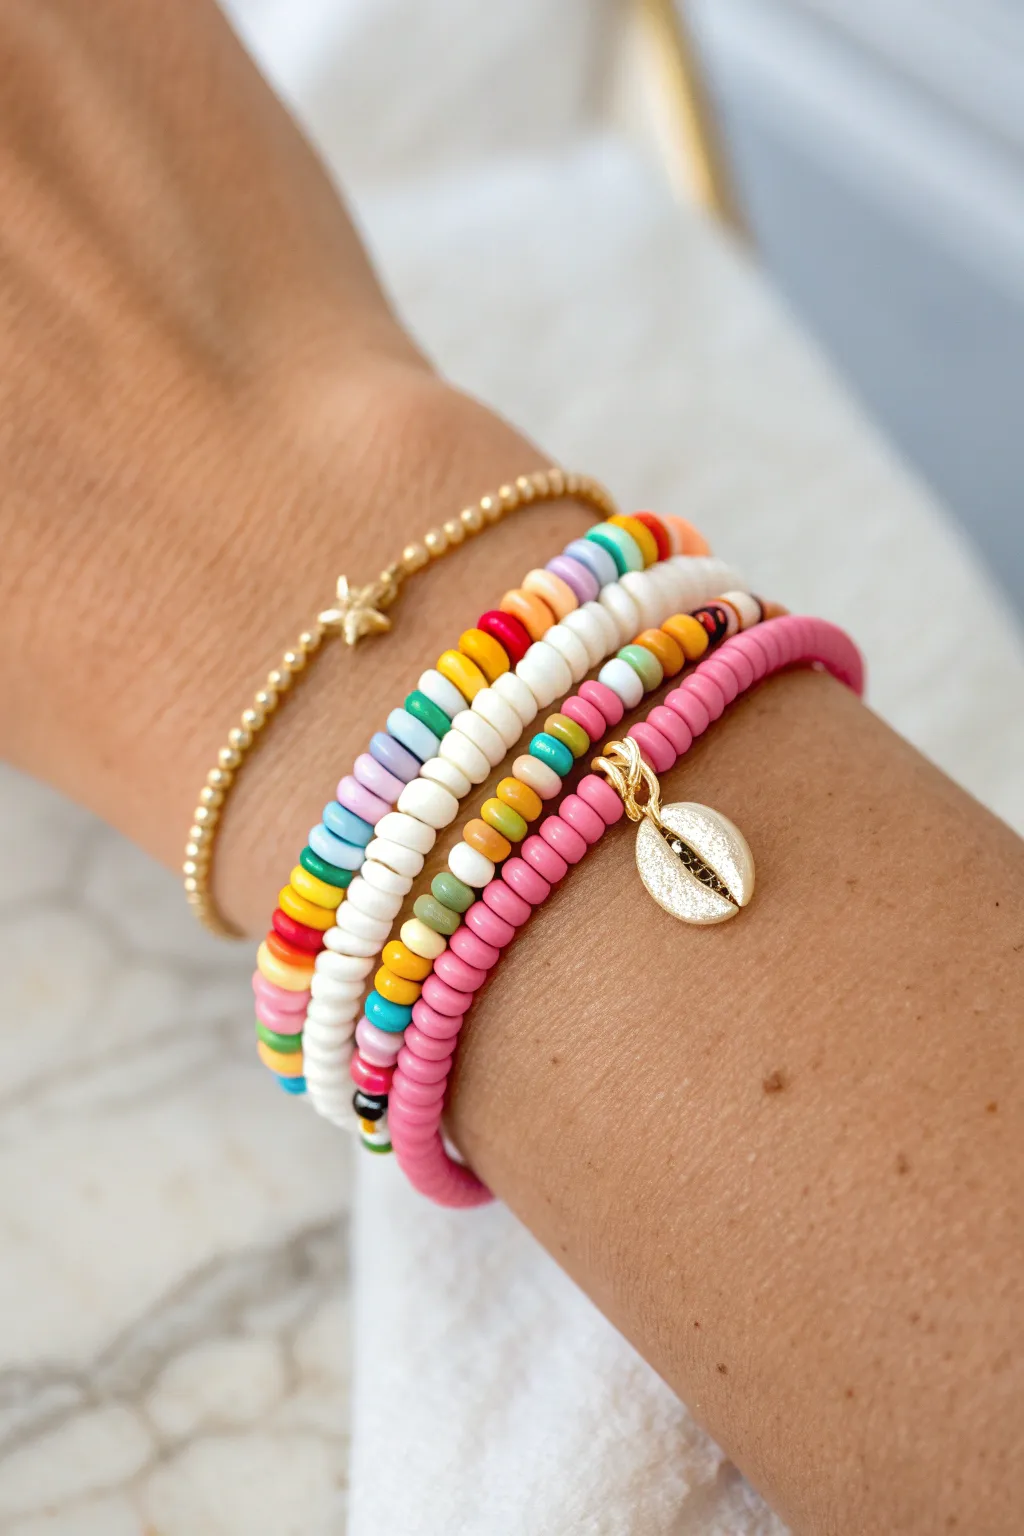
Capture the essence of summer with this vibrant trio of beaded bracelets featuring a playful mix of classic rainbow heishi beads, soft pearlescent accents, and a charming gold cowrie shell. This stack balances colorful fun with elegant gold tones for a look that is beach-ready yet chic enough for daily wear.
Detailed Instructions
Materials
- Polymer clay heishi beads (assorted rainbow colors: red, orange, yellow, green, teal, blue, purple, pink)
- Polymer clay heishi beads (white or cream)
- Polymer clay heishi beads (hot pink/rose)
- Small gold spacer beads (round or disc-shaped)
- Gold cowrie shell charm with jump ring
- Delicate gold bead chain bracelet (optional, for layering)
- See-through elastic cord (0.8mm or 1mm)
- Jewelry glue or clear nail polish
- Scissors
Step 1: The Rainbow Mix Bracelet
-
Measure the Cord:
Cut a piece of elastic cord about 9-10 inches long. This gives you plenty of extra room to tie knots later without the beads sliding off the ends. -
Establish a Pattern:
The charm of this specific strand is its organized chaos. Plan to group 3-4 beads of similar colors together before switching to the next hue, rather than doing a strict single-bead pattern. -
Begin Beading:
Start threading your beads. I like to begin with the cooler tones like blues and purples to anchor the design. -
Create Sections:
Add small sections of yellow, orange, and red. Don’t worry if the sections aren’t perfectly equal in length; organic variation looks better here. -
Finish the Strand:
Continue until the beaded portion measures your wrist size. Test the fit by wrapping it around your wrist; it should sit comfortably without digging in.
Knot Slipping?
If your elastic knot wont stay tight while gluing, use a piece of tape to hold one end down against the table, or ask a friend to hold his finger on the first knot tie while you make the second.
Step 2: The White & Color Accent Bracelet
-
Prep the Second Cord:
Cut another length of elastic cord, keeping it the same size as your first one for consistency. -
Start with White:
Thread on about 10 to 12 white or cream heishi beads to create a solid base section. -
Insert Color Pops:
After the white section, add a single colorful bead—like a bright teal or sunny yellow—sandwiched between two tiny gold spacer beads. -
Repeat the Pattern:
Follow the color pop with another 5-8 white beads, then add another colorful accent. Vary the accent colors as you go around the bracelet. -
Check Length:
Ensure this bracelet aligns in length with your first rainbow one so they stack perfectly.
Step 3: The Pink Shell Charm Bracelet
-
Prepare the Third Strand:
Cut your final piece of elastic cord. -
Thread the Base:
String on your hot pink or rose-colored heishi beads. This bracelet is monochromatic, so just keep threading the same color until you reach the halfway point. -
Attach the Charm:
Open a gold jump ring using pliers (or your fingers if it’s soft enough) and slide the cowrie shell charm onto it. Slide the jump ring onto the elastic cord. -
Finish Beading:
Continue adding pink beads after the charm until the strand matches the length of the others.
Pro Tip: Texture Mix
Add variation by mixing matte and glossy clay beads. Using a few gold disc spacers in the rainbow strand ties it visually to the gold charm bracelet.
Step 4: Finishing Touches
-
Tie the Knots:
For each bracelet, bring the two ends of the elastic together. Tie a square knot (right over left, left over right) and pull it tight. -
Secure with Glue:
Place a tiny drop of jewelry glue or clear nail polish directly onto the knot. This prevents the slick elastic from unraveling over time. -
Hide the Knot:
Once the glue is tacky but not fully dry, try to slide the knot inside the hole of the nearest bead to conceal it. -
Trim Excess:
After the glue has fully dried, snip off the excess cord tails as close to the bead as possible. -
The Final Stack:
Layer your three new creations on your wrist. For the complete look in the photo, add a delicate gold chain bracelet at the base of the stack.
Now you have a shimmering, custom-fitted stack ready for sunny days


All-Black With Gold Pop
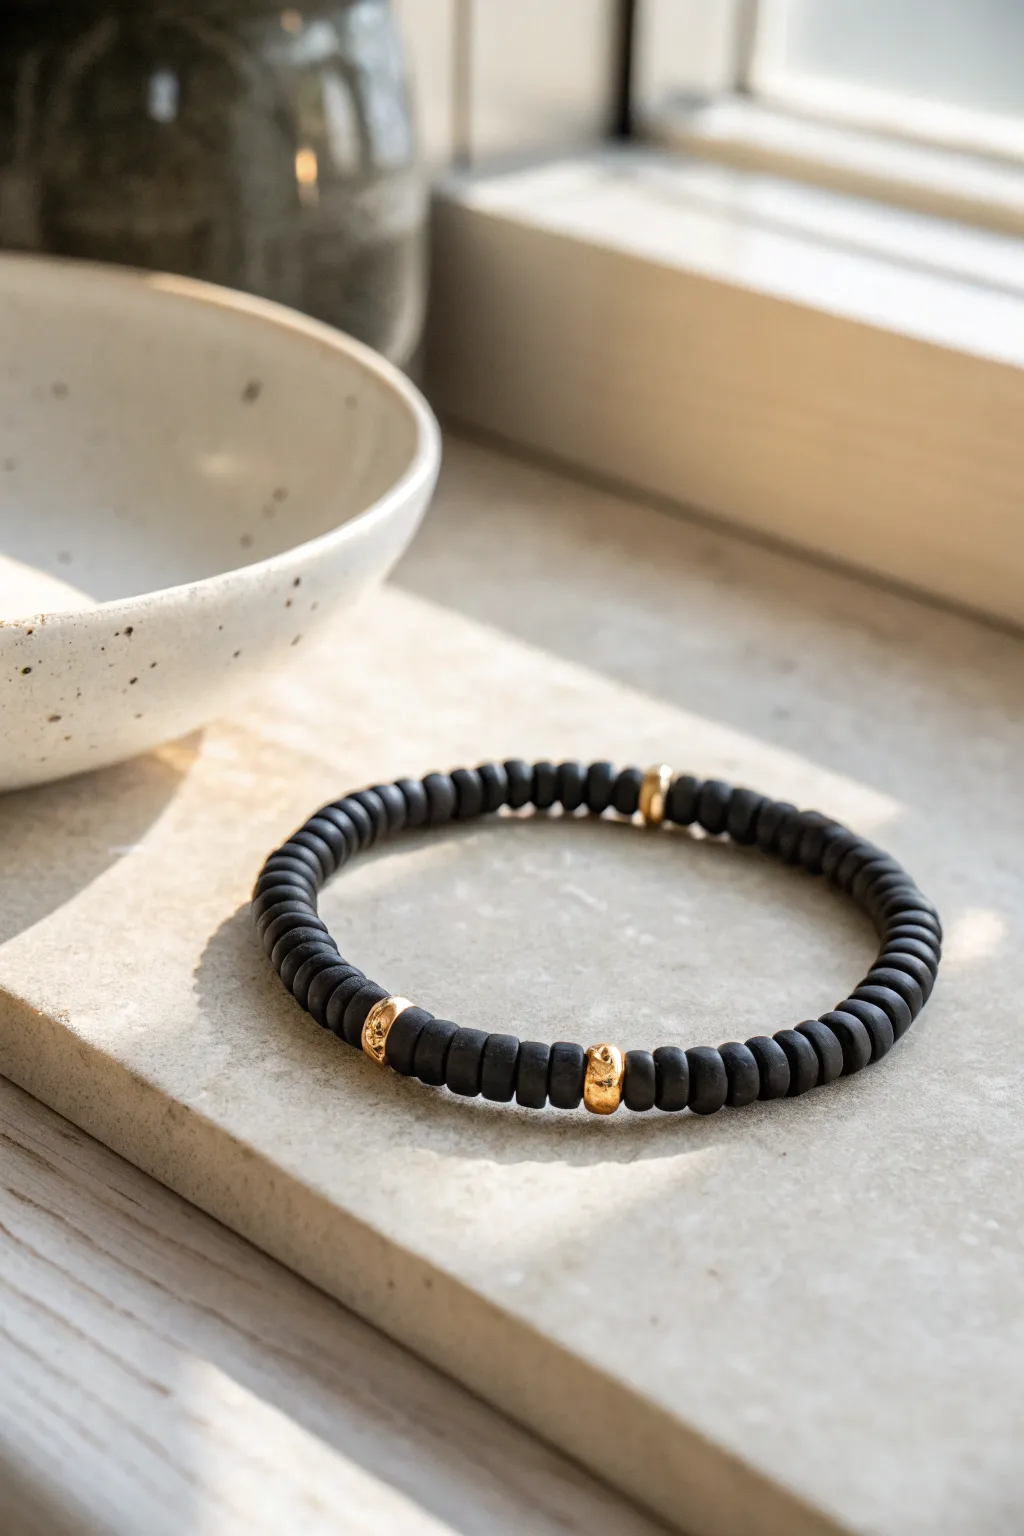
Embrace the sophisticated contrast of matte black and polished gold with this understated bracelet design. It features sleek, disc-shaped polymer clay beads interrupted by striking gold nuggets for a modern, high-end look.
Detailed Instructions
Materials
- Matte black polymer clay heishi beads (disc beads, approx. 6mm)
- 3 Gold-plated nugget or textured spacer beads (approx. 4-6mm)
- Strong elastic cord (0.8mm or 1mm clear)
- Jewelry glue or clear nail polish
- Scissors
- Bead stopper or binder clip
- Optional: Measuring tape
Step 1: Planning and Prep
-
Measure your wrist:
Wrap a measuring tape comfortably around your wrist where you want the bracelet to sit. Add about half an inch to this measurement to ensure the finished piece isn’t too tight. -
Cut the cord:
Cut a length of elastic cord about 10-12 inches long. Having extra length makes the final knotting process much less frustrating. -
Pre-stretch the elastic:
Hold the cord ends and give it several gentle tugs. This pre-stretching step is crucial because it prevents the bracelet from loosening up and sagging after you wear it a few times. -
Secure the end:
Attach a bead stopper or simply clip a binder clip to one end of the elastic cord to stop beads from sliding off while you work.
Step 2: Stringing the Beads
-
Start the black base:
Begin threading on your matte black heishi beads. You’ll want to string enough to cover about a third of your bracelet’s total length. -
Add the first gold accent:
Slide on your first gold nugget bead. These textured spacers add that essential ‘pop’ against the flat black discs. -
Continue the pattern:
Add another section of black heishi beads. For a balanced look like the photo, aim for an equal number of black beads between each gold accent. -
Second gold accent:
Thread on the second gold bead. I like to double-check the spacing here by holding the strand up to see if the distance matches the first section. -
Finish the sequence:
Add your final section of black beads, then the third gold bead, and finish with the remaining black beads needed to reach your measured length. -
Check the fit:
Wrap the unfinished strand around your wrist to verify the size. The ends should meet comfortably without gaps, but shouldn’t dig into your skin.
Knot Slipping?
If your elastic keeps slipping while tying, try clamping the first knot with a helper’s finger or a clip while you form the second loop to keep tension tight.
Step 3: Securing the Bracelet
-
Prepare to knot:
Remove the bead stopper carefully, holding both ends of the elastic firmly so your work doesn’t scatter. -
Tie the first knot:
Cross the ends and tie a simple overhand knot. Pull it tight, bringing the beads close together so there is no slack. -
Tie a surgeon’s knot:
For the second knot, loop one end through the circle twice (instead of once) before pulling tight. This extra friction helps the knot hold securely. -
Tighten securely:
Pull on all four strands—the two tail ends and the two bracelet sides—to really cinch that knot down. -
Apply adhesive:
Dab a tiny drop of jewelry glue or clear nail polish directly onto the knot. This seals it and prevents unraveling over time. -
Hide the knot:
While the glue is still slightly tacky but not wet, trim the excess cord ends close to the knot. Gently slide a nearby bead over the knot to conceal it inside the hole.
Metallic Mix-Up
Swap the gold nuggets for rose gold or brushed silver spacers to change the metal tone while keeping the sleek, monochromatic black vibe.
Wear your new bracelet alone for a minimal statement or stack it with other textures for a bold wrist stack


Preppy Color-Block Bands
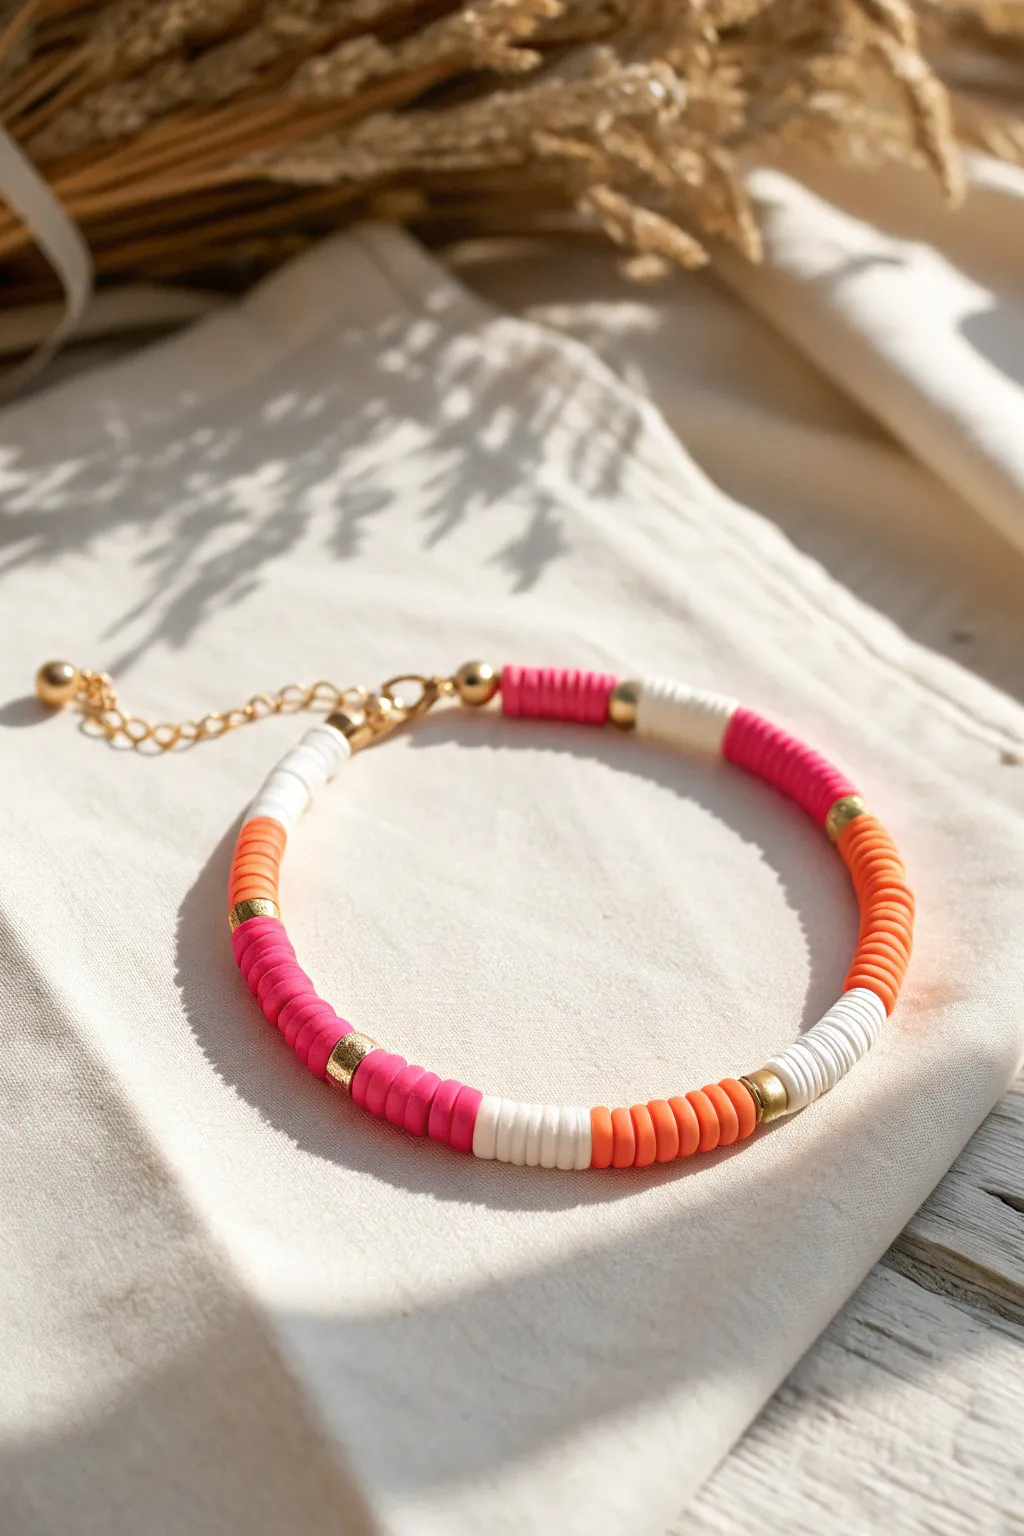
Capture the warmth of a summer evening with this vibrant color-block bracelet featuring cheerful pink, orange, and white clay beads. The addition of gold spacer beads and hardware elevates the simple design into a chic accessory perfect for stacking or wearing solo.
Step-by-Step
Materials
- 6mm flat Heishi clay beads: Hot Pink, Bright Orange, White
- 4mm gold spacer beads (round or flat disc style)
- Gold beading wire or strong stretch cord (0.8mm)
- 2 Gold crimp beads (2mm)
- 2 Gold wire guards (optional but recommended for durability)
- 2 Gold lustrous bead caps (optional, for ends)
- Gold lobster clasp
- Gold extension chain
- 2 Gold jump rings (4mm)
- Jewelry pliers (flat nose and cutting pliers)
- Tape or a bead stopper
Step 1: Preparation
-
Measure and Cut:
Cut a length of beading wire approximately 9-10 inches long. This gives you plenty of extra room to work with the clasp attachment later without the beads sliding off. -
Secure the End:
Place a piece of tape or a bead stopper on one end of your wire. This simple step saves you the headache of beads slipping off while you focus on stringing your pattern.
Step 2: Stringing the Pattern
-
Start with Gold:
Begin your threading by sliding on one small gold spacer bead. This acts as a neat bookend for your first color section. -
First Block: Hot Pink:
Thread on roughly 10 to 12 Hot Pink Heishi clay beads. You can adjust this number depending on how long you want your color blocks to be, but consistency is key for this look. -
Add a Spacer:
Slide on another gold spacer bead. This metallic accent breaks up the matte colors and adds a touch of shine. -
Second Block: White:
Thread on 10 to 12 White clay beads. Ensure this section matches the length of your pink section for a balanced color-block effect. -
Add a Spacer:
Add your next gold spacer bead. -
Third Block: Orange:
Thread on 10 to 12 Bright Orange clay beads. This completes your primary color trio pattern. -
Close the Motif:
Slide on a gold spacer bead to finish this specific pattern sequence. -
Repeat the Sequence:
Repeat the threading pattern: Pink block, gold spacer, White block, gold spacer, Orange block, gold spacer. Continue until the beaded portion measures about 6 to 6.5 inches, or your desired wrist size. -
Check the Fit:
Wrap the unfinished strand around your wrist to check the length. Remember that the clasp and jump rings will add about half an inch to the total length.
Keep It Uniform
Count your beads! Using the exact same number of discs (e.g., 12) for every single color block creates a much cleaner, more professional high-end look.
Step 3: Attaching the Hardware
-
Prepare the Crimp:
Remove the tape or stopper from the starting end. Slide on a gold crimp bead, followed by a wire guard. -
Add the Clasp:
Thread the wire through the loop of your lobster clasp, then loop it back through the other side of the wire guard and back down through the crimp bead. -
Secure the Crimp:
Use your flat nose pliers to flatten the crimp bead firmly. Give the wire a gentle tug to ensure it is secure, then trim the excess wire tail close to the bead. -
Finish the Other End:
Move to the other end of the bracelet. Slide on a crimp bead and a wire guard. -
Attach the Chain:
Loop the wire through the last link of your extension chain, back through the wire guard, and down into the crimp bead. -
Tighten and Crimp:
Pull the wire taut so there are no gaps between your beads, but leave just enough slack so the bracelet remains flexible and isn’t stiff. Flatten the crimp bead with your pliers. -
Trim and Polish:
I usually like to feed the remaining wire tail back through the first couple of clay beads before trimming it, which hides the sharp end neatly.
Texture Play
Replace one color block with small freshwater pearls or gemstone chips instead of clay. This mixed-texture style is trending and adds an organic feel.
Now you have a stunning, colorful accessory ready to wear for your next sunny outing


Half-and-Half Split Bracelet
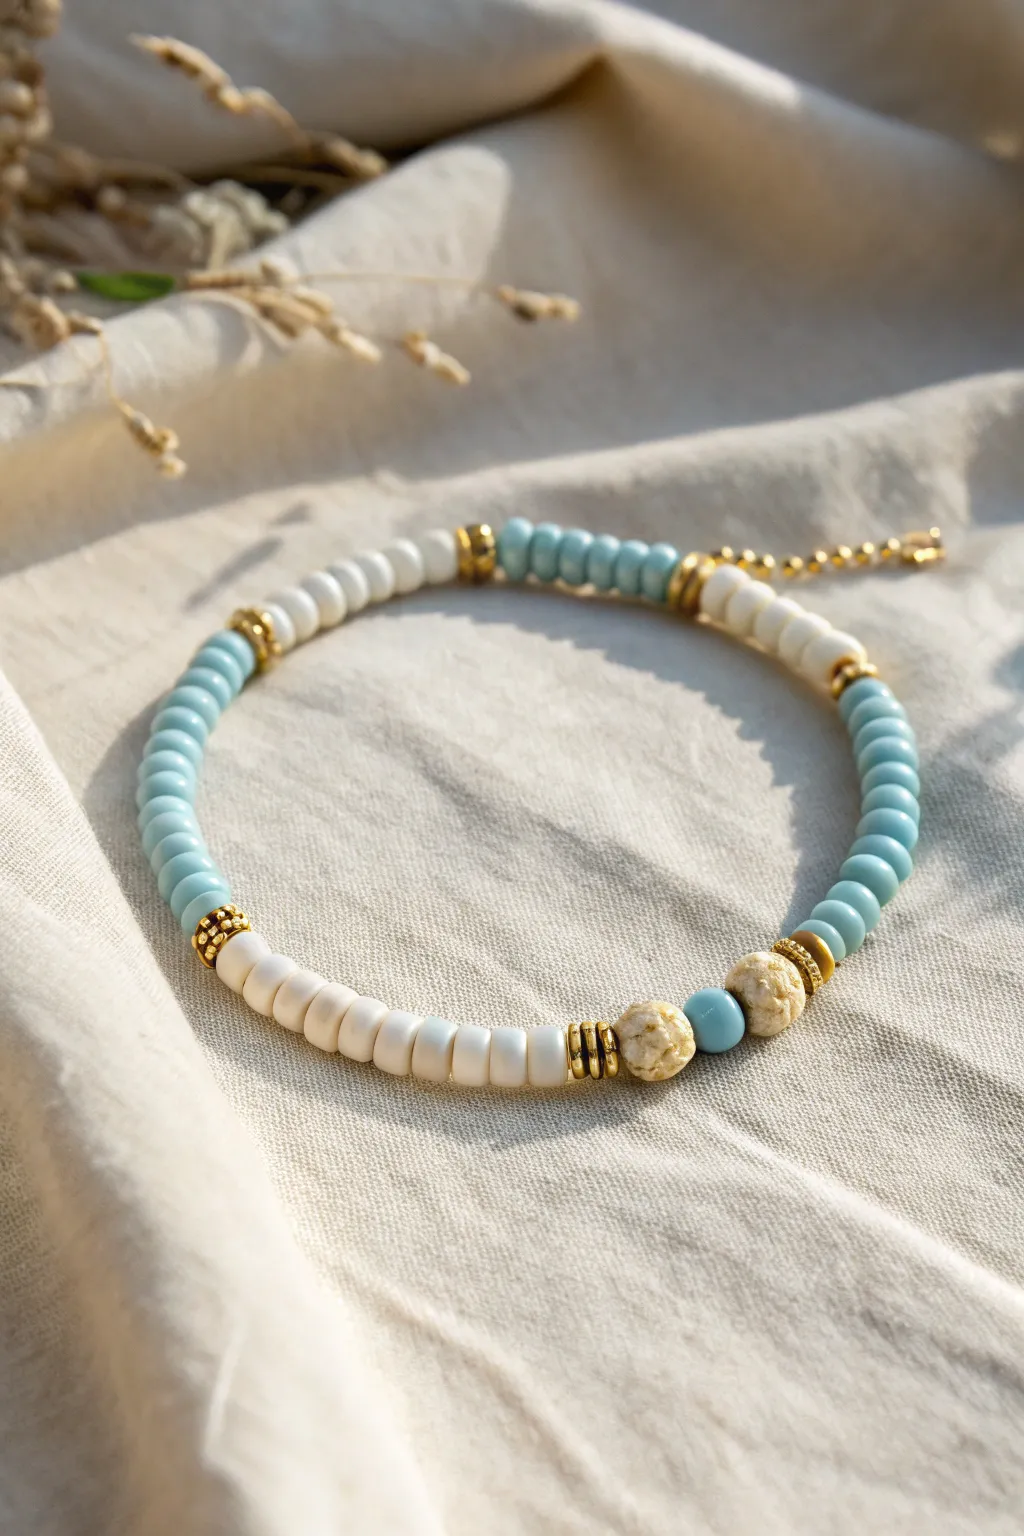
This elegant design elevates the simple clay bead bracelet by combining creamy white and soft turquoise hues with sophisticated gold accents. The ‘half-and-half’ concept is broken up by unique focal beads, creating a rhythmic and balanced piece perfect for stacking or wearing solo.
Step-by-Step Guide
Materials
- Elastic stretch cord (0.7mm or 0.8mm)
- Cream/off-white heishi clay beads (approx. 4-6mm)
- Light turquoise/baby blue heishi clay beads (approx. 4-6mm)
- Gold tone spacer beads (small flat discs)
- Gold tone textured accent beads (various shapes: ribbed rings, small barrels)
- Two textured beige/natural stone focal beads (rough round shape)
- One smooth turquoise focal bead (round)
- Small gold crimp beads (optional)
- Jewelry glue (e.g., G-S Hypo Cement)
- Scissors
Step 1: Preparation
-
Measure and cut:
Begin by measuring your wrist with a soft tape measure. Add about 3-4 inches to this measurement to ensure you have plenty of extra cord for tying the knot later. Cut your elastic cord. -
Pre-stretch the cord:
Give your cut piece of elastic a few gentle tugs. Pre-stretching helps prevent the bracelet from loosening up and sagging after the first few times you wear it. -
Secure the end:
Place a piece of tape over one end of the cord or attach a bead stopper clip. This simple step saves you the frustration of beads sliding right off while you work.
Gold Preservation Pro-Tip
Coat your metallic gold spacer beads with a thin layer of clear nail polish before stringing. This helps prevent tarnishing and keeps the gold shiny longer.
Step 2: Creating the Cream Sections
-
Start the first segment:
Begin threading your cream-colored clay heishi beads. You want to create a substantial section, approximately 1.5 inches long. -
Add gold accents:
Slide on a decorative gold bead. Looking at the design, this transition uses a wider, ribbed gold spacer to define the end of the cream section. -
Second cream segment:
Thread another section of cream beads, but make this one slightly longer than the first, perhaps around 2 inches. This asymmetry adds visual interest. -
Transition point:
Place another decorative gold spacer bead to mark the end of the solid cream color block.
Troubleshooting: Uneven Loops
If the bracelet twists or doesn’t lay flat, check your heishi beads. Occasionally, a bead with uneven thickness sneaks in; removing it usually fixes the kink.
Step 3: The Turquoise Rhythm
-
Begin the blue section:
Switch to your light turquoise heishi beads. Thread a segment that matches the length of your first cream section to maintain balance. -
Gold interruption:
Add a gold accent bead. I personally love using a slightly different shape here, like a flat disc spacer, if you have one available. -
Continue the blue:
Add another segment of turquoise clay beads. Keep checking the length against your wrist; you want to cover about two-thirds of the total bracelet circumference with these main solid sections. -
Prepare for the focal point:
End the main turquoise section with a distinct gold spacer bead, preferably one with some texture or ribbing.
Step 4: The Focal Centerpiece
-
First texture bead:
Thread on one of the textured beige stone beads. These rougher, organic beads provide a beautiful contrast to the smooth clay discs. -
Center pop of color:
Slide on the single smooth turquoise round bead. This sits directly in the center of the focal arrangement. -
Mirror the texture:
Add the second textured beige stone bead to flank the blue center bead. -
Gold separators:
Insert three flat gold spacer rings immediately after the stone bead. This small stack acts as a visual buffer before restarting the pattern. -
Short cream connector:
Thread a very short section of cream heishi beads—about 8 to 10 beads is usually perfect here. -
Final decorative stop:
Place a decorative gold bead that features some detailed granulation or texture, similar to the one shown in the reference.
Step 5: Finishing Touches
-
Check the fit:
Wrap the strand around your wrist. The ends should meet comfortably without stretching the cord tight. If it’s too loose, remove a few heishi beads from the ends; if too tight, add a few. -
Tie the knot:
Tie a surgeon’s knot (right over left, left over right, and loop through an extra time). Pull the elastic tight from all four strands to secure it firmly. -
Add security:
Place a tiny drop of jewelry glue on the knot. Let this dry for a moment before trimming the excess cord close to the knot. -
Hide the knot:
Ideally, gently tug the bracelet so the knot slides inside the hole of one of the larger beads or the stone focal beads to conceal it.
Enjoy styling your new bracelet stack with other textures and metals for a personalized look

The Complete Guide to Pottery Troubleshooting
Uncover the most common ceramic mistakes—from cracking clay to failed glazes—and learn how to fix them fast.
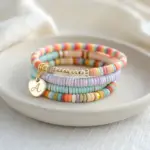
Tiny Stripe Repeat Pattern
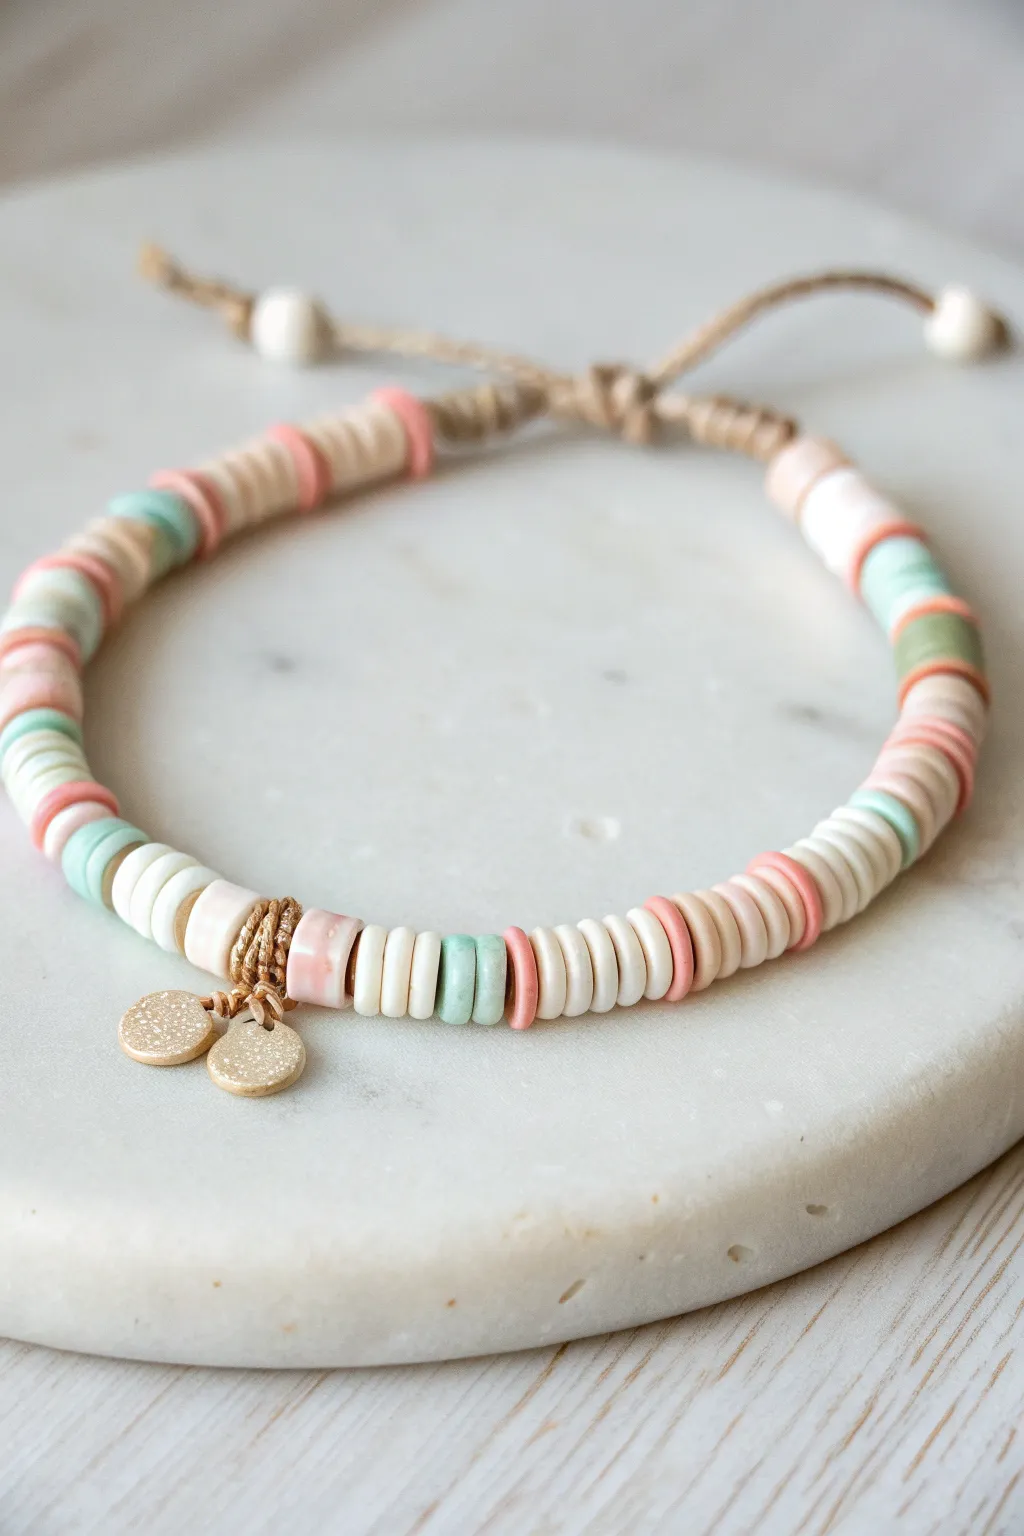
Embrace a soft and coastal aesthetic with this delicate polymer clay disc bracelet, featuring a rhythmic pattern of pastels and neutrals. The sliding knot closure ensures a perfect fit, while the dual gold charms add a touch of sophisticated shimmer to the matte beads.
Step-by-Step
Materials
- Polymer clay heishi disc beads (6mm) in: White, Coral/Salmon, Mint/Seafoam Green, Tan/Beige
- Waxed polyester cord or heavy-duty nylon beading cord (thin enough to pass through beads, approx. 0.8mm)
- Two small gold disc charms (sequin style), hammered or textured finish
- Two gold jump rings (4-5mm)
- White or cream wood beads (optional, for cord ends)
- Scissors
- Tape or clipboard
- Jewelry pliers (chain nose and bent nose)
- Lighter (for sealing cord ends)
Step 1: Setting the Foundation
-
Measure and Cut:
Cut a length of your waxing cord to approximately 16 inches. This generous length gives you plenty of room for knotting the sliding closure later without frustration. -
Prep the End:
If your cord ends are fraying, quickly pass them through a flame with a lighter and tap them into a point (be careful, it’s hot!) or use a dab of clear glue to stiffen them. This acts as a built-in needle. -
Secure the Start:
Tape one end of your cord down to your workspace or clip it onto a clipboard. Tie a simple overhand knot about 4 inches from the end to stop beads from sliding off while you work.
Knotting Pro Tip
When melting cord ends with a lighter, use the blue part of the flame rather than the yellow tip. This prevents the cord from turning black and sooty, keeping the finish clean.
Step 2: Creating the Bead Pattern
-
Establish the Core Pattern:
Begin stringing your beads. The pattern in this design relies on blocks of white interrupted by colorful accents. Start with a segment of about 4-6 white discs. -
Add Color Segments:
Introduce color by adding one coral bead, followed by 3-4 tan beads, and another coral bead. This creates a warm ‘frame’ around the neutral tone. -
Insert Cool Tones:
Follow your warm section with another block of 4-6 white beads. Then, add a mint green bead, 3-4 tan beads, and another mint green bead. -
Repeat and vary:
Continue this alternating rhythm—white block, coral/tan section, white block, mint/tan section. Occasionally, vary the pattern by doing a simple alternating stripe of single beads for visual interest, as seen on the left side of the bracelet. -
Check the Length:
Wrap the strand around your wrist occasionally. You want the beaded section to cover almost your entire wrist, leaving just a small gap (less than an inch) for the closure.
Level Up: Texture Mix
Swap the plain gold jump rings for twisted wire rings, or place a tiny gold spacer bead between every color change to make the bracelet glitter more in sunlight.
Step 3: Adding the Charms
-
Locate the Center:
Once you have completed your beading, identify the exact center point of the bracelet visually. You will attach the charms here after the bracelet structure is finished, or you can string a small jump ring directly onto the cord at the halfway mark now if you prefer. -
Secure the End:
Tie a secure overhand knot flush against the last bead to lock everything in place. Ensure there is no slack in the beaded section.
Step 4: The Sliding Closure
-
Cross the Cords:
Bring the two cord ends together to form a circle, crossing them over each other so they overlap by about 3 inches. -
Anchor the Overlap:
Cut a separate piece of cord, about 10 inches long. Place it under the two overlapped cords. -
Start the Square Knot:
Create a macramé square knot. Take the right end of the new cord, pass it over the bracelet cords but under the left loop cord. Take the left cord, pass it under the bracelet cords and up through the loop on the right. -
Tighten and Repeat:
Pull tight. Repeat the process starting with the left side this time. Continue alternating sides for about 4-5 full knots until the closure is sturdy. -
Finish the Knot:
Trim the tails of the knotting cord (not the bracelet cords!) very close to the knot. Carefully melt the stubs with a lighter to seal them against the knot.
Step 5: Final Details
-
Finish the Tails:
On the two loose ends of the bracelet cord, slide on a single wooden or clay bead. Tie a knot at the very end to secure it and trim excess cord. -
Attach Charms:
Using two pairs of pliers, twist open your jump rings sideways. Slip the gold disc charms onto the rings. -
Install the Dangles:
Hook the jump rings around the main cord at the center point you identified earlier (nestling it between two beads). Close the jump rings securely so the gap disappears completely.
Now you have a breezy, custom-fitted accessory perfect for stacking or gifting to a friend
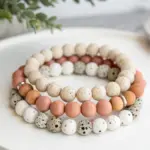
Gold Spacers Every Few Beads
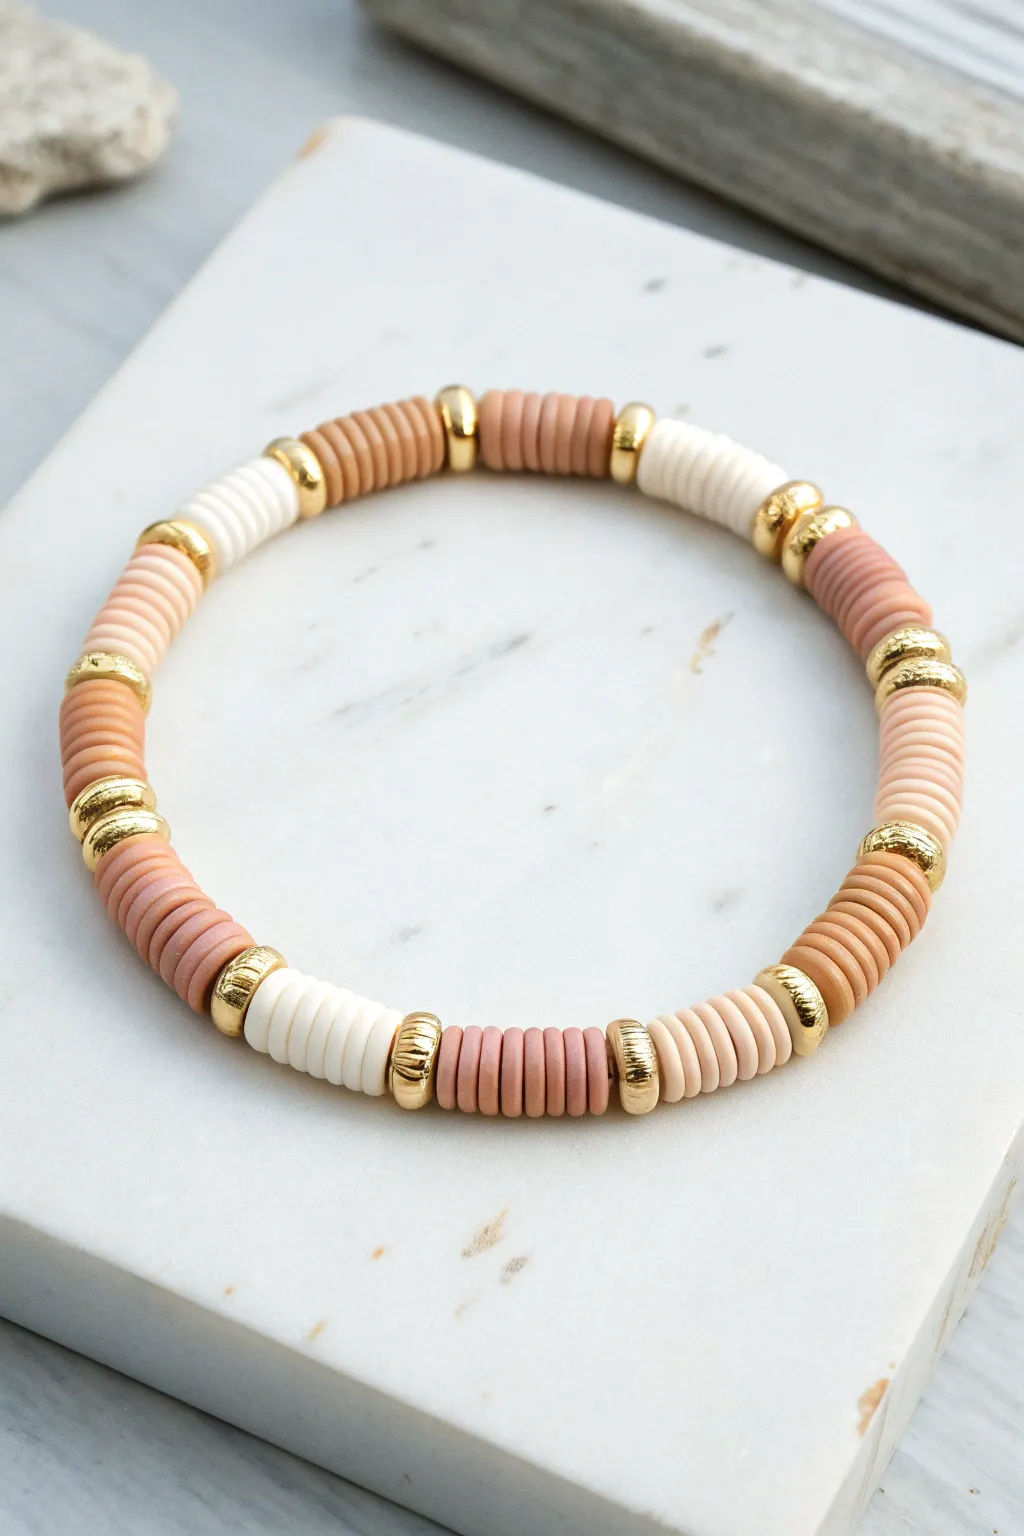
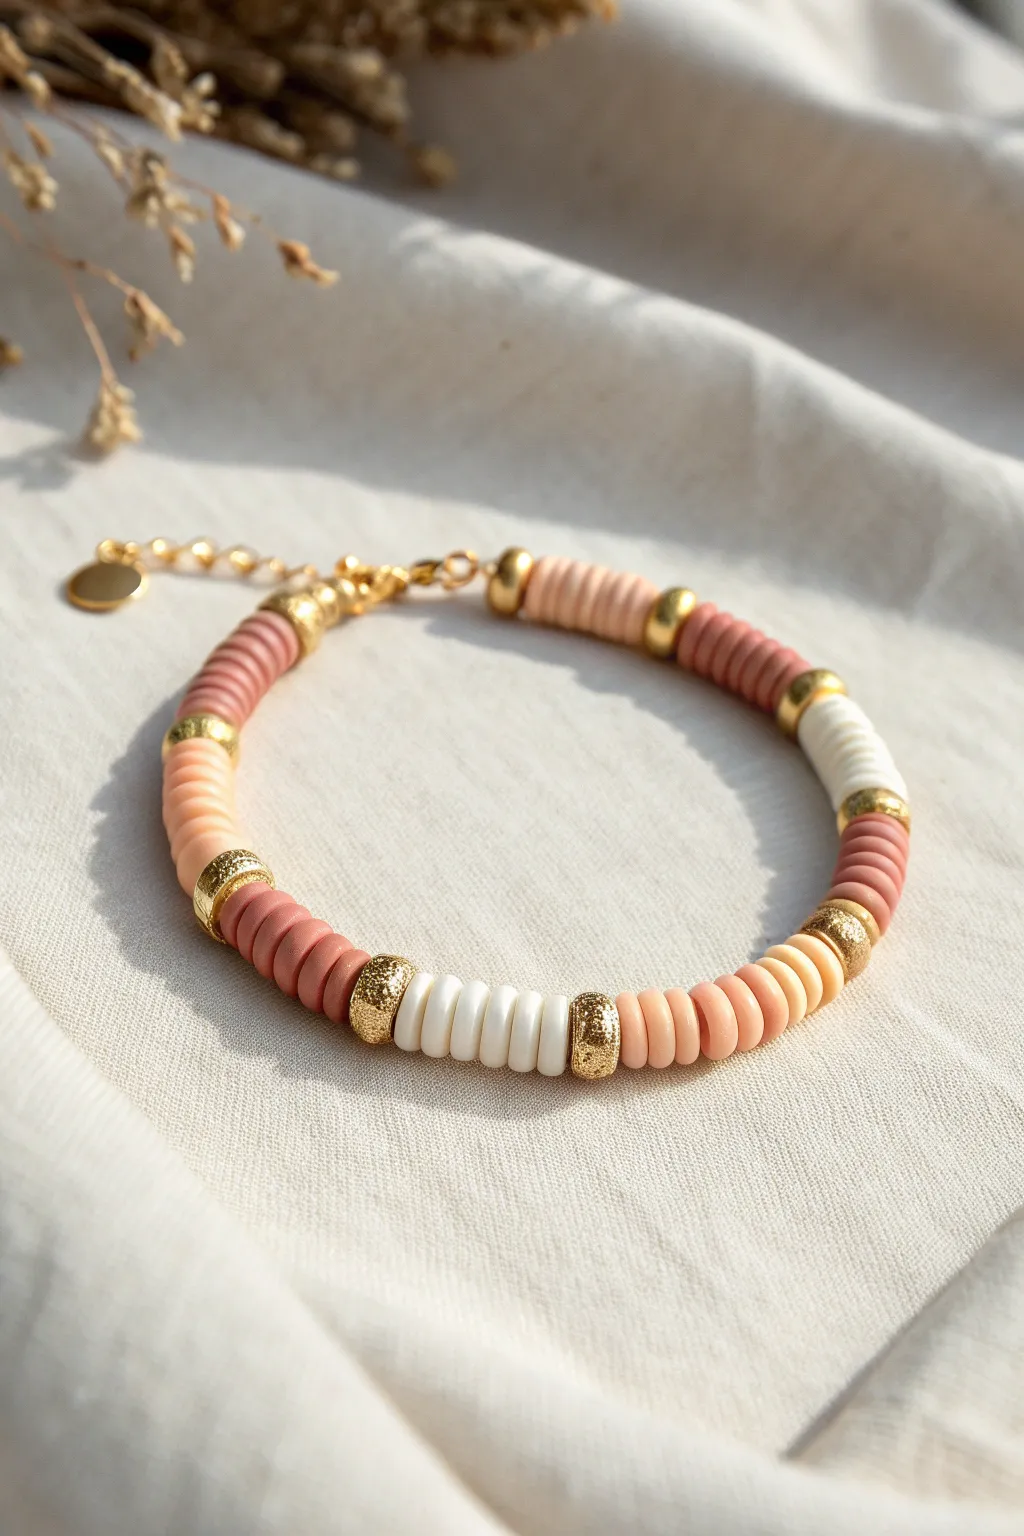
This elegant stretch bracelet combines the earthy warmth of clay disc beads with luxury gold accents for a versatile accessory. The repeating pattern of neutral tones separated by textured gold spacers creates a rhythm that feels both modern and timeless.
Step-by-Step Tutorial
Materials
- 6mm polymer clay disc beads (heishi beads) in four colors: white, light sand/peach, camel/tan, and dusty rose
- Gold tone spacer beads (approx. 5-6mm), ideally rounded saucer or rondelle shape with ribbed texture
- 0.8mm clear elastic stretch cord
- Super glue or jewelry cement
- Scissors
Step 1: Planning and Prep
-
Measure your wrist:
Wrap a flexible measuring tape or a piece of string around your wrist to find your size. Add about 1/2 inch to this measurement to ensure the bracelet fits comfortably without pinching. -
Prepare the cord:
Cut a length of elastic cord about 10-12 inches long. Having this extra length makes tying the finishing knot significantly easier than struggling with short ends. -
Pre-stretch the elastic:
Give your cut piece of elastic a few firm tugs. This pre-stretching step is crucial because it prevents the bracelet from drooping or loosening up immediately after you wear it. -
Secure the end:
Place a piece of tape or a bead stopper clip on one end of the cord to stop your beads from sliding off while you work.
Step 2: Creating the Pattern
-
Start with gold:
Begin threading by adding one gold spacer bead first. This will act as the anchor for your repeating pattern. -
First color block: Camel:
Thread on approximately 7-9 camel-colored clay beads. The exact number isn’t strict, but aim for a stack height of about 1 centimeter. -
Add a spacer:
Slide on another gold spacer bead to cap off the camel section. -
Second color block: White:
String on about 7-9 white clay beads. Try to keep the count consistent with your first block so the sections look uniform. -
Add a spacer:
Add your next gold spacer bead. -
Third color block: Dusty Rose:
Thread on your dusty rose or mauve colored beads. I like to double-check the stack height against the previous sections to ensure symmetry. -
Add a spacer:
Place another gold spacer bead. -
Fourth color block: Light Sand:
Finish the color sequence with the light sand or peach colored beads. -
Repeat until full:
Continue this pattern (Gold -> Camel -> Gold -> White -> Gold -> Rose -> Gold -> Sand) until the beaded length matches your wrist measurement.
Use a Bead Board
Lay out your beads on a flocked bead board or a towel first. This stops them from rolling away and lets you preview the color order before stringing.
Step 3: Finishing Touches
-
Check the fit:
Wrap the unfinished strand around your wrist to verify the size. Add or remove a bead section if needed, aiming to end with a color block rather than a gold spacer (since you started with gold). -
Tie the knot:
Remove the tape or clip. Tie a surgeon’s knot: cross left over right, then wrap it twice, pull tight. Then cross right over left and pull tight again. -
Apply adhesive:
Dab a tiny drop of super glue or jewelry cement directly onto the knot. Be careful not to glue the beads themselves. -
Hide the knot:
While the glue is still tacky, gently slide the nearest gold spacer bead over the knot to conceal it inside the bead’s hole. -
Trim excess:
Once dry, trim the excess elastic tails with scissors as close to the bead as possible without cutting the knot.
Knot Won’t Hide?
If your knot is too bulky to fit inside the spacer bead, try enlarging the hole of the clay bead next to it using a bead reamer or a thick needle.
Now slip on your custom bracelet and enjoy the subtle shine of gold among the soft clay tones


What Really Happens Inside the Kiln
Learn how time and temperature work together inside the kiln to transform clay into durable ceramic.
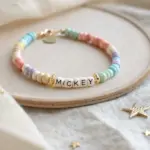
Letter Bead Word Centerpiece
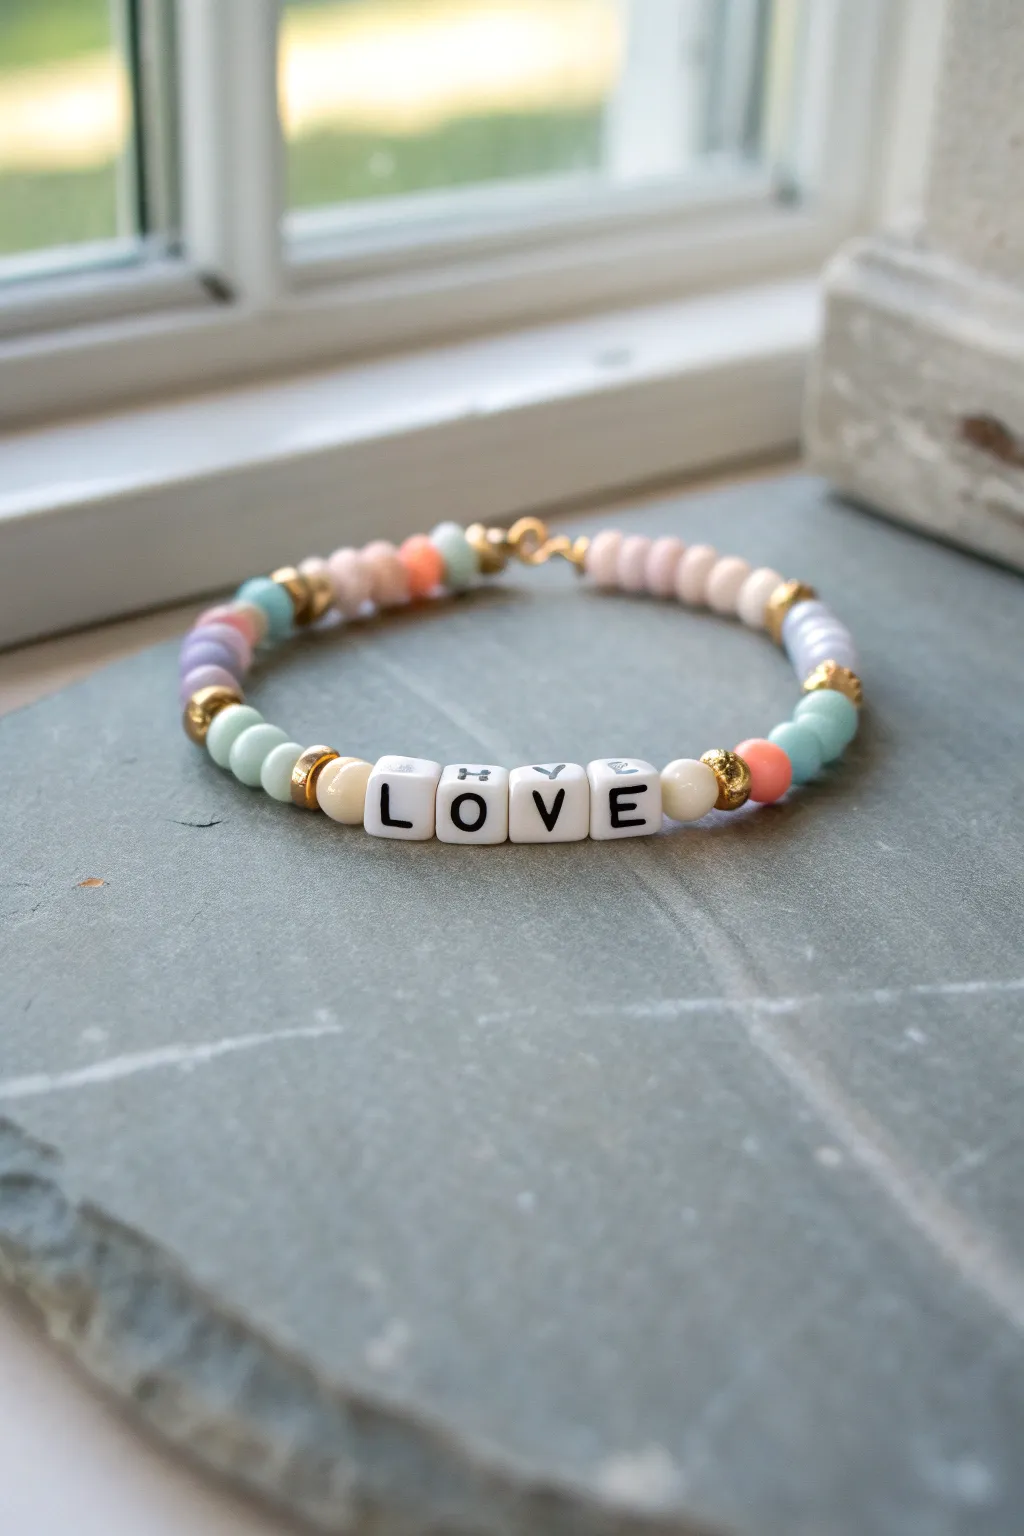
Create a sweet and stylish accessory with this pastel-toned bracelet featuring a classic “LOVE” centerpiece. The combination of soft clay hues and striking gold accents makes for a perfect friendship gift or a lovely addition to your own stack.
Detailed Instructions
Materials
- Elastic jewelry cord (0.5mm – 0.8mm clear)
- White square letter beads spelling “L”, “O”, “V”, “E”
- 6mm – 8mm round clay or ceramic beads in pastel colors (blush pink, peach coral, mint green, lavender)
- Small gold disc spacer beads (heishi style)
- Larger gold ball accent beads
- Jewelry glue (optional)
- Scissors
- Bead stopper or masking tape
Step 1: Planning and Prep
-
Measure your wrist:
Before cutting any string, take a measurement of your wrist using a soft tape measure or a piece of string. Add about half an inch for a comfortable fit. -
Cut the cord:
Cut a piece of elastic cord about 10-12 inches long. Having extra length makes tying the final knot much easier than struggling with short ends. -
Prevent slipping:
Attach a bead stopper or simply place a piece of masking tape on one end of your cord. This keeps your beads from sliding right off while you work. -
Lay out the design:
On a bead board or a soft towel, arrange your beads. Start with the “LOVE” letters in the center to visualize the spacing. I like to lay out the color pattern on either side to ensure symmetry.
Step 2: Creating the Centerpiece
-
Start the center:
Thread the first letter bead ‘L’ onto the cord, making sure it’s facing the right direction for how you want to read it. -
Add the rest of the word:
Continue threading ‘O’, ‘V’, and ‘E’ in order. Double-check that all letters are upright and facing the same way. -
Frame the word:
Slide one round pastel bead (like the cream or light blush one shown) onto each side of the word ‘LOVE’. -
Add gold accents:
Immediately follow the framing pastel beads with a gold disc spacer on each side to highlight the centerpiece.
Knot Security
Pre-stretch your elastic cord by pulling it firmly a few times before you start beading. This prevents the bracelet from stretching out and becoming loose after the first few wears.
Step 3: Beading the Band
-
Establish the pattern:
Begin your pattern moving outward from the center. The pattern shown generally alternates 2-3 pastel beads followed by a gold spacer. -
Mix your pastels:
Thread on a mint green bead, followed by a gold spacer or gold ball bead. Then switch to a coral or peach bead. -
Continue the symmetry:
Mirror your work on the other side of the word. If you placed a mint bead on the left, place a mint bead on the right. -
Incorporate lavender:
Add in your lavender or purple beads further down the strand, separating sections with those shiny gold spacers to break up the matte clay textures. -
Check the length:
Periodically wrap the strand around your wrist to check the size. Stop adding beads when the ends touch comfortably around your wrist without stretching the elastic. -
Finish the ends:
End your pattern with a few solid pastel beads (like the light pink ones shown) at the back so the knot will be hidden among simpler beads.
Design Twist
Add a small charm, like a gold heart or a tiny tassel, near the clasp area or next to the word beads for extra movement and personalization.
Step 4: Finishing Touches
-
Prepare to tie:
Remove the tape or bead stopper carefully, holding both ends of the elastic firmly. -
Tie the knot:
Tie a surgeon’s knot: cross the ends like a normal knot, but loop the top strand through twice before pulling tight. Repeat this process for a second secure knot. -
Secure with glue:
Apply a tiny dot of jewelry glue or superglue specifically to the knot. Let it dry for a minute to ensure it doesn’t slip undone. -
Hide the knot:
If one of your beads has a large enough hole, gently pull the elastic so the knot slides inside a bead, hiding it from view. -
Trim excess:
Snip off the excess elastic cord close to the knot (but not too close—leave about 1-2mm) with your sharp scissors.
Enjoy wearing your lovely new bracelet or gifting it to someone special to brighten their day
Name Bracelet With Soft Neutrals
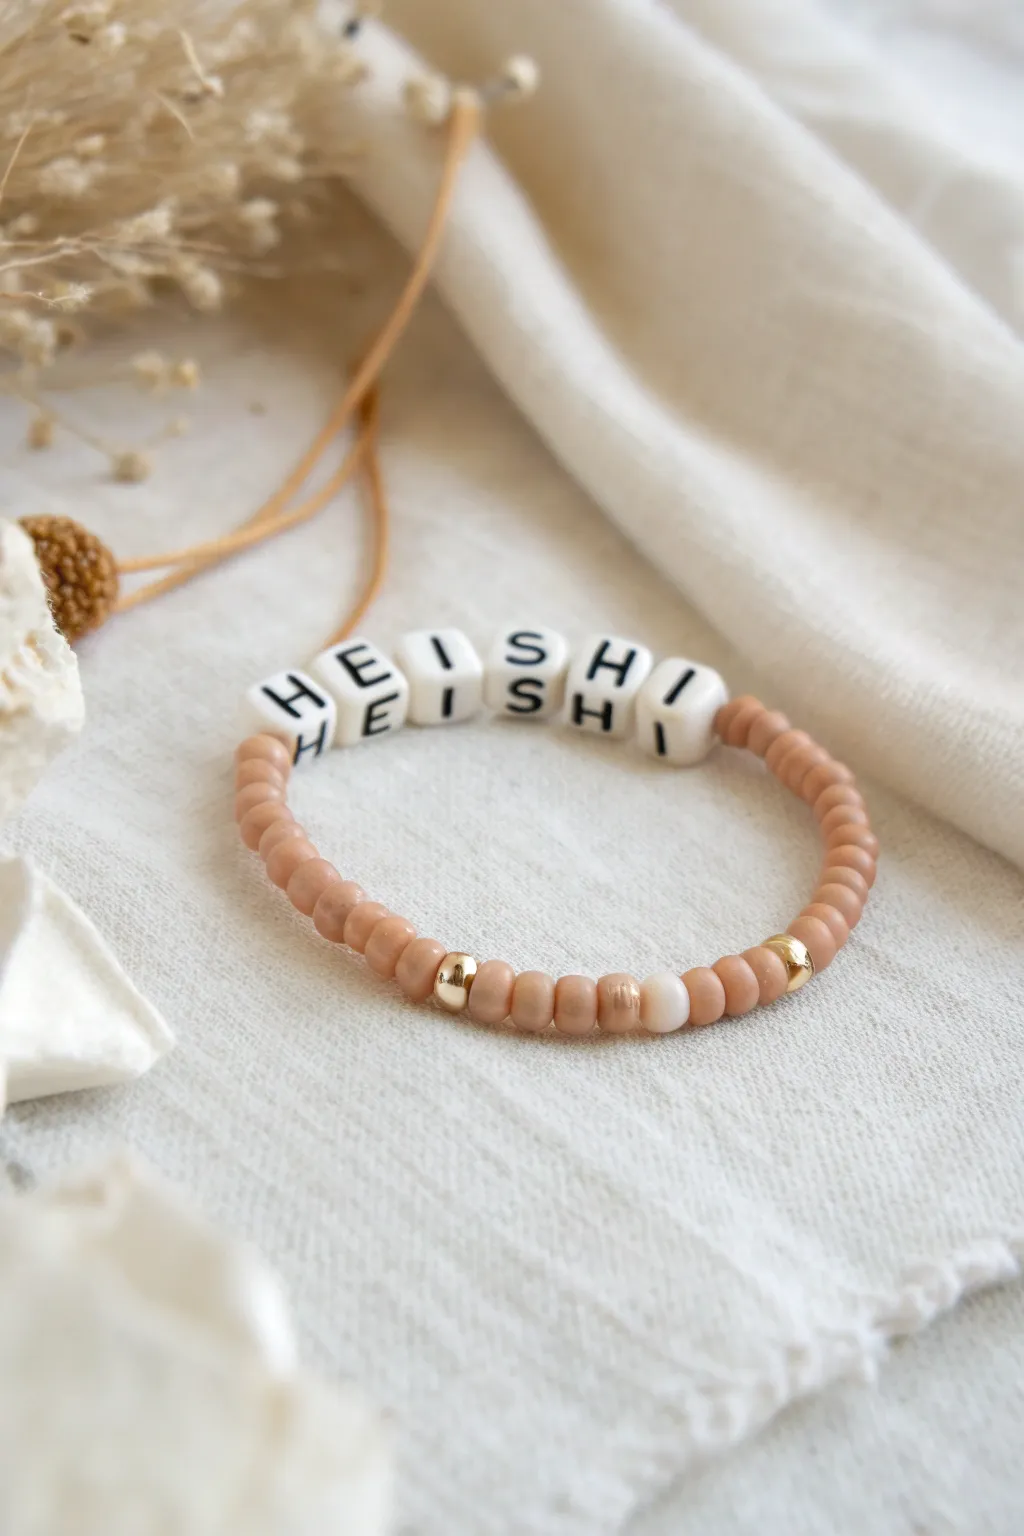
Embrace the understated elegance of soft neutrals with this charming name bracelet. Combining warm beige seed beads with classic block letters, this piece is a perfect everyday accessory that stacks beautifully with other jewelry.
Step-by-Step Tutorial
Materials
- Elastic beading cord (0.5mm to 0.8mm, clear)
- Small beige/taupe glass seed beads (approx. size 6/0 or 8/0)
- White cube letter beads with black text
- 2 small gold spacer beads (round or nugget style)
- 1 accent bead (soft cream or blush tone)
- Scissors
- Jewelry glue or clear nail polish
- Bead stopper or tape
Step 1: Preparation
-
Measure your wrist:
Start by measuring your wrist with a flexible measuring tape. If you don’t have one, use a piece of string and measure it against a ruler. Add about half an inch to this measurement for a comfortable fit. -
Cut the cord:
Cut a length of elastic cord about 10-12 inches long. This extra length is crucial; you don’t want to struggle with short ends when tying the final knot. -
Pre-stretch the elastic:
Hold both ends of the cord and give it a few gentle tugs. Pre-stretching helps prevent the bracelet from sagging or loosening after you’ve worn it a few times. -
Secure one end:
Attach a bead stopper to one end of the cord, or simply tape it down to your work surface. This saves you from the heartbreak of beads sliding right off as you work.
Step 2: Beading the Pattern
-
Start with neutrals:
Thread approximately 15 to 20 of your beige seed beads onto the cord. The exact number will depend on your wrist size, but you want this section to cover about a third of the bracelet. -
Add the first gold accent:
Slide on one gold spacer bead. This adds a lovely little flash of metallic warmth that breaks up the matte texture of the seed beads. -
Focus on the letter beads:
Select your letter beads. For this design, we are doubling up the word for a stacked look. Gather two sets of letters for your chosen word (e.g., ‘H-E-I-S-H-I’). -
String the name:
Thread the first letter bead onto the cord. Follow it immediately with the second matching letter bead, or string the entire word once before repeating the sequence. In the bracelet shown, the letters are mixed to create a playful, almost jumbled aesthetic. -
Complete the name section:
Continue adding all your letter beads until your word or phrase is complete. Check that they are facing the right way so they remain legible when worn. -
Add the second half of neutrals:
Resume threading the beige seed beads on the other side of the letters. String about 10 beads to start wrapping around towards the back. -
Insert the centerpiece:
Thread your second gold spacer bead, followed by the single cream accent bead, and then finish with the remaining beige seed beads needed to reach your desired length.
Knot Slipping?
If your elastic knot feels insecure or slippery, try tying it while the elastic is slightly stretched. The tension helps grip the cord material more tightly.
Step 3: Finishing Touches
-
Check the fit:
Wrap the unfinished bracelet around your wrist to check the size. Look for gaps or tightness. Add or remove a few seed beads from the ends if necessary to get perfectly balanced spacing. -
Tie the knot:
Remove the bead stopper and bring the two cord ends together. Tie a standard surgeon’s knot: cross right over left, loop it through twice, pull tight, then cross left over right and pull tight again. -
Secure the knot:
Apply a tiny dot of jewelry glue or clear nail polish directly onto the knot. I find using a toothpick helps place the glue precisely without getting it on the beads. -
Let it dry:
Allow the glue to dry completely—usually about 15 minutes is safe—before handling the bracelet further. -
Hide the knot:
Trim the excess cord ends close to the knot, leaving about 1mm. Gently pull the bracelet so the knot slides inside the hole of a neighboring bead to hide it securely.
Texture Play
Swap the smooth round seed beads for matte-finish beads or faceted crystals in the same beige tone. This subtle texture contrast adds a high-end feel.
Enjoy wearing your custom neutral stack or gifting it to a friend.

TRACK YOUR CERAMIC JOURNEY
Capture glaze tests, firing details, and creative progress—all in one simple printable. Make your projects easier to repeat and improve.
Single Charm Focal Bracelet
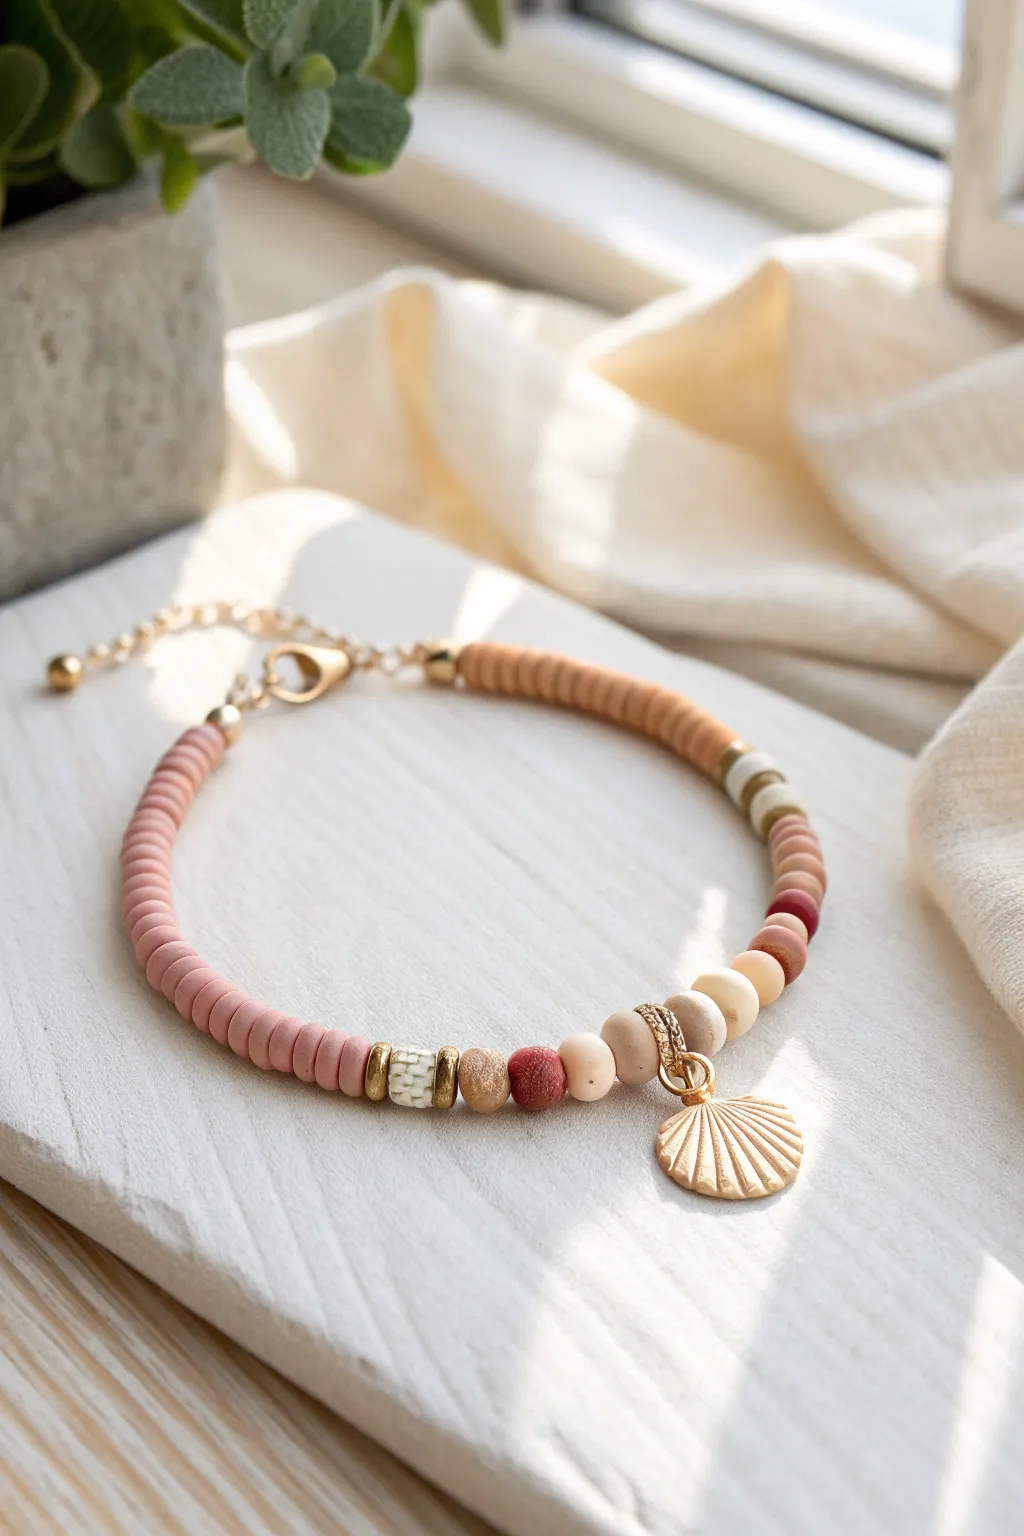
Capture the relaxed vibe of the coast with this dusty rose and terracotta beaded bracelet. Featuring flat clay heishi beads mixed with earthy round accents and a delicate gold shell charm, this piece is the perfect accessory for beach days or casual wear.
Step-by-Step
Materials
- Polymer clay heishi beads (6mm) in dusty rose
- Polymer clay heishi beads (6mm) in tan or light terracotta
- Matte round beads (6mm-8mm) in cream, beige, and rust red (wood or matte gemstone)
- Gold-tone metal spacer beads (small discs and textured rings)
- One cylindrical textured bead (white with gold veining or gold detail)
- Gold-tone scallop shell charm
- Gold jump ring (approx. 5-6mm)
- Beading wire (such as flexible 49-strand wire)
- 2 Gold crimp beads
- 2 Gold wire guardians (optional but recommended)
- Gold lobster clasp and extender chain
- Wire cutters
- Crimping pliers
- Flat nose pliers
Step 1: Planning Your Pattern
-
Measure and Cut:
Cut a length of beading wire approximately 10-12 inches long. This generous length gives you plenty of room to work with the clasp ends without struggling. -
Layout the Focal Section:
Before stringing, lay out your beads on a bead board or soft cloth. Identify the center point where the charm will hang. Arrange a pattern of round matte beads in cream and beige around this center. -
Design the Sides:
Plan the sides to be asymmetrical for a modern look. On the left side of your focal area, extend a long section of dusty rose heishi beads. On the right, plan a mix of tan heishi beads and patterned accent beads.
Step 2: Stringing the Design
-
Secure the First End:
Thread a crimp bead and a wire guardian onto one end of your wire. Loop the wire through the last link of your extender chain, then back through the guardian and crimp bead. -
Crimp and Cover:
Use your crimping pliers to flatten the crimp bead securely, ensuring the wire is tight but moves freely. Trim the excess tail close to the crimp. -
Start with Clay Beads:
Begin stringing from the right side of the bracelet (the side opposite the dusty rose section). Thread on about 1.5 to 2 inches of the tan/terracotta heishi beads. -
Add Decorative Spacers:
Slide on a white/gold cylindrical bead, flanked by flat gold spacers on either side to add a touch of shine. -
Transition to Rounds:
Thread a few more heishi beads, then switch to a pattern of round beads: striped white/tan, dusty red, and solid tan heishi spacers in between. -
Create the Focal Point:
Now, build the center. String a sequence of matte round beads—rust red, beige, and cream—separated by thin gold spacers. In the very center, place a decorative gold ring or textured bail where the charm will attach. -
Finish the Sequence:
After the center point, mirror the round beads slightly or continue an organic pattern with a cream round bead, a rust round bead, then the special textured cylindrical bead again. -
Complete the Left Side:
Finish the strand by threading the long section of dusty rose heishi beads. I usually keep adding these until the bracelet reaches about 6.5 to 7 inches in total length.
Pro Tip: Wire Slack
Before the final crimp, curve the bracelet into a circle. If you crimp the wire while it’s completely straight, the beads will be too tight and rigid when worn.
Step 3: Finishing Touches
-
Check the Fit:
Wrap the unfinished strand around your wrist to verify the size. Add or remove a few rose clay beads if necessary to get the perfect fit. -
Attach the Clasp:
Thread a crimp bead and wire guardian onto the remaining wire end. Loop the wire through the loop of your lobster clasp, back through the guardian, and into the crimp bead. -
Tighten and Crimp:
Pull the wire snug, eliminating gaps between beads but leaving a tiny bit of slack so the bracelet stays flexible. Flatten the crimp bead with your pliers. -
Trim Excess Wire:
Trim the excess wire tail as close to the crimp as possible using your flush cutters. -
Open the Jump Ring:
Locate your gold jump ring. Using two pairs of pliers (flat nose and chain nose work best), gently twist the ring open sideways—never pull it apart. -
Hang the Charm:
Slide the gold shell charm onto the open jump ring, then hook the ring onto the center gold carrier bead or bail you placed earlier. -
Close the Ring:
Twist the jump ring back into a closed position, ensuring the ends meet perfectly flush so the charm doesn’t slip off.
Level Up: Scent Diffuser
Use unfinished wood beads for the round accents instead of stones. Apply a drop of essential oil to them, turning your jewelry into a wearable diffuser.
Now you have a breezy, beach-inspired bracelet ready to bring a little sunshine to any outfit
Charm Station Trio Design
This elegant bracelet design features sections of soft blush, terracotta, and cream heishi beads separated by shimmering gold accents. The result is a sophisticated yet bohemian piece that feels warm and perfectly balanced on the wrist.
Step-by-Step Guide
Materials
- Polymer clay heishi beads (6mm or 4mm) in: Cream/White, Light Peach/Blush, Terracotta/Rose
- Gold tone spacer beads (various organic shapes/textures)
- Small gold round beads or rondelles
- Gold textured focal beads (slightly larger than the clay beads)
- Strong elastic cord (0.8mm recommended)
- Gold finish lobster clasp
- Gold finish jump rings (4mm and 6mm)
- Gold finish extension chain with tag charm
- Crimping beads or knot covers (calottes)
- Jewelry pliers (chain nose and flat nose)
- Scissors or jewelry snips
- Bead design board or clear tape
- Super glue or jewelry adhesive
Step 1: Planning and Setup
-
Measure and Cut:
Begin by measuring your wrist to determine the desired length using the elastic cord. I like to add about 3-4 inches of extra cord to make the knotting process easier at the end. -
Secure the End:
Before you start beading, place a piece of clear tape over one end of your elastic cord or attach a temporary stopper bead so your beads don’t slide off immediately. -
Layout Your Pattern:
Lay out your bead design on a bead board or a towel. The pattern consists of color blocks separated by gold spacers. The sequence shown is: White block, Peach block, Terracotta block, Peach block, Terracotta block.
Gold Preservation
To keep your gold spacers shiny, coat them with a thin layer of clear nail polish before stringing. This prevents tarnishing from skin oils.
Step 2: Beading the Pattern
-
Start the First Section:
String on a crimp bead cover (or calotte) first, facing away from the clasp end, followed by a gold jump ring if you aren’t using a calotte that has a loop attached. -
Create the First Gold Chunk:
Thread on a textured gold spacer bead, followed by a small stack of about 8-10 Terracotta clay heishi beads. -
Add a Gold Spacer:
Separate the terracotta section with a single smooth gold rondelle bead to create definition. -
Transition to Peach:
Add your first block of Light Peach beads. Aim for a slightly longer section here, using about 12-15 beads. -
Insert Texture:
Place a highly textured, slightly larger gold bead here. This acts as a ‘station’ marker in the design. -
Start the Cream Block:
Thread on the Cream/White heishi beads. This is the central high-contrast section, so keep it compact—about 8 beads looks perfect. -
Add the Second Station:
Sandwich the white section by adding another one of those textured gold focal beads. -
Repeat the Peach:
Create symmetry by adding another section of Light Peach beads, matching the count of your previous peach section. -
Add Definition:
Insert a smooth gold rondelle spacer again. -
Add Terracotta:
String on your second block of Terracotta beads. -
Final Gold Accent:
Finish the bead pattern with a textured gold spacer and a smooth gold rondelle to mirror the start. -
Add Final Crimp Cover:
Thread on your second crimp bead cover (calotte), ensuring it is facing the correct way (cup side facing the beads).
Step 3: Finishing Touches
-
Secure the Ends:
Tie a secure surgeon’s knot with the elastic cord ends inside the cup of the calotte. Add a tiny dot of super glue to the knot. -
Close the Findings:
Carefully close the calotte shells over the knot using your flat nose pliers. Trim any excess elastic close to the metal. -
Attach the Clasp:
Open a 4mm jump ring using two pairs of pliers (twist sideways, don’t pull apart). Slide it through the loop of one calotte and attach the lobster clasp. Close the ring securely. -
Attach the Extension Chain:
Open another jump ring and attach it to the loop of the other calotte. Slide on the extension chain and close the ring. -
Add the Charm:
For that professional finish, use a small jump ring to attach a small metal tag or charm to the very end of the extension chain.
Mixed Textures
Swap the smooth round gold spacers for tiny rhinestone rondelles to add a subtle sparkle that catches the light between clay sections.
Now you have a stunning, warm-toned accessory ready to layer with your favorite watch or bangles
Heart Bead Sweet Spot
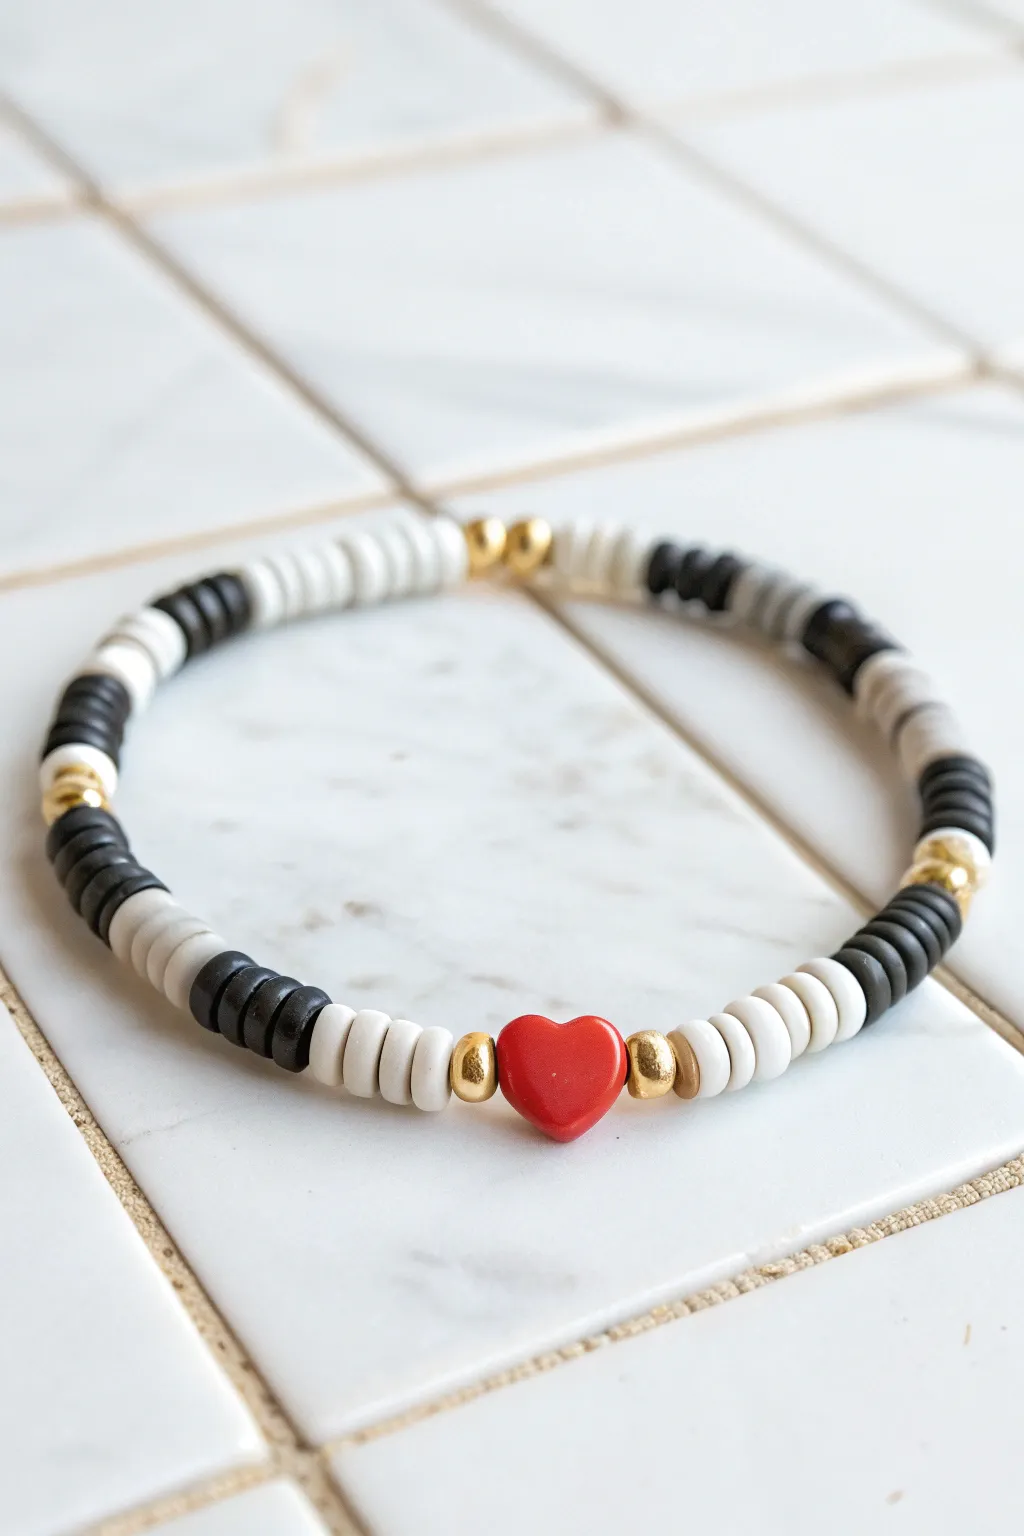
This striking bracelet balances modern minimalism with a pop of romance, featuring a crisp black and white pattern anchored by a vibrant red heart. It’s the perfect stackable accessory that looks sophisticated but is surprisingly simple to string together.
How-To Guide
Materials
- Polymer clay heishi beads (flat disc beads) in black
- Polymer clay heishi beads (flat disc beads) in white
- One red heart-shaped bead (vertical hole)
- Small round gold spacer beads (approx. 4mm)
- Clear elastic beading cord (0.7mm recommended)
- Scissors or jewelry snips
- Super glue or jewelry cement (optional)
- Bead stopper or tape
Step 1: Planning the Pattern
-
Measure your wrist:
Before cutting any string, wrap a piece of string or tape measure around your wrist to determine the desired length. Add about 1/2 inch to this measurement for a comfortable fit. -
Cut the elastic:
Cut a piece of elastic cord about 10-12 inches long. Having extra length makes tying the knot significantly easier at the end. -
Secure the end:
Attach a bead stopper or simply place a piece of tape around one end of the elastic to prevent beads from sliding off while you work. I normally double-check this hold, as losing a string of beads mid-project is heartbreaking.
Keep It Tidy
When threading heishi beads, stack 4-5 on your needle or wire tool at once before sliding them onto the elastic. It speeds up the process significantly compared to doing them one by one.
Step 2: Creating the Centerpiece
-
Thread the first spacer:
Start by threading one round gold spacer bead onto the elastic. This will frame one side of your heart. -
Add the heart:
Slide on the red heart bead. Ensure the heart is oriented correctly if it has a specific vertical direction. -
Finish the focal point:
Add a second gold spacer bead immediately after the heart. You now have your central ‘sweet spot’ completed.
Mix Your Metals
Try swapping the gold spacer beads for silver or rose gold to match your other jewelry, or use faceted spacers instead of smooth round ones for extra sparkle.
Step 3: Building the Pattern
-
Begin the white section:
On the side of the gold bead, thread on approximately 4 white heishi beads. This creates a soft buffer before the bold pattern starts. -
Start the striping:
Thread on a section of black heishi beads approximately the same length as the white section (about 4-5 beads). -
Establish the rhythm:
Continue alternating between small groups of white and black heishi beads. Aim for about 4-6 beads per color block to match the reference photo’s rhythm. -
Insert gold accents:
After completing about three sets of alternating black/white stripes, slide on a single gold spacer bead to break up the pattern. -
Repeat the sequence:
Resume the black and white alternating pattern. Continue this sequence—stripes, then a gold bead—until you reach about halfway around the planned length on one side. -
Mirror the other side:
Now, go back to the other side of your red heart (remove the tape/stopper temporarily if needed) and repeat the exact same pattern so the bracelet is symmetrical. Start with the white beads next to the gold spacer. -
Check the fit:
Once both sides are beaded and the total length looks right, carefully wrap the bracelet around your wrist to verify the size. Add or remove a few disc beads at the ends to adjust.
Step 4: Finishing Touches
-
Pre-stretch the cord:
Gently give the beaded cord a little tug to pre-stretch the elastic. It helps prevent the bracelet from loosening up after the first wear. -
Tie the knot:
Tie a secure surgeon’s knot (right over left, left over right, and loop through an extra time). Pull it tight so the beads sit flush against each other. -
Secure with glue:
Dab a tiny drop of super glue or jewelry cement onto the knot. Let it dry for a minute or two. -
Hide the knot:
Ideally, slide the knot inside one of the nearby gold spacer beads or heishi beads to conceal it. -
Trim excess:
Snip off the excess elastic tail close to the bead, being careful not to cut the main cord or the knot itself.
Slip on your new bracelet and enjoy the customized pop of color on your wrist
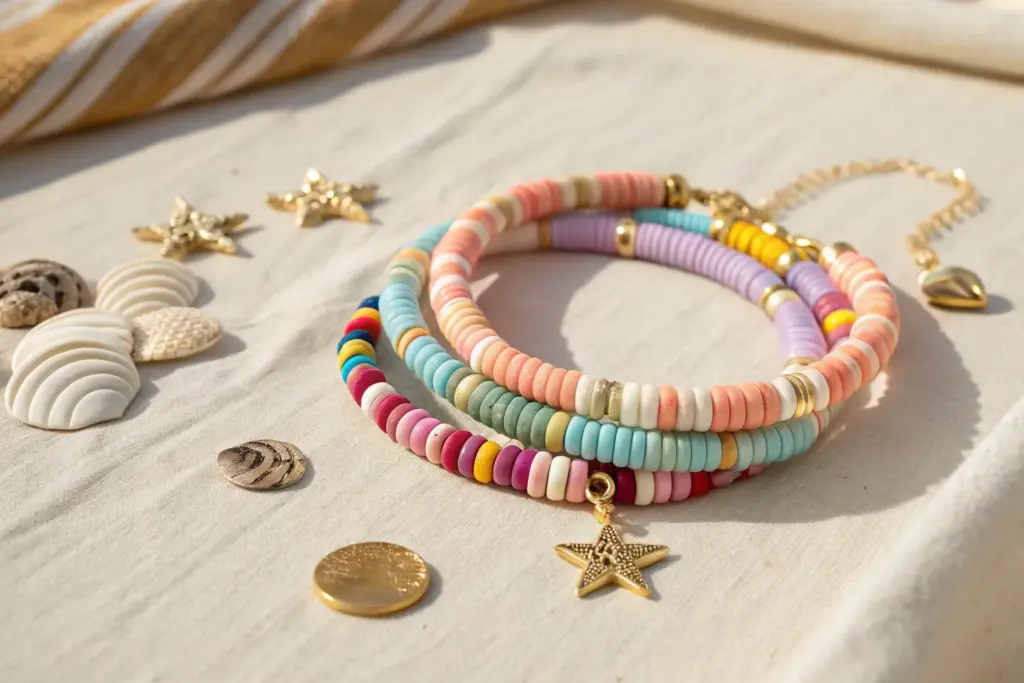
Star Accent Sprinkle Pattern
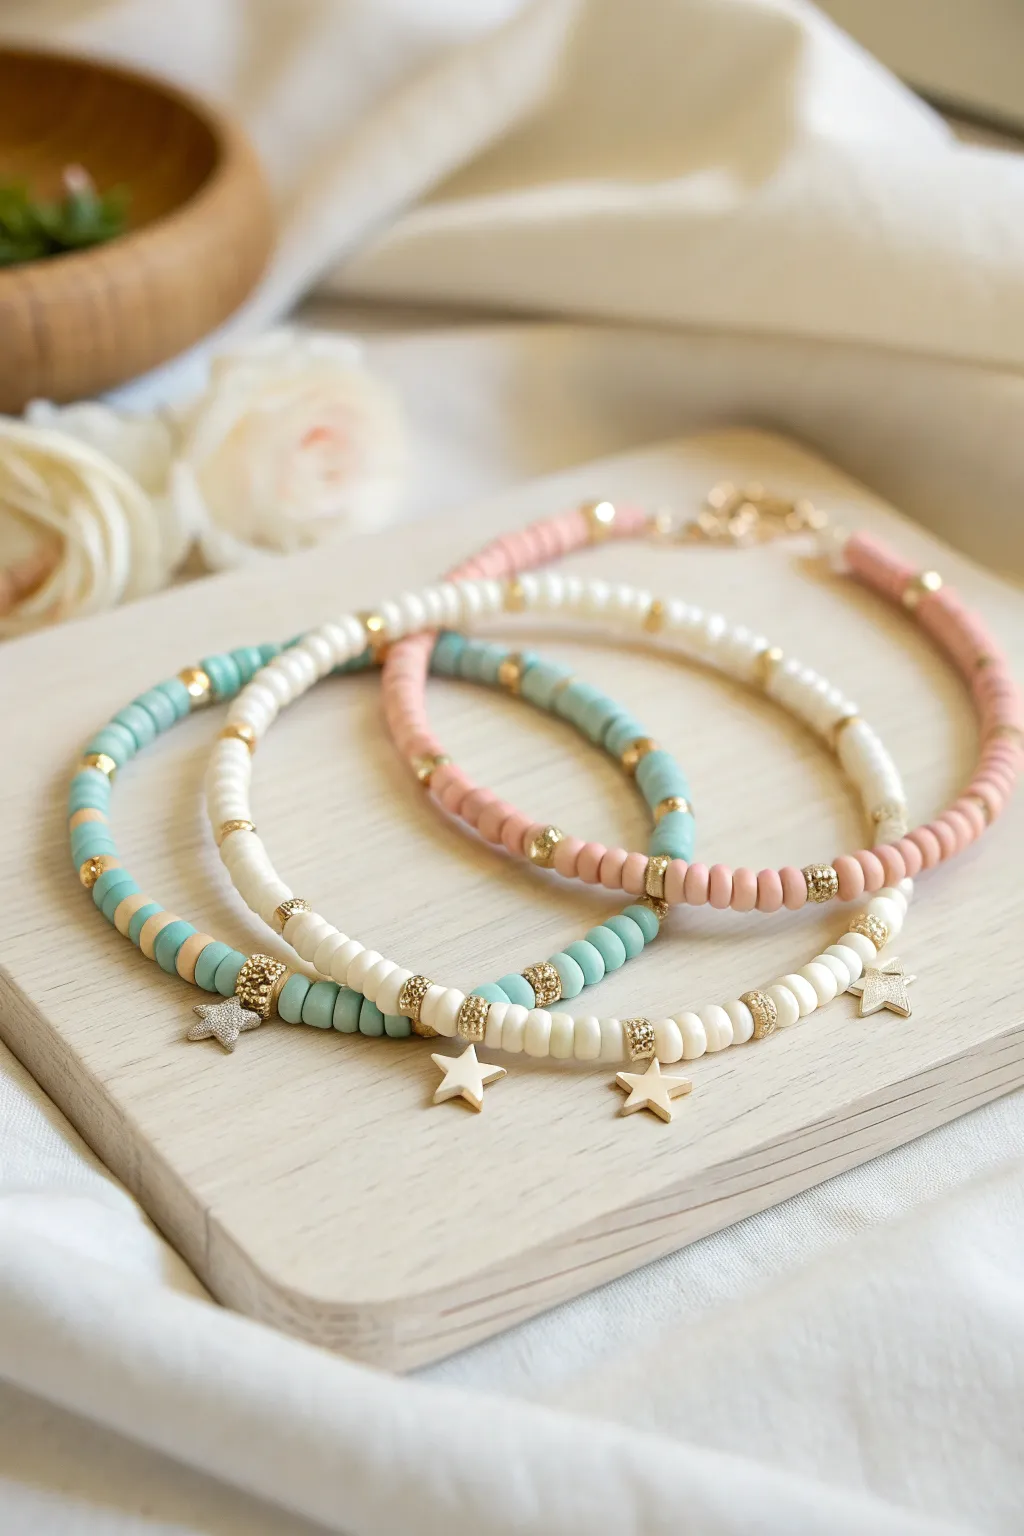
These charming bracelets combine the matte texture of heishi clay beads with the sparkle of gold and delicate star charms. The set of three features distinct but complementary colorways—soft turquoise, creamy white, and blush pink—perfect for wearing stacked or sharing with friends.
Detailed Instructions
Materials
- Polymer clay heishi beads (6mm or 4mm) in three colors: Turquoise, Cream/White, Blush Pink
- Gold tone spacer beads (small rounds or faceted)
- Small textured gold accent beads (barrel or rondelle shaped)
- Gold star charms (small, with top loop)
- Gold jump rings (approx. 4-5mm)
- Strong elastic stretch cord (0.5mm or 0.8mm typical)
- Jewelry glue or clear nail polish
- Scissors
Step 1: Preparation & Design
-
Measure your cord:
Cut a piece of elastic cord about 10-12 inches long for each bracelet. This gives you plenty of extra room to tie the knots securely at the end without struggling. -
Pre-stretch the elastic:
Gently tug on the cord a few times before you start beading. I find this helps prevent the bracelet from stretching out and sagging after the first few wears. -
Plan your pattern:
Lay out your beads on a bead board or a piece of felt. Notice the pattern in the photo uses sections of solid color clay beads separated by metallic gold accents. -
Prepare the charms:
Use your pliers to carefully open the jump rings, slide on your star charms, and close the jump rings securely. You’ll need about 4-5 stars for the white bracelet and 1-2 for the turquoise one.
Sticky Situation
Use a piece of tape on one end of your elastic cord while you string the beads. It acts as a stopper so your hard work doesn’t slide off.
Step 2: The Creamy White Star Bracelet
-
Start the base pattern:
Thread on about 10-12 cream clay beads. Creating these blocks of color sets the rhythm for the bracelet. -
Add a gold accent:
Slide on a textured gold spacer bead. These act as dividers between your solid color sections. -
Attach the first star:
Slide the jump ring of one star charm onto the cord, positioning it right next to the gold spacer. -
Continue the sequence:
Repeat the pattern: 10-12 cream beads, one gold spacer, followed immediately by a star charm. -
Check the fit:
Wrap the strand around your wrist. If you need more length, add a small section of beads without a charm at the very end.
Step 3: The Turquoise & Pink Bracelets
-
Create the color blocks:
For the turquoise bracelet, use a slightly different rhythm. Thread on about 6 turquoise heishi beads. -
Insert mixed metallic spacers:
Add a simple round gold spacer, followed by a single contrasting bead (like cream or peach), and another round gold spacer. -
Incorporate the focal charm:
For the turquoise design, place a single textured gold bead and one star charm in the center of the bracelet design to act as a focal point, rather than repeating it all the way around. -
Build the pink strand:
For the pink bracelet, keep it simple to balance the stack. Create long sections of pink beads (about 20-25) separated only by single larger gold faceted beads or textured spacers. -
Vary the texture:
Mix flat disc spacers and rounded gold beads on the pink strand to add visual interest without needing charms.
Mix & Match
Swap the star charms for tiny crescent moons, hearts, or initials to personalize the stack for a specific gift or theme.
Step 4: Finishing Touches
-
Tie the knot:
Bring the ends of your elastic cord together. Tie a standard square knot (right over left, left over right) and pull tight. -
Secure with adhesive:
Place a tiny drop of jewelry glue or clear nail polish directly onto the knot. This is crucial for longevity. -
Hide the knot:
If possible, slide an adjacent bead with a larger hole over the knot while the glue is still wet to conceal it. -
Trim excess cord:
Once the glue is fully dry, snip off the excess elastic tails close to the bead, being careful not to cut the main cord.
Now you have a gorgeous stack of beachy, bohemian bracelets ready to wear all summer long
Pastel Sorbet Gradient
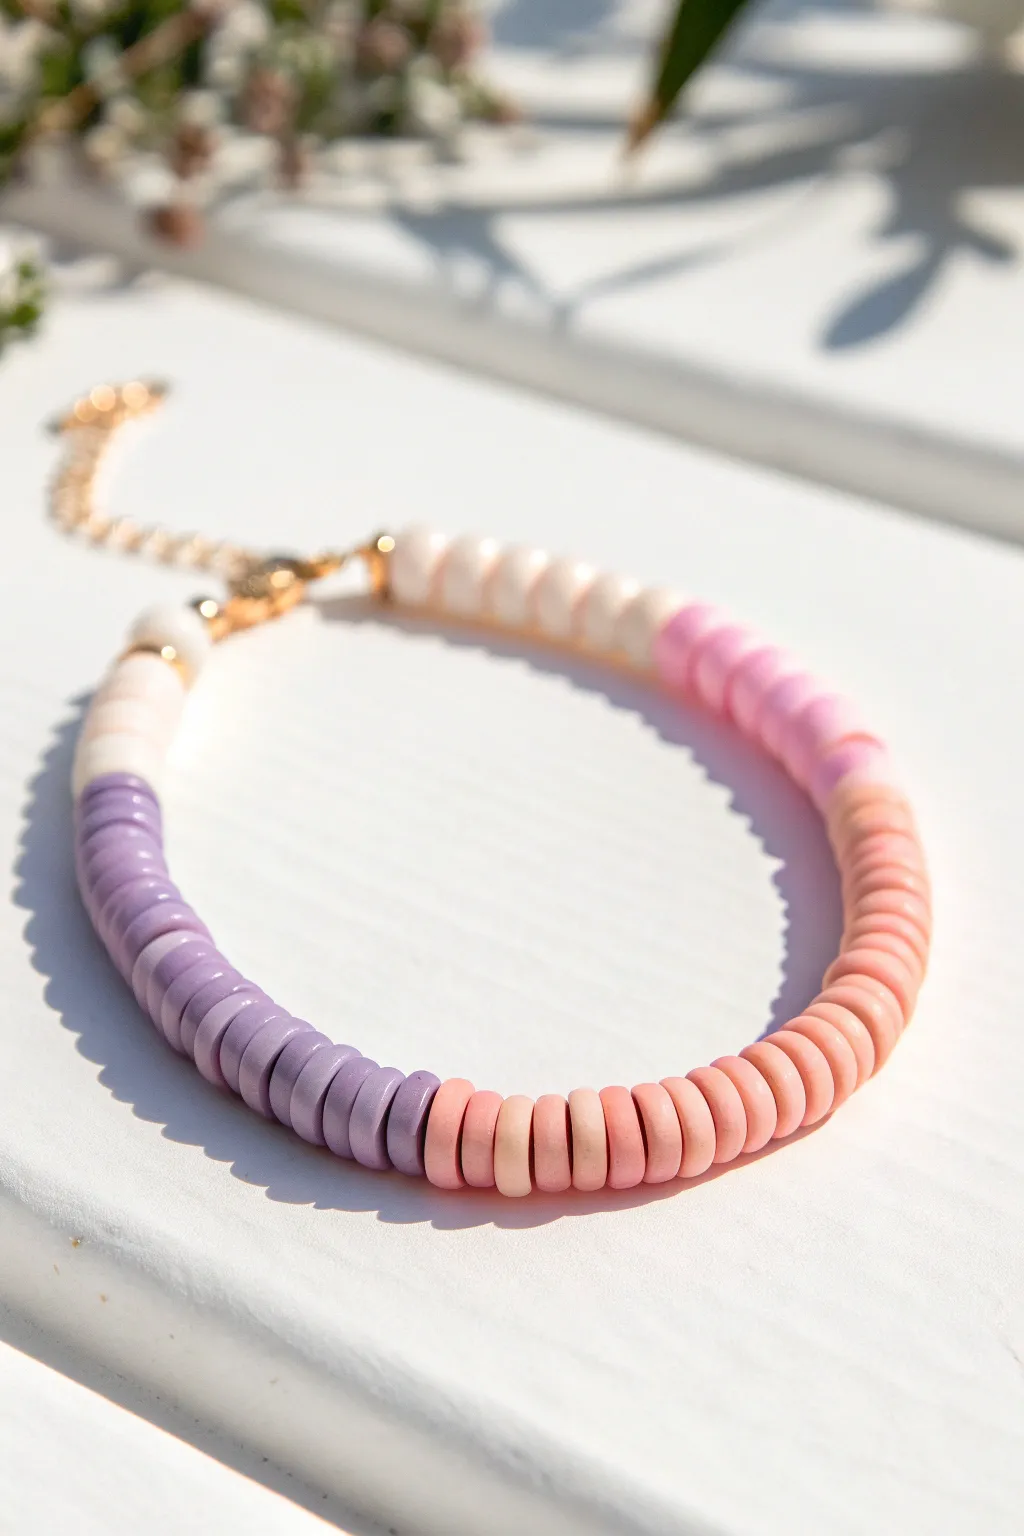
This dreamy bracelet captures the soft, melting hues of summer sorbet with a smooth gradient of polymer clay heishi beads. The transition from creamy white to lavender, peach, and pink creates a sophisticated yet playful accessory perfect for stacking.
Step-by-Step Tutorial
Materials
- 6mm flat disc polymer clay beads (Heishi beads) in cream/off-white
- 6mm flat disc polymer clay beads in lavender/light purple
- 6mm flat disc polymer clay beads in peach or coral
- 6mm flat disc polymer clay beads in light pink
- Gold-plated lobster clasp
- Gold-plated extension chain
- 2 Gold open jump rings (4mm or 5mm)
- 2 Gold crimp beads
- 2 Gold clam shell bead tips (calottes) or crimp covers
- Clear elastic bead cord (0.8mm) or beading wire (Tiger tail)
- Jewelry pliers (flat nose and chain nose)
- Scissors or wire cutters
- Bead design board or masking tape
Step 1: Planning the Pattern
-
Measure your wrist:
Wrap a piece of string around your wrist to find your size, then add about half an inch for a comfortable fit. Keep the measurement handy. -
Lay out the design:
Using a bead board or a towel on a flat surface, begin laying out your beads to visualize the gradient. The pattern in the image follows distinct color blocks rather than a bead-by-bead mix. -
Create the cream section:
Start with a segment of cream or off-white beads. Aim for about 1.5 inches of length for this first section. -
Transition to lavender:
Follow the cream section immediately with a block of lavender beads. Make this section slightly longer, perhaps around 2 inches, to serve as a focal point on the wrist. -
Add the peach tone:
Next, place your peach or soft coral beads. This segment should balance the lavender, roughly equal in length. -
Finish with pink:
Complete the loop with the light pink beads, ensuring the total length matches your measured wrist size. Adjust by adding or removing a few beads from each section until the proportions look pleasing.
Gradient Smoothness
For a smoother blend, mix 2-3 beads of the next color into the end of the previous color block before switching completely.
Step 2: Stringing and Assembly
-
Cut the cord:
Cut a piece of beading wire or elastic cord about 10 inches long. This gives you plenty of extra room to work with the clasps. -
Secure the first end:
Thread a crimp bead onto the wire, followed by a jump ring or the loop of your extension chain. Loop the wire back through the crimp bead. -
Crimp firmly:
Use your flat nose pliers to squash the crimp bead flat, securing the wire. For a polished look, you can cover this with a clam shell bead tip. -
Start stringing:
Begin threading your beads onto the wire, following the pattern you laid out. I find it helpful to double-check the gradient against the layout every inch or so to ensure no colors got mixed up. -
Check the fit:
Once all beads are strung, carefully wrap the strand around your wrist to verify the size before sealing the other end. -
Prepare the closure:
Thread a crimp bead onto the open end of the wire, followed by the lobster clasp. -
Create the loop:
Feed the wire back through the crimp bead and pull it tight, but leave a tiny bit of slack (about 1mm) so the bracelet remains flexible and doesn’t become stiff. -
Secure the second crimp:
Flatten the crimp bead with your pliers to lock the clasp in place. -
Hide the tail:
Thread the excess wire tail back through the first two or three beads on the strand to hide it. -
Trim excess wire:
Using your wire cutters or sharp scissors, snip off the remaining wire as close to the beads as possible without cutting the main strand.
Gold Accents
Insert a tiny gold spacer bead or a flat gold disc bead between color changes to make the transition pop and add a metallic shine.
Your wrist now sports a beautiful sunset gradient ready for sunny days and layered styling
Sunset-to-Ocean Ombré
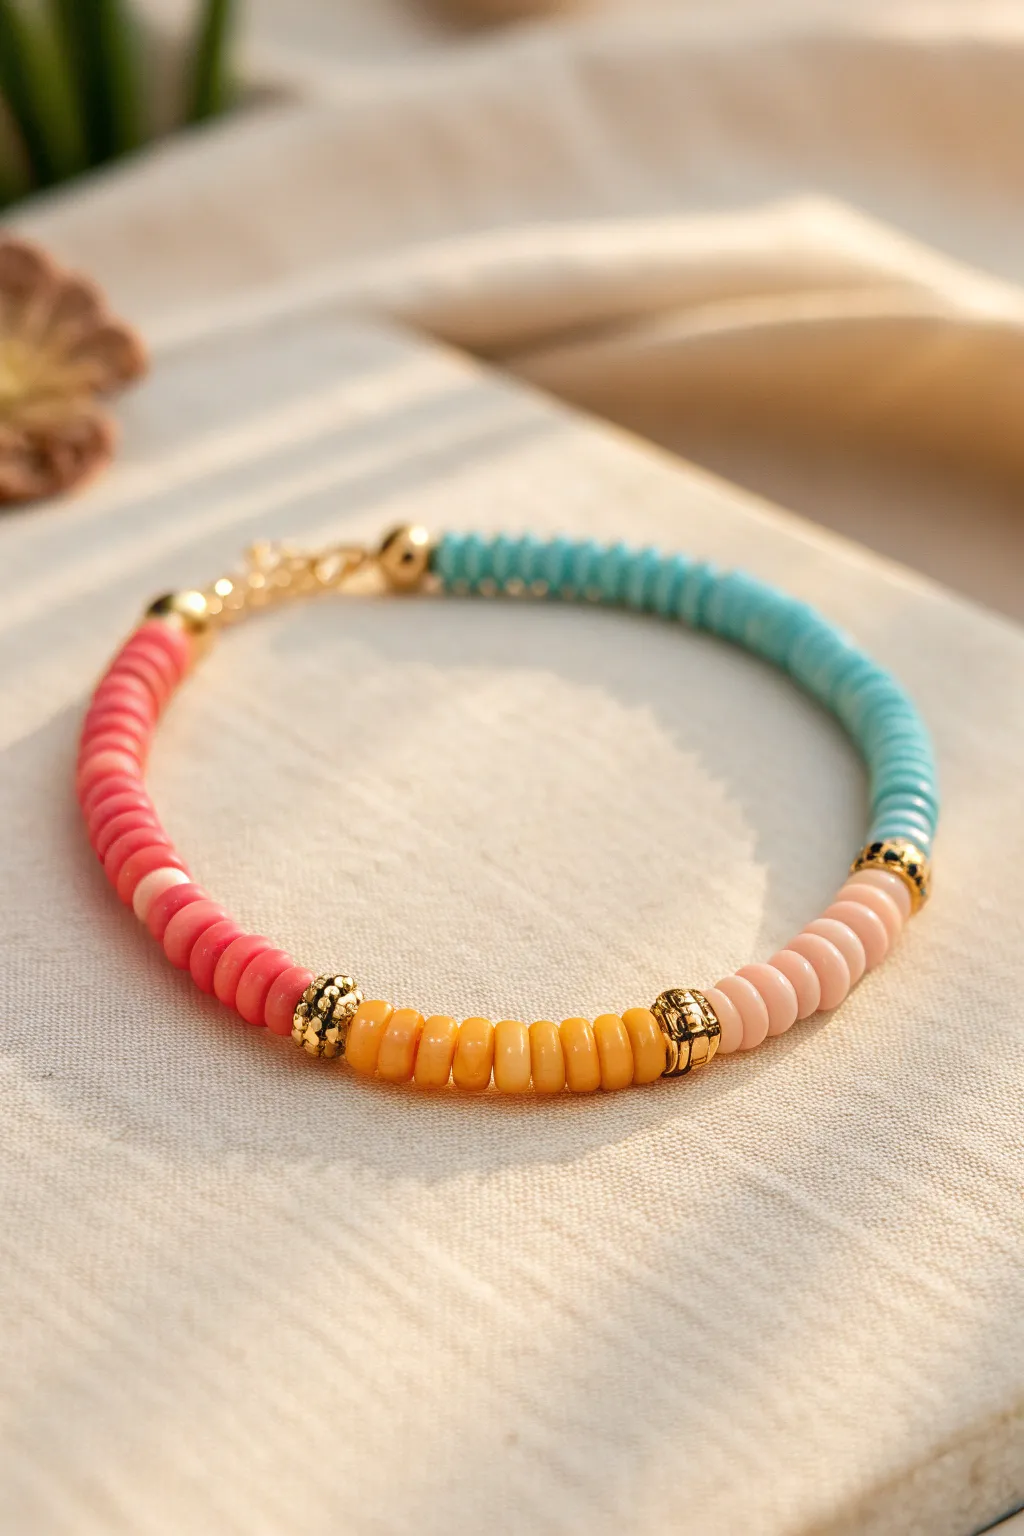
Capture the magic of golden hour meeting the sea with this stunning segmented bracelet. This design features distinct blocks of color separated by elegant gold spacers, moving from warm corals and oranges into cool, calming turquoise.
How-To Guide
Materials
- Polymer clay heishi beads (6mm or similar): Dark Coral/Pink
- Polymer clay heishi beads: Bright Yellow/Orange
- Polymer clay heishi beads: Light Peach/Blush
- Polymer clay heishi beads: Turquoise/Teal
- Gold-tone metal spacer beads: textured rounds or nuggets
- Gold-tone crimp covers
- Gold-tone lobster clasp
- Gold-tone jump rings and chain extender
- Flexible beading wire (e.g., Soft Flex or Beadalon, 0.015-0.018 in)
- Crimp beads or crimp tubes (2mm)
- Wire cutters
- Chain nose pliers
- Flat nose pliers
Step 1: Setting up the Base
-
Measure and cut:
Begin by measuring your wrist size. Add about 2 inches to this measurement to allow room for crimping and clasping. Cut a length of flexible beading wire using your wire cutters. -
Attach the first clasp component:
Thread a crimp bead onto one end of the wire, followed by a jump ring or the loop of your chain extender. Loop the wire back through the crimp bead. -
Secure the crimp:
Using your flat nose pliers (or specialized crimping pliers if you have them), flatten the crimp bead securely. Give the wire a gentle tug to ensure it holds. -
Hide the crimp:
Place a gold crimp cover over the flattened crimp bead. Use your pliers to gently close the cover until it looks like a round gold bead.
Uneven Blocks?
Count your beads before stringing! Laying them out on a bead board or ruler first ensures your color blocks are perfectly proportional before you commit.
Step 2: Creating the Color Blocks
-
Start with turquoise:
String on your turquoise clay beads. You’ll want this section to cover roughly half of the bracelet’s circumference, creating the ‘ocean’ side. I usually count around 35-40 beads depending on wrist size. -
Add a gold accent:
Select a textured gold spacer bead—something with a bit of visual weight like a nugget or rondelle—and slide it on next to finish the turquoise section. -
The first sunset transition:
Now transition to the warm tones. String on a small section of light peach or blush beads. Use about 8 to 10 beads here for a short, delicate transitional block. -
Second gold separation:
Add another textured gold spacer bead to bracket the peach section. -
Mid-sunset orange:
Thread on the bright yellow-orange beads. Make this section slightly longer than the peach one, using approximately 10 to 12 beads to create a vibrant pop of color. -
Third gold spacer:
Slide on your third gold spacer bead to close off the orange block. -
Deep coral finish:
Finish the beading pattern with the dark coral or deep pink beads. This section should mirror the opposite side’s length (minus the clasp allowance), typically using around 15-20 beads. -
Final gold accent:
Add one last small gold bead (a simple round one often works best here) just before the clasp to polish off the look.
Step 3: Finishing the Bracelet
-
Check the fit:
Wrap the unfinished strand around your wrist to verify the sizing. The beads should sit comfortably without gaps, but not be too tight. -
Prepare the final crimp:
Thread a crimp bead onto the open wire end, followed by the lobster clasp. -
Loop and tighten:
Pass the wire back down through the crimp bead and through the first few coral beads. Pull the wire until the loop is small but allows the clasp to move freely. -
Secure the end:
Flatten the crimp bead securely with your pliers. Trim the excess wire tail flush with the beads using your wire cutters. -
Cover the crimp:
Just like the start, place a gold crimp cover over the flattened crimp bead and gently close it with pliers for a professional finish.
Level Up: Texture Mix
Replace one of the straight gold spacers with a small pearl or a paved crystal rondelle to add unexpected luxury to the casual clay texture.
Enjoy wearing this vibrant reminder of summer sunsets on your wrist
Neutrals With Metallic Bursts

Embrace sophistication with this stunning combination of matte clay discs, earthy grey stone accents, and brilliant gold hardware. The subtle interplay between the warm beige tones and the cool grey creates a versatile accessory that pairs perfectly with almost any outfit.
Step-by-Step Tutorial
Materials
- Polymer clay heishi disc beads (6mm) in cream/off-white
- Polymer clay heishi disc beads (6mm) in tan or light beige
- 4 Round grey stone or jasper beads (approx 6-8mm)
- 2 Large textured gold geometric spacer beads (approx 8mm)
- Small gold disc spacer beads or heishi spacers
- Small gold daisy spacers or bead caps
- Gold tone clasp (lobster claw) and jump rings
- Crimp beads and crimp covers (gold tone)
- Beading wire (flexible, 7-strand or 19-strand)
- Wire cutters
- Crimping tool or flat nose pliers
Step 1: Planning and Preparation
-
Measure your wrist:
Before cutting any wire, measure your wrist circumference and add about an inch to allow for the bulk of the beads and ease of clasping. -
Cut the wire:
Cut a length of beading wire about 3-4 inches longer than your final measurement. This extra length prevents beads from sliding off while you work and gives you enough room to attach the clasp comfortably. -
Secure one end:
To stop beads from sliding off as you string them, place a piece of tape or a bead stopper on one end of your wire.
Keep It Taut
When stringing flat heishi discs, check for gaps frequently. Push beads together firmly before crimping so no wire shows between the slices.
Step 2: Creating the Central Focal Point
-
Start the center sequence:
We will build the pattern from the center outwards to ensure symmetry. Start by threading one of the round grey stone beads onto the middle of your wire. -
Add gold framing:
On immediately both sides of the grey stone bead, slide on a small gold disc spacer to frame it. -
Transition with clay discs:
Now, add 3 of the tan clay heishi beads on each side of the central stone assembly. -
Add the textured gold accents:
Slide one large textured gold bead onto the wire on the left side, and one on the right side. These large metallic beads act as the main anchors for the design.
Texture Play
Swap the smooth grey stone beads for faceted labradorite or matte lava stone to add an extra dimension of tactile contrast against the soft clay.
Step 3: Building the Pattern Outwards
-
Second clay section:
On both sides, following the large gold bead, add a stack of about 4 tan clay discs. -
Add a separator:
Place a single small gold disc spacer on each side. -
Mix in stone accents:
Thread a round grey stone bead onto both sides. Adding these helps carry the grey theme throughout the bracelet. -
Shift to lighter tones:
Beyond the grey stones, switch to the cream or off-white clay discs. String a long section of these—about 1.5 to 2 inches worth—on each side to create the back portion of the bracelet. -
Interject with spacer details:
Create visual interest in this long cream section by inserting a thin gold disc spacer every 6-8 beads. This breaks up the solid color and adds a hint of shimmer. -
Final stone placement:
About halfway through the cream section on each side, place your final remaining grey stone beads, framed by small gold spacers.
Step 4: Finishing the Bracelet
-
Check the fit:
Wrap the unfinished strand around your wrist to verify the size. Add or remove cream clay discs from the ends to adjust the length until it sits perfectly. -
Attach the first crimp:
On one end, thread on a crimp bead followed by a jump ring (or the clasp component directly). Loop the wire back through the crimp bead. -
Secure the crimp:
Pull the wire snug but not tight—leave a tiny bit of slack so the bracelet can flex. Flatten the crimp bead firmly with your crimping tool or pliers to lock it in place. -
Cover the crimp:
Place a crimp cover over the flattened bead and gently squeeze it shut until it looks like a round gold bead. I find this gives the piece a truly professional finish. -
Complete the second end:
Repeat the crimping process on the other end of the wire, attaching the corresponding part of your clasp. -
Trim excess wire:
Use your flush cutters to trim the remaining wire tails close to the crimp beads. Tuck any sharp ends inside the nearest bead hole if possible.
Now you have a chic, neutral accessory ready to stack or wear solo
Confetti Mix With Clean Breaks
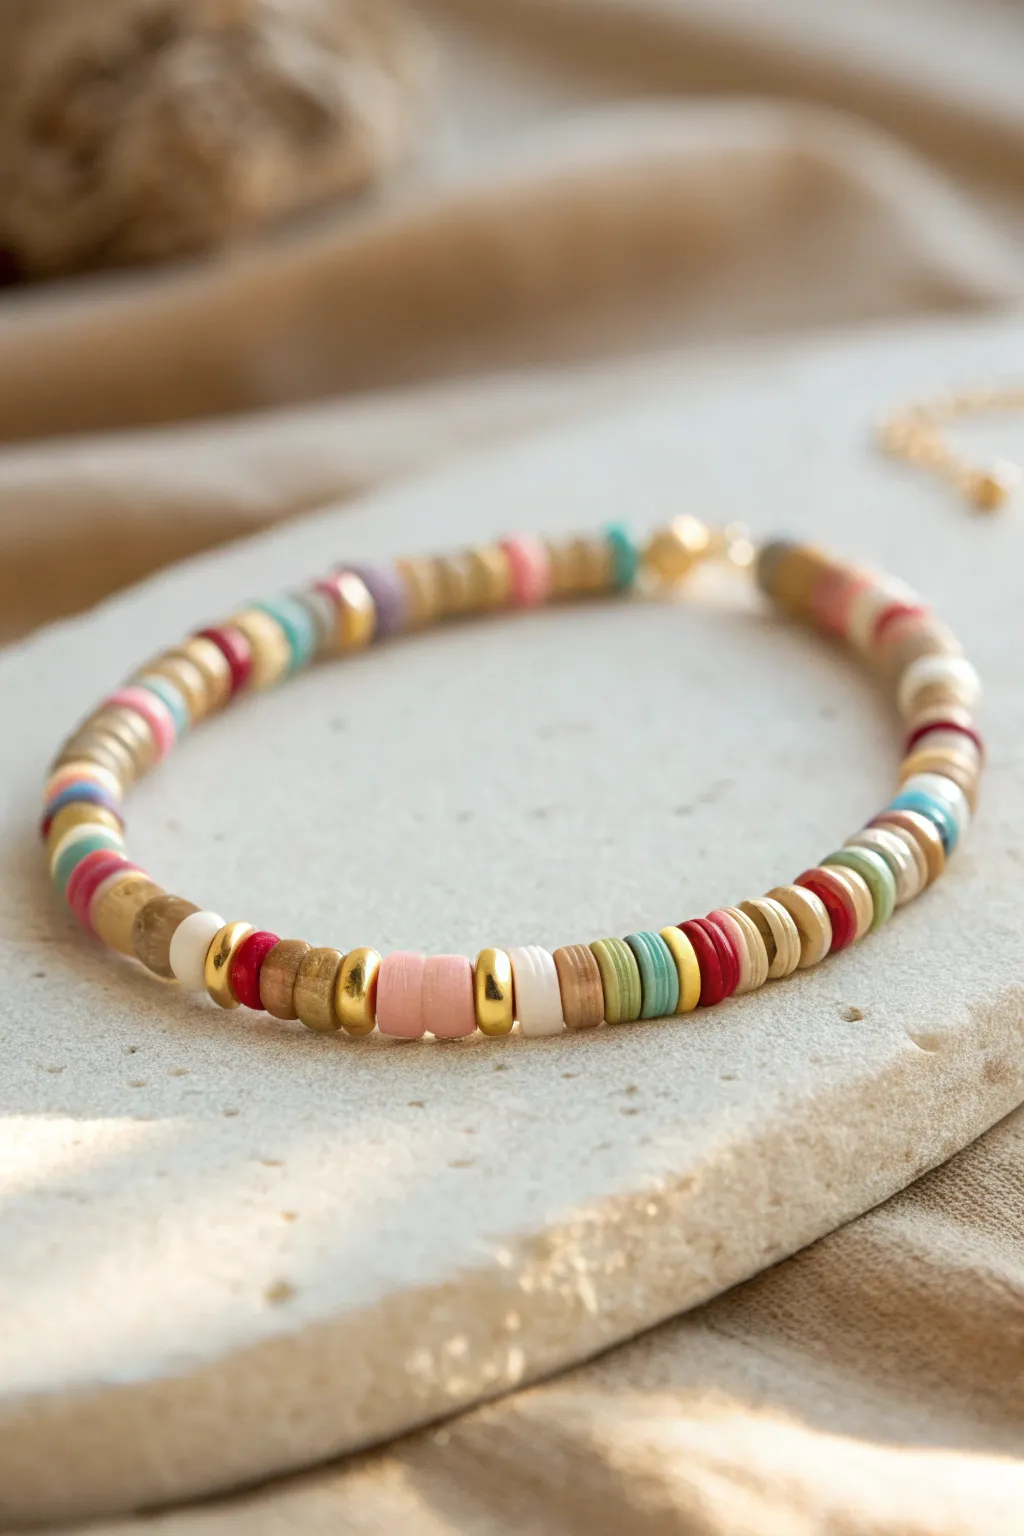
This elegant bracelet balances a playful confetti aesthetic with a grounded, earthy color palette, making it a versatile accessory for any season. By mixing matte polymer clay discs with shining gold accents, you create a piece that feels both organic and polished.
Detailed Instructions
Materials
- Polymer clay heishi beads (flat disc beads) in: beige/sand, white, dusty pink, deep red, teal/turquoise, and tan
- Gold tone metallic spacer beads (rounded or donut shape)
- Elastic beading cord (0.8mm recommended) OR beading wire if using a clasp
- Gold tone lobster clasp
- Gold tone jump rings (4mm or 5mm)
- 2 Crimp beads or bead tips (gold tone)
- Jewelry pliers (flat nose and cutting pliers)
- Beading board or measuring tape
- Super glue or jewelry cement (optional)
Step 1: Preparation and Design
-
Measure your wrist:
Before cutting any wire, wrap a measuring tape around your wrist to find your size. Add about 0.5 to 1 inch to this measurement to ensure a comfortable fit that isn’t too tight. -
Cut the wire:
Cut a piece of beading wire or elastic cord that is at least 4 inches longer than your final bracelet size. This extra length is crucial for tying knots or attaching crimps without frustration. -
Plan your color palette:
Pour out a small amount of each bead color onto your workspace. This ‘confetti’ mix relies on randomness, but controlling the ratio is key; use more of the neutral tan and beige beads as your base, treating the red, teal, and pinks as accents. -
Secure one end:
If using beading wire and a clasp (as shown in the reference), thread a crimp bead onto one end, loop the wire through a jump ring or the clasp itself, and thread it back through the crimp bead. Flatten the crimp bead firmly with your pliers.
Stiff Bracelet Syndrome?
If the finished bracelet feels rigid or kinks up, you likely strung the beads too tightly. Leave a millimeter of slack before crimping to allow the beads to rotate comfortably.
Step 2: Stringing the Pattern
-
Start with neutrals:
Begin threading by adding a small cluster of 3-4 neutral beads (tan or beige). This creates a soft transition near the clasp. -
Introduce the first accent:
Slide on your first pop of color, perhaps a deep red or teal disc. Follow it immediately with a gold spacer bead to make the color sing. -
Building the ‘clean break’:
The key to this look is separating color clusters. After your accent bead, add a larger section of neutral beads—mix the beige, sand, and wood-tone clays randomly here for 4-6 beads. -
Add a gold highlight:
Insert a metallic gold bead. Placing these next to the darker colors like the red or teal really helps define the sections. -
Create a color block:
Thread on two or three pink beads in a row. Sometimes I like to sandwich a white bead in the middle of these colored sections to keep the look fresh and airy. -
Repeat the rhythm:
Continue this irregular pattern: a section of neutrals, a metallic accent, a color pop, then back to neutrals. Avoid perfect repetition; the charm lies in the slight asymmetry. -
Check the length:
Periodically hold the strand up to your wrist or measuring tape. Stop adding beads when you are about 0.5 inches short of your total desired length to account for the clasp assembly.
Pro Tip: Gold Placement
Don’t just use gold beads randomly; place them specifically next to your darkest colors (like the red or teal). The contrast makes the metallic finish pop much brighter.
Step 3: Finishing Touches
-
Add the final crimp:
Thread a crimp bead onto the open end of your wire. -
Attach the closure ring:
Thread the wire through the second jump ring (or the other half of your clasp set). Loop the wire back down through the crimp bead and through the first bead or two of your bracelet. -
Pull tight:
Pull the wire taut so there are no wide gaps between beads, but leave just a hair of wiggle room so the bracelet remains flexible and drapes well. -
Secure the crimp:
Use your flat nose pliers to crush the crimp bead flat, locking everything in place. -
Trim excess wire:
Using your cutting pliers, snip off the excess tail of wire as close to the beads as possible without nicking your main strand. -
Double check security:
Give the bracelet a gentle tug to ensure the crimps are holding tight. If you like, add a tiny drop of jewelry glue over the crimp beads for extra peace of mind.
Slip on your new bracelet and enjoy the subtle pop of color it adds to your wrist stack
Flower Bead Garden Bracelet
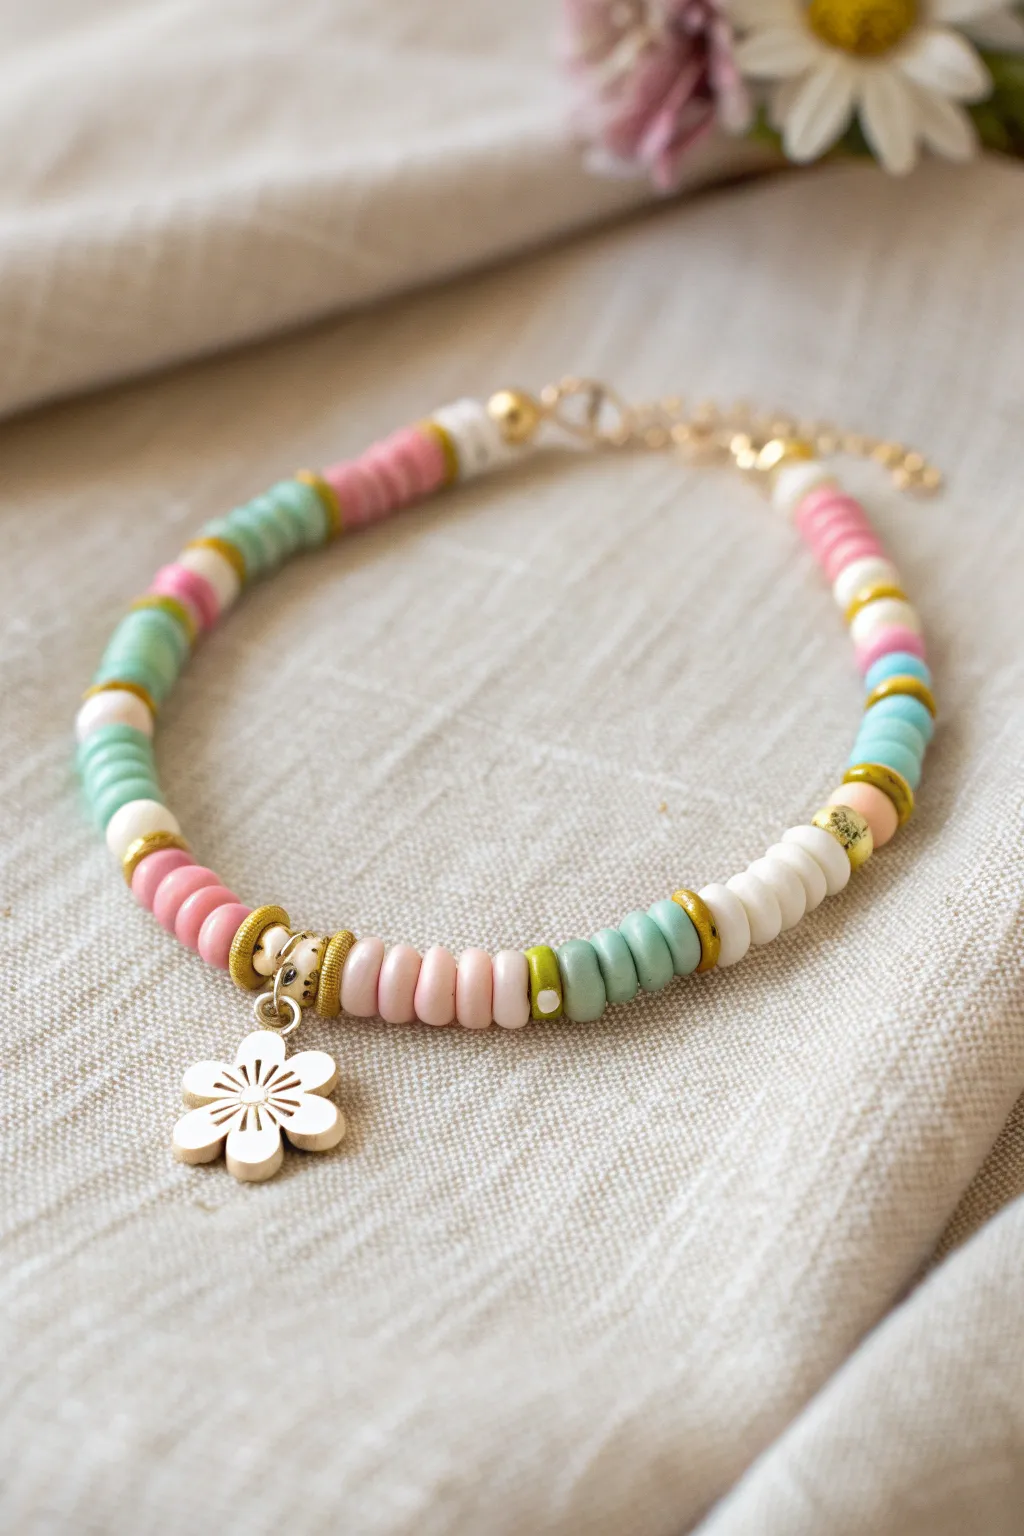
Capture the fresh, playful essence of a garden in bloom with this delightful heishi bead bracelet. Featuring soft pastels, touches of gold, and a darling flower charm, this accessory adds a sweet, handmade touch to any outfit.
Step-by-Step Guide
Materials
- Polymer clay heishi beads (6mm) in light pink
- Polymer clay heishi beads (6mm) in pastel mint green
- Polymer clay heishi beads (6mm) in white
- Gold disc spacer beads
- Gold round beads (small)
- Gold flower charm (enamel or metal)
- 6mm gold jump ring
- Elastic stretch cord (0.8mm recommended)
- Jewelry glue or clear nail polish
- Scissors
Step 1: Planning Your Pattern
-
Measure and cut:
Cut a piece of elastic cord about 10-12 inches long. This generous length makes it much easier to tie knots later without struggling with short ends. -
Secure the end:
Place a piece of tape on one end of your cord or clip on a bead stopper so your beads don’t slide off while you work. I usually just use a binder clip for this. -
Observe the sequence:
Study the photo’s pattern. It relies on color-blocking sections separated by gold accents. The main sequence typically alternates between blocks of pink, mint, and white.
Stringing Success
Use a flexible beading needle with a large eye if you find it hard to push the elastic through the clay beads. It speeds up the process significantly.
Step 2: Stringing the Beads
-
Start the first block:
Begin by threading on about 5 to 7 light pink heishi beads. -
Add a gold accent:
After the pink block, slide on one gold disc spacer bead to act as a shiny separator. -
Create the mint section:
Thread on 5 to 7 pastel mint green heishi beads. -
Add another separator:
Slide on another gold disc spacer bead. -
Thread the white section:
Add a small block of 3 to 5 white heishi beads. This smaller white section acts as a palate cleanser between the colors. -
Repeat the pattern:
Continue repeating these color blocks (Pink -> Gold -> Mint -> Gold -> White -> Gold) until you have reached roughly half of your desired bracelet length. -
Prepare the charm area:
When you reach the center point, thread on two gold disc spacers side-by-side or a decorative gold bead to frame the charm. -
Attach the jump ring:
Open your gold jump ring with pliers, slip the flower charm onto it, and close the ring securely. Slide this jump ring onto the cord between the gold spacers you just added. -
Finish the bead stringing:
Resume your color block pattern until the bracelet measures your wrist size (usually about 6.5 to 7 inches for an average fit).
Step 3: Finishing Touches
-
Check the fit:
Wrap the unfinished strand around your wrist to ensure it fits comfortably, leaving a little slack so it isn’t too tight. -
Pre-stretch the cord:
Gently pull tightly on both ends of the elastic a few times. This pre-stretching step prevents the bracelet from drooping or loosening after the first time you wear it. -
Tie the knot:
Remove the tape or clip. Tie a surgeon’s knot by crossing right over left, then looping the left side through twice before pulling tight. -
Secure the knot:
Apply a tiny dab of jewelry glue or clear nail polish directly onto the knot. Let this dry completely before moving on. -
Hide the ends:
Once dry, trim the excess elastic cord close to the knot. If possible, gently tug the bracelet so the knot slides inside one of the adjacent beads to hide it.
Customize Your Garden
Swap the single flower charm for tiny fruit charms like strawberries or lemons to create a ‘tutti frutti’ summer version of this design.
Now you have a charming accessory perfect for stacking or gifting to a friend
Heishi and Pearl-Style Mix
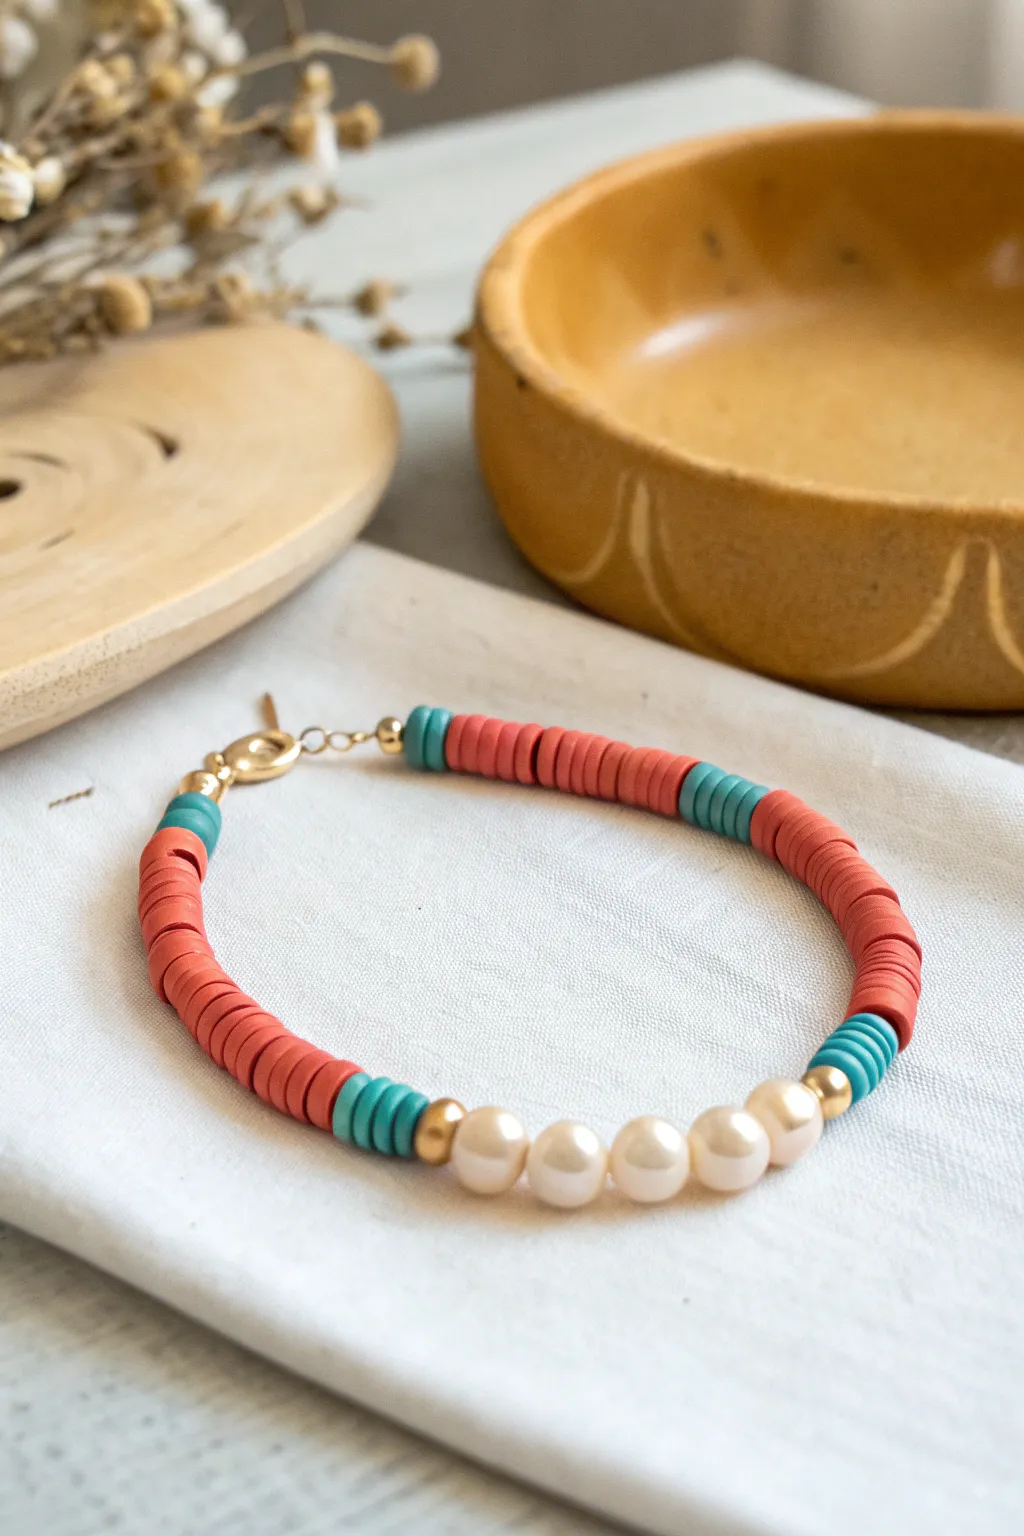
This elegant yet playful bracelet blends the timeless beauty of freshwater pearls with the vibrant pop of polymer clay heishi beads. The matte finish of the clay contrasts beautifully with the luster of pearls and gold accents, creating a versatile accessory perfect for stacking.
Step-by-Step
Materials
- Coral/salmon polymer clay heishi beads (approx. 4-6mm)
- Teal/turquoise polymer clay heishi beads (approx. 4-6mm)
- Small freshwater pearls (4-6mm, off-white/cream)
- Gold round spacer beads (3-4mm)
- Gold lobster clasp and jump rings
- Gold extender chain (optional but recommended)
- Beading wire (flexible, coated)
- 2 Gold crimp beads
- 2 Crimp bead covers (gold)
- Crimping pliers
- Wire cutters
- Tape or a bead stopper
Step 1: Preparation and Design Layout
-
Measure and Cut Wire:
Start by cutting a piece of beading wire about 9-10 inches long. This gives you plenty of extra room to work with the clasps without struggling. -
Secure the End:
Place a piece of tape or a bead stopper on one end of the wire so your beads don’t slide off while you are designing your pattern. -
Plan the Centerpiece:
Lay out your beads on a bead board or cloth to visualize the pattern. For this design, identify five pearls to serve as the focal point.
Stiff Bracelet?
If the bracelet feels rigid after crimping, you likely pulled the wire too tight. Leave a millimeter of slack before the final crimp to allow the beads to curve naturally around your wrist.
Step 2: Stringing the Central Pattern
-
Thread the Pearls:
Begin by sliding the five freshwater pearls onto the middle of the wire. Their natural shape variation adds organic charm to the piece. -
Add Gold Accents:
On both sides of the pearl cluster, slide on one gold round spacer bead. This metallic touch acts as a transition between the elegant pearls and the colorful clay. -
Add Teal Highlights:
Next, thread three teal heishi beads onto each side, right next to the gold spacers.
Step 3: Building the Colorful Strands
-
Begin the Coral Section:
Add a long segment of coral heishi beads to both sides. Aim for about 15-20 beads per side, though you can adjust this length based on your wrist size. -
Create a Teal Stripe:
After the coral section, add another small pop of color by threading three or four teal heishi beads on each side. -
Finish the Pattern:
Complete the beading by adding another section of coral heishi beads on both ends. String enough to reach your desired total bracelet length, keeping in mind the clasp adds about half an inch. -
Final Gold Touch:
End the bead sequence on both sides with one final gold spacer bead to give the ends a polished look against the hardware.
Pro Tip: Pearl Sizing
Since freshwater pearls are irregular, try to select pearls that have roughly the same diameter as your heishi beads (4-6mm) created a smooth silhouette without awkward bumps.
Step 4: Attaching the Clasp
-
Prepare the Crimp:
On the first end, slide on a crimp bead followed by a jump ring (or the loop of your extender chain). -
Loop and Secure:
Take the wire tail and pass it back through the crimp bead and the first gold spacer bead. Pull it tight enough to be secure, but leave a tiny loop so the hardware moves freely. -
Crimp the Bead:
Use your crimping pliers to flatten or fold the crimp bead securely. I always give it a gentle tug to make sure it won’t slip. -
Add a Cover:
Place a crimp cover over the flattened crimp bead and gently squeeze it closed with pliers to make it look like a regular gold bead. -
Finish the Second End:
Repeat the crimping process on the other end, attaching the lobster clasp this time. Be sure to pull the wire taut so there are no gaps between beads, but not so tight the bracelet becomes stiff. -
Trim Excess Wire:
Use your flush cutters to trim the remaining wire tail as close to the beads as possible, ensuring no sharp ends stick out.
Enjoy styling your new handcrafted accessory this season