If you’ve got a block of purple clay calling your name, I’ve got you—this color is basically instant magic in miniature form. Here are my favorite beginner-friendly ideas that lean into soft lavender vibes, bold violet pops, and all the cute little details that make tiny projects feel extra special.
Lavender Kawaii Star Charms
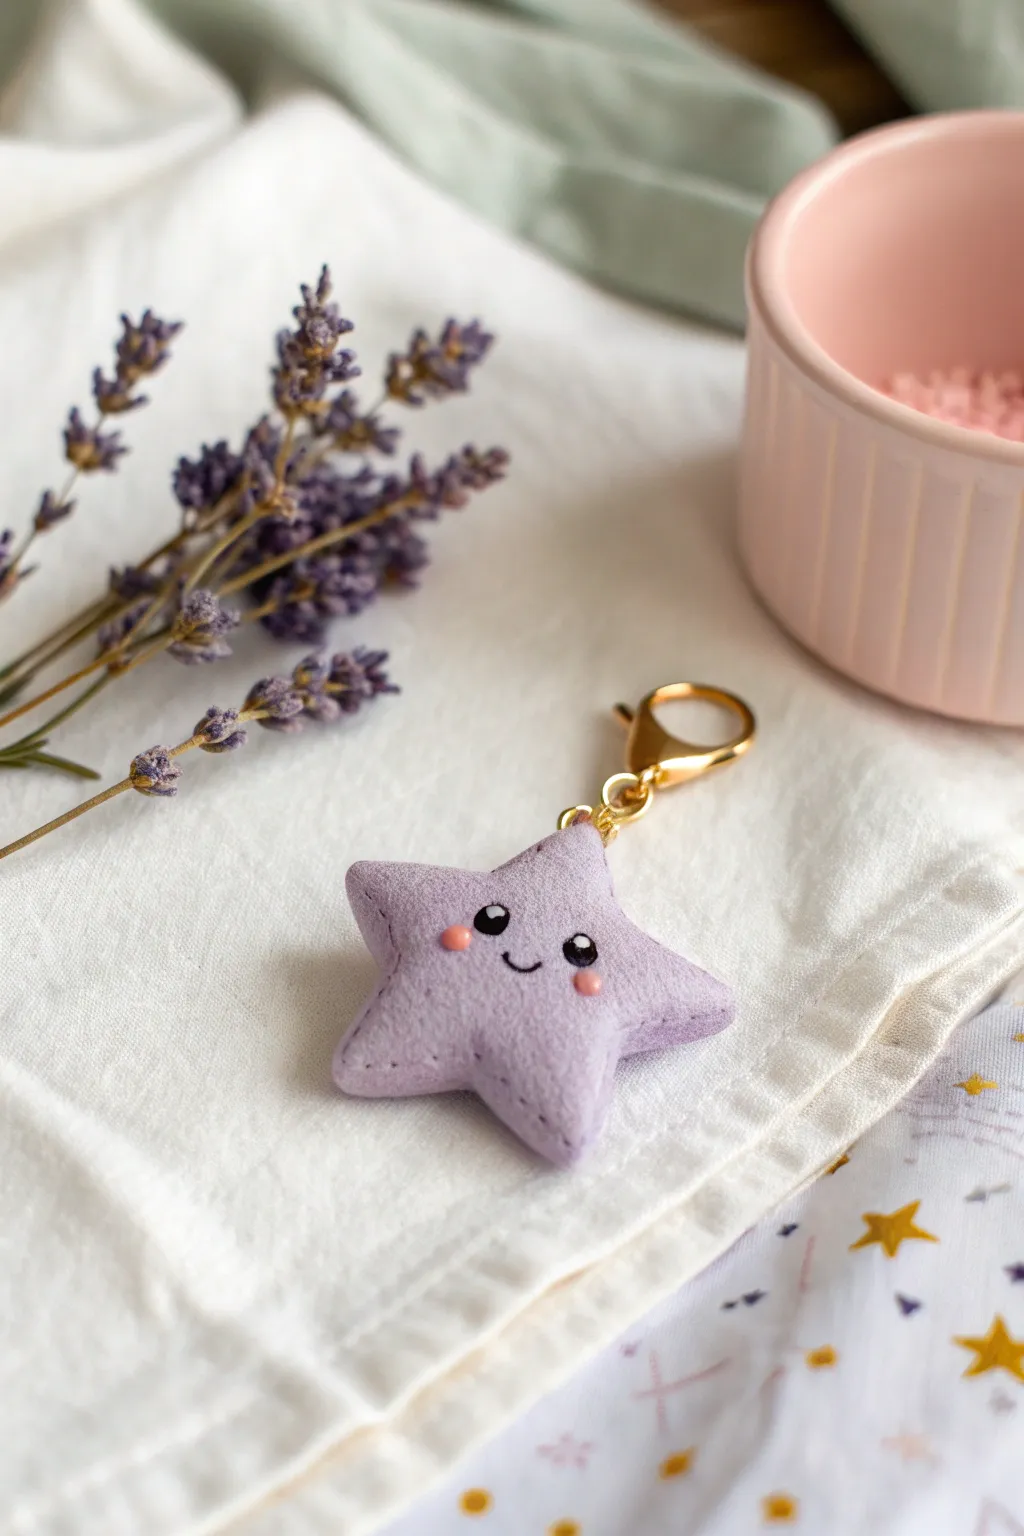
This adorable star charm mimics the soft texture of lavender-colored suede, creating a tactile and visual delight. With its sweet kawaii face and golden hardware, it makes the perfect soothing accessory for your keys or bag.
Step-by-Step
Materials
- Lavender purple polymer clay
- Small amounts of black, white, and pink polymer clay (or acrylic paints)
- Star-shaped cookie cutter (approx. 1.5 – 2 inches)
- Old toothbrush or stiff bristle brush
- Gold screw eye pin
- Gold jump ring and lobster clasp
- Baking tile or parchment paper
- Oven (if using polymer clay)
- Polymer clay glaze (matte or satin, optional)
- Needle tool or toothpick
- Round ball tool (small)
Step 1: Shaping the Base
-
Condition the Clay:
Begin by thoroughly conditioning your lavender polymer clay until it is soft and pliable. Warm clay is less likely to crack during the texturing process, so take your time here. -
Roll Out the Slab:
Roll the clay into a smooth slab that is roughly 1/4 inch thick. You want it to be thick enough to hold the screw eye securely later without bulging. -
Cut the Shape:
Press your star-shaped cutter firmly into the clay slab. Wiggle it slightly to ensure a clean cut, then release the shape and smooth any rough edges with your finger. -
Create the Suede Texture:
This is the magic step. Take an old toothbrush or a stiff stipple brush and firmly tap the bristles all over the surface of the star. Don’t drag the brush; just tap up and down to create tiny dimples that mimic a soft, fabric-like texture. -
Detail the Edges:
For a ‘stitched’ fabric look, use a needle tool to gently press small, evenly spaced dashes around the perimeter of the star, just inside the edge.
Sticky Fingerprints?
If you smudge the texture while adding the face, simply tap the area again with your toothbrush before baking to hide any prints or dents.
Step 2: Adding the Face
-
Prepare the Eye Sockets:
Use a small ball tool to gently impress two shallow indentations where you want the eyes to sit. This helps the black clay sit flush rather than protruding too much. -
Create the Eyes:
Roll two tiny, equal-sized balls of black clay. Place them into the indentations you made and press them flat gently so they adhere. -
Add Sparkle:
Roll two extremely tiny specks of white clay. Place one on the upper right corner of each black eye pupil to give that classic ‘kawaii’ sparkle. -
Form the Cheeks:
Roll two small balls of pink clay. Press these onto the star’s face, slightly below and to the outside of the eyes, flattening them into sweet little blushes. -
Draw the Mouth:
Roll a very thin ‘snake’ of black clay and curve it into a ‘U’ shape for a smile, or simply paint a tiny mouth on after baking if working with clay threads feels too fiddly for you.
Step 3: Assembly and Baking
-
Insert Hardware:
Insert a gold screw eye pin into the top point of the star. Be careful to push it straight down into the center of the clay thickness so it doesn’t poke out the front or back. -
Bake:
Place your star on a baking tile or parchment paper. Bake according to your clay manufacturer’s specific instructions (usually 275°F/135°C for 15-30 minutes depending on thickness). -
Cool Down:
Allow the star to cool completely in the oven or on a dedicated cooling rack. The clay hardens fully only after it returns to room temperature. -
Secure the Pin:
Once cool, unscrew the eye pin, place a tiny dab of superglue on the threads, and screw it back in. This ensures it will never pull out under the weight of keys. -
Attach Clasp:
Use pliers to open a gold jump ring. Thread it through the eye of the screw pin and the loop of your lobster clasp, then close the ring securely.
Scent Infusion
For a true sensory experience, rub a single drop of lavender essential oil onto the back of the baked, unglazed clay. The porous clay holds the scent for days!
Now you have a charming, textured star companion ready to brighten up your daily routine


Lilac Bunny Keychain Charm
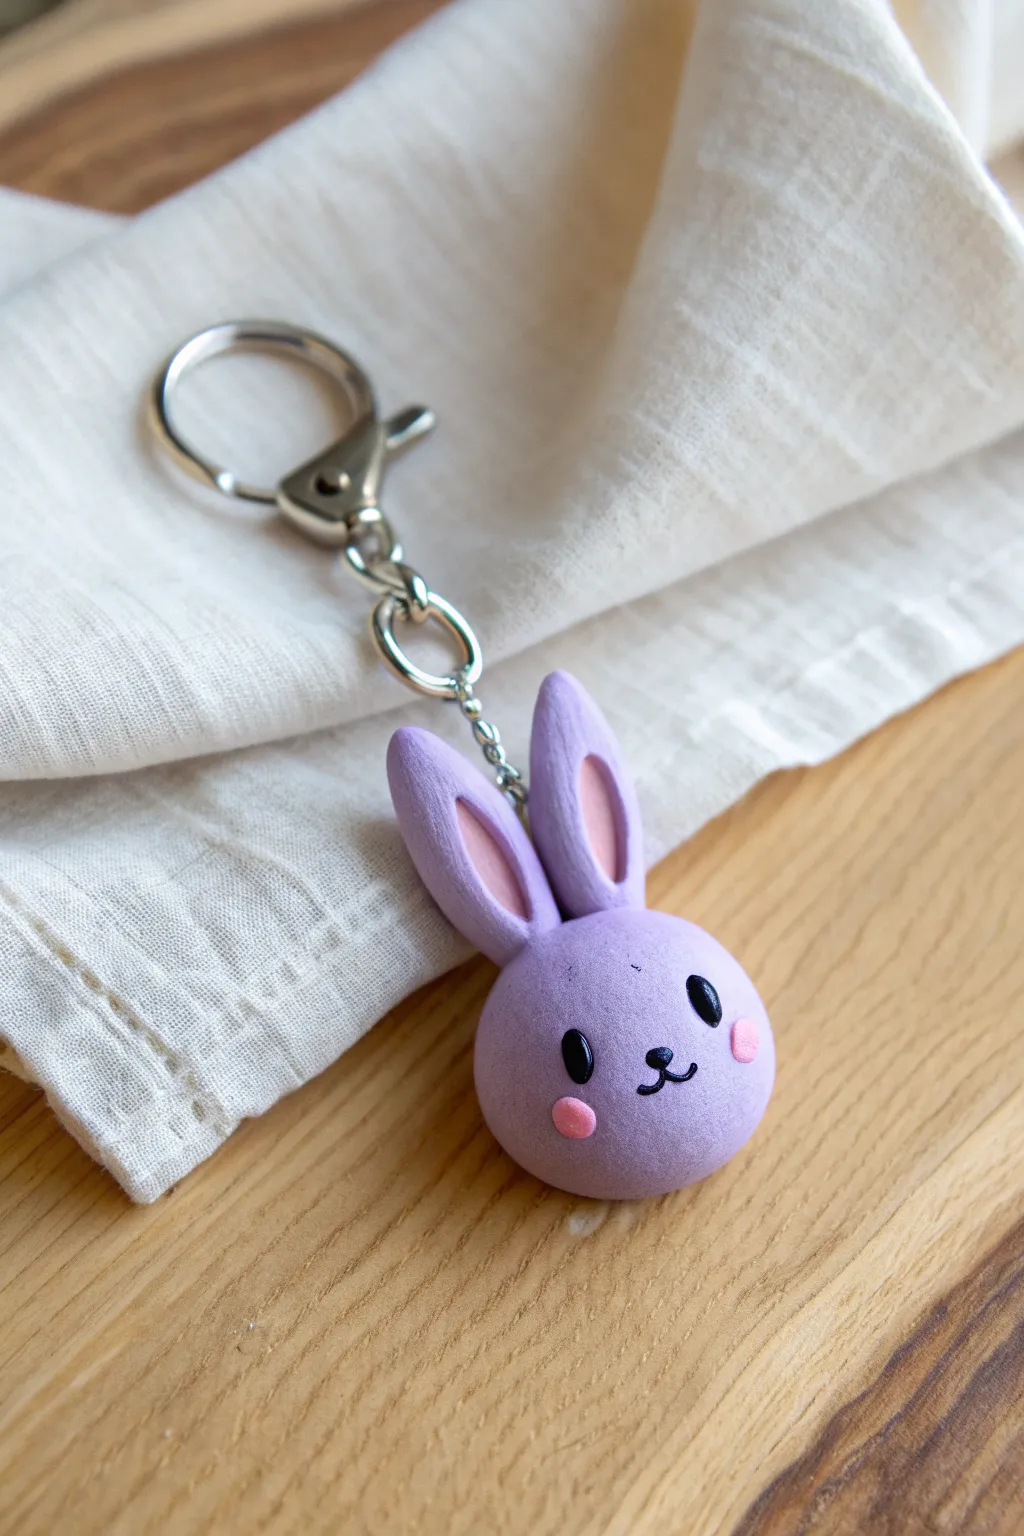
This adorable lilac bunny charm combines a soft, matte finish with cute kawaii features for a perfect accessory. Its simple spherical shape and gentle pastel colors make it a beginner-friendly project that looks professionally crafted.
Step-by-Step Tutorial
Materials
- Polymer clay (lilac/light purple, light pink, black, white)
- Eye pin or screw eye pin
- Keychain hardware (jump rings, chain, lobster clasp)
- Needle tool or toothpick
- Small ball tool
- Dotting tool
- Pliers (round nose and flat nose)
- Gloss glaze (optional, for eyes)
- Baking surface (ceramic tile or parchment paper)
- Oven
Step 1: Shaping the Head
-
Condition the clay:
Start by thoroughly conditioning your lilac clay until it is soft and pliable. This prevents cracking later. -
Roll the base:
Roll a piece of the lilac clay into a smooth ball, approximately 1 inch in diameter. Ensure there are no visible seams or fingerprints. -
Shape the cheeks:
Gently press the spherical ball down just slightly onto your work surface to create a tiny flat base so it doesn’t roll away. -
Add blush:
Take two tiny amounts of light pink clay and roll them into small balls. Flatten them into thin discs and press them onto the lower cheeks of the bunny face.
Clean Clay Tip
Keep baby wipes or rubbing alcohol nearby. Clean your hands and tools before handling the lilac clay to avoid transferring lint or dark pigments.
Step 2: Creating the Ears
-
Form ear shapes:
Roll two equal-sized logs of lilac clay, tapering them at one end so they look like elongated teardrops. -
Create inner ears:
Take smaller amounts of pink clay and roll them into similar, but thinner, teardrop shapes. -
Assemble the ears:
Flatten the lilac teardrops slightly. Place the pink teardrops on top of the lilac ones and press them gently so they merge into a single flat ear shape. -
Attach to head:
Press the wider bottom ends of the ears onto the top of the head. Use a designated blending tool or the back of a fingernail to smooth the seam where the clay attaches.
Texture Twist
Before baking, gently stipple the lilac clay with a toothbrush to create a fuzzy, flocked texture instead of a smooth finish.
Step 3: Adding Facial Features
-
Plan eye placement:
Use a small ball tool to make two shallow indentations where you want the eyes to sit. This helps them stay secure. -
Place the eyes:
Roll two small oval shapes from black clay. Press them firmly into the indentations you created. -
Add eye highlights:
Using a tiny dot of white clay, place a highlight in the upper corner of each black eye to give the bunny life. -
Create the mouth:
Roll a microscopically thin snake of black clay. Cut a tiny ‘V’ or ‘U’ shape for the mouth and a tiny dot for the nose. -
Attach mouth and nose:
carefully place the nose between the eyes and the mouth directly below it. I find a needle tool helps position these tiny pieces without smushing them.
Step 4: Finishing Touches
-
Insert hardware:
Insert an eye pin into the top center of the head, between the ears. You can add a drop of bake-and-bond or liquid clay for extra security. -
Bake:
Bake the charm according to your clay manufacturer’s instructions (usually 275°F/130°C for 15-30 minutes). Let it cool completely. -
Glaze eyes (Optional):
Once cool, you can apply a tiny drop of gloss glaze or UV resin just to the black eyes to make them shine. -
Assemble keychain:
Using pliers, open a jump ring and attach your pre-made chain and lobster clasp to the eye pin on the bunny’s head.
Now you have a sweet little companion to keep your keys safe and stylish


Purple Cat Paw Earrings
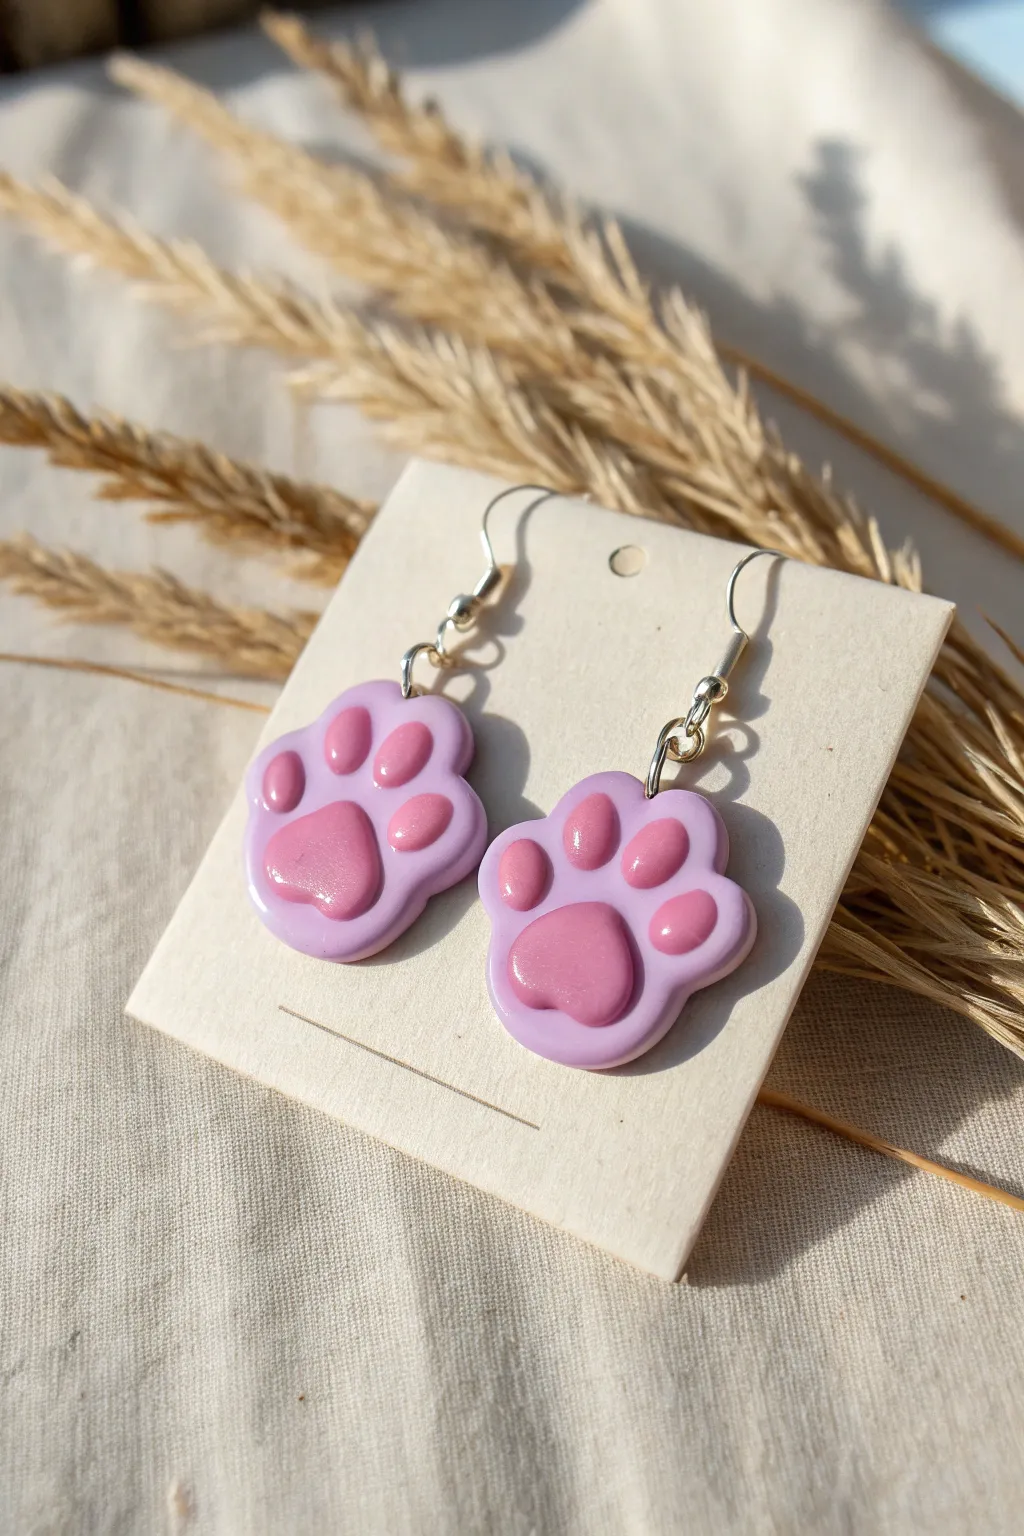
These adorable paw print earrings feature a soft lilac base with contrasting rose-pink toe beans, finished with a high-gloss shine for a professional look. They are lightweight, durable, and perfect for adding a touch of whimsy to any outfit.
Step-by-Step Tutorial
Materials
- Polymer clay (light lavender/purple)
- Polymer clay (rose pink)
- Small circle cutters (two sizes) or ball tools
- Rolling pin or pasta machine
- X-Acto knife or clay blade
- Needle tool or small drill bit
- UV resin or polyurethane gloss varnish
- UV lamp (if using resin)
- Small paintbrush
- Silver jump rings (4mm or 5mm)
- Silver earring hooks
- Jewelry pliers (flat nose and round nose)
- Baking sheet and parchment paper
- Oven
Step 1: Shaping the Clay Base
-
Condition the lilac clay:
Start by warming the light lavender polymer clay in your hands, kneading it until it is soft and pliable. This conditioning step is crucial to prevent cracks during baking. -
Roll out the slab:
Using a rolling pin or a pasta machine on a medium setting (around 3mm thick), roll the lavender clay into a smooth, even sheet. -
Cut the paw shapes:
Create the main paw shape. You can use a specific paw-shaped cutter if you have one. If not, lightly sketch a rounded, slightly organic paw outline on the clay with a needle tool and carefully cut it out with your X-Acto knife. You’ll need two identical pieces. -
Smooth the edges:
Gently run your fingertip along the cut edges of the fresh clay to round them off slightly, removing any sharp angles from the cutting process. -
Make the hole:
Use a needle tool to pierce a small hole at the very top of each paw shape. Make sure the hole is big enough for your jump rings but not too close to the edge to avoid tearing.
Step 2: Adding the Toe Beans
-
Prepare the pink clay:
Condition the rose-pink clay just as you did the lavender, ensuring it is soft and ready for shaping. -
Create the main pad:
Roll two small balls of pink clay for the large central palm pads. Gently press one onto the center of each lavender base, flattening it slightly into a rounded triangular or heart-like shape. -
Form the toes:
Roll eight tiny balls of pink clay for the toe pads—four for each earring. Keep them relatively consistent in size. -
Attach the toes:
Place four pink balls in an arc above the main pad on each earring. Press them down gently so they adhere to the lavender base but still retain a nice, puffy 3D dimension. -
Refine the shape:
I like to use a small ball tool or just my finger to smooth the edges of the pink pads where they meet the purple, ensuring a secure bond.
Smooth Operator
Before baking, use a drop of baby oil on your finger to gently rub out fingerprints on the raw clay for a flawless finish.
Step 3: Baking and Finishing
-
Bake the pieces:
Place your clay paws on a parchment-lined baking sheet. Bake according to your specific brand of clay’s instructions (usually around 275°F or 135°C for 15-30 minutes). -
Cool down:
Allow the pieces to cool completely before moving them. They are fragile while warm. -
Clean surface (optional):
If there are any fingerprints, you can lightly sand them away with fine-grit sandpaper or wipe with a little acetone on a cotton swab. -
Apply gloss finish:
For that wet, shiny look seen in the photo, apply a thin, even layer of UV resin or gloss varnish over the front of the earrings. Don’t forget to coat the sides. -
Cure or dry:
If using UV resin, cure under a UV lamp for 2-3 minutes until hard and tack-free. If using varnish, let it air dry completely according to the bottle instructions. -
Open the jump rings:
Using two pairs of pliers, twist a jump ring open sideways (never pull it apart). -
Assemble the earring:
Slide the jump ring through the hole in the clay paw and then hook on the earring finding. -
Close the ring:
Twist the jump ring back into a closed position, ensuring the ends meet perfectly so the earring doesn’t slip off.
Glitter Upgrade
Mix fine iridescent glitter into the pink clay before shaping to make the toe beans sparkle in the light.
Now you have a charming pair of handmade accessories perfect for any animal lover


Violet Butterfly Hair Clip Topper
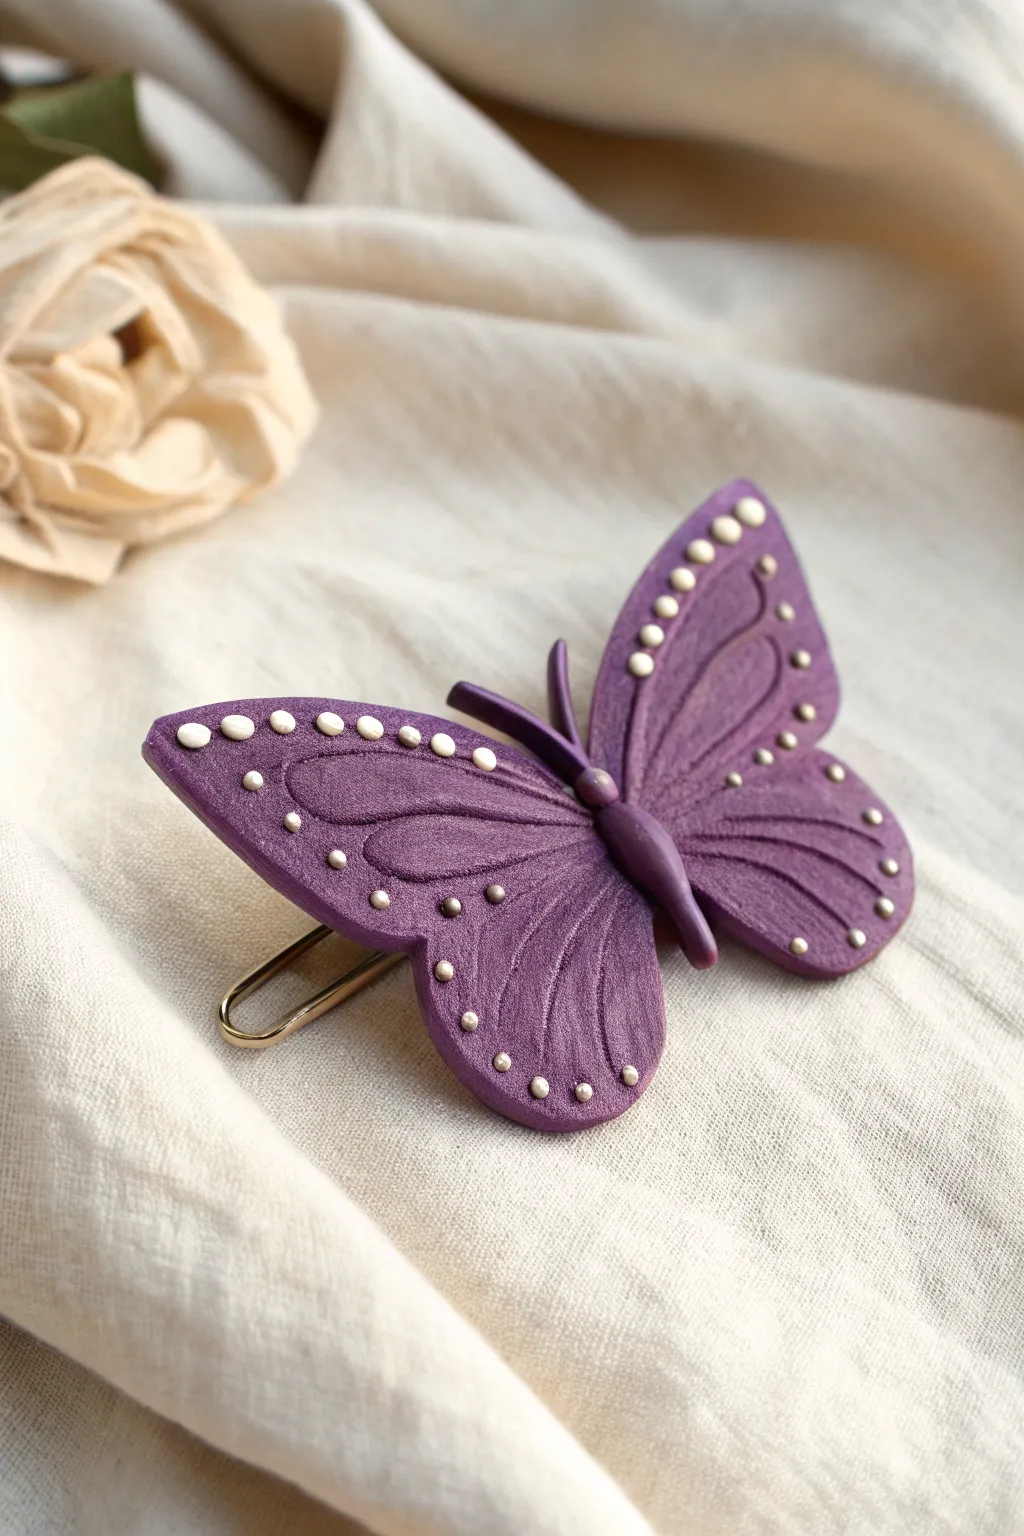
Add a touch of whimsy to your hairstyle with this enchanting purple butterfly hair clip. This polymer clay project features delicate wing texturing and sweet white dotted accents for a polished, professional look.
How-To Guide
Materials
- Purple polymer clay (violet or plum shade)
- White polymer clay
- Gold-tone alligator hair clip blank
- Liquid polymer clay (bake-and-bond) or strong adhesive
- Acrylic roller or pasta machine
- Needle tool or fine-point modeling tool
- Small ball stylus tool
- Butterfly wing cutter (optional) or craft knife/scalpel
- Flexible clay blade
- Ceramic tile or glass work surface
- Oven for baking
Step 1: Shaping the Wings
-
Condition the clay:
Start by thoroughly conditioning your purple clay until it is soft and pliable. Roll it out into a flat sheet, approximately 3mm thick. An acrylic roller works great here, but a pasta machine on a medium setting ensures perfect uniformity. -
Cut the wing shapes:
If you have a butterfly cutter, press it firmly into the clay. Alternatively, sketch a butterfly outline on paper, cut it out to use as a template, and trace around it on the clay with a craft knife. -
Separate the wings:
For this specific design, the butterfly isn’t flat; the wings angle upward slightly. Carefully separate the left and right wing sections or cut the butterfly in half down the center of the body line if it is one piece. -
Smooth the edges:
Gently run your finger along the cut edges of the claywings to round them off slightly. This removes sharp cutting marks and gives the piece a soft, organic finish.
Step 2: Adding Texture and Details
-
Create the main veins:
Using a needle tool or a blunt side of a knife, gently press indentation lines into the wings. Start from the center (where the body will be) and curve outward toward the wing edges to mimic natural vein patterns. -
Define secondary veins:
Add smaller, shorter lines branching off the main veins or near the bottom of the wings for added texture. Don’t press too hard; you just want surface detail, not to cut through the clay. -
Add surface texture:
For that matte, slightly velvety look, I sometimes take a piece of fine grit sandpaper or a stiff brush and very lightly tap perpendicular to the surface. It breaks up the shine of the smooth clay. -
Prepare the white dots:
Condition a very small amount of white clay. Roll it into a tiny, thin snake (about 1mm thick) and slice off minuscule discs. -
Apply the dot border:
Place the tiny white discs along the upper edges of the wings. Use your smallest ball tool or the tip of a needle to press them gently into the purple clay so they adhere completely. -
Indent the dots:
Gently press the center of each white dot with a needle tool to create a tiny dimple. This adds dimension and ensures a mechanical bond between the two clay colors. -
Add metallic accents:
There are tiny metallic-looking dots on the lower wings. You can use gold mica powder on a dot of clay, or simply create small indentations now and paint them with gold acrylic after baking.
Baking Support Tip
To keep the wings lifted while baking, make small V-shaped props out of index cards or cardstock. Place them under the wings so they don’t sag in the oven heat.
Step 3: Assembly and Baking
-
Form the body:
Roll a small sausage of purple clay for the butterfly’s body. Taper it slightly at the bottom (abdomen) and round it at the top (head). -
Attach the wings:
Press the wings into the sides of the clay body. To create the lifted effect seen in the photo, prop up the wings with folded cardstock or tissue paper while the clay is raw. -
Add antennae:
Roll two very thin short strips of purple clay. Attach them to the head area of the body, curving them slightly outwards. -
Secure the joints:
Blend the clay where the wings meet the body on the underside to ensure the structure is solid. A drop of liquid polymer clay here acts as excellent glue. -
Bake the piece:
Place your propped-up butterfly on a ceramic tile. Bake according to your clay manufacturer’s instructions (usually 275°F/130°C for 15-30 minutes). Let it cool completely. -
Attach the clip:
Once cool, turn the butterfly over. Apply strong adhesive (like E6000 or two-part epoxy) to the flat pad of the alligator clip. -
Final bonding:
Press the clip firmly onto the back of the butterfly body. Let the glue cure fully (usually 24 hours) before wearing to ensure longevity.
Level Up: Shimmer Wings
Before baking, lightly brush the purple wings with Pearl Ex mica powder in a violet or interfering gold shade. This adds a magical, iridescent sheen.
Enjoy styling your hair with this charming, handmade accessory that looks delicate but is durable enough for daily wear

The Complete Guide to Pottery Troubleshooting
Uncover the most common ceramic mistakes—from cracking clay to failed glazes—and learn how to fix them fast.
Purple Narwhal Desk Buddy
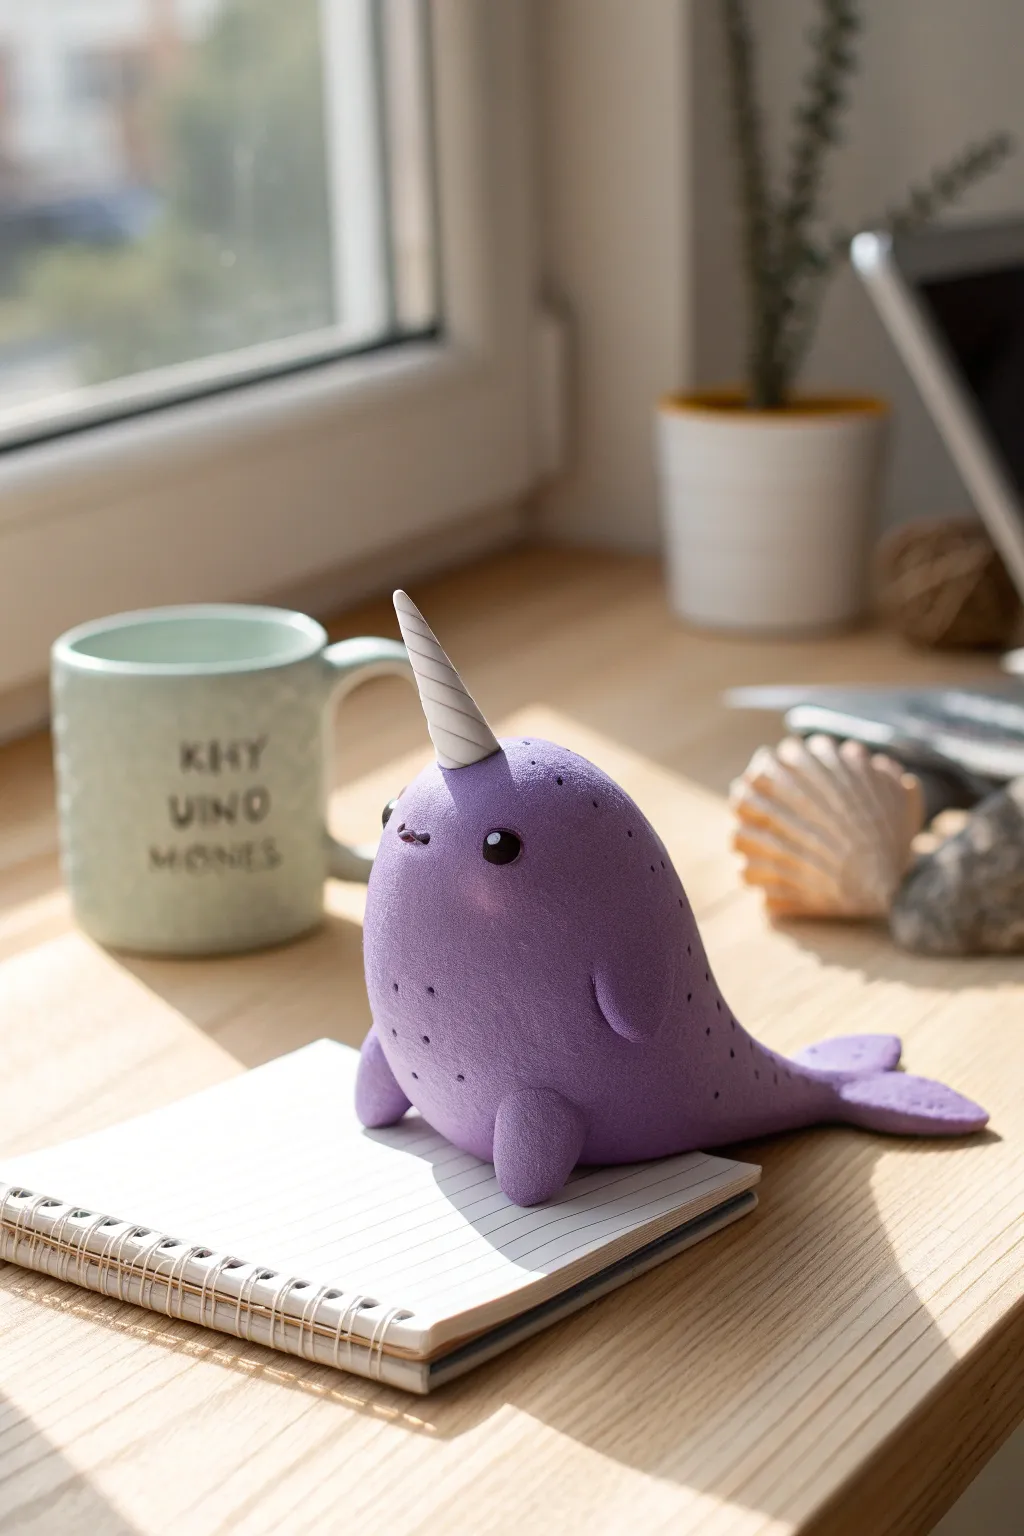
Bring a touch of magic to your workspace with this adorable purple clay narwhal, featuring a textured body and a classic twisted horn. Its gentle expression and soft, rounded form make it the perfect friendly companion for your desk or windowsill.
Step-by-Step Tutorial
Materials
- Polymer clay (medium purple shade)
- Polymer clay (white or light cream)
- Black glass beads or black clay (for eyes)
- Clay sculpting tools (needle tool, small ball stylus)
- Toothbrush or soft texture sponge
- Aluminum foil (for armature core)
- Liquid clay adhesive (optional)
- Gloss glaze (optional for eyes)
- Baking sheet and oven
Step 1: Forming the Base
-
Create the core:
Start by crumpling a small piece of aluminum foil into a teardrop shape. This saves clay and helps with even baking, making sure your narwhal isn’t too heavy. -
Condition the purple clay:
Knead your purple polymer clay until it is soft and pliable. Roll it into a smooth ball free of cracks. -
Cover the armature:
Flatten the purple clay slightly and wrap it completely around your foil core. Roll it gently between your palms to smooth out the seams and re-establish that rounded, teardrop body shape. -
Shape the body:
Refine the shape so it has a chubby bottom that tapers slightly upward toward the head area. Tap the bottom gently on your work surface so the figure sits flat and stable.
Step 2: Adding Texture and Features
-
Apply surface texture:
Before adding limbs, take a clean toothbrush or a texture sponge and gently press it all over the purple surface. This gives the narwhal a soft, matte, almost plush-like appearance rather than a shiny plastic look. -
Make the flippers:
Roll two small balls of purple clay. Flatten them into teardrop shapes and gently curve the wider end. These will be the side flippers. -
Attach the flippers:
Press the flippers onto the lower sides of the body. You can blend the clay at the shoulder joint using a sculpting tool or just press firmly if the clay is sticky enough. Re-texture the join area if needed. -
Form the tail:
Create a flattened heart shape or two joined teardrops for the tail flukes. Attach this to the back bottom of the body, curving it slightly upward for a playful swimming pose.
Texturing Tip
To avoid fingerprints flattening your texture while you work, try hold the narwhal gently with a piece of plastic wrap or wear finger cots during the assembly phase.
Step 3: The Magical Horn
-
Prepare the horn clay:
Take a small amount of white or cream clay. Roll it into a long, thin tapered snake or cone. -
Twist the horn:
Gently twist the cone of clay to create the spiral texture characteristic of a narwhal tusk. I find rolling it lightly against a ruler edge helps keep the twist even. -
Secure the horn:
Poke a small hole in the center of the narwhal’s forehead using a tool. Insert the base of the twisted horn. Use a tiny dab of liquid clay adhesive here if you want extra durability.
Sagging Horn?
If the horn starts to droop while shaping, insert a small piece of toothpick or wire into the center of the horn clay to act as an internal spine before attaching it.
Step 4: Facial Details
-
Position the eyes:
Use a ball stylus to make two small indents where the eyes will go. Place small black glass beads or tiny balls of black clay into these sockets. -
Create the mouth:
use a needle tool or a very small blade to press a tiny ‘w’ shape or a simple curve between the eyes to create a happy little smile. -
Add freckles:
Using a needle tool, poke very shallow, tiny holes on the cheeks and sides of the body for decorative ‘freckles’ or sensory pits.
Step 5: Finishing Up
-
Final check:
Look over your little friend one last time. Smooth out any accidental fingerprints, and ensure the texture looks consistent. -
Bake:
Bake the figurine according to your clay manufacturer’s instructions (usually around 275°F or 130°C for 15-30 minutes depending on thickness). -
Glaze (Optional):
Once fully cooled, you can apply a tiny dot of gloss glaze to the black eyes to make them look wet and lively.
Place your new purple friend on your desk to keep you company during your workday
Purple Turtle With Floral Shell
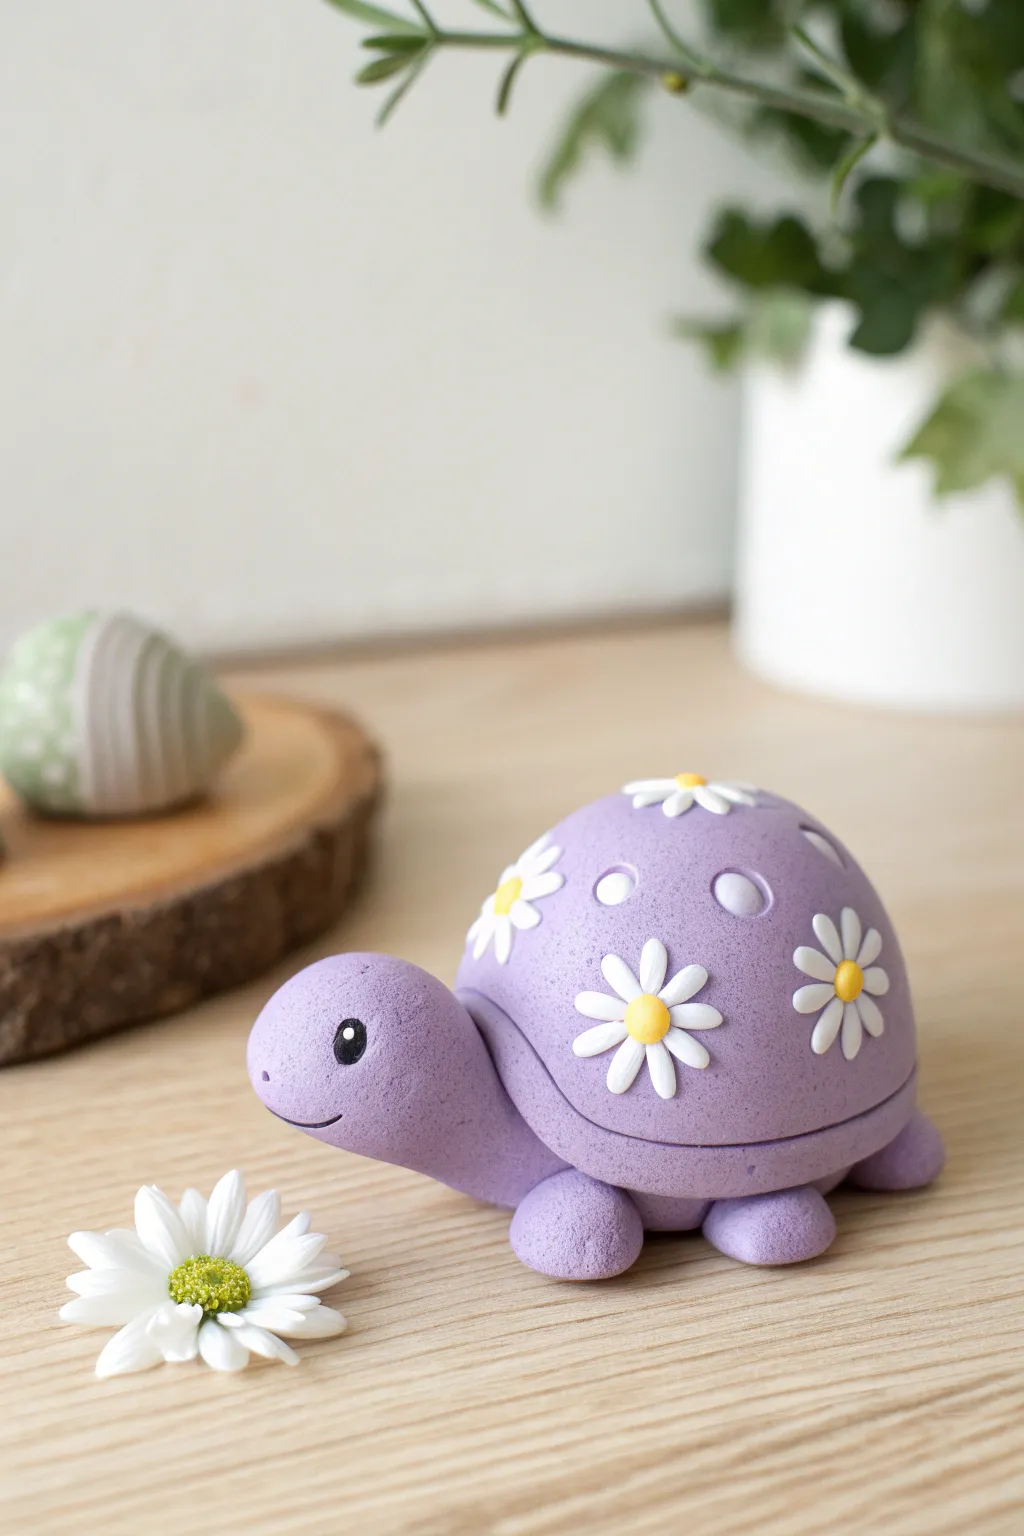
This charming purple turtle features a smooth, rounded shell decorated with cheerful white daisies, bringing a touch of spring to your desk or shelf. With its friendly painted smile and soft pastel hues, this project is perfect for beginners looking to practice simple sculpting shapes.
Detailed Instructions
Materials
- Purple polymer clay (lavender/lilac shade)
- White polymer clay
- Yellow polymer clay
- Black acrylic paint or clay marker
- Ball stylus tools (various sizes)
- Needle tool or toothpick
- Clay roller
- Blade or craft knife
- Oven for baking (if using polymer clay)
Step 1: Sculpting the Body
-
Prepare the base clay:
Begin by conditioning your purple clay until it is soft and pliable. You want to ensure there act no air bubbles trapped inside to keep the surface smooth. -
Form the shell:
Roll a large portion of the purple clay into a smooth ball. Gently press it down onto your work surface to flatten the bottom while keeping a high, rounded dome shape on top for the shell. -
Create the head:
Roll a smaller ball of purple clay, roughly one-third the size of the shell. Briefly roll one side into a slight teardrop shape to form a neck. -
Attach the head:
Press the teardrop end of the head piece against the front base of the shell. Smooth the seam underneath where the clay meets to secure it firmly. -
Make the legs:
Create four small, equal-sized balls of purple clay. Slightly flatten the bottom of each to give the turtle stable footing. -
Attach the legs:
Place the four legs under the shell body—two near the front and two near the back. Press gently so the turtle sits level on your work surface. -
Add the shell rim:
Roll a very thin snake of purple clay. Wrap this around the base of the shell dome, just above where the legs and head attach, to create a distinct separation between the shell and the underbelly.
Step 2: Face and Details
-
Sculpt the smile:
Using a needle tool or the edge of a small spoon tool, gently impress a curved line into the lower part of the face to create a happy smile. -
Indent the cheeks:
Use the tip of a small tool to press tiny dimples at the ends of the smile line for extra character. -
Texture the shell:
Take a medium-sized ball tool and press three or four shallow circular indentations randomly onto the upper part of the shell. These add texture without needing extra color.
Smooth Seams
To erase fingerprints before baking, lightly brush the raw purple clay with a tiny amount of baby oil or clay softener on your fingertip.
Step 3: Adding the Daisies
-
Click out petals:
Roll a very thin sheet of white clay. Use a tiny teardrop cutter, or shape tiny balls into teardrops by hand, to make the petals. You will need roughly 5-6 petals per flower. -
Arrange the first flower:
Choose a spot on the side of the shell. Press the pointed ends of five white petals together in a circle, flat against the purple surface. -
Add remaining flowers:
Repeat the process to place 3 or 4 more flowers around the shell, spacing them out evenly so the design looks balanced. -
Create flower centers:
Roll tiny balls of yellow clay. I find it helpful to pick these up with a needle tool to place them precisely. -
Secure the centers:
Press a yellow ball into the center of each white flower cluster. Use a small dotting tool to gently press the yellow clay down, securing the petals beneath it.
Storage Secret
Make the shell distinctively functional by slicing the top of the dome off before baking to turn the turtle into a tiny trinket box.
Step 4: Finishing Touches
-
Bake the piece:
Follow the instructions on your specific package of clay to bake the turtle. Usually, this involves baking at a low temperature (around 275°F/130°C) for 15-30 minutes. -
Cool down:
Let the sculpture cool completely before handling, as the clay is fragile while hot. -
Paint the eyes:
Using a fine detail brush or a black clay marker, carefully draw two solid black circles for eyes. -
Add the eye highlights:
Dip the very tip of a toothpick into white paint and place a tiny white dot in the upper corner of each black eye to bring the turtle to life.
Now you have a sweet floral friend perfect for holding your rings or simply brightening your day


What Really Happens Inside the Kiln
Learn how time and temperature work together inside the kiln to transform clay into durable ceramic.
Purple Cloud And Raindrop Charms
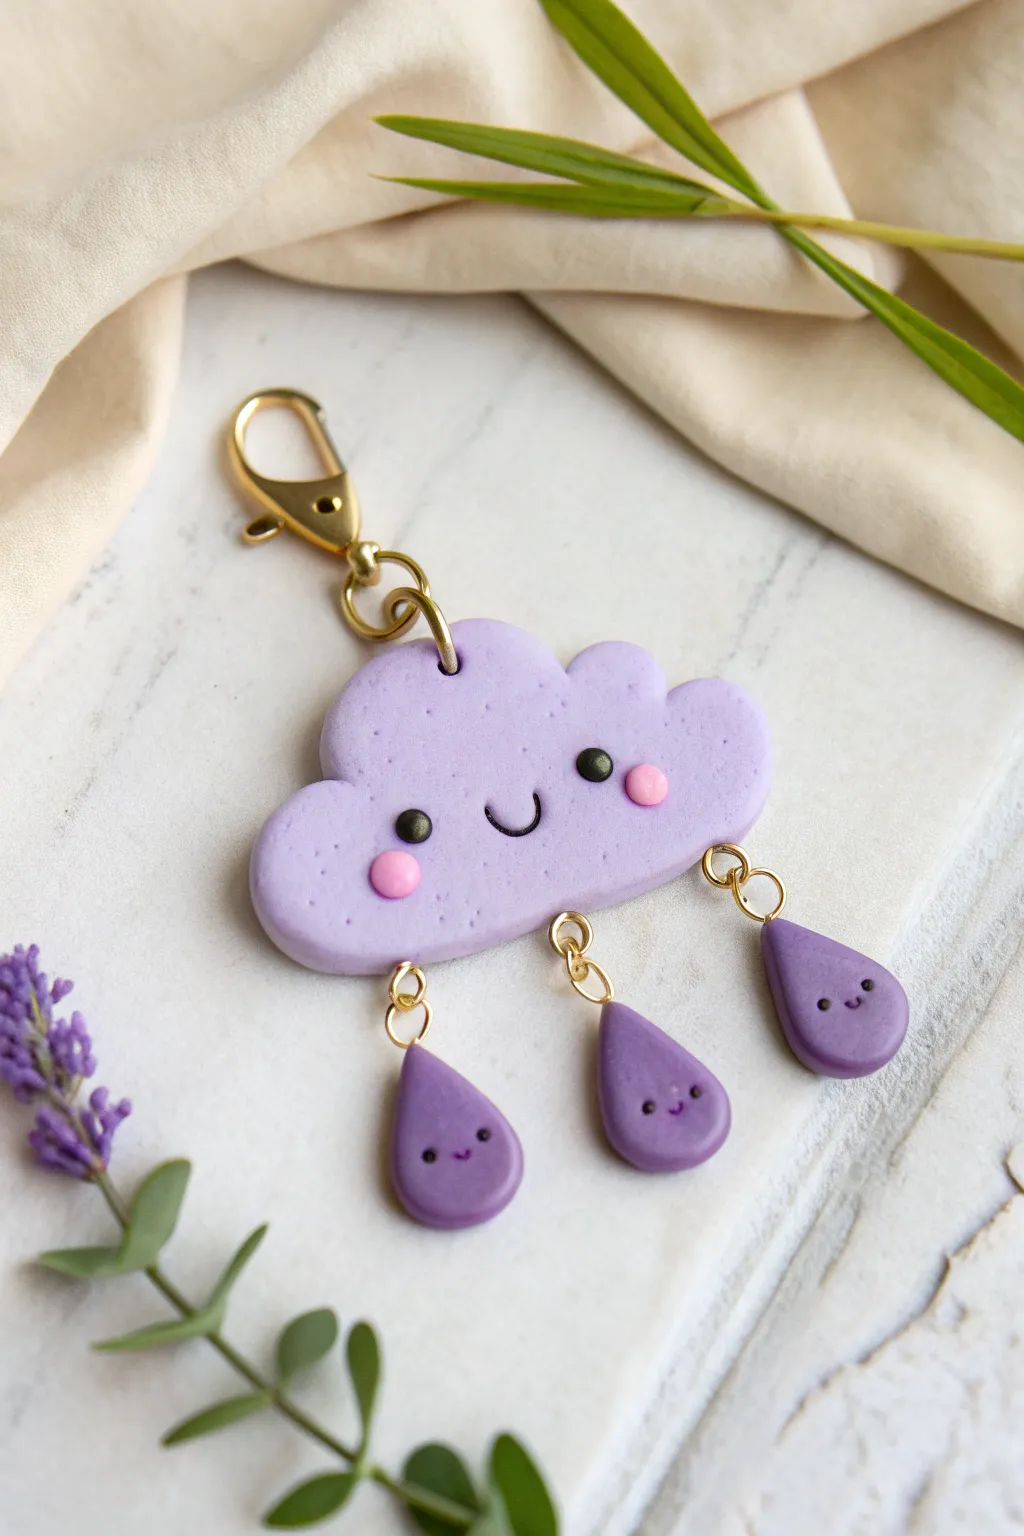
Brighten up even the gloomiest weather with this adorable polymer clay charm featuring a cheerful lavender cloud and her trio of happy little raindrop friends. The gold hardware adds a touch of shine, making it perfect for keychains or bag zippers.
Step-by-Step
Materials
- Polymer clay (light lavender, dark purple, black, pink)
- Clay roller or pasta machine
- Cloud-shaped clay cutter (approx. 2 inches wide)
- Teardrop-shaped mini cutter (or craft knife)
- Needle tool or toothpick
- Small ball tool
- Gold screw eye pins (4 pieces)
- Gold jump rings (small)
- Gold lobster clasp keychain finding
- Jewelry pliers
- Gloss glaze or UV resin (optional)
- Oven for baking
Step 1: Sculpting the Cloud
-
Condition the clay:
Start by conditioning your light lavender clay until it is soft and pliable. Use a roller or pasta machine to flatten it into a sheet about 1/4 inch thick. -
Cut the shape:
Use your cloud cutter to stamp out the main shape. If you don’t have a cutter, you can freehand cut the shape with a craft knife or shape it by hand. -
Soften edges:
Gently gently rub your finger along the cut edges of the cloud to smooth them out and give the clay a nice, rounded finish rather than a sharp cut edge. -
Add texture:
For a bit of character, take a stiff toothbrush or a textured sponge and lightly tap the surface of the clay to give it a subtle, porous stone-like texture. -
Insert hardware:
Insert a gold screw eye pin into the top center of the cloud. Then, insert three more eye pins into the bottom edge—one in the center and one on each side—leaving the loops exposed.
Step 2: Making the Raindrops
-
Form the drops:
Take the dark purple clay and roll it into a thin sheet. Use a small teardrop cutter to create three identical shapes. -
Shape manually:
If you are shaping by hand, roll three equal pea-sized balls, then pinch and roll one side of each ball to create a tapered point. -
Pierce holes:
Use a needle tool or the tip of a toothpick to carefully poke a horizontal hole through the top tapered point of each raindrop so they can be hung later.
Stay Clean!
Use rubbing alcohol or baby wipes to clean your hands and tools between colors. Light purple picks up dust easily, so work on a clean surface.
Step 3: Adding Faces
-
Create eye sockets:
Using a small ball tool, gently press indentations where you want the eyes to go on both the cloud and the three raindrops. -
Place the eyes:
Roll tiny specks of black clay into balls and press them firmly into the indentations you just made. I find using a needle tool helps transfer these tiny pieces. -
Add cheeks:
Roll very small balls of pink clay and flatten them slightly. Press these onto the cloud (below the eyes) and the raindrops for rosy cheeks. -
Draw the smiles:
Roll a super thin snake of black clay for the cloud’s smile and press it into a ‘U’ shape. For the tiny raindrops, it might be easier to paint the smile on after baking, or use a very fine needle tool to impress a small curve.
Sparkle Upgrade
Mix a tiny pinch of iridescent mica powder or fine glitter into the dark purple clay before shaping the raindrops for a magical, shimmering storm effect.
Step 4: Assembly and Baking
-
Bake the pieces:
Arrange all your clay pieces on a baking tile or parchment paper. Bake according to your customized clay brand’s package instructions (usually 275°F for 15-30 minutes). -
Cool down:
Allow the pieces to cool completely before handling them, as the clay is fragile while hot. -
Attach raindrops:
Open a small gold jump ring with your pliers. Thread it through the hole in a raindrop and loop it onto one of the bottom eye pins on the cloud. Close the ring securely. Repeat for all three drops. -
Add clasp:
Attach a larger jump ring to the top eye pin on the cloud, and thread your lobster clasp onto it before closing. -
Seal:
For extra durability and shine, brush a thin layer of gloss glaze or UV resin over the pieces, avoiding the metal hardware.
Now you have a charming little storm cloud ready to clip onto your accessories
Ombre Purple Heart Pendant
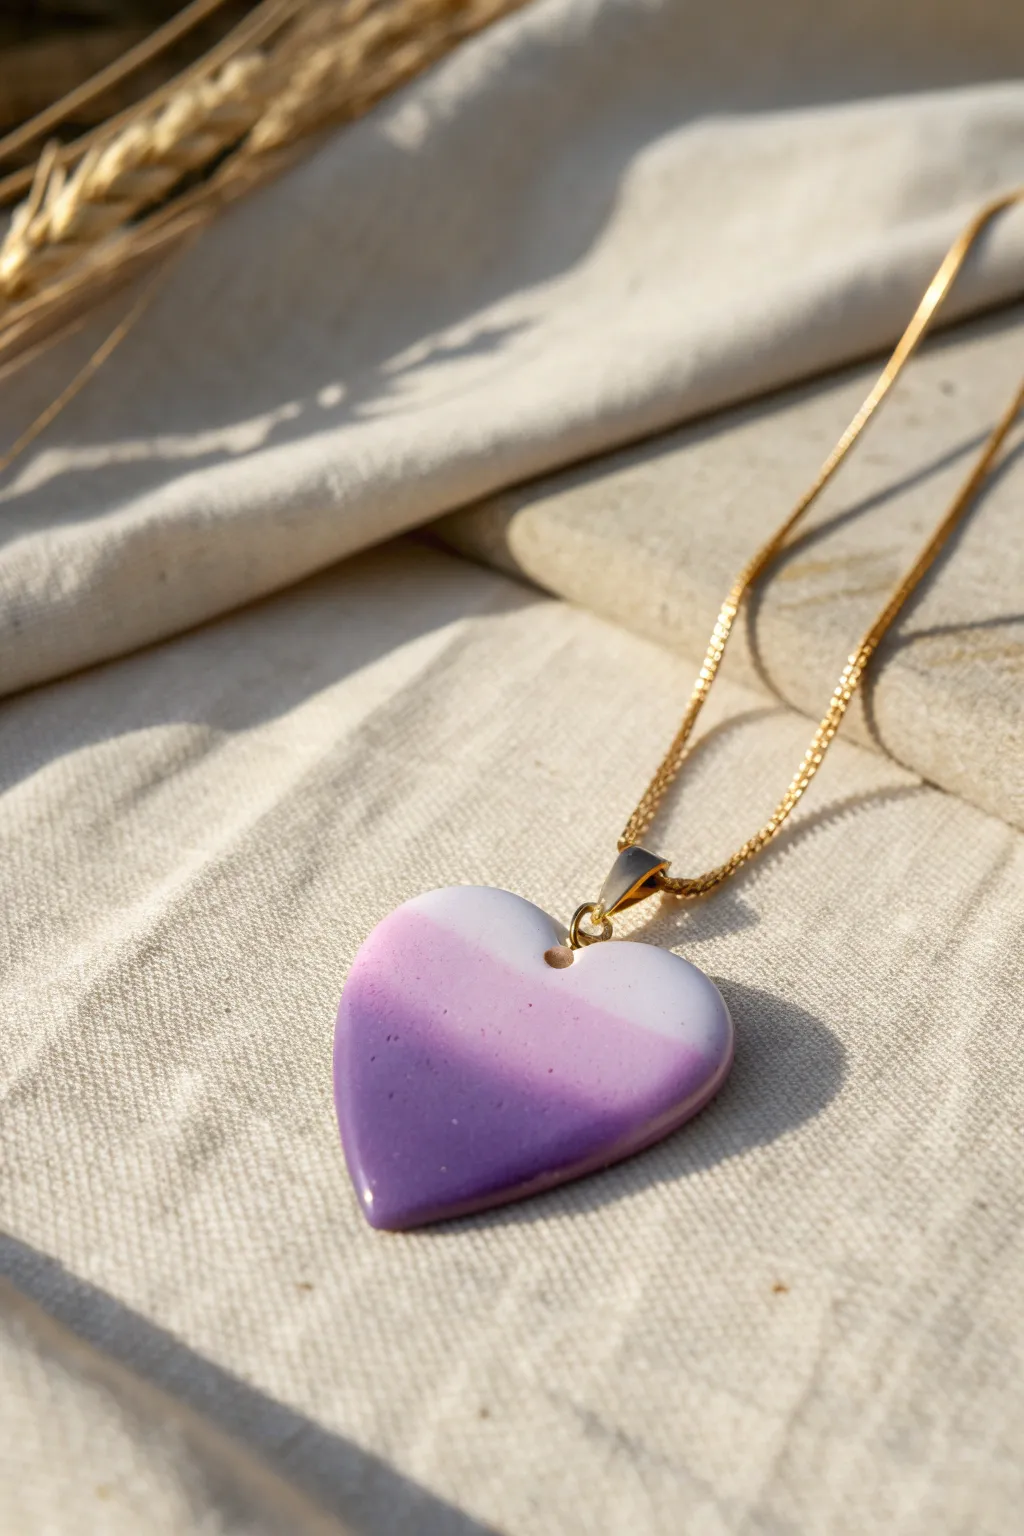
Capture the elegance of a sunset sky with this lovely polymer clay pendant that features a smooth ombre fade from deep violet to pure white. The glossy finish gives it a professional ceramic look, making it a perfect handmade gift or a stylish addition to your own jewelry collection.
Detailed Instructions
Materials
- Polymer clay (Deep Purple, Lavender, White)
- Acrylic roller or pasta machine
- Heart-shaped clay cutter (medium size)
- Tissue blade or X-Acto knife
- Glossy polyurethane varnish or UV resin
- Small paintbrush (for varnish)
- Hand drill or needle tool
- Gold pinch bail
- Gold chain necklace
- Ceramic tile or baking surface
- Fine grit sandpaper (400-1000 grit)
Step 1: Preparing the Clay Gradient
-
Condition the clay:
Begin by conditioning your three colors of clay—deep purple, lavender, and white—until they are soft and pliable. Ensure your hands and work surface are clean to avoid transferring lint to the white clay. -
Form the blocks:
Shape each color into a small rectangular block or thick log of roughly the same size. -
Arrange the colors:
Place the blocks side-by-side in order of the gradient: deep purple on the left, lavender in the middle, and white on the right. Press them firmly together so they stick. -
Initial rolling:
Flatten the combined block slightly with your hand, then roll it through your pasta machine on the thickest setting. Make sure the stripes are vertical as they go through the rollers. -
The Skinner Blend technique:
Fold the sheet in half, bringing the bottom up to the top, matching the colors (purple to purple, white to white). Insert the sheet into the pasta machine fold-first. -
Repeat the process:
Continue folding and rolling about 15-20 times. You will see the hard distinct lines between the colors start to blur into a seamless transition. -
Final sheet thickness:
Once the gradient is smooth, adjust your machine to a slightly thinner setting (about 3mm to 4mm) for the final pass. The sheet needs enough thickness to be sturdy.
Clean Edges Buffing
Before baking, brush a tiny amount of baby oil or cornflour on the clay surface before cutting. It stops the clay sticking to the cutter and creates softer edges.
Step 2: Shaping and Baking
-
Choosing the best spot:
Inspect your gradient sheet and identify the section with the most aesthetically pleasing color transition. Place your heart cutter over this area. -
Cutting the shape:
Press the cutter firmly down to cut out your heart pendant. I sometimes like to wiggle the cutter ever so slightly before lifting to ensuring the edges separate cleanly. -
Smoothing edges:
Gently gently rub the cut edges with your finger to remove any sharp ridges or loose bits of clay without distorting the heart shape. -
Adding the hole:
Use a needle tool to create a pilot hole near the top center of the heart (in the white section) where the bail will go. Alternatively, you can drill this after baking for more precision. -
Baking:
Place the pendant on a ceramic tile and bake according to your specific clay brand’s instructions (usually 275°F/130°C for 30 minutes). Let it cool completely in the oven to prevent cracking.
Muddy Colors?
If your gradient looks muddy grey instead of purple, you over-mixed. Stop folding once the blend looks smooth. Don’t let the purple invade the white completely.
Step 3: Finishing Touches
-
Sanding imperfections:
If there are any fingerprints or rough spots, wet-sand the pendant lightly with fine-grit sandpaper under running water. -
Applying the gloss:
Apply a thin, even coat of glossy polyurethane varnish or UV resin to the front and sides of the heart. If using resin, cure it under a UV lamp; if varnish, let it air dry completely. -
Installing hardware:
If you didn’t obscure the hole with resin, it should be clear. If needed, re-drill gently. Open the prongs of your gold pinch bail and insert them into the hole. -
Securing the bail:
Squeeze the pinch bail closed firmly with pliers so it grips the clay securely. -
Assembly:
Thread your gold chain through the loop of the bail to complete the necklace.
Wear your beautiful new ombre heart with pride, knowing you created that seamless color blend by hand

TRACK YOUR CERAMIC JOURNEY
Capture glaze tests, firing details, and creative progress—all in one simple printable. Make your projects easier to repeat and improve.
Purple Galaxy Swirl Beads
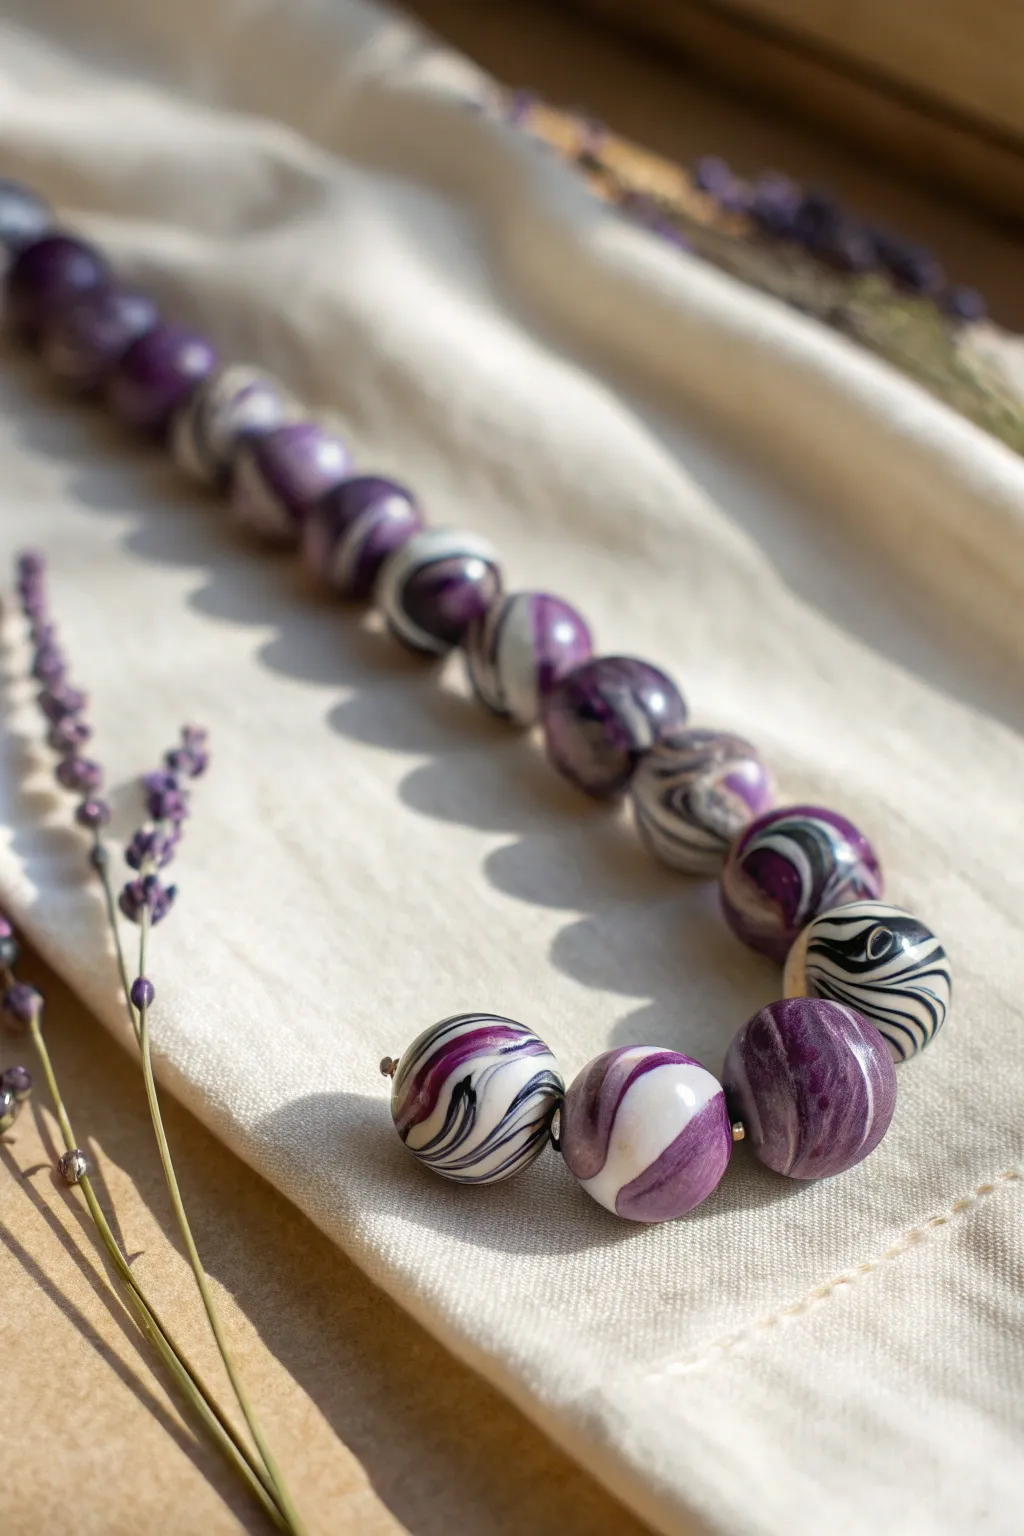
Capture the magic of deep space or a blooming lavender field with these mesmerizing polymer clay beads. The stunning marbled effect blends rich purples, stark whites, and hints of black into unique, glossy spheres perfect for statement jewelry.
Step-by-Step Tutorial
Materials
- Polymer clay in deep purple
- Polymer clay in bright white
- Polymer clay in black
- Translucent polymer clay (optional)
- Acrylic roller or pasta machine
- Tissue blade or craft knife
- Bead piercing pins or toothpicks
- Baking sheet with cardstock or parchment paper
- Wet/dry sandpaper (400 to 2000 grit)
- Glossy polymer clay varnish or UV resin
- Soft brush for glazing
Step 1: Preparing the Clay Cane
-
Condition the colors:
Begin by thoroughly conditioning your purple, white, and black clay separately until each is soft and pliable. Warm clay mixes better and prevents cracking during the rolling process. -
Create logs:
Roll each color into a long snake or log shape. Make the purple log the thickest, the white slightly thinner, and the black the thinnest to balance the colors as shown in the photo. -
Optional translucent addition:
If you want extra depth, mix a very small amount of translucent clay into half of your purple clay to create a second, lighter shade for dimension. -
Combine the logs:
Bundle the clay snakes together, twisting them gently into one large, thick rope. Fold this rope in half and twist again. Repeat this twist-and-fold action about 4-5 times. -
Avoid over-mixing:
Be careful not to over-twist. You want distinct streaks of color rather than a muddy gray-purple blend. Stop when you see pleasing striations. -
Form the main log:
Roll the twisted clay on your work surface to smooth it into a uniform log, approximately 1/2 inch to 3/4 inch in diameter.
Pro Tip: No Fingerprints
Wear latex or nitrile gloves while rolling the final sphere shape. This eliminates fingerprints entirely, saving you significant sanding time later.
Step 2: Shaping and Baking
-
Section the clay:
Using your tissue blade, slice the log into equal segments. These slices will determine the size of your finished beads, so try to keep them consistent. -
Roll the spheres:
Place a slice between your palms and gently roll in a circular motion. I like to start with light pressure and increase it slightly as the ball becomes smoother. -
Check the pattern:
Inspect the swirl. If the lines are too straight, give the ball a tiny twist with your fingertips and re-roll to create that swirling ‘galaxy’ look. -
Pierce the beads:
Gently insert a bead pin or toothpick through the center of each sphere. Twist the pin as you push to avoid squashing the bead’s round shape. -
Prepare for baking:
Arrange the beads on a baking sheet lined with cardstock or parchment. If possible, suspend the pins on a foil rack so the beads don’t develop a flat spot on the bottom. -
Bake properly:
Bake according to your clay manufacturer’s instructions (usually around 275°F or 130°C) for at least 45 minutes to ensure durability. -
Cool down:
Let the beads cool completely in the oven or on a wire rack before handling them, as warm clay is fragile.
Level Up: Galaxy Dust
Mix a pinch of fine silver mica powder or holographic glitter into the black clay before twisting. It adds a subtle starry sparkle to the dark swirls.
Step 3: Finishing Touches
-
Sand for smoothness:
Using wet/dry sandpaper under running water, lightly sand the beads starting with 400 grit and working up to 2000 grit. This removes fingerprints and refines the shape. -
Buff (optional):
Rub the beads vigorously on a piece of denim or use a buffing wheel for a natural sheen if you prefer a semi-matte finish. -
Apply gloss:
For the high-shine look in the photo, skew the beads on a stick and apply a thin, even coat of gloss varnish or UV resin. -
Final cure or dry:
Allow the varnish to dry fully or cure the resin under a UV lamp. Your cosmic purple beads are now ready for stringing.
String your beautiful new creations onto elastic or wire to enjoy your wearable piece of art
Lavender Cactus Mini Planter
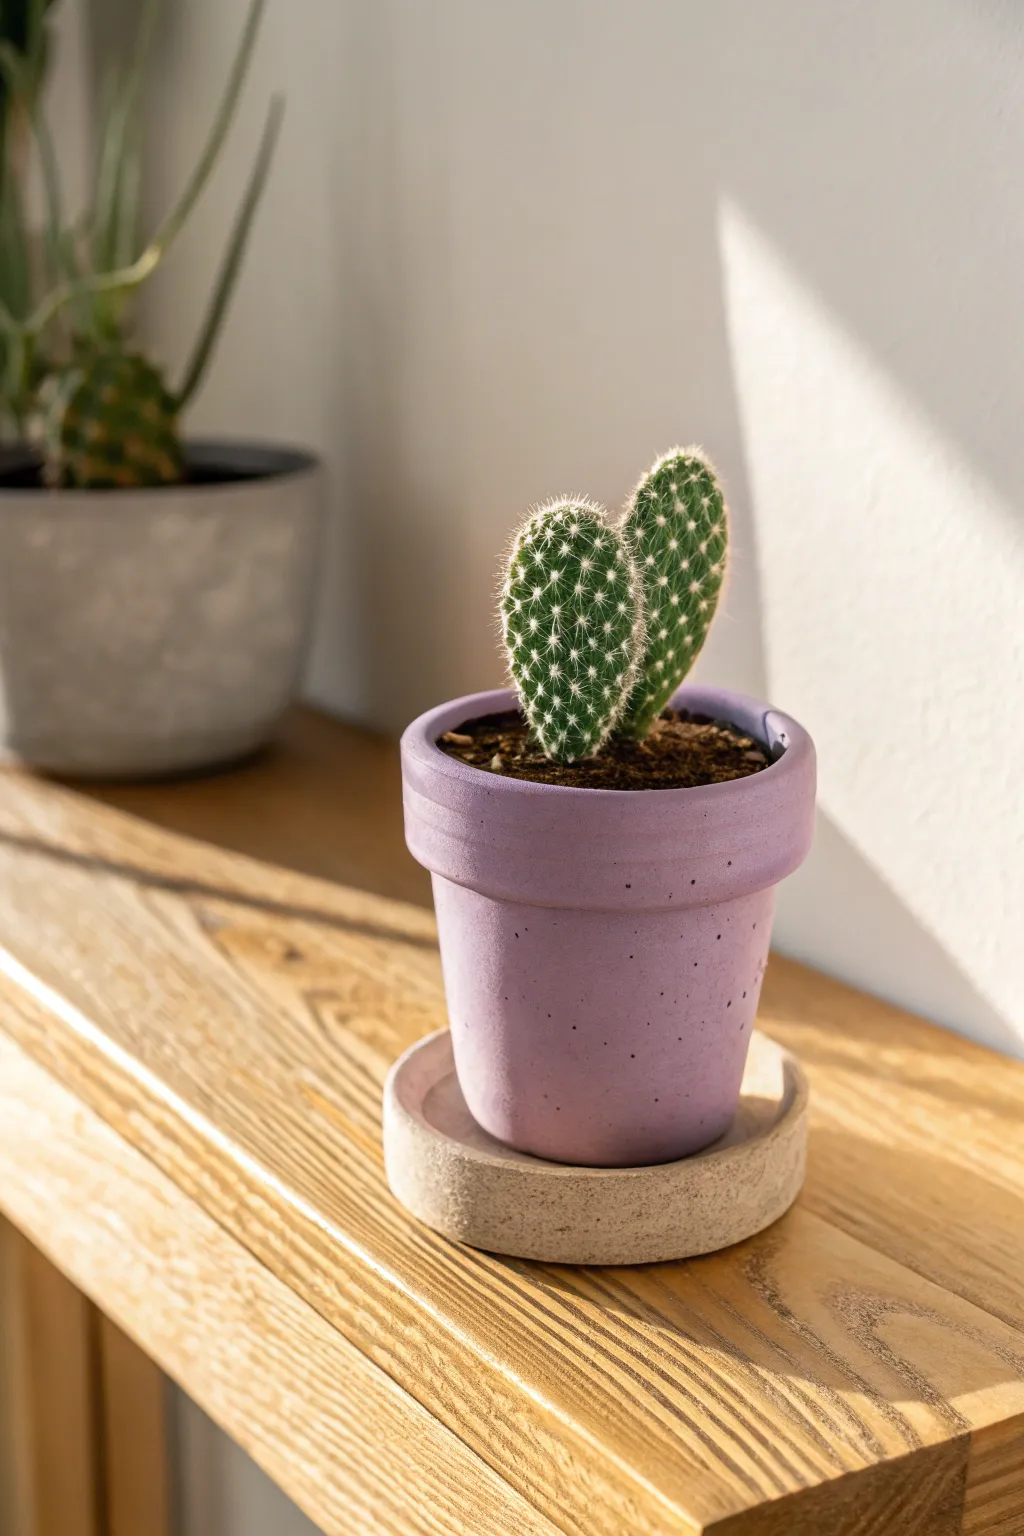
This chic little planter contrasts soft, pastel lavender against a raw, stone-like saucer for a modern touch. It’s perfectly sized for small cacti or succulents and brings a subtle pop of color to any sun-drenched shelf.
Step-by-Step Tutorial
Materials
- Lavender polymer clay (soft finish)
- Granite or stone-effect polymer clay (beige/gray mix)
- Small terracotta pot (approx. 2-3 inches) to use as a mold form
- Rolling pin or pasta machine
- Blade or craft knife
- Sandpaper (medium to fine grit)
- Ceramic sealant or matte varnish
- Round cookie cutter (slightly larger than pot base)
- Oven for baking
Step 1: Shaping the Pot
-
Prepare the lavender clay:
Condition your lavender clay until it is soft and pliable. If the color feels too saturated, mix in a small amount of white clay to achieve that pale, pastel hue seen in the image. -
Roll out the slab:
Roll the clay into a long rectangular strip, aiming for a consistent thickness of about 4-5mm to ensure the pot is sturdy. -
Create the base:
Using the base of your terracotta pot as a guide, cut a circle from the lavender clay that matches the diameter exactly. -
Wrap the form:
Wrap your lavender strip around the sides of the terracotta pot (which acts as your internal support). Overlap the ends slightly where they meet. -
Seal the seam:
Where the clay overlaps, slice straight down through both layers with your blade to create a perfect butt joint. Smooth the seam with your finger until it disappears. -
Attach the bottom:
Place the clay-wrapped sides onto the clay base circle. Gently blend the clay from the walls down onto the base to fuse them together securely. -
Create the rim:
Roll a separate, thicker strip of lavender clay—about 1cm wide. Wrap this around the very top edge of your pot to create the distinct, chunky rim. -
Texture the surface:
To mimic the matte, slightly porous look of the photo, gently tap the exterior with a toothbrush or a crumpled ball of aluminum foil. This removes the plastic shine. -
Remove the form:
Carefully slide the terracotta pot out. If it sticks, you can bake it with the pot inside, but removing it now allows for better airflow.
Step 2: Crafting the Stone Saucer
-
Condition the stone clay:
Prepare your granite or beige-speckled clay. I find mixing a little translucent clay here adds depth to the stone effect. -
Form the saucer slab:
Roll the stone clay into a thick slab, slightly thicker than the pot walls, perhaps 6-7mm. -
Cut the circle:
Use your large round cutter to stamp out the base. This needs to be wider than the bottom of your lavender pot. -
Add the lip:
Roll a thin snake of the same stone clay. Place it around the perimeter of the circle base to create a raised edge. -
Blend and smooth:
Blend the snake into the base on the inside, keeping the outside edge sharp and vertical to match the modern aesthetic. -
Add texture:
Use sandpaper or a rough stone to press texture into the saucer before baking. It should look gritty and natural.
Seamless Finish
Dust your fingers with a little cornstarch before smoothing the clay seams. This eliminates fingerprints and helps the clay glide without dragging or thinning.
Step 3: Finishing Touches
-
Bake the pieces:
Bake both the pot and saucer according to your clay package instructions (usually 275°F/135°C for 15-30 minutes). -
Cool down:
Let the pieces cool completely in the oven before moving them to prevent cracking. -
Add speckles (optional):
If your lavender clay looks too flat, flick a tiny amount of diluted gray acrylic paint onto the pot with a toothbrush to create subtle speckles. -
Seal the interior:
Apply a waterproof varnish to the inside of the pot and saucer to protect the clay from moisture during watering. -
Plant:
Fill with cactus soil and your favorite prickly plant.
Faux Concrete Look
Mix black pepper or dried tea leaves into your lavender clay before rolling. It creates organic, tiny imperfections that mimic dyed concrete perfectly.
Now you have a serene, custom-made home for your favorite green companion that looks professionally crafted
Purple Checkerboard Trinket Tray
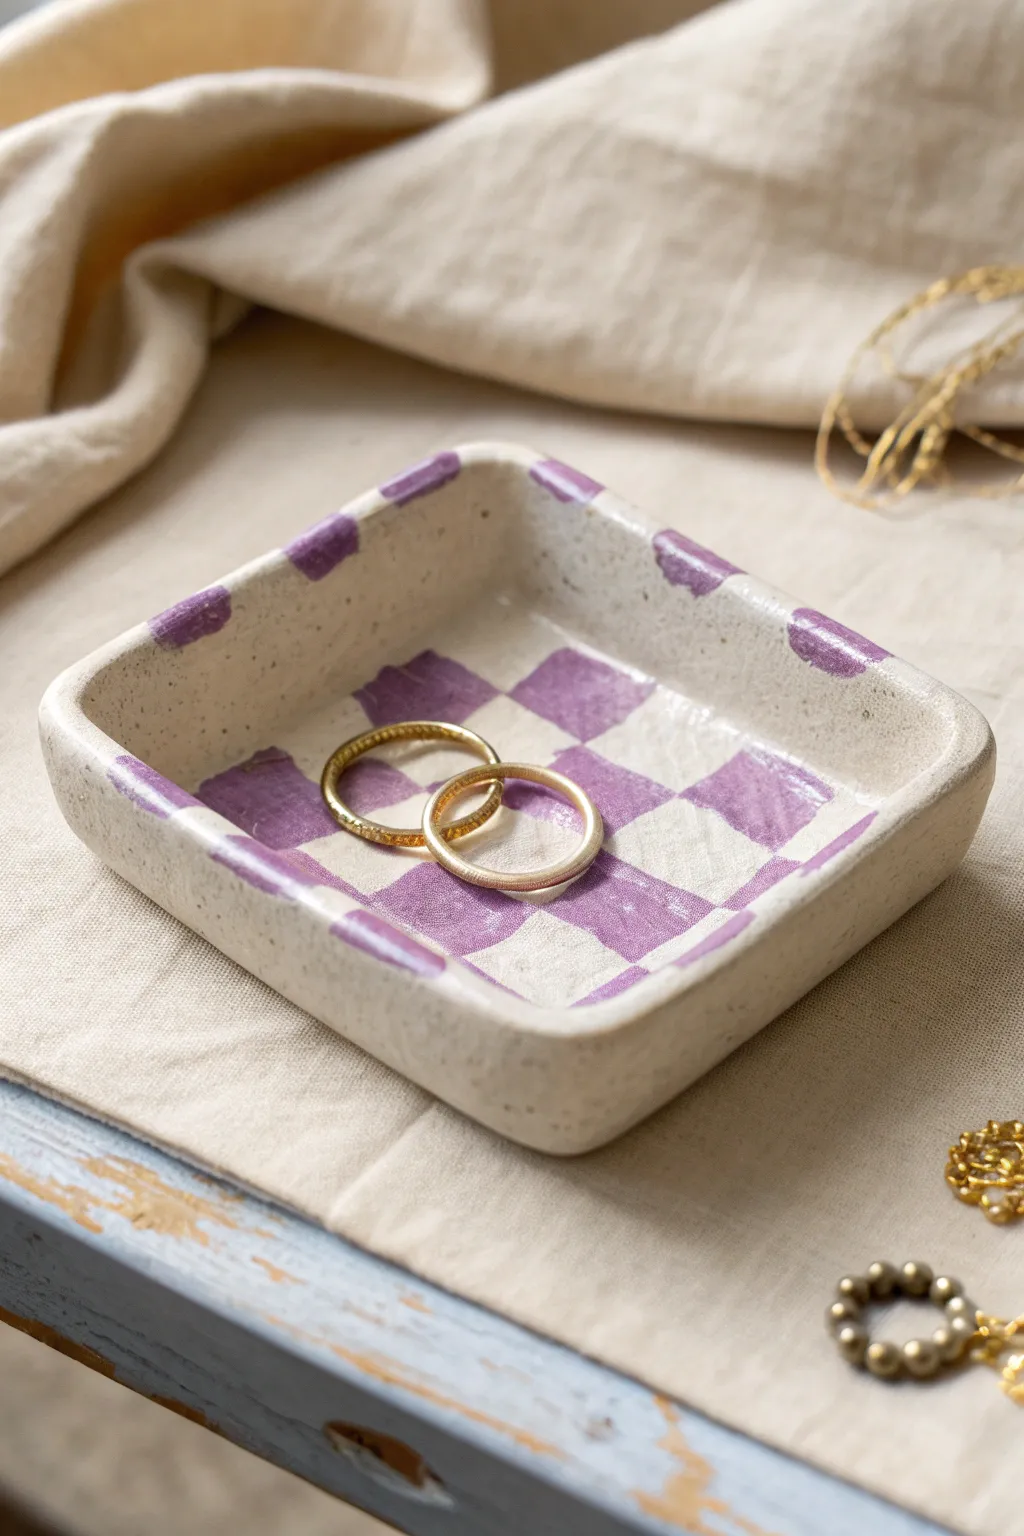
This trendy trinket tray combines a classic checkerboard pattern with the organic charm of speckled clay. It is the perfect size for holding your favorite rings and adds a playful pop of purple to any bedside table.
How-To Guide
Materials
- Polymer clay (white or translucent)
- Speckled clay inclusions (ground black pepper or commercial speckles)
- Acrylic rolling pin
- Square clay cutter (approx. 4 inches) or craft knife
- Small flat shader brush
- Purple acrylic paint (matte finish)
- Gloss glaze or polyurethane varnish
- Soft paintbrush for glazing
- Parchment paper or baking mat
- Oven
Step 1: Shaping the Base
-
Prepare the Clay:
Start by conditioning your white polymer clay until it is soft and malleable. To achieve that stony, speckled look seen in the photo, knead in a pinch of ground black pepper or pre-mixed clay speckles until evenly distributed. -
Roll it Out:
Using your acrylic rolling pin, flatten the clay into a sheet about 1/4 inch thick. Aim for an even thickness to ensure the tray sits flat later. -
Cut the Square:
Press your square cutter firmly into the clay sheet. If you don’t have a cutter, use a ruler and a craft knife to measure and cut a 4×4 inch square. -
Soften the Edges:
Gently run your finger along the cut edges to smooth them out. The goal is to remove any sharp corners created by the blade for a softer, organic feel. -
Form the Dish:
To create the raised sides, pinch the corners of the square gently upward. Work your way around the perimeter, lifting the edges slightly to create a shallow basin shape. -
Smooth the shape:
Use your thumbs to smooth out the interior curve where the base meets the walls. I like to check the bottom frequently to make sure it hasn’t warped and still sits flat on the table.
Uneven Grid?
Use masking tape to section off your squares before painting. Press the edges down firmly to prevent bleed-through for crisp lines.
Step 2: Baking and Design
-
Bake:
Place your shaped tray on a parchment-lined baking sheet. Bake according to your specific clay package instructions, usually around 275°F (135°C) for 15-30 minutes. -
Cool Down:
Allow the clay to cool completely before determining your design. Painting on warm clay can ruin the texture of the acrylic. -
Plan the Grid:
Lightly trace a grid pattern on the inside of the tray using a pencil. For a tray this size, a 5×5 or 4×4 grid works best depending on how chunky you want the checks. -
Mix Paint:
Pour a small amount of purple acrylic paint onto a palette. You can mix in a tiny drop of white if you want a softer lavender tone. -
Paint the Centers:
Using a small flat brush, fill in alternating squares on the floor of the tray. Don’t worry about razor-sharp lines; a slightly painterly edge adds to the handmade aesthetic. -
Paint the Walls:
Continue the pattern up the sides of the tray. Where a purple square hits the edge, extend the color right up to the rim. -
Detail the Rim:
Add small dashes of purple along the top rim corresponding to the painted squares below. This connects the interior pattern to the outer shape.
Step 3: Finishing Touches
-
Dry:
Let the paint dry completely. Acrylics dry fast, but giving it a full hour ensures you won’t smudge the pattern during glazing. -
Glaze:
Apply a thin coat of gloss glaze over the entire piece. This mimics the shine of ceramic and protects the paint from scratching. -
Final Cure:
Some varnishes require a second low-heat bake to set, while others air dry. Follow the instructions on your specific bottle to finish the piece.
Make it Luxe
After the purple paint dries, outline each checkerboard square with a thin liquid gold leaf pen for an elegant, gilded finish.
Enjoy styling your new handmade tray with your favorite jewelry pieces
Purple Terrazzo Coaster Tiles
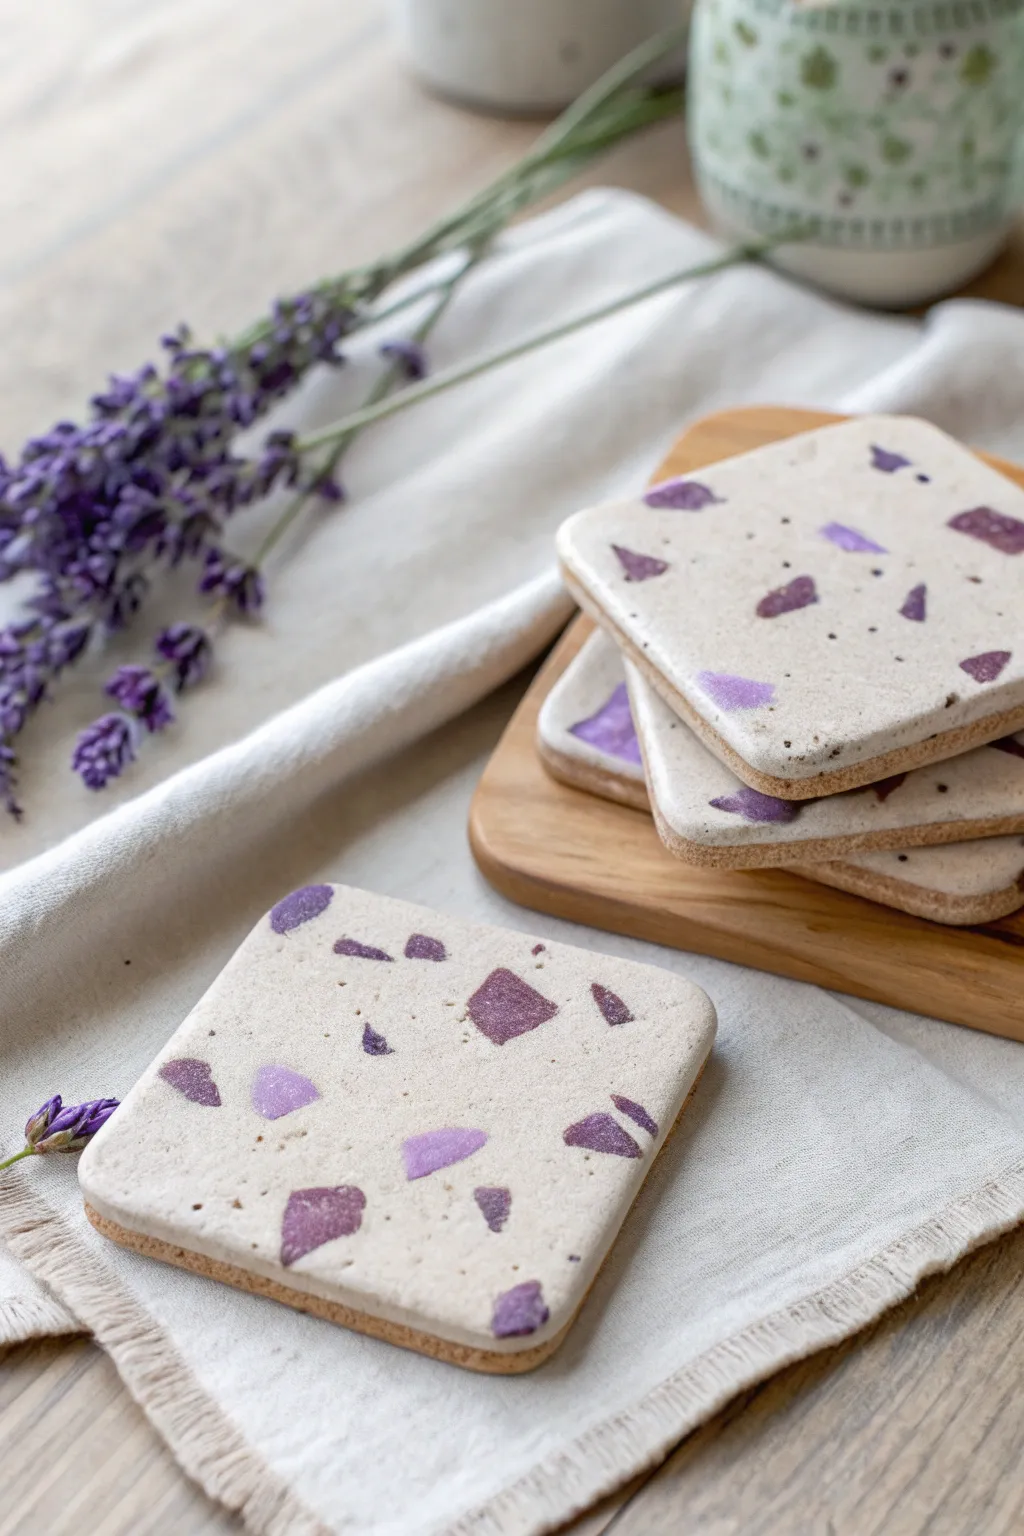
These elegant coasters feature shards of purple and lavender clay embedded in a soft, creamy stone-effect base, reminiscent of a terrazzo floor. They make a sophisticated addition to any coffee table, bringing a touch of calming botanical color to your home decor.
Detailed Instructions
Materials
- Polymer clay (white, violet, dark purple, and beige/granite)
- White or cream polymer clay (for the base)
- Square clay cutter (approx. 3.5 inches)
- Acrylic rolling pin
- Pasta machine (optional but helpful)
- Sharp craft knife or tissue blade
- Adhesive cork backing sheet or thin cork tiles
- Fine-grit sandpaper (400 to 1000 grit)
- Oven and baking tray
- Matte or satin polymer clay warmth varnish (optional)
Step 1: Creating the Chips
-
Rolling the colors:
Begin by conditioning your violet, dark purple, and a speckled beige or granite clay separately until they are soft and pliable. Roll each color out into a thin sheet, roughly 1/8 inch thick. -
Baking the sheets:
Place these thin colored sheets on a baking tray lined with parchment paper. Bake them for about 15-20 minutes, or just until they are firm enough to snap without bending. Let them cool completely. -
Making the terrazzo:
Once cooled, take the baked sheets and break them up. For precise edges like the ones in the photo, use a sharp craft knife to chop the clay into irregular geometric shards. Aim for a mix of sizes, from tiny specks to larger triangles.
Stone Effect
Mix translucent clay into your white base at a 1:4 ratio. After baking, this adds depth and makes the faux stone look incredibly realistic.
Step 2: Forming the Base
-
Preparing the base clay:
Condition a large block of white or cream polymer clay. This needs to be quite soft to accept the chips. I like to add a pinch of black pepper or black embossing powder to the white clay to give it that natural stony speckle seen in the image. -
Initial rolling:
Roll your base clay into a thick slab, slightly thicker than you want your final coaster to be (about 1/4 inch is good). -
Adding the chips:
Scatter your chopped purple and granite chips onto the slab. Press them gently into the surface with your fingers so they stick. -
Embedding the pattern:
Use your acrylic roller to firmly roll over the slab again. Roll in different directions to ensure the chips are fully embedded and flush with the surface of the white clay. -
Filling gaps:
If you see large empty white spaces, press a few more purple shards into those areas and roll again until the surface is smooth and even.
Step 3: Cutting and Refining
-
Cutting the shape:
Place your square cutter over the most attractive section of your terrazzo slab. Press down firmly to cut the coaster shape. If you don’t have a cutter, use a ruler and craft knife to vibrant straight edges. -
Softening edges:
Gently smooth the cut edges with your finger to remove any sharpness, giving the coaster a slightly rounded, tumbled stone look. -
Final bake:
Place your raw coasters on a parchment-lined baking sheet. Bake according to the manufacturer’s instructions for the base clay (usually 30-45 minutes to ensure durability).
Metallic Accent
Add tiny shavings of gold leaf to the white base before rolling. The gold will peek through alongside the purple for a luxurious touch.
Step 4: Finishing Touches
-
Sanding:
Once fully cooled, wet-sand the surface using fine-grit sandpaper. This reveals the crisp shapes of the chips and removes any thin film of white clay that might be obscuring the purple colors. -
Buffing:
Buff the surface with a soft denim cloth or a buffing wheel to create a smooth, matte stone finish. -
Cutting the cork:
Cut your adhesive cork sheet into squares that are just slightly smaller than your clay coasters. This prevents the cork from peeking out from the sides. -
Attaching the backing:
Peel the backing off the cork and press it firmly onto the bottom of the baked clay tile. This protects your furniture and adds a professional finish.
Stack your set of coasters and tie them with twine for a beautiful handmade gift