Raku is my favorite kind of kiln magic—fast, fiery, and full of surprises. If you’re craving bold crackle glaze, smoky blacks, and those shimmery metallic lusters, these raku pottery ideas will keep your studio brain buzzing.
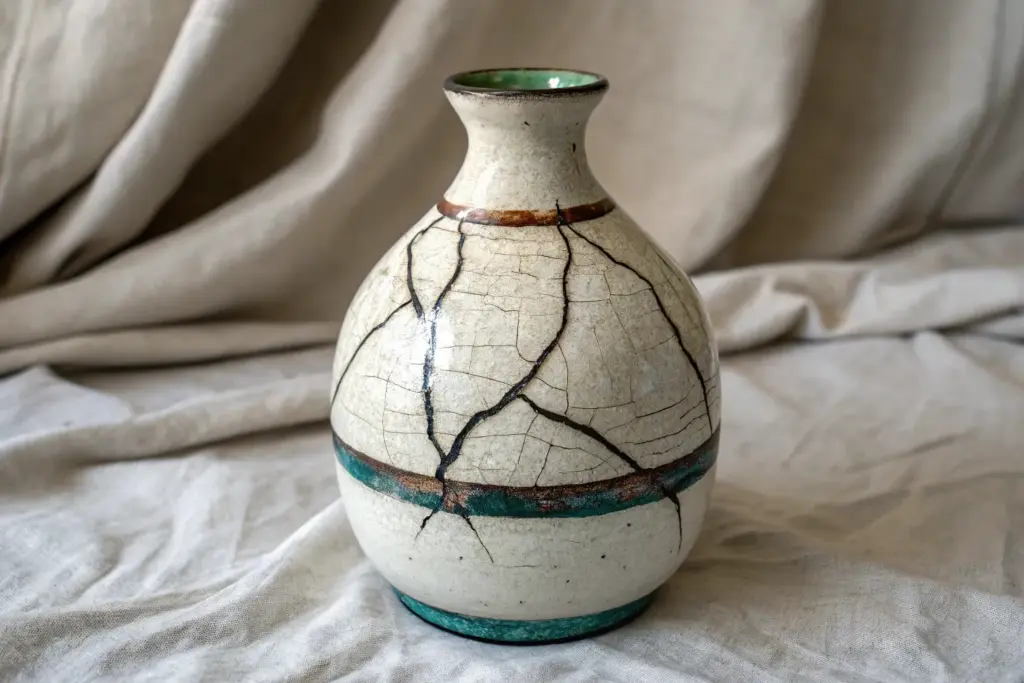
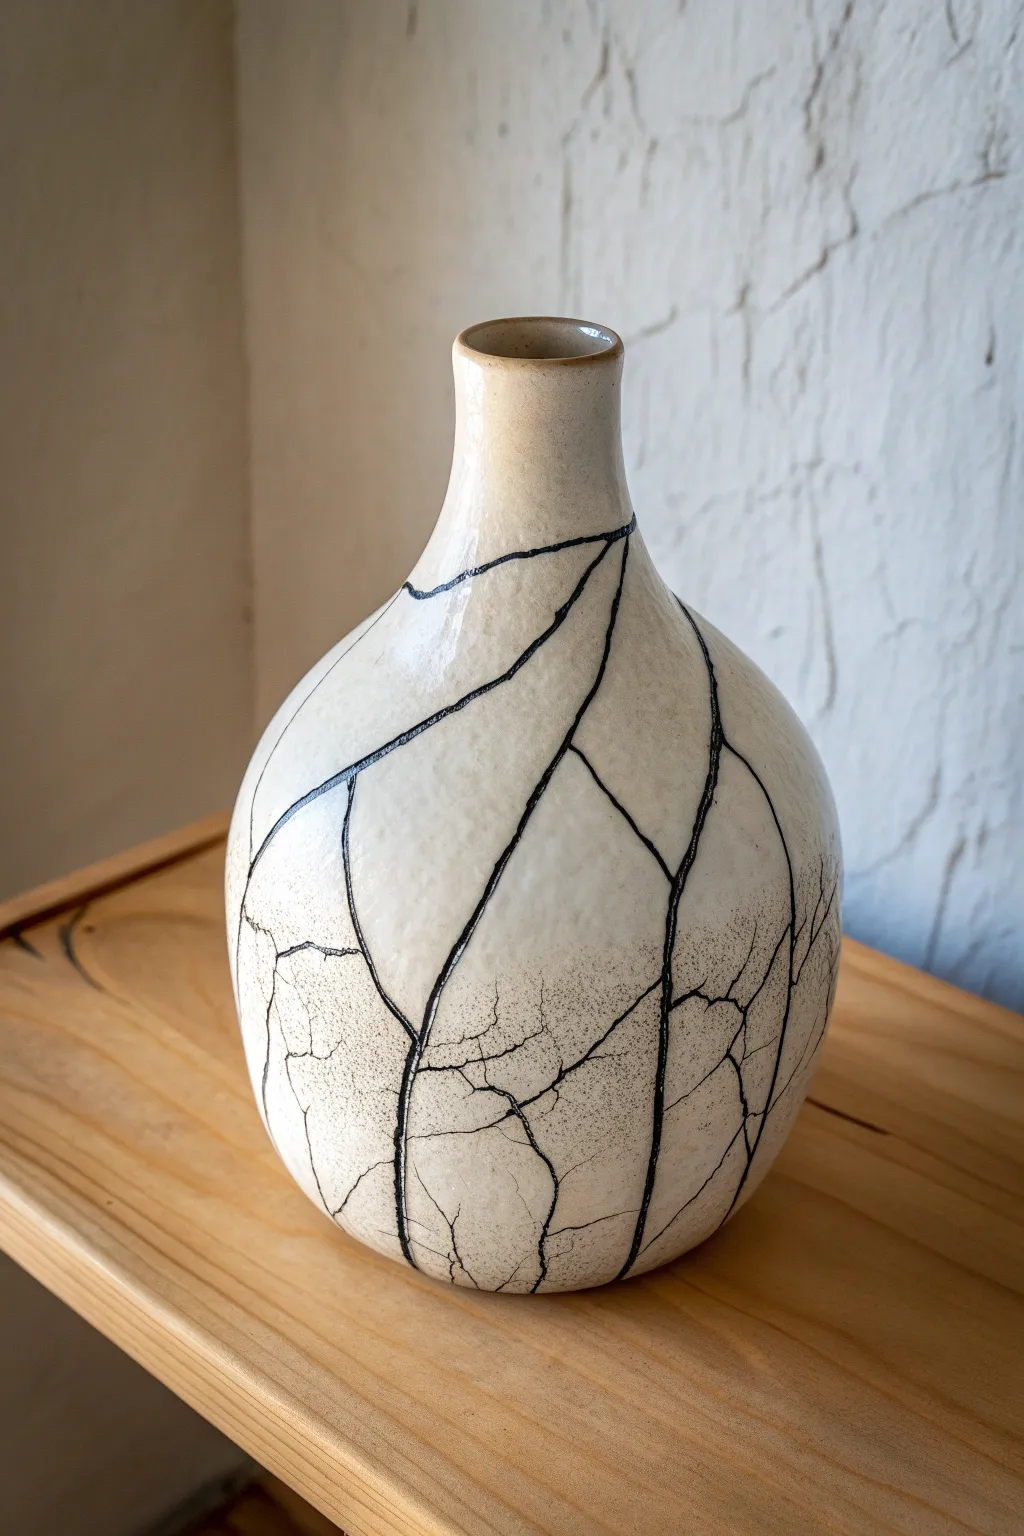
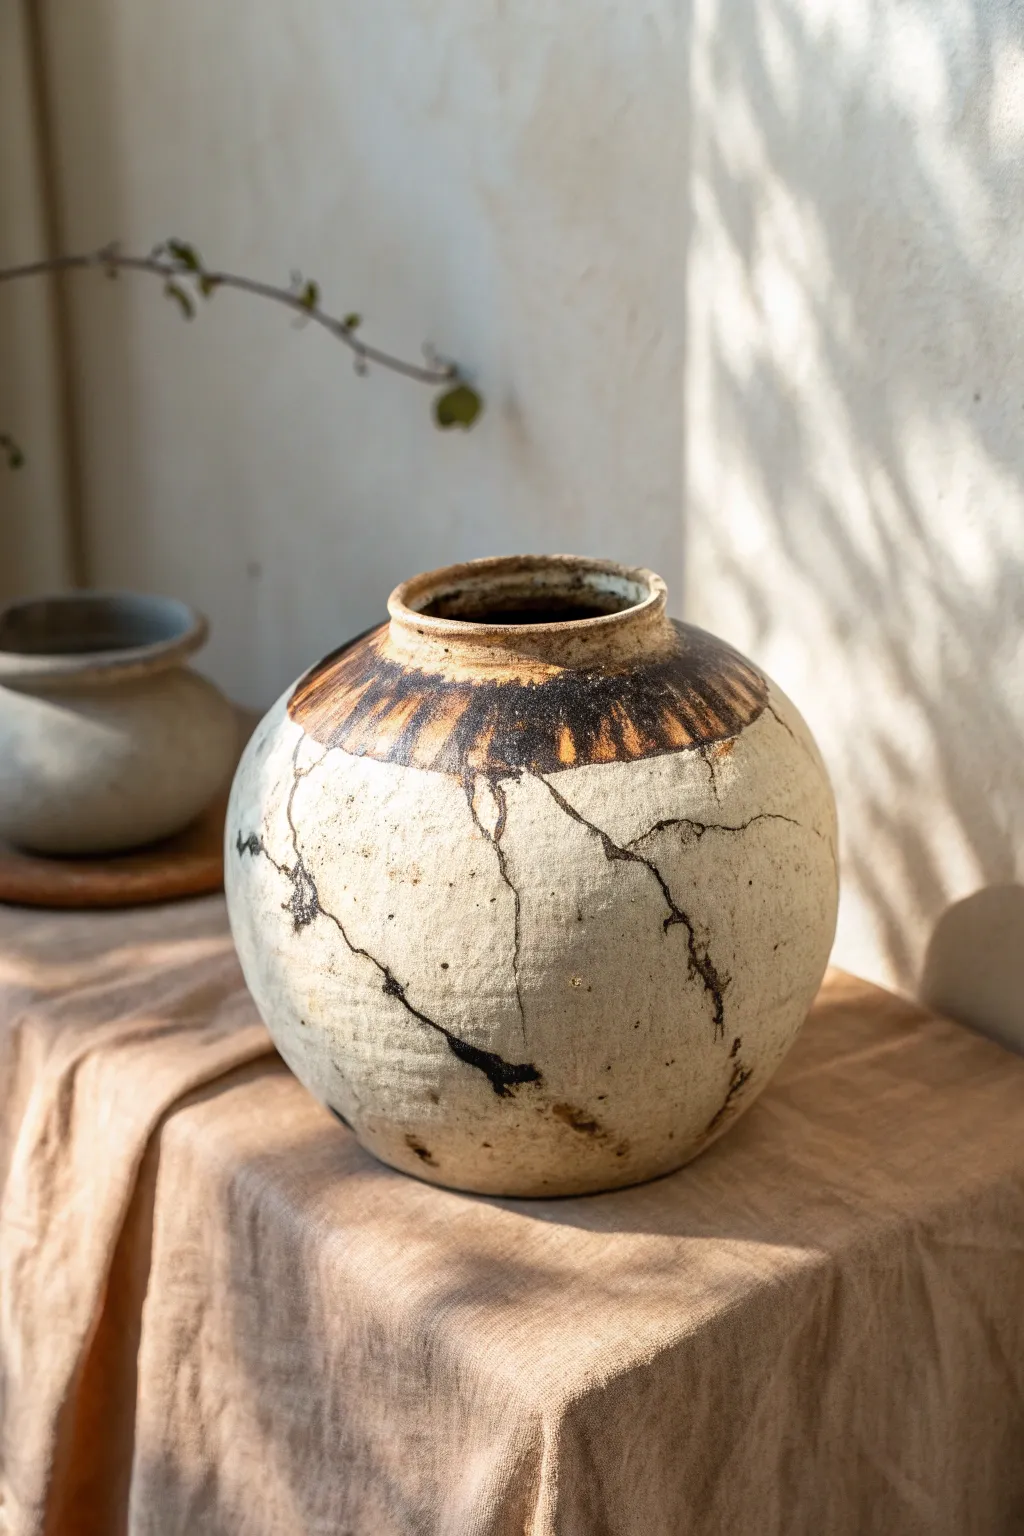
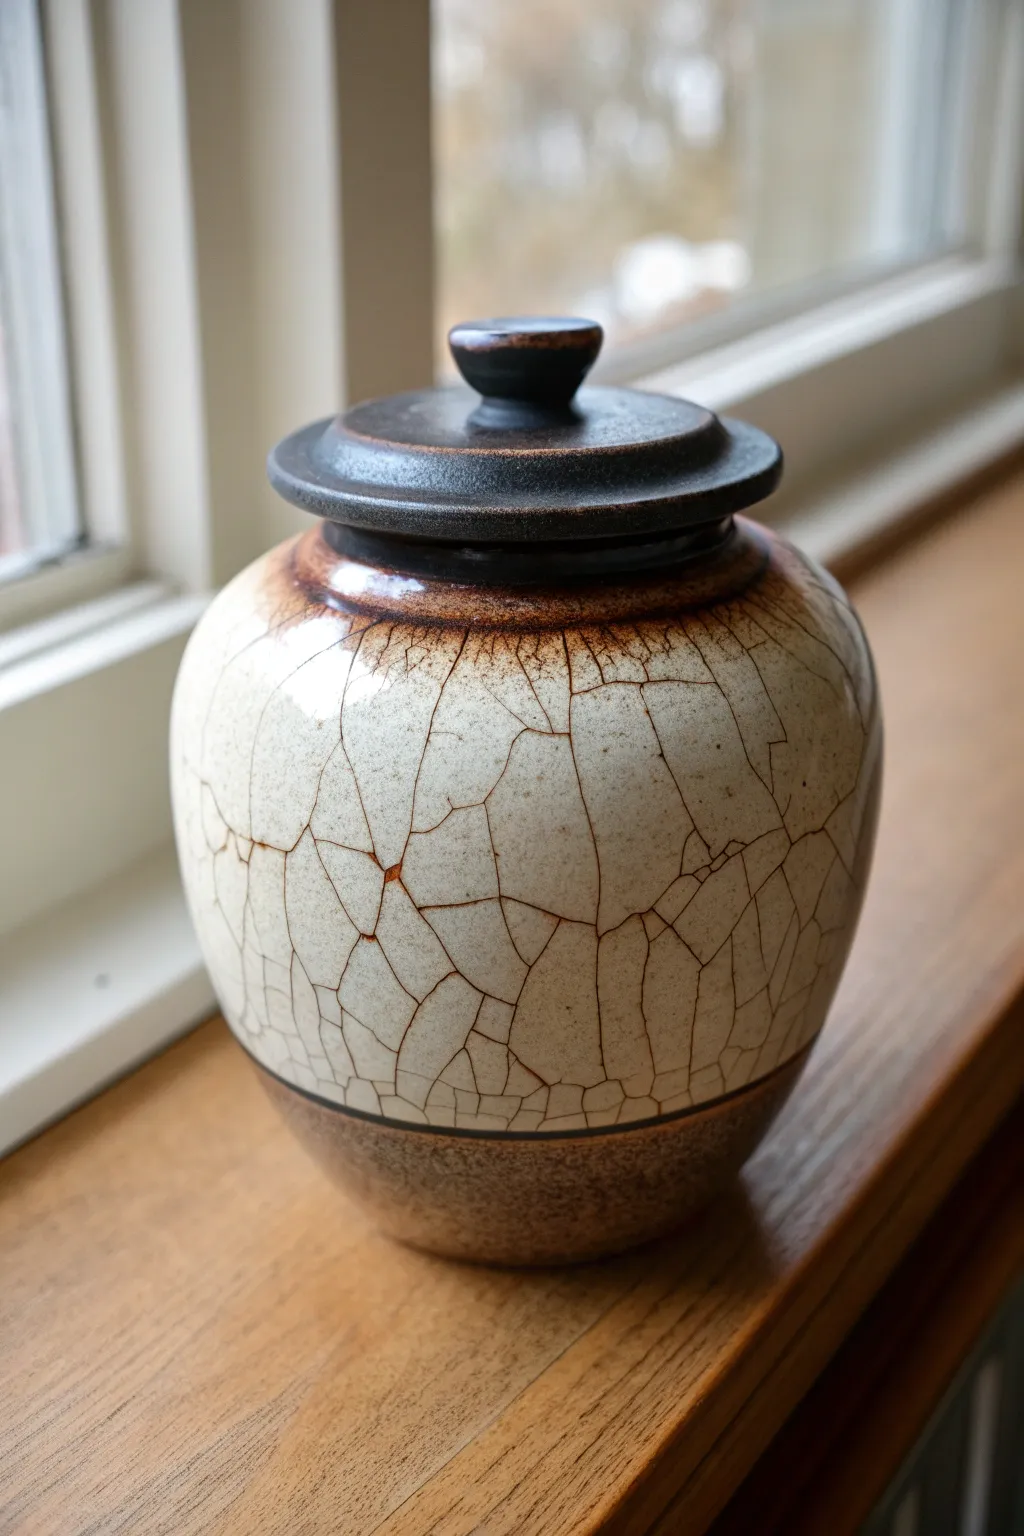
Classic Crackle Glaze Vase
Master the dramatic and unpredictable art of raku firing with this stunning crackle glaze vase project. The stark contrast between the bright white glaze and the deep black carbon veins creates a sophisticated finish that makes every piece completely unique.
Step-by-Step
Materials
- White stoneware or raku clay body (groggy for thermal shock resistance)
- Pottery wheel and throwing tools
- Rib tool
- Sponge
- Wire cutter
- White Raku crackle glaze (commercially available or homemade recipe)
- Raku kiln
- Reduction bin (metal trash can with tight lid)
- Combustibles (sawdust, newspaper, or dried leaves)
- Raku tongs
- Heat-resistant gloves and face shield
- Bucket of water
Step 1: Throwing and Shaping
-
Center and open:
Start with about 3-4 lbs of well-wedged raku clay. Secure it to the wheel head and center it perfectly. Open the clay up, keeping a relatively narrow floor to support the bulbous shape. -
Pull the cylinder:
Begin pulling up the walls. Aim for an even thickness throughout. Since you’ll be bulging the belly out later, leave slightly more clay in the lower middle section to support the expansion. -
Shape the belly:
Using a rib tool on the outside and your hand on the inside, gently push the belly of the vase outward to create that rounded, organic form. Smooth the curve so it transitions gracefully from the base. -
Collar the neck:
Slow the wheel down. Using both hands, gently collar the clay inward at the top to form the long, slender neck. This requires patience; compress the clay frequently to prevent the walls from buckling. -
Refine the rim:
Trim the very top rim to be level. I like to use a chamois leather here to make the lip incredibly smooth and slightly rounded, which mimics the finish in the photo. -
Dry and trim:
Allow the vase to dry to a leather-hard state. Return it to the wheel to trim the foot, creating a clean definition at the bottom that lifts the pot slightly off the surface.
Glaze Didn’t Crackle?
If you lack cracks, your glaze layer might be too thin, or you didn’t let it cool enough in the air before reduction. Hold it in the air longer next time to hear the ‘pinging’ sound before smoking it.
Step 2: Bisque Firing and Glazing
-
Bisque fire:
Fire the completely dry vase in an electric kiln to cone 04 or 06. This strengthens the pot for the intense thermal shock it will endure later. -
Clean surface:
Once cool, wipe the bisque ware down with a damp sponge to remove any dust. This ensures the glaze adheres properly without crawling. -
Apply glaze:
Pour your white raku crackle glaze inside the vase, swirl to coat, and pour out. Then, dip or pour the glaze over the exterior. You want a medium-thick application—too thin and it won’t crackle well; too thick and it might run off the pot. -
Clean the foot:
Meticulously wipe the glaze off the bottom foot ring. If glaze is left here, the pot will fuse to the kiln shelf.
Step 3: The Raku Firing Process
-
Load and fire:
Place the glazed vase into your raku kiln. Fire rapidly until the glaze melts and becomes glossy. This usually happens around 1830°F (1000°C), but watch for the surface to look wet and shiny. -
Prepare reduction bin:
While the kiln is firing, prepare your metal reduction bin with a bed of sawdust or shredded newspaper. Have your lid ready and nearby. -
Pull the pot:
Turn off the gas. Wearing full protective gear, open the kiln. Using long raku tongs, firmly grasp the vase by the neck (or body if stable) and remove it from the kiln. The sudden temperature drop causes the glaze to craze (crack). -
Air cool briefly:
Hold the pot in the air for just a few seconds (5-10 seconds) until you hear the ‘pinging’ of the glaze cracking. This step is crucial for developing the network of lines. -
Reduction chamber:
Place the glowing hot pot into the reduction bin filled with combustibles. It will immediately ignite. Quickly place the lid on the bin to smother the fire. -
Smoke infusion:
Leave the pot in the smoke-filled bin for at least 15-20 minutes. The lack of oxygen forces carbon from the smoke into the clay body and into the fresh cracks in the glaze, turning them black. -
Quench:
Carefully remove the still-hot pot with tongs and dunk it into a bucket of water to freeze the cracking process and cool the piece. -
Scrub clean:
The pot will be covered in soot and grime. Use a scrubbing pad and water to aggressively clean the surface, revealing the brilliant white glaze and the stark black crackle lines beneath.
Control the Lines
To encourage specific crack lines, like the large diagonal one in the photo, lightly blow cool air on that specific area immediately after pulling the pot from the kiln to force a stress fracture there.
Place your finished vase near a window where natural light can highlight the delicate web of black lines against the snowy white surface.


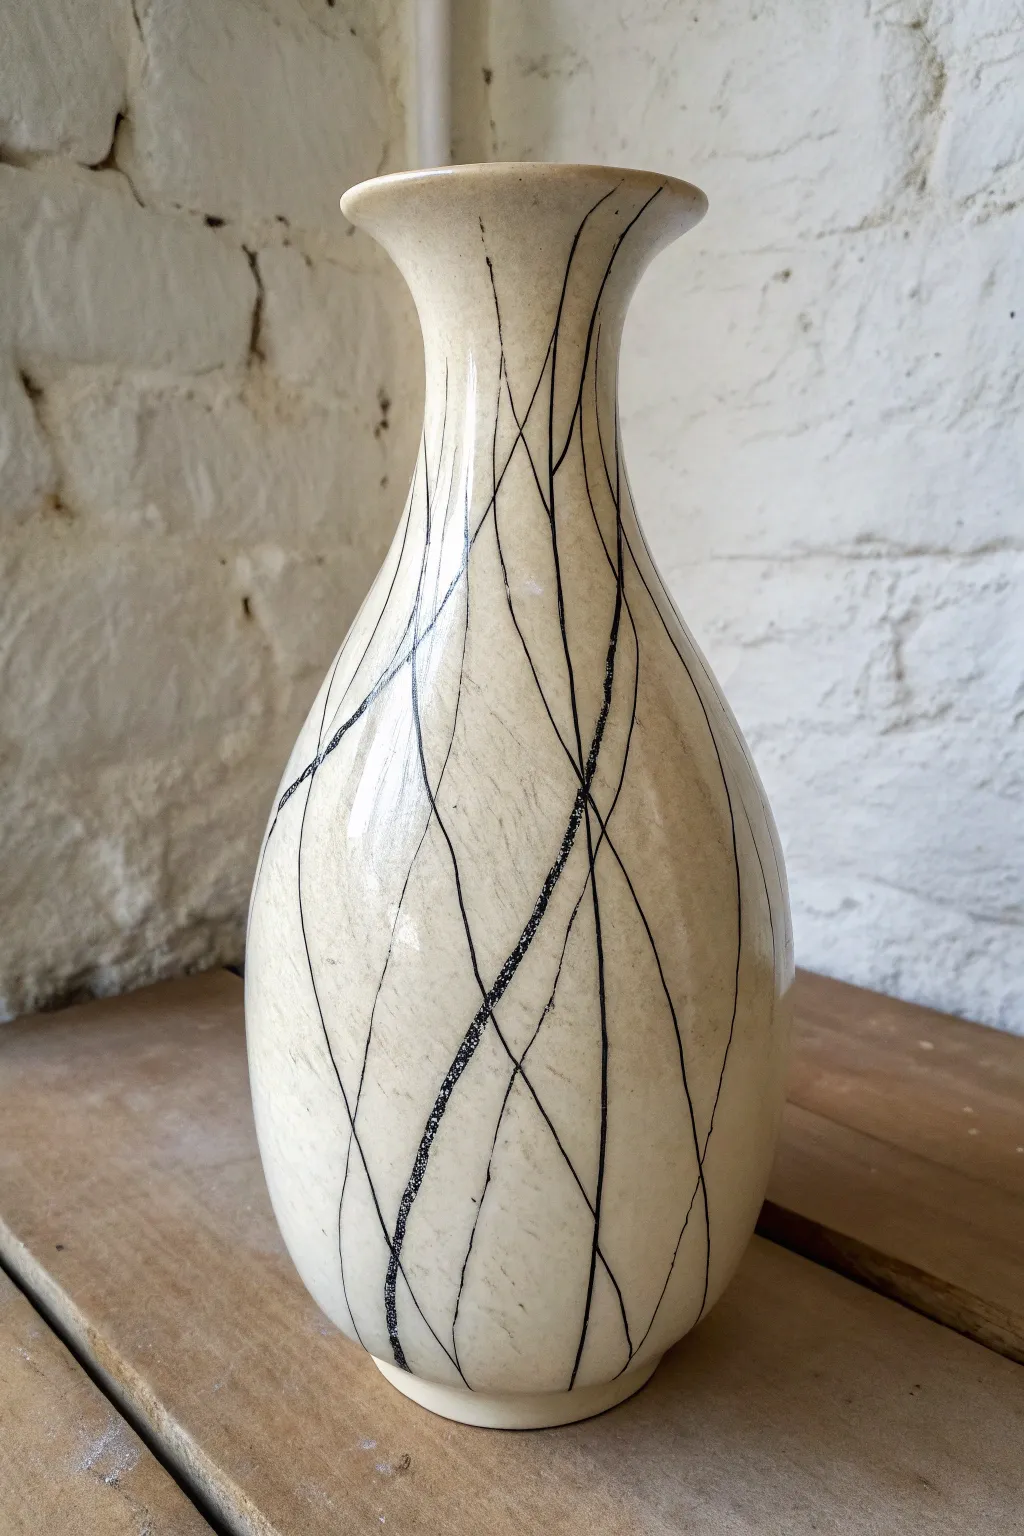
Traditional Raku Tea Bowl (Chawan) With Smoky Flashing
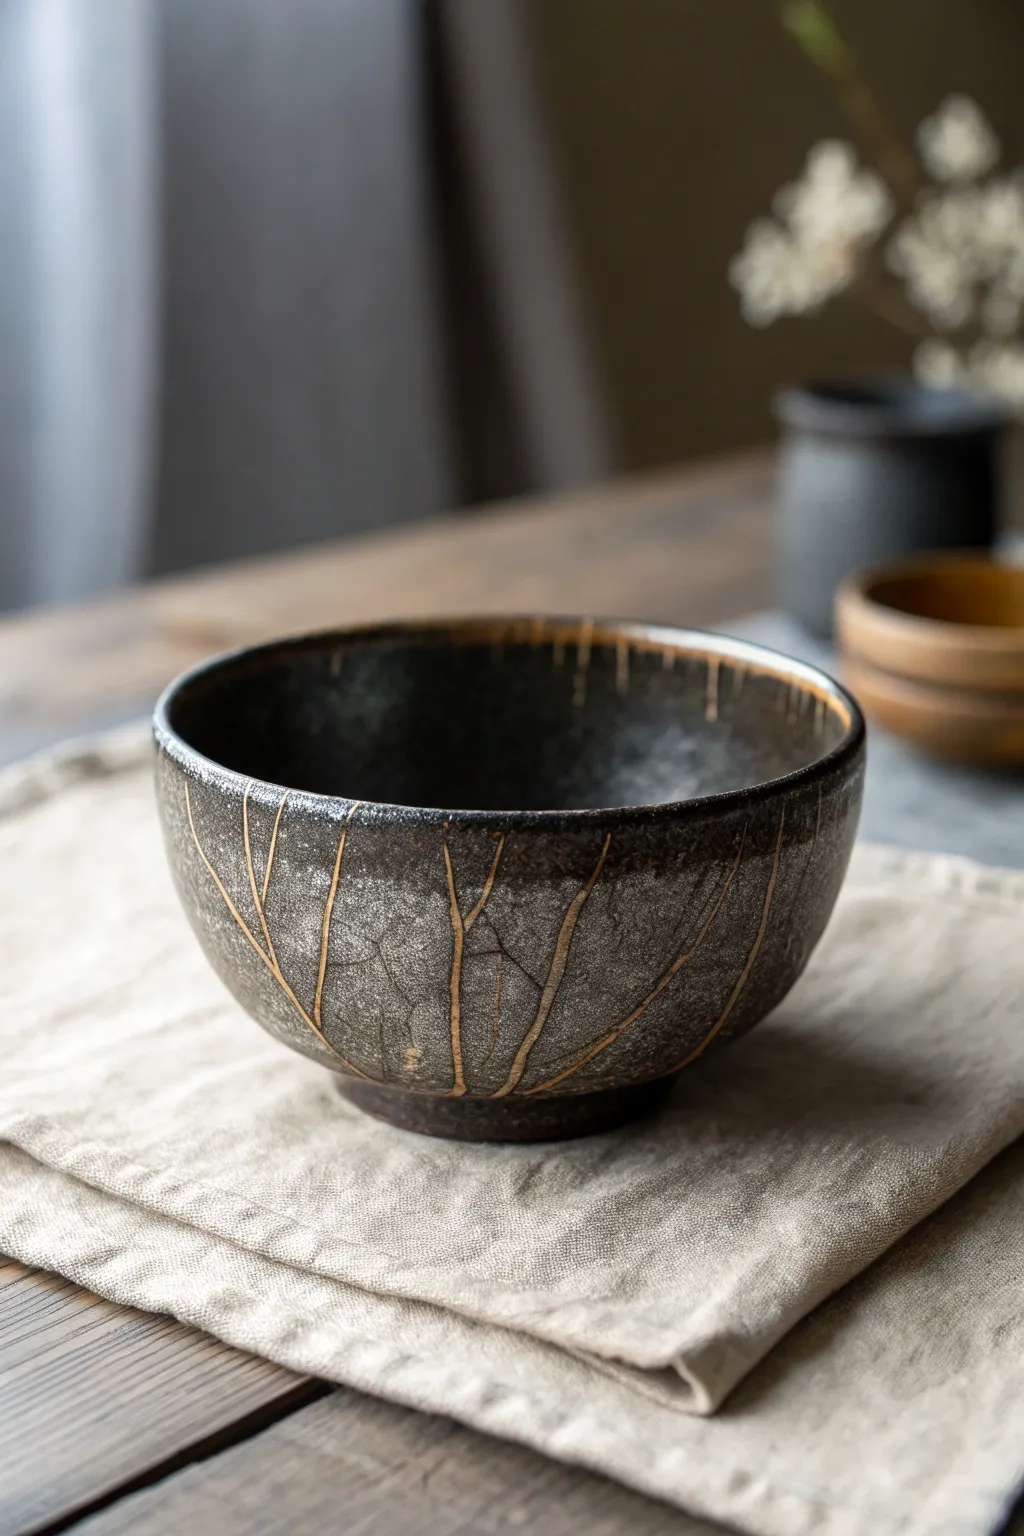
This project captures the soulful aesthetic of wabi-sabi with a traditional handmade tea bowl featuring delicate, organic etched lines. The darkened, smoky surface contrasts beautifully with warm golden-brown undertones, created through the unique alchemy of the raku firing process.
Step-by-Step Tutorial
Materials
- Raku clay body (grogged stoneware)
- Pottery wheel (or hand-building tools for pinch method)
- Wooden rib tool
- Loop trimming tool
- Needle tool or sgraffito styling tool
- Copper matte raku glaze or metallic oxide wash
- Raku kiln
- Raku tongs
- Metal reduction bin
- Combustible material (sawdust, newspaper, or dried leaves)
- Water bucket for quenching
Step 1: Forming the Bowl
-
Prepare the Clay:
Begin by wedging about 1.5 to 2 pounds of raku clay thoroughly to remove air bubbles. Raku clay needs to be distinctively grogged to withstand the thermal shock of the firing process. -
Center and Open:
Throw the ball of clay onto the wheel head and center it. Open the form wide, aiming for a classic ‘chawan’ or tea bowl shape, which typically has a slightly wider base and gentle, upward-curving walls. -
Pull the Walls:
Pull the walls up, keeping them relatively thick compared to standard tableware; raku ware benefits from a bit of heft. Aim for a distinct rim that curves slightly inward to contain the tea. -
Refine the Surface:
Use a wooden rib on the exterior while the wheel is spinning slowly to smooth out throwing lines and create a canvas for your texture. I like to leave just a hint of irregularity to keep it feeling organic. -
Trim the Foot:
Once the bowl is leather-hard, flip it over and trim a distinct foot ring. This elevates the bowl and gives it a traditional silhouette.
Pro Tip: Line Variation
When carving your veins, tremble your hand slightly. Perfectly straight lines look stiff; shaky lines mimic the natural growth of plants and roots.
Step 2: Texturing and Glazing
-
Carve the Design:
While the clay is still leather-hard, use a needle tool or specialized sgraffito tool to carve tree-like branch patterns or leaf veins. Vary your pressure to create lines of different depths, extending from the base up toward the rim. -
Bisque Fire:
Allow the bowl to dry completely (bone dry) and bisque fire it in an electric kiln to approximately Cone 04 to prepare it for glazing. -
Apply Oxide or Glaze:
Brush a thin layer of copper matte raku glaze or an iron oxide wash over the exterior. The goal isn’t a thick glassy coating, but a surface that will react with the smoke. -
Wipe Back:
Take a damp sponge and gently wipe away some of the surface glaze, leaving heavier deposits inside the carved vein lines. This ensures the pattern pops against the dark background. -
Glaze the Interior:
Pour a raku-safe clear or white crackle glaze inside the bowl if you want it functional for dry goods, or use the same exterior treatment for a purely decorative piece.
Step 3: The Raku Firing
-
Heat the Kiln:
Place the bowl in your raku kiln and fire rapidly until the glaze melts (usually around 1830°F or 1000°C). You can check visually through the peep hole to see if the glaze surface looks glossy and wet. -
Prepare Reduction Chamber:
While the kiln fires, prep your metal bin with combustibles. For this specific dark, earthy look, a mixture of fine sawdust and shredded newspaper works well. -
Pull the Piece:
Wearing high-heat safety gear, open the kiln. Using long raku tongs, firmly grasp the bowl by the foot or thickest part of the wall and remove it from the kiln. -
Enter Reduction:
Immediately place the glowing red-hot bowl into the metal bin. Let the paper ignite for just a second, then cover the bin tightly with a lid to starve the fire of oxygen. -
Smoke the Piece:
Leave the bowl in the reduction chamber for at least 15-20 minutes. The smoke will penetrate the unglazed clay and the carved lines, turning them black or dark gray. -
Quench:
Remove the bowl from the smoke bin (it will still be hot) and carefully dunk it into a bucket of water to freeze the reduction effects and cool the pot. -
Scrub and Clean:
Once cool, use a stiff brush and water to scrub away the soot and ash residue. This final reveal will show the contrast between the blackened veins and the metallic or earthy tones of the body.
Troubleshooting: Dull Colors
If your copper matte looks muddy or dull brown instead of metallic, you likely re-oxidized the pot. Get it into the reduction bin faster next time!
Enjoy using your beautifully charred vessel as a meditation piece or a stunning display of fire’s artistic power.


Iridescent Metallic Raku Platter
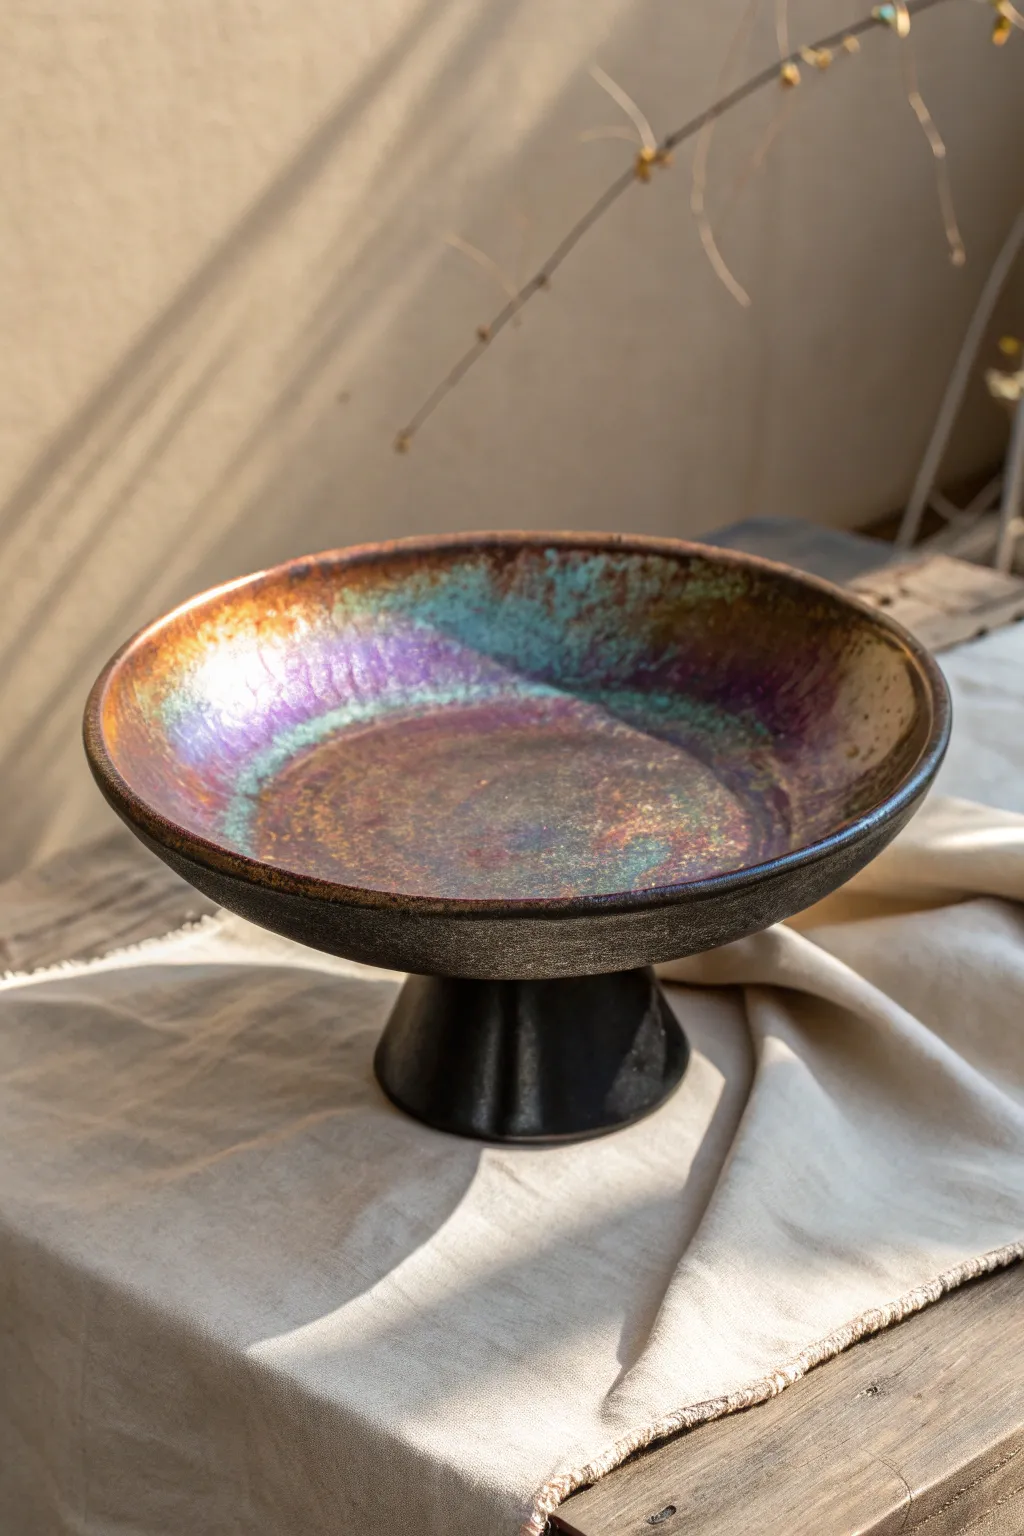
Capture the ethereal beauty of an oil slick on wet pavement with this dramatic footed platter. The contrast between the rough, matte black exterior and the explosive, iridescent rainbow interior makes this piece a true showstopper for any table setting.
Detailed Instructions
Materials
- High-grog raku clay body (white or buff)
- Pottery wheel
- Throwing tools (ribs, wire cutter, needle tool)
- Trimming tools
- Copper matte raku glaze
- Cobalt or silver nitrate based luster glaze (for purples)
- Black iron oxide wash or black underglaze
- Raku kiln
- Metal reduction bin
- Combustible material (newspaper, sawdust)
- Raku tongs
- Safety gear (respirator, leather gloves, goggles)
Step 1: Throwing the Form
-
Center the clay:
Start with a generous ball of raku clay (about 3-4 lbs). Center it firmly on the wheel head, ensuring it is wide and low to support a platter shape. -
Open wide:
Open the clay all the way down, leaving about a half-inch thickness for the base to attach the foot later, and pull the floor out wide and flat. -
Pull the walls:
Pull the walls up and out into a shallow bowl or deep platter shape. Aim for a distinct, rounded curve rather than a flat plate profile. -
Refine the rim:
Compress the rim with a chamois or your finger to prevent cracking during the thermal shock of raku firing. Keep the rim slightly thick for visual weight. -
Throw the foot separately:
While the platter stiffens, throw a tall, hollow cylinder pedestal on a separate bat. Flares at the bottom add stability and elegance.
Dull Colors?
If the metallic finish is dull or muddy, you likely reduced it too long or didn’t cool it fast enough. Quench immediately after the reduction phase for snap.
Step 2: Assembly and Bisque
-
Trim the platter:
Once leather hard, flip the platter and trim the underside flat to prepare it for the pedestal attachment. -
Attach the pedestal:
Score and slip both the underside of the platter and the top of the pedestal cylinder. Join them firmly, smoothing the seam so it looks like one cohesive piece. -
Dry slowly:
Raku clay can warp, so dry this piece slowly under loose plastic for the first few days, especially around the connection point. -
Bisque fire:
Fire the assembled piece to cone 04 or 06 in an electric kiln. This prepares the clay to accept the glaze without blowing up.
Step 3: Glazing and Firing
-
Apply the oxide:
Brush black iron oxide wash or a satin black glaze onto the exterior of the bowl and the entire pedestal foot. Wipe back slightly if you want more texture to show. -
Glaze the interior:
Pour or heavily brush your copper matte raku glaze inside the bowl. I often overlay a touch of cobalt luster near the rim to encourage those deep purple hues. -
Load the Raku kiln:
Place the piece securely in your raku kiln. Fire rapidly until the glaze melts and becomes glossy (usually around 1800°F/982°C). -
Pull while hot:
Turn off the gas. Wearing full safety gear, lift the glowing red pot out of the kiln with long metal tongs. -
Heavy reduction:
Immediately place the piece into a metal bin lined with shredded newspaper. Cover it instantly with the lid to starve the oxygen. -
Wait and Burp:
Let it smoke for 15-20 minutes. You might ‘burp’ the lid (lift briefly and close) once to re-ignite the carbon if the smoke dies down too fast. -
Rapid cool:
Remove the piece from the bin and spray it with water or dunk it to freeze the iridescence in place. This thermal shock is risky but necessary for the brightest colors. -
Scrub clean:
Once cool, scrub the charred residue off the glaze with a stiff brush and water to reveal the metallic finish beneath.
Use Resist
Apply wax resist or masking tape in geometric patterns over the oxide layer before reducing. This leaves un-smoked white clay lines for high contrast.
Place this dramatic vessel near a window where sunlight can dance across the ever-changing metallic surface


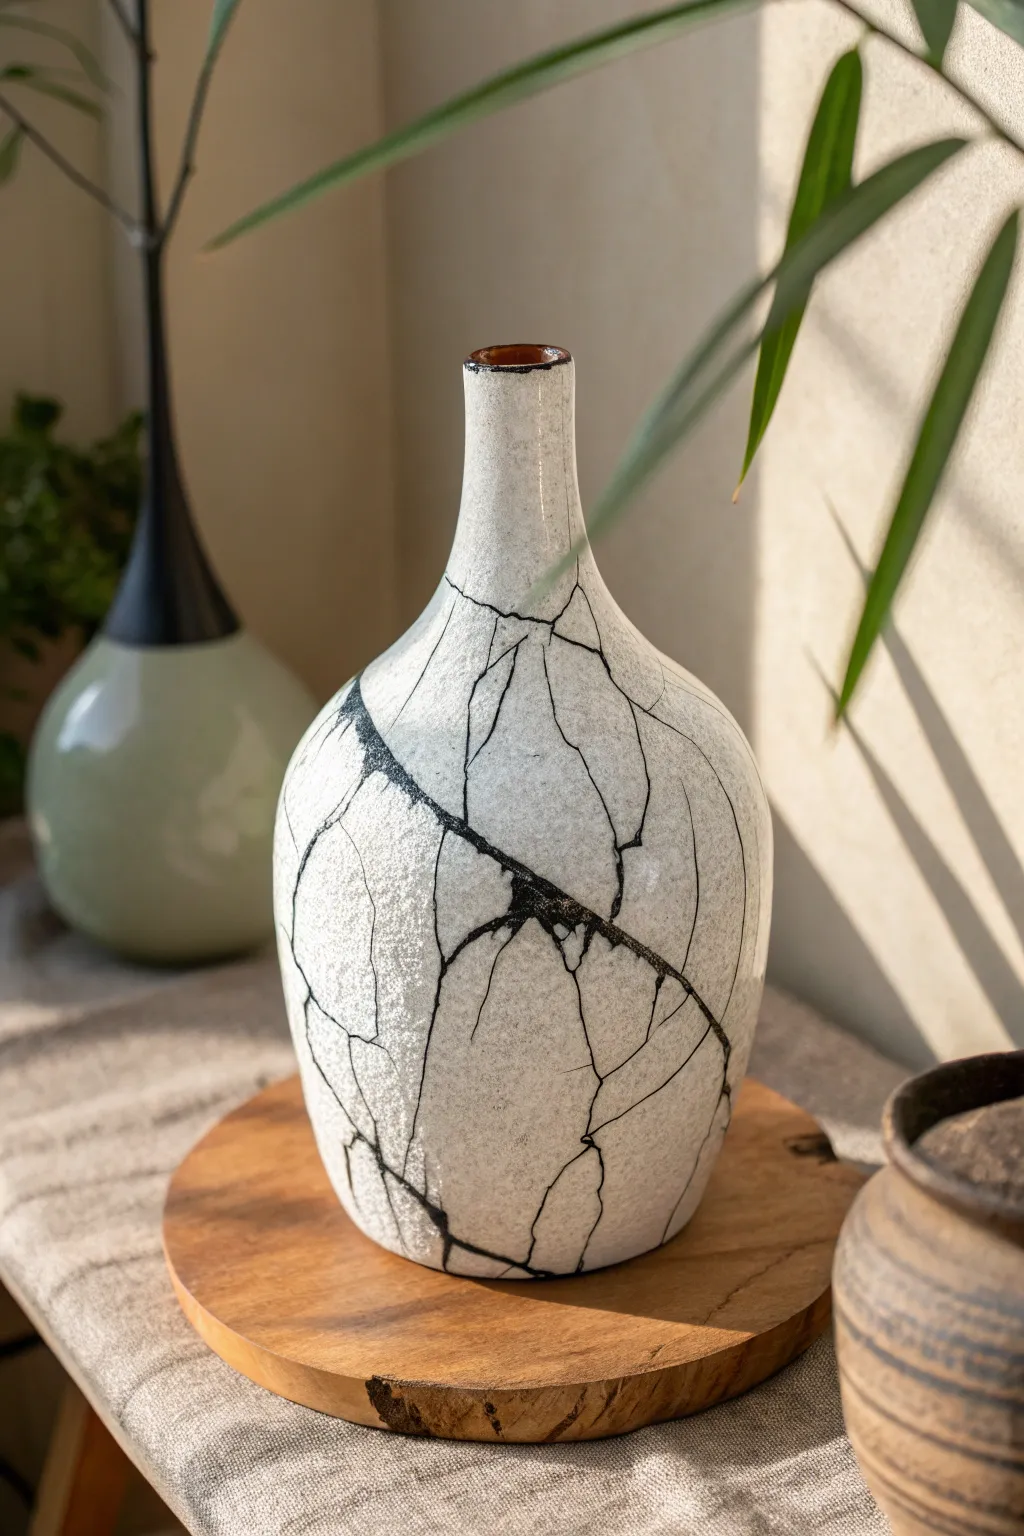
Naked Raku With Peel-Off Slip Webbing
This striking vase features a high-contrast design created not by glaze, but by the smoke of a reduction chamber etching itself into bare clay. The technique uses a sacrificial slip layer to create organic, lightning-bolt patterns that feel both ancient and modern.
How-To Guide
Materials
- White Raku Clay Body (groggy)
- Pottery wheel or slab building tools
- Rib tools (metal and rubber)
- Burnishing stone or spoon
- High-Alumina Kiln Wash (or Resist Slip)
- Raku Glaze (clear or white crackle)
- Raku Kiln and tongs
- Reduction bin (metal trash can)
- Combustible material (sawdust, newspaper)
- Scrubbing pad or steel wool
- Water bucket
Step 1: Forming & Burnishing
-
Shape the vessel:
Throw or hand-build a vase with a narrow neck and a bulbous body using a white Raku clay body. Keep walls relatively even to withstand thermal shock. -
Refine the surface:
Once the piece is leather hard, trim away excess weight and use a metal rib to scrape the surface perfectly smooth, removing all throwing rings or texture tools marks. -
Burnish to a shine:
Rub the surface with a smooth stone or the back of a spoon while the clay is still slightly damp. This compresses the particles and creates the smooth, satin finish seen on the white areas of the final piece. -
Bisque fire:
Fire the piece in an electric kiln to cone 06 or roughly 1830°F (999°C). This prepares the pot for the raku process without fully vitrifying it.
Smoke Not Hitting?
If lines are grey instead of black, you likely didn’t bury the pot in combustible material quickly enough. Speed is key from kiln to can.
Step 2: Slip & Glaze Application
-
Apply resist slip:
Mix a ‘resist slip’ or apply a thick layer of high-alumina kiln wash over the entire exterior. This layer prevents the glaze from actually fusing to the pot. -
Let the slip dry:
Allow this slip layer to dry just until it loses its sheen but isn’t bone dry. It needs to remain stable for the next layer. -
Apply the glaze coat:
Brush or pour a layer of standard raku glaze directly over the slip. The glaze will shrink differently than the slip during firing, creating the cracks. -
Force the cracking:
I rely on rapid drying here; use a heat gun or place the pot in the sun to dry the glaze quickly. This forces wide cracks to form in the glaze/slip shell, which will become your black lines.
Control the Chaos
Etch into the dry slip layer with a needle tool before glazing to force specific crack lines or drawing patterns where the smoke will enter.
Step 3: Firing & Reduction
-
Load the raku kiln:
Place the vessel into your preheated raku kiln. Fire rapidly until the glaze melts and looks glossy, usually around 1830°F (1000°C). -
Prepare reduction bin:
While the kiln fires, fill your metal bin with sawdust or shredded newspaper. You want enough fuel to create heavy smoke. -
Pull and reduce:
Wearing safety gear, remove the glowing pot with tongs and immediately place it into the reduction bin. Cover it with lid instantly. -
Smoke infusion:
Leave the pot in the smoke for about 15-20 minutes. The carbon smoke will penetrate the cracks where the slip separated, turning the bare clay underneath black.
Step 4: The Reveal
-
Cool with water:
Remove the hot pot and spray it with water or cautiously dunk it to stop the reduction and cool the piece enough to handle. -
Peel the shell:
The glaze and slip layer should now be loose. Gently chip it away; it often pops off in large flakes like a cracked eggshell. -
Scrub the surface:
Take the pot to a water bucket and scrub vigorously with a scouring pad or steel wool. You want to remove every bit of residue to reveal the stark white clay and black carbon lines. -
Seal (optional):
Since naked raku is porous, apply a thin coat of acrylic sealer or wax if you want to protect the white surface from fingerprints.
Enjoy the tactile satisfaction of peeling away the charred outer shell to find your clean, contrasting masterpiece underneath

What Really Happens Inside the Kiln
Learn how time and temperature work together inside the kiln to transform clay into durable ceramic.
Horsehair Raku Vase With Wandering Carbon Lines
This elegant project captures the essence of unpredictability, featuring delicate, carbon-trapped lines dancing across a smooth ivory surface. The contrast between the sleek, burnished form and the erratic, organic trails created by singed horsehair makes every piece entirely unique.
Step-by-Step
Materials
- White Raku clay body (grogged for thermal shock resistance)
- Pottery wheel (or coil building tools)
- Rib tool (metal or rubber)
- Terra Sigillata (white)
- Soft brush for application
- Soft cloth or chamois for burnishing
- Raku kiln
- Propane torch or kiln gloves/tongs
- Horsehair (clean, strands separated)
- Clear spray sealer or beeswax polish
Step 1: Throwing and Shaping
-
Center and open:
Begin with a well-wedged ball of white Raku clay. Center it firmly on the wheel head and open up the interior, keeping the base relatively narrow to match the vase shown. -
Pull the height:
Pull the walls up tall and even. Aim for a teardrop shape that is wider at the bottom third and gently tapers upward toward a graceful neck. -
Define the neck and rim:
Collar the clay in near the top to form a tall, slender neck, then flair the rim outward slightly, creating a soft, inviting opening. -
Refine the surface:
Before removing it from the wheel, use a rib tool to smooth the exterior walls thoroughly, removing all throwing lines and finger ridges to create a blank canvas for the carbon.
Hair Selection Tip
Coarse tail hair creates thick, bold lines, while finer mane hair creates delicate, wispy trails. Use horsehair specifically; human hair is too thin to leave good carbon marks.
Step 2: Surface Preparation
-
Leather hard smoothing:
Allow the vase to dry to a leather-hard state. I find this is the perfect time to go back over the surface with a smooth rib or the back of a spoon to compress the clay particles. -
Apply Terra Sigillata:
Apply three to four thin, even coats of white Terra Sigillata. This ultra-refined clay slip creates the satiny, non-porous surface needed for sharp lines. -
Burnish the piece:
Between coats and after the final coat dries, gently buff the surface with a soft cloth, piece of plastic grocery bag, or chamois until it develops a soft, low sheen. -
Bisque fire:
Bisque fire the vase to roughly cone 08 (approx. 1728°F / 942°C). The clay needs to remain porous enough to withstand thermal shock but solid enough to handle.
Add Subtle Color
Before applying hair, lightly mist the hot pot with a ferric chloride solution. This adds soft blushes of orange and apricot behind the black carbon lines.
Step 3: The Horsehair Raku Process
-
Prepare the kiln:
Load the bisqued vase into your Raku kiln. Heat the kiln relatively quickly until the pot reaches approximately 1300°F – 1400°F (700°C – 760°C). -
Check the visuals:
The pot should look glowing orange. Raku is often done by eye or color rather than pyrometer, so look for a bright, consistent heat distribution. -
Remove from heat:
Wearing high-heat safety gear, turn off the kiln and carefully lift the vase out with tongs. Place it immediately onto a firebrick or non-flammable surface. -
Wait for the window:
This is crucial: Wait about 15-30 seconds. If the pot is too hot, the hair will simply vaporize instantly without leaving a mark. If too cool, it won’t burn. -
Apply the hair:
Gently drape individual strands or small bundles of horsehair against the hot surface. The heat will melt the hair, leaving meandering black carbon trails as it curls. -
Vary the lines:
Blow gently on the hair as you apply it to encourage the lines to wander and squiggly across the form rather than burning in a straight line. -
Experiment with thickness:
Use a single strand for a hairline fracture look, or a small clump of 3-5 hairs for the thicker, bolder black lines seen in the example image. -
Add detail:
Quickly touch the hair to different sections—neck, belly, and base—working fast before the pot cools below the combustion point (around 900°F).
Step 4: Cooling and Finishing
-
Cool down:
Unlike Western Raku, do not place this in a reduction bin (sawdust). Leave it in the open air to cool naturally, or spray very lightly with water if you want to freeze the process quickly. -
Clean the surface:
Once fully cool, the pot will likely have soot and ash residue. Gently wash it with water and a soft sponge to reveal the crisp black lines against the white clay. -
Seal the piece:
Since Raku is porous, apply a high-quality beeswax polish or a clear acrylic sealer to protect the carbon markings and give the vase a finished sheen.
Place your finished vase in a spot with good lighting to highlight the intricate, smoky trails of the carbon design
Wax-Resist Raku With Bold Smoke-to-Clean Contrast
This striking vase combines the raw, unpredictable beauty of raku firing with precise geometric control. By using wax resist and tape, you’ll create a stunning interplay between crackled white glaze, warm unglazed clay, and smoke-blackened lines.
Step-by-Step
Materials
- Raku clay body (grogged stoneware)
- Pottery wheel and tools
- Bisque kiln
- Raku kiln and reduction bin (metal trash can with lid)
- Sawdust or newspaper (reduction material)
- Raku tongs and heat-resistant gloves
- White crackle raku glaze
- Graphic art tape (automotive striping tape works well, 1/8 inch or thinner)
- Wax resist (brush-on or liquid emulsion)
- Needle tool
- Sponge and bucket of water
- Soft glaze brush
- Iron oxide wash (optional for warmth)
Step 1: Forming and Bisque Firing
-
Throw the form:
Begin by centering about 3-4 pounds of raku clay on your wheel. Pull the walls to create a bulbous belly that tapers inward at the shoulder. Flare the rim outward slightly to create a strong, defined lip, which helps frame the geometric pattern later. -
Refine the surface:
Once leather hard, trim the foot of the vase. Smooth the entire surface with a metal rib to remove throwing rings; a smooth canvas is crucial for the tape resist to adhere properly. -
Bisque fire:
Allow the pot to dry completely, then bisque fire it to cone 04 or 06, depending on your clay body’s specifications. The pot needs to be porous but strong enough to handle rapid thermal shock.
Smudgy Lines?
If your black lines look blurry, the tape likely lifted during glazing. Next time, burnish the tape down firmly with a wooden rib before glazing to seal the edges tight against the bisque.
Step 2: Applying the Resist Design
-
Create the geometric framework:
Using thin graphic art tape (about 1/8 inch width), apply your primary geometric lines directly onto the bisque ware. Create large triangles and intersecting angles. These taped lines will eventually become the black, smoke-infused lines shown in the image. -
Plan your zones:
Decide which triangles will be glazed white and which will remain unglazed (brown/orange). Mark the ‘unglazed’ sections lightly with a pencil so you don’t get confused during waxing. -
Apply wax resist:
Brush a coat of wax resist carefully into the geometric shapes you want to remain unglazed. I find it helpful to overlap the wax slightly onto the tape borders to ensure crisp edges. -
Sgrafitto details:
To achieve the fine, spiderweb-like crackle lines inside the unglazed shapes, wait for the wax to dry significantly but not harden fully. Use a needle tool to scratch fine, chaotic lines through the wax layer, exposing the bisque clay underneath.
Step 3: Glazing and Firing
-
Apply the white glaze:
Brush or pour a white crackle raku glaze over the entire pot. The glaze will adhere to the unwaxed sections and bead up on the waxed areas. -
Clean the resist areas:
Use a damp sponge to wipe away any glaze beads sitting on top of the waxed triangles. Be thorough; any leftover glaze here will ruin the matte contrast. -
Remove the tape:
Carefully peel away the graphic art tape. This will reveal raw bisque lines between your glazed and waxed sections. These exposed lines are essential as they will absorb the carbon smoke during reduction. -
Load and fire:
Place the vase in your raku kiln. Fire rapidly until the glaze melts and becomes glossy, typically around 1830°F (1000°C). Watch through the spyhole to see the glaze bubbling and then smoothing out.
Pro Tip: Oxide Wash
For richer color on the unglazed triangles, brush a very thin wash of iron oxide over those areas before waxing. This enhances the warm, rusty tones after the reduction info.
Step 4: Post-Firing Reduction
-
Pull the pot:
Turn off the burner. Wearing full protective gear, open the kiln and use tongs to grip the vase by the sturdy rim. Remove it immediately while glowing hot. -
Reduction chamber:
Place the vase directly into a metal bin lined with sawdust or newspaper. The combustible material will ignite instantly. -
Smoke infusion:
Quickly cover the bin with a tight-fitting lid to starve the fire of oxygen. Let it smoke for at least 15–20 minutes. The smoke will penetrate the naked clay lines and the cracks in the glaze, turning them black. -
Quench the piece:
Remove the vase from the reduction bin. You can spray it with water or submerge it carefully to freeze the crackle pattern and stop the reduction process. Be cautious of thermal shock. -
Scrub clean:
Once cool, the pot will be covered in soot and ash. Use a stiff brush and water to scrub the entire surface vigorously, revealing the brilliant white glaze and the sharp black lines.
Display your finished vessel where natural light can highlight the intricate network of smoke lines and crackles you’ve created


The Complete Guide to Pottery Troubleshooting
Uncover the most common ceramic mistakes—from cracking clay to failed glazes—and learn how to fix them fast.
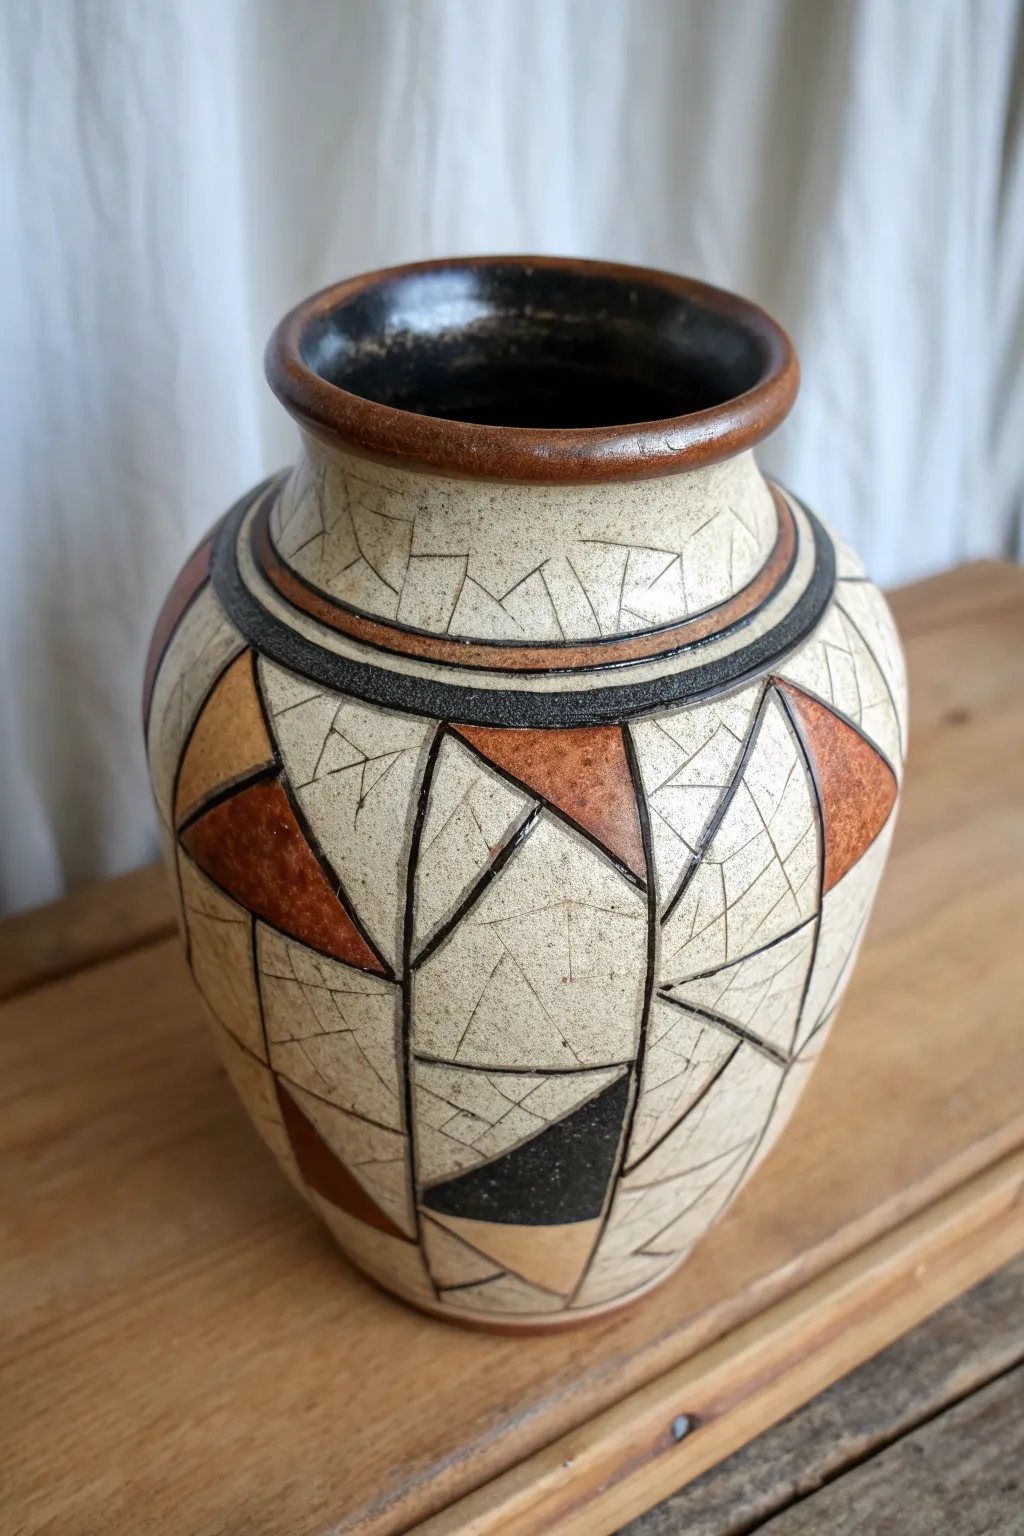
Raku Ikebana Bowl With Minimal Open Form
Embrace the unpredictability of Raku firing with this minimal yet striking ikebana bowl. The dramatic contrast between the metallic black interior and the speckled white and bronze exterior creates a profound sense of depth perfect for stark floral arrangements.
How-To Guide
Materials
- Raku clay body (high grog content)
- Pottery wheel
- Throwing tools (rib, sponge, wire)
- Loop trimming tools
- Masking tape
- White Raku crackle glaze
- Copper matte or metallic black Raku glaze
- Raku kiln
- Reduction bin with combustibles (sawdust/newspaper)
- Tongs and safety gear (gloves, goggles)
Step 1: Forming the Bowl
-
Prepare the Clay:
Begin by thoroughly wedging about 3-4 pounds of Raku clay. Raku clay needs high grog content to withstand the thermal shock of the firing process. -
Center and Open:
Center your clay on the wheel head. Open the form wider than a standard bowl, aiming for a shallow, expansive curve rather than a deep vessel. -
Pull the Walls:
Pull the walls outward and upward. Aim for a distinct shape: start with a rounded bottom curve that transitions into a slightly vertical wall, avoiding a simple V-shape. -
Refine the Rim:
Use a rib tool to smooth the interior curve. Keep the rim slightly thick and rounded; sharp edges tend to chip easily during the violent Raku process. -
Dry to Leather Hard:
Allow the bowl to dry slowly to a leather-hard state. I like to cover the rim with plastic while the base dries to keep the moisture even. -
Trim the Foot:
Flip the bowl and trim a modest foot ring. A defined foot lifts the form visually, giving it a lighter appearance despite the heavy clay. -
Bisque Fire:
Once bone dry, bisque fire the piece to Cone 06. This prepares the clay for glazing without fully vitrifying it.
Sticky Glaze?
If the tongs stick to the pot when unloading, your glaze might be too thick or the firing temperature too high. Try a thinner application next time to prevent fusion.
Step 2: Glazing and Decoration
-
Clean the Bisque:
Wipe the bisque-fired bowl with a damp sponge to remove any dust that might resist the glaze. -
Apply the Base Band:
Using masking tape or a steady hand, leave the bottom third of the exterior unglazed or apply a thin wash of iron oxide if you want a bronze tone. The raw clay often turns a beautiful smoky brown in reduction. -
Glaze the Exterior Band:
Brush or dip a band of white crackle glaze around the middle section of the bowl. Let the edges of this band be slightly uneven for an organic look. -
Glaze the Interior:
Pour a copper matte or metallic black glaze into the interior. Swirl it to coat evenly and pour out the excess. Ensure the interior glaze slightly overlaps the white exterior rim. -
Clean the Foot:
Thoroughly wipe any glaze off the foot ring and the very bottom of the pot to prevent it from sticking to the kiln shelf.
Boost the Crackle
For more dramatic crackle lines in the white section, blow on the hot glaze gently right before placing it in the smoke bin. The thermal shock creates deeper fissures.
Step 3: Raku Firing
-
Load the Raku Kiln:
Place the bowl into your Raku kiln. Heat the kiln rapidly until the glazes melt and mature, typically around 1830°F (1000°C). -
Watch for Melt:
Observe the glaze through the spyhole. You know it’s ready when the surface looks wet and glossy, and the bubbling has smoothed out. -
Pull and Reduct:
Turn off the gas. While wearing high-heat safety gear, use tongs to remove the glowing red hot bowl. Immediately place it into a reduction bin filled with sawdust. -
Cover and Smoke:
Quickly place the lid on the reduction bin. The combustion sucks oxygen out of the atmosphere, turning unglazed clay black/brown and creating the metallic effects in the glaze. -
Quench the Piece:
After about 15-20 minutes of smoking, remove the bowl and either spray it with water or submerge it to freeze the crackle patterns and stop the reduction. -
Scrub Clean:
Once cool, scrub the bowl vigorously with water and a stiff brush to remove soot and residue, revealing the white crackle and metallic interior.
Place a floral frog inside your new bowl and enjoy how the dark interior makes your flower arrangement pop
Wabi-Sabi Raku Moon Jar With Torn Rim Texture
Capture the imperfect beauty of wabi-sabi with this stunning raku firing project, featuring a heavily textured white cracked slip and dramatic carbon trapping. This moon jar contrasts a creamy, organic body with a scorched, dripping collar for a timeless, excavated look.
Step-by-Step Tutorial
Materials
- High-grog stoneware clay (Raku bodies preferred)
- Raku white crackle glaze or thick white slip
- Copper carbonate or Ferric oxide wash
- Pottery wheel
- Rib tools (smooth and serrated)
- Heat gun or blowtorch (optional)
- Raku kiln
- Reduction bin with sawdust/newspaper
- Long Raku tongs
- Safety gear (gloves, respirator, goggles)
Step 1: Throwing the Form
-
Center and open:
Begin with a substantial ball of clay (around 4-6 lbs) to achieve that voluminous moon jar shape. Center it firmly on the wheel and open it wide, leaving a floor about half an inch thick. -
Pull the walls:
Pull the cylinder tall and relatively thick initially. You need extra clay to support the belly as you stretch it outward. Aim for an even thickness throughout the wall. -
Shape the belly:
Using a rib on the inside and your hand on the outside, gently push the walls outward to create a spherical ‘moon’ shape. Work gradually from the bottom up to prevent collapse. -
Collar the neck:
Slowly collar the neck inward to close the form somewhat, leaving a wide, open mouth. Refine the rim but don’t worry about perfection; a slightly uneven lip adds character. -
Create texture:
While the pot is still turning slowly, use a serrated rib or a rough sponge to disturb the surface, creating initial pits and grooves that will catch the glaze later. -
Dry partially:
Allow the pot to reach leather-hard stage. This is crucial before applying any heavy slip textures or trimming the foot.
Step 2: Surface Treatment & Biscuit
-
Apply thick slip:
Mix a very thick white slip, possibly with added grog or sand. Slather this onto the main body of the pot using your hands or a wide brush, intentionally creating ridges and uneven patches. -
Induce cracking:
I like to use a heat gun or blowtorch on the wet slip immediately after application. Rapid drying forces the slip to crackle and separate, mimicking aged earth. -
Carve fissures:
Once the slip is firm, use a needle tool or carving knife to deepen some of the natural cracks into larger ‘lightning bolt’ fissures like those seen in the reference image. -
Bisque fire:
Load the bone-dry jar into your electric kiln and bisque fire to Cone 04. This prepares the piece for the thermal shock of the raku process.
Rim Too Uniform?
If your oxide rim looks too perfect, splash water on the dry glaze before firing. The water disrupts the powder, creating organic separation and bolder drip lines during the melt.
Step 3: Glazing & Raku Firing
-
Wax the bottom:
Apply wax resist to the foot and bottom inch of the jar to prevent glaze from fusing it to the kiln shelf. -
Glaze the body:
Dip or pour a matte white Raku crackle glaze over the entire exterior. This glaze should be formulated to crack heavily during the cooling phase. -
Apply the oxide rim:
Mix a thick paste of copper carbonate or iron oxide. brush a heavy band around the rim and shoulder, allowing it to drip naturally down into the white glaze. -
Fire the kiln:
Place the jar in the Raku kiln and fire rapidly until the glaze melts and looks glossy/bubbling (usually around 1830°F / 1000°C). -
Remove while hot:
Suit up in safety gear. once temperature is reached, shut off the gas, open the kiln, and immediately grab the glowing pot with long tongs. -
Heavy reduction:
Place the hot pot directly into a metal bin lined with sawdust. Throw more sawdust on top of the rim area specifically to encourage dark carbon trapping where the oxide is. -
Seal the bin:
Cover the bin tightly with a lid to starve the fire of oxygen. Let it smoke for at least 15-20 minutes. This smoke will penetrate the cracks in the white glaze, turning them black. -
Quench and clean:
carefully remove the pot (it may still be hot) and spray it with water to halt the chemical reactions. Use a stiff brush and water to scrub off the soot and reveal the stark black crackles against the white body.
Smoke Effect Boost
For darker crackle lines, wait 10 seconds after pulling the pot before putting it in the bin. The glaze stiffens slightly, creating wider cracks for smoke to enter.
Place your finished moon jar in a spot with natural light to highlight the intricate network of smoke-filled cracks and the rich charred rim texture

TRACK YOUR CERAMIC JOURNEY
Capture glaze tests, firing details, and creative progress—all in one simple printable. Make your projects easier to repeat and improve.
Faceted Geometric Raku Vase With Metallic Breaks
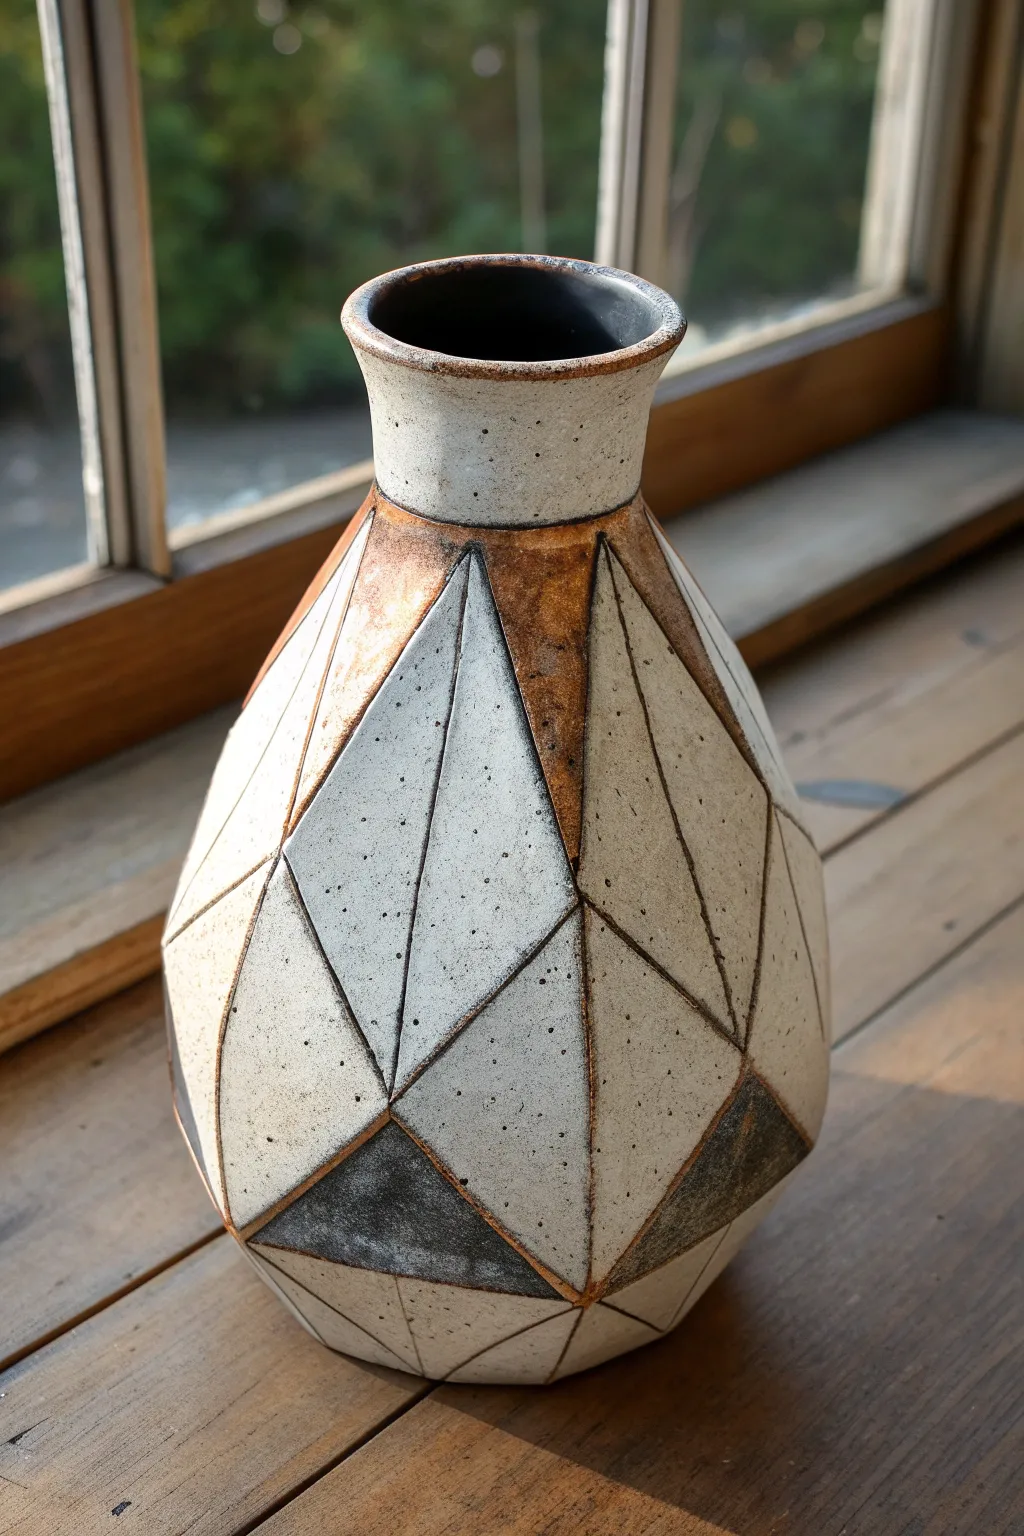
This striking vase combines sharp architectural lines with the unpredictable, smoky beauty of raku firing. Its creamy, speckled glaze contrasts beautifully with raw, copper-hued clay seams, creating a piece that feels both ancient and modern.
How-To Guide
Materials
- High-grog raku clay body (white or buff)
- Pottery wheel
- Throwing tools (ribs, sponge, wire cutter)
- Clean-up tool or sharp knife
- Needle tool
- Carving tool or loop tool (small)
- White crackle or white matte raku glaze
- Wax resist (emulsion)
- Copper carbonate or red iron oxide wash
- Sponge brush
- Raku kiln and reduction bin
- Combustible material (sawdust or newspaper)
Step 1: Throwing and Shaping
-
Center and throw:
Begin with about 3-4 pounds of well-wedged raku clay. Center it on the wheel and open it up, ensuring a base thickness of about half an inch. -
Pull the cylinder:
Pull the walls up into a tall, relatively thick cylinder. For faceted work, you need slightly thicker walls than usual—aim for roughly 3/4 inch thickness to allow for deep carving without puncturing the vessel. -
Shape the belly:
Gently balloon the middle section outward to create a rounded belly, while keeping the neck narrower. Don’t refine the curve too perfectly yet, as the faceting will change the silhouette. -
Form the collar:
Collar the neck in significantly, then flare the rim outward to create a distinct, trumpet-like opening. Smooth the transition between the belly and the neck. -
Wait for leather hard:
Wire the pot off the wheel but leave it on the bat if possible. Allow it to dry until it reaches a sturdy leather-hard stage. It needs to be firm enough to withstand slicing without warping.
Step 2: Faceting and Detailing
-
Mark the grid:
Use a needle tool or pencil to lightly sketch a geometric diamond or triangle pattern across the surface of the pot. These guides will ensure your facets align symmetrically. -
Slice the facets:
Using a sharp knife, cheese cutter, or faceting tool, slice away the clay along your marked lines. Make decisive, straight cuts to create flat planes that contrast with the round vessel interior. -
Refine the edges:
Once the main facets are cut, go back and clean up the ridges where the planes meet. I prefer using a slightly damp sponge to soften the sharpness just a touch, preventing chipping later. -
Carve the separation lines:
Use a small loop tool or V-groove tool to carve deep channels between the geometric shapes. These channels will remain unglazed and metallic, framing the white shapes. -
Bisque fire:
Let the vase dry slowly under plastic to prevent uneven shrinkage. Once bone dry, bisque fire it to Cone 04 or 06.
Clean Lines
Use automotive detailing tape (thin vinyl tape) instead of free-handing wax resist. It creates razor-sharp geometric boundaries for the glaze.
Step 3: Glazing and Firing
-
Apply oxide wash:
Mix copper carbonate or red iron oxide with water to create a thin wash. Brush this into the carved channels and potential unglazed areas (like the neck transition) to encourage metallic flashing. -
Wax the lines:
Carefully apply wax resist over the oxide-filled channels and any other areas you want to remain raw clay, such as the darker triangular accents shown in the photo. -
Glaze application:
Dip or pour a white raku glaze over the vessel. The wax will repel the glaze from the lines, keeping your geometric definition crisp. Wipe away any stray droplets on the waxed areas. -
Raku firing:
Place the vase in a raku kiln and fire rapidly until the glaze melts and matures (usually around 1830°F / 1000°C). -
Reduction process:
Remove the glowing pot with tongs and immediately place it into a reduction bin filled with sawdust or newspaper. Cover the bin with a lid to starve the fire of oxygen. -
Cool and scrub:
Let the pot smoke for roughly 15-20 minutes, then remove and quench it carefully in water or let it air cool. Scrub the charred residue off with a stiff brush and water to reveal the crackle and metallic lines.
Smoky Accents
Leave one or two entire facets unglazed. The bare clay will turn matte black or grey from the carbon smoke, adding dramatic contrast to the glossy white.
Display your geometric vessel in natural light where the subtle glaze crackle can truly shine
Fossil-Inspired Raku Bowl With Carved Spiral Details
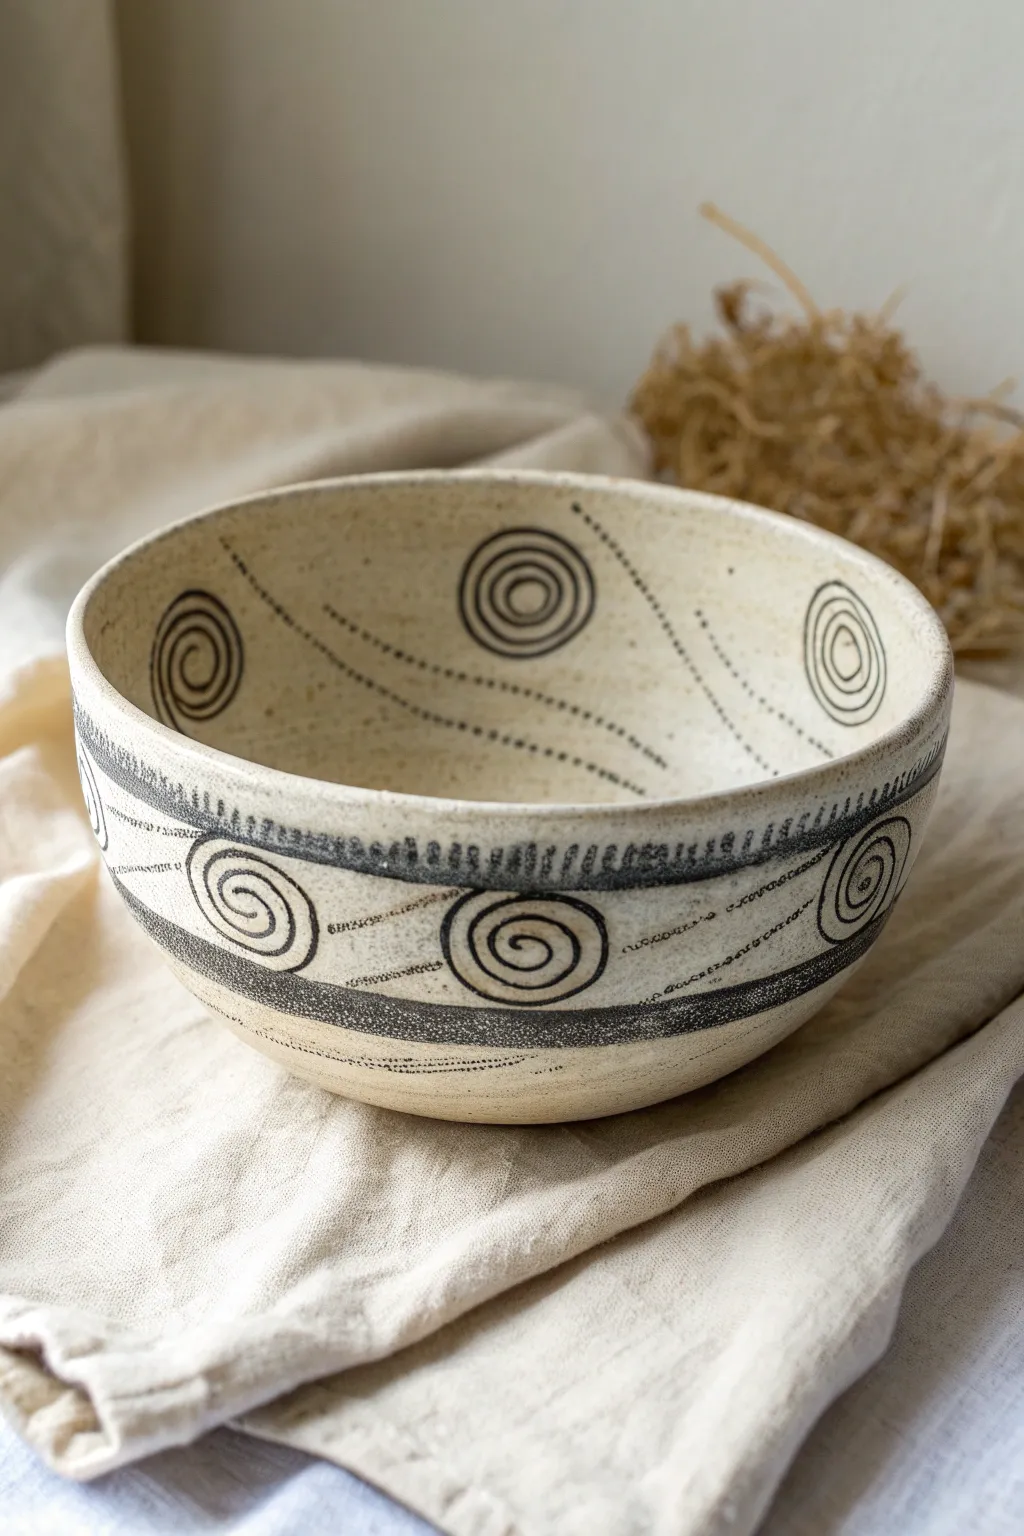
This rustic, nature-inspired bowl combines the elegance of prehistoric motifs with modern ceramic techniques. Using a specialized inlay method for crisp black lines against speckled cream clay, you will create a piece that feels bothancient and contemporary.
Step-by-Step Guide
Materials
- Speckled stoneware clay body (cone 5-6 recommended)
- Pottery wheel
- Throwing tools (sponge, wire cutter, rib, trimming tools)
- Leather-hard stage clay
- Needle tool or fine sgraffito tool
- Black underglaze or black slip
- Clean sponge and water bucket
- Metal rib or scraper
- Clear matte glaze
- Fine paintbrush
Step 1: Throwing and Shaping
-
Center and open:
Start with about 2-3 lbs of well-wedged speckled stoneware clay. Center it firmly on the wheel head and open the clay to create the floor of your bowl, aiming for a smooth, curved interior transition. -
Pull the walls:
Pull the walls up and out to form a classic hemispherical bowl shape. Keep the rim slightly thickened for durability, but aim for even walls throughout the belly. -
Refine the curve:
Use a smooth kidney rib to compress the inside curve, removing throwing lines and ensuring a pristine canvas for your future carving. -
Dry to leather hard:
Cut the bowl from the wheel and let it dry slowly until it reaches a firm leather-hard stage. It needs to be sturdy enough to handle carving without warping. -
Trim the foot:
Invert the bowl on the wheel and trim a clean, defined foot ring. Keep the outside surface smooth, as this will be your primary decorating space.
Step 2: Carving the Design
-
Plan the layout:
Lightly sketch your design with a pencil directly onto the clay if you need a guide, or freehand it for a more organic feel. The design features evenly spaced spirals and dotted flow lines. -
Carve the spirals:
Using a needle tool or a fine loop tool, carve the concentric spirals. You want to incise specifically—removing thin strips of clay to create a channel, rather than just scratching the surface. -
Add dotted trails:
Create the movement lines by pressing a small, blunt tool (a dull pencil tip works well) into the clay in dotted rows. Connect the spiral motifs with these sweeping, curved dotted paths on both the interior and exterior. -
Carve the bands:
Carve two horizontal bands around the lower exterior of the bowl. Within the top band, make short vertical hash marks to create a textured border effect. -
Clean the burrs:
Gently brush away any loose clay crumbs. Don’t sponge it yet, or you might blur the crisp edges of your carved channels.
Mishima Clean-Up Tip
If scraping feels risky, wipe the excess underglaze with a damp sponge instead. Rinse the sponge after *every* single swipe to avoid staining the raw clay.
Step 3: Inlay and Finishing
-
Apply black underglaze:
Generously paint black underglaze or slip over all the carved areas. I like to really work the brush into the grooves to ensure no air bubbles are trapped at the bottom of the carved lines. -
Wait for stiffening:
Let the underglaze dry until it is no longer shiny and feels chalky to the touch. This prevents it from smearing uncontrollably in the next step. -
Scrape the surface:
Using a sharp metal rib, gently scrape the surface of the pot. You are shaving off the excess black underglaze from the high points, leaving the black only trapped inside your carved recesses. -
Sponge clean:
Finalize the cleanup with a barely damp sponge. Wipe lightly across the surface to remove any lingering black haze, revealing the clean speckled clay body underneath. -
Bisque fire:
Place the bowl in the kiln for a bisque firing according to your clay body’s specifications (usually cone 04 or 06). -
Glaze application:
Once cool, dip the entire bowl into a clear matter glaze. A matte finish is crucial here to mimic the ‘fossil’ look; a glossy glaze might obscure the tactile quality of the carving. -
Final firing:
Fire the piece to maturity (cone 5 or 6). The clear glaze will seal the clay while letting the iron speckles and the sharp black inlay design shine through.
Try Wax Resist
Paint wax resist over your finished inlaid spirals before dipping in a contrasting glaze. The glaze will bead off the design, creating deeper texture.
Now you have a striking vessel that perfectly balances primitive aesthetics with modern craftsmanship
Raku Wall Medallions With Crackle and Luster Mix
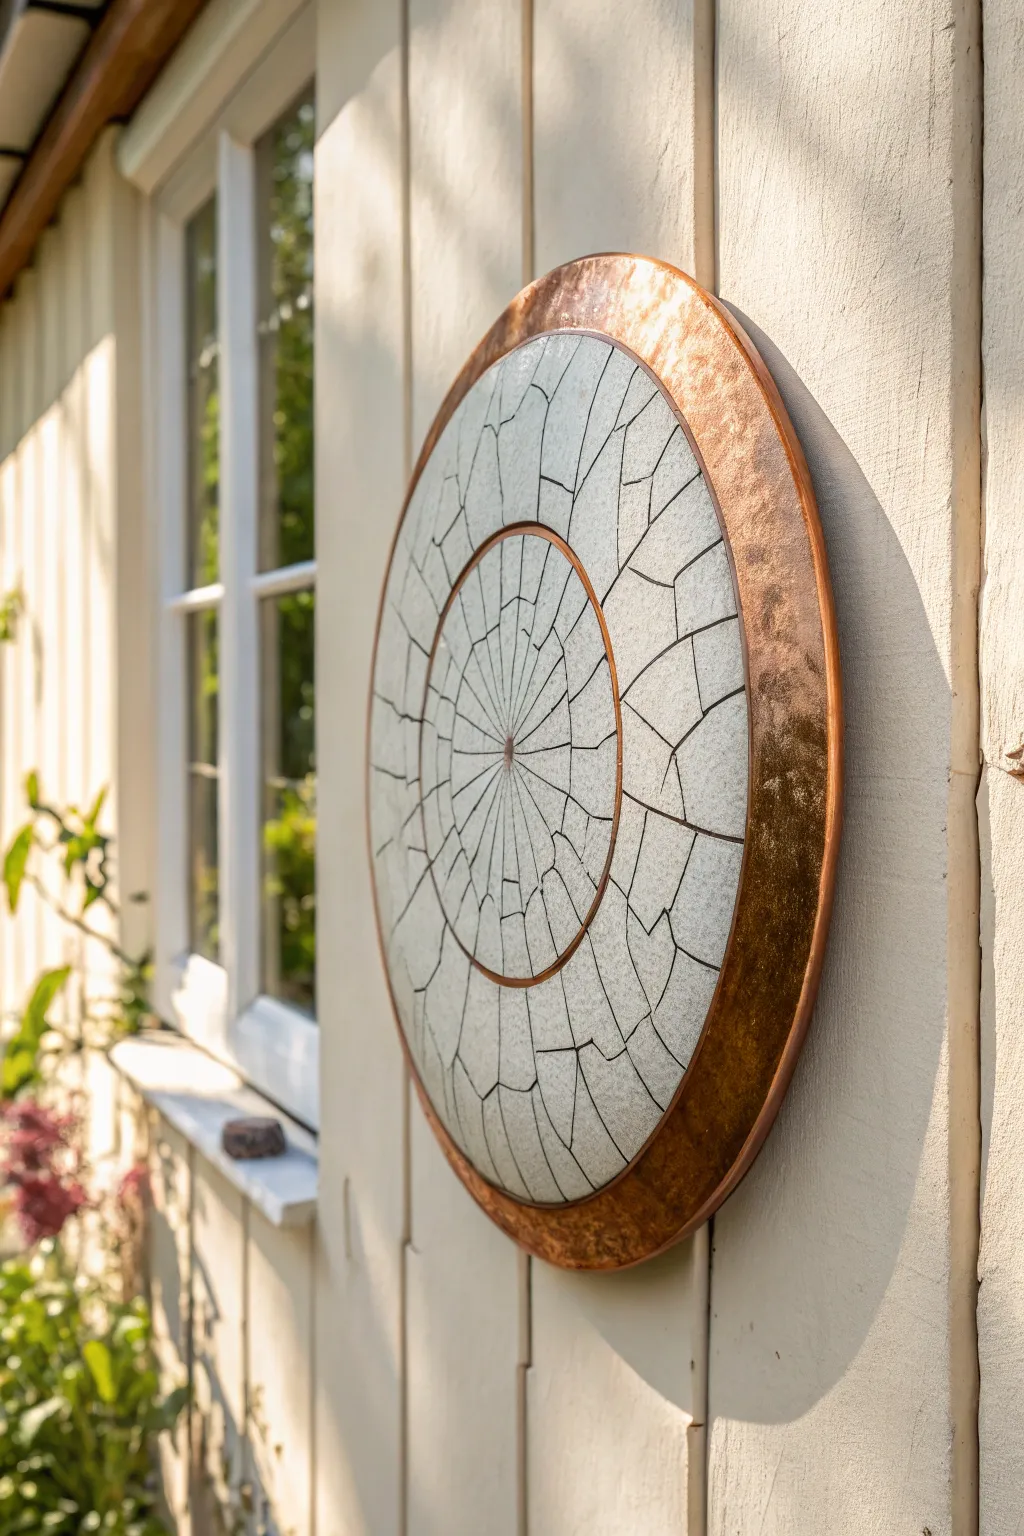
Capture the magic of fire and smoke with this stunning wall medallion that pairs the stark, elegant spiderwebbing of white crackle glaze with the warm, shifting hues of metallic copper luster. This multi-part assembly creates a sophisticated focal point, perfect for brightening up an exterior wall or bringing an architectural element indoors.
Step-by-Step
Materials
- Raku clay body (grogged for thermal shock resistance)
- White crackle Raku glaze
- Copper matte or metallic Raku luster glaze
- Rolling pin and guide strips (slab roller optional)
- Circle cutter or templates (various diameters)
- Pottery knife or needle tool
- Compass tool
- Scoring tool and slip
- Raku kiln and tongs
- Reduction bin (metal trash can)
- Combustible materials (sawdust, newspaper, or straw)
- High-temperature epoxy or strong construction adhesive
- Backing board (marine plywood or sealed MDF) for mounting
- Hanging hardware
Step 1: Forming the Clay Components
-
Prepare the slab:
Begin by rolling out a distinct, even slab of Raku clay to a thickness of about 3/8 inch. Using guide strips ensures the thickness is uniform, which is crucial for even drying and firing to prevent warping. -
Cut the central disc:
Using a template or compass, cut the innermost circle. For the scale shown in the image, aim for a diameter of roughly 6-8 inches. Smooth the edges with a damp sponge. -
Create the middle ring:
Cut a second, larger circle from the slab. Then, carefully cut a smaller circle out of its center to create a donut shape (annulus). The inner diameter of this ring needs to be slightly larger than your central disc to allow for the copper dividing line later. -
Form the outer rim:
Roll a fresh slab if necessary and cut the largest ring for the exterior border. This should be a wide band, perhaps 2-3 inches wide, to hold the copper luster glaze prominently. -
Refine and incise:
On the central disc and the middle white ring, lightly incise radial lines with a needle tool. You aren’t cutting through; you are creating ‘paths’ that will encourage the glaze to crack in a radiating sunburst pattern. I find lightly scoring these lines helps guide the stress fractures during cooling. -
Bisque fire:
Allow all pieces to dry slowly and completely to avoid warping. Once bone dry, bisque fire them to approximately Cone 06, or according to your clay body’s specifications.
Step 2: Glazing and Differential Firing
-
Apply the crackle glaze:
Dip or brush the central disc and the middle ring with a thick layer of white crackle Raku glaze. Wipe the edges clean where they will abut other sections. -
Apply the copper glaze:
Coat the large outer ring and a separate thin coil or strip (which will act as the inner divider) with a copper matte or luster glaze. Apply 2-3 coats for depth. -
Fire the crackle sections:
Fire the white glazed pieces first. When the glaze melts and looks glossy (around 1830°F/1000°C), remove them with tongs. Place them on a non-flammable surface and wait until you hear the glaze ‘ping’ and crackle from the thermal shock. -
Smoke the crackle:
Once the cracking has started but the pieces are still hot, move them into a reduction bin with sawdust. Cover the bin to let smoke penetrate the cracks, turning them black. Remove after 15 minutes and quench in water to freeze the pattern. -
Fire the copper sections:
Fire the copper-glazed outer ring and divider strip. Remove them at temperature and place them immediately into a heavy reduction bin (lots of combustible material) and seal it tight instantly. Starving the copper glaze of oxygen is what creates the metallic flash. -
Clean the surfaces:
Once cool, scrub all pieces vigorously with a stiff brush and water to remove soot and residue. This reveals the stark white contrast and the metallic shine.
Smoke Distribution
If your crackle lines are faint gray instead of black, you likely didn’t generate enough smoke. Ensure your reduction bin has ample sawdust and damp newspaper, and keep the lid sealed tight.
Step 3: Assembly and Mounting
-
Prepare the backing:
Cut a circular backing board from plywood that is slightly smaller than the total diameter of your artwork so it won’t be visible from the front. Seal the wood if this will hang outside. -
Dry fit the layout:
Lay out all your ceramic pieces on the board. You will likely have a gap between the central disc and the middle crackle ring—this is where you insert the copper-glazed divider strip or a heavy copper wire if you preferred that method. -
Adhere the center:
Apply high-strength epoxy or construction adhesive to the back of the central crackle disc and press it firmly onto the center of your backing board. -
Install the divider:
Glue down the copper divider ring around the central disc. Ensure it fits snugly. -
Mount the middle ring:
Adhere the white crackle ring next. Pay attention to rotating it so the radial crackle lines align aesthetically with the center lines, creating a continuous flow. -
Attached the final border:
Glue the large copper luster rim to the outer edge of the backing board. Let the adhesive cure fully for 24 hours while the piece lies flat.
Adding Texture
Before the bisque fire, gently press a varied texture, like crumpled foil or burlap, into the outer ring’s clay surface. The copper glaze will pool in these divots for a more antique look.
Hang your finished medallion in a spot where the changing daylight can play across the metallic copper rim and illuminate the intricate web of cracks
Lidded Raku Jar With Smoky Halo Around the Shoulder
This elegant raku jar features a classic white crackle glaze contrasted by deep, smoky accents on the lid, shoulder, and foot. The dramatic blackened fissures and the halo effect around the rim demonstrate the unpredictable beauty of the post-firing reduction process.
Detailed Instructions
Materials
- Raku clay body (high grog content to withstand thermal shock)
- Pottery wheel and throwing tools
- Calipers (for measuring lid fit)
- White Raku crackle glaze
- Wax resist (emulsion or hot wax)
- Raku kiln
- Reduction bin (metal trash can with tight lid)
- Reduction material (newspaper, sawdust, or dried leaves)
- Long metal tongs
- Heat-resistant safety gear (gloves, face shield, jacket)
- Scrubbing sponge
Step 1: Throwing and Trimming
-
Throw the body:
Center roughly 3-4 pounds of raku clay on the wheel. Open and pull the walls into a rounded, bulbous form, narrowing significantly at the neck. Ensure the walls are even to prevent cracking during the rapid raku firing. -
Refine the rim:
Create a distinct gallery inside the neck to hold the lid secure. I prefer to use a rib tool to smooth the transition from the shoulder to the neck, creating a clean line for the glaze to stop. -
Measure for the lid:
Use calipers to measure the exact diameter of the gallery seating. This measurement is crucial, so double-check it before moving on. -
Throw the lid:
Throw a lid off the hump or using a small ball of clay. Use your caliper measurement to size the flange so it fits the jar’s gallery. Add a simple, solid knob for easy lifting with tongs later. -
Trim the foot:
Once leather hard, trim a clean foot ring on the jar. The bottom third needs to be smooth and defined, as this area will be left unglazed to show the smoky clay body.
Step 2: Glazing and Preparation
-
Bisque fire:
Fire the pieces to bisque temperature (usually cone 04 or 06) to prepare them for glazing. -
Apply wax resist:
Apply a band of wax resist to the bottom third of the jar (the foot area) and the very top rim/neck area. Also wax the entire lid except for the inner flange if desired, though leaving the lid entirely unglazed creates the specific dark contrast shown in the photo. -
Glaze the body:
Pour or dip the white crackle glaze onto the central bulbous section of the jar. The wax will prevent glaze from sticking to the neck and foot. Wipe away any errant drips immediately. -
Dry thoroughly:
Allow the glaze to dry completely before loading into the raku kiln. Moisture can cause the glaze to crawl or the pot to explode.
Uneven Crackling?
If you aren’t getting enough cracks, blow gently on the glaze surface immediately after pulling it from the kiln, before placing it in the bin.
Step 3: Raku Firing and Reduction
-
Fire the kiln:
Load the jar and lid into the raku kiln. Fire rapidly until the glaze melts and becomes glossy, typically around 1830°F (1000°C). Watch through the spyhole for the glaze surface to shimmer like wet ice. -
Prepare reduction bin:
While the kiln fires, prepare your metal reduction bin with a bed of sawdust or shredded newspaper. Have the lid ready nearby. -
Pull the pot:
Turn off the gas and, wearing full safety gear, lift the glowing jar out with tongs. Hold it in the air for just 5-10 seconds to let the glaze surface tension settle; you’ll hear the characteristic ‘pinging’ sound of the glaze cracking. -
Begin reduction:
Place the jar and lid (separately) into the reduction bin. Quickly cover them with more combustible material to ensure the smoke penetrates the clay and the crackles. -
Create the halo:
By placing dry combustibles specifically around the shoulder area before closing the bin lid, you encourage heavy carbon trapping where the glaze meets the bare clay neck. -
Seal and smoke:
Place the lid on the reduction bin tightly. Let the pottery smoke for at least 15-20 minutes. The lack of oxygen turns the unglazed clay black and forces carbon into the glaze cracks.
Copper Flash
Add a pinch of copper carbonate to your clear crackle glaze recipe. In heavy reduction, this can add subtle metallic flashes alongside the black cracks.
Step 4: Post-Firing Cleanup
-
Quench and cool:
Carefully remove the pieces (they may still be hot) and spray them with water or dunk them to freeze the effects. Be cautious of thermal shock. -
Scrub the surface:
Use a stiff brush or scouring pad and water to scrub off the soot and residue. The white crackle glaze will emerge from beneath the soot, revealing the intricate black spiderweb pattern.
Display your finished jar near natural light to highlight the intricate web of cracks against the dark, smoky stoneware clay
Stacked Raku Totem Sculpture With Mixed Surfaces
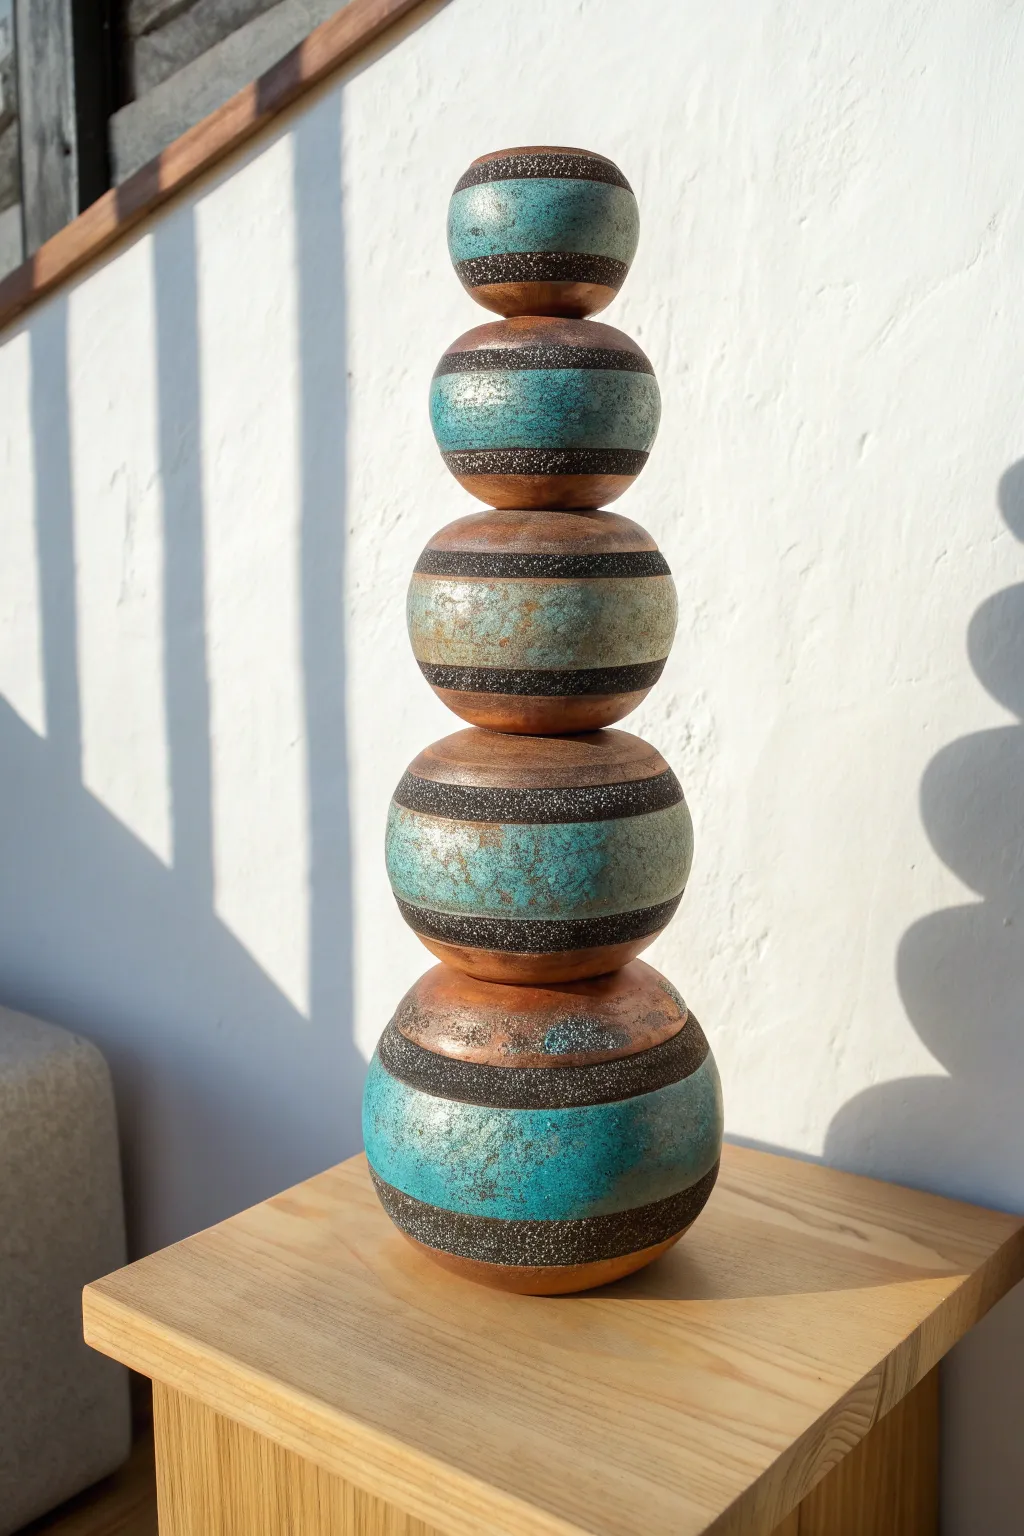
This striking vertical sculpture combines the earthy warmth of naked clay with the vibrant flash of metallic raku glazes. By creating graduated spheres with distinct banded patterns, you achieve a modern totem that feels both ancient and contemporary.
Step-by-Step Guide
Materials
- Raku clay body (grogged stoneware)
- Pottery wheel (or coil building tools)
- Calipers
- Rib tools (metal and rubber)
- Strong playful epoxy or metal rod for assembly
- Raku turquoise crackle glaze
- Copper matte raku glaze
- Black copper oxide wash
- Wax resist
- Raku kiln
- Metal tongs
- Reduction bin with sawdust/newspaper
Step 1: Forming the Spheres
-
Wedging and portions:
Begin by thoroughly wedging your raku clay to remove air bubbles. Separate the clay into five balls of decreasing weight (e.g., 3 lbs, 2.5 lbs, 2 lbs, 1.5 lbs, 1 lb) to create the graduated sizing. -
Throwing the base form:
Throw the largest ball on the wheel first. Create a closed form or a very narrow-necked bottle shape. Since these will be stacked, flattening the top and bottom slightly while throwing helps with stability. -
Shaping the profile:
Use a metal rib to smooth the exterior, ensuring a clean, continuous spherical curve. If you are throwing closed forms, trap the air inside to keep the walls firm while you shape. -
Repeating the process:
Throw the remaining four spheres, using calipers to check that each one is proportionally smaller than the last. I find it helpful to line them up on a ware board to visually confirm the taper looks correct. -
Trimming the foot:
Once leather hard, trim the bottom of each sphere. For a stacking sculpture, trim a slight indentation or ‘key’ into the bottom of the upper spheres and a corresponding flattened area on the top of the lower spheres to help them nest securely.
Pro Tip: Masking Tape Tricks
Use automotive masking tape instead of wax for sharper lines. Remove the tape before firing to leave clean, unglazed bands for oxide.
Step 2: Glazing and Decorating inside the Raku Process
-
Bisque firing:
bisque fire all five pieces to cone 06 or 04, depending on your clay body specifications. -
Applying wax resist:
Using a banding wheel, apply two bands of wax resist around each sphere where you want the black, textured charcoal lines to appear. This will separate the copper zones from the turquoise zones. -
Glazing the turquoise band:
Brush or dip the central band (between your wax lines) with a high-alkaline turquoise crackle glaze. Two to three coats are usually necessary for a rich color. -
Applying copper glaze:
Apply the copper matte glaze to the top and bottom sections of the spheres. Be careful not to let this run into the turquoise section; clean up any drips immediately. -
The oxide accents:
For the black bands where you applied wax, wipe away any bead-up of glaze. Then, apply a wash of black copper oxide or a black stain into those unglazed areas to ensure they turn dark and textured in the firing.
Troubleshooting: Dull Copper?
If your copper matte looks dull or green, you likely reduced it too long or oxidized lightly upon removal. Re-fire to try again!
Step 3: Firing and Assembly
-
Loading the kiln:
Place the spheres in your raku kiln. It is safer to fire them individually or in pairs to ensure you can remove them quickly enough. -
Firing to temperature:
Fire rapidly until the glazes differ flux and melt, typically around 1830°F (1000°C). Watch for the glazes to become glossy and wet-looking. -
The reduction chamber:
Wearing safety gear, pull a sphere with tongs and immediately place it into a metal bin lined with sawdust or shredded newspaper. Cover it instantly with a tight lid. -
Post-fire reduction:
Let the piece smoke in the reduction bin for 15–20 minutes. This oxygen-starved environment creates the metallic copper flashes and the black crackle lines in the turquoise. -
Quenching:
Remove the pieces and quench them in water to stop the chemical reaction and freeze the colors. Scrub off the soot and residue with a stiff brush and water. -
Stacking the totem:
Arrange the cleaned spheres from largest to smallest to test the balance. If they wobble, you can use a small amount of sanding screen to level the contact points. -
Final bonding:
Secure the stack using a strong two-part epoxy adhesive between each sphere. Alternatively, if you planned ahead with holes, thread them onto a central metal rod anchored in a wooden base.
Place your finished totem near a window where natural light can catch the shifting metallic hues of the raku surface
Mixed-Media Raku Vessel on a Simple Wood Stand
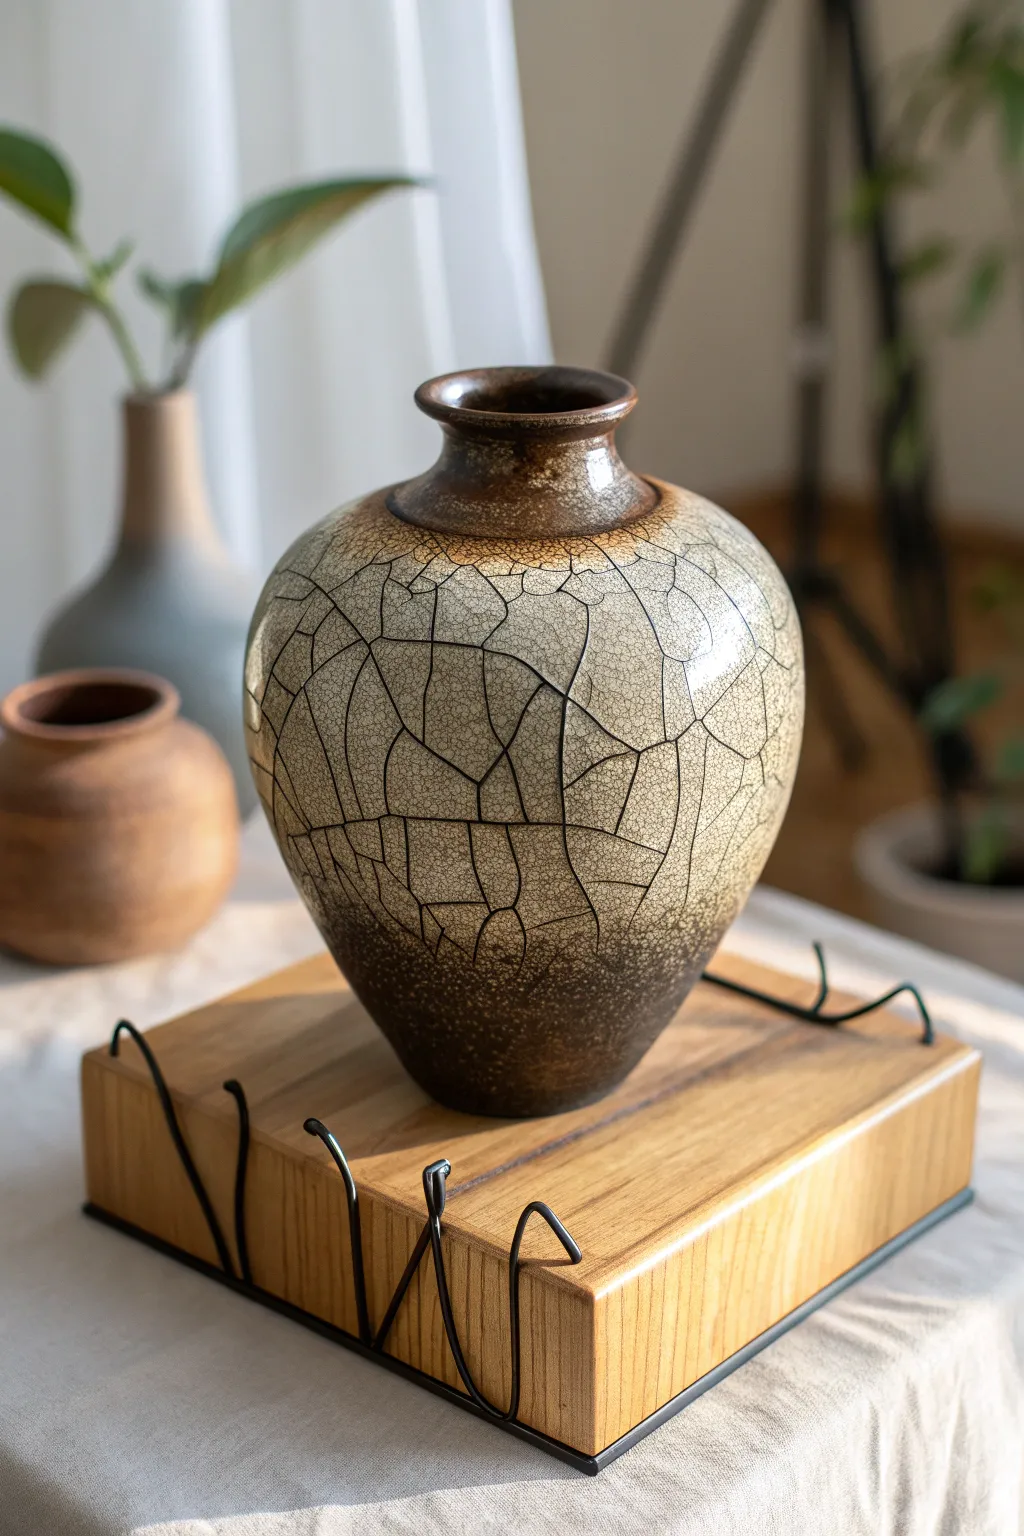
This striking project combines the unpredictable beauty of raku firing with minimalist mixed-media display. The result is a beautifully textured vessel boasting smoky crackle patterns, elevated—quite literally—by a simple wooden plinth with decorative wire accents.
Step-by-Step Guide
Materials
- Raku clay body (grogged stoneware)
- Pottery wheel or coil-building tools
- Bisque kiln and Raku kiln
- White crackle raku glaze
- Copper carbonate (for metallic/dark accents)
- Reduction bin with combustible material (sawdust, newspaper)
- Block of light harwood (oak or maple), approx 8x8x2 inches
- Thick gauge black steel or aluminum wire (approx 12-14 gauge)
- Drill with small bit matching wire gauge
- Wire cutters and pliers
- Epoxy or wood glue
- Tongs and safety gear for raku firing
Step 1: Forming the Vessel
-
Throw the base form:
Begin with about 3-4 lbs of well-wedged raku clay. Center it on the wheel and throw a bulbous, spherical form with a narrow collection point at the foot. -
Refine the neck:
As you pull the walls upward, collar the clay inward significantly to create a narrow neck. Flare the very top rim outwards slightly to create a distinct, rolled lip. -
Trim the foot:
Once the pot is leather hard, trim the bottom to create a rounded curve that tapers sharply. The pot doesn’t need a wide flat bottom since it will sit on a stand, but ensure it’s stable enough to stand during firing. -
Bisque fire:
Let the piece dry slowly and completely to avoid cracking. Bisque fire it to cone 04 or 06, depending on your clay body’s specifications.
Step 2: Glazing and Firing
-
Apply masking (optional):
If you want the very top and bottom to be purely metallic/black without glaze, you can leave them bare or apply a thin wash of copper carbonate mixed with water. -
Glaze application:
Dip or pour your white crackle glaze over the middle section of the pot. I prefer to pour it to get an uneven, organic transition line where the glaze meets the unglazed (or copper-washed) top and bottom sections. -
Raku firing:
Place the pot in your raku kiln and heat rapidly until the glaze melts and becomes glossy (usually around 1830°F / 1000°C). -
Reduction process:
Remove the pot while red-hot using tongs. Place it immediately into a reduction bin filled with sawdust. Cover the bin with a lid to starve the fire of oxygen. -
Thermal shock:
After about 15-20 minutes in reduction, remove the pot and spray it with water or dunk it to lock in the crackle pattern and cool the piece. -
Cleaning:
Scrub the pot vigorously with a stiff brush and water to remove soot and carbon residue, revealing the white crackle and the dark, smoked clay body.
Smoke Marks Not Showing?
If your crackle lines are too faint, you likely didn’t generate enough smoke. Ensure your reduction bin has plenty of dry sawdust and cover the lid tightly immediately after dropping the pot in.
Step 3: Creating the Stand
-
Prepare the wood block:
Cut your hardwood block to size. Sand all faces smooth, starting with 80 grit and working up to 220 grit for a silky finish. -
Seal the wood:
Apply a clear matte varnish or wood oil to protect the timber and bring out the grain pattern without darkening it too much. -
Shape the wire accents:
Cut four lengths of black wire, roughly 6 inches each. Using pliers, bend them into organic, wavy ‘V’ or ‘U’ shapes. These don’t need to be identical; irregular curves mimic the crackle on the pot. -
Drill attachment holes:
Drill small holes into the side edges of your wood block. You’ll need two holes for each wire piece. Angle the drill slightly downward if possible for better grip. -
Install the wire:
Dab a tiny amount of epoxy on the ends of the wire shapes and insert them into the drilled holes. The wires should protrude outward and upward, cradling the space around the pot. -
Final assembly:
Place your finished raku vessel centrally on the wooden block. The wire accents should frame the base of the pot, creating a visual connection between the rustic ceramic and the clean wood.
Add Metallic Luster
Brush a thin layer of silver nitrate or bismuth oxide wash over the rim before firing. The reduction atmosphere will turn these areas into a brilliant, iridescent metallic finish.
Now step back and admire how the clean geometry of the stand perfectly complements the organic chaos of your fired vessel