Whenever I’m stuck or just want to play, I reach for clay and make something totally random—no pressure, just pure fun. These ideas are the kind you can start on a whim, finish in a sitting, and still feel ridiculously proud of.
Tiny Food Charms With Faces
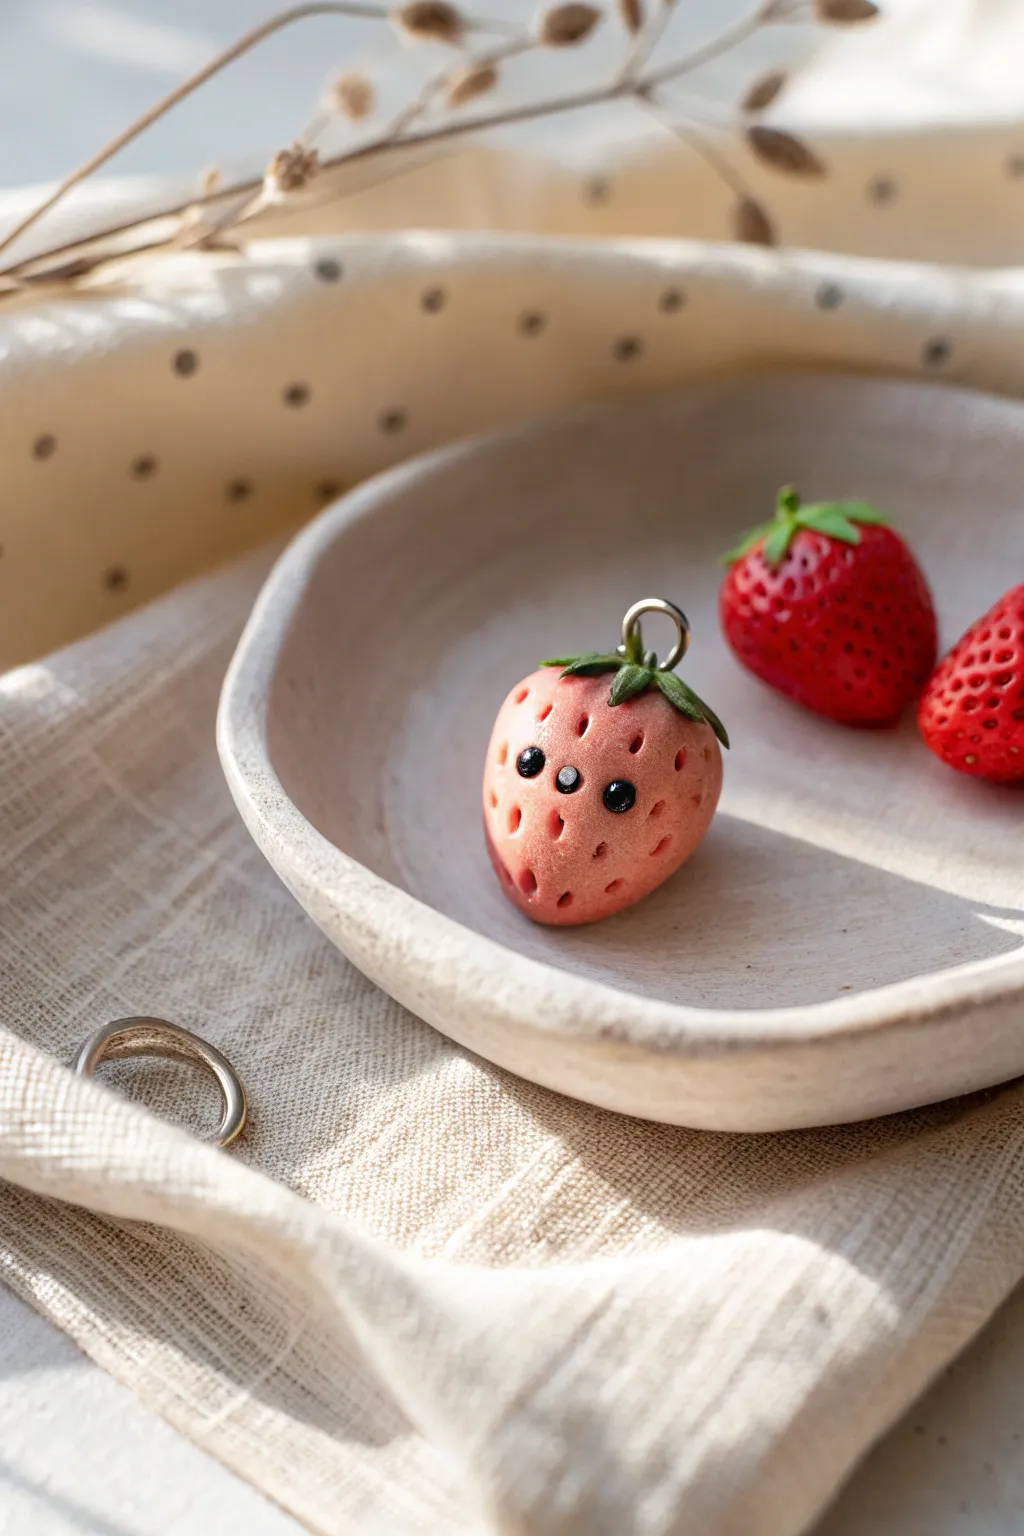
This adorable polymer clay charm captures the sweetness of a real strawberry with a playful, friendly twist. With its soft matte texture and tiny kawaii face, it makes for a perfect necklace pendant or keychain companion.
Step-by-Step Tutorial
Materials
- Polymer clay (pink or light red, green, black)
- White acrylic paint
- Headpin or eye screw
- Dotting tool or toothpick
- Needle tool
- Small blade
- Soft pastel chalks (red/dark pink)
- Small paintbrush
- Oven for baking
Step 1: Shaping the Berry
-
Base shape:
Start by conditioning your pink or light red polymer clay until it’s soft and pliable. Roll a small amount into a smooth ball, roughly the size of a marble. -
Refining the form:
Gently roll one end of the ball between your fingers to taper it, creating a softly rounded cone or strawberry shape. Flatten the top just slightly where the leaves will sit. -
Texture prep:
To mimic the soft, almost velvety look of a real strawberry, you can lightly roll the shape over a piece of fine sandpaper or gently tap it with an old toothbrush. This removes fingerprints and adds realism.
Oops! Fingerprints?
If you smudge the clay while attaching the leaves, lightly brush a bit of baby oil or clay softener over the area to smooth it out before baking.
Step 2: Adding Details
-
Seed indentations:
Using a needle tool or a very fine dotting tool, press small indentations all over the surface of the berry. Keep these random but evenly spaced. -
Creating the face:
Choose a spot near the middle of the berry for the face. Use a larger dotting tool to press two eye sockets. This helps embed the eyes so they don’t protrude too much. -
Inserting the eyes:
Roll two tiny, equal-sized balls of black clay. Place them carefully into the sockets you just created and press gently to secure them. -
Adding the mouth:
Right between the eyes, use a needle tool to create a tiny oval indentation for the mouth. You can fill this with a speck of white or black clay, or simply leave it as a cute little ‘o’ shape. -
Shading:
Scrape a little red or dark pink pastel chalk into a powder. Using a soft paintbrush, gently dust the bottom tip of the strawberry and around the seed holes to add depth and a ripened look.
Step 3: The Leafy Cap
-
Leaf shape:
Condition a small piece of green clay. Flatten it into a thin disk and use a small blade or needle tool to cut out a 5- or 6-pointed star shape. -
Vein details:
Using a needle tool, score a line down the center of each leaf point to create vein textures. -
Attachment:
Place the green star on the flat top of your strawberry. Gently press the points down so they curve over the ‘shoulders’ of the fruit. -
Stem stub:
Roll a tiny log of green clay and attach it to the center of the leaves to act as the stem.
Make it Sweet
Coat the finished berry in a thin layer of UV resin and sprinkle fine white glitter over it before curing to simulate a sugar-coated candy look.
Step 4: Finishing Touches
-
Adding hardware:
Trim an eye pin or screw pin to the correct length. Dip the end in a tiny bit of liquid clay (or bake-and-bond) and insert it straight down through the center of the stem. -
Baking:
Bake the charm according to your clay manufacturer’s instructions. Usually, this is around 275°F (130°C) for 15-30 minutes depending on thickness. -
Cooling:
Allow the piece to cool completely before handling. It will be slightly soft when hot but hardens as it cools. -
Eye highlights:
I always find this step brings the character to life: dip a needle tip into white acrylic paint and add a tiny white dot to the upper corner of each black eye. -
Final assembly:
Once the paint is dry, attach a jump ring to the eye pin, and your charm is ready to be worn.
Enjoy your new tiny fruit friend, perfect for brightening up any accessory collection


Mushroom Buddies and Mini Toadstools
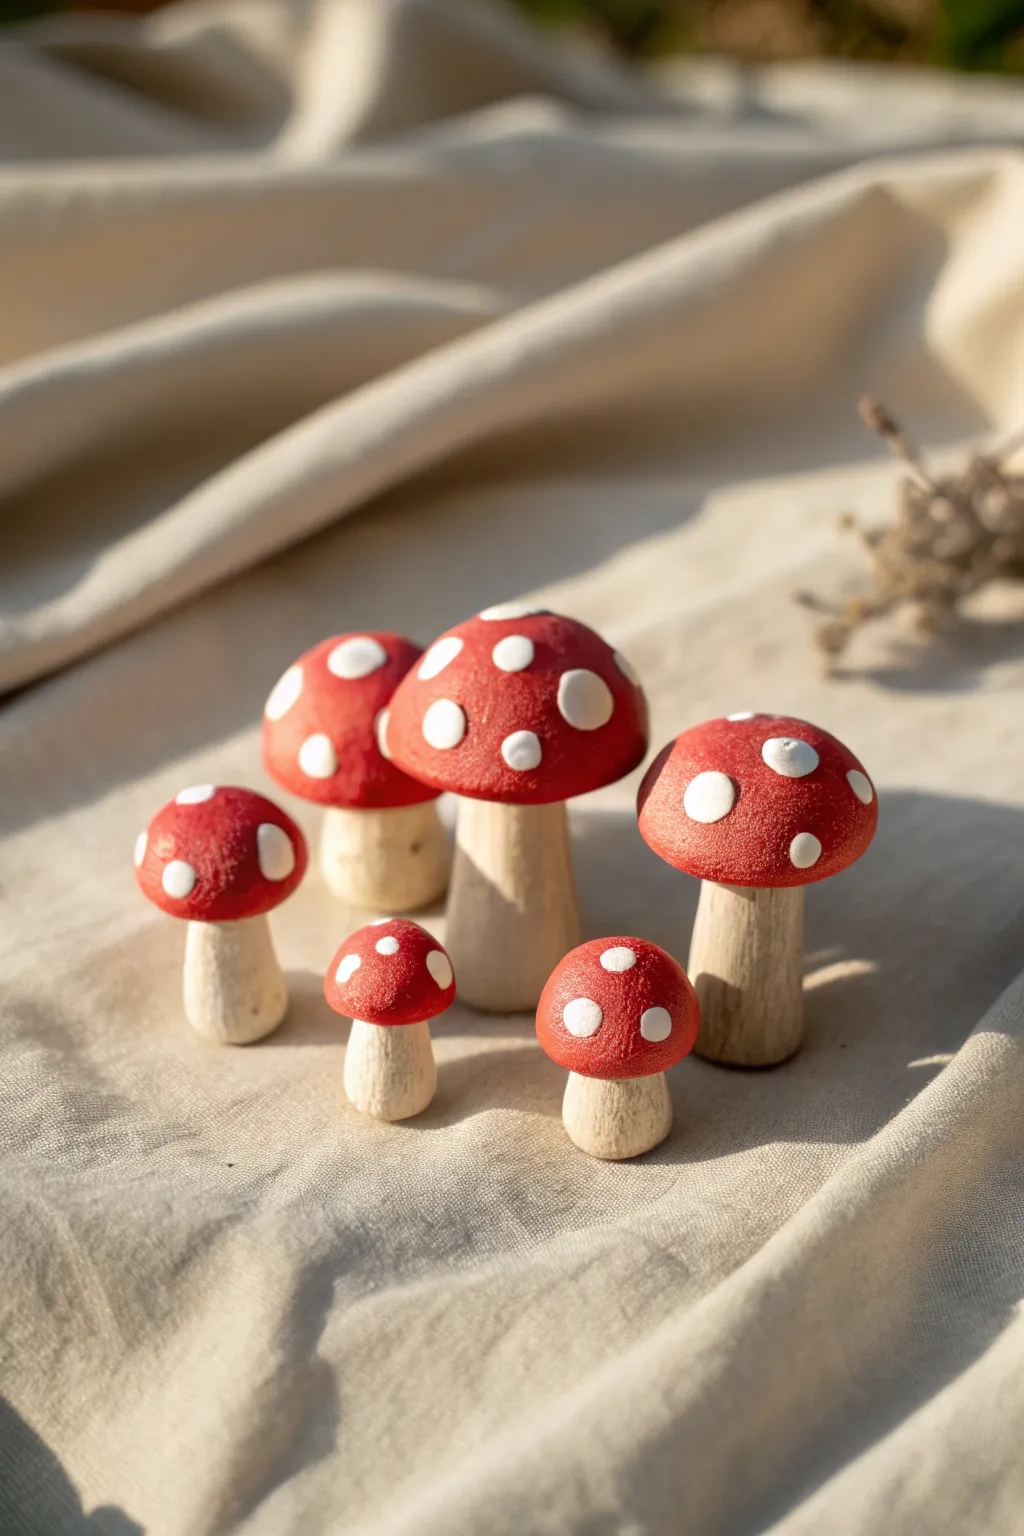
Bring a touch of forest magic into your home with these adorable toadstools that blend natural wooden textures with vibrant red clay caps. This project creates a charming set of 6 mushrooms in various sizes, perfect for shelf decor or fairy gardens.
How-To Guide
Materials
- Red polymer clay (e.g., Fimo Soft or Sculpey III)
- White acrylic paint
- Small dowel rods or thick twigs (varying diameters)
- Small sponge brush or fine paintbrush
- Sandpaper (medium grit)
- Craft saw or strong pruning shears
- Super glue or strong craft adhesive
- Oven for baking (if using polymer clay)
- Aluminum foil
- Baking tray
Step 1: Preparing the Wooden Stems
-
Select your timber:
Gather your wooden dowels or thick twigs. For variety, you’ll want at least three different thicknesses to create the natural family look seen in the photo. -
Cut to size:
Using a craft saw or shears, cut the wood into six pieces of varying lengths ranging from 1 inch to 3 inches tall. -
Shape the bases:
Sand the bottom of each piece flat so they stand up sturdily on their own. -
Round the tops:
Gently sand the top edge of each wooden stem to create a slightly rounded surface, which helps the clay cap sit more naturally later. -
Add texture (optional):
If using smooth dowels, you might want to rough up the sides slightly with coarse sandpaper to mimic a natural mushroom stem texture.
Step 2: Sculpting the Caps
-
Condition the clay:
Take your red polymer clay and knead it well in your hands until it becomes soft and pliable. -
Portion control:
Divide the clay into six balls proportional to your wooden stems. You’ll need two large, two medium, and two small balls. -
Form the dome:
Roll a ball of clay in your palms until smooth, then gently press your thumb into the center of the underside to create a thick, rounded dome shape. -
Refine the shape:
Place the clay dome onto its corresponding wooden stem to check the fit. The cap should overhang the stem slightly like an umbrella. -
Smooth the surface:
While the cap is resting on the stem (don’t glue yet!), smooth out any fingerprints using a very light touch or a drop of baby oil. -
Repeat for all mushrooms:
Create caps for all six stems, ensuring slight variations in roundness—some can be taller domes, others slightly flatter.
Textured Cap Tip
Before baking, gently tap the red clay with an old toothbrush or a piece of crumpled foil. This removes fingerprints and adds a lovely organic stone-like texture.
Step 3: Baking and Assembly
-
Prepare for baking:
Remove the clay caps from the wooden stems. Place the caps on a baking tray lined with aluminum foil. -
Bake the clay:
Bake the clay caps according to the package instructions (usually around 230°F – 275°F for 15-30 minutes). I like to keep a close eye on red clay to ensure it doesn’t darken too much. -
Cool down:
Once baked, remove the tray from the oven and let the caps cool completely before handling. -
Secure the caps:
Apply a dot of strong super glue or craft adhesive to the top of a wooden stem and press the corresponding cooled clay cap firmly in place. -
Hold steady:
Hold the cap in place for 30 seconds to allow the glue to bond securely.
Make Them Magical
Mix a tiny amount of glitter into the white paint for the dots or use glow-in-the-dark paint so your mushrooms light up when night falls.
Step 4: Painting the Details
-
Prepare the paint:
Pour a small amount of white acrylic paint onto a palette or scrap paper. -
Dot the caps:
Using a fine paintbrush or the wrong end of a brush handle, dot white spots onto the red caps. -
Vary the spots:
Make different sized dots—some large, some tiny—and scatter them randomly rather than in a perfect pattern for a more organic feel. -
Dry completely:
Allow the paint to dry fully before moving your new mushroom family to their display spot.
Now you have a charming little grove of mushrooms ready to brighten up any corner of your room


Pocket-Size Blob Creatures
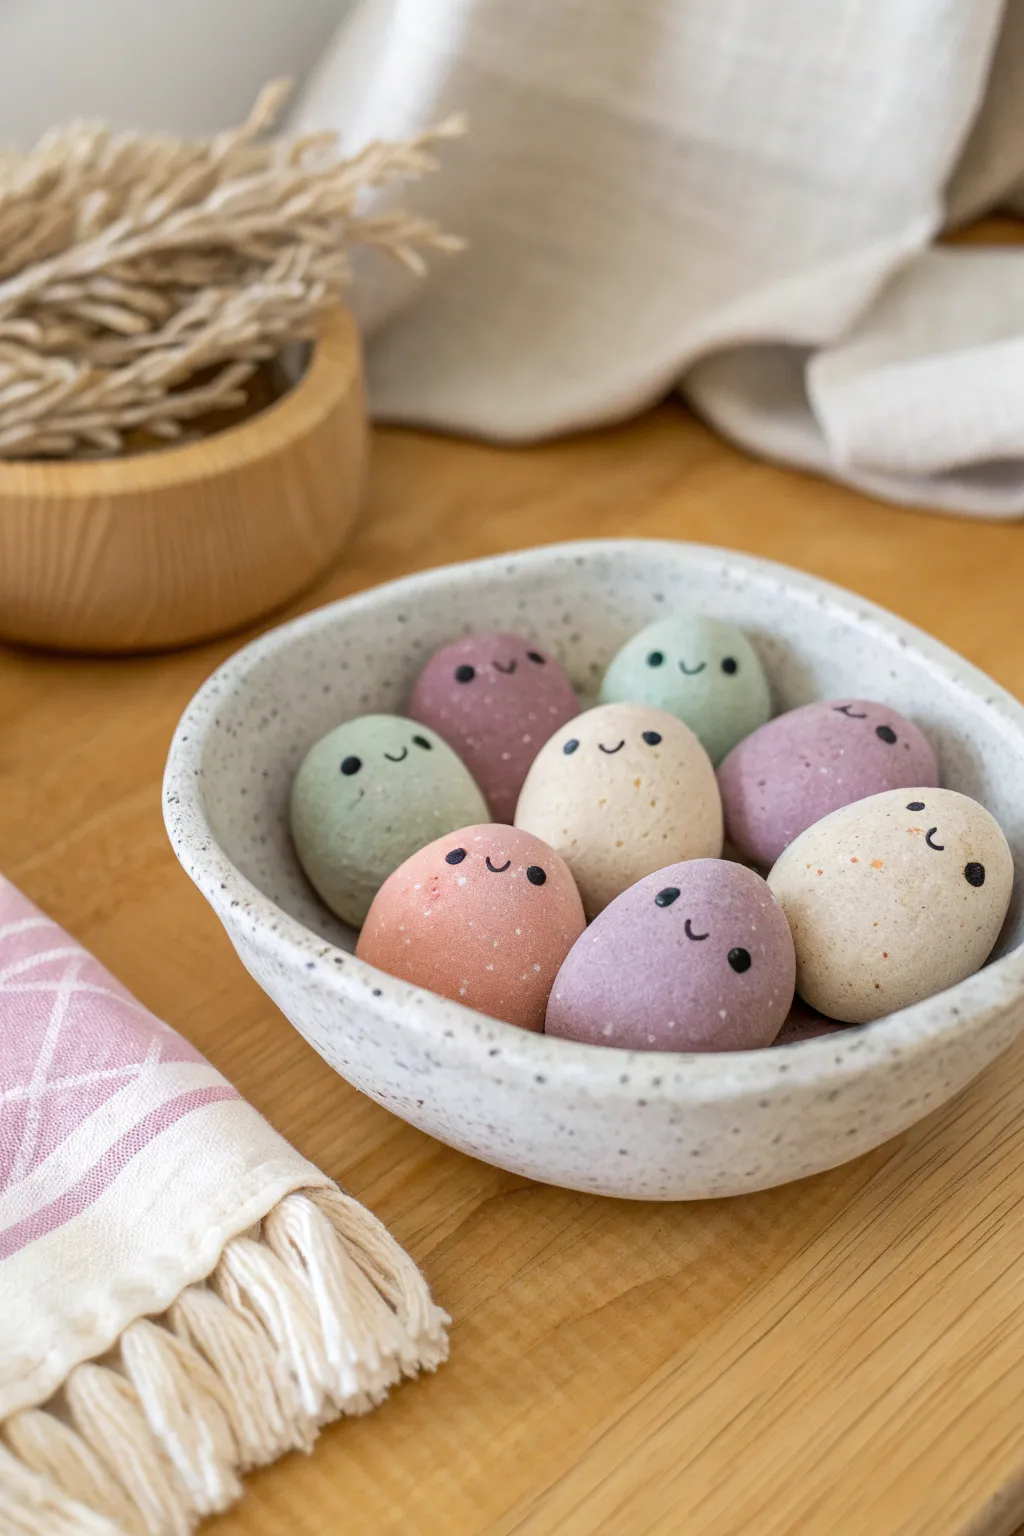
These soothing, palm-sized friends are the perfect low-stress clay project, featuring a satisfyingly smooth finish and naturally speckled texture. With their gentle pastel tones and minimalist faces, they look lovely grouped in a bowl or scattered on a desk for a bit of cheer.
Step-by-Step Guide
Materials
- Polymer clay (white, plus muted colors like sage, dusty rose, lavender, beige)
- Faux granite or speckled polymer clay (optional, for texture)
- Coarse black pepper or dried used coffee grounds (alternative for texture)
- Black acrylic paint
- Small dotting tool or toothpick
- Fine-grit sandpaper (400-800 grit)
- Matte varnish or sealant
- Baking sheet and parchment paper
- Oven (for curing)
Step 1: Mixing and Shaping
-
Prepare the base colors:
Start by conditioning your polymer clay blocks until they are soft and pliable. You want a palette of muted, earthy pastels, so mix white into your colored clays to soften them if they are too vibrant right out of the package. -
Add that stony speckle:
To achieve the realistic stone look seen in the photo, take a pinch of faux granite clay and mix it thoroughly into each of your solid pastel colors. If you don’t have specialty clay, kneading in a tiny pinch of coarse black pepper or dried coffee grounds works surprisingly well. -
Portion the clay:
Pull off pieces of clay about the size of a golf ball or a large walnut. Vary the sizes slightly so your group of creatures looks organic and not mass-produced. -
Form the basic shape:
Roll a piece of clay between your palms to create a smooth ball. Gradually apply a bit more pressure on one side to taper it slightly into an egg or rounded pebble shape. -
Flatten the bottom:
Gently tap the wider end of your egg shape against your work surface. This creates a small flat spot that ensures your creature will sit upright displayed without rolling away. -
Refine the surface:
Spend an extra minute smoothing out any fingerprints. I find that lightly brushing the surface with a tiny drop of baby oil on my finger helps melt away uneven ridges before baking.
Stone Effect Secret
Mix in a tiny amount of translucent clay with your pastels. When baked, this adds a depth that mimics real polished river rocks better than opaque colors alone.
Step 2: Baking and Smoothing
-
Baking time:
Arrange your pebbles on a parchment-lined baking sheet, ensuring they aren’t touching. Bake according to your specific clay manufacturer’s instructions—usually around 275°F (135°C) for 15-30 minutes depending on thickness. -
Cooling down:
Let the clay shapes cool completely in the oven with the door cracked open. This gradual cooling helps prevent any structural cracks. -
Sand for smoothness:
Once fully cool and hard, take your fine-grit sandpaper and gently buff the surface under a trickle of water. This wet-sanding technique removes any remaining lint or fingerprints and gives the ‘stone’ a professional matte finish. -
Wash and dry:
Rinse off any milky residue from the sanding process and dry the pebbles thoroughly with a lint-free cloth.
Make Them Useful
Before baking, slice a deep slit into the top of the head to turn these into adorable photo holders or place card stands for a dinner party.
Step 3: Bringing them to Life
-
Planning the faces:
Decide on the expressions. The charm of these creatures lies in the simplicity—tiny wide-set eyes and a small smile placed relatively high up on the ‘face’ area. -
Paint the eyes:
Dip a dotting tool or the blunt end of a toothpick into black acrylic paint. Carefully stamp two small dots for eyes. Keep them small; you can always make them bigger, but it’s hard to make them smaller. -
Paint the smile:
Using the very tip of a toothpick or a super-fine detail brush, paint a small, shallow ‘U’ shape between the eyes. Some can have happy smiles, others can be straight-faced or slightly crooked for personality. -
Fixing mistakes:
If a face goes wrong, don’t panic. Since the clay is baked, you can quickly wipe the wet acrylic paint off with a damp paper towel or scratch dry paint off with a fingernail and try again. -
Seal the deal:
Once the paint is completely bone dry, apply a thin coat of matte varnish over the entire piece. This protects the painted face and deepens the color of the speckles without making the creature look unnaturally shiny.
Gather your new little rock family in a shallow bowl and enjoy their quiet company


Teeny Animal Minis (Chibi Style)
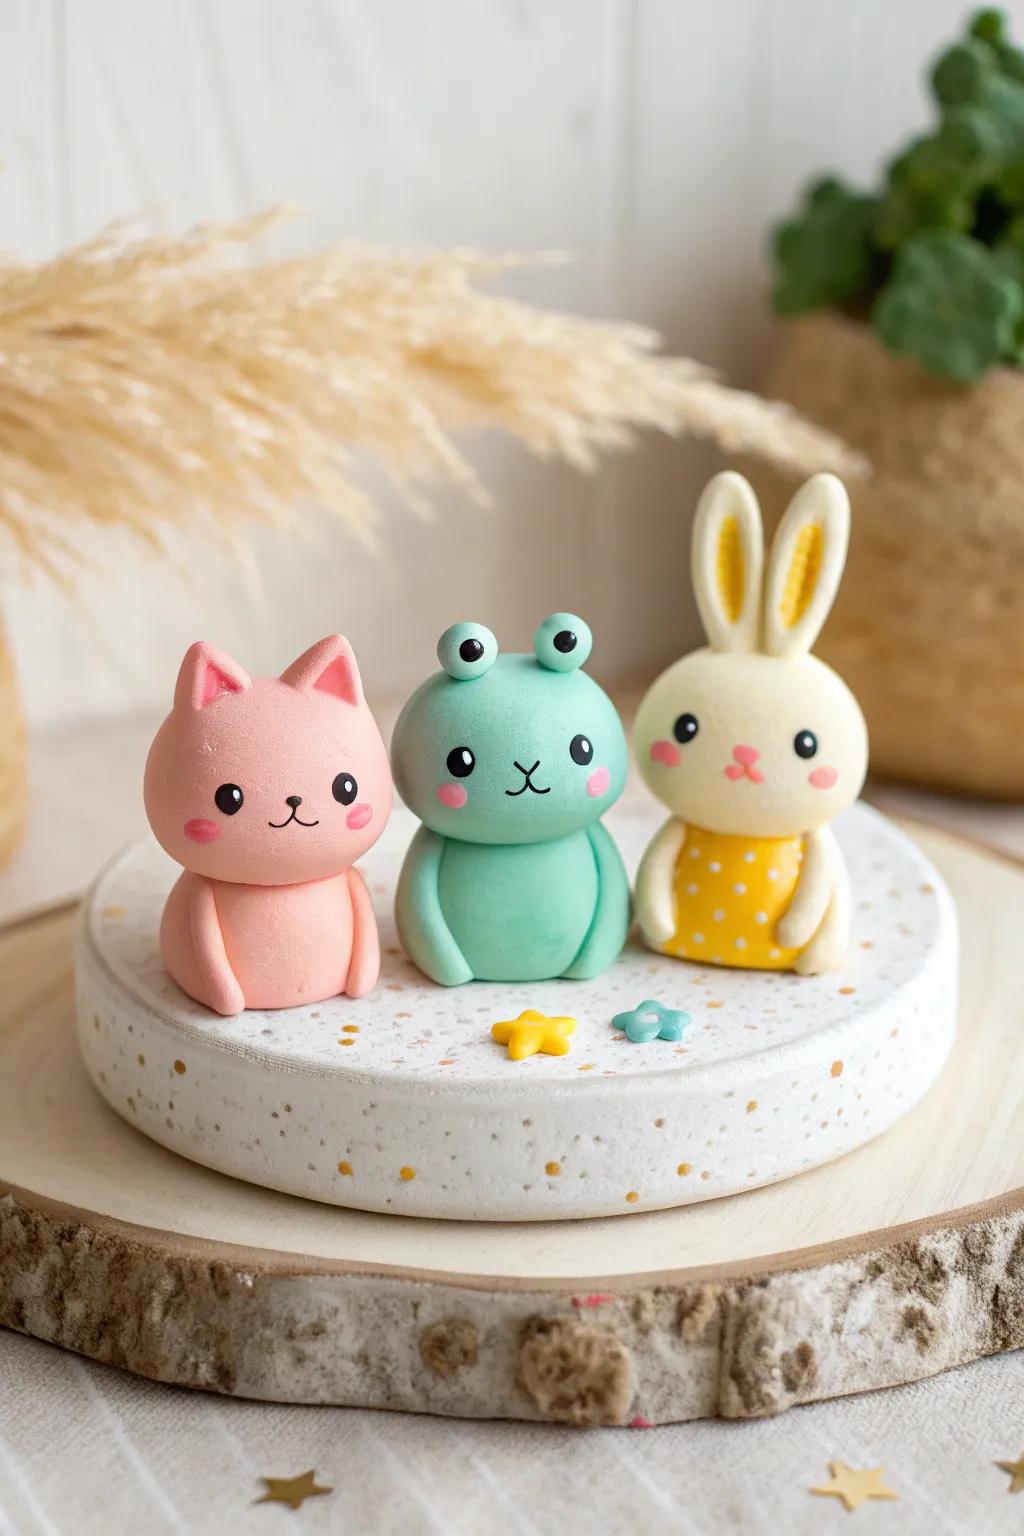
Create this adorable lineup of palm-sized animal friends using smooth polymer clay in soft pastel shades. This project captures the essence of chibi style with oversized heads, minimalist features, and a cohesive, matte finish.
Step-by-Step
Materials
- Polymer clay (baby pink, mint teal, cream/white, yellow)
- Black acrylic paint or black clay
- Small dotting tools or ball stylus
- Modeling tools (blade, needle tool)
- Soft pastel chalks (pink) for blushing
- Small paintbrush
- Gloss glaze (optional for eyes)
- Textured white clay or white acrylic paint for the base
- Round cookie cutter (approx 3-4 inches)
Step 1: Base Preparation
-
Form the Disc:
Condition a large ball of white clay. Roll it out to about 1/2-inch thickness and cut a perfect circle using your round cookie cutter. -
Add Texture:
To mimic the speckled terrazzo look shown, knead in tiny shavings of gold or brown clay, or simply splatter the baked base lightly with diluted brown paint later. -
Decorate Base:
Mold two tiny decorative shapes—a yellow star and a blue flower—and press them gently onto the front center of the base.
Clean Clay Trick
Keep baby wipes nearby! When switching between colored clays (especially going from the mint frog to the cream bunny), wipe your hands and tools to avoid color transfer.
Step 2: Sculpting the Cat
-
Cat Head & Body:
Roll a smooth ball of baby pink clay for the head and a slightly smaller, gumdrop-shaped piece for the body. Gently press them together to check proportions. -
Ears:
Shape two small triangles of pink clay. Indent the centers with a small ball tool and add a tiny sliver of darker pink clay inside for depth before attaching them to the head. -
Cat Limbs:
Roll two thin sausages for arms and attach them vertically along the sides of the body so they look like they are propping the cat up.
Step 3: Sculpting the Frog
-
Frog Head & Body:
Using mint teal clay, form a round head and a squat, rounded body similar to the cat’s dimensions. -
Frog Eyes:
Create two small balls of teal clay for the eye sockets and attach them to the top of the head. I find pressing a small indentation into these balls helps the black eyes sit better later. -
Frog Limbs:
Form two curved, slightly flattened logs for the frog’s legs and attach them to the front of the body, curving inwards.
Make It Functional
Instead of a display base, flatten the bottoms of the figures and glue strong magnets to them. They make adorable fridge magnets or planner clips.
Step 4: Sculpting the Bunny
-
Bunny Head:
Roll a cream-colored ball for the head. This should match the size of the other two animals. -
Bunny Outfit:
For the body, shape a yellow cone. Add tiny white polka dots by pressing minute balls of white clay flat onto the yellow surface. -
Bunny Ears:
Roll two long tear-drop shapes from cream clay. Flatten them slightly and use a tool to imprint a long inner ear texture. Fill this indentation with yellow clay. -
Connect Pieces:
Attach the ears upright on the head and join the head to the yellow body. Add two small cream arms resting on the lap.
Step 5: Details & Finishing
-
Baking:
Pre-bake the base if needed, or place all three figures onto the raw base. Bake according to your clay manufacturer’s instructions (usually 275°F/135°C for 15-30 minutes). -
Face Painting:
Once cool, use a fine detail brush or a needle tool dipped in black paint to carefully draw the eyes, noses, and mouths. Keep the eyes wide-set for cuteness. -
Blushing Cheeks:
Scrape a little pink pastel chalk into a powder. Use a dry, soft brush to gently dust rosy cheeks onto all three figures. -
Highlights:
Add a tiny white dot to the eyes for a ‘sparkle’ effect using a toothpick.
Set your finished trio on a shelf to bring a tiny spark of joy to your room

The Complete Guide to Pottery Troubleshooting
Uncover the most common ceramic mistakes—from cracking clay to failed glazes—and learn how to fix them fast.
Random Trinket Dishes With Wonky Edges
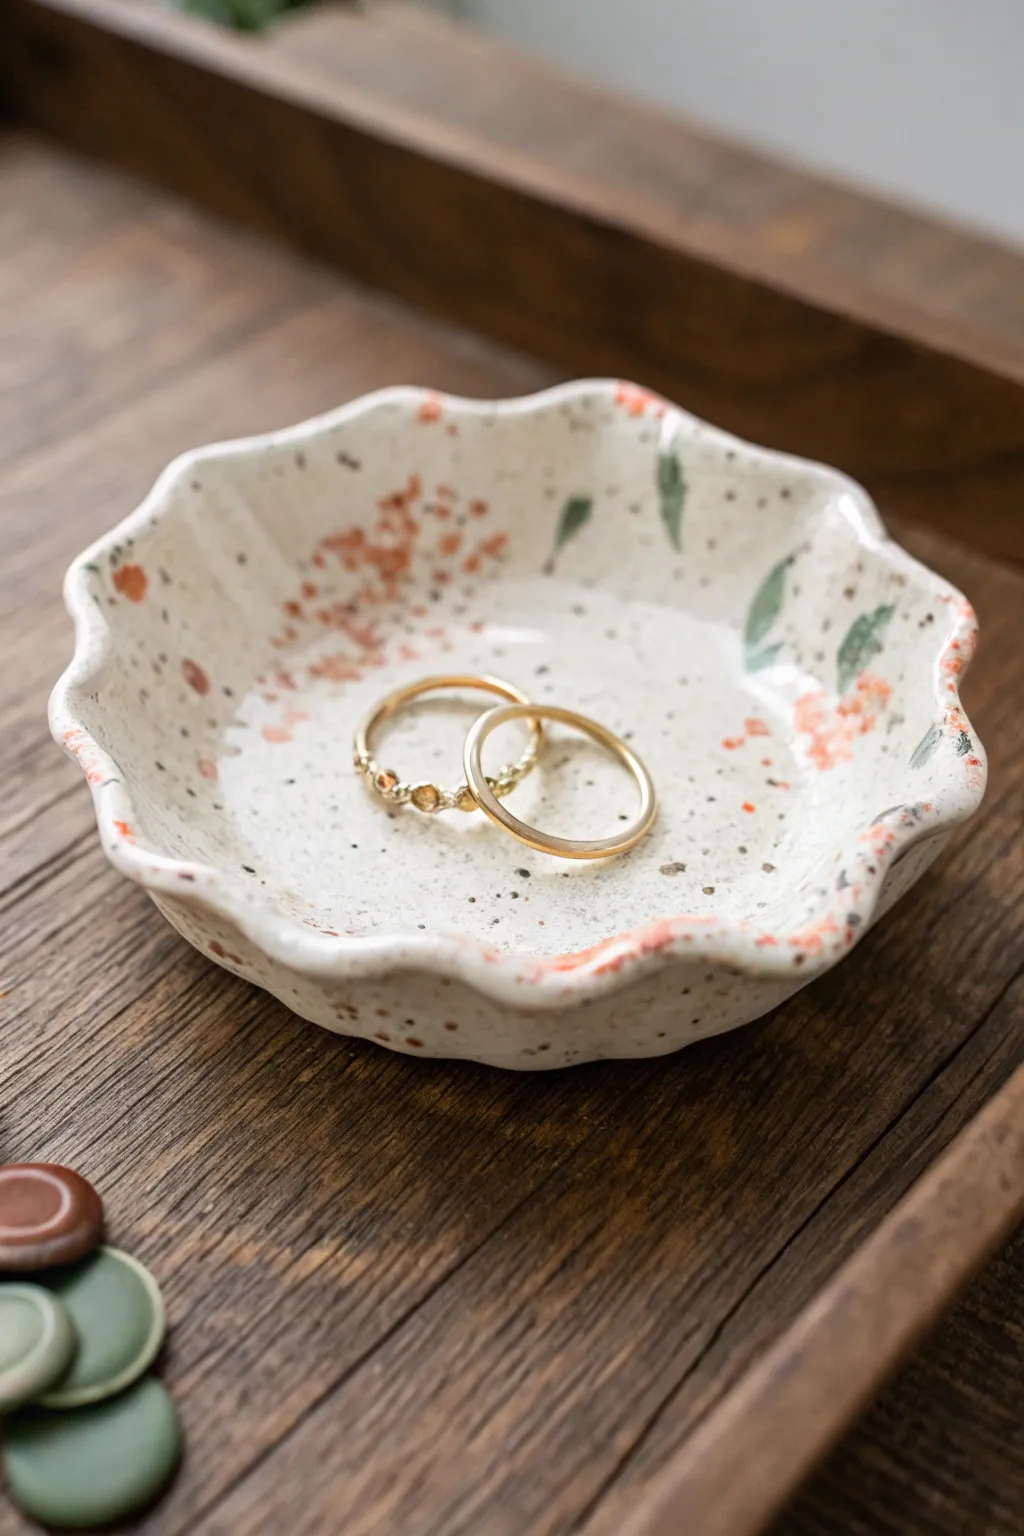
This charming little catch-all tray features gentle, undulating edges and a rustic speckled glaze that feels organic and handmade. It’s the perfect size for holding your favorite rings or daily jewelry pieces.
Detailed Instructions
Materials
- White or light-colored air-dry clay or polymer clay
- Rolling pin
- Small bowl or cookie cutter (approx 4-5 inches)
- Craft knife
- Medium-grit sandpaper
- Sponge
- Speckled cream acrylic paint (or a specialized speckled glaze if firing)
- Terracotta or burnt orange acrylic paint
- Sage or olive green acrylic paint
- Small round paintbrush
- Old toothbrush (for splattering)
- Glossy sealant (water-based varnish or resin)
Step 1: Shaping the Form
-
Prepare the clay:
Begin by kneading a ball of clay until it is warm and pliable, removing any air bubbles to prevent cracking later. -
Roll it out:
Roll the clay onto a smooth surface until you have an even slab roughly 1/4 inch thick. Move the clay occasionally so it doesn’t stick. -
Cut the circle:
Place your small bowl or cookie cutter onto the slab and cut around it with a craft knife to create a perfect circle base. -
Smooth the edges:
Dip your finger in a little water and run it along the cut rim to smooth down any sharp corners or clay burrs. -
Create the wave effect:
Gently pinch the rim of the dish between your thumb and forefinger at intervals. Push down slightly with your thumb while lifting with your finger to create the undulating ‘wonky’ wave. -
Establish the curve:
Place the clay circle into a slightly larger bowl acting as a mold, or press the center down gently on a flat surface while lifting the wavy sides to create a concave dish shape. -
Dry thoroughly:
Allow the piece to dry completely according to your clay package instructions. I find letting it dry slowly away from direct heat prevents warping.
Cracked Edges?
If the rim cracks while pinching waves, dip a paintbrush in water (or clay slip) and smooth the fissure immediately. Keep your fingers damp while working.
Step 2: Decorating and Finishing
-
Sand imperfections:
Once bone dry, use medium-grit sandpaper to smooth out any rough patches on the rim or surface. -
Wipe clean:
Use a slightly damp sponge to remove all clay dust before painting; dust will prevent the paint from sticking properly. -
Base coat:
Apply two coats of a creamy white base acrylic. If you want a built-in speckled look, use a ‘pottery glaze’ effect acrylic paint found in craft stores. -
Paint the leaves:
Using a thin round brush and sage green paint, dab on very loose, abstract leaf shapes near the rim. Keep them elongated and casual rather than detailed. -
Add floral blotches:
With the burnt orange paint, stipple small clusters of dots or rough blotches near the leaves to suggest abstract flowers. -
Create speckles:
Dip an old toothbrush into diluted brown or dark grey paint. Run your thumb over the bristles to flick tiny speckles across the entire dish for that stone-ware look. -
Let paint cure:
Allow all paint layers to dry completely, ensuring the thickest blotches are hard to the touch. -
Seal the piece:
Apply a coat of high-gloss varnish to mimic the look of fired ceramic glaze. A second coat adds extra durability. -
Final dry:
Let the gloss finish cure for at least 24 hours before placing any jewelry inside.
Gold Rim Upgrade
For an elegant touch, paint just the very top edge of the wavy rim with metallic gold leaf paint after the main glazing is dry.
Now you have a sweet, handmade spot to keep your treasures safe
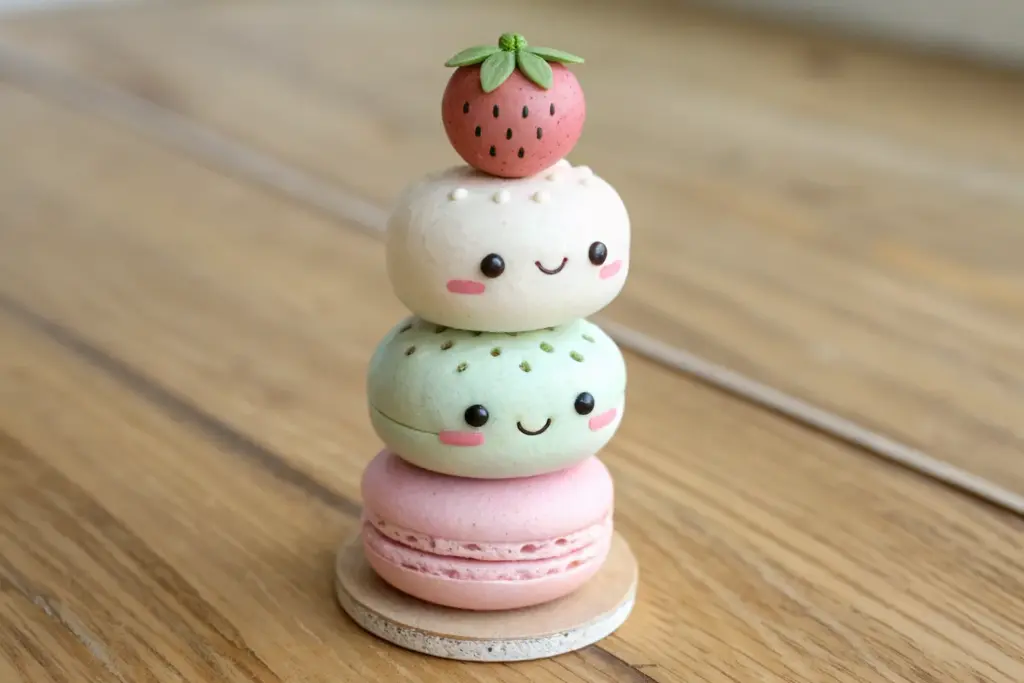
Mini Donut and Cookie Stud Shapes
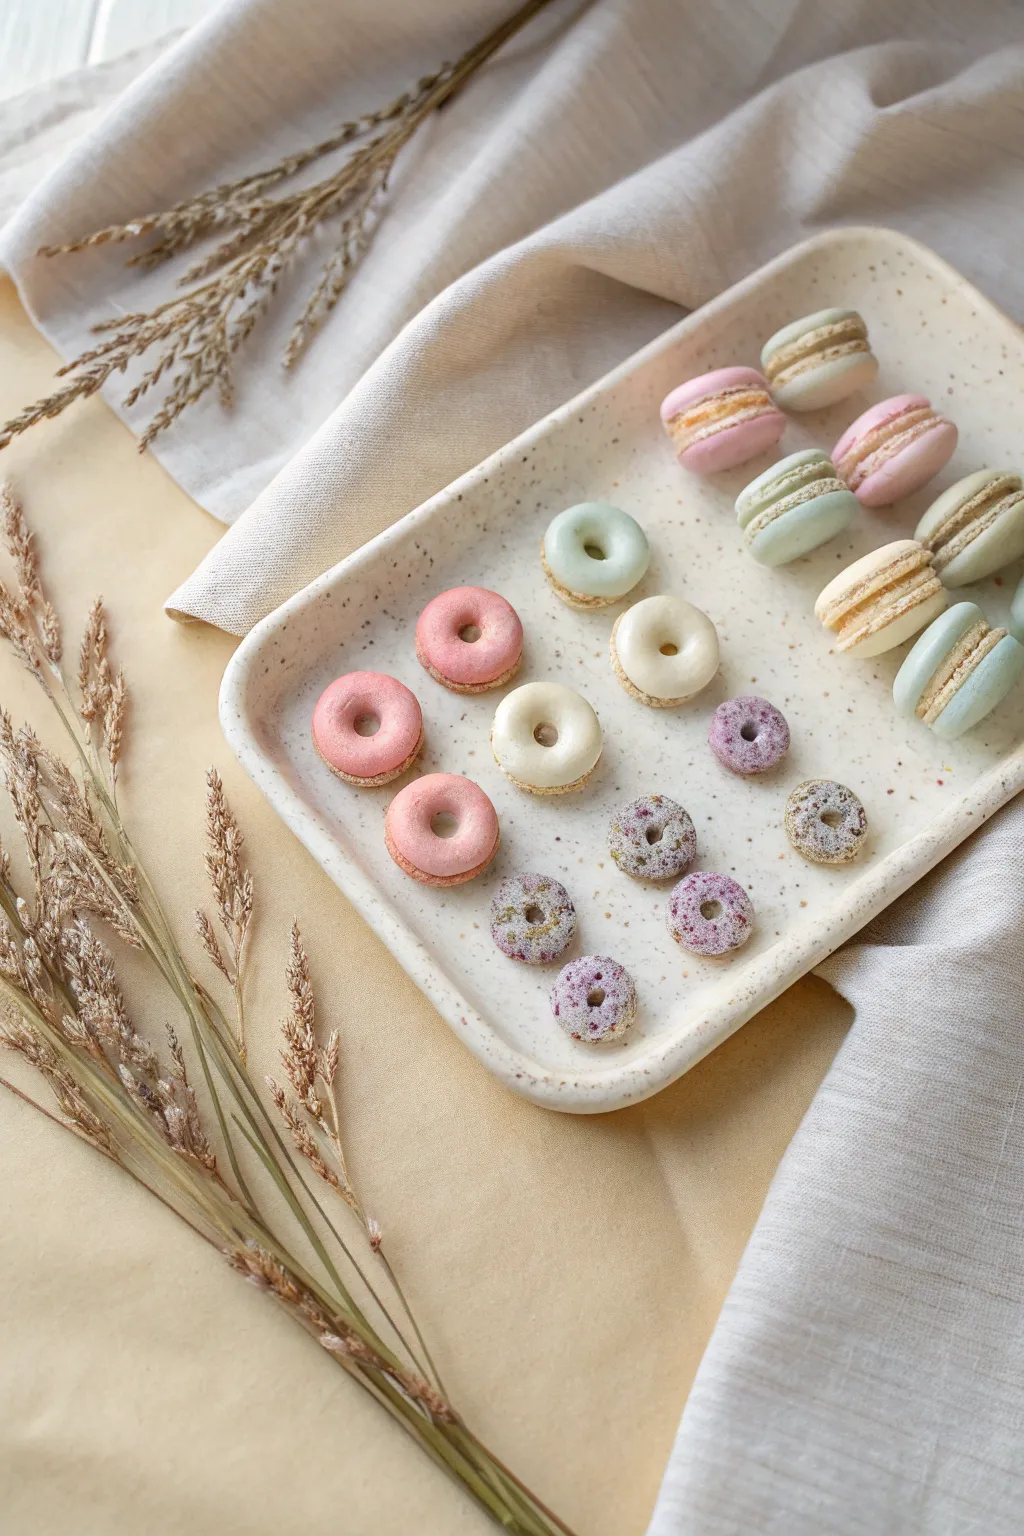
Capture the charm of a French bakery with these incredibly tiny polymer clay macarons and donuts. This project uses soft pastel hues and realistic texturing to create dainty components perfect for stud earrings or charm bracelets.
Step-by-Step Guide
Materials
- Polymer clay (white, pink, mint green, beige, lavender)
- Small circle cutter (approx. 1 cm)
- Tiny piping tip or straw (for donut holes)
- Needle tool or toothpick
- Liquid polymer clay (Translucent or Bake & Bond)
- Soft pastel chalks (browns, dark purples)
- Sandpaper or toothbrush (for texturing)
- Standard oven and baking sheet
- Ceramic tile/work surface
- Sharp crafting blade
Step 1: Crafting the Macarons
-
Mix pastel shades:
Begin by conditioning your clay. Mix white clay with very small amounts of pink, mint green, and beige to achieve soft, milky pastel tones. You want the colors to look delicate, not saturated. -
Form the shells:
Roll the colored clay into a slab about 3-4mm thick. Use your small circle cutter to punch out two identical circles for each macaron. Gently smooth the top edge of each circle with your finger to create the macaron’s signature dome shape. -
Create the ‘feet’:
Use a needle tool to gently tease the clay at the very base of each shell. Poke and drag small amounts of clay downwards to create the rough, crumbly texture known as ‘feet’. Do this all around the circumference. -
Prepare the filling:
Roll out a thin sheet of white or cream clay for the filling. It should be slightly smaller in diameter than the shells. You can cut a circle and gently press it to size. -
Assemble the cookies:
Sandwich the filling between two matching shells. Press them together very gently so you don’t squash the textured feet or the domed tops.
Step 2: Making the Mini Donuts
-
Shape the dough:
Mix beige clay with a tiny bit of white for a doughy color. Roll small balls of clay and flatten them slightly into thick discs. -
Cut the centers:
Use a tiny straw or the smallest piping tip available to punch a hole directly in the center of each disc to create the classic donut ring. -
Create the frosting:
Roll out very thin sheets of your pink, white, mint, and cream clay. Use the same cutters as before to cut rings, but stretch them slightly or pinch the edges to make them look like melted glaze. -
Apply the glaze:
Lay the thin colored ‘frosting’ rings over the donut bases. Smooth the edges down so they hug the curves of the donut naturally. -
Add powder texture:
For the sugared or speckled donuts, shave some pastel chalk into a fine powder. Use a brush or your finger to dab speckles onto the raw clay. -
Simulate sprinkles:
For the purple speckled donuts, scrape tiny bits of dark purple hardened clay or use coarse pastel shavings and press them into the surface to mimic dried fruit or sprinkles.
Sticky Situation?
If clay sticks to your cutter, dip the cutter in cornstarch before pressing it into the clay. This creates a release barrier and keeps edges sharp.
Step 3: Baking and Finishing
-
Texture check:
Before baking, give everything a once-over. The macarons should look airy at the bottom, and the donuts should be smooth. If you have fingerprints, lightly buf them away with a bit of cornstarch. -
Organize for baking:
Arrange all your pieces on a ceramic tile or a baking sheet lined with parchment paper. Leave a little space between each connection so they don’t stick. -
Bake:
Bake according to your clay manufacturer’s instructions, usually at 275°F (130°C) for about 15-20 minutes since these are small. -
Cool down:
Let the pieces cool completely inside the oven with the door slightly ajar; this helps prevent cracking from thermal shock. -
Seal (optional):
If you want a glossy look on the donuts, apply a very thin layer of water-based varnish to just the frosting area.
Make Them Wearable
Turn these into earring studs! Once baked and cooled, use strong superglue (E6000) to attach flat-pad earring posts to the back of each treat.
You now have a delightful tray of calorie-free treats ready to wear or display in a dollhouse scene


What Really Happens Inside the Kiln
Learn how time and temperature work together inside the kiln to transform clay into durable ceramic.
Vegetables With Big Personalities
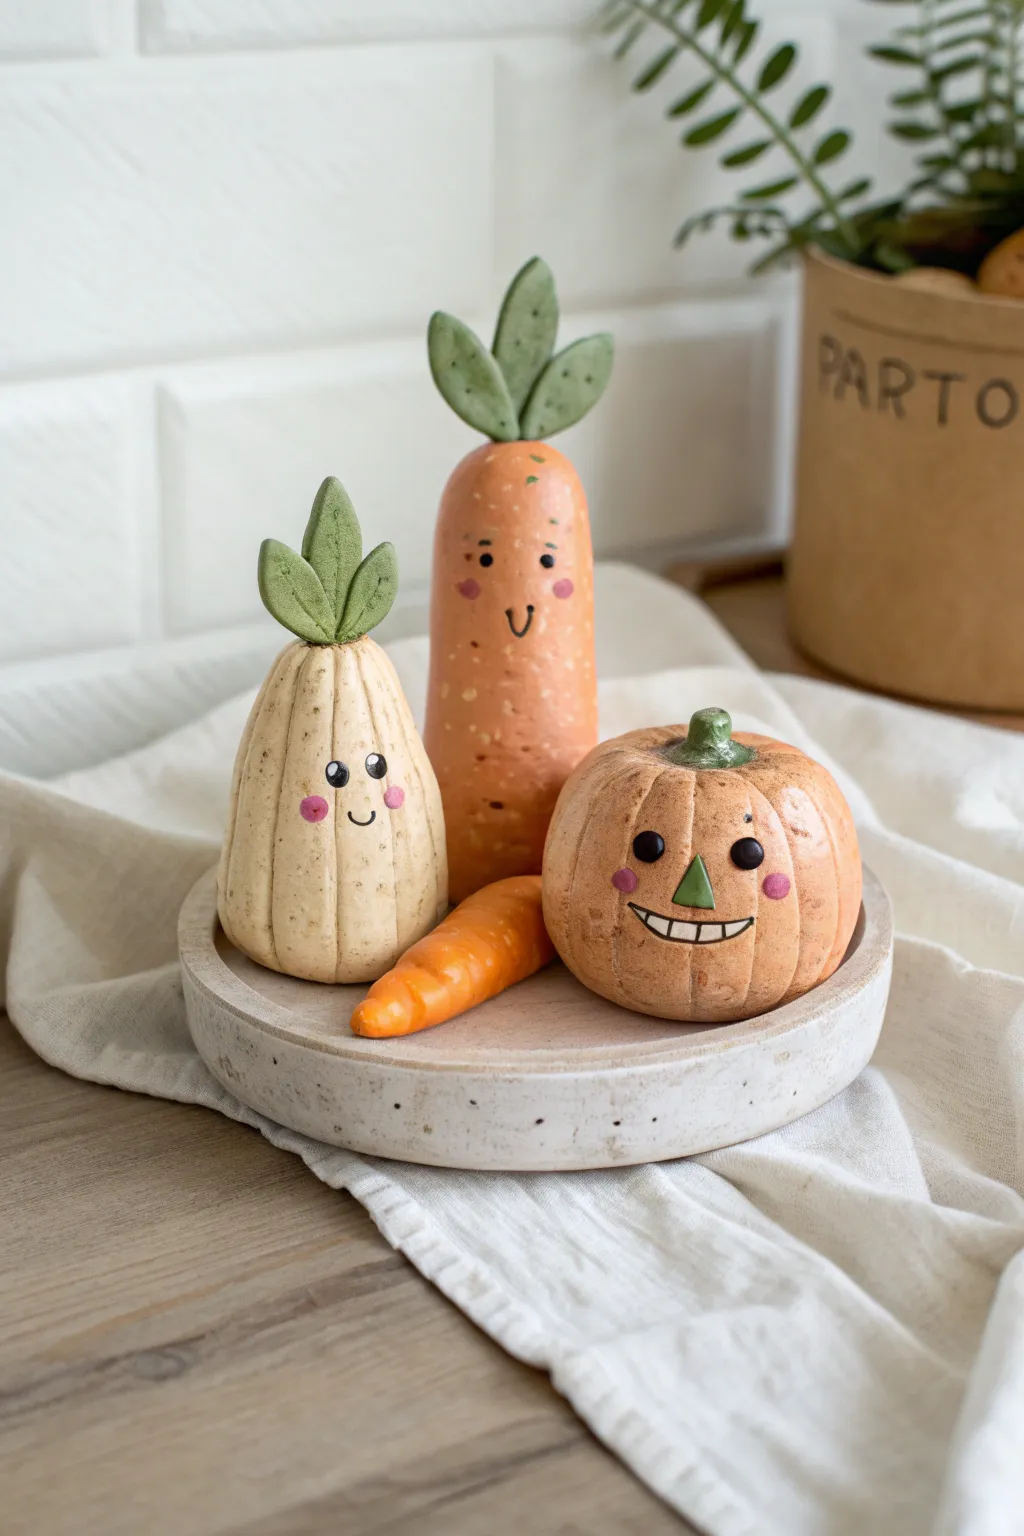
Bring your vegetable garden indoors with this adorable trio of smiling clay figurines. Featuring a cheerful parsnip, a tall carrot, and a happy little pumpkin, these hand-sculpted friends add whimsical charm to any shelf.
Detailed Instructions
Materials
- White creative paperclay or polymer clay
- Acrylic paints (orange, cream/off-white, sage green, pink, black)
- Fine grit sandpaper
- Sculpting tools (needle tool, smooth modeling tool)
- Small detail paintbrushes
- Matte or satin varnish
- Water cup and paper towels
Step 1: Sculpting the Carrot
-
Base shape:
Start by conditioning a medium-sized ball of clay and rolling it into a cylinder. Gently taper the top half so it resembles a tall, rounded pillar, flattening the bottom so it stands securely. -
Leaf assembly:
Create three small oval shapes for the leaves. I like to flatten them slightly and use a needle tool to press a central vein and tiny pores into the surface for texture. -
Comparison check:
Attach the three leaves to the very top center of your carrot body. Blend the seams at the base of the leaves carefully so they look like they are growing out of the vegetable.
Cracked Clay?
If small cracks appear as your air-dry clay cures, mix a tiny bit of fresh clay with water to make a paste and smooth it into the fissures before painting.
Step 2: Sculpting the Parsnip and Pumpkin
-
Forming the parsnip:
Take a slightly smaller amount of clay to form the pale vegetable. Roll it into a teardrop shape with a wide base, making sure it’s shorter than your carrot. -
Texture detail:
Use a modeling tool to press vertical indentations all around the parsnip’s body, giving it a ribbed, natural texture. Attach three leaves to the top just like you did for the carrot. -
Shaping the pumpkin:
Roll a ball of clay and press it down slightly to create a squat, round shape. Use the side of a tool or a credit card to press deep vertical lines from top to bottom to create the pumpkin’s segments. -
Pumpkin stem:
Add a tiny, stubby cylinder to the center of the pumpkin for the stem. Don’t forget to sculpt a tiny baby carrot as a separate accessory piece. -
Drying time:
Allow all your pieces to dry completely according to your clay’s instructions. If using air-dry clay, this may take 24-48 hours; if polymer, bake as directed.
Step 3: Painting & Personality
-
Base coats:
Paint the tall carrot with a warm orange and the pumpkin with a softer, peach-toned orange. For the parsnip, mix a creamy off-white with a tiny drop of brown. -
Adding speckles:
To achieve that organic look, dilute a darker brown paint with water and flick it lightly onto the dried base coats using a stiff brush (or an old toothbrush). -
Leaf color:
Paint all the leaves and the pumpkin stem with a muted sage green. Two thin coats are better than one thick one to preserve the texture. -
Pumpkin face:
Map out the pumpkin’s face first. Paint a green triangle nose, two round black eyes, and a wide, toothy grin with white teeth outlined in thin black lines. -
Other faces:
For the carrot and parsnip, use a very fine brush to paint simple black eyes and small, U-shaped smiles. It helps to practice the expression on paper first. -
Rosy cheeks:
Dip the end of a paintbrush handle into pink paint and dot it onto the cheeks of all three figures. This simple step instantly adds life to their expressions. -
Finishing touch:
Once all paint is fully dry, apply a coat of matte or satin varnish to protect your work and give the vegetables a cohesive finish.
Pro Tip: Weighted Base
Before sealing the bottom of your shapes, push a small, flat stone or a ball of foil into the base. This adds weight and prevents your tall carrot from tipping over.
Enjoy arranging your cheerful little garden crew on your desk or windowsill
Miniature Plant Pots for Tiny Plants
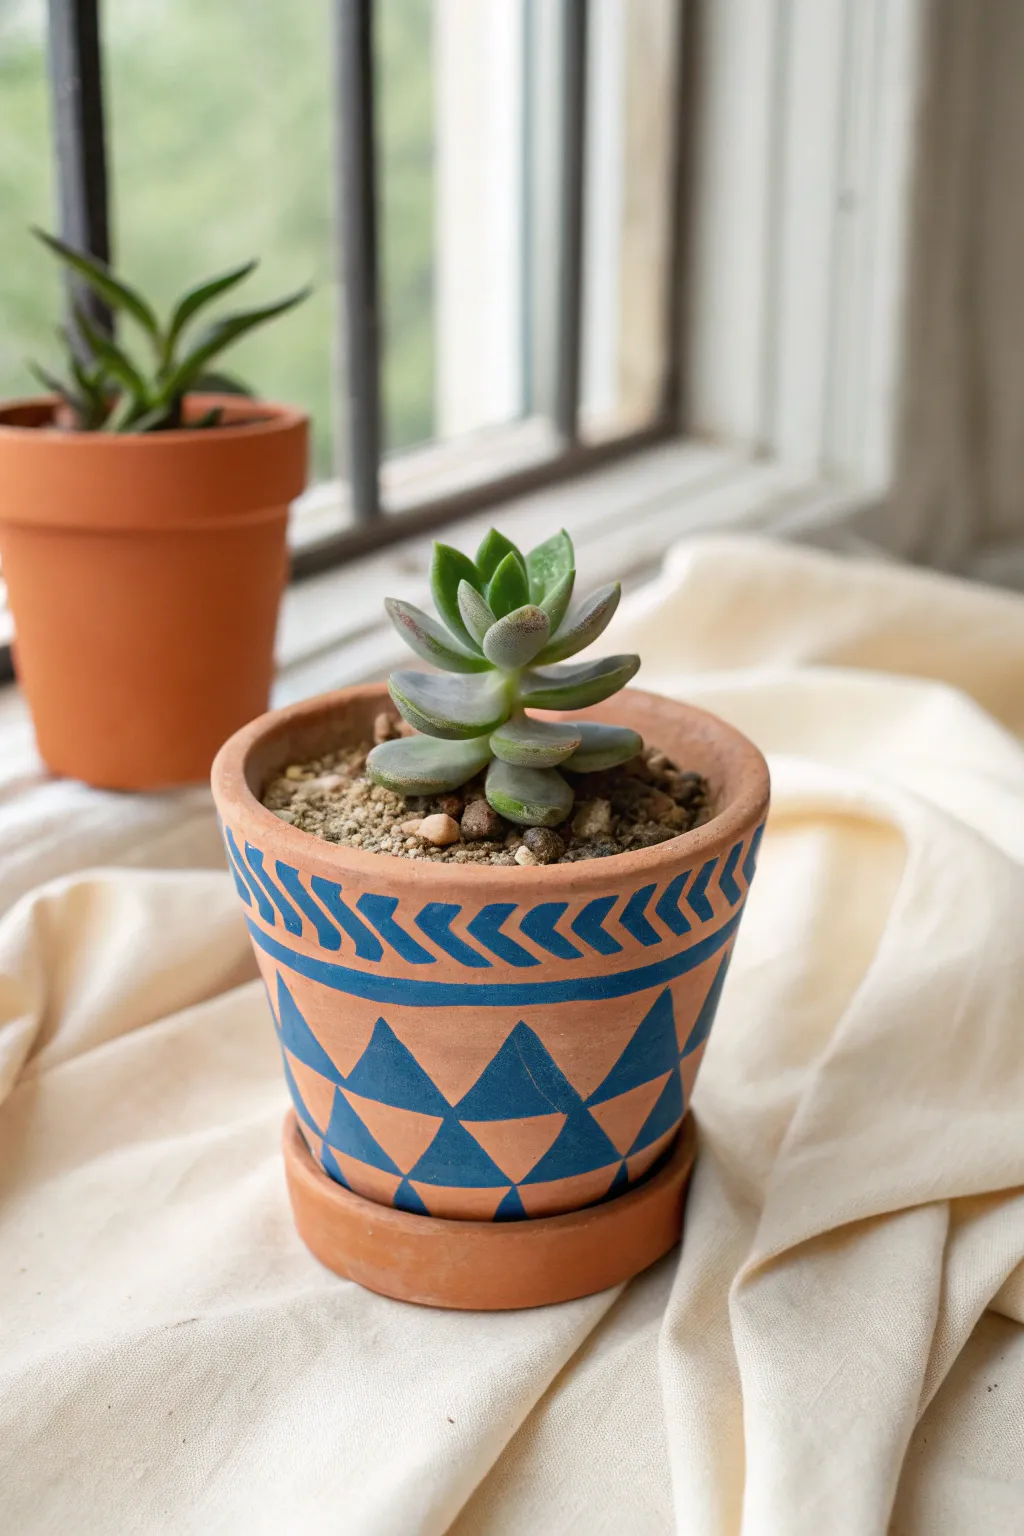
Add a crisp, modern touch to your windowsill garden with this dual-patterned miniature plant pot. Using simple masking techniques and bold blue acrylic, you’ll transform a plain terra cotta vessel into a stylish home for your favorite succulent.
Step-by-Step Tutorial
Materials
- Small terra cotta pot (approx. 3-4 inch diameter) with matching saucer
- Acrylic paint (Deep Cobalt Blue)
- Painter’s tape or masking tape (various widths)
- Small flat paintbrush (size 4 or 6)
- Detail round paintbrush (size 0 or 1)
- Pencil
- Ruler or measuring tape
- Clear matte sealer or varnish
- Succulent potting mix and small succulent (optional, for finishing)
Step 1: Preparation & Base Layout
-
Clean surface:
Begin by wiping down your terra cotta pot with a damp cloth to remove any dust or warehouse grit. Let it dry completely so the paint adheres properly. -
Mark the sections:
Using a pencil, lightly draw a horizontal line around the circumference of the pot, just below the thick rim. This separates your two design areas. -
Draft the triangle grid:
For the lower section, use your ruler to mark evenly spaced points around the bottom edge and the middle line you just drew. I find connecting these dots lightly with a pencil helps visualize the large triangles before painting.
Clean Lines Hack
For ultra-crisp triangle edges, use thin washi tape or painter’s tape to mask off the shapes before painting. Press the edges down firmly with a fingernail to stop bleed-through.
Step 2: Painting the Lower Triangles
-
Outline the shapes:
Load your small flat brush with Deep Cobalt Blue paint. Carefully outline the large triangle shapes on the main body of the pot, using the straight edge of the brush to keep lines crisp. -
Fill in the blue:
Fill in the triangles that point upwards with solid blue paint. Use smooth, vertical strokes to minimize brush marks. -
Create the negative space:
Leave the adjacent downward-pointing triangles unpainted, allowing the natural clay color to form the counter-pattern. -
Refine edges:
Go back over the edges with your detail round brush if any corners look rounded or uneven. Sharp points make this geometric design pop. -
Second coat:
Once the first layer is dry to the touch, apply a second coat of blue to ensure the terra cotta doesn’t show through the paint.
Step 3: Rim Detail & Finishing
-
Start the rim pattern:
Move to the thick rim of the pot. You will serve be creating a chevron or ‘arrow fletching’ pattern. Start by painting a solid blue horizontal stripe at the very bottom of the rim to ground the design. -
Mark the diagonals:
Lightly tick marks around the top edge of the rim to space your diagonal lines evenly. -
Paint diagonal dashes:
Using the flat edge of your small brush, paint short, diagonal strokes all leaning in the same direction around the rim. -
Complete the chevron:
Now, paint a second set of diagonal strokes connecting to the first ones, creating a repeated ‘>’ arrow shape. Keep the spacing consistent so the natural clay shows through as separating lines. -
Clean up mistakes:
If paint strays onto the unpainted clay areas, quickly wipe it with a damp cotton swab or gently scrape it off with a craft knife once dry. -
Seal the pot:
Allow the paint to cure fully, preferably overnight. Apply a coat of clear matte sealer over the outside of the pot to protect the design from water damage during watering. -
Plant or display:
Once the sealer is dry, fill the pot with succulent soil and nestle your tiny plant inside, placing the saucer underneath to catch drainage.
Color Variations
Try a monochromatic look by using white paint for a subtle style, or reverse the scheme by painting the whole pot white first and adding blue geometry on top.
Now you have a striking geometric vessel ready to brighten up any small corner of your home

TRACK YOUR CERAMIC JOURNEY
Capture glaze tests, firing details, and creative progress—all in one simple printable. Make your projects easier to repeat and improve.
Little Magnet Characters for the Fridge
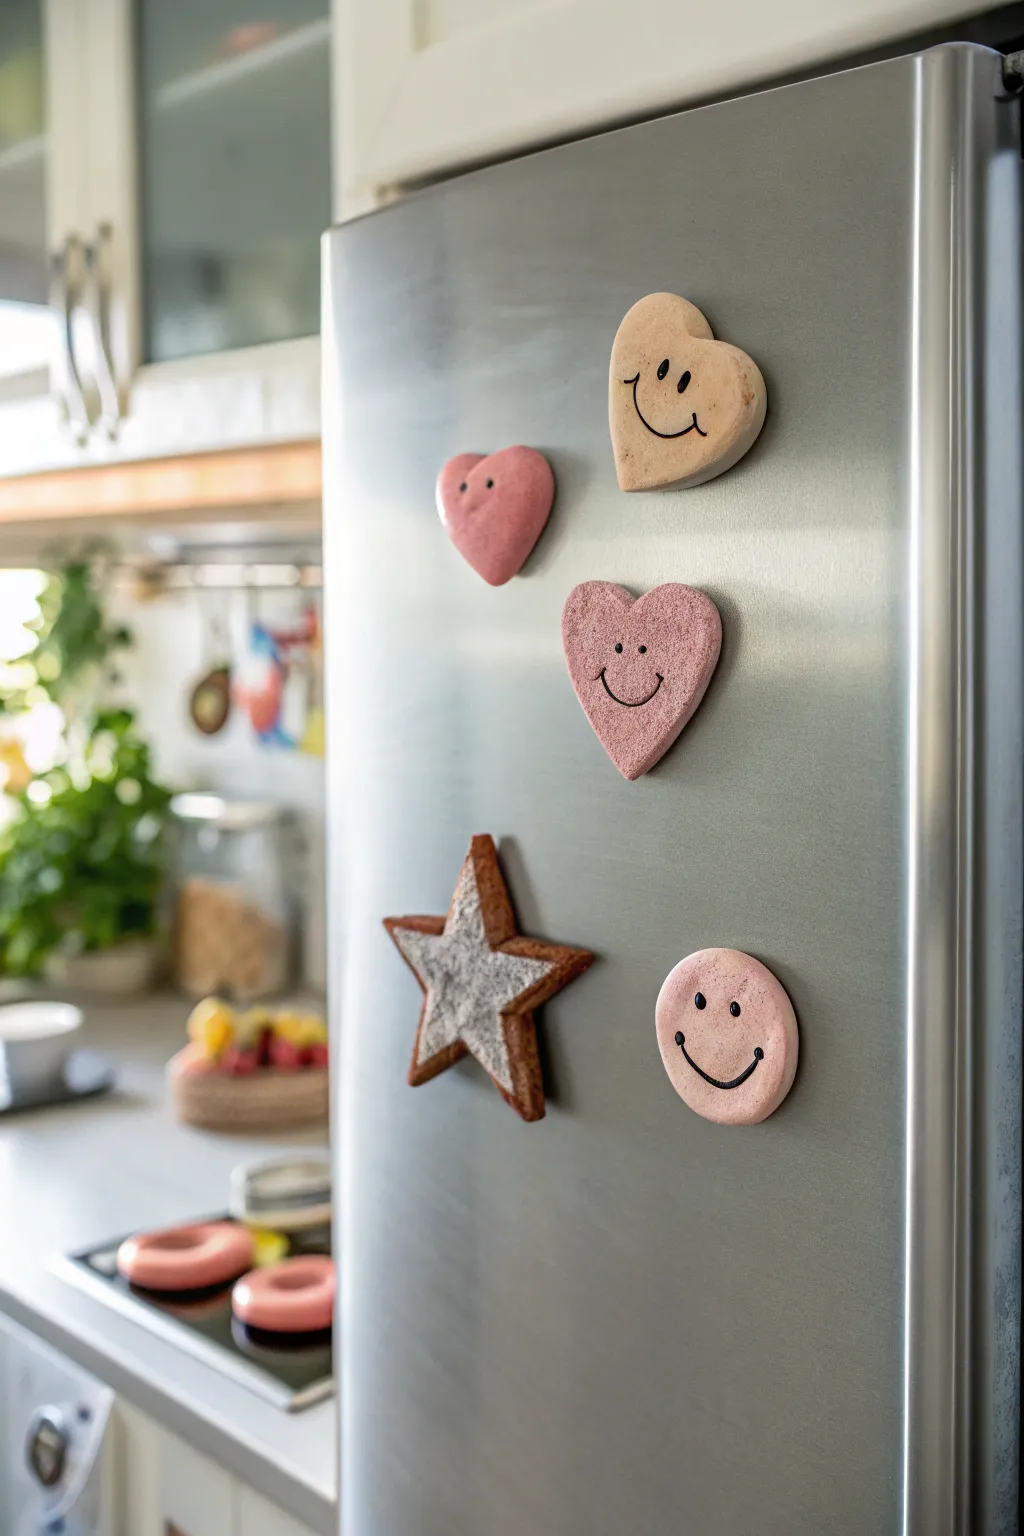
Brighten up your kitchen with these adorable, cookie-inspired clay magnets. Featuring charming textures and simple smiling faces, these easy-to-make pieces look almost good enough to eat while holding your important notes in place.
Step-by-Step
Materials
- Polymer clay (beige, pastel pink, terracotta/brown)
- Sandpaper or a clean toothbrush (for texturing)
- Heart and star cookie cutters
- Rolling pin
- Parchment paper
- Black acrylic paint
- Very fine detail paintbrush
- White pastel chalk or baby powder
- Strong round craft magnets
- Superglue or E6000 adhesive
- Oven (for baking)
Step 1: Shaping the Base Forms
-
Condition the clay:
Begin by kneading your chosen clay colors—beige, pink, and brown—until they are soft and pliable. This prevents cracking later. -
Roll out slabs:
Place the clay on parchment paper and roll it out to a uniform thickness, about 1/4 inch thick. You want them chunky enough to look like cookies. -
Cut the shapes:
Use your cookie cutters to punch out several hearts and at least one star shape. If the edges are sharp, gently tap them with your finger to soften the look. -
Add texture (Optional):
For the “sugar cookie” look seen on the pink smiling heart, gently press sandpaper or a clean toothbrush bristles all over the surface of the raw clay. -
Create the smooth pink heart:
Leave one pink heart completely smooth for variety. If you leave fingerprints, smooth them away with a tiny drop of baby oil. -
Embed the face details (Method A):
For the beige heart, use a needle tool to lightly impress the curve of the smile and two small dots for eyes before baking. This gives you a guide for painting later. -
Prepare the round face:
Cut a circle shape from pink clay to create the round smiley face magnet shown at the bottom.
Step 2: Special Effects & Baking
-
Create the powdered star:
Take your brown star cutout. Scrape some white pastel chalk into a fine powder (or use baby powder) and dust it over the center of the star using a soft brush, leaving the edges brown to simulate a baked cookie look. -
Bake the pieces:
Arrange all your clay pieces on a parchment-lined baking sheet. Bake according to your brand of polymer clay instructions (usually 275°F/135°C for 15-30 minutes). -
Cool down completely:
Let the pieces cool in the oven or on a wire rack until they are room temperature and hard.
Uneven Surfaces?
If your magnets don’t lie flat against the fridge, your magnets might be glued too deep. Add a small ball of raw clay behind the magnet before gluing to extend it outward.
Step 3: Finishing Touches
-
Paint the smiles:
Squeeze a tiny dot of black acrylic paint onto a palette. Using your finest detail brush, carefully paint the U-shaped smiles and small oval eyes on the hearts and round face. -
Add expression details:
Don’t forget the tiny ‘c’ curves at the ends of the smiles for cheeks, and small eyebrows on the beige heart to give them personality. -
Let the paint dry:
I prefer to let the acrylic paint dry for at least an hour to avoid smudging it during the final assembly. -
Seal the paint (Optional):
If you want extra durability, dab a tiny bit of matte varnish just over the painted facial features. -
Attach the magnets:
Flip the hardened clay pieces over. Apply a drop of strong adhesive to the back of each piece. -
Secure the backing:
Press a magnet firmly into the glue. Let them cure face-down for 24 hours to ensure the magnet never pops off.
Scented Magnets
Mix a tiny drop of vanilla or cinnamon essential oil into the raw clay before baking. Your kitchen will smell like real fresh-baked cookies every time you walk by.
Pop these on your fridge and enjoy the cheerful company every time you reach for a snack
Mini Fairy Garden Corner
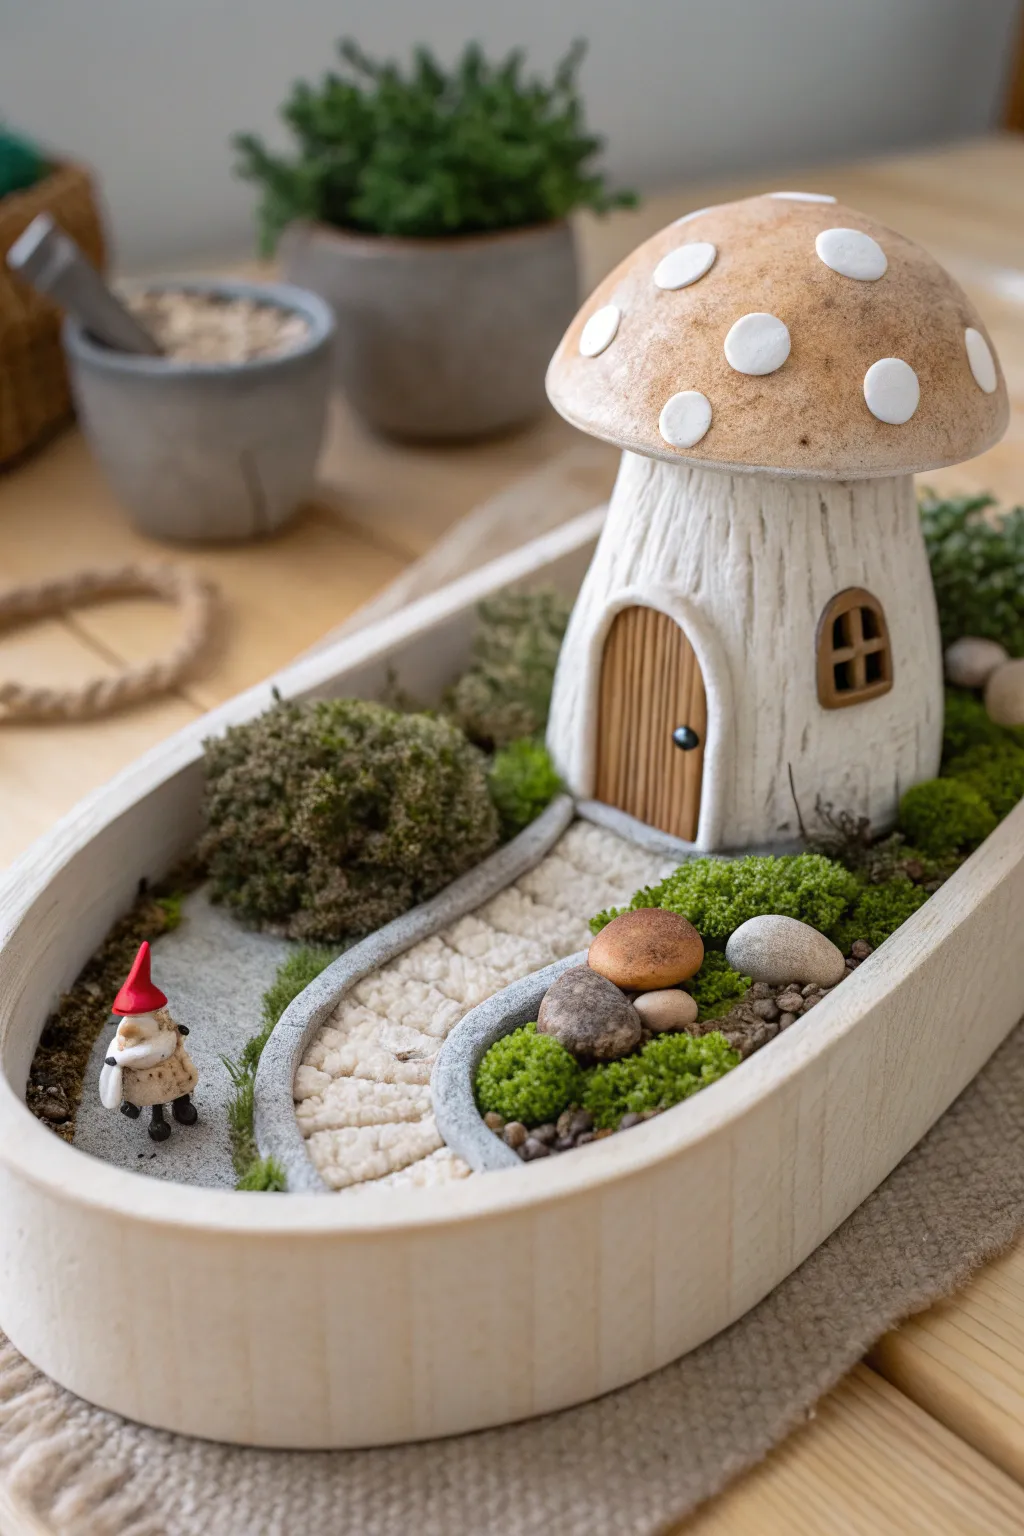
Bring a touch of enchantment to your desk or shelf with this self-contained miniature world. Featuring a hand-sculpted mushroom dwelling and a wandering gnome, this complete scene sits snugly in a custom-made oval basin.
Step-by-Step
Materials
- Air-dry clay (white or light grey)
- Polymer clay (for the gnome)
- Acrylic paints (terracotta, cream, dark brown, grey, green)
- Sculpting tools (needle tool, ball stylus, knife)
- Texturing tools (old toothbrush, crumpled foil)
- Small rolling pin
- Dried moss (preserved moss)
- Small pebbles and tiny gravel
- Sandpaper
- Strong craft glue or clear tacky glue
- Clear matte varnish
Step 1: Sculpting the Base and House
-
Create the basin base:
Roll out a thick slab of air-dry clay (about 1/4 inch thick) into a long oval shape. Cut a long strip of clay of the same thickness for the walls. Score and slip the edges of the base, then attach the strip to create a shallow walled tray. Smooth the seams on the inside and outside with a little water. -
Form the mushroom stalk:
Roll a cylinder of clay for the house body. It should be wider at the bottom and slightly tapered at the top. Hollow it out slightly from the bottom if you want to save clay, or keep it solid for stability. Use a needle tool to scratch vertical wood-grain lines all around the exterior. -
Sculpt the mushroom cap:
Shape a dome of clay that acts as the roof. It should overhang the stalk significantly. Create several small, flat discs of clay and press them onto the dome to simulate the spots. Do not attach the cap to the stalk yet; let them dry separately for easier painting. -
Detail the door and window:
Roll a small slab and cut an arch shape for the door. Scribe vertical planks and add a tiny ball of clay for the doorknob. Create a small arched window frame with a cross-pane design. Attach these securely to the stalk using slip. -
Construct the path borders:
Inside your drying tray, arrange two thin snakes of clay to define the winding path leading to where the house will sit. Press them down firmly to adhere to the base. -
Pave the path:
Fill the space between the borders with tiny, flattened balls of clay to create a cobblestone effect. I prefer to press each ‘stone’ slightly with a texture tool to make them look weathered and natural. -
Final drying stage:
Allow all the air-dry clay components (tray, house parts) to dry completely. This usually takes 24-48 hours depending on humidity. Sand any rough edges on the tray rim once dry.
Cracking Up?
If the clay shrinks and pulls away from the tray walls while drying, fill the gaps with a mixture of fresh clay and white glue, then smooth it over.
Step 2: Painting and Assembly
-
Paint the mushroom cap:
Paint the main dome of the roof with a soft terracotta or light brown paint, using a sponge to dab it for texture. Carefully paint the raised spots a bright white or cream. -
Color the house and timber:
Apply a white-wash (watered down white paint) to the stalk, wiping away excess so the dark clay or a dark base coat shows in the deep wood grain grooves. Paint the door and window frame a warm wood brown. -
Paint the landscape base:
Paint the path stones a light cream or grey. Paint the path borders a stone grey. Paint the ground areas inside the tray a dark brown or grey to act as ‘dirt’ shadow under the moss. -
Assemble the house:
Glue the mushroom cap onto the stalk. Once secure, glue the entire house into its designated spot at the end of the cobblestone path. -
Add nature elements:
Apply glue to the ‘ground’ areas. Press clumps of preserved moss into these spots, varying the texture. Add the real pebbles and tiny gravel near the path borders for realism.
Texture Trick
Press a real rock or piece of rough bark into the damp clay of the mushroom stalk to get realistic organic textures instantly.
Step 3: The Tiny Gnome
-
Body and Hat:
Using polymer clay (which won’t shrink), form a tiny cone for the body and a smaller red cone for the hat. Add a tiny ball of flesh-tone clay for the nose peeking out. -
Feet and Details:
Add two minuscule black balls for shoes. Add a white clay beard texture under the nose. Bake the gnome according to your polymer clay package instructions (usually 275°F for 15 mins). -
Final Placement:
Once cool, glue your tiny gnome onto the path, as if he is walking toward his mushroom home.
Now you have a peaceful little corner of the forest captured forever.
Gnomes With Oversized Hats

These charming clay gnomes feature exceptionally tall, textured hats that sit low over round noses, giving them a delightful, secretive personality. With their carved beards and sturdy boot-clad feet, they make for perfect rustic decor.
Detailed Instructions
Materials
- Polymer clay or air-dry clay (white/neutral)
- Acrylic paints (terracotta red, teal, dark green, cream, brown)
- Clay sculpting tools (needle tool, small knife)
- Aluminum foil
- Rolling pin
- Texture sponge or stiff brush
- Clear matte varnish
Step 1: Shaping the Base and Body
-
Create a foil core:
Start by scrunching aluminum foil into a cone shape for the hat and a rounded cylinder for the body to save clay and reduce weight. -
Cover the body:
Roll out a sheet of white clay and wrap it around your foil body base, smoothing the seams until you have a clean, cylindrical shape that tapers slightly at the top. -
Form the feet:
Shape two small, flattened ovals from clay for the shoes. Attach these firmly to the bottom front of the body so the gnome stands securely. -
Add the arms:
Roll two small sausage shapes for arms. Attach them to the sides of the body, blending the clay at the shoulder area so they look integrated into the cloak. -
Attach the hands:
Form two tiny balls of clay for hands and press them onto the ends of the sleeves.
Step 2: Sculpting the Face and Beard
-
Position the nose:
Roll a prominent, round ball of clay for the nose. Place it high up on the body, leaving just enough room for the hat to rest directly on top of it. -
Draft the beard shape:
Apply a triangular wedge of clay below the nose, extending down the front of the body to form the beard. -
Carve the beard flow:
Using a needle tool or small knife, carve deep, flowing vertical lines into the beard clay. Curve the lines outward slightly to mimic real hair. -
Add the mustache:
Create two small swooping shapes of clay and place them directly under the nose, on top of the beard base, to create a mustache. Texture these with horizontal strokes.
Hat Too Heavy?
If the tall hat keeps slumping, insert a toothpick or crumpled wire into the body extending upward to act as an internal spine for the hat cone.
Step 3: Crafting the Oversized Hat
-
Roll the hat cone:
Roll out a large cone of clay. It needs to be significantly taller than the body to achieve that signature look seen in the photo. -
Fit the hat:
Place the cone over the top of the body and foil core. Pull the brim down so it touches the top of the nose and covers the tops of the arms. -
Add rustic texture:
Gently tap a texture sponge or stiff brush against the surface of the hat. You want a rough, felt-like appearance rather than perfectly smooth clay. -
Refine the shape:
Use your fingers to pinch the tip of the hat slightly askew for character, ensuring the brim has a defined, slightly thick edge. -
Final curing:
Bake (for polymer) or let dry (for air-dry) according to your specific clay manufacturer’s instructions.
Natural Stone Look
Mix baking soda or dried coffee grounds into your acrylic paint. This creates a grainy, specked texture that makes the gnome look like real carved stone.
Step 4: Painting and Finishing
-
Base coat the beard:
Paint the body and beard in a creamy off-white or light stone color. I like to let this dry briefly before adding any washes. -
Paint the hat:
Apply your chosen hat color (terracotta red or teal) using a dabbing motion to enhance the texture you created earlier. -
Color the boots:
Paint the shoes a warm, medium brown. -
Highlight the beard:
Mix a very watery grey or brown wash and brush it into the grooves of the beard, then quickly wipe the surface with a paper towel to make the details pop. -
Detail the face:
Paint the nose and hands with a flesh tone. Add two tiny black dots for eyes just barely visible under the brim if desired, though the nose often hides them. -
Seal the gnome:
Apply a coat of matte varnish to protect the paint and give the surface a finished ceramic look.
Now you have a trio of forest friends to guard your shelf or garden
Costumed Animals (The Weirder, the Better)
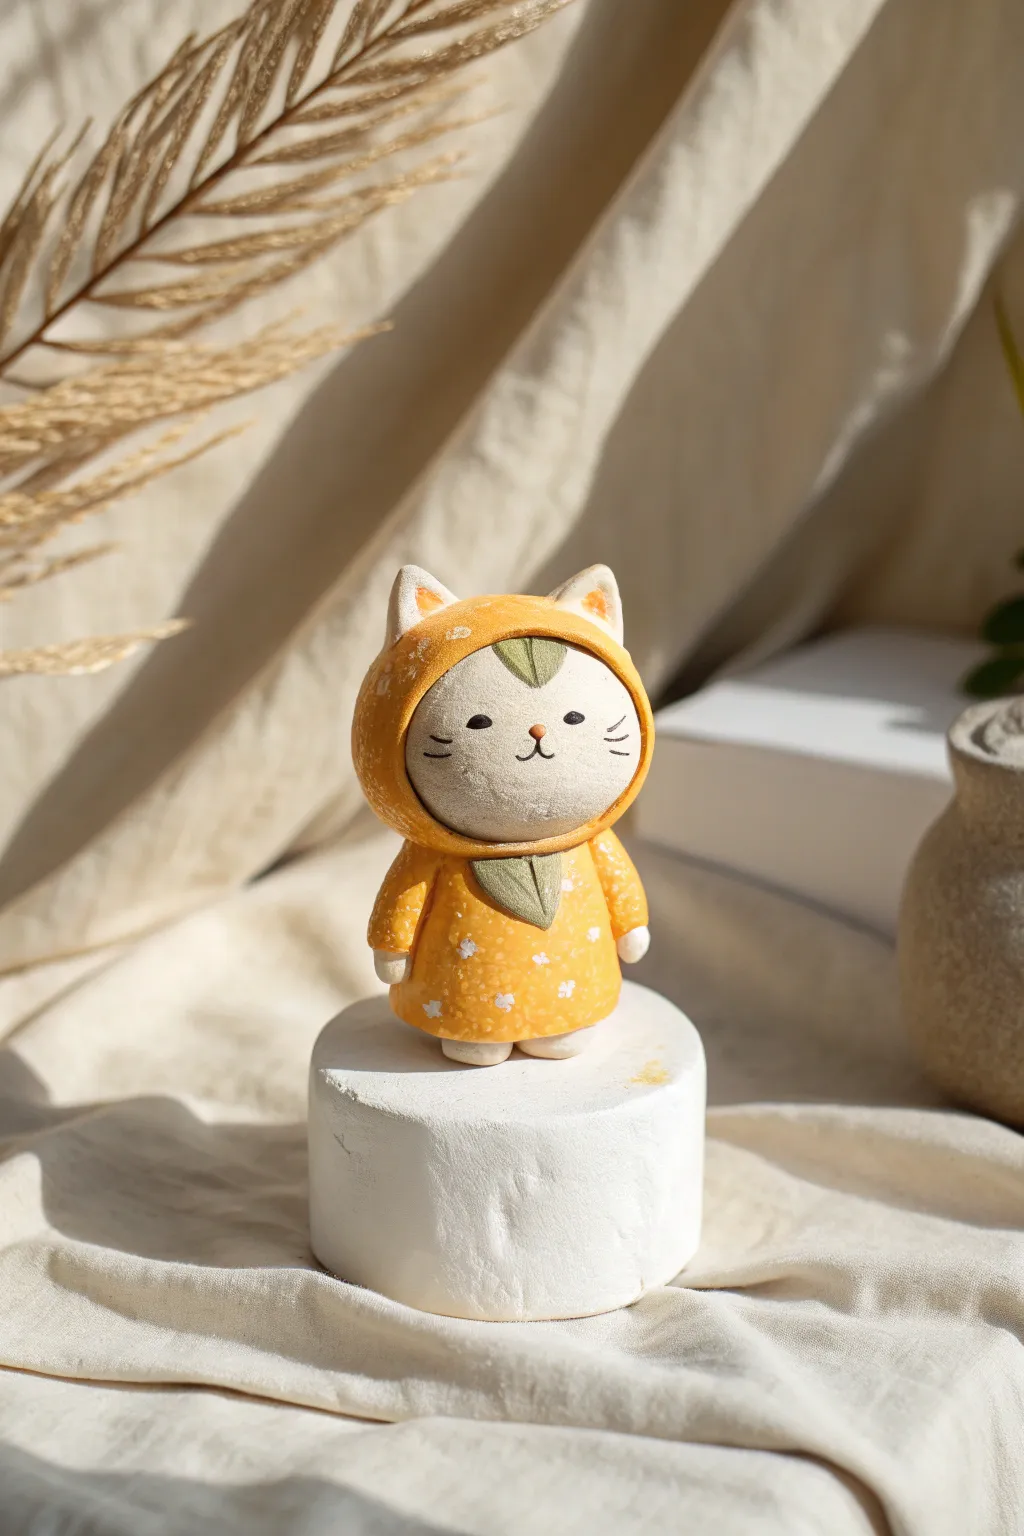
Brighten up your shelf with this adorable ceramic or polymer clay feline, bundled up in a cheerful yellow hooded coat. The speckled floral pattern and leafy collar detail give it a cozy, nature-inspired charm perfect for a rainy afternoon craft session.
How-To Guide
Materials
- Polymer clay (white, sunshine yellow, moss green, pale peach)
- Acrylic paints (white, black, blush pink)
- Fine detail paintbrush (00 or 000 size)
- Needle tool or toothpick
- Ball stylus tool
- Aluminum foil (for armature core)
- Small cylindrical base (optional, can be clay or wood)
- Matte spray varnish
Step 1: Forming the Body & Base
-
Create the core:
Start by balling up a small piece of aluminum foil about the size of a walnut to act as a lightweight core for the head, and a slightly smaller oval piece for the body. -
Cover the head:
Roll out a sheet of white clay and wrap your foil head-ball completely, smoothing out any seams until you have a perfect sphere. Gently press the front to flatten the face area slightly. -
Shape the coat body:
Take your sunshine yellow clay and shape it into a rounded cone for the body. Gently press the bottom against your work surface so it stands flat. -
Join the pieces:
Attach the white head firmly to the top of the yellow body. If using polymer clay, adding a small piece of wire or a toothpick between them adds necessary structural support.
Texturing Tip
Before baking, lightly tap the yellow coat with a toothbrush. This creates a subtle fabric-like texture that makes the clay look soft and cozy rather than plastic-smooth.
Step 2: The Hood & Costume Details
-
Form the hood base:
Roll a disk of yellow clay, slightly larger than the head. Drape this over the back of the head, molding it until it hugs the sides of the face, stopping just at the ‘hairline’. -
Refine the hood edge:
Use your fingers or a smoothing tool to slightly curl the edge of the hood outward, creating that distinct thick rim that frames the face perfectly. -
Add the cat ears:
Shape two small triangles of white clay. Press a smaller triangle of pale peach clay into the center of each for the inner ear. Attach these to the top of the hood, blending the seams at the back. -
Sculpt the leaf collar:
Take a pinch of moss green clay and shape it into a tear-drop or leaf shape. Flatten it slightly and use a needle tool to impress a central vein. -
Attach the collar:
Place the leaf directly under the cat’s chin, overlapping the top of the yellow coat. This acts as a cute fastener for the outfit.
Head Heavy?
If the head keeps tipping the body over before baking, press the bottom of the figurine firmly onto a ceramic tile to create a temporary bond/suction while you work.
Step 3: Painting & Finishing Details
-
Add arms and feet:
Roll two small sausages of yellow clay for sleeves and attach them to the sides. Add tiny white balls at the ends for paws. I like to add two flattened white balls peeking out from under the hem for feet. -
Bake the figurine:
Place your creation on a baking sheet and bake according to your specific clay package instructions. Let it cool completely before painting. -
Paint the face:
Using your finest brush, paint two simple black dots for eyes and a small inverted ‘Y’ for the mouth nozzle. Add tiny whiskers on dressed cheeks. -
Blush the cheeks:
Dilute a tiny bit of pink paint or use chalk pastel dust to gently blush the cheeks and the tip of the nose. -
Paint the coat pattern:
Dip a toothpick or fine brush into white paint. Dot tiny clusters of three dots (to look like flowers) randomly across the yellow hood and coat. -
Add leaf detail:
Paint a small green leaf shape directly on the forehead of the white face clay, just peeking out from under the hood rim. -
Seal the work:
Once all paint is totally dry, give the entire piece a light coat of matte varnish to protect the surface and unify the sheen.
Now you have a sweet little companion ready to weather any storm on your desk
Surprise Texture Minis (Stamps, Lace, Leaves)
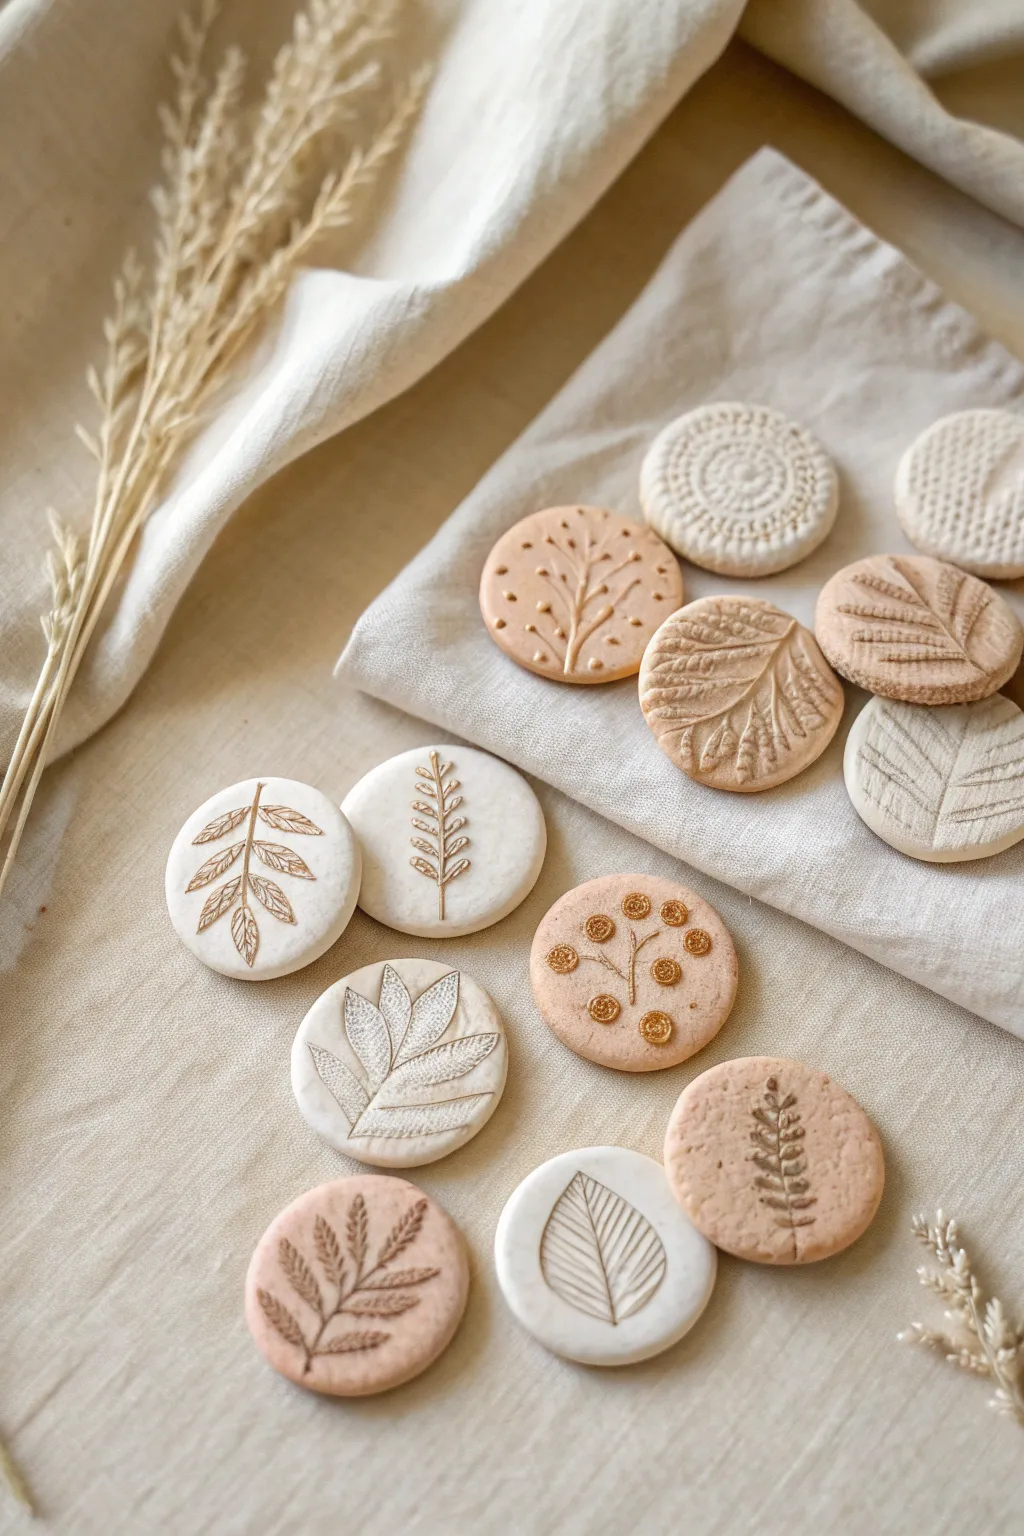
Create a soothing collection of textured clay discs that celebrate the simple beauty of nature through imprint techniques. These minimalist tokens, featuring delicate leaf veins and intricate patterns in earthy white and terracotta tones, make beautiful magnets, game pieces, or decorative vase fillers.
Detailed Instructions
Materials
- White air-dry clay or polymer clay
- Terracotta or beige colored polymer clay (or white clay tinted with acrylics)
- Rolling pin or acrylic roller
- Circular cookie cutter (approx. 1.5 – 2 inches)
- Various botanical stamps or texture sheets
- Real dried leaves or sturdy fresh foliage (ferns, veins)
- Gold acrylic paint or metallic wax rub
- Fine detail paintbrush
- Parchment paper or silicone mat
- Sandpaper (fine grit)
- Matte spray varnish (optional)
Step 1: Clay Preparation
-
Condition the Clay:
Begin by taking a chunk of your white clay and kneading it thoroughly in your hands until it becomes warm, soft, and pliable. Repeat this process separately with your terracotta or beige clay. Proper conditioning prevents cracking later. -
Roll the Sheets:
Place your clay on a sheet of parchment paper or a silicone mat to prevent sticking. Use your rolling pin to flatten the clay into an even slab, aiming for a consistent thickness of about 1/4 inch (6mm) so the discs feel substantial. -
Smooth the Surface:
Before stamping, gently run your finger or a slightly damp sponge over the surface of the clay slab to remove any fingerprints or minor imperfections.
Step 2: Texturing & Cutting
-
Plan Your Layout:
Look at your clay slab and decide where you want to place your textures. It is often easier to impress the texture onto the slab *before* cutting out the circles to avoid distorting the shape. -
Apply Botanical Stamps:
Take your botanical rubber stamps (fern patterns, leaf veins) and press them firmly into the clay. Apply even pressure to ensure all the fine details transfer, then lift the stamp straight up. -
Use Natural Materials:
For an organic look, I like to place a real dried leaf or piece of lace directly onto the clay. Roll over it gently with your rolling pin to embed the texture, then carefully peel the object away. -
Create Patterns:
For the geometric or berry patterns, use tools like the end of a paintbrush handle to make dots, or a specialized texture roller for concentric circles. -
Cut the Shapes:
Position your circular cutter over the textured areas. Press down firmly to cut clean circles. If the clay sticks inside the cutter, gently push it out from the edges. -
Soften Edges:
Once cut, life the discs carefully. If the edges maximize sharpness, gently tap them with your fingertip to round them off slightly for a softer, stone-like finish.
Sticky Stamp Fix
If stamps are sticking to the clay, dust the clay surface lightly with cornstarch or dip the stamp in water before pressing down.
Step 3: Finishing Touches
-
Drying or Baking:
If using air-dry clay, lay the discs flat on a wire rack to dry for 24-48 hours, flipping them occasionally to prevent curling. If using polymer clay, bake according to the manufacturer’s instructions on the package. -
Sanding:
Once fully cured and hard, check the edges for any rough spots. Use a fine-grit sandpaper to buff away any burrs or uneven areas gently. -
Adding Metallic Accents:
Dip a very fine brush into gold acrylic paint or use a finger to pick up a tiny amount of metallic wax. -
Highlighting Details:
Lightly brush the gold over the raised textures—like the stems or the centers of the berry patterns—to make the design pop. You aren’t painting the whole groove, just catching the high points or filling specific deep recesses for contrast. -
Sealing:
To protect the surface from dust and fingerprints, give the finished pieces a light coat of matte spray varnish. This keeps the natural clay look without adding unwanted gloss.
Functional Art
Glue round magnets to the back to make a custom fridge set, or drill a small hole before drying to create minimalist gift tags.
Now you have a set of elegant, tactile art pieces ready to display or gift
A Mystery Grab-Bag Series (Make 10 in One Sitting)
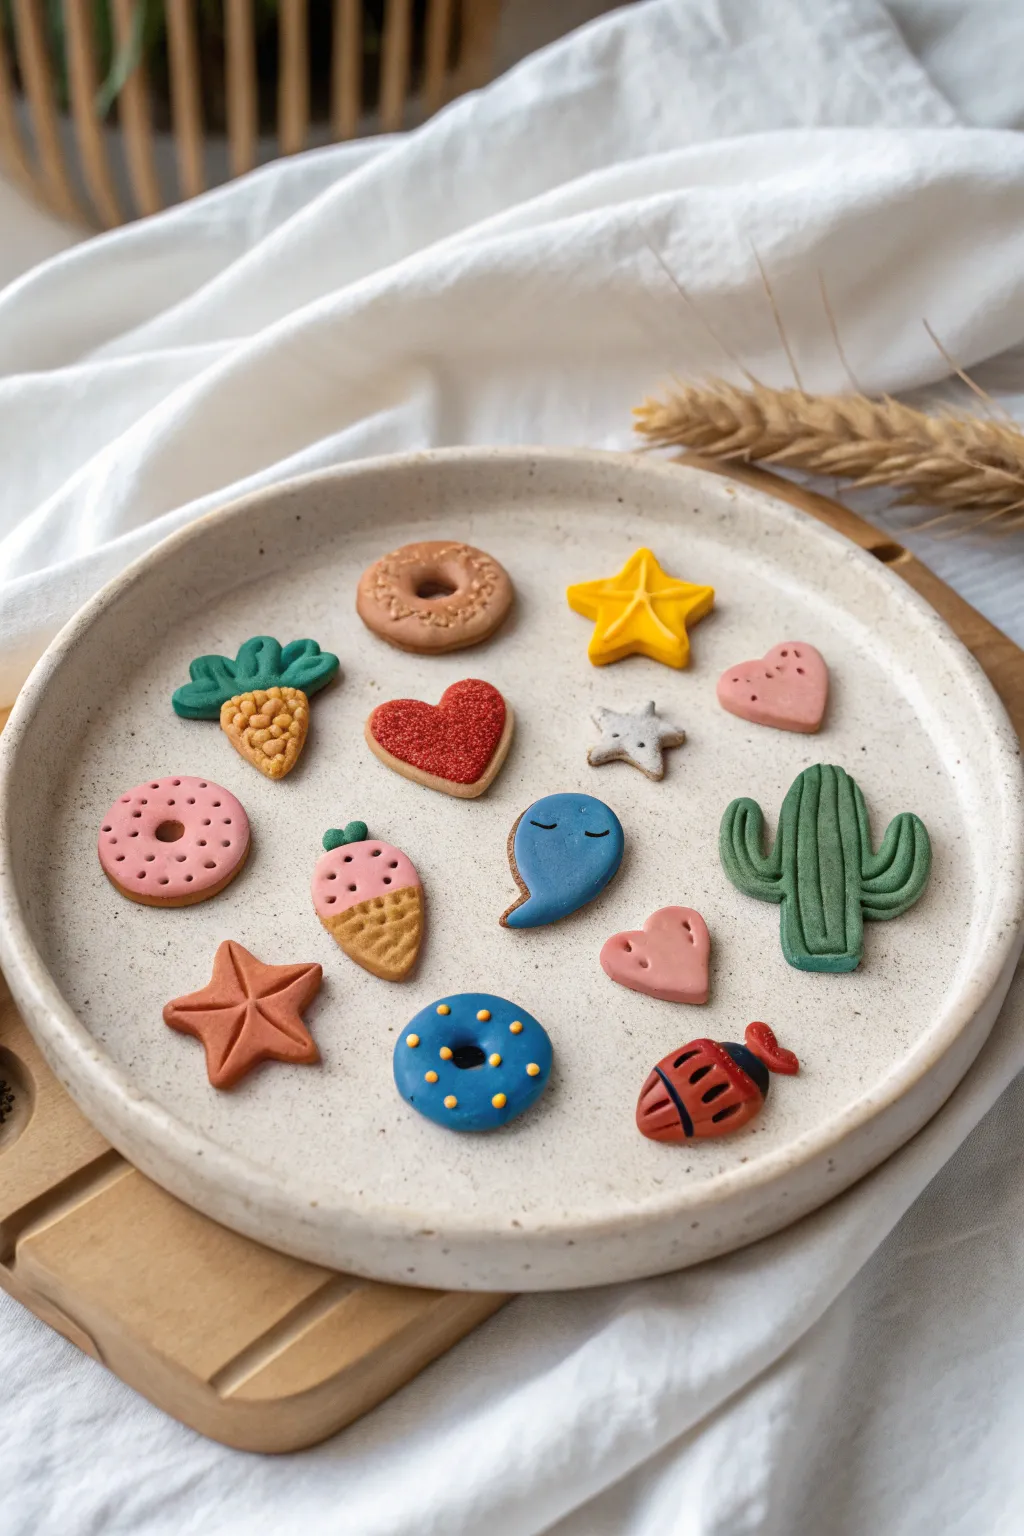
Create a delightful assortment of miniature clay icons, from scattered sprinkles to spiky cacti, perfect for magnets or jewelry. These tiny, matte-finish charms have a charmingly handmade feel with their soft colors and simple, graphic shapes.
Step-by-Step
Materials
- Polymer clay (various colors: pink, red, blue, green, yellow, orange, tan, white, brown)
- Clay roller or pasta machine
- Small round cutters (for donuts)
- Needle tool or toothpick
- Ball tool (small)
- Hobby knife or clay blade
- Texturing tool (clean toothbrush or stiff brush)
- Baking sheet and parchment paper
- Oven (for baking polymer clay)
Step 1: Prepping the Dough Base
-
Condition the clay:
Begin by kneading each color of polymer clay until it is soft and pliable. This prevents cracking later. -
Mix custom shades:
To achieve the matte, pastel look in the image, mix a tiny amount of white or tan into your brighter colors to mute them slightly. -
Roll out slabs:
Roll your clay out to a uniform thickness, roughly 1/8th of an inch (3-4mm). You want them substantial but not chunky.
Texturing Tip
For realistic cookie textures on the tan donut or cone, gently pat the clay surface with a crumpled ball of aluminum foil before baking.
Step 2: Sculpting the Shapes
-
Design the Pink Donut:
Cut a small circle from pink clay. Use a smaller tool to remove the center hole. Poke tiny random indentations all over the surface with a needle tool to mimic texture or ‘invisible’ sprinkles. -
Build the Blue Donut:
Create a blue ring similar to the pink one. Roll incredibly tiny balls of yellow clay and press them gently onto the surface for polka dots. -
Form the Carrot:
Shape a small orange cone. Use a knife to gently press grid lines onto it for texture. Attach three small green logs to the top for leaves. -
Create the Cactus:
Roll a green snake and bend it into a ‘U’ shape for the arms, attaching a central thick log. Use the backside of a knife to press vertical lines down the length of the cactus. -
Mold the Star and Starfish:
For the yellow star, press a five-point shape and indent the center with a star tool. For the reddish-brown starfish, pinch five legs from a central ball and use a knife to score a line down the center of each leg. -
Shape the Blue Ghost/Blob:
Flatten a teardrop of blue clay, curving the tail slightly. Use a needle tool to carve two simple arc eyes that looked closed. -
Make the Hearts:
Cut out a red heart and texture it heavily with a toothbrush for a fuzzy look. Make a smaller pink heart and poke three small holes in it for a ‘button’ effect. -
Assemble the Ice Cream:
Create a textured tan triangle for the cone. Add a pink semi-circle on top. Add three tiny green leaves at the very top for a berry embellishment. -
Form the Ladybug:
Shape a red oval and add a black stripe across the body. Add a small red tail and black stripes. This one is quite abstract, so keep the shapes simple.
Make them Magnets
Once baked and cooled, use superglue to attach small neodymium magnets to the back of each piece for a cute fridge set.
Step 3: Finishing Touches
-
Final texture check:
I like to go over my pieces one last time with a soft brush to remove any fingerprints before baking. -
Bake the batch:
Arrange all your charms on a parchment-lined baking sheet. Bake according to your clay manufacturer’s instructions (usually 275°F/135°C for 15-30 minutes). -
Cool down:
Let the pieces cool completely on the tray carefully, as the clay is still slightly fragile while warm.
Now you have a handful of tiny treasures ready to brighten up any small space