There’s something about red clay that instantly makes a piece feel warm, grounded, and handmade in the best way. If you’re craving projects that are simple to build but still look extra special on the shelf, these terracotta pottery ideas are my go-to starting points.
Classic Pinch Pots for Rings and Snacks
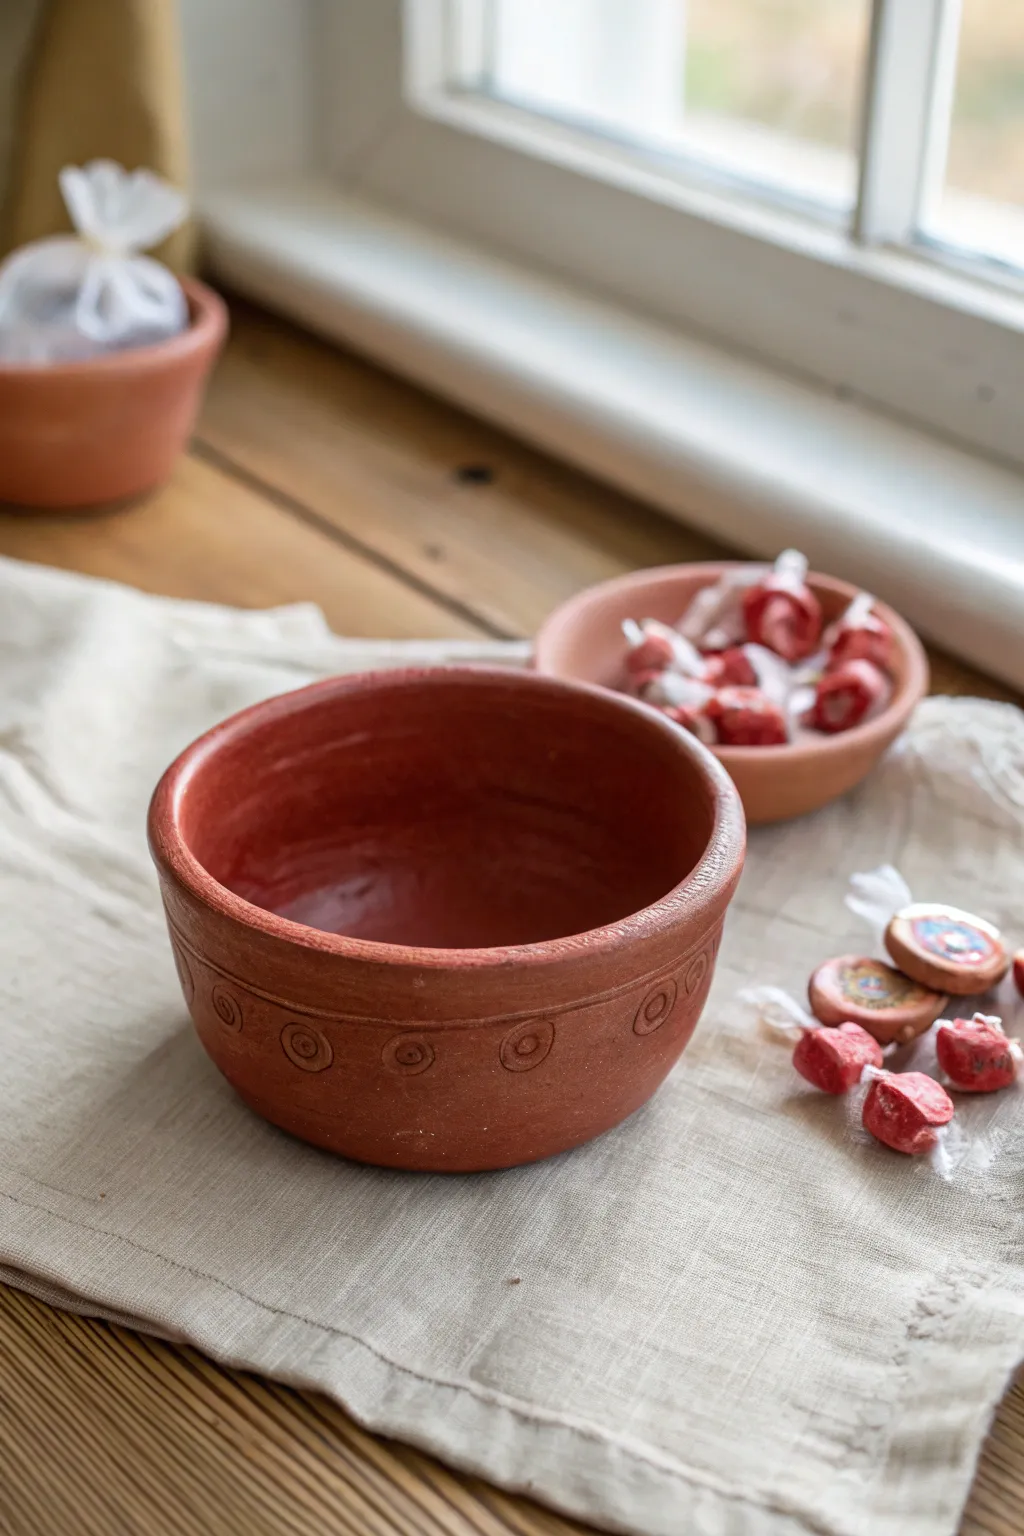
Embrace the rustic charm of earthenware with this simple yet elegant red clay bowl project. Featuring a smooth interior and a subtle stamped geometric border on the outside, it is the perfect vessel for holding trinkets or serving dry snacks.
Detailed Instructions
Materials
- Red earthenware or terracotta clay (low fire)
- Pottery wheel (optional, can be hand-built)
- Sponge
- Water bowl
- Wooden modeling tool
- Metal kidney rib
- Small circular stamp tool (or finding a household object like a pen cap)
- Pottery wire cutter
- Clear food-safe glaze (glossy or satin)
- Kiln access
Step 1: Forming the Bowl
-
Prepare the Clay:
Begin by wedging a softball-sized ball of red earthenware clay thoroughly to remove air bubbles and ensure an even consistency. -
Center and Open:
Place the ball on the wheel head and center it. Open the clay in the middle, creating a flat floor about 3-4 inches wide. -
Pull the Walls:
Gently pull the walls upward. Aim for a vertical rise initially, then gradually flare it out slightly to create a deep, open bowl shape. -
Shape the Curve:
Use a rib tool on the inside while supporting the outside with your hand to create a smooth, continuous curve from the floor to the rim. -
Refine the Rim:
Compress the rim with a damp sponge or piece of chamois leather to make it smooth and rounded, which prevents chipping later. -
Smooth the Surface:
Run a metal kidney rib gently over the exterior while the wheel spins slowly to remove finger ridges and create a polished surface. -
Remove from Wheel:
Cut the bowl from the wheel head using a wire cutter and slide it onto a ware board.
Stamp Tip
No professional tools? A pen cap, the end of a marker, or even a small button glued to a dowel makes excellent concentric circle stamps.
Step 2: Decorating and Finishing
-
Dry to Leather Hard:
Allow the bowl to dry until it reaches the leather-hard stage, where it is firm but still cool to the touch and able to be carved. -
Trim the Foot:
Place the bowl upside down on the wheel and trim the bottom to create a neat foot ring, removing excess weight. -
Mark the Guide Line:
While the bowl is centered, use a needle tool to scratch a very faint horizontal line about an inch or so below the rim as a guide for your pattern. -
Stamp the Pattern:
Take your small circular stamp tool. Press firmly into the clay just below your guide line to create a concentric circle design. -
Repeat Around the Circumference:
Continue stamping evenly spaced circles all the way around the bowl. I find spacing them by eye gives it a lovely handmade character rather than measuring perfectly. -
Connect the Circles:
Using a blunt wooden tool or the back of a needle tool, gently burnish a shallow horizontal line connecting the circles to unite the border design. -
Smooth Imperfections:
Use a barely damp sponge to gently wipe away any clay burrs raised by the stamping process without washing out the detail.
Step 3: Firing and Glazing
-
Bone Dry:
Let the bowl dry completely to the bone-dry stage. This usually takes several days depending on humidity. -
Bisque Fire:
Fire the piece in a kiln to cone 04 (or the specific temperature required by your clay body) for the bisque firing. -
Apply Glaze:
Once cool, wipe the bisque ware with a damp sponge to remove dust. Pour a clear, food-safe glaze inside and swirl to coat, then dip the exterior if fully glazed, or brush carefully to keep the raw clay look outside. -
Wipe the Foot:
Clean off any glaze from the bottom foot ring with a sponge so it doesn’t stick to the kiln shelf. -
Glaze Fire:
Fire the bowl a second time to the maturation temperature of your glaze and clay body.
Warping Warning
If the bowl warps while drying, you likely let it dry unevenly. Cover the rim with plastic loosely so the thicker bottom dries at the same rate.
Once cooled from the final firing, fill your beautiful red clay bowl with sweets or seasonal decorations to enjoy the warmth it brings to the room


Terracotta Plant Pots With Matching Saucers
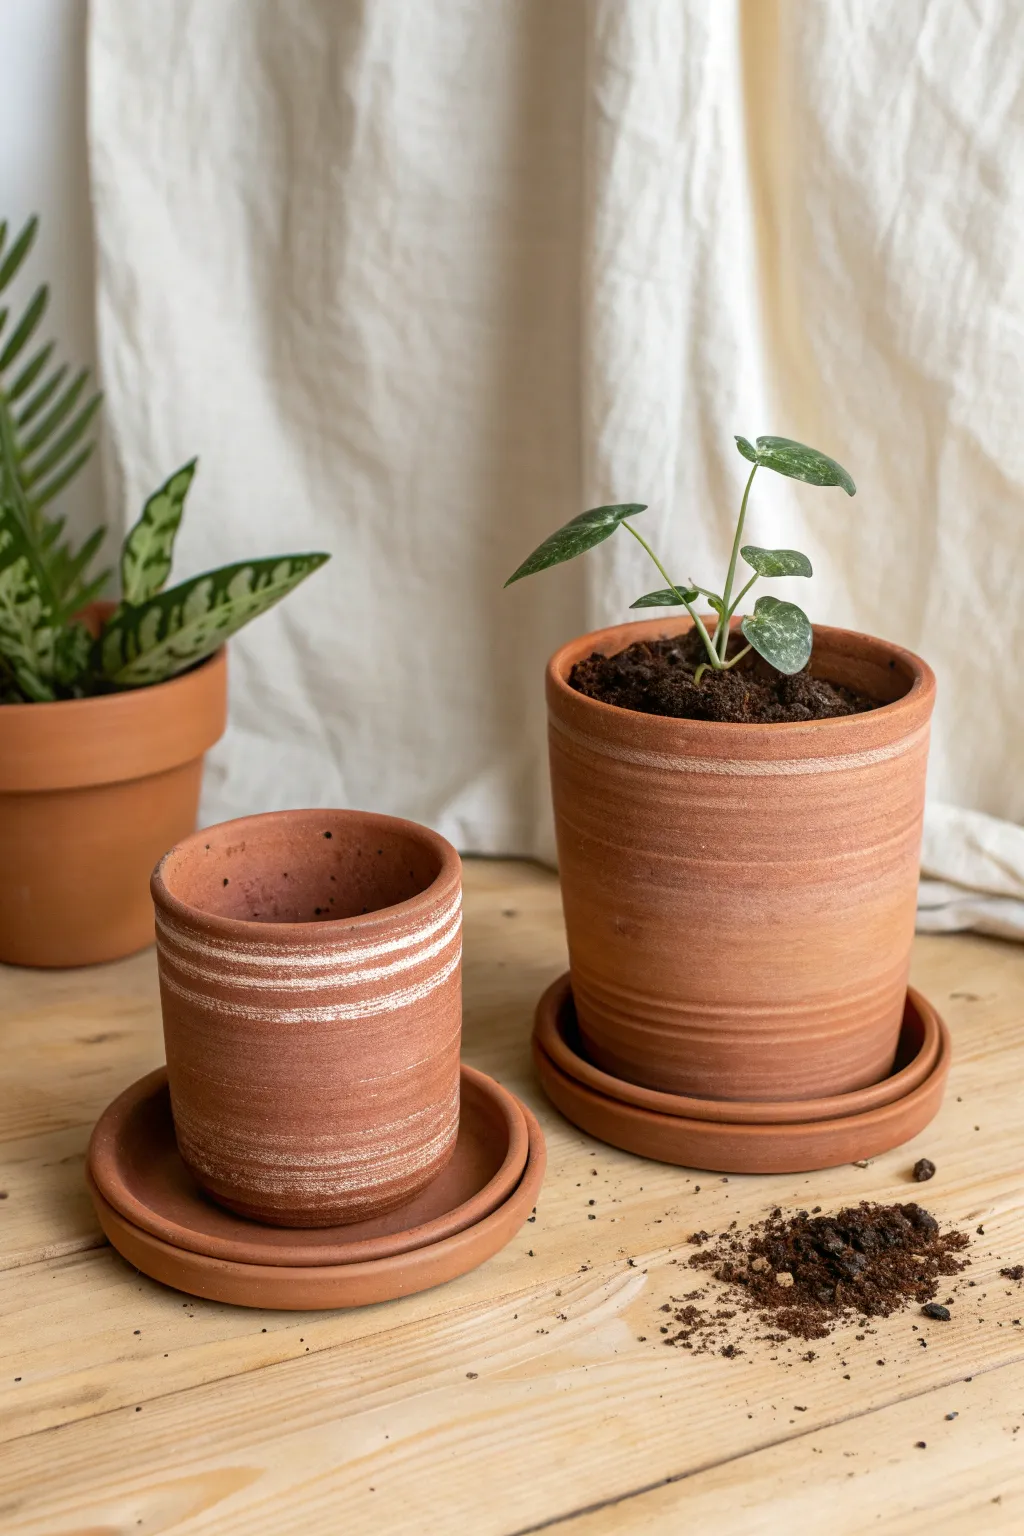
These classic terracotta pots feature a charming, earthy aesthetic with subtle white textured bands that add modern visual interest. This project guides you through throwing simple cylinder shapes and adding distinctive decorative slip details before firing.
Step-by-Step Guide
Materials
- Red earthenware clay (terracotta)
- Pottery wheel
- Wire cutter
- Sponge
- Medium rib tool (wood or metal)
- Needle tool
- Trim tool
- White decorating slip or engobe
- Stiff bristle brush (e.g., a fan brush or an old toothbrush)
- Wooden bat
- Kiln
Step 1: Throwing the Pot Forms
-
Prepare the Clay:
Begin by thoroughly wedging about 1.5 to 2 pounds of red earthenware clay per pot to remove air bubbles and ensure consistency. -
Center on the Wheel:
Slam your clay ball onto the center of the wheel head. Use wet hands and firm pressure to center the clay, pushing it up into a cone and then pressing it back down into a puck shape. -
Open the Clay:
Press your thumbs into the center of the spinning puck to open it, leaving about half an inch of clay at the bottom for the base. Pull the floor out to your desired width. -
Pull the Walls:
Using firm, steady pressure, pull the clay walls upward. Aim for a straight-sided cylinder shape, keeping the rim slightly thicker than the walls for stability. -
Shape the Rim:
Ideally, we want a simple, flat rim. Use a chamois or your sponge to compress the rim gently, ensuring it is smooth and level. -
Refine the Surface:
While the wheel is spinning slowly, run a rib tool up the outside of the pot to remove excess slurry and throwing lines, creating a smooth canvas for our texture later. -
Apply the White Texture:
Dip a stiff bristle brush into white slip. While the wheel spins at a medium-slow speed, hold the brush against the pot in bands. Vary the pressure to create streaky, organic white lines that blend with the red clay. -
Cut and Remove:
Use your wire cutter to slice purely through the bottom of the pot. Carefully lift the pot off the wheel using pot lifters or by sliding it onto a ware board.
Step 2: Creating the Saucers
-
Flatten the Clay:
Use a smaller amount of clay (about 0.5 to 0.75 pounds). Center it low and wide, creating a flat pancake shape. -
Open and Raise the Edge:
Open the clay but keep the floor wide. Pull up a very short wall—just about half an inch high—to create the saucer lip. -
Smooth the Saucer:
Angle your rib tool to create a clean transition between the floor and the lip. Ensure the floor is perfectly flat so the pot won’t wobble.
Wobbly Walls?
If your walls get thin or wobbly while pulling, don’t force it. Use a rib to compress the wall and regain stability, then try one more gentle pull from the bottom up.
Step 3: Finishing and Firing
-
Dry to Leather Hard:
Allow your pots and saucers to dry slowly until they reach a leather-hard state. This usually takes a day or two depending on humidity. -
Trim the Foot:
Place the pot upside down on the wheel. Center it and secure it with lugs of clay. Use a trim tool to carve away excess clay from the bottom, creating a neat foot ring. -
Add Drainage Holes:
I usually do this right after trimming; turn the pot over and use a hole punch tool or drill bit to create a central drainage hole. This is crucial for plant health. -
Bisque Fire:
Once bone dry, load the pieces into the kiln for a bisque firing (usually to Cone 04). This hardens the clay and prepares it for glazing if desired. -
Optional Clear Glaze:
If you want the inside to be waterproof, apply a clear glaze to the interior. Leave the exterior raw (unglazed) to maintain that matte terracotta look. -
Final Firing:
Fire the pieces a final time according to your clay and glaze specifications. Allow the kiln to cool completely before unloading.
Make it Waterproof
Terracotta is naturally porous, which plants love. However, if you want to protect your furniture, glaze the *inside* of the saucer so water doesn’t seep through the clay body.
Once cooled, fill your new handmade vessels with soil and your favorite greenery for a fresh, organic display


Handbuilt Red Clay Mugs With Chunky Handles
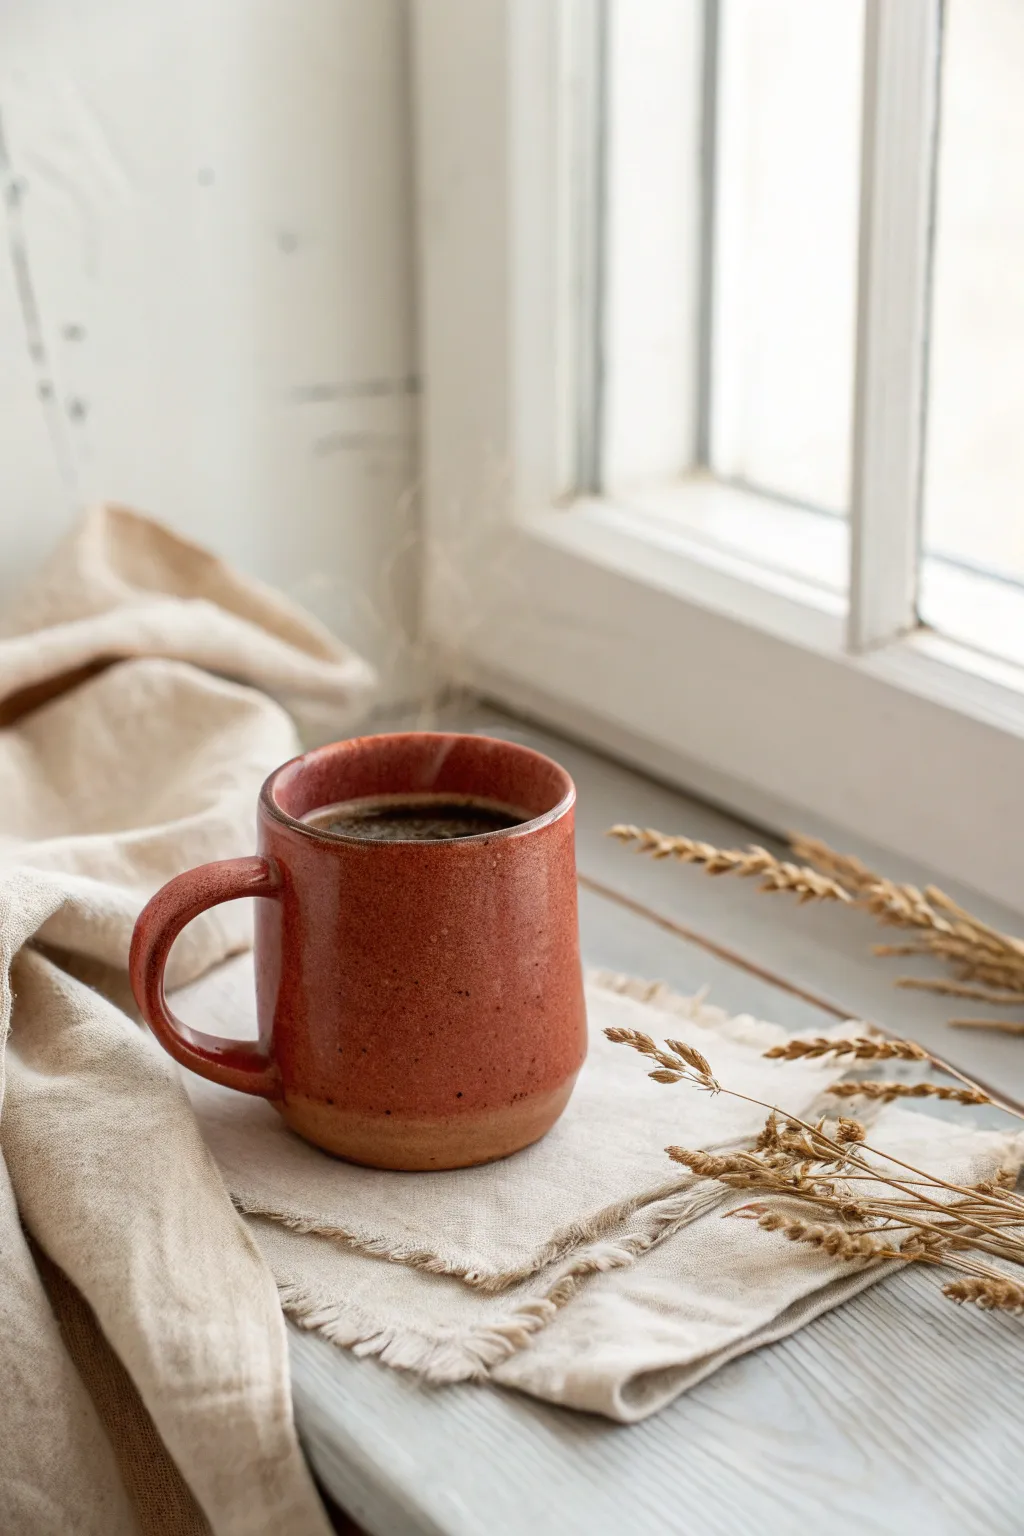
Embrace the warmth of red clay with this cozy, handbuilt mug tutorial. The finished piece features a charmingly uneven texture, a speckled red glaze, and a classic chunky handle perfect for wrapping your fingers around on a cold morning.
How-To Guide
Materials
- Red stoneware or earthenware clay
- Rolling pin
- Canvas, slab mat, or wooden work board
- Fettling knife
- Ruler
- Serrated rib or scoring tool
- Slip (clay mixed with water)
- Wooden modeling tool
- Sponge
- Red or rusty orange glaze (food safe)
- Small kiln
Step 1: Creating the Body
-
Roll the slab:
Begin by wedging your red clay to remove air bubbles. Roll it out into a slab about 1/4 inch thick. Aim for an even thickness, but don’t worry if it’s not machine-perfect; the handbuilt look is part of the charm. -
Texture the slab (optional):
If you want a subtle texture like the mug in the photo, you can lightly roll a piece of fabric or canvas over the slab before cutting. -
Cut the rectangle:
Using your ruler and fettling knife, cut a rectangle approximately 4 inches high and 10-11 inches long. This will determine the circumference and height of your mug. -
Cut the base:
Use a round cookie cutter or a spare cup to trace and cut a circle from the remaining slab for the base of your mug. -
Score and slip:
Score the short ends of your rectangle and the outer edge of your circular base. Apply a generous amount of slip to these scored areas. -
Form the cylinder:
Gently curve the rectangle into a cylinder. Press the two slipped ends together firmly. I like to reach inside the cylinder to support the wall while I smooth the seam on the outside. -
Attach the base:
Place the cylinder onto the scored base. Use a wooden modeling tool to blend the clay from the outside of the wall down onto the base, sealing the joint completely. -
Refine the shape:
With the cylinder formed, gently push the walls out slightly from the inside to create a subtle curve or belly, making it less of a stiff pipe and more of a cup.
Rim Comfort Secret
Running a strip of plastic wrap over the rim while gently pinching it with your fingers is a great trick for getting a super smooth, rounded lip without water.
Step 2: Adding the Handle
-
Pull or roll the handle:
Take a ball of clay and roll it into a thick coil, slightly flattening it to create a strap shape. The mug in the image has a sturdy, chunky handle, so keep it substantial. -
Curve and dry:
Shape the coil into a ‘C’ or ear shape. Let it stiffen up for about 15-20 minutes until it holds its curve without sagging. -
Attach the handle:
Score and slip the attachment points on both the mug body and the handle ends. Press the handle firmly onto the mug. -
Blend the seams:
Use your thumb or a modeling tool to smooth the clay around the connection points. Ensure there are no cracks where the handle meets the body.
Step 3: Finishing and Glazing
-
Smooth the lip:
Use a damp sponge or a piece of chamois leather to smooth the rim of the mug. A rounded, smooth lip is crucial for a comfortable drinking experience. -
Bisque fire:
Allow the mug to dry completely (bone dry) before loading it into the kiln for a bisque fire according to your clay body’s specifications (usually Cone 04 or 06). -
Wax the bottom:
Apply wax resist to the bottom of the mug and slightly up the sides to create that unglazed ‘foot’ seen in the image. -
Apply glaze:
Dip the mug into a rusty red or speckled red glaze. Alternatively, brush on 2-3 coats if you are using commercial brush-on glazes. Avoid the waxed bottom area. -
Glaze fire:
Fire the mug again to the glaze temperature recommended for your specific clay and glaze combination (often Cone 5 or 6 for stoneware). -
Sand the bottom:
Once cooled and removed from the kiln, use fine-grit sandpaper to smooth any rough spots on the unglazed clay foot so it won’t scratch your table.
Creative Texture
Before glazing, lightly sponge the surface with iron oxide wash. This enhances the red clay’s natural speckling and adds depth similar to wood-fired pottery.
Enjoy your morning coffee in a vessel made with your own two hands


Nesting Bowls With Wavy, Pinched Rims
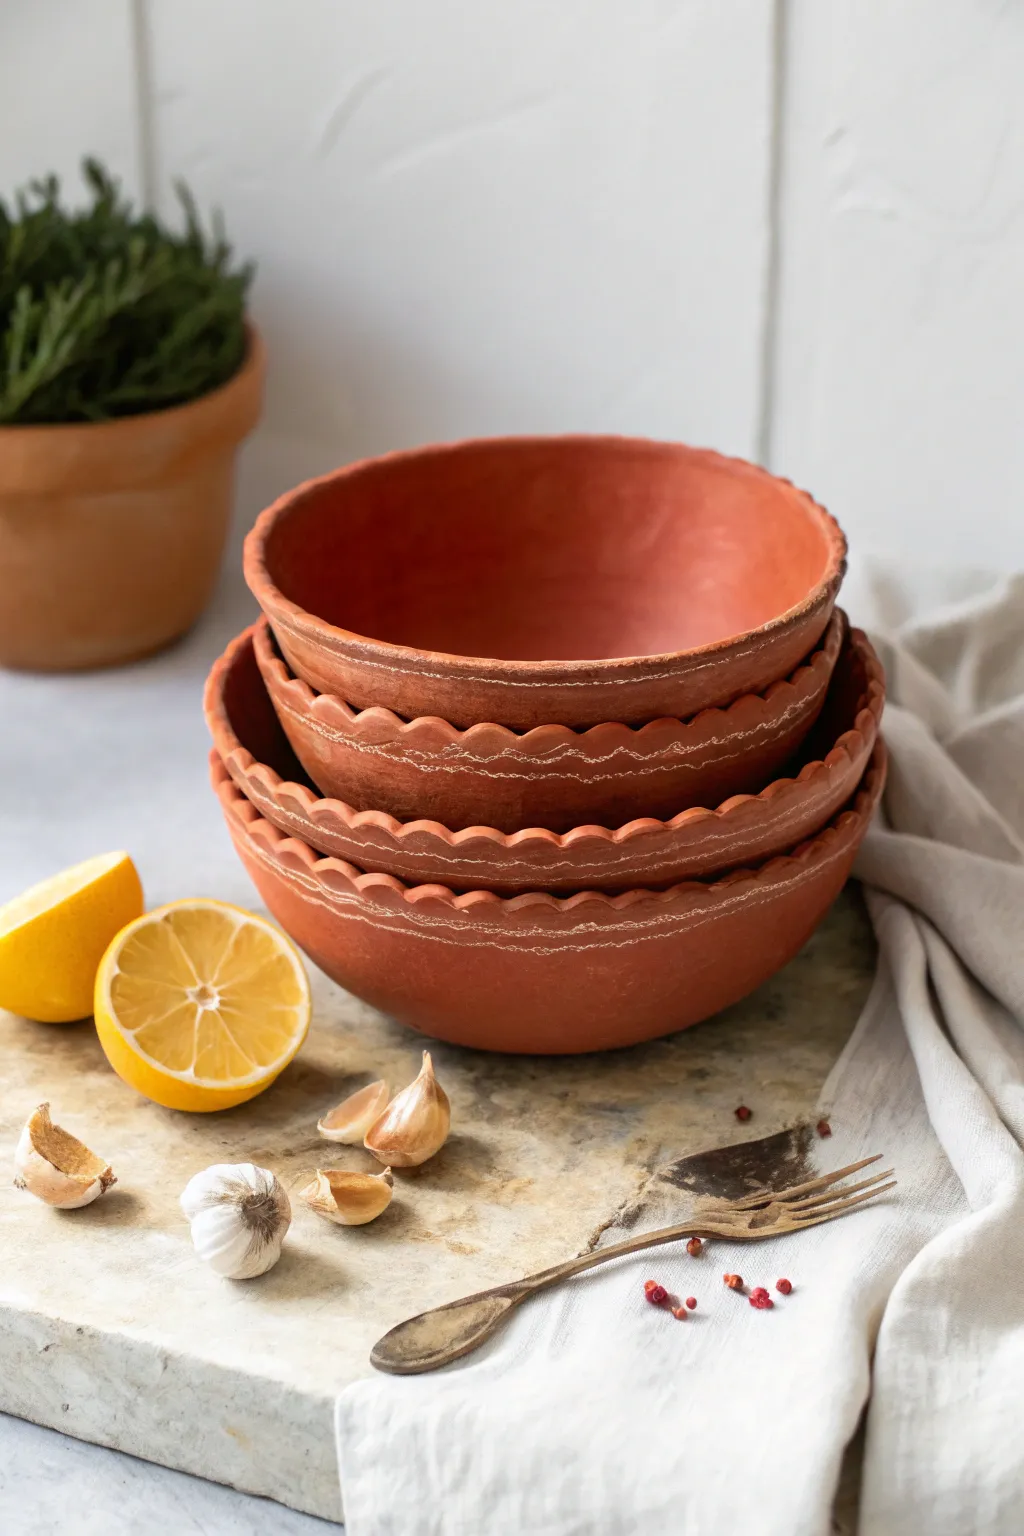
Embrace the warmth of natural terracotta with this set of three nesting bowls, featuring a charmingly imperfect wavy rim and delicate sgraffito details. Their matte, earthy finish makes them perfect for serving dry goods or simply adding a touch of rustic elegance to your kitchen counter.
Step-by-Step Tutorial
Materials
- Red earthenware clay (terracotta)
- Rolling pin
- Guide strips or slats (approx. 1/4 inch thick)
- Canvas or heavy fabric mat for rolling
- Bisque bowl molds (small, medium, large)
- Fettling knife or needle tool
- Rib tool (kidney shaped, soft rubber)
- White underglaze or slip
- Sgraffito tool or sharp needle tool
- Small sponge
- Clear matte glaze (optional, for food safety)
Step 1: Forming the Bowls
-
Prepare the clay:
Begin by wedging your red earthenware clay thoroughly to remove any air bubbles. Divide the clay into three portions: one large, one medium, and one small, roughly corresponding to the size of bowls you intend to make. -
Roll the slabs:
Place your canvas mat on a flat surface. Working with one portion at a time, roll the clay out into a slab using the wooden guide strips to ensure an even thickness of about 1/4 inch. -
Smooth the texture:
Before cutting, take your soft rubber rib and gently compress the slab on both sides. This smooths out the canvas texture and aligns the clay particles which helps prevent warping later. -
Drape and shape:
Gently lift your clay slab and drape it over your chosen bowl mold (hump mold technique) or press it inside a bowl (slump mold technique). For these specific shapes, pressing inside a mold often helps maintain the round bottom better. -
Trim the excess:
Using a needle tool or fettling knife, trim the excess clay around the rim of the mold. Leave about half an inch of extra clay above the final height you want, as we will need material for the rim manipulation. -
Create the wave:
With the clay still in the mold, use your thumb and forefinger to gently pinch the rim at regular intervals. Push down slightly with your index finger while supporting from below with your thumb to create a scalloped, undulating wave pattern. -
Repeat for the set:
Repeat this rolling, draping, and pinching process for the remaining two bowl sizes. I find it helpful to line them up next to each other to ensure the wave patterns look cohesive across the set.
Step 2: Detailing and Finishing
-
Leather hard stage:
Allow the bowls to dry slowly until they reach a leather-hard state. The clay should be firm enough to handle without deforming but still cool to the touch and able to be carved. -
Refine the rim:
Take a slightly damp sponge and run it gently over the wavy rim to soften any sharp edges created during the pinching phase. You want a smooth, organic feel, not a jagged one. -
Apply the slip decoration:
Using a small brush, paint a thin band of white underglaze or slip just below the rim on the exterior of the bowl. It doesn’t need to be perfectly opaque; a translucent wash adds to the rustic look. -
Sgraffito the pattern:
Once the white slip has dried to the touch but the clay is still leather hard, use your sharp needle tool to scratch a wavy line through the white band, revealing the red clay beneath. Mirror the undulation of the rim for a harmonious design. -
Dry completely:
Let the bowls dry completely. This is critical with earthenware to avoid cracking during firing. The bowls will turn a lighter, chalky color when bone dry. -
Bisque fire:
Fire the bowls in a kiln to a bisque temperature (usually cone 04). This hardens the ware and prepares it for glazing. -
Glazing (Optional):
If you want the bowls to be food-safe, apply a clear matte glaze to the interior. You can leave the exterior unglazed to maintain that raw, tactile terracotta finish shown in the photo, or apply a very thin matte sealant. -
Final firing:
Fire the pieces a second time according to your clear glaze instructions (often cone 05 or 06 for earthenware).
Rim Rhythm
Use the width of two fingers as a spacer when pinching the rim. This ensures your scallops are evenly spaced and consistent across all three bowl sizes.
Rustic Wash
Instead of a solid white stripe, dilute your white underglaze with 20% water. This creates a weathered, whitewashed effect that blends beautifully with the red clay.
Stack your finished set on a linen cloth to highlight the beautiful contrast between the warm clay and the crisp white detailing

What Really Happens Inside the Kiln
Learn how time and temperature work together inside the kiln to transform clay into durable ceramic.
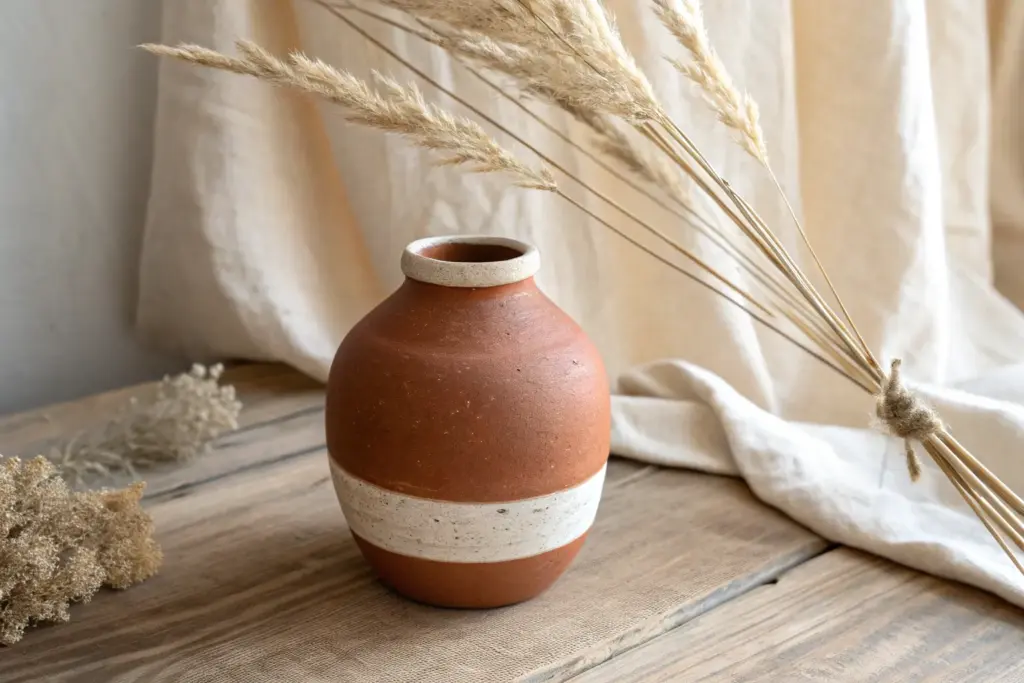
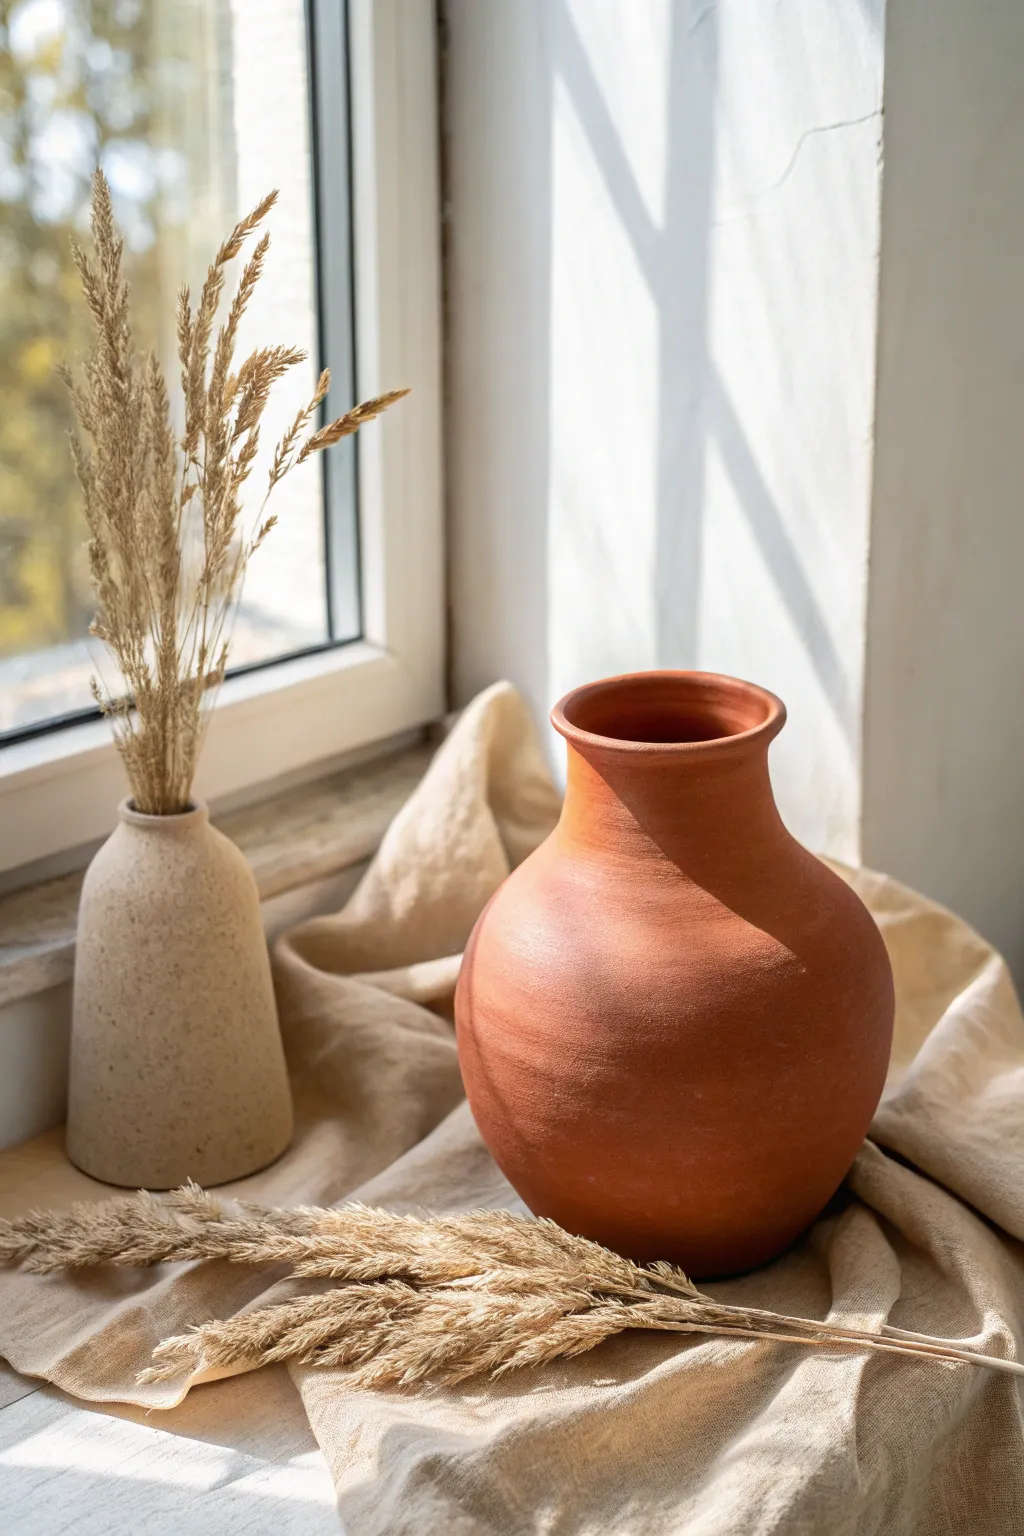
Bud Vases in Simple Bottle Shapes
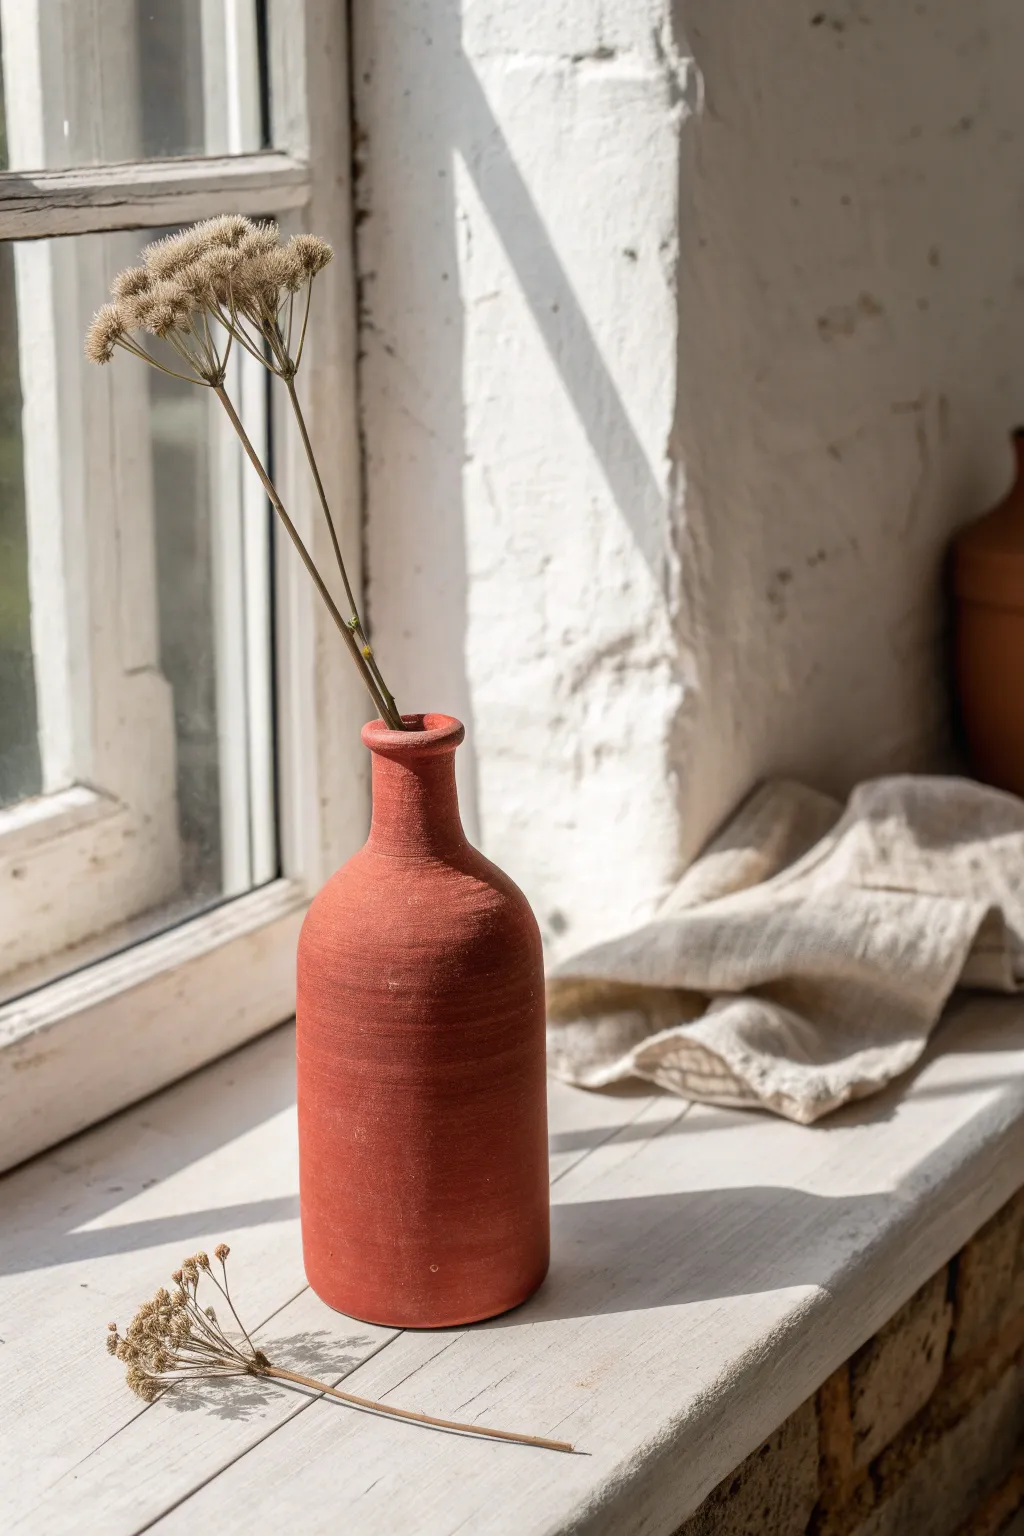
Capture the earthy charm of terracotta with this minimalist bottle vase, perfect for displaying a single dried stem. Its cylindrical body and narrow neck create a classic silhouette that allows the natural red clay texture to take center stage.
Step-by-Step Guide
Materials
- Red stoneware or terracotta clay (approx. 2 lbs)
- Fettling knife
- Rolling pin with guide strips (1/4 inch)
- Scoring tool or fork
- Slip (clay and water mixture)
- Wooden modeling tool
- Sponge
- Flexible metal rib
- Guide template (optional, paper cylinder)
Step 1: Forming the Main Body
-
Prepare the slab:
Begin by wedging your red clay thoroughly to remove air bubbles, then flatten it onto a canvas worksurface. Using a rolling pin and guide strips, roll out an even slab that is roughly 1/4 inch thick. -
Cut the rectangle:
Measure and cut a rectangle from your slab based on how tall and wide you want the vase body to be. A good starting size is about 6 inches tall by 10 inches wide. -
Connect the cylinder:
Stand the rectangle up and curve it into a tube shape. Where the two short ends meet, score the edges aggressively and add a generous amount of slip. -
Seal the seam:
Press the scored edges together firmly. I like to use a wooden tool to blend the clay across the seam on both the inside and outside, ensuring the join is completely invisible and strong. -
Create the base:
Place your clay cylinder onto the remaining slab and trace around the bottom. Cut out this circle, score and slip the contact points, and attach the base to the cylinder, smoothing the clay upward to seal it.
Step 2: Shaping the Neck
-
Close the shoulder:
Now for the tricky part. Gently pinch the top rim of the cylinder inward, rotating the piece constantly. You want to slowly encourage the clay to lean toward the center to create a shoulder. -
Add a coil:
If pinching doesn’t give enough height, roll a medium-thick coil of clay. Score the top of your angled shoulder and attach the coil, smoothing it upwards to form the narrow neck. -
Refine the shape:
Use your fingers or a modeling tool to straighten the neck. Aim for a vertical rise of about 1.5 to 2 inches, keeping it narrow enough to support a single stem. -
Form the rim:
Roll a very tiny, thin coil of clay. Attach this to the very top edge of the neck to create a slight lip or ‘donut’ ring, which mimics the finish of a traditional glass bottle.
Rib for Texture
Don’t over-smooth with the sponge! Using a metal rib while the wheel spins (or moving it vertically by hand) leaves those subtle horizontal scrape marks that give the pot character.
Step 3: Surface Finishing
-
Smooth the exterior:
Wait until the clay is leather-hard (firm but cool to the touch). Use a flexible metal rib to scrape the sides. This removes fingerprints and creates that distinctive matte, slightly grooved texture seen in the photo. -
Clean the bottom:
Check the connection at the base one last time. Run your thumb around the bottom edge to create a slight bevel, which lifts visual weight and prevents sharp edges. -
Dry slowly:
Cover the vase loosely with plastic for the first day to let the moisture equalize, then uncover it to dry completely. This prevents the neck from cracking away from the body. -
First firing:
bisque fire the bone-dry piece in a kiln to cone 04 (or according to your clay’s specific instructions). -
Glazing (Interior):
Pour a clear glaze inside the vessel and swirl it around to coat the interior waterproof. Pour out the excess. This makes the vase functional for water without altering the exterior look. -
Leave exterior bare:
To achieve the look in the photo, leave the outside unglazed. If you want a deeper color, you can apply a red iron oxide wash and sponge it off, leaving pigment only in the textures. -
Final firing:
Fire the piece a final time to the maturity temperature of your clay body (likely Cone 5 or 6 for stoneware) to sinter the clay and vitrify the interior glaze.
Level Up: Smoke Finish
For a more ancient look, try a pit fire or barrel fire with sawdust after the bisque stage. This will infuse unpredictable black and grey smoke clouds onto the raw red clay surface.
Place your finished vase near a window where the light can graze the textured surface and highlight the rich color of the clay
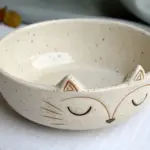
Leaf-Impressed Trinket Dishes
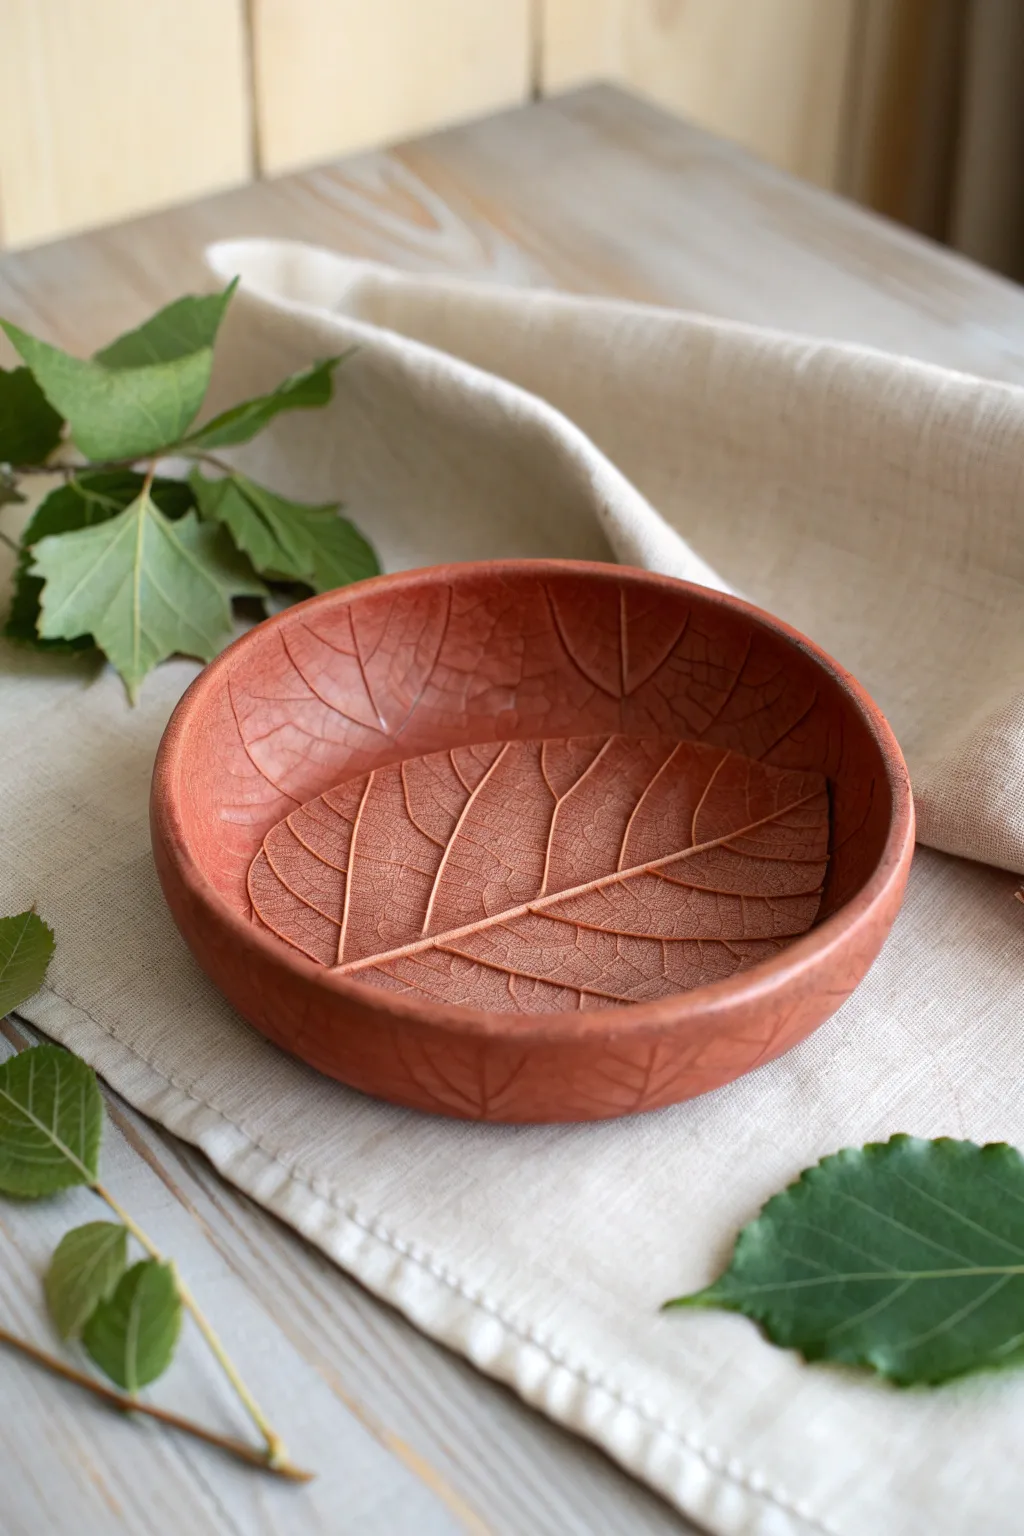
This earthy trinket dish transforms a simple slab of red clay into a permanent botanical record, featuring deep, intricate leaf veins pressed directly into the bowl’s surface. The warm terracotta tones and organic texture make it a perfect autumn accent or a thoughtful handmade gift.
Detailed Instructions
Materials
- Red earthenware clay (or air-dry terracotta clay)
- Large, fresh leaf with prominent veins (e.g., hydrangea, grape, or maple)
- Rolling pin
- Canvas mat or heavy cloth (to roll on)
- Fettling knife or needle tool
- Small bowl or slump mold (for shaping)
- Sponge
- Clear matte varnish or kiln firing access
Step 1: Preparing the Slab
-
Wedge the clay:
Begin by taking a ball of red clay about the size of a grapefruit. Wedge it thoroughly to remove air bubbles and ensure the consistency is uniform, which prevents cracking later. -
Roll out the slab:
Place the clay on your canvas mat. Using a rolling pin, roll the clay out into an even slab, approximately 1/4 inch thick. Turn the clay occasionally to keep the thickness consistent. -
Smooth the surface:
Before adding texture, use a damp rib tool or a slightly moist sponge to wipe the surface smooth, removing any canvas marks or cracks.
Step 2: Impressing the Leaf
-
Select and position the leaf:
Choose a fresh leaf with thick, stiff veins. Place it vein-side down onto the center of your clay slab. This underside usually provides the crispest impression. -
Roll in the texture:
Gently roll your rolling pin over the leaf. I like to do one pass with firm, even pressure to embed the veins deep into the clay without shifting the leaf. -
Peel away:
Carefully lift the stem and peel the leaf off the clay. You should see a highly detailed negative impression of the leaf structure left behind.
Clay Cracking?
If the edges crack while shaping the bowl, your clay might be too dry. Smooth cracks immediately with a slurry of water and clay (slip) or a vinegar-dampened sponge.
Step 3: Shaping the Bowl
-
Cut the shape:
Place a circular template (like a paper plate) over the leaf impression to frame it. Use a needle tool to cut a perfect circle around the design. -
Smooth the edges:
Dip your finger in a little water and run it along the cut rim of the circle to round it off. This removes the sharp cut angle and gives it a finished pottery look. -
Slump the clay:
Gently lift your clay circle and place it inside a shallow bowl lined with plastic wrap or a plaster slump mold. Press it gently so it conforms to the curve of the mold. -
Refine the imprint:
While the clay is in the mold, check the center. If the leaf impression faded during handling, you can carefully re-press prominent veins with a modeling tool. -
Dry slowly:
Let the clay sit in the mold until it is leather hard (stiff but cool to the touch). This usually takes about 24 hours depending on humidity. -
Remove from mold:
Once stiff, remove the bowl from the mold and let it dry completely on a wire rack. This ensures air circulates underneath for even drying.
Keep it clean
Work on a piece of canvas or an old pillowcase. Clay sticks to smooth tables, but fabric allows the slab to release easily without distorting your leaf shape.
Step 4: Finishing
-
Sand imperfections:
If using air-dry clay, wait until fully dry and lightly sand the rim with fine-grit sandpaper to smooth out any rough spots. -
Enhance the veins:
To make the veins pop like the photo, you can do a ‘wash.’ Dilute a darker brown acrylic paint or underglaze, brush it over the texture, and immediately wipe the surface with a damp sponge. The dark color remains in the deep crevices. -
Seal or Fire:
If using ceramic clay, bisque fire and then glaze (clear or transparent colors work best) before the final firing. For air-dry clay, apply two coats of a matte varnish to seal and protect the surface.
Display your new botanical creation on a coffee table or use it to hold keys near the entryway


The Complete Guide to Pottery Troubleshooting
Uncover the most common ceramic mistakes—from cracking clay to failed glazes—and learn how to fix them fast.
Spoon Rests With Rustic Texture
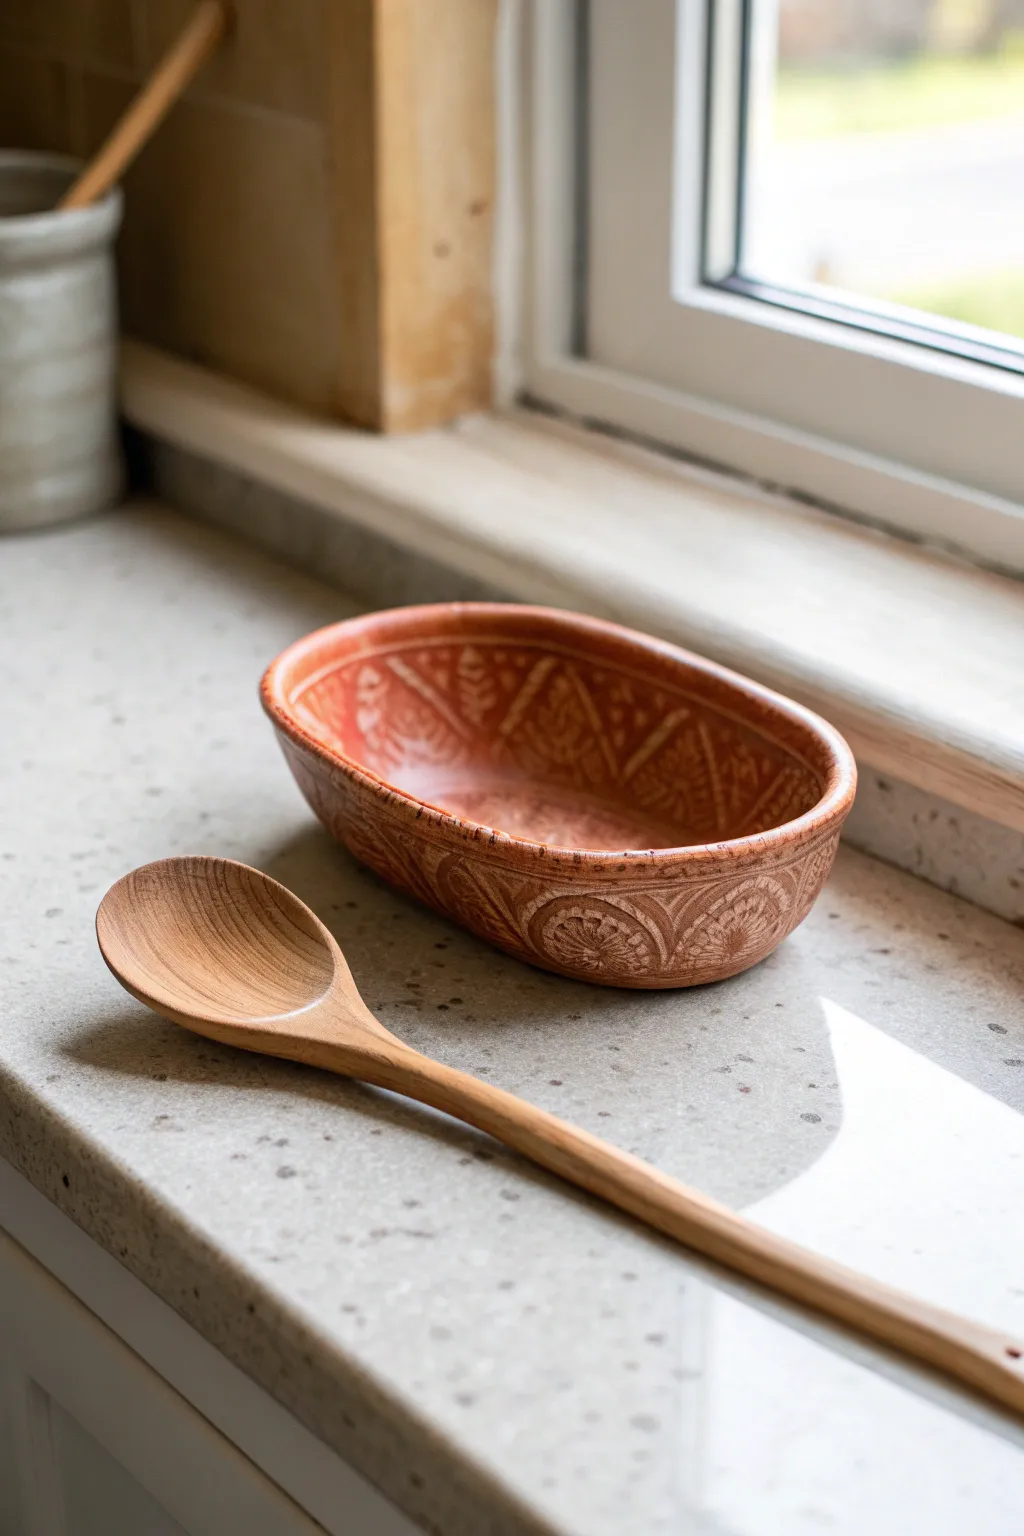
This charming, rustic spoon rest brings a touch of warmth to any kitchen counter with its deep reddish-brown hue and intricate white-slip detailing. Its oval shape is perfectly sized for cradling a wooden spoon, making it both functional and beautifully crafted.
Step-by-Step
Materials
- Red earthenware clay (terracotta)
- White decorative slip (engobe)
- Oval hump mold or plaster mold
- Rolling pin
- Canvas work surface
- Pottery knife or needle tool
- Rubber kidney rib
- Sgraffito tool or fine loop tool
- Fine sponge
- Clear glaze (food safe)
- Kiln
Step 1: Forming the Base
-
Prepare the slab:
Begin by wedging your red earthenware clay to remove air bubbles. Roll it out on a canvas surface into a consistent slab about 1/4 inch thick. -
Cut the shape:
Place your oval template on the slab and cut out the shape using a needle tool or pottery knife, leaving a little extra margin for the walls. -
Shape the dish:
Gently press the slab into your oval plaster mold or drape it over a hump mold. If using a slump mold, ensure you press the clay firmly into the corners to establish the flat bottom and raised walls. -
Smooth the surfaces:
Use a rubber kidney rib to compress the clay and smooth out any canvas texture. Pay special attention to the rim, rounding it off with a damp sponge so it isn’t sharp. -
Let it stiffen:
Allow the clay to dry to a firm leather-hard stage. It needs to hold its shape perfectly without warping when handled.
Slip Consistency
For sgraffito, your slip should be like heavy cream. If it’s too runny, the lines constantly bleed; too thick, and it flakes off.
Step 2: Decorating the Surface
-
Apply white slip:
Once leather-hard, brush a coat of white decorative slip over the interior and exterior walls where you want the pattern. Depending on the opacity, you might need two thin coats. -
Wait for slip to set:
Let the slip dry until it is no longer tacky but still damp enough to carve through crisply. Timing is key here. -
Plan your design:
Using a very light touch with a needle tool, lightly scratch guiding lines for your geometric pattern. The design features repeating triangular and fan motifs. -
Carve the triangles:
Using a sgraffito tool, carve out the negative space around your triangular shapes, revealing the red clay body beneath the white slip. -
Add floral details:
Inside the triangular sections, carve small leaf-like dashes. I find a small loop tool works best to scoop out these tiny repetitive marks cleanly. -
Carve the exterior:
Don’t forget the outside; repeat a complementary pattern of arches or fans on the exterior walls to tie the design together. -
Final cleanup:
Once the carving allows the clay burrs to dry, brush them away gently with a soft, dry brush to avoid smearing the design.
Step 3: Firing and Glazing
-
Bisque fire:
Place the completely dry piece in the kiln for a bisque firing (typically cone 04 or 06, depending on your clay body). -
Clean the bisque:
Wipe the bisqued piece with a damp sponge to remove any dust that might prevent glaze adhesion. -
Apply clear glaze:
Dip the piece into a clear, food-safe glaze. Ensure an even coat and wipe the foot (bottom) clean so it doesn’t stick to the kiln shelf. -
Glaze fire:
Fire the piece again to the glaze temperature recommended for your specific clay and glaze combination.
Go Antique
Use an amber-tinted clear glaze instead of a pure clear one. This warms up the white slip, giving the piece an aged, vintage pottery look.
Your finished spoon rest will be a durable and eye-catching addition to your stovetop lineup
Stamped Red Clay Catch-All Bowls
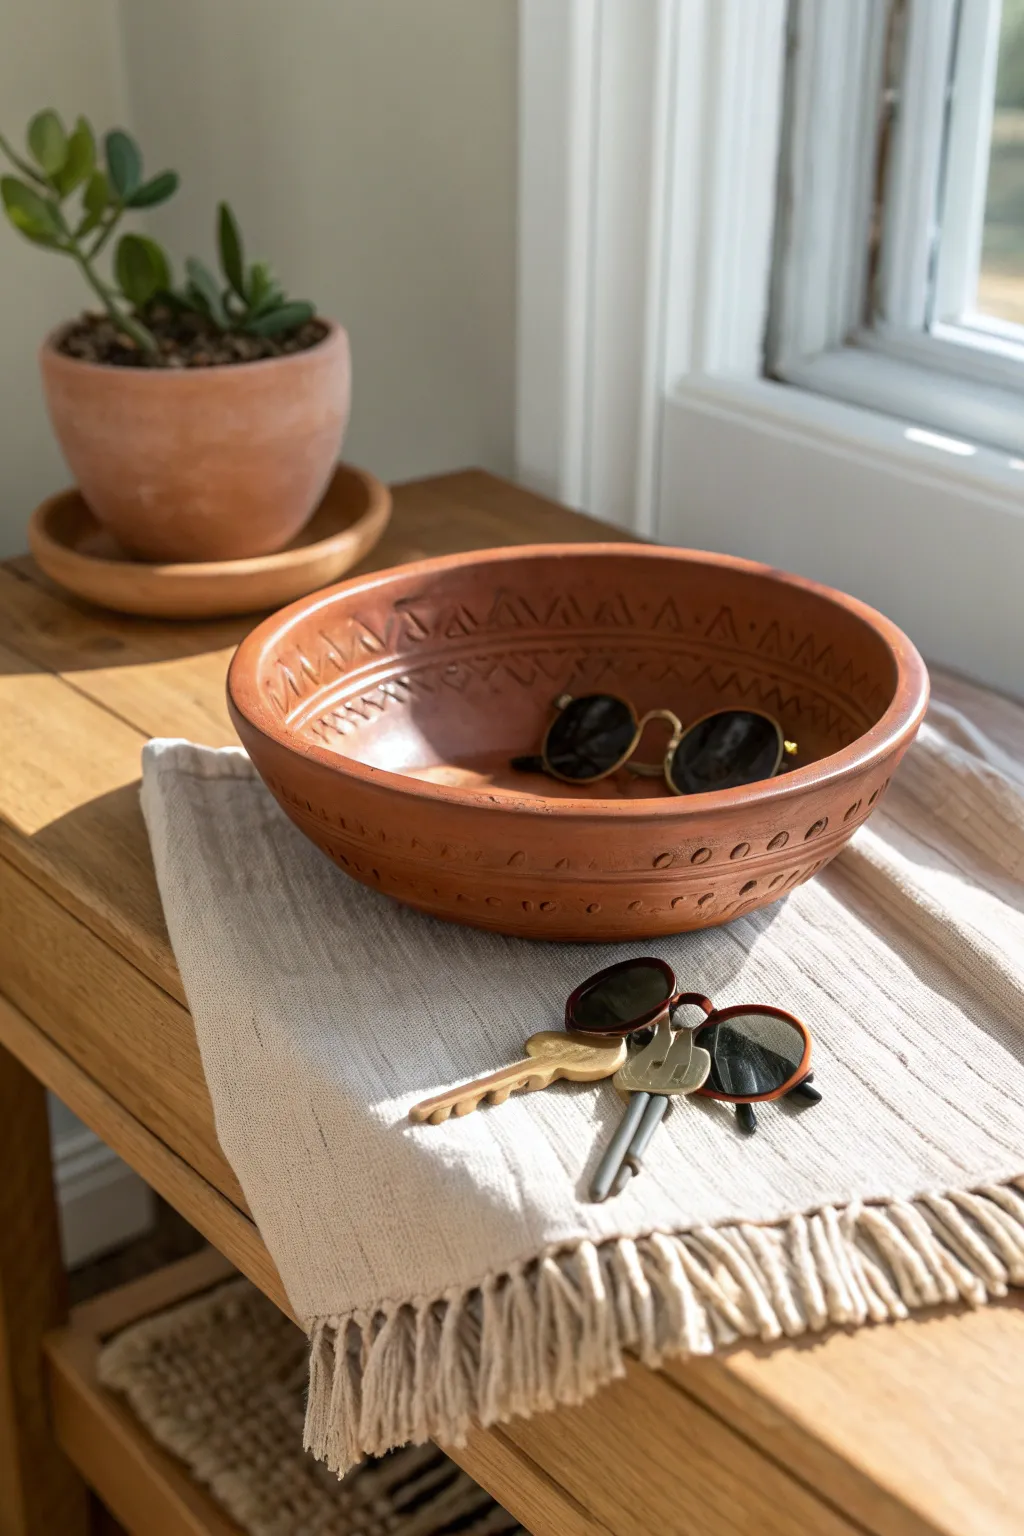
Bring earthy warmth to your entryway or dresser with this handcrafted terracotta catch-all. Featuring a wide, shallow profile and charming stamped geometric details on the rim, it’s the perfect spot to land your keys and sunglasses at the end of the day.
Step-by-Step
Materials
- Red earthenware clay or air-dry terracotta clay
- Rolling pin
- Canvas mat or cloth (to prevent sticking)
- Bowl mold (a kitchen bowl works well)
- Plastic wrap
- Needle tool
- Wooden sculpting rib or old credit card
- Geometric texture stamps (or found objects like pen caps)
- Sponge
- Water cup
- Matt varnish (if using air-dry clay)
- Clear glaze (if kiln-firing)
Step 1: Forming the Base
-
Prepare your clay:
Start by taking a grapefruit-sized ball of red clay. Knead it thoroughly on your canvas surface to remove air bubbles and warm it up, ensuring it’s pliable and ready for shaping. -
Roll out a slab:
Using your rolling pin, roll the clay out into a consistent slab about 1/4 inch thick. Rotate the clay frequently to keep the circle relatively even. -
Prepare the mold:
Select a bowl from your cupboard that has the shape you want to mimic. Cover the inside of it smoothly with plastic wrap; this barrier prevents the fresh clay from sticking to the rigid form. -
Slump the clay:
Gently lift your clay slab and place it inside the lined bowl. Let gravity do most of the work, then lightly press the clay against the bowl walls to adopt the shape. -
Trim the excess:
Using your needle tool, run it along the rim of the mold to cut away the overhanging clay, leaving a clean, even edge. -
Smooth the interior:
Take a damp sponge or a wooden rib and gently smooth the interior surface of your clay bowl, erasing any fingerprints or canvas marks.
Clean Impressions
If your stamps are sticking to the clay and ruining the detail, dust the stamp face with a tiny amount of cornstarch before pressing it into the moist surface.
Step 2: Refining and Decorating
-
Firm up slightly:
Let the clay sit in the mold for about 30-60 minutes until it is leather-hard—firm enough to hold its shape but soft enough to stamp. -
Remove from mold:
Carefully lift the clay bowl out of the mold using the plastic wrap edges. Place it rim-up on your work surface and peel away the plastic. -
Smooth the rim:
Dip your finger in a little water and run it specifically along the cut rim to round off the sharp edge created by the needle tool. -
Plan the stamping:
Visually divide the interior rim into sections. I like to lightly mark vague spacing with my thumbnail so the pattern meets up perfectly at the end. -
Create the heavy triangular pattern:
Using a triangular stamp or a notched tool, press a repeating ‘zigzag’ or triangle pattern just below the inner rim. Apply support on the outside of the bowl with your other hand to prevent warping. -
Add secondary details:
Use a smaller tool, like the end of a chopstick or a small tube, to stamp a row of dots or dashes beneath the main triangle pattern for visual interest. -
Detail the exterior:
Don’t forget the outside; replicate a simple dot or line pattern near the exterior rim so the design feels cohesive from all angles. -
One final smooth:
Check the interior bottom one last time. If stamping caused any bumps, gently smooth them out with a flexible rib.
Step 3: Finishing
-
Slow drying:
Loosely cover the bowl with plastic to let it dry slowly over 24-48 hours. Drying too fast can crack the rim. -
Finishing air-dry clay:
If you used air-dry clay, wait until the piece is bone dry and light in color, then apply two coats of matte varnish to seal it against moisture. -
Firing kiln clay:
If using traditional pottery clay, bisque fire the piece, then apply a clear glaze (or leave the raw clay unglazed for that rustic look shown in the photo) and glaze fire.
Warping Walls?
If the bowl walls start sagging while you stamp, place the clay back into the original mold (with plastic wrap) to support it while you add the texture.
Place your finished bowl on a side table to catch the sunlight and your everyday essentials

TRACK YOUR CERAMIC JOURNEY
Capture glaze tests, firing details, and creative progress—all in one simple printable. Make your projects easier to repeat and improve.
White-Dipped Rim Bowls for Contrast
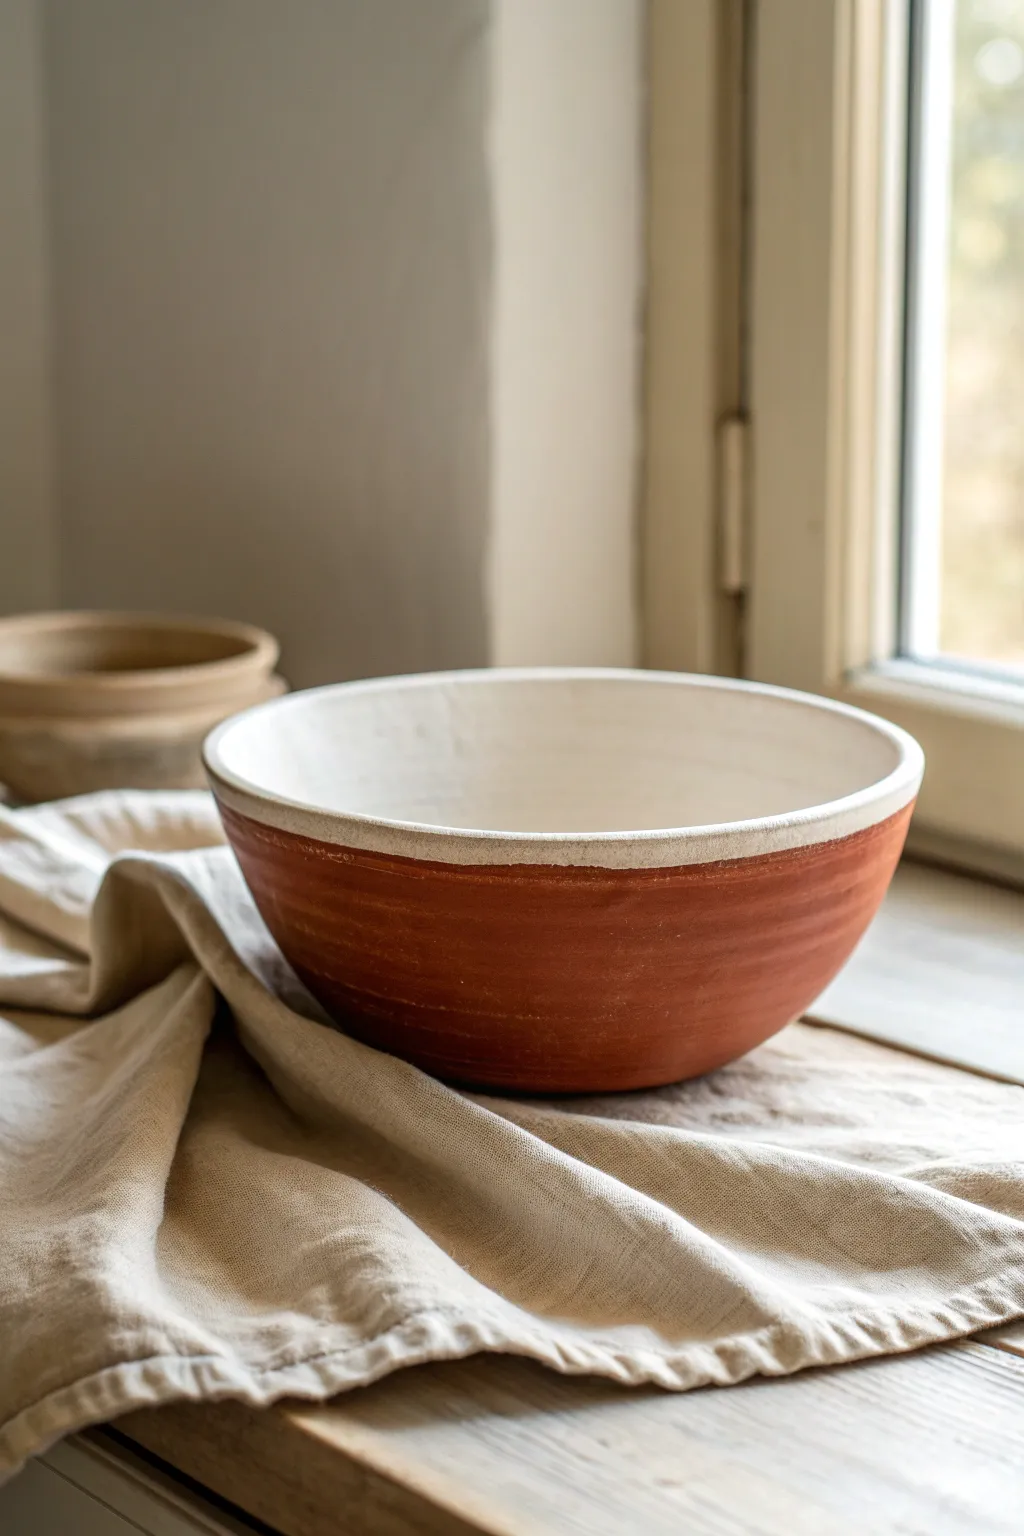
This project celebrates the simple beauty of contrasting textures, pairing the raw warmth of earthy red clay with a crisp, clean white glaze. By leaving the exterior unglazed and dipping only the rim and interior, you create a striking visual line that highlights the handmade nature of the form.
Step-by-Step Guide
Materials
- Red earthenware clay (approx. 2-3 lbs)
- Potter’s wheel
- Throwing sponge
- Wooden rib tool
- Wire clay cutter
- Loop trimming tools
- White food-safe dipping glaze
- Large bucket for glazing
- Wax resist emulsion
- Sponge brush
- Kiln access
Step 1: Throwing the Form
-
Prepare the Clay:
Begin by thoroughly wedging your red earthenware clay to remove air bubbles and ensure a uniform consistency. Pat it into a rounded cone shape before placing it on the wheel head. -
Center and Open:
Secure the clay to the wheel and center it using firm, steady pressure. Once centered, open the clay to create a wide, flat bottom, leaving about half an inch of thickness for the floor. -
Pull the Walls:
Pull the walls upward and outward to form a wide, open bowl shape. Aim for a distinct curve that isn’t too shallow; you want the side profile to be visible. Keep the rim slightly thickened to prevent warping later. -
Refine the Curve:
Use a wooden rib tool on the interior while supporting the outside with your hand to smooth the surface and establish a consistent, gentle curve from the floor to the rim. -
Detail the Rim:
Compress the rim using a chamois or your sponge. I find that slightly flattening the very top edge gives the white glaze a better surface to break over later. -
Create Texture:
While the wheel is spinning slowly, use your finger or a soft rib to leave very subtle horizontal throwing lines on the exterior. This texture will look fantastic on the raw clay portion. -
Cut and Dry:
Wire the bowl off the batt and set it aside until it reaches a leather-hard state. This usually takes a day depending on humidity.
Step 2: Trimming and Bisque
-
Center for Trimming:
Invert your leather-hard bowl onto the wheel head. Use small clay lugs to secure it in place once it is perfectly centered. -
Trim the Foot:
Use a sharp loop tool to carve away excess clay from the base. Create a defined foot ring that lifts the bowl slightly, mirroring the curve of the interior. -
Smooth the Exterior:
Burnish the exterior slightly with a soft rubber rib to compress the red clay particles, which creates a nicer tactile finish on the unglazed portion. -
Bisque Fire:
Allow the bowl to dry completely to the bone-dry stage. Load it into the kiln for a bisque firing (typically Cone 04) to prepare it for glazing.
Clean Lines
For a sharper contrast line, use precision masking tape instead of wax resist. Remove the tape immediately after dipping while the glaze is still wet to prevent chipping.
Step 3: Glazing and Finishing
-
Clean the Ware:
Wipe the bisque-fired bowl with a damp sponge to remove any kiln dust. This ensures the glaze adheres properly without crawling. -
Apply Wax Resist:
Paint a line of wax resist around the exterior of the bowl, roughly 1.5 inches down from the rim. I like to keep this line slightly organic rather than perfectly straight. Coat the entire bottom section and foot ring with wax as well. -
Prepare the Glaze:
Stir your white dipping glaze thoroughly. You want a creamy consistency—if it’s too thin, the red clay will show through; too thick, and it might drip excessively. -
Pour the Interior:
Pour a ladle of glaze into the bowl. Quickly swirl it around to coat the entire interior surface up to the rim, then pour the excess back into your bucket. -
Dip the Rim:
Immediately flip the bowl upside down and submerge the rim into the glaze bucket, dipping just deep enough to meet your wax line. Hold for three seconds and lift straight up. -
Clean Up:
Once the glaze is dry to the touch, use a damp sponge to wipe away any stray glaze beads that may have settled on the waxed red clay exterior. -
Glaze Fire:
Load the bowl into the kiln for the final glaze firing. Ensure the unglazed foot is clean so it doesn’t fuse to the kiln shelf.
Uneven Glaze Coat?
If you see streaks in the interior, your glaze might be too thick. Add a small amount of water to the bucket and mix well, or try pouring the interior more quickly next time.
Now you have a stunning piece that highlights the raw beauty of the earth alongside a polished finish
Half-Dipped Vases With Clean Color Blocking
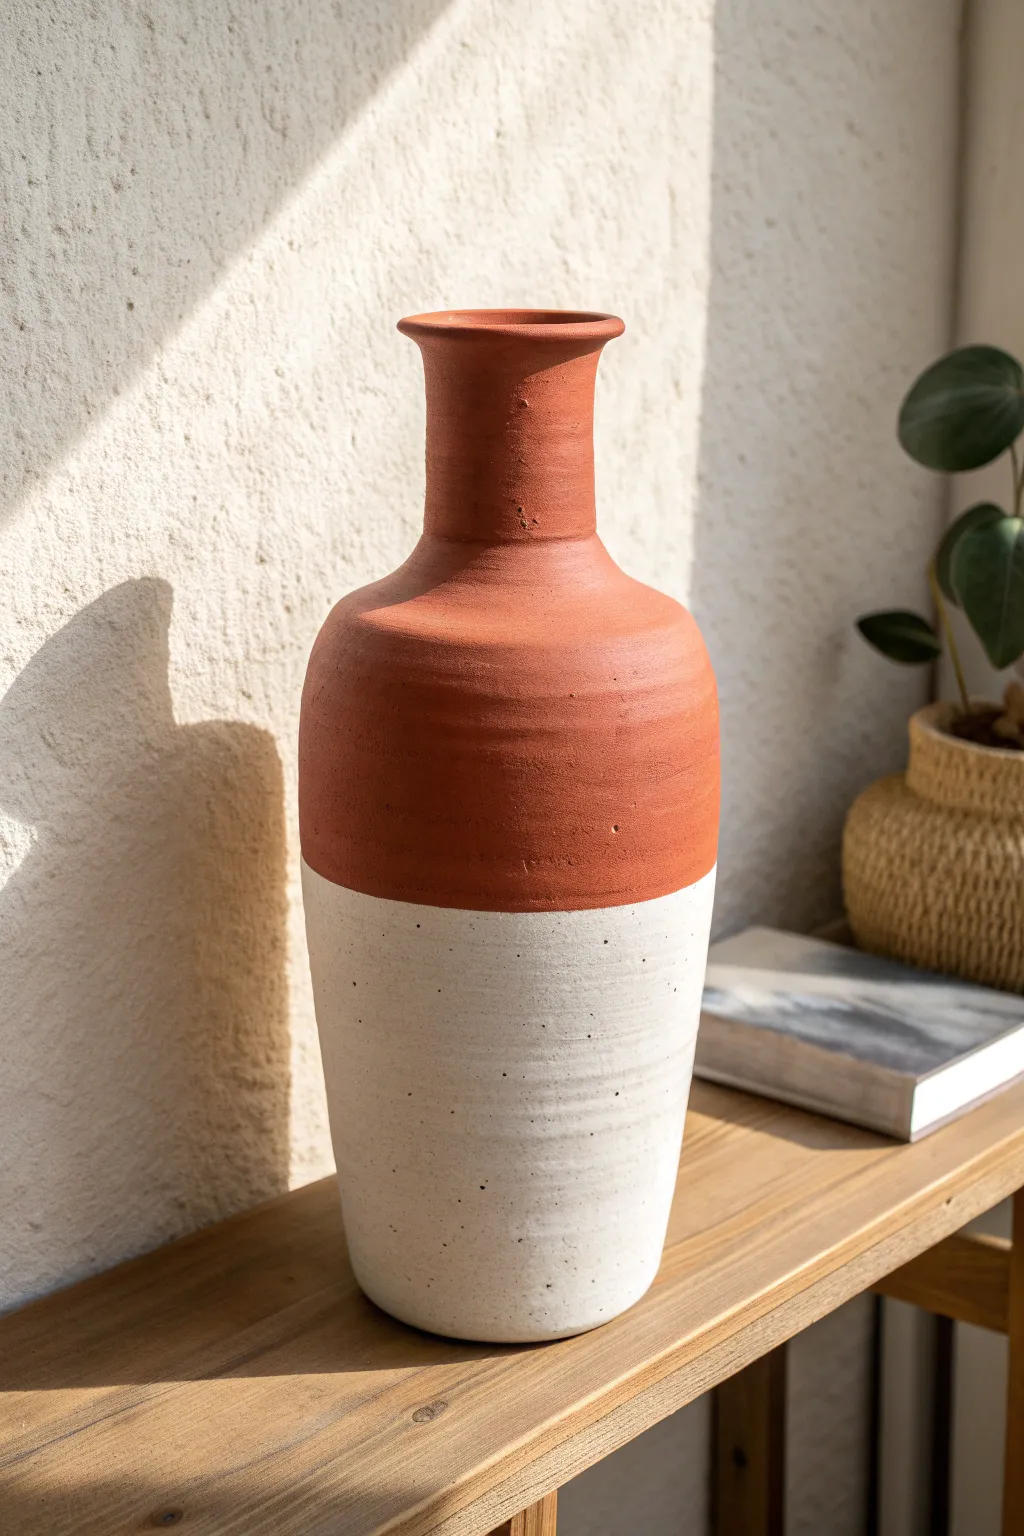
Bring a touch of modern earthiness into your home with this clean, color-blocked vase project. By combining the raw warmth of red clay with a crisp, speckled white bottom, you achieve a sophisticated look that mimics expensive boutique ceramics.
How-To Guide
Materials
- Tall terracotta vase (unglazed/bisque)
- White matte acrylic craft paint or matte ceramic glaze
- Fine grit sandpaper (220 grit)
- Painter’s tape (high quality)
- Wide flat brush or foam brush
- Old toothbrush
- Black acrylic paint (tiny amount)
- Clear matte spray sealer
- Measuring tape
- Pencil
- Damp cloth
- Palette or small dish for mixing
Step 1: Preparation and Masking
-
Prepare the surface:
Start by ensuring your terracotta vase is clean and free of dust. Wipe it down with a damp cloth and let it dry completely. If the clay feels particularly rough, lightly sand the entire surface with 220 grit sandpaper to ensure a smooth finish, then wipe again. -
Determine the line:
Decide where you want your color block to begin. For this project, striking a balance slightly below the halfway point creates a pleasing visual weight. Measure from the bottom up to your desired height and make small pencil marks around the circumference of the vase. -
Apply the tape:
Carefully apply painter’s tape connecting your pencil marks. This is the most crucial step for that clean ‘dipped’ look. Press down firmly on the edge of the tape with your fingernail or a credit card to seal it tight against the clay, preventing paint bleed. -
Card trick:
Run a credit card or gift card firmly over the tape edge one last time to ensure absolute adhesion to the textured clay surface.
Clean Line Secret
Paint a thin layer of clear medium or sealer over the tape edge FIRST. This fills any tiny gaps so the white paint sits perfectly on top of the seal.
Step 2: Painting the Base
-
First coat application:
Using a wide flat brush or foam brush, apply your matte white acrylic paint to the bottom section of the vase. Brush in vertical strokes, moving from the tape downward. -
Initial drying:
Allow the first coat to dry slightly until it loses its sheen, usually about 15-20 minutes. Don’t worry if the red clay shows through a bit at this stage. -
Build opacity:
Apply a second coat of white paint. I like to paint horizontally this time to create a subtle woven texture and ensure full refreshing coverage. Repeat with a third coat if necessary until the clay color is completely hidden. -
Create the speckles:
While the white base is dry, squeeze a pea-sized amount of black paint onto a palette and water it down slightly until it’s inky. Dip the bristles of an old toothbrush into this mixture. -
Flick technique:
Test the splatter on a scrap piece of paper first. Hold the toothbrush near the painted section of the vase and run your thumb across the bristles to flick tiny specks onto the white paint. Rotate the vase carefully to get even coverage without touching the red clay top.
Step 3: Finishing Touches
-
Remove the tape:
This is the satisfying part. Before the paint is bone dry (when it’s just tacky), slowly peel back the painter’s tape at a 45-degree angle. Pulling while slightly damp prevents the paint film from cracking along the edge. -
Touch up edges:
Inspect your line. If any red clay is peeking through or the line is fuzzy, use a very small detail brush with white paint to carefully sharpen the edge. -
Clean up bleed:
Conversely, if white paint bled under the tape onto the upper red section, use a damp Q-tip or a hobby knife to gently scrape or wipe away the excess immediately. -
Texture matching:
To make the painted section feel more like ceramic glaze and less like plastic, lightly buff the dry painted surface with a very fine sanding sponge. This knocks back any brush strokes. -
Seal the work:
Take the vase to a well-ventilated area. Lightly mist the entire piece (both red and white sections) with a clear matte spray sealer. This unifies the sheen and protects the raw clay from fingerprints and moisture. -
Final cure:
Let the sealer cure for at least 24 hours before filling the vase with dried florals or placing it on a surface.
Make It Functional
If you want to use fresh flowers rather than dried, coat the INSIDE of the vase with a waterproof sealer or beeswax to prevent water seepage.
Place your new vase near a sunny window where the light can highlight the texture contrast
Sgraffito Line Art on Red Clay Cups
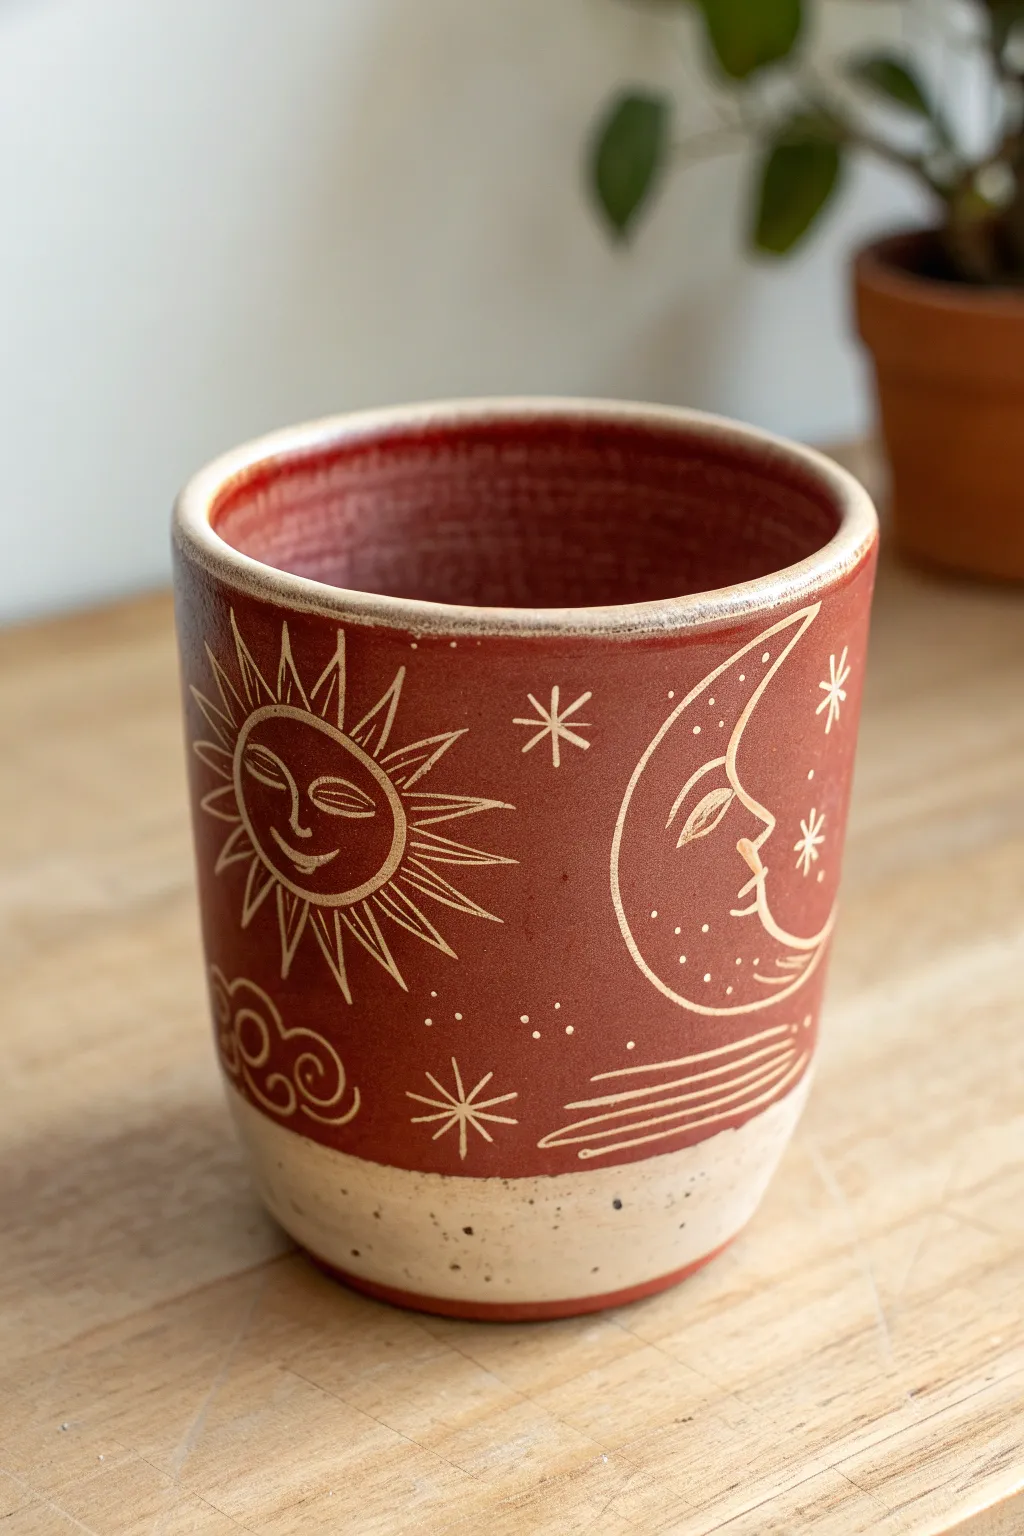
This project combines the rustic warmth of speckled clay with the crisp, illustrative beauty of sgraffito. By carving through a layer of deep red underglaze, you’ll reveal a whimsical sun and moon design that feels both modern and mythical.
Step-by-Step Tutorial
Materials
- Speckled stoneware clay (buff or light color base)
- Red underglaze (terra cotta or deep red shade)
- Clear transparent glaze
- Pottery wheel or rolling pin/slab tools
- Sgraffito tools (loop tool, needle tool)
- Small carving gouge
- Soft fan brush
- Sponge
- Wire cutter
- Pencil and paper (optional for sketching)
Step 1: Forming the Vessel
-
Throw or Build the Cup:
Whether you are throwing on the wheel or hand-building with slabs, create a simple cylinder shape about 4-5 inches tall. Aim for straight walls with a slight outward curve at the rim for comfortable drinking. -
Refine the Rim:
While the clay is still workable, compress the rim with a chamois or sponge. This ensures the drinking edge is smooth and durable. -
Dry to Leather Hard:
Allow your cup to dry slowly until it reaches the leather-hard stage. The clay should be firm enough to hold its shape perfectly but soft enough to carve into without chipping. -
Trim the Foot:
If wheel-throwing, trim a clean foot ring. If hand-building, smooth out the bottom edges. This creates a professional finish and a defined stopping point for your design.
Chipped Lines?
If your carved lines look jagged or chipped, your clay is likely too dry. Mist the pot slightly and wrap it in plastic for an hour to rehydrate the surface before trying again.
Step 2: Applying Color & Design
-
Apply Red Underglaze:
Using a soft fan brush, apply 2-3 even coats of deep red underglaze to the exterior. Leave the bottom third of the cup and the foot unpainted to show off the natural speckled clay. -
Coat the Interior:
Apply the same red underglaze to the inside of the cup for a cohesive look. I like to do this before the outside dries completely to maintain even moisture content. -
Let the Underglaze Set:
Wait until the underglaze is dry to the touch and no longer tacky. It shouldn’t be bone dry, just set enough that your hand won’t smudge it while holding the cup. -
Plan Your Celestial Design:
Lightly scratch your layout onto the red surface using a dull pencil or very light touch with a needle tool. Map out a large crescent moon on one side and a sun with rays on the other.
Step 3: Carving the Sgraffito
-
Carve the Moon Outline:
Using a fine-point sgraffito tool or small loop tool, carve the outline of the crescent moon. Use confident, smooth strokes to cut through the red layer and reveal the light clay beneath. -
Add Facial Features:
Carefully carve a profile face into the inner curve of the moon. A simple nose, lips, and closed eye give it a serene expression. -
Detail the Moon Texture:
Add small dots and tiny craters inside the moon shape to give it texture without fully removing all the red color. -
Carve the Sun Face:
On the opposite side, carve a circular sun face. Give it distinctive eyes and a smiling mouth, keeping the lines crisp. -
Create the Sun Rays:
Carve alternating straight and triangular rays extending outward from the sun face. Varying the length of the rays makes the design feel more dynamic. -
Fill the Negative Space:
In the open red spaces between the sun and moon, carve simple 5-point stars, small dots for distant starlight, and perhaps a stylized cloud or wind swirl near the bottom. -
Clean Up Crumbs:
Gently brush away the clay burrs and crumbs with a soft, clean brush. Be careful not to smudge the red underglaze into your fresh white lines.
Gold Dust
For a truly magical finish, apply gold luster over the stars and moon rays after the glaze firing, then re-fire at a low temperature (cone 018) for metallic shine.
Step 4: Firing and Glazing
-
Bisque Fire:
Once the piece is bone dry, load it into the kiln for a bisque firing (usually cone 04). This hardens the clay and sets the underglaze permanently. -
Apply Clear Glaze:
Dip or brush a clear, transparent glaze over the entire cup (except the bottom of the foot). This will make the red vibrant and the raw clay buff/white, while sealing the piece for food safety. -
Wipe the Foot:
Use a damp sponge to meticulously wipe any clear glaze off the very bottom of the cup so it doesn’t fuse to the kiln shelf. -
Glaze Fire:
Fire the cup to the maturity temperature of your clay body (likely cone 5 or 6). This final firing melts the glaze into a glossy, protective glass layer.
Enjoy sipping from your personal piece of the night sky, knowing the design is permanently etched into the clay
Geometric Carved Bands and Chevrons
This rustic red clay vase features deeply carved geometric bands that wrap around its bulbous form, creating a rhythmic visual texture. The unglazed finish highlights the natural warmth of the terracotta, making the sharp chevron patterns stand out beautifully.
How-To Guide
Materials
- Red earthenware or terracotta clay (approx. 3-5 lbs)
- Pottery wheel (or coil building tools for hand-building)
- Wire cutter
- Sponge
- Rib tool (metal and rubber)
- Needle tool
- Ribbon tool or loop tool (small and medium sizes)
- Carving tool (V-gouge or specialized sgraffito tool)
- Banding wheel (if trimming off the main wheel)
- Wooden modeling tool
Step 1: Throwing and Shaping
-
Center and open:
Begin by centering your red clay on the wheel. Open the clay and pull up a cylinder, ensuring the walls are thick enough (about 1/4 inch) to support the deep carving you’ll do later. -
Belly out the form:
Using a rib tool on the inside, gently push the clay outward while supporting the outside to create a round, bulbous ‘belly’ for the vase. Aim for a nice, spherical lower section. -
Collar the neck:
Gently collar the clay inward as you move up past the belly to define the shoulder and create a narrower neck. -
Flare the rim:
Pull the clay slightly outward at the very top to create a flared, confident rim. Use a chamois or sponge to smooth the lip so it’s pleasant to the touch. -
Refine the surface:
Before taking it off the wheel, use a metal rib to smooth the exterior walls, removing any throwing rings. A smooth canvas is essential for the geometric patterns. -
Leather hard drying:
Remove the vase from the wheel and let it dry to a leather-hard state. It needs to be firm enough to handle without warping but soft enough to carve easily.
Step 2: Mapping the Design
-
Trim the foot:
Place the leather-hard vase back on the wheel (or a banding wheel) to trim the excess clay from the bottom, creating a neat foot ring. -
Mark horizontal bands:
While the pot is spinning slowly on the banding wheel, use a needle tool to lightly score horizontal guidelines. These lines define the top and bottom of each decorative band. -
Create spacing guides:
Look at the main central band. I like to make small tick marks along the top guideline to ensure my large chevrons are spaced evenly before I start committing to deep cuts.
Clean Lines
Wait until the clay is almost ‘chocolate hard’ before carving. If it’s too wet, the tool will drag and create ragged edges instead of crisp chevrons.
Step 3: Carving the Geometry
-
Carve the dividing rings:
Use a small loop tool or a V-gouge to carve deep, continuous horizontal grooves over your initial guidelines. These separate the different pattern sections. -
Carve the main chevrons:
On the widest part of the belly, carve the large zig-zag pattern. Use a sharp ribbon tool to remove the clay inside the triangles, leaving a double-line effect for depth. -
Detail the upper shoulder:
Move to the shoulder area. Carve a smaller, tighter zig-zag band here. Using a finer tool will help keep the proportions balanced with the narrowing neck. -
Add the lower band:
Repeat a similar smaller chevron pattern near the base of the vase. This grounds the design and mirrors the shoulder detail. -
Clean up burrs:
Once the carving is complete, let the pot dry a little more until the crumbs are bone dry, then brush them away with a soft brush. Don’t wipe with a wet sponge, or you’ll soften the crisp edges. -
Final smoothing:
Gently run a finger or a smooth stone over the high points of the relief to burnish them slightly, creating a nice contrast with the rougher carved recessed areas. -
Bisque fire:
Fire the vase to cone 04 (or your clay’s specific bisque temperature). Since this look relies on the raw clay color, you can leave it unglazed or apply a clear matte sealer after firing.
Color Wash
After different firing, apply a diluted black iron oxide wash and wipe it back. The dark pigment will stick in the carved grooves, intensifying the pattern.
Place your finished vase near a window where the sunlight can catch the relief and show off your precision carving skills
Slip-Trailed Dots and Swirls in White
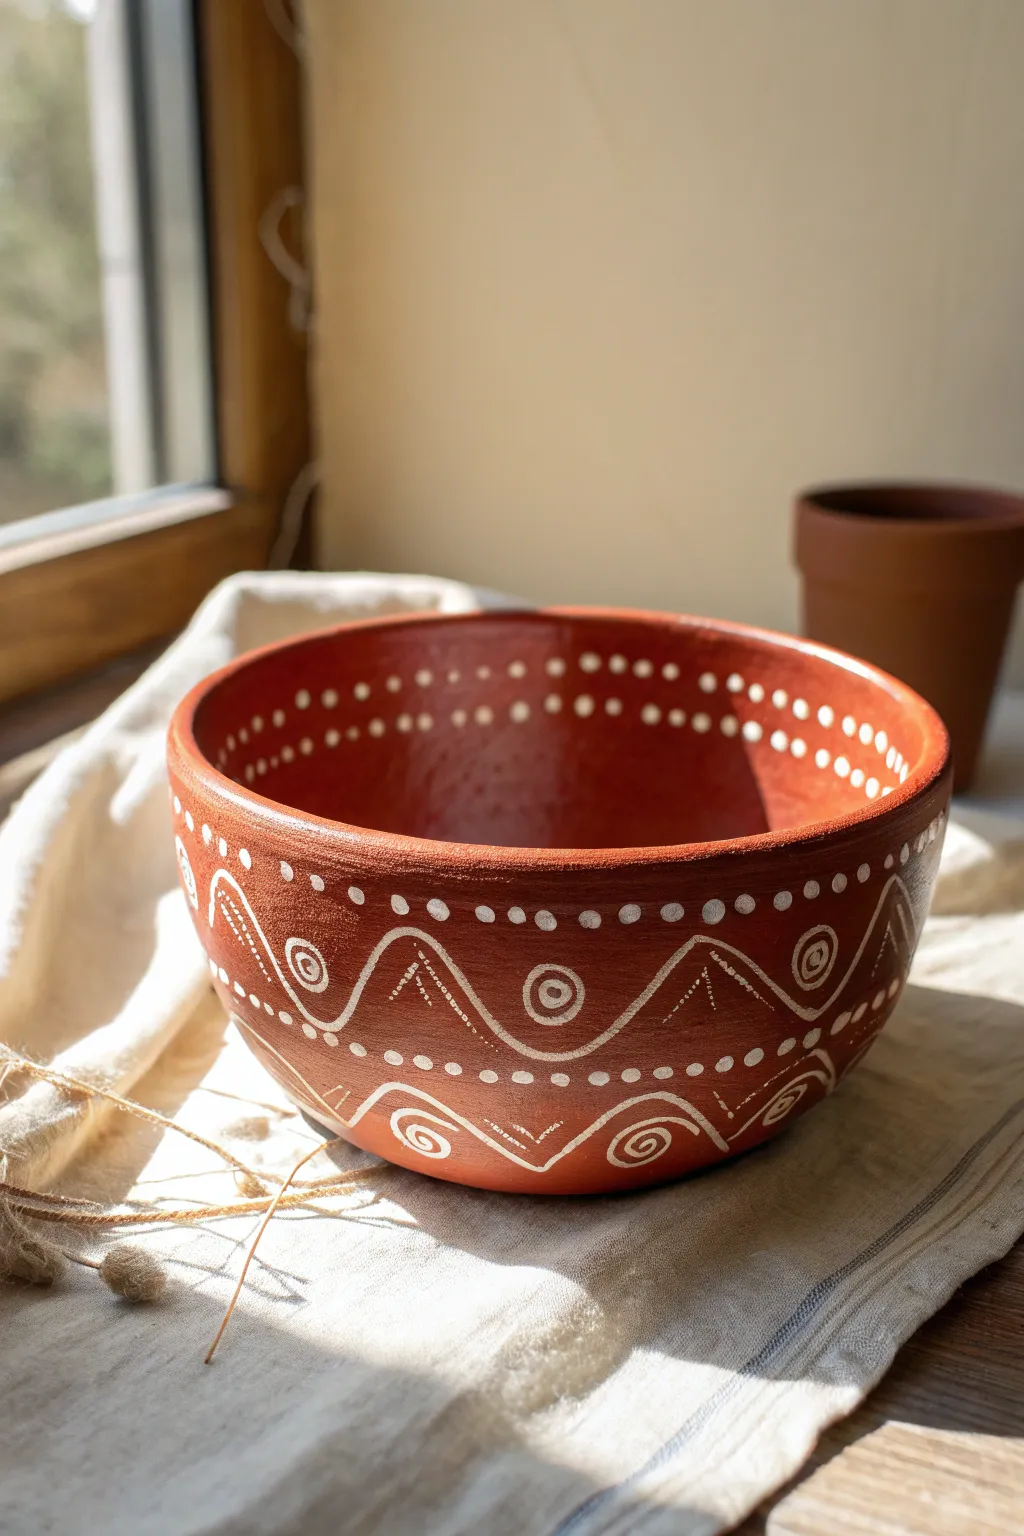
Transform a simple red clay bowl into a striking piece of functional art using the traditional technique of slip trailing. The contrast between the warm, terracotta body and the crisp white raised patterns creates a timeless, folk-art aesthetic that feels both rustic and refined.
Step-by-Step
Materials
- Red earthenware clay (or a pre-made leather-hard red clay bowl)
- White decorating slip (or white underglaze in a fine-tip applicator)
- Slip trailer bulb or precision squeeze bottle with fine metal tips
- Pottery wheel or banding wheel
- Sponge
- Needle tool
- Clear transparent glaze
- Kiln
Step 1: Preparation
-
Create or Select Your Form:
Begin with a red clay bowl that has been thrown or hand-built and allowed to dry to a ‘leather-hard’ state. This is crucial because the clay needs to be firm enough to handle but damp enough to bond with the wet slip. -
Smooth the Surface:
Gently wipe the surface of your bowl with a slightly damp sponge to remove any grog or rough patches. A smooth canvas ensures your slip lines track cleanly without bumping over imperfections. -
Prepare the Slip:
Fill your slip trailer or precision bottle with white decorating slip. Test the consistency on a scrap piece of clay first; it should flow like thick heavy cream—smooth enough to trail, but stiff enough to hold a raised line without spreading.
Clogged Nozzle?
If the slip stops flowing, don’t squeeze harder or the bulb might explode. Use a thin needle or wire to clear the metal tip, and ensure your slip was sieved to remove lumps.
Step 2: Interior Detailing
-
Map the Inner Rim:
Place your bowl on a banding wheel. While slowly spinning the wheel, apply a series of small, evenly spaced dots just below the interior rim. -
Add Secondary Rows:
Create a second row of dots about an inch below the first. Try to stagger these slightly if you want a more organic look, or keep them aligned for structure. -
Connect the Rows:
Between your two rows of dots, carefully trail a thin, horizontal line. This bands the design together and frames the interior space of the bowl.
Step 3: Exterior Patterning
-
Define the Top Border:
Moving to the outside, replicate the interior design by trailing a row of dots near the upper rim. Follow this with a solid horizontal line just underneath. -
Create the Sine Wave:
Lightly sketch a guiding line with a needle tool if needed, then trail a large, continuous wavy line (a sine wave) around the belly of the bowl. The peaks and valleys should be dramatic and evenly spaced. -
Double the Wave:
To add visual weight, trail a second wavy line directly below the first one, mirroring its path perfectly. I prefer to leave about a quarter-inch gap between them. -
Fill the Peaks:
Inside the triangular peaks formed by your waves, draw a smaller, inverted V-shape. Fill the space between the main wave and this inner V with tiny, delicate hatching lines. -
Add Spiral Accents:
In the valley spaces beneath the waves (and in the open spaces above peaks if room allows), trail a tight spiral or concentric circle motif. -
Central Dots:
Place a prominent, solid white dot in the exact center of your spirals to create a focal point for the eye. -
Lower Border:
Frame the bottom of your design with another horizontal line, accented by a final row of dots underneath it to mirror the rim. -
Clean Up:
If any slip peaks are too sharp or jagged, wait until the slip loses its sheen and gently tap them down with a clean finger.
Color Pop
Instead of pure white slip, try mixing a small amount of mason stain (like turquoise or yellow) into your white slip for a vibrant, modern twist on this classic design.
Step 4: Finishing
-
Slow Drying:
Allow the bowl to dry very slowly under loose plastic. If it dries too fast, the white slip (which shrinks differently than the red body) might peel or flake off. -
Bisque Fire:
Once bone dry, bisque fire the piece to the appropriate cone (usually Cone 04 or 06) for your specific clay body. -
Glazing:
Dip or brush a clear, transparent glaze over the entire piece. This will seal the clay and make the red color deepen and rich while keeping the white design crisp. -
Final Firing:
Glaze fire the bowl to maturity. The clear glaze will melt to a glossy finish, highlighting the tactile, raised nature of the slip trailing.
Now you have a stunning, tactile vessel ready to be displayed or used daily
Burnished Terracotta With a Soft Shine
Embrace the natural warmth of the earth with this classic red clay vessel, distinguished by its incredibly smooth, satiny finish. The burnishing technique used here creates a soft, organic shine without the need for glaze, resulting in a timeless piece perfect for rustic or minimalist decor.
Step-by-Step Guide
Materials
- Red earthenware clay (terracotta)
- Pottery wheel (or coils for hand-building)
- Throwing sponge
- Wire clay cutter
- Kidney scraper (metal and rubber)
- Polished river stone or back of a spoon (for burnishing)
- Plastic bag (for slow drying)
- Chamois leather strip
- Vegetable oil or burnishing slip (optional)
Step 1: Throwing the Form
-
Wedge the Clay:
Begin by thoroughly wedging your red earthenware clay to remove air bubbles and ensure a uniform consistency. This step is crucial for maintaining the structural integrity of a large, bulbous form. -
Center on the Wheel:
slam your clay ball onto the wheel head and center it using firm pressure. Make sure the clay is perfectly centered before you begin opening it to avoid wobbling later. -
Open and Pull:
Open the clay to create the floor, establishing the width of your base. Begin pulling up the walls into a cylinder, keeping the walls relatively thick at the bottom to support the belly of the vase. -
Shape the Belly:
Gently push the clay outward from the inside with one hand while supporting the outside with the other to create a voluminous, rounded body. Move slowly to prevent the walls from collapsing. -
Collar the Neck:
As you move upward, gently squeeze or ‘collar’ the clay in to form a narrower neck. This requires careful compression to thicken the clay as the circumference shrinks. -
Form the Rim:
Flare the lip slightly outward to create a distinct, rolled rim. Use a damp chamois strip draped over the rim while the wheel spins to compress and smooth it perfectly. -
Smooth the Surface:
Before taking it off the wheel, run a flexible metal kidney rib up the exterior while spinning. This removes throwing lines and prepares the surface for burnishing later.
Stone Selection
The smoother your burnishing tool, the glassier the finish. Agate stones are ideal, but a vintage stainless steel spoon works wonders too.
Step 2: Refining and Burnishing
-
Leather Hard Drying:
Cut the vase from the wheel and let it dry slowly under loose plastic until it reaches a sturdy leather-hard stage. It should be firm enough to handle but still cool to the touch. -
Trim the Base:
Invert the pot onto the wheel (using a chuck if necessary) and trim the excess clay from the bottom to define a clean foot ring. -
Initial Smoothing:
Wipe the entire surface with a barely damp sponge to remove any trimming crumbs. Follow this by rubbing the surface firmly with a rubber rib to compress the clay particles further. -
Apply Lubricant:
I find that apply a very thin layer of vegetable oil or a fine terra sigillata slip helps the burnishing tool glide smoothly without dragging the clay. -
Begin Burnishing:
Using a polished river stone or the convex back of a spoon, rub the surface of the pot in small, circular motions. Apply firm, consistent pressure to compress the clay surface. -
Work Systematically:
Start from the rim and work your way down to the base, ensuring you overlap your strokes so no matte patches remain. -
Second Pass:
Let the pot dry slightly more, then repeat the burnishing process. This second pass often deepens the gloss significantly as the clay hardens. -
Final Polish:
For an ultra-high sheen, buff the surface briskly with a soft cloth or a piece of plastic grocery bag just before the clay is bone dry.
Smoke Effect
After bisque firing, try pit-firing the vase in sawdust or dried leaves. The smoke will create stunning black and grey clouds on the red surface.
Step 3: Firing
-
Slow Drying:
Allow the burnished pot to dry very slowly to prevent cracking or losing the sheen. Avoid direct sunlight or drafts. -
Bisque Fire:
Fire the vessel in a kiln to a low temperature (around Cone 06 to 04). Since this is a decorative burnished piece, it typically isn’t glazed or fired to high stoneware temperatures, which would dull the shine.
Place your warm, polished vessel in a sunlit spot to watch the light play across its hand-burnished curves
Cutout Candle Holders That Glow Warm
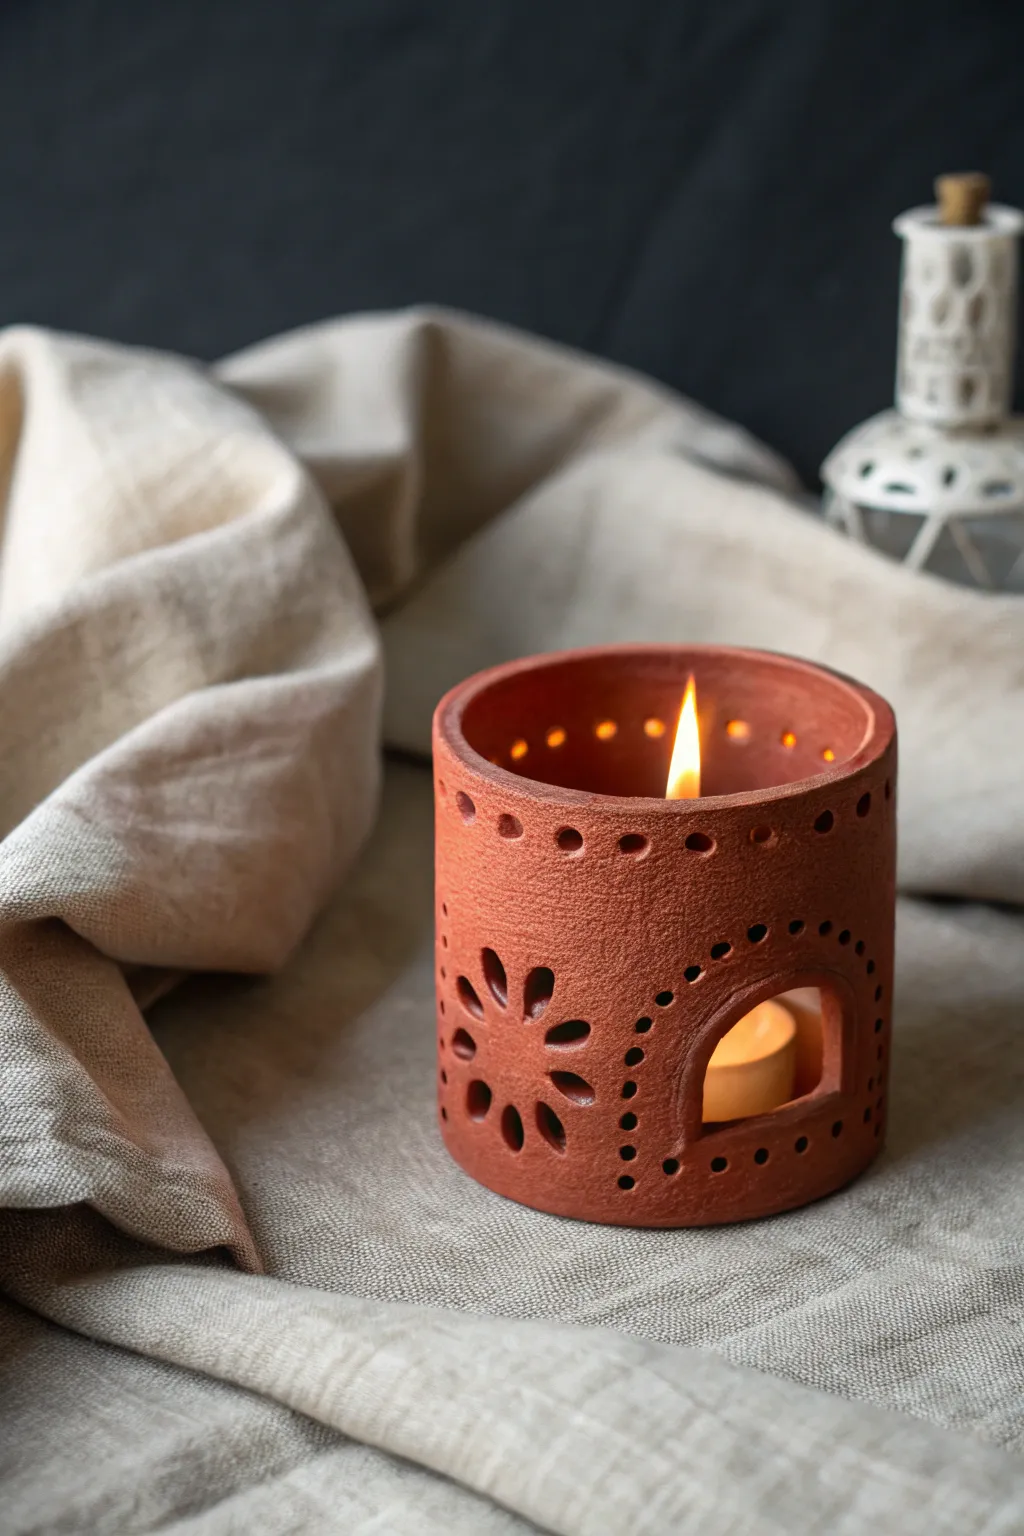
Bring a cozy warmth to your evenings with this charming red clay lantern, featuring delicate floral cutouts and dotted patterns that cast dancing shadows. The natural terracotta finish provides an earthy, grounded aesthetic that looks beautiful even when unlit.
Detailed Instructions
Materials
- Red earthenware clay (terracotta)
- Rolling pin
- Canvas mat or cloth (to prevent sticking)
- Can or rigid cylinder (approx. 3-4 inches diameter) for a mold
- Craft knife or fettling knife
- Potter’s needle tool
- Small circular punch or straw (for dots)
- Small teardrop cutter (optional for petals)
- Slip (clay mixed with water)
- Scoring tool or old toothbrush
- Sponge
Step 1: Forming the Cylinder
-
Prepare the slab:
Begin by rolling out your red earthenware clay on a canvas mat until it is an even slab, approximately 1/4 inch thick. Aim for a consistent thickness to prevent cracking during drying. -
Cut to size:
Using a ruler and your fettling knife, cut a clean rectangle from the slab. The length should be the circumference of your chosen can mold plus a little overlap, and the height should be about 4-5 inches. -
Construct the base:
Cut a separate circle from the remaining slab that matches the diameter of your can mold; this will serve as the floor of your lantern. -
Wrap the form:
Wrap your rectangular slab around the can or cylinder form. If you wrap the can in a sheet of newspaper first, the clay will slide off much easier later. -
Join the seam:
Where the two ends of the rectangle meet, score the edges (scratch them up) and apply a dab of slip. Press them firmly together to create a seamless cylinder. -
Attach the base:
Score and slip the bottom edge of your cylinder and the outer edge of your circular base. Press the cylinder onto the base. -
Smooth the connections:
Use your finger or a modeling tool to blend the clay at the seams inside and out until the join lines disappear.
Step 2: Carving and Cutouts
-
Initial drying:
Let the cylinder sit until it is leather-hard. It needs to be firm enough to hold its shape when you cut into it, but soft enough to carve easily. -
Mark the design:
Lightly trace your design onto the clay surface with a needle tool. Plan for a large arched window on one side and a flower motif on another. -
Cut the arch:
Carefully slice out the arched window using your craft knife. Remove the piece of clay and smooth the raw edges with a damp finger immediately. -
Create the flower:
For the flower petals, use a small teardrop cutter or carefully freehand cut teardrop shapes radiating from a center point. Leave enough negative space between cuts so the wall remains strong. -
Add dotted details:
Use a small circular punch, a drill bit twirled by hand, or even a sturdy straw to punch clean holes around the top rim and along the borders of your arch and flower. -
Refine the rim:
Run a damp sponge along the top rim of the cylinder to round it off slightly, removing any sharp angles. -
Clean the cutouts:
I usually go back in with a small brush or slightly damp sponge to smooth inside every cutout hole, ensuring no sharp burrs remain that could snag cloth later.
Collapsing Walls?
If the clay slumps while cutting, it’s too wet. Stop immediately, cover the cut edges with plastic, and let the rest air dry for an hour before trying again.
Step 3: Finishing and Firing
-
Slow drying:
Cover the piece loosely with plastic and let it dry very slowly over several days to prevent warping. -
Bisque fire:
Once bone dry, fire the piece in a kiln to bisque temperature (usually cone 04 for terracotta). -
Final look:
Since this is a raw terracotta look, you don’t need to glaze it. However, you can apply a clear matte glaze if you want to seal the surface without changing the color. -
Final firing:
If you applied glaze, fire it a second time. If leaving raw, your bisqued piece is ready to hold a tealight.
Scent Diffuser Hack
Flatten the top rim slightly and place a small heat-safe glass dish on top. The heat from the candle below will warm essential oils in the dish.
Now you have a warm, custom vessel ready to brighten up any corner of your home