Whenever I’m stuck on what to make next, I come back to relief tile work because it’s basically a tiny canvas with instant drama from light and shadow. Here are my favorite relief tile ideas—starting with the classics everyone loves, then drifting into the weirder, bolder stuff once you’re warmed up.
Classic Botanical Sprigs
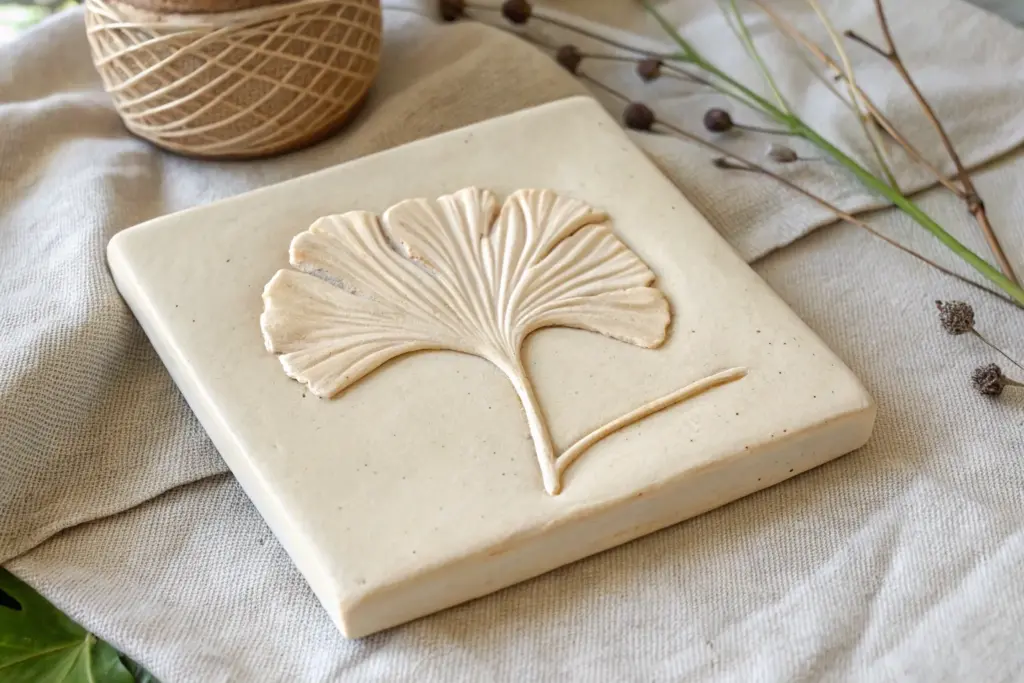
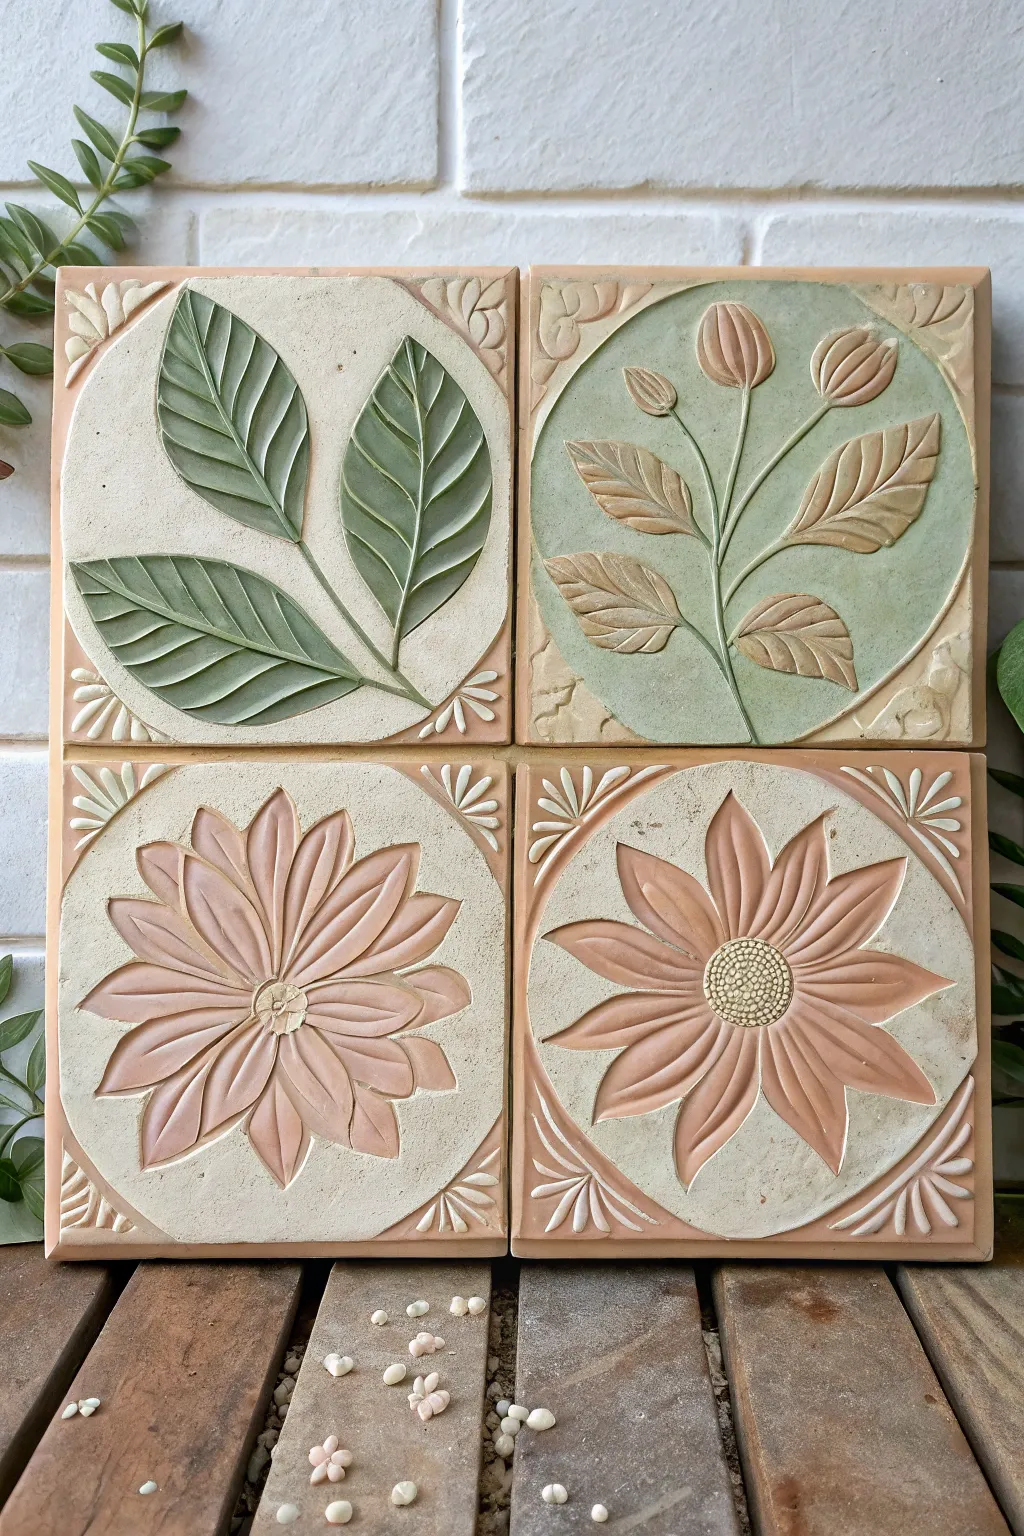
Capture the delicate details of nature with this elegant relief tile project that mimics the look of classic creamware ceramics. By pressing botanical sprigs into clay and casting the impression, you’ll create a piece with stunning, raised textures and a soft, matte finish.
Step-by-Step
Materials
- White or cream-colored air-dry clay (or polymer clay)
- Plaster of Paris or casting stone powder
- Rolling pin
- Square cookie cutter or knife and ruler
- Fresh or faux botanical sprigs (ferns, small flowers, seed heads)
- Tweezers
- Fine-grit sandpaper (320-400 grit)
- Matte finish sealant spray
- Disposable mixing cup and stick
- Mold release agent (or cooking spray)
- Cardboard or plastic strips (for mold walls)
Step 1: Creating the Negative
-
Prepare your clay base:
Begin by rolling out a smooth slab of your chosen clay on a flat, non-stick surface. Aim for a thickness of about 1/2 inch to ensure it’s sturdy enough to take a deep impression. -
Size the tile:
Use a square cutter or a ruler and knife to define the boundaries of your tile. Don’t cut it out completely yet; just mark the square area so you know where to arrange your composition. -
Select your botanicals:
Choose sprigs that are relatively flat but have distinct textures. Ferns, as shown in the reference, work beautifully, as do small daisy-like flowers and seed pods. I find that sturdy, slightly dried stems press cleaner than very soft, fresh ones. -
Arrange the composition:
Lay your chosen plants gently onto the clay square. Create a balanced design, perhaps centering a large fern leaf and flanking it with smaller floral stems and seed heads for symmetry. -
Press the design:
Using the rolling pin, firmly roll over the plants once. Apply even, heavy pressure to embed them deep into the clay without shifting them. You want a crisp, deep impression. -
Remove the vegetation:
carefully lift the plant material out of the clay. Use tweezers to pluck out any tiny bits of leaves or seeds that get stuck. This leaves you with a ‘negative’ mold. -
Build the walls:
Construct a barrier around your clay square using plastic strips or cardboard taped securely at the corners. Press these walls slightly into the excess clay outside your square to create a seal against leaks.
Step 2: Casting the Relief
-
Apply release agent:
Lightly mist the clay mold and the interior walls with a mold release spray or a very light coat of cooking spray. This acts as a barrier so your plaster doesn’t fuse to the clay. -
Mix the casting medium:
In a disposable cup, mix your Plaster of Paris or casting stone with water according to the package instructions. Aim for a consistency distinct like heavy cream or pancake batter—pourable but not watery. -
Tap out bubbles:
Tap the mixing cup on the table a few times to force air bubbles to the surface before you pour. -
Pour the cast:
Slowly pour the mixture into your walled mold area. Pour it into a corner and let it flow over the impressions naturally to minimize trapped air. Fill to a depth of roughly 1/2 to 3/4 inch. -
Settle the mixture:
Gently wiggle the table or tap the sides of the mold walls. This vibration helps the liquid settle into the finest veins of the leaf impressions. -
Initial cure:
Let the plaster sit undisturbed. Depending on the brand, this could be 30 minutes to an hour. It will heat up as it sets; wait until it is cool to the touch and hard.
Sticky Situation?
If clay sticks in the fine veins of your cast, let the clay dry completely on the plaster. It will shrink and often flake right off with a stiff toothbrush.
Step 3: Revealing and Refining
-
Demold the tile:
Gently peel away the mold walls. Carefully peel the clay layer off the hardened plaster. The clay needs to be soft enough to pull away; if it dried out, you may need to chip it off. -
Clean the details:
Use a needle tool or stiff brush to clean out any stubborn bits of clay stuck in the deep crevasses of the relief design. -
Trim the edges:
The edges might be sharp or uneven from the pouring process. While the plaster is still slightly ‘green’ (damp but hard), use a craft knife to scrape the edges square. -
Sand for smoothness:
Once fully dry (usually 24 hours), lightly sand the flat borders and the top surface of the relief with fine-grit sandpaper to achieve a porcelain-smooth finish. -
Antique the surface (Optional):
If you want the details to pop more, you can brush on a diluted brownish wash and wipe it back immediately, leaving color only in the recesses. However, for the clean look in the photo, leave it natural. -
Seal the artwork:
Spray the finished tile with a clear matte sealant. This protects the porous plaster from dust and fingerprints without adding an artificial sheen.
Pro Tip: No Bubbles
After pouring the plaster, run a toothpick through the mixture directly over the deep floral impressions to manually release any trapped air bubbles.
Now you have a timeless botanical relief ready to be displayed on a shelf or mounted as wall art


Floral Medallion in Low Relief
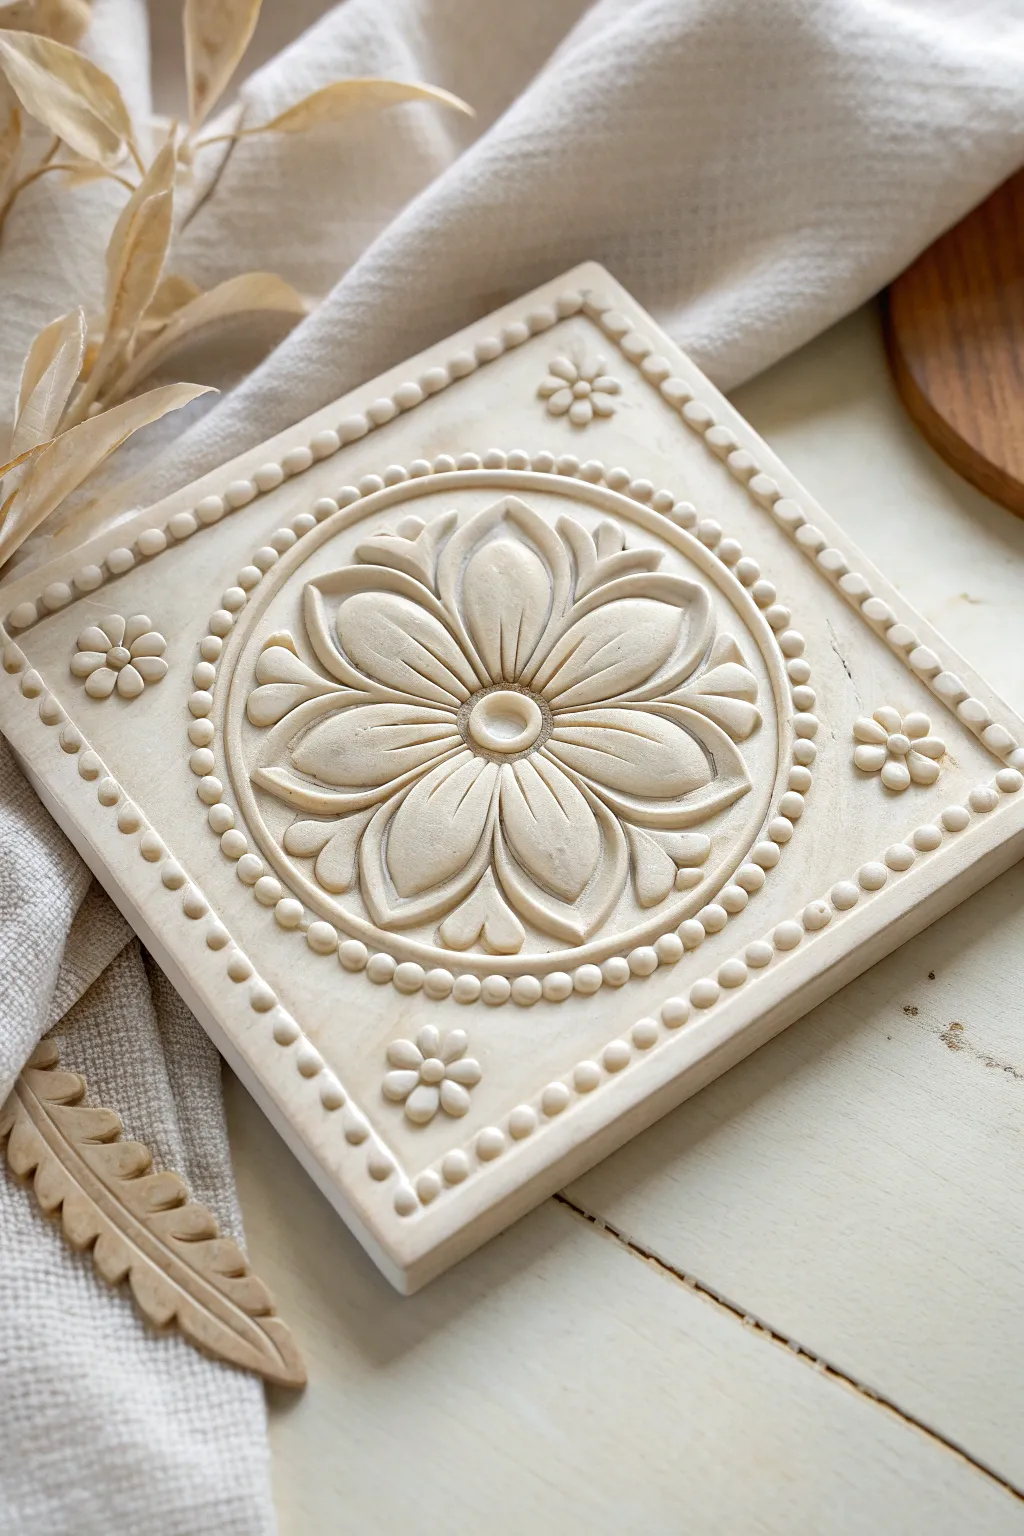
This elegant relief tile features a classic floral medallion design carved into soft, creamy soapstone or alabaster. The monochromatic, low-relief style mimics architectural molding, making it a timeless decorative piece for a mantel or shelf.
Detailed Instructions
Materials
- Square soapstone or alabaster block (approx. 6×6 inches)
- Pencil and ruler
- Carbon transfer paper
- V-gouge carving tool
- U-gouge carving tools (small and medium)
- Flat chisel
- Fine-grit sandpaper (220, 400, 600 grit)
- Polishing wax or oil
- Soft cloth for buffing
- Small stiff brush
Step 1: Preparation and Transfer
-
Surface Prep:
Begin by ensuring the top surface of your stone block is perfectly flat. Sand it gently with 220-grit sandpaper if there are any rough saw marks from the cutting process. -
Mark the Border:
Using your ruler and pencil, lightly draw a square border about half an inch from the edge of the tile. This will be the guideline for your outer beaded trim. -
Center the Design:
Find the exact center of the square by lightly marking diagonal lines from corner to corner. Draw your large circle for the medallion border using a compass centered on the intersection. -
Draft the Floral Motif:
Sketch the eight-petaled flower inside the circle. Start with a small central circle, then radiate eight main petals outward. Add smaller secondary petals or leaves in the gaps between the main petals. -
Corner details:
In the four corners outside the central circle, sketch simple five-petaled flower motifs to balance the negative space.
Step 2: Rough Carving
-
Outline the Shapes:
Soften your stone slightly with a damp sponge if needed. Use a V-gouge to trace all your pencil lines, cutting a shallow groove around the main circle, the petals, and the corner flowers. -
Lower the Background:
Using a flat chisel, carefully remove the stone in the negative spaces between the central medallion and the outer square border. You only need to go down about 1/8th of an inch to create depth. -
Define the Petals:
Switch to a medium U-gouge. Carve into the center of each main petal to create a concave depression, leaving the edges raised. This gives the flower its puffed, three-dimensional look. -
Carve the Inner Circle:
Use a small U-gouge to carve the channel between the floral design and the beaded circle border. Keep this channel consistent in depth.
Mastering the Beads
To get uniform beads, mark the spacing with a ruler before cutting. Use a rounded file to shape each bead individually after the rough cuts are made for perfect spheres.
Step 3: Detailing and Beading
-
Refine the Petal Veins:
Use a sharp V-gouge to carve the singular central vein into each of the eight main petals. -
Create the Beaded Borders:
For the ‘pearls’ or beads around the circle and the outer square edge, start by carving a continuous ridge. Then, use a small U-gouge to make perpendicular cuts at regular intervals, rounding off each segment into a small bead shape. -
Sculpt the Corner Flowers:
Carve the small corner flowers using a chip-carving technique. Push the knife in at an angle to remove small triangles of stone, creating distinct petal separations. -
Smooth the Background:
Take a moment to use a small flat chisel or scraper to smooth out the recessed background areas, removing any distractingly deep tool marks.
Stone Cracking?
If the stone chips or cracks while carving, you are likely forcing the tool. Let the tool do the work with lighter, shorter strokes rather than deep gouges.
Step 4: Finishing
-
Dry Brush Cleaning:
Use a stiff brush to vigorously sweep away all stone dust from the crevices, especially around the beaded trim. -
Sanding:
Fold a piece of 400-grit sandpaper into a small point. Gently sand the high points of the petals and beads. I find this really helps soften the sharp carving edges into that buttery look shown in the photo. -
Final Polish:
Move to 600-grit sandpaper for a satin finish. Wipe the stone clean with a damp cloth. -
Sealing:
Apply a thin layer of polishing wax or mineral oil with a soft cloth. Buff it gently to bring out a subtle sheen and protect the surface from oils.
Place your finished relief tile on a small easel or embed it into a tiled wall for a custom architectural touch


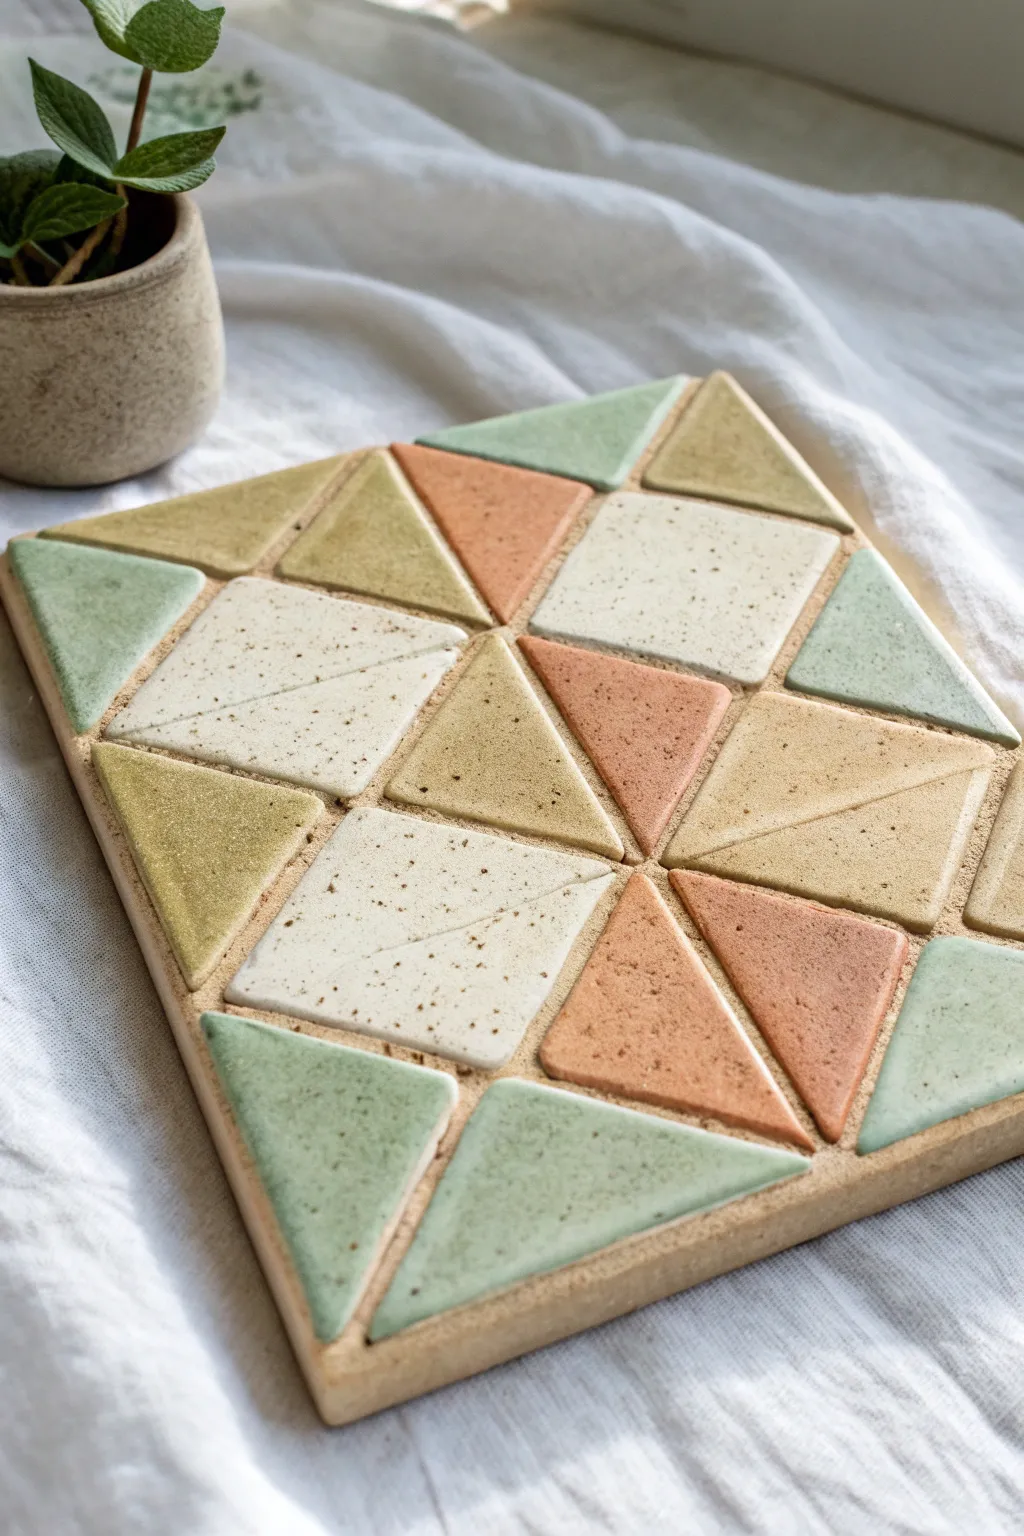
Geometric Starburst Relief Pattern
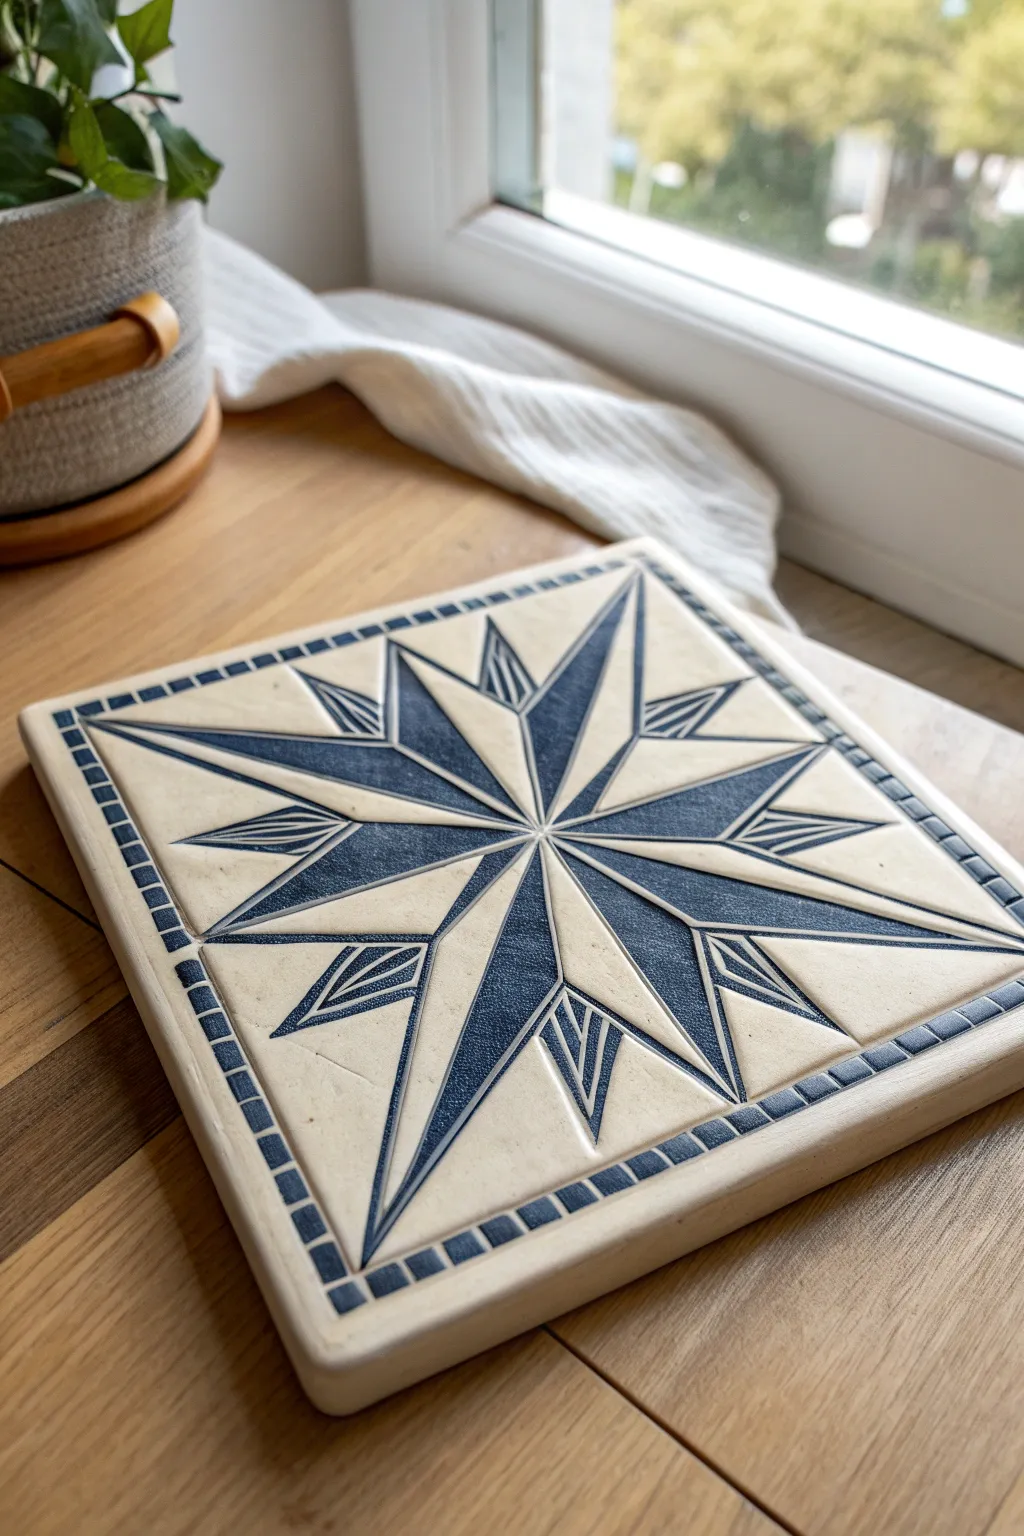
This striking relief tile captures the timeless elegance of a compass rose with deep blue inlays against a crisp cream background. By carving into soft clay and carefully applying glaze, you will create a dimensional piece of art that feels both modern and historic.
Step-by-Step Guide
Materials
- White or cream stoneware clay (fine grog)
- Roller guide sticks (approx. 1/2 inch or 1.2 cm)
- Rolling pin
- Carving tools (ribbon tool and needle tool)
- Fine-point sgraffito tool or V-gouge
- Ruler and protractor
- Sponge
- Cobalt blue underglaze
- Clear transparent glaze
- Fine detail paintbrush
- Wax resist (optional)
Step 1: Preparing the Slab
-
Roll the clay:
Begin by wedging your clay to remove air bubbles. Place the clay between two guide sticks on a canvas board and roll it out until it is perfectly flat and uniform in thickness. -
Cut the square:
Using a sharp fettling knife and a ruler, cut a perfect square from your slab. A 6×6 inch (15×15 cm) square is a manageable size for this level of detail. -
Smooth the surface:
Wipe the surface gently with a damp sponge or a soft rib tool to remove canvas texture and create a pristine, smooth canvas for your carving. -
Establish the border:
Lightly sketch a border about 1/4 inch from the edge using a needle tool. Create small, evenly spaced tick marks within this border to define the outer ‘rope’ or ‘mosaic’ edge later.
Step 2: Drafting the Design
-
Find the center:
Use a ruler to lightly draw diagonal lines from corner to corner to find the exact center of your tile. -
Draft the main axes:
Draw vertical and horizontal lines intersecting at the center point, creating a cross. Then, bisect these quadrants with diagonal lines. -
Outline the large star:
Mark a point on each of the eight main radiating lines, about an inch from the border. Connect these points to the center and to the inner intersections to form an eight-pointed star shape. -
Add the secondary points:
Sketch smaller, thinner diamond shapes between the main star points. These should be shorter, extending only about halfway to the border. -
Detail the geometry:
Inside the smaller secondary diamonds, draw internal lines to create the segmented look seen in the reference image.
Crisp Lines
Wait until the clay is leather-hard before doing your final deep carving. If the clay is too wet, the tool will drag and create ragged edges instead of sharp geometric lines.
Step 3: Carving the Relief
-
Carve the main lines:
Using a V-gouge or fine ribbon tool, carve along the lines of your star. I like to keep the tool at a shallow angle to create clean, sharp channels without digging too deep. -
Create the border texture:
Carve out the small squares or rectangles along the perimeter border you marked earlier, leaving raised ridges between them to mimic a mosaic edge. -
Recess the background (optional):
If you want the star to stand out more, you can gently shave away a thin layer of clay from the negative space triangles between the star points, though simple line carving works too. -
Clean up burrs:
Let the clay dry to a leather-hard state. Once firm, use a soft brush or a dry sponge to gently sweep away any clay crumbs or sharp burrs left from carving. -
Bisque fire:
Allow the tile to dry slowly between plastic sheets to prevent warping. Once bone dry, fire the tile to cone 04 (or your clay’s bisque temperature).
Warping Woes
If your tile corners curl up while drying, flip the tile over onto a piece of drywall or plasterboard and weigh it down gently with a small bag of sand for a day.
Step 4: Glazing and Finishing
-
Clean the bisque:
Wipe the fired tile with a damp sponge to remove any kiln dust ensuring the glaze adheres properly. -
Apply blue underglaze:
Using a fine detail brush, flood the carved channels and specific geometric sections with cobalt blue underglaze. Following the photo, fill alternating sections of the star points to create depth. -
Fill the border:
Carefully paint the recessed squares of the border with the same blue underglaze. -
Clean the high points:
If you accidentally got blue on the raised white areas, use a damp, clean sponge to wipe the surface lightly. The color will stay in the recesses but wipe off the high points. -
Apply clear glaze:
Dip or brush a coat of clear transparent glaze over the entire face of the tile to seal the clay and make the blue pop. -
Final firing:
Fire the tile a second time to the maturation temperature of your clay and glaze (typically cone 5 or 6 for stoneware).
Display your finished tile on a stand or mount it as a focal point in a backsplash to enjoy that classic craftsmanship daily


Arabesque Scrollwork Tile
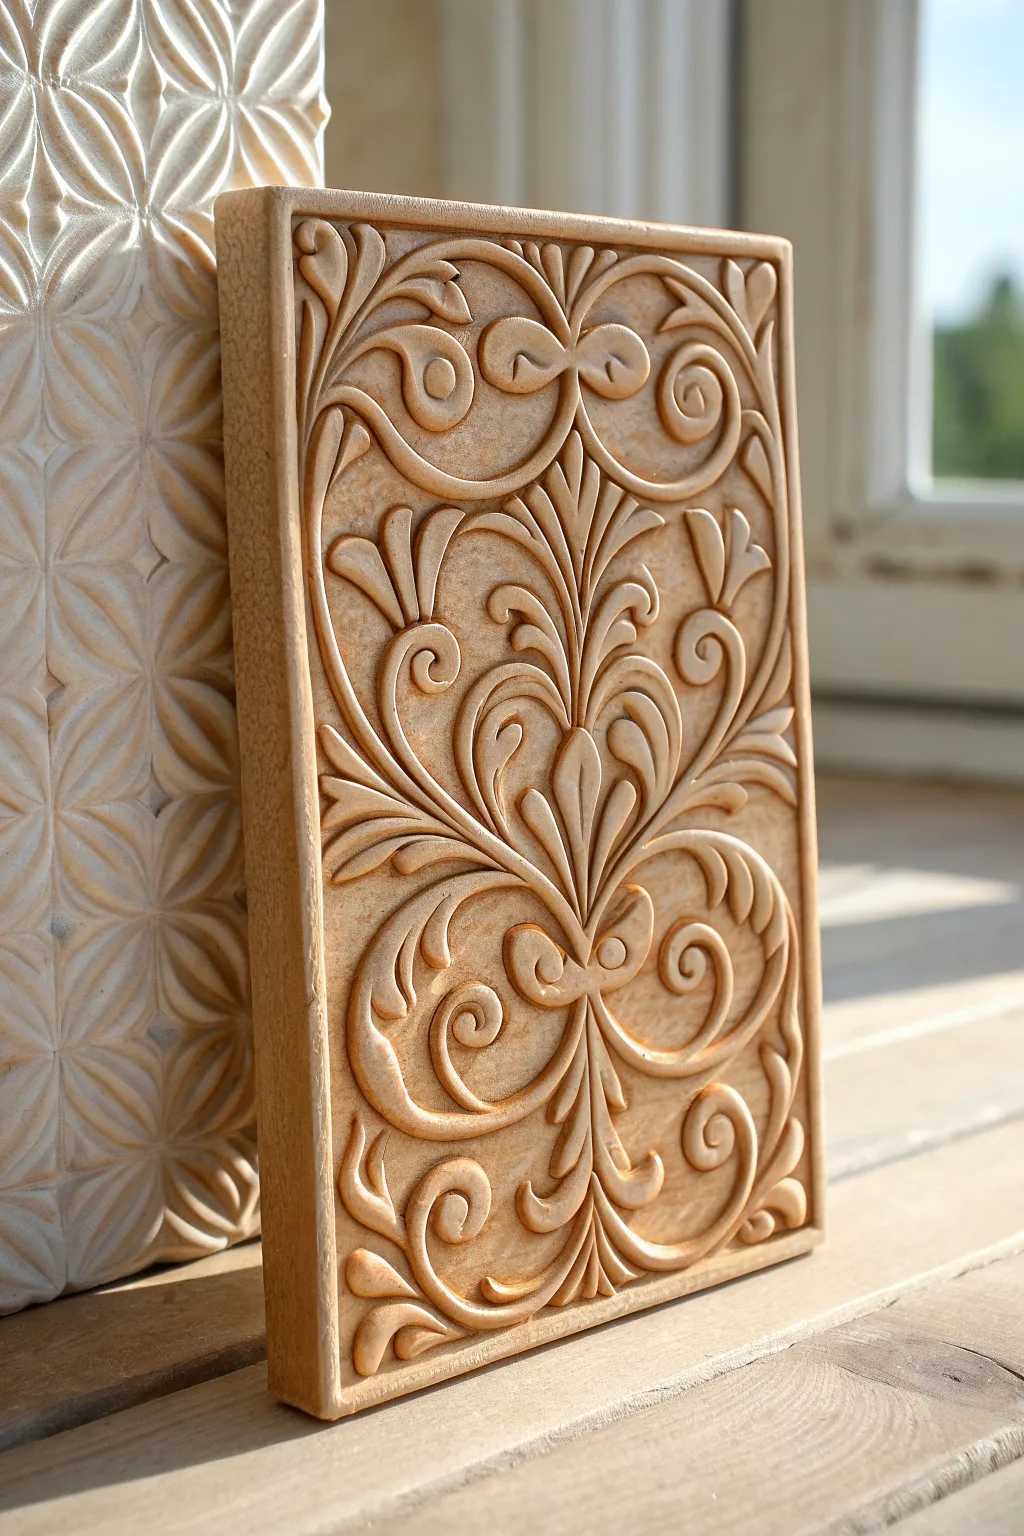
Capture the timeless beauty of classical ornamentation with this intricate relief tile project. Featuring symmetrical scrollwork and delicate floral motifs, this piece mimics the look of carved sandstone or light wood, adding a sophisticated architectural detail to any space.
Step-by-Step
Materials
- High-density urethane foam board or basswood block (approx. 6×10 inches)
- Pencil and transfer paper
- Printed scrollwork pattern
- V-gouge carved tool (small)
- U-gouge carving tools (assorted sizes)
- Flat chisel
- Detail carving knife or X-Acto knife
- Sandpaper (220, 320, and 400 grit)
- Pre-stain wood conditioner (if using wood)
- Light maple gel stain or antiquing wax
- Clean lint-free rags
- Soft bristle brush
- Clear matte polyurethane spray
Step 1: Preparation and Transfer
-
Prepare the surface:
Begin by ensuring your block is perfectly smooth. Sand the surface with 220-grit sandpaper to remove any manufacturing marks or rough grain. Wipe away all dust with a tack cloth or slightly damp rag. -
Transfer the design:
Tape your printed scrollwork pattern securely to the block. Slide a sheet of transfer paper underneath. Trace the lines firmly with a pencil, paying close attention to the symmetrical curves and the central floral spine. -
Reinforce the lines:
Once transferred, lift the paper and go over faint lines with a pencil directly on the material. Clear guidelines are crucial for intricate relief work.
Step 2: Establishing Levels
-
Outline deep cuts:
Using a V-gouge, carefully carve along the outlines of the main scroll shapes. I like to keep my cuts shallow at first, establishing a ‘stop cut’ barrier between the pattern and the background. -
Lower the background:
Use a wider U-gouge to remove material from the negative negative spaces around the scrolls. Aim to lower the background by about 3-4mm, leaving the decorative pattern raised. -
Flatten the background:
Refine the lowered background areas with a flat chisel or a small scraper. The goal is to make the background relatively flat and uniform so the raised design pops.
Fixing Slips
Did your gouge slip and gauge the background? Don’t panic. Use a tiny bit of wood filler, let it dry, sand it flush, and re-carve the texture before staining.
Step 3: Detailing the Relief
-
Round the edges:
Switch to a small U-gouge or a detail knife. Gently round over the sharp 90-degree edges of the raised scrolls. This creates that soft, fluid look rather than a blocky, stamped appearance. -
Carve the internal details:
Carve the interior lines of the leaves and scrolls using a fine V-tool. These sweeping lines inside the shapes give the design its flow and depth. -
Deepen the intersections:
Where stems overlap or curlicues meet, deepen the cut slightly where the bottom element goes ‘under.’ This undercut creates a shadow that enhances the illusion of weaving. -
Refine the border:
Use a straight chisel to clean up the raised border edge of the tile. A crisp, straight frame contrasts beautifully with the organic curves inside.
Depth Perception
To make the 3D effect pop, stain the background slightly darker than the raised pattern. You can water down acrylic paint for a subtle wash effect.
Step 4: Finishing and Antiquing
-
Initial sanding:
Fold a small piece of 320-grit sandpaper to sand the raised surfaces. Be gentle to avoid flattening your carefully rounded details. -
Detail sanding:
For the tight nooks inside the scrolls, I sometimes glue a bit of sandpaper to a toothpick or skewer to reach deep crevices without damaging the surrounding areas. -
Apply conditioner:
If using wood, apply a pre-stain conditioner now. This prevents blotchiness and ensures the finish absorbs evenly. -
Stain application:
Apply a light maple gel stain or a brown antiquing wax using a soft brush. Work it into all the deep crevices and background areas. -
Wipe back:
Immediately wipe the high points of the relief with a clean rag. This leaves the dark stain in the recesses (shadows) while highlighting the raised curves in a lighter tone. -
Seal the piece:
Once the stain is fully dry, finish with two light coats of clear matte polyurethane spray to protect the carving without making it look plastic.
Now you have a stunning relief tile that looks like a museum artifact ready for display.

The Complete Guide to Pottery Troubleshooting
Uncover the most common ceramic mistakes—from cracking clay to failed glazes—and learn how to fix them fast.
Fish Scale Overlap Relief
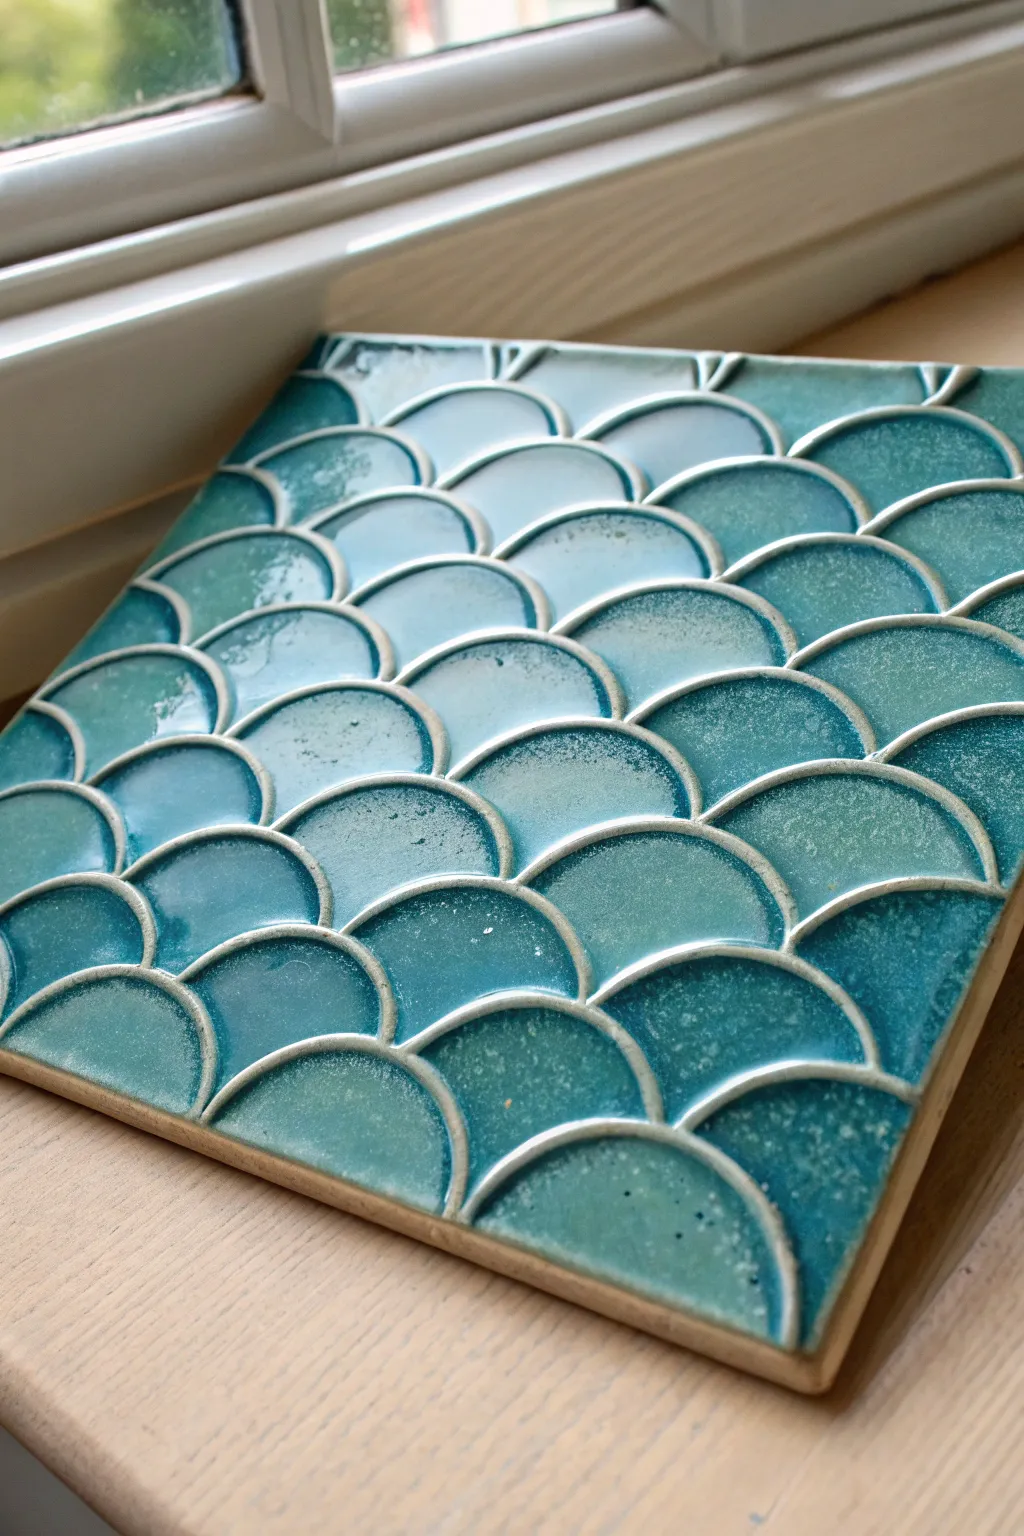
This project captures the shimmering beauty of ocean waves through a classic fish scale pattern, rendered in stunning turquoise relief. The reactive glaze technique creates depth as the color pools in the recesses and breaks over the raised edges, resulting in a professional-looking ceramic tile.
Step-by-Step Guide
Materials
- White or light-colored stoneware clay (low-fire or mid-fire)
- Square cookie cutter (approx. 6×6 inches) or ruler and knife
- Small round cookie cutter or a custom U-shaped clay cutter
- Rolling pin
- Wooden guide strips (1/4 inch thick)
- Slip (clay mixed with water)
- Scoring tool or needle tool
- Canvas work surface
- Soft sponge
- Turquoise reactive glaze (cone 5/6 recommended for best pooling effects)
- Clean paintbrush
- Kiln access
Step 1: Base and Scale Preparation
-
Roll the slab:
Begin by rolling out your clay on a canvas surface. Use wooden guide strips on either side of the clay to ensure an even thickness of about 1/4 inch across the entire slab to prevent warping later. -
Cut the base:
Using your square cutter or a ruler and knife, cut out the base of your tile. A standard 6×6 inch square works well, but feel free to adjust the size to your preference, keeping in mind clay shrinkage. -
Roll scale clay:
Roll out a second, slightly thinner slab of clay (about 3/16 inch) for the scales. This slight difference in thickness helps keep the overall weight down while maintaining the relief effect. -
Cut the scales:
Use a small round cutter to punch out numerous circles. Cut each circle in half to create semi-circles, or use a U-shaped cutter if you have one available. You will need roughly 40-50 scales for a standard tile. -
Texture the scales:
Smooth the cut edges of each scale with a damp finger to remove any sharp burrs. I prefer to gently press the curved edge slightly thinner to make the overlap look more delicate.
Step 2: Assembling the Relief
-
Plan the layout:
Lightly mark a straight horizontal line near the top edge of your base tile. This will guide your first row of scales. -
Attach the first row:
Score the back of your first row of scales and the corresponding area on the tile base. Apply a small amount of slip and press the scales down firmly, aligning the flat tops with the top edge of the tile. -
Start the overlap:
For the second row, position the scales so the center of each curve sits directly below the meeting point of the two scales above it. This creates the classic offset ‘fish scale’ or scallop pattern. -
Score and slip continuously:
Continue adding rows downwards. Ensure you score and slip every single attachment point aggressively; trapped air or weak bonds can cause scales to pop off during firing. -
Trim the edges:
Once all rows are attached and the tile is covered, flip the tile over carefully. Use a sharp knife to trim any excess clay from the scales that overhang the square edges of the base. -
Dry slowly:
Place the finished tile between two pieces of drywall or lightly cover with plastic to ensure slow, even drying. Uneven drying is the enemy here and will cause the corners to curl up.
Warping Woes
If your tile corners curl up while drying, place a weighted wooden board on top of the tile (sandwiching it with paper) for the first 24 hours of drying to keep it perfectly flat.
Step 3: Glazing and Firing
-
Bisque fire:
Once bone dry, fire the tile in the kiln to a bisque temperature (usually Cone 04). This hardens the clay and makes it porous enough to accept glaze. -
Clean the bisque:
Wipe the bisque-fired tile with a damp sponge to remove any kiln dust. This step is crucial for preventing pinholes in your final glaze finish. -
Select the glaze:
Choose a teal or turquoise glaze labeled as ‘translucent’ or ‘reactive.’ These glazes are designed to break over texture, meaning they will be thinner and lighter on the raised ridges and pool darker in the crevices. -
Apply the glaze:
Brush on 2-3 coats of glaze, allowing each coat to dry to the touch before adding the next. Ensure the glaze gets deep into the overlapping crevices, as that’s where the beautiful dark pooling happens. -
Wipe the edges:
Use a damp sponge to wipe any glaze off the very bottom and side edges of the tile to prevent it from fusing to the kiln shelf. -
Final fire:
Fire the tile to the temperature specified by your glaze manufacturer (typically Cone 5 or 6 for stoneware). Allow the kiln to cool completely before opening to discover the deep, oceanic colors.
Pro Tip: Surface Depth
Before the final firing, gently wipe a damp sponge over the highest raised edges of the dried glaze. This thins the application slightly, accentuating the white ‘break’ lines.
Once cooled, your relief tile serves as a stunning coaster or a striking component of a larger mosaic wall installation
Wave Lines and Ocean Current Swirls
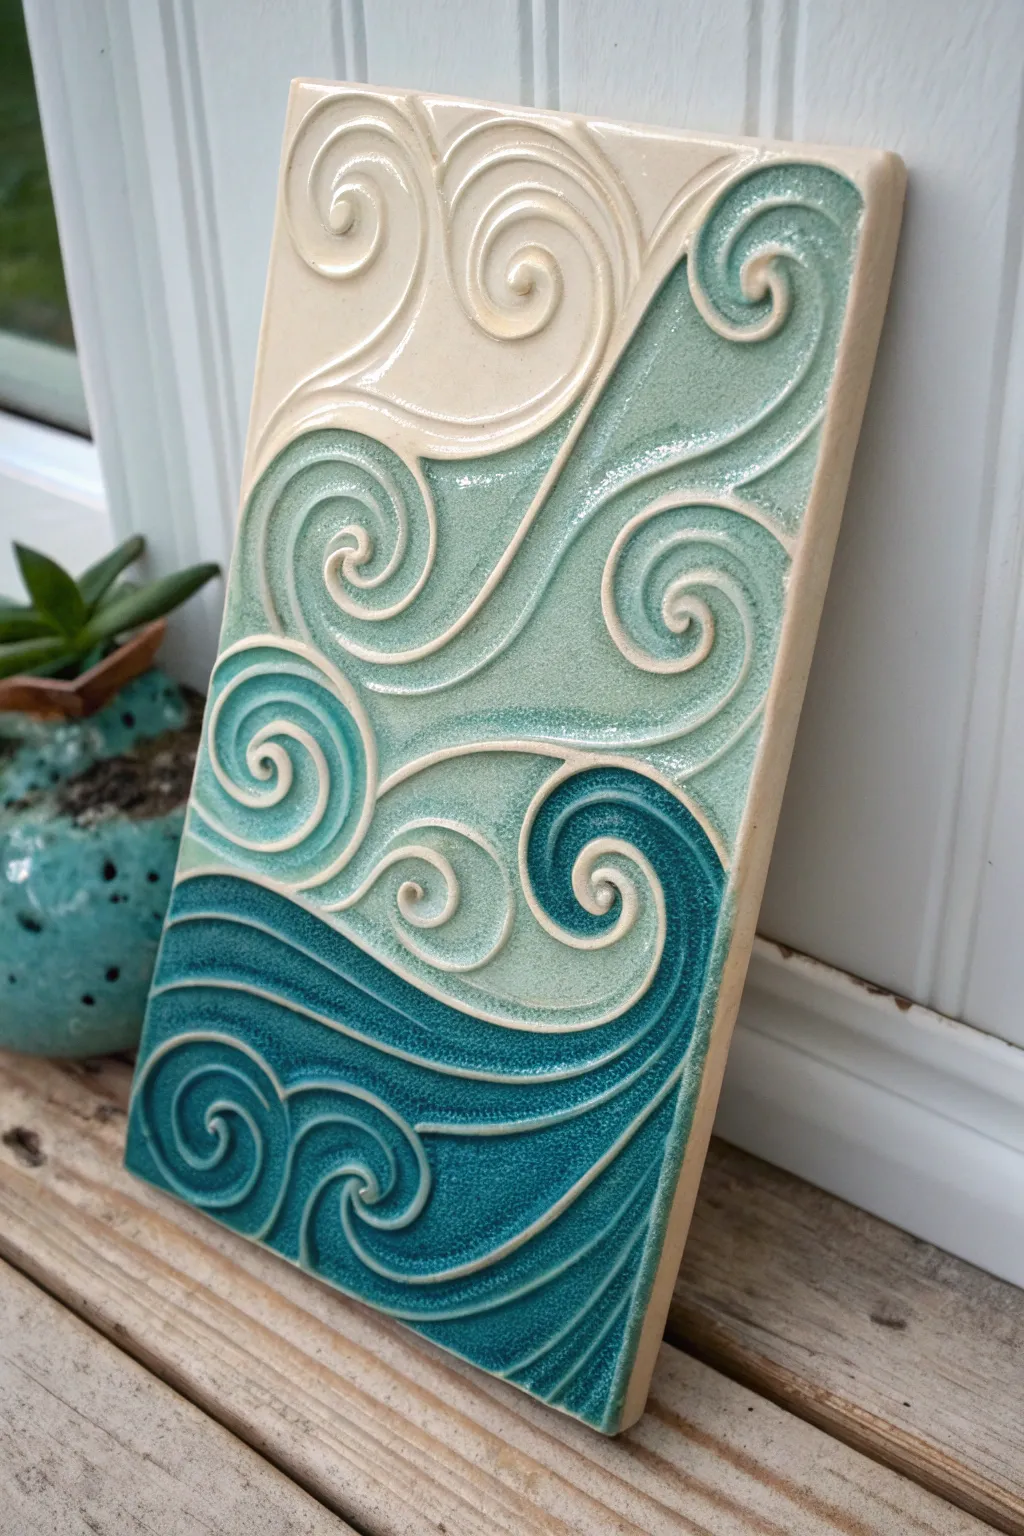
Capture the rhythmic motion of the ocean with this stunning handmade relief tile. Featuring a mesmerizing gradient of teal glazes over raised clay coils, this project combines sculpture and color theory for a professional-looking ceramic finish.
How-To Guide
Materials
- White stoneware clay or clay suitable for relief carving
- Rolling pin and guide sticks (approx. 1/4 inch thick)
- Needle tool or fettling knife
- Loop carving tools (various sizes)
- Modeling tool (rounded tip)
- Slip (liquid clay)
- Low-fire glazes: Clear/White, Light Teal/Celadon, Deep Turquoise/Petrol Blue
- Soft fan brush and fine detail brush
- Sponge
- Kiln access
Step 1: Shaping the Foundation
-
Prepare the slab:
Begin by rolling out your white stoneware clay into an even slab using your guide sticks. Aim for a thickness of about 1/4 to 3/8 inch. Cut out a rectangular tile shape, roughly 4×8 inches, using a fettling knife and a ruler for straight edges. -
Sketch the flow:
Lightly trace your wave design onto the leather-hard clay surface with a needle tool. Focus on creating large, sweeping ‘S’ curves that interlock, mimicking the churning of ocean currents. Don’t dig too deep; these are just guidelines. -
Add raised elements:
Roll thin coils of fresh clay. Score the lines you traced on the slab and apply a small amount of slip. Gently press the coils onto the scored lines to build up the ‘crests’ of the waves. -
Sculpt the relief:
Use a modeling tool to smooth the edges of the coils onto the slab, integrating them so they look like raised ripples rather than stuck-on worms. You want a distinct ridge, but a smooth transition at the base. -
Carve the negative space:
Using a loop tool, gently carve away clay in the areas between the raised swirls. This emphasizes the height difference. I find carving slightly deeper near the raised lines makes the relief pop more dramatically. -
Refine the swirls:
Go back in with a damp sponge or your finger to smooth any rough carving marks or sharp burrs. Pay special attention to the spiral centers; they should be clean and smooth to allow the glaze to pool beautifully later. -
Dry slowly:
Place the tile between two pieces of drywall or under loose plastic to dry slowly. This is crucial for flat tiles to prevent warping. Once bone dry, bisque fire the tile according to your clay body’s specifications.
Glaze Pooling
Choose glazes marked as ‘breaking’ or ‘semi-transparent’. These will naturally pool darker in the carved recesses and thinner on the ridges, enhancing the 3D effect without extra painting.
Step 2: Glazing the Gradient
-
Plan the zones:
Visualize your tile in three horizontal sections. The top third will be the lightest, the middle moderate teal, and the bottom the deepest turquoise. Wipe down the bisque tile with a damp sponge to remove dust. -
Apply the base white:
Start at the top. Apply a creamy white or clear glaze to the upper swirls. Let this glaze feather down slightly into the middle section to help with blending later. -
Layer the mid-tone:
Apply your light teal or celadon glaze to the middle section. Where it meets the white section, overlap the strokes slightly. The texture of the relief will naturally help break up the transition line. -
Deepen the depths:
Paint the bottom third with the deep turquoise or petrol blue glaze. Be generous here; darker colors look richer when thick. -
Create the gradient:
While the glazes are still damp, use a clean, slightly moist brush to feather the boundaries where the colors meet. Don’t over-mix, but soften the hard edges. -
Highlight the crests:
Here is a trick: Take a damp sponge and very lightly wipe the very tops of the raised scrolling lines across the teal and blue sections. This reveals a bit of the light clay body underneath, imitating sea foam and defining the drawing. -
Clean the edges:
Ensure the sides and back of your tile are free of glaze drips. Use a sponge to wipe back approximately 1/8 inch from the bottom edge to prevent sticking to the kiln shelf. -
Final fire:
Fire the tile again to the temperature required by your specific glazes (typically Cone 04-06 for low fire or Cone 5-6 for mid-range). Allow the kiln to cool completely before opening to avoid thermal shock.
Warping Woes?
If your tile curls up at the edges while drying, flip it over and gently weight it down with a heavy board sandwiched between newspaper. Dry it much slower next time.
Once cooled, mount your ceramic artwork in a frame or display it on a stand to bring a splash of the ocean into your home


What Really Happens Inside the Kiln
Learn how time and temperature work together inside the kiln to transform clay into durable ceramic.
Sea Turtle in Layered Relief
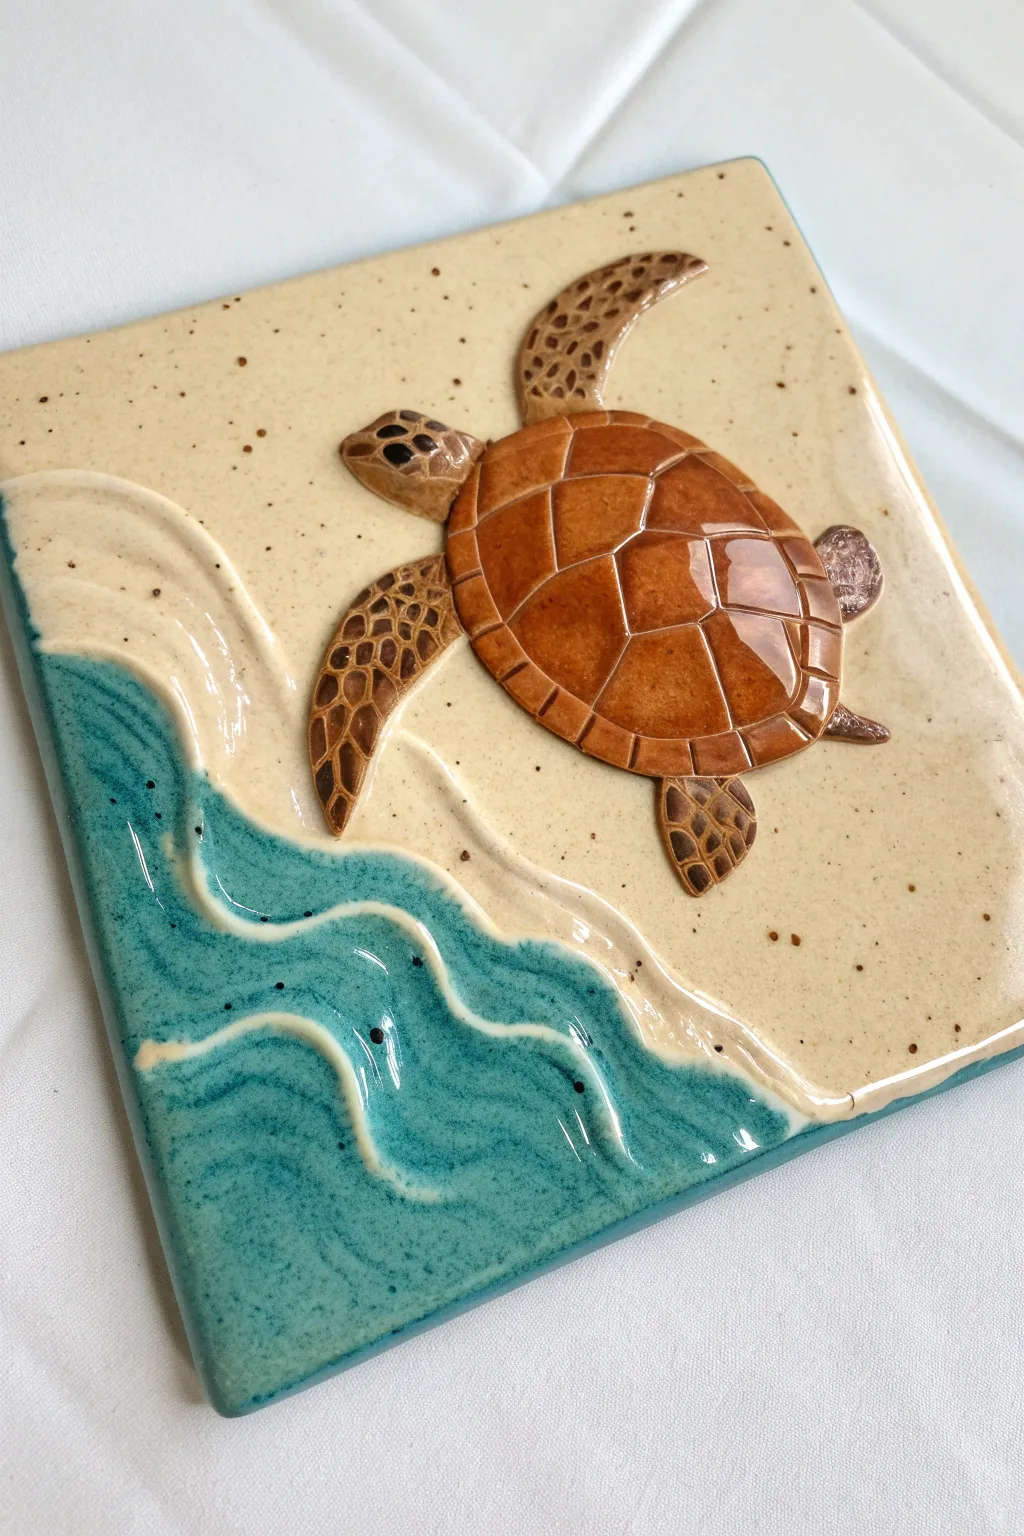
Capture the gentle movement of the ocean with this beautiful ceramic relief tile featuring a detailed sea turtle emerging from the surf. By layering vibrant glazes over sculptured clay, you’ll create a stunning contrast between the glossy amber shell and the cool, rippled teal waves.
Step-by-Step Guide
Materials
- Low-fire white earthenware clay slab (approx. 6×6 inches, 1/2 inch thick)
- Needle tool
- Loop tools (small and medium)
- Detailing tool or small wooden skewer
- Slip (clay slurry) and scoring tool
- Rolling pin
- Canvas mat or slab roller
- Underglazes: Dark brown, mocha, sand/tan
- Gloss glazes: Turquoise/teal (translucent), amber/honey (translucent), clear gloss
- Small soft paintbrushes
- Sponge
Step 1: Sculpting the Foundation
-
Prepare the Slab:
Roll out a slab of white earthenware clay to a consistent half-inch thickness. Cut it into a precise square, roughly 6×6 inches, smoothing the edges with a damp sponge. -
Sketch the Design:
Lightly trace your design directly onto the leather-hard clay using a needle tool. Draw the curved line separating the sand from the water, and outline the general oval shape and position of the turtle. -
Establish the Water Line:
Using a loop tool, gently carve away a small amount of clay from the ‘water’ side of the line to create a lower elevation than the ‘sand’ side. This establishes the first level of relief. -
Model the Waves:
Roll thin coils of clay and attach them along the water line to create raised wave crests. Use your thumb to smear the clay downward into the water section, blending it seamlessly while leaving the top edge distinct and raised. -
Add Texture to the Water:
With a modeling tool or your fingers, shape the water section into undulating ripples that flow parallel to the shoreline, giving the impression of gentle movement.
Pool That Glaze
For the shell scutes, apply the amber glaze slightly thicker in the center of each ‘plate.’ Gravity will pull it to the edges during firing, creating a natural gradient.
Step 2: Creating the Sea Turtle
-
Form the Shell:
Shape a flattened oval of clay for the turtle’s shell. It should be domed slightly in the center. Score the back of the shell and the spot on the tile where it will sit, apply slip, and press firmly to attach. -
Carve the Scutes:
Once the shell is secure, us a needle tool or small styling tool to carve the geometric plate pattern (scutes) into the shell. Deep, clean lines will help the glaze pool beautifully later. -
Add Head and Flippers:
Fashion the head, front flippers, and small back flippers from smaller pieces of clay. I find it helpful to taper the edges of the flippers so they look like they are sliding onto the sand or under the water. -
Attach Limbs:
Score and slip these appendages, tucking them slightly under the rim of the shell for a realistic connection point. Smooth the seams where they meet the background tile. -
Texture the Skin:
Use a small, round tool to impress tiny scales onto the head and flippers. Leave the areas between the scales slightly raised to catch the glaze. -
Refine the Sand:
Gently stipple the sand area with a stiff-bristled brush or a textured sponge to create a sandy grain texture, being careful not to disturb the smooth turtle shell.
Frame It Up
Before the clay dries, poke two angled holes in the back corners or attach a clay hook. This allows you to hang the finished tile without needing a separate frame.
Step 3: Glazing and Finishing
-
First Firing:
Allow the tile to dry slowly and completely before bisque firing it according to your clay body’s specifications (usually cone 04). -
Apply Sand Glaze:
Paint a creamy, speckled sand-colored glaze onto the beach section. Look for a glaze that has ‘speckles’ or iron spots to mimic real sand grains. -
Glaze the Water:
Apply a translucent turquoise or teal gloss glaze to the water section. Let the glaze pool slightly in the wave troughs to create depth and varying shades of blue. -
Detail the Turtle Skin:
Wash a dark brown underglaze over the flippers and head, then wipe it back with a damp sponge. The dark color will stay in the impressed scale textures, popping against the lighter clay. -
Glaze the Shell:
Carefully paint a translucent amber or honey gloss glaze inside the shell scutes. This transparency allows the clay color underneath to shine through, creating a brilliant tortoiseshell effect. -
Glaze the Foam:
Apply a stripe of opaque white or very light cream glaze along the raised crest of the wave to represent sea foam washing up on the shore. -
Final Polish:
Coat the entire turtle and the water section with a final layer of clear gloss if your colored glazes aren’t naturally high-gloss. Wipe the edges of the tile clean with a sponge. -
Final Firing:
Fire the tile a second time (glaze firing) to the temperature required by your glazes. Let the kiln cool completely before removing your masterpiece.
Once cooled, your vibrant relief tile is ready to bring a splash of coastal charm to your wall or shelf
Feathered Owl Tile With Carved Relief
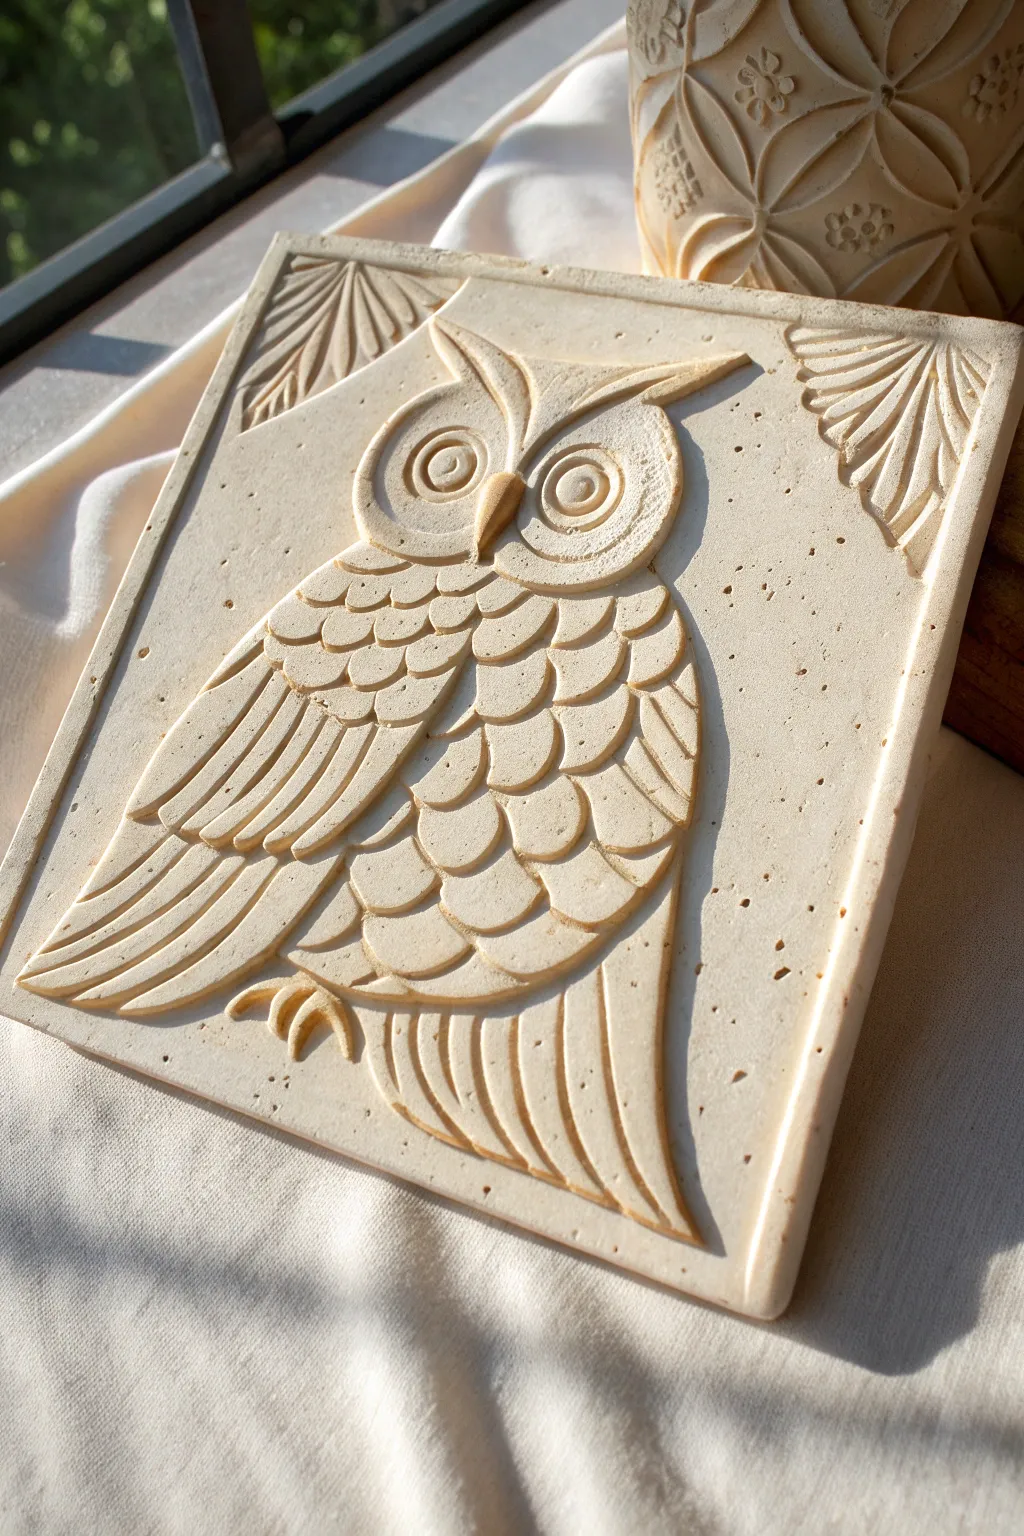
Capture the wisdom of the woods with this elegant relief tile featuring a stylized owl design. Using soft carving stone or high-density clay, you’ll create textured layers of feathers and deep carved lines for a classic, architectural look.
Detailed Instructions
Materials
- Soft carving block (soapstone, Basswood, or high-density air-dry clay)
- Linoleum cutter set (V-gouge and U-gouge)
- Small carving knife or scalpel
- Tracing paper and soft pencil (4B or 6B)
- Fine-grit sandpaper (220 and 400 grit)
- Stylus tool or ball-point embossing tool
- Soft bristle brush (for dust removal)
- Ruler
- Protective sealant (matte varnish or wax)
Step 1: Preparation and Transfer
-
Prepare the slab:
Cut your carving block into a square tile shape, roughly 6×6 inches. Sand the surface completely smooth using 220-grit sandpaper to remove any manufacturing marks or rough texture. -
Draft the design:
On a piece of tracing paper cut to size, sketch the owl design. Focus on the large symmetrical eyes, the layered semi-circles for chest feathers, and the long, sweeping lines of the wing feathers. -
Add corner details:
Draw the fan-like palm leaf motifs in the top two corners. Ensure they mirror each other to frame the owl’s head. -
Transfer the image:
Flip your tracing paper over and scribble graphite heavily over the lines. flip it back right-side up onto the tile, and trace over your drawing firmly with a stylus to transfer the graphite lines onto the stone surface.
Slip of the Knife?
If you gouge a mistake into the background, don’t panic. Deepen the texture of the ENTIRE background with stippling to camouflage the scratch as intentional stone texture.
Step 2: Carving the Outlines
-
Define the main perimeter:
Using a small V-gouge, carefully carve along the outer outline of the entire owl. Keep this cut shallow initially; you can deepen it later. -
Carve the eyes:
Switch to a finer V-tool or a knife tip to carve the concentric circles of the eyes. The pupils should be raised buttons, not recessed holes. -
Outline the feathers:
Gently trace the U-shapes of the chest feathers and the long lines of the wings with your smallest carving tool to distinct sections.
Depth Perception
Work in varied depths. The outline of the bird should be the deepest cut, while the internal feather details should be shallower. This hierarchy creates realistic 3D volume.
Step 3: Creating Relief and Texture
-
Lower the background:
To make the owl pop, you need to lower the negative space around it. Use a wider U-gouge to shave away the flat background area, leaving the owl raised. -
Detail the wing feathers:
On the left wing, carve deep grooves between the long feathers. I find angling the blade slightly creates a nice overlapping effect, making one feather look like it’s resting on the next. -
Sculpt the chest scales:
For the chest, don’t just outline the scales; slope the cut. Carve deeper at the bottom of each scale and taper up overlap the one below it, creating a roof-shingle effect. -
Carve the corner motifs:
Carve the radiating lines in the corner fans. These should be sharp, clean V-cuts to contest with the softer curves of the owl. -
Deepen shadows:
Go back over the deepest areas—under the beak, between the wing and body, and around the eyes—and remove a bit more material to increase contrast.
Step 4: Finishing Touches
-
Texture the stone:
The reference image has a speckled, natural look. You can mimic this by gently tapping the flat background areas with a stiff brush or a crumpled ball of aluminum foil to add subtle pitting. -
Clean the debris:
Use your soft bristle brush to sweep away all carving dust. Check specifically in the deep grooves of the wings where dust likes to hide. -
Sand highlights:
Take a small piece of 400-grit sandpaper and very lightly buff the highest points of the relief (the tops of the feathers and the brow) to make them smooth and slightly lighter. -
Apply sealant:
Seal the tile with a clear matte varnish or a thin layer of wax. This will protect the carving and slightly darken the stone, enhancing the shadows.
Place your finished tile on a stand near a window where the shifting daylight will highlight your carving work

TRACK YOUR CERAMIC JOURNEY
Capture glaze tests, firing details, and creative progress—all in one simple printable. Make your projects easier to repeat and improve.
Simple Reeded Lines for Modern Texture
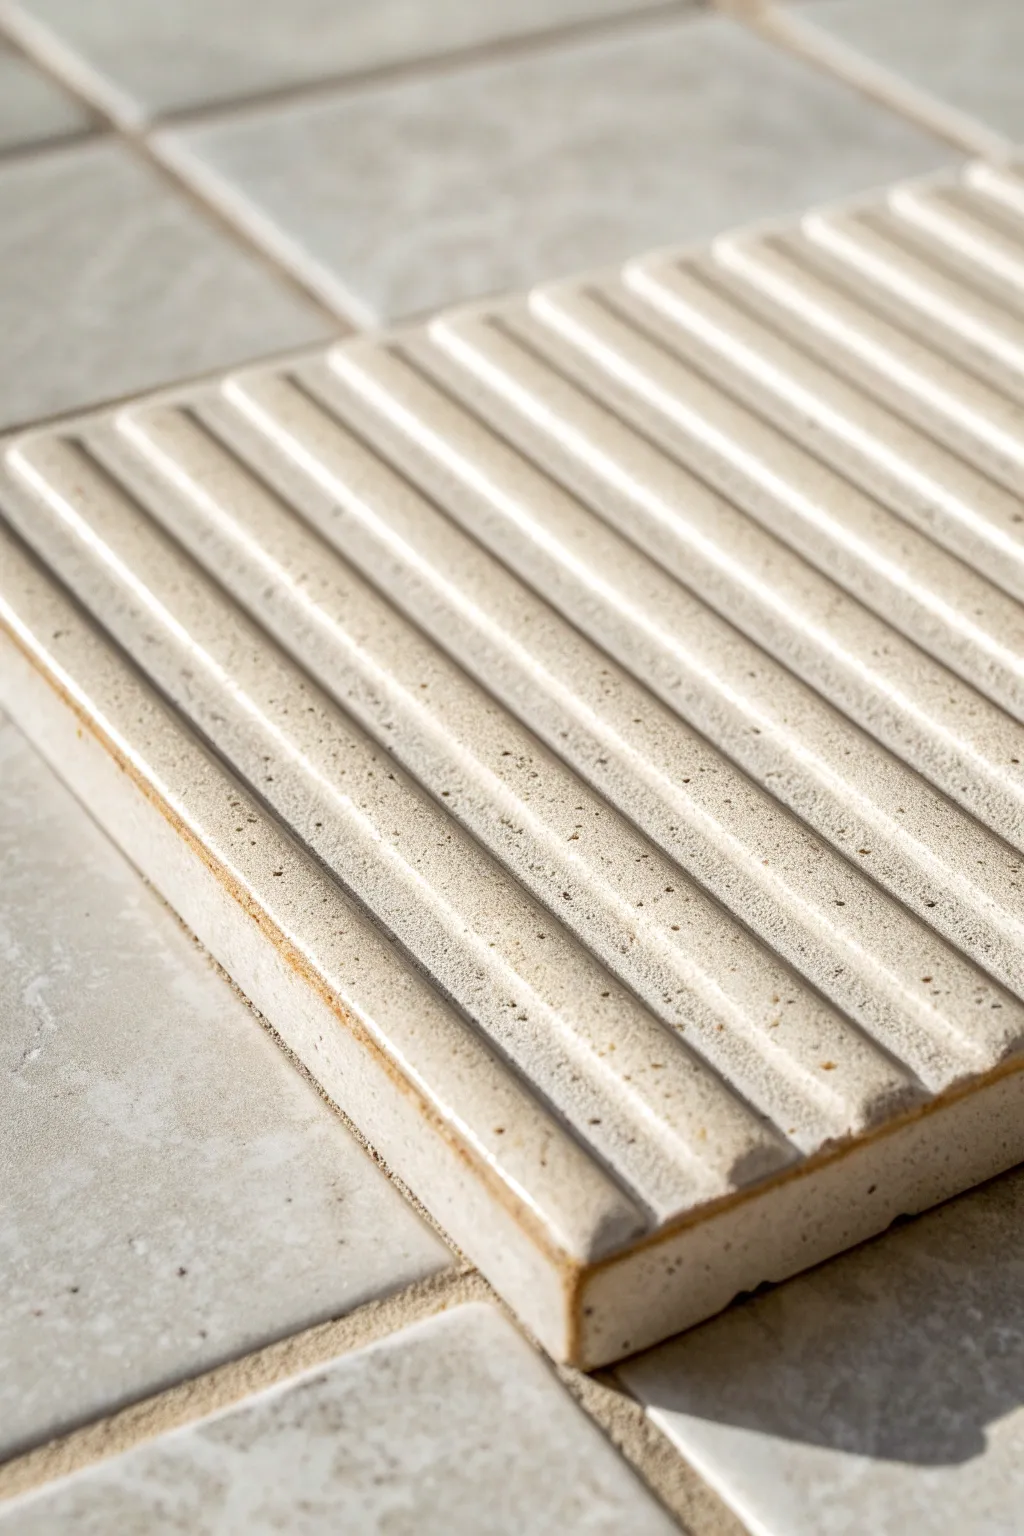
Achieve a sophisticated, modern look with this handmade relief tile featuring simple, linear reeding. The subtle ridges and speckled glaze create a tactile surface that catches the light beautifully, perfect for adding architectural interest to any small space or coaster set.
Step-by-Step Tutorial
Materials
- Stoneware clay (smooth or with fine grog)
- Wooden rolling pin
- Two 1/4-inch wooden guide strips (thickness guides)
- Wooden dowel or specialized reeding tool
- Rectangular clay cutter or fettling knife
- Metal rib scraper
- Sponge
- Cream or oatmeal speckled glaze (stoneware temperature)
- Kiln access
- Canvas work surface
Step 1: Shaping the Slab
-
Prepare the workspace:
Lay down your canvas cloth on a flat table to prevent the clay from sticking. Place your two wooden thickness guides parallel to each other, slightly wider than the finished tile width you desire. -
Wedge the clay:
Thoroughly wedge a ball of stoneware clay to remove air bubbles. This ensures the tile won’t crack during firing and gives you a consistent texture to work with. -
Roll the slab:
Place the clay ball between the wooden guides. Using your rolling pin, roll the clay out until the pin rests flat on both guides, creating a perfectly even slab. -
Compress the surface:
Take a metal rib and drag it smoothly across the surface of the slab. This aligns the clay particles and creates a pristine, smooth canvas for your texture work.
Warping Worries
If your tile corners lift while drying, flip the tile upside down on a flat board and place a light weight (like a small sandbag) on top for a day.
Step 2: Creating the Relief Texture
-
Plan the lines:
Lightly mark the width of your tile on the slab before cutting. This helps center your pattern. I find it helpful to lightly visualize where the first central reed will go. -
Form the ridges:
Place a long wooden dowel or a specialized reeding tool horizontally across the slab. Press down firmly and evenly to create a straight, concave channel. The clay displaced will form the ‘peak’ of the next ridge. -
Repeat the pattern:
Lift the dowel and move it parallel to your first indentation. Leave a small gap—about the width of the ridge you want—and press again. Continue this process down the entire length of the slab. -
Refine the edges:
Once the texture covers the area, place your rectangular cutter over the most consistent part of the pattern. Press straight down to cut the tile shape without dragging, which could warp the lines.
Dual-Tone Detail
Wipe the glaze off the very tops of the ridges with a damp sponge before firing. This exposes the raw clay body, highlighting the linear structure.
Step 3: Drying and Bisque Firing
-
Clean the borders:
Once cut, gently smooth the sharp outer edges of the tile with a damp finger or a soft sponge. Be careful not to smudge the ridges you just created. -
Slow drying:
Place the tile on a drywall board or wooden ware board. Cover it loosely with plastic for the first day to ensure slow, even drying. This prevents the corners from curling up. -
Bone dry stage:
Remove the plastic and let the tile dry completely until it is bone dry and room temperature to the touch. It will be very fragile at this stage. -
Bisque fire:
Load the tile into the kiln for a bisque firing (typically Cone 04 or 06). This hardens the clay and prepares it to accept glaze.
Step 4: Glazing and Final Fire
-
Wax the bottom:
Apply wax resist to the flat bottom of the tile and slightly up the side edge. This prevents the glaze from fusing the tile to your kiln shelf. -
Apply the glaze:
Dip the tile face-down into your cream speckled glaze. Hold it there for about 3 seconds to get an even coat. The glaze should pool slightly in the valleys of the reeds. -
Check for pinholes:
Once the glaze dries to a powder touch, gently rub any pinholes with a clean, dry finger to smooth them over. -
Glaze fire:
Fire the tile again to the maturation temperature of your specific clay and glaze (often Cone 5 or 6 for stoneware). Let the kiln cool completely before opening.
Your finished relief tile brings a serene, tactile element to your decor that begs to be touched.
Quilt-Block Patchwork Relief
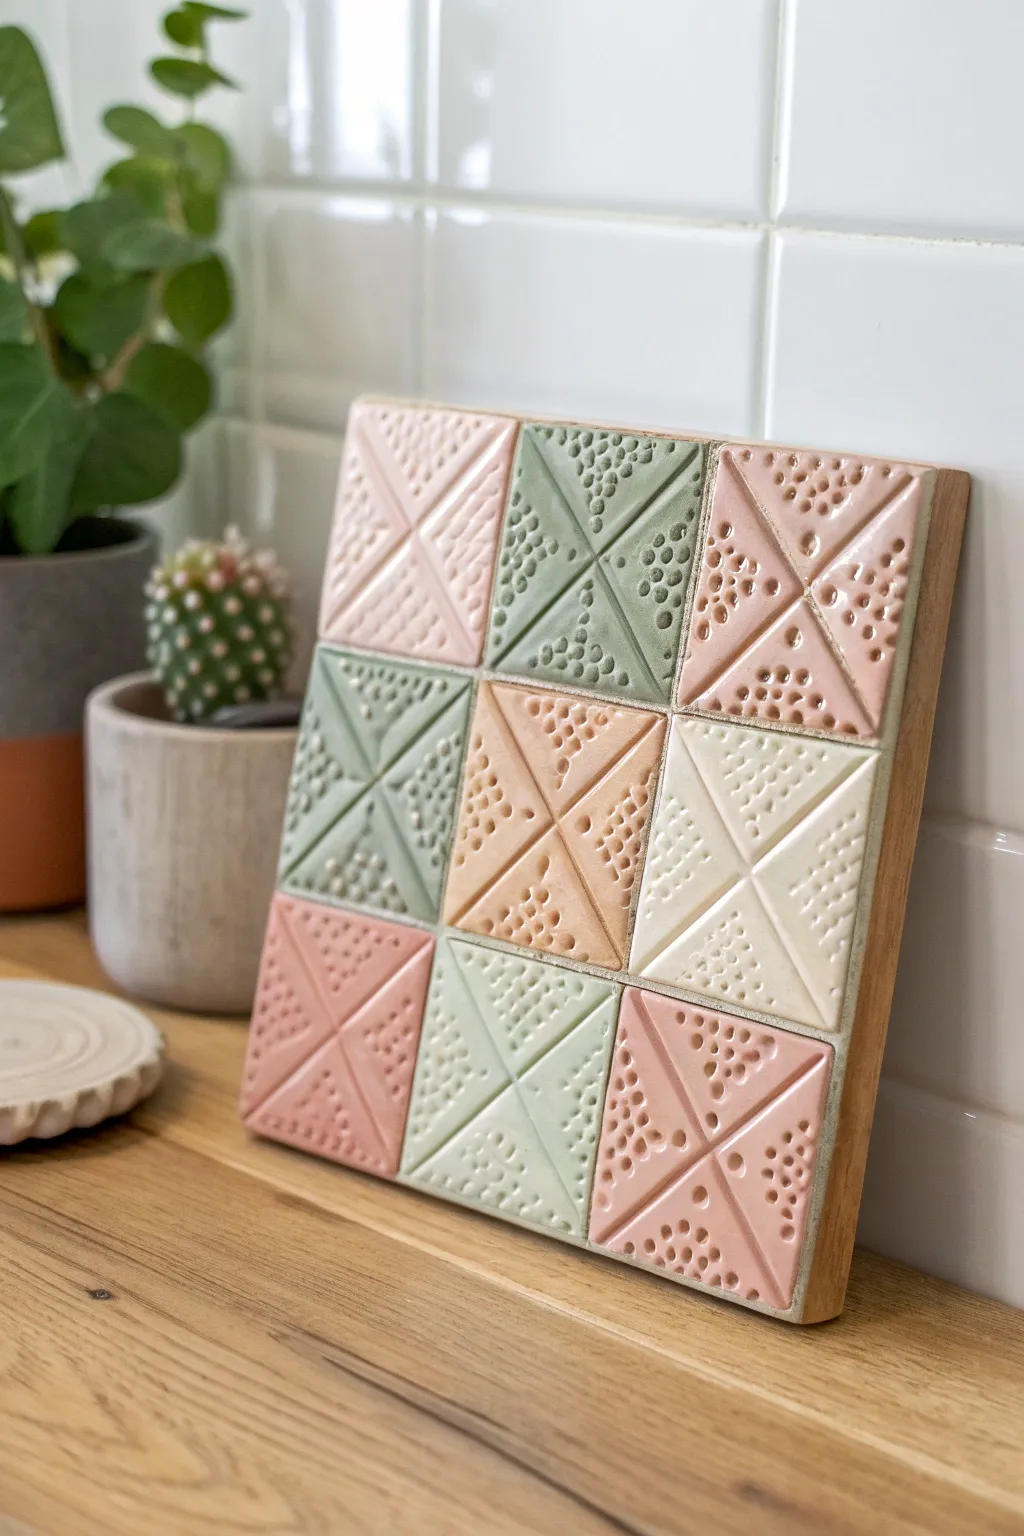
This project combines the cozy charm of traditional quilt patterns with the sleek appeal of modern ceramics. By creating a custom 3×3 grid of relief tiles, you’ll craft a stunning textural piece that stands beautifully on a shelf or hangs as wall art.
Step-by-Step
Materials
- White air-dry clay or polymer clay (approx. 500g)
- Square cookie cutter (approx. 2.5 inches)
- Rolling pin
- Ruler or straight edge
- Modeling tool or dull knife
- Ball stylus tool (various sizes for dots)
- Acrylic paints (pale pink, sage green, cream, terracotta)
- Small flat paintbrush
- Clear matte varnish or sealant
- Square plywood backing board (approx. 8×8 inches)
- Strong craft glue (e.g., E6000)
- Sandpaper (fine grit)
Step 1: Sculpting the Tiles
-
Prepare the clay slab:
Begin by rolling out your clay on a flat, non-stick surface until it is about 1/4 inch thick. Try to keep the thickness consistent so all your tiles will sit flush with each other later. -
Cut the squares:
Using your square cookie cutter, press firmly into the clay to create nine identical squares. If the edges are ragged, gently smooth them with a slightly damp finger. -
Mark the diagonal lines:
Take your ruler and a modeling tool. Gently score an ‘X’ across each square, connecting corner to opposite corner. Don’t cut all the way through; imply a deep groove to define four triangular sections. -
Deepen the relief:
Use the edge of your tool to slightly bevel the clay downwards where the lines meet. This enhances the 3D effect, making the center point look dipped and the corners raised.
Warping Woes?
If air-dry clay curls while drying, place a heavy book on top of the tiles once they are semi-dry to flatten them.
Step 2: Adding Texture
-
Select texture zones:
Decide which triangles will be textured. For the quilt-block look shown, pick two opposite triangles (like North and South) to texture, leaving the East and West triangles smooth. -
Create the stippling:
Using a ball stylus tool, press small dents into the chosen clay sections. Vary the pressure lightly to create different sizes of dots, packing them densely near the center and slightly looser near the edges. -
Vary the patterns:
While you work, I like to switch up the orientation for a few tiles. On some squares, texture the top/bottom triangles; on others, texture the left/right ones. This creates visual movement in the final grid. -
Final smoothing:
Check the non-textured triangles. If you accidentally marked them, smooth the surface with a drop of water on your finger. -
Re-define the grooves:
Go back over your main ‘X’ pattern lines with the modeling tool to ensure they remain crisp and haven’t been distorted by the texturing process. -
Drying time:
Let the tiles dry completely according to your clay package instructions. For air-dry clay, flip them carefully halfway through to prevent warping.
Color Harmony
Limit your palette to 3-4 shades that share the same undertone (warm or cool) to keep the patchwork design cohesive.
Step 3: Painting and Assembly
-
Sand edges:
Once fully cured, use fine-grit sandpaper to gently buff away any sharp burrs on the edges or corners of the tiles. -
Plan the palette:
Mix your acrylic paints to achieve soft, earthy pastels. You’ll want a muted pink, a sage green, a warm cream, and a soft terracotta. -
Apply base coats:
Paint each tile a solid color. Ensure you get paint into the stippled dots, but avoid pooling. A stamping motion with the brush helps fill the texture. -
Highlight the relief:
After the base coat dries, mix a slightly lighter shade of the same color. Dry-brush this very lightly over the textured triangles to catch the raised areas and emphasize the depth. -
Arrange the pattern:
Lay your tiles out on the plywood backing board without glue first. Rotate them to distribute colors and relieve patterns evenly. -
Glue the grid:
Apply strong craft glue to the back of each tile and press them onto the board. Keep the spacing minimal—almost touching—to simulate a grouted look. -
Seal the piece:
Once the glue is set, brush on a coat of clear matte varnish. This unifies the sheen and protects the paint from dust.
Now you have a charming piece of geometric art that adds a handcrafted touch to any corner of your home
Stamped Texture Sampler Tiles
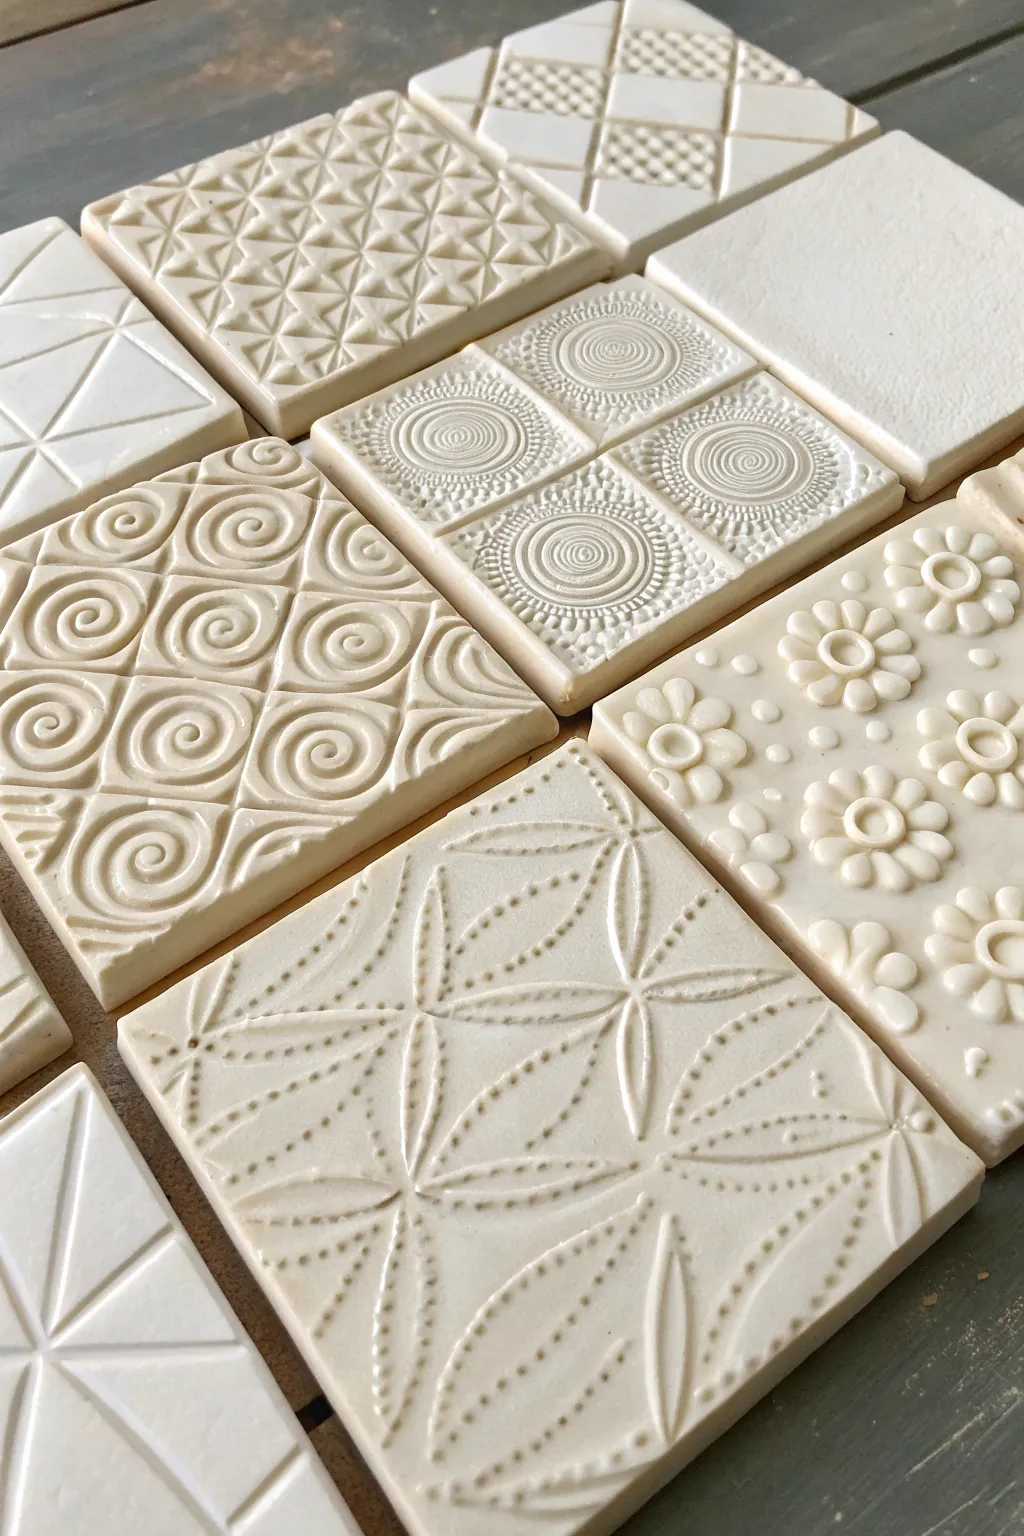
These elegant, monochromatic tiles act as a tactile library of patterns, showcasing how simple impressions can create complex surfaces. Each square explores a different textural theme, from geometric triangles to organic florals, unified by a clean, natural clay finish.
Step-by-Step Tutorial
Materials
- White earthenware or polymer clay
- Rolling pin
- Two 1/4-inch wooden guide strips
- Square cookie cutter (approx. 4×4 inches)
- Rubber or wooden pattern stamps
- Found objects for textures (buttons, lace, gears)
- Needle tool or clay knife
- Smooth work surface or canvas mat
- Sponge and water
- Kiln (if using earthenware) or oven (if using polymer)
Step 1: Preparation & Base Creation
-
Wedge the clay:
Begin by thoroughly wedging your clay to remove any air bubbles. This ensures a consistent texture and prevents cracking during the firing or baking process. -
Set up guides:
Place your two wooden guide strips on either side of your work area. These will help keep your rolling pin level so every tile has a uniform thickness. -
Roll the slab:
Roll out the clay between the guides until it is perfectly flat and smooth. Take your time to ensure there are no lumps or dips in the surface. -
Cut the shapes:
Use your square cookie cutter to stamp out several identical tiles. If you don’t have a cutter, you can measure 4×4 inch squares and cut them carefully with a needle tool or clay knife. -
Smooth the edges:
Gently run a damp finger or a slightly moist sponge along the cut edges of each square to soften any sharp corners or burrs left by the cutting tool.
Sticky Situation?
If your stamps are sticking to the raw clay, lightly dust the clay surface with cornstarch (or baby powder for polymer clay) before pressing down to ensure a clean release.
Step 2: Texturing Techniques
-
Plan your designs:
Before pressing into the clay, sketch out a few geometric ideas on paper. Look at the reference image: some tiles use grids, others usually radial symmetry or repeating border patterns. -
Create the triangle grid:
For the geometric triangle tile, lightly score a grid onto the surface. Press a triangular object or stamp into alternating sections to create the raised and recessed pyramid effect. -
Press spiral motifs:
For the spiral tile, use a premade spiral stamp. Press it firmly into the clay in a grid pattern. I find that rocking the stamp slightly helps get a clean impression without suctioning the clay up. -
Imprint floral patterns:
Create the floral tile by pressing flower-shaped stamps or buttons into the clay. Vary the pressure to create depth, perhaps adding smaller dots between the petals using the back of a paintbrush. -
Form the dotted leaves:
For the large leafy design, use a needle tool or a small stylus. Gently poke rows of dots into the clay to ‘draw’ the vein lines and leaf outlines. Keep your hand steady and the spacing consistent. -
Make the radial circles:
Use circular objects or mandala stamps for the radial design. Press a large circle in the center of a quadrant, then smaller textures inside it to build layers of detail. -
Refine the surface:
Look closely at your impressed lines. If the clay has pushed up unevenly around the stamps, gently pat it back down with a smooth, flat tool or your finger to keep the tile surface level.
Add a Wash
To highlight the textures, dilute acrylic paint or dark glaze and brush it over the relief. Wipe away the excess on the high points to make the recessed patterns pop.
Step 3: Drying and Finishing
-
Slow drying:
Place your finished heavy-relief tiles on a wire rack or a piece of drywall board. Cover them loosely with plastic to ensure they dry slowly and evenly, which prevents warping. -
Check flatness:
After a few hours, check your tiles. If edges are curling up, gently weigh them down with a small board to keep them flat as they stiffen. -
Bisque fire:
If using ceramic clay, fire the tiles to bisque temperature (usually cone 04) once they are bone dry. If using polymer clay, bake according to the package instructions. -
Optional glazing:
The image shows unglazed or matte-finished tiles. If you want this look, you can leave the ceramic bare or apply a clear matte glaze. For polymer clay, a light sanding enhances the stone-like finish. -
Final cure:
If you applied glaze, fire the tiles a second time. Once cool, they are ready to be displayed as a wall installation or used as stylish coasters.
Now you have a stunning set of textured tiles that invite touch and add architectural interest to any space
Raised Dots and Bead Rows
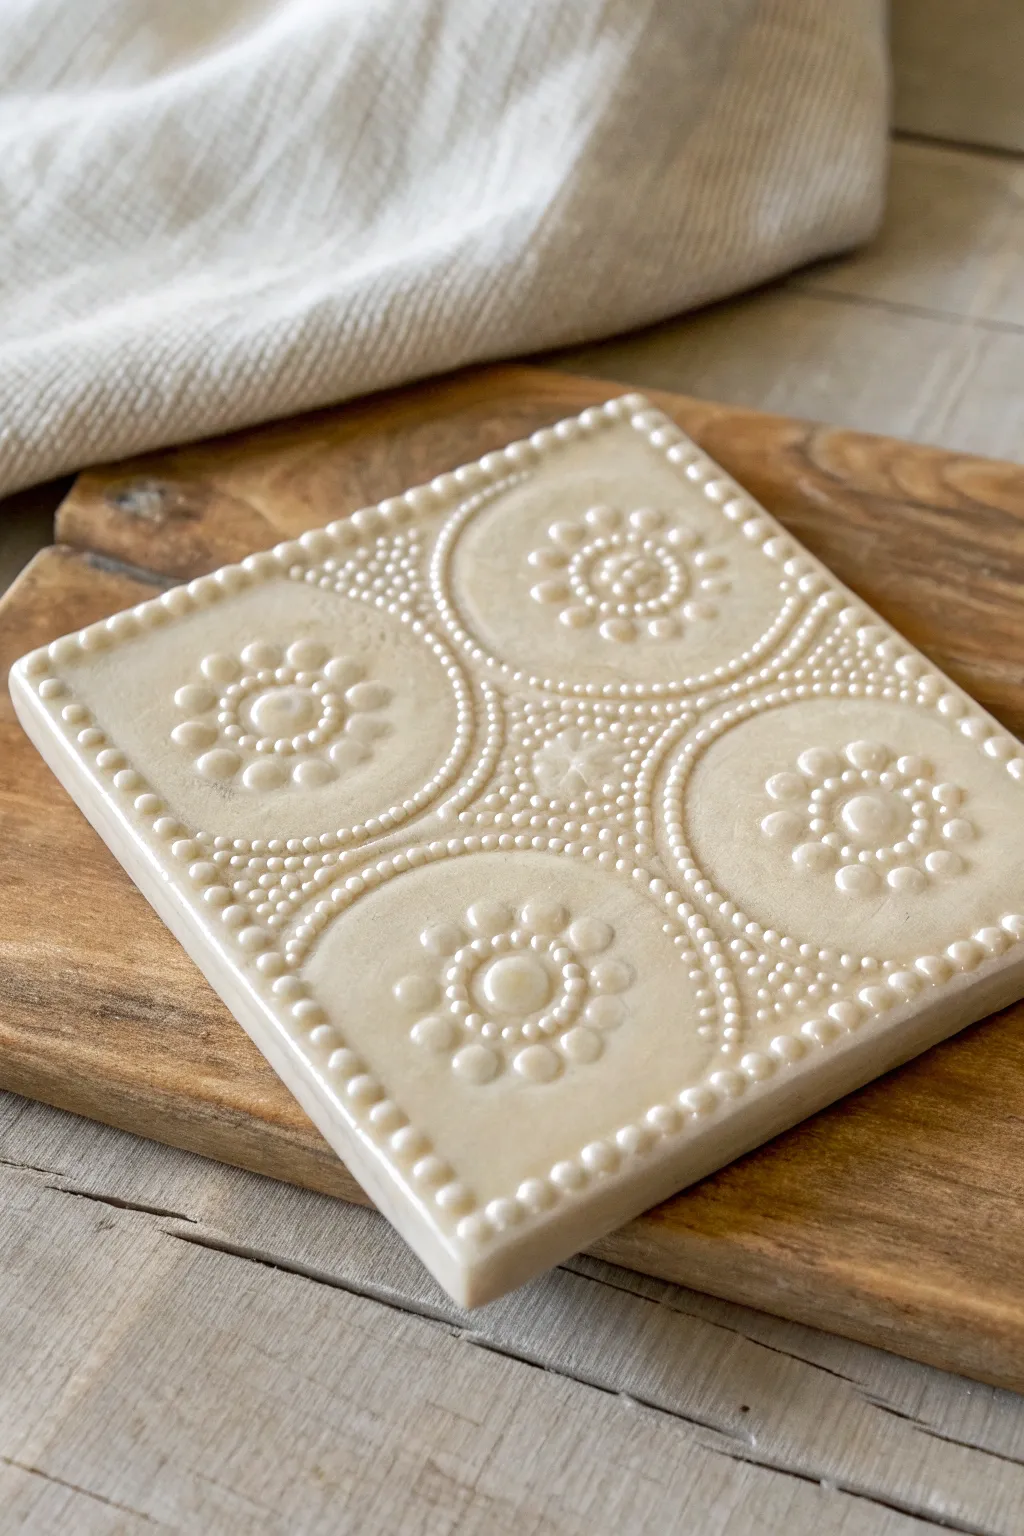
This elegant relief tile project celebrates texture through the timeless art of slip trailing, creating a raised design that feels wonderful to touch. The finished piece features a creamy, high-gloss glaze that catches the light and highlights the intricate rows of beaded dots.
Step-by-Step
Materials
- White earthenware or stoneware clay slab (approx. 1/4 inch thick)
- Slip trailer bottle with fine nozzle tip
- Thick slip (made from the same clay body)
- Needle tool
- Fettling knife
- Ruler or square template
- Compass or circular cookie cutters (for guidelines)
- Sponge
- Soft fan brush
- Transparent or cream-colored gloss glaze
- Canvas work surface
Step 1: Preparing the Base
-
Roll out the slab:
Begin by rolling out your white clay on a canvas surface until it is an even 1/4 to 3/8 inch thickness. Smooth the surface with a damp sponge or rib to remove any canvas texture. -
Cut the square:
Use a ruler and fettling knife to cut a precise 4-inch by 4-inch square (or your desired size). Ensure the corners are perfect 90-degree angles. -
Refine the edges:
Gently run a damp finger or sponge along the cut edges to soften the sharpness slightly, preventing future chipping. -
Mark light guidelines:
Using a compass or a circular cutter, very lightly press four circles into the clay to create your quadrant layout. Don’t dig deep; you just need a faint guide for where your dot patterns will go.
Step 2: Creating the Relief Design
-
Prepare the slip:
Fill your slip trailer bottle with thick slip. I like to test the consistency on a scrap piece of clay first; it should hold a peaked dot shape without slumping or running. -
Pipe the border:
Start by piping a row of evenly spaced, medium-sized dots along the entire perimeter of the square tile. Try to keep your hand steady and the pressure consistent. -
Outline the quadrants:
Following your impressed circular guides, pipe a continuous chain of small, tight dots to outline the four main circles. Where the circles meet in the center, allow the dots to nestle close together. -
Create the central floral motifs:
Inside the center of each large circle, pipe a medium dot. Surround this center dot with a ring of slightly smaller dots to create a flower-like appearance. -
Add secondary rings:
Pipe another ring of dots around your central flower motif, leaving a bit of negative space between the flower and this new ring to let the design breathe. -
Fill the negative spaces:
In the diamond-shaped gap at the very center of the tile where the four circles meet, add a small cluster of tiny dots or a small cross shape to fill the void. -
Detail the outer corners:
Use very fine dots to fill the triangular spaces in the corners of the tile, creating a texture that contrasts with the smooth raised circles. -
Clean up peaks:
If your slip dots have sharp ‘Hershey’s Kiss’ peaks, wait until they are leather hard and then gently tap them down with a clean finger to round them off.
Slip Consistency Trick
Add a teaspoon of vinegar to your slip if it seems runny. The acid flocculates the clay particles, making the slip stiffer so your dots stand taller and hold their shape better.
Step 3: Finishing and Glazing
-
Slow drying:
Cover the tile loosely with plastic to dry slowly. Because of the added moisture from the slip, drying too fast can cause warping. -
Bisque fire:
Once bone dry, fire the tile in the kiln to a bisque temperature (usually cone 04) to prepare it for glazing. -
Wipe down:
Wipe the bisque tile with a damp sponge to remove any kiln dust, which helps the glaze adhere properly. -
Apply glaze:
Using a soft fan brush, flow a coat of transparent or creamy semi-transparent gloss glaze over the tile. Ensure the glaze gets into the crevices between the dots but doesn’t pool too thickly. -
Check for pinholes:
inspect the glaze for bubbles. Rub them out gently with your finger if you find any, as relief textures can sometimes trap air. -
Final firing:
Fire the tile a second time to the glaze temperature appropriate for your clay and glaze combination.
Level Up: Color Wash
Before glazing, apply an iron oxide wash and wipe it back with a sponge. The dark oxide will stay in the crevices around the dots, making the relief pop dramatically under a clear glaze.
Once cooled, your tile is ready to be used as a stunning coaster or mounted as part of a larger wall installation
Inlay-Look Relief With Separated Cells
Recreate the charm of classic quilt patterns with this earthy, inlaid ceramic tile project. By arranging individually cut glazed shapes into a unified mortar base, you achieve a sophisticated relief texture that feels both modern and handmade.
How-To Guide
Materials
- Speckled stoneware clay (mid-fire)
- Rolling pin and guide sticks (approx. 1/4 inch thick)
- Sharp clay knife or needle tool
- Ruler or geometric template
- Grout or heavy-duty tile adhesive (sandstone color)
- Square wooden form or deep frame (approx. 6×6 inches)
- Ceramic glazes in sage, terracotta, mustard, and creamy white
- Sponge and bucket of water
- Sandpaper (for finishing edges)
- Kiln access
Step 1: Shaping the Geometric Tiles
-
Roll the slab:
Begin by wedging your speckled stoneware clay to remove air bubbles, then roll it out into an even slab using 1/4 inch guide sticks for uniform thickness. -
Cut the master square:
Using a ruler, lightly mark out a large 6×6 inch square on your clay slab to define your working area, but don’t cut it free yet. -
Grid the design:
Lightly score a grid into the clay surface. For this pattern, divide your large square into smaller 2×2 inch quadrants. -
Create the geometry:
Use your ruler to cut the shapes. Some quadrants should remain as full squares (or two large triangles), while others are divided into four smaller triangles. Follow the photo’s ‘pinwheel’ logic. -
Clean the edges:
Once cut, carefully separate the pieces. Smooth the sharp cut edges of each tiny tile with a damp finger or sponge to prevent sharp burrs after firing. -
Dry slowly:
Place all the individual geometric pieces between two boards or drywall sheets to dry slowly. This prevents the small triangles from warping. -
Bisque fire:
Once bone dry, load the pieces into the kiln for a bisque fire. I usually stack them carefully or use a setter to save space.
Step 2: Glazing and Assembly
-
Sort and plan:
After the bisque firing, lay out your pattern on a table. Decide which pieces get which color: sage green for corners, creamy white for centers, and accents of terracotta and mustard. -
Apply glaze:
Brush or dip each small tile into its designated glaze color. Wipe the bottoms of each piece clean with a damp sponge. -
Glaze fire:
Fire the pieces again to the glaze temperature appropriate for your clay body (likely Cone 5 or 6). -
Prepare the base:
Take your wooden form or frame. If you want a ceramic base, you could also use a pre-fired plain slab, but a wooden frame filled with grout works well for a trivet. -
Mix the grout:
Mix a sanded grout or heavy-duty tile adhesive. Choose a color close to the bare clay body (like a sandy beige) to make the gaps feel intentional. -
Fill the form:
Spread a thick, even layer of the adhesive mix into the bottom of your form, enough to embed the tiles but not cover them. -
Inlay the tiles:
Press the fired ceramic pieces into the wet bed. Ensure they sit slightly proud of the grout line to create that specific relief look. -
Level the surface:
Place a flat board gently over the top of the arranged tiles and press down lightly to ensure all tile faces are perfectly level with each other. -
Clean the gaps:
Before the grout/adhesive sets fully, use a damp tool or sponge to wipe away excess material from the ‘valleys’ between the tiles. The separation should be distinct. -
Final cure:
Let the piece cure undisturbed for 24-48 hours. If needed, attach felt pads to the bottom to protect your table surfaces.
Shrinkage Rates
Remember stoneware shrinks 10-12%. Cut your initial clay pieces slightly larger than the final frame size to account for this difference.
Go Vertical
Skip the trivet frame and adhere these directly to a mesh backing to create custom accent tiles for a kitchen backsplash update.
This distinctive geometric piece now serves as a durable, heat-safe surface that brings a touch of architectural color to your home
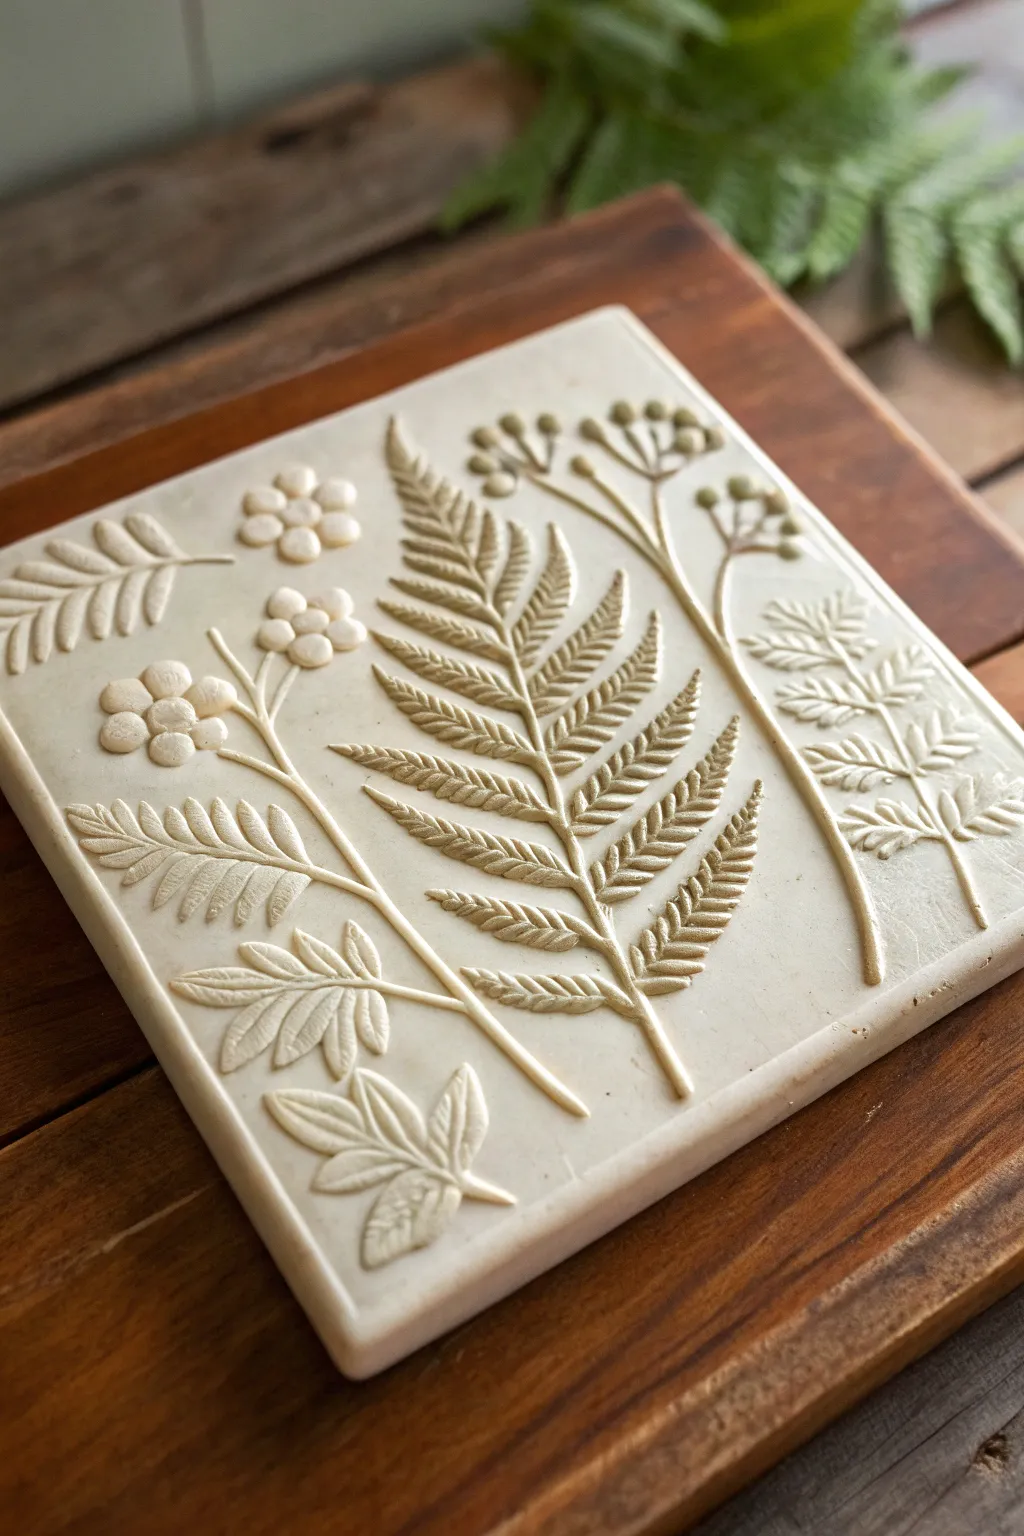
Multi-Tile Botanical Mural Panel
This project guides you through creating a stunning four-panel botanical relief mural inspired by classic ceramic tiles. The finished piece features organic leaf and floral motifs carved into polymer or air-dry clay, washed with earthy greens and terracotta hues for a sophisticated, rustic finish.
Detailed Instructions
Materials
- Air-dry clay (white or light tint) or polymer clay
- Rolling pin
- Square cookie cutter (approx. 4-5 inches) or square template and knife
- Clay carving tools (loop tool, needle tool, small spatula)
- Modeling tools or spoon back for smoothing
- Acrylic paints (Olive Green, Sage, Terracotta, Burnt Sienna, Antique White)
- Water and spray bottle
- Paper towels or soft rags
- Matte varnish or sealant
- Fine-grit sandpaper
- Texturing tool (canvas scrap or sponge) – optional
Step 1: Base Preparation
-
Roll your slabs:
Begin by rolling out your clay to a consistent thickness of about 1/4 to 3/8 inch. You will need enough area to cut four equal squares. -
Cut the tiles:
Using your square cutter or a template, cut four identical squares. Smooth the cut edges with a damp finger or a sponge to remove any sharp burrs. -
Create the circular border:
Lightly scribe a circle within each square using a round object or compass, leaving about an inch of space at the corners. This defines your central cameo area. -
Corner detailing:
In the triangular corners outside the circle, use a small carving tool to incise simple, fanned lines or abstract petal shapes. This acts as a frame for the central botanical.
Step 2: Sculpting the Botanicals
-
Leaf motif (Top Left):
Roll separate thin coils and flattened leaf shapes from spare clay. Attach three large leaves to the first tile using the ‘score and slip’ method (scratching both surfaces and adding water/slurry). -
Detailing the leaves:
Press the added clay down firmly but gently. Use a needle tool to carve deep central veins and smaller side veins into the raised leaf shapes to create dimension. -
Stem and Bud motif (Top Right):
For the second tile, roll thin snake-like coils for stems and attach them in a branching pattern. Add small balls of clay for buds and flattened almond shapes for leaves. -
Refining the buds:
Carve vertical lines into the bud shapes to simulate petals affecting to open. Use a modeling tool to smooth the connection points where stems meet the background. -
Floral motifs (Bottom Two):
For the bottom tiles, place a flat disk of clay in the center for the flower heart. Surround it with teardrop-shaped pieces of clay for petals. -
Sculpting the petals:
Flatten each petal slightly with your thumb or a spoon. Use a knife tool to indent the center of each petal, giving it a ‘scooped’ look characteristic of relief carving. -
Texturing the center:
Use a needle tool or a small textured stamp to stipple the center disk of the flowers, creating a seed-head texture. -
Drying:
Allow all four tiles to dry completely. For air-dry clay, this may take 24-48 hours. Turn them occasionally if possible to prevent curling.
Clean Corner Cuts
To keep your square edges sharp while sculpting, place objects like wood blocks or rulers against the sides of the clay slab.
Step 3: Finishing and Coloring
-
Sanding:
Once bone dry, lightly sand any rough edges or unintentional sharp peaks with fine-grit sandpaper. Wipe away all dust. -
Base coat:
Apply a wash of Antique White acrylic paint over the entire surface of all tiles. I like to water this down slightly so it sinks into the crevices without obscuring texture. -
Applying the green wash:
For the top two tiles, mix Olive Green and Sage with a lot of water. Brush this wash over the leaves and background. While wet, wipe the high points with a rag, leaving darker color in the recesses. -
Applying the terracotta wash:
Repeat the wash technique on the bottom two floral tiles using a mix of Terracotta and Burnt Sienna. Let the paint settle into the carved veins and petal grooves. -
Highlighting:
Using a ‘dry brush’ technique with very little unthinned white paint, lightly skim over the tops of the sculpts to make the relief pop. -
Sealing:
Finish by applying a coat of matte varnish to protect the clay and seal the paint. This gives it a professional, ceramic-like sheen without being overly glossy.
Level Up: Antique Effect
Mix a tiny amount of raw umber paint with glazing medium and cover the dried piece. Wipe it back immediately to create an aged patina.
Mount these on a wooden board or hang them individually to bring a touch of the garden indoors
Topographic Contour Line Tile

This elegant relief tile combines the organic flow of topographic maps with the luxurious sparkle of gold inlay. The soft sage green glaze breaks beautifully over the textured surface, highlighting the intricate dotted lines that map out the raised terrain.
Step-by-Step Guide
Materials
- White or light buff stoneware clay slab (approx. 1/4 thick)
- Square tile cutter or template (4×4 inches)
- Needle tool
- Small loop tool or carving stylus
- Sponge
- Celadon or breaking glaze (Sage Green)
- Gold luster or gold leaf pen (for non-fired option)
- Kiln (if firing)
- Fine-grit sandpaper
- Tracing paper (optional for specific patterns)
- Rolling pin and guide sticks
Step 1: Shaping the Foundation
-
Roll the slab:
Begin by rolling out your clay slab on a canvas surface. Use guide sticks to ensure an even thickness of about 1/4 inch, which helps prevent warping during drying. -
Cut the square:
Using a square template or a tile cutter, press firmly into the clay to cut your base shape. Remove the excess clay and smooth the edges with a slightly damp finger to remove any sharp burrs. -
Plan the topography:
Lightly sketch your contour lines onto the surface using a needle tool. You want organic, concentric shapes that resemble hills and valleys on a map. Don’t worry about perfection; natural lines are wavering and irregular.
Warping Worries
If corners curl up during drying, flip the leather-hard tile over and weigh down the corners gently with small sandbags or extra clay chunks for a day.
Step 2: Carving the Relief
-
Carve grooves:
Using a small loop tool or a rounded stylus, gently carve along your sketched lines. You want to create shallow valleys, leaving the areas between them smooth and raised. The depth should be consistent but not too deep. -
Refine the surface:
Once the major carving is done, take a slightly damp sponge and wipe the entire surface very gently. This softens the hard edges of your carving, giving the tile that weathered, fluid look seen in the photo. -
Add texture dots:
This is the signature detail. Use a dull needle tool or a very fine styling tool to press rows of tiny dots directly into the bottom of your carved grooves. Create a consistent chain of indentations along every single line. -
Slow drying:
Place the tile between two pieces of drywall or under loose plastic to dry very slowly. Tiles are prone to warping, so rushing this stage can lead to curled corners. Let it dry to the bone-dry stage.
Display Idea
Glue a cork backing to the finished tile to turn it into a luxury coaster, or frame four of them in a shadow box for a stunning topographical wall art piece.
Step 3: Glazing and Finishing
-
Bisque fire:
Fire the tile to bisque temperature (usually cone 04) to prepare it for glazing. -
Apply glaze:
Dip or brush your celadon-style sage green glaze onto the tile. I like to make sure the glaze pools slightly in the grooves but doesn’t completely obscure the texture. -
Wipe back:
If the glaze is too thick in your dotted grooves, gently wipe the raised surfaces with a damp sponge, leaving more glaze in the recesses to accentuate the relief. -
Glaze fire:
Fire the tile again to the maturation temperature of your specific clay and glaze (often cone 5 or 6 for stoneware). -
Apply gold detail:
Once the tile is fully fired and cooled, apply gold overglaze (luster) into the dotted grooves using a extremely fine liner brush. If you don’t have a kiln for luster firing, a high-quality gold leaf paint pen works for decorative pieces. -
Final firing (Luster only):
If using real ceramic gold luster, return the tile to the kiln for a third firing at a much lower temperature (usually cone 018) to fuse the metal to the glaze.
Place your finished tile where it can catch the light, letting the gold contour lines shimmer against the serene green glaze
High-Relief Motif That Breaks the Edge
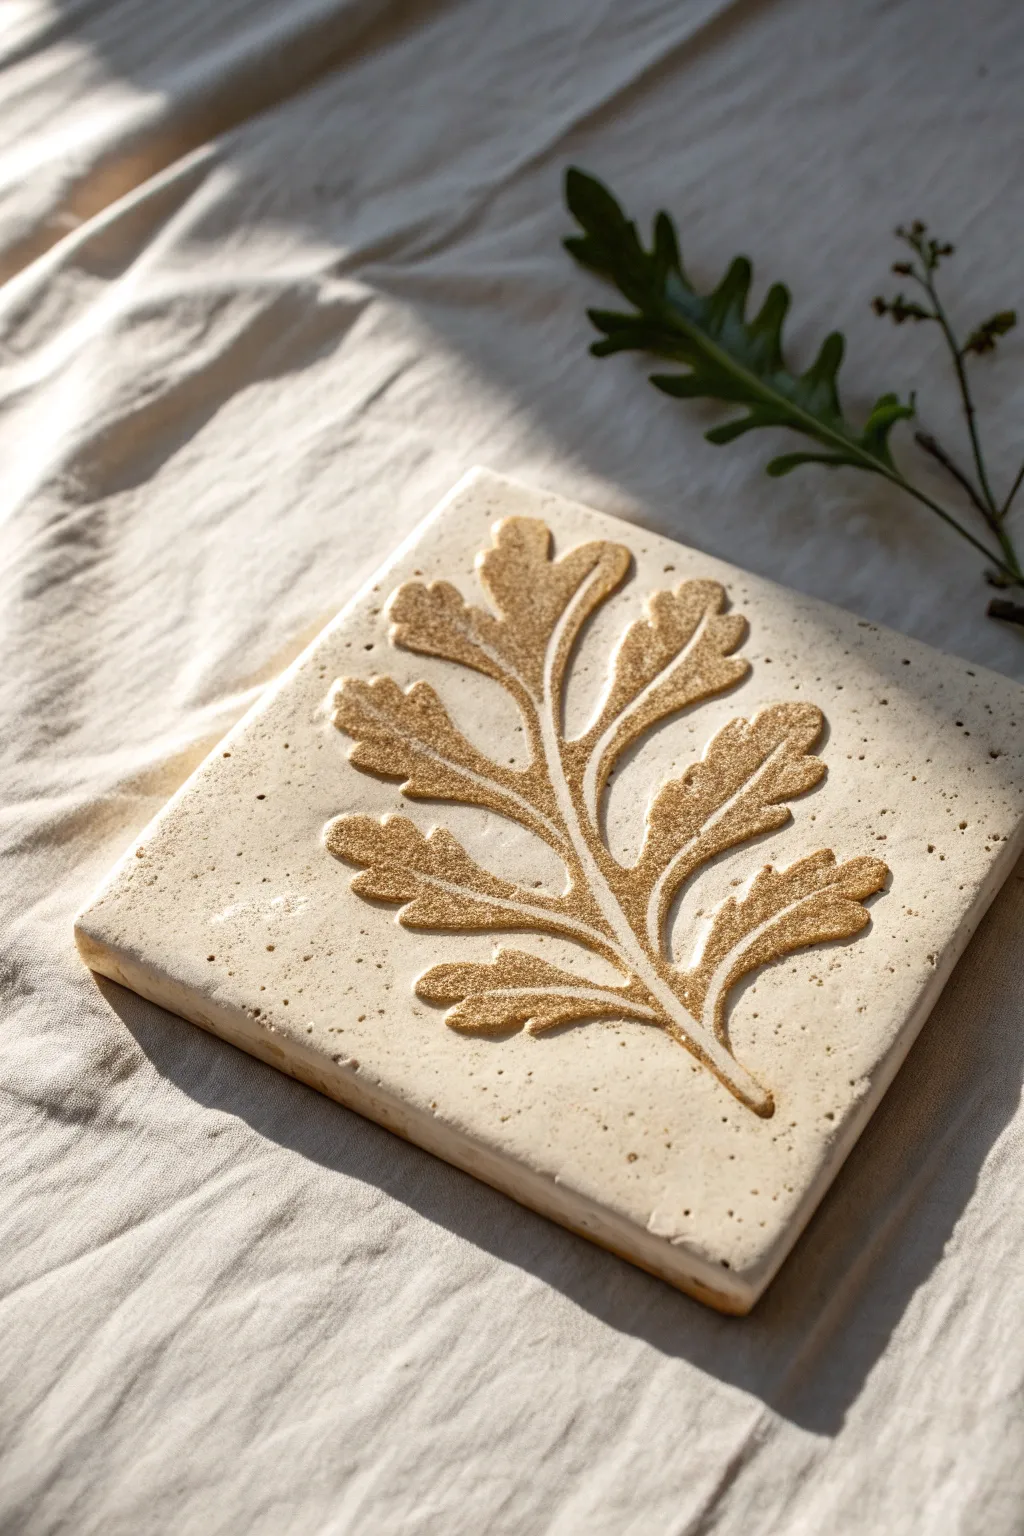
Capture the delicate beauty of nature in stone with this elegant relief tile project. Featuring a stylized oak leaf motif with a warm, sandy-gold finish, this piece combines the rustic charm of stoneware with sophisticated, raised detailing.
Step-by-Step
Materials
- White stoneware clay or air-dry clay (for a non-fired version)
- Square tile cutter or ruler and knife
- Rolling pin
- Canvas mat or slab roller
- Oak leaf template or real leaf
- Carving tools (loop tool, needle tool)
- Small sponge
- Golden-brown underglaze or acrylic paint (depending on clay type)
- Clear matte glaze or sealant
- Fine-grit sandpaper
Step 1: Preparation & Shaping
-
Prepare the slab:
Begin by wedging your clay to remove air bubbles, then roll it out into a smooth, even slab about 1/2 inch thick on a canvas mat. -
Cut the tile base:
Measure a perfect square, approximately 6×6 inches, and cut it cleanly using a ruler and a sharp fettling knife or clay cutter. -
Smooth the surface:
Run a damp sponge or a rubber rib over the surface to erase any canvas texture, ensuring the face of the tile is perfectly smooth. -
Transfer the design:
Place your oak leaf paper template (or a real pressed leaf) onto the center of the tile. Lightly trace the outline with a needle tool, pressing just enough to leave a faint guide line.
Step 2: Carving the Relief
-
Define the outline:
Using a small loop tool, begin carving away the clay *outside* your traced leaf shape. I find it helpful to start near the leaf edge and work outward. -
Create depth:
Lower the background level by about 1/8 to 1/4 inch, leaving the leaf raised. Try to keep the background depth consistent for a professional look. -
Smooth the background:
Use your finger or a slightly damp sponge to smooth out tool marks in the recessed background area, creating a flat plane behind the leaf. -
Refine the leaf edges:
Use a modeling tool to bevel or round the edges of the raised leaf slightly, so they aren’t sharp or jagged. -
Carve internal veins:
With a fine V-tip carving tool or a sharp needle, deeply score the central stem and the branching veins into the raised leaf surface. Make these lines bold and clean.
Warping Woes?
Tiles curl if they dry unevenly. Dry strictly on a porous surface (like wood or plaster) and flip the tile daily during the drying phase.
Step 3: Texturing & Drying
-
Add subtle texture:
Gently tap the raised leaf surface with a coarse sponge or a stiff brush to give it a slightly organic, granular texture distinct from the smooth background. -
Clean the edges:
Run a finger along the outer perimeter of the square tile to soften the sharp corners and ensure a neat finish. -
Slow drying:
Place the tile between two pieces of drywall or loosely cover with plastic to let it dry slowly. This prevents warping, which is crucial for flat tiles. -
Bisque firing (if using ceramic):
Once bone dry, fire the tile in a kiln to bisque temperature (usually cone 04). If using air-dry clay, allow to cure fully for 24-48 hours.
Use Nature Direct
Instead of carving, press a real, deeply veined leaf into the wet clayslab, then carefully cut away the background for an instant organic relief.
Step 4: Finishing
-
Clean the surface:
Wipe the fired (or dried) tile with a damp sponge to remove any dust. -
Apply color wash:
Dilute your golden-brown underglaze (or acrylic paint) with water. Brush it generously over the raised leaf and the recessed veins. -
Wipe back:
Before the color dries completely, use a clean, damp sponge to wipe the surface creating a distressed look where the color stays in the textures. -
Speckling effect:
Dip an old toothbrush into slightly watered-down dark brown paint or glaze. Flick the bristles to create tiny speckles across the entire tile for a stone-like appearance. -
Final seal:
Apply a clear matte glaze and fire again (for ceramics) or brush on a matte sealant (for air-dry clay) to protect your work.
Display your finished tile on a stand or mount it as part of a larger backsplash to enjoy its tactile beauty every day
Faceted Origami-Inspired Relief Planes
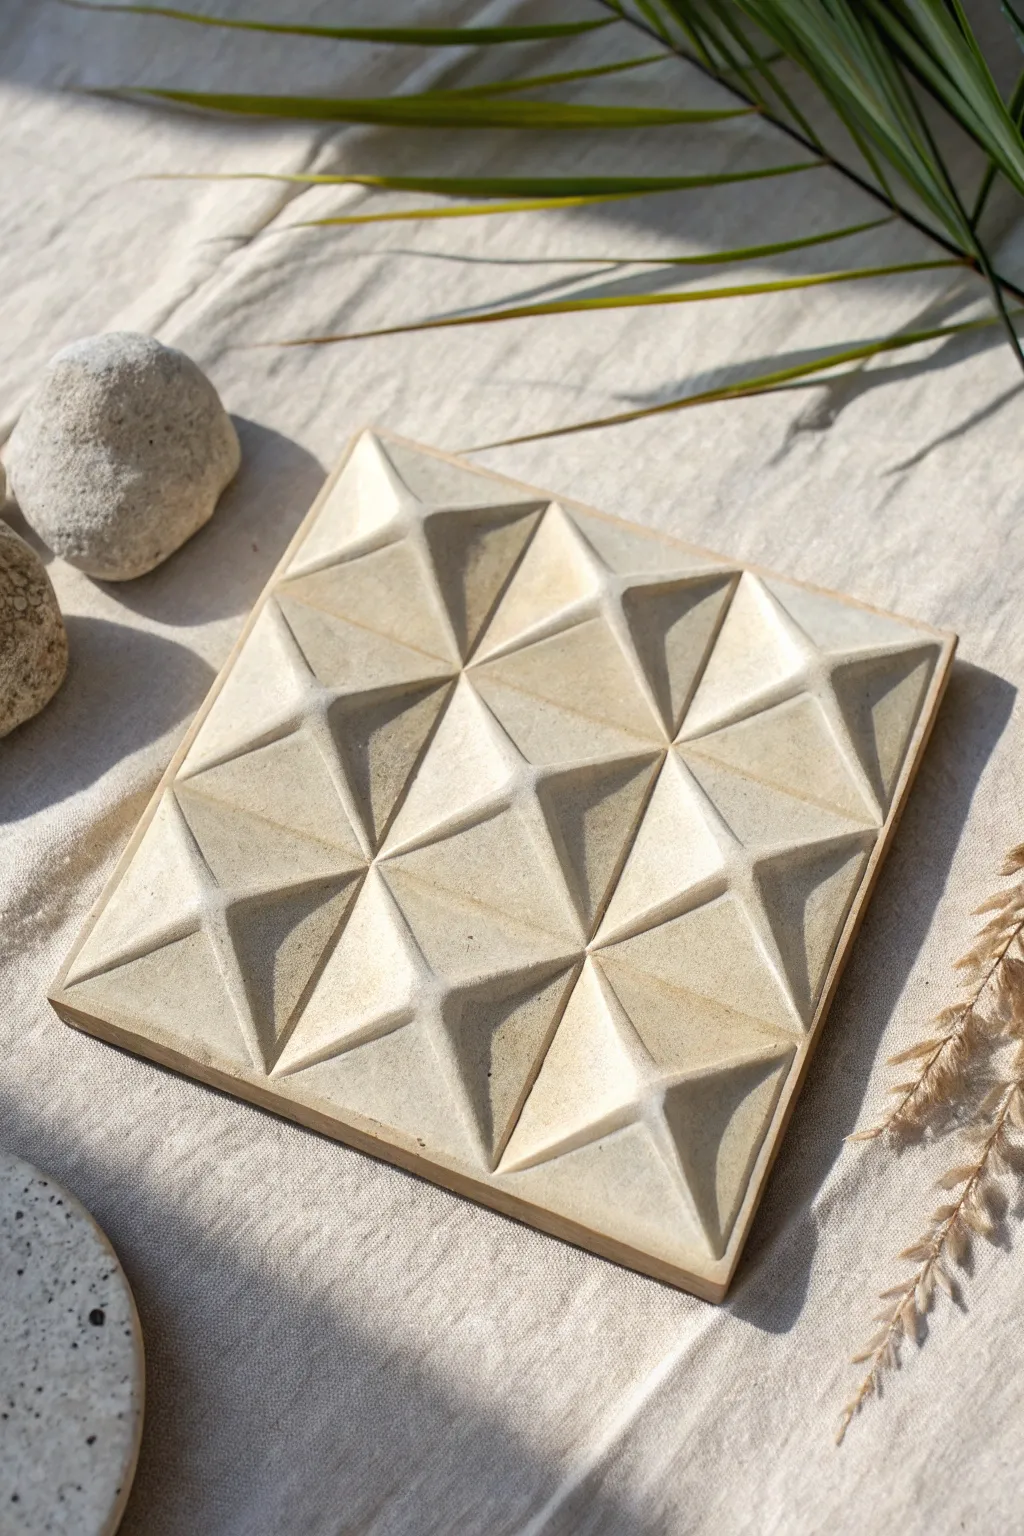
This fascinating project transforms a classic origami fold pattern into a permanent, architectural relief tile with a stunning limestone-like finish. The interplay of light and shadow across the faceted peaks creates a dynamic surface that feels both modern and ancient.
How-To Guide
Materials
- High-density styling foam or stiff cardboard (for the master mold)
- Ruler and protractor
- sharp craft knife or X-Acto blade
- Cutting mat
- Hot glue gun or rapid-set adhesive
- Mold-making silicone rubber (pourable)
- Foam board (for mold walls)
- Gypsum cement (like Hydrocal) or fine concrete mix
- Beige/sandstone pigment or acrylic paint washes
- Fine grit sandpaper (220-400 grit)
- Mixing buckets and stir sticks
- Release agent (petroleum jelly or specialized spray)
Step 1: Designing the Master Model
-
Map out the grid:
Begin by drawing a perfect 6×6 inch square on your styling foam or stiff cardboard. Divide this square into a 3×3 grid of smaller 2-inch squares. -
Draw the star pattern:
Within each small square, draw an ‘X’ from corner to corner to find the center point. Then, draw lines bisecting the square vertically and horizontally through that center point. This creates the radiating lines for your geometric peaks. -
Cut the facets:
This is the most critical step. If using styling foam, carefully carve away material to create pyramids. If using cardboard, cut individual triangles for each facet—four triangles per square section will need to be raised to meet at a central peak. -
Assemble the peaks:
Glue your triangular facets together. Each 2-inch square section should form a four-sided pyramid. Ensure the seams are tight and the points are sharp. -
Seal the master:
Once your faceted pyramids are arranged into the full 3×3 grid, seal the entire surface with a spray sealer or diluted white glue. This prevents the silicone from sticking to the porous foam or paper.
Air Bubble Pro-Tip
Before pouring the full batch, use a dedicated cheap paintbrush to brush a thin layer of wet concrete into the deepest tips of the mold. This guarantees sharp points.
Step 2: Creating the Silicone Mold
-
Build the containment box:
Cut strips of foam board to create walls around your master model. Leave about 1/2 inch of space between the model edge and the wall. Glue these walls securely to a base board so no silicone leaks out. -
Mix and pour silicone:
Measure your two-part silicone rubber according to the package instructions. Mix it thoroughly but gently to avoid introducing too many air bubbles. I find it helpful to pour the mixture in a thin stream into one corner, letting it flow over the model naturally. -
Let it cure:
Allow the silicone to cure fully, usually overnight. Once solid, carefully remove the mold walls and peel the flexible silicone mold off your master model.
Step 3: Casting the Tile
-
Prepare the casting mix:
Mix your gypsum cement or fine concrete with water. Aim for a consistency similar to pancake batter. If you want an integral color, add a small amount of beige or sandstone pigment powder at this stage. -
Pour the cast:
Spray a light mist of release agent into your silicone mold. Pour the concrete mixture in slowly. Fill it about halfway first. -
Vibrate the mold:
Tap the sides of the mold vigorously or lift and drop it gently on the table. This forces trapped air bubbles to rise to the surface, ensuring the sharp tips of your pyramids don’t have voids. -
Finish the pour:
Top off the mold until it is level with the rim. Use a straight edge to scrape across the top (which will be the back of your tile) to ensure it is perfectly flat. -
Demold the piece:
Wait for the full cure time (usually 1-2 hours for gypsum, 24+ for concrete). Gently flex the silicone mold to pop the hardened tile out.
Troubleshooting: Fragile Tips
If your pyramid tips break upon demolding, your mix ratio might be too watery, or you demolded too soon. Let it cure 30% longer and try a stiffer mix next time.
Step 4: Finishing Touches
-
Sand edges:
Use fine-grit sandpaper to smooth the bottom edges and back of the tile. If there are any sharp flashing lines from the mold, sand them away very lightly. -
Enhance texture:
To get that aged stone look seen in the photo, dip a rag in a very watery brown or warm grey acrylic wash. Wipe it over the tile and immediately wipe most of it off, leaving pigment only in the deeper recesses. -
Seal the surface:
Finish with a matte aesthetic sealer to protect the surface without adding unwanted gloss, preserving the raw material look.
Display your architectural tile flat on a table as a sculptural object or mount several together for a stunning wall installation