Salt dough ornaments are my favorite kind of holiday-making: simple ingredients, big cozy payoff. If you’re craving fresh salt dough ornament ideas that feel classic but still totally you, these are the ones I keep coming back to in my studio.
Classic Cookie-Cutter Christmas Shapes

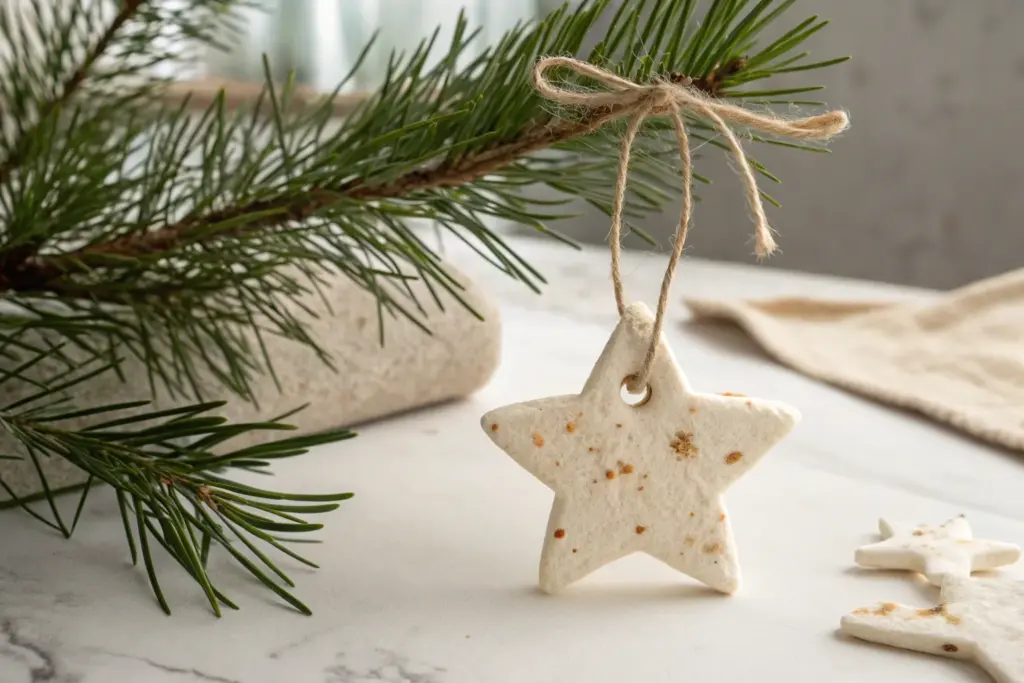
These elegant star ornaments bring a touch of minimalist Scandinavian charm to your holiday decor with their crisp white finish and delicate hand-painted botanical sprigs. The simple red and green leaf motifs pop beautifully against the porcelain-like texture of the salt dough.
Step-by-Step Guide
Materials
- Batch of classic salt dough (flour, salt, warm water)
- White acrylic craft paint (matte finish)
- Red acrylic craft paint (berry red)
- Green acrylic craft paint (forest or sage green)
- Star-shaped cookie cutter (medium size)
- Rolling pin
- Parchment paper
- Straw or skewer (to make the hole)
- Fine-grit sandpaper
- Very fine detail paintbrush (size 0 or 00)
- Clear matte sealant spray (optional)
- Red satin ribbon (approx. 1/4 inch width)
Step 1: Shaping and Baking
-
Prepare the Dough:
Begin by kneading your salt dough thoroughly until it is completely smooth and pliable. If the dough feels sticky, dust your surface lightly with flour; if it’s crumbly, wet your hands slightly and keep kneading. -
Roll to Thickness:
Roll the dough out on a sheet of parchment paper. Aim for an even thickness of about 1/4 inch (6mm). This thickness ensures the ornament is sturdy but not too heavy for a tree branch. -
Cut the Stars:
Press your star-shaped cookie cutter firmly into the dough. Wiggle it slightly to ensure clean edges before lifting the cutter. Carefully peel away the excess dough from around your shapes. -
Smooth the Edges:
Dip your finger in a little water and gently run it along the cut edges of the star to smooth down any roughness or stray crumbs. -
Create the Hanging Hole:
Using a straw or a skewer, poke a hole near the top point of the star. Make sure the hole is large enough for your ribbon to pass through easily, bearing in mind it might shrink slightly during baking. -
Bake Low and Slow:
Transfer the parchment paper with the stars onto a baking sheet. Bake in an oven set to 200°F (95°C) for roughly 2-3 hours. You want them to dry out hard, not brown. -
Flip Midway:
After the first hour, carefully flip the stars over so the bottom side can dry evenly. Return them to the oven until they are rock hard and sound hollow when tapped. -
Cool and Sand:
Let the stars cool completely on a wire rack. Once cool, use fine-grit sandpaper to gently buff the surface and edges, creating a perfectly smooth canvas for painting.
Step 2: Painting the Design
-
Base Coat:
Paint the entire front and sides of the star with white matte acrylic paint. You may need two thin coats to get a solid, opaque coverage that hides the natural dough color. Let this dry fully. -
Plan the Layout:
Visualize the center of the star. You will be painting five botanical sprigs radiating outward—one pointing toward each of the five tips of the star. -
Paint Red Stems:
Using your finest detail brush and red paint, draw three thin, curved lines starting near the center and extending toward three of the star points. I usually choose the top-left, bottom-left, and top-right points for the red stems. -
Add Red Leaves:
Along these red stems, paint small, teardrop-shaped leaves in pairs. Use a ‘press and lift’ motion with your brush to create the organic leaf shape naturally. -
Paint Green Stems:
Clean your brush thoroughly. Now paint two green stems radiating toward the remaining two star points generally the bottom-right and middle-right sectors. -
Add Green Leaves:
Fill these stems with small green leaves using the same technique as before. The leaves should look delicate and somewhat uniform. -
Dry and Seal:
Allow the design to dry completely, preferably overnight. Once dry, mist the ornament lightly with a clear matte sealant spray to protect the paint from moisture and handling. -
Add the Ribbon:
Cut a length of red satin ribbon, about 8-10 inches long. Thread it through the hole at the top of the star. -
Secure the Loop:
Tie the ends of the ribbon into a knot or a bow to create a hanging loop, trimming the ends neatly for a polished finish.
Smooth Surface Secret
For a porcelain-smooth look, sand the dried dough before painting, then apply a layer of white gesso primer instead of straight acrylic.
Puffy Stars?
If your dough puffs up while baking, your oven was likely too hot. Lower the temp to 175°F (80°C) and bake longer. Prick back with a pin if needed.
Hang these charming stars on your tree or use them as personalized gift toppers to spread handmade holiday cheer


Handprint Keepsake Ornaments That Actually Look Cute
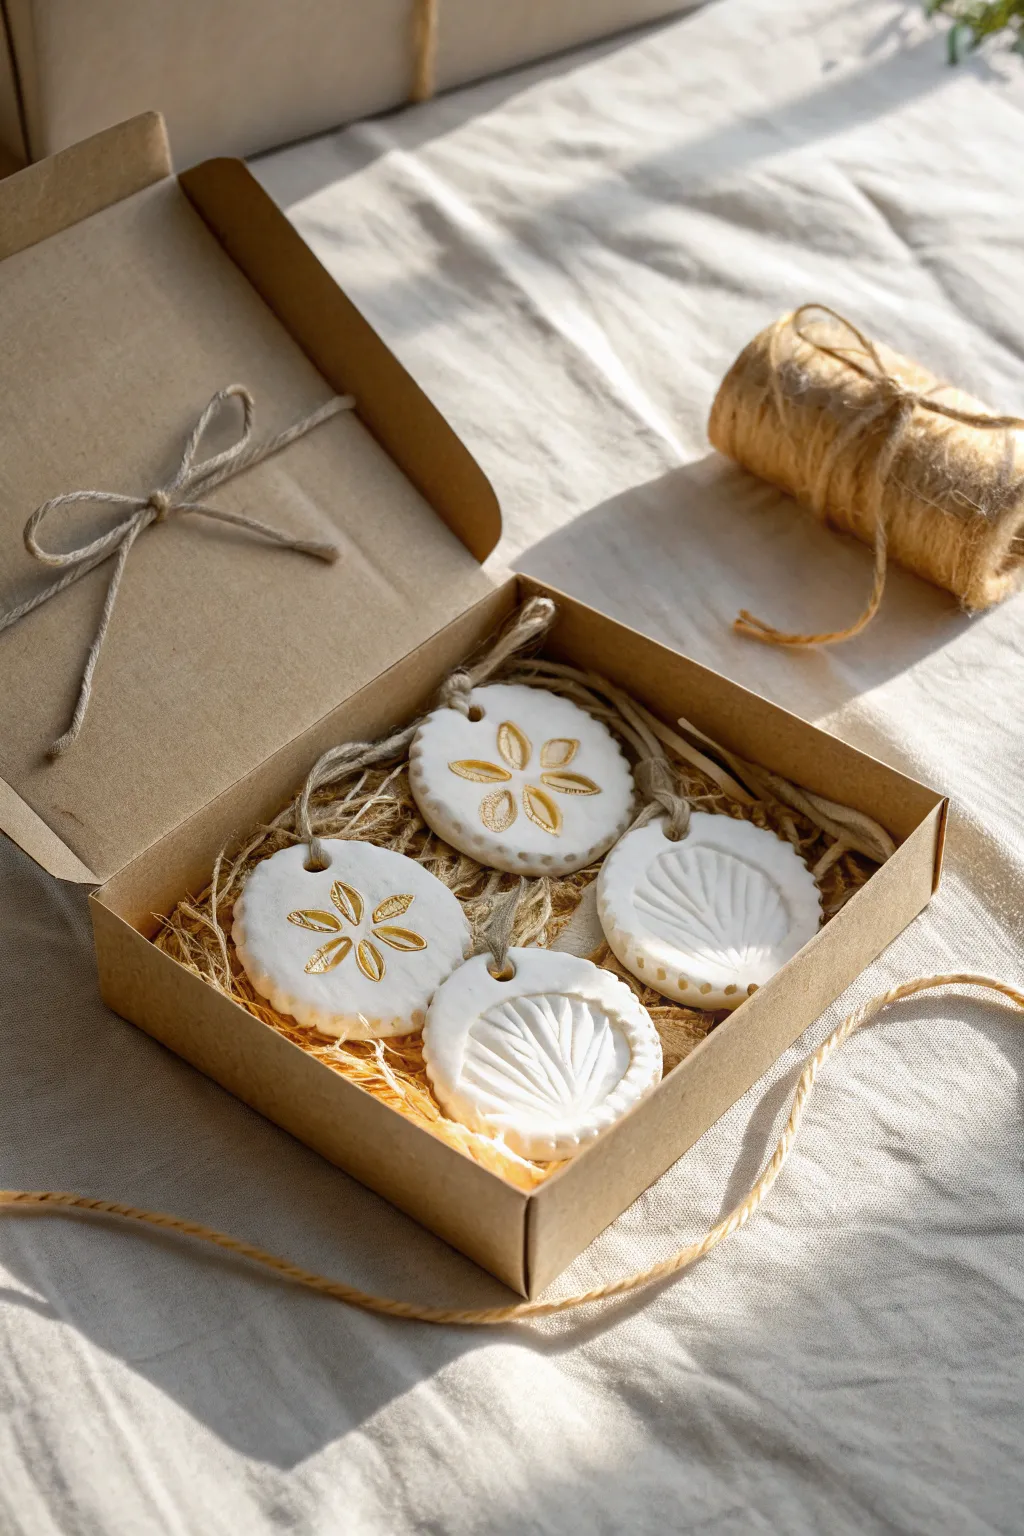
These elegant, minimalist ornaments prove that salt dough can look surprisingly high-end with the right finishing touches. The set features a mix of embossed textures and gold-painted accents, all nestled perfectly in a rustic gift box.
Step-by-Step Tutorial
Materials
- All-purpose flour
- Table salt
- Warm water
- Mixing bowl
- Rolling pin
- Round cookie cutter (approx. 2.5-3 inches)
- Straw or cocktail stick
- Found objects for stamping (leaf stems, seed pods) or clay stamps
- Small clay sculpting tool or butter knife
- Gold acrylic paint
- Fine detail paintbrush
- Jute twine
- Parchment paper
- Baking sheet
- Sandpaper (fine grit)
Step 1: Mixing and Shaping
-
Create the dough base:
Mix 2 cups of flour and 1 cup of salt in a large bowl. Slowly add up to 1 cup of warm water, stirring constantly until a firm, pliable dough forms that isn’t sticky. -
Knead for smoothness:
Remove the dough from the bowl and knead it on a clean surface for at least 5-10 minutes. This step is crucial for getting that smooth, porcelain-like finish seen in the photo. -
Roll it out:
Place the dough between two sheets of parchment paper to prevent sticking. Roll it out to an even thickness of about 1/4 inch. -
Cut the rounds:
Using your round cookie cutter, punch out four circles. Gently lift away the excess dough, which you can re-roll later for more ornaments. -
Smooth the edges:
Dip your finger in a little water and run it along the cut edges of each circle to smooth out any roughness or fraying from the cutter. -
Create the hanging hole:
Use a straw or a cocktail stick to poke a hole near the top edge of each circle. Make sure the hole is wide enough to accommodate your jute twine.
Puffy Dough?
If your ornaments are puffing up in the oven, your temperature is too high. Switch to air-drying for 2-3 days or lower the oven heat significantly.
Step 2: Designing and Baking
-
Design 1: The Petal Stamp:
Take two of the rounds. Using a seed pod, a specialized clay stamp, or even the tip of a teaspoon handle, press a petal shape into the center to form a five-point flower pattern. Press deeply enough to create a distinct groove. -
Design 2: The Fan Embossing:
For the other two rounds, use a clay tool or dull knife to gently score radiating lines from the bottom center, creating a fan or palm leaf texture. I like to vary the pressure to make the center lines deeper. -
Add rim details:
For the fan-design ornaments, use a small tool or toothpick to poke tiny decorative dots along the bottom rim of the circle. -
Baking process:
Transfer the ornaments on parchment paper to a baking sheet. Bake at a low temperature around 250°F (120°C) for 2 to 3 hours. Flip them halfway through to ensure even drying. -
Cooling and Sanding:
Once they are hard and sound hollow when tapped, remove them from the oven and let them cool completely. Lightly sand any rough edges with fine-grit sandpaper.
Scented Dough
Add cinnamon or clove powder to the flour mix for a subtle holiday scent, or knead in a few drops of essential oil before rolling.
Step 3: Finishing Touches
-
Painting the gold accents:
Shake your gold acrylic paint well. For the flower-stamped ornaments, use a fine detail brush to carefully fill the depressed petal shapes with gold paint. -
Painting the details:
Don’t forget to paint the tiny center circle of the flower gold as well. Leave the fan-textured ornaments plain white for a beautiful contrast. -
Drying the paint:
Allow the paint to dry completely, which should take about 15-20 minutes depending on how thickly you applied it. -
Adding the twine:
Cut four lengths of jute twine, each about 6 inches long. Thread a loop through the hole of each ornament. -
Secure the loop:
Pass the loose ends of the twine through the loop and pull tight to create a lark’s head knot, securing the hanger. -
Packaging presentation:
If presenting as a gift, nestle the ornaments into a small cardboard box filled with wood wool or shredded paper, alternating the gold and white designs.
These sophisticated ornaments make a lovely handmade gift set or a classic addition to your own tree


Footprint Tree Ornaments for Baby’s First Holiday

This elegant salt dough project transforms simple pantry ingredients into a sophisticated, deep green holiday tree. With its embedded golden accents and delicate white wintry details, it strikes the perfect balance between rustic charm and modern festive decor.
Step-by-Step Guide
Materials
- Salt dough (flour, salt, water)
- Christmas tree cookie cutter
- Small star cookie cutter (tiny size for topper)
- Dark green acrylic paint (forest or pine shade)
- White acrylic paint or a fine-tip paint pen
- Gold sphere beads or metallic dragees
- Jute twine or craft string
- Mod Podge or clear sealant (matte or satin)
- Parchment paper
- Rolling pin
- Small paintbrush
- Toothpick or skewer
- Super glue or craft glue
Step 1: Shaping the Dough
-
Prepare your workspace:
Lay out a sheet of parchment paper to prevent your dough from sticking to the counter. Dust your rolling pin lightly with flour. -
Roll the dough:
Take a handful of your prepared salt dough and roll it out evenly. Aim for a thickness of about 1/4 inch—too thin and it might crack, too thick and it takes forever to dry. -
Cut the shapes:
Press your Christmas tree cookie cutter firmly into the dough. Gently wiggle it to ensure clean edges before lifting the cutter away. Simultaneously, cut out a tiny star shape from the excess dough for the topper. -
Smooth the edges:
Dip your finger in a little bit of water and run it along the cut edges of the tree and star to smooth down any rough spots or crumbs. -
Create the hanging hole:
Using a skewer or a straw, punch a hole at the very top of the tree. Make sure the hole is wide enough for your twine to pass through after baking.
Step 2: Adding Texture & Baking
-
Embed the ornaments:
While the dough is still soft, take your gold beads and gently press them into the surface of the tree. Push them deep enough so they are securely seated, but ensure the top half is still visible. I like to arrange them diagonally or randomly for a natural look. -
Initial drying:
Transfer the parchment paper with your shapes onto a baking sheet. Preheat your oven to its lowest setting (usually around 200°F or 95°C). -
Bake the ornaments:
Bake for approximately 2-3 hours. Halfway through, flip the tree and star over so the backs dry evenly. Keep an eye on them to ensure they aren’t browning. -
Cool down:
Once hard and dry, remove them from the oven and let them cool completely on a wire rack before starting any painting.
Bead Rescue
If a bead pops out during baking, don’t panic. Just let the ornament cool, add a tiny drop of super glue to the indentation, and press the bead back into place.
Step 3: Painting & Decoration
-
Base coat:
Using a soft brush, paint the entire front and sides of the tree with dark forest green acrylic paint. Paint carefully around the gold beads if you left them in, or pop them out and glue them back later (though painting around them gives a nice embedded look). -
Second coat:
Allow the first layer to dry, then apply a second coat if the dough color is still showing through. A rich, opaque green works best here. -
Paint the star topper:
Paint the tiny star topper a solid white or cream color. Let it dry completely. -
Add snowflakes:
Dip a very fine brush or a toothpick into white paint. Draw simple asterisks or six-pointed stars on the green surface to resemble snowflakes. -
Dot details:
Using the tip of a toothpick, add tiny white dots scattered across the tree to mimic falling snow. Vary the spacing to keep it looking organic.
Glossy Finish
For a ceramic look, use a high-gloss glaze instead of matte Mod Podge. It makes the green paint look like glazed pottery and catches the light beautifully.
Step 4: Assembly
-
Seal the work:
Once all paint is dry, apply a thin coat of matte or satin sealant over the tree to protect the paint and preserve the dough. -
Attach the star:
Thread a small piece of twine through the hole in the star first, or simply glue the star directly onto the front of the tree, just below the hanging hole, covering the base of the loop. -
Thread the hanger:
Cut a length of jute string, thread it through the hole at the top of the tree, and knot it securely to create a rustic hanging loop.
Hang your beautiful new creation in a sunny window or on the tree to admire the festive contrast of deep green and gold


Paw Print Ornaments for Pet Lovers
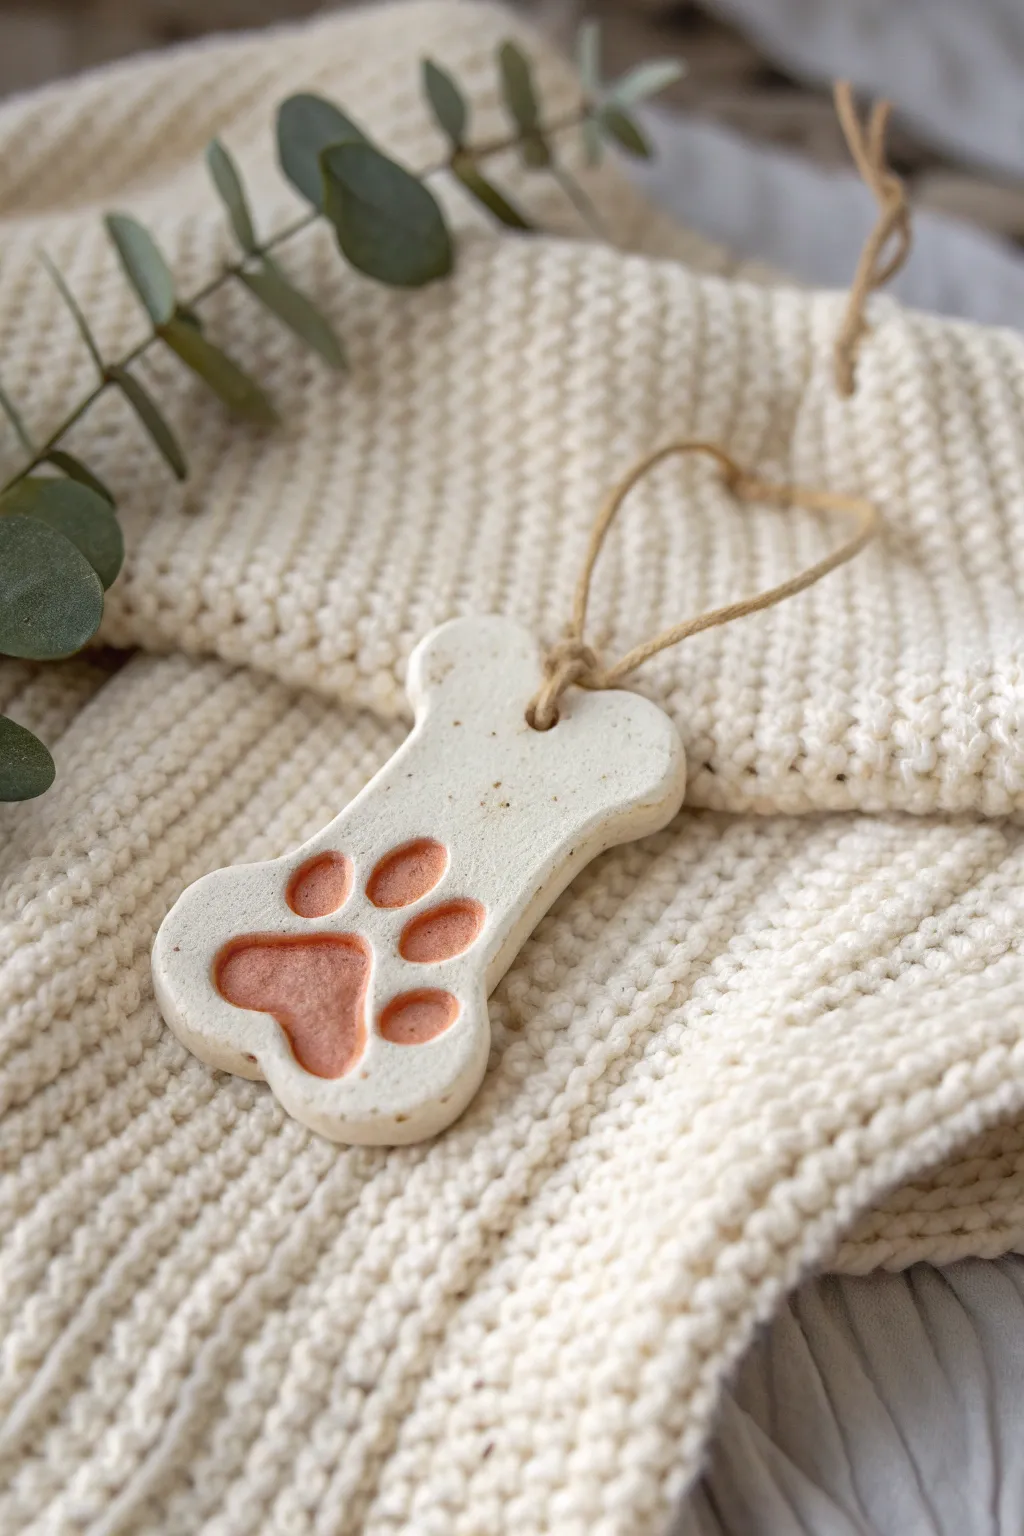
Capture your furry friend’s presence forever with this charming bone-shaped ornament featuring a warm, terracotta-hued paw print. This simple project transforms basic pantry staples into a rustic, textured memento that looks lovely hanging on the tree or as year-round decor.
Detailed Instructions
Materials
- All-purpose flour (2 cups)
- Salt (1 cup)
- Warm water (1 cup)
- Bone-shaped cookie cutter (medium size)
- Terracotta or warm orange acrylic paint
- Off-white or cream acrylic paint (matte finish)
- Fine grit sandpaper
- Jute twine or hemp cord
- Rolling pin
- Straw or skewer (for hole punching)
- Fine tip paintbrush
- Clear matte sealant spray (optional)
- Baking sheet with parchment paper
Step 1: Preparing the Dough & Impression
-
Mix dry ingredients:
In a large mixing bowl, combine the flour and salt thoroughly. Breaking up any salt clumps now ensures a smoother surface for the final ornament. -
Add water gradually:
slowly pour in the warm water while stirring. You may not need the full cup, or you might need a drop more; aim for a consistency that is firm and pliable, like playdough, not sticky. -
Knead the dough:
Turn the dough onto a floured surface and knead for at least 5-7 minutes. This step is crucial for developing a smooth texture that won’t crack easily during baking. -
Roll out the slab:
Using a rolling pin, flatten the dough to a uniform thickness of about 1/4 inch. If it’s too thin, the impression won’t be deep enough; too thick, and it takes forever to dry. -
Cut the shape:
Press your bone-shaped cookie cutter firmly into the dough. Wiggle it slightly before lifting to ensure a clean cut, then carefully transfer the shape to a parchment-lined baking sheet. -
Capture the paw print:
Gently press your pet’s clean paw into the center of the bone shape. Apply even pressure on the toe pads and main pad to get a clear, deep relief. -
Refine the edges:
Dip your finger in a little water and smooth out any rough edges around the bone outline or the paw impression to give it a finished, professional look. -
Create the hanging hole:
Use a straw or skewer to punch a hole at the top of the bone. Make sure the hole is not too close to the edge to prevent tearing later.
Step 2: Baking & Painting
-
Bake slowly:
Place the baking sheet in an oven preheated to 200°F (95°C). Bake for approximately 2-3 hours, flipping the ornament halfway through so it dries evenly. -
Cool and sand:
Let the ornament cool completely on a wire rack. Once cool, lightly sand the surface and edges with fine-grit sandpaper to remove any texture imperfections. -
Base coat application:
Paint the entire ornament, front and back, with the off-white or cream acrylic paint. Apply two thin coats rather than one thick one for better coverage. -
Speckling effect:
To mimic the stone-like texture in the photo, dip an old toothbrush or stiff brush into slightly watered-down brown paint and flick tiny specks onto the white surface. -
Paint the impression:
Using a fine-tip paintbrush, carefully fill in the depressed areas of the paw print with the terracotta paint. I find it helpful to brace my hand against the table for steadiness. -
Clean up edges:
If any terracotta paint gets on the raised surface, quickly wipe it away with a damp cloth or touch it up with the cream base color once dry. -
Seal the piece:
Once all paint is fully dry, spray the ornament with a clear matte sealant. This protects the salt dough from moisture, which can cause it to soften over time. -
Add the hanger:
Cut a length of jute twine, thread it through the hole, and tie a secure knot to create a rustic loop for hanging.
Clean Paws Pro Tip
Place cling wrap over the dough before pressing the paw. This keeps your pet’s foot clean while still leaving a perfect, detailed impression in the clay.
Level Up: Name It
Use a small letter stamp set to imprint your pet’s name along the top edge of the bone before baking for a personalized, custom finish.
Hang your finished ornament on the tree or display it in a shadow box to cherish that tiny paw print for years to come

The Complete Guide to Pottery Troubleshooting
Uncover the most common ceramic mistakes—from cracking clay to failed glazes—and learn how to fix them fast.
Stamped Lace and Doily Texture Medallions
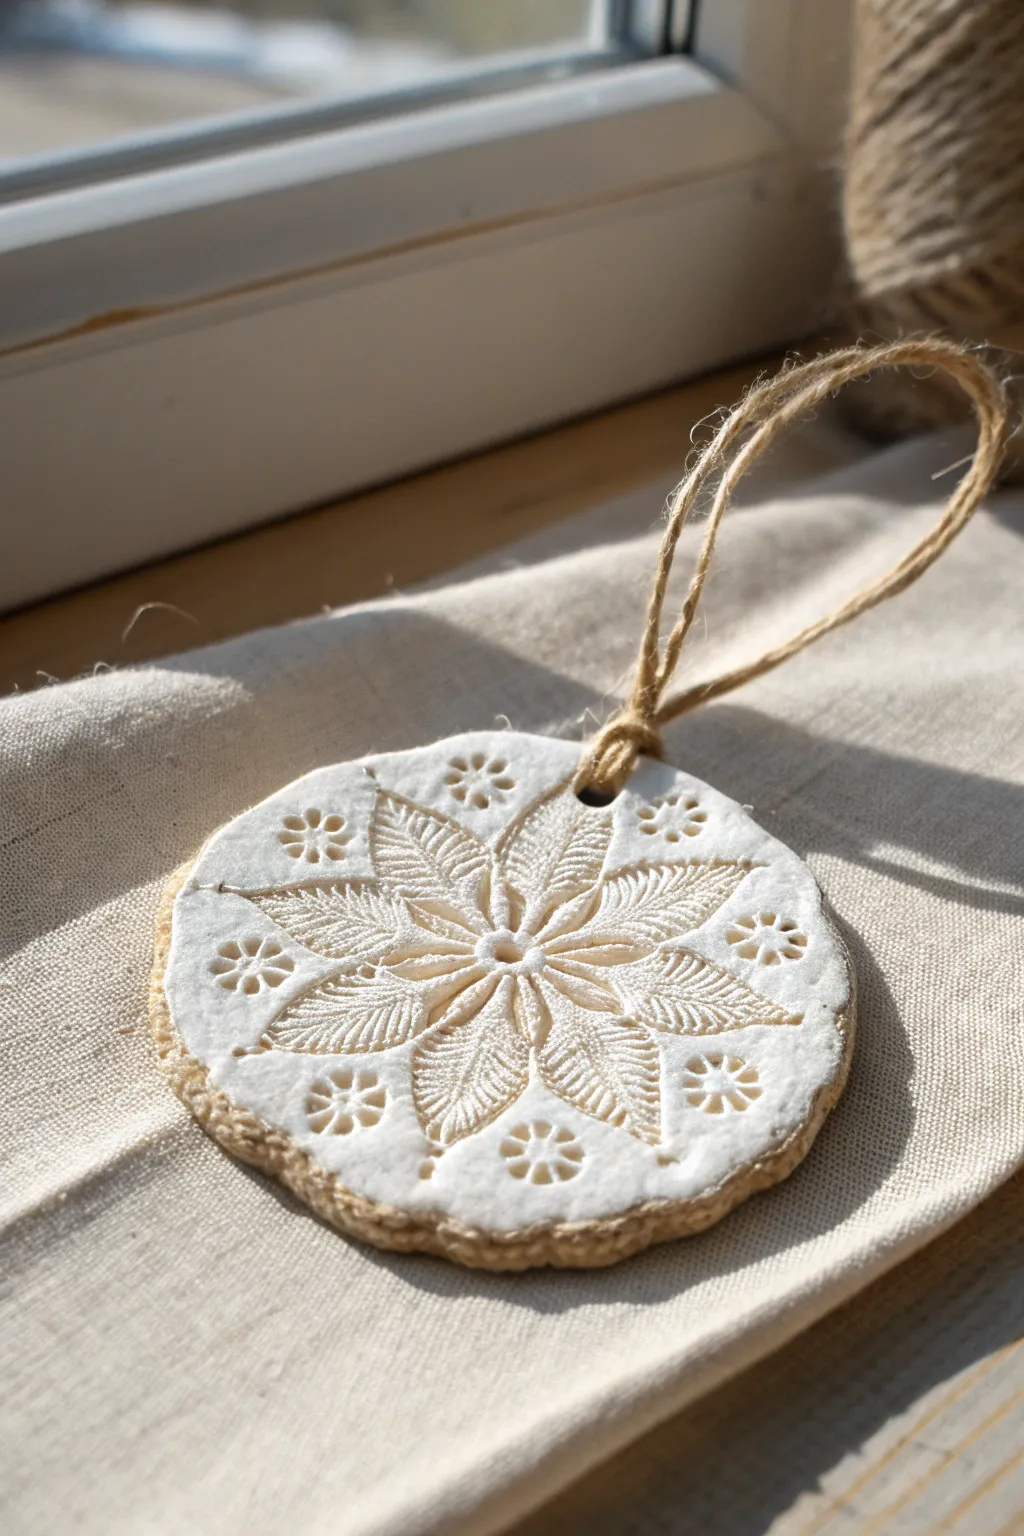
Capture the delicate beauty of winter flora with this elegant salt dough ornament, featuring a crisp, embossed botanical design. The bright white finish and natural jute hanger create a lovely contrast that feels both rustic and refined.
Step-by-Step
Materials
- Salt dough (1 cup flour, 1/2 cup salt, 1/2 cup water)
- Round scalloped cookie cutter (approx. 3-4 inches)
- Botanical rubber stamp or detailed embossed rolling pin
- Rolling pin
- Parchment paper
- Plastic drinking straw or skewer
- White acrylic paint (matte or satin finish)
- Paintbrush
- Fine-grit sandpaper (optional)
- Jute twine for hanging
- Baking sheet
Step 1: Preparing the Dough
-
Mix the ingredients:
Combine your flour and salt in a large mixing bowl, stirring until well incorporated. -
Add water gradually:
Slowly pour in the water while stirring. You may not need every drop, or you might need a splash more, so go slowly until a dough forms. -
Knead until smooth:
Turn the dough onto a clean surface and knead for at least 5-10 minutes. The goal is a very smooth, pliable consistency that won’t crack at the edges. -
Roll it out:
Place a portion of dough between two sheets of parchment paper. Roll it out to an even thickness of about 1/4 inch. Too thin and it cracks; too thick and it won’t bake thoroughly.
Stamp Clarity Tip
If your stamp is sticking, lightly mist the dough surface with water, let it sit for 30 seconds, then dust with flour before stamping for extra sharp details.
Step 2: Stamping and Cutting
-
Apply the stamp:
Lightly dust your rubber stamp or texture tool with a tiny bit of flour to prevent sticking. Press it firmly and evenly into the rolled-out dough to create a deep impression. -
Cut the shape:
Center your round scalloped cookie cutter over the stamped design. Press down firmly to cut out the medallion, wiggling slightly to ensure a clean cut. -
Create the hanging hole:
Use a drinking straw to punch a neat hole near the top edge of the ornament. Make sure it’s not too close to the rim to prevent breakage later. -
Transfer to baking sheet:
Carefully lift the ornament using a spatula and place it on a parchment-lined baking sheet.
Vintage Wash
After the white paint dries, wipe a diluted brown or grey paint over the surface and immediately wipe it off with a rag to execute a vintage, antiqued look.
Step 3: Baking and Finishing
-
Low and slow bake:
Bake the ornaments at a very low temperature, around 200°F (95°C), for 2-3 hours. You want to dry them out, not cook them. -
Check for doneness:
I like to flip them halfway through baking so the bottoms dry evenly. They are done when they feel hard and sound hollow when tapped. -
Cool completely:
Let the ornaments cool fully on a wire rack. Don’t rush this step, or any trapped moisture could cause molding later. -
Sand the edges:
If there are any rough burrs or sharp points on the edges, gently smooth them away with fine-grit sandpaper. -
Painting base coat:
Apply a coat of white acrylic paint. Use a brush that can get into the deep grooves of the stamped design without flooding them entirely. -
Review coverage:
Let the first coat dry. If the dough color is still peeking through too much, add a second thin coat. -
Dry styling:
Once the paint is fully cured, cut a length of jute twine. Fold it in half, pass the loop through the hole, and pull the ends through the loop to secure it with a lark’s head knot.
Hang your new medallion in a window or on the tree to enjoy the interplay of light and texture
Snowflake Ornaments With Fork-Pressed Details
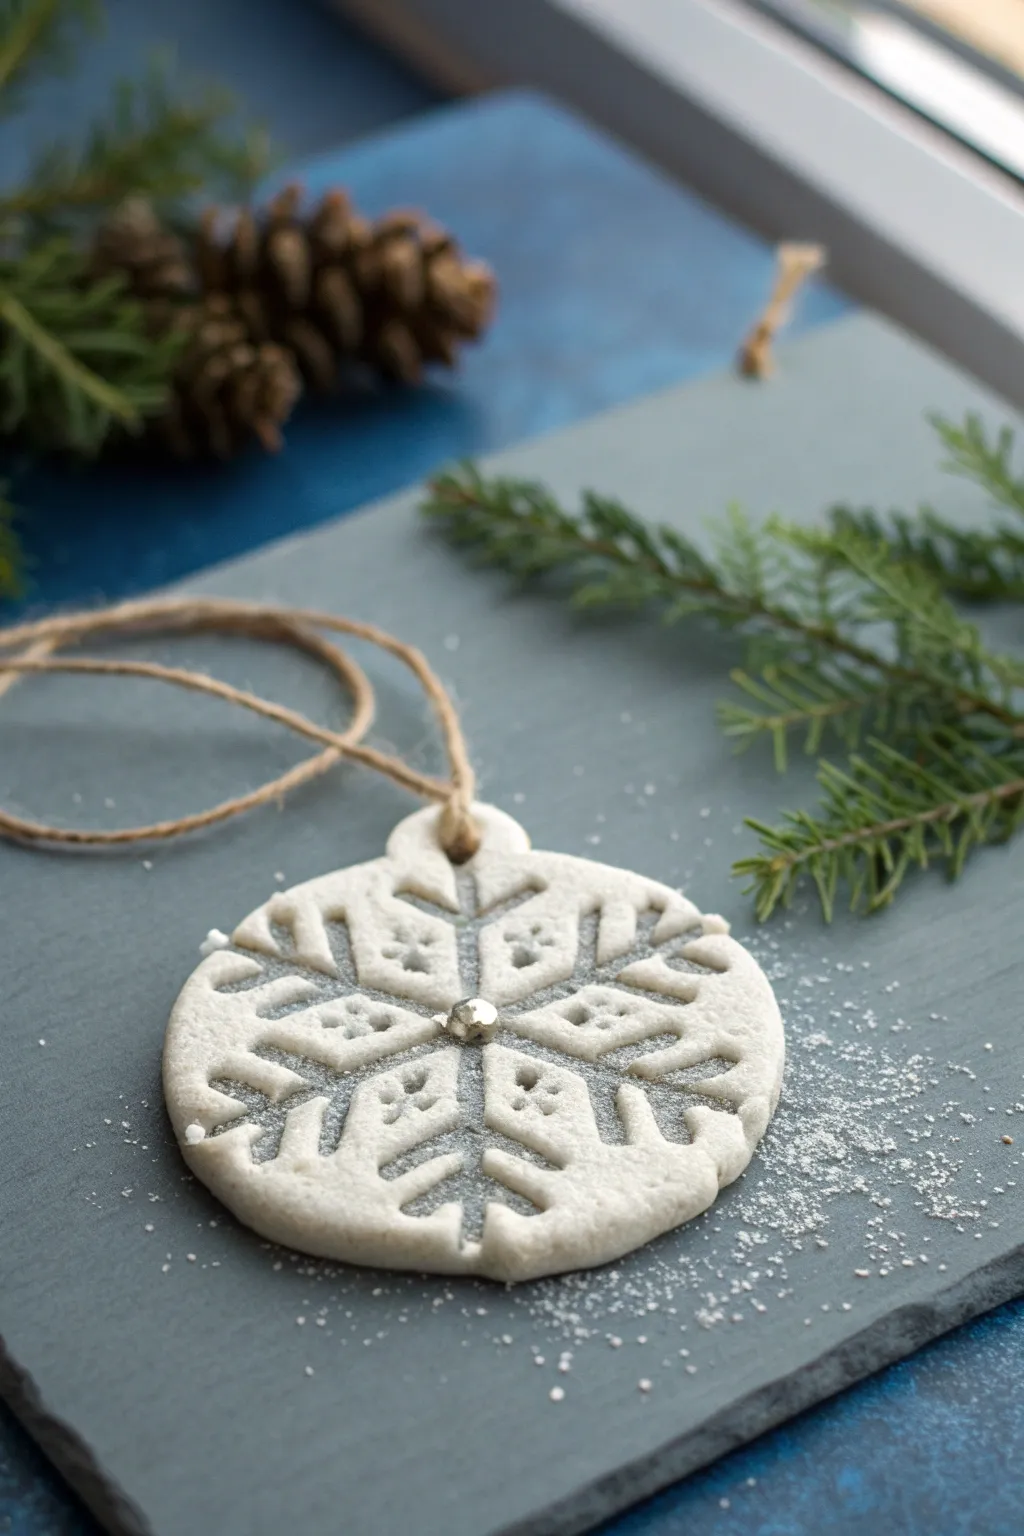
Transform basic salt dough into a winter wonder with this clever embossing technique that uses simple kitchen tools. The result is a classic white snowflake ornament featuring glittering, recessed patterns that catch the light beautifully.
Step-by-Step Guide
Materials
- Batch of salt dough (flour, salt, warm water)
- Round cookie cutter (approx. 3-4 inches)
- Rolling pin
- Silver edible glitter or fine craft glitter
- Paintbrush (small, soft bristles)
- Dinner fork (for pattern making)
- Drinking straw or skewer
- Jute twine or ribbon for hanging
- Baking sheet with parchment paper
- Small silver bead or dragee (optional)
Step 1: Shaping the Base
-
Prepare the dough:
Begin by rolling out your prepared salt dough on a lightly floured surface. Aim for a thickness of about 1/4 inch—thick enough to hold an impression but thin enough to dry evenly. -
Cut the shape:
Use your round cookie cutter to punch out a perfect circle. Gently lift it away from the scraps and place it directly onto your parchment-lined baking sheet to avoid distorting the shape later. -
Smooth the edges:
Dip your finger in a tiny bit of water and run it along the outer rim of the circle to smooth down any rough or jagged edges from the cutter.
Troubleshooting: Puffiness
If the dough puffs up in the oven and distorts the design, your oven was likely too hot. Keep it under 200°F and bake longer to dry it slowly rather than cook it.
Step 2: Creating the Design
-
Mark the center:
Lightly press a small dot or indentation in the exact center of the circle to serve as a guide for your snowflake spans. -
Press the primary lines:
Take your fork and press the side edge of the tines (not the points) into the dough to create linear indentations. Make a cross shape first, intersecting at the center dot. -
Add diagonal lines:
Rotate the ornament slightly and press two more lines diagonally through the center, creating an eight-point star or asterisk shape. -
Detail the tips:
At the end of each line, press the fork tines flat briefly to create small, textured indentations that look like the feathery ends of a snowflake crystal. -
Add inner details:
Using the tip of a skewer or a toothpick, press small sets of three dots inside the wedge spaces between the main lines to add geometric complexity. -
Create the hanger:
Use a drinking straw to punch a clean hole near the top edge of the ornament. Wiggle it slightly as you pull it out to ensure the hole is clear. -
Embellish the center:
If desired, gently press a silver bead or dragee into the very center of the snowflake for extra dimension.
Step 3: Baking and Finishing
-
Bake the ornament:
Bake in a low oven (around 200°F or 95°C) for 2-3 hours. You want to dry it out completely without browning the dough. -
Cool completely:
Let the ornament cool on a wire rack. It must be room temperature before you apply any adhesive or glitter. -
Apply adhesive:
Mix a tiny amount of water with white craft glue. Carefully paint this mixture only into the recessed grooves of your fork-pressed design. -
Add the sparkle:
Generously sprinkle silver glitter over the wet glue. I find it helpful to do this over a paper plate to catch the excess. -
Shake off excess:
Once the glue tacks up slightly, tap the ornament vertically against your table to knock off the loose glitter, leaving sparkles only in the cracks. -
Clean up stray glitter:
Use a dry, soft paintbrush to sweep away any rogue glitter specks from the raised white surfaces to keep the design crisp. -
Seal (Optional):
For longevity, you can spray a light coat of matte clear acrylic sealer over the entire piece. -
Attach the twine:
Cut a length of jute twine, thread it through the top hole, and tie it in a secure loop.
Level Up: Icy Finish
Before baking, lightly brush the entire surface with egg white and sprinkle with coarse sugar. This creates a frosted, icy texture over the white parts of the dough.
Hang your shimmering creation on the tree or use it as a festive gift tag for a handmade touch


What Really Happens Inside the Kiln
Learn how time and temperature work together inside the kiln to transform clay into durable ceramic.
Reindeer Faces Using Thumbprints and Simple Paint
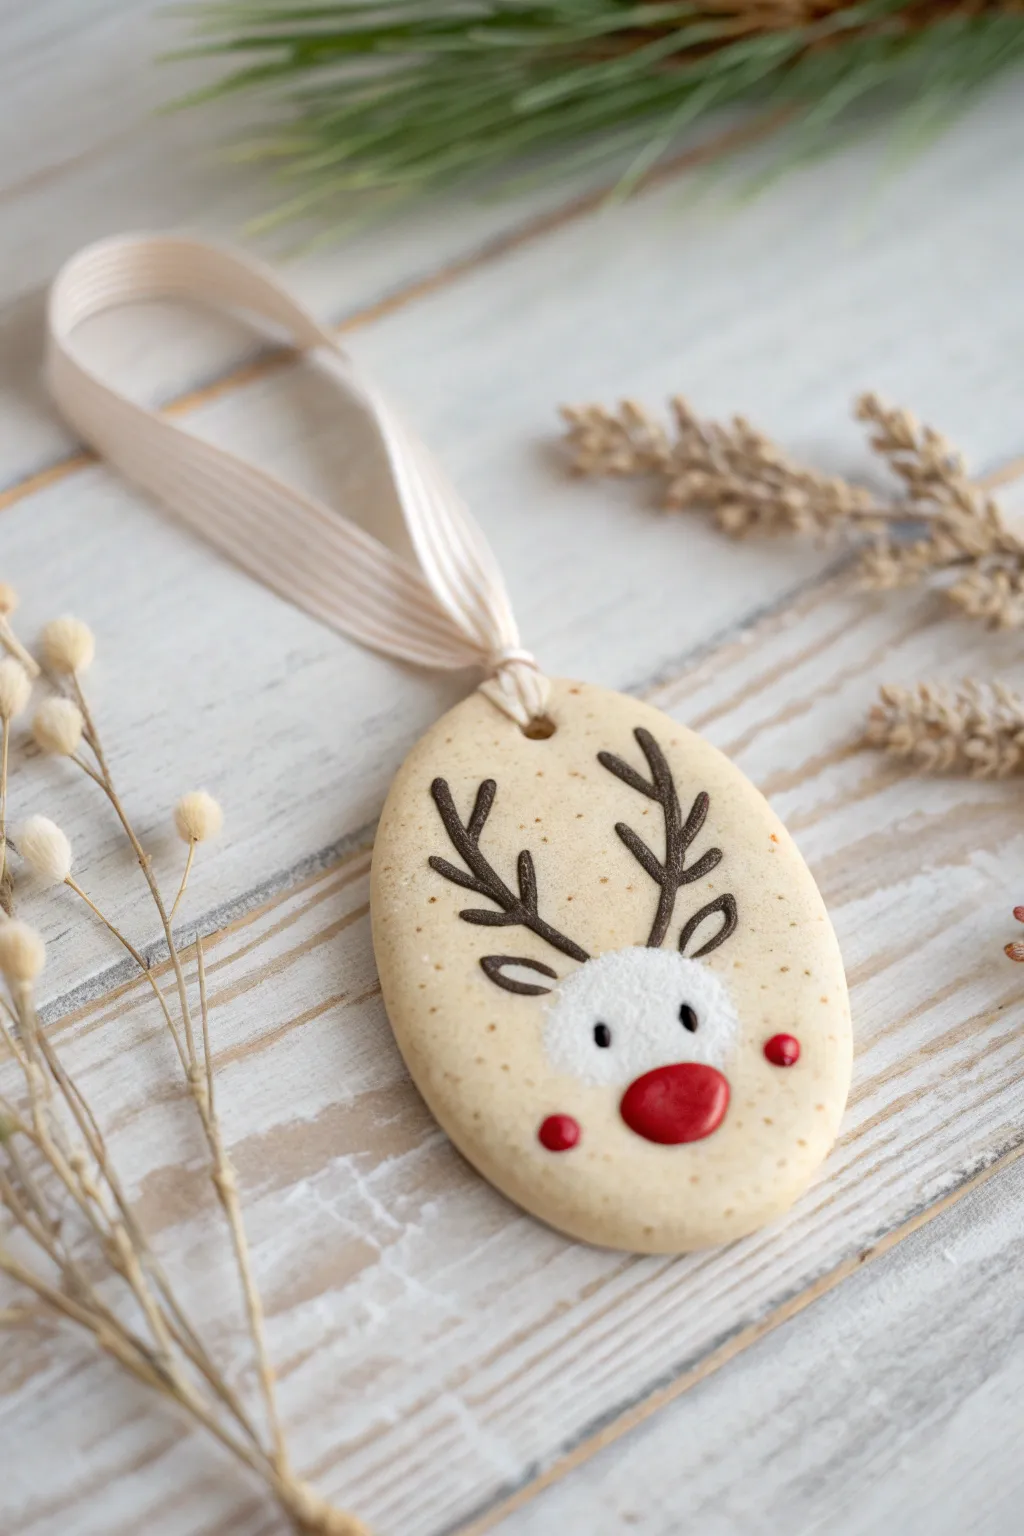
Capture the holiday spirit with this adorable reindeer ornament made from simple salt dough. The smooth oval shape serves as the perfect canvas for a whimsical painted face, complete with a bright red nose and delicate antlers.
Step-by-Step
Materials
- Salt dough (flour, salt, water)
- Oval cookie cutter (or a knife)
- Straw or skewer (for the hole)
- Sandpaper (fine grit)
- White acrylic paint
- Red acrylic paint
- Dark brown acrylic paint
- Fine detail paintbrush
- Round sponge dabber or small pom-pom
- Ribbon or twine for hanging
- Clear sealant (matte or satin)
- Baking sheet and parchment paper
Step 1: Dough Preparation & Baking
-
Mix and Roll:
Prepare your standard salt dough recipe, kneading until smooth and pliable. Roll the dough out on a lightly floured surface to a consistent thickness of about 1/4 inch. -
Cut the Shape:
Using an oval cookie cutter, press firmly into the dough to create your base shape. If you don’t have a cutter, you can freehand an oval shape using a sharp knife. -
Create the Hanging Hole:
Before baking, use a straw or a skewer to poke a hole near the top center of the oval. Ensure the hole is large enough for your ribbon to pass through later, as it may shrink slightly during baking. -
Bake the Ornament:
Place the oval on a parchment-lined baking sheet. Bake at a low temperature (around 200°F or 95°C) for several hours (often 2-3 hours) until the ornament is rock hard and dry. Flip halfway through for even drying. -
Cool and Smooth:
Allow the ornament to cool completely on a wire rack. Once cool, gently run fine-grit sandpaper over the edges and surface to remove any rough spots or crumbs.
Puffy Paint Fix
If your dough puffs up while baking, gently press it down with a flat spatula or oven mitt every 30 minutes while it’s still pliable in the oven.
Step 2: Painting the Reindeer
-
Create the Fur Base:
Dip a round sponge dabber or a small piece of sponge into white acrylic paint. Blot off the excess paint on a paper towel until it’s almost dry. -
Sponge the Head:
Gently dab the sponge onto the lower middle section of the oval to create a fluffy, textured circle for the reindeer’s snout area. Let this dry completely. -
Paint the Antlers:
Using a very fine detail brush and dark brown paint, draw two main lines curving upward from the top of the white snout area. These form the main beams of the antlers. -
Add Antler Details:
Paint smaller, branching lines coming off the main beams to create the tines of the antlers. Keep your hand steady and use light pressure for thin lines. -
Draw the Ears:
With the same brown paint and fine brush, outline two small, leaf-shaped ears just below the base of each antler. -
Add the Eyes:
Dip the handle end of a paintbrush into black or dark brown paint. Dot two small eyes onto the upper part of the white snout area. -
Paint the Nose:
Using a clean brush and bright red paint, create a generous oval shape in the center of the white snout, just below the eyes. This is the reindeer’s signature red nose. -
Adding Nose Highlight:
I like to add a tiny dot of white paint to the upper side of the red nose once it’s dry; this little reflection makes the nose look shiny and dimensional. -
Cheek Details:
Dip the handle end of a brush into the red paint and add one small dot on the dough outside the white area, on either side of the snout, to create rosy cheeks.
Step 3: Finishing Touches
-
Seal:
Once all paint is thoroughly dry, apply a coat of clear matte or satin sealant over the entire front of the ornament to protect the design from moisture. -
String:
Thread a piece of decorative ribbon—cream or beige looks lovely—through the hole at the top. Tie it securely in a loop.
Pro Tip: Texture
Add a few drops of cinnamon or nutmeg to your dough before baking. It gives the unpainted ‘skin’ of the reindeer a speckled, natural look.
Hang your charming reindeer on the tree or use it as a festive gift tag for someone special
Mini Wreath Ornaments With Cut-Out Centers
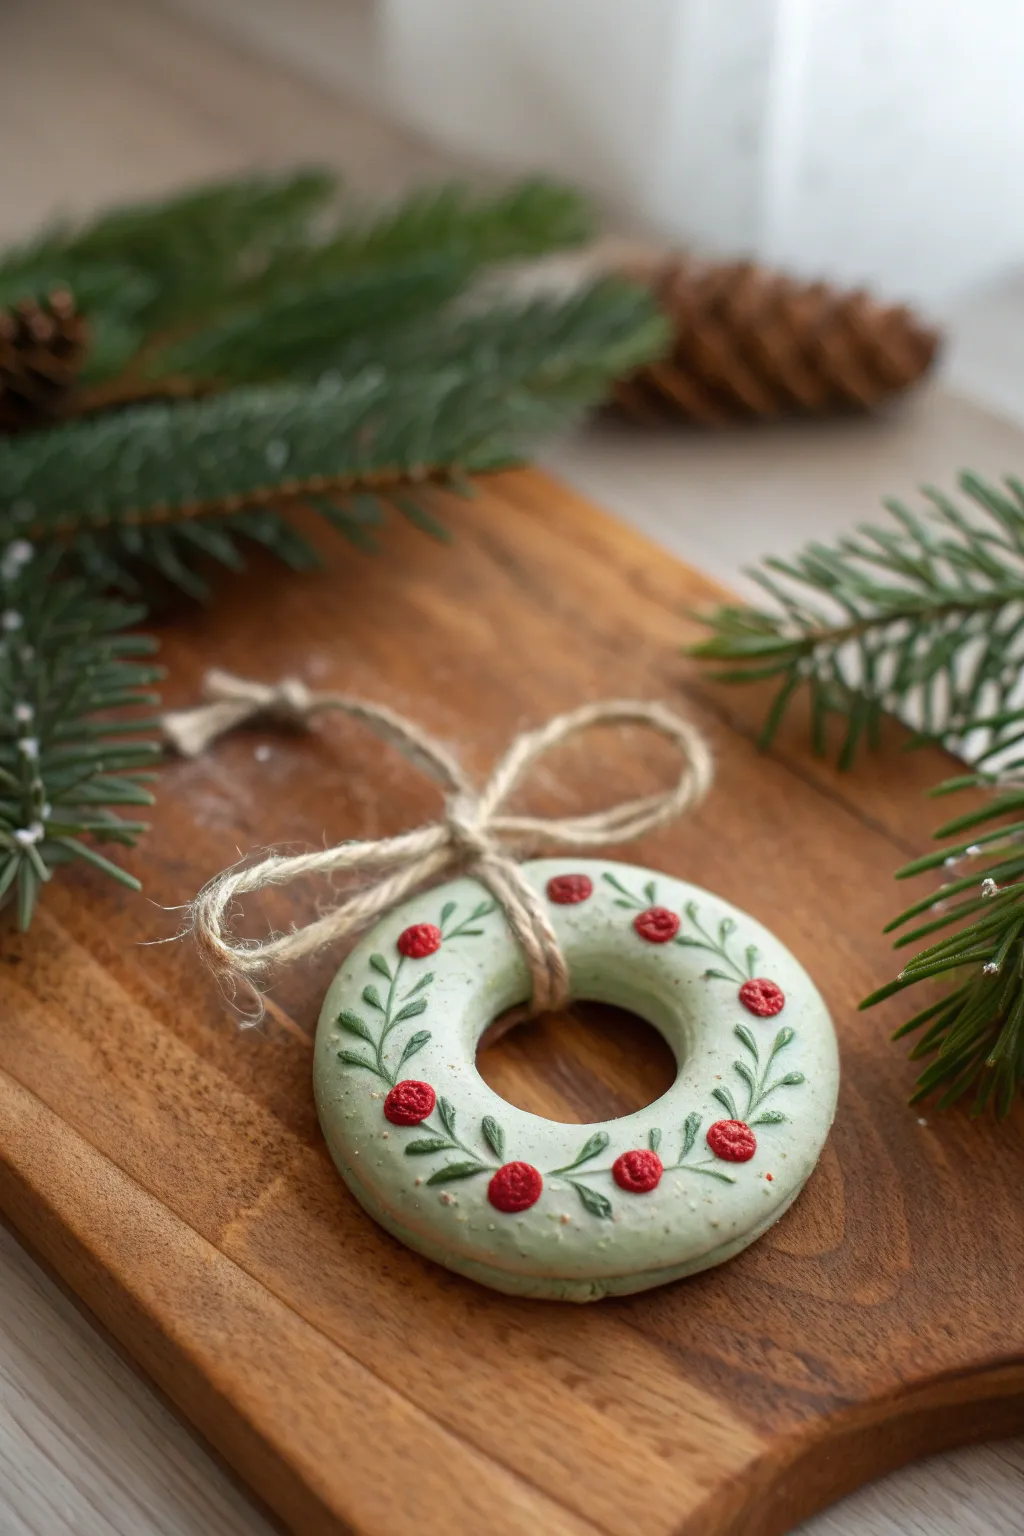
These charming donut-shaped ornaments feature delicate hand-painted botanical details against a soft sage green backdrop. The combination of rustic jute twine and precise berry motifs gives them a sophisticated, heirloom-quality appearance perfect for a nature-inspired tree.
Step-by-Step Tutorial
Materials
- Salt dough (flour, salt, water)
- Round cookie cutter (approx. 3 inches)
- Small round cutter (approx. 1 inch) or bottle cap
- Acrylic paints: Sage green, Forest Green, Bright Red
- Fine detail paintbrush (size 0 or 00)
- Small flat paintbrush
- Jute twine
- Matte finish sealant spray or varnish
- Sandpaper (fine grit)
- Parchment paper
- Baking sheet
Step 1: Shaping and Baking
-
Roll the dough:
Begin by rolling out your salt dough on a floured surface to a uniform thickness of about 1/4 inch. You want these to be sturdy but not overly heavy. -
Cut the outer shape:
Use your larger 3-inch round cutter to stamp out circles from the dough. Twist the cutter slightly before lifting to ensure a clean edge. -
Create the center:
Take the smaller 1-inch cutter or a clean bottle cap and remove the center of each circle to create the donut-wreath shape. -
Smooth the edges:
Dip your finger in a little water and gently run it around the cut edges (both inner and outer) to smooth away any roughness or jagged bits. -
Bake securely:
Place the wreaths on a parchment-lined baking sheet. Bake at 200°F (95°C) for several hours (usually 2-3) until they are rock hard and completely dry. Flip them halfway through baking. -
Cool and sand:
Let the ornaments cool completely. If there are any stray rough spots, give them a quick pass with fine-grit sandpaper for a professional finish.
Step 2: Painting the Base
-
Apply base coat:
Using a flat brush, paint the entire front and sides of the wreath with the sage green acrylic paint. You may need two coats for full opacity; let each layer dry fully in between. -
Add texture (optional):
For the slightly speckled look seen in the photo, you can flick a tiny amount of watered-down brown paint or use an old toothbrush to create microscopic speckles, though a solid color works beautifully too.
Prevent Puffing
If your dough puffs up too much and loses the flat surface needed for painting, try drying them at an even lower temp (175°F) for longer, or let them air-dry for 24 hours before baking.
Step 3: Adding Details
-
Start the vines:
Switch to your finest detail brush (size 00) and Forest Green paint. Paint a thin, curving line that meanders around the face of the wreath ring. -
Add leaves:
Along the vine, paint small, simple leaves. Use a ‘press and lift’ motion with your brush—press down for the base of the leaf and lift up as you drag to create a pointy tip. -
Paint the berries:
Once the green is dry, use the Bright Red paint. Dip the handle end of a paintbrush or a dotting tool into the paint and stamp clusters of 2-3 small circles along the vine. -
Detail the berries:
I like to create texture on the berries by waiting for the red paint to get slightly tacky, then gently stippling the surface with a barely-damp brush to make them look dimensional rather than flat. -
Seal the work:
Once all paint is completely dry (give it at least an hour), spray the ornament with a matte sealant to protect the artwork and prevent the dough from absorbing moisture.
Cookie Sandwich Look
To mimic the ‘macaron’ seam look in the photo, glue two thinner baked wreaths together before painting, or gently score a groove around the side edge with a knife before baking.
Step 4: Assembly
-
Cut the twine:
Cut a piece of jute twine approximately 12 inches long. -
Loop and tie:
Loop the twine through the center hole of the wreath. Instead of just hanging it, tie a secure knot at the top of the wreath ring first. -
Make the bow:
Tie a classic shoelace bow with the twine, adjusting the loops so they are proportional to the wreath size. The bow should sit right on the rim of the ornament.
Now you have a set of handcrafted botanical ornaments ready to grace your tree or be given as thoughtful gifts

TRACK YOUR CERAMIC JOURNEY
Capture glaze tests, firing details, and creative progress—all in one simple printable. Make your projects easier to repeat and improve.
Rustic Woodland Ornaments With Leaf Impressions
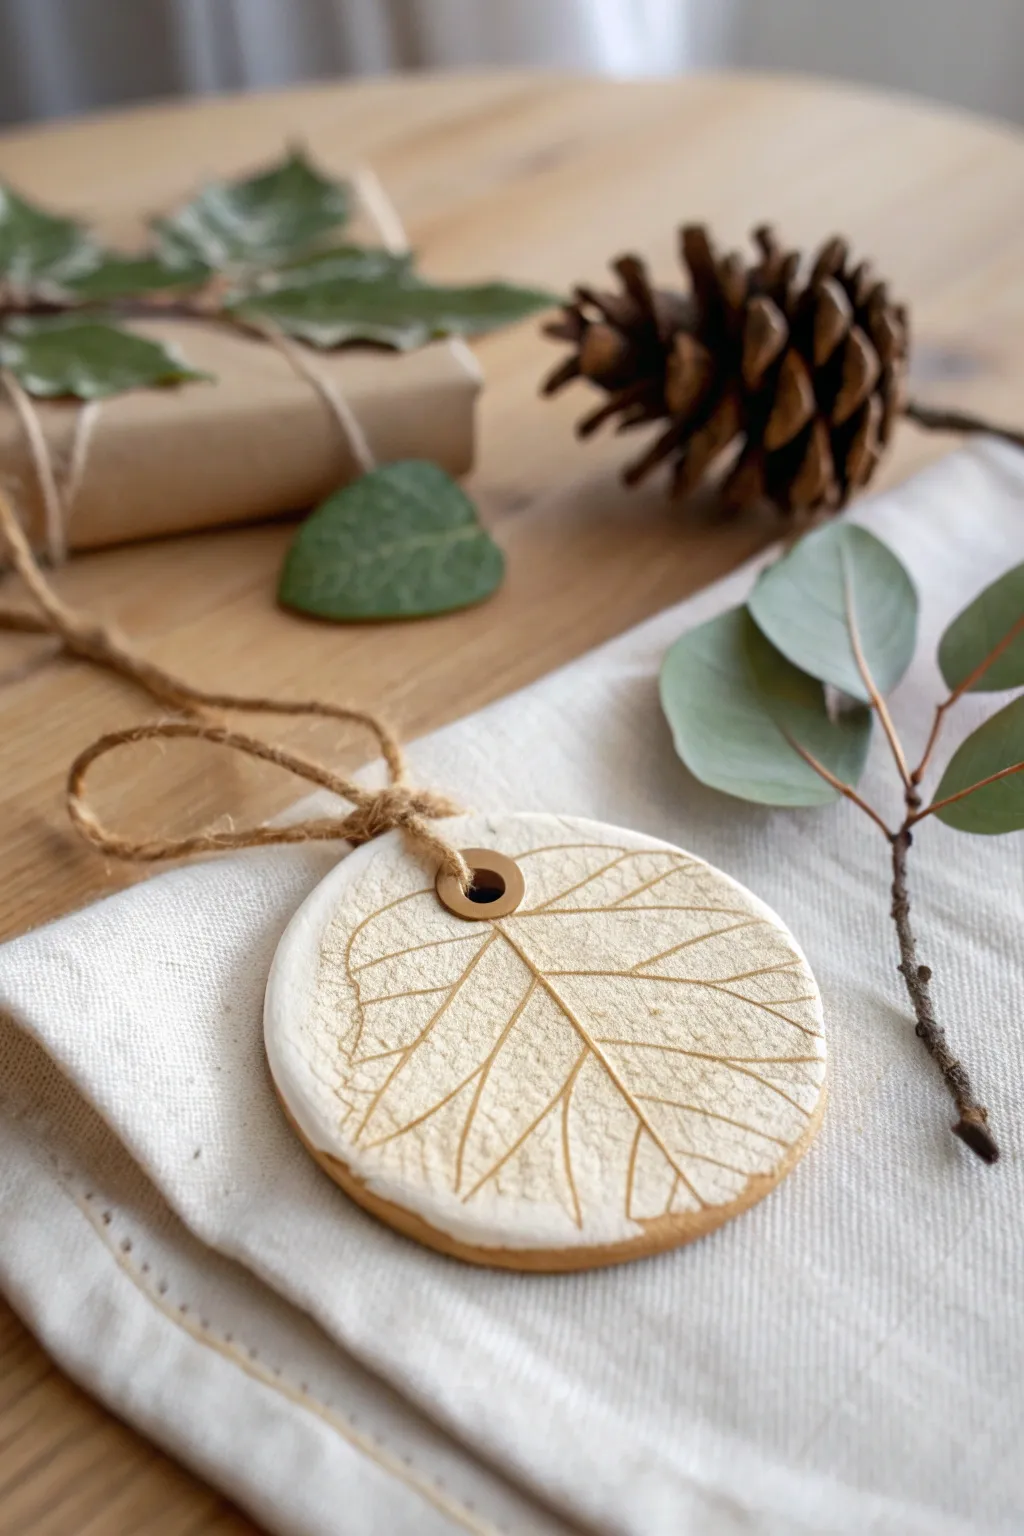
Capture nature’s delicate details with these elegant rustic ornaments that bring the outdoors in. The contrast between the creamy white clay and the golden-brown leaf impression creates a sophisticated, fossil-like effect perfect for any season.
How-To Guide
Materials
- All-purpose flour
- Table salt
- Warm water
- Rolling pin
- Round cookie cutter (approx. 3-4 inches)
- Fresh leaves with prominent veins (like sage or hydrangea)
- Parchment paper
- Baking sheet
- Straw or skewer (for hole)
- Small metal eyelet/grommet (gold or brass)
- White acrylic paint (matte finish)
- Brown antiquing wax or watered-down brown acrylic paint
- Soft cloth or paper towel
- Jute twine
- Soft paintbrush
- Fine-grit sandpaper (optional)
- Eyelet setting tool (if needed for your specific eyelets)
Step 1: Mixing and Shaping the Dough
-
Prepare the Dough:
Combine 2 cups of flour and 1 cup of salt in a large mixing bowl. Slowly add up to 1 cup of warm water, stirring constantly until a firm dough forms. Knead on a floured surface for 5-10 minutes until smooth and pliable. -
Roll It Out:
Roll your dough onto a sheet of parchment paper to a thickness of about 1/4 inch. Try to keep the thickness even to ensure consistent baking. -
Select Your Leaf:
Choose a fresh leaf with a strong vein structure on the back side. Place the leaf vein-side down onto the rolled dough. -
Create the Impression:
Gently glide your rolling pin over the leaf once or twice firmly. You want to press the veins deep into the dough without distorting the overall shape. -
The Reveal:
Carefully peel back the leaf from the stem end to reveal the intricate imprint left behind. -
Cut the Shape:
Position your round cookie cutter so the leaf impression is centered attractively. Press down firmly to cut the circle. -
Create Hanging Hole:
Use a straw or skewer to poke a hole near the top edge. Make sure it’s large enough to accommodate your metal eyelet later.
Vein Definition Tip
Use leaves with stiff, woody veins like viburnum, sage, or oak. Soft, fleshy leaves like spinach won’t leave a crisp enough impression to hold the antiquing wash later.
Step 2: Baking and Decorating
-
Bake the Ornament:
Transfer the parchment paper with the cutout to a baking sheet. Bake at a low temperature, around 250°F (120°C), for 2-3 hours. Flip them halfway through so the bottom dries thoroughly. -
Cool and Smooth:
Let the ornament cool completely on a wire rack. If the edges feel rough, I like to gently run a bit of fine-grit sandpaper over the rim. -
Apply Base Coat:
Paint the entire surface, including the indented leaf veins, with matte white acrylic paint. You may need two coats for full opacity. Let this dry completely. -
Highlight the Veins:
Mix a small amount of brown acrylic paint with water (or use antiquing wax). Brush this wash over the leaf impression, ensuring it gets into the deep crevices. -
Wipe Back:
Immediately use a damp cloth or paper towel to wipe the brown paint off the raised surface. The dark color should remain only in the indented veins, revealing the pattern. -
Install the Hardware:
Place your gold metal eyelet into the pre-made hole. If it’s a friction-fit eyelet, push it in gently; otherwise, use an eyelet setting tool to secure it. -
Add the Twine:
Cut a length of natural jute twine, approximately 8 inches long. Thread it through the eyelet. -
Finish the Knot:
Tie a secure knot at the top of the loop, trimming any excess fraying for a clean finish.
Gilded Edge Upgrade
For a touch of luxury, lightly brush the outer rim of the circle with liquid gold leaf or metallic gold paint. This frames the rustic leaf impression beautifully.
Hang your finished piece in a sunny spot to let the natural textures shine
Metallic Edge-Dipped Stars for a Fancy Look
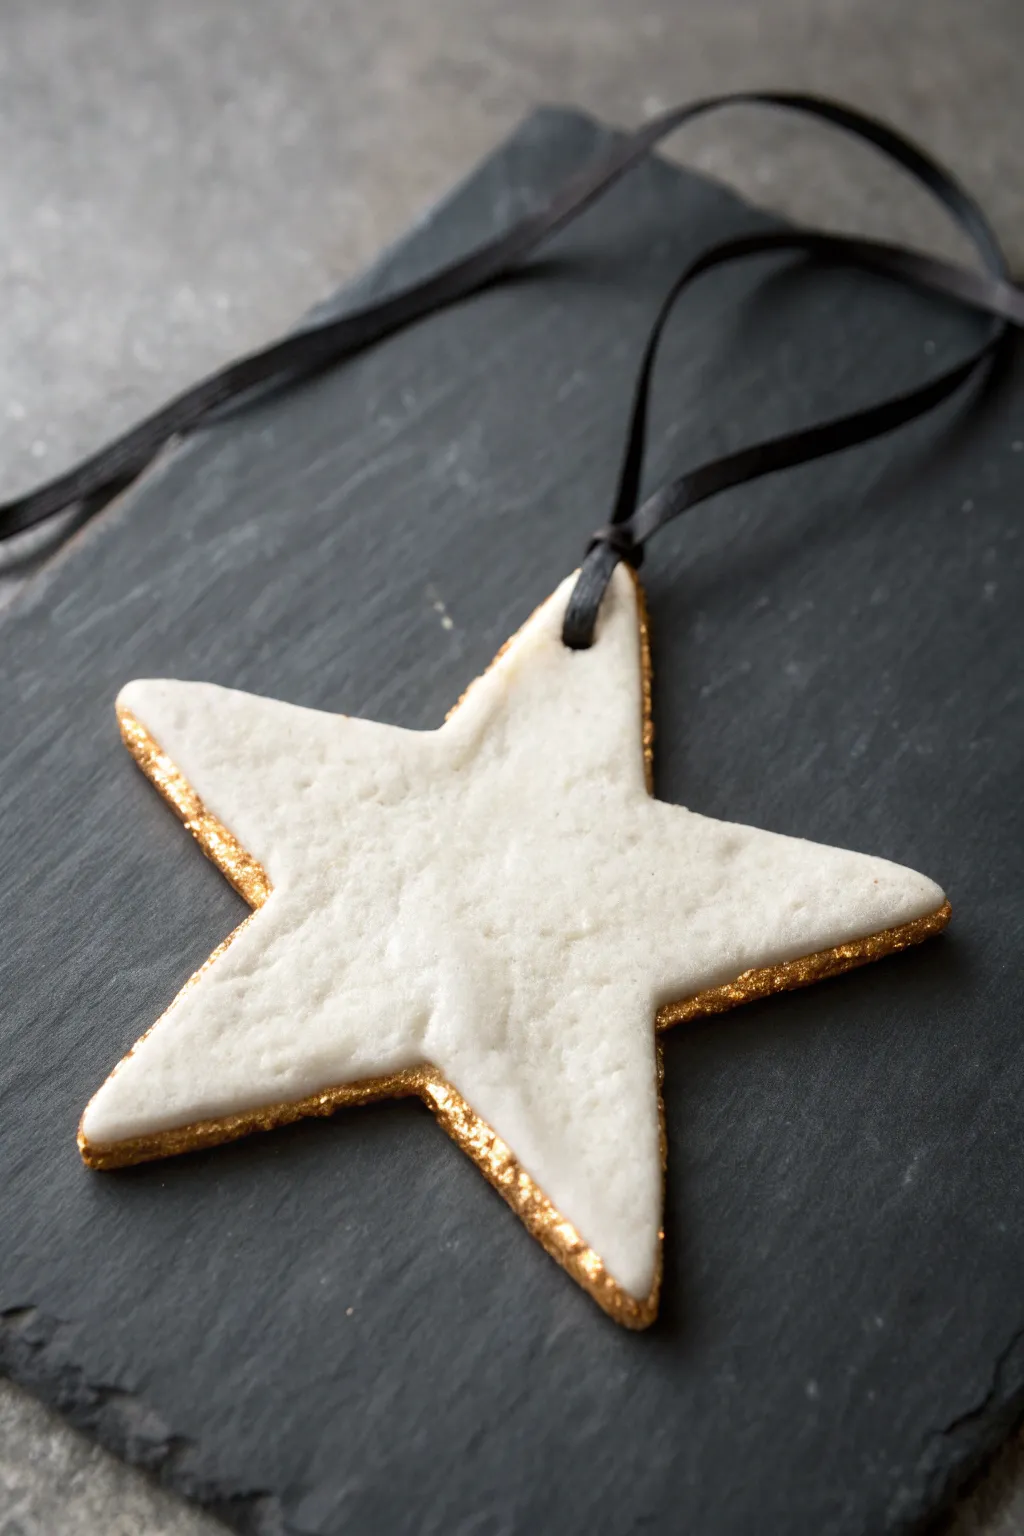
Elevate simple salt dough into elegant decor with this sophisticated star ornament featuring distinct, gold-dipped edges. The contrast between the stark white dough and the rich metallic trim creates a high-end look perfect for modern holiday styling.
Step-by-Step Guide
Materials
- Batch of white salt dough
- Star-shaped cookie cutter
- Rolling pin
- Parchment paper
- Sandpaper (fine grit)
- White acrylic paint (matte)
- Liquid gilding paint or gold leaf paint
- Small flat paintbrush
- Black satin ribbon (1/8 inch width)
- Straw or skewer for hole punching
- Sealant spray (clear matte, optional)
Step 1: Shaping and Baking
-
Roll the Dough:
Roll your prepared salt dough out on a piece of parchment paper to a uniform thickness of about 1/4 inch. Keeping it slightly thick gives the star a nice substantial feel and provides more surface area for the gold edge. -
Cut the Shape:
Press your star-shaped cookie cutter firmly into the dough. Wiggle it slightly to ensure a clean cut before lifting it away. -
Create the Hanging Hole:
Use a straw or a skewer to punch a neat hole near the top point of one of the star’s rays. Make sure the hole is big enough for your ribbon to pass through later, keeping in mind the dough might shrink slightly. -
Smooth the Edges:
Dip your finger in a little water and run it gently around the cut edges of the star to smooth down any rough burrs or crumbs from the cutting process. -
Bake or Dry:
Transfer the parchment paper with your stars onto a baking sheet. Bake at a low temperature (around 200°F or 100°C) for several hours until completely hard. Flip them halfway through so the back dries evenly.
Sticky Situation
If your dough puffs too much while baking, creating a domed surface instead of flat, gently press it down with a flat spatula about 15 minutes into the baking time to flatten it back out.
Step 2: Refining the Surface
-
Cool Completely:
Once baked, let the stars cool down entirely on a wire rack. Don’t start painting while they are still warm, as it can affect paint adhesion. -
Sand Imperfections:
Take a fine-grit sandpaper and very lightly sand the edges and surface. You want to remove any sharp peaks or rough texture to get that smooth, porcelain-like finish. -
Base Coat:
Paint the entire star—front, back, and sides—with a coat of matte white acrylic paint. This ensures the dough looks bright white and seals the porous surface. -
Let it Dry:
Allow the white paint to dry completely. I prefer to let this sit for at least an hour to ensure the next layers don’t lift the base coat.
Step 3: Gilding the Edges
-
Prepare Gold Paint:
Shake your liquid gilding or gold paint well. Pour a small amount into a palette or cap. -
Paint the Edge:
Dip a small flat brush into the gold paint. Carefully paint the vertical edge of the star. You want to cover the entire thickness of the side. -
Create the Lip:
Here is the key to this look: intentionally let the gold paint wrap slightly over onto the front face of the star. Create a thin, somewhat irregular ‘lip’ or border of gold on the front surface, about 1-2mm wide. -
Refine the Gold Line:
Go back over the gold edge to make sure the coverage is opaque and rich. The slight irregularity of the gold line on the front adds to the handmade charm. -
Dry the Gold:
Set the star on its unpainted back or prop it up carefully to let the gold edges dry without touching anything. Liquid gilding usually fumes, so do this in a ventilated area.
Make it Sparkle
While the gold paint on the edge is still wet, sprinkle a tiny pinch of fine gold glitter onto the rim for added texture and a festive twinkle that catches holiday lights.
Step 4: Finishing Touches
-
Seal (Optional):
If you want extra durability, mist the star with a matte clear sealant spray. This protects the white paint from yellowing and the gold from tarnishing. -
Thread the Ribbon:
Cut a length of black satin ribbon, roughly 8-10 inches long. -
Tie the Loop:
Thread one end through the hole in the star. Bring the ends together and tie a simple knot or a bow, depending on your preference. The black ribbon provides a modern graphic contrast to the gold and white.
Hang these striking stars on your tree or use them as luxurious gift toppers for special presents
Swirled Marbled Color Salt Dough Ornaments
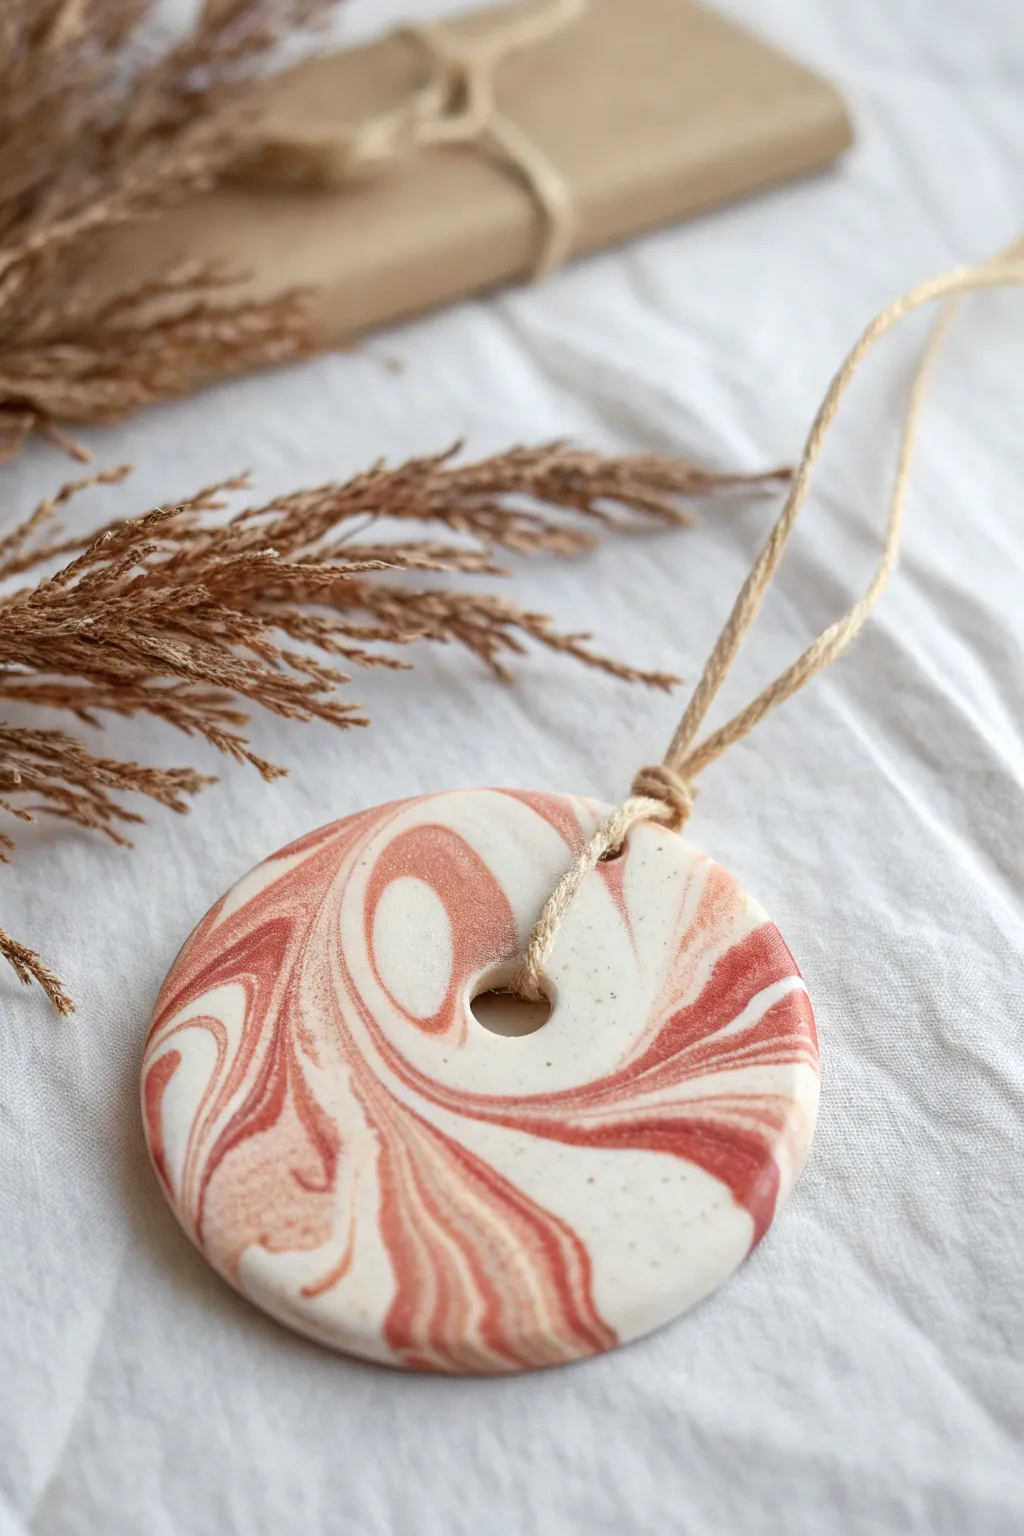
These sophisticated ornaments mimic the look of high-end ceramic pieces using nothing but simple kitchen staples. The rich terracotta ribbons swirling through creamy white dough create a natural, earthy aesthetic that looks lovely on a tree or as a gift tag.
Step-by-Step Tutorial
Materials
- All-purpose flour
- Table salt
- Warm water
- Terracotta or rust-colored acrylic paint
- White or cream acrylic paint (optional, for base)
- Rolling pin
- Round cookie cutter (approx. 3 inches)
- Wide drinking straw or small cutter (for the center hole)
- Baking sheet
- Parchment paper
- Jute twine or hemp cord
- Fine-grit sandpaper
- Clear matte varnish or sealant
Step 1: Preparing the Base
-
Mix the dry ingredients:
In a large mixing bowl, combine 2 cups of all-purpose flour and 1 cup of salt. Whisk them together thoroughly to ensure there are no clumps of salt, which creates a smoother finished surface. -
Add water gradually:
Slowly pour in up to 1 cup of warm water while stirring. Stop when the dough begins to come together; you may not need every drop. If it’s too sticky, sprinkle in a little more flour. -
Knead until smooth:
Turn the dough onto a clean surface and knead it for about 5 to 7 minutes. You want a consistency similar to playdough—pliable, smooth, and soft, but not tacky. -
Divide the dough:
Separate the dough ball into two uneven sections. Keep about 2/3 of the dough plain (natural white). Take the remaining 1/3 and place it in a separate small bowl.
Clean Cuts Pro-Tip
Flour your cookie cutter before each press. If the edges still look ragged, wait 15 minutes for the dough to surface-dry slightly, then smooth edges with a damp finger for a pottery-like finish.
Step 2: Coloring and Marbling
-
Tint the accent dough:
Add a generous squirt of terracotta or rust acrylic paint to the smaller dough ball. Knead the paint directly into the dough while wearing gloves to avoid staining your hands. Work it until the color is solid and uniform. -
Whiten the base (optional):
If you want a brighter contrast rather than the natural off-white of the flour, you can knead a small amount of white acrylic paint into the larger dough ball at this stage. -
Create ropes:
Roll both the white dough and the terracotta dough into long, snake-like ropes. I usually aim for ropes about an inch thick. -
Twist them together:
Lay the ropes side by side and twist them around each other to form one large, two-toned spiral. Fold this twisted rope in half and twist it again. -
Combine but don’t overmix:
Squash the twisted dough into a rough ball. Knead it gently just two or three times. This is the crucial moment—if you knead too much, the colors will blend into a muddy pink. You want distinct striations.
Step 3: Shaping and Baking
-
Roll out the slab:
Place your marbled dough ball on a sheet of parchment paper. Use a rolling pin to flatten it to a thickness of about 1/4 inch. Roll in different directions to help spread the marbled pattern outward. -
Cut the shapes:
Press your round cookie cutter into the most attractive parts of the marble pattern. Lift the cutter straight up to get clean edges. -
Punch the center hole:
Use a wide straw or a very small circle cutter to punch a hole directly in the center of the ornament. Ensure the hole is large enough to accommodate thick twine later. -
Smooth the edges:
Dip your finger in a little water and run it gently around the rim of the cut circle and the inner hole to smooth down any ragged crumbs before baking. -
Bake low and slow:
Transfer the parchment paper with the ornaments onto a baking sheet. Bake in an oven preheated to 200°F (95°C) for approximately 2 to 3 hours. Flip them over halfway through so the bottoms dry evenly.
Level Up: Scent it
Add 10 drops of essential oil like cinnamon, clove, or pine into the water before mixing your dough. The warmth of the Christmas tree lights will release a subtle, festive fragrance.
Step 4: Finishing Touches
-
Cool and sand:
Let the ornaments cool completely on a wire rack. Once cool, gently rub the edges with fine-grit sandpaper if there are any rough spots left. -
Seal the surface:
Apply a thin coat of clear matte varnish or sealant to both sides. This protects the salt dough from moisture and gives the colors a slightly richer depth without making them look like plastic. -
Attach the hanging loop:
Cut a length of jute twine, roughly 8 inches long. Fold it in half to create a loop. -
Secure the twine:
Thread the folded end through the ornament’s center hole, then pass the loose ends through that loop (a lark’s head knot) and pull tight. Tie the ends together at the top to finish.
Hang your new marbled creations on the tree or use them as sophisticated gift toppers that act as a bonus present
Scented Spice Ornaments for a Cozy Tree Moment

Bring the warm, nostalgic scent of cinnamon into your holiday decor with these naturally beautiful star ornaments. The dough incorporates ground spices for a speckled, rustic finish that looks as cozy as it smells.
Step-by-Step
Materials
- 1 cup all-purpose flour
- 1/2 cup salt
- 1/2 cup warm water
- 2-3 tablespoons ground cinnamon
- 1 teaspoon ground nutmeg or ginger (optional)
- Star-shaped cookie cutter
- Rolling pin
- Natural jute twine
- Drinking straw or skewer
- Baking sheet
- Parchment paper
- Sandpaper (fine grit)
- White acrylic paint (optional for dry brushing)
- Matte sealant (optional)
Step 1: Preparing the Spiced Dough
-
Mix dry ingredients:
In a large mixing bowl, combine the flour, salt, cinnamon, and any other ground spices you wish to include. Whisk them together thoroughly so the spices are evenly distributed, which creates that lovely speckled look. -
Add water gradually:
Slowly pour in the warm water while stirring. You might not need every drop, or you might need a splash more. You aim for a dough that feels firm and smooth, not sticky or crumbly. -
Knead the dough:
Turn the mixture onto a clean surface and knead for about 5 to 10 minutes. The warmth from your hands will help release the spice oils, making the dough smell incredible. -
Check consistency:
If the dough feels too sticky, add a sprinkle of flour. If it’s cracking, wet your hands and keep kneading until it becomes pliable.
Step 2: Shaping and Baking
-
Roll it out:
Roll the dough out on a lightly floured surface or between two sheets of parchment paper. Aim for a thickness of about 1/4 inch to ensure durability. -
Cut the shapes:
Press your star-shaped cookie cutter firmly into the dough. Gently wiggle it to ensure a clean cut before lifting it away. -
Create the hanging hole:
Using a drinking straw or a skewer, poke a hole near the top point of the star. Make sure the hole is distinct and goes all the way through, as it tends to shrink slightly during baking. -
Place on baking sheet:
Transfer your cut stars onto a baking sheet lined with parchment paper. Leave a little space between each one to allow airflow. -
Bake slowly:
Place the tray in an oven preheated to 200°F (95°C). Bake for roughly 2 to 3 hours. You want to dry them out, not cook them, so low and slow is key. -
Flip halfway:
After about an hour, flip the ornaments over carefully. I like to do this to ensure the back dries just as evenly as the front. -
Cool down:
Once the stars feel hard and solid, remove them from the oven and let them cool completely on a wire rack.
Dough Puffing Up?
If your stars puff up like pillows in the oven, your temperature is too high. Lower the heat or bake with the oven door slightly ajar to let moisture escape slowly.
Step 3: Finishing Touches
-
Sand edges:
If there are any rough or sharp edges from the cookie cutter, gently smooth them down with fine-grit sandpaper for a polished look. -
Enhance texture (optional):
To bring out the rustic texture seen in the photo, you can lightly dry-brush the surface with a tiny amount of watered-down white acrylic paint, wiping most of it off immediately. -
Seal:
To preserve the ornament for years to come, apply a thin coat of matte sealant. Note that this might dampen the scent slightly. -
Prepare twine:
Cut a piece of natural jute twine, about 8-10 inches long. -
Thread the loop:
Thread the twine through the hole you made earlier. Tie the ends together in a simple knot to create a hanging loop.
Add Orange Zest
For more texture and scent, knead finely grated dried orange zest into the dough. It adds vibrant orange speckles that complement the cinnamon perfectly.
Hang your spiced stars alongside dried orange slices and cinnamon sticks for a truly natural holiday display