
When I want something spooky on my shelf (without going full nightmare fuel), I reach for creepy-cute Halloween clay projects that are quick to sculpt and fun to paint. Here are my favorite scary Halloween clay ideas—starting with the classics and drifting into the weirder corners of the studio.
Classic Jack O’ Lantern Faces
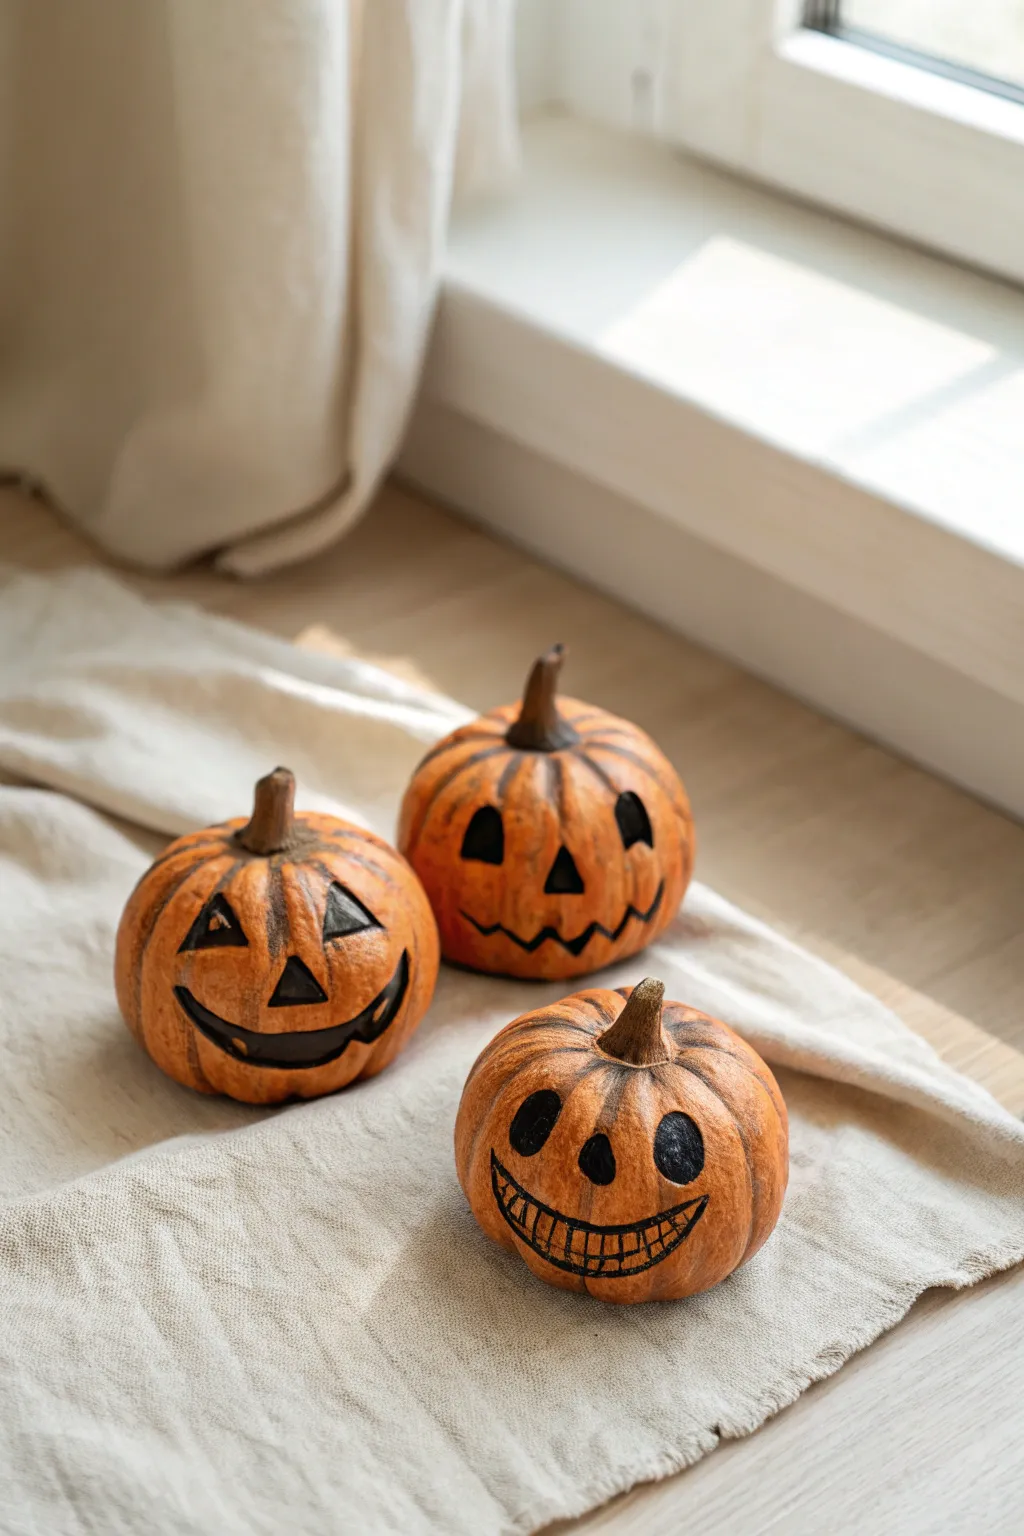
These charming miniature pumpkins capture the spirit of Halloween with their textured, realistic orange finish and classic expressive faces. This project uses air-dry clay to sculpt three distinct characters that look adorable grouped together on a windowsill or mantle.
Step-by-Step
Materials
- Air-dry clay (white or terracotta)
- Acrylic paints (bright orange, burnt sienna/dark brown, black, dark green)
- Sculpting tools (or a toothpick and butter knife)
- Paintbrushes (flat brush for base, fine liner brush for details)
- Aluminum foil
- Water cup
- Matte sealant or varnish
Step 1: Sculpting the Base
-
Prepare the core:
Start by crumpling three balls of aluminum foil, each roughly the size of a tangerine. This saves clay and keeps the pumpkins lightweight. -
Cover with clay:
Roll out your air-dry clay into flat sheets about 1/4 inch thick. Wrap one sheet around each foil ball, smoothing the seams together with a bit of water until you have a solid sphere. -
Add the ridges:
Use a modeling tool or the back of a butter knife to press vertical indentations all around the sphere. Start at the top center and pull the tool down to the bottom center to create the classic pumpkin ribs. -
Softening the form:
Gently press your thumb into the top center to create a dip where the stem will go. Smooth out the ridges slightly with a damp finger so they look organic, not sharp. -
Forming the stems:
Roll three small coils of clay. Attach one to the center dip of each pumpkin using the score-and-slip method (scratching both surfaces and adding water). Twist slightly as you attach them to give them a natural, dried look. -
Drying:
Let your sculpted pumpkins dry completely. Air-dry clay usually takes 24-48 hours depending on thickness. Rotate them occasionally so the bottoms dry evenly.
Fixing Cracks
If small cracks appear as the clay dries, don’t panic. Mix a small amount of fresh clay with water to make a paste (slip) and fill in the cracks, then smooth over.
Step 2: Painting the Texture
-
Base coat:
Paint the entire body of each pumpkin with a bright orange acrylic paint. You may need two coats for full coverage. -
Adding depth with a wash:
Mix a small amount of burnt sienna or dark brown paint with water to create a thin wash. Brush this freely over the orange pumpkin. -
Wiping back:
Before the brown wash dries, use a paper towel or rag to wipe the surface. This leaves the dark color in the deep grooves of the ribs while revealing the bright orange on the high points. -
Dry brushing:
I like to take a dry brush with a tiny bit of light orange or yellow paint and whisk it over the very tops of the ridges to add a highlighted, weathered texture. -
Stem color:
Paint the stems a dark brown. Blend a little of the brown down onto the top of the pumpkin shoulders for a realistic transition.
Glow in the Dark
Mix glow-in-the-dark powder into a clear varnish and paint it over the black facial features. In the dark, the faces will appear to float eerily.
Step 3: Adding the Faces
-
Planning the expressions:
Lightly sketch your faces with a pencil. Aim for variety: one classic triangle-eye grin, one goofy toothy smile, and one spooky face. -
Painting the classic grin:
For the first pumpkin, use a fine liner brush and black paint to fill in triangle eyes and a wide, curved mouth. Add small triangles within the mouth to look like missing teeth. -
The toothy skeleton grin:
For the second pumpkin, paint circular eyes and a nose. Draw a wide crescent shape for the mouth, then carefully paint vertical lines and a horizontal bisecting line to create a grid of teeth. -
The simple spoopy face:
For the third, paint slanted, half-moon eyes and a jagged zig-zag mouth. Keep your hand steady and use fluid paint for crisp lines. -
Sealing:
Once the paint is completely dry, apply a coat of matte sealant to protect your work and unify the finish without making it too shiny.
Arranging your trio on a soft linen cloth creates the perfect rustic autumn vignette


Tiny Sheet Ghost Figurines
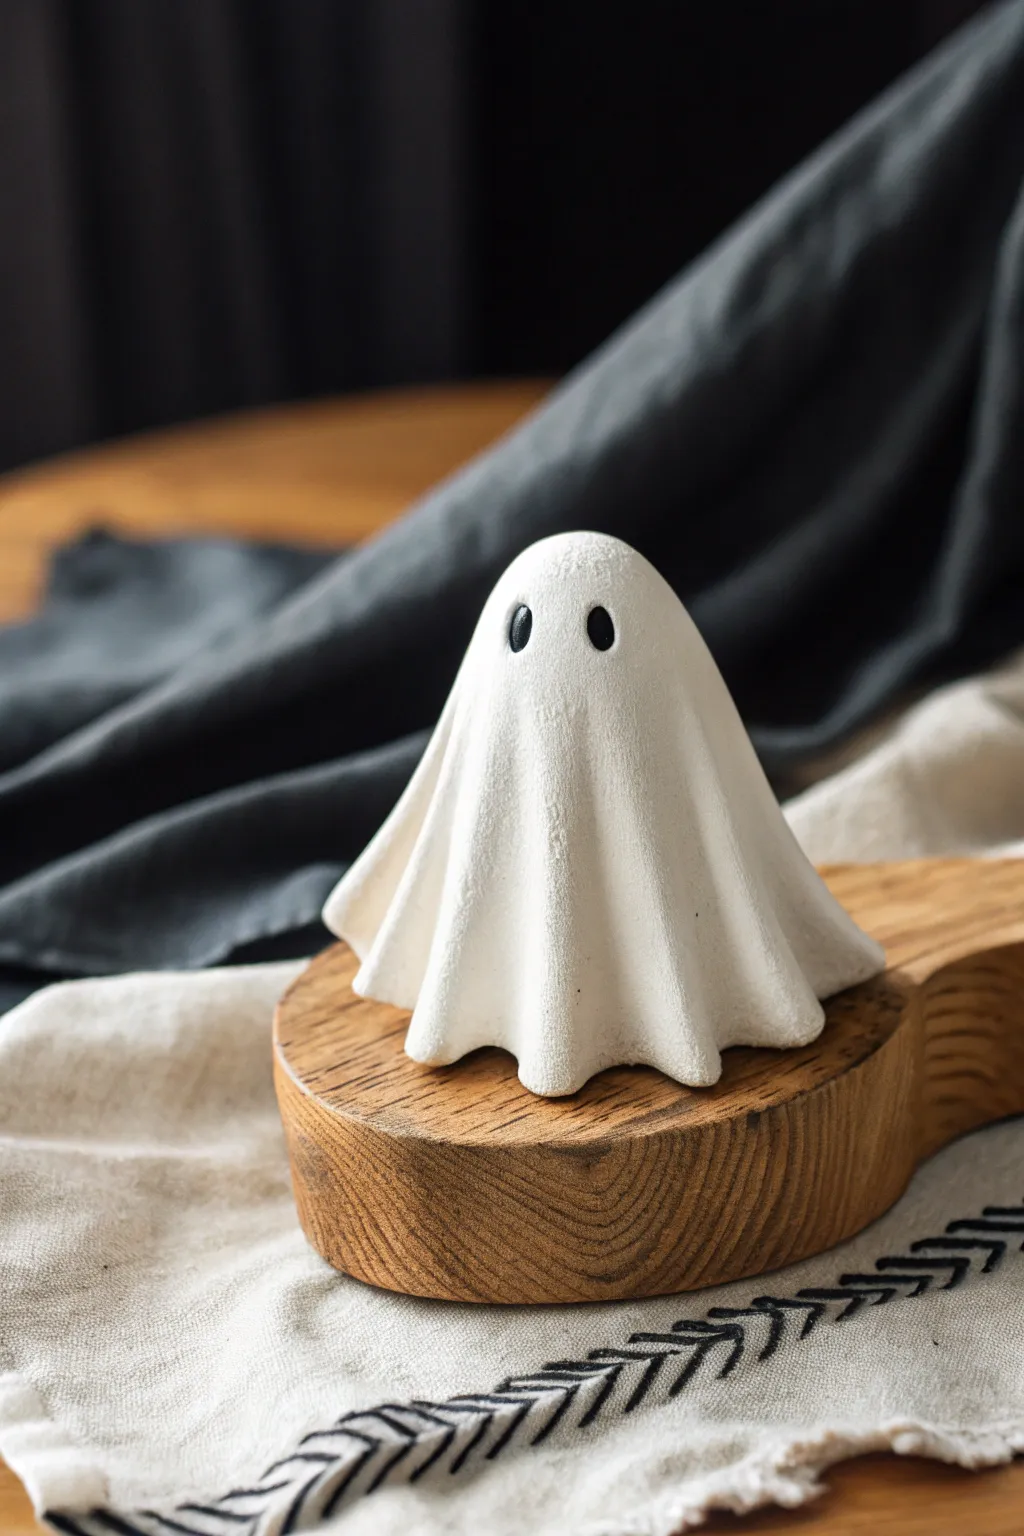
Capture the classic spookiness of a bedsheet ghost with this charming little clay figurine. Its matte white finish and simple black eyes give it a timeless, minimalist appeal perfect for Halloween shelf decor.
Detailed Instructions
Materials
- White polymer clay or air-dry clay
- Aluminum foil
- Rolling pin or smooth glass jar
- Small round cutter or craft knife
- Sculpting tool with a small ball end
- Black acrylic paint
- Black fine-point marker (optional)
- Small detail paintbrush
- Toothpick
- Cornstarch (to prevent sticking)
Step 1: Forming the Base Structure
-
Create the core:
Begin by crumpling a small piece of aluminum foil into a cone shape. This will act as the armature or support structure for your ghost, saving clay and keeping the figurine lightweight. -
Smooth the armature:
Press and roll the foil cone against a table to smooth out sharp edges as much as possible. The smoother your base, the easier it will be to drape the clay later. -
Cover the top:
Take a small pinch of clay and flatten it. Place this over the very tip of your foil cone to create a smooth, rounded head shape where the sheet will drape.
Step 2: Draping the Sheet
-
Prepare the clay sheet:
Condition your white clay until it is soft and pliable. Roll it out into a flat, circular slab about 1/8 inch thick. Aim for a circle roughly 3-4 inches in diameter, depending on how tall your foil cone is. -
Position the drape:
Gently lift the clay circle and center it over the top of the foil cone. Let the sides hang down naturally at first. -
Create the folds:
Using your fingers, gently guide the clay downward to create vertical folds. Pinch the clay lightly at the bottom hem to emphasize the wavy, fabric-like movement. -
Define the silhouette:
I like to gently press the clay inward slightly around the ‘neck’ area to suggest a head shape underneath the sheet, rather than just a perfect cone. -
Trim the excess:
If the clay sheet is too long and pooling too much at the bottom, use your craft knife to trim the excess clay around the base. You want the ghost to look like it’s floating or standing just on the edge of the sheet. -
Smooth the surface:
Dip your finger in a little bit of water (for air-dry clay) or baby oil (for polymer clay) and gently smooth out any fingerprints or unwanted texture on the surface of the sheet.
Cracking Clay?
If using air-dry clay, wrap a damp paper towel loosely around it while drying to slow the process. This prevents cracks.
Step 3: Adding Details & Finishing
-
Mark the eye placement:
Use a toothpick to lightly mark two small dots where you want the eyes to be. Placing them slightly higher up on the head usually makes the ghost look cuter. -
Indent the eyes:
Take your small ball-ended tool and press gently into the marked spots to create shallow sockets. This adds dimension and helps the paint sit better later. -
Final shaping check:
Look at your ghost from all angles. Adjust the folds so they look fluid and natural. Ensure the bottom edge is uneven and wavy like real fabric. -
Cure or dry:
If using polymer clay, bake according to the package instructions (usually around 275°F for 15-30 minutes). If using air-dry clay, set it aside in a safe spot to dry completely for 24-48 hours. -
Paint the eyes:
Once the clay is fully hardened and cool, use a fine detail brush and black acrylic paint to fill in the eye sockets. You can also use a black paint pen for more control. -
Add texture (optional):
To mimic the matte texture seen in the photo, you can lightly dab a dry sponge with white paint over the surface, or simply leave the natural matte finish of the clay.
Glow Up
Mix glow-in-the-dark powder into your white clay before rolling it out for a spooky surprise when the lights go out.
Now you have a spooky little friend ready to haunt your halloween display


Colorful Skeleton Minis
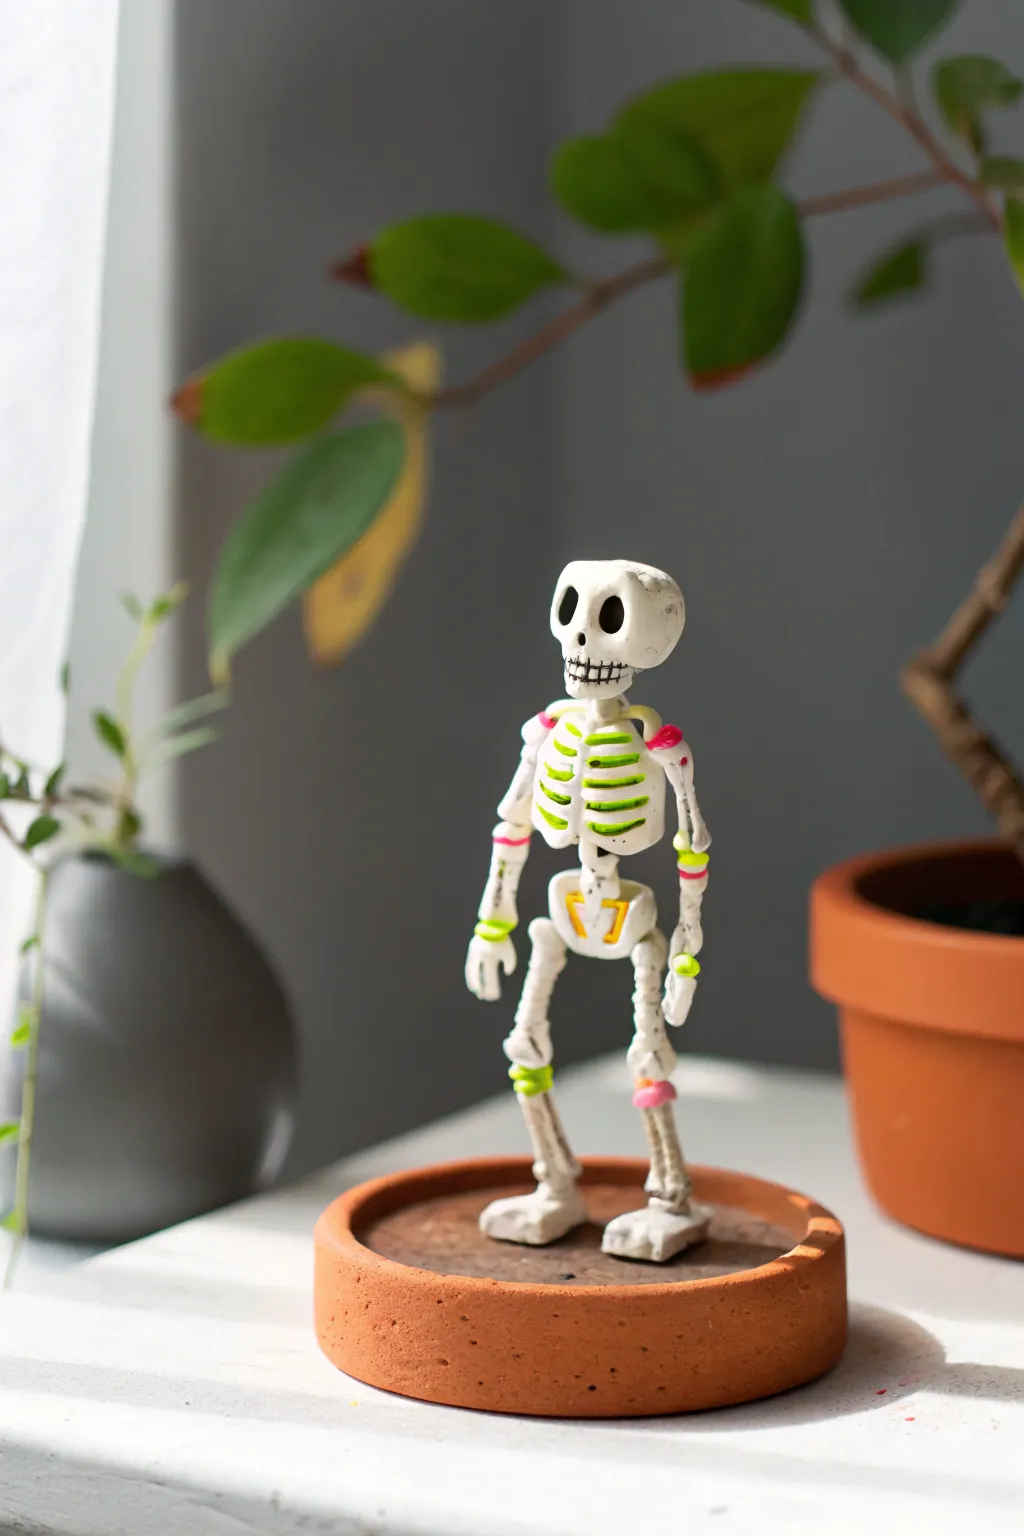
Move over spooky scares, this adorable little skeleton brings a pop of bright color to your Halloween décor. Crafted from clay with painted neon accents on its ribs and joints, this standing figure strikes a pose that’s more friendly than frightening.
Step-by-Step Tutorial
Materials
- White polymer clay (or air-dry clay)
- Small disk of terracotta-colored clay (or painted base)
- Neon acrylic paints (green, pink, yellow)
- Black fine-tip permanent marker or acrylic paint
- Sculpting tools (needle tool, small ball stylus)
- Wire armature or toothpicks (for structural support)
- Fine detail paintbrush
- Matte varnish (optional)
- Strong craft glue (if baking in parts)
Step 1: Forming the Skeleton Structure
-
Sculpt the Head:
Start with a small ball of white clay for the skull. Gently press indentations for the eye sockets using a ball stylus and slightly flatten the jaw area. It doesn’t need to be anatomically perfect; a slightly oversized head adds to the cute factor. -
Create the Torso:
Shape a small, somewhat rectangular block of white clay for the ribcage. Use a needle tool to score horizontal lines across the chest to define the ribs, leaving space between them for our neon accents later. -
Build the Pelvis:
Mold a smaller, triangular piece for the pelvis. I like to score a ‘V’ shape into the front to give it definition and create a distinct zone for painting. -
Roll the Limbs:
Roll out four thin snakes of white clay for the arms and legs. Cut them into segments: two upper arms, two lower arms, two thighs, and two shins. Keep the ends slightly rounded. -
Make Hands and Feet:
Fashion two small flattened shapes for feet and two smaller ones for hands. Use a craft knife to nick the edges, creating the suggestion of finger and toe bones.
Step 2: Assembly and Baking
-
Connect the Body:
If your clay is soft, you might need short pieces of wire or toothpicks to connect the head to the ribcage, and the ribcage to the pelvis. This internal armature helps the figure stand upright without sagging. -
Attach the Limbs:
Press your arm and leg segments onto the main body. Position one leg slightly forward to create a walking stance. Ensure the joints (elbows and knees) are distinct, as we will be highlighting these areas. -
Prepare the Base:
Create a round, flat disk from terracotta-colored clay (or use wood/cork later). Press the feet firmly onto this base to ensure the skeleton stands securely. -
Refine Details:
Go over your connections with a blending tool to smooth the clay where pieces join, but keep the ‘bone’ segments distinct. -
Bake or Dry:
Follow the manufacturer’s instructions for your specific clay. If using polymer clay, bake it in the oven. If using air-dry clay, let it sit undisturbed for at least 24 hours until fully hard.
Wobbly Walker?
If your skeleton won’t stand, bake the body lying down first. Glue the feet to the base after baking using superglue for a permanent, instant hold.
Step 3: Painting and Finishing
-
Paint the Details Black:
Once cool and dry, use a fine-tip black marker or a very thin brush with black paint to fill in the eye sockets deeply. draw a stitched mouth line with small vertical dashes for teeth. -
Highlight the Ribs:
Using a neon green paint, carefully fill in the scored lines of the ribcage. A steady hand is key here; wipe away any excess immediately with a damp cotton bud. -
Accent the Joints:
Apply bands of neon color to the joints. Paint thin rings of pink around the elbows and knees, and perhaps touches of yellow on the wrists or ankles. Alternating colors makes the figure pop. -
Decorate the Pelvis:
Paint the ‘V’ shape on the pelvis with a contrasting neon color, like yellow, to tie the color scheme together. -
Seal the Project:
To protect your paint job, apply a thin coat of matte varnish over the entire figure. This unifies the sheen of the clay and the paint.
Glow Up
Swap the standard neon acrylics for glow-in-the-dark paint. Your mini skeleton will look cute by day and delightfully eerie once the lights go out.
Place your colorful little skeleton on a sunny windowsill or desk to bring a smile to your face every day


Vampire Bat Wall Hangings
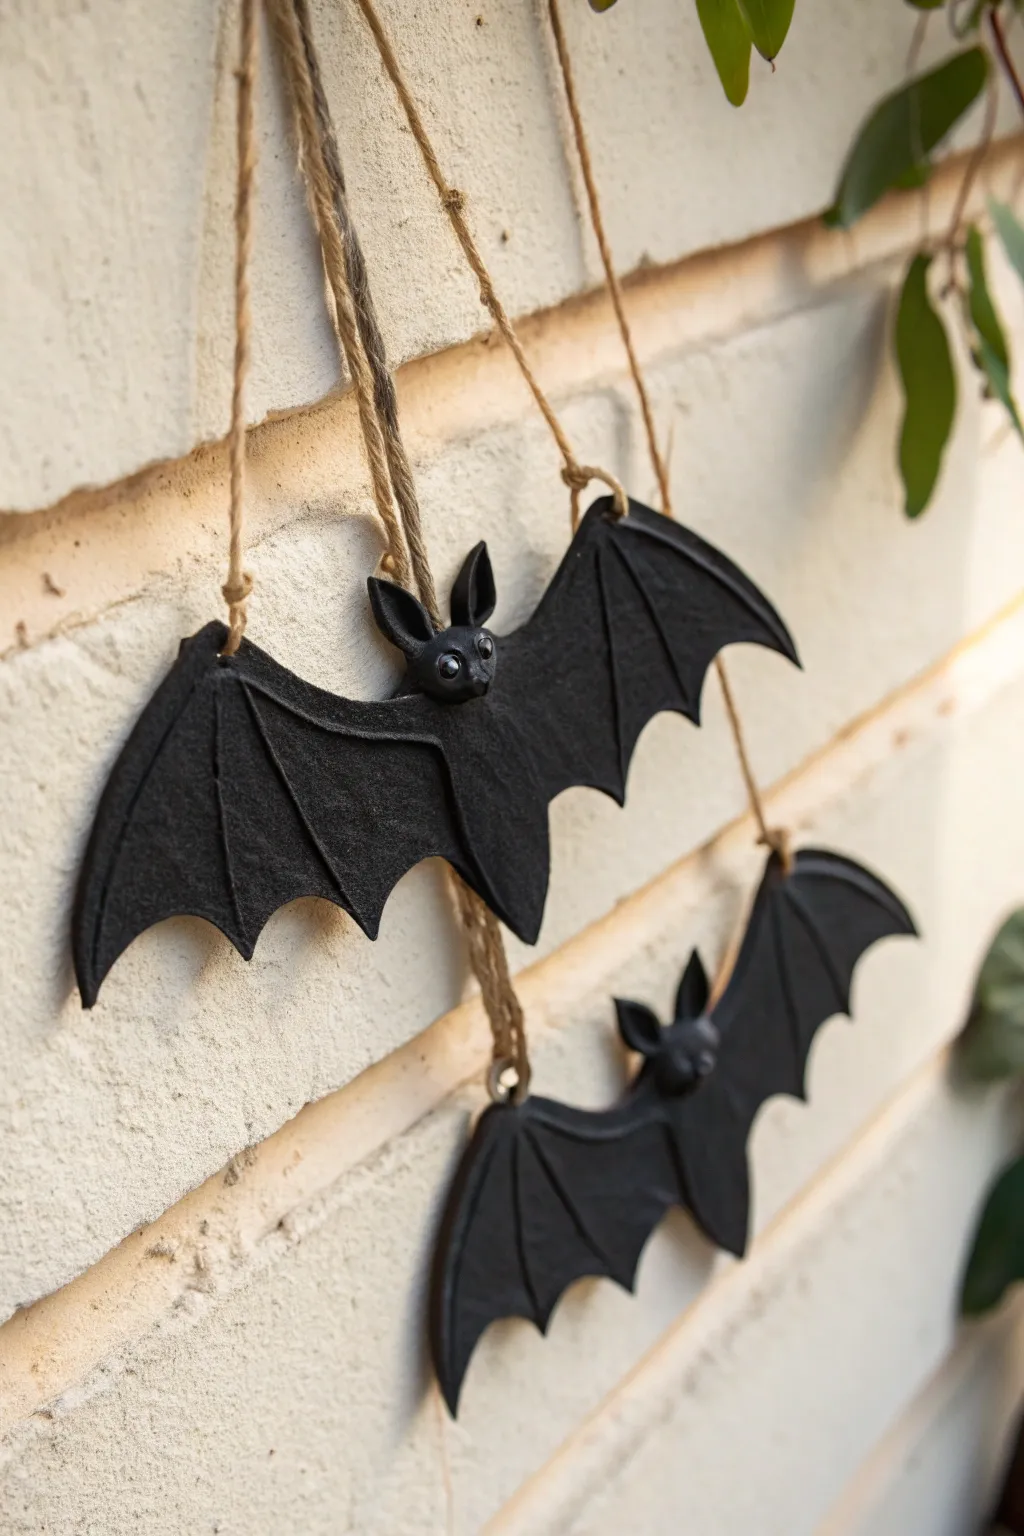
Suspended from rustic twine, these midnight-black clay bats add a spooky yet elegant touch to any Halloween display. Their defining feature is the subtle, stone-like texture and dimensional wings that cast dramatic shadows against your walls.
Step-by-Step
Materials
- Black polymer clay (or white clay + black acrylic paint)
- Rolling pin or pasta machine
- Bat wing template (paper or card stock)
- X-Acto knife or clay craft blade
- Ball stylus tools (various sizes)
- Needle tool
- Coarse grit sandpaper or a stiff toothbrush (for texture)
- Two small black beads (for eyes)
- Jute twine
- Oven and baking sheet (if using polymer clay)
- Super glue (optional)
Step 1: Shaping the Bat
-
Prepare the Clay:
Begin by conditioning your block of black polymer clay in your hands until it is pliable and warm. Roll it out into a sheet approximately 1/4 inch thick. You want it sturdy enough to hang but not heavy. -
Cut the Shape:
Place your paper bat template onto the clay. Using your craft knife, carefully trace around the silhouette to cut out the main body and wing shape. Peel away the excess clay. -
Soften the Edges:
The cut edges will be sharp and boxy, so use your fingertip to gently smooth and round them off. This gives the bat a more organic, finished look. -
Create the Head:
Roll a small separate ball of clay for the head and attach it to the center of the wings. Blend the clay seams at the neck so it looks like one solid piece. -
Form the Ears:
Shape two tiny triangles for ears. Press a small indent into the center of each with a small ball tool to create the inner ear, then attached them firmly to the top of the head.
Fixing Broken Ears
If an ear snaps off after baking, don’t panic. Use a tiny dab of gel super glue. For a stronger bond, sprinkle a little baking soda on the glue for an instant rock-hard set.
Step 2: Texturing and Detailing
-
Define the Wings:
Use a medium-sized ball stylus or a modeling tool to press lines radiating from the bat’s body to the points of the wings. This simulates the bat’s skeletal wing structure. -
Add Texture:
To achieve that matte, stony finish seen in the photo, gently press coarse sandpaper or a stiff toothbrush over the entire surface of the wings. Don’t press too hard; you just want surface noise. -
Insert the Eyes:
Press two small indentations into the face for eye sockets. Place a tiny black bead into each socket. If you prefer painted eyes, skip the beads and make smooth indentations instead. -
Refine the Nose:
Use a needle tool to add two tiny holes below the eyes for nostrils, giving the face a bit of character. -
Make Hanging Holes:
This step is crucial. Using a straw or a large needle tool, punch two holes near the top of the wings (one on each side of the body) or a single hole centered on the body. Ensure the hole is wide enough for your twine.
Step 3: Finishing Touches
-
Bake the Clay:
Transfer your bat to a baking sheet lined with parchment paper. Bake according to your customized clay package instructions (usually 275°F for 15-30 minutes for polymer clay). -
Cool Down:
Let the clay cool completely on the baking sheet. It will harden structurally as it returns to room temperature. -
Paint (Optional):
If you used white clay, now is the time to paint the entire piece with matte black acrylic paint. I personally like to do two thin coats rather than one thick one to preserve the texture. -
Seal the Surface:
For durability, apply a clear matte varnish. Avoid glossy finishes if you want to maintain the spooky, realistic look shown in the image. -
Attach the Twine:
Cut a length of jute twine. Thread it through the holes you created earlier. If you made two wing holes, thread it through the front and knot it in the back to create a loop. -
Secure Knots:
Add a tiny drop of super glue to the knots on the back of the bat to ensure they don’t slip undone while hanging.
Moonlit Shimmer
Before baking, brush a tiny amount of silver mica powder or metallic eyeshadow onto the raised ridges of the wings. This highlights the texture subtly.
Hang your colony of bats at varying heights to transform your wall into a wonderfully eerie scene

The Complete Guide to Pottery Troubleshooting
Uncover the most common ceramic mistakes—from cracking clay to failed glazes—and learn how to fix them fast.
Witchy Black Cat With Arched Back
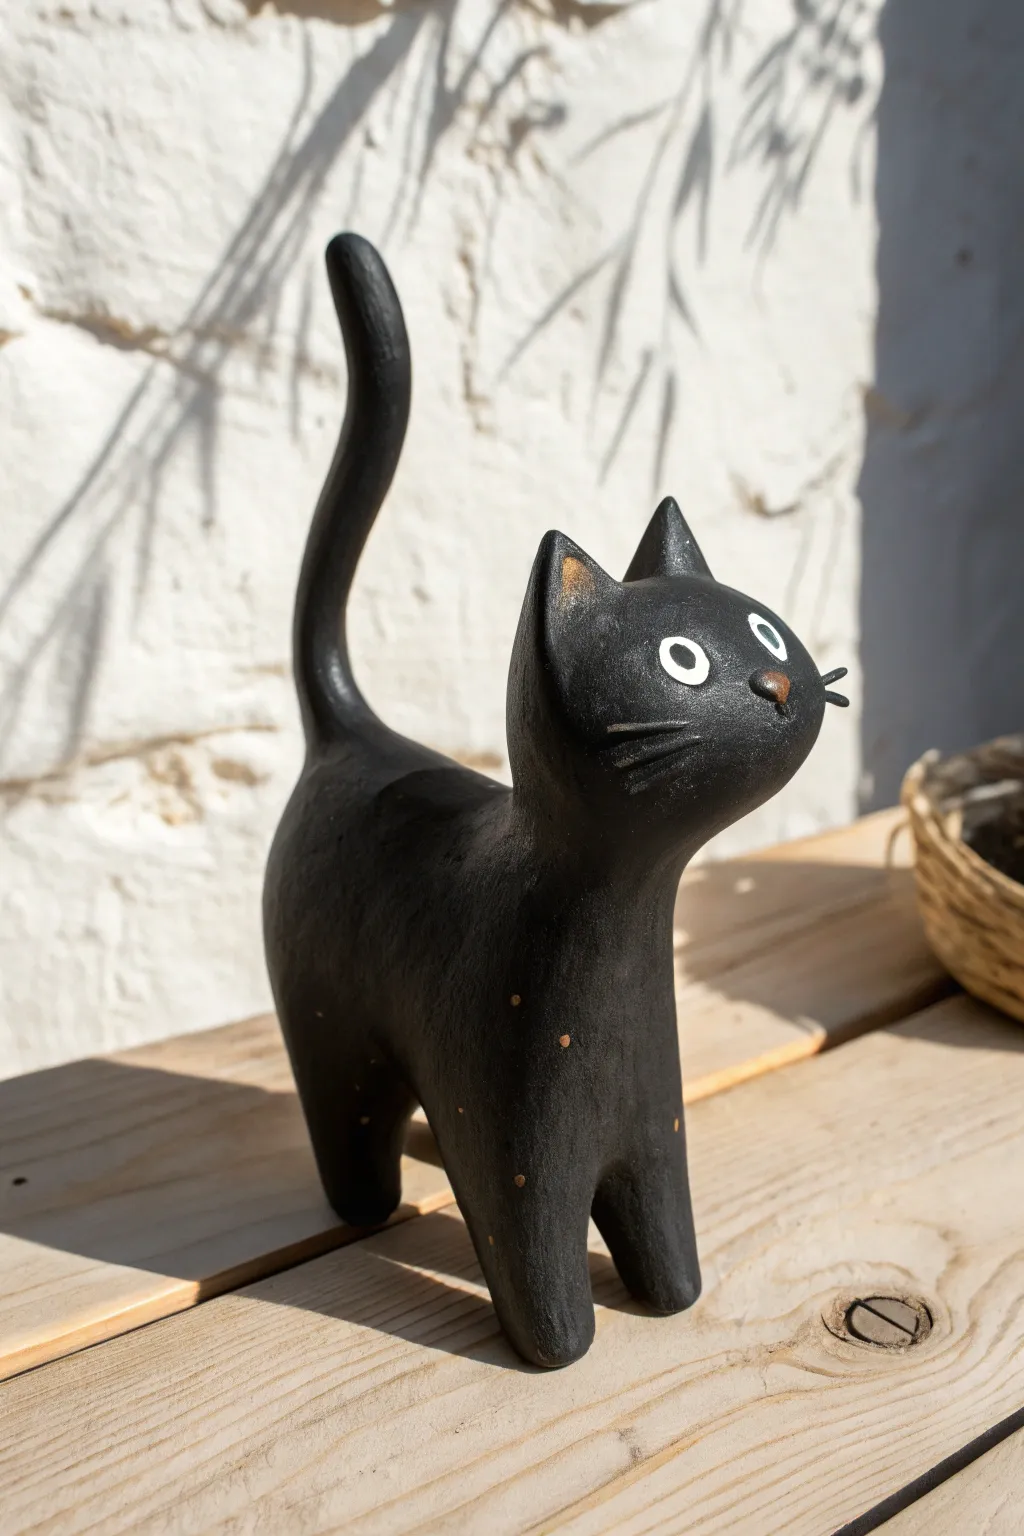
Embrace the spooky spirit of the season with this minimalist black cat sculpture, perfect for a subtle Halloween display. Featuring a long, elegant tail and wide, curious eyes, this project captures the lovable mystery of a witch’s familiar in simple clay form.
Detailed Instructions
Materials
- Air-dry clay or polymer clay (black or white)
- Aluminum foil (for armature)
- Sculpting tools (needle tool, smoothing tool)
- Acrylic paint (black, white, brown, tan)
- Matte varnish or sealant
- Paintbrushes (small detail brush, medium flat brush)
- Water cup
Step 1: Forming the Body and Tail
-
Create the core:
Start by crumpling a piece of aluminum foil into an elongated oval shape about the size of a small potato. This will serve as the inner core for the body, saving clay and reducing weight. -
Cover the armature:
Roll out a sheet of clay roughly 1/4 inch thick. Wrap this around your foil core, pressing the seams together firmly and smoothing them out until you have a solid, seamless oval shape. -
Shape the torso:
Gently gently press and pull one end of the oval upwards to begin defining the neck area, creating a smooth slope from the back up towards where the head will attach. -
Form the tail:
Roll a snake of clay that tapers slightly at one end. Attached the thicker end to the rear top of the body, blending the clay downwards so it looks like it grows naturally from the spine. -
Pose the tail:
Bend the tail into a gentle ‘S’ curve or an upright question mark shape to give the cat some attitude. I find adding a small wire inside the tail helps it hold this vertical position while drying.
Step 2: Sculpting the Head and Legs
-
Attach the legs:
Roll four short, sturdy cylinders for legs. Attach them to the underside of the body, blending the seams completely smooth so the cat stands stable and straight. -
Shape the head:
Roll a sphere for the head, slightly flattening the front for the face. Attach this to the neck area you prepared earlier, tilting it upward slightly so the cat looks inquisitive. -
Add ears:
Form two small triangles and attach them to the top of the head. Use a small ball tool to indent the inner ear slightly, giving them depth. -
Refine the surface:
Dip your finger in a little water (for air-dry clay) or baby oil (for polymer) and run it over the entire sculpture to remove any fingerprints or cracks. -
Drying or baking:
Let the sculpture dry completely according to your clay’s package instructions. If using air-dry clay, this might take 24-48 hours given the thickness.
Wire Support Trick
Insert a toothpick or stiff wire connecting the head to the body before the clay dries. This invisible spine prevents the heavy head from drooping.
Step 3: Painting and Details
-
Base coat:
Paint the entire sculpture with a solid coat of black acrylic paint. You may need two coats to get a rich, opaque finish. -
Painting the eyes:
Using a small detail brush, paint two white circles for eyes. Once dry, add a tiny black dot in the center of each for the pupils. -
Adding the nose:
Mix a little brown and tan paint to create a soft nose color. Paint a tiny inverted triangle just below and between the eyes. -
Whiskers and highlights:
Use a very fine liner brush or a toothpick to paint three short, white or light grey lines on each cheek for whiskers. -
Inner ear detail:
Dab a small amount of the tan/brown mix into the inner triangles of the ears to define them. -
Weathering effects:
For a rustic look, you can dry-brush a tiny amount of brown paint on the chest or paws to simulate faint spotting or wear. -
Seal the work:
Finish by applying a coat of matte varnish. This removes the shine of the acrylics and gives the piece a professional, ceramic-like quality.
Cracks Appearing?
If small cracks form as air-dry clay shrinks, mix a tiny bit of fresh clay with water to make a paste (slip) and fill them in before painting.
Place your charming feline on a windowsill or mantle to keep watch over your Halloween festivities
Stitched Bolt-Neck Monster Head
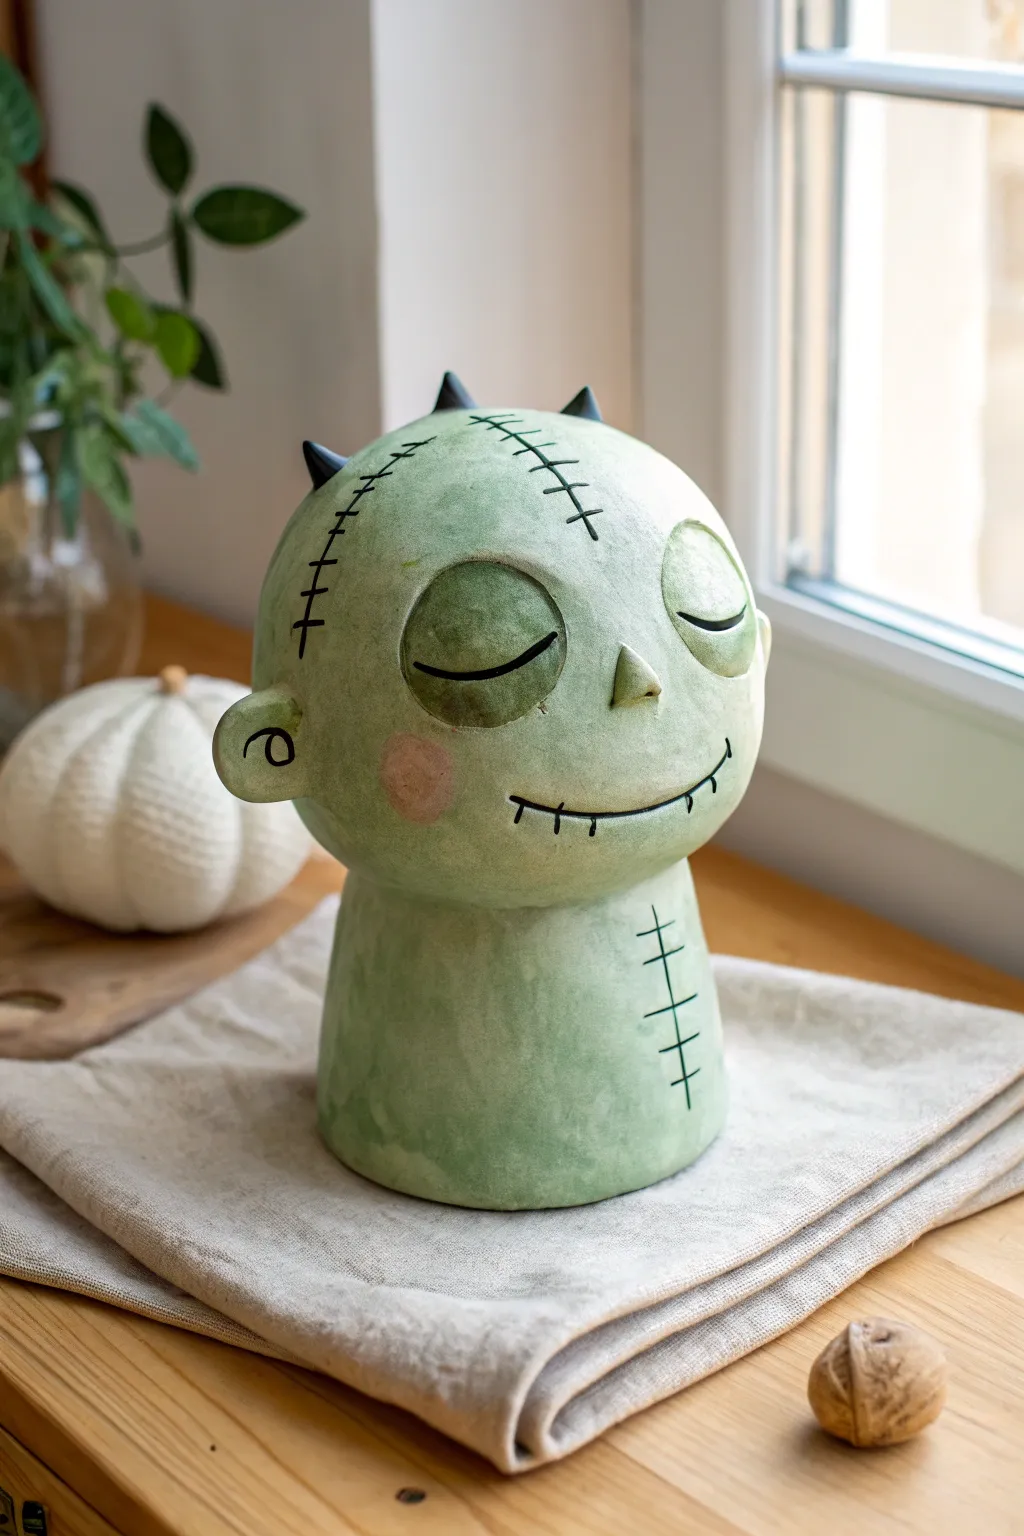
This whimsical take on the classic monster swaps terror for tranquility with a peaceful, sculpted clay expression. The muted green wash and distinct stitched details give it a charmingly rustic, handmade feel perfect for a Halloween shelf display.
Step-by-Step
Materials
- Air-dry clay or polymer clay (white or light grey)
- Acrylic paints (olive green, black, pink, white)
- Water
- Aluminum foil (for armature)
- Clay sculpting tools (needle tool, ball stylus)
- Sponge or paper towel
- Paintbrushes (flat wash brush and fine liner)
- Matte varnish/sealer
Step 1: Sculpting the Base Structure
-
Form the core:
Begin by crumpling aluminum foil into a tight ball for the head and a slightly tapered cylinder for the neck. This saves clay and keeps the sculpture lightweight. -
Cover with clay:
Roll out a sheet of clay approximately 1/4 inch thick. Wrap the foil armature completely, smoothing the seams where the head joins the neck to create a seamless, solid busts shape. -
Shape the head:
Gently gently pat and smooth the head into a rounded, slightly bulbous shape. The chin area should taper down into the thick neck base without a sharp jawline definition. -
Add the spikes:
Roll three or four small cones of clay. Score and slip (create texture and add water/clay slurry) the bottom of each cone, then attach them in a line along the top center of the head. -
Create the ears:
Shape two small semi-circles of clay. Attach them to the sides of the head, relatively low down. Use a small ball tool to impress a spiral or simple indentation into the center of each ear.
Crack Control
If small cracks appear while air-drying, mix a small amount of fresh clay with water to make a paste and fill them in. Smooth with a damp finger.
Step 2: Refining Facial Features
-
Define the eyes:
Roll two medium-sized balls of clay and flatten them slightly into discs. Press these firmly onto the face. -
Sculpt the eyelids:
I like to use a flat modeling tool to gently press a horizontal line across the middle of each eye disc, suggesting closed, peaceful eyelids. -
Make the nose:
Form a small, triangular pyramid shape. Attach this centrally between and slightly below the eyes, smoothing the edges into the face so it looks organic. -
Carve the mouth:
Using a needle tool or a knife, carve a long, gently curving smile line. Don’t go too deep; just enough to catch the paint later. -
Add stitched texture:
Use your needle tool to lightly scratch ‘stitch’ lines across the forehead, the smile, and vertically down the neck. These are guides for painting later. -
Smooth and dry:
Dip your finger in a little water and smooth out any fingerprints or rough bumps. Let the piece dry completely according to your clay’s instructions (usually 24-48 hours).
Step 3: Painting and Finishing
-
Mix the base color:
Create a watery wash by mixing olive green acrylic paint with a generous amount of water. You want a translucent glaze, not an opaque coat. -
Apply the wash:
Brush the green wash over the entire sculpture. Use a sponge to dab away excess paint immediately, leaving more pigment in the crevices and textures for an aged, stone-like look. -
Paint the spikes:
Use undiluted black paint to carefully color the spikes on top of the head. -
Highlight the eyes:
Paint the eyelid area with a slightly darker, more opaque green to make the closed eyes stand out from the rest of the face. -
Detail the stitches:
With a fine liner brush and black paint, trace over your carved scar lines and draw small perpendicular hatch marks to create the ‘stitched’ effect. -
Rosy cheeks:
Dilute a tiny drop of pink paint until it is very faint. Gently dab circular patchy cheeks onto the face for a soft, friendly appearance. -
Define the features:
Add a thin black line for the closed eye slits and re-trace the smile line to ensure the expression reads clearly. -
Seal the work:
Once all paint is bone dry, apply a coat of matte varnish to protect the surface without making it too shiny.
Hollow It Out
For a functional twist, omit the foil ball and build the head using coil building techniques. Leave the top open to use it as a quirky succulent planter or pencil holder.
Place your gentle monster near a window to let the natural light highlight those subtle textures


What Really Happens Inside the Kiln
Learn how time and temperature work together inside the kiln to transform clay into durable ceramic.
Spiderweb Trinket Dish
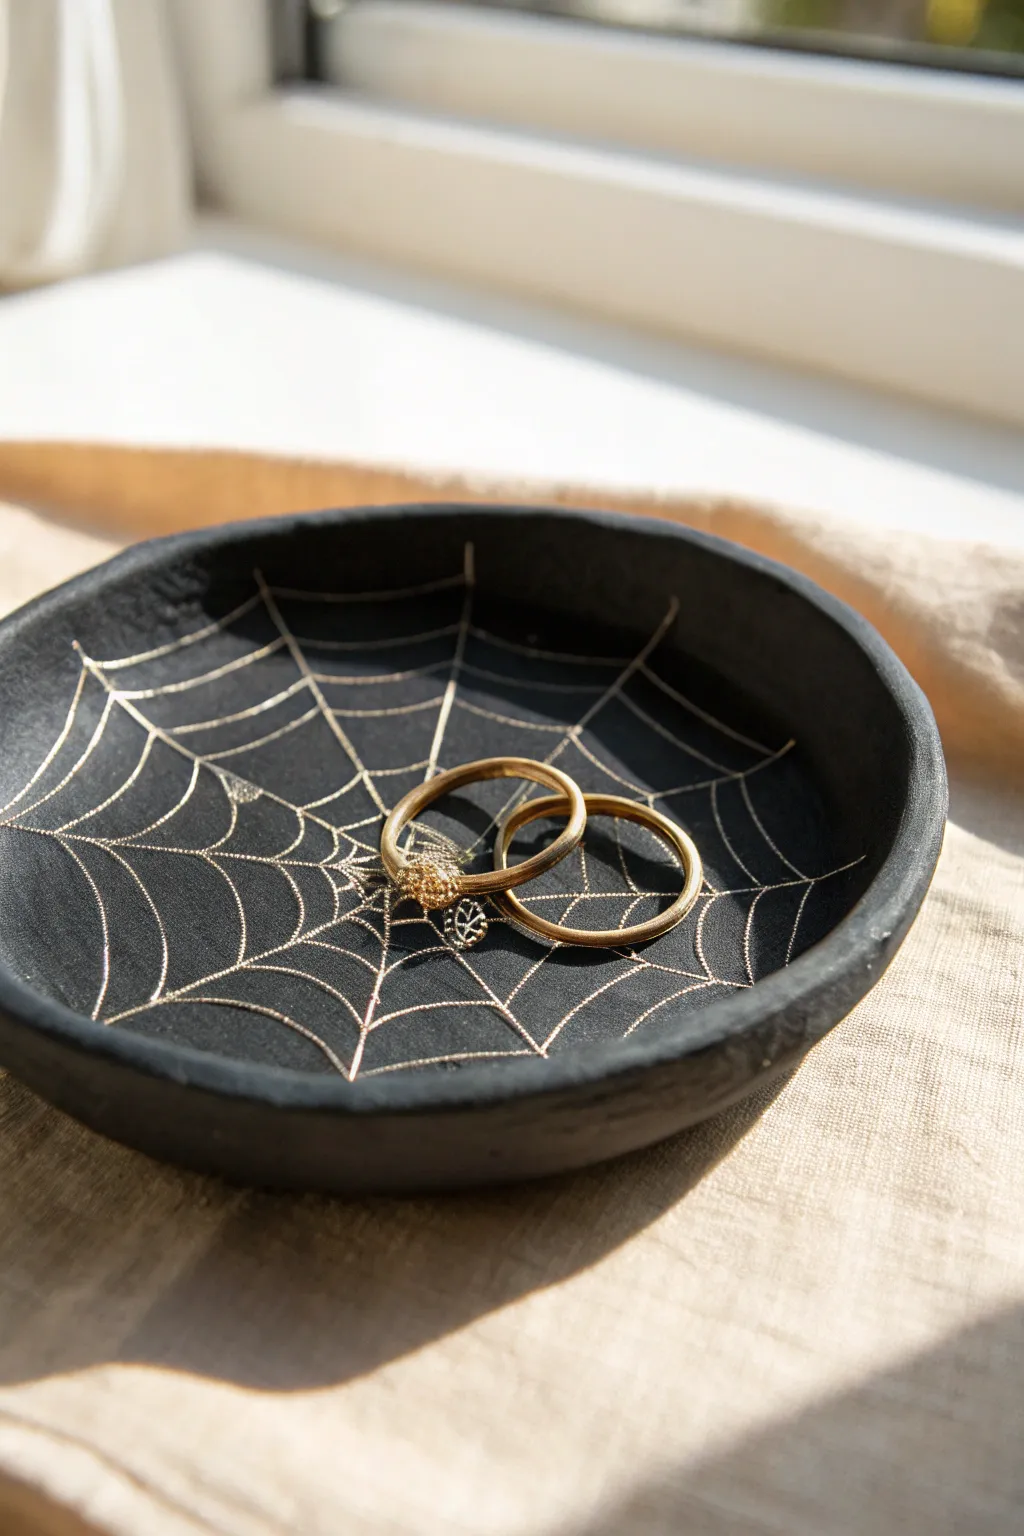
This elegant trinket dish combines a matte black finish with delicate metallic gold webbing for a sophisticated take on Halloween decor. It creates the perfect resting spot for your everyday rings and earrings while adding a subtle touch of witchy aesthetic to your vanity.
Detailed Instructions
Materials
- Air-dry clay (white or grey)
- Rolling pin or acrylic roller
- Small bowl or round cookie cutter (approx. 4-5 inches)
- Sponge
- Fine-grit sandpaper
- Black acrylic paint (matte finish)
- Fine-point gold paint pen or gold liner paint
- Small paintbrush
- Matte spray varnish or sealant
- Small cup of water
Step 1: Shaping the Clay Base
-
Prepare the clay:
Begin by taking a handful of air-dry clay and kneading it in your hands until it becomes soft, pliable, and free of air bubbles. -
Roll it out:
Roll the clay out on a smooth, flat surface until it is an even slab, approximately 1/4 inch thick. Rotate the clay occasionally to prevent sticking. -
Cut the circle:
Place your small bowl or round cookie cutter onto the slab and press down to cut a perfect circle. Remove the excess clay from around the edges. -
Smooth the edges:
Dip your finger in a little water and run it gently along the cut edge of the circle. This gets rid of any sharpness or ragged pieces from the cutting process. -
Form the lip:
Gently pinch and lift the edges of the circle upward to create a shallow rim. I like to work my way around the circle twice, slowly raising the wall rather than forcing it all at once. -
Refine the shape:
Use a damp sponge to smooth out the interior and exterior of the dish. Pay special attention to the rim to ensure it feels organic and handmade, giving it that slight unevenness seen in pottery. -
Allow to dry:
Set the dish in a safe, dry place. Let it cure completely for 24-48 hours, flipping it over halfway through so the bottom dries evenly.
Smooth Operator
To get a super smooth black finish, use a slightly damp soft paintbrush. This helps the acrylic paint level out and minimizes visible brushstrokes.
Step 2: painting and Detailing
-
Sand imperfections:
Once fully dry and hard, lightly sand any rough spots or fingerprints with fine-grit sandpaper. Wipe away the dust with a barely damp cloth. -
Apply base coat:
Paint the entire dish—inside, outside, and bottom—with matte black acrylic paint. You may need two thin coats to get full, opaque coverage. -
Dry the base:
Let the black paint dry completely before reacting to touch. This is crucial so your gold lines don’t smudge into the background. -
Start the web center:
Using your gold paint pen, draw a small dot slightly off-center inside the dish. This offset placement makes the web look more realistic and dynamic. -
Draw radial lines:
Draw straight lines radiating outward from your center dot to the rim of the dish, like spokes on a wheel. Space them somewhat evenly, but don’t worry about perfection. -
Connect the webbing:
Starting near the center, draw curved lines connecting the spokes. These should swoop inward toward the center slightly to mimic the tension of a real spiderweb. -
Expand the web:
Continue drawing these connecting swoops in concentric circles, moving outward until you reach the rim of the dish. -
Add rim details:
Extend the radial lines slightly over the lip of the dish just a tiny bit, which adds a nice dimension to the edge. -
Seal the piece:
In a well-ventilated area, spray the entire dish with a matte varnish. This protects the clay from moisture and prevents the gold paint from scratching off over time.
Level Up: Gemstone Spider
Glue a small black rhinestone or bead onto the web after sealing to simulate a tiny spider waiting for its catch, adding extra sparkle.
Now your spooky trinket dish is ready to catch your favorite rings
Mini Tombstones and Coffins Set
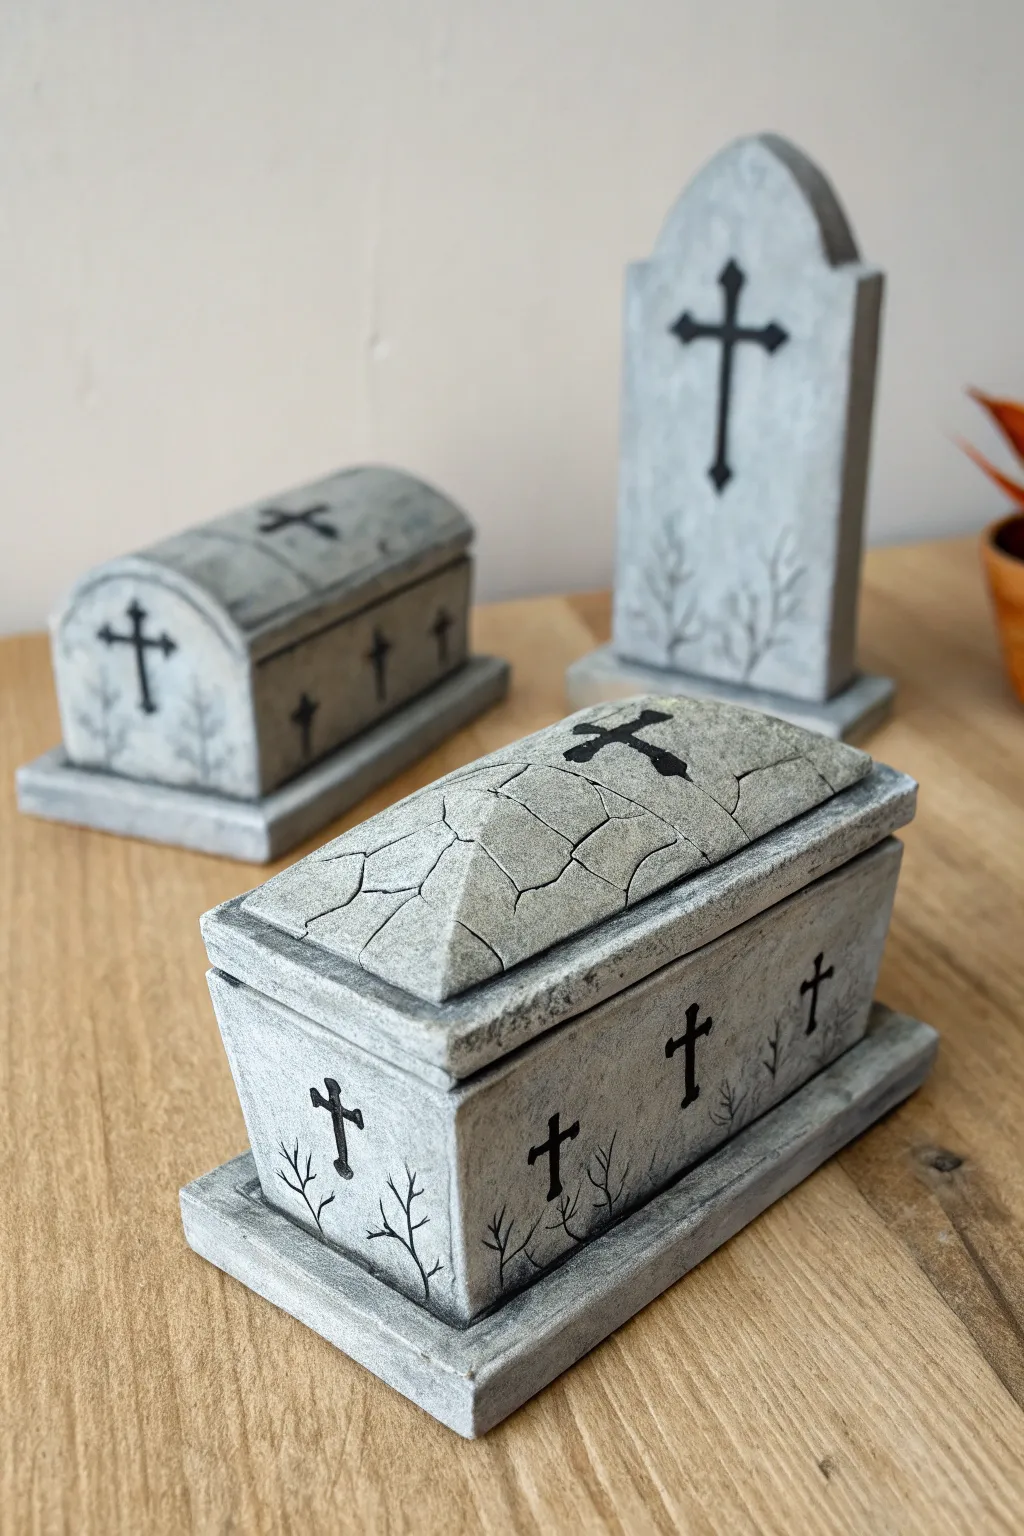
Bring your Halloween display to life with this trio of realistically weathered miniature graves made from clay. The set features two unique coffin styles with removable lids and a classic standing headstone, all finished with a convincing faux-stone texture.
How-To Guide
Materials
- Air-dry clay (grey or white)
- Rolling pin
- Clay knife or craft scalpel
- Ruler
- Acrylic paints (light grey, dark grey, black)
- Paintbrushes (flat brush and fine liner)
- Texture tool (ball of foil or stiff brush)
- Water for smoothing
- Cardboard or cardstock (for templates)
Step 1: Shaping the Coffin Base
-
Roll the Slabs:
Start by rolling out your clay to a consistent thickness of about 1/4 inch. For the angular coffin, cut a rectangular base and four trapezoid-shaped side walls (two long, two short) so they angle outward slightly. -
Assemble the Box:
Score the edges of your base and wall pieces with your knife, apply a little water as slip, and press the walls onto the base. Smooth the seams inside and out with your finger or a modeling tool to ensure a solid bond. -
Create the Plinth:
Roll a second slab slightly larger than your coffin base. Place the assembled box onto this larger rectangle to create the stepped ‘plinth’ at the bottom, pressing firmly to attach them.
Warping Walls?
If your flat clay slabs curl up while drying, try flipping the pieces over every few hours. Weighing them down gently with a book (use parchment paper!) can also keep bases flat.
Step 2: Crafting the Lids and Headstone
-
Form the Angular Lid:
For the faceted lid in the foreground, cut a rectangular slab that fits inside the top of your coffin box. Then, shape a smaller, solid block of clay into a beveled, prism-like shape and attach it to the center of the flat slab. -
Add Cracks:
While the clay is still soft, use your craft knife to carve deep, jagged lines across the top of the angular lid to simulate cracked stone slabs. Press gently to widen the cracks slightly. -
Form the Rounded Coffin:
For the background coffin, repeat the box construction but keep the walls straight. Create a lid by gently bending a clay slab over a cylindrical object (like a rolling pin) to get a perfect arch, then reinforce the underside. -
Shape the Headstone:
Cut a tall, thick rectangle with an arched top for the standing tombstone. Attach this to a rectangular base plinth just like the coffins.
Spookier Vibes
Glue patches of dried crafting moss to the corners or the base plinth for an ancient, overgrown cemetery look. A dab of green wash in the cracks adds a moldy effect.
Step 3: Texturing and Details
-
Stone Texture:
Lightly crumble a ball of aluminum foil and press it repeatedly over every surface of your dried or semi-dry pieces. This creates a pitted, realistic stone surface. -
Emboss Crosses:
Using a sculpting tool or the back of a knife, gently impress decorative crosses into the sides and lids. I find it easier to do this before the clay is bone dry so the edges remain clean. -
Drying Time:
Allow all pieces to dry completely. Depending on the thickness of your clay, this may take 24-48 hours. Turn them occasionally to ensure even drying.
Step 4: Painting the Stone Finish
-
Base Coat:
Paint the entirety of the pieces with a medium grey acrylic paint. Ensure you get coverage into all the cracks and textured pits. -
Dark Wash:
Mix a small amount of black paint with water to create a thin wash. Brush this over the grey base, letting it pool in the cracks and texture indentations, then wipe away the excess on the surface with a paper towel. -
Dry Brushing:
Dip a dry flat brush into very light grey or off-white paint and wipe most of it off. Lightly flick the brush over the raised edges and surface texture to highlight the stone effect. -
Detailing Symbols:
Using a fine liner brush and undiluted black paint, carefully fill in the indented crosses you made earlier to make them pop. -
Adding Vegetation:
With the very tip of your fine brush, paint delicate, branching black lines climbing up the sides of the coffins and headstone to represent dead vines or thorny brambles.
Arrange your completed set on a mantelpiece or as part of a larger diorama for a customized haunt

TRACK YOUR CERAMIC JOURNEY
Capture glaze tests, firing details, and creative progress—all in one simple printable. Make your projects easier to repeat and improve.
Creepy Pumpkin Monster Mashup
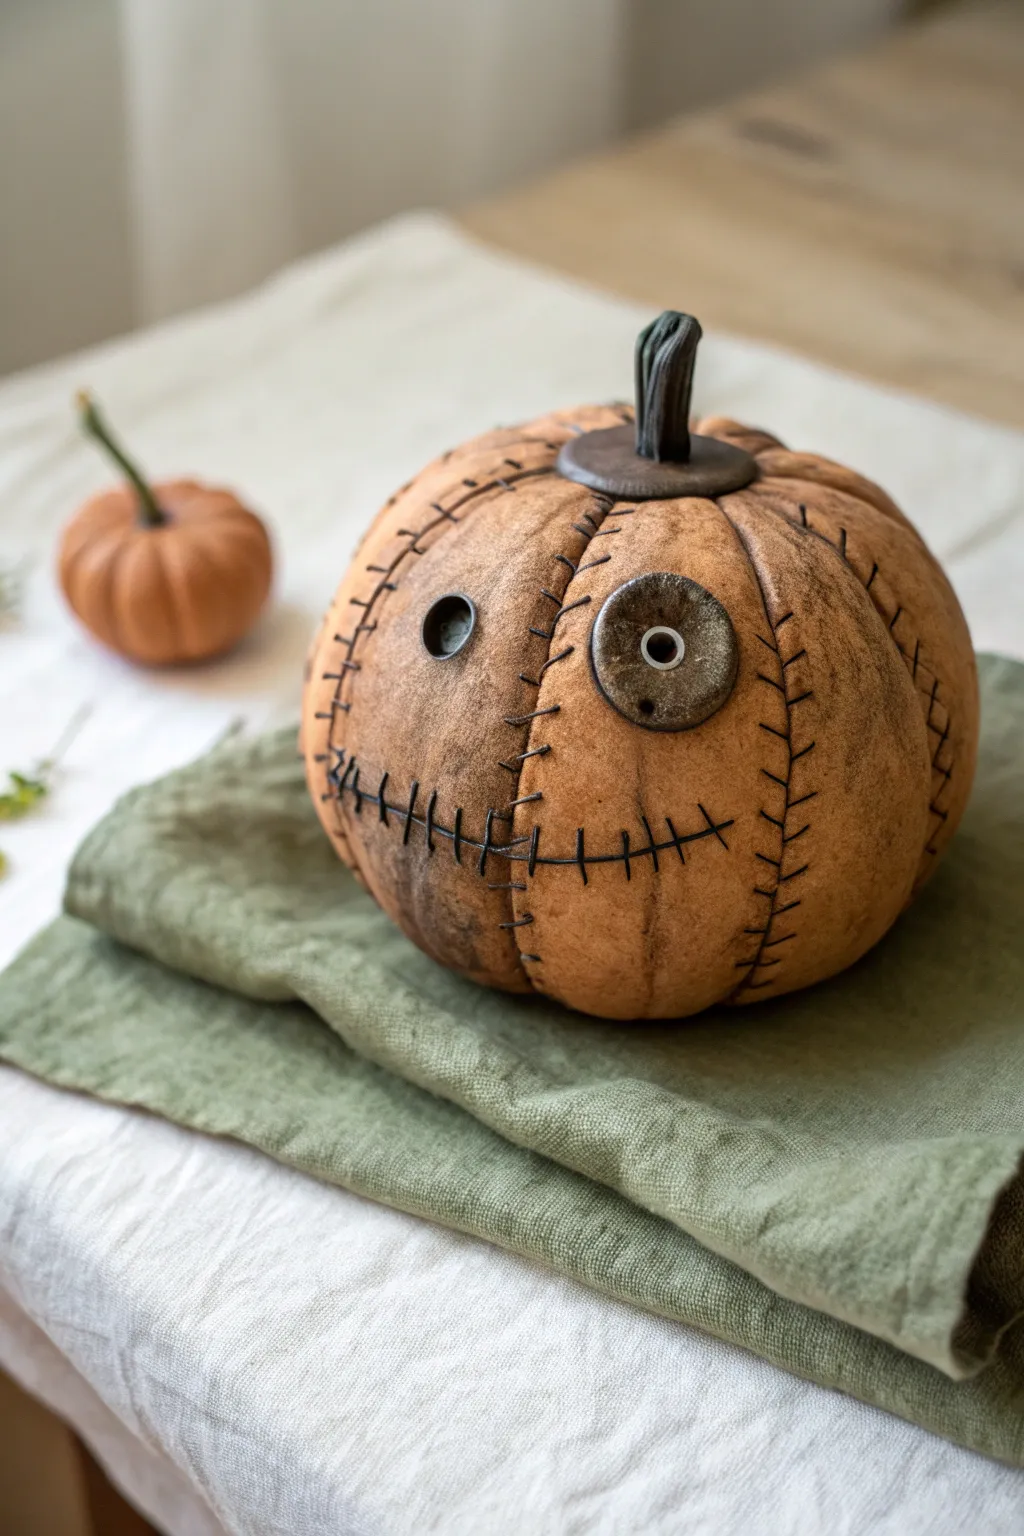
This eerie yet adorable project combines the classic pumpkin shape with a Frankenstein-inspired twist. With its stitched seams and mismatched button eyes, this clay creation brings a delightfully ragged charm to your Halloween decor.
Step-by-Step
Materials
- Polymer clay (Orange/Terracotta, Dark Brown, Black)
- Aluminum foil
- Pointed sculpting tool or needle tool
- Modeling tools (ball tool, blending tool)
- Acrylic paints (Burnt Umber, Black)
- Small paintbrush or sponge
- Paper towel or rag
- Metal or wooden washer (optional, for eye)
- Texturing sponge or toothbrush
Step 1: Forming the Base
-
Create the core:
Start by crumpling a tight ball of aluminum foil to form the core of your pumpkin; this saves clay and keeps the sculpture lightweight. -
Condition the clay:
Knead your orange or terracotta polymer clay until it is soft and pliable, ensuring it won’t crack during shaping. -
Cover the foil:
Flatten the clay into a sheet and wrap it completely around the foil ball, smoothing out any seams until you have a uniform sphere. -
Shape the pumpkin:
Gently press down on the top and bottom of the sphere to flatten it slightly into a squat pumpkin shape. -
Define the sections:
Use a modeling tool or the handle of a paintbrush to press vertical indentations from the top center to the bottom, creating the pumpkin’s distinctive ribs.
Step 2: Adding Texture and Details
-
Texture the surface:
Gently dab the entire surface with a texturing sponge or a clean toothbrush to remove fingerprints and give it an organic, skin-like texture. -
Create the stitched seams:
Using a needle tool, score jagged lines vertical down the ribs and horizontally where the mouth will be, simulating where pieces of ‘skin’ are joined. -
Add the stitches:
Roll very thin threads of black clay. Cut them into tiny segments and press them across your scored lines to look like heavy thread stitches. -
Sculpt the mouth:
For the mouth, use the needle tool to deepen a long, jagged horizontal cut near the bottom, then add perpendicular black clay stitches across it. -
Form the left eye:
Press a small indentation into the clay for the left eye. Roll a tiny ring of black clay and press it inside to create a sunken buttonhole effect. -
Create the right eye:
Fashion a larger, flat circle from grey or metallic-colored clay to resemble a large button or washer. Press it onto the right side of the face. -
Detail the button eye:
Add a small white or light grey dot in the center of the large button eye to create the pupil or fastener detail.
Clay Cracking?
If you see cracks while smoothing the clay over the foil, your layer is too thin. Add a patch of clay and smooth it out, or thicken the entire outer layer.
Step 3: Finishing Touches
-
Add the stem base:
Flatten a small disc of dark brown clay and place it on the very top center of the pumpkin, smoothing the edges onto the orange surface. -
Sculpt the stem:
Roll a cylinder of dark brown or green-black clay. Twist it slightly and press vertical lines into it for texture, then attach it securely to the center of the base disc. -
Bake the project:
Bake your pumpkin according to the polymer clay manufacturer’s instructions for time and temperature, then let it cool completely. -
Apply an antique wash:
Mix a small amount of black or burnt umber acrylic paint with water. Brush this wash over the entire pumpkin, letting it settle into the grooves and stitches. -
Wipe back the paint:
Before the paint dries, quickly wipe the surface with a paper towel. This leaves the dark color in the crevices and textures, creating a dirty, aged look.
Glossy Gore
Add a dab of clear UV resin or gloss varnish to the eyes after baking. This makes them look wet and lifelike against the matte, textured pumpkin skin.
Set this little monster on a linen napkin and enjoy the spooky handcrafted atmosphere
Tiny Graveyard Diorama in a Box
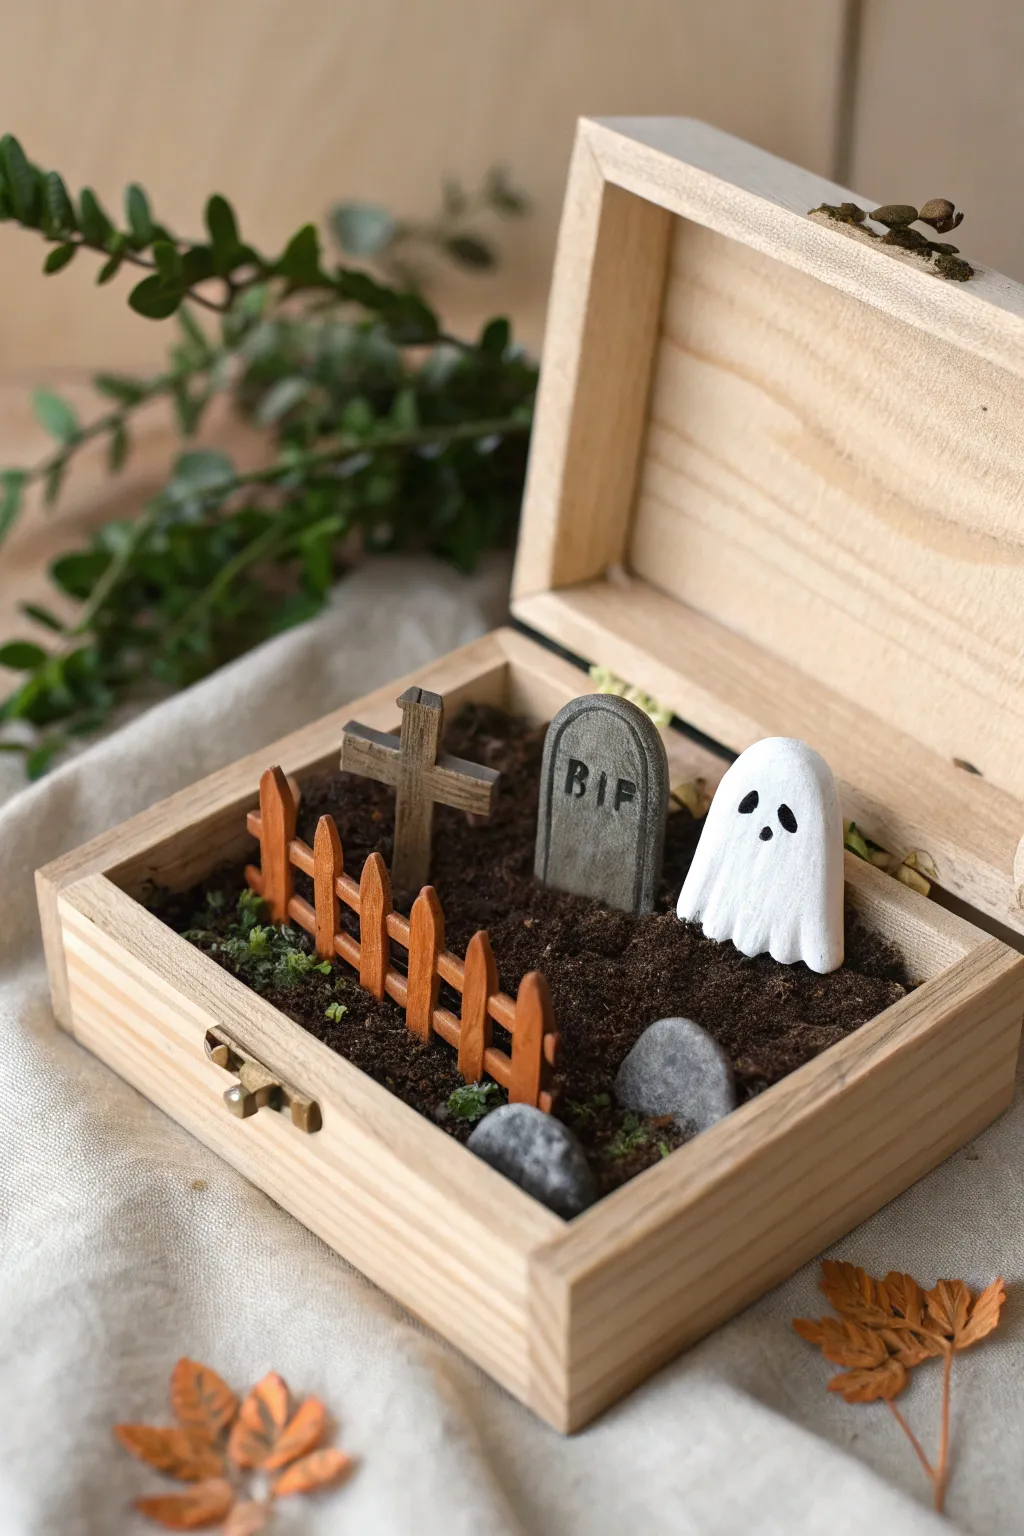
Transform a simple wooden jewelry box into a spooky miniature scene complete with a friendly ghost, a solemn tombstone, and a rustic fence. This tiny diorama captures the eerie charm of a graveyard in a compact format that’s perfect for subtle Halloween decor.
Step-by-Step Guide
Materials
- Small hinged wooden box (unfinished)
- Polymer clay (white, grey, brown)
- Acrylic paints (black, dark brown, grey)
- Dried coffee grounds or dark brown texture paste
- Small craft rocks or pebbles
- Mod Podge or strong craft glue
- Sculpting tools (needle tool, small blade)
- Fine detail paintbrush
- Dried moss or green flocking
- Rolling pin
Step 1: Sculpting the Residents
-
Form the Ghost:
Start by conditioning a small ball of white polymer clay until pliable. Roll it into a smooth, rounded cone shape, approximately 1 inch tall, flattening the bottom so it stands independently. -
Add Ghostly Details:
Gently press the bottom edges of the cone inward to create wavy folds, mimicking draped fabric. Use a small ball tool or just your pinky finger to smooth these folds upward. -
Shape the Headstone:
Roll out grey clay to about 1/4 inch thickness. Cut a tombstone shape with an arched top. Create a slightly smaller, thinner panel of grey clay and press it onto the front to add dimension and mimic a stone inlay. -
Engrave the Epitaph:
Using a needle tool or a very fine stamp, carefully press ‘RIP’ into the center of the headstone. Don’t worry if it’s not perfect—weathered stones look better with imperfections. -
Create the Cross:
Shape brown clay into a simple cross. You can add texture by lightly dragging a needle tool down the lengths to simulate wood grain. -
Build the Picket Fence:
Roll a thin snake of terracotta or brown clay. Cut several small vertical posts (varying the height slightly looks more natural) and two long horizontal rails. Assemble them into a fence section that will fit diagonally across your box.
Uneven Soil Base?
If your coffee grounds look too flat, mix them directly with a little brown acrylic paint and glue to form a thick paste before applying. This lets you mound up areas around graves.
Step 2: Setting the Scene
-
Bake the Components:
Arrange your ghost, tombstone, cross, and fence on a baking sheet or tile. Bake according to your clay manufacturer’s specific temperature instructions, usually around 275°F (135°C) for 15-20 minutes. -
Prepare the Ground:
While the clay cools, coat the bottom interior of the wooden box with a thick layer of craft glue or Mod Podge. Ensure you get into the corners. -
Create the Soil:
Sprinkle dried coffee grounds or apply a dark brown grit paste over the wet glue to simulate fresh earth. Press it down firmly to ensure adhesion. -
Enhance the Stone:
Once the tombstone is cool, dilute black acrylic paint with water to create a wash. Brush it over the stone, letting it settle into the ‘RIP’ letters and crevices, then wipe away the excess for an aged look. -
Paint the Ghost’s Face:
Using a fine detail brush and black acrylic paint, add two oval eyes and a small mouth to your ghost. I find keeping the features simple adds to the cute factor.
Step 3: Final Assembly
-
Install the Elements:
Glue the tombstone and cross towards the back of the box. Place the fence diagonally in the foreground to create depth. -
Secure the Ghost:
Glue the ghost securely on the right side of the graveyard, slightly angled towards the center. -
Add Stone Accents:
Glue 2-3 small real pebbles near the front edge or corners to balance the composition. -
Plant Foliage:
Dab tiny spots of glue around the base of the fence and tombstone. Press small tufts of dried moss or green flocking into these spots to mimic overgrown weeds. -
Seal (Optional):
If you want the ‘dirt’ to be extra secure, spray a light coat of matte creative fixative over the soil areas, being careful to mask off the wooden lid.
Spooky Lighting Trick
Use glow-in-the-dark polymer clay for the ghost instead of plain white. When you open the box in a dim room, your little spirit will actually glow.
Close the lid to keep your ghostly friend safe until you’re ready to reveal the haunting surprise inside
Haunted House Tealight Holder
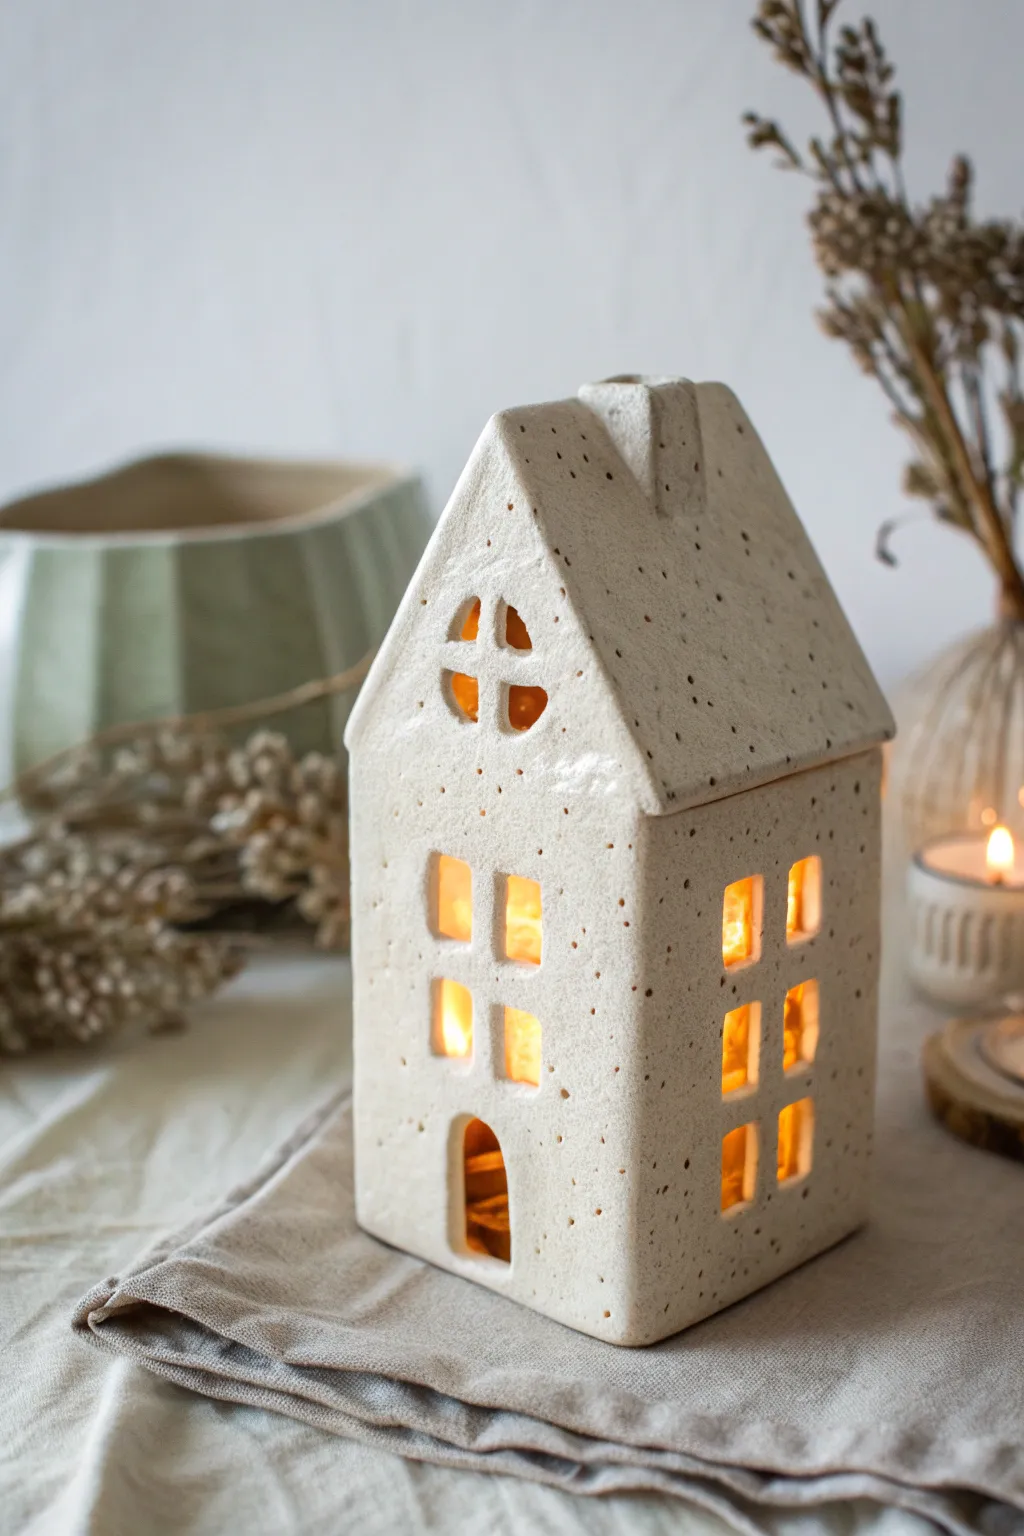
Move beyond the traditional orange pumpkins and craft this elegant, minimalist ghost house that glows warmly from within. This slab-built clay votive features charm-filled cutout windows and a speckled finish that mimics real stoneware pottery.
Detailed Instructions
Materials
- Air-dry clay (white or cream)
- Flecked clay additive or coarse ground black pepper (optional for speckles)
- Rolling pin
- Two wooden guide strips (approx. 1/4 inch thick)
- Sharp crafting knife or X-Acto knife
- Ruler
- Cardstock or paper for templates
- Slip (clay mixed with water)
- Clay scoring tool or toothbrush
- Small square clay cutter (optional)
- Sandpaper (fine grit)
- Matte sealant or varnish
Step 1: Preparation and Cutting
-
Prepare the Speckled Clay:
If using plain air-dry clay, knead in a small amount of faux speckle additive or even coarse black pepper to achieve that stoneware look. Knead thoroughly until the speckles are evenly distributed. -
Create Templates:
Sketch your house panels on cardstock first. You will need two identical pentagons for the front/back (tall rectangles with peaked tops) and two rectangular side walls that match the height of the front and back walls before the peak starts. -
Roll the Slabs:
Place your clay between the two wooden guide strips. Roll the clay out until the rolling pin rests on the guides, ensuring a perfectly even thickness of about 1/4 inch across the entire slab. -
Cut the Shapes:
Lay your cardstock templates onto the clay. Using your ruler as a guide for the knife, cut out the four main wall sections. Save the excess clay for the roof. -
Design the Openings:
While the walls are still flat on your work surface, plan the windows. Use a small square cutter or carefully freehand square windows with your knife. Create a grid of four or six windows on the sides. -
Cut the Attic Window:
For the front panel, cut a rounded arched door at the bottom. Near the peak of the roof, cut a circular window and slice a cross shape through it to create window panes. -
Smooth the Edges:
Dip your finger in a little water and gently run it along all the cut edges of the windows and doors to remove any sharp burrs or crumbs.
Step 2: Assembly
-
Dry Fit the Walls:
Let the slabs sit for about 15-20 minutes to firm up slightly; this makes them easier to handle without warping. -
Score the Seams:
Use your scoring tool or a toothbrush to rough up the vertical edges where the walls will connect. Apply a generous amount of slip to these roughened areas. -
Construct the Base:
Stand the walls up, pressing the scored seams together. Use a small coil of clay on the inside corners to reinforce the bond, smoothing it out with a modeling tool so seams disappear. -
Measure the Roof:
Measure the distance from the roof peak to the side wall, adding a half-inch for overhang. Cut two rectangular slabs for the roof panels based on these measurements. -
Attach the Roof:
Score and slip the top edges of the house walls and the underside of the roof panels. Gently press the roof pieces into place, ensuring they meet cleanly at the top ridge. -
Add the Chimney:
Form a small rectangular prism of clay. Cut an angle on the bottom ensuring it matches the slope of your roof. Score, slip, and attach it to one side of the roof. -
Final Smoothing:
Check all exterior seams. I like to use a slightly damp sponge to wipe down the entire piece, blending the joints until the house looks like one solid unit.
Sagging Roof?
If the roof sags during assembly, stuff the inside of the house with crumpled newspaper or paper towels to support the structure while the clay dries and stiffens.
Step 3: Finishing Touches
-
Proper Drying:
Loosely cover the house with plastic wrap for the first 24 hours to prevent cracking, then uncover and let it dry completely for another 24-48 hours. -
Sanding:
Once bone dry, take your fine-grit sandpaper and gently buff the surfaces. Focus on the window corners and the roof ridge to get that professional, sharp finish. -
Sealing:
Apply a coat of matte sealant or varnish. This protects the clay and gives it that finished ceramic feel without making it too glossy.
Spooky Shadows
Carve the windows slightly inward at an angle (beveling the inside) to allow more light to cast outward, creating larger, spookier shadows on your wall.
Place a battery-operated tealight inside and watch your haunted cottage come to life
Witch’s Cauldron Mini Planter
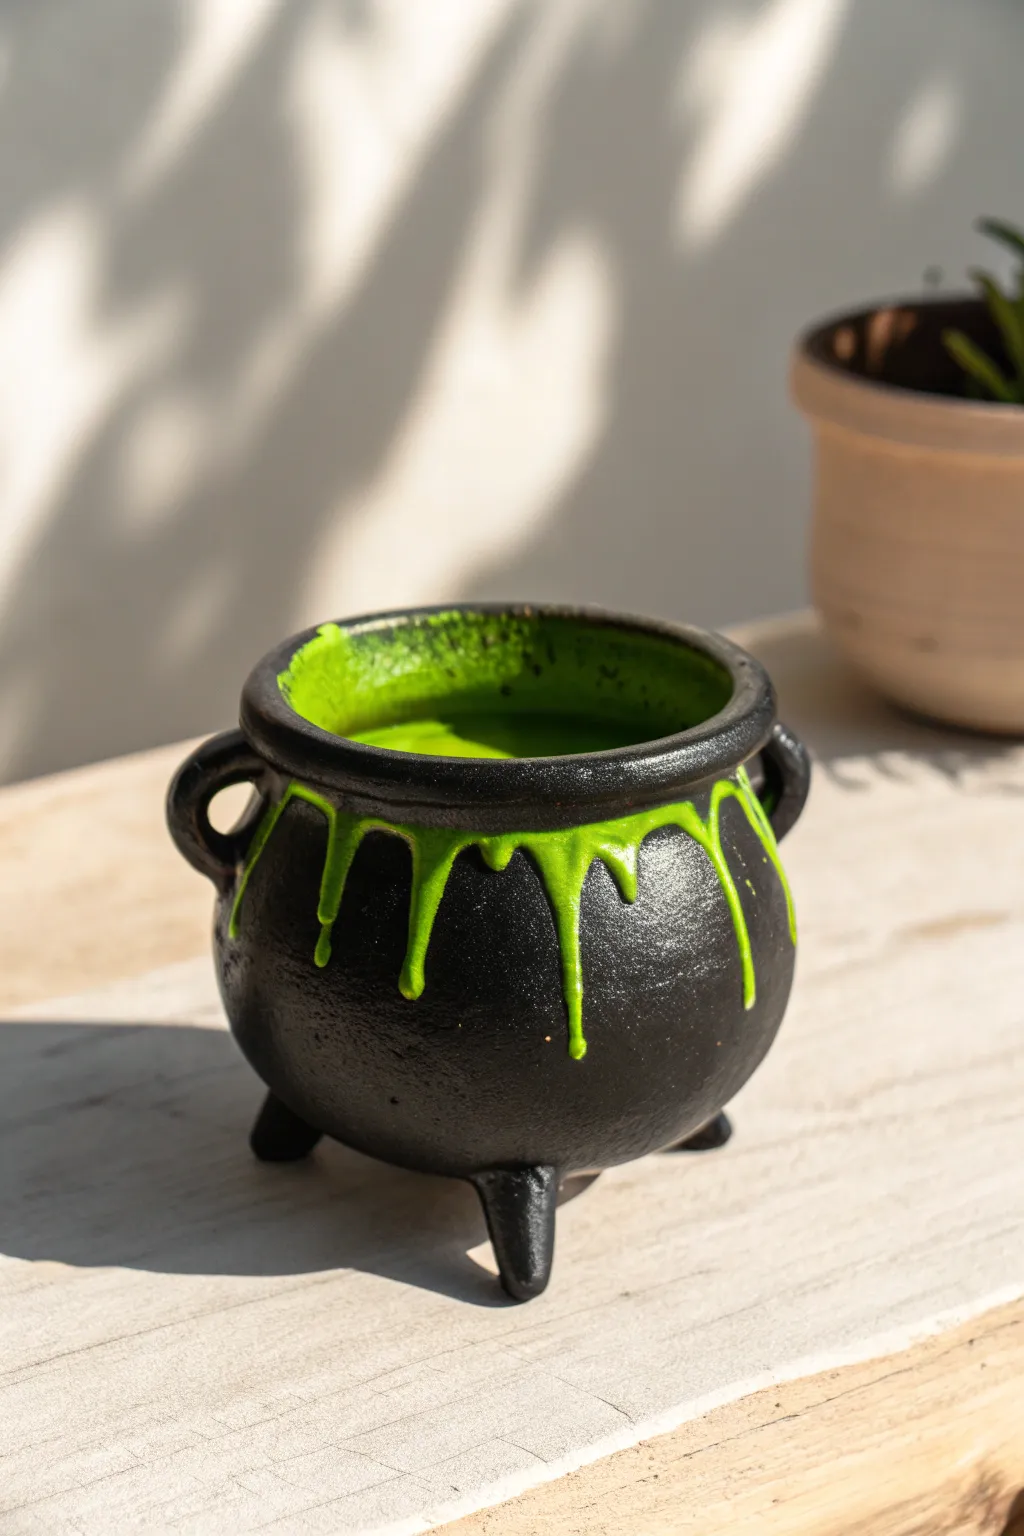
Capture the spooky spirit of the season with this enchanting mini cauldron planter. This project combines simple pinch-pot techniques with a striking neon “slime” glaze to create a piece that looks like it’s bubbling over with a witch’s mysterious potion.
Step-by-Step Guide
Materials
- Black polymer clay (or air-dry clay)
- Acrylic paint (neon lime green)
- Glossy varnish or glaze
- Modeling tools (ball tool, needle tool)
- Rolling pin
- Aluminum foil
- Fine-grit sandpaper
- Paintbrushes (small detail brush and medium flat brush)
Step 1: Sculpting the Base
-
Create the core shape:
Start by conditioning your black clay until it is soft and pliable. Roll a ball of clay about the size of a tangerine. Using your thumb, press into the center to begin a pinch pot, gently thinning the walls while keeping the base slightly thicker for stability. -
Refine the belly:
Gently push the walls outward from the inside to create a bulbous, round ‘belly’ shape for the cauldron. You want it to look full and heavy, not like a straight cylinder. -
Form the rim:
At the top opening, flare the clay slightly outward to create a distinct rim. Roll the edge over a tiny bit to make it thick and rounded, like a heavy cast iron pot would have. -
Smooth the surface:
Use a little bit of water (if using air-dry) or baby oil (specifically for polymer clay) on your finger to smooth out any fingerprints or cracks on the exterior. The smoother the surface now, the more it will look like metal later.
Slime not shiny?
If your slime looks dull, try UV resin instead of varnish for the green parts. It creates a thick, glass-like wet look that really pops against the matte black.
Step 2: Adding Details
-
Make the legs:
Roll three small, equal-sized cones of black clay. These will be the feet. Turn your cauldron upside down and attach them in a tripod formation. -
Blend the seams:
Using a modeling tool or your finger, blend the clay from the top of the legs seamlessly into the body of the cauldron so they don’t look stuck on. Stand the pot up and press gently to ensure it sits level. -
attach handles:
Roll two small snakes of clay and curl them into ‘C’ shapes or rings. Attach one to each side of the cauldron, just below the rim. Blend the attachment points thoroughly for a strong bond. -
Create texture:
To mimic the look of rough cast iron, take a stiff-bristled toothbrush or a crumpled ball of aluminum foil and gently tap it all over the black surface. This stippling effect breaks up the perfect smoothness and adds realism.
Make it bubble
Before baking, adhere tiny balls of clay inside the rim. Paint them green later to look like the potion is actively bubbling up and over the edge.
Step 3: Finishing and Painting
-
Bake or dry:
Follow the manufacturer’s instructions for your specific clay. If baking polymer clay, consider propping the handles with foil so they don’t droop in the heat. -
Sand imperfections:
Once fully cured and cooled, check for any sharp burrs or rough spots. I like to quickly run a piece of fine-grit sandpaper over the rim to make sure it’s nice and even. -
Paint the slime interior:
Load a brush with neon lime green acrylic paint. Paint the entire inside of the pot. You may need two or three coats to get a solid, opaque neon color against the black clay. -
Add the drip effect:
This is the fun part. Load a small detail brush with a generous amount of green paint. Place the brush at the very top of the rim and let the paint naturally pool and drag downwards creates organic-looking drips. -
Refine the drips:
Vary the length of your painted drips—some should be long trickles reaching halfway down the pot, while others are just small bumps on the rim. Ensure the paint connects seamlessly to the green interior. -
Varnish the slime:
Once the green paint is totally dry, apply a high-gloss varnish or glaze ONLY to the green painted areas (inside and the drips). This makes the potion look wet and slimy. -
Matte the metal:
Leave the black clay unvarnished or apply a matte sealer to maintain the dull, iron-like appearance of the cauldron body.
Pop a small succulent inside and you have the perfect witchy accent for your windowsill
Cursed Spellbook Keepsake Box

Transform a simple wooden box into a mysterious, weathered tome using polymer clay and clever texturing techniques. This project creates a convincingly aged leather effect with faux metal straps, perfect for stashing your most secret Halloween trinkets.
Step-by-Step Tutorial
Materials
- Unfinished rectangular wooden box (book shape preferred)
- Polymer clay (olive green or deep forest green)
- Polymer clay (brown or bronze for straps)
- Liquid polymer clay or Bake & Bond
- Acrylic paints (black, dark brown, antique gold)
- Texture tools (sandpaper, toothbrush, crinkled foil)
- Clay carving tools or needle tool
- Small metal brass studs or brads (optional, can be sculpted)
- Small metal latch hardware
- Rolling pin or pasta machine
- X-acto knife
- Gloss or satin varnish
Step 1: Preparing the Base
-
Prime the Surface:
Apply a thin layer of liquid polymer clay or Bake & Bond to the top, spine, and bottom of your wooden box. This ensures the clay adheres permanently to the wood during baking. -
Roll the Cover:
Condition your green clay thoroughly. Roll it out into a large, even sheet about 1/8 inch thick. You need enough to cover the front ‘cover’ of the box seamlessly. -
Apply the Clay:
Carefully drape the green clay sheet over the top of the box. Press it down firmly, smoothing out any air bubbles with your fingers. Trim the excess flush with the edges using an X-acto knife. -
Create the Spine and Back:
Repeat the rolling and application process for the ‘spine’ and back cover of the box. Blend the seams where the clay pieces meet just slightly, though the straps we add later will hide most joints.
Air Bubbles Be Gone
If you trap air under the clay sheet, pierce the bubble with a needle and press the air out, then smooth the hole closed with your finger.
Step 2: Texturing the Leather
-
Base Texture:
Take a ball of crinkled aluminum foil and press it firmly all over the cured green clay. This irregular pitting mimics the look of ancient, worn leather immediately. -
Fine Details:
For finer grain, gently press sandpaper or a stiff toothbrush into the clay surface. I like to focus on the edges where a real book would see the most wear. -
Add the Central Motif:
Roll a small snake of green clay or use a stamp to create the starburst design in the center. Press it into the cover and blend the edges so it looks embossed rather than stuck on. -
Embossing Lines:
Use a dull carving tool to press deep border lines around the perimeter of the cover, creating a framed effect typical of old bookbinding.
Step 3: Rigging the Straps
-
Create Strap Strips:
Roll out your brown or bronze-colored clay into thin, flat strips approximately 1/2 inch wide. These will simulate the leather binding straps. -
Position the Straps:
Lay two strips vertically across the book cover, spacing them evenly. Press them down firmly so they bond with the green clay beneath. -
Add Stitching Detail:
Use a needle tool or a small spur wheel to press tiny stitch marks along the edges of the brown straps. This small detail adds immense realism. -
Hardware Embellishment:
Push small brass studs into the clay straps at the connection points. Alternatively, roll tiny balls of gold clay and press them on to simulate rivets. -
Simulate Pages:
While the exterior clay is still uncured, use a carving tool to score deep, parallel horizontal lines into the exposed wooden sides of the box. This creates the illusion of stacked paper pages.
Secret Compartment
Line the inside of the wooden box with dark purple velvet or felt after baking to give your cursed object a luxurious interior finish.
Step 4: Finishing Touches
-
Baking:
Bake the entire box according to your clay manufacturer’s instructions. Usually, this is around 275°F (130°C) for 30 minutes per 1/4 inch of thickness. Let it cool completely. -
The Dark Wash:
Water down black acrylic paint until it’s very runny. Brush it over the entire green surface, ensuring it gets into the foil texture pits. -
Wipe Back:
Before the paint dries, quickly wipe the surface with a damp paper towel or sponge. The dark paint will remain in the cracks, highlighting the texture, while the high points return to green. -
Weathering the Pages:
Paint the scored ‘page’ sides with a cream or beige color. Once dry, apply a wash of diluted brown paint to age the paper edges. -
Highlighting and Sealing:
Dry brush a tiny amount of antique gold paint onto the straps and the central starburst to make them pop. Finalize the piece with a coat of satin varnish to protect your work.
Place this ancient-looking tome on your shelf and watch as guests do a double-take when they realize it’s actually a box
Stitched Rag Doll Charms
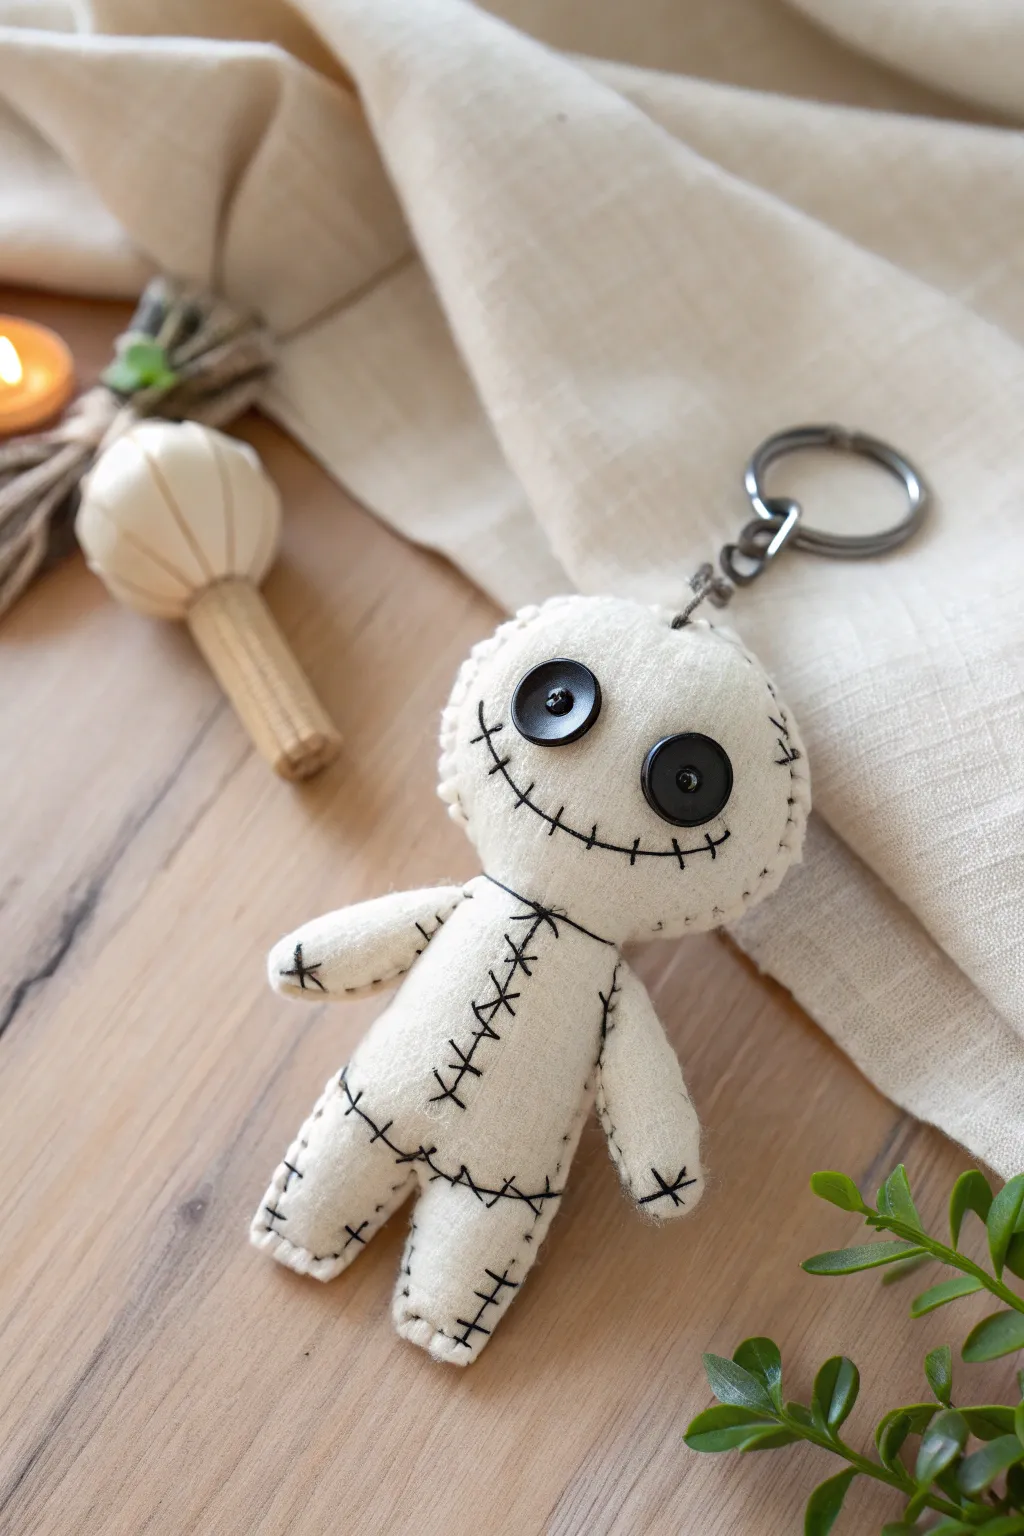
Transform humble polymer clay into an eerie yet adorable rag doll charm that looks convincingly soft and stitched. This project mimics the texture of fabric using simple tools, resulting in a durable Halloween accessory perfect for your keys or bag.
Step-by-Step Guide
Materials
- White or cream polymer clay
- Black polymer clay (very small amount)
- Two small black 4-hole buttons
- Silver keychain hardware with screw eye pin
- Texture tool (toothbrush or sandpaper)
- Needle tool or toothpick
- Black acrylic paint
- Fine detail paintbrush
- Paper towel or wet wipe
- Clay carving tools (knife)
- Oven for baking
Step 1: Sculpting the Doll Body
-
Condition the Clay:
Start by thoroughly conditioning your white or cream polymer clay. Knead it until it is soft and pliable to prevent cracks during sculpting. -
Form the Head:
Roll a ball of clay roughly 1 to 1.5 inches in diameter for the head. Flatten it slightly into a rounded disc shape, rather than a perfect sphere, to give it that stuffed pillow look. -
Create the Torso:
Roll a slightly smaller, oblong cylinder for the body. Attach it firmly to the bottom of the head. Use a blending tool or your finger to smooth the seam where they join so it doesn’t break apart later. -
Attach Limbs:
Roll four small sausages of clay for the arms and legs. Attach the legs to the bottom of the torso and the arms to the sides. Press them on gently but firmly, blending the clay at the attachment points. -
Texturing the ‘Fabric’:
To make the clay look like felt or fabric, take an old toothbrush or a piece of coarse sandpaper. Gently tap and press this texture over the entire surface of the doll—front, back, and sides. Don’t miss the nooks between the limbs.
Step 2: Adding Details & Stitches
-
Add the Eyes:
Take your two black buttons and press them firmly into the face area. I find pressing them in deep enough so the clay slightly bulges around the edges makes them look properly sewn on. -
Carve the Seams:
Using a needle tool or sharp knife, lightly carve lines where ‘seams’ would be on a fabric doll. Create a line around the perimeter of the head and down the center or sides of the torso. -
Impress the Stitches:
Across your seam lines, press small ‘X’ marks or perpendicular dashes into the clay using your needle tool. These indentations will hold paint later to look like black thread. -
Sculpt the Mouth:
Carve a wide, stitched smile across the face. Add vertical hash marks across the smile line to resemble a mouth that has been sewn shut. -
Insert Hardware:
Before baking, screw the eye pin of your keychain hardware into the top of the doll’s head. You can add a drop of liquid clay or bake-and-bond glue to the threads for extra security.
Paint Stuck Everywhere?
If the black paint dries too fast on the ‘fabric’ texture, use a wipe with a tiny bit of rubbing alcohol to clean the high points without removing paint from the grooves.
Step 3: Baking & Finishing
-
Bake:
Bake the piece according to your polymer clay package instructions. This is typically around 275°F (135°C) for 15-30 minutes, depending on thickness. Let it cool completely. -
apply the ‘Thread’ Wash:
Dilute a small amount of black acrylic paint with water. Brush this wash liberally over all the carved stitch marks and the mouth. -
Wipe Clean:
Quickly wipe the surface with a damp paper towel or wet wipe. The paint will stay trapped in the carved crevices, creating perfectly crisp ‘stitches’ while leaving the raised ‘fabric’ clean. -
Enhance the Edges:
If you want a grungier look, use a dry brush with very little black paint to lightly dab the edges of the limbs and head, simulating dirty fabric seams. -
Final Seal:
Once the paint is fully dry, coat the doll with a matte varnish. Avoid glossy finishes, as you want to maintain the illusion of a soft, fabric texture.
Use Real Buttons
While you can sculpt clay buttons, using actual small plastic buttons adds amazing realism. Just ensure they are oven-safe (most are) before baking.
Now you have a spooky little guardian for your keys that looks soft but is tough as stone
Eyeball Beads and Mini Charms
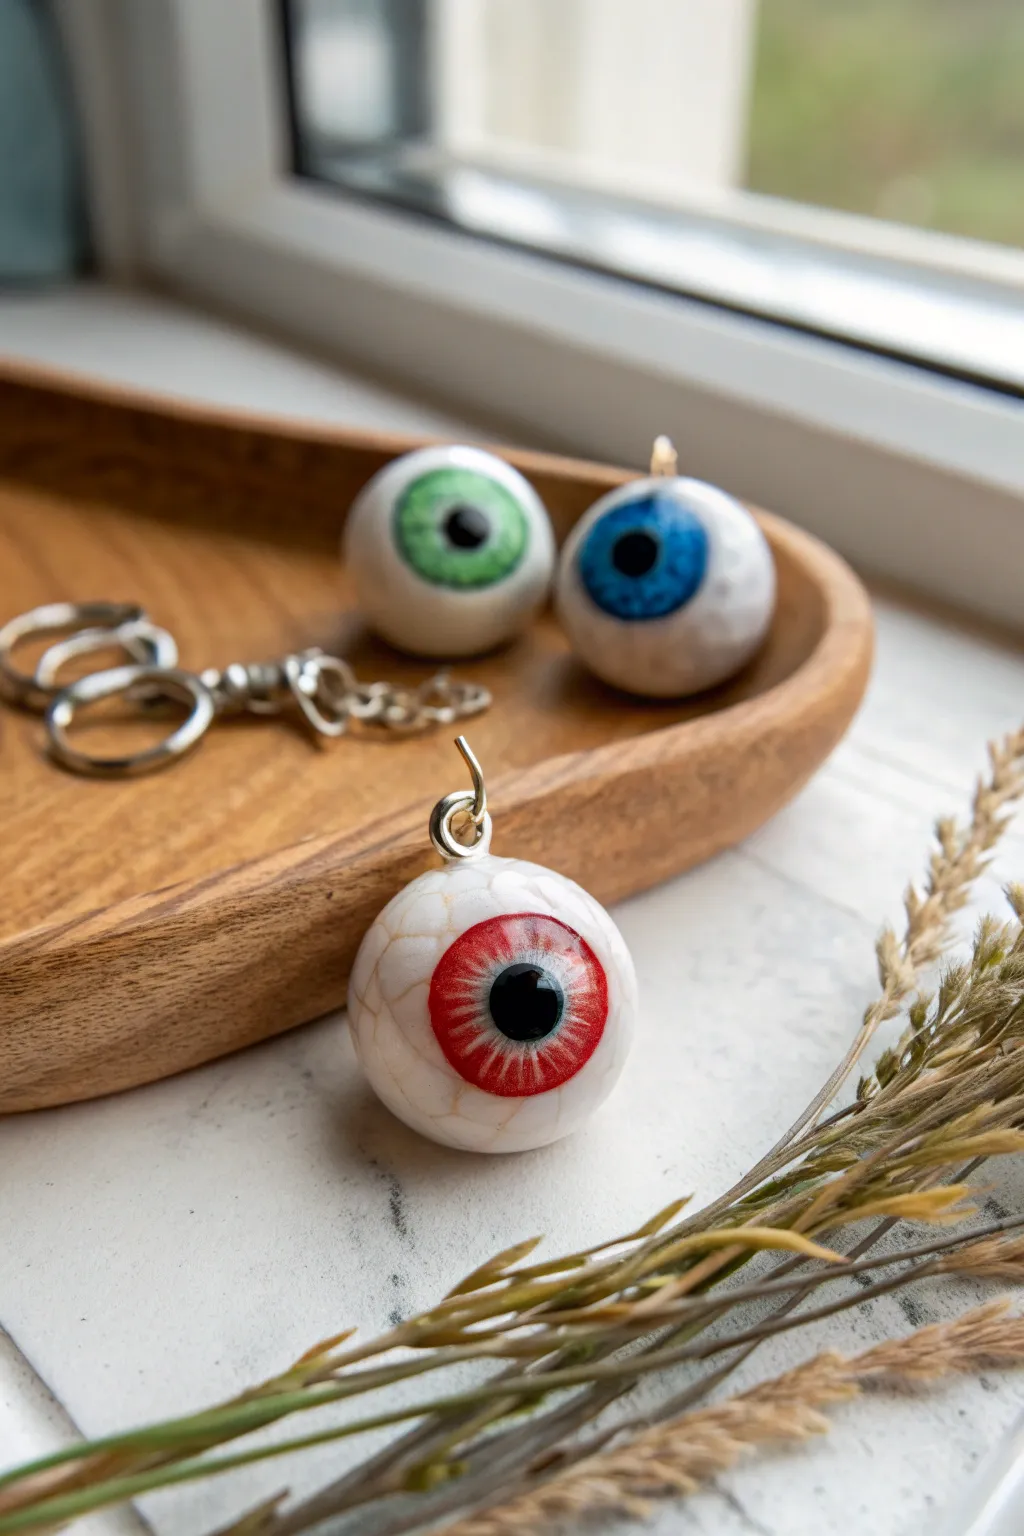
These eerie yet charming eyeball pendants are crafted to look surprisingly realistic, featuring a glossy cornea and a textured sclera. They make perfect spooky keychains or focal beads for Halloween jewelry that stares right back at you.
Step-by-Step Tutorial
Materials
- White polymer clay
- Translucent polymer clay
- Colored polymer clay (iris colors: green, blue, red)
- Black polymer clay (for pupil)
- Red acrylic paint (for blood vessels)
- Silver eye pins or screw eyes
- UV resin or glossy glaze
- Ball stylus tool
- Needle tool or toothpick
- Texturing tool (sandpaper or stiff bristle brush)
- Small paintbrush
- Oven for baking
Step 1: Forming the Base
-
Roll the Sclera:
Begin by conditioning your white polymer clay until it is soft and pliable. Roll a piece into a smooth ball, approximately the size of a large marble or a gobstopper. -
Create Texture:
Instead of leaving the white ball perfectly smooth, gently roll the surface over a piece of sandpaper or tap it with a stiff brush. This subtle texture mimics organic tissue better than a polished surface. -
Insert the Finding:
Take a silver eye pin or screw eye. If using an eye pin, trim the wire to about 1cm and bend the end slightly into a hook for grip. Push it firmly into the top of the white ball so the loop sits flush against the clay.
Step 2: Creating the Iris and Pupil
-
Prepare the Iris Color:
Choose your iris color—bright red, green, or blue work well. Roll a small amount of clay into a tiny ball, then flatten it into a thin disk. -
Attach the Iris:
Press the colored disk onto the center front of the white eyeball. Use your finger to smooth the edges down slightly so it integrates with the curve of the eye. -
Add Detail Lines:
Using a needle tool, gently scratch very fine lines radiating from the center of the iris outward to the edge. This striation adds depth and realism to the colored part of the eye. -
Add the Pupil:
Roll an even smaller ball of black clay for the pupil. Flatten it and press it directly into the center of the colored iris. -
The Cornea Dome:
This is a key step: roll a small ball of translucent polymer clay. Ensure it is clean relative to dust. Flatten it into a dome that is slightly larger than the iris. -
Place the Lens:
Carefully place this translucent dome over the iris and pupil. Gently press the edges down to seal it, creating the look of a clear lens over the eye.
Cloudy Cornea?
If your translucent clay looks milky after baking, you may have under-baked it or used a brand that isn’t fully clear. Try quenching the hot clay in ice water immediately after baking to improve clarity.
Step 3: Finishing Touches
-
Bake the Clay:
Place your eyeballs on a baking sheet or suspended on a bead rack to avoid flat spots. Bake according to your clay manufacturer’s instructions (usually 275°F/135°C for 15-30 minutes). -
Cool Down:
Allow the clay to cool completely before moving to the painting stage. The clay hardens fully as it returns to room temperature. -
Dry Brushing Veins:
Dip a very fine brush into red acrylic paint and wipe most of it off on a paper towel. Gently drag the dry brush across the textured white surface to catch the high points, creating faint, bloodshot veins. -
Glazing the Eye:
To make the eye look wet and alive, apply a drop of UV resin or high-gloss glaze specifically to the iris area (the translucent dome). I like to cure this under a UV lamp immediately to prevent dripping. -
Sealing the Rest:
For the white part, you can leave it matte for contrast or apply a very thin layer of satin varnish to protect the paint without making it overly shiny. -
Assembly:
Once everything is dry and cured, attach a jump ring to the eye pin loop. You can now connect your spooky charm to a keychain or necklace chain.
Pro Tip: Depth of Field
For a hyper-realistic iris, dust a tiny bit of darker mica powder or pastel chalk around the outer edge of the colored iris disk before adding the translucent dome. It adds instant dimension.
With these finishing touches complete, your unblinking creations are ready to add a creepy flair to your accessories
Bone-Hand Ring Holder

This eerie yet elegant hand sculpture serves as both chilling Halloween decor and a functional jewelry stand for your favorite rings. Crafted to mimic the texture of aged bone, it rises from a marble-effect base to grasp at the air with anatomical precision.
Detailed Instructions
Materials
- White or bone-colored polymer clay
- Translucent liquid clay (Bake & Bond)
- Small circular wooden plaque or ceramic coaster
- Marble contact paper (optional, for base)
- Acrylic paints: Burnt Umber, Yellow Ochre, Black, White
- Sculpting tools (needle tool, ball stylus)
- Aluminum foil
- Armature wire (16 or 18 gauge)
- Wire cutters and pliers
- Matte varnish
- Paintbrushes (fine detail and flat shader)
- Paper towels or sponge
Step 1: Building the Framework
-
Wire fingers:
Cut five lengths of wire, each slightly longer than your own fingers. These will form the core of the skeletal digits. -
Wrist bundle:
Twist the bottom ends of the five wires together securely to create a central wrist stem. Fan out the top ends to resemble the spread of a hand. -
Base connection:
Drill a hole into the center of your chosen base if using wood, or fashion a strong clay mound if using a coaster. Insert the twisted wire wrist firmly so the armature stands upright. -
Bulk up the wrist:
Wrap a small amount of aluminum foil tightly around the wrist area and the palm section to save clay and reduce baking time.
Floppy Fingers?
If the clay is sliding down the wire while you sculpt, apply a thin layer of liquid clay (Bake & Bond) to the wire first to help the raw clay grip the metal.
Step 2: Sculpting the Bones
-
Finger segments:
Roll small snakes of polymer clay. Apply them to each wire finger, pressing firmly to adhere them to the metal core. -
Joint definition:
Instead of smoothing the whole finger, pinch the clay to define the knuckles. Bones are widest at the joints, so add tiny extra bits of clay here. -
Carpal details:
Form the wrist bones (carpals) by adding small, pebble-like shapes of clay at the base of the hand where it meets the arm stand. Blend them slightly but leave the distinct bumpy texture. -
Refining the shape:
Use a needle tool or knife to carve slight indentations along the sides of the finger bones, mimicking the concave shape of phalanges. -
Adding texture:
Take a stiff bristle brush or a ball of crumpled foil and gently press it all over the clay surface. This creates a porous, organic bone texture rather than a smooth plastic look. -
Final posing:
Before baking, gently bend the wire fingers into a natural, slightly curled position. Make sure they are spread enough to hold rings later. -
First bake:
Bake the sculpture according to your clay package instructions. I usually tent it with foil to prevent scorching the tips.
Gilded Glamour
For a luxe twist, paint just the fingertips or the knuckles with gold leaf paint after the wash dries. It makes the piece look like a high-end artifact.
Step 3: Finishing and Aging
-
The antiquing wash:
Mix a large amount of water with a drop of Burnt Umber and a tiny touch of black acrylic paint to create a thin wash. -
Apply the grime:
Brush the dark wash over the entire baked hand, ensuring it sinks into the deep textures, knuckle crevices, and joint lines. -
Wipe back:
Immediately wipe the high points of the hand with a damp paper towel or sponge. The paint should remain only in the cracks, highlighting the sculpted details. -
Dry brush highlights:
Dip a dry brush into white or light cream paint. Offload almost all the paint on a napkin, then lightly flick the brush over the raised knuckles and ridges to make them pop. -
Base preparation:
If you used a plain wooden base, cover it with marble contact paper for a chic look, or paint it to resemble stone. -
Sealing:
Apply a coat of matte varnish to the bone hand to protect the paint job without making it look glossy and artificial.
Place your creation on your vanity and let this skeletal assistant hold your treasures securely
Twisted Tree With Hidden Faces
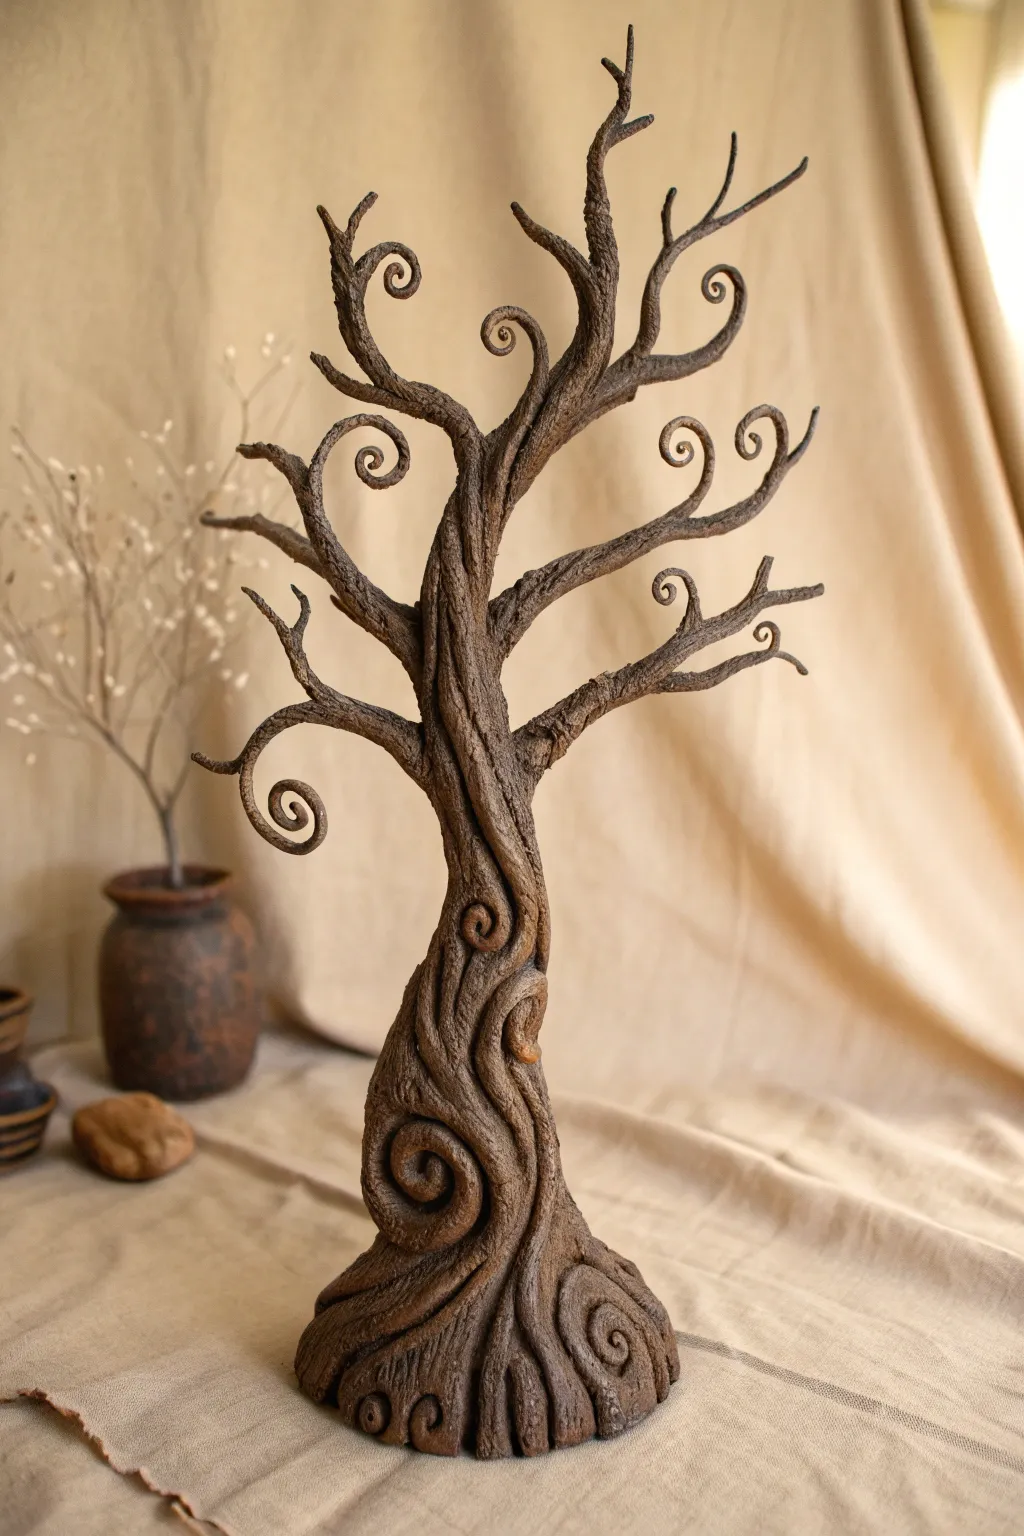
Bring the eerie elegance of a haunted forest into your home with this textured clay sculpture. The twisted trunk and spiraling branches create a sense of ancient movement, making it a perfect centerpiece for a sophisticated Halloween display.
How-To Guide
Materials
- Air-dry clay or polymer clay (brown or grey)
- Strong armature wire (medium gauge)
- Aluminum foil
- Needle tool or toothpick
- Clay sculpting tools (hook and ball stylus)
- Acrylic paints (dark brown, black, grey-brown)
- Wire cutters
- Pliers
- Small paintbrush
- Matte varnish (optional)
Step 1: Building the Skeleton
-
Form the Base Wires:
Cut five to seven lengths of wire, each about 12-15 inches long. Twist them together tightly at the bottom for about 3 inches to create the main trunk section, leaving the bottom ends flared out to form a stable root base. -
Branching Out:
Separate the top wires into smaller groupings to form primary branches. Twist these new sections for an inch or two, then separate them again into individual wires for the finer twigs. -
Creating the Curvature:
Use pliers to curl the tips of each single wire into tight spirals and loops. Bend the main trunk slightly to give it a windswept, leaning posture rather than standing perfectly straight. -
Bulking the Core:
Wrap the twisted trunk section tightly with aluminum foil. This saves clay and keeps the sculpture lightweight. Squeeze the foil so it is dense and follows the twisted shape of the wire.
Cracking Up?
If cracks appear while air-dry clay dries, mix a small amount of fresh clay with water to make a paste (slip) and fill them in. Smooth deeply.
Step 2: Sculpting the Bark
-
Base Clay Layer:
Roll out thin snakes of clay and begin wrapping them around the main trunk, covering the foil completely. Smooth the seams with a little water or slip to ensure the clay adheres well. -
Branch Application:
Apply thinner ropes of clay to the wire branches. I find it easiest to start from the trunk and work outward toward the spiral tips, carefully smoothing the clay over the wire so no metal shows. -
Adding the Swirls:
For the signature spirals on the trunk, roll tapering coils of clay and press them onto the surface in a swirl pattern, particularly near the base. Blend the edges of these coils into the trunk to make them look like grown knots. -
Texturing the Bark:
Using a needle tool or a stiff brush, drag jagged lines vertically up the trunk. Follow the flow of the twisted clay to emphasize the movement. Deepen the grooves between the coiled roots for dramatic shadows. -
Face Integration:
This is the ‘hidden’ part—press small indentations into the knots or swirls to suggest hollow eyes or a gaping mouth. Keep these subtle so they emerge from the bark organically.
Step 3: Refining and Finishing
-
Check Stability:
Before the clay hardens, make sure your root base is flat and the tree stands on its own. Gently press the base onto the table to flatten the bottom. -
Drying Time:
Allow the sculpture to dry completely. For air-dry clay of this thickness, this may take 24-48 hours. Keep it away from direct heat to prevent cracking. -
The Base Coat:
Once dry, paint the entire sculpture with a dark brown acrylic paint. Be sure to work the paint into all the deep crevices and bark texture. -
Adding Depth:
Mix a small amount of black water-based wash and brush it over the dried base coat, then wipe away the excess with a rag. This leaves darkness in the cracks. -
Dry Brushing Highlights:
Dip a dry brush into a lighter grey-brown or tan paint. Wipe most of it off, then lightly graze the raised surfaces of the bark and spirals to highlight the texture. -
Protection:
Seal your work with a matte varnish to protect the paint and give the clay a unified finish.
Spooky Glow Up
Embed tiny, battery-operated LED fairy lights into the spirals of the branches before the clay sets for a magical glowing effect.
Now you have a hauntingly beautiful sculpture that captures the twisted spirit of the season
Haunted Doorway Shadowbox Scene
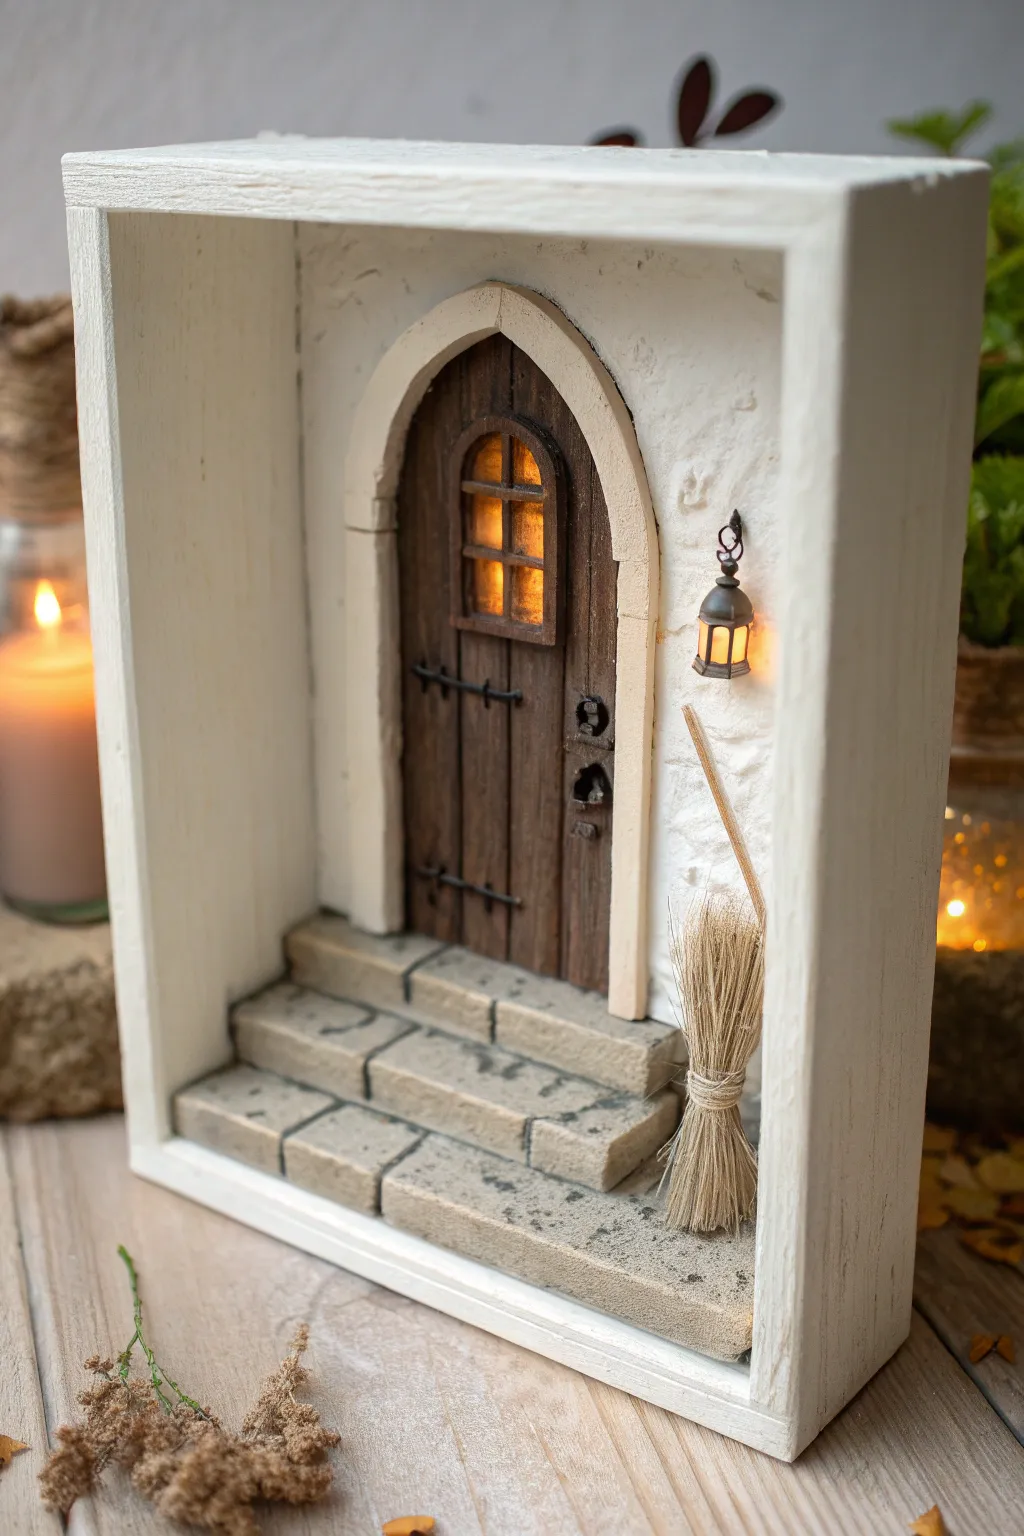
Create a cozy yet mysterious portal to another world with this lighted shadowbox scene. Featuring realistic stone textures, aged wood, and a flickering lantern, this miniature diorama is perfect for adding a subtle spooky touch to your shelves.
Detailed Instructions
Materials
- Deep wooden shadowbox frame (approx. 6×8 inches)
- Air-dry clay (grey and white)
- Balsa wood sheet or craft sticks
- Acrylic paints (dark brown, black, grey, cream, metallic black)
- Small LED tea light or fairy light strand
- Yellow translucent vellum or tissue paper
- Miniature lantern charm or dollhouse accessory
- Dried grass or twine (for the broom)
- Wood stain (dark walnut)
- Mod Podge or craft glue
- Sculpting tools
- Texture sponge
- Hot glue gun
Step 1: Constructing the Door
-
Cut the base shape:
Begin by measuring the inside height of your shadowbox. Cut a rectangle from balsa wood that fits comfortably within the frame, then carefully trim the top into a rounded arch shape to serve as the main door base. -
Add plank details:
Use a scoring tool or the back of a hobby knife to carve deep vertical grooves into the wood. This simulates individual planks. I find that varying the pressure slightly creates a more rustic, aged look. -
Create the window:
Cut a small arched window opening in the upper third of the door. Glue a small piece of yellow vellum behind this opening to diffuse the light later. -
Stain and age:
Apply a coat of dark walnut wood stain to the door. While it’s still slightly wet, wipe away excess from the center of the planks to create a worn, highlighted effect. Let this dry completely. -
Add window panes and hardware:
Cut thin slivers of balsa wood to create a cross shape for the window pane and glue them over the vellum. Paint small hardware details like hinges and a handle using metallic black paint; you can make these from tiny scraps of cardstock or clay for dimension.
Clay Cracking?
If your air-dry clay cracks while drying, mix a small amount of fresh clay with water to create a paste (slip) and fill in the cracks. Smooth it over with a damp finger.
Step 2: Building the Stonework
-
Form the steps:
Using grey air-dry clay, form a blocky staircase shape at the bottom of the shadowbox. Carve lines to separate individual stone slabs, making sure to round off the harsh edges for a weathered appearance. -
Texture the stone:
Press a crumpled ball of foil or a rough stone onto the surface of the wet clay steps to give them a realistic pitted texture. -
Create the door frame:
Roll out a thin snake of white or light grey clay. Press this around the arched wooden door you created earlier to form a stone casing. Flatten it slightly and scribe lines to mimic fitted arch stones. -
Paint a wash:
Once the clay is fully hardened, mix a very watery black paint. Brush this over the steps and door frame, then immediately wipe the surface with a paper towel. The dark paint will stay in the crevices, popping the texture.
Spooky Atmosphere
Add tiny dried moss between the stone steps or cobwebs made from pulled cotton balls in the corners to make the entrance look abandoned and ancient.
Step 3: Assembly and Lighting
-
Prepare the box:
Paint the interior walls of your shadowbox with a textured cream paint. You can mix a little baking soda into acrylic paint to get that rough, stucco plaster look. -
Install the light:
Drill a small hole in the back of the shadowbox where the door window will align. Secure your LED light source behind the box so it shines through. -
Mount the elements:
Glue the stone steps into the bottom of the box first, followed by the door and its clay archway. Ensure the door window aligns with your light hole. -
Add the lantern:
Hang the miniature lantern on the wall beside the door using a tiny bent wire or hook. If your lantern works, position it; otherwise, you can drill another small hole to feed a fairy light LED into it. -
Craft the broom:
Gather a small bundle of dried grass or stiff twine. Bind one end tightly with thread, insert a small stick for the handle, and trim the bottom bristles evenly. Lean it casually against the wall.
Now switch on the light and admire your mysterious little gateway