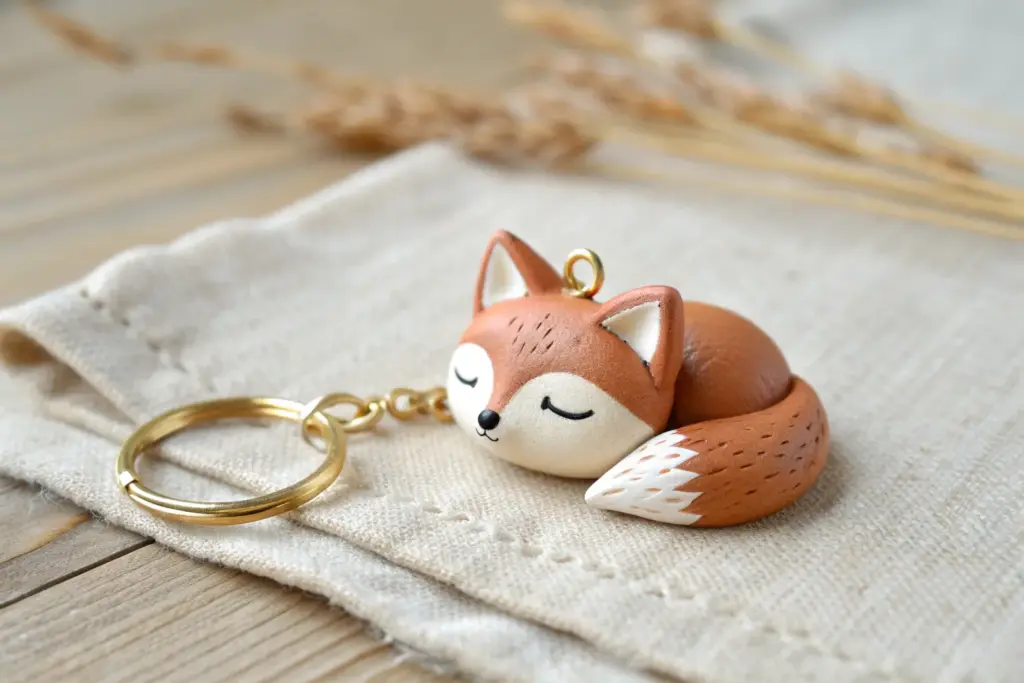
When I’m craving a creative reset, I reach for polymer clay because you can go from a lump of color to something adorable in a single afternoon. Here are my favorite Sculpey-style clay ideas that stay beginner-friendly, but still look like you really knew what you were doing.
Marbled Statement Earrings in Easy Shapes
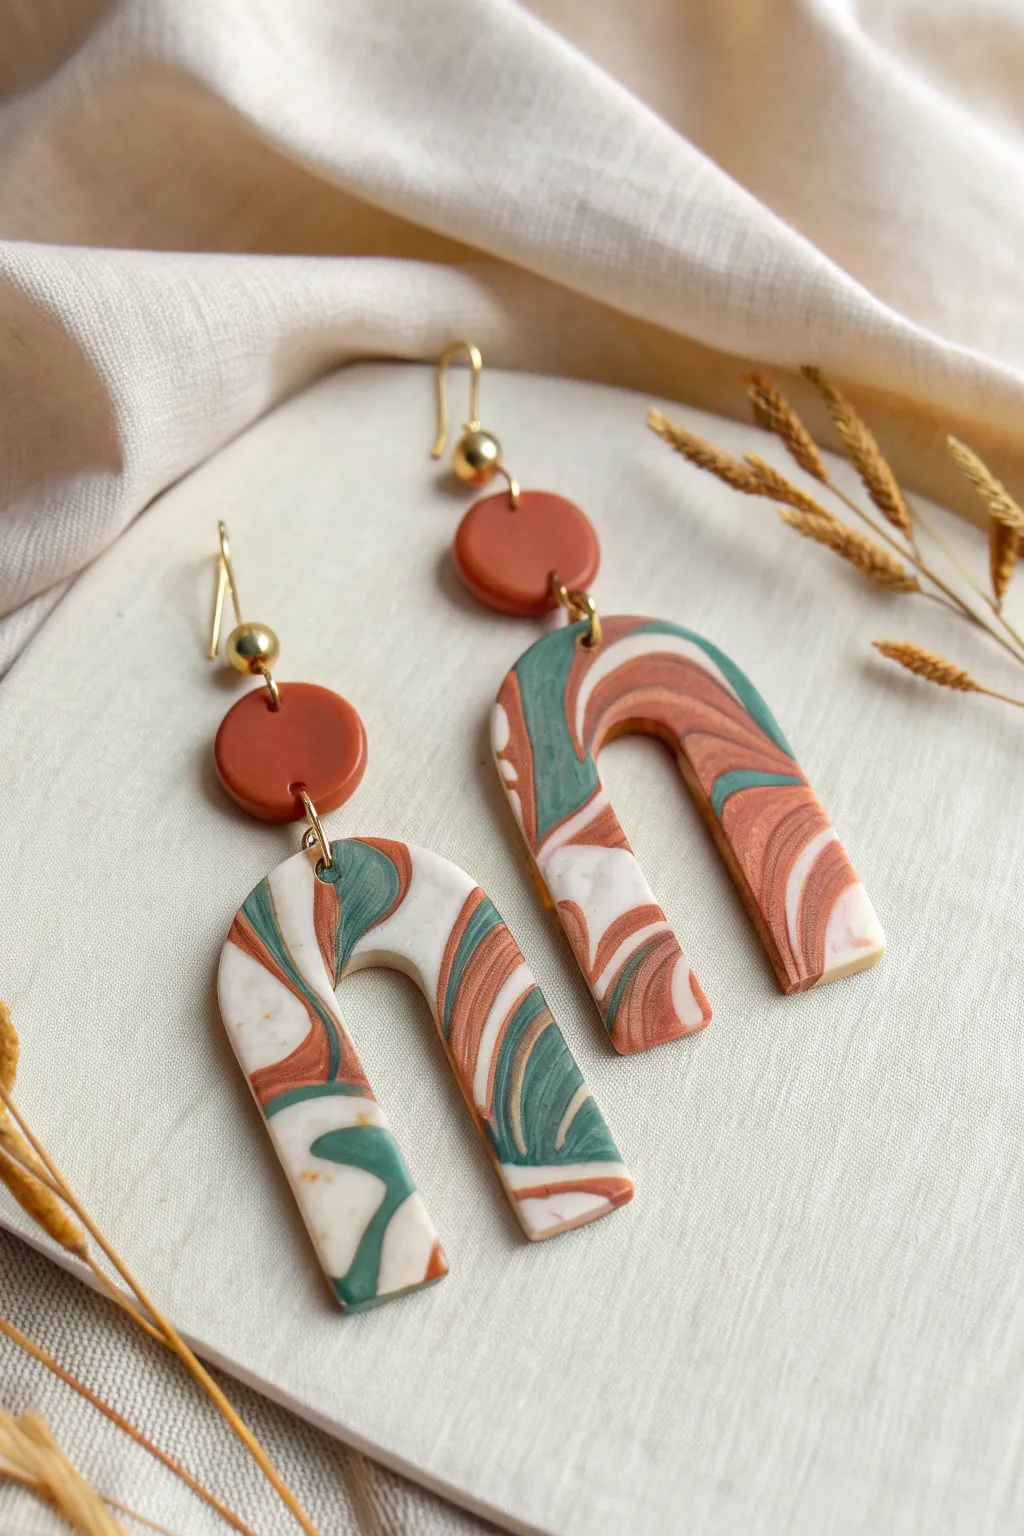
Embrace the beauty of unpredictable patterns with these stunning statement earrings featuring a classic U-shaped arch. The swirling blend of terracotta, sage green, and creamy white creates an artistic, earthy look that pairs perfectly with casual linen or dressy wear.
Step-by-Step Guide
Materials
- Polymer clay (Terracotta/Rust, Sage Green, and White/Cream)
- Acrylic rolling pin
- Set of creative clay cutters (small circle and large U-shaped arch)
- Tissue blade or flexible clay slicer
- Ceramic tile or glass work surface
- Parchment paper
- Two gold jump rings (approx. 7-8mm)
- Two gold earring hooks (French hook style)
- Jewelry pliers (flat nose and round nose)
- Hand drill or small pin vise (optional if not pre-piercing)
- Small needle tool or toothpick
- Baking sheet
Step 1: Preparing the Clay
-
Condition the Colours:
Begin by thoroughly kneading each color of clay separately. You want the terracotta, sage green, and white to be soft, warm, and pliable to ensure they mix smoothly later without cracking. -
Roll Snakes:
Roll each color into several long, thin ropes or ‘snakes.’ Aim for varying thicknesses to create a more organic marbled look—make the white snakes slightly thicker if you want that to be your base tone. -
Twist and Combine:
Gather your snakes into one bundle and twist them together tightly like a candy cane. Fold the twisted log in half and twist again. Repeat this twist-and-fold process about 3-4 times. Be careful not to over-twist, or the colors will turn into a muddy brown instead of distinct swirls.
Step 2: Marbling and Cutting
-
Form a Ball:
Once you have a nice striped log, squish it into a rough ball shape. This helps rearrange the colors in a random, natural pattern. -
Roll out the Slab:
Place your marbled ball on your work surface or parchment paper. Use your acrylic roller to flatten it into a slab approximately 3mm thick. Roll in different directions to stretch the pattern out interestingly. -
Assess the Pattern:
Check your slab for the best swirling sections. I like to frame these specific areas with my cutters before pressing down, ensuring the most beautiful parts of the marble end up in the final piece. -
Cut the Arches:
Press your large U-shaped arch cutter firmly into the best part of the slab. Wiggle it very slightly to ensure a clean cut, then lift. Cut two identical arches. -
Cut the Solid Tops:
For the top stud pieces, you can use leftover marbled clay, but the example uses solid terracotta for contrast. Roll out a small piece of plain terracotta clay to the same thickness and cut two small circles.
Air Bubble Blues?
If you see air bubbles after rolling your slab, pierce carefully with a needle and smooth over with your finger. To prevent them, condition clay well and avoid folding air pockets into the log.
Step 3: Refining and Baking
-
Smooth the Edges:
Gently run your finger dipped in a little cornstarch or water along the cut edges of your shapes to smooth out any roughness or cutter marks. -
Pierce Holes:
Using a needle tool, poke a hole at the very top center of each U-shape and at the bottom center of each terracotta circle. Ensure the hole is large enough for your jump rings. -
Bake:
Arrange your pieces on a parchment-lined baking sheet. Bake according to your brand of polymer clay instructions (usually around 275°F/135°C for 15-30 minutes). Usually, baking longer yields stronger clay. -
Cool Down:
Let the pieces cool completely on the baking sheet. They will be slightly flexible when hot but will harden as they cool.
Glossy or Matte?
For a high-end finish, coat the baked pieces with UV resin and cure under a UV lamp for a glass-like shine. For a matte, organic feel, sand lightly and buff with denim.
Step 4: Assembly
-
Open Jump Rings:
Using two pairs of pliers, twist a jump ring open. Always twist side-to-side (like opening a door), never pull the ends apart, to maintain the ring’s circular shape. -
Connect the Pieces:
Thread the open jump ring through the hole in the U-arch and the hole in the terracotta circle, connecting them together. Close the jump ring securely by twisting it back. -
Attach Earring Hooks:
The earring hooks in the image have a small loop and bead. Open the loop at the bottom of the earring hook slightly and slide it onto the jump ring connecting the two clay pieces, or thread it through a top hole if your circle is the stud. -
Final Check:
Ensure all rings and loops are closed tight so pieces don’t slip off. Give the earrings a gentle wipe with a soft cloth to remove any lingering fingerprints.
Enjoy wearing your unique, handmade art pieces on your next outing


Minimal Geometric Dangles With a Modern Palette
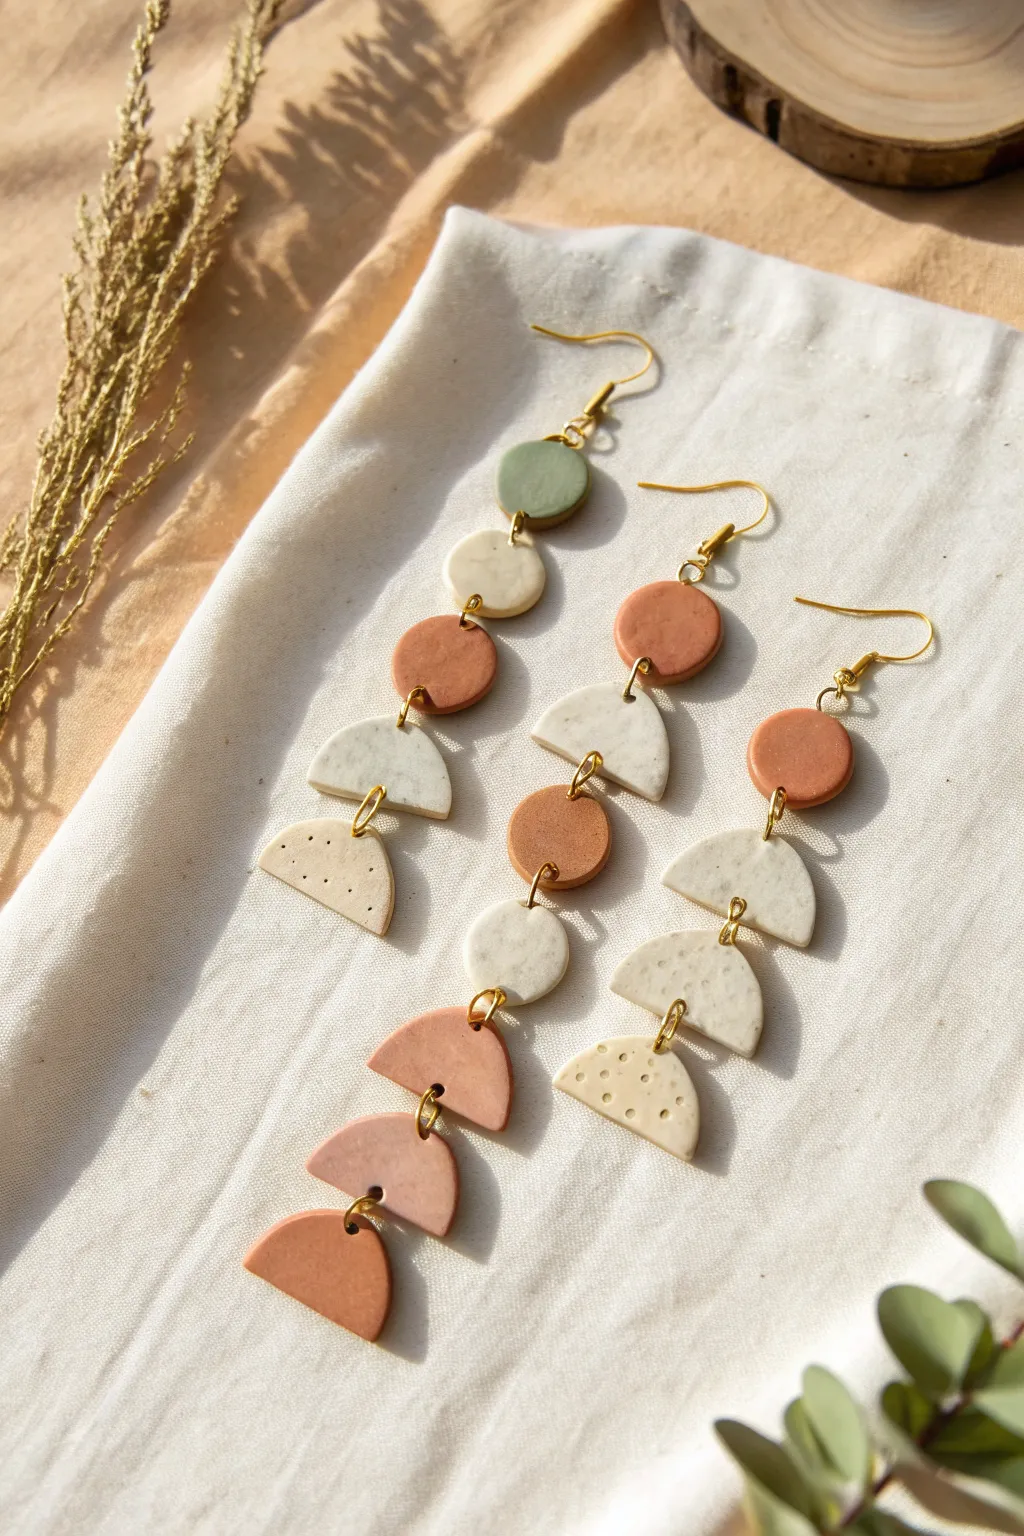
Embrace a modern, minimalist aesthetic with these multi-tiered geometric earrings featuring a soothing palette of terracotta, sage, and speckled cream. The simple shapes and mixed textures create movement and interest, making them a perfect statement piece for everyday wear.
Step-by-Step Tutorial
Materials
- Polymer clay (colors: terracotta/rust, sage green, beige, speckled white/granite)
- Acrylic rolling pin or clay machine
- Geometric clay cutters (small circles, medium circles, semicircles)
- Needle tool or toothpick
- Jump rings (gold, 6mm or 7mm)
- Fishhook earring wires (gold)
- Jewelry pliers (flat nose and round nose)
- Ceramic tile or baking sheet with parchment paper
- Oven
- Wet sandpaper or denim fabric (for finishing)
- Liquid clay or bake and bond (optional)
Step 1: Clay Conditioning & Cutting
-
Condition the clay:
Start by warming the polymer clay in your hands, kneading each color separately until it is soft and pliable. This prevents cracking and air bubbles. -
Roll out slabs:
Using your acrylic roller or pasta machine on a medium setting (approx. 3mm thick), roll out slabs of each color. Aim for a consistent thickness across all colors for a uniform look. -
Cut the circles:
Use your circle cutters to punch out the base shapes. For the design on the left, you’ll need small sage circles and medium beige circles. For the others, mix and match sizes based on your desired pattern. -
Create semicircles:
To make the half-moon shapes shown in the image, cut a full circle using your cutter, then use a tissue blade specifically to slice it in half. Alternatively, use a specialty semicircle cutter. -
Add texture:
For the bottom semicircles (like the ones in the middle pair), use a needle tool to gently press small dots into the raw clay. I like to vary the depth slightly for a more organic feel. -
Pierce holes:
Before baking, carefully use your needle tool to poke holes where the jump rings will go. Make sure the hole is close enough to the edge (about 2-3mm) but not so close that it will tear. -
Double-check connections:
If a piece hangs from another vertical piece (like the long chain on the left), ensure you have a hole at the top *and* bottom of the connecting pieces.
Step 2: Baking & Assembly
-
Bake the pieces:
Arrange your shapes on a ceramic tile or baking sheet. Bake according to the manufacturer’s instructions for your specific brand of clay (usually 275°F/130°C for 15-30 minutes). -
Cool down:
Allow the clay to cool completely before handling. It is fragile when hot and hardens fully as it returns to room temperature. -
Sand edges:
Once cool, inspect edges for any roughness. You can smooth them lightly with wet high-grit sandpaper or rub them briskly with a piece of denim for a polished finish. -
Open jump rings:
Using two pairs of pliers, twist your jump rings open laterally (front-to-back motion), never pulling them apart sideways, to preserve their circle shape. -
Connect the tiers:
Thread the open jump ring through the hole of the bottom shape and the corresponding hole of the shape above it. Close the ring securely with your pliers. -
Build the chains:
Continue linking the shapes together according to your design layout. The left design has five tiers, while the right has four. -
Add earring hooks:
Attach the final jump ring to the top shape, then slide the loop of the fishhook ear wire onto that ring before closing it tightly. -
Final check:
Hold the earrings up to ensure all pieces hang straight and that all jump rings are fully closed so the clay pieces don’t slip off.
Bubbles Be Gone
If you see air bubbles after rolling, slice them with a blade and smooth the clay down. If baked, sand the surface or add a thin layer of UV resin to hide imperfection.
Style Variation
Swap the bottom semicircle for a brass or gold charm component to add extra shine and mix materials for a high-end boutique look.
Enjoy styling these versatile, lightweight earrings with your favorite casual outfits


Tiny Fruit Slice Cane Charms
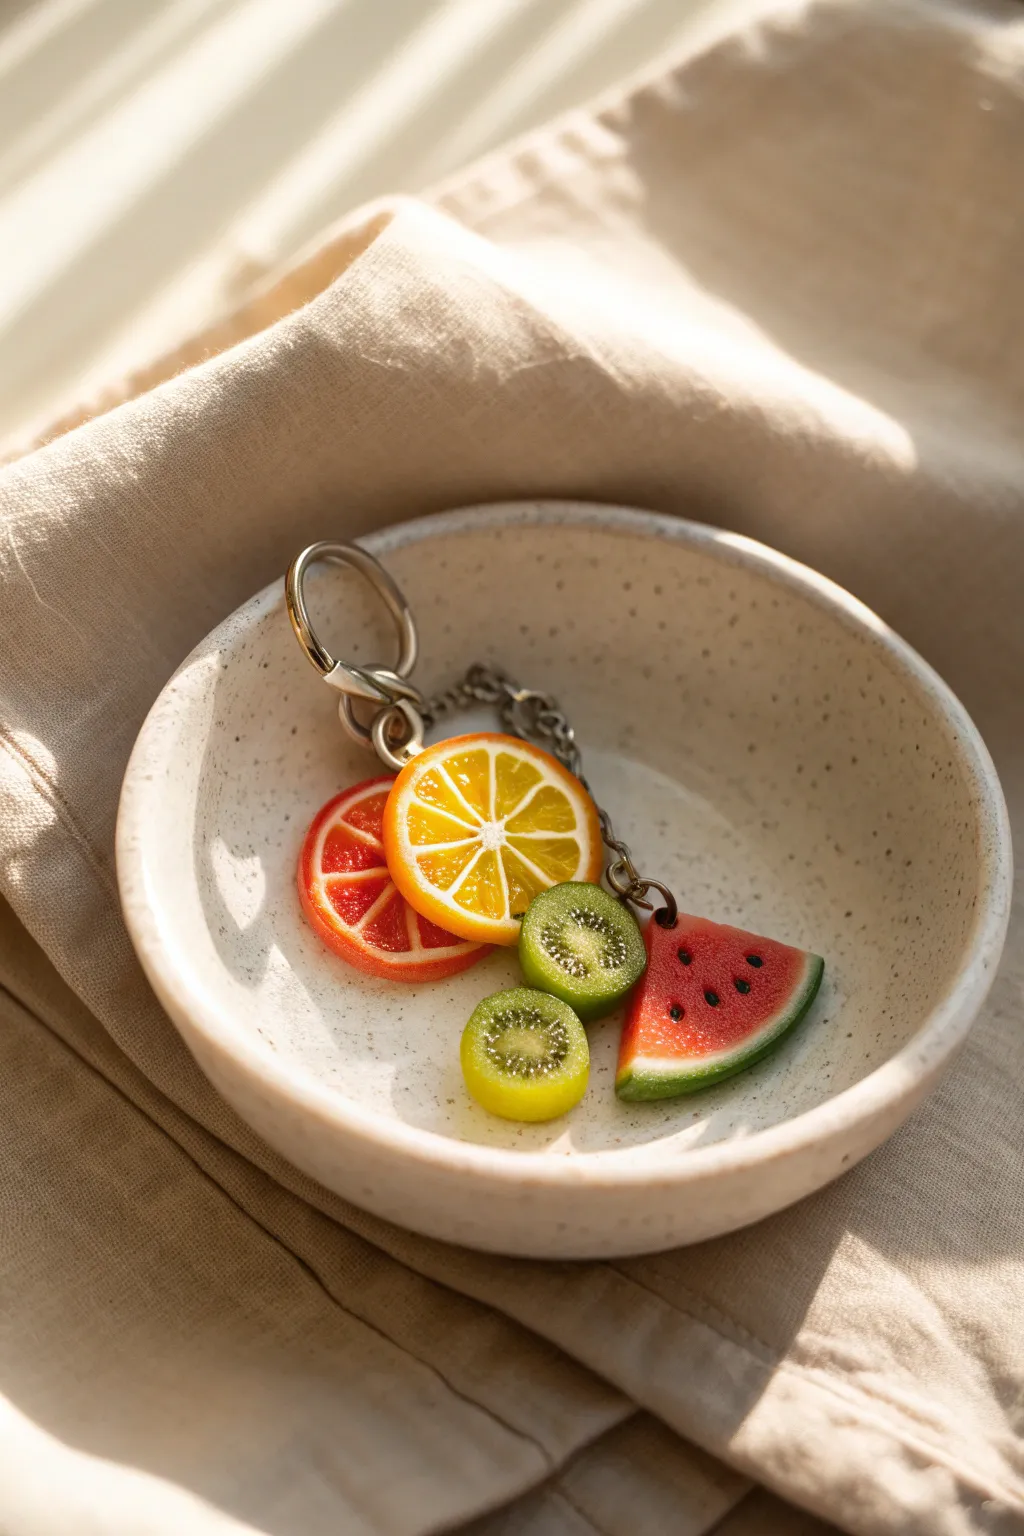
These vibrant fruit slice charms are a refreshing way to add a pop of color to your keys or bag. By building miniature canes using polymer clay, you can achieve translucent, realistic details that capture the juicy essence of citrus, kiwi, and watermelon.
Step-by-Step Guide
Materials
- Translucent polymer clay (white or colorless)
- Opaque polymer clay (orange, red, yellow, green, white, black)
- Liquid polymer clay (optional, for gloss)
- Tissue blade or very sharp craft knife
- Acrylic rolling pin or pasta machine
- Needle tool
- Ball stylus tool
- Headpins or eye screws
- Jump rings and keychain hardware
- Gloss glaze or UV resin
- Sandpaper (fine grit)
Step 1: Creating the Citrus Canes
-
Mix the fruit flesh color:
Start by mixing translucent clay with a very small amount of orange pergment (for the orange slice) or red pigment (for the blood orange). You want the clay to remain mostly see-through after baking to mimic juicy fruit flesh. -
Form the segments:
Roll your tinted translucent clay into a thick log. Then, roll out a very thin sheet of opaque white clay. Wrap the white sheet around the translucent log and trim away the excess. -
Shape the wedges:
Gently pinch one side of the wrapped log to create a teardrop shape that runs the entire length. This teardrop profile will form your individual fruit segments. -
Assemble the center:
Cut the teardrop log into 6 to 8 equal lengths. Arrange them in a circle with the pointy (white) ends touching in the center. Use a thin snake of white clay in the very center to help them adhere if needed. -
Add the pith and rind:
Wrap this clustered cylinder in another sheet of opaque white clay to create the pith. Finally, wrap a sheet of orange (or reddish-orange) clay around the outside for the rind. -
Reduce the cane:
Gently squeeze and roll the cane on your work surface to reduce its diameter. Start from the middle and work outward to avoid distorting the pattern inside. Reduce it until it’s about 1 inch wide.
Keep it Clean
Work with the lightest colors first (white/translucent) and clean your hands beautifully before touching the rinds to prevent color transfer.
Step 2: Making the Kiwi & Watermelon
-
Construct the Kiwi center:
For the kiwi, create a white center log and surround it with a thick layer of translucent green clay mixed with tiny specks of black clay (or black glitter) to simulate seeds. -
Building the Kiwi rays:
To get those radiating lines, I like to insert thin strips of white clay into the green flesh before wrapping the whole cylinder in a brownish-green skin color. Reduce this cane just like the citrus ones. -
Form the Watermelon:
The watermelon is simpler; make a log of translucent red clay. Wrap it half-way with white (for the rind layer), then fully wrap the white with a dark green layer. -
Adding watermelon seeds:
Before reducing, slice into the red face of the cane and insert small snakes of black clay for seeds, or simply paint them on after baking for easier detailing.
Step 3: Slicing and Assembly
-
Slice the canes:
Once your canes are rested and slightly cool (pop them in the fridge for 10 minutes for cleaner cuts), use your tissue blade to slice incredibly even discs. Aim for about 3-4mm thickness. -
Texture the surface:
Use a needle tool to gently gently poke and scratch the surface of the fruit flesh. This adds a fibrous, realistic texture that catches the glaze later. -
Insert hardware:
Carefully push an eye screw or headpin into the ‘rind’ edge of each slice. If using a headpin, curl the top into a loop with pliers. -
Bake the charms:
Arrange the slices on a tile or parchment-lined baking sheet. Bake according to your clay manufacturer’s instructions, usually around 275°F (135°C) for 15-30 minutes. -
Finishing touches:
Once cooled, coat the fruit flesh area with a high-gloss glaze or UV resin to make it look wet and juicy. Leave the rind matte for contrast. -
Attach to keychain:
Use jump rings to attach your cured fruit slices onto a short length of chain connected to a keyring.
Smudged Slices?
If slicing the cane distorts the image, your clay is too warm. Refrigerate the cane for 20 mins to firm it up before trying to cut again.
Enjoy carrying a little slice of summer with you wherever you go


Cute Animal Face Studs From Basic Shapes
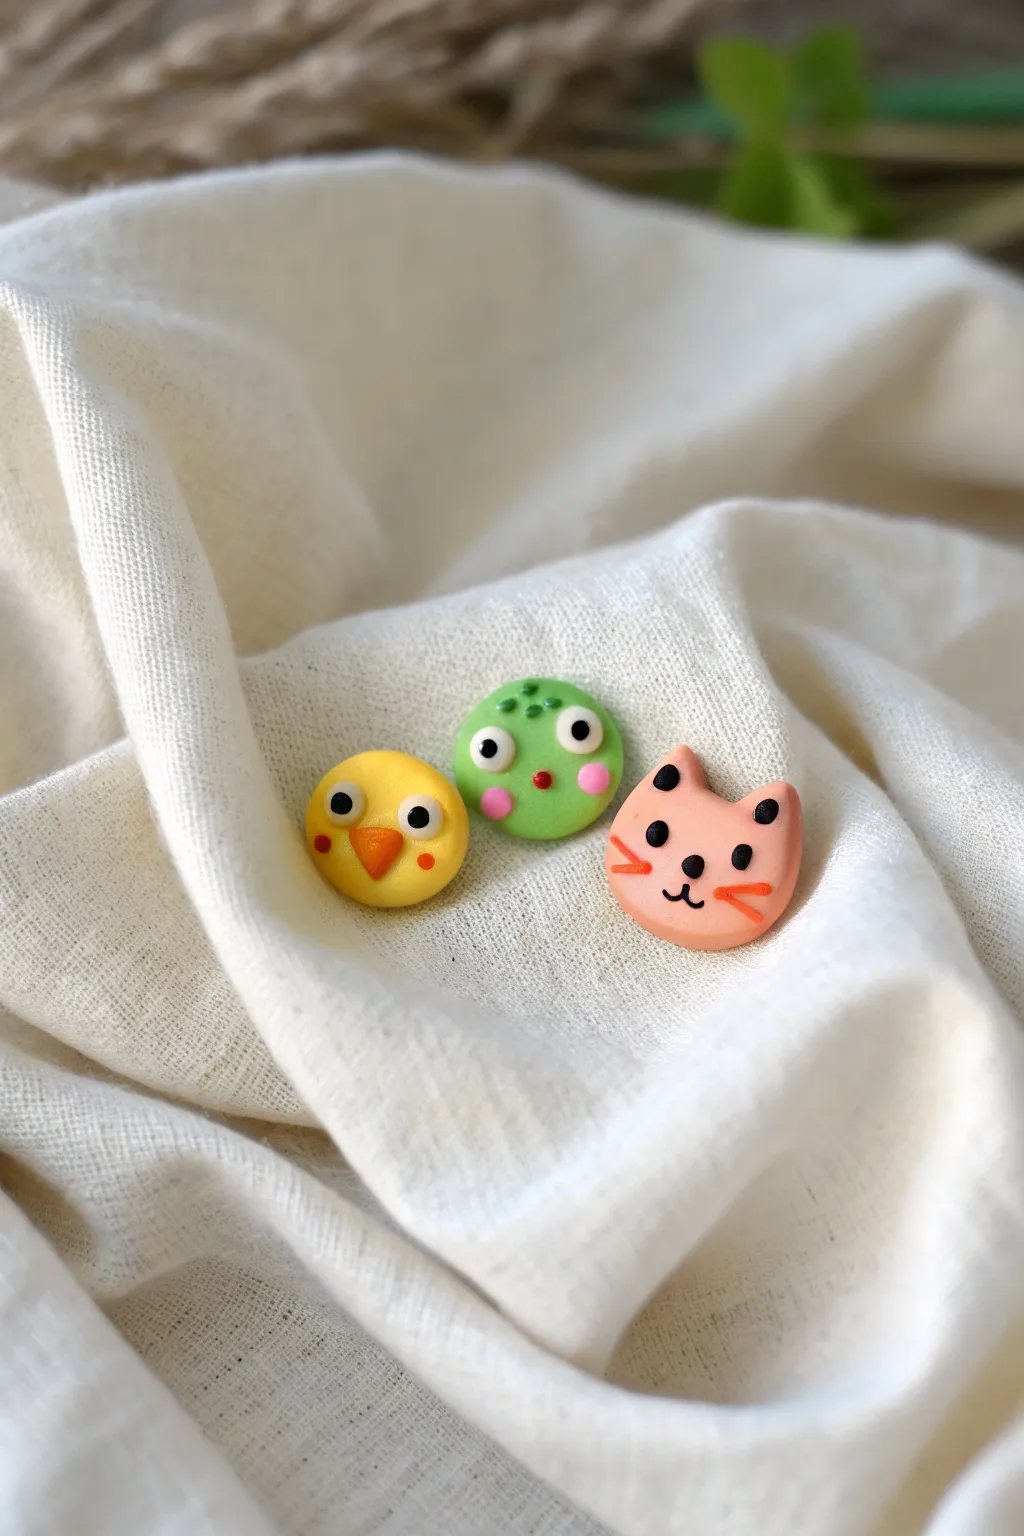
Using simple geometric shapes as a base, you can craft this adorable trio featuring a chick, a frog, and a cat. These tiny polymer clay faces make perfect stud earrings or sweet little pins for a jacket collar.
Step-by-Step Tutorial
Materials
- Polymer clay (yellow, green, peach/pink, orange, black, white, red)
- Dotting tool or ball stylus
- Needle tool
- Small circle cutter (approx. 1 cm)
- Sharp clay blade
- Liquid polymer clay (optional)
- Gloss glaze
- Small paintbrush
- Earring posts or pin backs
- Superglue or E6000
Step 1: Shaping the Base Faces
-
Condition the clay:
Begin by conditioning your yellow, green, and peach clay until it is soft and pliable. Roll each color into a smooth sheet about 3mm thick. -
Cut the circles:
Use your small circle cutter to punch out one circle of each color. These will become the heads for the chick, frog, and cat. -
Shape the cat ears:
For the peach cat face, pinch the top two corners of the circle gently upwards to form triangular ears. Soften the curve between the ears with your fingertip so it looks organic rather than sharp. -
Smooth the edges:
Run your finger lightly around the edges of all three shapes to remove any harsh cut lines and give them a slightly domed, ‘cushioned’ look.
Clean Hands Tip
Work from lightest colors to darkest colors (yellow -> green -> black) to prevent dark clay from staining your bright yellow chick face.
Step 2: Detailing the Chick
-
Add the beak:
Take a tiny amount of orange clay and roll it into a small cone. Press this onto the center of the yellow circle, flattening it slightly to form a triangular beak pointing downward. -
Create the eyes:
Roll two miniscule balls of white clay and press them onto the face above the beak. Follow this by pressing even smaller balls of black clay into the center of the white circles for pupils. -
Add blush:
Using a needle tool, pick up a microscopic speck of red clay and place it on the cheeks to create rosy dots.
Step 3: Detailing the Frog
-
Construct frog eyes:
Make two small balls of white clay and place them near the top edge of the green circle. Top each with a tiny black dot for the pupil. -
Add pink cheeks:
Roll two small balls of pink clay, flatten them into discs, and press them onto the frog’s cheeks. -
Make the mouth:
Roll a tiny red ball for the mouth and place it centrally below the eyes. Use a needle tool to gently poke a small indentation into the red dot to suggest an open mouth. -
Texture the head:
Use a needle tool or the very tip of a blade to lightly stiple or scratch tiny green texture marks on the forehead area between the eyes.
Make Them Dangle
Instead of gluing posts on the back, insert a small metal eye pin into the top of the head before baking to turn these into charms for a bracelet.
Step 4: Detailing the Cat
-
Place the eyes:
Roll two small black balls for the cat’s eyes and press them firmly into the peach face, spaced slightly apart. -
Add nose and mouth:
Place a tiny black oval for the nose. For the mouth, roll an extremely thin snake of black clay, cut a tiny ‘w’ shape or two curves, and press it beneath the nose. -
Add whiskers:
Roll very thin snakes of orange clay. Cut four small lengths and press two onto each cheek for whiskers. -
Detail the ears:
Add tiny black dots to the tips of the ears for a calico-inspired look.
Step 5: Finishing Up
-
Bake the pieces:
Place your animals on a ceramic tile or baking sheet. Bake according to your clay package instructions (usually 275°F/130°C for 15-30 minutes). -
Cool and glaze:
Allow the pieces to cool completely. Apply a thin coat of gloss glaze to the eyes and noses to make them shine and bring the characters to life. -
Attach hardware:
Once the glaze is dry, use strong superglue or E6000 to attach earring posts or pin backs to the reverse side.
Wear your new tiny animal friends together or mix and match them for a playful asymmetrical look.

What Really Happens Inside the Kiln
Learn how time and temperature work together inside the kiln to transform clay into durable ceramic.
Mini Mushroom Pendant Necklace
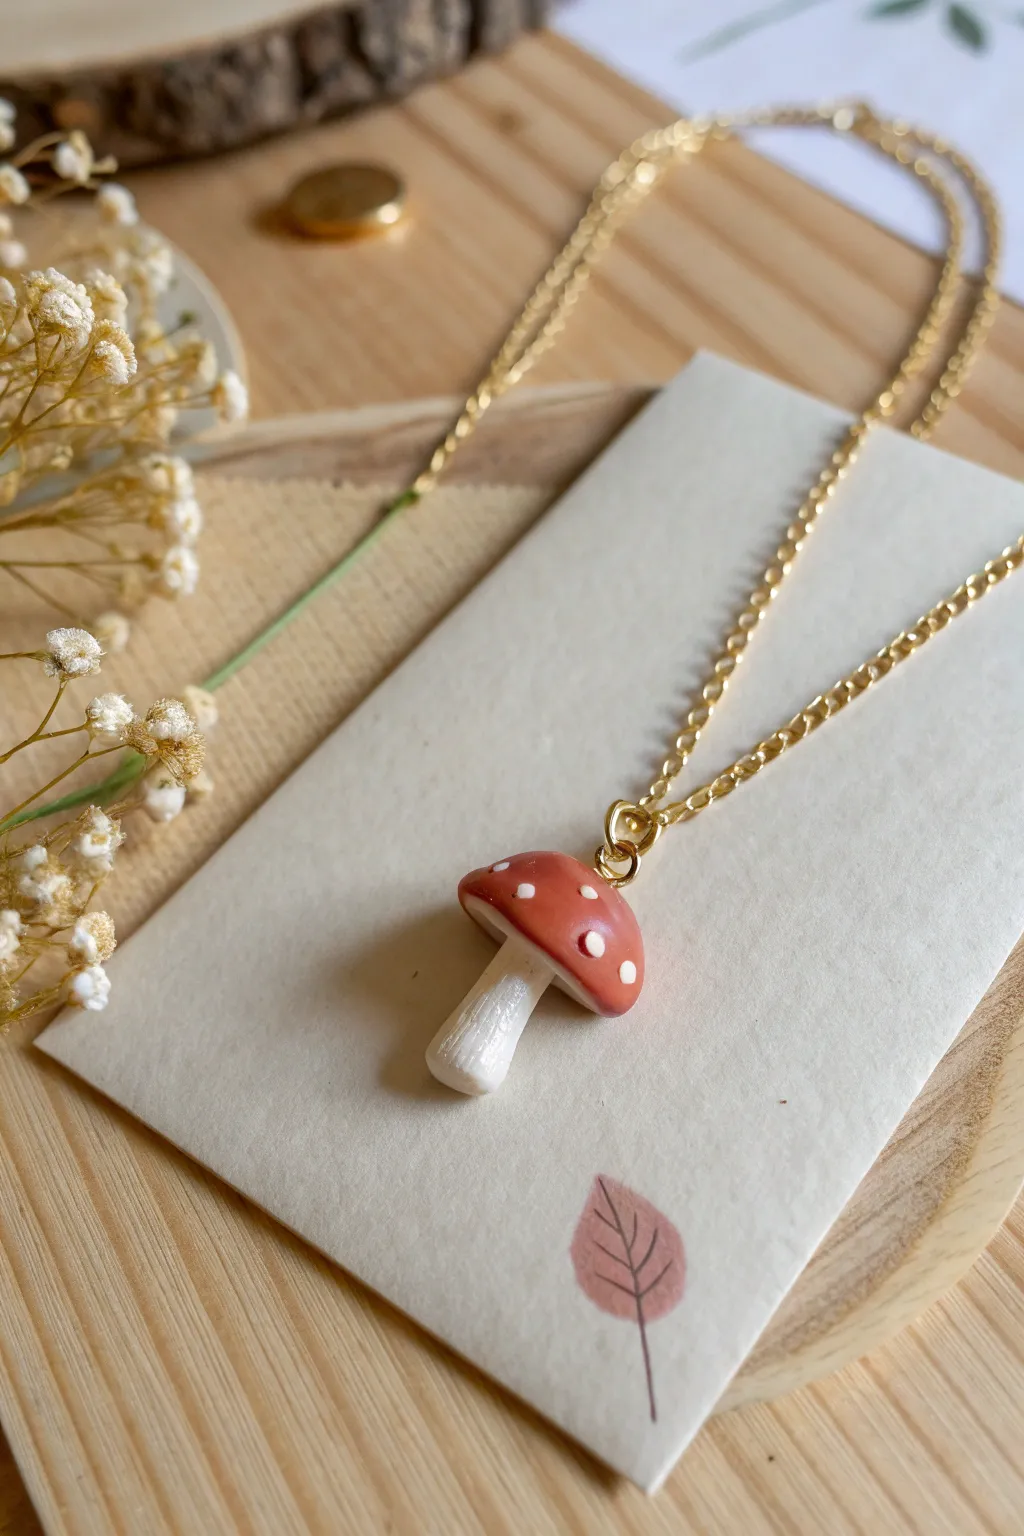
Capture the magic of the forest floor with this adorable miniature mushroom pendant. Featuring a classic reddish-brown cap speckled with white and a delicately textured stem, this piece hangs on a gold chain for a touch of woodland elegance.
Step-by-Step
Materials
- Polymer clay (terracotta/red-brown, white)
- Small eye pin (gold)
- Gold finish chain necklace with clasp
- Liquid polymer clay or Bake & Bond
- Pointed sculpting tool or toothpick
- Dotting tool or small ball stylus
- Gloss or satin glaze
- Soft paintbrush
- Ceramic tile or baking surface
- Jewelry pliers
- Oven
Step 1: Sculpting the Stem
-
Condition the white clay:
Start by warming up a small pea-sized amount of white polymer clay in your hands. Knead it until it is soft, pliable, and free of cracks. -
Shape the base cylinder:
Roll the conditioned white clay into a short, thick cylinder. It should be slightly thicker at the bottom and taper very gently toward the top. -
Flatten the bottom:
Press the wider end of the cylinder onto your work surface to create a flat base so the stem can stand upright on its own. -
Create the stem texture:
Using a pointed sculpting tool or a toothpick, gently drag vertical lines from the bottom of the stem up towards the top. Vary the pressure slightly to create organic, wood-like striations. -
Refine the texture:
Lightly tap the textured surface with your finger to soften any harsh ridges, ensuring the stem looks natural rather than scratched.
Fingerprint Fix
If you see fingerprints on the smooth cap before baking, lightly brush the raw clay with a little baby oil or clay softener to smooth them away instantly.
Step 2: Creating the Cap
-
Condition the cap color:
Take a portion of terracotta or reddish-brown clay—slightly more than you used for the stem—and condition it thoroughly. -
Form a ball:
Roll the colored clay into a smooth, crack-free ball. -
Shape the dome:
Gently press the ball onto your work surface to flatten the bottom, then use your fingers to round out the top into a perfect dome shape. -
Hollow the underside:
Flip the dome over and use a large ball tool or your thumb to create a slight indentation in the center where the stem will connect. -
Add the dots:
Roll tiny, microscopic bits of white clay into balls. Press these randomly onto the surface of the colored cap. I like to vary the sizes to keep it looking organic. -
Flatten the dots:
Gently roll the entire cap between your palms or lightly press the dots down so they become flush with the cap’s surface rather than sticking out.
Make it Magical
Mix a tiny amount of glitter into the white clay for the dots, or use glow-in-the-dark clay for the stem to make a magical night-time accessory.
Step 3: Assembly and Finishing
-
Attach the stem:
Place a tiny drop of liquid clay or Bake & Bond into the indentation under the cap. Press the textured stem firmly into place. -
Trim the eye pin:
Using your wire cutters, trim a gold eye pin so the shaft is shorter than the height of the mushroom cap. -
Insert the hardware:
Dip the end of the eye pin in a little liquid clay for extra security. Push it straight down into the center top of the mushroom cap until the loop sits flush against the clay. -
Bake the piece:
Place your mushroom on a ceramic tile or baking sheet. Bake according to your specific clay manufacturer’s instructions (usually 275°F/130°C for 15-30 minutes). -
Cool down:
Allow the piece to cool completely in the oven or on the counter before handling to ensure strength. -
Glaze the cap:
Using a soft brush, apply a coat of satin or gloss glaze specifically to the colored cap to make the dots pop. Leave the stem matte for a realistic texture contrast. -
Add the necklace:
Once the glaze is dry, thread your gold chain through the eye pin loop. If the chain end is too thick, use a small jump ring to connect them.
Now you have a charming piece of nature to wear around your neck or gift to a friend
Speckled Trinket Dish for Rings and Pins

Capture the organic charm of handmade pottery without needing a kiln with this simple polymer clay project. This wavy-edged trinket dish features realistic faux-ceramic speckling and a rustic, glazed rim that looks beautifully high-end on any nightstand.
How-To Guide
Materials
- White polymer clay (Sculpey Premo or Soufflé)
- Black pepper or black embossing powder
- Rolling pin or acrylic roller
- Round cookie cutter (approx. 4 inches) or a bowl to trace
- Small oven-safe bowl (for forming)
- Brown acrylic paint (Burnt Umber or Sienna)
- Glossy polyurethane varnish or glaze
- Soft paintbrush
- Paper towel
- Cornstarch (optional, for release)
Step 1: Prepping and Speckling the Clay
-
Condition the clay:
Start by kneading your white polymer clay in your hands until it becomes soft, pliable, and warm to the touch. -
Add the speckles:
Flatten the clay slightly and sprinkle a pinch of coarse black pepper or black embossing powder on top. Fold the clay over to trap the particles inside. -
Marbling process:
Knead the clay thoroughly to distribute the black specks evenly. You want a random, natural stone look, so don’t over-mix if you prefer distinct clusters. -
Roll it out:
Use your rolling pin to flatten the clay into a slab about 1/4 inch thick. I find this thickness gives the final dish a substantial, ceramic-like feel. -
Cut the shape:
Press your round cookie cutter into the clay to create a perfect circle. If you don’t have a cutter large enough, trace around a cereal bowl with a craft knife.
Pepper Protocol
Use coarse black pepper rather than fine dust. The larger chunks won’t bleed heavily into the clay during baking, keeping crisp, defined speckles.
Step 2: Forming and Baking
-
Texture the edges:
Gently pinch the very edge of the clay circle between your thumb and forefinger, moving all the way around to thin it out slightly. -
Create the waves:
Use your finger to push sections of the rim inward and upward to create a fluted, wavy effect. Aim for organic irregularity rather than perfect symmetry. -
Prepare the form:
Lightly dust the bottom of your small oven-safe bowl with cornstarch to prevent sticking. -
Shape the dish:
Drape your clay circle over the inverted bowl, or place it inside the bowl if you want a steeper curve. Gently press it to conform to the shape. -
Refine the form:
Check the wavy rim again; gravity might have flattened it, so push the waves back up if needed. -
Bake the clay:
Bake according to the package instructions (usually 275°F or 130°C for 15-30 minutes). Let it cool completely inside the oven or on the counter before removing it from the form.
Step 3: Finishing the Faux-Ceramic Look
-
Prepare the rim paint:
Squeeze a tiny drop of brown acrylic paint onto a palette. You want a dry-brush effect, so don’t add water. -
Apply the ‘burnt’ edge:
Dip your brush, wipe most of the paint off on a paper towel, and gently drag the bristles along the very top edge of the rim. This mimics the toasted look of kiln-fired pottery. -
Soften the paint:
If the line looks too harsh, quickly smudge it with your finger or a damp paper towel to blend it into the white clay. -
Seal the dish:
Once the paint is dry, apply a generous coat of glossy varnish or glaze to the entire surface. -
Final cure:
Allow the varnish to dry completely according to the manufacturer’s directions. The glossy finish will make the pepper specs pop and look just like ceramic glaze.
Gold Rim Upgrade
Swap the brown acrylic paint for metallic gold liquid leaf on the rim. It transforms the rustic vibe into something modern and luxurious.
Place your favorite rings inside your new creation and enjoy the handmade warmth it brings to your space


The Complete Guide to Pottery Troubleshooting
Uncover the most common ceramic mistakes—from cracking clay to failed glazes—and learn how to fix them fast.
Marbled Coasters That Look Like Stone
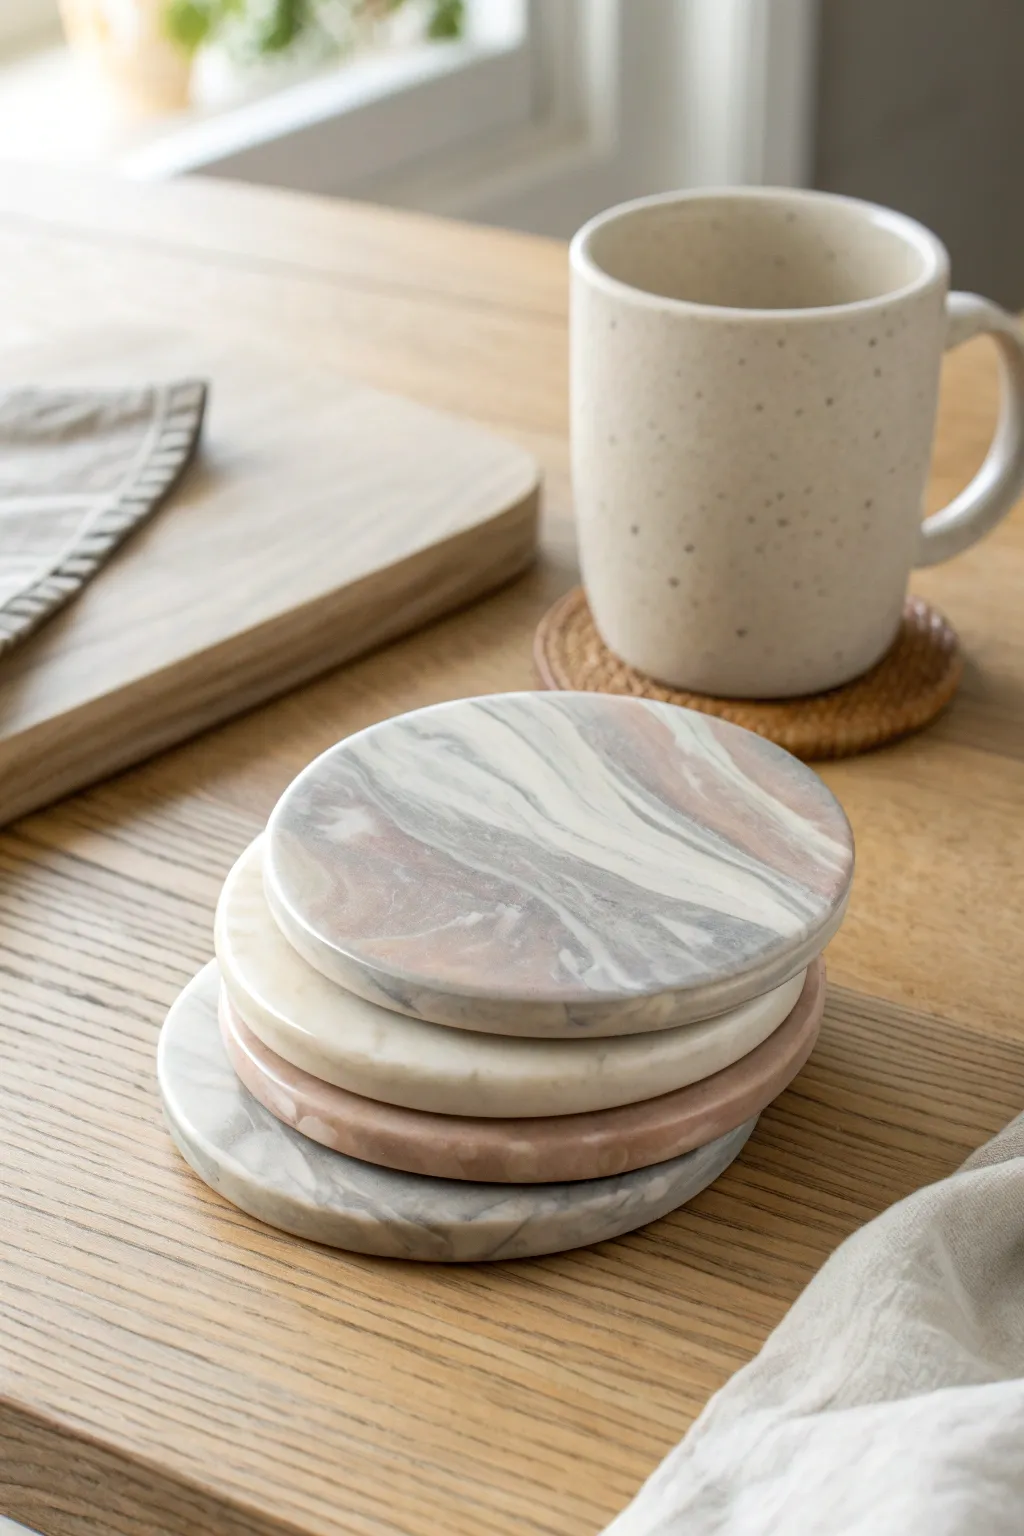
Achieve the high-end look of natural stone without the heavy price tag using simple polymer clay marbling techniques. These elegant coasters blend swirls of grey, white, and blush pink for a sophisticated, modern home accessory that looks surprisingly realistic.
Detailed Instructions
Materials
- Polymer clay (white, translucent, grey, and blush pink)
- Acrylic rolling pin or pasta machine
- Large circular cookie cutter (approx. 4 inches)
- Parchment paper or ceramic tile
- Craft knife or clay blade
- Fine-grit sandpaper (400 to 1000 grit)
- UV resin or polyurethane gloss varnish (optional for shine)
- Felt or cork backing
- Strong craft glue
Step 1: Preparing the Clay
-
Condition the clay:
Start by kneading each block of polymer clay separately until it is soft, pliable, and warm to the touch. This prevents cracking later on. -
Create base logs:
Roll your white clay into a thick log—this will be the dominant color. Roll the grey, blush, and translucent clays into much thinner snakes. -
Combine the colors:
Lay the thinner colored snakes lengthwise across the thick white log. Vary the placement so the colors aren’t perfectly symmetrical. -
Twist and lengthen:
Grab both ends of the combined log and twist them in opposite directions like a candy cane. Then, roll the twisted log against your work surface to lengthen it back out. -
Fold and repeat:
Fold the lengthened log in half and twist it again. Repeat this twisting, rolling, and folding process 2-3 times. Be careful not to over-mix, or the colors will turn muddy instead of distinct veins.
Glitter Veins
For a luxe touch, mix a tiny amount of gold or silver leaf foil into the clay log before twisting. It creates metallic veins that catch the light.
Step 2: Creating the Slab
-
Form a ball:
Once you are happy with the marbling pattern in your log, squish it into a tight ball, ensuring all air bubbles are pressed out. -
Roll out the slab:
Place the ball on parchment paper and use your acrylic roller to flatten it into a sheet about 1/4 inch thick. Roll in different directions to stretch the marble pattern organically. -
Inspect the pattern:
Look closely at your slab. If you want more veining, you can slice off a thin layer from the top to reveal the pattern beneath, or just proceed if it looks good. -
Cut the shapes:
Press your large circular cutter firmly into the clay slab. Wiggle it slightly to ensure a clean cut, then lift the cutter. Repeat for as many coasters as your slab allows. -
Smooth the edges:
Gently run your finger along the cut edge of each circle to soften any sharp ridges left by the cutter. I like to dip my finger in a little cornstarch to prevent sticking during this step.
Troubleshooting: Flatness
If coasters curl during baking, reheat them briefly until slightly flexible, then immediately press them under a heavy object until completely cool.
Step 3: Baking and Finishing
-
Bake the coasters:
Transfer the parchment paper with the clay circles onto a baking sheet. Bake according to your specific clay package diagrams (usually 275°F for 15-30 minutes per 1/4 inch thickness). -
Cool under weight:
As soon as the coasters come out of the oven, place a heavy book or flat board on top of them while they cool. This forces them to cool perfectly flat. -
Wet sanding:
Once fully cooled, submerge the coasters in a bowl of water and sand the edges and top surface with fine-grit sandpaper. This creates that silky, stone-like feel. -
Add a finish (optional):
For a glossy ‘polished marble’ look, apply a thin layer of UV resin or gloss varnish. For a raw stone look like the image, you can leave them matte or buff them with a soft cloth. -
Cut the backing:
Trace your circular cutter onto a sheet of felt or thin cork and cut out circles slightly smaller than the coasters. -
Attach the base:
Apply a strong craft glue to the back of the clay coaster and press the felt or cork circle firmly in place. Let the glue dry completely.
Stack your new set on the coffee table and enjoy the stylish, handmade upgrade to your decor
Ring Cone Holder With a Glossy Edge
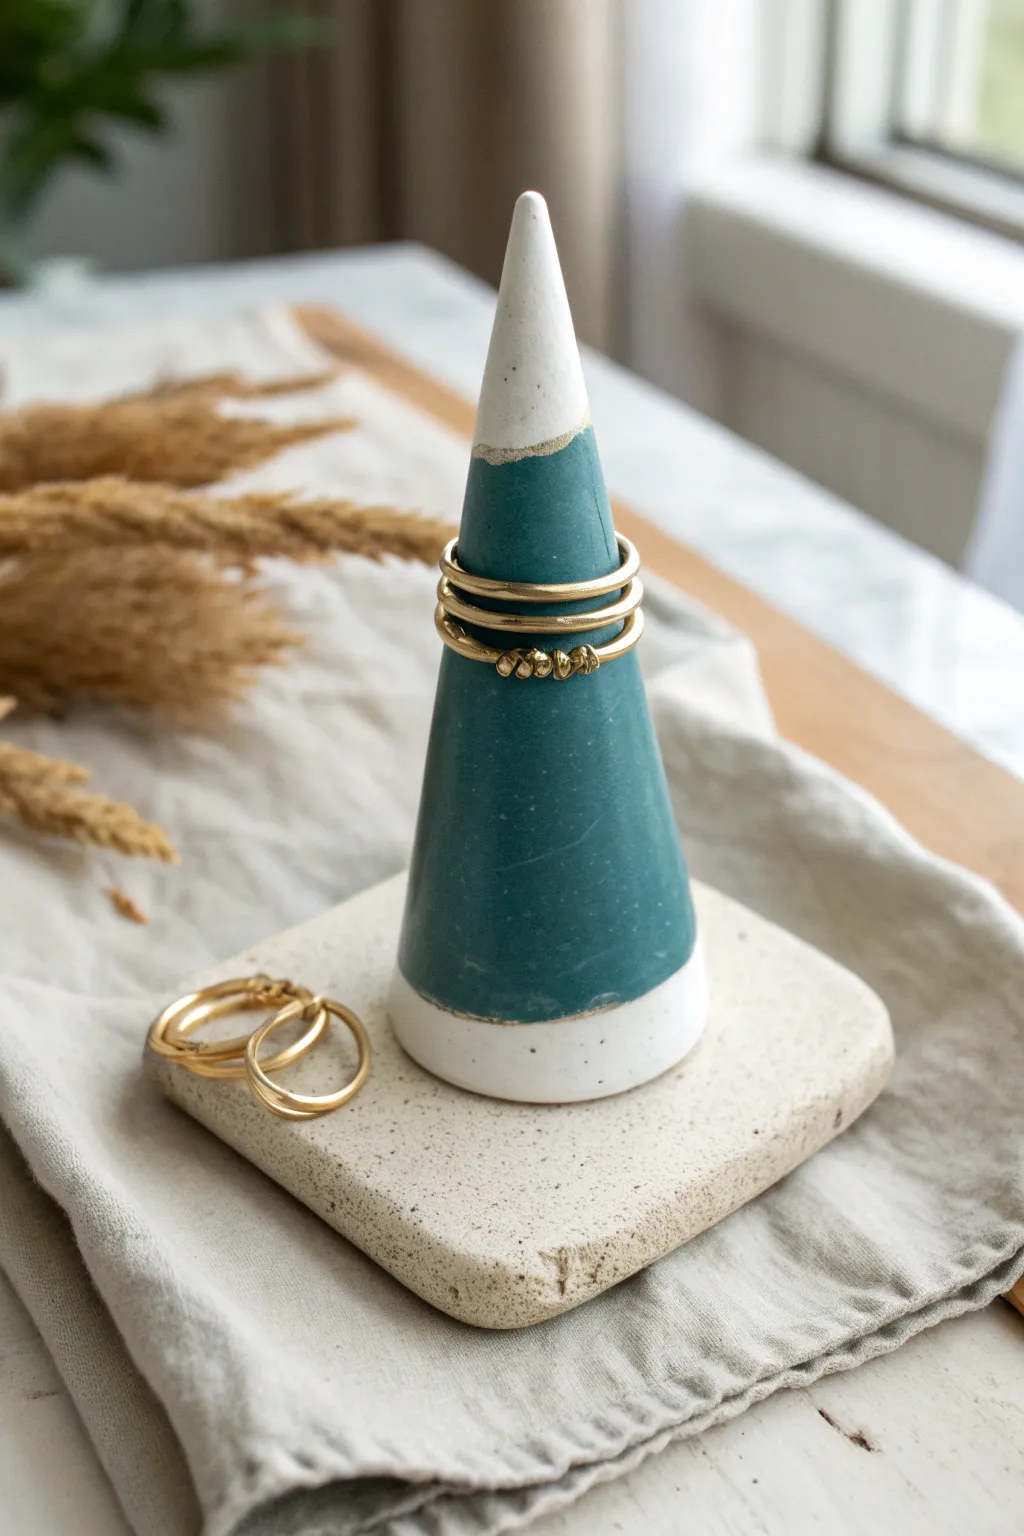
This minimalist jewelry stand features a sleek cone rising from a textured square base, perfect for displaying your favorite gold rings. The two-tone design combines a raw stone texture with a smooth, painted teal finish for a modern, sophisticated look.
How-To Guide
Materials
- White granite or speckled polymer clay (e.g., Sculpey Premo ‘Granite’)
- Acrylic roller or rolling pin
- Tissue blade or sharp craft knife
- Medium-grit sandpaper
- Teal acrylic paint
- Small flat paintbrush
- Matte or satin glaze (optional)
- Small square cookie cutter (approx. 3 inches) or ruler
- Oven baking sheet and parchment paper
- Gold paint or gold leaf pen (for the subtle rim detail)
Step 1: Forming the Base
-
Condition the Clay:
Begin by thoroughly kneading your speckled or granite-effect polymer clay until it is soft and pliable. This prevents cracks during baking. -
Roll the Slab:
Roll out a portion of the clay into a thick slab, aiming for a thickness of about 1/4 to 1/2 inch. You want the base to have some visual weight. -
Cut the Square:
Use your square cookie cutter or a ruler and knife to cut out a perfect square. If you want the organic look from the photo, gently soften the sharp corners by tapping them with your finger. -
Texture the Base:
To mimic the stone-like texture seen in the image, lightly press a piece of coarse sandpaper or a stiff bristle brush onto the surface of the clay square.
Uneven Cone Tips?
If your cone tip keeps drooping while you form it, refrigerate the clay for 10 minutes to firm it up before final smoothing.
Step 2: Creating the Cone
-
Shape the Cone Log:
Take a new ball of the same clay and roll it into a thick cylinder between your palms. -
Refine the Taper:
Focus pressure on just one side of the cylinder while rolling it against your work surface. Continue this motion until you have a smooth cone shape that matches the height you desire, roughly 3-4 inches tall. -
Check the Fit:
Place the cone onto the center of your square base to check proportions. The base of the cone should be wide enough to stand stable. -
Attach the Pieces:
Score the bottom of the cone and the center of the base with a needle tool. Add a drop of liquid polymer clay or Bake and Bond if you have it, then press the cone firmly onto the base. -
Blend Seams (Optional):
For a seamless look, use a modeling tool to drag clay from the cone down onto the base, then smooth it out. However, the photo shows a distinct resting cone, so simply pressing them together firmly is sufficient. -
Bake:
Bake the assembled piece according to the manufacturer’s instructions on your clay package. Use an oven thermometer to ensure the temperature is accurate to prevent scorching.
Step 3: Painting and Finishing
-
Cool and Sand:
Allow the clay to cool completely. If there are any rough fingerprints, lightly wet-sand the cone area to ensure it is perfectly smooth for painting. -
Mark the Paint Lines:
Use a pencil to lightly mark where you want your teal section to begin and end. The design features a white tip and a white base, with a wide teal band in the middle. -
Apply the Teal:
Using a flat brush, carefully paint the middle section teal. I find that rotating the piece while holding the brush steady helps create a cleaner horizontal line. -
Add Texture Details:
The image shows the painted edge isn’t perfectly taped off; it has a slightly organic, hand-painted feel. Don’t stress about laser-straight lines. -
Gold Accent:
Once the teal paint is dry, use a gold pen or a very fine brush with gold paint to trace the very top edge where the teal meets the white tip for a metallic highlight. -
Seal (Optional):
If you want a glossy finish like the inspiration photo likely mimics, apply sculpey glaze over the painted section. Leave the raw stone parts matte for contrast.
Marbled Effect
Mix a tiny amount of gold or translucent clay into your granite mix before rolling. It creates faint, realistic stone veins in the unpainted sections.
Now display this elegant cone on your vanity and enjoy having your rings organized in style

TRACK YOUR CERAMIC JOURNEY
Capture glaze tests, firing details, and creative progress—all in one simple printable. Make your projects easier to repeat and improve.
Mini Food Keychains for Instant Cute

Transform polymer clay into delectable, realistic-looking mini donut keychains that are calorie-free and full of charm. These tiny accessories capture the texture of baked dough and shiny icing, making them perfect gifts or personal trinkets.
Step-by-Step
Materials
- Beige or tan polymer clay (dough color)
- Pink polymer clay
- White or translucent liquid polymer clay (TLS)
- Pastel colored polymer clay scraps or pre-made polymer clay sprinkles
- Soft pastel chalks (orange, yellow, brown)
- Small paintbrush
- Toothbrush or texturing tool
- Needle tool or toothpick
- Small circle cutter
- Tiny circle cutter (or straw)
- Eye pins
- Gold keychain hardware
- Gloss glaze (optional)
- Pliers
- Super glue (optional)
Step 1: Baking the Dough Base
-
Condition the Clay:
Begin by taking your beige or tan polymer clay and kneading it in your hands until it becomes soft and pliable. This conditioning step prevents cracks during baking. -
Shape the Base:
Roll the clay into a smooth ball, approximately 1 inch in diameter, then flatten it slightly into a thick disk shape. It should look like a small hockey puck with rounded edges. -
Cut the Center:
Use a tiny circle cutter or a small straw to punch a hole directly in the center of your disk to create the classic donut ring shape. -
Soften the Edges:
Gently smooth the inner edges of the hole and the outer rim with your fingertips so the donut looks baked and puffy, rather than sharp and cut. -
Create Texture:
Take a toothbrush or a dedicated texturing tool and tap it all over the surface of the clay donut. This mimics the porous, airy texture of real fried dough. -
Shade for Realism:
Here I like to scrape a little dust from orange, yellow, and brown soft pastel chalks. Use a dry paintbrush to gently dust this ‘toasted’ color onto the edges and bottom of the donut for a golden-brown finish. -
Add the Horizontal Line:
Use a needle tool to gently impress a faint horizontal line around the middle of the donut’s side. This represents the lighter ‘fry line’ often seen on real donuts.
Step 2: Icing and Assembly
-
Prepare the Pink Icing:
Mix a small amount of pink clay with liquid polymer clay (TLS) in a small container or on a tile. Smash and stir until you reach a consistency similar to thick frosting or heavy cream. -
Prepare the White Icing:
Repeat the process with white clay and liquid clay to create a second icing color for added variety. -
Apply the Base Frosting:
Carefully scoop the liquid clay mixture onto the top of your textured donut base. Use your needle tool to guide the icing, letting it drip slightly over the sides for a natural look. -
Make the Sprinkles:
Roll tiny snakes of various pastel-colored clays very thinly. Bake these snakes partially for 5 minutes, then chop them into tiny bits with a blade to create realistic jimmies. -
Decorate:
While the liquid clay icing is still wet, use tweezers to place your clay sprinkles individually, or gently pinch and scatter them over the icing. -
Insert Hardware:
Trim an eye pin to an appropriate length and insert it into the side or top of the donut. Make sure the loop sits flush against the clay surface. -
Final Bake:
Bake the donuts according to the polymer clay package instructions, usually at 275°F (130°C) for about 15-20 minutes depending on thickness. -
Secure the Pin:
Once cooled, gently pull the eye pin out. Add a tiny drop of super glue to the stem and reinsert it to ensure it won’t pull out later. -
Glaze (Optional):
For a sugary shine, brush a thin layer of gloss glaze exclusively over the icing and sprinkles, leaving the ‘dough’ matte. -
Attach Keychain:
Use pliers to open the jump ring on your gold keychain hardware and attach it securely to the eye pin loop on your finished donut.
Sticky Situation?
If your liquid clay icing is too runny and dripping too much, let it sit out for 20 minutes to thicken slightly, or mix in a tiny bit more solid clay.
Scented Surprise
Mix a tiny drop of vanilla or strawberry fragrance oil into the liquid clay icing before applying. Your keychain will smell as sweet as it looks!
Now you have an adorable set of donut accessories ready to sweeten up your keys or backpack
Pocket-Size Fantasy Monsters With One Big Eye
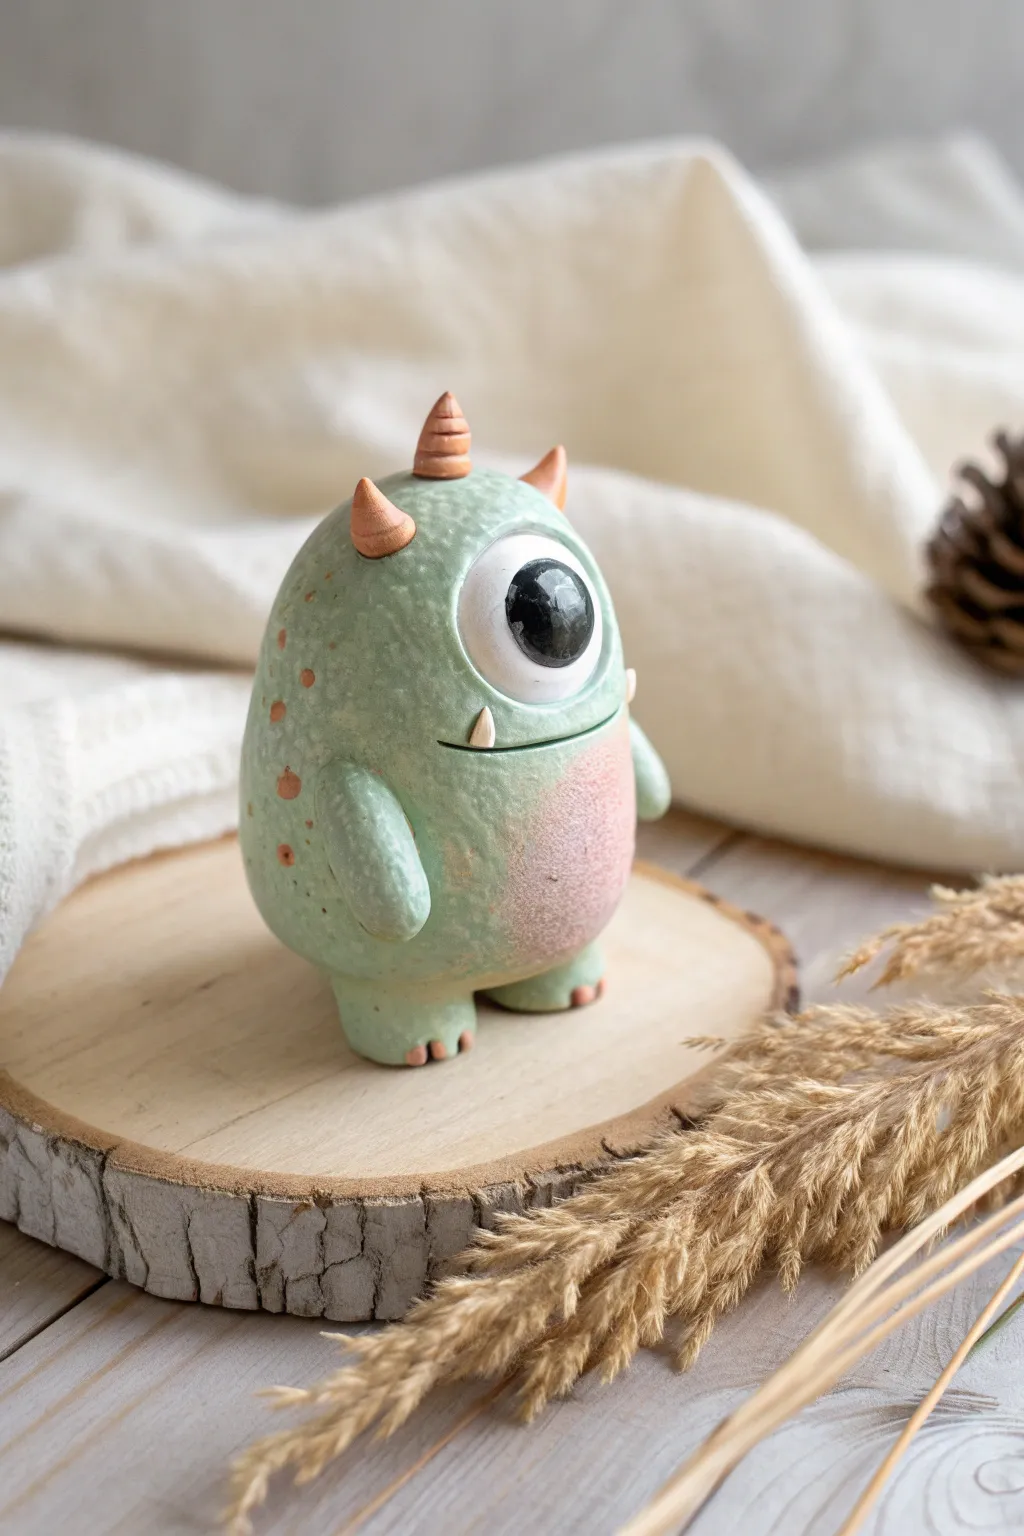
Create this charmingly anxious little pocket monster using polymer clay in soft pastel hues. With its speckled skin, tiny horns, and oversized single eye, this figurine makes for an adorable desktop companion or fantasy gift.
Step-by-Step Tutorial
Materials
- Polymer clay (colors: mint green, translucent or pale pink, white, black, terracotta/brown)
- Foil or scrap clay for armature
- Sculpting tools (needle tool, ball stylus)
- Soft pastel chalks (red/pink and brown)
- Small paintbrush
- Gloss varnish or UV resin
- Oven for baking clay
Step 1: Basic Form
-
Prepare the core:
Creating a solid clay creature this size uses a lot of material and can risk cracking during baking. Instead, roll a tight ball of aluminum foil about the size of a golf ball into an egg shape to serve as the core armature. -
Wrap the body:
Condition your mint green clay until soft and pliable. Flatten a large sheet and wrap it entirely around your foil egg, smoothing the seams until you have a seamless, avocado-shaped body. -
Add stubby legs:
Roll two short, thick sausage shapes of green clay. Attach them firmly to the bottom of the body, blending the clay upwards so there are no visible lines between the legs and the torso. -
Create tiny toes:
Using a needle tool or knife, press slight indentations into the front of each foot to suggest simplified toes. Add tiny specks of terracotta clay to the tips for claws. -
Attach the arms:
Form two teardrop shapes from mint clay for the arms. Press them onto the sides of the body, blending only the shoulder area so the arms hang slightly loose against the torso.
Keeping It Clean
White clay picks up dust instantly. Clean your hands and work surface thoroughly with a baby wipe before touching the white eye parts to keep them pristine.
Step 2: Facial Features
-
Carve the eye socket:
Use a large ball tool or your thumb to press a shallow, circular indentation in the upper center of the face where the eye will sit. -
Construct the eye:
Roll a ball of white clay and press it flat into the socket you just created. Ensure it looks slightly bulging. -
Add the pupil:
Take a smaller ball of black clay, flatten it, and center it on the white sclera. Press it down gently. -
Sculpt the eyelid:
Roll a very thin snake of mint green clay. Place it over the top edge of the eye to create an upper eyelid, blending the top edge into the forehead. -
Cut the smile:
Use a sharp blade or needle tool to slice a wide, slightly crooked smile just below the eye. -
Insert the tooth:
Shape a tiny, triangular cone of white clay and tuck it into the side of the smile so it pokes upward.
Leaning Tower of Monster?
If your monster tips over, gently tap the bottom against your table while the clay is still raw to create a wider, flatter base for better stability.
Step 3: Detailing & Texturing
-
Add the belly blush:
Before baking, use a dry brush to apply shaved pink pastel chalk powder to the belly area. Rub it in gently to create a soft, blushing gradient. -
Texture the skin:
Take an old toothbrush or a stiff stipple brush and gently tap it all over the green areas of the skin to create a porous, stone-like texture. -
Make the horns:
Roll three small cones of terracotta-colored clay. Press a needle tool gently around them to create spiral grooves. -
Mount the horns:
Attach the horns to the top of the head in a triangle formation. I find using a tiny dab of liquid clay helps secure these small parts. -
Apply spots:
Add randomly placed tiny balls of terracotta clay to the back and sides of the monster, flattening them flush with the surface for a spotted pattern.
Step 4: Finishing
-
Bake the piece:
Bake your monster according to the manufacturer’s instructions for your specific brand of clay (usually 275°F/130°C for 15-30 minutes per 1/4 inch thickness). -
Cool down:
Allow the figure to cool completely inside the oven to prevent thermal shock cracks. -
Highlight the eye:
Once cool, paint a tiny white dot on the black pupil to bring the character to life. -
Glaze the eye:
Apply a coat of gloss varnish or UV resin ONLY to the eyeball. This makes it look wet and shiny while keeping the skin matte.
Now you have a quirky little cyclops friend ready to guard your desk.
Halloween Mini Magnet Set You Can Finish in a Day
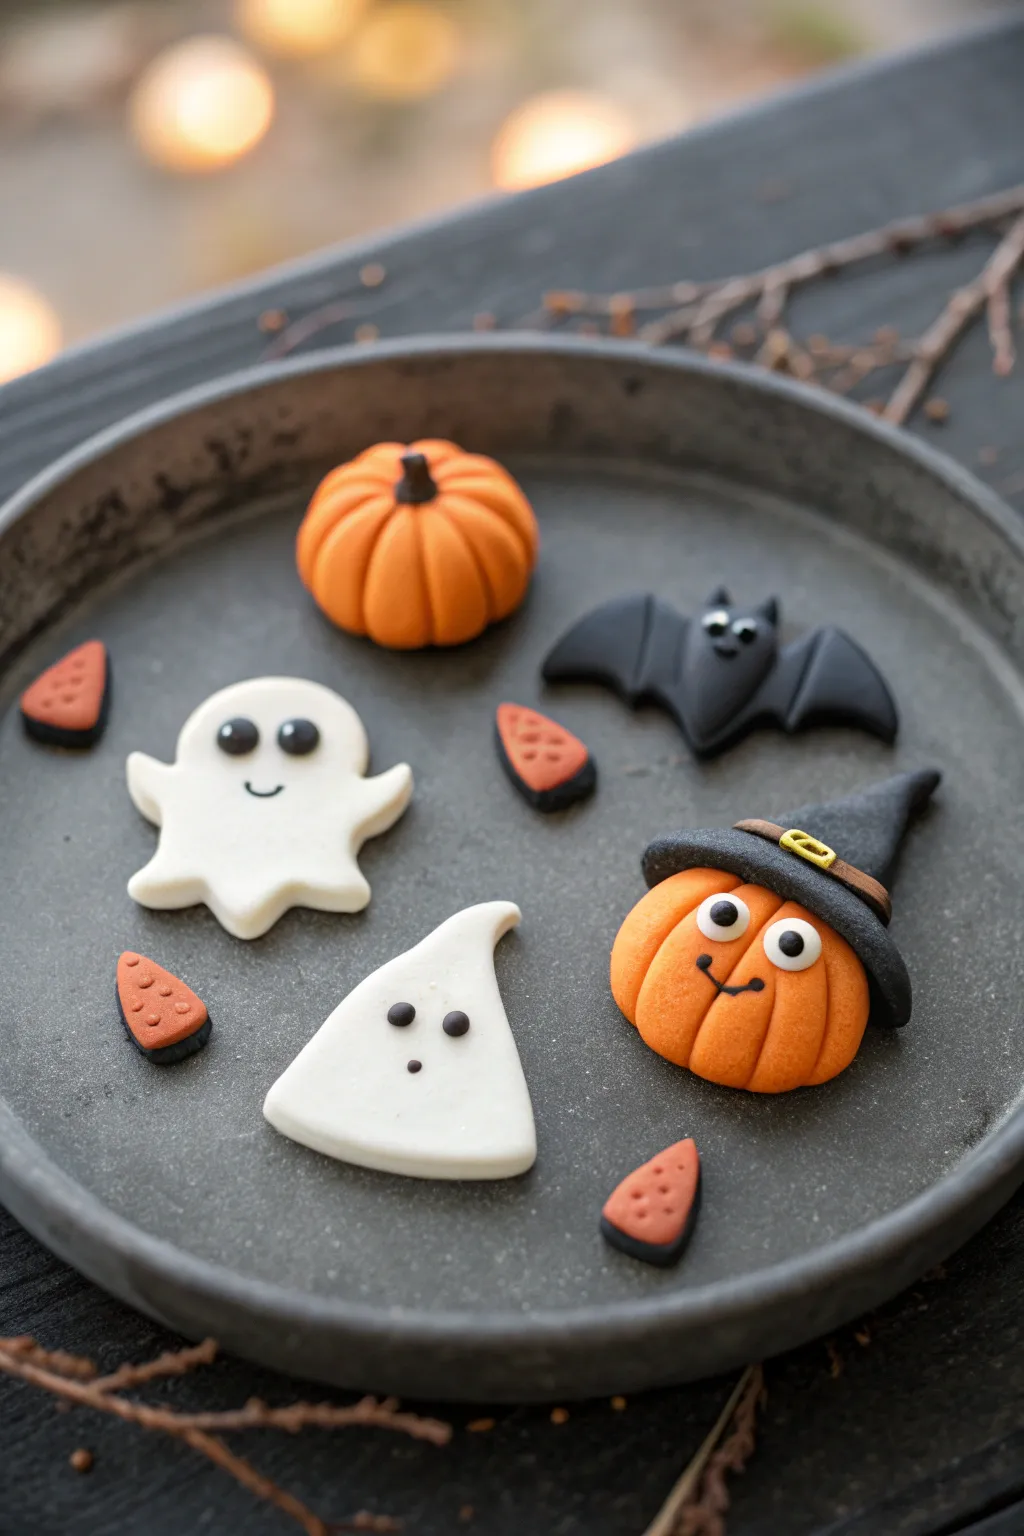
This adorable set features classic Halloween characters—pumpkins, ghosts, and a bat—sculpted into smooth, flat-backed charms perfect for fridge magnets. The finished pieces have a delightful matte texture and simple, expressive faces that capture the playful side of the holiday.
Detailed Instructions
Materials
- Polymer clay (orange, white, black, brown, yellow)
- Clay sculpting tools (needle tool, ball stylus)
- Rolling pin or pasta machine
- Small round cutter (optional)
- Cyanoacrylate glue (Super Glue)
- Small round magnets
- Baking sheet and parchment paper
- Wet wipes (for cleaning hands between colors)
Step 1: Sculpting the Pumpkins
-
Base shape:
Start by conditioning the orange clay until soft. Roll two balls of clay, roughly 1 inch in diameter, and flatten them slightly into rounded discs to create the pumpkin bases. -
Add ribs:
Use a needle tool or the back of a knife to press vertical indentations around the sides of the orange discs, mimicking pumpkin ribs. Soften the edges with your finger so they aren’t too sharp. -
Simple stem:
For the plain pumpkin, roll a tiny log of brown clay. Press it into the center top of one orange disc. -
Witch hat base:
For the character pumpkin, flatten a circle of black clay and drape it over the top of the second pumpkin for the hat brim. -
Witch hat cone:
Form a cone shape from black clay and attach it to the center of the brim, curving the tip slightly for character. Wrap a thin strip of brown clay around the base of the cone. -
Hat details:
Create a tiny yellow rectangle, cut out the center, and press it onto the brown strip to serve as a buckle. -
Pumpkin face:
Add two small flattened white circles for eyes and place tiny black pupils on top. Roll a very thin thread of black clay for the smile and press it gently onto the orange surface.
Smudge Patrol
Black clay stains light colors easily! Clean your hands and tools with baby wipes or rubbing alcohol before switching from dark clay to white or orange.
Step 2: Crafting the Ghosts
-
Cut the shapes:
Roll out a sheet of white clay. Use a cutter or freehand cut two shapes: one traditional bell-shape with arms, and one simple triangular sheet-ghost shape. -
Soften edges:
Gently rub the cut edges with your fingertip to round them over; this gives the ghosts a pillowy, soft look rather than a cookie-cutter appearance. -
Facial features:
Press two small black balls of clay into the white clay for eyes. For the arm-ghost, add a tiny black thread smile similar to the pumpkin. -
Adding dimension:
I like to gently lift the bottom edges of the ghosts to give them a wavy, floating effect before baking.
Step 3: Bat and Accessories
-
Bat body:
Roll a small oval of black clay for the body and press it flat. -
Bat wings:
Cut two wing shapes from flattened black clay. Attach them to the sides of the body, blending the seams with a modeling tool. -
Bat face:
Add tiny white eyes with black pupils, pointy ears on top, and use a needle tool to create a small mouth indentation. -
Candy corn accents:
Take leftover orange clay and flatten it into triangles. Add a strip of flattened black clay to the bottom (as a playful twist on traditional colors) and texture perfectly with a needle tool.
Design Remix
Make them glow! Swap the standard white clay for glow-in-the-dark polymer clay on the ghosts’ bodies and the pumpkin eyes for a fun night-time surprise.
Step 4: Finishing
-
Bake:
Place all pieces on a parchment-lined baking sheet. Bake according to your clay manufacturer’s instructions (typically 275°F/135°C for 15-30 minutes per 1/4 inch thickness). -
Cool and Magnetize:
Let the pieces cool completely on the tray. Once hardened, flip them over and glue a strong magnet to the back of each figure.
Pop these festive little characters on your refrigerator to bring a handcrafted touch to your Halloween decor
Moon Phase Wall Hanging Made From Clay Tiles
Bring the celestial beauty of the night sky into your home with this modern wall hanging featuring the phases of the moon. Using contrasting black, white, and terracotta polymer clays, you’ll create a striking vertical display that adds a touch of bohemian elegance to any space.
Step-by-Step Tutorial
Materials
- Polymer clay in black, white, terracotta/rust, and granite gray
- Rolling pin or pasta machine
- Square clay cutter (approx. 1.5 inches)
- Circle clay cutter (slightly smaller than the square)
- Craft knife or tissue blade
- Gold finish jump rings (medium size)
- Two larger gold hoop findings for the top
- Hand drill or pin vibe with small bit
- Jewelry pliers (needle nose and round nose)
- Needle tool or toothpick
- Parchment paper and baking tray
- Super glue or liquid polymer clay (optional)
Step 1: Preparing the Base
-
Condition the black clay:
Begin by thoroughly conditioning your black polymer clay until it is soft and pliable. This prevents cracking later. -
Roll out the slab:
Roll the black clay out to a uniform thickness, aiming for about 1/8th of an inch. A pasta machine on a medium setting works perfectly here. -
Cut the squares:
Use your square cutter to punch out 12 identical black squares. Place them on a parchment-lined baking sheet, leaving a little space between each. -
Pierce the connections:
Using a needle tool, carefully poke holes in the top and bottom center of each square for the jump rings. The bottom-most squares only need a top hole.
Step 2: Creating the Moons
-
Roll accent colors:
Roll out your white, granite, and terracotta clays to the same thickness as the black base. -
Cut full circles:
Cut out several full circles from each color. I usually start with four full circles of each to ensure I have enough material for mixing and matching. -
Create moon phases:
To make the half-moons and crescents, simply cut your colored circles in half using a tissue blade or craft knife. For mixed moons (like the speckled white and gray one), push two different colored halves together gently so the seam bonds. -
Texture the moons:
For added visual interest, lightly press a coarse sponge or crumpled tin foil onto the white sections to mimic lunar craters. -
Attach to bases:
Place your moon shapes onto the center of the black squares. Press them down gently to adhere the raw clay together. If you want a super secure bond, a tiny drop of liquid clay acts as great glue here.
Sticky Situation?
If fingerprints are marring your black clay, wipe the unbaked surface gently with a Q-tip dipped in rubbing alcohol or baby oil to smooth them away instantly.
Step 3: Baking and Assembly
-
Bake the tiles:
Bake all your tiles according to the package instructions of your specific clay brand (usually 275°F for 15-30 minutes). -
Cool and inspect:
Let the tiles cool completely on the tray. Check that your holes are still open; if they shrank, clear them out with a small hand drill. -
Sort the layout:
Arrange your cooled tiles in two vertical columns on your work surface to finalize the order of the moon phases. -
Open jump rings:
Use two pairs of pliers to twist your gold jump rings open sideways (never pull them apart outward) to preserve their shape. -
Connect the tiles:
Thread an open jump ring through the bottom hole of one tile and the top hole of the next, then close the ring securely. -
Complete the chains:
Continue linking the tiles until you have two complete vertical chains. -
Add the top hanger:
Attach a large gold hoop to the top hole of the uppermost tile in each chain. These will serve as your hanging mechanism.
Level Up Your Design
Add gold leaf flakes to the black background or the terracotta moons before baking. It creates a shimmering, starry effect that catches the light beautifully.
Hang your new celestial art piece near a window where the light can highlight the clay textures and gold hardware
Leaf-Imprint Gift Tags and Ornament Medallions
These elegant, minimalist ornaments capture the delicate beauty of nature in a permanent form. Using nothing more than simple white polymer clay and a fresh leaf, you can create sophisticated medallions perfect for gift tags or holiday decor.
Step-by-Step
Materials
- White polymer clay (Sculpey Premo or Soufflé recommended)
- Fresh fern frond or similar textured leaf
- Rolling pin or smooth glass jar
- Round cookie cutter (approx. 2-3 inches)
- Straw or small circular tool (for hole punching)
- Jute twine
- Parchment paper or baking mat
- Baking sheet
- Fine-grit sandpaper (optional)
Step 1: Preparing the Clay Canvas
-
Condition the clay:
Start by taking a chunk of white polymer clay and kneading it thoroughly in your hands. You want it to be warm, pliable, and free of any cracks before you begin working. -
Roll it out:
Place the conditioned clay onto a piece of parchment paper to prevent sticking. Using your rolling pin, roll the clay out into an even slab. -
Check the thickness:
Aim for a thickness of about 1/4 inch (approx. 6mm). This ensures the ornament is sturdy enough to handle without being too heavy. -
Smooth the surface:
Inspect the clay surface for any fingerprints or dust specks. Gently smooth them away with the pad of your finger or a light pass of the roller.
Step 2: Creating the Impression
-
Select your botanical:
Choose a fresh leaf with prominent veins, like the fern shown in the example. Ensure it is clean and dry. -
Position the leaf:
Lay the leaf vein-side down onto the clay slab. I like to plan where the circle will be cut later so the leaf creates a pleasing composition. -
Roll over the leaf:
Take your rolling pin and gently roll directly over the leaf. Apply firm, even pressure to push the leaf into the clay surface, embedding it flush with the clay. -
Remove the leaf:
Find the stem end of the leaf and very carefully peel it away from the clay. Do this slowly to ensure you don’t smudge the intricate details of the impression. -
Cut the shape:
Position your round cookie cutter over the impression to frame the design perfectly. Press down firmly to cut the circle shape. -
Peel away excess:
Remove the excess clay from around the outside of the cookie cutter before lifting the cutter itself. This prevents distorting the circle.
Clean Impressions
If your leaf is sticking to the clay during removal, lightly dust the leaf with cornstarch or baby powder before pressing it down.
Step 3: Finishing and Baking
-
Create the hanging hole:
Use a straw or a small circular tool to punch a hole near the top of the ornament. Make sure it isn’t too close to the edge to prevent breakage. -
Smoothing edges:
Gently tap down any sharp edges created by the cookie cutter or the hole punch with your finger. -
Transfer to baking sheet:
Carefully move the parchment paper with your clay cutout onto a baking sheet. -
Bake:
Bake the ornament according to your specific clay package instructions (usually 275°F/135°C for 15-30 minutes per 1/4 inch of thickness). -
Cool completely:
Remove from the oven and allow the piece to cool fully. It will harden as it cools. -
Sand edges (optional):
If there are any rough spots on the rim, lightly buff them away with fine-grit sandpaper for a professional finish. -
Add the twine:
Cut a length of jute twine, thread it through the hole, and tie it securely in a loop.
Add a Wash
After baking, rub diluted brown or green acrylic paint into the grooves and wipe the surface clean to make the leaf veins pop with contrast.
Now you have a timeless nature-inspired decoration that looks beautiful on a gift or hanging on a tree
Faux Agate Slice Ornaments With Layered Color
Capture the natural beauty of semi-precious stones with this vibrant faux agate ornament. Created by layering translucent and opaque clay, this project features stunning concentric rings of color finished with a luxurious gold edge.
How-To Guide
Materials
- Polymer clay (white, translucent, magenta, orange, teal/turquoise)
- Liquid polymer clay (translucent)
- Gold leaf or gold metallic paint
- High-gloss glaze or UV resin
- Acrylic rolling pin or pasta machine
- X-Acto knife or tissue blade
- Circle cutter (approx. 2-3 inches)
- Small eye screw
- Suede cord or ribbon
- Small wooden bead
- Sandpaper (wet/dry varying grits)
- Small paintbrush
Step 1: Creating the Color Canes
-
Condition the Clay:
Begin by conditioning all your clay colors until they are soft and pliable. For the best faux stone effect, mix translucent clay into your colored clays at a 1:1 ratio. This gives the final piece that depth and light-transmission quality real agate possesses. -
The Center Core:
Roll a small snake of the dark magenta clay, about half an inch thick and 3 inches long. This will be the vibrant heart of your geode. -
First Layer:
Roll a sheet of translucent white clay to a medium thickness. Wrap this sheet fully around your magenta core, trimming away excess and smoothing the seam with your finger. -
Building Rings:
Roll out a sheet of orange clay. Wrap this around the white layer. Repeat this process, alternating with white or translucent layers between colored layers (teal, then white again) to create distinct bands. -
Outer Crust:
For the final outer layer, use a mix of white and a tiny touch of pink or brown for a more natural, stony crust look. Wrap this thick layer around the entire log. -
Consolidate the Log:
Gently roll the entire cane on your work surface to adhere all the layers together and eliminate trapped air. Compress it slightly to shape it into an oval rather than a perfect circle, mimicking a natural stone slice.
Step 2: Slicing and Shaping
-
Chill the Cane:
Place your clay log in the refrigerator for about 15-20 minutes. Firm clay slices much more cleanly and prevents the colors from smearing into each other. -
Slice the Clay:
Using a sharp tissue blade, slice a piece off the log approximately 1/4 inch thick. Try to cut in one smooth motion to avoid distinct drag marks. -
Texture the Edges:
Use your fingers or a rough tool to gently pull and texture the outer rim of the slice. Real geodes have rough, rocky exteriors, so imperfections here are desirable. -
Insert Hardware:
Carefully screw the small eye screw into the top center of the slice. If the clay distorts, gently reshape it back into an oval. -
Bake:
Bake the slice according to the manufacturer’s instructions for your specific brand of clay (usually 275°F for 15-30 minutes). Let it cool completely.
Transparency Trick
To increase the realistic depth, wipe the unbaked clay slice with a little baby oil before baking. It clarifies the clay and enhances translucency.
Step 3: Finishing Touches
-
Sand for Smoothness:
Wet sand the face of the ornament starting with 400 grit and working up to 1000 grit. This removes fingerprints and prepares the surface for the glossy finish. -
Gild the Edge:
Dip a small brush into gold metallic paint. Carefully paint the rough, textured outer rim of the slice. I like to let the brush dry slightly so the gold only catches the high points of the texture. -
Apply Glaze:
Apply a coat of high-gloss glaze or UV resin to the front and back surfaces. This is the magic step that makes the translucent clay look like real stone. -
Install the Cord:
Cut a length of suede cord. Thread it through the eye screw. Before knotting, string a small wooden bead onto both ends of the cord and slide it down to sit just above the metal eyelet. -
Final Secure:
Tie a knot at the top of the cord to create a hanging loop. Your faux agate slice is now ready to catch the light in a sunny window.
Crystal Center
Before baking, adhere coarse glitter or crushed glass beads into the very center magenta ring to mimic a natural druzy crystal cavity.
Hang these singly or group them for a striking, colorful mobile that catches the afternoon sun
Color-Block Bead Bracelet With Custom Shapes
Embrace earthy geometric vibes with this chic color-blocked bracelet featuring handmade polymer clay tube beads. The matte finish and unique ridged details give it an artisanal, high-end look without requiring complex tools.
Detailed Instructions
Materials
- Polymer clay (Terracotta/Peach, Sage Green, and Cream/Speckled White)
- Dark Green polymer clay for accent beads
- Rolling pin or acrylic clay roller
- Tissue blade or sharp craft knife
- Small circular clay cutter (approx. 0.5 inch diameter)
- Bead piercing pins or toothpicks
- Texturing tool (comb tool or ridged roller)
- Elastic beading cord (0.7mm to 1mm)
- Super glue or jewelry cement
- Sandpaper (wet/dry, fine grit)
- Optional: Gold accent beads and crimp covers
Step 1: Color Prep & Conditioning
-
Condition the Clay:
Begin by working each block of clay in your hands until it becomes soft and pliable. This conditioning step is crucial to prevent cracks during baking. -
Create Custom Shades:
To match the photo, you might need to mix colors slightly. Add a touch of white to terracotta for a softer peach tone, and mix a little beige into white for that creamy, natural look. -
Form the Speckled Cream:
If you don’t have pre-speckled clay, mix tiny shavings of black or brown clay into your cream clay, kneading well until the specks are distributed evenly.
Smooth Roll Trick
To prevent fingerprints on your final beads, wear latex finger cots or dip your fingertips in a little cornstarch before the final smoothing roll.
Step 2: Shaping the Tube Beads
-
Roll the Sheets:
Roll your terracotta, cream, and sage green clay into thick sheets, roughly 1/4 inch thick. Uniform thickness is key for a cohesive look. -
Cut the Cylinders:
Use your small circular cutter to punch out multiple circles from each color sheet. Stack 3-4 circles of the same color on top of each other to form a rough cylinder shape. -
Smooth the Seams:
Gently roll the stacked cylinder on your work surface to fuse the layers together and smooth out the seams. Apply light pressure to maintain the cylinder shape without flattening it. -
Refine the Ends:
Tap each end of the cylinder gently against your work surface to make them flat and flush. This creates that sharp ‘color-block’ aesthetic between beads. -
Pierce the Holes:
Slowly insert a bead piercing pin or toothpick through the center of each cylinder. Use a twisting motion to avoid squashing the bead.
Step 3: Creating the Textured Accents
-
Form Dark Green Spheres:
Roll small amounts of the darker green clay into balls. These should be slightly smaller in diameter than your tube beads to add visual variety. -
Apply the Texture:
While the bead is on the piercing pin, gently roll a ridged tool or press the edge of a comb around the circumference to create vertical grooves. -
Pierce the Accent Beads:
Make sure your hole goes through the center, perpendicular to the ridges you just created.
Squashed Holes?
If piercing distorts the bead shape, try refrigerating the clay cylinders for 10 minutes before making holes. The firmer clay holds its shape much better.
Step 4: Baking & Finishing
-
Bake the Beads:
Arrange your beads on a baking sheet lined with parchment paper or cardstock. Bake according to your clay manufacturer’s instructions (usually 275°F for 15-30 minutes). -
Cool and Sand:
I like to let the beads cool completely inside the oven to prevent thermal shock. Once cool, use wet sandpaper to buff away any fingerprints or uneven edges. -
Clean the Beads:
Wash the beads with mild soap and water to remove any sanding dust. Dry them thoroughly before stringing. -
Layout Design:
Lay out your beads on a bead board or towel. Alternate colors (Earth tone – Cream – Sage – Earth tone) and intersperse the textured green beads every 4-5 main beads. -
Stringing:
Thread your beads onto the elastic cord. Pre-stretch the cord slightly before stringing to prevent the bracelet from sagging later. -
The Final Knot:
Tie a secure surgeon’s knot (right over left, left over right twice) and pull tight. Ideally, hide the knot inside one of the larger tube beads. -
Secure the Knot:
Apply a tiny dab of super glue or jewelry cement to the knot for extra security before snipping off the excess cord.
Enjoy styling your new bracelet stack with neutral outfits for a perfect pop of earthy color
Tiny Character Diorama in a Matchbox-Size Frame
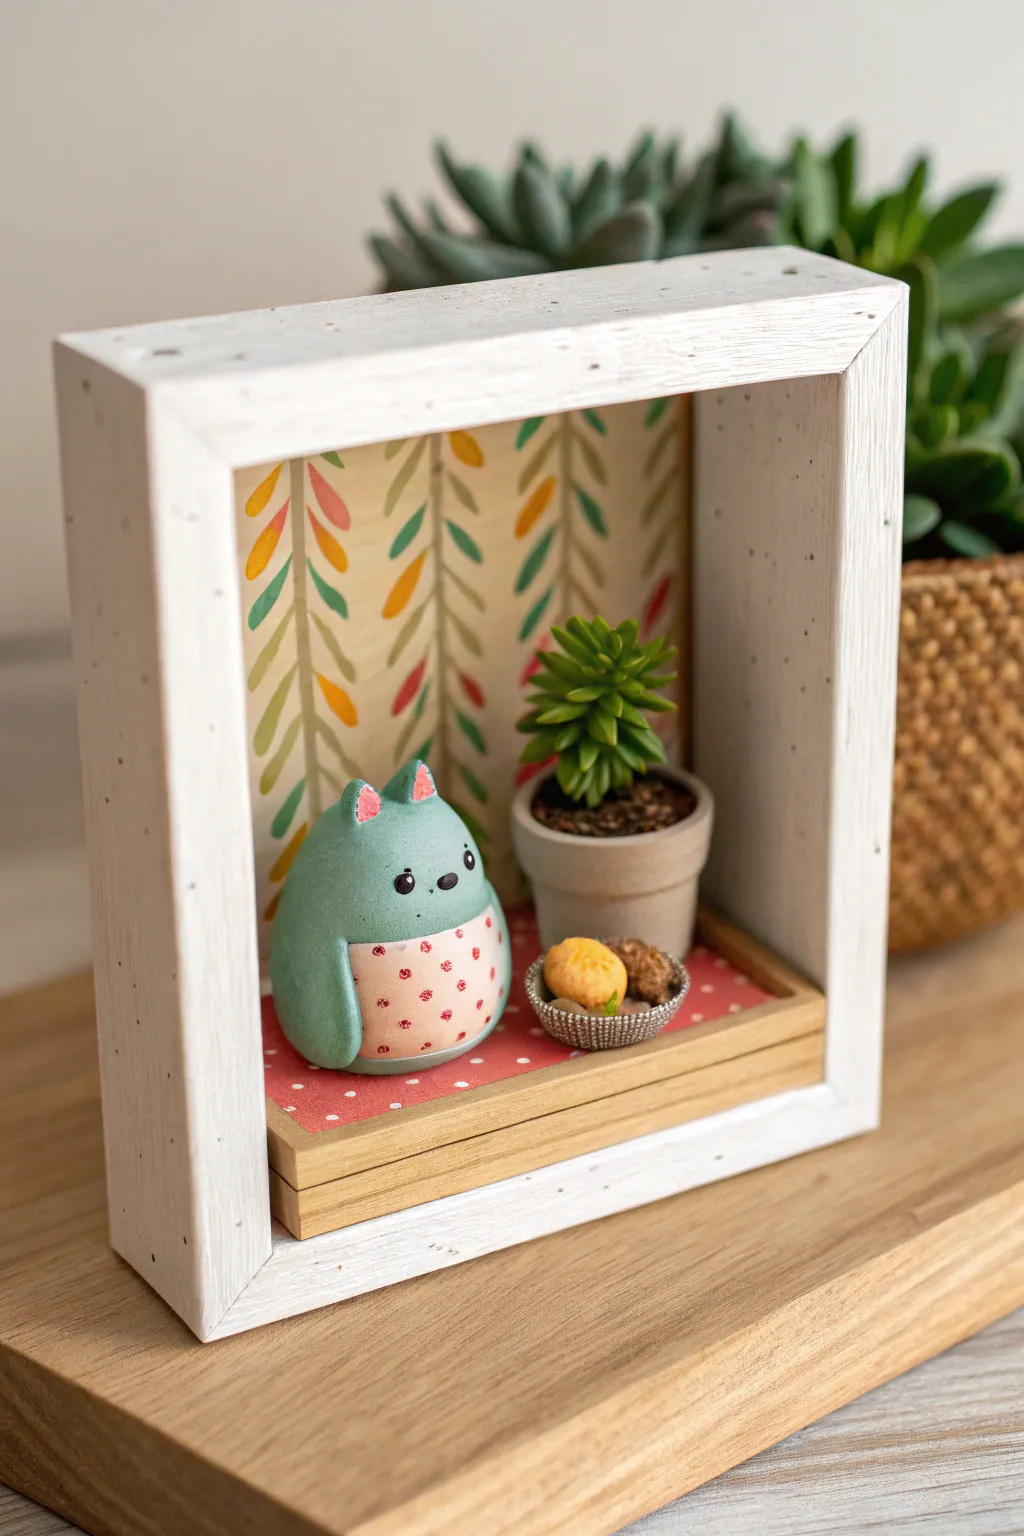
Create a cozy miniature world inside a deep frame featuring an adorable teal clay creature and its tiny plant companion. This mixed-media project combines polymer clay sculpting with simple paper crafting to make a charming, self-contained diorama perfect for a bookshelf.
How-To Guide
Materials
- Teal, pink, green, brown, terra cotta, and yellow polymer clay (e.g., Sculpey Premo or Soufflé)
- Deep shadow box frame (approx. 4×4 or 5×5 inches)
- Patterned scrapbooking paper (leaf motif for back, red polka dot for floor)
- Small balsa wood block or thick cardstock (for the raised floor base)
- White acrylic paint (for the frame)
- Black acrylic paint and fine detail brush (for eyes)
- Clay sculpting tools (needle tool, ball stylus)
- Liquid clay or Bake & Bond
- Craft glue or hot glue gun
- Gloss glaze (optional for eyes)
Step 1: Sculpting the Critter
-
Form the body:
Start by conditioning a golf-ball-sized amount of teal clay. Roll it into a smooth ball, then gently taper the top to create a rounded egg shape with a slightly flattened bottom so it sits completely stable. -
Add the belly:
Roll a thin sheet of pale pink clay. Use a small round cutter or craft knife to cut a half-circle shape. Gently press this onto the lower front of the teal body, smoothing the edges so it looks seamless. -
Create the ears:
Shape two tiny triangles from the teal clay. Indent the centers slightly with a ball tool and press a tiny speck of pink clay into the hollows. Attach these firmly to the top of the head. -
Add belly details:
Using a needle tool, gently poke small indentations or press tiny flattened dots of darker pink or red clay onto the belly patch to create a polka-dot pattern. -
Initial bake:
Pre-bake this main figure according to your clay package instructions (usually 15-20 minutes) so you don’t smudge it while painting the face later.
Sticky Situation?
If your clay is getting too soft or sticky to hold the tiny plant leaf shapes, pop it in the fridge for 10 minutes to firm it up before sculpting tiny details.
Step 2: Creating the Accessories
-
Make the flower pot:
Take terra cotta or grey granite-colored clay and form a cylinder slightly wider at the top. Indent the top deep enough to hold the ‘soil.’ Add a thin strip of clay around the rim for detail. -
Add soil and plant:
Fill the pot with textured dark brown clay. For the succulent, roll tiny teardrops of green clay and assemble them in a rosette pattern, starting from the center and working outward. Press this assemblage onto the soil. -
Sculpt the tiny bowl:
Form a minuscule bowl shape using grey or metallic clay. Fill it with small round balls of yellow and brown clay to represent food or treasures. -
Final bake:
Bake the plant pot and the bowl along with your critter (if it needs more time) according to manufacturer instructions. Let everything cool completely.
Pro Tip: Texture
To make the soil in the pot look realistic, tap the brown clay surface with a stiff toothbrush or a crumple of aluminum foil before baking.
Step 3: Face & Assembly
-
Paint the face:
Once the critter is cool, use a fine detail brush and black acrylic paint to make two wide-set eyes and a tiny nose between them. Add tiny white reflections to the eyes for life. -
Prepare the frame:
If your wooden shadow box isn’t white, give it a coat of white acrylic paint. I like to dry-brush it slightly for a rustic, matte look rather than a solid glossy finish. -
Create the raised floor:
Cut a piece of balsa wood or thick foam core to fit the width of the frame’s bottom. It should be deep enough to hold your figures. Cover the top surface with your red polka-dot paper using craft glue. -
Wallpaper the background:
Measure the inside back of the frame. Cut your leaf-patterned paper to size and glue it securely to the back panel. -
Install the floor:
Glue the paper-covered wooden base into the bottom of the frame. The wood grain on the front edge adds a nice natural touch, similar to the image. -
Final arrangement:
Using a strong craft glue or a dab of hot glue, secure the teal critter on the left side of the red floor. Place the succulent pot to its right, and the tiny bowl near the front.
Place your finished shadow box on a shelf near some real plants for the cutest display possible