
If you’ve been craving sculpture clay ideas for adults that feel stylish, useful, and actually worth displaying, you’re in the right place. I love projects that look elevated on a shelf or coffee table, but still feel totally doable at your own kitchen table.
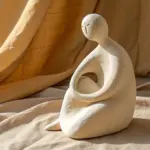
Minimalist Face Vase Sculptures
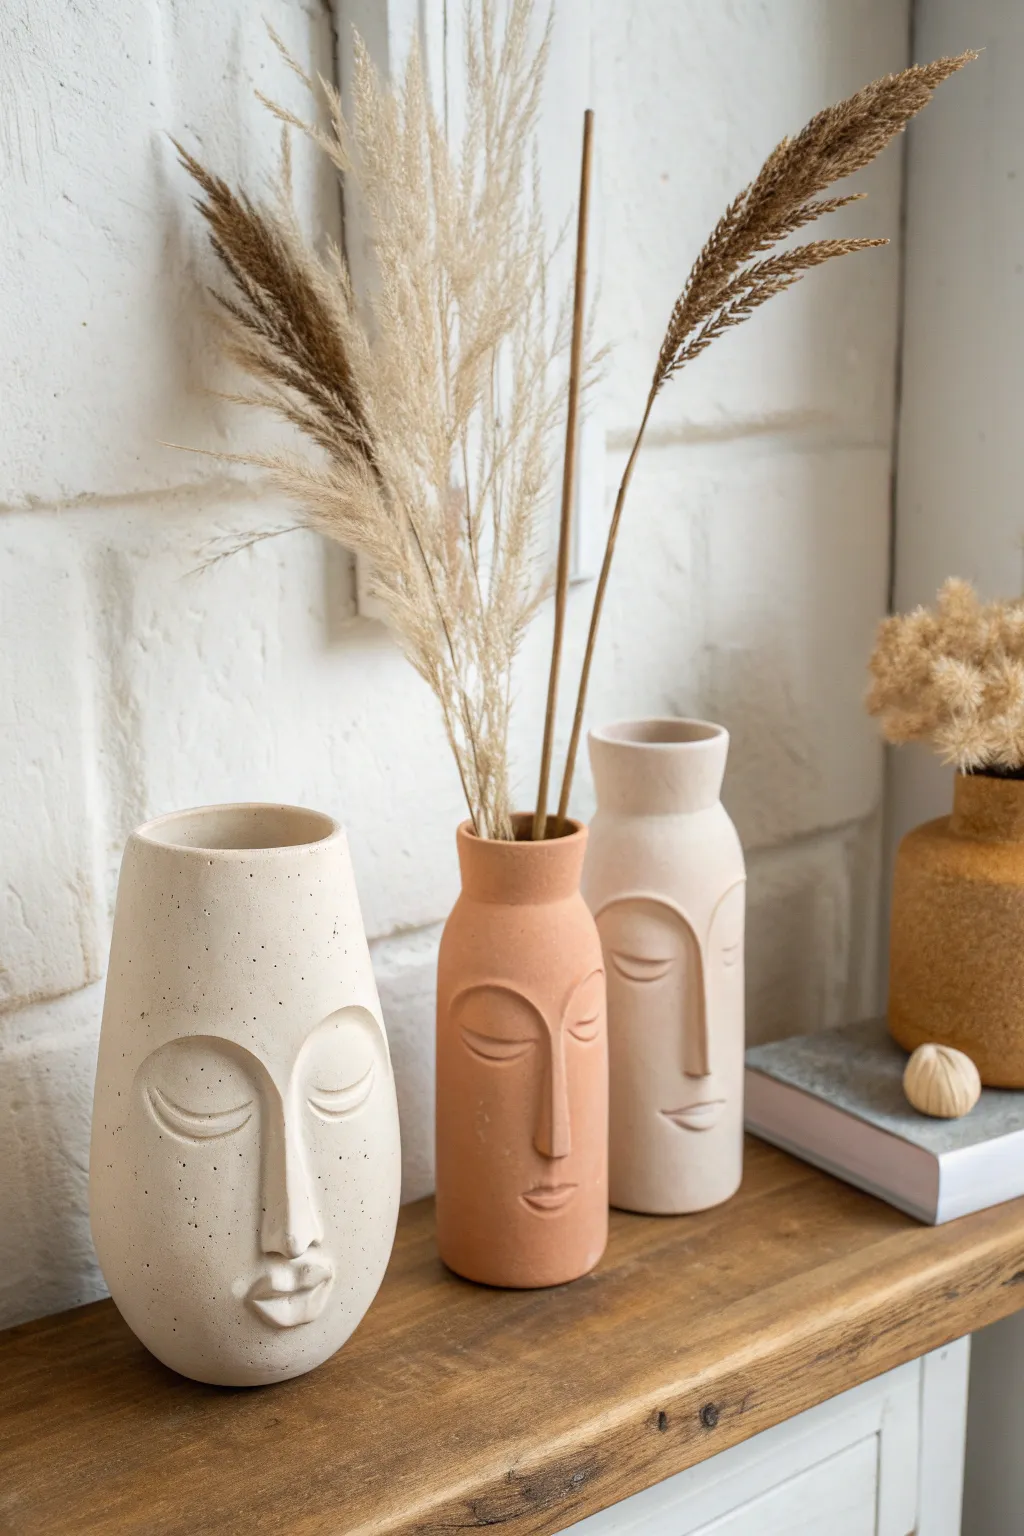
Embrace the beauty of modern art with these serene, minimalist face vases that bring a touch of calmness to any shelf. Featuring elongated features and a speckled, matte stone finish, this project transforms simple cylindrical forms into soulful, contemplative pieces of functional decor.
Step-by-Step Tutorial
Materials
- Air-dry clay (stone, sand, or white color) or ceramic clay if you have access to a kiln
- Rolling pin
- Clay knife or fettling knife
- Needle tool
- Slip (clay mixed with water to a paste consistency)
- Scoring tool or old fork
- Sponge
- Wooden modeling tools (especially a rounded spoon shape)
- Cardboard mailing tube or PVC pipe (for armature support)
- Paintbrush
- Water spray bottle
- Optional: Speckled glaze or acrylic paint with faux stone texture spray
Step 1: Forming the Base Cylinder
-
Prepare the Clay Slab:
Begin by wedging your clay to remove air bubbles, then roll it out into a large, even rectangular slab about 1/4 inch thick. I find that using guide sticks on either side of the rolling pin helps keep the thickness perfectly consistent. -
Cut the Body:
Measure the circumference of your cardboard tube support. Cut a rectangle from your clay slab that matches this width plus a slight overlap, and decide on your desired height—make one taller and one shorter for variety. -
Wrap the Form:
Wrap a sheet of paper or plastic wrap around your tube armature to prevent sticking. Carefully wrap the clay slab around the tube. -
Join the Seam:
Score both overlapping edges thoroughly using your needle tool or fork. Apply a generous amount of slip to the scored areas. -
Blend the Connection:
Press the edges together firmly. Take a wooden tool or your thumb and drag clay across the seam to meld the two sides into one, smoothing it inside and out until the join is invisible. -
Attach the Base:
Roll out a small circle of clay for the bottom. Score and slip the bottom edge of your cylinder and the edge of the circle, then press them together. Smooth the exterior seam upwards to seal the base completely.
Clean Lines Tip
To get perfectly smooth facial features, dip your finer modeling tools or your finger in a tiny bit of water (or oil for polymer clay) before the final blending pass.
Step 2: Sculpting the Features
-
Define the Nose Bridge:
Roll a small coil of clay for the nose. Since these faces are stylized, make the nose long and slender. Score the area on the cylinder where the nose will go—starting quite high up for that abstract look—and attach the coil. -
Refine the Nose Shape:
Use a modeling tool to blend the sides of the nose seamlessly into the vase face. The bridge should be prominent but smooth, merging gently into the forehead area. -
Add the Eyebrows:
For the prominent brow ridge, add two small arches of clay just above the nose bridge. Blend the top edges smoothly into the vase surface while leaving the bottom edge slightly more defined to create a shadow for the eyes. -
Sculpt the Eyelids:
Create two large almond shapes from thin slabs of clay. Attach them below the brow ridge. These represent closed eyelids, giving the sculpture its meditative quality. -
Detail the Eyes:
Using a fine needle tool or a loop tool, gently carve a curved line across the middle of the almond shapes to depict the lash line of the closed eye. Smooth the edges so they look soft, not sharp. -
Create the Lips:
Form two small, slightly flattened teardrop shapes for the lips. Attach them below the nose. I like to keep the mouth quite small and pursed to maintain the minimalist aesthetic. -
Blend the Mouth:
Use a small tool to blend the outer corners of the lips into the cheeks. Ensure the center line between the lips is deep enough to be visible but soft enough to look natural.
Step 3: Refining and Finishing
-
Add the Neck (Optional):
If creating the narrower-necked version (the taller vase), gently squeeze the top rim inwards or add a tapered coil ring to the top edge, blending it downwards to create a bottleneck shape. -
Smooth the Surface:
Once the features are set, take a slightly damp sponge and wipe down the entire piece. This removes fingerprints and creates that ultra-smooth, matte texture seen in the inspiration photo. -
Create Texture:
If you want the speckled look without paint, you can gently flicker a stiff toothbrush dipped in iron oxide wash or watered-down brown paint over the raw clay now, or wait until after drying to paint it on. -
Slow Drying:
If using the cardboard tube, carefully slide it out once the clay can support itself but is still leather hard. Let the vase dry slowly under a loose plastic bag to prevent cracking. -
Final Finish:
Once fully dry (and fired, if using ceramic clay), leave it unglazed for a raw stone look or apply a matte varnish. If using air-dry clay, seal the inside with a waterproof sealant if you plan to use fresh flowers.
Creative Twist
Try mixing dried tea leaves or used coffee grounds into your clay body before rolling it out. This creates a natural, organic speckled texture that mimics real stone.
Place your dried grasses or reeds inside and enjoy the serene atmosphere these sculptures bring to your space


Abstract Female Torso Figurines
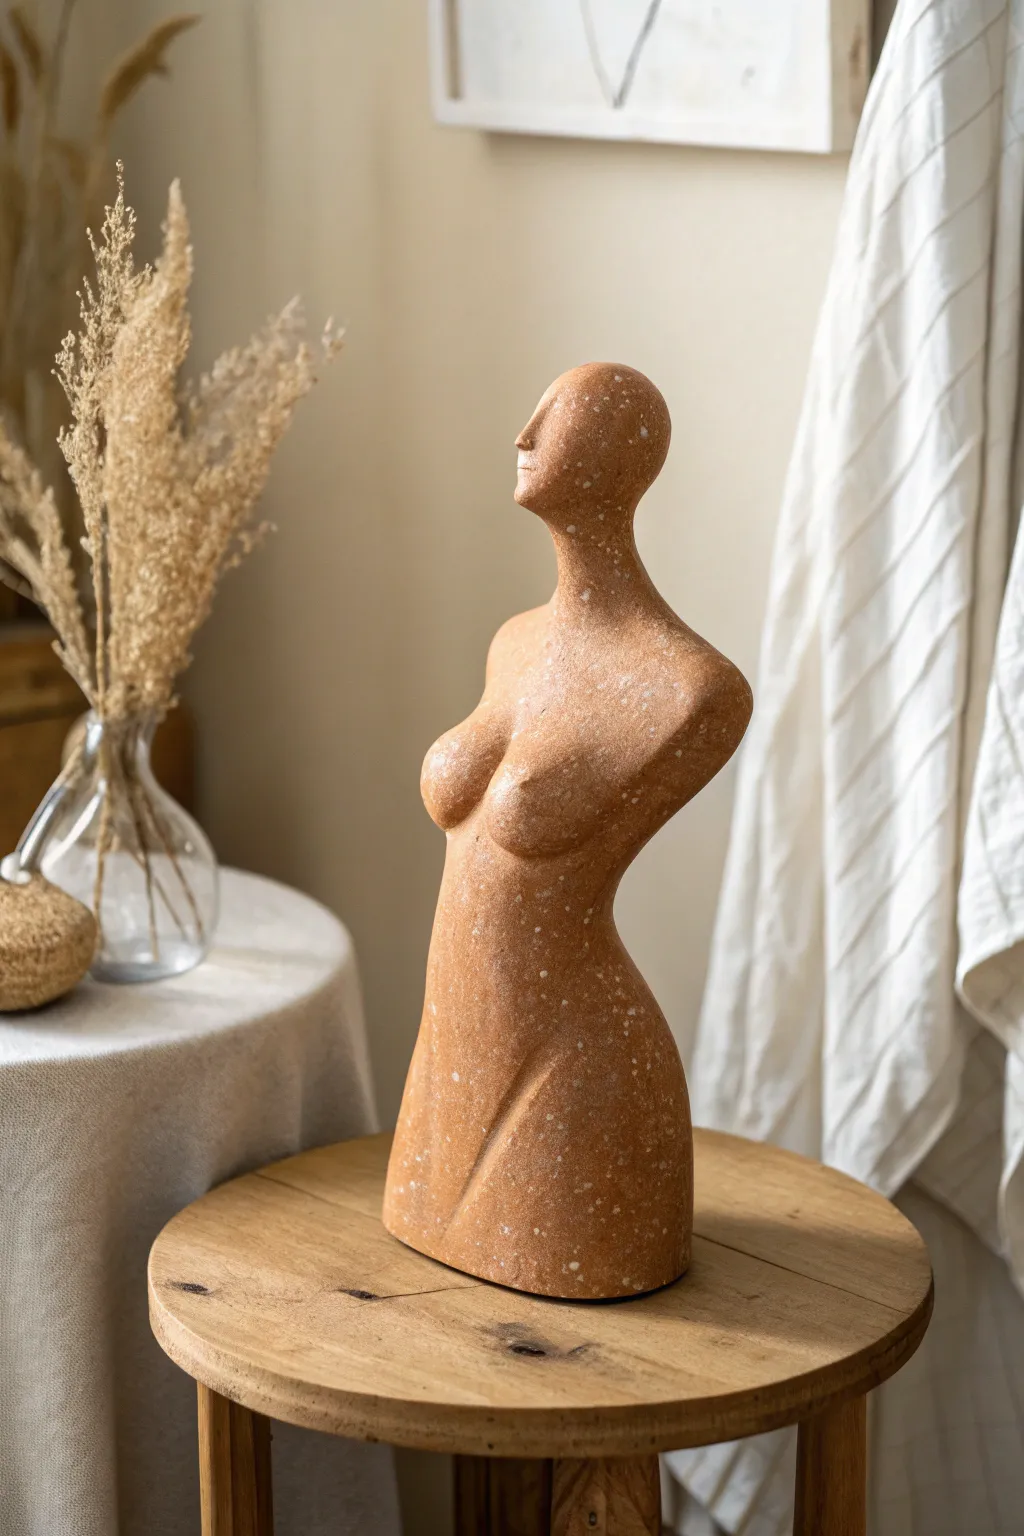
Capture the elegance of the human form with this stylized abstract torso sculpture. Featuring a warm, earthy finish with purposeful speckles, this piece brings a modern, organic aesthetic to any shelf or mantel.
Detailed Instructions
Materials
- Air-dry clay or polymer clay (terracotta or reddish-brown color)
- Aluminum foil
- Masking tape
- Armature wire (heavy gauge)
- Sculpting tools (rib tool, modeling stick, loop tool)
- Spray bottle with water (if using air-dry clay)
- Sponge
- White or cream acrylic paint
- Old toothbrush or stiff bristle brush
- Matte clear sealant spray
Step 1: Building the Armature
-
Wire spine and neck:
Begin by twisting your armature wire to create a simple spine. Leave extra length at the bottom to form a wide, flat loop that will serve as a stable base for the sculpture. -
Bulking out the form:
Crumple aluminum foil firmly around the wire. Focus on creating the general mass of the hips, waist, and chest, then form a smaller roughly egg-shaped mass for the head. -
Securing the foil:
Use masking tape to wrap the entire foil structure tightly. This prevents the clay from slipping later and smooths out the sharpest crinkles of the foil.
Step 2: Blocking the Form
-
Applying the base layer:
Roll your terracotta clay into flat sheets or pancakes. Press these firmly onto the taped armature, ensuring full coverage without trapping air bubbles underneath. -
Merging the seams:
Use your thumbs or a wooden modeling tool to vigorously smudge the seams together until the clay surface is uniform and the ‘pancake’ look disappears. -
Defining the twist:
Before adding detail, gently gently twist the torso slightly if your armature allows, or add clay preferentially to one side to create the subtle turn seen in the reference image.
Fixing Cracks
Using air-dry clay? If small cracks appear during drying, mix a tiny bit of fresh clay with water to make a paste (slip) and fill the cracks, then sand smooth once dry.
Step 3: Sculpting the Anatomy
-
Adding the chest:
Form two small balls of clay and blend them onto the upper torso for the bust. Smooth the edges seamlessly into the main body so they look organic, not stuck on. -
Refining the neck:
Elongate the neck area. This sculpture features a graceful, stylized neck that seamlessly transitions into the jawline without harsh angles. -
Stylizing the face:
Rather than carving eyes or a mouth, simply pinch a small ridge for the nose. Keep the rest of the face smooth and featureless to maintain the abstract look. -
Defining the hip line:
Use a modeling tool to carefully carve or press a distinct line where the leg meets the hip. This groove adds depth and suggests the pose without needing full limbs. -
Shaping the shoulders:
Smooth the shoulder area downwards where the arms would be. Creating a clean ‘cut-off’ or smoothed slope here emphasizes the torso-only composition.
Make it Ancient
Before the splatter step, do a ‘black wash.’ Paint it black, wipe nearly all of it off immediately. The dark paint stays in the crevices, adding antique depth.
Step 4: Smoothing and Finishing
-
Initial smoothing:
Go over the entire piece with a kidney rib tool or credit card to remove fingerprints and bumps. I find this stage meditative as the final form emerges. -
Water sponge technique:
Dampen a sponge slightly and wipe down the surface. This creates a slightly gritty, stone-like texture rather than perfectly polished plastic smoothness. -
Drying or baking:
Follow your specific clay’s instructions for drying or baking. If air-drying a solid piece like this, allow several days and turn it occasionally for even drying.
Step 5: The Speckled Effect
-
Mixing the splatter paint:
Dilute a small amount of white or cream acrylic paint with water until it has the consistency of thin milk. -
Testing the splatter:
Dip an old toothbrush into the paint mixture. Run your thumb across the bristles to flick paint. Test this on a piece of paper first to gauge the droplet size. -
Applying the speckles:
Gently flick the paint onto the dried sculpture. vary your distance: closer for clusters of dots, further away for a fine mist. -
Sealing the work:
Once the paint is completely dry, spray the entire sculpture with a matte clear sealant to protect the finish and deepen the terracotta color.
Place your finished sculpture near a window where the light can play across the subtle curves you created

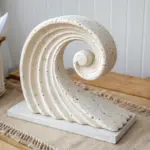


Arch Candle Holders With Sculptural Lines
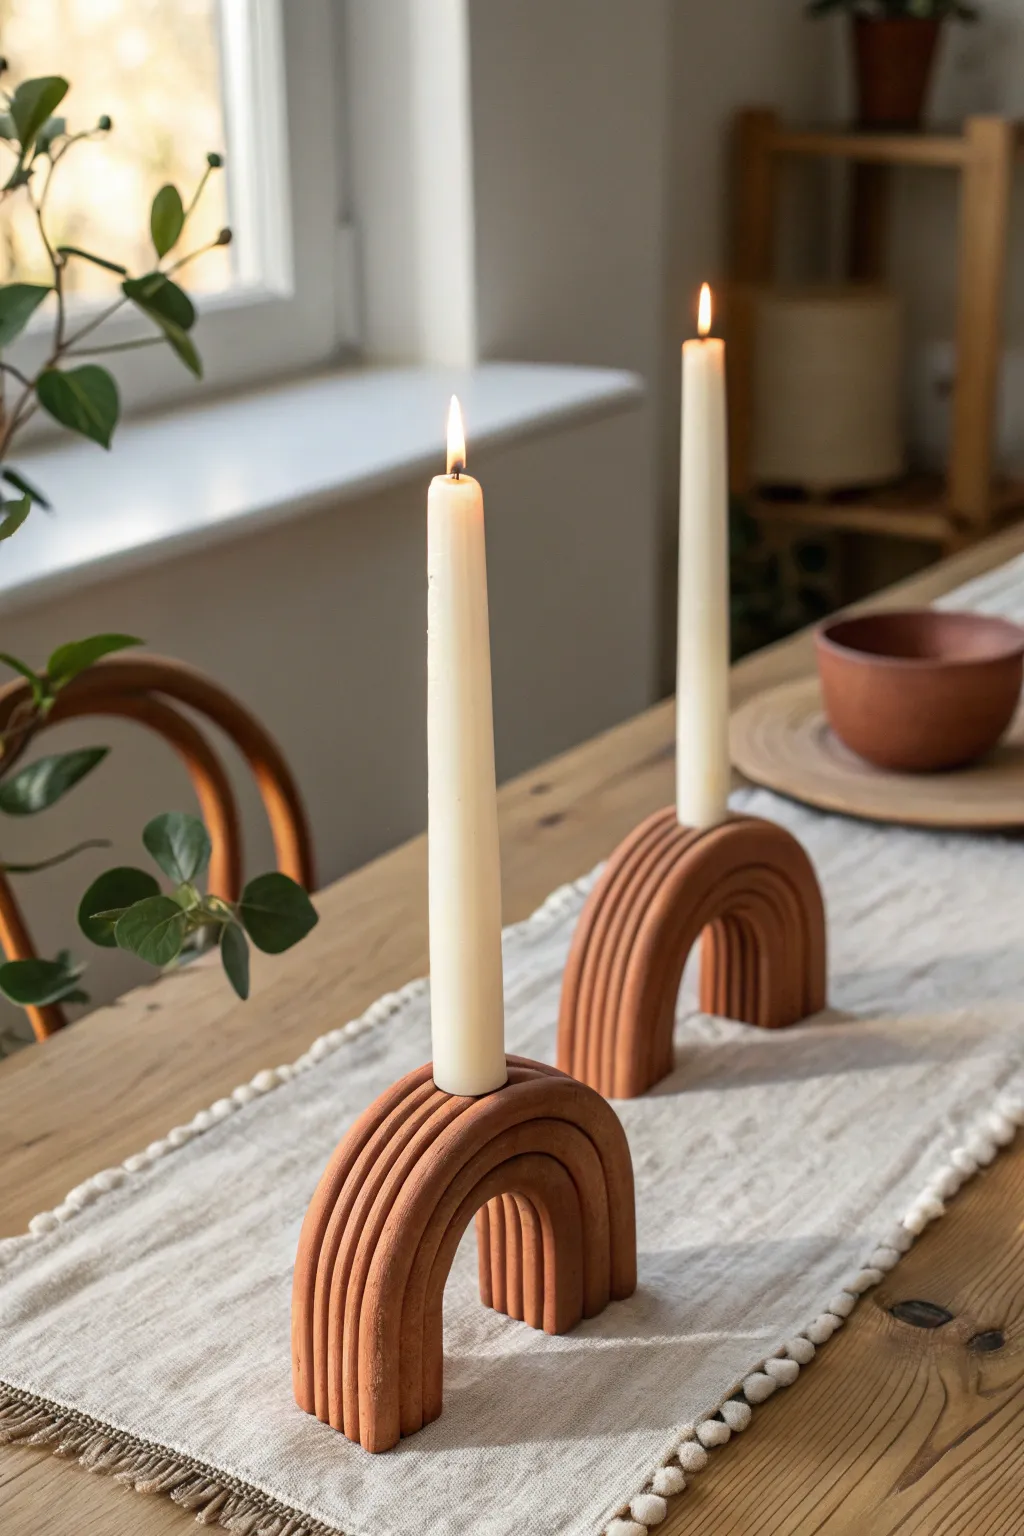
Bring a touch of modern earthiness to your dining table with these stunning arch candle holders featuring deep, sculptural ridges. The natural terracotta tone adds warmth, while the repetitive lines create a satisfying visual texture that looks far more expensive than it is.
Step-by-Step Guide
Materials
- Air-dry clay (terracotta color) or polymer clay
- Rolling pin
- Two long wooden dowels (1/4 inch thick) for depth guides
- Sharp craft knife or clay slicer
- Small bowl of water
- Candle (taper style) to use as a sizing guide
- Ruler
- Fine-grit sandpaper
- Sponge
- Cardboard or cardstock (for template)
- Clay carving tool or loop tool (optional)
Step 1: Preparing the Base Arch
-
Create a template:
Before touching the clay, draw a perfect arch shape on a piece of cardstock. It should be about 4-5 inches wide at the base and 3-4 inches tall. Cut this out to use as your master guide. -
Condition the clay:
Take a large chunk of your terracotta clay and knead it thoroughly until it is soft, pliable, and free of air bubbles. Warm hands help this process go faster. -
Roll out a slab:
Place your wooden dowels on either side of the clay as thickness guides. Roll the clay out into a uniform slab that is roughly 1/2 to 3/4 inch thick. You want a substantial thickness to support the candle. -
Cut the arch shape:
Lay your cardstock template onto the slab. Using your sharp craft knife, trace around the template to cut out the main arch shape. Keep your knife perpendicular to the table for clean edges. -
Smooth the edges:
Dip your finger in a little water and run it along the cut edges of the arch to soften any sharp corners or drag marks left by the knife.
Step 2: Sculpting the Lines
-
Mark the ridge lines:
Using a ruler and a light touch with a needle tool or toothpick, lightly score parallel curved lines following the shape of the arch. Space them evenly to create the rainbow effect. -
Carve the grooves:
Using a loop tool or the rounded edge of a sculpting tool, carefully carve out the clay between your scored lines. I like to do this slowly, pulling the tool toward me for better control. -
Refine the ridges:
Once the deep grooves are carved, use a damp sponge or your finger to smooth the ‘hills’ of the ridges. You want them to look rounded and fluid, not jagged. -
Create the candle socket:
At the very top center of the arch, gently press your taper candle into the clay to create an indentation. Don’t push too deep, just enough to mark the spot. -
Hollow the holder:
Remove the candle and use a carving tool to deepen that hole carefully. It needs to be snug and vertical so the candle stands straight. -
Check the fit:
Test the fit with the candle again. The hole should be slightly larger than the candle base if using air-dry clay, as the clay will shrink slightly when drying.
Consistent Ridges
Instead of carving, you can roll thin ‘snakes’ of clay and layer them over a base arch shape. Smooth the seams with water for a seamless, ribbed look without the difficult carving work.
Step 3: Finishing Touches
-
Clean the surface:
Do a final pass over the entire piece with a barely damp sponge. This removes any tiny clay crumbs or fingerprints before the drying phase begins. -
Initial drying:
Stand the arch upright on a piece of parchment paper. Let it dry slowly in a cool area away from direct sunlight to prevent cracking. -
Rotate frequently:
Every few hours, I gently turn the piece or lay it on its side briefly to ensure air circulates around the bottom legs, helping it dry evenly. -
Sanding:
Once the clay is bone dry (usually 24-48 hours depending on humidity), use fine-grit sandpaper to buff away any remaining imperfections or rough spots. -
Dust off:
Wipe away the sanding dust with a dry cloth or a soft brush. -
Sealing (optional):
If desired, apply a matte varnish to protect the surface, or leave it raw for that authentic, earthy terracotta texture shown in the photo.
Uneven Drying?
If the legs of the arch start to warp or splay outward while drying, place two heavy objects (like books) on either side to hold them straight until the clay firms up completely.
Place your finished holders on a linen runner and enjoy the warm, flickering glow of your handcrafted centerpiece
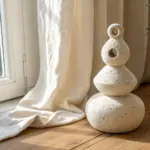


Incense Holders That Double as Decor
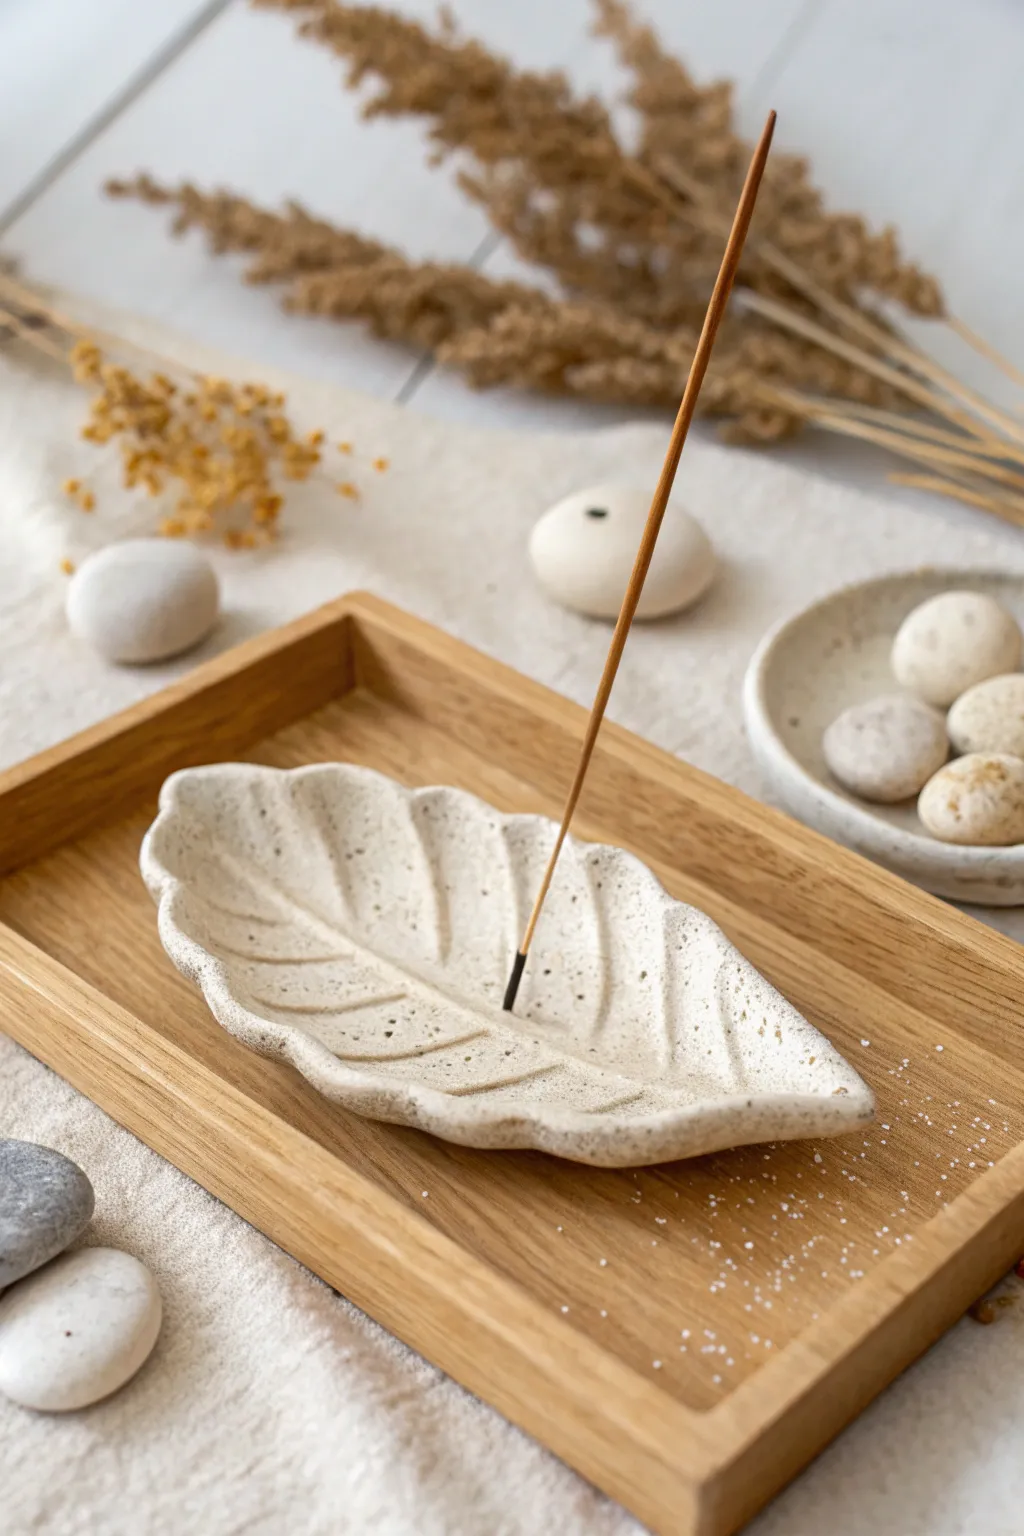
This elegant incense holder combines organic texture with minimalist design, creating a functional piece of art that looks right at home in any meditative space. The naturally speckled clay body and soft matte finish give it a sophisticated, stone-like appearance.
How-To Guide
Materials
- Speckled stoneware clay (or white polymer clay with inclusions)
- Rolling pin
- Real leaf for impressing (optional) or sculpting tools
- Fettling knife or needle tool
- Small sponge
- Incense stick (for sizing the hole)
- Smooth wooden board or canvas mat
- Clear matte glaze (if firing) or matte varnish (if air-dry)
Step 1: Preparation & Shaping
-
Wedge the clay:
Begin by wedging your clay thoroughly to remove any air bubbles. Work with a ball about the size of a lemon, ensuring the speckles are evenly distributed throughout the mass to get that consistent stone-like look later. -
Roll out the slab:
Place the clay on your canvas mat or wooden board. Using a rolling pin, flatten the ball into an even slab approximately 1/4 inch thick. Avoid going too thin, as the edges need to be sturdy. -
Cut the leaf shape:
Use a needle tool or fettling knife to cut out a simple, elongated leaf shape. You can freehand this for a more organic feel, or lightly trace a real leaf placed on top of the clay before cutting. -
Smooth the edges:
Dip your finger or a small sponge in a tiny bit of water and run it along the cut edges. Compressing and rounding these edges now prevents sharpness and cracking later on.
Hole Size Warning
Clay shrinks 10-15% during firing! Make your incense hole noticeably larger than the stick while the clay is wet, or it won’t fit after the kiln.
Step 2: Adding Texture & Detail
-
Establish the curve:
Gently lift the clay leaf and cradle it in your palm or place it on a curved drying form. You want to create a subtle bowl shape so the ash will fall into the center rather than onto your table. -
Carve the central vein:
Using a modeling tool or the dull side of your knife, press a long, central line down the middle of the leaf. Start from the stem end and stop just before the tip. -
Add side veins:
Carve smaller veins radiating outward from the center line. Vary the pressure slightly; deeper near the center and fading out toward the edges mimics nature beautifully. -
Refine the texture:
If you want extra texture on the surface, gently dab the clay with a dry sponge or balled-up foil. This enhances the natural, stone-like aesthetic of the speckled clay.
Step 3: The Incense Mechanism
-
Position the hole:
Locate a spot along the central vein, slightly towards the back third of the leaf. This balance ensures the stick angles correctly over the dish. -
Punch the hole:
Using an actual incense stick or a tool of the same diameter, poke a hole into the clay. Insert it at a slight angle—essential for catching ash—rather than straight up and down. -
Wiggle for clearance:
Gently wiggle the stick or tool in a small circular motion to widen the hole just a fraction. Clay shrinks as it dries, and you don’t want the fit to be too tight later. -
Clean up:
Check the underside of the leaf where your tool exited. Smooth away any little burrs of clay that pushed through so the piece sits flat.
Add Realism
Instead of carving veins by hand, press a rigid, deeply veined leaf (like a hydrangea or oak leaf) into the wet slab before cutting out your shape.
Step 4: Finishing
-
Dry slowly:
Place your leaf on a flat board or leave it on the curved form. Cover it loosely with plastic for the first day to ensure slow, even drying, which prevents warping. -
Refine dry edges:
Once bone dry (or fully cured if using polymer), take a fine-grit sandpaper and very gently smooth any remaining rough spots on the rim. -
Apply finish:
To maintain that raw, earthy look seen in the photo, apply a clear matte glaze if you are kiln-firing. If using air-dry clay, a matte varnish works perfectly to seal the speckles without adding unwanted shine. -
Final check:
Once your finish is dry, test the holder with a lit incense stick to ensure the angle is correct and the ash lands safely within the curved leaf basin.
Now you have a serene, handcrafted vessel ready to hold your favorite scents

The Complete Guide to Pottery Troubleshooting
Uncover the most common ceramic mistakes—from cracking clay to failed glazes—and learn how to fix them fast.
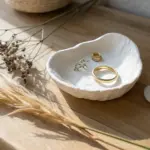
Photo and Place Card Holders With Sculpted Bases
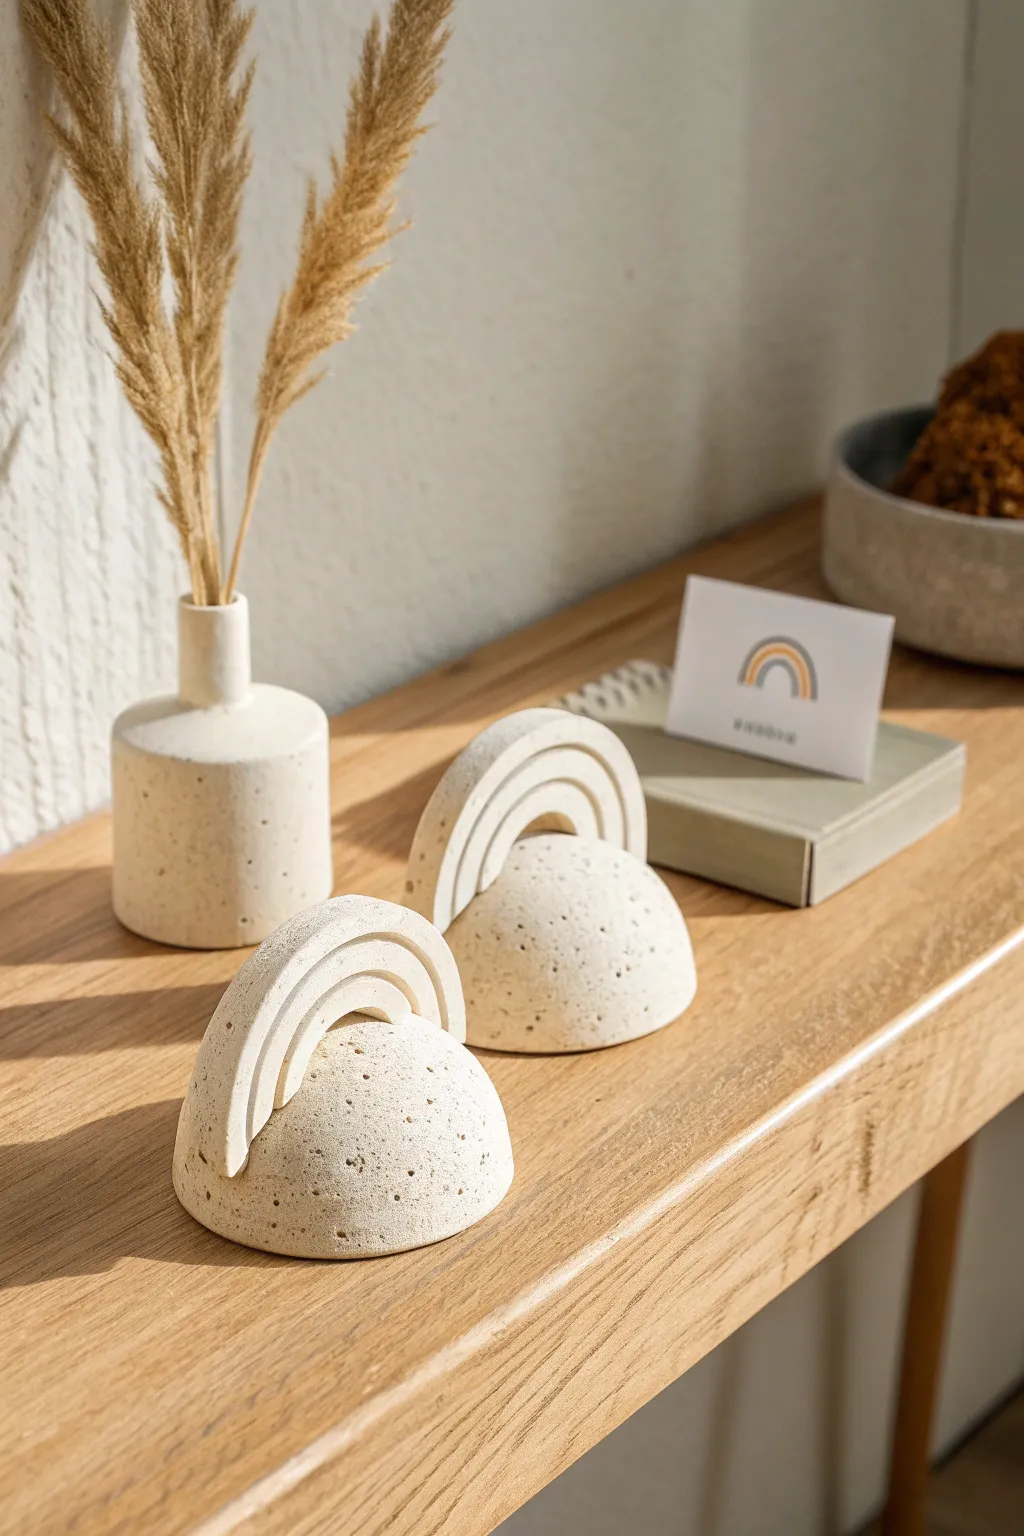
These minimalist photo and place card holders combine a trendy terrazzo-style stone finish with soft, geometric arches. They serve as perfect, understated functional art pieces that can hold everything from wedding place cards to cherished polaroids.
Step-by-Step Tutorial
Materials
- Stone-effect polymer clay (granite or speckled white)
- Translucent liquid clay or bake-and-bond
- Acrylic rolling pin
- Round cutter (approx. 2.5 – 3 inches diameter)
- Small round cutters (graduated sizes) or a sharp craft knife
- Flexible tissue blade
- Sandpaper (medium to fine grit)
- Ceramic tile or baking sheet
- Oven
Step 1: Forming the Base
-
Condition the clay:
Begin by thoroughly kneading your stone-effect polymer clay. This type of clay can be a bit crumbly at first due to the inclusions, so take your time until it is pliable and smooth. -
Create a solid sphere:
Roll a substantial amount of clay into a tight ball, ensuring there are no air bubbles trapped inside. It should be roughly the size of a golf ball or slightly larger. -
Cut the hemisphere:
Place the ball on your work surface and use your flexible tissue blade to slice it directly in half. You now have two hemispheres, which will serve as the heavy bases for two holders. -
Smooth the dome:
Gently smooth the cut edge with your finger so it isn’t sharp, but keep the bottom flat so it sits flush on the table. Refine the dome shape if it got squashed during cutting.
Clean Cuts Tip
Chill your rolled clay sheet in the fridge for 10 minutes before cutting the arches. Firm clay cuts much cleaner and prevents the rainbow shape from warping.
Step 2: Sculpting the Rainbow Arch
-
Roll a sheet:
Using your acrylic roller, roll out a sheet of the same clay to a thickness of about 1/4 inch (6mm). It needs to be thick enough to stand up on its own. -
Cut the outer arch:
Use your large round cutter to punch a circle from the slab. Then, using the same cutter, off-set it slightly and cut again to create a crescent or rainbow shape. -
Refine the shape:
Alternatively, you can hand-cut two concentric arches using a craft knife if you want a more organic look like the photo. You need a larger outer arch and a slightly smaller inner arch. -
Create the gap:
Ensure there is a deliberate space between the two arches. Cut the bottom of the arches flat so they can sit cleanly on top of the hemisphere base. -
Assemble the rainbow:
Arrange the smaller arch inside the larger arch on your work surface. The gap between them is crucial—this is where your photo or card will eventually sit.
Level Up: Color Pop
Paint the inner edge of the rainbow arch with a muted gold or pastel acrylic paint after baking to add a hidden pop of color that reveals itself when empty.
Step 3: Assembly and Baking
-
Score the connection points:
Rough up the bottom flat edges of your rainbow arches and the top center of your hemisphere base using a needle tool or toothpick to create texture for a better bond. -
Apply adhesive:
Dab a small amount of liquid clay or bake-and-bond onto the scored area on the dome. -
Attach the arches:
Press the arches firmly onto the dome. I find it helpful to use a ruler to ensure the slot between the two arches remains straight and parallel. -
Smooth the seams:
Use a silicone sculpting tool to gently blend the clay where the arches meet the base, ensuring there are no visible gaps, though the connection doesn’t need to be invisible. -
Final check:
Insert a piece of cardstock into the slot to make sure it fits before baking. Remove the cardstock before the clay goes into the oven. -
Bake carefully:
Place your holders on a ceramic tile and bake according to the manufacturer’s instructions for your specific brand of clay usually around 275°F (135°C). -
Cool completely:
Allow the pieces to cool completely in the oven or on a wire rack. Do not try to move them while hot, as the clay is fragile until fully cool.
Step 4: Finishing Touches
-
Sand for texture:
Once cool, use fine-grit sandpaper to buff out any fingerprints. Sanding also exposes the ‘stone’ speckles in the clay, enhancing the granite look. -
Wash and dry:
Rinse the pieces under water to remove any sanding dust and dry them thoroughly with a lint-free cloth.
Set these beautiful stone-effect holders on your desk or mantelpiece to showcase your favorite memories with modern style
Tiny Shelf “Book Nook” Sculpture Scenes
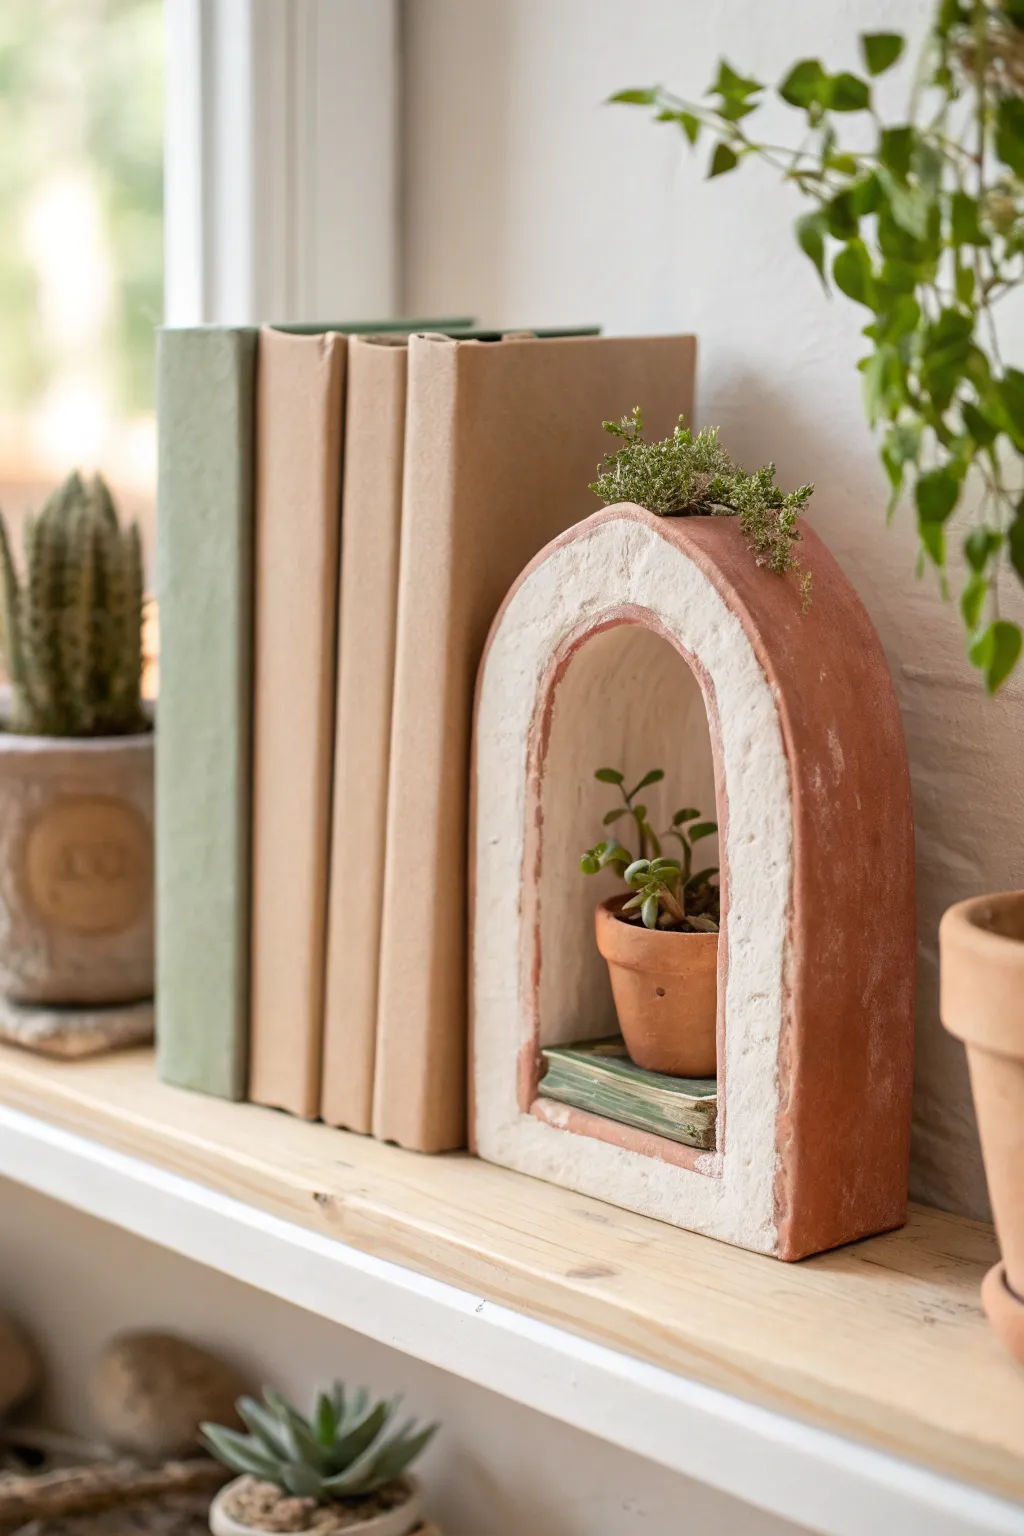
This charming, arch-shaped sculpture doubles as a miniature display shelf that tucks neatly between your books. With its rustic terracotta finish and textured white interior, it brings a touch of Mediterranean warmth to any bookshelf or windowsill.
Step-by-Step
Materials
- Air-dry clay (terracotta color)
- White acrylic paint
- Sandpaper (medium and fine grit)
- Rolling pin
- Craft knife
- Ruler
- Cardboard or sturdy cardstock (for the mold)
- Masking tape
- Baking soda (optional, for texture)
- Old paintbrush
- Small dowel or sculpting tool
- Clear matte varnish
- Miniature terracotta pot and faux plant (for display)
Step 1: Designing the Form
-
Create the structural arch:
Cut a strip of sturdy cardboard about 3 inches wide and 12 inches long. Bend it into a tall U-shape to form the inner curve of your arch. -
Secure the shape:
Tape the cardboard arch onto a flat piece of cardboard that acts as a base. Ensure the walls stand straight up at a 90-degree angle so your shelf won’t lean. -
Prepare the workspace:
Cover your work surface with canvas or parchment paper to prevent sticking. Since we are using colored clay, I find it helpful to keep wet wipes nearby to keep hands clean.
Pro Tip: Rustic Texture
Don’t over-blend your clay seams. Leaving slight thumb impressions and irregularities gives the finished piece that authentic, old-world plaster look.
Step 2: Sculpting the Arch
-
Roll out the slab:
Roll your terracotta air-dry clay to an even thickness of about 1/4 inch. If you want a chunky, rustic look, you can leave it slightly thicker. -
Cut the back panel:
Place your cardboard mold on the slab and trace around it, adding about 1/2 inch width around the outside for the wall thickness. Cut this shape out; this is the back wall of your nook. -
Cut the long strip:
Cut a long, rectangular strip of clay. It should be the same width as your cardboard mold (approx. 3 inches) and long enough to wrap around the entire arch shape. -
Wrap the mold:
Drape the clay strip over your cardboard form. Gently press it against the cardboard support, ensuring it takes the U-shape without stretching too thin at the corners. -
Attach the back:
Score the edges of both the draped strip and the back panel piece. Apply a little water or slip, then press the back panel firmly onto the main arched strip. -
Smooth the seams:
Use a sculpting tool or your finger to blend the clay where the pieces join. Since this is a rustic piece, you don’t need it perfectly seamless—a little visual texture is lovely. -
Create the front lip:
Roll a thin coil or cut a narrow flat strip of clay and attach it to the front face of the arch. Blend it inwards to create the appearance of a thick, solid wall. -
Add nature pockets (optional):
If you want the top planter feature shown in the image, press a small divot into the very top of the arch wall before the clay dries.
Step 3: Finishing and Painting
-
Allow to dry:
Let the sculpture dry completely for 24-48 hours. Keep the cardboard form inside for the first 12 hours to prevent sagging, then gently remove it to let the inside dry. -
Sand the surface:
Once bone dry, use medium-grit sandpaper to remove any sharp or unwanted jagged edges, paying attention to the bottom so it sits flat. -
Create texture paste:
Mix a small amount of baking soda into white acrylic paint. This creates a gritty, stucco-like texture. -
Paint the interior:
Apply your textured white paint heavily to the interior walls and the front face of the rim. Use a dabbing motion with an old brush to enhance the rough, plastered look. -
Distress the edges:
While the white paint is still slightly tacky, wipe away random sections along the rim with a damp paper towel to reveal the terracotta color beneath. -
Seal the piece:
Coat the entire piece, including the raw terracotta exterior, with a clear matte varnish to protect the clay and prevent the paint from chipping. -
Style your nook:
Once fully cured, place a miniature pot on the ‘shelf’ floor and secure a tiny sprig of moss or dried thyme in the top divot.
Troubleshooting: Sagging Arch
If the clay starts sagging off the cardboard mold, lay the entire piece on its back while it dries initially, rather than standing it upright immediately.
This little architectural delight is now ready to nestle onto your shelf and house your tiniest treasures


What Really Happens Inside the Kiln
Learn how time and temperature work together inside the kiln to transform clay into durable ceramic.
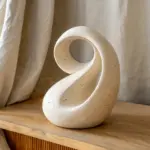
One-Color Abstract Sculptures for Coffee Tables
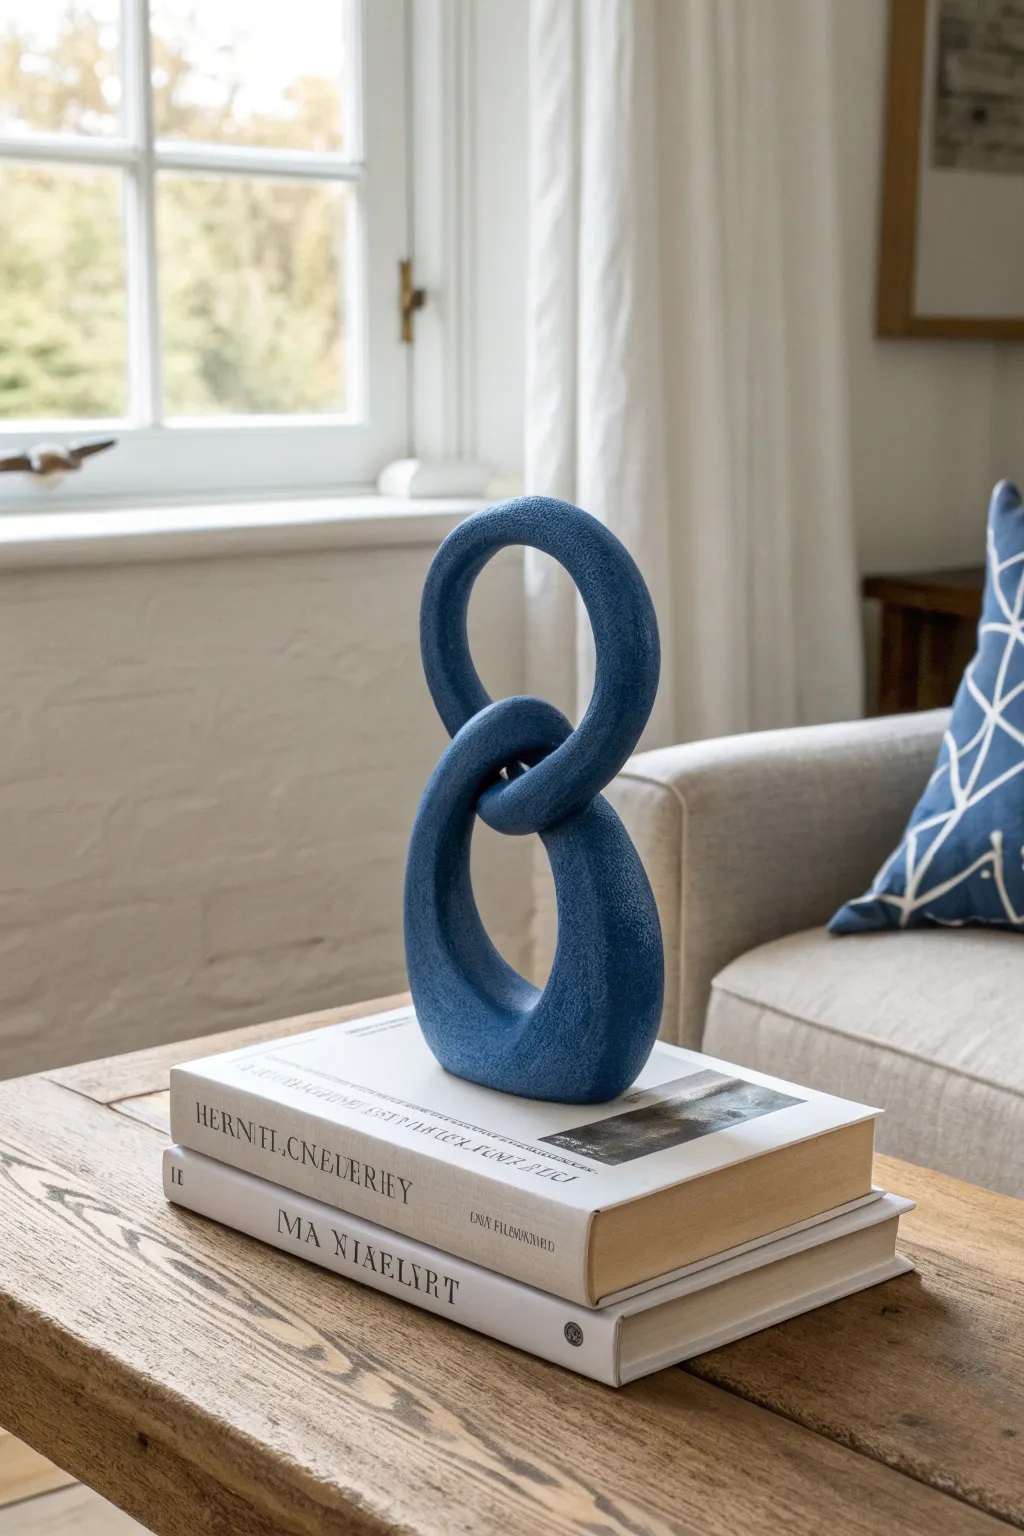
This striking accent piece mimics the look of high-end stone décor with its deep indigo hue and satisfying granular texture. By interlocking two simple clay loops and standing them upright, you create a sophisticated infinity-style sculpture perfect for styling a coffee table stack of books.
Step-by-Step Guide
Materials
- Air-dry clay (white or grey, strong formula)
- Aluminum foil
- Rolling pin
- Sculpting wire or armature wire (medium gauge)
- Clay sculpting tools (specifically a needle tool and smoother)
- Sponge and water cup
- Fine-grit sandpaper (220 grit)
- Acrylic paint (Deep Indigo/Navy Blue)
- Baking soda or texture medium
- Matte clear sealant spray
- Paintbrushes (flat and stippling brush)
Step 1: Building the Armature
-
Form the wire loops:
Cut two lengths of armature wire, approximately 12-14 inches each. Bend the first wire into an oval loop and twist the ends together securely. -
Interlock the structure:
Take your second length of wire and thread it through the first loop. Bend this second wire into a loop of similar size and twist its ends to close it, creating a chain of two links. -
Bulk up with foil:
Tear off strips of aluminum foil and wrap them tightly around the wire loops. This saves clay and keeps the sculpture lightweight. -
Refine the foil shape:
Continue wrapping and squeezing the foil until you have a consistent snake-like thickness of about 1 inch all around the loops.
Stone Effect Secret
Mix different sizes of sand or even dried coffee grounds into your paint instead of baking soda for a rougher, more organic concrete texture.
Step 2: Sculpting the Form
-
Condition the clay:
Knead a large hunk of air-dry clay until it is warm and pliable. I find this prevents cracking later on. -
Roll out sheets:
Use your rolling pin to flatten the clay into slabs about 1/4 inch thick. Cut these into long strips wide enough to wrap around your foil armature. -
Cover the first loop:
Wrap clay strips around the top loop first, pressing the seams together firmly. Use a little water on your finger to blend the joins until they disappear. -
Cover the second loop:
Carefully wrap the bottom loop with clay. The tricky part is the intersection; ensure the clay doesn’t fuse the two loops together if you want them loose, or purposefully blend them if you want a rigid, static sculpture. -
Establish the base:
For the sculpture to stand upright as shown, slightly flatten the bottom curve of the lower loop by pressing it gently against your table surface. -
Smooth the surface:
Dip a sponge in water (squeeze it out well so it’s damp, not dripping) and wipe it over the entire sculpture to remove fingerprints and large bumps. -
Allow to dry:
Let the sculpture dry completely for 24-48 hours. rotate it occasionally so air reaches all sides.
Level Up: Speckled Finish
Once the blue is dry, use a stiff brush to flick tiny droplets of white or light grey paint onto the surface for a realistic granite terrazzo look.
Step 3: Finishing and Texturing
-
Sand imperfections:
Once bone dry, use 220-grit sandpaper to smooth out any sharp ridges or uneven lumps. Wipe away the dust with a dry cloth. -
Prepare textured paint:
Mix your deep indigo acrylic paint with baking soda (approx. 1 part baking soda to 2 parts paint) to create a thick, gritty paste that mimics stone. -
Apply the base coat:
Using a flat brush, apply a heavy coat of the textured paint mixture to the entire sculpture. Don’t worry about brush strokes; the texture hides them. -
Stipple for effect:
While the paint is still wet, take a dry stippling brush or an old toothbrush and dab over the surface to enhance the granular, stone-like appearance. -
Touch ups:
Check the inside curves and the underside of the base to ensure no white clay is showing through. -
Seal the piece:
Once the paint is fully dry, spray the sculpture with a matte clear sealant to protect the finish without adding unwanted shine.
Place your new sculpture on a stack of favorite books to instantly elevate your room’s decor