
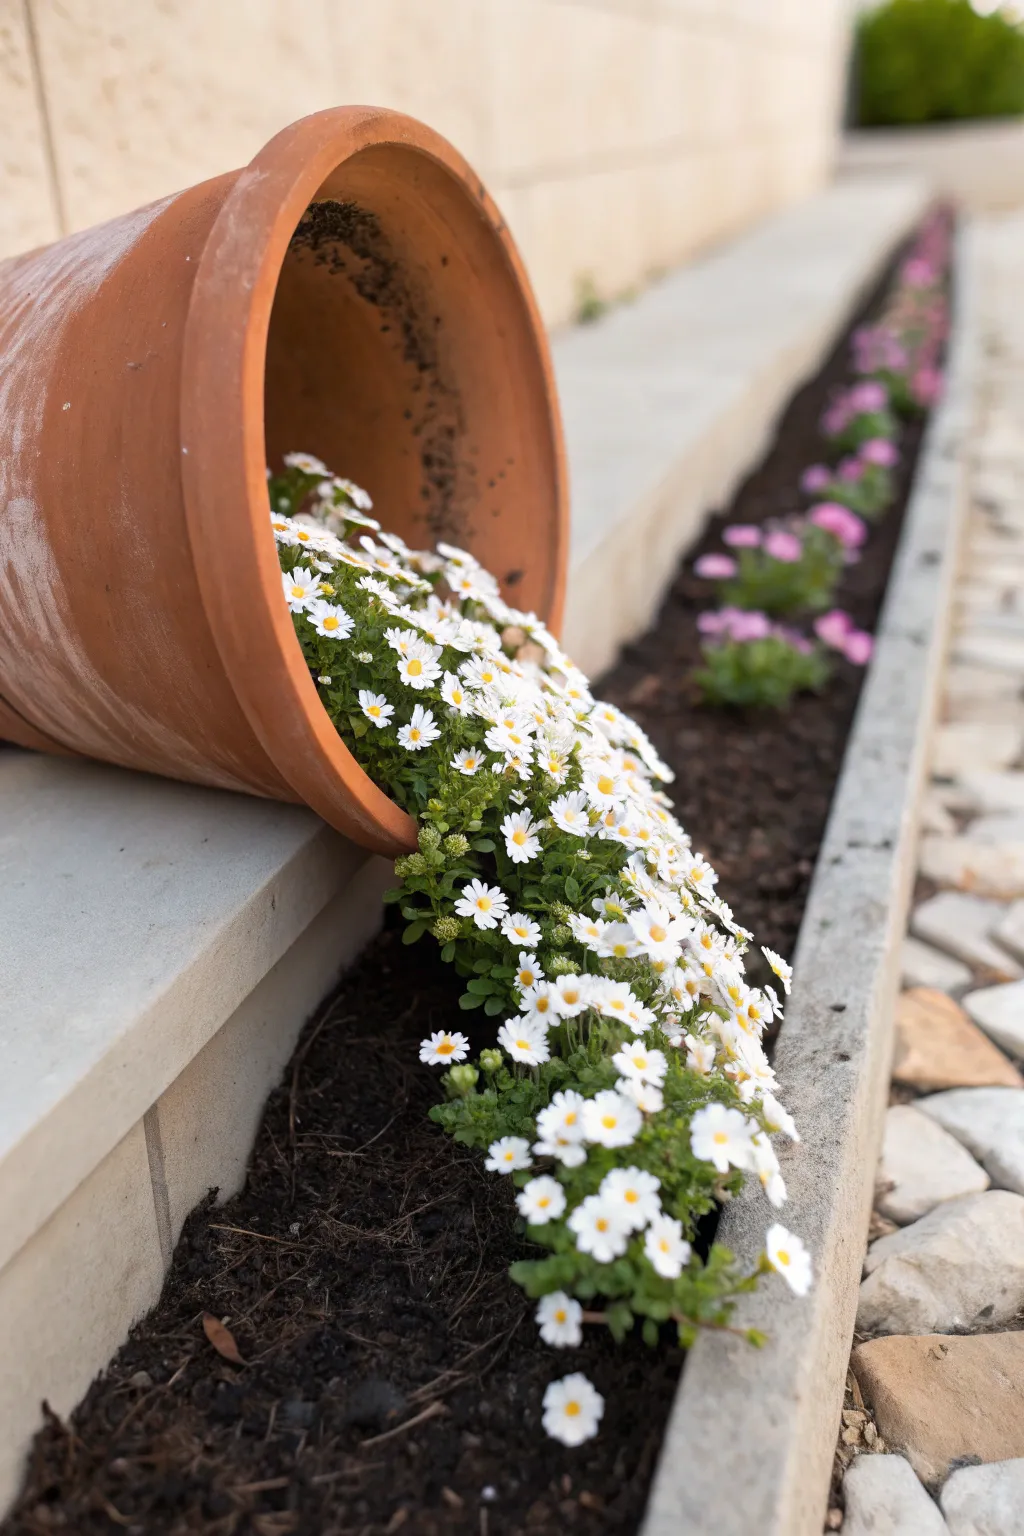
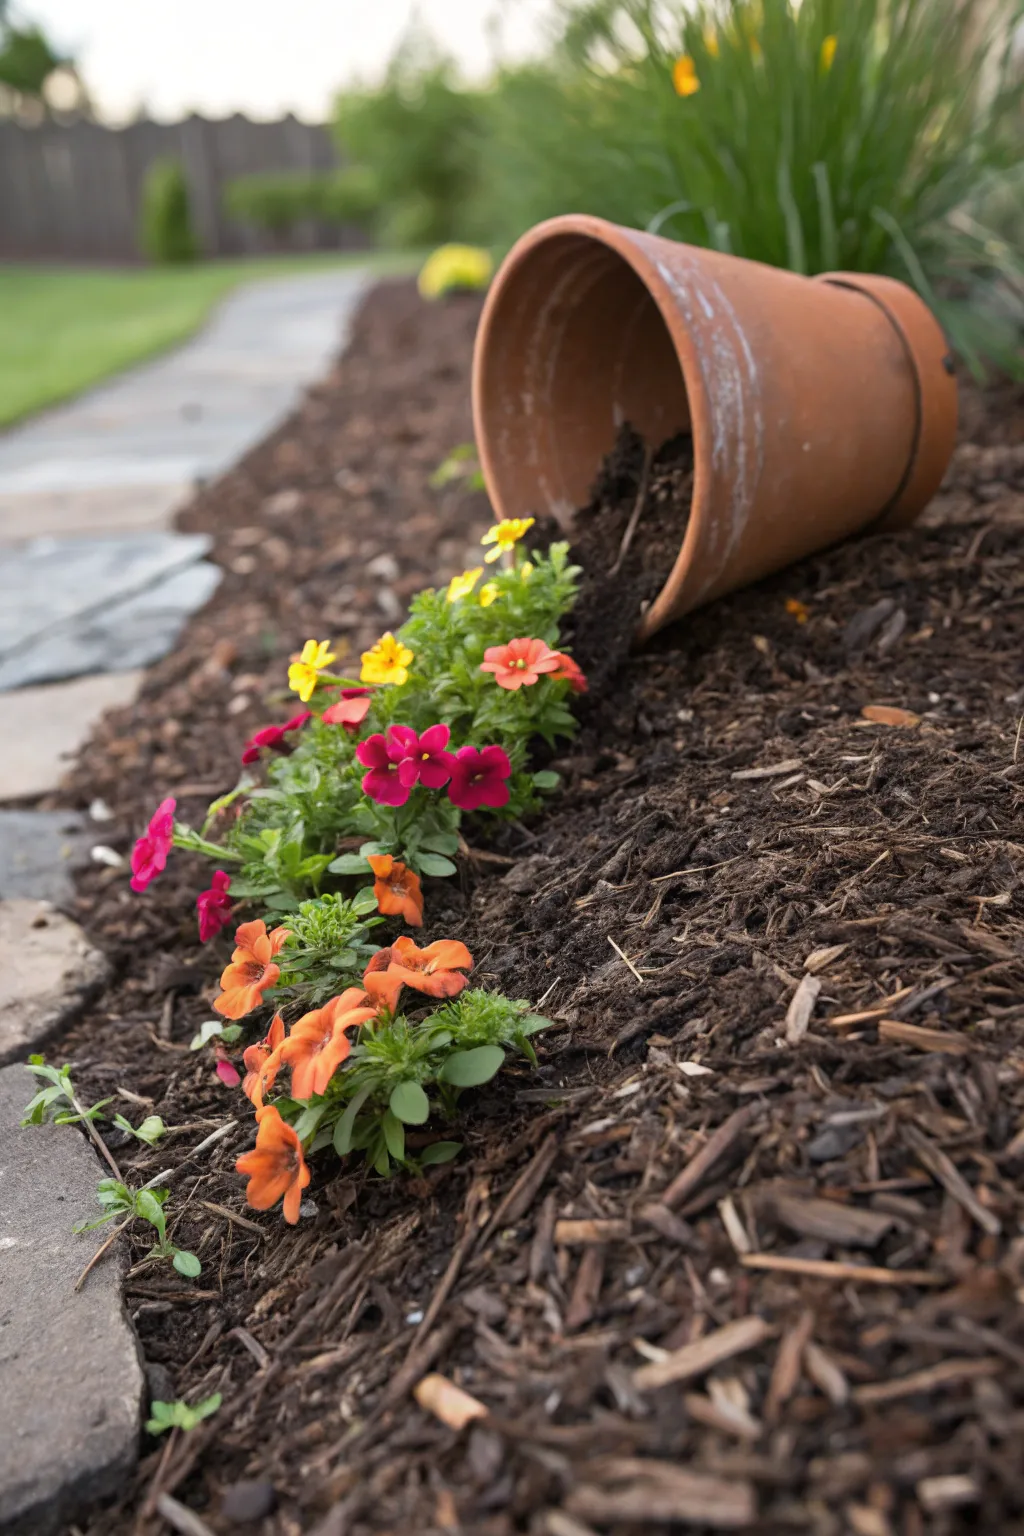
I never get tired of the sideways planter look—something about that tipped-pot “oops” moment that turns into a totally intentional design just makes me smile. Below are my go-to spilled planter ideas, starting with the classics and drifting into the delightfully weird studio-style twists.
Classic Spilled Terracotta Pot
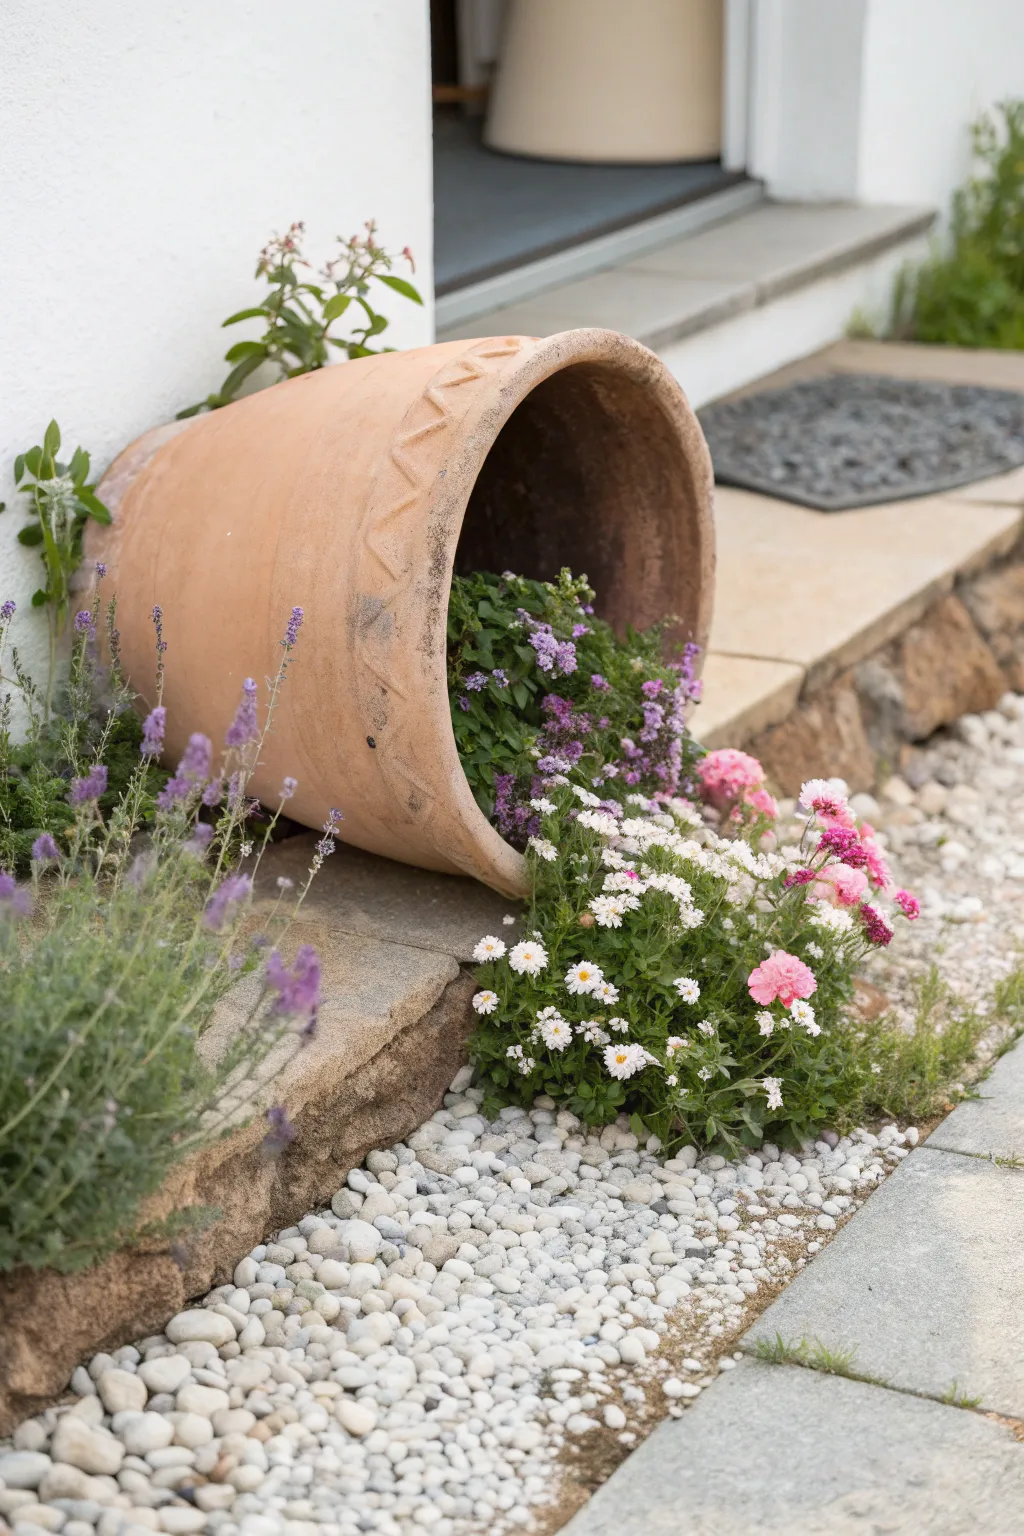
This whimsical garden feature creates the delightful illusion that vibrant blooms have just tumbled out of a tipped-over terracotta vessel. It adds a touch of playful movement to garden borders or gravel paths, transforming a simple planter into a dynamic focal point.
Step-by-Step Guide
Materials
- Large terracotta pot (12-16 inch diameter)
- Potting soil mixed with slow-release fertilizer
- Small landscape rocks or burying stones
- White decorative pebbles or river stones
- Purple trailing flowers (like Verbena or Lobelia)
- White mounding flowers (like Daisies or Bacopa)
- Pink accent flowers (like Dianthus or Verbena)
- Tall purple spikes (like Lavender or Salvia) for the background
- Garden spade or trowel
Step 1: Setting the Scene
-
Select the perfect spot:
Find a location in your garden where the ground is relatively flat but allows for a natural transition between a raised border and a path. This project works best where soil meets hardscaping or gravel. -
Prepare the ground:
Clear away weeds and level the soil in your chosen area. If you are placing this purely on soil, dig a shallow depression about 3-4 inches deep where the pot will rest. -
Position the pot:
Lay your terracotta pot on its side. Take a moment to adjust the angle; the mouth should be open towards the viewer, slightly tilted downward so soil doesn’t just fall out backward. -
Anchor the vessel:
To prevent the pot from rolling away during storms, dig it into the soil slightly. I like to bury the bottom third of the pot’s side into the earth for stability and a natural ‘sunken’ look. -
Secure the inside:
Place a few heavy, non-decorative stones inside the very back bottom of the pot. This counterweight is crucial to keep the heavy rim from tipping forward unpredictably.
Soil Washout Woes?
If watering erodes your mound, mix polymer soil glue into the top layer or bury chicken wire just under the surface to hold the earth shape.
Step 2: Creating the Spill
-
Fill with soil:
Fill the pot about halfway with potting mix, packing it tighter at the back. Then, mound soil spilling out of the mouth of the pot onto the ground in a fan or teardrop shape. -
Define the flow shape:
Use your hands to sculpt the external soil mound so it looks like a liquid spill—narrow at the pot’s rim and widening as it moves away. -
Plant the interior:
Start planting deep inside the pot’s mouth. Place the purple trailing verbena or similar creeping plants here so they look like the source of the spill. -
Transition outwards:
Plant the white daisies or mounding flowers right at the rim and just outside on the soil mound. Pack them closely together to hide any bare earth. -
Add color pops:
Intersperse the pink flowers towards the outer edges of the spill to create visual interest and break up the white and purple blocks. -
Feather the edges:
As you reach the end of your soil ‘spill,’ use smaller plants or separate root balls to make the flow look like it’s naturally tapering off rather than ending in a straight line.
Step 3: Finishing Touches
-
Background planting:
Behind and to the side of the pot, plant the taller lavender or salvia. These upright spikes provide a nice vertical contrast to the horizontal ‘spill’ and help anchor the pot visually. -
Clean the perimeter:
Brush away any loose potting soil that strayed too far from your planting zone. -
Add decorative stones:
Pour white pebbles or river stones around the area where the flowers meet the path. This high-contrast mulching highlights the greenery and mimics the look of water or foam. -
Tuck in the edges:
Ensure the white stones are pushed gently under the foliage of the outer plants. This prevents mud splatter when you water and keeps the ‘spill’ shape distinct. -
Water carefully:
Water the new plants gently using a watering can with a rose attachment. I aim the water directly at the roots to avoid washing your carefully sculpted soil mound away.
Pro Tip: Continuous Bloom
Swap the ‘spilled’ plants seasonally! Use pansies in spring, petunias in summer, and mums in fall to keep the installation fresh all year.
Enjoy your charming garden accident that brings a smile to everyone who walks by

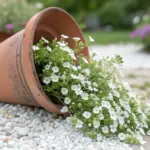
Cascading Flower “Stream” Shape
Create a whimsical garden feature that looks like a happy accident with this spilled flower pot design. By positioning a terracotta pot on its side, you can plant a stream of bright white blooms that appear to be tumbling out onto the soil.
Step-by-Step
Materials
- Medium to large terra cotta pot
- Potting soil (high quality)
- Garden soil or compost
- White bedding flowers (Daisies, Vincas, or Lobelia)
- Trowel or small shovel
- Mulch (optional)
- Watering can
Step 1: Preparing the Bed
-
Choose your location:
Find a spot in your garden bed that has a slight slope or enough clear space to create the flowing effect. A border edge, as seen in the photo, works perfectly to frame the stream. -
Dig a shallow depression:
Using your trowel, dig a small, scoop-shaped hole where the pot will rest. This depression should be just deep enough to nestle the pot securely so it doesn’t roll away. -
Loosen the soil:
In the area extending out from the pot’s mouth—where the ‘spill’ will go—tull the soil to loosen it up. This ensures the roots of your spill plants can establish easily. -
Enrich the ground:
Mix some potting soil or compost into the loosened ground soil to provide nutrients for your new plants.
Step 2: Positioning the Pot
-
Place the pot:
Lay the terra cotta pot on its side into the depression you created. The mouth of the pot should face the direction you want your flower stream to flow. -
Bury the pot partially:
Push soil around the bottom and sides of the pot to bury it slightly (about 1/4 to 1/3 of its depth). This anchors it firmly and makes it look like it has been part of the landscape for a while. -
Fill the pot:
Pack potting soil inside the pot itself, filling it about halfway up the side that is touching the ground. Ensure the soil level inside meets the soil level outside at the rim seamlessly.
Natural Flow Tip
For a more natural look, don’t plant in a perfect straight line. Curve the stream slightly as if liquid were flowing around a rock or following the gravity of the slope.
Step 3: Planting the Flow
-
Start inside the pot:
Take your first few flower starts and plant them deep inside the pot’s mouth. I like to angle these slightly outward so they look like they are tumbling forward. -
Create the heavy spill:
Plant a dense cluster of flowers right at the lip of the pot. Arrange them close together here to hide the rim of the pot partially and create volume. -
Form the stream:
Begin planting the rest of the flowers in a curving or straight line extending away from the pot. Place them wider at the base of the pot and taper the shape slightly as it flows outward. -
Tuck in the edges:
Ensure the plants on the edges of your stream are nestled firmly into the soil, covering any gaps so the flow looks continuous. -
Check density:
Step back and look at the arrangement. If you see bare soil between the plants in the ‘stream,’ add another small plant. The illusion works best when the flowers create a solid carpet of color.
Pot Stability
If your pot feels wobbly or you live in a windy area, dig the pot in deeper—up to half its diameter—or place a heavy rock inside the very back of the pot before adding soil.
Step 4: Finishing Touches
-
Clean up the pot:
Brush off any loose soil that may have gotten onto the visible top curve of the terracotta pot. -
Water gently:
Using a watering can with a rose attachment, gently water both the plants inside the pot and the stream. Avoid a heavy hose spray, which might wash away your careful soil grading. -
Backfill if needed:
After watering, the soil might settle. Add a little extra soil around the base of the plants if roots become exposed.
Enjoy the charm of your new spilling flower feature throughout the blooming season
River Rock–Bordered Spill Bed

Create a whimsical ‘oops’ moment that doubles as stunning decor with this spill pot arrangement. By tipping a terracotta planter on its side, you can craft a cascading river of greenery and stones that brings organic movement to any sunny windowsill.
Step-by-Step Tutorial
Materials
- Standard terracotta pot (6-8 inch)
- Potting soil mixed with perlite
- Assorted river rocks (smooth, grey/white mix)
- Trailing succulent (e.g., Sedum or Crassula)
- Rosette succulent (e.g., Echeveria)
- Small shovel or spoon
- Protective surface mat (optional)
Step 1: Setting the Scene
-
Choose your location:
Select a bright spot for your display, ideally near a window receiving indirect light. Ensure the surface is flat and stable, like a wide windowsill or a sturdy side table. -
Clean the pot:
If using a reused terracotta pot, give it a quick scrub to remove old dirt. For that authentic aged look shown in the image, don’t worry about scrubbing off mineral deposits or water stains on the outside. -
Position the planter:
Lay the terracotta pot on its side. Rotate it until it finds its natural resting point so it won’t roll. If it feels unstable, wedge two small, flat stones on either side of the bottom curve to act as subtle doorstops.
Step 2: Creating the Soil Base
-
Fill the bottom half:
carefully spoon your succulent soil mix into the pot. You want to fill the bottom ‘belly’ of the sideways pot until the soil level is about halfway up the opening. -
Create a gradient:
Slope the soil gently downwards so it spills out of the mouth of the pot onto the table surface. This creates a ramp for your plants to follow. -
Pack it down:
Lightly press the soil with your fingers to firm it up. This prevents the dirt from washing away immediately when you water later.
Soil Spilling Out?
If loose dirt keeps sliding out onto the table, mist the soil surface lightly with water. The moisture bonds the particles together, making the slope stable.
Step 3: Planting the Spill
-
Place the anchor plant:
Take your rosette succulent (the Echeveria) and nestle it deep inside the pot, near the back but still visible. This acts as the visual source of the spill. -
Arrange the trailer:
Plant your trailing sedum or flowering succulent right at the lip of the pot. Tease the stems so they stretch outward onto the table surface, mimicking liquid pouring out. -
Tuck the roots:
Ensure all root balls are covered with a bit more soil. I find using a teaspoon helps get dirt into tight crevices without disturbing the arrangement. -
Check the flow:
Adjust the trailing stems. They should look chaotic but directional, flowing away from the pot mouth in a widening distinctive fan shape.
Add Sparkle
Mix a handful of clear glass gems or polished quartz pieces into your river rocks to catch the sunlight and make the ‘water’ spill look wet.
Step 4: The Stone River
-
Start inside:
Begin placing your river rocks inside the pot, covering the exposed soil around the plant bases. This hides the dirt and weighs down the roots. -
Bridge the gap:
Place stones directly under the lip of the pot where it touches the table. This seamless transition is key to the illusion. -
Pour the stones:
Arrange the remaining river rocks on the table surface, flowing out from the pot alongside and underneath the plant stems. -
Shape the spill:
Widen the pile of rocks as it gets further from the pot. It should look like a puddle spreading out naturally. -
Intertwine elements:
Gently lift the trailing plant stems and place a few smooth stones underneath them. This creates depth and keeps foliage off the bare wood. -
Final touches:
Scatter a few rogue stones slightly away from the main pile to soften the edges and make the spill look less rigid. -
Clean up:
Use a soft brush or a puff of air to dust off any loose soil particles from the stones or plant leaves.
Enjoy the effortless charm of your new living art piece as it basks in the sunlight


Mulch-as-Canvas Spill Design
This whimsical garden feature creates the playful illusion of liquid color tumbling from an overturned vessel. By partially burying a terracotta pot and creating a calculated flow of blooms, you can add a touch of storybook magic to any garden pathway or flowerbed.
How-To Guide
Materials
- Medium to large terracotta pot (clay)
- Potting soil (high quality)
- Garden trowel
- Small shovel
- Mulch (dark brown or black for contrast)
- Flowering annuals (petunias, calibrachoa, or begonias)
- Watering can
- Slow-release fertilizer pellets
- Gloves
Step 1: Setting the Scene
-
Choose your location:
Select a spot in your garden bed that has a slight slope or is near a pathway. The visual effect works best where the ‘spill’ can naturally flow downwards or outwards. -
Clear the area:
Remove existing weeds, rocks, or old mulch from a rectangular patch roughly 3 feet long by 2 feet wide. This will be your canvas. -
Prepare the pot depression:
Using your small shovel, dig a depression for the pot. You don’t want it just sitting on top; it needs to look like it has been there for a while. Dig down about 2-3 inches where the belly of the pot will rest. -
Position the pot:
Lay the terracotta pot on its side in the depression. Angle the opening slightly downward so it faces the direction you want the flowers to flow. -
Secure the vessel:
Pack excavated soil firmly around the bottom half of the pot to stabilize it. I like to bury about a third of the pot’s side into the earth to prevent it from rolling during heavy winds. -
Add potting soil inside:
Fill the bottom half of the pot (which is now horizontal) with good quality potting soil. This gives the roots of the first few plants a nutrient-rich home.
Muddy Mess?
If soil washes out of the pot when watering, tuck a small rock or shard of pottery just inside the rim as a subtle dam to hold the dirt back.
Step 2: Creating the Flow
-
Map the spill shape:
Take a handful of flour or sand and lightly outline a triangular or teardrop shape extending from the mouth of the pot. It should start narrow at the rim and widen as it moves away. -
Prepare the planting bed:
Inside your outlined shape, loosen the native soil with your trowel and mix in some fresh potting soil to create a fluffy, welcoming bed for the annuals. -
Loosen root balls:
Gently remove your flowers from their nursery containers. Tease the roots apart slightly with your fingers to encourage them to spread. -
Plant the source:
Place the first one or two plants slightly inside the mouth of the pot. They should look like they are just tumbling out over the rim. -
Plant the flow:
Continue planting the rest of the flowers within your teardrop shape. Pack them fairly close together—closer than the plant tag recommends—to create an instant, dense carpet of color. -
Mix your colors:
If using mixed colors like the red, orange, and yellow seen here, distribute them randomly rather than in stripes to maintain a natural, tumbled look. -
Taper the end:
As you reach the wide end of the spill, stagger the plants slightly so the flow doesn’t end in a harsh, straight line. It should look organic and irregular.
River of Milk
Use white alyssum or white lobelia instead of multi-colored blooms to create a stunning ‘spilled milk’ effect that glows beautifully in moonlight.
Step 3: Finishing Touches
-
Water gently:
Give the new plants a thorough but gentle watering. Use a watering can right at the soil level to avoid washing away the loose dirt near the pot rim. -
Apply soil accents:
Sprinkle a little extra potting soil over the root balls to ensure they are fully covered and the surface looks dark and rich. -
Mulch the perimeter:
Spread your dark mulch around the pot and the flower spill. Carefully push the mulch up to the edges of your flower line, creating a clean contrast. -
Clean the pot:
Use a damp cloth or your gloved hand to wipe any mud splashes off the visible terracotta surface so the orange clay stands out against the mulch. -
Fertilize:
Scatter a small pinch of slow-release fertilizer pellets around the base of the plants to keep the blooms vibrant throughout the season.
Enjoy the charmed smiles this playful landscape illusion brings to your garden visitors

The Complete Guide to Pottery Troubleshooting
Uncover the most common ceramic mistakes—from cracking clay to failed glazes—and learn how to fix them fast.
Sideways Urn on a Gentle Slope
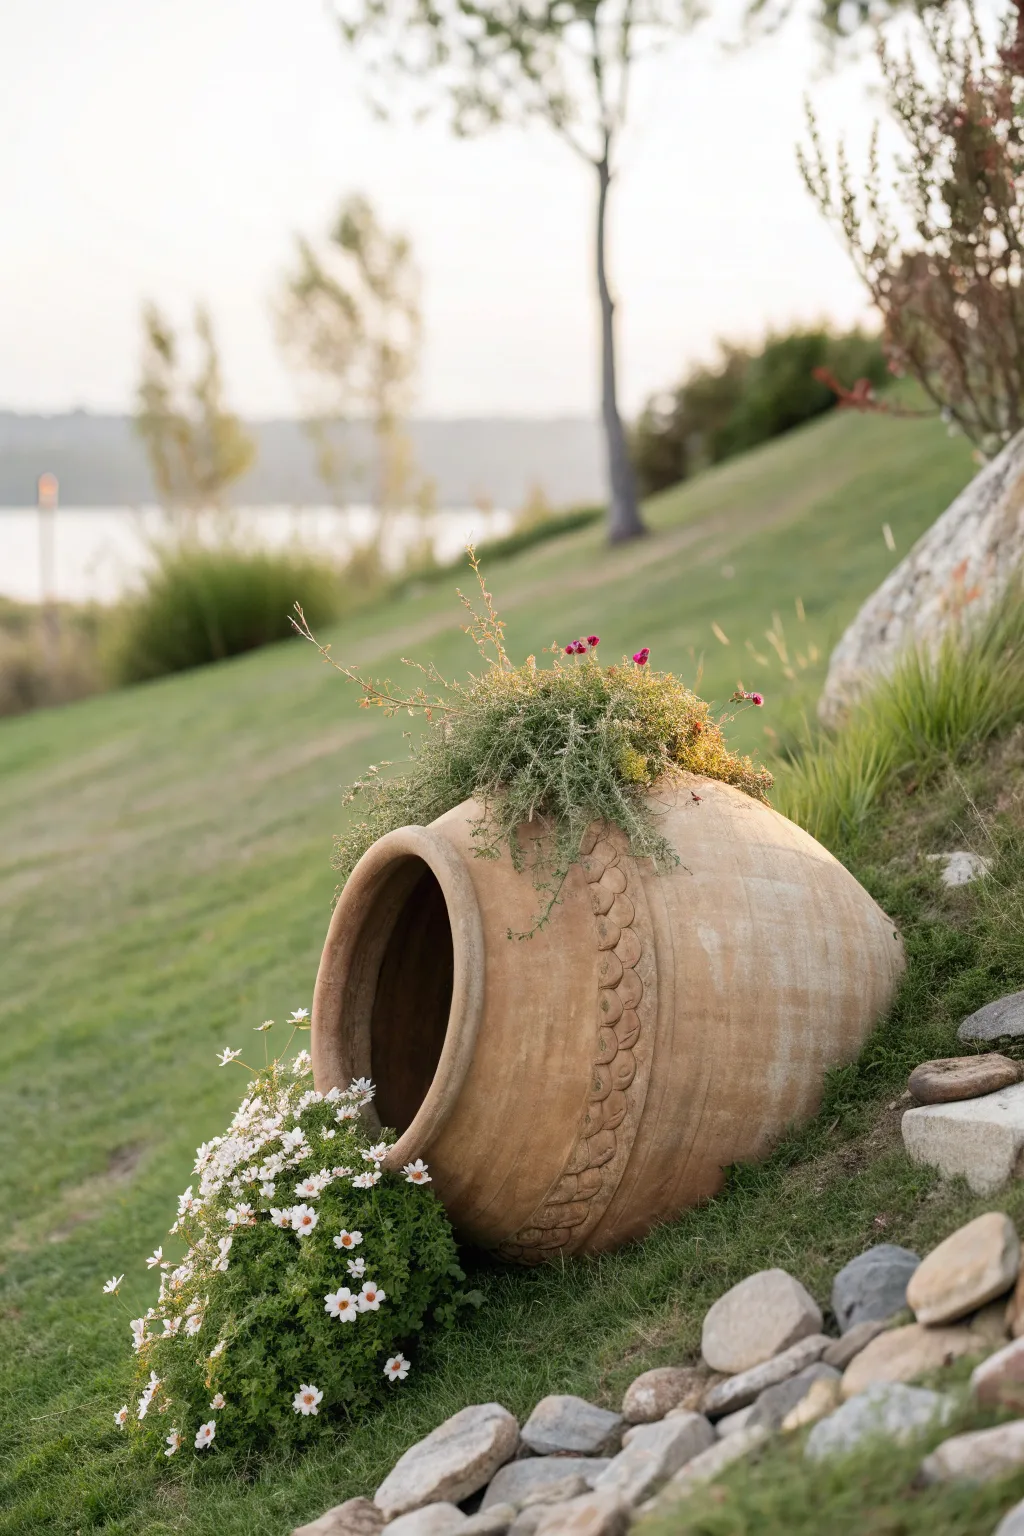
Create a whimsical garden feature that looks like a giant urn has tumbled down a hill, spilling a cascade of blooms onto the grass. This landscaping project combines rustic pottery with strategic planting to add movement and charm to any sloped area of your yard.
Step-by-Step
Materials
- Large terracotta or clay urn (frost-proof if necessary)
- Shovel and spade
- Gravel or small rocks for drainage
- Potting soil mix
- White daisies or similar creeping flowers (e.g., creeping phlox, chamomile)
- Small succulent or sedum plugs (for the top)
- River rocks or decorative stones
- Trowel
- Watering can
Step 1: Site Prep and Placement
-
Select the slope:
Choose a gentle incline in your garden where the ‘spilled’ effect will look natural. A steep hill might make the pot unstable, while flat ground loses the rolling illusion. -
Dig the depression:
Using your shovel, dig a shallow depression into the hillside slightly larger than the side of your urn. You want the pot to look like it has settled there over time, not just been placed on top. -
Create a drainage base:
Add a layer of gravel to the bottom of your dug-out hollow. I find this critical because it prevents the terracotta from sitting in puddles, creating a barrier that protects the pot from soil moisture. -
Position the urn:
Lay the heavy urn on its side in the depression. Wiggle it back and forth until about one-third of the bottom side is submerged in the earth and it feels stable. -
Backfill for stability:
Pack excavated soil firmly around the bottom and back of the urn to lock it in place. Ensure the mouth is tilted slightly downward so water doesn’t pool inside the rim.
Soil Washout Woes
If rain washes soil out of the pot’s mouth, tuck a piece of landscape fabric or a hidden stone inside the lower lip to act as a dam while still allowing roots to pass through.
Step 2: Creating the Spill
-
Prepare the spilling zone:
Loosen the soil directly in front of the urn’s mouth, fanning out in a triangle shape down the slope. This is where your ‘spilled liquid’ of flowers will go. -
Enrich the soil:
Mix high-quality potting soil into the loosened dirt area. This amended soil ensures your blooming plants get a healthy start compared to the possibly compacted lawn soil. -
Fill the urn mouth:
Scoop soil into the mouth of the pot itself, filling the bottom curve. This connects the soil inside the pot to the soil on the ground, creating a continuous planting bed. -
Plant the cascade:
Install your white daisies (or chosen spilling flower) starting deeply inside the rim of the pot and working your way out. Plant them densely near the mouth and space them out slightly as you move down the slope. -
Feather the edges:
As you reach the end of your ‘spilled’ shape, plant smaller clumps to make the flow look like it is naturally dissipating into the grass.
Step 3: Finishing Touches
-
Add top accents:
If your urn has a rough texture or cracks like the one pictured, tuck small sedum plugs or succulents into any crevices or mound a small bit of soil on top for a ‘vestigial’ look. -
Clean the pot:
Brush off excessive loose dirt from the terracotta surface so the color of the clay contrasts beautifully against the green grass. -
Arrange river stones:
Place a few river rocks or stones near the base of the spill and further down the slope. This frames the scene and adds a rugged, natural texture. -
Water thoroughly:
Water the new plants immediately. Focus the stream gently at the roots so you don’t wash away the fresh soil or displace the carefully arranged spill. -
Maintain the illusion:
Over the first few weeks, keep the soil moist. As plants grow, trim the grass around the pot carefully by hand to keep the hardware from hitting the terracotta.
Aged Patina Trick
To make a new pot look old instantly, rub plain yogurt on the terracotta surface before placing it. This encourages moss and lichen growth for that ancient, ruin-like vibe.
Enjoy the relaxed, picturesque charm this tumbling planter adds to your garden landscape
Half-Barrel Sideways Spill
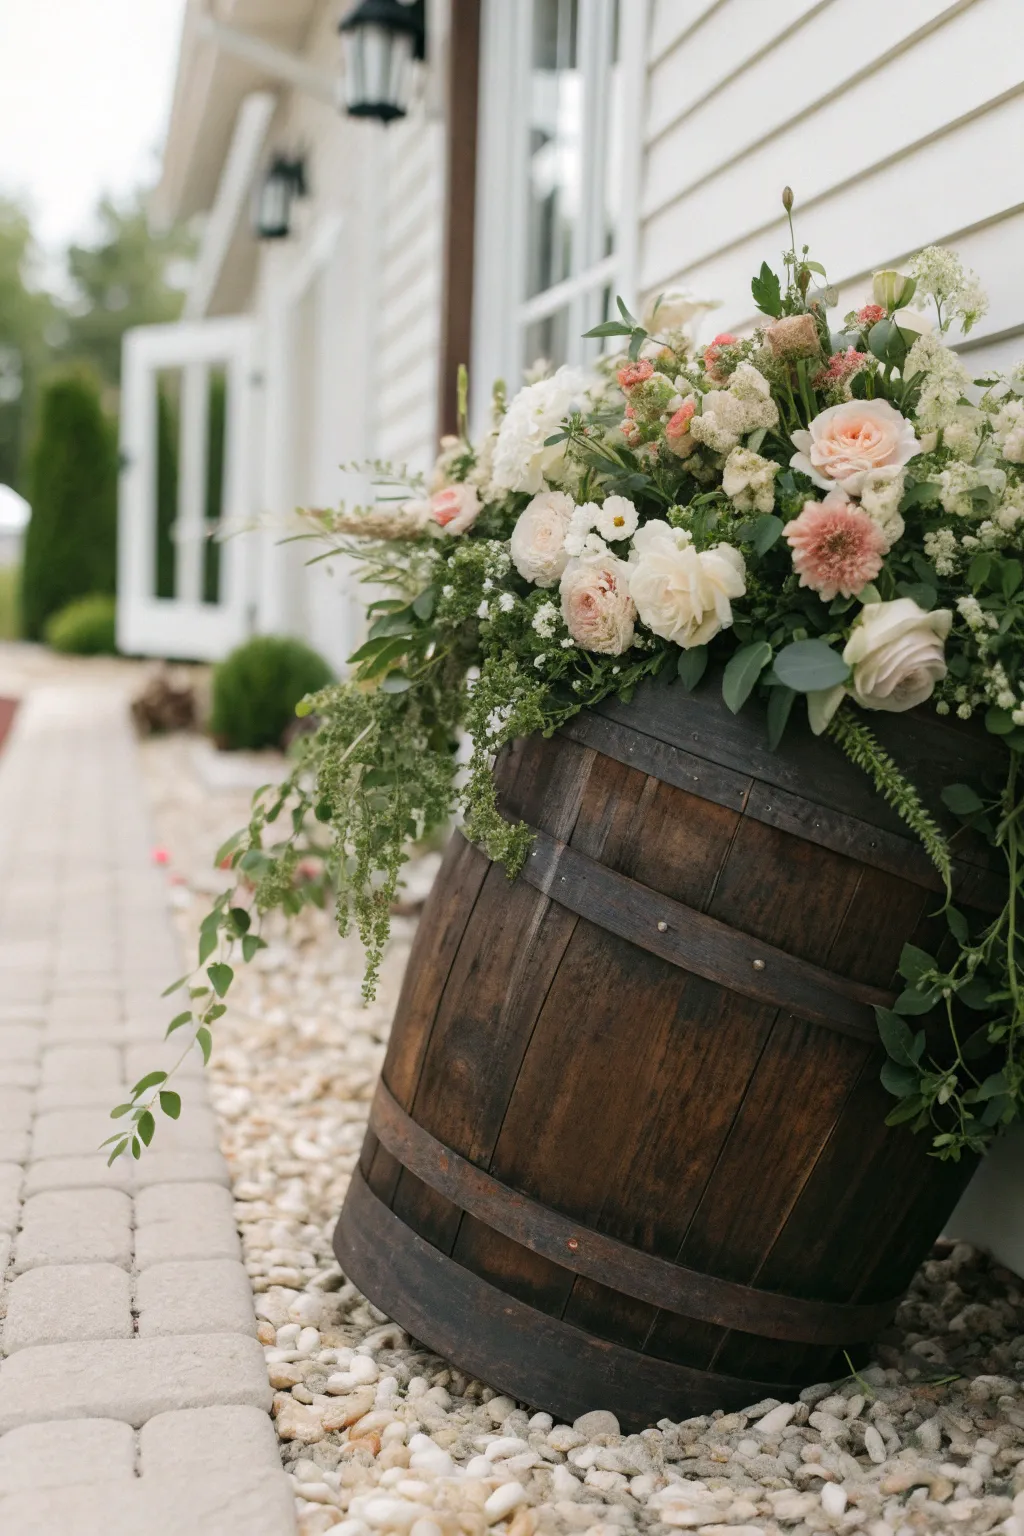
Create a stunning entrance display with this tilted wine barrel planter that appears to be spilling a lush bounty of roses and greenery. This project combines rustic charm with elegant florals for a show-stopping landscaping feature.
Detailed Instructions
Materials
- Half wine barrel planter (oak)
- Potting soil (large bag)
- Pea gravel or river stones
- Slow-release fertilizer granules
- Support wedge (brick, stone, or wood block)
- Trailing greenery (Ivy, creeping Jenny, or Vinca)
- Filler flowers (Baby’s breath, Queen Anne’s lace, or Alyssum)
- Focal flowers (Garden roses, Ranunculus, or Peonies in pastel shades)
- Spiller plants (Amaranth or hanging floral varieties)
- Landscape fabric (optional)
Step 1: Setting the Scene
-
Prepare the location:
Choose a spot near a wall or siding where the barrel can be safely propped. Clear the ground of debris and level the gravel or soil base to ensure stability. -
Position the barrel:
Place your half-barrel on the ground. Instead of setting it flat, tilt it forward slightly at a 45 to 60-degree angle. The open face should point outward towards the viewer. -
Secure the tilt:
Wedge a sturdy brick, stone, or treated wood block firmly underneath the back bottom edge of the barrel. This prop is crucial to keep that dramatic tilted angle without the planter falling over. -
Check stability:
Give the barrel a gentle nudge to ensure it won’t roll or slide. I always double-check this before adding any weight inside. -
Line the bottom:
If your barrel has large drainage holes or gaps, line the bottom quarter with landscape fabric to keep soil from washing out onto your pathway.
Step 2: Building the Soil Base
-
Add drainage layer:
Pour a thin layer of pea gravel into the bottom of the tilted barrel. This helps water drain away from the roots, which is especially important in a deep container. -
Fill with soil:
Pack high-quality potting soil into the barrel. Because of the tilt, you’ll need to pack it tighter towards the back and let it slope naturally towards the front rim. -
Create a mound:
Mound the soil slightly higher in the center and back. This allows your taller plants to stand out and gives the arrangement a full, bursting look. -
Mix in nutrients:
Sprinkle a generous amount of slow-release fertilizer granules into the top few inches of soil and mix it in deeply with a hand trowel.
Soil Slide Solution
If soil slides out the front rim due to rain, tuck sphagnum moss firmly along the lower soil line. It acts like a green dam to hold earth in place.
Step 3: The Floral Arrangement
-
Plant the trailers first:
Start at the very front rim—the lowest point of the soil. Plant your trailing ivy or greenery here so it can cascade down the front of the wood staves immediately. -
Establish the background:
In the back of the barrel (the highest point), plant your tallest greenery or structural foliage. This creates a lush backdrop against the house siding. -
Add focal point blooms:
Place your large focal flowers—like the pale pink roses or ranunculus—in the center or slightly off-center. Group them in clusters of three for a natural, professional look. -
Flesh out with mid-size blooms:
Fill the gaps around the roses with medium-sized flowers like carnations or spray roses in complementary peach and cream tones. -
Insert filler textures:
Tuck stems of Baby’s breath, Queen Anne’s lace, or seeded eucalyptus into empty spaces. These airy textures bridge the gap between heavy blooms and creates that wild, gathered garden feel. -
Encourage the spill:
Take a few longer stems of greenery or amaranth and angle them so they drape over the side edges, not just the front. This enhances the ‘overflowing’ illusion. -
Water carefully:
Water the planter gently with a watering can featuring a rose attachment. Water from the top back so it trickles down through the root systems without washing away the soil at the front rim.
Seasonal Swap
Use plastic nursery pots inside the barrel instead of loose soil. This lets you instantly swap faded spring bulbs for summer mums or winter evergreens.
Enjoy the romantic, tumbling display of flowers welcoming guests to your home


What Really Happens Inside the Kiln
Learn how time and temperature work together inside the kiln to transform clay into durable ceramic.
Broken Pottery Mosaic Spill
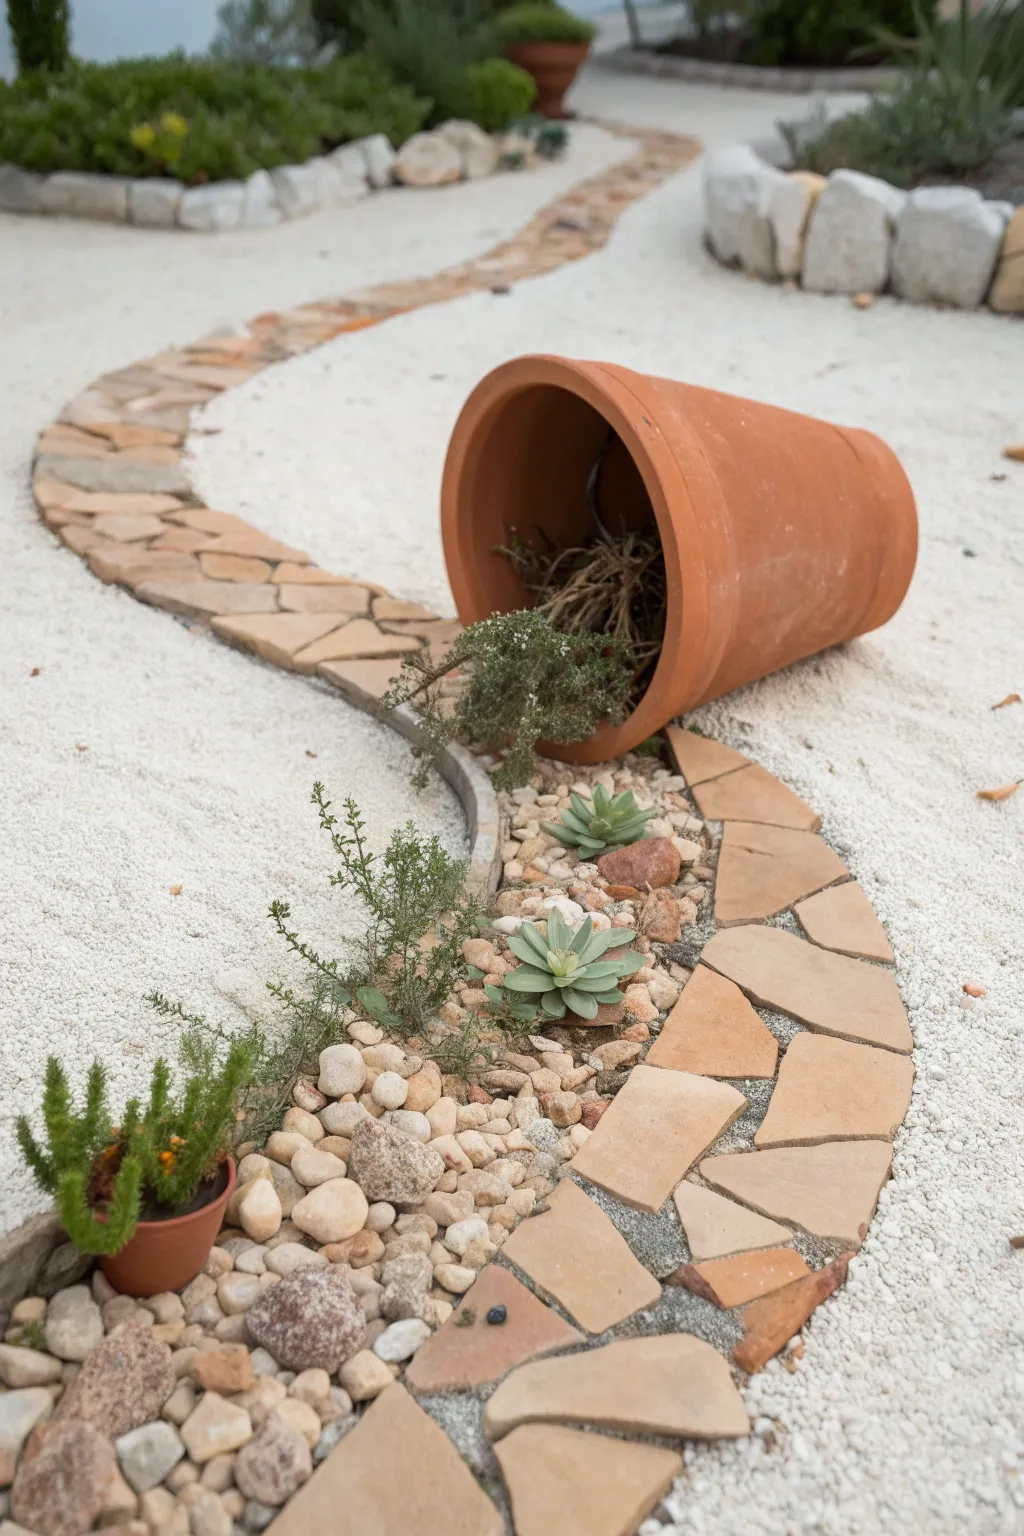
Transform a simple garden path into a whimsical scene with this ‘spilled’ pot effect. By combining warm terracotta tones with cool white gravel and succulents, you create a dynamic, flowing landscape feature that mimics a tumbling planter.
How-To Guide
Materials
- Large terracotta pot (approx. 12-16 inch rim)
- Irregular flagstone or sandstone pavers (warm tones)
- Fine white decorative gravel or decomposed granite
- River rocks and pebbles (mixed sizes, beige/tan)
- Sand (for leveling pavers)
- Succulents (Echeveria, Sempervivum)
- Creeping Thyme or similar ground cover
- Small terracotta pot (nursery size) with matching saucer
- Landscape fabric (optional)
- Trowel and shovel
- Rubber mallet
Step 1: Preparing the Canvas
-
Clear and level the area:
Begin by clearing your chosen pathway area of grass or weeds. I usually dig down about 2-3 inches to create a stable base for the gravel and stones. -
Install weed barrier:
Lay down landscape fabric over the cleared soil. This step is crucial for keeping your white gravel pristine and preventing weeds from ruining the clean aesthetic. -
Spread the base layer:
Pour a layer of fine white decorative gravel or decomposed granite over the entire area, smoothing it out with a rake until it creates a flat, snowy-white canvas.
Naturalizing the Look
Don’t clean the terracotta pot too perfectly. A bit of moss or weathering on the rim makes the ‘spilled’ effect feel like an established, aged part of the garden.
Step 2: Laying the Stone Path
-
Mark the path curve:
Use a hose or string to visualize a gentle S-curve for your path. The curve should look natural and meandering rather than rigid. -
Position the border stones:
Select your irregular flagstones. Arrange them along the edges of your S-curve first to define the boundaries of the walkway. -
Fill in the path:
Place remaining flagstones inside the borders. Leave consistent gaps between them—about 1 to 2 inches—to allow the white gravel to show through, creating that mosaic effect. -
Set the stones:
Once satisfied with the arrangement, tap each stone gently with a rubber mallet to seat it firmly into the base layer so they don’t wobble when walked on.
Nighttime Glow
Tuck solar-powered fairy lights inside the spilled pot and weave them through the creeping plants. At night, it will look like the pot is spilling liquid light.
Step 3: Creating the Spill Feature
-
Position the main pot:
Dig a small depression in the gravel where the path curves. Place the large terracotta pot on its side, angling the opening so it faces the direction of the path. -
Bury the pot slightly:
Burrow the side of the pot into the gravel by an inch or two. This grounds the object and makes it look like a permanent fixture rather than something just dropped there. -
Create the spill zone:
Directly in front of the pot’s mouth, clear a small section of the white gravel. Replace it with a mix of larger river rocks and pebbles to simulate soil spilling out. -
Plant the ‘spill’:
Nestle a creeping plant, like Creeping Thyme or a trailing sedum, right into the pot’s mouth and letting it drape over the river rocks. This connects the pot to the ground visually.
Step 4: Detailing the Borders
-
Add the rock margin:
Along the *inside* curve of your stone path, create a dedicated planting border. Use round river stones and pebbles to build a defined edge separating the planting zone from the path. -
Plant succulents:
In this pebbled border, dig small pockets and plant rosette-shaped succulents (like Echeveria). Space them out—one every 6-8 inches—so they look like jewels dropped in the stones. -
Incorporate height:
Add a taller, feathery plant (like a small ornamental grass or taller sedum) behind the succulents to create vertical interest and texture variance. -
Place the accent pot:
Tuck the small nursery-sized terracotta pot near the border edge for scale. Place a small succulent inside it to echo the larger theme. -
Final grooming:
Brush any displaced white sand off the pavers and pebbles. Water the new plants gently to help settle the soil around their roots.
Now you have a charming garden feature that guides the eye and adds a touch of playful narrative to your landscape.
Ceramic Log Planter Laid Sideways

Create a modern, earthy home for your rosemary cuttings with this tri-tone painted ceramic bowl. By mimicking glazed pottery techniques with standard acrylics and baking soda, you can achieve a high-end, textured look without a kiln.
Step-by-Step
Materials
- Low, wide cylindrical ceramic or terracotta bowl (unglazed preferred)
- Acrylic paint (Cream/Off-White)
- Acrylic paint (Teal/Deep Turquoise)
- Acrylic paint (Terracotta/Rust Orange)
- Acrylic paint (Dark Brown/Espresso)
- Baking soda (to add texture)
- Painter’s tape or masking tape
- Medium flat paintbrush
- Small round detail brush
- Old toothbrush (for splattering)
- Matte spray sealer or varnish
- Palette or paper plate for mixing
Step 1: Preparation and Base Texture
-
Clean the surface:
Wipe down your ceramic bowl with a damp cloth to remove any dust or oils. Let it dry completely to ensure the paint adheres well. -
Mix the texture paint:
Pour a generous amount of your terracotta/rust orange paint onto the palette. Mix in baking soda gradually—about a 1:1 ratio—until the paint becomes thick and grainy, almost like fluffy frosting. -
Apply the bottom layer:
Paint the bottom third of the planter with your textured terracotta mix. Use vertical strokes to build up a slight thickness, giving it that raw clay feel. I like to keep the top edge of this section relatively straight, but don’t worry about perfection yet. -
Let it set:
Allow this base layer to dry until it is firm to the touch. The baking soda extends drying time slightly, so give it an extra 15 minutes.
Step 2: Creating the Striped Design
-
Tape the boundary:
Once the orange base is fully dry, apply a strip of painter’s tape horizontally around the bowl, covering the top edge of the orange paint. This will protect your bottom layer while you work on the middle section. -
Mix the teal band:
Mix your teal acrylic paint with a much smaller amount of baking soda this time. You want a little opacity, but less texture than the bottom section. -
Paint the middle stripe:
Apply a thin band of the teal mixture right above your tape line. This stripe should be narrow, roughly half an inch to an inch tall depending on your bowl’s size. -
Remove tape and dry:
Carefully peel back the tape while the paint is still slightly wet to avoid peeling up chunks. Let the teal stripe dry completely. -
Prepare the top section:
Mix your cream or off-white paint with baking soda (1:1 ratio again). This needs to be opaque to cover the underlying ceramic color. -
Paint the top band:
Paint the remaining top portion of the bowl with the cream mixture, carefully cutting in against the top edge of the teal stripe. Coat the inner rim of the bowl as well for a finished look. -
Smooth the transition:
If the lines between colors look too sharp or raised, lightly tap the junctions with a mostly dry brush to soften them slightly.
Sticky Situation
If your painter’s tape peels up the textured base layer, press the tape against your clothes first to reduce tackiness before applying it to the bowl.
Step 3: Detailing and Finishing
-
Dilute the speckle paint:
Taking your dark brown or espresso paint, add a few drops of water until it is very fluid and inky. -
Test the splatter:
Dip your old toothbrush into the watered-down brown paint. holding it over a scrap piece of paper, run your thumb across the bristles to test the spray pattern. You want fine mists, not large blobs. -
Apply speckled finish:
Gently flick the paint onto the bowl using the toothbrush method. Focus on an even distribution to mimic the natural impurities found in stoneware clay. -
Address any large drops:
If a large droplet accidentally hits the cream section, quickly dab it gently with a dry paper towel to blend it in, making it look like a deliberate clay imperfection. -
Dry thoroughly:
Let the entire project sit for several hours or overnight to ensure the thick baking soda paint layers are cured all the way through. -
Seal the work:
Take the planter outside or to a well-ventilated area. Apply two light coats of matte spray sealer. This is crucial to prevent the baking soda texture from crumbling or reacting to moisture when you water your plants.
Go Geometric
Instead of horizontal bands, use the tape to create diagonal geometric shapes or triangles for a deeper Memphis-style modern aesthetic.
Fill your new vessel with soil and your favorite succulents or herbs to enjoy a touch of handcrafted charm

TRACK YOUR CERAMIC JOURNEY
Capture glaze tests, firing details, and creative progress—all in one simple printable. Make your projects easier to repeat and improve.
Sideways Cylinder Planter on a Shelf
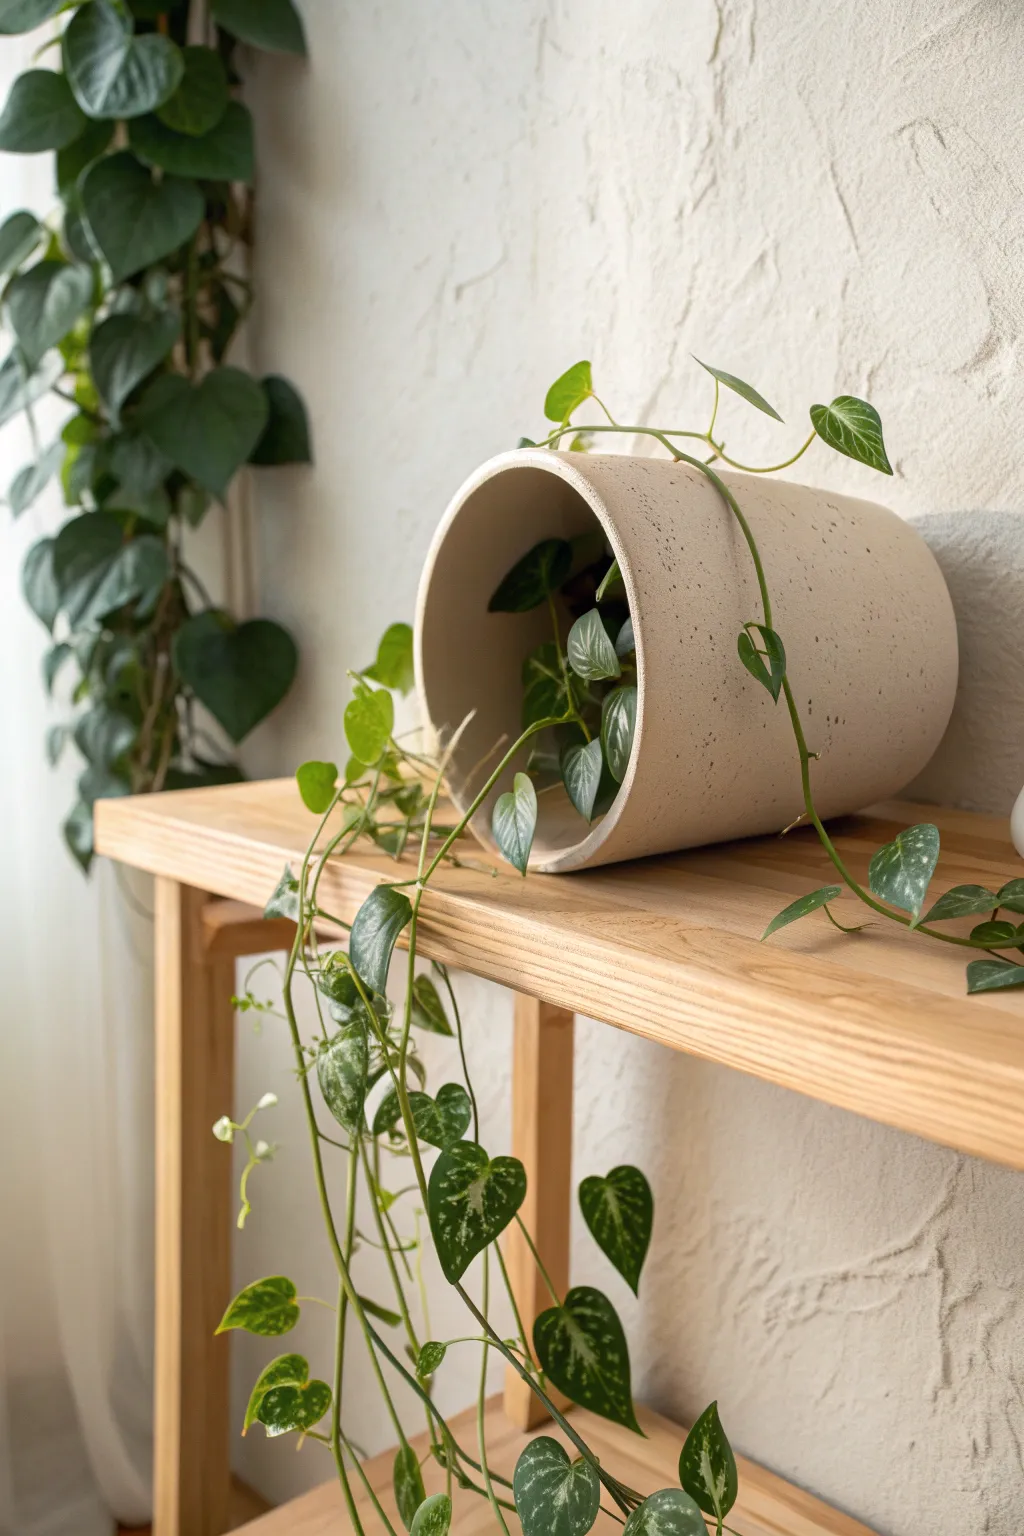
Embrace a playful sense of gravity with this sideways planter that looks like it just happened to roll over. The speckled ceramic cylinder creates a perfect minimalist tunnel for trailing vines to spill through, adding movement and whimsy to any shelf.
Detailed Instructions
Materials
- Cylindrical ceramic or concrete planter (no drainage hole preferred)
- Small plastic nursery pot (must fit inside the cylinder)
- Trailing plant (Satin Pothos or Philodendron)
- Potting soil
- Adhesive putty or museum wax
- Small handful of clay pebbles or gravel
- Sheet moss (optional)
- Wooden shelf or surface
Step 1: Preparing the Vessel
-
Check the fit:
Before you begin potting, take your empty plastic nursery pot and slide it into the cylindrical planter. It needs to fit snugly but have enough clearance to be tilted slightly without crushing the plant’s stems later. -
Clean the surface:
Wipe down the inside of your ceramic cylinder to remove any dust. Since this pot will be lying sideways, you want the interior walls to look clean and intentional, not dusty. -
Create a drainage buffer:
Place a small layer of clay pebbles or gravel at the bottom of the plastic nursery pot. Since the outer pot is decorative and sideways, proper drainage inside the liner is crucial to prevent root rot.
Soil Spilling Out?
If dirt keeps tumbling out, cut a circle of coconut fiber liner to fit the nursery pot’s top. Slit it to the center to slide around the stems, creating a physical barrier.
Step 2: Planting the Inner Pot
-
Position the plant:
Remove your trailing plant from its original container. Gently loosen the root ball and place it into the plastic nursery pot. -
Angle the stems:
This is the trickiest part: when adding fresh soil, try to position the root ball so the stems emerge at a slight angle rather than straight up. I like to encourage the vines toward one side of the rim. -
Secure the soil:
Pack the soil a bit firmer than usual. Since gravity will be pulling at the soil surface once tilted, a compact root ball helps keep everything in place. -
Add a top dressing:
To prevent soil spills, press a layer of sheet moss or decorative stones firmly onto the soil surface of the nursery pot. This acts like a plug. -
Water carefully:
Water the plant lightly and let it drain completely in the sink. The soil needs to be moist but not dripping wet, as standing water will leak out of the sideways assembly.
Step 3: Assembly and Styling
-
Apply the stabilizer:
Take a small ball of adhesive putty or museum wax and press it onto the side of the ceramic cylinder that will rest on the shelf. This prevents the round pot from literally rolling away. -
Position the cylinder:
Press the cylinder firmly onto your wooden shelf. Ensure the opening is facing the direction you want your vines to cascade. -
Insert the plant:
Gently slide the planted nursery pot inside the cylinder. You want to push it deep enough that the ugly plastic rim is hidden in the shadows, but not so deep the leaves are cramped. -
Wedge it in:
If the inner pot slides around, use a small folded piece of cardboard or a stone behind it (deep inside the cylinder) to wedge it in place so it doesn’t slide forward. -
Arrange the vines:
Gently pull the long trailing vines out through the opening. Let some loop over the top edge of the rim and others spill directly downward towards the floor. -
Create volume:
Fluff the leaves inside the cylinder mouth. The goal is to make it look like the plant is bursting out from the darkness. -
Final check:
Step back and check the balance. If the pot looks like it might tip, add a little more museum wax under the base for peace of mind.
Light It Up
Hide a tiny, battery-operated puck light deep in the back of the cylinder behind the plant pot. It creates a stunning backlit silhouette of the leaves at night.
Enjoy the effortless, tumbled look of your new modern planter display
Sideways Wall Pocket Spill Line
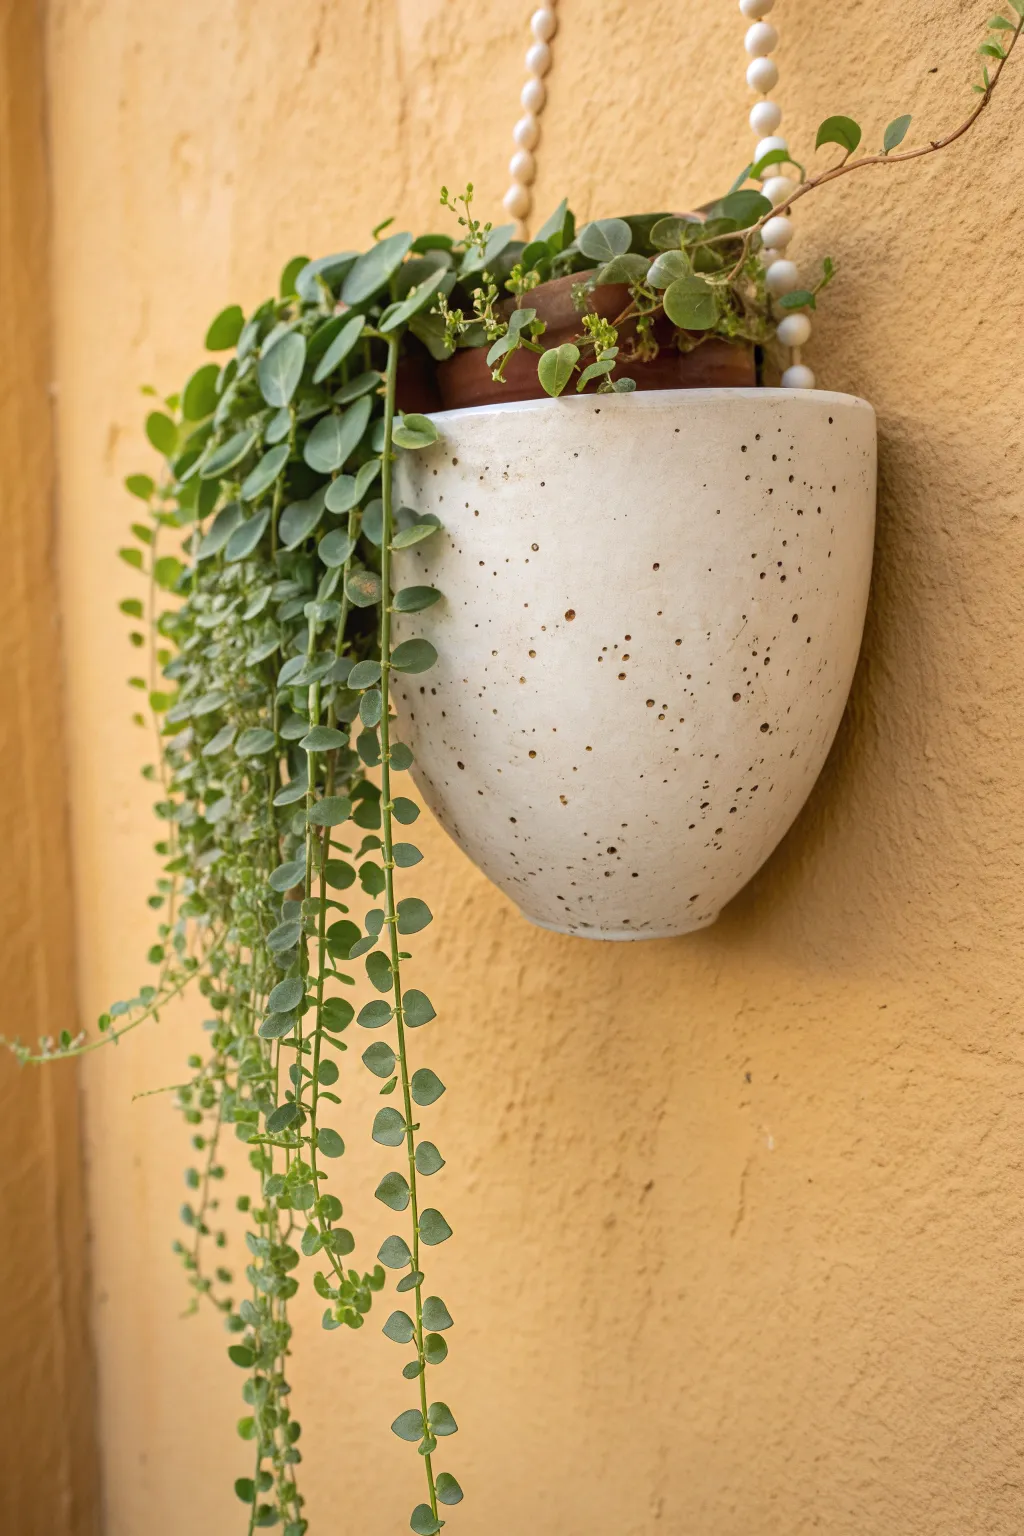
Embrace the organic beauty of trailing plants with this handmade speckled wall pocket that brings a modern, earthy touch to any vertical space. The smooth, off-white curve of the planter contrasts beautifully with the cascading greenery, while a simple beaded hanger adds a subtle bohemian flair.
Step-by-Step Tutorial
Materials
- Air-dry clay or polymer clay (white)
- Rolling pin
- Large bowl (for molding)
- Plastic wrap
- Craft knife or clay cutter
- Sandpaper (fine grit)
- Acrylic paint (warm white/cream)
- Acrylic paint (dark brown or black)
- Old toothbrush or stiff bristle brush
- Clear matte sealant or varnish
- Wooden beads (undyed)
- Strong jute twine or cotton cord
- Drill with small bit (if using air-dry clay)
- Small potted trailing plant (e.g., Peperomia Hope)
Step 1: Shaping the Pocket
-
Prepare the workspace:
Clear a flat surface and lay down a piece of canvas or parchment paper to prevent sticking. If you are using air-dry clay, keep a small bowl of water nearby for smoothing edges. -
Roll the slab:
Take a large chunk of clay and condition it by kneading until pliable. Roll it out into an even slab, aiming for a thickness of about 1/4 inch to ensure structural stability. -
Prepare the mold:
Select a bowl that has the curve shape you want for your planter. Cover the outside of the bowl tightly with plastic wrap to ensure the clay releases easily later. -
Cut the shape:
Lay your clay slab over the covered bowl. You want to cut a semi-circle shape that hugs the curve but leaves a flat opening at the top. Use your craft knife to trim away excess clay, creating a clean, deep pocket shape. -
Create the back:
Cut a separate flat semi-circle from your remaining clay slab. This will be the back of the planter that sits against the wall. Measure it against the molded pocket to ensure they match up perfectly. -
Join the pieces:
Score the edges of both the pocket piece (still on the mold) and the flat back piece. Apply a little water or ‘slip’ (clay mixed with water) to the scored areas. -
Seal the seam:
Press the pieces together firmly to join. Use a modeling tool or your finger to smooth the seam completely so it looks like one continuous piece of clay. -
Add hanging holes:
While the clay is still soft, use a straw or a tool to punch two holes near the top corners of the back plate. These will be for the beaded hanger later.
Step 2: Finishing and Decorating
-
Dry or bake:
Follow the manufacturer’s instructions for your specific clay. If using air-dry clay, let it sit for 24-48 hours until fully hardened. If using polymer, bake according to the package directions. -
Sand for smoothness:
Once fully cured, use fine-grit sandpaper to smooth out any rough edges, particularly around the rim and the back seam. -
Base coat:
Apply two coats of warm white or cream acrylic paint. I like to sponge this on sometimes to give it a slightly textured, ceramic feel. -
Create the speckles:
Mix a small amount of dark brown paint with water to thin it out. Dip your toothbrush bristles into the paint. -
Splatter technique:
Hold the toothbrush near the planter and run your thumb across the bristles to flick tiny droplets of paint onto the surface. Practice on paper first to control the density of your speckles. -
Seal:
After the paint is bone dry, coat the entire piece, inside and out, with a matte waterproof sealer. This is crucial to protect the clay from moisture.
Sticky Seams?
If your clay seam keeps cracking open as it dries, dampen the area slightly and apply fresh clay ‘slip’ (a paste of clay and water) to fill the gap, then smooth again.
Step 3: Assembly
-
String the beads:
Cut a length of strong cord. Thread one end through one of the holes you created, tying a secure double knot on the inside. -
Create the handle:
Thread your wooden beads onto the cord until you have the desired handle length. Thread the remaining end through the second hole and knot securely. -
Pot the plant:
Place your nursery pot directly inside the finished pocket. Arrange the vines so they spill over the front edge authentically.
Make it Waterproof
For a truly functional planter, coat the INTERIOR with liquid epoxy resin. This allows you to plant directly into the pocket without risking water damage to the clay.
Hang your new creation on a sun-drenched wall and enjoy the vibrant splash of green it brings to the room
Sleepy Animal Planter Spilling Greenery
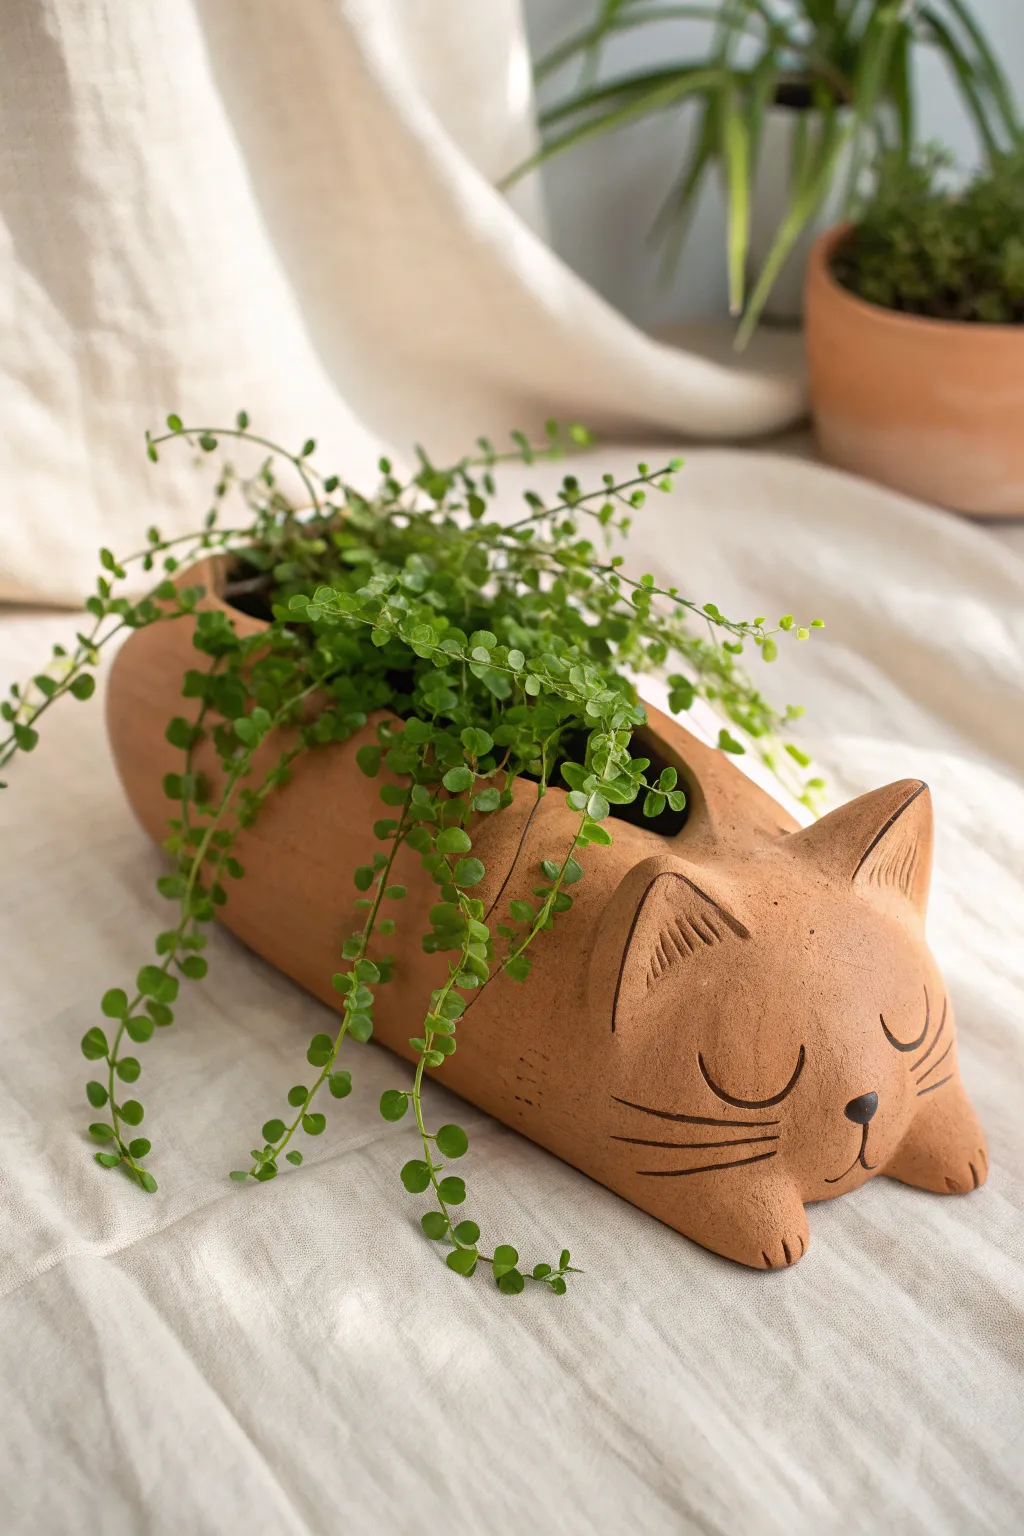
Bring a cozy, restful vibe to your windowsill with this handmade terracotta clay planter shaped like a slumbering cat. The long, cylindrical body acts as the perfect vessel for trailing vines, creating the illusion of a soft, green blanket draped over a sleeping pet.
How-To Guide
Materials
- Air-dry terracotta clay (or kiln-fire stoneware if you have access)
- Wide rolling pin
- Fettling knife or clay cutting tool
- Slip (clay mixed with water) and scoring tool
- Wooden modeling tools
- Sponge
- Small round piping tool or straw (for the nose)
- Black acrylic paint (if using air-dry clay)
- Fine detail paintbrush
- Matte sealant/varnish (for air-dry clay)
- Small creeping wire vine or string of turtles plant
- Circular cardboard tube (optional, for support)
Step 1: Shaping the Sleeping Body
-
Roll the main slab:
Start by rolling out a generous slab of terracotta clay until it is about 1/4 inch thick. Aim for a rectangular shape roughly 10 inches long and 6 inches wide to form the main body cylinder. -
Form the cylinder:
Carefully curve the slab into a long tube shape. If you have a cardboard tube handy, you can wrap the clay loosely around it for support, but ensure you put a layer of paper between the clay and cardboard to prevent sticking. -
Seal the seam:
Join the long edges of your cylinder by scoring the clay (scratching crisscross marks) and applying a little slip. Press the edges firmly together and smooth the seam completely with your thumb or a rib tool so it disappears. -
Create the planting opening:
Before the clay hardens, use your fettling knife to cut a large oval opening along the top of the cylinder’s back. This needs to be wide enough to insert roots and soil later. -
Close the ends:
Cut two circular shapes from your remaining clay slab to cap off the front and back of the cylinder. Score, slip, and attach these to the open ends of the tube, blending the clay for a seamless look.
Keep it Steady
Before drying, gently press the formed cylinder down onto a table to flatten the bottom slightly. This creates a stable base so your kitty doesn’t roll away once planted.
Step 2: Sculpting the Features
-
Shape the head:
Roll a smooth ball of clay, slightly flattening the back side where it will attach to the body. Gently pinch the front to form a subtle snout area. -
Attach the head:
Score the front cap of your cylinder and the back of the head heavily. Apply slip and press the head firmly onto the body. I find using a small coil of clay around the seam helps reinforce this connection. -
Add the ears:
Cut two thick triangles from your clay scraps. Gently pinch them to give them a curved, organic shape, then score and slip them onto the top of the head. Use a wooden tool to carve shallow indentations inside the ears for depth. -
Form the paws:
Roll two small, sausage-like shapes for the front paws. Attach them under the chin area so the cat looks like it’s resting its head on its hands. Use a needle tool to press three small lines into the end of each paw for toes. -
Refine the surface:
Take a slightly damp sponge and wipe down the entire piece to remove fingerprints and smooth out any rough textures. The surface should look matte and velvety.
Step 3: Details & Planting
-
Scribe the face:
Using a sharp needle tool or fine point, gently carve two wide U-shapes for the closed sleeping eyes. Add three whiskers on each cheek and a small vertical line for the mouth. -
Add a nose:
Roll a tiny ball of clay for the nose and press it right at the junction of the eyes and mouth line. You can paint this later, but attaching a physical nose adds a nice dimensional touch. -
Dry completely:
Let your sculpture dry slowly away from direct heat or sunlight. If using air-dry clay, this may take 24-48 hours. If firing ceramic, follow your kiln’s firing schedule. -
Paint the details:
Once fully dry (and fired, if applicable), use a very fine brush and black acrylic paint to carefully fill in the carved lines of the eyes, whiskers, and mouth. Paint the nose black as well. -
Seal the interior:
If using air-dry clay, you must waterproof the inside thoroughly. Apply at least three coats of a heavy-duty waterproof varnish or sealant to the interior cavity to prevent the clay from disintegrating when watered. -
Pot the greenery:
Fill the opening with potting mix and tuck in your creeping wire vine or similar trailing plant. Tease the vines so they cascade down the sides of the planter.
Add Texture
Before the clay dries, gently press a piece of rough fabric or burlap against the body area to create a subtle fur-like texture, contrasting with the smooth head.
Place your sleepy feline in a spot with filtered light and enjoy the peaceful atmosphere it brings to the room
Pebble “Paint Pour” Sideways Planter
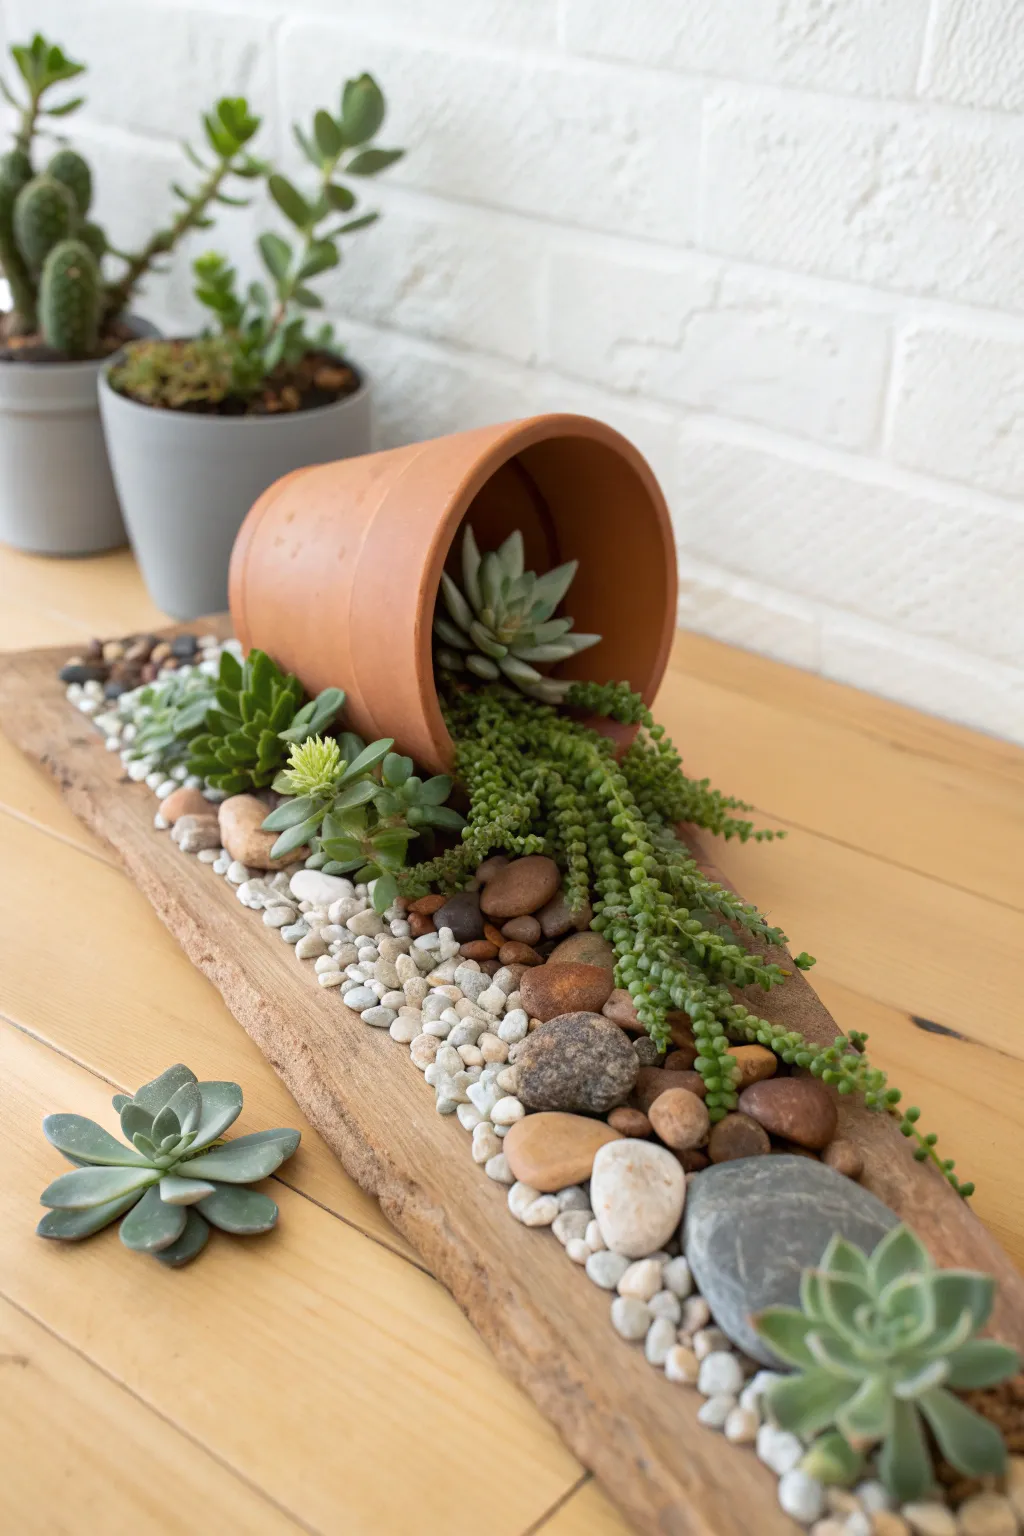
Transform a simple terracotta pot into a dynamic living sculpture with this spilled-effect arrangement. By laying the pot on its side atop a rustic wooden base, you create the illusion of succulents and stones tumbling out in a beautiful, organic cascade.
Detailed Instructions
Materials
- Long, flat piece of driftwood or bark (approx. 18-24 inches)
- Small terracotta pot (4-6 inch diameter)
- Succulent potting soil
- String of Pearls or String of Bananas succulent (trailing variety)
- Assorted rosette succulents (Echeveria, Sempervivum)
- Small white decorative gravel
- Medium-sized river rocks (smooth, mixed colors)
- Large accent stones (dark grey/slate)
- Hot glue gun and glue sticks
- Clear E6000 craft adhesive (optional for extra strength)
- Spoon or small scoop
- Soft brush for cleaning
Step 1: Preparing the Base
-
Select and clean the wood:
Choose a piece of driftwood or bark that is relatively flat on the bottom so it sits securely on a table. Use a soft brush to remove any loose debris or dust from the top surface where you’ll be building your arrangement. -
Position the pot:
Place your terracotta pot on its side near one end of the wood. Experiment with the angle; it should look like it has naturally tipped over. The opening of the pot should face down the length of the wood. -
Secure the pot:
Once you like the position, apply a generous amount of hot glue to the part of the pot rim and side touching the wood. Hold it firmly in place for 30-60 seconds until the glue sets completely. For a permanent hold, I sometimes add a dab of E6000 alongside the hot glue.
Root Stability
If the trailing succulents keep shifting while you work, use U-shaped floral pins or bent paperclips to gently pin the stems into the soil until they root deeply.
Step 2: Planting the ‘Spill’
-
Add soil inside:
Carefully spoon succulent soil into the bottom half of the sideways pot. Pack it down slightly so it creates a sloping ramp leading out of the pot mouth. -
Create a soil path:
Extend a thin layer of soil directly onto the wood, trailing out from the pot’s mouth for about 4-6 inches. This will be the planting bed for the trailing succulents. -
Plant the anchor:
Take a rosette succulent (like an Echeveria) and plant it just inside the rim of the pot at the top of the pile. This anchors the visual center of the spill. -
Install the trailing elements:
Plant the root ball of your String of Pearls or similar trailing succulent into the soil ramp. Gently drape the long strands over the edge of the soil path, moving down the center of the wood plank. -
Add secondary rosettes:
Tuck a few more small rosette succulents along the sides of the ‘spill’ zone, right where the soil meets the wood, to blend the transition.
Step 3: Layering the Stones
-
Start with river rocks:
Place medium-sized smooth river rocks around the base of the planted succulents. These help hold the soil in place and hide the root balls. -
Create the white stream:
Pour small white gravel along the edges of the wood plank, framing the central ‘green river.’ Let the gravel wander in and out naturally, rather than making straight lines. -
Mix textures:
Where the white gravel meets the succulents, mix in a few more medium river rocks to create a gradual transition between the tiny stones and the plants. -
Extend the flow:
Continue adding white gravel all the way to the far end of the driftwood, tapering it off slightly as you reach the edge. -
Place loose rosettes:
Set a single loose succulent cutting or small potted rosette near the very end of the plank, nestled among the stones, and perhaps one off to the side on the table for staging.
Watering Woes
Since this planter is sideways and shallow, water very sparingly with a syringe or squirt bottle. Direct water only at the roots to avoid washing away the design.
Step 4: Final Details
-
Add large accents:
Place 2-3 large, dark grey slate stones near the end of the driftwood or interspersed among the white gravel to add visual weight and contrast. -
Clean up:
Use a small, dry paintbrush to sweep any stray soil particles off the leaves of the succulents and the white stones to keep the colors crisp. -
Final check:
Look at the arrangement from all angles. If any soil is visible, tuck a few more small pebbles into the gap to conceal it entirely.
Place your beautifully spilled planter on a dining table or mantle where the detailed textures can be admired up close