If your clay projects have been feeling a little too serious, it’s time to lean into silly clay ideas that celebrate weird faces, wonky proportions, and pure personality. In my studio, the best pieces are the ones that make you laugh the second you set them on your desk or tuck them into a plant pot.
Googly-Eyed Blob Monsters
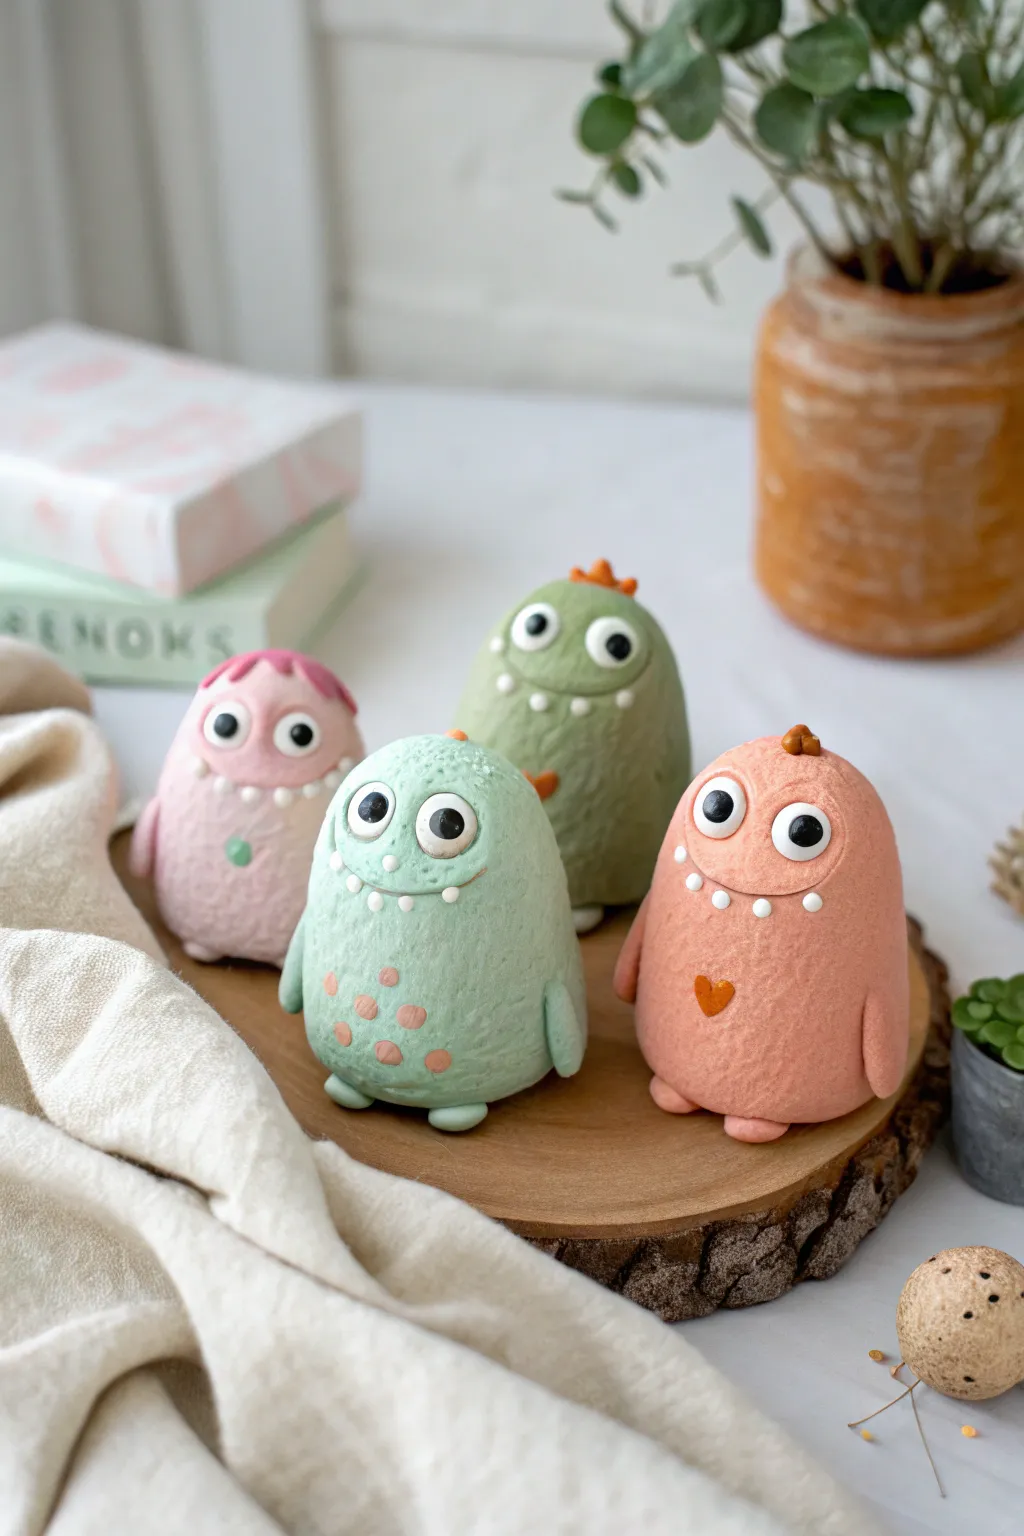
These adorable, stout little monsters are full of personality and make perfect desk companions or small gifts. Using soft pastel polymer clay, you’ll sculpt simple egg-like shapes and bring them to life with expressive, oversized eyes and tiny details.
Step-by-Step Guide
Materials
- Polymer clay in pastel pink, mint green, peach, and olive green
- White polymer clay
- Black polymer clay
- Orange polymer clay (tiny amount)
- Sculpting tools (needle tool, small ball tool)
- Aluminum foil (for armature core)
- Baking sheet and parchment paper
- Soft toothbrush or texture sponge (optional)
Step 1: Shaping the Bodies
-
Create foil cores:
To save clay and keep the figures light, tightly scrunch aluminum foil into four egg-shaped balls, each about 1.5 to 2 inches tall. -
Condition the clay:
Knead your pastel clay colors until they are soft and pliable. You’ll need one main color for each monster. -
Cover the cores:
Flatten a sheet of conditioned clay and wrap it fully around an aluminum foil core. Smooth the seams with your fingers until you have a seamless, egg-shaped blob. -
Flatten the base:
Gently tap the bottom of the shape onto your work surface so the monster stands up sturdily on its own. -
Add texture (optional):
If you want that slightly matte, stone-like look seen in the photo, gently dab the surface with a soft toothbrush or a texture sponge. I find this hides fingerprints nicely.
Uneven Eyes?
Don’t stress if the eyes aren’t perfectly symmetrical! In fact, having one eye slightly larger or higher than the other often adds to the silly, monstrous charm of these characters.
Step 2: Face Features
-
Make eye sockets:
Using a large ball tool or your thumb, press two shallow indentations where you want the eyes to sit. -
Form the whites of the eyes:
Roll small balls of white clay, flattening them slightly into thick discs. Press these firmly into the indentations you just made. -
Add the pupils:
Roll tiny balls of black clay. Place them onto the white discs. You can center them for a surprised look or make them look sideways for a mischievous expression. -
Create the mouth:
Use a needle tool or a clay knife to impress a shallow, curved line for the smile. -
Add teeth:
Roll very tiny, rice-sized bits of white clay. Press them gently along the top or bottom of the smile line to create goofy little teeth.
Make Them Magnetic
Before baking, press a strong ceramic magnet into the back of the monster. Bake firmly, then glue the magnet back in if it pops out, turning your blobs into fridge magnets.
Step 3: Limbs and Details
-
Sculpt the arms:
Roll two small sausage shapes of the matching body color. Flatten one end to attach it to the body, leaving the other end rounded. -
Attach the arms:
Blend the flattened end of the arm onto the side of the body so it looks seamless, letting the arms hang down naturally. -
Make the feet:
Create two small, flattened balls for feet. Place the monster body on top of them so they peek out from underneath, helping stabilize the figure. -
Embellish with belly spots:
For the mint green monster, add small flattened circles of pink clay to the belly area. -
Add a heart detail:
For the peach monster, shape a tiny piece of dark orange clay into a heart and press it onto the chest. -
Create hair or spikes:
Add personality with head details. For the pink monster, use flattened teardrop shapes for hair; for the olive one, add tiny orange spikes.
Step 4: Baking and Finishing
-
Prep for baking:
Place all your finished monsters on a parchment-lined baking sheet. -
Bake:
Bake according to your polymer clay package instructions (usually around 275°F or 135°C for 15-30 minutes depending on thickness). -
Cool down:
Let the figures cool completely on the baking sheet before handling them to ensure they harden fully.
Arrange your little monster squad on a shelf or gift them to a friend who needs a smile


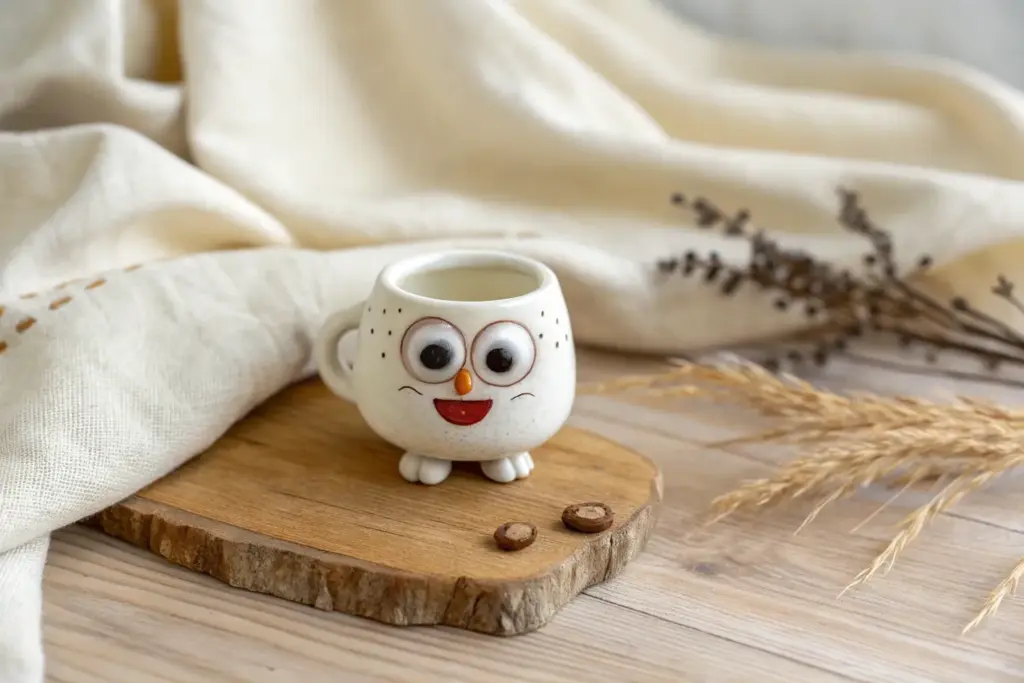
Toothy Grin Desk Buddy

Add some whimsical character to your workspace with this charming speckled monster sculpture. With its wide, toothy smile and playful tongue, this simple ceramic friend is guaranteed to brighten even the dreariest Monday morning.
How-To Guide
Materials
- Speckled stoneware clay (about 1 lb)
- Needle tool
- Small loop tool
- Scoring tool or serrated kidney
- Slip (clay slurry)
- Wooden modeling tool
- Underglaze (pink/red and black)
- Small paintbrush
- Sponge
- Clear matte glaze (optional)
Step 1: Shaping the Body
-
Form the base shape:
Start with a ball of clay roughly the size of a large orange. Roll it between your palms to smooth out any cracks, then gently elongate it into a thick, rounded cylinder or egg shape. This will be the main body of your monster. -
Create the legs:
Turn the cylinder upside down. Use your thumb or a modeling tool to press an indentation into the bottom center. Gently pinch and pull the clay on either side of the indentation to form two stubby, sturdy legs. -
Refine the stance:
Flip the figure back onto its feet. Tap it gently on your work surface to flatten the bottoms of the feet so it stands securely without wobbling. Smooth the transition between the legs and the torso using your fingers or a rib tool. -
Tap the top:
Gently pat the top of the head to round it off slightly, ensuring the overall silhouette is smooth and potato-shaped.
Clean Teeth Tip
Keep the teeth unglazed or wax resist them before dipping in clear glaze. This keeps them looking sharp and prevents glaze from blurring their definition.
Step 2: Adding Features
-
Mark the mouth:
Decide where the happy face will go. Use a needle tool to lightly sketch a wide, horizontal crescent shape for the mouth about halfway up the body. This monster needs a big grin, so don’t be shy with the size. -
Excavate the mouth:
Using a loop tool, carve out the clay within your sketched mouth lines. Dig deep enough to create a distinct cavity but be careful not to poke through the back of the figure. Smooth the interior walls of the mouth with a damp sponge or fingertip. -
Form the tongue:
Take a small scrap of clay and flatten it into a tongue shape—rounded at the bottom and flat at the top. Test fit it against the bottom lip of the mouth opening; it should drape down slightly over the body. -
Attach the tongue:
Score the back of the tongue and the area below the mouth where it will attach. Apply a dab of slip, press the tongue firmly into place, and smooth the join underneath so it looks integrated. -
Make the teeth:
Roll tiny little cones or balls of clay for the teeth. You’ll want a mix of slightly different sizes for a goofy, organic look. Aim for about 6-8 teeth for the top row and maybe 4-6 for the bottom. -
Install the teeth:
Score the gum lines inside the mouth cavity. Using tweezers or nimble fingers, slip and score each individual tooth into place along the upper and lower ridges of the mouth. I like to alternate sizes slightly to give him more personality. -
Add the arms:
Roll two small coils of clay, about the thickness of a pencil but shorter. Score and slip these onto the sides of the body, blending the clay at the shoulders so they hang naturally. Leave the ends slightly loose or pressed against the body.
Step 3: Finishing Touches
-
Create the eyes:
Roll two very small balls of clay for eyes. Attach them above the mouth using slip. Press them flat slightly so they don’t protrude too much. -
Smoothen surfaces:
Take a barely damp sponge and wipe down the entire exterior of the monster. This removes fingerprints and exposes the grog or speckles in the clay, which gives it that nice texture. -
Dry partially:
Let the piece dry slowly until it reaches a leather-hard state. This is crucial before painting so the underglaze adheres well without becoming muddy. -
Paint the details:
Apply pink or light red underglaze to the tongue and the interior back wall of the mouth to create depth. Use a steady hand to paint small black dots for the pupils on the eyes. -
Biscuit fire:
Once bone dry, fire the piece to bisque temperature (usually Cone 04) in a kiln. -
Glaze and final fire:
If you want a shiny finish, dip the piece in a clear matte or glossy glaze. Alternatively, leave the raw speckled clay unglazed for a natural stone look, only glazing the interior mouth and tongue. Fire again to the clay body’s maturity temperature (e.g., Cone 5 or 6).
Mouth Collapse?
If the mouth opening starts to sag while working, prop it open with a small piece of paper towel or sponge until the clay stiffens up enough to support itself.
Place your little monster on your desk and enjoy his goofy companionship while you work


Derpy Animal Figurines
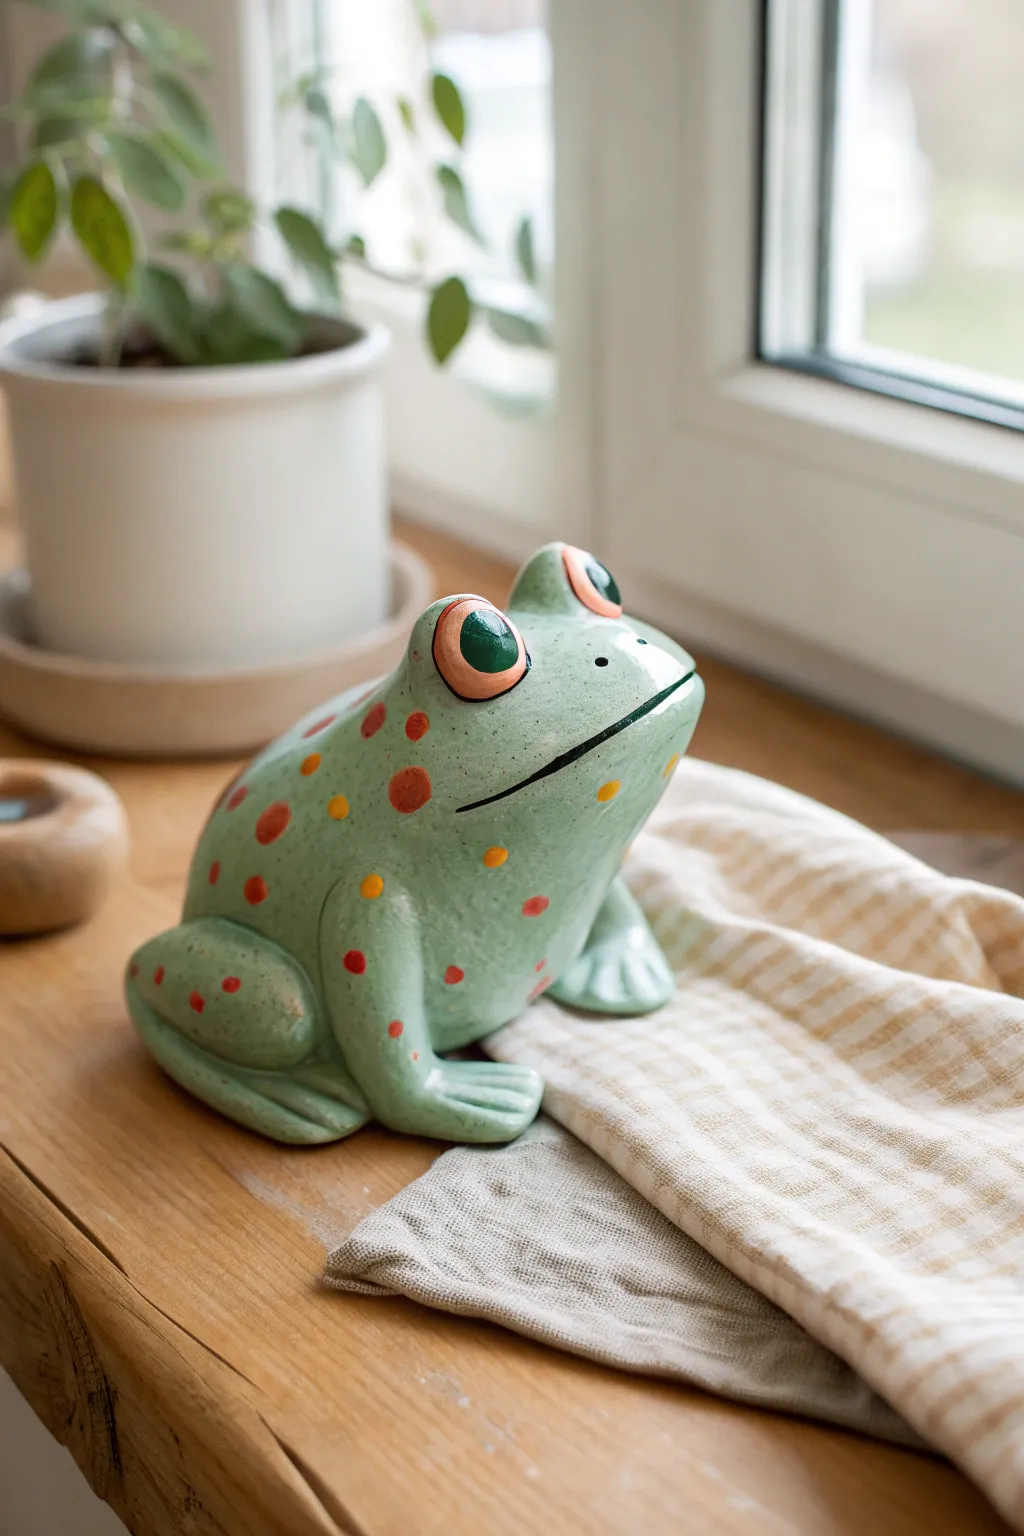
This charmingly whimsical frog figurine combines a smooth, glossy finish with a deliberately simple, wide-eyed expression that radiates personality. Its muted seafoam green body is dotted with playful red and orange spots, making it a perfect, low-stress project for adding character to any nook.
Step-by-Step Tutorial
Materials
- Earthenware or stoneware clay (white or light grey)
- Modeling tools (wooden kidney, needle tool)
- Small bowl of water and sponge
- Ceramic underglazes: Seafoam Green, Burnt Orange, Bright Red, Black, White
- Clear glossy glaze (food safe if applicable)
- Kiln (or air-dry clay alternatives with acrylics/varnish)
- Soft synthetic brushes (medium shader and fine liner)
- Rolling pin
Step 1: Shaping the Base Form
-
Establish the main body:
Begin with a lump of clay roughly the size of a large grapefruit. Working it in your hands, shape it into a rounded, slightly slumped pyramid shape. The bottom should be wide and flat for stability, tapering up to a rounded head area without a distinct neck. -
Smooth the surface:
Use a damp sponge or a flexible wooden kidney tool to smooth out any fingerprints or lumps on the main body. The charm of this piece relies on a very smooth, almost balloon-like surface texture. -
Create the legs:
Roll two thick coils of clay for the rear legs. Flatten them slightly and attach them to the sides of the body using the score-and-slip method. Blend the upper thigh area seamlessly into the main body so it looks like one continuous form. -
Form the feet:
At the base of your leg coils, press down to form flat flippers. Use a modeling tool handle or your thumb to press indentations for the toes, keeping them stylized and rounded rather than anatomically sharp. -
Shape the front arms:
Pull or attach two smaller columns of clay from the front chest area to create the front legs. These should be straighter and simpler than the back legs, resting flat on the table surface with simple three-toed feet.
Step 2: Adding Personality Details
-
Sculpt the eye sockets:
Roll two small balls of clay for the eyes. Score the top of the head and attach them securely. Instead of leaving them as perfect spheres, press them slightly to flatten the tops, blending the bottom edges into the head to create eyelids. -
Refine the eyeballs:
The eyes are the key to the ‘derpy’ look. Ensure the clay balls are prominent and bug-eyed. Use a damp brush to smooth the transition between the eye mound and the skull. -
Carve the mouth:
Using a needle tool or a thin fettling knife, slice a long, gently curving line across the entire width of the face. It should reach almost from one side of the jaw to the other to create that wide, vaguely satisfied grin. -
Final smoothing:
Give the entire piece one last pass with a very slightly damp sponge. This removes any final burrs or tool marks. Let the piece dry slowly to leather hard, then bone dry, and bisque fire it according to your clay body’s instructions.
Uneven Glaze?
If your green base coat looks streaky, sponge the first layer on instead of brushing. This creates a textured tooth for subsequent brushed layers to grab onto evenly.
Step 3: Glazing and Finishing
-
Base coat application:
Once bisque fired, apply three even coats of a Seafoam Green underglaze to the entire frog. I like to let each coat dry until it’s matte before applying the next to prevent streaking. -
Painting the eyes:
Paint the eye mounds with a coral or salmon pink underglaze. Once dry, add a large circle of black in the center for the pupil, leaving a small sliver of the pink visible as the iris. -
Adding the catchlight:
Take a tiny dot of white underglaze and place it in the upper right corner of the black pupil. This simple white dot instantly brings the character to life. -
Spotting the back:
Using a round brush, dab varied sizes of spots onto the frog’s back. Alternate between a Burnt Orange and a Bright Red. Make them irregular and scattered; perfect symmetry makes it look too manufactured. -
Darkening the mouth:
Use a very fine liner brush and black underglaze to re-trace the incision of the mouth line. This helps the smile stand out clearly against the green skin. -
Clear glaze application:
Once all underglaze design work is completely dry, carefully brush on or dip the frog in a clear transparent glaze. Ensure the coat is even, paying attention to the crevices around the legs. -
Final firing:
Place the frog on a stilt in the kiln (to prevent the glazed bottom from sticking to the shelf) and glaze fire to the appropriate cone temperature for your materials.
Make it a Bank
Before the clay dries, cut a coin slot in the back and a hole in the base for a stopper. Hollow out the body more aggressively to maximize coin space.
Place your shiny new amphibian friend near a window or plant pot where he can survey his kingdom


Silly Little Alien Heads
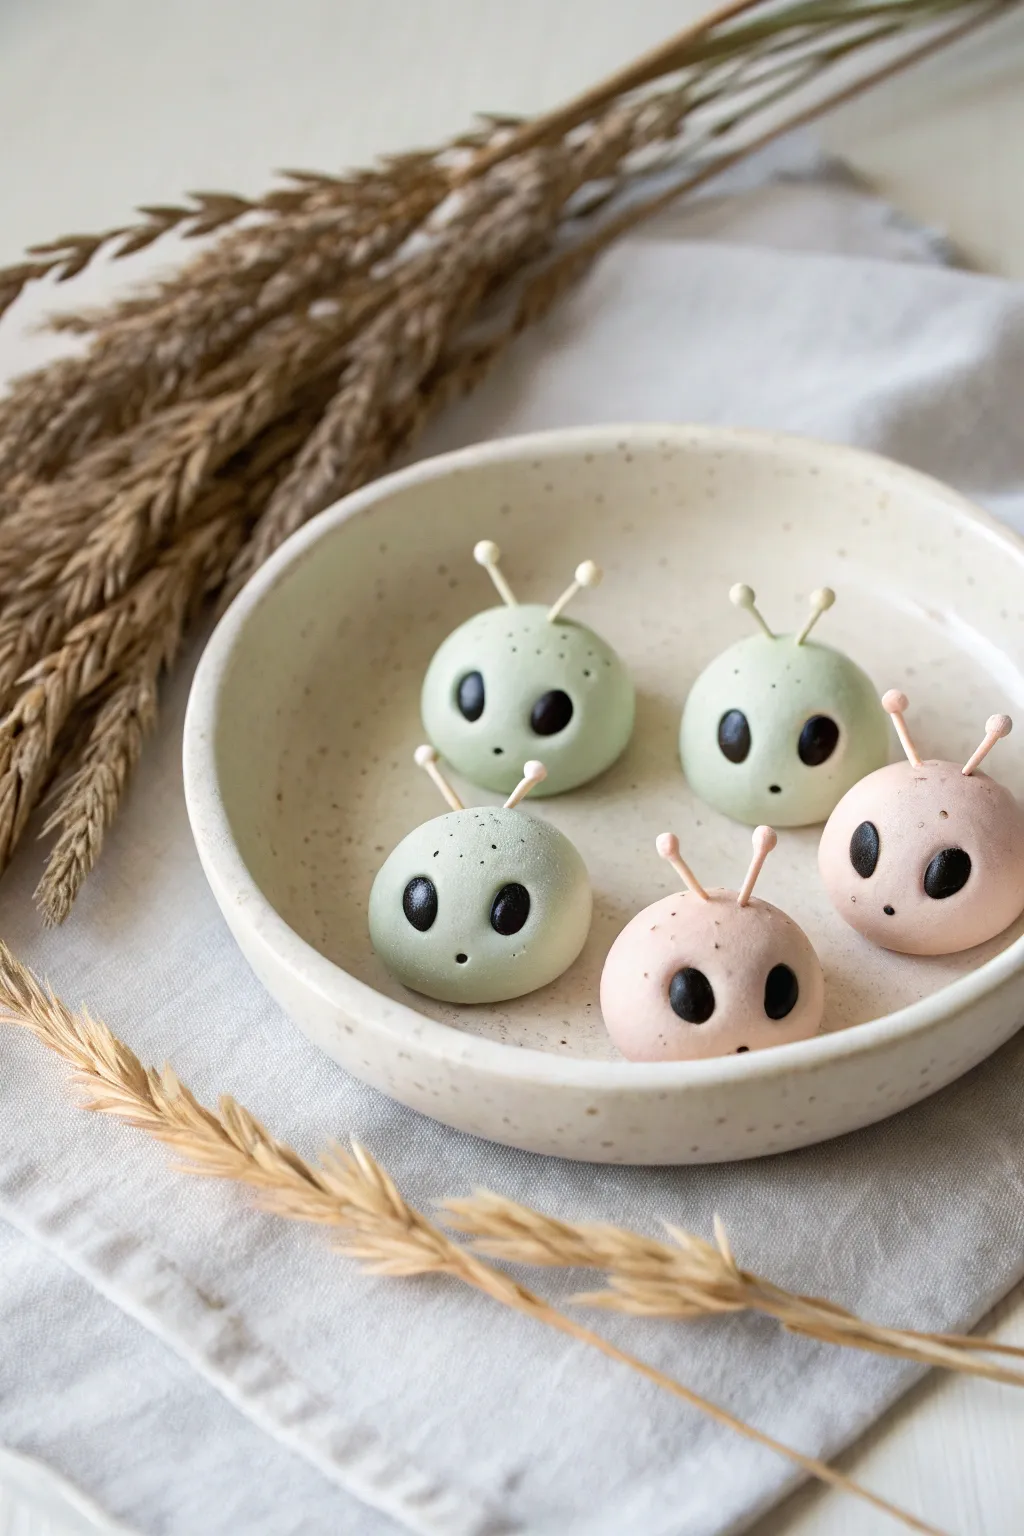
These adorable little alien heads are minimal, sweet, and perfect for beginners looking to practice simple shapes. With their matte finish and wide-set eyes, they create a charmingly curious display that looks great grouped in a small bowl.
Step-by-Step
Materials
- Polymer clay (pale mint green, pale blush pink, and black)
- White polymer clay (optional, to lighten colors)
- Thin floral wire or metal headpins (for antennae)
- Needle tool or toothpick
- Ball stylus tool (medium size)
- Baking sheet and parchment paper
- Oven (per clay manufacturer instructions)
- Soft brush (for dusting)
- Cornstarch (optional, for smoothing)
Step 1: Forming the Base
-
Prepare the Colors:
Start by conditioning your clay until it is soft and pliable. If your green or pink clay is too vibrant, mix in a significant amount of white clay until you achieve a very soft, pastel milky-green and blush-pink tone. -
Portion the Clay:
Pinch off small pieces of your pastel clay, each about the size of a large gumball or a walnut. You want enough clay to form a satisfying rounded shape. -
Roll spheres:
Roll each portion between your palms to create a smooth, tight ball. Aim for a shape that is slightly flattened at the bottom so it sits stable without rolling away. -
Smooth imperfections:
Inspect surface for fingerprints. If necessary, lightly dust your finger with a tiny bit of cornstarch and gently buff out any prints or lint.
Fingerprint Troubles?
If fingerprints are stubborn, lightly brush the raw clay with baby oil or a smoothing oil before baking. It melts away ridge lines perfectly.
Step 2: Creating the Faces
-
Mark Eye Sockets:
Using a medium ball stylus or the rounded end of a paintbrush, gently press two indentations where the eyes will go. Place them somewhat wide apart to get that classic ‘cute alien’ look. -
Make the eyes:
Take a tiny amount of black clay and roll it into a thin snake. Cut small, equal segments to ensure all eyes will be roughly the same size. -
Shape the eyes:
Roll the black segments into balls, then slightly flatten them into ovals. These shouldn’t be perfectly round; a slight almond or teardrop shape works well. -
Place the eyes:
Press the black ovals gently into the indentations you made earlier. They should protrude slightly but look integrated into the face. -
Add the mouth:
Using a needle tool or a very sharp toothpick, poke a tiny, single hole centrally below the eyes to create a surprised little ‘o’ mouth. -
Add freckles:
For extra texture, you can use the needle tool to add extremely faint, random pockmarks or ‘freckles’ on the forehead area, though this is optional.
Wire Stability Tip
Bend the bottom 2mm of your wire into a tiny ‘L’ hook before inserting it into the head. This anchors it inside the clay so it won’t fall out after baking.
Step 3: The Antennae
-
Cut the wires:
Cut your thin floral wire or headpins into short segments, about 1/2 inch to 3/4 inch long. You will need two per alien. -
Cap the wires:
Take extremely tiny bits of the matching pastel clay (green for green heads, pink for pink heads) and roll them into tiny micro-balls. -
Secure the tips:
Press one micro-ball onto the end of each wire segment. I find it helps to add a microscopic dot of liquid clay or bake-and-bond here, though pressure usually suffices. -
Insert antennae:
Gently push the bare end of the wires into the top of the alien heads. Angle them slightly outward for a jauntier personality.
Step 4: Baking and Finishing
-
Final check:
Give your little squad a once-over. Ensure the antennae are straight and no dust has settled on the light clay. -
Bake:
Place the figures on a parchment-lined baking sheet. Bake according to your polymer clay package directions—usually around 275°F (130°C) for 15-20 minutes depending on thickness. -
Cool down:
Let them cool completely on the baking tray. The wire antennae will be hot, so resist the urge to touch them until cool. -
Matte finish:
These aliens look best with a natural matte finish, so no glazing is required. Simply arrange them in a bowl and enjoy your extraterrestrial friends.
Group your new friends together on a desk or shelf for a quiet little invasion

The Complete Guide to Pottery Troubleshooting
Uncover the most common ceramic mistakes—from cracking clay to failed glazes—and learn how to fix them fast.
Not-So-Scary Mini Monsters
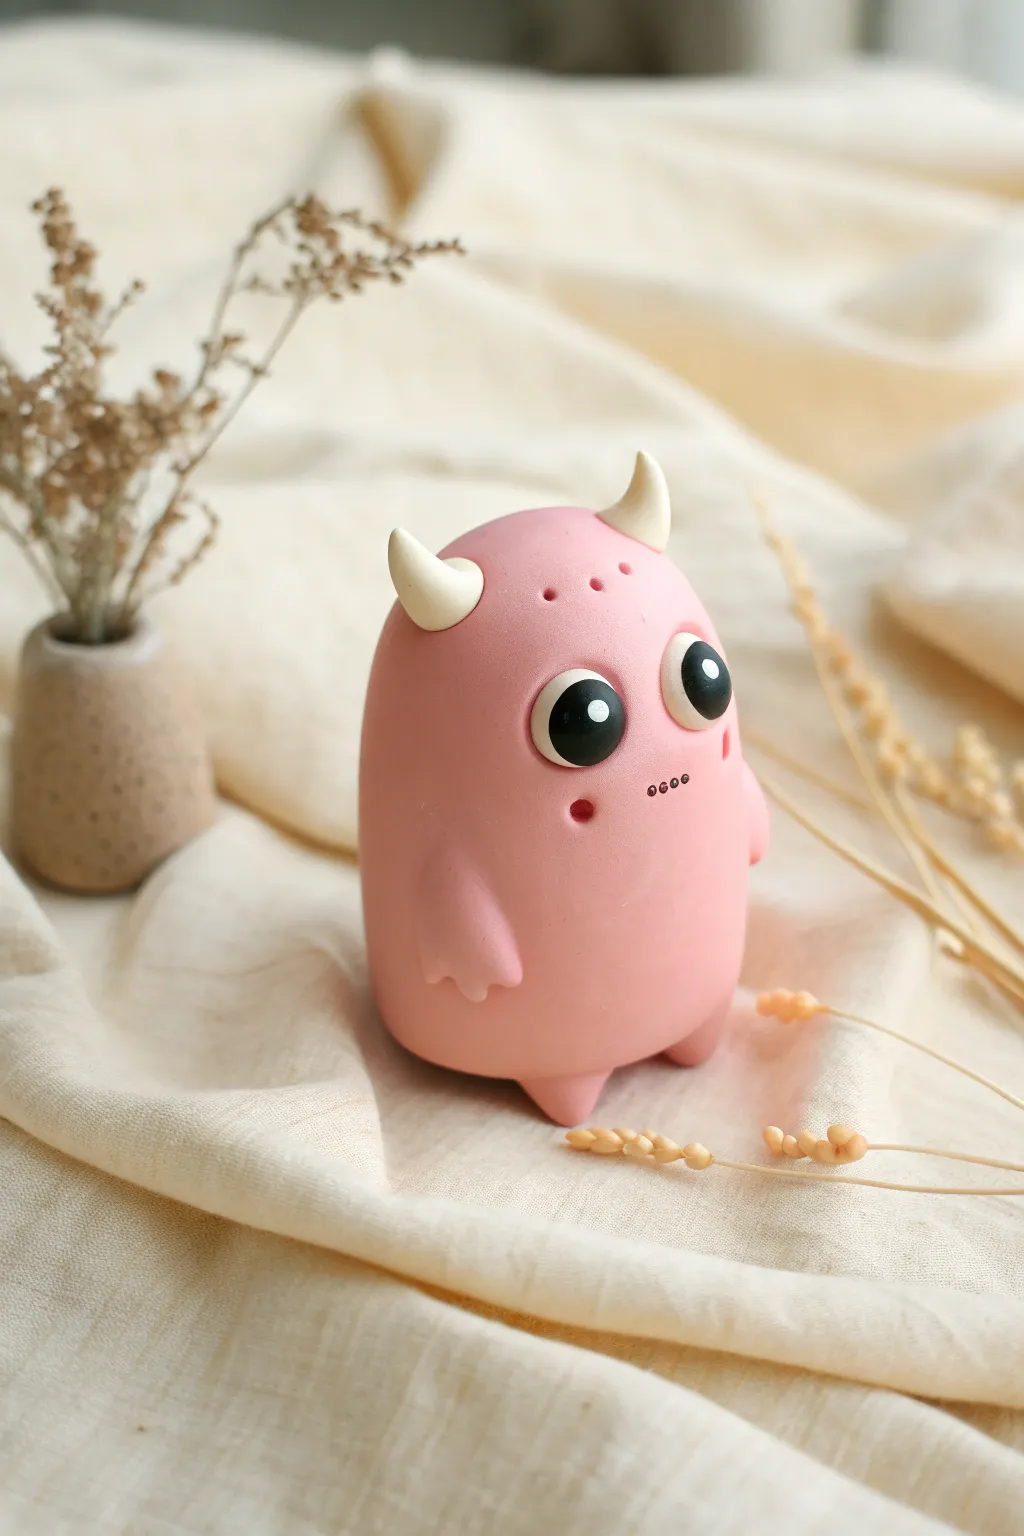
This adorable little desk friend features a soft matte finish and big, expressive eyes that make it impossible not to smile at. It is a deceptively simple sculpt that relies on smooth shaping to create a clean, minimalist character perfect for beginners.
Step-by-Step Tutorial
Materials
- Pink polymer clay (soft pink or bubblegum)
- White polymer clay
- Black polymer clay
- Pointed sculpting tool or toothpick
- Small ball stylus tool
- Needle tool
- Baking sheet
- Parchment paper
- Oven (for curing)
Step 1: Shaping the Body
-
Condition the clay:
Start by taking a generous amount of pink polymer clay. Knead it thoroughly in your hands until it is warm, soft, and pliable to prevent cracking later. -
Form the base cylinder:
Roll the pink clay into a neat ball, then gently roll it back and forth on your work surface to elongate it into a thick cylinder. -
Create the dome:
Stand the cylinder up and gently round off the top with your thumbs to create a smooth, domed head shape, similar to a large gumdrop. -
Smooth the surface:
Use the heat of your fingers to gently buff away any fingerprints. I find that lightly rolling the body against my palm helps get that seamless, matte finish.
Clean Clay Pro-Tip
White clay picks up dust easily. Wiping your hands with a baby wipe before handling the white horn and eye pieces keeps them bright and pristine.
Step 2: Adding the Limbs
-
Make the feet:
Pinch off two very small, equal-sized pieces of pink clay. Roll them into tiny cones. -
Attach the feet:
Press the wide end of the cones onto the bottom of the body so the little points stick out like stubby legs. Ensure the monster sits stable on a flat surface. -
Form the arms:
Create two small teardrop shapes from pink clay. Flatten them slightly. -
Detail the hands:
Using a needle tool or small knife, cut two tiny notches into the wider end of each teardrop to create three little fingers. -
Attach the arms:
Press the narrow end of the teardrops onto the sides of the body, positioned fairly low, blending the seam with a sculpting tool so they look like part of the main shape.
Step 3: The Face & Horns
-
Create eye sockets:
Use a large ball stylus or the rounded end of a paintbrush to press two large, shallow indentations into the upper front of the face. -
Place the eye whites:
Roll two balls of white clay and flatten them into thick discs. Press these firmly into the sockets you just made. -
Add the pupils:
Roll two slightly smaller balls of black clay. Flatten them and place them onto the white discs, positioning them slightly off-center for a quirky look. -
Highlight the eyes:
This is crucial for cuteness: add a tiny speck of white clay to the upper right corner of each black pupil for a reflective shine. -
Form the horns:
Roll two pieces of white clay into smooth, curved cones. They should look a bit like garlic cloves. -
Attach the horns:
Press the horns onto the sides of the head area, curving slightly upward. Blending the base isn’t necessary here; they can just sit on the surface.
Level Up: Pastel Blush
Before baking, use a dry paintbrush to dust a tiny bit of pink chalk pastel powder underneath the eyes to give your monster rosy, blushing cheeks.
Step 4: Texturing & Finishing
-
Add head vents:
Using a needle tool, poke three vertical holes in a row on the very top of the head for a textured detail. -
Create the mouth detail:
Use the needle tool to poke a horizontal row of four tiny dots right between the eyes to simulate a minimalist mouth. -
Add cheek dimples:
Press a medium-sized ball tool into the cheek area to create a single deep dimple on one or both sides. -
Final inspection:
Do a final check for lint or dust. If you see any, you can gently wipe it away with a touch of rubbing alcohol on your finger. -
Bake:
Place your monster on parchment paper on a baking sheet. Bake according to your clay manufacturer’s instructions (usually 275°F/135°C for 15-30 minutes).
Once cooled, your little pink monster is ready to guard your desk or shelf with its wide-eyed charm
Creature Toothbrush Holder
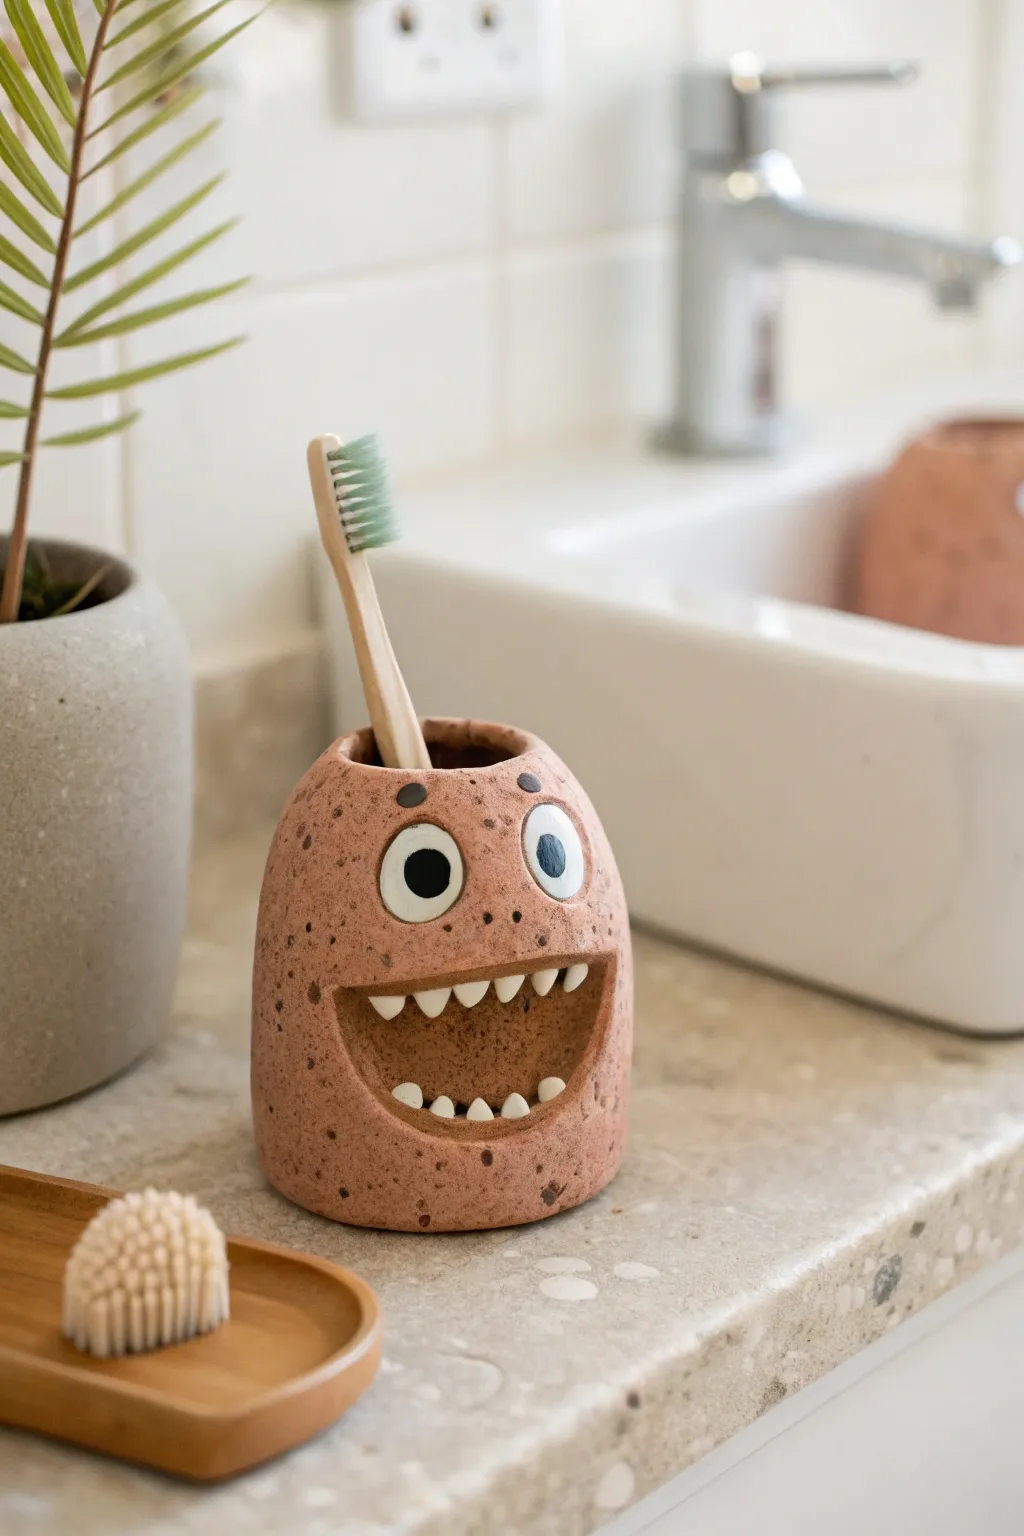
Transform your morning routine with this whimsical creature that happily holds your toothbrush in place. Crafted from speckled clay with a wide, toothy grin and expressive eyes, this functional sculpture adds a playful touch to any bathroom sink.
How-To Guide
Materials
- Speckled stoneware clay (mid-fire or air-dry depending on preference)
- White or light-colored clay slip (for teeth and eyes)
- Black underglaze (for pupils)
- Clear matte or glossy glaze
- Pottery tools (needle tool, rib, sponge)
- Small paintbrush
- Rolling pin
- Water/slip for joining
Step 1: Forming the Body
-
Prepare the base:
Start with a ball of speckled clay slightly larger than a softball. Ensure it is well-wedged to remove air bubbles. Flatten the bottom slightly on your work surface to create a stable base, aiming for a rounded, egg-like silhouette. -
Pinch the form:
Using the pinch pot method, press your thumb into the center of the ball and gently pinch the walls upward. You want a thick, sturdy wall—about a half-inch thick is ideal for this chunky style. Maintain the narrower opening at the top. -
Shape the dome:
Gently curve the walls inward as you reach the top to close up the shape, leaving an opening just wide enough for a toothbrush handle (about 1 inch diameter). Smooth the exterior with a damp sponge or a flexible rib to erase fingerprints while keeping the organic speckled texture. -
Refine the surface:
Use a wooden paddle or a flat rib to gently pat the sides if they are getting too lumpy. The goal is a smooth, rounded pebble shape. Let the clay firm up slightly (leather hard) before moving to the carving stage.
Step 2: Carving the Expression
-
Map the features:
With a needle tool, lightly sketch the location of the large oval mouth and the eyes. Position the mouth low on the form to give it a silly, heavy-chin look. -
Create the mouth cavity:
Carefully cut out the mouth shape you sketched. Don’t discard the clay if you’re working solid, but since this is hollow, you are cutting a window. Smooth the cut edges with a damp finger so they are rounded, not sharp. -
Build the interior wall:
If your pinch pot walls are thin, you might need to add a slab backing inside the mouth so the toothbrush doesn’t fall out the front. Score and slip a small curved slab behind the mouth opening, sealing it well from the inside.
Drooping Mouth?
If the clay above the mouth sags while drying, prop it up with a small wad of paper towel or newspaper inside the mouth. This supports the shape until the clay stiffens to leather hard.
Step 3: Adding Details
-
Form the teeth:
Roll tiny cones of white clay (or the same clay body if you plan to paint them white later). You’ll need about 5-6 for the top and 4-5 for the bottom. Vary their sizes slightly for a goofier look. -
Attach the teeth:
Score the upper and lower lips of the mouth opening. Apply a dab of slip and firmly press the teeth into place. I like to blend the back of the tooth into the gum line with a small modeling tool so they don’t pop off during firing. -
Make the eyes:
Roll two small balls of white clay and flatten them into discs. Score the clay body above the mouth and attach the discs using slip. Make sure they are placed slightly apart. -
Add pupils:
Roll tiny, tiny balls of black clay or use a small dot of black underglaze later. If using clay, press these ‘pupils’ into the white eye discs. Placing them slightly cross-eyed or different sizes adds character. -
Paint the pupils:
If you didn’t use colored clay, wait for the piece to dry to bone dry, then paint the pupils with black underglaze using a fine-point brush. -
Whiten the teeth:
If you used the base speckle clay for teeth, carefully paint them with white underglaze now. Apply 2-3 coats for solid coverage.
Pro Tip: Drainage
Drill a small hole in the bottom of the holder before firing. This lets trapped water drain out, keeping your toothbrush handle dry and preventing mold buildup inside the creature.
Step 4: Finishing
-
Bisque fire:
Once the piece is completely bone dry, fire it to cone 04 (or the appropriate temperature for your clay body). -
Glazing:
Dip the entire piece in a clear matte glaze. Wipe the foot (bottom) clean with a sponge so it doesn’t stick to the kiln shelf. -
Final fire:
Fire the piece to its final maturity temperature (typically Cone 5 or 6 for stoneware). This will bring out the lovely speckles in the clay.
Place your finished little monster on the counter and enjoy a smile every time you brush your teeth


What Really Happens Inside the Kiln
Learn how time and temperature work together inside the kiln to transform clay into durable ceramic.
Goofy Pencil Cup With Arms
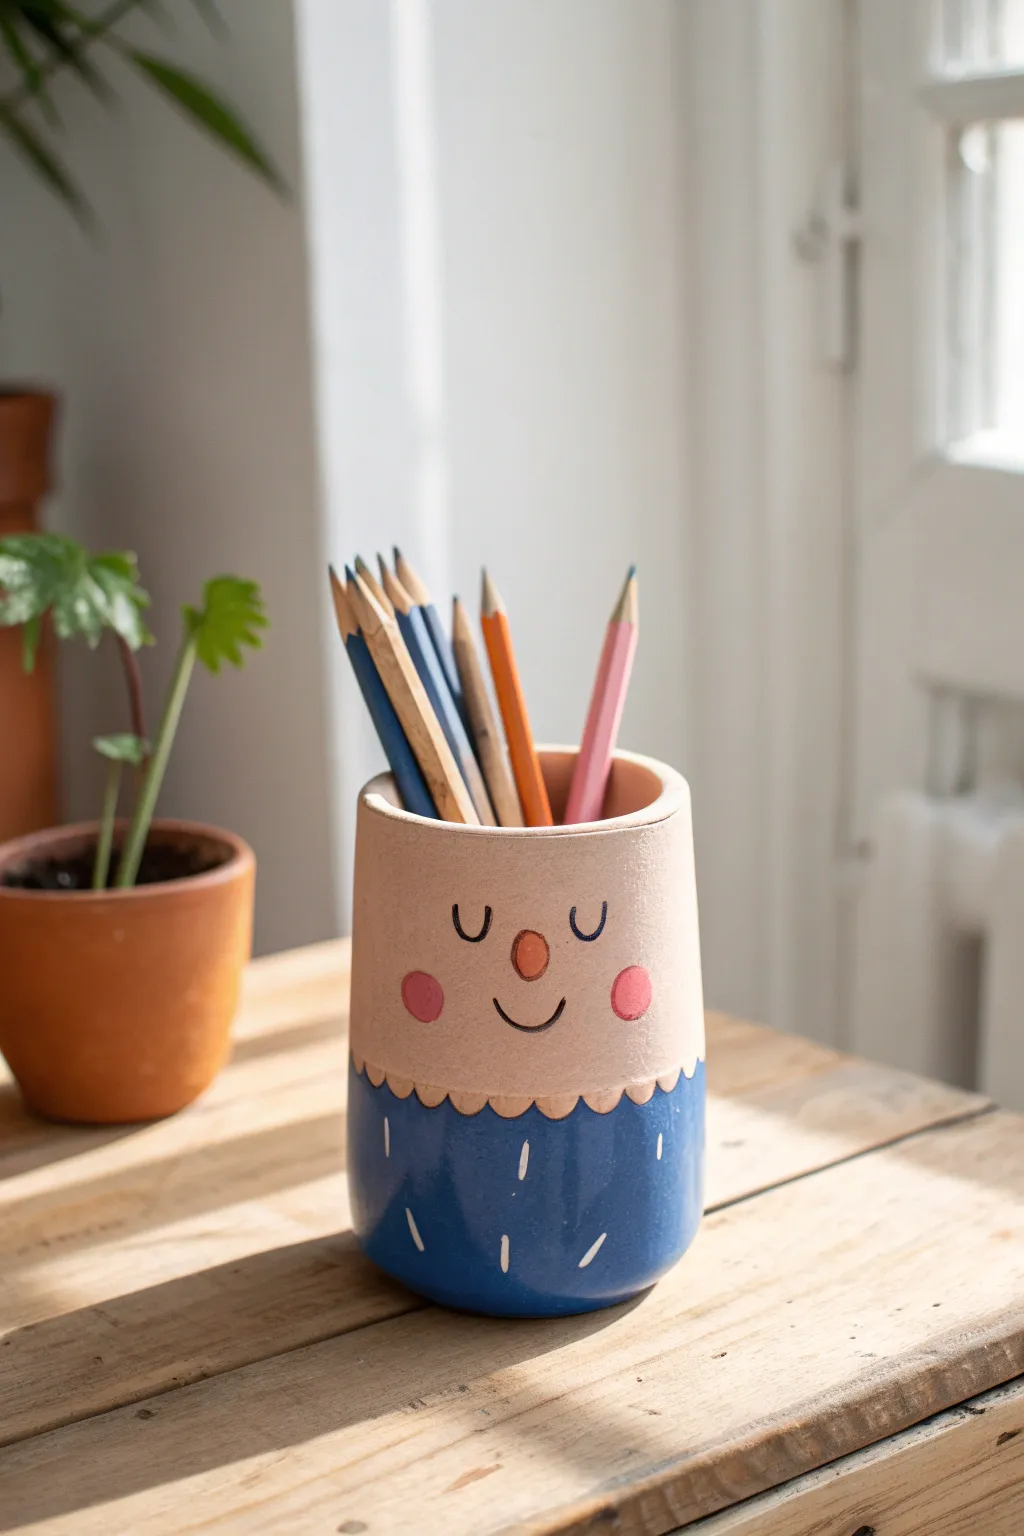
Bring a little personality to your desk with this charming two-toned pencil holder. With its serene sleeping face and textured blue sweater, this ceramic-style cup makes organizing your stationery feel like making a new friend.
Step-by-Step Guide
Materials
- Air-dry clay or oven-bake polymer clay (white or beige)
- Rolling pin
- Cutting tool or craft knife
- Empty can or jar (to use as a mold)
- Parchment paper
- Slip (clay and water mixture) or scoring tool
- Acrylic paints (navy blue, pink, orange, black, white)
- Fine detail paintbrush
- Medium flat paintbrush
- Matte varnish or sealant
- Sandpaper (fine grit)
Step 1: Shaping the Cup
-
Prepare your mold:
Clean and dry your chosen can or jar. Wrap it completely in parchment paper to prevent the clay from sticking, securing the paper with a small piece of tape on the inside. -
Roll the clay:
Roll out a slab of clay to an even thickness of about 1/4 inch. You want it substantial enough to stand up but not too heavy. -
Cut the base and walls:
Cut a circle for the base slightly larger than your mold. Then, cut a long rectangular strip that is tall enough to cover the can and long enough to wrap around it fully. -
Construct the cylinder:
Wrap the rectangular strip around the parchment-covered mold. Where the ends meet, score the edges (scratch them up) and add a little water or slip to join them securely. -
Blend the seam:
Use your finger or a smoothing tool to blend the vertical seam until it disappears completely. This will be the back of your cup. -
Attach the base:
Place the cylinder onto the circular base. Score and slip the contact points, then blend the clay upwards from the base into the wall to create a seamless join. -
Refine the rim:
Trim any excess clay from the top rim to make it level. Gently smooth the edge with a damp finger so it’s rounded, not sharp. -
Dry or bake:
Allow the clay to dry fully (24-48 hours for air-dry) or bake according to your polymer clay package instructions. Once solid, remove the inner mold.
Smooth Operator
Use a slightly damp sponge to smooth the clay before it dries. This reduces sanding time later and gives that slick, ceramic finish.
Step 2: Painting the Character
-
Sand for smoothness:
Once hardened, lightly sand any bumps or rough patches, especially around the rim and the vertical seam, to get a professional ceramic look. -
Apply the base tone:
If you used white clay, paint the top half of the cup in a warm beige or bisque color. If you used beige clay, you can skip this to keep the natural raw look. -
Create the sweater line:
Using a pencil, lightly sketch a wavy line around the middle of the cup. This divides the ‘face’ area from the ‘sweater’ area. -
Paint the sweater:
Fill in the area below the wavy line with navy blue acrylic paint. You may need two coats to get a solid, opaque color. -
Add the collar detail:
Carefully outline the wavy edge where the sweater meets the face. If needed, touch up the curves to make them look like a scalloped collar. -
Paint the sweater texture:
Dip a very fine brush into white paint. Add small, vertical dashes scattered randomly across the blue section to mimic heavy fabric texture or rain. -
Paint the features:
Using black paint and a steady hand, draw two ‘U’ shapes for sleeping eyes and a shallow curve for the smile. I find it helps to practice these shapes on paper first. -
Add the nose and cheeks:
Paint a small orange oval for the nose. Then, add two soft pink circles for rosy cheeks on either side of the smile. -
Seal the piece:
Once all paint is completely dry, coat the entire pencil cup with a matte varnish to protect the paint and give it a finished, store-bought feel.
Make it 3D
Before drying, form a tiny ball of clay and attach it where the nose goes for a pop-out 3D nose instead of a painted one.
Now you have a cozy, desktop companion ready to hold your favorite tools
Tiny Hats Make Everything Funnier
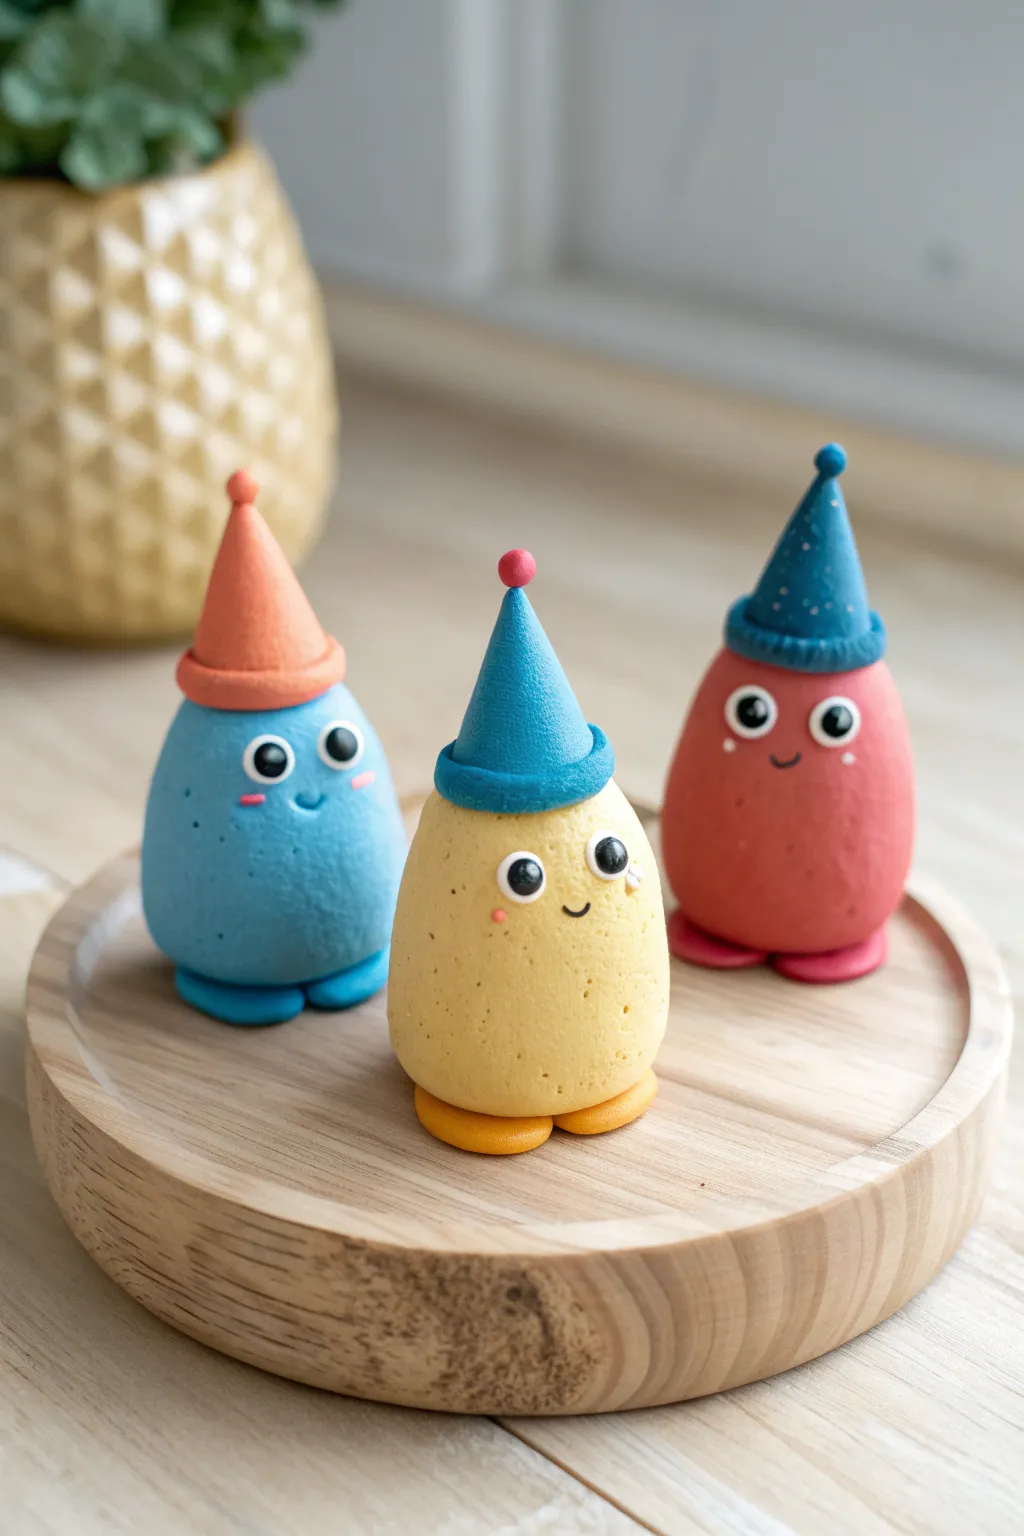
These adorable egg-shaped characters prove that a tiny hat instantly adds personality to any sculpture. With their texture-rich finish and sweet expressions, they make the perfect trio for a desk companion or a whimsical shelf display.
Step-by-Step Tutorial
Materials
- Polymer clay (Blue, Yellow, Red, Orange, White, Black)
- Texturing tool (stiff toothbrush or crumpled foil)
- Clean work surface (ceramic tile or glass mat)
- Needle tool or toothpick
- Ball tool (small)
- Acrylic roller
- Oven (for baking per clay instructions)
Step 1: Shaping the Bodies
-
Prepare the base clay:
Start by conditioning your blue, yellow, and red clay separately until they are soft and pliable. Roll each color into a smooth sphere about the size of a golf ball. -
Form the egg shape:
Take one sphere and gently role it on your work surface, applying slightly more pressure to the top half to create a tapered, egg-like silhouette. Repeat for all three colors to create body bases. -
Flatten the bottom:
Tap the bottom of each egg shape firmly against your work surface so they stand upright independently without wobbling. -
Add texture:
Using a stiff toothbrush or a ball of crumpled aluminum foil, gently press texture all over the surface of the bodies. I like to do this lightly so it looks like stone or porous sponge rather than deep gouges.
Step 2: Creating Tiny Hats
-
Form the cones:
Select contrasting colors for the hats (orange for the blue figure, blue for the others). Roll small balls of clay into tapered cones. -
Make the brims:
Roll thin snakes of clay in the same color as the hats. Wrap one around the base of each cone and blend the seam at the back, pressing gently to secure it. -
Attach the hats:
Place the finished hats onto the tips of the egg bodies. Press down firmly enough to adhere them without crushing your shapes. -
Decorate the hats:
Add tiny details like a small ball on the very tip of the hat (pom-pom style) or use a needle tool to add prick marks for texture.
Uneven Texture?
If fingerprints are ruining your texture work, lightly dust your finger with cornstarch before smoothing, or do a final texture pass with the toothbrush right before baking.
Step 3: Adding Faces & Feet
-
Create eye sockets:
Use a small ball tool to press two shallow indentations where you want the eyes to sit. This helps the eyes stay in place. -
Make the whites of the eyes:
Roll tiny balls of white clay and flatten them into discs. Press these into the sockets you just made. -
Add pupils:
Roll even tinier balls of black clay and press them onto the white discs. Placing them slightly off-center or looking in different directions gives them a goofier personality. -
Sculpt the smiles:
Use a needle tool or the edge of a small spoon to impress a tiny, curved smile between the eyes. -
Blush cheeks:
Take a microscopic amount of pink clay, flatten it extremely thin, and apply it under the eyes for rosy cheeks. -
Form the feet:
Roll two small balls of clay (matching the body color) for each figure. Flatten them slightly into discs. -
Attach the feet:
Place the two discs side-by-side on your baking surface, then press the body firmly on top of them so the feet stick out just slightly.
Festive Flair
Make them seasonal! Swap the party hats for Santa hats, witch hats, or even tiny graduation caps to match upcoming holidays or events.
Step 4: Final Touches
-
Double check stability:
Ensure all attachments like hats and feet are secure. If the clay feels dry, a drop of liquid clay or ‘bake and bond’ can help. -
Bake:
Bake your trio in the oven according to the manufacturer’s instructions for your specific brand of polymer clay.
Once cooled, these little party pals are ready to bring a smile to anyone who sees them

TRACK YOUR CERAMIC JOURNEY
Capture glaze tests, firing details, and creative progress—all in one simple printable. Make your projects easier to repeat and improve.
Unlikely Friendship Figurine Duo
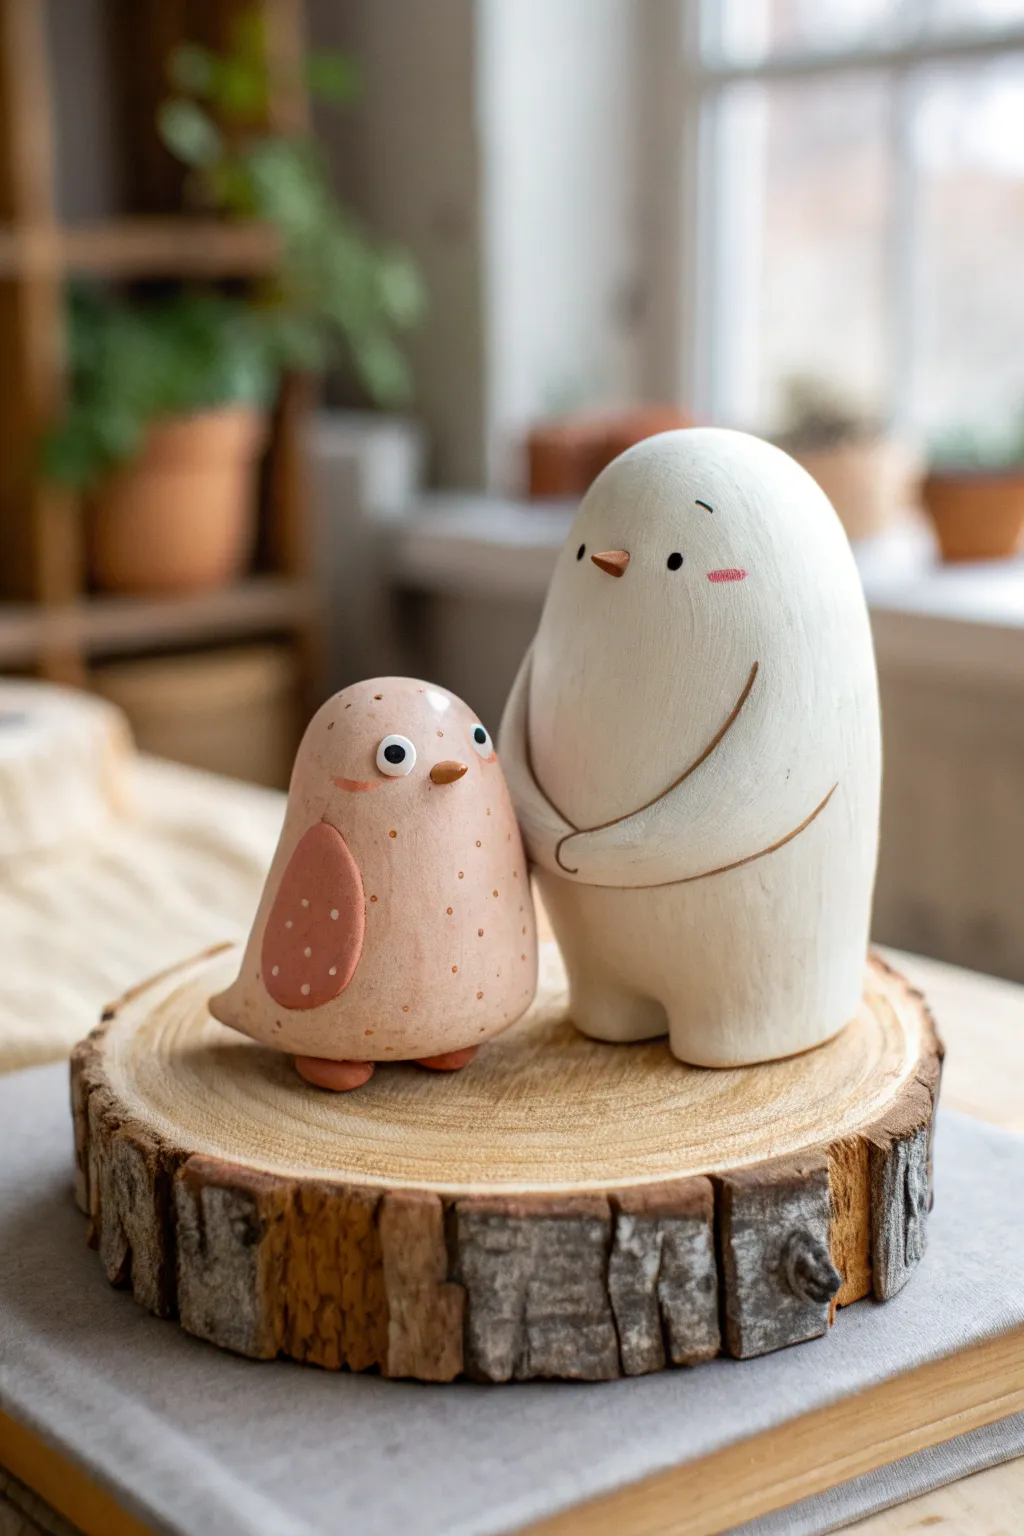
Create this charming pair of oddball friends featuring a tall, ghostly white creature and its small, spotted avian companion. Perfect for a desktop or shelf, these minimalist figurines rely on smooth forms and subtle facial expressions to convey their quirky friendship.
Detailed Instructions
Materials
- Air-dry clay or polymer clay (White)
- Acrylic paints (White, pale pink-beige, terracotta/rust, black)
- Fine-grit sandpaper
- Sculpting tools (needle tool, small ball stylus)
- Fine detail paintbrush
- Matte varnish or sealant
- Wooden slice base (optional for display)
Step 1: Sculpting the Tall Friend
-
Form the main body:
Start with a large ball of white clay and roll it into a smooth, upright cylinder that tapers slightly toward the top, resembling a tall egg or a ghost shape. -
Create the legs:
Press a groove into the bottom center of the form to suggest two stubby legs. Flatten the base of each ‘foot’ so the figurine stands remarkably stable on its own. -
Define the arms:
Use a needle tool or a clay shaper to etch a long, curved line across the belly, suggesting arms clasped politely in front. The line should curve upward on the sides. -
Add facial features:
Attach a tiny, flattened triangle of clay for the nose. Use a small ball stylus to press two eye indentations on either side. -
Smooth everything out:
Use a little water (for air-dry) or baby oil (for polymer) on your finger to smooth away any fingerprints, ensuring the shape remains organic and soft.
Step 2: Sculpting the Small Bird
-
Shape the bird body:
Roll a smaller ball of clay into a gumdrop shape—flat on the bottom and rounded on top. -
Add the feet:
Create two tiny, flattened ovals of clay and press them underneath the body for feet, positioning them slightly forward so the bird doesn’t tip. -
Create the wings:
Flatten a small piece of clay into a teardrop shape and attach it to the side of the body for the wing. Blend the edges seamlessly if you want a subtle look, or leave them distinct. -
Attach the beak and eyes:
Add a very small clay beak to the center of the face. For the eyes, you can either create small clay balls now or wait to paint them later; I prefer adding clay eyes for dimension. -
Final drying or baking:
Follow the manufacturer’s instructions to bake (polymer) or dry (air-dry) both figurines. Sand lightly with fine-grit sandpaper once hard if there are rough spots.
Smoother Surfaces
If using air-dry clay, keep a damp sponge nearby. Wiping the clay gently before it dries eliminates cracking and reduces sanding time later.
Step 3: Painting and Details
-
Base coat the tall figure:
Paint the entire tall figure with an opaque layer of cream or off-white acrylic paint. Let it dry completely. -
Base coat the bird:
Mix a pale pink-beige color and paint the bird’s body. Paint the wing utilizing a darker terracotta or rust shade for contrast. -
Paint the bird’s details:
Using a fine brush or a toothpick, add tiny white or light pink dots all over the bird’s body. Paint the feet and beak in the same rust tone as the wing. -
Add facial expressions:
Using the finest brush or a black paint pen, fill in the eyes on both figures. Add tiny eyebrows to the tall figure to give it a concerned or gentle expression. -
Apply blush:
Dry brush a tiny amount of pink paint onto the cheeks of the tall white figure for a rosy glow. Keep this very subtle. -
Define the arm line:
Run a very thin wash of brown or dark beige paint into the etched arm line on the tall figure to make the detail pop without looking like a harsh outline. -
Seal the work:
Once all paint is visibly dry, apply a matte varnish to protect your new friends and give them a professional, finished texture.
Seasonal Varations
Add tiny clay scarves or hats to the duo for a winter theme, or place a tiny clay flower in the tall friend’s hands for spring.
Set your finished duo on a wood slice or windowsill to enjoy their quiet companionship
Surprise-Lid Trinket Box Character
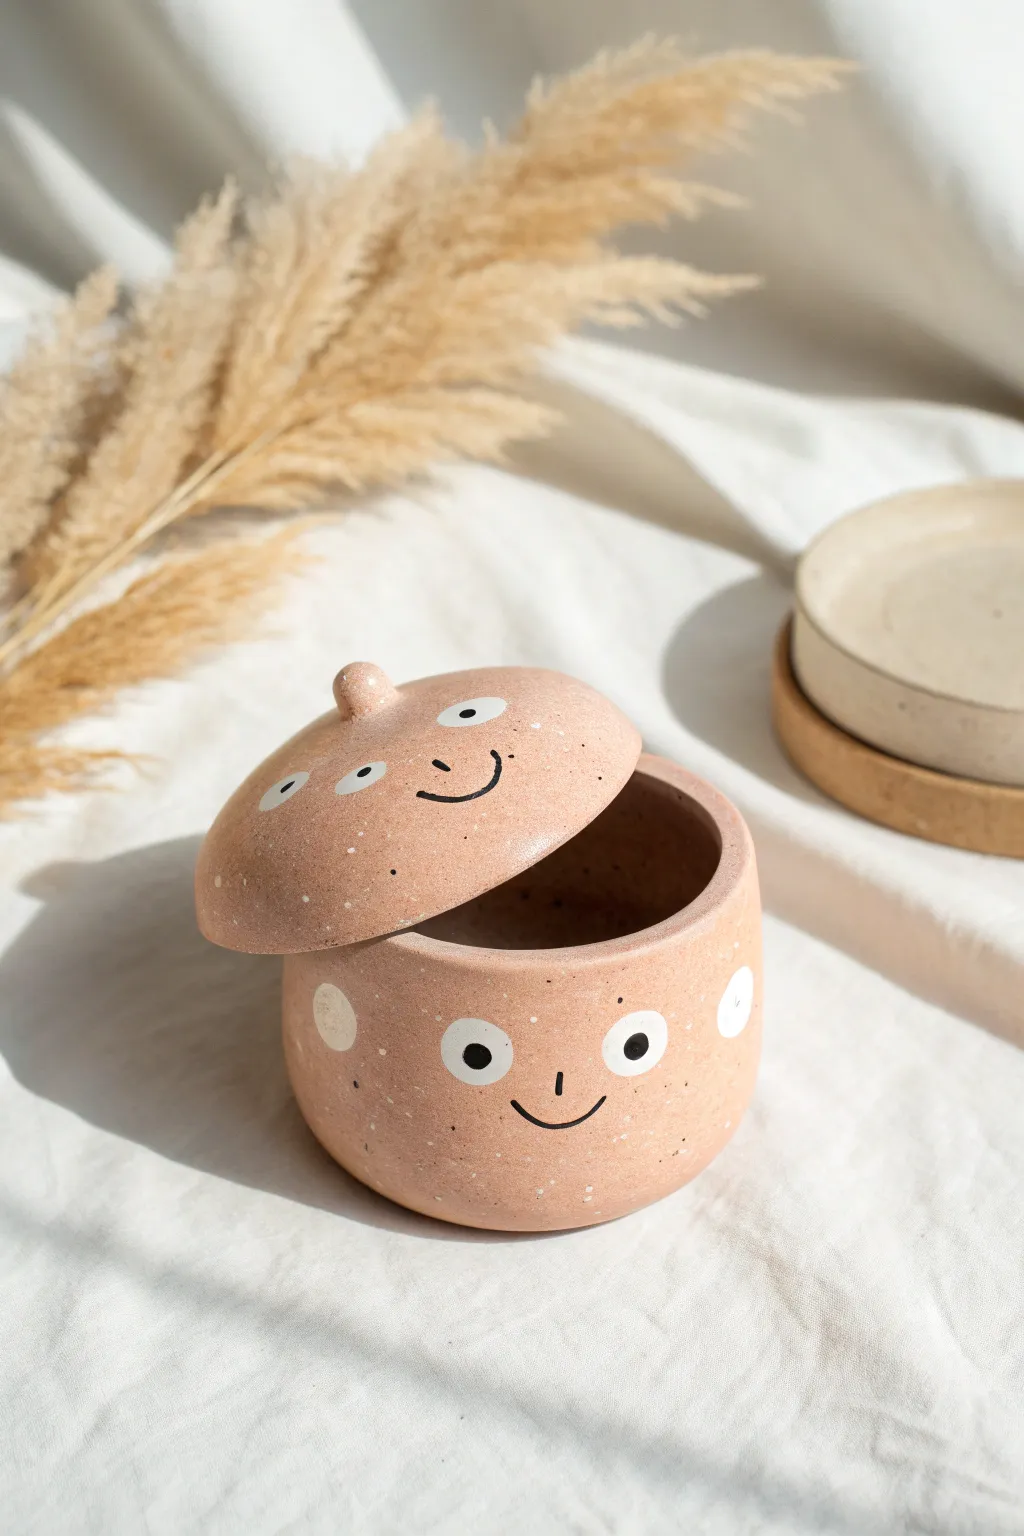
This charming ceramic trinket box features not just one, but two cheerful personalities to guard your tiny treasures. With its speckled pinkish-terracotta finish and a whimsical, mismatched lid that peeks back at you, it’s the perfect beginner-friendly project to add some joy to your shelf.
Step-by-Step
Materials
- Terracotta or pink speckle stoneware clay
- Rolling pin
- Canvas mat or cloth (to prevent sticking)
- Circle cutters (approx. 3-inch and 3.5-inch)
- Needle tool or fettling knife
- Scoring tool or old toothbrush
- Slip (clay mixed with water)
- Small sponge
- Underglaze pencil or fine liner brush
- White underglaze
- Black underglaze
- Clear transparent glaze
- Small round brushes
Step 1: Forming the Base
-
Prepare the Clay:
Begin by wedging your speckled clay thoroughly to remove air bubbles. Roll out a slab of clay to an even thickness of about 1/4 inch using guide sticks or a steady hand. -
Cut the Base Circle:
Use your smaller circle cutter (around 3 inches) to punch out the flat bottom of the pot. Set this aside on a small board. -
Create the Wall Slab:
From the remaining rolled clay, cut a long, rectangular strip. Width should determine the height of your box (about 2.5 inches), and length should be slightly longer than the circumference of your base circle. -
Attach the Wall:
Score the outer edge of your base circle and one long edge of your rectangular strip. Apply slip generously to both scored areas. -
Secure the Join:
Wrap the strip around the base circle, pressing the slipped edges together firming. Where the two ends of the wall meet, overlap slightly, slice through both layers with a bevel cut, score, slip, and smooth the vertical seam until invisible. -
Refine the Form:
Use a slightly damp sponge to smooth the rim and the connection point at the bottom. The walls should be straight or slightly rounded outward for a chubby look.
Smoother Surfaces
Burnish the clay with the back of a spoon when leather-hard before adding underglaze. This creates a silky, stone-smooth canvas for painting faces.
Step 2: Sculpting the Domed Lid
-
Pinch the Lid Shape:
Take a ball of clay slightly larger than a golf ball. Gently pinch the clay while rotating it in your hand to form a shallow, curved bowl shape that is wider than the opening of your base pot. -
Check the Fit:
Test the lid on the base. It should overhang slightly. Adjust the curvature so it sits comfortably but looks a bit jaunty. -
Add a Flange (Optional):
To keep the lid secure, you can add a small coil of clay to the underside of the lid, just inside where it rests on the pot rim. Score and slip this coil into place. -
Add the Handle:
Roll a tiny ball of clay for the knob. Score the very center of the top of the lid, apply slip, and press the knob on. Smooth the transition area with a modeling tool. -
Slow Drying:
Cover both pieces loosely with plastic and let them dry slowly to the leather-hard stage. This prevents warping.
Double Sided Fun
Paint a different expression on the back of the pot—maybe a sleeping face or a surprised one—so you can rotate it to match your daily mood.
Step 3: Decoration & Glazing
-
Apply White Eyes:
Once leather hard or bisque fired (depending on your underglaze type), allow yourself to get creative with placement. Paint simple white circles for eyes on both the lid and the base. Make the lid eyes look upward and the base eyes look forward. -
Add Polka Dots:
Using the same white underglaze, dab a few random decorative dots around the sides of the base to add texture and whimsy. -
Draw the Details:
Using a fine liner brush and black underglaze, carefully paint small black dots inside the white eyes. Add a simple U-shaped smile between the eyes and a tiny vertical dash for a nose. -
Bisque Fire:
If you decoration was done on greenware, fire the piece to cone 04 (or your clay’s specified bisque temperature). -
Clear Glaze Application:
Dip or brush a clear, glossy transparent glaze over the entire piece. I find dipping gives a smoother finish for round shapes like this. -
Final Firing:
Stilt the lid so it doesn’t fuse to the kiln shelf, and wipe the bottom of the base clean. Fire to your clay body’s maturity temperature (e.g., cone 5 or 6).
Once cool, your cheerful little container is ready to hold buttons, jewelry, or secrets while beaming a smile at everyone who walks by
Mini Tiny-World Garden Guardians
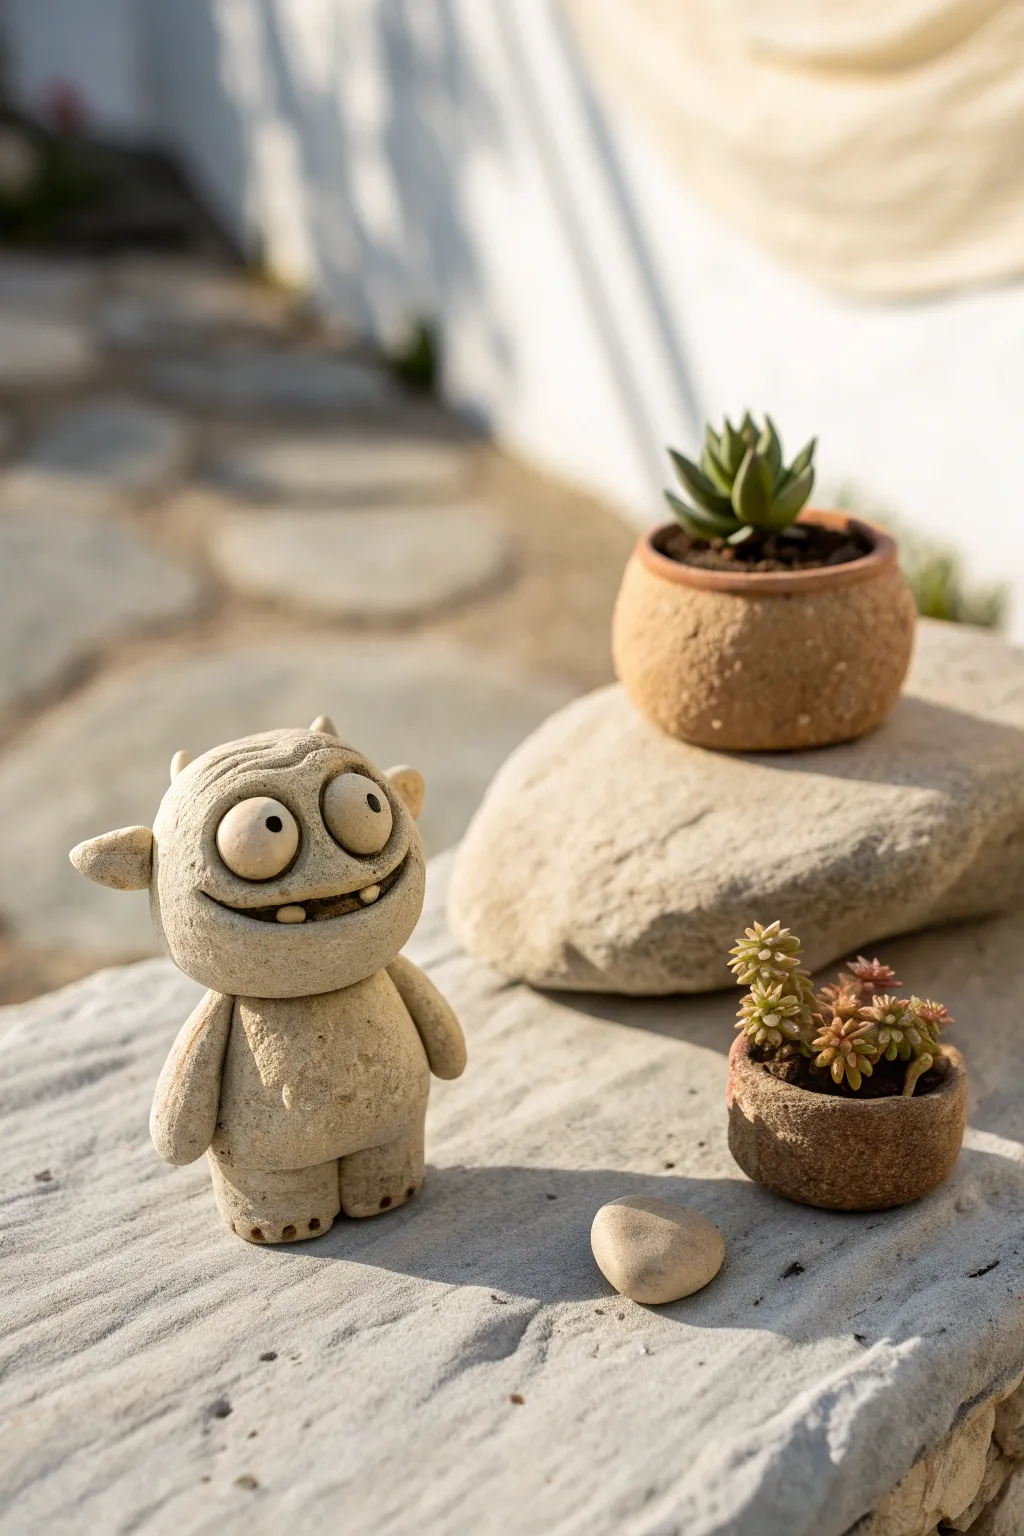
Create a delightfully goofy little monster guardian for your potted plants using polymer or air-dry clay. With its speckled stone texture and wide-eyed grin, this character adds a touch of whimsy to any succulent arrangement without looking out of place.
Step-by-Step Tutorial
Materials
- Stone-effect polymer clay (e.g., Granite or Limestone) or air-dry clay
- Aluminum foil
- Needle sculpting tool or toothpick
- Ball stylus tools (various sizes)
- Black acrylic paint
- Stiff bristle toothbrush (for texturing)
- Oven (if using polymer clay)
Step 1: Forming the Base Structure
-
Prepare the core:
Crumple a piece of aluminum foil into a tight oval shape, roughly the size of a large egg. This will serve as the armature for the main body, saving clay and reducing weight. -
Cover with clay:
Condition your stone-effect clay until it’s pliable. Flatten a large sheet and wrap it completely around the foil core, smoothing out any seams with your thumb until you have a seamless oval. -
Flatten the base:
Gently tap the bottom of the oval against your work surface. You create a flat base so your guardian stands upright without tipping over.
Cracks Appearing?
If you see cracks forming while baking or drying, fill them with a mix of fresh clay and liquid clay (or water for air-dry clay) and re-texture with the toothbrush.
Step 2: Sculpting the Face
-
Create eye sockets:
Use your thumbs or a large ball tool to press two shallow indentations into the upper half of the face area where you want the eyes to sit. -
Add the eyeballs:
Roll two balls of clay, slightly flattening the backs, and press them firmly into the sockets. I like to make one slightly larger than the other for a sillier expression. -
Define the pupils:
With a small stylus tool or the end of a toothpick, poke a deep hole into the center of each eyeball. -
Carve the mouth:
Use a needle tool to slice a wide, curved line across the ‘chin’ area for a big grin. Gently pull the clay slightly open to create depth. -
Add teeth:
Roll tiny, tic-tac-sized pellets of clay. Insert two or three into the bottom lip of the mouth opening, blending the bottom edge of the tooth into the lip so they don’t fall out. -
Contour the face:
Using a needle tool, lightly etch curved wrinkles around the eyes and forehead. This gives him an aged, stony appearance.
Step 3: Adding Limbs and Horns
-
Form the arms:
Roll two thick logs of clay with rounded ends. Attach them to the sides of the body, blending the clay at the shoulder joint smoothly into the torso. -
Refine the hands:
Use a knife tool to press a simple indentation at the end of the arms to suggest a thumb or mitten-hand shape without needing detailed fingers. -
Attach the legs:
Roll two short, stout cylinders for legs. Attach them to the bottom front of the body. They should look stubby and cute. -
Add toes:
Use a small tool to press three little divots into the end of each foot to represent toes. -
Create ears and horns:
Shape two small triangles for ears and attach them to the sides of the head. Add two tiny cones to the top of the head for horns.
Mossy Makeover
For an ancient look, dab tiny spots of matte green paint into the crevices after baking, then wipe the surface with a damp cloth to leave ‘moss’ in the texture.
Step 4: Texturing and Finishing
-
Apply stone texture:
Take a stiff toothbrush and tap it all over the surface of the figure. This removes fingerprints and creates a pitted, realistic rock texture. -
Final check:
Look over your guardian from all angles. Ensure the horns and ears are securely blended so they don’t snap off after curing. -
Bake or dry:
If using polymer clay, bake according to package instructions (usually 275°F/135°C for 15-30 mins). If using air-dry clay, leave it in a safe spot for 24-48 hours. -
Enhance darkness:
Once cool or dry, dilute a tiny drop of black acrylic paint with water. Brush it into the pupils and the deepest part of the mouth line for contrast.
Now place your new little friend on a rock near your succulents to keep watch over your garden.