Whenever I need a low-pressure creative win, I reach for air dry clay because it’s all about simple shapes and satisfying results. These ideas are the kind you can pull off at a kitchen table with minimal tools, then actually use around your home.
Simple Air Dry Clay Trinket Dish
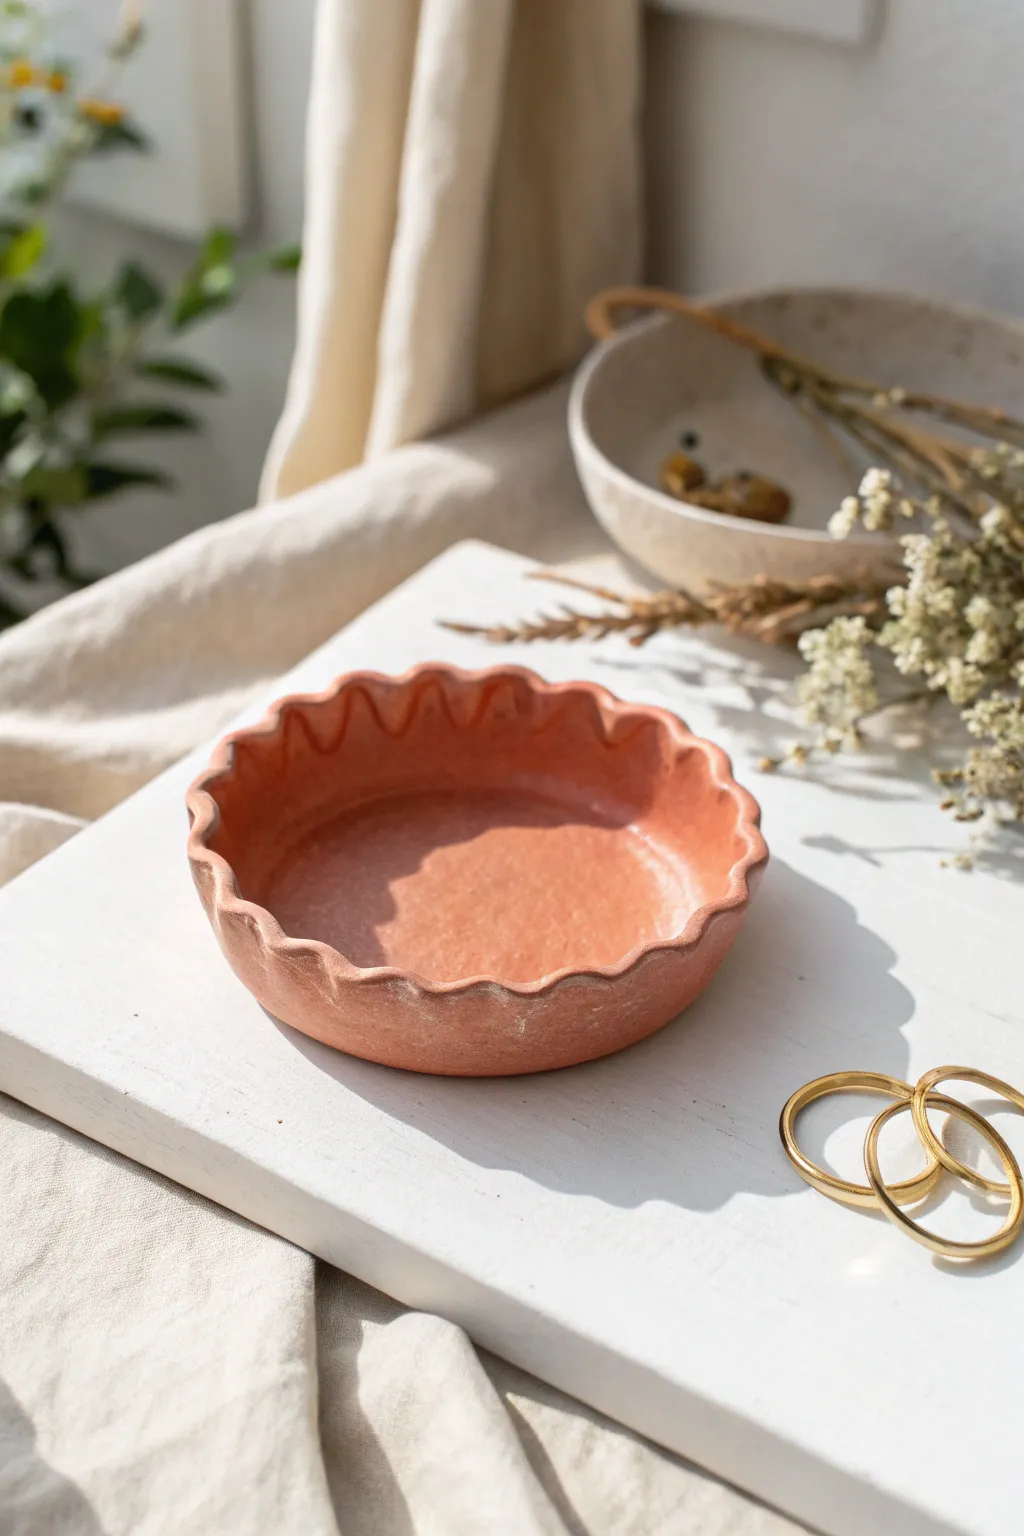
This charming trinket dish combines the warmth of terracotta with a delicate, wavy edge for a piece that feels both organic and elegant. It’s the perfect size for holding rings or small jewelry and adds a lovely pop of earthy color to any dresser or nightstand.
Step-by-Step
Materials
- Terracotta-colored air dry clay
- Rolling pin
- Circle cutter or small bowl (approx. 4-5 inches)
- Craft knife
- Small cup or bowl for water
- Sponge
- Sandpaper (fine grit)
- Matte sealant or varnish
Step 1: Shaping the Base
-
Prepare the Clay:
Begin by taking a handful of terracotta air dry clay and kneading it thoroughly in your hands. You want to warm it up until it is pliable and smooth, removing any potential air bubbles. -
Roll it Out:
Place the clay on a clean, flat surface or a mat. Use your rolling pin to flatten the clay into an even slab. Aim for a thickness of about 1/4 inch—not too thin, so the walls have stability. -
Cut the Circle:
Place your circle cutter or an upside-down bowl (about 4-5 inches in diameter) onto the clay slab. Press down firmly or trace around the bowl with a craft knife to create a perfect circle. -
Smooth the Edges:
Dip your finger into a small amount of water and gently run it along the cut edge of the circle. This smooths out any sharpness or rough bits left by the cutting tool.
Step 2: Creating the Ruffled Rim
-
Lift and Form:
Carefully peel the clay circle off your work surface. Gently cup the clay in your hand to start curving the edges upward, creating a shallow bowl shape. -
Pinch the Walls:
Work your way around the circumference, pinching the clay upwards to form a vertical wall. Keep the height consistent, aiming for about an inch high. -
Create the Waves:
Now for the fun part: creating the ruffled edge. Use your index finger on one hand to push the rim inward while using two fingers on the other hand to support the clay on either side, pushing outward. -
Repeat the Pattern:
Continue this push-and-pull motion around the entire rim. Try to space the waves evenly, but don’t worry about perfection; slight irregularities add to the organic charm. -
Sponing Smooth:
Take a slightly damp sponge and very lightly wipe the interior and exterior of the dish. This helps erase your fingerprints and softens the transitions between the waves. -
Check the Shape:
Set the dish down on a flat surface to ensure the bottom is flat and stable. If it wobbles, gently press the center down from the inside to flatten it.
Smooth Moves
Keep a small bowl of water nearby while sculpting. If the clay starts to crack while you are forming the ruffles, a tiny drop of water on your finger can smooth it right back together.
Step 3: Finishing Touches
-
Let it Dry:
Place your dish in a safe, dry spot away from direct heat. Let it dry completely for 24 to 48 hours. I find flipping it over halfway through the drying process helps the bottom dry more evenly. -
Initial Sanding:
Once the clay is fully hardened and turns a lighter shade, inspect the rim. Use fine-grit sandpaper to gently smooth out any sharp peaks on the ruffled edge. -
Refine the Surface:
Lightly sand the interior and exterior surfaces to remove any remaining bumps or rough texture, wiping away the dust with a dry cloth or brush. -
Seal for Protection:
Apply a thin coat of matte varnish or sealant to the entire dish. This deepens the terracotta color slightly and protects the clay from moisture and wear. -
Apply Second Coat:
Allow the first layer of sealant to dry according to the bottle’s instructions, then apply a second coat for extra durability. -
Final Cure:
Let the final coat of sealant cure completely before placing any jewelry inside to ensure the surface is non-tacky and ready for use.
Golden Glamour
After the sealant dries, take a fine paintbrush and gold acrylic paint to highlight just the very top rim of the waves. It adds a luxurious, gilded finish to the rustic clay.
Now you have a beautifully handcrafted dish ready to organize your favorite treasures


Minimal Ring Cone Holder
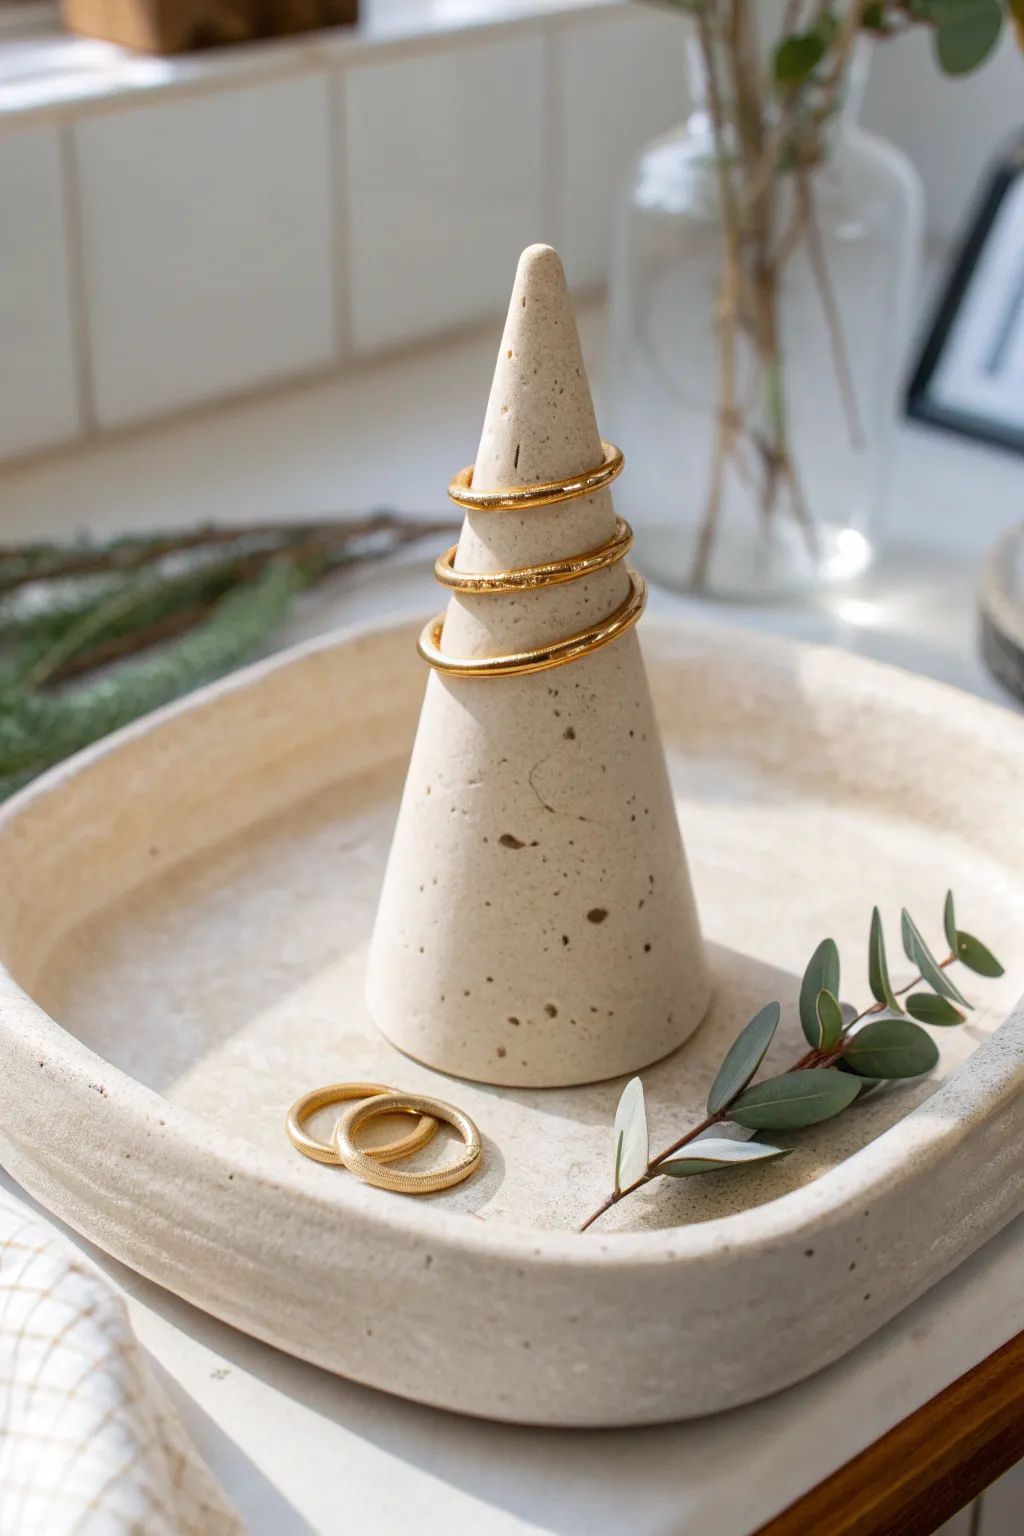
Create a sophisticated jewelry display with this minimalist ring cone and matching trinket dish. The subtle speckled finish mimics natural stone, bringing an earthy, elegant touch to your vanity while keeping your favorite rings organized and within reach.
Step-by-Step Tutorial
Materials
- White or cream air dry clay
- Rolling pin
- Craft knife or clay cutter
- Medium-grit sandpaper
- Fine-grit sandpaper
- Small bowl or sponge for water
- Acrylic paint (brown, black, tan)
- Old toothbrush
- Clear matte sealant or varnish
- Parchment paper or work mat
Step 1: Shaping the Cone
-
Condition the clay:
Start by taking a handful of air dry clay and kneading it in your hands until it becomes warm, soft, and pliable, which prevents cracking later. -
Form a ball:
Roll the conditioned clay into a smooth, tight ball between your palms, aiming for about the size of a golf ball or slightly larger. -
Create the taper:
Begin rolling the ball on your work surface, applying more pressure to one side to elongate it into a teardrop or cone shape. -
Refine the cone:
Stand the cone up on its flat base. I find it helpful to gently tap the base against the table to flatten it perfectly while using your fingers to smooth the sides upward. -
Check symmetry:
Rotate the cone and check it from all angles, ensuring it stands straight and the point is centered, adjusting the slope as needed.
Clean Slates
Work on a fresh sheet of parchment paper. Dust and lint love to stick to white clay, and keeping your surface pristine saves sanding time later.
Step 2: Crafting the Tray
-
Roll out the slab:
Using a larger portion of clay, use your rolling pin to create a flat slab about 1/4 inch thick on a piece of parchment paper. -
Cut the shape:
Freehand cut a rounded square or soft rectangle shape with your craft knife for an organic look, or use a template if you prefer precision. -
Lift the edges:
Gently lift the edges of the slab upward to create a rim. You can pinch the corners slightly to define the square shape while keeping the aesthetic soft. -
Smooth the surfaces:
Dip your finger in a tiny bit of water and run it along the rim and inside the dish to erase any fingerprints or cracks. -
Dry completely:
Let both the cone and tray dry for 24-48 hours. Turn the tray over halfway through the drying process to ensure the bottom dries evenly.
Step 3: Finishing Touches
-
Sand for smoothness:
Once fully dry, use medium-grit sandpaper to remove major bumps, followed by fine-grit sandpaper for a silky smooth finish. -
Prepare the speckle paint:
Mix a small amount of brown and black acrylic paint with a few drops of water to create a fluid, inky consistency. -
Test your splatter:
Dip an old toothbrush into the paint mixture and run your thumb across the bristles over a scrap piece of paper to test the splatter size. -
Apply the effect:
Holding the toothbrush about 6 inches away, gently flick the bristles to spray fine speckles over both the cone and the tray. -
Let paint dry:
Allow the speckles to dry completely, which should only take about 15-20 minutes depending on how thick the paint was applied. -
Seal the set:
Apply a thin coat of clear matte sealant to protect the clay from moisture and give it a finished, professional look. -
Assemble:
Once the sealant is cured, place your cone in the center of the tray and arrange your rings.
Marble Magic
Knead coffee grounds or black pepper directly into the wet clay before shaping. This creates a natural, embedded stone texture instead of painting it on.
Now you have a chic, modern place to rest your treasures.


Easy Stamped Air Dry Clay Coasters
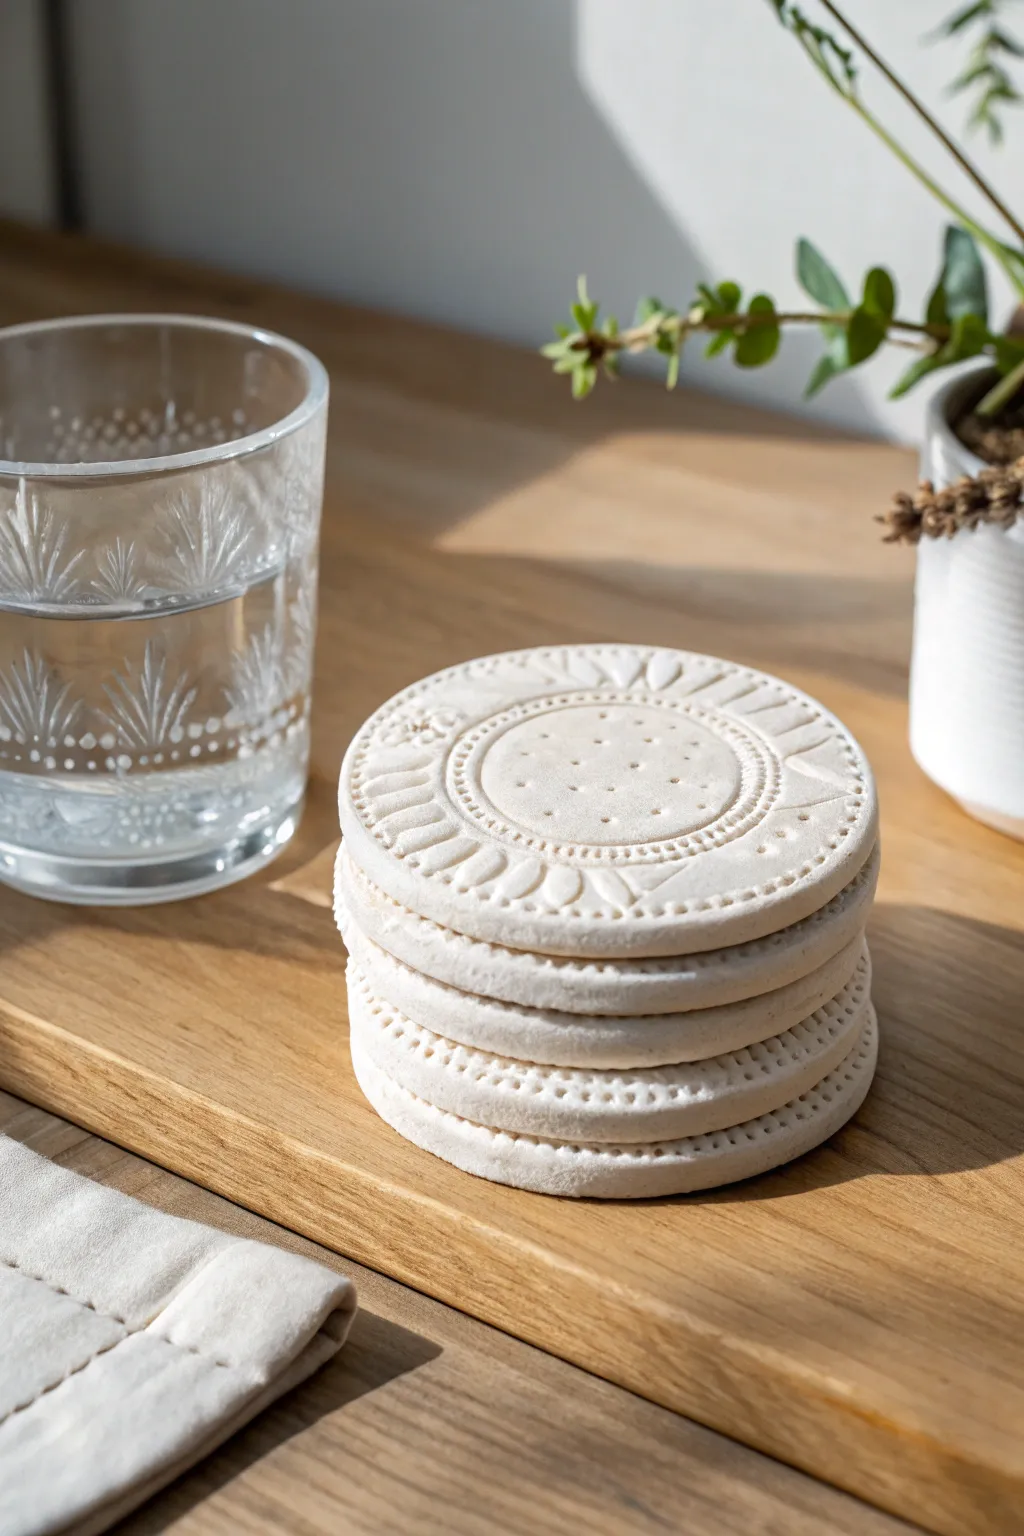
These sophisticated coasters bring a touch of minimalist beauty to your table, combining the rustic charm of unglazed clay with intricate stamped patterns. The crisp white finish and delicate embossing look like high-end ceramics, but are incredibly simple to create at home without a kiln.
Step-by-Step
Materials
- White smooth air dry clay (e.g., Das or Crayola)
- Round cookie cutter (approx. 3.5-4 inches diameter)
- Acrylic rolling pin
- Patterned stamps (mandala, floral, or geometric)
- Fine grit sandpaper (200-400 grit)
- Small bowl of water
- Parchment paper or non-stick silicone mat
- Canvas fabric or old tea towel (for texture on the bottom)
- Flat, wide paintbrush
- Matte acrylic varnish or sealant (water-resistant)
Step 1: Preparation & Rolling
-
Prepare your workspace:
Lay down parchment paper or a canvas cloth on a flat, sturdy surface. Using canvas creates a nice texture on the back of the coaster preventing slippage, while parchment ensures zero sticking. -
Condition the clay:
Take a handful of air dry clay and knead it in your hands until it feels warm and pliable. This conditioning step is crucial to prevent internal air bubbles and cracks later. -
Initial rolling:
Place the ball of clay on your work surface. Use the acrylic rolling pin to roll it out evenly. You might want to rotate the clay periodically so it keeps a generally circular shape. -
Achieve uniform thickness:
Aim for a thickness of about 1/4 inch (approx. 5-6mm). If it’s too thin, the coaster will be fragile; too thick, and it takes ages to dry. I find that using two wooden paint stirrers as depth guides on either side helps keep the rolling pin level.
Step 2: Stamping & Cutting
-
Position the stamp:
Select your patterned stamp. Center it visually over the rolled slab of clay. If you are using a large mandala stamp that covers the whole surface, ensure it aligns where you want the final cut to be. -
Apply pressure:
Press the stamp firmly and evenly into the clay. Do not wiggle it, or you’ll blur the impression. Press deep enough to get a clear design but not so deep that you distort the clay’s thickness significantly. -
Lift carefully:
Gently peel the stamp away from the clay. If it sticks, you can very lightly dust the stamp with cornstarch before the next press. -
Cut the shape:
Position your round cookie cutter over the stamped design. Press straight down firmly to cut a clean circle. Twist slightly before lifting to ensure the edges separate cleanly. -
Remove excess clay:
Peel away the scrap clay from around the circle. You can ball this up and store it in an airtight bag for the next coaster. -
Smooth the edges:
Dip your finger into a small bowl of water. Very gently run your damp finger along the cut edge of the coaster to smooth out any sharpness or burrs left by the cutter.
Uneven Impressions?
If your stamp impression is deeper on one side, try standing up while stamping. Using your body weight from directly above helps distribute pressure more evenly than sitting.
Step 3: Drying & Finishing
-
Initial drying phase:
Carefully transfer the coaster to a clean sheet of parchment paper on a flat board. Let it sit undisturbed for about 24 hours. -
Flipping for even drying:
After the top feels dry to the touch, flip the coaster over. This allows the bottom to dry and helps prevent the clay from curling upwards at the edges. -
Checking for dryness:
Allow another 24-48 hours for complete drying. The clay will turn a chalky white and feel room temperature, not cold, when it is fully bone dry. -
Sanding imperfections:
Once fully dry, take your fine-grit sandpaper and lightly buff the edges. You can also very gently sand the surface if there are any unwanted bumps, but be careful not to erase your pattern. -
Clean off dust:
Use a dry, soft brush or a tack cloth to wipe away all the sanding dust. The surface needs to be perfectly clean before sealing. -
Applying the sealant:
Using a flat brush, apply a layer of matte acrylic varnish or sealant. This is essential for specific use as coasters, as raw clay will absorb condensation and disintegrate. -
Final coat:
Let the first coat dry completely according to the bottle instructions, then apply a second coat. Don’t forget to seal the bottom and the sides as well for full water resistance.
Level Up: Color Wash
Before sealing, apply a watered-down acrylic paint wash over the texture. Wipe the surface quickly with a damp cloth; paint stays in the grooves, highlighting the pattern.
Stack these beautifully textured discs on your coffee table for a handmade accent that looks professionally crafted


Leaf-Impressed Clay Keepsake Tags
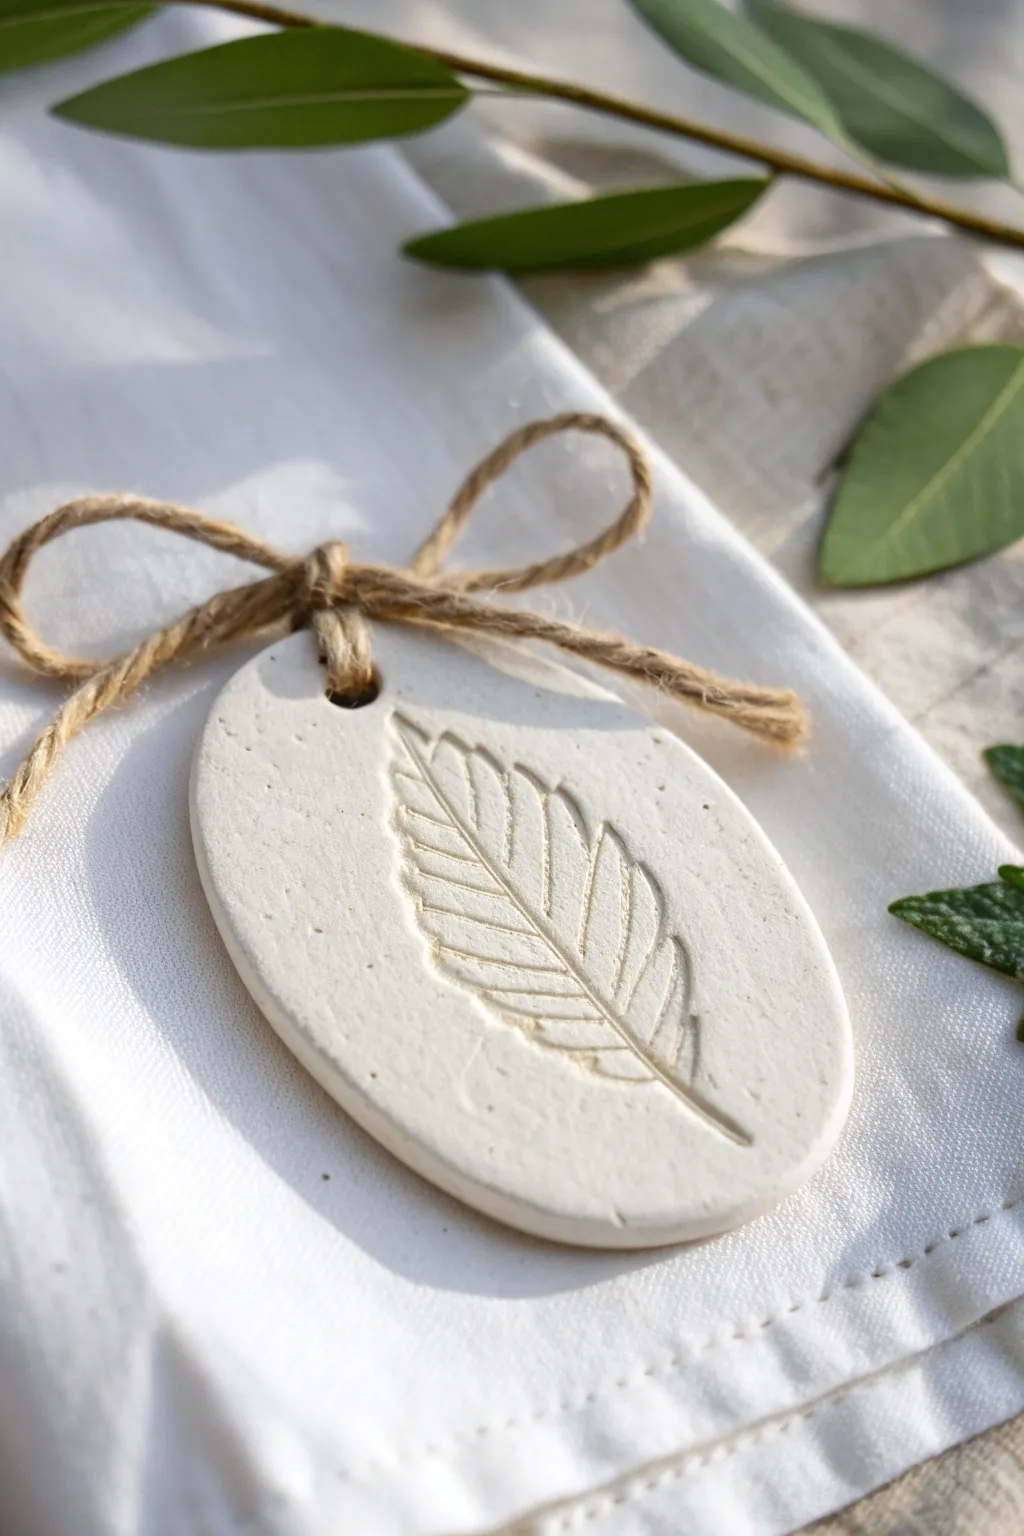
Capture the delicate details of nature with these elegant, minimalist clay tags. Featuring a deep leaf impression on smooth white clay, they make perfect gift toppers, napkin rings, or rustic ornaments.
Step-by-Step Tutorial
Materials
- White smooth air-dry clay (e.g., DAS or Crayola)
- Small rolling pin or acrylic roller
- Fresh leaf with prominent veins (fern or similar)
- Oval cookie cutter (approx. 2-3 inches)
- Parchment paper or smooth work surface
- Drinking straw or small circular cutter
- Jute twine
- Fine-grit sandpaper (optional)
- Small bowl of water
Step 1: Preparing the Clay Canvas
-
Condition the clay:
Begin by taking a handful of white air-dry clay. Knead it in your hands for a minute or two until it feels warm, pliable, and free of any initial cracks. -
Roll it out:
Place the clay on a sheet of parchment paper to prevent sticking. Use your rolling pin to flatten the clay into a smooth sheet, aiming for an even thickness of about 1/4 inch (6mm). -
Check surface quality:
Inspect the surface for air bubbles or wrinkles. If you spot any imperfections, lightly smooth them out with wet fingertips before moving on.
Vein Visibility Tip
For the crispest details, always place the leaf vein-side down. The back of the leaf usually has much stronger texture than the smooth top side.
Step 2: Creating the Impression
-
Select your botanical:
Choose a fresh leaf that fits within the size of your intended cutter. A leaf with thick, raised veins on the underside works best for a crisp print. -
Position the leaf:
Place the leaf vein-side down onto your rolled clay. Consider the angle; placing it slightly diagonal often looks more artistic. -
Press the design:
Gently roll your rolling pin over the leaf once with firm, even pressure to embed it into the clay. Be careful not to shift the leaf as you roll. -
reveal the pattern:
Carefully find the stem or edge of the leaf and slowly peel it away to reveal the detailed impression underneath.
Add a Wash of Color
After drying, lightly brush watered-down brown or green acrylic paint into the grooves, then wipe the surface clean to highlight the leaf veins.
Step 3: Cutting and Refining
-
Cut the shape:
Position your oval cookie cutter over the leaf impression, centering the design nicely. Press down firmly to cut through the clay. -
Remove excess clay:
Peel away the excess clay from around the outside of the cutter before lifting the cutter itself. This prevents the oval shape from distorting. -
Smooth the edges:
Dip your finger in a little water and gently run it along the cut edge of the oval to smooth out any sharpness or burrs left by the cutter. -
Create the hanging hole:
Using a drinking straw, punch a hole near the top of the oval. Make sure it isn’t too close to the edge to ensure the clay remains strong.
Step 4: Drying and Finishing
-
Begin drying:
Transfer the tag carefully to a clean flat surface or wire rack. Let it air dry for 24 to 48 hours, flipping it over halfway through to prevent curling. -
Test for dryness:
The clay should turn a bright, chalky white and feel hard to the touch when fully cured. If it feels cold, it likely needs more time. -
Sand imperfections:
Once fully dry, you can use fine-grit sandpaper to buff the edges or surface very lightly if you want an ultra-smooth finish. -
Prepare the twine:
Cut a length of jute twine, approximately 10-12 inches long. -
Thread the tag:
Fold the twine in half, push the loop through the hole in the tag, and pull the loose ends through the loop to secure it (a lark’s head knot). -
Tie the bow:
Tie the loose ends into a simple, charming bow just above the top of the tag, adjusting the loops until they look balanced.
These natural, handmade accents add a sophisticated organic touch to any table setting or gift wrap

What Really Happens Inside the Kiln
Learn how time and temperature work together inside the kiln to transform clay into durable ceramic.
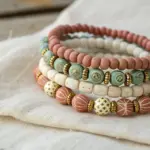
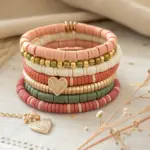
Simple Bead Bracelet or Necklace
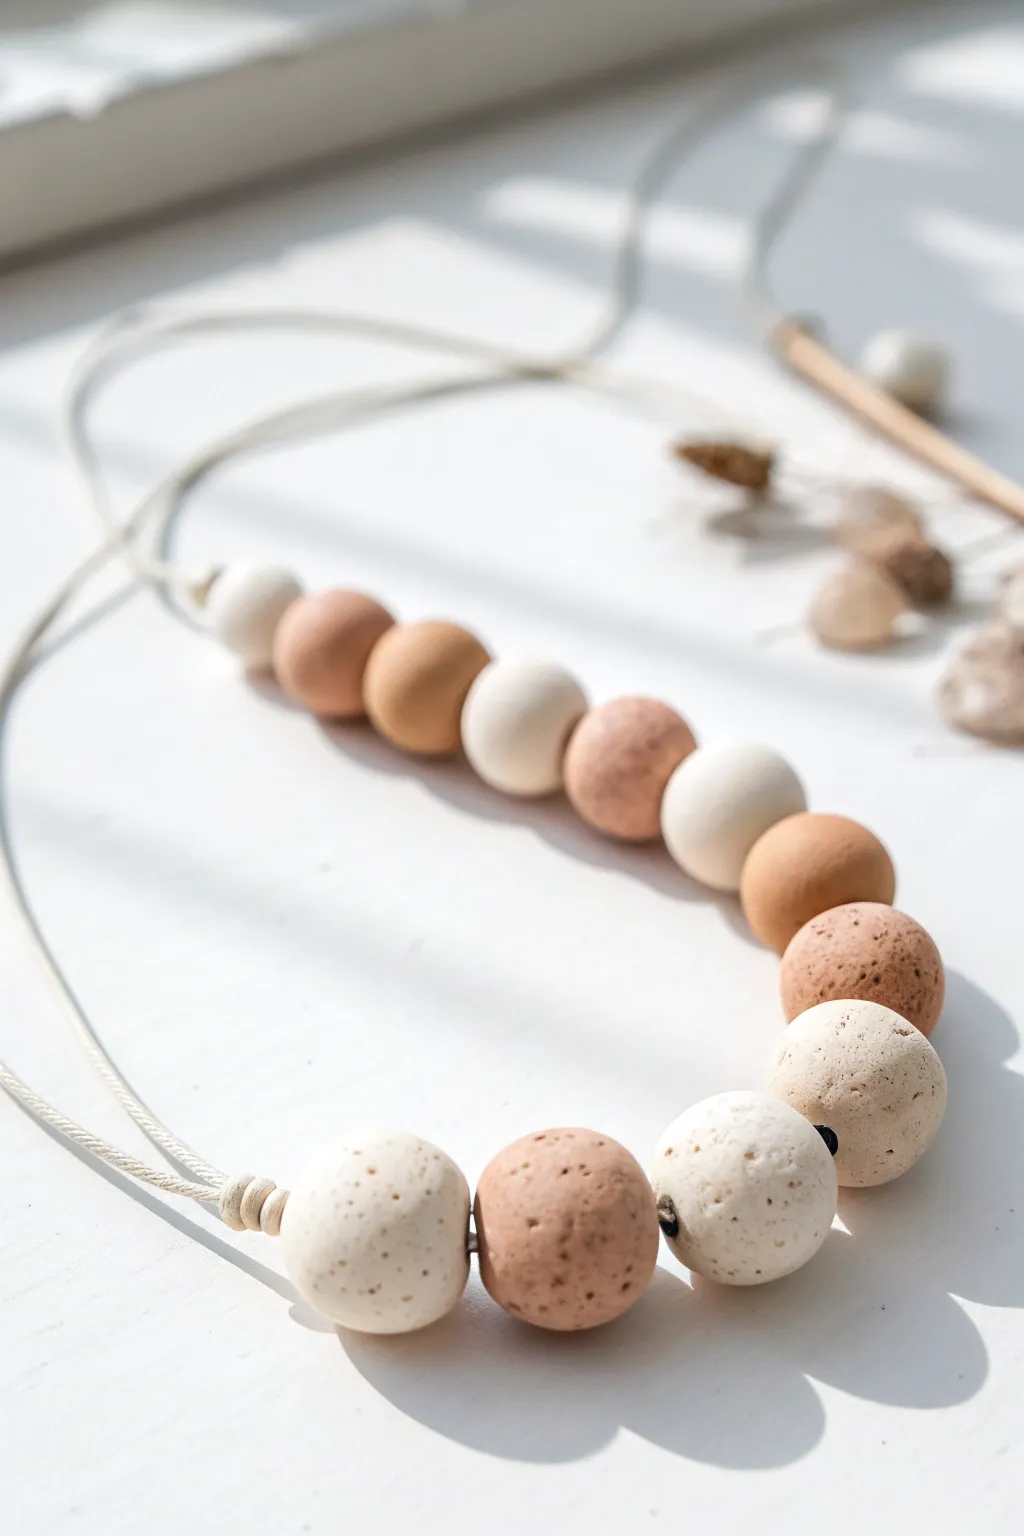
Embrace earthy elegance with this minimalist necklace featuring handmade air-dry clay beads in soft terracotta and cream tones. The unique speckled texture gives these beads a natural, stone-like appearance that pairs beautifully with simple cord for a relaxed, bohemian vibe.
Detailed Instructions
Materials
- Air dry clay (white)
- Acrylic paint (terracotta, warm beige, chocolate brown)
- Coffee grounds or black pepper (for speckling)
- Bamboo skewer or toothpick
- Waxed cotton cord or hemp twine (natural color)
- Fine-grit sandpaper
- Clear matte varnish (optional)
- Small bowl relative to mixing clay
Step 1: Preparing the Clay
-
Portion Your Clay:
Start by cutting your block of white air-dry clay into three equal sections. Keep two sections covered with a damp cloth or plastic wrap to prevent them from drying out while you work on the first color. -
Mix the Cream Color:
Take the first section of clay and add a very small drop of warm beige acrylic paint. Knead the clay thoroughly until the color is completely uniform and streak-free. -
Create the Terracotta Tone:
For the second section, mix in terracotta acrylic paint. Use enough paint to achieve a rich, warm earth tone, kneading until consistency is reached. If the clay feels sticky from the paint, let it sit for a few minutes. -
Add Texture:
To achieve that signature stone-like look, flatten each of your colored clay balls slightly. Sprinkle a pinch of dried coffee grounds or coarse black pepper onto the clay. -
Knead in Speckles:
Fold the clay over the speckles and knead gently to distribute them. You want them visible but embedded within the clay body rather than just sitting on the surface.
Clean Lines Pro-Tip
To keep bead holes clean while drying, leave them threaded on a skewer suspended across the rim of a bowl. This prevents flat spots from forming on the bottom of the beads.
Step 2: Shaping the Beads
-
Roll Spheres:
Pinch off small pieces of clay—about the size of a large marble or a grape. Roll them between your palms to create smooth, round spheres. Aim for roughly 11 to 13 beads total for the design shown. -
Vary the Sizes:
Create a slight graduation in size if you like, making the central beads just slightly larger than the ones near the ends of the strand. -
Refine the Shape:
Inspect each ball for cracks. If you see tiny fissures, dip your finger in water and smooth them over gently to ensure a flawless finish after drying. -
Pierce the Holes:
Hold a bead gently without squishing it. Using a bamboo skewer or a thick needle tool, slowly pierce through the center. twist the skewer as you push to prevent deforming the sphere. -
Clean the Exit:
Flip the bead over and poke the skewer through from the other side to ensure the hole is neat and clean on both ends. -
Drying Time:
Thread the wet beads onto a spare skewer or lay them on a parchment-lined tray. Let them dry for at least 24-48 hours. I find rotating them occasionally helps them dry evenly.
Sticky Clay Fix
If acrylic paint makes your clay too sticky to roll, dust your hands with a little cornstarch or baby powder. This restores a smooth, workable texture instantly.
Step 3: Finishing and Assembly
-
Sand and Smooth:
Once fully cured and hard, gently rub each bead with fine-grit sandpaper to remove any fingerprints or rough ridges around the holes. -
Seal the Beads:
Apply a thin coat of matte varnish to protect the clay and lock in the speckles. This step is optional but adds durability to your wearable art. -
Prepare the Cord:
Cut a length of natural cotton cord or hemp twine, approximately 30 inches long, or adjusted to your preferred necklace length. -
Stringing the Pattern:
Thread your beads onto the cord. Follow the pattern in the reference: alternate between cream and terracotta, or group colors for an ombre effect. -
Secure the Ends:
Tie a small overhand knot tight against the first and last bead on the strand to keep them centered and prevent sliding. -
Create a Closure:
Finish the necklace with a sliding knot closure for adjustability, or simply tie the loose ends together in a secure bow for a rustic look.
Enjoy wearing your handcrafted piece that brings a touch of natural beauty to any outfit
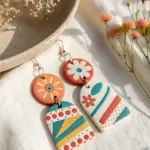
Lightweight Air Dry Clay Earrings
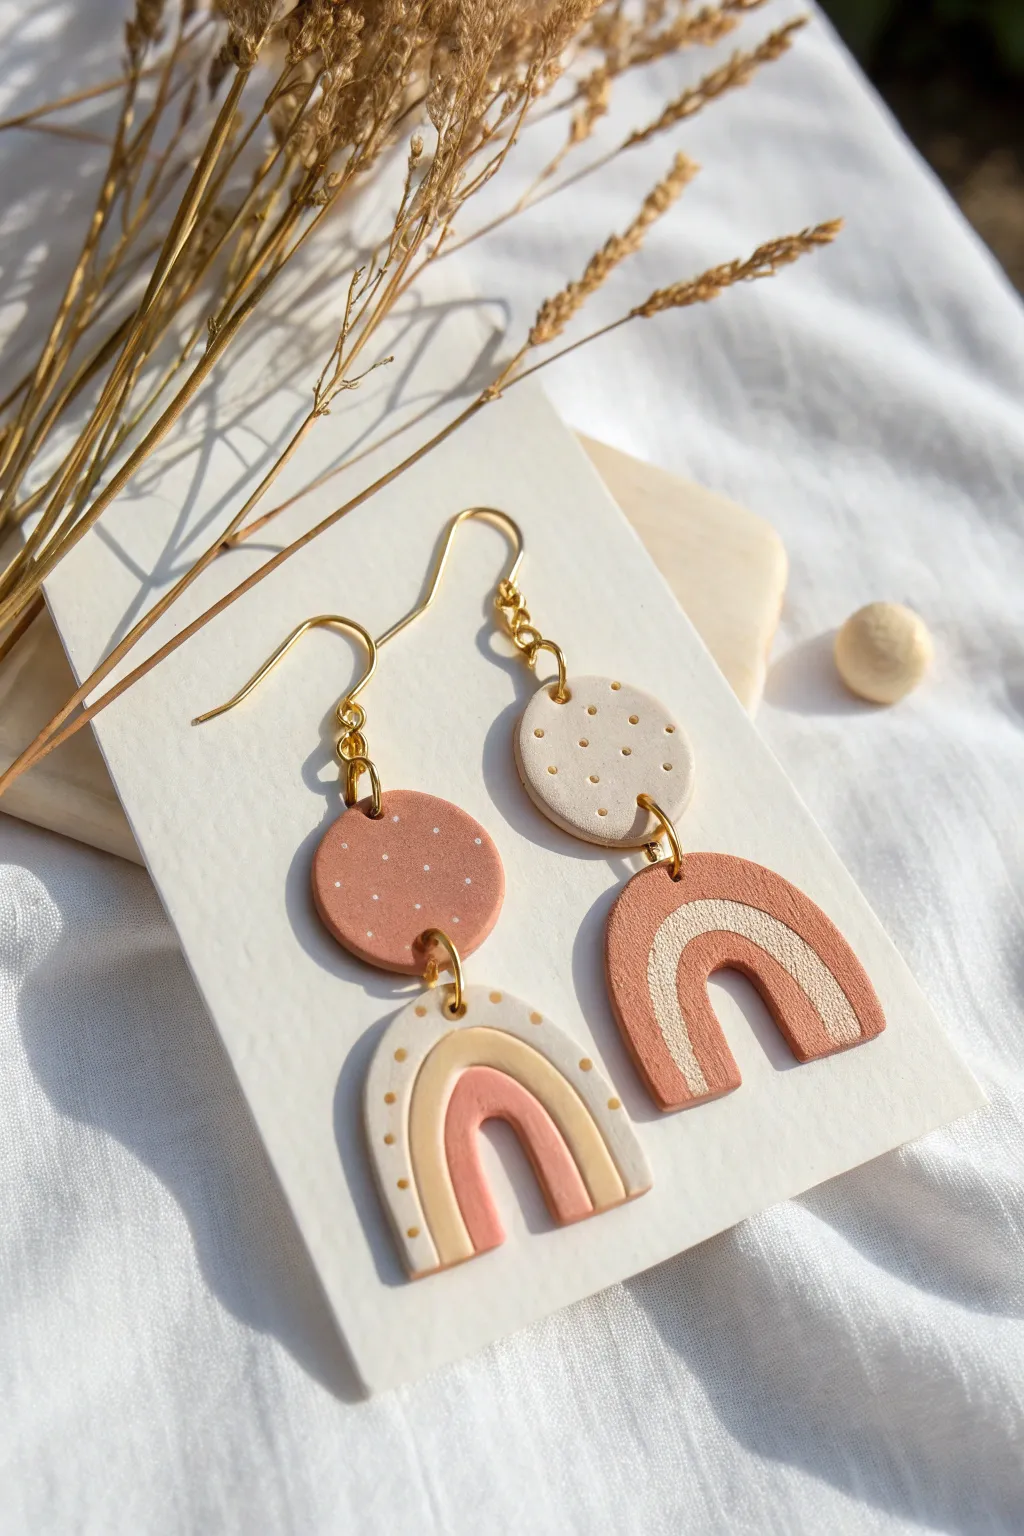
These charming lightweight earrings combine earthy terracotta tones with creamy whites for a modern bohemian look. Featuring a simple circle stud and a dangling rainbow arch, they are surprisingly easy to sculpt and customize with your favorite patterns.
How-To Guide
Materials
- Lightweight air dry clay (terracotta and white colors)
- Rolling pin or smooth glass jar
- Small round clay cutters (approx. 1.5cm diameter)
- Sharp clay blade or craft knife
- Medium-grit sandpaper
- Hand drill or needle tool for holes
- White acrylic paint
- Fine detail paintbrush or dotting tool
- 4 large gold jump rings
- 2 earring hooks (gold finish)
- Jewelry pliers
- Matte varnish or sealant (optional)
Step 1: Sculpting the Shapes
-
Condition the clay:
Begin by taking a small amount of terracotta clay and kneading it in your hands until soft and pliable. Do the same with a piece of white clay. -
Roll out the slabs:
Roll both clay colors out on a smooth, non-stick surface until they are about 3-4mm thick. Keep the thickness consistent for a professional finish. -
Cut the top circles:
Use your small round cutter to punch out two circles. For the mismatched look shown, cut one from terracotta clay and one from white clay. -
Cut the arch bases:
Cut out two larger arch shapes. You can do this freehand with a craft knife or use a U-shaped cutter. One should be terracotta and the other white. -
Refine the arches:
Use your fingers or a dampened brush to smooth the edges of your arches. If you want the layered rainbow look, you can lightly carve curved lines into the surface now, or simply paint them later. -
Create holes:
Using a needle tool or toothpick, poke a hole near the bottom edge of each circle and the top center of each arch. Ensure the hole is big enough for your jump rings. -
Add earring holes:
Don’t forget to add a second hole at the very top of each circle component for the earring hooks to attach later. -
Let them dry:
Place your clay pieces on a clean, flat surface and let them air dry completely. This usually takes 24-48 hours depending on humidity; flipping them halfway through helps prevent warping.
Cracked Clay?
If small cracks appear as the clay dries, mix a tiny bit of fresh clay with water to make a paste. Fill the cracks, let dry, and sand smooth.
Step 2: Decoration & Assembly
-
Sand for smoothness:
Once fully dry, gently sand the edges and surfaces with medium-grit sandpaper to remove any fingerprints or rough spots. -
Paint the dots:
Dip a fine dotting tool or toothpick into white acrylic paint. Carefully dab a pattern of tiny dots onto the top circle pieces. -
Paint the rainbow details:
On the arch pieces, use a fine brush to paint curved stripes. For the terracotta arch, paint creamy yellow and white stripes. For the white arch, I like to mix a little terracotta paint for a contrasting stripe. -
Seal the pieces:
Apply a thin coat of matte varnish to protect the paint and clay from moisture. Let this dry completely before handling. -
Open jump rings:
Using two pairs of jewelry pliers, twist your jump rings open sideways (never pull them apart outward). -
Connect the components:
Thread an open jump ring through the bottom hole of a circle and the top hole of an arch, then close the ring securely. -
Attach the hooks:
Finally, open the loop on your earring hooks and attach them to the top holes of the circle pieces. Close the loops to finish your earrings.
Pro Tip: Precise Dots
If you don’t have a dotting tool, the head of a sewing pin pushed into a pencil eraser makes perfect, uniform tiny dots every time.
Now you have a stunning pair of handmade earrings ready to wear or gift.


The Complete Guide to Pottery Troubleshooting
Uncover the most common ceramic mistakes—from cracking clay to failed glazes—and learn how to fix them fast.
Mini Photo or Place Card Holders
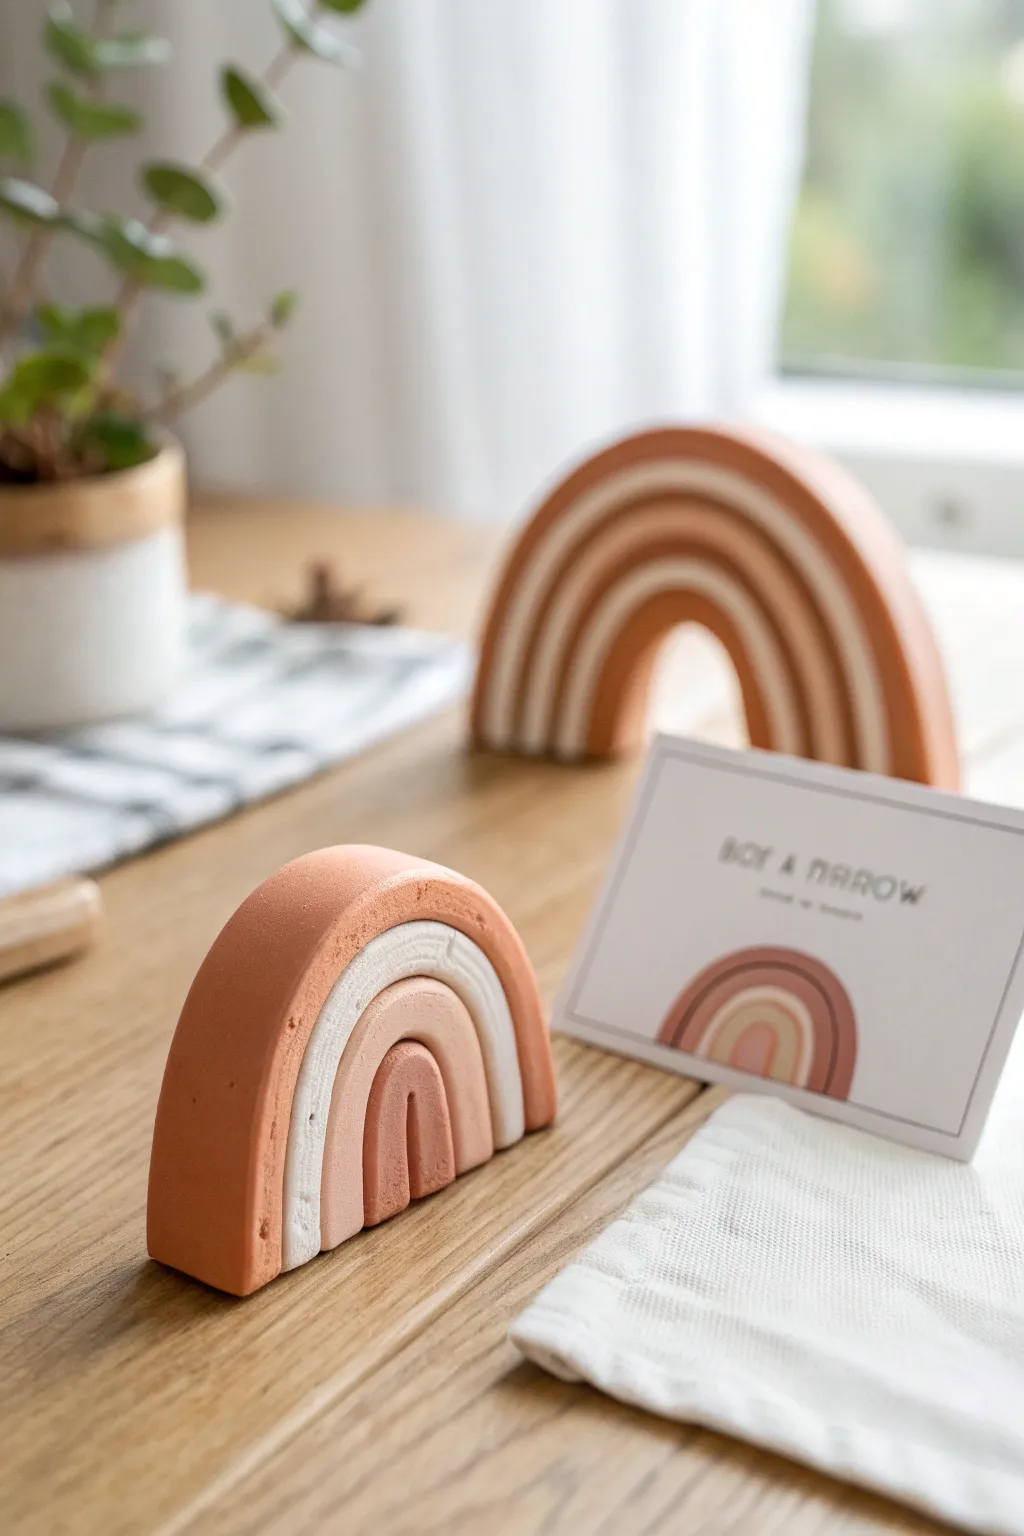
These charming, terracotta-toned rainbows are the perfect blend of functional decor and handmade artistry. With their matte, earthy finish and simple arches, they serve as unique place card holders for events or sweet photo displays for your shelves.
Detailed Instructions
Materials
- Air dry clay (white or terracotta colored)
- Acrylic paints (terracotta, burnt orange, beige/white, dark rust)
- Rolling pin
- Sharp craft knife or clay blade
- Small bowl of water
- Fine grit sandpaper
- A smooth work surface (silicone mat or parchment paper)
- Ruler
Step 1: Shaping the Arches
-
Prepare the clay:
Start by grabbing a substantial chunk of air dry clay. Knead it in your hands for a minute or two to warm it up and make it pliable, removing any air bubbles. -
Roll the coils:
Divide your clay into four balls of graduated sizes. Roll each ball into a long, even snake or coil. Aim for a thickness of about 1/2 inch for a sturdy base. -
Form the smallest arch:
Take the shortest coil and bend it into a tight ‘U’ shape. This will be the center of your rainbow. Place it on your work surface and flatten the bottom edges slightly so it stands upright later. -
Layer the middle arches:
Take the next longest coil and curve it directly over the first arch. I like to score the touching sides slightly with a needle tool and dab a tiny bit of water to help them adhere, though simply pressing them together gently works too. -
Add the contrast layer:
For the third arch, which will eventually be painted white or beige, repeat the process. Ensure the coil is snug against the previous one to avoid gaps. -
Finish the outer layer:
Wrap the final, longest coil around the outside to complete the rainbow shape. Gently press all the layers together from the sides to ensure they form a cohesive unit without distorting the rounded tops.
Create Seamless Coils
To get perfectly even snakes without flat spots, use a flat acrylic block or a hardback book to roll the clay instead of just your hands.
Step 2: Refining and Cutting
-
Trim the bottom:
Once your layers are assembled, the bottom of the rainbow will likely be uneven. Use a long, sharp clay blade or a knife to slice straight across the bottom, creating a perfectly flat base so the rainbow stands on its own. -
Create the card slot:
This is the functional part. Using your knife, cut a straight slit across the very top center of the rainbow. It should be deep enough to hold a card securely (about 1/4 to 1/2 inch) but not so deep that it cracks the clay. -
Smooth the imperfections:
Dip your finger in a little water and run it over the clay to smooth out any fingerprints or cracks. Pay special attention to the joins between the arches. -
Let it dry:
Place your rainbow in a safe, dry spot away from direct sunlight. Allow it to dry for at least 24-48 hours, flipping it occasionally to ensure the bottom dries evenly.
Step 3: Painting and Finishing
-
Sand for smoothness:
Once fully dry and hard, use fine-grit sandpaper to gently buff away any rough spots or sharp edges, particularly around the bottom cut. -
Mix your palette:
Prepare your acrylic paints. You’ll need a terracotta or rust orange for the outer and center arches, a lighter dusty pink for the second arch, and a creamy white or beige for the third arch. -
Paint the outer arch:
Using a small, flat brush, carefully paint the outermost arch with your darkest terracotta shade. Keep a steady hand to maintain clean lines between the layers. -
Paint the center detail:
Use the same terracotta shade for the tiny, innermost arch. If you accidentally get paint on the neighboring section, wipe it quickly with a damp cotton swab. -
Apply the middle tones:
Paint the second arch (counting from the inside) with your dusty pink or lighter clay tone. This creates a lovely gradient effect. -
Add the white accent:
Instructions vary here, but I prefer painting the third arch in a creamy off-white or beige to break up the warm tones. Apply two thin coats for opaque coverage. -
Final touches:
Let the paint dry completely. If you want a matte finish like the reference photo, leave it as is. Insert your favorite photo or place card into the top slot to test the fit.
Fixing Cracks
If small cracks appear as the clay dries, make a paste of clay and water (slip) to fill them in, then sand smooth once dry.
Now you have a stylish, earthy accent piece ready to hold your fondest memories or guide guests to their seats.
Cute Clay Magnets With Simple Faces
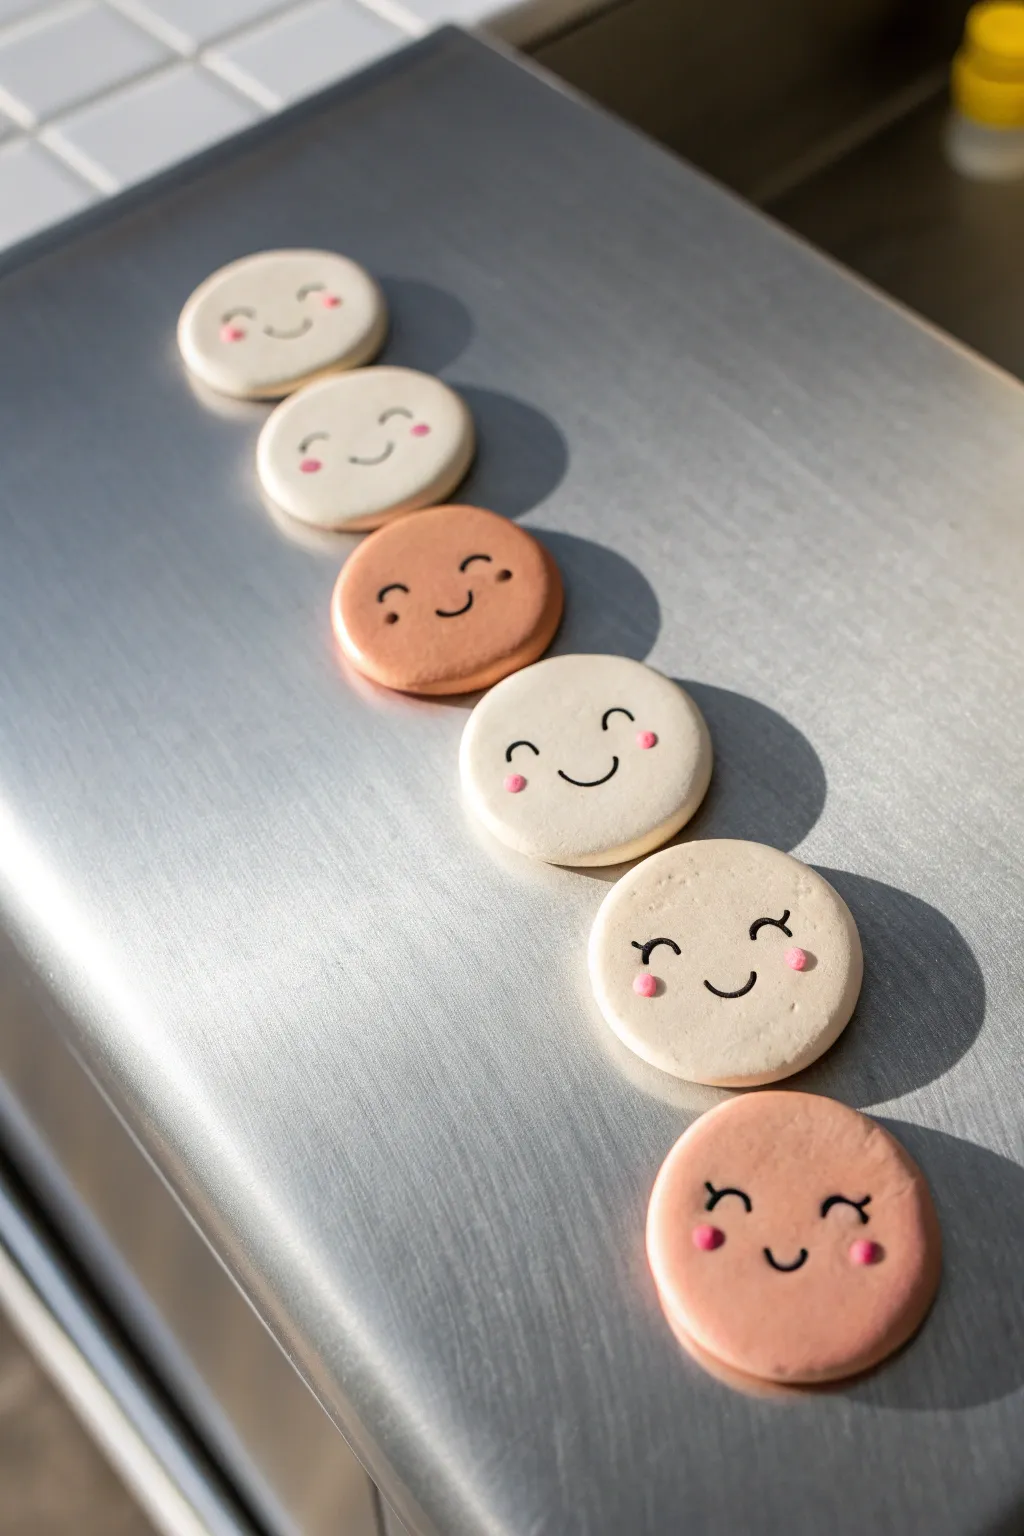
Brighten up your fridge or magnetic board with these charmingly simple round magnets featuring sweet, smiling expressions. The minimalist design uses natural clay tones and delicate painted details to create a modern yet adorable set of functional decor.
Step-by-Step
Materials
- White air dry clay
- Terracotta or peach-colored air dry clay
- Rolling pin
- Small round cookie cutter or bottle cap (approx. 1.5 inches)
- Fine grit sandpaper (optional)
- Black fine-tip acrylic paint marker or permanent marker
- Pink craft paint or acrylic marker
- Small dotting tool or toothpick
- Strong craft magnets (round)
- Strong craft glue (e.g., E6000 or super glue)
- Matte sealant or varnish
Step 1: Shaping the Clay
-
Condition the clay:
Begin by taking a chunk of your white air dry clay and kneading it in your hands until it is smooth, pliable, and free of cracks. -
Roll it out:
Place the clay on a smooth, non-stick surface or a piece of parchment paper. Use your rolling pin to flatten the clay into an even slab, aiming for a thickness of about 1/4 inch (6mm). -
Cut the shapes:
Using your small round cutter or a clean bottle cap, press firmly into the clay to cut out perfect circles. Lift the cutter straight up to avoid warping the shape. -
Repeat with color:
Repeat the conditioning, rolling, and cutting process with your terracotta or peach-colored clay to create a mix of different skin tones for your magnets. -
Smooth the edges:
Dip your finger in a tiny bit of water and gently run it around the circumference of each clay circle to smooth out any rough bits left by the cutter. This makes the finished product look much more professional. -
Dry thoroughly:
Lay the circles flat on a clean surface to dry. I usually flip them over halfway through the drying process to ensure both sides dry evenly and stay flat. Allow 24-48 hours depending on your clay brand.
Step 2: Adding the Faces
-
Surface prep:
Once the clay is completely bone dry, check for any remaining rough spots. If needed, very lightly sand the edges with fine-grit sandpaper for a flawless finish. -
Draft the features (optional):
If you are nervous about freehand drawing, lightly sketch the eyes and mouth placement with a pencil first. Keep the expressions simple—wide-set eyes look cute. -
Draw the eyes:
Using a black fine-tip acrylic paint marker or permanent marker, draw two small arcs for closed, smiling eyes. You can add tiny lashes to some for variation. -
Draw the mouth:
Center a small ‘u’ shape between and slightly below the eyes to create a happy smile. The simplicity of the line is key to the aesthetic. -
Add rosy cheeks:
Dip a dotting tool or the blunt end of a toothpick into pink acrylic paint. Gently stamp a small dot on either side of the smile, right under the eyes. -
Let paint set:
Allow the painted features to dry completely, which should only take a few minutes.
Smooth Surface Trick
To get that perfectly flat, brushed-metal look on the clay itself, roll your slab out between two rulers of equal thickness. This ensures every single magnet is exactly the same height.
Step 3: Finishing Up
-
Seal the clay:
Apply a thin coat of matte varnish or sealant over the front and sides of each disc. This protects the clay from moisture and dirt while keeping the paint fresh. -
Prepare the back:
Once the sealant is dry, flip the circles over to expose the unpainted back. -
Attach the magnet:
Apply a dab of strong craft glue to the center of the back of the clay disc. Press a round magnet firmly into the glue. -
Final cure:
Let the glue cure according to the manufacturer’s instructions (usually overnight for maximum strength) before placing them on a vertical surface.
Expression Ideas
Don’t stop at smiles! Try winking eyes (one arc, one dot), surprised ‘o’ mouths, or sleepy straight lines. A mixed set of expressions looks adorable grouped together.
Now you have a cheerful set of magnets to hold your photos and notes with style

TRACK YOUR CERAMIC JOURNEY
Capture glaze tests, firing details, and creative progress—all in one simple printable. Make your projects easier to repeat and improve.
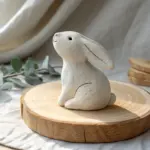
Tiny Bud Vase Wrap (Bottle-Style Form)
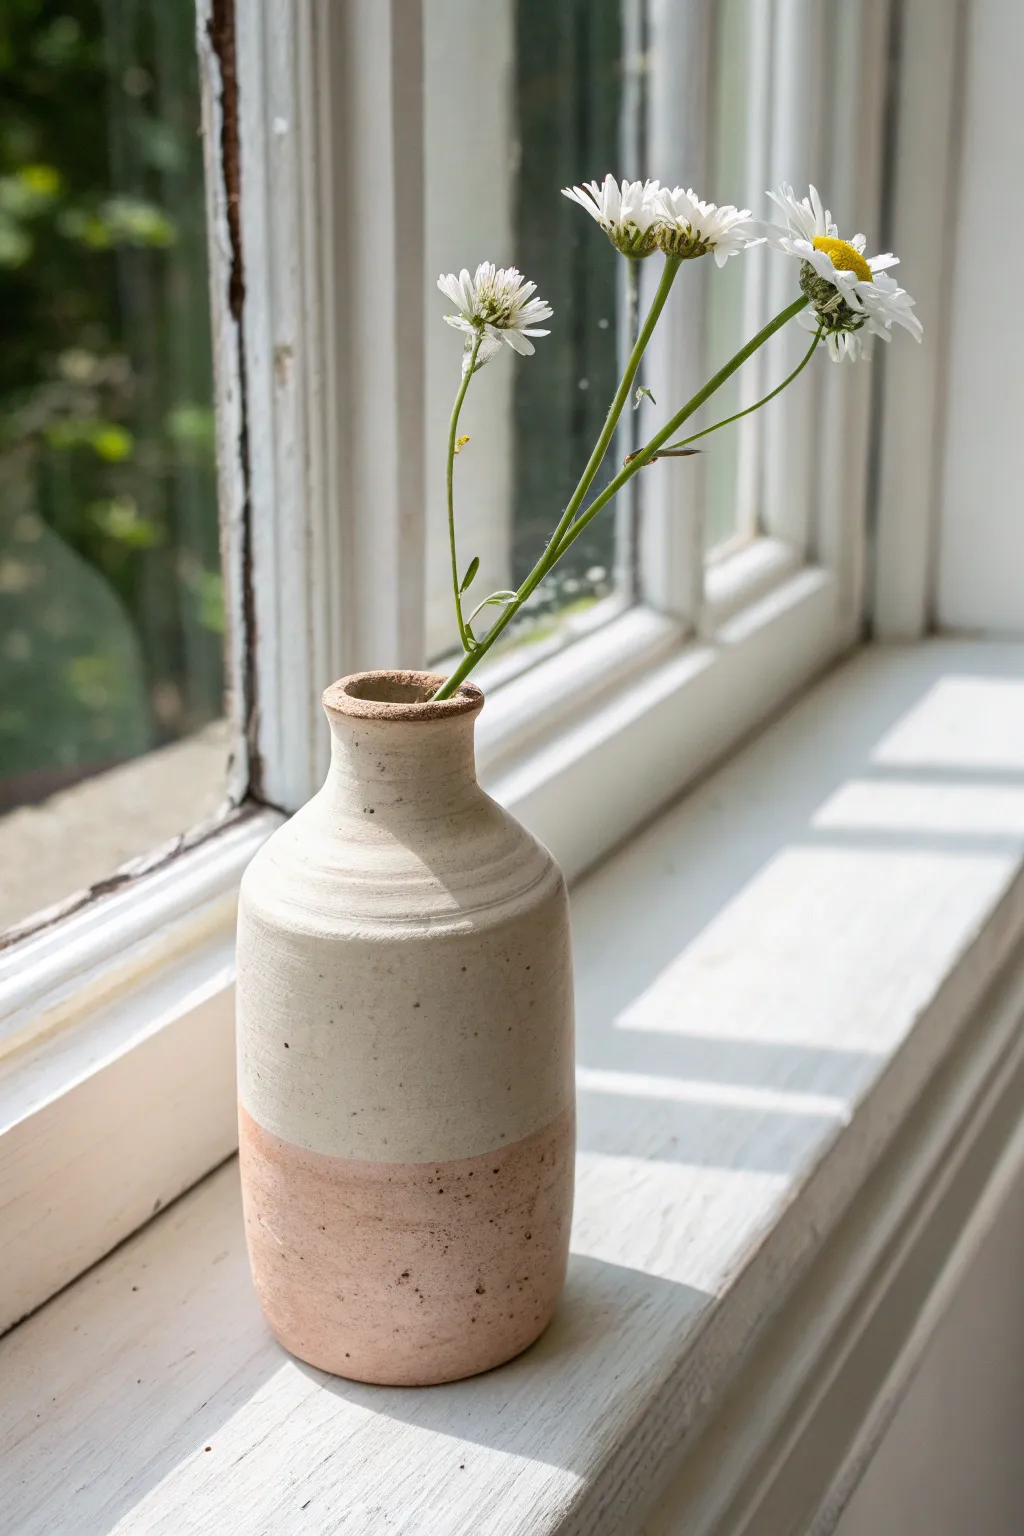
This rustic, minimalist bud vase captures the charm of wheel-thrown pottery using humble hand-building techniques. With a distinct two-tone texture and a classic bottle silhouette, it’s perfect for displaying a few stems of wildflowers by a sunny window.
How-To Guide
Materials
- Air dry clay (white or light grey)
- Small glass jar or bottle (to use as an internal form/armature)
- Rolling pin
- Cutting tool or butter knife
- Sponge
- Water based varnish or sealant (matte)
- Acrylic paint (warm blush or terracotta color)
- Water cup
- Sandpaper (fine grit)
Step 1: Forming the Base
-
Prep the armature:
Select a small glass bottle or jar to serve as the permanent internal structure. This ensures your vase is water-tight from the get-go. -
Roll out the slab:
Roll your air dry clay into a slab approximately 1/4 inch thick. Aim for a long rectangle that is slightly taller than your glass bottle. -
Measure and cut:
Wrap the slab loosely around the bottle to check the length, then trim the clay into a clean rectangle that will overlap slightly when wrapped. -
Wrap the form:
Apply the clay slab around the glass bottle. Press the seam together firmly where the edges meet, smoothing the clay with a wet finger to make the line disappear. -
Trim the top:
Using your cutting tool, slice off any excess clay extending beyond the top rim of the glass bottle, but leave just enough to fold slightly inward if you want to hide the glass edge.
Seamless Finish
Use a remarkably generous amount of water when smoothing the vertical seam. The clay should turn into a slip (mud) which acts as the perfect glue to hide the join.
Step 2: Adding the Neck and Lip
-
Shape the shoulder:
Gently squeeze the clay inward near the top of the bottle to create a tapered ‘shoulder’ shape, molding it against the glass neck. -
Create a coil:
Roll a small, even snake of clay for the lip. It should be thick enough to create that distinct, rounded rim seen in the photo. -
Attach the rim:
Score the top edge of your vase form and moisten it with a little water. Place the coil on top and smooth the connection joint downwards on the outside. -
Refine the silhouette:
Run a damp sponge vertically along the sides of the vase to uniform the shape and remove stray fingerprints. Create slight horizontal grooves near the neck for a thrown-pottery look. -
Check stability:
Tap the bottom of the vase gently on your work surface to ensure it sits flat and stable.
Faux-Ceramic Texture
Mix dried coffee grounds or sand into your clay before rolling it out. When sanded later, this texture reveals itself, looking just like expensive speckled stoneware.
Step 3: Finishing and Coloring
-
Dry thoroughly:
Let the piece dry completely. This usually takes 24-48 hours depending on humidity; the clay should turn white and feel room temperature, not cool to the touch. -
Sand for texture:
Once dry, use fine-grit sandpaper to smooth out any rough patches, but don’t over-sand; the slightly speckled, uneven texture adds character. -
Mix the glaze color:
Mix a warm blush or diluted terracotta acrylic paint. You want a ‘dip-dye’ effect, so the color shouldn’t be too opaque. -
Apply the bottom color:
Paint the bottom third of the vase. I find using a wide, flat brush helps create a crisp horizontal line separating the painted base from the raw clay top. -
Add speckles (optional):
To mimic the speckled clay body in the photo, flick a stiff toothbrush with watered-down brown paint lightly over the surface. -
Seal the piece:
Coat the entire exterior with a matte varnish. This protects the clay from moisture and gives it a finished, ceramic feel without making it shiny.
Set your new vase on a windowsill and enjoy the simple beauty of bringing nature indoors
Simple Succulent Planter or Catchall Pot
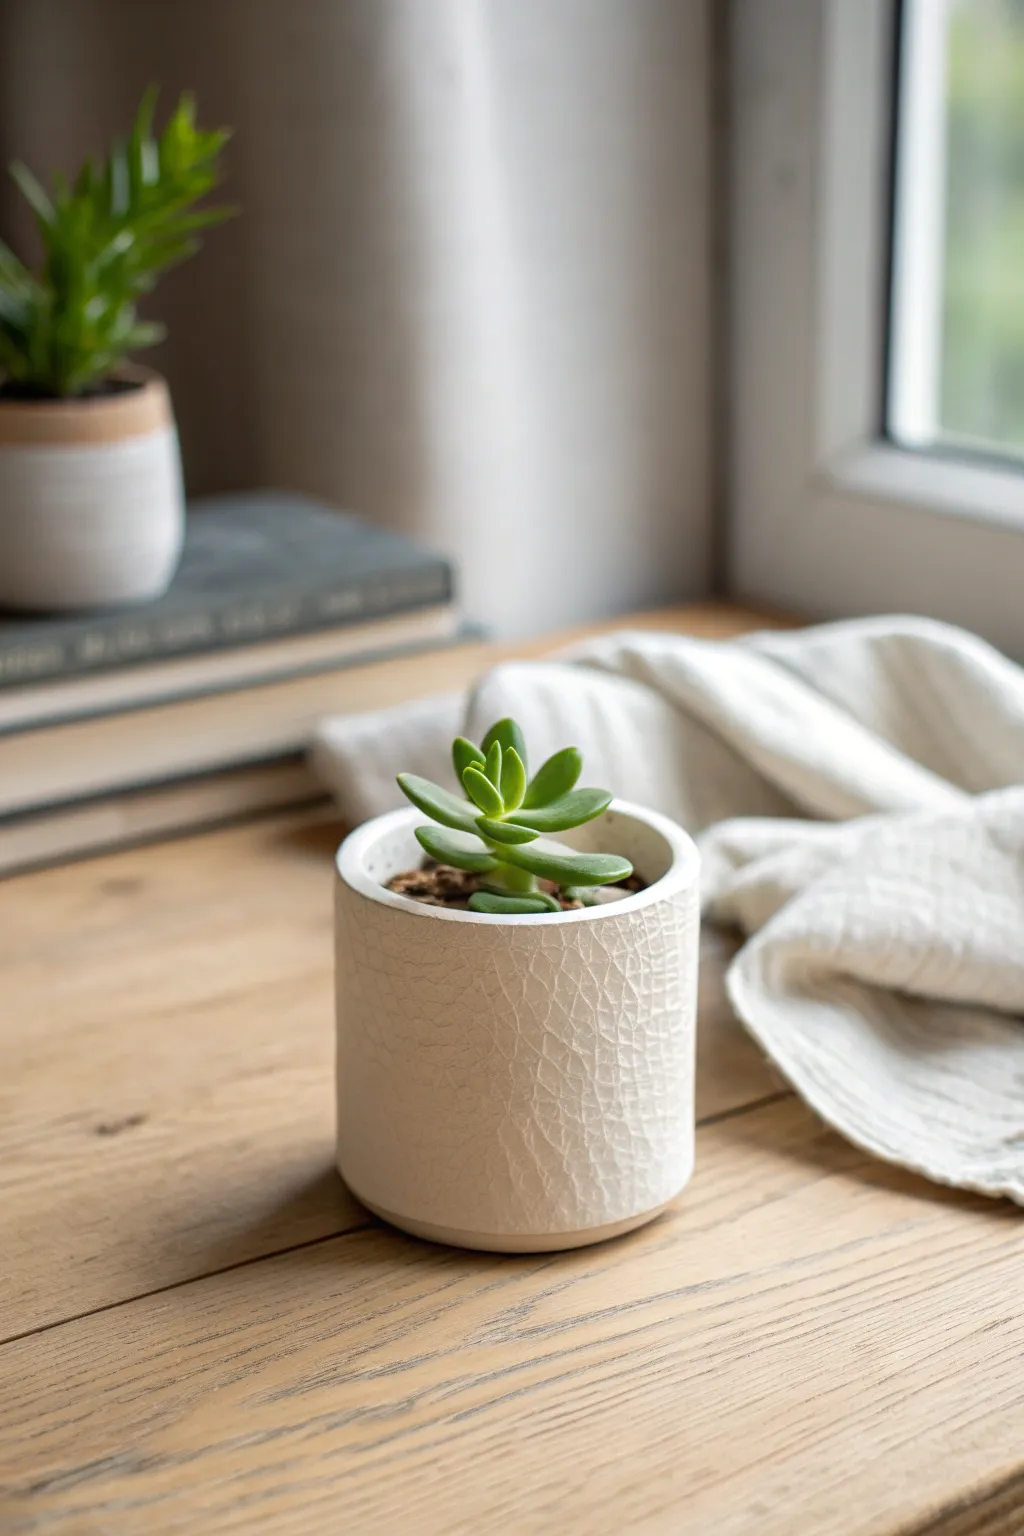
This minimalist planter combines a clean cylindrical shape with a sophisticated, organic texture that looks like aged ceramic. Using a simple rolling technique, you can create a high-end crackled finish that catches the light beautifully.
Step-by-Step Tutorial
Materials
- White polymer clay or air-dry clay (approx. 500g)
- Rolling pin or smooth glass jar
- Circle cutter or a round bowl (approx. 3-4 inches diameter)
- Ruler and craft knife
- Textured rolling pin or crumpled aluminum foil ball
- Small cup of water (for smoothing)
- Slip (clay mixed with water to form a paste)
- Acrylic matte varnish or sealant (optional)
- Fine-grit sandpaper
Step 1: Preparing the Base
-
Condition the Clay:
Begin by kneading your white clay in your hands until it is warm, pliable, and free of any air bubbles. If the clay feels too stiff, add a tiny drop of water or baby oil to soften it up. -
Roll the Slab:
Place the clay on a smooth, non-stick surface. Use your rolling pin to flatten it into an even sheet, aiming for a consistent thickness of about 1/4 inch (6mm) to ensure the walls are sturdy. -
Cut the Base:
Press your circle cutter or upside-down bowl into the clay to cut out a perfect circle. This will serve as the bottom of your pot. Set this disc aside on a small piece of parchment paper so you can move it easily later. -
Measure the Circumference:
To determine the length of the wall you need, either calculate the circumference based on your base diameter or simply loosely wrap a string around your base disc and mark the length.
Secret Texture Tool
Don’t have foil? Pressing a piece of rough linen fabric or dried leaves into the wet clay creates equally stunning organic patterns.
Step 2: Creating the Textured Walls
-
Cut the Wall Strip:
Cut a long rectangular strip from your remaining rolled clay. The length should match your measurement plus an extra inch for overlap, and the height should be about 2.5 to 3 inches. -
Add Texture:
This is the crucial step for that crackled look. Take a ball of crumpled aluminum foil and gently roll and press it over the entire surface of your clay strip. Press firmly enough to create deep, irregular veins but not so hard that you deform the shape. -
Refine the Edges:
After texturing, the edges of your rectangle might have spread out. Use your ruler and craft knife to trim the top and bottom edges straight again, ensuring the height is even all the way across. -
Score the clay:
Take a needle tool or toothpick and scratch up (score) the outer edge of your circular base. Do the same along the bottom edge of your textured rectangular strip where it will connect to the base. -
Apply Slip:
Dab a small amount of slip—or just water if your clay is fresh—onto the scored areas. This acts as the glue to fuse the pieces together.
Cracks Appearing?
If small hairline cracks appear while drying, mix a tiny bit of fresh clay with water to make a paste and fill them in, then smooth over.
Step 3: Assembly and Finishing
-
Attach the Wall:
Carefully lift the textured strip and wrap it around the circular base. I find it easiest to place the strip on its side and roll the base along it initially. Bring the two ends of the wall together. -
Seal the Seams:
Where the wall ends meet, cut through both layers at a diagonal angle and remove the excess clay. Push the cut edges together and smooth the seam on the *inside* of the pot with your finger or a modeling tool. Try to leave the outside texture undisturbed. -
Secure the Base:
Turn the pot upside down gently. Use a smoothing tool or your finger to firmly blend the clay from the wall onto the base, ensuring there is no gap where water could leak out. Smooth this bottom connection completely. -
Refine the Rim:
Dip your finger in water and run it along the top rim of the pot. Smooth out any sharp edges or unevenness to create that flat, clean lip seen in the photo. -
Check the Shape:
Stand the pot upright and look at it from all sides. If the circle has become warped during handling, gently nudge it back into a perfect cylinder. -
Drying:
Place the finished pot in a cool, dry area away from direct sunlight. Let it air dry for at least 24-48 hours. Turn it over halfway through the drying process to let the underside breathe. -
Sanding:
Once bone dry, use fine-grit sandpaper to lightly buff the rim and any sharp spots on the bottom. Be careful not to sand away the beautiful foil texture on the sides. -
Sealing:
To make the pot water-resistant, seal the inside with two coats of waterproof varnish. For the outside, a matte sealer will protect the white clay while keeping that natural, stone-like appearance.
Once sealed and dry, your new planter is ready to home a small succulent and bring a touch of greenery to your space
No-Fuss Desk Organizer Tray
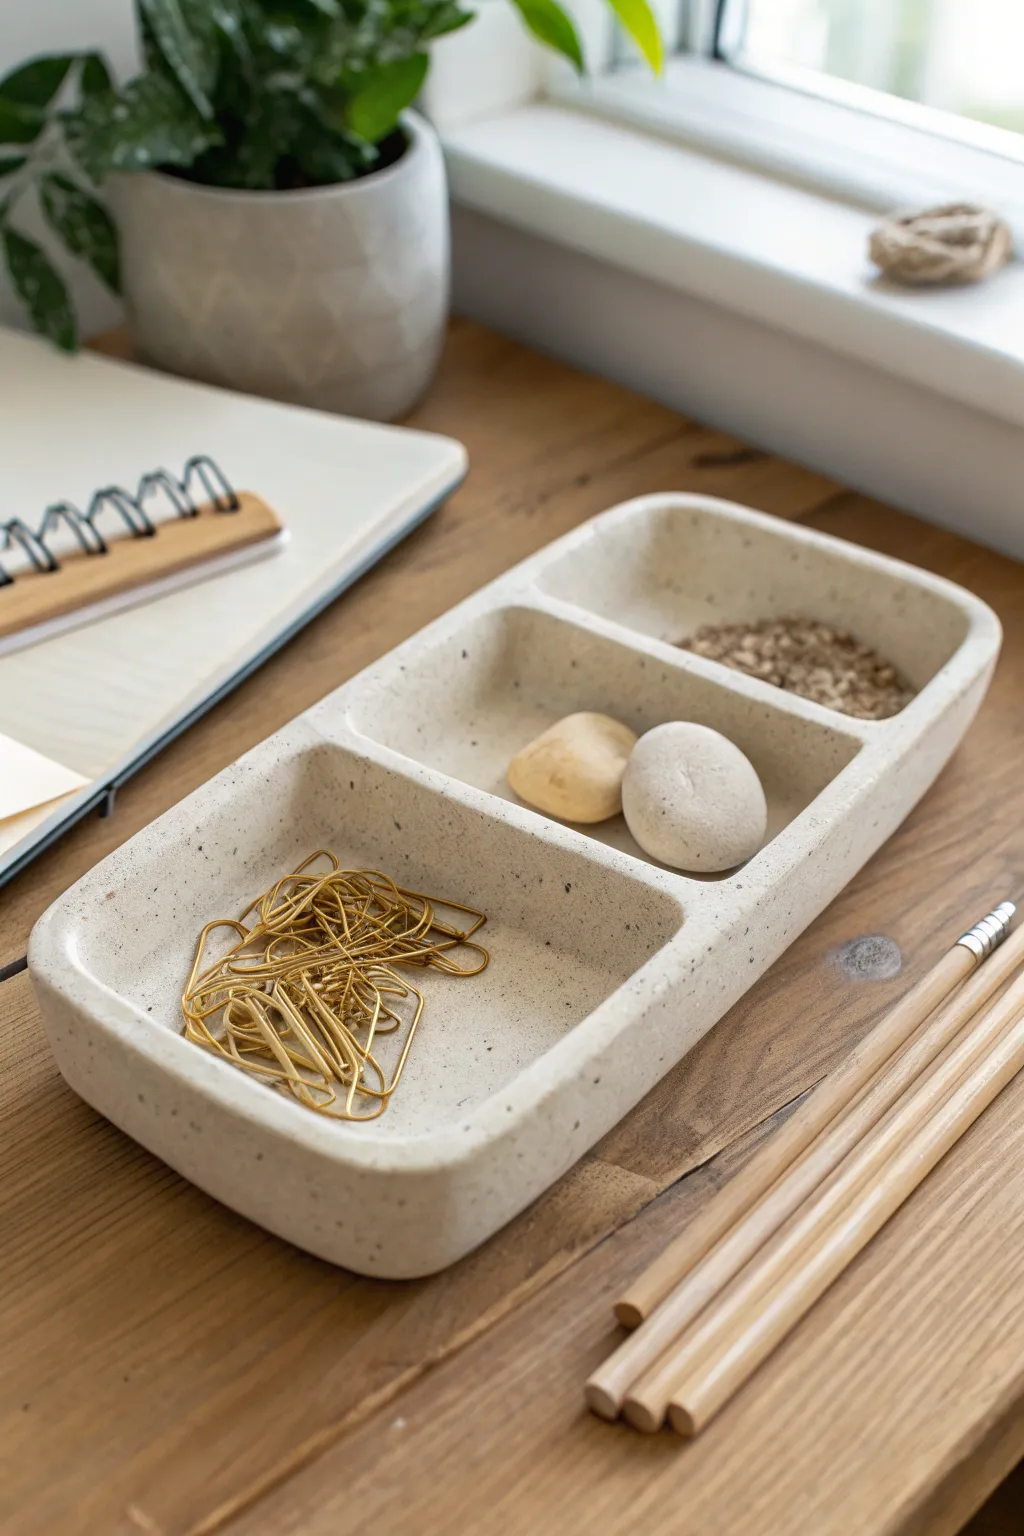
Bring a touch of minimalist calm to your workspace with this segmented tray, perfect for keeping small essentials in check. The organic, speckled finish mimics natural stone, giving your desk a grounded and earthy feel without the weight.
How-To Guide
Materials
- White air dry clay
- Used coffee grounds or fine black pepper (for speckling)
- Rolling pin
- Ruler
- Craft knife or clay cutter
- Small bowl of water
- Smoothing sponge
- Fine-grit sandpaper (220 grit or higher)
- Matte acrylic sealant (spray or brush-on)
- Parchment paper or craft mat
Step 1: Preparing the Clay Base
-
Mix the Speckles:
Take a large chunk of white air dry clay and flatten it slightly. Sprinkle a small pinch of dried used coffee grounds or cracked black pepper onto the surface. Fold the clay over and knead thoroughly until the speckles are evenly distributed throughout the mass. -
Roll the Slab:
Place your speckled clay onto a sheet of parchment paper. Use a rolling pin to roll it out into a long rectangle, aiming for a consistent thickness of about 1/4 inch (6mm) to ensure stability. -
Cut the Base Rectangle:
Using a ruler and craft knife, trim the rolled slab into a neat rectangle. A good size for a desk tray is approximately 4 inches wide by 9 inches long, but you can adjust this to fit your specific desk space. -
Smooth the Edges:
Dip your finger into a little water and run it along the cut edges of your base rectangle to soften any sharp corners left by the knife.
Cracks Appearing?
If small cracks appear while drying, don’t panic. Mix a tiny bit of fresh clay with water to make a paste and fill the cracks. Smooth it over and let it dry again.
Step 2: Building the Walls
-
Create Wall Strips:
Gather the excess clay trimmings and roll them out again to the same 1/4 inch thickness. Cut long strips that are about 1 inch high. These will become the outer walls of your tray. -
Score and Slip:
Use your craft knife to make small hatch marks (scoring) along the outer perimeter of your base and on the bottom edge of your clay strips. Dab a little water (slip) onto the scored areas to act as glue. -
Attach the Outer Frame:
Place the strips onto the base to form the outer walls. Press down firmly but gently. Where the strips meet at the corners, blend the clay together ensuring no gaps remain. -
Reinforce the Seams:
Roll a very thin snake of clay and press it into the inside seam where the wall meets the floor. Use a modeling tool or your finger to smooth this coil out, merging the wall and floor seamlessly for extra strength.
Step 3: Adding Dividers & Finishing
-
Measure Dividers:
Measure the interior width of your tray. cut two clay strips to match this width, keeping the height identical to the outer walls. -
Install the Dividers:
Decide on your spacing. I prefer one large section and two smaller ones, but you can space them evenly. Score and slip the contact points, then slide the dividers into place. -
Blend the Joins:
Just like the outer walls, smooth the clay where the dividers meet the sides and the base. Use a wet finger or sponge to erase any visible seams. -
Round the Top Edges:
Gently run a damp sponge along the top rim of the entire tray and the dividers. This will create that soft, rounded stone-like appearance seen in the photo. -
Slow Drying:
Place the tray in a cool, dry spot away from direct sunlight. To prevent warping, you can loosely cover it with a plastic bag for the first 24 hours giving it a slow cure. -
Sanding:
Once the clay is bone dry (usually 24-48 hours), use fine-grit sandpaper to buff away any remaining fingerprints or rough patches. The sanding might reveal more of your speckles, which is a nice bonus. -
Sealing:
Wipe away any dust with a slightly damp cloth. Apply a coat of matte acrylic sealant to protect the tray from moisture and stains, preserving that raw clay look.
Go Modern
For a contemporary twist, paint just the inside floor of each compartment with a pastel acrylic paint, leaving the speckled walls raw.
Now you have a serene spot to organize your daily stationery essentials
Simple Wall Hanging Tiles With Texture

Bring earthy charm to your space with this textured wall hanging featuring five semi-circle tiles in a soothing gradient of terracotta, teal, and beige. The concentric arch pattern adds wonderful depth while the wooden beads provide a polished, organic finish.
How-To Guide
Materials
- Air dry clay (white)
- Rolling pin
- Circle cutter (approx. 3-4 inches diameter) or a bowl and knife
- Modeling tool with a blunt rounded tip or a chopstick
- Sandpaper (fine grit)
- Acrylic paints (beige/peach, terracotta, deep teal)
- Paintbrushes (flat and detail)
- Jute twine or heavy string
- Wooden beads (various sizes, some painted teal/white)
- Skewer or straw (for making holes)
- Clear matte varnish (optional)
Step 1: Shaping the Clay Tiles
-
Roll out the slab:
Begin by conditioning your air dry clay until it is smooth and pliable. Roll it out on a flat surface to an even thickness of about 1/4 inch (6mm). Using guide sticks on either side can help keep the thickness uniform. -
Cut the base circles:
Use your large circle cutter or trace around a bowl to cut out three perfect circles. You will need enough clay for these three shapes to eventually become five distinct semi-circle pieces. -
Create semi-circles:
Use a sharp craft knife or a clay blade to slice each circle directly in half. You now have six semi-circles. Select the best five for your hanging (keep the sixth as a tester for paint colors). -
Smooth the edges:
Dip your finger in a little bit of water and gently run it along the cut straight edge and the curved outer edge of each semi-circle to remove any sharpness or burrs.
Step 2: Adding Texture and Holes
-
Imprint the center arch:
Take your blunt modeling tool or a chopstick. Find the bottom center of the semi-circle (the flat edge) and press a small, tight arch shape into the clay. -
Create concentric lines:
Work your way outward from that center arch, pressing parallel curved lines into the clay to create a rainbow-like pattern. Press firmly enough to leave a deep groove but be careful not to cut all the way through. -
Pierce the hanging holes:
Using a skewer or a straw, poke a hole vertically through the thickness of the clay at the top center of the arch (the curved side) and another directly opposite on the flat bottom edge. Important: The top tile only needs a bottom hole if you attach the string differently, but creating pass-through holes on all pieces is the most versatile method. -
Dry the pieces:
Place all five tiles solely on a wire rack or clean paper towel. Let them dry completely for 24-48 hours, flipping them occasionally to prevent curling.
Groove Tool Tip
For perfectly uniform arches, try using different sized jar lids or cookie cutters to gently impress the initial guide lines before deepening them with your tool.
Step 3: Painting and Assembly
-
Sand imperfections:
Once fully bone dry, lightly sand any rough edges with fine-grit sandpaper. Dust off the pieces thoroughly with a dry brush. -
Paint the base coats:
Paint the top tile a light beige or peach. Paint the second, third, and fifth tiles a warm terracotta or rust color. Paint the fourth tile a deep teal. I find two thin coats give better coverage than one thick one. -
Paint the beads:
While the tiles dry, paint a few wooden beads to match your color scheme (one large deep teal bead, small light blue accent beads) and leave others natural. -
Seal the work:
Apply a coat of clear matte varnish to all clay pieces and painted beads to protect the finish and seal the texture. -
Prepare the hanger:
Cut a long length of jute twine. Fold it in half to create a loop at the top for hanging, tying a knot to secure it. -
String the beads:
Thread your sequence of beads onto the two tails of the string below the knot. Use a layout like: large wood, small wood, large teal, small wood, small blue accent, small wood. -
Attach the first tile:
Feed the twine through the hole in the curved top of the beige tile. Tie a knot or wrap the twine around the structure of the tile if you used vertical holes, securing it so it hangs straight. -
Connect the remaining tiles:
Continue down the chain, leaving a small gap of exposed twine (about 0.5 inches) between each tile. You can add a small wooden bead between tiles as a spacer if desired, or simply knot the twine to hold the spacing. -
Final secure knot:
Once the final terracotta tile is attached at the bottom, trim any excess string from the back or tie a hidden knot to finish the piece cleanly.
Fixing Cracks
If small hairline cracks appear during drying, mix a tiny amount of fresh clay with water to make a paste (slip) and fill the cracks, then sand smooth once dry.
Hang your new textured art piece in a well-lit spot to let the shadows accentuate those beautiful concentric arches.
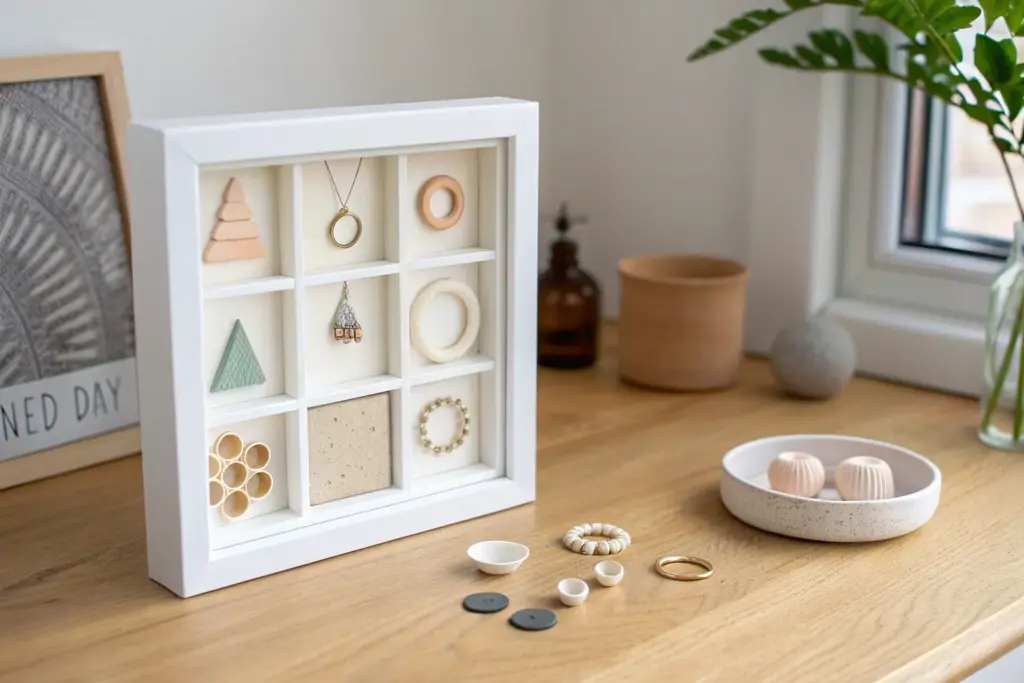
Marbled or Terrazzo-Style Air Dry Clay Minis
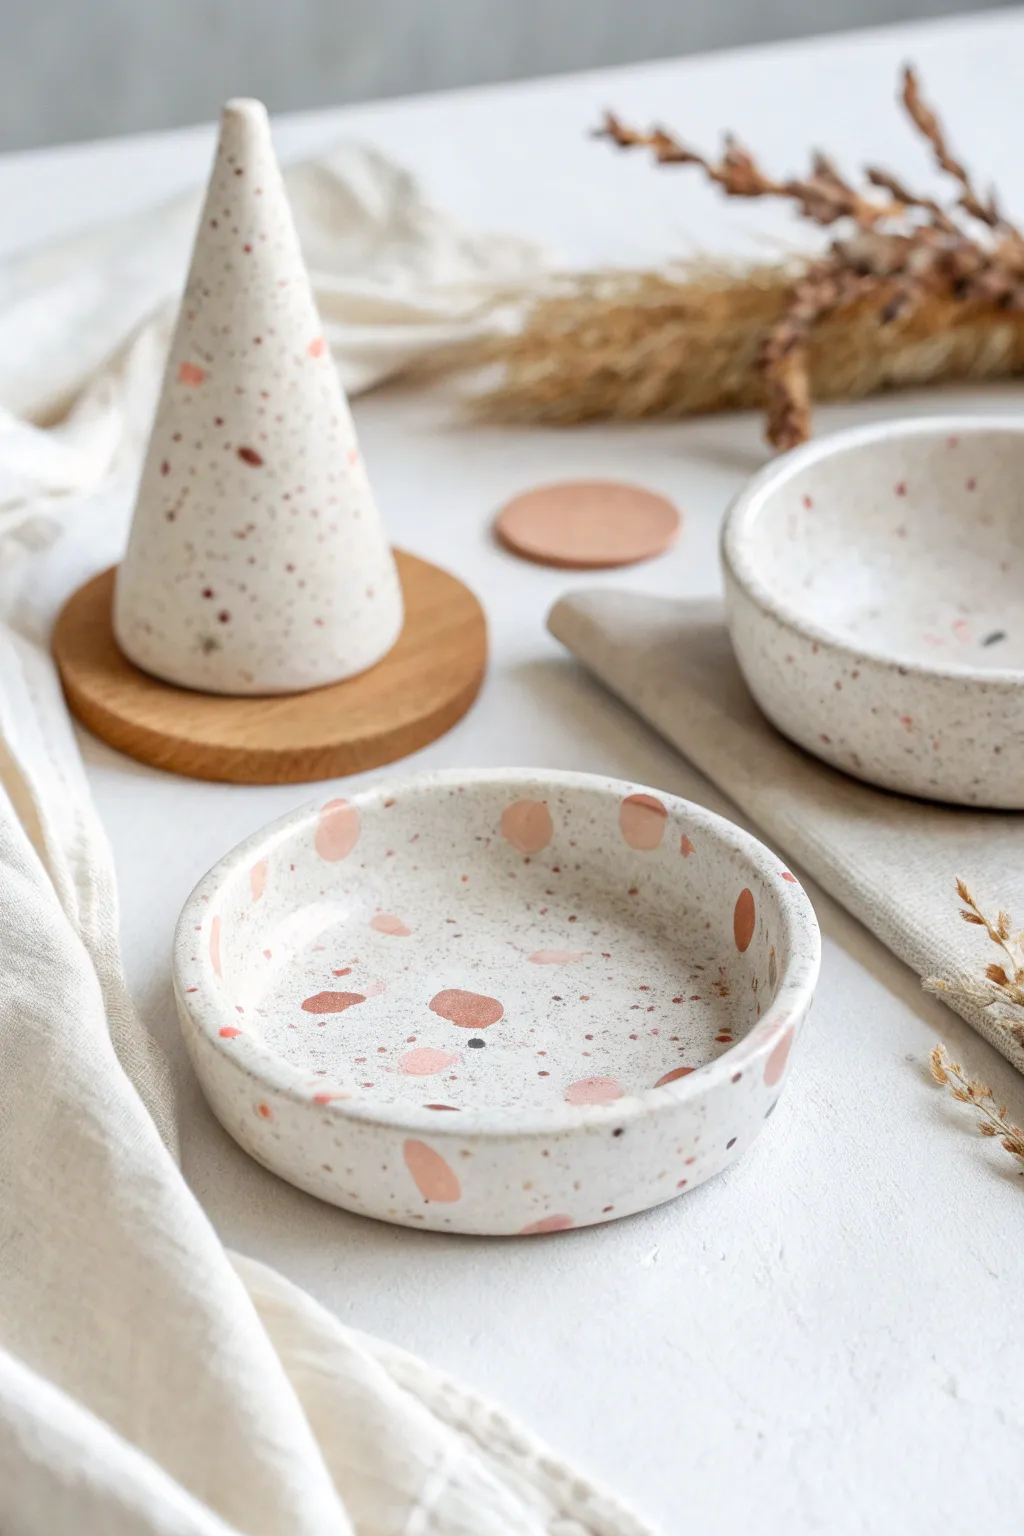
Achieve the high-end look of terrazzo stone using affordable air dry clay in this stunning project. By mixing custom-colored clay chips into a white base, you can create a cohesive set featuring a trinket dish, a ring cone, and a shallow bowl with varying speckle dynamics.
Step-by-Step Guide
Materials
- White cosmetic-grade air dry clay
- Acrylic paints (terracotta, soft pink, black/dark brown)
- Rolling pin
- Precision knife or craft blade
- Bowl for shaping (to use as a mold)
- Fine-grit sandpaper (200-400 grit)
- Gloss or matte varnish/sealant
- Small cup of water
- Wax paper or craft mat
Step 1: Creating the Terrazzo Chips
-
Prepare the Colors:
Take two small balls of white clay, each about the size of a walnut. Add a drop of terracotta paint to one and soft pink to the other, kneading thoroughly until the color is uniform throughout. -
Flatten the Colored Clay:
Roll each colored ball out very thinly on your work surface—aim for the thickness of cardstock or thinner. This thinness is crucial for delicate flakes. -
Quick Dry:
Let these thin colored sheets sit for about 20-30 minutes. They don’t need to be bone dry, but they should be leathery and stiff enough to cut without squishing. -
Chop the Chips:
Using your craft knife or scissors, randomly chop the colored sheets into various small shapes. Create a mix of tiny specks and slightly larger ‘stone’ chunks for visual interest.
Chips Smearing?
If your colored chips are turning into streaks when rolling, let them dry longer before mixing them in. They need to be stiffer than the base white clay.
Step 2: Forming the Base
-
Prepare the White Clay:
Take a large portion of white clay and flatten it slightly with your hand. Sprinkle your prepared colored chips onto the clay, along with some tiny flecks of black acrylic paint (dried beforehand or painted directly as tiny dots). -
Integrate the Chips:
Fold the clay over the chips and gently knead it just a few times. Don’t over-knead, or the colors will streak and turn into a marble swirl instead of distinct terrazzo chunks. -
Roll out the Slab:
Roll the clay out to an even thickness of about 1/4 inch. As you roll, the colorful chips will stretch and adhere into the surface. -
Smooth the Surface:
If the surface looks bumpy, run a damp finger lightly over the clay to ensure the chips are fully embedded and leveled with the white base.
Pro Seam Smoother
When attaching raised rims or smoothing cracks, use a tiny amount of vinegar on your finger instead of water. It breaks down the clay surface for a seamless bond.
Step 3: Shaping the Dishes
-
Cut the Circles:
Use a round cookie cutter or trace around a bowl to cut perfect circles from your terrazzo slab. You’ll need a larger circle for the bowl and a smaller one for the trinket dish. -
Form the Bowl:
Gently lift your larger circle and drape it into a small bowl lined with cling film (to prevent sticking). Press it gently to take the curve of the bowl. -
Form the Dish:
For the flat trinket dish, simply roll a small snake of plain white clay and attach it to the rim of your smaller circle with a little water, smoothing the seam for a raised edge. -
Shape the Ring Cone:
Take remaining scraps, roll them into a ball, and then shape into a tall cone. Roll the cone on your table to smooth the sides and create a flat bottom.
Step 4: Finishing Touches
-
Let it Dry:
Allow all pieces to air dry completely for 24-48 hours. Rotate the bowl occasionally so air reaches all sides. -
Sanding for Detail:
Once bone dry, sand the surface vigorously with fine-grit sandpaper. This step is magical—it removes the cloudy top layer of white clay and reveals the crisp, bright colors of the chips underneath. -
Wipe Clean:
Use a damp cloth or sponge to remove all the sanding dust from the surface. The pattern should now look sharp and distinct. -
Apply Splatters:
For extra detail (like the tiny dark specks in the photo), dilute a tiny bit of brown or black paint on a toothbrush and flick the bristles to mist the surface lightly. -
Seal the Work:
Finish by applying 1-2 coats of clear acrylic varnish or sealant. This deepens the colors and gives the set a polished, ceramic-like sheen.
Display your new terrazzo set together for a modern, textured touch to your home decor