Air dry clay is my favorite way to make something that feels like real pottery—without the kiln or the learning curve. These simple air dry clay ideas for adults lean clean, modern, and totally display-worthy, even if you’re a total beginner.
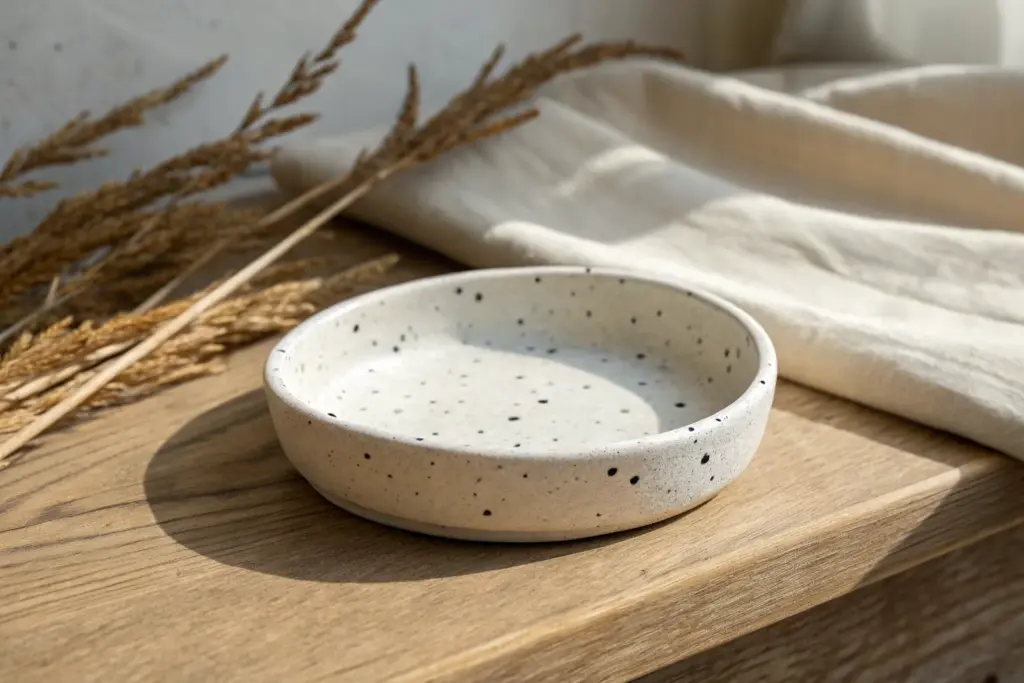
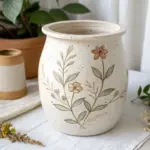
Minimal Trinket Dish
Embrace the beauty of imperfection with this minimalist trinket dish that mimics the look of natural speckled stone. Its organic shape and subtle texture make it the perfect resting place for your favorite jewelry pieces.
Step-by-Step
Materials
- White air dry clay
- Rolling pin
- Small bowl (for use as a slump mold)
- Plastic wrap
- Coarse sandpaper (80 grit)
- Fine sandpaper (220 grit) or sanding sponge
- Dried coffee grounds or coarse black pepper
- Small cup of water
- Clear matte varnish or sealant
- Soft paintbrush
Step 1: Preparation & Mixing
-
Prepare your clay:
Cut off a chunk of white air dry clay about the size of a tennis ball. Knead it in your hands for a few minutes until it feels warm and pliable, which helps prevent cracks later on. -
Add the speckles:
Flatten your clay ball into a thick pancake. Sprinkle a small pinch of dried coffee grounds or coarse black pepper onto the surface. This is the secret ingredient for that faux-stone ceramic look. -
Knead again:
Fold the clay over the speckles and knead thoroughly. You want the particles distributed somewhat evenly throughout the entire lump, but distinct clusters are okay too. -
Roll it out:
Place the clay on a clean surface or canvas sheet. Use your rolling pin to flatten the clay to an even slab about 1/4 inch thick. Rotate the clay occasionally to keep the shape relatively circular.
Cracks Appearing?
If hairline cracks appear while drying, mix a tiny bit of fresh clay with water to make a paste (slip). Smooth this into the cracks with your finger and let dry again.
Step 2: Shaping the Dish
-
Cut the circle:
Find a bowl or round object slightly larger than your desired finished dish size. Place it upside down on the slab and use a craft knife to trace around it, removing the excess clay. -
Prepare the mold:
Take your slump mold bowl and line the inside with plastic wrap. This step is crucial so the clay doesn’t stick to the bowl as it dries. -
Slump the clay:
Gently lift your clay circle and place it inside the lined bowl. Press carefully into the center so it conforms to the curve, but don’t squish it too hard. -
Refine the rim:
The rim in the photo has a lovely organic, slightly wobbly feel. Use a wet finger to smooth the sharp top edge made by the knife, rounding it off gently. -
Smooth the interior:
Dip your finger in a little water and smooth out any fingerprints or wrinkles on the inside surface of the dish. -
Initial dry:
Leave the clay inside the bowl mold for about 24 hours. Placing it in a cool, dry spot away from direct sunlight helps it dry evenly without warping.
Gilded Edge Style
For a luxe upgrade, paint just the very top rim of the dried dish with liquid gold leaf or metallic acrylic paint before you apply the final clear varnish.
Step 3: Finishing Touches
-
Flip and dry:
Once the clay is firm enough to hold its shape, carefully remove it from the bowl and peel off the plastic wrap. Turn it upside down to let the bottom dry completely for another 12-24 hours. -
Sand for texture:
When bone dry, take your coarse sandpaper to the outside and rim. Sand vigorously to expose more of the coffee or pepper speckles, giving it that weathered stone texture. -
Refine the surface:
Switch to your fine sandpaper (or sanding sponge) to smooth the interior and rim. You want it to feel pleasant to the touch while maintaining the visual texture. -
Dust off:
Use a dry paintbrush or a soft cloth to thoroughly wipe away all the clay dust. Any dust left behind will get trapped in your sealant. -
Seal the piece:
Apply a thin coat of clear matte varnish to the entire dish. I find matte finish works best here to keep the natural, stone-like appearance rather than making it look like shiny plastic. -
Final cure:
Let the varnish dry according to the bottle instructions, usually overnight, before placing your jewelry inside.
Now you have a chic, modern catchall dish perfect for organizing your bedside treasures


Ring Cone Holder
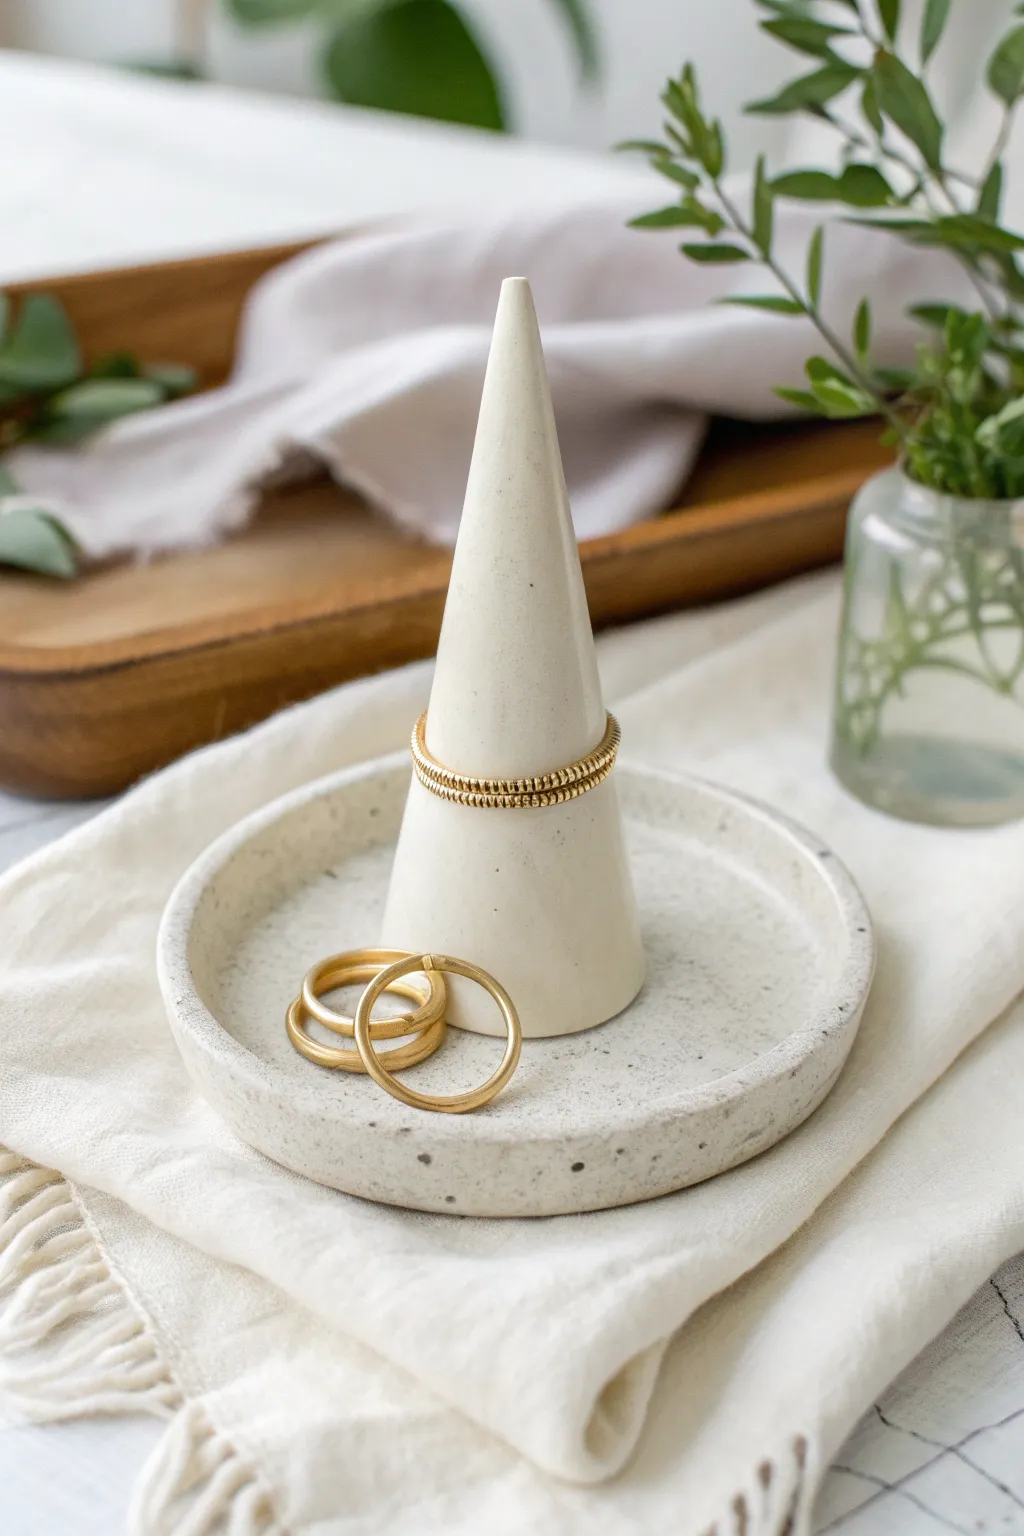
This elegant organizer combines two classic jewelry storage shapes—a shallow dish and a standing cone—into one seamless piece. The faux-stone speckle effect gives it a modern, high-end ceramic look without needing a kiln.
Step-by-Step Guide
Materials
- White air dry clay
- Rolling pin
- Circle cookie cutter (approx. 4 inches) or a bowl to trace
- Sharp craft knife
- Small sponge
- Water
- Ground black pepper or dried coffee grounds
- Fine grit sandpaper
- Matte or satin acrylic varnish
Step 1: Preparing the Speckled Clay
-
Condition the clay:
Start by grabbing a generous handful of white air dry clay. Knead it in your hands for a few minutes to warm it up and make it pliable. -
Add texture:
Flatten the clay slightly and sprinkle a pinch of ground black pepper or dried coffee grounds over the surface. This is the secret ingredient for that realistic stoneware look. -
Fold and knead:
Fold the clay over the speckles and continue kneading until the particles are evenly distributed throughout the batch. Add more if you want a bolder pattern.
Kitchen Spice Hack
Don’t overmix the pepper! Knead just enough to distribute it. Too much mixing can cause the pepper to bleed into the wet clay, turning it grey instead of keeping distinct speckles.
Step 2: Forming the Base Dish
-
Roll out the slab:
Roll your speckled clay out on a smooth surface until it is about 1/4 inch thick. Try to keep the thickness consistent. -
Cut the circle:
Use your large circle cutter or trace around a bowl to cut a perfect circle from the slab. Remove the excess clay but keep it nearby for the cone. -
Create the rim:
Gently curve the outer edges of the circle upward with your fingertips to create a slight lip. I find rotating the circle while pressing gently creates the most even rim. -
Smooth the edges:
Dip your finger in a little water and run it along the rim of the dish to smooth out any cracks or rough cuts.
Step 3: Modelling the Cone
-
Roll a snake:
Take the remaining clay scraps and roll them into a thick log or snake shape. -
Shape the taper:
Roll one end of the log back and forth on the table with more pressure than the other end to create a tapered cone shape. -
Refine the form:
Stand the cone up and gently tap the bottom on the table to flatten it. Use your fingers to smooth the sides until it is symmetrical and the tip is slightly rounded, not lethally sharp. -
Check proportions:
Place the cone in the center of your dish to ensure it isn’t too tall or wide. Adjust the size if necessary before attaching.
Fixing Cracks
If you see hairline cracks while drying, mix a tiny bit of fresh clay with water to make a paste. Fill the crack, smooth it over, and let it dry again before sanding.
Step 4: Assembly and Finishing
-
Score the surfaces:
Use your craft knife to scratch cross-hatched lines (scoring) onto the bottom of the cone and the center of the dish where they will meet. -
Apply slip:
Dab a small amount of water or liquid clay slurry (slip) onto the scored areas to act as glue. -
Attach the pieces:
Press the cone firmly into the center of the dish. Give it a tiny twist to lock the scored grooves together. -
Blend the seam:
Use a small modeling tool or your finger to smooth the clay where the cone meets the dish so they look like one continuous piece. -
Final smooth:
Give the entire piece one last wipe with a slightly damp sponge to remove fingerprints. -
Let it dry:
Set the piece aside in a cool, dry place for 24-48 hours. Turn it occasionally to ensure the bottom of the dish dries evenly. -
Sand:
Once fully bone dry, lightly sand any rough imperfections with fine-grit sandpaper. -
Seal:
Apply a coat of matte or satin varnish to protect the clay and prevent the pepper specs from smearing over time.
Now you have a chic, modern display for your favorite rings and trinkets


Botanical Imprint Coasters
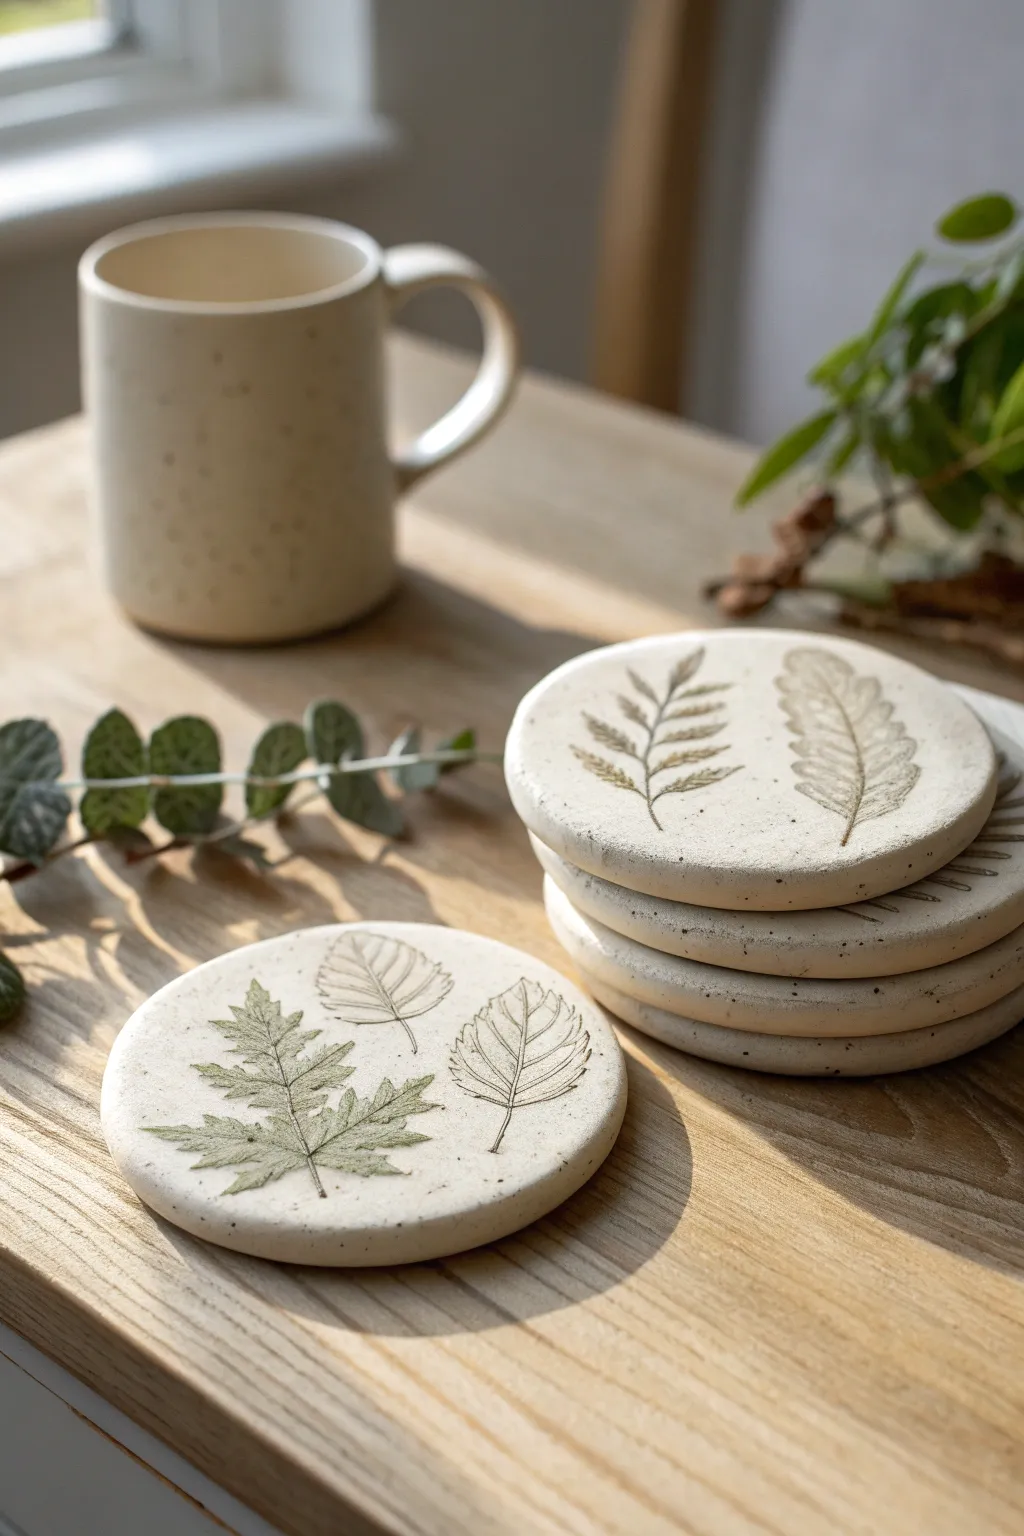
Bring the outdoors in with these understated, speckled coasters that capture the delicate veins of your favorite leaves. These simple air dry clay creations have a rustic, ceramic pottery look without the need for a kiln, making for a perfect afternoon craft.
Step-by-Step Tutorial
Materials
- White or cream air dry clay
- Rolling pin
- Round cookie cutter (approx. 4 inches) or a glass
- Fresh or dried leaves (ferns, oak leaves, herbs)
- Sandpaper (fine grit)
- Acrylic paint (brown or earthy green)
- Small paintbrush
- Matte varnish or sealant (waterproof)
- Old toothbrush (for speckling)
- Parchment paper or canvas mat
Step 1: Shaping the Clay
-
Prepare your surface:
Lay down a piece of parchment paper or a canvas mat to prevent the clay from sticking to your table. Take a handful of air dry clay and knead it briefly in your hands to warm it up and make it pliable. -
Roll the slab:
Place the clay ball on your mat and use a rolling pin to flatten it. Aim for an even thickness of about 1/4 inch (6-7mm). If the clay is too thin, the coasters might crack; too thick, and they will take forever to dry. -
Select your botanicals:
Choose leaves with prominent veins on the backside, as these create the crispest impressions. Ferns, sage, and heavily veined tree leaves work beautifully. -
Press the leaves:
Arrange your leaves vein-side down onto the rolled clay slab. Gently roll over the leaves with your rolling pin once or twice. Apply firm, even pressure to push the botanical material into the clay surface without distorting the slab’s shape too much. -
Remove the foliage:
Carefully peel the leaves off the clay. Do this slowly to ensure you don’t pull up chunks of clay. You should be left with a clear, debossed impression. -
Cut the shapes:
Position your round cookie cutter over the leaf impression to frame it nicely. Press down firmly to cut the circle. If you don’t have a cutter, trace around a wide glass or bowl with a craft knife. -
Smooth the edges:
Lift away the excess clay. Dip your finger in a little water and gently run it along the rim of the coaster to smooth out any rough cutting marks or sharp edges.
Step 2: Finishing Touches
-
Allow to dry:
Place the coasters on a flat surface to dry. I find that flipping them over carefully halfway through the drying process helps prevent them from curling at the edges. Let them dry for 24-48 hours until they are bone dry and turn a chalky white. -
Sand for perfection:
Once fully dry, take a piece of fine-grit sandpaper and lightly buff the edges and surface. This removes any final imperfections and gives the piece a professional, smooth feel. -
Enhance the imprint:
Dilute a small amount of earthy brown or green acrylic paint with water to create a ‘wash.’ Paint this into the leaf grooves, then quickly wipe the surface with a damp paper towel. The paint will stay in the recesses, highlighting the veining details. -
Create the speckled effect:
To mimic the stoneware look in the photo, dilute some dark brown paint. Dip an old toothbrush into it, point the bristles toward the coasters, and run your thumb across the bristles to flick tiny speckles over the surface. -
Seal the deal:
Since air dry clay is porous, sealing is crucial for coasters. Apply 2-3 coats of a waterproof matte varnish or sealant, allowing proper drying time between coats. This protects them from moisture rings.
Fixing the Curl
If your coasters warp while drying, wait until they are fully dry, then lightly mist the concave side with water. Stack heavy books on top for a day to flatten them back out
Level Up: Color Tinting
Knead a tiny drop of acrylic paint directly into the raw white clay before rolling. This creates a uniform pastel base color for your coasters instead of plain white
Set these out on your coffee table for a touch of natural elegance that protects your furniture


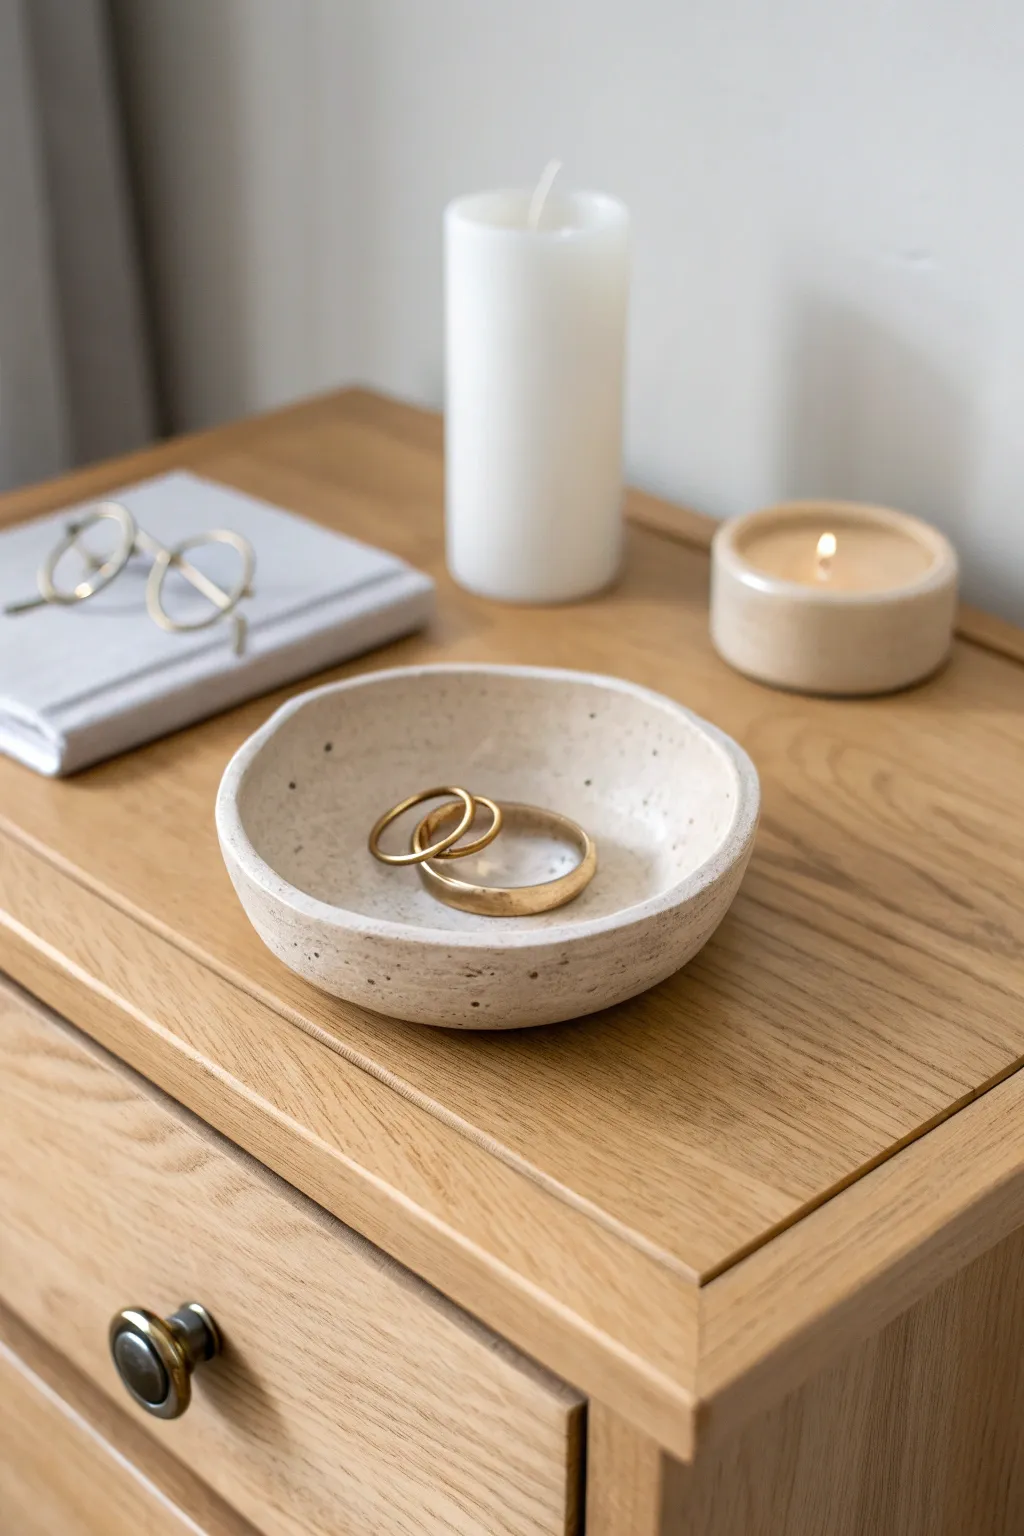
Textured Catchall Bowl
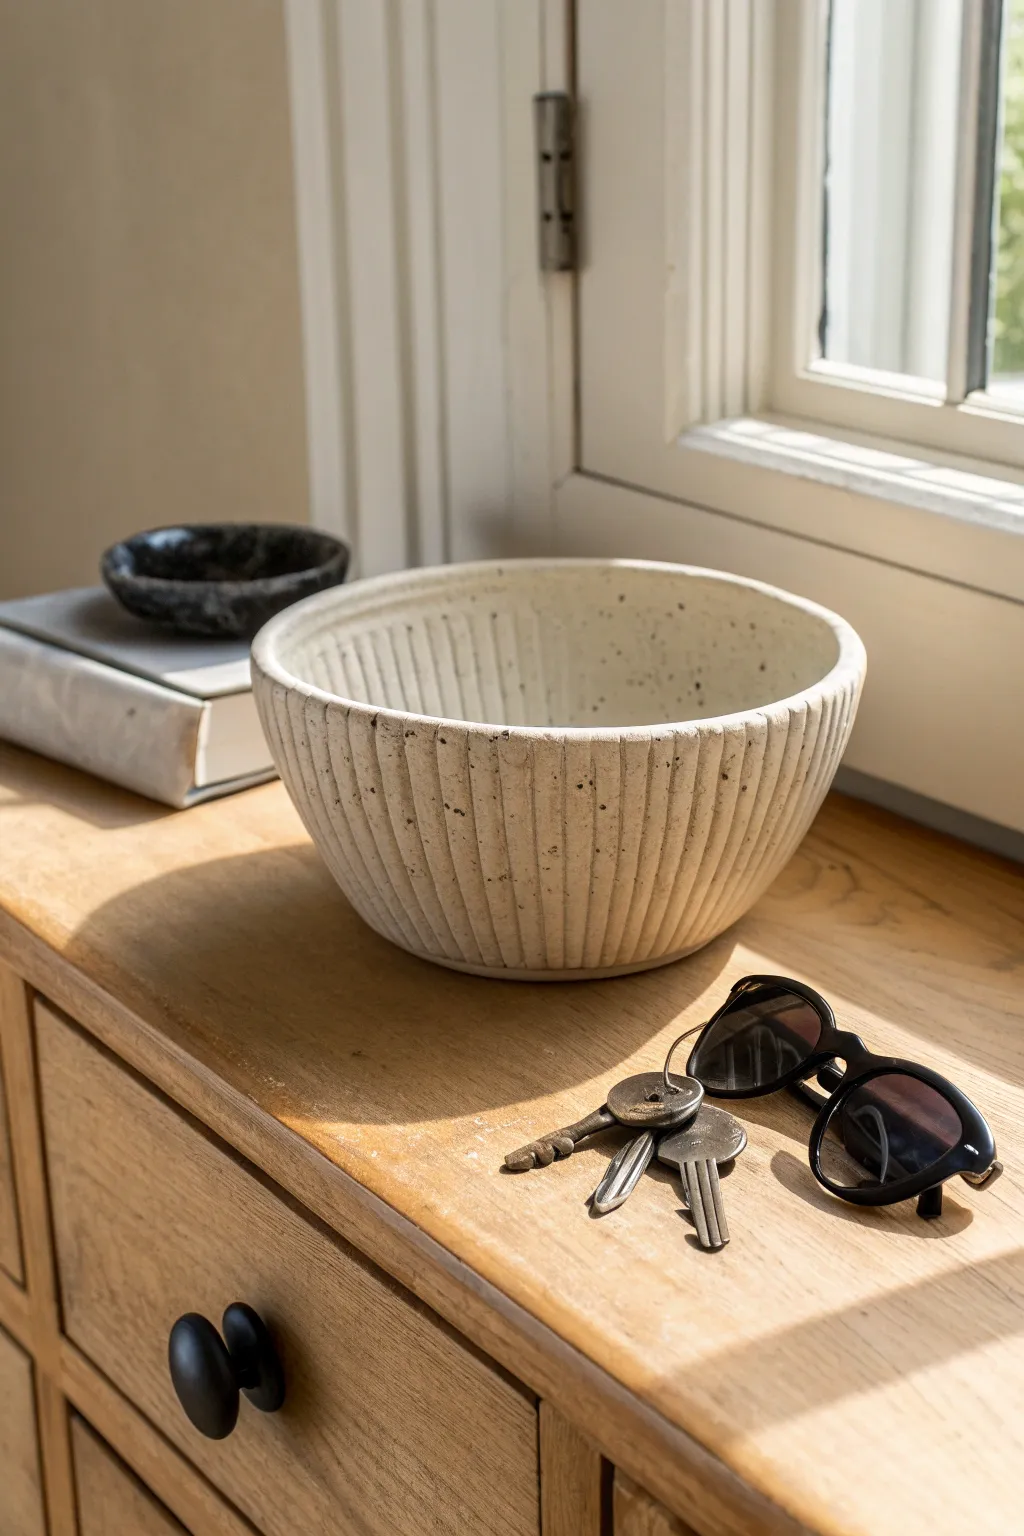
This minimalist catchall combines a satisfyingly chunky shape with a sophisticated vertical rib texture that looks far more expensive than it is. Using faux stone techniques and simple carving tools, you’ll create a piece that perfectly mimics high-end ceramic stoneware.
Step-by-Step Guide
Materials
- White air dry clay (approx. 1kg)
- Rolling pin
- Bowl for a mold (medium size)
- Cling film
- Pottery rib or old credit card
- Loop tool or U-shaped carving tool
- Sponge and water
- Acrylic paints (white, beige, espresso brown)
- Old stiff toothbrush
- Matte varnish
Step 1: Forming the Base
-
Prep the mold:
Find a medium-sized bowl from your kitchen to use as a slump mold. Cover the inside completely with cling film, ensuring it’s smooth to prevent sticking later. -
Roll the slab:
Roll out a large portion of your air dry clay on a flat surface until it is about 1/4 inch thick. Aim for an even thickness throughout for structural integrity. -
Slump the clay:
Carefully lift your clay sheet and drape it into the prepared bowl mold. Gently press the clay against the bottom and sides, easing it in to avoid trapping any air bubbles. -
Trim the edge:
Use a knife or needle tool to trim the excess clay flush with the rim of your bowl mold. This creates a clean, level top edge. -
Smooth the interior:
Dip your finger or a sponge in a little water and smooth out the inside surface. Compress the clay slightly to make it strong and remove any fingerprints. -
Initial drying:
Let the clay sit in the mold for about 2-4 hours until it is leather-hard—stiff enough to hold its shape but still soft enough to carve.
Step 2: Carving & Texturing
-
Unmold carefully:
Gently lift the clay form out of the bowl using the cling film edges. Place it upside down on your work surface so the exterior is accessible. -
Mark your guidelines:
Using a needle tool, lightly scratch a vertical line from the rim to the base. Rotate the bowl and mark the opposite side, breaking the circumference into quarters to help keep your carving straight. -
Carve the first channel:
Take your loop tool or U-shaped carver. Start just below the rim and drag the tool downwards toward the base to create a vertical groove. -
Continue the pattern:
Repeat the carving motion around the entire bowl. Try to keep the ridges between the grooves relatively even in width, but embrace slight irregularities for a handmade feel. -
Clean the crumbs:
Once carved, use a dry, soft brush to sweep away the little clay crumbs produced by the carving tool. Don’t use water yet, or you’ll wash away the sharp definition. -
Refine the rim:
Flip the bowl right-side up. Smooth the top rim with a damp sponge so it’s comfortable to the touch, softening the transition where the grooves meet the lip. -
Full dry:
Allow the bowl to dry completely upside down. This usually takes 24-48 hours depending on humidity; the clay should turn chalky white and feel room temperature.
Uneven Ridges?
If you carve a groove too deeply, don’t panic. Fill it with a tiny snake of fresh wet clay, smooth it over with a little water, let it firm up slightly, and re-carve that section.
Step 3: The Stone Finish
-
Base coat:
Paint the entire bowl, inside and out, with a matte cream or warm off-white acrylic paint. I find distinct brush strokes help add to the texture here. -
Create the speckle mix:
Dilute a small amount of espresso brown or dark grey paint with water until it has an inky consistency. -
Splatter technique:
Dip an old toothbrush into the dark, watery paint. Hold the brush near the bowl and run your thumb across the bristles to flick tiny speckles onto the surface. -
Seal the work:
Once the paint is totally dry, apply two thin coats of matte varnish to protect the surface and seal the paint.
Pro Tip: Weighted Drying
While drying upside down, place a small, light object (like a jar lid) gently on the base. This gentle weight prevents the bottom from puffing out and keeps the bowl sitting flat.
Now you have a stunning, architectural piece ready to hold your keys or simply look beautiful on a shelf

What Really Happens Inside the Kiln
Learn how time and temperature work together inside the kiln to transform clay into durable ceramic.
Fluted Tea Light Holder
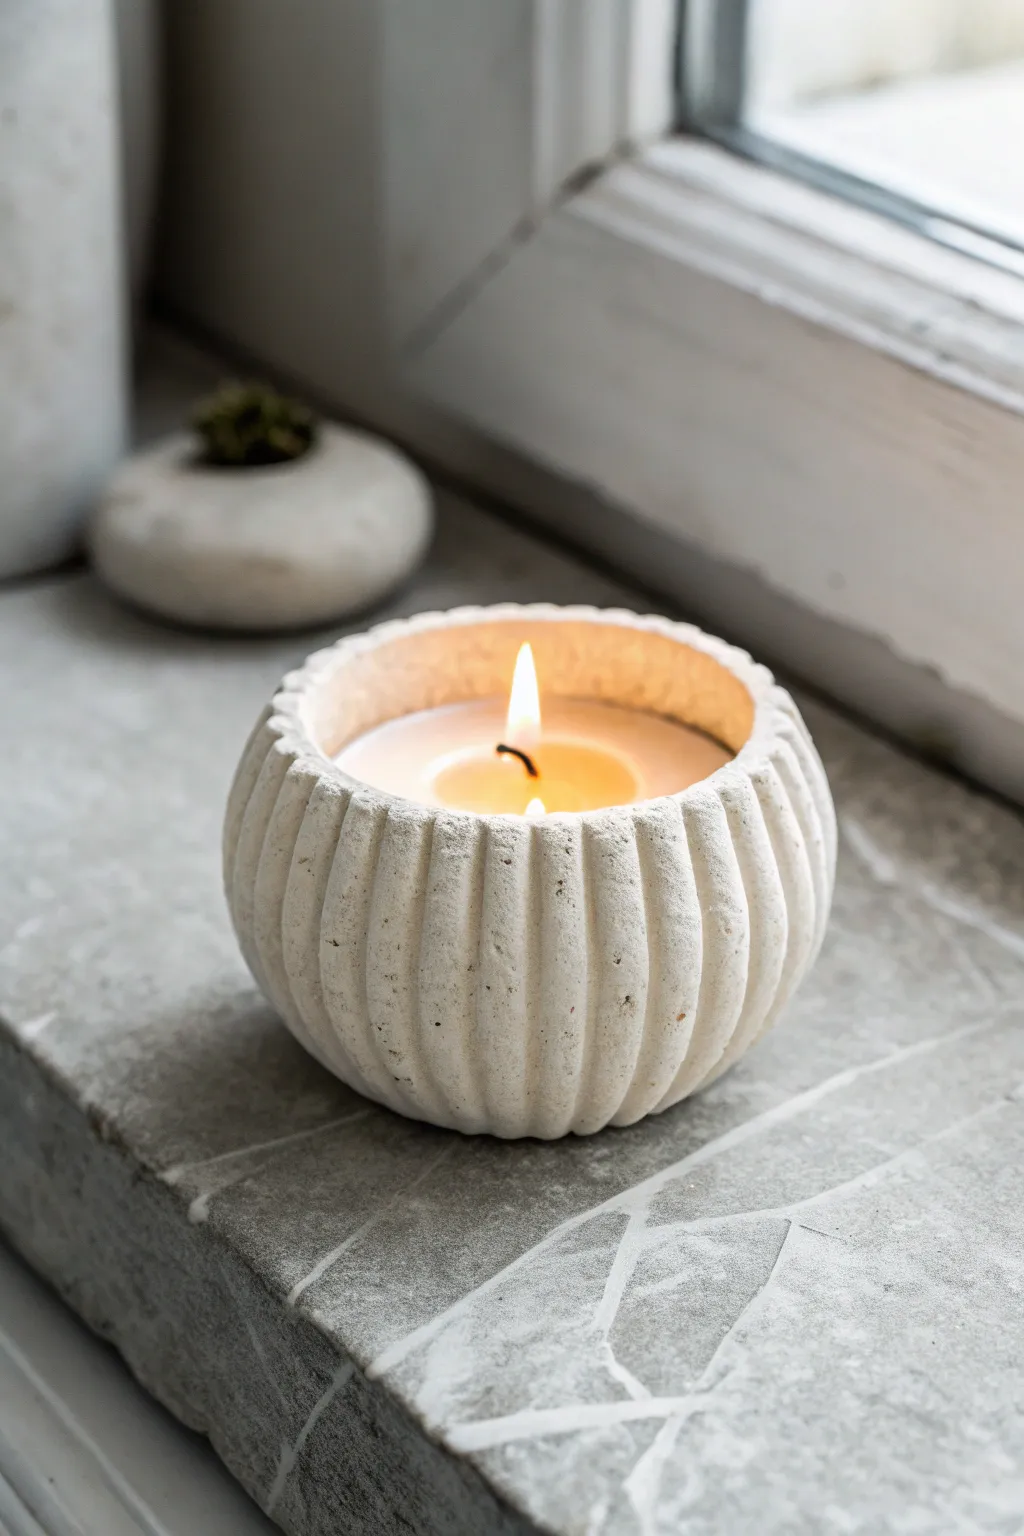
Bring a touch of minimalist elegance to your space with this fluted candle holder that mimics the look of carved limestone. The textured ridges catch the candlelight beautifully, creating a cozy and sophisticated atmosphere.
Step-by-Step Tutorial
Materials
- White or stone-colored air-dry clay (approx. 300g)
- Small rolling pin
- Circular cookie cutter or jar lid (approx. 4 inches)
- Modeling tool with a rounded edge or even a simple wooden skewer
- Small bowl of water
- Sponge or fine-grit sandpaper
- Tealight candle for sizing
- Acrylic varnish (matte finish)
Step 1: Forming the Base
-
Condition the clay:
Begin by kneading your block of clay until it is pliable and warm. This removes air bubbles and prevents cracking later on. -
Roll a sphere:
Shape the clay into a smooth, seamless ball. Aim for a size roughly similar to a tennis ball or a large navel orange. -
Create the opening:
Using your thumb, press gently into the center of the sphere to create a hollow depression. Rotate the ball in your hand as you press to keep the walls even. -
Pinch the walls:
Gradually pinch and pull the clay walls upward and outward to form a bowl shape. Keep the walls relatively thick—about a quarter-inch is ideal for this sturdy design. -
Check the interior size:
Place your tealight candle inside the hollow to ensure it fits comfortably with a little wiggle room. Remove the candle before proceeding. -
Shape the exterior:
Gently gently roll the bottom of the bowl on your work surface to flatten the base so it sits stable. Then, cup your hands around the sides to curve them inwards slightly at the top rim.
Cracks happen!
If small hairline cracks appear during drying, create a slip by mixing a little clay with water into a paste. Rub this into the cracks with your finger and let dry again.
Step 2: Adding the Fluted Texture
-
Mark the quadrants:
To keep your spacing even, lightly mark four equidistant points around the top rim of your bowl. -
Create the first ridges:
Using the side of a modeling tool or a wooden skewer, press a vertical indentation from the base to the rim at each of your four marked points. -
Fill in the gaps:
Between each of those four main lines, add more vertical indentations. Try to keep the spacing consistent, but don’t worry about perfection; slight irregularities add to the organic, stone-carved look. -
Deepen the grooves:
Go back over each line, pressing a bit firmly to make the fluting pronounced. The grooves should be deep enough to cast shadows. -
Refine the rim:
Gently smooth the top edge of the pot with a wet finger. I like to let the vertical grooves extend slightly over the lip for a continuous flow.
Step 3: Finishing Touches
-
Stone texture effect:
Take a rough sponge or a crumpled ball of aluminum foil and lightly dab the surface of the clay. This creates a porous, limestone-like texture. -
Initial drying:
Set the piece aside in a cool, dry place away from direct sunlight. Rotate it every few hours to ensure even drying. -
Sanding:
Once fully dry (usually 24-48 hours), use fine-grit sandpaper to gently knock back any sharp shards of clay on the rim or base. -
Tinting (Optional):
If you want a warmer tone, mix a tiny drop of beige paint into a mostly water wash and brush it over the piece, wiping it back immediately so color only remains in the deep textures. -
Sealing:
Apply a coat of matte spray varnish or acrylic sealer. This protects the clay from heat and potential wax drips.
Faux Stone Hack
Mix varying sizes of sand or even dried coffee grounds into your clay before sculpting. This creates gorgeous speckles and a gritty, authentic stone texture instantly.
Enjoy the calm ambiance as the candlelight flickers against your beautiful handmade creation
Geometric Planter Sleeve
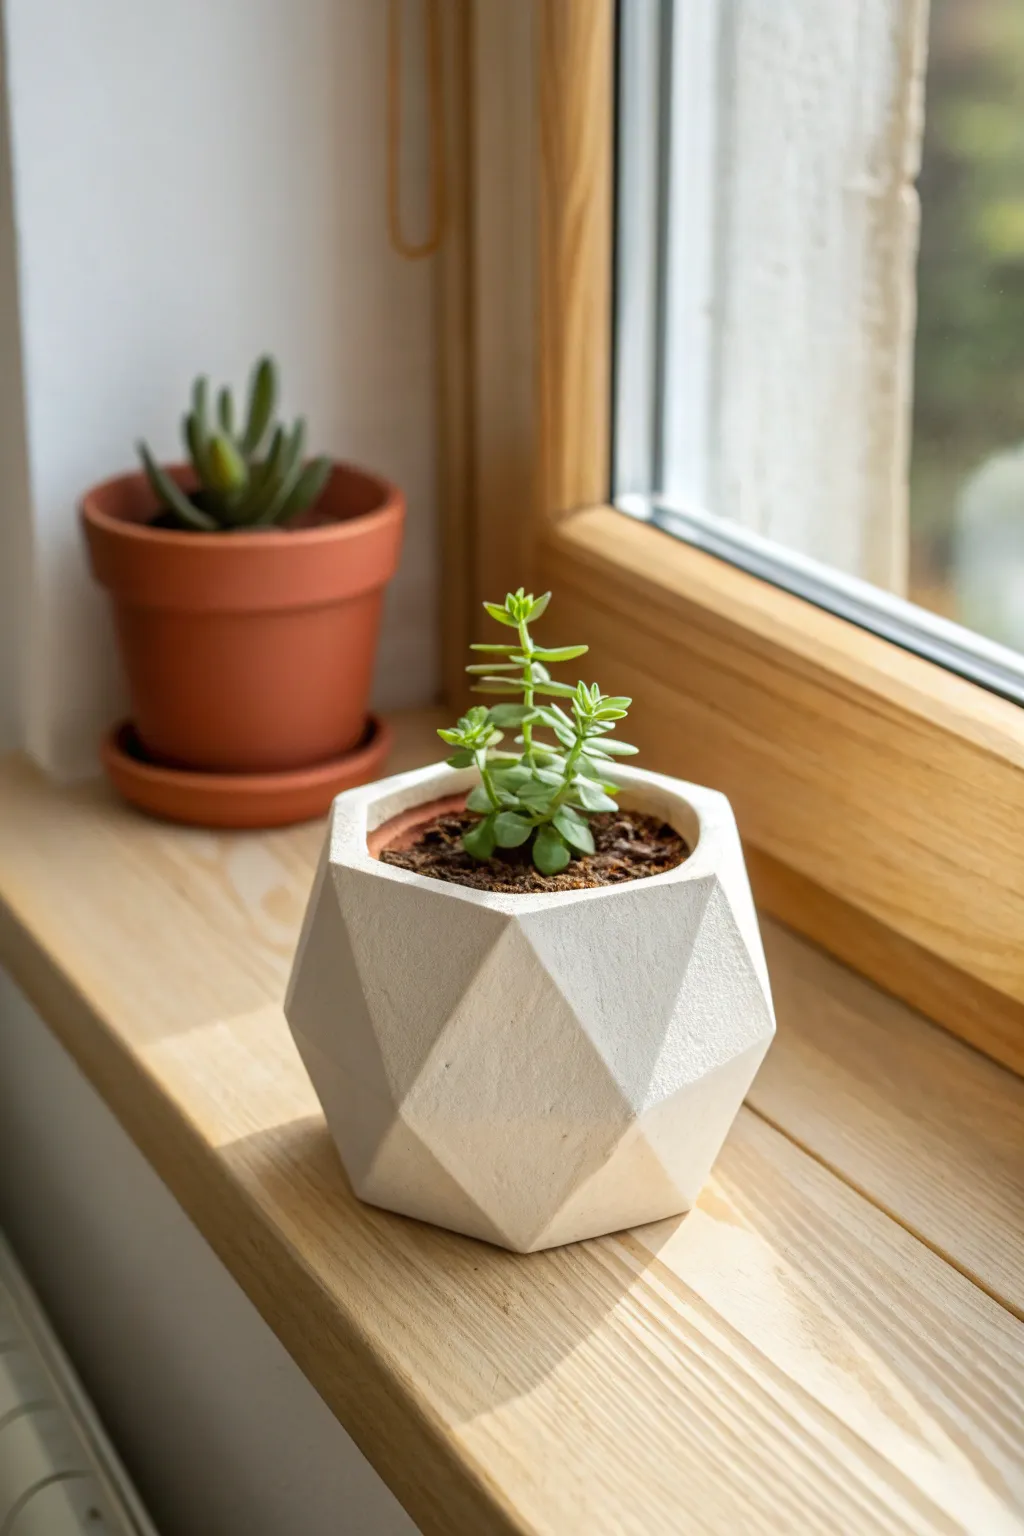
Transform a basic plant pot into a modern architectural statement with this sharp, faceted design. The bright white finish and angular shadows create a sophisticated look that mimics expensive ceramic ware.
How-To Guide
Materials
- White air-dry clay (approximately 1kg)
- Small plastic terracotta pot (to use as a mold)
- Rolling pin
- Sharp craft knife or scalpel
- Ruler
- Parchment paper or craft mat
- Small cup of water
- Fine-grit sandpaper (220 and 400 grit)
- White acrylic paint (optional, for extra brightness)
- Matte spray varnish
Step 1: Base Construction
-
Prepare the workspace:
Lay down parchment paper or a non-stick craft mat to protect your surface. This ensures the clay won’t stick while you are rolling it out. -
Roll the slab:
Take a large chunk of clay and condition it briefly in your hands. Roll it out into a long rectangular slab about 1/4 inch (6mm) thick. Ensure the thickness is even throughout so the walls of your planter remain sturdy. -
Measure the mold:
Place your plastic pot on the clay. You need a strip of clay that is slightly taller than the pot and long enough to wrap around its circumference with a bit of overlap. -
Cut the strip:
Using your ruler and craft knife, cut a clean, straight rectangular strip based on your measurements. Remove the excess clay. -
Wrap the mold:
Wrap the clay strip loosely around your plastic pot. You aren’t adhering it *to* the pot, just using the pot to hold the cylindrical shape. Press the seam together firmly, scoring the edges and using a dab of water to slip and join them invisibly. -
Create the bottom:
Roll a smaller piece of clay for the base. Place your wrapped cylinder on top of it and trace a hexagon shape around the bottom edge (or a circle, but a hexagon starts the geometric theme early). Cut this shape out. -
Attach the base:
Score the bottom edge of your cylinder and the outer edge of your base piece. Add water, press them together, and smooth the clay on the outside so the seam disappears completely.
Step 2: Sculpting the Facets
-
Thicken the walls:
To carve deep facets later, the walls need to be substantial. If your cylinder looks too thin, add slabs of clay to the exterior now to build up volume. You want a thick, chunky block of clay surrounding the inner pot void. -
Rough initial shaping:
With the pot still inside for support, use your hands to roughly press the exterior clay into a hexagonal or octagonal prism shape. It doesn’t need to be perfect yet, just establish the planes. -
Firming up:
Let the clay sit for about 30-60 minutes. You want it to be ‘leather hard’—firm enough to slice cleanly without squishing, but soft enough to cut. -
Slicing the first angles:
Remove the inner plastic pot carefully. Using a very sharp craft knife, slice off a triangular section from the top rim at an angle. This creates the first facet. -
Creating the pattern:
Continue slicing triangular and diamond-shaped sections off the exterior. Try to make the cuts interesting by angling your knife differently for each one—some slicing upward, some downward. -
Refining the edges:
As you carve, ensure the ridges where the facets meet are crisp. If a cut looks messy, slice a thin layer off the entire face to clean it up rather than trying to patch it. -
Check symmetry:
Rotate the planter. While it shouldn’t be perfectly symmetrical, you want the visual weight to look balanced. If one side looks too heavy, slice a larger facet off that area.
Keep it Sharp
For the crispest edges, wipe your blade with a damp cloth between every single cut. Clay residue on the knife causes dragging and ragged edges.
Step 3: Finishing Touches
-
Slow drying:
Once you are happy with the shape, let the planter dry slowly away from direct sunlight or heat sources to prevent cracking. This usually takes 24-48 hours depending on thickness. -
Sanding flat surfaces:
When bone dry, place a sheet of sandpaper on a flat surface. Hold the planter flat against it and sand the top rim and bottom base in a circular motion to get them perfectly level. -
Sanding the facets:
Use fine-grit sandpaper (400 grit) to lightly smooth the faces of the facets. Be very careful not to round over the sharp edges where the facets meet; you want those lines to remain crisp. -
Painting (Optional):
The natural white clay looks great, but for a stark, architectural white, apply two thin coats of white acrylic paint. This helps cover any sanding dust or discoloration. -
Sealing:
Finish with a matte spray varnish. This protects the clay from moisture, which is vital since it will be near a plant, though remember this is a decorative sleeve, so keep the actual plant in a plastic nursery pot inside.
Marble Effect
Before rolling your initial slab, twist a small amount of grey or black clay into your white clay. Stop mixing before it blends fully for a stone marble look.
Now you have a stunning geometric vessel ready to catch the light on any windowsill


The Complete Guide to Pottery Troubleshooting
Uncover the most common ceramic mistakes—from cracking clay to failed glazes—and learn how to fix them fast.
Essential Oil Diffuser Disc
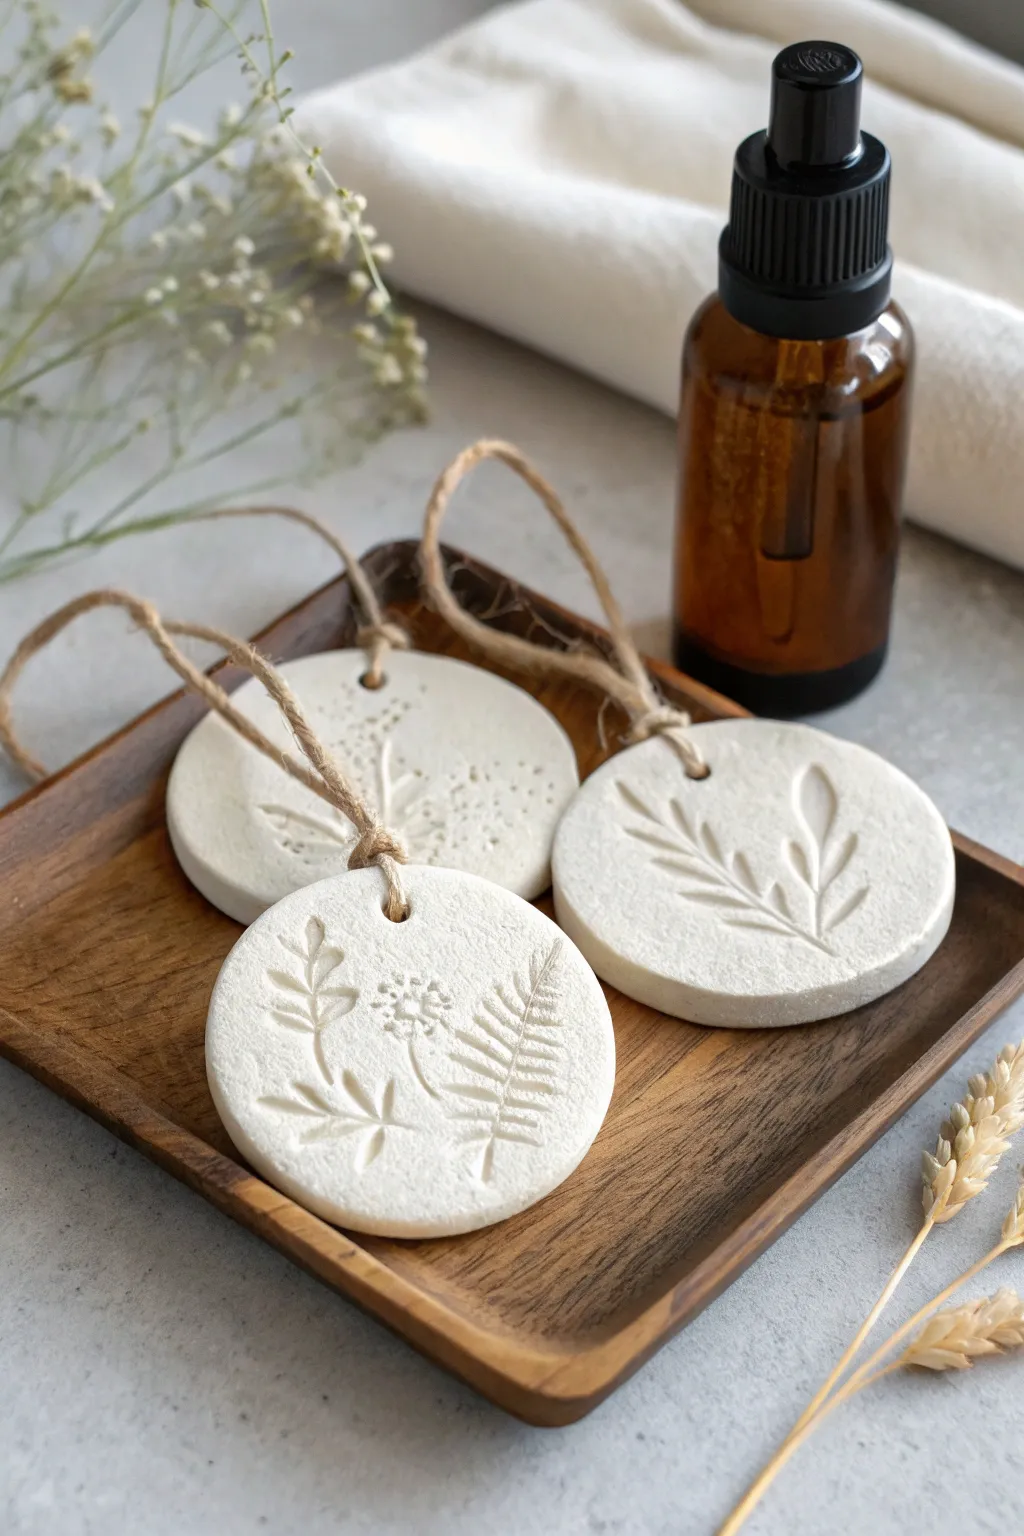
These elegant clay discs double as beautiful minimalist decor and natural air fresheners for your home. By capturing the delicate textures of real leaves and flowers, you’ll create porous ceramic-like stones that absorb and slowly release your favorite essential oils.
Step-by-Step Guide
Materials
- White stone clay or air dry clay (fine grain)
- Small rolling pin or glass jar
- Circle cookie cutter (approx. 3-inch diameter) or a clean glass rim
- Fresh or dried botanical sprigs (fern, lavender, leaves with raised veins)
- Drinking straw or skewer
- Jute twine or natural hemp cord
- Fine grit sandpaper (320-400 grit)
- Parchment paper or wax paper
- Small bowl relative to cutter size (optional)
- Essential oils for finishing
Step 1: Preparation & Imprinting
-
Prepare your workspace:
Lay down a sheet of parchment paper on a flat surface to prevent sticking. This makes it much easier to move your clay later without warping the shape. -
Condition the clay:
Take a handful of air dry clay and knead it in your hands until it feels pliable and smooth. If it feels slightly dry or cracks, dampen your fingers with water and work the moisture in. -
Roll out the slab:
Place the ball of clay on the parchment paper and flatten it with your palm. Use your rolling pin to roll it out to a consistent thickness of about 1/4 inch (6mm). Too thin and it might crack; too thick and it stays heavy. -
Arrange your botanicals:
Select your plant clippings. Ferns, lavender, or leaves with prominent veins work best. Place them thoughtfully on the clay surface, considering the composition within where your circle cut will fall. -
Embed the botanicals:
Gently roll over the plant material with your rolling pin. Use firm, even pressure to press the stems and leaves into the clay so they leave a deep impression, but don’t push all the way through. -
Reveal the texture:
Carefully peel the plant material away from the clay using tweezers or your fingernails. I love this part—seeing the intricate veins appear in the white surface is deeply satisfying.
Step 2: Cutting & Shaping
-
Cut the circles:
Position your round cutter over the imprinted designs to frame them perfectly. Press straight down firmly, give it a tiny wiggle to separate the edges, and lift the cutter. -
Create the hanging hole:
Use a drinking straw to punch a hole near the top edge of each disc. A straw creates a cleaner hole than a skewer, removing the little plug of clay neatly. -
Smooth the edges:
Dip your finger in a little water and gently run it around the cut edge of the circle and the inner rim of the hanging hole to smooth out any roughness or sharp bits. -
Initial drying phase:
Let the discs sit on the parchment paper undisturbed for about 24 hours. Keep them away from direct heat sources to prevent uneven drying or curling. -
Flip and finish drying:
After the top is dry to the touch, flip the discs over to let the bottom breathe. Allow another 24–48 hours until the clay is completely white and hard (it will feel room temperature, not cool).
Clean Imprints
If your plants stick to the clay, lightly dust the greenery with cornstarch before pressing. It acts as a release agent and brushes off easily once the clay is dry.
Step 3: Refining & Uses
-
Sand for perfection:
Once fully cured, use fine-grit sandpaper to gently buff the outer edges. This gives the finished piece a professional, ceramic-like quality. -
Dust off residue:
Wipe the discs with a clean, dry cloth or a soft brush to remove any clay dust from the sanding process. -
Add the hanger:
Cut a length of jute twine (about 8 inches). Fold it in half, push the loop through the hole, and pull the tails through the loop to create a lark’s head knot, or simply tie a knot at the top. -
Apply fragrance:
Lay the finished disc flat and drip 3–5 drops of your preferred essential oil directly onto the textured front or the plain back. The porous clay will soak it up instantly.
Watercolor Wash
Mix a tiny amount of watercolor paint with water and brush it over the dry impressions. Wipe the surface quickly with a damp cloth; color stays only in the veins.
Hang these fragrant discs in a closet, car, or bathroom for a subtle, natural scent boost
Simple Bud Vase (Decor Only)

This rustic bud vase uses blending and texturing techniques to mimic the high-end look of speckled stoneware pottery. It’s the perfect minimalist vessel for displaying dried grasses or faux florals on a sunny windowsill.
How-To Guide
Materials
- White air-dry clay (approx. 1 lb)
- Used coffee grounds or black pepper
- Rolling pin
- Small bowl of water
- Clay sponge or soft foam
- Pottery rib tool or old credit card
- Paintbrush (soft bristle)
- Matte spray varnish or Mod Podge
Step 1: Preparing the Speckled Clay
-
Condition the clay:
Cut off a substantial chunk of white air-dry clay and knead it in your hands until it becomes warm, soft, and pliable. This prevents cracking later on. -
Add texture material:
Create a deep indentation in your ball of clay. Sprinkle in about a teaspoon of dried used coffee grounds or coarse black pepper. These organic touches create that stunning speckled ‘ceramic’ illusion. -
Knead to integrate:
Fold the clay over the speckles and knead thoroughly. Keep folding and rolling until the specks are distributed evenly throughout the entire lump of clay.
Cracks Appearing?
If tiny cracks appear while drying, mix a small amount of fresh clay with water to make a paste (slip). Fill the cracks with this paste and smooth over immediately.
Step 2: Shaping the Base
-
Form the initial sphere:
Roll your conditioned clay into a smooth, tight sphere between your palms. Aim for something roughly the size of a large orange. -
Begin the pinch pot:
Hold the sphere in one hand and gently press your thumb into the center, stopping about half an inch from the bottom. Do not push all the way through. -
Open the form:
Gently pinch the clay between your thumb and fingers, rotating the ball as you go. Work your way from the bottom up, thinning the walls significantly while keeping that round, bulbous shape. -
Refining the curve:
Use your fingers to push the belly of the vase outward from the inside to enhance the round profile. I like to keep the walls slightly thicker than usual for this rustic look. -
Narrowing the top:
As you reach the upper third of the sphere, change your pinching motion to gently collar the clay inward, making the opening significantly smaller to prepare for the neck.
Make it Waterproof
To hold real flowers, hide a small glass spice jar or test tube inside the clay body while you are building it. Build the clay walls directly around the glass insert.
Step 3: Building the Neck
-
Create a coil:
Take a separate small piece of speckled clay and roll out a thick snake, approximately the width of your pinky finger. -
Attach the coil:
Score the top rim of your base and the underside of the coil with a needle tool or toothpick. Dab a little water on the scored areas and press the coil firmly onto the rim. -
Blend the seams:
Use your thumb or a modeling tool to drag the clay from the coil down onto the body, and the clay from the body up onto the coil. Smooth this seam inside and out until it’s invisible. -
Shape the flare:
Gently pinch the added coil to pull it upward. At the very top rim, use your thumbs to press gently outward to create a slight flare or trumpet shape.
Step 4: Refining and Drying
-
Smooth the surface:
Dip a sponge in water—squeezing out almost all the excess moisture—and gently wipe the entire exterior. This smooths fingerprints and exposes the coffee or pepper speckles. -
Flatten the bottom:
To ensure stability, firmly tap the vase on your work surface a few times to create a flat, sturdy base. -
Initial dry:
Let the vase sit undisturbed in a cool, dry place away from direct heater vents. Rotating it every few hours helps it dry evenly. -
Sanding (Optional):
Once bone dry (usually 24-48 hours), you can lightly sand any rough spots with fine-grit sandpaper, though leaving it slightly organic adds charm. -
Sealing:
Apply a coat of matte spray varnish or matte Mod Podge to protect the clay and keep the speckles in place. Remember, this is for dry stems only, so don’t add water.
Enjoy styling your new faux-stone vase with some dried bunny tails or pampas grass for an instant textural upgrade to your shelf

TRACK YOUR CERAMIC JOURNEY
Capture glaze tests, firing details, and creative progress—all in one simple printable. Make your projects easier to repeat and improve.
Soap Dish With Drain Ridges
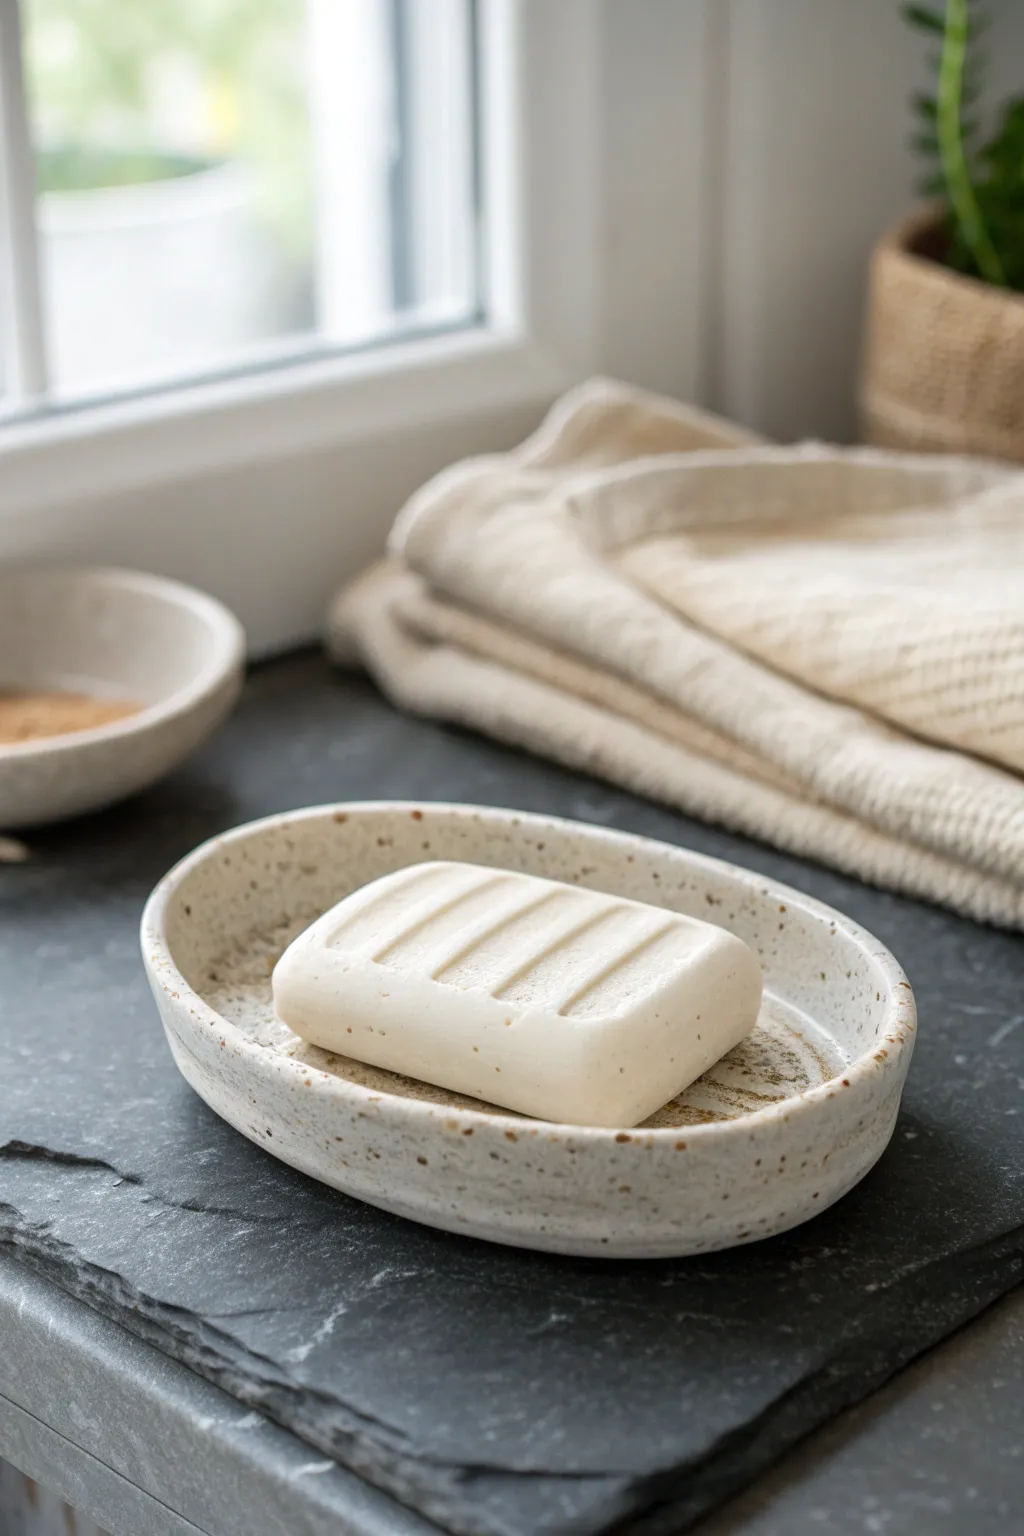
This minimalist soap dish features a gently curved oval shape and built-in ridges to keep your soap dry and lasting longer. The faux-speckled finish gives it a high-end ceramic look without needing a kiln, making it a perfect functional addition to any bathroom or kitchen sink.
Step-by-Step Tutorial
Materials
- White air dry clay
- Rolling pin
- Clay knife or craft knife
- Small bowl of water
- Sponge
- Sandpaper (fine grit)
- Acrylic paint (cream/white and brown)
- Old toothbrush
- Waterproof varnish or sealant (glossy)
- Long, thin cylindrical object (like a pencil or dowel)
Step 1: Shaping the Base
-
Prepare the clay:
Start by taking a generous handful of air dry clay and kneading it in your hands until it becomes soft, pliable, and free of cracks. -
Roll the slab:
Use your rolling pin to flatten the clay into a slab that is roughly 1/4 to 1/2 inch thick. Keep the thickness consistent for durability. -
Cut the oval:
Freehand an oval shape with your clay knife or trace around a template made from cardstock. The oval should be slightly larger than your favorite bar of soap. -
Create the rim:
Roll a long snake of clay about the thickness of a pencil. This coil will become the raised wall of your dish. -
Attach the wall:
Score the outer edge of your oval base and the underside of your coil. Wet both scored areas with water. -
Blend the seams:
Place the coil onto the edge of the base. deeply blend the clay of the coil down into the base on both the inside and outside using your thumb or a modeling tool until the seam disappears. -
Smooth the surface:
Dip your sponge or finger in water and run it over the entire piece to smooth out fingerprints and uneven bumps.
Smoother Ridge Tip
Instead of adding clay snakes for ridges, you can carve grooves into the thick base while the clay is wet using a loop tool for a negative-space effect.
Step 2: Adding Details
-
Form the ridges:
Roll out four or five small, thin snakes of clay. These should fit inside the flat bottom of your dish. -
Secure the ridges:
Score the bottom of the dish and the underside of each snake. Press them down firmly, spacing them evenly apart to create drainage channels. -
Refine the shape:
Gently press the ridges down slightly so they aren’t too high; you want the soap to rest on top, not wobble. -
Dry thoroughly:
Let the dish dry completely for 24 to 48 hours. I find flipping it over halfway through helps the bottom dry evenly.
Step 3: Finishing Touches
-
Sand for smoothness:
Once fully dry, use fine-grit sandpaper to buff away any rough edges or sharp points on the rim and ridges. Wipe away the dust. -
Base coat:
Paint the entire dish with a creamy white acrylic paint. You may need two coats for full opacity. -
Create the speckles:
Mix a small amount of brown paint with a drop of water. Dip an old toothbrush into the mixture. -
Splatter effect:
Run your thumb over the bristles of the toothbrush to flick tiny specks of brown paint onto the dish. Practice on paper first to control the spray. -
Seal heavily:
Apply at least two or three coats of a high-quality waterproof varnish. This is crucial since the dish will be sitting in water.
Go High-Gloss
Use a resin coating instead of standard varnish. It makes the piece 100% waterproof and gives it that professional, shiny ‘kiln-fired’ ceramic glaze look.
Place your favorite soap bar on top and enjoy the handmade charm on your countertop
Neutral Napkin Rings
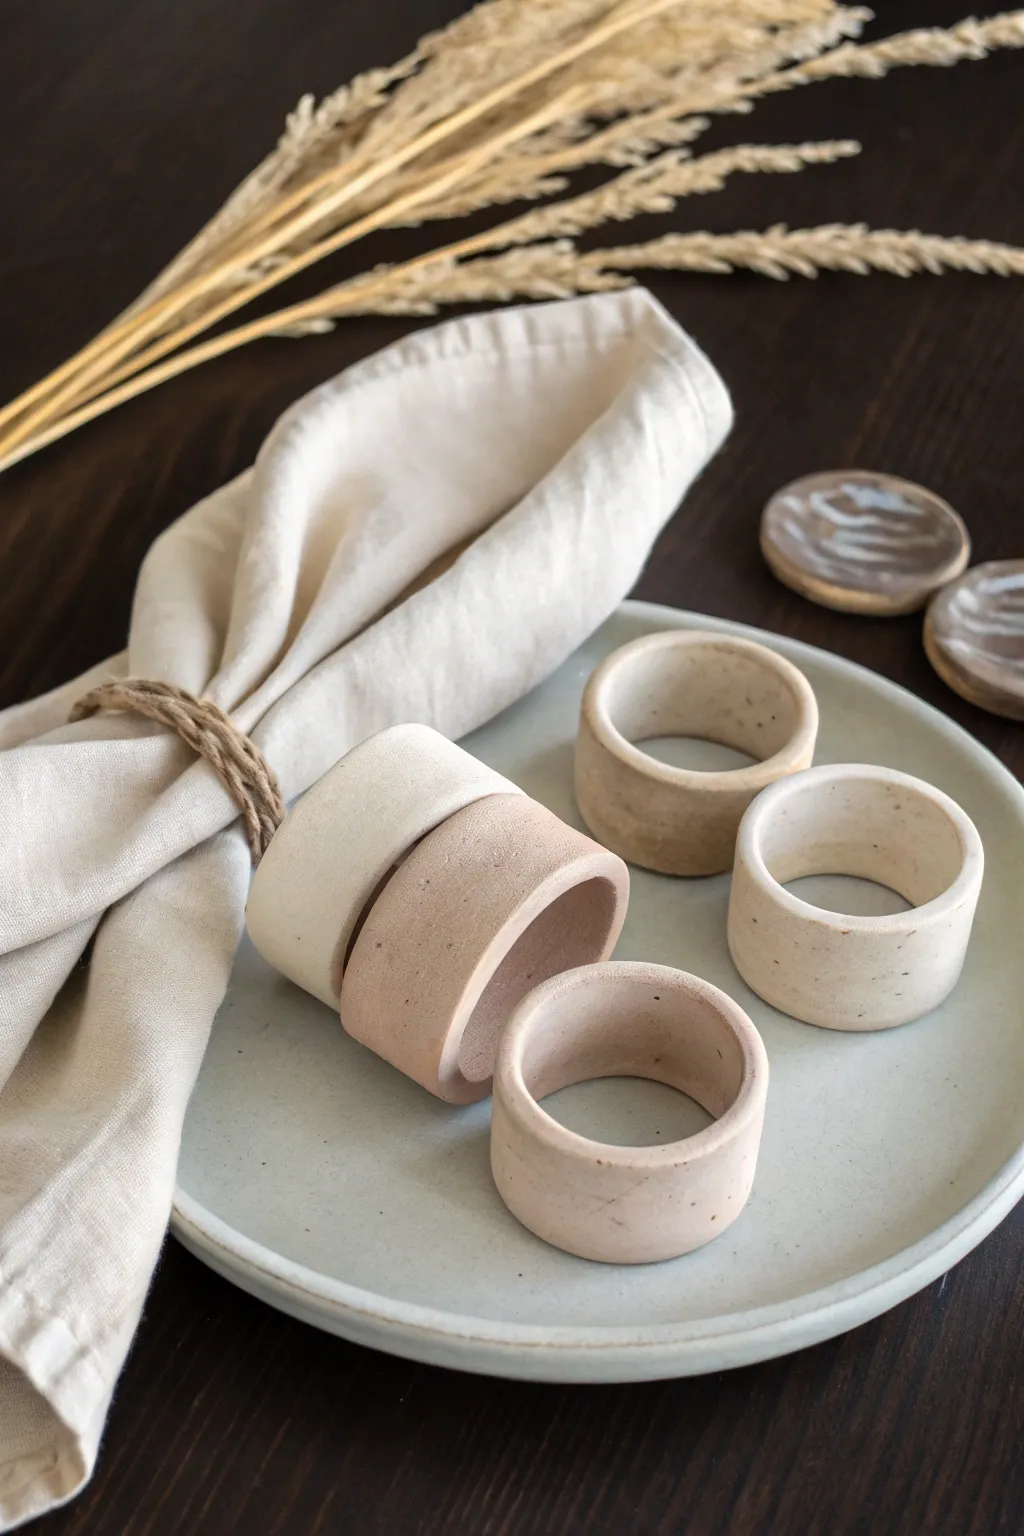
Elevate your table setting with these beautifully simple, organic napkin rings that boast a modern matte finish. This project uses basic rolling and cutting techniques to create smooth, cylindrical rings in soft neutral tones that complement any linen napkin perfectly.
Step-by-Step Tutorial
Materials
- Air dry clay (white and terracotta/stone color)
- Acrylic rolling pin or glass jar
- Sharp craft knife or clay blade
- Ruler
- Small cylindrical form (like a spice jar or cardboard tube, approx. 1.5 inch diameter)
- Parchment paper or wax paper
- Small cup of water
- Fine grit sandpaper (320 or 400 grit)
- Matte spray varnish (optional)
Step 1: Preparing the Clay
-
Condition the clay:
Start by taking a handful of your air dry clay. Knead it in your hands for a minute or two until it feels warm, pliable, and free of cracks. If you want that speckled look seen in the photo, I sometimes knead in a tiny pinch of dried coffee grounds or black pepper at this stage. -
Mix your tones:
To achieve the gradient of neutrals shown, you can mix white clay with varying amounts of terracotta or brown clay. Create three separate balls of clay: one pure white, one light beige, and one deeper tan.
Seamless Join Trick
Score (scratch) both ends of the clay strip before joining them. Add a drop of water to make a ‘slip’ paste, ensuring a bond that won’t crack apart later.
Step 2: Rolling and Cutting
-
Prepare your workspace:
Lay down a sheet of parchment paper to prevent sticking. This makes it much easier to lift your delicate clay strips later. -
Roll out the slab:
Place your first ball of clay on the paper. using your acrylic roller, roll the clay out into an even slab. Aim for a consistent thickness of about 1/4 inch (4-5mm). Consistency here is key for durable rings. -
Measure your strips:
Using your ruler and craft knife, cut a long rectangular strip from the slab. A good standard size is about 1.25 inches wide and 5.5 inches long, but check this length against your chosen cylinder form to ensure it wraps around with a slight overlap. -
Trim the edges:
Make sure the long edges are perfectly parallel. Slice off the ragged ends cleanly so you have a sharp, rectangular strip of clay.
Step 3: Forming the Ring
-
Wrap the form:
Take your cylindrical form (like a spice jar) and wrap it with a small piece of parchment paper. This prevents the clay from bonding to the jar. -
Shape the clay:
Gently lift your clay strip and wrap it around the parchment-covered form. Bring the two ends together until they touch. -
Join the seam:
Cut through both layers of the overlapping clay at a diagonal angle with your knife. Remove the excess clay pieces from underneath and on top. This creates a perfect butt joint where the two cut edges meet flush. -
Blend the connection:
Dip your finger in a tiny bit of water and gently rub across the seam to blend the clay together. Use a modeling tool or the back of your fingernail to smooth the inside and outside of the join until the line disappears. -
Refine the shape:
While the clay is still on the form, tap the edges gently on your table surface to ensure the rim of the ring is flat and even. -
Repetition:
Repeat this process with your other clay colors to create a cohesive set. Make sure to clean your roller between colors to keep the light tones pristine.
Cracking During Drying?
Air dry clay shrinks as it dries. If it cracks, you likely left it on the rigid form too long. Remove the form once the clay can hold its own shape but is still damp.
Step 4: Drying and Finishing
-
Initial drying:
Stand the rings upright on their forms in a safe, dry place away from direct sunlight. Let them dry for about 2-4 hours until they are leather-hard. -
Remove the form:
Carefully slide the clay rings off their forms. The parchment paper usually makes this slide off easily. Lay the rings on their sides to allow the inside to dry fully. -
Full cure:
Allow the rings to dry for another 24-48 hours. They will lighten in color and feel hard to the touch when fully cured. -
Sanding:
Once bone dry, take your fine grit sandpaper and gently sand the edges and the outer surface. Focus on the seam area to make it completely invisible and smooth out any fingerprints. -
Dusting off:
Wipe the rings down with a slightly damp cloth or a dry brush to remove all the sanding dust. -
Sealing (Optional):
For protection against food stains, apply a light coat of matte spray varnish. This preserves the natural, stone-like look while adding durability.
Now you have a stunning set of custom napkin rings ready to grace your next dinner party table
Terrazzo-Style Tray
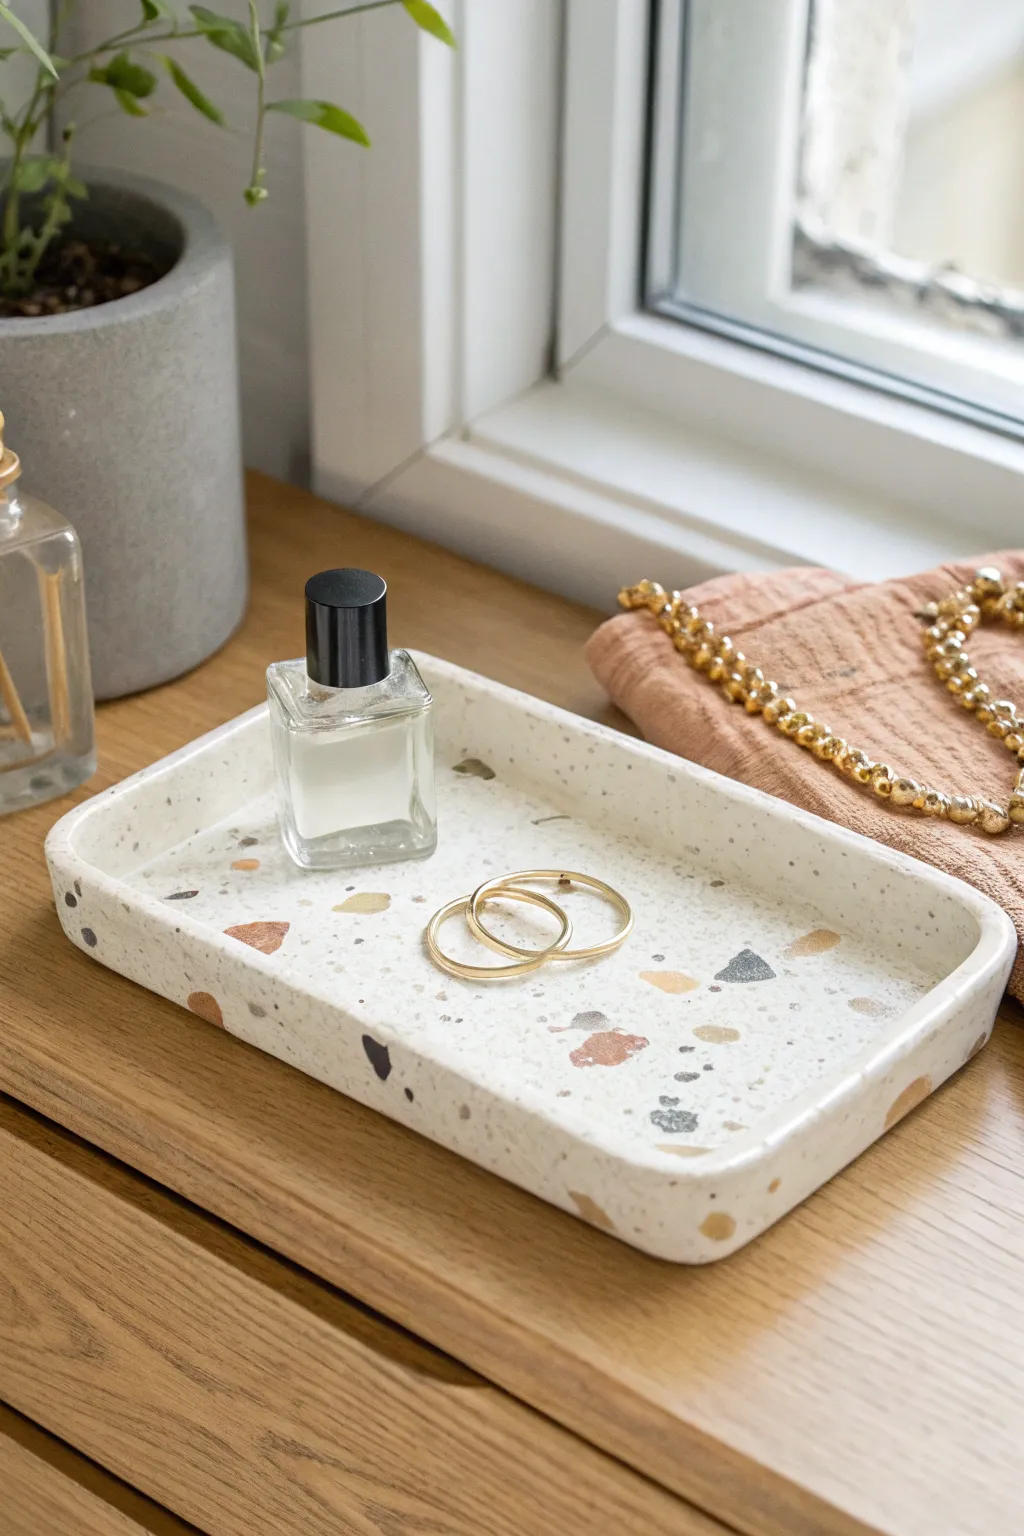
Bring the high-end look of terrazzo into your home with this surprisingly simple air dry clay project. This rectangular tray features a classic white base speckled with organic fragments of terracotta, mustard, charcoal, and grey for a sophisticated, modern finish.
How-To Guide
Materials
- White stone-effect air dry clay or white polymer clay
- Acrylic paints (terracotta, mustard yellow, charcoal grey, light grey)
- Rolling pin
- Craft knife or clay slicer
- Sandpaper (fine and medium grit)
- Gloss varnish or sealant
- Water and a small bowl
- Rolling guides or two wooden rulers (optional)
- Baking paper or non-stick work mat
Step 1: Creating the Chips
-
Prepare custom colors:
Pinch off four small balls of white clay, roughly the size of a large marble each. Mix a small drop of acrylic paint into each ball to create your chip colors: terracotta, mustard, charcoal, and light grey. Knead until the color is solid and uniform. -
Flatten the colored clay:
Roll each colored ball out very thinly onto your baking paper. Aim for a thickness of about 1-2mm. Don’t worry about the shape; ragged edges are perfectly fine here. -
Dry the thin sheets:
Let these colored sheets sit for about 20-30 minutes. You want them to be firm enough to cut cleanly without smearing, but not completely brittle. -
Create the terrazzo chips:
Once firm, tear or cut the colored sheets into small, irregular fragments. Vary the sizes from tiny specks to larger triangles and polygons to mimic real stone aggregate. Set them aside in a pile.
Cracking Up?
If small cracks appear while drying, mix a tiny bit of fresh clay with water to make a paste. Fill the crack, let dry, and sand smooth.
Step 2: Forming the Tray Base
-
Roll the base slab:
Take a large block of white clay and roll it out into a thick slab, approximately 5-7mm thick. Using rolling guides helps keep the thickness consistent. -
Embed the chips:
Scatter your colored clay chips randomly over the surface of the white slab. Press them gently into the surface with your fingers. -
Integrate the pattern:
Use your rolling pin to gently roll over the slab again. This forces the colored chips into the white base so they become flush with the surface rather than sitting on top. -
Cut the shape:
Use a ruler and your craft knife to cut a clean rectangle from the slab. A size of around 5×7 inches works well for a vanity tray. -
Create the rim strips:
Gather the excess white clay (avoiding the colored bits if possible to keep the rim clean, or re-roll the scraps for a speckled rim). Roll a long snake and flatten it into a long strip about equal thickness to your base. -
Attach the rim:
Score the edges of your rectangular base and the bottom of your rim strip. Apply a little water or liquid clay as ‘glue’ and press the strip onto the edge of the base to create the wall. -
Reinforce the joins:
Use a modeling tool or your finger to smooth the seam where the wall meets the base, both on the inside and outside. This ensures the tray is sturdy and looks like one solid piece. -
Shape the corners:
Gently curve the corners of the tray with your fingers to soften the look, matching the rounded aesthetic of the photo.
Make it Luxe
Add flecks of gold leaf to the white clay base along with your colored chips before the final roll for an elegant, gilded stone effect.
Step 3: Finishing Touches
-
Initial dry:
Allow the tray to dry completely. For air dry clay, this usually takes 24-48 hours depending on humidity. Flip it halfway through to ensure the bottom dries evenly. -
Reveal the pattern:
Here I prefer to sand quite vigorously. Start with medium-grit sandpaper to remove the top layer of clay ‘haze’ that might be obscuring your colored chips. You’ll see the colors become sharp and distinct. -
smooth the surface:
Switch to fine-grit sandpaper to buff the entire tray until it feels smooth to the touch. Pay extra attention to the rim and corners. -
Clean up dust:
Wipe the tray down with a slightly damp cloth or sponge to remove all sanding dust. -
Seal and protect:
Apply a coat of gloss varnish or sealant. This not only protects the clay from moisture but makes the terrazzo colors pop and gives it that ceramic-like sheen.
Now you have a stylish spot to display your favorite rings and perfumes
Moon Phase Wall Hanging
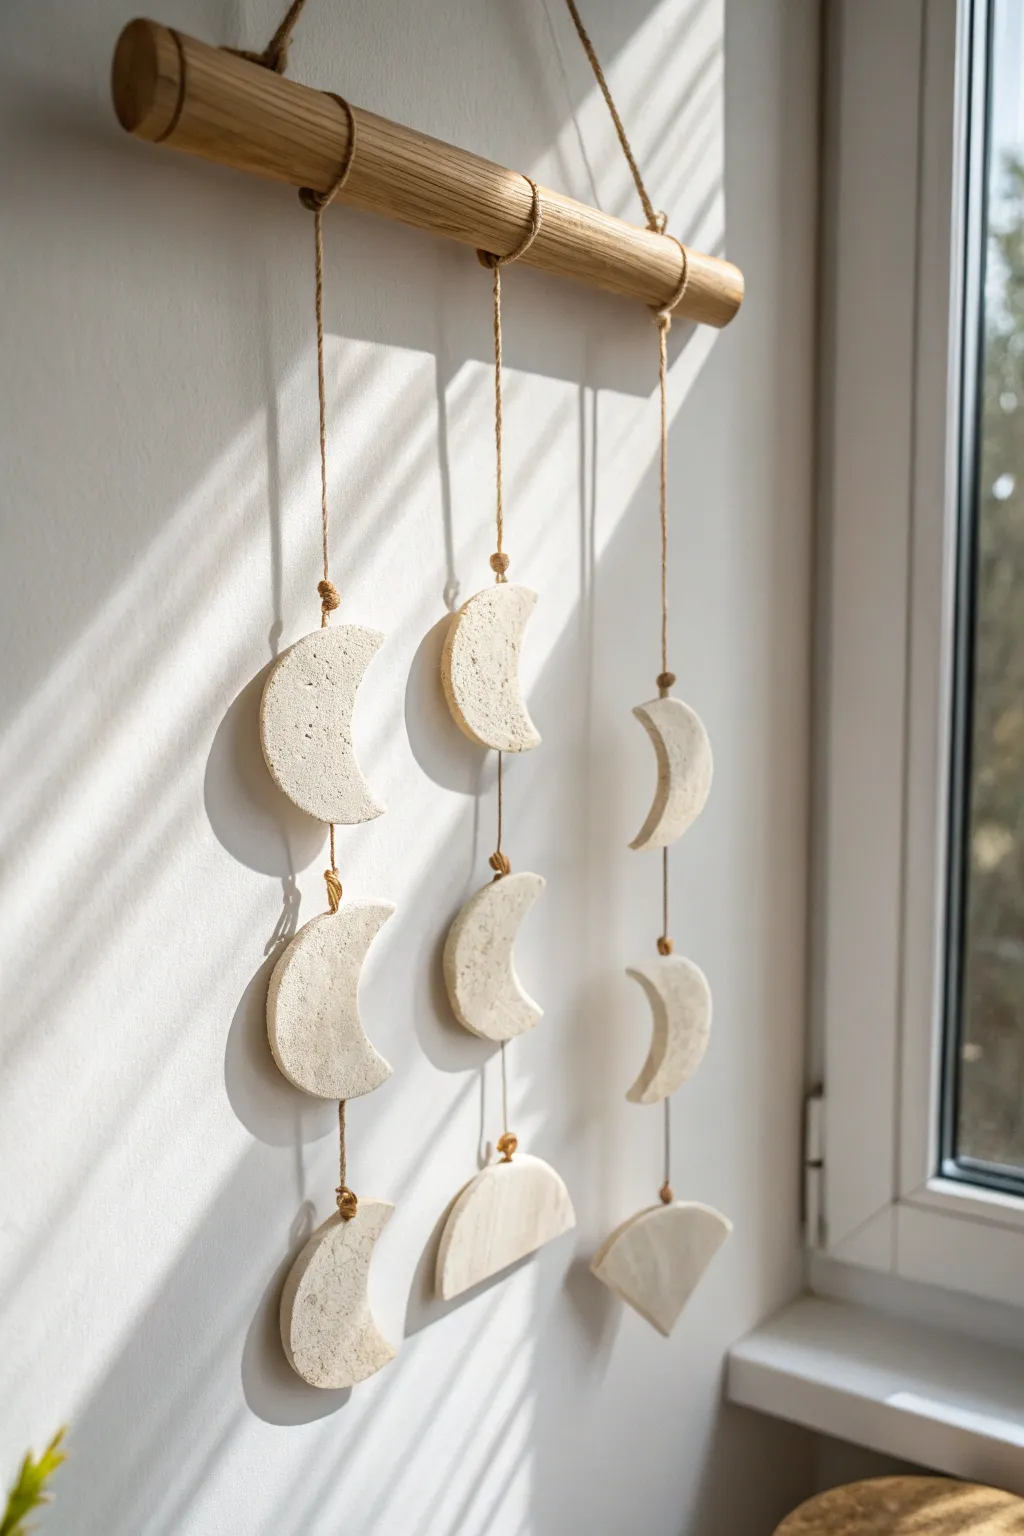
Bring a touch of celestial magic to your walls with this earthy, minimalist mobile featuring textured moon crescents. The simple combination of air-dry clay and natural wood creates a calm, bohemian aesthetic perfect for any sunlit corner.
Step-by-Step Tutorial
Materials
- White or natural air-dry clay (approx. 500g)
- Wooden dowel (approx. 12-16 inches long, roughly 1-inch diameter)
- Jute twine or hemp cord
- Rolling pin
- Circle cookie cutter (3-inch diameter) or a glass
- Drinking straw or skewer
- Sandpaper (fine grit)
- Scissors
Step 1: Creating the Clay Moons
-
Roll the clay:
Begin by kneading a large handful of air-dry clay to warm it up. Roll it out on a smooth surface until it’s about a 1/4 inch thick sheet. I find that keeping it slightly thicker prevents the pieces from warping as they dry. -
Cut the base circles:
Using your circle cutter or a drinking glass, punch out nine full circles from the clay sheet to serve as your base shapes. -
Shape the crescents:
To create the crescent moons, use the same circle cutter. Position the cutter so it overlaps with a cut circle, slicing away a curved section to leave behind a crescent shape. Vary the overlap slightly to create waxing and waning illusions if desired. -
Create the half-moons:
For the bottom pieces, take three of your circles and simply cut them in half with a knife or a clay slicing tool to create semicircles. -
Keep them aligned:
You should aim for three vertical columns of three shapes each. Layout your pieces: three crescents facing left, three crescents facing right, and three half-moons for the bottom row. -
Punch hanging holes:
Use a straw to punch a hole at the top and bottom of the top and middle pieces. For the bottom pieces (the half-moons), only punch one hole at the top. -
Add texture:
Before the clay sets, lightly dab the surface with a crumpled piece of aluminum foil or a stiff-bristled brush. This mimics the moon’s cratered surface and gives it that rustic finish seen in the photo. -
Dry thoroughly:
Lay all pieces flat on a piece of parchment paper. Let them dry for 24-48 hours, flipping them halfway through to ensure even drying.
Smooth Moves
Use a tiny bit of water on your finger to smooth out the edges of your clay cuts before drying. This reduces the amount of sanding you’ll need later.
Step 2: Assembly and Hanging
-
Refine the edges:
Once fully dry, take a piece of fine-grit sandpaper and gently smooth any rough or sharp edges on your clay pieces. -
Prepare the dowel:
Cut a piece of jute twine about 2 feet long. Tie each end securely to the outer edges of your wooden dowel to create the main hanger. -
Cut vertical strings:
Cut three lengths of jute twine, each roughly 24 inches long. These will hold your clay columns. -
Attach the first row:
Tie the top of each string to the wooden dowel, spacing them evenly apart. Secure them with a tight double knot so they don’t slide. -
Thread the top moons:
Take a top crescent moon and thread the hanging string through its top hole, then feed it out through the bottom hole. Tie a small knot underneath the bottom hole to hold the moon in place at your desired height. -
Add the middle moons:
Continue down the same string. Thread the next crescent moon (middle row), leaving a few inches of space between it and the top one. Again, knot the string just below the moon’s bottom hole to secure it. -
Attach the bottom pieces:
Finally, tie the end of the string through the single top hole of the bottom half-moon piece. Trim any excess string close to the knot. -
Repeat for all columns:
Repeat the threading and knotting process for the remaining two columns, ensuring the moons hang at level heights across the rows. -
Final adjustments:
Hang the dowel on a wall hook and gently rotate the moons if they have twisted, ensuring they all face forward properly.
Golden Touch
Paint the dried clay moons with metallic gold acrylic paint, or just gild the edges for a luxurious, shimmering finish against the rustic twine.
Hang your creation near a window to watch the shadows shift across your personal lunar cycle throughout the day
Minimal Desk Pencil Cup
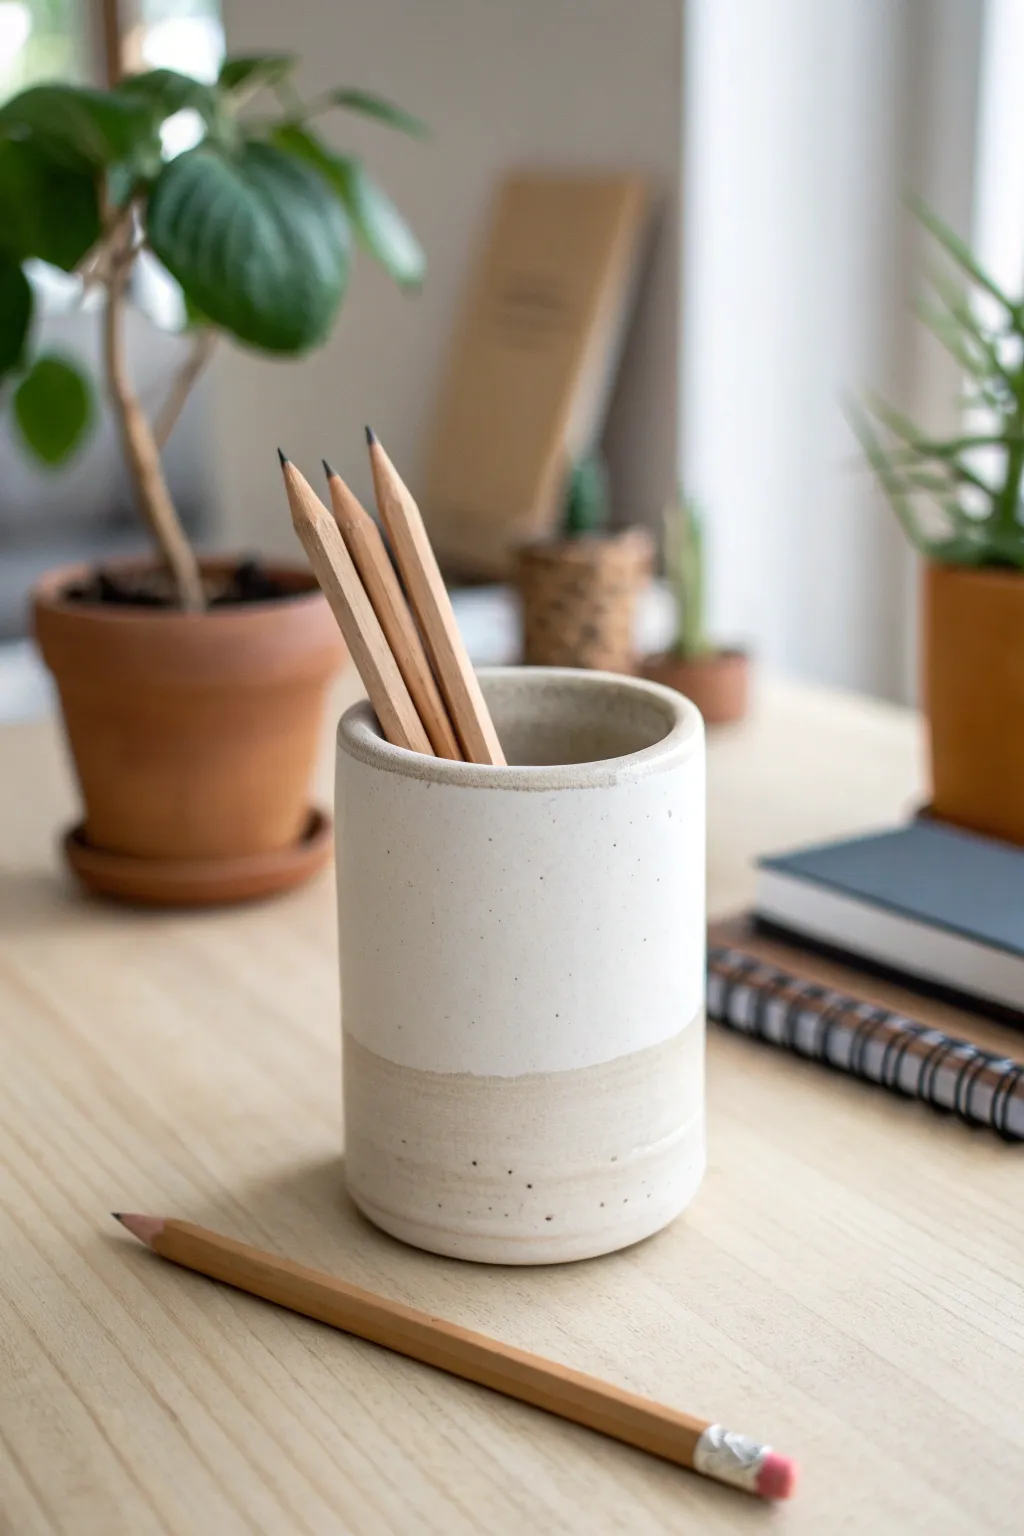
Bring a touch of serene organization to your workspace with this sleek, cylindrical pencil holder. This project combines the raw, natural texture of unpainted clay with a crisp, speckled white finish for a modern two-tone look.
Step-by-Step Guide
Materials
- Air dry clay (white or light grey)
- Rolling pin
- Sharp crafting knife or clay Slicer
- Guide sticks or 1/4 inch slats (optional)
- Slip (clay mixed with water)
- Cylindrical mold (like a rigid cardboard tube or glass jar)
- Parchment paper
- Sandpaper (medium and fine grit)
- White acrylic paint
- Small stiff paintbrush
- Old toothbrush (for speckling)
- Dark grey or black acrylic paint (watered down)
- Matte varnish or sealant
- Ruler
Step 1: Forming the Cylinder
-
Prep the Clay:
Begin by kneading a large ball of air dry clay until it is warm and pliable. This conditioning step is crucial to prevent internal air bubbles and cracks later on. -
Roll the Slab:
Roll the clay out into a long rectangular slab. Using guide sticks on either side of your roller helps ensure an even thickness of about 1/4 inch across the entire piece. -
Cut the Base:
Use your chosen cylindrical mold (a jar or tube) as a template. Place it on the slab and cut a circle around it with your craft knife to create the base of your cup. -
Measure the Walls:
Measure the circumference of your mold or simply wrap a piece of string around it to find the length needed. Add a tiny bit of extra length for the overlap. -
Cut the Wall Rectangle:
Using a ruler for a straight edge, cut a long rectangle from your clay slab. It should be wide enough to be the height of your cup (likely 4-5 inches) and long enough to wrap around the base. -
Prep the Mold:
Wrap your cylindrical mold in parchment paper. This prevents the wet clay from sticking to the mold and makes it much easier to remove the form later. -
Score and Slip:
Score (scratch hatch marks) one long edge of the rectangle and the outer edge of your circular base. Apply a little slip to these roughed-up areas to act as glue. -
Assemble the Cylinder:
Carefully wrap the rectangular slab around the parchment-covered mold. Stand the cylinder up and place it directly onto the circular base, pressing the scored edges together firmly. -
Seal the Seams:
For the vertical seam where the wall overlaps, cut through both layers at a diagonal angle and remove the excess clay. Score, slip, and smooth this joint together until the seam disappears. Do the same blending action for the bottom seam where the wall meets the base.
Step 2: Refining and Finish
-
Smooth the Rim:
Before the clay dries, check the top rim. I find that wetting my finger slightly and running it along the edge softens any sharpness and creates that lovely rounded look seen in the photo. -
Dry Completely:
Let the piece dry for 24-48 hours. Remove the inner mold carefully once the clay is stiff enough to hold its own weight, which helps the inside dry faster. -
Sand for Perfection:
Once fully dry and chalky white, use medium grit sandpaper to smooth out any bumps or unevenness on the walls. Follow up with fine grit sandpaper to make the surface silky smooth. -
Tape the Line:
To achieve the dipped look, place painter’s tape or masking tape horizontally around the cup, about one-third of the way up from the bottom. Press the edge of the tape down firmly to prevent paint bleed. -
Apply the Base White:
Paint the area above the tape with opaque white acrylic paint. You may need two or three thin coats to get solid coverage, letting each coat dry in between. -
Create the Speckles:
Dilute a tiny drop of black or dark grey paint with water. Dip an old toothbrush into it, and flick the bristles with your thumb to spray tiny speckles over the white section. -
Reveal the Design:
Carefully peel away the tape while the paint is still slightly tacky to reveal the crisp line between the painted section and the raw clay bottom. -
Seal the Cup:
Apply a clear matte varnish over the entire piece, inside and out. This seals the raw clay at the bottom and protects the paint work, giving it a finished ceramic feel.
Cracks while rolling?
If the edges crack while rolling the slab, your clay might be too dry. Dip your fingers in water and work it back into the clay, or spray a fine mist over the slab before smoothing it out again.
Seamless Seams
Use the back of a spoon to burnish and compress the seam line. The curved metal glides over the clay better than fingers, making the join invisible and stronger.
Place your favorite pens inside and enjoy the calm, organized vibe your new creation brings to your desk