
When I want holiday decorating to feel relaxing (not stressful), I reach for air-dry clay or polymer clay and make a few cute pieces in one cozy session. These simple Christmas clay ideas are all about easy shapes, quick wins, and decorations you’ll actually want to hang up every year.
Classic Cookie Cutter Ornaments
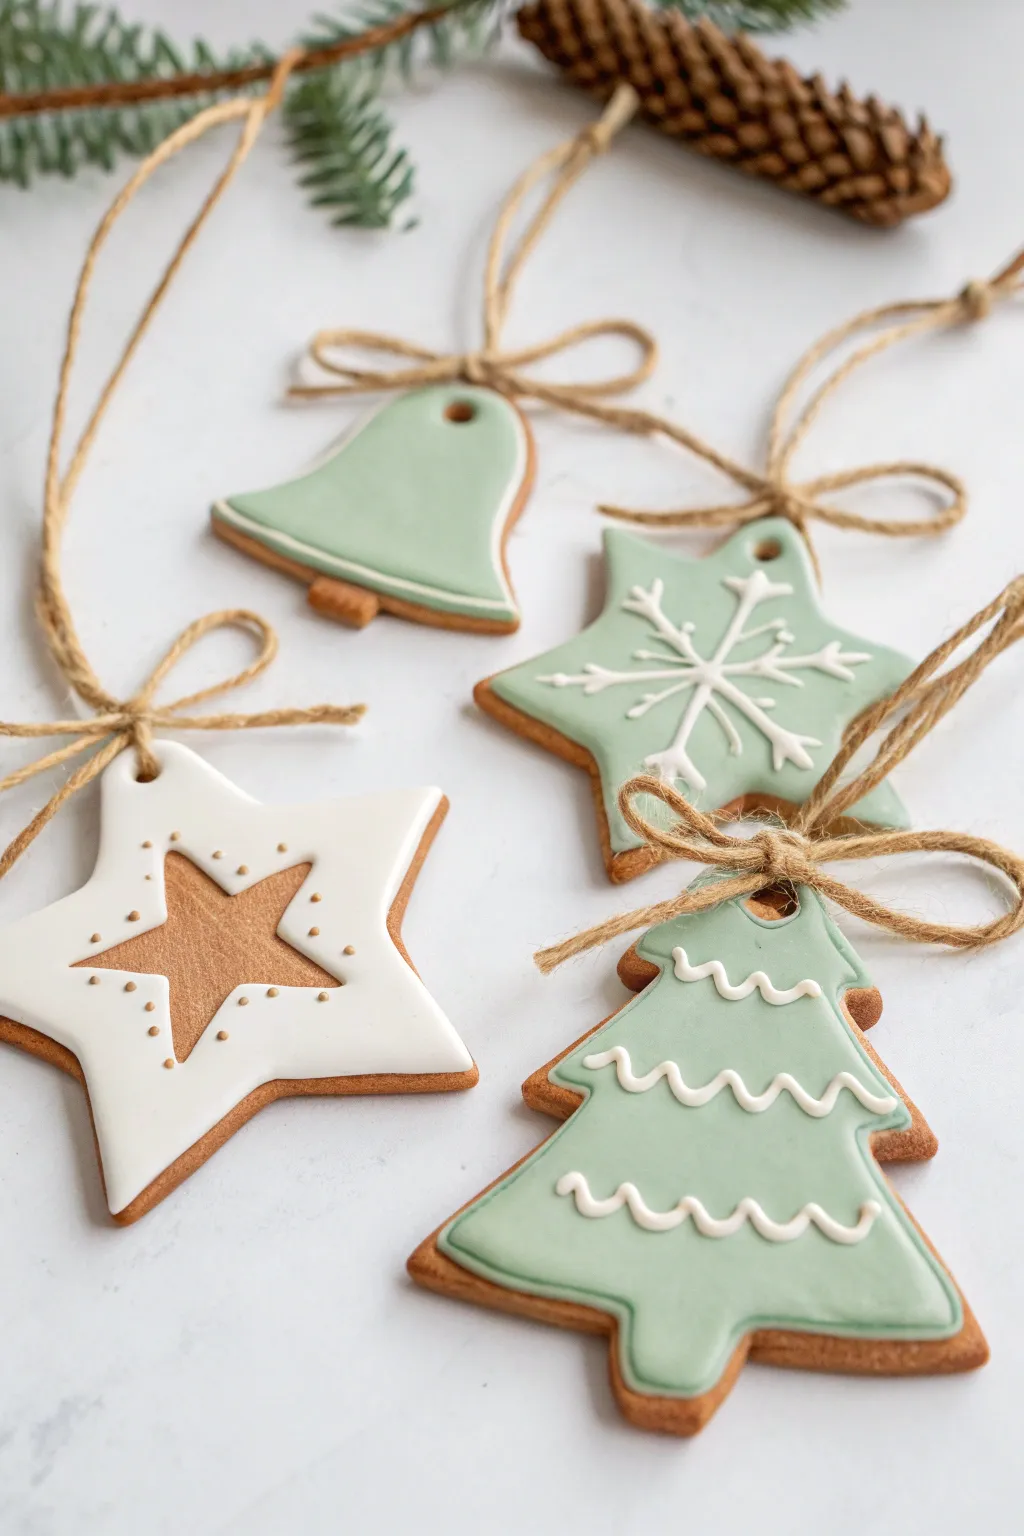
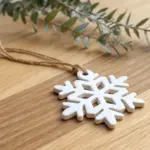
Capture the cozy charm of traditional gingerbread cookies without the baking by crafting these durable clay ornaments. With a soft pastel palette of sage green and classic white icing details, these cookie-cutter creations bring a timeless, handmade warmth to your holiday decor.
Step-by-Step
Materials
- Polymer clay (tan/light brown for the base, white, and sage green)
- Liquid polymer clay or ‘Bakery Crafts’ icing medium (white)
- Christmas cookie cutters (star, tree, bell, large star)
- Rolling pin or clay machine
- Parchment paper
- Drinking straw or small circular cutter
- Needle tool or toothpick
- Jute twine
- Fine-grit sandpaper (optional)
- Gloss glaze (optional)
Step 1: Creating the Dough Base
-
Prepare the brown clay:
Start by conditioning your tan or light brown polymer clay until it is soft and pliable. If the color is too flat, I sometimes mix in a tiny speck of translucent clay to mimic the depth of real dough. -
Roll it out:
Roll the clay onto parchment paper to a uniform thickness, ideally about 1/4 inch thick. You want them substantial enough to look like real cookies. -
Cut the shapes:
Press your cookie cutters—bells, trees, and stars—firmly into the clay sheet. Wiggle slightly to ensure a clean cut, then peel away the excess clay. -
Add hanging holes:
Use a drinking straw to punch a neat hole at the top of each ornament for the string. Make sure the hole isn’t too close to the edge to prevent tearing. -
Smooth the edges:
Dip your finger in a little cornstarch or water and gently rub the raw edges of your shapes to smooth out any roughness from the cutter. -
Pre-bake the bases:
Bake the plain shapes according to your clay package instructions (usually 275°F for 15-30 minutes). Let them cool completely before decorating.
Fixing Smudges
If you get a fingerprint on the smooth icing layer before baking, lightly brush it with a tiny amount of baby oil or rubbing alcohol to smooth it out instantly.
Step 2: Applying the ‘Icing’ Layer
-
Prepare the colored icing:
Condition your sage green clay and roll it out very thinly—much thinner than your base layer, almost like a sheet of paper. -
Cut the icing shapes:
Use the same cookie cutters to cut matching shapes from the thin green sheet. For the large star, you might use a smaller star cutter to create an interior shape, or freehand cut the center. -
Attach the layer:
Apply a tiny amount of liquid clay to the baked brown base and gently press the green layer on top. For the bell and tree, cover the mostly entire surface; for the star, leave a wide border of brown showing. -
Detail the bell:
For the bell ornament, trim the green layer slightly at the bottom to expose the brown ‘clapper’ area. -
Detail the open star:
For the large white star shown, roll out white clay instead of green. Cut the star shape, then use a smaller star cutter to remove the center, creating a frame. -
Re-pierce the holes:
Use your needle tool to poke through the green or white layer where it covers the hanging hole you made earlier.
Textured Dough
Before baking the brown base, gently press a piece of sandpaper or a toothbrush onto the surface. It gives the clay instantly realistic baked cookie texture.
Step 3: Piping and Finishing
-
Mix liquid icing:
Mix white polymer clay with liquid clay (or use pre-made white liquid clay) until it reaches a pipeable consistency, similar to real royal icing. -
Pipe the tree details:
Pour the mixture into a squeeze bottle with a fine tip. On the green tree, pipe horizontal zig-zag lines to mimic garland. -
Decorate the snowflake star:
On the green star base, pipe intersecting lines to create a snowflake pattern. Start with a simple cross, add an X, and then shorter V-shapes at the ends. -
Add dot accents:
For the white star frame, use a needle tool dipped in brown liquid clay (or acrylic paint) to create tiny faux-stitched dots around the inner border. -
Final bake:
Bake the ornaments one last time for about 15-20 minutes to set the ‘icing’ layers and liquid clay details. -
String them up:
Once fully cooled, cut lengths of jute twine. Thread them through the holes and tie a simple loop know. -
Add a bow:
Cut a second piece of twine and tie a small bow around the base of the loop knot for that extra rustic touch.
Hang your batch of clay cookies on the tree and enjoy the sweetness without the crumbs


Stamped Name Ornaments
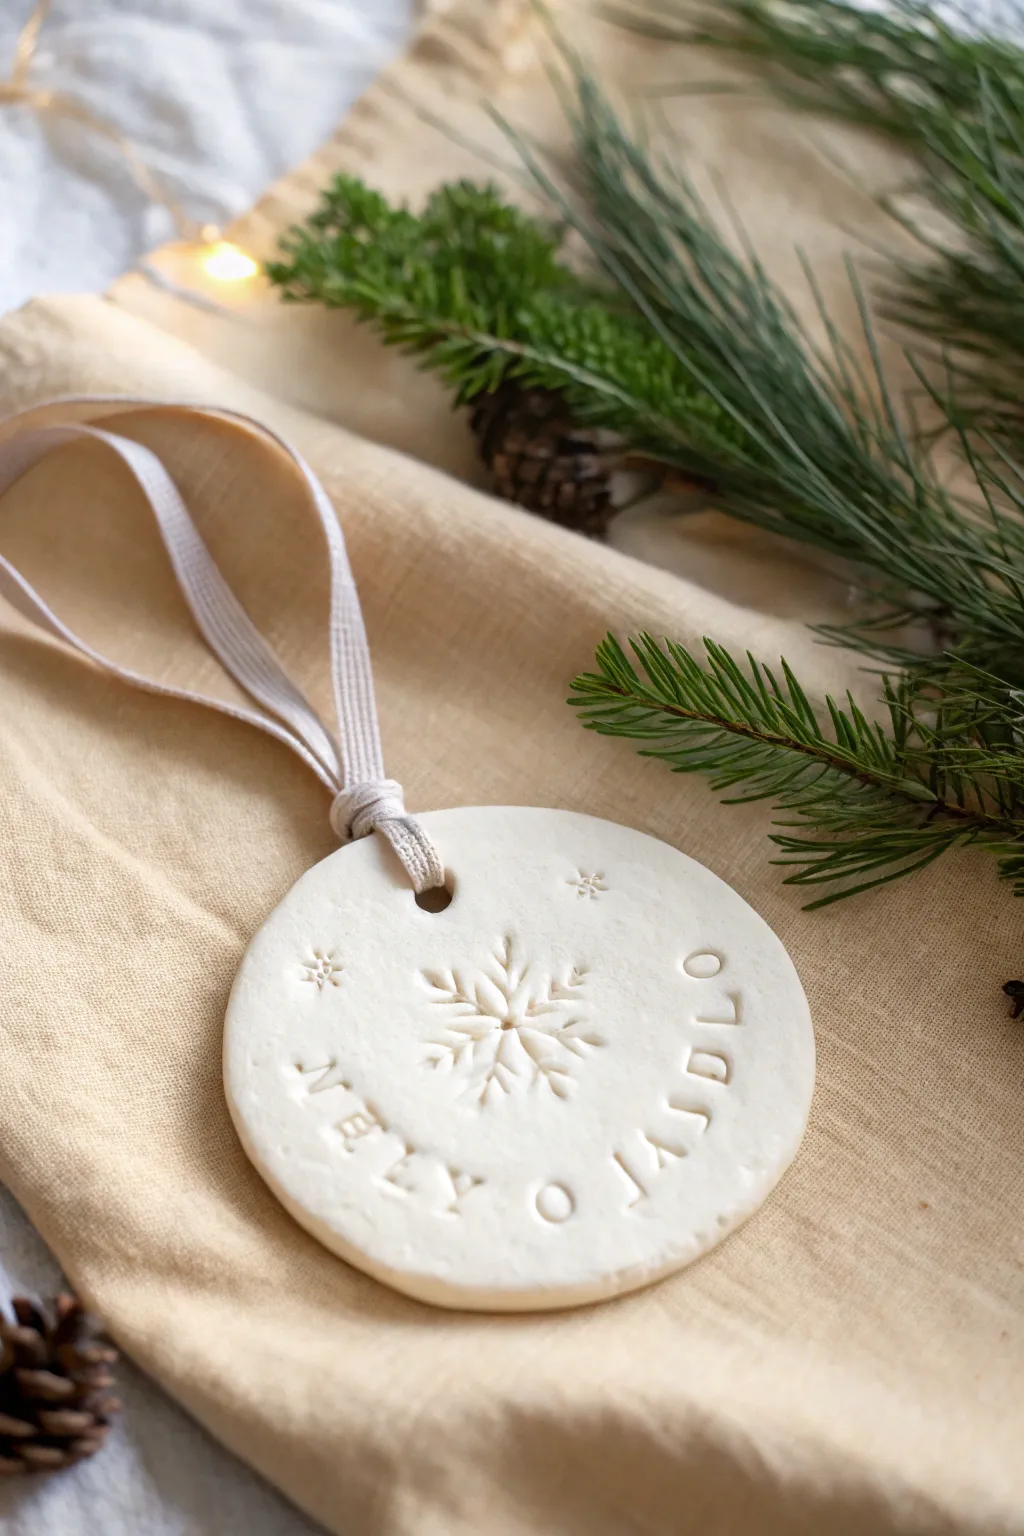
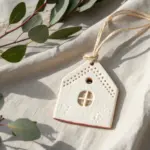
Create a timeless holiday memento with this minimalist white clay ornament, featuring a delicate central snowflake and personalized stamped text. Its matte finish and natural ribbon tie give it a sophisticated, Scandinavian-inspired look perfect for tree decorating or gift wrapping.
How-To Guide
Materials
- Air-dry clay (white) or polymer clay
- Rolling pin
- Circular cookie cutter (approx. 3-4 inches)
- Small letter stamp set
- Snowflake stamp or textured button
- Drinking straw or small circular tool
- Fine-grit sandpaper
- Fabric ribbon (cream or off-white)
- Parchment paper or non-stick mat
- Sponge and water (optional)
Step 1: Preparation and Shaping
-
Prepare your workspace:
Lay down a sheet of parchment paper or a non-stick silicone mat to prevent the clay from sticking to your table. Clean the surface thoroughly to ensure no dust creates dark specks in your white clay. -
Condition the clay:
Take a handful of white air-dry clay and knead it gently in your hands until it becomes soft, pliable, and free of cracks. If working with polymer clay, warm it up well. -
Roll out the slab:
Place the clay on your mat and use a rolling pin to flatten it. Aim for an even thickness of about 1/4 inch (6mm) to ensure the ornament is sturdy enough to hang. -
Cut the shape:
Position your circular cookie cutter over the smoothest part of the rolled clay. Press down firmly to cut a clean circle, then gently peel away the excess clay from the outside. -
Smooth the edges:
Dip your finger in a tiny bit of water and run it lightly along the cut edge of the circle to soften any sharp ridges left by the cutter. -
Create the hanging hole:
Using a drinking straw or a small circular cutting tool, press a hole near the top edge of the circle. Make sure it isn’t too close to the rim to prevent tearing later.
Step 2: Stamping and Detailing
-
Position the central design:
Take your snowflake stamp. Center it visually in the middle of the clay circle. I find it helpful to hover over the clay first to double-check alignment before committing. -
Impress the snowflake:
Press the snowflake stamp firmly and evenly into the clay. Don’t push all the way through; you just want a clear, crisp impression. Lift the stamp straight up to avoid smudging the design. -
Add accent stars:
If your stamp set includes tiny asterisk or star shapes, gently press one or two small accents near the top or sides of the snowflake for extra detail. -
Plan your text:
Before stamping letters, arrange your letter stamps in order on the table to ensure you have the spelling correct and to visualize the spacing along the curved edge. -
Stamp the inscription:
Starting with the middle letter of your phrase at the bottom center of the ornament, work your way outward. Press each letter stamp gently into the clay, following the bottom curve of the circle. -
Refine the surface:
Check for any accidental fingernail marks or rough spots. You can gently buff these out with a barely damp finger or a soft, dry paintbrush.
Cracking Up?
If small cracks appear while drying, mix a tiny bit of fresh clay with water to make a paste (slip). Rub this into the cracks with your finger and let it dry again.
Step 3: Finishing Touches
-
Allow to dry:
Let the ornament air dry completely on a flat surface. This usually takes 24-48 hours depending on humidity. Rotate it occasionally so both sides dry evenly and to prevent curling. -
Sand for perfection:
Once fully hard, take a piece of fine-grit sandpaper and very lightly sand the edges and surface to remove any remaining jagged bits or fingerprints. -
Dust off:
Wipe the ornament with a dry cloth to remove any white dust created by the sanding process. -
Prepare the ribbon:
Cut a length of cream-colored fabric ribbon, approximately 8-10 inches long. -
Thread the loop:
Fold the ribbon in half. Push the folded loop end through the hole from the front to the back. -
Secure the tie:
Pass the loose ends of the ribbon through the loop you just pushed through the hole and pull tight to create a lark’s head knot at the top of the ornament.
Add a Little Sparkle
Before the clay dries, brush a tiny amount of pearl mica powder over the snowflake impression. It catches the light subtly without needing glitter.
Hang your custom creation on the tree or tuck it into a stocking for a handmade touch.


Leaf-Print Evergreen Tags
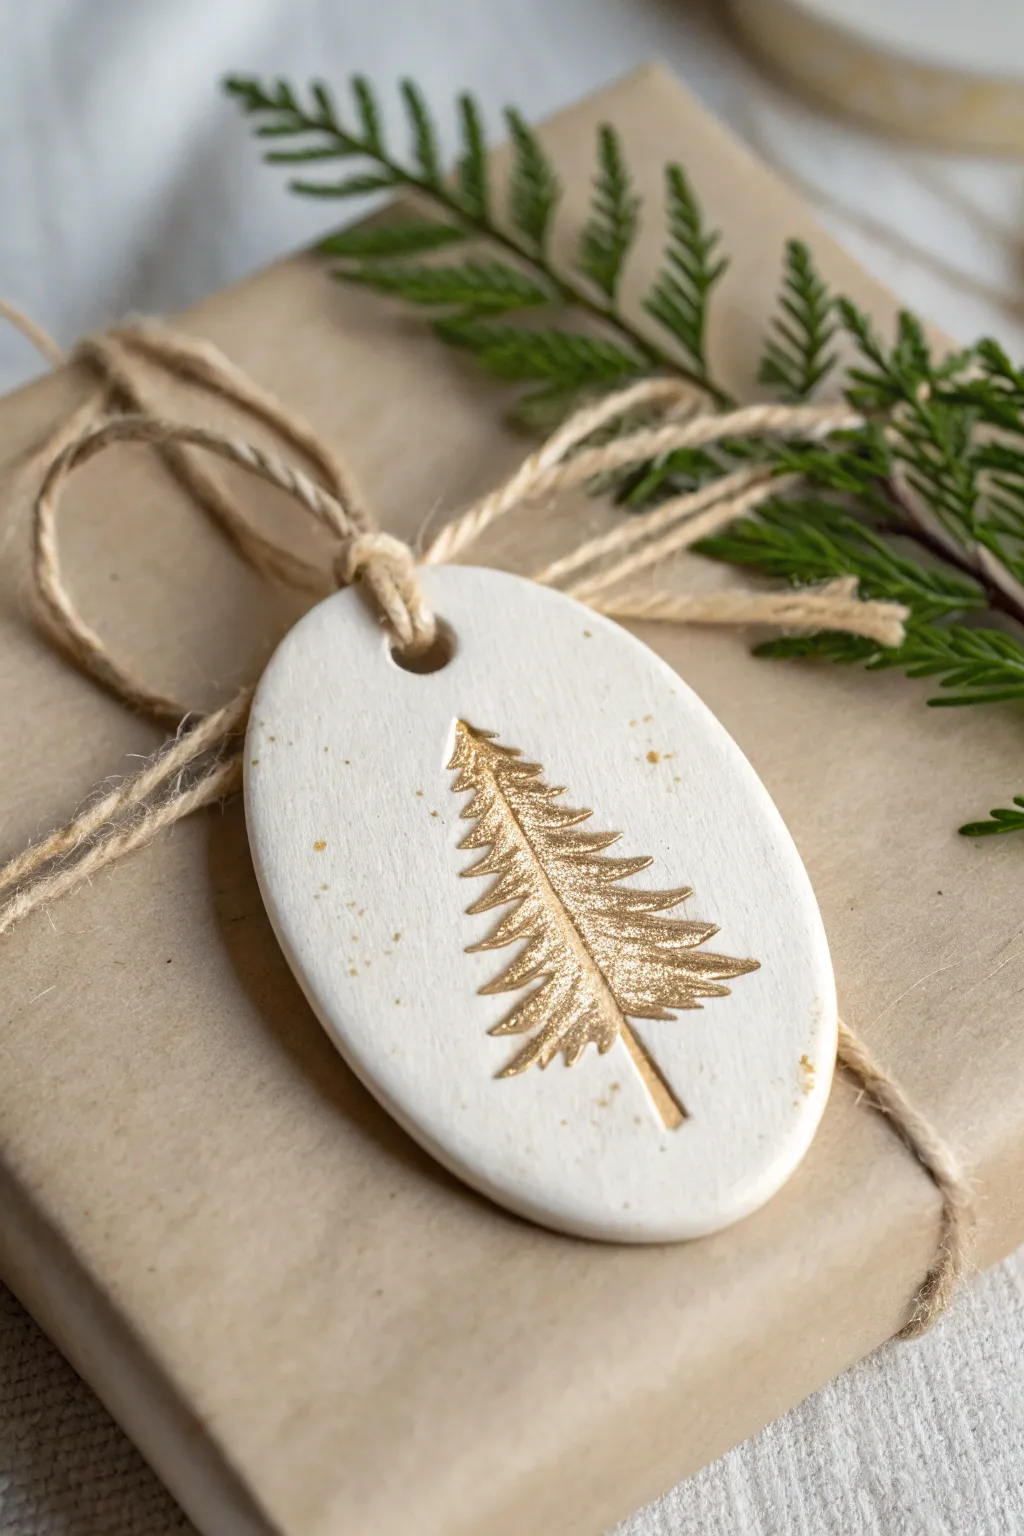
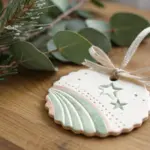
These elegant oval tags bring a sophisticated touch to gift giving with their crisp white finish and shimmering gold details. By pressing an evergreen stamp into soft clay and highlighting the impression with metallic gold, you create a timeless keepsake that doubles as an ornament.
Step-by-Step Tutorial
Materials
- White air-dry clay or polymer clay
- Rolling pin
- Oval cookie cutter (approx. 3 inches)
- Evergreen tree rubber stamp (deeply etched works best)
- Straw or small circular cutter for the hole
- Fine grit sandpaper
- Metallic gold acrylic paint or gilding wax
- Small fine-point paintbrush
- Old toothbrush (for splattering)
- Twine or jute cord
- Parchment paper or baking mat
Step 1: Prepping and Cutting
-
Condition the CLay:
Begin by taking a handful of your white clay and kneading it in your hands until it becomes soft, pliable, and free of cracks. If using polymer clay, this might take a few minutes to warm up. -
Roll Out:
Place the clay on a sheet of parchment paper or a baking mat. Use your rolling pin to flatten the clay to an even thickness of about 1/4 inch or roughly 5-6mm. -
Check Smoothness:
Look closely at the surface for any air bubbles or uneven spots. Gently smooth these out with a damp finger or lightly roll over them again to ensure a flawless canvas. -
Cut the Shape:
Position your oval cookie cutter onto the clay maximizing space. Press down firmly and wiggle slightly to cut through completely, then lift the cutter away carefully. -
Clean Edges:
Peel away the excess clay from around your oval. Dip your finger in a little water and gently run it along the cut edges of the oval to smooth down any rough ridges left by the cutter.
Step 2: Stamping and Drying
-
Make the Hole:
Before the clay starts to dry, use a drinking straw or a small circular cutter to punch a hole at the top center of the oval. Twist the straw as you pull it out for a clean cut. -
Position the Stamp:
Take your evergreen tree stamp and center it visually on the clay oval. Make sure the tree is upright relative to the hole you just punched. -
Impress the Design:
Press the stamp straight down into the clay with firm, even pressure. You want a deep impression, but be careful not to push all the way through the clay. -
Reveal the Tree:
Lift the stamp straight up to avoid smudging the design. Check that the branches are clearly defined in the clay surface. -
Drying Time:
Allow the clay to dry completely according to the package instructions. For air-dry clay, I usually flip the tag over halfway through the drying process (about 12 hours in) to prevent warping. -
Sand Imperfections:
Once fully cured and hard, check the edges again. If there are any sharp spots, very lightly buff them with fine-grit sandpaper until smooth.
Stamp Release Trick
To stop the stamp from sticking to fresh clay, lightly dust the rubber surface with cornstarch or baby powder before pressing it down. Blow off excess powder after stamping.
Step 3: Gilding and Finishing
-
Paint the Impression:
Dip a fine-point brush into your metallic gold paint. Carefully fill in the indented tree design. The paint will naturally pool in the deepest parts of the impression, creating lovely depth. -
Clean Up Edges:
If any paint strays outside the lines, quickly wipe it away with a damp paper towel or cotton swab before it dries. -
Add Speckles:
For that subtle spotted effect, dip an old toothbrush into a small amount of gold paint. Run your thumb across the bristles to flick tiny specks of gold across the white surface of the tag. -
Let Paint Dry:
Set the tag aside for 15-20 minutes to let the paint and speckles dry completely. -
Thread the Twine:
Cut a length of natural jute twine or rough string. Fold it in half, push the loop through the tag’s hole, and pull the tails through the loop to secure it with a lark’s head knot. -
Attach to Gift:
Tie the ends of the twine around your gift box, pairing the tag with a fresh sprig of greenery for the complete organic look.
Warped Clay?
If your air-dry clay curls up significantly while drying, place a heavy book on top of it once it’s surface-dry but still slightly flexible to flatten it out again.
Your handmade gilded tag is now ready to add a memorable sparkle to your holiday presents

Mini Christmas Tree Charms
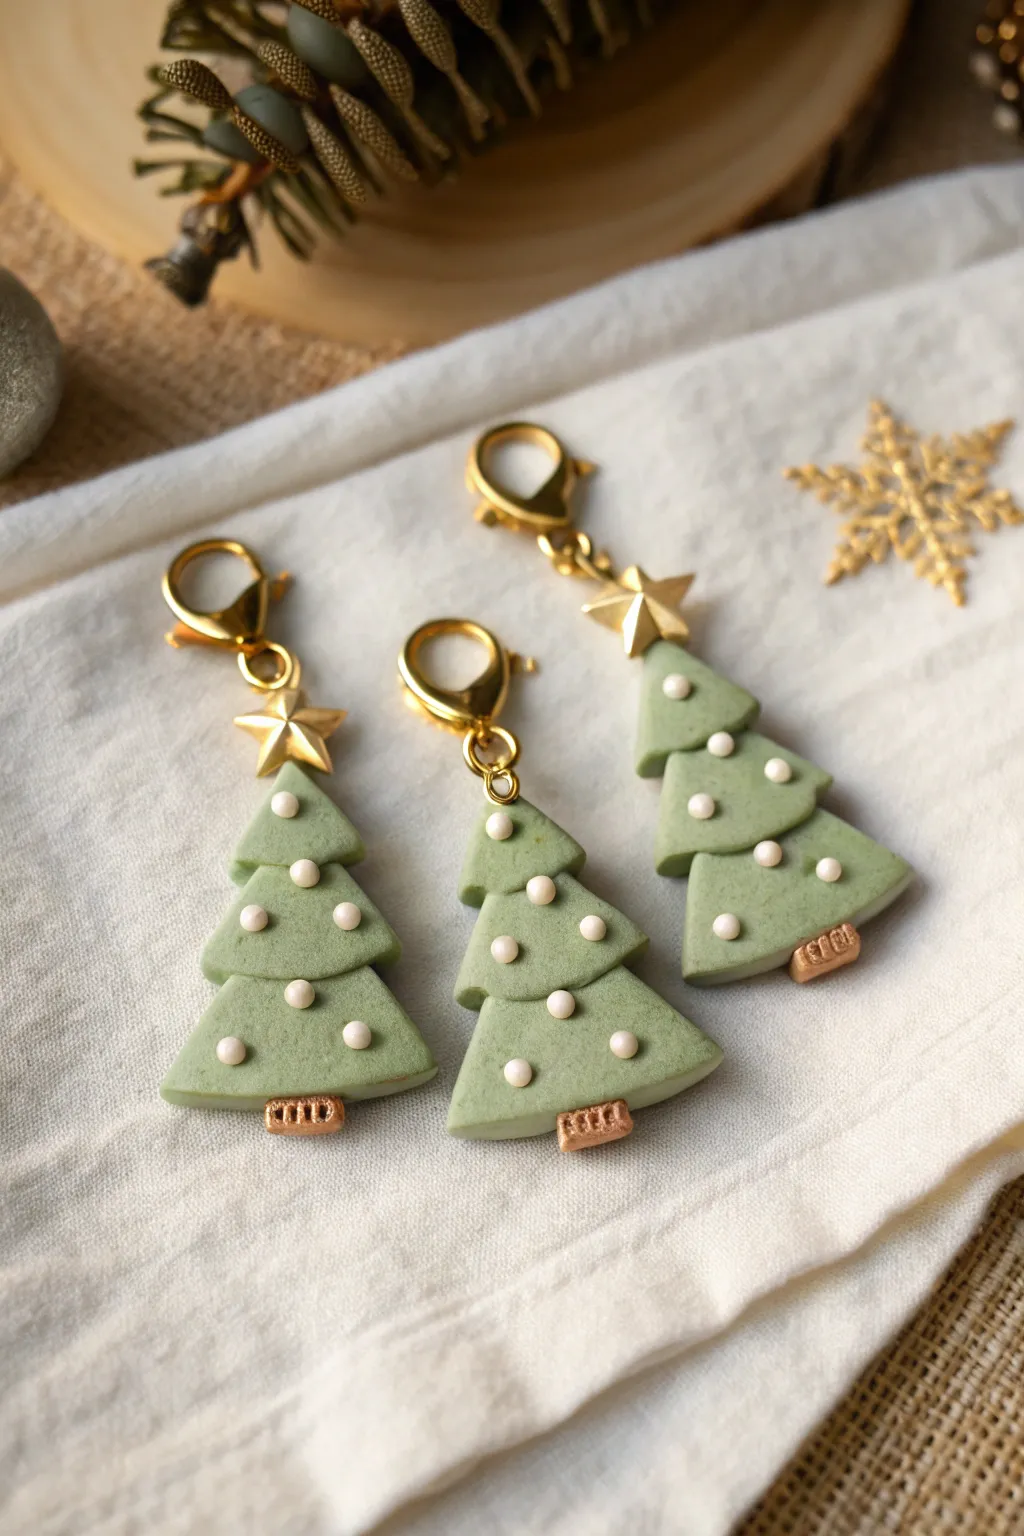
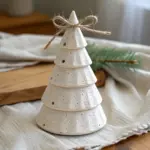
These elegant little charms feature a soft sage green palette accented with tiny pearl-like decorations and a golden star. They make perfect stitch markers, zipper pulls, or dainty earrings for the holiday season.
Step-by-Step Tutorial
Materials
- Polymer clay in sage green
- Polymer clay in bronze or metallic copper
- Small white pearl beads (no-hole or half-drilled preferred) OR white liquid clay
- Gold star charms or studs with loops
- Gold lobster clasps
- Gold jump rings (approx. 4-6mm)
- Small geometric clay cutters (triangle or tree shape) OR a sharp craft knife
- Ball stylus tool
- Needle tool or toothpick
- Clean ceramic tile or baking sheet
- Oven (for baking polymer clay)
Step 1: Shaping the Trees
-
Condition the green clay:
Begin by kneading your sage green polymer clay until it is soft and pliable. Roll it out into a slab approximately 3mm to 4mm thick for a sturdy base. -
Cut the basic shapes:
Using a small triangle cutter or a sharp craft knife, cut out three small triangles for each tree. Size them progressively; you want a small, medium, and large triangle to stack later. -
Round the edges:
Gently tap the cut edges of your triangles with your fingertip to soften the sharp cut lines, giving the clay a pillowy, organic look. -
Stack the layers:
Overlap the triangles slightly to form the tree shape. Start with the largest at the bottom, place the medium one slightly overlapping the top point of the base, and finish with the smallest triangle on top. Press gently to adhere them without squishing the shapes.
Step 2: Adding Details
-
Create the trunk:
Roll a very small amount of bronze or copper metallic clay into a tiny log. Cut small squares or rectangles for the trunks. -
Texture the trunk:
Before attaching, use a needle tool or craft knife to press vertical lines into the bronze clay to simulate bark texture. -
Attach the trunk:
Press the textured trunk centered at the bottom of the lowest green triangle. Blend the clay slightly on the back side to ensure a secure bond. -
Add texture to the tree:
Using an old toothbrush or a piece of sandpaper, lightly tap the surface of the green clay to give it a subtle, stone-like texture, removing any fingerprints in the process. -
Create indentations for pearls:
Use a small ball stylus to make shallow indentations scattered across the tree surface where you want your ornaments to sit.
Sticky Situation?
If your clay gets too soft and sticky while stacking, pop the pieces in the fridge for 10 minutes. This firms up the clay, making it easier to layer without distortion.
Step 3: Assembly & Baking
-
Insert the top hardware:
Insert a gold eye pin or a small jump ring directly into the very top tip of the tree. I prefer to use a touch of liquid clay on the metal to help it bake securely inside. -
Add the pearls:
Place tiny white pearl beads into the indentations you made earlier. Press them in firmly so they are embedded halfway. If using liquid clay instead of beads, carefully drop small white dots into the holes now. -
Bake the pieces:
Arrange your trees on a ceramic tile or baking sheet lined with parchment paper. Bake according to the instructions on your specific brand of polymer clay (usually around 275°F/130°C for 15-30 minutes). -
Cool down:
Let the trees cool completely before handling. Polymer clay is fragile when hot and hardens fully as it cools. -
Connect the star:
Open a jump ring and thread it through the loop at the top of your baked tree. Slide on your gold star charm so it sits right above the tree tip. -
Attach the clasp:
Before closing that same jump ring, slide on the gold lobster clasp. Close the jump ring securely using two pairs of pliers to twist the ends back together. -
Final check:
Ensure all metal connections are tight and the pearls are secure. If any pearls popped out during baking, a tiny dot of superglue will fix them instantly.
Make It Sparkle
Brush a tiny amount of mica powder or pearl ex powder over the green clay before baking. This gives the trees a subtle, festive shimmer that catches the light.
Now you have a set of woodland-inspired charms ready to clip onto gifts or accessories

The Complete Guide to Pottery Troubleshooting
Uncover the most common ceramic mistakes—from cracking clay to failed glazes—and learn how to fix them fast.
Snowman Faces With Simple Details
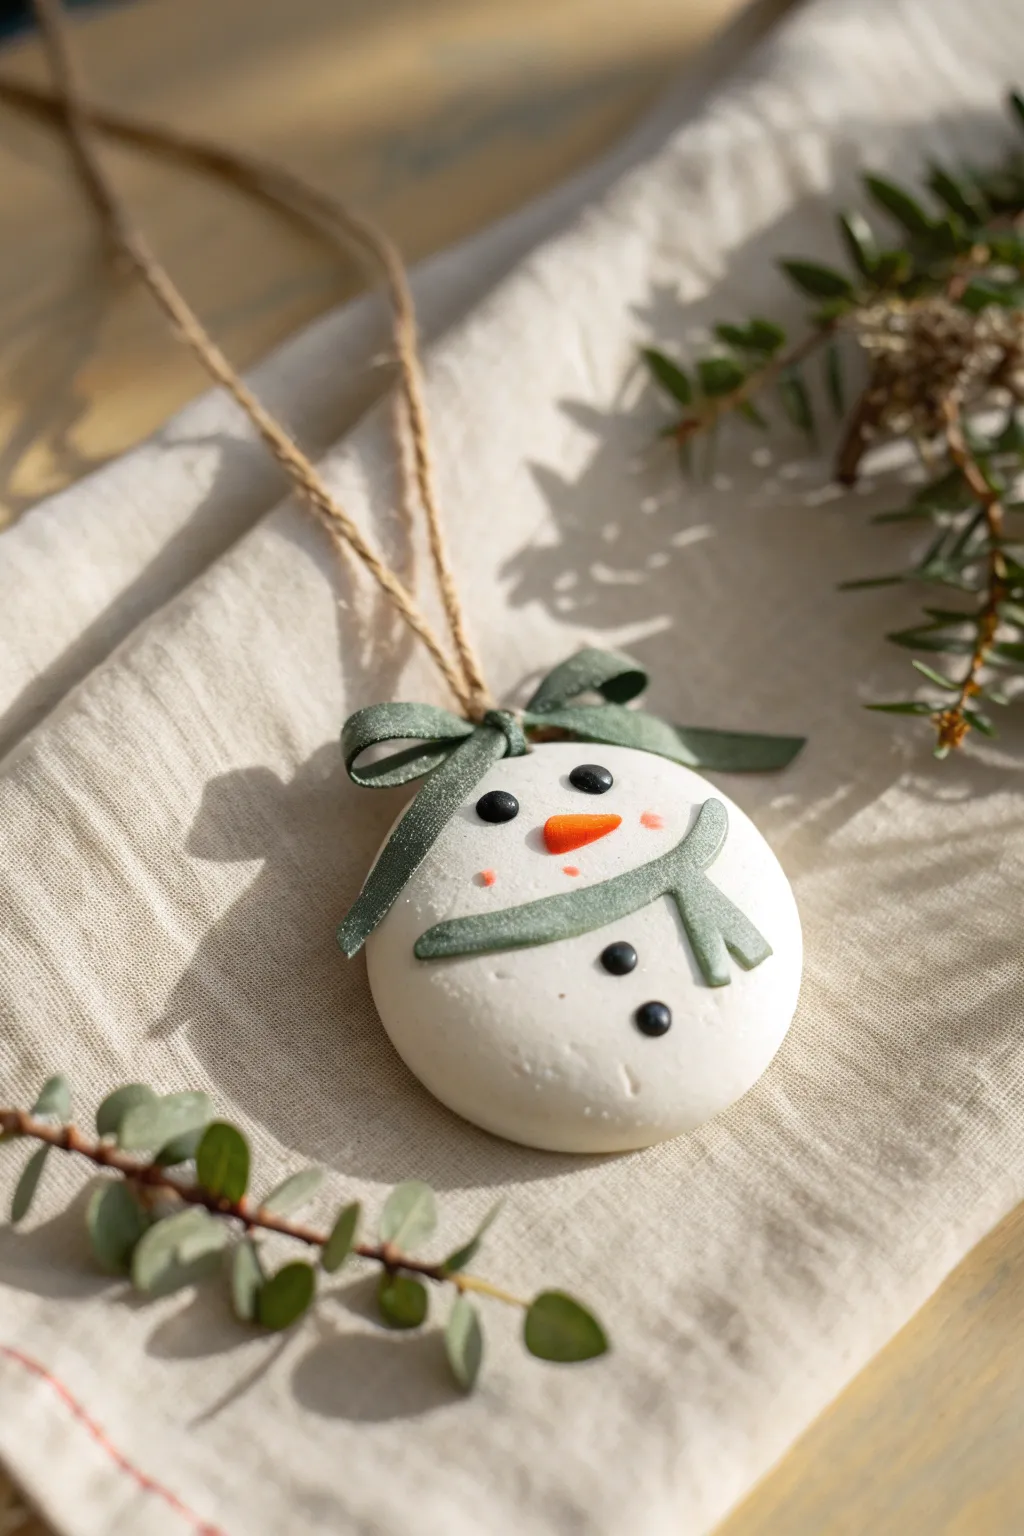
This friendly snowman face ornament brings a touch of minimalist winter charm to your tree with its smooth white finish and subtle sage green accents. The design relies on simple shapes and gentle textures to create a sophisticated yet adorable holiday keepsake.
How-To Guide
Materials
- White polymer clay (or air-dry clay)
- Small amount of sage green clay (or white clay painted green)
- Tiny amount of orange clay
- Tiny amount of black clay
- Rolling pin
- Round cookie cutter (approx. 2.5-3 inches)
- Needle tool or toothpick
- Twine or jute cord
- Green ribbon (matching the scarf)
- Craft knife
- Blush pink soft pastel or chalk (for cheeks)
- Small soft paintbrush
- Parchment paper
Step 1: Shaping the Base
-
Prepare the clay:
Condition your white clay by kneading it until it is soft, pliable, and free of cracks. Ensure your hands and workspace are perfectly clean to avoid transferring lint to the pure white surface. -
Roll the circle:
Roll the clay out onto parchment paper to a uniform thickness of about 1/4 inch. You want it sturdy enough to hang without warping. -
Cut the shape:
Use your round cookie cutter to punch out a clean circle. Gently smooth the edges with your fingertip to round off any sharpness left by the cutter. -
Make the hanging hole:
Use a needle tool or a straw to create a hole at the very top center of the circle for the twine. Make sure the hole goes all the way through.
Step 2: Adding the Face
-
Form the eyes:
Take two tiny pinches of black clay and roll them into small, equal-sized spheres. Gently press them onto the upper half of the face, flattening them slightly. -
Create the nose:
Roll a small piece of orange clay into a teardrop or carrot shape. Place it horizontally between the eyes, pointing slightly to the side for character, and press lightly to adhere. -
Add rosy cheeks:
Scrape a tiny bit of powder from a pink pastel chalk. Dip a soft, dry brush into the powder and gently dab two small circles onto the white clay cheeks for a soft, blushing effect. -
Make the buttons:
Roll two more tiny black spheres, slightly smaller than the eyes. Press these into the lower right quadrant of the circle to imply the snowman’s body or chin area.
Dirty Clay Blues?
White clay picks up dust instantly. Keep a pack of baby wipes or rubbing alcohol nearby to clean your hands and tools constantly between steps.
Step 3: Accessorizing the Snowman
-
Roll the scarf strip:
Roll out a thin sheet of sage green clay. Cut a narrow strip, about 1/4 inch wide and 2 inches long. -
Attach the scarf body:
Drape this strip across the lower portion of the snowman’s face in a gentle curve. Press it down lightly so it bonds with the white base without losing its dimensional look. -
Add scarf tails:
Cut two shorter pieces of the green strip for the tails. Attach them where the scarf ‘ends’ on the right side, overlapping slightly to look like a knot. -
Texture the scarf:
I like to use a clean toothbrush or a piece of sandpaper to gently tap texture onto the green clay only, giving it a fabric-like appearance.
Sparkle Upgrade
Before baking, lightly brush the white areas with white mica powder or extra-fine iridescent glitter for a frosty, glistening snow effect.
Step 4: Finishing
-
Bake or dry:
If using polymer clay, bake according to the package instructions (usually 275°F for 15-30 minutes). If using air-dry clay, let it sit in a dry spot for 24-48 hours. -
Cool down:
Allow the ornament to cool completely before handling to prevent fingerprints or bending. -
Make the bow:
Take your sage green ribbon and tie a small, neat bow. Trim the ends at an angle to prevent fraying. -
Attach the bow:
Use a drop of strong craft glue to attach the ribbon bow to the top of the ornament, just covering the hanging hole slightly but leaving the loop accessible. -
String it up:
Thread a length of jute twine through the hole and tie it securely to create the hanger.
Now you have a charming, handcrafted snowman to hang on the tree or gift to a friend
Santa Hat Magnets
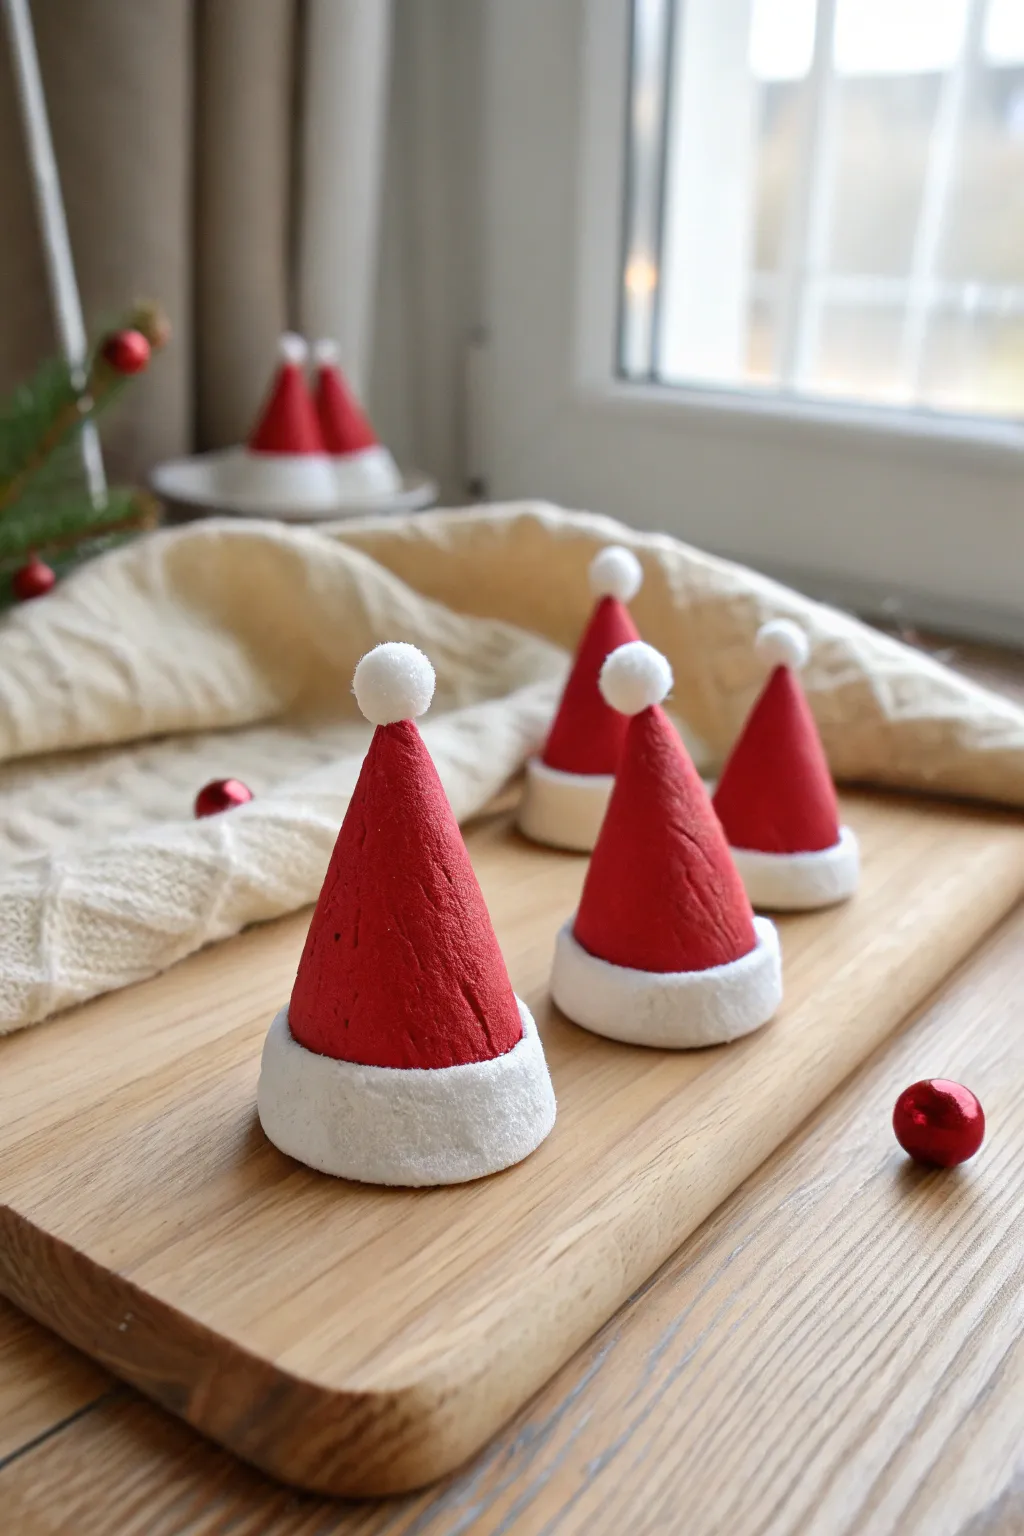
These adorable Santa hat magnets add a touch of festive whimsy to any metal surface with their distinctive matte texture and soft white trim. They are surprisingly simple to sculpt, making them a perfect afternoon project for getting into the holiday spirit.
Step-by-Step Guide
Materials
- Red air-dry clay (or polymer clay)
- White air-dry clay (or polymer clay for the trim)
- Small round magnets
- Texturing tool (clean toothbrush or stiff bristle brush)
- Strong craft glue (E6000 or similar)
- Rolling pin or smooth glass jar
- Craft knife or clay blade
- Parchment paper or silicone mat (work surface)
- Optional: White acrylic paint (if using only white clay)
Step 1: Sculpting the Base
-
Prepare the red clay:
Begin by conditioning your red clay. Knead a walnut-sized amount in your hands until it becomes warm, pliable, and free of cracks. -
Form the basic cone:
Roll the red clay into a ball first to smooth out imperfections. Then, place it on your work surface and use your fingers to gently taper one end, rolling it back and forth to create a cone shape. -
Flatten the bottom:
Once you have a nice cone, press the wide base gently against the table to flatten it so it stands upright securely. Ensure the height is proportional to the width, roughly 2 inches tall. -
Add surface texture:
This is the secret to the velvety look shown in the photo. Take a clean, dry toothbrush or a stiff bristle brush and gently tap it all over the surface of the red cone. Don’t drag it; just stipple it to create a pitted, fabric-like texture. -
Smooth the peak:
If the very tip of the hat got smashed during texturing, gently pinch it back into a soft point. It doesn’t need to be needle-sharp; a slightly rounded tip looks softer.
Step 2: Adding the Trim
-
Roll out the white band:
Take a portion of white clay and roll it into a long, thin snake or rope. You can flatten this slightly with a rolling pin to create a band about 1/4 inch high. -
Measure and cut:
Wrap the white strip around the base of your red cone to gauge the length. Cut the strip so the ends just barely meet without overlapping too much. -
Attach the brim:
Press the white band firmly onto the bottom edge of the red cone. If your clay is dry, you might need a tiny dab of water or liquid clay to help it adhere. -
Hide the seam:
Where the two ends of the white band meet, use a modeling tool or your fingernail to blend the clay together so the seam disappears. -
Texture the brim:
Using the same stippling technique as before, tap your toothbrush over the white brim. This makes it look fluffy, like faux fur or wool. -
Create the pom-pom:
Roll a small pea-sized ball of white clay. Make sure it stays round and doesn’t flatten out. -
Attach the pom-pom:
Place the white ball on the very tip of the red cone. Press down gently to secure it, but be careful not to crush the cone shape. -
Texture the pom-pom:
Give the little white ball the same stippled texture as the brim to match the fluffy aesthetic.
Sticky Situation?
If the clay sticks to your texturing tool (toothbrush), dip the bristles lightly in cornstarch or baby powder before tapping the clay. This acts as a release agent.
Step 3: Finishing Up
-
Drying or baking:
If using air-dry clay, set the hats aside on parchment paper for 24-48 hours. If using polymer clay, bake according to the manufacturer’s instructions on the package. -
Check the bottom:
Once fully cured or dried, check the bottom of the hat. If it’s slightly uneven, you can sand it lightly against a piece of fine-grit sandpaper to make it perfectly flat. -
apply the magnet:
Apply a dab of strong craft glue to the center of the base. Press your magnet firmly into the glue. -
Final dry:
Place the hat on its side or upside down so the magnet doesn’t slide while the glue sets completely. Allow the glue to cure for a few hours before sticking it to your fridge.
Make It Sparkle
Before the clay dries, dust the white trim with fine iridescent glitter. It will catch the light and make the ‘fur’ look like freshly fallen snow.
Now your festive magnets are ready to hold up your holiday cards or grocery lists with style


What Really Happens Inside the Kiln
Learn how time and temperature work together inside the kiln to transform clay into durable ceramic.
Stocking-Shaped Gift Tag Ornaments
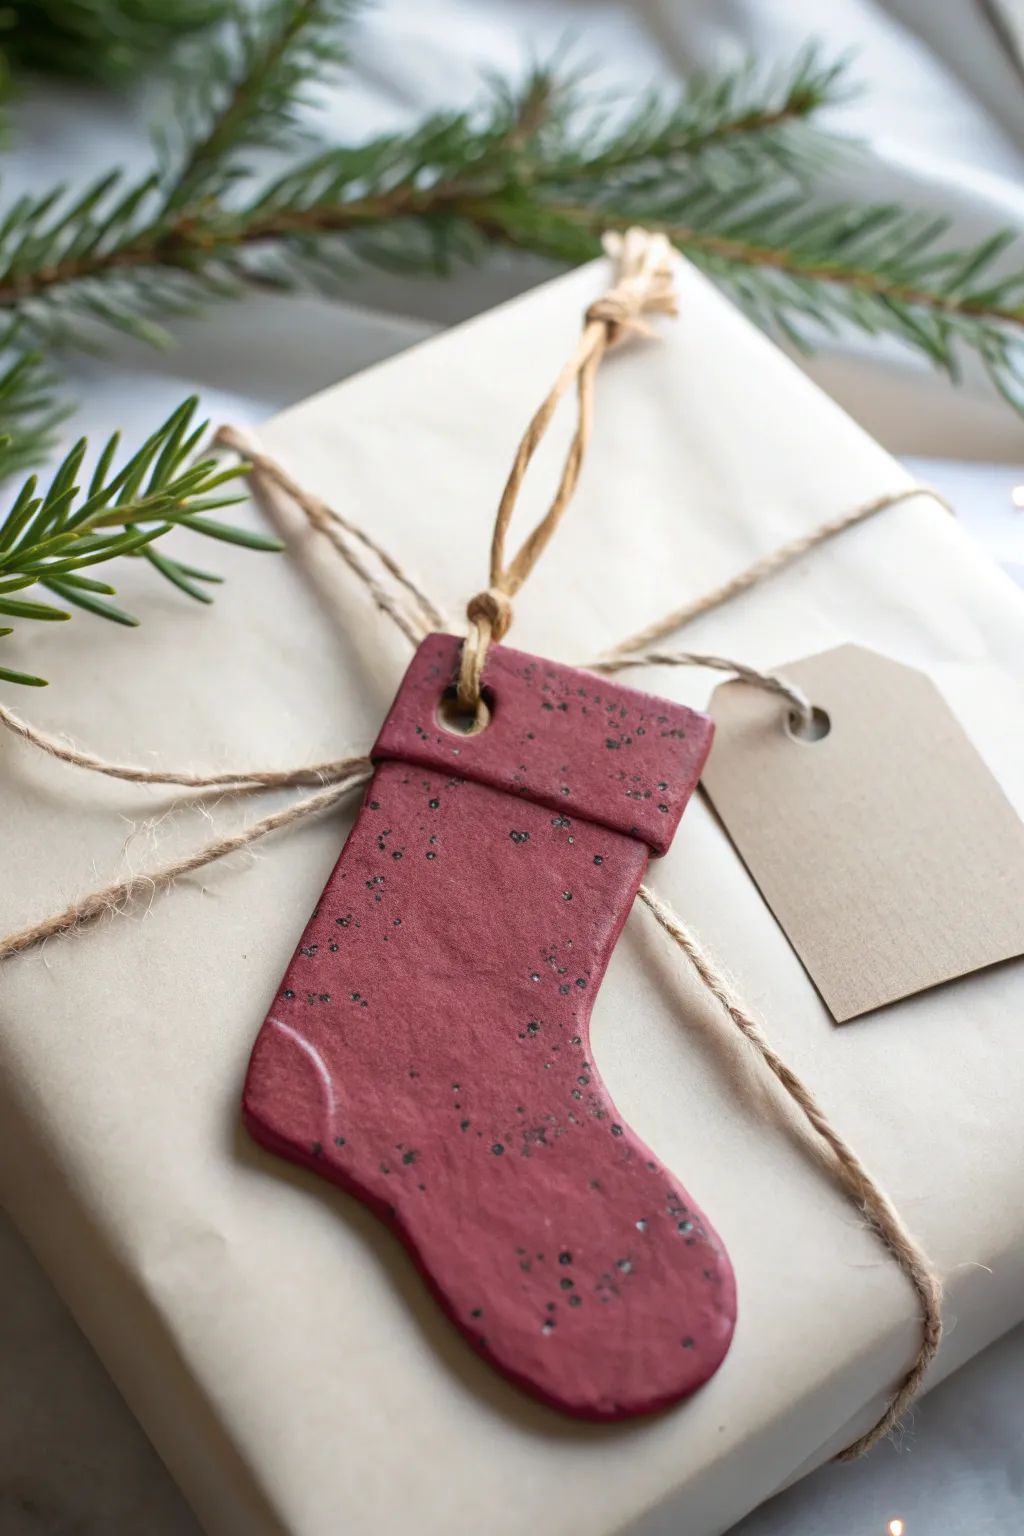
Add a handmade touch to your holiday wrapping with these charming stocking-shaped clay tags. Their deep red finish and speckled texture give them a cozy, vintage feel that looks beautiful against simple kraft paper.
Detailed Instructions
Materials
- Air-dry clay (white or terra cotta)
- Stocking-shaped cookie cutter (approx. 3-4 inches)
- Acrylic rolling pin
- Parchment paper or smooth work surface
- Drinking straw or small circular tool
- Sandpaper (fine grit)
- Deep red acrylic paint (matte finish)
- Black acrylic paint
- Old toothbrush or stiff bristle brush
- Small flat paintbrush
- Matte finish sealant or Mod Podge
- Jute twine or rustic string
- Scissors
Step 1: Shaping the Clay
-
Preparation:
Begin by kneading a handful of air-dry clay until it is warm, pliable, and free of cracks. Lay down parchment paper to protect your work surface. -
Rolling it out:
Use your acrylic rolling pin to flatten the clay to an even thickness of about 1/4 inch. Try to keep the pressure consistent so the tag isn’t lumpy. -
Cutting the shape:
Press your stocking cookie cutter firmly into the clay. Give it a gentle wiggle to ensure a clean cut, then lift the cutter away. -
Creating the cuff:
To mimic the folded cuff of a real stocking, carefully etch a horizontal line across the top portion of the stocking shape using a clay tool or a dull knife. Don’t cut all the way through; just create a visible groove. -
Adding texture details:
You can also gently press a curved line near the toe and heel area to suggest the reinforced stitching of a sock. This adds a lovely dimension once painted. -
punching the hole:
Using a drinking straw or a small circular cutter, punch a hole near the top cuff corner of the stocking. This is where your twine will go later. -
Drying time:
Carefully transfer your clay shape to a drying rack or flat surface. Let it dry completely for 24-48 hours, flipping it occasionally to prevent warping. -
Smoothing:
Once fully dry and hard, take a piece of fine-grit sandpaper and gently smooth the edges of the stocking to remove any sharp burrs or roughness.
Smooth Operator
Dip your fingertip in a tiny bit of water and run it along the cut edges of the wet clay before drying. This smooths out rough spots so you have less sanding to do later.
Step 2: Painting and Finishing
-
Base coat:
Apply a coat of deep red matte acrylic paint to the front and sides of the stocking. I prefer to use a slightly darker, muted red rather than a bright cherry red for a more sophisticated look. -
Second layer:
Allow the first coat to dry, then apply a second coat if needed to ensure opaque coverage. Let this dry completely. -
Preparing the speckle:
Dilute a small amount of black acrylic paint with a few drops of water on a palette or paper plate until it has an inky consistency. -
Applying the speckles:
Dip an old toothbrush into the watered-down black paint. Hold the brush over the stocking and run your thumb across the bristles to flick tiny droplets of paint onto the surface. -
Controlling the splatter:
Practice the splatter technique on a scrap piece of paper first to get the density right. Aim for an uneven, organic distribution across the stocking. -
Drying the details:
Let the speckled paint dry completely. This usually takes only about 15-20 minutes since the droplets are so small. -
Sealing:
Brush a thin layer of matte sealant over the entire front surface. This protects the paint and deepens the color slightly without making it too shiny. -
Looping the twine:
Cut a length of jute twine, fold it in half, and thread the loop through the hole in the stocking. Pass the loose ends through the loop and pull tight to secure it. -
Final assembly:
Attach your clay stocking to your wrapped gift, pairing it with a simple kraft paper tag for a professionally styled look.
Personalize It
Use tiny letter stamps to press a recipient’s initial into the clay while it’s still wet, or paint their name in white or gold along the cuff area after the red base coat dries.
Now you have a timeless keepsake ornament that doubles as the perfect gift topper
Simple Wreath Ornaments
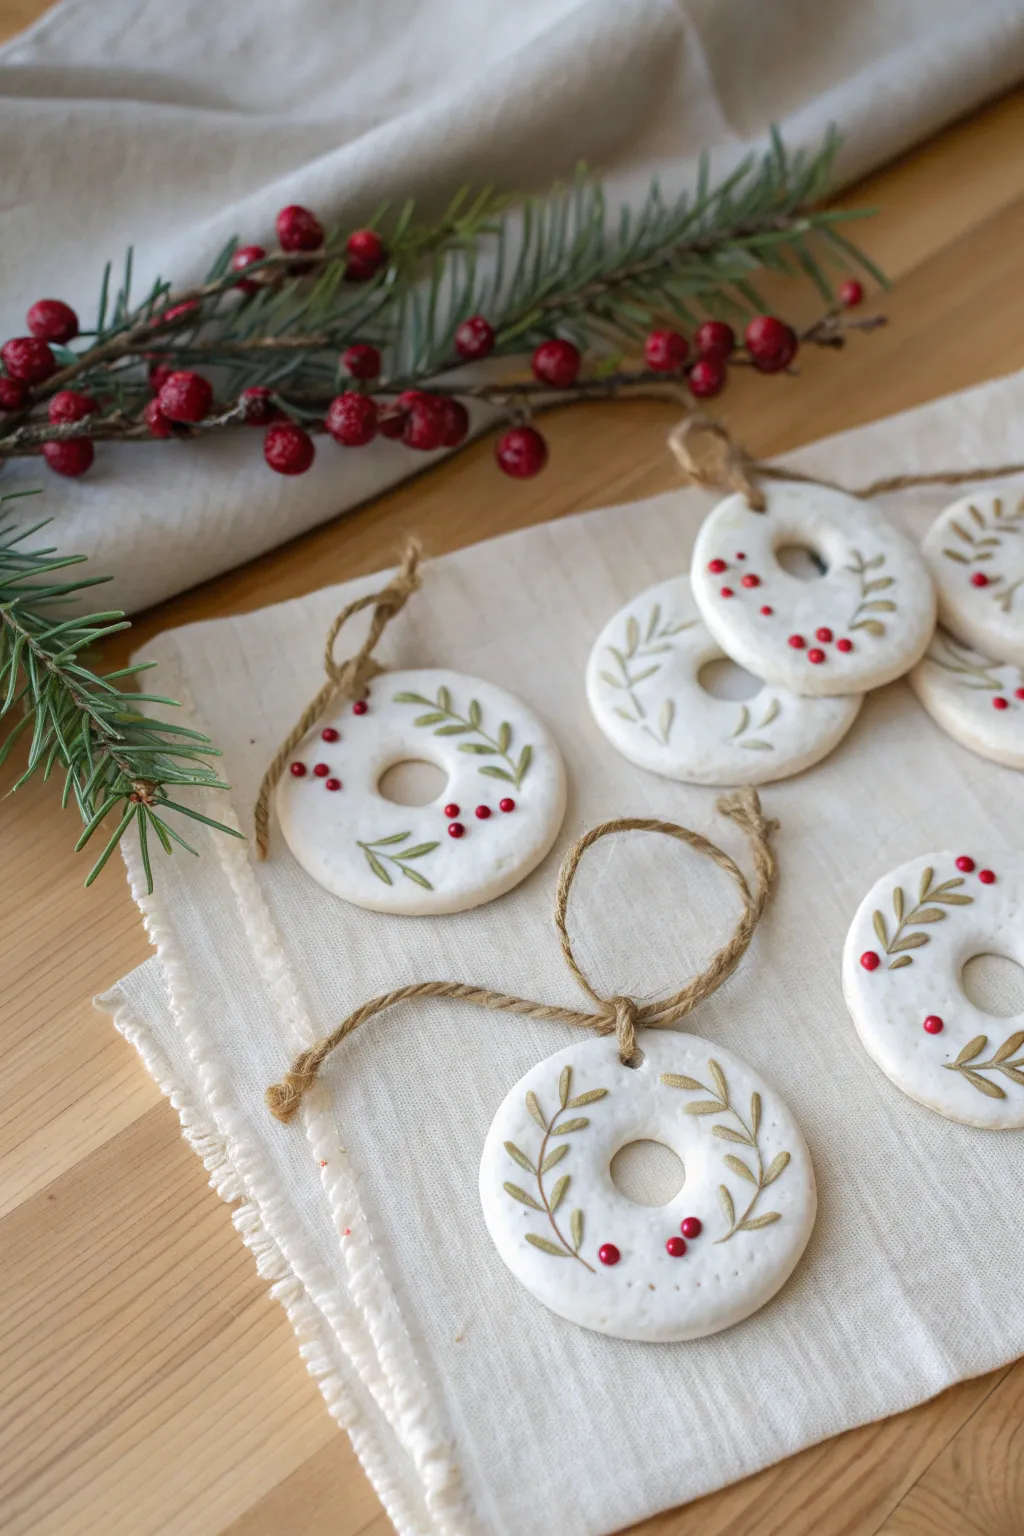
Capture the quiet beauty of winter with these minimalist white clay ornaments featuring delicate botanical reliefs. The simple donut shape provides the perfect canvas for stamped leaves and vibrant red berry accents, creating a timeless decoration for your tree.
Step-by-Step Tutorial
Materials
- White spreadable air-dry clay or polymer clay
- Rolling pin
- Circle cookie cutters (one large approx. 3-inch, one small approx. 1-inch)
- Fresh evergreen or fern sprigs (for stamping)
- Red acrylic paint
- Fine detail paintbrush or dotting tool
- Green acrylic paint (muted olive tone)
- Jute twine
- Fine-grit sandpaper
- Parchment paper
- Clear matte varnish (optional)
Step 1: Shaping the Clay Base
-
Prepare your workspace:
Lay down a sheet of parchment paper to prevent sticking. Take a handful of white clay and knead it briefly until it is pliable and smooth, working out any air bubbles. -
Roll out the slab:
Using your rolling pin, flatten the clay to an even thickness of about 1/4 inch. If you want perfectly uniform ornaments, you can place wooden dowels on either side of the clay to guide the rolling pin. -
Cut the outer shape:
Press your larger circle cutter firmly into the clay. Give it a gentle wiggle before lifting to ensure a clean cut. -
Create the wreath form:
Use the smaller circle cutter to punch a hole directly in the center of your large circle. Remove the center excess clay; you can save these scraps to re-roll later. -
Smooth the edges:
Dip your finger in a tiny bit of water and run it gently around the inner and outer edges of the clay ring to soften any sharp cuts or jagged bits.
Leaves sticking to clay?
If your fresh greenery is sticking inside the impression, lightly dust the leaf with cornstarch or baby powder before pressing it into the wet clay.
Step 2: Creating the Botanical Design
-
Select your greenery:
Pick small, sturdy sprigs of greenery. The image shows a fern-like pattern, so look for leaves with distinct veins or separated needles that will leave a clear impression. -
Imprint the leaves:
Place your sprig gently onto the clay wreath surface. Use the rolling pin to roll *over* the plant material with firm, even pressure to embed it into the clay. -
Reveal the texture:
Carefully peel the greenery away from the clay. I find using tweezers helps to lift the stem without gouging the soft surface. -
Add pierced details:
Using a needle tool or toothpick, add tiny decorative pinpricks around the design if desired for extra texture, though the main focus should remain on the leaf impression. -
Make the hanging hole:
Use a straw or a skewer to poke a hole near the top of the wreath for the twine. Ensure it goes all the way through and is large enough to thread thick jute. -
Let them dry:
Transfer the ornaments to a flat drying rack. Allow air-dry clay to cure for 24-48 hours, flipping them once halfway through to prevent curling.
Add a scent boost
Mix a few drops of essential oil like cinnamon or pine directly into the air-dry clay before rolling it out to make your ornaments smell like Christmas.
Step 3: Painting and Finishing
-
Sand imperfections:
Once fully hard, lightly gently sand the edges with fine-grit sandpaper if there are any remaining rough spots. -
Enhance the leaves:
With a fine brush, carefully paint into the debossed leaf impressions using a muted olive green paint. Following the grooves makes this easier than freehand painting. -
Add the berries:
Dip the end of a paintbrush handle or a dotting tool into red acrylic paint. Dot small clusters of ‘berries’ near the leaves or scattered around the wreath. -
Seal the piece:
To protect your work, apply a thin coat of clear matte varnish over the top. This gives the white clay a finished ceramic look without being too shiny. -
Attach the hanger:
Cut a length of jute twine roughly 8 inches long. Thread it through the top hole. -
Tie the loop:
Bring the ends of the twine together and tie a varied knot or a simple bow, leaving a loop large enough to hang easily on a branch.
Hang these charming wreaths on your tree or use them as unique gift toppers for a handmade holiday touch

TRACK YOUR CERAMIC JOURNEY
Capture glaze tests, firing details, and creative progress—all in one simple printable. Make your projects easier to repeat and improve.
Holly Berry Pinch Bowls
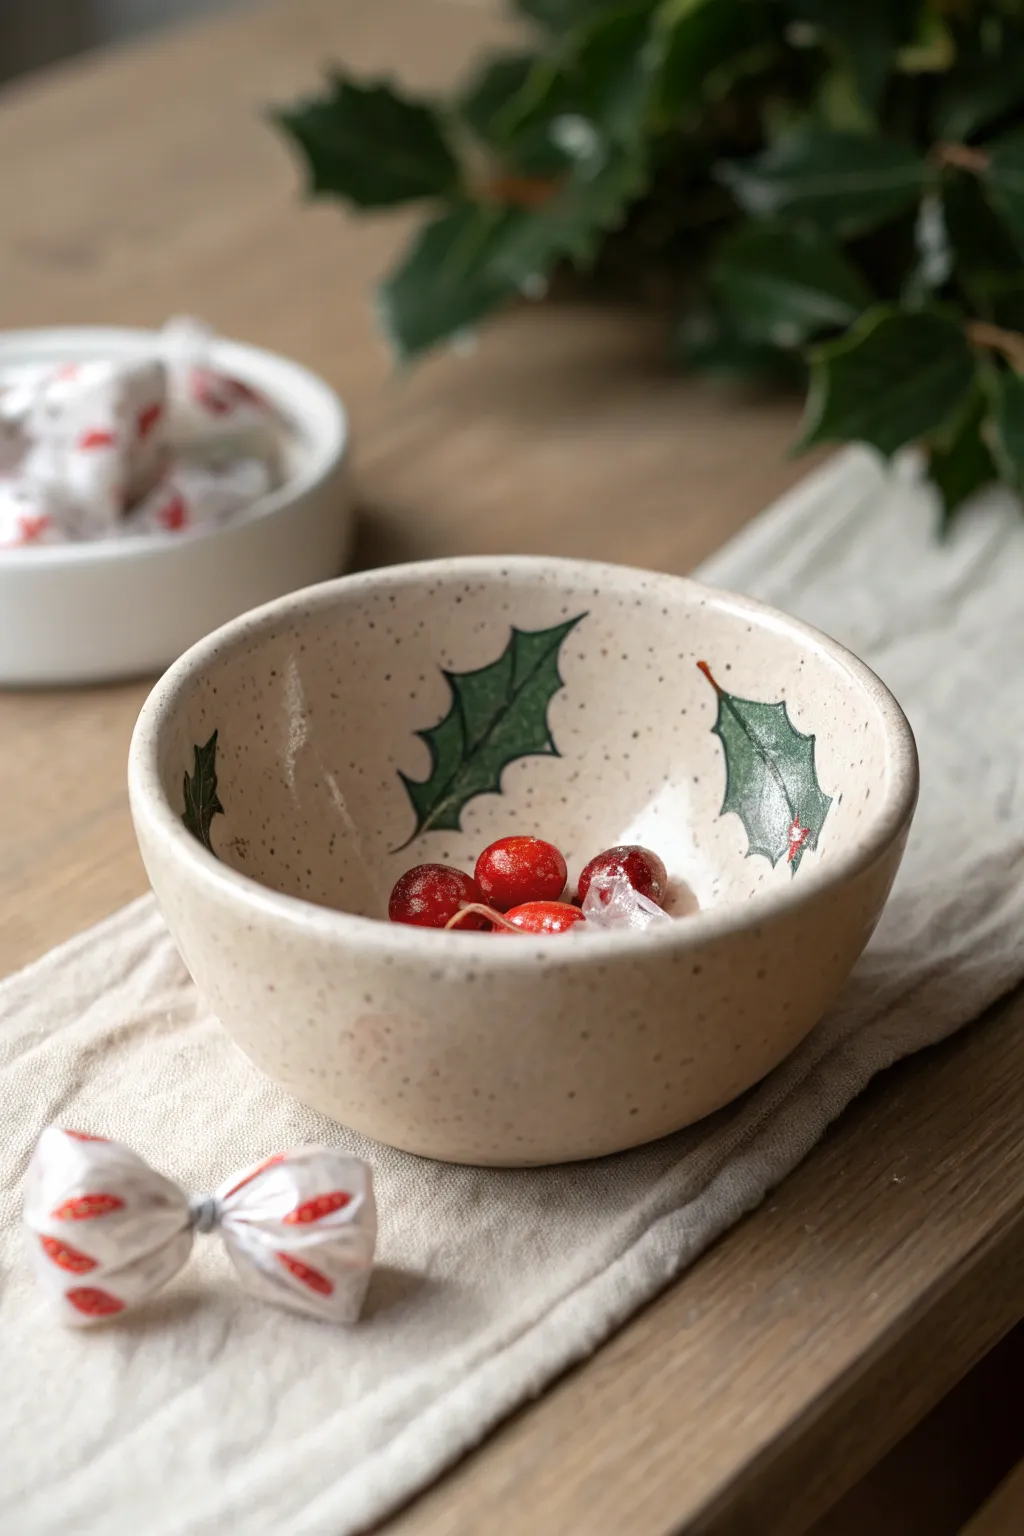
These charming little bowls combine a rustic, speckled finish with festive hand-painted holly leaves for a classic holiday look. They are the perfect size for holding small candies, jewelry, or simply acting as seasonal decor on your side table.
How-To Guide
Materials
- White or beige air-dry clay (or polymer clay)
- Acrylic rolling pin
- Small bowl or sphere (as a mold)
- Fine sandpaper
- Acrylic paints (Forest Green, Dark Green, Bright Red, White)
- Fine detail paintbrushes (sizes 0 and 2)
- Old toothbrush (for speckling)
- Brown acrylic paint (watered down)
- Glossy varnish or sealant (food-safe if using for wrapped treats)
Step 1: Forming the Bowl
-
Condition the clay:
Begin by kneading a ball of clay about the size of a tennis ball until it is soft, pliable, and free of cracks. -
Roll it out:
Roll the clay into a slab approximately 1/4 inch thick. Aim for an even thickness to ensure the bowl dries uniformly. -
Cut the circle:
Use a round cookie cutter or trace around a bowl rim to cut a perfect circle from your clay slab. -
Shape the curve:
Gently drape your clay circle inside a small bowl or over a sphere mold to establish the shape. Press lightly so it takes the form without thinning the clay too much. -
Smooth the edges:
Dip your finger in a little water and run it along the rim of the bowl to smooth out any sharp edges or cutting marks. -
Let it dry:
Allow the clay to dry completely according to the package instructions. This usually takes 24-48 hours. Rotate it occasionally for even airflow.
Oops! Uneven Rim?
If your bowl rim dried wavy or sharp, simply wet a piece of sandpaper and firmly sand the rim in a circular motion against a flat surface until level.
Step 2: Creating the Speckled Base
-
Sand imperfections:
Once bone dry, lightly sand any bumps or rough spots on the rim and interior using fine-grit sandpaper. -
Mix the splatter paint:
Dilute a small amount of brown acrylic paint with water until it reaches an ink-like consistency. -
Apply the speckles:
Dip an old toothbrush into the brown wash. Hold it over the bowl and run your thumb across the bristles to flick tiny speckles onto the surface. I like to practice on a paper towel first to control the spray. -
Seal the speckles:
Wait for the specks to dry fully, then apply a thin layer of matte varnish to protect the base pattern before painting the design.
Step 3: Painting the Holly Design
-
Outline the leaves:
Using your smallest brush and forest green paint, carefully outline the spiky shape of holly leaves at three or four intervals around the inner wall of the bowl. -
Fill in the green:
Fill in the leaf outlines with the forest green paint. You may need two thin coats for opaque coverage. -
Add leaf details:
Mix a tiny bit of white or lighter green into your main color and paint a very thin central vein line down each leaf for dimension. -
Paint the berries:
Using the back end of a paintbrush or a dotting tool, dab clusters of bright red berries near the base of the leaves. -
Highlight the berries:
Once the red is dry, add a microscopic dot of white paint to each berry to simulate a light reflection. -
Final gloss coat:
Finish the entire piece with a high-gloss varnish to give it a ceramic-like shine and protect your artwork from chipping.
Add a Golden Touch
For extra holiday luxury, paint the very top rim of the bowl with chrome gold paint or use gold leaf sizing.
Enjoy displaying your festive handmade bowl or filling it with treats for a thoughtful gift
Reindeer Thumbprint Ornaments
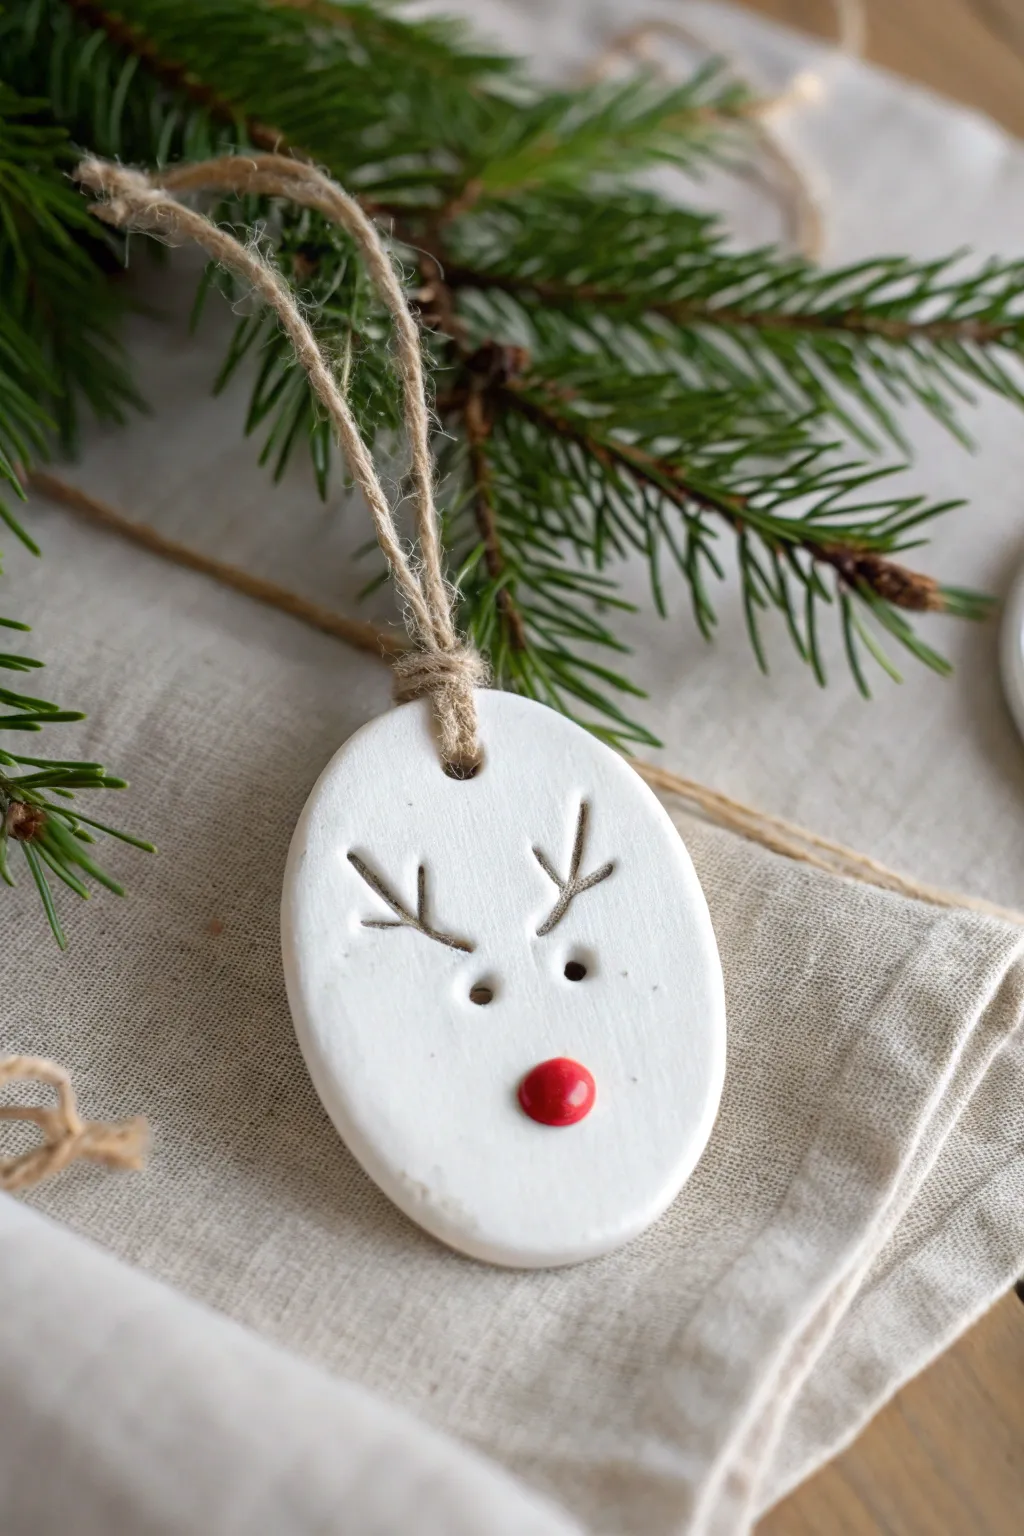
Capture the essence of the holidays with this surprisingly elegant white clay ornament featuring a simple reindeer face. The clean lines and single pop of red create a modern Scandinavian look that stands out beautifully against evergreen branches.
Step-by-Step Tutorial
Materials
- White air-dry clay or polymer clay
- Rolling pin
- Oval cookie cutter (or a round one to squish)
- Darning needle or toothpick
- Jute twine
- Bright red acrylic paint
- Fine detail paintbrush (size 0 or similar)
- Drinking straw or skewer (for the hole)
- Small carving tool or butter knife
Step 1: Shaping the Base
-
Condition the clay:
Begin by taking a small handful of white clay and kneading it in your hands until it becomes soft, pliable, and free of cracks. -
Roll it smooth:
Place the clay on a clean, flat surface. Use a rolling pin to flatten it to an even thickness of about 1/4 inch (6mm). If you don’t have a rolling pin, a smooth glass jar works essentially the same way. -
Cut the shape:
Press a cookie cutter into the clay to create your shape. While circles are classic, gently squeezing a circle form into an oval gives the reindeer face a more natural silhouette. -
Smooth the edges:
Dip your finger in a tiny bit of water and run it along the cut edges of the clay to smooth down any roughness or stray crumbs. -
Create the hanging point:
Use a drinking straw or a thick skewer to punch a clean hole near the top center of the oval. Make sure it’s not too close to the edge to prevent breaking later.
Smooth Surface
Before drying, use a barely damp sponge to gently wipe the clay surface. This removes fingerprints and creates a professional porcelain-like finish.
Step 2: Carving the Features
-
Mark the center:
Visualize where the nose will go—roughly in the lower third of the oval—to ensure the antlers fit comfortably above. -
Indenting the eyes:
Take a blunt tool, like the end of a paintbrush handle or a thick skewer, and press two small, deep dots into the clay for the eyes. Position them midway down the face. -
Draft the antlers:
I find it helpful to lightly scratch the antler guide lines with a needle first before committing to the deeper cuts. -
Carve the main beams:
Using a sharp tool or needle, press firmly to create the main varying ‘Y’ shapes for the antlers, extending up and slightly outward from above the eyes. -
Add antler branches:
Press in smaller lines branching off the main beams to create the classic reindeer rack shape. Keep the lines clean and relatively deep so they remain visible after drying. -
Impression versus carving:
Instead of dragging the tool like a pencil, try pressing it straight down into the clay to create cleaner lines with fewer crumbly edges.
Step 3: Finishing Touches
-
The drying phase:
Set your ornament aside on a piece of parchment paper. If using air-dry clay, let it sit for 24-48 hours, flipping it halfway through to prevent curling. -
Baking (if applicable):
If you chose polymer clay, bake it according to the specific temperature and time instructions on your package, then let it cool completely. -
Prep the paint:
Squeeze a tiny dot of bright red acrylic paint onto your palette or a scrap piece of paper. -
Paint the nose:
Dip the back end of a paintbrush or a toothpick into the paint. Carefully dot it onto the lower center of the face to create a perfectly round, raised red nose. -
Let the paint set:
Allow the red paint to dry completely. Since the dab is thick, this might take an hour or so to firm up. -
Prepare the hanger:
Cut a length of jute twine, roughly 8 inches long. -
Thread the twine:
Fold the twine in half, push the loop through the hole in the ornament from front to back, and pull the tails through the loop to create a lark’s head knot. -
Secure the top:
Tie the two loose ends of the twine together in a simple overhand knot to close the hanging loop.
Rustic Texture
Before cutting your oval, roll a piece of linen fabric or a lace doily over the clay slab to imprint a subtle texture onto the reindeer’s face.
Hang this charming little character on your tree for a handmade touch that feels both playful and sophisticated
Mini Nativity Silhouette Ornaments
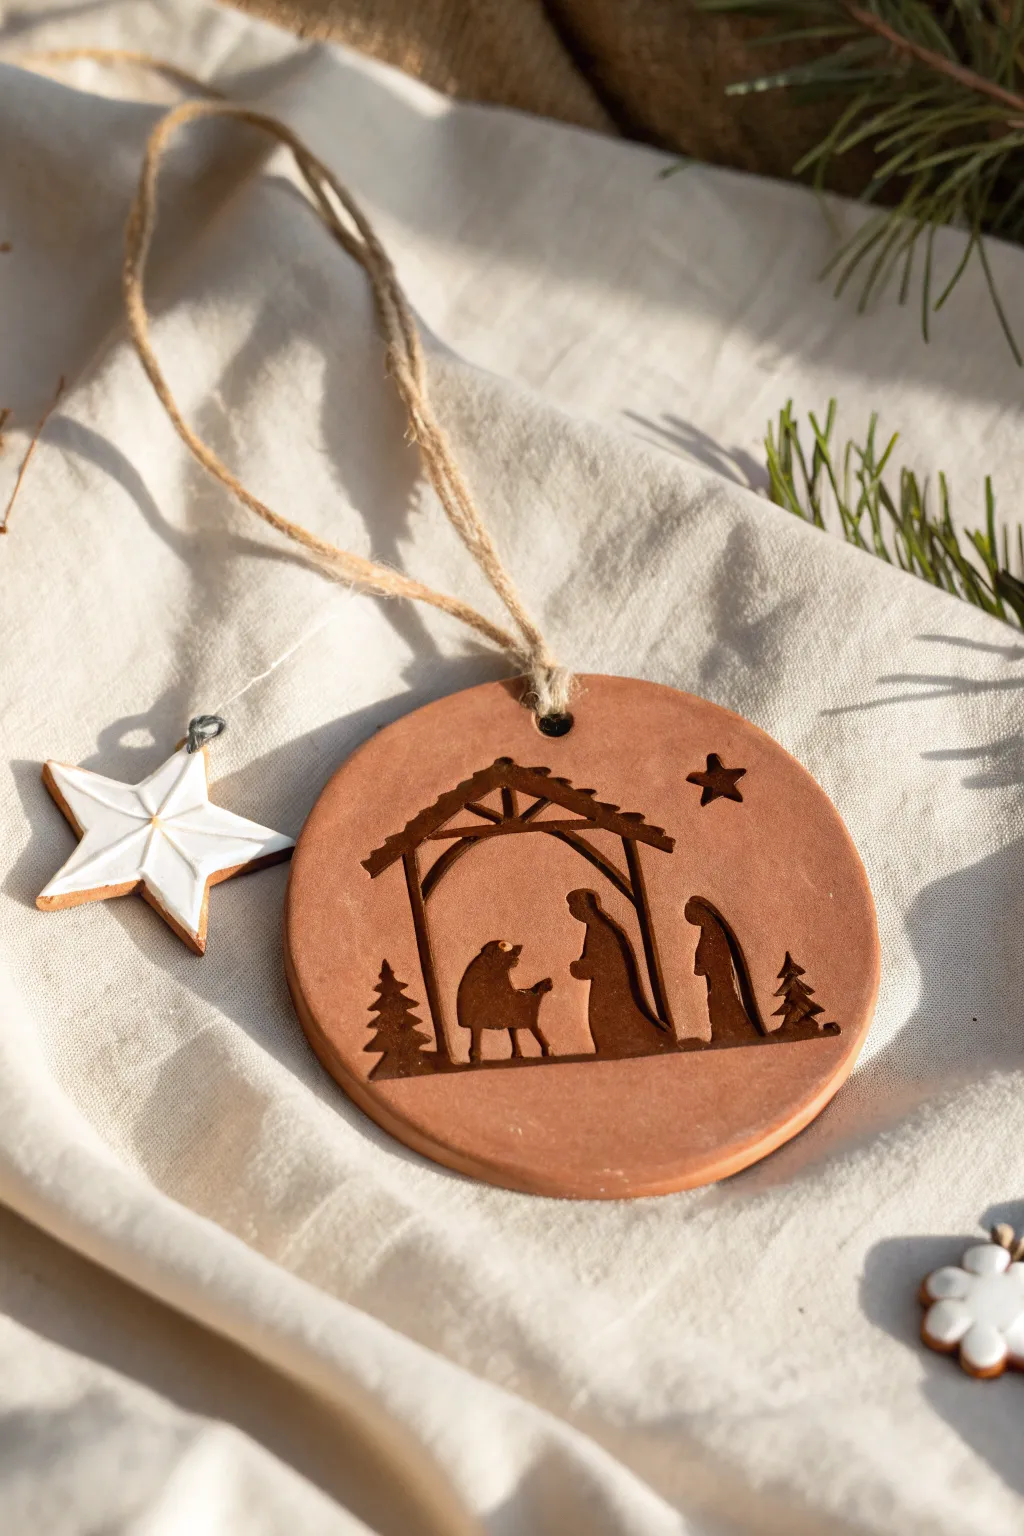
Create a rustic and heartwarming addition to your holiday decor with this terra cotta-style clay ornament. Featuring a delicate engraved nativity silhouette, this piece combines earthy textures with a classic Christmas motif for a timeless look.
How-To Guide
Materials
- Terra cotta colored air-dry clay or polymer clay
- Rolling pin
- Circle cookie cutter (3-4 inch diameter)
- Nativity silhouette stamp or laser-cut wood shape
- Dark brown or black acrylic paint
- Fine-point paintbrush
- Straw or small stick (for the hole)
- Jute twine
- Sandpaper (fine grit)
- Matte clear sealant (optional)
- Damp sponge or cloth
Step 1: Shaping the Base
-
Prepare the Clay:
Begin by conditioning a handful of terra cotta-colored clay. Knead it in your hands until it is smooth, pliable, and free of cracks. Warm clay is much easier to work with and leaves a smoother finish. -
Roll to Thickness:
Place the clay on a clean, flat surface. Using a rolling pin, roll the clay out evenly until it is approximately 1/4 inch thick. Aim for a consistent thickness across the slab to ensure even drying. -
Cut the Circle:
Press your circle cookie cutter firmly into the clay. Give it a gentle twist to detach the shape cleanly from the excess clay, then lift the cutter away. Carefully remove the surrounding scrap clay. -
Smooth the Edges:
Dip your finger in a little water and run it gently around the outer edge of the circle. This softens any sharp ridges left by the cutter giving it a more finished, pottery-like appearance. -
Create the Hanger Hole:
Using a drinking straw or a small stick, punch a clean hole near the top edge of the circle. Make sure it’s centered and not too close to the edge to prevent tearing later.
Clean Impressions
Dust your stamp lightly with cornstarch or baby powder before pressing it into the clay. This acts as a release agent and prevents the clay from sticking inside the detailed crevices.
Step 2: Creating the Design
-
Position the Silhouette:
Take your nativity stamp or laser-cut wooden shape. Center it carefully on the clay surface, ensuring the stable is upright relative to the hanger hole you just made. -
Impress the Image:
Press the stamp firmly and evenly into the soft clay. You want a deep, clear impression, but be careful not to push all the way through the back. Lift the stamp straight up to avoid smudging the edges. -
Add Details:
If your stamp didn’t include the star or side trees, you can use smaller individual stamps or a sculpting tool to manually press these shapes into the clay now. A small star shape near the top right adds perfect balance. -
Drying Phase:
Place the ornament on a flat wire rack to dry. If using air-dry clay, let it sit for 24-48 hours, flipping it occasionally to prevent curling. If using polymer clay, bake according to the package instructions. -
Surface Refinement:
Once fully cured or dry, gently sand the edges with fine-grit sandpaper if there are any rough spots. Wipe away any dust with a barely damp cloth.
Step 3: Finishing Touches
-
Paint the Inlay:
Dip a fine-point paintbrush into dark brown or black acrylic paint. Sometimes I like to dilute the paint slightly with water to make it flow better into the crevices. -
Fill the Grooves:
Carefully paint inside the indented nativity scene, the trees, and the star. The goal is to darken the recessed areas to create a high-contrast silhouette effect against the terra cotta background. -
Clean Up Edges:
If paint gets onto the raised surface, quickly wipe it away with a damp sponge or paper towel before it dries. This technique helps keep lines crisp and enhances the ‘engraved’ look. -
Seal (Optional):
For longevity, you can brush a thin layer of matte sealant over the entire ornament. This protects the paint and deepens the clay color slightly without adding unwanted shine. -
Add the Twine:
Cut a length of rustic jute twine, about 8 inches long. Thread one end through the hole at the top of the ornament. -
Secure the Loop:
Bring the ends of the twine together and tie a simple overhand knot. Trim any excess close to the knot for a tidy finish, ready for hanging on the tree.
Gilded Glory
Instead of dark paint, use metallic gold liquid leaf to fill in the engraved silhouette. This creates a stunning, elegant effect that catches the Christmas tree lights brilliantly.
Hang this serene little scene on a sturdy branch where the lights can illuminate the simple beauty of your handiwork
Sweater Texture Tree Ornaments
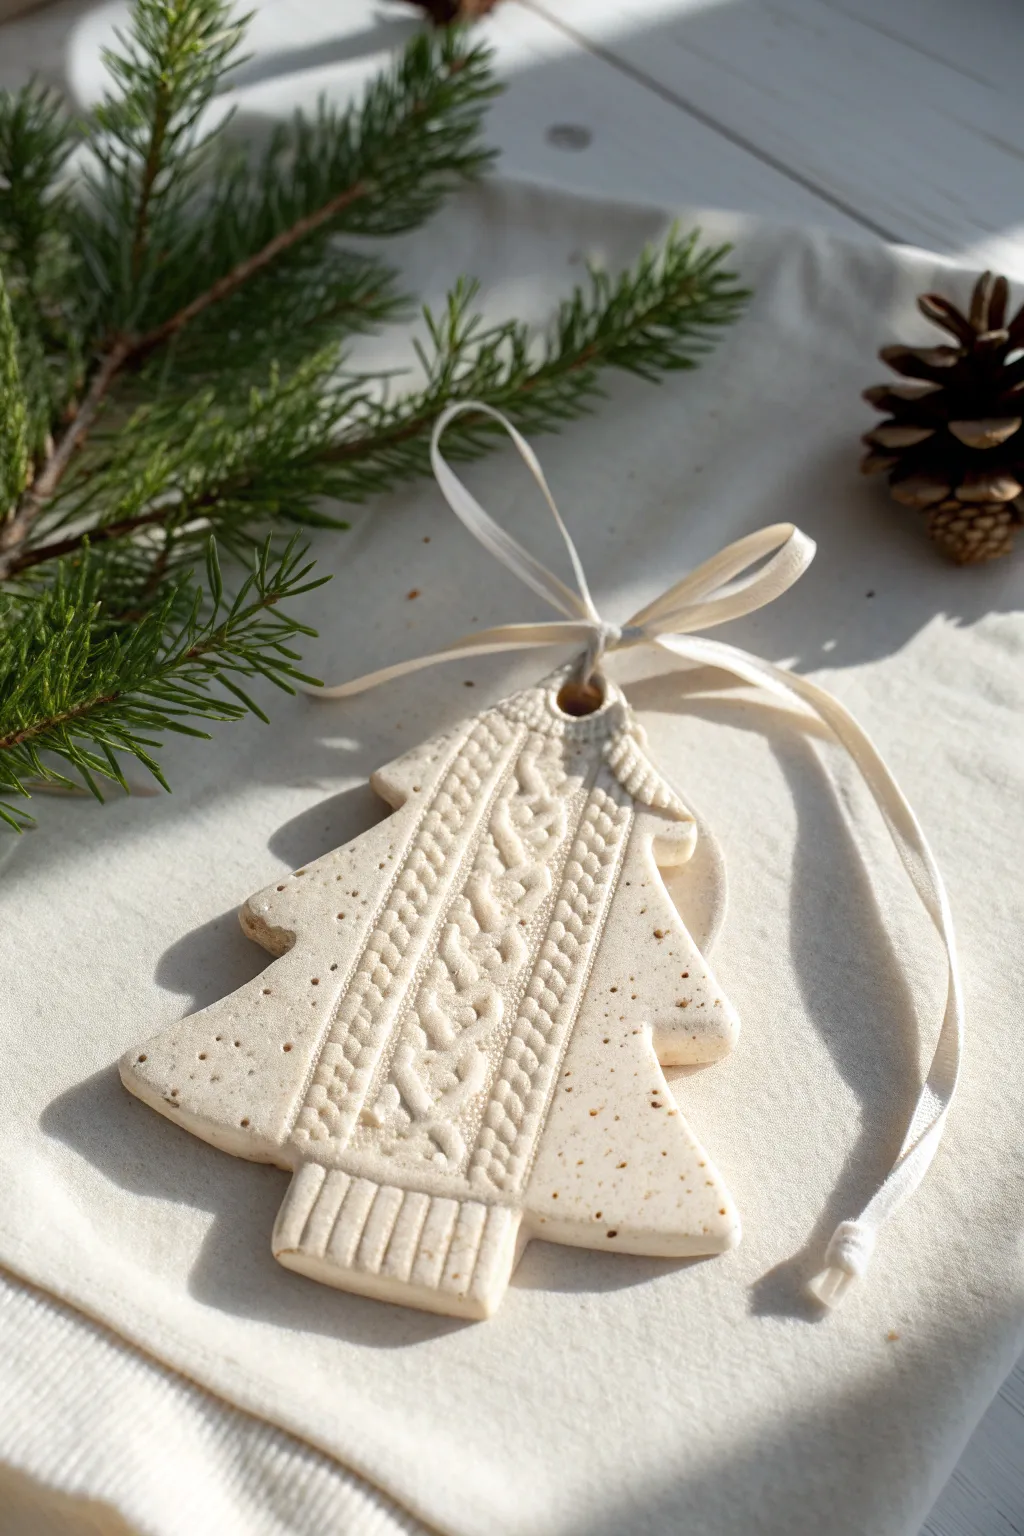
Bring the warmth of your favorite winter sweater to your tree with these textured ornaments. Using simple tools and a bit of fabric, you can emboss a realistic cable-knit design right into the clay for a rustic, handmade look.
Step-by-Step Tutorial
Materials
- White or speckled polymer clay (or air-dry clay)
- Rolling pin
- Christmas tree cookie cutter
- Old cable-knit sweater or textured fabric remnant
- Modeling tool or butter knife
- Straw or cocktail stick
- Sandpaper (fine grit)
- White satin ribbon
- Parchment paper
Step 1: Preparation & Rolling
-
Prepare your workspace:
Lay down a sheet of parchment paper to prevent sticking. Condition your clay by kneading it in your hands until it becomes soft, pliable, and warm. -
Roll out the base:
Roll the clay into a smooth, even slab about 1/4 inch thick. Aim for a consistent thickness so the ornament is sturdy but not too heavy. -
Prepare the texture:
Select a section of your cable-knit fabric that has a distinct braid or ribbing pattern. Ensure the fabric is clean and lint-free.
Step 2: Embossing the Texture
-
Press the fabric:
Place the fabric texture-side down onto the clay slab. I find that pressing firmly and evenly with a rolling pin works best here. -
Deepen the impression:
Roll over the fabric one pass at a time, applying steady pressure to ensure the knit pattern transfers deeply into the clay. -
Reveal the design:
Carefully peel back the fabric from one corner to check the impression. If it looks good, remove the entire piece of fabric. -
Align the cutter:
Position your Christmas tree cookie cutter over the textured clay. Try to center the cable-knit ‘braid’ vertically down the middle of the tree for the best sweater effect.
Clay sticking to fabric?
Dust your clay lightly with cornstarch or baby powder before placing the sweater fabric on top. This acts as a release agent and creates a clean peel-off.
Step 3: Cutting & Shaping
-
Cut the shape:
Press the cutter down firmly. Give it a tiny wiggle to ensure it cuts all the way through, then lift the cutter away. -
Refine the edges:
Gently remove the excess clay from around the tree. Use your finger to smooth any rough edges left by the cutter. -
Create the ribbed trunk:
Use a modeling tool or the back of a butter knife to gently press vertical lines into the trunk section, mimicking the ribbed cuff of a sweater. -
Add texture to the sides:
If the sides of your tree look too smooth compared to the center, gently dab them with a toothbrush or coarse sponge to add a subtle speckle texture. -
Make the hanging hole:
Use a drinking straw to punch a clean hole at the very top of the tree. Twist the straw as you pull it out to remove the clay plug cleanly.
Add a frosted look
After baking, lightly dry-brush white acrylic paint over the raised cable-knit texture to make the details pop like snow on a cozy sweater.
Step 4: Finishing Touches
-
Bake or dry:
If using polymer clay, bake according to the package instructions (usually around 275°F for 15-30 minutes). If using air-dry clay, let it sit for 24-48 hours. -
Cool down:
Allow the ornament to cool completely on a flat surface. This prevents warping while the clay hardens. -
Sand edges:
Once hard, take a small piece of fine-grit sandpaper and lightly buff the edges to make them perfectly smooth. -
Thread the ribbon:
Cut a length of white satin ribbon. Fold it in half and thread the loop through the hole. -
Tie the bow:
Pull the ends through the loop to secure it, then tie a neat bow at the base of the loop for a polished finish.
Hang your new textured ornaments near fairy lights to highlight the beautiful shadows in the clay