Whenever I need a quick, happy project in the studio, I make a clay fairy house—because it’s all charm and zero pressure to be “perfect.” Here are my favorite simple clay fairy house ideas that stay beginner-friendly but still look totally magical on a shelf or tucked into a planter.
Classic Mushroom Roof Fairy House

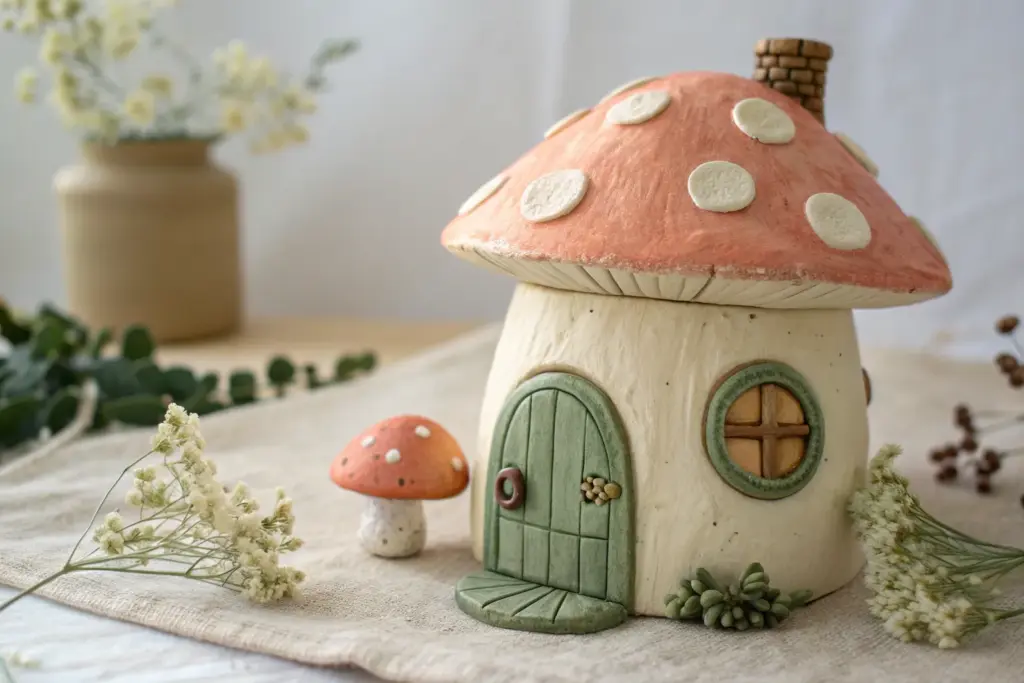
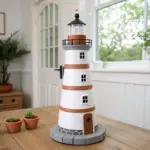
This enchanting fairy house features a classic red-and-white spotted mushroom cap roof perched atop a textured white stalk. With its inviting wooden door and warm, glowing windows, this project creates a cozy, magical hideaway perfect for a windowsill display.
Step-by-Step Guide
Materials
- Air-dry clay (white)
- Acrylic paints (bright red, warm white, beige, light brown, dark brown)
- Clay sculpting tools (needle tool, ball stylus, knife tool)
- Rolling pin
- Aluminum foil
- LED tea light (battery operated)
- Circular cookie cutter (approx. 3-4 inches)
- Paintbrushes (small detail brush, flat shader brush)
- Water bonding slip (clay mixed with water)
- Clear matte varnish or sealant
- Sandpaper (fine grit)
Step 1: Forming the Structure
-
Create the foil armature:
Begin by crumpling aluminum foil into a cylinder shape for the base and a separate dome shape for the mushroom cap. Ensure the cylinder is slightly wider at the bottom for stability and hollow enough at the core if you plan to insert a light later. -
Cover the base with clay:
Roll out a slab of white air-dry clay to about 1/4 inch thickness. Wrap this around your foil cylinder, smoothing the seam where the clay meets with a bit of water. -
Texture the stalk:
Use a toothbrush or a crumpled ball of foil to gently tap texture onto the white clay surface, giving it a natural, organic mushroom stalk appearance rather than a perfectly smooth finish. -
Sculpt the cap:
Roll out a second slab of clay and drape it over your foil dome. Trim the excess around the rim, leaving a slight overhang. Smooth the surface with a damp finger to remove any fingerprints. -
Check the fit:
Rest the cap on the stalk to ensure they fit together well, but do not join them yet. You want the roof to be removable to access the tea light inside.
Uneven Paint?
If your red paint looks streaky, let the first coat dry completely before adding a second. Using a sponge dabber instead of a brush can also help create a smooth, texture-free finish on the cap.
Step 2: Adding Details
-
Cut the windows:
Using a sharp knife tool or small square cutter, carefully cut out two window openings on the stalk. If you used a foil core, you’ll need to dig out the foil behind these openings slightly. -
Frame the windows:
Roll thin snakes of clay and press them around the window edges to create stone frames. Use a needle tool to press vertical lines into these frames to simulate brickwork. -
Add window panes:
Create a cross shape with very thin strips of clay and press them inside the window openings to form the divided light panes. -
Sculpt the door:
Roll a small oval of clay for the door. Use a needle tool to score deep vertical lines to mimic wood planks. Add a tiny ball of clay for the doorknob. -
Attach the door:
Score the back of the door and the spot on the house where it will go. Apply a little water or slip and press the door firmly onto the stalk. Frame it with a thin clay arch. -
Add the raised dots:
Roll various sizes of small clay balls and flatten them into discs. Attach these randomly over the mushroom cap using slip, gently pressing the edges down so they look integrated but slightly raised. -
Create the front step:
Shape a semi-circle of clay and score it with horizontal lines to look like a wooden slat doorstep. Attach this right at the base of the door. -
Let it dry:
Allow all pieces to dry completely for at least 24-48 hours. I usually rotate the pieces occasionally so air reaches all sides evenly.
Let There Be Light
Make the windows glow realistically by gluing a small piece of yellow tracing paper or tissue paper on the *inside* of the window openings before placing your LED tea light inside.
Step 3: Painting and Finishing
-
Paint the cap base:
Paint the entire mushroom cap (avoiding the white spots if possible, though you can paint over them) with a vibrant red acrylic paint. Apply two coats for solid opacity. -
Paint the spots:
Carefully paint the raised discs with a warm white or cream color. Add tiny dots of white paint in the empty red spaces for extra texture and detail. -
Detail the door and windows:
Mix a light brown wash (paint diluted with water) and brush it over the door and doorstep, wiping away the excess so the brown settles into the carved grooves. -
Paint the window frames:
Use a beige or light stone color for the window frames. You can dry-brush a little darker brown on top to make them look weathered. -
Shade the stalk:
Keep the stalk mostly the natural white of the clay, but lightly brush a very diluted beige near the bottom and under the roofline to create false shadows and depth. -
Seal the project:
Once the paint is fully dry, coat the entire house with a matte varnish to protect the clay and give it a unified finish.
Place your finished cottage on a shelf or among your plants to add a touch of woodland magic to your home


Jar Lantern Fairy House
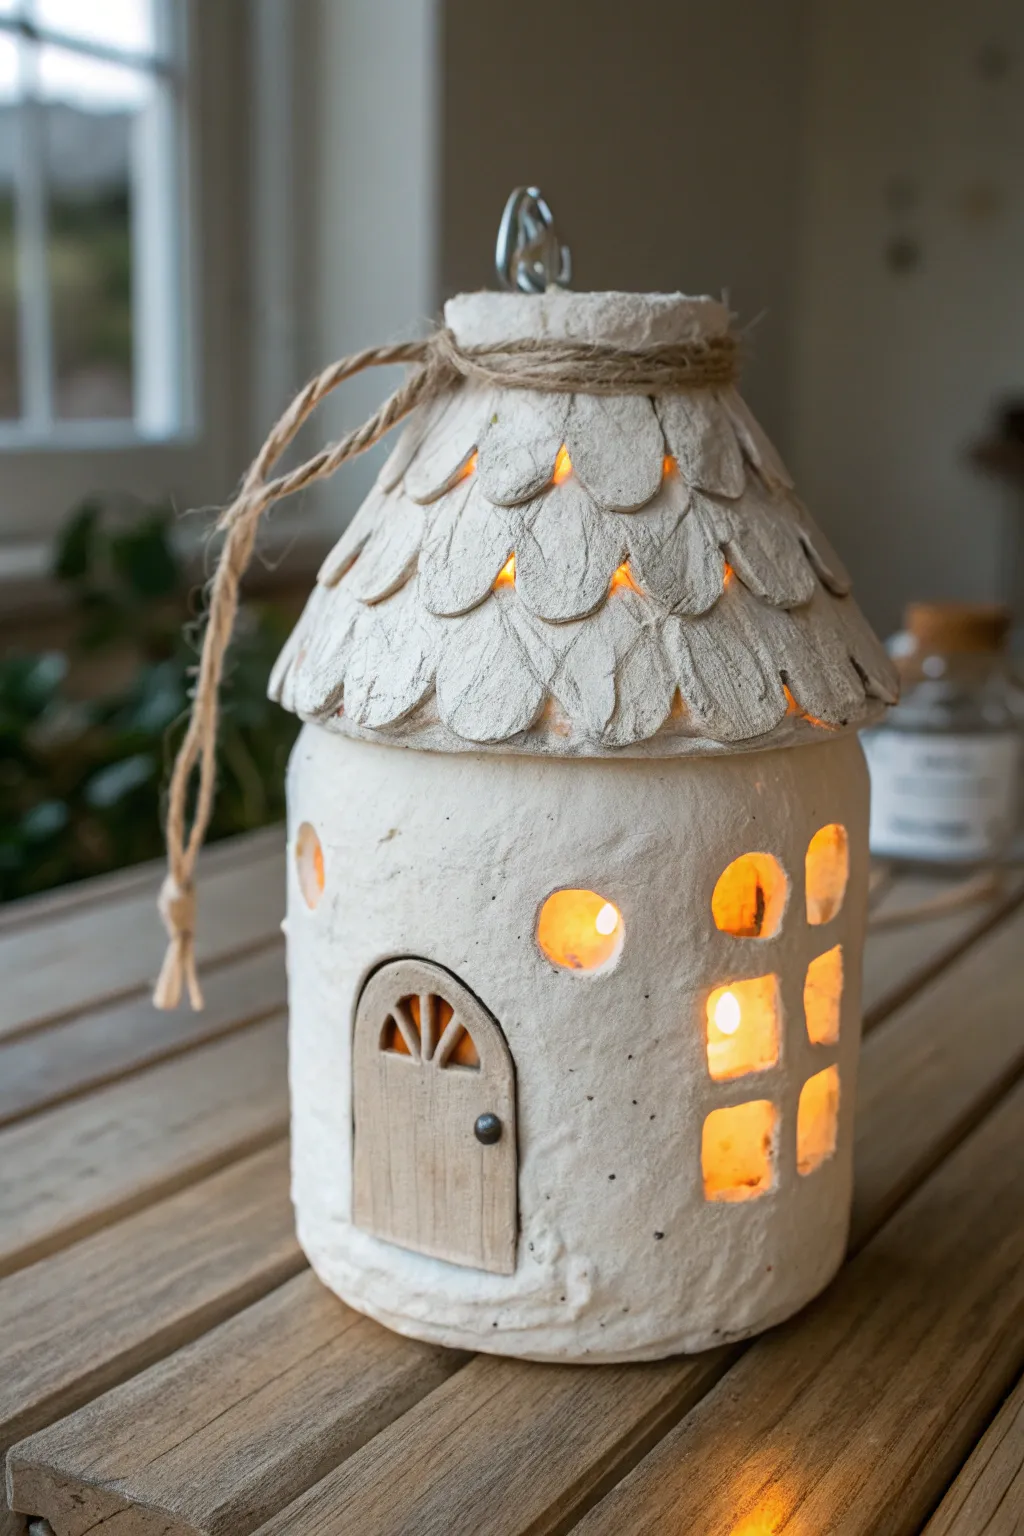
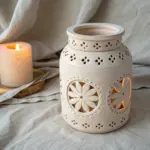
Transform a simple glass jar into a whimsical, textured fairy dwelling that radiates warmth and charm. This project combines air-dry clay sculpting with the sturdy base of a recycled jar to create a sturdy, luminescent lantern perfect for a cozy corner.
How-To Guide
Materials
- Clean glass jar (mason jar or jam jar)
- White creative paper clay or air-dry clay (textured/fibrous type recommended)
- Cardboard or stiff cardstock (for the roof cone)
- Parchment paper or aluminum foil
- Rolling pin
- Craft knife or scalpel
- Small circular cutters (optional)
- Sculpting tools or toothpicks
- Jute twine
- Small metal loop or eye hook (for the handle)
- Brown acrylic paint (for the door)
- Battery-operated LED tea light or fairy lights
- Mod Podge or white glue (optional, for adhesion)
Step 1: Prepping the Base
-
Prepare the jar:
Begin with a clean, dry glass jar. Remove any labels or sticky residue to ensure your clay adheres properly to the surface. -
Base layer application:
Roll out a sheet of your white clay to about 1/4 inch thickness. Wrap this layer around the cylindrical body of the glass jar, pressing firmly so it sticks to the glass. Leave the very top threads of the jar exposed if you plan to screw a lid on, or cover them if the roof will sit loosely. -
Smooth and texturize:
Use a little water on your fingertips to smooth the seam where the clay joins. Don’t aim for perfection—dab the surface gently with a sponge or a crumpled ball of foil to give it that rustic, stucco-like texture seen in the photo.
Clay Adhesion Trick
If the clay keeps sliding down the smooth glass, brush a thin layer of PVA glue (white school glue) onto the glass and let it get tacky before applying your base layer of clay.
Step 2: Adding Architectural Details
-
Carve the windows:
While the clay is still wet, plan your window placement. Use a craft knife to carefully cut out the window shapes. For the multi-pane window, cut a large rectangle first, then carefully place small strips of clay back in to form the crossbars. -
Create round portals:
Cut out circular peepholes near the top or sides for extra light ventilation. If you have small round cookie cutters or a large straw, these work perfectly for clean edges. -
Sculpt the door:
Roll a small slab of clay into an arch shape for the door. Use a sculpting tool to press vertical lines into it to mimic wood grain. Attach this directly to the main body of the house, blending the edges slightly so it stays put. -
Door details:
Cut out the small window panes at the top of the door. Roll a tiny ball of clay and press it onto the door to serve as the doorknob. I find adding these tiny details really brings the personality out.
Mossy Upgrade
For an aged, forest-floor look, dab diluted green craft paint into the crevices of the roof shingles and base, or glue small bits of dried preserved moss around the bottom rim.
Step 3: Constructing the Roof
-
Create the roof form:
Make a cone shape out of cardstock that fits generously over the opening of your jar. Tape it securely. -
Cover with release layer:
Wrap your cardstock cone in parchment paper or foil. This ensures you can remove the cardstock later if you wish, or prevents moisture from warping the cardboard while the clay dries. -
Make the shingles:
Roll out more clay and use a tear-drop cutter or hand-cut many petal shapes. These will be your roof shingles. -
Layering shingles:
Starting at the bottom rim of the cone, apply the clay petals in a circle, overlapping slightly. Work your way upward, row by row, ensuring each upper row covers the seam of the row below it. -
Secure the top:
Once you reach the peak, mould a small cap of clay to cover the tips of the final row of shingles. This creates a flat platform for the handle mechanism. -
Add the hardware:
Insert a metal eye hook or form a clay loop at the very top of the roof structure while the clay is wet. This will hold the jute twine later. -
Roof ventilation:
Before the roof dries, gently poke a few discreet holes or gaps under the shingles near the top, or ensure the fit on the jar isn’t airtight, so heat can escape if you ever use a real candle (though LEDs are safer).
Step 4: Finishing Touches
-
Drying time:
Let both the jar body and the roof dry completely. This usually takes 24 to 48 hours depending on humidity. Keep them away from direct heat sources to prevent cracking. -
Painting the door:
Once dry, use a small brush to paint the wooden door section with a light brown acrylic wash. Wipe off excess paint immediately with a paper towel to enhance the wood grain texture. -
Painting the knob:
Paint the tiny doorknob with a metallic silver or dark grey paint to look like iron. -
Assembly:
Tie a piece of rustic natural jute twine through the top loop. Wrap extra twine around the transition between the handle and the roof for a finished look. -
Lighting it up:
Place your LED tea light or string lights inside the jar, set the roof on top, and watch your fairy cottage glow.
Enjoy the cozy atmosphere your handcrafted fairy lantern brings to your space

Tree Stump Fairy House
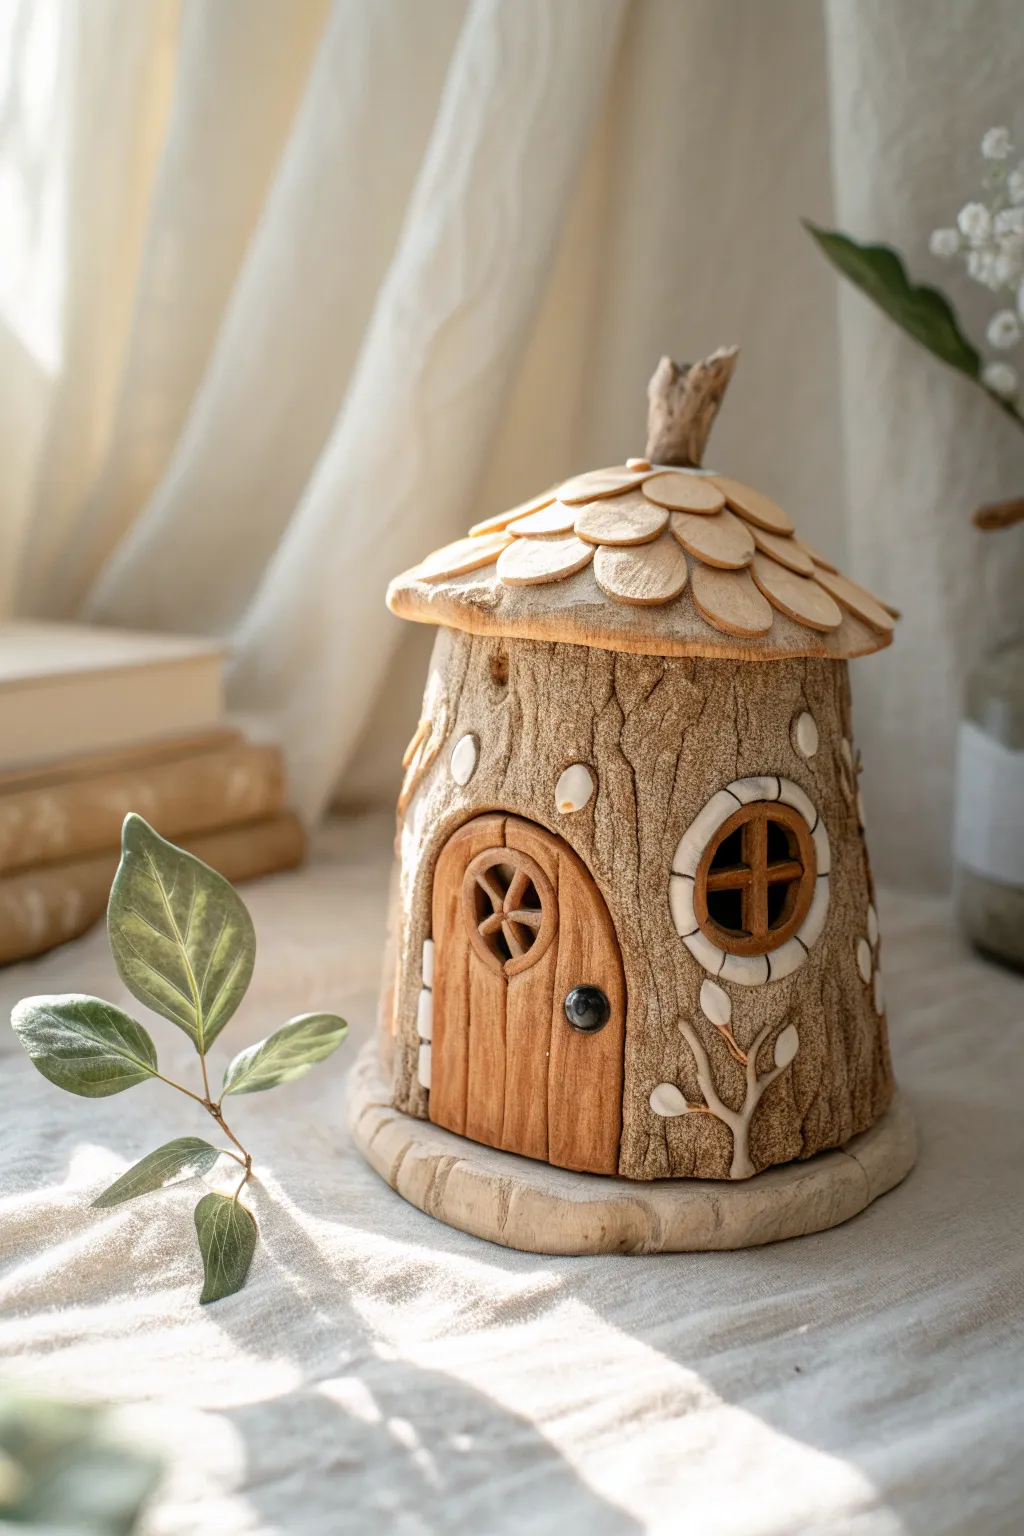
Transform a simple lump of clay into a magical woodland dwelling with this tree stump fairy house tutorial. Featuring realistic bark textures, a charming layered roof, and delicate white accents, this piece brings a touch of enchantment to any shelf or garden.
Detailed Instructions
Materials
- Light brown/tan polymer clay (for the base)
- Terra cotta or warm brown clay (for the door and window frames)
- Cream or off-white clay (for accents)
- Cylindrical form (glass jar or cardboard tube)
- Aluminum foil
- Texturing tools (needle tool, toothbrush, crumpled foil ball)
- Clay knife or scalpel
- Rolling pin
- Liquid clay or bake-and-bond
- Small black bead or dark clay (for doorknob)
- Acrylic paints (browns, creams) for antiquing (optional)
Step 1: Forming the Structure
-
Prepare the core:
Begin by covering your cylindrical form (like a small glass jar) with a layer of crumpled aluminum foil to build up a slightly tapered, stump-like shape. This saves clay and keeps the piece lightweight. -
Roll the base sheet:
Condition your light brown clay and roll it out into a large, even sheet about 1/4 inch thick. It needs to be large enough to wrap entirely around your foil core. -
Wrap the stump:
Carefully wrap the clay sheet around the foil form, smoothing the seam where the edges meet so it blends invisibly. Trim the top and bottom to ensure it stands flat. -
Create bark texture:
Use a needle tool or clay knife to carve vertical, wavy lines into the clay surface to mimic tree bark. Vary the depth and spacing of these lines for a natural look. I like to press a crumpled ball of foil against the clay afterwards to add a rough, organic surface texture.
Step 2: Adding Doors and Windows
-
Shape the door:
Roll out a slab of warm brown or terra cotta clay. Cut an arched door shape that fits the scale of your stump. -
Texture the woodgrain:
Before attaching, use a needle tool to score vertical wood planks into the door. Add tiny knots and grain lines for detail. -
Add the window:
Create a detailed window frame using white clay. Roll a thin snake of white clay and form a circle, then press it onto the side of the house. Fill the center with dark brown clay or simply paint it later to suggest depth. -
Install the door:
Apply a small amount of liquid clay to the back of the door and press it firmly onto the main stump body. Smooth the edges gently to ensure a good bond. -
Finish the entryway:
For the door window, create a small diamond or circular cutout near the top. Add a tiny black bead or a ball of black clay for the doorknob.
Natural Texture Hack
Gently press real tree bark or a rough stone against the clay surface before baking. This imprints authentic patterns that are hard to sculpt by hand.
Step 3: Roof and Finishes
-
Form the roof base:
Create a shallow cone shape from aluminum foil that sits slightly wider than your stump base. Cover this cone with a thin layer of light brown clay. -
Make the shingles:
Roll out a thin sheet of light cream or tan clay. Use a small oval cutter or hand-shape dozens of small, flat tear-drop or oval shingles. -
Layer the roof:
Starting at the bottom edge of the roof cone, attach the shingles in overlapping rows, working your way upward toward the peak. Stagger each row so the gaps below are covered. -
Create the stem:
Fashion a twisted, branch-like stem from brown clay and attach it securely to the very top center of the roof. -
Add nature details:
Roll tiny snakes of white clay to create vines or branches creeping up the side of the stump. Add small flattened teardrops of white clay to serve as leaves or abstract flowers. -
Final assembly:
Place the roof onto the stump base. You can adhere it permanently with liquid clay or leave it removable if using it as a container. -
Base plate:
Create a textured slab of clay slightly wider than the house to act as a base or ‘ground’. Texture the edges to look like stone or wood and place the house on top. -
Bake and cool:
Bake the project according to your clay manufacturer’s specific temperature and time instructions. Let it cool completely inside the oven to prevent cracking.
Glow-in-the-Dark Magic
Mix a tiny amount of glow-in-the-dark pigment powder into the white clay used for the windows and accent leaves. Your fairy house will softly illuminate at night.
Once cooled, your charming fairy dwelling is ready to welcome its tiny magical inhabitants into your home

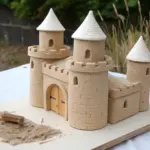
Stone Cottage Fairy House
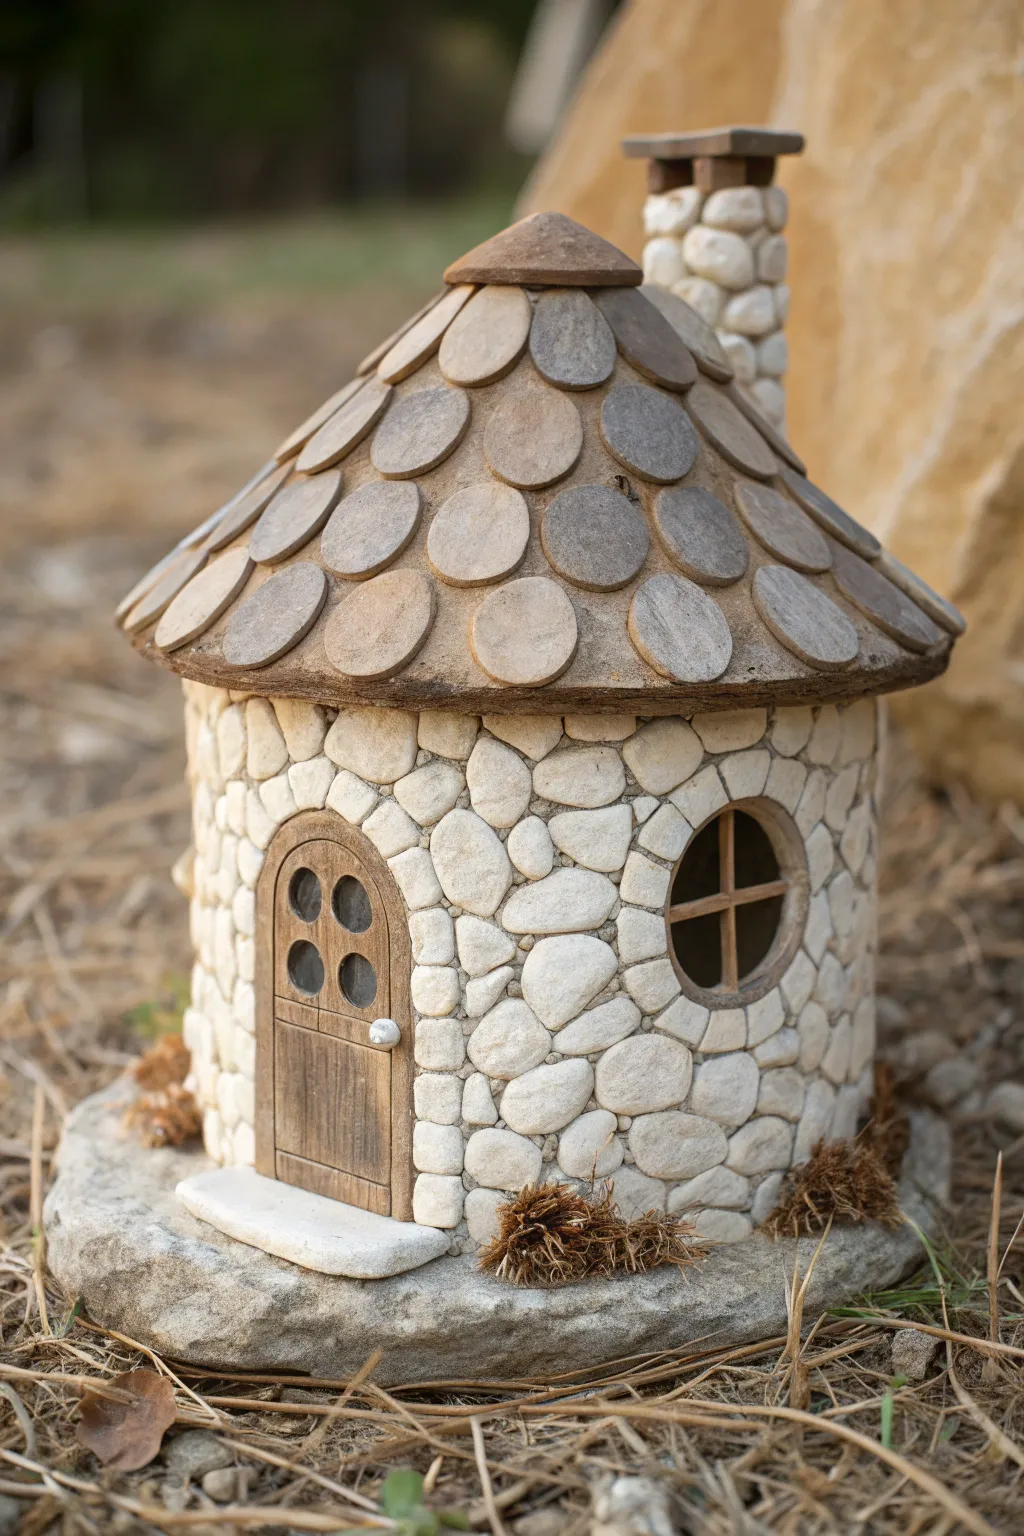
Bring a touch of magic to your garden with this charming stone fairy cottage, featuring a distinctive rounded shingle roof and a rustic cobblestone exterior. This project combines natural textures with simple sculpting techniques to create a cozy home perfect for any woodland sprite.
Step-by-Step Guide
Materials
- Plastic bottle or sturdy jar (as an armature)
- Air-dry clay (stone gray or white)
- Small, smooth pebbles (white or light gray)
- Flat, oval-shaped stones or slate pieces (for the roof)
- Large flat rock (for the base)
- Balsa wood or popsicle sticks
- Wood stain or brown acrylic paint
- Strong craft glue (e.g., E6000) or clear silicone adhesive
- Small bead or pin head (for door knob)
- Dried moss or jute twine
- Cardboard or stiff cardstock
- Sculpting tools
Step 1: Building the Core Structure
-
Prepare the Base:
Begin by selecting a large, flat rock to serve as the foundation. Clean it thoroughly to ensure your adhesive will stick, and position your armature (the jar or cut plastic bottle) in the center. -
Fix the Armature:
Glue the bottle or jar securely to the stone base. If you are using a plastic bottle, you may want to cut the top off to create a straight cylinder about 4-5 inches tall. -
Create the Roof Cone:
Fashion a cone shape out of cardstock or cardboard that fits perfectly over your cylinder base. Glue this cone in place to form the roof structure, ensuring it has a slight overhang. -
Door and Window Placement:
Sketch out where you want your door and round window to be. If using a plastic bottle, you can cut these distinct shapes out, or simply leave these areas blank when applying the stones later.
Natural Seams
If gaps between wall stones look too deep, push a simple grout of sand and glue into the cracks to smooth it out.
Step 2: Stonework and Siding
-
Apply the Base Clay:
Spread a thin layer of air-dry clay or strong tile adhesive over the cylinder walls. Work in small sections so the adhesive doesn’t dry out before you place the stones. -
Set the Stones:
Press your small, white pebbles into the clay or adhesive, fitting them together like a puzzle. Keep the gaps minimal for a tight, cobblestone look. -
Create the Door Frame:
Leave the arched door space empty of stones. Instead, frame the arch with slightly flatter or smaller stones to define the entryway clearly. -
Frame the Window:
Similarly, arrange stones in a circle around your designated window area. Using consistent sized stones here makes the window look neat and deliberate. -
Construct the Chimney:
Build a small rectangular chimney structure using a scrap of cardboard or clay. Attach it to the side of the roof cone and clad it with tiny pebbles to match the house walls.
Light it Up
Use a hollow jar and leave the bottom open so you can place an LED tea light underneath for a glowing window effect.
Step 3: Roofing and Details
-
Base Roof Layer:
Coat the cardboard roof cone with a layer of adhesive or clay. Start applying your flat, oval stones at the very bottom edge, letting them overhang slightly. -
Overlay Shingles:
Work your way up the roof in concentric circles. Overlap each upper row slightly over the lower row, staggering the joints like real slate roofing. -
Cap the Roof:
When you reach the peak, use a small cone of clay or a single round stone to cover the point where all the shingles meet, sealing the top. -
Make the Door:
Cut a piece of balsa wood into an arch shape that fits your doorway. Use a tool to score vertical lines into the wood to mimic planks. -
Window Details:
Cut four small holes into the upper part of the door for ‘windows’ if desired, or paint them dark create depth. Apply a dark wood stain to the door and let it dry. -
Install Woodwork:
Glue the stained door into the archway. Create a small cross from thin wood scraps for the round window pane and glue that inside the stone circle. -
Add Hardware:
Glue a small white bead or pin head onto the door to serve as the handle. -
Final Touches:
Tuck small bits of dried moss or jute bristles into the crevice between the house and the stone base to look like dry grass tufts.
Place your finished cottage in a sheltered garden spot or a potted plant to invite the fairies in

The Complete Guide to Pottery Troubleshooting
Uncover the most common ceramic mistakes—from cracking clay to failed glazes—and learn how to fix them fast.
Arched Wood Door Fairy House
This enchanting little dwelling combines rustic textures with delightful architectural details, featuring a convincing faux-wood door and a speckled, conical roof. It’s the perfect beginner-friendly project that uses basic slab-building techniques to create a sturdy, weatherproof garden accent.
Step-by-Step
Materials
- Light-colored stoneware clay (or polymer clay for indoor use)
- Rolling pin
- Clay knife or fettling knife
- Scoring tool or old toothbrush
- Slip (clay and water slurry)
- Small round cutter or straw
- Needle tool
- Brown underglaze or acrylic paint (if not firing)
- Black glass bead or small ball of black clay
- Texture tools (sponge, sandpaper)
- Clear matte glaze (optional)
Step 1: Forming the Base Structure
-
Roll the main slab:
Start by rolling out a medium-thick slab of clay, roughly 1/4 inch thick. Cut a rectangular strip that is long enough to form the circumference of your desired house size; aiming for about 4-5 inches tall is manageable. -
Create the cylinder:
Stand the strip up and curl it into a cylinder, overlapping the ends slightly. Score both overlapping edges, apply slip, and press them firmer together. Smooth the seam inside and out so it disappears. -
Press onto the base:
Roll a second smaller slab for the floor. Place your cylinder on top of it, score and slip the contact points, and trim away the excess clay around the bottom, leaving a slight lip to create the stone foundation look seen in the photo. -
Shape the walls:
Gently push the walls from the inside out to give the house a slightly bulbous, organic shape. It shouldn’t be a perfect pipe; a little unevenness adds character.
Collapsing Roof?
If the cone roof sags while you work on it, loosely crumple a ball of newspaper or paper towel and stuff it underneath for support until the clay stiffens up.
Step 2: Crafting the Roof
-
Form the cone:
Roll another slab and cut out a large circle. Cut a slit from the edge to the center, then overlap the cut edges to form a cone shape. Adjust the overlap until the cone is slightly wider than your house walls. -
Texture the roof surface:
Before attaching, use a stiff brush or a textured rock to press a rough, stucco-like pattern into the roof surface. I like to drag a tool downwards to mimic thatch or rain runoff patterns. -
Create the dormer windows:
Roll two small coils and shape them into tiny arches. Attach these to the roof slope. Use a needle tool to carve out the inner window space and add a tiny clay cross for the panes. -
Add the finial:
Roll a small ball of clay and attach it to the very peak of the cone. Smooth the connection point so it looks like a unified architectural detail.
Step 3: Adding the Door
-
Cut the doorway:
On the main cylinder, use your knife to lightly trace an arched doorway shape. You don’t need to cut the hole out completely unless you want a hollow house; instead, we will build on top of it for a relief effect. -
Sculpt the door planks:
Roll a thin slab and cut it to match your traced arch. Use a needle tool to deeply score vertical lines to resemble wooden planks. Add wood grain texture by drawing wavy lines. -
Build the stone arch:
Roll a long, flat strip of clay and frame the door. Use your knife to impress horizontal lines around this frame to create the look of individual stone blocks or bricks. -
Install the hardware:
Fashion two small, flat strips of clay for the hinges and press them horizontally across the door. Press a small black bead (or a ball of black clay) into the right side for the doorknob. -
Create side windows:
Similar to the door frame, create an arched window frame on the side of the house. Fill the center with crossbars made of thin clay strips.
Realistic Wood Grain
For better wood texture, let the clay firm up slightly before carving the grain lines. Drag an old, stiff-bristled toothbrush over the ‘planks’ for extra realism.
Step 4: Finishing Touches
-
Add ventilation holes:
Using a small straw or a round tool, poke randomly swirled patterns of tiny holes around the roof and the upper walls. This adds visual interest and allows light to escape if you use an LED tea light inside. -
Refine the texture:
Use a damp sponge to smooth any sharp, jagged edges, particularly around the roofline and the base. You want the clay to look weathered, not freshly cut. -
Attach the roof:
Score and slip the top rim of your house walls. Place the roof on top. You can leave it removable to insert lights, or seal it shut for a solid sculpture. -
Apply finish:
If firing, use a brown underglaze on the door and hinges, wiping it back to highlight the texture. If using air-dry clay, paint these details with acrylics after drying.
Place your finished cottage among some moss or potted plants to complete the scene
Leafy Roof Fairy House
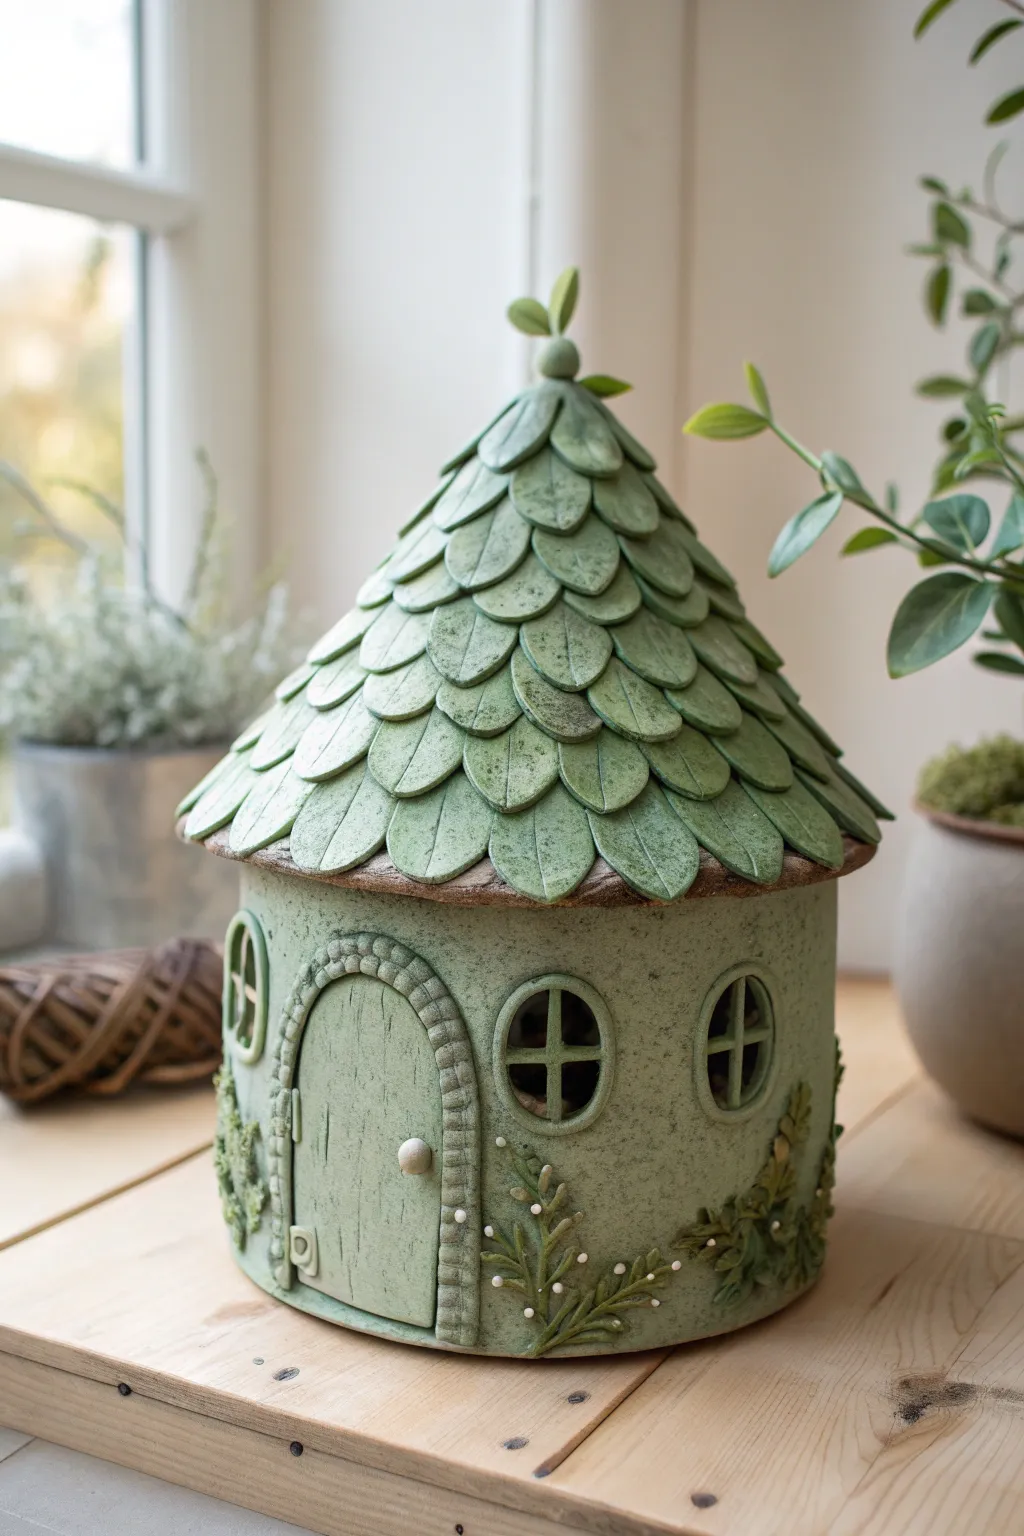
Bring the magic of the deep woods indoors with this enchanting sage green cottage featuring a distinctive layered leaf roof. The soft, monochromatic color palette and highly textured details make this a sophisticated yet approachable project for sculptors of any skill level.
Step-by-Step Tutorial
Materials
- Air-dry clay or polymer clay (approx. 2-3 lbs)
- Acrylic rolling pin
- Circle cutter or a clean jar
- Leaf-shaped clay cutter (or a teardrop shape)
- Clay sculpting tools (needle tool, ball stylus)
- Texture sponge or stiff brush
- Soft sage green acrylic paint
- Darker green and white acrylic paint for shading
- Matte sealant or varnish
- Cardboard or foil for structural support armature
- Strong craft glue (if using air-dry clay)
Step 1: Building the Base Structure
-
Prepare the armature:
Create a cylindrical form using cardboard or a recycled can to act as an internal support. If you are using polymer clay and plan to bake it, ensure your core is oven-safe or use crumpled aluminum foil. -
Roll out the walls:
Roll your clay into a large, even slab about 1/4 inch thick. You want it sturdy enough to stand but not too heavy. -
Texture the surface:
Before cutting, gently dab the entire slab with a texture sponge or a stiff brush to give it a stone-like, slightly pitted surface characteristic of the cottage walls. -
Form the cylinder:
Cut a rectangular strip long enough to wrap around your armature. Join the seam by scoring the edges and smoothing the clay together until the line disappears. -
Cut the windows:
Use a small circle cutter to remove clay for two oval windows. Save the excess clay for later details. -
Create the roof cone:
Fashion a separate cone shape from foil or cardboard that fits strictly atop your cylinder walls. Cover this cone with a thin layer of clay to serve as the base for your leaves.
Fixing Sagging Roofs
If the roof tiles begin to slide down while working, the clay is likely too soft. Place the roof in the fridge for 10 minutes to firm it up before continuing.
Step 2: Adding Architectural Details
-
Sculpt the door:
Roll a small slab and cut an arch shape for the door. Use a needle tool to score vertical wood grain lines into it, then attach it to the front of the house. -
Add the stone archway:
Roll a thin snake of clay and flatten it slightly. Press it around the door frame, using a tool to indent separate ‘stones’ to create the masonry arch. -
Window frames:
Roll very thin coils of clay to create the cross-bars for the window panes and the outer trim. Attach these carefully inside your window cutouts. -
Add vegetation details:
Hand-sculpt tiny vines and little leaves. Press these onto the lower walls, trailing upward from the base to make the house look overgrown.
Turn on the Lights
Make the house hollow and cut a hole in the bottom so you can place it over a battery-operated tea light for a glowing nighttime effect.
Step 3: Shingling the Leafy Roof
-
Cut the leaves:
Use your leaf or teardrop cutter to punch out roughly 40-50 tiles. If you don’t have a cutter, I find hand-forming teardrops and flattening them works just as well. -
Texture the leaves:
Use a needle tool or knife to gently press a central vein line down the middle of each leaf. -
Apply the bottom row:
Start at the very bottom edge of the roof cone. Attach a row of leaves slightly overlapping the edge, using a dab of water or liquid clay to secure them. -
Layer upward:
Continue adding rows of leaves, moving upward. Place each new leaf over the seam of the two leaves below it to create a scale-like effect. -
Cap the peak:
Once you reach the top point, create a small ball or finial shape to cover the final tips of the leaves, and add two or three small leaves springing from the very top.
Step 4: Finishing Touches
-
Dry or bake:
Allow your piece to air dry completely (at least 24-48 hours) or bake according to your polymer clay package instructions. -
Base coat painting:
Paint the entire house, including the roof, in a solid coat of sage green. You may need two coats for full coverage. -
Dry brushing:
Dip a dry brush into a lighter, whitish-green paint. Wipe most of it off on a paper towel, then lightly brush over the roof leaves and wall textures to highlight the raised details. -
Detail work:
Paint the door handle a soft cream or metallic hook. Add tiny white dots to the creeping vines to represent small flower buds.
Place your finished cottage among potted plants to complete the natural woodland look


What Really Happens Inside the Kiln
Learn how time and temperature work together inside the kiln to transform clay into durable ceramic.
Flower Trellis Fairy House
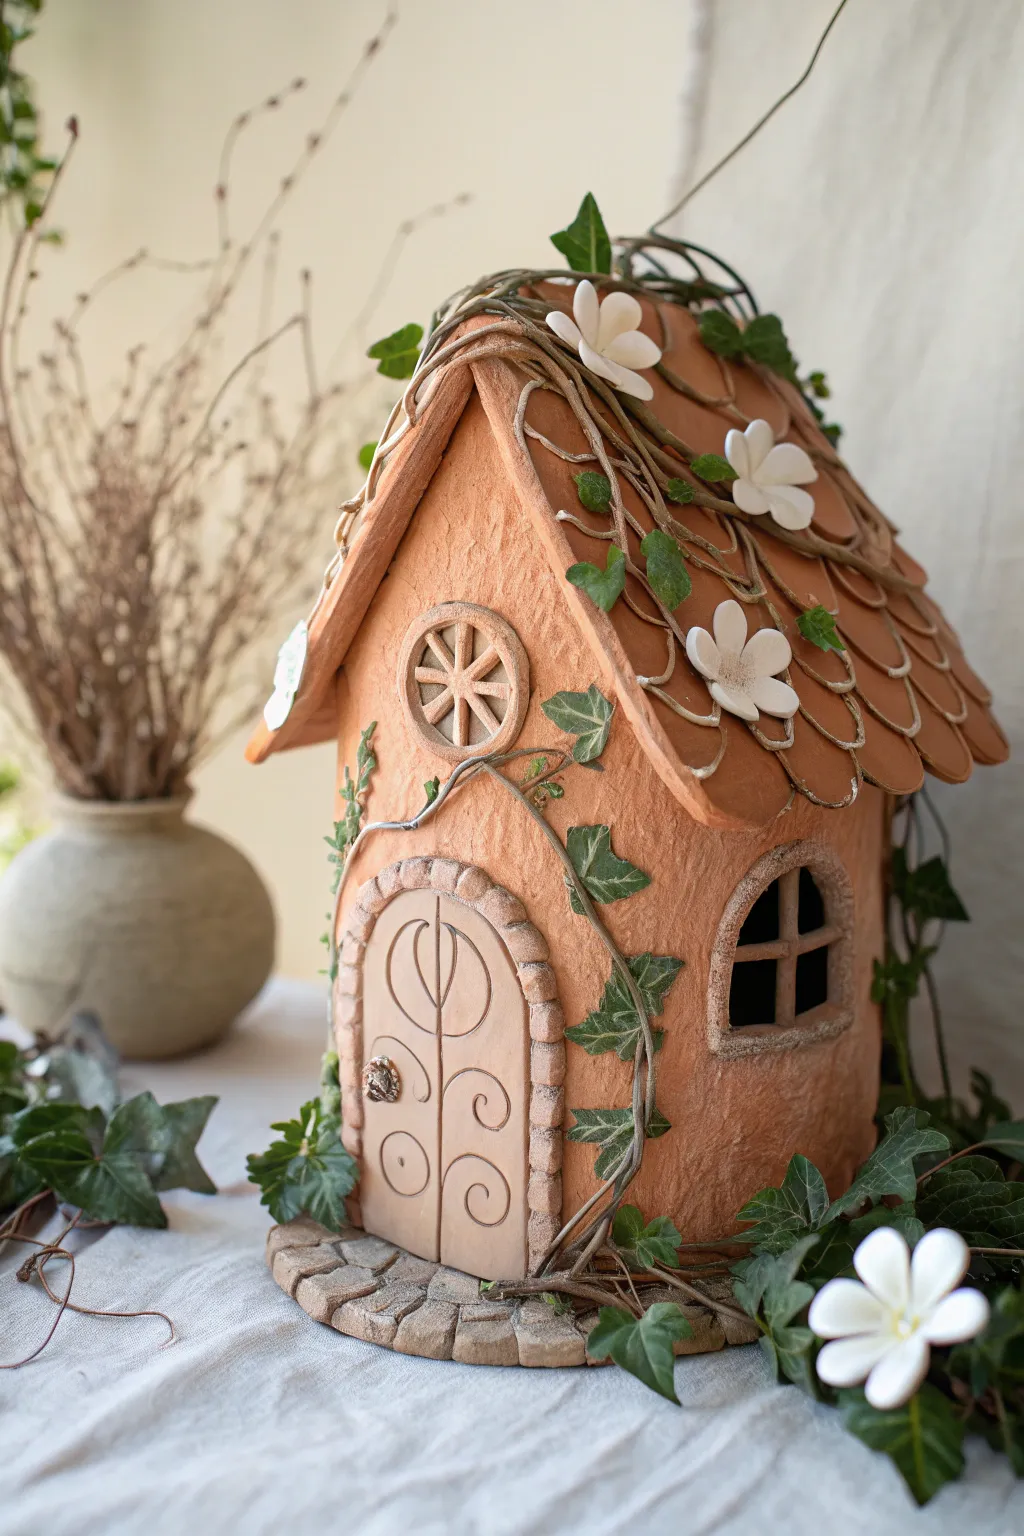
This charming, rustic fairy house brings a touch of woodland magic to your shelf with its terracotta-toned walls and delicate climbing vines. The project combines slab-building techniques with intricate appliqué details to create a cozy dwelling perfect for imaginary forest friends.
Detailed Instructions
Materials
- Air-dry clay (terracotta color)
- White air-dry clay (small amount for flowers)
- Rolling pin
- Clay knife or craft knife
- Texturing tools (sponge, soft bristle brush)
- Small circle cutter
- Liquid clay or slip (water and clay mix)
- Sculpting tools (needle tool, small spoon tool)
- Acrylic paints (brown/grey antiquing wash, green, gold)
- Artificial ivy leaves (optional for mixed media) or green acrylic paint
- Wire (thin gauge for vines, optional structure)
Step 1: Constructing the Base Structure
-
Prepare the Clay Slabs:
Roll out a large slab of terracotta-colored clay to a uniform thickness of about 1/4 inch. If you want a textured wall effect like the photo, gently press a coarse sponge or a crumpled ball of aluminum foil over the surface to give it a stucco-like finish. -
Cut the Walls:
Cut out four wall panels. You’ll need two rectangular side walls and two peaked walls for the front and back. The front wall needs to be slightly wider to accommodate the arched door. -
Cut Out the Openings:
While the walls are flat, carefully cut out an arched doorway on the front panel. On one of the side walls, cut out a small arched window opening. For the circular attic window, use a small circle cutter on the upper peak of the front wall. -
Bevel and Score:
Cut the edges of your walls at a 45-degree angle where they will join. Score these edges (scratch them up with a needle tool) and apply a generous amount of slip. -
Assemble the Frame:
Stand the walls up and press the scored edges together to form the house box. Smooth the seams on the inside for strength. I like to use a small coil of clay along the interior corners to reinforce the bond.
Step 2: Roofing and Architectural Details
-
Create the Roof Panels:
Roll out two rectangular slabs for the roof. They should be long enough to create an overhang on the eaves. Drape them over the peaked walls, scoring and slipping the contact points to secure them. -
Add Shingles:
Roll out a thin sheet of clay and cut numerous semi-circles or scalloped shapes. Starting from the bottom edge of the roof, layer these tiles upwards, overlapping each row slightly until you reach the peak. -
Add the Roof Ridge:
Roll a long, thin snake of clay and place it along the very top ridge of the roof to cover the seam where the shingles meet. Texture it gently to blend in. -
Construct the Door:
Roll a slab slightly thicker than the walls and cut it into an arch shape that fits inside your door frame. Use a needle tool to carve a vertical line down the center and swirl designs on each side. -
Install Trim Work:
Roll small bricks or stones out of clay and attach them around the door frame to create a masonry arch. Do the same for the window ledge. For the round attic window, insert a small wheel-spoke design made of thin clay strips.
Collapsing Roof?
If the roof sags while wet, bunch up dry paper towels or newspaper and stuff them inside the house to support the structure until the clay hardens.
Step 3: Vines, Flowers, and Finishing
-
Sculpt the Vines:
Roll out very long, thin snakes of terracotta clay. Twist two strands together loosely to create a gnarled vine effect. Drape these across the roof, down the sides, and around the door frame, using slip to attach them securely. -
Add Leaf Details:
Hand-sculpt small ivy leaves from green-tinted clay (or paint them later) and press them onto the vines. Alternatively, shape leaves from the terracotta clay to be painted green after drying. -
Create White Blossoms:
Using a small amount of white clay, shape simple five-petal flowers. Press the centers with a ball tool to cup them slightly. Attach these randomly along the vines on the roof and near the base. -
Step: Add Hardware Details:
Fashion a tiny round ball for the doorknob and press it into place. Add a small cross-bar inside the side window opening to create window panes. -
Construct the Base:
Place the entire house onto a final slab of clay cut into an irregular oval. Score and press small flat clay stones around the perimeter to create a paved patio look. -
Painting and Antiquing:
Once fully dry, paint the ivy leaves a deep green. Use a watered-down brown or grey acrylic paint as a wash over the entire piece—wipe it back quickly with a damp cloth so the dark color stays only in the recesses, highlighting the texture. -
Final Highlights:
Dry brush a little lighter terracotta or cream paint over the shingles and stucco texture to make the details pop.
Vine Variation
For realistic, thin vines that won’t break, try embedding thin floral wire inside your clay snakes. This allows you to bend them off the wall for a 3D effect.
Place your finished cottage among some potted plants or on a sunny windowsill to enjoy a little everyday enchantment
Pebble Path Fairy House Base
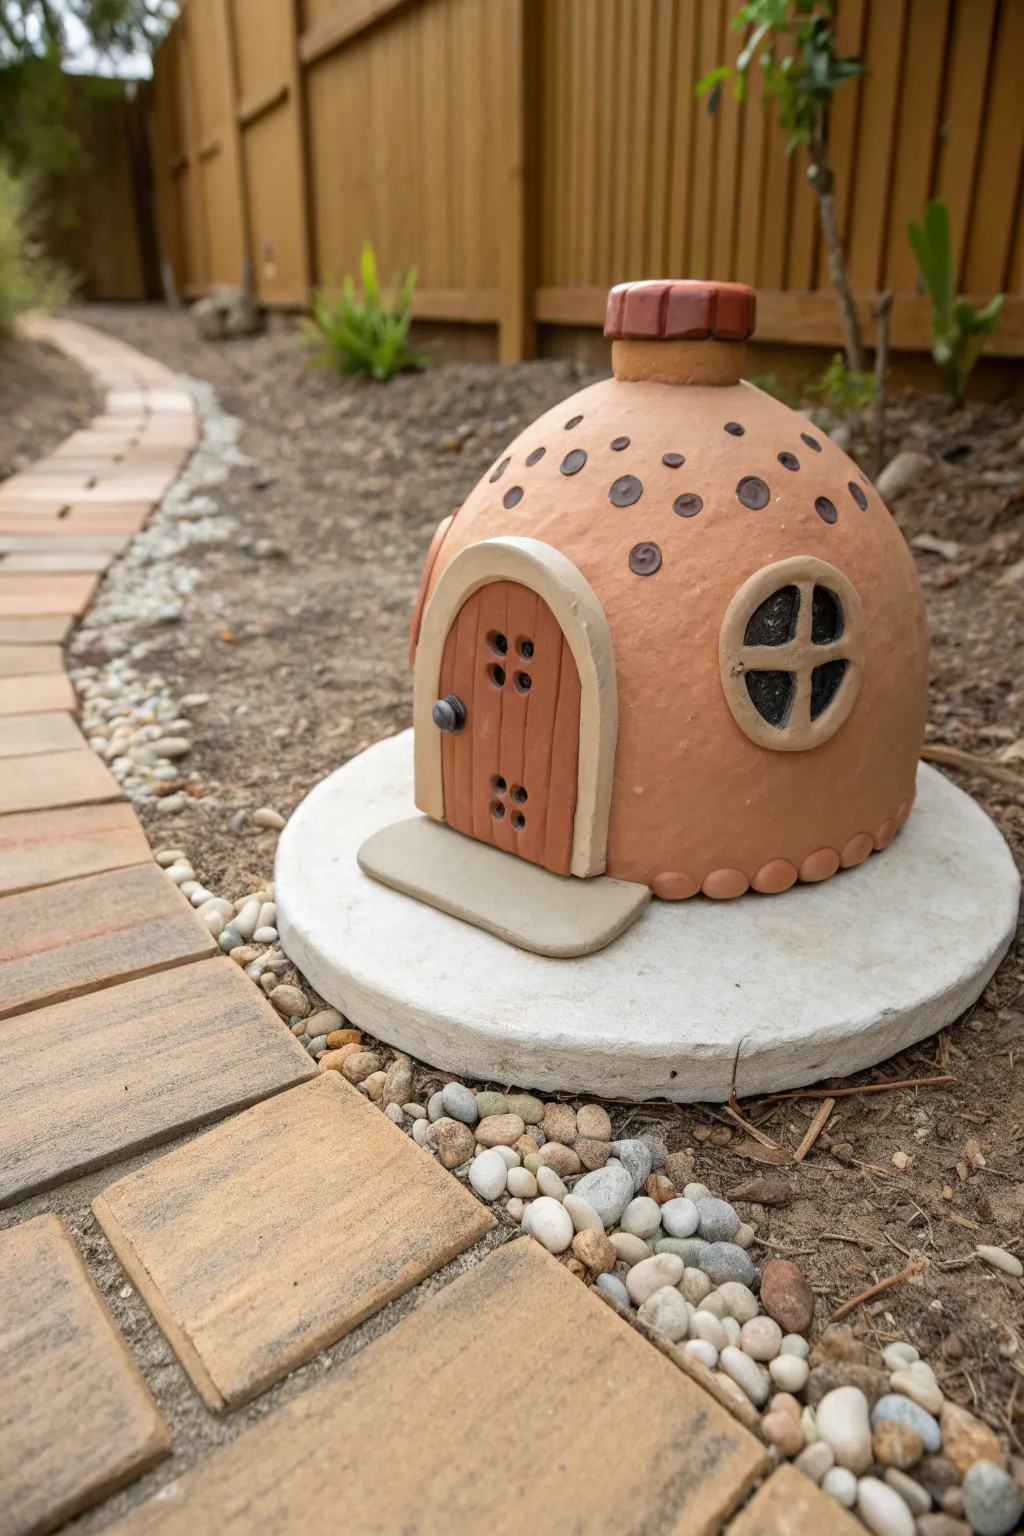
This charming, dome-shaped dwelling features a warm terracotta finish and delightful polka-dotted details. Resting on a sturdy stone base, it creates an inviting stop along any garden path for your magical visitors.
Step-by-Step
Materials
- Terracotta-colored polymer clay (approx. 8 oz)
- Beige or sand-colored polymer clay (approx. 2 oz)
- Dark brown polymer clay (small amount)
- Black polymer clay (small amount)
- Large aluminum foil ball (approx. 3-inch diameter)
- Circle stepping stone or concrete paver (approx. 8-10 inches)
- Clay sculpting tools (knife, needle tool, ball stylus)
- Circular cookie cutter (small)
- Rolling pin or pasta machine
- Liquid clay adhesive (optional)
- Matte outdoor varnish
Step 1: Forming the Base Structure
-
Prepare the foil core:
Crumple aluminum foil into a tight ball, roughly the size of a large orange. Press it firmly against a flat surface to create a flat bottom creates stability for your structure later. -
Condition the main clay:
Warm up your terracotta-colored clay by kneading it until it is soft and pliable. Roll it out into a large, even sheet about 1/4 inch thick. -
Cover the form:
Drape the clay sheet over the foil ball, smoothing it downwards. Trim any excess clay at the bottom and blend the seams so the foil is completely hidden and the surface is smooth. -
Create the chimney mount:
Form a small, thick cylinder of terracotta clay and attach it to the very top center of the dome. Blend the edges downward into the roof so it sits seamlessly. -
Add the scalloped trim:
Roll small balls of terracotta clay, roughly pea-sized. Press them gently around the entire bottom circumference of the house to create a decorative scalloped border.
Step 2: Building the Entryway
-
Make the door frame:
Switch to your beige clay. Roll a thick snake (coil) and flatten it slightly. Shape this into an arch and press it onto the front of the dome where you want the door to be. -
Cut the door slab:
Roll out a small piece of terracotta clay. Using the inside of your beige arch as a template, cut out a door shape that fits snugly inside the frame. -
Texture the wood:
Before placing the door, use a needle tool or knife to score vertical lines into the clay to mimic wood planks. Press the door gently inside the beige frame. -
Add door details:
create tiny spheres of dark brown clay. Press four of them into the upper half of the door and four into the lower half. Add a small grey or black ball for the doorknob. -
Lay the welcome mat:
Roll a rectangular slab of beige clay with rounded corners. Place this directly in front of the door frame, pressing it flat to serve as a stepping stone.
Sticky Situation
If clay isn’t sticking to the foil core or other clay pieces, use a tiny dab of Liquid Clay or ‘Bake and Bond’ as a glue before pressing parts together.
Step 3: Roof and Windows
-
Construct the window frame:
Make a thick ring of beige clay—I often use a small round cutter to get a perfect circle. Attach this to the side of the house. -
Fill the window pane:
Fill the center of the ring with black clay. Roll two very thin snakes of black clay and cross them over the center to create window panes. -
Apply roof spots:
Roll out thin dark brown clay. Use a small straw or cutter to punch out tiny circles. Press these spots randomly all over the terracotta roof for texture. -
Top the chimney:
Create a flat disk of terracotta clay slightly wider than your chimney mount. Score vertical lines around the edge to look like brickwork and place it on top of the mount.
Clean Trim Trick
For the beige door frame, freeze the rolled clay strip for 5 minutes before handling. It makes it stiffer and stops fingerprints from ruining the smooth arch.
Step 4: Finishing Touches
-
Bake the house:
Follow the baking instructions on your specific brand of clay (usually 275°F for 15-30 minutes). Let it cool completely inside the oven to prevent cracking. -
Removal (Optional):
If you want a hollow house, you can carefully dig out the foil core once the piece is fully cooled, though leaving it in adds weight and stability against wind. -
Seal the piece:
Apply two coats of matte outdoor varnish to protect the clay from the elements, letting it dry fully between coats. -
Position on the base:
Place your finished house on the concrete paver base. You can use a strong outdoor adhesive if you want it permanently attached to the stone.
Now you have a sturdy, whimsical home ready to welcome tiny guests to your garden path

TRACK YOUR CERAMIC JOURNEY
Capture glaze tests, firing details, and creative progress—all in one simple printable. Make your projects easier to repeat and improve.
Pumpkin Cottage Fairy House
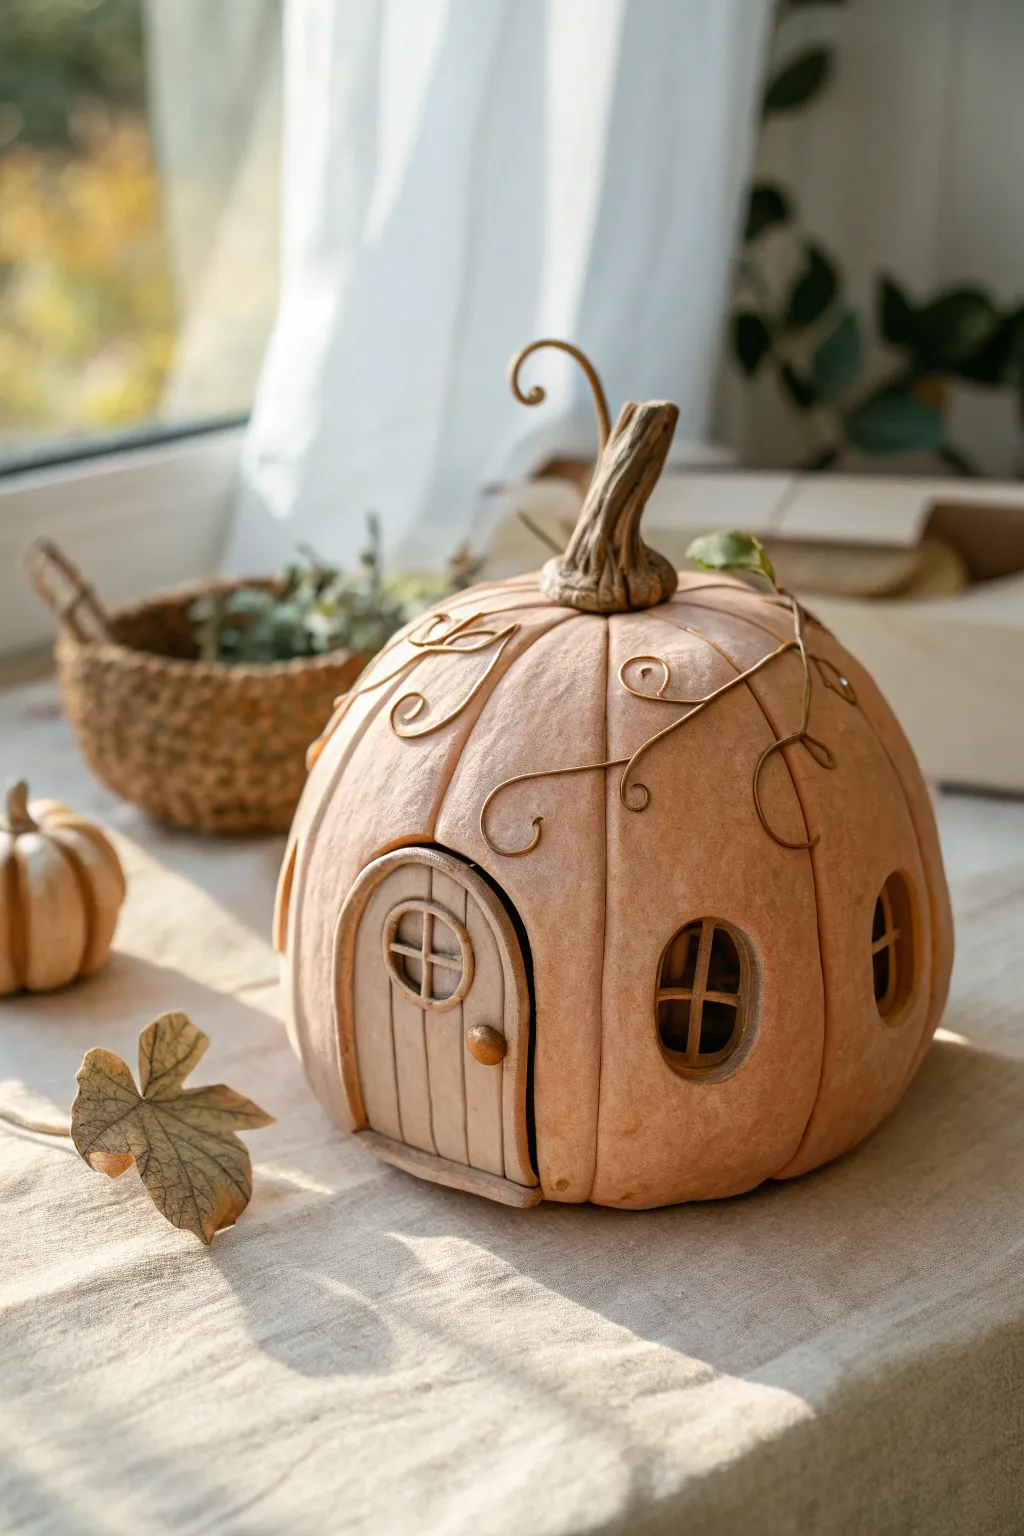
Transform humble clay into this enchanting pumpkin dwelling featuring delicate wire tendrils and a realistic woody stem. The soft, peach-orange matte finish gives it a cozy, autumnal feel perfect for a fairy garden or windowsill display.
Detailed Instructions
Materials
- Air-dry clay (stone or terracotta color optional, otherwise white)
- Aluminum foil (for the armature)
- Acrylic paints (pale orange, peach, brown, cream)
- Floral wire or copper crafting wire (thin gauge)
- Sculpting tools (needle tool, ball stylus, knife)
- Matte finish sealant/varnish
- PVA glue or clay slip
- Paintbrushes (soft bristle and detail brush)
- Rolling pin
Step 1: Forming the Pumpkin Base
-
Create the Core:
Crumple aluminum foil into a tight ball, slightly flattened at the top and bottom to create a squat pumpkin shape. This armature saves clay and reduces drying time. -
Cover with Clay:
Roll out a sheet of clay to about 1/4 inch thickness. Wrap the clay completely around your foil ball, smoothing out any seams with a little water on your finger until you have a smooth, uniform sphere. -
Define the Segments:
Using the side of a knitting needle or a modeling tool, press vertical indentations from the top center down to the bottom center all way around. This creates the classic ribbed sections of the pumpkin. -
Smooth & Shape:
Soften the edges of your indented ribs with a damp sponge or finger. The pumpkin should look plump and organic, not sharp or geometric.
Step 2: Carving Details
-
Draft the Openings:
Use a needle tool to lightly sketch the outlines for the arched door and two oval windows on the pumpkin’s surface. -
Carve the Windows:
Carefully cut out the window shapes. Remove the clay inside the lines. You can gently push the foil armature back a bit to create depth, or paint the foil black later if you don’t want to cut through it. -
Define the Door Frame:
Instead of cutting the door out completely, carve a deep groove around the door outline to separate it from the pumpkin wall. Create a second, smaller groove inside the first to act as the doorjamb. -
Add Texture:
Use a knife tool to score vertical wood grain lines onto the door surface. Roll a tiny ball of clay for the doorknob and attach it with a dab of clay slip or water.
Cracking Issues?
If cracks appear while drying, don’t panic. Mix a small amount of clay with water to make a paste (slip) and fill the cracks, then sand smooth once dry.
Step 3: Sculpting the Stem & Vines
-
Form the Stem:
Take a walnut-sized piece of clay and roll it into a thick, twisted log. Attach it securely to the top center of the pumpkin, blending the clay into the main body at the base. -
Detail the Stem:
Deeply score the stem with twisting vertical lines to mimic dried wood texture. Pinch the top to unevenly break it off visually, giving it a harvested look. -
Create Window Mullions:
Roll very thin snakes of clay. Place them inside the window openings in a cross shape to create the windowpanes, using a drop of water to secure them to the edges. -
Add Wire Tendrils:
Cut lengths of floral or copper wire. Twisting them around a paintbrush handle creates those lovely corkscrew shapes. Poke the ends into the semi-soft clay near the stem and upper pumpkin ribs. -
Final Clay Embellishment:
Roll tiny snakes of clay to mimic thinner vines. I like to drape these over the wire and surface, gently pressing them down so they look like they are growing from the stem.
Illuminate It
Before drying, cut a hole in bottom and remove the foil armature completely. Once finished, place an LED tea light underneath to make the windows glow.
Step 4: Painting & Finishing
-
Base Coat:
Once fully dry (24-48 hours), paint the entire pumpkin body. Mix orange with a generous amount of white and a touch of brown to get that muted, realistic pale peach tone shown in the image. -
Painting the Wood:
Paint the door and the stem a natural brown. While the paint is wet, wipe a little off the raised areas to let the lighter clay underneath peek through for highlights. -
Adding Depth:
Mix a watery wash of darker orange-brown paint. Brus this into the deep ribs of the pumpkin and the creases around the door, then wipe the surface clean. This shadows the crevices beautifully. -
Simulating Metal:
If your wire isn’t the color you want, carefully paint the wire tendrils with a metallic bronze or copper paint. -
Seal:
Finish the project with a spray of matte sealant to protect the paint and give it that soft, velvety porcelain look.
Place your finished cottage near a sunny window or nestled among houseplants to invite a little magic into your home
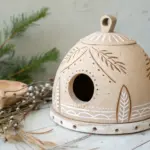
Acorn Cap Roof Fairy House

Bring a touch of woodland magic indoors with this charming clay fairy house, featuring a beautifully textured roof that mimics the scales of an acorn. The warm, earthy tones and rounded shape make it a delightful addition to any windowsill or fairy garden display.
Step-by-Step
Materials
- Air-dry clay or polymer clay (beige or light brown base)
- Acrylic paints (dark brown, ochre, cream, terracotta)
- Clay sculpting tools (knife tool, ball stylus)
- Rolling pin
- Aluminum foil (for armature)
- Small paintbrush (fine tip and flat shader)
- Small black bead or tiny button
- Texturing tool (sponge or toothbrush)
- Gold paint or marker (optional for details)
- Super glue or tacky glue
Step 1: Forming the Base Structure
-
Create the Armature:
Begin by scrunching aluminum foil into a round, squat ball shape, slightly wider at the bottom. This saves clay and keeps the house lightweight. Ensure the top is somewhat flat to support the roof later. -
Roll the Base Clay:
Roll out a slab of beige or light tan clay to about 1/4 inch thickness. It needs to be large enough to completely wrap around your foil ball. -
Wrap the Walls:
Drape the clay over the foil form, smoothing the seams together until you have a continuous, smooth surface. Slice off any excess clay at the bottom so it sits flat. -
Add Texture to the Base:
Gently press a sponge or stiff brush against the clay walls to give it a slightly organic, stone-like texture rather than leaving it perfectly smooth. -
Create the Foundation:
Take a separate strip of clay and roughen it significantly. Wrap this around the very bottom edge of the house to create a distinct, textured ‘foundation’ layer that looks like rock or uneven earth.
Step 2: Sculpting the Acorn Roof
-
Form the Roof Dome:
Create a separate, slightly smaller dome of foil for the roof. Cover this with a layer of clay, shaping it to slightly overhang the walls of the house. -
Make the Roof Tiles:
Roll out a thin sheet of clay. Use a teardrop-shaped cutter or a knife to cut out many small, uniform ‘scales’ or shingles for the acorn cap. -
Apply the Tiles:
Starting at the bottom rim of the roof, attach the scales in overlapping rows. Works your way upward, staggering the seams like brickwork. -
Texture the Shingles:
For that realistic acorn look, use a knife tool to score fine vertical lines into each individual shingle. I find it easiest to do this row by row as I attach them. -
Add the Stem:
Fashion a small, twisted stump of clay and attach it to the very peak of the roof. Texture it heavily to look like a broken woody stem.
Scale Texture Trick
Instead of cutting individual tiles, press a melon baller or rounded textural tool into the wet clay roof repeatedly to stamp the scale pattern quickly.
Step 3: Adding Details & Painting
-
Carve the Doorway:
On the main body, firmly press an oval or arch shape into the clay where the door will go. Don’t cut all the way through; just create an indentation for the door to sit in. -
Sculpt the Door:
Fill the indentation with a flat piece of clay. Score vertical wood grain lines into this piece using your knife tool. -
Add the Door Frame:
Roll a thin snake of clay and line the arch of the door. Use a small stylus tool to press intricate scallop patterns or dots into this frame for a decorative touch. -
Install the Window:
Create a smaller arched window frame using clay snakes. Add a cross shape inside for the window panes. To simulate depth, paint the inside of the window spacing black before attaching the crossbars. -
Attach Hardware:
Press a tiny black bead into the door for a knob, and add a small clay details like a hinge or a decorative floral medallion near the handle. -
Base Coast Painting:
Once the clay is fully dry (follow package instructions), paint the roof a medium warm brown and the walls a creamy beige. Paint the foundation darker brown. -
Dry Brushing:
To make the textures pop, dip a dry brush into lighter tan paint and lightly whisk it over the roof scales and the door grain. This highlights the raised edges. -
Final Assembly:
If you made the roof removable, check the fit. If you want it permanent, glue the roof securely to the base using strong adhesive.
Glow From Within
Cut the bottom out of the house and leave the windows open (no backing clay) so you can place an LED tea light inside for a warm night-time glow.
Place your finished house near a potted plant or on a shelf to invite a little everyday magic into your home
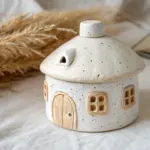
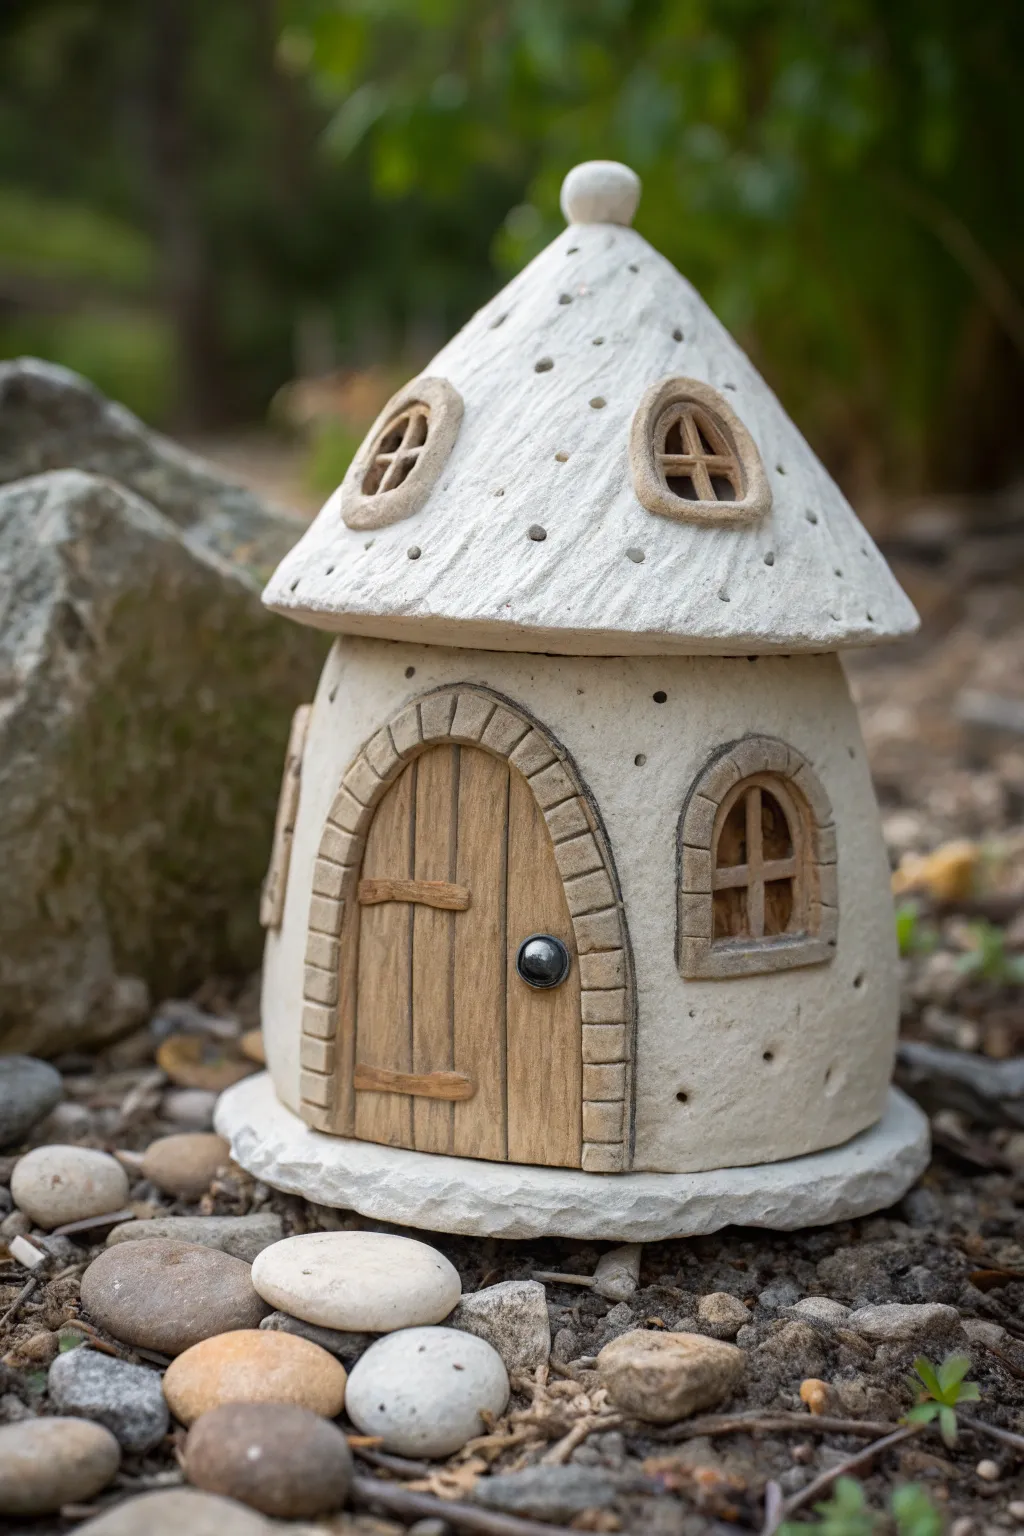
Mini Pinch Pot Dome Fairy House
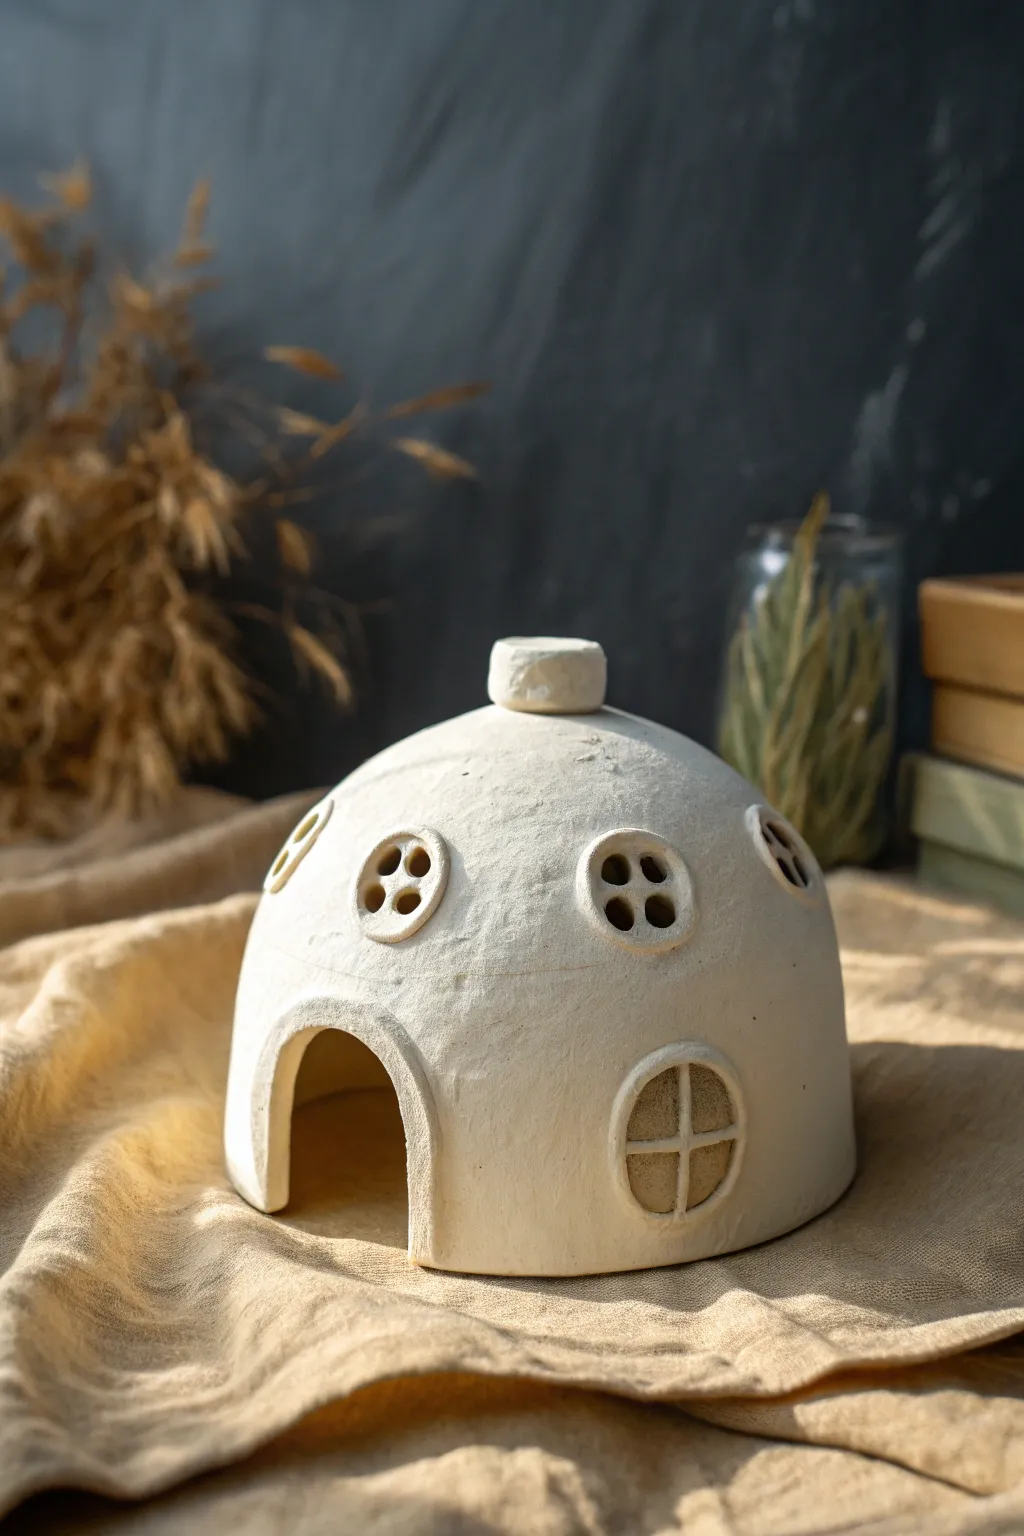
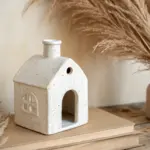
This charming, minimalist fairy dwelling features a smooth dome shape punctuated by playful, button-like circular windows. Its pale, stone-like texture makes it a perfect subtle addition to a garden nook or a cozy bookshelf display.
How-To Guide
Materials
- White air-dry clay or stoneware clay (approx. 1 lb)
- Small rolling pin
- Fettling knife or craft knife
- Small round cookie cutters (two sizes: approx. 1-inch and 1/2-inch)
- Small bowl or sphere (approx. 4-5 inches diameter) to use as a slump mold
- Plastic wrap
- Slip (clay and water mixture) and scoring tool (if using stoneware)
- Sponge and water
- Fine-grit sandpaper
Step 1: Forming the Base Structure
-
Prepare the clay:
Begin by kneading your clay until it is pliable and smooth, removing any air bubbles to prevent cracks later on. -
Roll out a slab:
Use your rolling pin to flatten the clay into a consistent slab about 1/4 inch thick. Aim for an even thickness to ensure the dome dries uniformly. -
Prepare the mold:
Take your small bowl or sphere and cover it tightly with plastic wrap. This prevents the clay from sticking to the mold and makes removal much easier. -
Drape the clay:
Gently lift the clay slab and drape it over your covered mold. Smooth the clay down the sides with your hands to conform to the shape. -
Trim the excess:
Using a fettling knife or craft knife, trim the excess clay around the base of the mold to create a clean, flat bottom edge. -
Partial drying:
Let the clay sit on the mold for about 30-60 minutes until it is leather-hard—firm enough to hold its shape but still workable.
Step 2: Adding Architectural Details
-
Create the doorway:
Carefully remove the dome from the mold. Mark an arch shape on one side for the door and cut it out cleanly with your craft knife. -
Smooth the edges:
Dip your finger or a small sponge in water and gently round off the cut edges of the doorway to remove any sharpness. -
Form the doorway trim:
Roll a thin coil of clay and flatten it slightly. Attach this around the exterior of the door arch to create a raised frame. If using stoneware, score and slip this connection. -
Make the chimney:
Form a small, thick cylinder of clay. Attach it to the very top center of the dome, blending the bottom edge of the cylinder into the roof for a seamless look.
Slumping Issues?
If your dome collapses when removed from the mold, it was too wet. Let it stiffen on the form longer next time, or speed up the process with a hair dryer on low.
Step 3: Creating the Windows
-
Cut window frames:
Roll out a small scrap of clay to 1/8 inch thickness. Use the larger circular cutter to cut out four or five circles. -
Create window openings:
Inside each clay circle, use the smaller cutter to remove the center, creating a ring or donut shape. These will be your window frames. -
Attach the frames:
Position these rings on the dome—two closer to the top, and one larger one near the base. Score, slip, and press them firmly onto the surface. -
Detail the upper windows:
For the upper windows, roll four tiny balls of clay for each window. Press them into the open center of the frame to create a ‘four-pane’ button look. -
Detail the lower window:
For the larger lower window, roll two very thin coils of clay. Place them inside the frame in a cross shape to form traditional windowpanes. -
Refine the texture:
Use a slightly damp sponge to wipe down the entire piece. This smooths out fingerprints and gives the surface a soft, matte stone-like appearance.
Add a Glow
Leave the bottom open and place the finished house over a battery-operated tea light. The light will shine through the little button holes for a magical night effect.
Step 4: Finishing Touches
-
Final drying:
Allow the house to dry slowly away from direct heat or drafts. This usually takes 24-48 hours depending on humidity. -
Sanding:
Once completely bone dry, lightly sand any rough patches or sharp edges with fine-grit sandpaper for a professional finish.
Place your finished dome among some moss to complete the scene
Hobbit Hill Fairy House
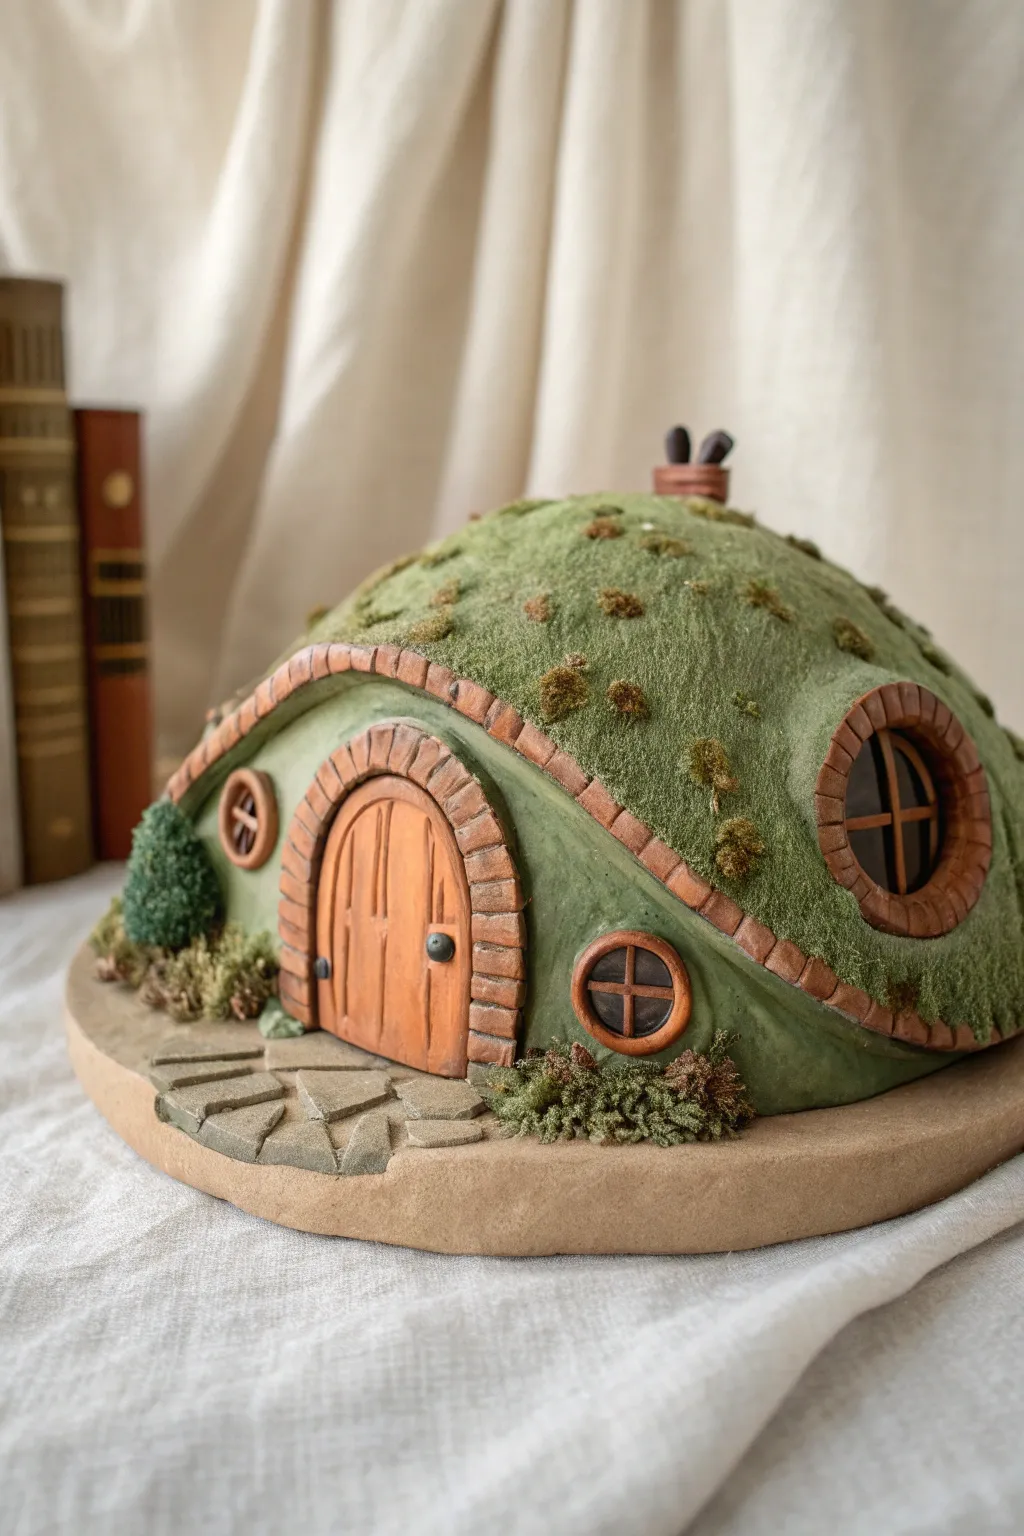
Transport yourself to the Shire with this charming polymer clay dwelling, featuring a signature rounded door and lush, mossy roof. This project combines sculpting textured stonework with flocked greenery to create a cozy, earthen home perfect for any bookshelf display.
Detailed Instructions
Materials
- Polymer clay (green, terracotta/brick red, brown, grey, beige)
- Aluminum foil
- Rolling pin or pasta machine
- Clay sculpting tools (needle tool, ball stylus, flexible blade)
- Texture sponge or stiff brush
- Static grass flocking (medium green)
- White craft glue or liquid clay
- Brown and black acrylic paint (for antiquing)
- Matte varnish
- Small paintbrush
Step 1: Sculpting the Base Structure
-
Form the core:
Create a tightly packed ball of aluminum foil and flatten the bottom against your work surface to form a sturdy dome shape. This saves clay and keeps the sculpture lightweight. -
Cover the dome:
Sheet out a layer of scrap clay or beige clay to about 3mm thickness. Drape this over your foil dome, smoothing the seams so the foil is completely covered. -
Establish the base:
Roll out a thicker slab of beige or light brown clay for the ground. Place your covered dome onto this base, pressing firmly to adhere them together. -
Add the grassy hill layer:
Cover the upper 80% of the dome with olive green clay. Smooth the edges down so it looks like turf growing over a mound, leaving the front area exposed for the house face.
Cracks in the Clay?
If you see small cracks in the clay before baking, smooth them with a drop of baby oil on your finger. If cracks appear after baking, fill them with a mix of liquid clay and regular clay, then rebake.
Step 2: Architectural Details
-
Create the door frame area:
Using a light sage green clay, create a flat facade on the front where the door will go. Blend the edges of this piece into the main dome structure. -
Sculpt the door:
Cut a thick arch shape from brown clay. Use a needle tool to score deep vertical lines to resemble wooden planks. -
Add wood grain texture:
Scratch finer grain details into the planks with a needle tool. Add a tiny black ball of clay for the doorknob and two small black hinges. -
Build the brick archway:
Roll a snake of terracotta clay and flatten it slightly. Wrap this around your wooden door. Use a blade to impress lines, separating the snake into individual brick shapes. -
Form the roof overhang:
Roll a longer snake of terracotta clay. Attach this along the edge where the grassy roof meets the house face, creating a protective brick eyebrow. Score brick lines into this strip as well. -
Construct the windows:
Create two small circles of terracotta clay for the side windows and a larger one for the right side. Indent the centers dark brown or black clay to mimic glass. -
Add window panes:
Roll extremely thin threads of brown clay. Cross them over the dark window centers to create the muntins (window pane dividers). -
Lay the stone path:
Cut irregular polygon shapes from grey clay. Press them onto the base in front of the door to form a flagstone path, leaving small gaps between the stones.
Make it Glow
Want a magical touch? Before starting, construct the core around a battery-operated LED tea light. Leave a hole in the bottom and use translucent yellow clay for the windows so the light shines through.
Step 3: Texturing and Finishing
-
Texture the bricks:
Gently tap a coarse sponge or a crumpled ball of foil against all the brickwork to give it a weathered, pitted stone texture. -
Add chimney details:
Fashion a small chimney stack from terracotta clay, add a tiny black top, and attach it to the highest point of the roof. -
Antiquing wash:
Before baking, you can apply a tiny amount of shading with chalk pastels, or wait until after baking to apply a wash of diluted brown acrylic paint to the crevices of the door and bricks. Wipe away the excess. -
Bake the piece:
Bake the sculpture according to your clay manufacturer’s instructions (usually 275°F/130°C for 15-30 minutes per 1/4 inch thickness). Let it cool completely. -
Apply the grass:
Brush white glue or liquid clay over the green roof area. Sprinkle static grass flocking generously over the glue. -
Add moss clusters:
Glue small clumps of darker, coarser scenic moss or dried tea leaves sporadically on the roof and around the base of the house for a wild, overgrown look. -
Final landscaping:
Add a small cone of green sponge or textured clay to the left of the door to serve as a shrub.
Place your finished hill home among your potted plants or books for a touch of everyday magic
Bottle Form Fairy House
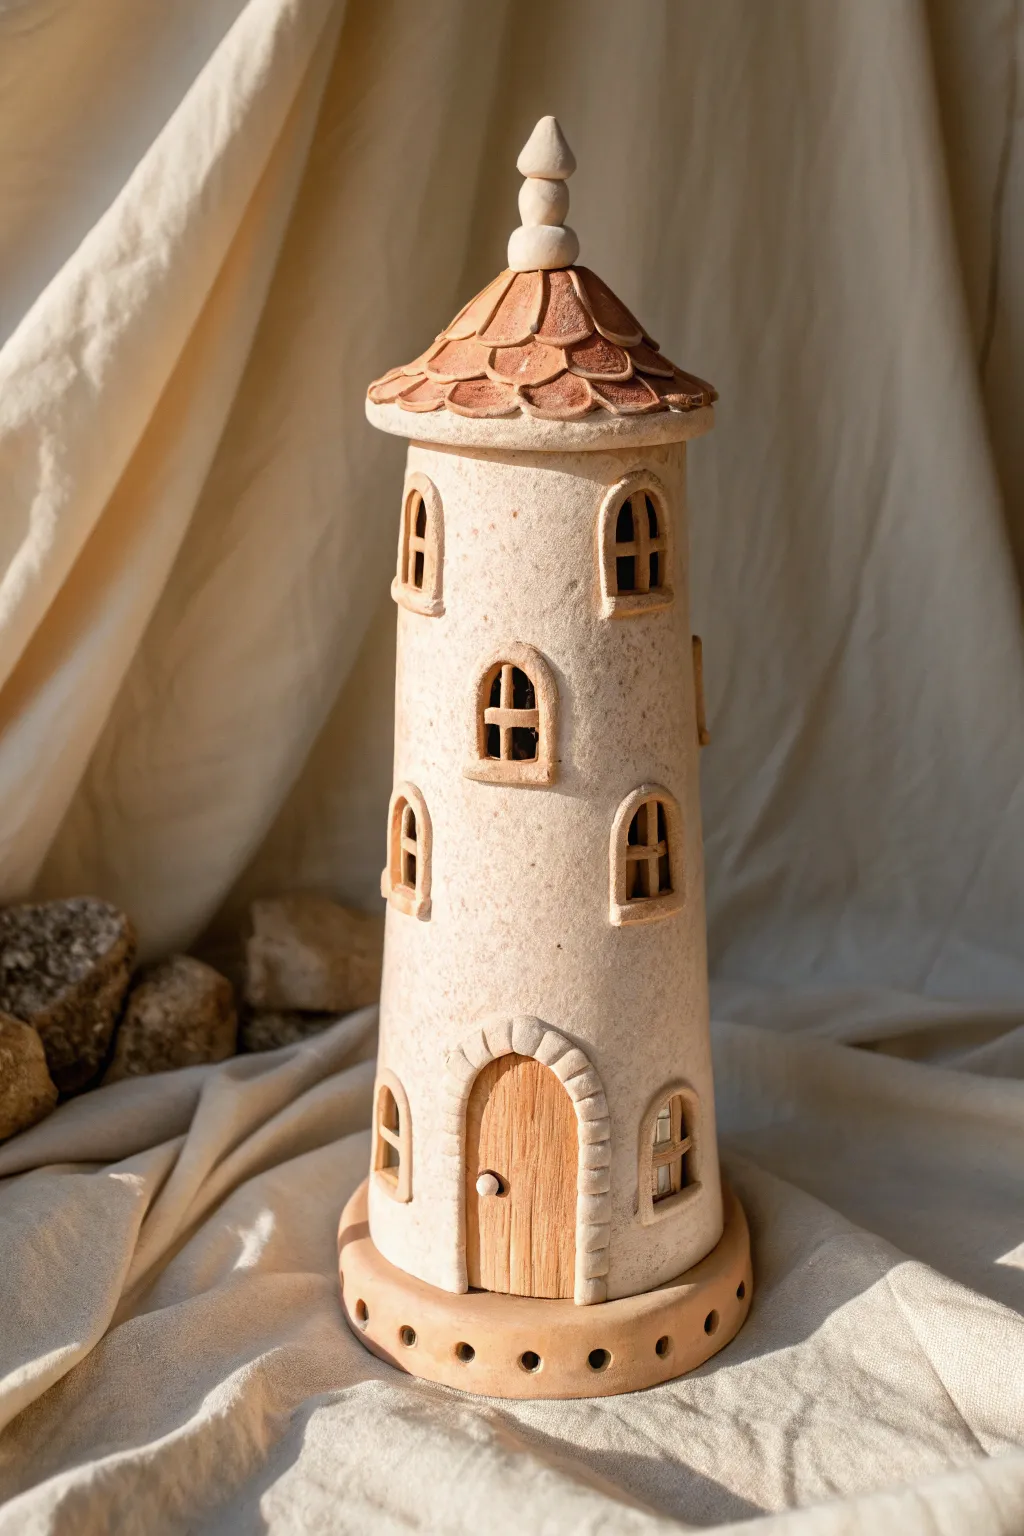
Transform simple clay slabs into a majestic fairy tower that doubles as a charming luminary. This project features a textured, stucco-like finish, rustic arched windows, and a warm wooden door that invites imaginary creatures home.
Step-by-Step
Materials
- White or speckled stoneware clay
- Terracotta colored clay (for roof)
- Wooden dowel or rolling pin
- Basic clay tool set (needle tool, knife, sponge)
- Small piece of balsa wood (for the door)
- Slip (clay mixed with water)
- Circular cookie cutters (optional)
- Canvas or cloth work surface
- Small hole cutter or straw
Step 1: Forming the Tower Base
-
Roll the main slab:
Begin by rolling out your white clay on a canvas surface to a consistent thickness, about 1/4 inch. Ensure the slab is large enough to wrap into a tall, slightly tapered cylinder. -
Create the cylinder:
Cut the slab into a tall trapezoid shape. Stand it up and curve it around to form a tube that is slightly narrower at the top. Score and slip the vertical seam, pressing firmly to join, then smooth the seam inside and out until invisible. -
Texture the surface:
Gently dab a textured sponge or crumpled aluminum foil all over the exterior of the tower. This creates that lovely, weathered stucco appearance rather than a smooth, manufactured look. -
Construct the base:
Roll a thick coil of clay or cut a circular slab slightly wider than the bottom of your tower. Attach this to the bottom of the cylinder using the score and slip method. -
Ventilation holes:
Using a small hole cutter or a sturdy straw, punch evenly spaced holes around the side perimeter of the base. This adds decorative flair and is crucial for airflow if you plan to use a candle inside.
Collapsing clay?
If the tower walls sag while you work, loosely stuff the interior with crumpled newspaper or paper towels to support the structure until the clay stiffens.
Step 2: Windows and Doorways
-
Cut the openings:
Plan your window placement—this tower has three levels. Carefully cut out arched window shapes with a needle tool or fettling knife. Save the clay you remove. -
Add window frames:
Roll tiny, thin snake-like coils of clay. Outline each window cutout with these coils to create a protruding frame, smoothing the clay onto the tower body so it sticks securely. -
Install windowpanes:
Cut very short lengths of your thin coils to create the cross-grid (muntins) inside each window arch. Gently press them into the inside edge of the window frames. -
Create the door arch:
Cut a larger arch at the base for the doorway. Instead of a smooth frame, form small rectangular bricks from clay and attach them around the door opening to create a stone masonry arch. -
Craft the wooden door:
Measure a piece of balsa wood to fit just behind your stone arch. Score vertical lines into the wood to simulate planks and glue a tiny clay bead on it for a doorknob. Set this aside to be glued in *after* the ceramic piece is fired.
Step 3: Roof and Finishing Touches
-
Shape the roof cone:
Using the terracotta-colored clay, roll a slab and cut a circle. Remove a pie-shaped wedge from the circle and join the straight edges to form a shallow cone that fits atop your tower. -
Make the roof tiles:
With the remaining terracotta clay, cut many small, thin semi-circles or U-shapes. I find using a small customized cookie cutter speeds this up significantly. -
Apply the shingles:
Starting at the bottom rim of the roof cone, attach the tiles in overlapping rows using a little slip. Work your way upward until you reach the peak. -
Add the finial:
Roll a small ball and a teardrop shape from white clay. Stack them on the very tip of the roof to create a decorative finial, blending the clay at the join point. -
Final assembly:
Score and slip the top rim of the white tower and the underside of the terracotta roof. Press them together gently. Once dry, fire the piece in a kiln according to your clay’s specifications, then glue the wooden door in place.
Light it up
Make the roof removable by creating a flange on the underside instead of sealing it shuts. This allows you to easily place an LED tea light inside for a glowing effect.
Place your finished tower on a shelf or in the garden to start your very own fairy village
Strawberry Fairy House
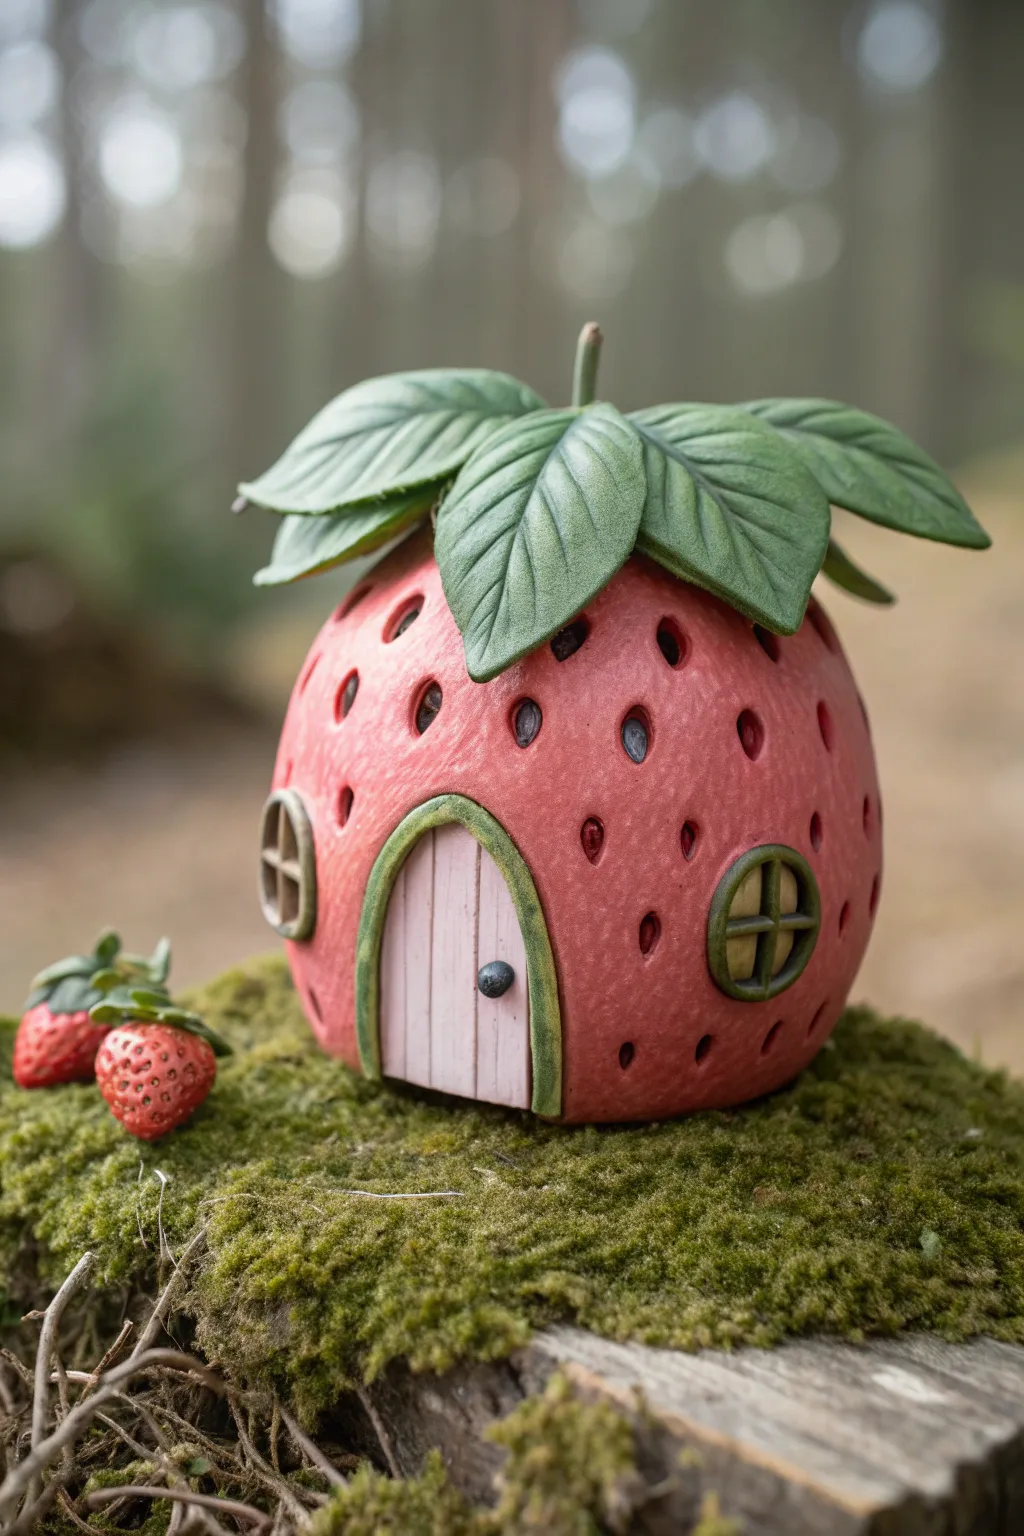
Transform a simple lump of clay into this enchanting woodland dwelling that looks like it was plucked straight from a fairy tale. With its vibrant red body, leafy green roof, and tiny inviting door, this strawberry house is the perfect centerpiece for any miniature garden.
How-To Guide
Materials
- Polymer clay (Red, Green, Light Pink, Dark Brown/Black)
- Aluminum foil
- Sculpting tools (needle tool, ball tool, clay knife)
- Acrylic rolling pin
- Liquid clay or Bake & Bond
- Matt varnish (optional)
- Soft pastel chalks (dark red/brown for shading)
- Small paintbrush
Step 1: Forming the Base
-
Create the core:
Begin by crumpling aluminum foil into a tight ball, roughly the size of a tennis ball. Shape it slightly into a tapered strawberry form—wider at the top and slightly narrower at the bottom. -
Condition the red clay:
Knead your red polymer clay until it is soft and pliable. Roll it out into a large, even sheet about 1/4 inch thick. -
Cover the foil:
Wrap the red clay sheet around your foil armature. Smooth the seams carefully with your fingers or a clay tool until the surface is seamless and the foil is completely hidden. -
Refine the shape:
Gently roll the covered form on your work surface to smooth out fingerprints. Gently pinch the bottom so it sits flat and stable.
Step 2: Adding Texture and Details
-
Create the seed indentations:
Using a large ball tool or the rounded end of a paintbrush, press small, teardrop-shaped indentations all over the surface of the strawberry. Space them somewhat regularly but keep it organic. -
Insert the seeds:
Roll tiny, tiny teardrops of dark brown or black clay. Place one into each indentation you created. I find it helps to use a needle tool to gently press them into the hollows so they stick well. -
Texture the surface:
Take an old toothbrush or a stiff bristle brush and gently tap it all over the red clay (avoiding the seeds) to create a realistic, porous fruit texture.
Sticky Situation?
If your clay gets too soft and sticky while sculpting, pop it in the fridge for 10 minutes. This firms it up, making it much easier to carve fine details like leaf veins.
Step 3: Constructing the Architectural Elements
-
Make the door frame:
Roll a thin snake of green clay. Flatten it slightly and form an arch shape on the front of the strawberry where you want the entrance. Use a needle tool to scratch a wood grain texture into it. -
Create the door:
Cut a piece of light pink clay to fit inside the green arch. Use a knife to score vertical lines to resemble wooden planks. Press a tiny ball of dark clay onto it for the doorknob. -
Add windows:
Form two small circles of green clay for window frames. Place them on either side of the house. Add cross-bars using thin strips of green clay to create mullions. -
Add depth:
If you want the windows to look like glass, you can place a small circle of dark yellow or black clay behind the cross-bars before attaching them to the strawberry body.
Pro Tip: Realistic Skin
Before baking, lightly pat the red surface with a piece of coarse sandpaper or a stiff brush. This removes fingerprints and mimics the real texture of a strawberry skin.
Step 4: The Leafy Roof
-
Shape the leaves:
Condition green clay and divide it into 5-7 portions. Shape each portion into a wide, flat tear-drop leaf shape. -
Veining detail:
Use a needle tool or knife to score a central vein and smaller branching veins onto each leaf. Deep scoring adds realism to the final look. -
Attach the calyx:
Arrange the leaves on top of the strawberry, overlapping them slightly. Let the tips of the leaves curl upward or drape naturally over the sides. -
Add the stem:
Roll a small cylinder of green clay for the stem. Attach it to the very center where the leaves meet, blending the clay at the base so it connects securely.
Step 5: Finishing Touches
-
Shade with pastels:
Use a brush to dust a little dark red or brown pastel powder into the creases around the door frame, windows, and under the leaves to create shadows and depth. -
Bake the project:
Bake the house according to your clay manufacturer’s instructions (usually around 275°F/130°C for 15-30 minutes per 1/4 inch of thickness). Let it cool completely inside the oven to prevent cracking. -
Varnish:
Once cool, apply a matte varnish to the whole piece to protect it, or use a gloss varnish just on the seeds for a fresh, juicy look.
Place your finished cottage on a bed of moss to welcome the fairies home
Seashell Shore Fairy House
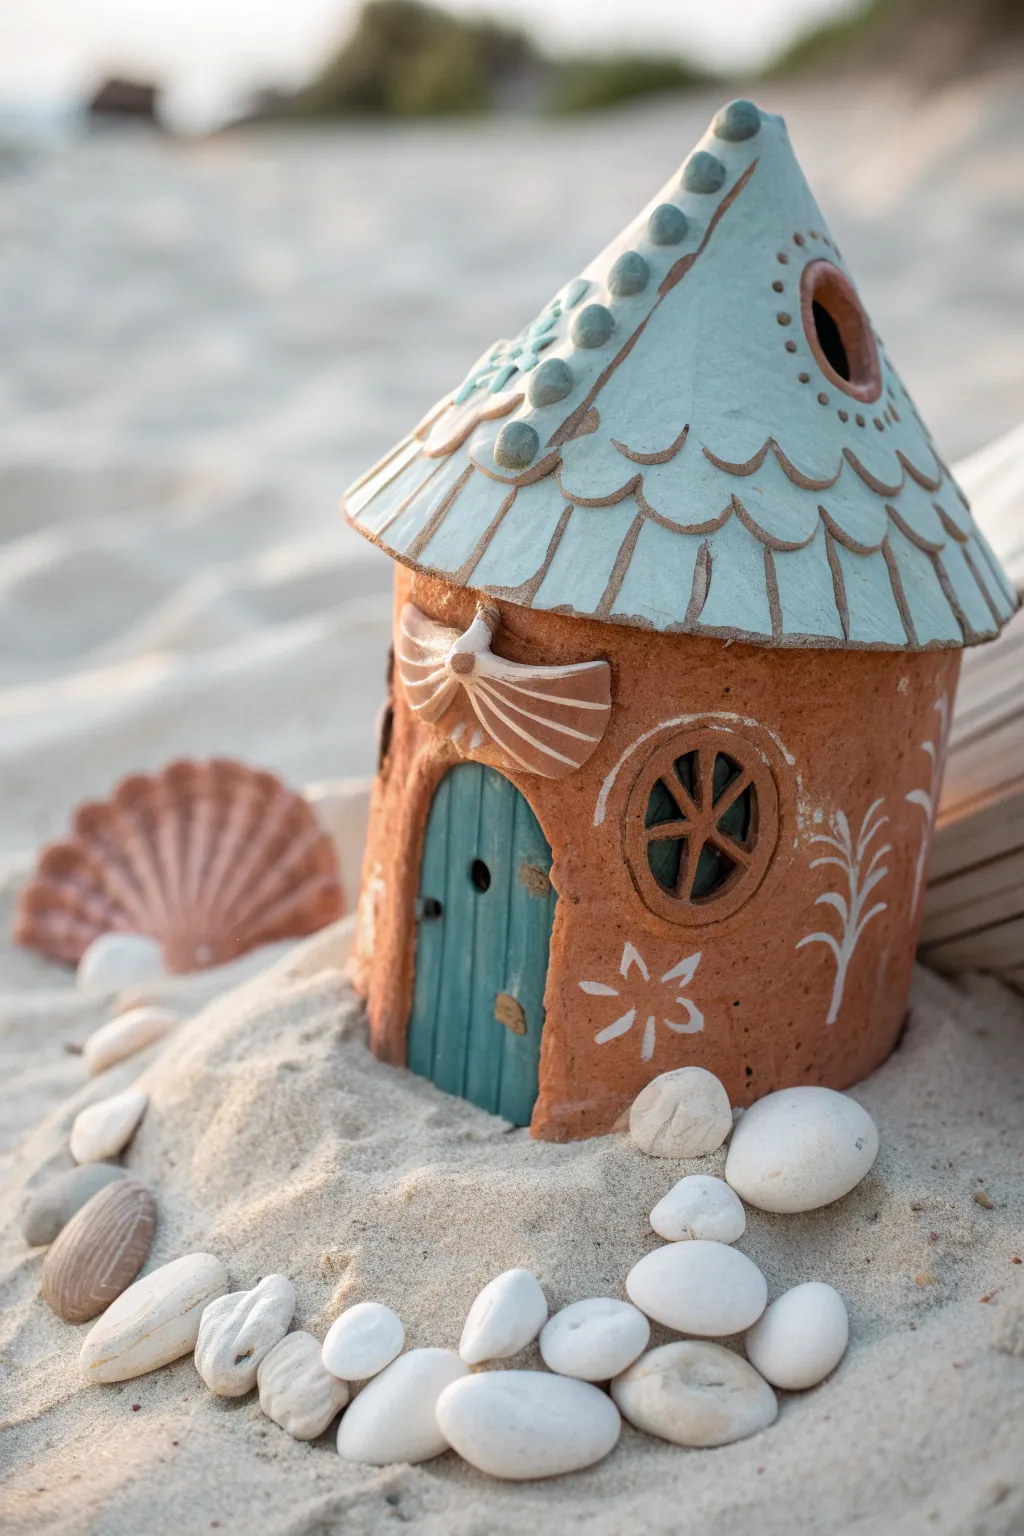
Bring the magic of the beach to your fairy garden with this adorable terra cotta-style cottage. Featuring a weathered teal roof and sea-inspired details, this clay project captures the breezy spirit of a coastal hideaway.
How-To Guide
Materials
- Air-dry clay (terra cotta color) or polymer clay
- Air-dry clay (white or light grey)
- Acrylic paints (teal, white, dark brown)
- Clay sculpting tools (needle tool, rolling pin, knife)
- Texture tool or small scallop cutter
- Small paintbrushes
- Water and slip (if using air-dry clay)
- Sandpaper
Step 1: Building the Structure
-
Form the Base:
Start by rolling out a slab of terra cotta-colored clay to about 1/4 inch thickness. Cut a rectangle roughly 8 inches long and 3 inches high, then wrap it into a cylinder to form the house walls. Smooth the seam thoroughly with a little water or slip. -
Create the Roof Cone:
Roll out a separate slab of clay (you can use white clay here since it will be painted later) and cut a large circle. Remove a pie-shaped wedge from the circle and join the straight edges together to form a tall, pointy cone that sits slightly wider than your house walls. -
Join Roof to Base:
Score and slip the top edge of your cylinder and the bottom inside edge of the roof cone. Press them firmly together, smoothing the clay on the inside if possible to ensure a strong bond.
Uneven Roof?
If your roof cone sags while drying, crumple a ball of aluminum foil or paper and place it inside the house structure to support the roof’s shape until it hardens.
Step 2: Sculpting Details
-
Cut the Doorway:
Use a sharp craft knife to cut an arch shape out of the front wall for the door. Save this piece of clay if you want to use it as a template, or simply roll a new slab of teal-tinted clay (or plan to paint it) to fit snugly inside this opening. -
Add Door Details:
Press the door piece into place. Use a needle tool to score vertical lines to resemble wood planks. Add a tiny ball of clay for a doorknob and two small rectangles for hinges. -
Create the Window:
On the side of the house, attach a thick ring of terra cotta clay to frame a circular window. Inside the ring, place two thin snakes of clay in a cross shape to create the window panes. -
Roof Texture:
To mimic the scalloped roof tiles, start at the bottom edge of the cone. Use a small U-shaped cutter or the rounded end of a tool to press tile shapes into the clay. Work your way up to the peak in overlapping rows. -
The Sea-Wing Motif:
Roll two small teardrop shapes of white clay and flatten them. Press a texture tool into them to create radiating lines, resembling a shell or moth wings. Attach these directly above the door arch. -
Roof Accents:
Add a line of small clay balls running down one side of the roof for extra texture. At the very top, refine the tip or add a slight curve for character. -
Vent Holes:
Use a straw or small circular cutter to create a small ventilation window near the peak of the roof, smoothing the edges with a wet finger.
Step 3: Finishing Touches
-
Initial Drying:
Allow the sculpture to dry until it is leather hard. If using polymer clay, bake according to the package instructions now. For air-dry clay, let it cure completely for 24-48 hours. -
Sanding:
Once fully dry, use fine-grit sandpaper to smooth any rough fingerprints or sharp edges on the base and roof. -
Painting the Roof:
Paint the entire roof cone with a soft teal acrylic paint. I prefer to water the paint down slightly so it settles into the recessed lines of the shingles, giving it naturally weathered depth. -
Painting the Door:
Use a slightly darker teal or turquoise for the door planks to make them pop against the terra cotta walls. -
Botanical Details:
Using a very fine detail brush and white acrylic paint, hand-paint simple leafy vines and star-shaped flowers on the terra cotta walls. Keep the strokes loose and organic. -
Highlighting Texture:
Dry brush a tiny amount of white paint over the raised sculpted elements—like the window frame and the wing motif above the door—to accentuate their texture. -
Protective Seal:
Finish with a matte spray varnish to protect the paint, especially if your fairy house will be living outside near actual sand.
Beach Glass Windows
Before the clay dries, press small pieces of sea glass into the window openings. The light will shine through them beautifully when placed in the sun.
Now you have a whimsical seaside dwelling ready to welcome fairies to the shore
Crystal Cave Fairy House
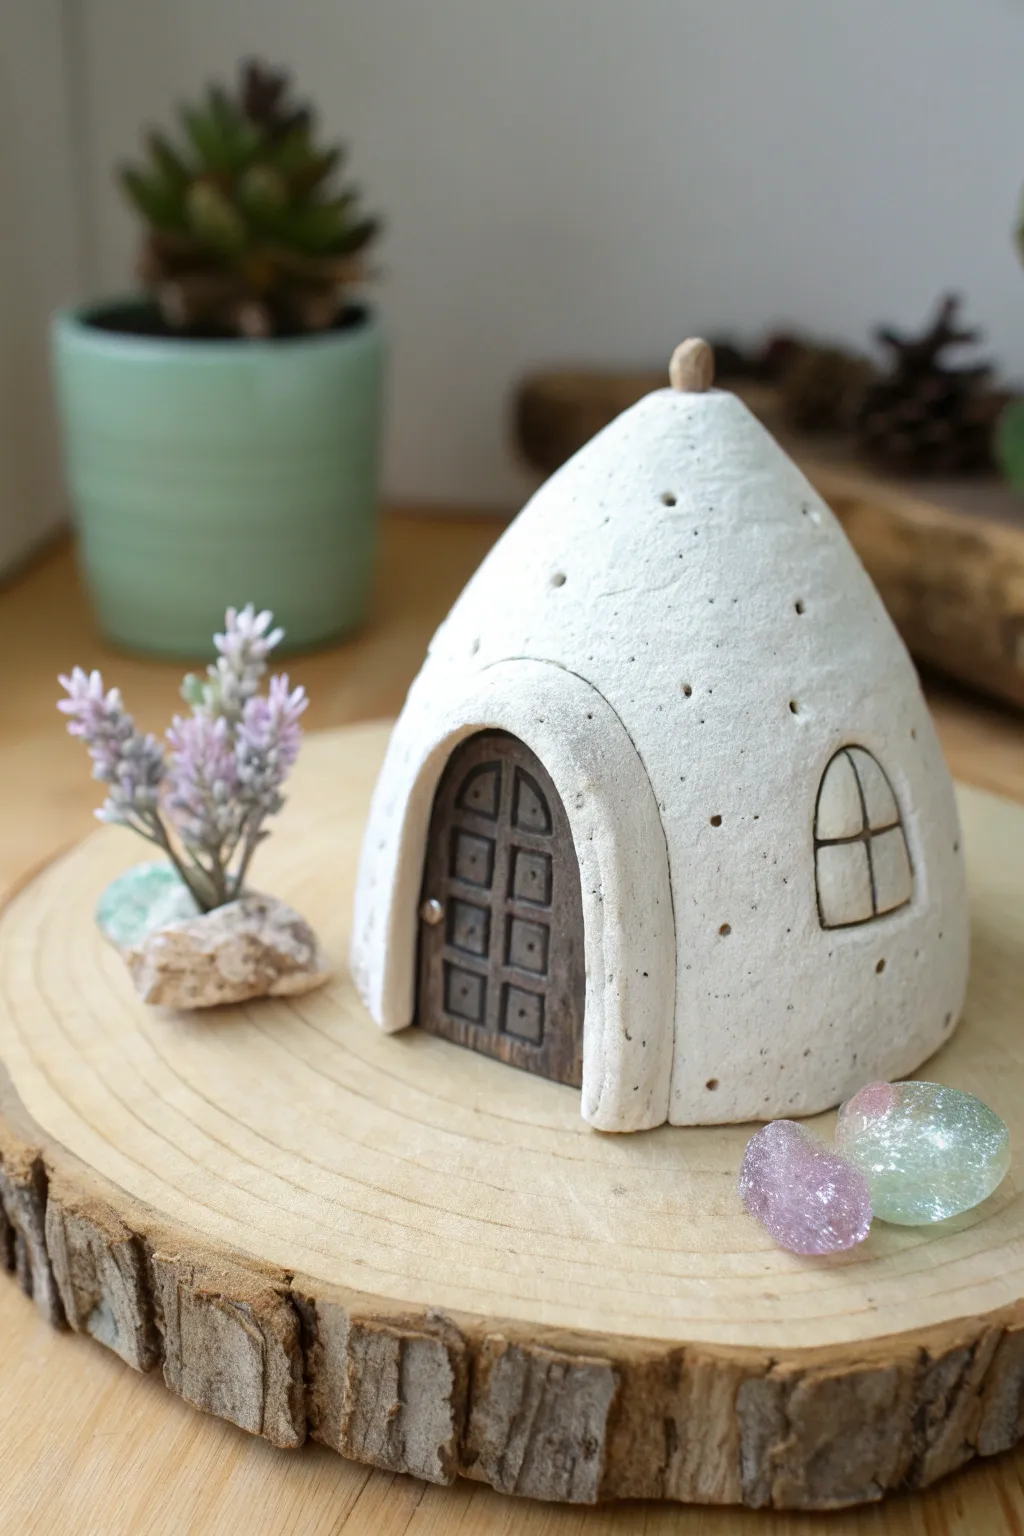
This minimalist, dome-shaped fairy house brings a touch of magic with its clean white texture and charming arched entryway. Sitting atop a natural wood slice and accented with shimmering crystals, it looks like a cozy retreat carved from stone or stucco.
Detailed Instructions
Materials
- White air-dry clay (or polymer clay)
- Brown acrylic paint
- Dark grey or black acrylic paint
- Fine-grit sandpaper
- Sculpting tools (needle tool, small knife)
- Rolling pin
- Aluminum foil
- Small wooden bead (for the top)
- Small paintbrush
- Clear matte varnish (optional)
- Wood slice base
- Faux crystal beads or stones
- Small faux flowers or succulents
- Hot glue gun
Step 1: Forming the Core Structure
-
Create the foil armature:
Begin by crumpling aluminum foil into a tight ball, then shape it slightly into a cone or beehive shape. This saves clay and keeps the structure light. -
Condition the clay:
Knead your white clay until it is soft and pliable. If you are using air-dry clay, keep a small bowl of water nearby to smooth out any cracks. -
Cover the form:
Roll out a slab of clay about 1/4 inch thick. Drape it over your foil armature, smoothing it down the sides to cover the foil completely. -
Shape the dome:
Using your hands, gently pat and smooth the clay into a seamless, slightly tapered dome shape. Ensure the bottom is flat so it sits evenly.
Stone Texture Trick
Gently press a piece of rough sandpaper or a crumpled ball of aluminum foil against the wet clay to create an instant, realistic stone texture.
Step 2: Adding Architectural Details
-
Define the doorway:
Roll a small snake of clay and flatten it slightly. attach this in an arch shape on the front of the dome to create the door frame. Blend the outer edges into the main dome using a sculpting tool or wet finger. -
Sculpt the door:
Inside the arch you just created, gently press a flat piece of clay to form the door itself. Use a needle tool to carve a grid pattern representing wooden panels. -
Add the window:
On the side of the dome, carve a small arched window shape. You can add a tiny cross of clay inside to mimic window panes. -
Texture the surface:
To get that porous, stone-like look, gently poke small, shallow holes all over the white surface using a needle tool or a toothpick. Vary the spacing for a natural look. -
Cap the roof:
Press a tiny wooden bead or a small ball of clay into the very top point of the roof to act as a finial or chimney. -
Let it dry:
Allow the clay to dry completely according to the package instructions. Air-dry clay often takes 24-48 hours depending on thickness.
Cracks in the Clay?
If small cracks appear while air-dry clay is drying, mix a tiny bit of fresh clay with water to make a paste and fill the cracks, then sand smooth.
Step 3: Painting and Finishing
-
Sand the surface:
Once fully dry, lightly sand the white dome with fine-grit sandpaper to remove any fingerprints or sharp ridges, keeping the texture intact. -
Paint the door:
Carefully paint the door area with brown acrylic paint. I find that a smaller brush gives better control near the edges of the white frame. -
Highlight the details:
Use a very fine brush or a toothpick dipped in dark grey or black paint to define the window frame and the tiny doorknob. -
Add a wash (optional):
If the white looks too pristine, you can apply a very watery grey wash over the texture holes and immediately wipe it off with a paper towel, leaving shadows in the recesses. -
Seal the house:
Apply a coat of clear matte varnish to protect the paint and clay.
Step 4: Assembling the Scene
-
Prepare the base:
Take your clean wood slice and decide where you want the house to sit. -
Attach the house:
Use a dab of hot glue or strong craft glue to secure the bottom of the fairy house to the wood slice. -
Plant the garden:
Glue a small cluster of faux lavender or succulents to the left side of the house, using a small stone or bit of clay to hide the glue point. -
Scatter the crystals:
Arrange two or three glass gems or faux crystals on the right side of the base to give the scene that magical ‘crystal cave’ vibe.
Place this enchanting little dwelling on a shelf or near a plant to invite fairies into your home
Glowing Window Fairy House
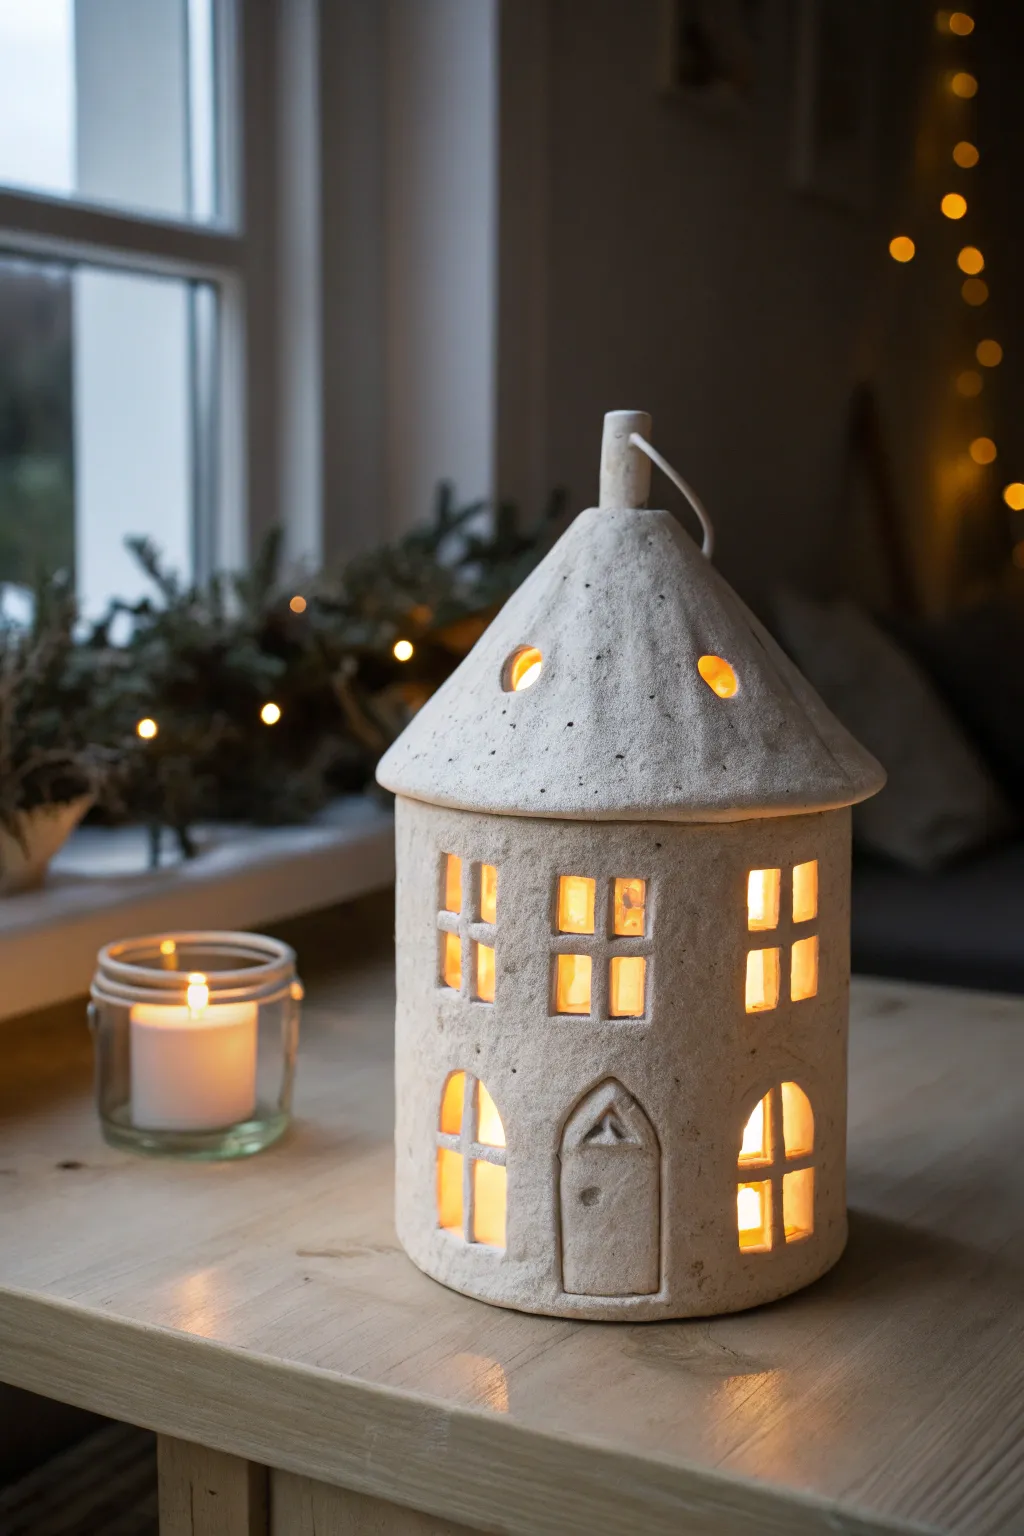
Create a charming, gently glowing focal point for your home with this rustic clay fairy house lantern. Its speckled texture, arched windows, and whimsical roof vents allow warm candlelight to spill out, casting cozy shadows in any room.
Step-by-Step Tutorial
Materials
- Air-dry clay (white or stone-effect) or low-fire ceramic clay
- Rolling pin with texture mat (optional)
- Clay knife or craft scalpel
- Circle cutters (various small sizes)
- Square or rectangular cutters (optional)
- Slip (clay and water mixture)
- Scoring tool or old toothbrush
- Sanding sponge
- Cardboard or sturdy paper (for templates)
- Small rolling pin or dowel
- Sponge and water
- LED tealight or real candle
Step 1: Forming the Main Structure
-
Prepare your template:
Begin by cutting a rectangle of cardstock that, when rolled into a cylinder, matches your desired house diameter (around 4-5 inches wide). Cut a separate semicircle that will form the cone roof. -
Roll the slab:
Roll out a slab of clay to an even thickness of about 1/4 inch. Ensure the slab is large enough to accommodate your wall template. -
Cut the walls:
Place your rectangular template on the clay and cut clearly around the edges with your knife. Save the excess clay for the roof and details. -
Create the cylinder:
Carefully lift the slab and curl it into a cylinder. Be gentle to avoid cracking the surface. -
Join the seam:
Score the meeting edges with a tool or toothbrush, apply a little slip, and press firmly together. Smooth the seam inside and out until it is invisible.
Clean Lines Hack
When cutting window panes, let the clay firm up to a ‘leather hard’ state first. The knife will drag less, giving you crisp, architectural corners.
Step 2: Carving Windows and Doors
-
Outline the features:
Lightly trace your window and door placements onto the soft clay cylinder. You’ll want a tall arched door at the bottom, two arched windows beside it, and four rectangular windows on the second ‘story’. -
Cut the windows:
Use a sharp craft knife to cut out the window panes. I prefer to cut the outer shape first, then carefully slice out the inner sections to leave the mullions (the cross-bars) intact. -
Add the door details:
Instead of cutting the door completely out, cut the outline but leave the clay piece in. Gently press it inward slightly to create depth, then carve a small window near the top and add a tiny ball of clay for a handle. -
Refine the edges:
Dip a finger or small sponge in water and smooth any sharp or ragged edges around the window frames.
Speckled Stone Effect
Mix dried tea leaves or actual sand into your fresh clay before rolling. After sanding, these specks reappear, mimicking real granite or stone.
Step 3: Constructing the Roof
-
Form the cone:
Roll out another slab and use your semicircle template to cut the roof shape. Curl it into a cone, scoring and slipping the seam just like the walls. -
Texture the roof:
Before attaching, tap the roof surface gently with a stiff brush or a textured stone to give it a rough, weathered stucco look. -
Cut roof vents:
Use a small circle cutter to punch out three or four round holes near the peak of the roof. These add character and let heat escape if using real wax candles. -
Add a chimney loop:
Roll a small coil of clay and attach it to the very peak of the coned roof to act as a handle or purely decorative loop. -
Attach roof to base:
Score the top rim of your cylinder and the underside of the roof. Apply slip and press the roof gently onto the walls. Smooth the connection point so it looks like one solid piece.
Step 4: Finishing Touches
-
Dry slowly:
Loosely cover your house with plastic wrap to let it dry slowly over 2-3 days. This prevents warping and cracks. -
Sand and smooth:
Once fully bone dry, use a sanding sponge to gently remove any sharp burrs or uneven spots, especially around the window cutouts. -
Seal or fire:
If using ceramic clay, fire according to instructions. If using air-dry clay, apply a matte sealant to protect the surface while maintaining that raw stone look.
Set your finished house on a windowsill and enjoy the soft ambience it creates
Mix-and-Match Fairy House Village Set
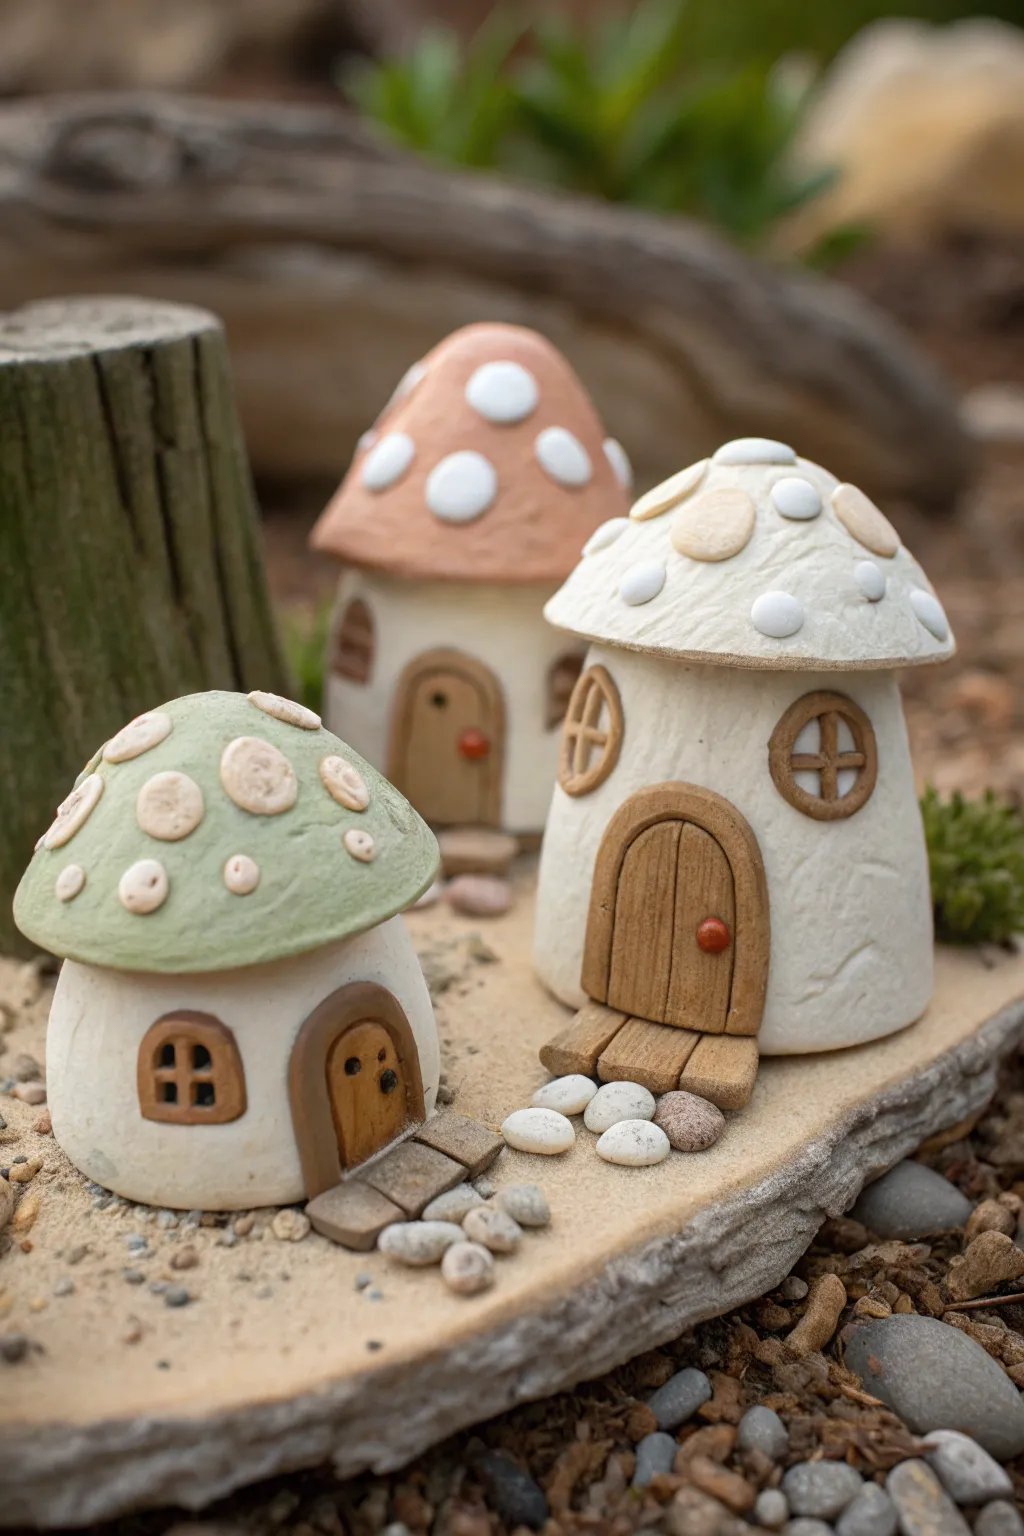
Create a charming trio of distinct yet coordinated fairy dwellings that mix and match colors, sizes, and architectural details for a lively village feel. This project focuses on building three unique mushroom shapes—a stout green cottage, a classic terracotta tower, and a spacious cream-colored manor—all united by whimsical rounded features and natural textures.
Step-by-Step Guide
Materials
- Polymer clay or air-dry clay (White, Terracotta, Sage Green, Beige, Dark Brown)
- Clay sculpting tools (needle tool, ball stylus, rubber shaper)
- Texturing tool (toothbrush or stiff bristle brush)
- Small rolling pin
- Liquid clay adhesive or slip
- Aluminum foil (for armature)
- Small wooden base or flat stone
- Miniature pebbles and sand for staging
Step 1: Shaping the Bases
-
Prepare the cores:
Crumple aluminum foil into three distinct shapes to serve as the sturdy cores for your houses: a short, wide ball for the green house, a taller, slender cone for the terracotta one, and a medium-sized, slightly bulbous cylinder for the cream house. -
Cover with clay:
Roll out sheets of beige or off-white clay to about 1/4 inch thickness. Wrap these sheets completely around your foil forms, smoothing the seams with your fingers until you have three seamless base structures. -
Texture the walls:
Gently press a stiff bristle brush or a crumpled ball of aluminum foil against the clay surfaces to create a slightly rough, stucco-like texture on all three walls. -
Flatten the bottoms:
Press each house firmly onto your work surface to ensure they sit flat and stable, adjusting the walls slightly if they bulge too much.
Step 2: Crafting the Mushroom Caps
-
Form the sage green cap:
Roll a ball of sage green clay and flatten it into a wide, shallow dome. Press it gently onto the shortest house base, molding the edges down slightly to hug the walls. -
Create the terracotta cap:
Shape terracotta-colored clay into a taller, more conical cap for the slender house. I find it helpful to pinch the top slightly to give it a whimsical peak before attaching it. -
Sculpt the cream cap:
For the largest house, form a broad, white or cream-colored cap with a generous overhang, giving it an umbrella-like silhouette. -
Add the spots:
Create small, flat discs of contrasting clay colors (cream for the green and terracotta caps; beige for the white cap) and press them randomly onto the roofs. Use a texturing tool to roughen the spots so they look organic, not perfectly smooth.
Pro Tip: Seamless texture
When adding the spots to the mushroom caps, press a piece of sandpaper over the spot after attaching it. This merges the clay pieces and unifies the texture instantly.
Step 3: Adding Architectural Details
-
Cut door openings:
Using a needle tool, lightly outline arched doorways on each house base to mark where the wood features will go. -
Install the doors:
Roll out brown clay and cut three arched door shapes. Use a needle tool to score vertical lines into the clay, mimicking wood grain, and adhere them to the designated spots. -
Frame the entryways:
Roll thin snakes of brown clay and wrap them around the door frames. For the largest house, create a wider frame and texture it heavily to look like rough-hewn timber. -
Add doorsteps:
From brown or grey clay, cut small rectangular slabs to serve as steps. Place a flat ‘wooden’ porch in front of the white house and simple stone-like slabs for the others. -
Create windows:
Form small balls of brown clay, flatten them, and attach them to the walls. Use a sharp tool to cut out or impress grid patterns (circles or squares) to create window panes. -
Final tiny touches:
Roll tiny balls of red or orange clay to serve as doorknobs and press them firmly onto the doors.
Level Up: Hidden lights
Build your houses around small, battery-operated LED tea lights instead of foil. Leave the bottom open so you can turn the glowing village on at night.
Step 4: Finishing the Village
-
Bake or dry:
If using polymer clay, bake according to the package instructions (usually 275°F for 15-30 minutes). If using air-dry clay, allow the pieces to dry fully for 24-48 hours. -
Prepare the landscape:
While the houses set, arrange a flat piece of drift wood or slate. Spread a thin layer of fine sand over the surface. -
Arrange the scene:
Place your finished houses onto the base. Create small paths leading to the doors using tiny pebbles or additional clay ‘stones’ pressed into the sand.
Now you have a delightful little neighborhood ready to welcome fairy visitors to your garden or shelf